Export Control
EAR Export Classification: Not subject to the EAR per 15 C.F.R. Chapter 1, Part 734.3(b)(3), except for the following Service Bulletins which are currently published as EAR Export Classification 9E991: SBE70-0992, SBE72-0483, SBE72-0580, SBE72-0588, SBE72-0640, SBE73-0209, SBE80-0024 and SBE80-0025.Copyright
© IAE International Aero Engines AG (2001, 2014 - 2021) The information contained in this document is the property of © IAE International Aero Engines AG and may not be copied or used for any purpose other than that for which it is supplied without the express written authority of © IAE International Aero Engines AG. (This does not preclude use by engine and aircraft operators for normal instructional, maintenance or overhaul purposes.).Applicability
All
Common Information
TASK 72-41-21-300-093 HPC Stage 10 Case - Replace The Seal Retainer Coating On The Stage 10 Case And With The Stage 11 Rotor Path Liners, Repair-093 (VRS6533)
Effectivity
FIG/ITEM | PART NO | ASSEMBLY |
|---|---|---|
04-350 | 6A3389 | A |
04-350 | 6A5436 | B |
04-350 | 6A5438 | A |
04-350 | 6A5624 | C |
04-350 | 6A5676 | B |
04-350 | 6A6512 | C |
04-350 | 6A6551 | D |
04-350 | 6A7531 | D |
04-350 | 6B1435 | E |
Material of components
PART IDENT | SYMBOL | MATERIAL |
|---|---|---|
HP Compressor Stage 10 Case and Stage 10 Case with Stage 11 Rotor Path | N/A | Nickel Based Alloy |
General Data
This repair must only be done when the instruction to do so is given in 72-41-21 Inspection or instructed by VRS6331 while performing the replacement of a worn seal ring.
Case and sealing ring retainer to be kept as a matched pair.
If the seal ring retainer is damaged then replace with new, refer to IPC reference HPC Ring Cases And Related Parts (72-41-21, 04-404) for applicable standard of replacement part.
Case and sealing ring retainer must be assembled again in accordance with VRS6331.
For Assembly D and E cases:
If the repair of Stage 11 Rotor Path liner is necessary, then VRS6023 must be done for the removal of the rotor path liner at the same time as this repair procedure, for convenience.
If the repair of Stage 11 Rotor Path liner is not necessary, then apply masking to the rotor path liner surface AF for coating protection against damage. Refer to SPM TASK 70-11-35-110-501.
Because of the chemical process for liner removal the part must be stripped of all attaching parts and surface protection removed, see below for related repairs.
Preliminary Requirements
Pre-Conditions
| Action/Condition | Data Module/Technical Publication |
|---|---|
| Make sure that all the cleaning and inspection procedures are done before this repair. |
Support Equipment
NONEConsumables, Materials and Expendables
| Name | Manufacturer | Part Number / Identification | Quantity | Remark |
|---|---|---|---|---|
| CoMat 01-025 NITRIC ACID HNO3, TECHNICAL GRADE | LOCAL | CoMat 01-025 | ||
| CoMat 03-036 METAL SPRAYING WIRE, Ni,Al | LOCAL | CoMat 03-036 | ||
| CoMat 03-089 METAL SPRAYING POWDER Ni/Al (95/5) | 00741 | CoMat 03-089 | ||
| CoMat 03-239 METAL SPRAYING POWDER, CHROMIUM CARBIDE/NICHROME 75/25, FINE | 00BB6 | CoMat 03-239 | ||
| CoMat 05-020 WATERPROOF SILICON CARBIDE | 1E1X8 | CoMat 05-020 | ||
| CoMat 05-021 WATERPROOF SILICON CARBIDE | 1E1X8 | CoMat 05-021 | ||
| DELETED | LOCAL | DELETED |
Spares
NONESafety Requirements
NONEProcedure
Refer to Figure.
Use CoMat 05-020 WATERPROOF SILICON CARBIDE or CoMat 05-021 WATERPROOF SILICON CARBIDE to remove coating, if present.
Remove minimum base metal.
Remove the surface protection from face AG inner and outer casing faces, as necessary.
SUBTASK 72-41-21-110-254 Remove the Surface Protection from Case Faces at AG, Assembly A and B
Refer to SPM TASK 70-11-35-110-501 or SPM TASK 70-38-24-300-503.
Seal the lined surface AF.
SUBTASK 72-41-21-110-255 Seal the Lining at AF, Assembly D and E
Machine minimum material to remove coating.
Machine 0.010 in. (0.25 mm) maximum in depth.
Machine retainer coating AG for Assemblies A, B, C and D.
Grind 0.010 in. (0.25 mm) maximum in depth.
Grind retainer coating AG for Assemblies E.
If all coating material is removed then continue with Step, SUBTASK 72-41-21-110-259.
If all coating material is not removed, then continue with Step, SUBTASK 72-41-21-110-257.
Remove the majority of seal retainer coating AG per TASK 70-32-07-100-501.
SUBTASK 72-41-21-110-256 Machine to Remove the Seal Retainer Coating at AG
Refer to SPM TASK 70-33-59-300-503 with the following exception:
Chemically remove the seal retainer coating material.
SUBTASK 72-41-21-110-257 Chemically Remove the Seal Retainer Coating at AG
Refer to SPM TASK 70-11-03-300-503.
Aqueous degrease the part.
SUBTASK 72-41-21-110-260 Clean the Part
Refer to TASK 72-41-21-200-000 and applicable part number.
Cracks are not permitted.
Do the penetrant crack test on the machined area at AG.
SUBTASK 72-41-21-230-242 Do a Crack Test
Refer to SPM TASK 70-11-03-300-503.
Aqueous degrease the part.
SUBTASK 72-41-21-110-262 Chemically Clean the Part
Prepare the part for coating per SPM TASK 70-34-18-380-501.
Use CoMat 03-036 METAL SPRAYING WIRE, Ni,Al for Assembly A, B, C and D. Refer to TASK 70-34-01-340-501, SUBTASK 70-34-01-340-010.
Use CoMat 03-089 METAL SPRAYING POWDER Ni/Al (95/5) for Assembly A, B, C and D. Refer to TASK 70-34-01-340-501, SUBTASK 70-34-01-340-025.
Use CoMat 03-239 METAL SPRAYING POWDER, CHROMIUM CARBIDE/NICHROME 75/25, FINE for Assembly E. Refer to TASK 70-34-01-340-501, SUBTASK 70-34-01-340-026.
Apply a layer of sufficient thickness to let the final machining of surface AG without voids or missing material.
Apply coating to surface AG by one of the following options.
Remove the tape residue per SPM TASK 70-11-26-300-503.
After the coat is applied and the part is cool, remove the mask or maskants.
SUBTASK 72-41-21-340-068 Apply the Coating
Finish surface AG per SPM TASK 70-32-07-100-501.
SUBTASK 72-41-21-324-055 Final Machine Surface AG
Refer to Figure.
Refer to SPM TASK 70-09-00-400-501, SUBTASK 70-09-00-400-001.
Vibration peen VRS6533 adjacent to the assembly number.
Refer to SPM TASK 70-38-21-380-501, SUBTASK 70-38-21-380-010.
Touch-up the surface protection at repair identification mark location.
SUBTASK 72-41-21-350-247-A00 Identify the Repair, Assembly A
Refer to SPM TASK 70-09-00-400-501, SUBTASK 70-09-00-400-001.
Vibration peen VRS6533 adjacent to the assembly number.
SUBTASK 72-41-21-350-247-B00 Identify the Repair, Assembly B, Assembly C, Assembly D and Assembly E
Figure: Repair Details and Dimensions - Assembly A and Assembly B
Repair Details and Dimensions - Assembly A and Assembly B
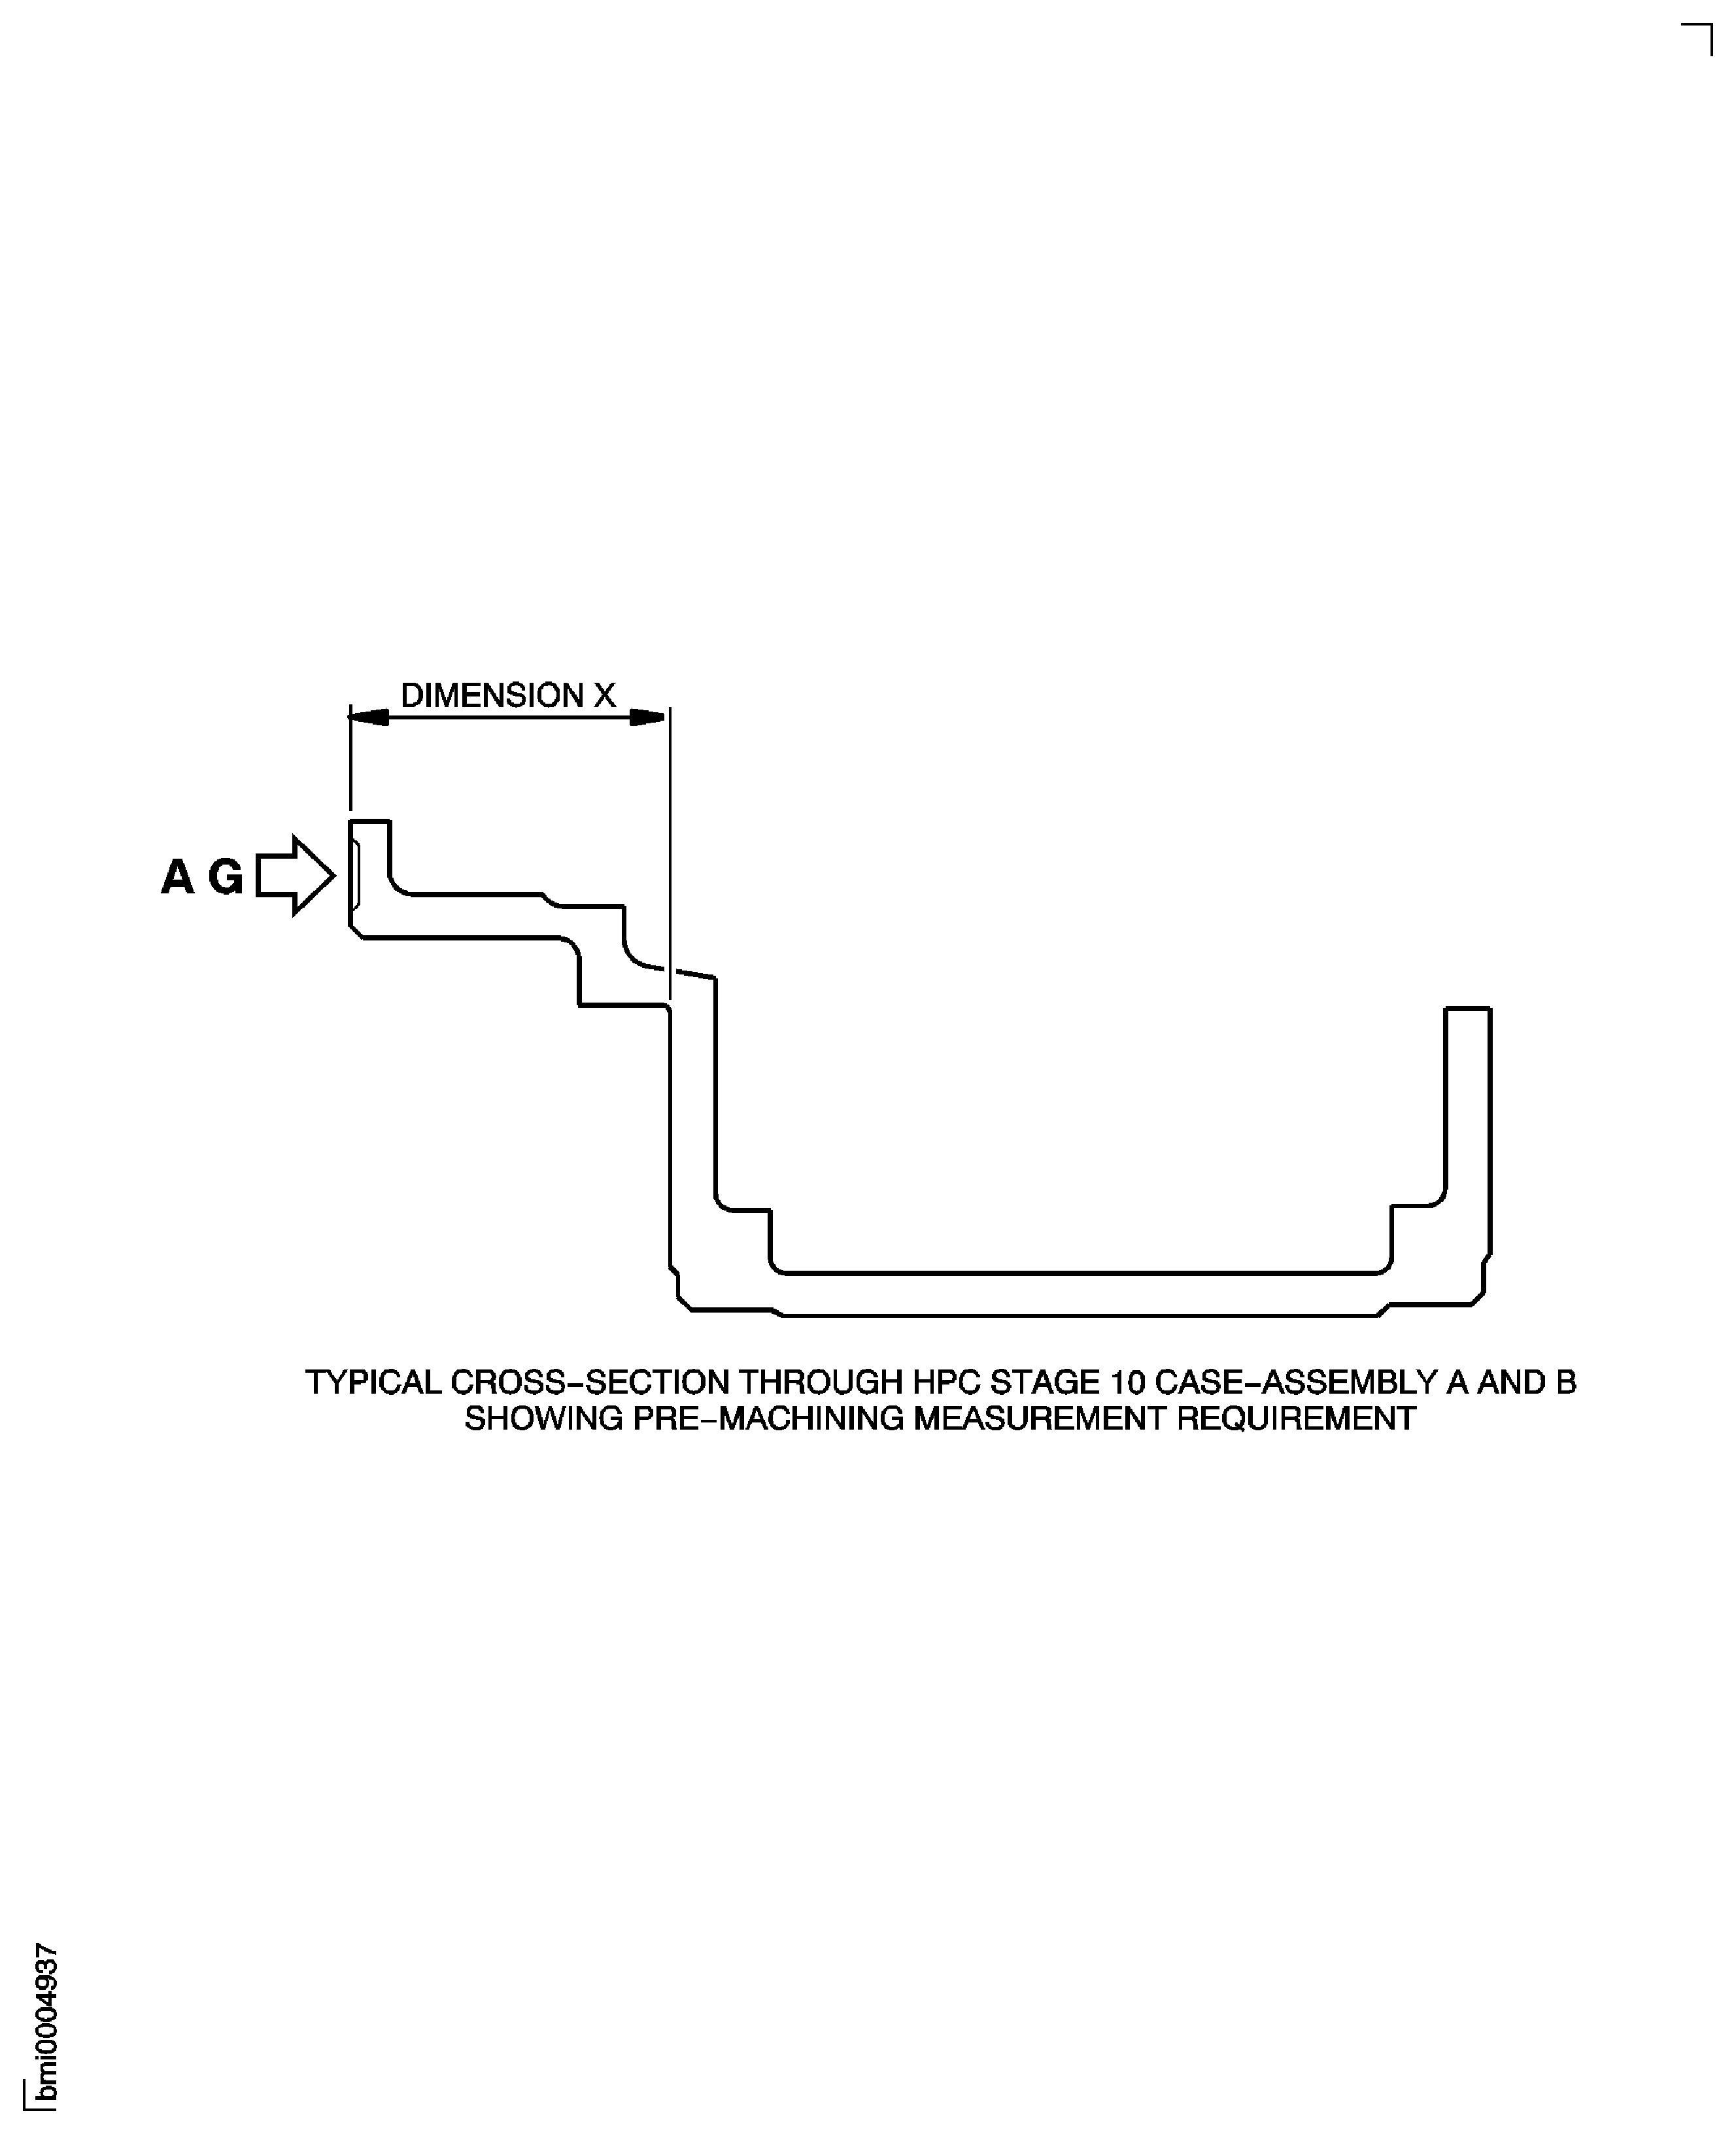
Figure: Repair Details and Dimensions - Assembly C
Repair Details and Dimensions - Assembly C
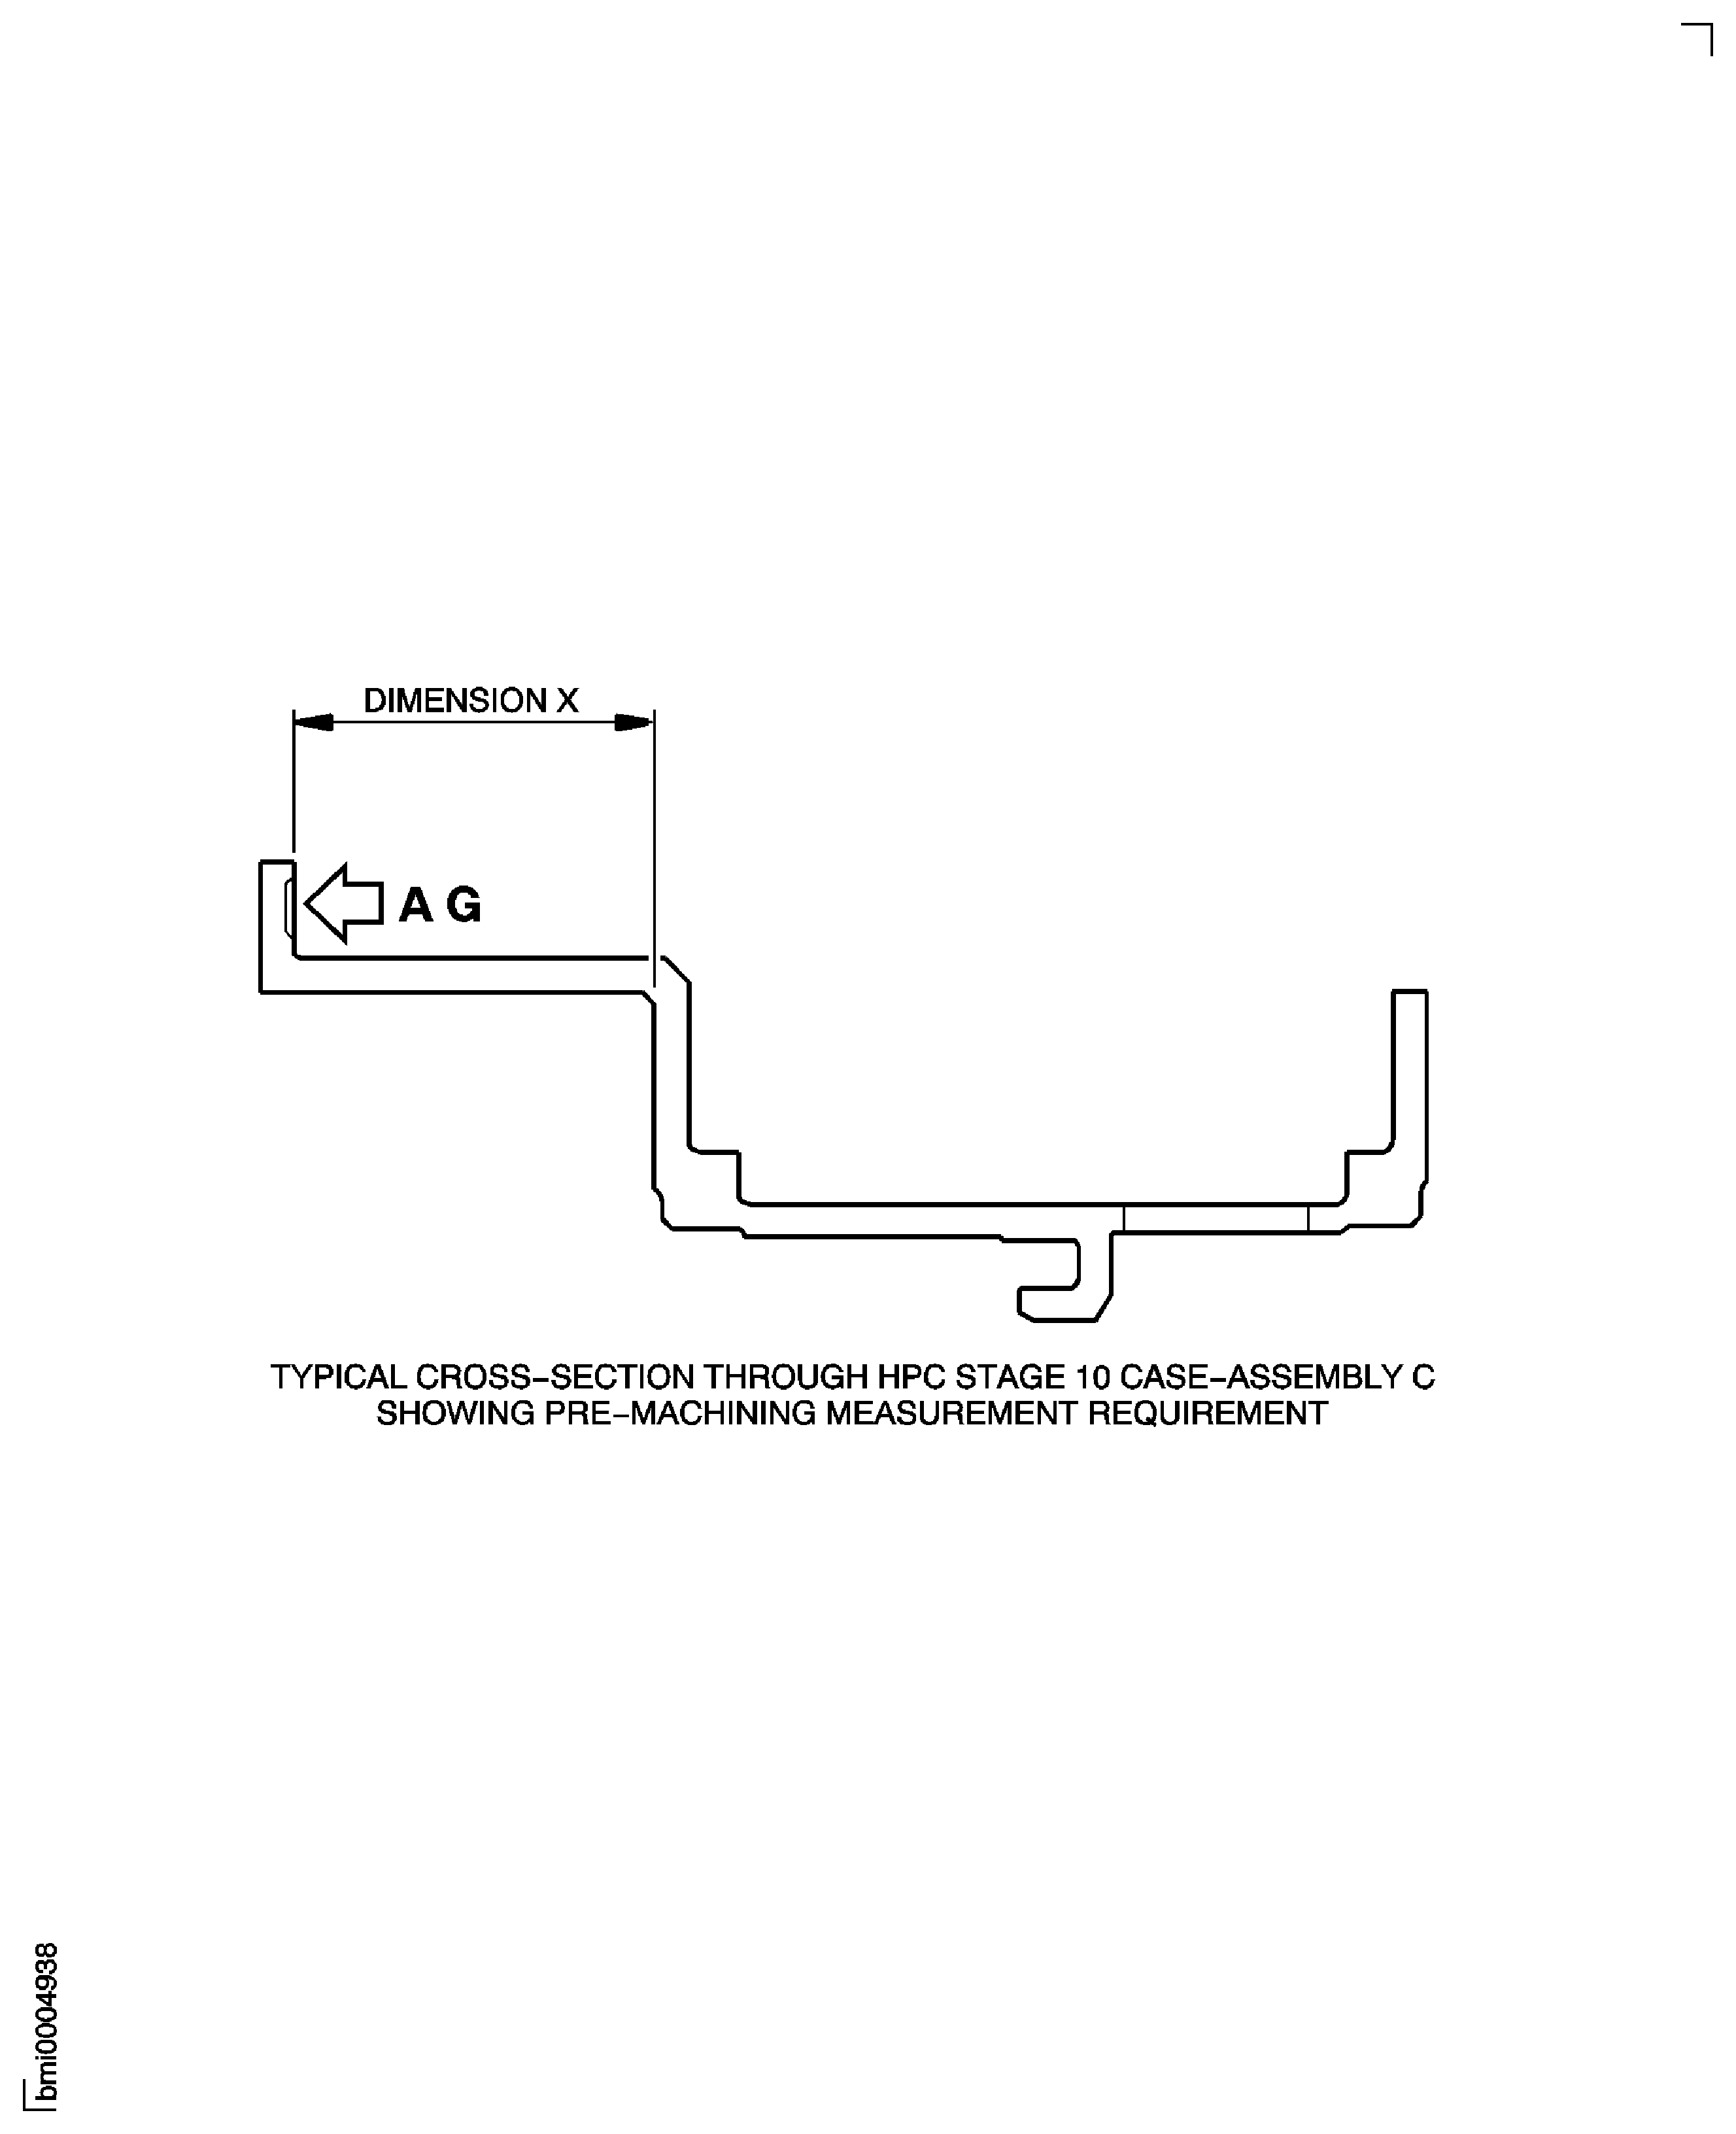
Figure: Repair Details and Dimensions - Assembly D
Repair Details and Dimensions - Assembly D
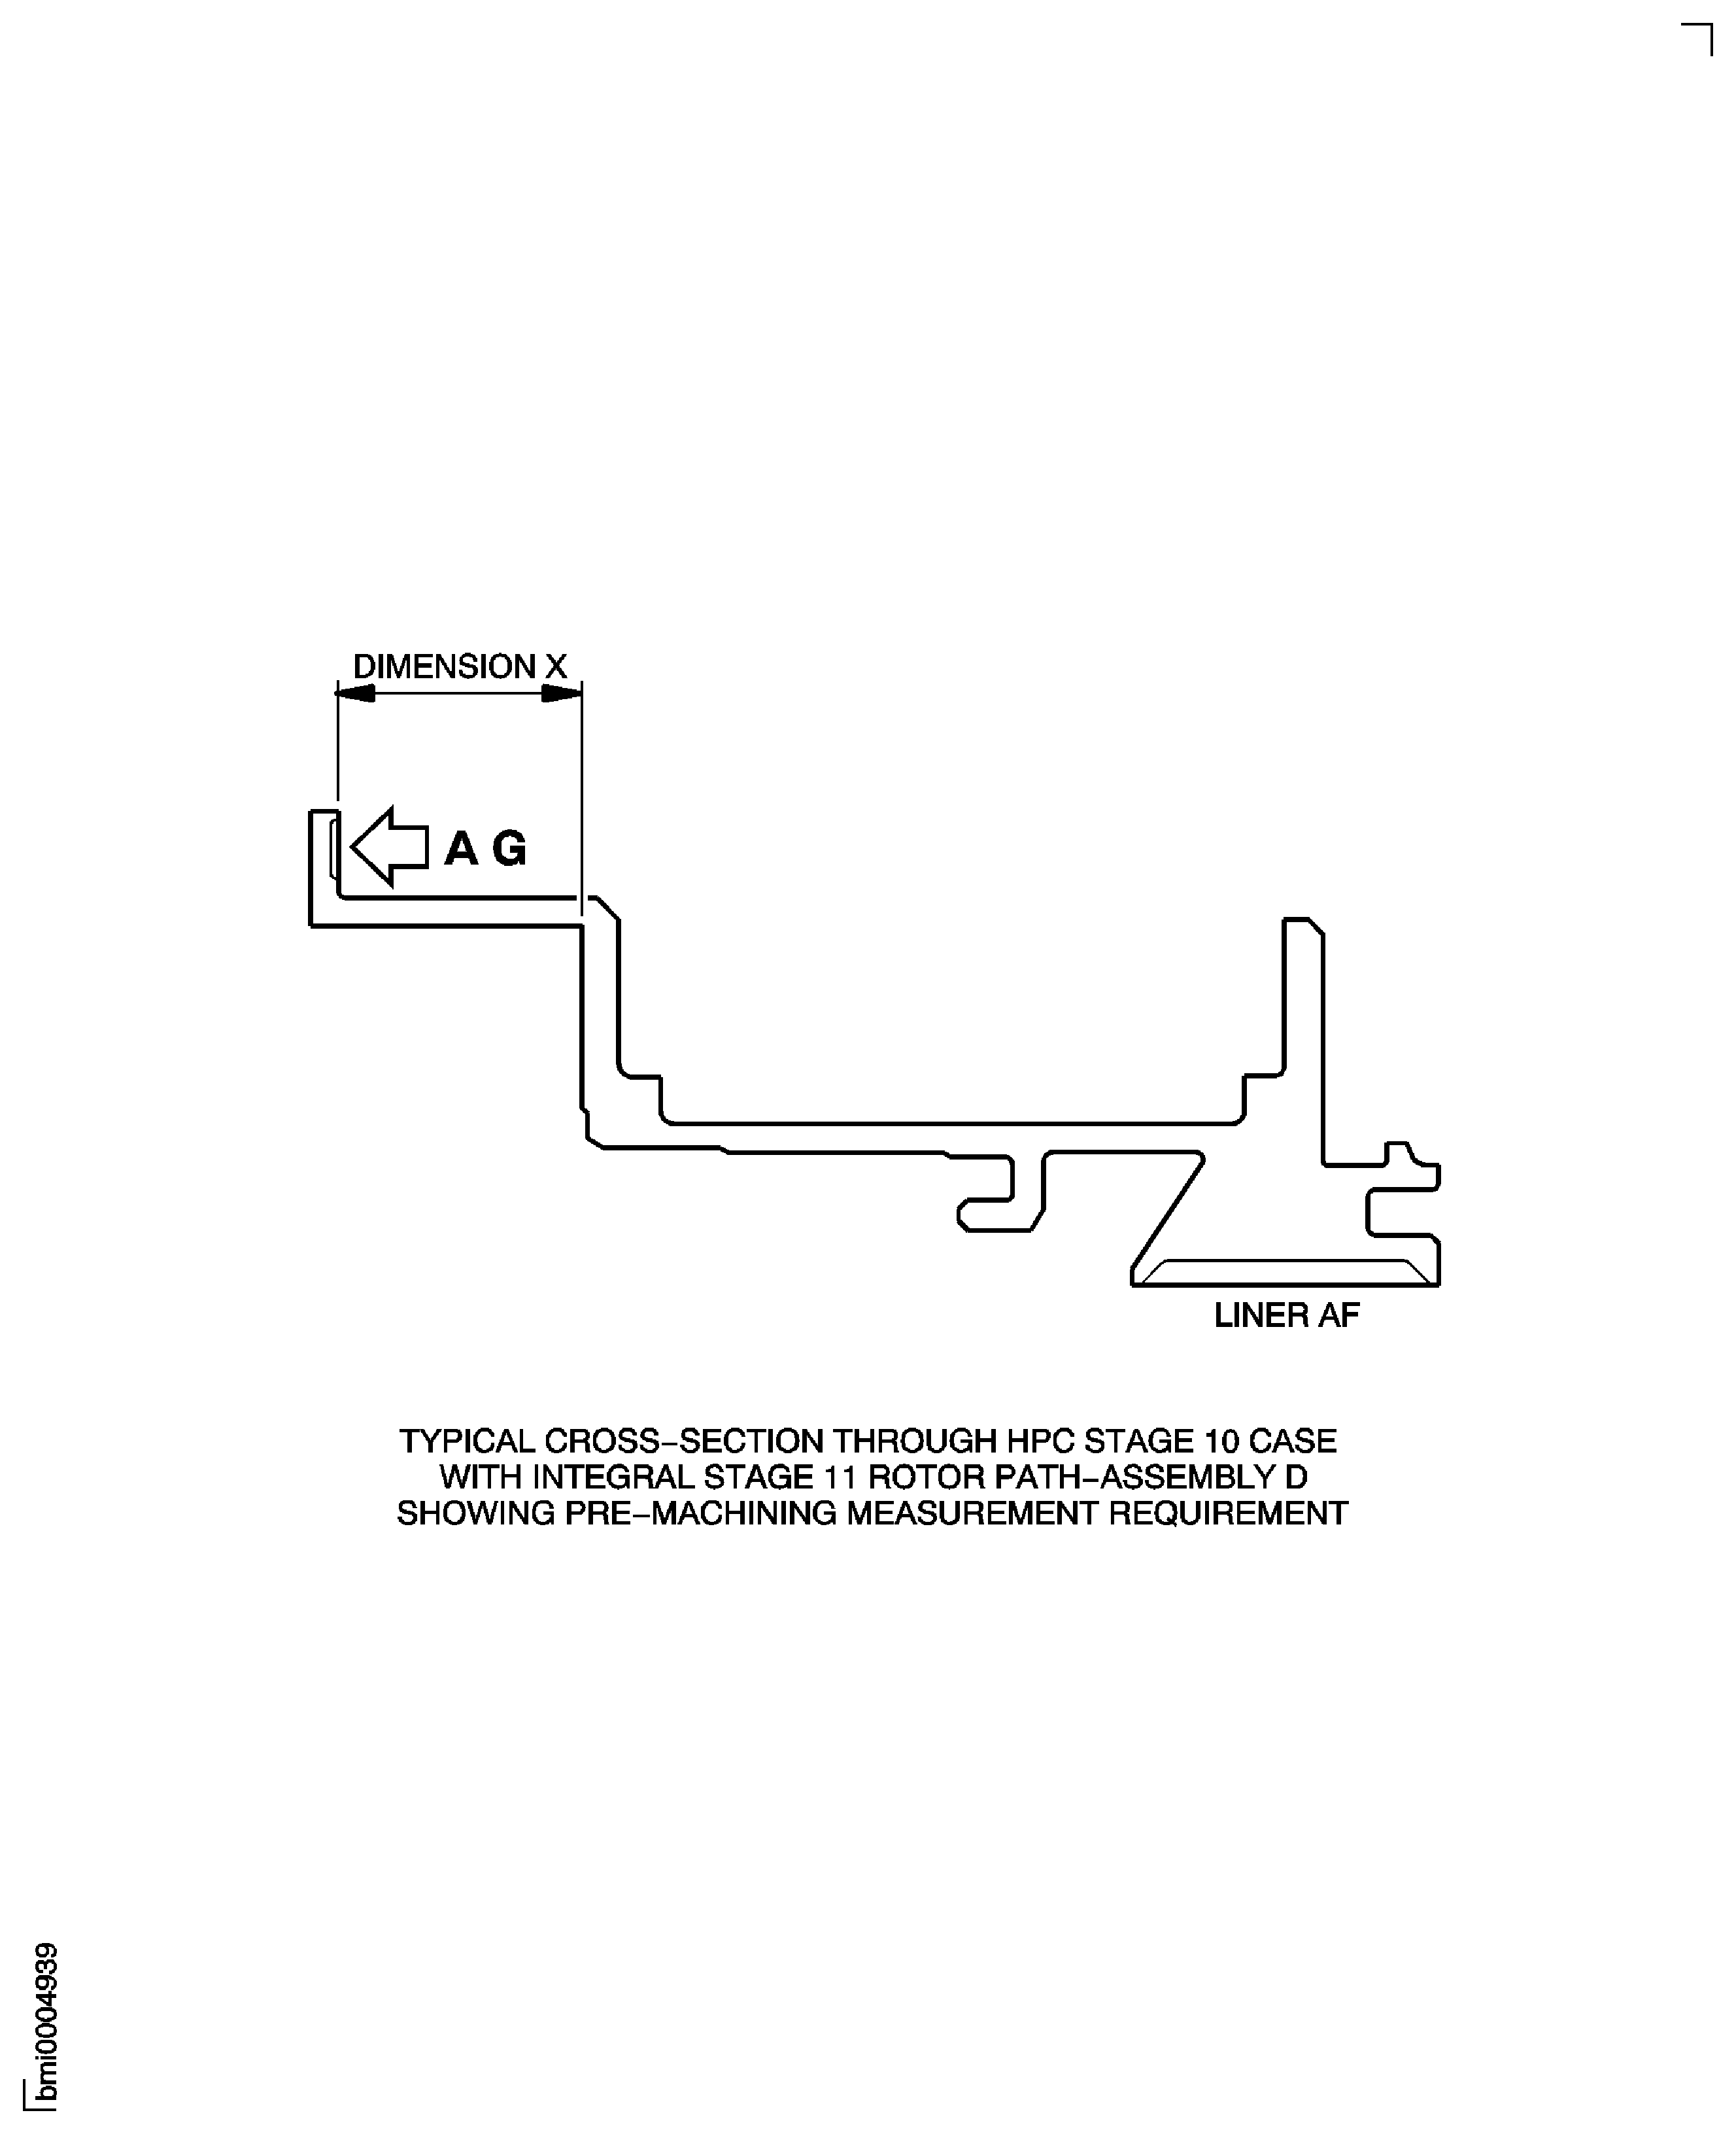
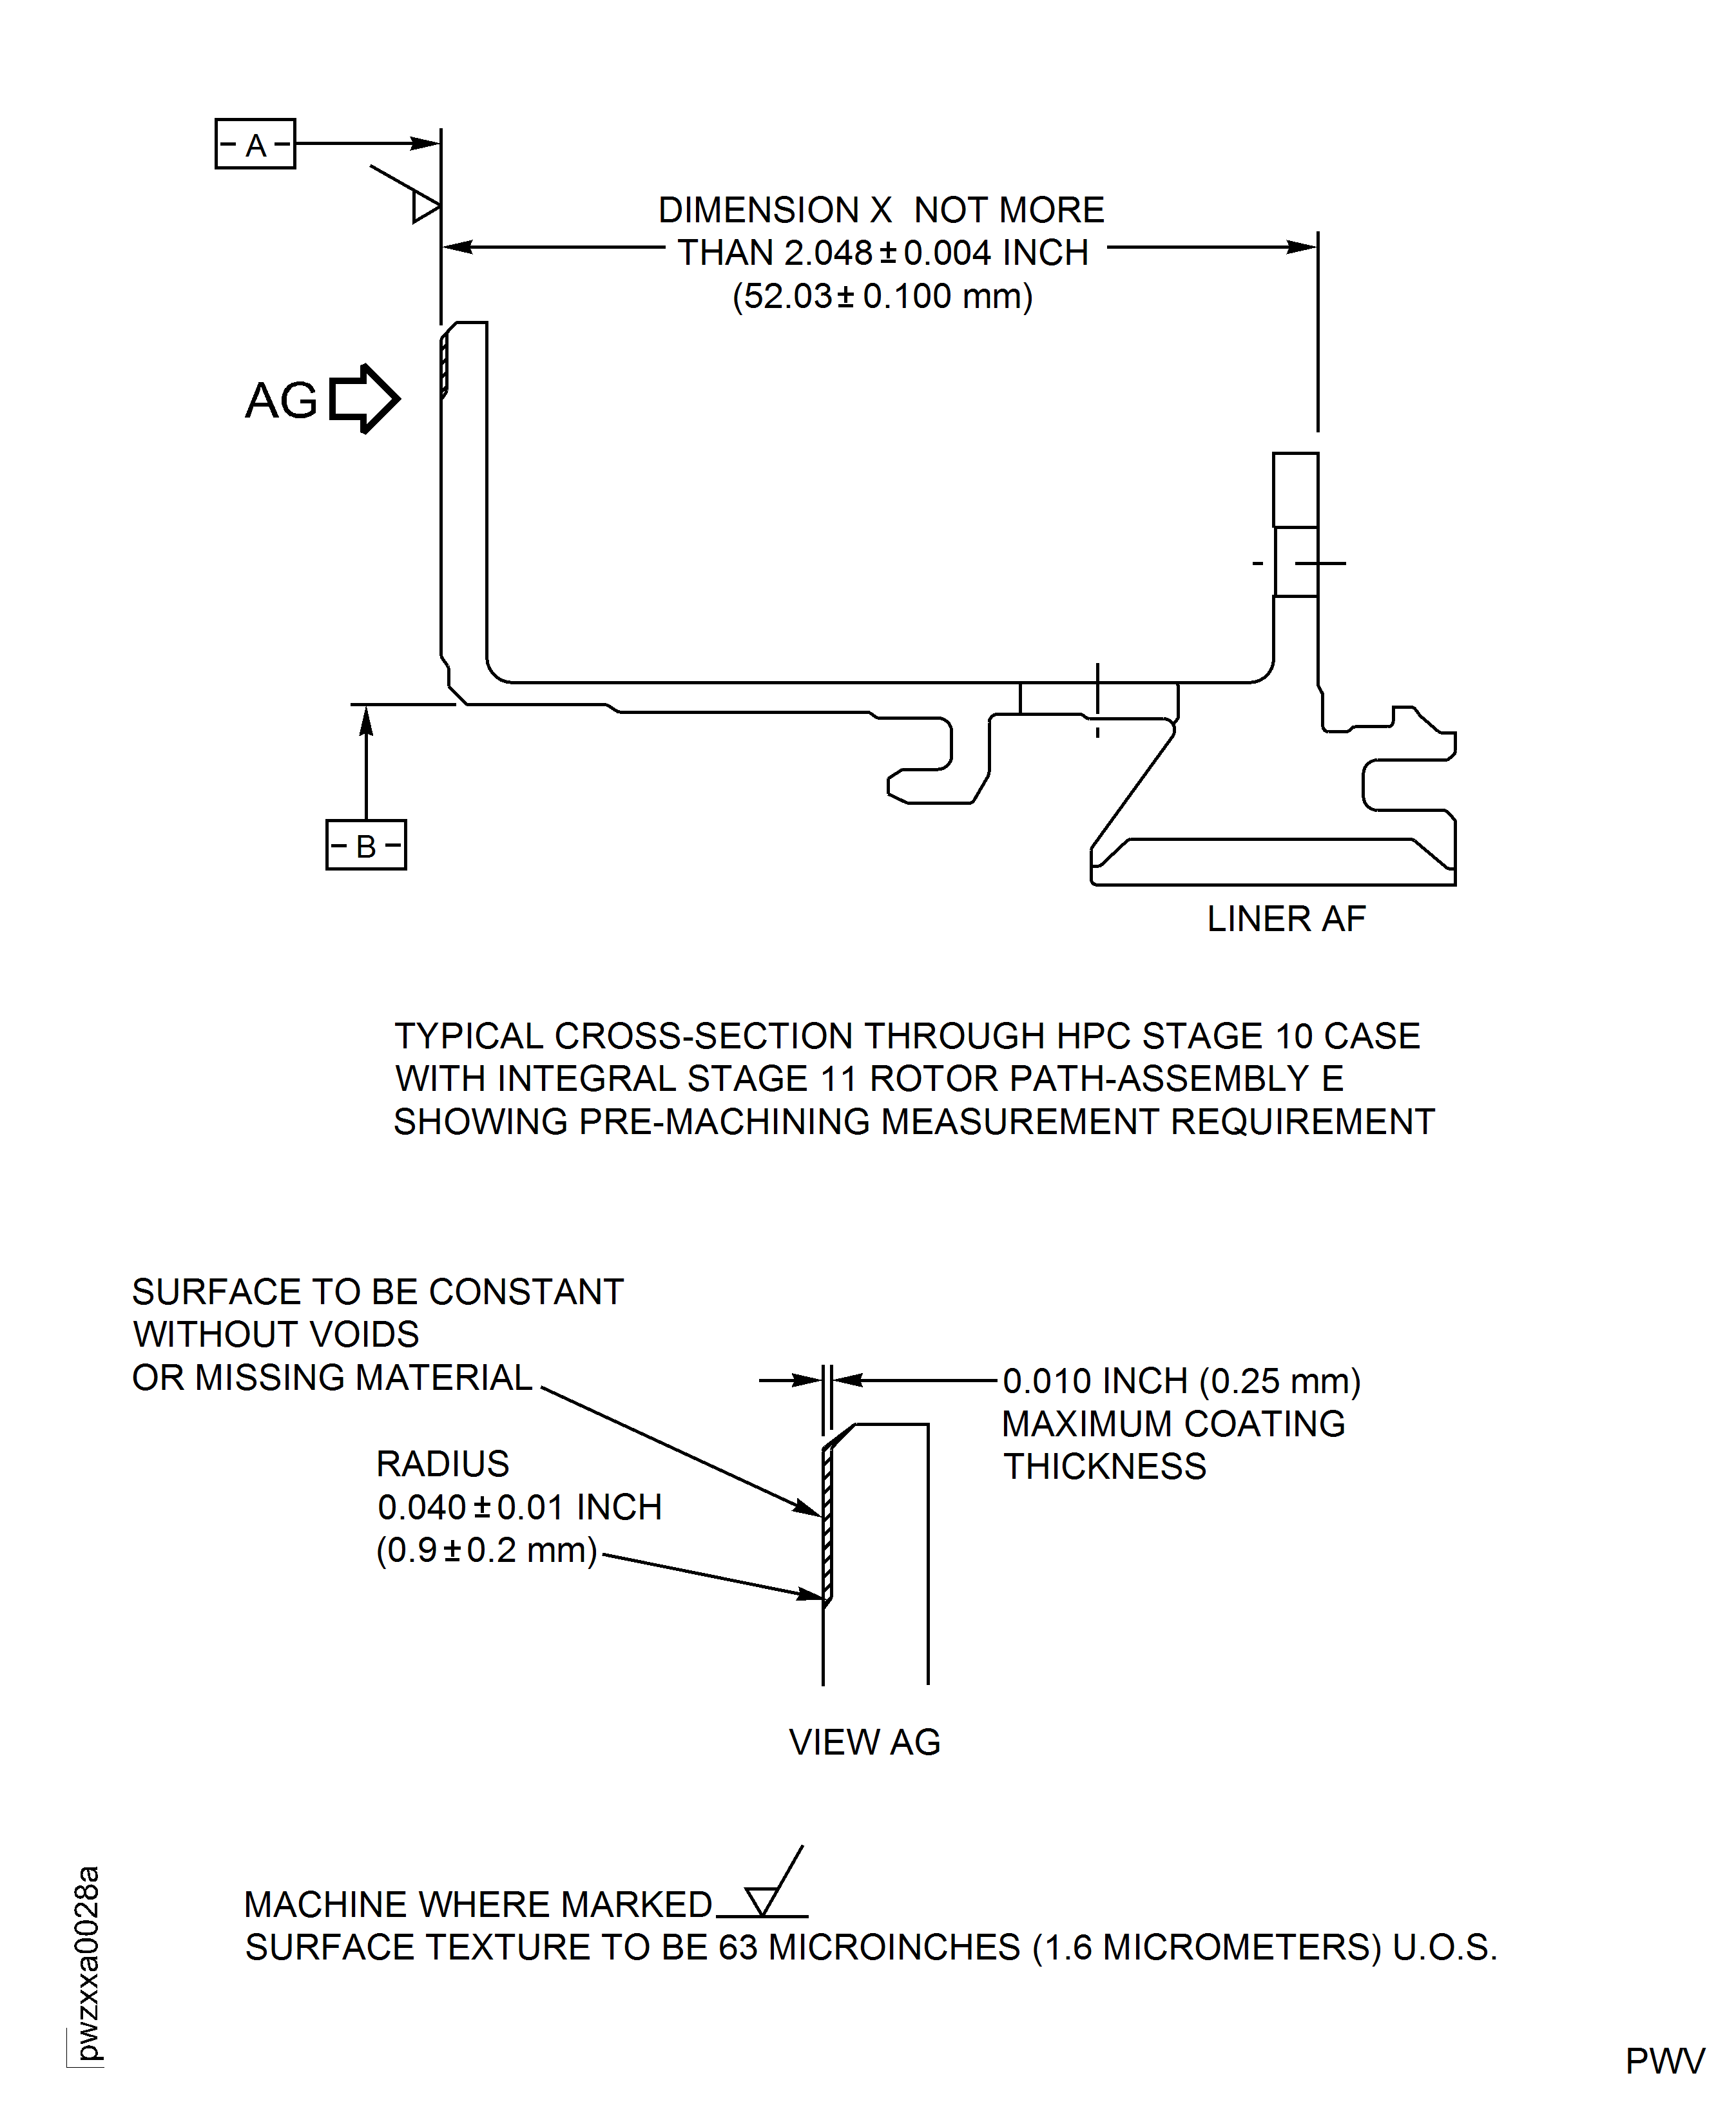
Figure: Repair Details and Dimensions - Assembly E
Repair Details and Dimensions - Assembly E
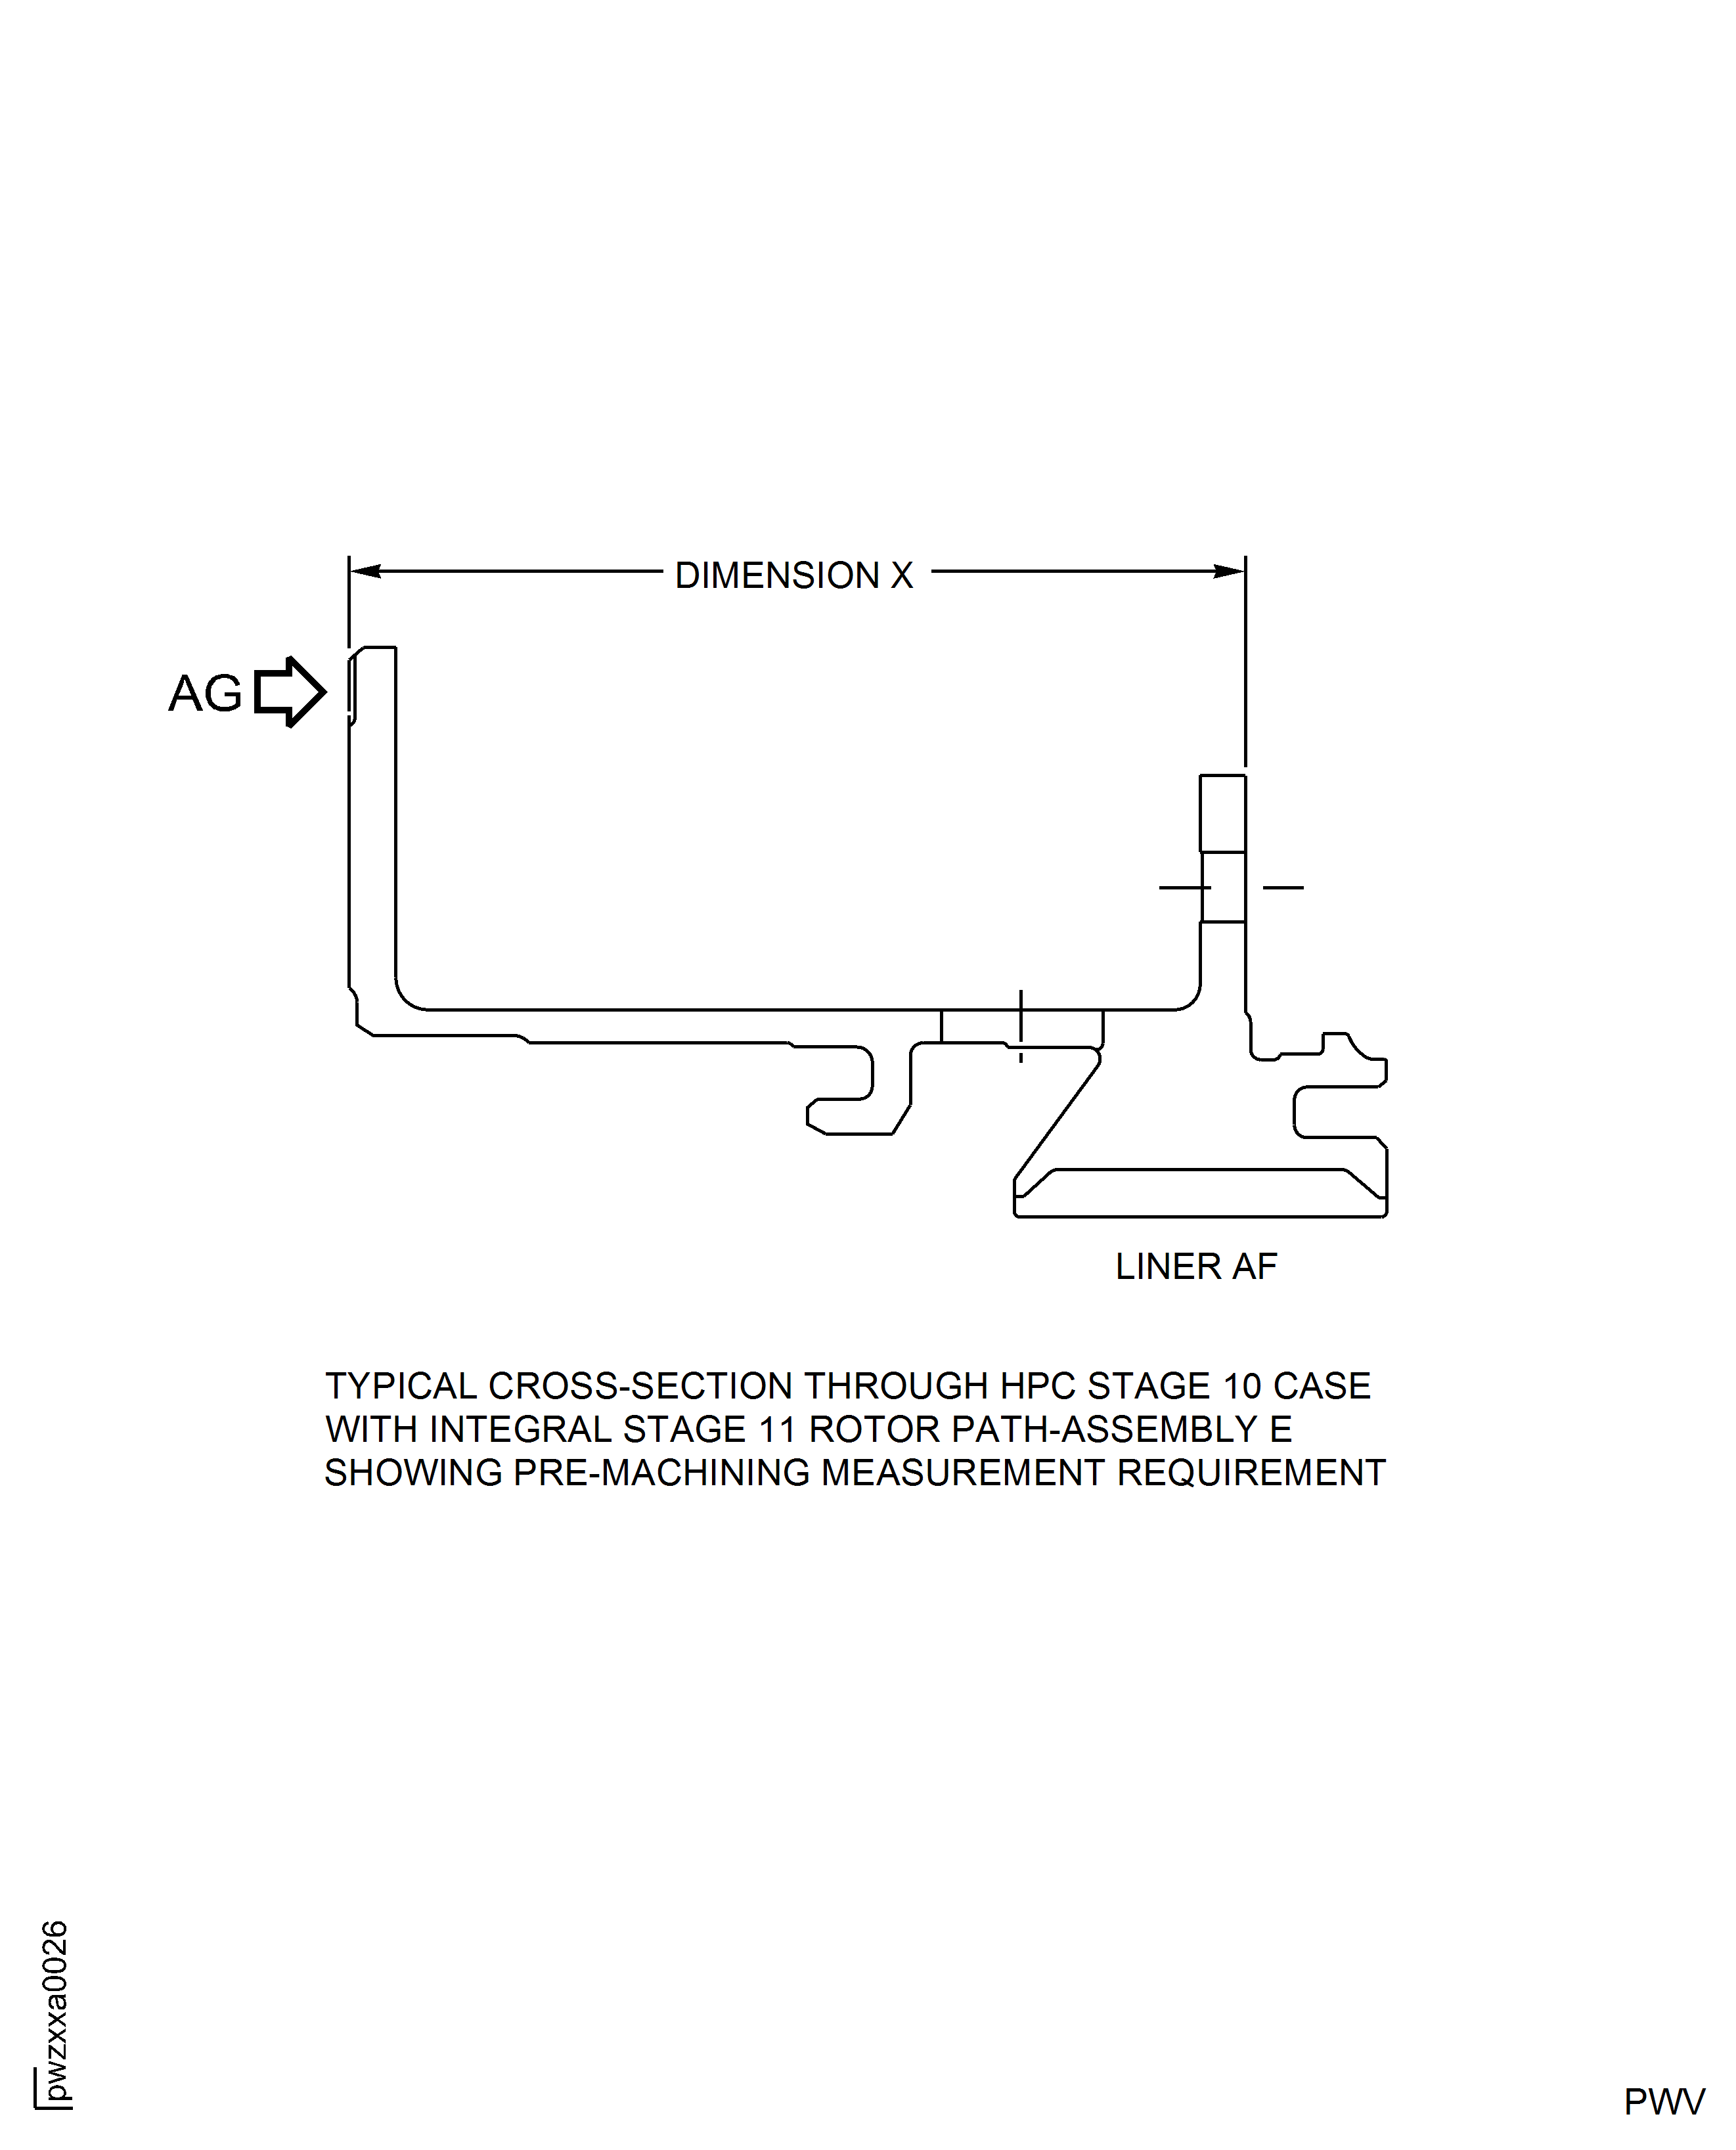
Figure: Repair Details and Dimensions - Assembly A and Assembly B
Sheet 1
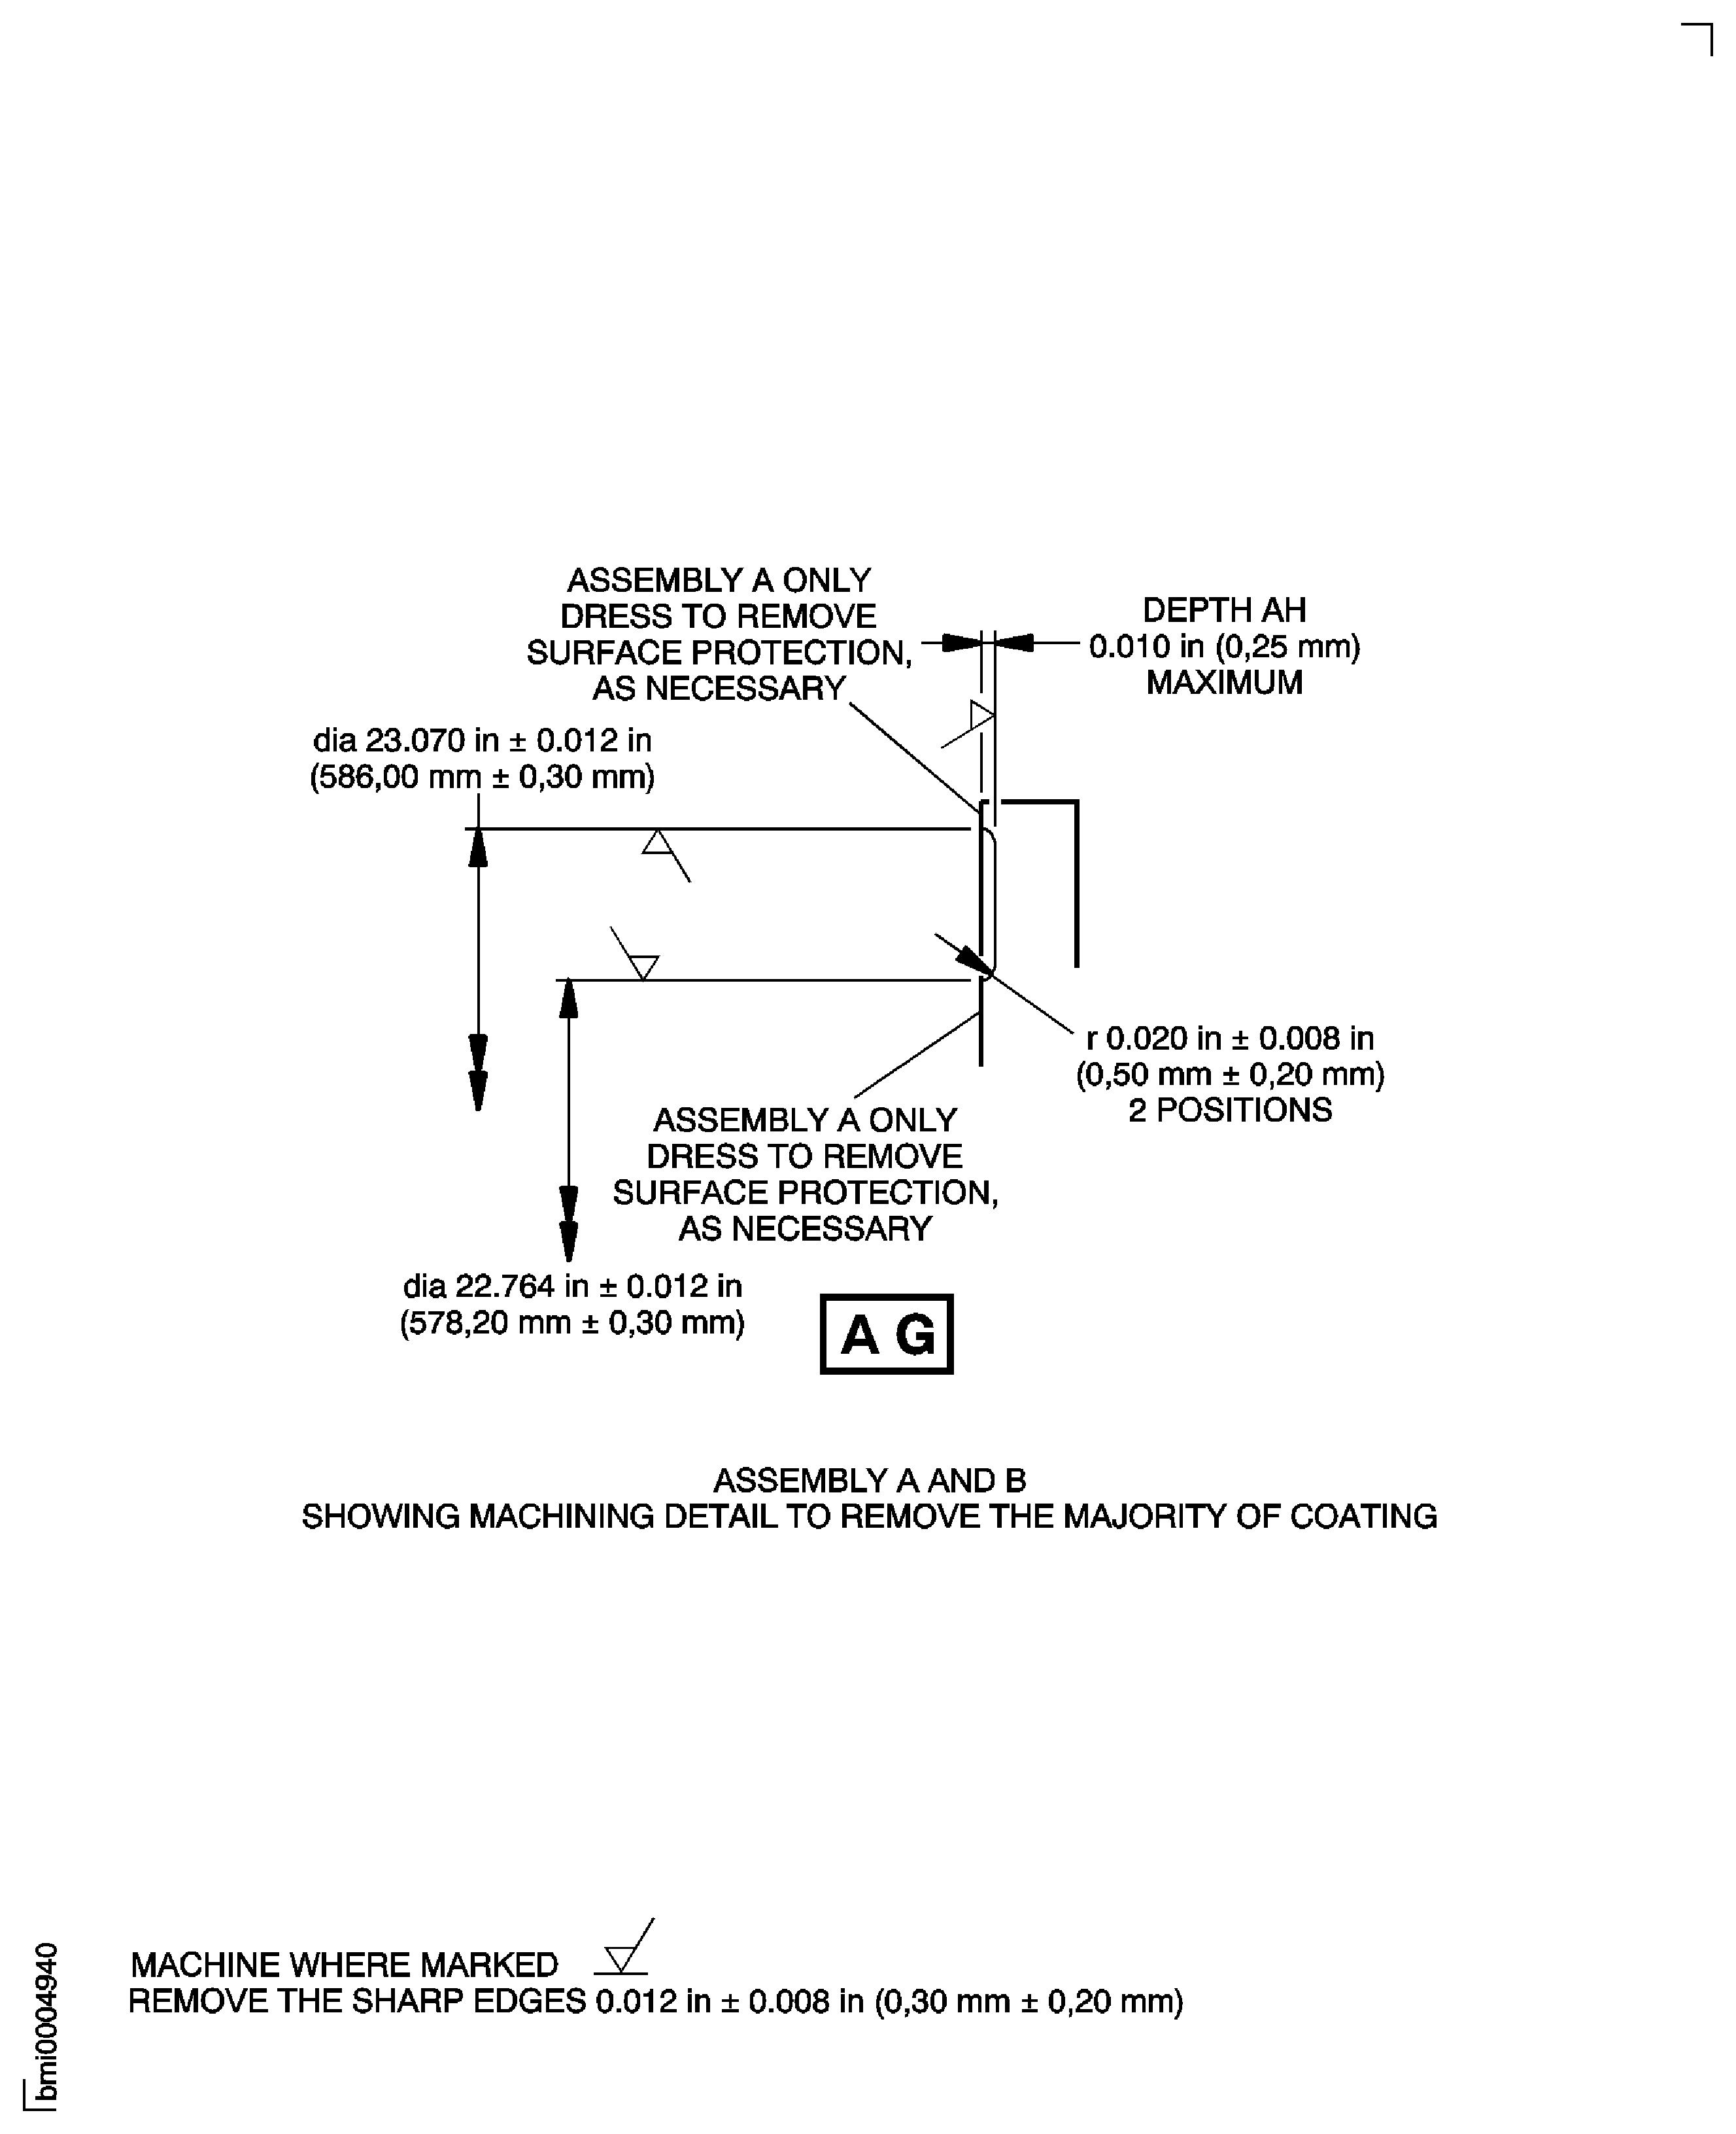
Figure: Repair Details and Dimensions - Assembly C and Assembly D
Sheet 2
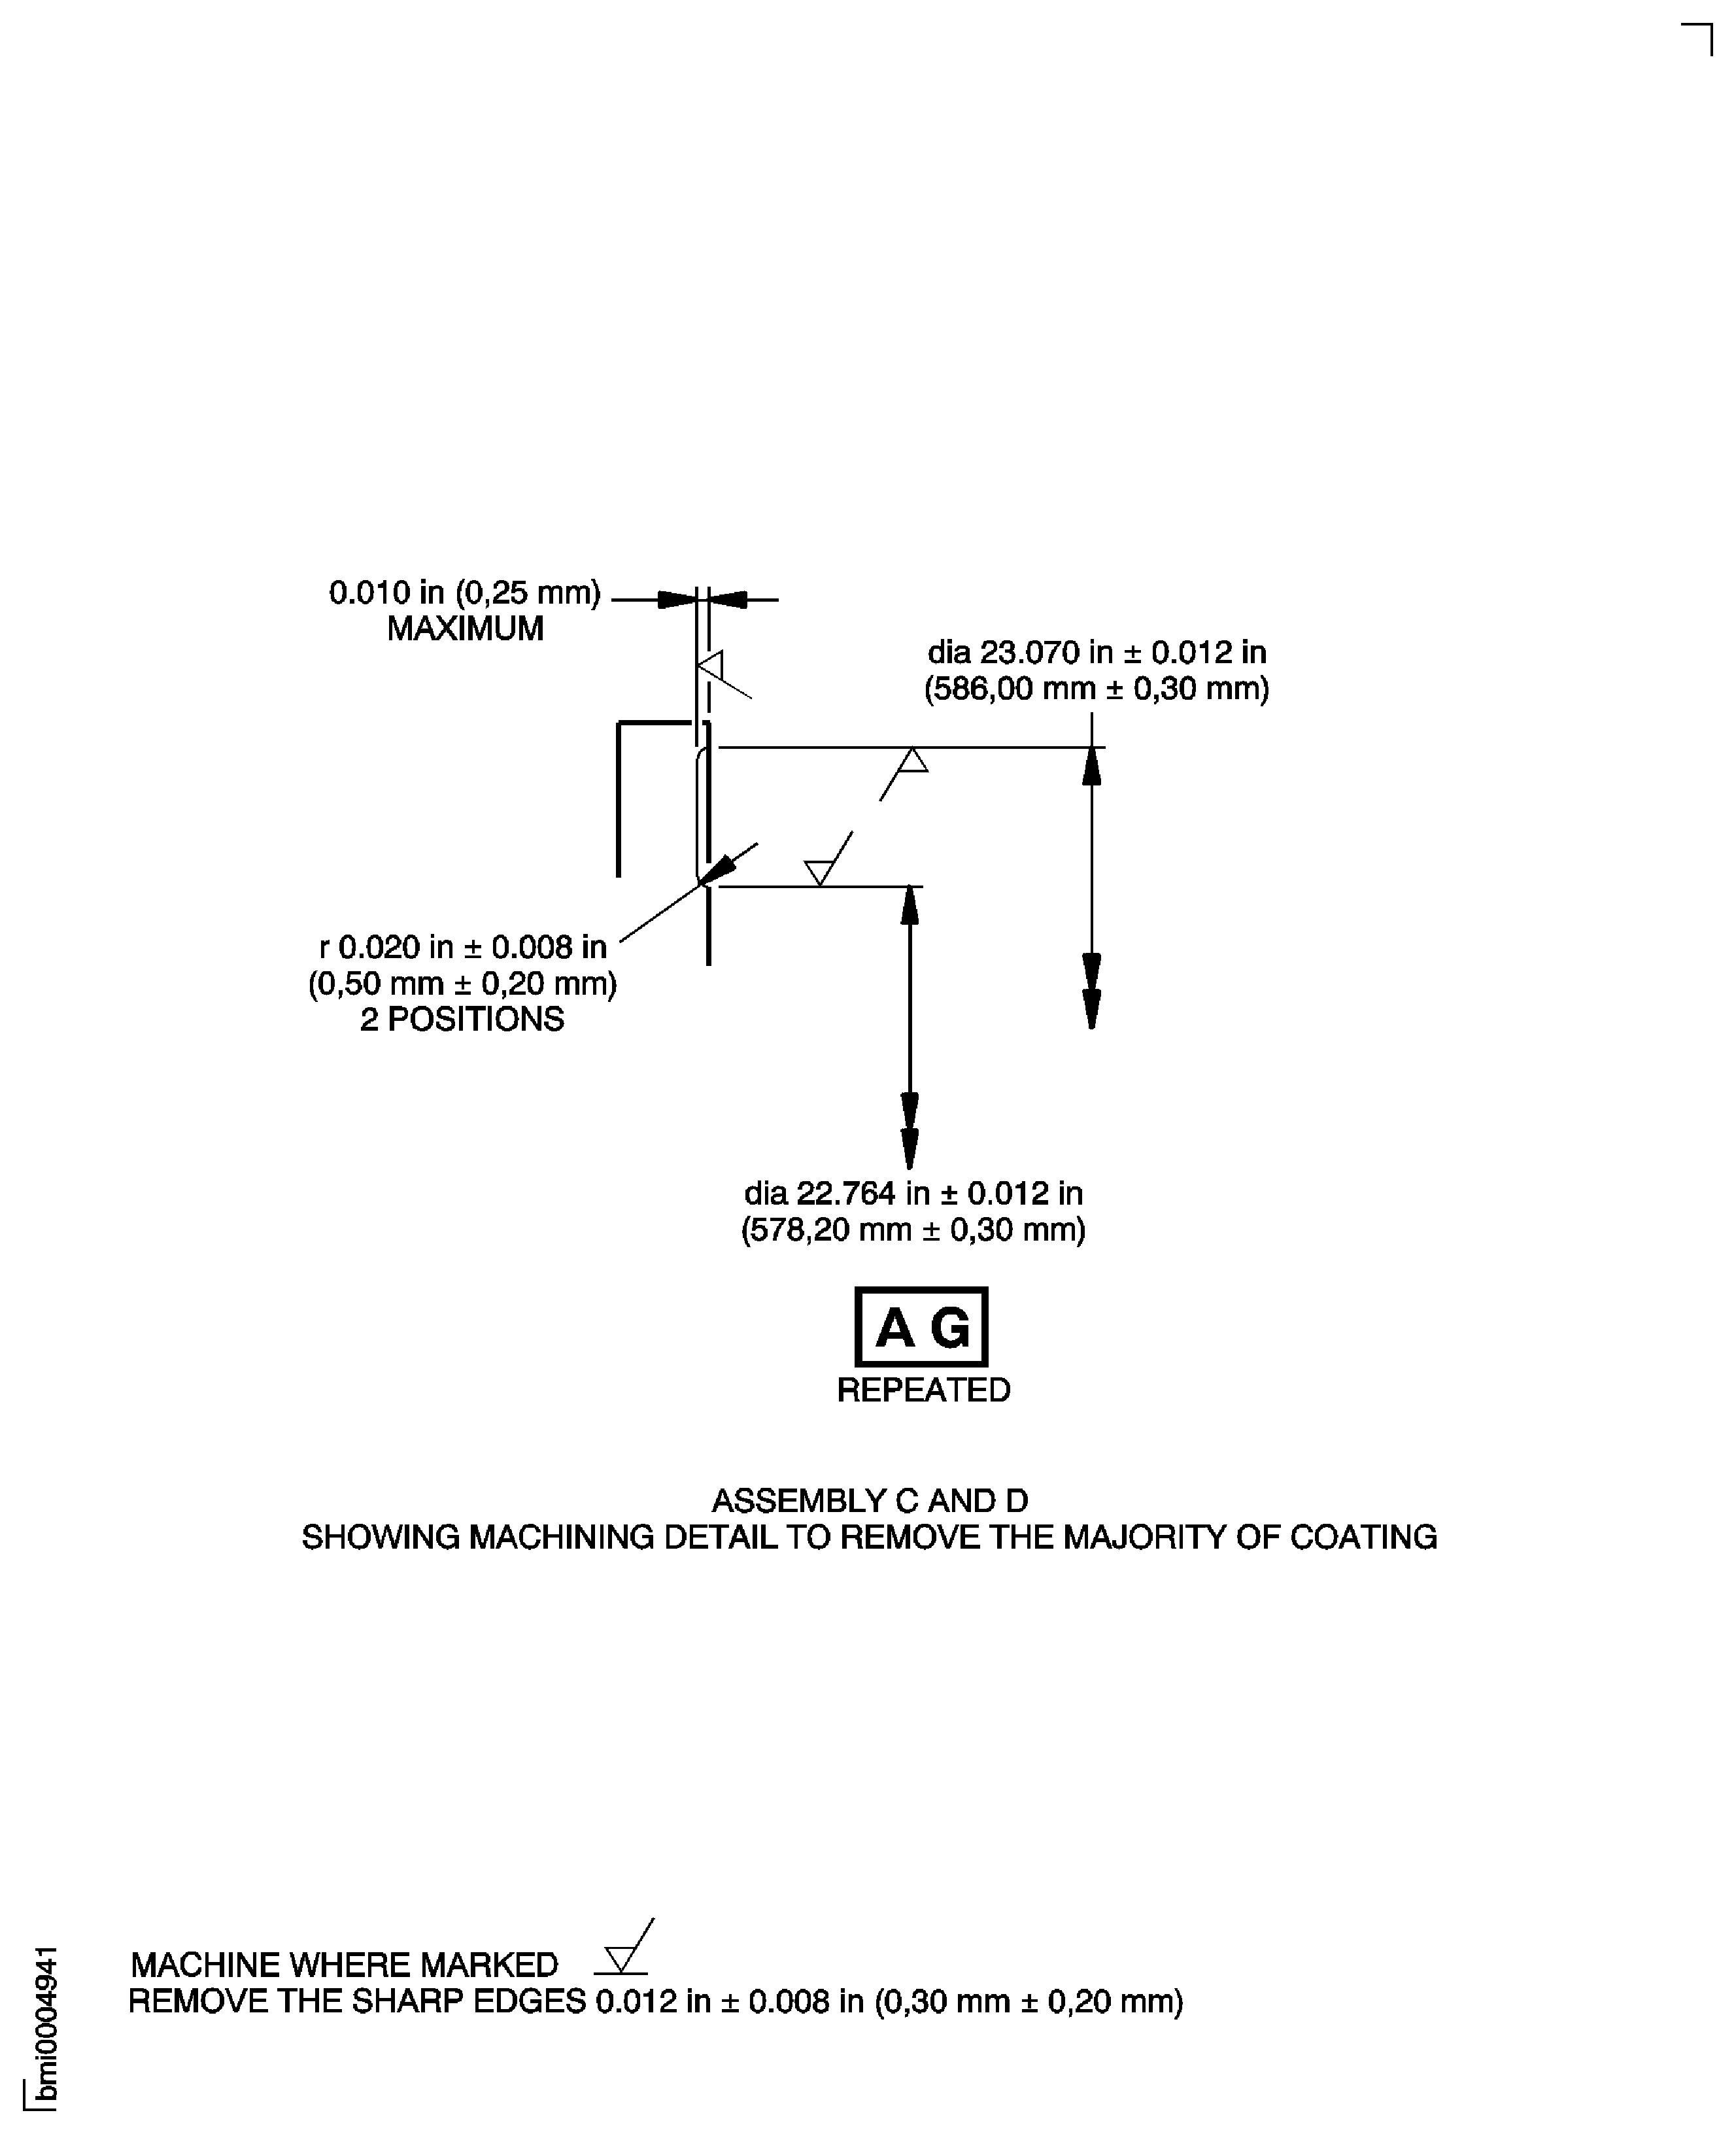
Figure: Repair Details and Dimensions - Assembly E
Repair Details and Dimensions - Assembly E
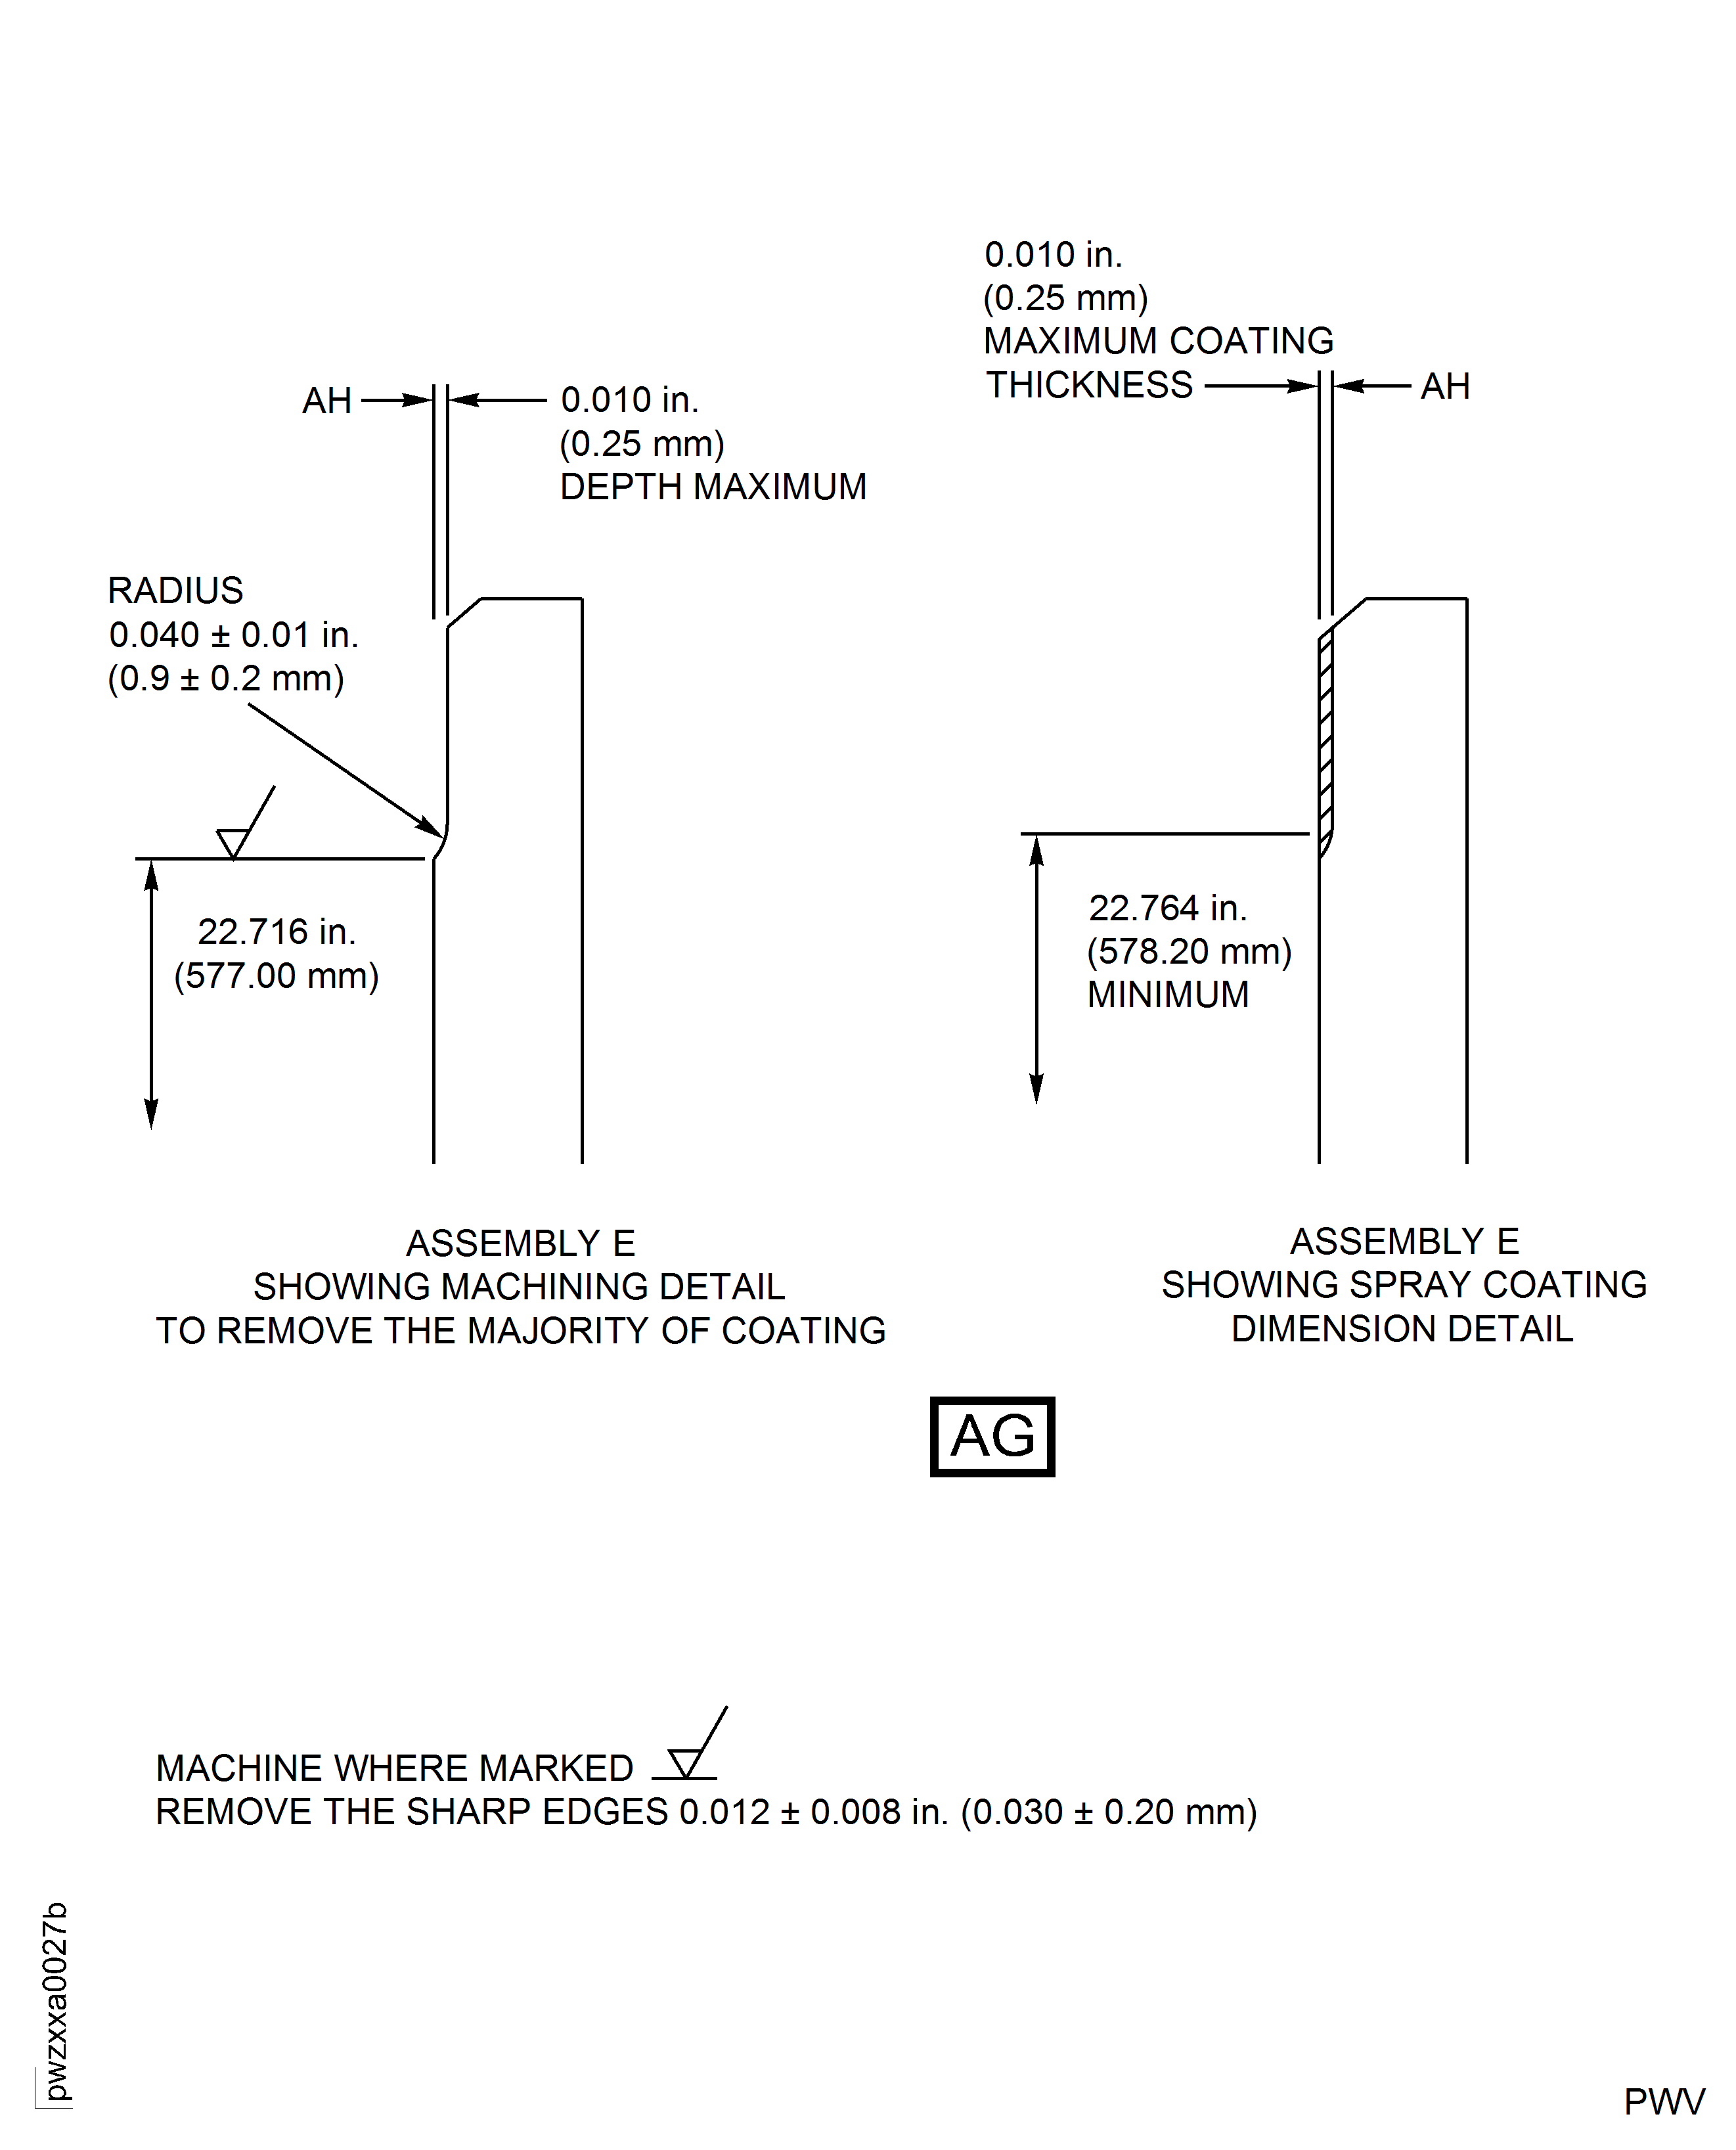
Figure: Repair Details and Dimensions - Assembly A and Assembly B
Repair Details and Dimensions - Assembly A and Assembly B
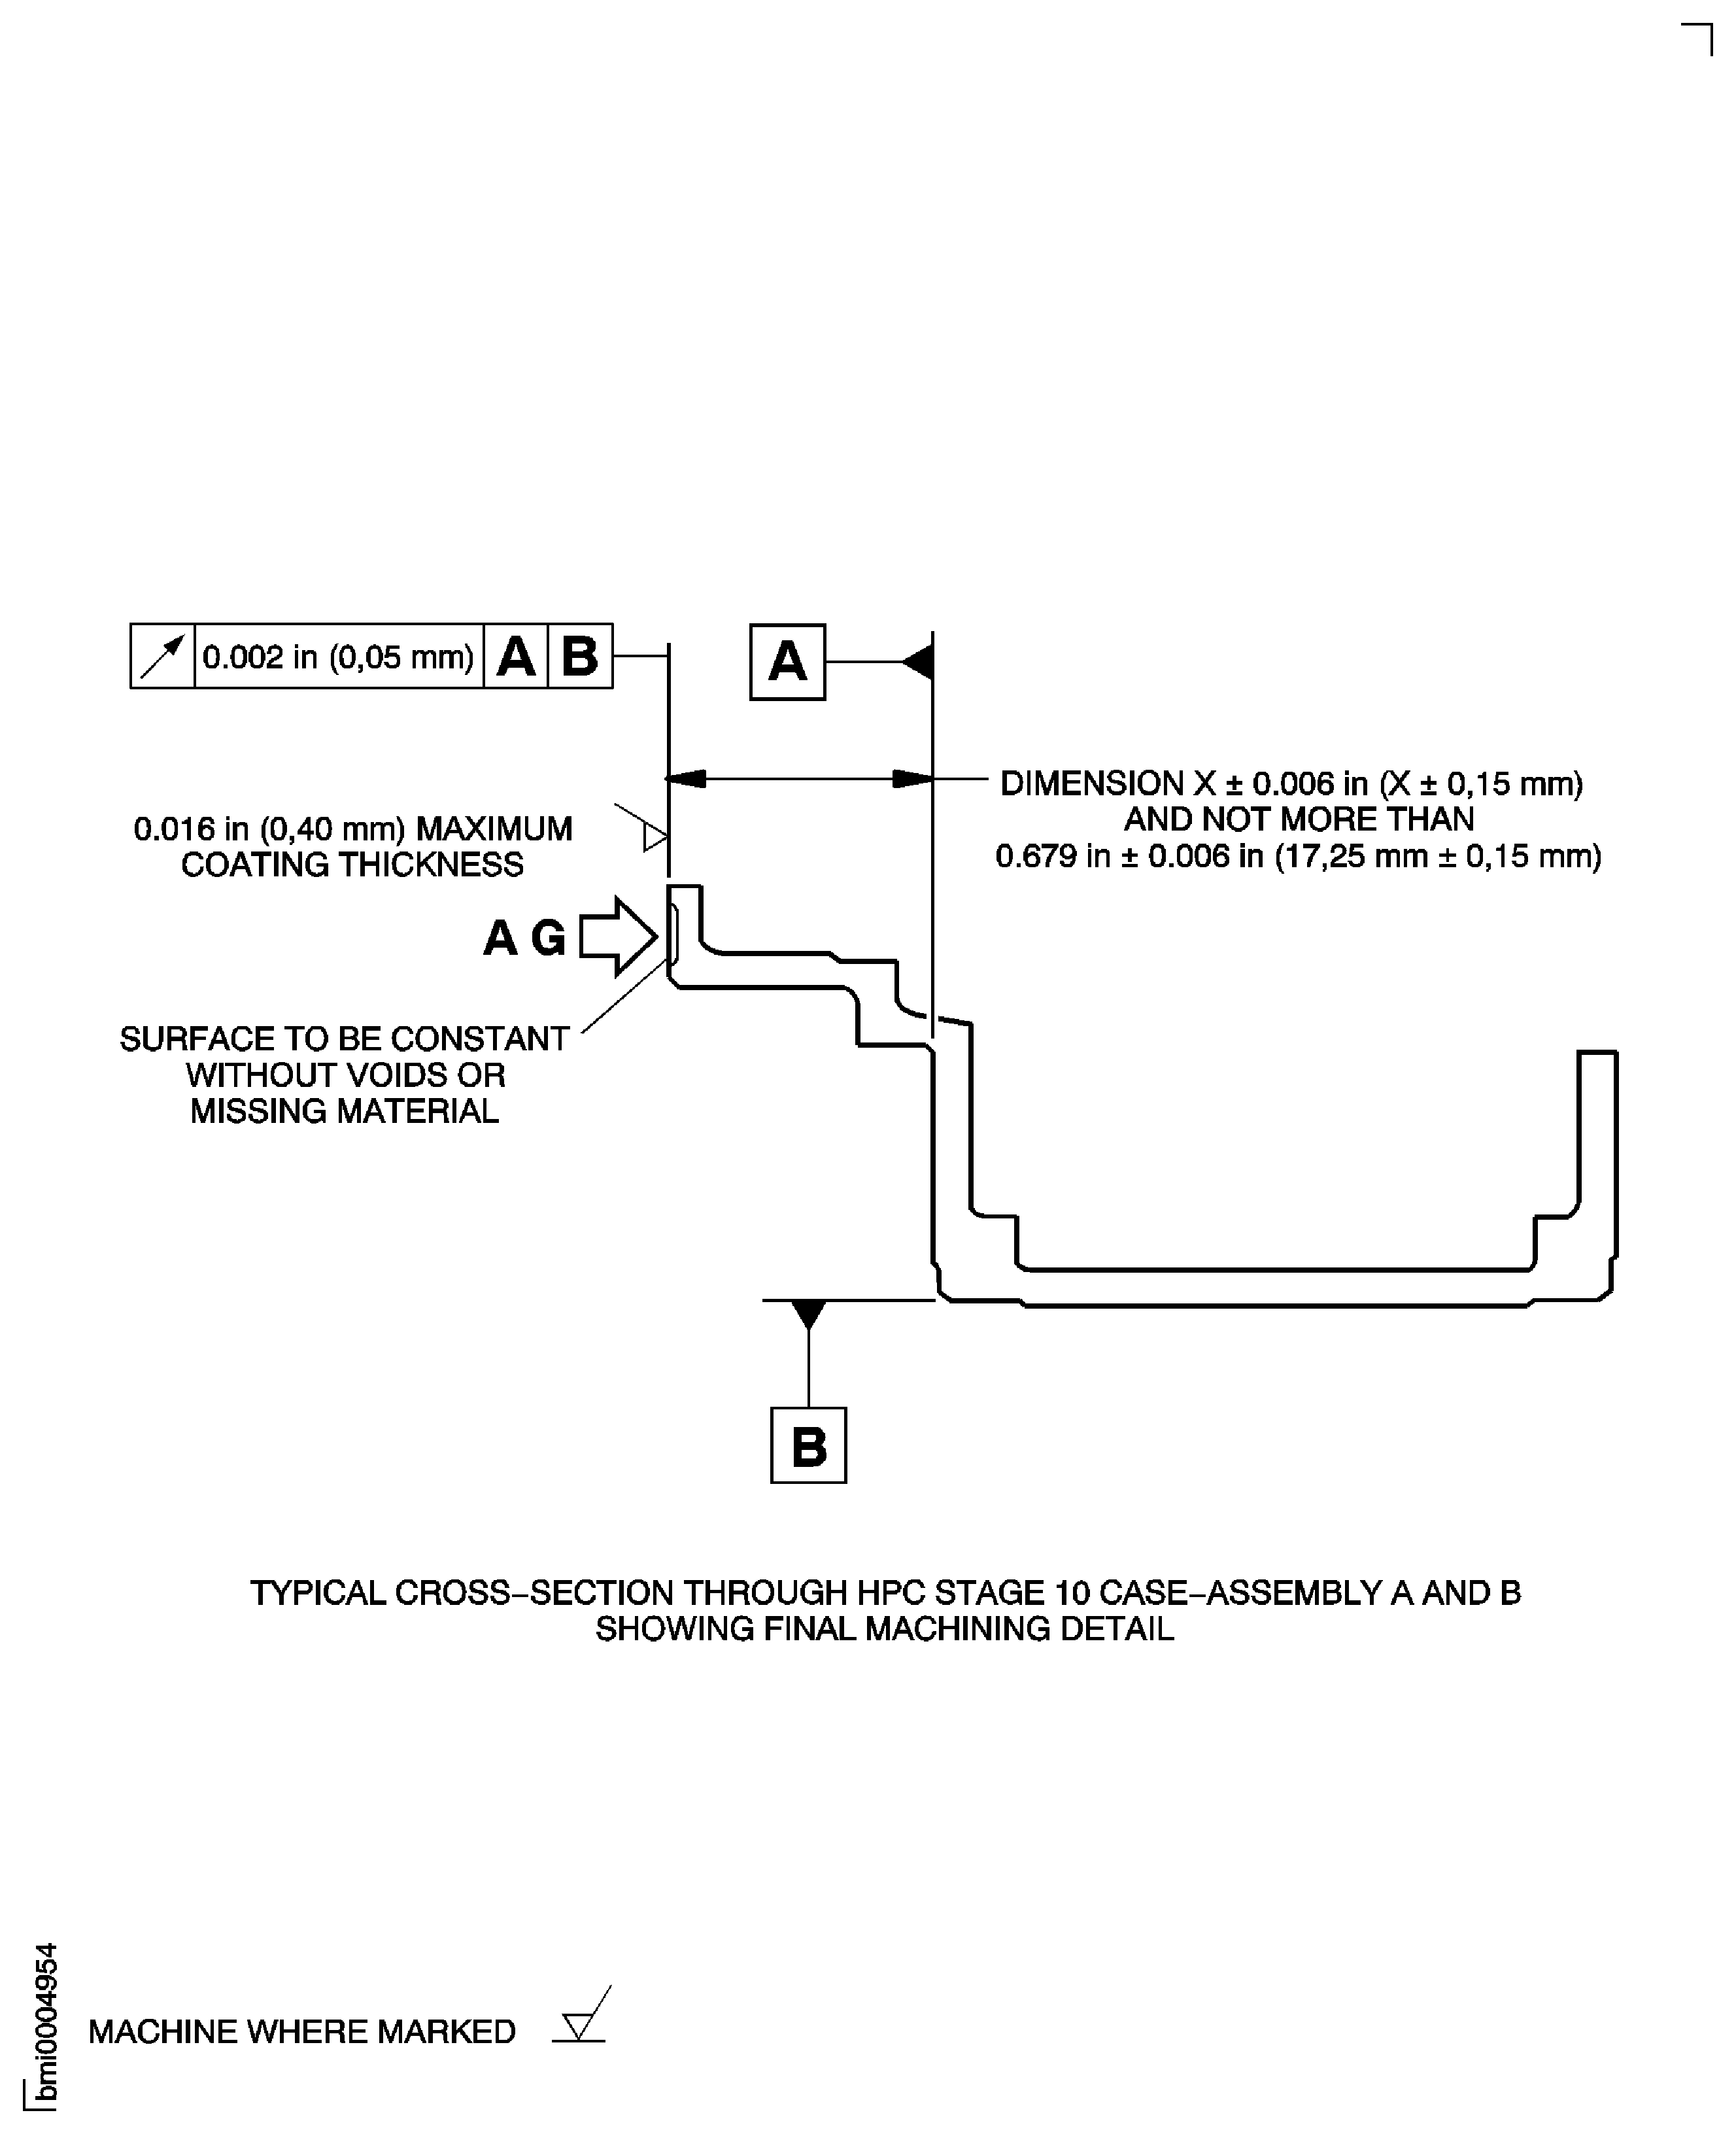
Figure: Repair Details and Dimensions - Assembly C
Repair Details and Dimensions - Assembly C
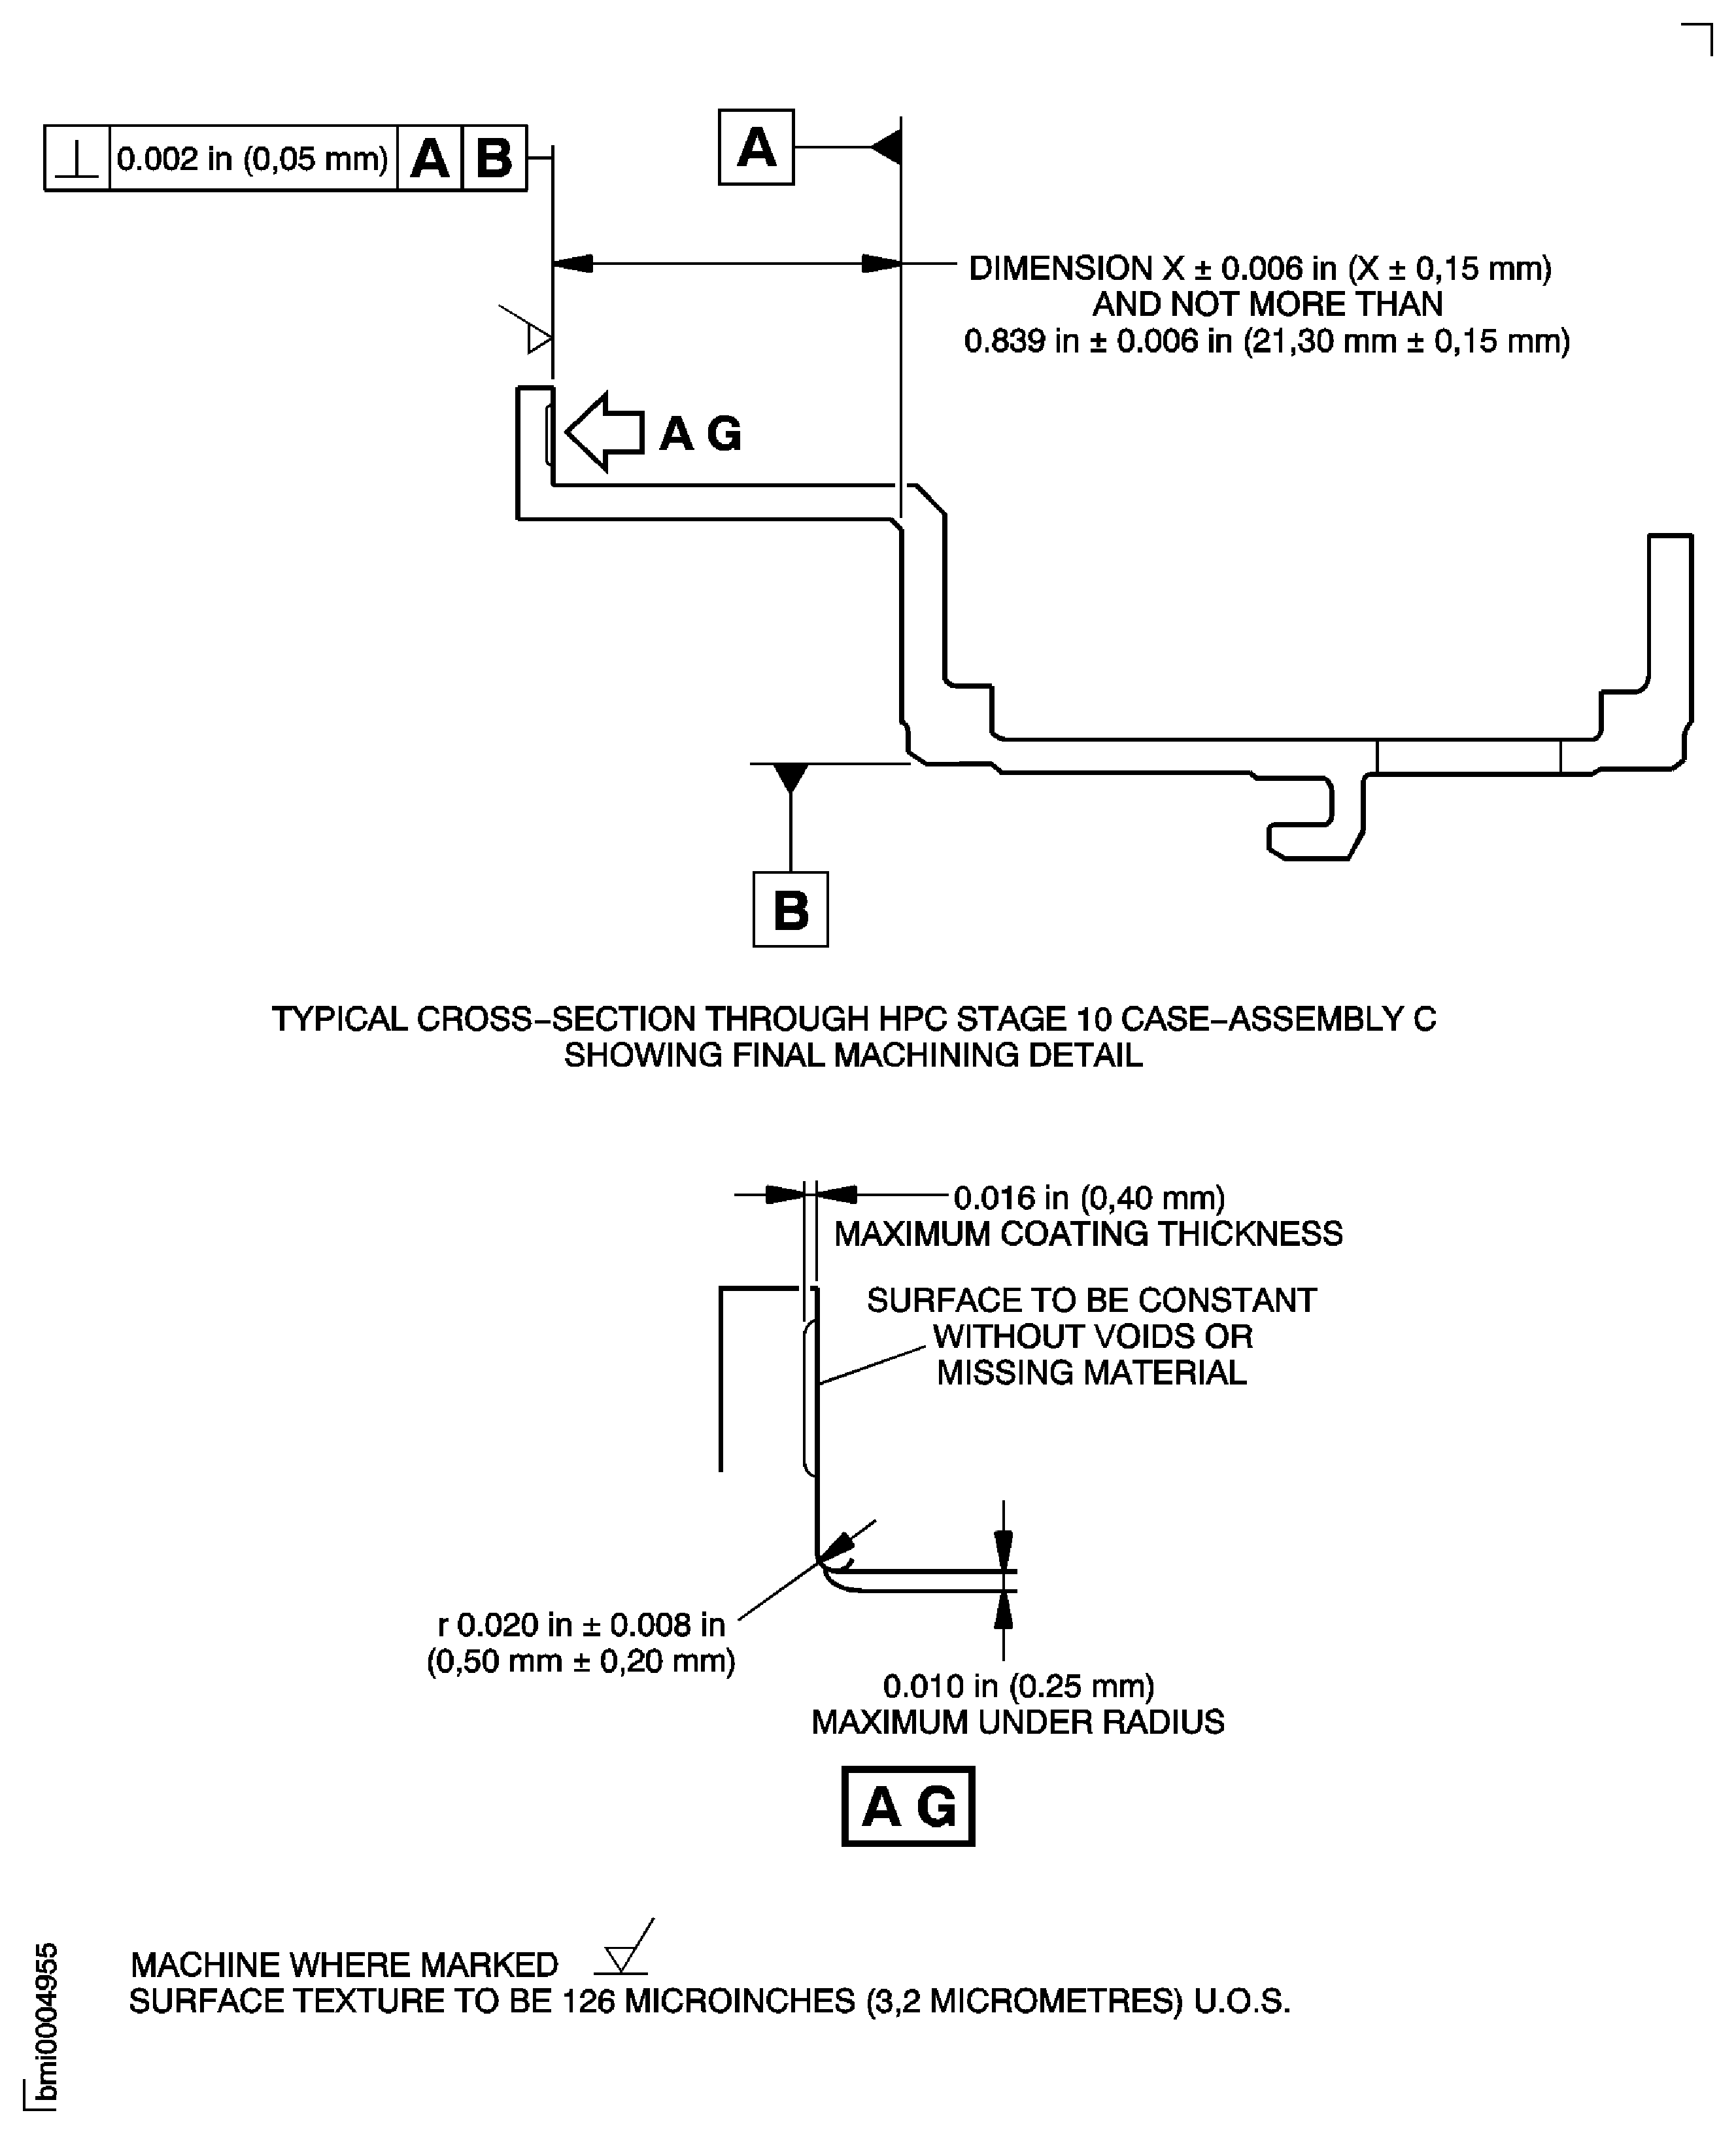
Figure: Repair Details and Dimensions - Assembly D
Repair Details and Dimensions - Assembly D
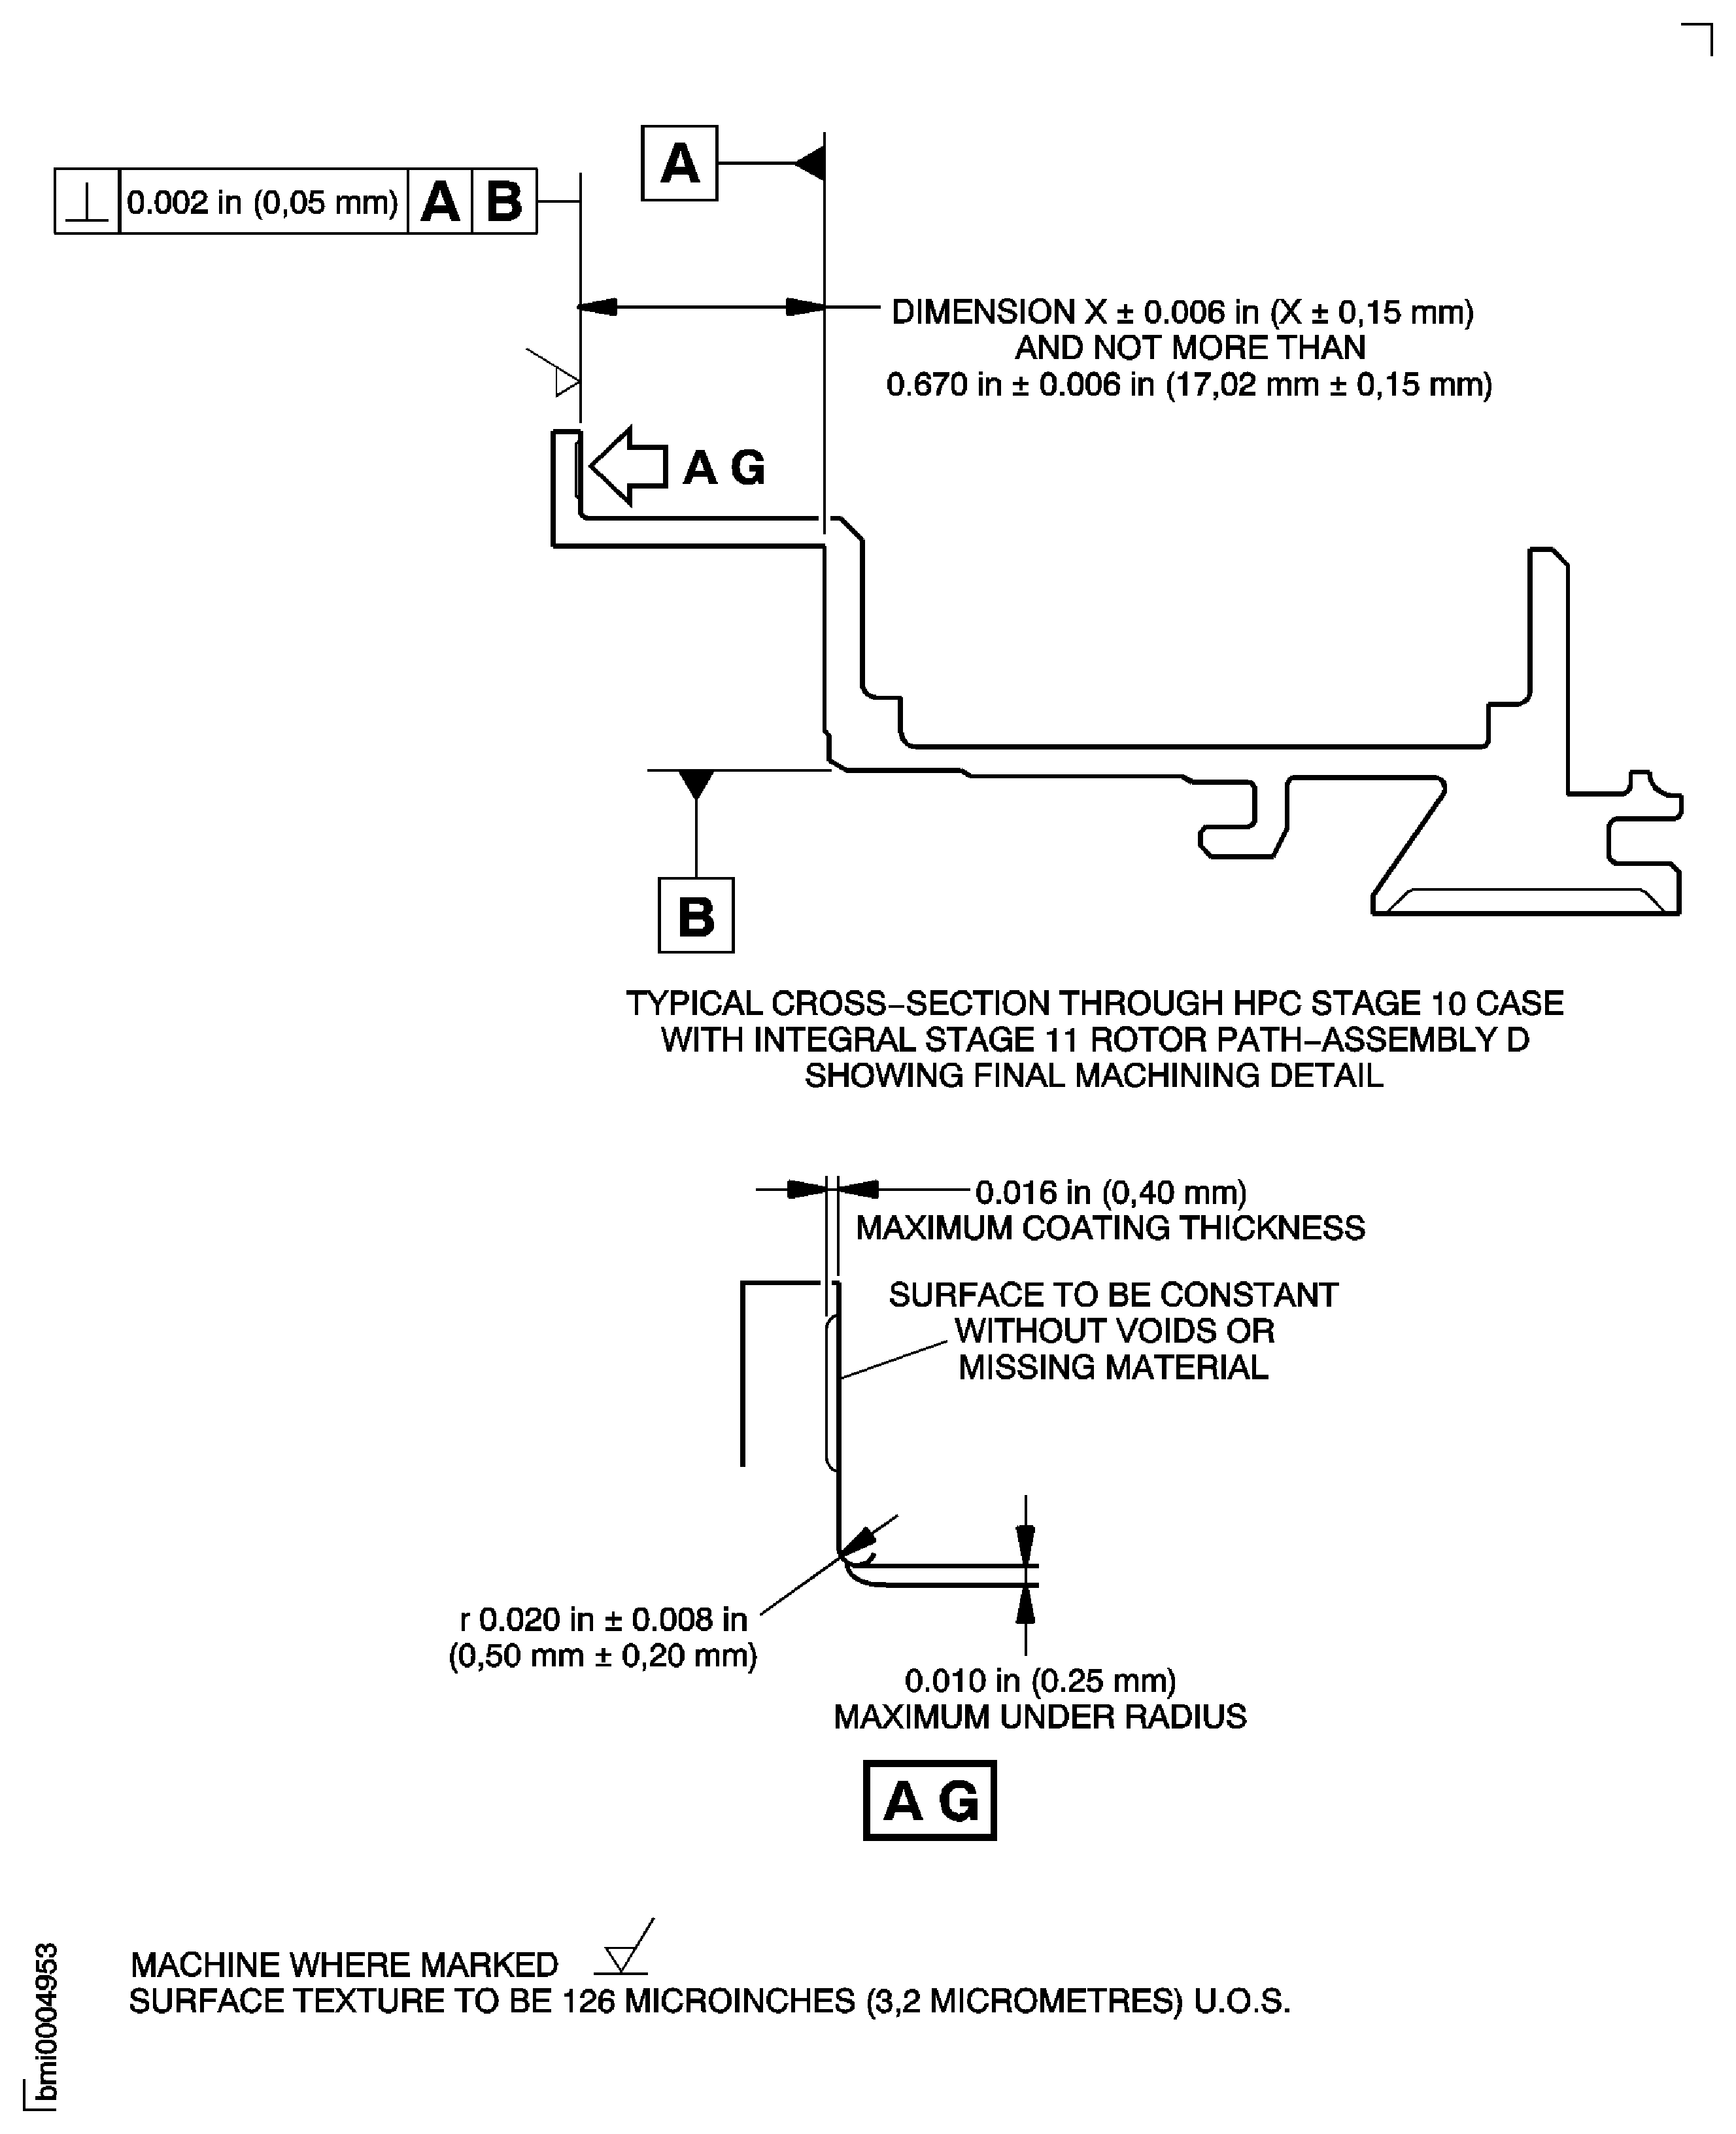
Figure: Repair Details and Dimensions - Assembly E
Repair Details and Dimensions - Assembly E
