Export Control
EAR Export Classification: Not subject to the EAR per 15 C.F.R. Chapter 1, Part 734.3(b)(3), except for the following Service Bulletins which are currently published as EAR Export Classification 9E991: SBE70-0992, SBE72-0483, SBE72-0580, SBE72-0588, SBE72-0640, SBE73-0209, SBE80-0024 and SBE80-0025.Copyright
© IAE International Aero Engines AG (2001, 2014 - 2021) The information contained in this document is the property of © IAE International Aero Engines AG and may not be copied or used for any purpose other than that for which it is supplied without the express written authority of © IAE International Aero Engines AG. (This does not preclude use by engine and aircraft operators for normal instructional, maintenance or overhaul purposes.).Applicability
All
Common Information
TASK 72-41-21-300-095 HPC Stage 11 Rotor Path Ring Case Assembly - Weld Repair, Repair-095 (VRS9295)
Material of component
DESCRIPTION | SYMBOL | MATERIAL |
|---|---|---|
HP Compressor Stage 11 Case | QTX, QRK, OR RQY | Nickel Alloy |
GENERAL
This repair must only be done when the instruction to do so is given in TASK 72-41-21-200-011-D00 for PNs 6A6551 and 6A7531.
This repair must only be done when the instruction to do so is given in TASK 72-41-21-200-011-E00 for PN 6B1435.
Preliminary Requirements
Pre-Conditions
| Action/Condition | Data Module/Technical Publication |
|---|---|
| Make sure that all the cleaning and inspection procedures are done before this repair. | |
| Remove the abradable lining. | TASK 72-41-21-300-019 |
| Remove all spacers for PNs 6A6551 and 6A7531 only. | TASK 72-41-21-300-040 |
Support Equipment
NONEConsumables, Materials and Expendables
| Name | Manufacturer | Part Number / Identification | Quantity | Remark |
|---|---|---|---|---|
| CoMat 03-374 WELDING FILLER WIRE | LOCAL | CoMat 03-374 |
Spares
NONESafety Requirements
NONEProcedure
Refer to SPM TASK 70-35-03-300-501.
Blend the area(s) of damage as necessary.
SUBTASK 72-41-21-320-007 Blend the Damage
Refer to SPM TASK 70-11-03-300-503.
Clean the part.
SUBTASK 72-41-21-110-283 Clean the Part
Refer to SPM TASK 70-23-05-230-501. Use high sensitivity penetrant. Cracks and indications are not permitted.
Refer to SPM TASK 70-23-03-230-501 or TASK 70-23-08-230-501. Cracks and indications are not permitted.
Do a penetrant crack inspection on the repair area(s) by one of the procedures that follow:
SUBTASK 72-41-21-230-245 Do a Fluorescent Penetrant Inspection
Refer to SPM TASK 70-31-13-310-501.
Use the suitable abrasive procedure to remove oxides and prepare the repair area(s) for weld.
SUBTASK 72-41-21-350-287 Preparation for Weld
Refer to SPM TASK 70-11-26-300-503.
Clean the repair area(s).
SUBTASK 72-41-21-110-284 Clean the Repair Area(s)
Refer to SPM TASK 70-31-13-310-501.
Use the Manual Gas Tungsten Arc Weld (GTAW-MA) procedure.
Weld build up the area(s) of damage as necessary.
SUBTASK 72-41-21-310-052 Weld the Area(s) of Damage
Refer to SPM TASK 70-37-29-370-501 and TASK 70-37-00-370-501.
Do a local heat treat of the repair area(s).
SUBTASK 72-41-21-370-052 Heat Treat
Hardness must be HV 326, HB 300, or equivalent minimum.
Do a hardness check in the heat treat areas but away from the welded area(s).
SUBTASK 72-41-21-220-774 Test the Hardness
Refer to SPM TASK 70-11-03-300-503.
Clean the part.
SUBTASK 72-41-21-110-285 Clean the Part
Refer to SPM TASK 70-23-05-230-501. Use high sensitivity penetrant. Cracks and indications are not permitted.
Refer to SPM TASK 70-23-03-230-501 or TASK 70-23-08-230-501. Cracks and indications are not permitted.
Do a penetrant crack inspection on the repair area(s) by one of the procedures that follow:
SUBTASK 72-41-21-230-246 Do a Fluorescent Penetrant Inspection
For PN 6A7531 refer to TASK 72-41-21-200-011-D00.
For PN 6B1435 refer to TASK 72-41-21-200-011-E00.
Do a visual and dimensional inspection of the part.
SUBTASK 72-41-21-220-775 Examine the HPC Stage 11 Rotor Path Ring Case Assembly
Refer to SPM TASK 70-09-00-400-501.
Vibration peen VRS9295 adjacent to the part number.
SUBTASK 72-41-21-350-288 Identify the Repair
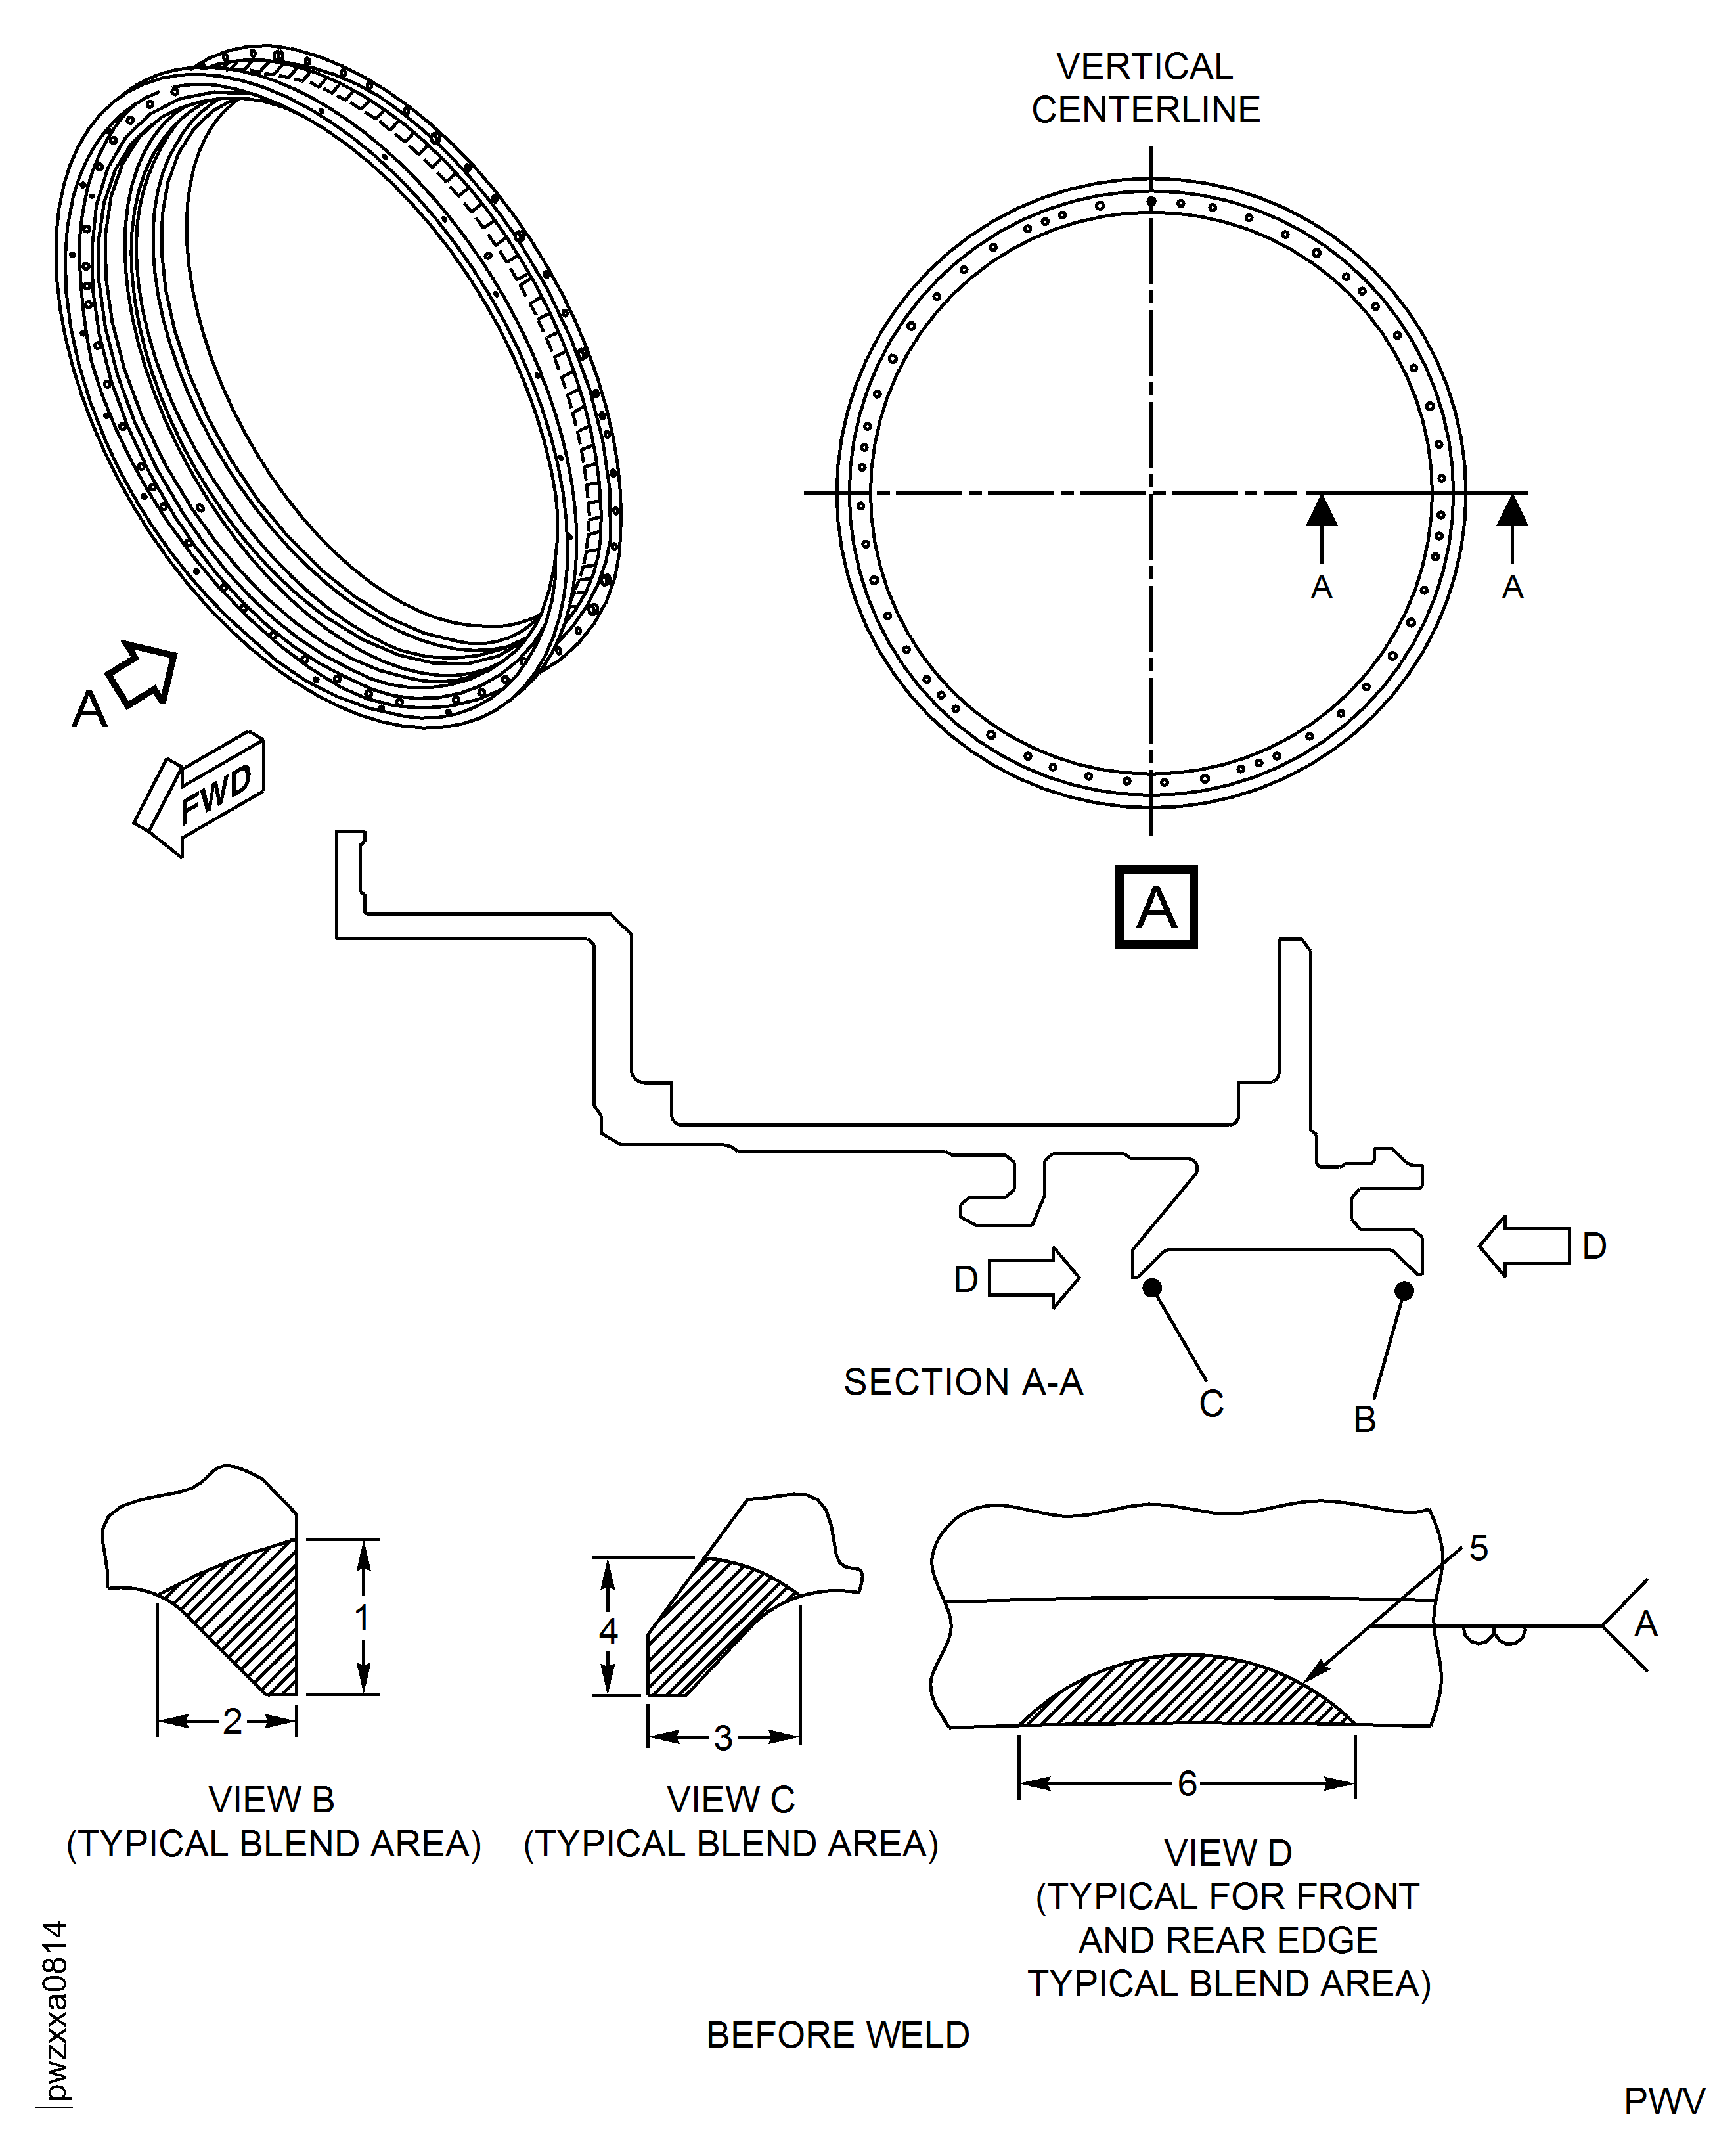
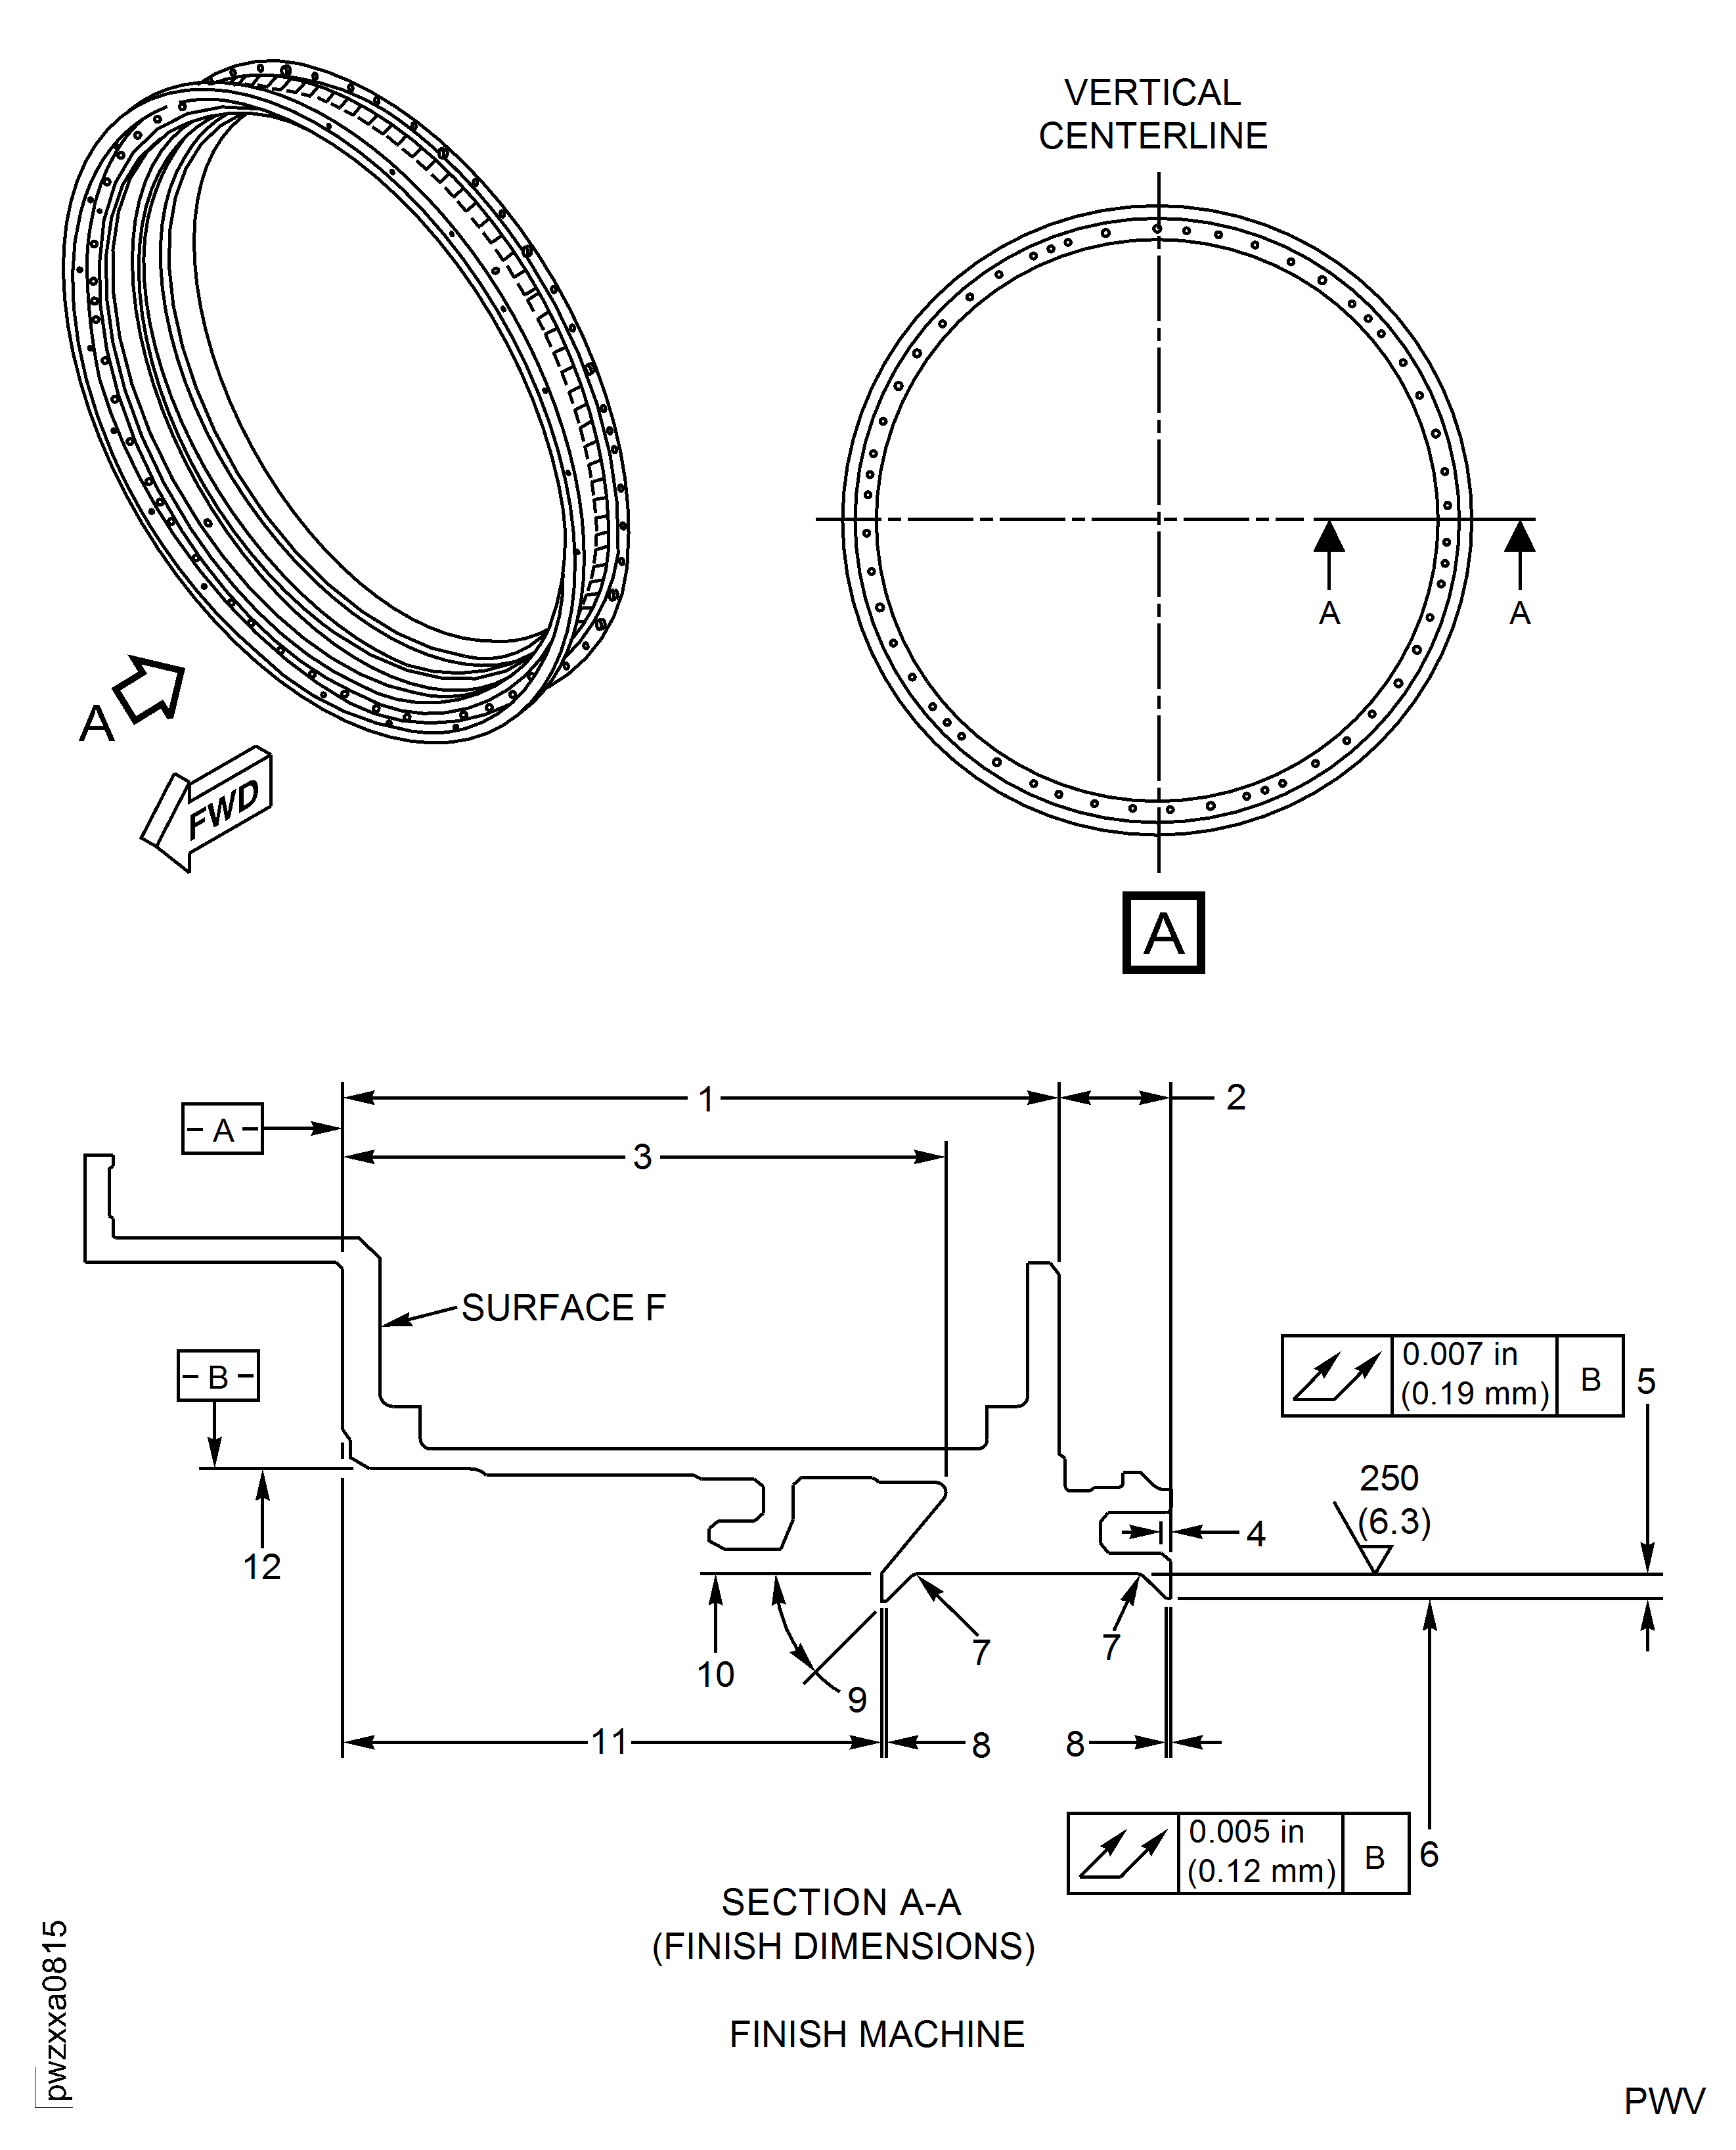
Figure: Lining Retaining Recess Front And Rear Lips Weld Repair (For Assembly A)
0.090 Inch (2.29 mm) Maximum After Blend Before Weld.

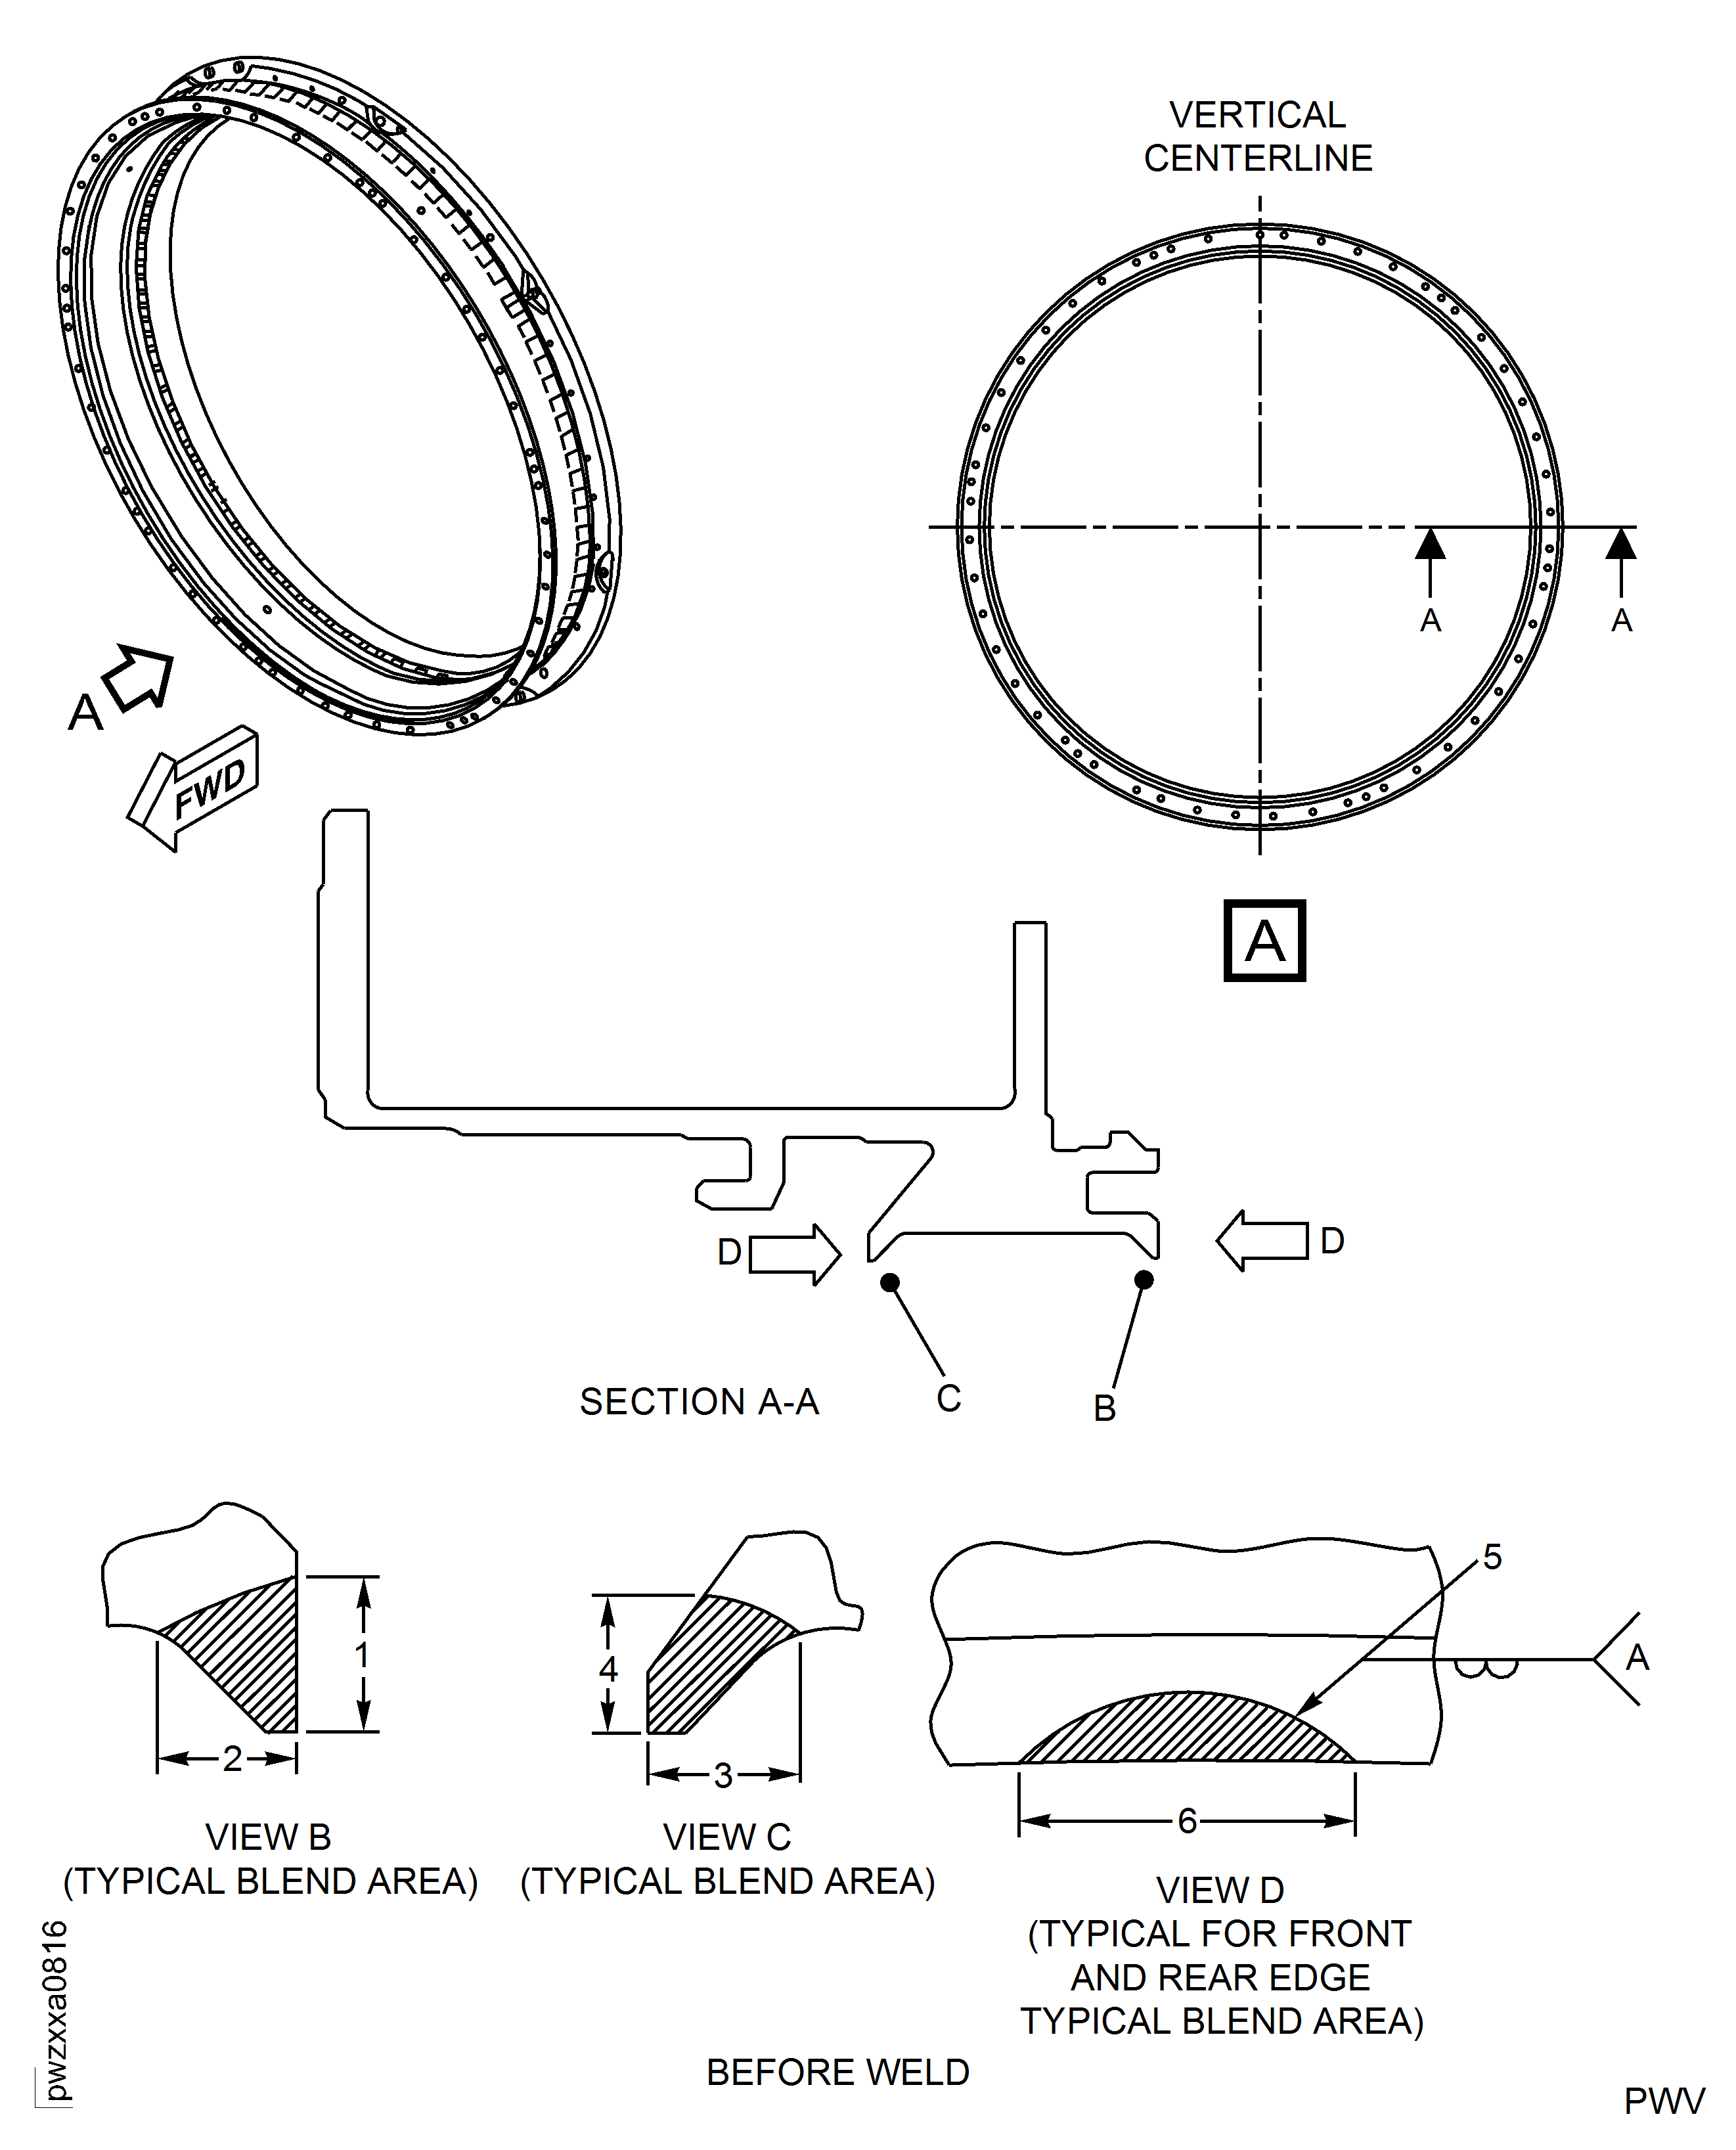
Figure: Lining Retaining Recess Front And Rear Lips Weld Repair (For Assembly A)
2.045 - 2.052 Inches (51.93 - 52.13 mm), Reference

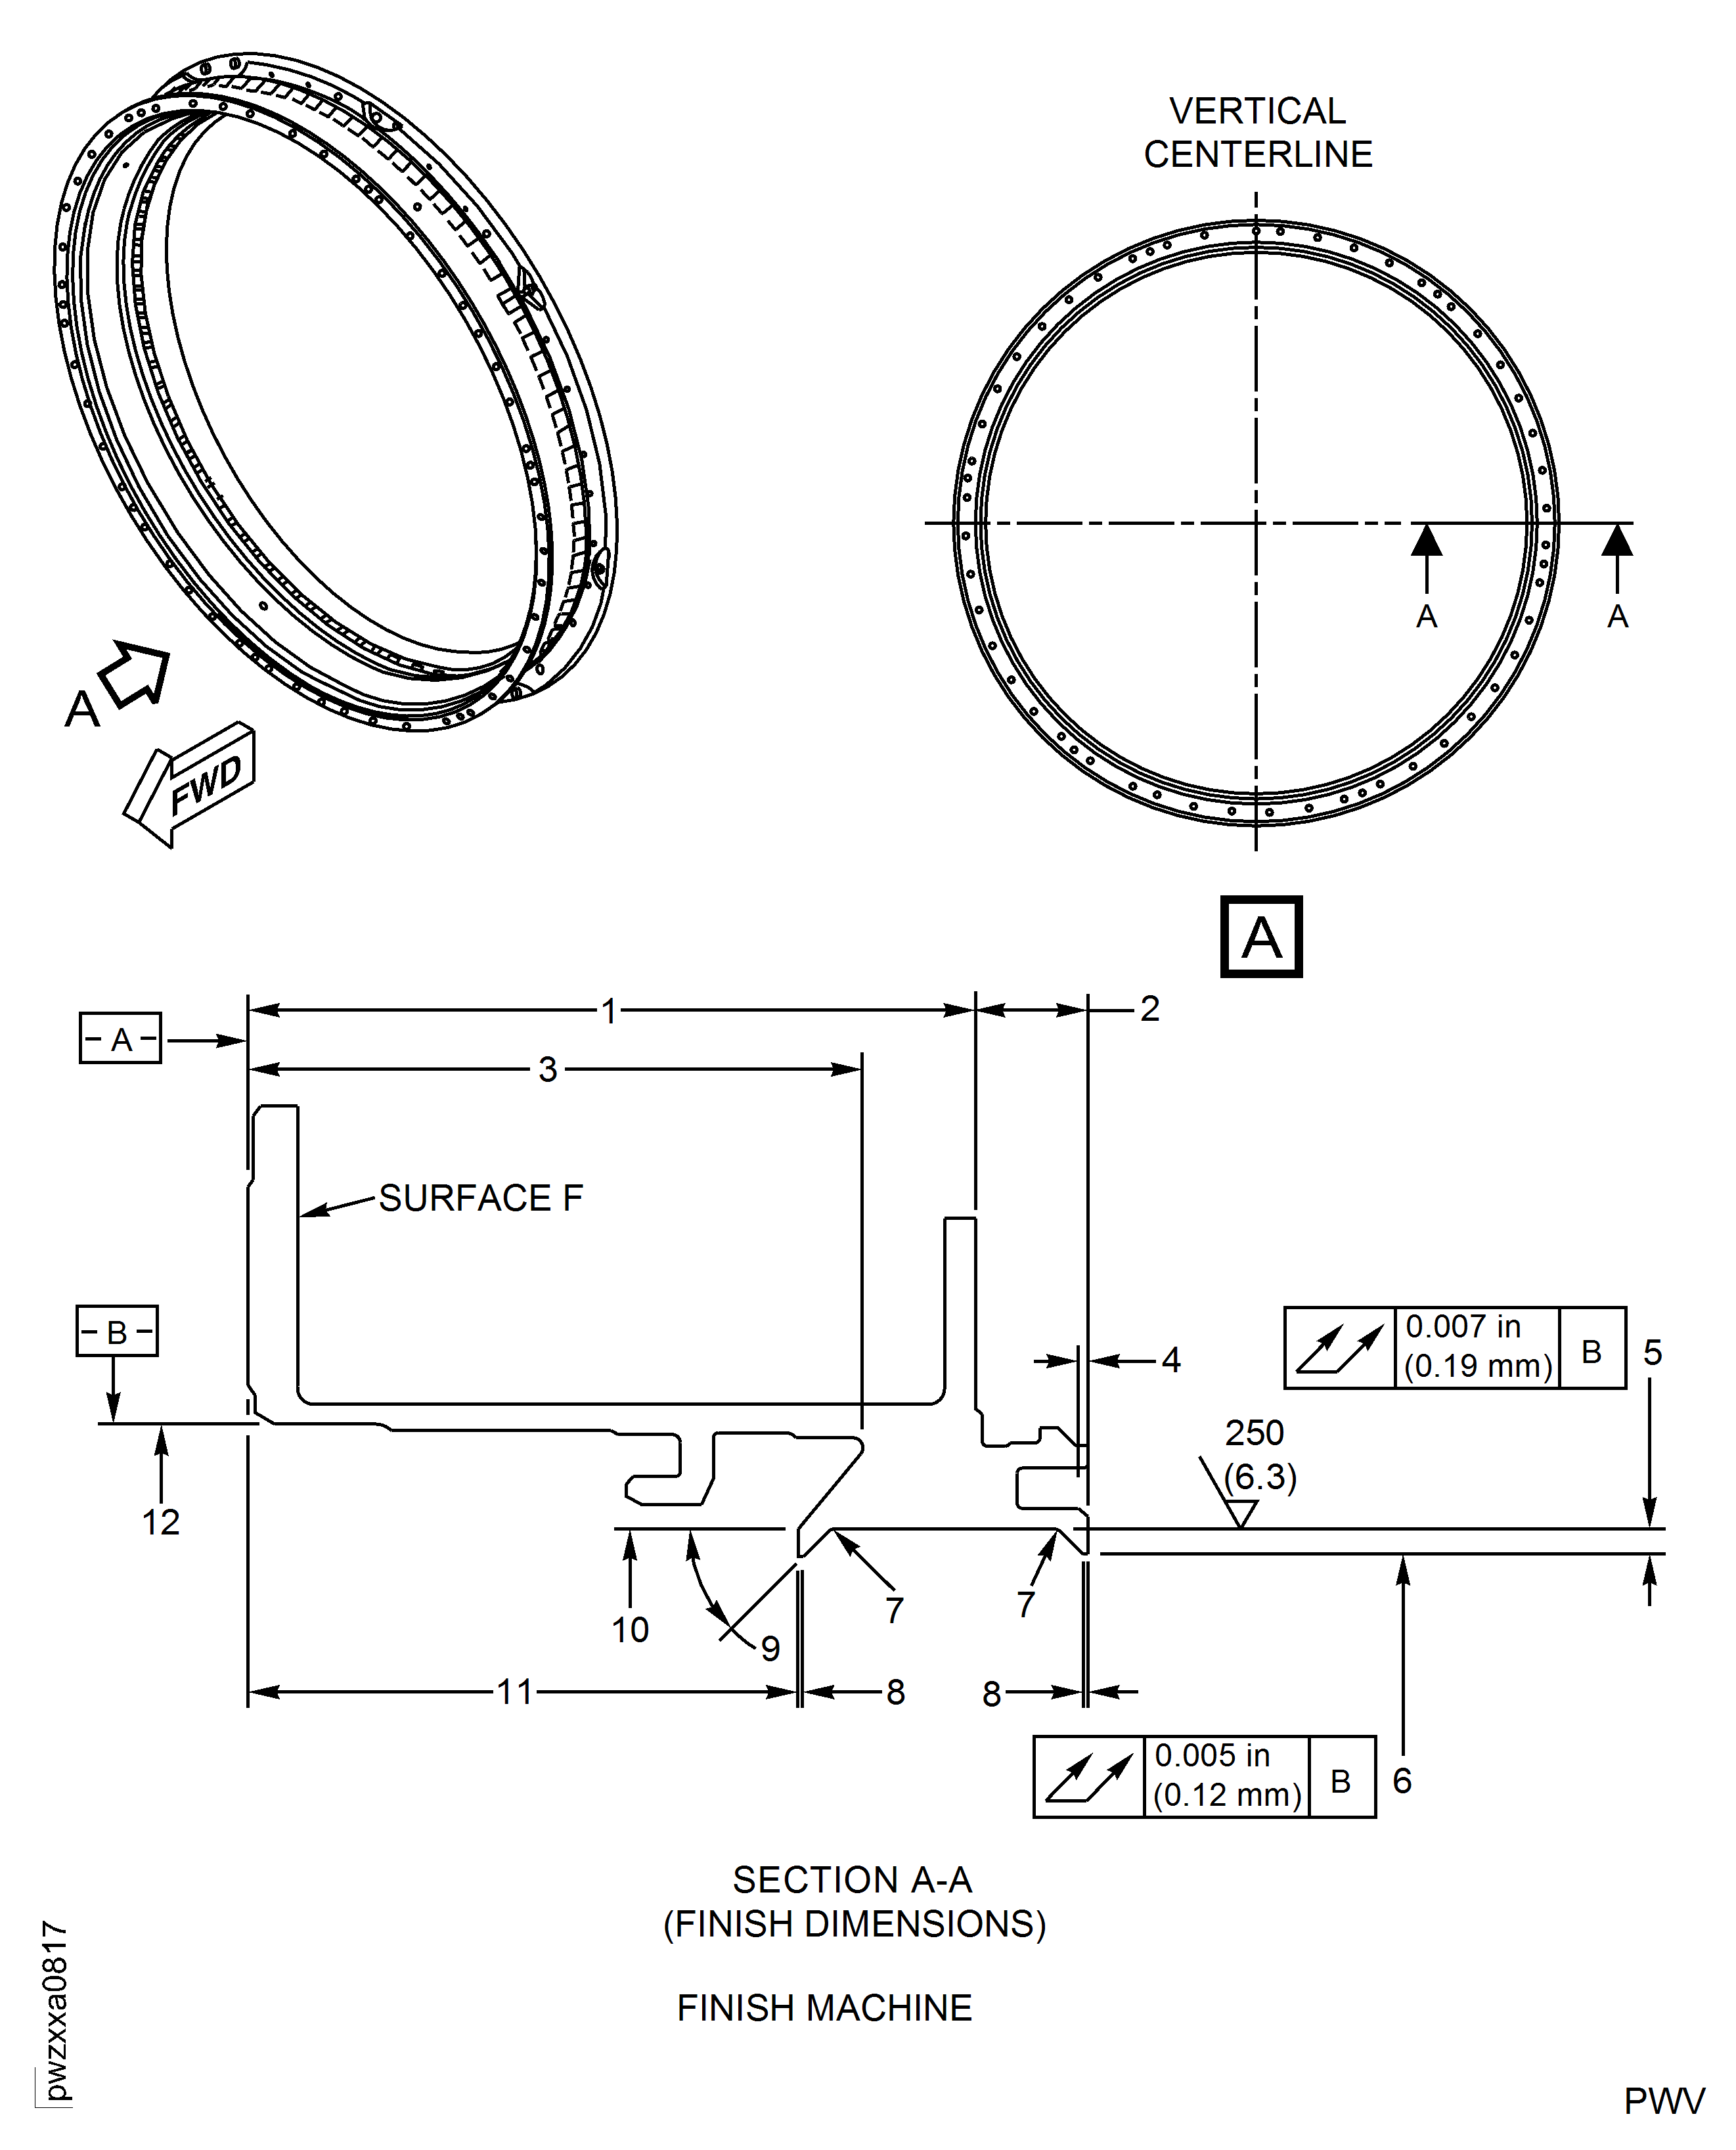
Figure: Lining Retaining Recess Front And Rear Lips Weld Repair (For Assembly B)
0.090 Inch (2.29 mm) Maximum After Blend Before Weld.

Figure: Lining Retaining Recess Front And Rear Lips Weld Repair (For Assembly B)
2.045 - 2.052 Inches (51.93 - 52.13 mm), Reference

Requirements After Job Completion
Follow-On Conditions
| Action/Condition | Data Module/Technical Publication |
|---|---|
| Apply the abradable lining again. | TASK 72-41-21-300-019 |
| Install all the removed spacers for PNs 6A6551 and 6A7531. | TASK 72-41-21-300-040 |
