Export Control
EAR Export Classification: Not subject to the EAR per 15 C.F.R. Chapter 1, Part 734.3(b)(3), except for the following Service Bulletins which are currently published as EAR Export Classification 9E991: SBE70-0992, SBE72-0483, SBE72-0580, SBE72-0588, SBE72-0640, SBE73-0209, SBE80-0024 and SBE80-0025.Copyright
© IAE International Aero Engines AG (2001, 2014 - 2021) The information contained in this document is the property of © IAE International Aero Engines AG and may not be copied or used for any purpose other than that for which it is supplied without the express written authority of © IAE International Aero Engines AG. (This does not preclude use by engine and aircraft operators for normal instructional, maintenance or overhaul purposes.).Applicability
All
Common Information
TASK 72-42-30-440-001 No. 4 Bearing Compartment Assembly - Assemble, Assembly-001
General
Fig/item numbers in parentheses in the procedure agree with those used in the IPC. Only the primary Fig/item numbers are used. For the service bulletin alpha variants refer to the IPC.
For all parts identified in a different Chapter/Section/Subject, the applicable Chapter/Section/Subject comes before the Fig/item number.
For standard torque data and procedures, refer to the SPM TASK 70-41-00-400-501 and SPM TASK 70-41-02-400-501.
Special torque data is identified by the symbol * after the torque value.
Special torque data and assembly tolerances are included in the procedure.
Lubricate all threads and abutment faces of nuts and bolts with CoMat 10-077 APPROVED ENGINE OILSs, unless other lubricants are referred to in the procedure.
To identify, lubricate and install seal rings, refer to the SPM TASK 70-44-01-400-501.
The number for each radial location must be identified in a clockwise direction. These start at the engine top position when you look from the rear of the engine, unless stated differently in the procedure.
NOTE
NOTE
Preliminary Requirements
Pre-Conditions
NONESupport Equipment
| Name | Manufacturer | Part Number / Identification | Quantity | Remark |
|---|---|---|---|---|
| IAE 1F10026 Hydraulic hand pump | 0AM53 | IAE 1F10026 | 1 | |
| IAE 6F10027 Heater control unit | 0AM53 | IAE 6F10027 | 1 | |
| IAE 6F10029 Air flow test cart | 0AM53 | IAE 6F10029 | 1 | |
| IAE 1P16389 Holding base | 0AM53 | IAE 1P16389 | 1 | |
| IAE 1P16041 Heater | 0AM53 | IAE 1P16041 | 1 | |
| IAE 1P16069 Wrench | 0AM53 | IAE 1P16069 | 1 | |
| IAE 1P16068 Support fixture | 0AM53 | IAE 1P16068 | 1 | |
| IAE 1P16469 Heater | 0AM53 | IAE 1P16469 | 1 | |
| IAE 1P16266 Air flow fixture | 0AM53 | IAE 1P16266 | 1 | |
| IAE 1P16390 Removal/installation drift | 0AM53 | IAE 1P16390 | 1 | |
| IAE 1P16104 Cover | 0AM53 | IAE 1P16104 | 1 | |
| IAE 1P16106 cover | 0AM53 | IAE 1P16106 | 1 | |
| IAE 1P16108 cover | 0AM53 | IAE 1P16108 | 1 | |
| IAE 1P16145 Crimp fixture | 0AM53 | IAE 1P16145 | 1 | |
| IAE 1P16469 Heater | 0AM53 | IAE 1P16469 | 1 | |
| IAE 1P17000 Protective cover | 0AM53 | IAE 1P17000 | 1 |
Consumables, Materials and Expendables
| Name | Manufacturer | Part Number / Identification | Quantity | Remark |
|---|---|---|---|---|
| CoMat 10-077 APPROVED ENGINE OILS | LOCAL | CoMat 10-077 | ||
| CoMat 02-141 LOCKWIRE | LOCAL | CoMat 02-141 |
Spares
| Name | Manufacturer | Part Number / Identification | Quantity | Remark |
|---|---|---|---|---|
| Key washer | 1 | |||
| Key washer | 1 | |||
| Key washer | 15 | |||
| Gasket | 1 | |||
| Gasket | 1 | |||
| Key washer | 1 |
Safety Requirements
NONEProcedure
Refer to Figure.
Reference the clearance/interference at location 2052. If required, use the data written as a note in TASK 72-42-33-200-001 (INSPECTION-001) and TASK 72-42-35-200-001 (INSPECTION-001).
Table 1. Fits and Clearances (all dimensions are in inches) NEW PART
WORN PART
DIMENSIONS
DIMENSIONS
PART IDENT
Size
Clearance
Non-select
REJECT IF
MORE THAN
LOCATION 2052
No. 4 Bearing Seal Assy No. 4 Bearing Front Face Seal Assembly (72-42-33, 01-010), Location Diameter
No. 4 Bearing Front Cooling Duct Assy ENGINE-NO.4 BEARING FRONT COOLING DUCT (72-42-35, 01-010), Location Diameter
Seal Assy Diameter
6.055
Clear
6.051
0.002
Cooling Duct Assy Diameter
6.057
0.006
6.053
Intf
Table 2. Fits and Clearances (all dimensions are in millimeters) NEW PART
WORN PART
DIMENSIONS
DIMENSIONS
PART IDENT
Size
Clearance
Non-select
REJECT IF
MORE THAN
LOCATION 2052
No. 4 Bearing Seal Assy No. 4 Bearing Front Face Seal Assembly (72-42-33, 01-010), Location Diameter
No. 4 Bearing Front Cooling Duct Assy ENGINE-NO.4 BEARING FRONT COOLING DUCT (72-42-35, 01-010), Location Diameter
Seal Assy Diameter
153.797
Clear
153.696
0.051
Cooling Duct Assy Diameter
153.847
0.152
153.747
Intf
SUBTASK 72-42-30-220-051 Reference the Fits and Clearances of the No. 4 Bearing Front Compartment at Location 2052
Refer to Figure.
Reference the interference at location 2053. If required, use the data written as a note in TASK 72-42-36-200-001 (INSPECTION-001) and TASK 72-42-35-200-001 (INSPECTION-001).
Table 3. Fits and Clearances (all dimensions are in inches) NEW PART
WORN PART
DIMENSIONS
DIMENSIONS
PART IDENT
Size
Clearance
Non-select
REJECT IF
MORE THAN
LOCATION 2053
No. 4 Bearing Heatshield Assy ENGINE-NO.4 BEARING FRONT HEATSHIELD (72-42-36, 01-010), Location Diameter
No. 4 Bearing Cooling Duct Assy ENGINE-NO.4 BEARING FRONT COOLING DUCT (72-42-35, 01-010), Location Diameter
Heatshield Location Diameter
5.963
Clear
5.940
0.002
Cooling Duct Assy Location Diameter
5.975
0.035
5.965
Clear
Table 4. Fits and Clearances (all dimensions are in millimeters) NEW PART
WORN PART
DIMENSIONS
DIMENSIONS
PART IDENT
Size
Clearance
Non-select
REJECT IF
MORE THAN
LOCATION 2053
No. 4 Bearing Heatshield Assy ENGINE-NO.4 BEARING FRONT HEATSHIELD (72-42-36, 01-010), Location Diameter
No. 4 Bearing Cooling Duct Assy ENGINE-NO.4 BEARING FRONT COOLING DUCT (72-42-35, 01-010), Location Diameter
Heatshield Location Diameter
151.46
Clear
150.88
0.05
Cooling Duct Assy Location Diameter
151.76
0.88
151.51
Clear
SUBTASK 72-42-30-220-052 Reference the Fits and Clearances of the No. 4 Bearing Front Compartment at Location 2053
Refer to Figure.
Reference the clearance/interference at location 2054. If required, use the data written as a note in TASK 72-42-36-200-001 (INSPECTION-001) and TASK 72-42-31-200-001 (INSPECTION-001).
Table 5. Fits and Clearances (all dimensions are in inches) NEW PART
WORN PART
DIMENSIONS
DIMENSIONS
PART IDENT
Size
Clearance
Non-select
REJECT IF
MORE THAN
LOCATION 2054
No. 4 Bearing Heatshield Assy ENGINE-NO.4 BEARING FRONT HEATSHIELD (72-42-36, 01-010), Location Diameter
No. 4 Bearing Support Assy ENGINE-NO.4 BEARING SUPPORT ASSEMBLY (72-42-31, 01-010), Location Diameter
Heatshield Assy Location Diameter
12.874
Clear
12.860
0.016
Support Assy Location Diameter
12.876
0.008
12.866
Intf
Table 6. Fits and Clearances (all dimensions are in millimeters) NEW PART
WORN PART
DIMENSIONS
DIMENSIONS
PART IDENT
Size
Clearance
Non-select
REJECT IF
MORE THAN
LOCATION 2054
No. 4 Bearing Heatshield Assy ENGINE-NO.4 BEARING FRONT HEATSHIELD (72-42-36, 01-010), Location Diameter
No. 4 Bearing Support Assy ENGINE-NO.4 BEARING SUPPORT ASSEMBLY (72-42-31, 01-010), Location Diameter
Heatshield Assy Location Diameter
327.00
Clear
326.64
0.406
Support Assy Location Diameter
327.05
0.203
326.80
Intf
SUBTASK 72-42-30-220-053 Reference the Fits and Clearances of the No. 4 Bearing Front Compartment at Location 2054
Refer to Figure.
Reference the interference at location 2055. If required, use the data written as a note in TASK 72-42-31-200-001 (INSPECTION-001) and TASK 72-42-35-200-001 (INSPECTION-001).
Table 7. Fits and Clearances (all dimensions are in inches) NEW PART
WORN PART
DIMENSIONS
DIMENSIONS
PART IDENT
Size
Clearance
Non-select
REJECT IF
MORE THAN
LOCATION 2055
No. 4 Bearing Support Assy ENGINE-NO.4 BEARING SUPPORT ASSEMBLY (72-42-31, 01-010), Location Diameter
No. 4 Bearing Front Cooling Duct Assy ENGINE-NO.4 BEARING FRONT COOLING DUCT (72-42-35, 01-010), Location Diameter
Support Assy Location Diameter
12.752
Intf
12.754
Intf
12.748
0.002
12.748
0.000
Duct Assy Location Diameter
12.758
0.010
12.758
0.010
12.754
Intf
12.754
Intf
Table 8. Fits and Clearances (all dimensions are in millimeters) NEW PART
WORN PART
DIMENSIONS
DIMENSIONS
PART IDENT
Size
Clearance
Non-select
REJECT IF
MORE THAN
LOCATION 2055
No. 4 Bearing Support Assy ENGINE-NO.4 BEARING SUPPORT ASSEMBLY (72-42-31, 01-010), Location Diameter
No. 4 Bearing Front Cooling Duct Assy ENGINE-NO.4 BEARING FRONT COOLING DUCT (72-42-35, 01-010), Location Diameter
Support Assy Location Diameter
323.900
Intf
323.952
Intf
323.800
0.051
323.800
0.000
Duct Assy Location Diameter
324.053
0.254
324.053
0.254
323.952
Intf
323.952
Intf
SUBTASK 72-42-30-220-054 Reference the Fits and Clearances of the No. 4 Bearing Front Compartment at Location 2055
Refer to Figure.
Reference the interference at location 2057. If required, use the data written as a note in TASK 72-42-33-200-001 (INSPECTION-001) and TASK 72-42-31-200-001 (INSPECTION-001).
Table 9. Fits and Clearances (all dimensions are in inches) NEW PART
WORN PART
DIMENSIONS
DIMENSIONS
PART IDENT
Size
Clearance
Non-select
REJECT IF
MORE THAN
LOCATION 2057
No. 4 Bearing Seal Assy No. 4 Bearing Front Face Seal Assembly (72-42-33, 01-010), Location Diameter
No. 4 Bearing Support Assy ENGINE-NO.4 BEARING SUPPORT ASSEMBLY (72-42-31, 01-010), Location Diameter
Seal Assy Location Diameter
10.892
Intf
10.892
Intf
10.888
0.000
10.888
0.000
Support Assy Location Diameter
10.896
0.008
10.897
0.009
10.892
Intf
10.892
Intf
Table 10. Fits and Clearances (all dimensions are in millimeters) NEW PART
WORN PART
DIMENSIONS
DIMENSIONS
PART IDENT
Size
Clearance
Non-select
REJECT IF
MORE THAN
LOCATION 2057
No. 4 Bearing Seal Assy No. 4 Bearing Front Face Seal Assembly (72-42-33, 01-010), Location Diameter
No. 4 Bearing Support Assy ENGINE-NO.4 BEARING SUPPORT ASSEMBLY (72-42-31, 01-010), Location Diameter
Seal Assy Location Diameter
276.656
Intf
276.656
Intf
276.556
0.000
276.556
0.000
Support Assy Location Diameter
276.758
0.203
276.784
0.228
276.656
Intf
276.656
Intf
SUBTASK 72-42-30-220-056 Reference the Fits and Clearances of the No. 4 Bearing Front Compartment at Location 2057
Refer to Figure.
Put the No. 4 Bearing Support ENGINE-NO.4 BEARING SUPPORT ASSEMBLY (72-42-31, 01-010) in to the IAE 1P16389 Holding base 1 off.
Install the IAE 1P16469 Heater 1 off to the No. 4 Bearing Support. Attach the heater to the IAE 6F10027 Heater control unit 1 off and heat the support to 345 deg F to 355 deg F (173 deg C to 179 deg C).
Put the outer race ENGINE-NO.4 BEARING (72-43-13, 01-010) in position.
Install the IAE 1P16390 Removal/installation drift 1 off onto the front support with the three pads that locate in the three scallops of the front support and the bearing outer race.
SUBTASK 72-42-30-440-051 Install the No. 4 Bearing Outer Race to the No. 4 Bearing Support
Rotate the No. 4 Bearing Support ENGINE-NO.4 BEARING SUPPORT ASSEMBLY (72-42-31, 01-010) 180 degrees and attach the No. 4 Bearing Support to the IAE 1P16068 Support fixture using the four work bolts.
NOTE
Make sure that the bearing support and outer race are at room temperature before installation of the nut lock and the key washer.Install the No. 4 Bearing ENGINE-NO.4 BEARING LOCK AND NUT (72-42-32, 01-010) key washer 1 off to the support with the tabs on the key washer in the slots on the support.
Install the No. 4 Bearing Outer Race Retaining Nut ENGINE-NO.4 BEARING LOCK AND NUT (72-42-32, 01-020) to the No. 4 Bearing Support.

CAUTION
WHEN USING THE IAE 1P16069 WRENCH THE ACTUAL TORQUE WRENCH READING WILL BE LESS THAN THAT GIVEN BELOW. REFER TO TASK 70-41-01-400-501.Put the IAE 1P16069 Wrench 1 off in place on the nut and, with a standard torque wrench, torque the nut to 1900 to 2100 lbfin (214.671 to 237.268 Nm). Loosen the nut to 0 lbfin (0 Nm) and then torque to 1900 lbfin to 2100 lbfin (214.671 Nm to 237.268 Nm) again. Remove the wrench from the nut.
NOTE
The fixture may be turned to obtain a positive location in the nut slot. The base of the fixture is slotted for visual verification of the locator in the nut slot.Lift the IAE 1P16145 Crimp fixture 1 off with a hoist and position over the assembly. Look to see if the jaws are rotated away from the base stop. Look to see if the locator has been retracted. Lower the fixture to the No. 4 Bearing Support. Hold the fixture to the support with the three capscrews and washers. Tighten by hand only, Figure.
Attach the IAE 1F10026 Hydraulic hand pump 1 off to the fixture and actuate to crimp the key washer. Hydraulic pressure setting should be 3000 psi (20684.3 kPa) to crimp the key washer in eight places.
SUBTASK 72-42-30-440-052 Install the No. 4 Bearing Retaining Nut and the No. 4 Bearing Key washer

CAUTION
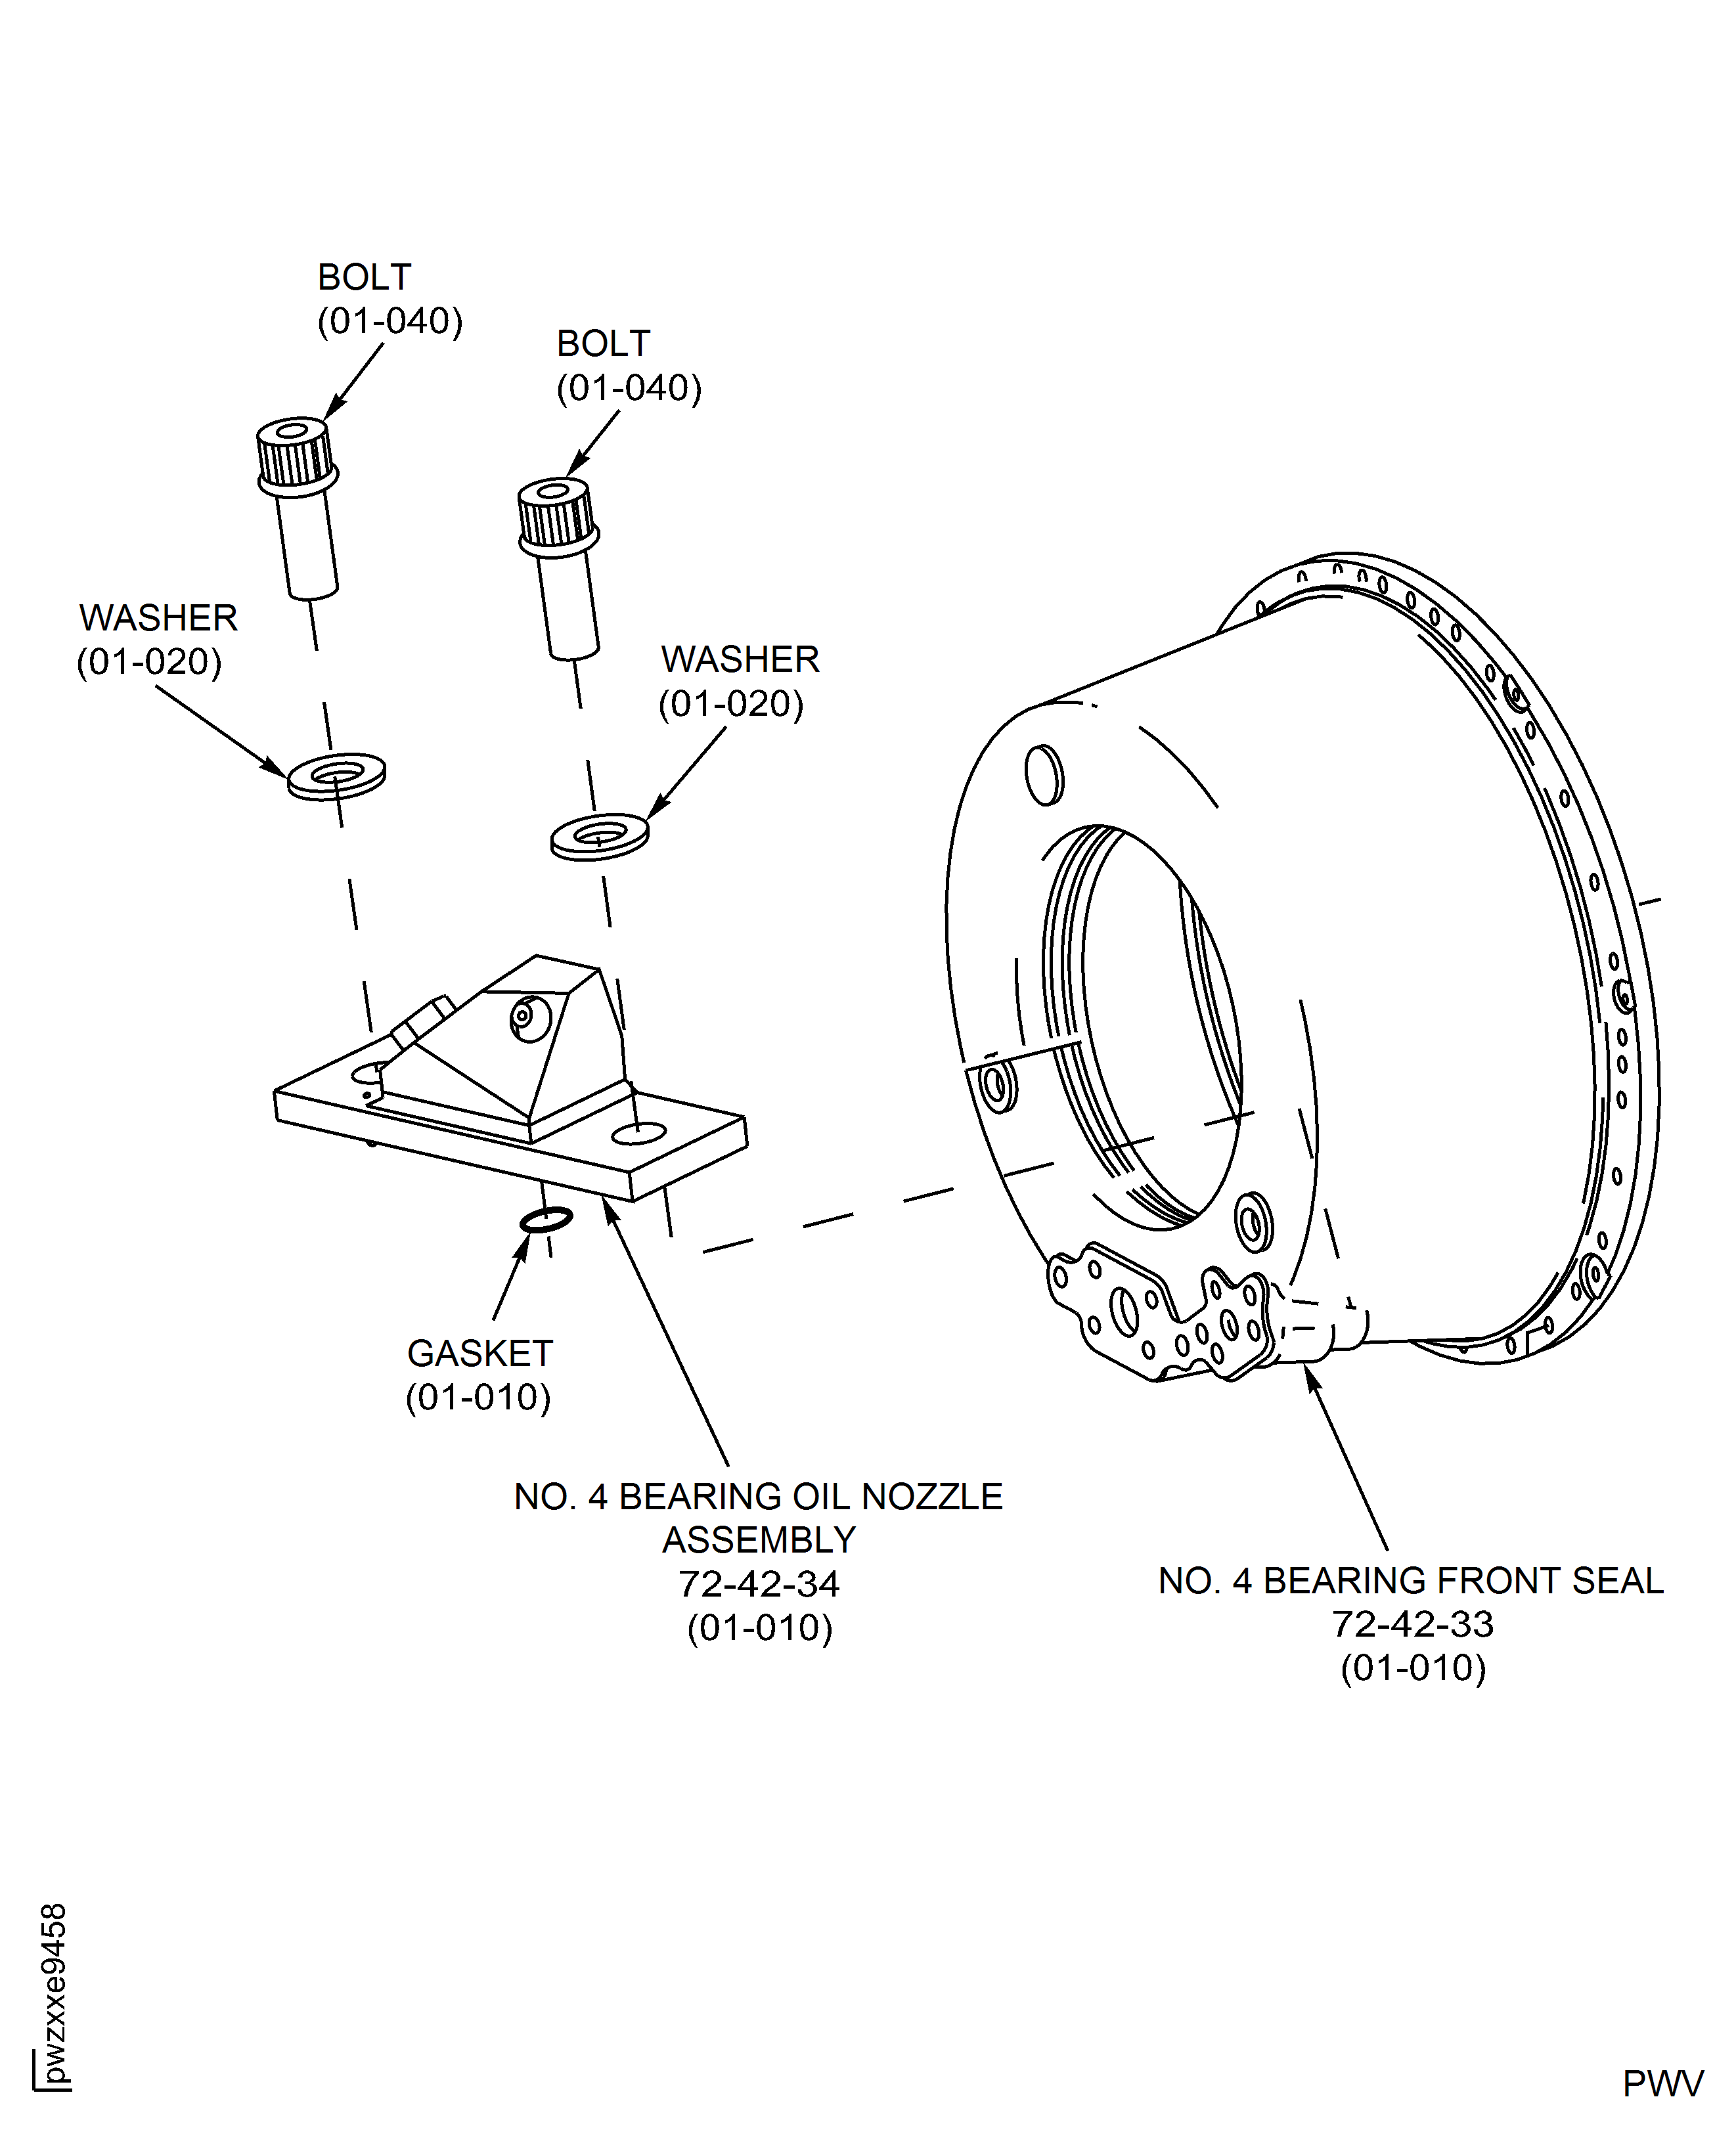
DO NOT LUBRICATE BOLT THREADS WITH OIL OR OTHER THREAD LUBRICANT. THE SUPPLIER GIVES BOLTS THAT ARE COATED.Install the two bolts (01-040 and 01-080), (01-020) key washer 1 off and (01-060) key washer 1 off to hold the oil nozzle.
NOTE
Bolts must operate freely when you install before the final torque procedure.Bend the key washers to attach the bolts by the SPM TASK 70-42-03-400-501 and by the procedure that follows:
SUBTASK 72-42-30-440-053 Install the No. 4 Bearing Oil Nozzle Assembly to the No. 4 Bearing Front Seal Assembly - Pre SB 72-0629
Refer to Figure.
Install gasket (01-010) 1 off in the groove of the No.4 Bearing Nozzle Assembly.
Put the oil nozzle in place in the Front Seal Support Assembly.

CAUTION
DO NOT LUBRICATE BOLT THREADS WITH OIL OR OTHER THREAD LUBRICANT. THE SUPPLIER GIVES BOLTS THAT ARE COATED.Install bolt (01-040) 2 off and flat washer (01-020) 2 off to hold the oil nozzle.
Torque both bolts to 125 lbfin. to 140 lbfin. (14.123 Nm to 15.818 Nm).
SUBTASK 72-42-30-440-061 Install the No.4 Bearing Oil Nozzle Assembly to the No.4 Bearing Front Seal Assembly - Post SB 72-0629
Refer to Figure.
Loosen the thumb screws that attach the bracket of the IAE 1P16266 Air flow fixture 1 off and slide the inlet and outlet tubes to make space for installation of the Front Seal Assembly and the pressure tube.
Install IAE 1P17000 Protective cover 1 off on the No. 4 Bearing face seal.
Put the assembly on the IAE 6F10029 Air flow test cart 1 off and connect the air supply to the pressure tube.
SUBTASK 72-42-30-720-051 Air Flow Check the No. 4 Bearing Front Seal Assembly and the No. 4 Bearing Pressure Tube
Refer to Figure.
Install the seven spacers No. 4 Bearing Front Face Seal Assembly (72-42-33, 01-300) on the forward side of the flange.
SUBTASK 72-42-30-440-055 Install the Spacers in the No. 4 Bearing Front Seal Assembly
Refer to Figure.
Lift the bearing support above the IAE 1P16068 Support fixture 1 off and turn the bearing support so the rear flange is down.
SUBTASK 72-42-30-440-056 Turn the No. 4 Bearing Support in the Support Fixture
Refer to Figure.
Install (01-100) gasket 1 off on the front side of the forward flange of the Support Assembly ENGINE-NO.4 BEARING SUPPORT ASSEMBLY (72-42-31, 01-010).
Install the Seal Assembly No. 4 Bearing Front Face Seal Assembly (72-42-33, 01-010) on the support. Make sure the Seal Assembly offset hole aligns with the offset hole of the Support Assembly Inner Flange.
SUBTASK 72-42-30-440-057 Attach the No. 4 Bearing Front Seal to the No. 4 Bearing Front Support Assembly
Refer to Figure.

CAUTION
DO NOT LUBRICATE THE SPACER THREADS ON THE NO. 4 BEARING FRONT COOLING DUCT WITH OIL OR OTHER THREAD LUBRICANTS. THESE SPACERS MUST HAVE ANTIGALLING COMPOUND PER TASK 72-42-35-200-001 BEFORE ASSEMBLY.Decrease the temperature of the Cooling Duct.
Install the Cooling Duct ENGINE-NO.4 BEARING FRONT COOLING DUCT (72-42-35, 01-010) to the bearing support and the Seal Assembly.
SUBTASK 72-42-30-440-058 Install the No. 4 Bearing Front Cooling Duct
Refer to Figure.
Install the heatshield ENGINE-NO.4 BEARING FRONT HEATSHIELD (72-42-36, 01-010) over the Cooling Duct.
SUBTASK 72-42-30-440-059 Install the No. 4 Bearing Front Heatshield
Install the IAE 1P16108 cover 1 off in to the No. 4 Bearing Front Cooling Duct Opening.
Remove the work bolts that attach the No. 4 Bearing Front Compartment to the IAE 1P16068 Support fixture.

CAUTION
MAKE SURE YOU INSTALL THE NUTS WITH THE SHOULDERS AGAINST THE HEATSHIELD.Install the IAE 1P16104 Cover 1 off in to the No. 4 Bearing Front Support.
Install the IAE 1P16106 cover 1 off over the No. 4 Bearing Outer Race.
SUBTASK 72-42-30-440-060 Install the Covers for the No. 4 Bearing Front Compartment
Figure: Install the No. 4 Bearing Outer Race
Install the No. 4 Bearing Outer Race
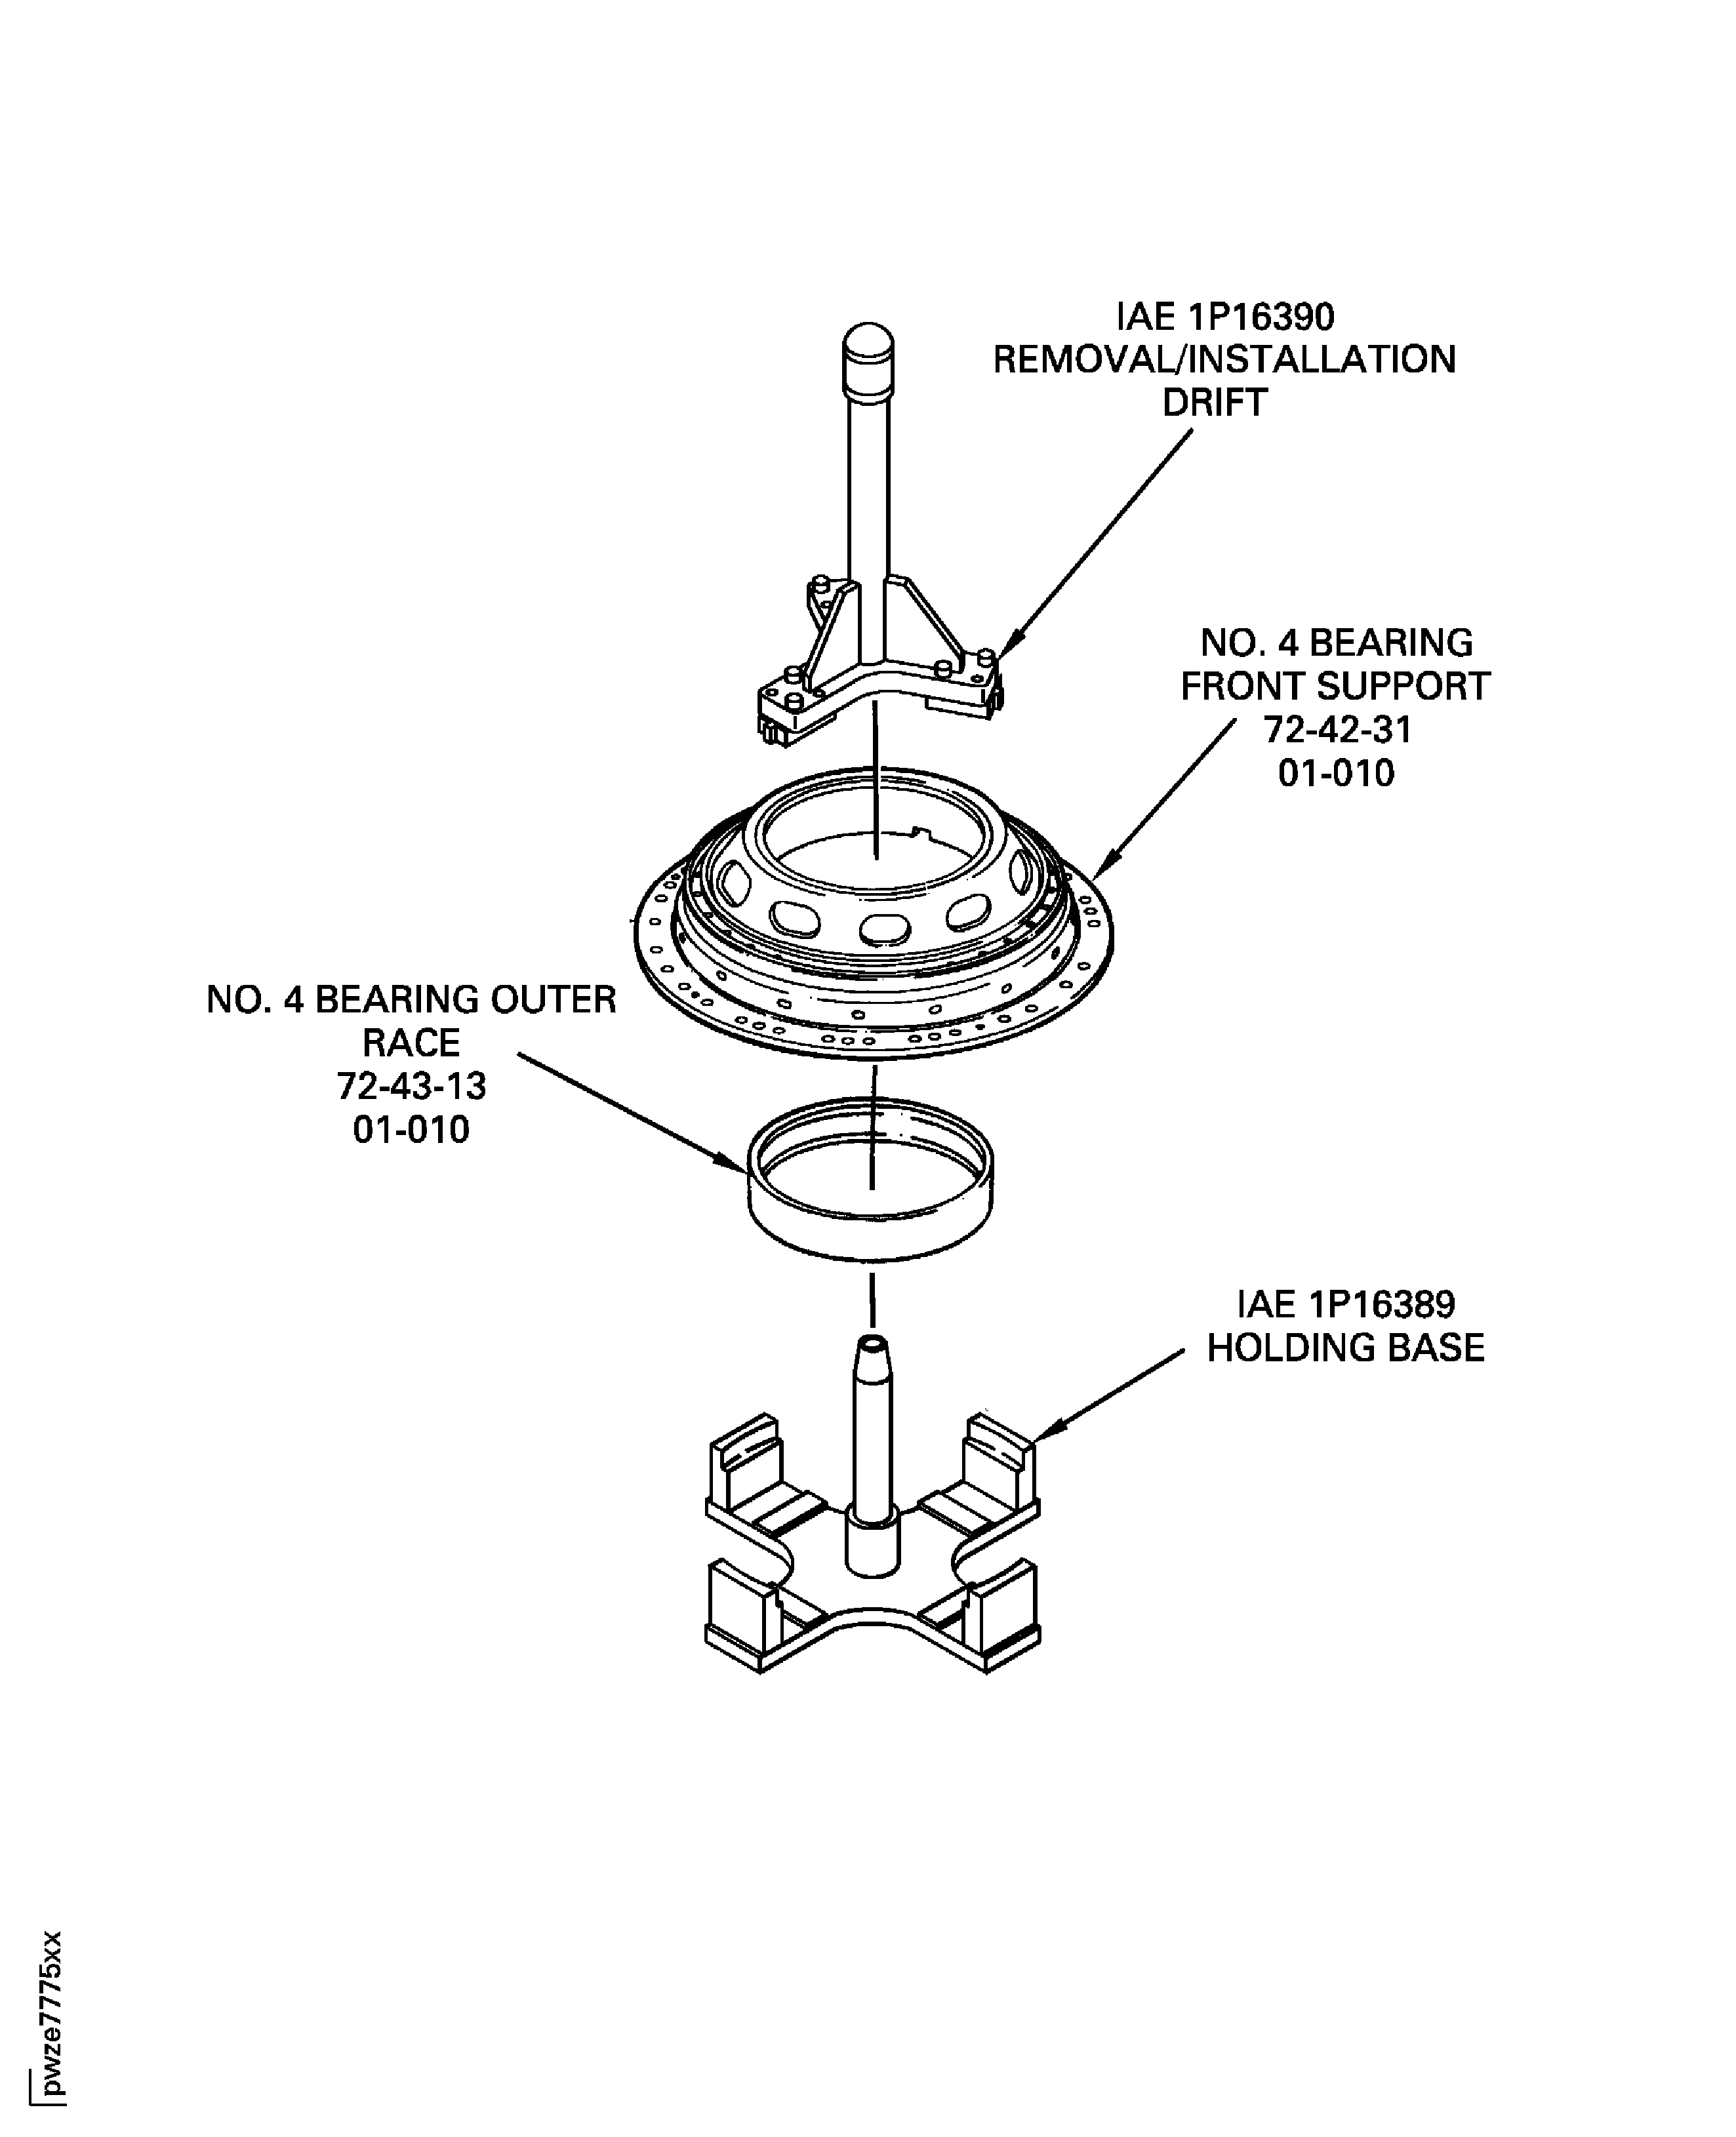
Figure: Install the No. 4 Bearing Outer Race Retaining Nut and the Nut Lock
Install the No. 4 Bearing Outer Race Retaining Nut and the Nut Lock
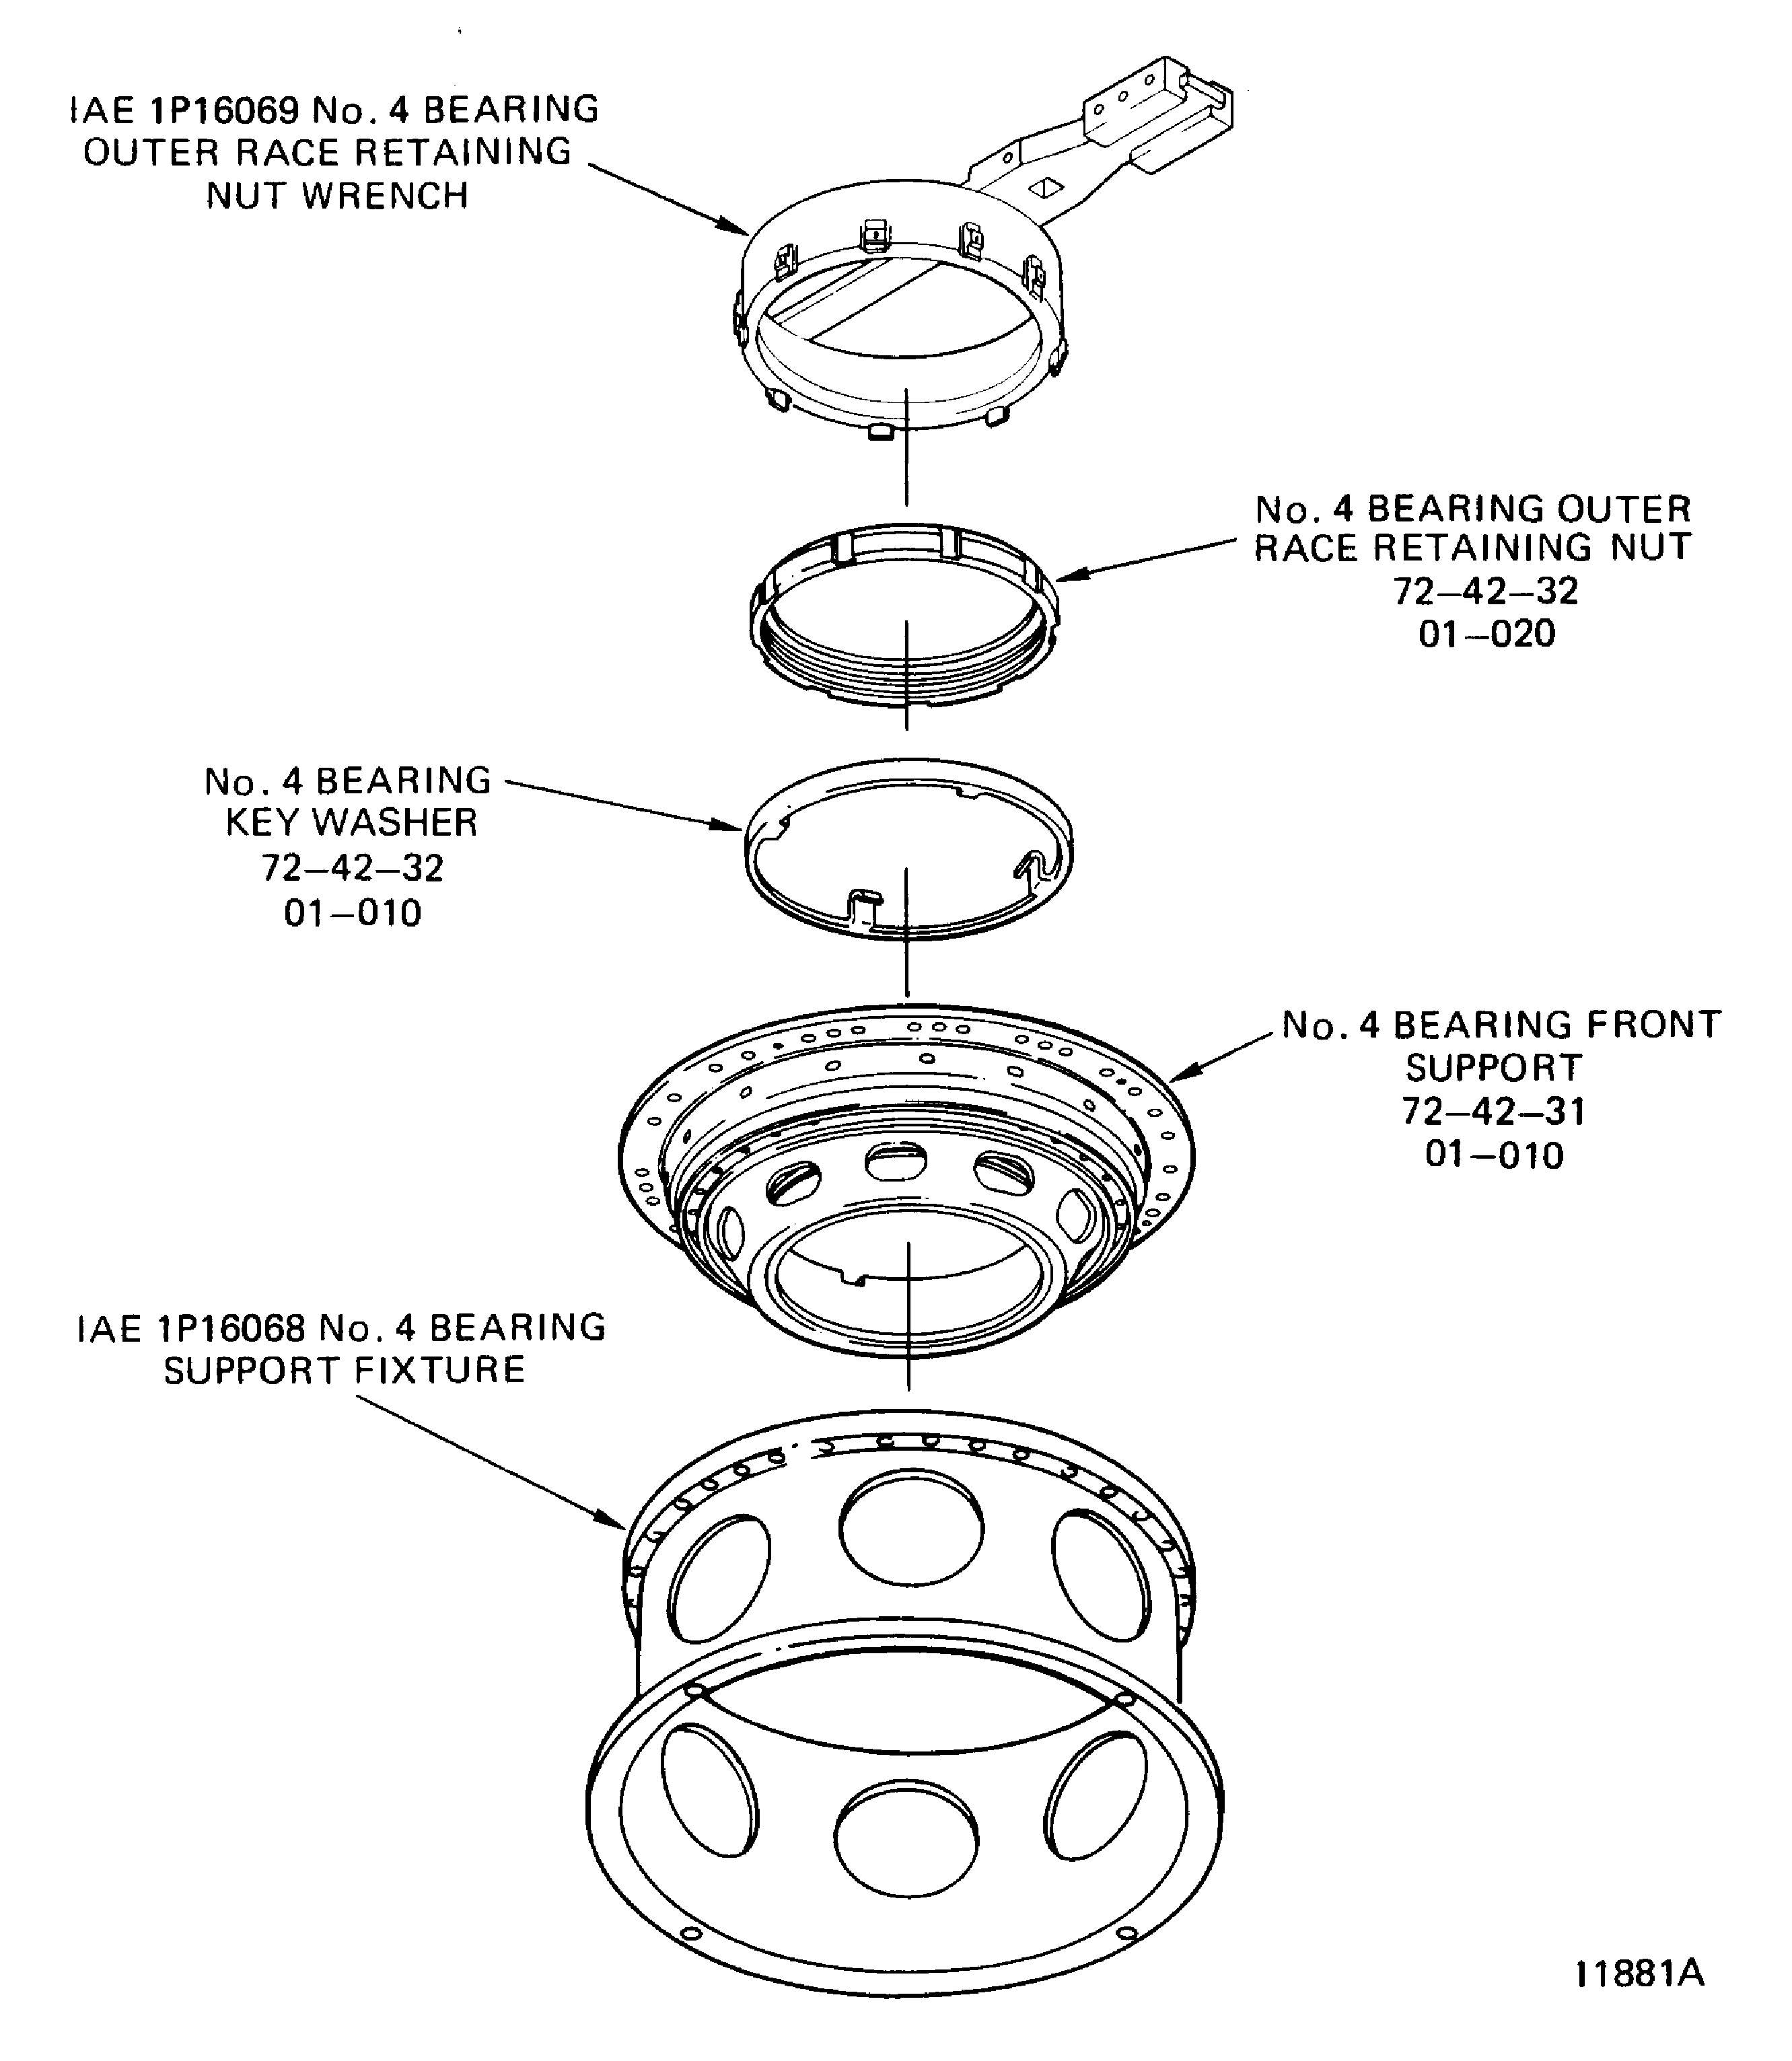
Figure: Crimp the No. 4 Bearing Retaining Lock Nut
Crimp the No. 4 Bearing Retaining Lock Nut
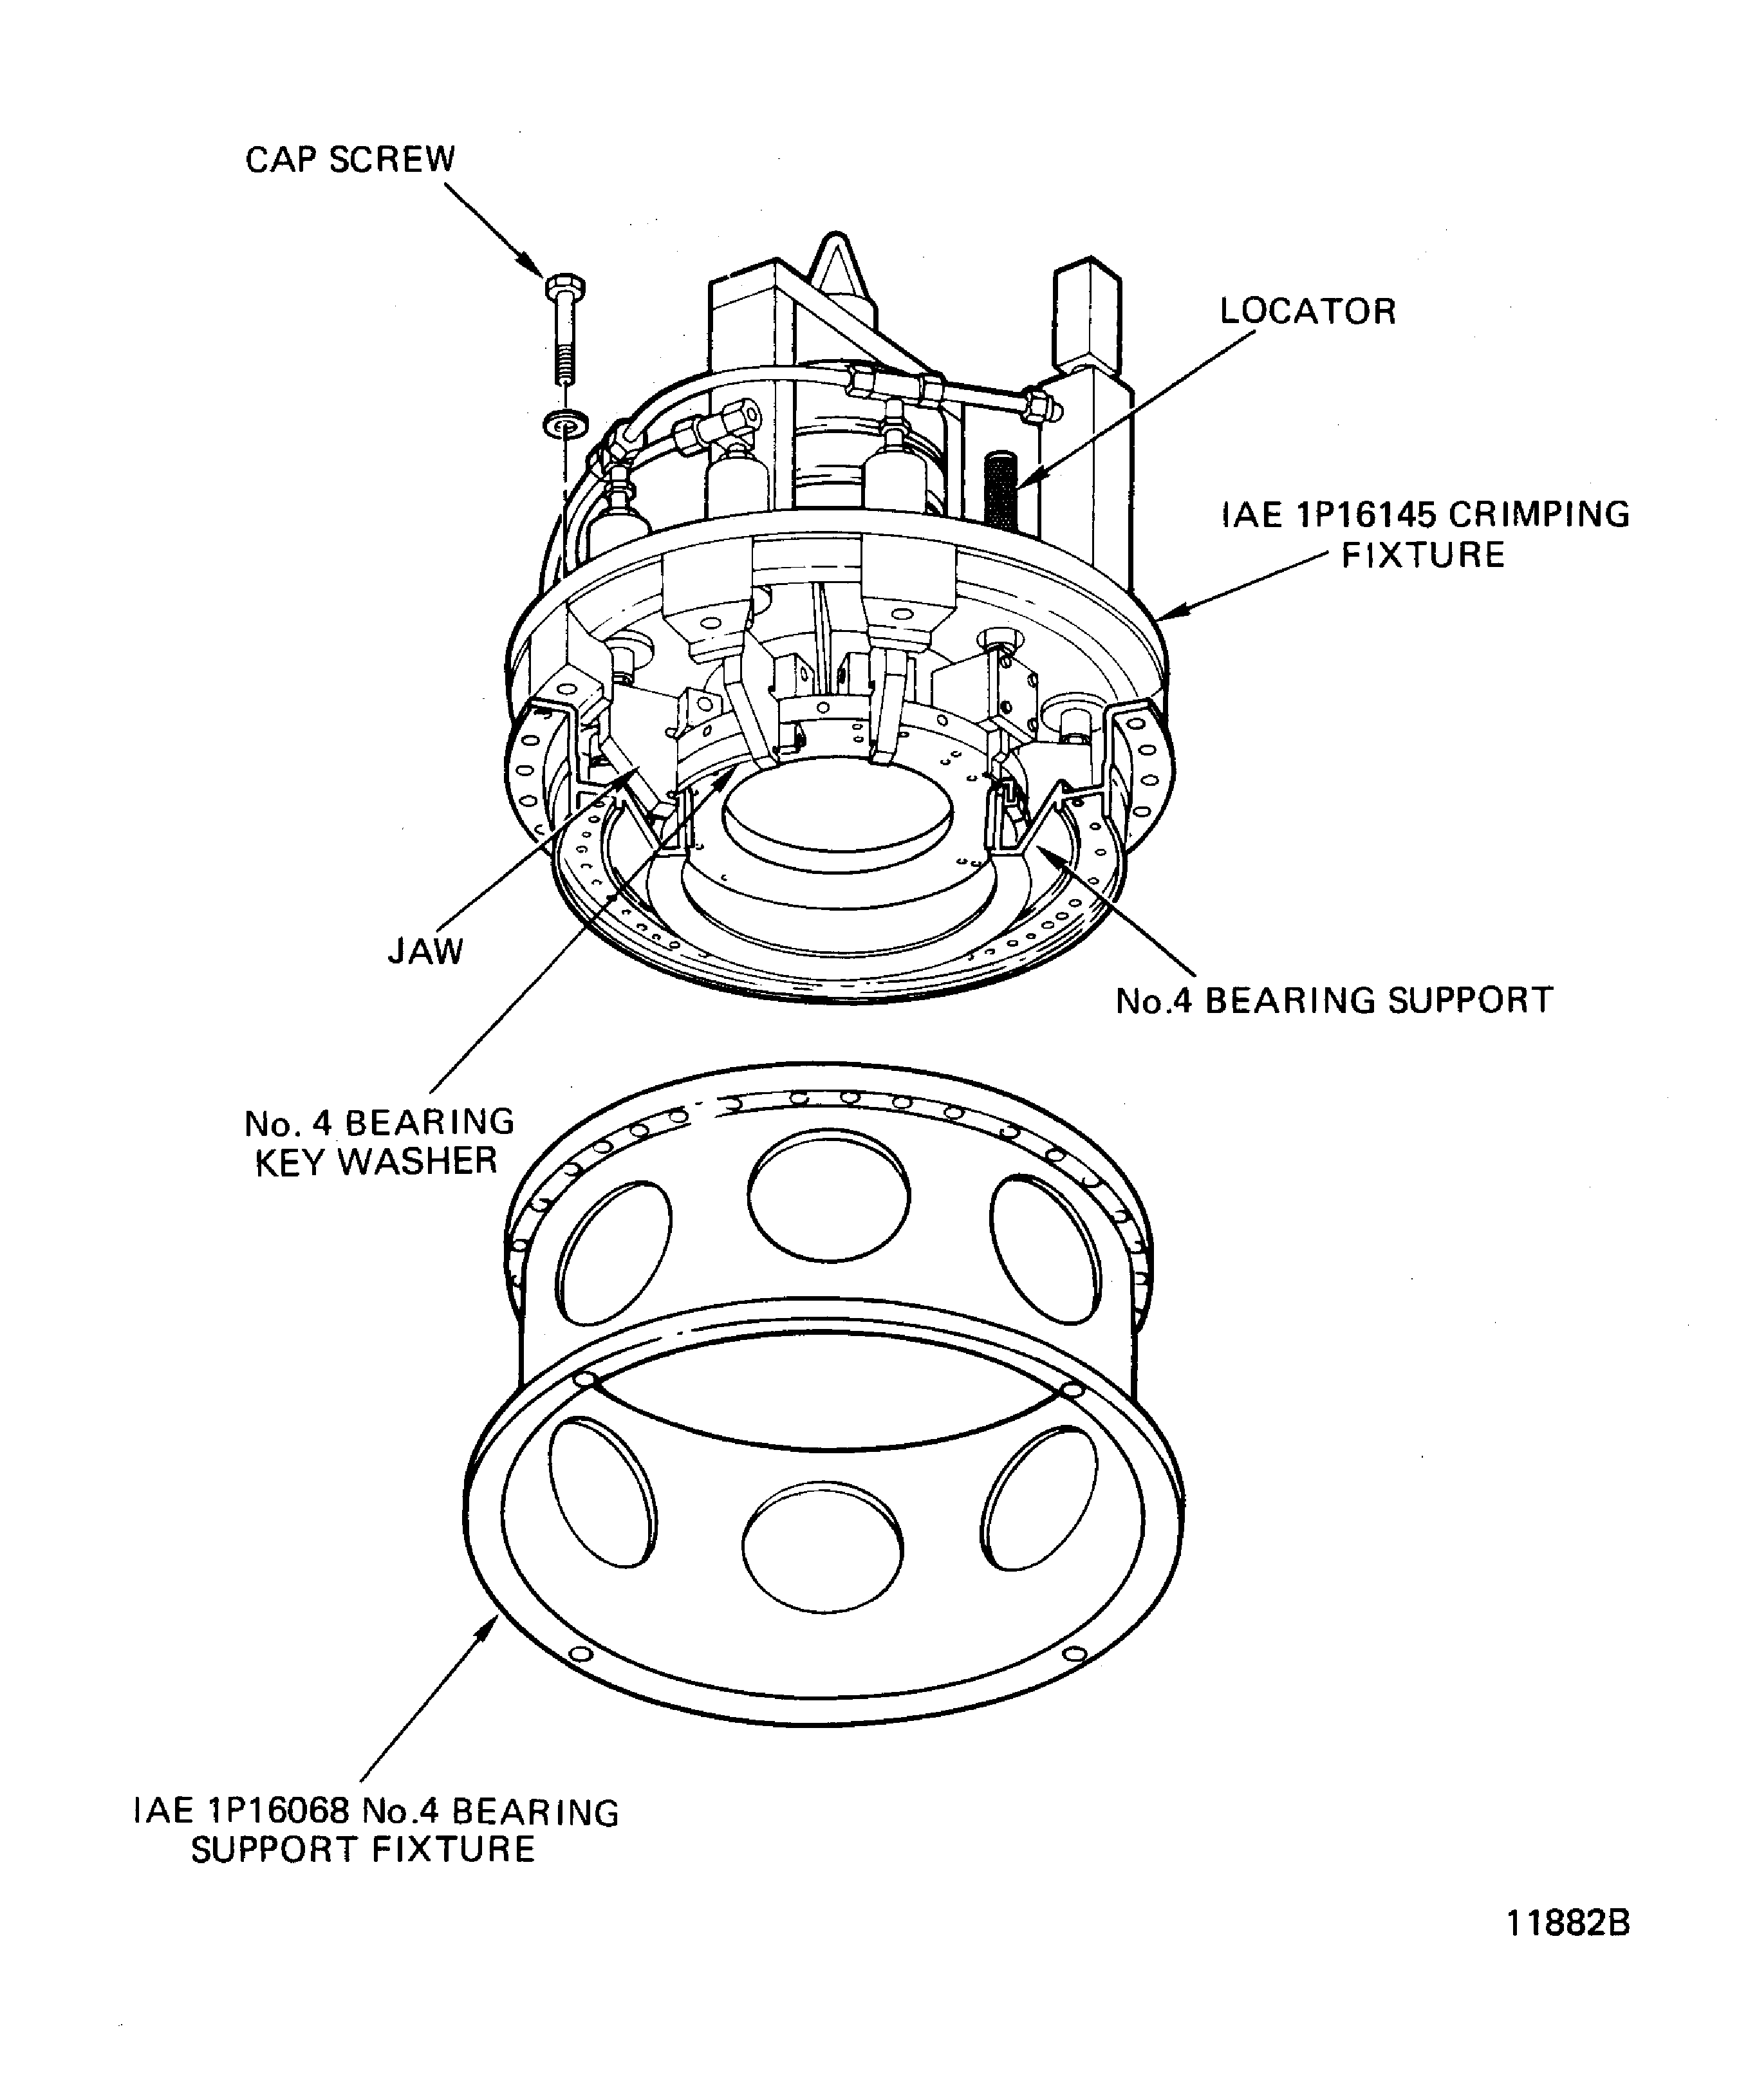
Figure: Install the No. 4 Bearing Oil Nozzle in the No. 4 Front Bearing Seal Assembly (Pre SB 72-0629)
Install the No. 4 Bearing Oil Nozzle in the No. 4 Front Bearing Seal Assembly (Pre SB 72-0629)
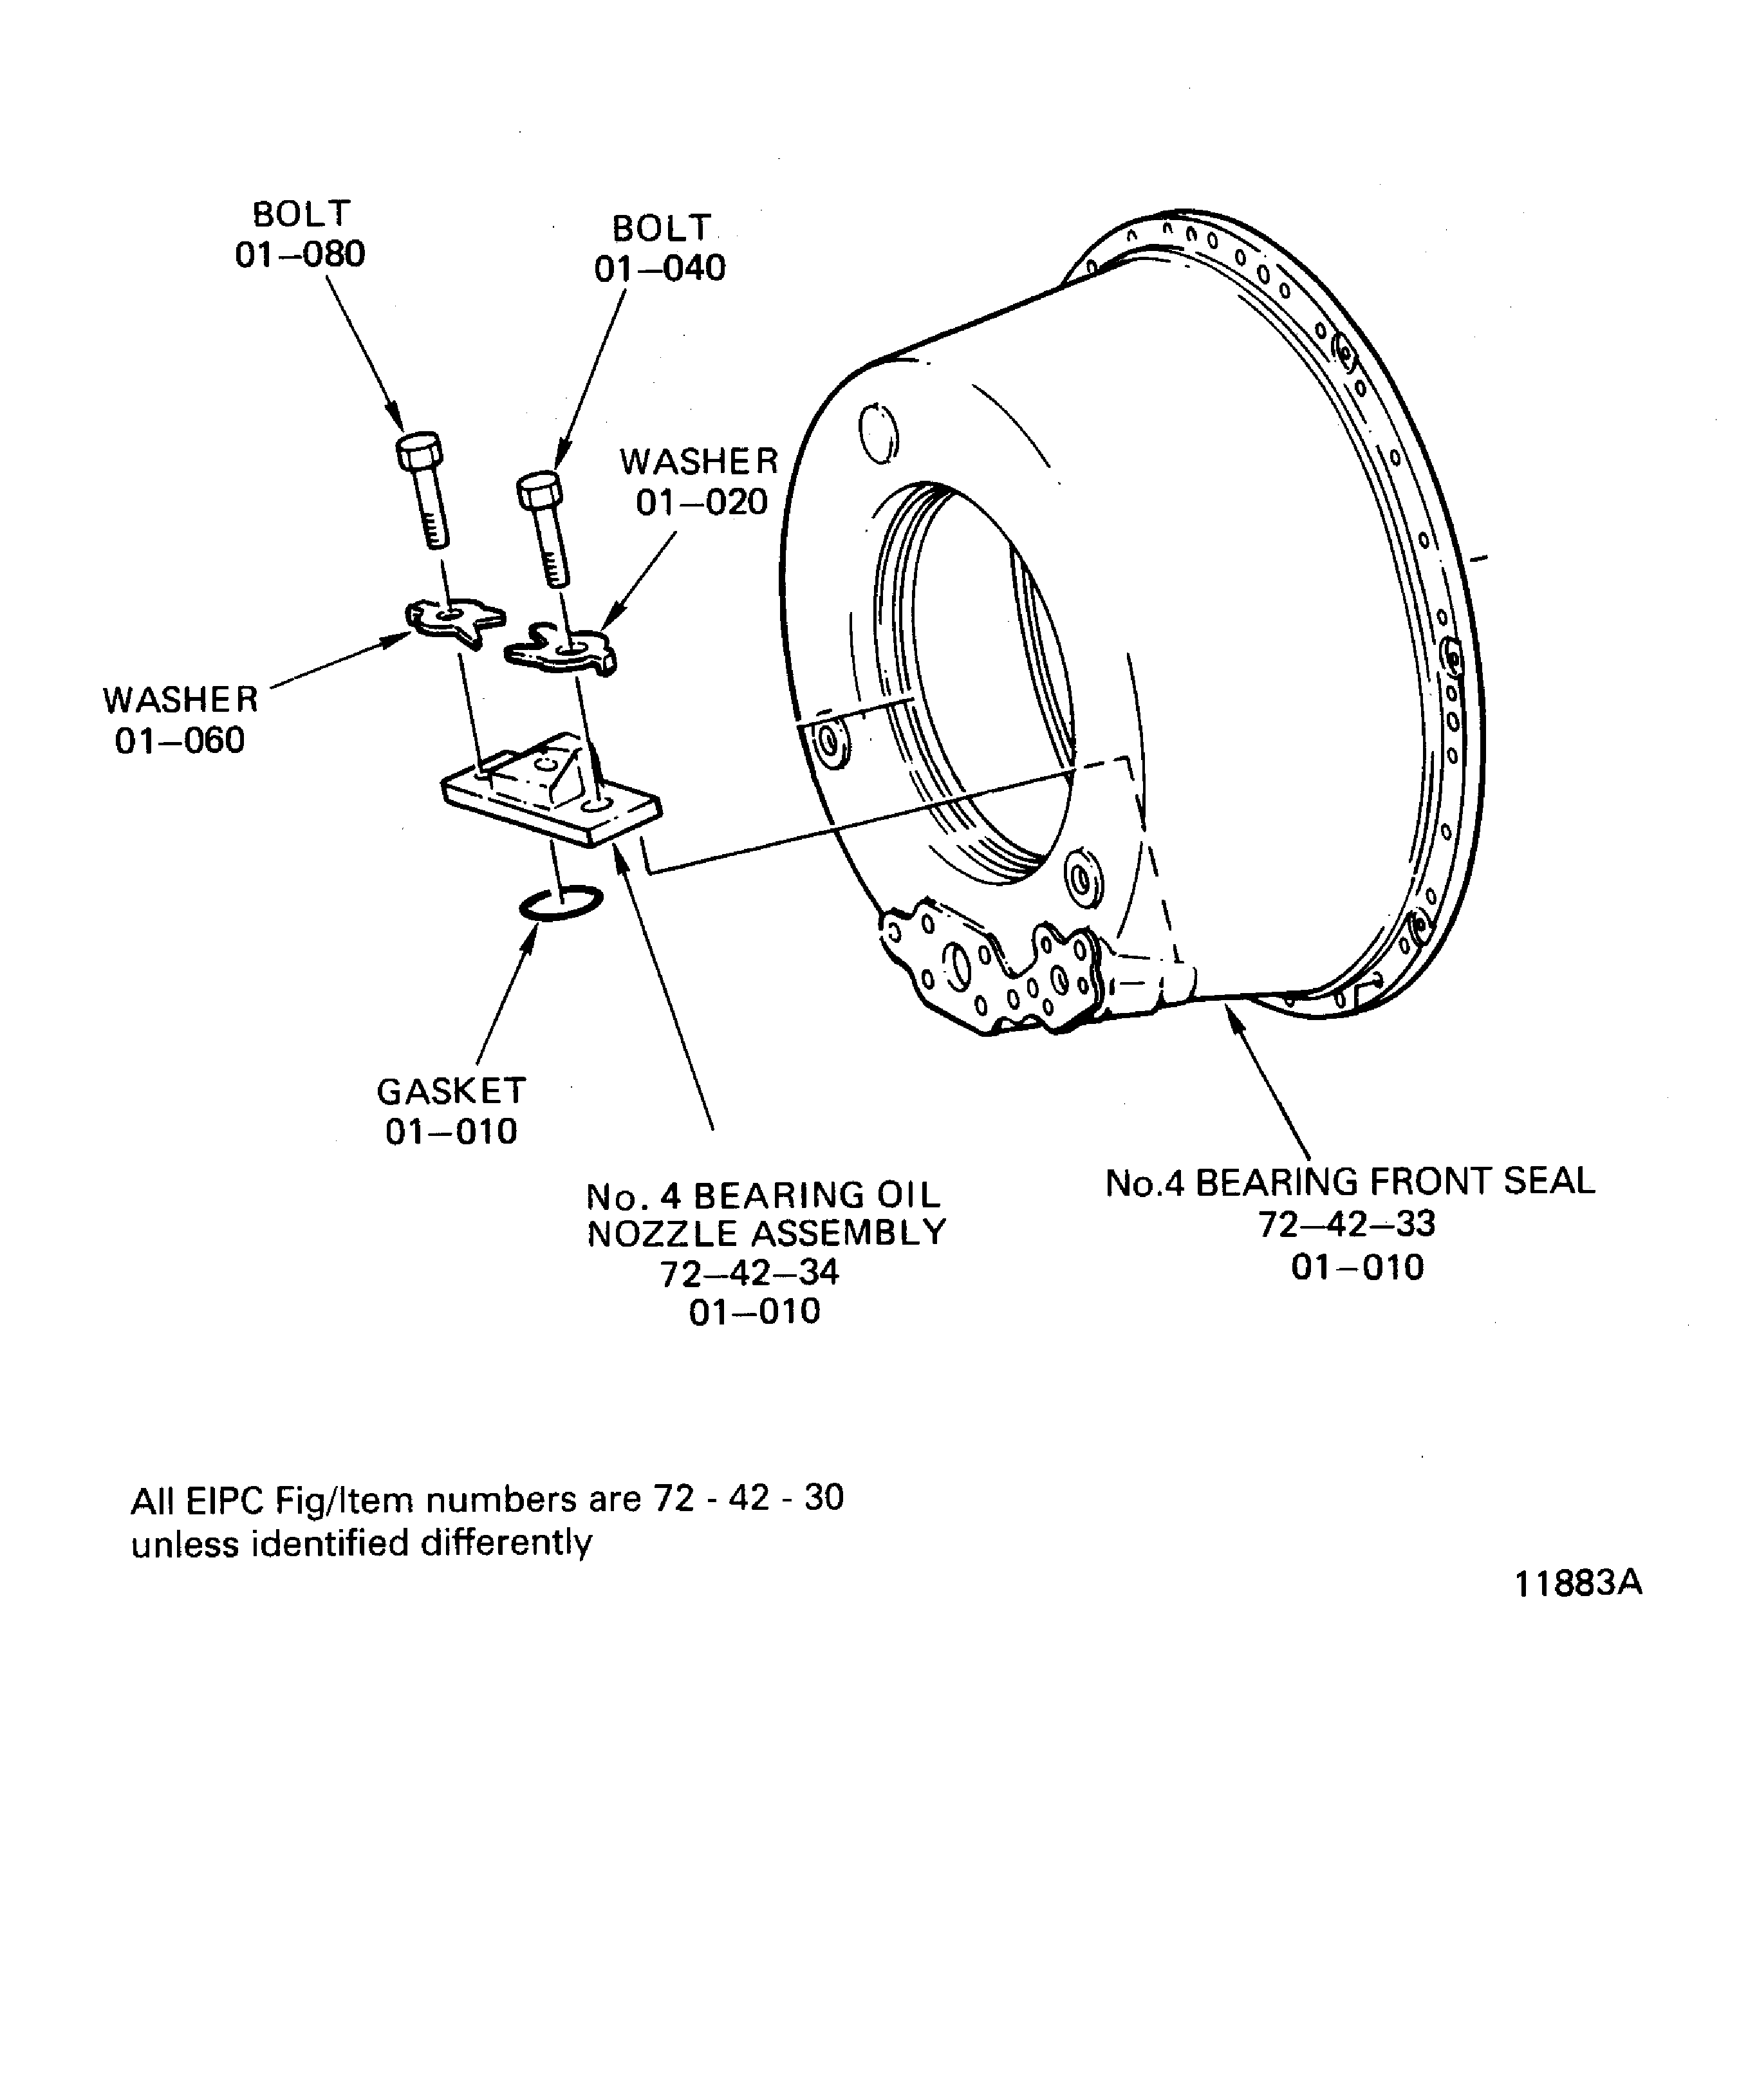
Figure: Air Flow Check the No. 4 Bearing Front Seal and the No. 4 Bearing Pressure Tube
Air Flow Check the No. 4 Bearing Front Seal and the No. 4 Bearing Pressure Tube
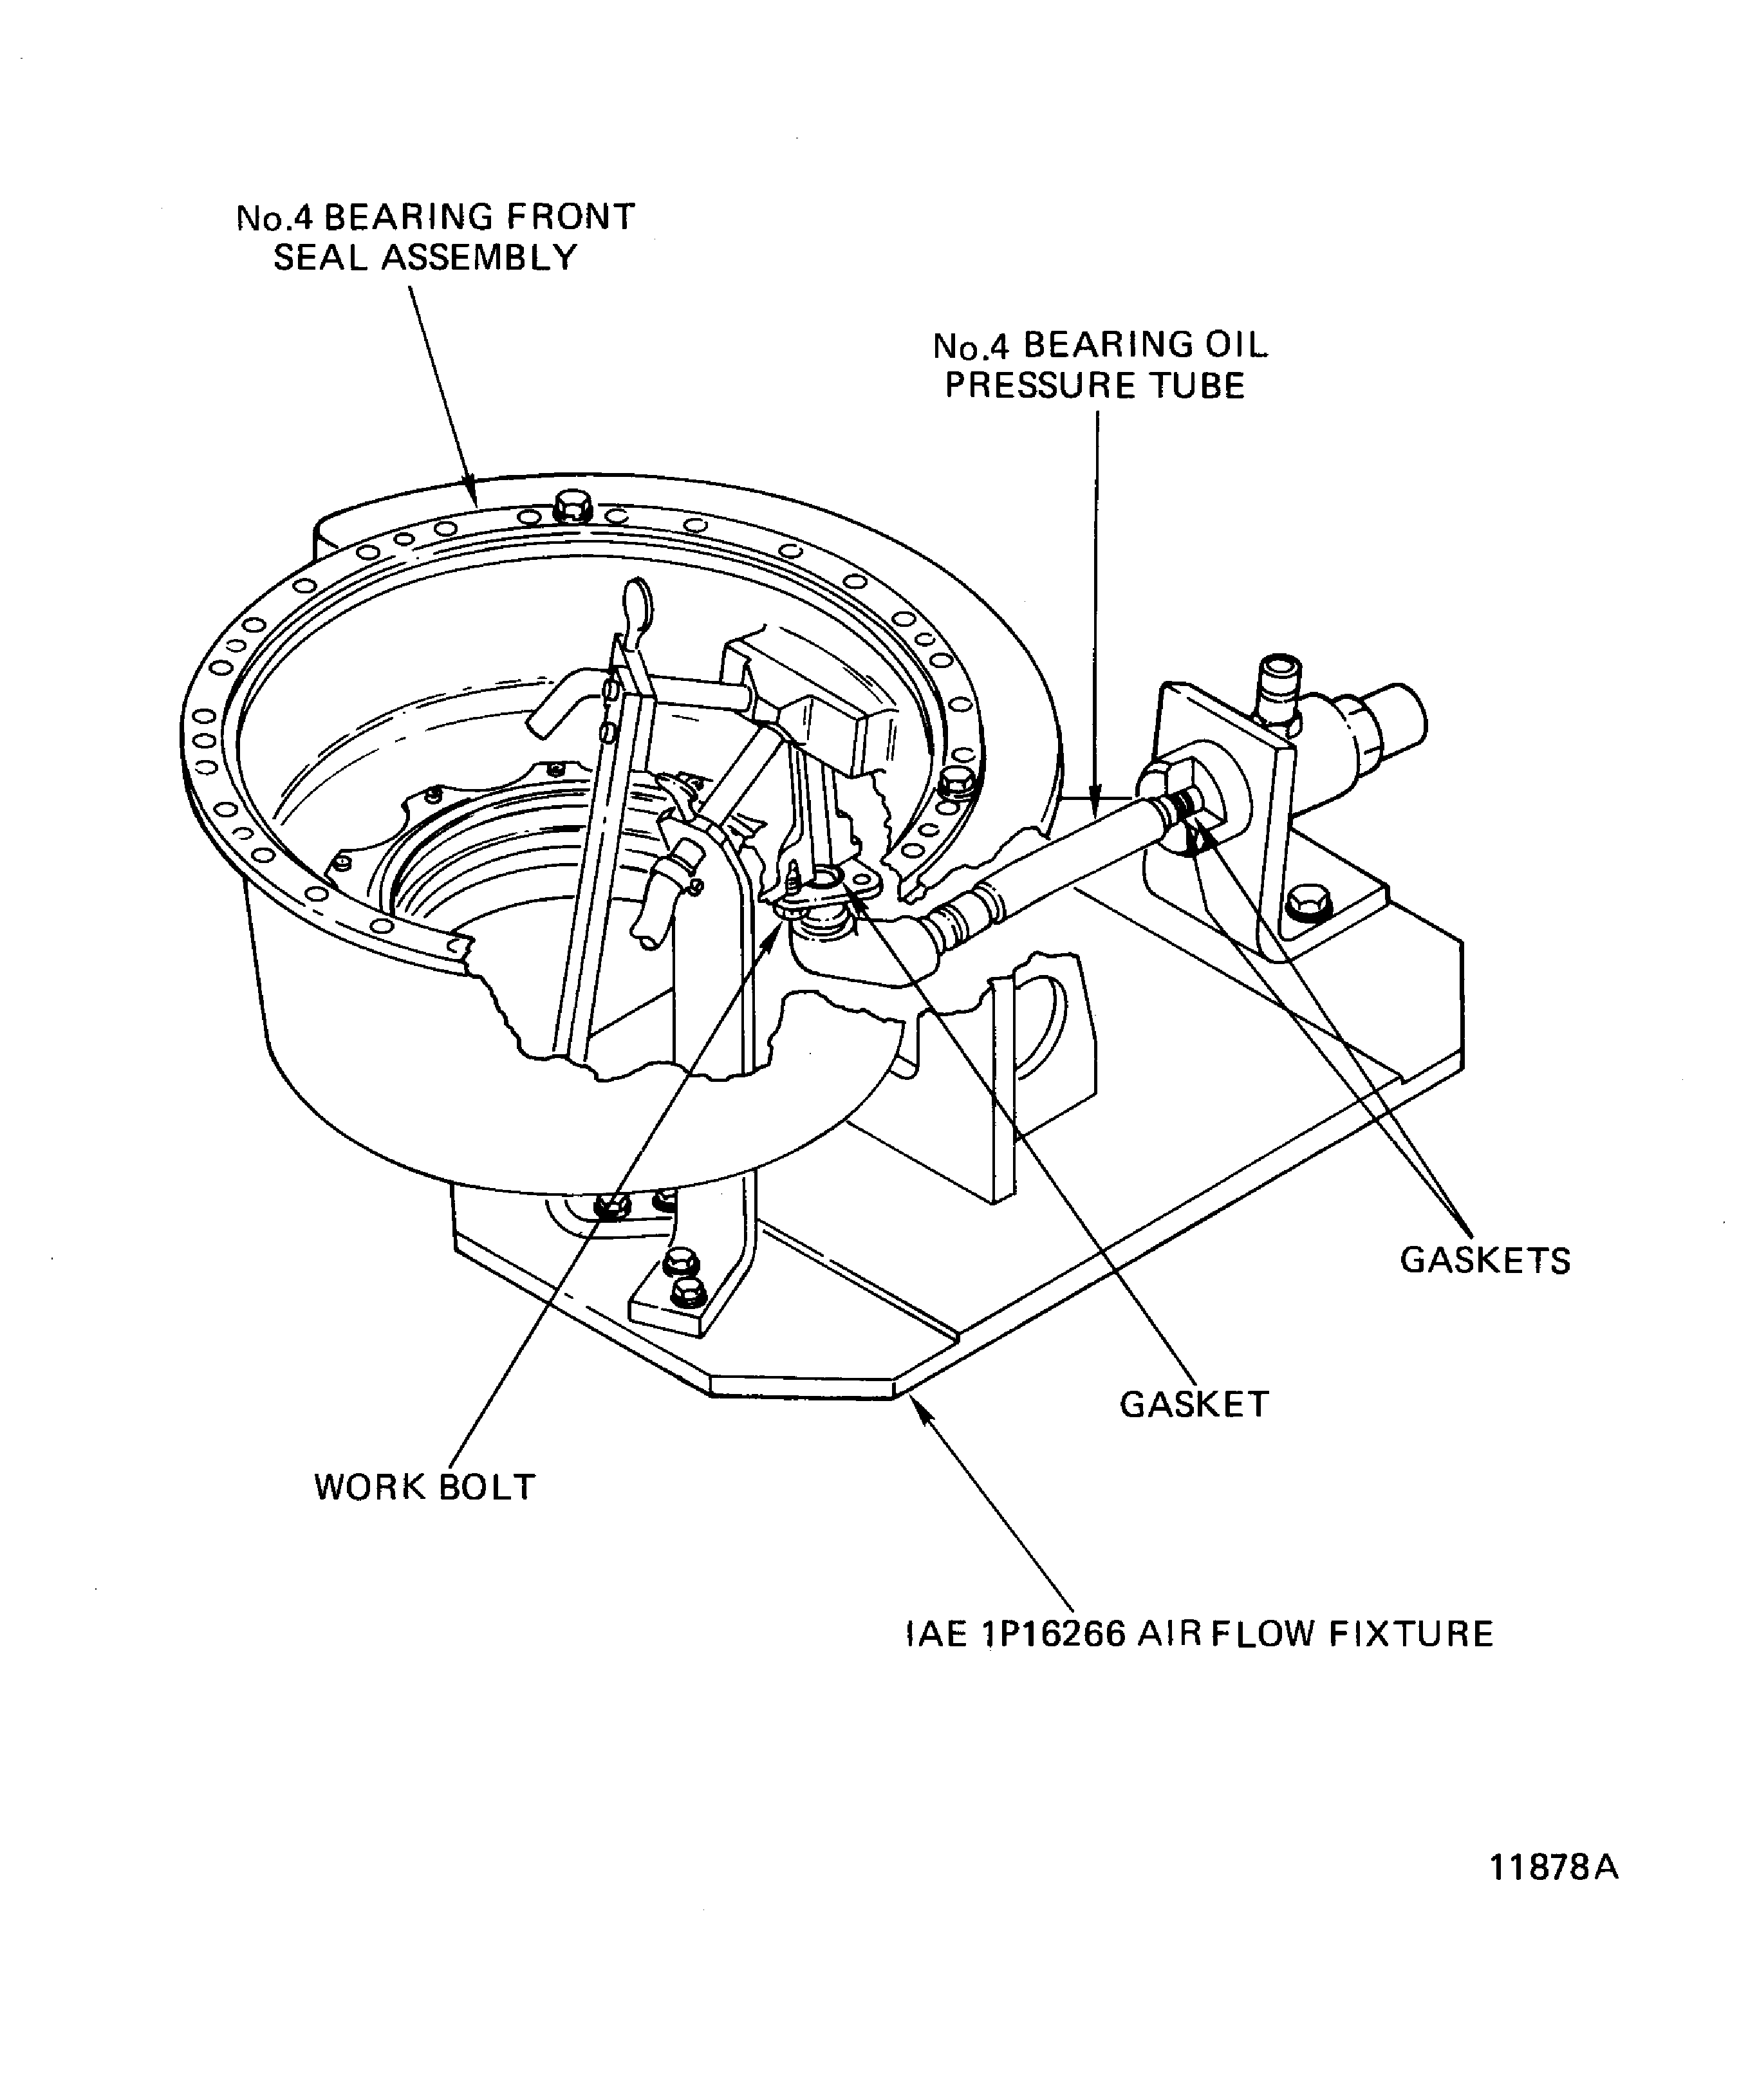
Figure: Assemble the No. 4 Bearing Front Compartment
Assemble the No. 4 Bearing Front Compartment
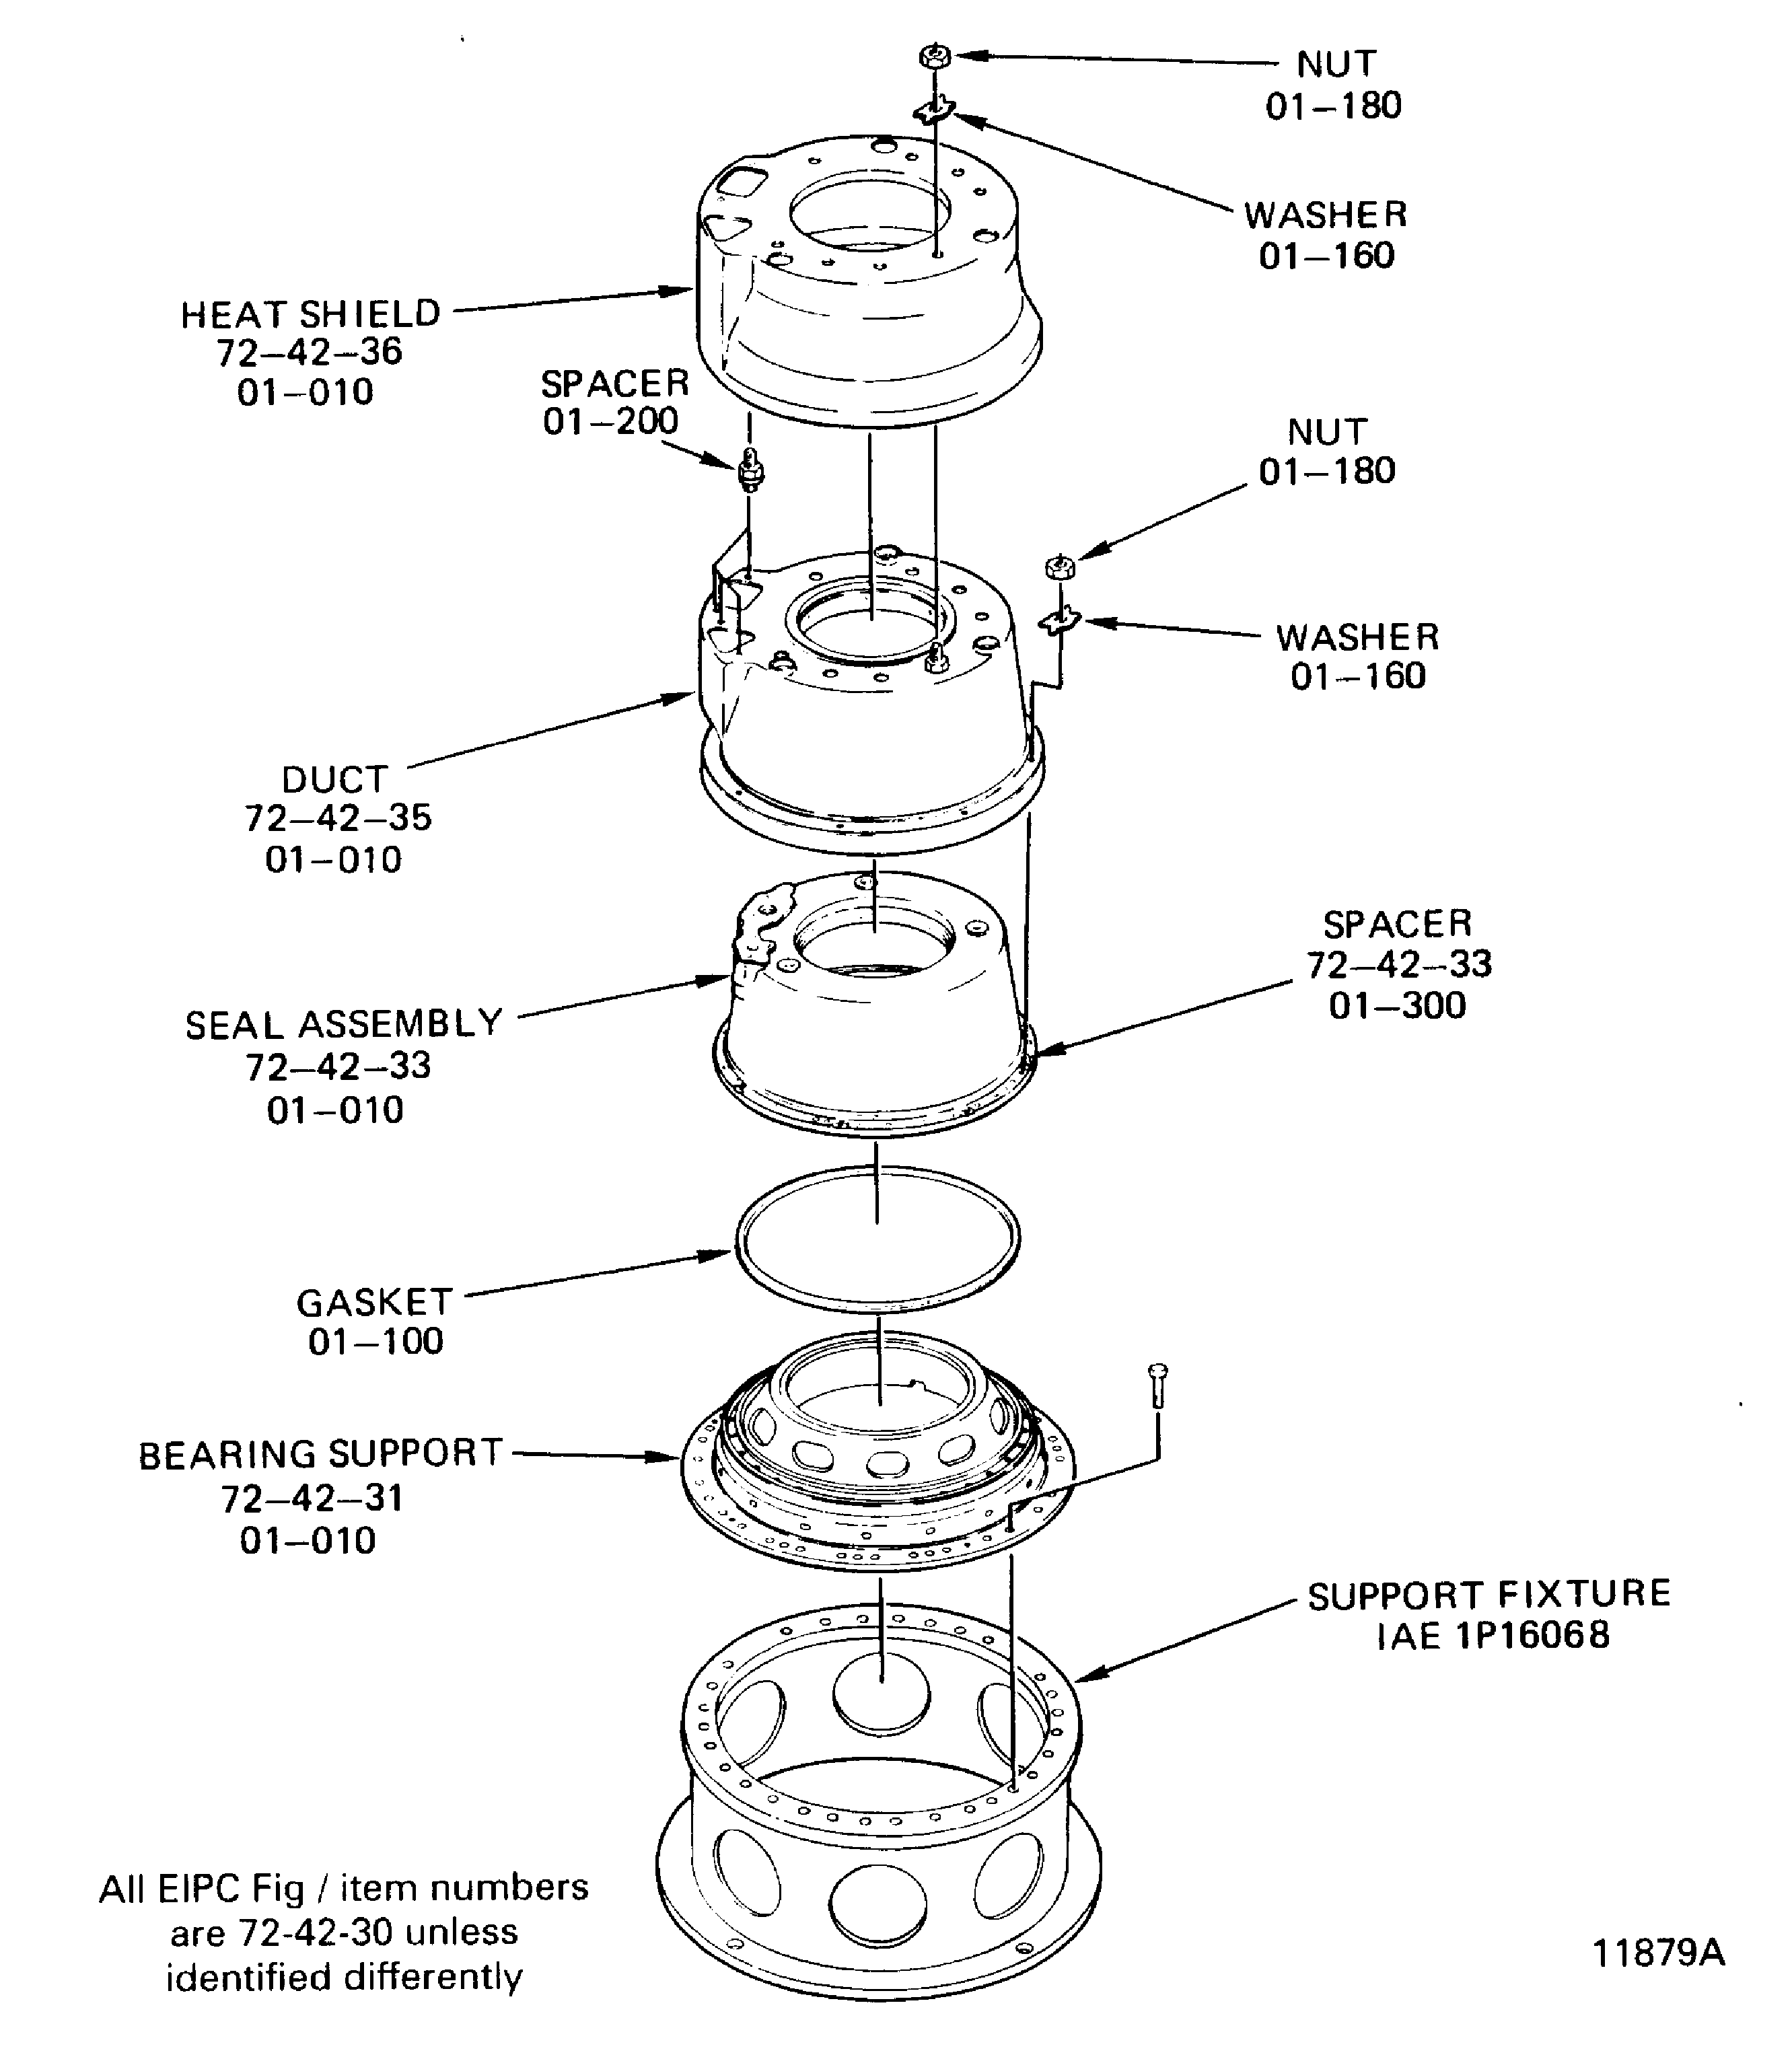
Figure: No. 4 Bearing Front Compartment - Fits and Clearances
No. 4 Bearing Front Compartment - Fits and Clearances
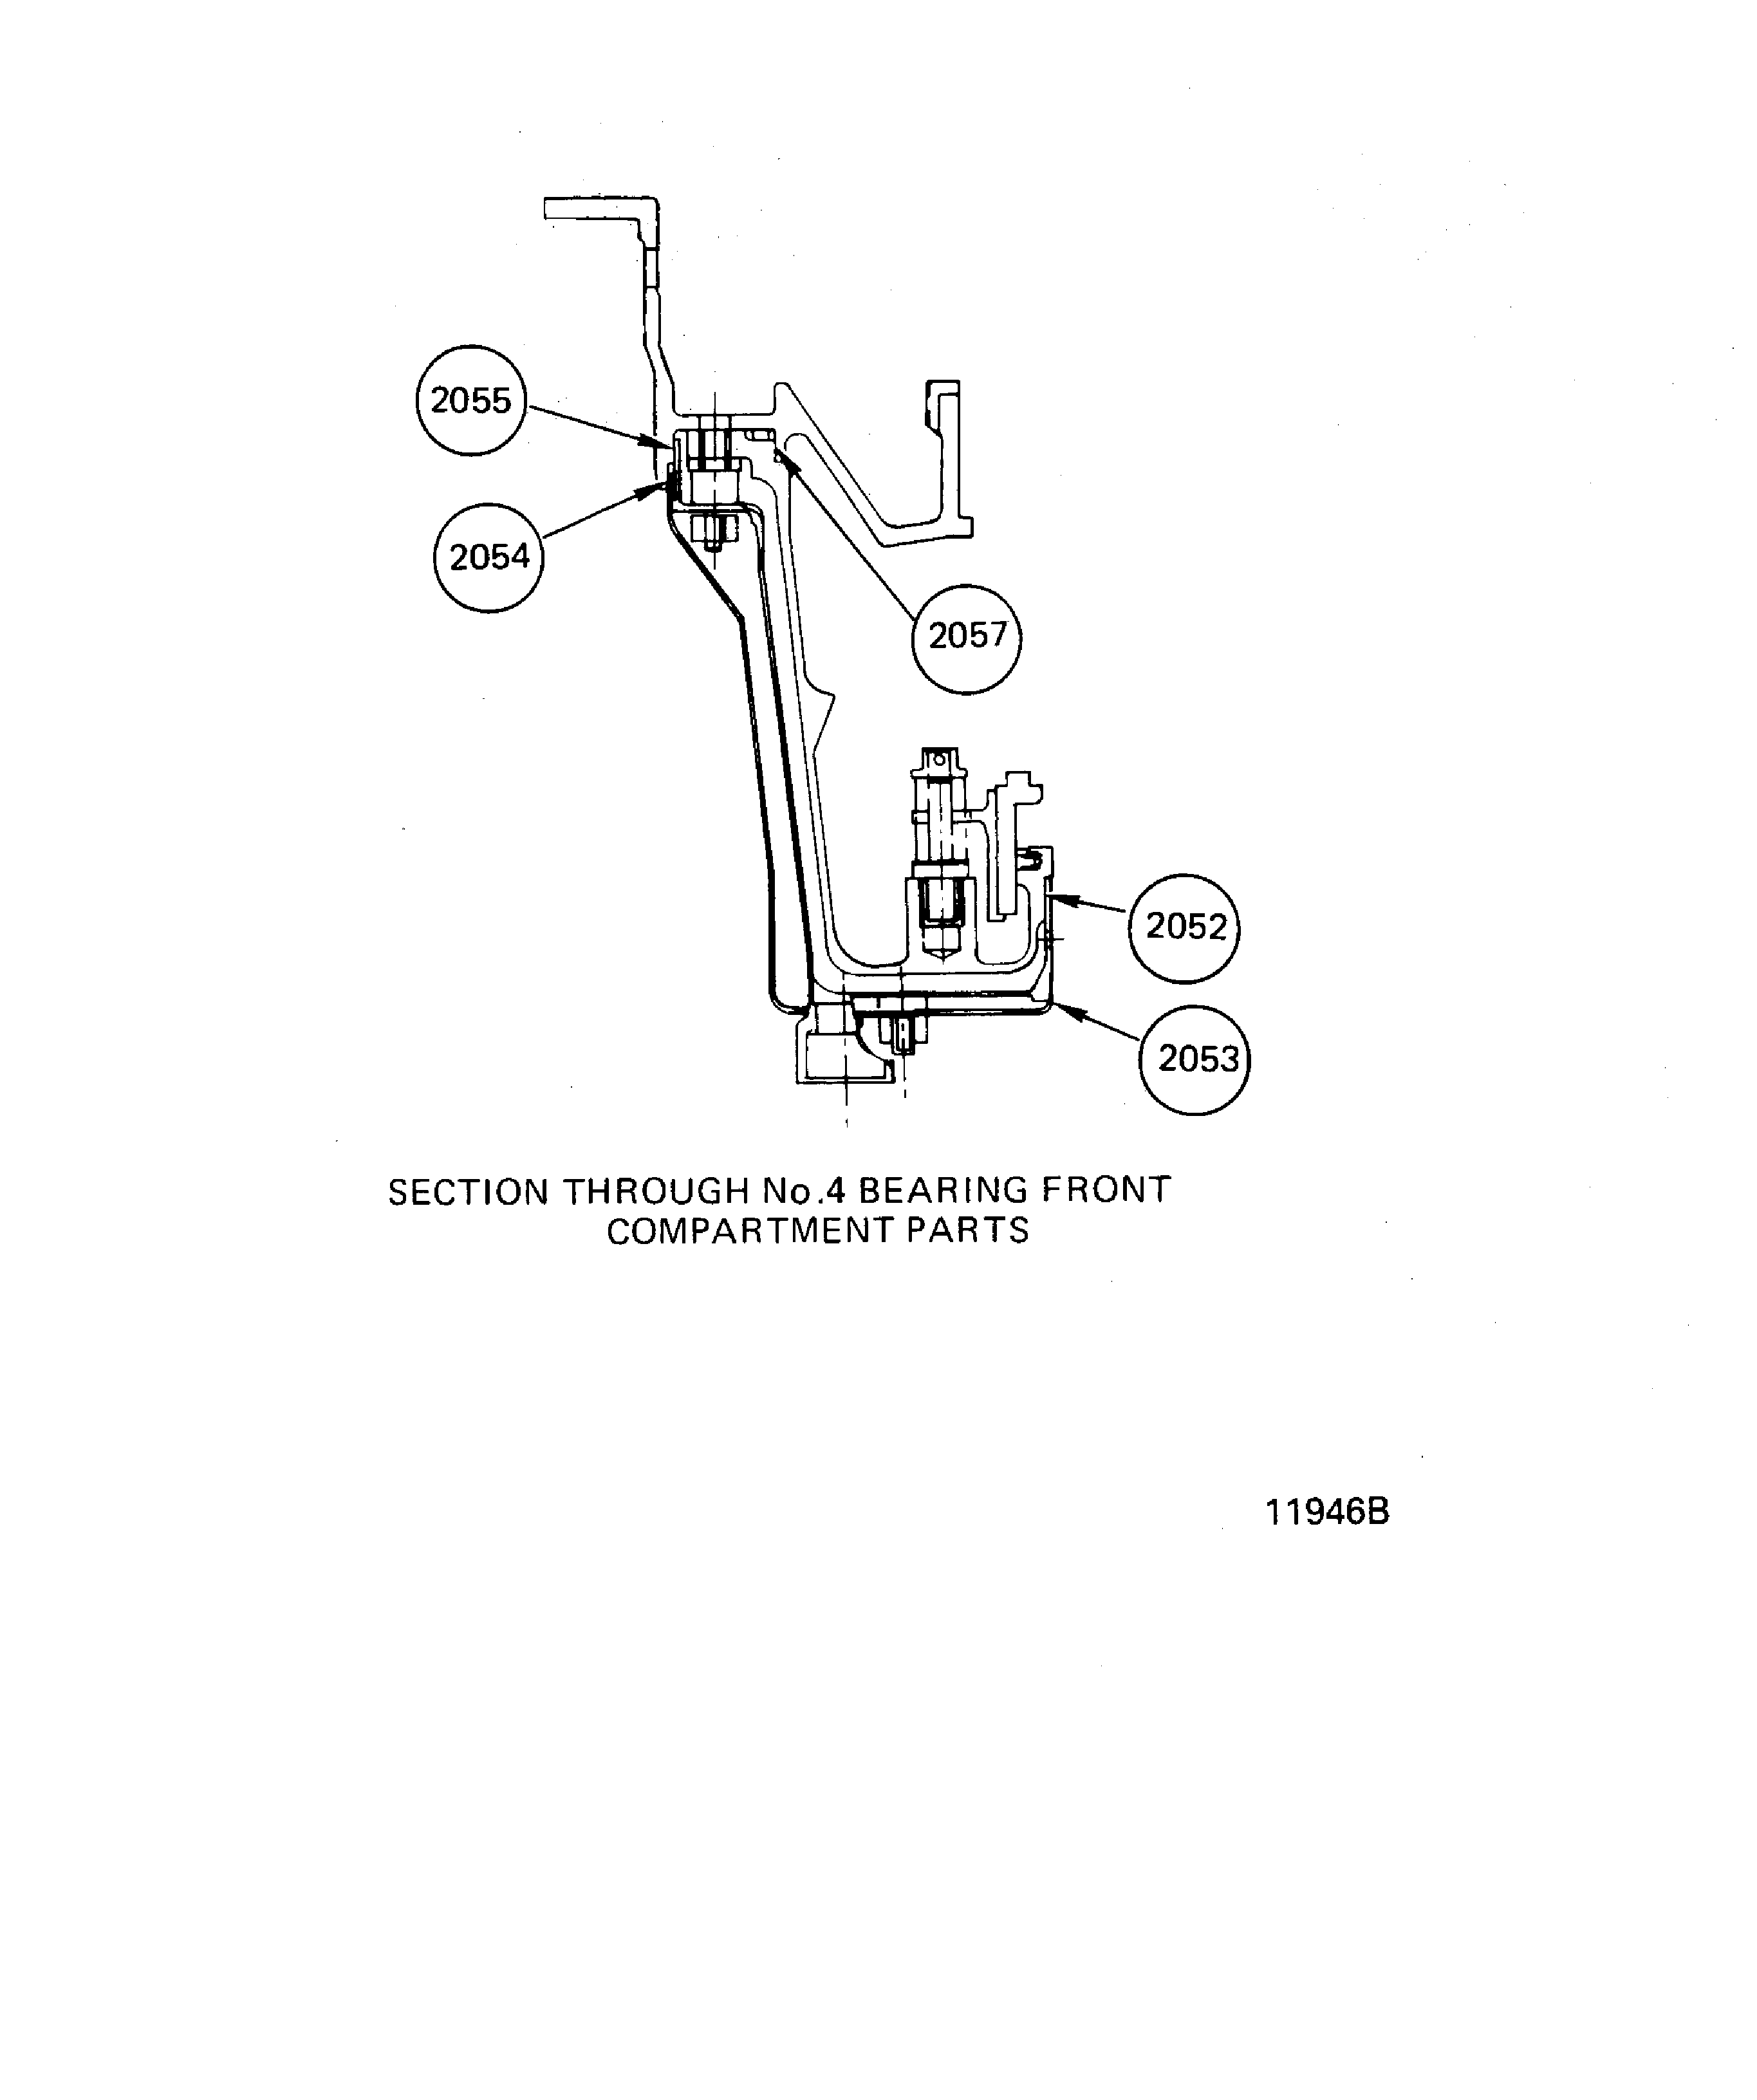
Figure: No. 4 Bearing Front Compartment - Anti-Rotation Key-Washer Tabs Bending and Installation Limits (Pre SB 72-0629)
No. 4 Bearing Front Compartment - Anti-Rotation Key-Washer Tabs Bending and Installation Limits (Pre SB 72-0629)
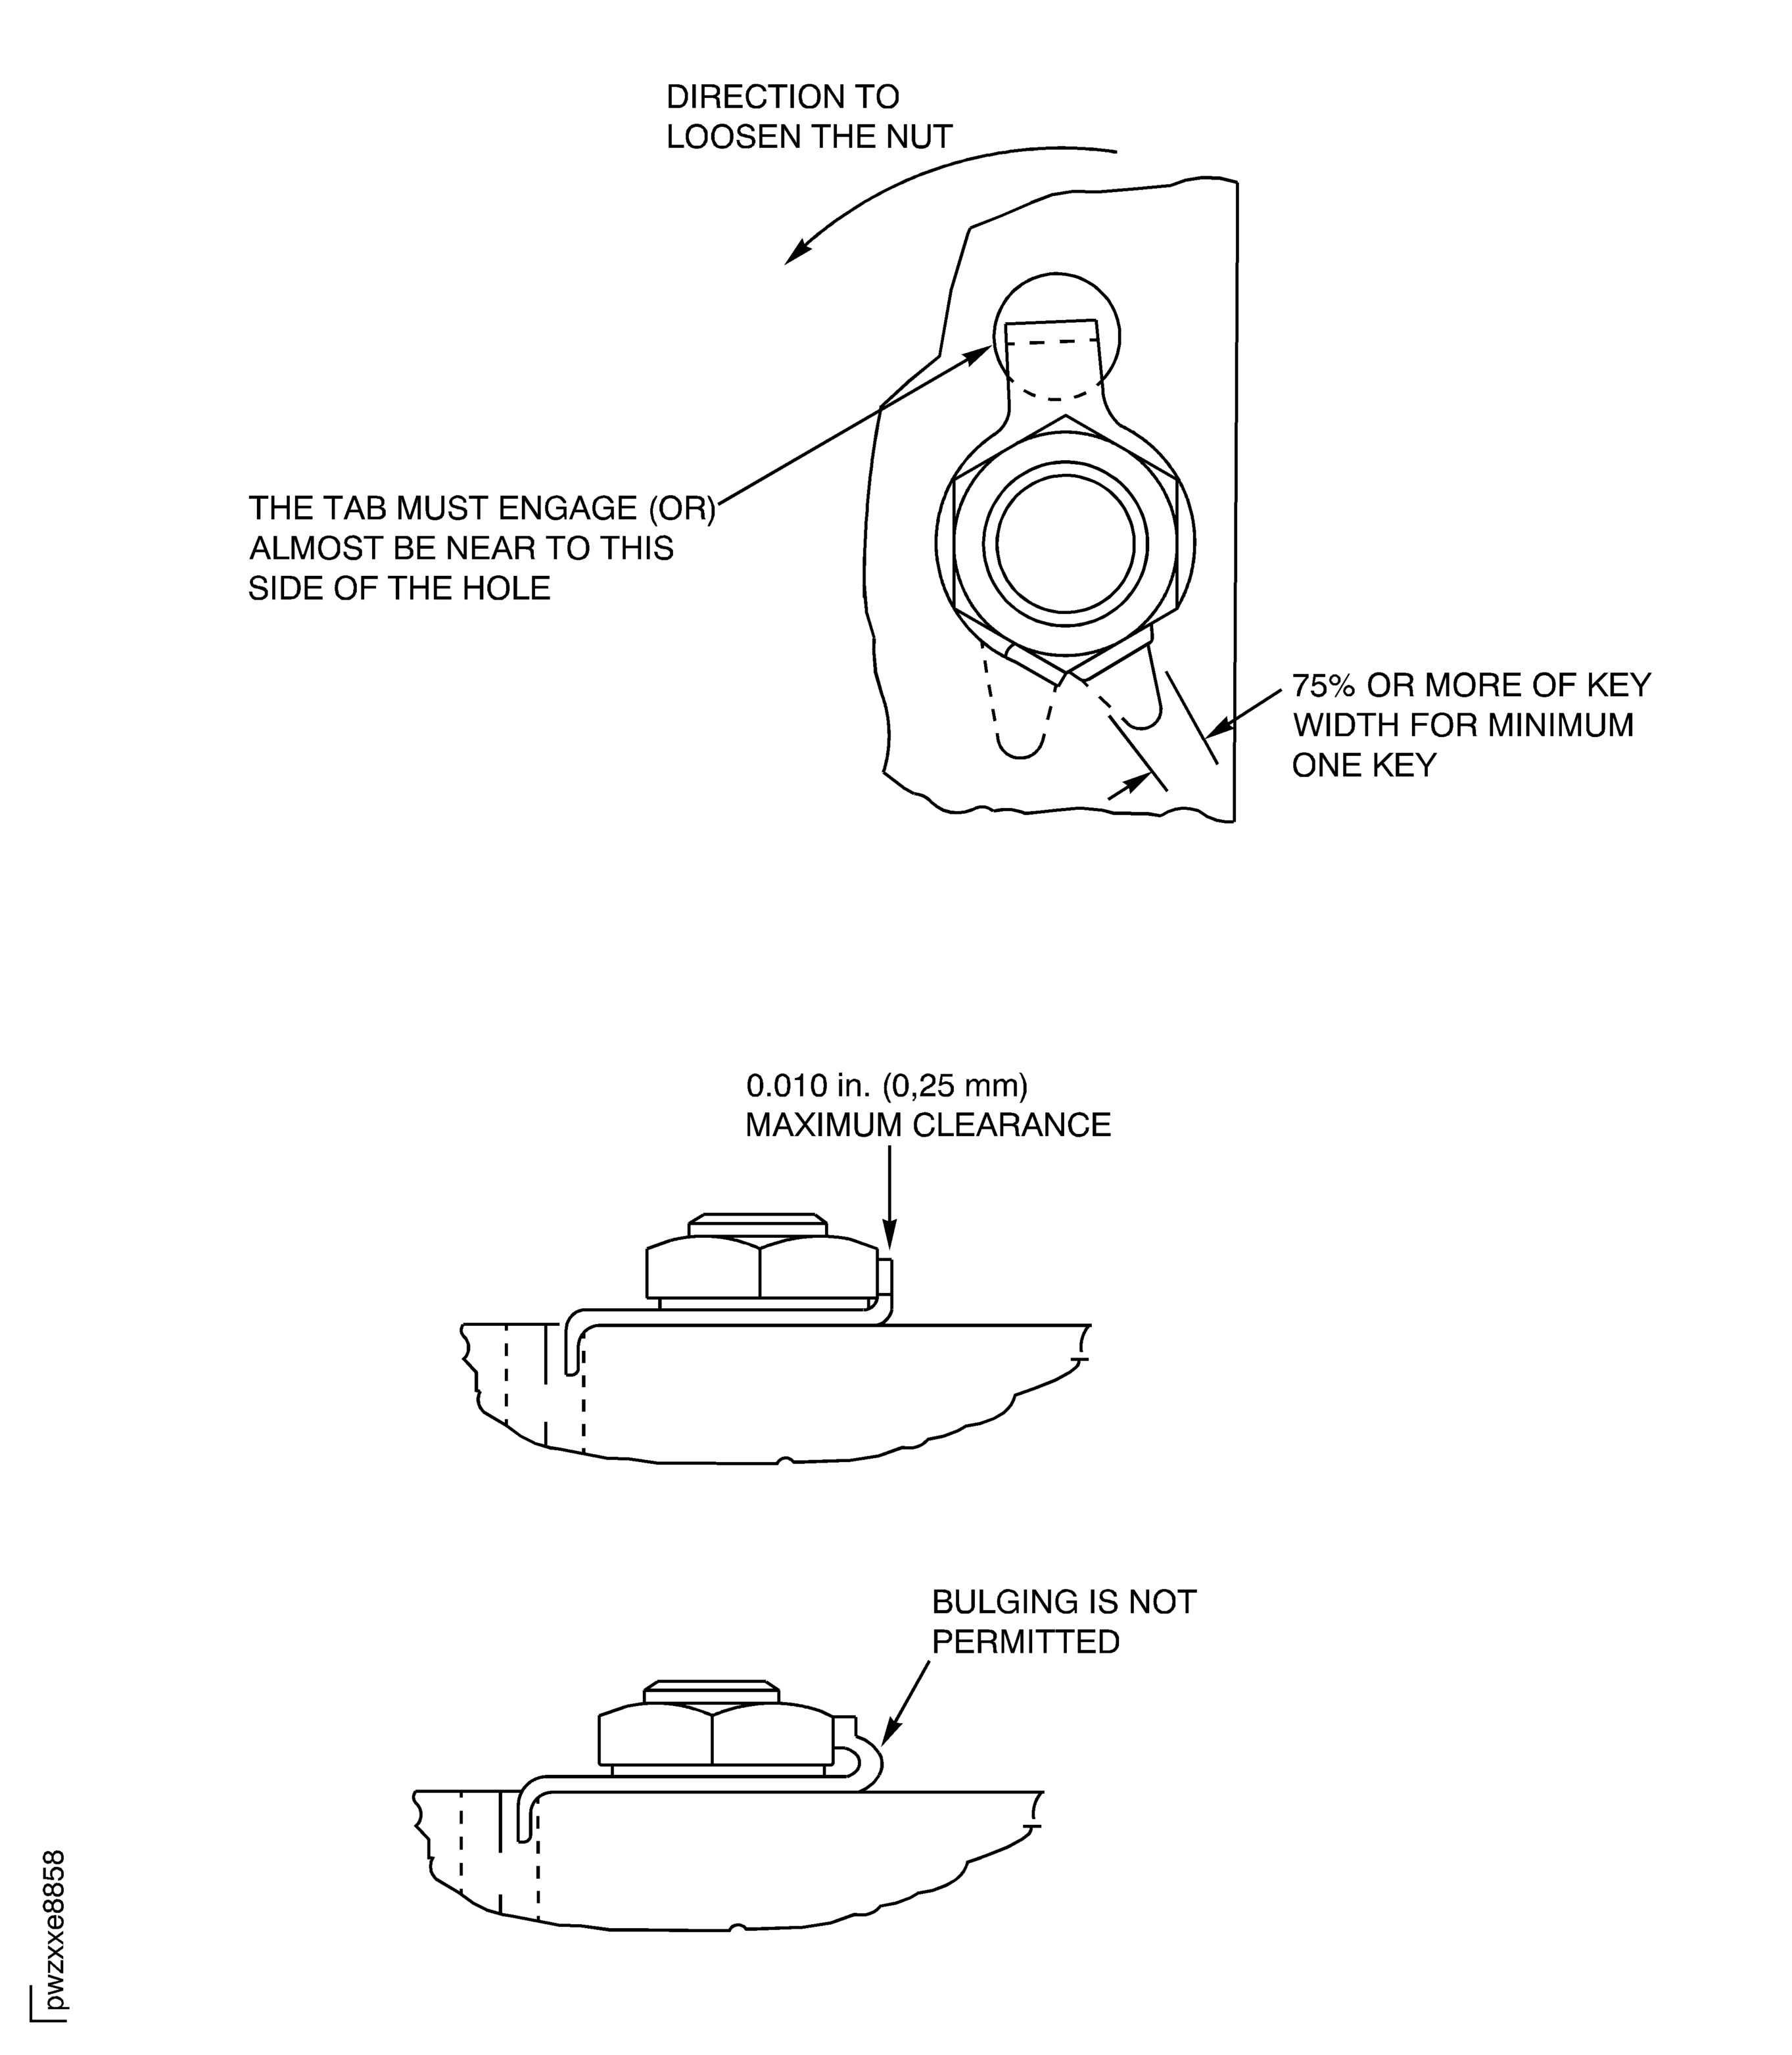
Figure: Install the No.4 Bearing Oil Nozzle in the No.4 Front Bearing Seal Assembly (Post SB 72-0629)
Install the No.4 Bearing Oil Nozzle in the No.4 Front Bearing Seal Assembly (Post SB 72-0629)
