Export Control
EAR Export Classification: Not subject to the EAR per 15 C.F.R. Chapter 1, Part 734.3(b)(3), except for the following Service Bulletins which are currently published as EAR Export Classification 9E991: SBE70-0992, SBE72-0483, SBE72-0580, SBE72-0588, SBE72-0640, SBE73-0209, SBE80-0024 and SBE80-0025.Copyright
© IAE International Aero Engines AG (2001, 2014 - 2021) The information contained in this document is the property of © IAE International Aero Engines AG and may not be copied or used for any purpose other than that for which it is supplied without the express written authority of © IAE International Aero Engines AG. (This does not preclude use by engine and aircraft operators for normal instructional, maintenance or overhaul purposes.).Applicability
All
Common Information
TASK 72-42-31-200-001 No. 4 Bearing Support - Examine, Inspection-001
General
This TASK gives the procedure for the inspection of the No. 4 bearing support.
Fig/item numbers in parentheses in the procedure agree with those used in the IPC.
The policy that is necessary for inspection is given in the SPM TASK 70-20-00-200-501.
All the parts must be cleaned before any part is examined. Refer to the SPM TASK 70-10-00-100-501.
All parts must be visually examined for damage, corrosion and wear. Any defects that are not identified in the procedure must be referred to IAE.
The procedure for those parts which must have a crack test is given in SUBTASK 72-42-31-230-051. Do the test before the part is visually examined.
Do not discard any part until you are sure there are no repairs available. Refer to the instructions in Repair before a discarded part is used again or oversize parts are installed.
Parts which should be discarded can be held although no repair is available. The repair of a discarded part could be shown to be necessary at a later date.
All parts must be examined to make sure that all the repairs have been completed satisfactorily.
The practices and processes referred to in the procedure by the TASK numbers are in the SPM.
References
Refer to the SPM for data on these items.
Definitions of Damage SPM TASK 70-02-02-350-501
Record and Control of the Lives of Parts, SPM TASK 70-05-00-220-501
Inspection of Parts, SPM TASK 70-20-01-200-501
Some data on these items is contained in this TASK. For more data on these items refer to the SPM.
Method of Testing for Crack Indications
Chemical Processes
Surface Protection
Preliminary Requirements
Pre-Conditions
NONESupport Equipment
NONEConsumables, Materials and Expendables
NONESpares
NONESafety Requirements
NONEProcedure
Clean the Part. Refer to the TASK 72-42-31-100-000 (CLEANING-000).
SUBTASK 72-42-31-230-051-001 Examine the No. 4 Bearing Support (01-010) for Cracks
Clean the Part. Refer to the TASK 72-42-31-100-000 (CLEANING-000).
SUBTASK 72-42-31-230-051-002 Examine the No. 4 Bearing Support (01-010) for Cracks
Refer to: Figure
Repair, VRS3078 TASK 72-42-31-300-007 (REPAIR-007)
Same as (a) but there is high metal
Repair, VRS3075 TASK 72-42-31-300-004 (REPAIR-004)
Other than (a) or (b)
Scoring and damage.
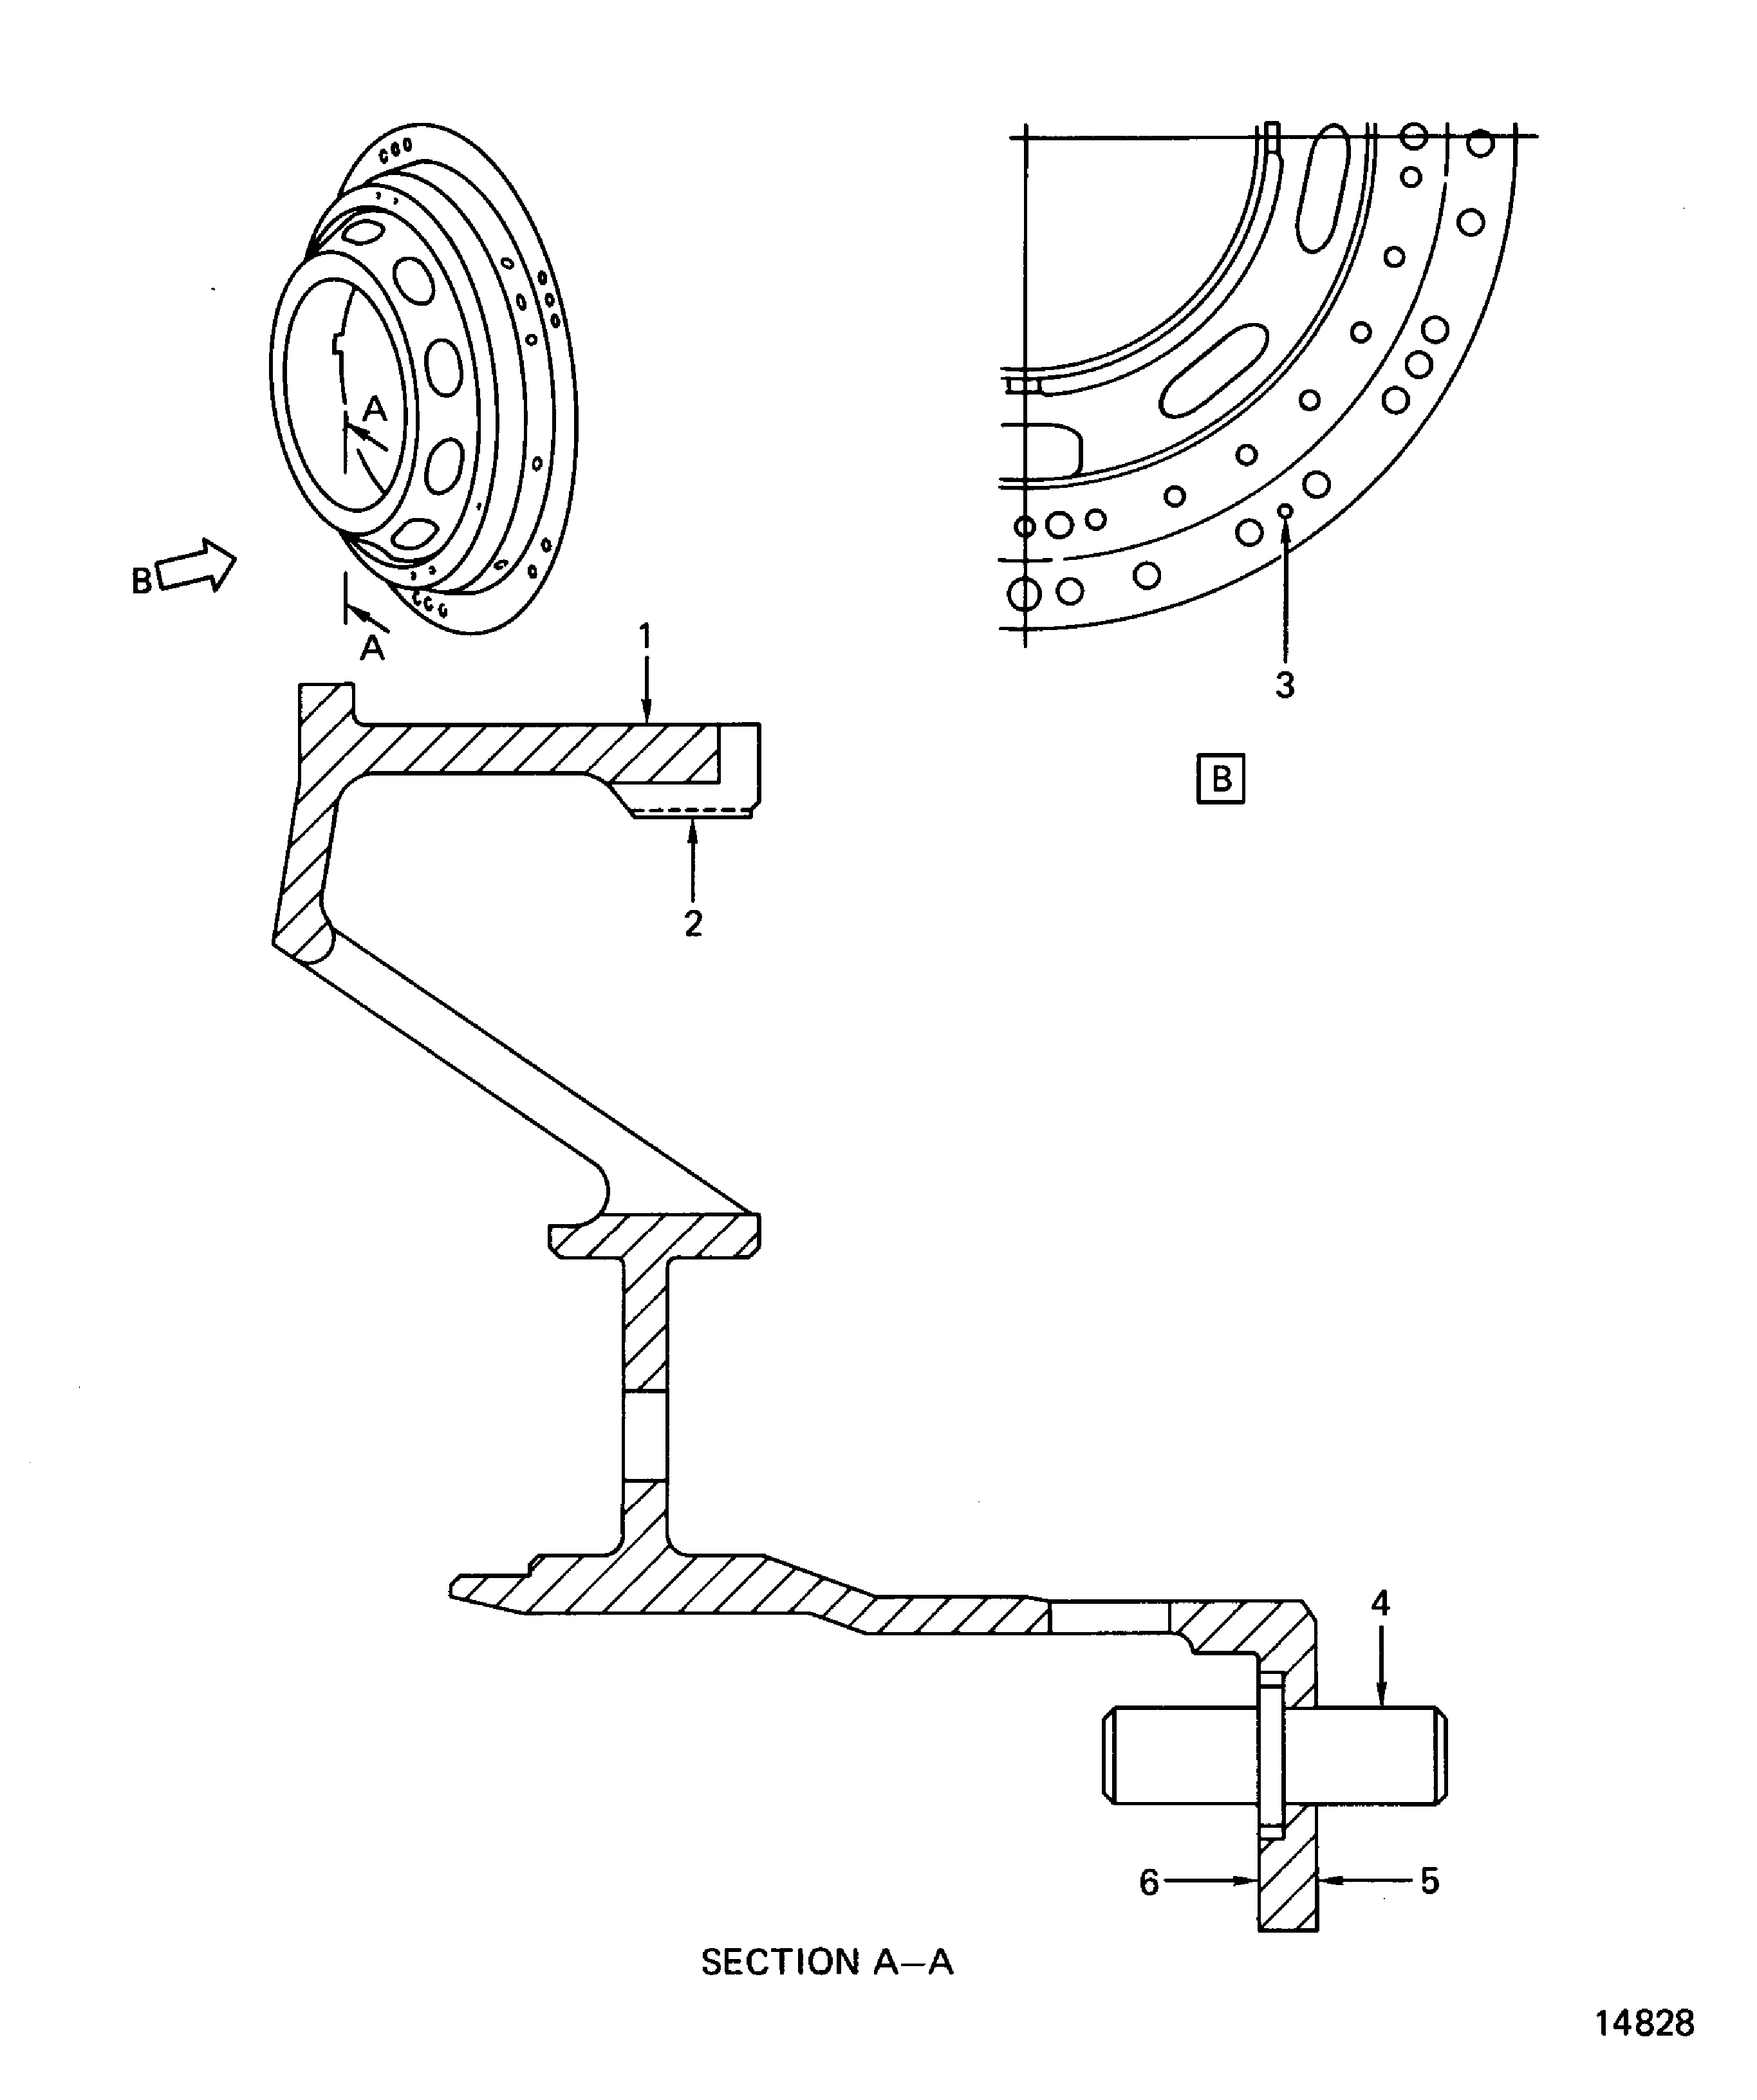
Examine the support at location 1 for scoring and damage on the inside diameter bearing bore surface.
SUBTASK 72-42-31-220-051 Examine the No. 4 Bearing Support (01-010) for Scoring and Damage on the Inside Diameter Bearing Bore Surface
Refer to: Figure
Repair, VRS3078 TASK 72-42-31-300-007 (REPAIR-007)
If you repaired less than 15 percent of the thread before
Nicks, burrs and damage.
Examine the support at location 2 for nicks, burrs and damage on the bearing race retaining threads.
SUBTASK 72-42-31-220-052 Examine the No. 4 Bearing Support (01-010) for Nicks, Burrs and Damage on the Bearing Race Retaining Threads
Refer to: Figure
Repair, VRS3274 TASK 72-42-31-300-008 (REPAIR-008)
Other than (a)
Damage.
Examine the support at location 3 for damage on the jackscrew hole threads.
SUBTASK 72-42-31-220-053 Examine the No. 4 Bearing Support (01-010) for Damage on the Jackscrew Hole Threads
Refer to: Figure
Repair, VRS3275 TASK 72-42-31-300-009 (REPAIR-009)
Looseness or damage
Examine the support dowel pin at location 4 for looseness or damage.
SUBTASK 72-42-31-220-054 Examine the No. 4 Bearing Support (01-010) Dowel Pin for Looseness or Damage
Refer to: Figure
Repair, VRS3078 TASK 72-42-31-300-007 (REPAIR-007)
Other than (a)
Nicks and dents.
Examine the support at locations 5 and 6 for nicks and dents on the flange faces.
Repair, VRS3078 TASK 72-42-31-300-007 (REPAIR-007)
Other than (a)
Nicks and dents.
Examine the support on all surfaces other than locations 5 and 6 for nicks and dents.
SUBTASK 72-42-31-220-055 Examine the No. 4 Bearing Support (01-010) for Nicks and Dents
Refer to Figure.
NOTE
All dimensions apply when Surface C is flat by 0.001 in. (0.03 mm) in a held condition or 0.005 in. (0.13 mm) in a free condition, and Diameter M maintains a clearance envelope of 13.350 in. (339.09 mm) in a free or held condition. Diameter M must be 13,338 to 13.354 in. (338.79 to 339.19 mm). Hold the part only on Surfaces C, L, S and Diameter M.Repair, VRS3075 TASK 72-42-31-300-004 (REPAIR-004)
Other than (a)
Axial dimension.
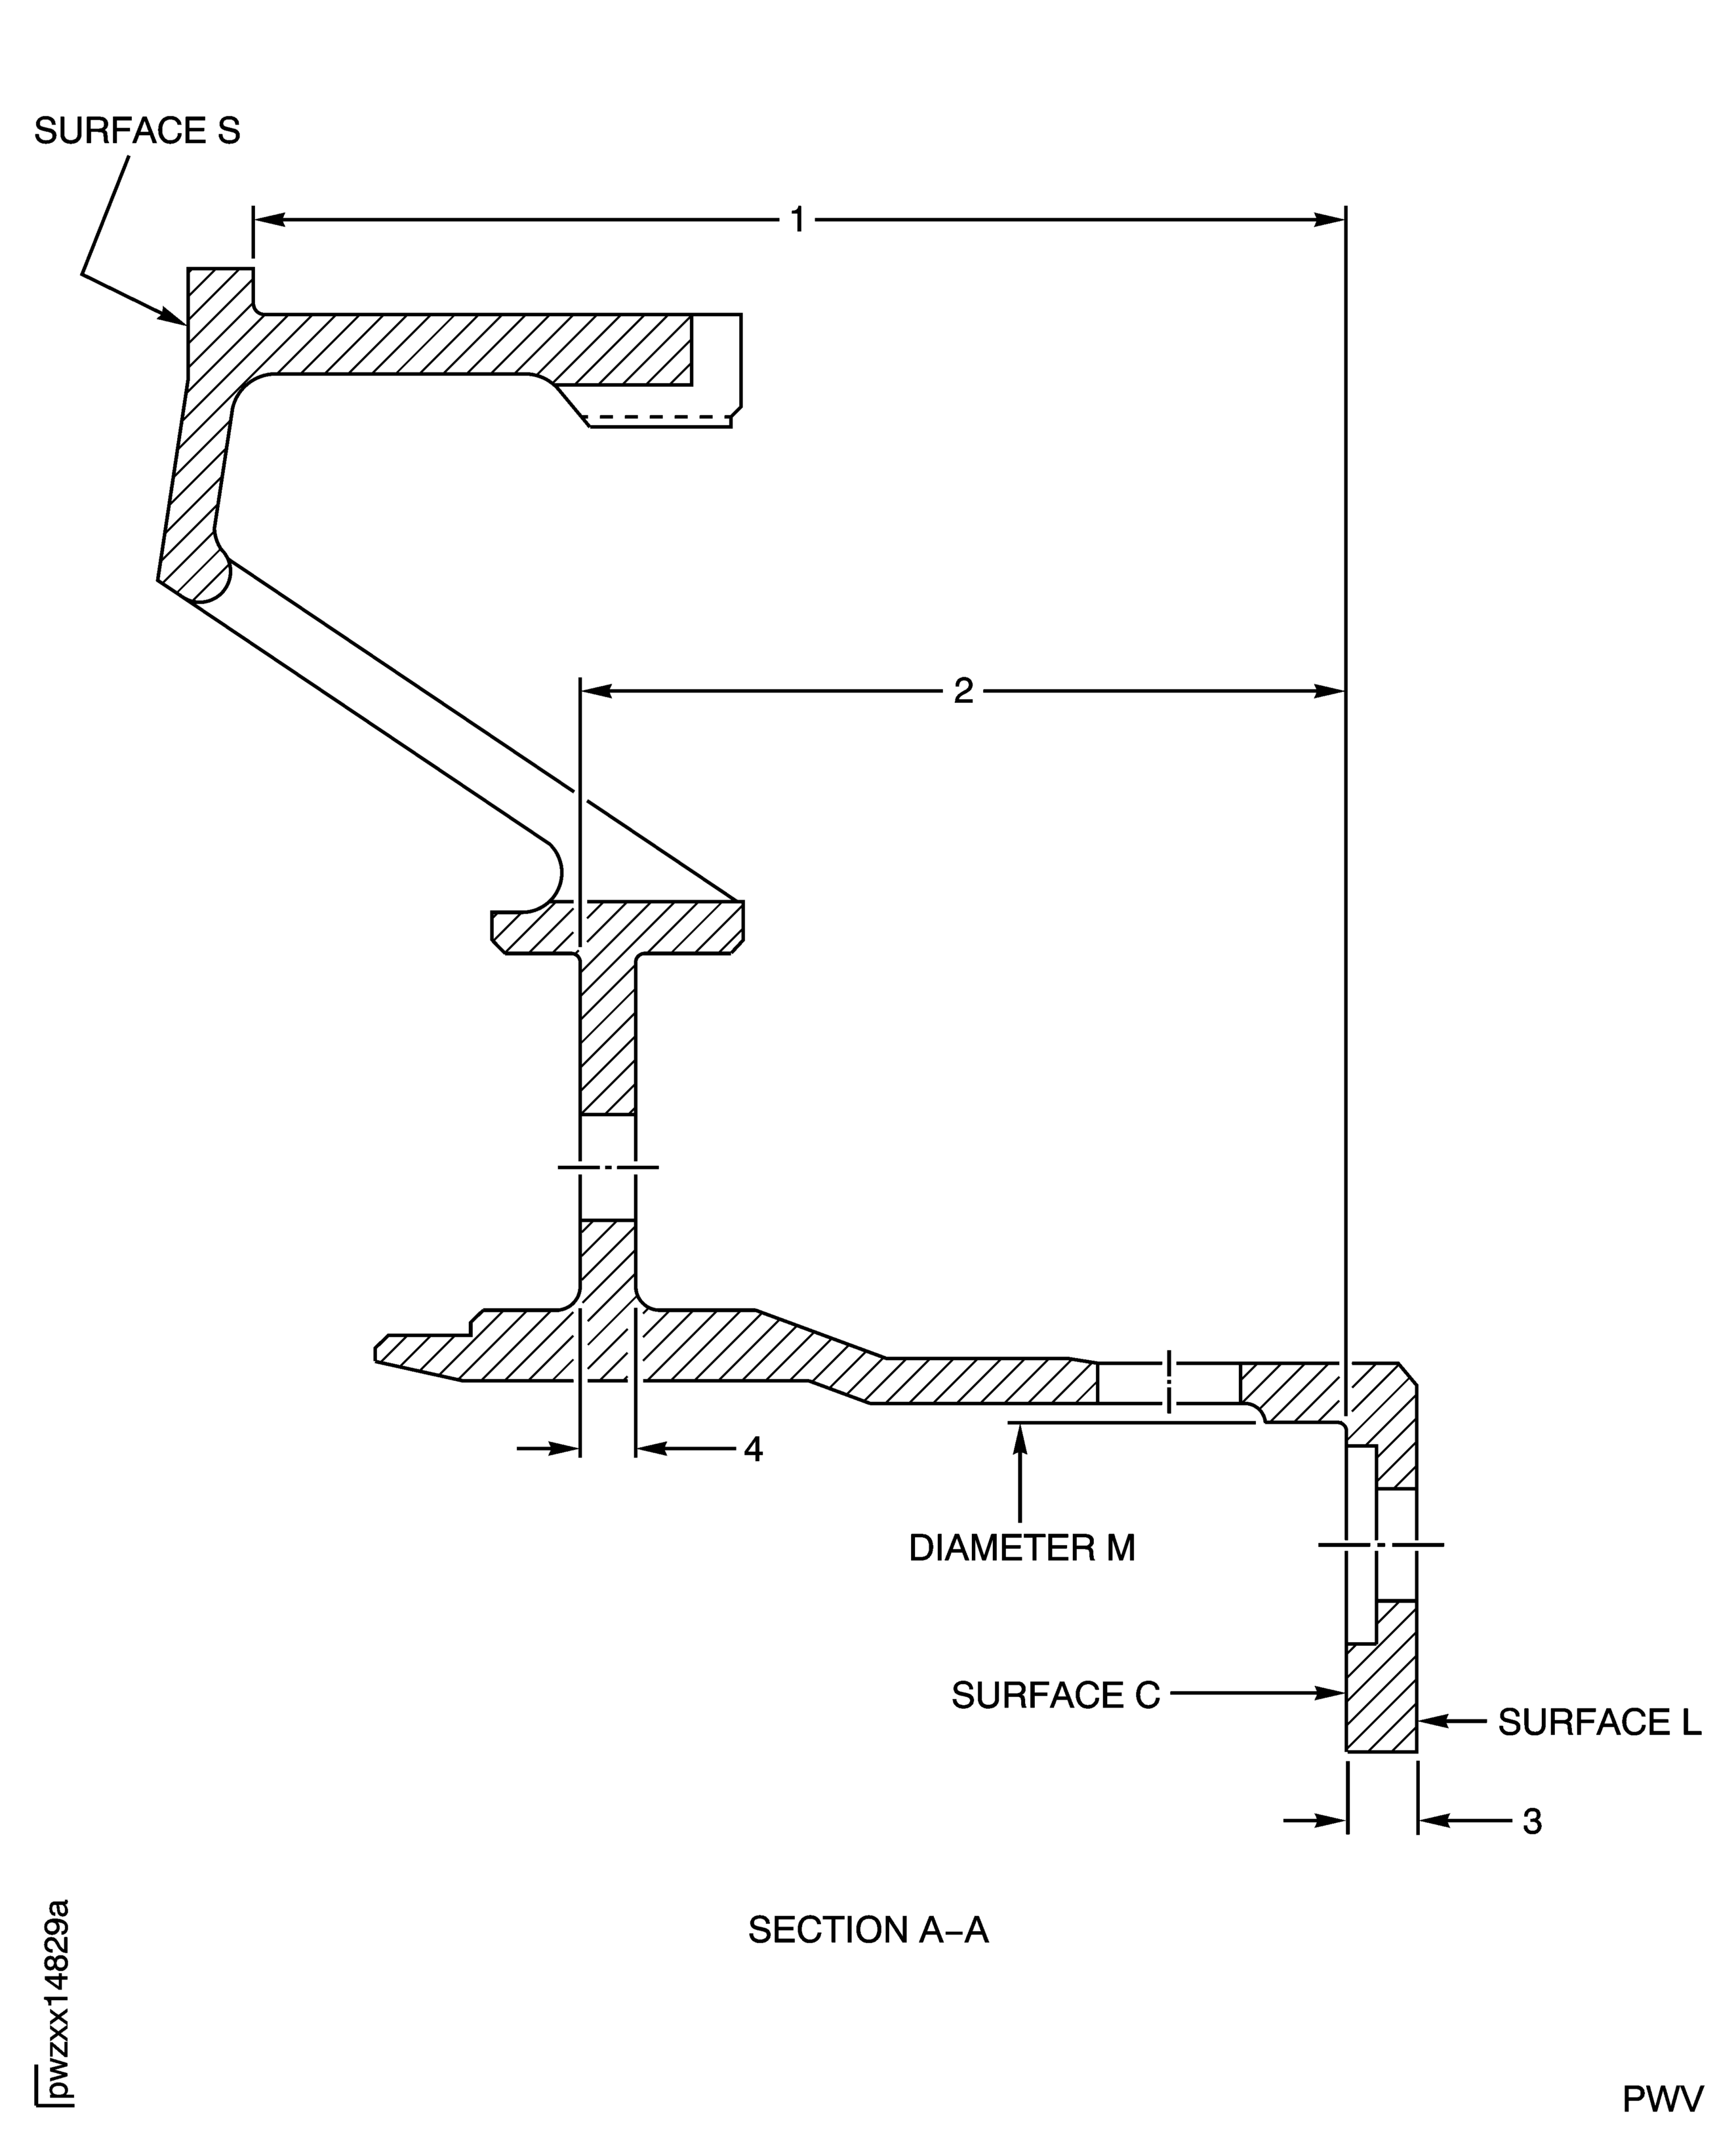
Examine the support at location 1 for the axial dimension of the bearing race stop to the rear flange.
Repair, VRS3072 TASK 72-42-31-300-001 (REPAIR-001)
Other than (a)
Axial dimension.
Examine the support at location 2 for the axial dimension of the intermediate flange to the rear flange.
SUBTASK 72-42-31-220-056 Examine the No. 4 Bearing Support (01-010) for the Axial Dimensions
Refer to: Figure
Repair, VRS3298 TASK 72-42-31-300-016 (REPAIR-016)
Other than (a)
Thickness.
Examine the support at location 3 for the thickness of the rear flange.
Repair, VRS3076 TASK 72-42-31-300-005 (REPAIR-005)
Other than (a)
Thickness.
Examine the support at location 4 for the thickness of the intermediate flange.
SUBTASK 72-42-31-220-057 Examine the No. 4 Bearing Support (01-010) for the Thickness of the Flanges
Refer to Figure.
NOTE
All dimensions apply when Surface C is flat by 0.001 in. (0.03 mm) in a held condition or 0.005 in. (0.13 mm) in a free condition, and Diameter M maintains a clearance envelope of 13.350 in. (339.09 mm) in a free or held condition. Diameter M must be 13.338 to 13.354 in. (338.79 to 339.19 mm). Hold the part only on Surfaces C, L, S and Diameter M.Repair, VRS3075 TASK 72-42-31-300-004 (REPAIR-004)
Other than (1)
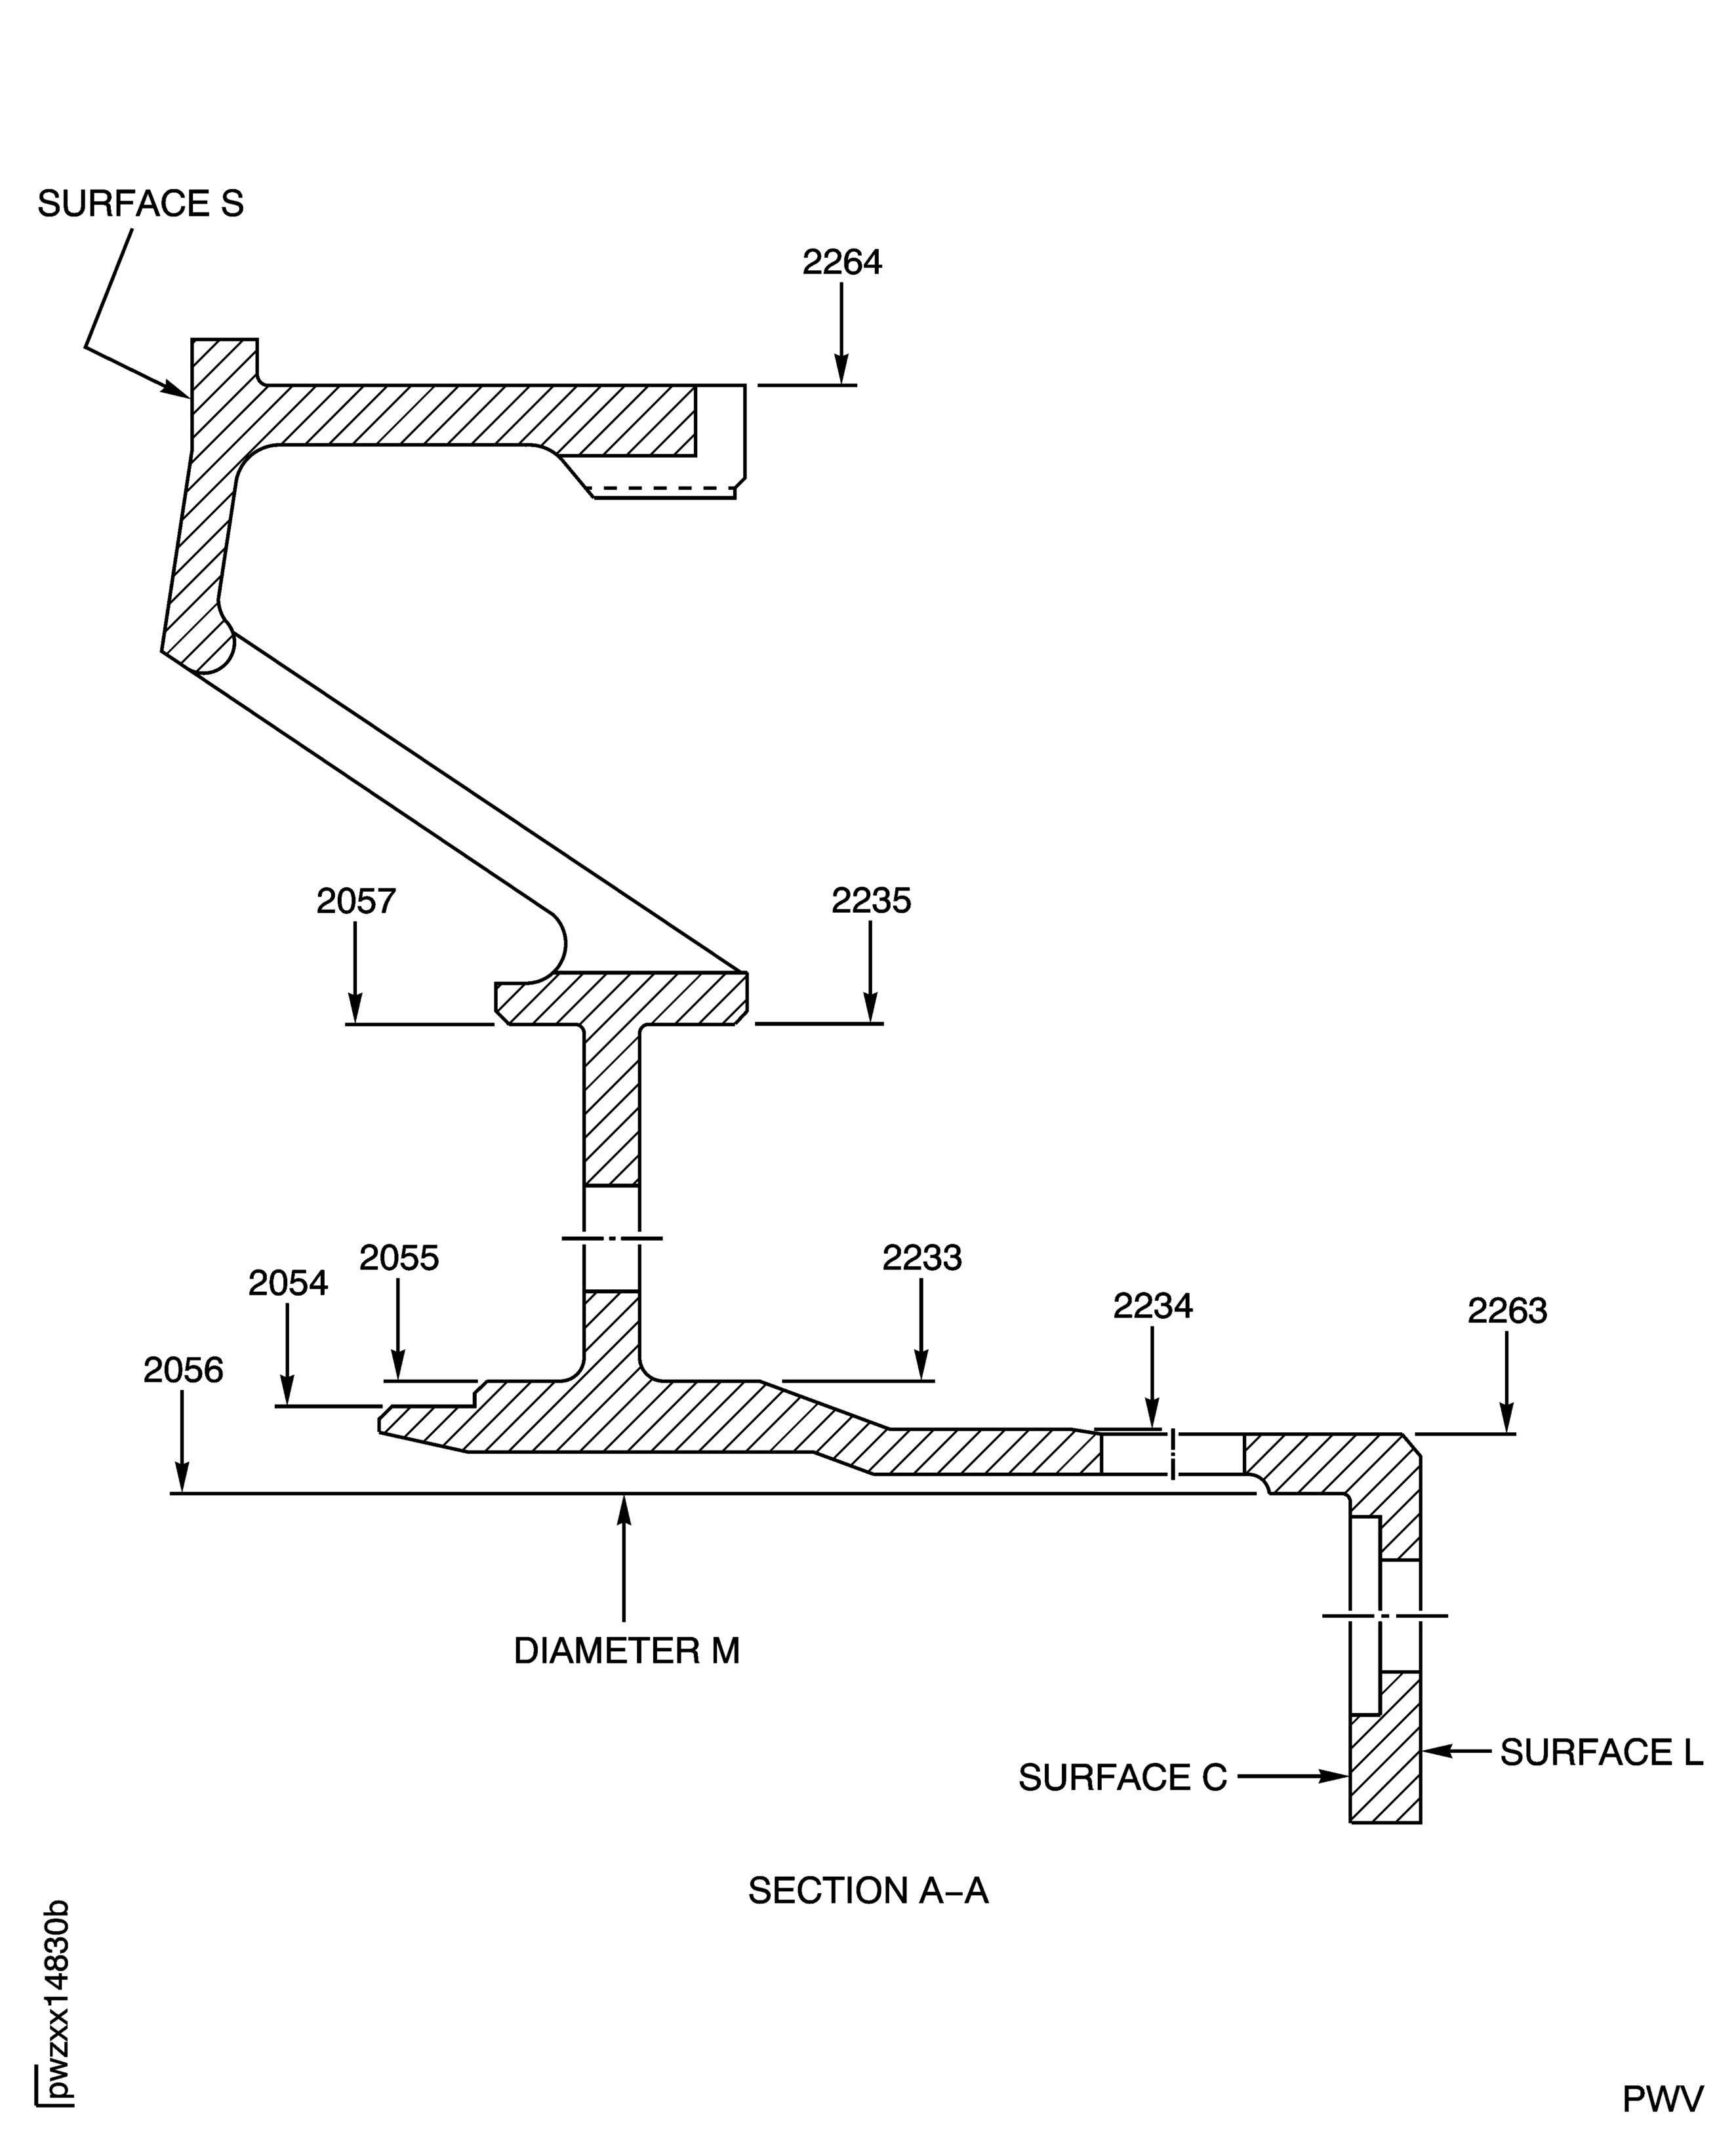
Examine the support for the bearing bore diameter at location 2264.
Repair, VRS3074 TASK 72-42-31-300-003 (REPAIR-003)
Other than (1)
Examine the rear seal support diameter at location 2235.
Repair, VRS3293 TASK 72-42-31-300-011 (REPAIR-011)
Other than (1)
Examine the support rear cooling duct diameter at location 2233.
Accept part for select fit only
NOTE
This part can be used only if the mating part has a diameter that will result in fit of reference No. 2234. Refer to TASK 72-40-00-430-003 (ASSEMBLY-003) or TASK 72-00-43-420-001 (INSTALLATION-001).
If the diameter is between 12.997 and 13.003 in. (330.124 and 330.276 mm)
Repair, VRS3295 TASK 72-42-31-300-013 (REPAIR-013)
Other than (1) or (2)
Examine the support rear heatshield diameter at location 2234.
Repair, VRS3073 TASK 72-42-31-300-002 (REPAIR-002)
Other than (1)
Examine the support turbine cooling air duct diameter at location 2263.
Repair, VRS3294 TASK 72-42-31-300-012 (REPAIR-012)
Other than (1)
Examine the support front cooling duct diameter at location 2055.
Repair, VRS3296 TASK 72-42-31-300-014 (REPAIR-014)
Other than (1)
Examine the support front heat shield diameter at location 2054.
Accept part for select fit only
NOTE
This part can be used only if the mating part has a diameter that will result in fit of reference No. 2056. Refer to V2500-A0-72-42-0000-00A-710A-B (ASSEMBLY-001).
If the diameter in a held condition is between 13.338 and 13.350 in. (338.79 and 339.09 mm)
Repair, VRS3297 TASK 72-42-31-300-015 (REPAIR-015)
Other than (1), (2) or (3)
Examine the support diffuser case diameter at location 2056.
Repair, VRS3292 TASK 72-42-31-300-010 (REPAIR-010)
Other than (1)
Examine the support front seal support diameter at location 2057.
SUBTASK 72-42-31-220-058 Examine the No. 4 Bearing Support Diameters
Figure: No. 4 Bearing Support Inspection Locations
No. 4 Bearing Support Inspection Locations

Figure: No. 4 Bearing Support Inspection Locations
No. 4 Bearing Support Inspection Locations

Figure: No. 4 Bearing Support Inspection Locations
No. 4 Bearing Support Inspection Locations

