Export Control
EAR Export Classification: Not subject to the EAR per 15 C.F.R. Chapter 1, Part 734.3(b)(3), except for the following Service Bulletins which are currently published as EAR Export Classification 9E991: SBE70-0992, SBE72-0483, SBE72-0580, SBE72-0588, SBE72-0640, SBE73-0209, SBE80-0024 and SBE80-0025.Copyright
© IAE International Aero Engines AG (2001, 2014 - 2021) The information contained in this document is the property of © IAE International Aero Engines AG and may not be copied or used for any purpose other than that for which it is supplied without the express written authority of © IAE International Aero Engines AG. (This does not preclude use by engine and aircraft operators for normal instructional, maintenance or overhaul purposes.).Applicability
All
Common Information
TASK 72-42-33-200-001 No. 4 Bearing Front Seal Support - Examine, Inspection-001
General
This TASK gives the procedure for the inspection of the No. 4 bearing seal support assembly. For the other part of the No. 4 bearing front seal assembly, refer to TASK 72-42-33-200-000 (INSPECTION/CHECK-000).
Fig/item numbers in parentheses in the procedure agree with those used in the IPC.
The policy that is necessary for inspection is given in the SPM TASK 70-20-01-200-501.
All the parts must be cleaned before any part is examined. Refer to the SPM TASK 70-10-00-100-501.
All parts must be visually examined for damage, corrosion and wear. Any defects that are not identified in the procedure must be referred to IAE.
The procedure for those parts which must have a crack test is given in SUBTASK 72-42-33-230-051. Do the test before the part is visually examined.
A ** following repair referenced in this inspection indicates that the repair is not yet published in the current revision of the manual and the part must be rejected. Contact IAE for additional information concerning FAA approved repair date.
Do not discard any part until you are sure there are no repairs available. Refer to the instructions in Repair before a discarded part is used again or oversize parts are installed.
Parts which should be discarded can be held although no repair is available. The repair of a discarded part could be shown to be necessary at a later date.
All parts must be examined to make sure that all the repairs have been completed satisfactorily.
The practices and processes referred to in the procedure by the TASK numbers are in the SPM.
References
Refer to SPM for data on these items.
Definitions of Damage SPM TASK 70-02-02-350-501.
Inspection of Parts, SPM TASK 70-20-01-200-501.
Surface Texture, SPM TASK 70-35-09-350-501.
Some data on these items is contained in this TASK. For more data on these items refer to the SPM.
Method of Testing for Crack Indications.
Chemical Processes.
Surface Protection.
Preliminary Requirements
Pre-Conditions
NONESupport Equipment
| Name | Manufacturer | Part Number / Identification | Quantity | Remark |
|---|---|---|---|---|
| IAE 2P16547 Holding fixture | 0AM53 | IAE 2P16547 | 1 |
Consumables, Materials and Expendables
NONESpares
NONESafety Requirements
NONEProcedure
Clean the Part. Refer to the TASK 72-42-33-100-000 (CLEANING-000).
Repair, VRS3666 TASK 72-42-33-300-019 (REPAIR-019)
Cracks in cast bosses radius - Location 13, Figure
Repair, VRS3666 TASK 72-42-33-300-019 (REPAIR-019)
Cracks in excess metal casting - Location 14, Figure
Repair, VRS3666 TASK 72-42-33-300-019 (REPAIR-019)
Cracks in casting datum lugs - Location 15, Figure
Do the test for cracks on the part that is given below. Use the applicable penetrant procedure.
PART IDENT
TASK/SUBTASK
No.4 bearing seal support assembly
SPM
TASK 70-23-01-230-501
(Dip or Spray)
SUBTASK 72-42-33-230-051-001 Examine the No. 4 Bearing Seal Support Assembly (01-020) for Cracks
Clean the Part. Refer to the TASK 72-42-33-100-000 (CLEANING-000).
SUBTASK 72-42-33-230-051-002 Examine the No. 4 Bearing Seal Support Assembly (01-020) for Cracks
Refer to Figure.
Repair, VRS3080 TASK 72-42-33-300-004 (REPAIR-004).
Bent, loose and carbon build-up.
Examine the seal support assembly at Location 4 for bent, loose and carbon build-up on the pins (four locations).
SUBTASK 72-42-33-220-056 Examine the No. 4 Bearing Seal Support Assembly (01-020) for Bent, Loose and Carbon Build-up on the Pins
Refer to Figure
Repair, VRS3427 TASK 72-42-33-300-009 (REPAIR-009)
Unwanted material and crushed or blocked holes
Repair, VRS3427 TASK 72-42-33-300-009 (REPAIR-009)
Looseness
Examine the seal support assembly at the scavenge port honeycomb location 8 for damage, unwanted material and looseness.
SUBTASK 72-42-33-220-057 Examine the No. 4 Bearing Seal Support Assembly (01-020) at the Scavenge Port Honeycomb for Damage, Unwanted Material and Looseness
Refer to Figure
Repair, VRS3085 TASK 72-42-33-300-006 (REPAIR-006)
Loose nuts
Examine the seal support assembly at location 7 for loose nuts (30 locations).
SUBTASK 72-42-33-220-058 Examine the No. 4 Bearing Seal Support Assembly (01-020) for Loose Nuts
Repair, VRS3080 TASK 72-42-33-300-004 (REPAIR-004)
Damage to single insert
Repair, VRS3080 TASK 72-42-33-300-004 (REPAIR-004)
Other than (a)
Installation depth of single insert
Repair, VRS3669 TASK 72-42-33-300-022 (REPAIR-022)
Repair, VRS3669 TASK 72-42-33-300-022 (REPAIR-022)
Other than (a)
Installation depth of double insert.
Damage to double insert
Repair, VRS3669 TASK 72-42-33-300-022 (REPAIR-022)
Damage to thread in parent material of front boss (Location 1 only)
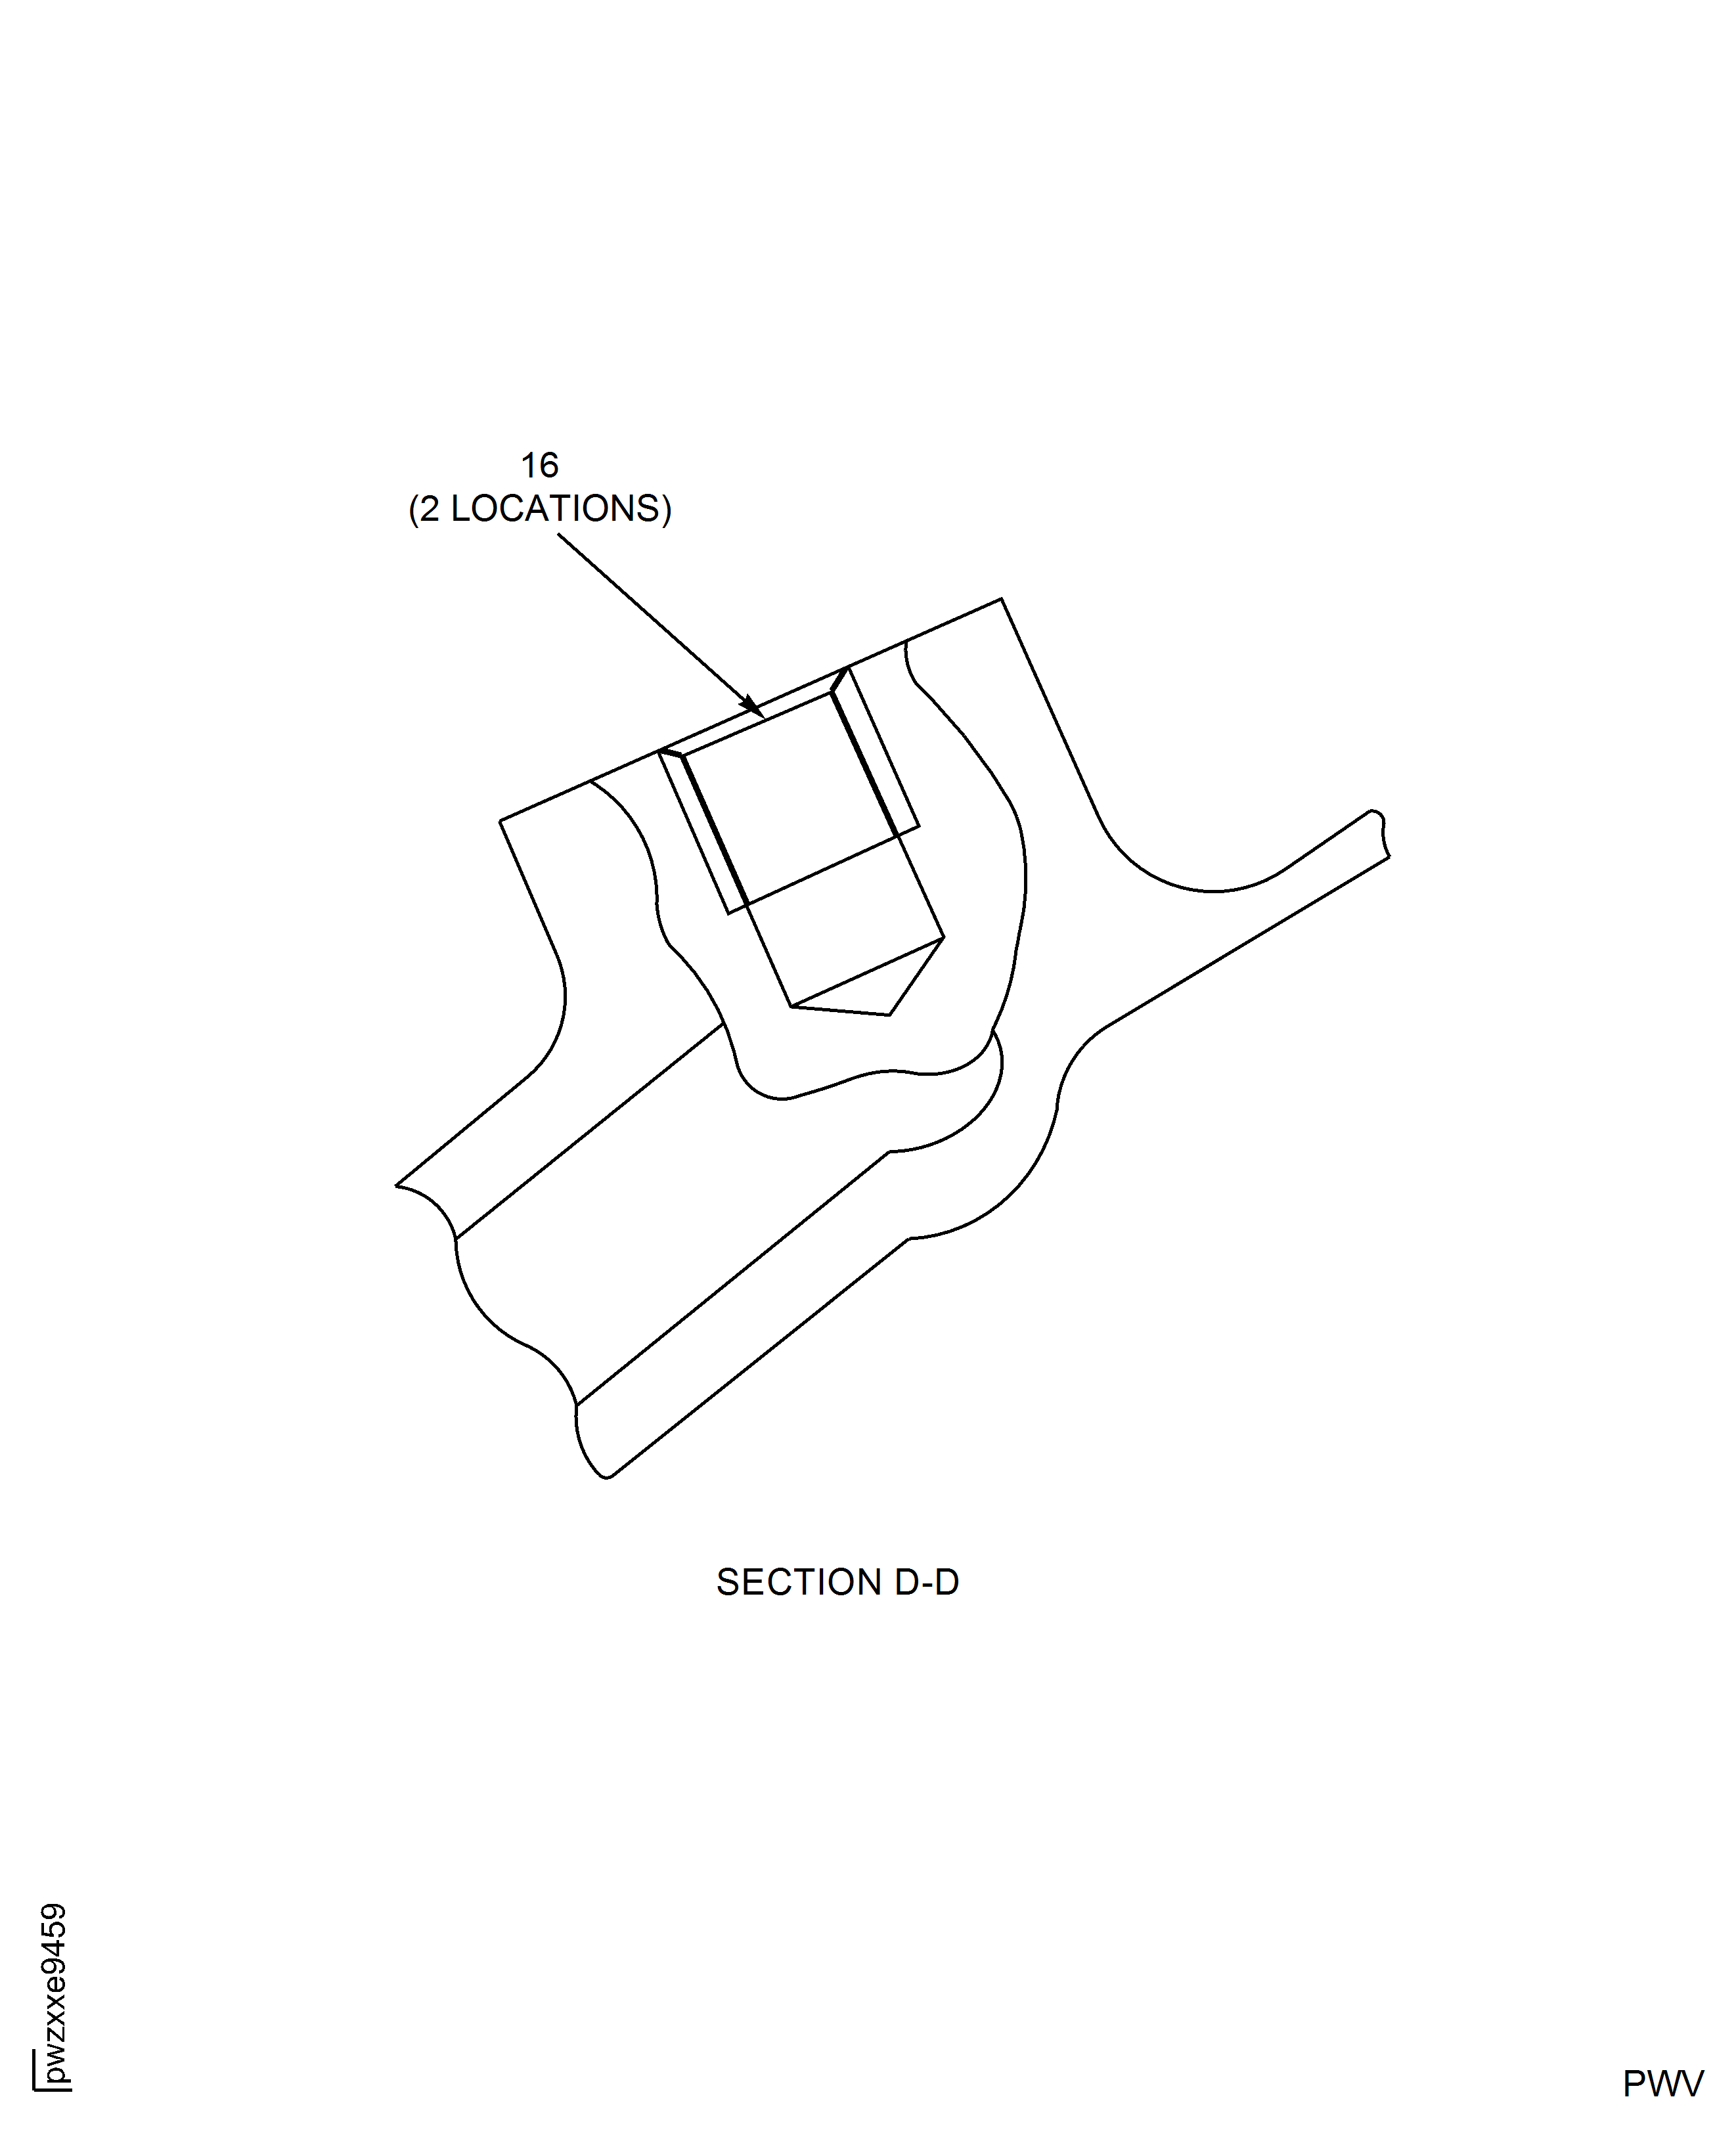
Examine the seal support assembly at Location 1, 5 and 16 for damage and installation depth of the threaded inserts (four locations each). Only examine the threaded inserts at Location 5 if the pins are removed.
NOTE
Location 16 is applicable for post SB 72-0629.
SUBTASK 72-42-33-220-059 Examine the No. 4 Bearing Seal Support Assembly (01-020) for Damage and Installation Depth of the Threaded Inserts
Repair, VRS3065 TASK 72-42-33-300-001 (REPAIR-001)
Up to 0.010 in. (0.254 mm) in depth
Area 2.
Repair, VRS3065 TASK 72-42-33-300-001 (REPAIR-001)
Up to 0.025 in. (0.635 mm) in depth
Area 9 only (outside of dashed lines).
Examine the seal support assembly at location 2 for damage, dents and nicks on the mating surfaces of the boss.
Repair, VRS3065 TASK 72-42-33-300-001 (REPAIR-001)
If stylus hesitates on areas that exhibit damage, dents, nicks or scratches
Examine the seal support assembly at locations X for damage, dents, nicks and scratches using a stylus with a 0.032 in. (0.813 mm) ball tip.
SUBTASK 72-42-33-220-060 Examine the No.4 Bearing Seal Support Assembly (01-020) for Damage, Dents, Nicks and Scratches of the Boss
NOTE
If the measured diameter in a free condition is not satisfactory, a held condition is permitted. All dimensions apply when Surface AB is flat by 0.002 in. (0.05 mm) and Diameters AC and AD maintain a clearance envelope of 10.887 in. (276.53 mm) and 6.050 in. (153.67 mm) in a free or held condition. Hold the support only on the Surfaces AB and AE and Diameters AC and AD.Install the seal support assembly into the IAE 2P16547 Holding fixture 1 off.
If the dimension is between 10.880 and 10.900 in. (276.35 and 276.86 mm) in a free condition or 10.888 and 10.892 in. (276.56 and 276.66 mm) in a held condition. A minimum of eight measurements is necessary for the free condition. The average of the measurements must be in the held condition limits for free or held conditions
Repair, VRS3768 TASK 72-42-33-300-023 (REPAIR-023)
Other than (a)
Diameter.
Examine the seal support assembly at location 2057 for the rear flange inner diameter.
NOTE
It is not necessary to measure the two conditions (free condition and held condition).If the dimension is between 6.043 and 6.063 in. (153.49 and 154 mm) in a free condition or 6.051 and 6.055 in. (153.70 and 153.80 mm) in a held condition. A minimum of eight measurements is necessary for the free condition. The average of the measurements must be in the held condition limits for free or held conditions
Repair, VRS3796 TASK 72-42-33-300-024 (REPAIR-024)
Other than (a)
Diameter.
NOTE
It is not necessary to measure the two conditions (free condition and held condition).
Examine the seal support assembly at location 2052 for the front inner diameter.
SUBTASK 72-42-33-220-061 Examine the No. 4 Bearing Seal Support Assembly (01-020) for the Diameters
Refer to Figure
Repair, VRS3067 TASK 72-42-33-300-002 (REPAIR-002)
Other than (a)
Width.
Examine the seal support assembly at location 2058 for the seal ring groove width.
SUBTASK 72-42-33-220-062 Examine the No. 4 Bearing Seal Support Assembly (01-020) for the Seal Ring Groove Width
Refer to Figure
Repair, VRS3067 TASK 72-42-33-300-002 (REPAIR-002)
Other than (a)
Surface finish of the groove over the surface covered by the 0.090in. (2.286 mm) dimension.
Examine the seal support assembly at location 6 for the surface finish of the seal ring groove front face.
Repair, VRS3067 TASK 72-42-33-300-002 (REPAIR-002)
Other than (a)
Parallelism of the groove at the 0.090 (2.286 mm) dimension.
Examine the seal support assembly at location 6 for the parallelism of the seal ring groove front face.
SUBTASK 72-42-33-220-063 Examine the No. 4 Bearing Seal Support Assembly (01-020) for the Surface Finish and the Parallelism of the Seal Ring Groove Front Face
Refer to Figure
SUBTASK 72-42-33-220-064 Examine the No. 4 Bearing Seal Support Assembly (01-020) for the Surface Finish on the Mating Surfaces of the Boss
Refer to Figure.
Install the seal support assembly into the IAE 2P16547 Holding fixture 1 off.
Repair, VRS3627 TASK 72-42-33-300-017 (REPAIR-017)
NOTE
If the measured diameter in a free condition is not satisfactory, a held condition is permitted. All dimensions apply when surface AB is flat by 0.002 in. (0.05 mm) and diameters AC and AD maintain a clearance envelope of 10.887 in. (276.53 mm) and 6.050 in. (153.67 mm) respectively, in a free or held condition. Hold the support only on the surfaces AB and AE and diameters AC and AD.
Other than (a)
Diameter.
Examine the seal support assembly at location 9 for the piston ring groove land.
SUBTASK 72-42-33-220-065 Examine the No. 4 Bearing Seal Support Assembly (01-020) for the Diameter
Figure: No. 4 Bearing Seal Support Assembly Inspection Locations
No. 4 Bearing Seal Support Assembly Inspection Locations
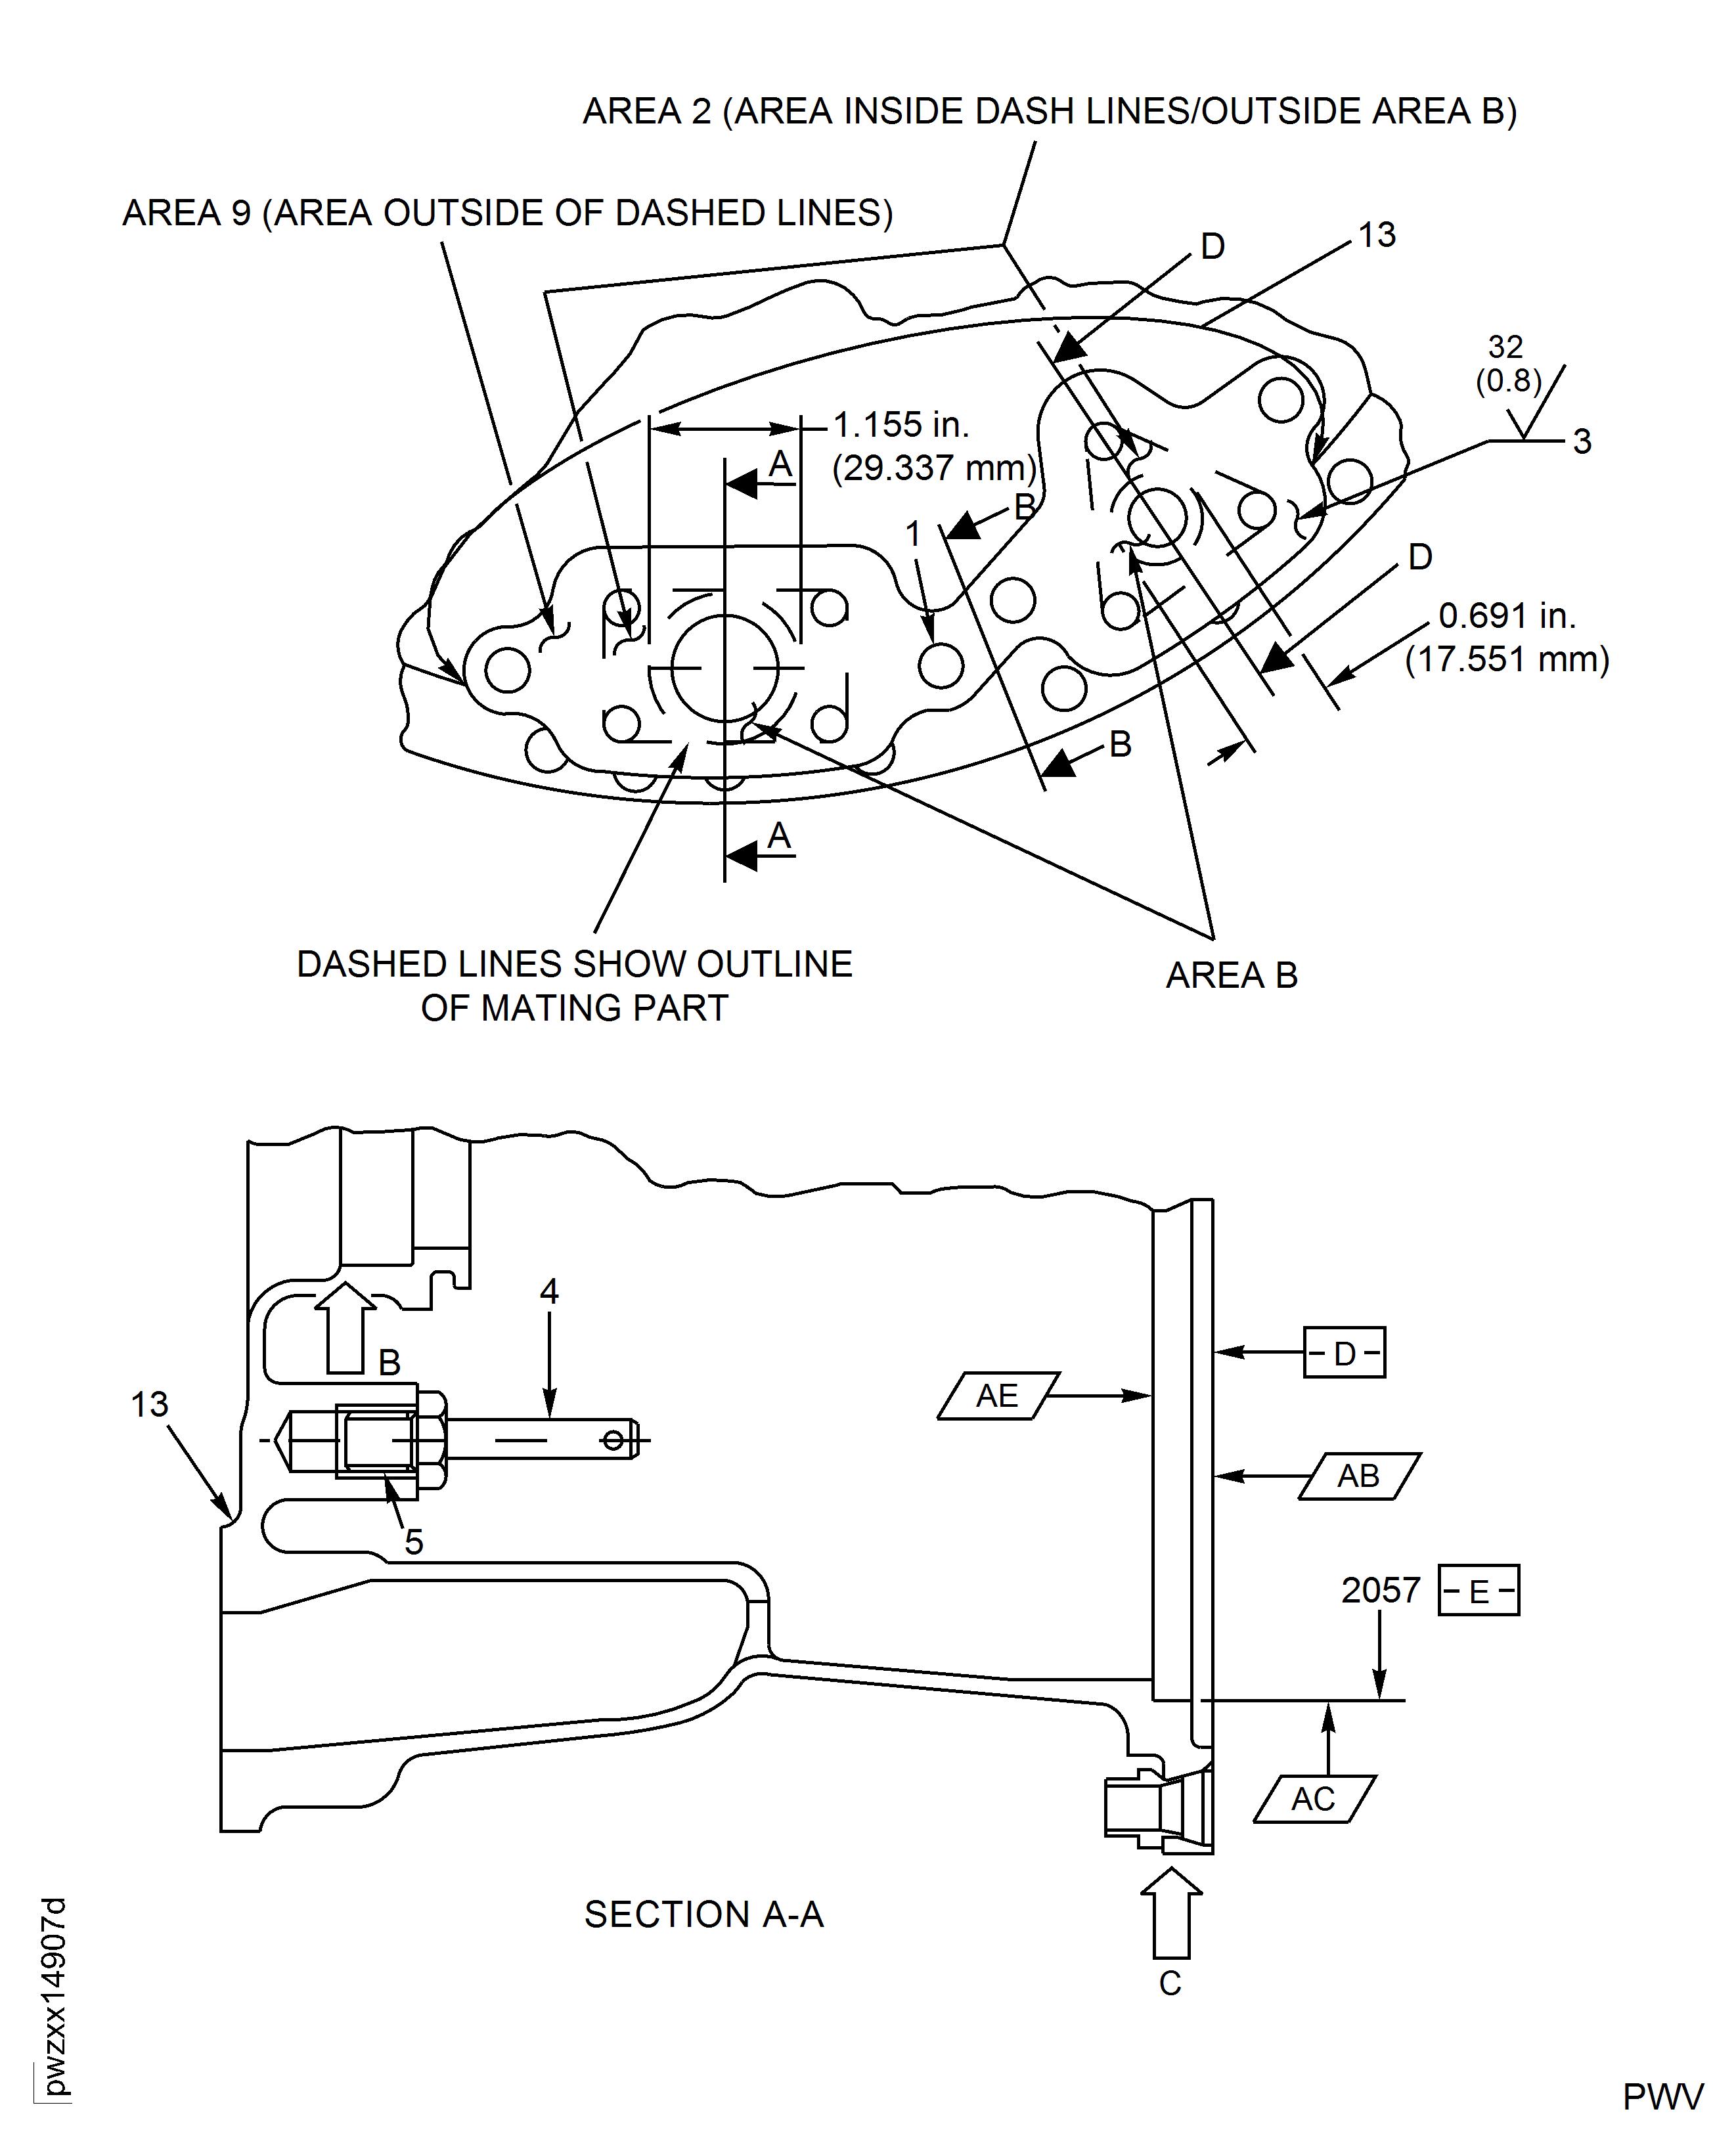
Figure: No. 4 Bearing Seal Support Assembly Inspection Locations
Sheet 2
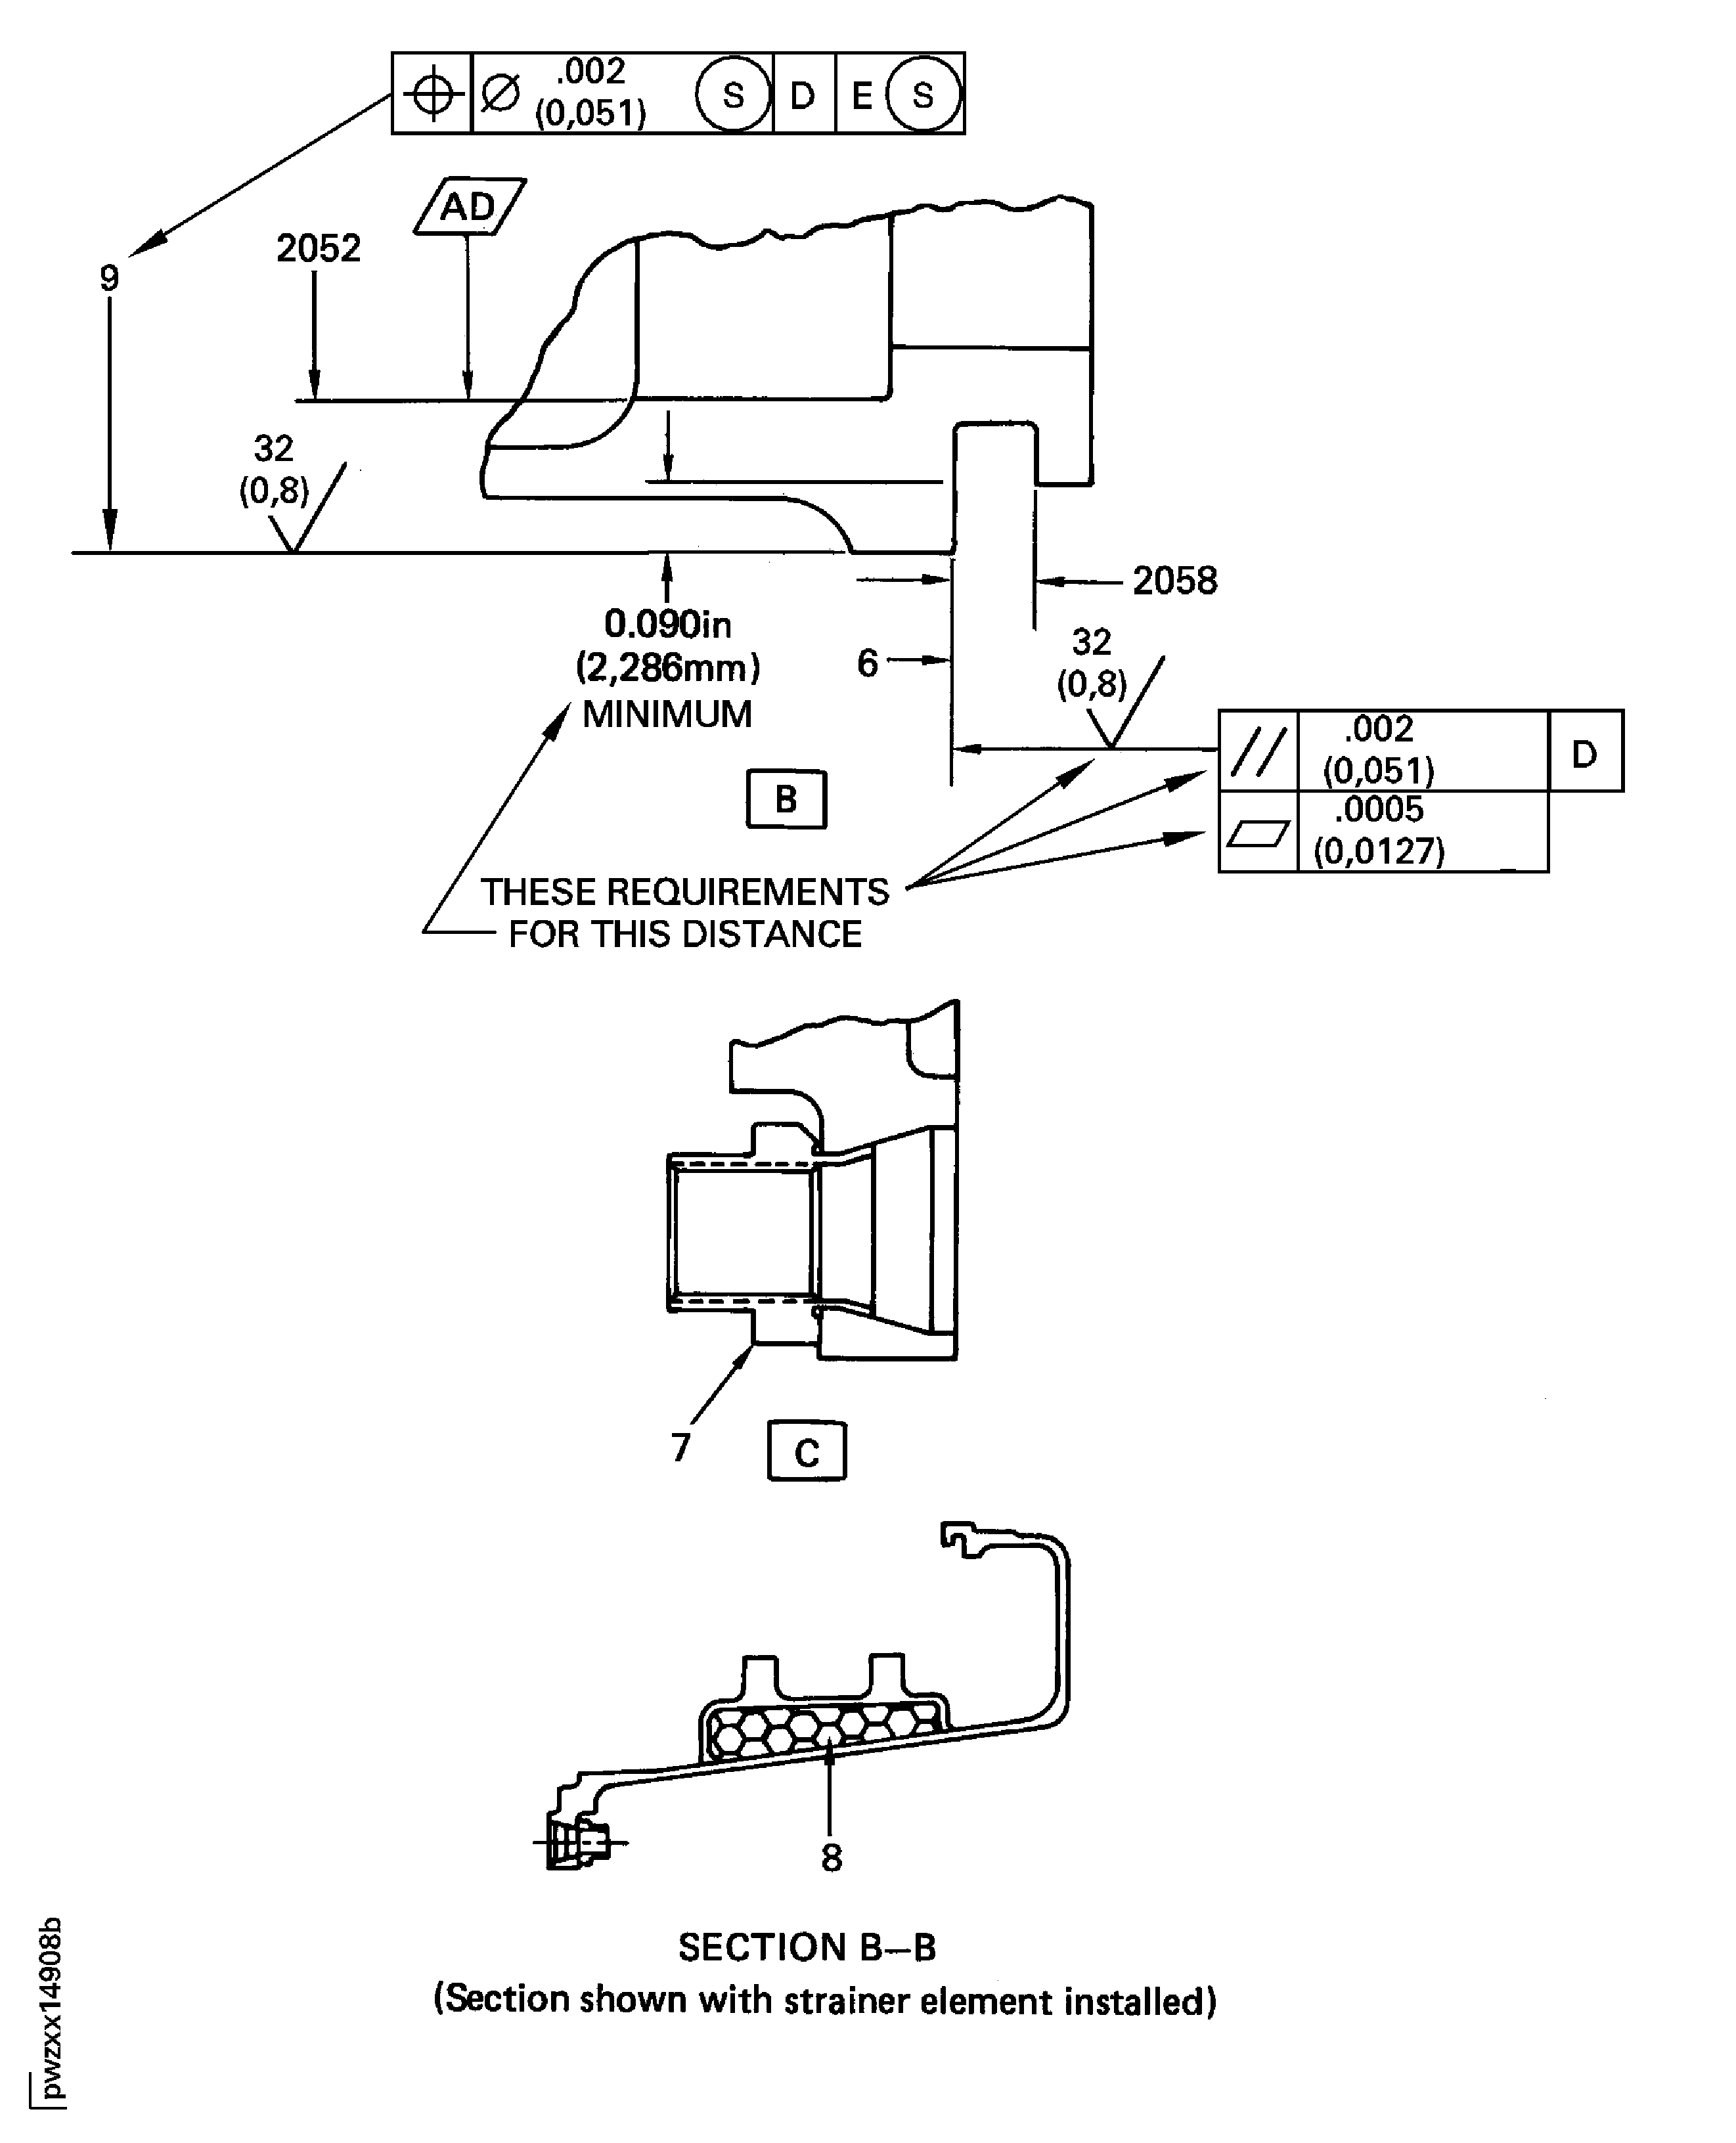
Figure: No. 4 Bearing Seal Support Assembly Inspection Locations
Sheet 3
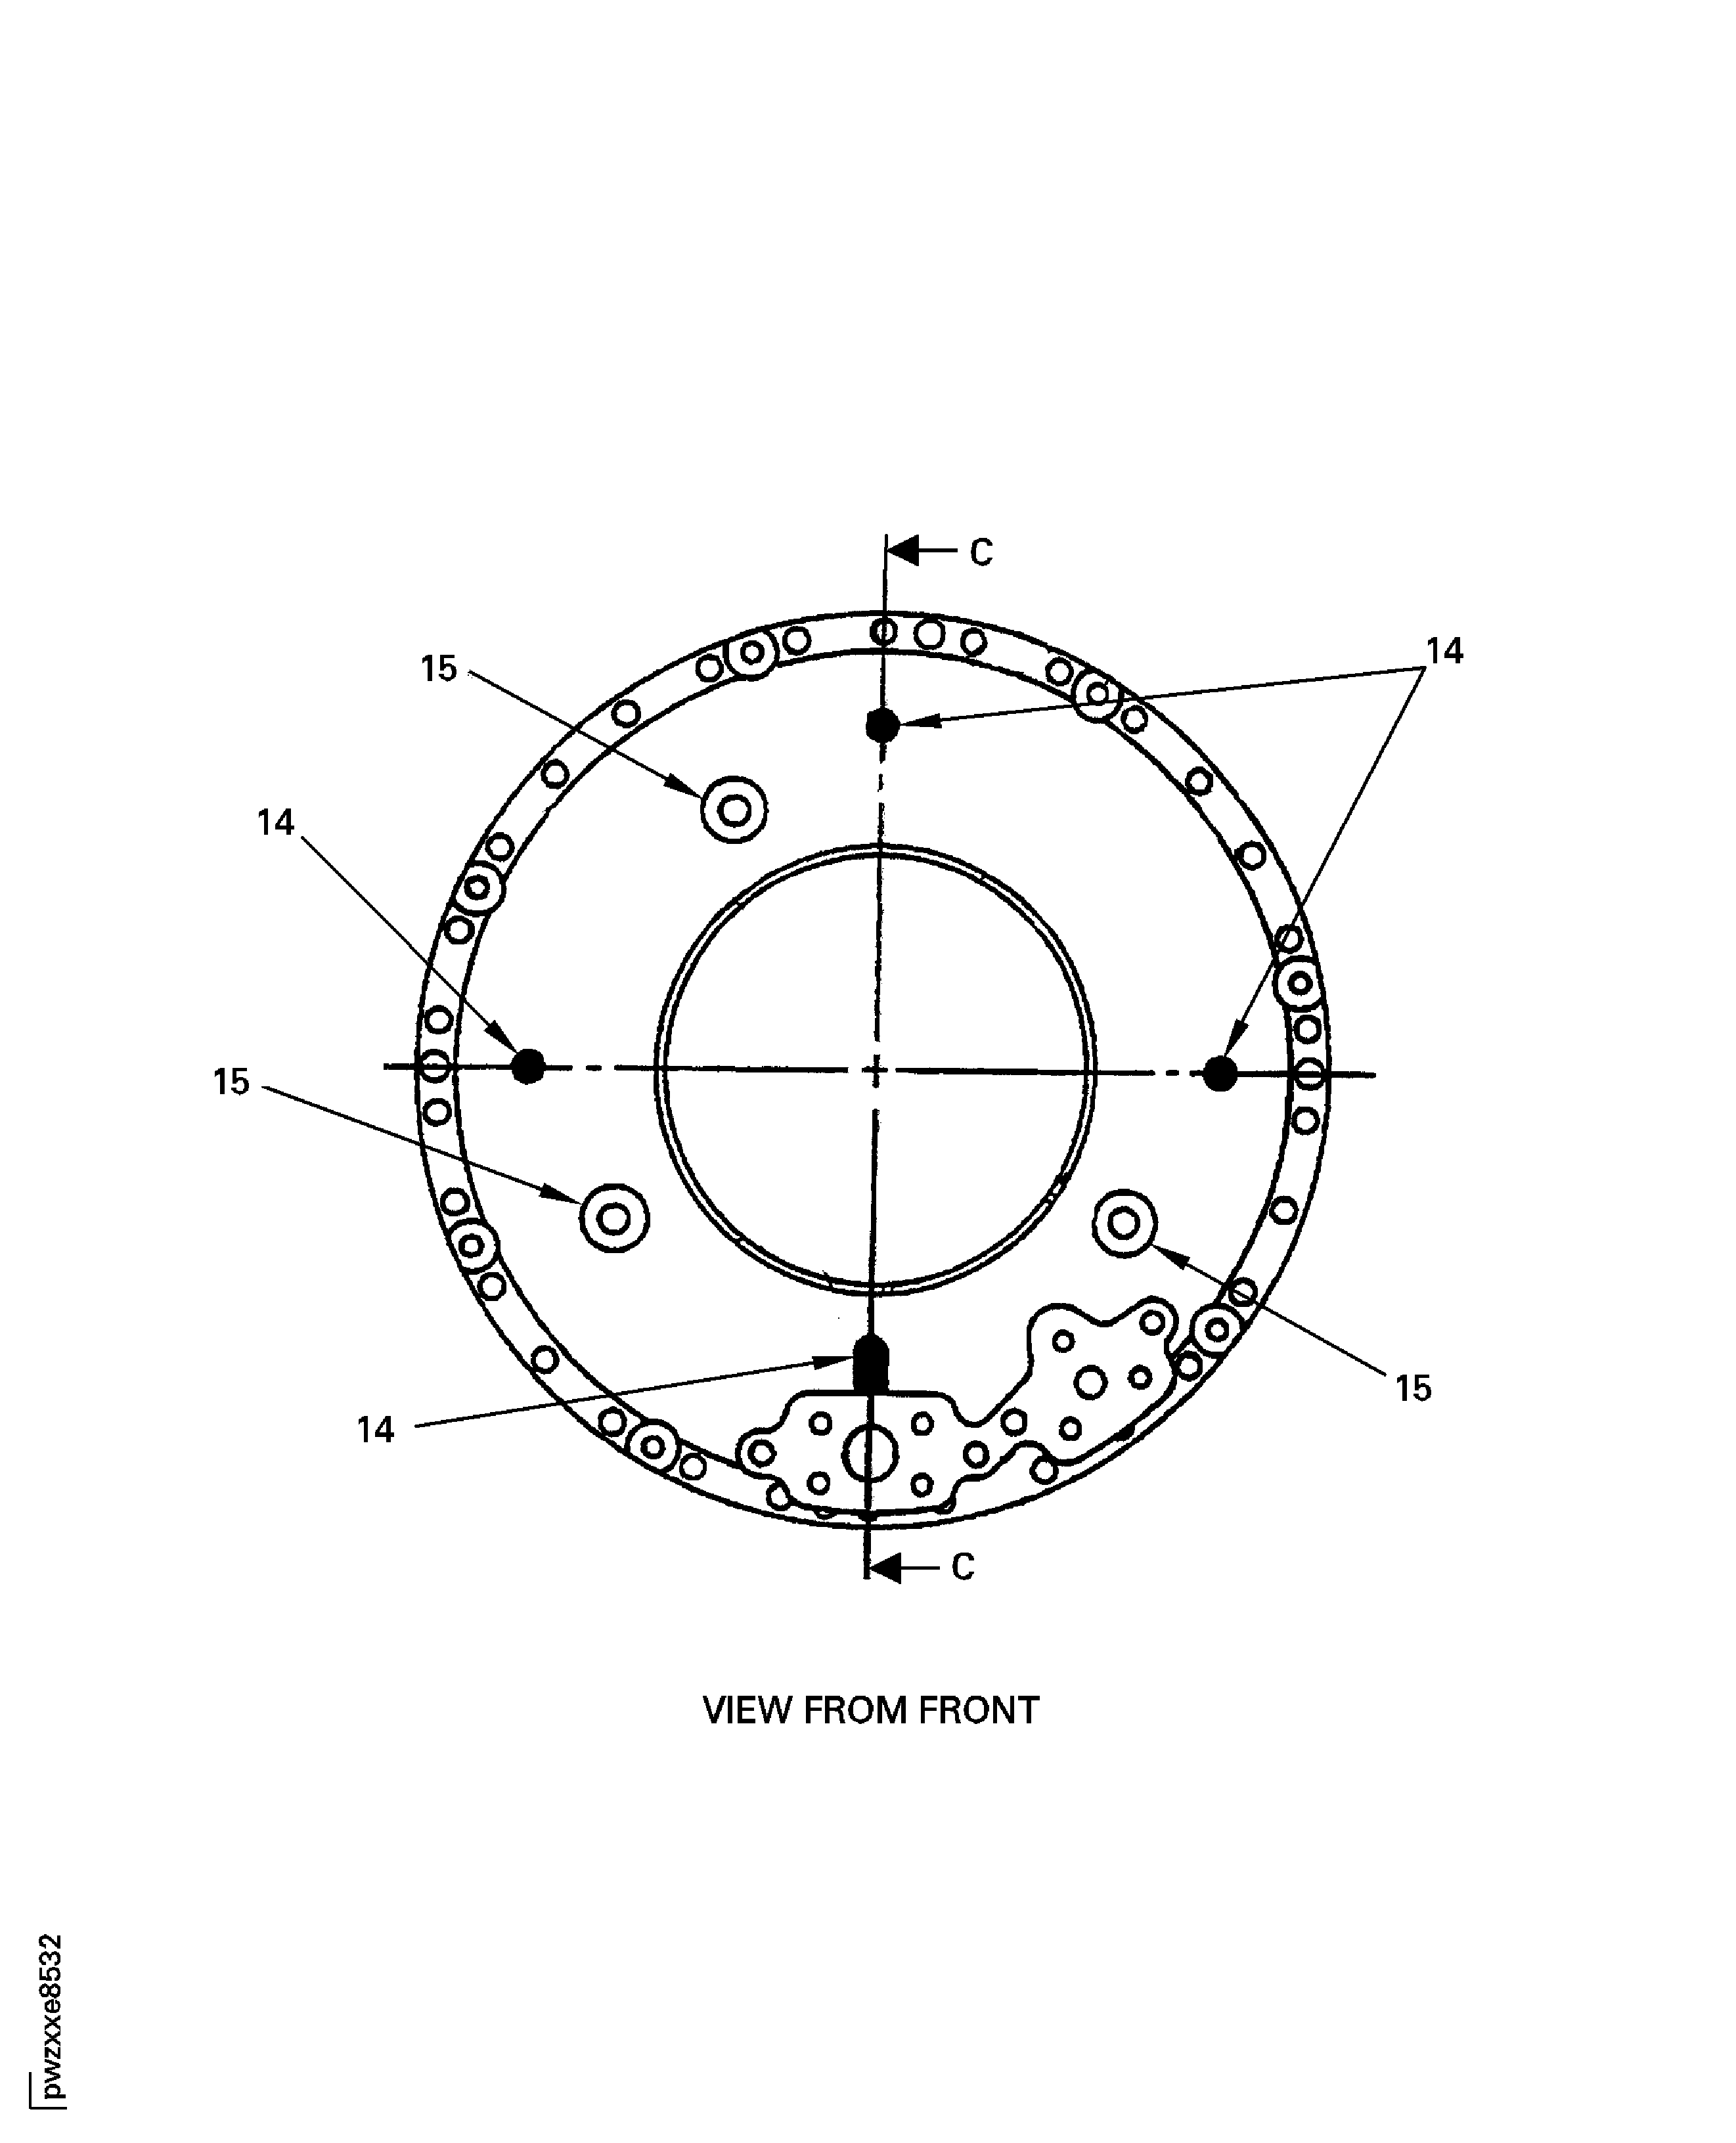
Figure: No. 4 Bearing Seal Support Assembly Inspection Locations
Sheet 4
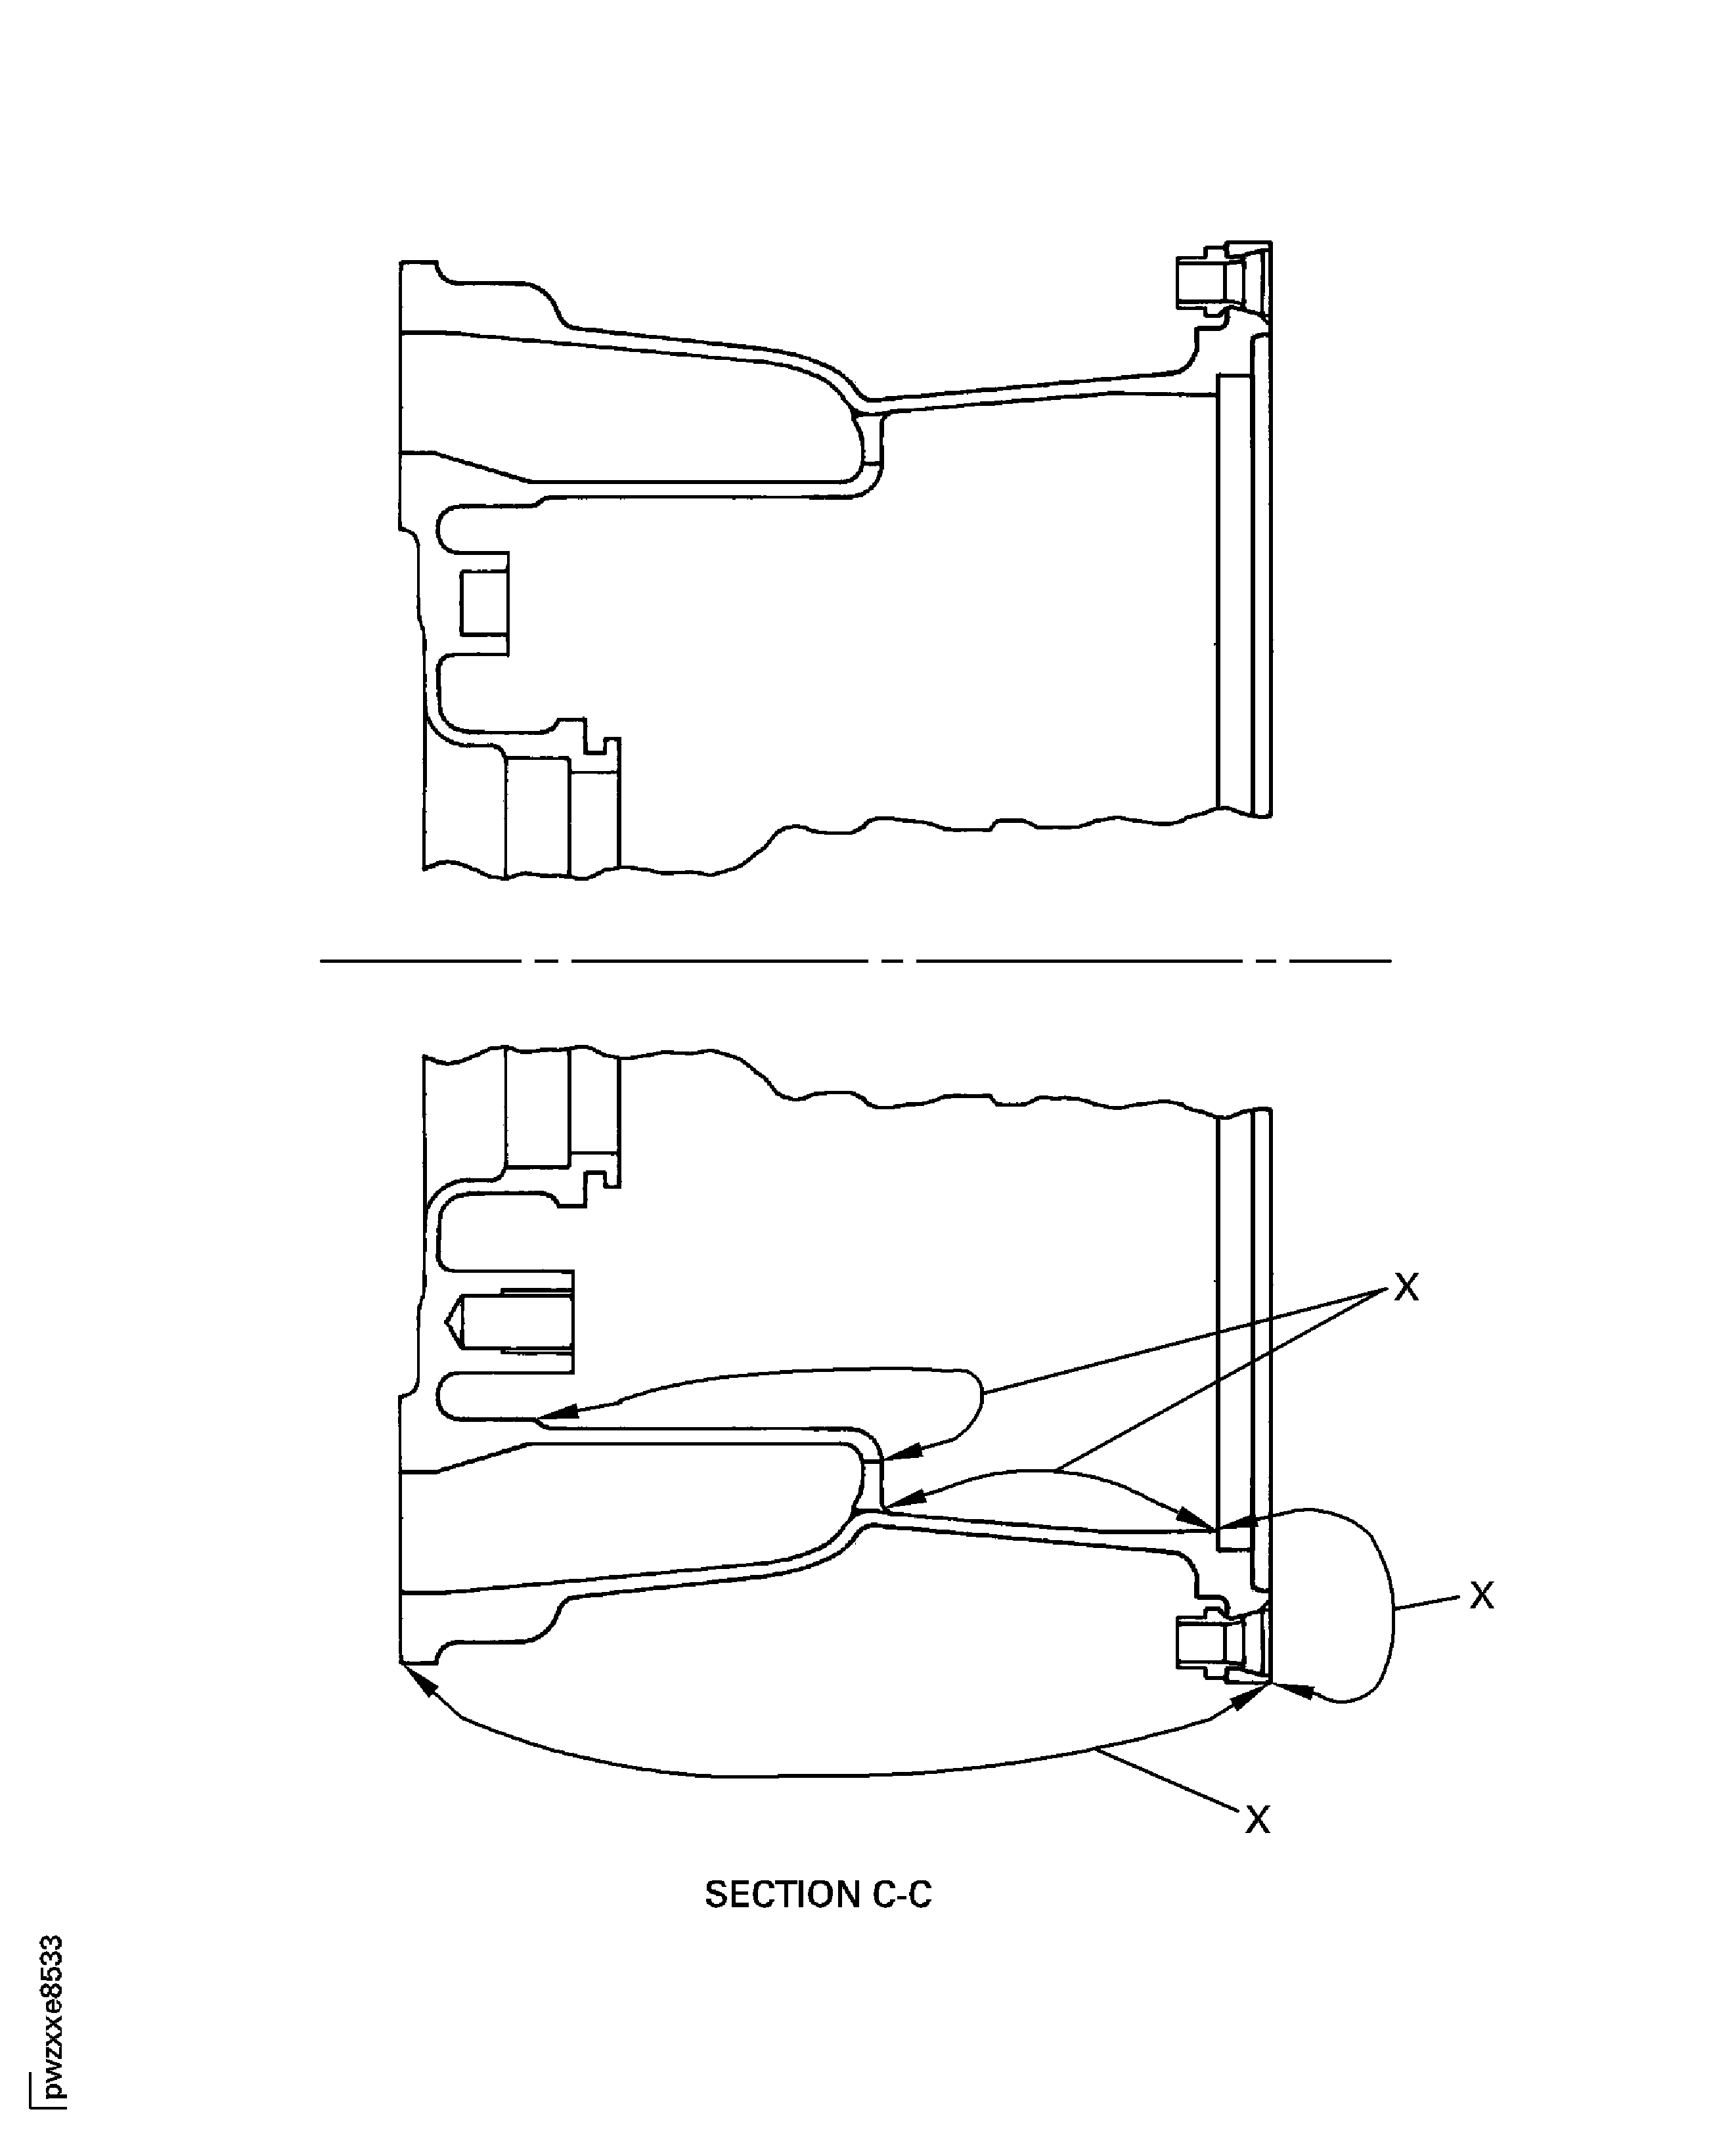
Figure: No.4 Bearing Seal Support Assembly Inspection Locations Only for Post SB 72-0629
No.4 Bearing Seal Support Assembly Inspection Locations Only for Post SB 72-0629
