Export Control
EAR Export Classification: Not subject to the EAR per 15 C.F.R. Chapter 1, Part 734.3(b)(3), except for the following Service Bulletins which are currently published as EAR Export Classification 9E991: SBE70-0992, SBE72-0483, SBE72-0580, SBE72-0588, SBE72-0640, SBE73-0209, SBE80-0024 and SBE80-0025.Copyright
© IAE International Aero Engines AG (2001, 2014 - 2021) The information contained in this document is the property of © IAE International Aero Engines AG and may not be copied or used for any purpose other than that for which it is supplied without the express written authority of © IAE International Aero Engines AG. (This does not preclude use by engine and aircraft operators for normal instructional, maintenance or overhaul purposes.).Applicability
All
Common Information
TASK 72-42-35-200-001 No. 4 Bearing Front Cooling Duct - Examine, Inspection-001
General
This TASK gives the procedure for the inspection of the No. 4 bearing front cooling duct.
Fig/item numbers in parentheses in the procedure agree with those used in the IPC.
The policy that is necessary for inspection is given in the SPM TASK 70-20-00-200-501.
All the parts must be cleaned before any part is examined. Refer to the SPM TASK 70-10-00-100-501.
All parts must be visually examined for damage, corrosion and wear. Any defects that are not identified in the procedure must be referred to IAE.
The procedure for those parts which must have a crack test is given in SUBTASK 72-42-35-230-051. Do the test before the part is visually examined.
A ** following repair referenced in this inspection indicates that the repair is not yet published in the current revision of the manual and the part must be rejected. Contact IAE for additional information concerning FAA approved repair date.
Do not discard any part until you are sure there are no repairs available. Refer to the instructions in Repair before a discarded part is used again or oversize parts are installed.
Parts which should be discarded can be held although no repair is available. The repair of a discarded part could be shown to be necessary at a later date.
All parts must be examined to make sure that all the repairs have been completed satisfactorily.
The practices and processes referred to in the procedure by the TASK numbers are in the SPM.
References
Refer to the SPM for data on these items.
Definitions of Damage, SPM TASK 70-02-02-350-501
Inspection of Parts, SPM TASK 70-20-00-200-501
Some data on these items is contained in this TASK. For more data on there items refer to the SPM.
Method of Testing for Crack Indications
Chemical Processes
Surface Protection
Preliminary Requirements
Pre-Conditions
NONESupport Equipment
NONEConsumables, Materials and Expendables
| Name | Manufacturer | Part Number / Identification | Quantity | Remark |
|---|---|---|---|---|
| CoMat 10-130 ANTIGALLING COMPOUND | 8F024 | CoMat 10-130 |
Spares
NONESafety Requirements
NONEProcedure
Clean the part. Refer to TASK 72-42-35-100-000 (CLEANING-000).
Repair, VRS3300 TASK 72-42-35-300-001 (REPAIR-001)
Cracked
Repair, VRS3648 TASK 72-42-35-300-007 (REPAIR-007)
Cracks in the spacer
Do the test for cracks on the part that is given below. Use the applicable penetrant procedures.
PART IDENT
TASK/SUBTASK
No. 4 bearing front cooling duct
(Dip or spray)
SUBTASK 72-42-35-230-051-001 Examine the No. 4 Bearing Front Cooling Duct (01-010) for Cracks
NOTE
Make sure that the antigalling compound is fully removed from the spacer threads.Repair, VRS3301 TASK 72-42-35-300-002 (REPAIR-002)
Other than (a)
Nicks or dents.
Examine the duct for nicks and dents.
SUBTASK 72-42-35-220-051 Examine the No. 4 Bearing Front Cooling Duct (01-010) for Nicks and Dents
Refer to: Figure
Repair, VRS3302 TASK 72-42-35-300-003 (REPAIR-003)
Damage, minor material pick-up
Repair, VRS3648 TASK 72-42-35-300-007 (REPAIR-007)
Damage more than (1) or severe thread wear
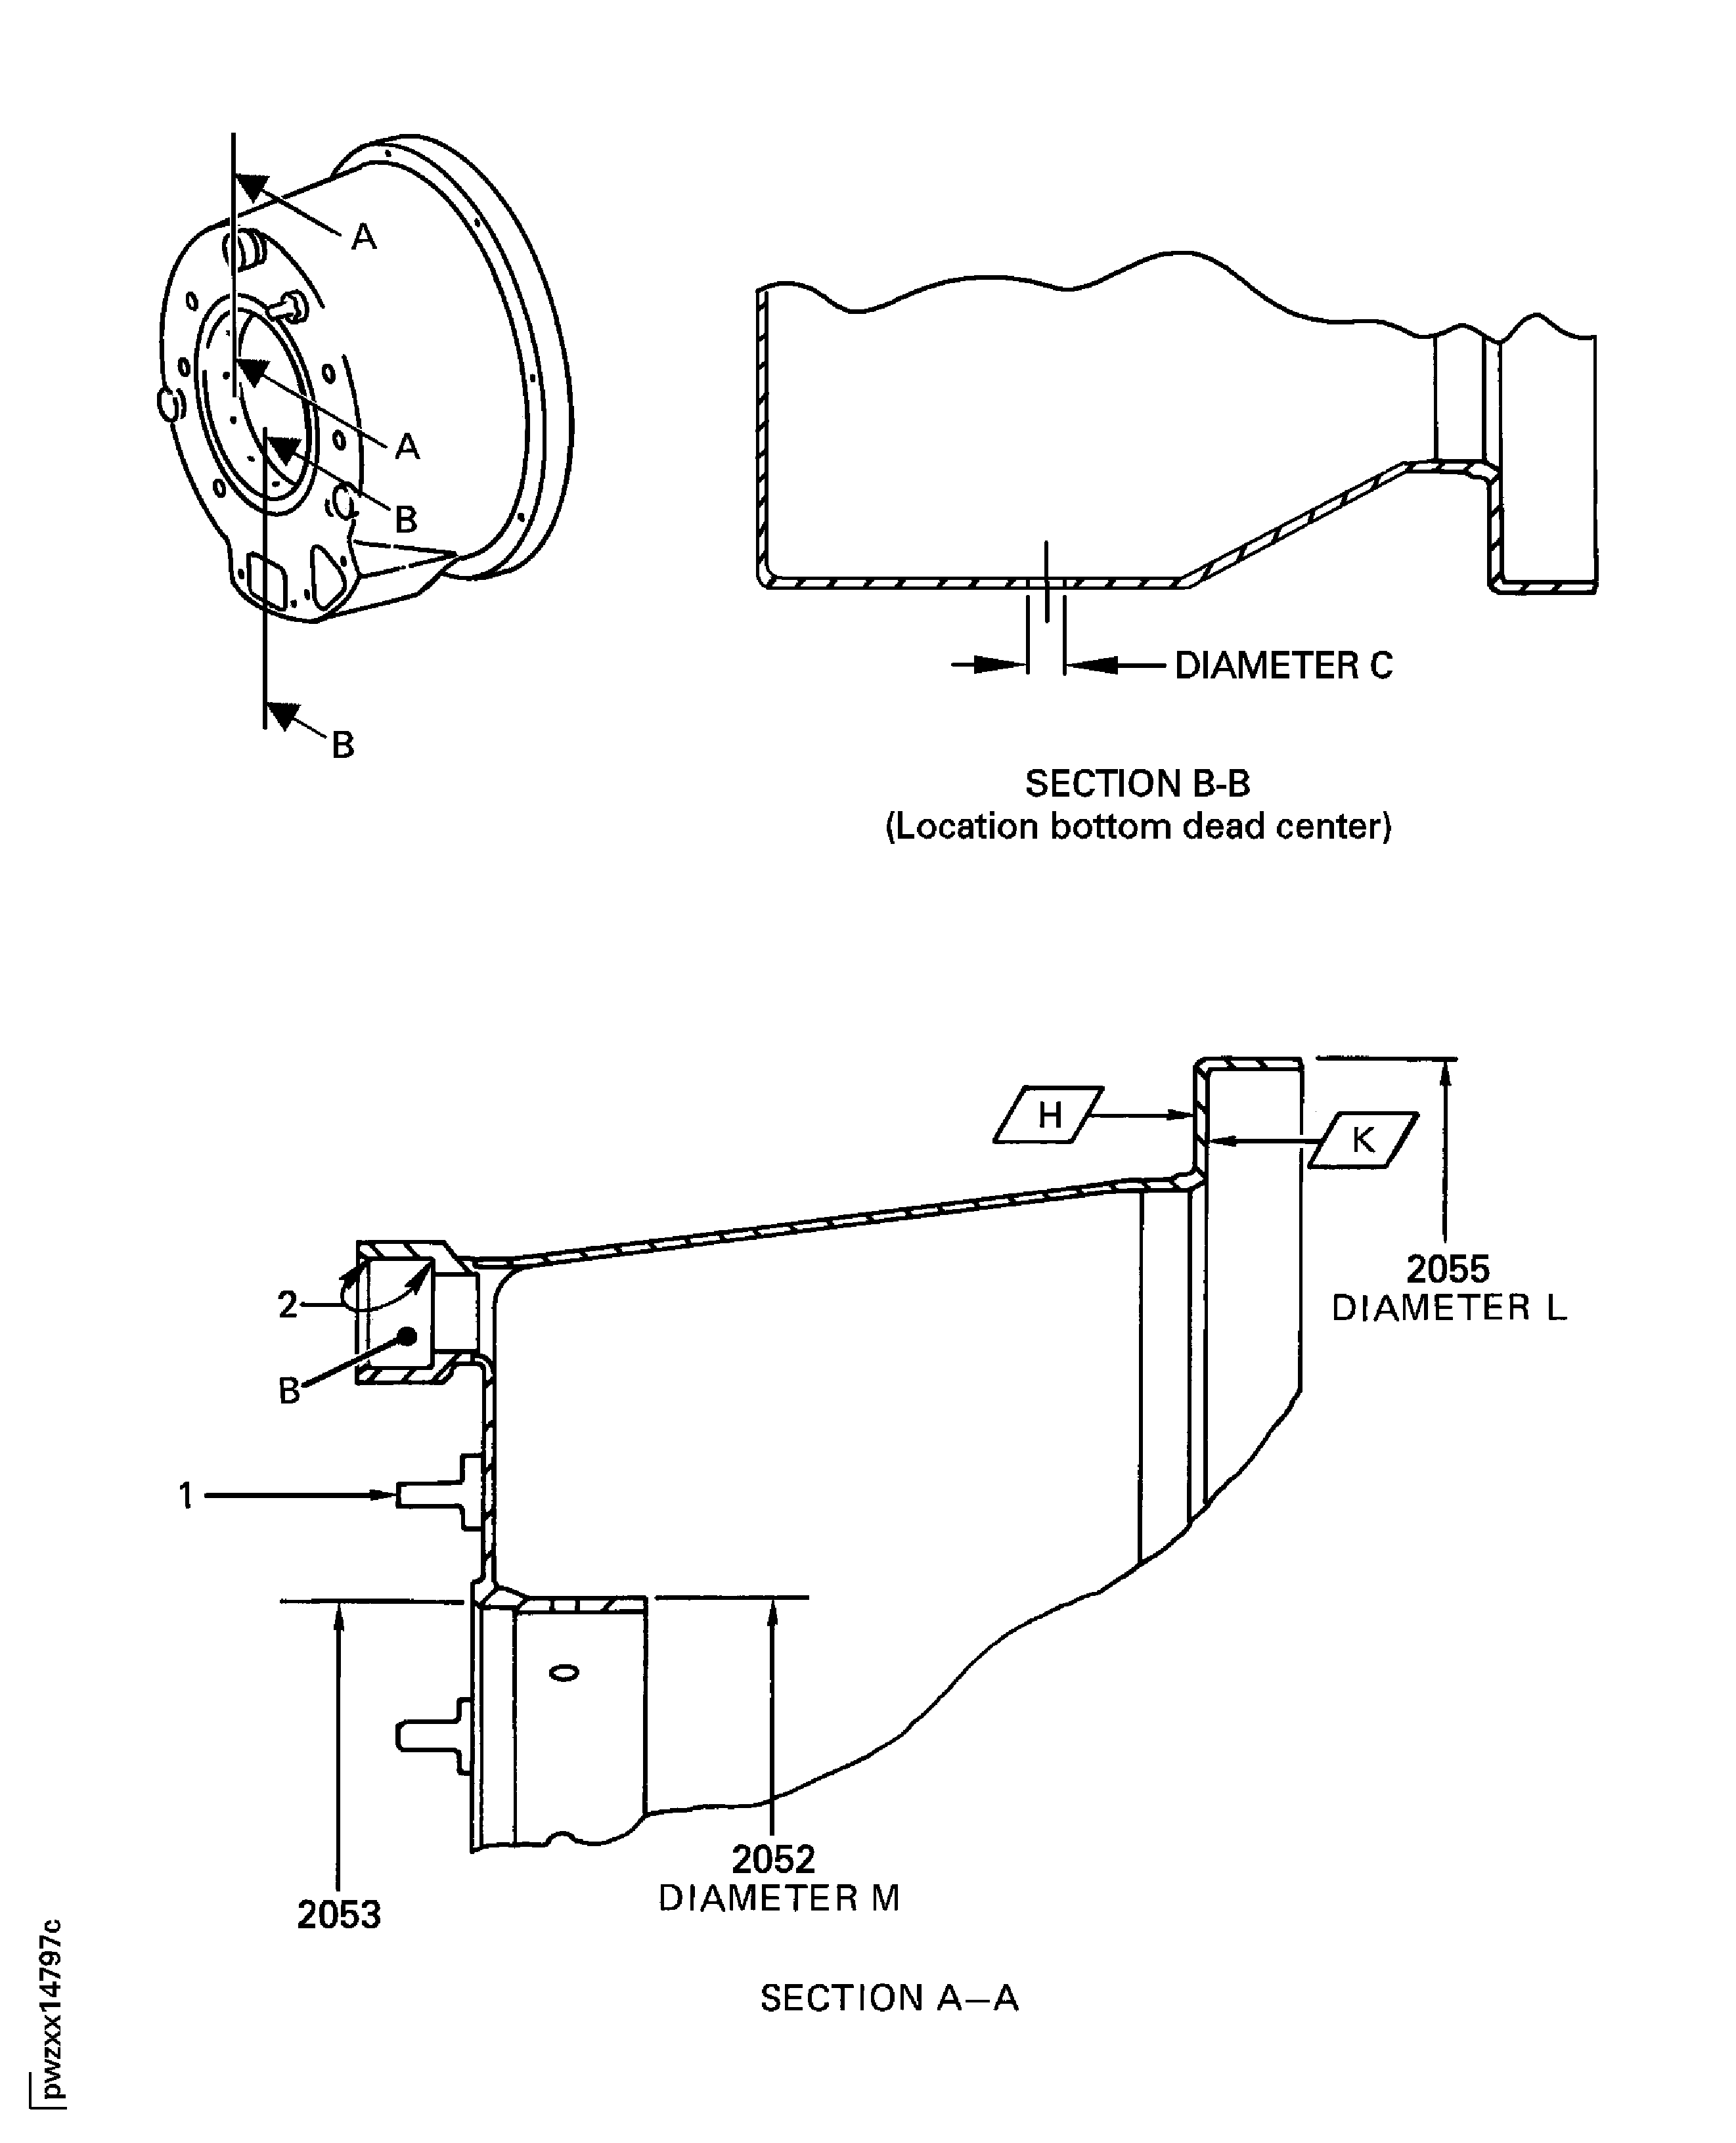
Examine the duct at location 1, for damage on the spacer threads.
SUBTASK 72-42-35-220-052 Examine the No. 4 Bearing Front Cooling Duct (01-010) for Damage on the Spacer Threads
Refer to: Figure
Repair, VRS3301 TASK 72-42-35-300-002 (REPAIR-002)
Other than (1)
Examine the duct at location 2 for wear and galling on the cooling air bosses.
SUBTASK 72-42-35-220-055 Examine the No. 4 Bearing Cooling Duct (01-010) for Wear and Galling on the Cooling Air Bosses
Refer to Figure.
If the dimension is between 12.739 and 12.773 in. (323.57 and 324.43 mm) in a free condition or 12.754 and 12.758 in. (323.95 and 324.05 mm) in a held condition. A minimum of eight measurements is necessary for the free condition. The average of the measurements must be in the held condition limits for free or held conditions
Diameter.
NOTE
It is not necessary to measure the two conditions (free condition and held condition).
Examine the No. 4 bearing front cooling duct at location 2055.
If the dimension is between 6.048 and 6.062 in. (153.62 and 153.98 mm) in a free condition or 6.053 and 6.057 in. (153.75 and 153.85 mm) in a held condition. A minimum of eight measurements is necessary for the free condition. The average of the measurements must be in the held condition limits for free or held conditions
Diameter.
NOTE
It is not necessary to measure the two conditions (free condition and held condition).
Examine the No. 4 bearing front cooling duct at location 2052.
SUBTASK 72-42-35-220-053 Examine the No. 4 Bearing Front Cooling Duct (01-010) for the Rear and Front Flange Outside Diameters
NOTE
The diameters can be measured in a free or a held condition. All dimensions apply when Surface K is flat by 0.002 in. (0.05 mm), Diameter L maintains a clearance envelope of 12.759 in. (324.08 mm) diameter, and Diameter M maintains a clearance envelope of 6.059 in. (153.90 mm) diameter in a free or held condition. Hold the duct only on Surfaces K and H and Diameters L and M.Refer to: Figure
SUBTASK 72-42-35-220-054 Examine the No. 4 Bearing Front Cooling Duct (01-010) for the Front Inside Diameter
Refer to Figure.
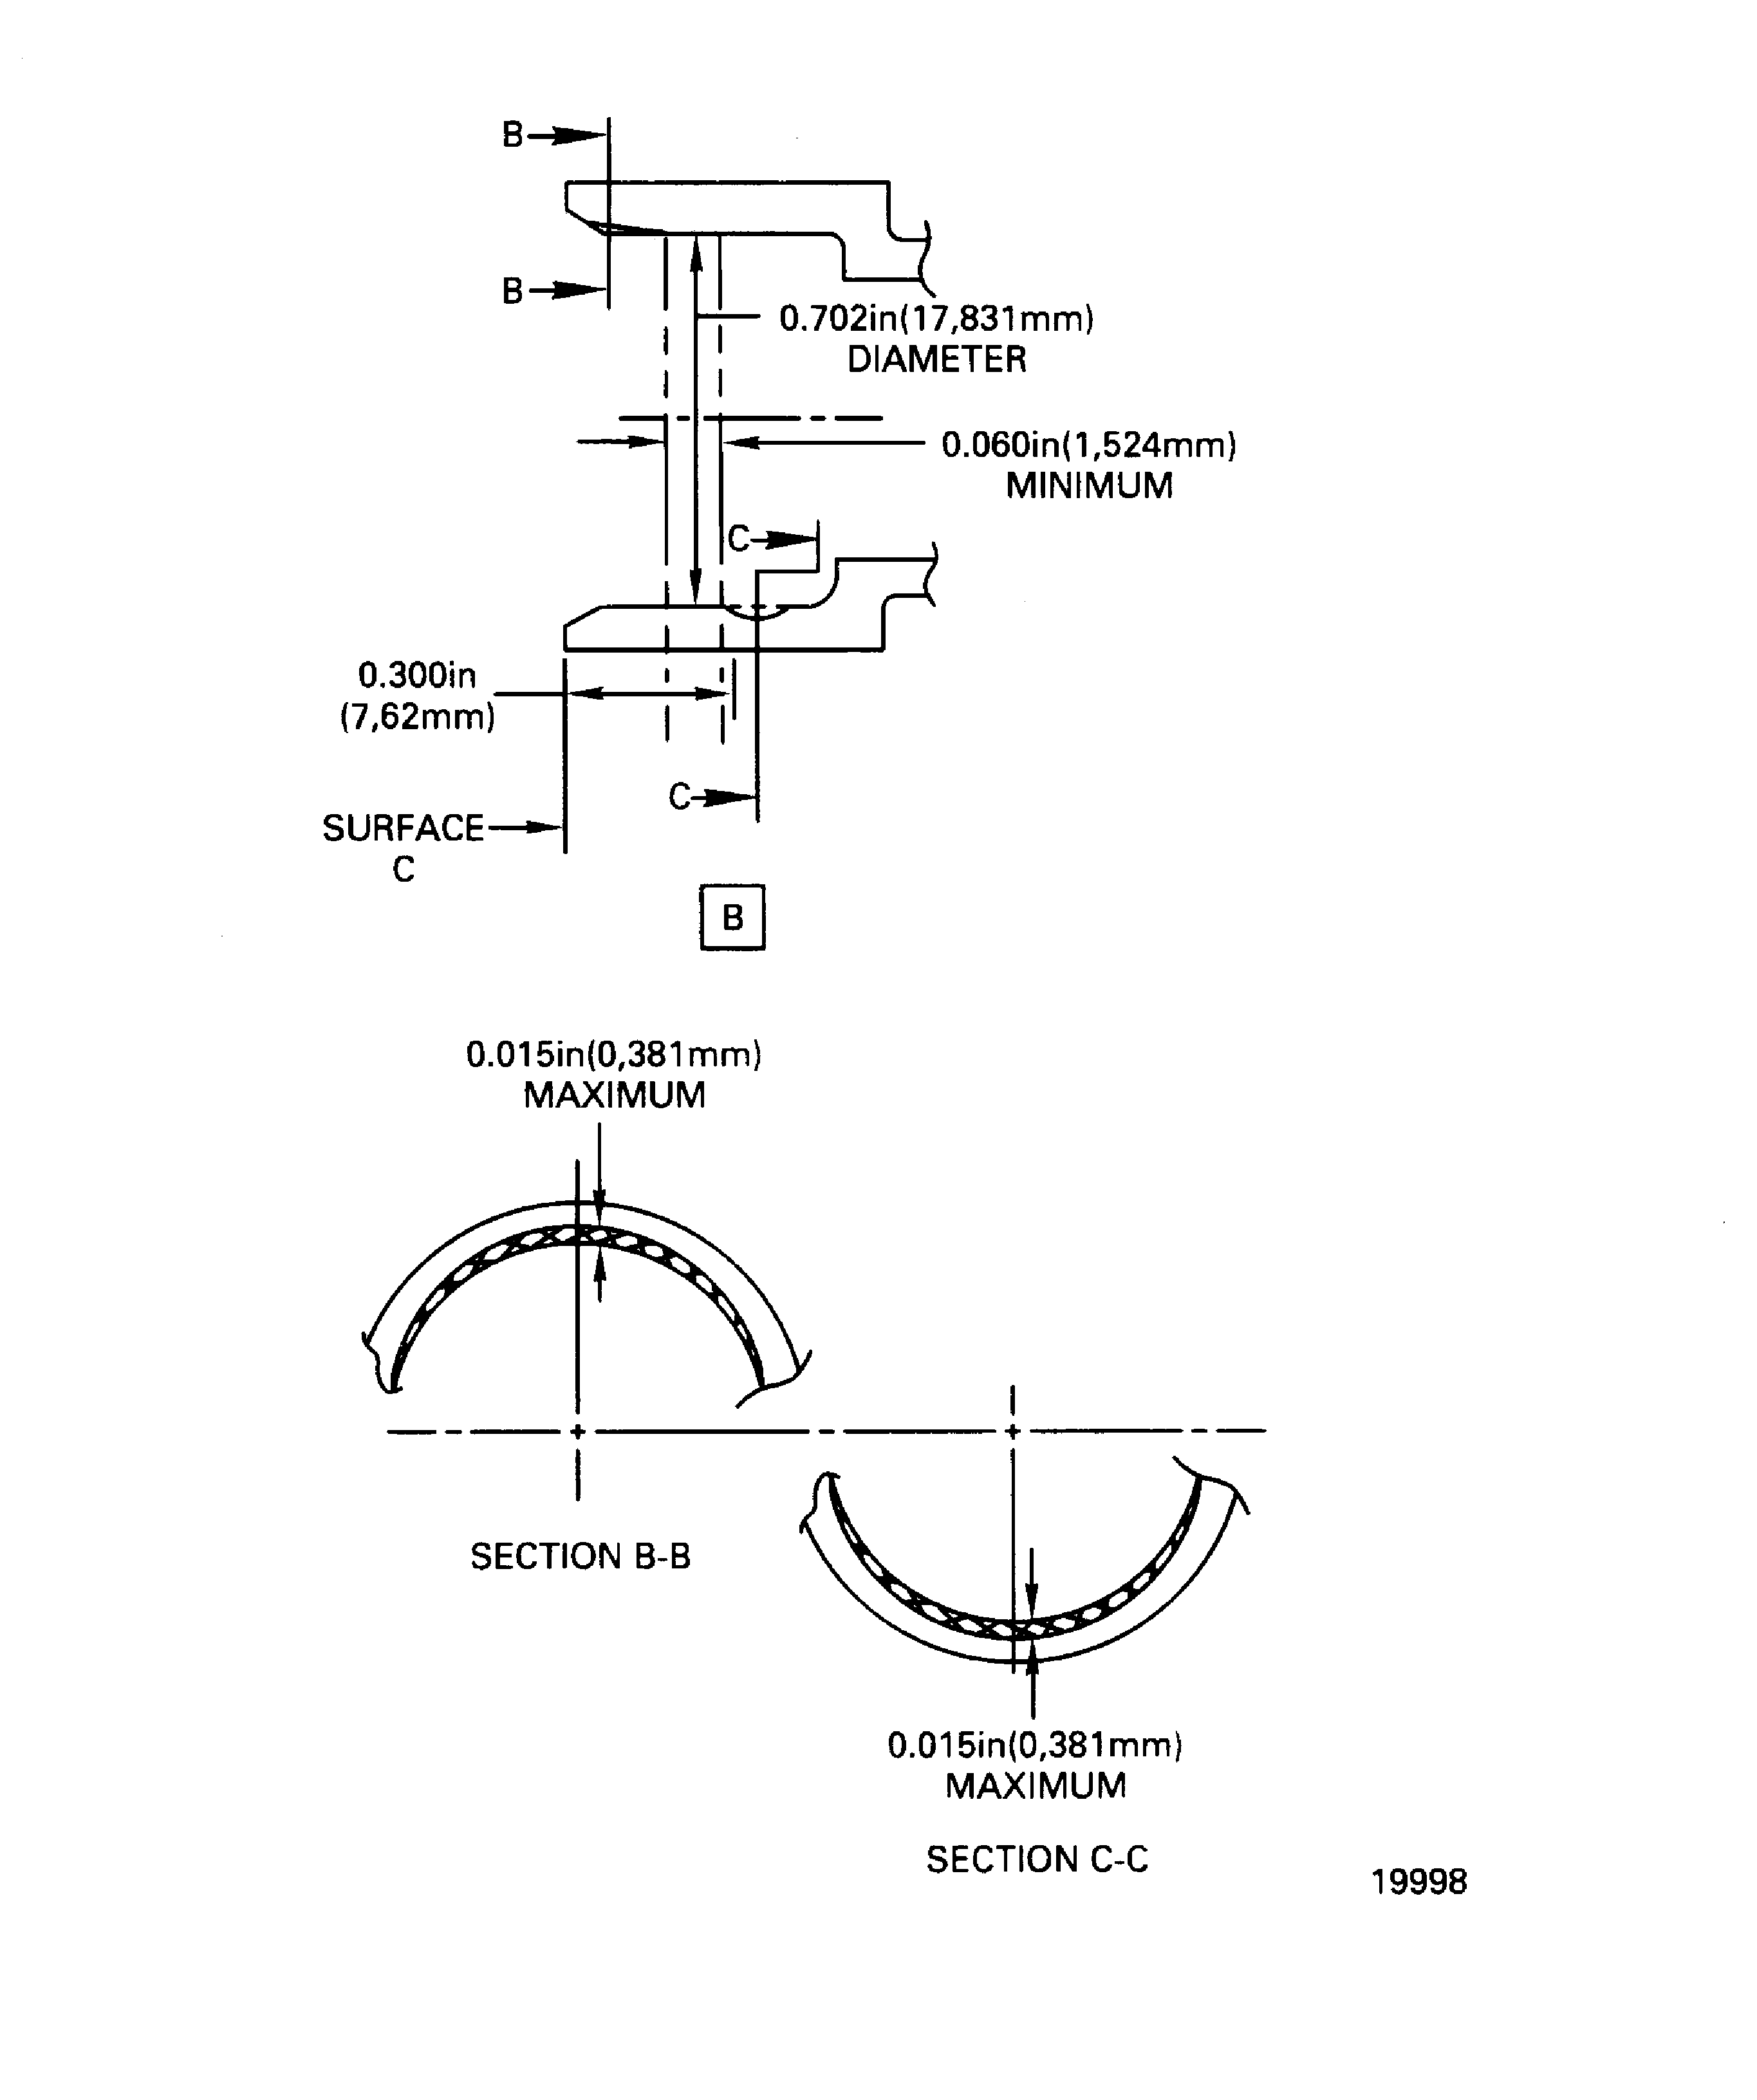
SUBTASK 72-42-35-220-061 Examine the No. 4 Bearing Front Cooling Duct (01-010) Oil Drain Hole
Refer to Figure.
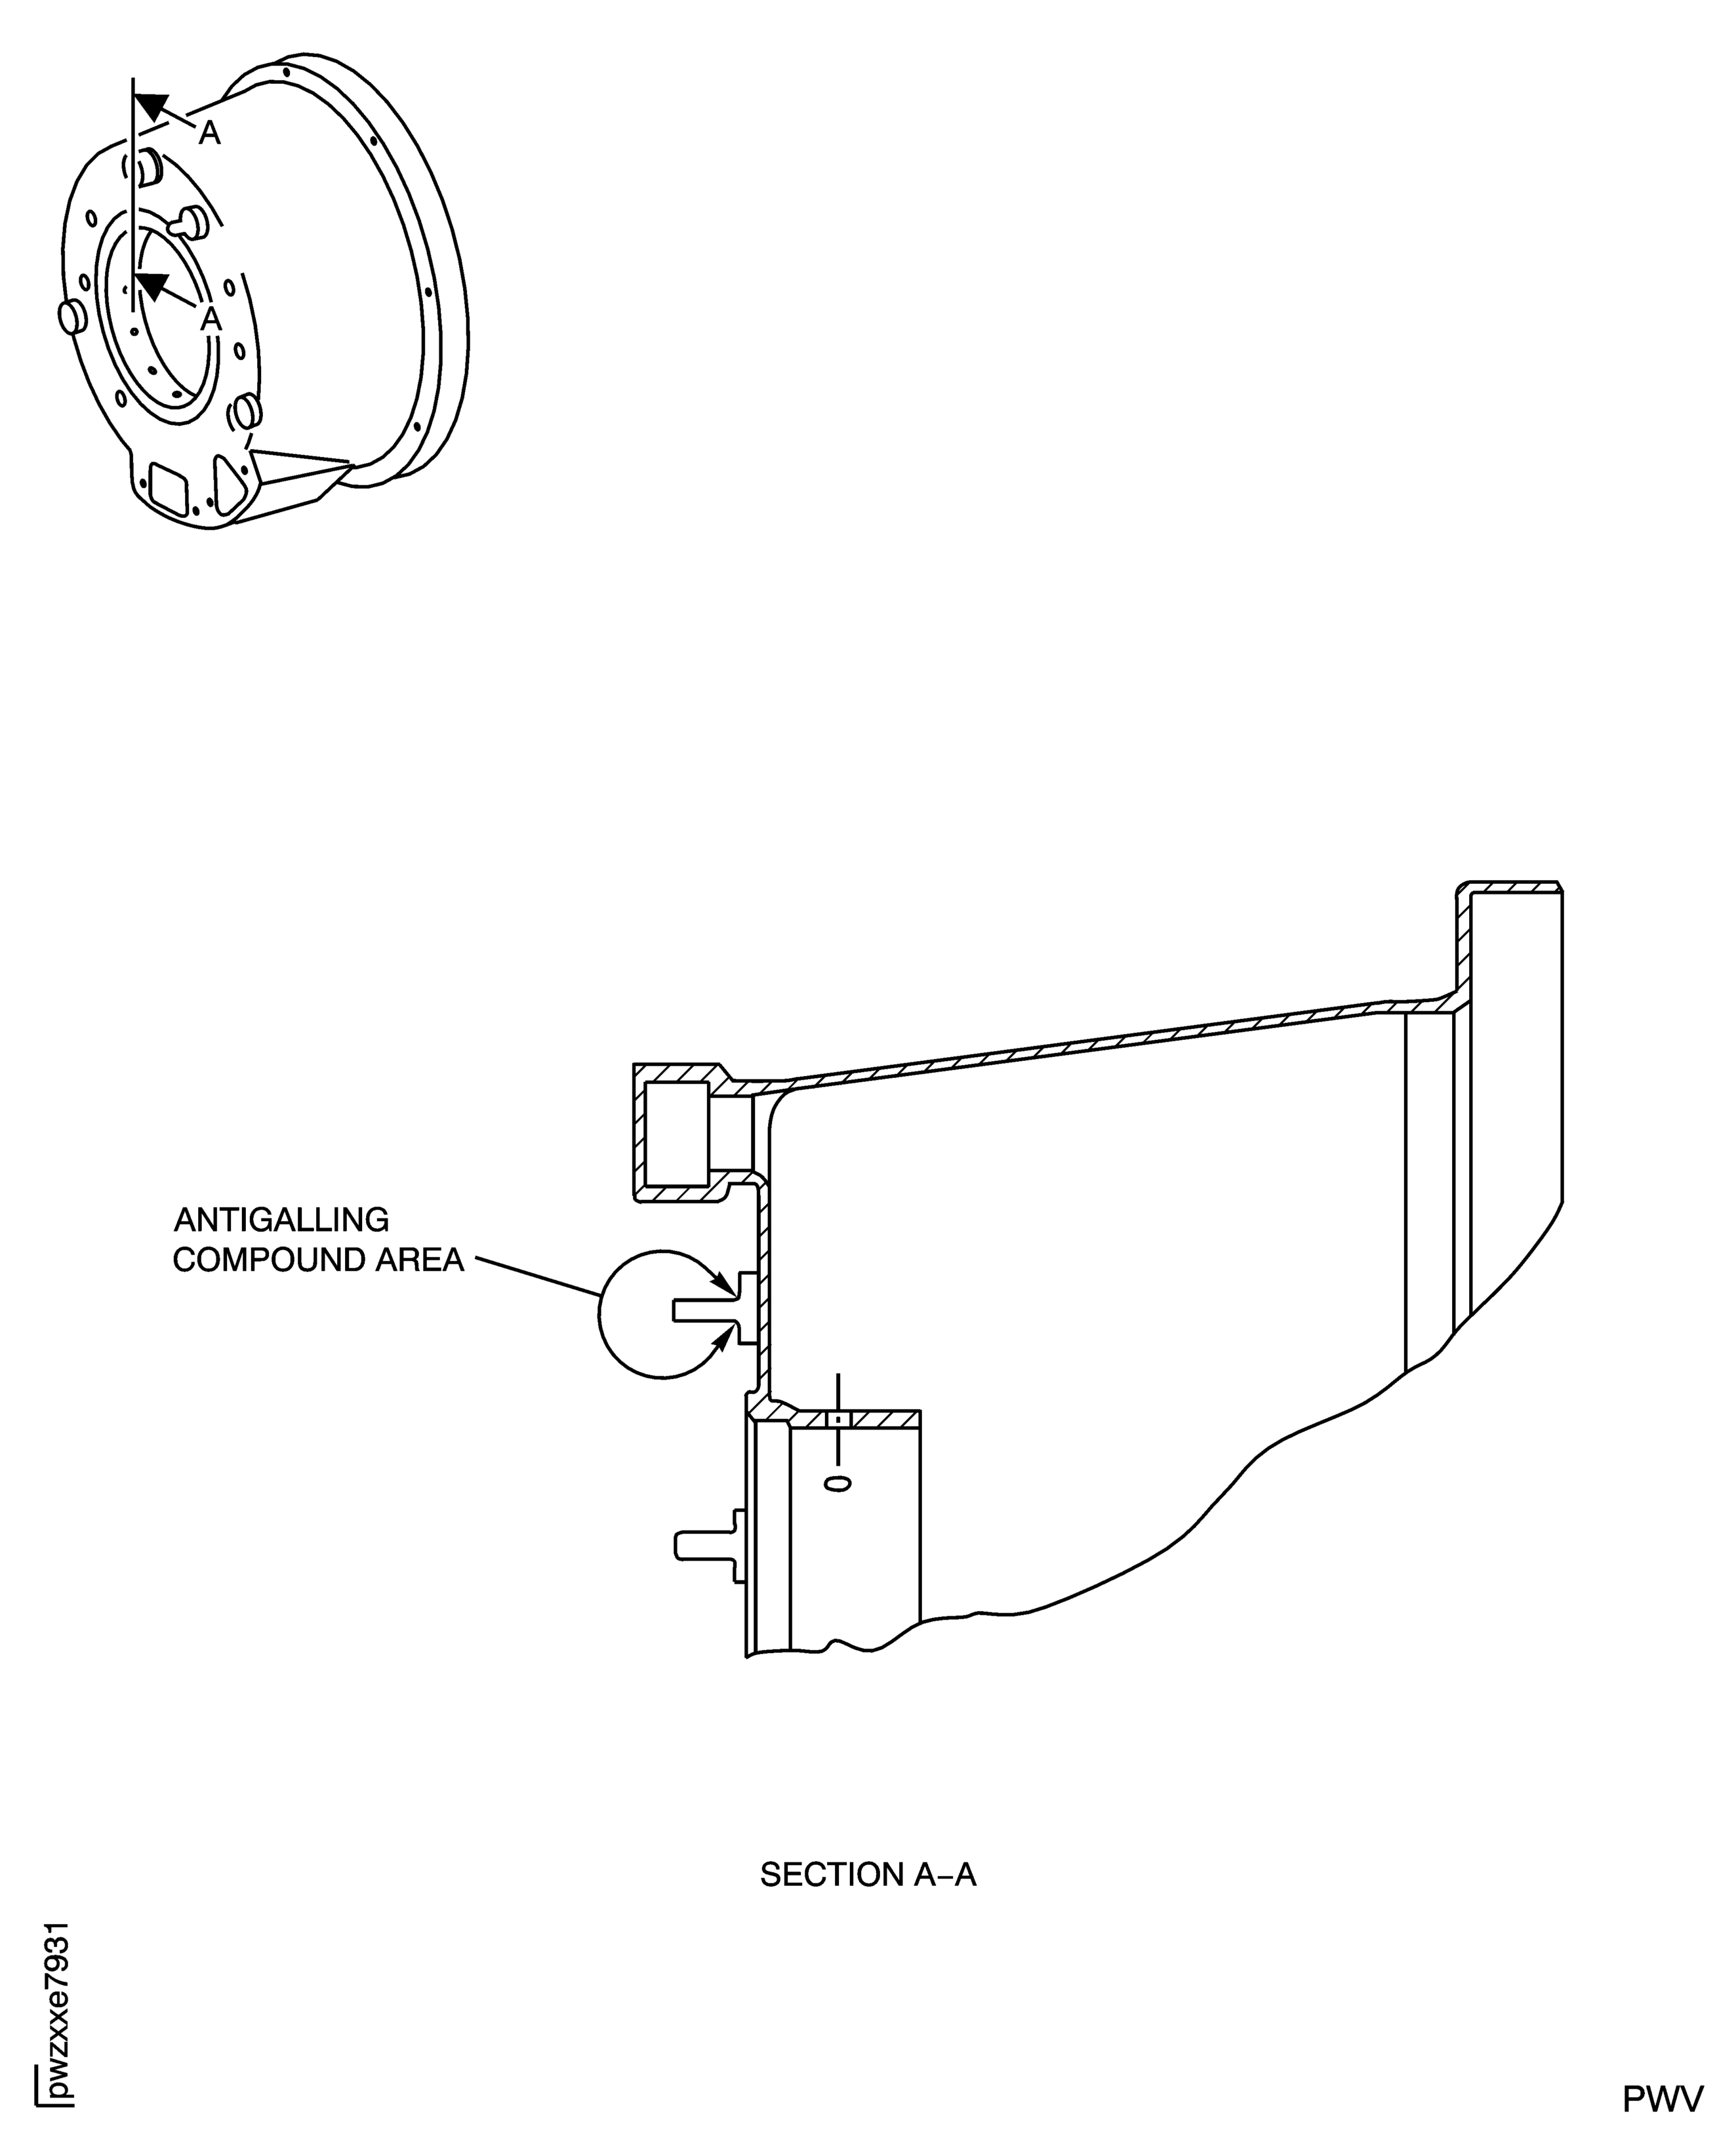
Refer to the SPM TASK 70-38-39-380-501. Use CoMat 10-130 ANTIGALLING COMPOUND
Apply antigalling compound on the spacer threads
SUBTASK 72-42-35-380-001 Apply Antigalling Compound on the Spacer Threads

CAUTION
YOU MUST DO THIS SUBTASK AFTER YOU COMPLETE ALL THE INSPECTIONS AND APPLICABLE REPAIRS AND BEFORE YOU INSTALL THE PART INTO THE ENGINE.
Figure: No. 4 Bearing Cooling Duct Inspection Locations
Sheet 1

Figure: No. 4 Bearing Cooling Duct Inspection Locations
Sheet 2

Figure: No. 4 Bearing Cooling Duct Inspection Locations
Sheet 3

