Export Control
EAR Export Classification: Not subject to the EAR per 15 C.F.R. Chapter 1, Part 734.3(b)(3), except for the following Service Bulletins which are currently published as EAR Export Classification 9E991: SBE70-0992, SBE72-0483, SBE72-0580, SBE72-0588, SBE72-0640, SBE73-0209, SBE80-0024 and SBE80-0025.Copyright
© IAE International Aero Engines AG (2001, 2014 - 2021) The information contained in this document is the property of © IAE International Aero Engines AG and may not be copied or used for any purpose other than that for which it is supplied without the express written authority of © IAE International Aero Engines AG. (This does not preclude use by engine and aircraft operators for normal instructional, maintenance or overhaul purposes.).Applicability
All
Common Information
TASK 72-42-33-200-002 No. 4 Bearing Face Seal - Examine, Inspection-002
General
This TASK gives the procedure for the inspection of the No. 4 bearing face seal.
Fig/item numbers in parentheses in the procedure agree with those used in the IPC.
The policy that is necessary for inspection is given in the SPM TASK 70-20-01-200-501.
All the parts must be cleaned before any part is examined. Refer to the SPM TASK 70-10-00-100-501.
All parts must be visually examined for damage, corrosion and wear. Any defects that are not identified in the procedure must be referred to IAE.
Do not discard any part until you are sure there are no repairs available. Refer to the instructions in Repair before a discarded part is used again or oversize parts are installed.
Parts which should be discarded can be held although no repair is available. The repair of a discarded part could be shown to be necessary at a later date.
All parts must be examined to make sure that all the repairs have been completed satisfactorily.
The practices and processes referred to in the procedure by the TASK numbers are in the SPM.
Repairs VRS3675 and VRS3676 are only applicable to part numbers 2A3499 and 2A3517. All other part numbers must be rejected if either of these repairs are necessary.
References
Refer to the SPM for data on these items.
Definitions of Damage, SPM TASK 70-02-02-350-501
Inspection of Parts, SPM TASK 70-20-01-200-501
Preliminary Requirements
Pre-Conditions
NONESupport Equipment
NONEConsumables, Materials and Expendables
NONESpares
NONESafety Requirements
NONEProcedure
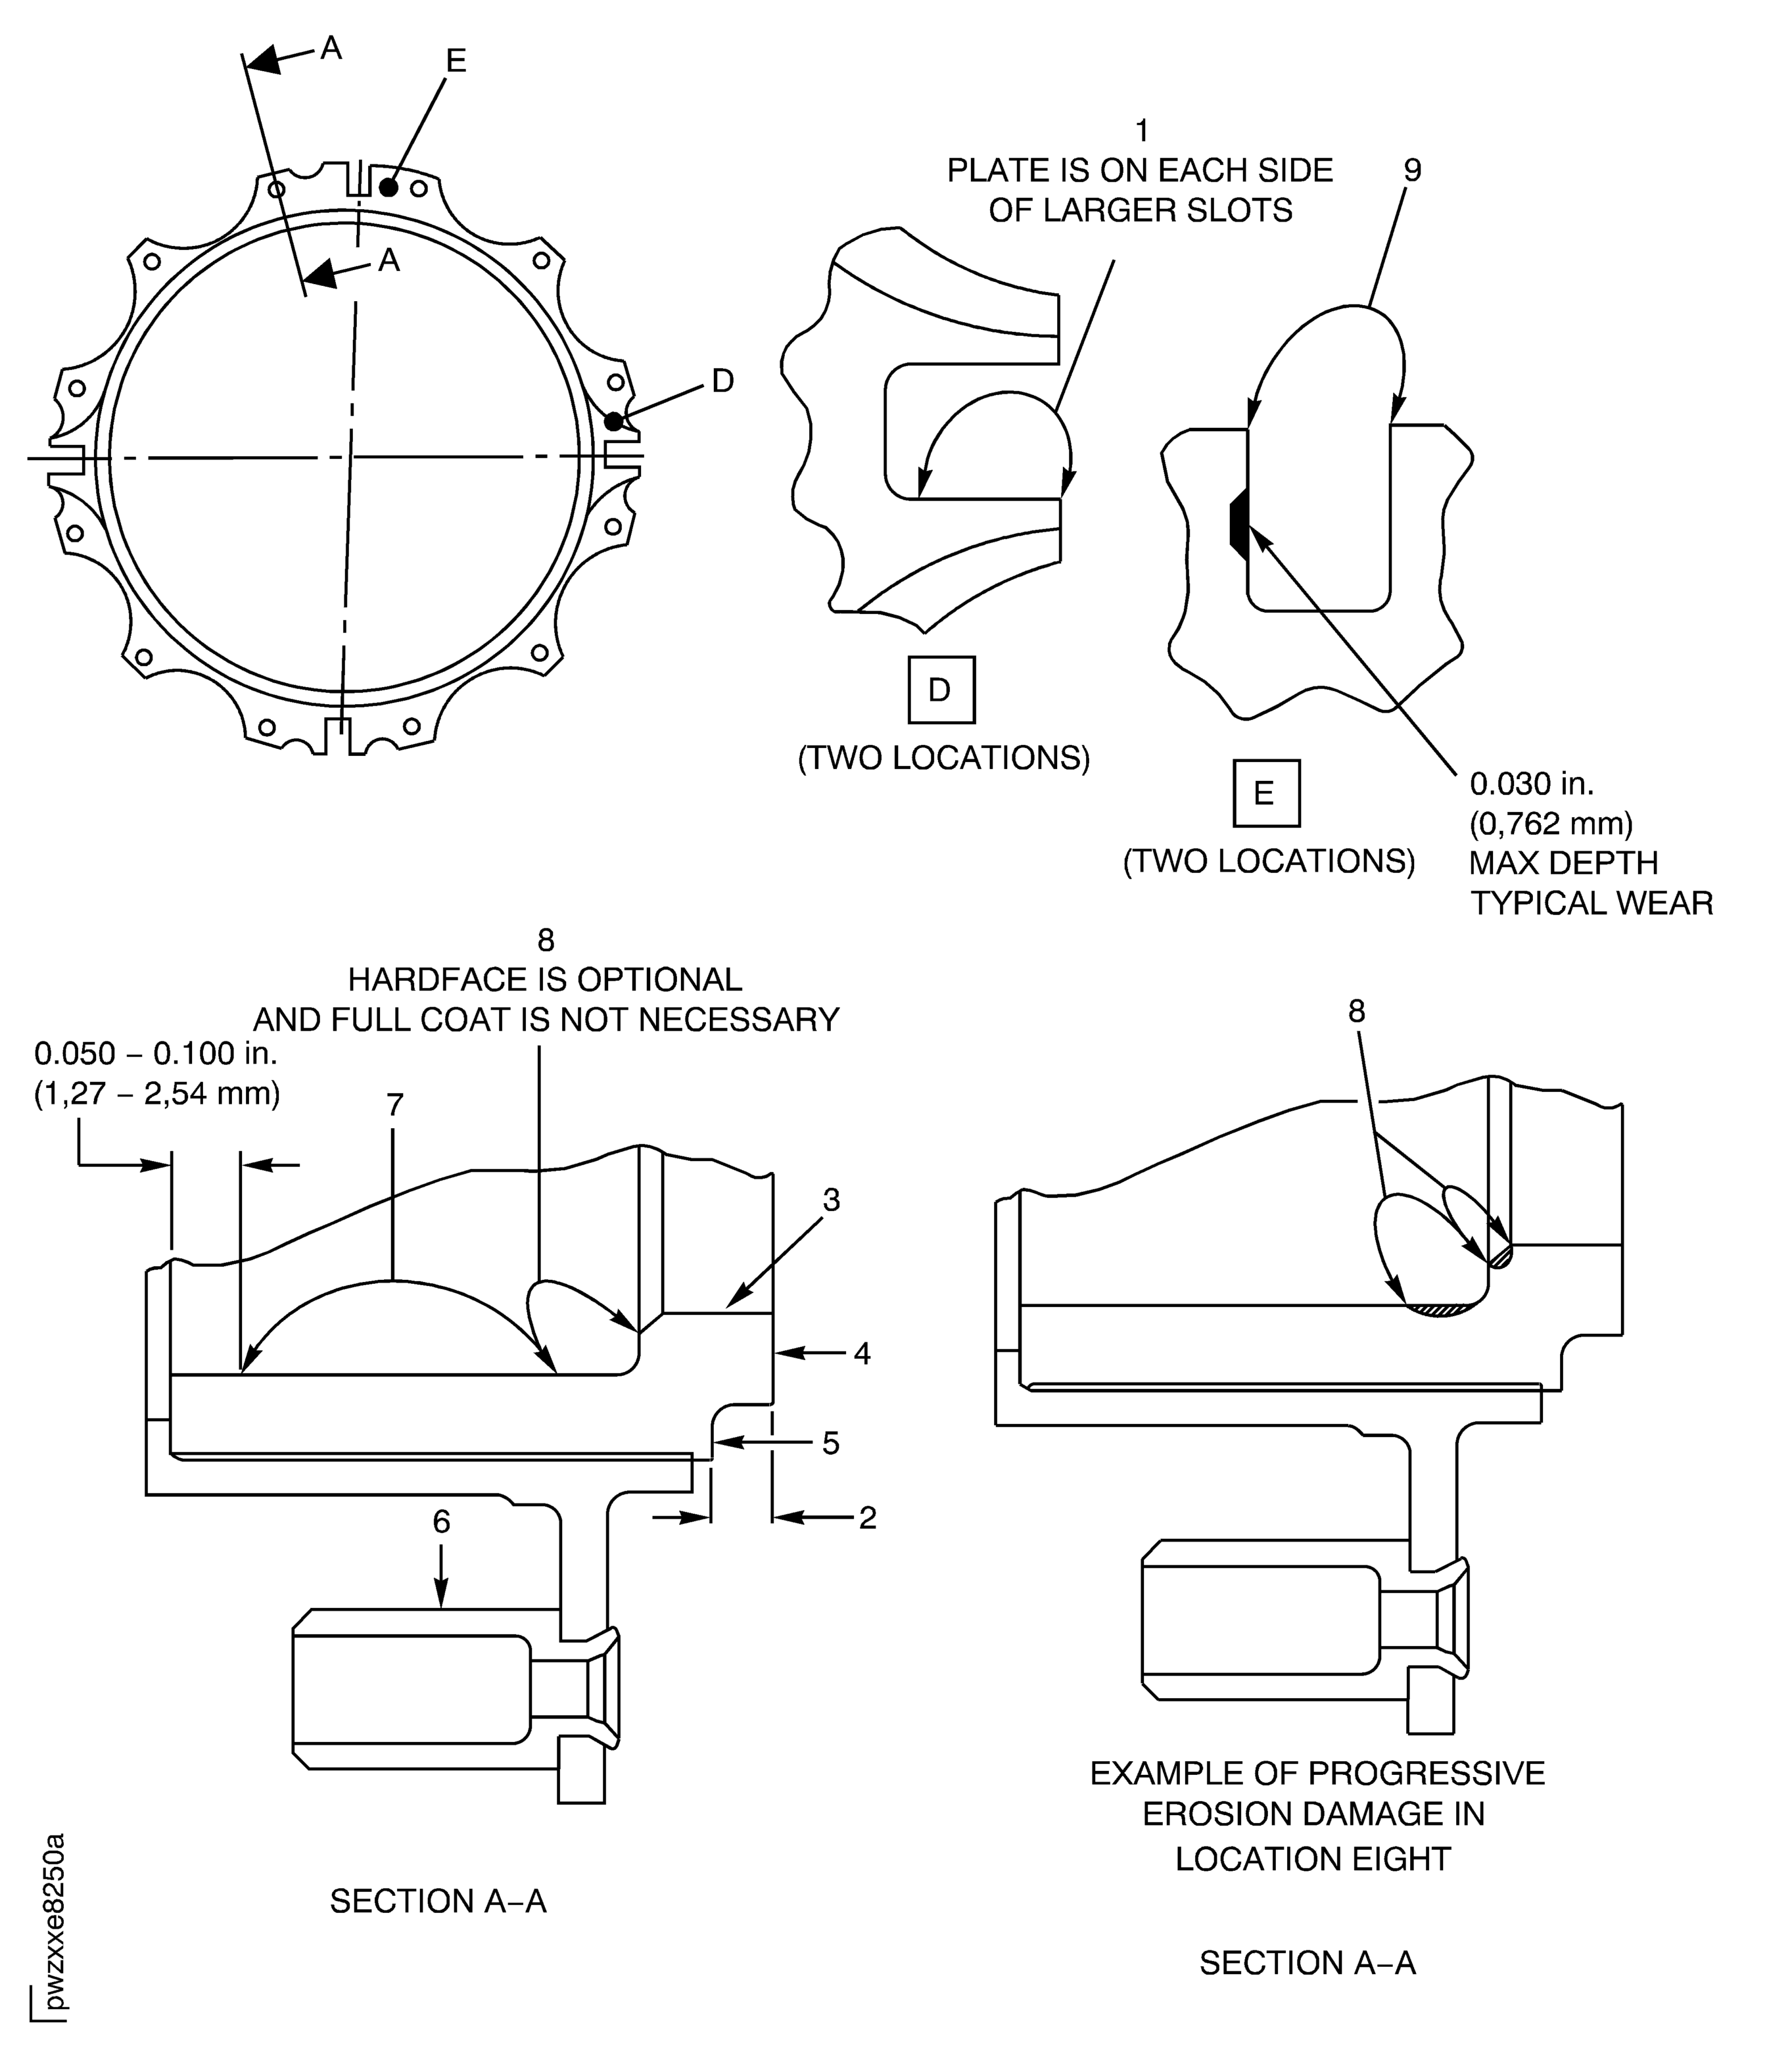
Refer to Figure.
Repair, VRS3675 TASK 72-42-33-300-020 (REPAIR-020)
Plate that is worn to the base metal, chipped beyond (1) or loose
Remove raised edges. Refer to the SPM TASK 70-35-21-350-501
Wear that goes into base metal that is not larger than 0.016 in. (0.41 mm) in depth and 0.115 in. (2.92 mm) in length. Wear on one slot face only, with no indications as given in the SPM TASK 70-23-01-230-501
Repair, VRS3675 TASK 72-42-33-300-020 (REPAIR-020)
Wear that goes into base metal other than (3)
Examine the seal at location 1 for worn, chipped or loose plate on the sides of the anti-rotation of slots.
SUBTASK 72-42-33-220-069 Examine the No. 4 Bearing Face Seal (01-220) for Worn, Chipped or Loose Plate on the Sides of the Horizontal Anti-Rotations Slots
Refer to Figure.
Blend to remove the raised material and sharp edges. Refer to the SPM TASK 70-35-21-350-501
Maximum depth of wear must not be more than 0.030 in. (0.76 mm) after blend. Blend or wear is not permitted in fillet
Examine the seal at location 9 for wear on the sides.
SUBTASK 72-42-33-220-110 Examine the No. 4 Bearing Face Seal for Wear on the Sides of the Vertical Slots
Refer to Figure.
Repair, VRS3676 TASK 72-42-33-300-021 (REPAIR-021)
Cracks
Examine the seal at all locations for cracks in the carbon seal detail. Refer to the SPM TASK 70-21-04-100-501.
The limits in the SPM TASK 70-21-04-100-501 are met
Repair, VRS3676 TASK 72-42-33-300-021 (REPAIR-021) or Repair, VRS3083 TASK 72-42-33-300-011 (REPAIR-011)
Other than (a)
Defects.
Examine the seal for defects on the carbon seal detail.
SUBTASK 72-42-33-220-070 Examine the No. 4 Bearing Face Seal (01-220) for Damage on the Carbon Seal Detail
Refer to Figure.
Repair, VRS3084 TASK 72-42-33-300-013 (REPAIR-013)
Looseness or wear
Examine the seal spring guide at location 6 for looseness or wear on the outside diameter (12 locations).
SUBTASK 72-42-33-220-071 Examine the No. 4 Bearing Face Seal (01-220) Spring Guides for Looseness or Wear on the Outside Diameter
Refer to Figure.
The limits in the SPM TASK 70-21-04-100-501 are met
Repair, VRS3676 TASK 72-42-33-300-021 (REPAIR-021)
Other than (1)
Examine the seal housing detail inside diameter at location 7 for defects.
Repair, VRS3676 TASK 72-42-33-300-021 (REPAIR-021)
Circumferential cracks, cracks that go through other cracks, chips, blisters, flakes or grooves
Examine the seal detail inside diameter at location 7 for damage other than axial cracks.
Repair, VRS3676 TASK 72-42-33-300-021 (REPAIR-021) and then examine the HPT metering plugs of the Stage 1 Disk at location 18. Refer to TASK 72-00-45-220-002-B00
Erosion
Examine the seal detail at locations 7 and 8 for erosion damage.
SUBTASK 72-42-33-220-072 Examine the No. 4 Bearing Face Seal (01-220) for Damage on the Hardface of the Seal Detail Inside Diameter
Refer to Figure.
Repair, VRS3676 TASK 72-42-33-300-021 (REPAIR-021)
Wear
Examine the seal at location 1 for wear on the hardface.
SUBTASK 72-42-33-220-073 Examine the No. 4 Bearing Face Seal (01-220) for Wear on the Hardface
Refer to Figure.
Repair, VRS3676 TASK 72-42-33-300-021 (REPAIR-021)
Other than (a)
Height.
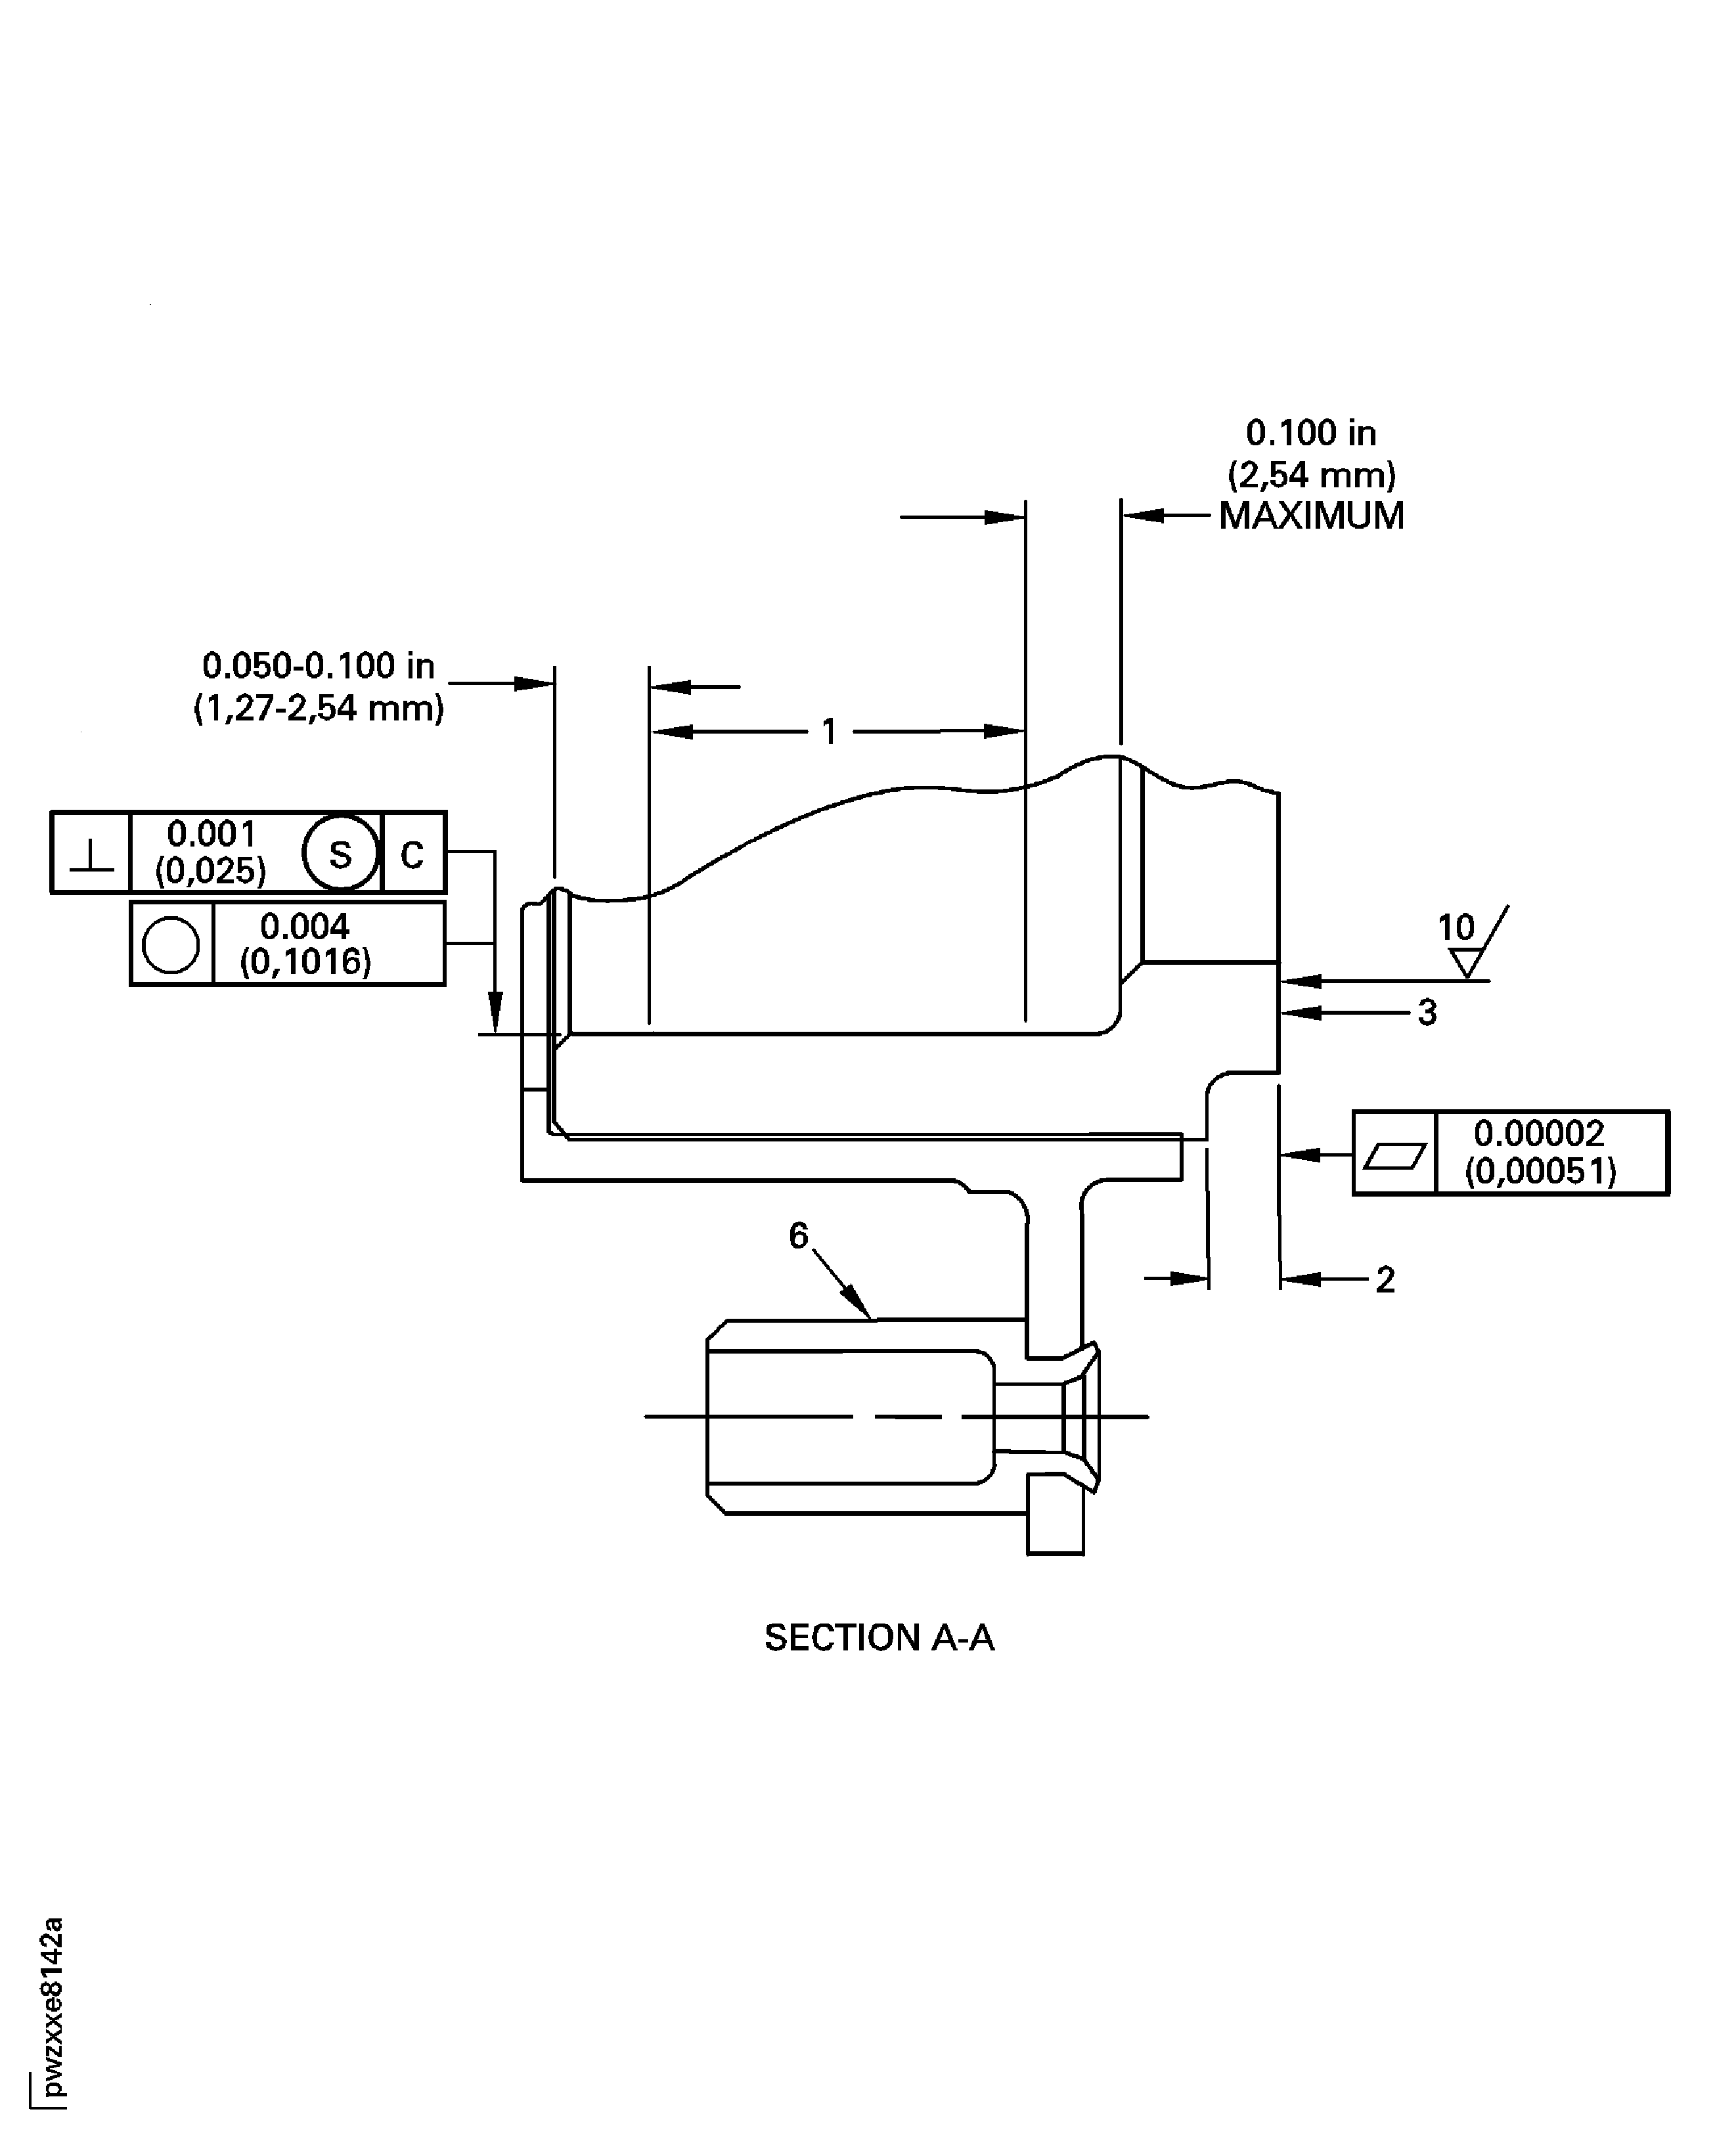
Examine the seal at location 2 for the height of the carbon seal lip (Reference No. 2051).
SUBTASK 72-42-33-220-074 Examine the No. 4 Bearing Face Seal (01-220) for the Height of the Carbon Seal Lip
Refer to Figure.
Repair, VRS3083 TASK 72-42-33-300-011 (REPAIR-011)
If the surface finish is other than the finish given in the figure
Examine the seal at location 3 for the surface finish of the carbon seal face.
SUBTASK 72-42-33-220-075 Examine the No. 4 Bearing Face Seal (01-220) for the Surface Finish of the Carbon Seal Face
Refer to Figure.
Repair, VRS3676 TASK 72-42-33-300-021 (REPAIR-021)
Other than (a)
Inside diameter.
Examine the seal at location 4 for the inside diameter of the housing detail hardface area (Reference number 2059).
Repair, VRS3676 TASK 72-42-33-300-021 (REPAIR-021)
Other than (a)
Roundness and perpendicularity.
Examine the seal at location 4 for the roundness and the perpendicularity of the housing detail inside diameter.
SUBTASK 72-42-33-220-076 Examine the No. 4 Bearing Face Seal (01-220) for the Diameter, Roundness and Perpendicularity of the Hardface on the Housing Detail Inside Diameter
Refer to Figure.
Repair, VRS3083 TASK 72-42-33-300-011 (REPAIR-011)
If the seal face is not the flatness given in the figure
Use an optical flat measuring tool to examine the seal at location 3 for the flatness of the carbon seal face.
SUBTASK 72-42-33-220-077 Examine the No. 4 Bearing Face Seal (01-220) for the Flatness of the Carbon Seal Face

CAUTION
DO THIS INSPECTION AFTER YOU HAVE DONE ALL OTHER INSPECTIONS IN THIS TASK. YOU CAN CAUSE DAMAGE TO THE SEAL FACE IF YOU TOUCH THE SEAL TOO FREQUENTLY.Reject, Repair, VRS3675 TASK 72-42-33-300-020 (REPAIR-020).
If there are non-conformances.
Examine by the SPM TASK 70-39-03-390-501, if VRS3675 (REPAIR 020) has been applied. It is permissible for the rivet head to be minus 0.010 in. (0.25 mm) to plus 0.005 in. (0.13 mm) above the part surface after riveting.
SUBTASK 72-42-33-220-100 Examine the No. 4 Bearing Face Seal (01-220, 01-248) for Loose or Damaged Rivets
Figure: No. 4 Bearing Face Seal Inspection Locations
No. 4 Bearing Face Seal Inspection Locations

Figure: No. 4 Bearing Face Seal Inspection Locations
No. 4 Bearing Face Seal Inspection Locations

