Export Control
EAR Export Classification: Not subject to the EAR per 15 C.F.R. Chapter 1, Part 734.3(b)(3), except for the following Service Bulletins which are currently published as EAR Export Classification 9E991: SBE70-0992, SBE72-0483, SBE72-0580, SBE72-0588, SBE72-0640, SBE73-0209, SBE80-0024 and SBE80-0025.Copyright
© IAE International Aero Engines AG (2001, 2014 - 2021) The information contained in this document is the property of © IAE International Aero Engines AG and may not be copied or used for any purpose other than that for which it is supplied without the express written authority of © IAE International Aero Engines AG. (This does not preclude use by engine and aircraft operators for normal instructional, maintenance or overhaul purposes.).Applicability
All
Common Information
TASK 72-44-20-200-001-A01 HPT Stage 1 Vane - Examine, Inspection-001
Effectivity
FIG/ITEM | PART NO. |
|---|---|
01-250 | 2A0091CL21 |
01-250 | 2A2591CL21 |
01-251 | 2A0091CL22 |
01-251 | 2A2591Cl22 |
01-252 | 2A0091CL23 |
01-252 | 2A2591CL23 |
01-253 | 2A0091CL24 |
01-253 | 2A2591CL24 |
01-254 | 2A0091CL25 |
01-254 | 2A2591CL25 |
01-255 | 2A0091CL26 |
01-255 | 2A2591CL26 |
01-256 | 2A0091CL27 |
01-256 | 2A2591CL27 |
01-257 | 2A0091CL28 |
01-257 | 2A2591CL28 |
01-258 | 2A0091CL29 |
01-258 | 2A2591CL29 |
01-259 | 2A0091CL30 |
01-259 | 2A2591CL30 |
01-260 | 2A0091CL31 |
01-260 | 2A2591CL31 |
01-261 | 2A0091CL32 |
01-261 | 2A2591CL32 |
01-262 | 2A0091CL33 |
01-262 | 2A2591CL33 |
01-263 | 2A0091CL34 |
01-263 | 2A2591CL34 |
01-264 | 2A0091CL35 |
01-264 | 2A2591CL35 |
01-265 | 2A0091CL36 |
01-265 | 2A2591CL36 |
01-266 | 2A0091CL37 |
01-266 | 2A2591CL37 |
01-267 | 2A0091CL38 |
01-267 | 2A2591CL38 |
01-268 | 2A0091CL39 |
01-268 | 2A2591CL39 |
01-269 | 2A0091CL40 |
01-269 | 2A2591CL40 |
01-270 | 2A0091CL41 |
01-270 | 2A2591CL41 |
01-271 | 2A0091CL42 |
01-271 | 2A2591CL42 |
01-272 | 2A0091CL43 |
01-272 | 2A2591CL43 |
01-273 | 2A0091CL44 |
01-273 | 2A2591CL44 |
01-274 | 2A0091CL45 |
01-274 | 2A2591CL45 |
01-275 | 2A0091CL46 |
01-275 | 2A2591CL46 |
01-276 | 2A0091CL47 |
01-276 | 2A2591CL47 |
01-277 | 2A0091CL48 |
01-277 | 2A2591CL48 |
01-278 | 2A0091CL48-5 |
01-279 | 2A0091CL49 |
01-279 | 2A2591CL49 |
01-280 | 2A0091CL49-5 |
01-284 | 2A2591CL50 |
01-286 | 2A2591CL51 |
General
This TASK gives the procedure for the inspection of the stage 1 HPT vane cluster assembly. For the other stage 1 HPT vane cluster assembly parts refer to TASK 72-44-20-200-000 (INSPECTION/CHECK-000).
Fig/item numbers in parentheses in the procedure agree with those used in the IPC.
The policy that is necessary for inspection is given in the SPM TASK 70-20-00-200-501.
All the parts must be cleaned before any part is examined. Refer to the SPM TASK 70-10-00-100-501.
All parts must be visually examined for damage, corrosion and wear. Any defects that are not identified in the procedure must be referred to IAE.
The procedure for those parts which must have a crack test is given in SUBTASK 72-44-20-230-051. Do the test before the part is visually examined.
Do not discard any part until you are sure there are no repairs available. Refer to the instructions in Repair before a discarded part is used again or oversize parts are installed.
Parts which should be discarded can be held although no repair available. The repair of a discarded part could be shown to be necessary at a later date.
All parts must be examined to make sure that all the repairs have been completed satisfactorily.
The practices and processes referred to in the procedure by the TASK numbers are in the SPM.
References
Refer to the SPM for data on these items.
Definition of Damages, SPM TASK 70-02-02-350-501
Moderate Cleaning, SPM TASK 70-11-03-300-503
Vapor Degrease, SPM TASK 70-11-01-300-503
Cleaning, SPM TASK 70-12-09-120-501
Air flow - Turbine Blades and Vanes, SPM TASK 70-72-01-720-501
Ultrasonic Clean all Metal (But not Magnesium), SPM TASK 70-13-01-100-501
Inspection of Parts, SPM TASK 70-20-00-200-501
NOTE
NOTE
Preliminary Requirements
Pre-Conditions
NONESupport Equipment
| Name | Manufacturer | Part Number / Identification | Quantity | Remark |
|---|---|---|---|---|
| Oven | LOCAL | Oven | (air furnace) | |
| IAE 2P16342 Digital indicator | 0AM53 | IAE 2P16342 | 1 | |
| IAE 2P16343 Computer kit | 0AM53 | IAE 2P16343 | 1 | |
| IAE 2P16344 Computer program | 0AM53 | IAE 2P16344 | 1 | |
| IAE 2P16234 Gage | 0AM53 | IAE 2P16234 | 1 | |
| IAE 2P16235 Master | 0AM53 | IAE 2P16235 | 1 | |
| IAE 2P16081 Airflow fixture | 0AM53 | IAE 2P16081 | 1 | |
| IAE 2P16085 Airflow master | 0AM53 | IAE 2P16085 | 1 | |
| IAE 2P16156 Airflow insert set | 0AM53 | IAE 2P16156 | 1 | |
| IAE 2P16157 Airflow insert set (Optional) | 0AM53 | IAE 2P16157 | 1 |
Consumables, Materials and Expendables
| Name | Manufacturer | Part Number / Identification | Quantity | Remark |
|---|---|---|---|---|
| CoMat 02-029 MASKING TAPE (CLOTH BACKING) | 0AM53 | CoMat 02-029 | ||
| CoMat 02-030 MASKING TAPE (CLOTH BACKING) | IE479 | CoMat 02-030 |
Spares
NONESafety Requirements
NONEProcedure
Clean the part. Refer to TASK 72-44-20-100-000 (CLEANING-000).
Examine the vane assembly airfoil surfaces (concave and convex sides) for axial and radial cracks, Figure.
Repair, VRS3141 TASK 72-44-20-300-001 (REPAIR-001).
Other than Step.
Examine the vane assembly trailing edge convex sides for cracks. Cracks are only permitted at locations 1 and 2, Figure.
Repair, VRS3141 TASK 72-44-20-300-001 (REPAIR-001).
Other than Step.
Examine the vane assembly leading edge for cracks at location 2, Figure.
Repair, VRS3141 TASK 72-44-20-300-001 (REPAIR-001).
Other than Step.
Examine the vane assembly leading edge platform fillet area at location 1, Figure.
Repair, VRS3141 TASK 72-44-20-300-001 (REPAIR-001).
Examine the vane assembly inner and outer platforms for cracks, Figure.
Repair, VRS3152 TASK 72-44-20-300-005 (REPAIR-005).
Cracks
Examine the vane assembly insert and impingement covers for cracks at locations 1, 2, 3, 5, 6 and 8, Figure.
Repair, VRS3141 TASK 72-44-20-300-001 (REPAIR-001).
Other than Step.
Cracks.
Examine the vane assembly for cracks in the feather seal slot plug welds at locations 1, 2 and 3, Figure.
SUBTASK 72-44-20-230-051-002 Examine the Stage 1 HPT Vane Cluster Assembly (01-250 thru 01-286) for Cracks
Refer to Figure.
Repair, VRS3165 TASK 72-44-20-300-007 (REPAIR-007).
Chipped coating
Examine the vane assembly at location 11 for chipped coating on the airfoil.
NOTE
To find if the base metal is shown, use the heat tint inspection in Step.Base metal does not show.
Repair, VRS3154 TASK 72-44-20-300-011 (REPAIR-011).
Other than Step.
Burns and erosion.
Examine the vane assembly at locations 4, 10 and 11 for burns and erosion on the airfoil, leading and trailing edges.
Repair, VRS3154 TASK 72-44-20-300-011 (REPAIR-011).
Burns and erosion.
Examine the vane assembly at locations 3 and 7 for burns and erosion on the inner and outer platforms.
Repair, VRS3154 TASK 72-44-20-300-011 (REPAIR-011).
Nicks at locations 3, 4, 7, 10 and 11.
NOTE
To find if the base metal is shown, use the heat tint inspection in Step.Dents with a rounded bottom up to 0.010 in. (0.254 mm) in depth and no base metal is shown at locations 3, 4, 7, 10 and 11. The dent must not block a cooling air hole by more than 50 percent.
Repair, VRS3154 TASK 72-44-20-300-011 (REPAIR-011).
Other than Step.
Dents
Examine the vane assembly for dents and nicks on the airfoils, platforms, leading and trailing edges.
SUBTASK 72-44-20-220-051 Examine the Stage 1 HPT Vane Cluster Assembly (01-250 thru 01-286) Airfoils and Platforms
Refer to Figure.
Repair, VRS3145 TASK 72-44-20-300-013 (REPAIR-013) and VRS3498 TASK 72-44-20-300-021 (REPAIR-021).
Plugging
Examine the vane assembly airfoils at location 10 (each side, all around), cooling air holes and the trailing edge at location 1 cooling air slots for plugging.
Repair, VRS3145 TASK 72-44-20-300-013 (REPAIR-013)
Other than Step.
Plugging.
Examine the vane assembly platforms cooling air holes for plugging at locations 6 and 9. Do not examine the holes at locations 2, 3, 4, 5, 7 and 8.
SUBTASK 72-44-20-220-052 Examine the Stage 1 HPT Vane Cluster Assembly (01-250 thru 01-286) Airfoils and Platforms Cooling Air Holes/Slots for Plugging
Refer to Figure.
Repairs, VRS3152 TASK 72-44-20-300-005 (REPAIR-005) and VRS3153 TASK 72-44-20-300-014 (REPAIR-014).
Plugging and unwanted material.
Examine the vane assembly for unwanted material and plugged cooling air holes on all the inserts and impingement covers at locations 1, 2, 3, 5, 6 and 8.
SUBTASK 72-44-20-220-053 Examine the Stage 1 HPT Vane Cluster Assembly (01-250 thru 01-286) for Unwanted Material and Plugging on the Front and Rear Inserts and Platform Impingement Covers
Refer to Figure.
Repairs, VRS3164 TASK 72-44-20-300-015 (REPAIR-015) and VRS3141 TASK 72-44-20-300-015 (REPAIR-001).
Other than Step.
Examine the vane assembly platforms for chipped coating.
SUBTASK 72-44-20-220-054 Examine the Stage 1 HPT Vane Cluster Assembly (01-250 thru 01-286) for Chipped Coating on the Platforms
Refer to Figure.
SUBTASK 72-44-20-220-056 Examine the Stage 1 HPT Vane Cluster Assembly (01-250 thru 01-286) for Wear and Chipped Plasma Spray Coat on the Rear Foot
Refer to Figure.
Repair, VRS3158 TASK 72-44-20-300-018 (REPAIR-018).
Other than Step.
Thickness
Examine the vane assembly at location 2002 for thickness of the outer diameter rear foot.
SUBTASK 72-44-20-220-057 Examine the Stage 1 HPT Vane Cluster Assembly (01-250 thru 01-286) for the Outer Diameter Rear Foot Thickness
Refer to Figure.
Other than Step.
Axial dimension.
Examine the vane assembly at location 2004 for axial dimension.
SUBTASK 72-44-20-220-058 Examine the Stage 1 HPT Vane Assembly (01-250 thru 01-286) for the Axial Dimension between the Inner Diameter Platform Leading Edge and the Front Edge of the Inner Diameter Rear Foot
Refer to Figure.
Other than Step.
Wear
Examine the vane assembly at locations 1 and 2 and two sides at location 3 for wear on the contact surface.
SUBTASK 72-44-20-220-059 Examine the Stage 1 HPT Vane Assembly (01-250 thru 01-286) for the Wear on the Platform Front Faces and Two Sides on the Rear Inner Diameter Flange Surfaces
Refer to Figure.
SUBTASK 72-44-20-220-060 Examine the Stage 1 HPT Vane Cluster Assembly (01-250 thru 01-286) for Burned Areas and Unwanted Material on all the Feather Seal Slots
Moderately clean the vane cluster by the SPM TASK 70-11-03-300-503 or vapor degrease the vane cluster by the SPM TASK 70-11-01-300-503.
Mask the inner and outer platform ceramic coated areas. Use CoMat 02-029 MASKING TAPE (CLOTH BACKING) or CoMat 02-030 MASKING TAPE (CLOTH BACKING).

CAUTION
DO NOT DRY BLAST THE VANE CLUSTER COATED AREA TOO MUCH. THIS CAUSES THE COATING TO BE REMOVED.Clean the vane cluster airfoils by the SPM TASK 70-12-09-120-501.
Repair, VRS3141 TASK 72-44-20-300-001 (REPAIR-001).
Blue color that is not shiny shows the vane has no coating.
NOTE
Heat tint does not show the thickness of the coating. The vane cluster can be repaired by Repair, VRS3141 TASK 72-44-20-300-001 (REPAIR-001) if the vane cluster will be installed in an engine for an extended length of time.Heat tint.
Examine the vane cluster airfoils coating for heat tint.
SUBTASK 72-44-20-280-051 Examine the Stage 1 HPT Vane Cluster Assembly (01-250 thru 01-286) Vane Coat by Heat Tint
Do the airflow procedure for the stage 1 HPT vane cluster assembly by the procedures given in the SPM TASK 70-72-01-720-501.
SUBTASK 72-44-20-280-052 Examine the Stage 1 HPT Vane Cluster Assembly (01-250 thru 01-286) by the Airflow Check
If the numerical class average has increased more than 0.64 class, identify the vane to the next vane class number. Use the vibration peen method. Refer to the SPM TASK 70-09-00-400-501.
If the numerical class average has increased 0.64 class or less.
Measure the vane class by the area method. Use the IAE 2P16342 Digital indicator 1 off, IAE 2P16343 Computer kit 1 off, IAE 2P16344 Computer program 1 off, IAE 2P16234 Gage 1 off and IAE 2P16235 Master 1 off (tool instructions are included in each tool).
SUBTASK 72-44-20-220-071 Examine the Stage 1 HPT Vane Cluster Assembly (01-250 thru 01-286) to Measure the Vane Class by the Area Method
Figure: Stage 1 HPT Vane Cluster Assembly Axial and Radial Cracks Inspection Locations
Stage 1 HPT Vane Cluster Assembly Axial and Radial Cracks Inspection Locations
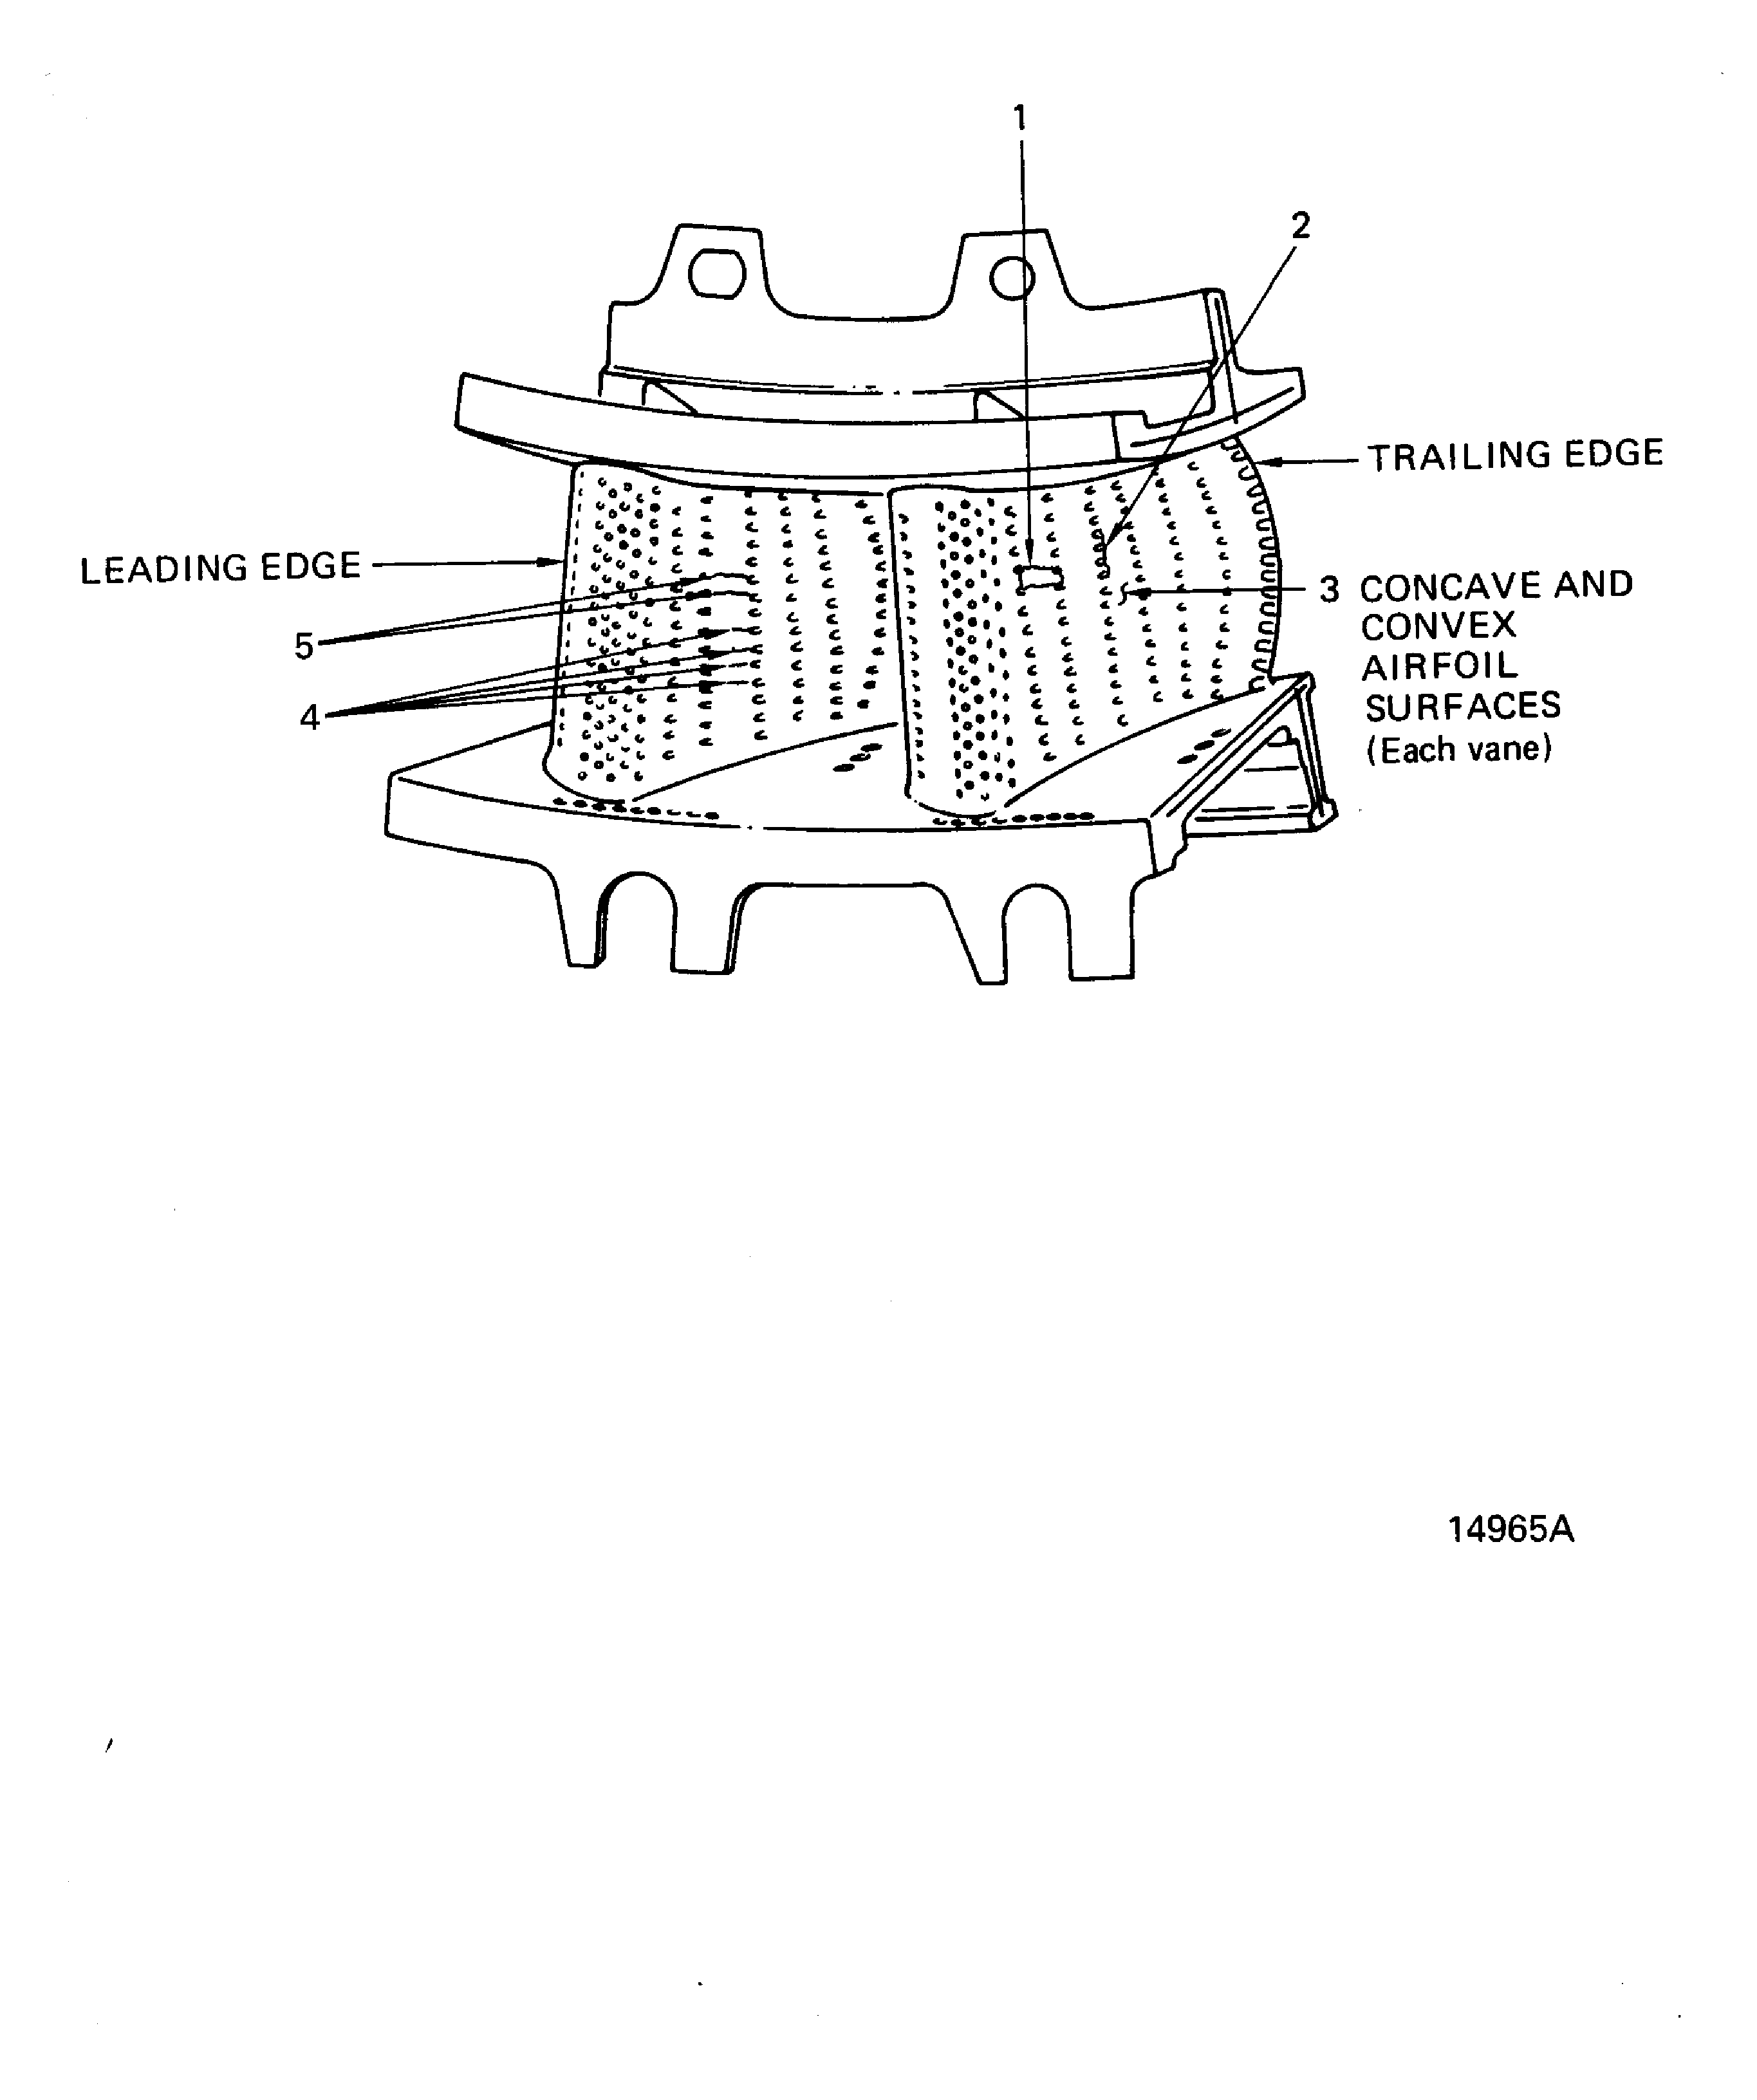
Figure: Stage 1 HPT Vane Cluster Assembly Trailing Edge Cracks (Convex Side) Inspection Locations
Stage 1 HPT Vane Cluster Assembly Trailing Edge Cracks (Convex Side) Inspection Locations
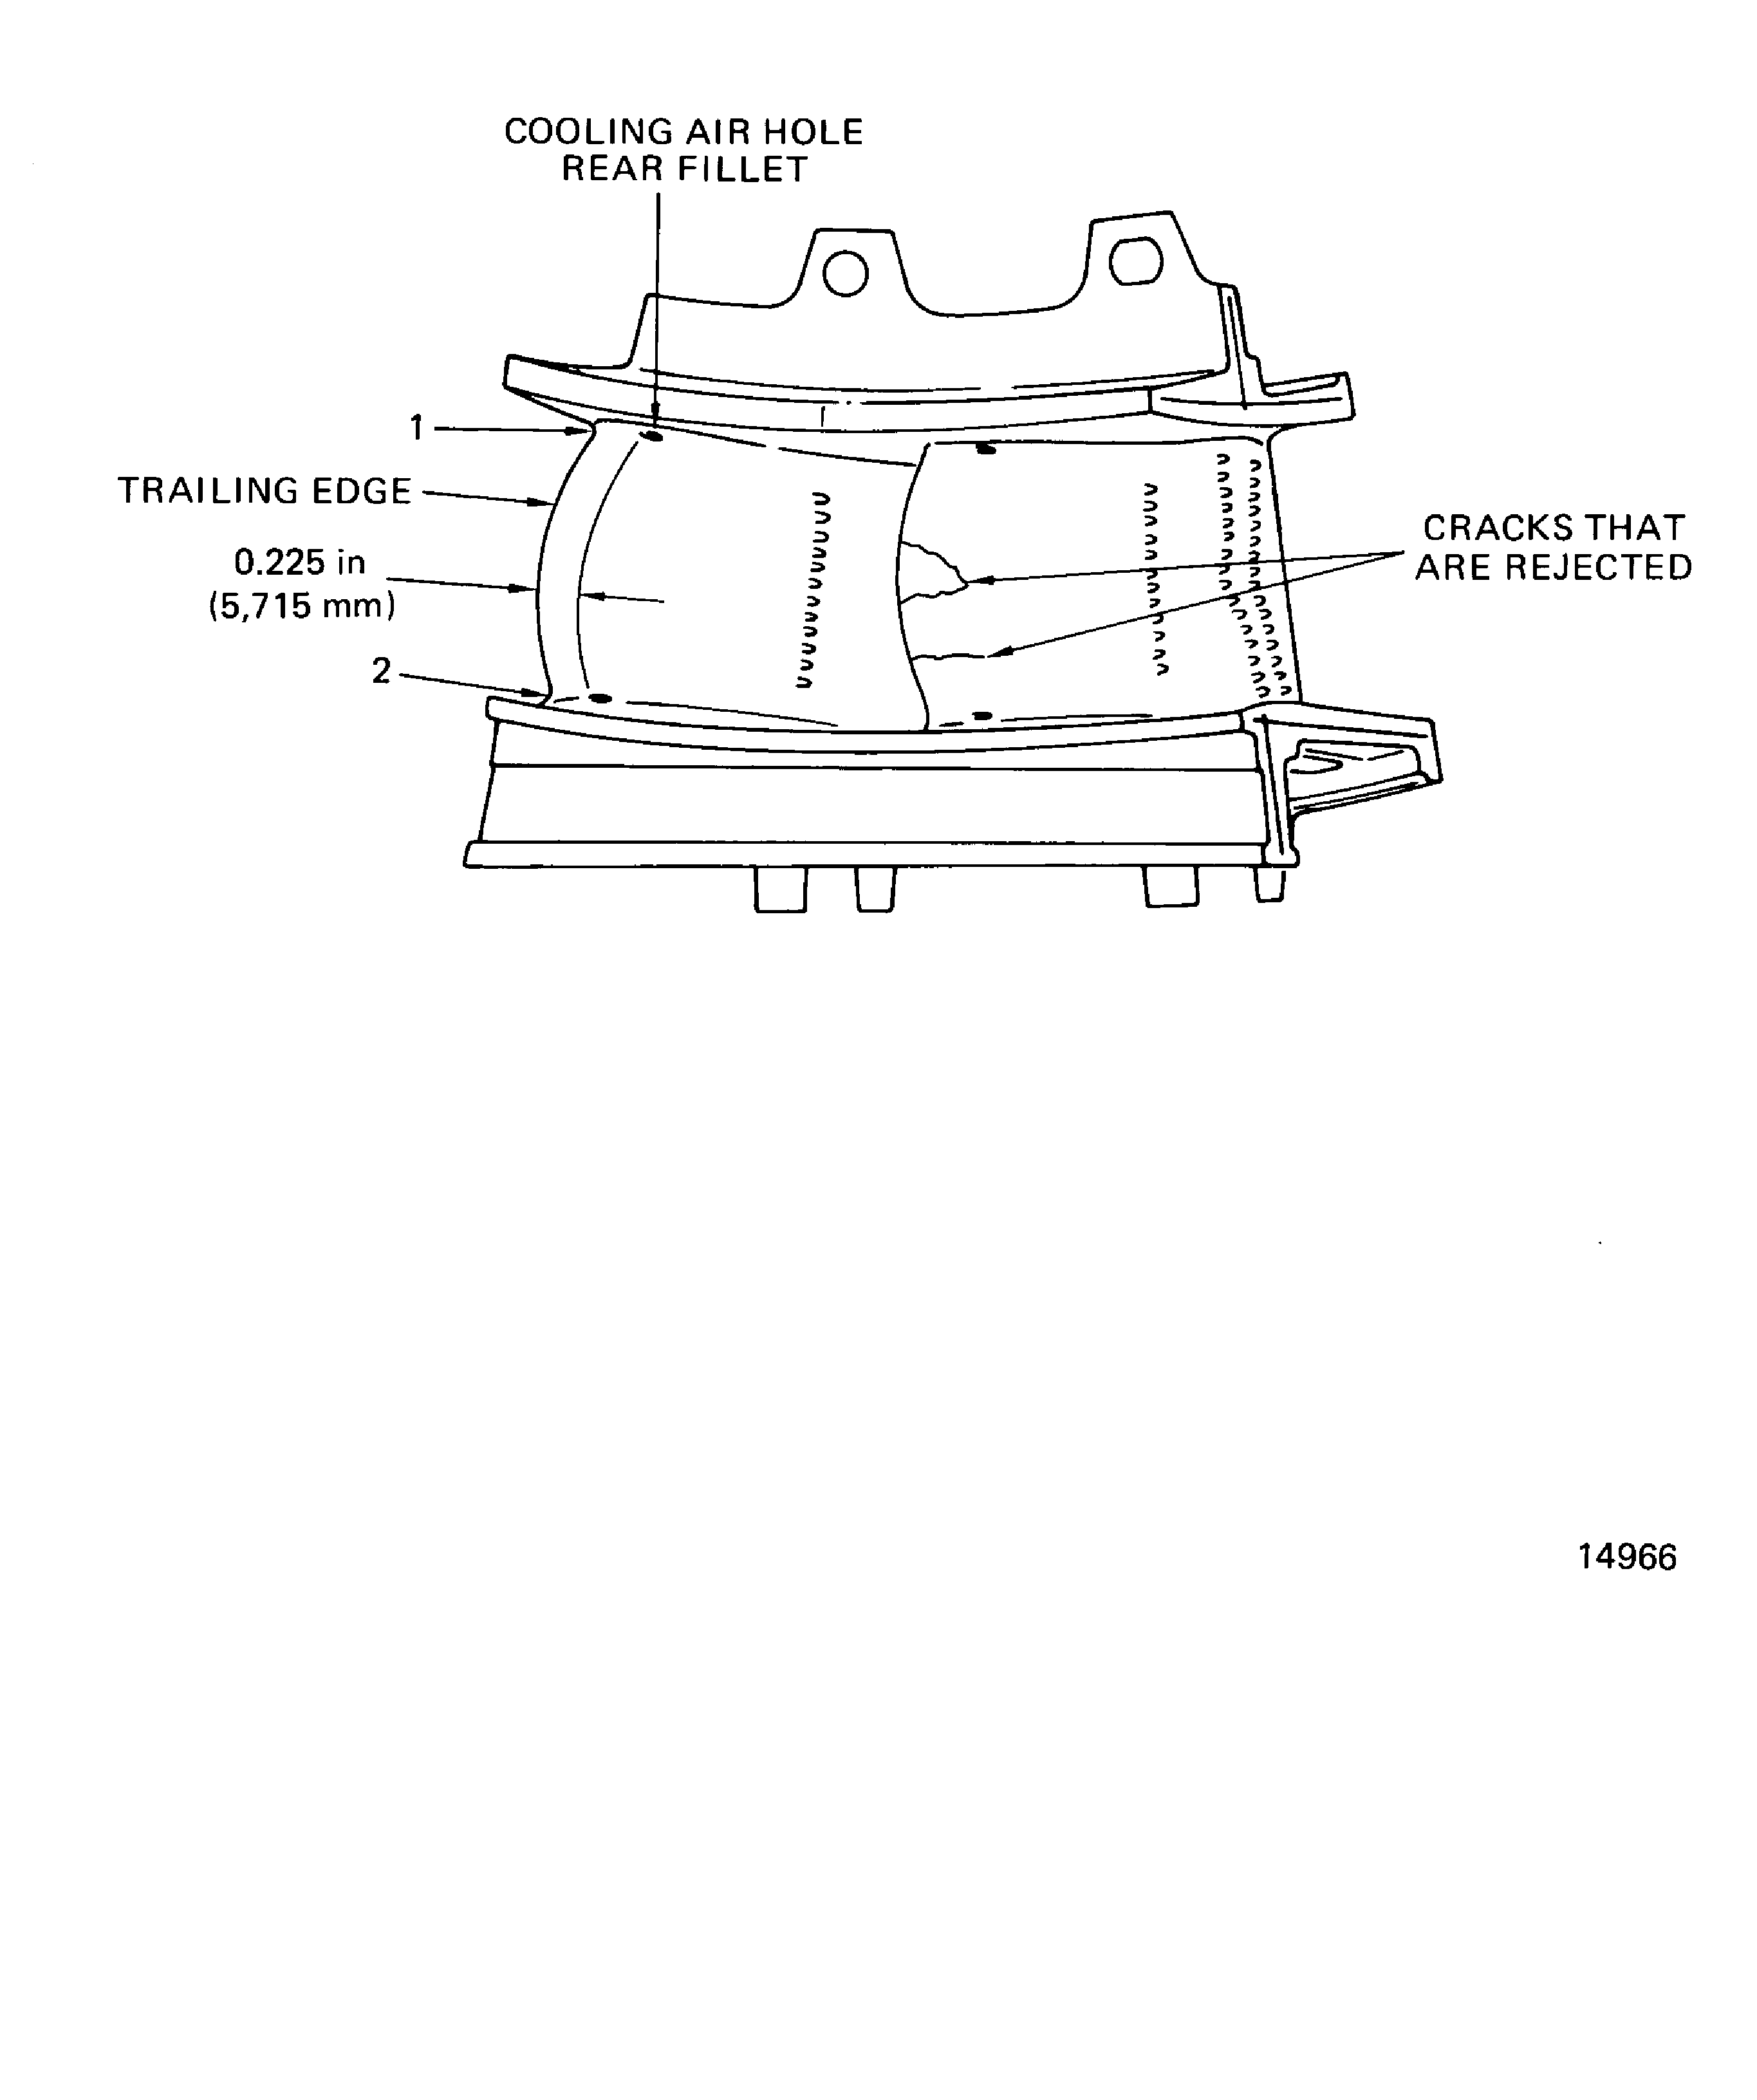
Figure: Stage 1 HPT Vane Cluster Assembly Leading Edge Cracks Inspection Locations
Stage 1 HPT Vane Cluster Assembly Leading Edge Cracks Inspection Locations
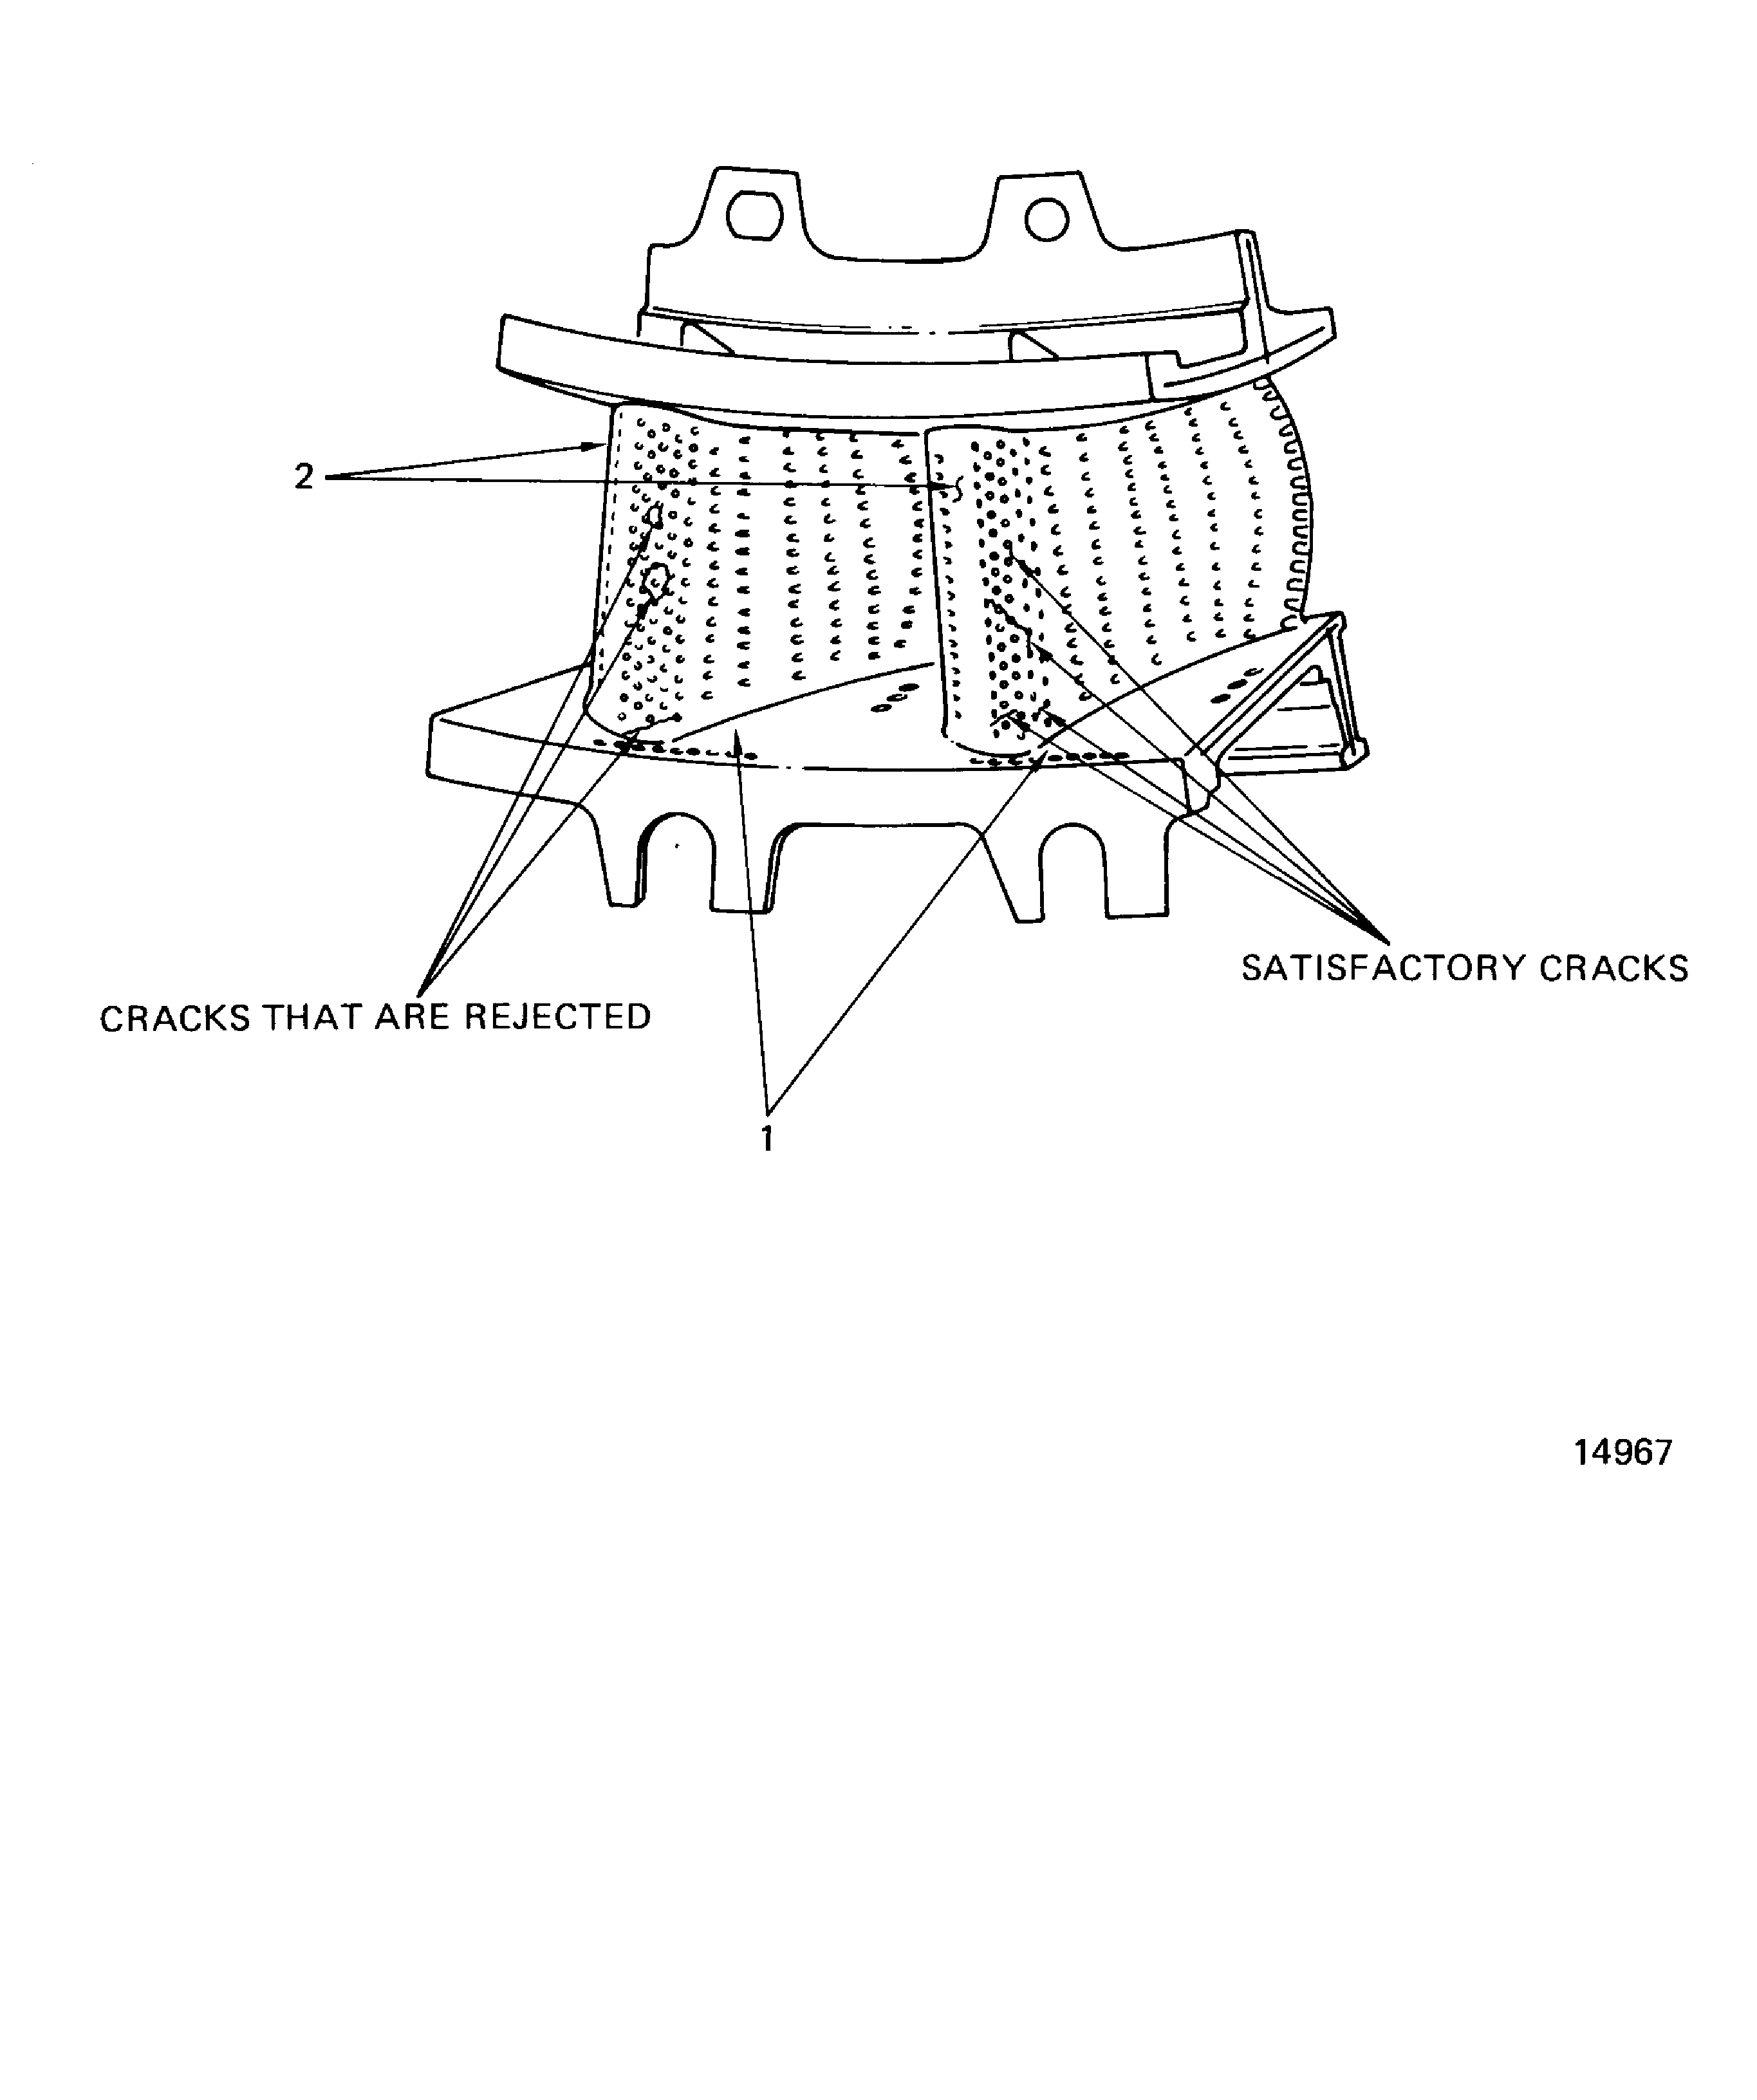
Figure: Stage 1 HPT Vane Cluster Assembly Inner and Outer Platform Cracks Inspection Location
Stage 1 HPT Vane Cluster Assembly Inner and Outer Platform Cracks Inspection Location
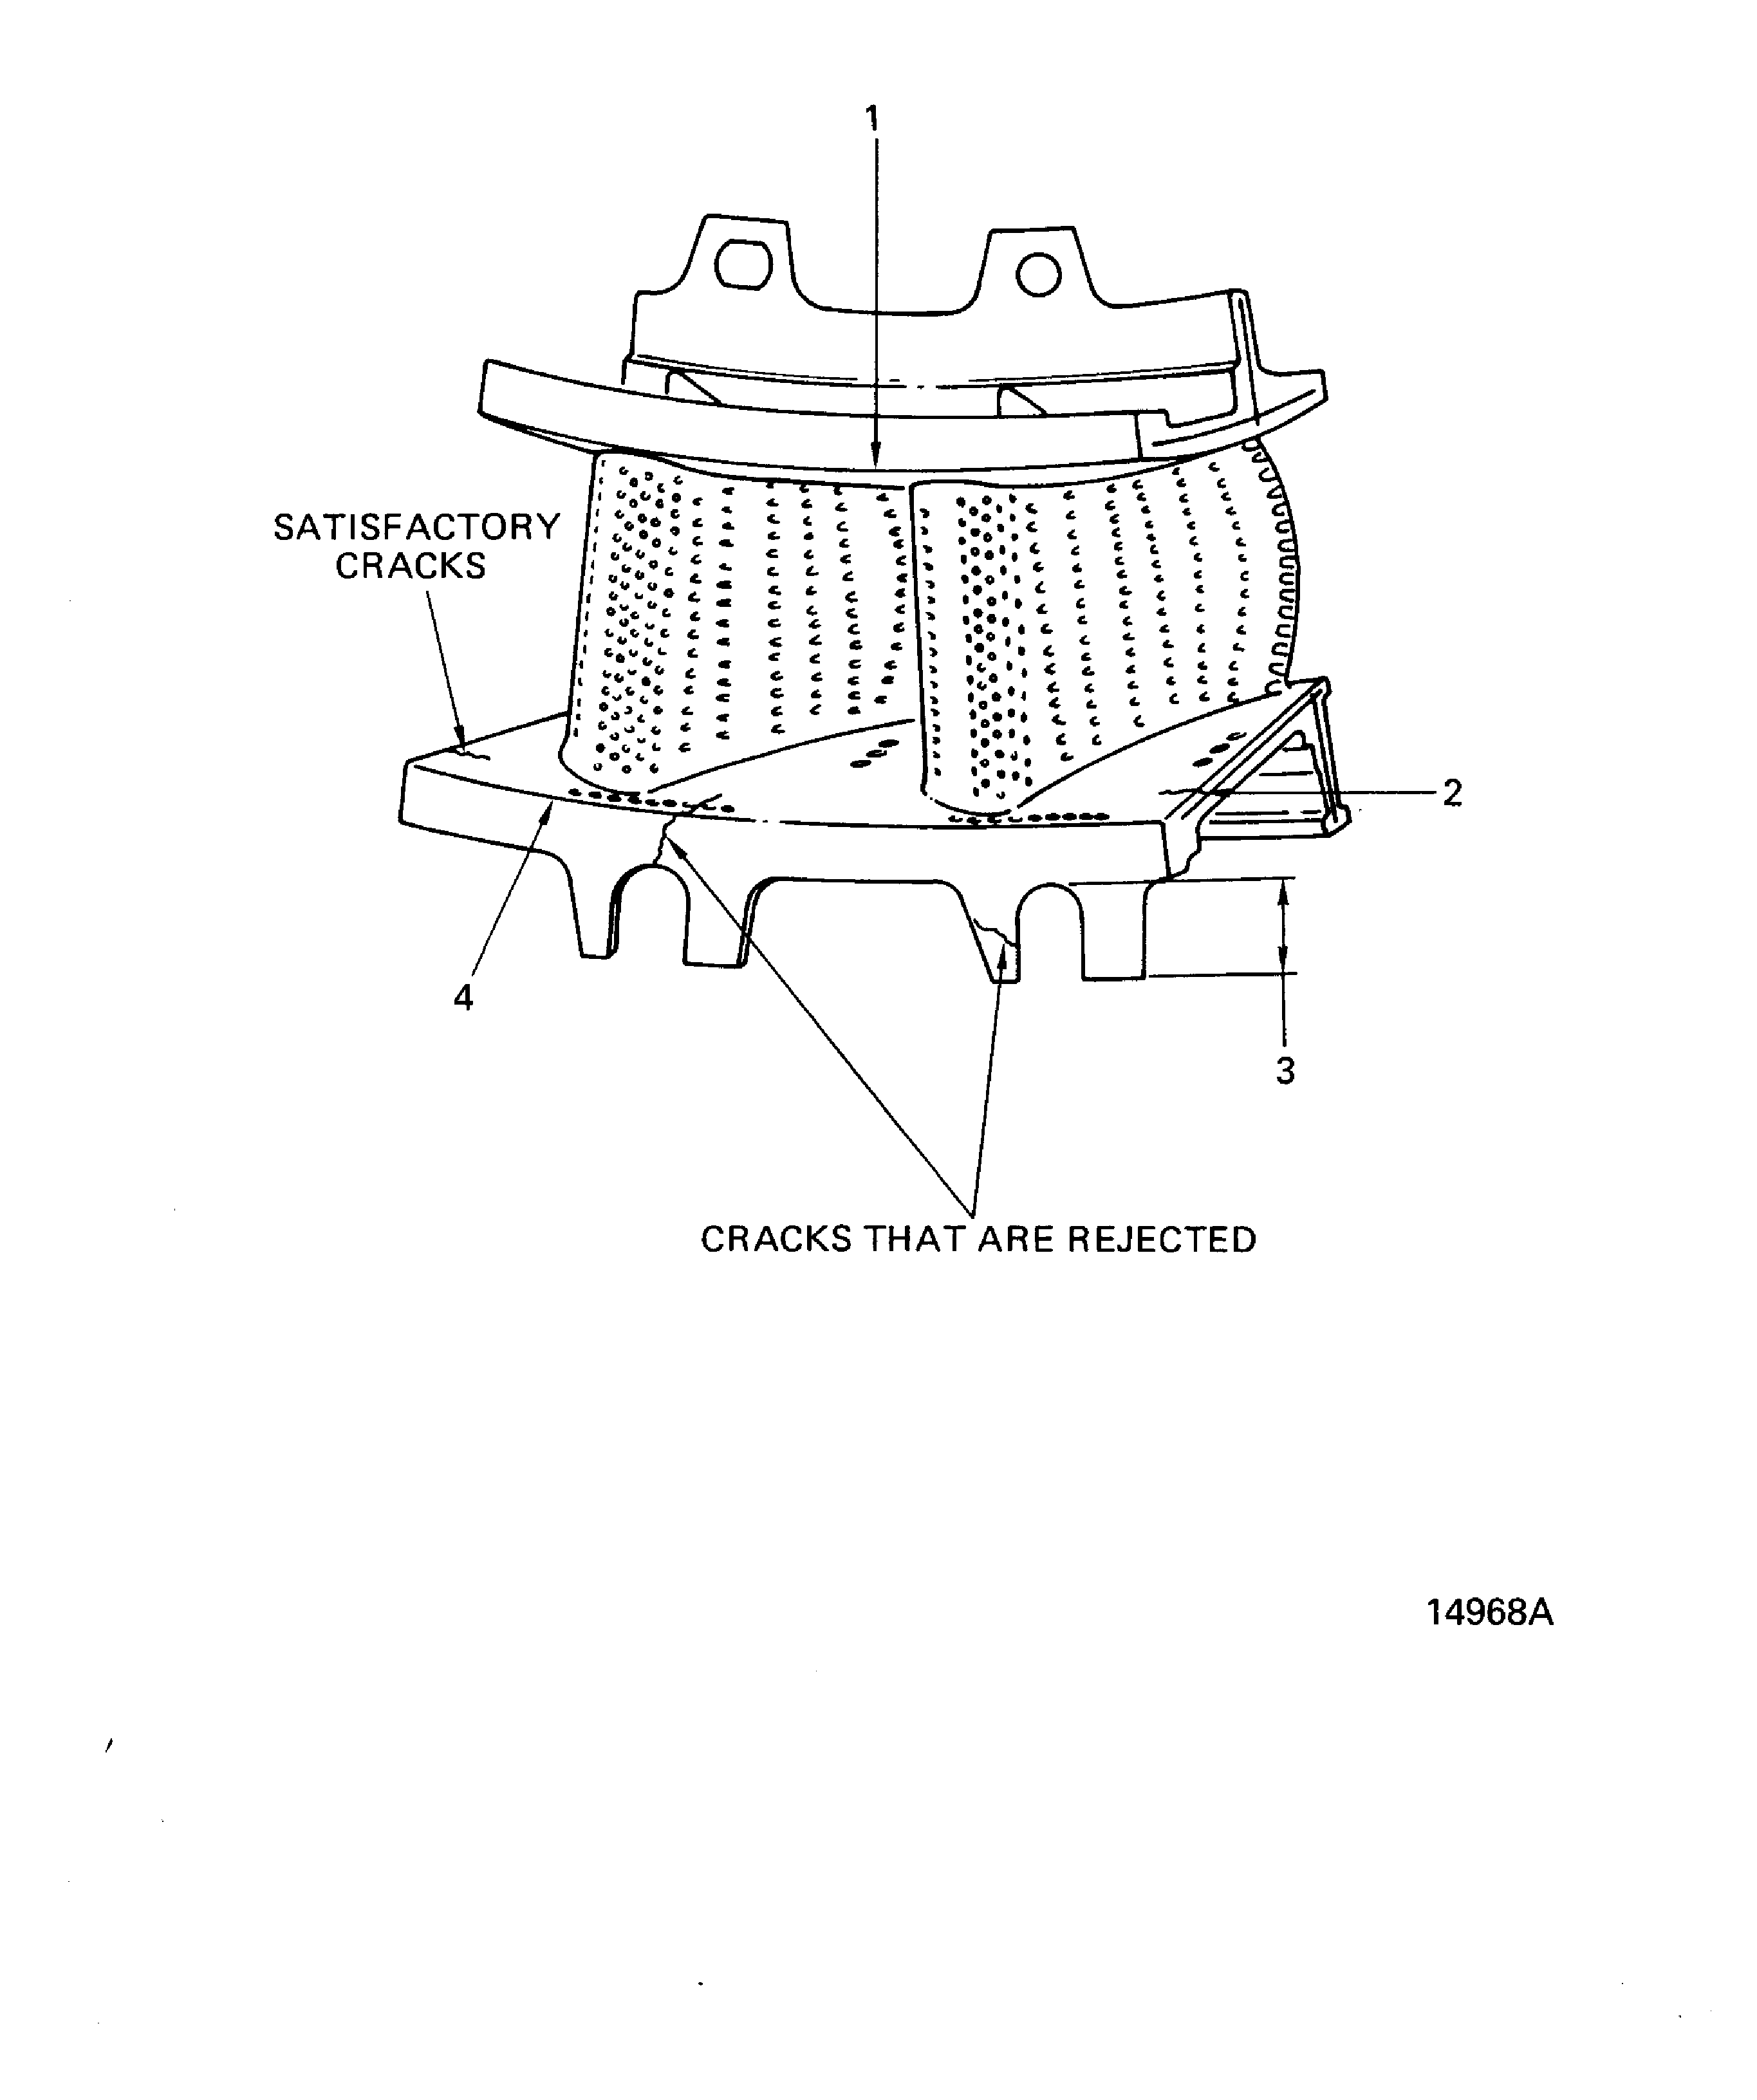
Figure: Stage 1 HPT Vane Cluster Assembly Platforms, Inserts and Impingement Cover Cracks Inspection Location
Stage 1 HPT Vane Cluster Assembly Platforms, Inserts and Impingement Cover Cracks Inspection Location
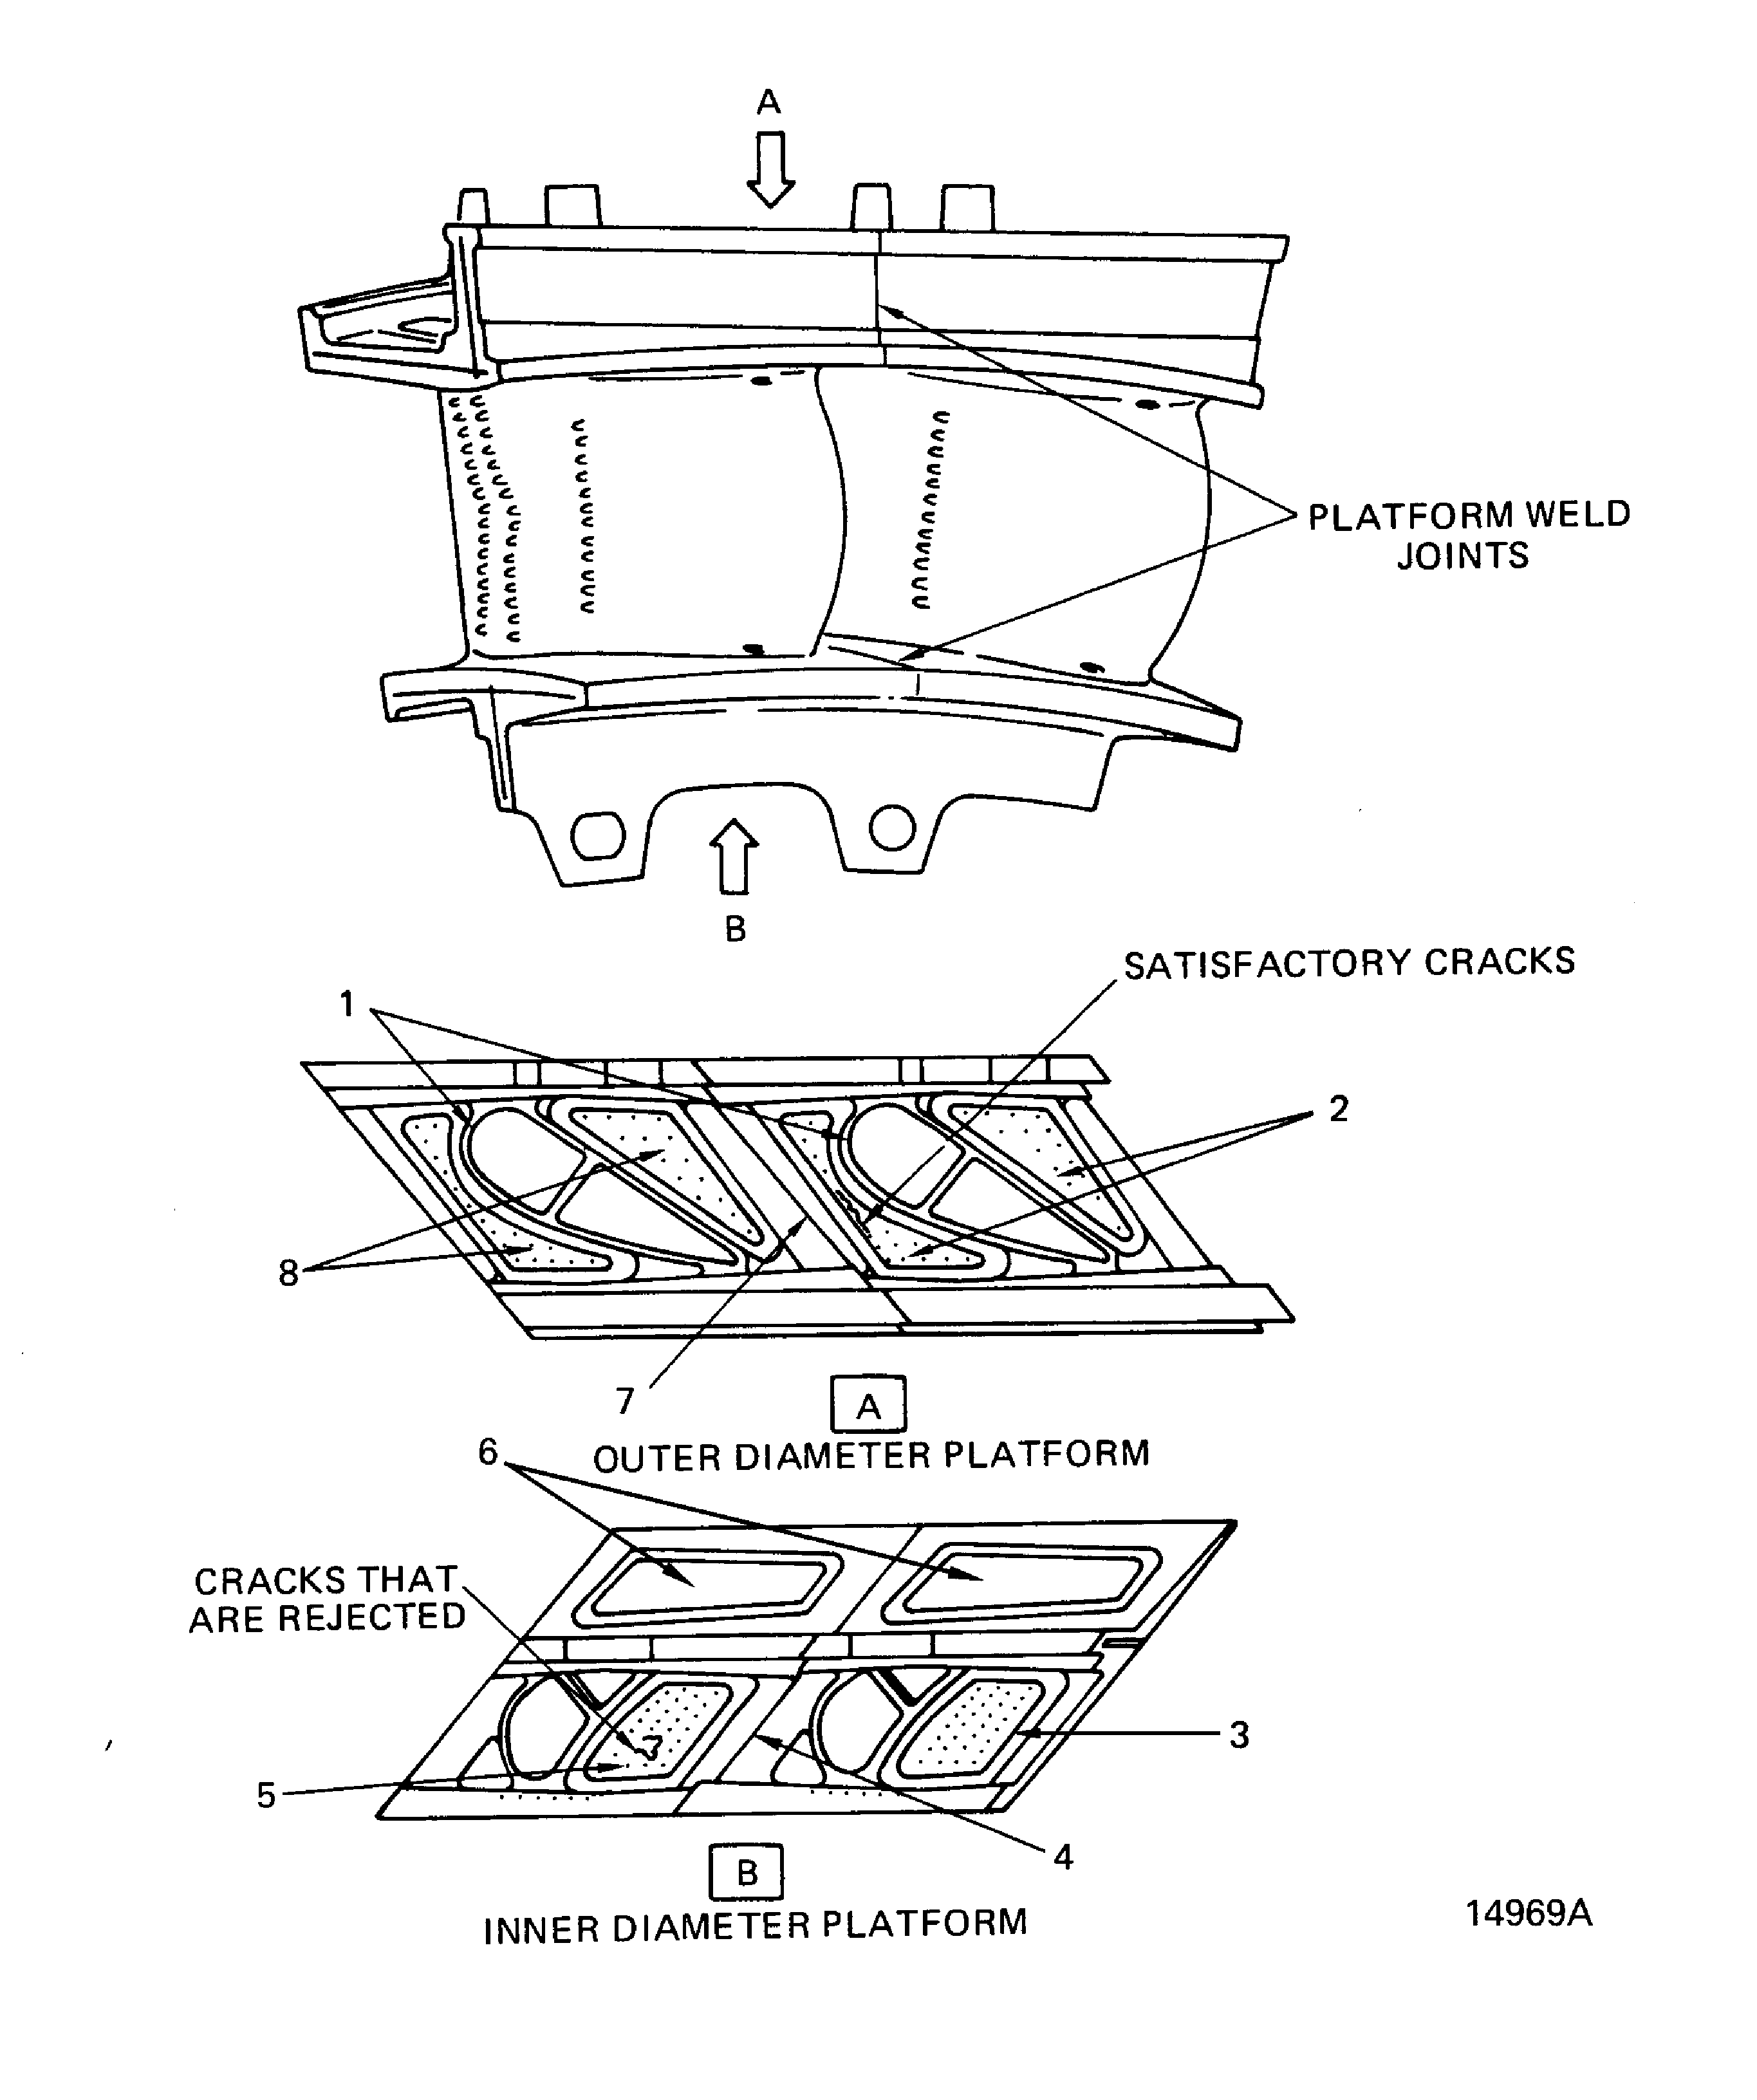
Figure: Stage 1 HPT Vane Cluster Assembly Feather Seal Slot Plug Welds Inspection Location
Stage 1 HPT Vane Cluster Assembly Feather Seal Slot Plug Welds Inspection Location
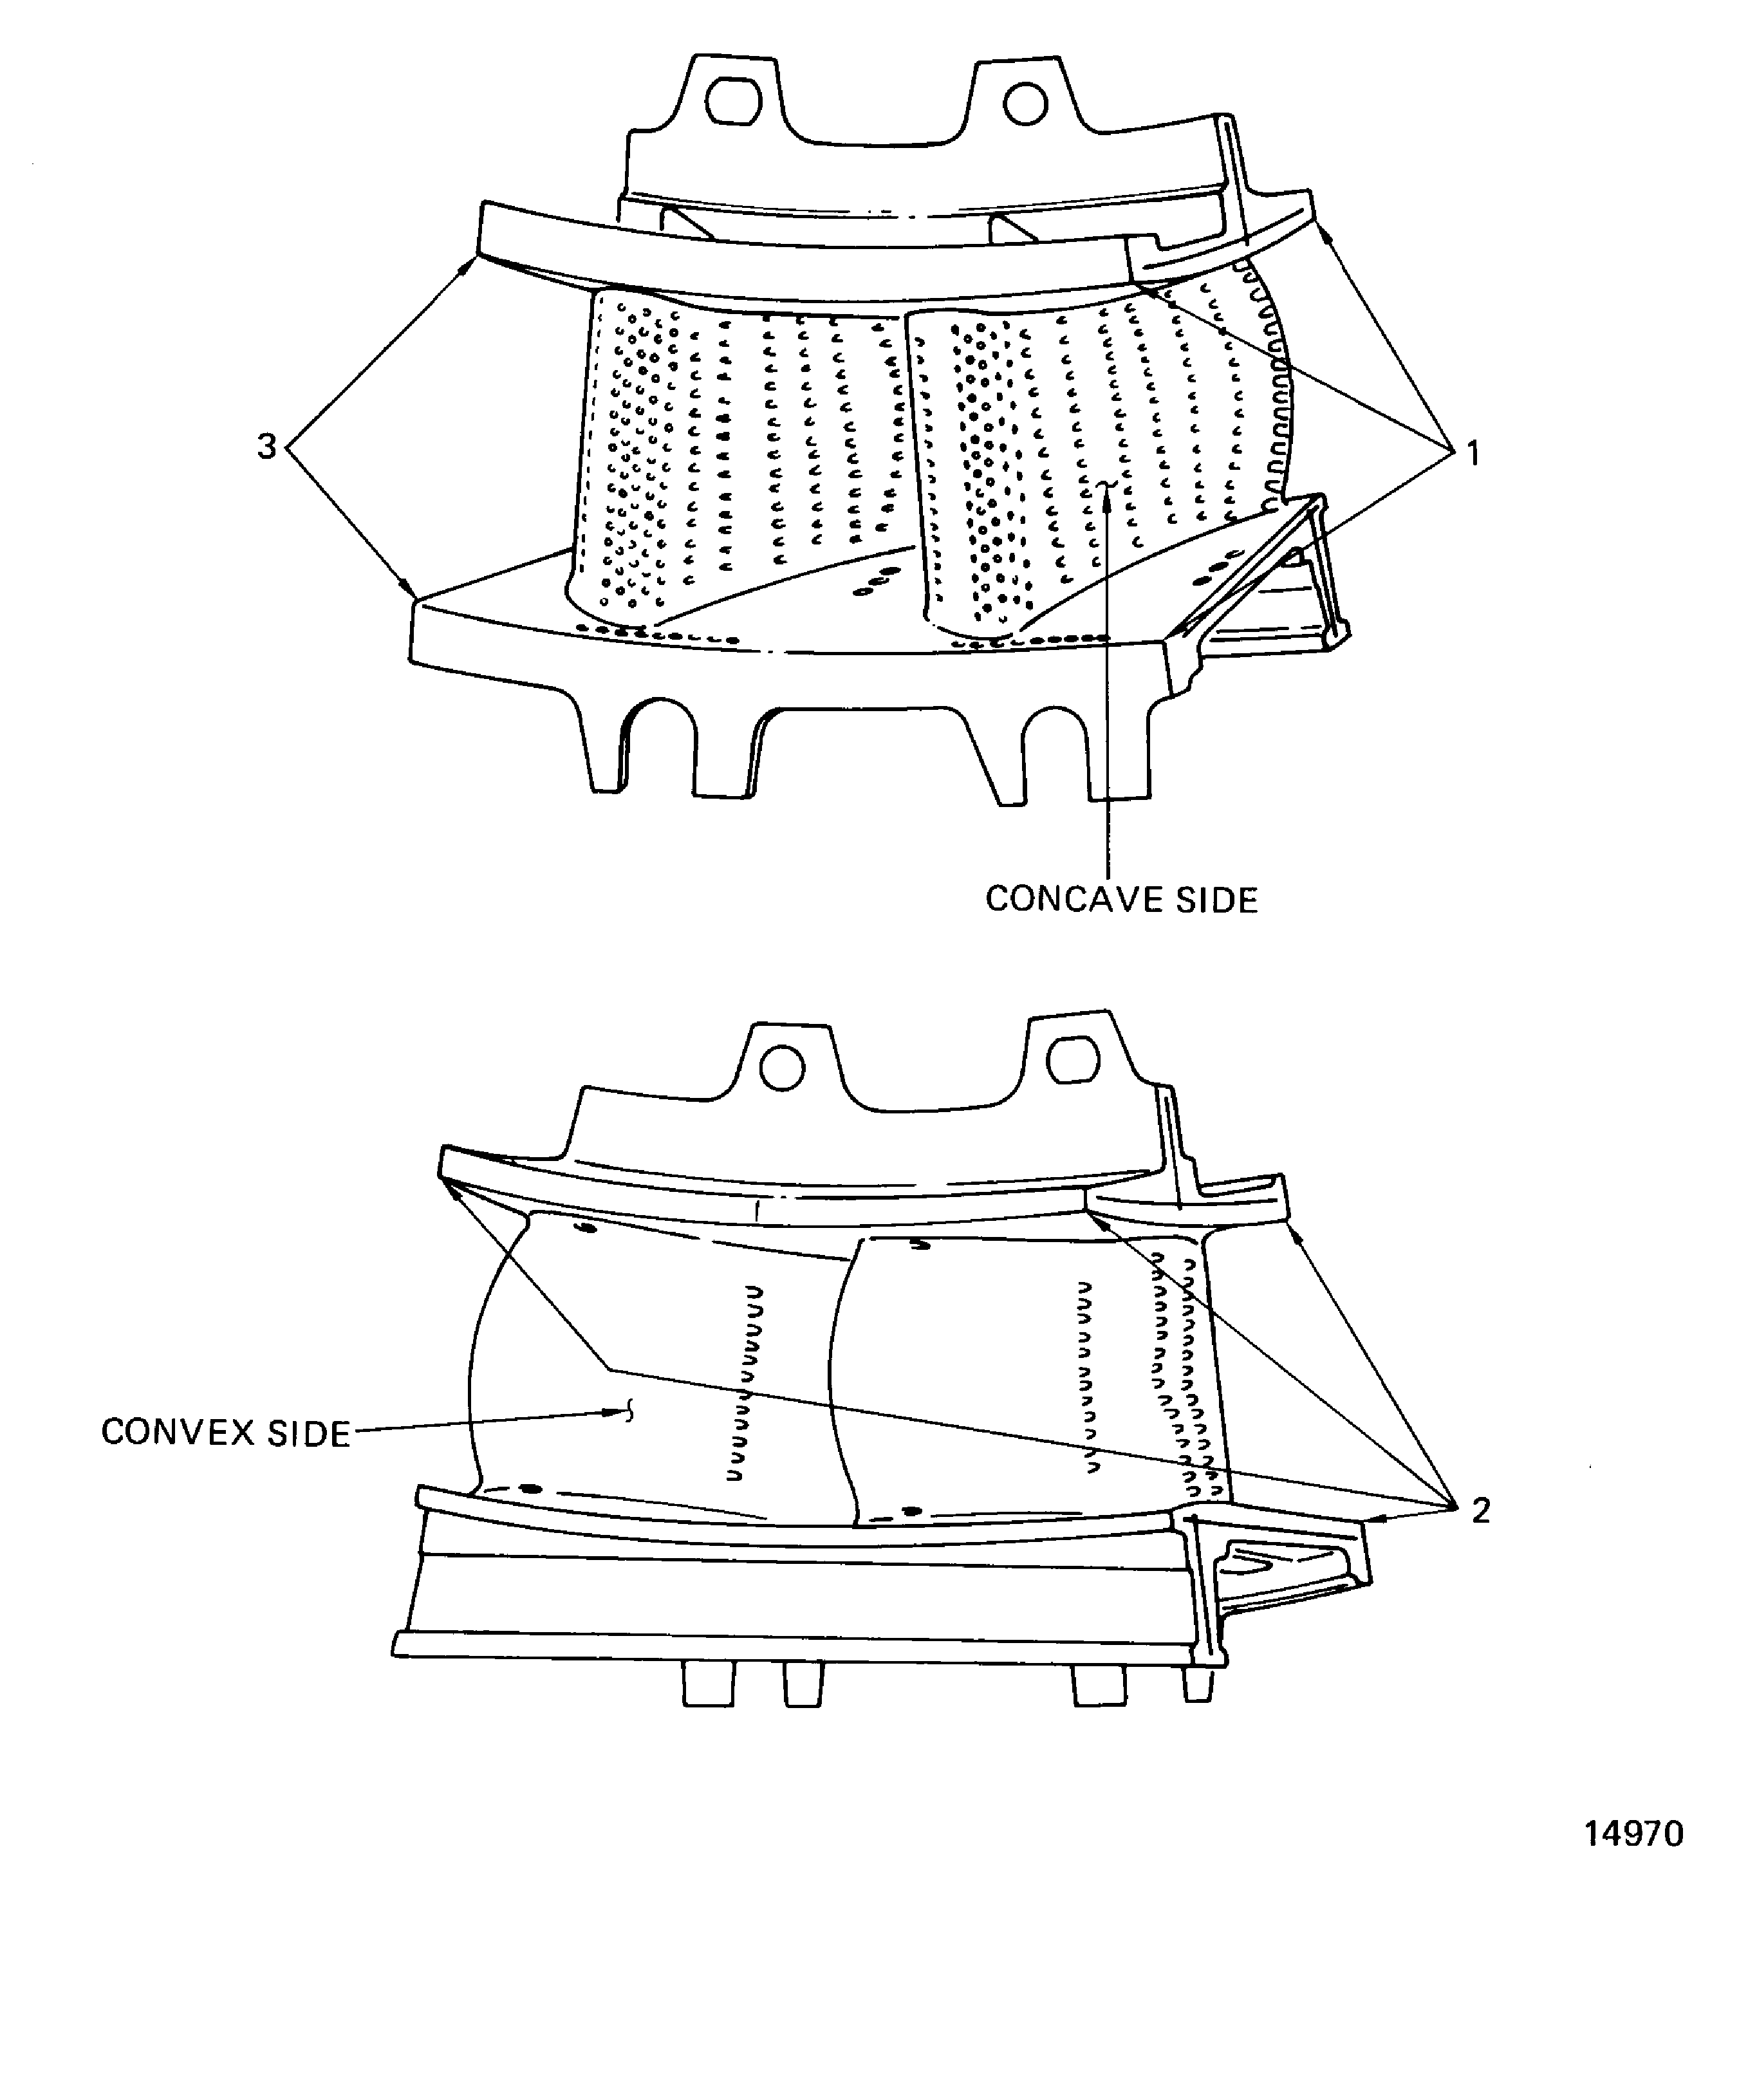
Figure: Stage 1 HPT vVane Cluster Assembly Inspection Locations
Stage 1 HPT vVane Cluster Assembly Inspection Locations
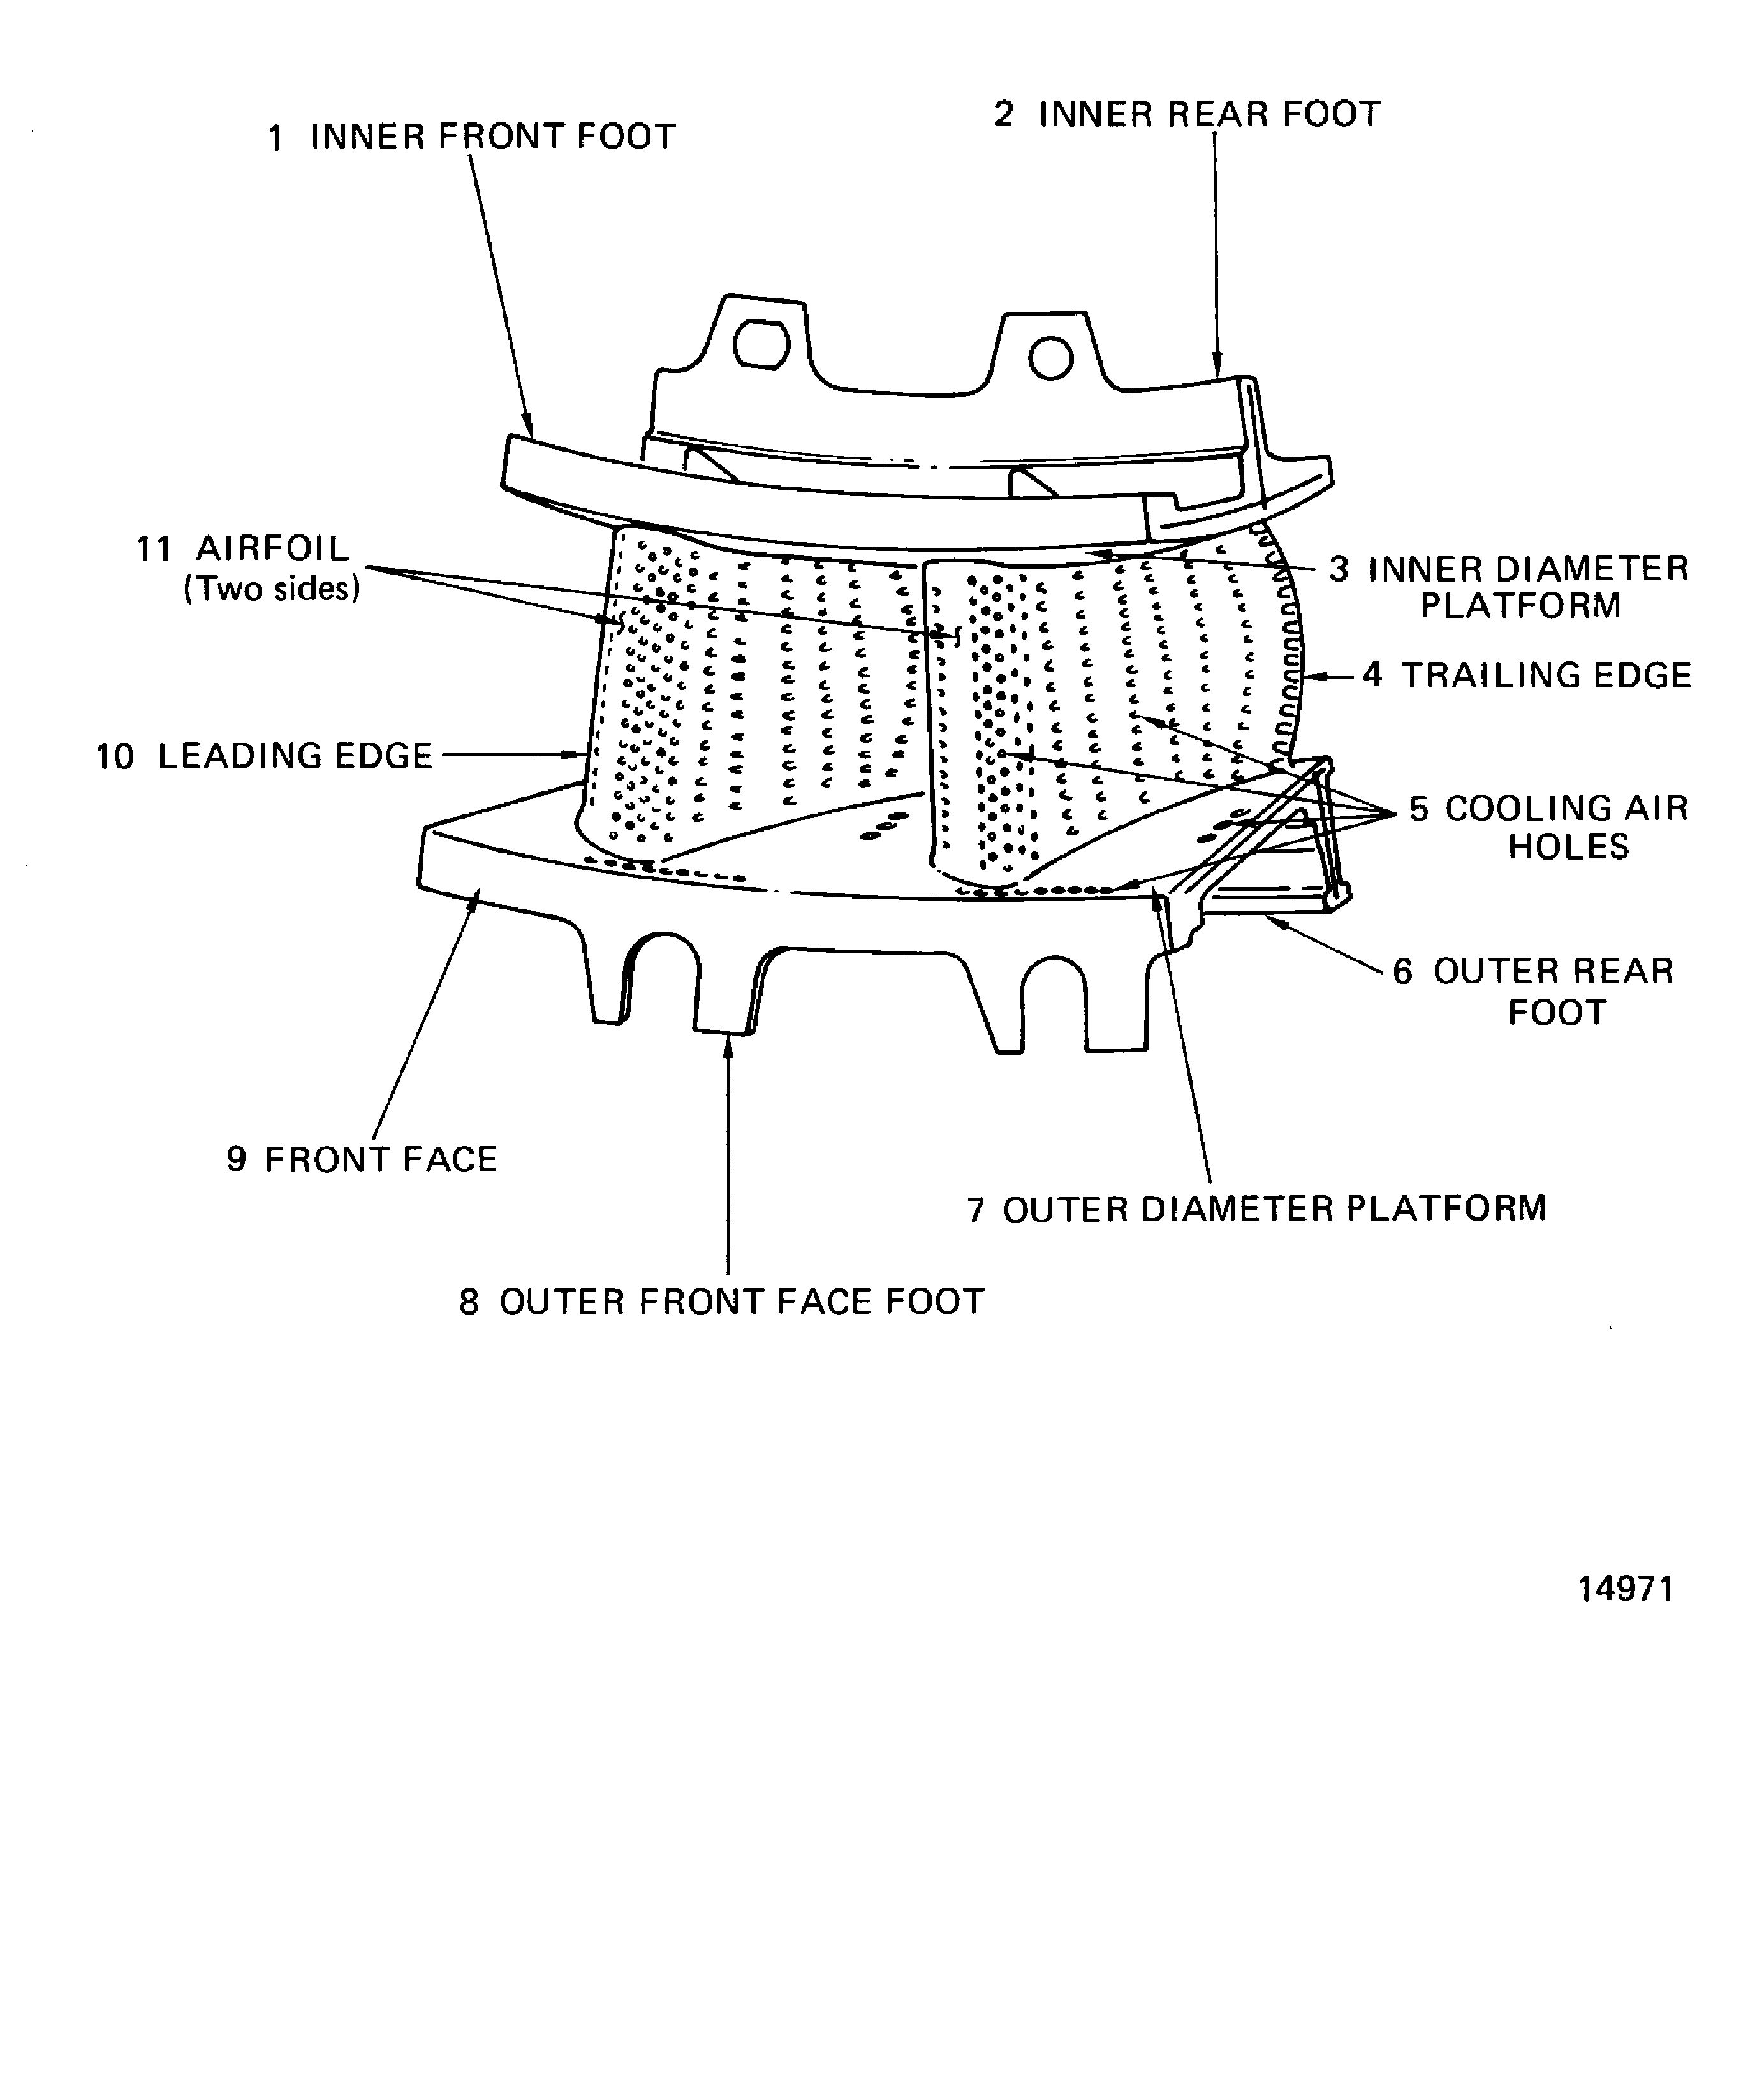
Figure: Stage 1 HPT Vane Cluster Assembly Cooling Air Holes Inspection Locations
Stage 1 HPT Vane Cluster Assembly Cooling Air Holes Inspection Locations
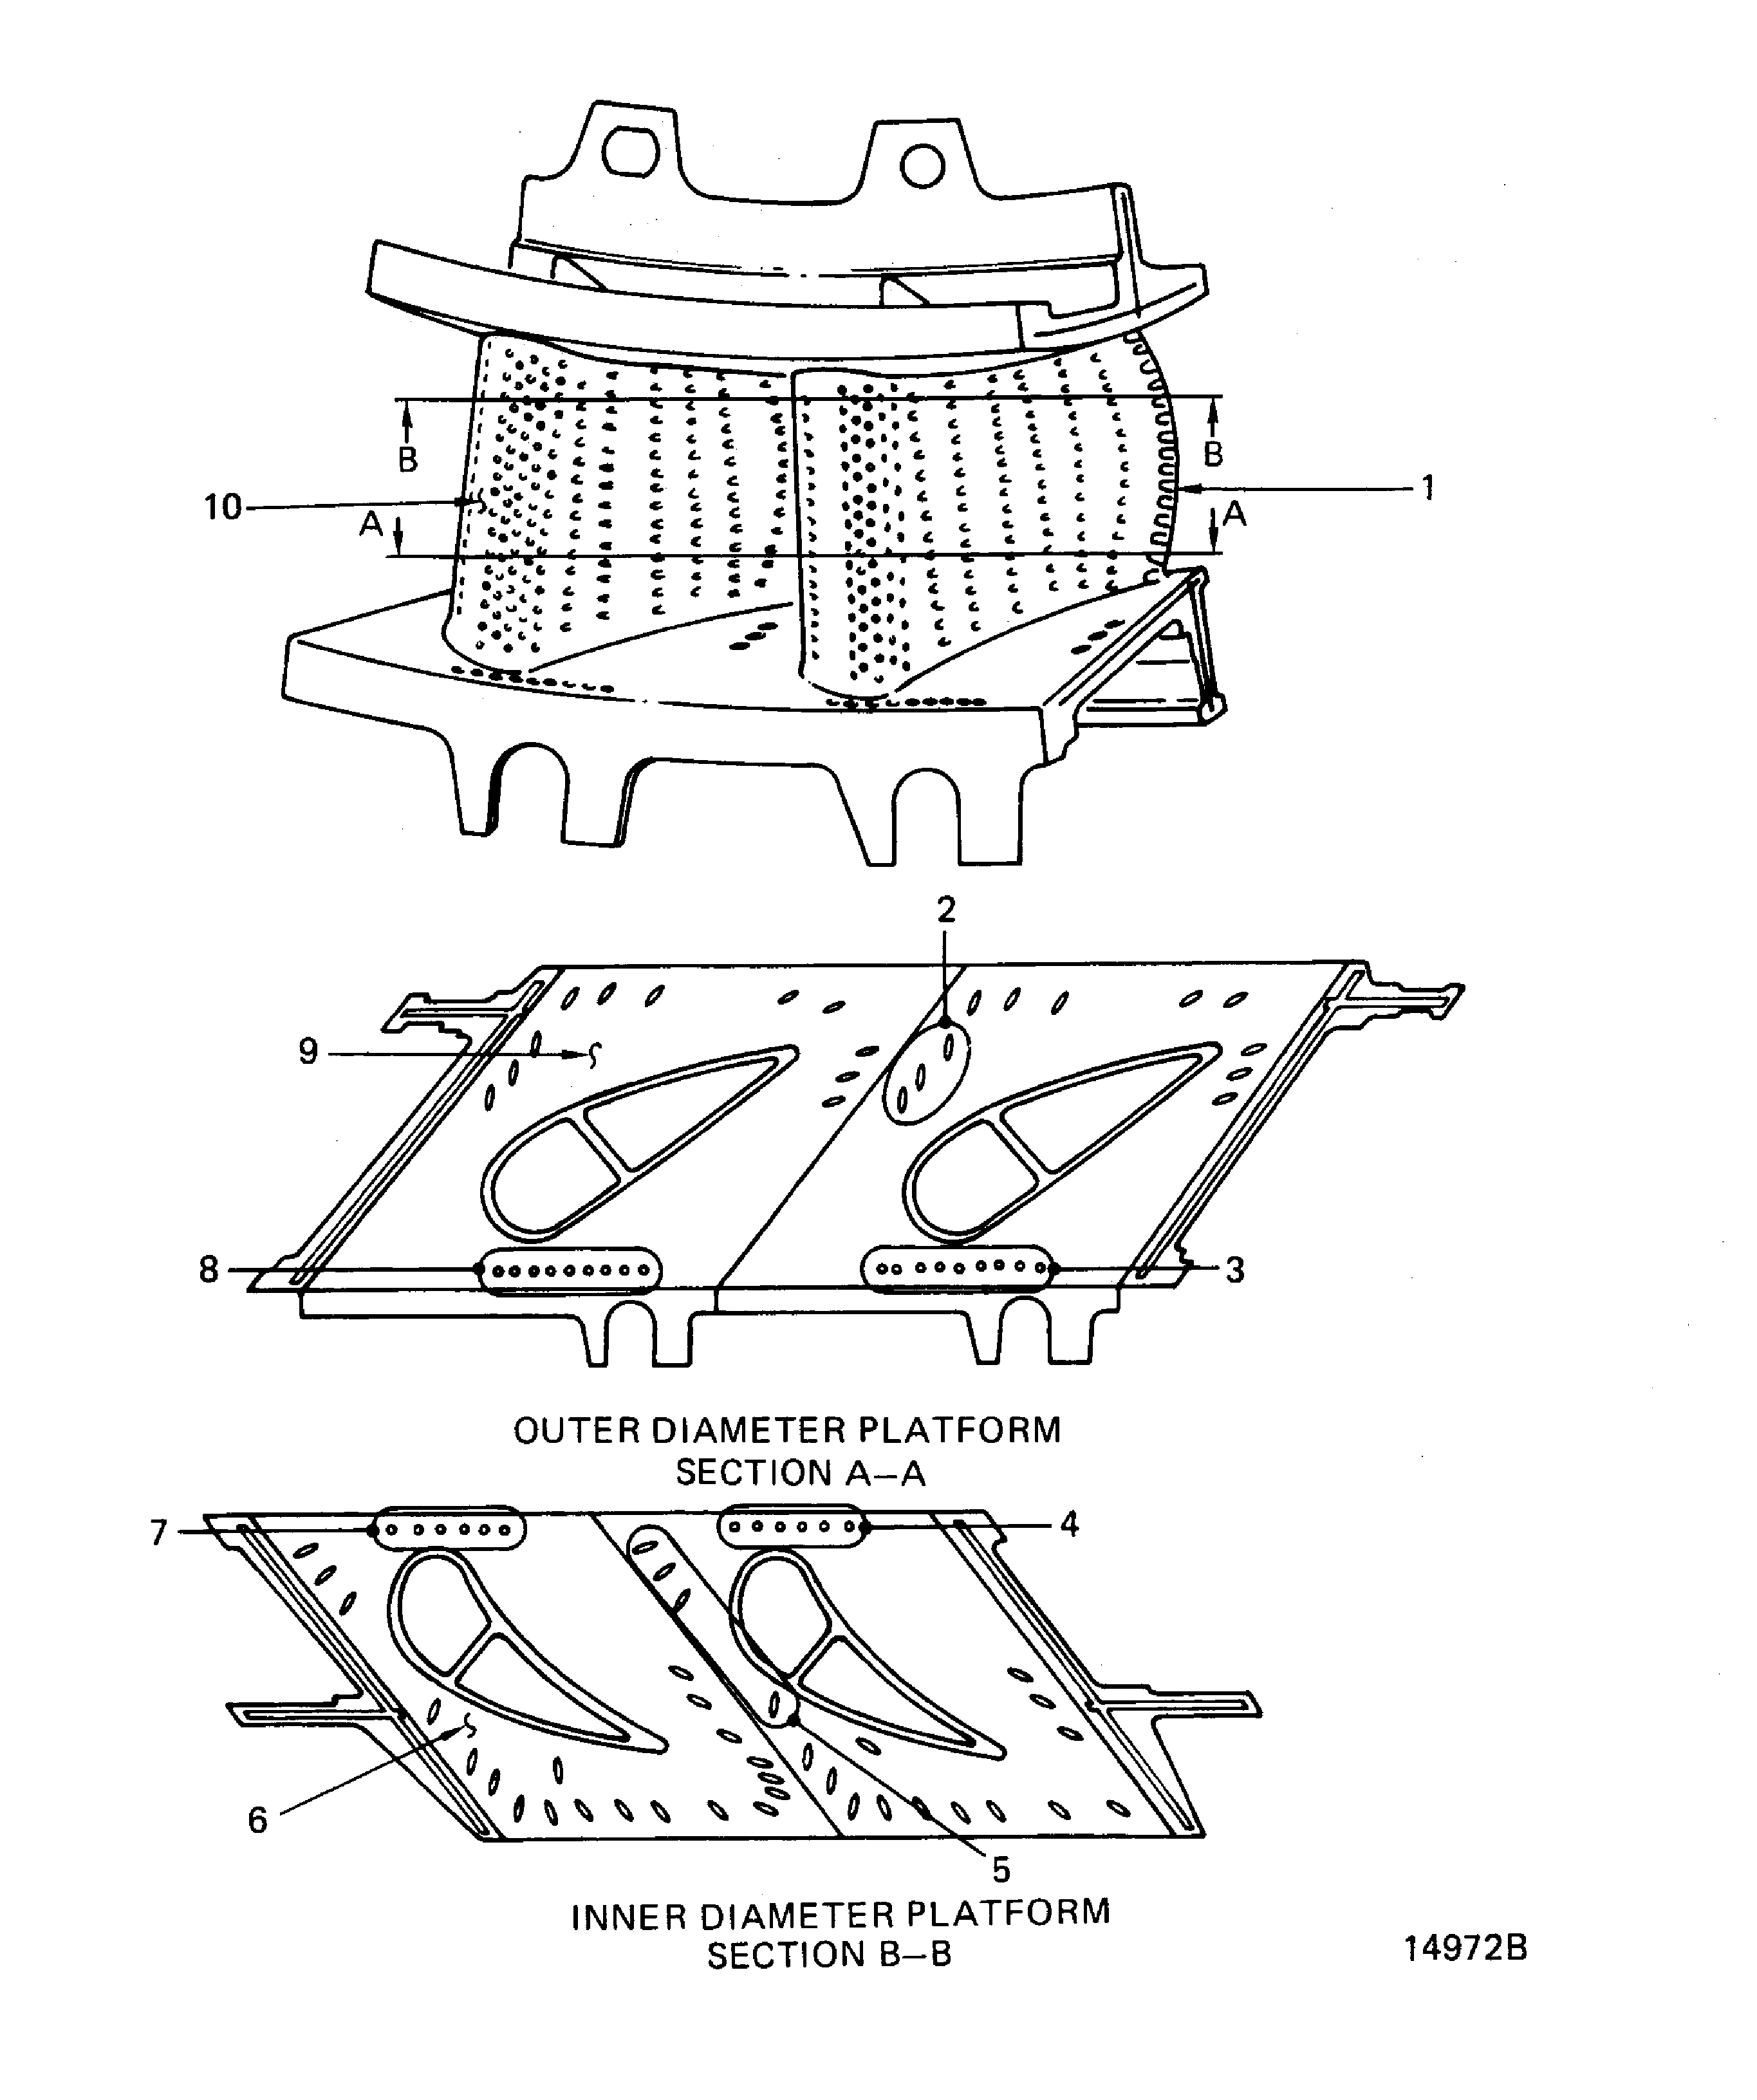
Figure: Stage 1 HPT Vane Cluster Assembly Platform Coating Inspection Locations
Stage 1 HPT Vane Cluster Assembly Platform Coating Inspection Locations
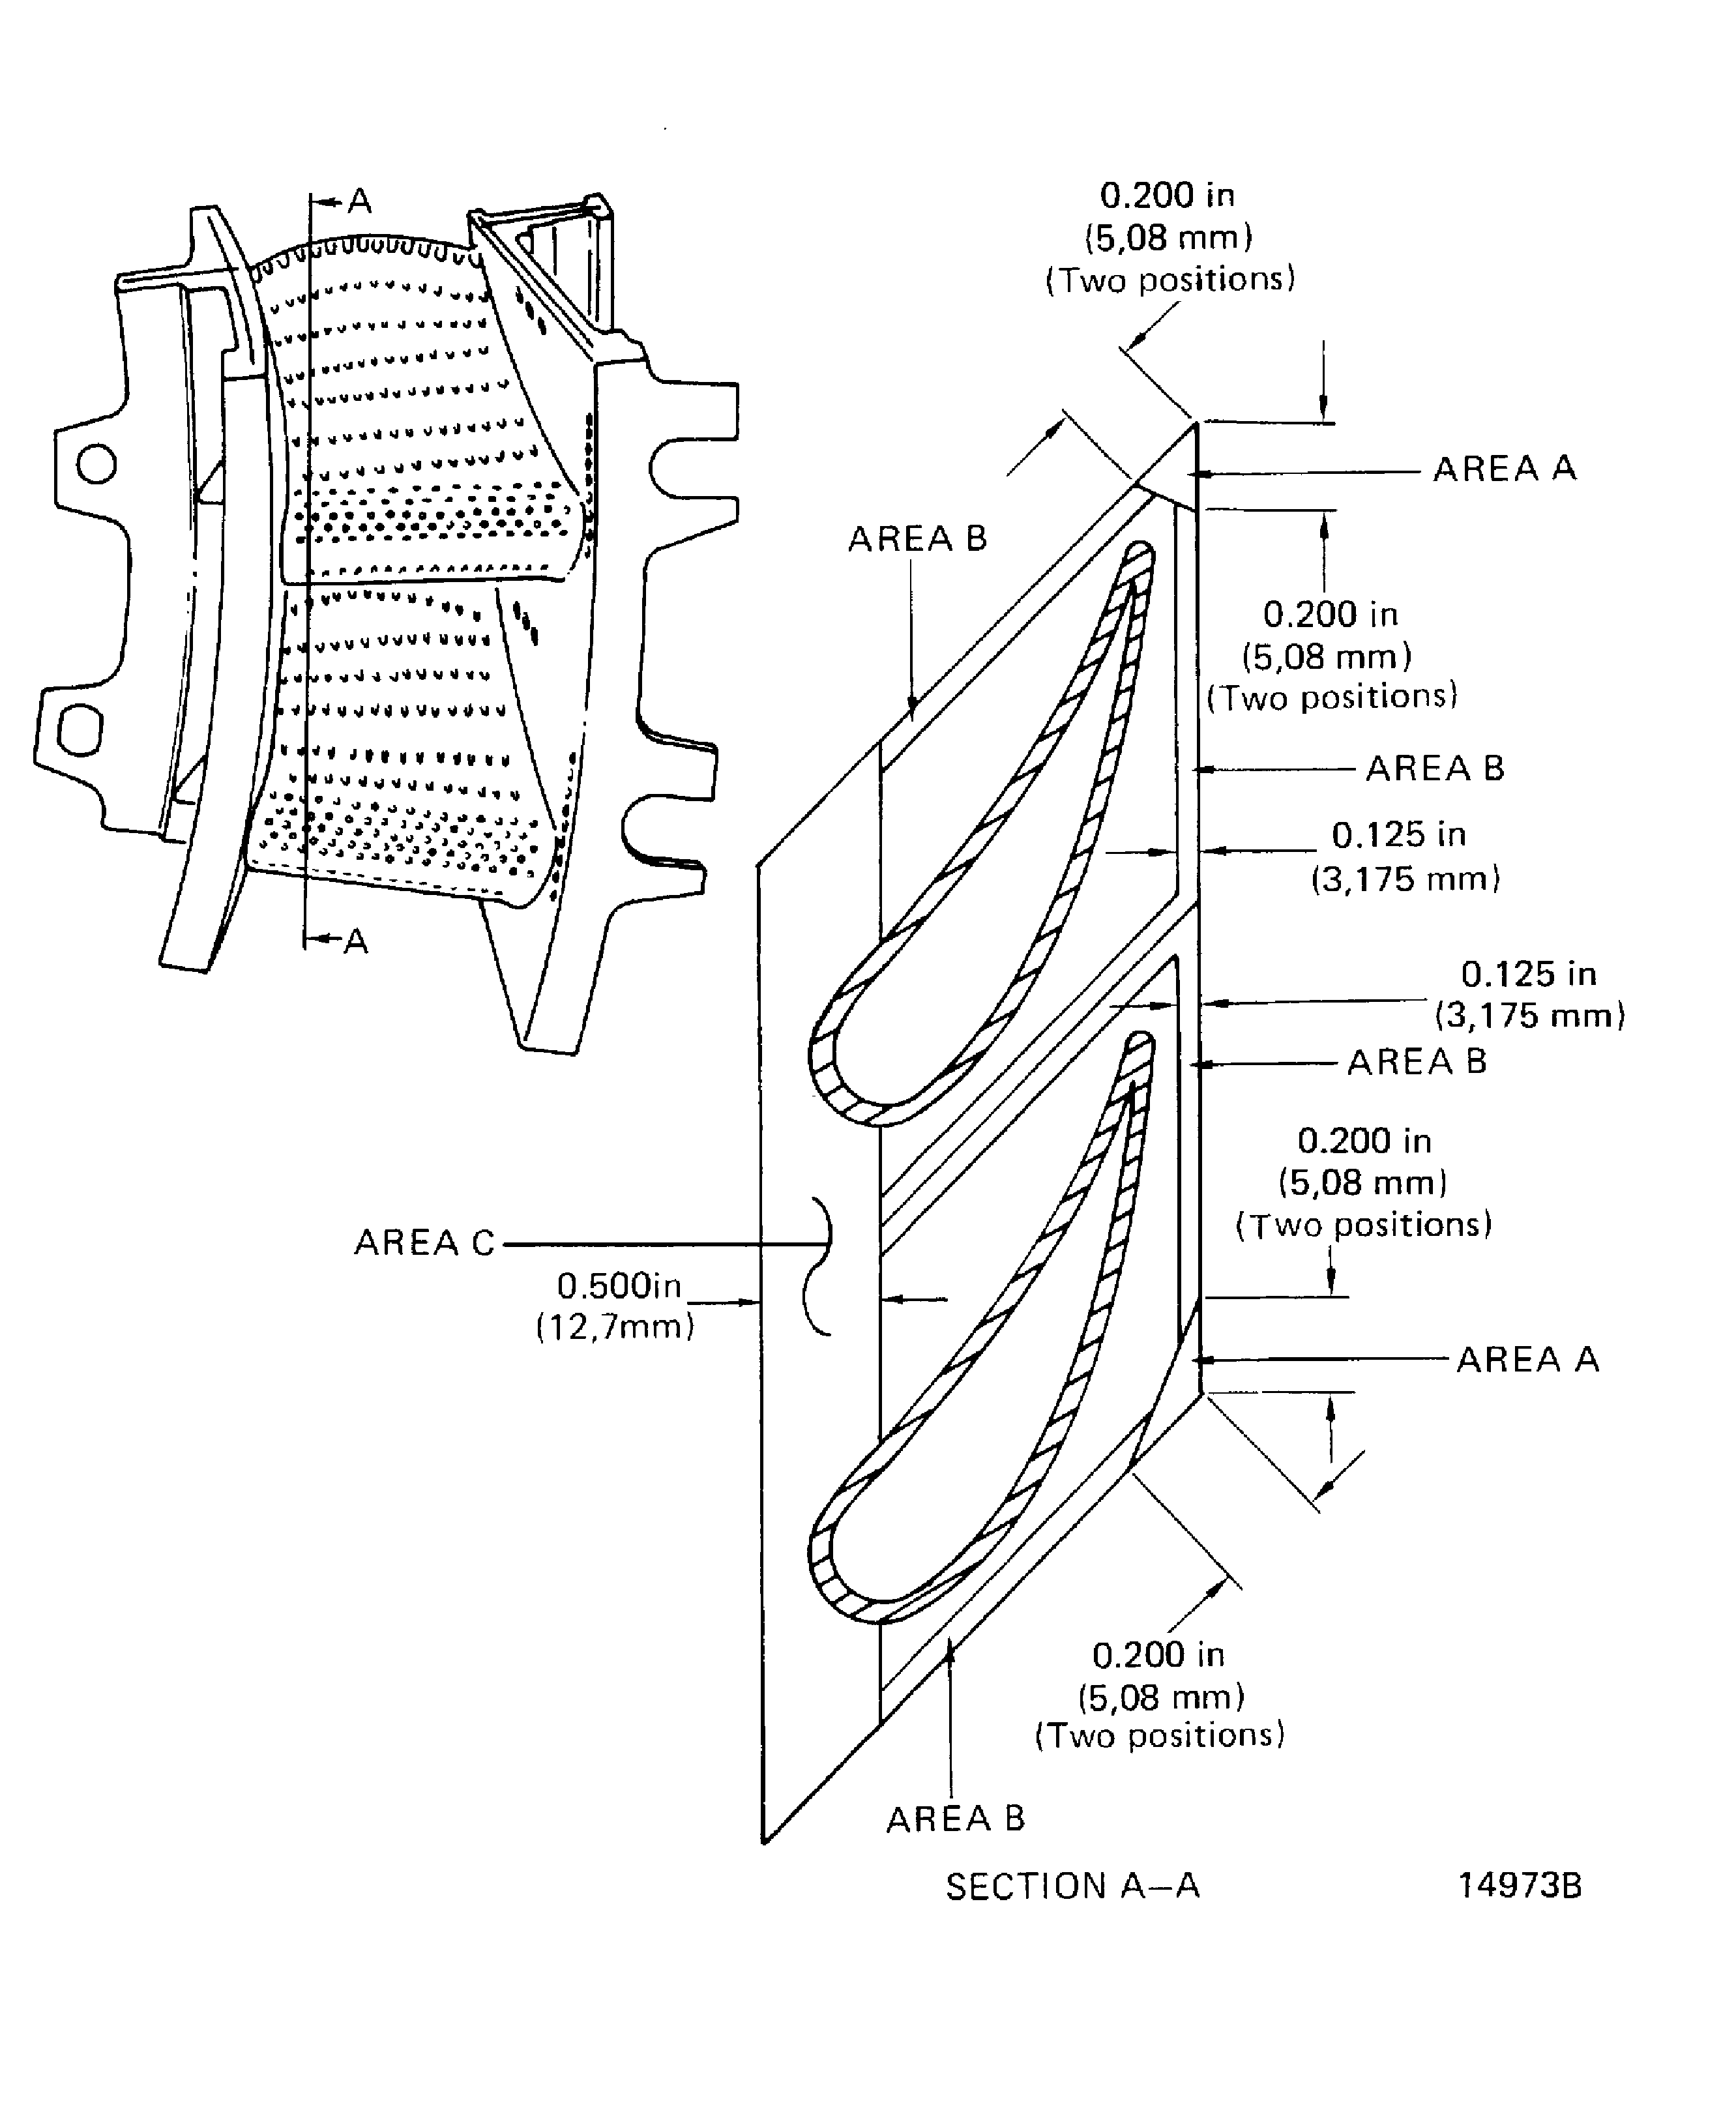
Figure: Stage 1 HPT vane cluster assembly inspection locations
Stage 1 HPT vane cluster assembly inspection locations
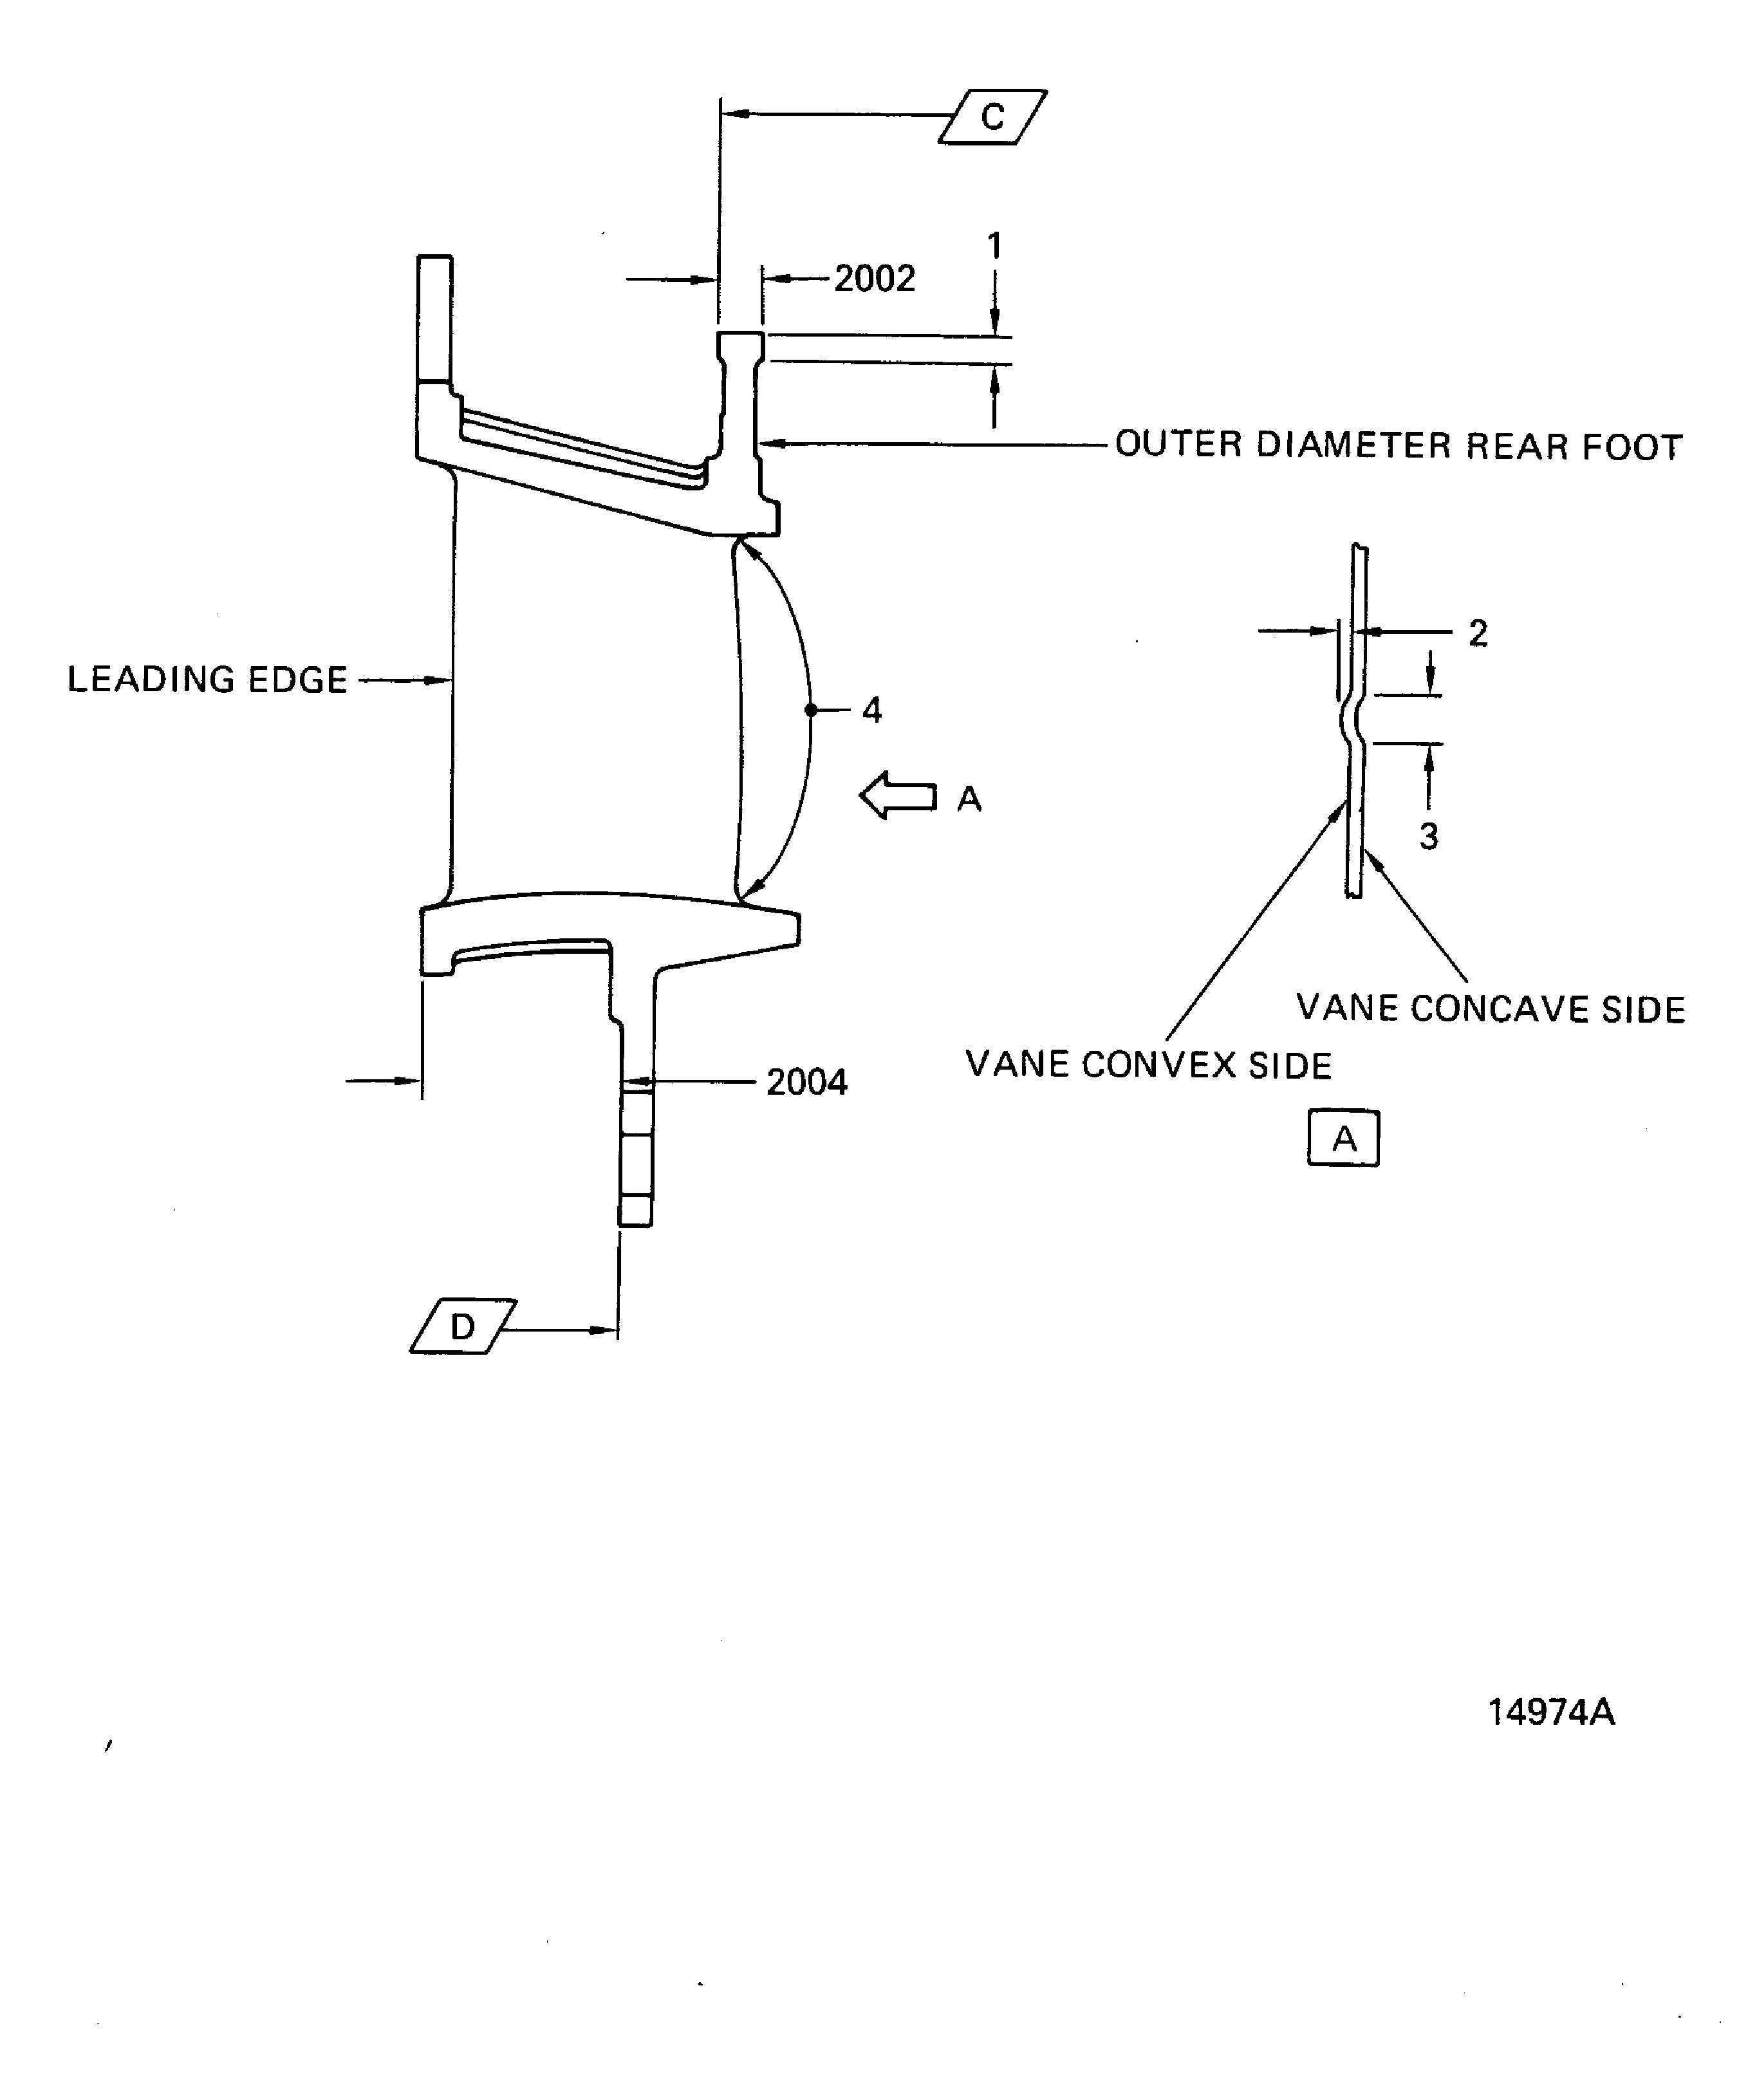
Figure: Stage 1 HPT Vane Cluster Assembly Inspection Locations
Stage 1 HPT Vane Cluster Assembly Inspection Locations
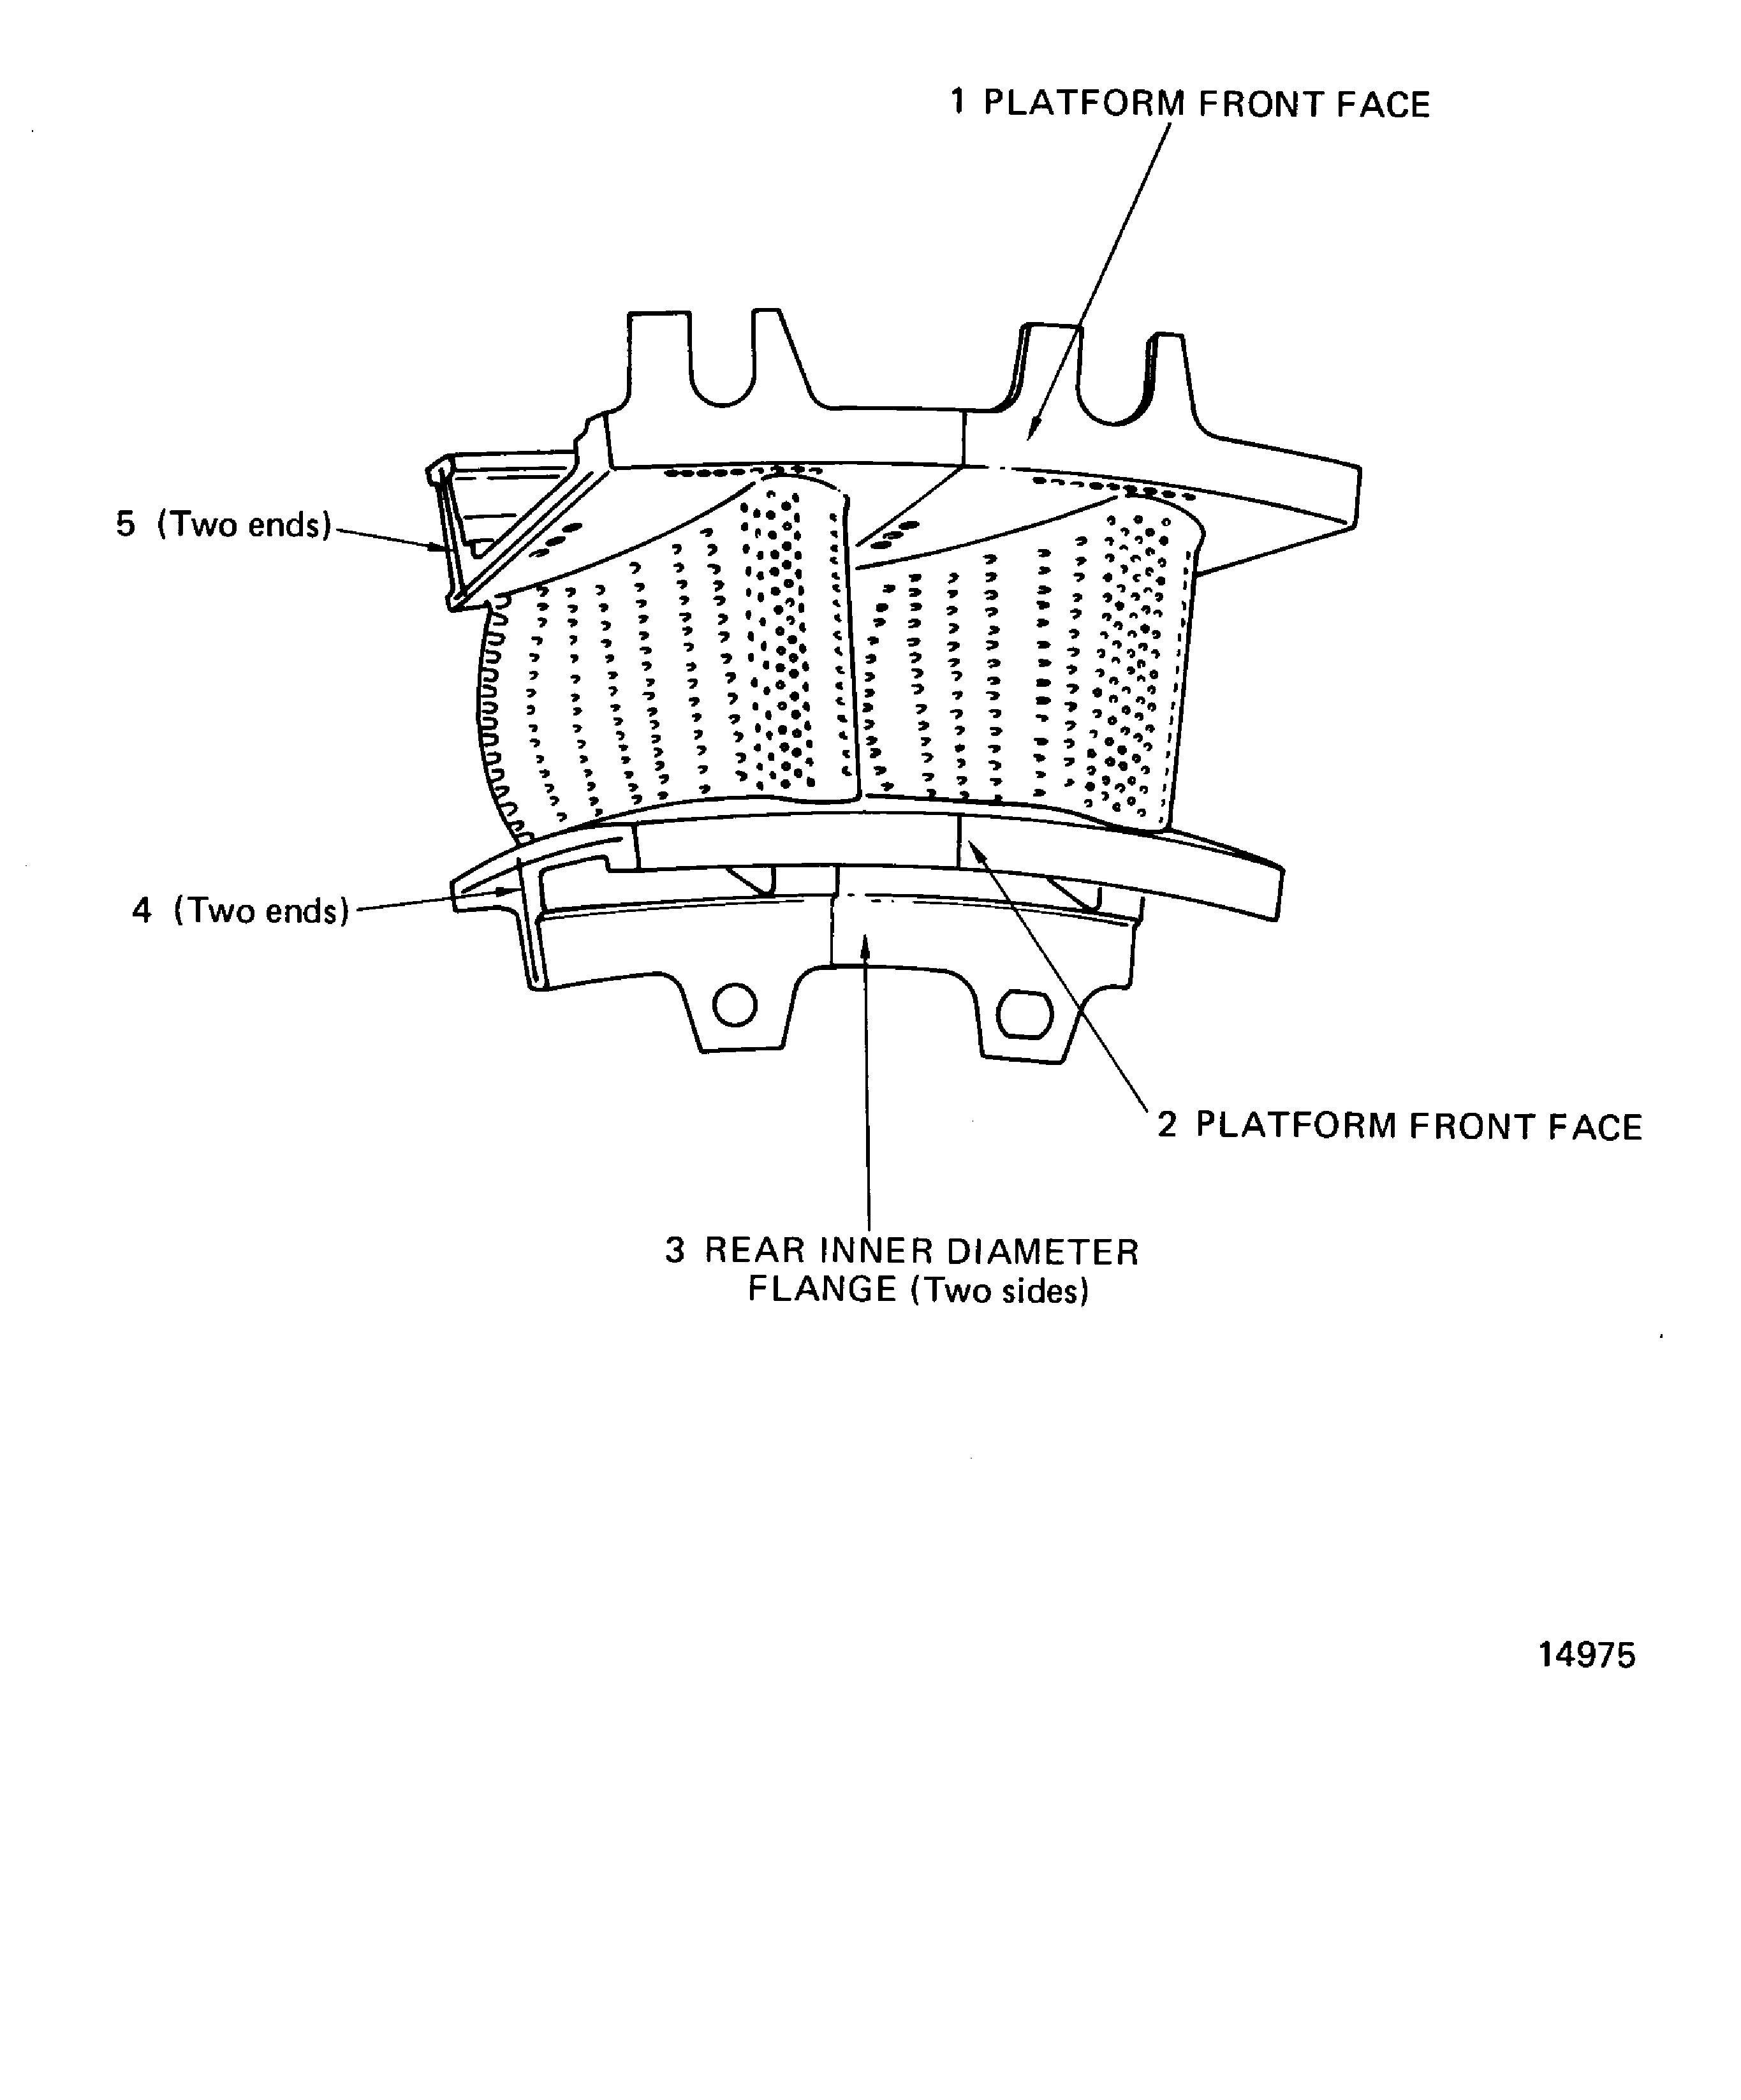
Figure: Stage 1 HPT Vane Cluster Assembly Airflow Limits Table
Sheet 1
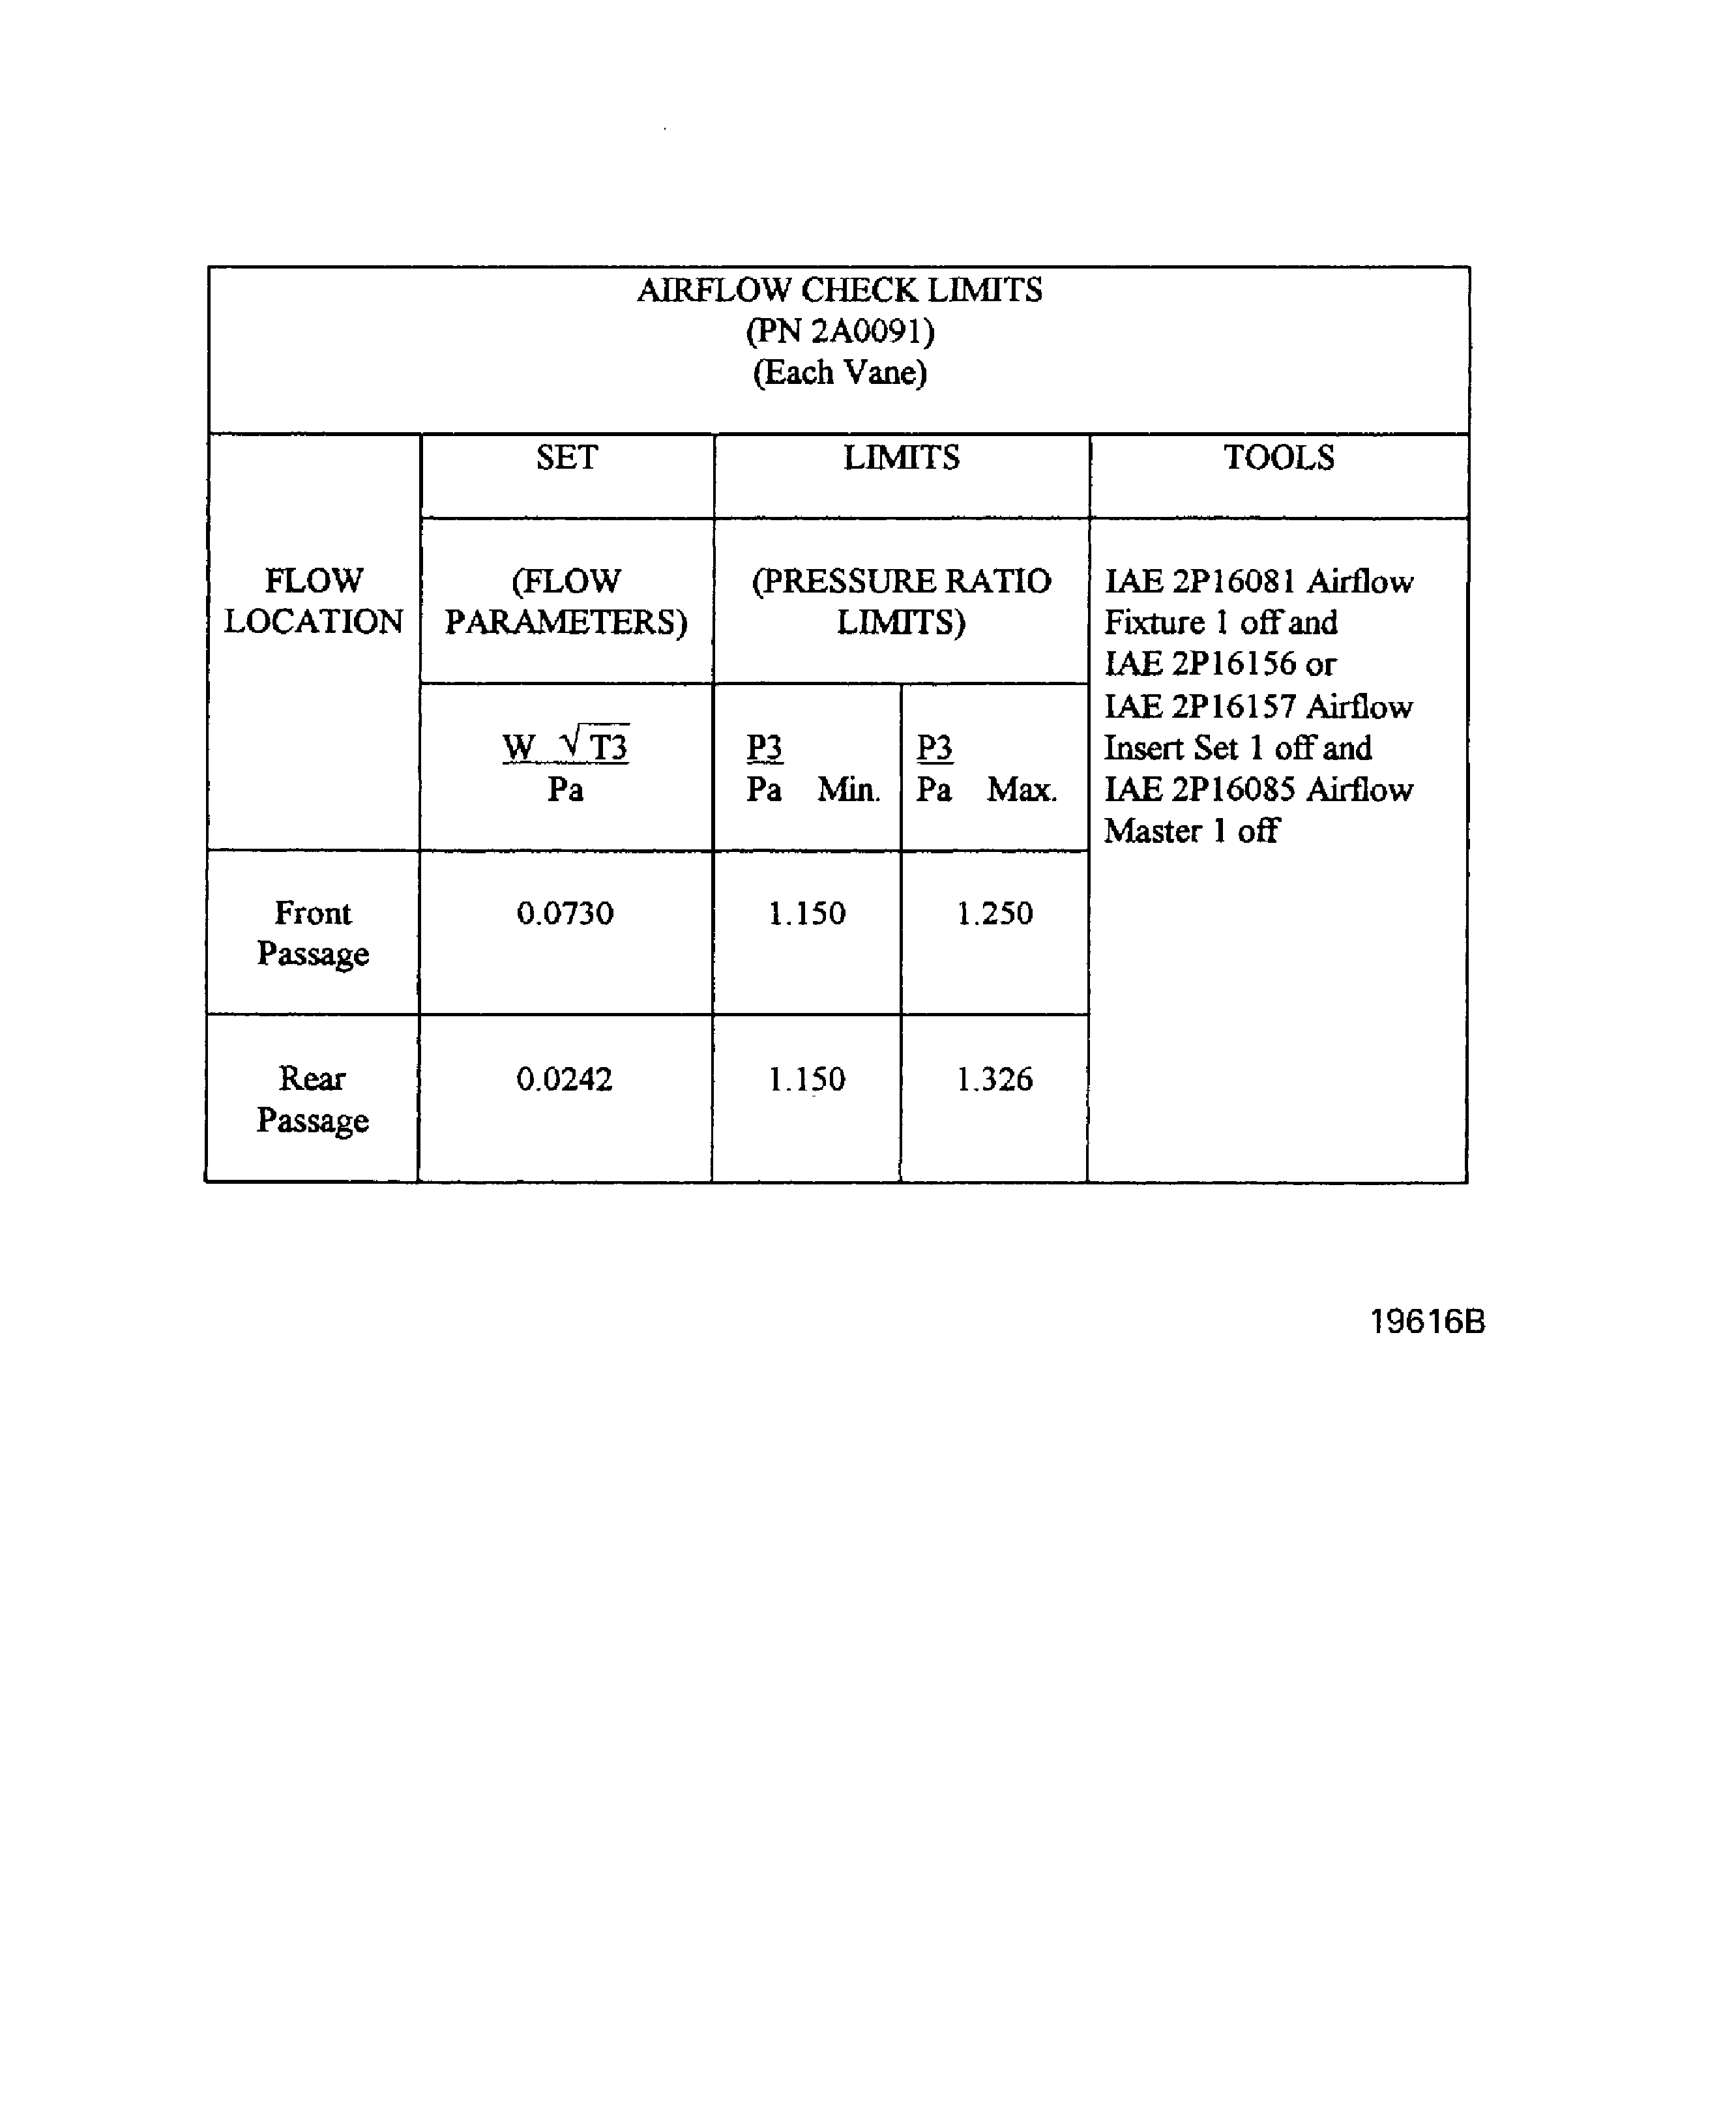
Figure: Stage 1 HPT Vane Cluster Assembly Airflow Limits Table
Sheet 2
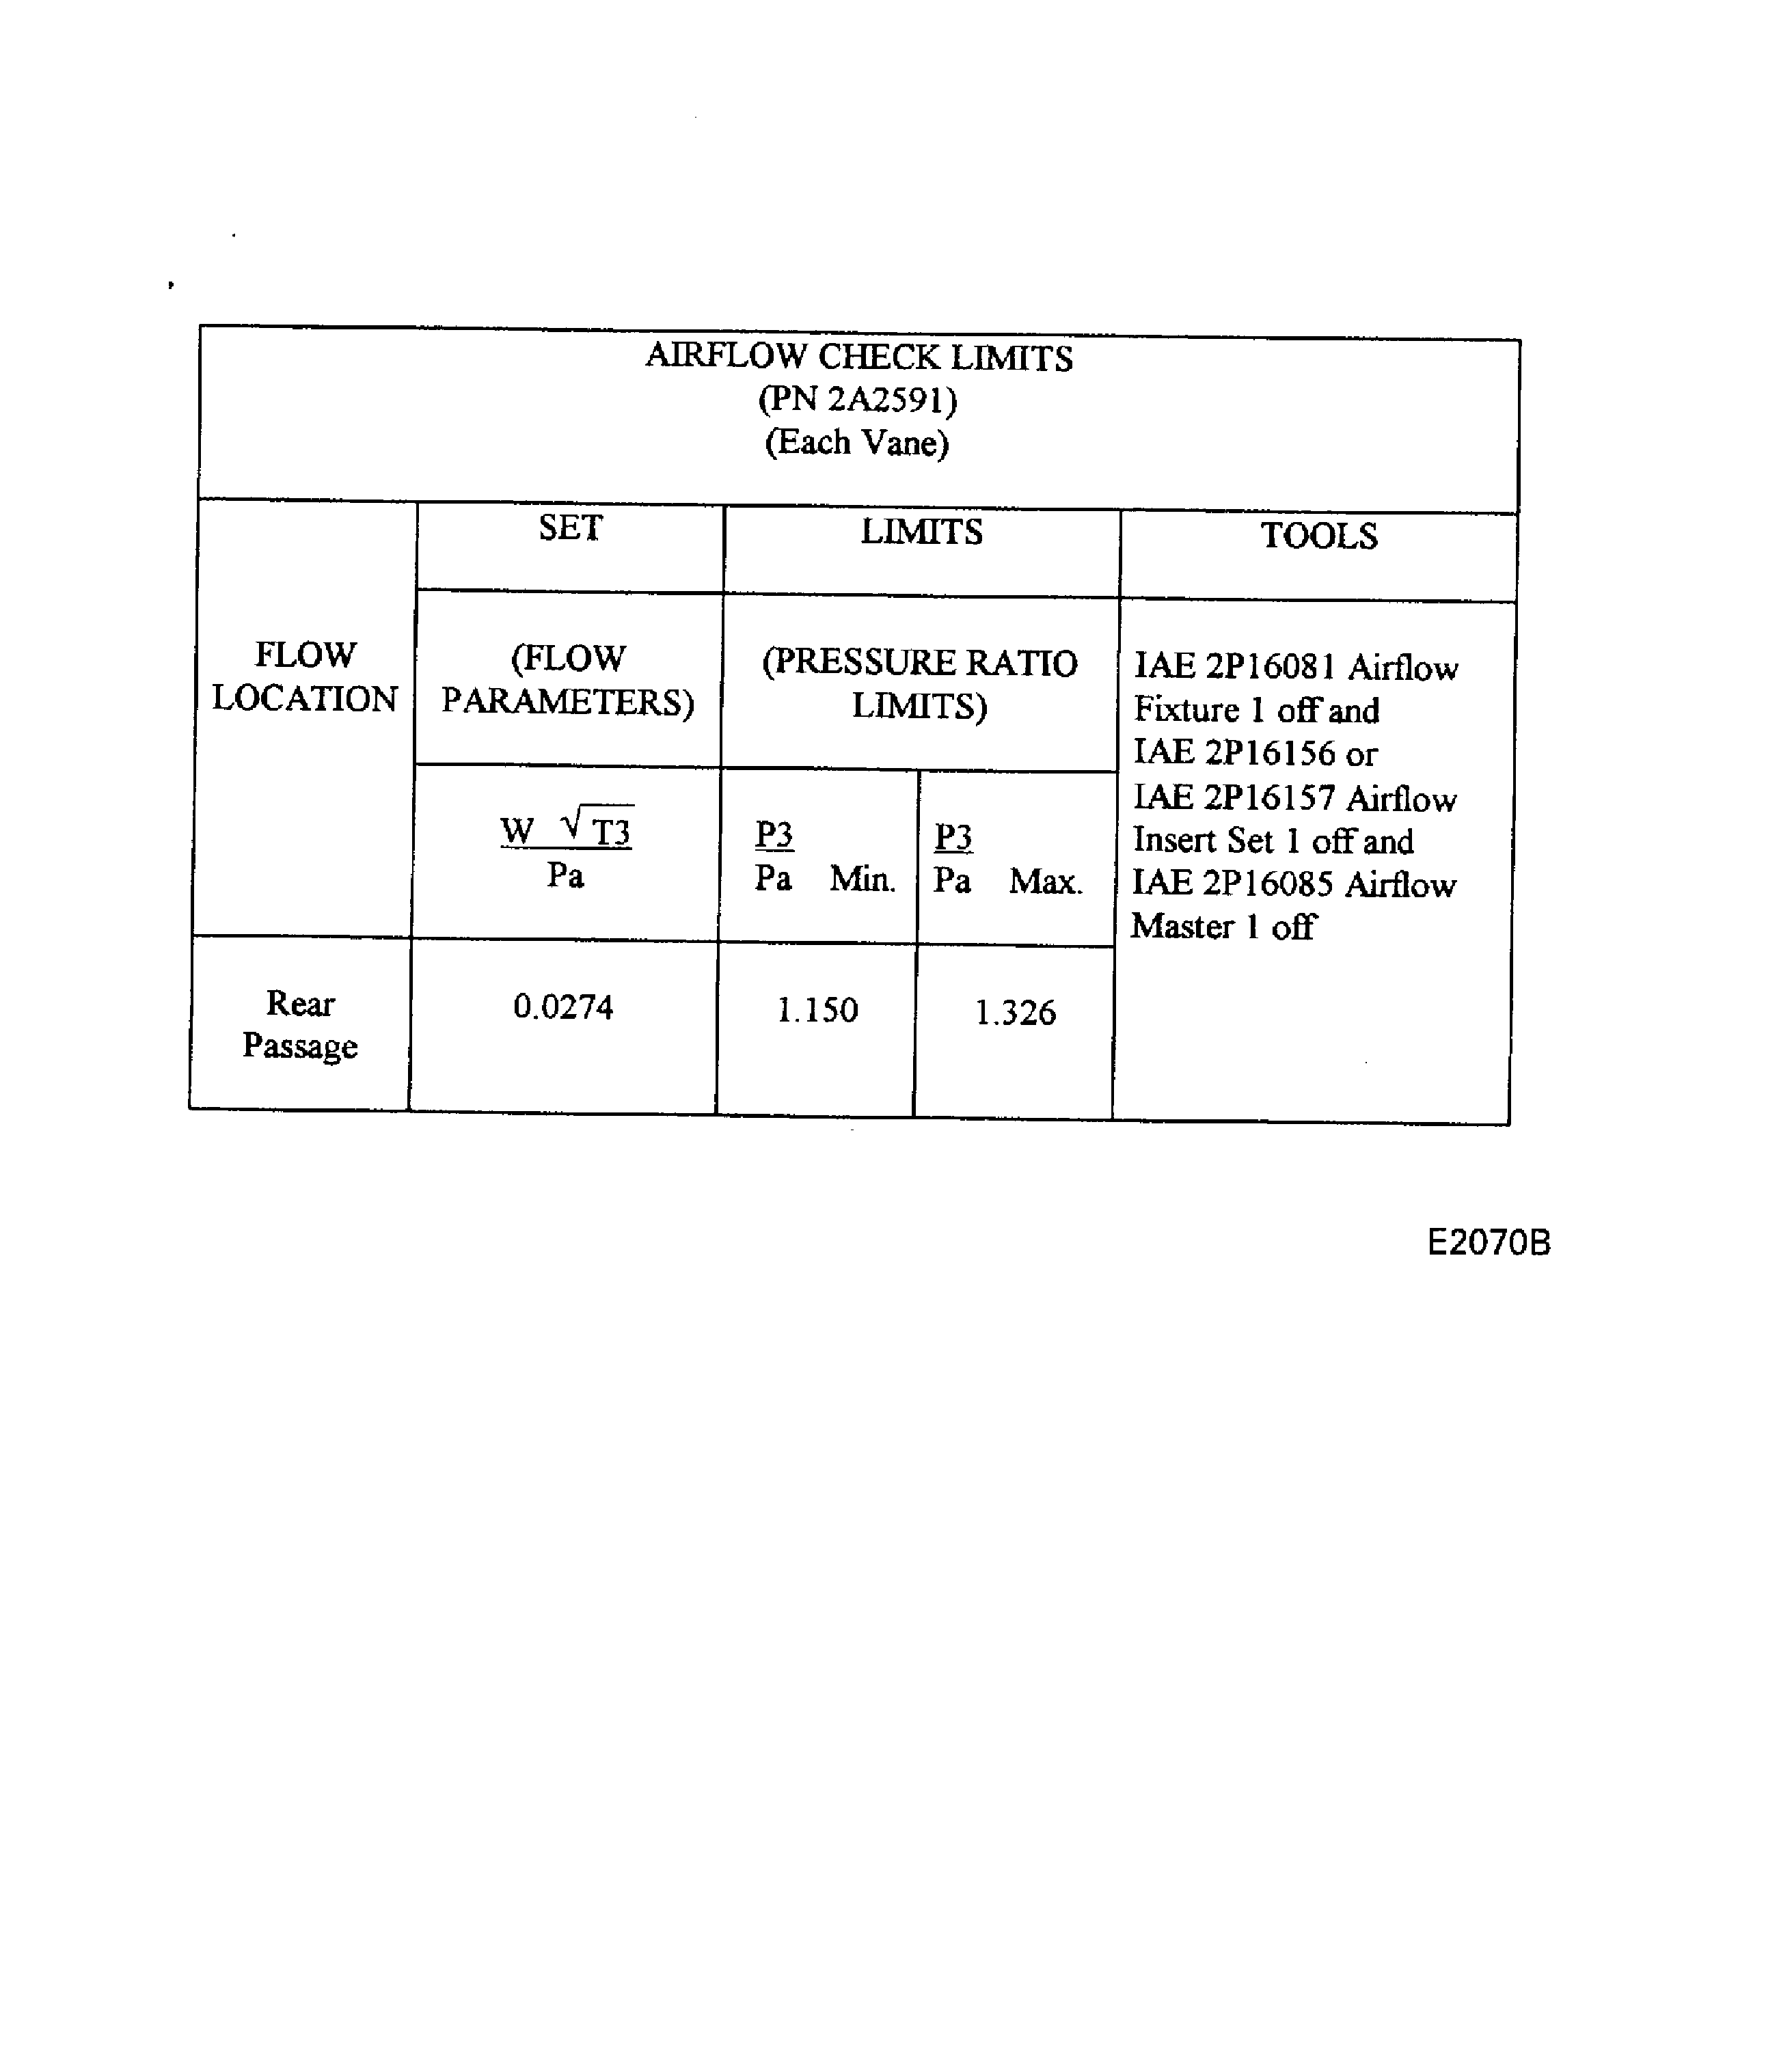
Figure: Stage 1 HPT Vane Cluster Assembly Airflow Check Tools
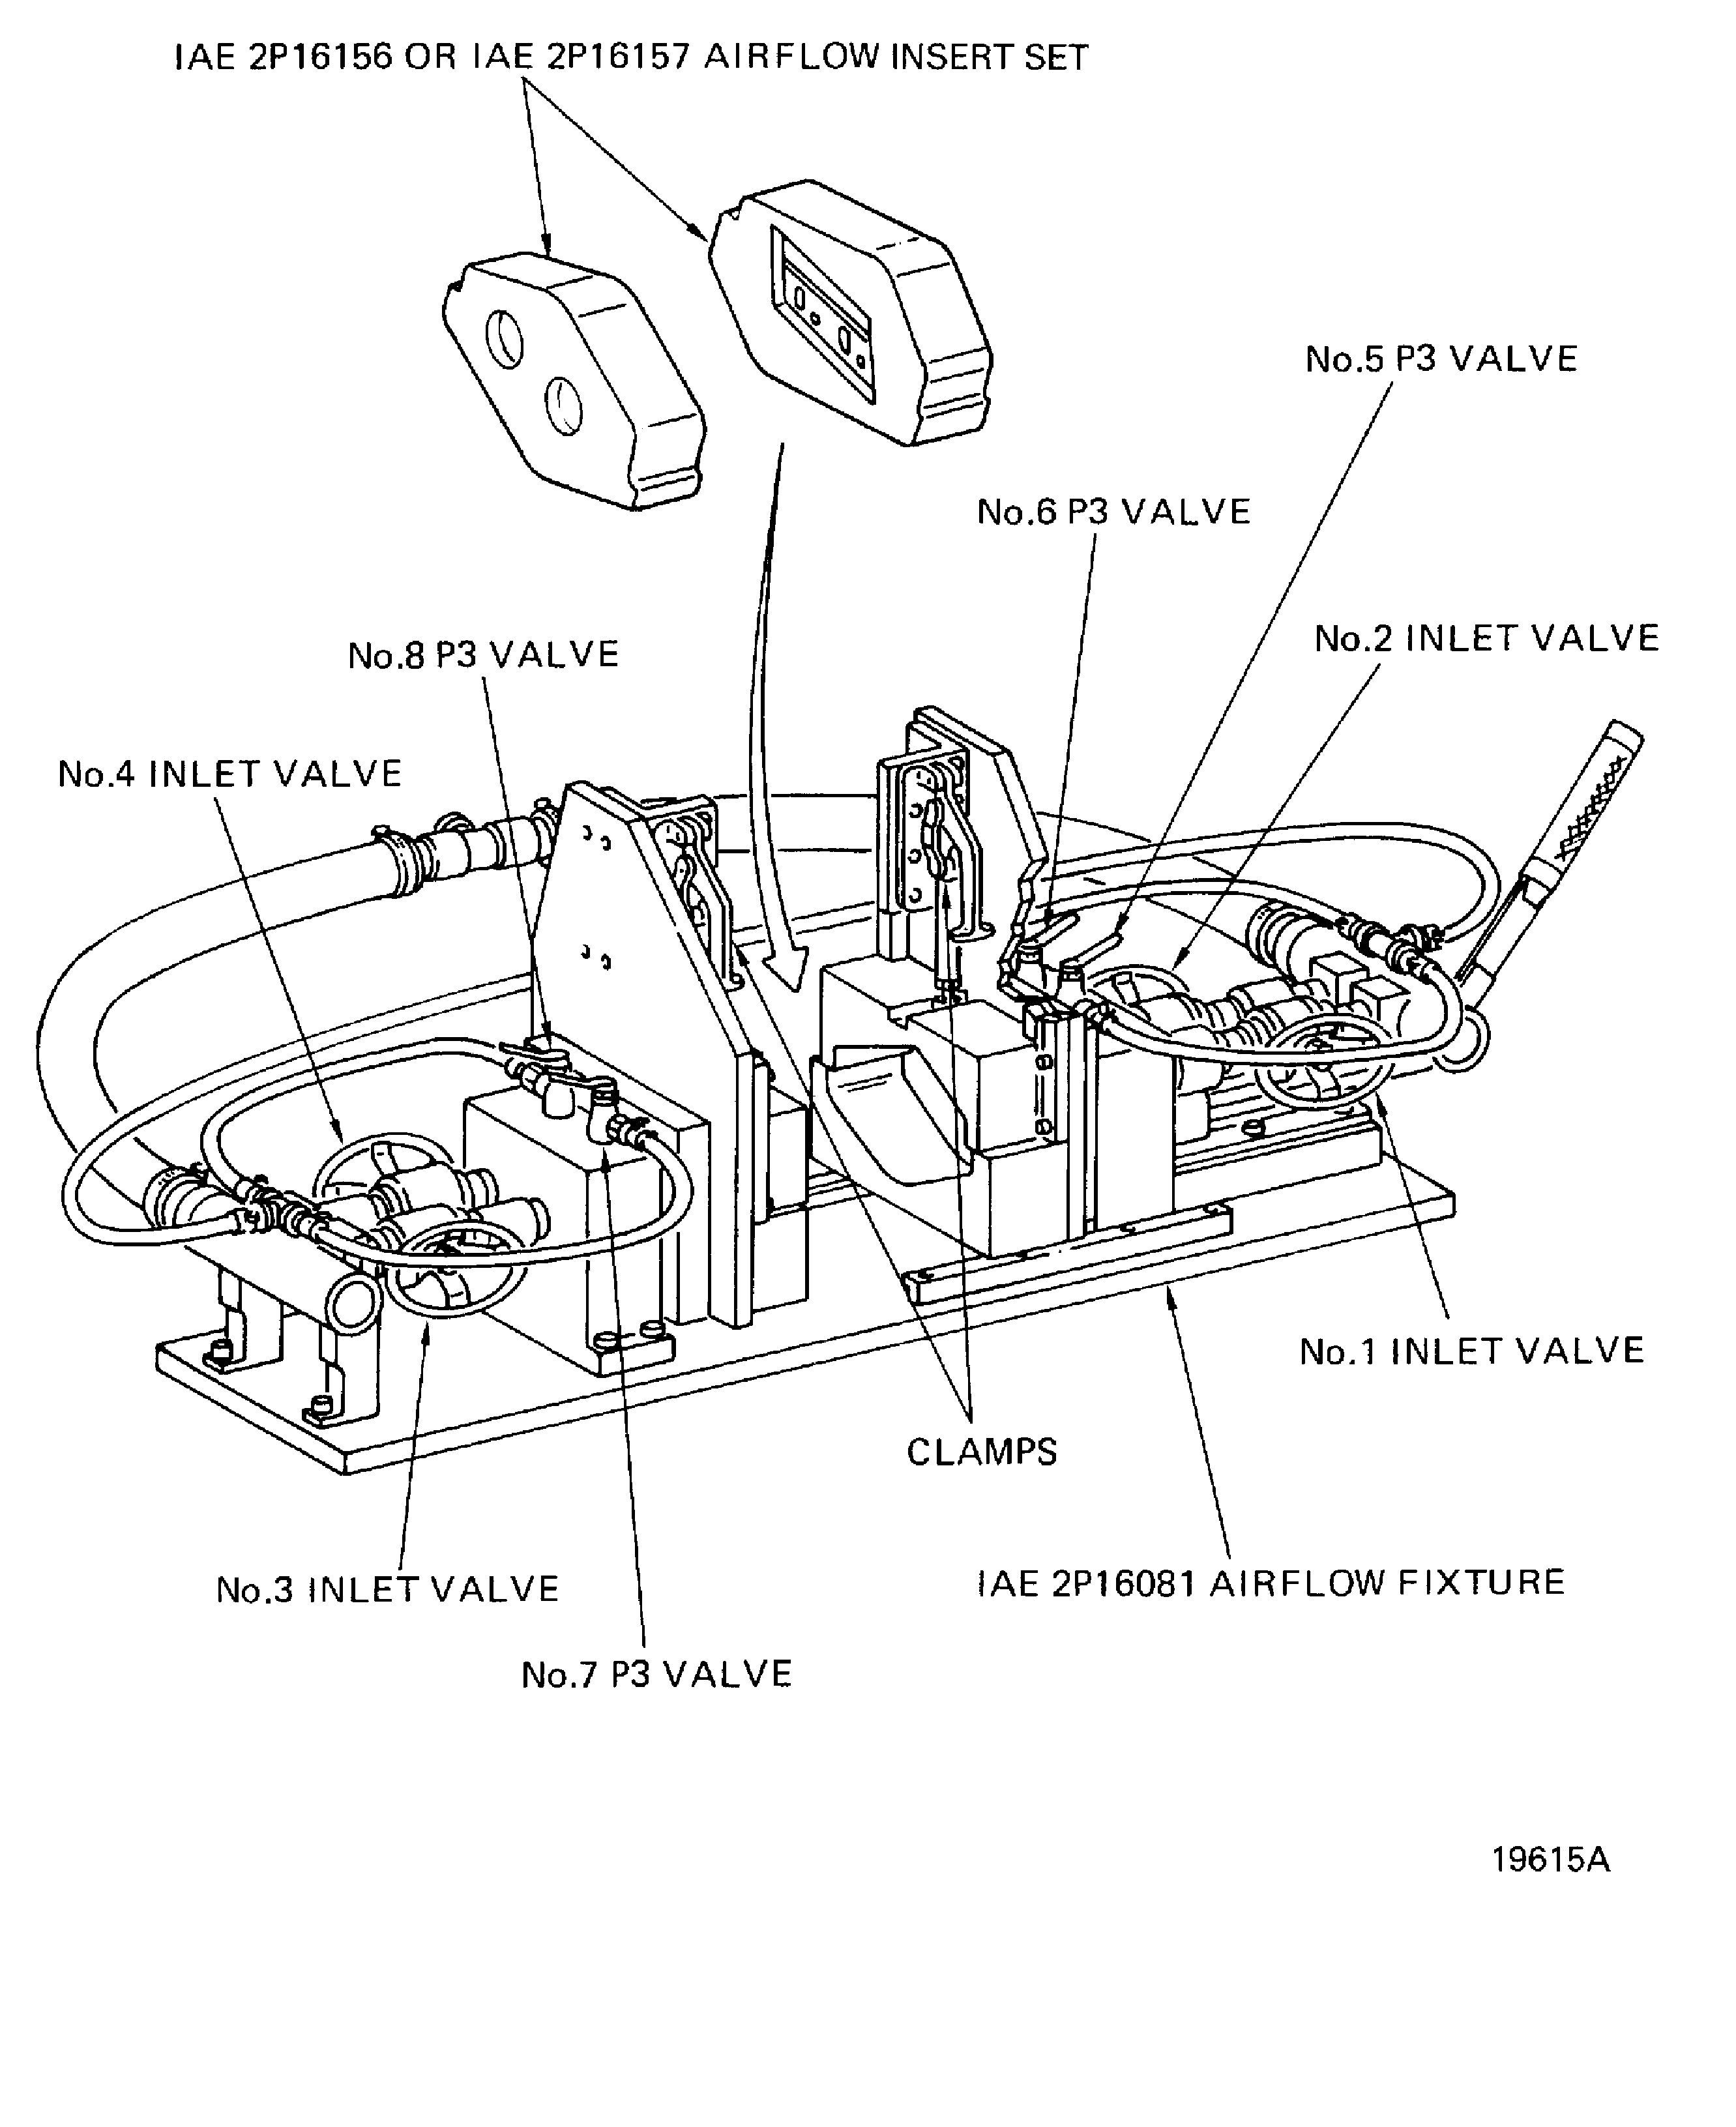
Stage 1 HPT Vane Cluster Assembly Airflow Check Tools
