Export Control
EAR Export Classification: Not subject to the EAR per 15 C.F.R. Chapter 1, Part 734.3(b)(3), except for the following Service Bulletins which are currently published as EAR Export Classification 9E991: SBE70-0992, SBE72-0483, SBE72-0580, SBE72-0588, SBE72-0640, SBE73-0209, SBE80-0024 and SBE80-0025.Copyright
© IAE International Aero Engines AG (2001, 2014 - 2021) The information contained in this document is the property of © IAE International Aero Engines AG and may not be copied or used for any purpose other than that for which it is supplied without the express written authority of © IAE International Aero Engines AG. (This does not preclude use by engine and aircraft operators for normal instructional, maintenance or overhaul purposes.).Applicability
All
Common Information
TASK 72-45-12-200-001-B00 HPT Stage 1 Rotating Outer Airseal - Examine, Inspection-001
General
This TASK gives the procedure for the inspection of the Stage 1 HPT Airseal. For the other part of the Stage 1 HPT Airseal (outer), refer to TASK 72-45-12-200-000 (INSPECTION-000).
Fig/item numbers in parentheses in the procedure agree with those used in the IPC.
The policy that is necessary for inspection is given in SPM TASK 70-20-00-200-501.
All the parts must be cleaned before any part is examined. Refer to SPM TASK 70-10-00-100-501.
All parts must be visually examined for damage, corrosion and wear. Any defects that are not identified in the procedure must be referred to IAE.
The procedure for those parts which must have a crack test is given in SUBTASK 72-45-12-230-052. Do the test before the part is visually examined.
Do not discard any part until you are sure there are no repairs available. Refer to the instructions in Repair before a discarded part is used again or oversize parts are installed.
Parts which should be discarded can be held although no repair is available. The repair of a discarded part could be shown to be necessary at a later date.
All parts must be examined to make sure that all the repairs have been completed satisfactorily.
The practices and processes referred to in the procedure by the TASK numbers are in SPM.
References
Refer to SPM for data on these items.
Definitions of Damage, SPM TASK 70-02-02-350-501.
Record and Control of the Lives of Parts, SPM TASK 70-05-00-220-501.
Marking of Parts, SPM TASK 70-09-00-400-501.
Inspection of Parts, SPM TASK 70-20-01-200-501.
Some data on these items is contained in this TASK. For more data on these items refer to SPM.
Method of Testing for Crack Indications.
Chemical Processes.
Surface Protection.
Preliminary Requirements
Pre-Conditions
NONESupport Equipment
NONEConsumables, Materials and Expendables
NONESpares
NONESafety Requirements
NONEProcedure
Accept.
No soot or oil.
Do inspection of HPT for possible oil ignition event. Refer to TASK 72-45-00-200-801. Report all findings to IAE Technical Services.
Soot or oil.

CAUTION
MAKE SURE THAT YOU DO THIS INSPECTION BEFORE YOU CLEAN THE PART OR CLEANING PROCEDURE WILL REMOVE THE INDICATION OF SOOT AND OIL.Examine the Stage 1 HPT airseal for soot and oil.
SUBTASK 72-45-12-230-058 Examine the Stage 1 HPT Airseal (01-040) for Soot and Oil
Clean the Part. Refer to TASK 72-45-12-100-000 (CLEANING-000).
Repair, VRS3196 TASK 72-45-12-300-002 (REPAIR-002).
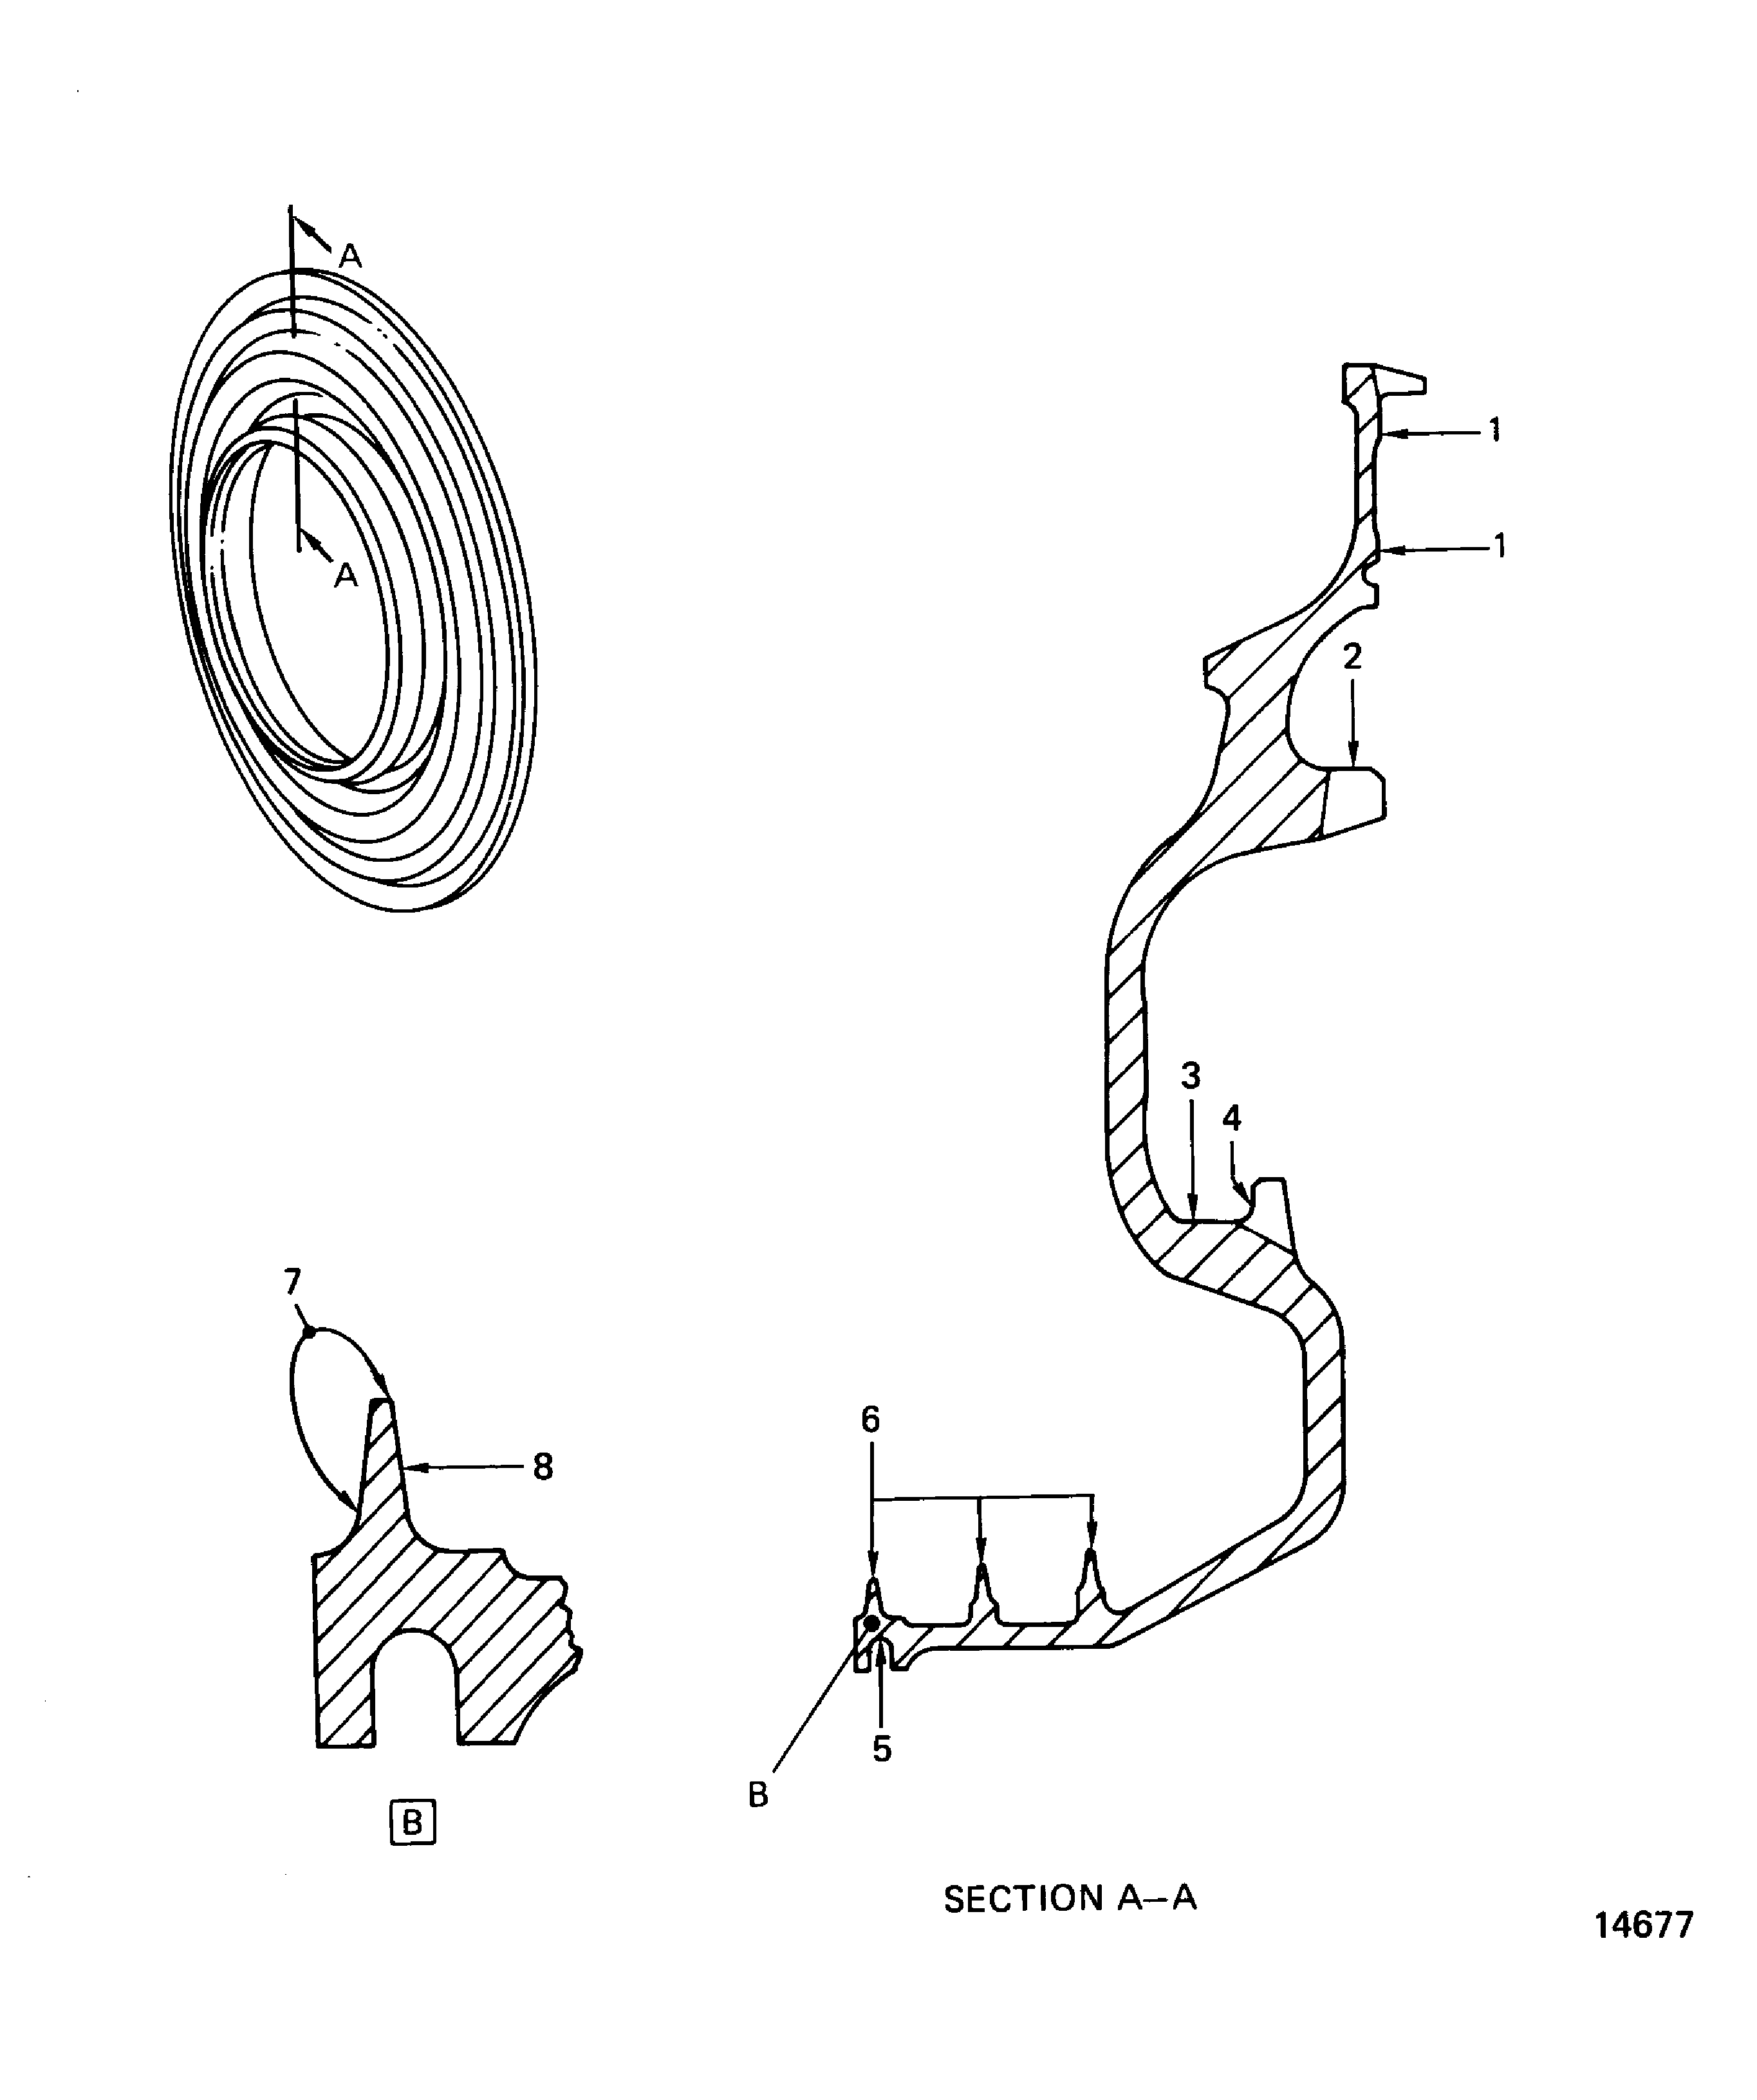
Cracks in the coating of the knife-edge seals at Location 7. Remove the coating.
Repair, VRS3196 TASK 72-45-12-300-002 (REPAIR-002).
Cracks in the coating at the rear side of the knife-edge seals at Location 8, where the coating is not complete. Remove the coating.
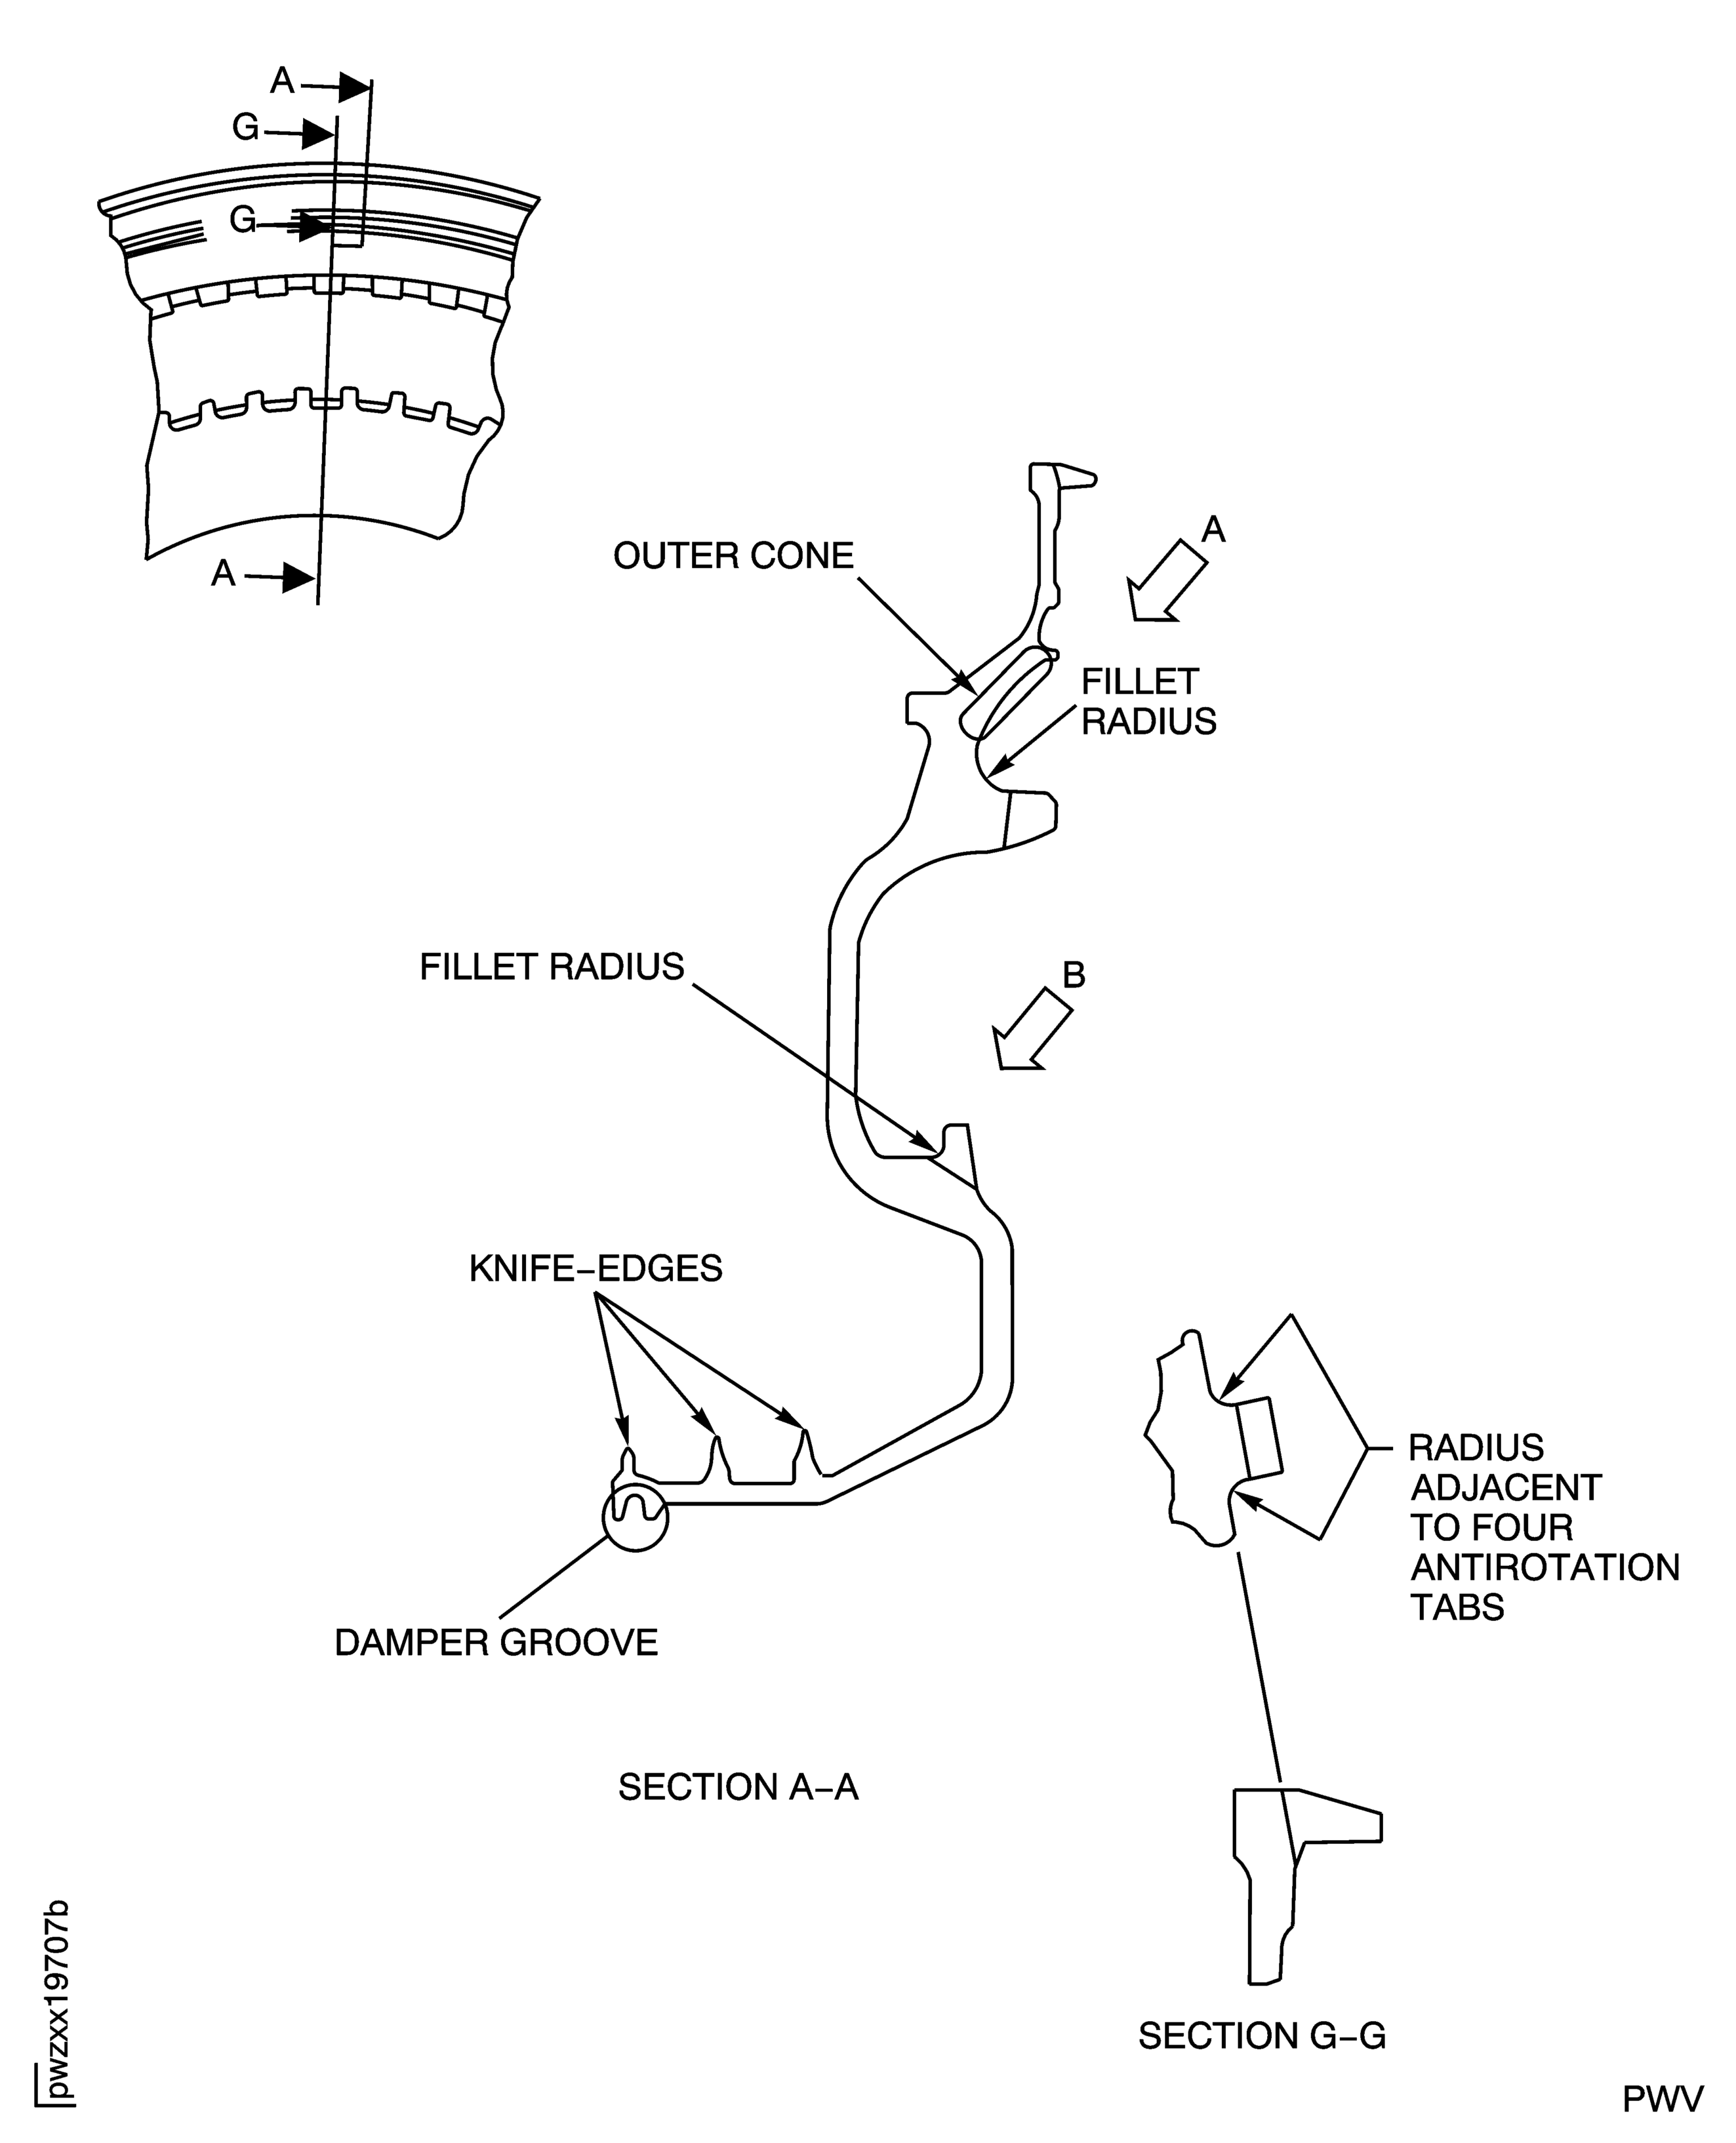
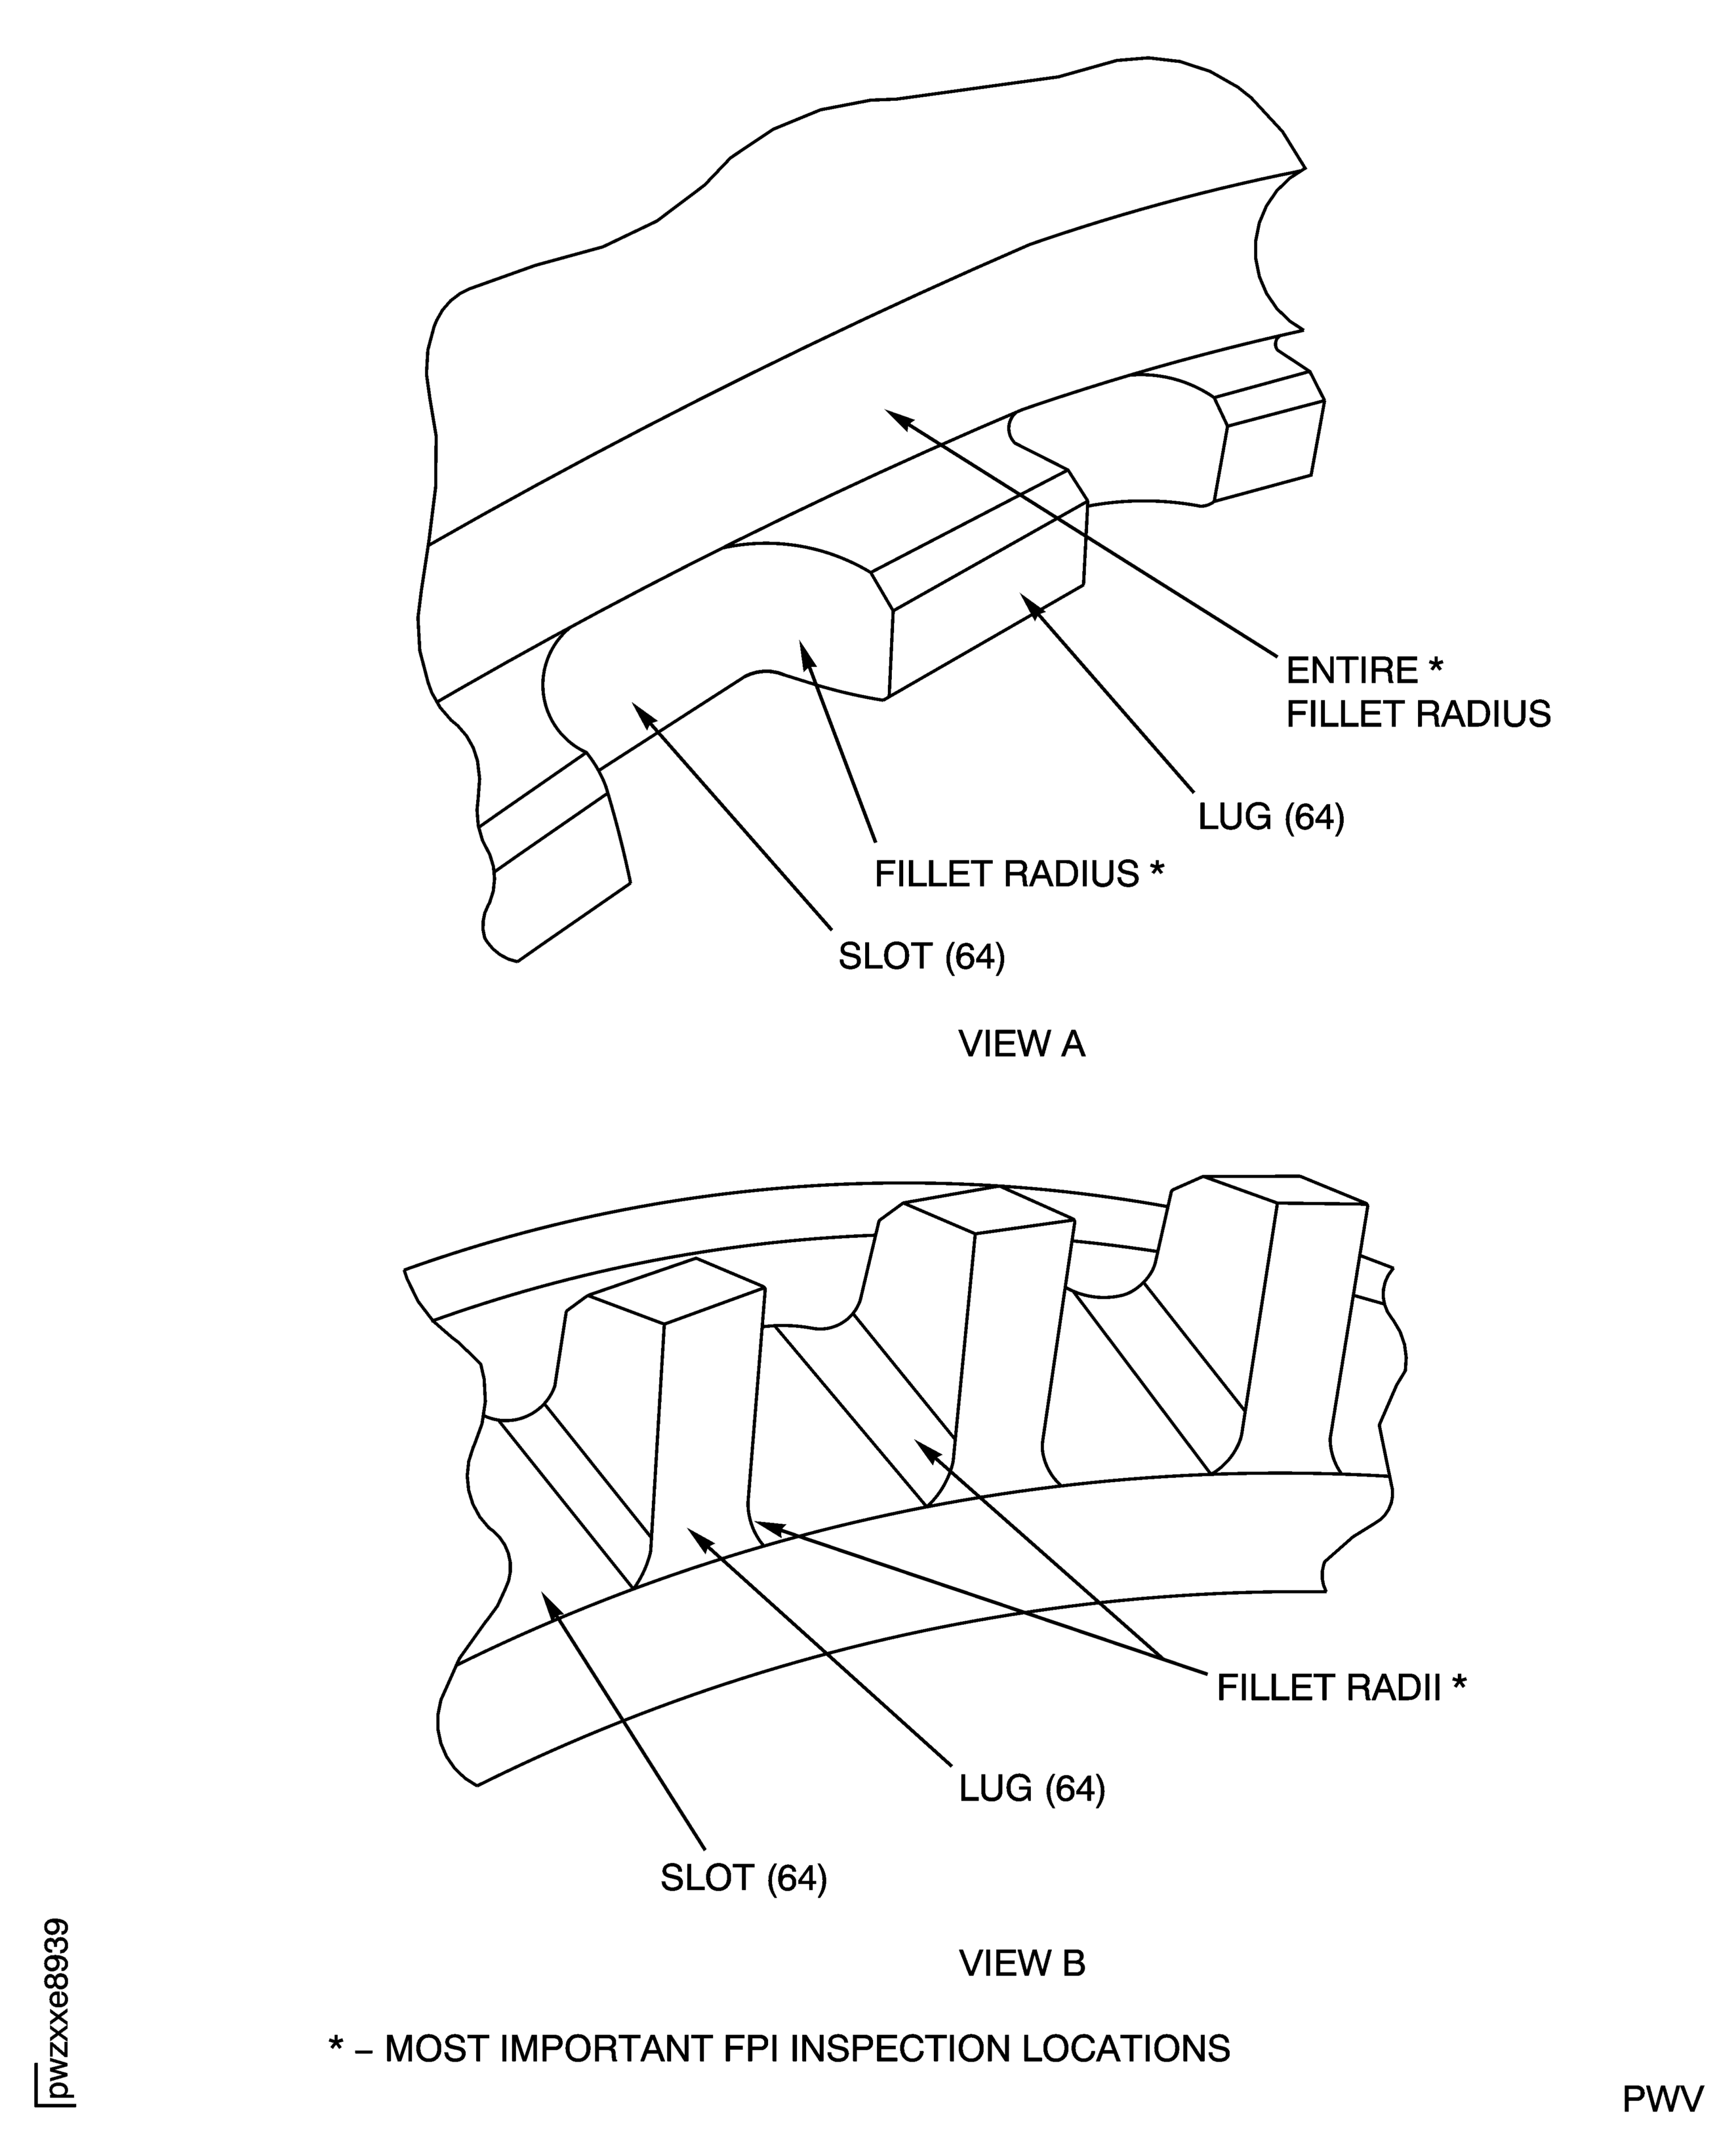
When you inspect the airseal for cracks in the radius adjacent to the anti-rotation tabs, carefully examine this location with low (2X to 5X) magnification. Refer to Figure and Figure.
PART IDENT
TASK/SUBTASK
Stage 1 HPT Airseal
(Dip or Spray)
SUBTASK 72-45-12-230-052-001 Examine the Stage 1 HPT Airseal (01-040) for Cracks
Refer to Figure.
Repair, VRS3195 TASK 72-45-12-300-001 (REPAIR-001).
Dents, nicks, scratches or corrosion.
Repair, VRS3195 TASK 72-45-12-300-001 (REPAIR-001).
Other than Step.
Examine the airseal at Location 1, for distortion, damage and wear on the axial contact faces (2 places).
SUBTASK 72-45-12-220-062 Examine the Stage 1 HPT Airseal (01-040) for Distortion, Damage and Wear on the Axial Contact Faces
Refer to Figure.
Repair, VRS3195 TASK 72-45-12-300-001 (REPAIR-001).
Other than Step.
Examine the airseal at Location 2, for wear, dents, nicks, scratches and corrosion on the outside diameter lock lug diameter surface.
SUBTASK 72-45-12-220-063 Examine the Stage 1 HPT Airseal (01-040) for Wear, Dents, Nicks, Scratches and Corrosion on the Outside Diameter Lock Lug Diameter Surface
Refer to Figure.
Repair, VRS3195 TASK 72-45-12-300-001 (REPAIR-001).
Wear more than 0.001 in. (0.025 mm), dents, nicks, scratches or corrosion.
Examine the airseal at Location 3, for wear, dents, nicks, scratches and corrosion on the inside diameter lock lug diameter surface.
SUBTASK 72-45-12-220-064 Examine the Stage 1 HPT Airseal (01-040) for Wear, Dents, Nicks, Scratches and Corrosion on the Inside Diameter Lock Lug diameter Surface
Refer to Figure.
Repair, VRS3195 TASK 72-45-12-300-001 (REPAIR-001).
Other than Step.
Examine the airseal at Location 4, for wear, dents, nicks, scratches and corrosion on the inside diameter lock lugs (front face).
SUBTASK 72-45-12-220-065 Examine the Stage 1 HPT Airseal (01-040) for Wear, Dents, Nicks, Scratches and Corrosion on the Inside Diameter Lock Lugs (Front Face)
Refer to Figure.
Repair, VRS3196 TASK 72-45-12-300-002 (REPAIR-002) or VRS3726 TASK 72-45-12-300-003 (REPAIR-003).
Other than Step.
Chipped or damaged.
Examine the airseal at Location 6, for chipped coating and damage on the knife-edge seals.
SUBTASK 72-45-12-220-067 Examine the Stage 1 HPT Airseal (01-040) for Chipped Plasma Spray Coating and Damage on the Knife-Edge Seals
Refer to Figure.
Repair, VRS3195 TASK 72-45-12-300-001 (REPAIR-001).
Nicks, dents or corrosion.
Examine the airseal for nicks, dents and corrosion in the areas that are not identified as inspection locations in Figure.
SUBTASK 72-45-12-220-068 Examine the Stage 1 HPT Airseal (01-040) for Nicks, Dents and Corrosion
Refer to Figure.
Other than Step.
Axial dimension.
Examine the airseal at Location 3 for the axial dimensions between the outside diameter outer contact face and the inner contact face.
Repair, VRS3407 TASK 72-45-12-300-008 (REPAIR-008)**.
Other than Step.
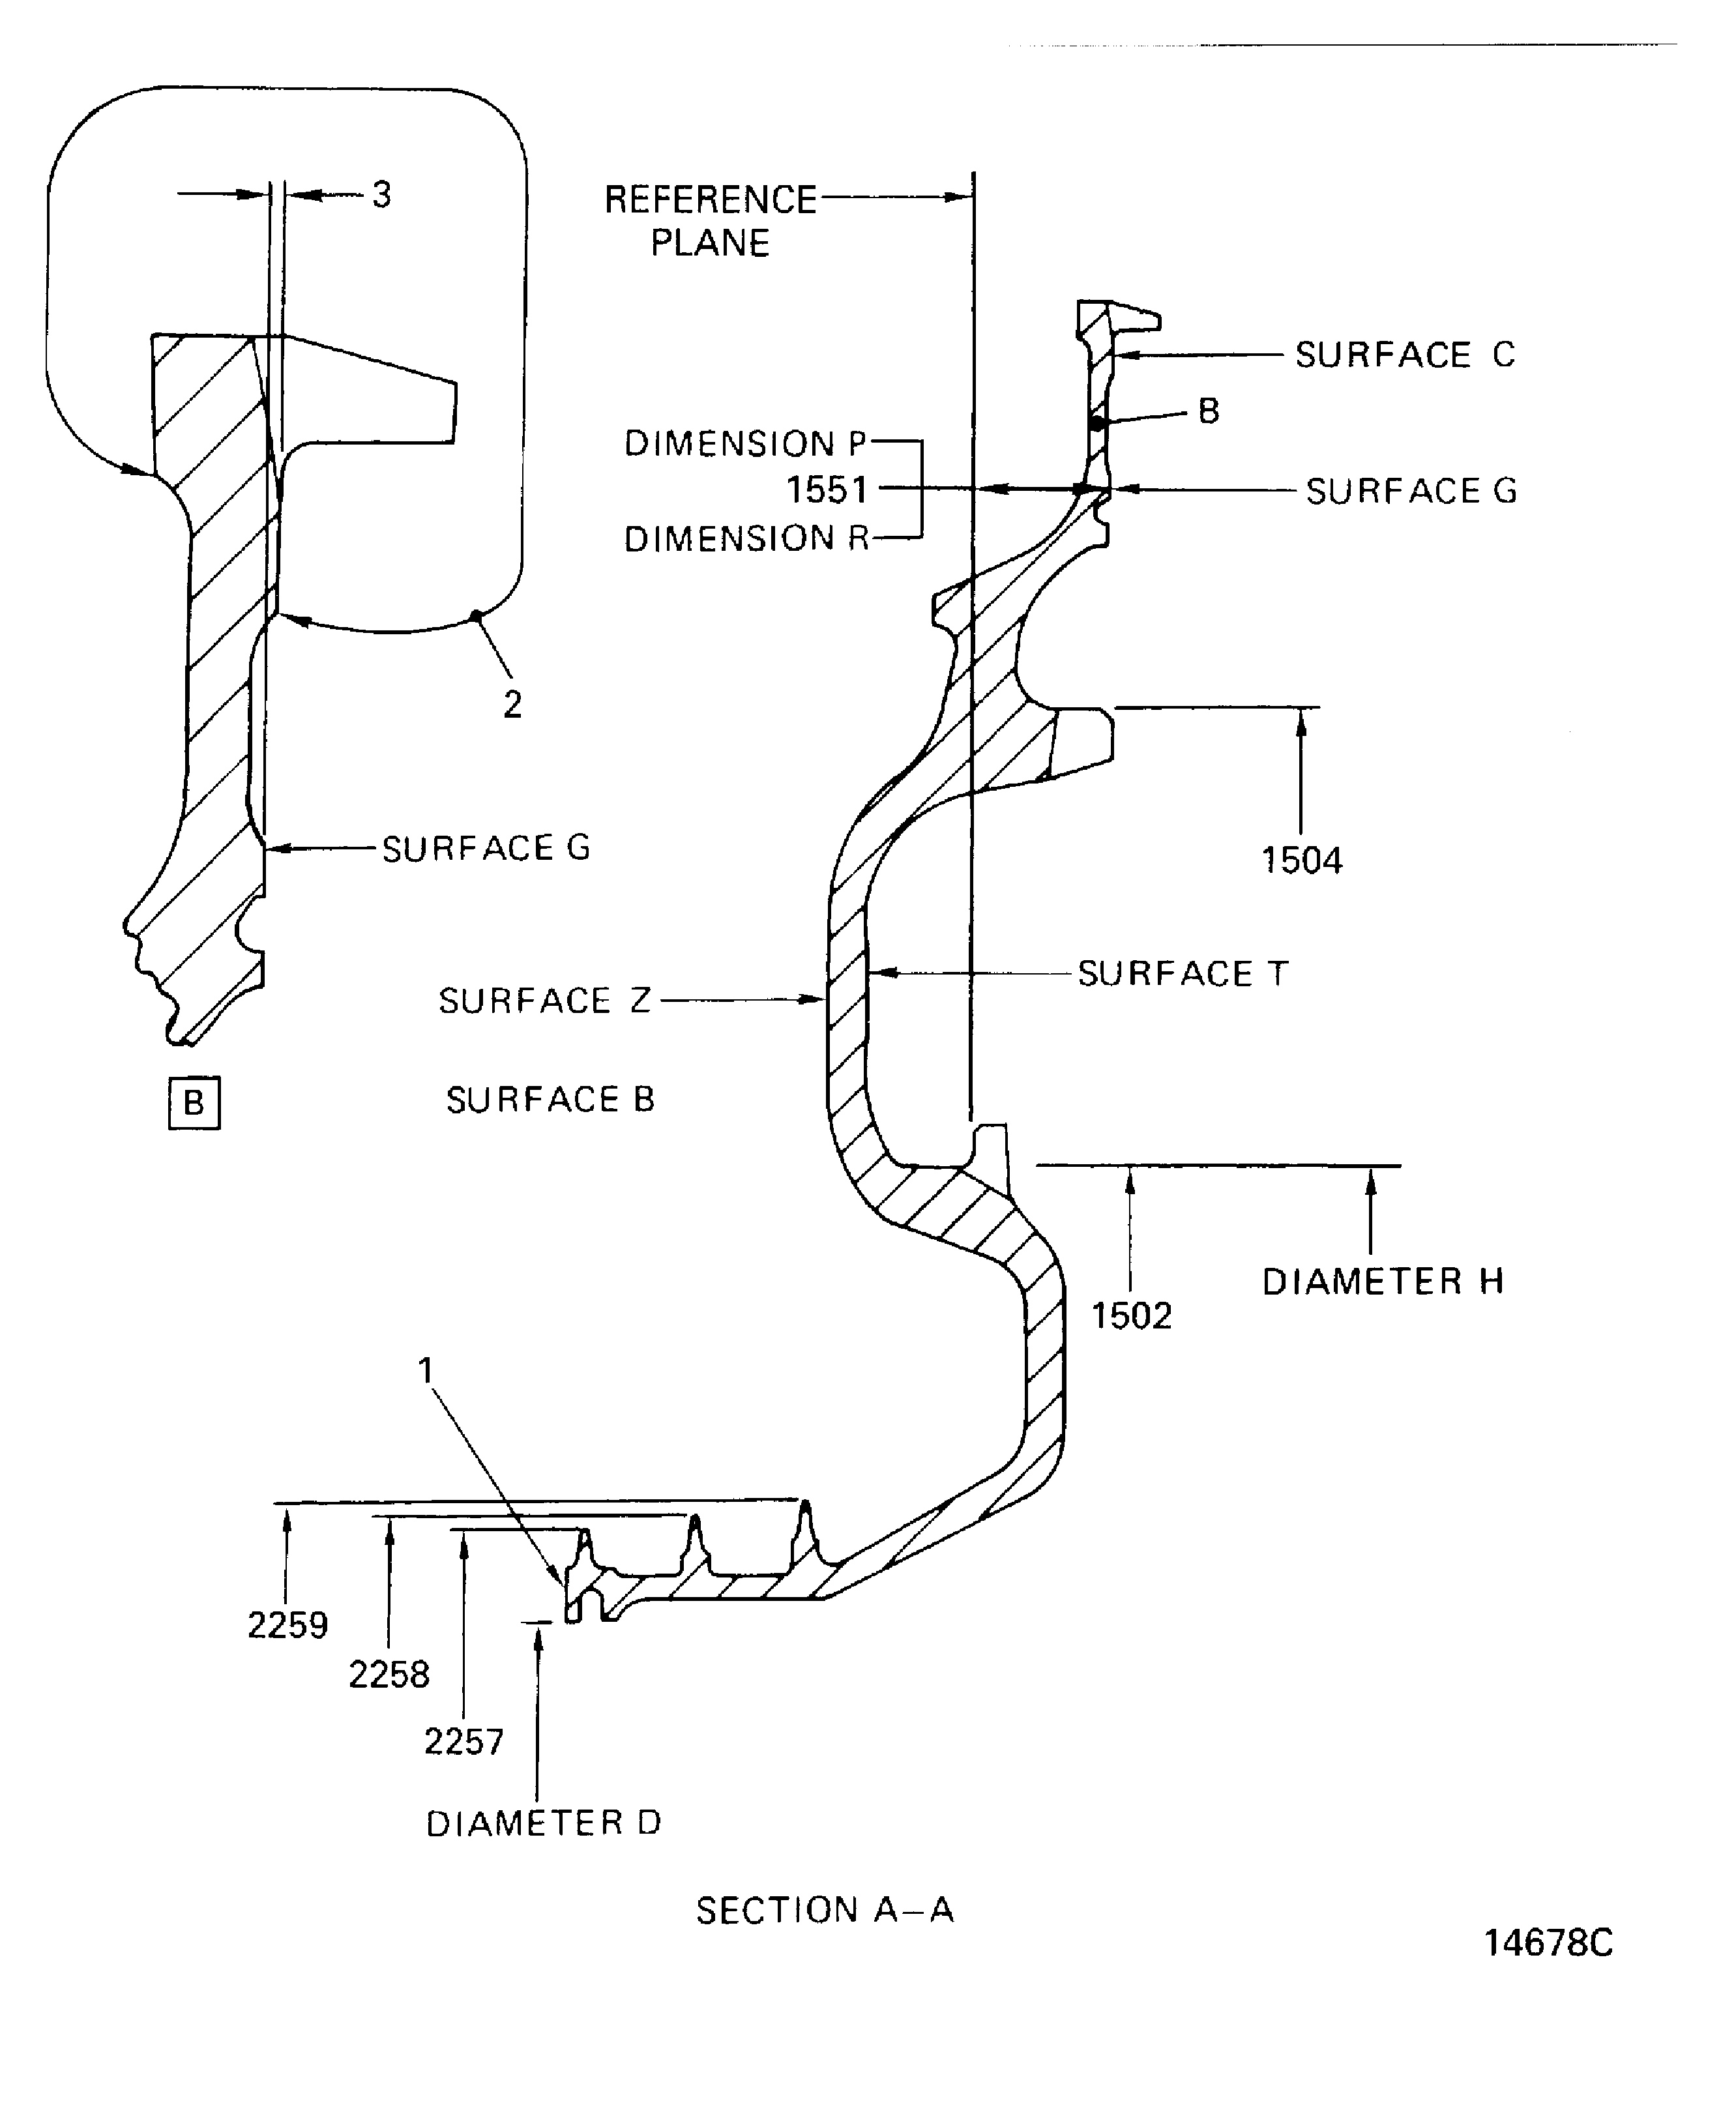
Examine the airseal at Location 1551, for the axial dimension of the outside diameter inner contact face.
SUBTASK 72-45-12-220-069 Examine the Stage 1 HPT Airseal (01-040) for the Axial Dimensions
NOTE
If the measured axial dimensions in a free condition are not satisfactory, a held condition is permitted. All dimensions apply when Surface B is flat by 0.0005 in. (0.0127 mm) and Diameters D and H maintain a clearance envelope of 10.664 in. (270.866 mm) and 14.169 in. (359.893 mm) and maintain Dimension P by 0.0005 in. (0.0127 mm) in a free or held condition. Dimension P is 0.523 in. (13.284 mm). In a free condition Dimension R applies and Diameters D and H are 10.660 in. to 10.680 in. (270.76 mm to 271.27 mm) and 14.159 in. and 14.173 in. (359.64 mm and 359.99 mm). Dimension R is 0.518 in. to 0.528 in. (13.16 mm to 13.41 mm). The airseal must be held only on Surfaces B, C, G, T and Z and Diameters D and H.Refer to Figure.
Write down the dimension of the diameter.
NOTE
This part can be used only if the mating part has a diameter that will result in fit of reference No. 1504. Refer to TASK 72-45-10-440-001 (ASSEMBLY).
If the diameter is between 17.747 in. and 17.7564 in. (450.774 mm and 451.013 mm).
Other than Step.
Examine the airseal at Location 1504, for the outside diameter of the lock lug.
Write down the dimension of the diameter.
NOTE
This part can be used if the mating part has a diameter that will result in fit of reference No. 1502. Refer to TASK 72-45-10-440-001 (ASSEMBLY).
If the average diameter is between 14.159 in. and 14.1685 in. (359.639 mm and 359.880 mm).
Other than Step.
Examine the airseal at Location 1502, for the inside diameter of the lock lug.
SUBTASK 72-45-12-220-070 Examine the Stage 1 HPT Airseal (01-040) for the Lock Lug Diameters
NOTE
If the measured axial dimensions in a free condition are not satisfactory, a held condition is permitted. All dimensions apply when Surface B is flat by 0.0005 in. (0.0127 mm) and Diameters D and H maintain a clearance envelope of 10.664 in. (270.866 mm) and 14.169 in. (359.893 mm) and maintain Dimension P by 0.0005 in. (0.0127 mm) in a free or held condition. Dimension P is 0.523 in. (13.284 mm). The airseal must be held only on Surfaces B, C, G, T and Z, and Diameters D and H. In a free condition Dimension R is between 0.518 in. and 0.528 in. (13.16 mm and 13.41 mm) and Diameter D is between 10.660 in. and 10.680 in. (270.76 mm and 271.27 mm) and Diameter H is between 14.159 in. and 14.173 in. (359.64 mm and 359.99 mm).Refer to Figure.
Repair, VRS3196 TASK 72-45-12-300-002 (REPAIR-002).
If the diameter is a minimum of 11.375 in. (288.93 mm).
Repair, VRS3726 TASK 72-45-12-300-003 (REPAIR-003).
If the diameter is between 11.331 in. and 11.375 in. (287.81 mm and 288.93 mm).
Other than Step.
Examine the airseal at Location 2257, for the diameter of the front knife-edge seal.
Repair, VRS3196 TASK 72-45-12-300-002 (REPAIR-002).
If the diameter is a minimum of 11.475 in. (291.47 mm).
Repair, VRS3726 TASK 72-45-12-300-003 (REPAIR-003).
If the diameter is between 11.431 in. and 11.475 in. (290.35 mm and 291.47 mm).
Other than Step.
Examine the airseal at Location 2258, for the diameter of the middle knife-edge seal.
Repair, VRS3196 TASK 72-45-12-300-002 (REPAIR-002).
If the diameter is a minimum of 11.575 in. (294.01 mm)..
Repair, VRS3726 TASK 72-45-12-300-003 (REPAIR-003).
If the diameter is between 11.531 in. and 11.575 in. (292.89 mm and 294.01 mm).
Other than Step.
Examine the airseal at Location 2259, for the diameter of the rear knife-edge seal.
SUBTASK 72-45-12-220-071 Examine the Stage 1 HPT Airseal (01-040) for the Diameters of the Knife-Edge Seals
Refer to Figure.
Make a mark on the airseal at Location 1, refer to SPM TASK 70-09-00-400-501.
Mark the new quantity of engine run cycles of the part on the airseal, refer to SPM TASK 70-05-00-220-501.
SUBTASK 72-45-12-220-072 Examine the Stage 1 HPT Airseal (01-040) for the Engine Run Cycles of the Part
Figure: Stage 1 HPT Airseal Inspection Locations
Stage 1 HPT Airseal Inspection Locations

Figure: Stage 1 HPT Airseal Inspection Locations
Stage 1 HPT Airseal Inspection Locations

Figure: Stage 1 HPT Airseal Important FPI Inspection Locations
Sheet 1

Figure: Stage 1 HPT Airseal Important FPI Inspection Locations
Sheet 2

