Export Control
EAR Export Classification: Not subject to the EAR per 15 C.F.R. Chapter 1, Part 734.3(b)(3), except for the following Service Bulletins which are currently published as EAR Export Classification 9E991: SBE70-0992, SBE72-0483, SBE72-0580, SBE72-0588, SBE72-0640, SBE73-0209, SBE80-0024 and SBE80-0025.Copyright
© IAE International Aero Engines AG (2001, 2014 - 2021) The information contained in this document is the property of © IAE International Aero Engines AG and may not be copied or used for any purpose other than that for which it is supplied without the express written authority of © IAE International Aero Engines AG. (This does not preclude use by engine and aircraft operators for normal instructional, maintenance or overhaul purposes.).Applicability
All
Common Information
TASK 72-45-23-200-004-D00 HPT Stage 1 Duct Segment - Examine, Inspection-004
General
This TASK gives the procedure for the inspection of the stage 1 HPT duct segment assembly.
Fig/item numbers in parentheses in the procedure agree with those used in the IPC.
The policy that is necessary for inspection is given in the SPM TASK 70-20-00-200-501.
All the parts must be cleaned before any part is examined. Refer to TASK 72-45-23-100-000 (CLEANING-000).
All parts must be visually examined for damage, corrosion and wear. Any defects that are not identified in the procedure must be referred to IAE.
The procedure for those parts which must have a crack test is given in Step or Step. Do the test before the part is visually inspected.
Do not discard any part until you are sure there are no repairs available. Refer to the instructions in Repair before a discarded part is used again or oversize parts are installed.
Parts which should be discarded can be held although no repair is available. The repair of a discarded part could be shown to be necessary at a later date.
All parts must be examined to make sure that all the repairs have been completed satisfactorily.
The practices and processes referred to in the procedure by the TASK numbers are in the SPM.
References
Refer to the SPM for data on these items.
Definitions of Damage, SPM TASK 70-02-02-350-501
Inspection of Parts, SPM TASK 70-20-00-200-501
Some data on these items is contained in this TASK. For more data on these items refer to the SPM.
Methods of Testing for Crack Indications
Chemical Processes
Surface Protection
Preliminary Requirements
Pre-Conditions
NONESupport Equipment
NONEConsumables, Materials and Expendables
NONESpares
NONESafety Requirements
NONEProcedure
Clean the part. Refer to TASK 72-45-23-100-000 (CLEANING-000).
Repair, VRS3717 TASK 72-45-23-300-016 (REPAIR-016) or Repair, VRS3760 TASK 72-45-23-300-021 (REPAIR-021)
Cracks at location 3
Repair, VRS3717 TASK 72-45-23-300-016 (REPAIR-016) or Repair, VRS3760 TASK 72-45-23-300-021 (REPAIR-021)
Repair, VRS3717 TASK 72-45-23-300-016 (REPAIR-016) or Repair, VRS3760 TASK 72-45-23-300-021 (REPAIR-021)
NOTE
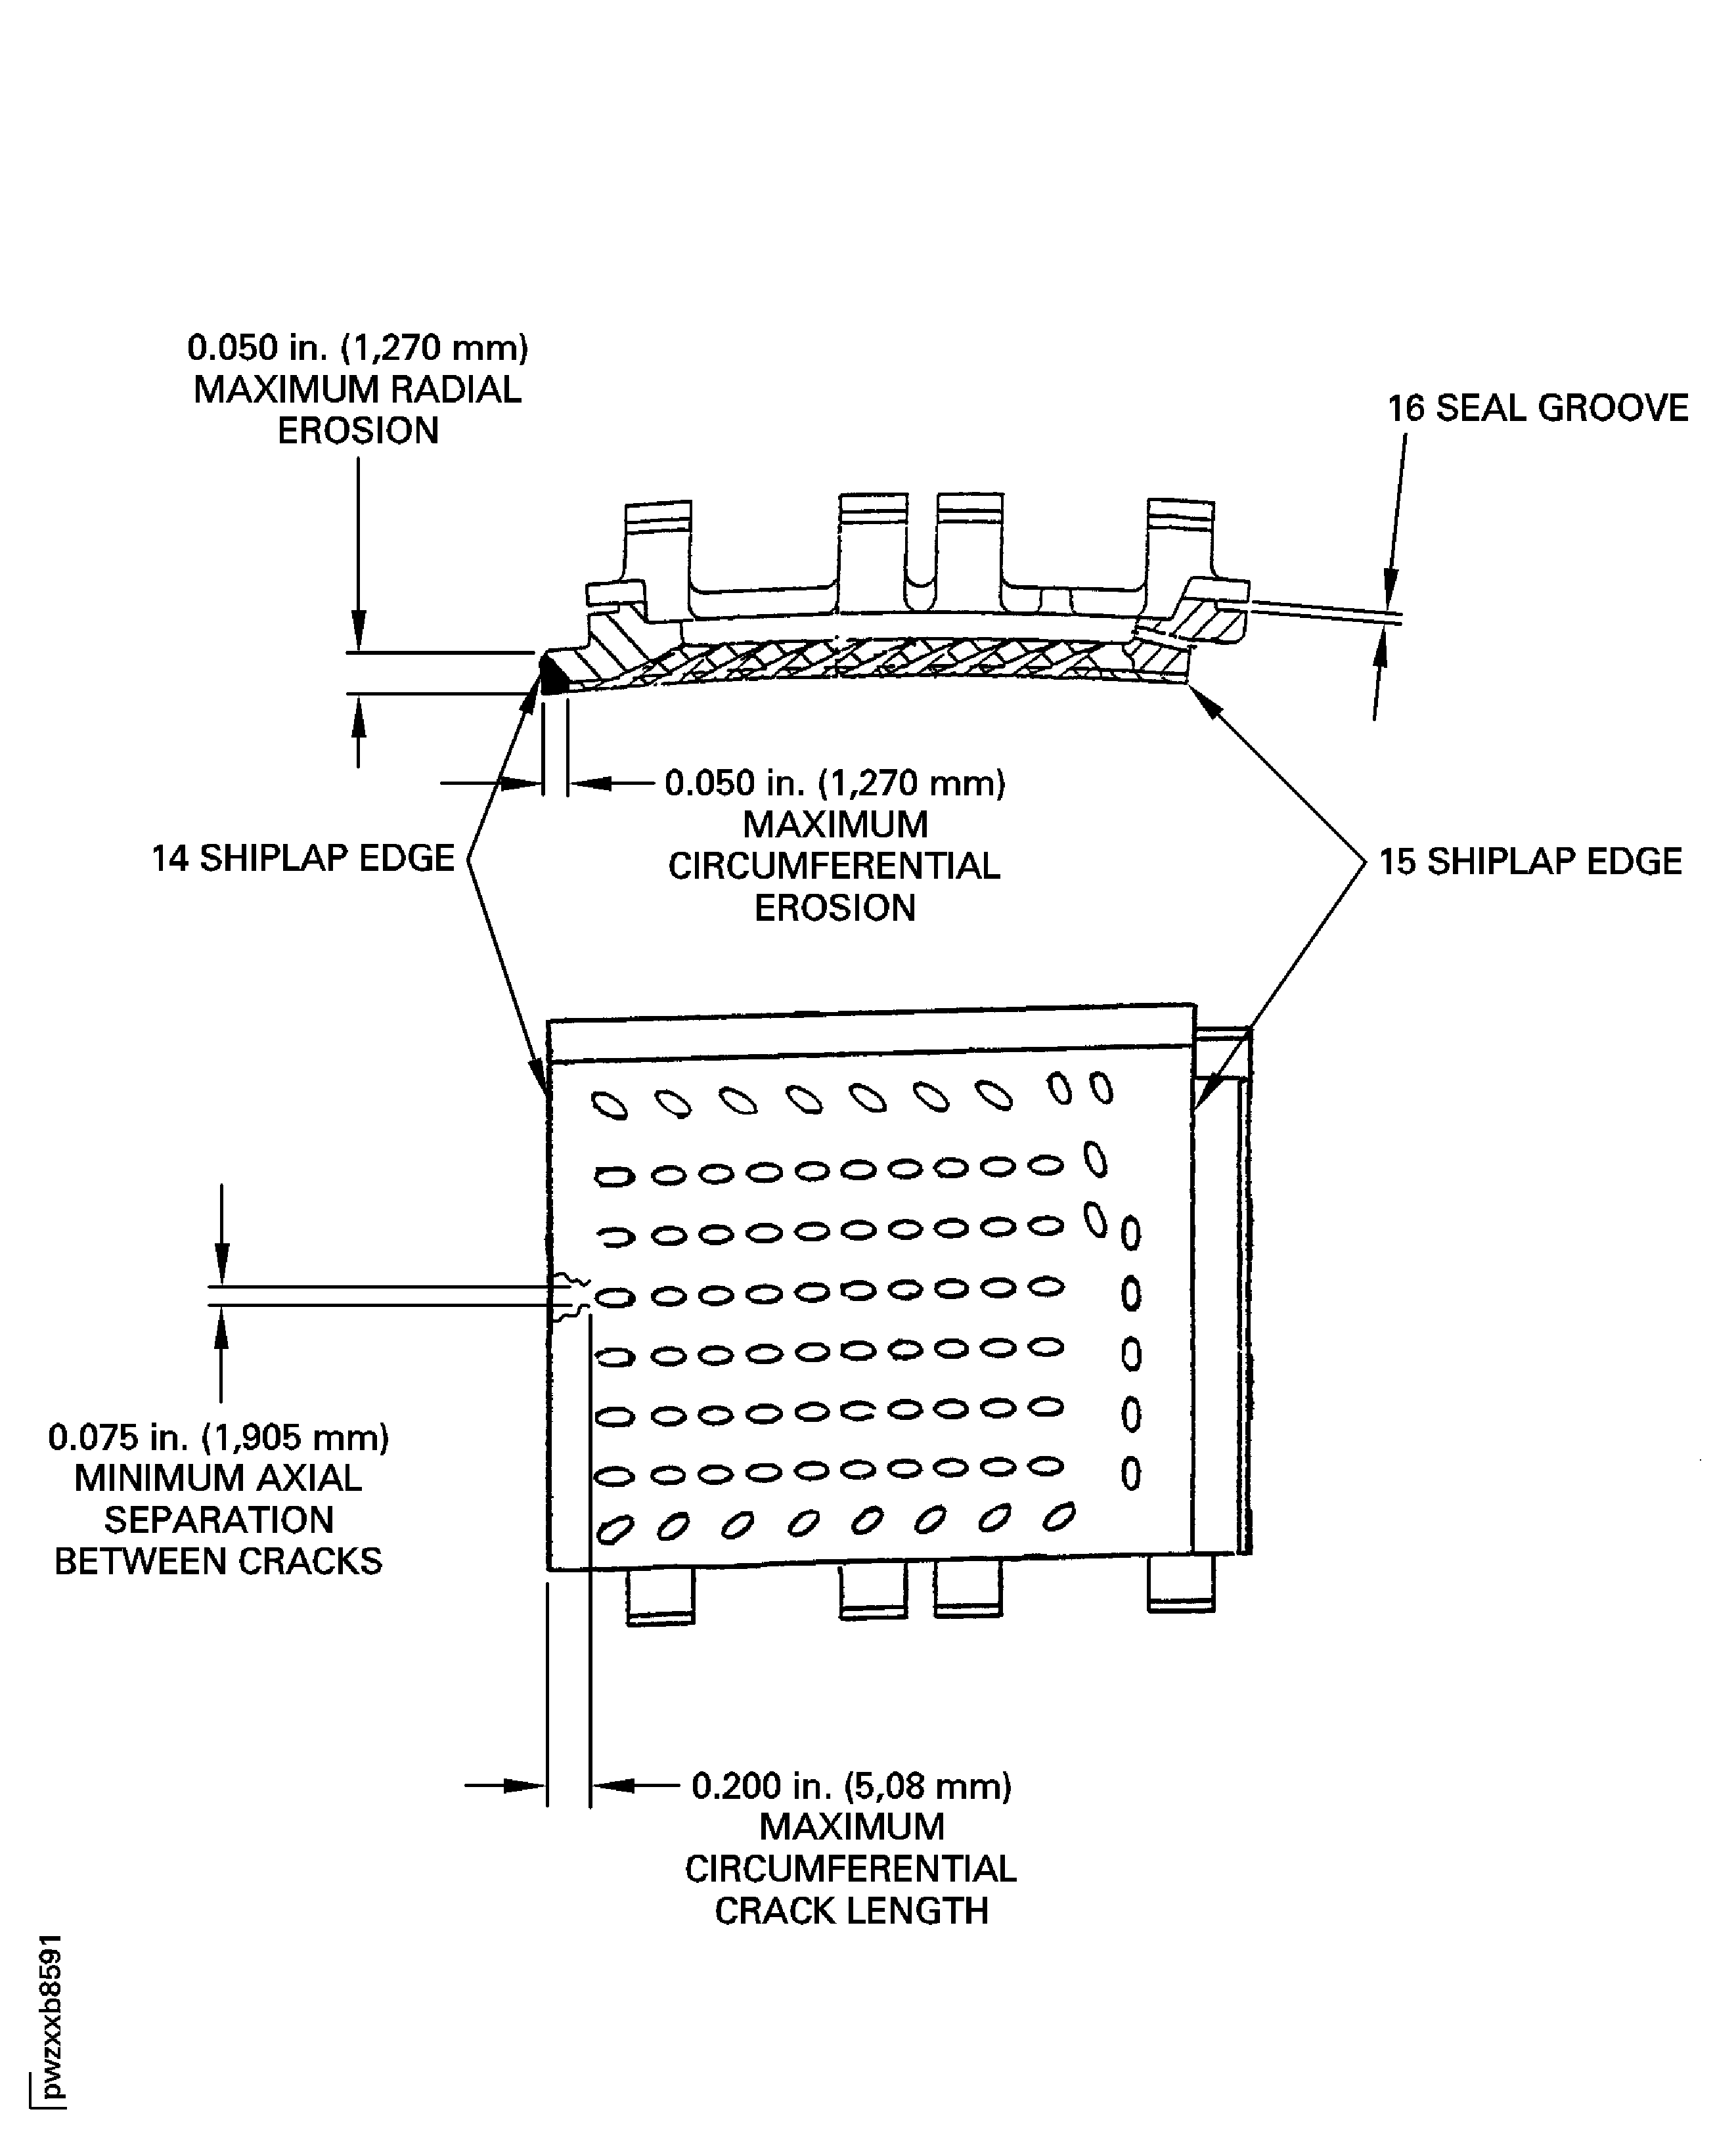
Depth measurement must be taken at the edge of the segment.A maximum of four cracks on each edge, not more than 0.200 in. (5.08 mm) in length (circumferentially) and 0.050 in. (1.27 mm) in depth (radially). Cracks must not break into the cooling holes and must be separated by a minimum of 0.075 in. (1.91 mm) (axially)
Cracks on the duct segment shiplap edges at location 14 and 15.
Base metal cracks, all other areas
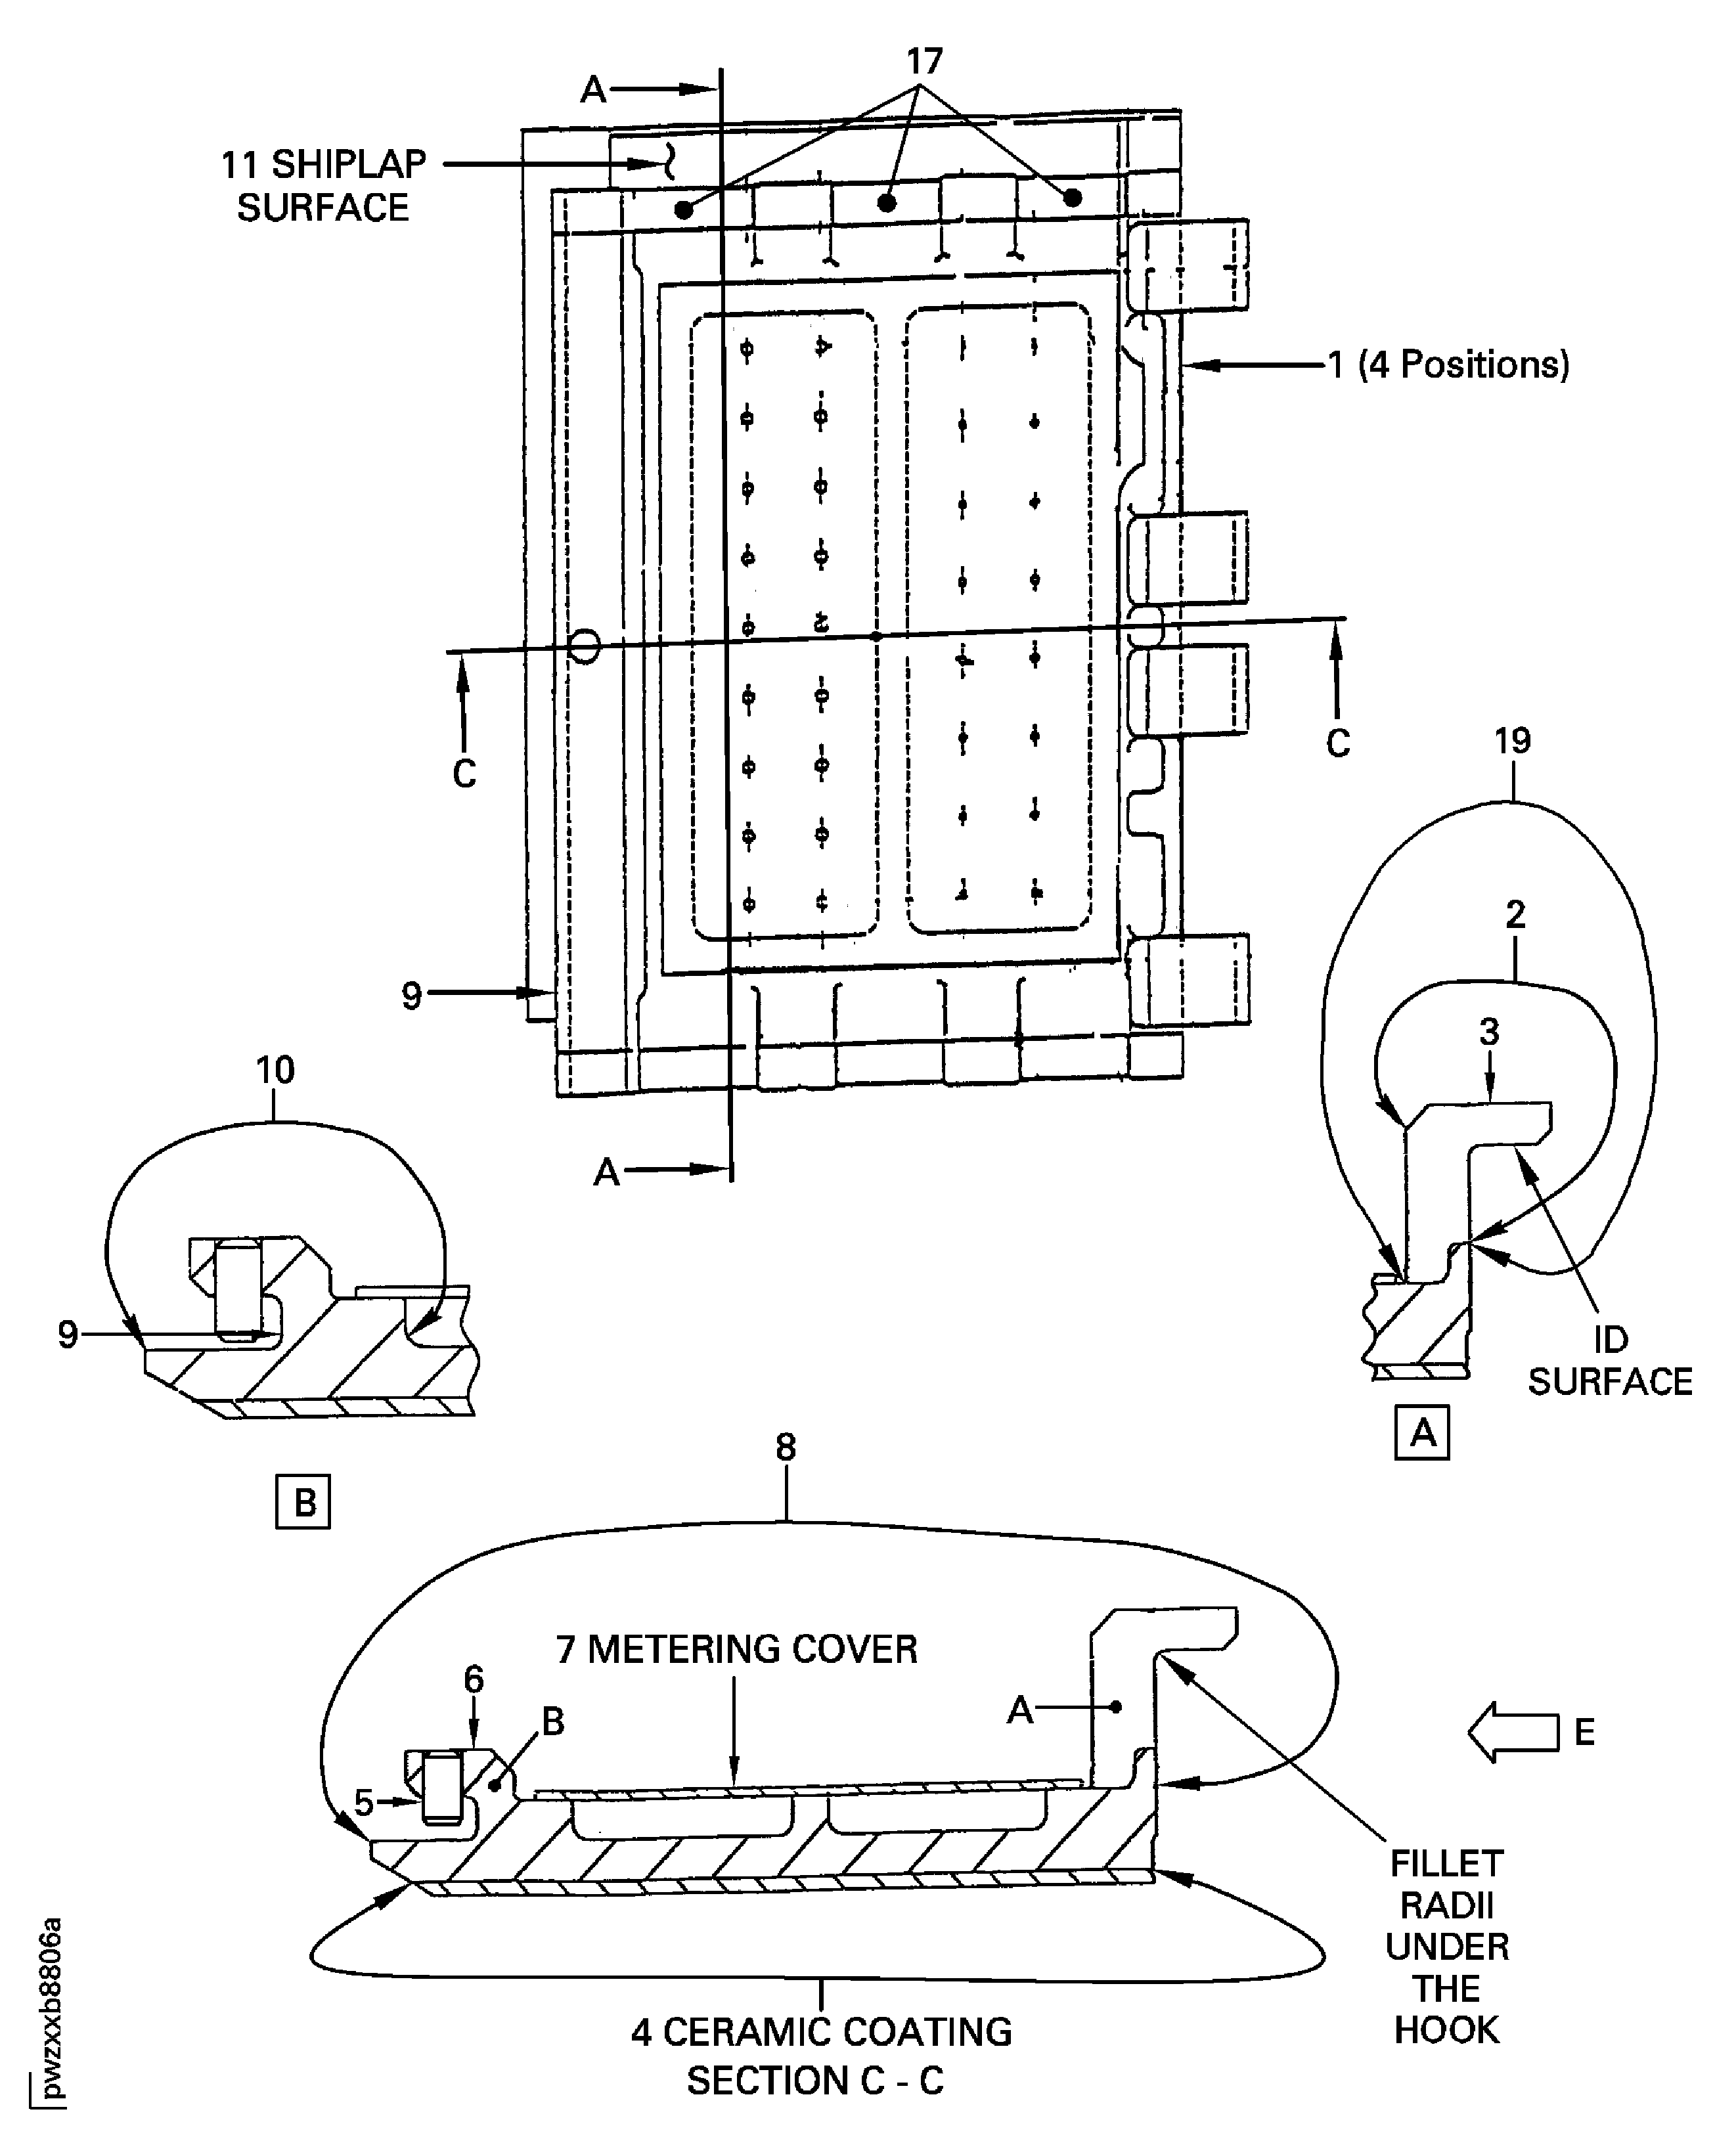
Do the test for cracks on the part that is given below. Examine the metal surfaces at location 8. Do not examine the ceramic coated areas at location 4. Look carefully at the metering cover at location 7 and the attachment slot and shiplap surfaces at locations 3, 6, 9, 11 and 12. Use the applicable penetrant procedure.
PART IDENT
TASK/SUBTASK
Stage 1 HPT duct segment
SUBTASK 72-45-23-230-065-001 Examine the Stage 1 HPT Duct Segments (01-060) for Cracks
Clean the part. Refer to TASK 72-45-23-100-000 (CLEANING-000).
Repair, VRS3717 TASK 72-45-23-300-016 (REPAIR-016) or Repair, VRS3760 TASK 72-45-23-300-021 (REPAIR-021)
Cracks at location 3
Repair, VRS3717 TASK 72-45-23-300-016 (REPAIR-016) or Repair, VRS3760 TASK 72-45-23-300-021 (REPAIR-021)
Repair, VRS3717 TASK 72-45-23-300-016 (REPAIR-016) or Repair, VRS3760 TASK 72-45-23-300-021 (REPAIR-021)
NOTE
Depth measurement must be taken at the edge of the segment.A maximum of four cracks on each edge, not more than 0.200 in. (5.08 mm) in length (circumferentially) and 0.050 in. (1.27 mm) in depth (radially). Cracks must not break into the cooling holes and must be separated by a minimum of 0.075 in. (1.91 mm) (axially)
Cracks on the duct segment shiplap edges at location 14 and 15.
Base metal cracks, all other areas
Do the test for cracks on the part that is given below. Examine the metal surfaces at location 8. Do not examine the ceramic coated areas at location 4. Look carefully at the metering cover at location 7 and the attachment slot and shiplap surfaces at locations 3, 6, 9, 11 and 12. Use the applicable penetrant procedure.
PART IDENT
TASK/SUBTASK
Stage 1 HPT duct segment
SUBTASK 72-45-23-230-065-002 Examine the Stage 1 HPT Duct Segments (01-060) for Cracks
Repair, VRS3717 TASK 72-45-23-300-016 (REPAIR-016) or Repair, VRS3760 TASK 72-45-23-300-021 (REPAIR-021)
Other than (a)
Wear.
Repair, VRS3717 TASK 72-45-23-300-016 (REPAIR-016) or Repair, VRS3760 TASK 72-45-23-300-021 (REPAIR-021)
Other than (4)
Examine the duct segment assembly for bends, part missing, wear and unwanted material on the attachment and shiplap surfaces.
SUBTASK 72-45-23-220-095 Examine the Stage 1 HPT Duct Segments (01-060) for Bent, Part Missing, Wear and Unwanted Material on the Attachment and Shiplap Surfaces
Refer to Figure.
Repair, VRS3640 TASK 72-45-23-300-015 (REPAIR-015) or Repair, VRS3760 TASK 72-45-23-300-021 (REPAIR-021)
The seal groove width is less than 0.016 in. (0.41 mm) and the tab is bent inward
Repair, VRS3760 TASK 72-45-23-300-021 (Repair-021)
The seal groove width is less than 0.016 in. (0.41 mm) or the tab is bent outward
Examine the duct segments at location 16 for the width of the seal groove.
SUBTASK 72-45-23-220-096 Examine the Stage 1 HPT Duct Segments (01-060) for the Seal Groove Width
Repair, VRS3071 TASK 72-45-23-300-007 (REPAIR-007) or Repair, VRS3760 TASK 72-45-23-300-021 (REPAIR-021)
Unwanted material
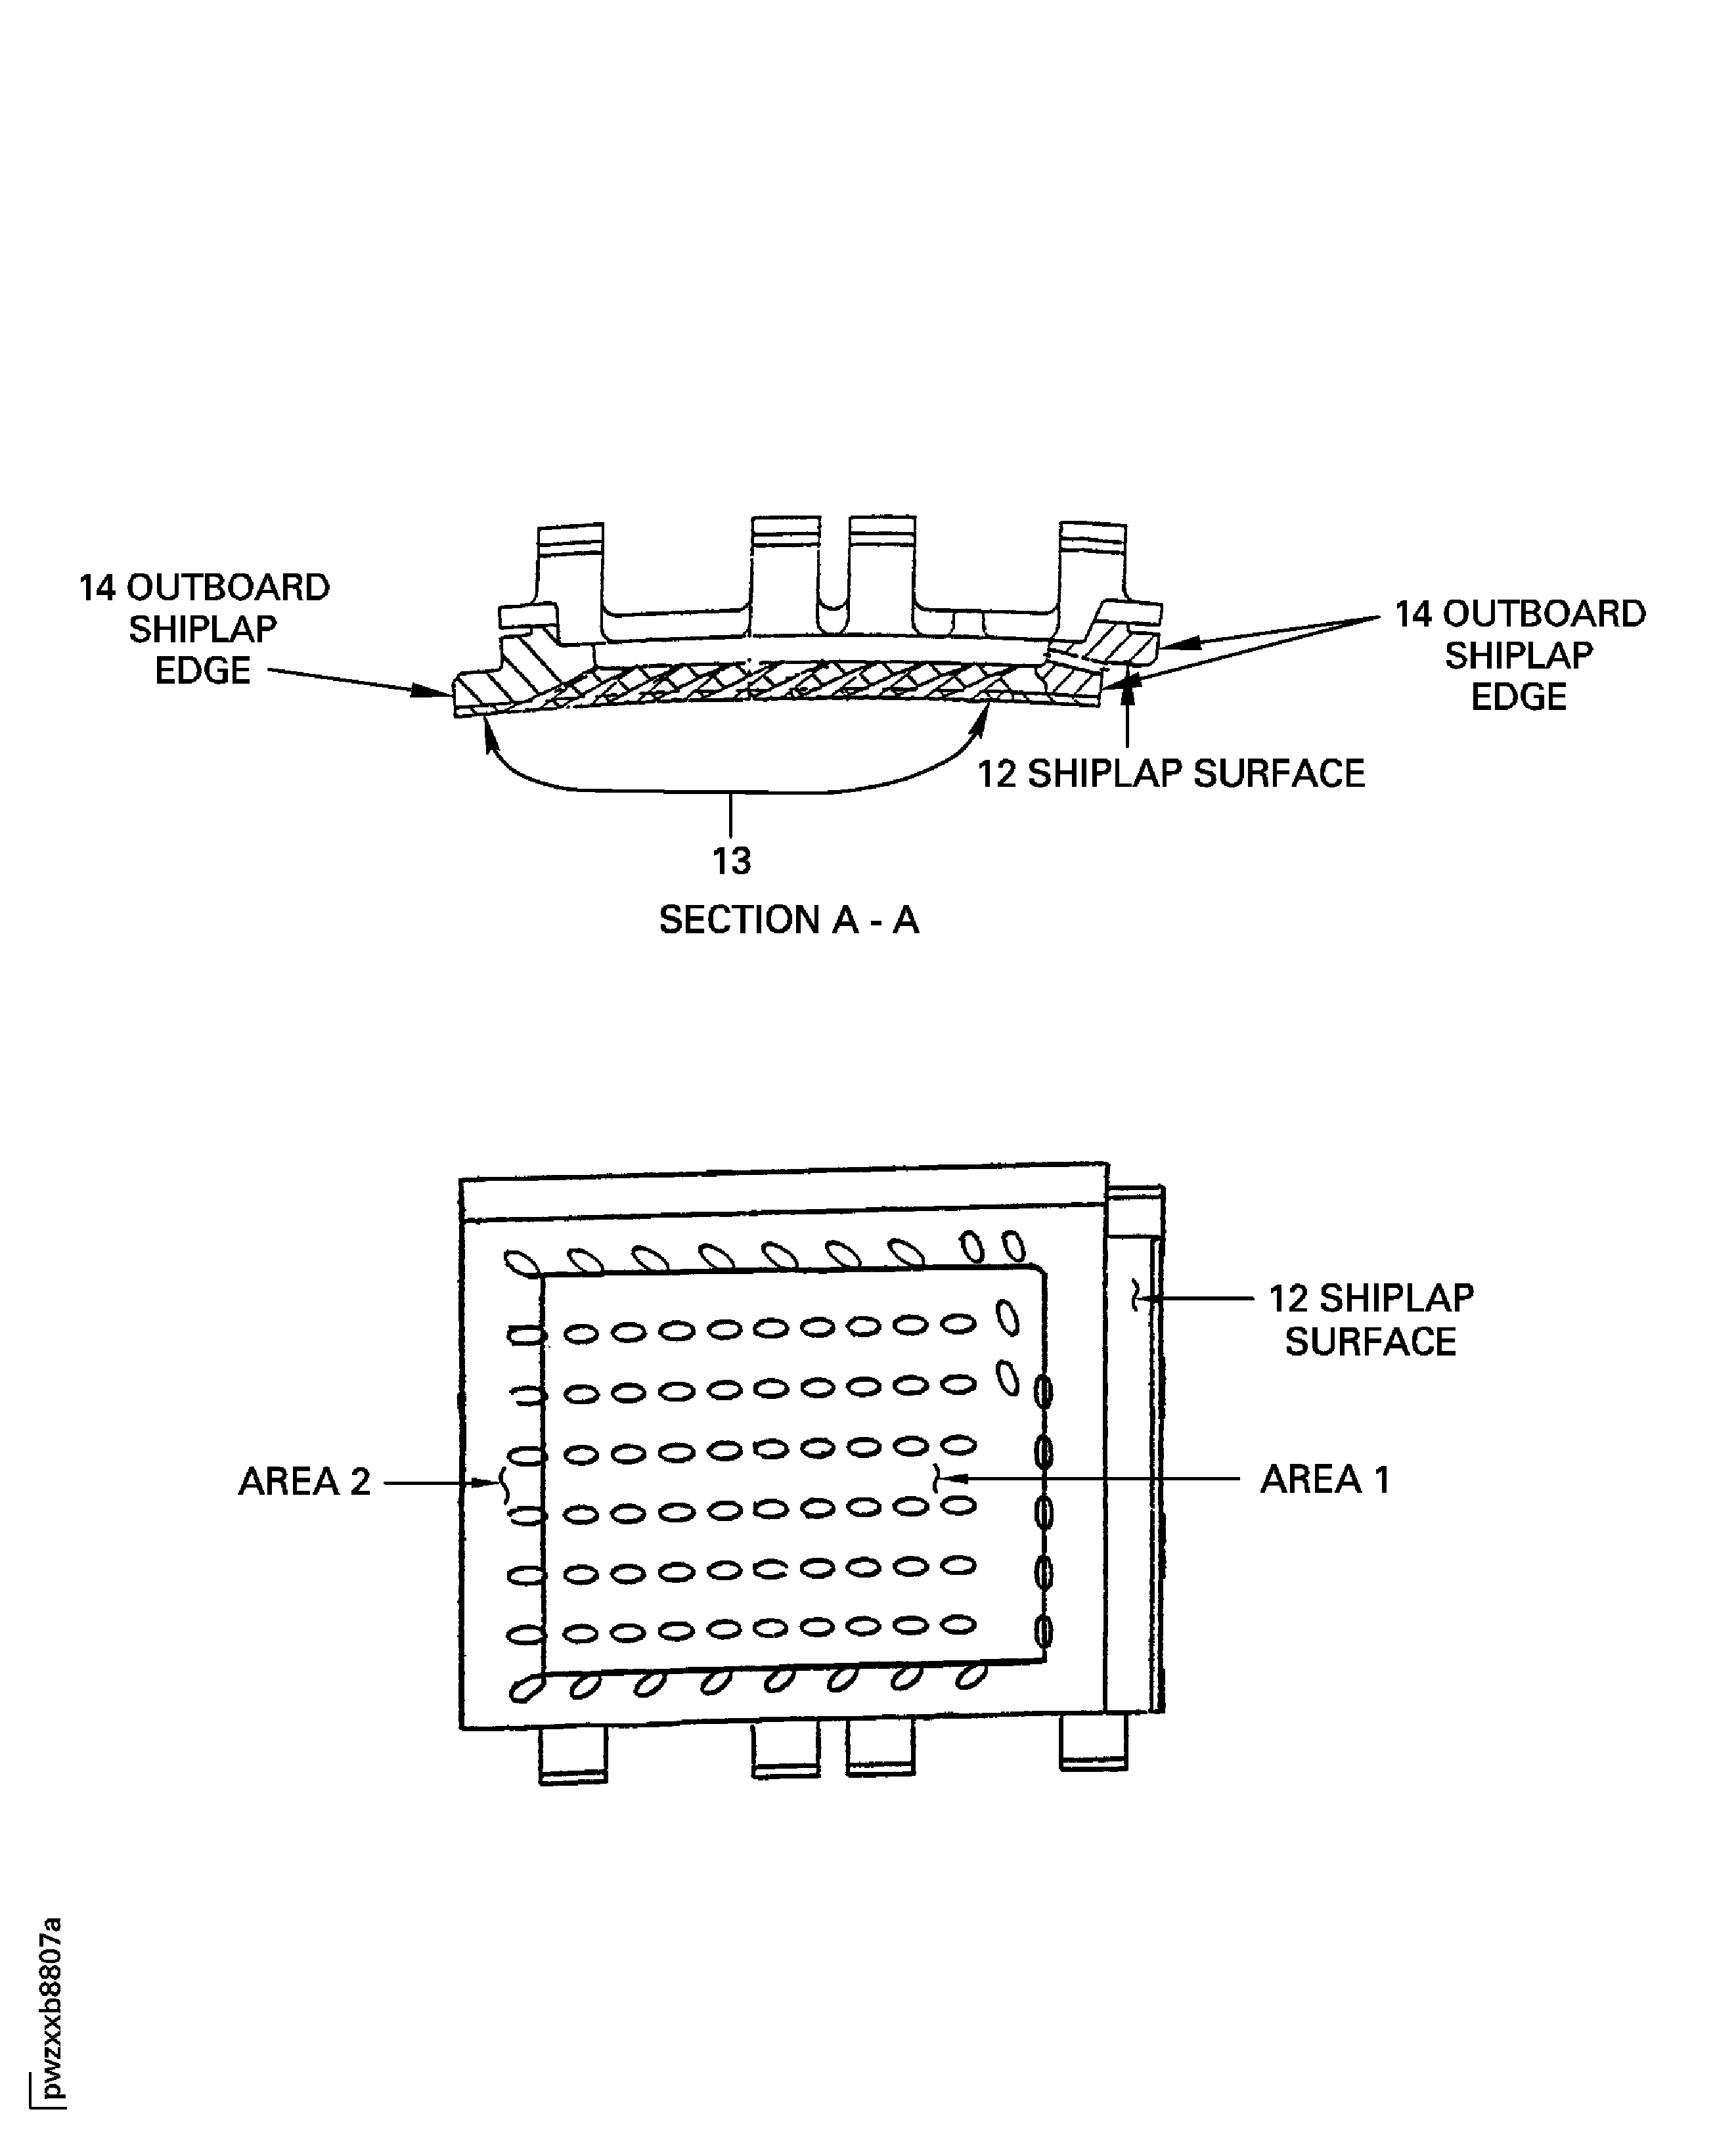
Examine the duct segment at location 13 for unwanted material in the cooling holes.
SUBTASK 72-45-23-220-097 Examine the Stage 1 HPT Duct Segment Assembly (01-060) Ceramic Coated Surfaces for Unwanted Material in the Cooling Holes
Hooks (location 19), nicks, dents, gouges and similar surface imperfections are permitted to 0.005 in. (0.13 mm) depth, if they are smooth bottomed and not in the fillet radii under the hooks. Outside of the fillet radii and ID surfaces, isolated surface imperfections are permitted to 0.040 in. (1.02 mm) depth, if they are smooth bottomed and no two adjacent hooks are affected. The total affected area on each hook is less than 0.016 sq in. (10.32 sq mm) and no imperfection spans more than 0.100 in. (2.54 mm) circumferentially. For hooks with multiple surface imperfections only one can be more than 0.005 in. (0.13 mm) depth
Shiplap surfaces (location 11 and 12), nicks, dents, gouges and similar surface imperfections are permitted to 0.005 in. (0.13 mm) depth, if they are smooth bottomed and not in the fillet radii, isolated surface imperfections are permitted to 0.040 in. (1.016 mm) depth, if they are smooth bottomed, the total affected area is less than 0.016 in. (0.406 mm) and no imperfection spans more than 0.100 in. (2.54 mm) axially. For multiple surface imperfections, only one can be more than 0.005 in. (0.13 mm) deep
All other surfaces, nicks, dents, gouges and similar surface imperfections are permitted to 0.005 in. (0.13 mm) depth, if they are smooth bottomed. Isolated surface imperfections are permitted to 0.040 in. (1.02 mm) depth, if fillet radii, metering cover, cooling holes and hook web are not affected, the imperfection is smooth bottomed and total affected area is less than 0.050 sq in. (32.26 sq mm). All imperfections more than 0.005 in. (0.13 mm) in depth must be separated by 0.010 in. (0.25 mm) minimum. Imperfections on axial and circumferential faces spanning more than half of the face width are not permitted. At location 20 the imperfection may span the entire radial width
Repair, VRS3721 TASK 72-45-23-300-017 (REPAIR-017) or Repair, VRS3760 TASK 72-45-23-300-021 (REPAIR-021)
Other than (a), (b), (c) and (d)
Corrosion, dents, erosion, nicks and pits.
Examine the duct segment assembly at location 8, 11, 12, 18 and 19 for corrosion, dents, nicks and pits on all the base metal surfaces.
Repair, VRS3721 TASK 72-45-23-300-017 (REPAIR-017) or Repair, VRS3717 TASK 72-45-23-300-016 (REPAIR-016) or Repair, VRS3760 TASK 72-45-23-300-021 (REPAIR-021)
Erosion on the edges not more 0.050 in. (1.27 mm) measured circumferentially from the shiplap edge, along the entire length
Repair, VRS3717 TASK 72-45-23-300-016 (REPAIR-016) or Repair, VRS3760 TASK 72-45-23-300-021 (REPAIR-021)
More than in (a)
Repair, VRS3717 TASK 72-45-23-300-016 (REPAIR-016) or Repair, VRS3760 TASK 72-45-23-300-021 (REPAIR-021)
Erosion on the shiplap edge at location 14 not more than 0.200 in. (5.08 mm) from the shiplap edge (circumferentially) by not more than 50 per cent of the edge (axially)
Erosion on the shiplap edges.
Examine the duct segment at locations 14 and 15 for erosion on the shiplap edges.
SUBTASK 72-45-23-220-098 Examine the Stage 1 HPT Duct Segment Assembly (01-060) for Corrosion, Dents, Erosion, Nicks and Pits on the Base Metal Surfaces
Repair, VRS3717 TASK 72-45-23-300-016 (REPAIR-016) or Repair, VRS 3760 TASK 72-45-23-300-021 (REPAIR-021)
Other than (a)
Chips and spalls in Area 2.
Repair, VRS3717 TASK 72-45-23-300-016 (REPAIR-016) or Repair, VRS3760 TASK 72-45-23-300-021 (REPAIR-021)
Other than (a) through (d)
Chips and spalls in Area 1.
Examine the duct segment assembly at location 4 for chips and spalls on the ceramic coating in areas 1 and 2.
SUBTASK 72-45-23-220-099 Examine the Stage 1 HPT Duct Segment Assembly (01-060) for Chips and Spalls on the Ceramic Coating
Repair, VRS3161 TASK 72-45-23-300-009 (REPAIR-009)
Bent anti-rotation pin
Examine the anti-rotation pin on the duct segment assembly at location 5 for bends or wear.
SUBTASK 72-45-23-220-100 Examine the Stage 1 HPT Duct Segment Assembly (01-060) for Bend or Wear on the Anti-Rotation Pin
Refer to Figure.
Repair, VRS3543 TASK 72-45-23-300-010 (REPAIR-010)
Metal transfer at location 1
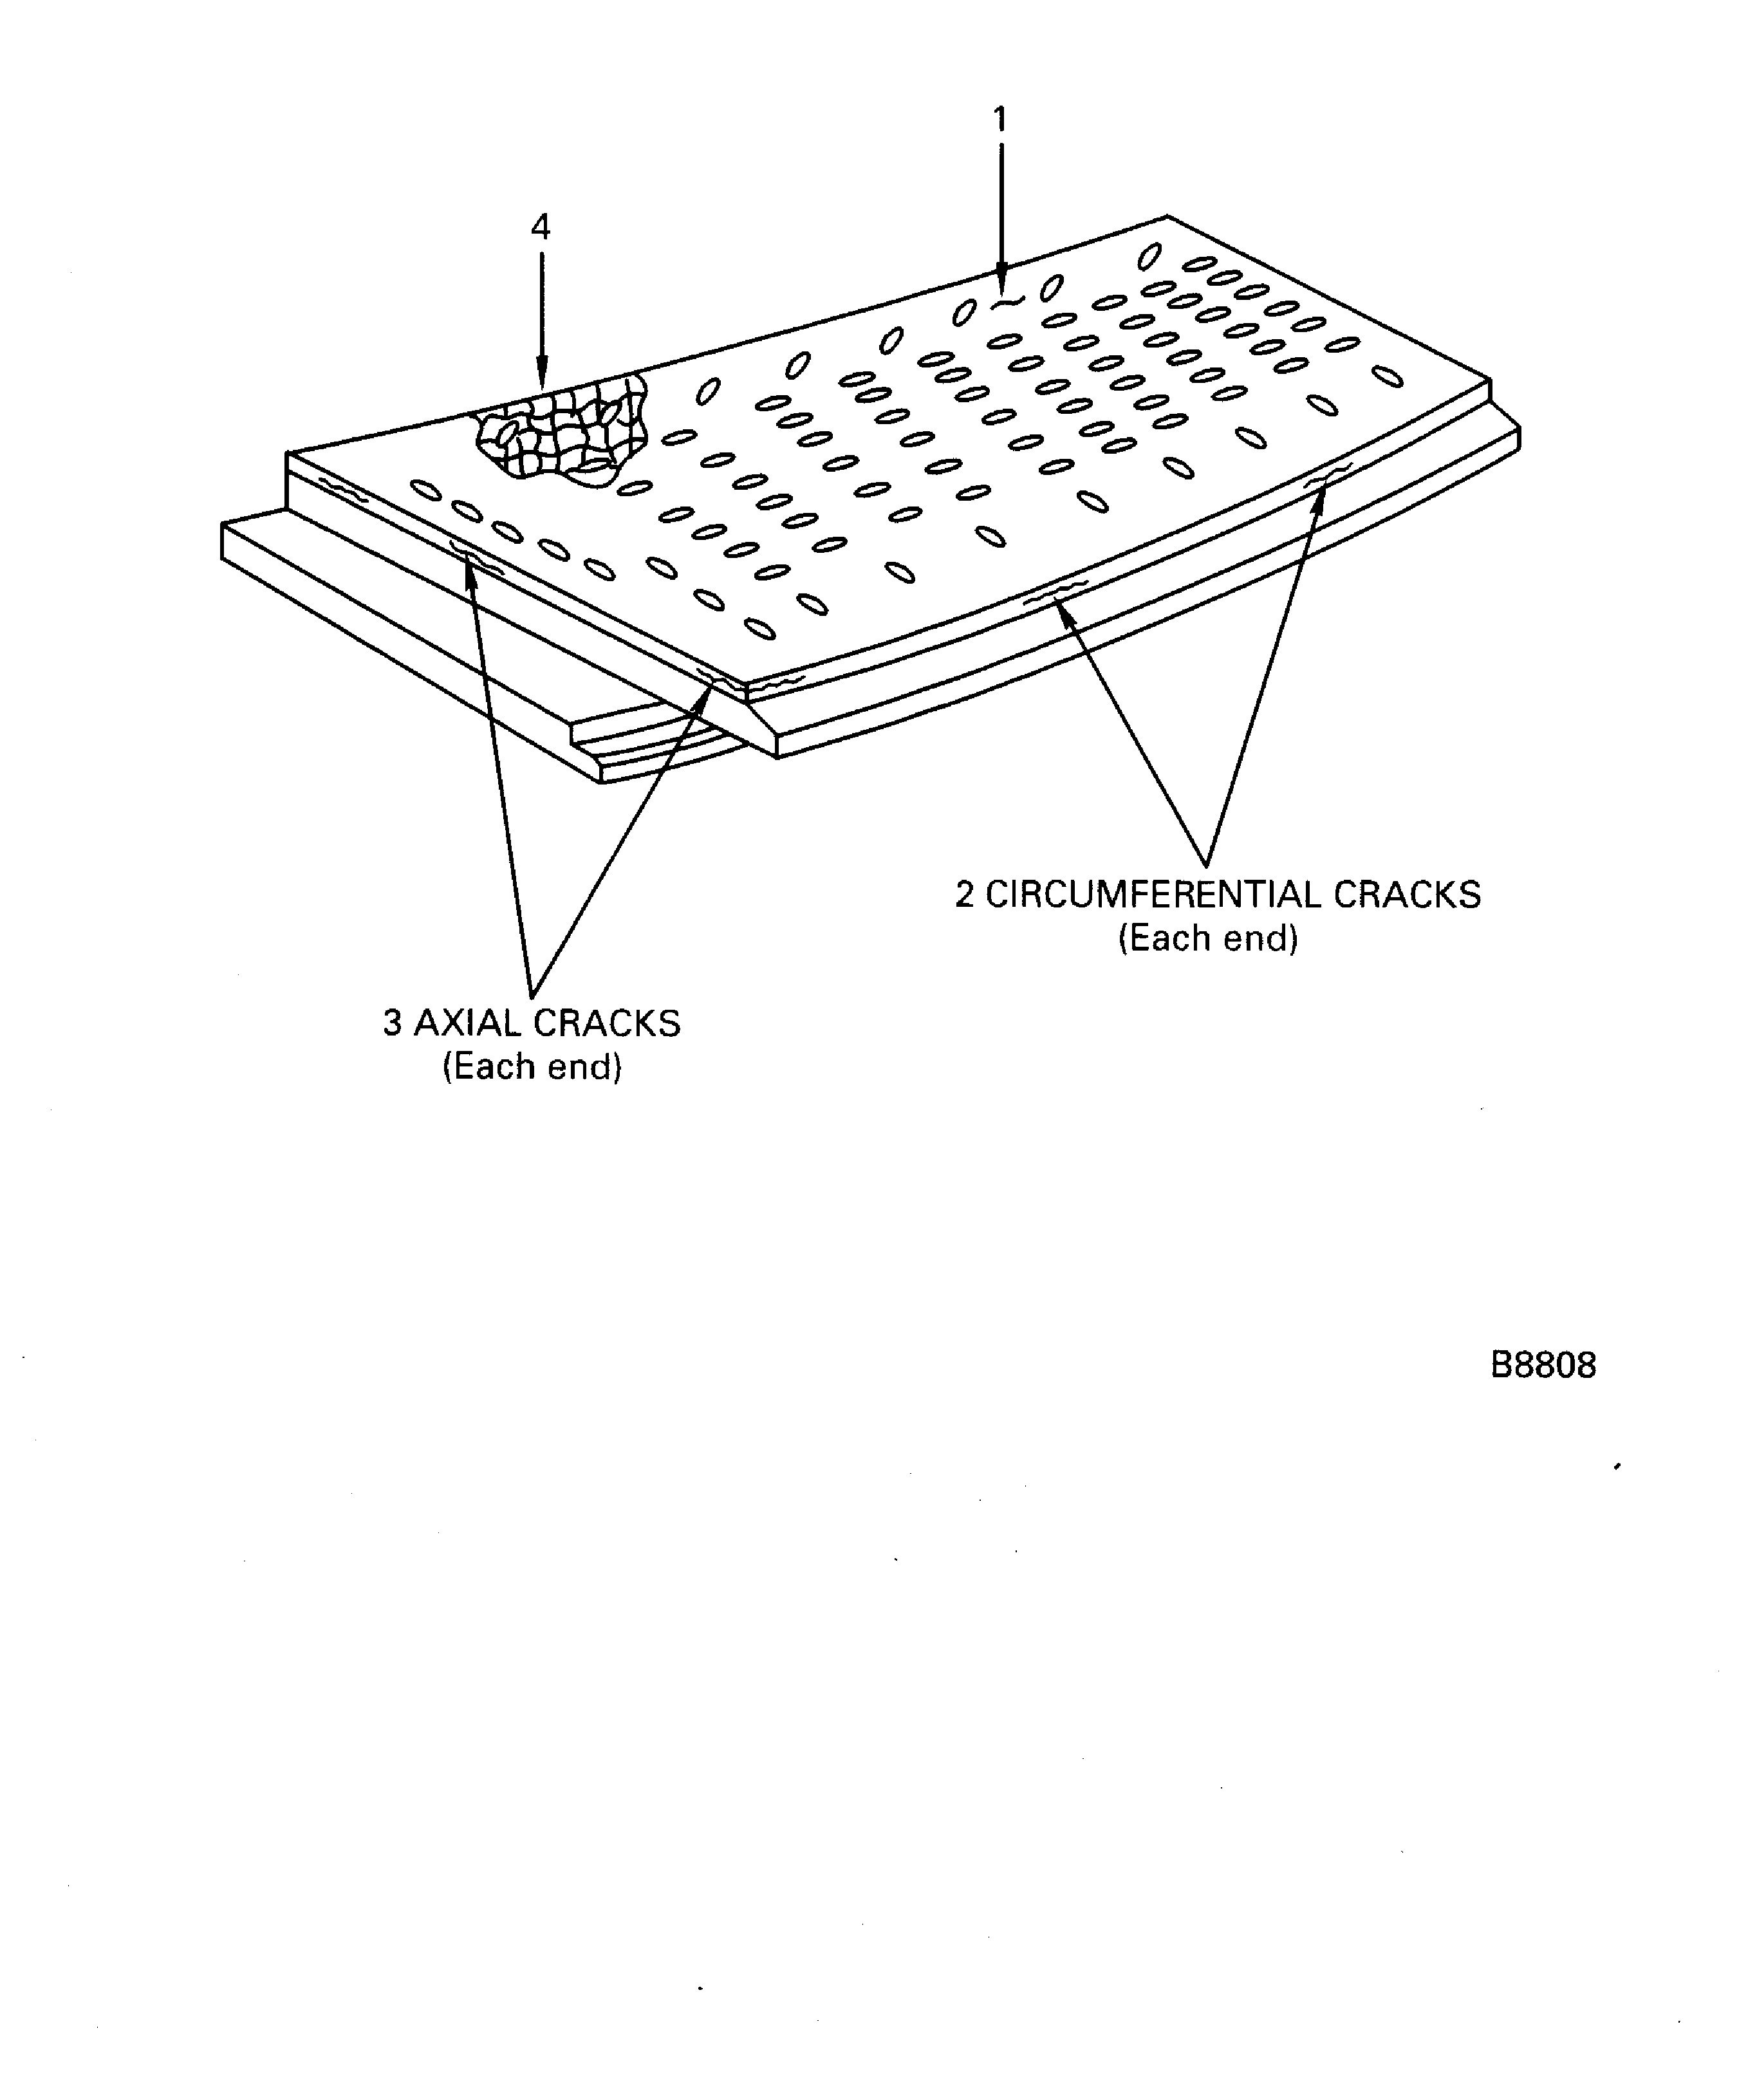
Examine the duct segment assembly for metal transfer and cracks.
Repair, VRS3717 TASK 72-45-23-300-016 (REPAIR-016) or Repair, VRS3760 TASK 72-45-23-300-021 (REPAIR-021)
Other than (a)
Erosion and rub.
Examine the duct segment assembly for erosion and rub at location 1.
SUBTASK 72-45-23-220-101 Examine the Stage 1 HPT Duct Segment Assembly (01-060) for Metal Transfer, Cracks, Erosion and Rub on the Ceramic Coating
Do the airflow procedure for the stage 1 HPT duct segment assembly by Repair, VRS3071 TASK 72-45-23-300-007 (REPAIR-007).
NOTE
If you did or will do an airflow check as a requirement of Repair 011, Repair 013, Repair 016 or Repair 021, then this TASK is not necessary.
SUBTASK 72-45-23-280-053-A00 Examine the Stage 1 HPT Duct Segment Assembly (01-060) by the Airflow Check
Figure: Stage 1 HPT Duct Segment Inspection Locations
Sheet 1

Figure: Stage 1 HPT Duct Segment Inspection Location
Sheet 2

Figure: Stage 1 HPT Duct Inspection Locations
Sheet 3

Figure: Stage 1 HPT Duct Segment Inspection Locations
Stage 1 HPT Duct Segment Inspection Locations

