Export Control
EAR Export Classification: Not subject to the EAR per 15 C.F.R. Chapter 1, Part 734.3(b)(3), except for the following Service Bulletins which are currently published as EAR Export Classification 9E991: SBE70-0992, SBE72-0483, SBE72-0580, SBE72-0588, SBE72-0640, SBE73-0209, SBE80-0024 and SBE80-0025.Copyright
© IAE International Aero Engines AG (2001, 2014 - 2021) The information contained in this document is the property of © IAE International Aero Engines AG and may not be copied or used for any purpose other than that for which it is supplied without the express written authority of © IAE International Aero Engines AG. (This does not preclude use by engine and aircraft operators for normal instructional, maintenance or overhaul purposes.).Applicability
All
Common Information
TASK 72-45-33-300-003 HPT Stage 2 Blade Retaining Plate - Plasma Spray Repair The Front Inner Diameter, Repair-003 (VRS3323)
Preliminary Requirements
Pre-Conditions
| Action/Condition | Data Module/Technical Publication |
|---|---|
| Make sure that all the cleaning and inspection procedures are done before the repair. |
Support Equipment
NONEConsumables, Materials and Expendables
| Name | Manufacturer | Part Number / Identification | Quantity | Remark |
|---|---|---|---|---|
| CoMat 03-080 METAL SPRAYING POWDER,Co BASE ALLOY | IE426 | CoMat 03-080 |
Spares
NONESafety Requirements
NONEProcedure
Grind the front inner diameter to remove the IAE 53-18 coating by SPM TASK 70-32-07-100-501. Refer to Figure and Figure.
SUBTASK 72-45-33-320-053-A00 Remove the Coating from the Front Diameter of the Stage 2 HPT Retaining Plate (PN 2A0160 and 2A1813)
NOTE
This procedure is an alternate to Step.NOTE
Do this procedure only if the part was repaired by VRS3323 before. If the part was repaired before, you will see VRS3323 marked near the part number. If the part was not repaired before by VRS3323, do the procedure in Step.NOTE
Unless specified differently, all dimensions apply when Surface F is flat by 0.010 in. (0.254 mm) in a free condition or 0.001 in. (0.025 mm) in a held condition and Diameter G maintains a clearance envelope of 17.387 in. (441.630 mm) in a free or held condition. Hold the part only on Surfaces F, H, S and T and on Diameter G.Grind the front inner diameter to remove the IAE 53-18 coating by SPM TASK 70-32-07-100-501. Refer to Figure and Figure.
SUBTASK 72-45-33-320-053-B00 Remove the Coating from the Front Diameter of the Stage 2 HPT Retaining Plate (PN 2A2097, 2A3426 and 2A3437)
NOTE
This procedure is an alternate to Step.NOTE
Do this procedure only if the part was repaired by VRS3323 before. If the part was repaired before, you will see VRS3323 marked near the part number. If the part was not repaired before by VRS3323, do the procedure in Step.NOTE
Unless specified differently, all dimensions apply when Surface F is flat by 0.010 in. (0.254 mm) in a free condition or 0.001 in. (0.025 mm) in a held condition and Diameter G maintains a clearance envelope of 17.215 in. (437.262 mm) in a free or a held condition. Hold the part only on Surfaces F, H, S and T and on Diameter G.Strip the coating from the front diameter by SPM TASK 70-15-01-160-501. Refer to Figure and Figure or Figure and Figure.
SUBTASK 72-45-33-150-051 Remove the Coating from the Front Diameter of the Stage 2 HPT Retaining Plate
NOTE
Do this procedure only if the part was repaired by TASK 72-45-33-300-003 before. If the part was repaired before, you will see TASK 72-45-33-300-003 marked near the part number. If the part was not repaired before by TASK 72-45-33-300-003, do this procedure in Step or TASK 72-45-33-300-003.SUBTASK 72-45-33-320-054-A00 Machine or Grind the Front Diameter of the Stage 2 HPT Retaining Plate (PN 2A0160 and 2A1813) Before Plasma Spray
NOTE
Do this procedure only if the part was not repaired by TASK 72-45-33-300-003 before. If the part was repaired before, you will see TASK 72-45-33-300-003 marked near the part number.NOTE
Unless specified differently, all dimensions apply when Surface F is flat by 0.010 in. (0.254 mm) in a free condition or 0.001 in. (0.025 mm) in a held condition and Diameter G maintains a clearance envelope of 17.387 in. (441.630 mm) in a free or a held condition. Hold the part only on Surfaces F, H, S and T and on Diameter G.SUBTASK 72-45-33-320-054-B00 Machine or Grind the Front Diameter of the Stage 2 HPT Retaining Plate (PN 2A2097, 2A3426 and 2A3437) Before Plasma Spray
NOTE
Do this procedure only if the part was not repaired by TASK 72-45-33-300-003 before. If the part was repaired before, you will see TASK 72-45-33-300-003 marked near the part number.NOTE
Unless specified differently, all dimensions apply when Surface F is flat by 0.010 in. (0.254 mm) in a free condition or 0.001 in. (0.025 mm) in a held condition and Diameter G maintains a clearance envelope of 17.215 in. (437.262 mm) in a free or a held condition. Hold the part only on Surfaces F, H, S and T and on Diameter G.Clean the retaining plate by SPM TASK 70-11-03-300-503.
SUBTASK 72-45-33-110-057 Clean the Stage 2 HPT Retaining Plate
Cracks are not permitted.
Fluorescent penetrant inspect the front inner diameter by applicable part number task given in SPM TASK 70-23-04-230-501.
SUBTASK 72-45-33-230-058 Fluorescent Penetrant Inspect the Front Inner Diameter
Use S-170, CW-20 or SCW-20 shot size with a hardness of 45 to 55 HRC or equivalent.
Shotpeen the area machined or ground by SPM TASK 70-38-13-380-501. Refer to Figure.
SUBTASK 72-45-33-380-052 Shotpeen the Front Inner Diameter
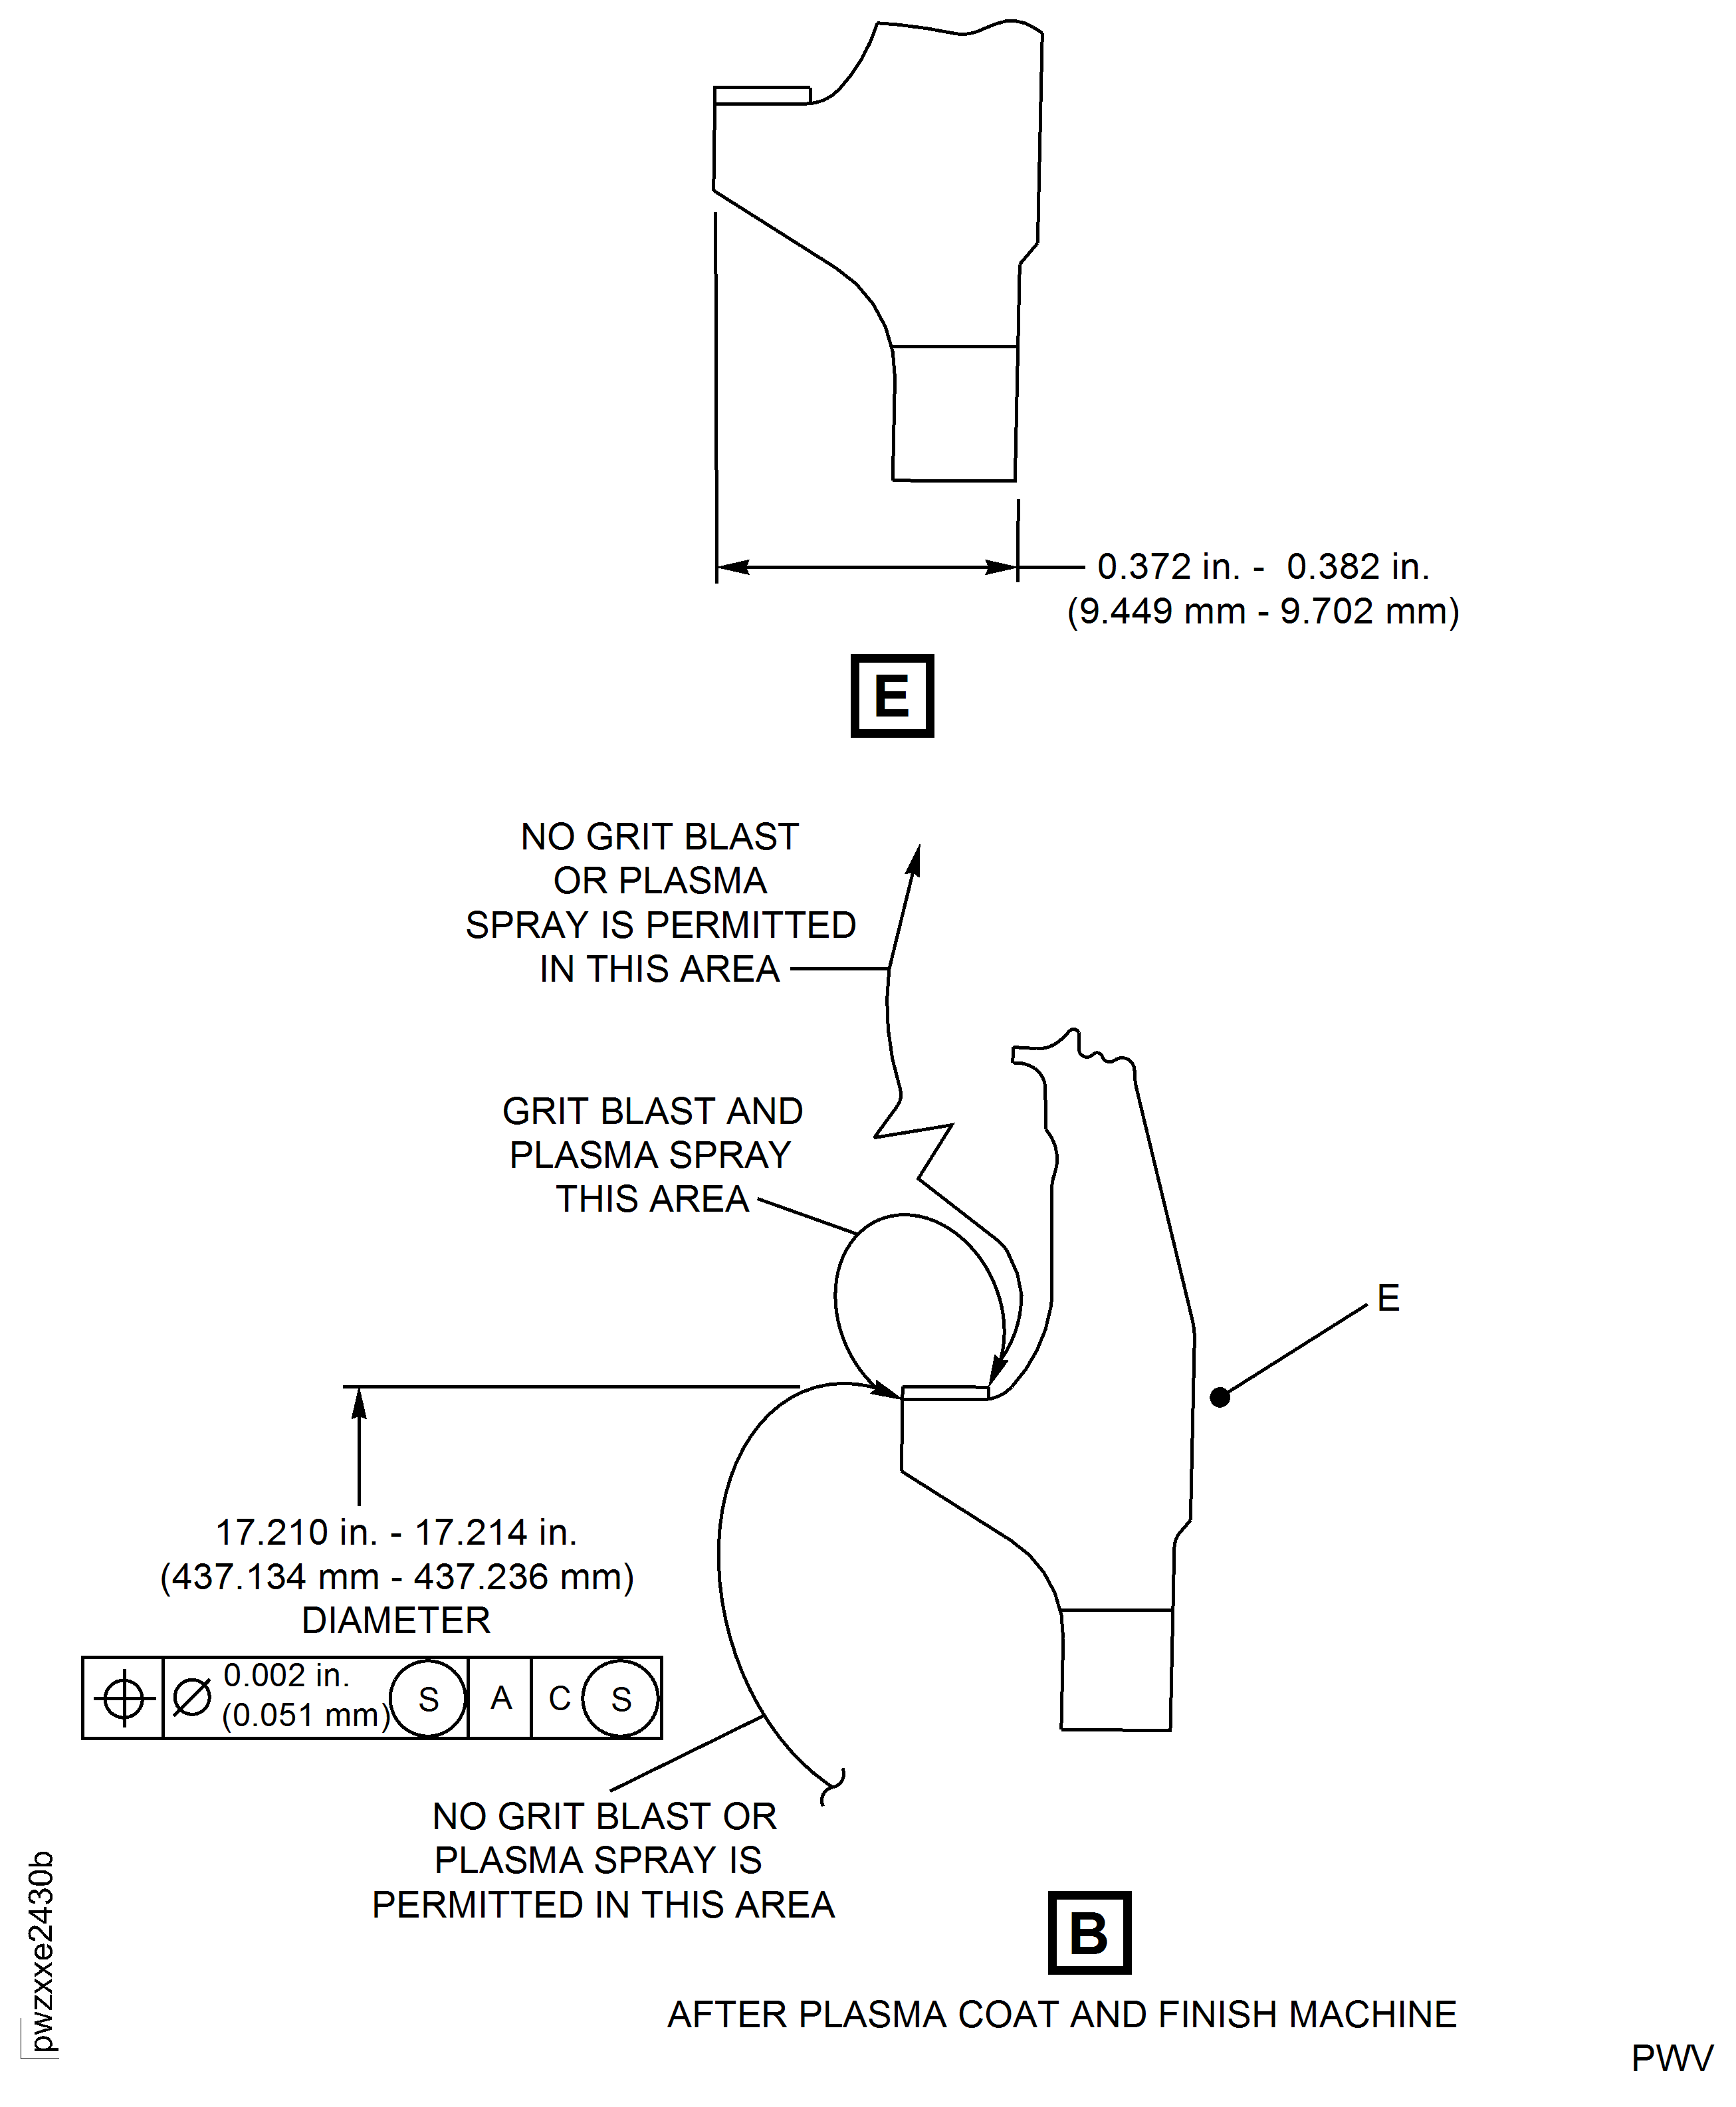
Grit blast outside of the repair area is not permitted. Use masks or maskants.
Prepare the repair area for plasma coat by SPM TASK 70-34-18-380-501. Refer to Figure and Figure.
SUBTASK 72-45-33-120-052 Prepare the Repair Area for Plasma Coat
Coating outside of repair area is not permitted. Use masks or maskants.
Coat to a sufficient thickness to allow for finishing.
The maximum thickness to be applied is 0.015 in. (0.381 mm).
The minimum thickness of the coating after finish machining is 0.003 in. (0.076 mm).
Coat the front inner diameter by SPM TASK 70-34-03-340-501 using CoMat 03-080 METAL SPRAYING POWDER,Co BASE ALLOY. Refer to Figure or Figure.
SUBTASK 72-45-33-340-052 Plasma Spray the Front Inner Diameter
Finish grind the front inner diameter IAE 53-18 coating by SPM TASK 70-32-07-100-501. Refer to Figure and Figure.
SUBTASK 72-45-33-320-055-A00 Finish Grind the Front Diameter of the Stage 2 HPT Retaining Plate (PN 2A0160 and 2A1813) After Plasma Spray
NOTE
Unless specified differently, all dimensions apply when Surface F is flat by 0.010 in. (0.254 mm) in a free condition or 0.001 in. (0.025 mm) in a held condition and Diameter G maintains a clearance envelope of 17.387 in. (441.630 mm) in a free or a held condition. Hold the part only on Sufaces F, H, S and T and on Diameter G.Finish grind the front inner diameter IAE 53-18 coating by SPM TASK 70-32-07-100-501. Refer to Figure and Figure.
SUBTASK 72-45-33-320-055-B00 Finish Grind the Front Diameter of the Stage 2 HPT Retaining Plate (PN 2A2097, 2A3426 and 2A3437) After Plasma Spray
NOTE
Unless specified differently, all dimensions apply when Surface F is flat by 0.010 in. (0.254 mm) in a free condition or 0.001 in. (0.025 mm) in a held condition and Diameter G maintains a clearance envelope of 17.215 in. (437.262 mm) in a free or a held condition. Hold the part only on Surfaces F, H, S and T and on Diameter G.Deleted.
Deleted.
Visually examine the coated area by SPM TASK 70-34-03-340-501.
SUBTASK 72-45-33-220-089 Examine the Repair
Mark the part with VRS3323 adjacent to the part number by SPM TASK 70-09-00-400-501, SUBTASK 70-09-00-400-001, using the vibration peen, dot peen or electrolytic etch methods. Remove high spots caused by marking.
For electrolytic etch marking, refer to Figure for the electrical contact area. No burning, pitting or selective attach on the electrical contact areas is permitted.
Permanently mark the part. Refer to Figure for the marking location. Ensure the part is marked as follows:
SUBTASK 72-45-33-350-052 Identify the Repair
Figure: HPT Stage 2 Blade Retaining Plate Repair Areas
HPT Stage 2 Blade Retaining Plate Repair Areas
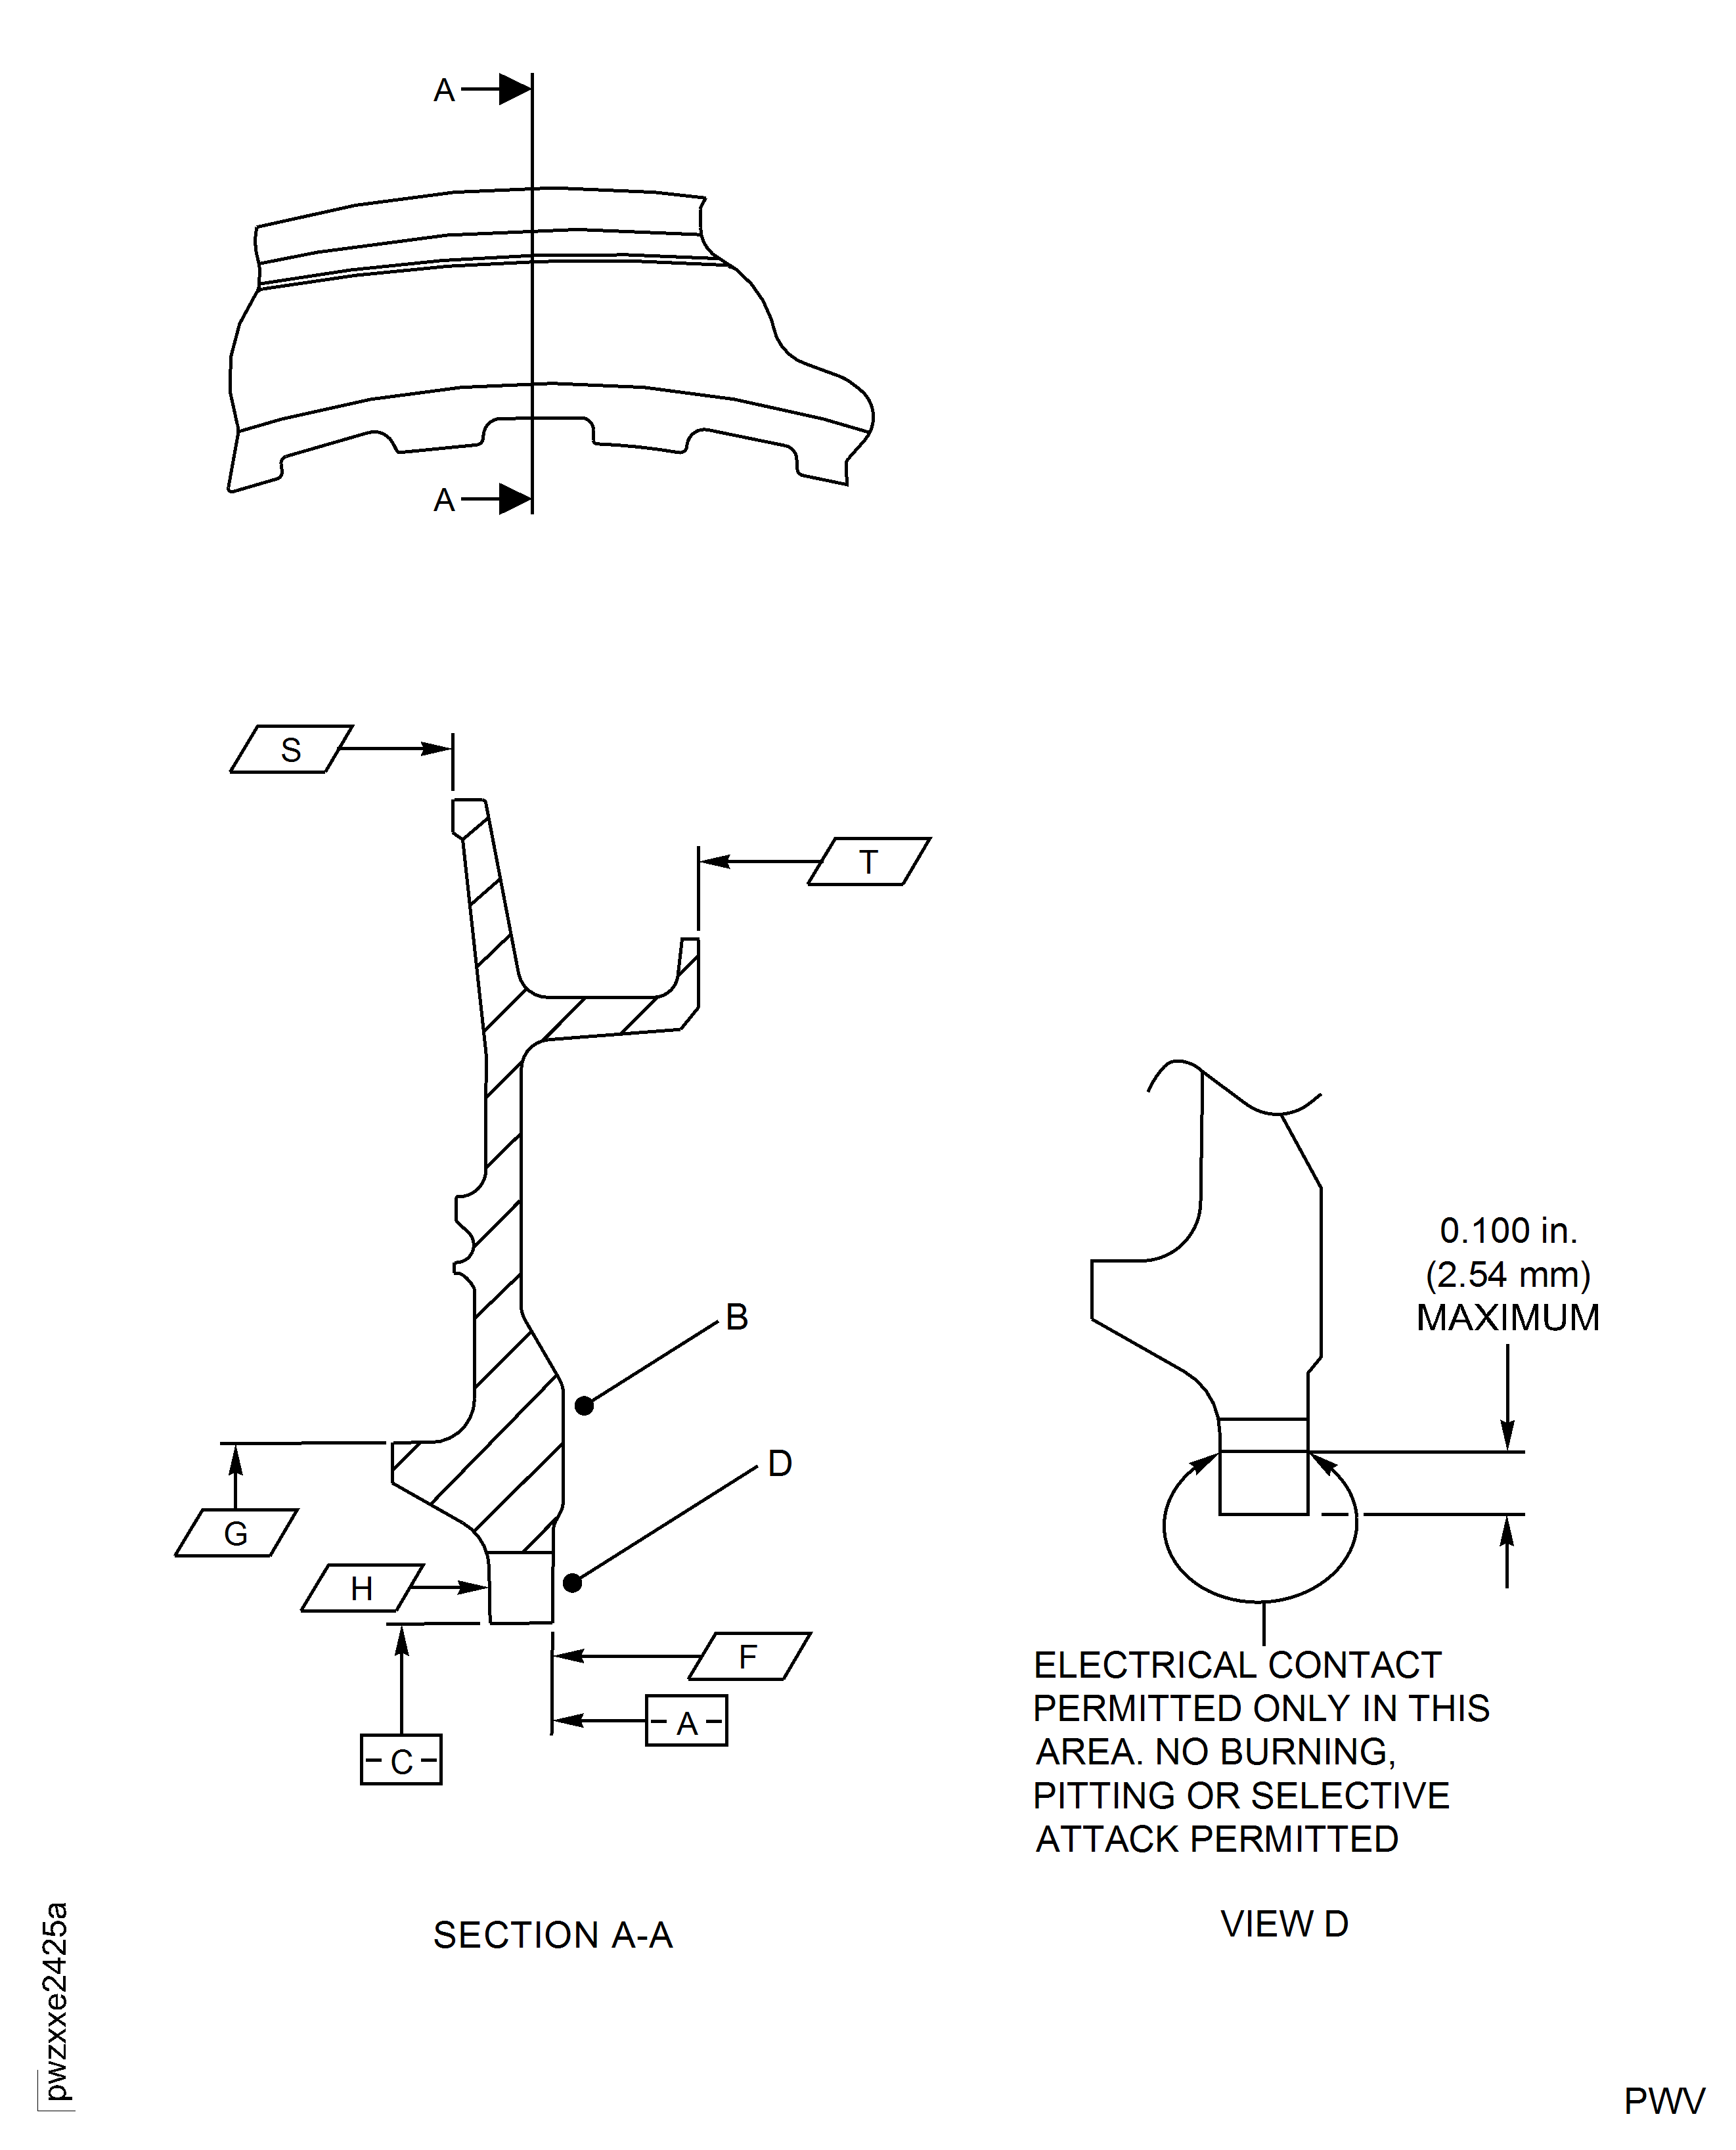
Figure: HPT Stage 2 Blade Retaining Plate Grind/Machine Before Plasma Spray Dimensions for PN 2A0160 and 2A1813
HPT Stage 2 Blade Retaining Plate Grind/Machine Before Plasma Spray Dimensions for PN 2A0160 and 2A1813
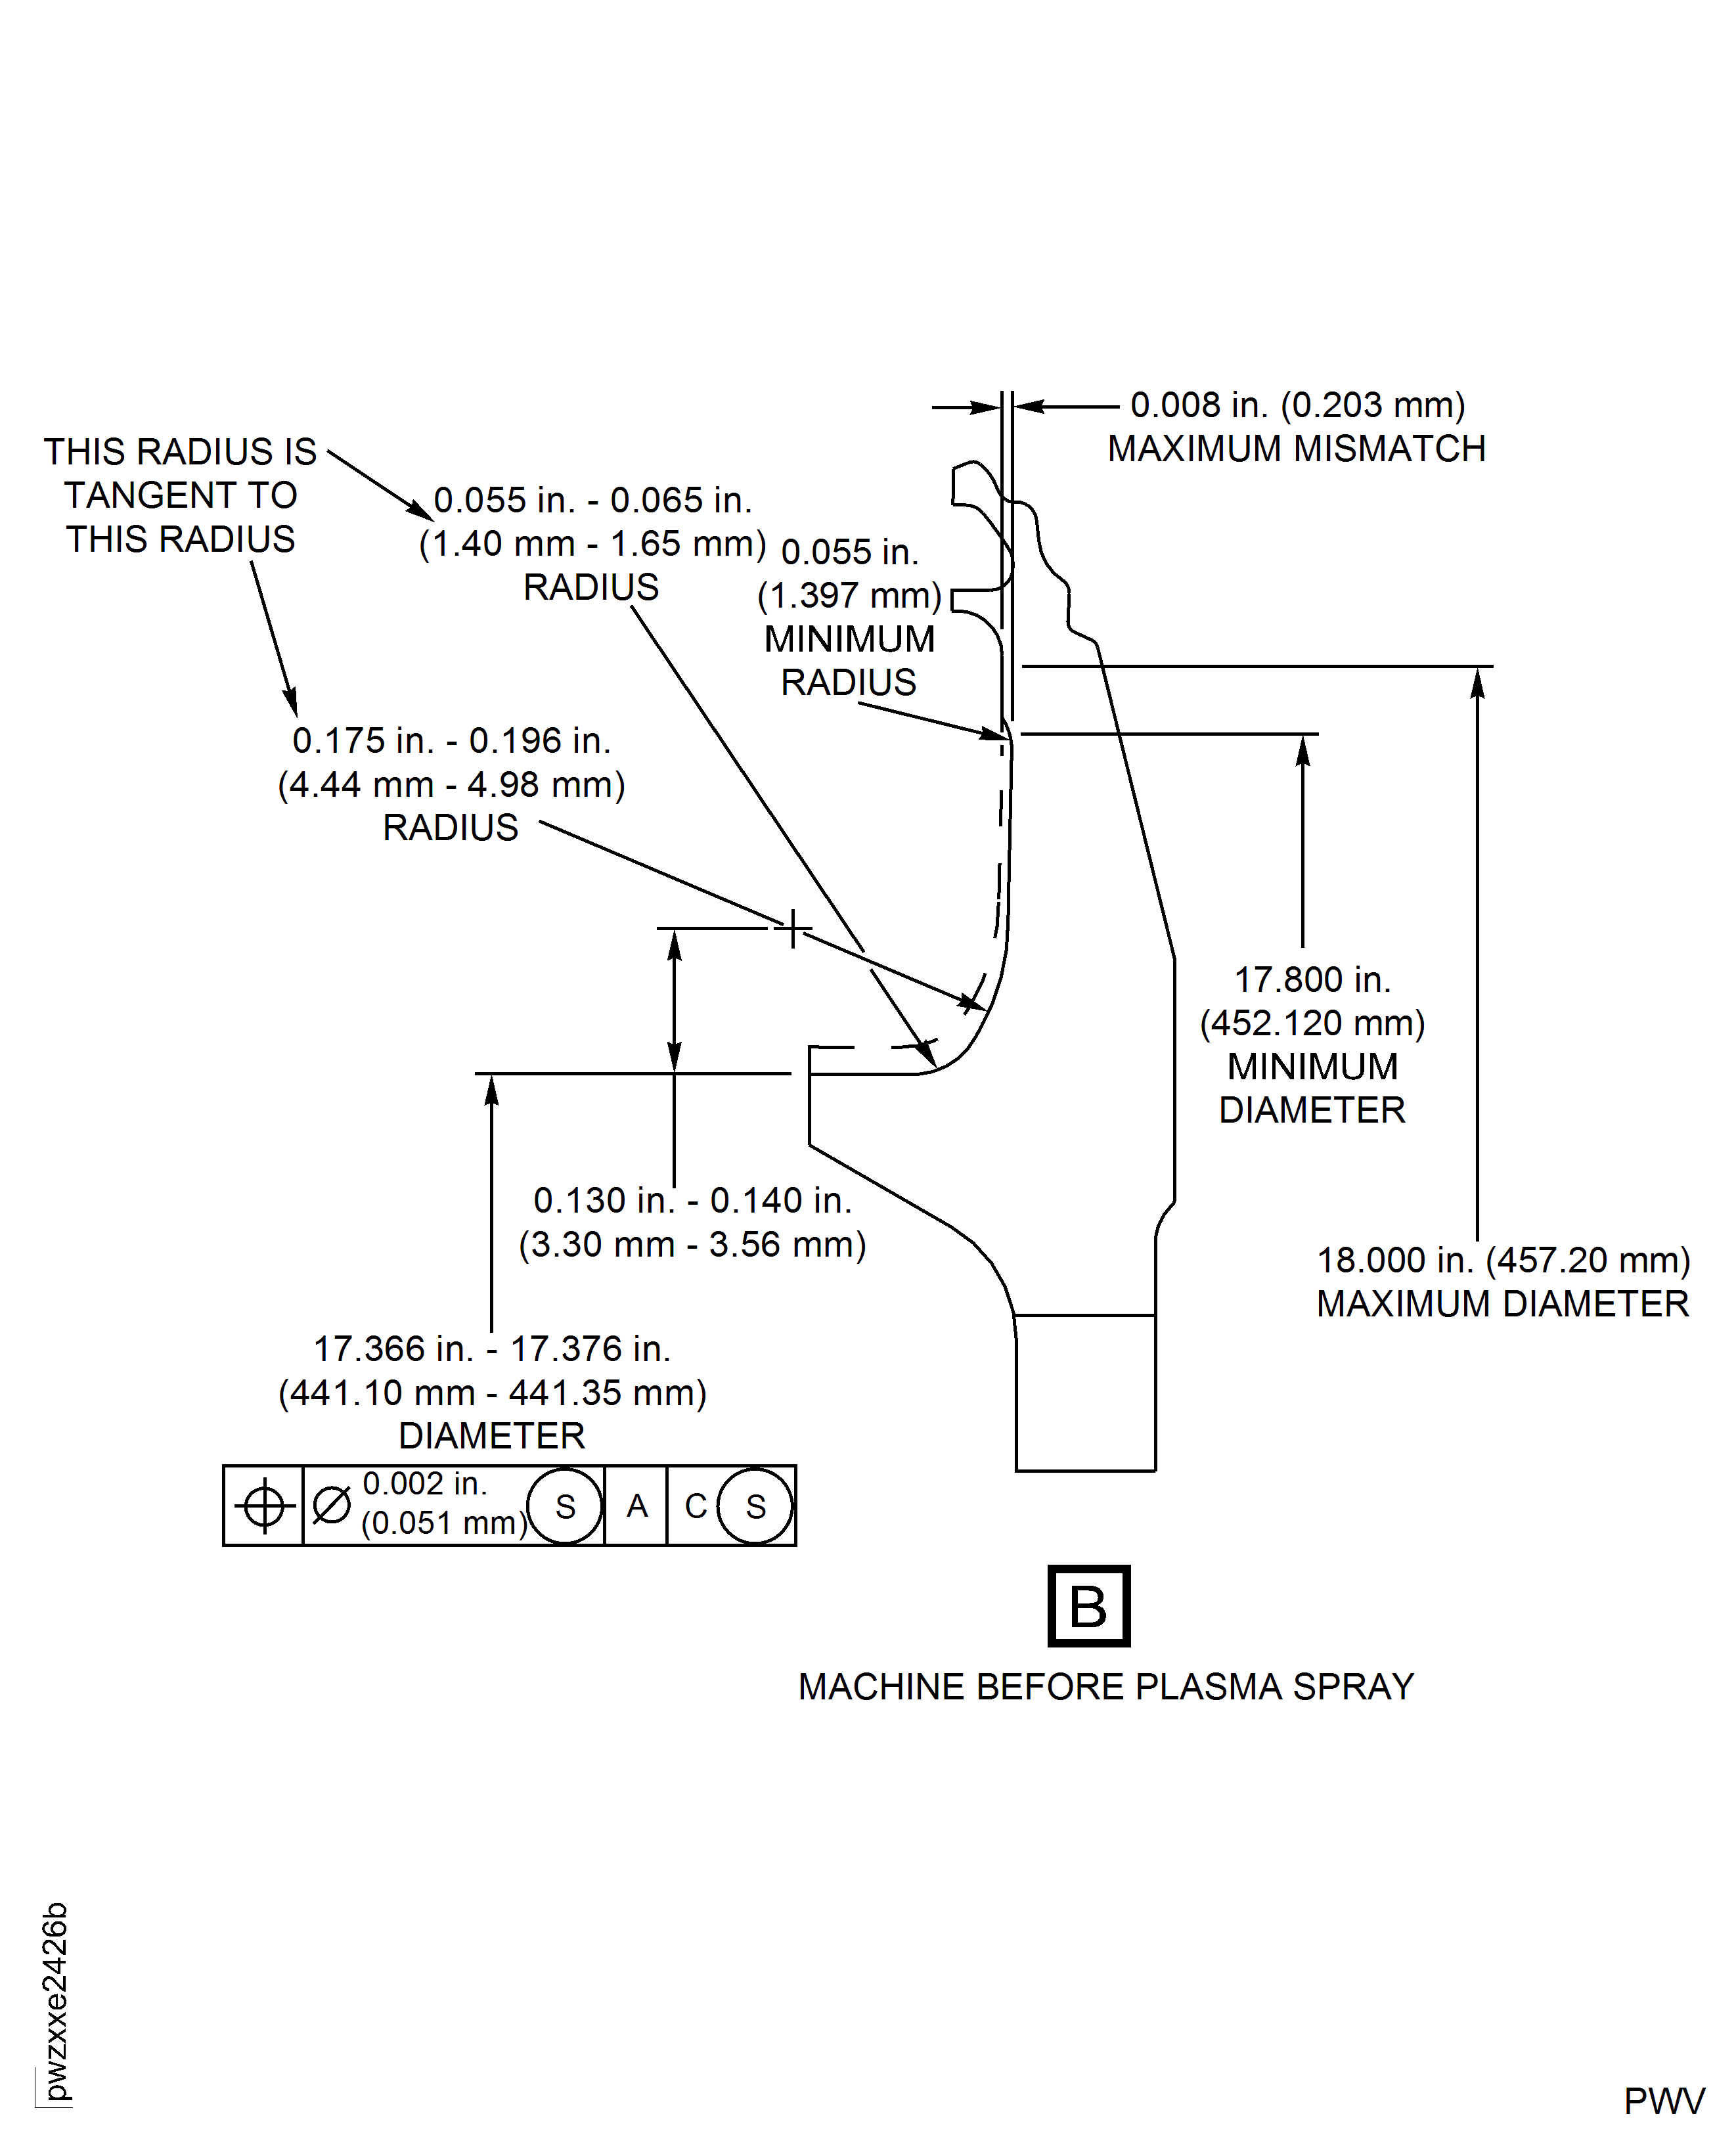
Figure: HPT Stage 2 Blade Retaining Plate Grind/Machine Before Plasma Spray Dimensions for PN 2A2097, 2A3426 and 2A3437
HPT Stage 2 Blade Retaining Plate Grind/Machine Before Plasma Spray Dimensions for PN 2A2097, 2A3426 and 2A3437
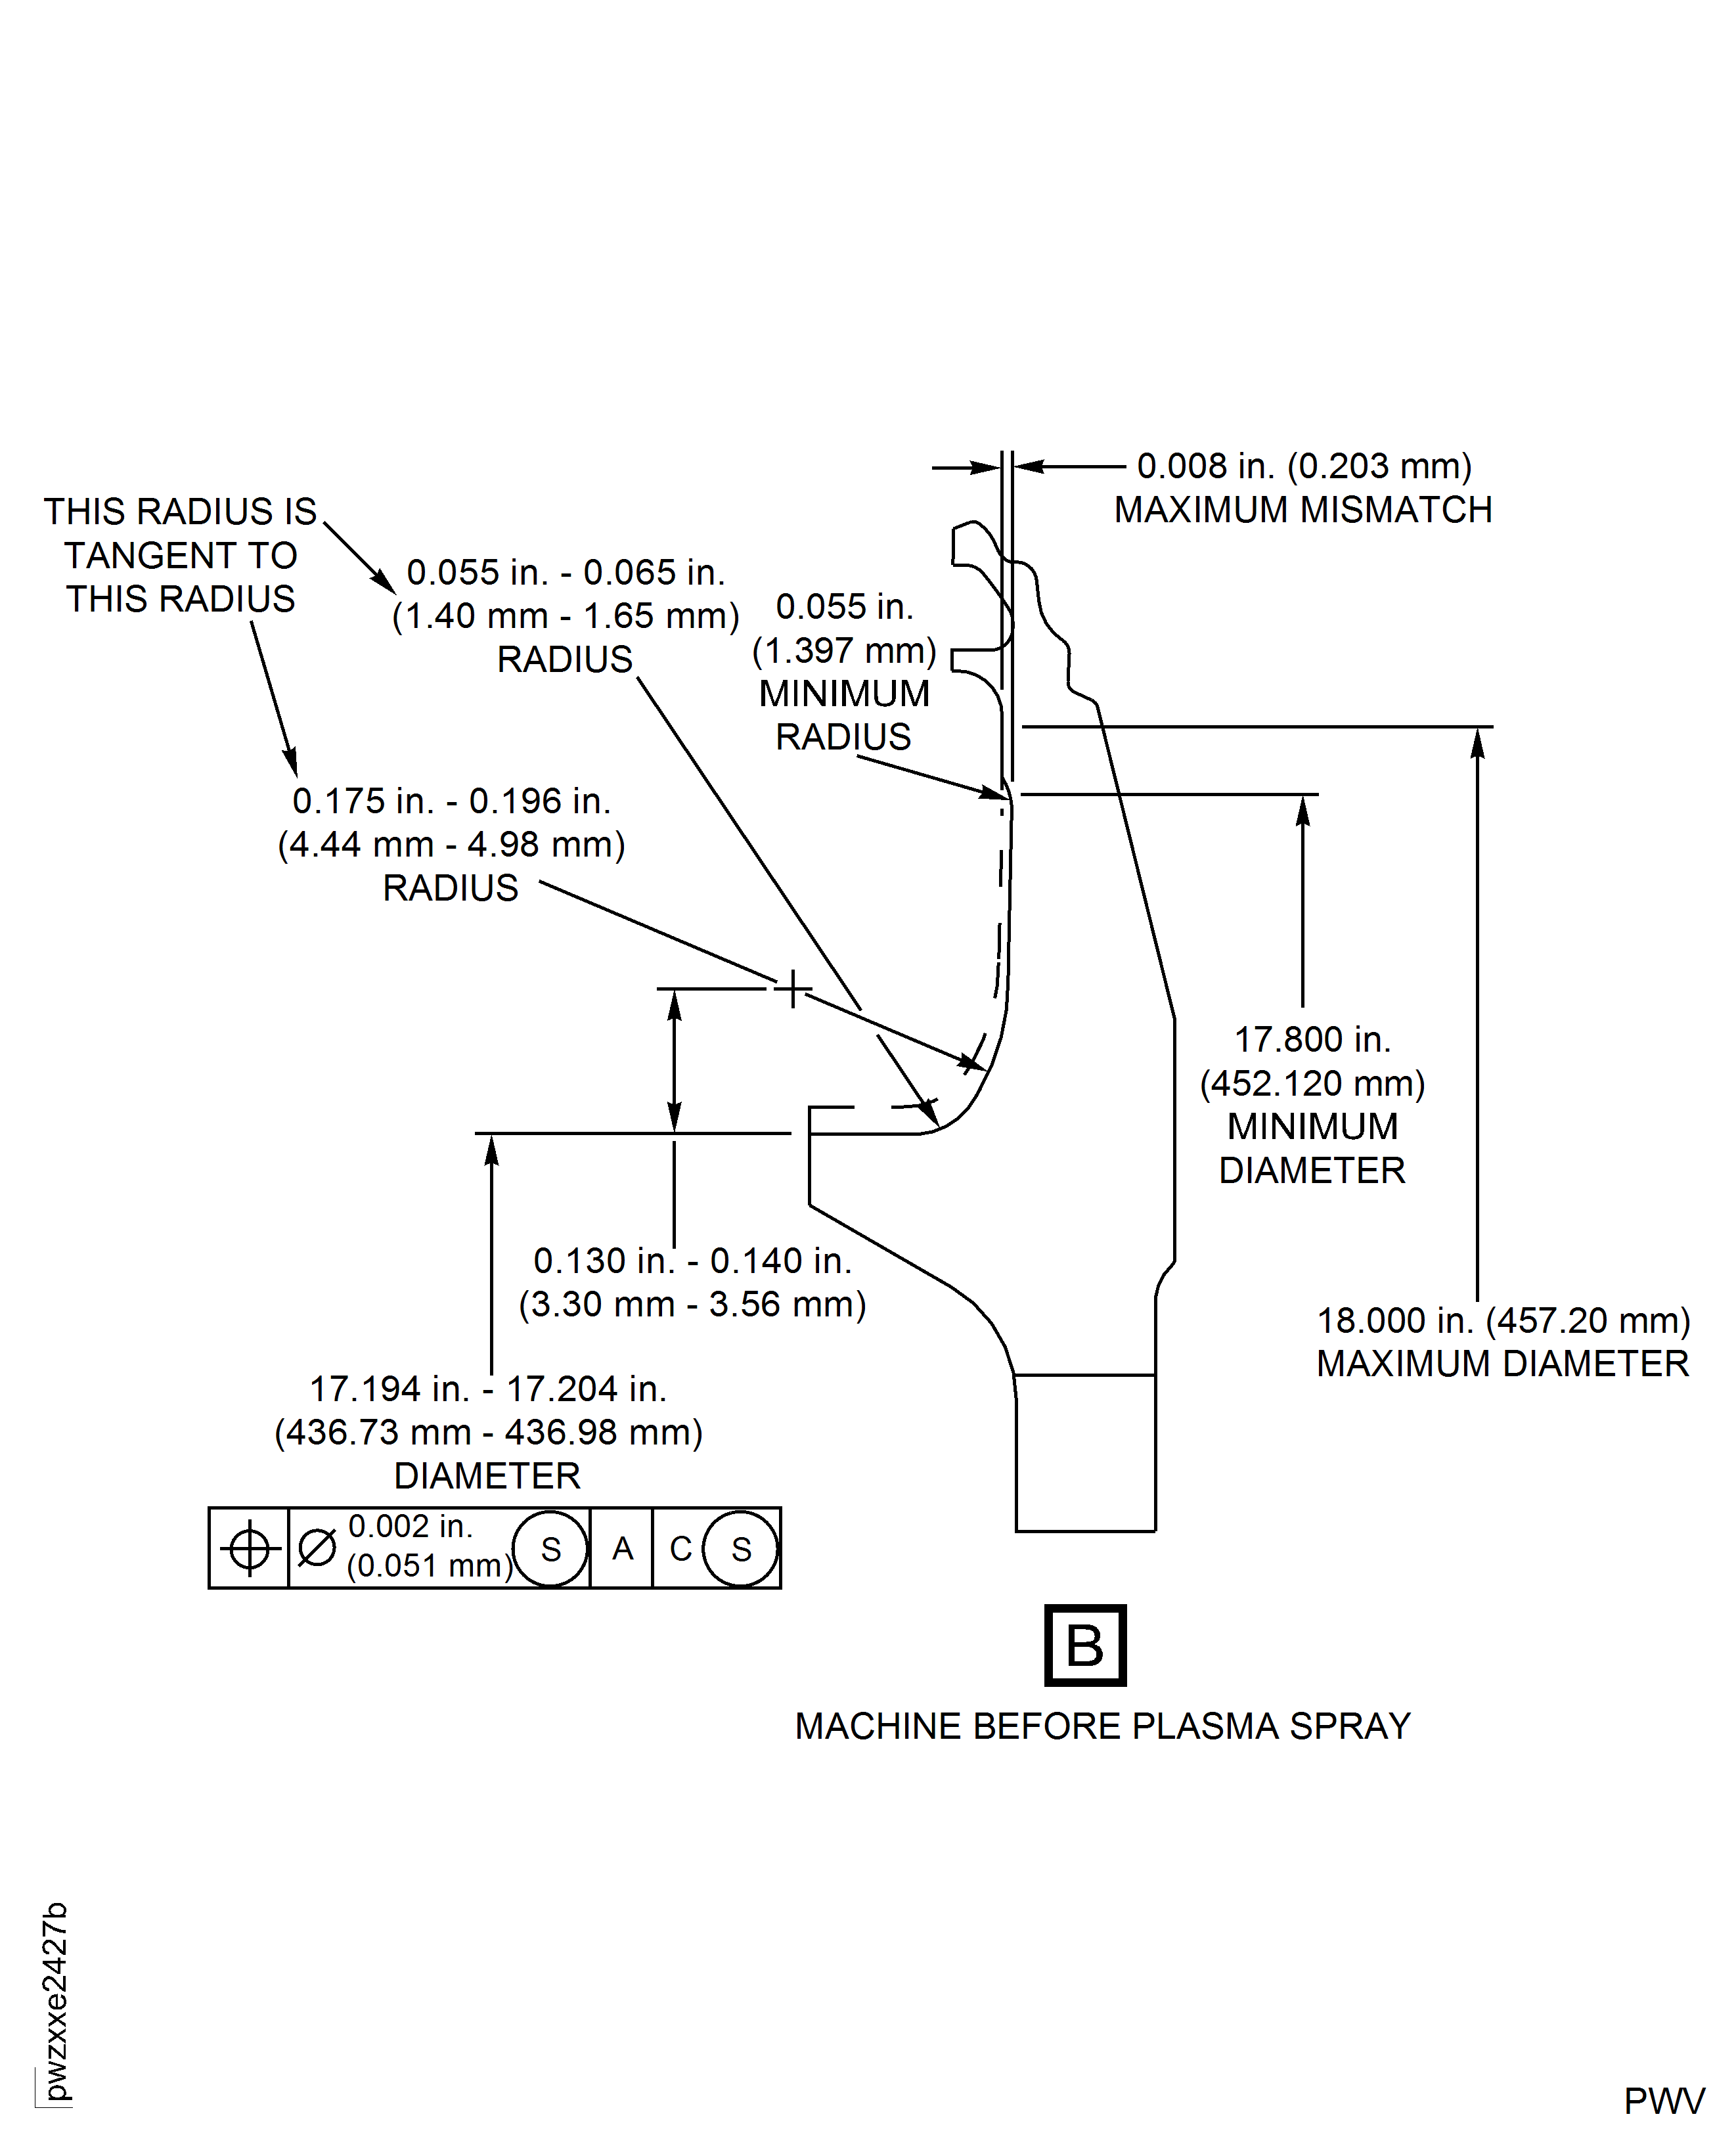
Figure: HPT Stage 2 Blade Retaining Plate Shotpeen Repair Areas
HPT Stage 2 Blade Retaining Plate Shotpeen Repair Areas
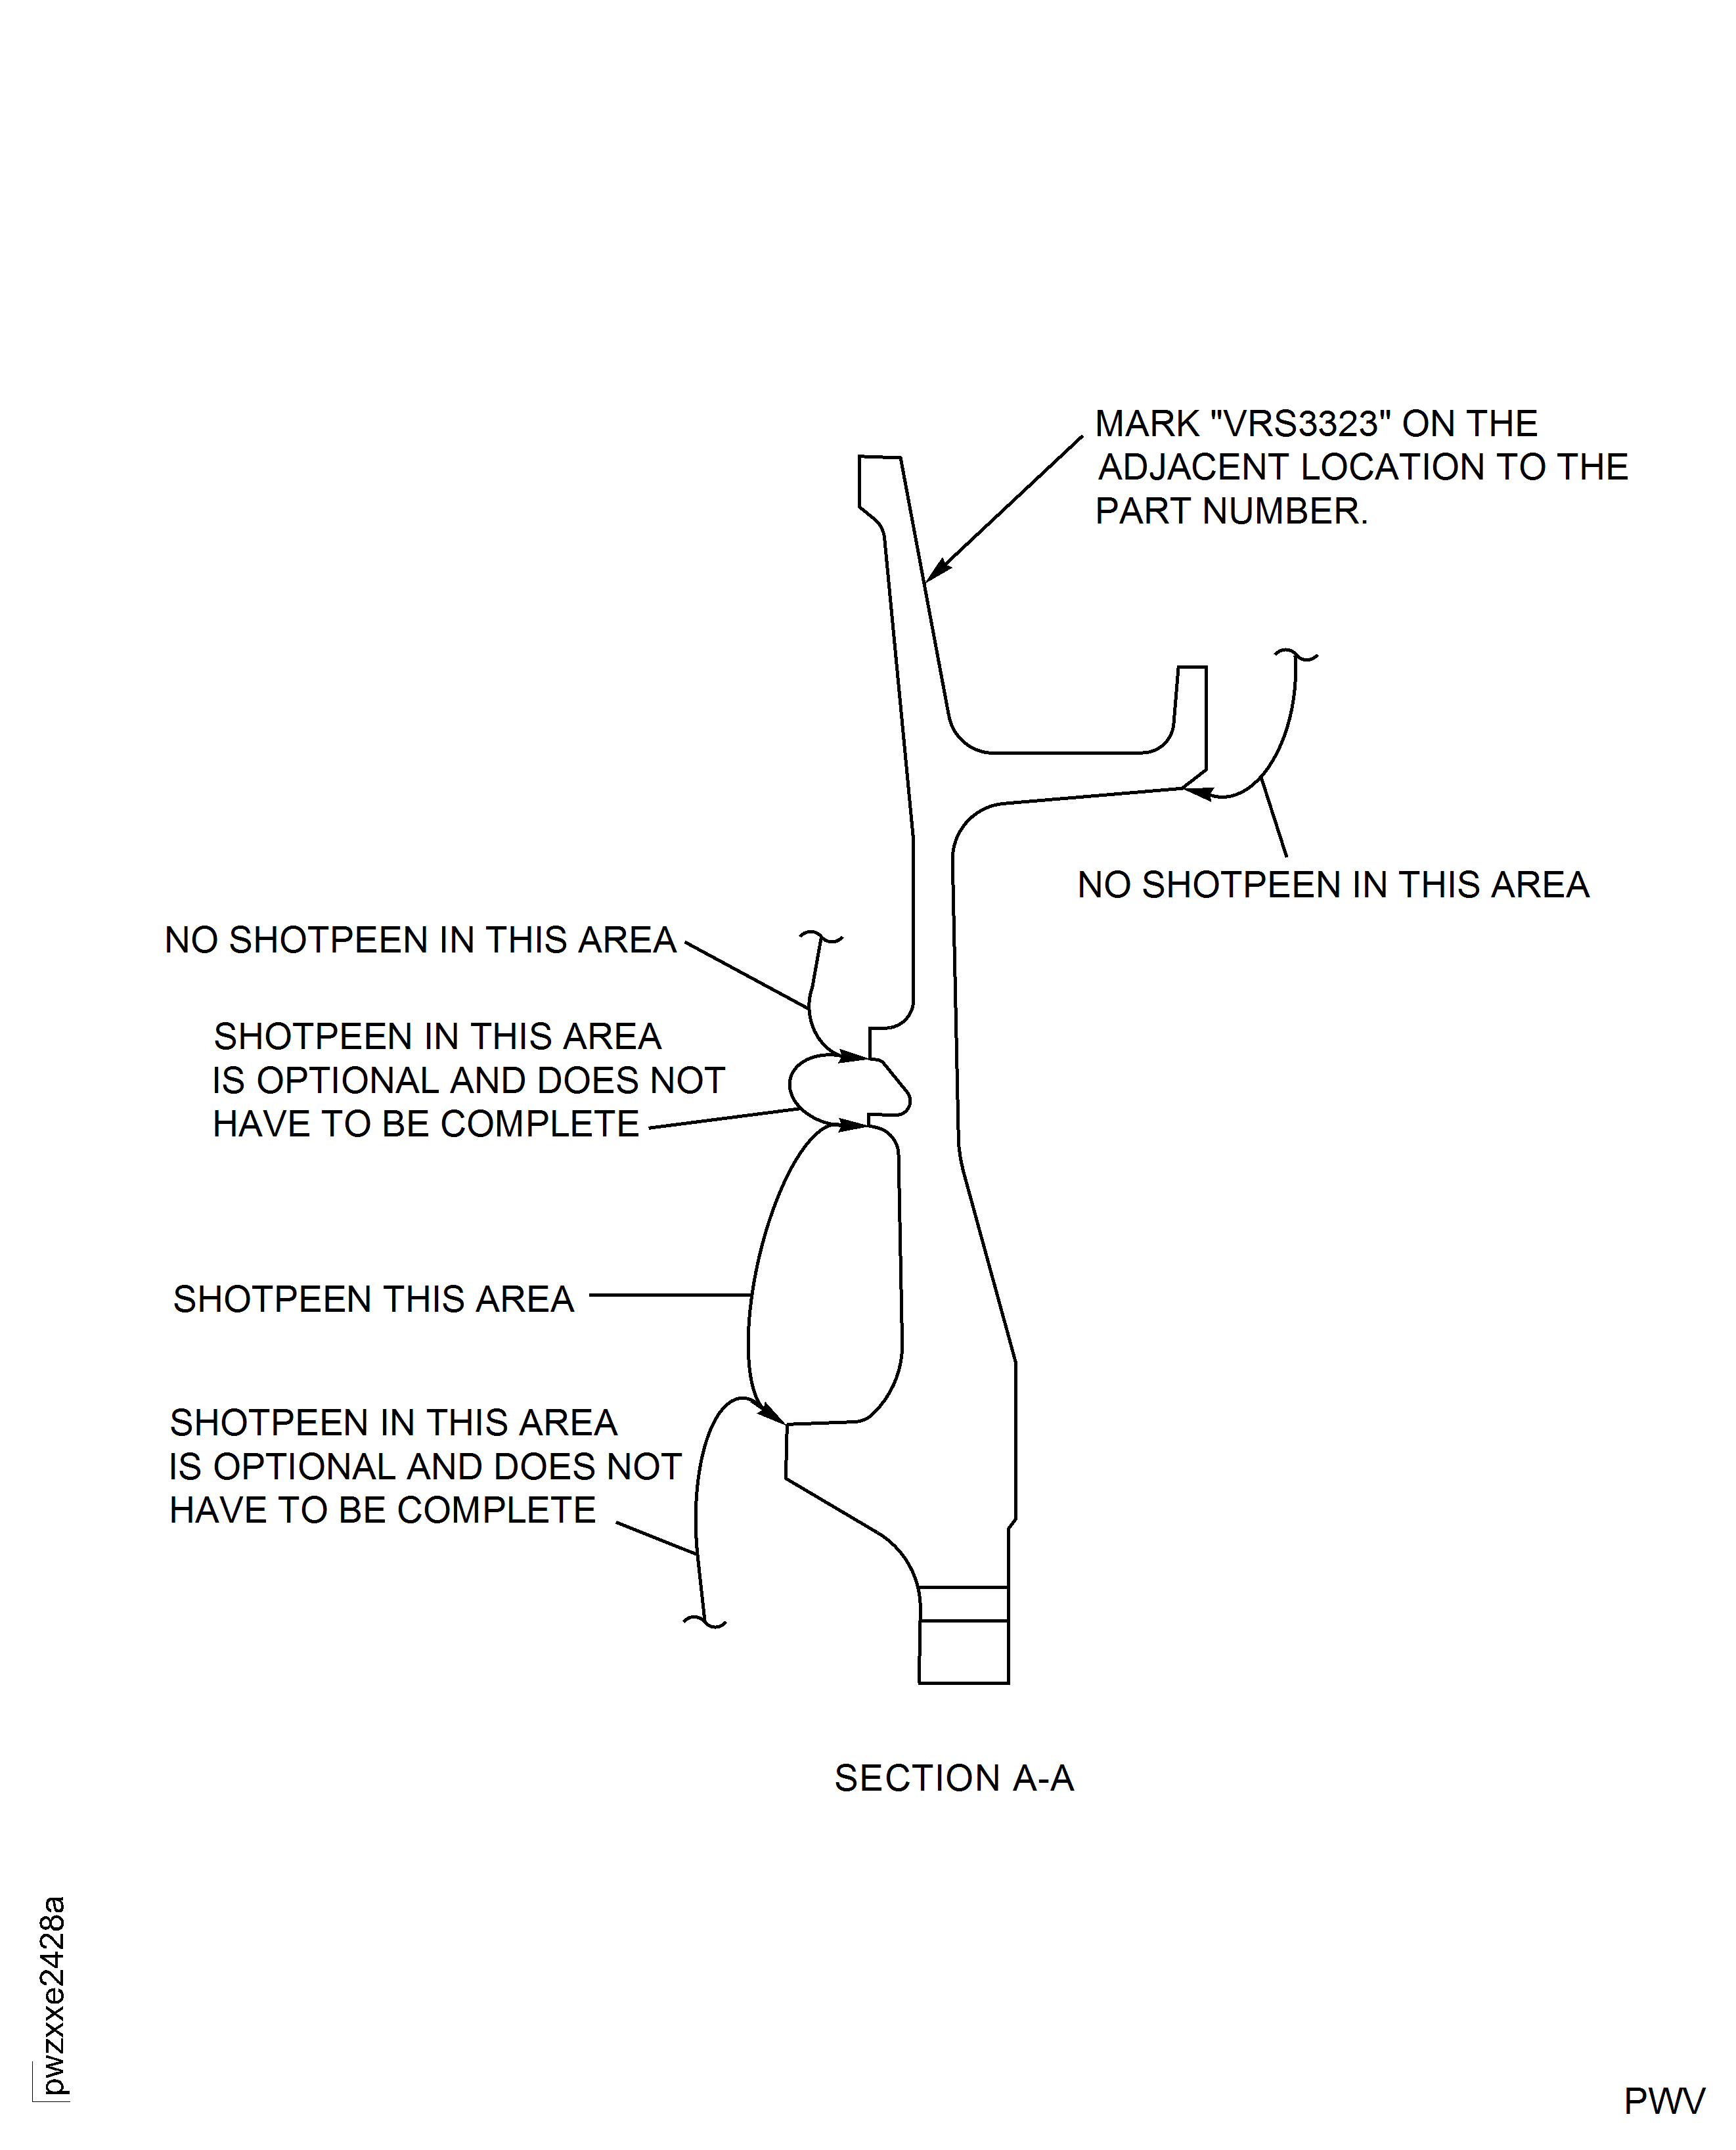
Figure: HPT Stage 2 Blade Retaining Plate After Plasma Coat and Finish Grind Repair Dimensions for PN 2A0160 and 2A1813
HPT Stage 2 Blade Retaining Plate After Plasma Coat and Finish Grind Repair Dimensions for PN 2A0160 and 2A1813
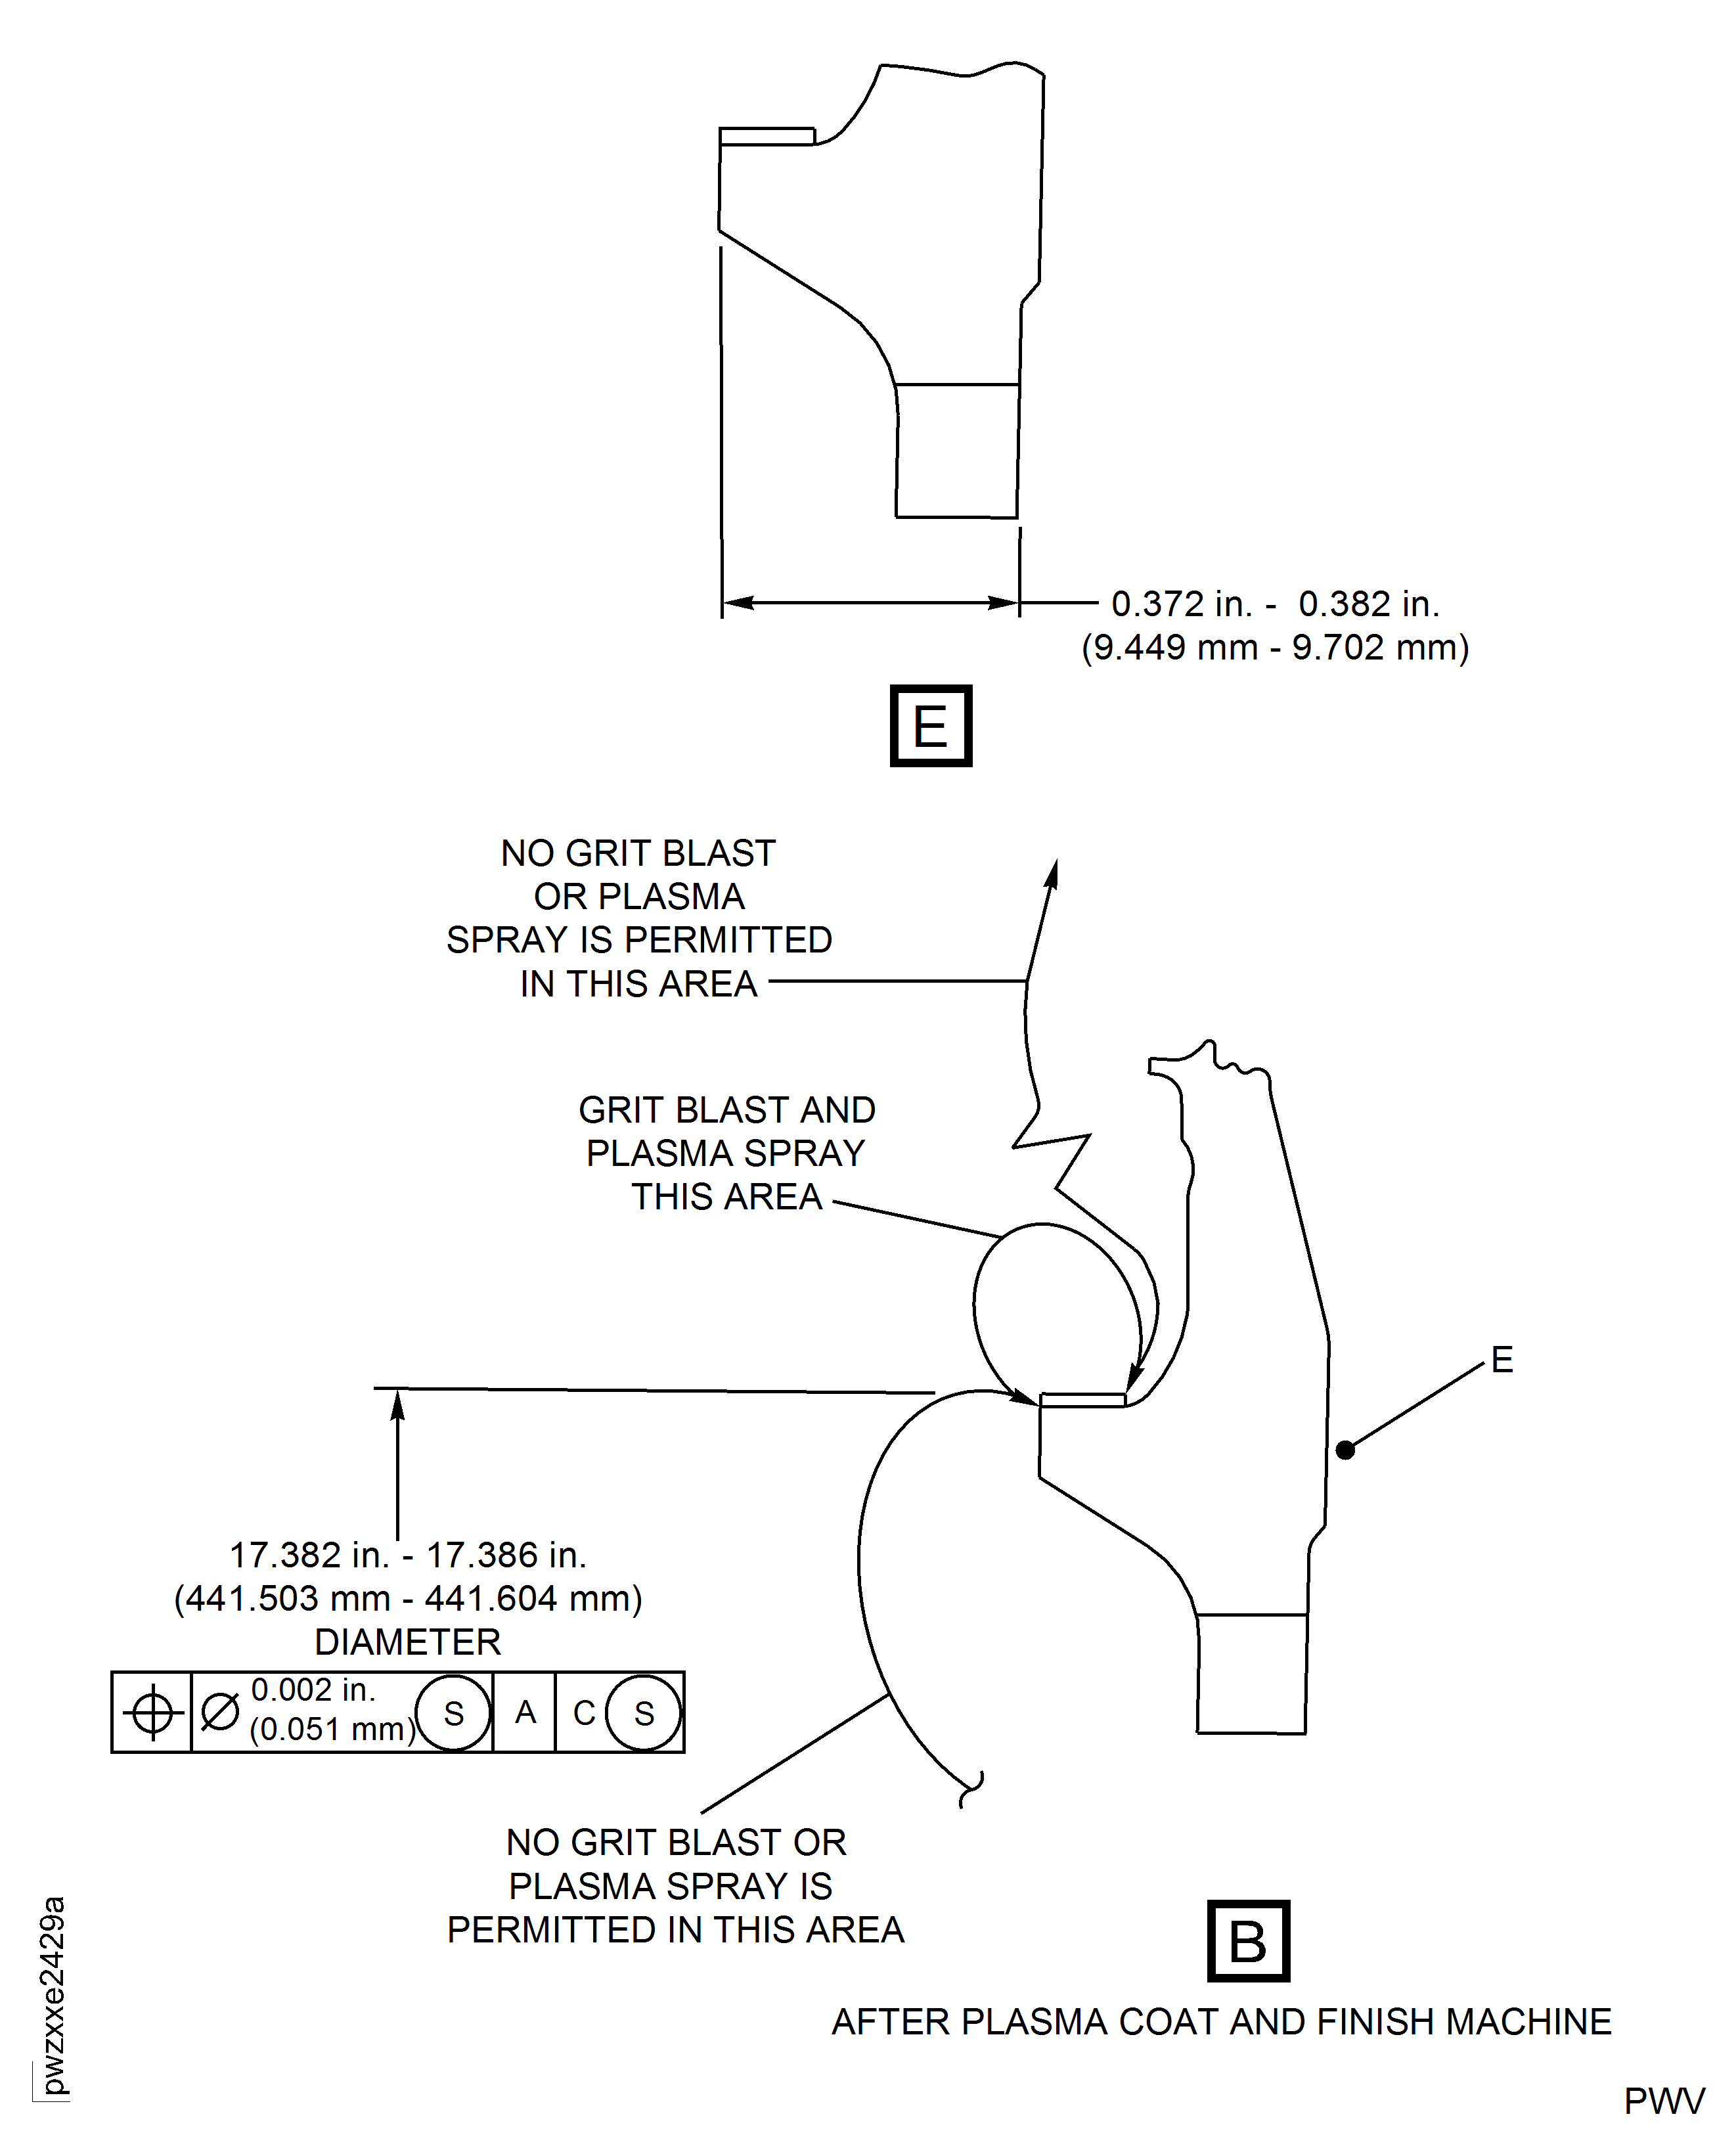
Figure: HPT Stage 2 Blade Retaining Plate After Plasma Coat and Finish Grind Repair Dimensions for PN 2A2097, 2A3426 and 2A3437
HPT Stage 2 Blade Retaining Plate After Plasma Coat and Finish Grind Repair Dimensions for PN 2A2097, 2A3426 and 2A3437
