Export Control
EAR Export Classification: Not subject to the EAR per 15 C.F.R. Chapter 1, Part 734.3(b)(3), except for the following Service Bulletins which are currently published as EAR Export Classification 9E991: SBE70-0992, SBE72-0483, SBE72-0580, SBE72-0588, SBE72-0640, SBE73-0209, SBE80-0024 and SBE80-0025.Copyright
© IAE International Aero Engines AG (2001, 2014 - 2021) The information contained in this document is the property of © IAE International Aero Engines AG and may not be copied or used for any purpose other than that for which it is supplied without the express written authority of © IAE International Aero Engines AG. (This does not preclude use by engine and aircraft operators for normal instructional, maintenance or overhaul purposes.).Applicability
All
Common Information
TASK 73-22-51-200-101-A00 P4.9 Air Sensor Tubes and Manifolds - Examine, Inspection-001
Effectivity
FIG/ITEM | PART NO. |
01-050 | 4B8051 |
01-050 | 4B8069 |
01-050 | 4B8071 |
01-050 | 2A3547-01 |
01-180 | 4B8052 |
01-180 | 4B8070 |
01-180 | 4B8072 |
01-180 | 2A3548-01 |
General
This TASK gives the procedure for the inspection of the RH and LH pressure control manifold. For the other parts of the P4.9 sensor and manifold refer to Inspection-000 TASK 73-22-51-200-100.
Fig/item numbers in parentheses in the procedure agree with those used in the IPC.
The policy that is necessary for inspection is given in SPM TASK 70-20-01-200-501.
All the parts must be cleaned before any part is examined. Refer to SPM TASK 70-11-03-300-503.
All parts must be visually examined for damage, corrosion and wear. Any defects that are not identified in the procedure must be referred to IAE.
The procedure for those parts which must have a crack test is given in SPM TASK 70-23-00-230-501. Do the test before the part is visually examined. Limits for cracks are given in the SUBTASK for each part.
Do not discard any part until you are sure there are no repairs available. Refer to the instructions in Repair before a discarded part is used again or oversize parts are installed.
Parts which should be discarded can be held although no repair is available. The repair of a discarded part could be shown to be necessary at a later date.
All parts must be examined to make sure that all the repairs have been completed satisfactorily.
The practices and processes referred to in the procedure by the TASK numbers are in the SPM.
References
Refer to the SPM for data on these items.
Definitions of Damage, SPM TASK 70-02-02-350-501.
Record and Control of the Lives of Parts, SPM TASK 70-05-00-220-501.
Inspection of Parts, SPM TASK 70-20-00-200-501.
Some data on these items is contained in this TASK. For more data on these items refer to the SPM.
Method of Testing for Crack Indications.
Chemical Processes
Surface Protection
Preliminary Requirements
Pre-Conditions
NONESupport Equipment
| Name | Manufacturer | Part Number / Identification | Quantity | Remark |
|---|---|---|---|---|
| Workshop inspection equipment | LOCAL | Workshop inspection equipment | ||
| Fluorescent Penetrant Inspection Equipment | LOCAL | Fluorescent penetrant inspection equipment |
Consumables, Materials and Expendables
NONESpares
NONESafety Requirements
NONEProcedure
Clean the parts. Refer to Cleaning-000 TASK 73-22-51-100-100.
SPM VRS7001 (Repair-001) TASK 70-35-24-300-501.
Cracked
SPM VRS7001 (Repair-001) TASK 70-35-24-300-501.
Trough porosity
RH and LH Pressure Control Manifold, Refer to SPM TASK 70-23-01-230-501.
Do the test for cracks on the parts that are given below. Use the applicable penetrant inspection procedure.
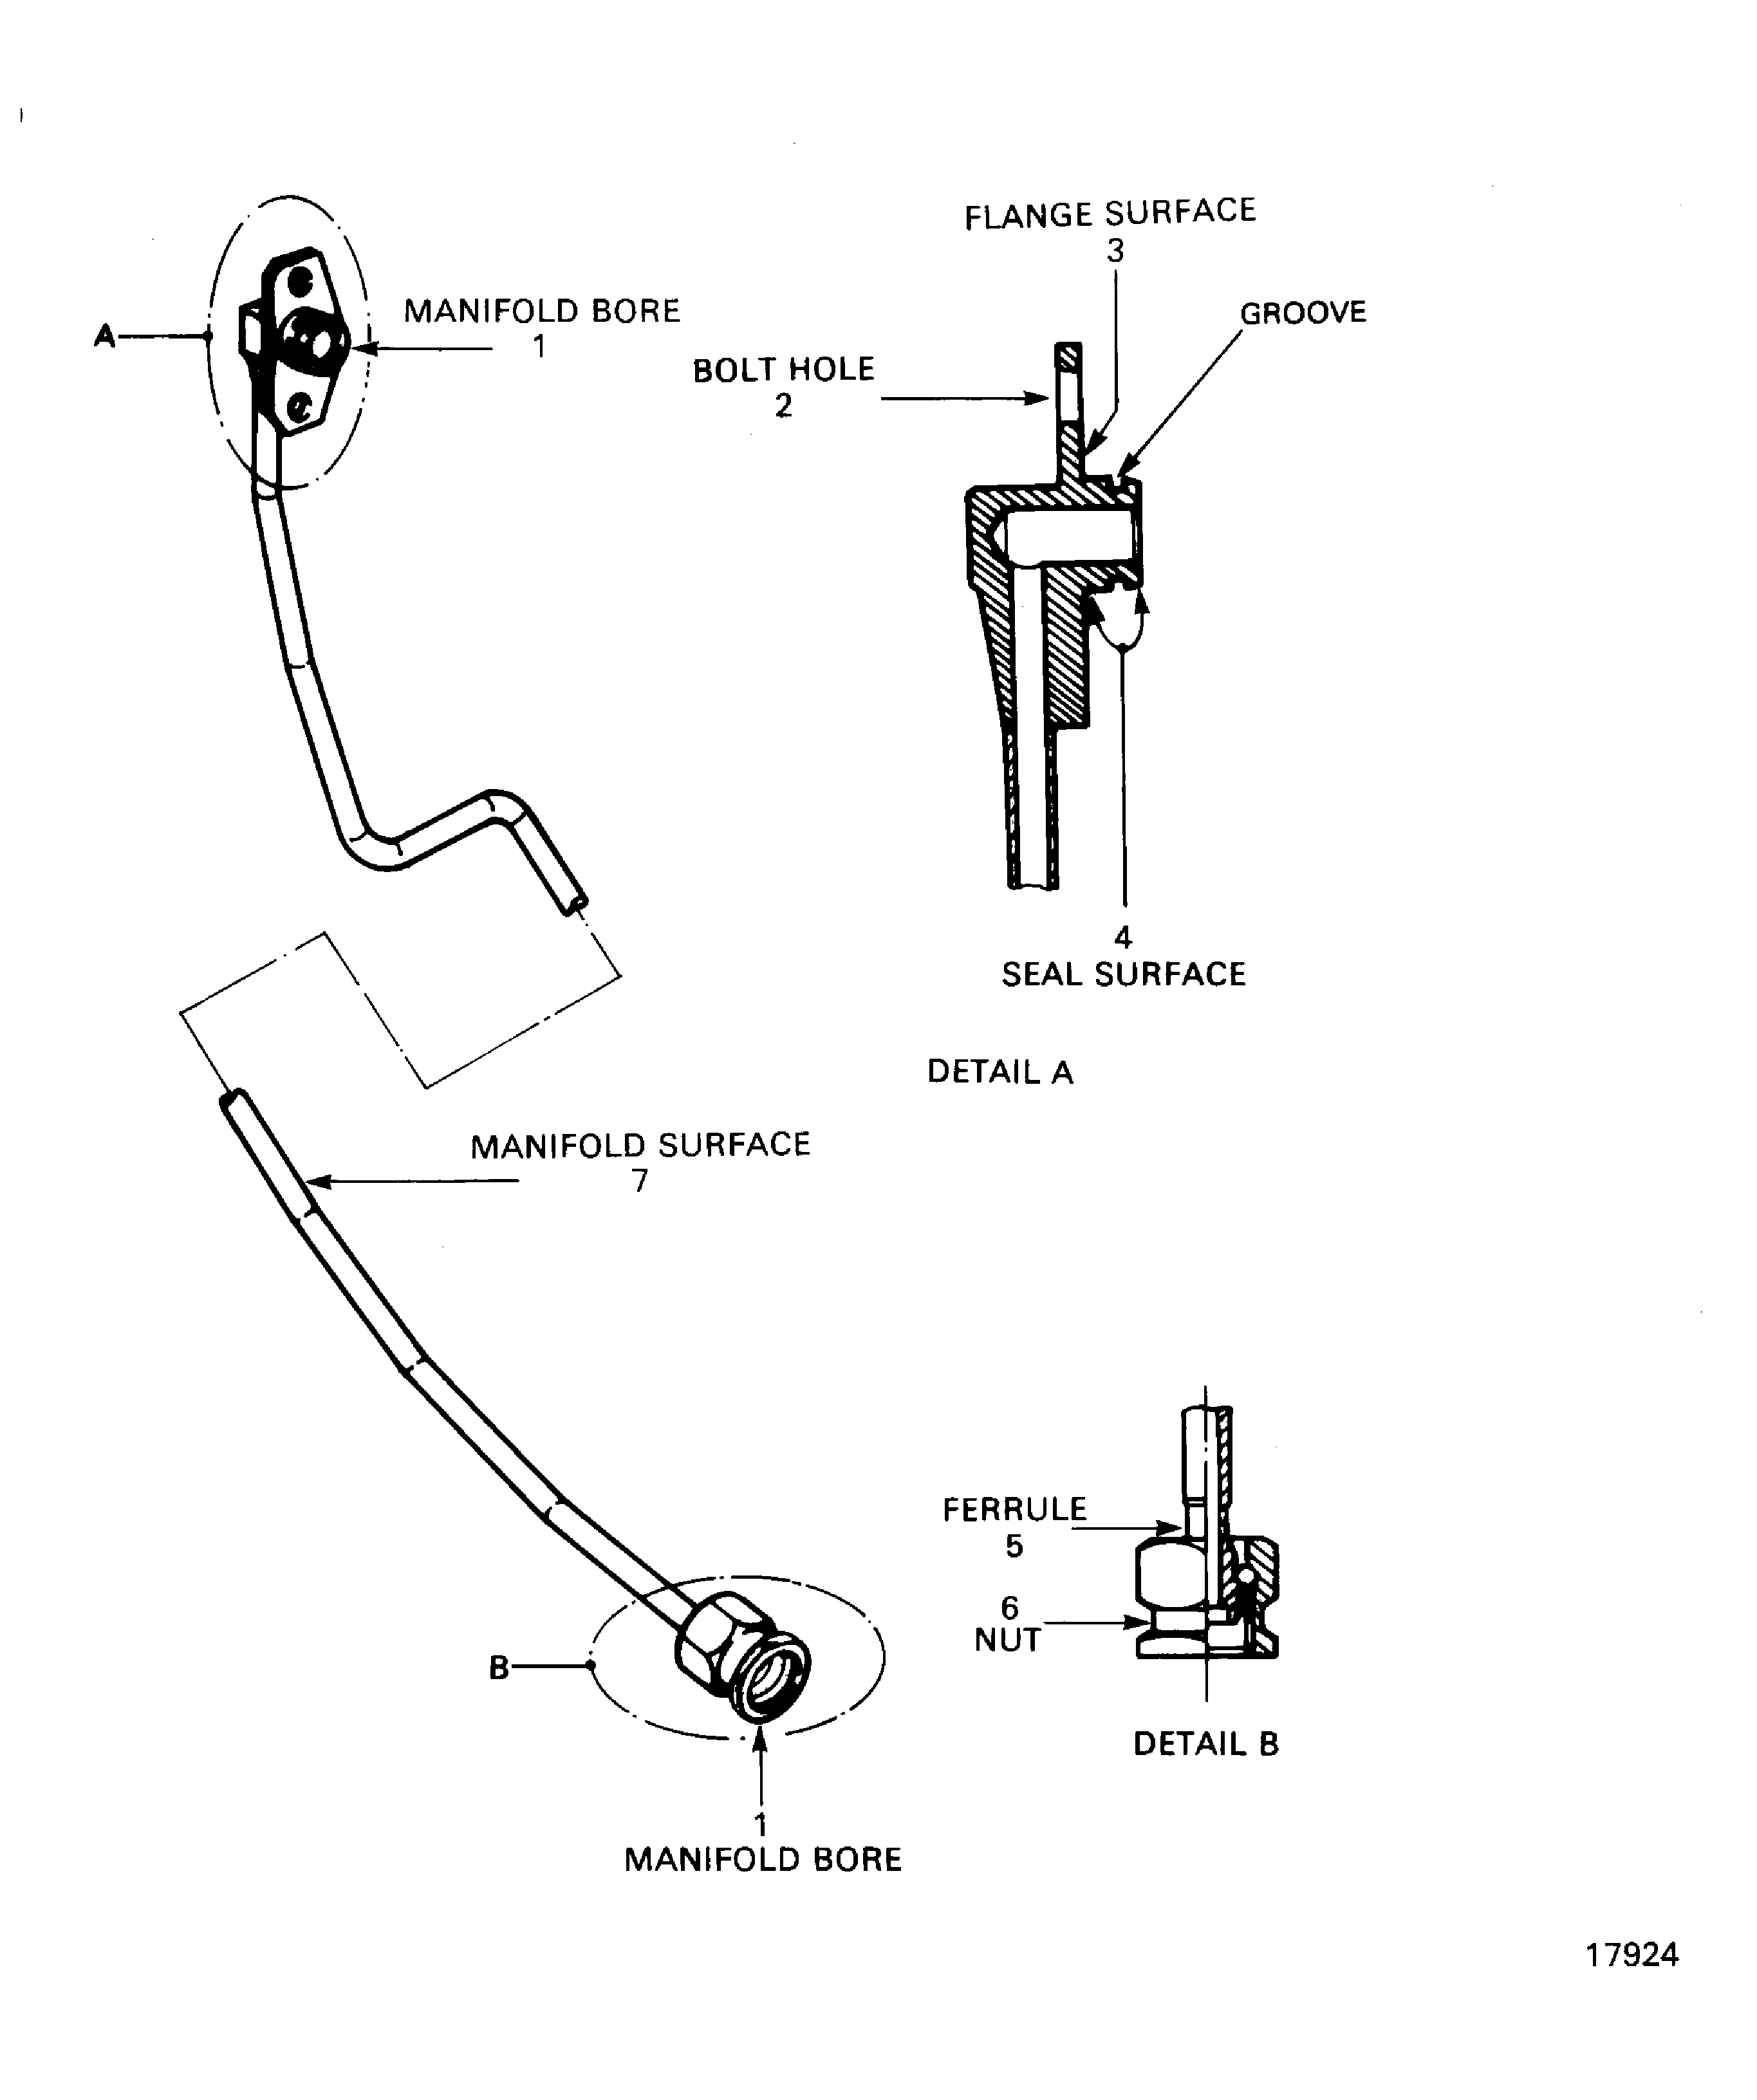
SUBTASK 73-22-51-230-051 Examine the RH and LH Press Control Manifold (01-050, 01-180) Surface for Cracks
Refer to Figure.
Clear with air blast.
Plugged
SUBTASK 73-22-51-220-052 Examine the RH and LH Pressure Control Manifold (01-050, 01-180) Manifold Bore at Location 1
Refer to Figure.
Repair, VRS5179 (Repair-001) TASK 73-22-51-300-001.
Any burrs
Burred
Examine the bolt holes at location 2.
Repair, VRS5179 (Repair-001) TASK 73-22-51-300-001 or SPM VRS7001 (Repair-001) TASK 70-35-24-300-501.
More than Step.
Nicked, scored, dented.
Examine the flange surface at location 3.
Repair, VRS5179 (Repair-001) TASK 73-22-51-300-001 or SPM VRS7001 (Repair-001) TASK 70-35-24-300-501.
More than Step.
Nicked, scored, dented.
Examine the seal surface at location 4.
SUBTASK 73-22-51-220-053 Examine the RH and LH Pressure Control Manifold (01-050,01-180) End Fitting
Refer to Figure.
Repair, VRS5179 (Repair-001) TASK 73-22-51-300-001 or SPM VRS7001 (Repair-001) TASK 70-35-24-300-501.
Galled
Sealing face
SUBTASK 73-22-51-220-054 Examine the RH and LH Pressure Control Manifold (01-050,01-180) Ferrule at Location 5
Refer to Figure.
Repair, VRS5179 (Repair-001) TASK 73-22-51-300-001.
Pick-up
SPM VRS7001 (Repair-001) TASK 70-35-24-300-501.
Crossed or stripped
Threads
SUBTASK 73-22-51-220-055 Examine the RH and LH Pressure Control Manifold (01-050,01-180) Nut at Location 6
Refer to Figure.
Repair, VRS5179 (Repair-001) TASK 73-22-51-300-001 or SPM VRS7001 (Repair-001) TASK 70-35-24-300-501.
Pitted
SPM VRS7001 (Repair-001) TASK 70-35-24-300-501.
Dented
Repair, VRS5179 (Repair-001) TASK 73-22-51-300-001 or SPM VRS7001 (Repair-001) TASK 70-35-24-300-501.
Any nicks
Nicked
Repair, VRS5179 (Repair-001) TASK 73-22-51-300-001 or SPM VRS7001 (Repair-001) TASK 70-35-24-300-501.
Any galls
Galled
Repair, VRS5179 (Repair-001) TASK 73-22-51-300-001.
Chafing up to 0.018 in. (0.45 mm).
Repair, VRS5428 (Repair-006) TASK 73-22-51-300-006.
Chafing up to 0.025 in. (0.63 mm).
SPM VRS7001 (Repair-001) TASK 70-35-24-300-501.
More than Step.
Chafed
SUBTASK 73-22-51-220-056 Examine the RH and LH Pressure Control Manifold (01-050, 01-180) Manifold Surface at Location 7
Figure: Locations on the RH and LH Pressure Control Manifold
Locations on the RH and LH Pressure Control Manifold

