Export Control
EAR Export Classification: Not subject to the EAR per 15 C.F.R. Chapter 1, Part 734.3(b)(3), except for the following Service Bulletins which are currently published as EAR Export Classification 9E991: SBE70-0992, SBE72-0483, SBE72-0580, SBE72-0588, SBE72-0640, SBE73-0209, SBE80-0024 and SBE80-0025.Copyright
© IAE International Aero Engines AG (2001, 2014 - 2021) The information contained in this document is the property of © IAE International Aero Engines AG and may not be copied or used for any purpose other than that for which it is supplied without the express written authority of © IAE International Aero Engines AG. (This does not preclude use by engine and aircraft operators for normal instructional, maintenance or overhaul purposes.).Applicability
V2500-A1 and POST SBE 72-0075
Common Information
TASK 72-45-30-440-001-B00 HPT Stage 2 Rotor Assembly - Assemble The HPT Stage 2 Rotor Assembly, Assembly-001 - SBE 72-0075
General
Fig/item numbers in parentheses in the procedure agree with those used in the IPC. Only the primary Fig/item numbers are used. For the service bulletin alpha variants refer to the IPC.
For all parts identified in a different Chapter/Section/Subject, the applicable Chapter/Section/Subject comes before the Fig/item number.
For standard torque data and procedures, refer to SPM TASK 70-41-00-400-501 and TASK 70-41-02-400-501.
Special torque data and assembly tolerances are included in the procedure.
For temporary marking procedures, refer to SPM TASK 70-09-01-400-501.
Lubricate all threads and abutment faces of nuts and bolts with CoMat 06-153W FELT TIP MARKER, RAPID DRYING, BOLD FINE POINT, BLUE, unless other lubricants are referred to in the procedure.
To identify, lubricate and install seal rings, refer to SPM TASK 70-44-01-400-501.
The number for each radial location must be identified in a clockwise direction. These start at the engine top position when you look from the rear of the engine, unless stated differently in the procedure.
NOTE
NOTE
Preliminary Requirements
Pre-Conditions
NONESupport Equipment
| Name | Manufacturer | Part Number / Identification | Quantity | Remark |
|---|---|---|---|---|
| Drift | LOCAL | Drift | Plastic | |
| IAE 1F10027 Heater control unit | 0AM53 | IAE 1F10027 | ||
| IAE 1P16010 Fixture | 0AM53 | IAE 1P16010 | ||
| IAE 1P16016 Blade adapter | 0AM53 | IAE 1P16016 | ||
| IAE 1P16030 Fixture | 0AM53 | IAE 1P16030 | ||
| IAE 1P16033 Calibration weight | 0AM53 | IAE 1P16033 | ||
| IAE 1P16039 Heater | 0AM53 | IAE 1P16039 | ||
| IAE 1P16062 Support | 0AM53 | IAE 1P16062 | ||
| IAE 1P16066 Fixture | 0AM53 | IAE 1P16066 | ||
| IAE 1P16140 Support base | 0AM53 | IAE 1P16140 | ||
| IAE 1P16164 Retainer | 0AM53 | IAE 1P16164 | ||
| IAE 1P16221 Fixture | 0AM53 | IAE 1P16221 | ||
| IAE 1P16366 Fixture | 0AM53 | IAE 1P16366 | ||
| IAE 1P16368 Support | 0AM53 | IAE 1P16368 | ||
| IAE 1P17020 Fixture | 0AM53 | IAE 1P17020 | ||
| IAE 1P17765 Alignment pin | 0AM53 | IAE 1P17765 | ||
| IAE 1P17766 Metering plug holder | 0AM53 | IAE 1P17766 | ||
| Mallet | LOCAL | Mallet |
Consumables, Materials and Expendables
| Name | Manufacturer | Part Number / Identification | Quantity | Remark |
|---|---|---|---|---|
| CoMat 01-573 WAX BLEND, PARAFFIN | 24269 | CoMat 01-573 | ||
| CoMat 06-153 FELT TIP MARKER, RAPID DRYING | LOCAL | CoMat 06-153 | ||
| CoMat 06-153H FELT TIP MARKER, RAPID DRYING, FINE POINT, BLACK | 86874 | CoMat 06-153H | ||
| CoMat 06-153K FELT TIP MARKER, RAPID DRYING, FINE POINT, BLUE | 86874 | CoMat 06-153K | ||
| CoMat 06-153L FELT TIP MARKER, RAPID DRYING, FINE POINT, RED | 86874 | CoMat 06-153L | ||
| CoMat 06-153P FELT TIP MARKER, RAPID DRYING | LOCAL | CoMat 06-153P | ||
| CoMat 06-153Q FELT TIP MARKER, RAPID DRYING | LOCAL | CoMat 06-153Q | ||
| CoMat 06-153S FELT TIP MARKER, RAPID DRYING, ULTRA FINE POINT, RED | 86874 | CoMat 06-153S | ||
| CoMat 06-153T FELT TIP MARKER, RAPID DRYING, ULTRA FINE POINT, BLUE | 86874 | CoMat 06-153T | ||
| CoMat 06-153U FELT TIP MARKER, RAPID DRYING, BOLD FINE POINT, BLACK | 86874 | CoMat 06-153U | ||
| CoMat 06-153V FELT TIP MARKER, RAPID DRYING, BOLD FINE POINT, RED | 86874 | CoMat 06-153V | ||
| CoMat 06-153W FELT TIP MARKER, RAPID DRYING, BOLD FINE POINT, BLUE | 86874 | CoMat 06-153W | ||
| CoMat 06-153X FELT TIP MARKER, RAPID DRYING, FINE POINT, BLACK, TRACE ELEMENT CERTIFIED | 86874 | CoMat 06-153X | ||
| CoMat 06-158 MARKER, EXTRA FINE POINT(BLACK) | 0AM53 | CoMat 06-158 | ||
| CoMat 10-077 APPROVED ENGINE OILS | X333X | CoMat 10-077 | ||
| DELETED | X111X | DELETED |
Safety Requirements
NONEProcedure
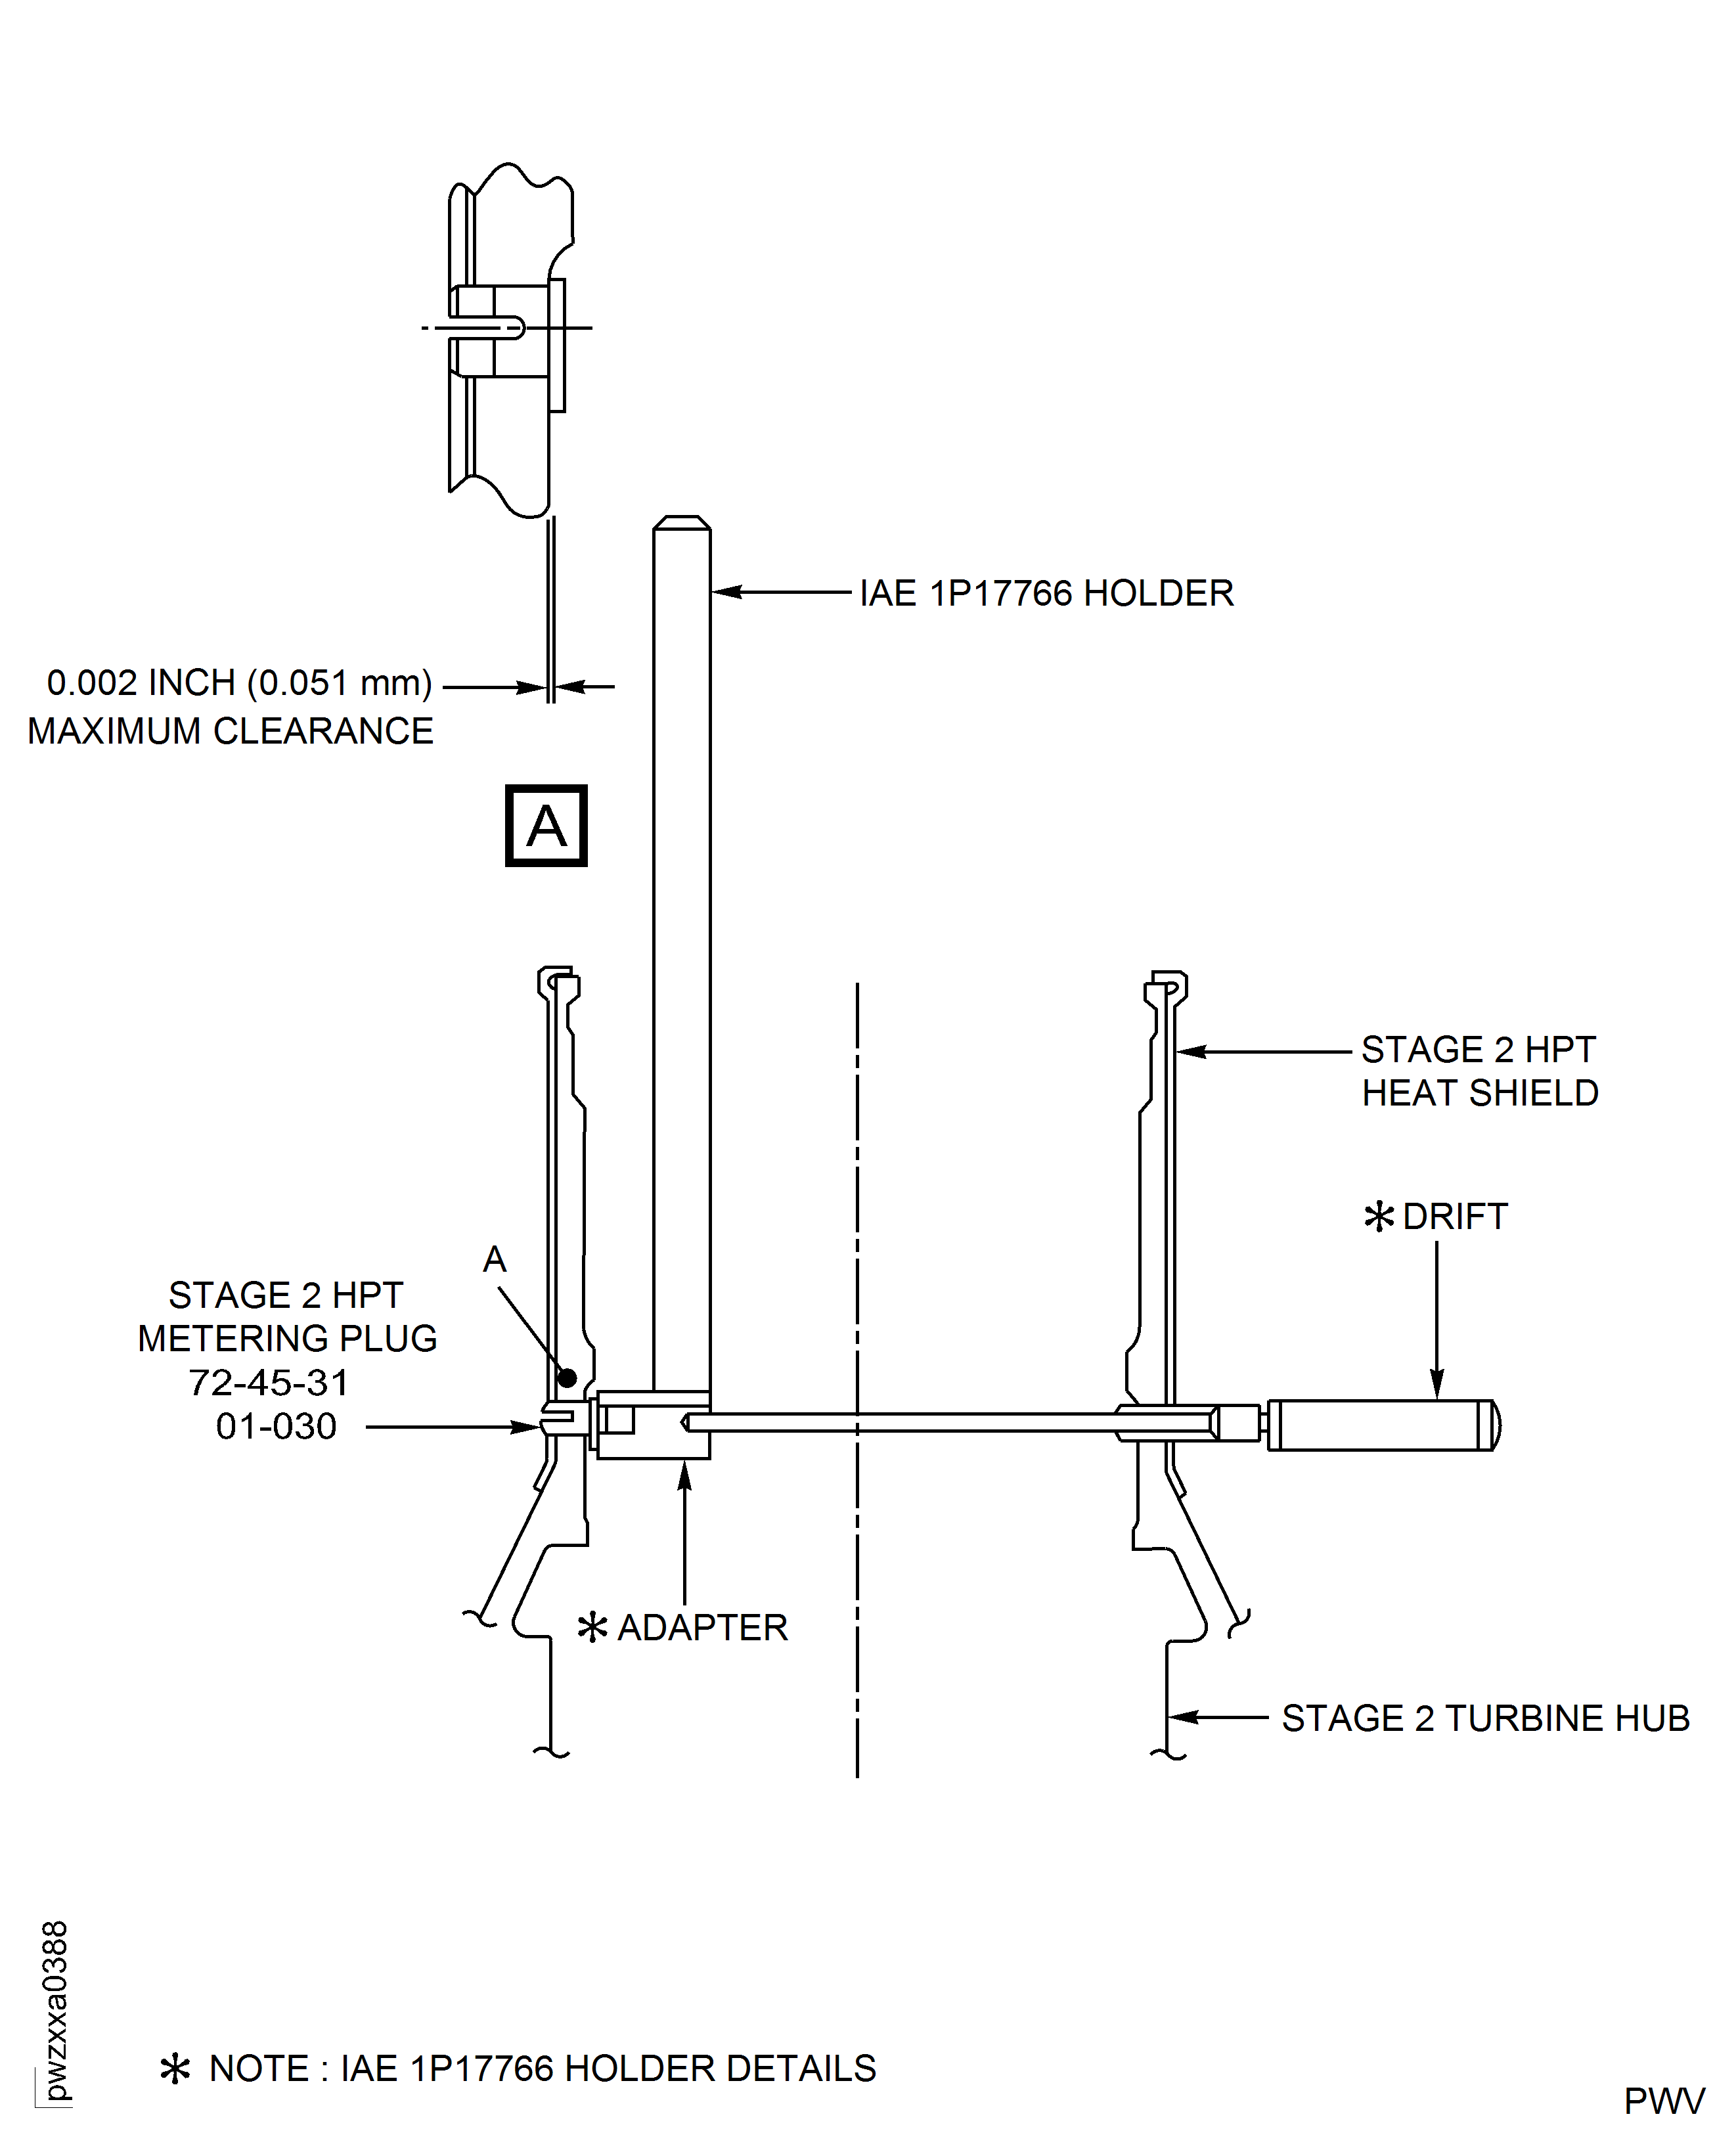
Put the IAE 1P17765 Alignment pin 1 off through a hole in the Heatshield and the hub.
Install the Heatshield on the stage 2 turbine hub shaft.
Put a metering plug on the IAE 1P17766 Metering plug holder 1 off detail adapter with the plug tab down.
Attach the Heatshield to the stage 2 turbine hub with the four metering plugs that are equally spaced.
SUBTASK 72-45-30-440-068 Install the Stage 2 HPT Heatshield (01-020) and Stage 2 HPT Metering Plugs (72-45-31, 01-030) on the Stage 2 Turbine Hub (01-011)
Refer to Figure.
Remove the support detail from the IAE 1P16030 Fixture 1 off or IAE 1P16366 Fixture 1 off.
SUBTASK 72-45-30-440-069 Install the Fixture and remove the Stage 2 Turbine Hub (72-45-31, 01-011) from the Pallet
Refer to Figure.
Lower the stage 2 turbine hub, small end down, in to the IAE 1P16039 Heater 1 off.
Connect the power line and the thermocouple fitting to the respective fittings of the IAE 1F10027 Heater control unit 1 off.
Remove the clevis and bar assembly from the pilot in the IAE 1P16030 Fixture or IAE 1P16366 Fixture.
SUBTASK 72-45-30-440-070 Install the Stage 2 Turbine Hub (72-45-31, 01-011) in the Heater
Refer to Figure.
Reference clearance at location 1500. If required use the data written as a note in TASK 72-45-31-200-001-B00 (INSPECTION-001).
Table 1. Fits and Clearances (all dimensions are in inches) NEW PART
WORN PART
DIMENSIONS
DIMENSIONS
PART IDENT
Size
Clearance
Non-select
REJECT IF
MORE THAN
LOCATION 1500
Stage 2 Turbine Hub ENGINE-STAGE 2 TURBINE HUB (72-45-31, 01-011), Location Diameter
Stage 2 HPT Heatshield ENGINE-STAGE 2 TURBINE HUB (72-45-31, 01-020), Location Diameter
Stage 2 Turbine Hub Location Diameter
5.529
5.533
0.002
Stage 2 HPT Heatshield Location Diameter
5.535
0.012
5.541
Table 2. Fits and Clearances (all dimensions are in millimeters) NEW PART
WORN PART
DIMENSIONS
DIMENSIONS
PART IDENT
Size
Clearance
Non-select
REJECT IF
MORE THAN
LOCATION 1500
Stage 2 Turbine Hub ENGINE-STAGE 2 TURBINE HUB (72-45-31, 01-011), Location Diameter
Stage 2 HPT Heatshield ENGINE-STAGE 2 TURBINE HUB (72-45-31, 01-020), Location Diameter
Stage 2 Turbine Hub Location Diameter
140.437
140.538
0.051
Stage 2 HPT Heatshield Location Diameter
140.589
0.305
140.741
SUBTASK 72-45-30-220-054 Reference Fits and Clearances of the Stage 2 Turbine Hub and Stage 2 HPT Heatshield at Location 1500
Refer to Figure.
Reference the interference/clearance at location 1506. If required use the data written as a note in TASK 72-45-33-200-000 (INSPECTION-000) and TASK 72-45-31-200-000 (INSPECTION-000).
Table 3. Fits and Clearances (all dimensions are in inches) NEW PART
WORN PART
DIMENSIONS
DIMENSIONS
PART IDENT
Size
Clearance
Non-select
REJECT IF
MORE THAN
LOCATION 1506
Stage 2 Blade Retaining Plate ENGINE-STAGE 2 HPT BLADE RETAINING PLATE (72-45-33, 01-020), Location Diameter
Stage 2 HPT Hub ENGINE-STAGE 2 TURBINE HUB (72-45-31, 01-011), Location Diameter
Retaining Plate Diameter
17.382
Intf
17.3815
Intf
17.384
0.002
17.3845
0.003
Hub Diameter
17.382
0.005
17.3815
0.007
17.387
Clear
17.3885
Clear
Table 4. Fits and Clearances (all dimensions are in millimeters) NEW PART
WORN PART
DIMENSIONS
DIMENSIONS
PART IDENT
Size
Clearance
Non-select
REJECT IF
MORE THAN
LOCATION 1506
Stage 2 Blade Retaining Plate ENGINE-STAGE 2 HPT BLADE RETAINING PLATE (72-45-33, 01-020), Location Diameter
Stage 2 HPT Hub ENGINE-STAGE 2 TURBINE HUB (72-45-31, 01-011), Location Diameter
Retaining Plate Diameter
441.503
Intf
441.490
Intf
441.553
0.051
441.566
0.076
Hub Diameter
441.503
0.127
441.490
0.178
441.629
Clear
441.668
Clear
SUBTASK 72-45-30-220-055-001 Reference the Fits and Clearances of the Stage 2 Blade Retaining Plate and the Stage 2 HPT Hub at Location 1506. (Pre SBE 72-0028)
SBE 72-0028: Introduce a revised stage 2 blade retaining plate.
Refer to Figure.
Reference the interference/clearance at location 1506. If required use the data written as a note in TASK 72-45-33-200-000 (INSPECTION-000) and TASK 72-45-31-200-000 (INSPECTION-000).
Table 5. Fits and Clearances (all dimensions are in inches) NEW PART
WORN PART
DIMENSIONS
DIMENSIONS
PART IDENT
Size
Clearance
Non-select
REJECT IF
MORE THAN
LOCATION 1506
Stage 2 Blade Retaining Plate ENGINE-STAGE 2 HPT BLADE RETAINING PLATE (72-45-33, 01-020), Location Diameter
Stage 2 HPT Hub ENGINE-STAGE 2 TURBINE HUB (72-45-31, 01-011), Location Diameter
Retaining Plate Diameter
17.382
Intf
Intf
17.386
0.004
0.005
Hub Diameter
17.382
0.005
0.008
17.387
Clear
Clear
Table 6. Fits and Clearances (all dimensions are in millimeters) NEW PART
WORN PART
DIMENSIONS
DIMENSIONS
PART IDENT
Size
Clearance
Non-select
REJECT IF
MORE THAN
LOCATION 1506
Stage 2 Blade Retaining Plate ENGINE-STAGE 2 HPT BLADE RETAINING PLATE (72-45-33, 01-020), Location Diameter
Stage 2 HPT Hub ENGINE-STAGE 2 TURBINE HUB (72-45-31, 01-011), Location Diameter
Retaining Plate Diameter
441.503
Intf
Intf
441.604
0.102
0.127
Hub Diameter
441.503
0.127
0.203
441.629
Clear
Clear
SUBTASK 72-45-30-220-055-002 Reference the Fits and Clearances of the Stage 2 Blade Retaining Plate and the Stage 2 HPT Hub at Location 1506 (SBE 72-0028)
Refer to Figure.
Reference interference at location 1514. If required use the data written as a note in TASK 72-45-31-200-001-B00 (INSPECTION-001).
Table 7. Fits and Clearances (all dimensions are in inches) NEW PART
WORN PART
DIMENSIONS
DIMENSIONS
PART IDENT
Size
Clearance
Non-select
REJECT IF
MORE THAN
LOCATION 1514
Stage 2 HPT Metering Plug ENGINE-STAGE 2 TURBINE HUB (72-45-31, 01-030), Location Diameter
Stage 2 HPT Hub ENGINE-STAGE 2 TURBINE HUB (72-45-31, 01-011), Location Diameter
Stage 2 HPT Metering Plug Location Diameter
0.262
0.264
0.002
Stage 2 HPT Hub Location Diameter
0.256
0.008
0.260
Table 8. Fits and Clearances (all dimensions are in millimeters) NEW PART
WORN PART
DIMENSIONS
DIMENSIONS
PART IDENT
Size
Clearance
Non-select
REJECT IF
MORE THAN
LOCATION 1514
Stage 2 HPT Metering Plug ENGINE-STAGE 2 TURBINE HUB (72-45-31, 01-030), Location Diameter
Stage 2 HPT Hub ENGINE-STAGE 2 TURBINE HUB (72-45-31, 01-011), Location Diameter
Stage 2 HPT Metering Plug Location Diameter
6.655
6.706
0.051
Stage 2 HPT Hub Location Diameter
6.502
0.203
6.604
SUBTASK 72-45-30-220-056 Reference Fits and Clearances of the Stage 2 HPT Metering Plug and the Stage 2 HPT Hub at Location 1514
Refer to Figure.
Reference the clearance at location 1553. If required use the data written as a note in TASK 72-45-33-200-000 (INSPECTION-000) and TASK 72-45-31-200-000 (INSPECTION-000).
Table 9. Fits and Clearances (all dimensions are in inches) NEW PART
WORN PART
DIMENSIONS
DIMENSIONS
PART IDENT
Size
Clearance
Non-select
REJECT IF
MORE THAN
LOCATION 1553
Stage 2 Blade Retaining Plate ENGINE-STAGE 2 HPT BLADE RETAINING PLATE (72-45-33, 01-020), Axial Dimension
Stage 2 HPT Hub ENGINE-STAGE 2 TURBINE HUB (72-45-31, 01-011), Axial Dimension D
Retaining Plate Dimension
0.224
0.234
0.001
Hub Dimension D
0.235
0.015
0.239
Table 10. Fits and Clearances (all dimensions are in millimeters) NEW PART
WORN PART
DIMENSIONS
DIMENSIONS
PART IDENT
Size
Clearance
Non-select
REJECT IF
MORE THAN
LOCATION 1553
Stage 2 Blade Retaining Plate ENGINE-STAGE 2 HPT BLADE RETAINING PLATE (72-45-33, 01-020), Axial Dimension
Stage 2 HPT Hub ENGINE-STAGE 2 TURBINE HUB (72-45-31, 01-011), Axial Dimension D
Retaining Plate Dimension
5.690
5.943
0.030
Hub Dimension D
5.969
0.380
6.070
SUBTASK 72-45-30-220-057-001 Reference the Fits and Clearances of the Stage 2 Blade Retaining Plate and the Stage 2 HPT Hub at Location 1553. (Pre SBE 72-0028)
Refer to Figure.
Reference the clearance at location 1553. If required use the data written as a note in TASK 72-45-33-200-000 (INSPECTION-000) and TASK 72-45-31-200-000 (INSPECTION-000).
Table 11. Fits and Clearances (all dimensions are in inches) NEW PART
WORN PART
DIMENSIONS
DIMENSIONS
PART IDENT
Size
Clearance
Non-select
REJECT IF
MORE THAN
LOCATION 1553
Stage 2 Blade Retaining Plate ENGINE-STAGE 2 HPT BLADE RETAINING PLATE (72-45-33, 01-020), Axial Dimension
Stage 2 HPT Hub ENGINE-STAGE 2 TURBINE HUB (72-45-31, 01-011), Axial Dimension D
Retaining Plate Dimension
0.224
0.222
0.234
0.001
0.234
0.001
Hub Dimension D
0.235
0.015
0.235
0.017
0.239
0.239
Table 12. Fits and Clearances (all dimensions in millimetres) NEW PART
WORN PART
DIMENSIONS
DIMENSIONS
PART IDENT
Size
Clearance
Non-select
REJECT IF
MORE THAN
LOCATION 1553
Stage 2 Blade Retaining Plate ENGINE-STAGE 2 HPT BLADE RETAINING PLATE (72-45-33, 01-020), Axial Dimension
Stage 2 HPT Hub ENGINE-STAGE 2 TURBINE HUB (72-45-31, 01-011), Axial Dimension D
Retaining Plate Dimension
5.690
5.639
5.943
0.030
5.943
0.025
Hub Dimension D
5.969
0.380
5.969
0.432
6.070
SUBTASK 72-45-30-220-057-002 Reference the Fits and Clearances of the Stage 2 Blade Retaining Plate and the Stage 2 HPT Hub at Location 1553. (SBE 72-0028)
Refer to Figure.
Reference the interference/clearance at location 1554. If required use the data written as a note in TASK 72-45-33-200-000 (INSPECTION-000) and TASK 72-45-31-200-001-A00 (INSPECTION-000).
Table 13. Fits and Clearances (all dimensions are in inches) NEW PART
WORN PART
DIMENSIONS
DIMENSIONS
PART IDENT
Size
Clearance
Non-select
REJECT IF
MORE THAN
LOCATION 1554
Stage 2 Blade Retaining Plate ENGINE-STAGE 2 HPT BLADE RETAINING PLATE (72-45-33, 01-020), Axial Dimension A
Stage 2 HPT blade ENGINE-STAGE 2 HPT BLADE ASSEMBLY (72-45-32, 01-010), Axial Dimension B
Retaining Plate Dimension A
0.239
Intf
0.239
Intf
0.235
0.004
0.230
0.004
Blade Dimension B
1.158
0.012
1.158
0.017
1.154
Clear
1.154
Clear
Hub Dimension C
1.162
1.162
1.158
1.158
Hub Dimension D
0.239
0.239
0.235
0.235
Clearance Is Found By The Formula That Follows: (C + D) - (A + B)
Table 14. Fits and Clearances (all dimensions are in millimeters) NEW PART
WORN PART
DIMENSIONS
DIMENSIONS
PART IDENT
Size
Clearance
Non-select
REJECT IF
MORE THAN
LOCATION 1554
Stage 2 Blade Retaining Plate ENGINE-STAGE 2 HPT BLADE RETAINING PLATE (72-45-33, 01-020), Axial Dimension A
Stage 2 HPT Blade ENGINE-STAGE 2 HPT BLADE ASSEMBLY (72-45-32, 01-010), Axial Dimension B
Retaining Plate Dimension A
6.071
Intf
6.071
Intf
5.969
0.102
5.842
0.102
Blade Dimension B
29.413
0.305
29.413
0.432
29.312
Clear
29.312
Clear
Hub Dimension C
29.515
29.515
29.413
29.413
Hub Dimension D
6.071
6.071
5.969
5.969
Clearance Is Found By The Formula That Follows: (C + D) - (A + B)
SUBTASK 72-45-30-220-085-001 Reference the Fits and Clearances of the Stage 2 Blade Retaining Plate and the Stage 2 HPT Hub at Location 1554. (Pre SBE 72-0028)
Refer to Figure.
Reference interference/clearance at location 1554. If required, use the data written as a note in TASK 72-45-33-200-000 (INSPECTION-000) and TASK 72-45-31-200-000 (INSPECTION-000).
Table 15. Fits and Clearances (all dimensions are in inches) NEW PART
WORN PART
DIMENSIONS
DIMENSIONS
PART IDENT
Size
Clearance
Non-select
REJECT IF
MORE THAN
LOCATION 1554
Stage 2 Blade Retaining Plate ENGINE-STAGE 2 HPT BLADE RETAINING PLATE (72-45-33, 01-020), Axial Dimension A
Stage 2 HPT blade ENGINE-STAGE 2 HPT BLADE ASSEMBLY (72-45-32, 01-010), Axial Dimension B
Retaining Plate Dimension A
0.242
Intf
0.242
Intf
0.232
0.007
0.225
0.007
Blade Dimension B
1.158
0.015
1.158
0.014
1.154
Clear
1.154
Clear
Hub Dimension C
1.162
1.162
1.158
1.158
Hub Dimension D
0.239
0.239
0.235
0.235
Clearance Is Found By The Formula That Follows: (C + D) - (A + B)
Table 16. Fits and Clearances (all dimensions are in millimeters) NEW PART
WORN PART
DIMENSIONS
DIMENSIONS
PART IDENT
Size
Clearance
Non-select
REJECT IF
MORE THAN
LOCATION 1554
Stage 2 Blade Retaining Plate ENGINE-STAGE 2 HPT BLADE RETAINING PLATE (72-45-33, 01-020), Axial Dimension A
Stage 2 HPT Blade ENGINE-STAGE 2 HPT BLADE ASSEMBLY (72-45-32, 01-010), Axial Dimension B
Retaining Plate Dimension A
6.150
Intf
6.150
Intf
5.890
0.178
5.715
0.178
Blade Dimension B
29.413
0.381
29.413
0.356
29.312
Clear
29.312
Clear
Hub Dimension C
29.515
29.515
29.413
29.413
Hub Dimension D
6.071
6.071
5.969
5.969
Clearance Is Found By The Formula That Follows: (C + D) - (A + B)
SUBTASK 72-45-30-220-085-002 Reference Fits and Clearances of the Stage 2 Blade Retaining Plate and the Stage 2 Hub at Location 1554. (SBE 72-0028)
Install the new ENGINE-STAGE 2 HPT BLADE RETAINING PLATE (72-45-33, 01-010) stage 1 and 2 HPT seal 1 off, in the groove in the blade retaining plate and do a clearance check. Use CoMat 01-573 WAX BLEND, PARAFFIN.
Put the IAE 1P16010 Fixture 1 off ring (clamp), with the threaded boltholes up, on the seal flange of the blade retaining plate.
SUBTASK 72-45-30-440-071 Install the Stage 2 Blade Retaining Plate (72-45-33, 01-020) in the Fixture
Heat the stage 2 turbine hub with the IAE 1P16039 Heater 1 off.
SUBTASK 72-45-30-440-072 Install the Blade Retaining Plate (72-45-33, 01-020) on to the Stage 2 Turbine Hub
NOTE
Do not use the old retainer or the retainer that was bent once. Use a new retainer.NOTE
If HPT Stage 2 Hub has "X" marked on each side of the slot do not install the retaining plate lock and key, another slot must be used.NOTE
If HPT Stage 2 Retaining Plate has "X" or "MS" marked at the slot location do not install the retaining plate lock and key, another slot must be used.
SUBTASK 72-45-30-440-073 Install the Turbine Lock Retainer (01-040) and the Stage 2 HPT Locks (72-45-33, 01-060)
NOTE
Pre SBE 72-0399 Stage 2 HPT locks and retainers should not be used in service. Stage 2 HPT rotor assembly must be equipped with four locks and retainers.When the top plate is properly secured, insert the lever arm into the slot by holding the lever arm parallel to the hub and turning the end into the slot counterclockwise. Once in the slot, slide lever arm to the left and straighten to the upright position, perpendicular to the hub.
NOTE
It can help to angle the tip of the arm toward engine center and rotate it up after you see that the retainer starts coming toward you.
SUBTASK 72-45-30-440-074 Install the Hold/Bend Fixture, PN IAE 1P16479 on the Stage 2 Turbine Hub and Bend the Retainer Tabs
Install the bar and clevis on the top end of the IAE 1P16030 Fixture 1 off or IAE 1P16366 Fixture 1 off.
Remove the fixture capscrews, Figure.
Lift the stage 2 turbine rotor assembly from the IAE 1P16039 Heater with the hoist.
SUBTASK 72-45-30-440-075 Remove the Stage 2 Turbine Rotor Assembly from the Heater and Turn it so the Large End is Down
Refer to Figure.
Lower the stage 2 turbine rotor assembly in to the IAE 1P16062 Support 1 off or IAE 1P16368 Support 1 off.
Remove the IAE 1P16030 Fixture or IAE 1P16366 Fixture from the assembly.
SUBTASK 72-45-30-440-076 Install the Stage 2 Turbine Rotor Assembly in to The Support
Refer to Figure.
NOTE
If new or fully repaired Stage 2 HPT Duct Segments (BOAS) are to be installed, two thirds of Stage 2 HPT blades must have fully repaired tips. One third of the blades can have complete, partial or no tip coating.Install and attach IAE 1P16016 Blade adapter 1 off to the lever arm on the moment weighing equipment.
Mark the moment weight on the concave side of the blade airfoil. Use CoMat 06-153H FELT TIP MARKER, RAPID DRYING, FINE POINT, BLACK, CoMat 06-153K FELT TIP MARKER, RAPID DRYING, FINE POINT, BLUE, CoMat 06-153L FELT TIP MARKER, RAPID DRYING, FINE POINT, RED, CoMat 06-153P FELT TIP MARKER, RAPID DRYING, CoMat 06-153Q FELT TIP MARKER, RAPID DRYING, CoMat 06-153S FELT TIP MARKER, RAPID DRYING, ULTRA FINE POINT, RED, CoMat 06-153T FELT TIP MARKER, RAPID DRYING, ULTRA FINE POINT, BLUE, CoMat 06-153U FELT TIP MARKER, RAPID DRYING, BOLD FINE POINT, BLACK, CoMat 06-153V FELT TIP MARKER, RAPID DRYING, BOLD FINE POINT, RED or CoMat 06-153W FELT TIP MARKER, RAPID DRYING, BOLD FINE POINT, BLUE (Ref to SPM TASK 70-09-01-400-501).
NOTE
Use an approved felt tip marker (fine/extra fine/ultra fine) CoMat for aluminide coat.
SUBTASK 72-45-30-440-077 Moment Weigh the Stage 2 HPT Blades (72-45-32, 01-010)
Use the Table Figure to find the dimension that will be used to machine the diameter of the stage 1 HPT outer air seal segments. Record this dimension.
NOTE
A blade set contains two blades of equal weight or near as possible to the same weight.
Record the type and quantity of blades used in this rotor assembly and the diameter that will be used to machine the OAS, Figure.
Put the moment weighed stage 2 HPT blades ENGINE-STAGE 2 HPT BLADE ASSEMBLY (72-45-32, 01-010) in to 36 sets on a bench.
Install the IAE 1P16221 Fixture 1 off to the assembly.
SUBTASK 72-45-30-440-078 Install the Stage 2 HPT Blade Assemblies (72-45-32, 01-010)

CAUTION
REPAIRED BLADES CAN BE THREE DIFFERENT LENGTHS. THEY CAN BE THE SAME LENGTH AS NEW BLADES, 0.005 IN. (0.127 MM) UNDERSIZE OR 0.010 IN. (0.254 MM) UNDERSIZE. REPAIRED BLADE LENGTHS ARE IDENTIFIED BY MARKS ON THE BLADE ROOT OR THE UNDERSIDE OF THE BLADE PLATFORMS AS THE LETTER K, L OR M AND CAN BE FOLLOWED BY A NUMBER 5 OR 10. A LETTER K, L OR M WITH NO NUMBER MEANS THE BLADE IS THE SAME LENGTH AS A NEW BLADE. A LETTER FOLLOWED BY A5 MEANS THE BLADE IS 0.005 IN. (0.127 MM) UNDERSIZE. A LETTER FOLLOWED BY A NUMBER 10 MEANS THE BLADE IS 0.010 IN. (0.254 MM) UNDERSIZE. YOU CAN INSTALL NEW, USED, OR REPAIRED BLADES, OR BLADES THAT ARE 0.005 IN. (0.127 MM) OR 0.010 IN. (0.254 MM) UNDERSIZE. COMBINATIONS OF DIFFERENT BLADE LENGTHS IN THE SAME ROTOR ARE NOT PERMITTED. YOU MUST INSTALL BLADES OF THE SAME LENGTH IN A ROTOR.Refer to Figure.
Install the eye bolts in the top of the IAE 1P17020 Fixture 1 off.
SUBTASK 72-45-30-440-079 Install the Fixture on A Vertical Balance Machine
Refer to Figure.
Remove the IAE 1P16221 Fixture from the assembly.
Install the IAE 1P16033 Calibration weight 1 off in any of the 36 slots on the front side of the hub.
Do a check for balance machine calibration.
SUBTASK 72-45-30-440-080 Install the Stage 2 Turbine Rotor Assembly in to the Fixture
Blade must be installed in a counterclockwise direction at the identical marked locations.
Blades must not be fully installed in the blade slots of the hub. This lets you install the blade seal and damper in to the first installed blade after all the blades are installed.
Install a stage 2 blade seal ENGINE-STAGE 2 HPT BLADE ASSEMBLY (72-45-32, 01-040) and a stage 2 blade damper ENGINE-STAGE 2 HPT BLADE ASSEMBLY (72-45-32, 01-020) to the No. 2 marked blade as follows:
Assemble the stage 2 HPT blades at the identical marked locations by the steps that follow.
NOTE
Do a check for balance by Step.
Make a mark to show the amount and position of the final unbalance by the CoMat 06-153 FELT TIP MARKER, RAPID DRYING, CoMat 06-153X FELT TIP MARKER, RAPID DRYING, FINE POINT, BLACK, TRACE ELEMENT CERTIFIED or CoMat 06-158 MARKER, EXTRA FINE POINT(BLACK). Refer to SPM TASK 70-09-00-400-501 and Figure.
SUBTASK 72-45-30-440-081 Balance the Stage 2 Turbine Rotor Assembly
Refer to Figure.
Install the IAE 1P16066 Fixture 1 off to the assembly.
Remove the IAE 1P16066 Fixture 1 off from the assembly.
SUBTASK 72-45-30-440-082 Remove the Stage 2 Turbine Rotor Assembly from the Fixture
Install the IAE 1P16030 Fixture 1 off or IAE 1P16366 Fixture 1 off per Step.
SUBTASK 72-45-30-440-083 Install the Fixture
Refer to Figure.
Lift the stage 2 turbine rotor assembly with a hoist, to permit installation of the IAE 1P16164 Retainer 1 off.
SUBTASK 72-45-30-440-084 Install the Retainers to the Stage 2 Turbine Rotor Assembly
Refer to Figure.
Lower the stage 2 turbine rotor assembly into the IAE 1P16140 Support base 1 off.
SUBTASK 72-45-30-440-085 Turn the Stage 2 Turbine Rotor Assembly to the Small End Down and Install It in the Support Base
Figure: Install the Heatshield and Metering Plugs
Install the Heatshield and Metering Plugs
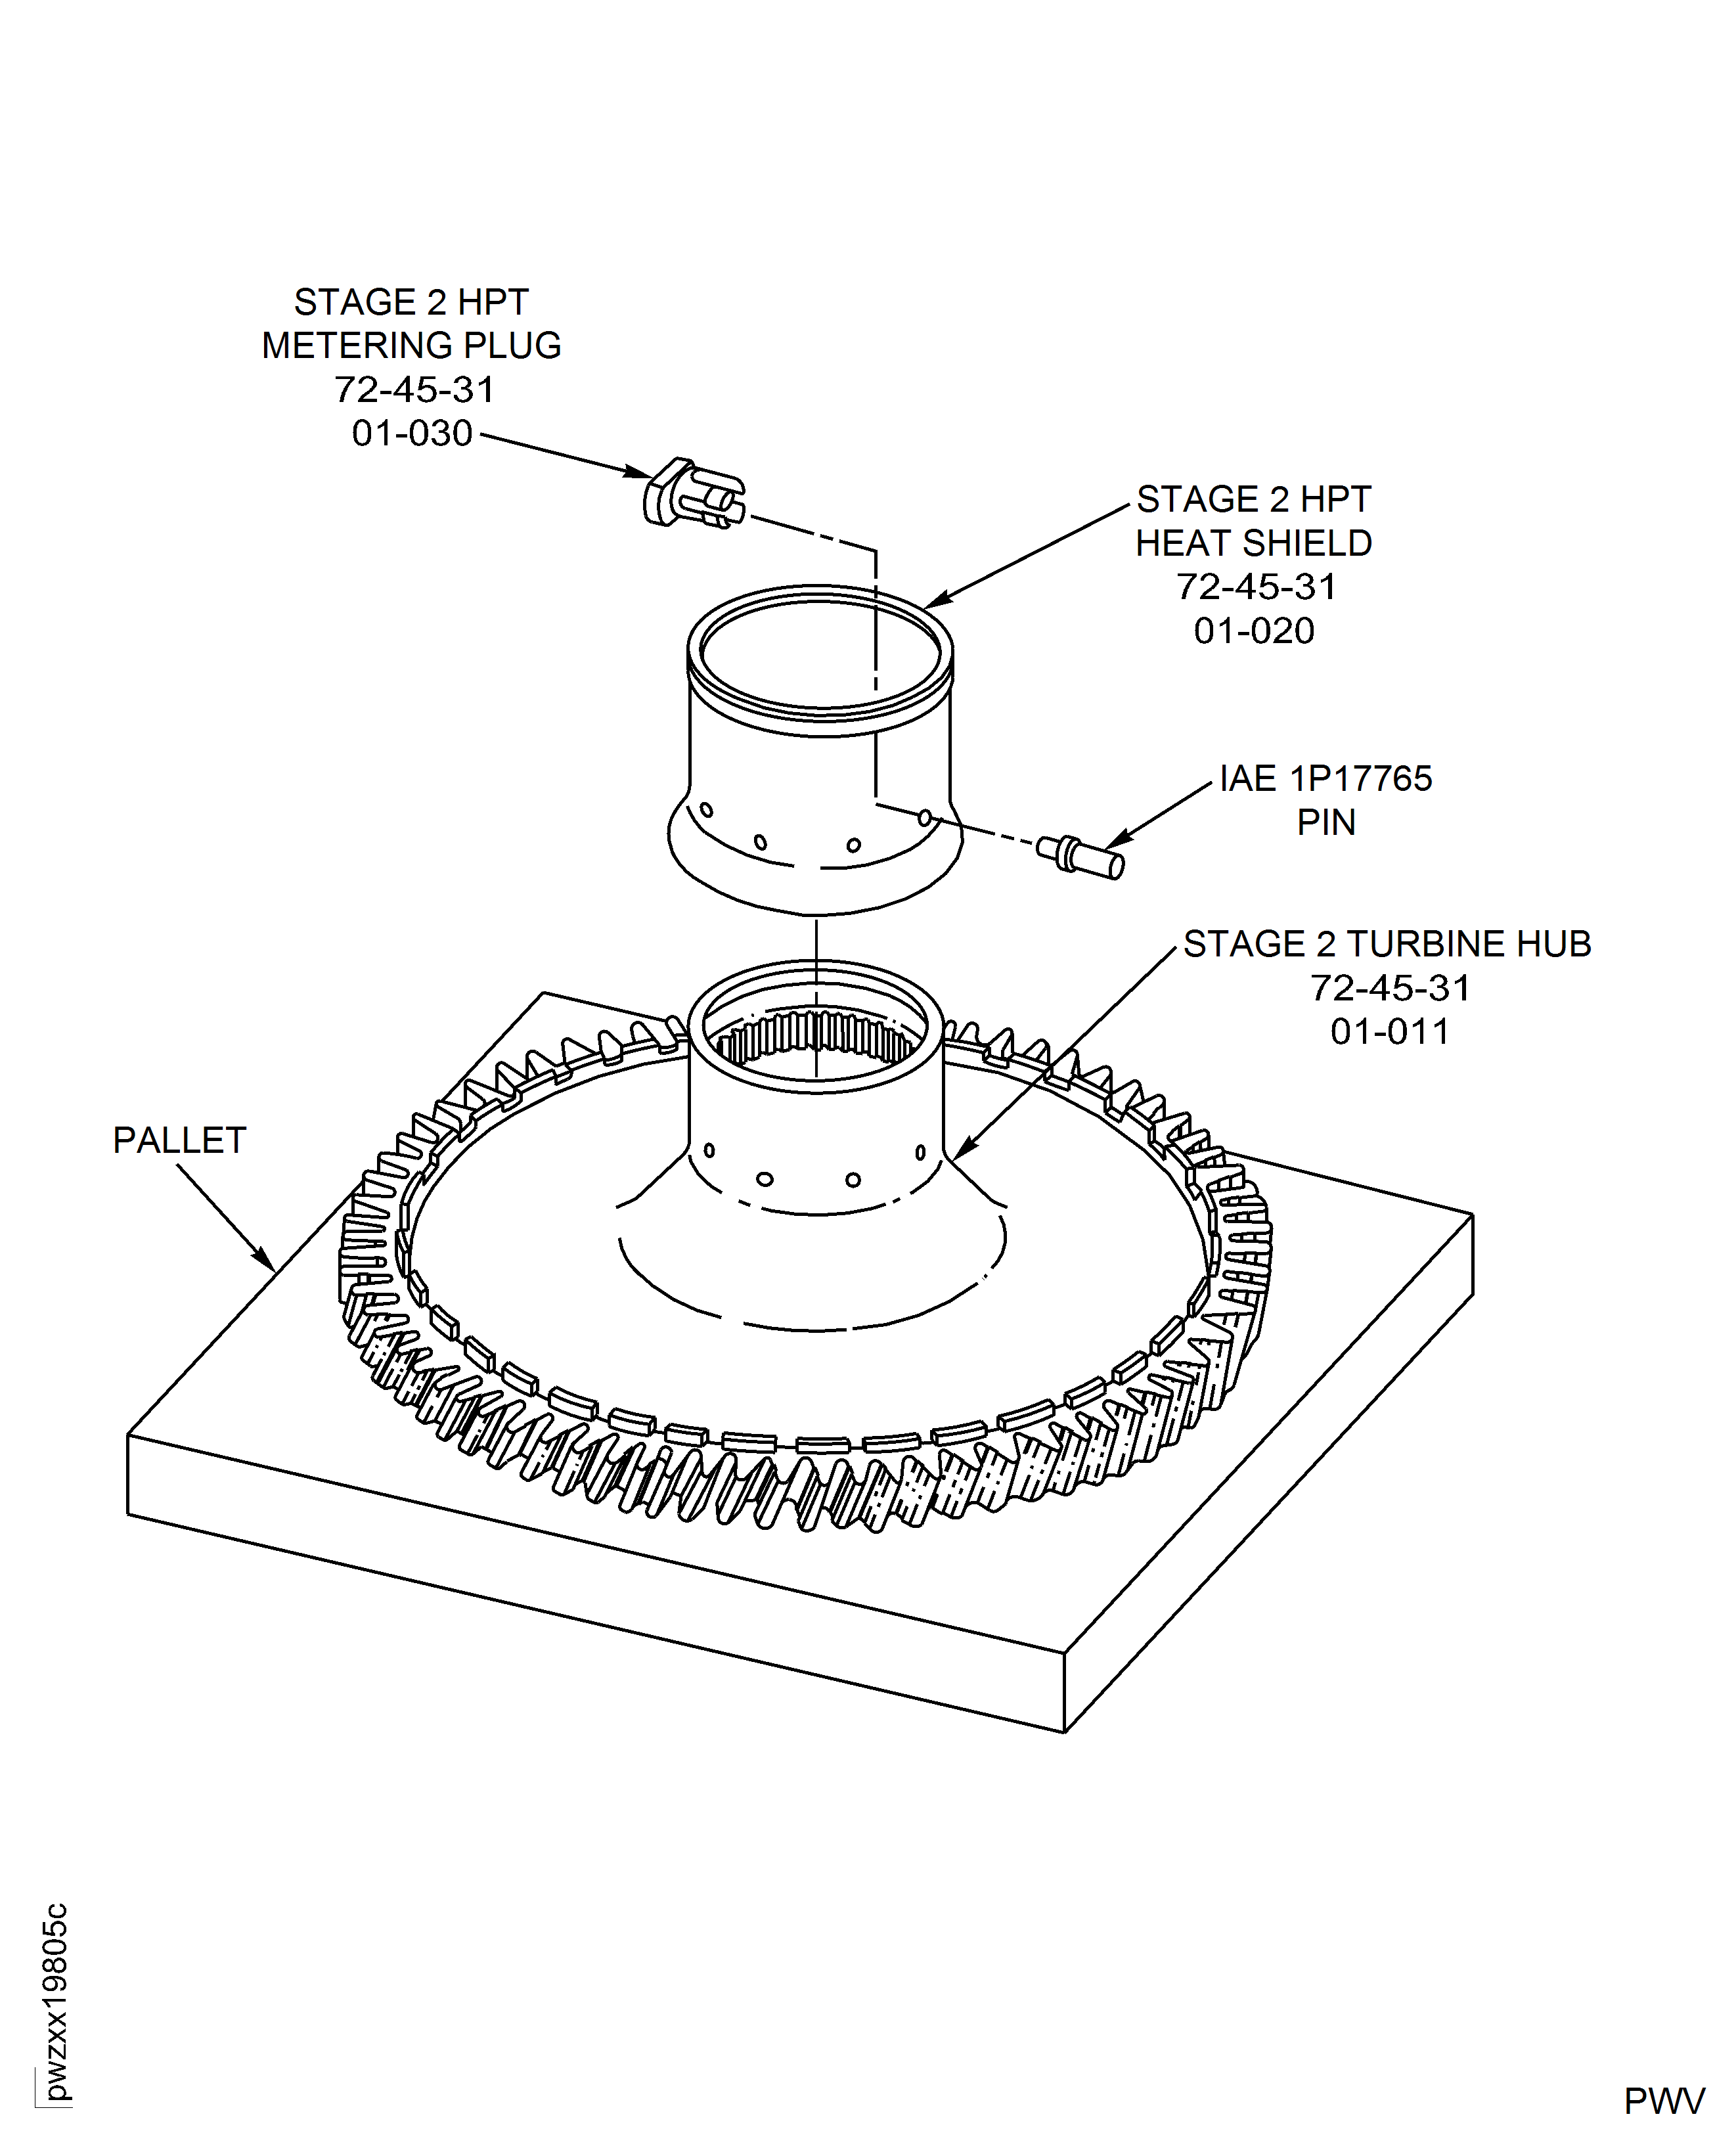
Figure: Remove the Stage 2 Turbine Rotor Assembly from the Pallet
Remove the Stage 2 Turbine Rotor Assembly from the Pallet
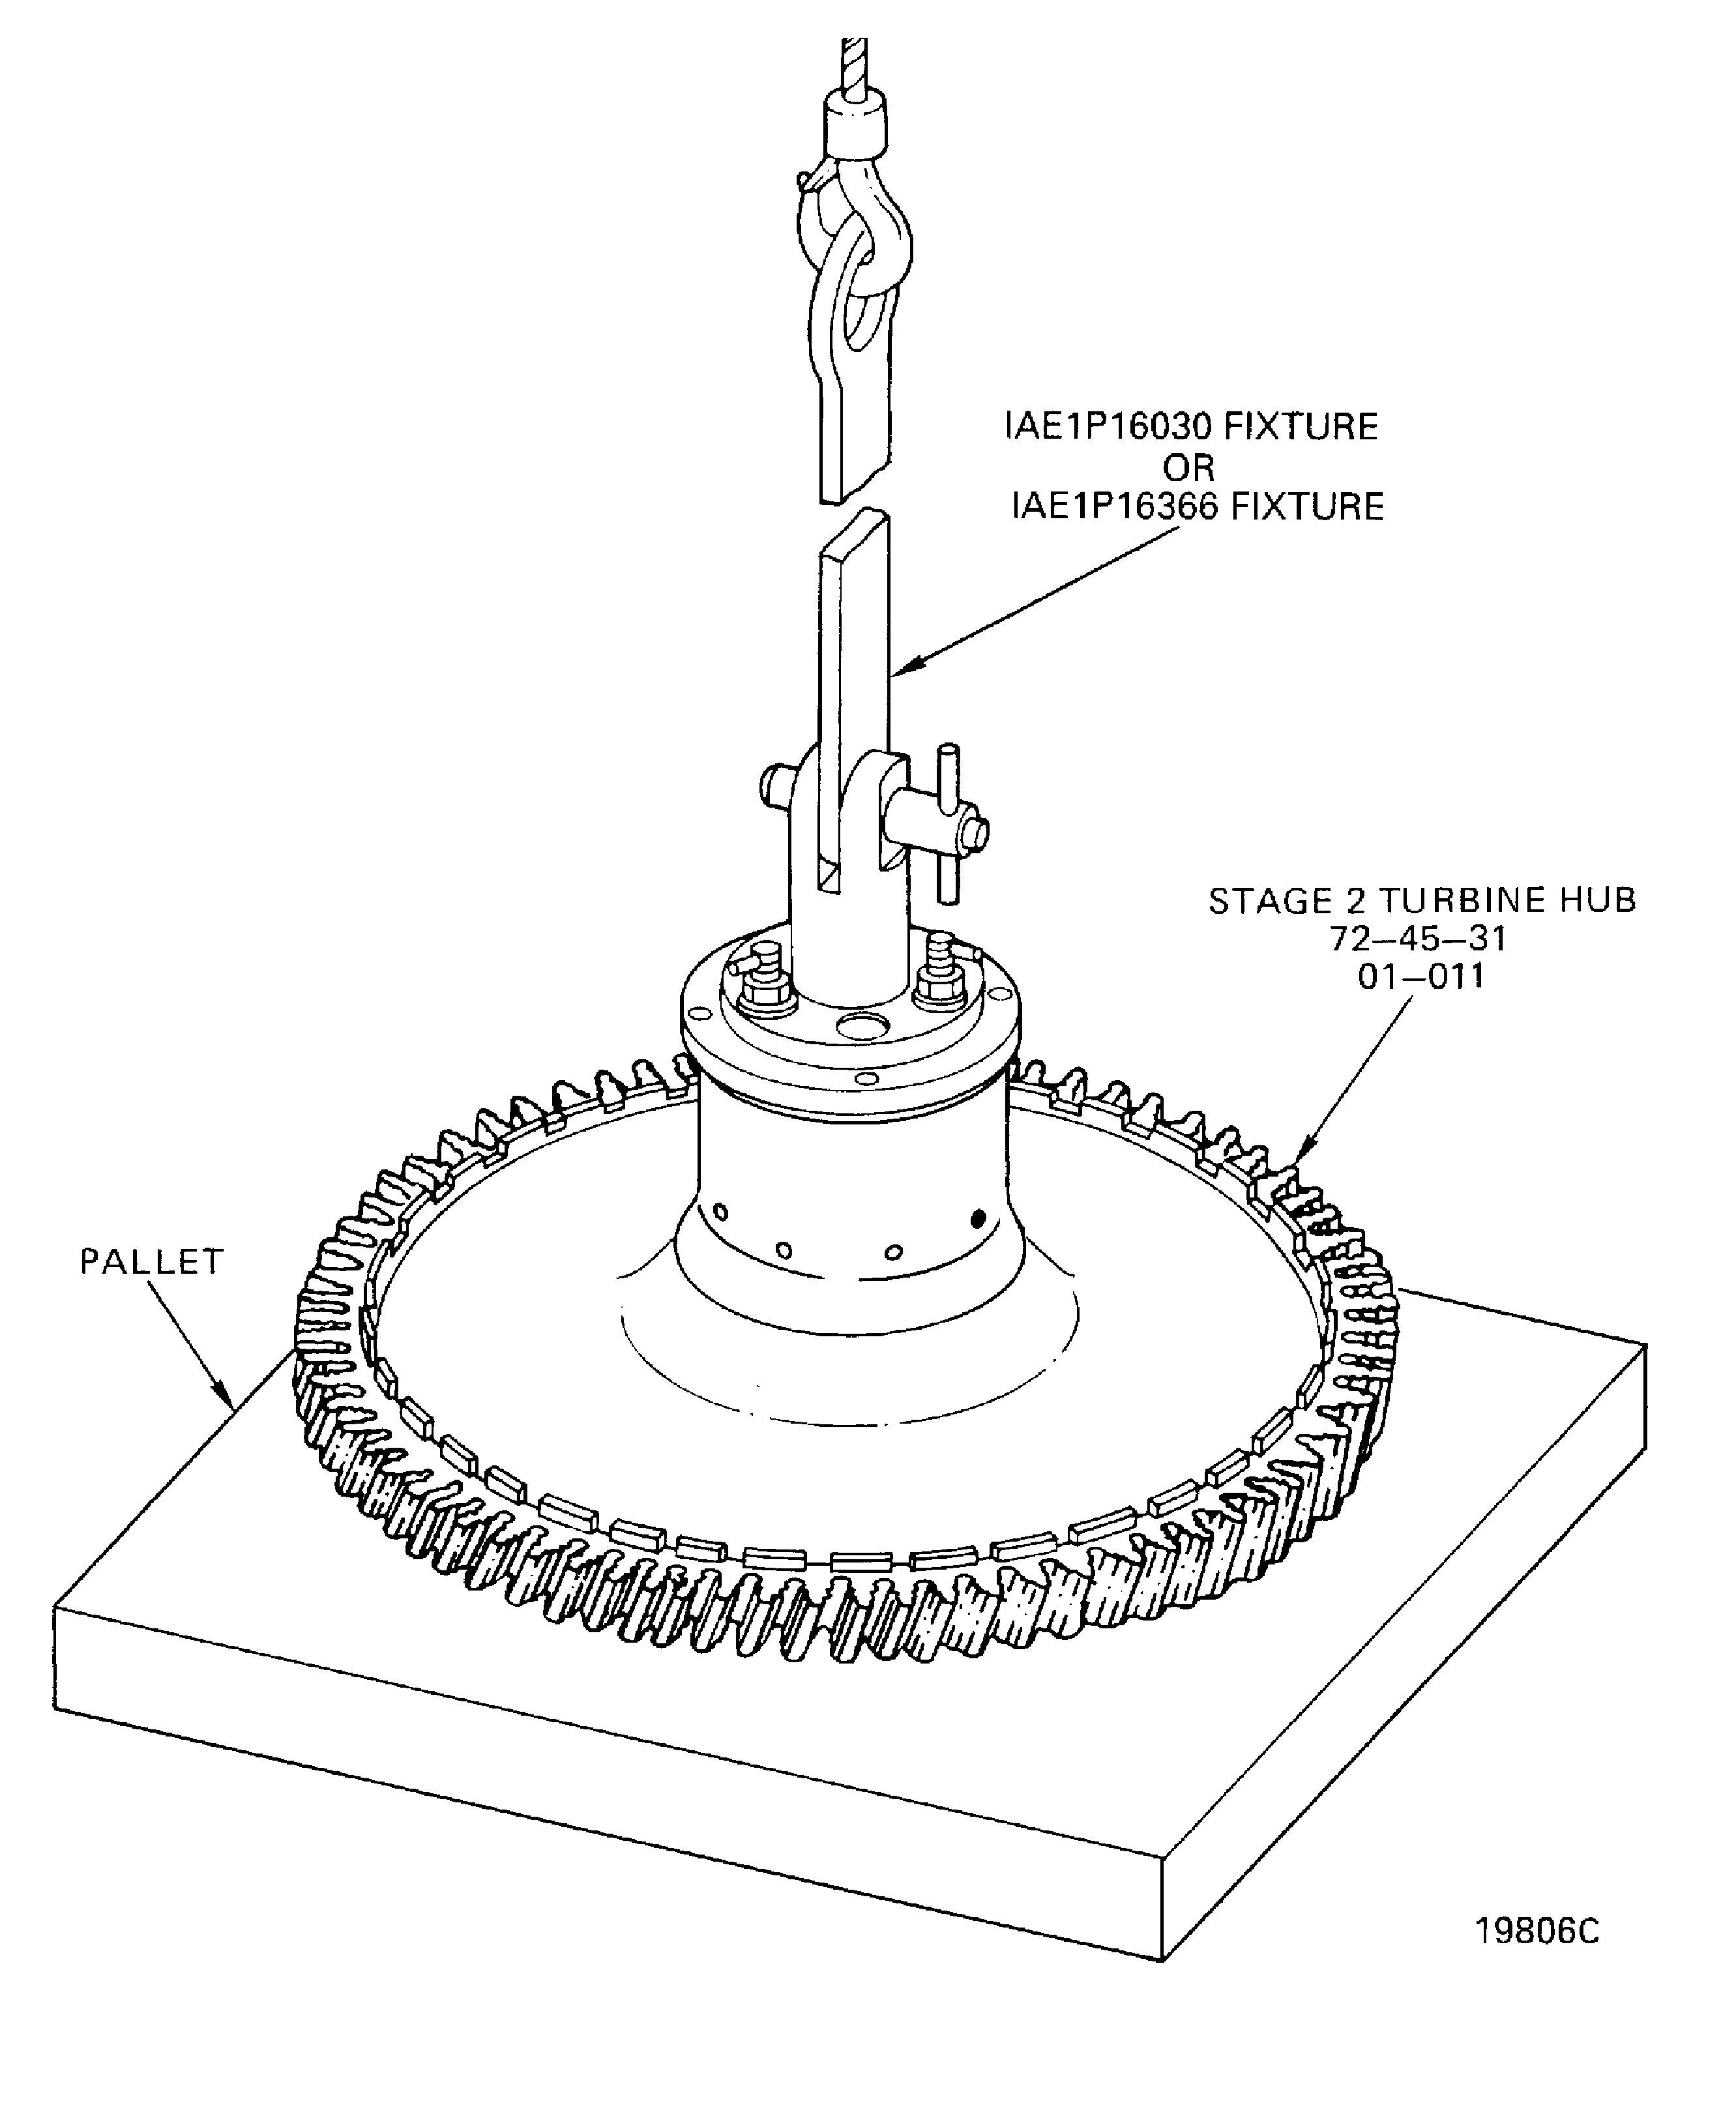
Figure: Install the IAE 1P16010 fixture
Install the IAE 1P16010 fixture
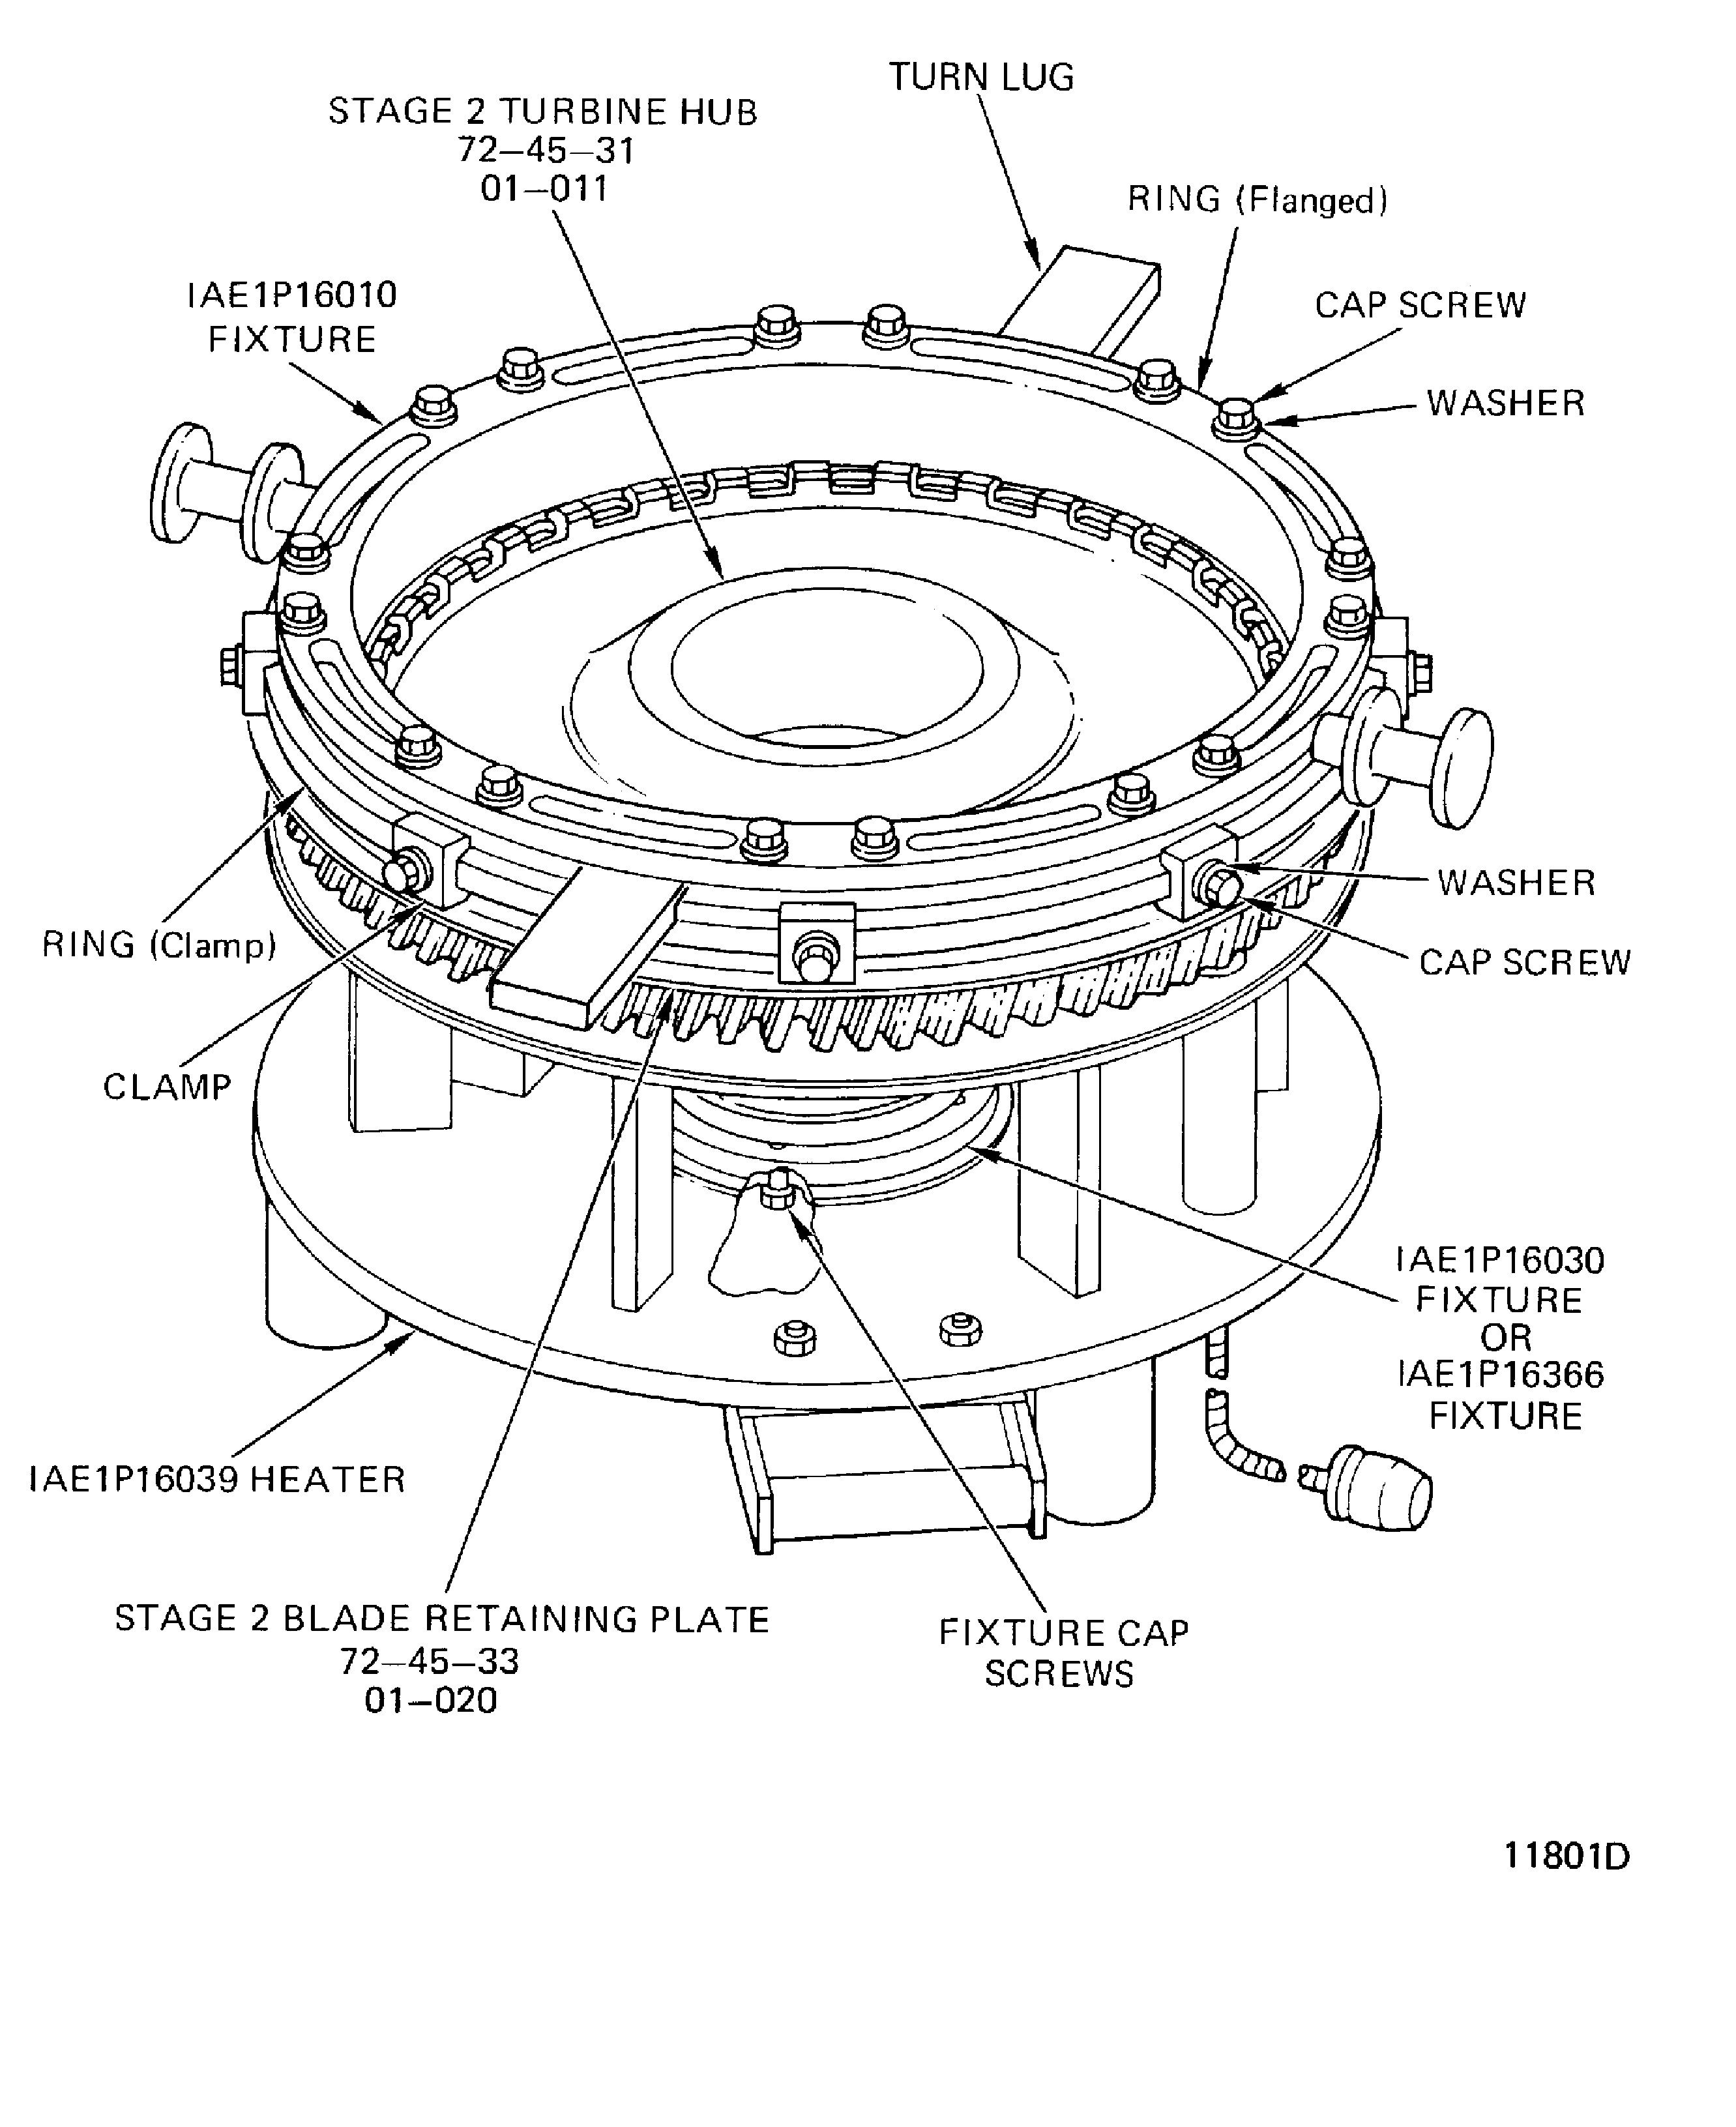
Figure: Stage 2 Turbine Rotor Assembly Fits and Clearances
Stage 2 Turbine Rotor Assembly Fits and Clearances
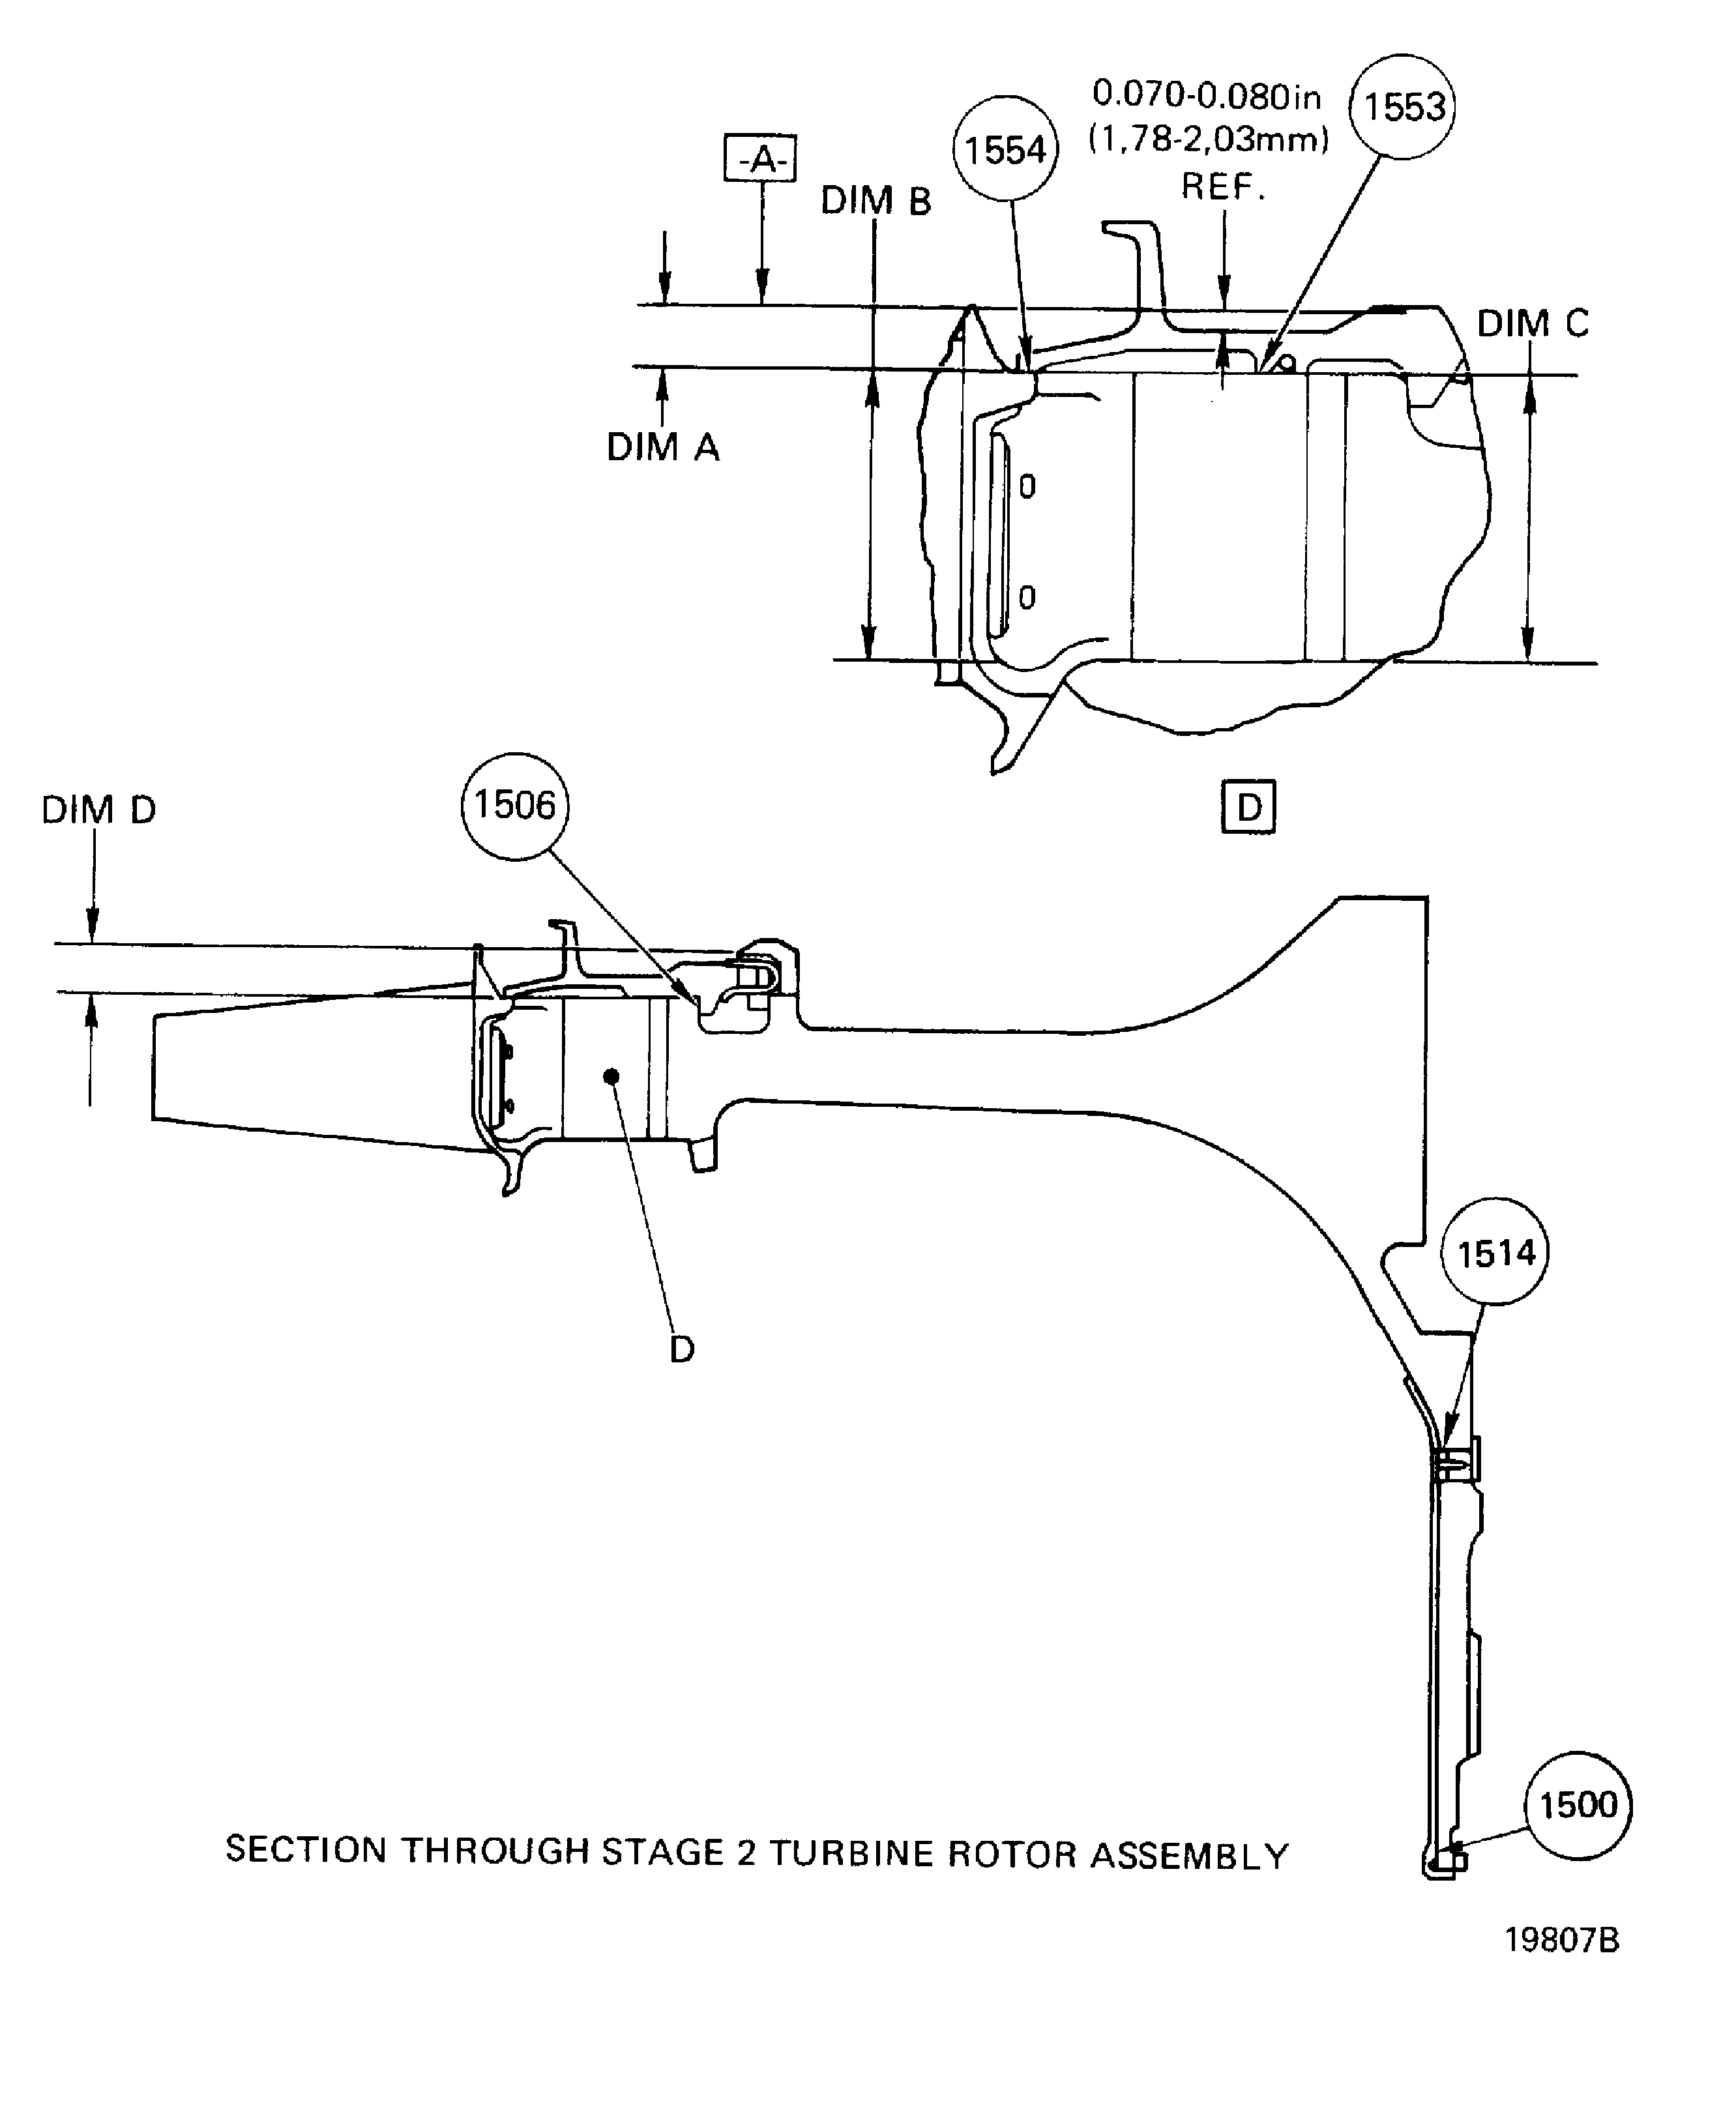
Figure: Check the Stage 1 and 2 HPT Seal Gap
Check the Stage 1 and 2 HPT Seal Gap
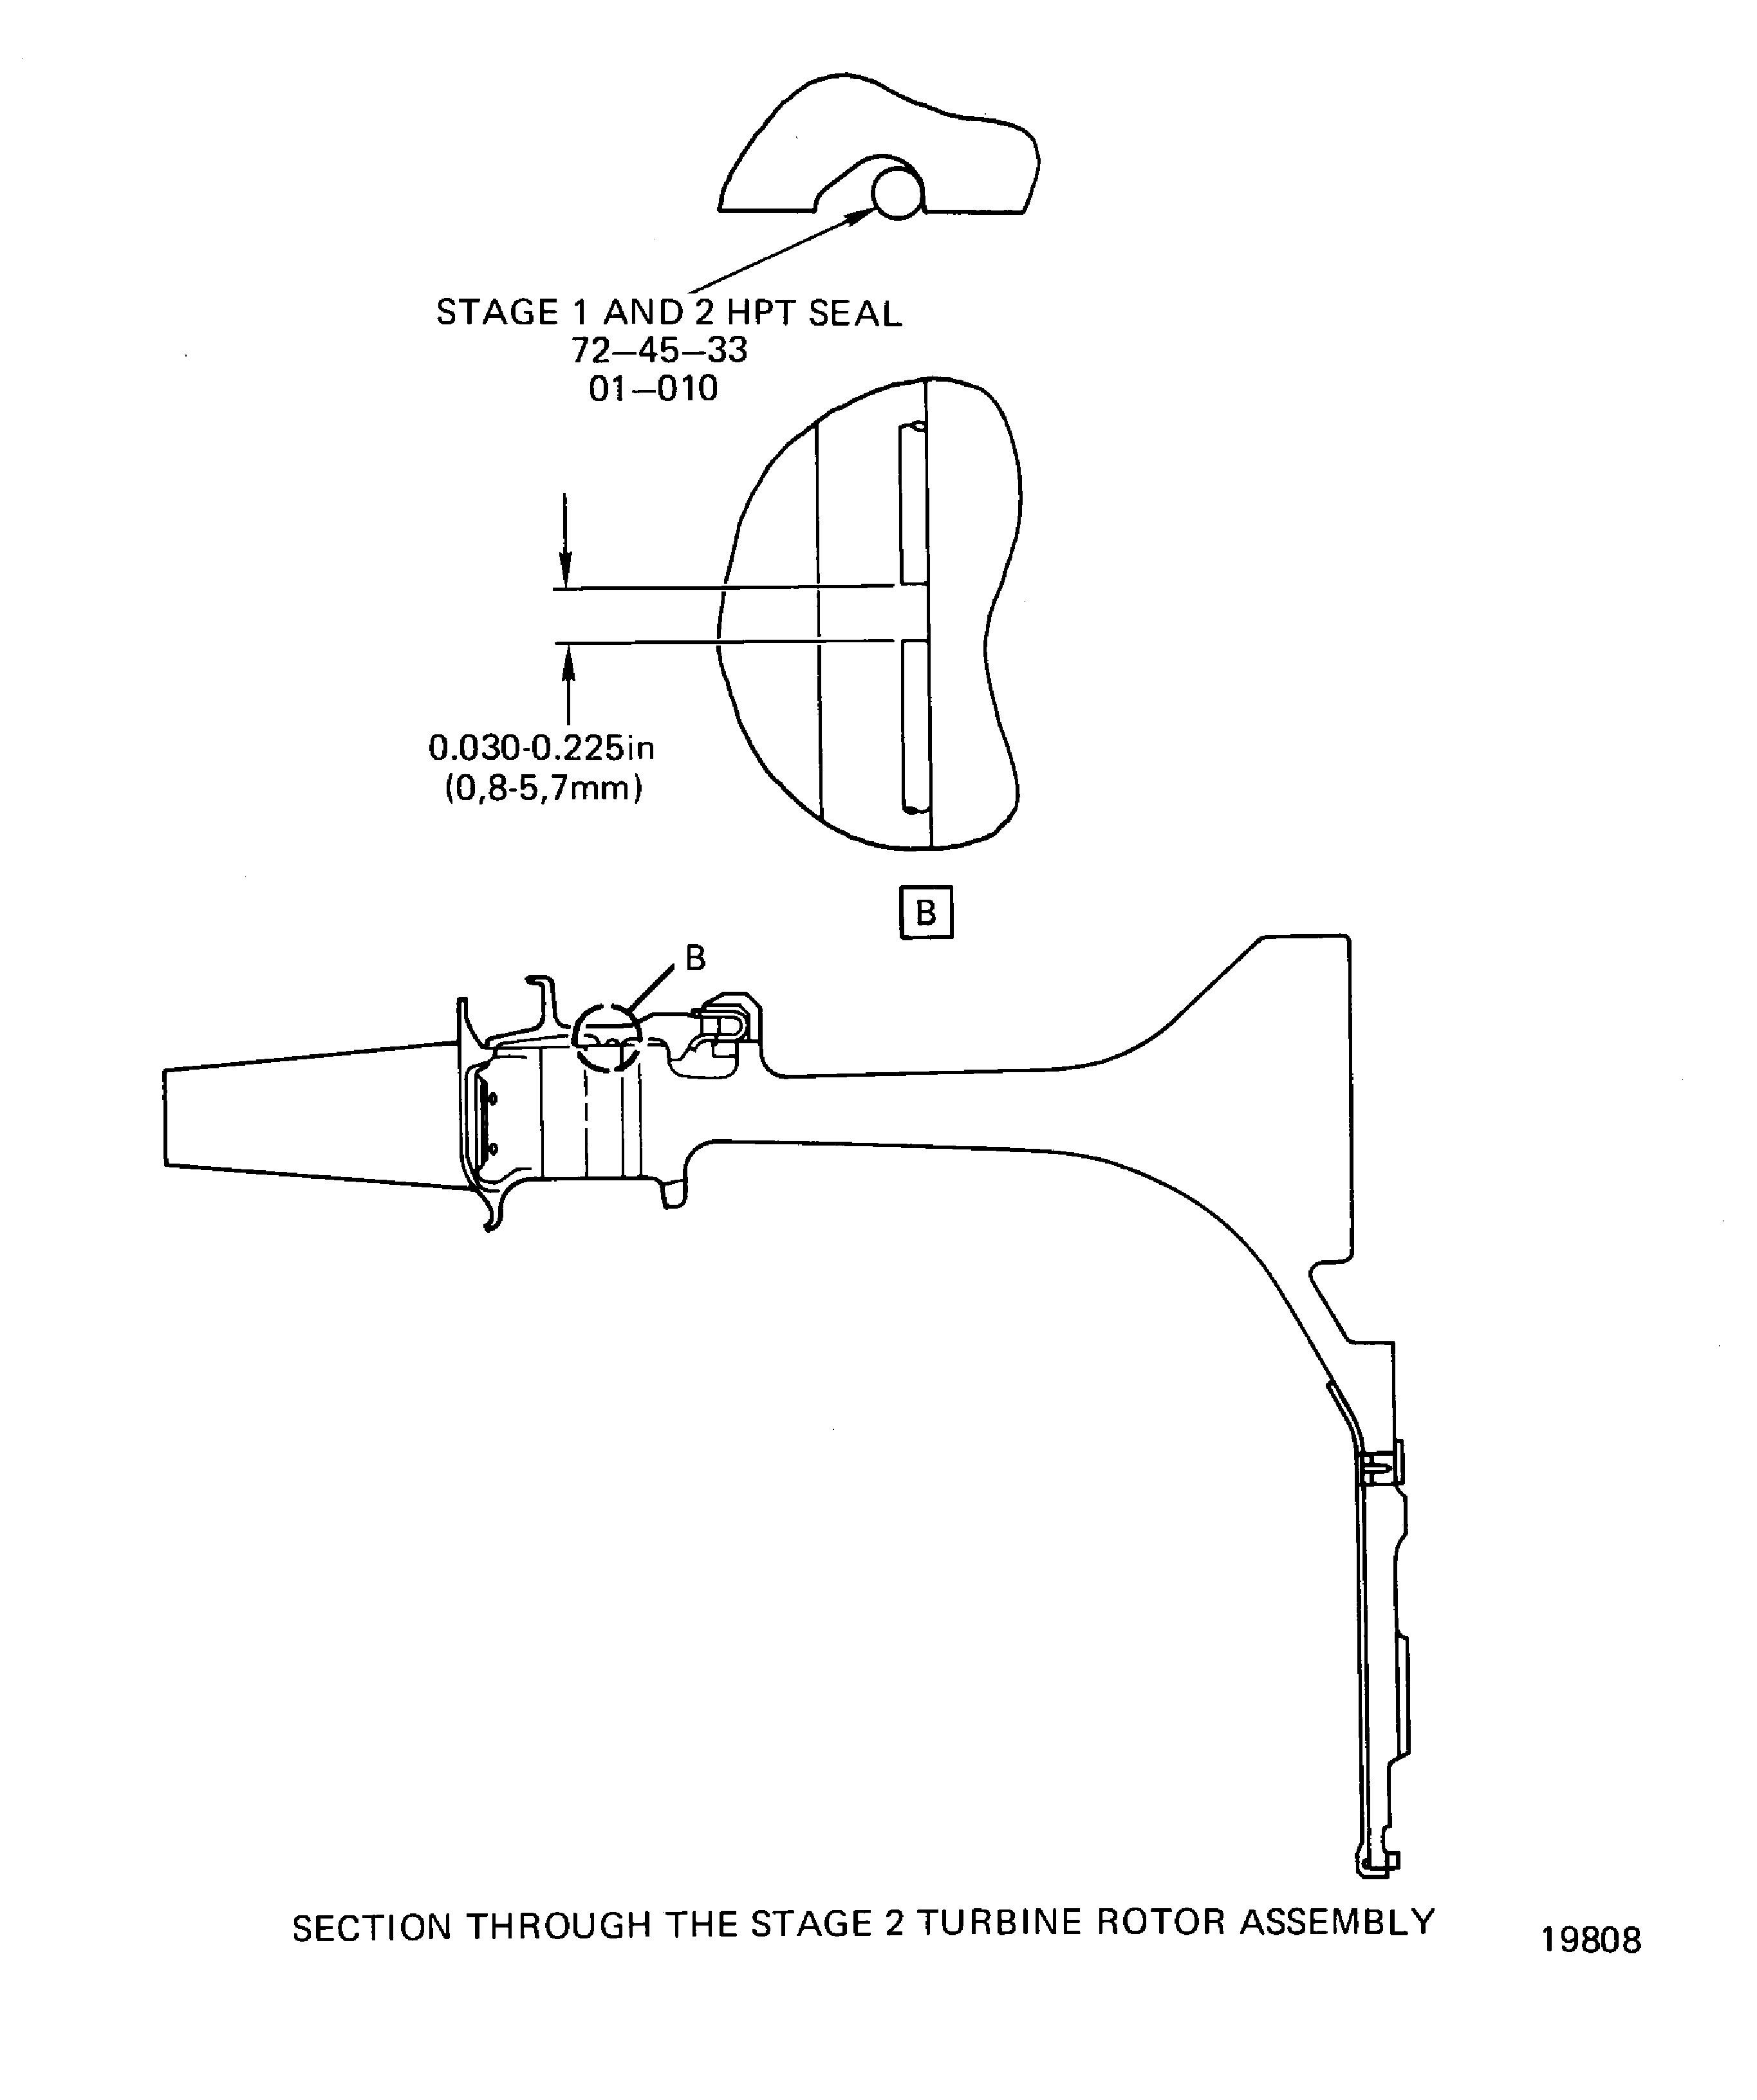
Figure: Location of Balance Marks
Location of Balance Marks
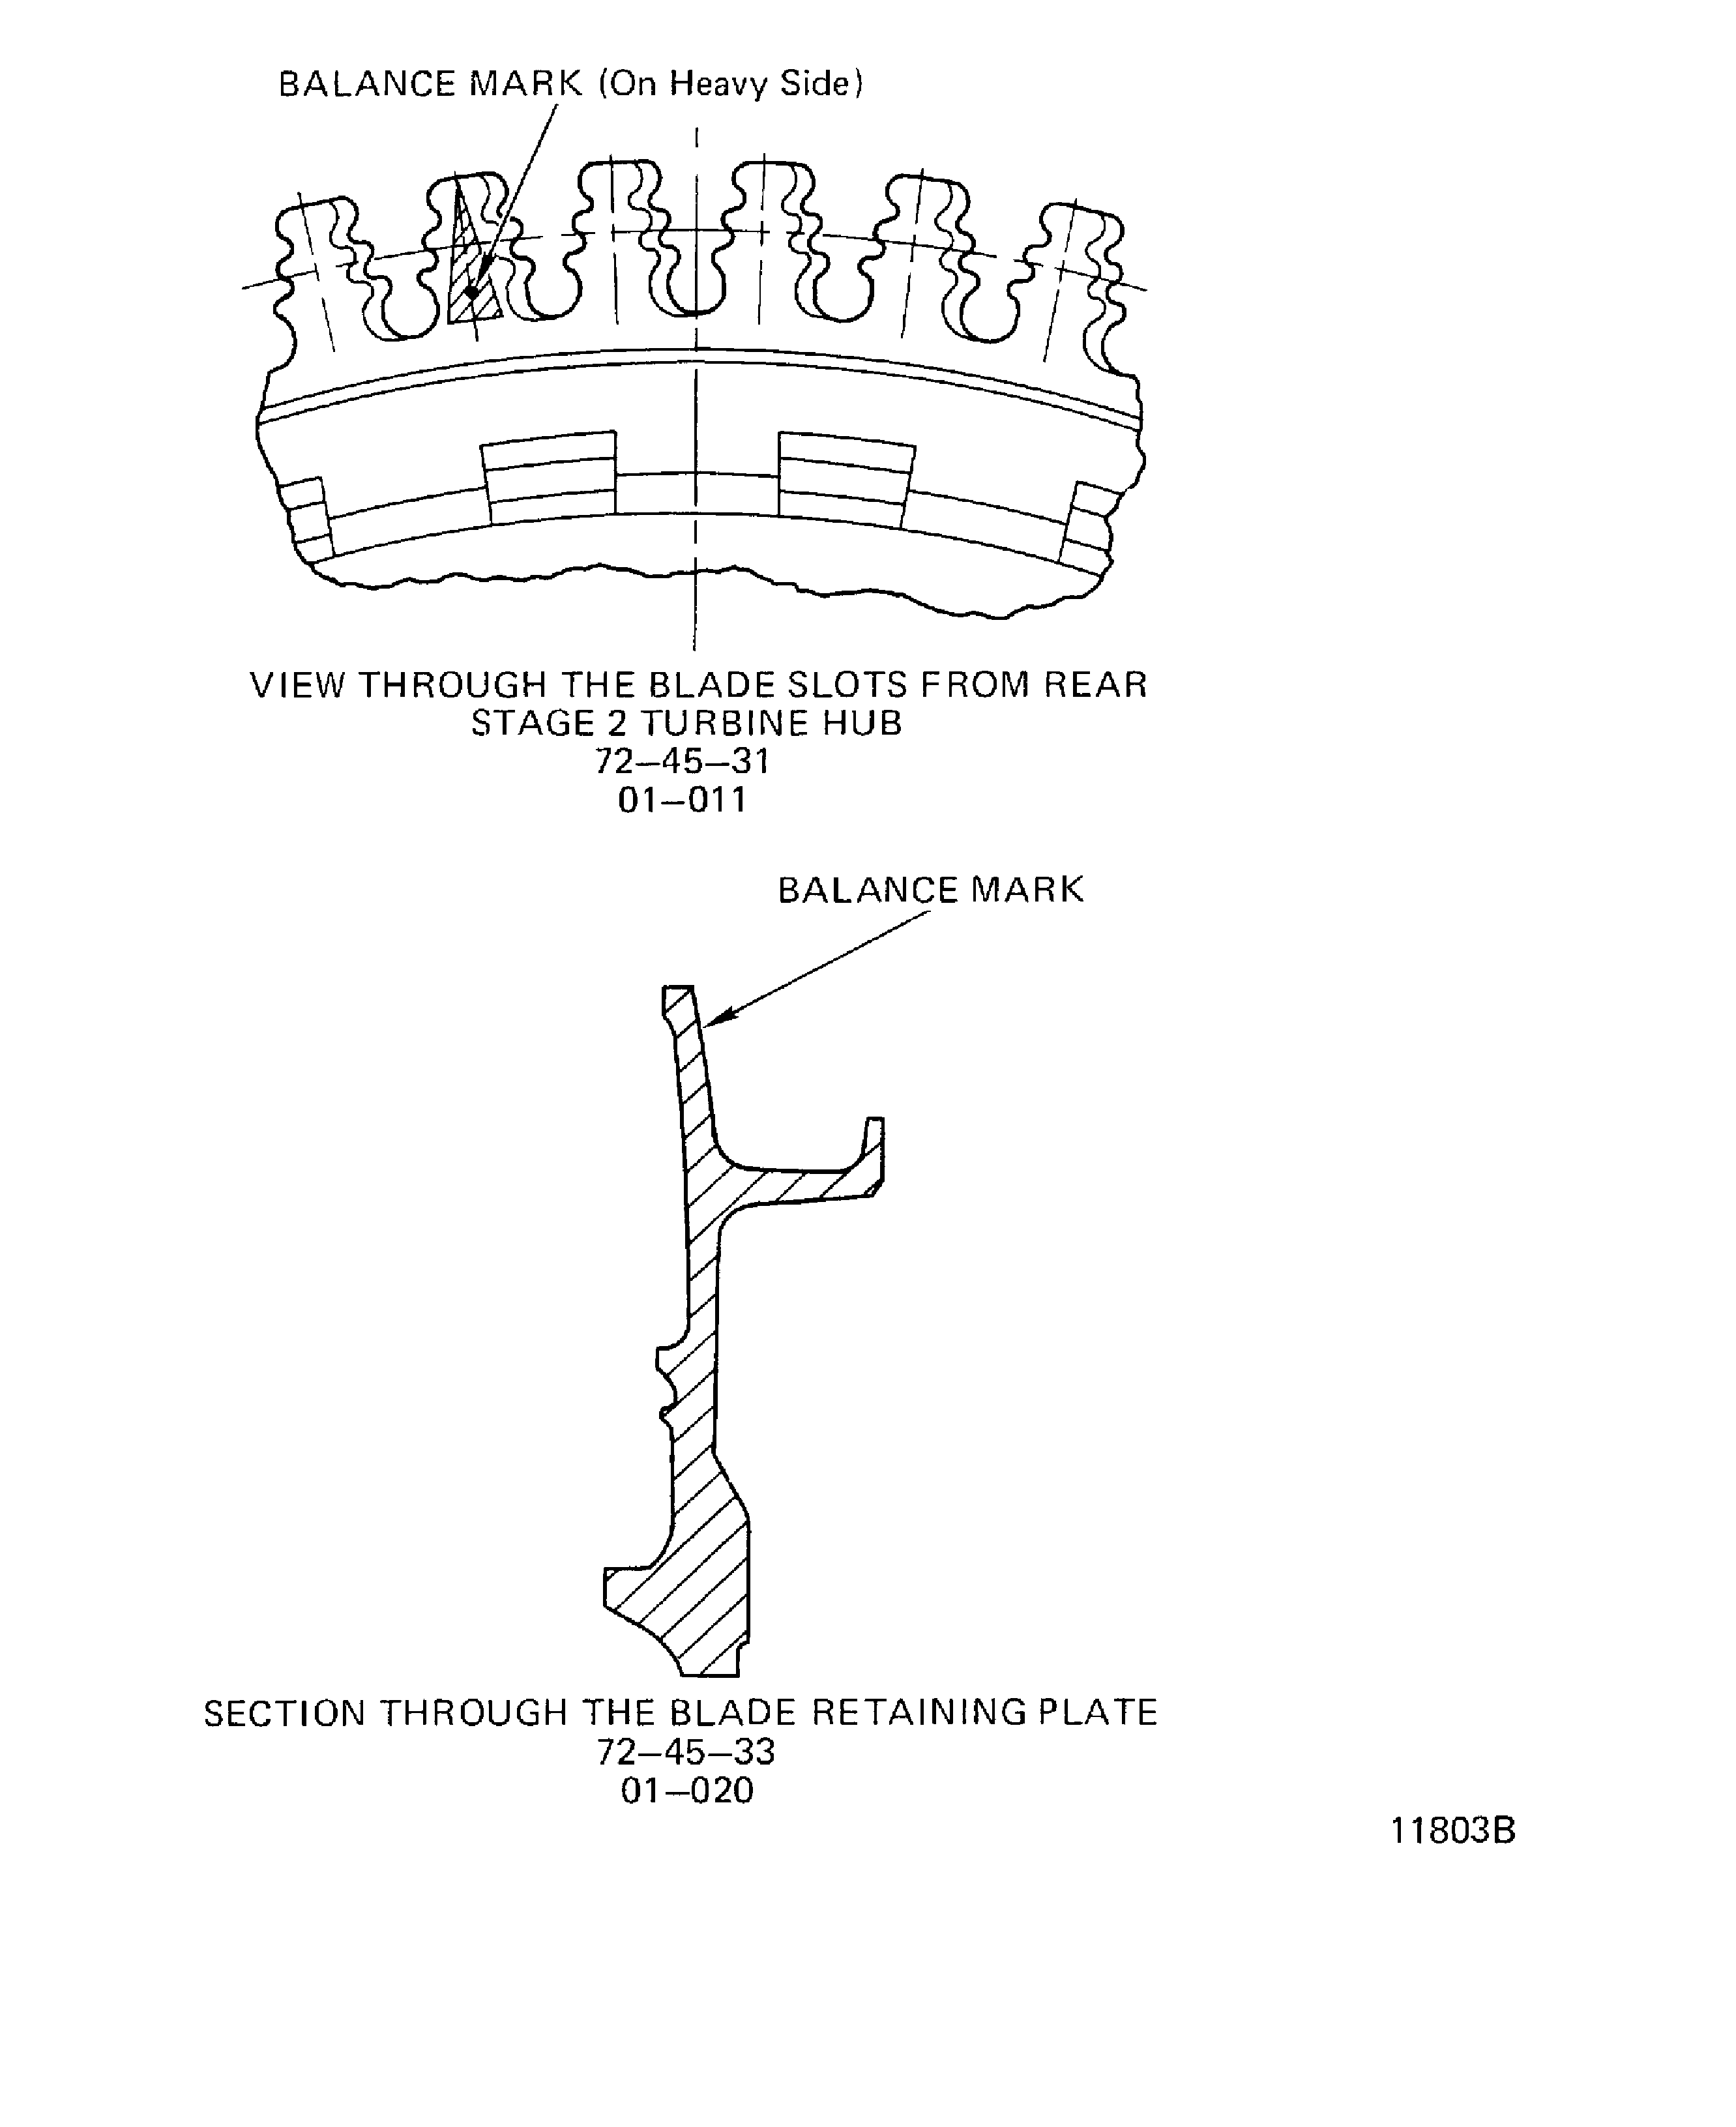
Figure: Install the Stage 2 HPT Locks and Turbine Blade Lock Retainers
Install the Stage 2 HPT Locks and Turbine Blade Lock Retainers
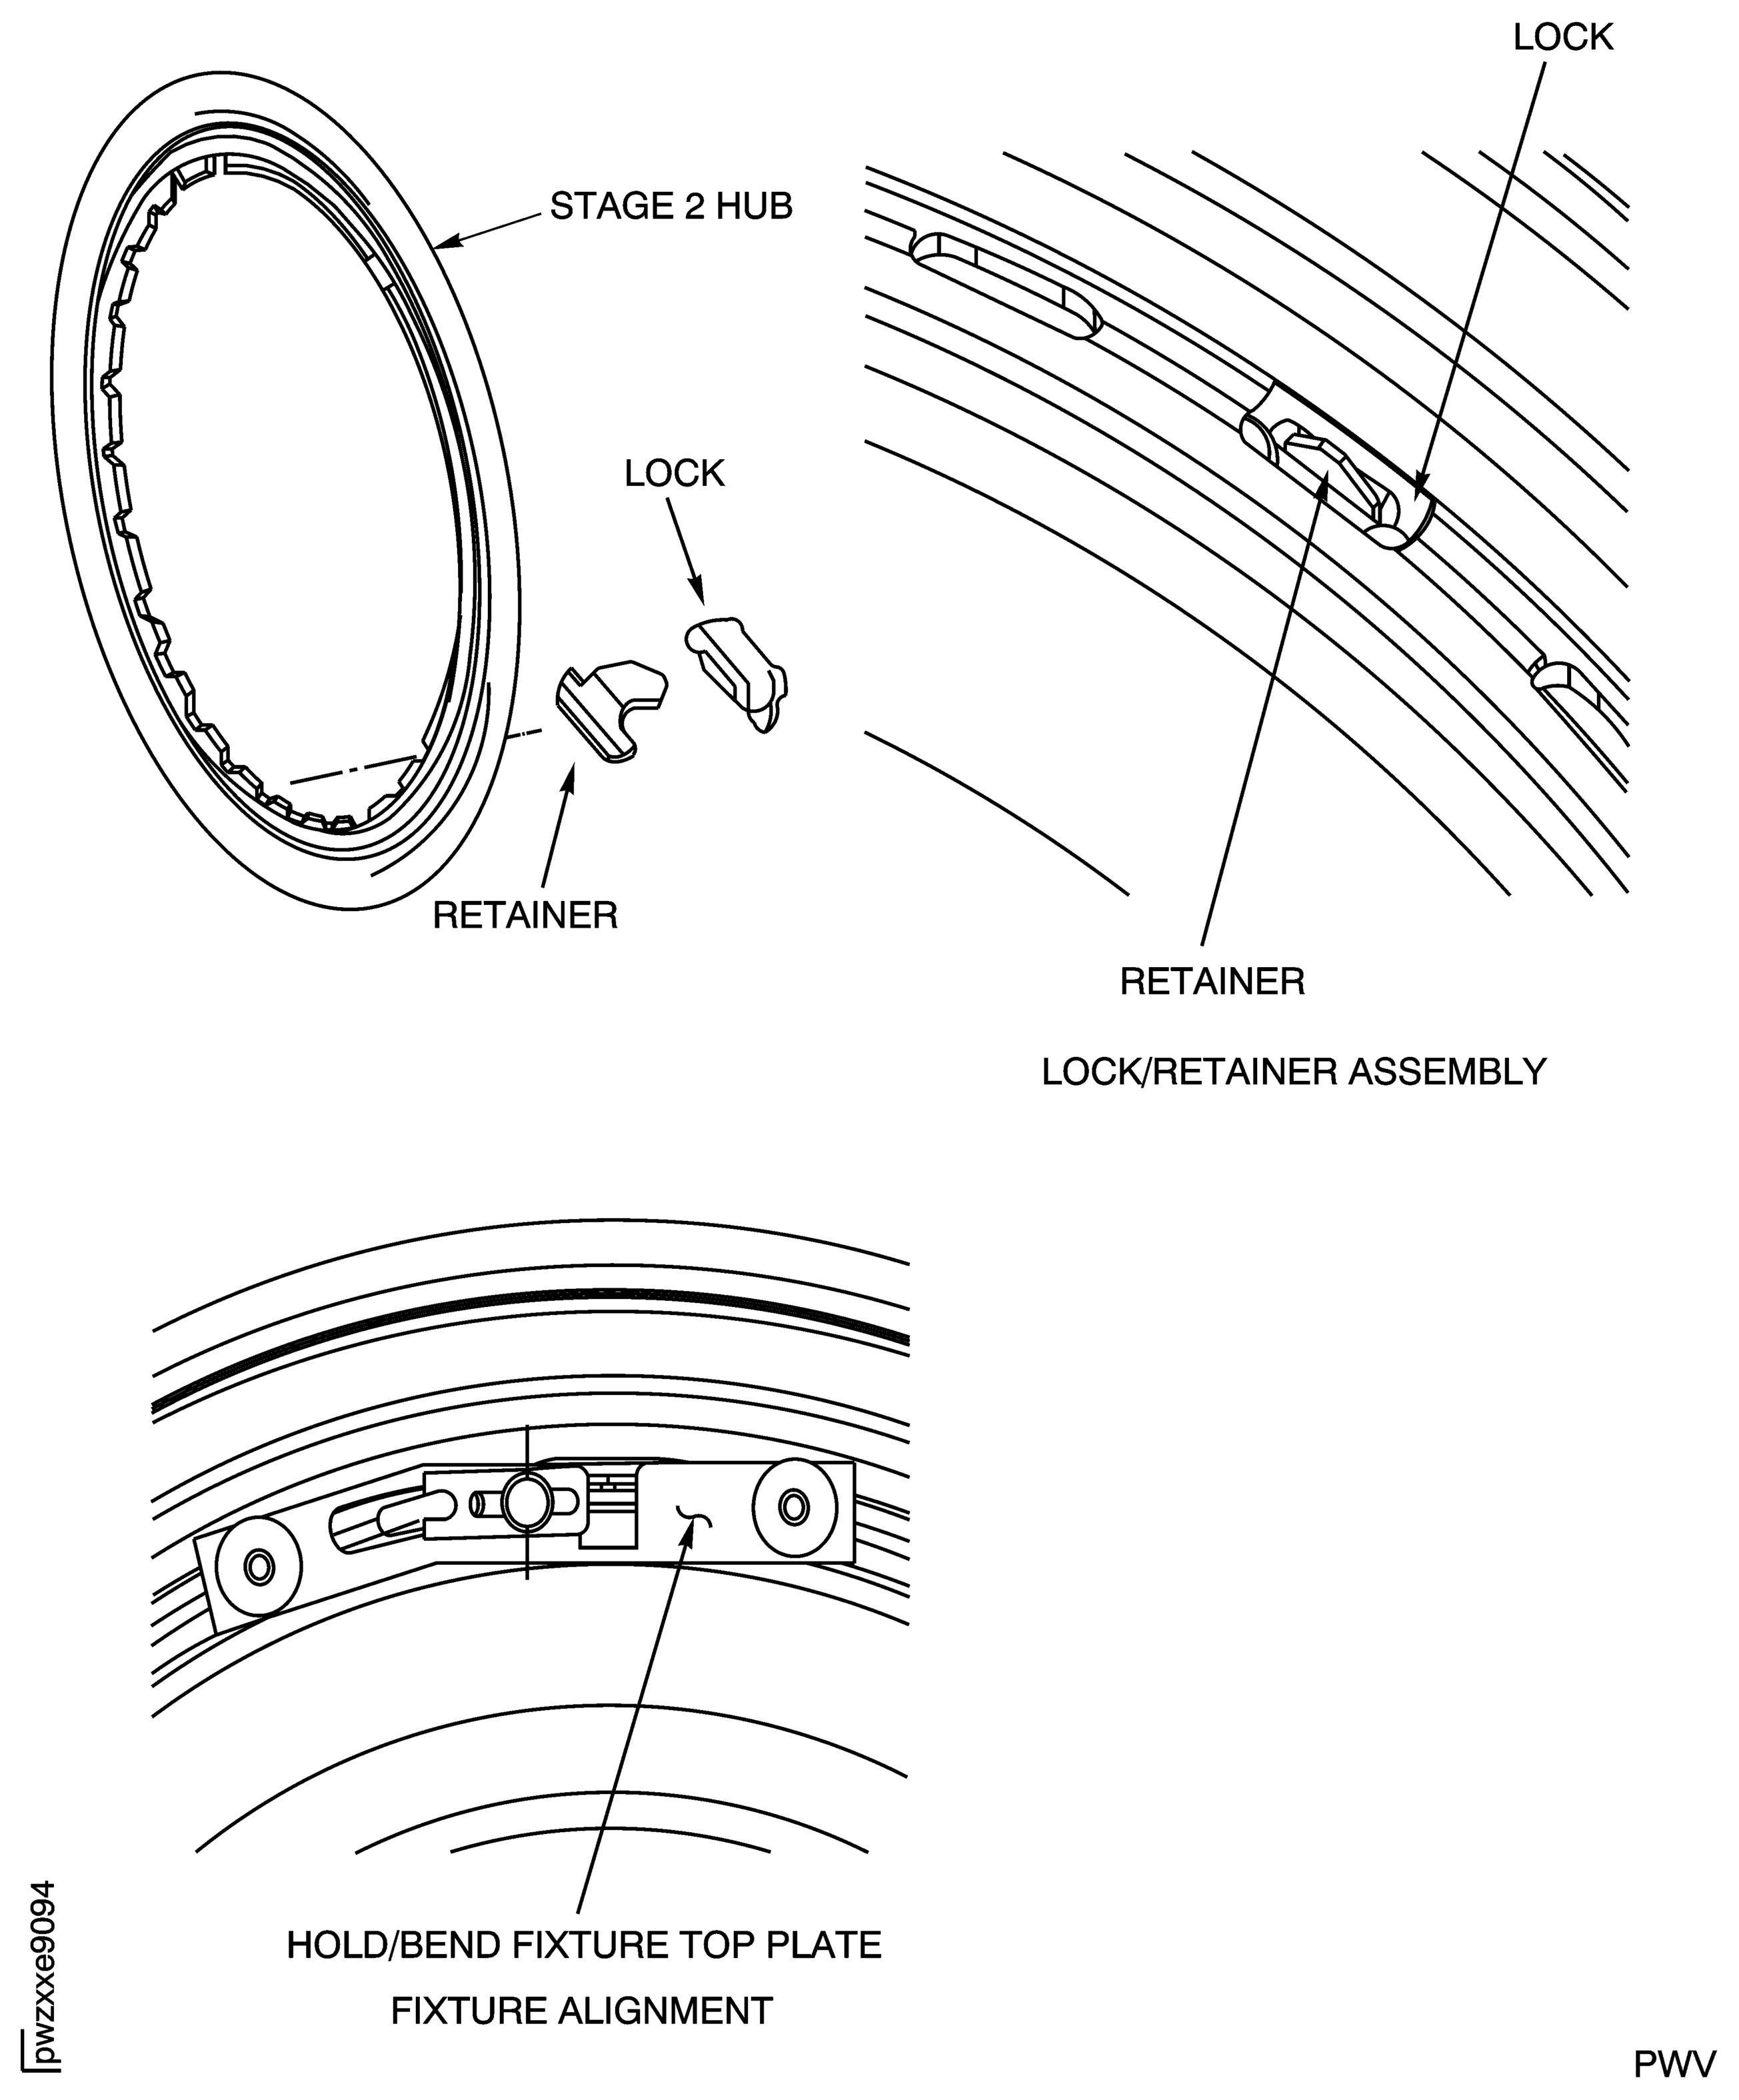
Figure: Install the Stage 2 HPT Locks and Turbine Blade Lock Retainers
Install the Stage 2 HPT Locks and Turbine Blade Lock Retainers
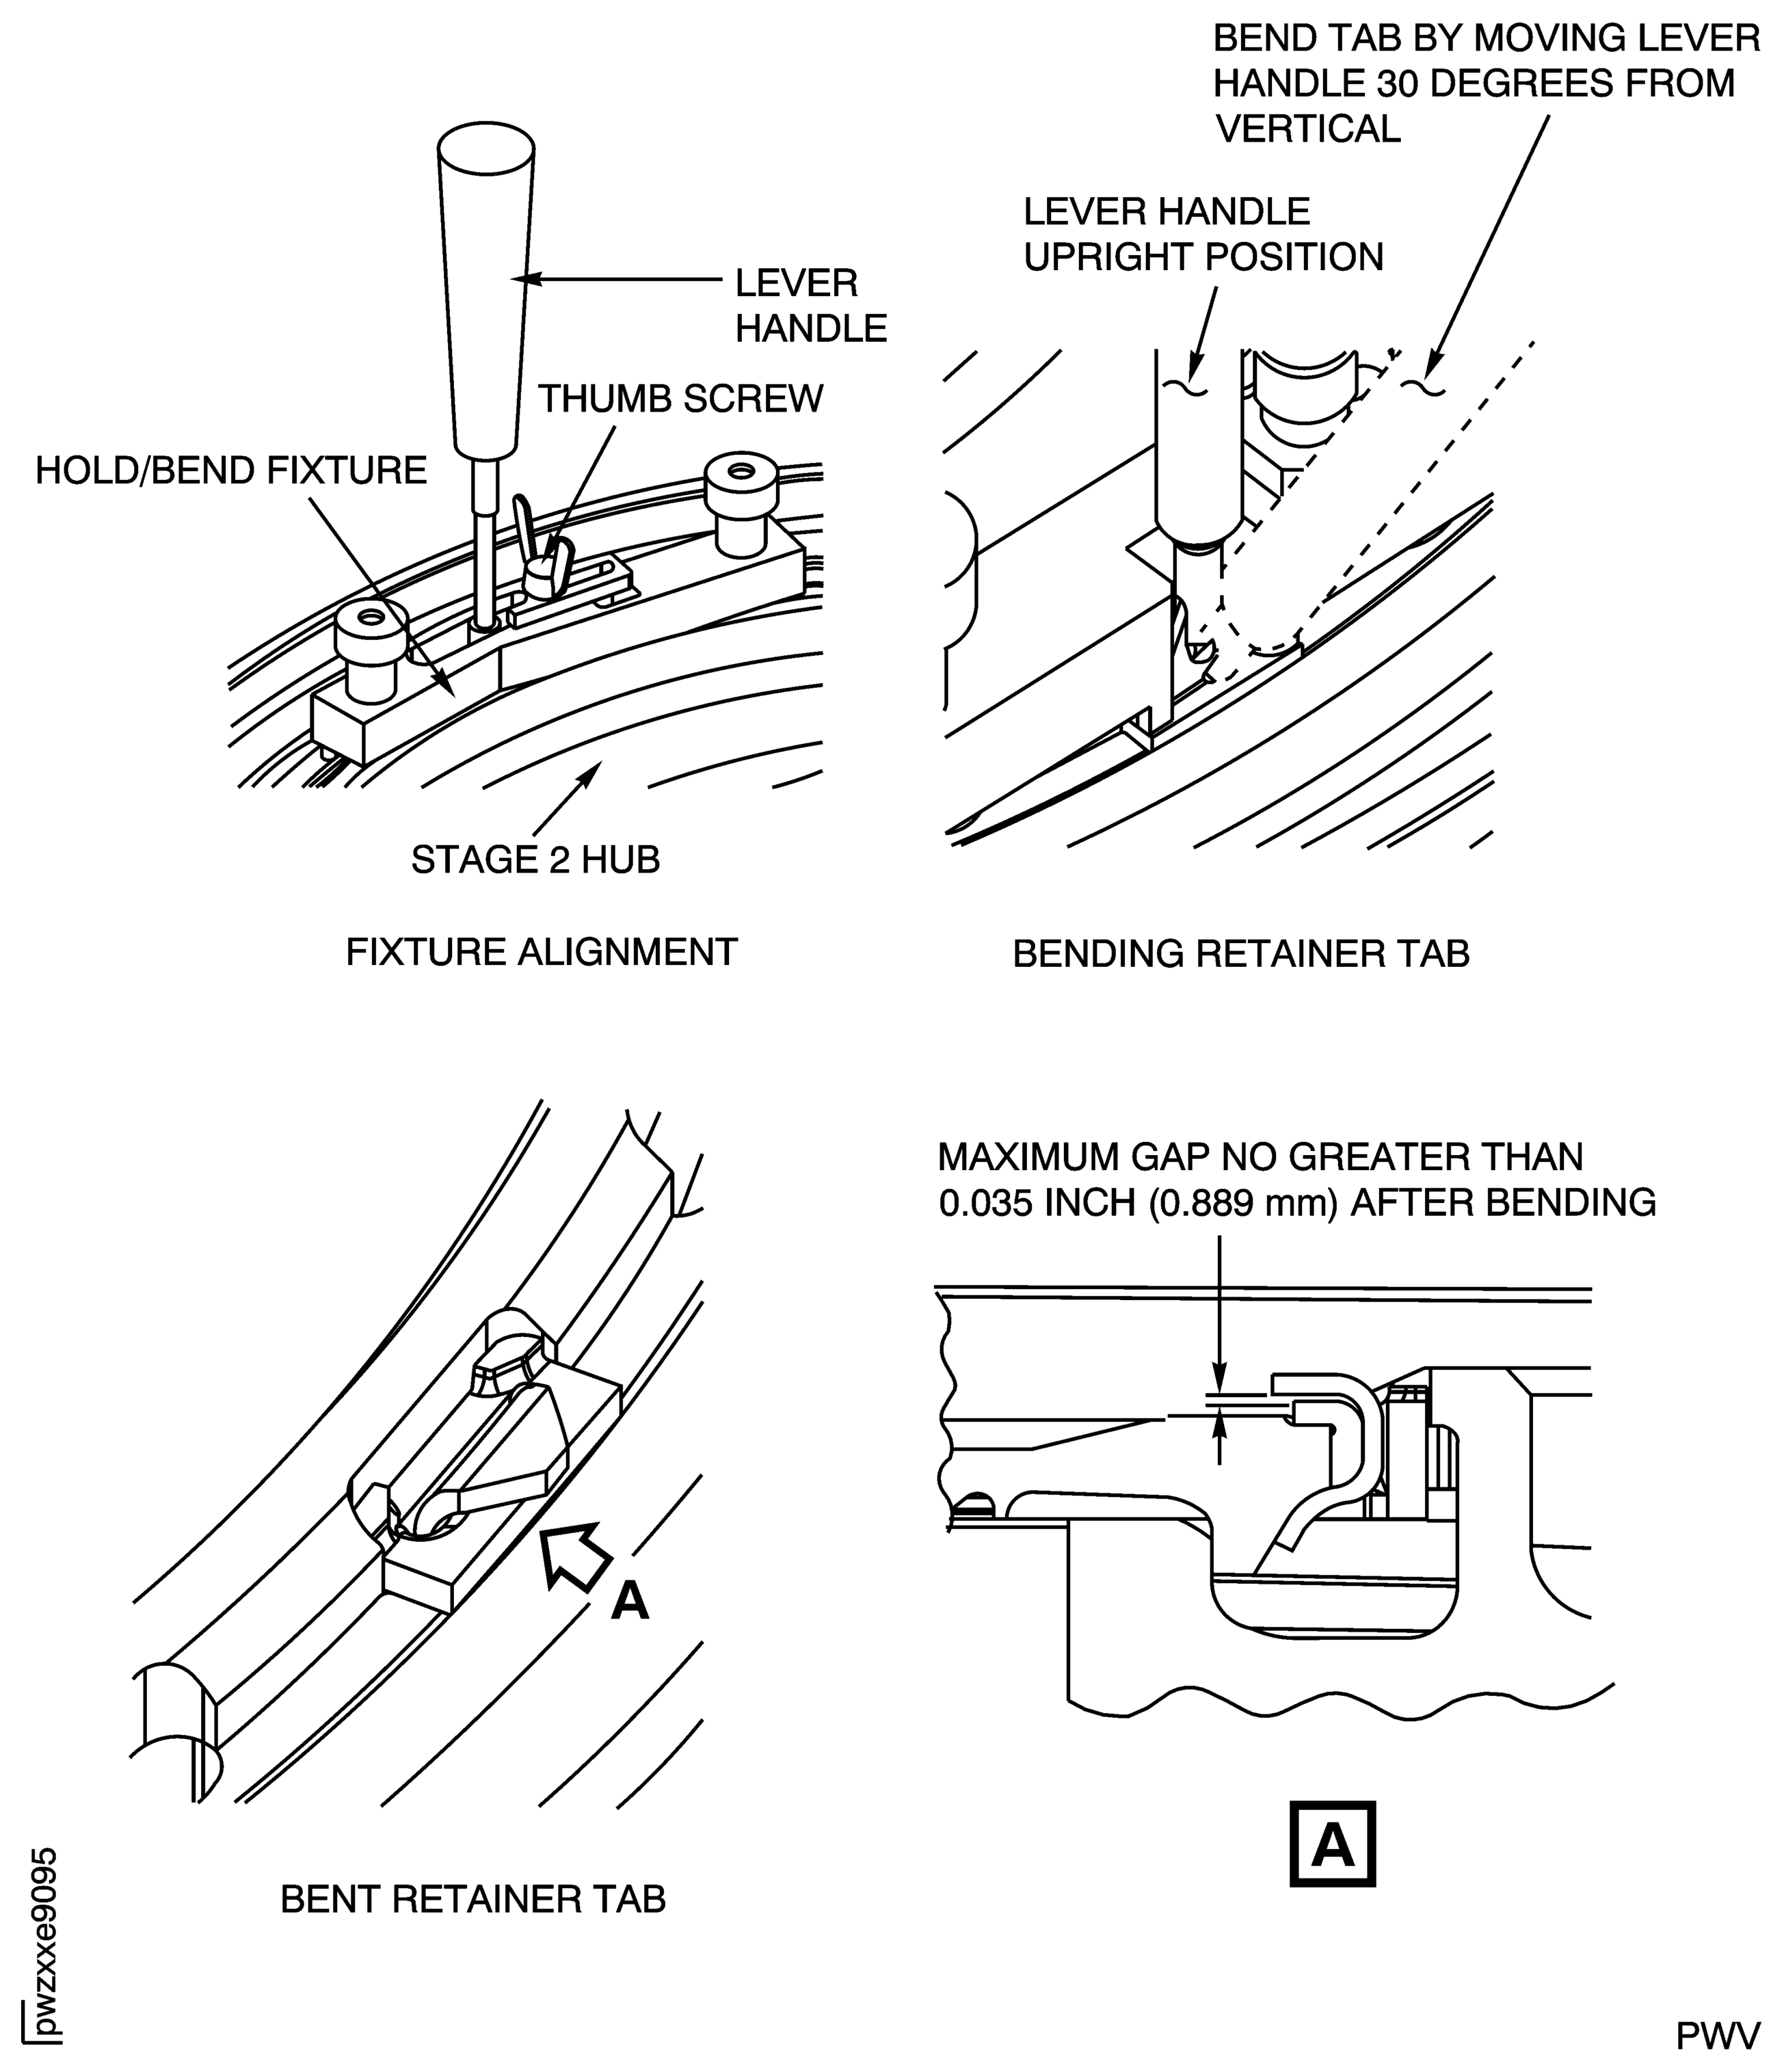
Figure: Remove the Stage 2 Turbine Rotor Assembly from the IAE 1P16039 Heater
Remove the Stage 2 Turbine Rotor Assembly from the IAE 1P16039 Heater
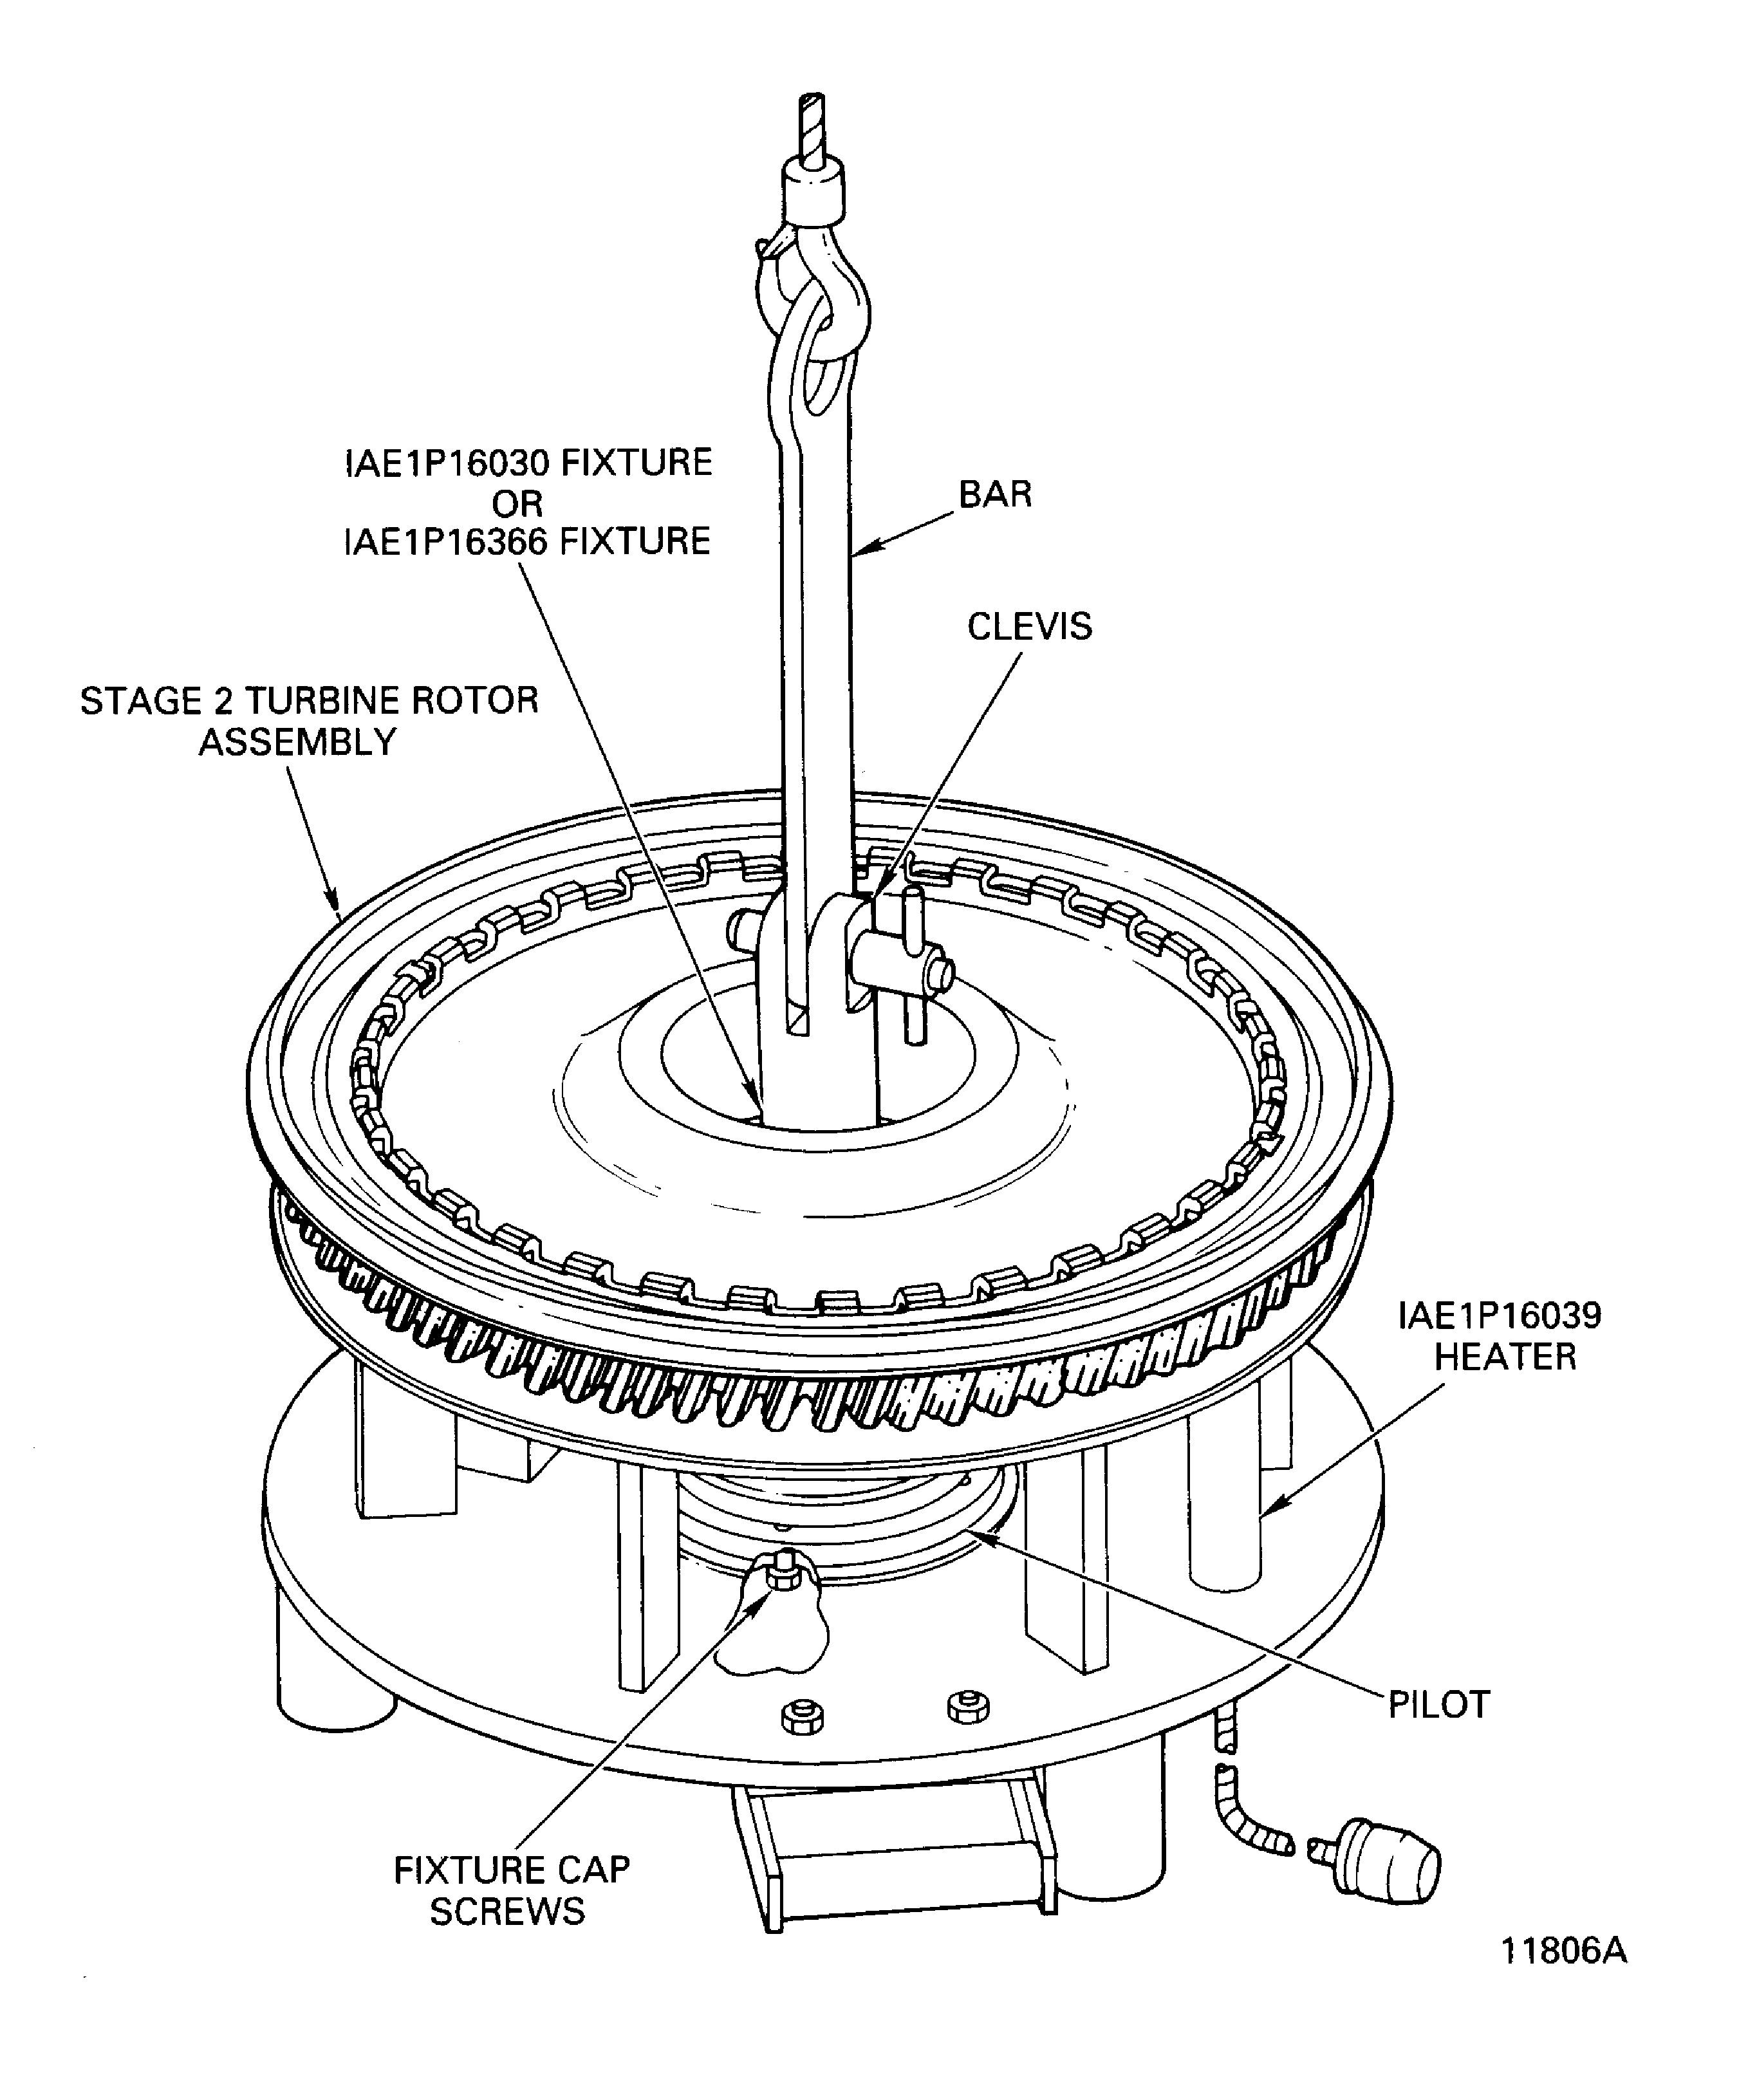
Figure: Stage 2 IAE 1P16016 Moment Weight Blade Adapter
Stage 2 IAE 1P16016 Moment Weight Blade Adapter
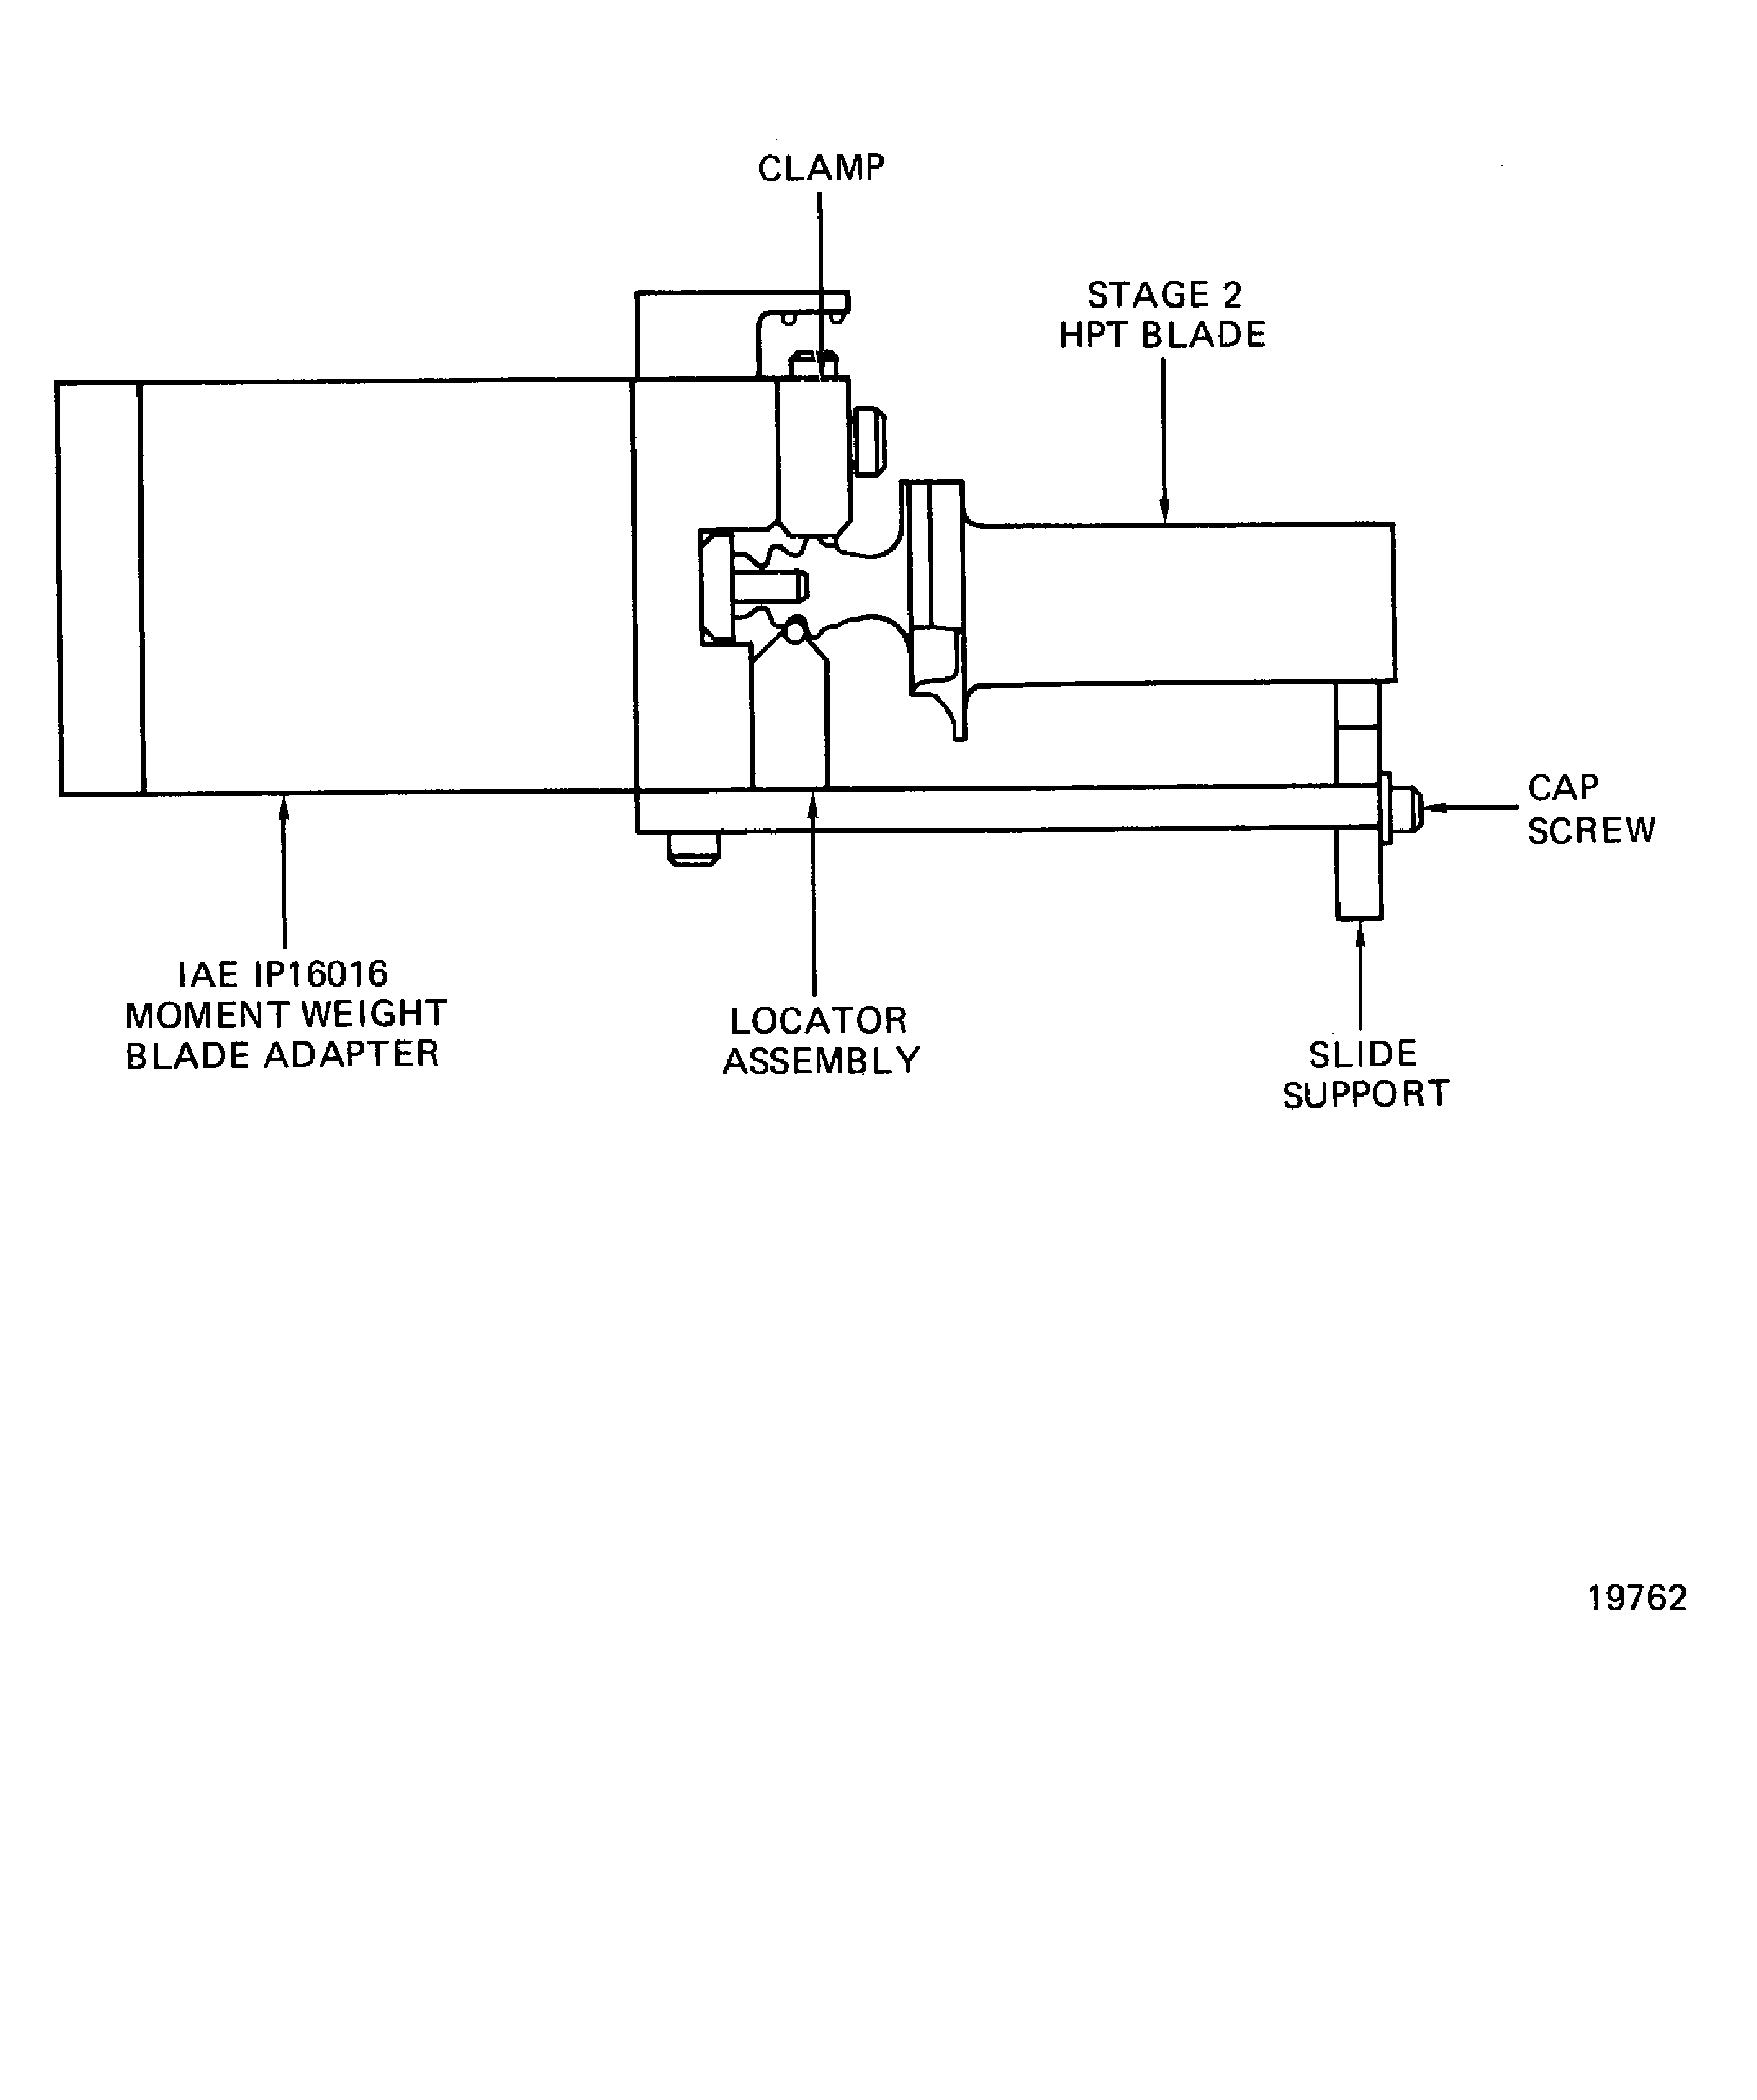
Figure: Install the Stage 2 HPT Blade Assemblies
Install the Stage 2 HPT Blade Assemblies
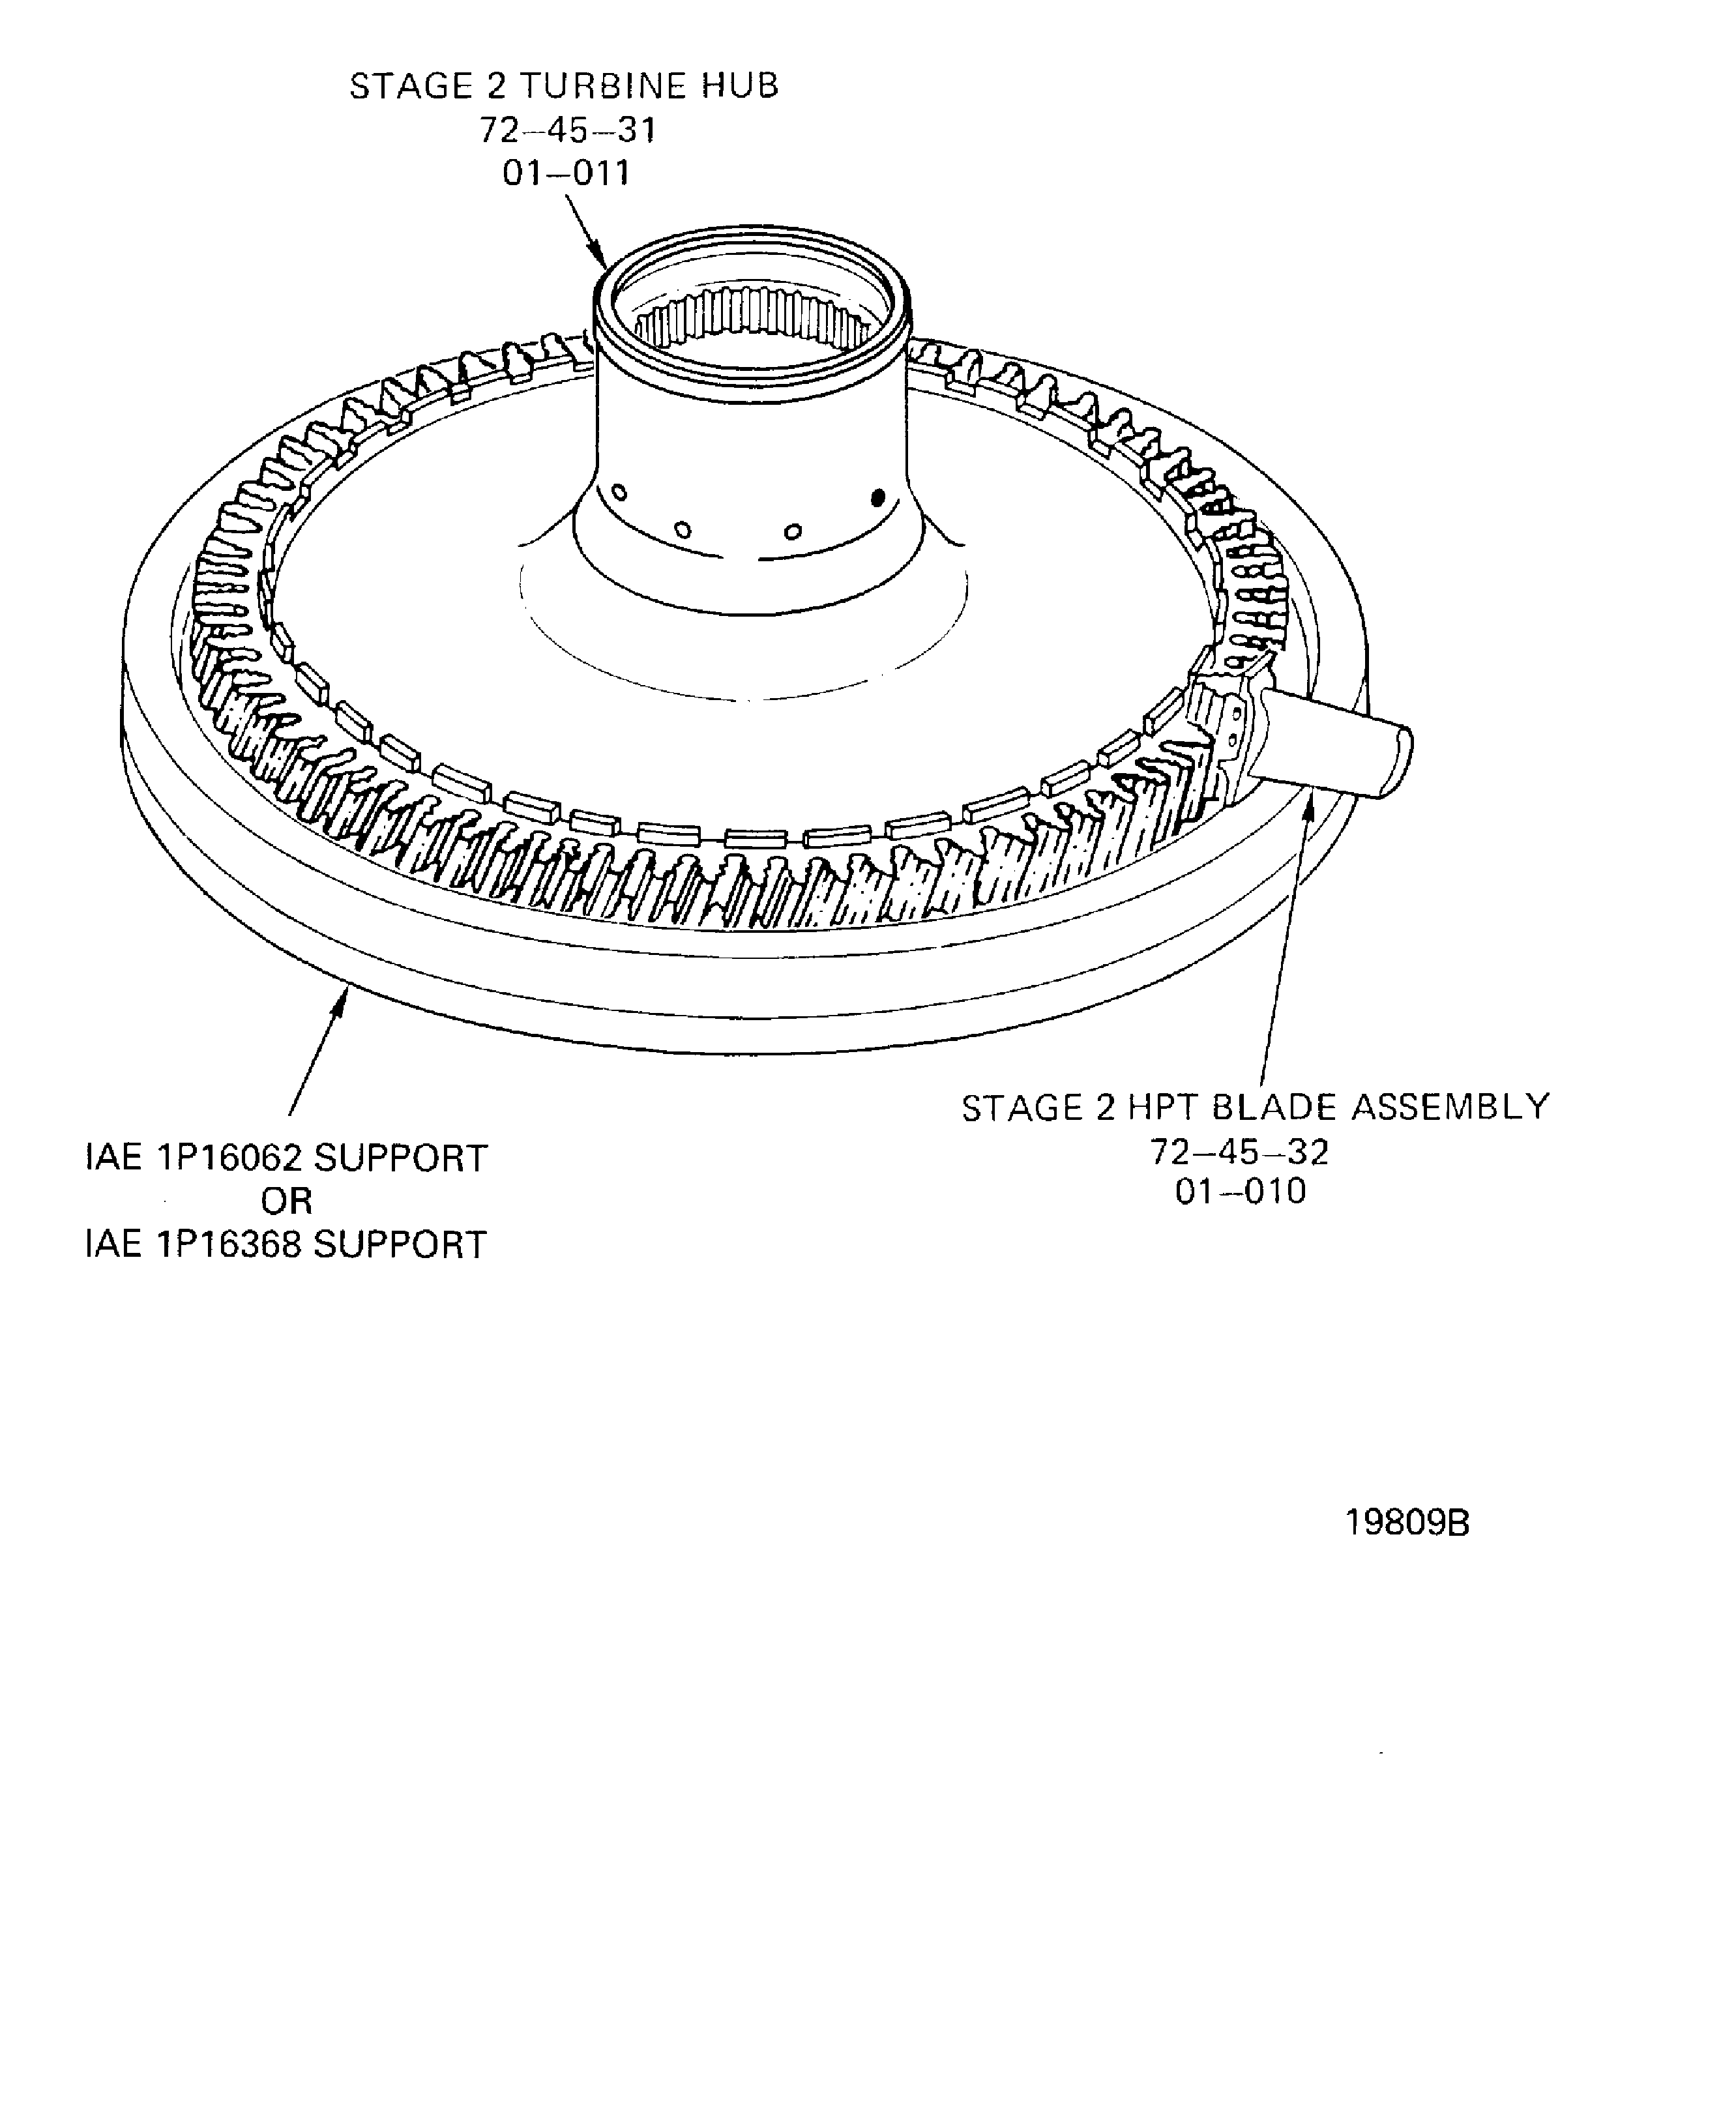
Figure: Install the IAE 1P16221 Fixture
Install the IAE 1P16221 Fixture
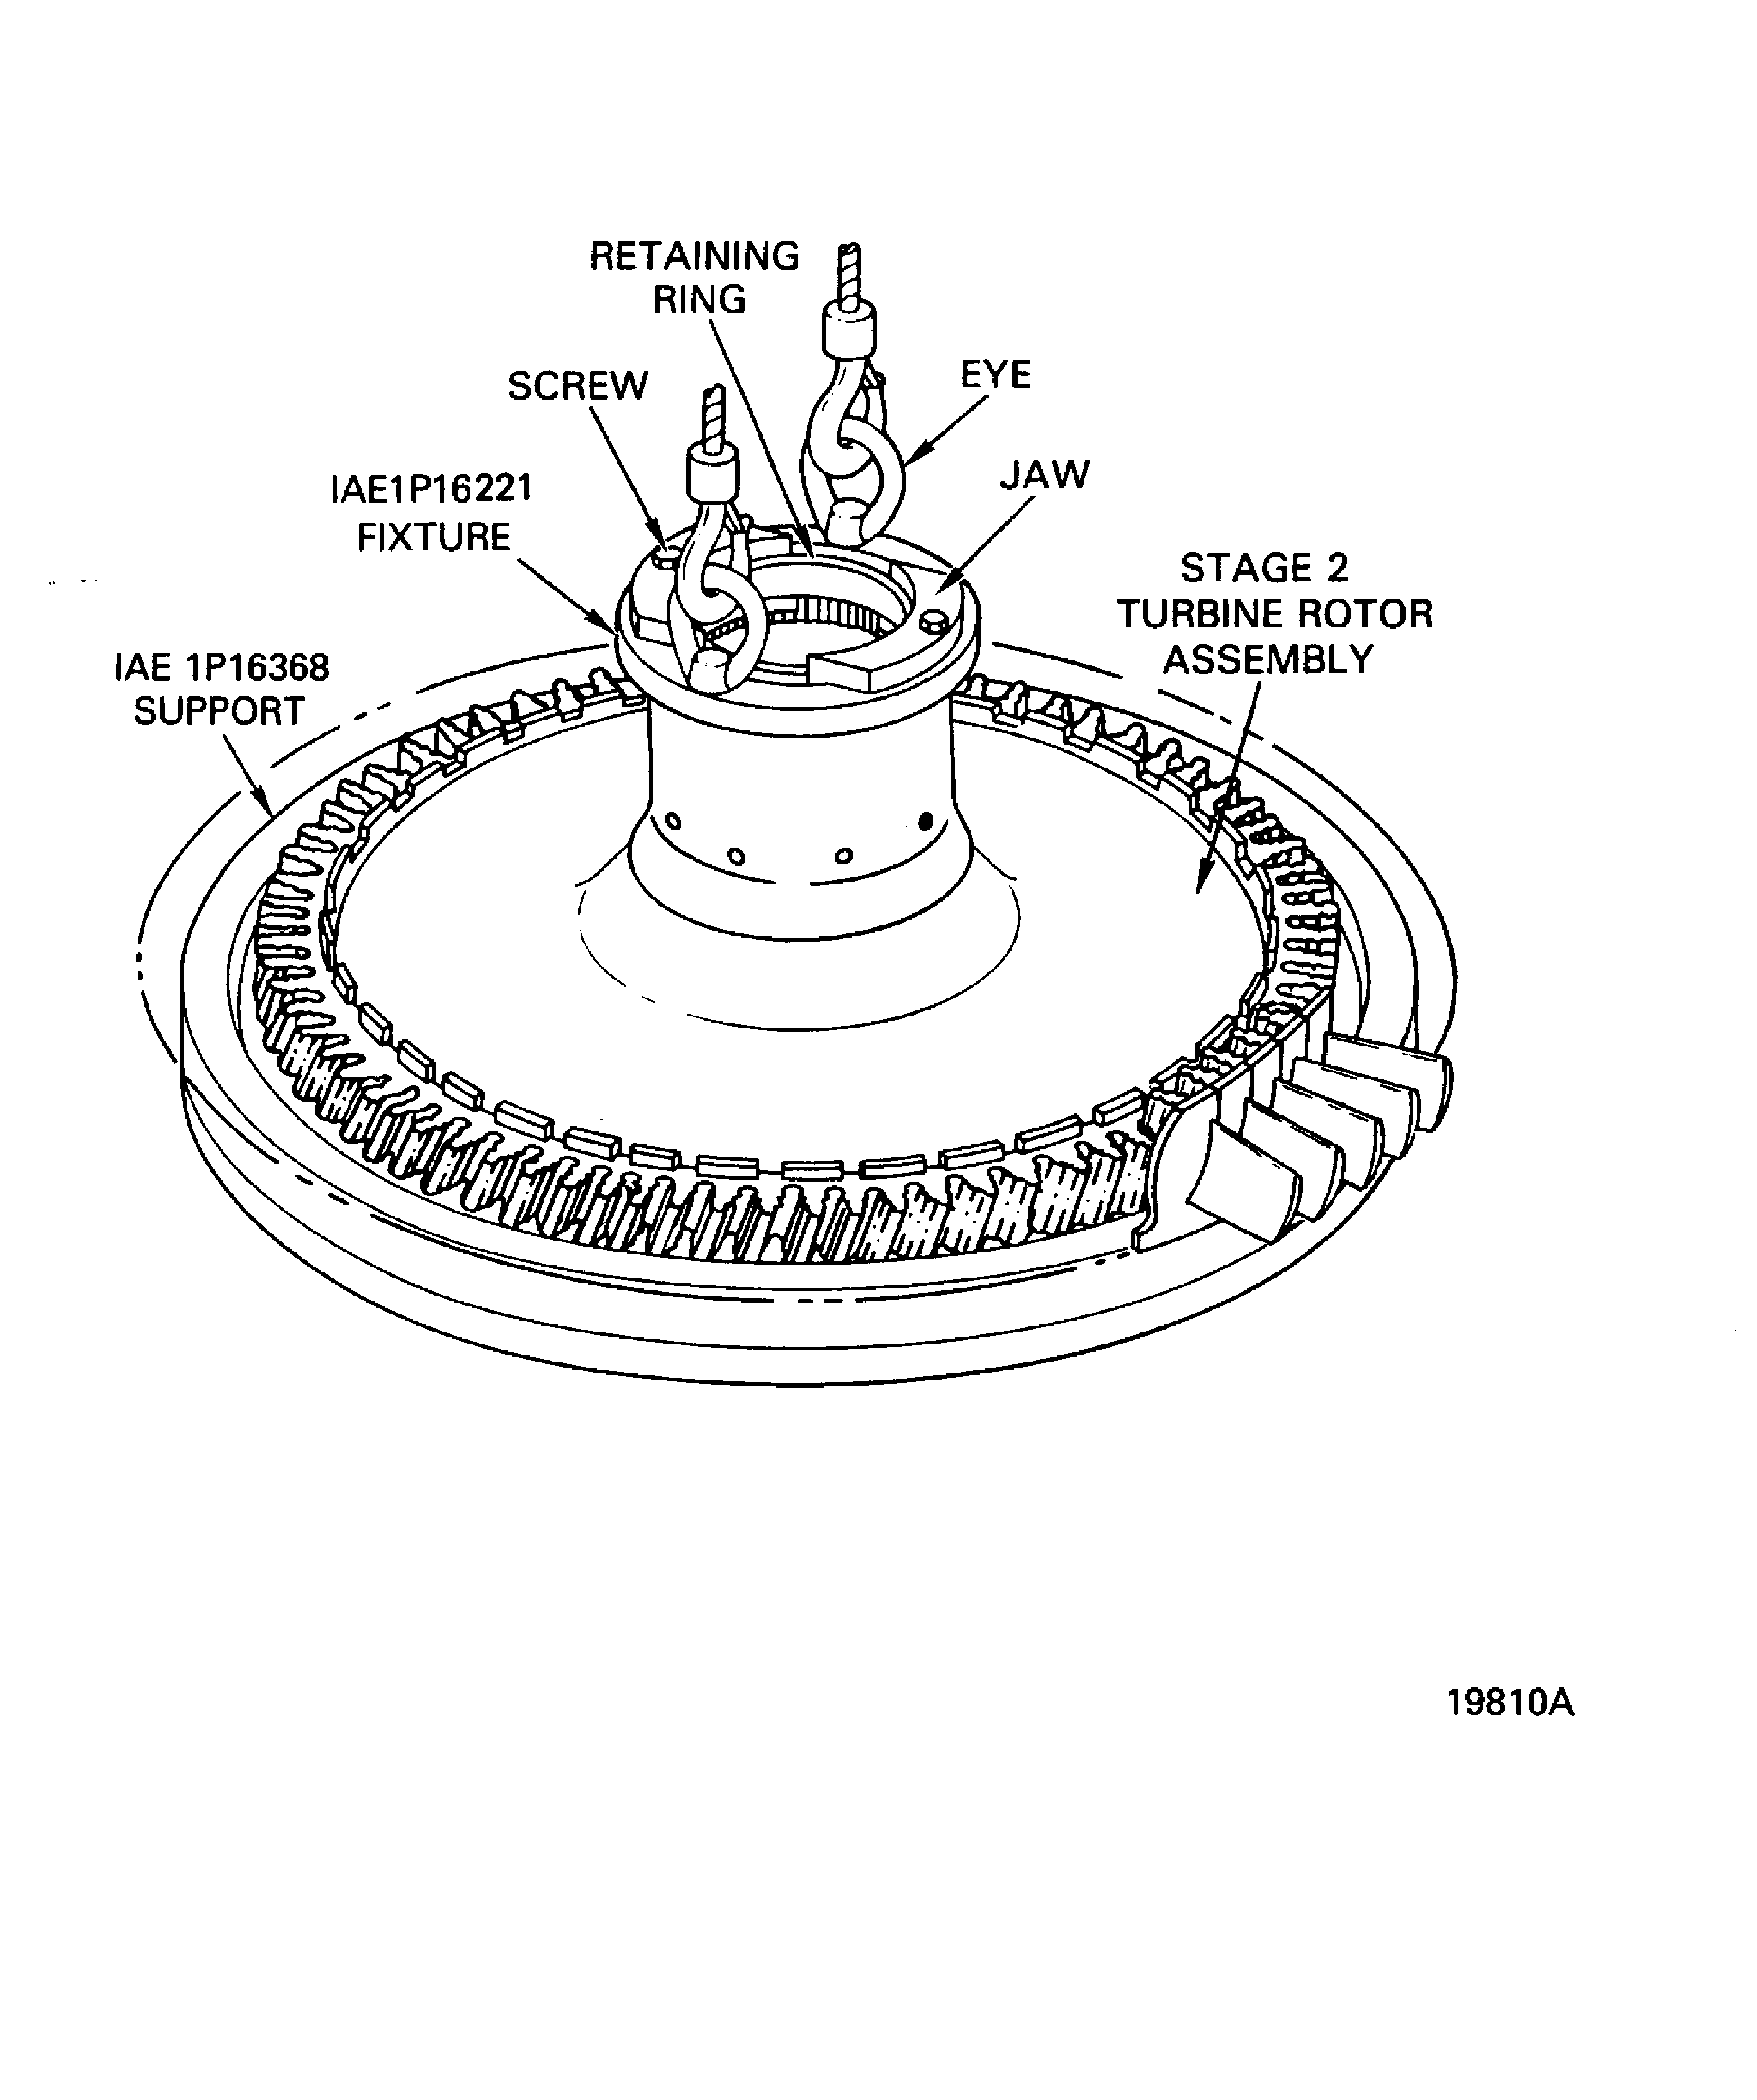
Figure: Install the Stage 2 Turbine Rotor Assembly in the IAE 1P16007 Fixture
Install the Stage 2 Turbine Rotor Assembly in the IAE 1P16007 Fixture
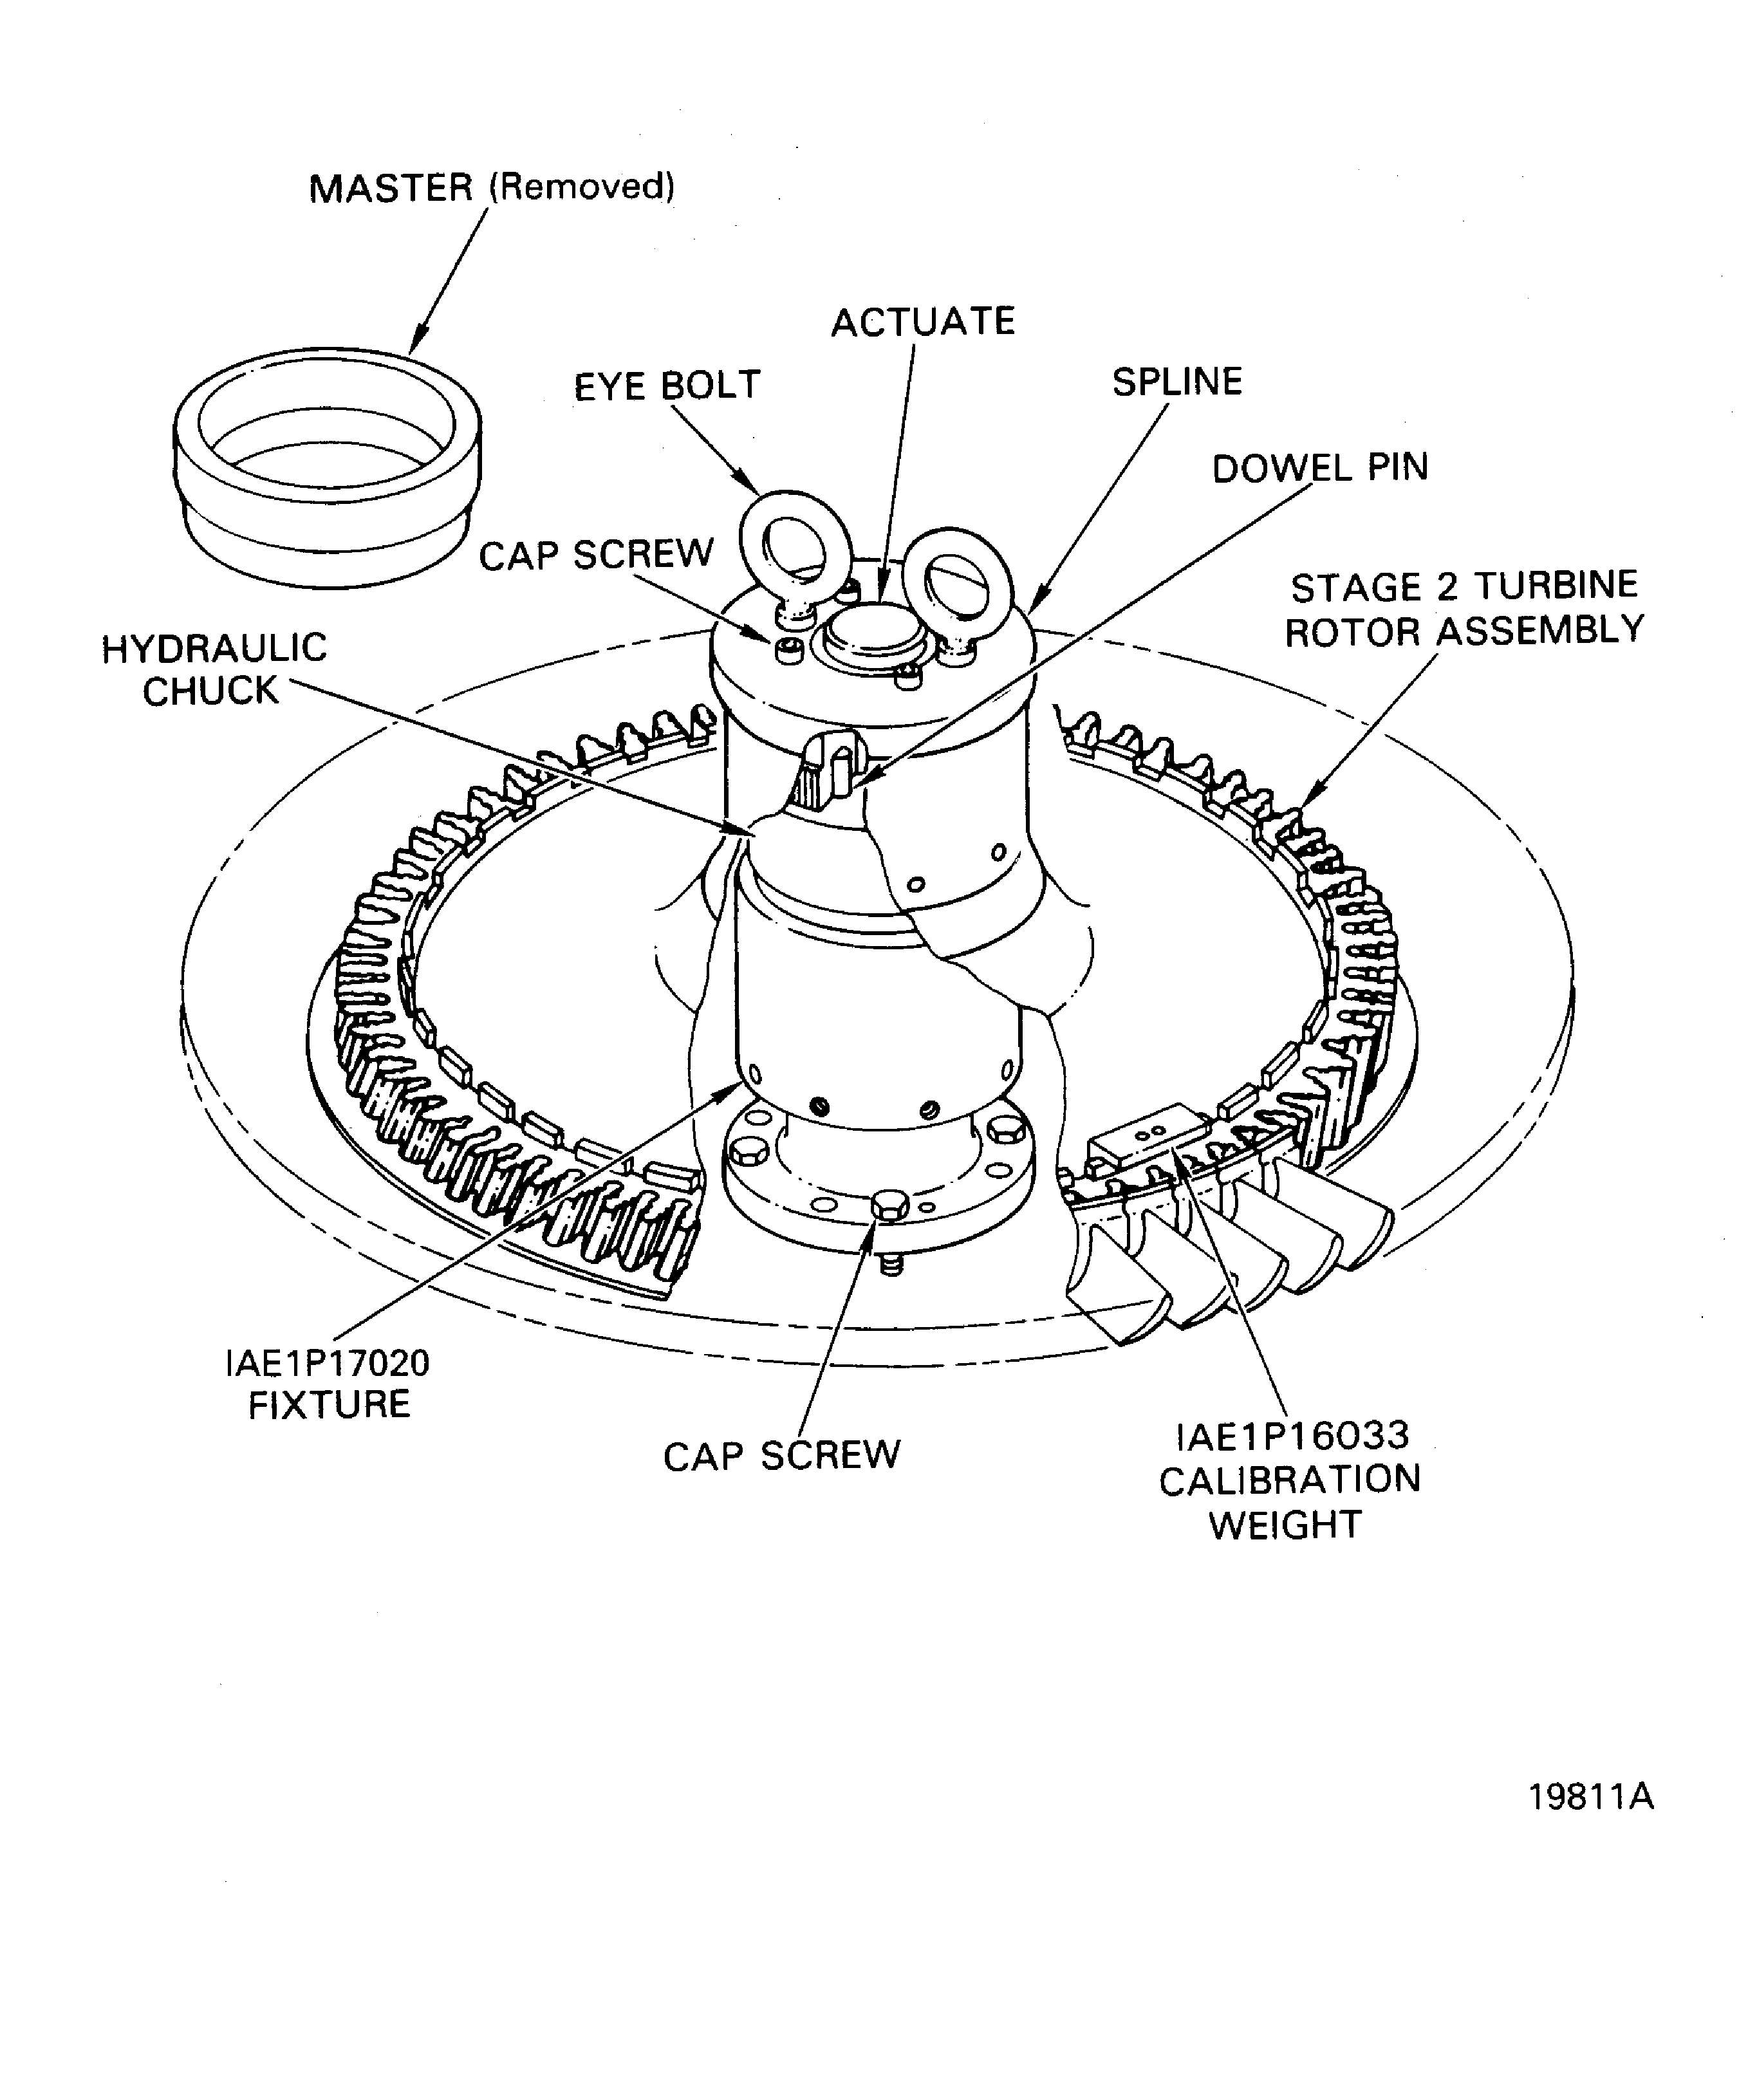
Figure: Install the Stage 1 HPT Seals and the Dampers and Make an Unbalance Mark
Install the Stage 1 HPT Seals and the Dampers and Make an Unbalance Mark
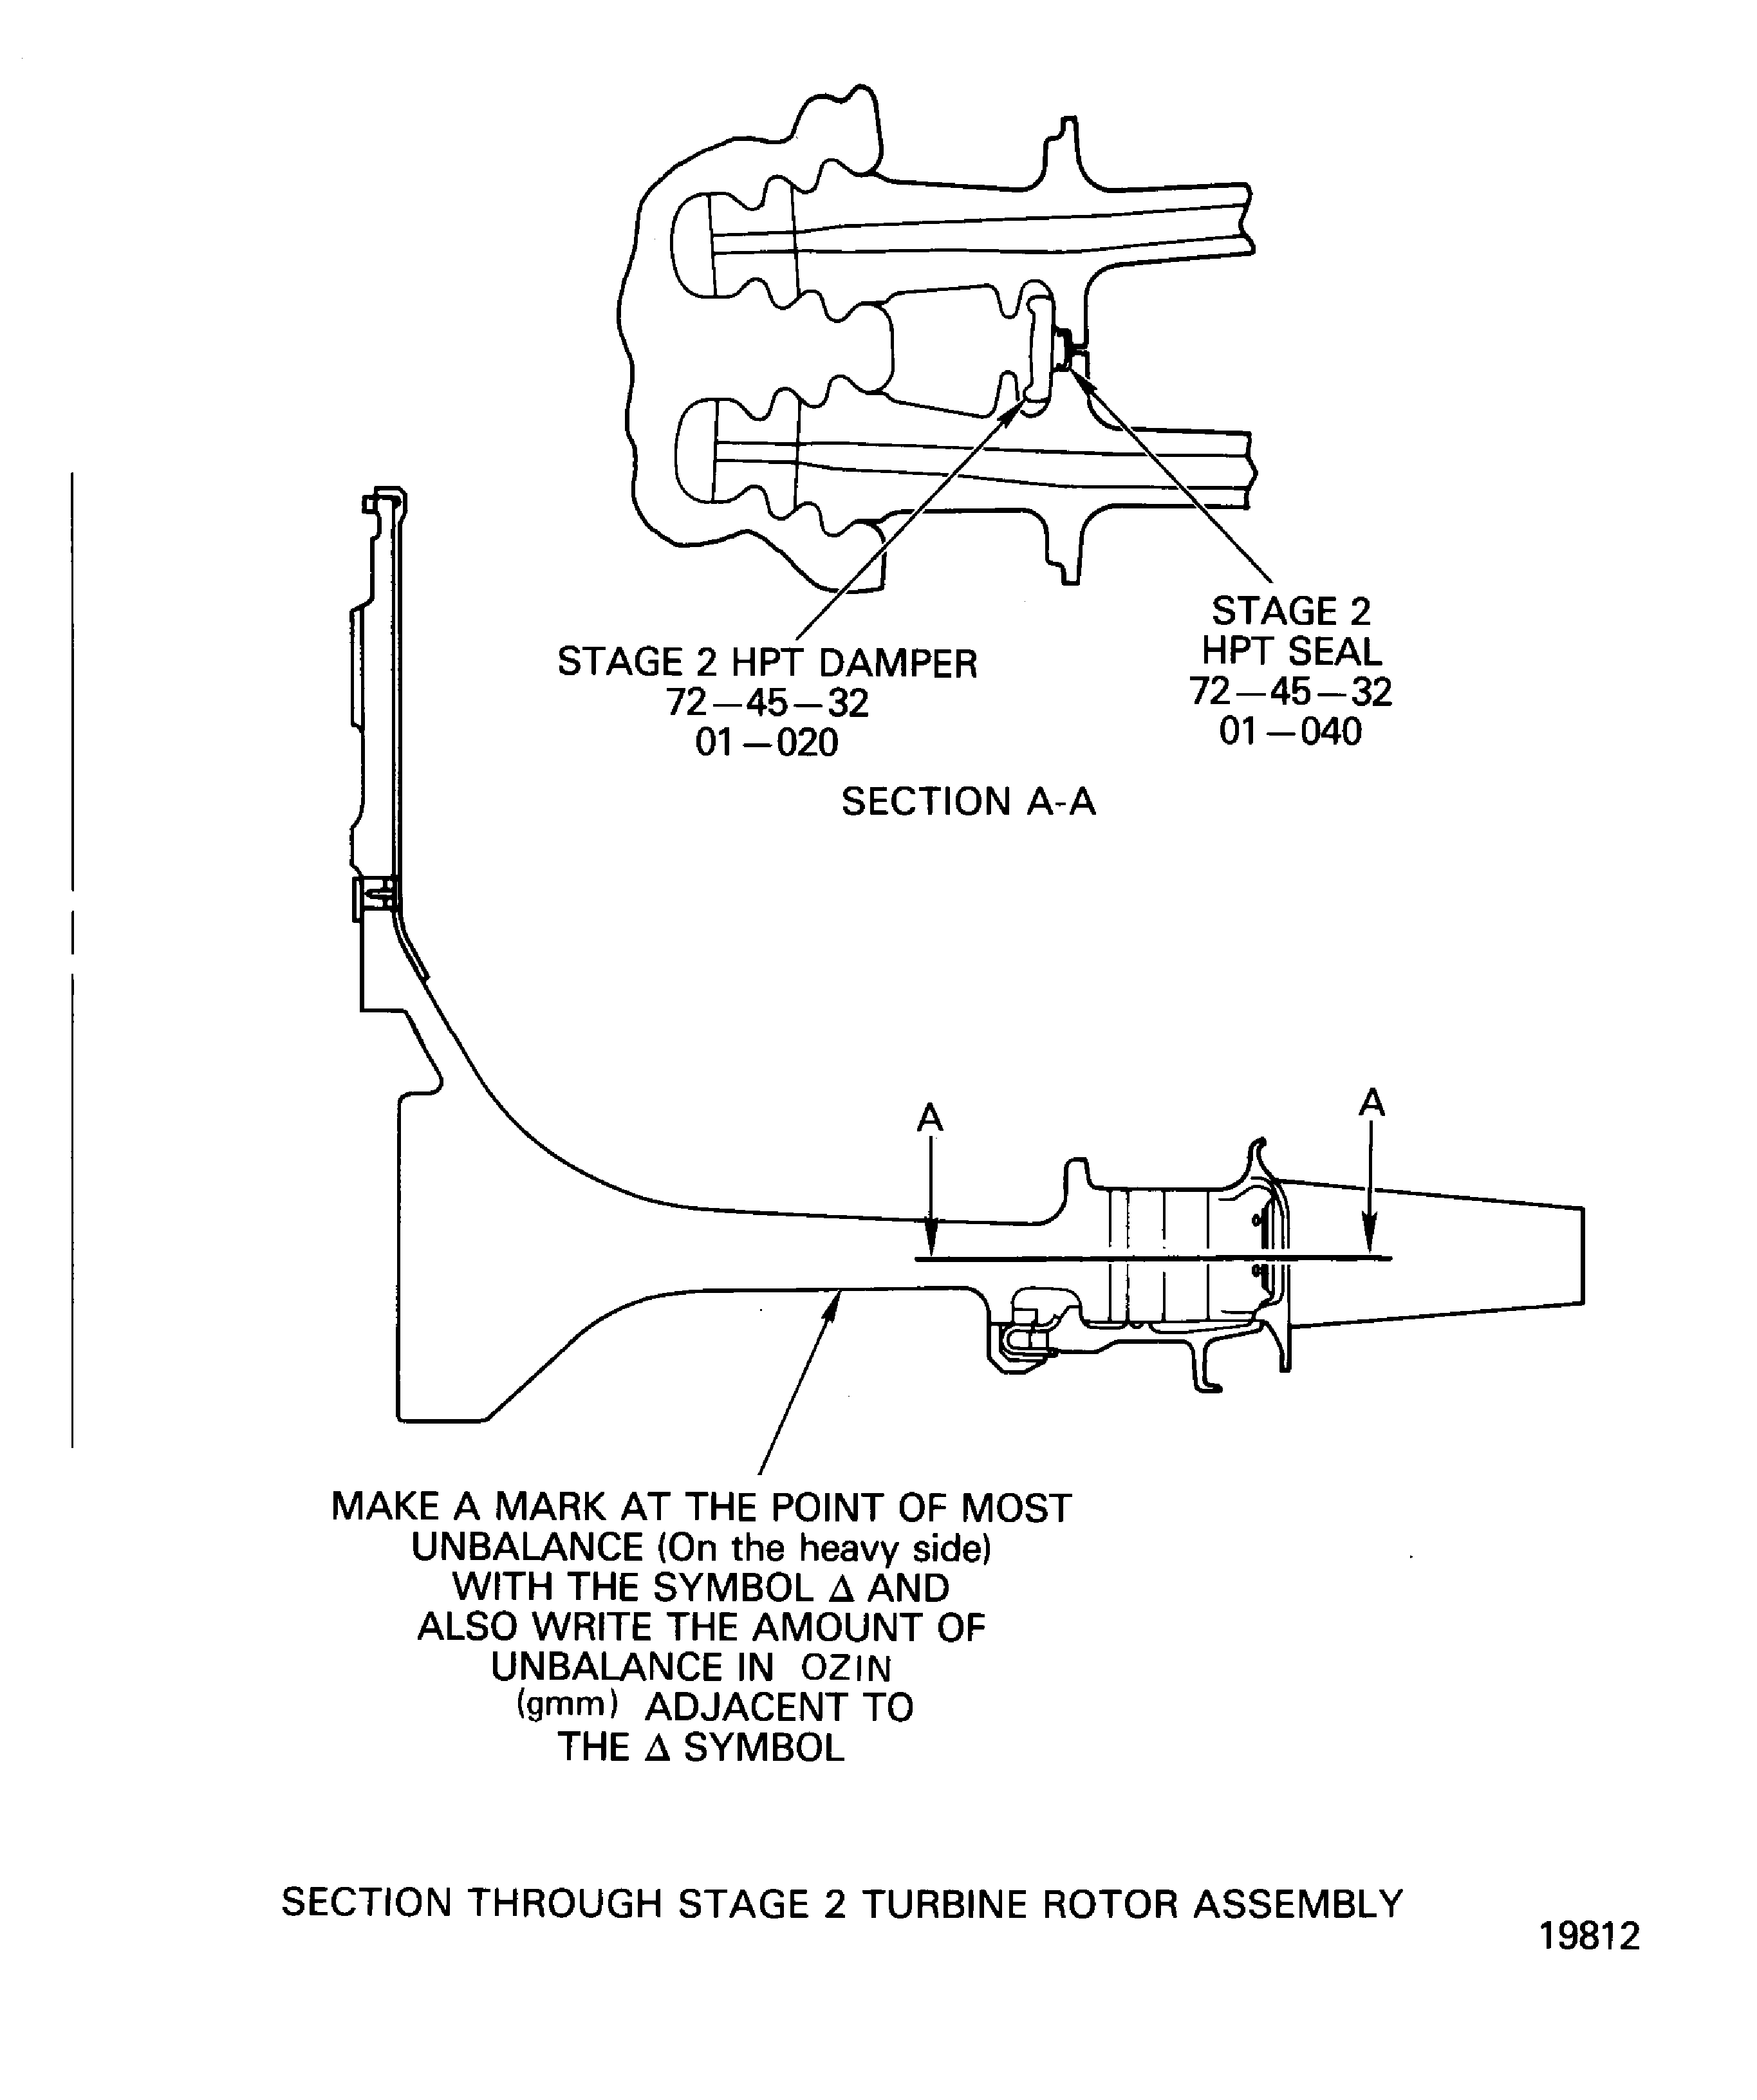
Figure: Remove the Stage 2 Turbine Rotor Assembly from the IAE 1P17020 Fixture
Remove the Stage 2 Turbine Rotor Assembly from the IAE 1P17020 Fixture
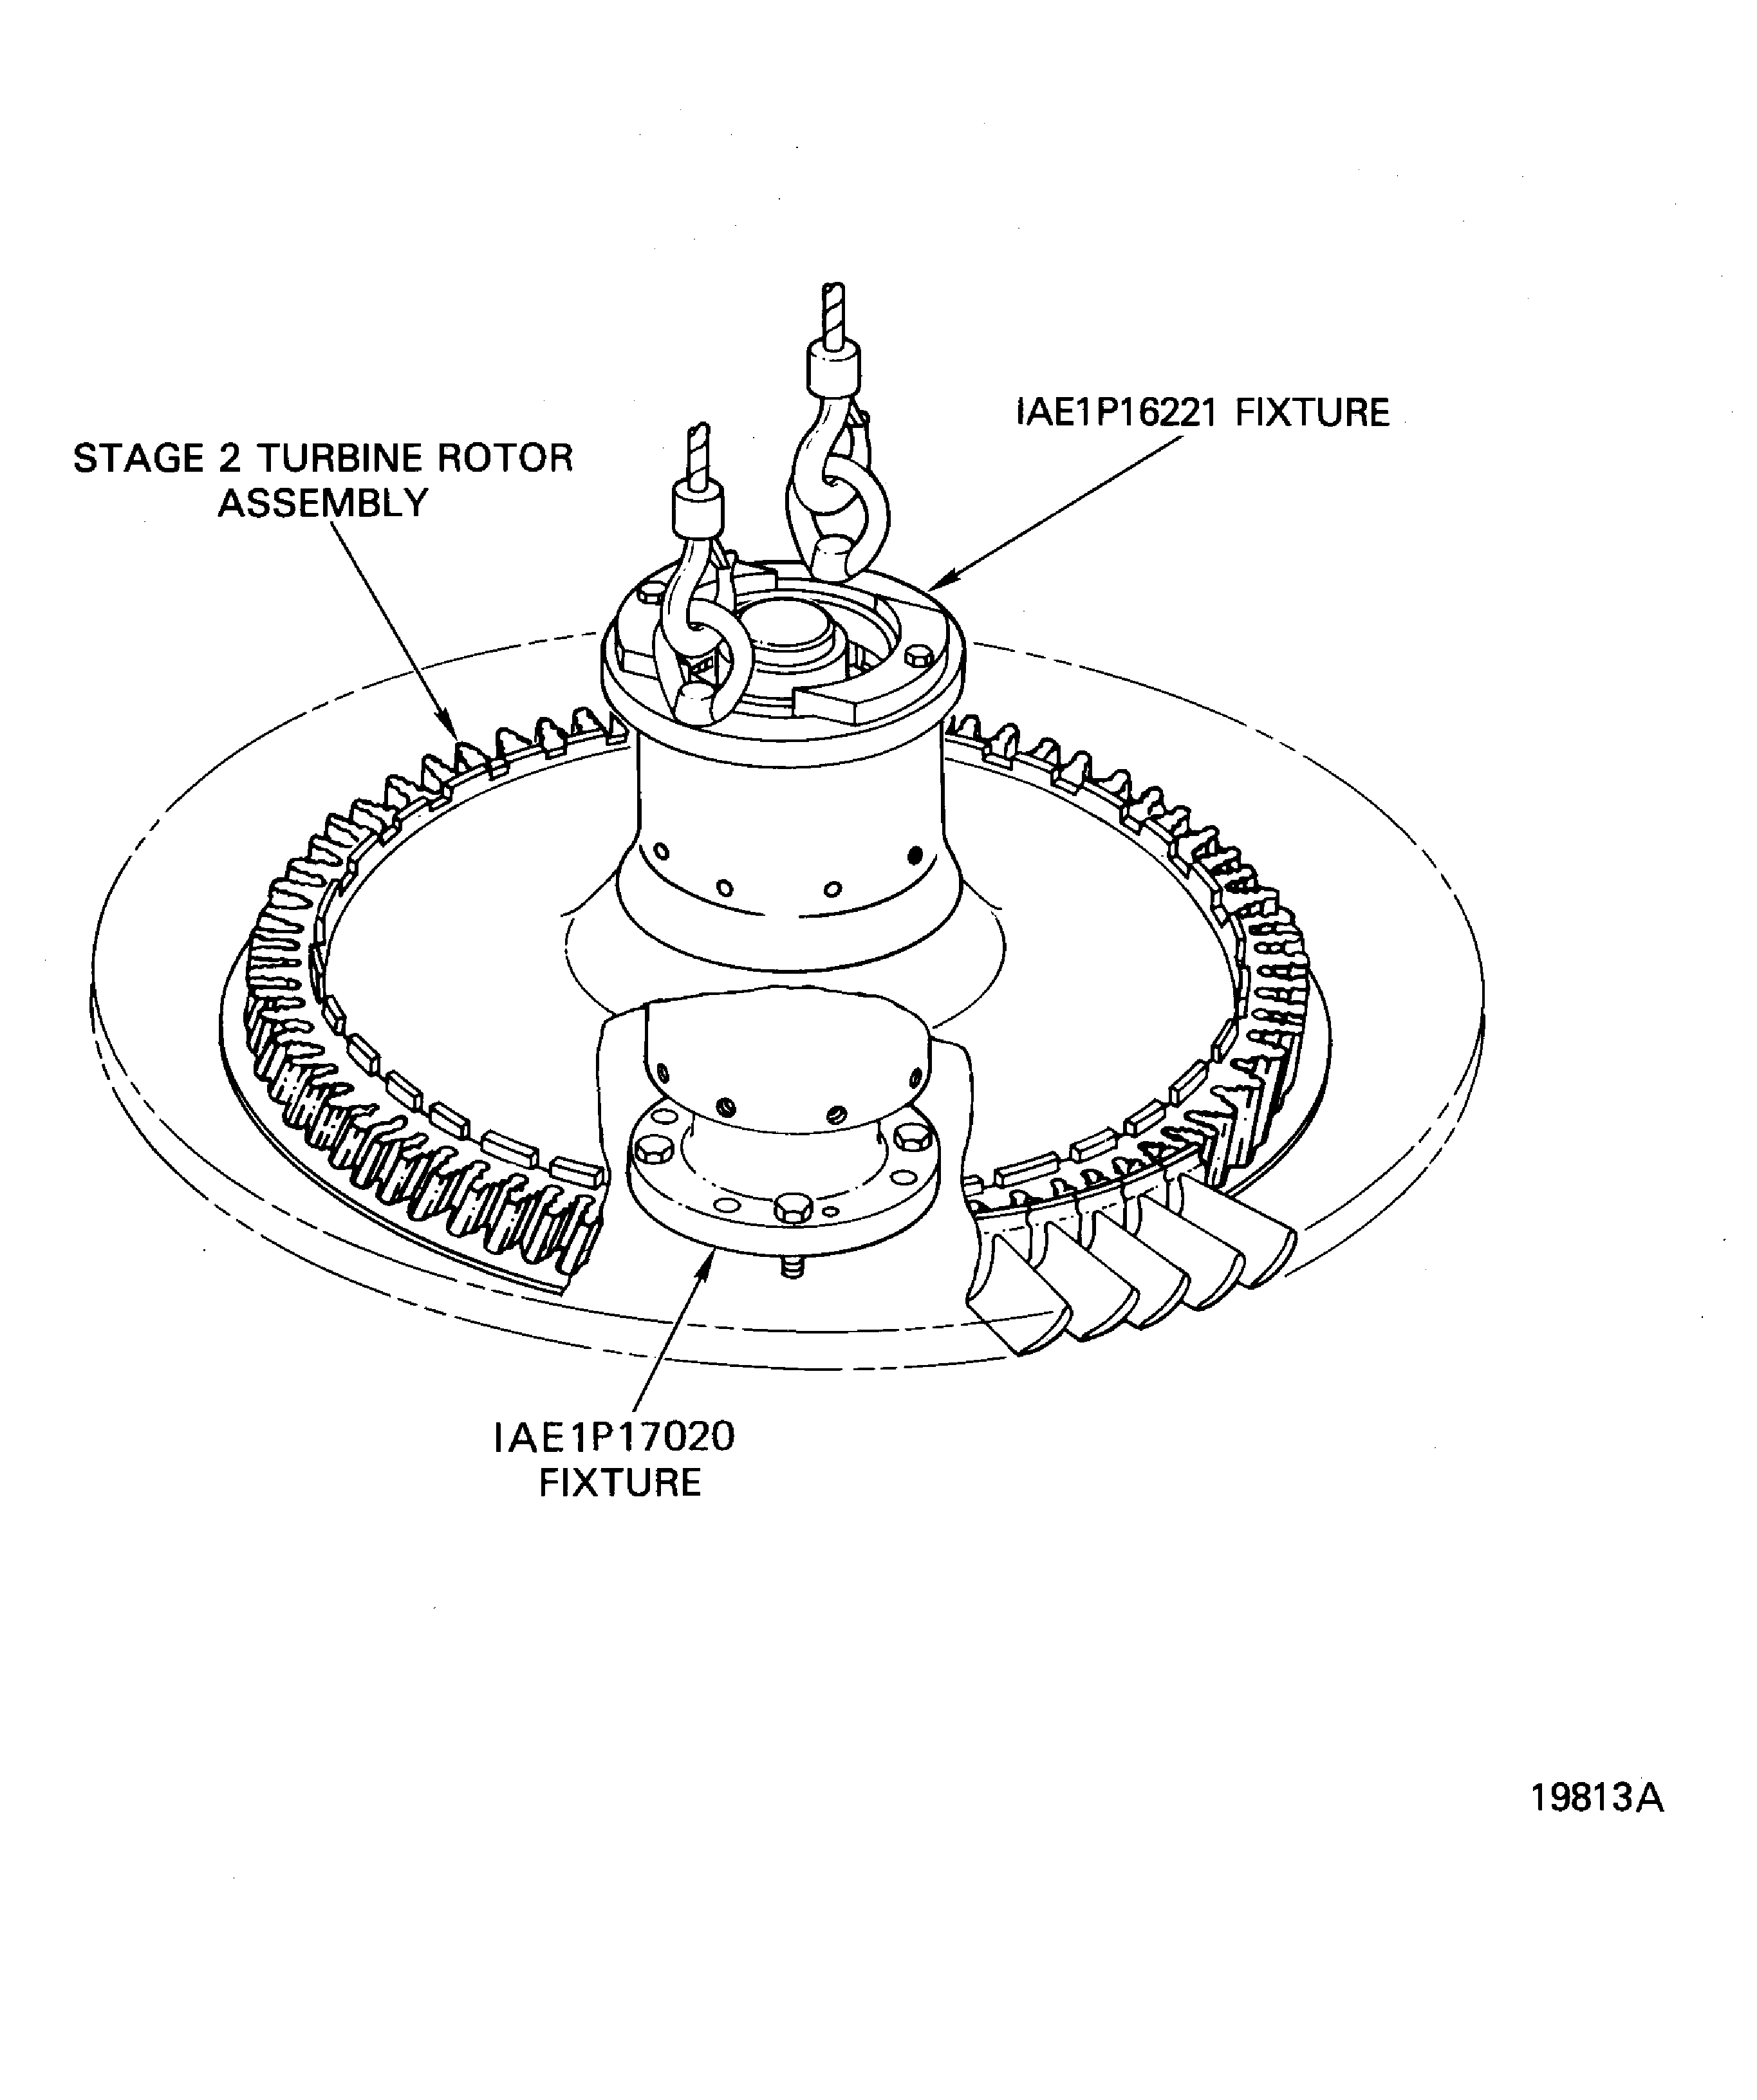
Figure: Install the IAE 1P16164 Retainers
Install the IAE 1P16164 Retainers
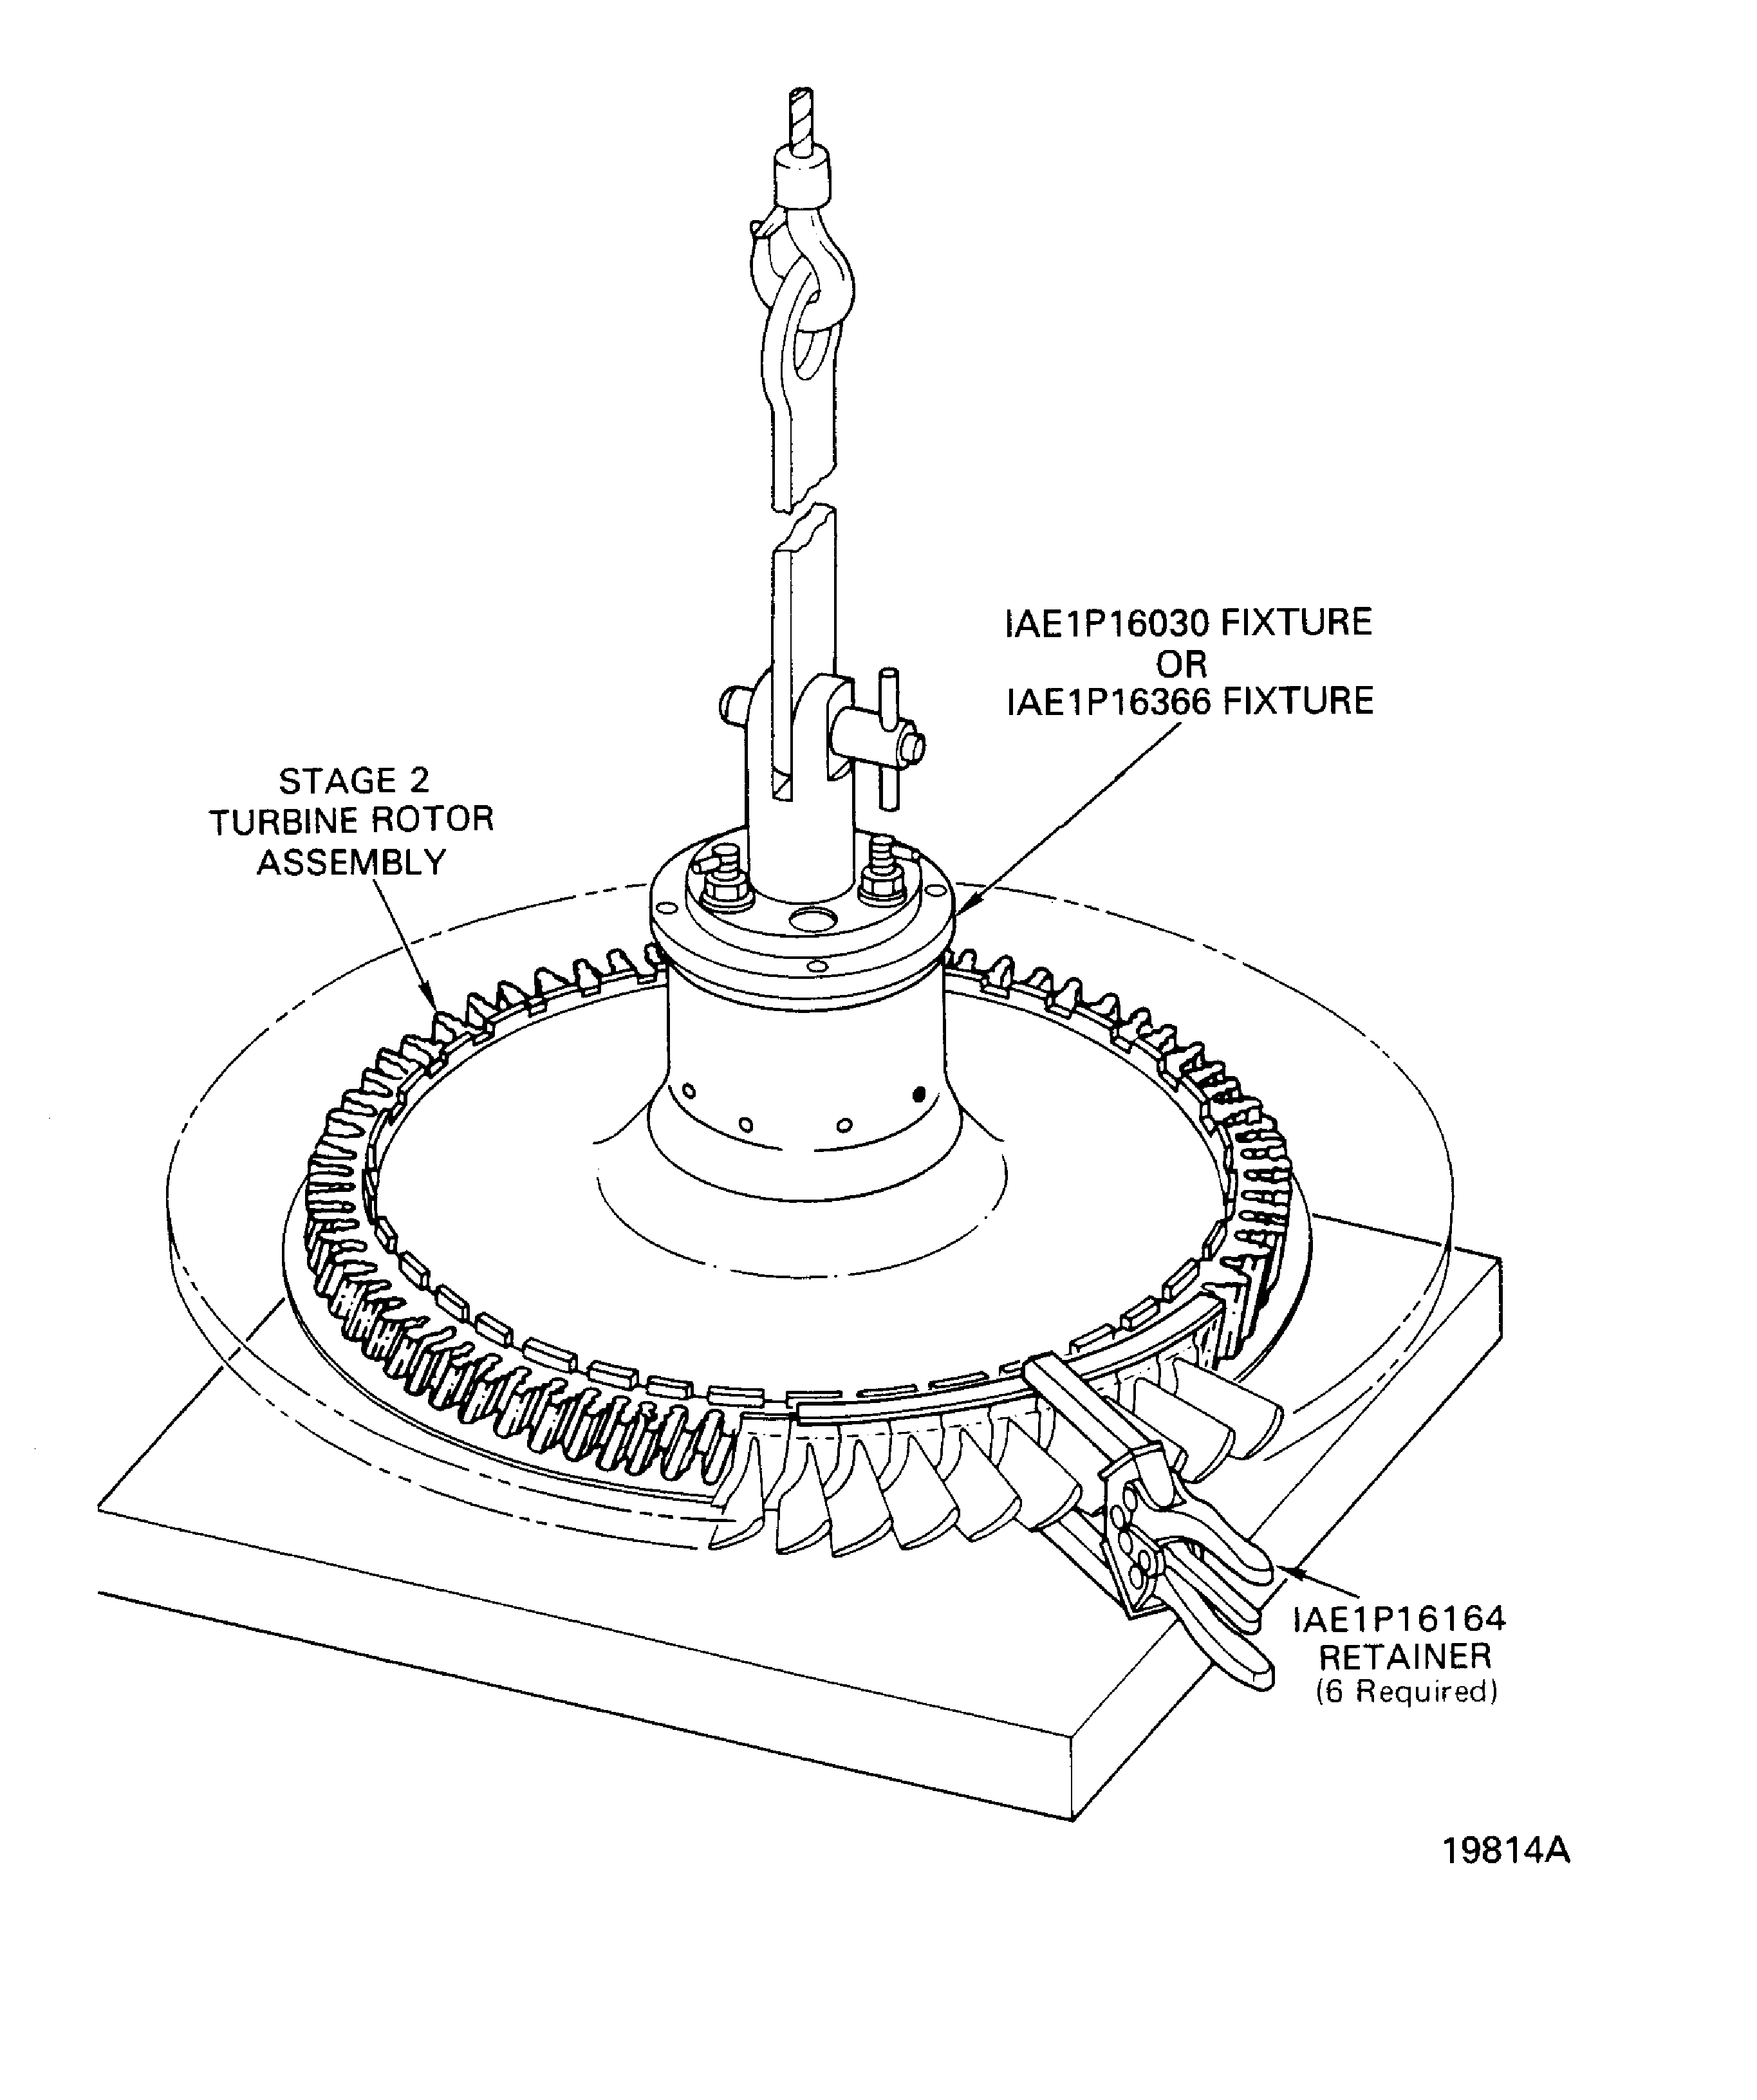
Figure: The stage 2 Turbine Rotor Assembly in the IAE 1P16140 Base
The stage 2 Turbine Rotor Assembly in the IAE 1P16140 Base
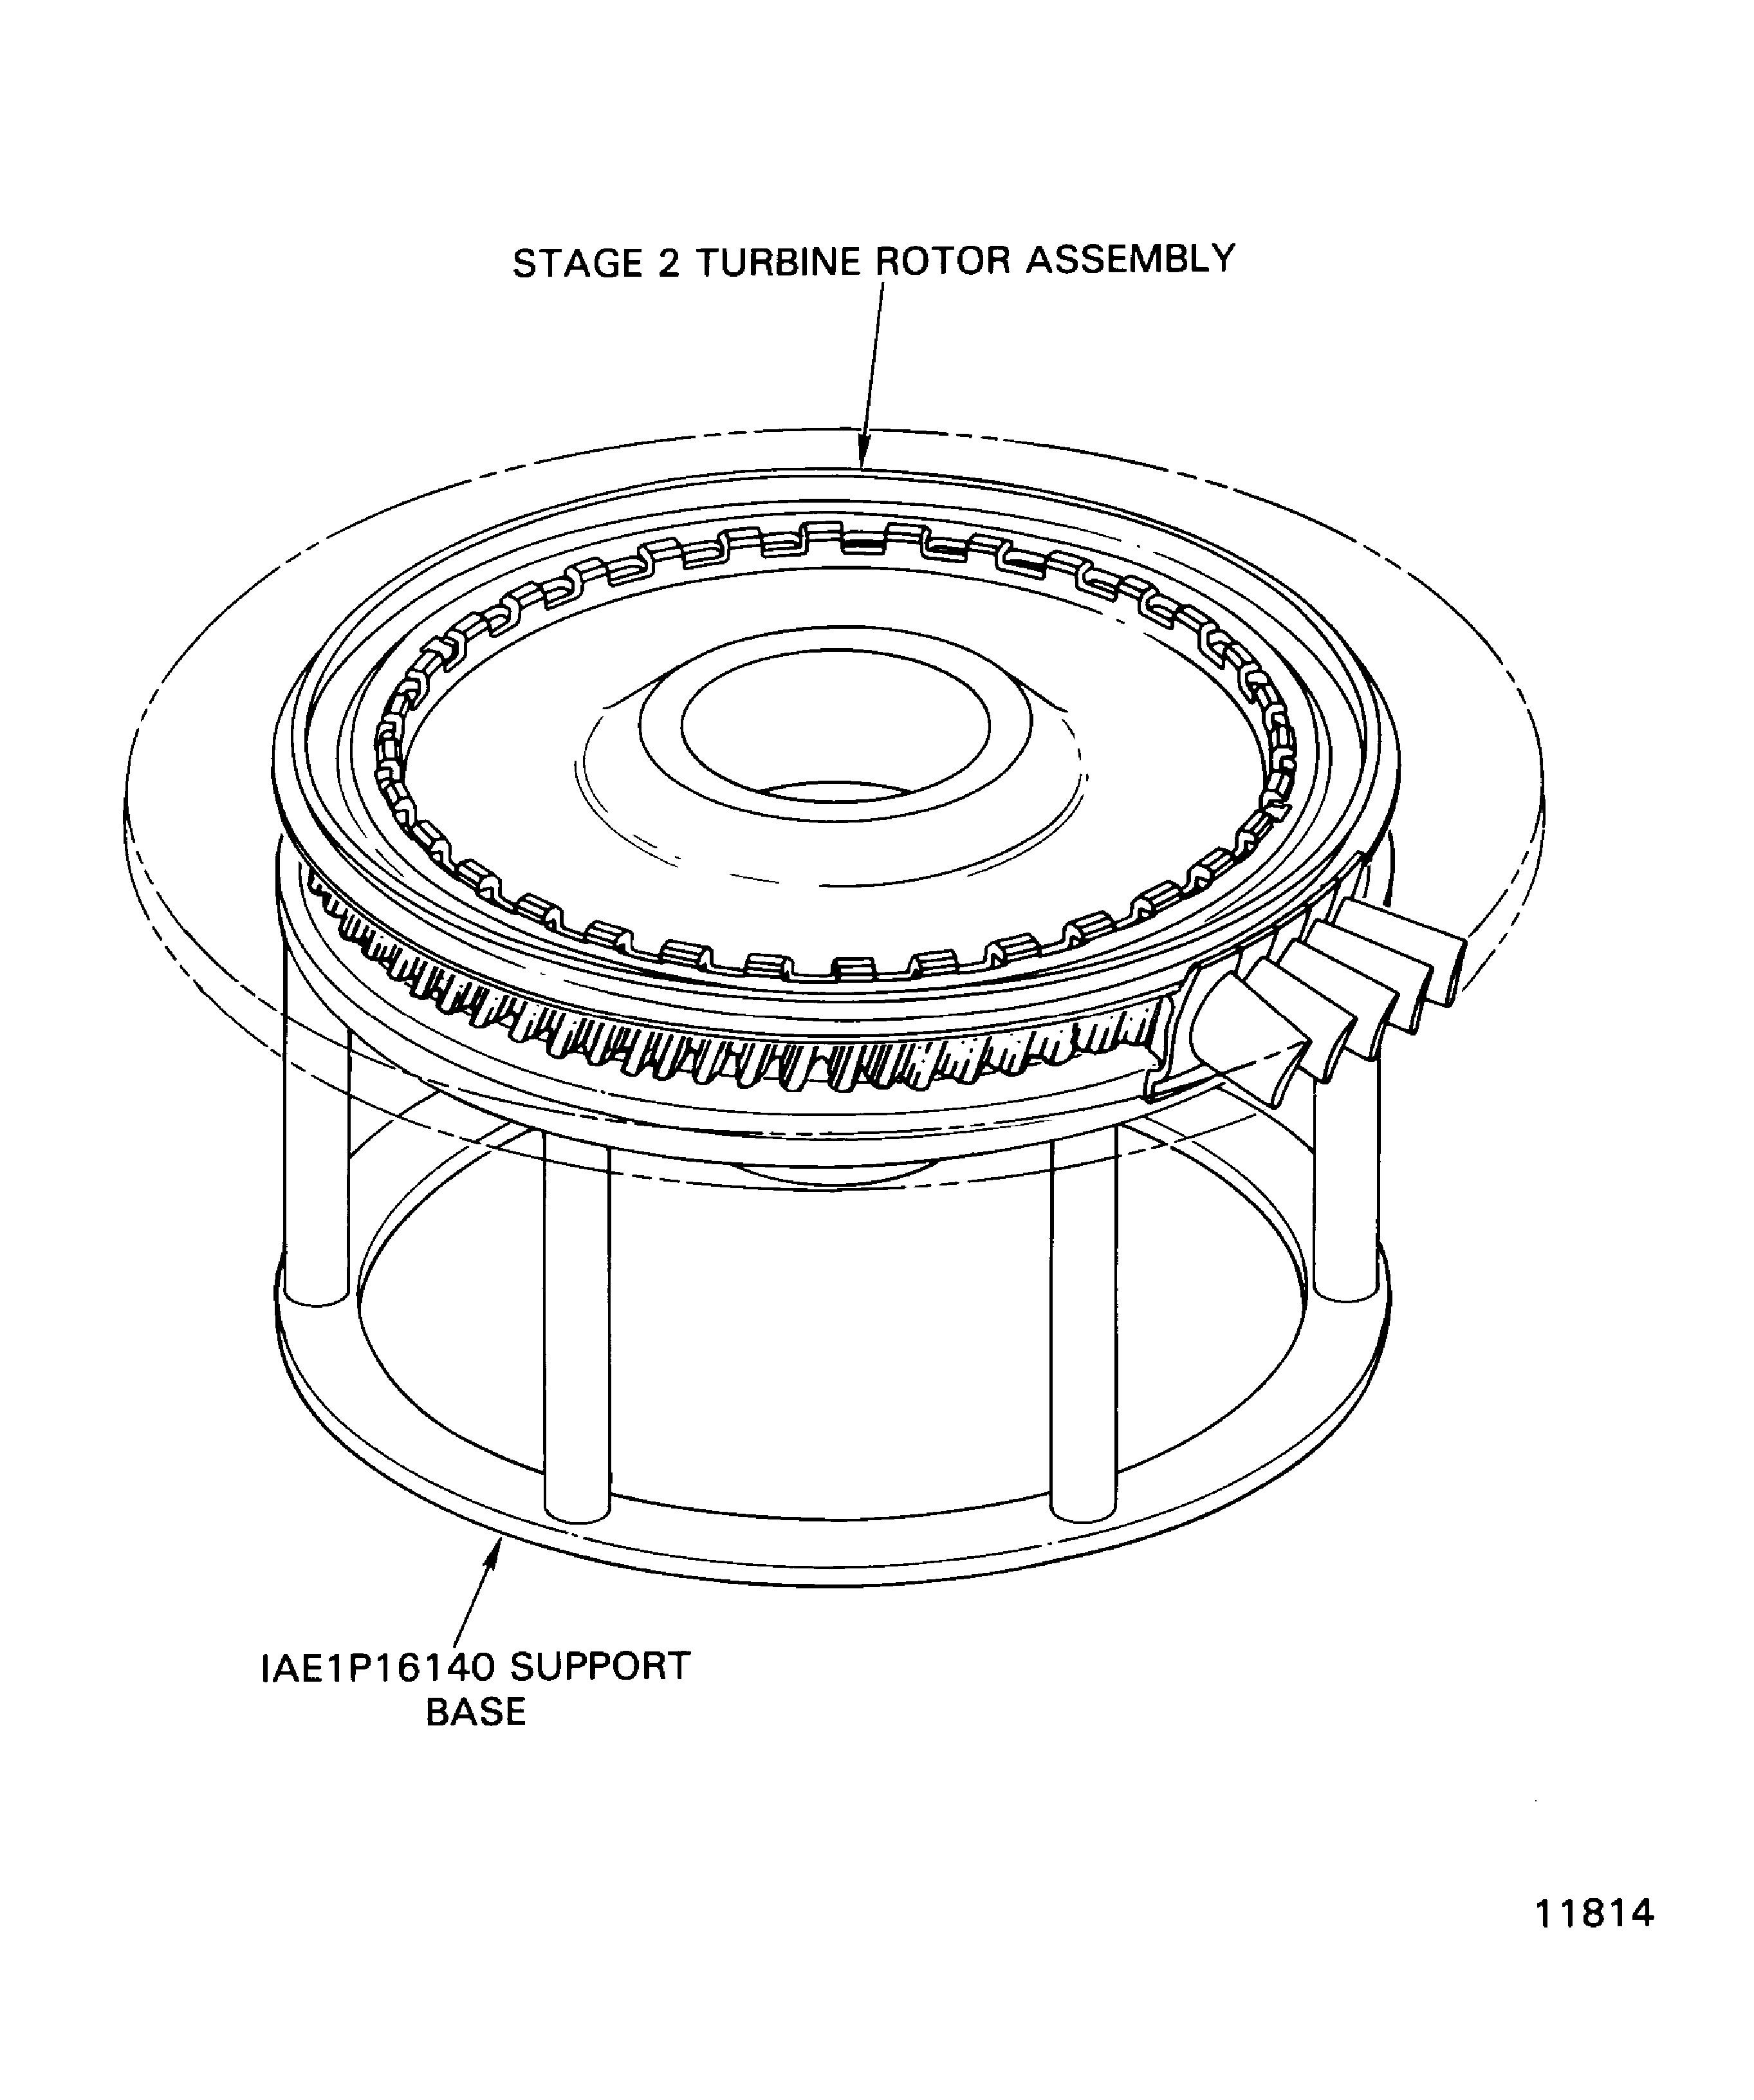
Figure: Stage 2 HPT Rotor Assembly, OAS Diameter Table
Stage 2 HPT Rotor Assembly, OAS Diameter Table
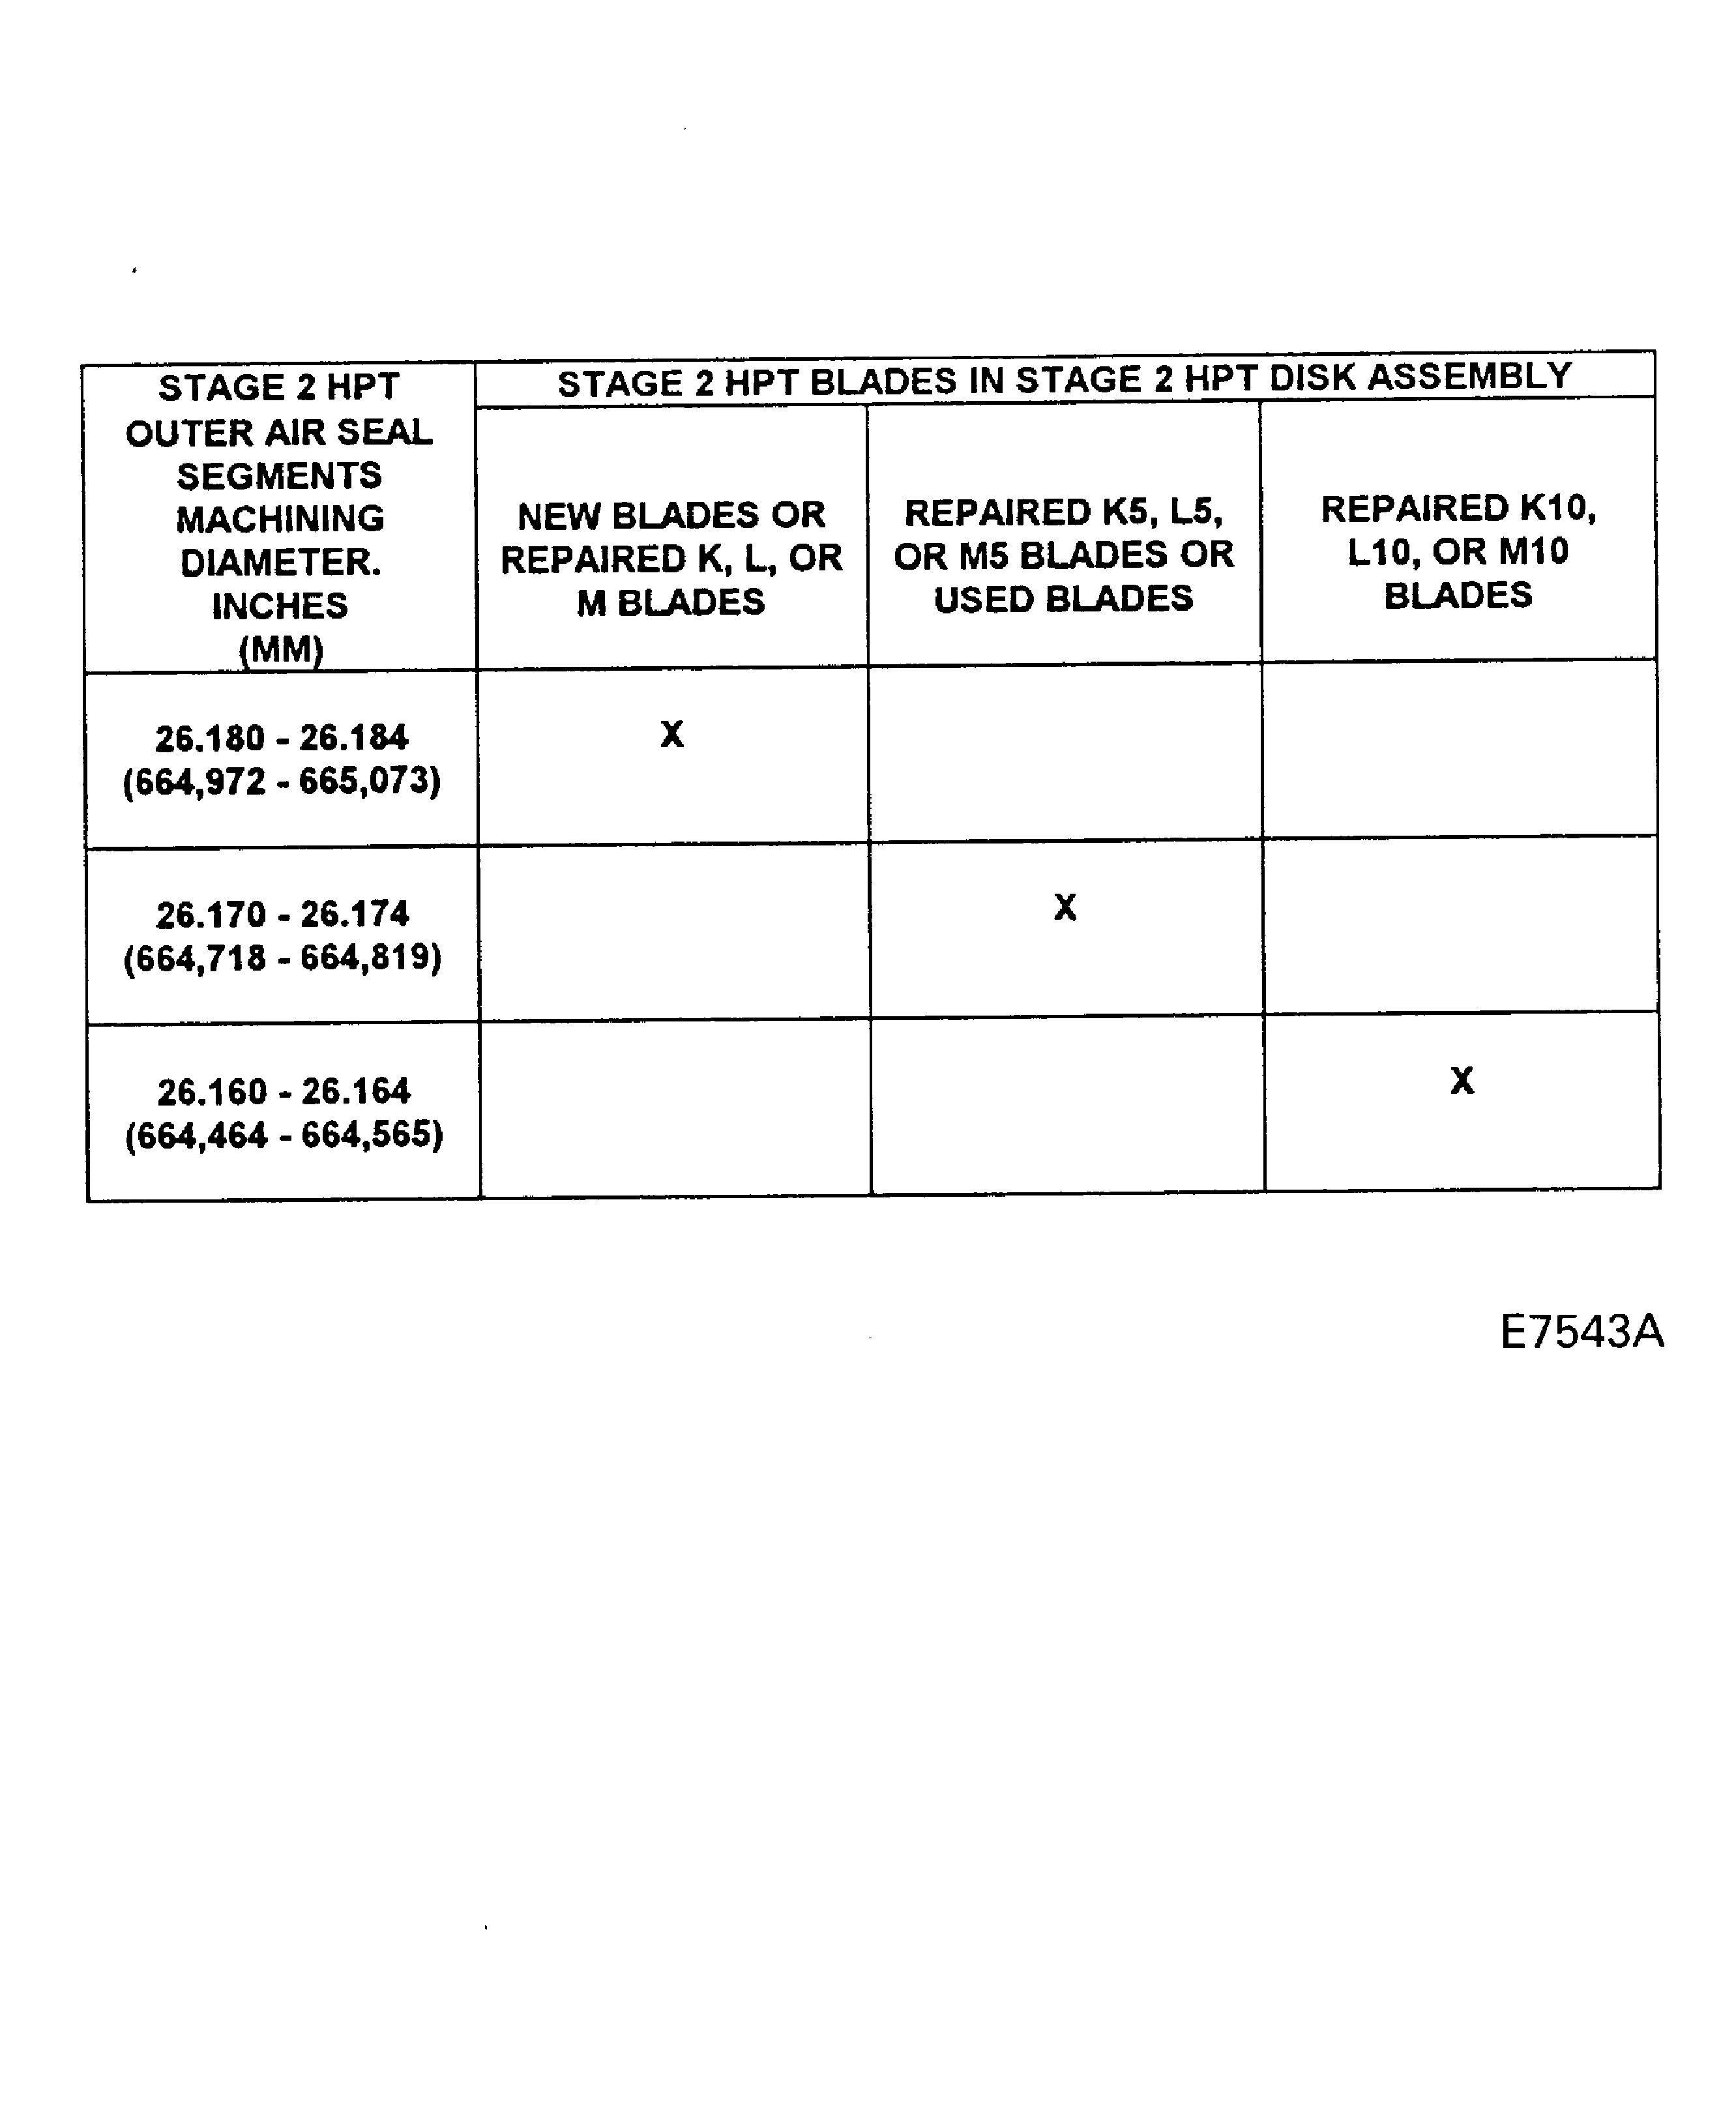
Figure: Repair Markings
Repair Markings
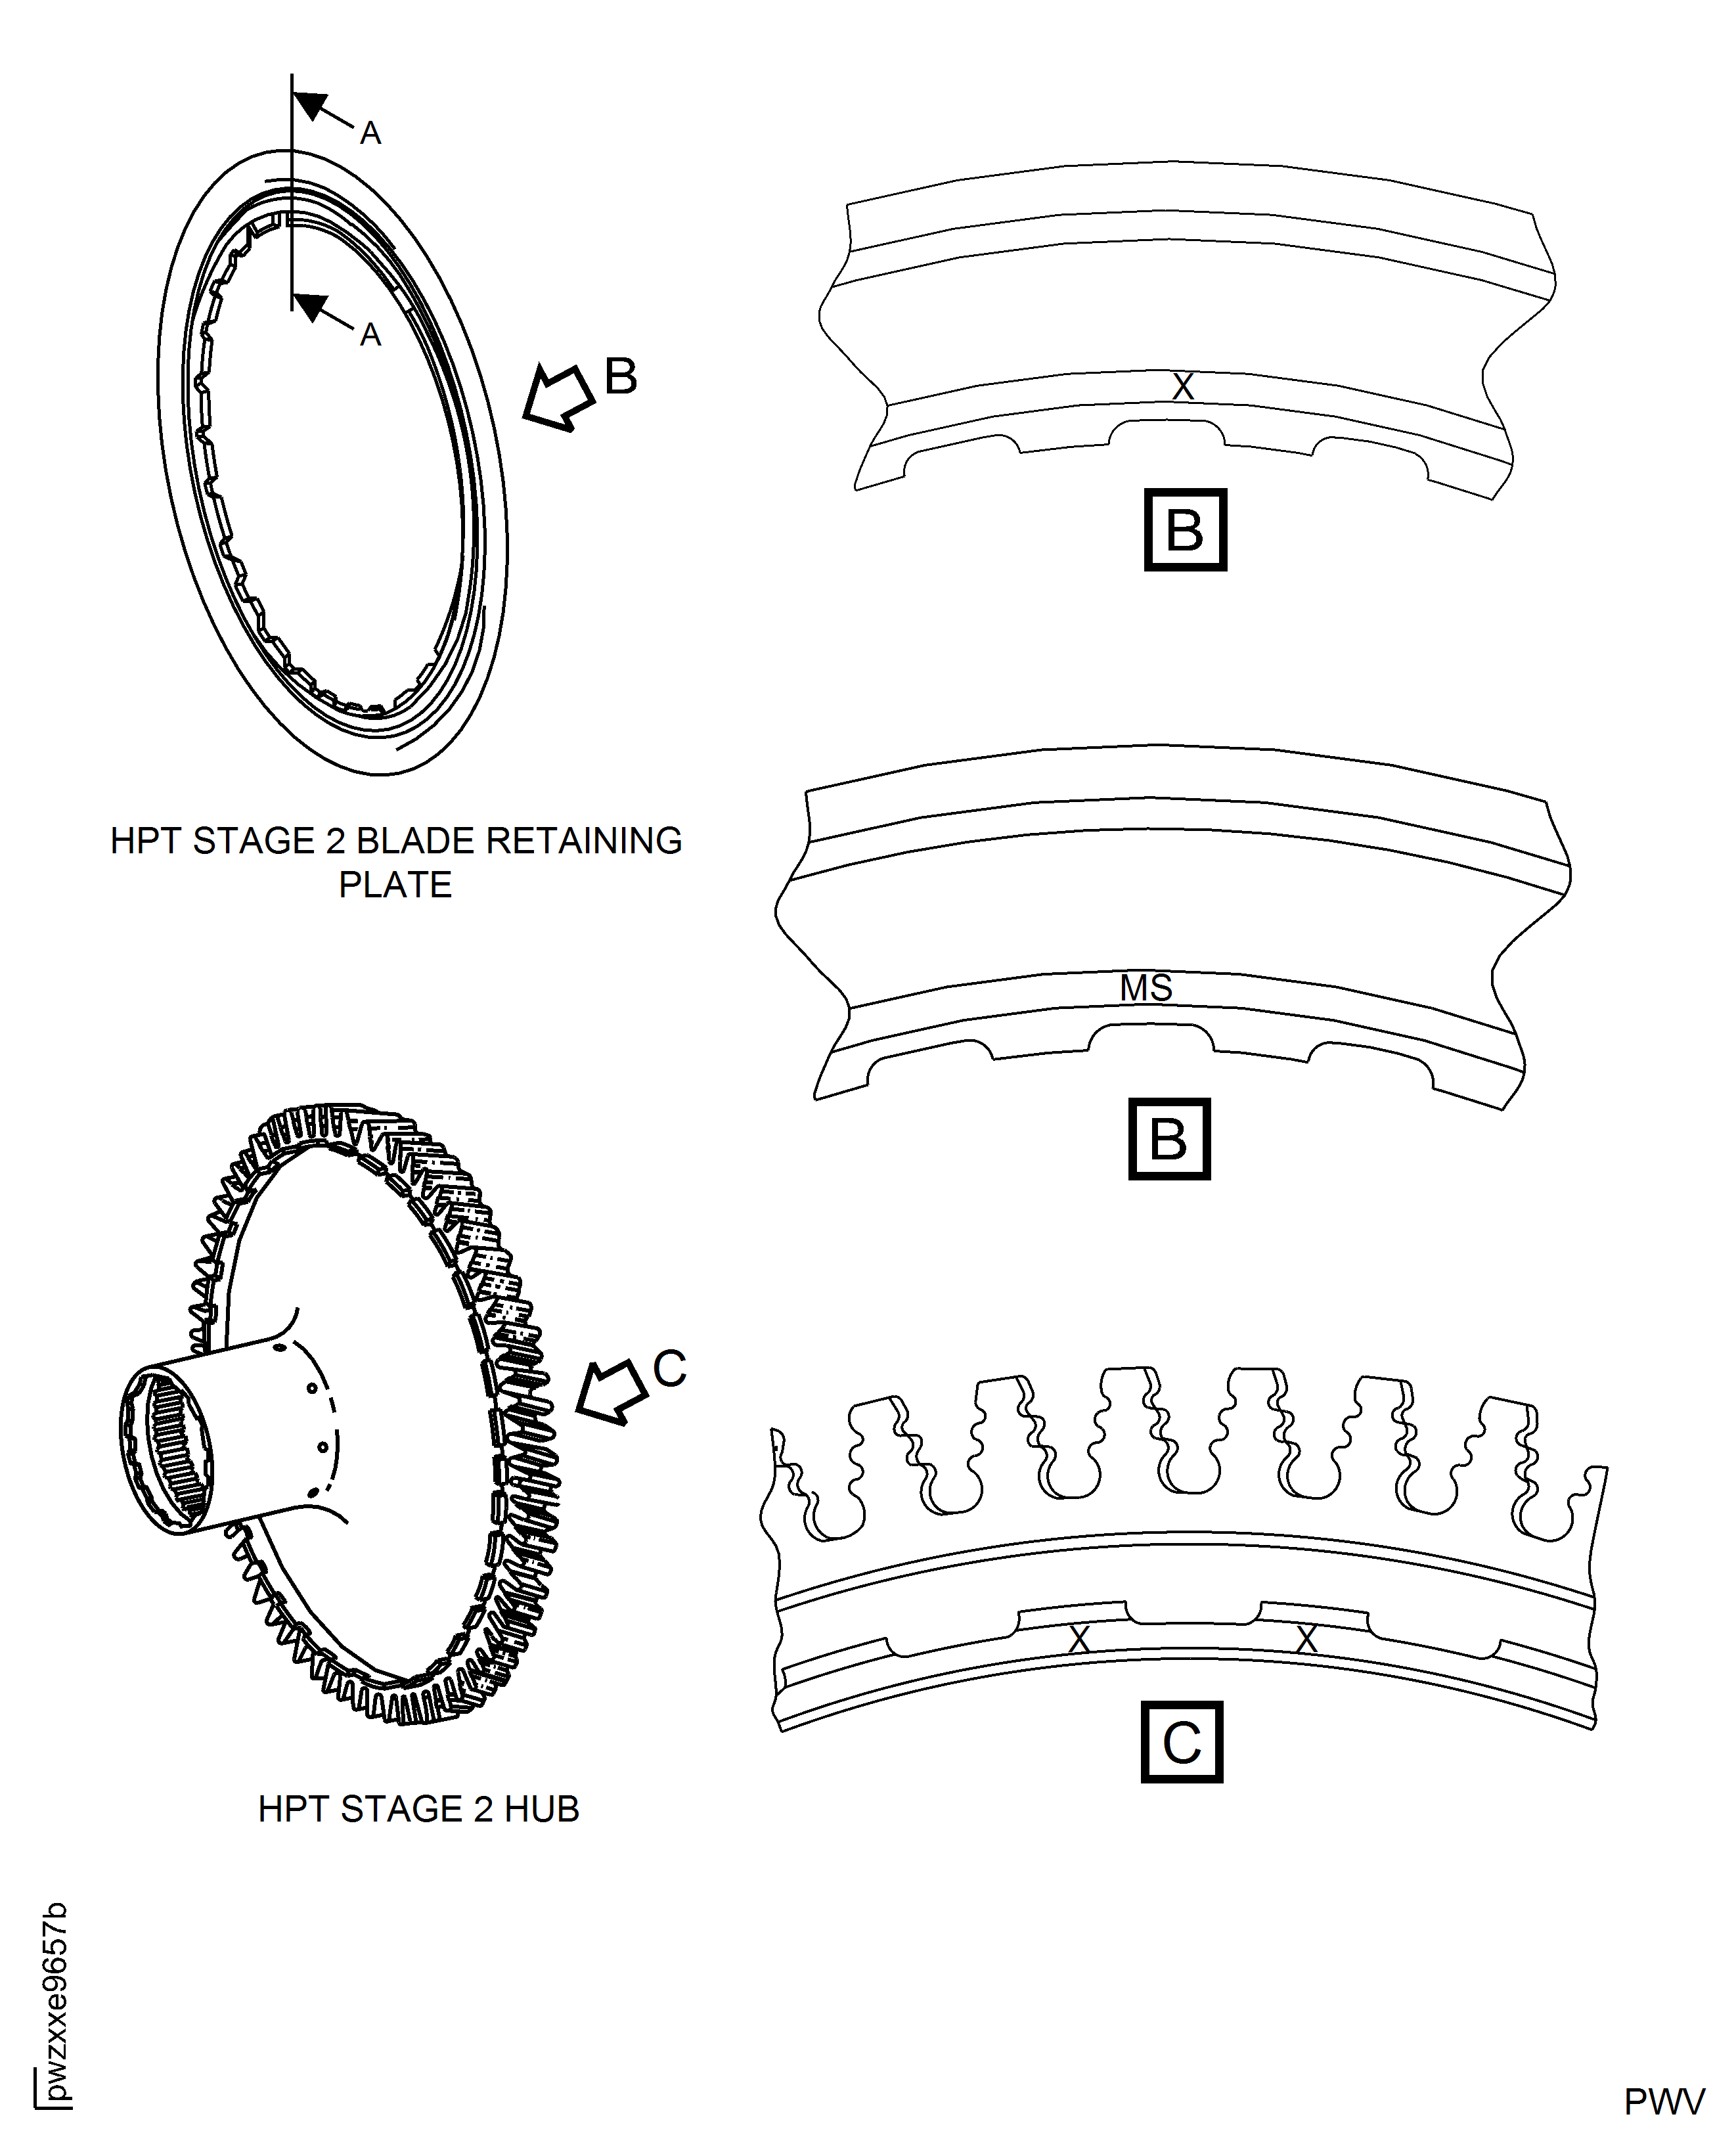
Figure: Install the Heatshield and the Metering Plugs
Install the Heatshield and the Metering Plugs
