TASK 72-00-00-200-001-B00 Engine General - Examine (Borescope) The LP Compressor (LPC), Inspection-001

DMC:V2500-A5-72-00-0000-03B-312A-B|Issue No:003.00|Issue Date:2017-02-01

Export Control

EAR Export Classification: Not subject to the EAR per 15 C.F.R. Chapter 1, Part 734.3(b)(3), except for the following Service Bulletins which are currently published as EAR Export Classification 9E991: SBE70-0992, SBE72-0483, SBE72-0580, SBE72-0588, SBE72-0640, SBE73-0209, SBE80-0024 and SBE80-0025.

Copyright

© IAE International Aero Engines AG (2001, 2014 - 2021) The information contained in this document is the property of © IAE International Aero Engines AG and may not be copied or used for any purpose other than that for which it is supplied without the express written authority of © IAE International Aero Engines AG. (This does not preclude use by engine and aircraft operators for normal instructional, maintenance or overhaul purposes.).

Applicability

V2500-A5

Common Information

TASK 72-00-00-200-001-B00 Engine General - Examine (Borescope) The LP Compressor (LPC), Inspection-001

General

This TASK gives the procedure for the borescope inspection of the LP compressor rotor blades.

NOTE

To identify the consumable materials refer to the PCI.

NOTE

Special tools are identified in the procedure by the tool primary number.

Preliminary Requirements

Pre-Conditions

NONE

Support Equipment

NameManufacturerPart Number / IdentificationQuantityRemark
IAE 2J12030 Guide tube0AM53IAE 2J120301
IAE 6F10056 Borescope equipment, 4 mm or 6 mm, video borescope0AM53IAE 6F100561

Consumables, Materials and Expendables

NameManufacturerPart Number / IdentificationQuantityRemark
CoMat 06-069 MARKERIE207CoMat 06-069

Spares

NameManufacturerPart Number / IdentificationQuantityRemark
Key washer1

Safety Requirements

NONE

Procedure

    1. SUBTASK 72-00-00-490-055 Install the Support Equipment to Examine the Stage 1.5 Blades

    2. Refer to Figure and Figure.

      1. CAUTION

        BE CAREFUL DURING INSTALLATION AND REMOVAL OF THE GUIDE TUBE AS NOT TO CAUSE DAMAGE TO THE OUTER OR INNER OUTLET GUIDE VANES.

        Put the guide tube and borescope probe in position to examine the stage 1.5 blades.

      2. Put the IAE 2J12030 Guide tube in position through the fan frame strut, LP compressor outlet guide vanes and the LP compressor inlet guide vane at approximately the 3 o'clock position.

      3. Put the IAE 6F10056 Borescope equipment, 4 mm or 6 mm, video borescope in to the guide tube until the stage 1.5 compressor blade can be examined.

    1. SUBTASK 72-00-00-220-131 Examine the Stage 1.5 LP Compressor Blades

      NOTE

      Do this operation with two persons: One person in the fan case to adjust the position of the guide tube and to turn the stage 1 fan blades. The other person at the right side of the engine to examine the compressor blades.
    2. Refer to Figure.

    3. Make a mark on a fan blade and the adjacent fan case using the CoMat 06-069 MARKER to identify the start position of the inspection.

    1. SUBTASK 72-00-00-220-132 Examine the Front Surface of Each Stage 1.5 LP Compressor Blade

    2. Refer to Figure.

      1. Zone A

        1. Cracked

        2. Reject

        1. Torn

        2. Reject

        1. Nicked and scratched.

          1. Fillet root.

            1. Less than 0.002 in. (0.05 mm) in depth.

            2. Accept.

            1. More than in Step.

            2. Reject.

          1. Other airfoil surface.

          2. Reject.

        1. Dented

          1. Leading edge

            1. Dents on the leading edge, which must have smoothly rounded bottom and no raised metal, are less than 0.0059 in. (0.15 mm) in depth

            2. Accept

            1. More than Step

            2. Reject

          1. Fillet root.

            1. Less than 0.002 in. (0.05 mm) in depth.

            2. Accept.

            1. More than in Step.

            2. Reject.

          1. Other airfoil surface except the fillet root and leading edge.

          2. Reject.

      1. Zone B

        1. Cracked

        2. Reject

        1. Torn

        2. Reject

        1. Leading or trailing edge

          1. Nicked

            1. Not more than 0.031 in. (0.79 mm) in axial length

            2. Accept

            1. More than in Step

            2. Reject

          1. Dented

            1. Not more than 0.031 in. (0.79 mm) in axial length

            2. Accept

            1. More than in Step

            2. Reject

        1. Other airfoil surface

          1. Nicked

            1. Not more than 0.007 in. (0.02 mm) in depth if the length or diameter is less than 0.100 in. (2.54 mm)

            2. Accept

            1. More than in Step

            2. Reject

          1. Dented

            1. Not more than 0.007 in. (0.02 mm) in depth if the length or diameter is less than 0.100 in. (2.54 mm).

            2. Accept

            1. More than in Step

            2. Reject

      1. Zone C

        1. Cracked

        2. Reject

        1. Torn

        2. Reject

        1. Leading or trailing edge blade tips

          1. Missing piece

            1. Not more than 0.079 in. (2.00 mm) in axial length and 0.079 in. (2.00 mm) radial length

            2. Accept

            1. More than in Step

            2. Reject

          1. NOTE

            The subsequent blade stages must be examined for damage if leading or trailing edge tips are lost.

            Overheated (related to tip rub)

          2. Reject

        1. Blade tips

          1. Bent or curled (not related to cracks or tears) not more than 10 percent of chord length

          2. Accept

          1. More than in Step

          2. Reject

        1. Leading or trailing edges

          1. Nicked

            1. Not more than 0.051 in. (1.30 mm) in depth

            2. Accept

            1. More than in Step

            2. Reject

          1. Dented

            1. Not more than 0.051 in. (1.30 mm) in depth

            2. Accept

            1. More than in Step

            2. Reject

        1. Other airfoil surface

          1. Nicked

            1. Not more than 0.007 in. (0.17 mm) in depth if the length or diameter is less than 0.250 in. (6.35 mm)

            2. Accept

            1. More than in Step

            2. Reject

          1. Dented

            1. Not more than 0.007 in. (0.17 mm) in depth if the length or diameter is less than 0.250 in. (6.35 mm)

            2. Accept

            1. More than in Step

            2. Reject

    1. SUBTASK 72-00-00-220-133 Remove the Borescope Probe and Guide Tube

    2. Refer to Figure.

    3. Remove the borescope probe from the guide tube.

    4. Remove the guide tube from the LP compressor/intermediate case.

    1. SUBTASK 72-00-00-490-056 Install the Borescope Probe to Examine the Stage 2.5 Blades

    2. Refer to Figure and Figure.

    3. Put the borescope in position through the outlet port of the booster stage bleed valve at approximately the 6 o'clock position.

    4. Put the borescope into the bleed duct until the stage 2.5 compressor blades can be examined.

    1. SUBTASK 72-00-00-220-134 Examine the Stage 2.5 LP Compressor Blades

      NOTE

      Do this operation with two persons: One person to turn the stage 1 fan blades. The other person at the right side of the engine to examine the LP compressor blades.
    2. Refer to Figure.

    3. Make a mark on a fan blade and adjacent fan case using the CoMat 06-069 MARKER to identify the start position of the inspection.

    1. SUBTASK 72-00-00-220-135 Examine the Rear Surface of Each Stage 2.5 LP Compressor Blade

    2. Refer to Figure.

      1. Zone A

        1. Cracked

        2. Reject

        1. Torn

        2. Reject

        1. Nicked and scratched.

          1. Fillet root.

            1. Less than 0.002 in. (0.05 mm) in depth.

            2. Accept.

            1. More than in Step.

            2. Reject.

          1. Other airfoil surface.

          2. Reject.

        1. Dented

          1. Leading edge

            1. Dents on the leading edge, which must have smoothly rounded bottom and no raised metal, are less than 0.0059 in. (0.15 mm) in depth. Number of dents to be one per blade.

            2. Accept

            1. More than in Step

            2. Reject

          1. Fillet root.

            1. Less than 0.002 in. (0.05 mm) in depth.

            2. Accept.

            1. More than in Step.

            2. Reject.

          1. Other airfoil surface except the fillet root and leading edge.

          2. Reject

      1. Zone B

        1. Cracked

        2. Reject

        1. Torn

        2. Reject

        1. Leading or trailing edge

          1. Nicked

            1. Not more than 0.031 in. (0.79 mm) in axial length

            2. Accept

            1. More than in Step

            2. Reject

          1. Dented

            1. Not more than 0.031 in. (0.79 mm) in axial length

            2. Accept

            1. More than in Step

            2. Reject

        1. Other airfoil surface

          1. Nicked

            1. Not more than 0.007 in. (0.17 mm) in depth if the length or diameter is less than 0.156 in. (3.96 mm)

            2. Accept

            1. More than in Step

            2. Reject

          1. Dented

            1. Not more than 0.007 in. (0.17 mm) in depth if the length or diameter is less than 0.156 in. (3.96 mm)

            2. Accept

            1. Not more than in Step

            2. Reject

      1. Zone C

        1. Cracked

        2. Reject

        1. Torn

        2. Reject

        1. Leading or trailing edge blade tips

          1. Missing piece

          2. Reject

          1. NOTE

            The subsequent blade stages must be examined for damage if leading or trailing edge tips are not there.

            Overheated (related to tip rub)

          2. Reject

        1. Blade tips

          1. Bent or curled (not related to cracks or tears) not more than 10 percent of chord length

          2. Accept

          1. More than in Step

          2. Reject

        1. Leading or trailing edges

          1. Nicked

            1. Not more than 0.051 in. (1.30 mm) in axial length

            2. Accept

            1. More than in Step

            2. Reject

          1. Dented

            1. Not more than 0.051 in. (1.30 mm) in axial length

            2. Accept

            1. More than in Step

            2. Reject

        1. Other airfoil surface

          1. Nicked

            1. Not more than 0.007 in. (0.17 mm) in depth if the length or diameter is less than 0.250 in. (6.35 mm)

            2. Accept

            1. More than in Step

            2. Reject

          1. Dented

            1. Not more than 0.007 in. (0.17 mm) in depth if the length or diameter is less than 0.250 in. (6.35 mm)

            2. Accept

            1. More than in Step

            2. Reject

    1. SUBTASK 72-00-00-220-136 Remove the Support Equipment

    2. Refer to Figure.

    3. Remove the borescope probe from the bleed duct.

    1. SUBTASK 72-00-00-090-053 Remove the LP Compressor (Fan) Module and the Fan exit Guide Vanes to Remove Plug

    2. Refer to Figure.

    3. Remove the inlet cone. Refer to TASK 72-38-11-020-001 (Removal-001).

    4. Remove the LP compressor (FAN) module. Refer to TASK 72-00-31-020-001 (Removal-001).

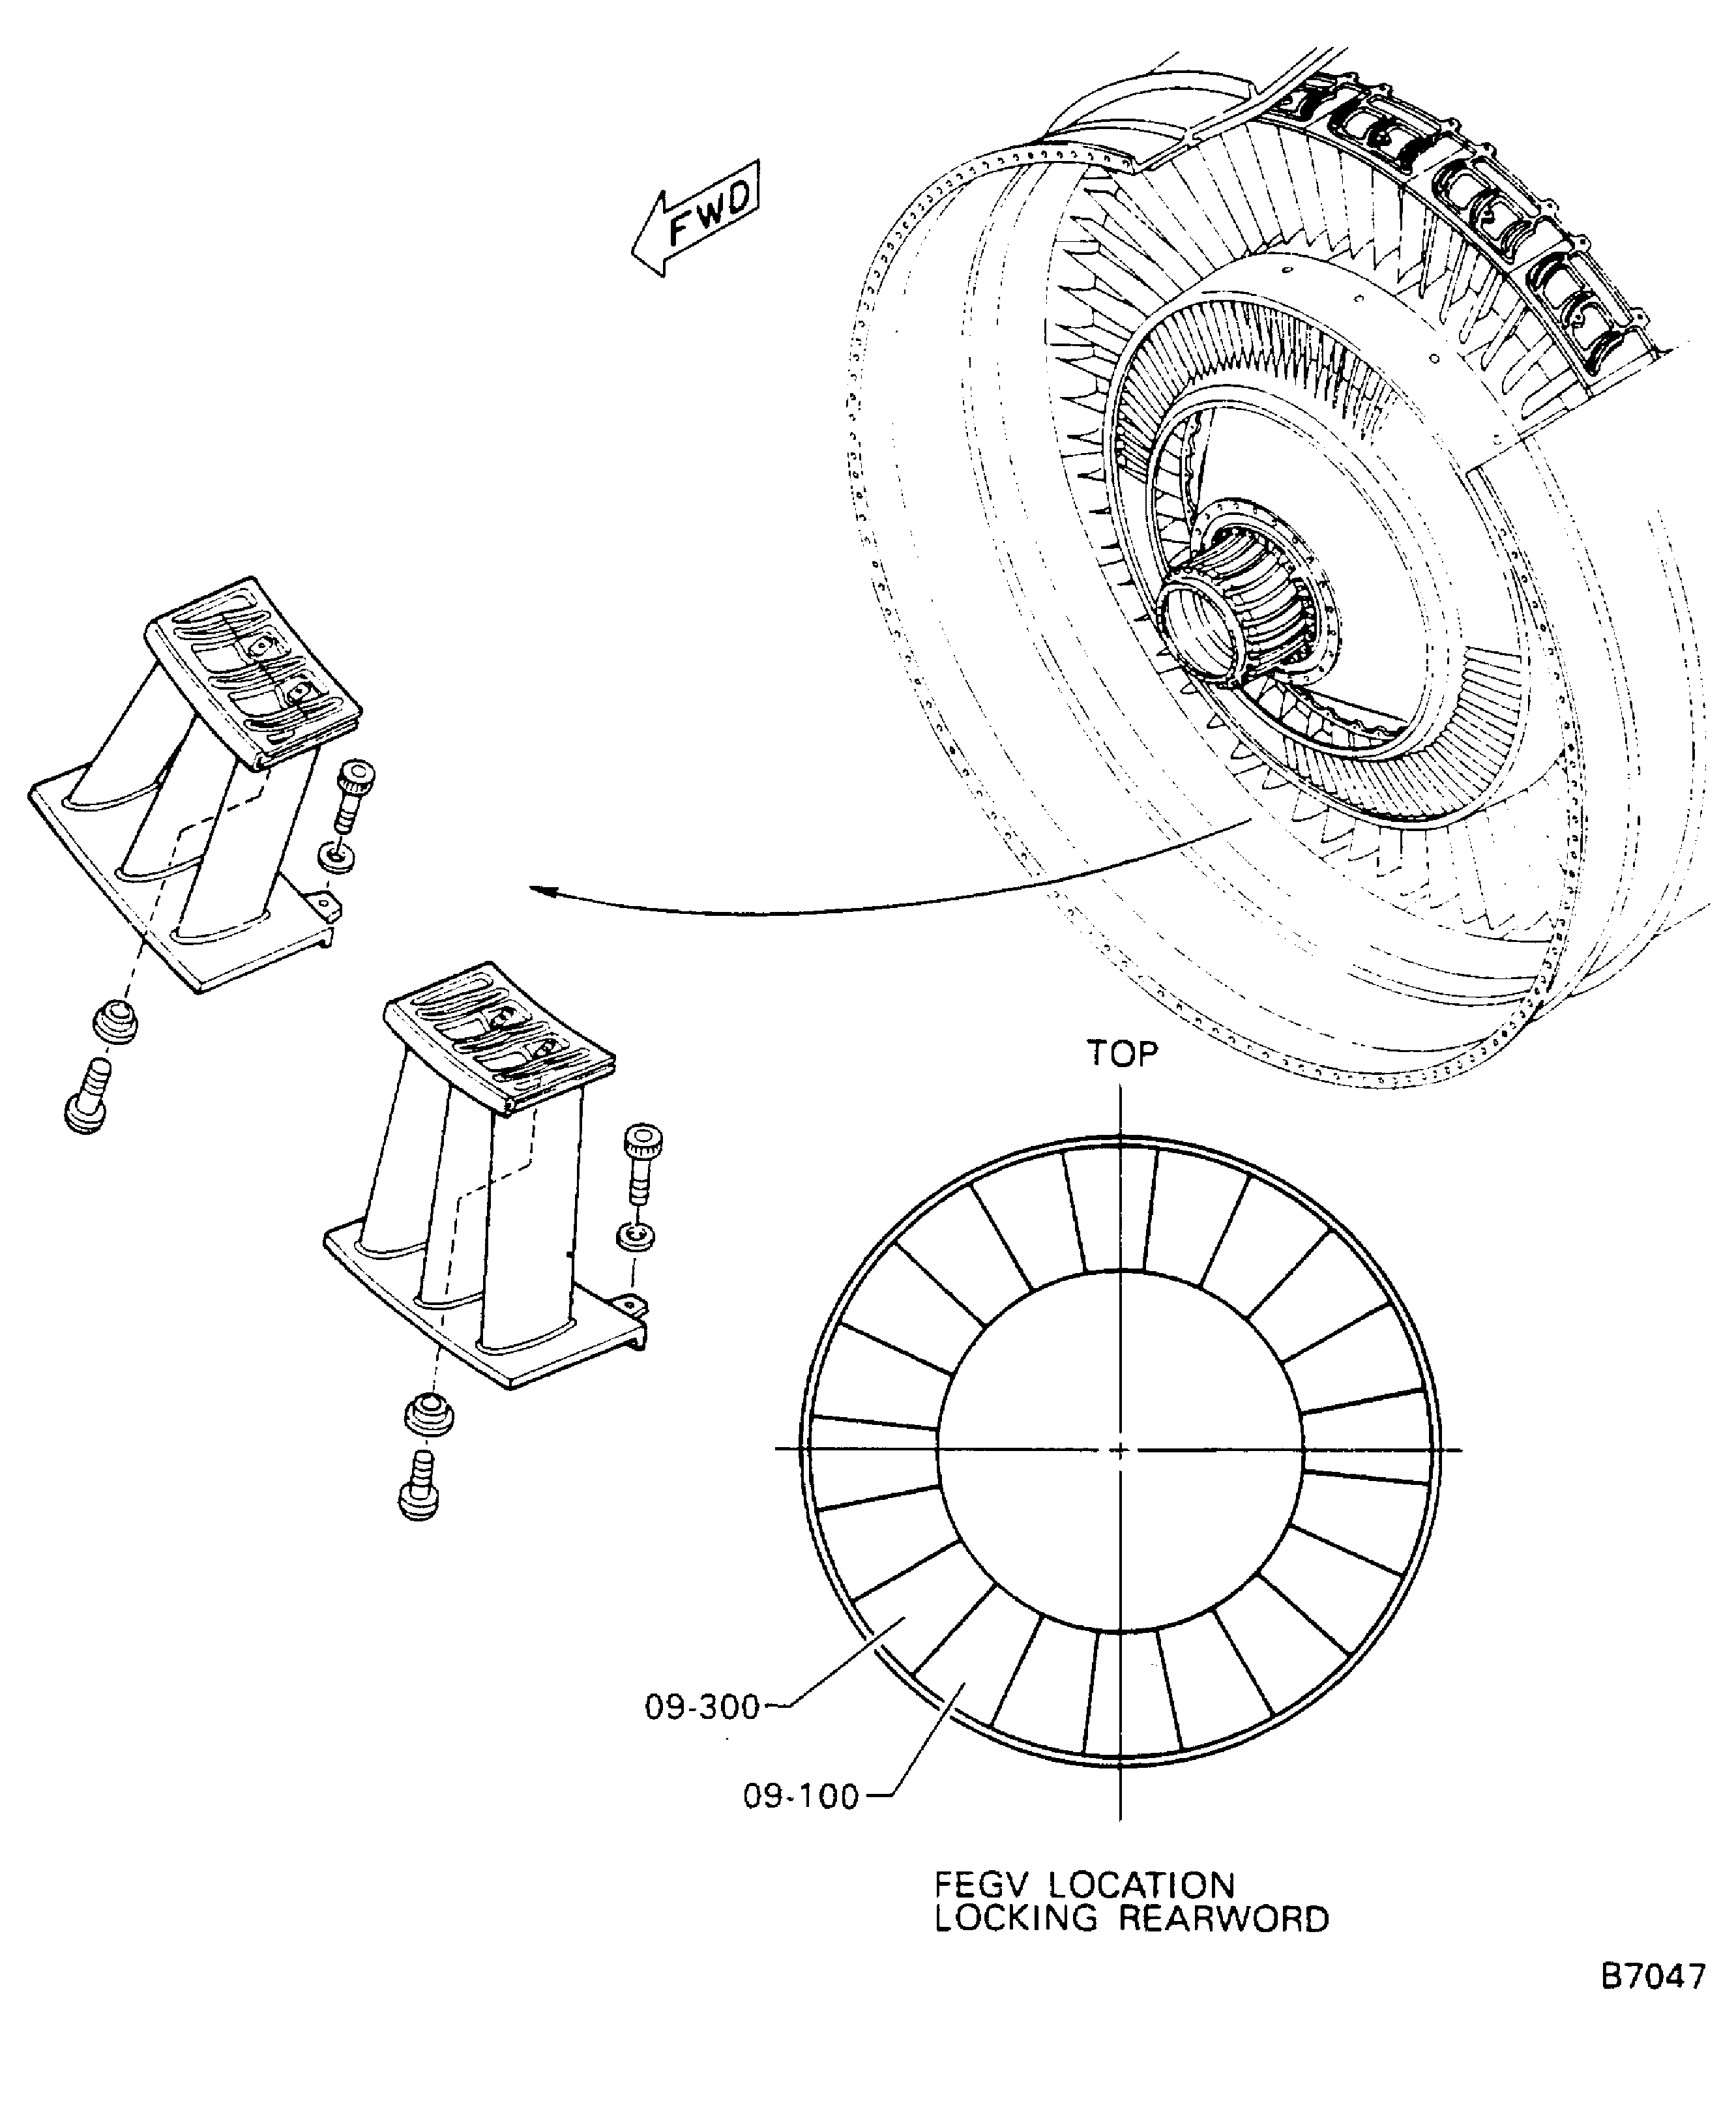
      1. Remove the fan exit guide vanes. Refer to TASK 72-32-00-030-002-B00 (Disassembly-002).

      2. Remove the two segments (72-32-88,09-100) and (72-32-88,09-300) at approximately 5 o'clock position.

    1. SUBTASK 72-00-00-090-054 Remove the Plug from the LP Compressor Rear Case

    2. Refer to Figure.

    3. Bend back to flat the tab of the key washer.

    4. Remove the plug and the key washer from hole on the LP compressor rear case. Discard the key washer.

    1. SUBTASK 72-00-00-490-057 Install the Borescope Probe to Examine the Stage 2.0 and 2.3 LP Compressor Blades

    2. Refer to Figure.

    3. Put the borescope probe through the borescope inspection hole at approximately 5 o'clock position.

    4. Put the borescope into the borescope inspection hole until the stage 2.0 and 2.3 compressor blades can be examined.

    1. SUBTASK 72-00-00-220-137 Examine the Stage 2.0 LP Compressor Blades

    2. NOTE

      Do this operation with two persons: One person in the fan case to turn the stage 1 fan rotor. The other person at the right side of the engine to examine the compressor blades.

      Refer to Figure.

    3. Make a mark on a fan rotor and adjacent fan case using the CoMat 06-069 MARKER to identify the start position of the inspection.

    1. SUBTASK 72-00-00-220-138 Examine the Rear Surface of Each Stage 2.0 LP Compressor Blade

    2. Refer to Figure.

      1. Zone A

        1. Cracked

        2. Reject

        1. Torn

        2. Reject

        1. Nicked and scratched.

          1. Fillet root.

            1. Less than 0.002 in. (0.05 mm) in depth.

            2. Accept.

            1. More than in Step.

            2. Reject.

          1. Other airfoil surface.

          2. Reject.

        1. Dented

          1. Leading edge

            1. Dents on the leading edge, which must have smoothly rounded bottom and no raised metal, are less than 0.0059 in. (0.15 mm) in depth. Number of dents to be one per blade.

            2. Accept

            1. More than in Step

            2. Reject

          1. Fillet root.

            1. Less than 0.002 in. (0.05 mm) in depth.

            2. Accept.

            1. More than in Step.

            2. Reject.

          1. Other airfoil surface except the fillet root and leading edge.

          2. Reject

      1. Zone B

        1. Cracked

        2. Reject

        1. Torn

        2. Reject

        1. Leading or trailing edge

          1. Nicked

            1. Not more than 0.031 in. (0.79 mm) in axial length

            2. Accept

            1. More than in Step

            2. Reject

          1. Dented

            1. Not more than 0.031 in. (0.79 mm) in axial length

            2. Accept

          2. More than in Step

        1. Other airfoil surface

          1. Nicked

            1. Not more than 0.007 in. (0.17 mm) in depth if the length or diameter is less than 0.156 in. (3.96 mm)

            2. Accept

            1. More than in Step

            2. Reject

          1. Dented

            1. Not more than 0.007 in. (0.17 mm) in depth if the length or diameter is less than 0.156 in. (3.96 mm)

            2. Accept

            1. More than in Step

            2. Reject

      1. Zone C

        1. Cracked

        2. Reject

        1. Torn

        2. Reject

        1. Leading or trailing edge blade tips

          1. Missing piece

          2. Reject

          1. NOTE

            The subsequent blade stages must be examined for damage if leading or trailing edge tips are lost.

            Overheated (related to tip rib)

          2. Reject

        1. Blade tips

          1. Bent or curled (not related to cracks or tears) not more than 10 percent of chord length

          2. Accept

          1. More than in Step

          2. Reject

        1. Leading or trailing edges

          1. Nicked

            1. Not more than 0.051 in. (1.30 mm) in axial length Accept

            2. Accept

            1. More than in Step

            2. Reject

          1. Dented

            1. Not more than 0.051 in. (1.30 mm) in axial length

            2. Accept

            1. More than in Step

            2. Reject

        1. Other airfoil surface

          1. Nicked

            1. Not more than 0.007 in. (0.17 mm) in depth if the length or diameter is less than 0.250 in. (6.35 mm)

            2. Accept

            1. More than in Step.

            2. Reject

          1. Dented

            1. Not more than 0.007 in. (0.17 mm) in depth if the length or diameter is less than 0.250 in. (6.35 mm)

            2. Accept

            1. More than in Step

            2. Reject

    1. SUBTASK 72-00-00-220-139 Examine the Stage 2.3 LP Compressor Blades

      NOTE

      Do this operation with two persons: One person in the fan case to turn the stage 1 fan rotor. The other person at the right side of the engine to examine the compressor blades.
    2. Refer to Figure.

    3. Make a mark on a fan rotor and adjacent fan case using the CoMat 06-069 MARKER to identify the start position of the inspection.

    1. SUBTASK 72-00-00-220-140 Examine the Front Surface of Each Stage 2.3 LP Compressor Blade

    2. Refer to Figure.

      1. Zone A

        1. Cracked

        2. Reject

        1. Torn

        2. Reject

        1. Nicked and scratched.

          1. Fillet root.

            1. Less than 0.002 in. (0.05 mm) in depth.

            2. Accept.

            1. More than in Step.

            2. Reject.

        1. Dented

          1. Leading edge

            1. Dents with smooth, rounded bottom and no raised metal are less than 0.0059 in. (0.15 mm) in depth. Number of dents to be one per blade.

            2. Accept

            1. More than in Step

            2. Reject

          1. Fillet root.

            1. Less than 0.002 in. (0.05 mm) in depth.

            2. Accept.

            1. More than in Step.

            2. Reject.

          1. Other airfoil surface except the fillet root and leading edge.

          2. Reject

      1. Zone B

        1. Cracked

        2. Reject

        1. Torn

        2. Reject

        1. Leading or trailing edge

          1. Nicked

            1. Not more than 0.031 in. (0.79 mm) in axial length

            2. Accept

            1. More than in Step

            2. Reject

          1. Dented

            1. Not more than 0.031 in. (0.79 mm) in axial length

            2. Accept

            1. More than in Step

            2. Reject

        1. Other airfoil surface

          1. Nicked

            1. Not more than 0.007 in. (0.17 mm) in depth if the length or diameter is less than 0.045 in. (1.14 mm)

            2. Accept

            1. More than in Step

            2. Reject

          1. Dented

            1. Not more than 0.007 in. (0.17 mm) in depth if the length or diameter is less than 0.045 in. (1.14 mm)

            2. Accept

            1. More than in Step

            2. Reject

      1. Zone C

        1. Cracked

        2. Reject

        1. Torn

        2. Reject

        1. Leading or trailing edge blade tips

          1. Missing piece

          2. Reject

            NOTE

            The subsequent blade stages must be examined for damage if leading or trailing edge tips are lost.
          1. Overheated (related to tip rub)

          2. Reject

        1. Blade tips

          1. Bent or curled (not related to cracks or tears) not more than 10 percent of chord length

          2. Accept

          1. More than in Step

          2. Reject

        1. Leading or trailing edges

          1. Nicked

            1. Not more than 0.051 in. (1.30 mm) in axial length

            2. Accept

            1. More than in Step

            2. Reject

          1. Dented

            1. Not more than 0.051 in. (1.30 mm) in axial length

            2. Accept

            1. More than in Step

            2. Reject

        1. Other airfoil surface

          1. Nicked

            1. Not more than 0.007 in. (0.17 mm) in depth if the length or diameter is less than 0.100 in. (2.54 mm)

            2. Accept

            1. More than in Step

            2. Reject

          1. Dented

            1. Not more than 0.007 in. (0.17 mm) in depth if the length or diameter is less than 0.100 in. (2.54 mm)

            2. Accept

            1. More than in Step

            2. Reject

    1. SUBTASK 72-00-00-220-141 Remove the Support Equipment

    2. Refer to Figure.

    3. Remove the borescope probe from the rear case.

    1. SUBTASK 72-00-00-430-083 Install the Plug in to the Rear Case

    2. Refer to Figure.

    3. Install the plug and a new key washer to the inspection hole of the stage 2.0 and 2.3 compressor blades.

    4. Torque the plug to 102 lbfin to 111 lbfin (11.50 Nm to 12.50 Nm).

    5. Bend the new key washer to lock.

    1. SUBTASK 72-00-00-410-051 Install the Fan Exit Guide Vanes and LP Compressor (FAN) Module

    2. Refer to Figure.

    3. Install the fan exit guide vanes. Refer to TASK 72-32-00-430-014-B00(ASSEMBLY-014).

    4. Install the LP compressor (fan) module. Refer to TASK 72-00-31-420-001 (INSTALLATION-001).

    5. Install the inlet cone. Refer to TASK 72-38-11-420-001 (INSTALLATION-001).

  1. Figure: Borescope inspection equipment

    Borescope inspection equipment

    Figure: Borescope inspection for LP compressor stage 1.5 blade

    Borescope inspection for LP compressor stage 1.5 blade
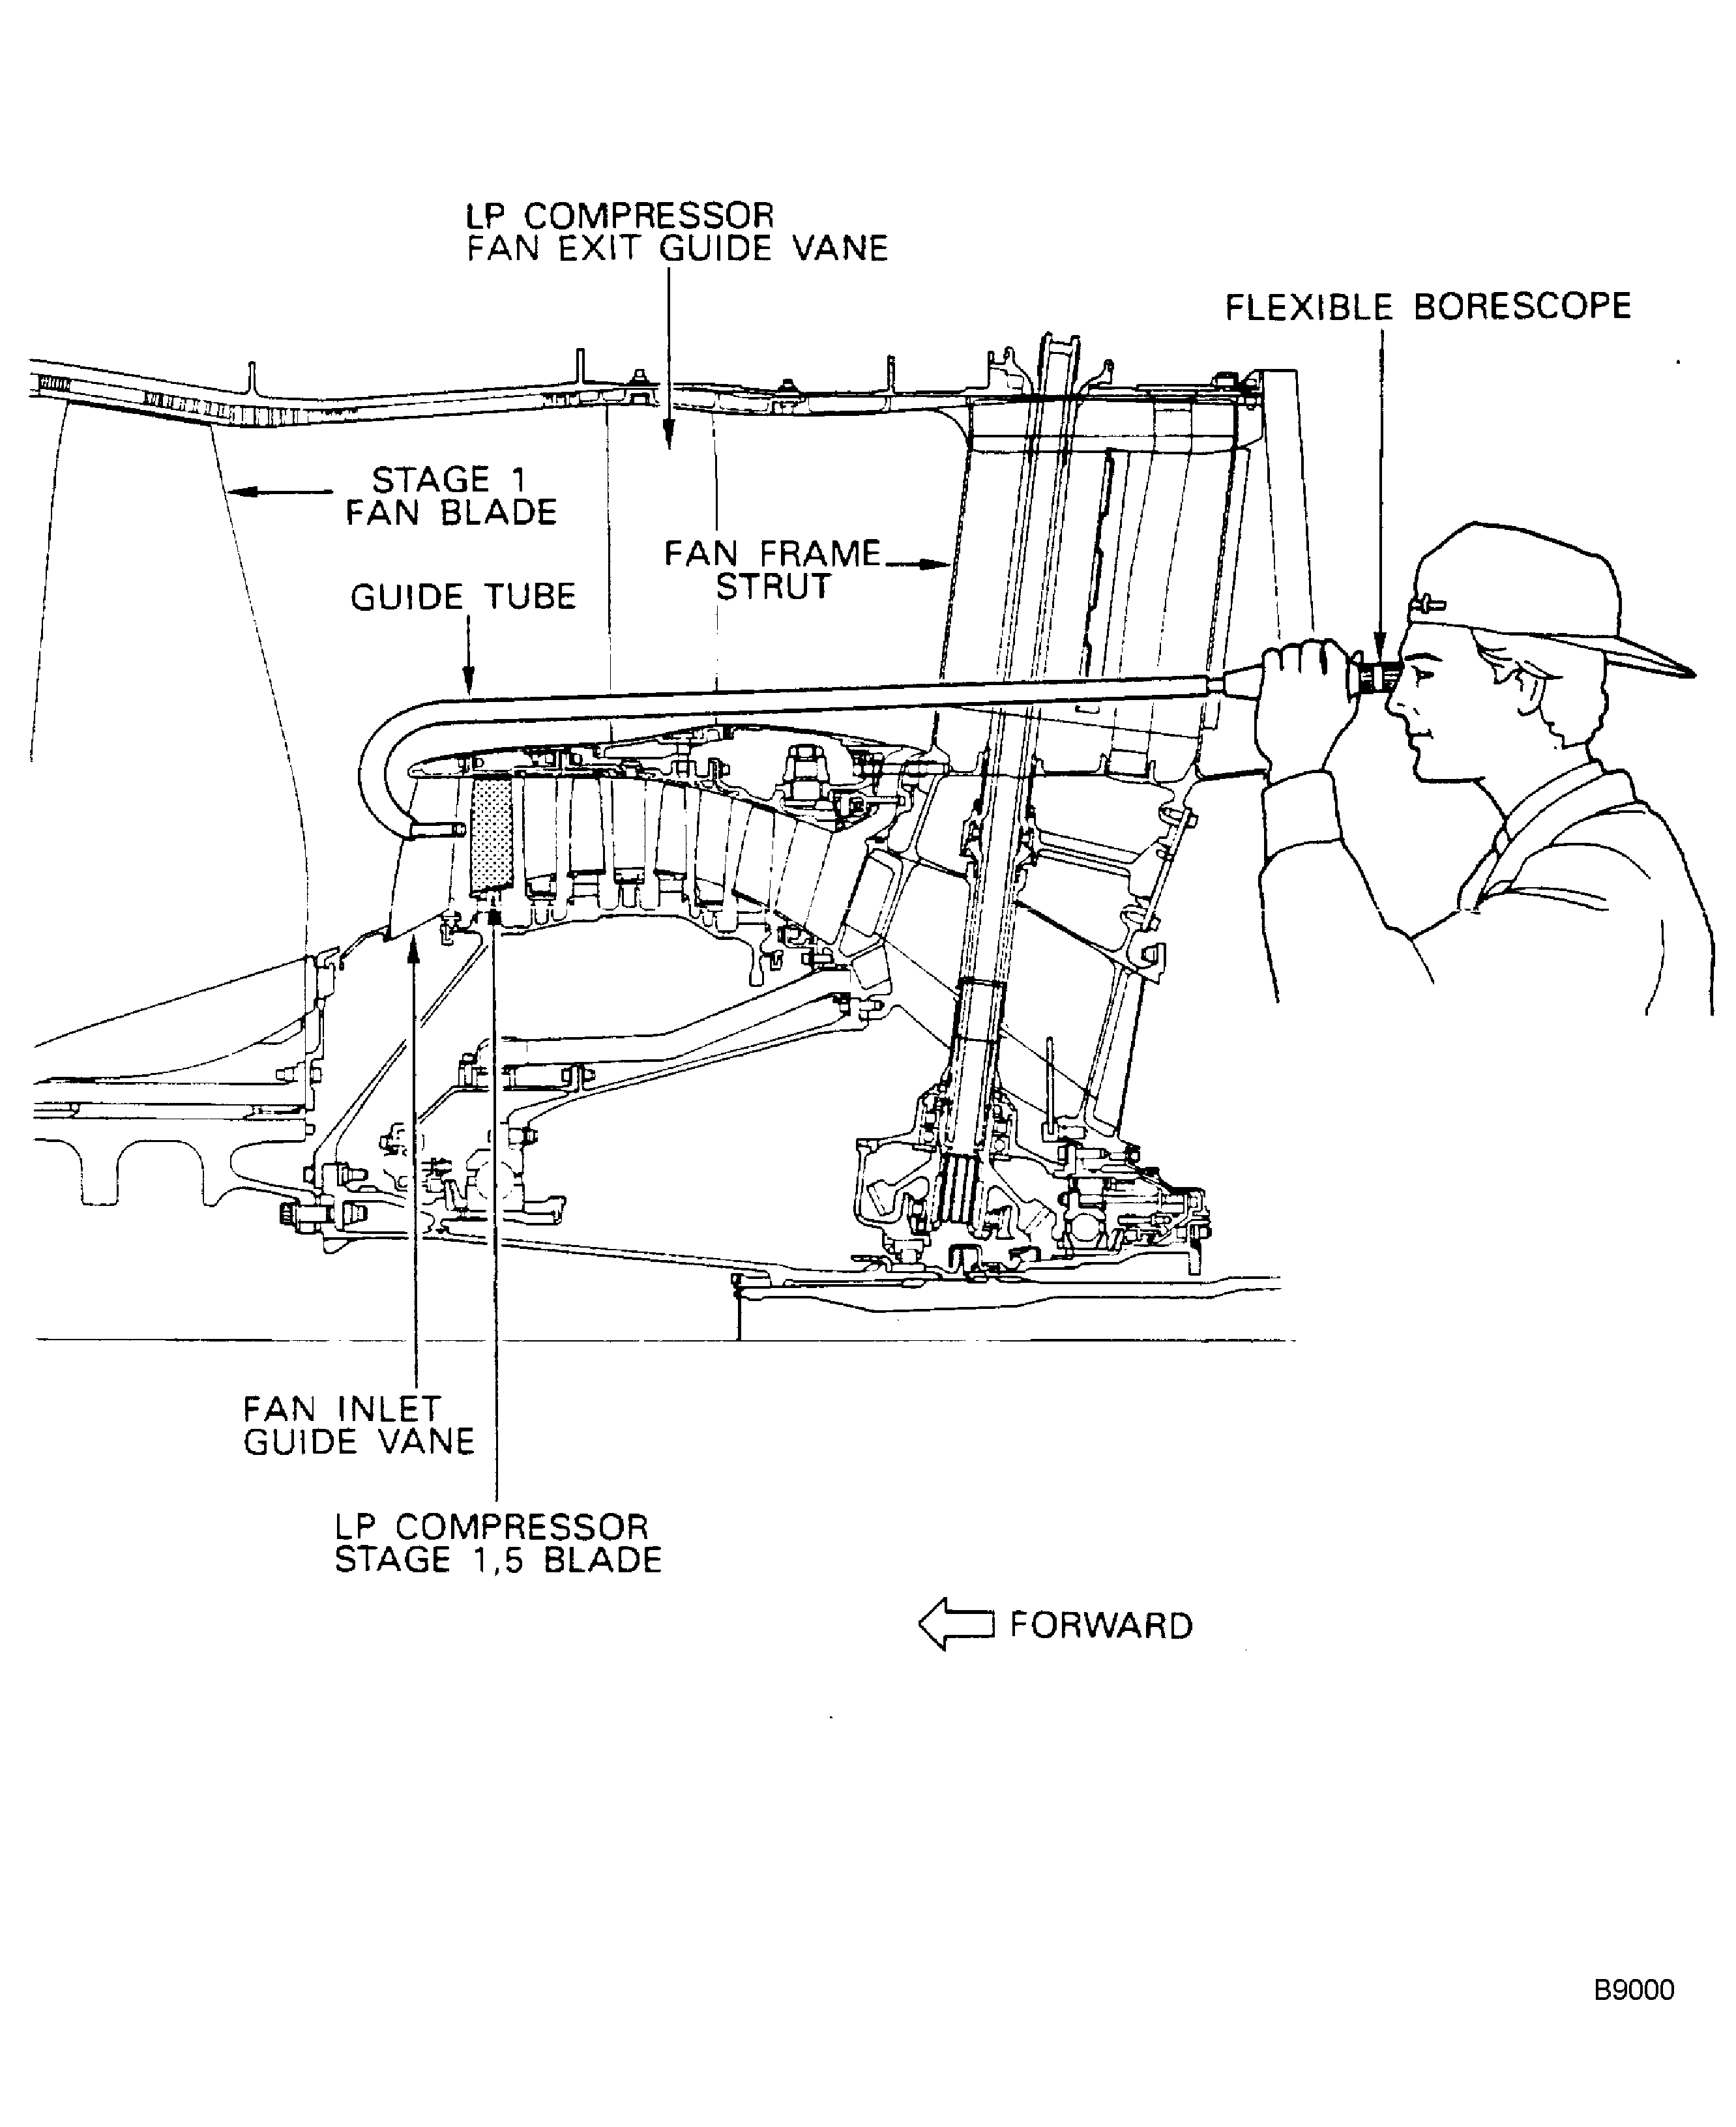
    Figure: Borescope inspection for LP compressor stage 2.5 blade

    Borescope inspection for LP compressor stage 2.5 blade
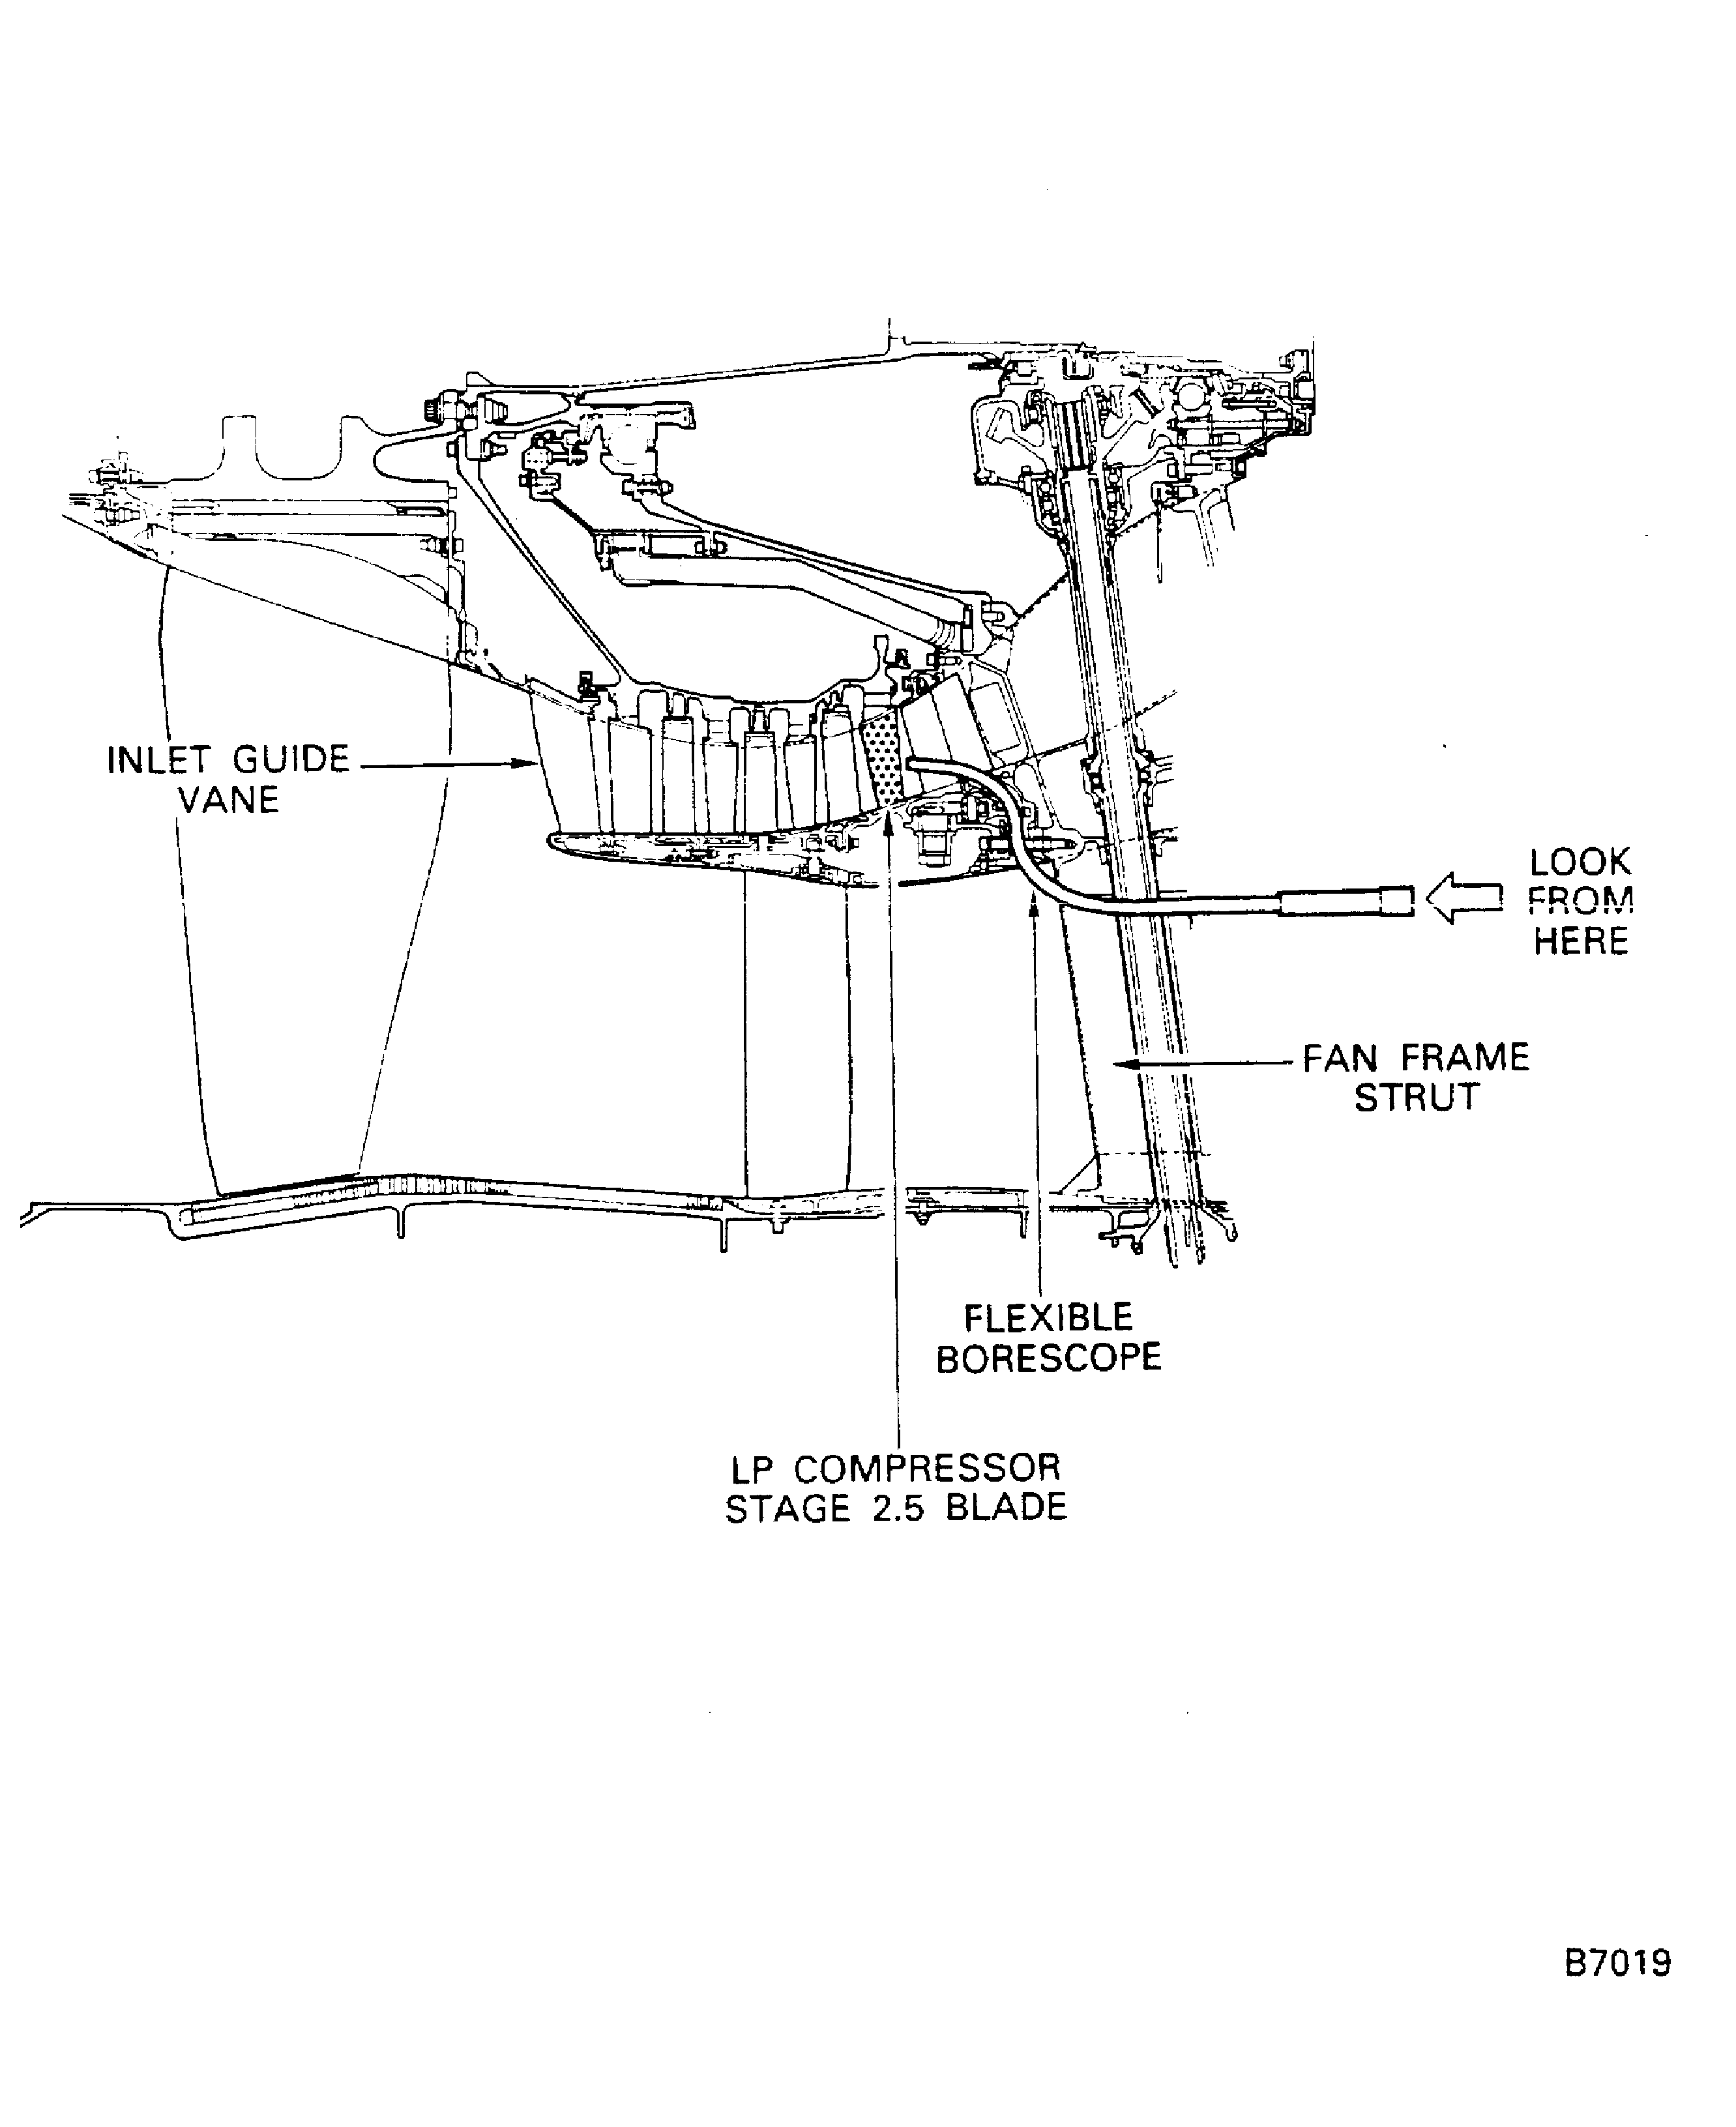
    Figure: Borescope inspection for LP compressor stage 2.0 and 2.3 blade

    Borescope inspection for LP compressor stage 2.0 and 2.3 blade
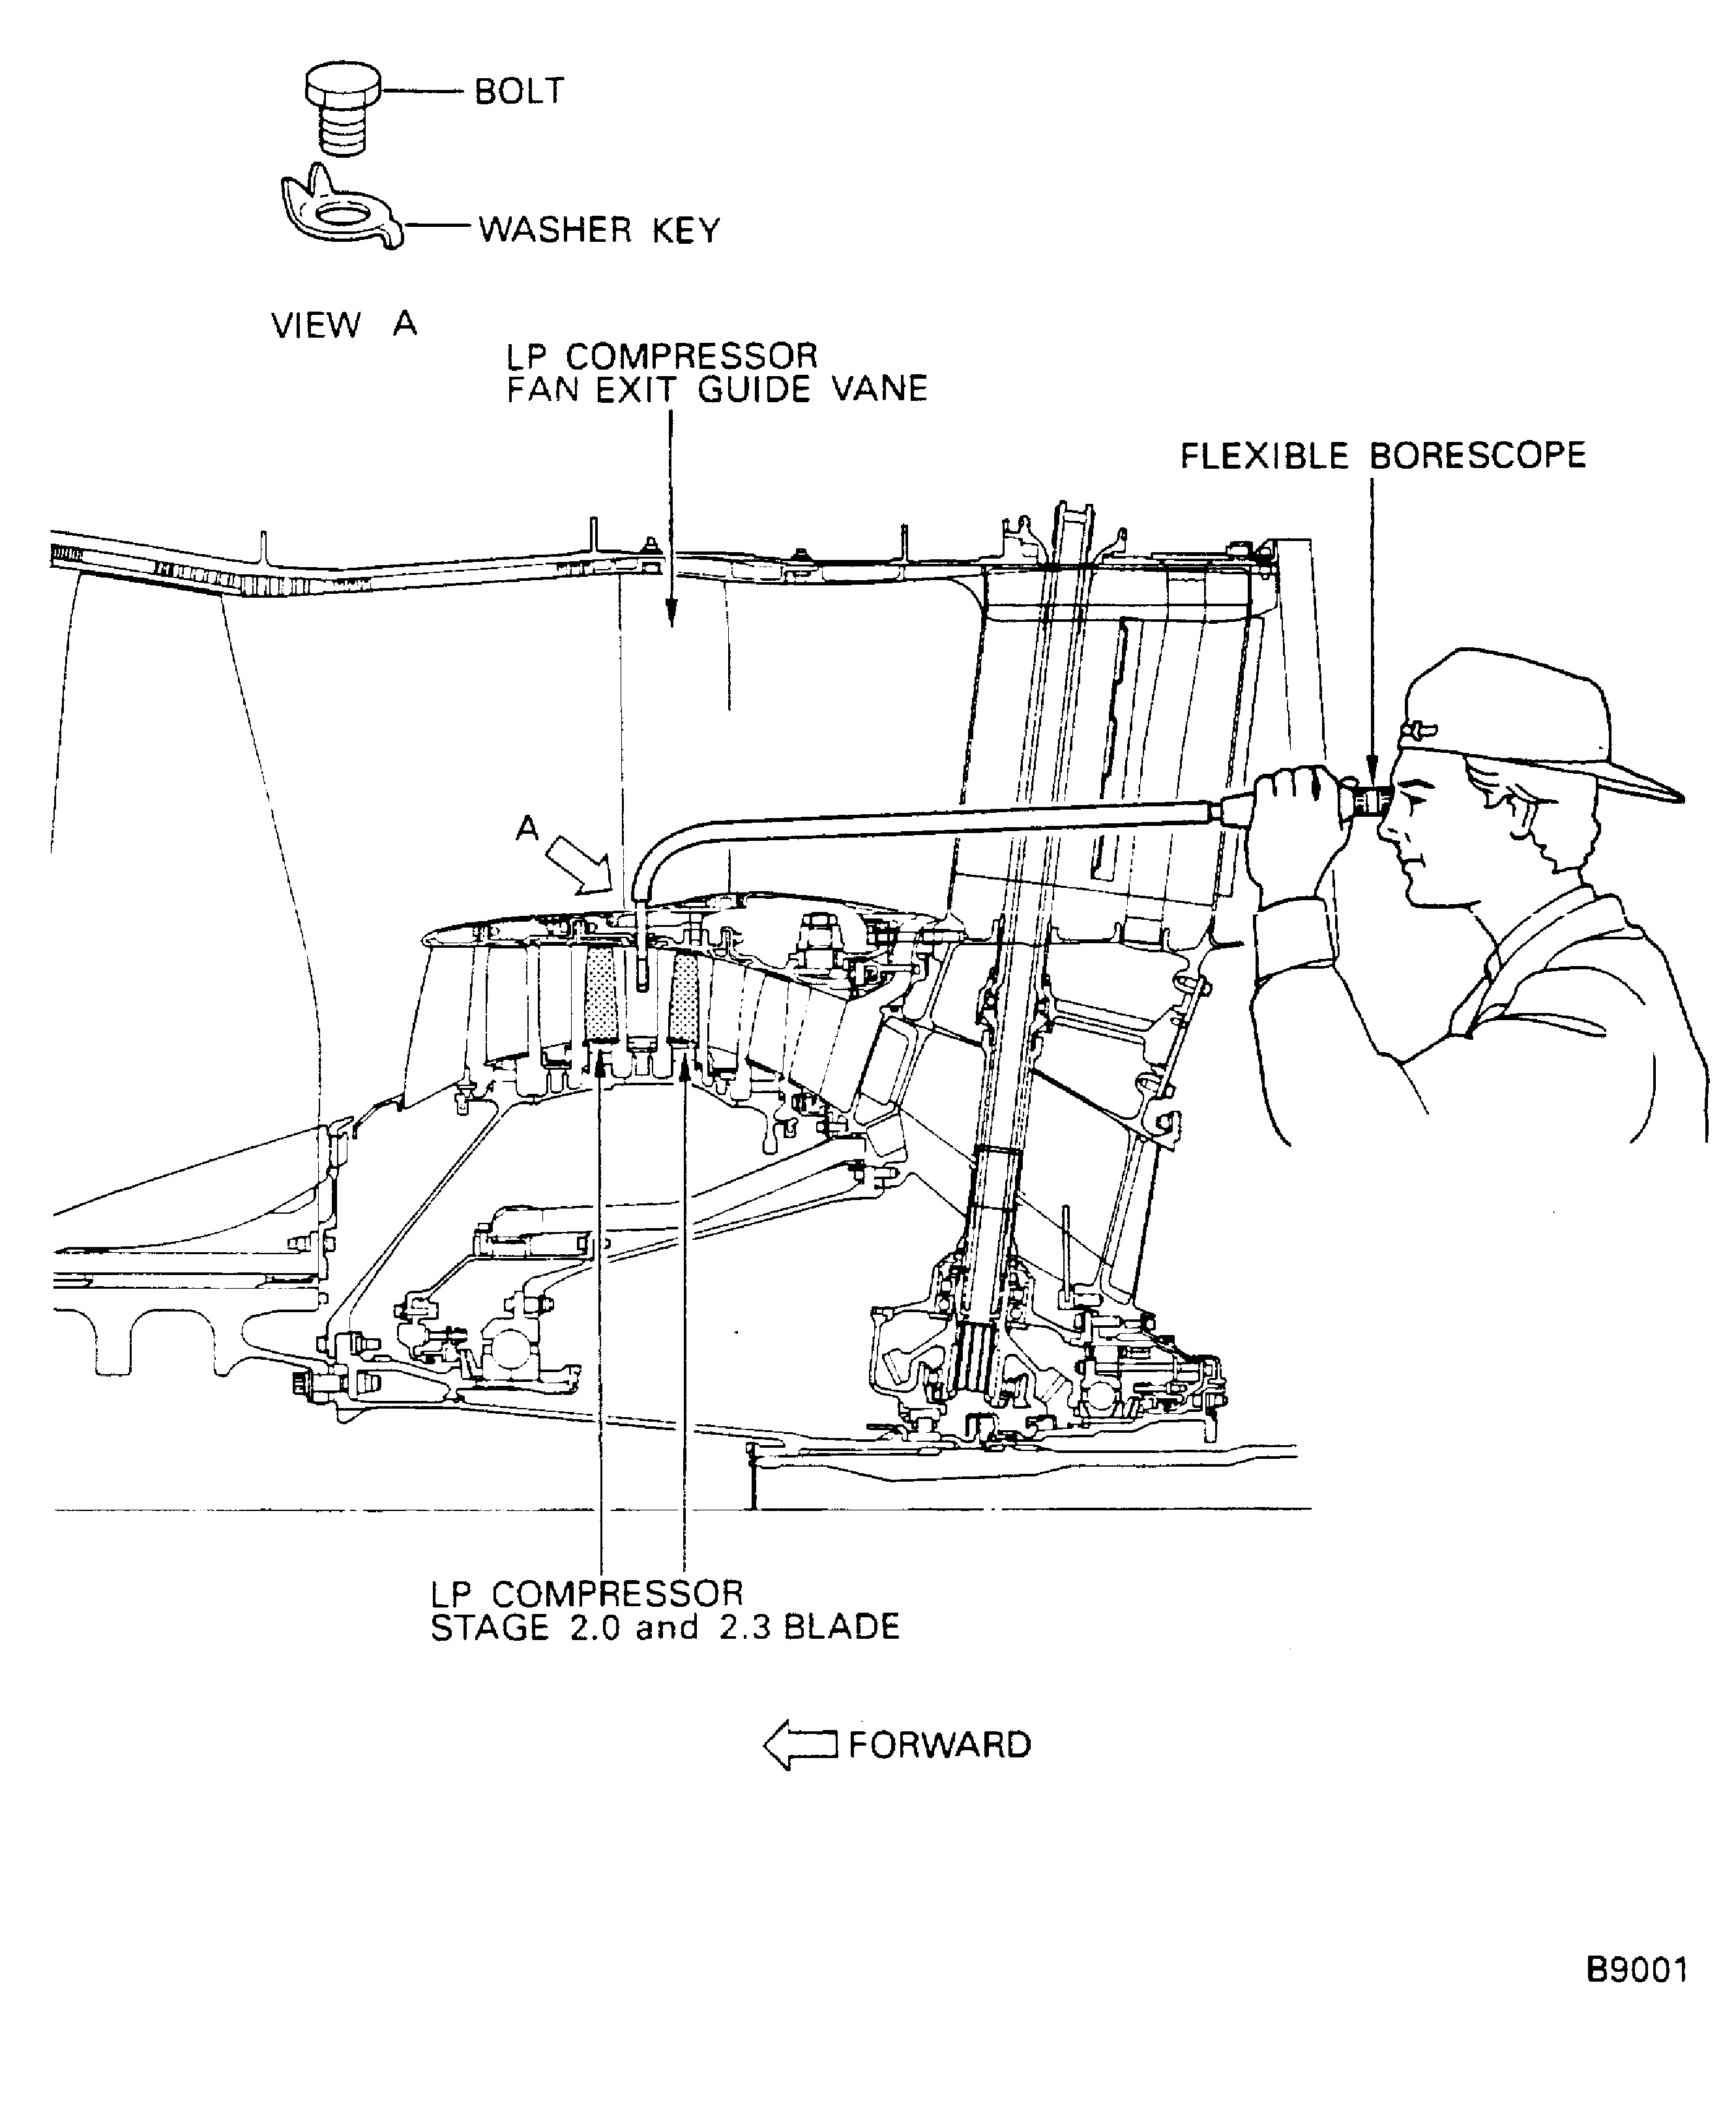
    Figure: LP Compressor Stage 1.5 Blade - Maximum Serviceable Limit

    LP Compressor Stage 1.5 Blade - Maximum Serviceable Limit
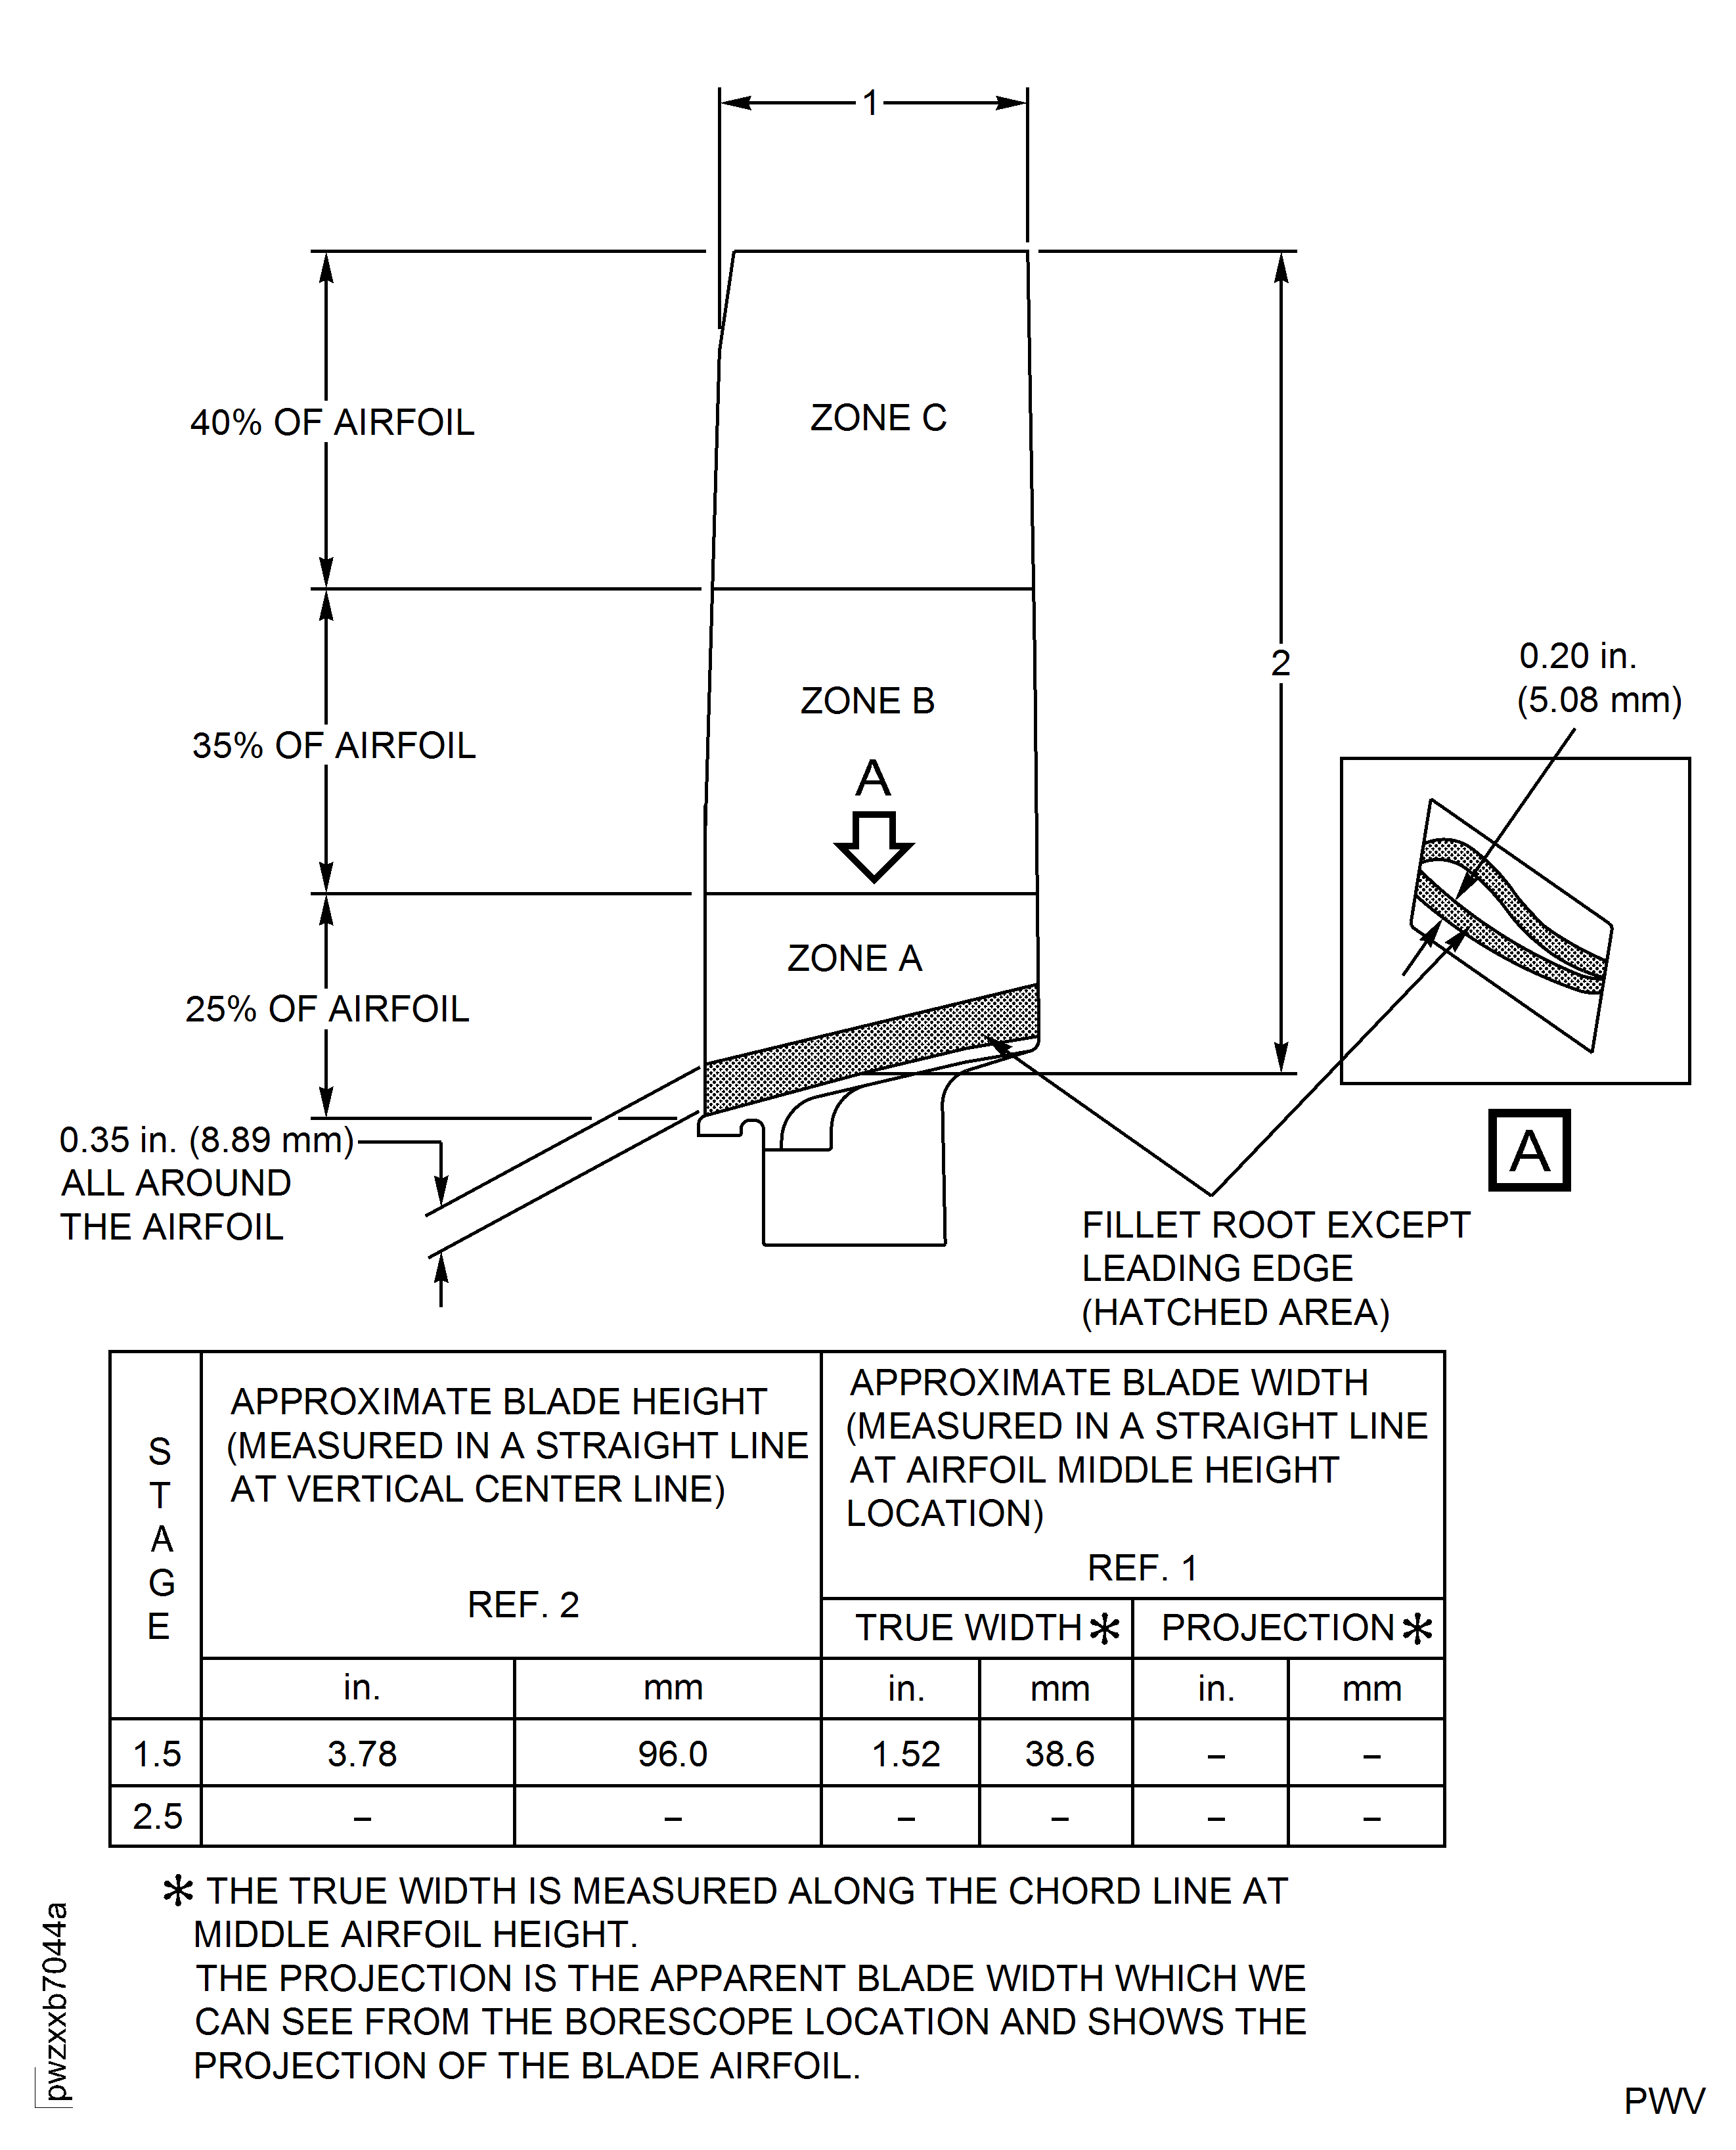
    Figure: LP Compressor Stage 2.0 Blade - Maximum Service Limit

    LP Compressor Stage 2.0 Blade - Maximum Service Limit
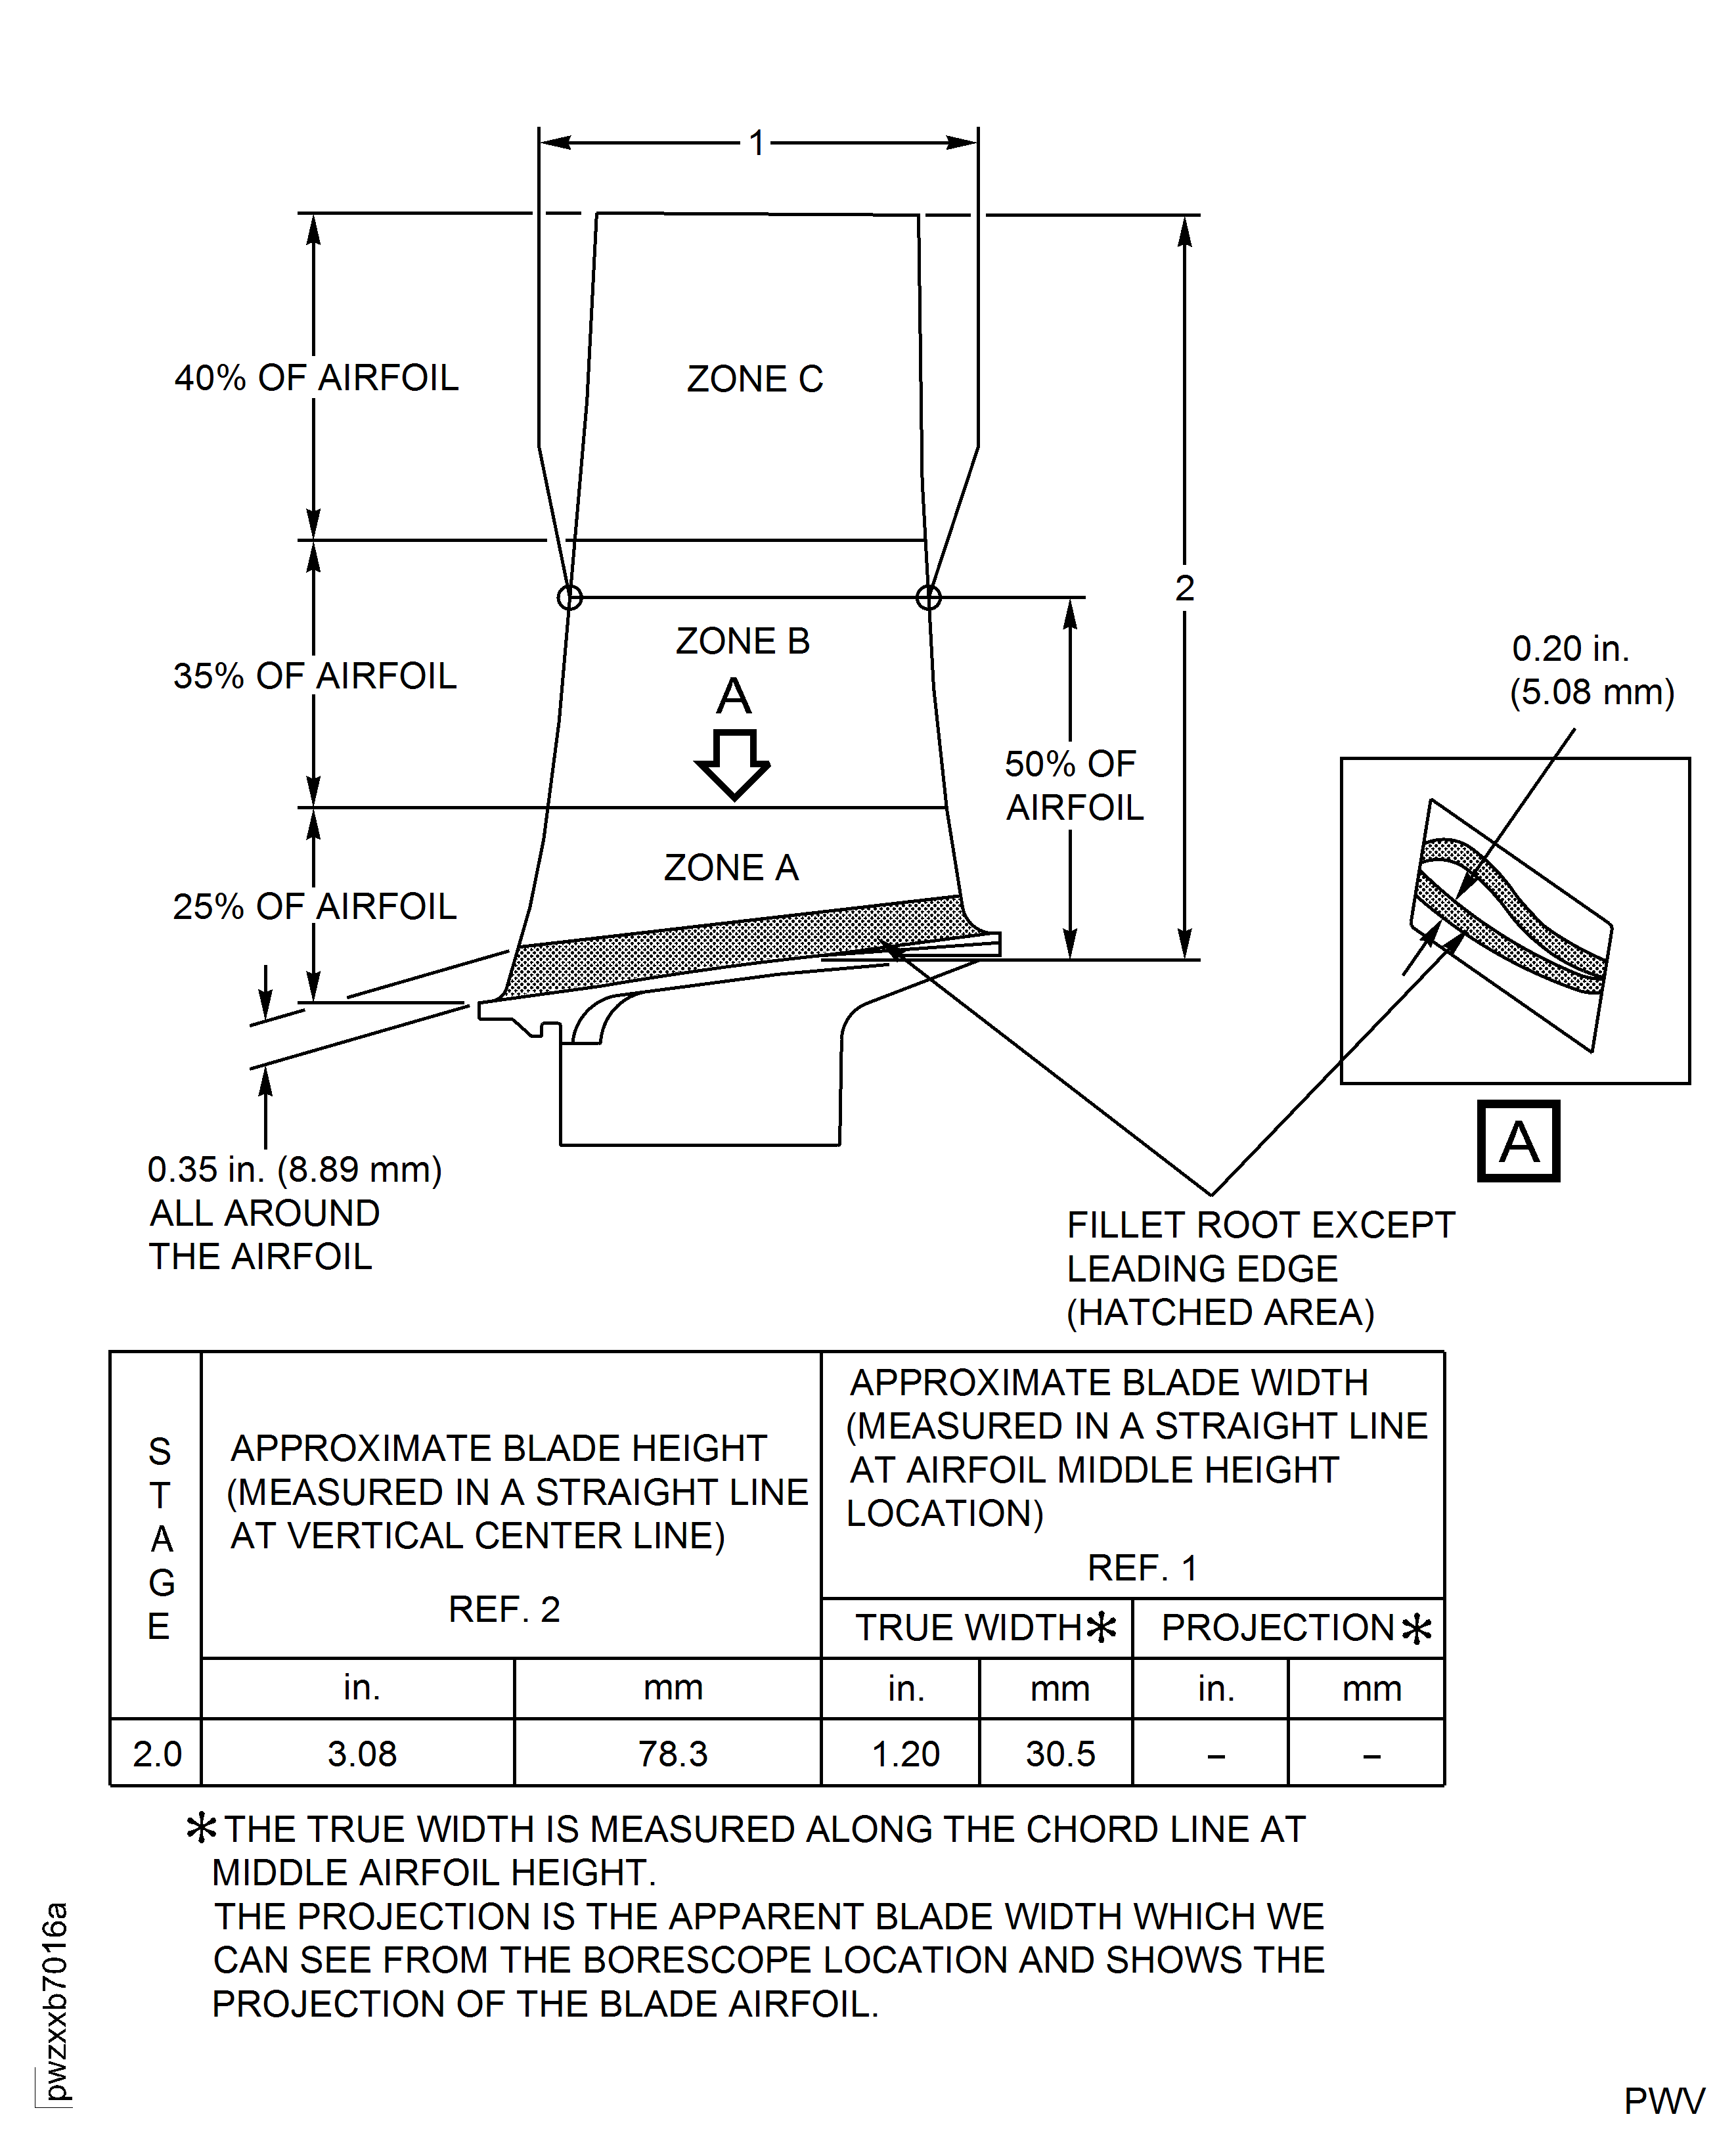
    Figure: LP Compressor Stage 2.3 Blade - Maximum Service Limit

    LP Compressor Stage 2.3 Blade - Maximum Service Limit
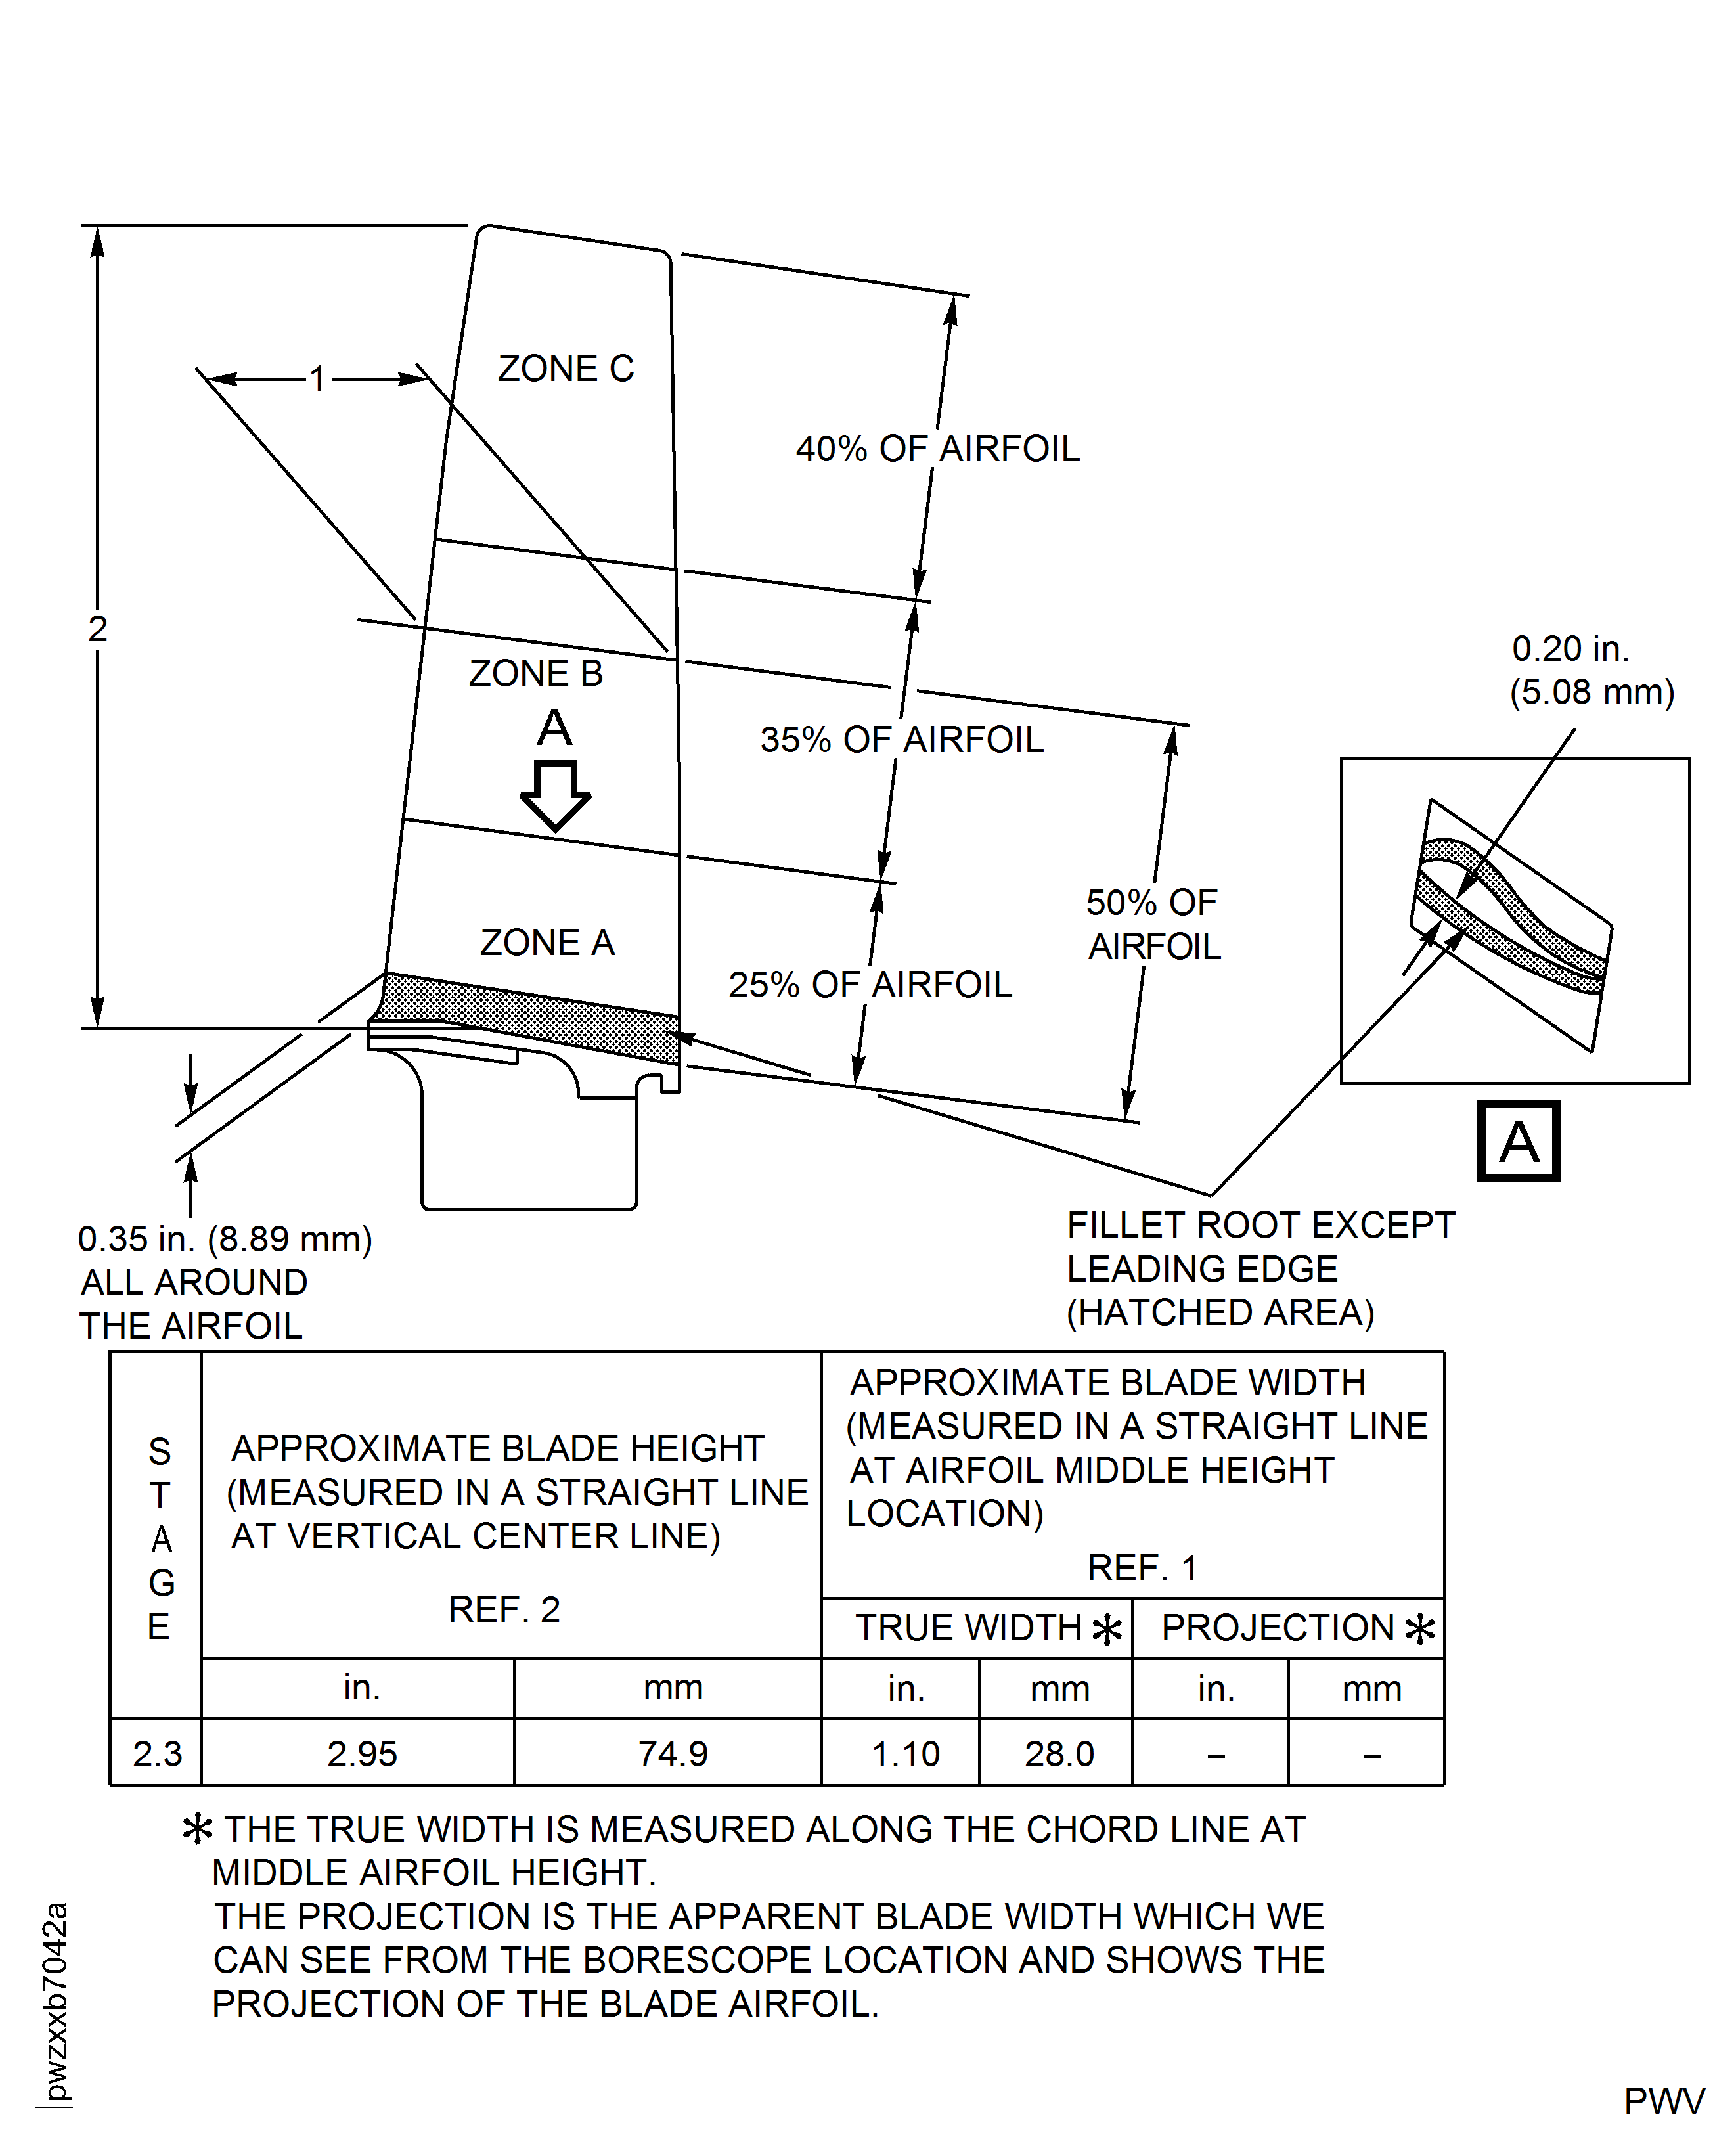
    Figure: LP Compressor Stage 2.5 Blade - Maximum Service Limit

    LP Compressor Stage 2.5 Blade - Maximum Service Limit
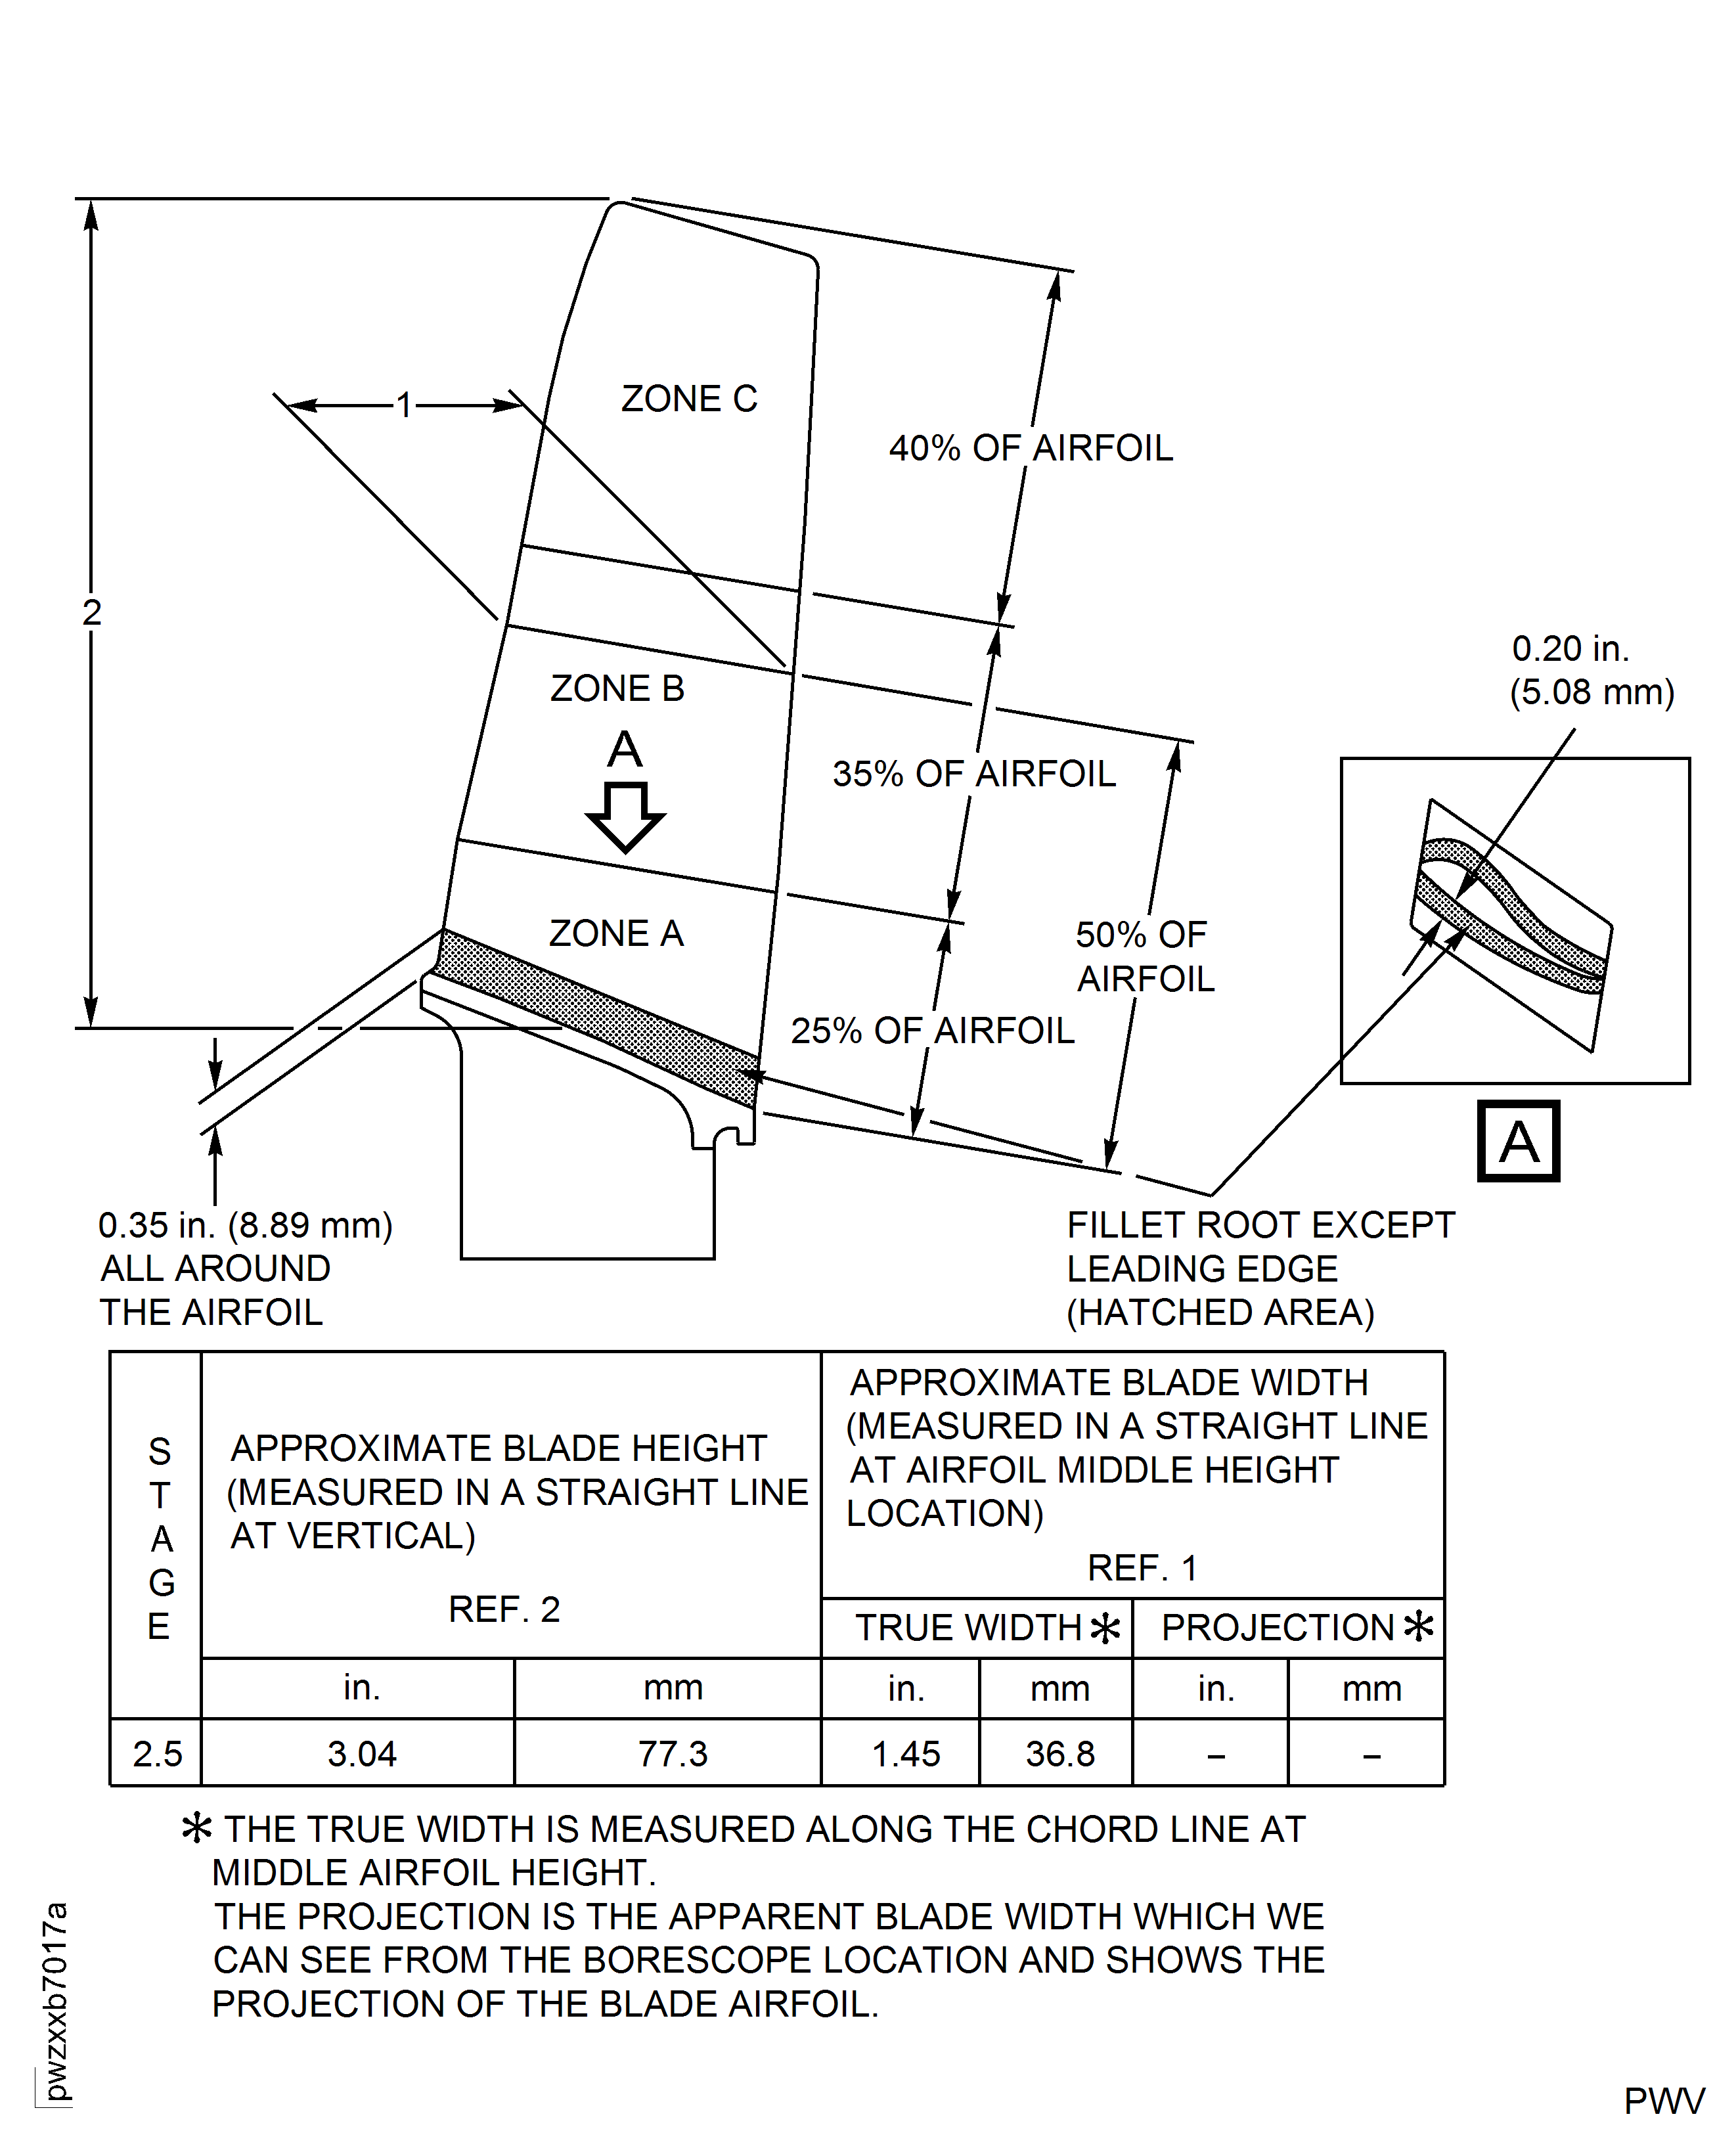
    Figure: Remove the Fan Exit Guide Vanes from the Fan Case Assembly

    Remove the Fan Exit Guide Vanes from the Fan Case Assembly
Requirements After Job Completion

Follow-On Conditions

NONE
Change Type:

Revised the procedure to add repairable limits and figure 5 thru figure 8. (94VJ829D)

Link not Found
Manufacturer Code:0AM53
Enterprise Name:IAE INTERNATIONAL AERO ENGINES AG
BU Name:NULL
Building:SUITE 400
Street:628 HEBRON AVENUE
City:GLASTONBURY
State:CT
Zip Code:06033
Country:USA
Manufacturer Code:IE207
Enterprise Name:DELETED, REFER TO 16956
Link not Found
Manufacturer Code:IE207
Supply Number:CoMat 06-069
Type:sp01
Supply Short Name:CoMat 06-069 MARKER
Supply Name:CoMat 06-069 MARKER
Specification Groups:
Doc NumberType
OMAT:262TMARKS-A-LOT
JCR-085MARKS-A-LOT
Suppliers:
ManufacturerRemarks
IE207
Manufacturer Code:0AM53
Tool Number:IAE 2J12030
Tool Name:IAE 2J12030 Guide tube
Manufacturer Code:0AM53
Tool Number:IAE 6F10056
Tool Name:IAE 6F10056 Borescope equipment, 4 mm or 6 mm, video borescope