Export Control
EAR Export Classification: Not subject to the EAR per 15 C.F.R. Chapter 1, Part 734.3(b)(3), except for the following Service Bulletins which are currently published as EAR Export Classification 9E991: SBE70-0992, SBE72-0483, SBE72-0580, SBE72-0588, SBE72-0640, SBE73-0209, SBE80-0024 and SBE80-0025.Copyright
© IAE International Aero Engines AG (2001, 2014 - 2021) The information contained in this document is the property of © IAE International Aero Engines AG and may not be copied or used for any purpose other than that for which it is supplied without the express written authority of © IAE International Aero Engines AG. (This does not preclude use by engine and aircraft operators for normal instructional, maintenance or overhaul purposes.).Applicability
All
Common Information
TASK 72-32-72-200-002-B00 LPC Bleed Valve Ring - Examine, Inspection-002
General
This TASK gives the procedure for the inspection of the valve ring assembly.
The policy that is necessary for inspection is given in the SPM TASK 70-20-00-200-501.
All the parts must be cleaned before any part is examined. Refer to TASK 72-32-72-100-000 (CLEANING-000).
All the parts must be visually examined for damage, corrosion and wear. Any defects that are not identified in the procedure must be referred to IAE.
The procedure for those parts which must have a crack test is given in Step. Do the test before the part is visually examined.
A ** following repair referenced in this inspection indicates that the repair is not yet published in the current revision of the manual and the part must be rejected. Contact IAE for additional information concerning FAA approved repair date.
Do not discard any part until you are sure there are no repairs available. Refer to the instructions in Repair before a discarded part is used again or oversize parts are installed.
Parts which should be discarded can be held although no repair is available. The repair of a discarded part could be shown to be necessary at a later date.
All the parts must be examined to make sure that all the repairs have been completed satisfactorily.
The practices and processes referred to in the procedure by the TASK numbers are in the SPM.
References
Refer to the SPM for data on these items.
Definitions of Damage, SPM TASK 70-02-02-350-501.
Inspection of Parts, SPM TASK 70-20-00-200-501.
Some data on these items are contained in this TASK. For more data on these items refer to the SPM.
Method of Testing for Crack Indications.
Chemical Processes.
Surface Protection.
Preliminary Requirements
Pre-Conditions
NONESupport Equipment
NONEConsumables, Materials and Expendables
NONESpares
NONESafety Requirements
NONEProcedure
Clean the parts. Refer to TASK 72-32-72-100-000 (CLEANING-000).
SUBTASK 72-32-72-230-062 Examine the Valve Ring Assembly for Cracks
NOTE
It is not necessary to remove the teflon coating before Fluorescent Penetrant Crack Inspection.Refer to Figure.
Repair, VRS1750 TASK 72-32-72-300-003 (REPAIR-003).
Corroded, nicked or scratched.
Examine the outer surface at Location 1.
SUBTASK 72-32-72-220-095 Examine the Valve Ring Assembly Outer Surface
Refer to Figure.
Repair, VRS1750 TASK 72-32-72-300-003 (REPAIR-003).
If the total peeled area is not more than 20 percent of the coating.
Repair, VRS1748 TASK 72-32-72-300-009 (REPAIR-009).
More than in Step.
Peeled teflon coating.
Repair, VRS1750 TASK 72-32-72-300-003 (REPAIR-003).
Corroded, nicked or scratched.
Examine the coating area at Location 2.
Repair, VRS1750 TASK 72-32-72-300-003 (REPAIR-003).
If the total peeled area is not more than five percent of the mating surface.
Repair, VRS1748 TASK 72-32-72-300-009 (REPAIR-009).
More than in Step.
Peeled teflon coating.
Repair, VRS1750 TASK 72-32-72-300-003 (REPAIR-003).
Not more than 0.0059 in. (0.150 mm) in depth.
Reject.
More than in Step.
Corroded, nicked or scratched.
Examine the mating surface at Location 6.
Repair, VRS1750 TASK 72-32-72-300-003 (REPAIR-003).
Any amount.
Peeled teflon coating.
Repair, VRS1750 TASK 72-32-72-300-003 (REPAIR-003).
Not more than 0.0059 in. (0.150 mm) in depth.
Reject.
More than in Step.
Corroded, nicked or scratched.
Examine the corner edges of mating surface at Location 9.
SUBTASK 72-32-72-220-096 Examine the Valve Ring Assembly (02-100) Coating Area
Refer to Figure.
Accept.
If the diameter is between 0.2476 in. and 0.2481 in. (6.289 mm and 6.304 mm).
Write down the dimension of the diameter.
Repair, VRS1752 TASK 72-32-72-300-005 (REPAIR-005).
More than 0.2481 in. (6.304 mm).
Worn.
Examine the pin holes at Location 0485.
Accept.
If the diameter is between 0.3102 in. and 0.3107 in. (7.877 mm and 7.892 mm).
Write down the dimension of the diameter.
Repair, VRS1752 TASK 72-32-72-300-005 (REPAIR-005).
More than 0.3107 in. (7.892 mm).
Worn.
Examine the pin holes at Location 0480.
Repair, VRS1752 TASK 72-32-72-300-005 (REPAIR-005).
Loose or missing.
Examine the bushing at Location 3.
SUBTASK 72-32-72-220-097 Examine the Valve Ring Assembly Holes
Refer to Figure.
Repair, VRS1751 TASK 72-32-72-300-006 (REPAIR-006).
Torn or missing.
Examine the seal at Location 4.
Repair, VRS1751 TASK 72-32-72-300-006 (REPAIR-006).
Other than in Step.
Worn.
Examine the distance at Location 7.
SUBTASK 72-32-72-220-098 Examine the Valve Ring Assembly Seal
Refer to Figure.
Repair, VRS1785 TASK 72-32-72-300-007 (REPAIR-007).
Loose or missing.
Examine the guide at Location 5.
Repair, VRS1785 TASK 72-32-72-300-007 (REPAIR-007).
Loose or missing.
Examine the rivet at Location 5.
SUBTASK 72-32-72-220-099 Examine the Valve Ring Assembly Guide Assembly
Refer to Figure.
Repair, VRS1750 TASK 72-32-72-300-003 (REPAIR-003).
Corroded or dented.
Examine the side surface at Location 8.
SUBTASK 72-32-72-220-100 Examine the Valve Ring Assembly Side Surfaces
Refer to Figure.
Repair, VRS1750 TASK 72-32-72-300-003 (REPAIR-003).
Corroded, nicked or scratched.
Examine all the surfaces which do not include the identified locations.
SUBTASK 72-32-72-220-101 Examine the Valve Ring Assembly all the Surfaces
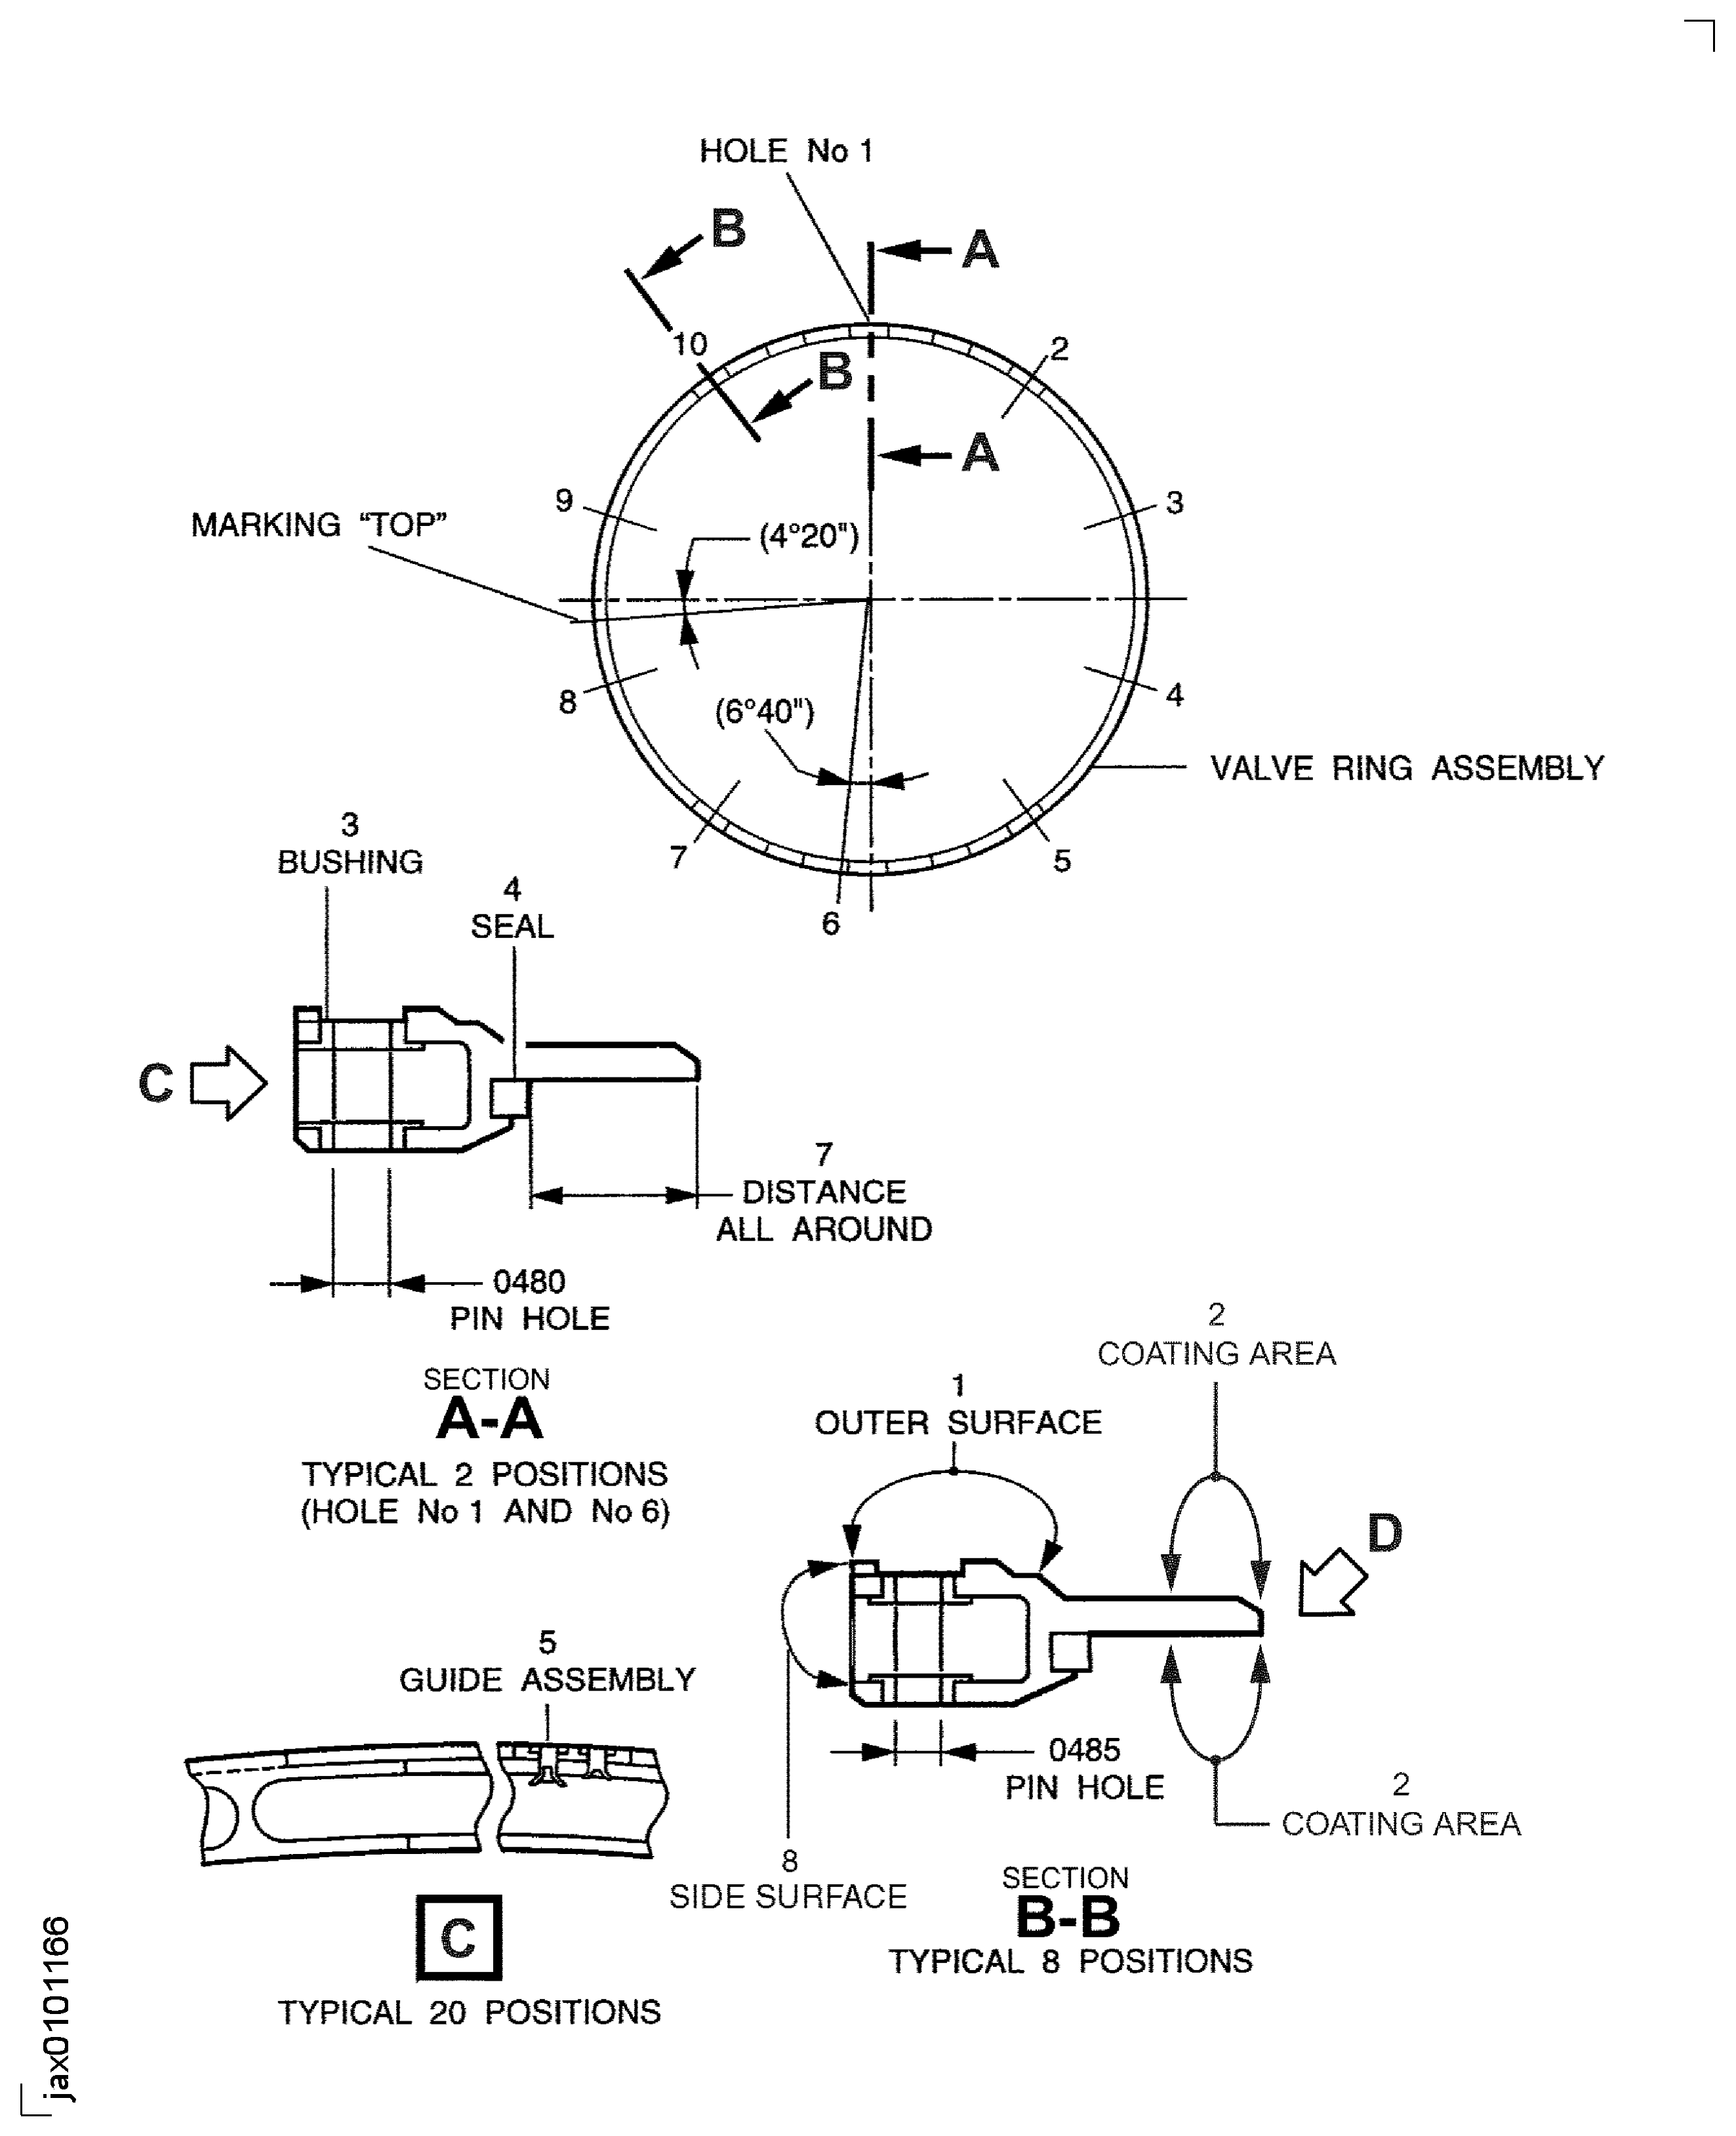
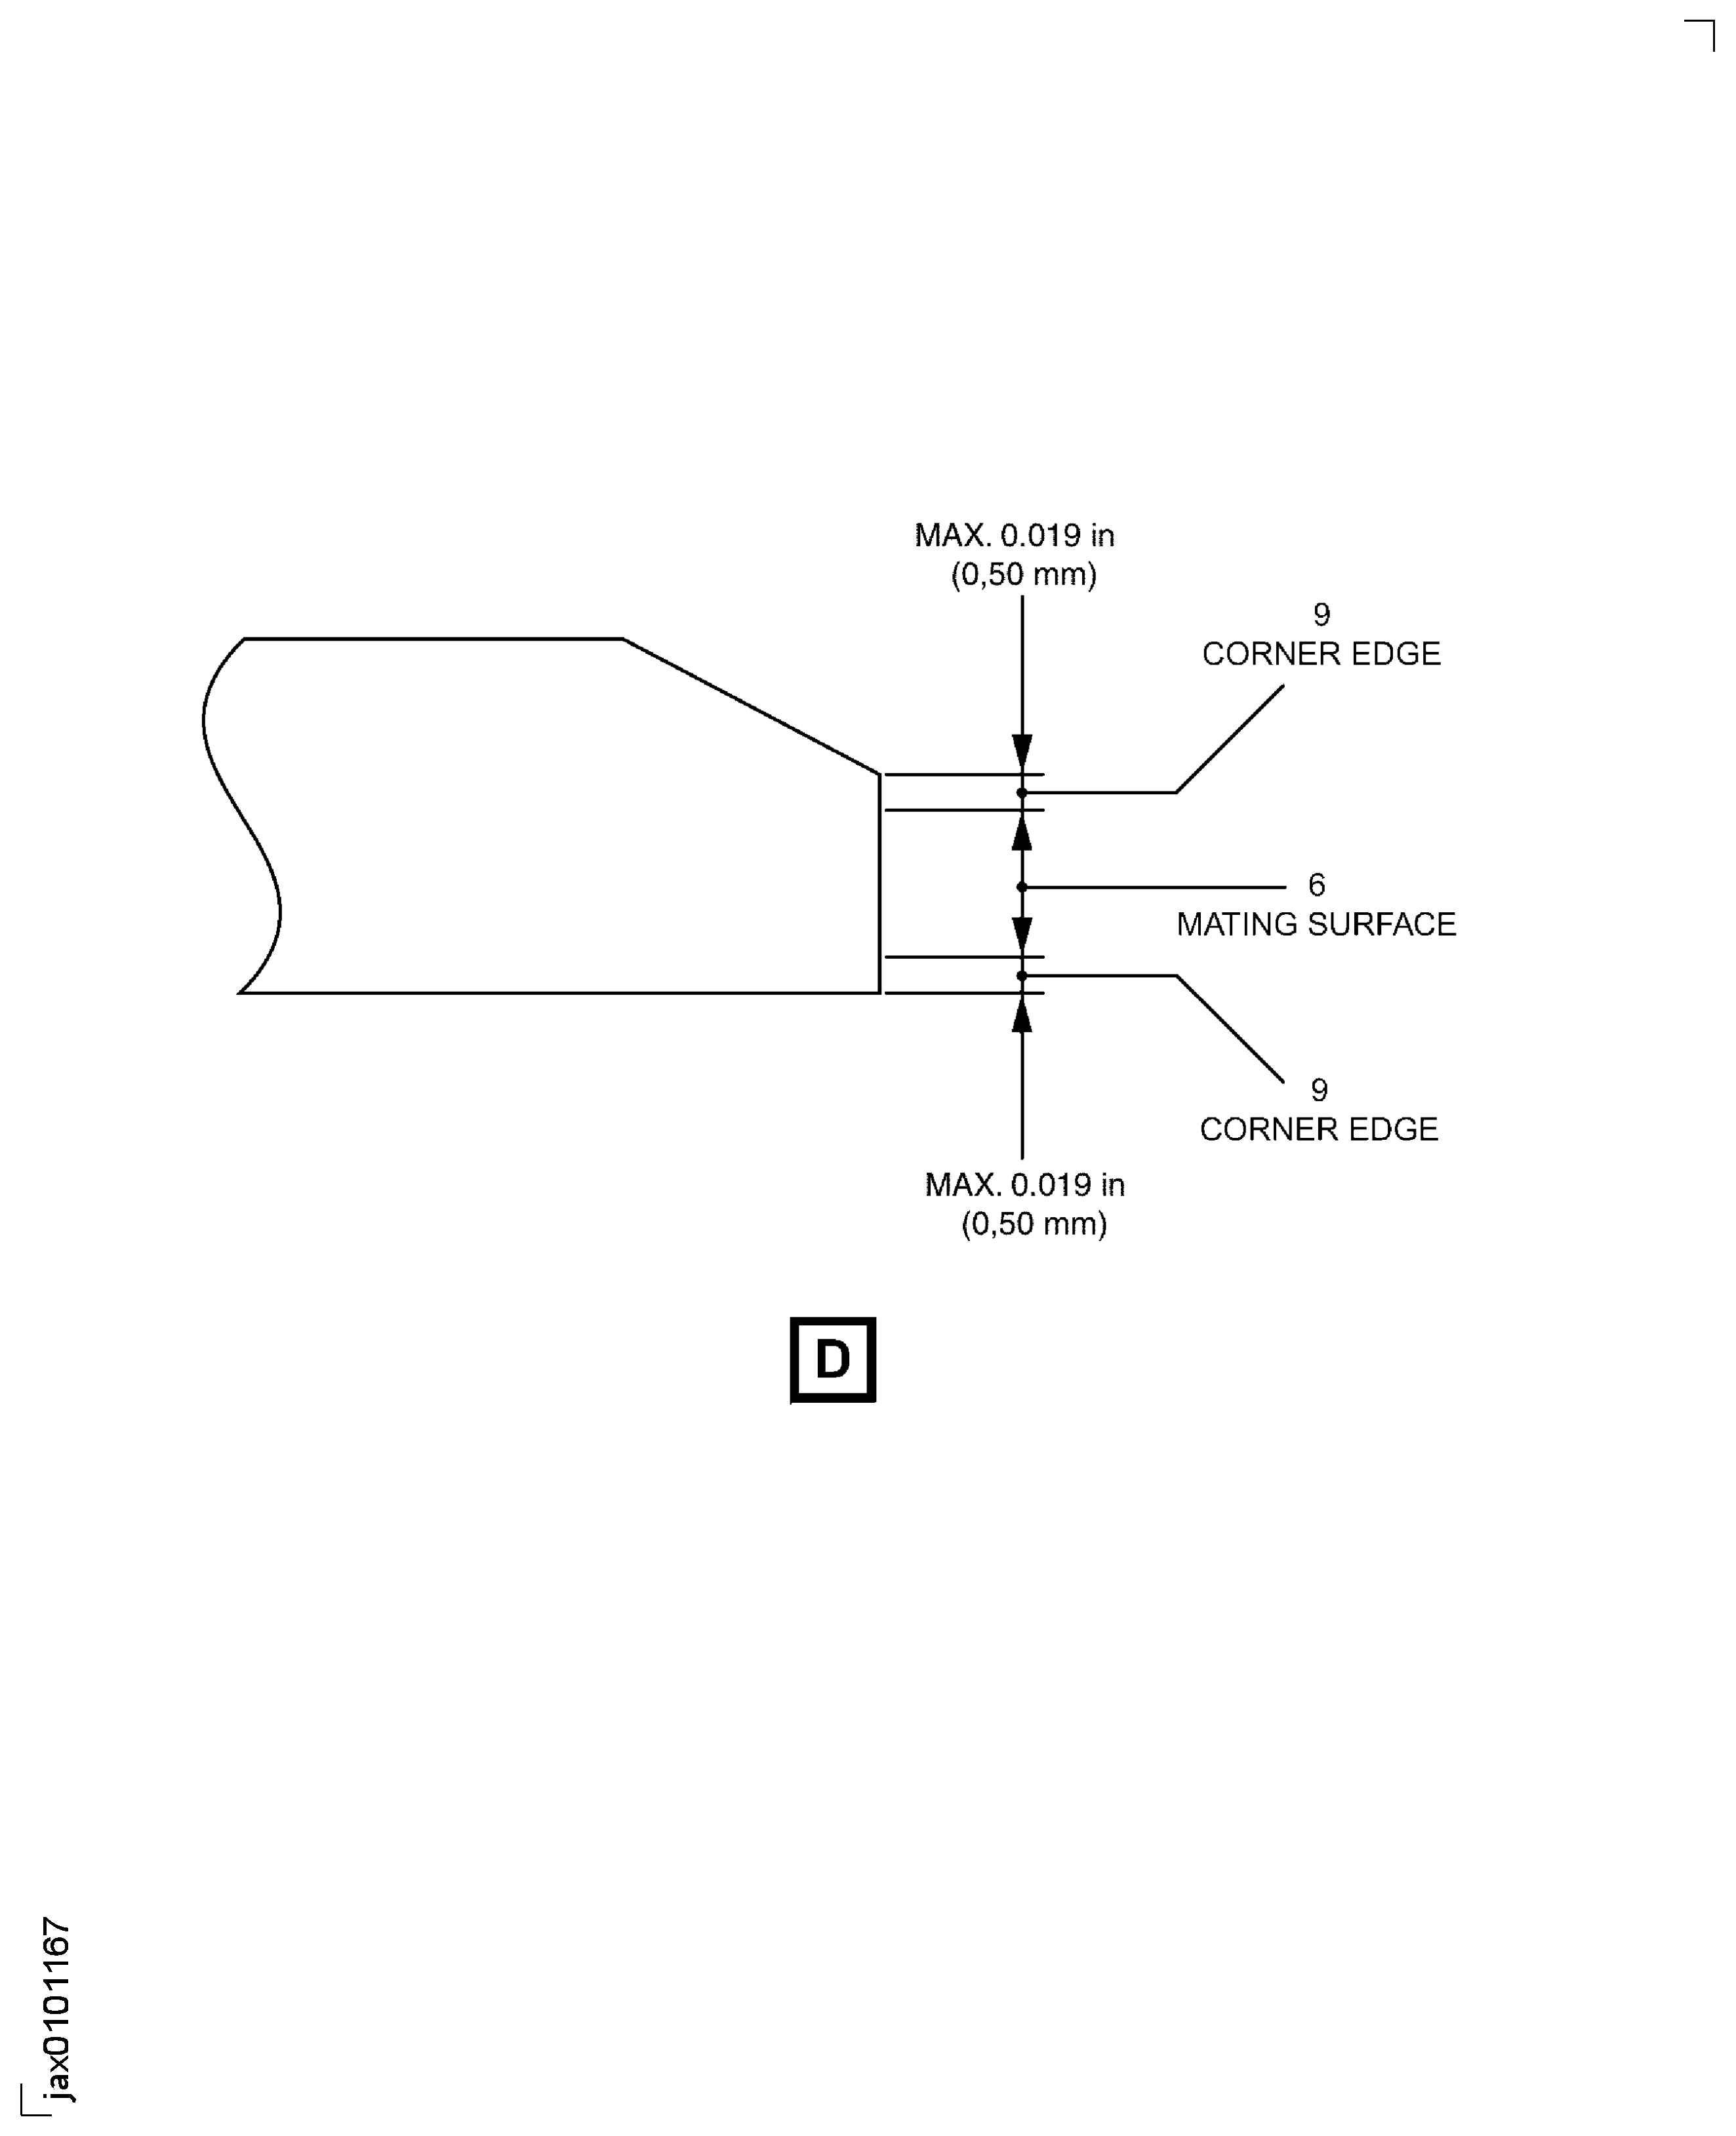
Figure: Locations On The Valve Ring Assembly
Locations On The Valve Ring Assembly

Locations On The Valve Ring Assembly

