Export Control
EAR Export Classification: Not subject to the EAR per 15 C.F.R. Chapter 1, Part 734.3(b)(3), except for the following Service Bulletins which are currently published as EAR Export Classification 9E991: SBE70-0992, SBE72-0483, SBE72-0580, SBE72-0588, SBE72-0640, SBE73-0209, SBE80-0024 and SBE80-0025.Copyright
© IAE International Aero Engines AG (2001, 2014 - 2021) The information contained in this document is the property of © IAE International Aero Engines AG and may not be copied or used for any purpose other than that for which it is supplied without the express written authority of © IAE International Aero Engines AG. (This does not preclude use by engine and aircraft operators for normal instructional, maintenance or overhaul purposes.).Applicability
All
Common Information
TASK 71-00-00-700-009 Test No. 9 - Low Pressure (LP) Compressor (Fan) Trim Balancing (Trial Weight Method), Testing-009
General
This TASK gives the trim balance procedure for the LP compressor (fan) rotor.
This procedure uses three trial balance weights (dummy weights). It makes you compare the actual unbalance vibration indication with the unbalance indication with the three trial trim balance weights installed at the consecutive positions (bolt holes).
The data is vectorially plotted to find the phase angle and the vibration amount necessary for the final trim balance.
This procedure requires three trial trim balance weights (dummy weights). Use the actual trim balance weights, Item No.14, Identification No. 5A0014, as the trial trim balance weights (dummy weights). Refer to Table 4, Figure.
This procedure requires graphical vectorial analysis. Prepare and use a polar graph sheet.
Instructions to operate the engine, engine safety precautions, and other general information are found in Engine Safety Precautions and Engine Operation Limits, Guidelines, and Special Precautions. Refer to TASK 71-00-00-700-050-A00 (TESTING-000, CONFIG-001), TASK 71-00-00-700-050-B00 (TESTING-000, CONFIG-002),TASK 71-00-00-700-051-A00 (TESTING-000, CONFIG-001), and TASK 71-00-00-700-051-B00 (TESTING-000, CONFIG-002).
When you measure the vibration amount and angle, you must use the same vibration channel throughout this TASK.
When you measure the vibration angle you must measure it in a clockwise direction when you look from the engine front.
Angular directions (clockwise/counterclockwise) in this TASK are identified as the directions when you look from the engine front.
NOTE
NOTE
NOTE
NOTE
NOTE
NOTE
NOTE
NOTE
Do not install the washer Inlet Cone Assembly And Inlet Cone Fairing (72-38-11, 01-215) at the bolt hole where the trim balance weight is installed.
The trial trim balance weight is the same as the trim balance weight Item No.14, Identification No.5A0014. See Table 4, Figure.
NOTE
NOTE
NOTE
NOTE
NOTE
NOTE
NOTE
NOTE
NOTE
NOTE
NOTE
NOTE
NOTE
NOTE
NOTE
NOTE
Preliminary Requirements
Pre-Conditions
NONESupport Equipment
| Name | Manufacturer | Part Number / Identification | Quantity | Remark |
|---|---|---|---|---|
| Oscilloscope | LOCAL | Oscilloscope |
Consumables, Materials and Expendables
| Name | Manufacturer | Part Number / Identification | Quantity | Remark |
|---|---|---|---|---|
| CoMat 06-069 MARKER | IE207 | CoMat 06-069 |
Spares
NONESafety Requirements
NONEProcedure
N1/N2 vibration peaks.
N1/N2 speeds at which vibration peaks occurred.
Do a vibration survey by the Test No.8 - Vibration Survey. Refer to TASK 71-00-00-700-008-A00 (TESTING-008, CONFIG-001) and TASK 71-00-00-700-008-B00 (TESTING-008, CONFIG-002). Measure and record the following data:
Do a Vibration Survey
N1/N2 vibration peaks.
N1/N2 speeds at which vibration peaks occurred.
Examine the following vibration peaks which are measured and recorded in step 3.A. For the limits, refer to TASK 71-00-00-700-051-A00 (TESTING-000, CONFIG-001) and TASK 71-00-00-700-051-B00 (TESTING-000, CONFIG-002), Engine Operation Limits, Guidelines and Special Procedures; Vibration Limits.
Examine the Vibration Amount at the Speed Where the Vibration Peak Occurs, Fig. 71-00-00-990-124
Slowly increase the engine speed to takeoff power. Refer to TASK 71-00-00-700-008-A00 (TESTING-008, CONFIG-001) and TASK 71-00-00-700-008-B00 (TESTING-008, CONFIG-002).
Slowly decrease the engine speed to the vibration check points which are shown in TABLE 3, Figure.
After the engine speed gets to a vibration check point, keep the speed for one minute before you measure the vibration.
Measure the angles AD1, AD2 and AD3 with an oscilloscope or an equivalent.
Measure the engine speeds (AS1, AS2, AS3), vibration amounts (AV1, AV2, AV3) and the angles (AD1, AD2, AD3) in N1 order at the three vibration check points and write on TABLE 3, Figure.
Go back to MIN IDLE for six minutes.
Do a shutdown by the Discontinued Start and Shutdown Procedure. Refer to TASK 71-00-00-700-054-A00 (TESTING-000, CONFIG-001) and TASK 71-00-00-700-054-B00 (TESTING-000, CONFIG-002).
Measure the Vibration at the Vibration Check Points Without the Trial Trim Balance Weights
Make temporary marks on the front blade retaining ring with CoMat 06-069 MARKER to identify the position of the inlet cone fairing.
Remove the six bolts and the inlet cone fairing from the inlet cone. Refer to TASK 72-38-11-020-001
Remove the inlet cone fairing
Make sure of the angular position AD1 which was measured in step 5.D.
The angular position AD1 was recorded on Table 3, Figure.
Find three consecutive bolts which are near the angular position AD1.
Find the position at which you install the three trial trim balance weights
Remove the three bolts and washers from the found bolt holes B.
Install the three trial trim balance weights Inlet Cone Assembly And Inlet Cone Fairing (72-38-11, 01-460) to the bolt holes B with the bolts Inlet Cone Assembly And Inlet Cone Fairing (72-38-11, 01-220).
Torque the bolts to 180 to 220 lbfin (20.00 to 25.00 Nm).
Install the three trial trim balance weights on to the inlet cone flange
Measure the angle ADo clockwise from the timing mark to the center of the three trial trim balance weights.
Write the angular position ADo on TABLE 7A, Figure.
Install the inlet cone fairing and the six bolts Inlet Cone Assembly And Inlet Cone Fairing (72-38-11, 01-130) to the initial position and torque the bolts to 180 to 220 lbfin (20.00 to 25.00 Nm). Refer toTASK 72-38-11-420-001.
Install the Trial Trim Balance Weights to the Inlet Cone Flange, Fig. 71-00-00-990-123-001 and Fig. 71-00-00-990-123-002
Do Test No.8. Refer to TASK 71-00-00-700-008-A00 (TESTING-008, CONFIG-001) and TASK 71-00-00-700-008-B00 (TESTING-008, CONFIG-002).
Measure and write the vibration at the vibration check points. Write the data on Table 5.
Go back to MIN IDLE for six minutes.
Do a shutdown by the Discontinued Start, Restart and Shutdown Procedures. Refer to TASK 71-00-00-700-054-A00 (TESTING-000, CONFIG-001) and TASK 71-00-00-700-054-B00 (TESTING-000, CONFIG-002).
Measure the Vibration at the Vibration Check Points in the TABLE 5, Fig. 71-00-00-990-125
Make temporary marks on the front blade retaining ring with CoMat 06-069 MARKER to identify the position of the inlet cone fairing.
Remove the six bolts and the inlet cone fairing from the inlet cone. Refer to TASK 72-38-11-020-001 (REMOVAL).
Remove the inlet cone fairing
Remove the three bolts which attach the trial trim balance weights to the inlet cone.
Replace each trial balance weight with the washer Inlet Cone Assembly And Inlet Cone Fairing (72-38-11, 01-215).
Install the washers with the bolts Inlet Cone Assembly And Inlet Cone Fairing (72-38-11, 01-220). Torque the bolts to 180 to 220 lbfin (20.00 to 25.00 Nm).
Remove the trial trim balance weights and install the washer.
Remove the Trial Trim Balance Weights, Fig. 71-00-00-990-123-001
Write the vector AV1 and AV4 on a polar coordinates, DIAGRAM 1.
Write the vector AV2 and AV5 on a polar coordinates, DIAGRAM 2.
Write the vector AV3 and AV6 on a polar coordinates, DIAGRAM 3.
Get the vector AC1 and the angle AB1 on the polar coordinates, DIAGRAM 1.
Get the vector AC2 and the angle AB2 on the polar coordinates, DIAGRAM 2.
Get the vector AC3 and the angle AB3 on the polar coordinates, DIAGRAM 3.
The direction of the vectors AW1, AW2 and AW3 are found as follows (DIAGRAM 4):
Direction AW1: Clockwise turned from the
trial trim weight direction by
angle AB1 that is the
clockwise angle from AC1 to AV1
Direction AW2: Clockwise turned from the
trial trim weight direction by
angle AB2 that is the
clockwise angle from AC2 to AV2
Direction AW3: Clockwise turned from the
trial trim weight direction by
angle AB3 that is the
clockwise angle from AC3 to AV3
Calculate the required balance effect vectors AW1, AW2 and AW3. They are calculated with the following equations:
Total amount TM0 = Moment effect of three trial trim
balance weights (Item No.14, 5A0014)
= 6.546 oz.in (4714 gm mm)
Amount AW1 = TM0 (6.546 oz.in) x
LENGTH AV1
LENGTH AC1
Amount AW2 = TM0 (6.546 oz.in) x
LENGTH AV2
LENGTH AC2
Amount AW3 = TM0 (6.546 oz.in) x
LENGTH AV3
LENGTH AC3
Calculate the Trim Balance Effect Vectors at the Three Speeds, Fig. 71-00-00-990-126
Make lines of vectors AW1, AW2 and AW3 on DIAGRAM 4 as following sequence, Figure.
AW1 has not got a start point but has a direction Clockwise angle AB1 from datum.
AW2 has a start point at the end of AW1 and a direction clockwise angle AB2 from the datum.
AW3 has a start point at the end of AW2 and a direction clockwise angle AB3 from the datum.
Get vector sum AW4 and angle AB4. Vector AW4 starts at the root of AW1 and stops at the tip of AW3. AB4 is the clockwise angle from the datum line to vector AW4.
Calculate vector sum of vectors AW1, AW2 and AW3
Get the required trim phase angle AK in the clockwise direction from the timing mark on the front retaining ring, Figure.
AK = ADo (clockwise angle from the timing mark
to the trial trim balance weight position)
+
AB4 (clockwise angle from the datum line
to the vector AW4)
Calculate the Vector Average of Vectors AW1, AW2 and AW3 to Get the Required Trim Balance Weight
If the required trim balance weight W is not more than 1 oz (28 gm), trim the LP compressor balance with the trim balance weights on the inlet cone flange. Go to step 12.
If the required trim balance weight W is more than 1 oz (28 gm), trim the LP compressor balance with the trim balance weights on the retaining ring flange. Go to step 13.
Find the Flange at which the Required Trim Balance Weight (Unbalance Amplitude W) is to be Installed
Make sure that the inlet cone fairing is not installed on the inlet cone.
Suppose that the required trim balance weight W calculated in step 10.B. is 12.7 gm and that the necessary trim angular position (phase angle) AK is 398 degrees.
Find the bolt hole A near to the unbalance phase, in a clockwise direction looking from the engine front.
The bolt hole A which is 195 degrees apart from the timing mark is selected, Figure.
Give the numbers N1 to N24 to the bolt holes. N1 must be given to the hole A found in step (4). The remaining numbers must be identified in clockwise direction when you look from the engine front.
Find the nearest unbalance amplitude on Table 7 to the W (12.7 gm).
The nearest unbalance amplitude = 15 gm.
Find the nearest unbalance phase angle FA on Table 7 to the FA (36 degrees) found in step (6).
The nearest unbalance phase angle = 25 degrees.
Find the trim balance weights and positions from Table 7 Sheet 4 with 15 gm and 25 degrees, Figure.
The following data are found
N2-11
N14-14
N15-14
N24-11
The found trim balance weights and positions are shown on Figure.
An example follows:
To find the positions where you require to install the trim balance weights, count the hole numbers. Start at bolt hole No.N1 which is near to the unbalance phase and go clockwise when you look from the engine front.
Make a mark on the front blade retaining ring with CoMat 06-069 MARKER to identify the position of the trim balance weights.
Remove the bolts and the washers from the found positions and remove the trim balance weights, if they were already installed at the positions. Refer to the NOTE in step 12.B.(2).
Make sure of the identification mark and the weight value identified on each trim balance weight, Figure.
Install the trim balance weights Inlet Cone Assembly And Inlet Cone Fairing (72-38-11, 01-440 , Inlet Cone Assembly And Inlet Cone Fairing 01-445, Inlet Cone Assembly And Inlet Cone Fairing 01-450, Inlet Cone Assembly And Inlet Cone Fairing 01-455 and Inlet Cone Assembly And Inlet Cone Fairing 01-460) to the positions found in step 12.B. with the bolts Inlet Cone Assembly And Inlet Cone Fairing (72-38-11, 01-220).
Torque the bolts to 180 to 220 lbfin (20.00 to 25.00 Nm).
Install the trim balance weights to the found positions which are found in step B., Figure.
Install the inlet cone fairing and the six bolts Inlet Cone Assembly And Inlet Cone Fairing (72-38-11, 01-130) to the initial position. Refer to TASK 72-38-11-420-001 (INSTALLATION).
Go to step 14.
Install the Trim Balance Weights to the Inlet Cone Flange (24 Bolt Flange)
Make sure that the inlet cone fairing is not installed on the inlet cone.
Remove the inlet cone. Refer to TASK 72-38-11-020-001.
Suppose that the required trim balance weight W is 28.4 gm and the trim phase angle AK (clockwise) is 241 degrees.
Find the trim balance weights and positions from Table 8 Sheet 18 with 30 gm and 60 degrees, Figure.
The following data are found
H24-2
H25-4
H28-1
The found trim balance weights and positions are shown on Figure.
An example follows:
To find the positions where you require to install the trim balance weights, count holes counterclockwise from the timing mark on the front blade retaining ring, Figure.
Remove the bolts at the found position. Remove the trim balance weight if it was already installed at the found position.
Make sure of the identification mark and the weight value of each trim balance weight, Figure.
Install the trim balance weights ENGINE-LP COMPRESSOR (FAN) MODULE (72-31-00, 01-164 , ENGINE-LP COMPRESSOR (FAN) MODULE 01-165, ENGINE-LP COMPRESSOR (FAN) MODULE 01-166 and ENGINE-LP COMPRESSOR (FAN) MODULE 01-167) to the front blade retaining ring with bolts ENGINE-LP COMPRESSOR (FAN) MODULE (72-31-00, 01-120).
Torque the bolts to 180 to 220 lbfin (22.00 to 25.00 Nm).
Install the trim balance weights at the positions, Figure.
Install the inlet cone, the trim balance weights Inlet Cone Assembly And Inlet Cone Fairing (72-38-11, 01-440 , Inlet Cone Assembly And Inlet Cone Fairing 01-445, Inlet Cone Assembly And Inlet Cone Fairing 01-450, Inlet Cone Assembly And Inlet Cone Fairing 01-455 and Inlet Cone Assembly And Inlet Cone Fairing 01-460), the washers Inlet Cone Assembly And Inlet Cone Fairing (72-38-11, 01-215) and the 18 bolts Inlet Cone Assembly And Inlet Cone Fairing (72-38-11, 01-220) to the initial positions, Figure and Figure. Refer to TASK 72-38-11-420-001.
Install the inlet cone fairing and the six bolts Inlet Cone Assembly And Inlet Cone Fairing (72-38-11, 01-130) to the initial position. Refer to TASK 72-38-11-420-001.
Install the Trim Balance Weights to the Front Blade Retaining Ring
Do a vibration survey by the Test No.8 - Vibration Survey. Refer to TASK 71-00-00-700-008-A00 (TESTING-008, CONFIG-001) and TASK 71-00-00-700-008-B00 (TESTING-008, CONFIG-002).
Make sure that the vibration is in the limits listed in TASK 71-00-00-700-051-A00 (TESTING-000, CONFIG-001) and TASK 71-00-00-700-051-B00 (TESTING-000, CONFIG-002), Engine Operation Limits, Guidelines and Special Procedures; Vibration Limits.
Do a Vibrational Survey
Figure: Trim balance weight installation position
Trim balance weight installation position

Figure: Trim balance weight installation position
Trim balance weight installation position

Figure: Vibration limits and vibration record sheets
Vibration limits and vibration record sheets

Figure: Trim Balance Weights and vibration record sheets
Trim Balance Weights and vibration record sheets

Figure: Vector diagram to calculate trim amount
Vector diagram to calculate trim amount

Figure: Table 7 Sheet 1 Trim balance weight and bolt hole No. (Inlet cone flange)
Table 7 Sheet 1 Trim balance weight and bolt hole No. (Inlet cone flange)
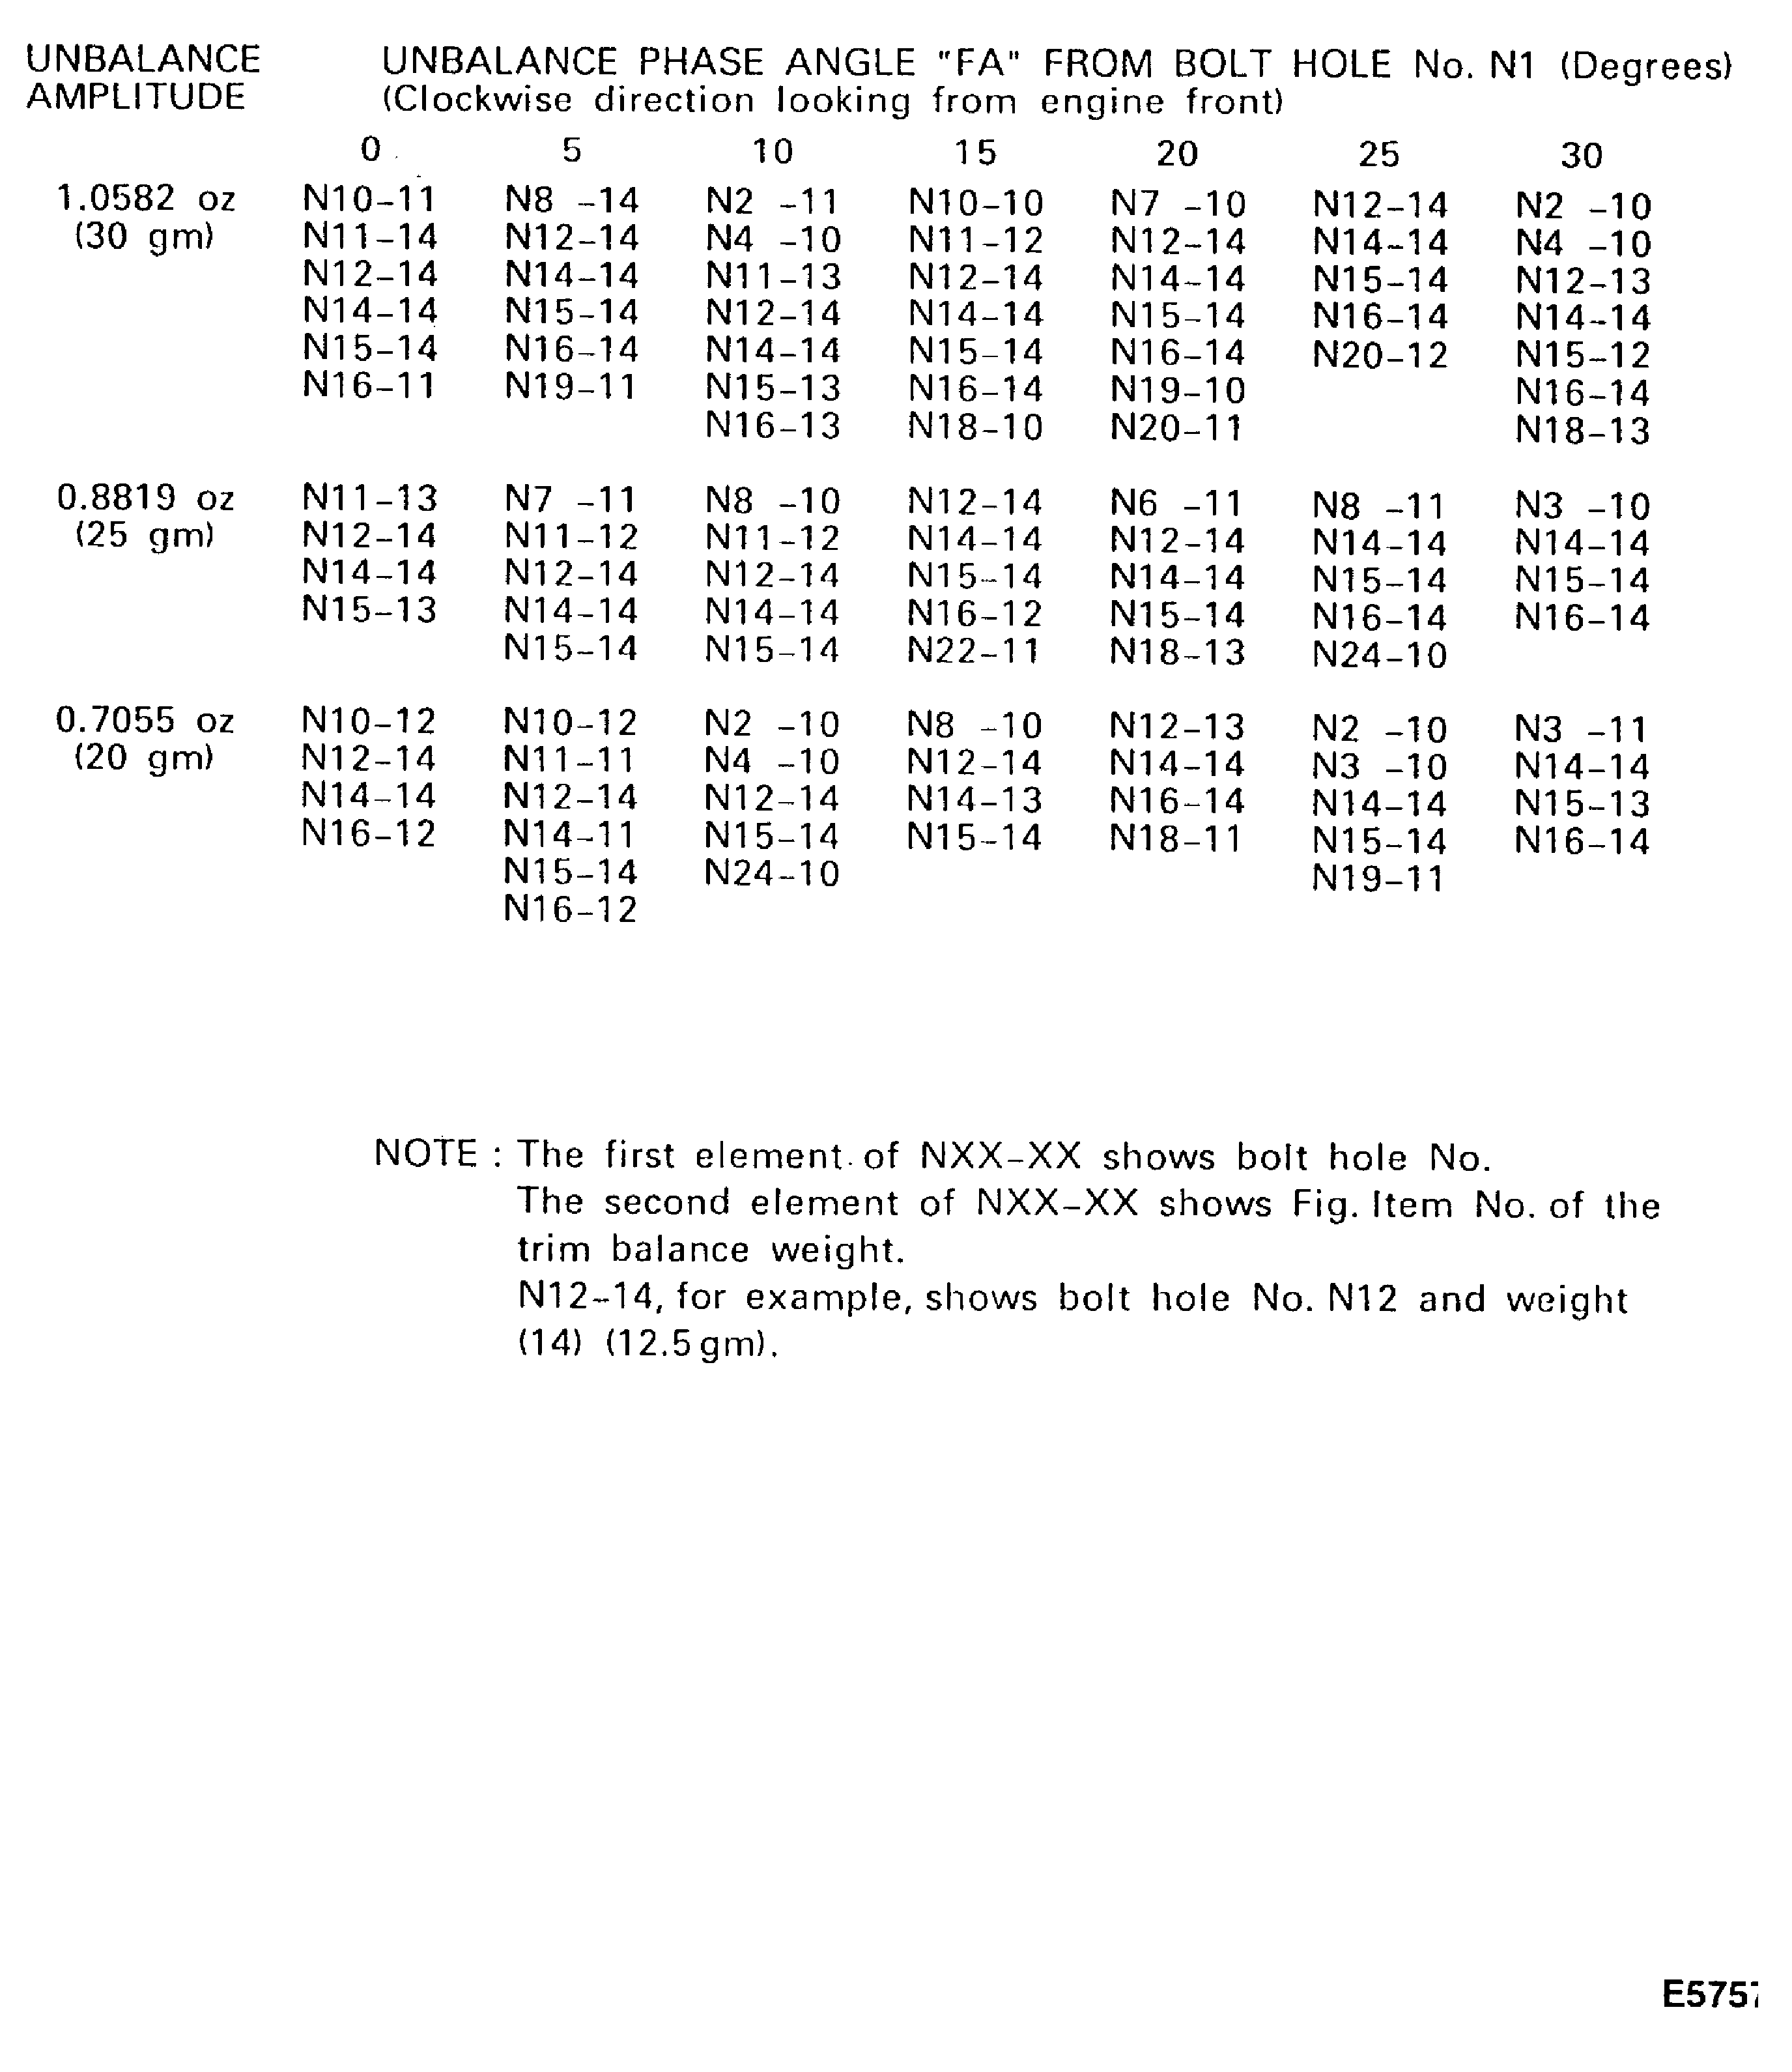
Figure: Table 7 Sheet 2 Trim balance weight and bolt hole No. (Inlet cone flange)
Table 7 Sheet 2 Trim balance weight and bolt hole No. (Inlet cone flange)

Figure: Table 7 Sheet 3 Trim balance weight and bolt hole No. (Inlet cone flange)
Table 7 Sheet 3 Trim balance weight and bolt hole No. (Inlet cone flange)

Figure: Table 7 Sheet 4 Trim balance weight and bolt hole No. (Inlet cone flange)
Table 7 Sheet 4 Trim balance weight and bolt hole No. (Inlet cone flange)
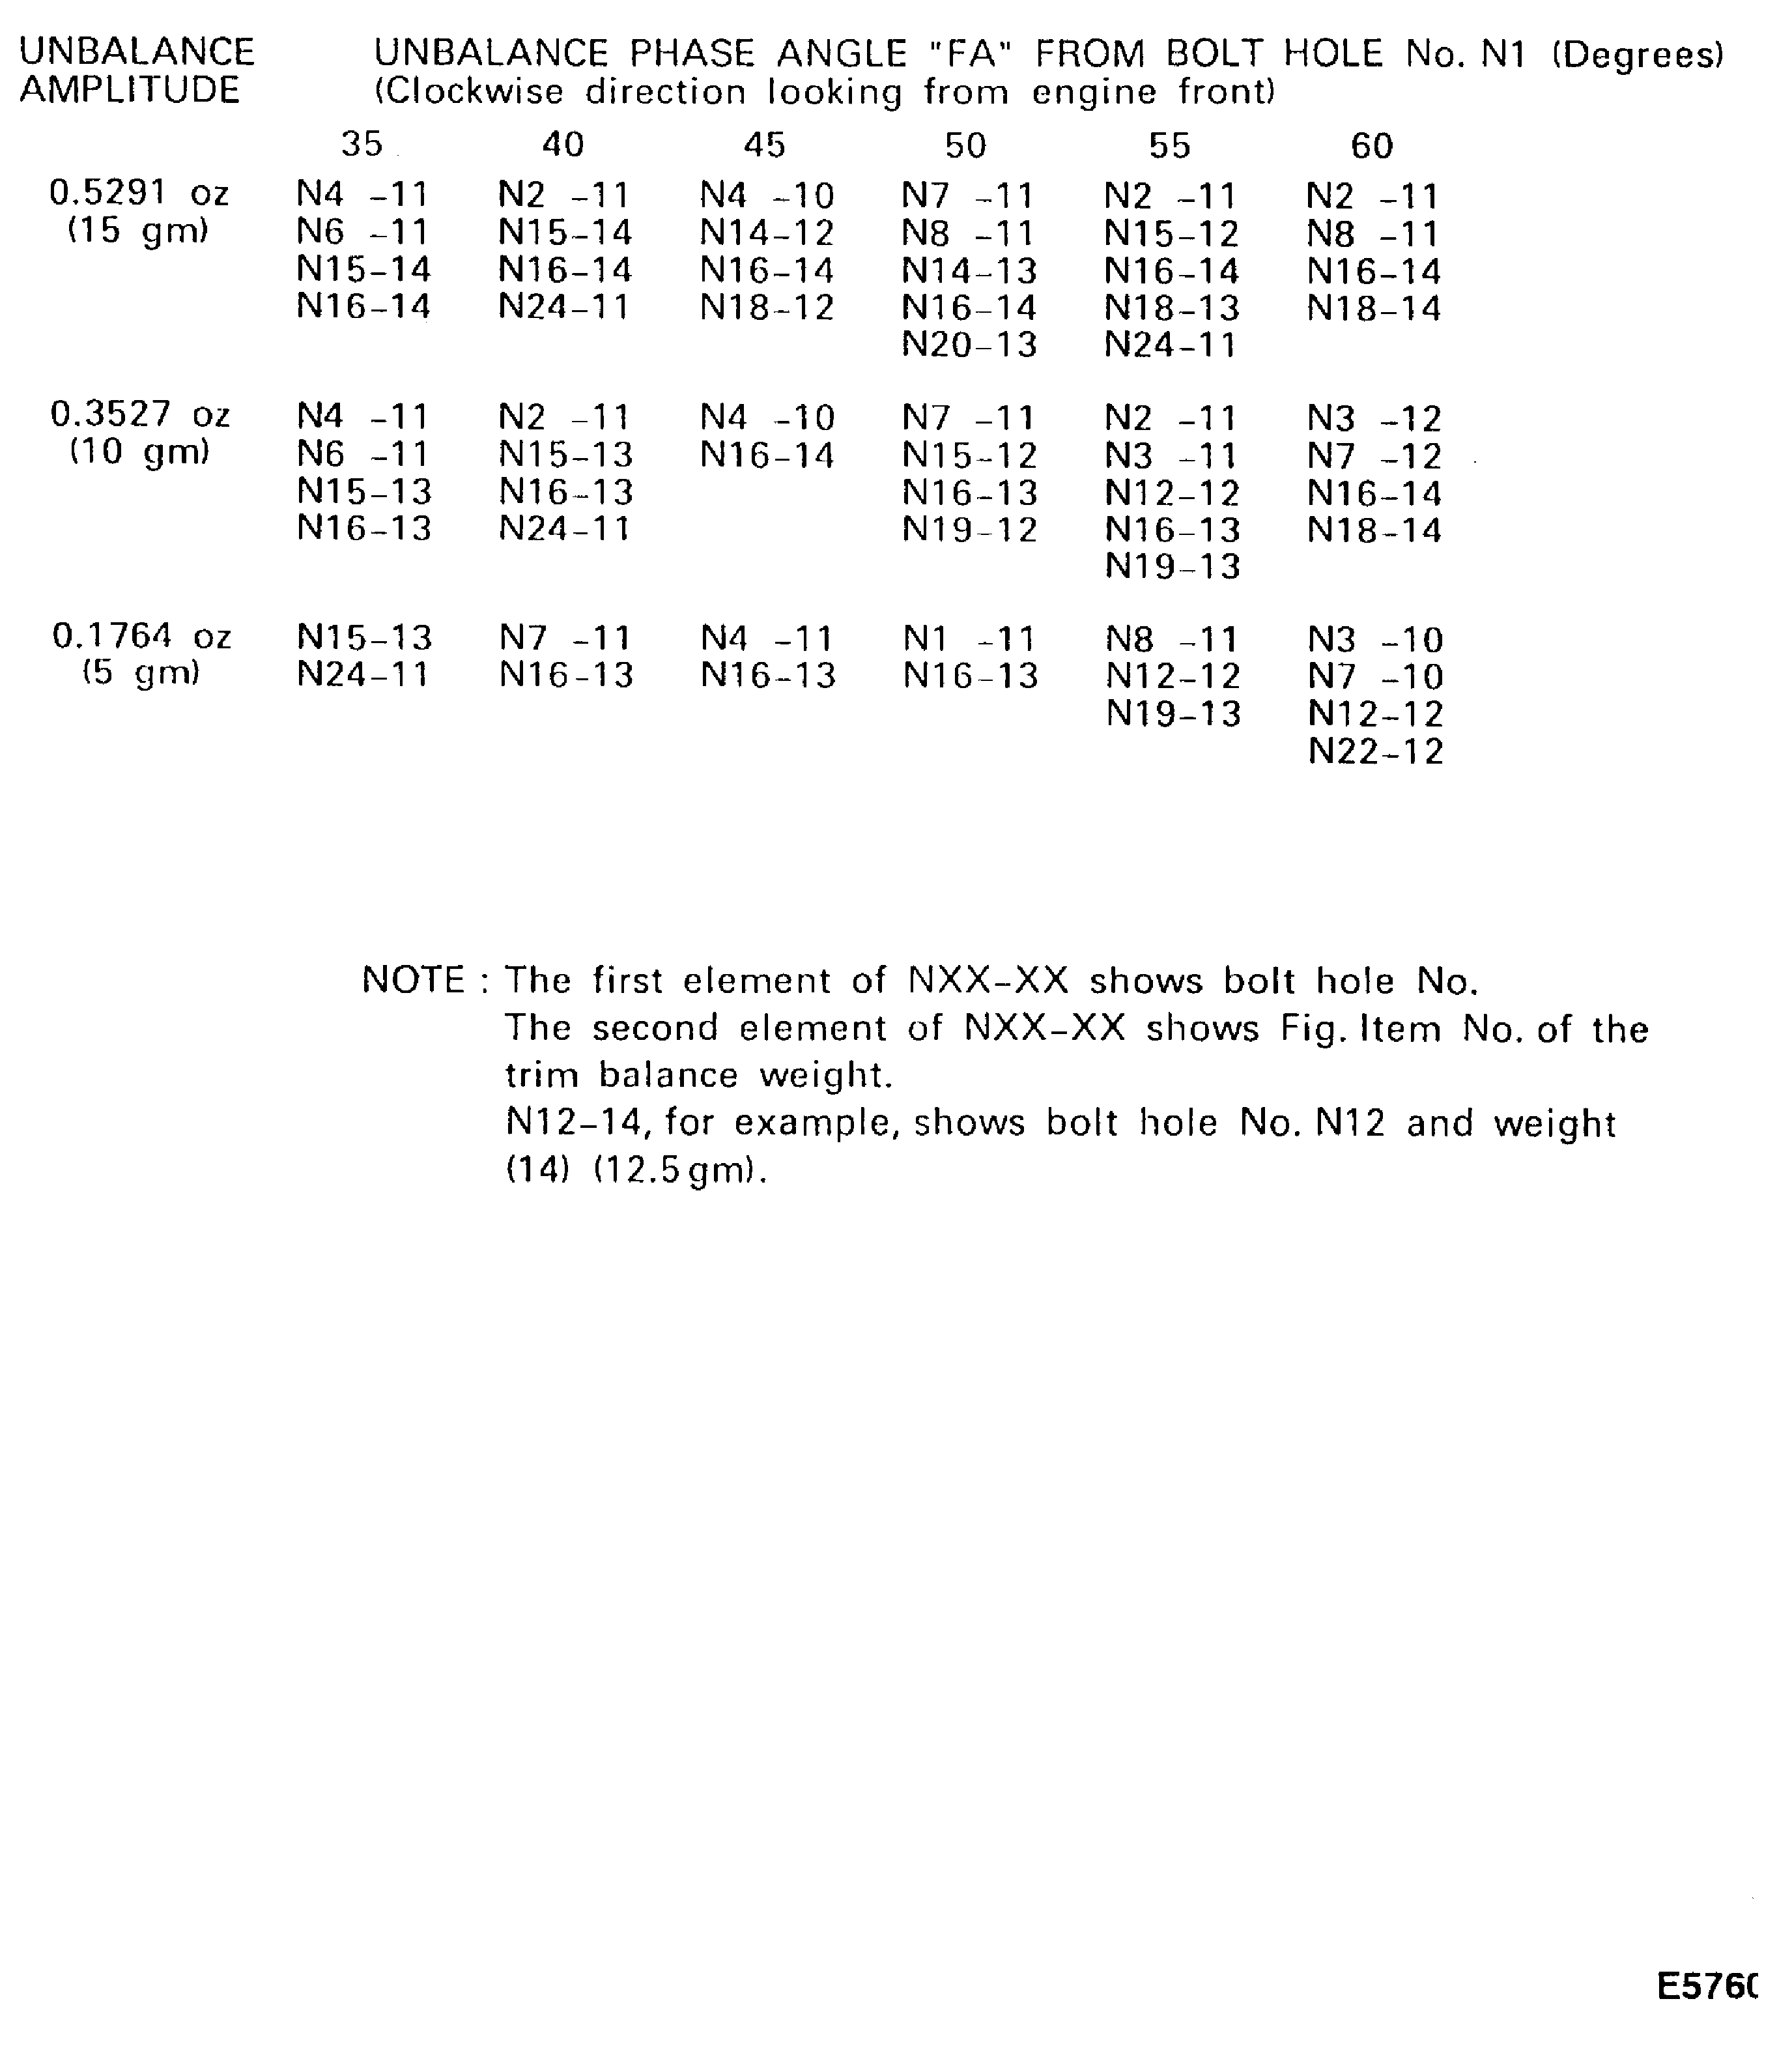
Figure: Example of trim balance weights on inlet cone flange
Example of trim balance weights on inlet cone flange
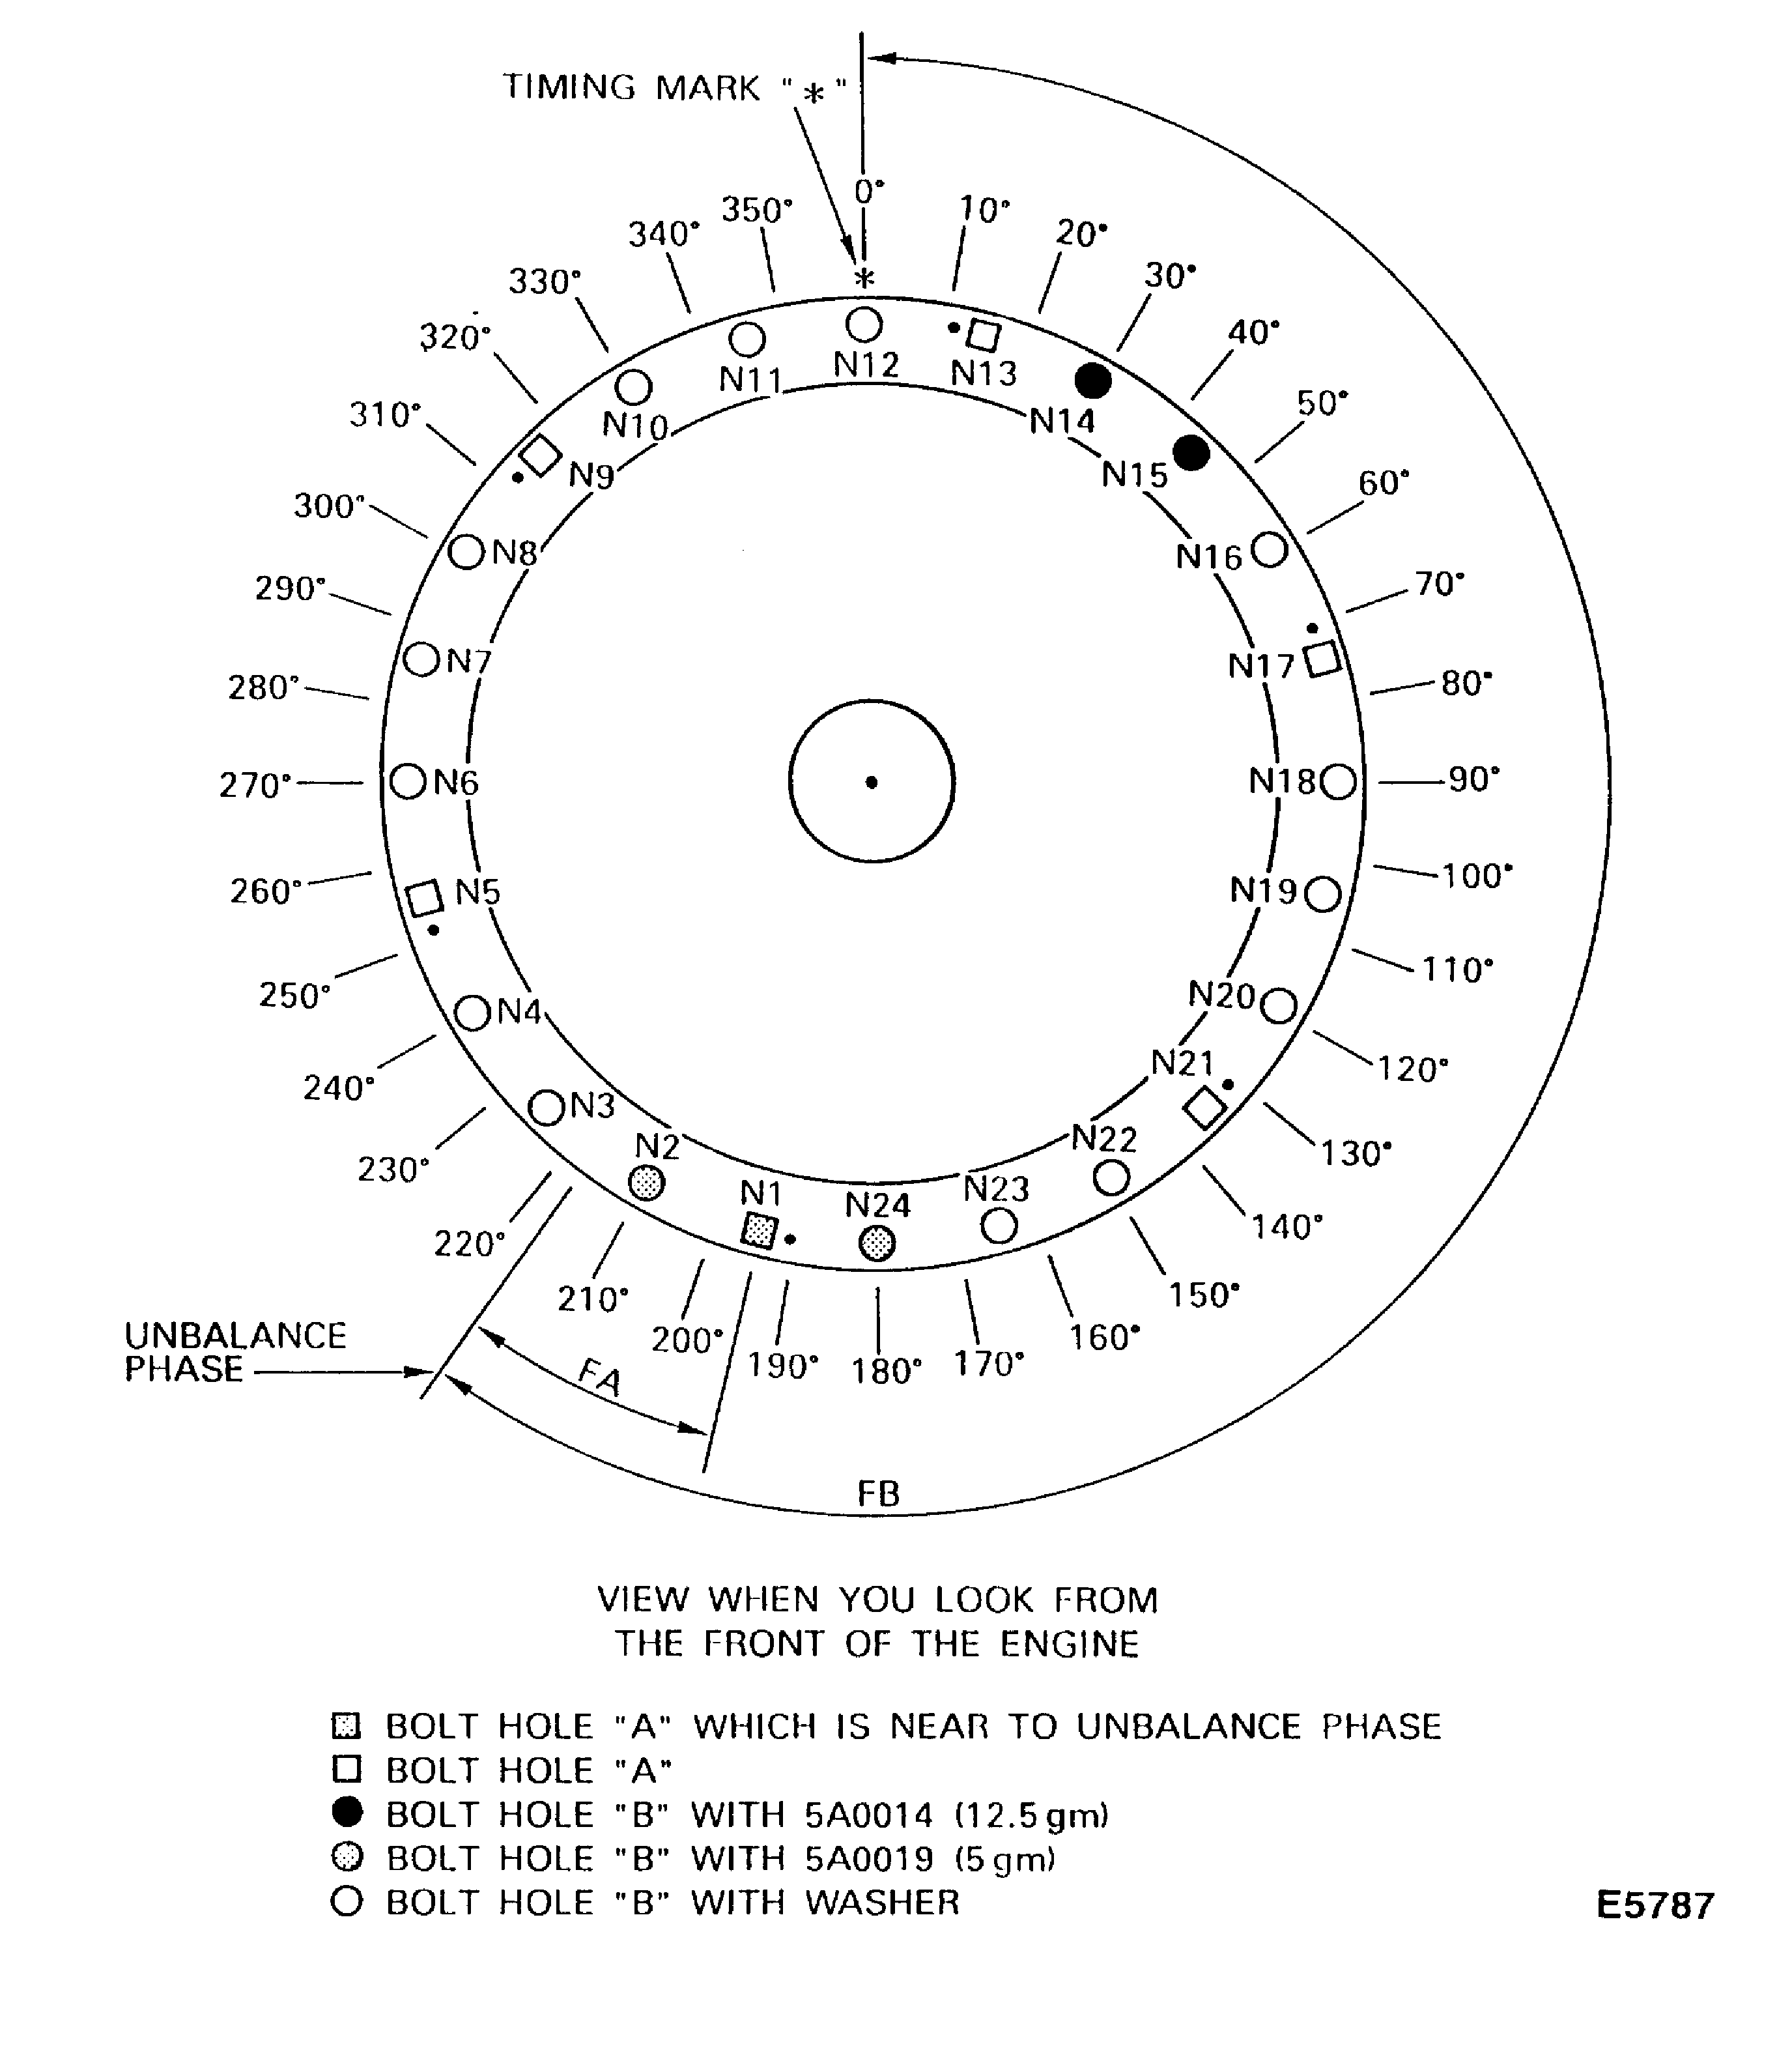
Figure: Table 8 Sheet 1 Trim balance weights and bolt hole No. (Retaining ring flange)
Table 8 Sheet 1 Trim balance weights and bolt hole No. (Retaining ring flange)
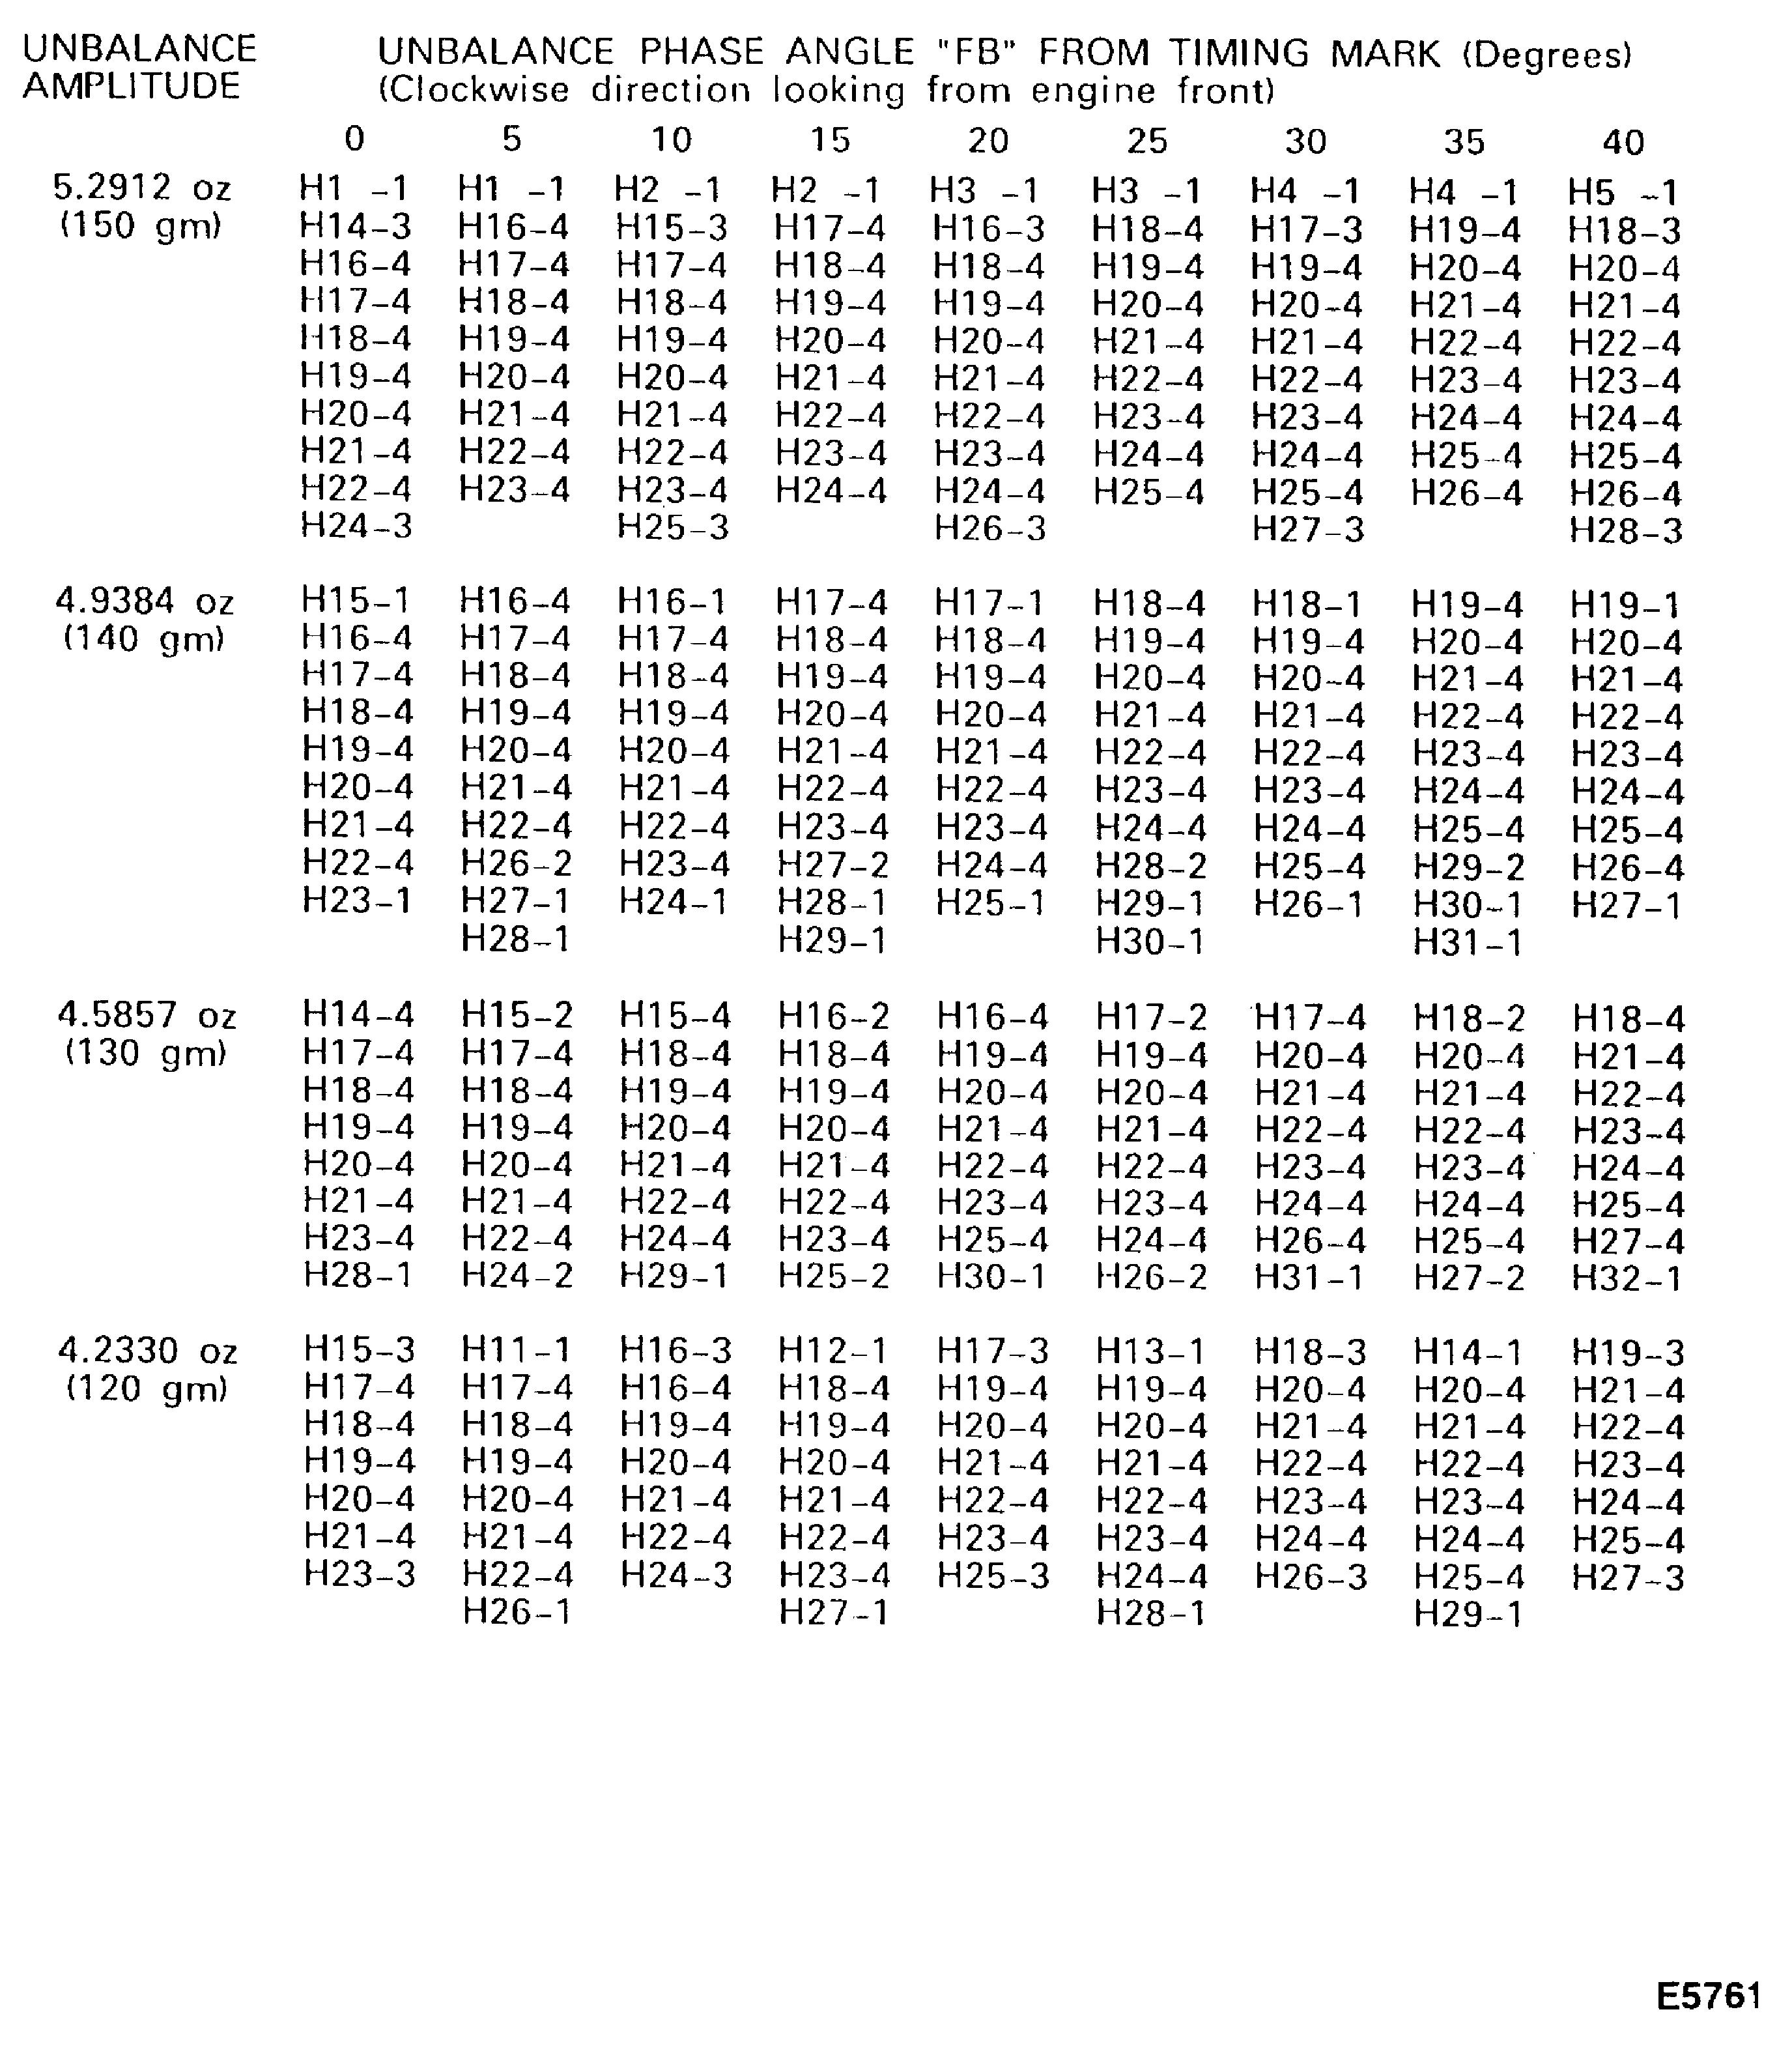
Figure: Table 8 Sheet 2 Trim balance weights and bolt hole No. (Retaining ring flange)
Table 8 Sheet 2 Trim balance weights and bolt hole No. (Retaining ring flange)

Figure: Table 8 Sheet 3 Trim balance weights and bolt hole No. (Retaining ring flange)
Table 8 Sheet 3 Trim balance weights and bolt hole No. (Retaining ring flange)

Figure: Table 8 Sheet 4 Trim balance weights and bolt hole No. (Retaining ring flange)
Table 8 Sheet 4 Trim balance weights and bolt hole No. (Retaining ring flange)

Figure: Table 8 Sheet 5 Trim balance weights and bolt hole No. (Retaining ring flange)
Table 8 Sheet 5 Trim balance weights and bolt hole No. (Retaining ring flange)

Figure: Table 8 Sheet 6 Trim balance weights and bolt hole No. (Retaining ring flange)
Table 8 Sheet 6 Trim balance weights and bolt hole No. (Retaining ring flange)
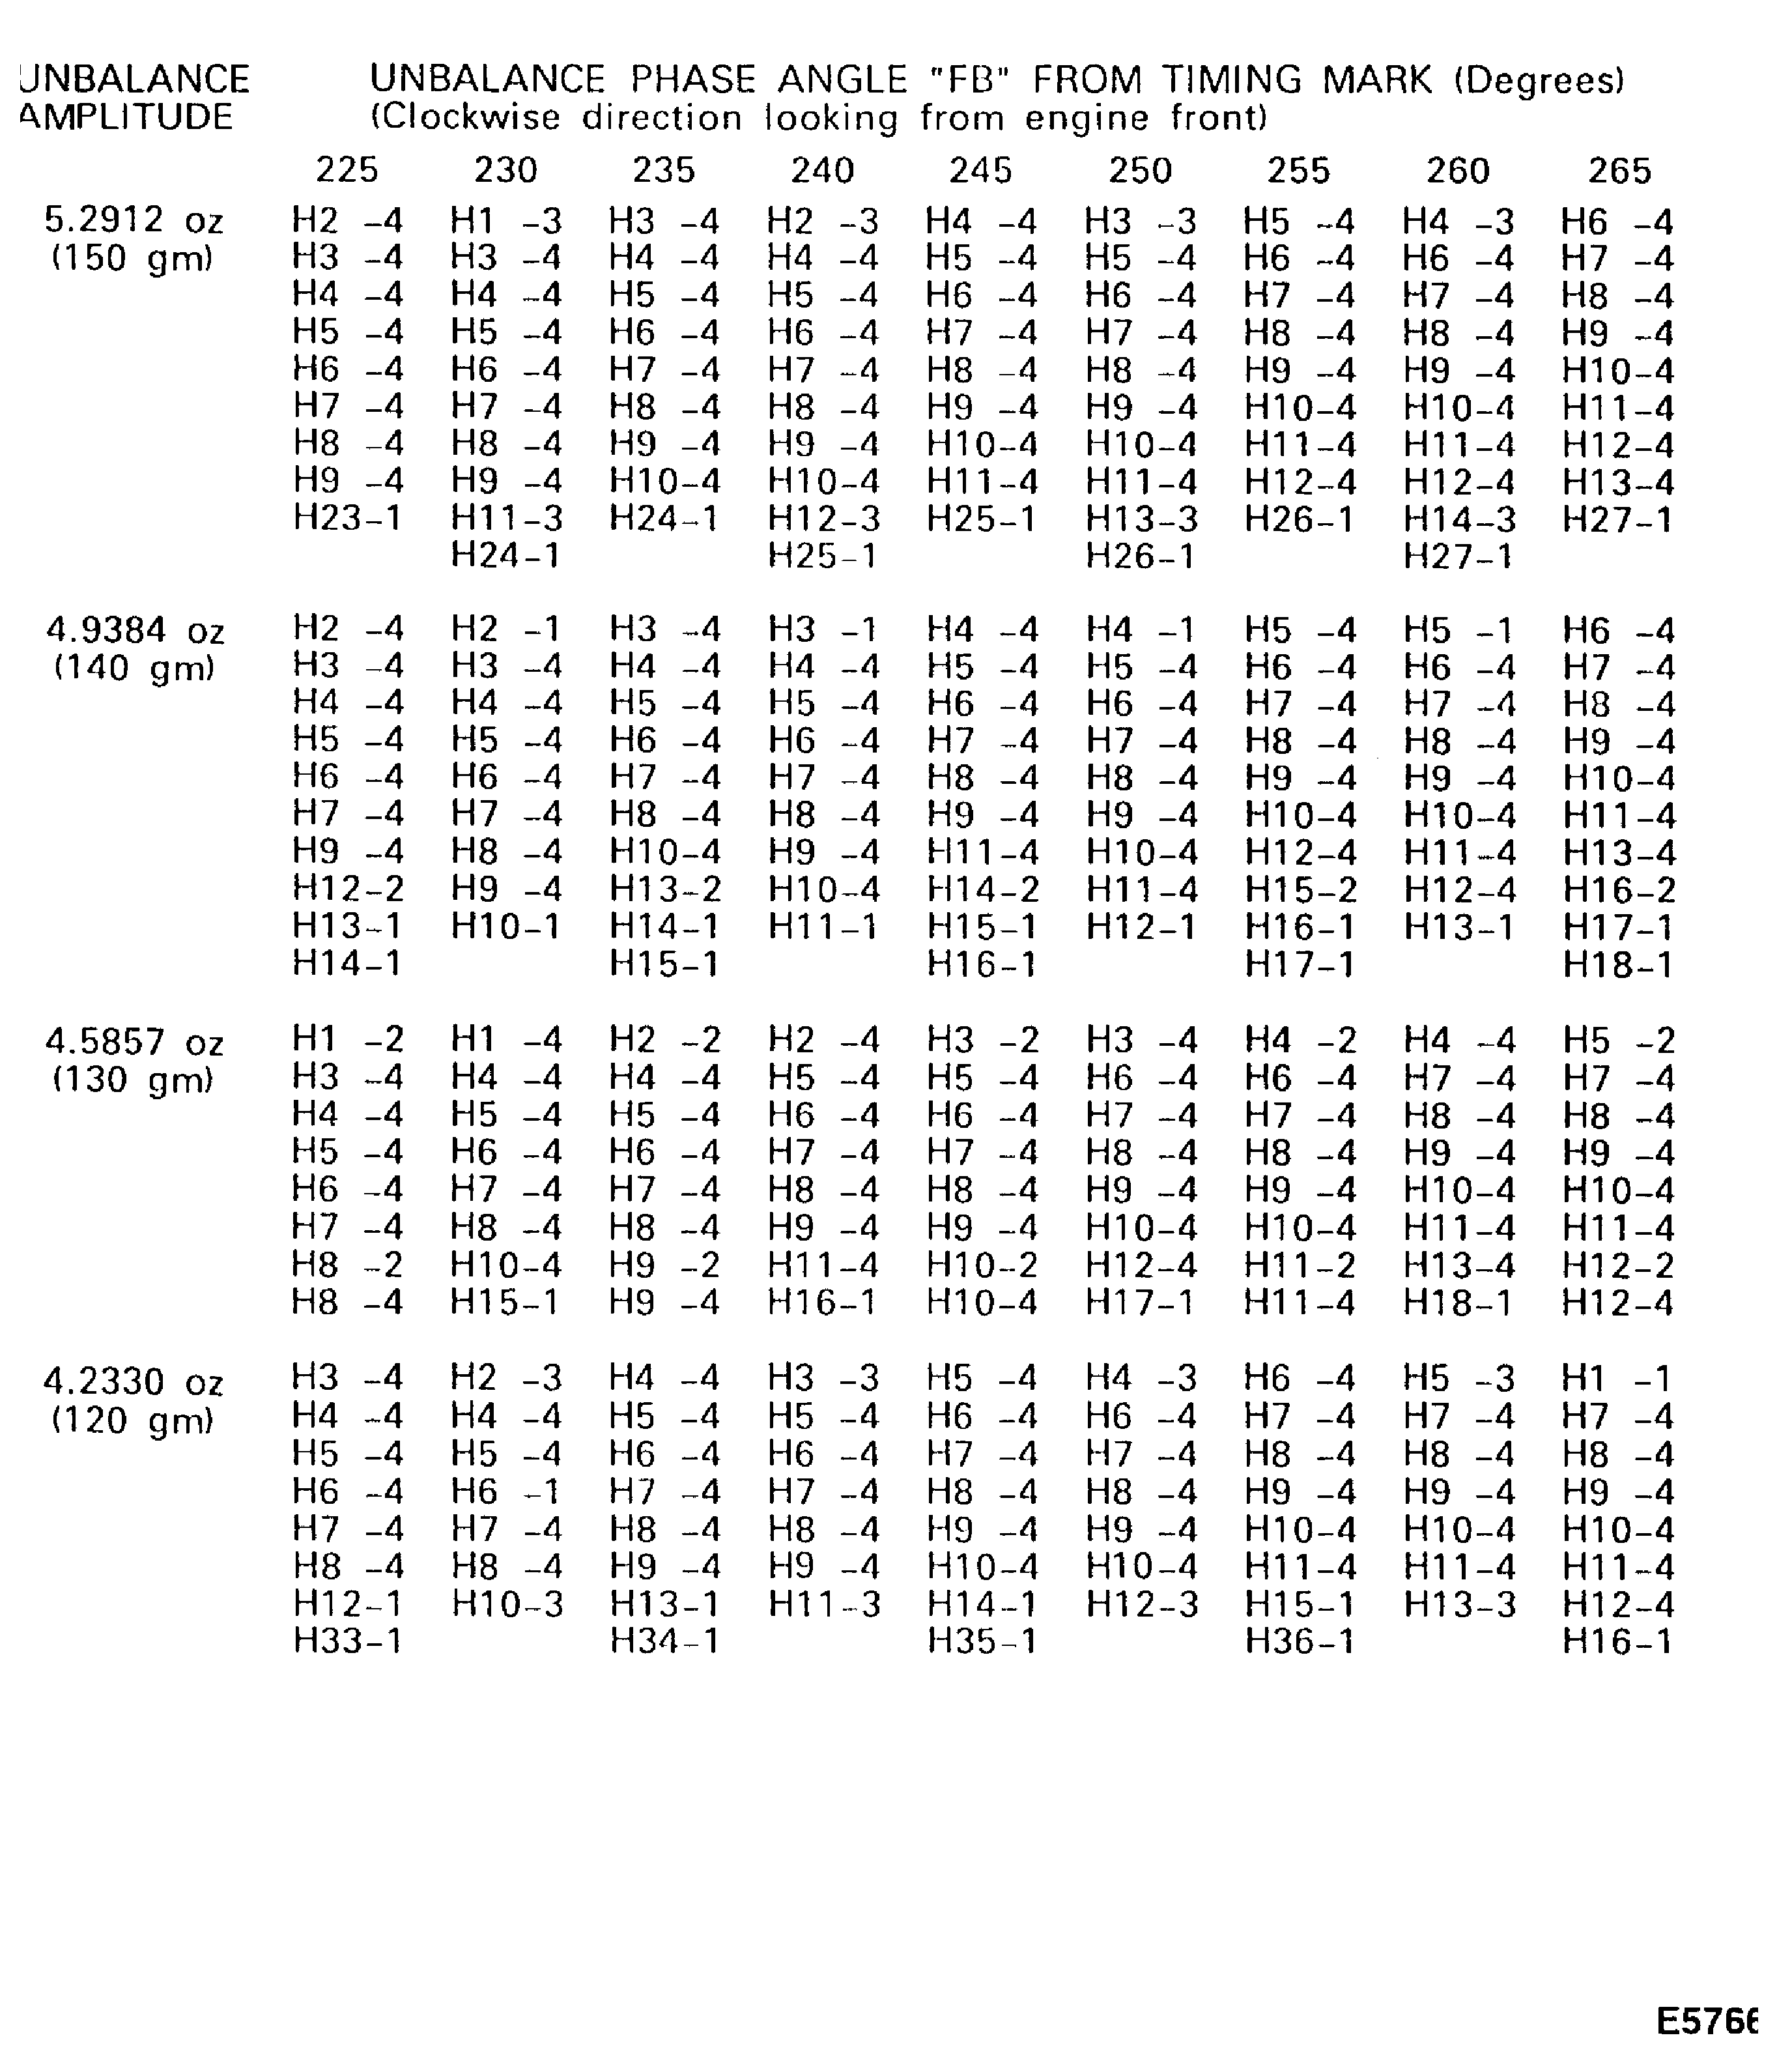
Figure: Table 8 Sheet 7 Trim balance weights and bolt hole No. (Retaining ring flange)
Table 8 Sheet 7 Trim balance weights and bolt hole No. (Retaining ring flange)
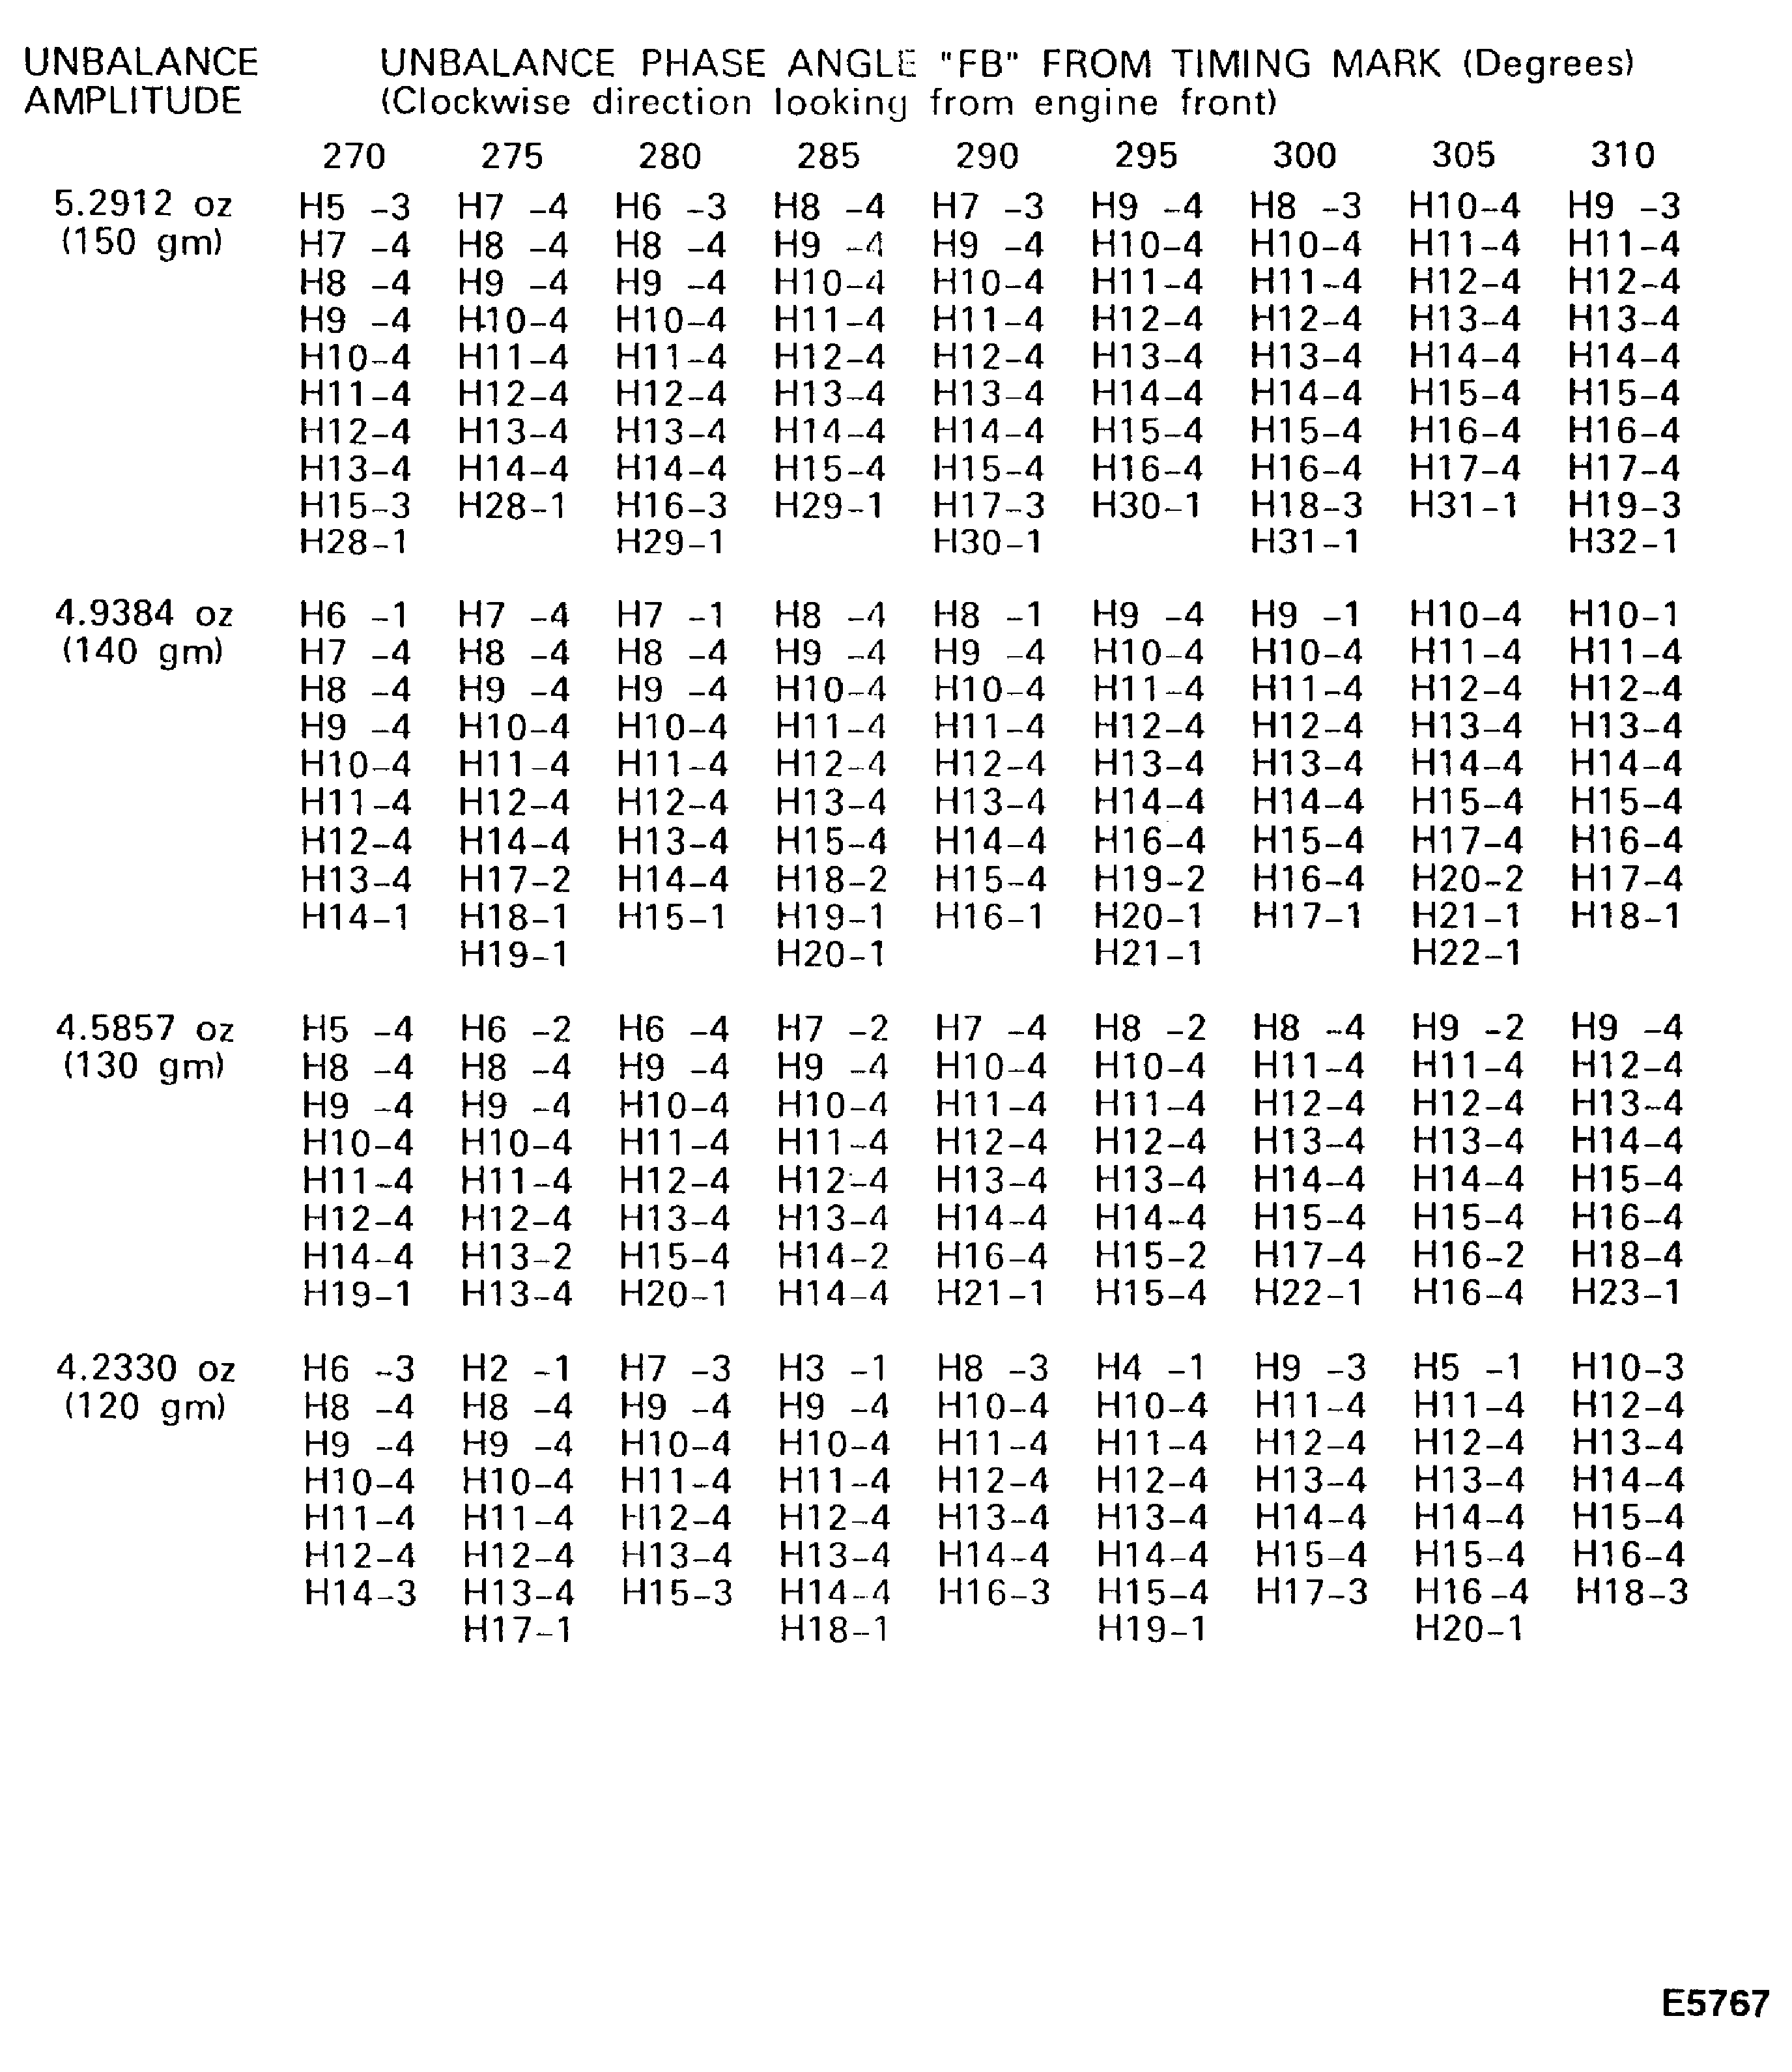
Figure: Table 8 Sheet 8 Trim balance weights and bolt hole No. (Retaining ring flange)
Table 8 Sheet 8 Trim balance weights and bolt hole No. (Retaining ring flange)

Figure: Table 8 Sheet 9 Trim balance weights and bolt hole No. (Retaining ring flange)
Table 8 Sheet 9 Trim balance weights and bolt hole No. (Retaining ring flange)

Figure: Table 8 Sheet 10 Trim balance weights and bolt hole No. (Retaining ring flange)
Table 8 Sheet 10 Trim balance weights and bolt hole No. (Retaining ring flange)

Figure: Table 8 Sheet 11 Trim balance weights and bolt hole No. (Retaining ring flange)
Table 8 Sheet 11 Trim balance weights and bolt hole No. (Retaining ring flange)

Figure: Table 8 Sheet 12 Trim balance weights and bolt hole No. (Retaining ring flange)
Table 8 Sheet 12 Trim balance weights and bolt hole No. (Retaining ring flange)

Figure: Table 8 Sheet 13 Trim balance weights and bolt hole No. (Retaining ring flange)
Table 8 Sheet 13 Trim balance weights and bolt hole No. (Retaining ring flange)
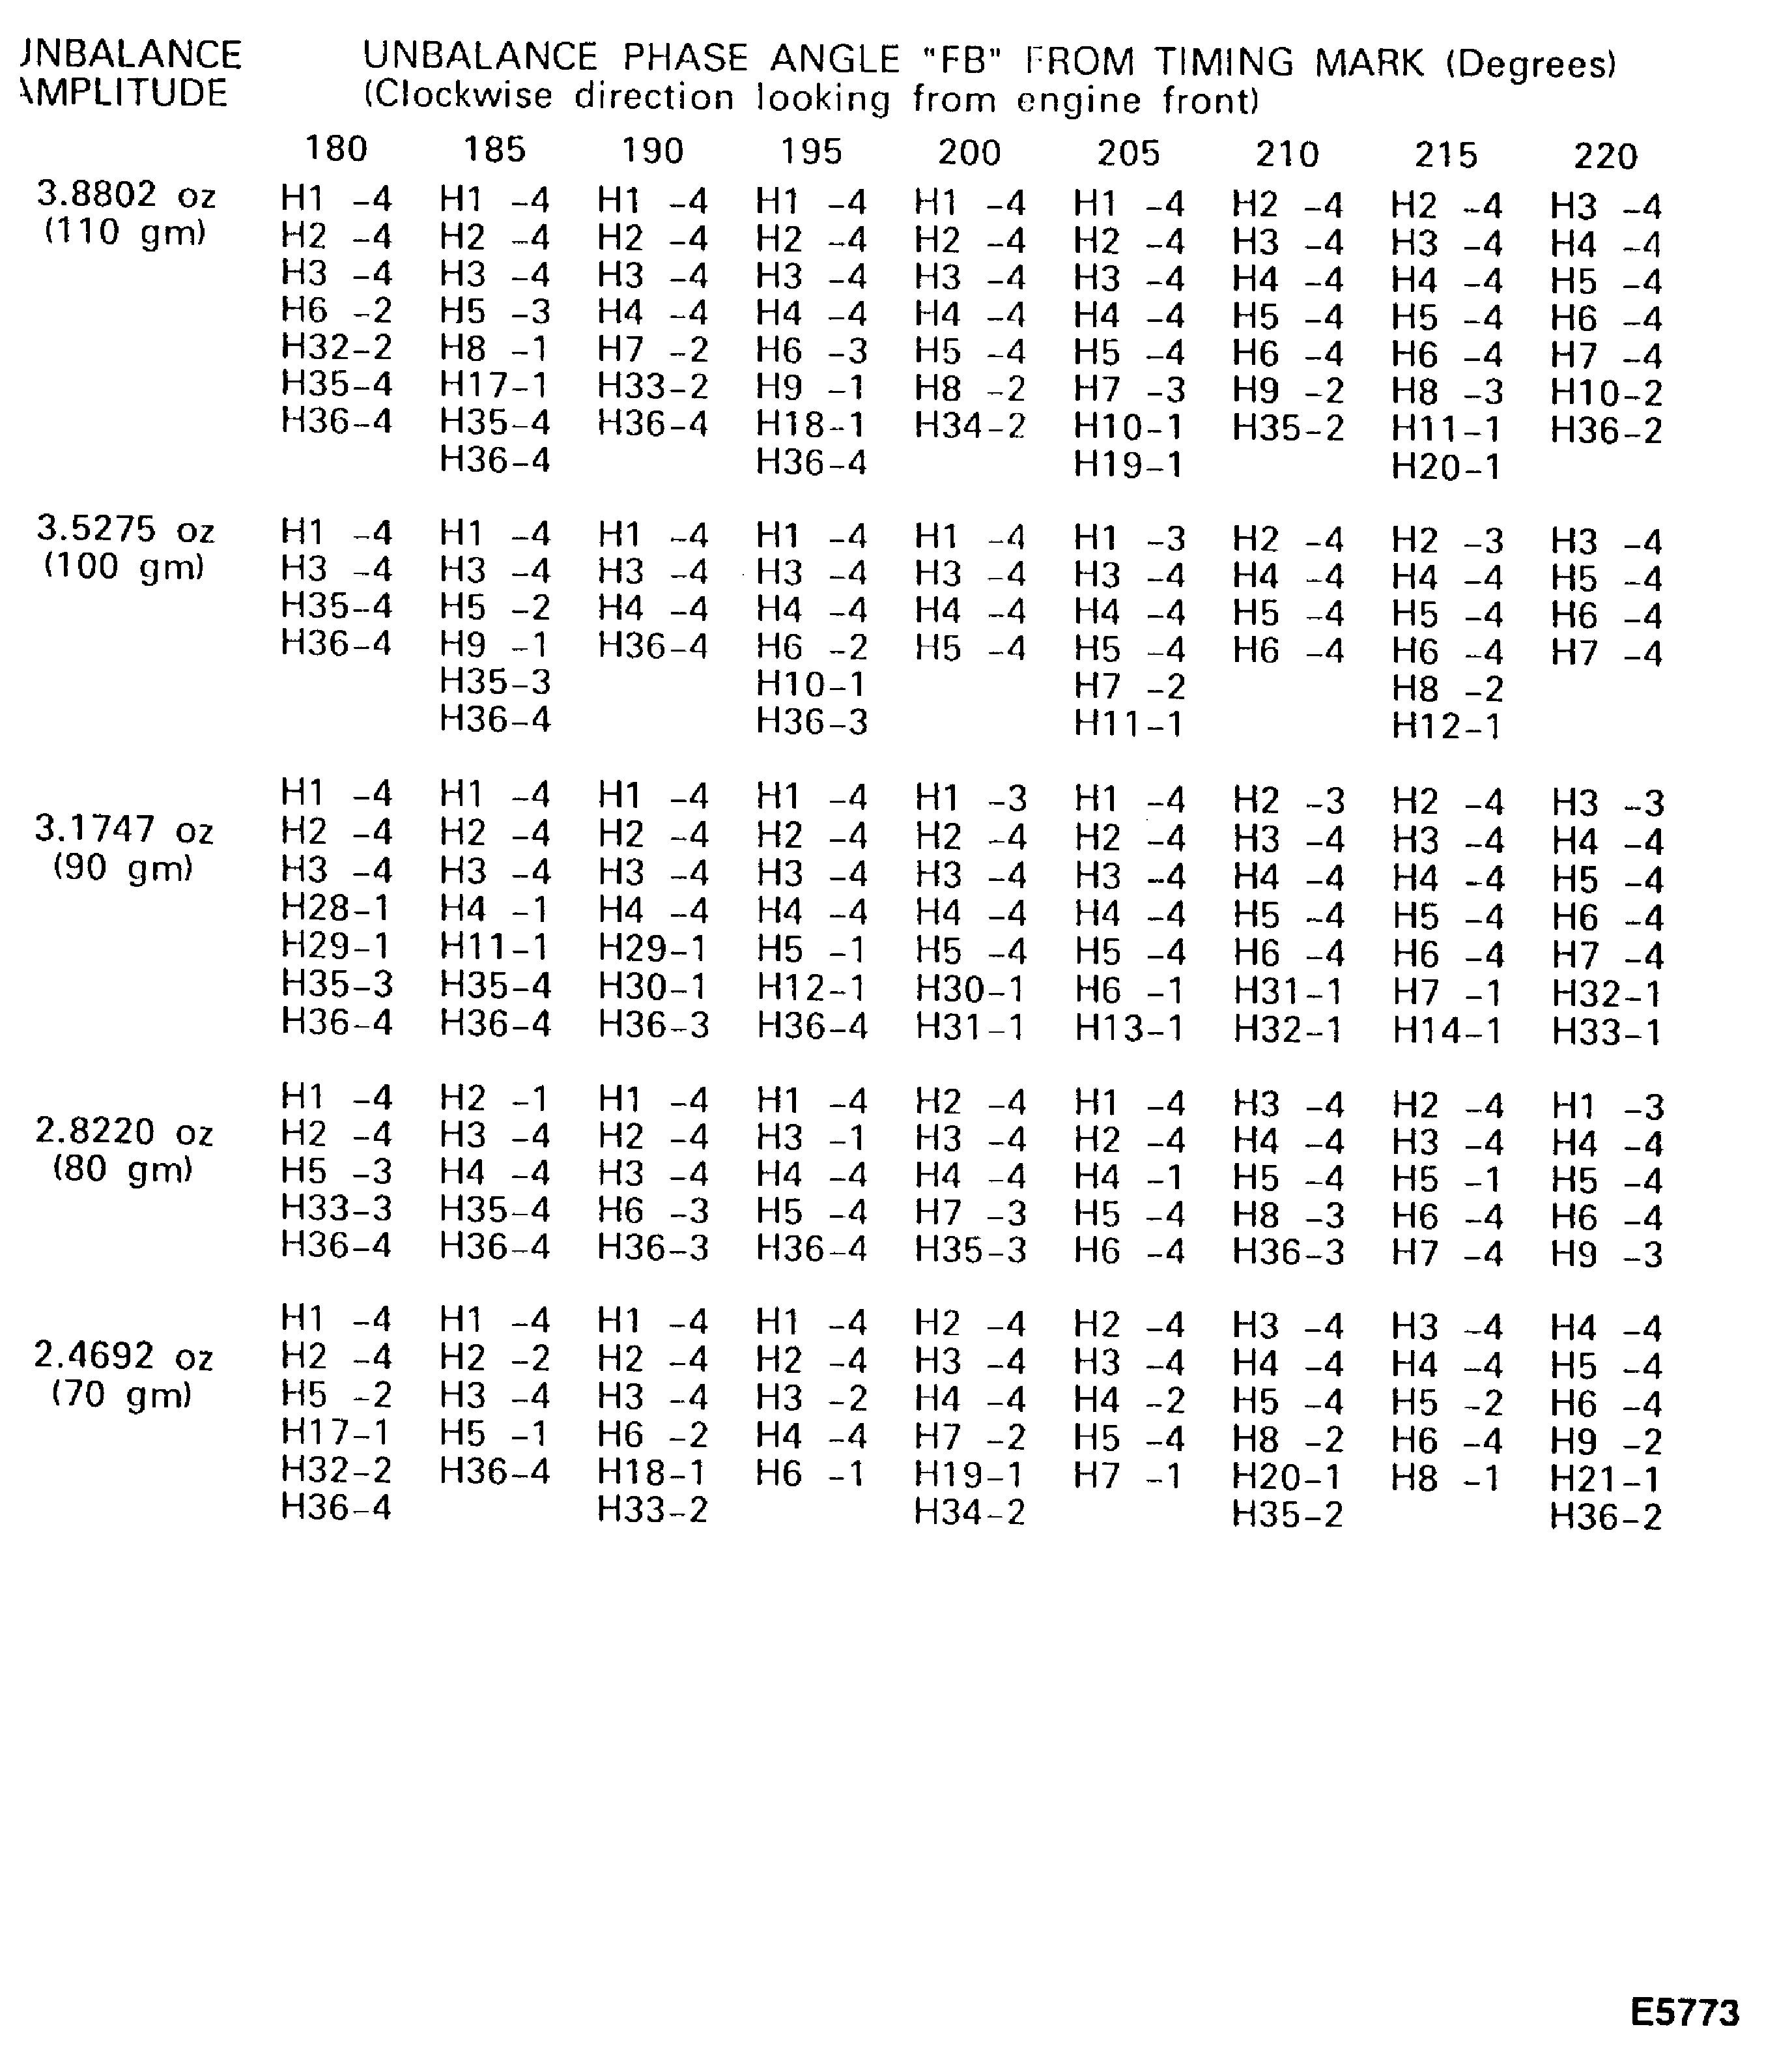
Figure: Table 8 Sheet 14 Trim balance weights and bolt hole No. (Retaining ring flange)
Table 8 Sheet 14 Trim balance weights and bolt hole No. (Retaining ring flange)
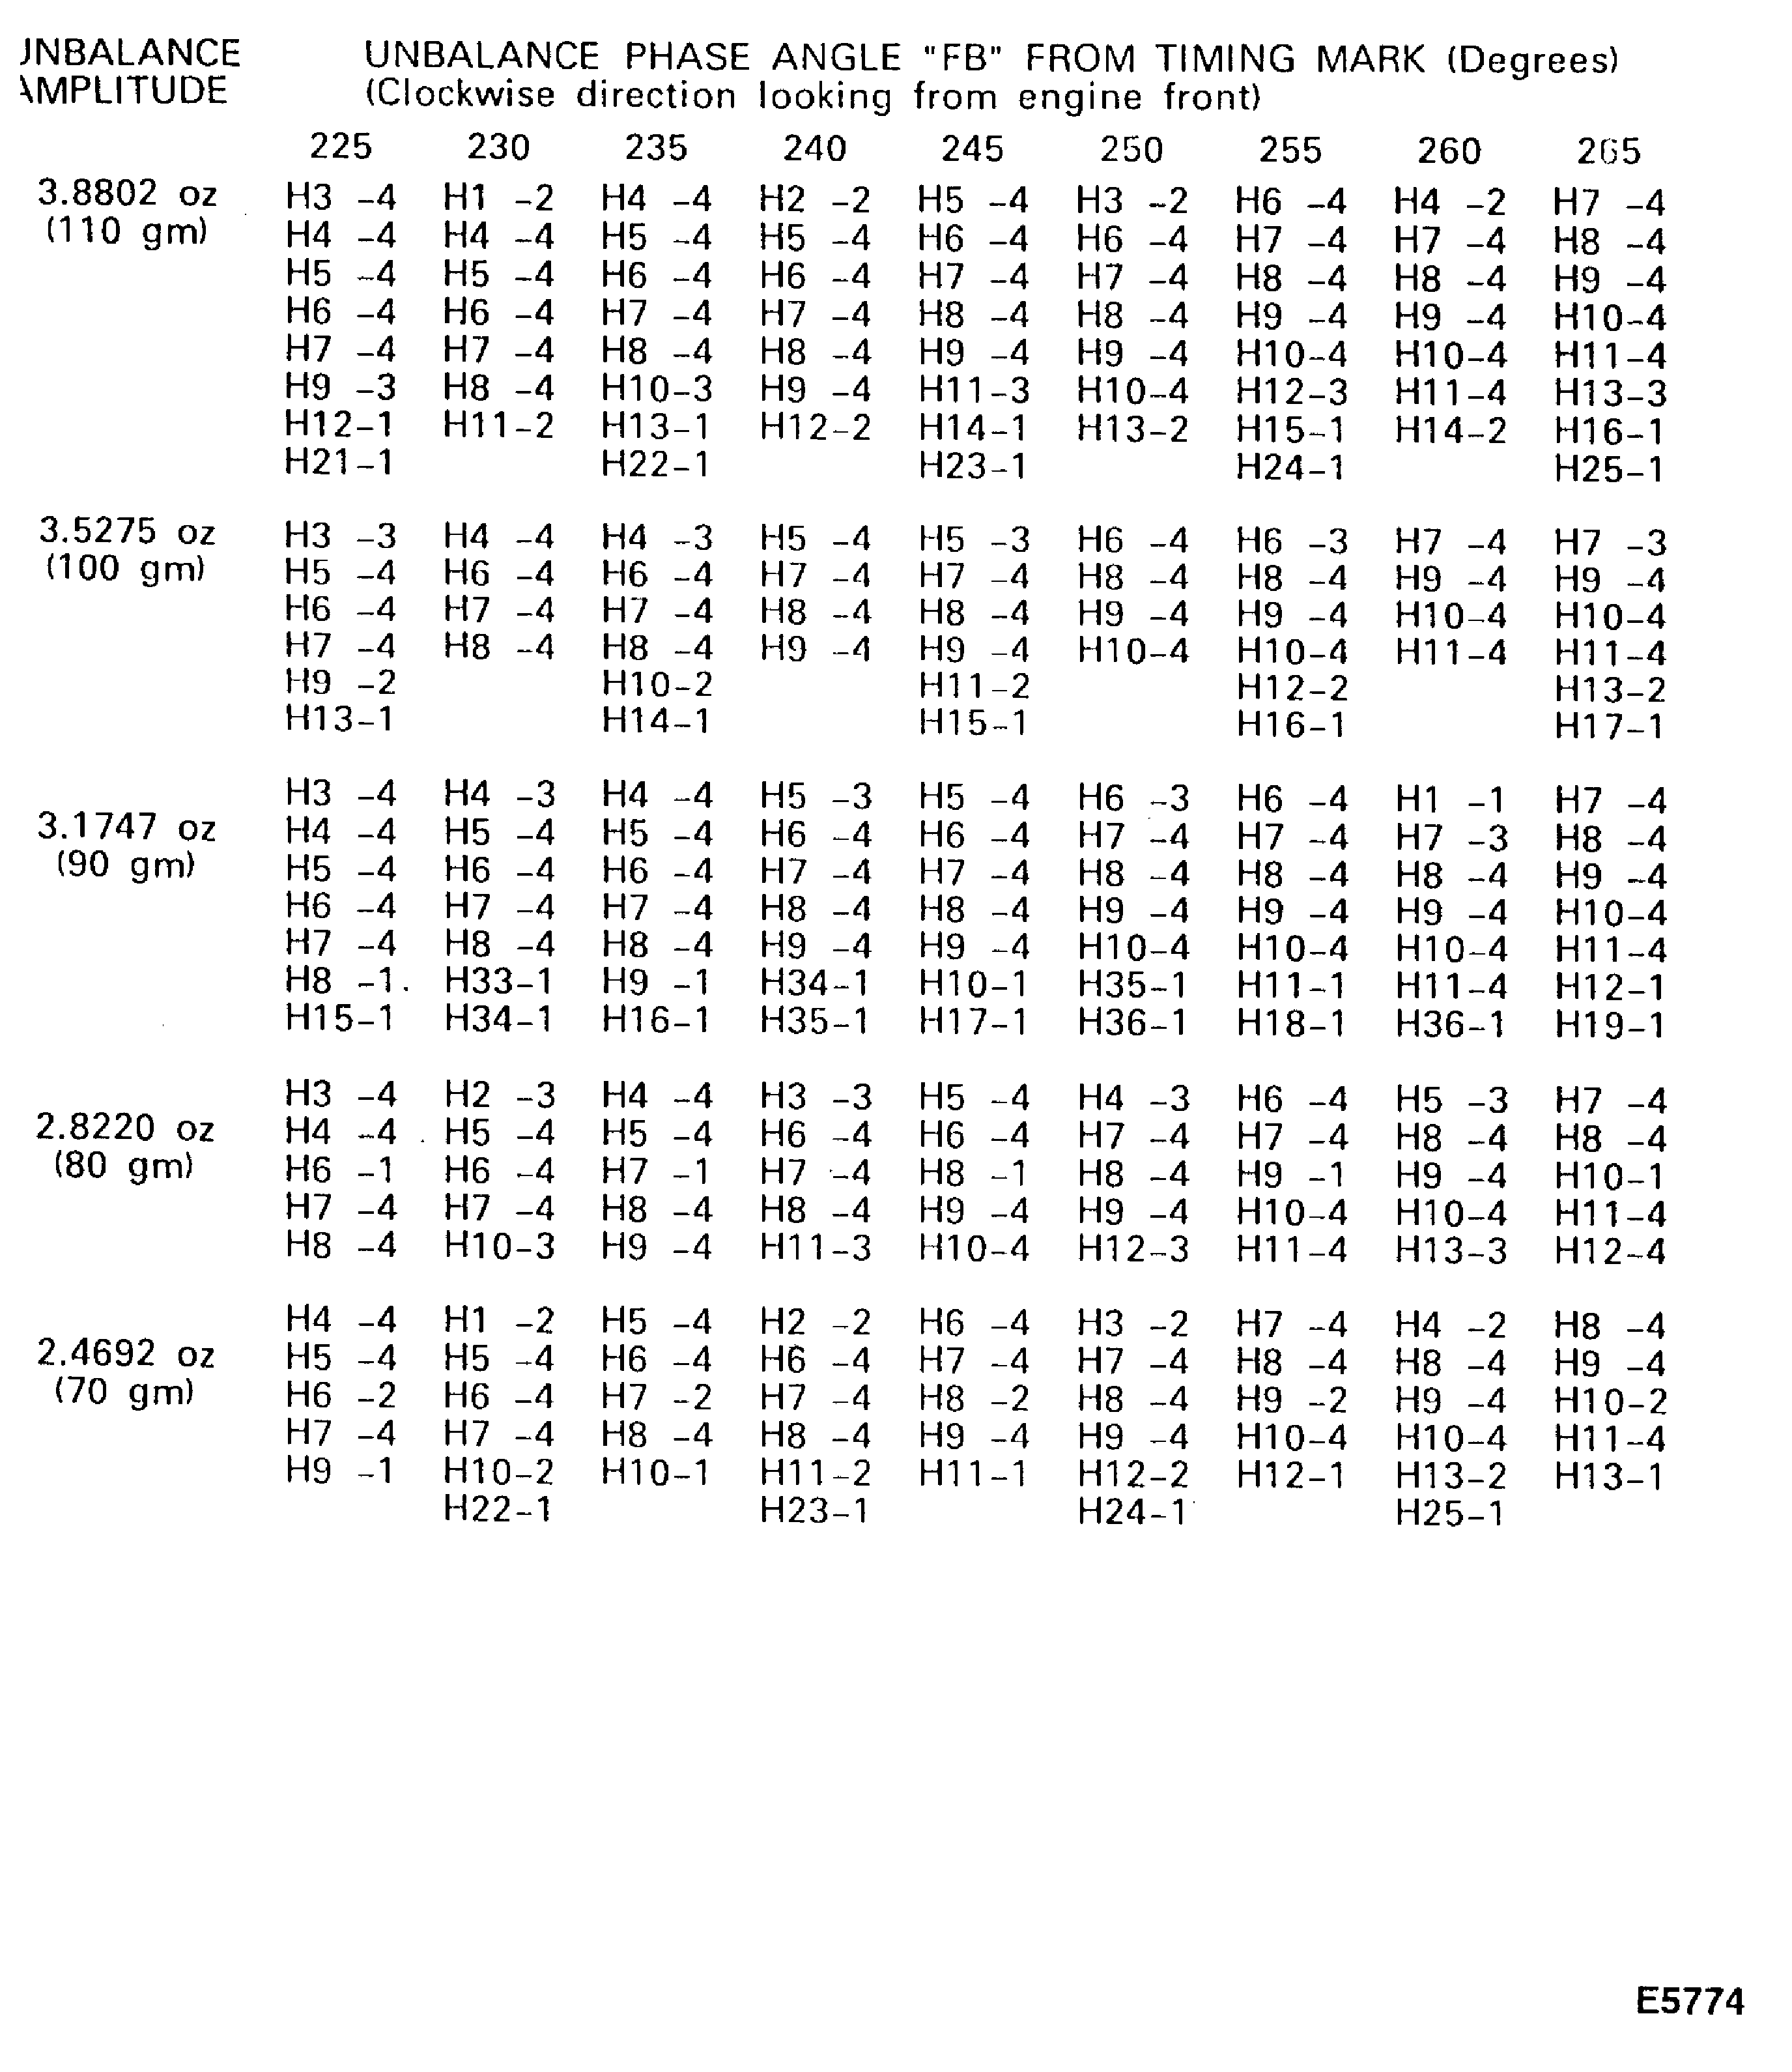
Figure: Table 8 Sheet 15 Trim balance weights and bolt hole No. (Retaining ring flange)
Table 8 Sheet 15 Trim balance weights and bolt hole No. (Retaining ring flange)
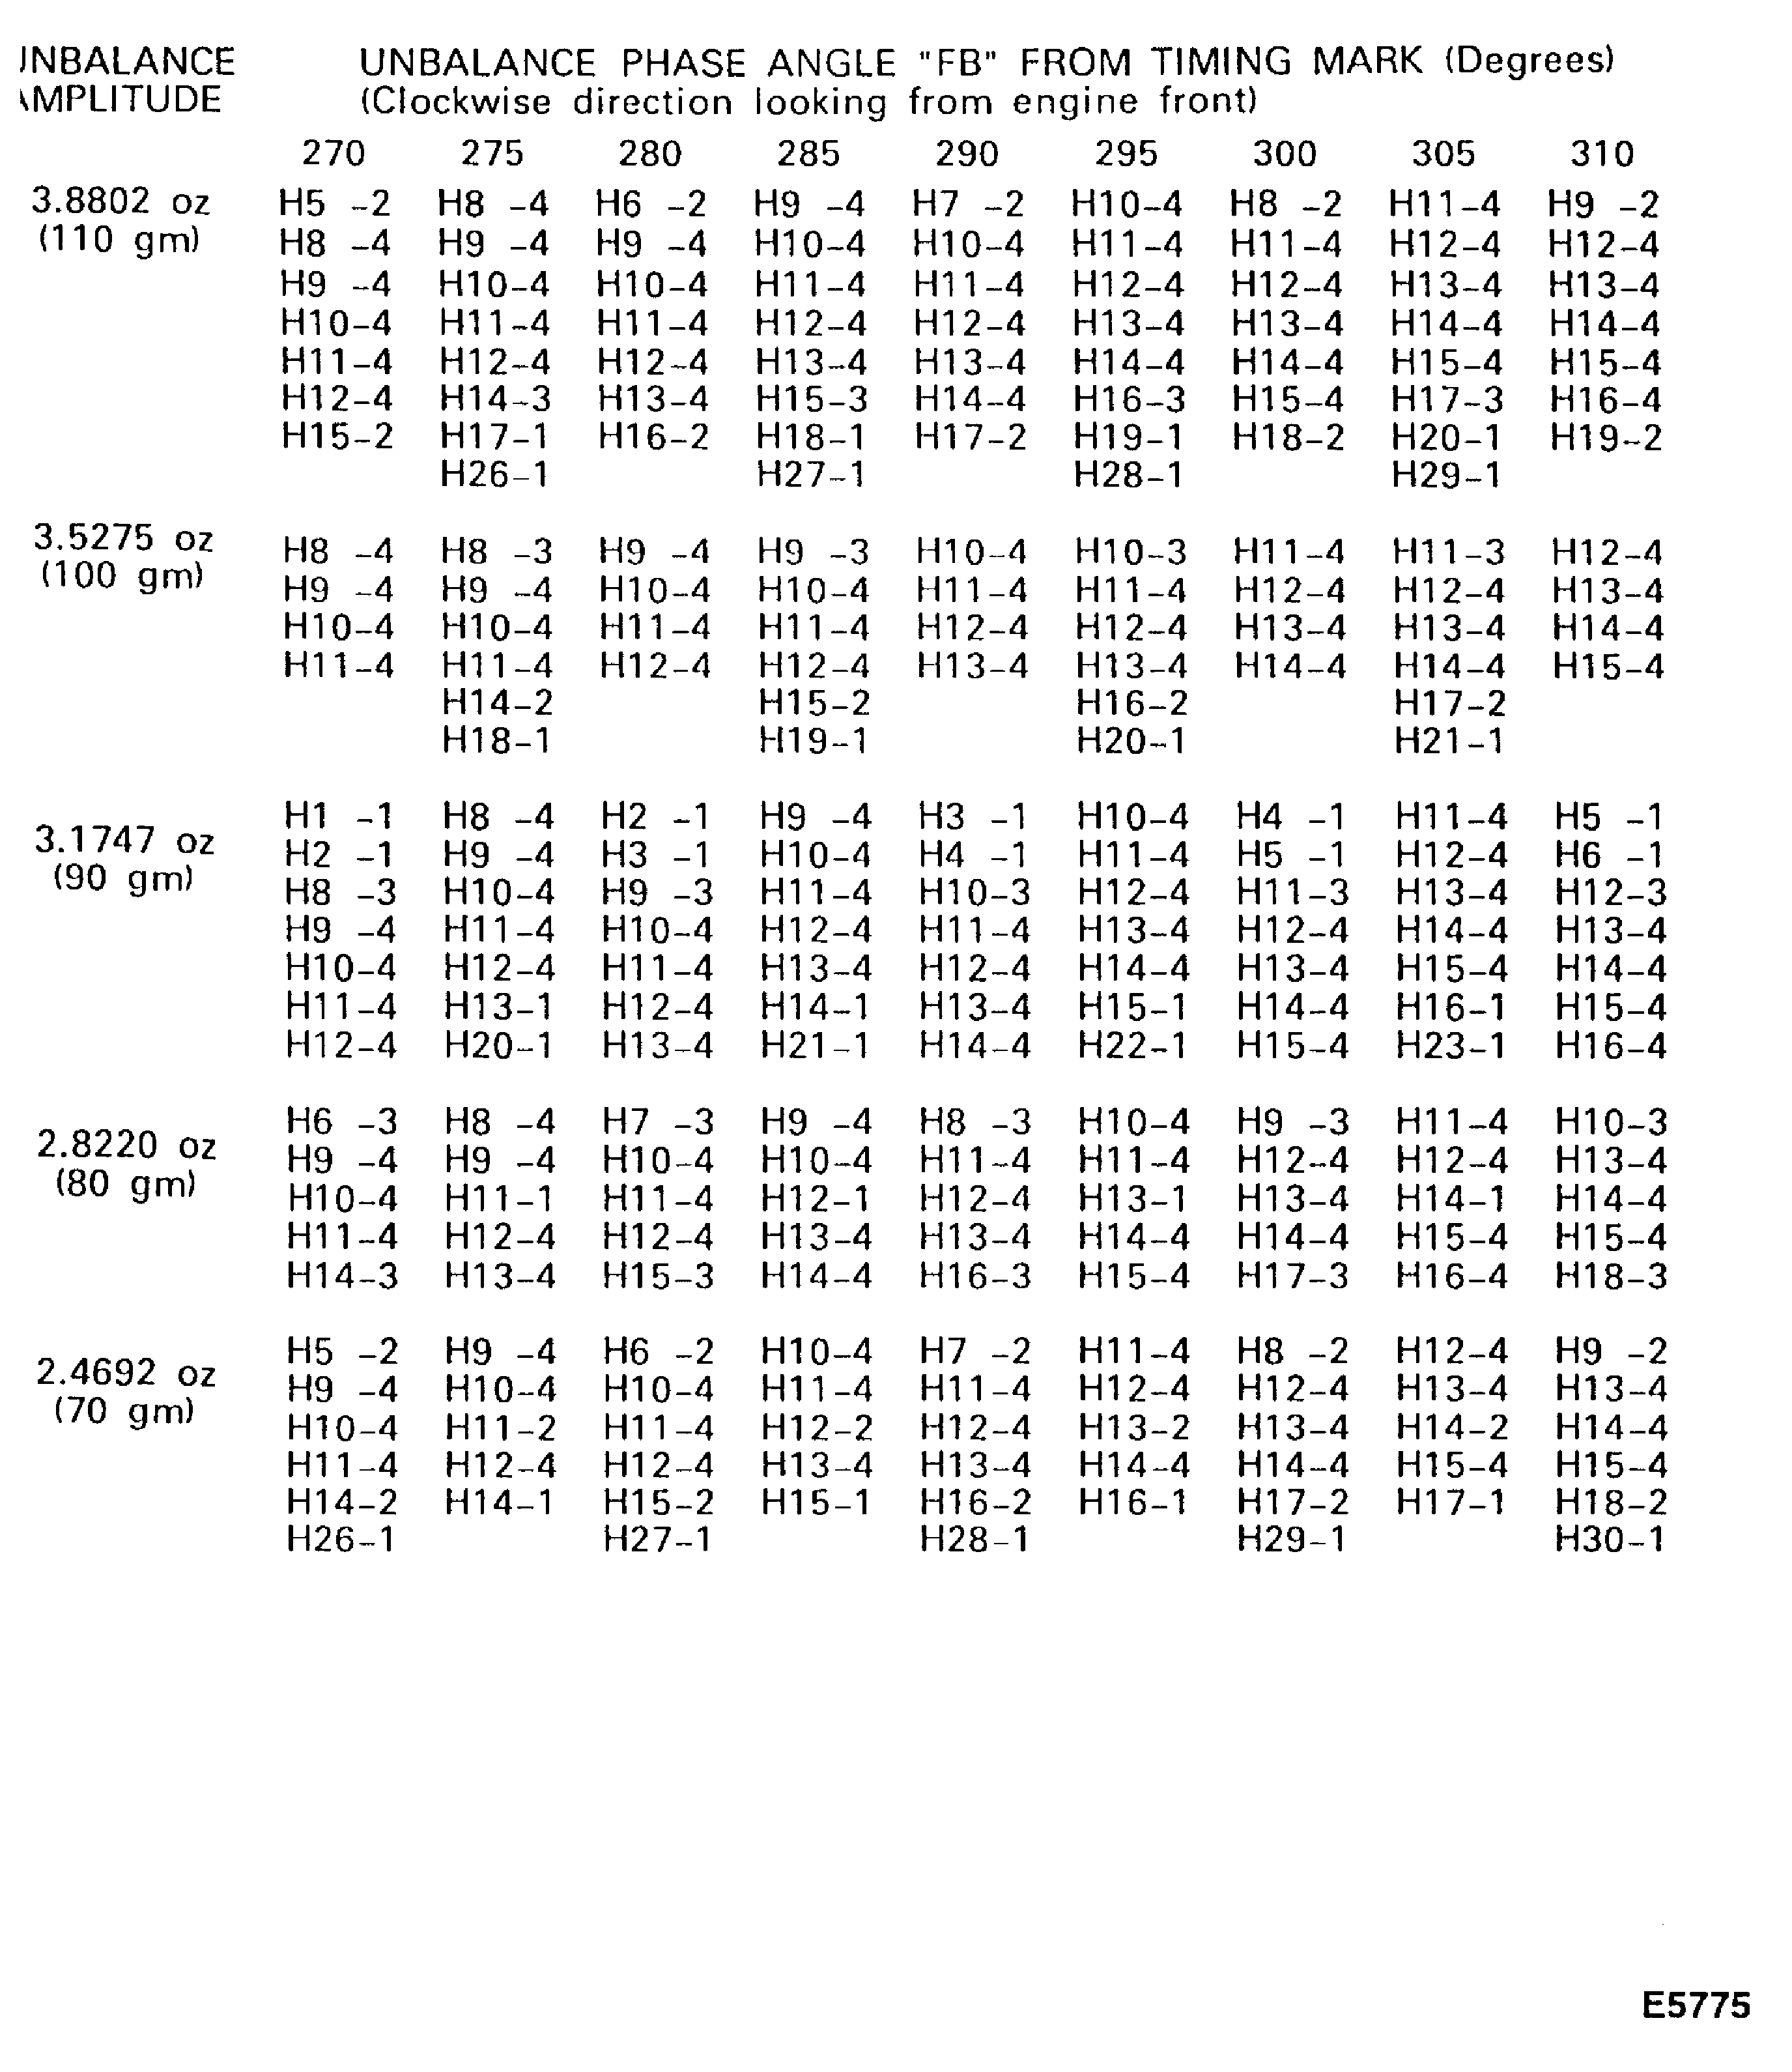
Figure: Table 8 Sheet 16 Trim balance weights and bolt hole No. (Retaining ring flange)
Table 8 Sheet 16 Trim balance weights and bolt hole No. (Retaining ring flange)

Figure: Table 8 Sheet 17 Trim balance weights and bolt hole No. (Retaining ring flange)
Table 8 Sheet 17 Trim balance weights and bolt hole No. (Retaining ring flange)

Figure: Table 8 Sheet 18 Trim balance weights and bolt hole No. (Retaining ring flange)
Table 8 Sheet 18 Trim balance weights and bolt hole No. (Retaining ring flange)
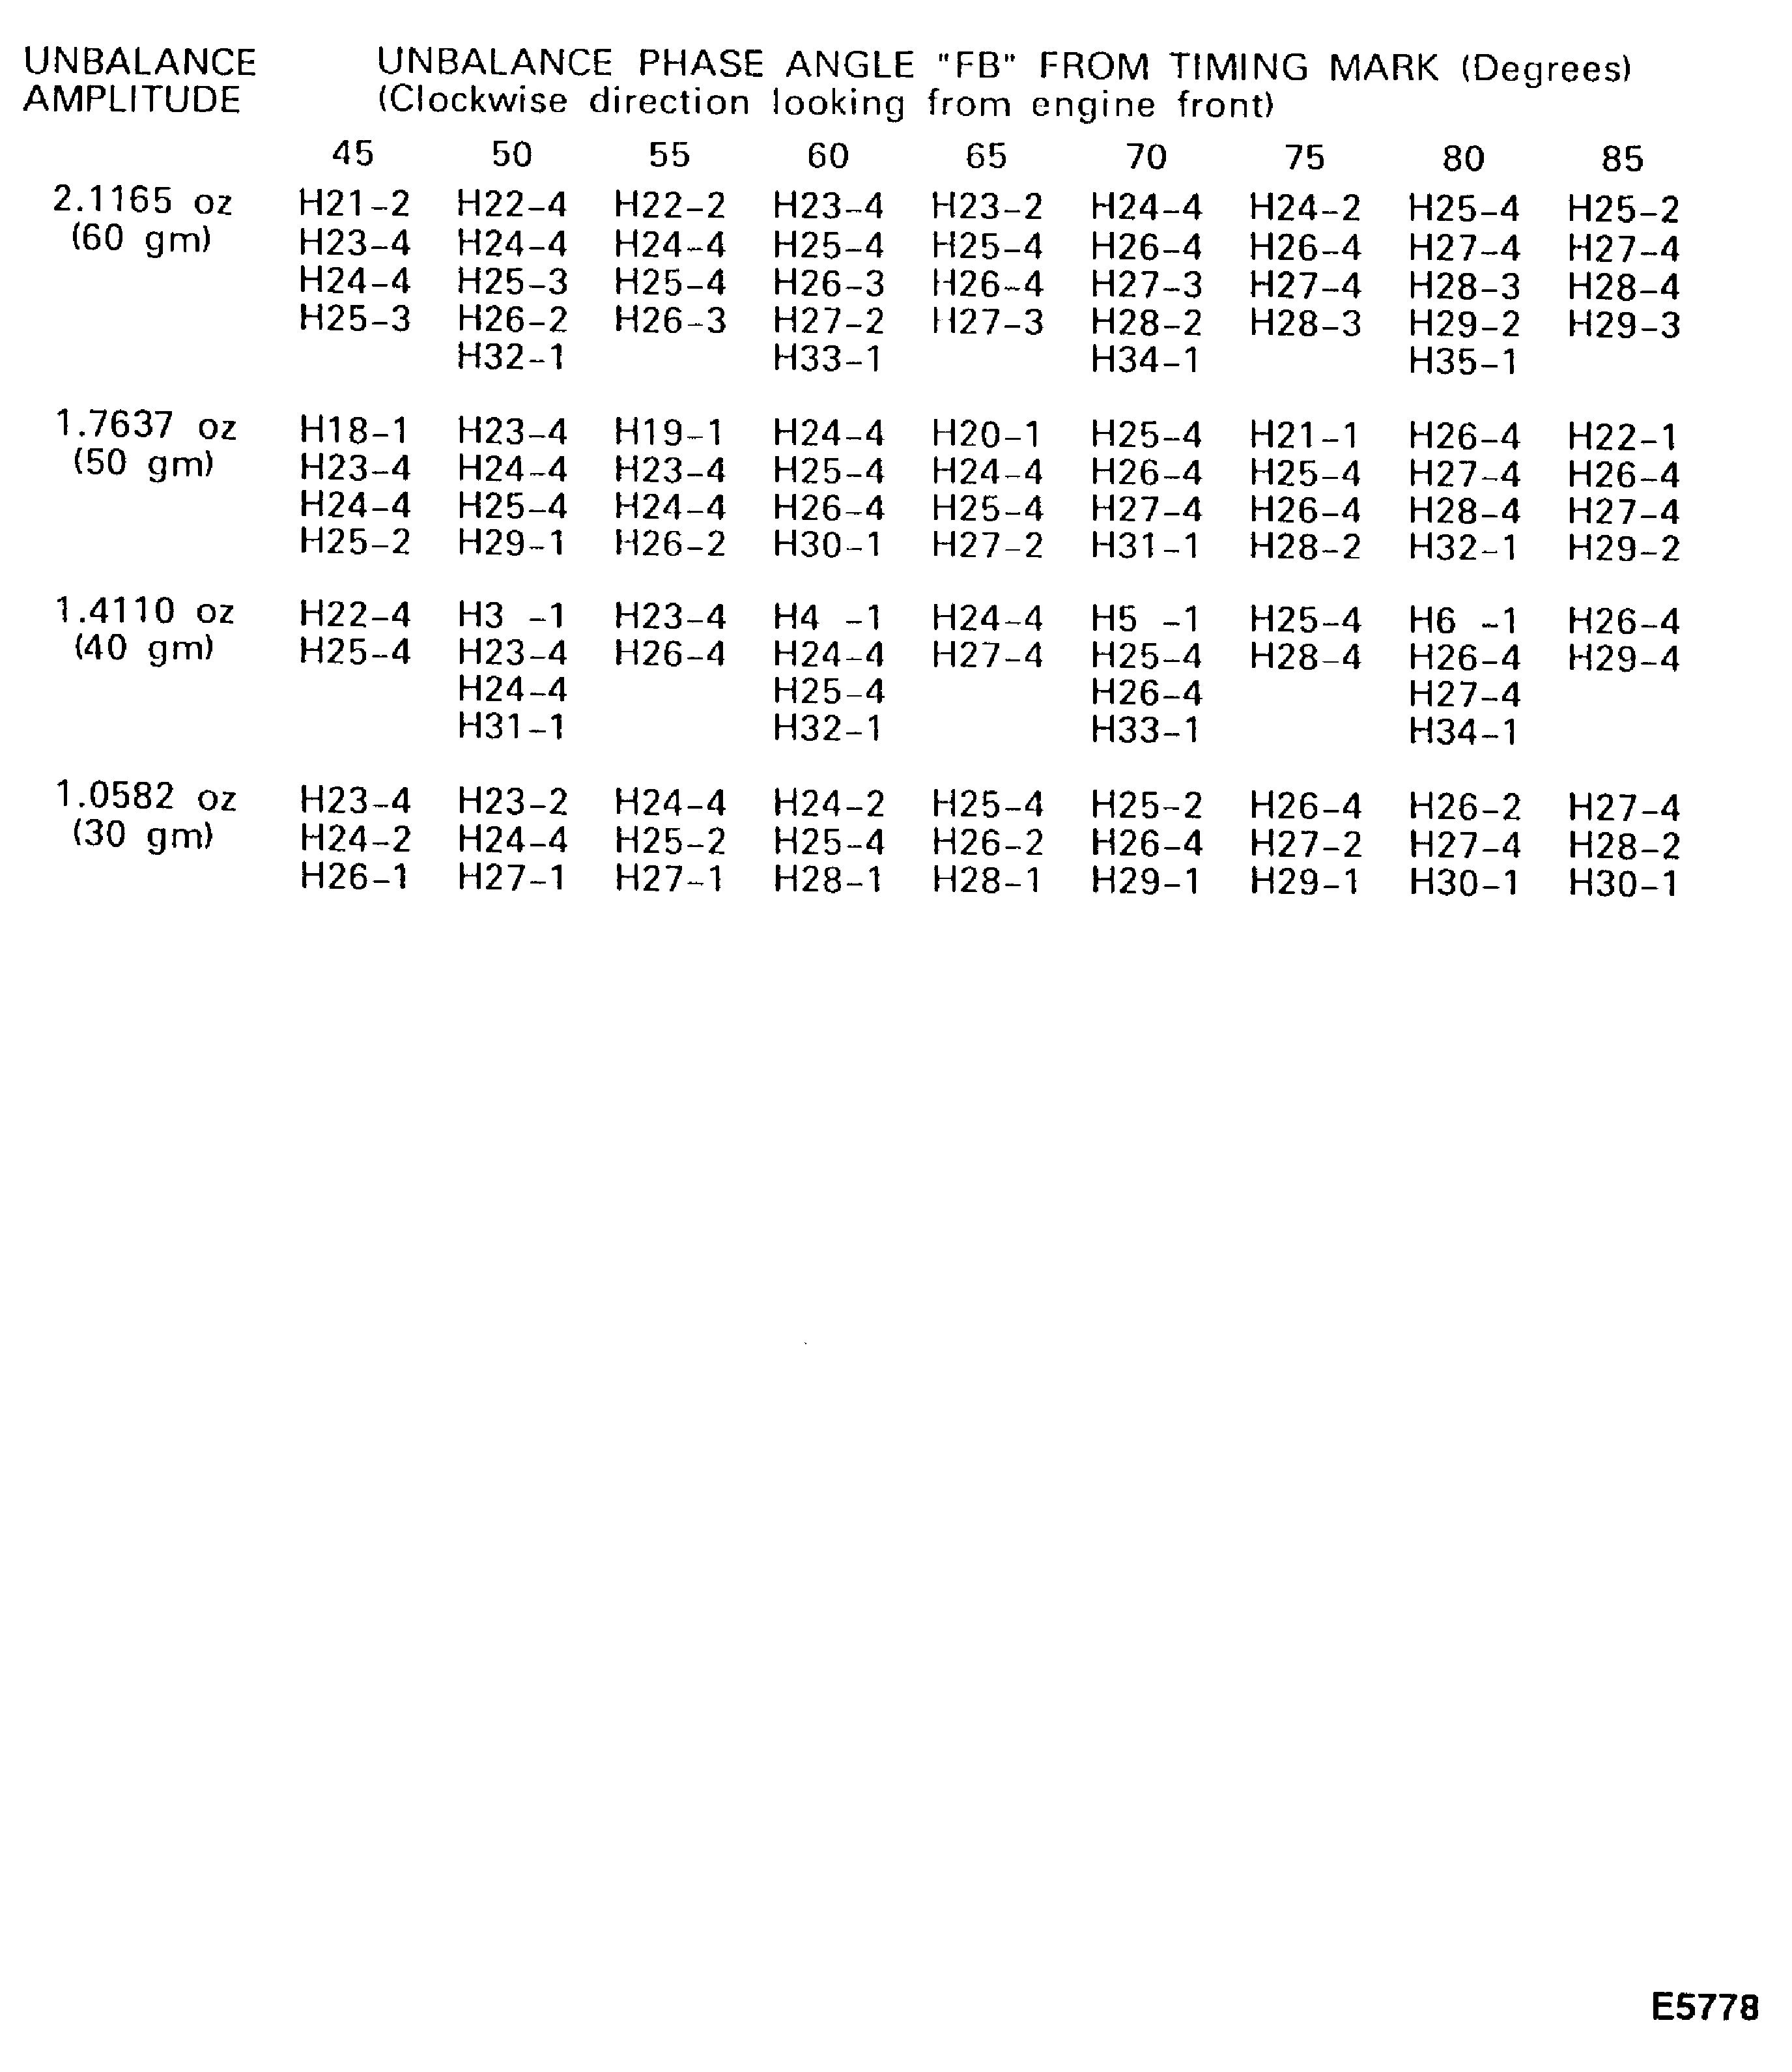
Figure: Table 8 Sheet 19 Trim balance weights and bolt hole No. (Retaining ring flange)
Table 8 Sheet 19 Trim balance weights and bolt hole No. (Retaining ring flange)
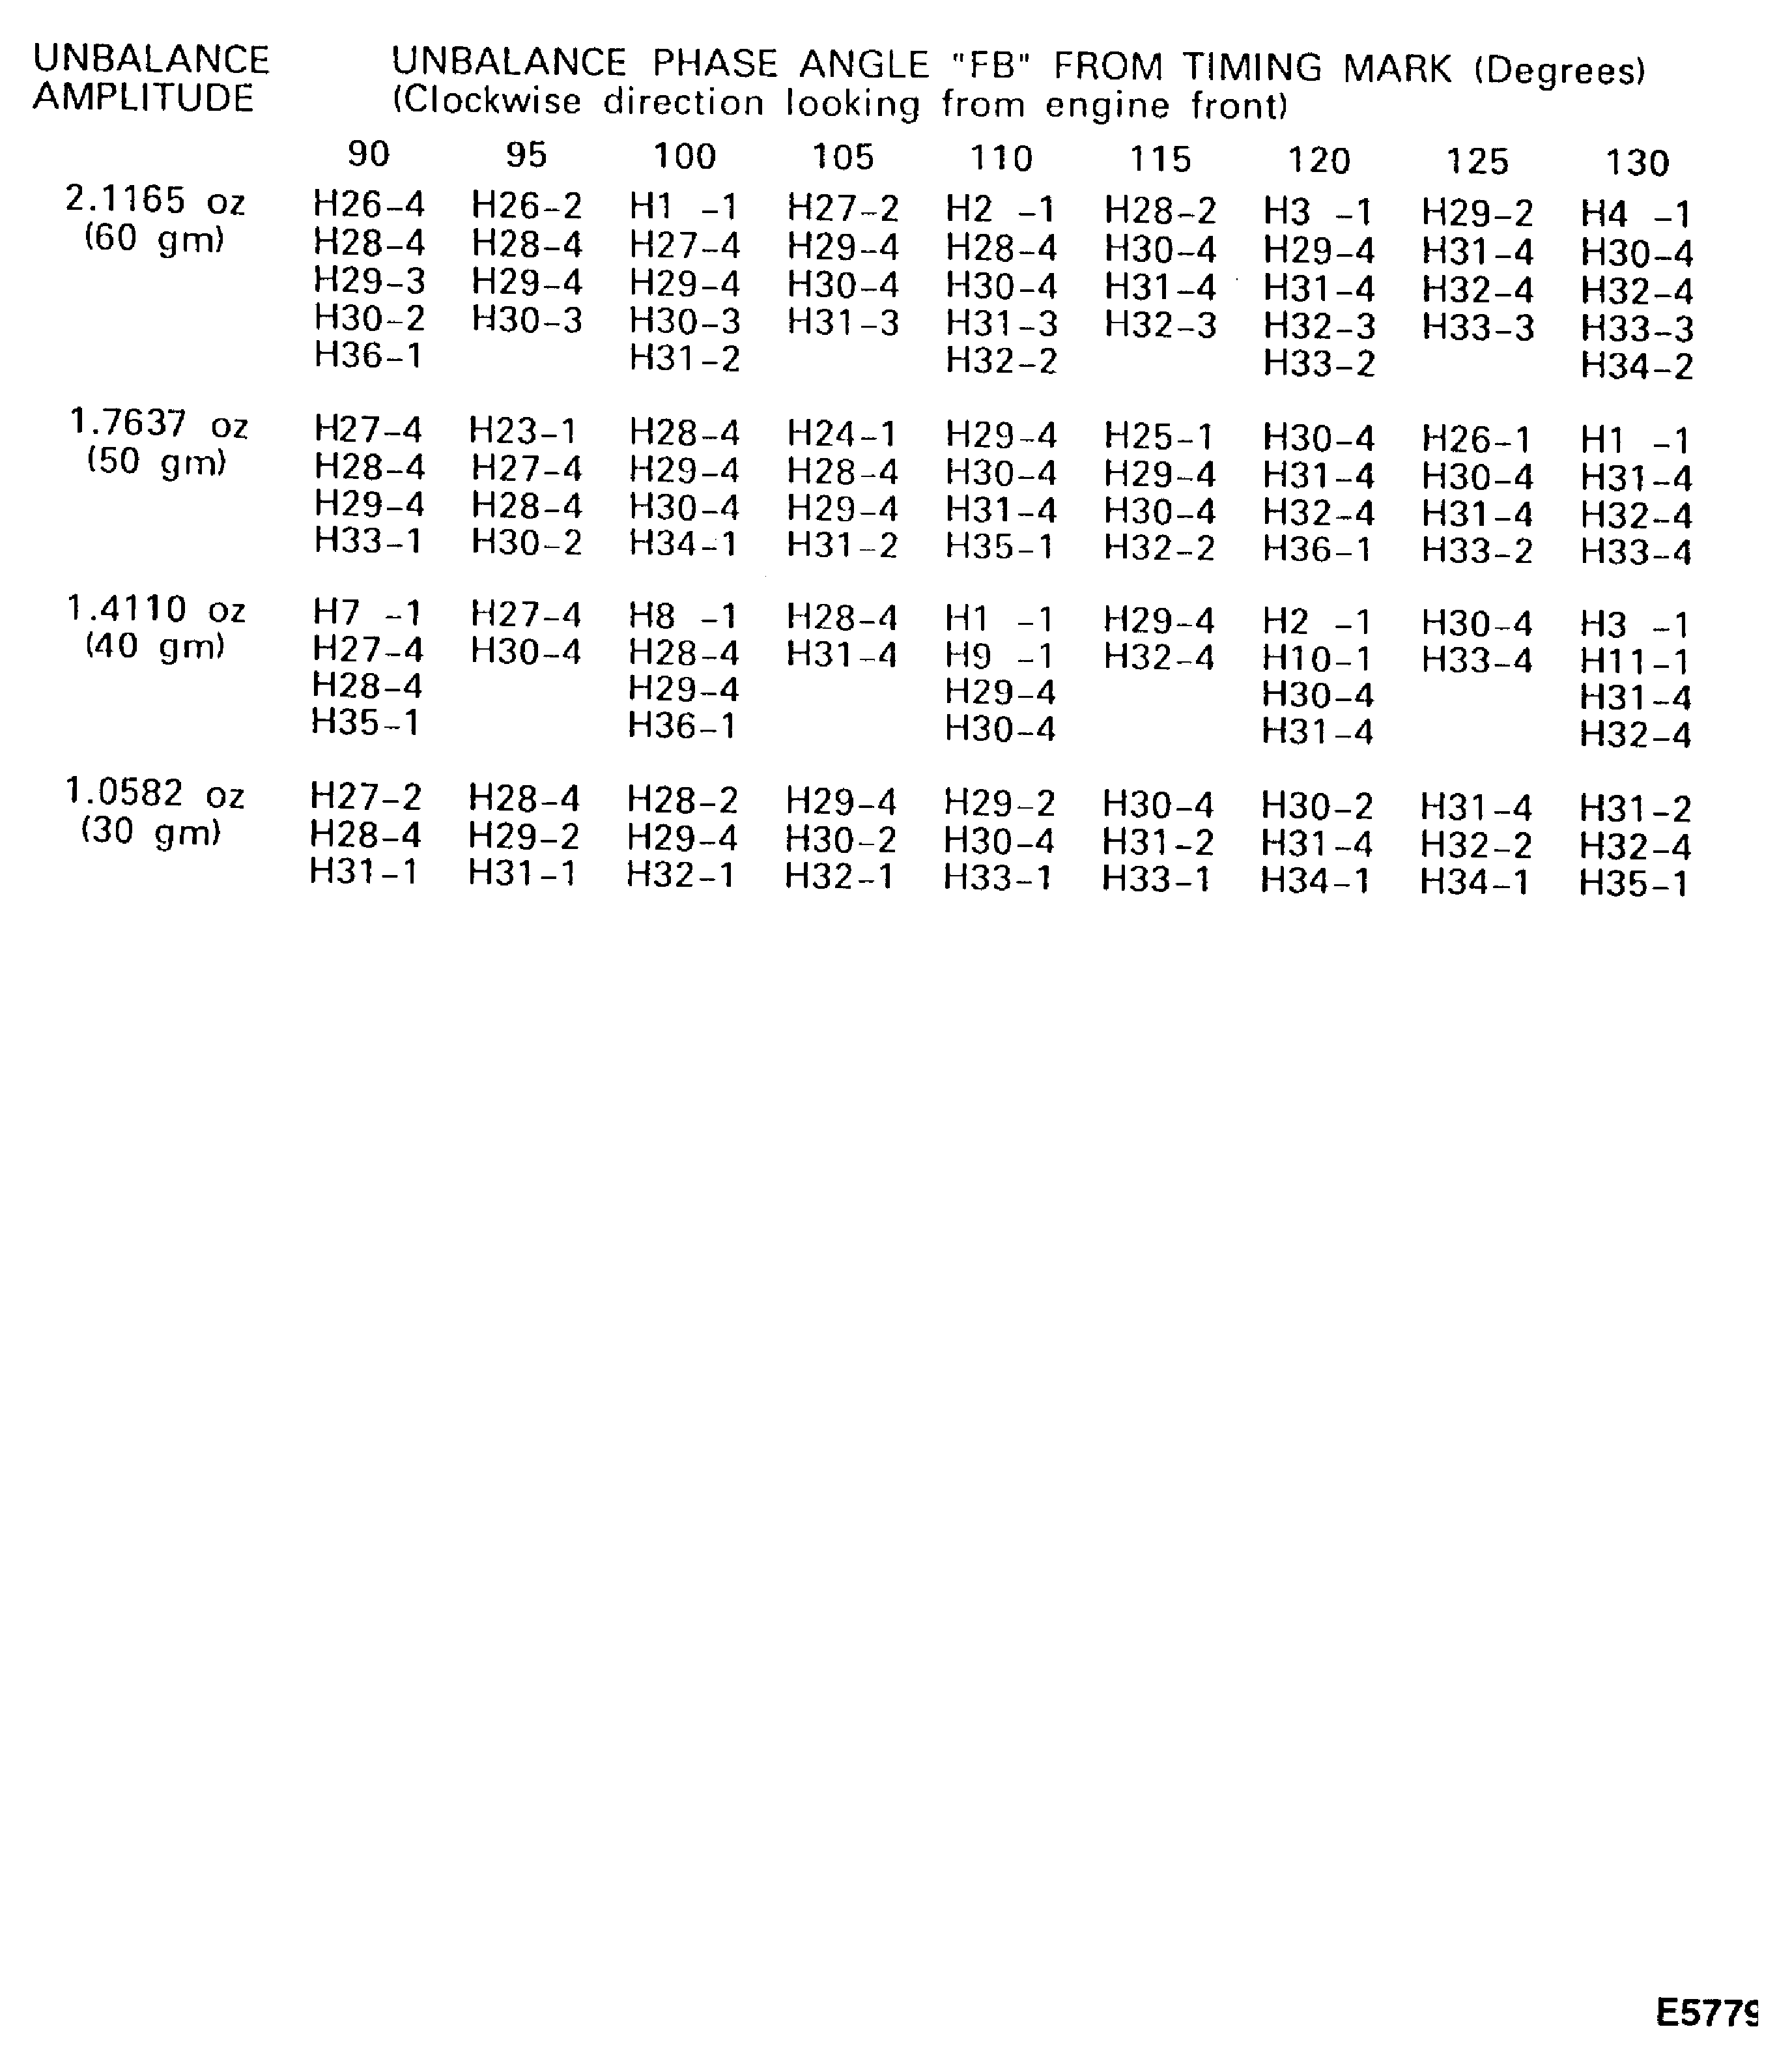
Figure: Table 8 Sheet 20 Trim balance weights and bolt hole No. (Retaining ring flange)
Table 8 Sheet 20 Trim balance weights and bolt hole No. (Retaining ring flange)
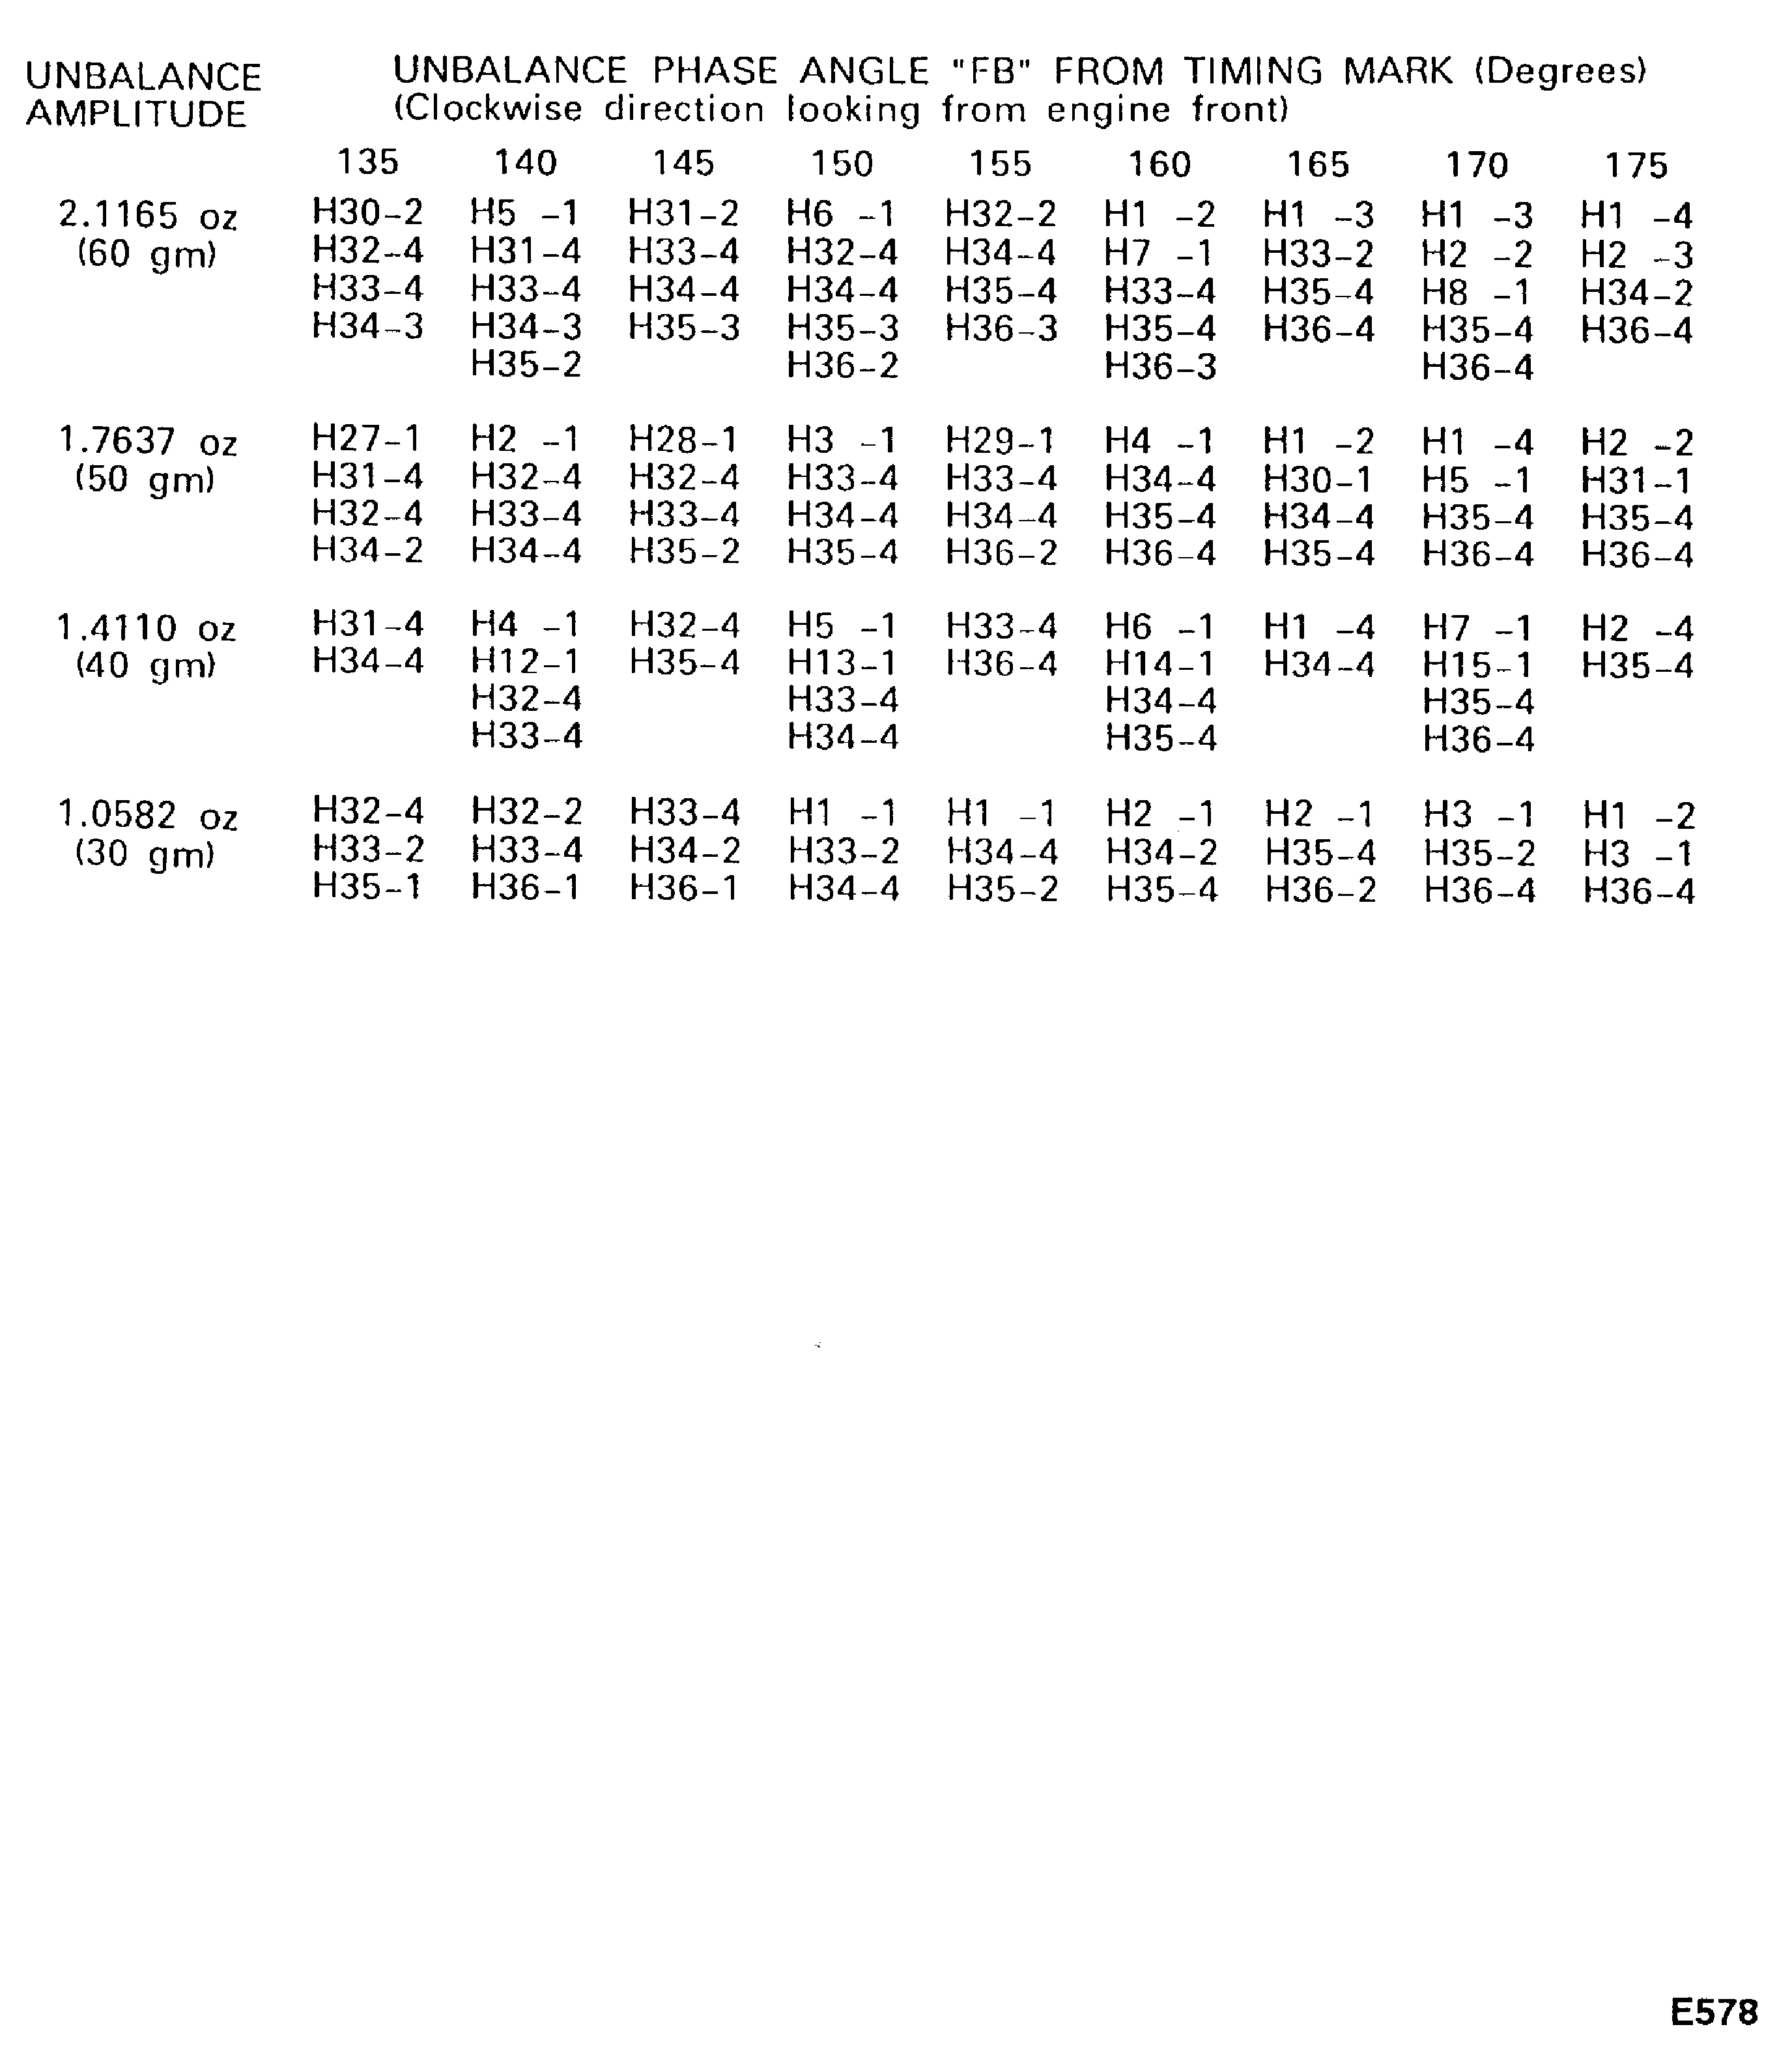
Figure: Table 8 Sheet 21 Trim balance weights and bolt hole No. (Retaining ring flange)
Table 8 Sheet 21 Trim balance weights and bolt hole No. (Retaining ring flange)
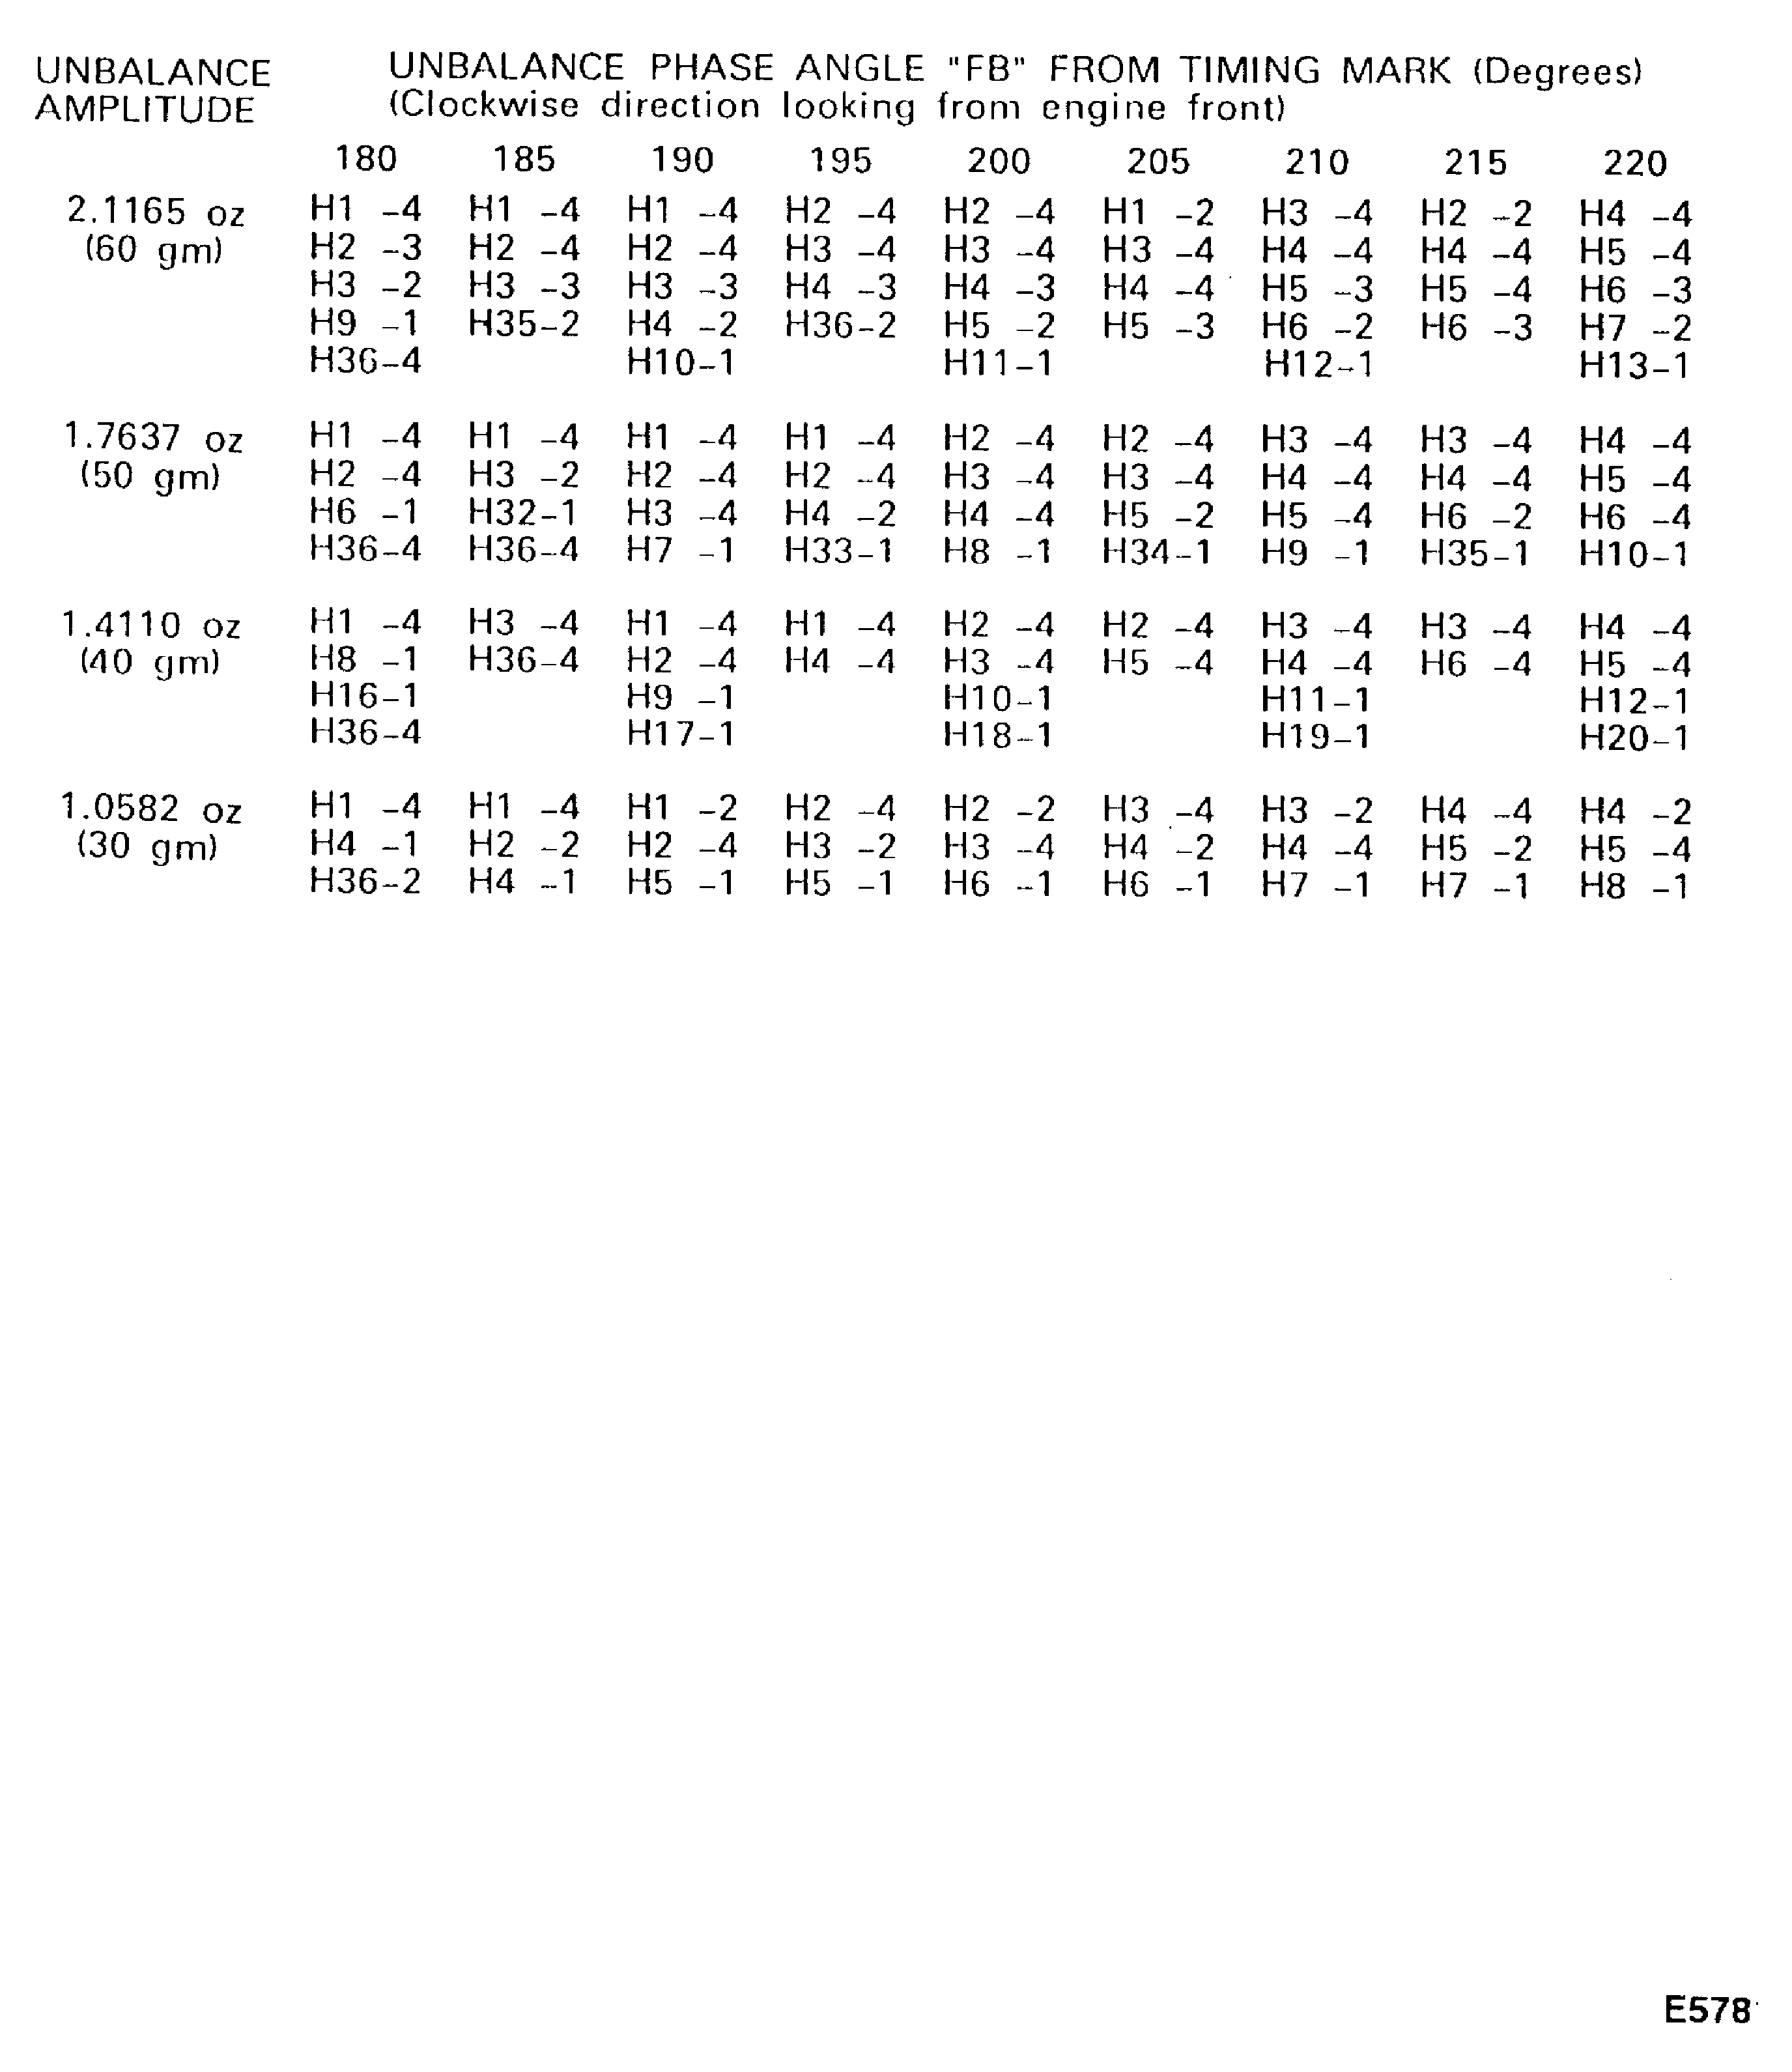
Figure: Table 8 Sheet 22 Trim balance weights and bolt hole No. (Retaining ring flange)
Table 8 Sheet 22 Trim balance weights and bolt hole No. (Retaining ring flange)

Figure: Table 8 Sheet 23 Trim balance weights and bolt hole No. (Retaining ring flange)
Table 8 Sheet 23 Trim balance weights and bolt hole No. (Retaining ring flange)

Figure: Table 8 Sheet 24 Trim balance weights and bolt hole No. (Retaining ring flange)
Table 8 Sheet 24 Trim balance weights and bolt hole No. (Retaining ring flange)

Figure: Example of trim balance weights on retaining ring flange
Example of trim balance weights on retaining ring flange
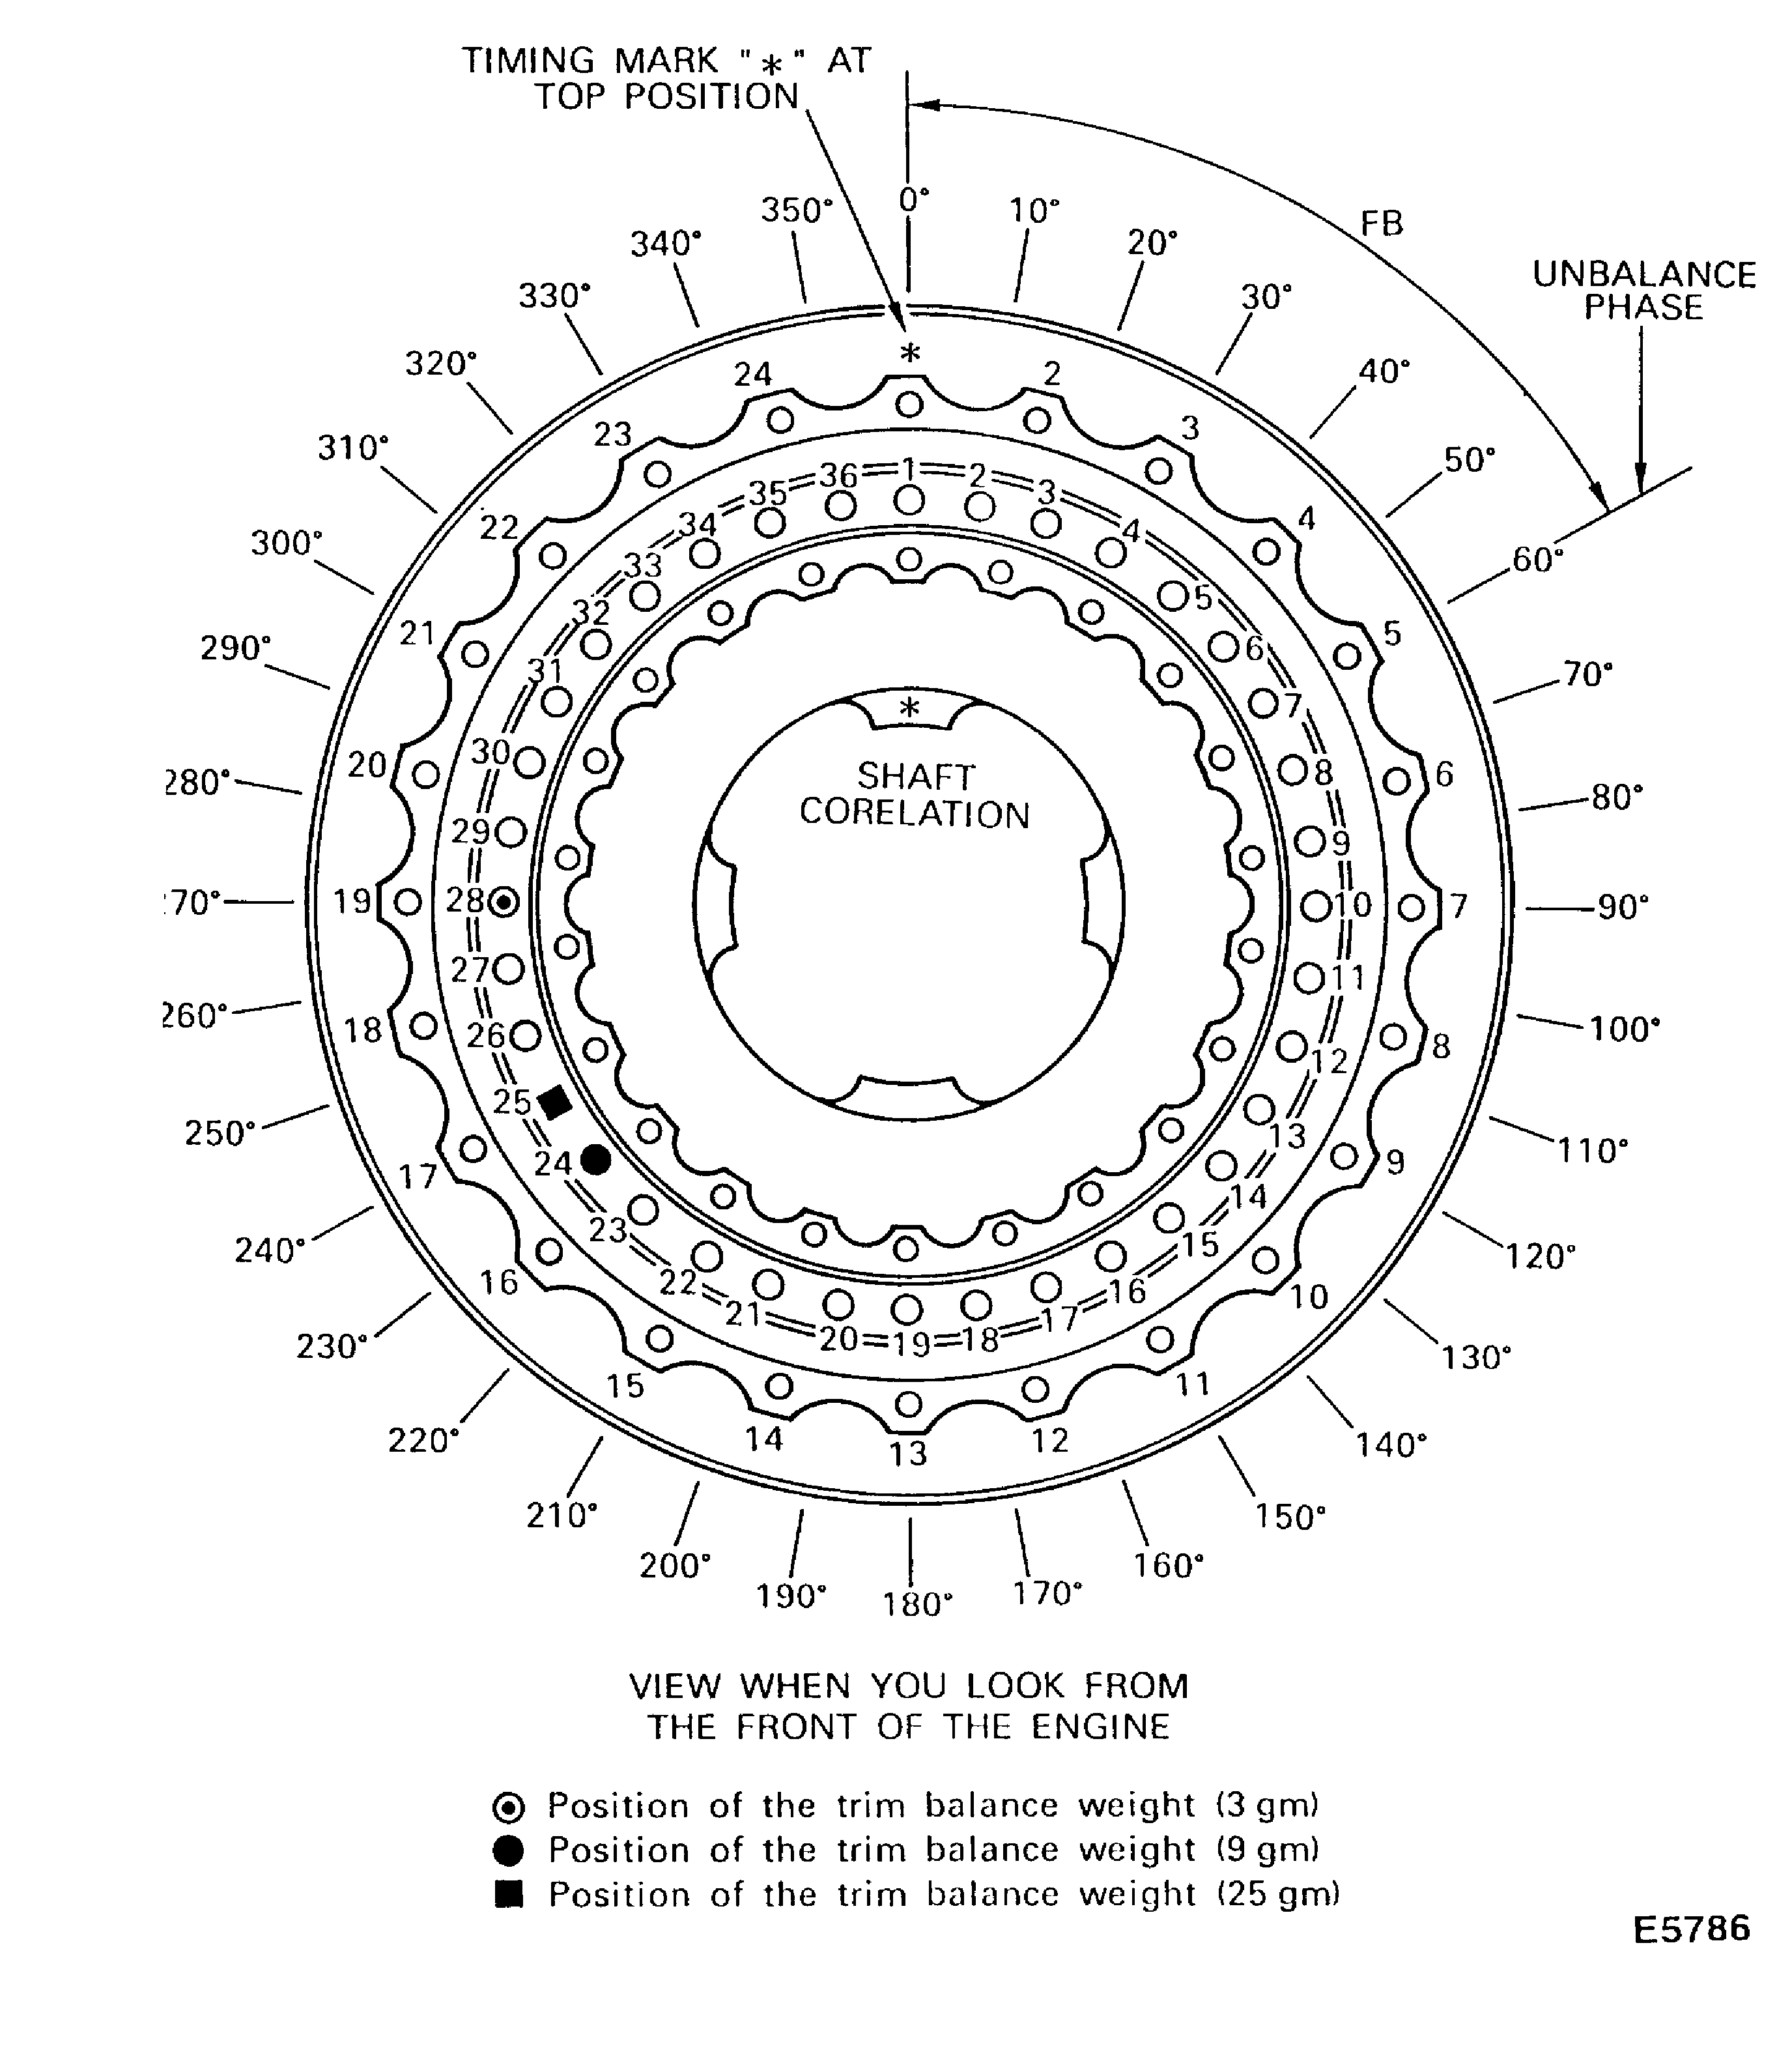
Figure: Identification mark on trim balance weight
Identification mark on trim balance weight

