Export Control
EAR Export Classification: Not subject to the EAR per 15 C.F.R. Chapter 1, Part 734.3(b)(3), except for the following Service Bulletins which are currently published as EAR Export Classification 9E991: SBE70-0992, SBE72-0483, SBE72-0580, SBE72-0588, SBE72-0640, SBE73-0209, SBE80-0024 and SBE80-0025.Copyright
© IAE International Aero Engines AG (2001, 2014 - 2021) The information contained in this document is the property of © IAE International Aero Engines AG and may not be copied or used for any purpose other than that for which it is supplied without the express written authority of © IAE International Aero Engines AG. (This does not preclude use by engine and aircraft operators for normal instructional, maintenance or overhaul purposes.).Applicability
All
Common Information
TASK 72-40-00-200-011 No. 4 Bearing/HPT Nut - Examine, Inspection-011
General
This TASK gives the procedure for the inspection of the bearing retaining nut. For the other HP system module parts, refer to TASK 72-40-00-200-000.
Fig/item numbers in parentheses in the procedure agree with those used in the IPC.
The policy that is necessary for inspection is given in SPM TASK 70-20-00-200-501.
All parts must be visually examined for damage, corrosion and wear. Any defects that are not identified in the procedure must be referred to IAE.
All the parts must be cleaned before any part is examined. Refer to the SPM TASK 70-10-00-100-501.
The procedure for those parts which must have crack test is given in SUBTASK 72-40-00-230-055. Do the test before the part is visually examined.
The procedure to silver plate is given in SUBTASK 72-40-00-220-106. Do the visual and dimensional examinations first. The Bearing retaining nut must be silver plated at each removal.
Do not discard any part until you are sure there are no repairs available. Refer to the instructions in Repair before a discarded part is used again or oversize parts are installed.
Parts which should be discarded can be held although no repair is available. The repair of a discarded part could be shown to be necessary at a later date.
All parts must be examined to make sure that all the repairs have been completed satisfactorily.
The practices and processes referred to in the procedure by the TASK numbers are in the SPM.
References
Refer to the SPM for data on these items.
Definitions of Damage, SPM TASK 70-02-02-350-501
Inspection of Parts, SPM TASK 70-20-01-200-501
Some data on these items is contained in this TASK. For more data on these items refer to the SPM.
Method of Testing for Crack Indications
Chemical Processes
Surface Protection
Preliminary Requirements
Pre-Conditions
NONESupport Equipment
NONEConsumables, Materials and Expendables
NONESpares
NONESafety Requirements
NONEProcedure
NOTE
Make sure that the antigalling compound is fully removed.Clean the part. Refer to TASK 72-40-00-100-000 (CLEANING-000).
SUBTASK 72-40-00-230-055-001 Examine the Bearing Retaining Nut (04-020) for Cracks
Refer to Figure.
Repair, VRS3011 TASK 72-40-00-300-006 (REPAIR-006)
NOTE
The silver plate on bearing retaining nut must be removed and replaced after each removal.Repair, VRS3010 TASK 72-40-00-300-005 (REPAIR-005)
Out of limits
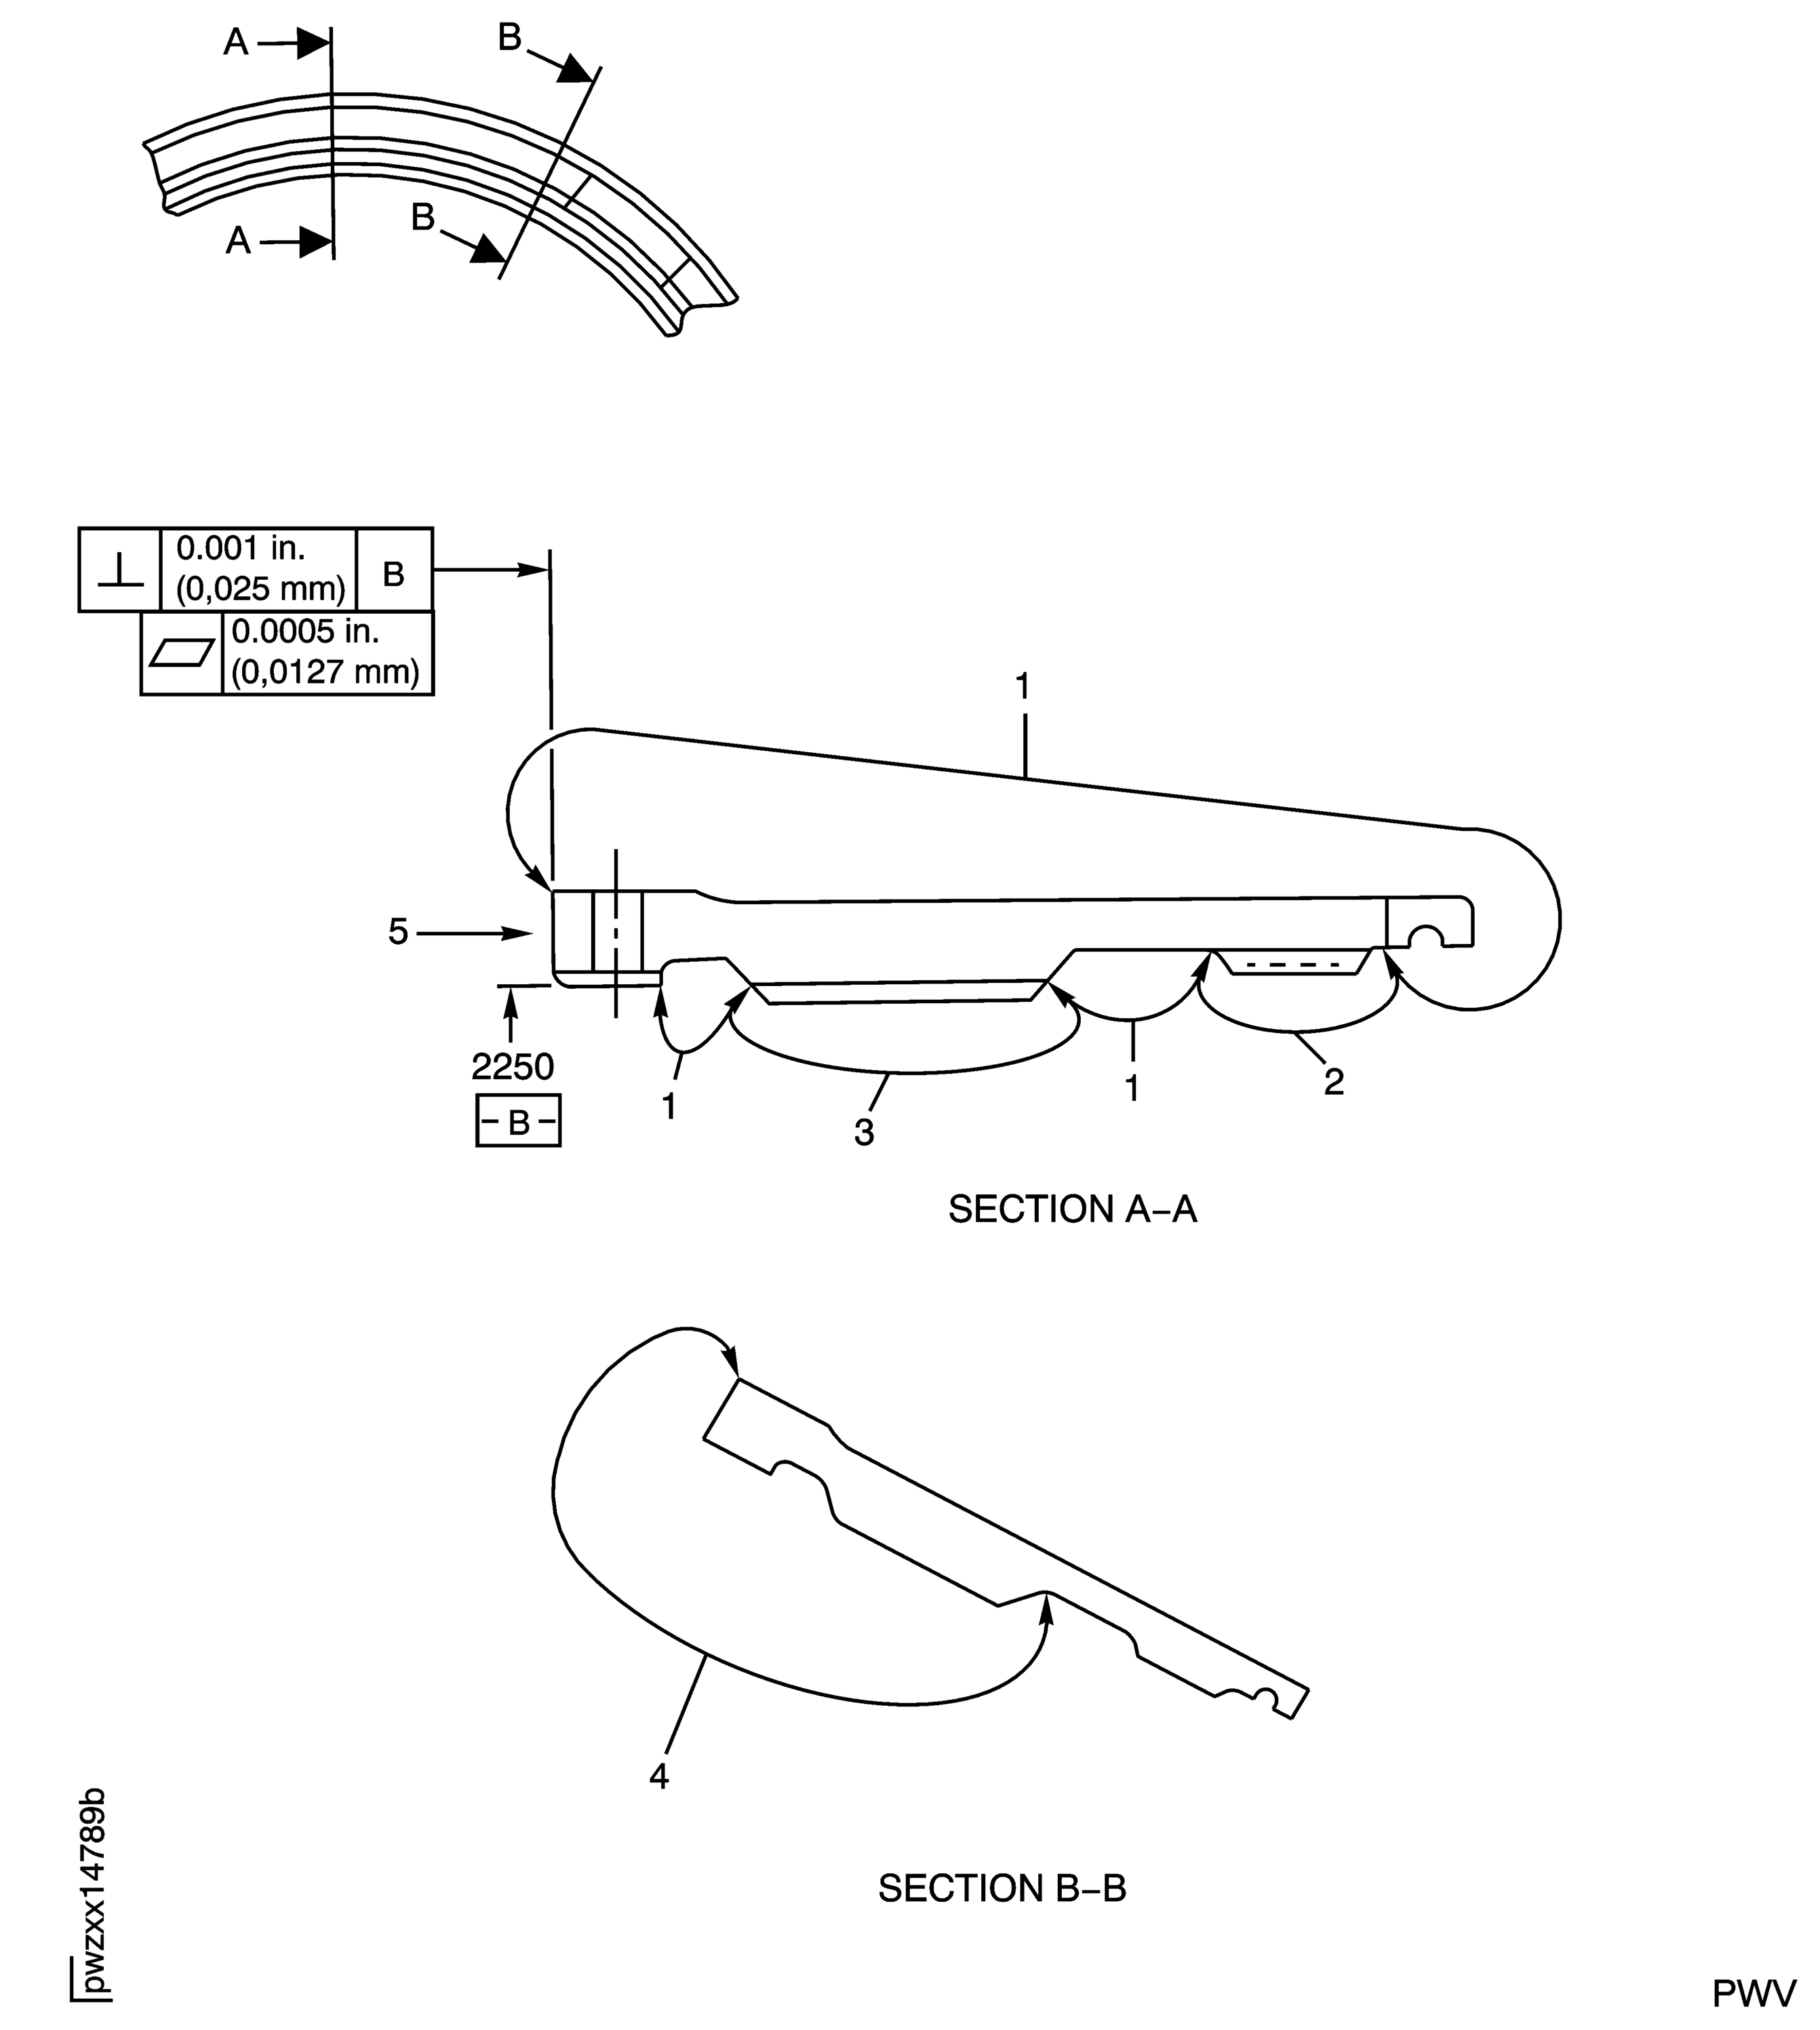
Examine the flatness and perpendicularity at location 5.
If present, remove the silver plate
SUBTASK 72-40-00-220-172 Examine the Bearing Retaining Nut (04-020) After Removing the Silver Plate
Refer to Figure.
Repair, VRS3454 TASK 72-40-00-300-004 (REPAIR-004)

CAUTION
A MAXIMUM OF 10% OF THE THREADS CAN BE REMOVED BY BLENDING.A maximum of 10% of the threads have burrs, nicks, or pick-up
SUBTASK 72-40-00-220-101 Examine the Bearing Retaining Nut (04-020) Threads for Burrs, Nicks and Pick-up
Refer to Figure.
Repair, VRS3454 TASK 72-40-00-300-004 (REPAIR-004)
Repair, VRS3454 TASK 72-40-00-300-004 (REPAIR-004)
Other than (a)
Burrs
Examine the bearing retaining nut splines for burrs and nicks at location 2.
SUBTASK 72-40-00-220-102 Examine the Bearing Retaining Nut (04-020) Splines for Burrs and Nicks
Refer to Figure.
Repair, VRS3010 TASK 72-40-00-300-005 (REPAIR-005)
Galls or pick-up
Repair, VRS3454 TASK 72-40-00-300-004 (REPAIR-004)
Burrs
Examine the retaining nut front face for burrs, galls and pick-up at location 5.
SUBTASK 72-40-00-220-103 Examine the Bearing Retaining Nut (04-020) Front Face for Burrs, Galls and Pick-up
Refer to Figure.
Repair, VRS3489 TASK 72-40-00-300-010 (REPAIR-010)
Galls or pick-up
Repair, VRS3454 TASK 72-40-00-300-004 (REPAIR-004)
Burrs
Examine the bearing retaining nut front inner diameter for burrs, galls and pick-up at location 2250.
SUBTASK 72-40-00-220-104 Examine the Bearing Retaining Nut (04-020) Front Inner Diameter for Burrs, Galls and Pick-up
Refer to Figure.
Repair, VRS3489 TASK 72-40-00-300-010 (REPAIR-010)
Other than (1) or (2)
Examine the bearing retaining nut front inner diameter at location 2250.
SUBTASK 72-40-00-220-105 Examine the Bearing Retaining Nut (04-020) Front Inner Diameter
Refer to Figure.
Repair, VRS3454 TASK 72-40-00-300-004 (REPAIR-004)
Nicks
Repair, VRS3454 TASK 72-40-00-300-004 (REPAIR-004)
Scratches
Repair, VRS3454 TASK 72-40-00-300-004 (REPAIR-004)
Burrs
Examine the bearing retaining nut for nicks, scratches and burrs at location 1.
SUBTASK 72-40-00-220-140 Examine All Other Areas for Nicks, Scratches and Burrs
Refer to Figure.
Repair, VRS3011 TASK 72-40-00-300-006 (REPAIR-006).
Silver plate.
Apply silver plating on the bearing retaining nut at location 4.
SUBTASK 72-40-00-330-060 Apply Silver Plate
Replace loose or missing plugs, Rework-001 TASK 72-40-00-840-001 (REWORK-001).
There are less than eight plugs or there are loose plugs.
Check for the quantity of plugs and for loose plugs in every other hole.
SUBTASK 72-40-00-220-171 Examine the Bearing Nut (PN 2A2247 only for Assembly of Metering Plugs
NOTE
If the part is new, it can have only eight holes and no plugs.
Figure: Bearing Retaining Nut Inspection Locations
Bearing Retaining Nut Inspection Locations

