Export Control
EAR Export Classification: Not subject to the EAR per 15 C.F.R. Chapter 1, Part 734.3(b)(3), except for the following Service Bulletins which are currently published as EAR Export Classification 9E991: SBE70-0992, SBE72-0483, SBE72-0580, SBE72-0588, SBE72-0640, SBE73-0209, SBE80-0024 and SBE80-0025.Copyright
© IAE International Aero Engines AG (2001, 2014 - 2021) The information contained in this document is the property of © IAE International Aero Engines AG and may not be copied or used for any purpose other than that for which it is supplied without the express written authority of © IAE International Aero Engines AG. (This does not preclude use by engine and aircraft operators for normal instructional, maintenance or overhaul purposes.).Applicability
All
Common Information
TASK 72-41-15-200-009-B00 HPC Stage 11 Rotor Blade - Examine, Inspection-009
Effectivity
FIG/ITEM | PART NO. |
|---|---|
02-670 | 6A4728 |
02-670 | 6A6568 |
Deleted | Deleted |
02-670 | 6A8759 |
02-685 | 6A4253 |
02-685 | 6A5647 |
Deleted | Deleted |
02-685 | 6A8760 |
02-700 | 6A4251C01 |
Deleted | Deleted |
02-700 | 6A8757 |
02-715 | 6A4251C01 |
Deleted | Deleted |
02-715 | 6A8757 |
02-717 | 6A4251C02 |
Deleted | Deleted |
02-717 | 6A8758 |
General
This TASK gives the procedure for the inspection of the HP Compressor Stage 11 rotor blades.
Nicks and dents 0.005 in. (0.13 mm) or less are acceptable without limit to the airfoil and gas washed surface of the platforms.
Fig/item numbers in parentheses in the procedure agree with those given in the EIPC. Only the primary Fig/item numbers are used. For the service bulletin alpha variants refer to the EIPC.
The policy that is necessary for inspection is given in SPM TASK 70-20-01-200-501.
All the parts must be cleaned before any part is examined.
All the parts must be visually examined for damage, corrosion and wear. Any defects that are not identified in the procedure must be referred to IAE.
The procedure for those parts which must have a crack test is given in Step Do the crack test before the part is visually examined.
Do not discard any part until you are sure there are no repairs available. Refer to the instructions in repair before a discarded part is used again or oversize parts are installed.
Parts which must be discarded can be held although no repair is available. The repair of a discarded part can be shown to be necessary at a subsequent date.
All the parts must be examined to make sure that all the repairs have been completed satisfactorily.
The practices and processes referred to in the procedure by the TASK/SUBTASK number are in SPM.
References
Refer to SPM for data on these items:
Definition of Damage, SPM TASK 70-02-02-350-501,
Inspection of Parts, SPM TASK 70-20-01-200-501.
Some data on these items are contained in this TASK. For more data on these items refer to SPM:
Method of Testing for Crack Indications,
Chemical Processes,
Surface Protection.
Preliminary Requirements
Pre-Conditions
NONESupport Equipment
NONEConsumables, Materials and Expendables
NONESpares
NONESafety Requirements
NONEProcedure
Clean the parts. Refer to TASK 72-41-15-100-000 (CLEANING-000).
SUBTASK 72-41-15-230-059 Examine the Stage 11 Rotor Blades for Cracks
Refer to Figure.
Repair VRS6017, TASK 72-41-15-300-009 (REPAIR-009).
More than in Step.
Nicks or dents.
Repair VRS6017, TASK 72-41-15-300-009 (REPAIR-009).
Eroded.
Accept.
If stylus does not hesitate or catch along the airfoil chord.
Reject.
If stylus hesitates or catches on the airfoil chord.
Along the Airfoil Chord - Inspect with SPM TASK 70-21-00-220-501 with a 0.020 in. (0.50 mm) radius stylus.
Reject.
Along the span of the airfoil surface.
Scored.
SUBTASK 72-41-15-220-542 Examine the Stage 11 Rotor Blades Concave and Convex Airfoil Surfaces at Locations 1 and 2
Refer to Figure.
Other than in Step if the repair identification symbol and /2 is engraved adjacent to the part number.
Repair VRS6073, TASK 72-41-15-300-028 (REPAIR-028) or Repair VRS6150, TASK 72-41-15-300-040 (REPAIR-040).
Examine the blade root to find if VRS6073 or VRS6150 has been completed.
SUBTASK 72-41-15-220-204-001 Examine the Stage 11 Rotor Blade Concave and Convex Airfoil Surface Finish at Locations 1 and 2, Platform at Location 8 and Root Radius at Location 9 (Pre SBE 70-0714 and SBE 70-0726)
Refer to Figure.
Repair, VRS6150 TASK 72-41-15-300-040 (REPAIR-040).
Mean surface finish greater than 10 microinches (0.25 micrometers).
Mean surface finish of 10 microinches (0.25 micrometers) or less.
SUBTASK 72-41-15-220-204-002 Examine the Stage 11 Rotor Blade Concave and Convex Airfoil Surface Finish at Locations 1 and 2 (SBE 72-0561)
Refer to Figure.
Repair VRS6017, TASK 72-41-15-300-009 (REPAIR-009).
Cracked.
Repair VRS6017, TASK 72-41-15-300-009 (REPAIR-009).
More than in Step.
Nicks or dents.
Repair VRS6017, TASK 72-41-15-300-009 (REPAIR-009).
Eroded.
SUBTASK 72-41-15-220-543 Examine the Stage 11 Rotor Blades Leading Edge at Location 3
Refer to Figure.
Repair VRS6017, TASK 72-41-15-300-009 (REPAIR-009).
More than in Step.
Nicks or dents.
Repair VRS6017, TASK 72-41-15-300-009 (REPAIR-009).
Eroded.
SUBTASK 72-41-15-220-544 Examine the Stage 11 Rotor Blades Trailing Edge at Location 4
Refer to Figure.
Repair, VRS6057 TASK 72-41-15-300-019 (REPAIR-019) or Repair, VRS6534 TASK 72-41-15-300-055 (REPAIR-055).
Cracked.
In the limits in TASK 72-41-10-040-001-B00 (DISASSEMBLY-001) or TASK 72-41-10-040-001-C00 (DISASSEMBLY-001).
Repair, VRS6057 TASK 72-41-15-300-019 (REPAIR-019) or Repair, VRS6534 TASK 72-41-15-300-055 (REPAIR-055).
Identified as too short in TASK 72-41-10-040-001-B00 (DISASSEMBLY-001) or TASK 72-41-10-040-001-C00 (DISASSEMBLY-001).
Rubbed or worn.
NOTE
This is an alternative to Step. If measurements taken during limits from disassembly (TASK 72-41-10-040-001-B00 or TASK 72-41-10-040-001-C00) have not been supplied, Step can be skipped.
SUBTASK 72-41-15-220-545 Examine the Stage 11 Rotor Blades Tips at Location 1054
Refer to Figure.
Accept.
If stylus does not hesitate or catch.
Reject.
If stylus hesitates or catches.
Inspect with SPM TASK 70-21-00-220-501 with a 0.020 in. (0.50 mm) radius stylus.
Scored.
Accept.
If stylus does not hesitate or catch and the imperfection does not display sharp edges, raised material, burrs, or a dark bottom.
Reject.
If stylus hesitates or catches, the imperfection displays sharp edges, raised material, burrs, or a dark bottom or the imperfection is located on the bedding area (pressure face).
Imperfections - Inspect with SPM TASK 70-21-00-220-501 with a 0.020 in. (0.50 mm) radius stylus.
Accept.
If stylus does not hesitate or catch and the nick or dent does not display sharp edges, raised material, or burrs.
Reject.
If stylus hesitates or catches, the nick or dent displays sharp edges, raised material, burrs, or the nick or dent is located on the bedding area (pressure face).
Nicks or dents - Inspect with SPM TASK 70-21-00-220-501 with a 0.020 in. (0.50 mm) radius stylus.
SUBTASK 72-41-15-220-546 Examine the Stage 11 Rotor Blades Dovetail at Location 5 (All Remaining Faces and/or Areas on Dovetail Excluding the Dovetail End Faces and Corners Addressed in Step)
NOTE
Damage of any kind is not allowed on the bedding area (also known as the pressure face) of the dovetail.Refer to Figure.
More than in Step.
Galled.
Accept.
If stylus does not hesitate or catch.
Reject.
If stylus hesitates or catches.
Scored - Inspect with SPM TASK 70-21-00-220-501 with a 0.020 in. (0.50 mm) radius stylus.
Accept.
If stylus does not hesitate or catch and the imperfection does not display sharp edges, raised material, burrs, or a dark bottom.
Reject.
If stylus hesitates or catches, the imperfection displays sharp edges, raised material, burrs, or a dark bottom.
Imperfections - Inspect with SPM TASK 70-21-00-220-501 with a 0.020 in. (0.50 mm) radius stylus.
Accept.
If stylus does not hesitate or catch and the nick or dent does not display sharp edges, raised material, or burrs.
Reject.
If stylus hesitates or catches, the nick or dent displays sharp edges, raised material, or burrs.
Nicks or dents - Inspect with SPM TASK 70-21-00-220-501 with a 0.020 in. (0.50 mm) radius stylus.
SUBTASK 72-41-15-220-547 Examine the Stage 11 Rotor Blades Cheeks at Locations 6 and 7
Refer to Figure.
More than in Step.
On top/gas washed face of the platform.
Accept.
If stylus does not hesitate or catch and the nick or dent does not display sharp edges, raised material, or burrs.
Reject.
If stylus hesitates or catches, the nick or dent displays sharp edges, raised material, or burrs.
On the bottom/non-gas washed face of the platform - Inspect with SPM TASK 70-21-00-220-501 with a 0.020 in. (0.50 mm) radius stylus.
Nicks or dents.
Accept.
If stylus does not hesitate or catch on the platform surface.
Reject.
If stylus hesitates or catches on the platform surface.
On top/gas washed face of the platform - Inspect with SPM TASK 70-21-00-220-501 with a 0.020 in. (0.50 mm) radius stylus.
Reject.
If stylus hesitates or catches on the platform surface or the criteria in Step is not maintained.
On the bottom/non-gas washed face of the platform - Inspect with SPM TASK 70-21-00-220-501 with a 0.020 in. (0.50 mm) radius stylus.
Scored.
Accept.
If stylus does not hesitate or catch and the imperfection does not display sharp edges, raised material, burrs, or a dark bottom.
Reject.
If stylus hesitates or catches, the imperfection displays sharp edges, raised material, burrs, or a dark bottom.
On the bottom/non-gas washed face of the platform - Inspect with SPM TASK 70-21-00-220-501 with a 0.020 in. (0.50 mm) radius stylus.
Imperfections.
SUBTASK 72-41-15-220-114 Examine the Stage 11 Rotor Blades Platform at Location 8
Refer to Figure.
Repair, VRS6150 TASK 72-41-15-300-040 (REPAIR-040).
Mean surface finish greater than 16 microinches (0.40 micrometers).
SUBTASK 72-41-15-220-433 Examine the Stage 11 Rotor Blades Platform Surface Finish at Location 8 (SBE 72-0561)
Refer to Figure.
Reject.
More than in Step.
Nicks or dents.
Accept.
If stylus does not hesitate or catch along the chord.
Reject.
If stylus hesitates or catches on the chord.
Inspect with SPM TASK 70-21-00-220-501 with a 0.020 in. (0.50 mm) radius stylus.
Scored.
Accept.
If stylus does not hesitate or catch and the imperfection does not display sharp edges, raised material, burrs, or a dark bottom.
Reject.
If stylus hesitates or catches, the imperfection displays sharp edges, raised material, burrs, or a dark bottom.
Imperfections - Inspect with SPM TASK 70-21-00-220-501 with a 0.020 in. (0.50 mm) radius stylus.
SUBTASK 72-41-15-220-548 Examine the Stage 11 Rotor Blades Root Radius at Location 9
Refer to Figure.
SUBTASK 72-41-15-220-550 Examine the Stage 11 Rotor Blades Chordal Checks
Refer to Figure.
Repair, VRS6057 TASK 72-41-15-300-019 (REPAIR-019) or Repair, VRS6534 TASK 72-41-15-300-055 (REPAIR-055).
Between 1.1410 in. and 1.1600 in. (28.981 mm and 29.464 mm).
Less than the minimum repair limit given in Repair, VRS6057 TASK 72-41-15-300-019 (REPAIR-019) or Repair, VRS6534 TASK 72-41-15-300-055 (REPAIR-055).
SUBTASK 72-41-15-220-462 Examine the Stage 11 Rotor Blades, Length Checks
NOTE
This is an alternative to measurements taken during disassembly (TASK 72-41-10-040-001-B00 or TASK 72-41-10-040-001-C00). If Step has been accomplished, Step can be skipped.Refer to SPM TASK 70-35-03-300-501 to remove score. Repair corner radius equal to adjacent edges which are not repaired.
Less than 0.039 in. (1.00 mm).
Location 10 - margin to bottom face.
Polish to remove score 1x depth, Refer to SPM TASK 70-35-03-300-501. Do not polish into neck edge radius at Location 12.
Not more than 0.002 in (0.05 mm) in depth.
More than in Step.
On radius.
Location 13 - under platform fillet radius (0.067 in. plus or minus 0.008 in. (1.70 mm plus or minus 0.20 mm)).
Scored.
SUBTASK 72-41-15-220-576 Examine the Stage 11 Rotor Blade, Dovetail End Faces at Location 9 and Corners at Location 10, Location 11, Location 12 and Location 13
Refer to Figure.
Accept.
If stylus does not hesitate or catch.
Reject.
If stylus hesitates or catches.
Scored - Inspect with SPM TASK 70-21-00-220-501 with a 0.020 in. (0.50 mm) radius stylus.
Accept.
If stylus does not hesitate or catch and the imperfection does not display sharp edges, raised material, burrs, or a dark bottom.
Reject.
If stylus hesitates or catches, the imperfection displays sharp edges, raised material, burrs, or a dark bottom.
Imperfections - Inspect with SPM TASK 70-21-00-220-501 with a 0.020 in. (0.50 mm) radius stylus.
Accept.
If stylus does not hesitate or catch and the nick or dent does not display sharp edges, raised material, or burrs.
Reject.
If stylus hesitates or catches, the nick or dent displays sharp edges, raised material, or burrs.
Nicks and dents - Inspect with SPM TASK 70-21-00-220-501 with a 0.020 in. (0.50 mm) radius stylus.
SUBTASK 72-41-15-220-621 Examine the Stage 11 Rotor Blades Front and Rear Lip at Location 19
Accept.
More than 0.032 in. (0.800 mm) from the edges and start of the adjacent fillet radius.
Reject.
Less than 0.032 in. (0.800 mm) from the edges and start of the adjacent fillet radius.
Location 14 - keep away areas on dovetail end faces and platform bottom faces.
Accept.
Not more than 0.006 in. (0.150 mm) in depth.
Reject.
More than 0.006 in. (0.150 mm) in depth.
Location 15 - platform bottom faces part marking and repair symbol depth.
Refer to SPM TASK 70-35-03-300-501 to remove part marking(s) or repair symbol(s). Repair corner radius equal to adjacent edges which are not repaired.
Do the identification marking again, if removed by Step. Refer to SPM TASK 70-09-00-400-501. Use vibration peen method.
Do Step again.
Less than 0.039 in. (1.00 mm).
Location 17 - keep away area on the bottom face edge.
Accept.
More than 0.039 in. (1.00 mm) from edges.
Reject.
Less than 0.039 in. (1.00 mm) from edges.
Location 18 - keep away area on the bottom face.
SUBTASK 72-41-15-220-577 Examine the Stage 11 Rotor Blade, Part Marking and Repair Symbol Location at Location 9, Location 14, Location 15, Location 16, Location 17 and Location 18
Figure: Stage 11 Rotor Blades - Inspection Locations And Orientation
Stage 11 Rotor Blades - Inspection Locations And Orientation
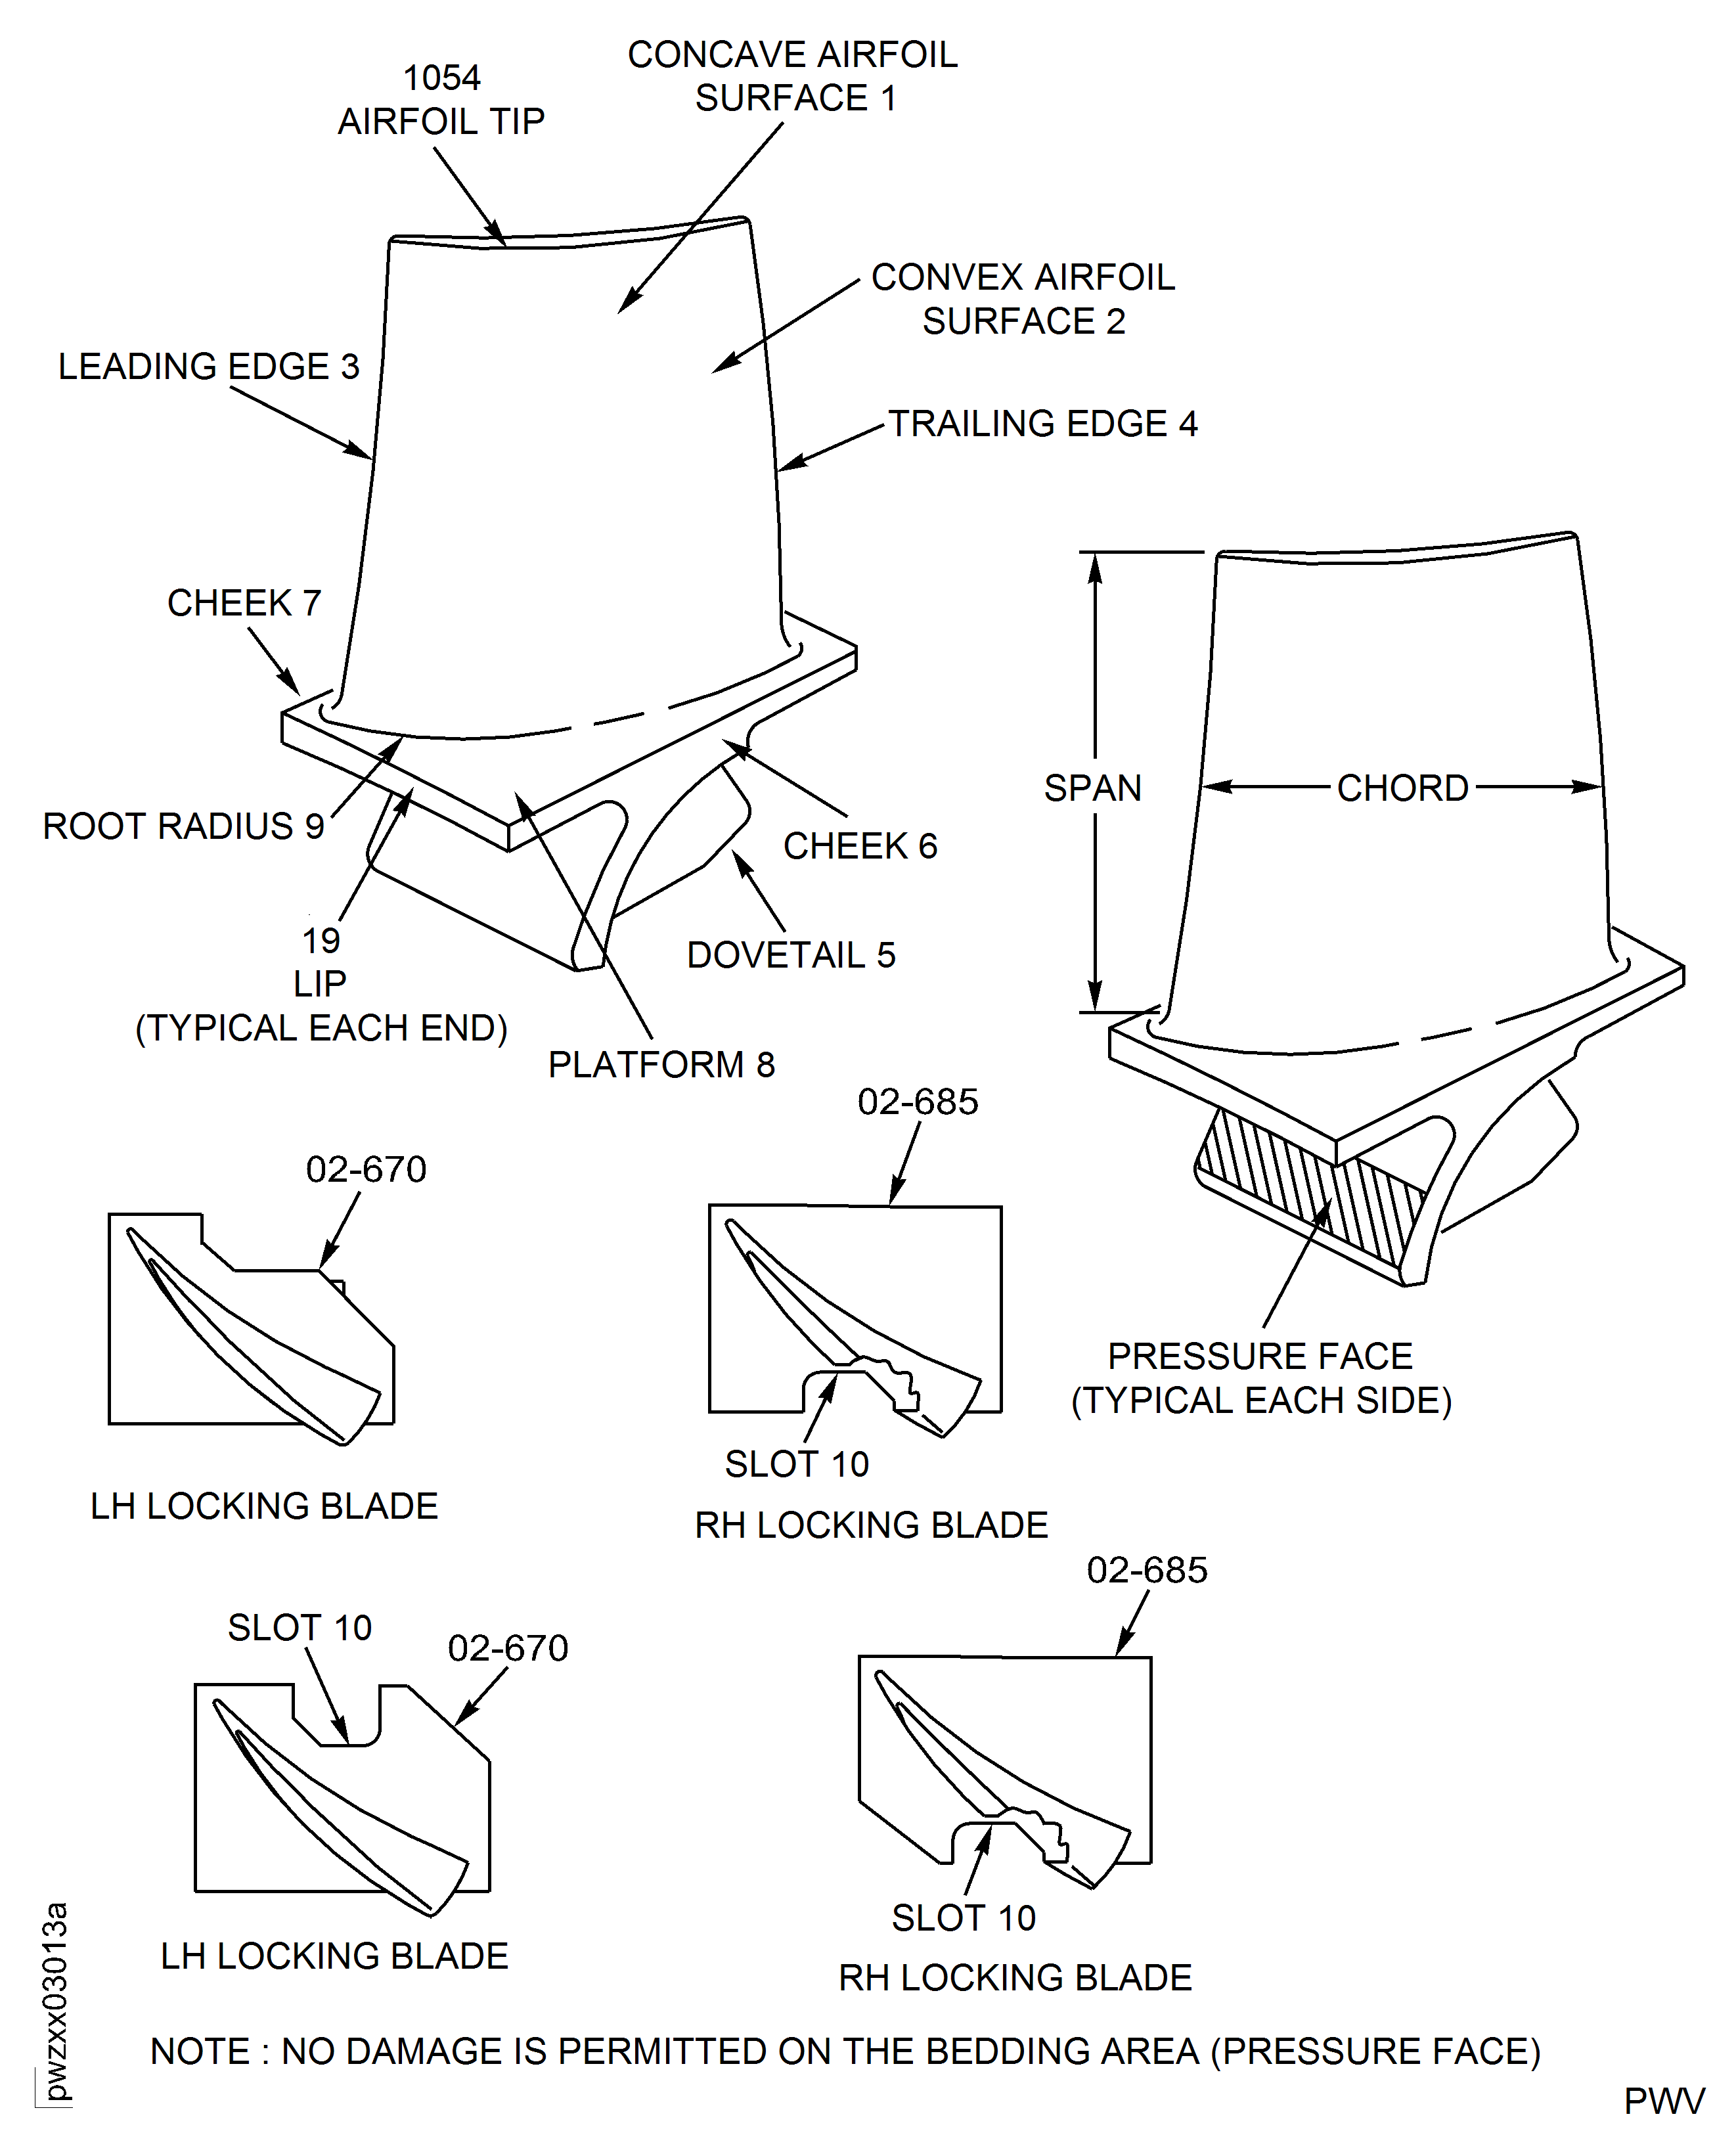
Figure: Stage 11 Rotor Blades - Chordal Checks
Stage 11 Rotor Blades - Chordal Checks
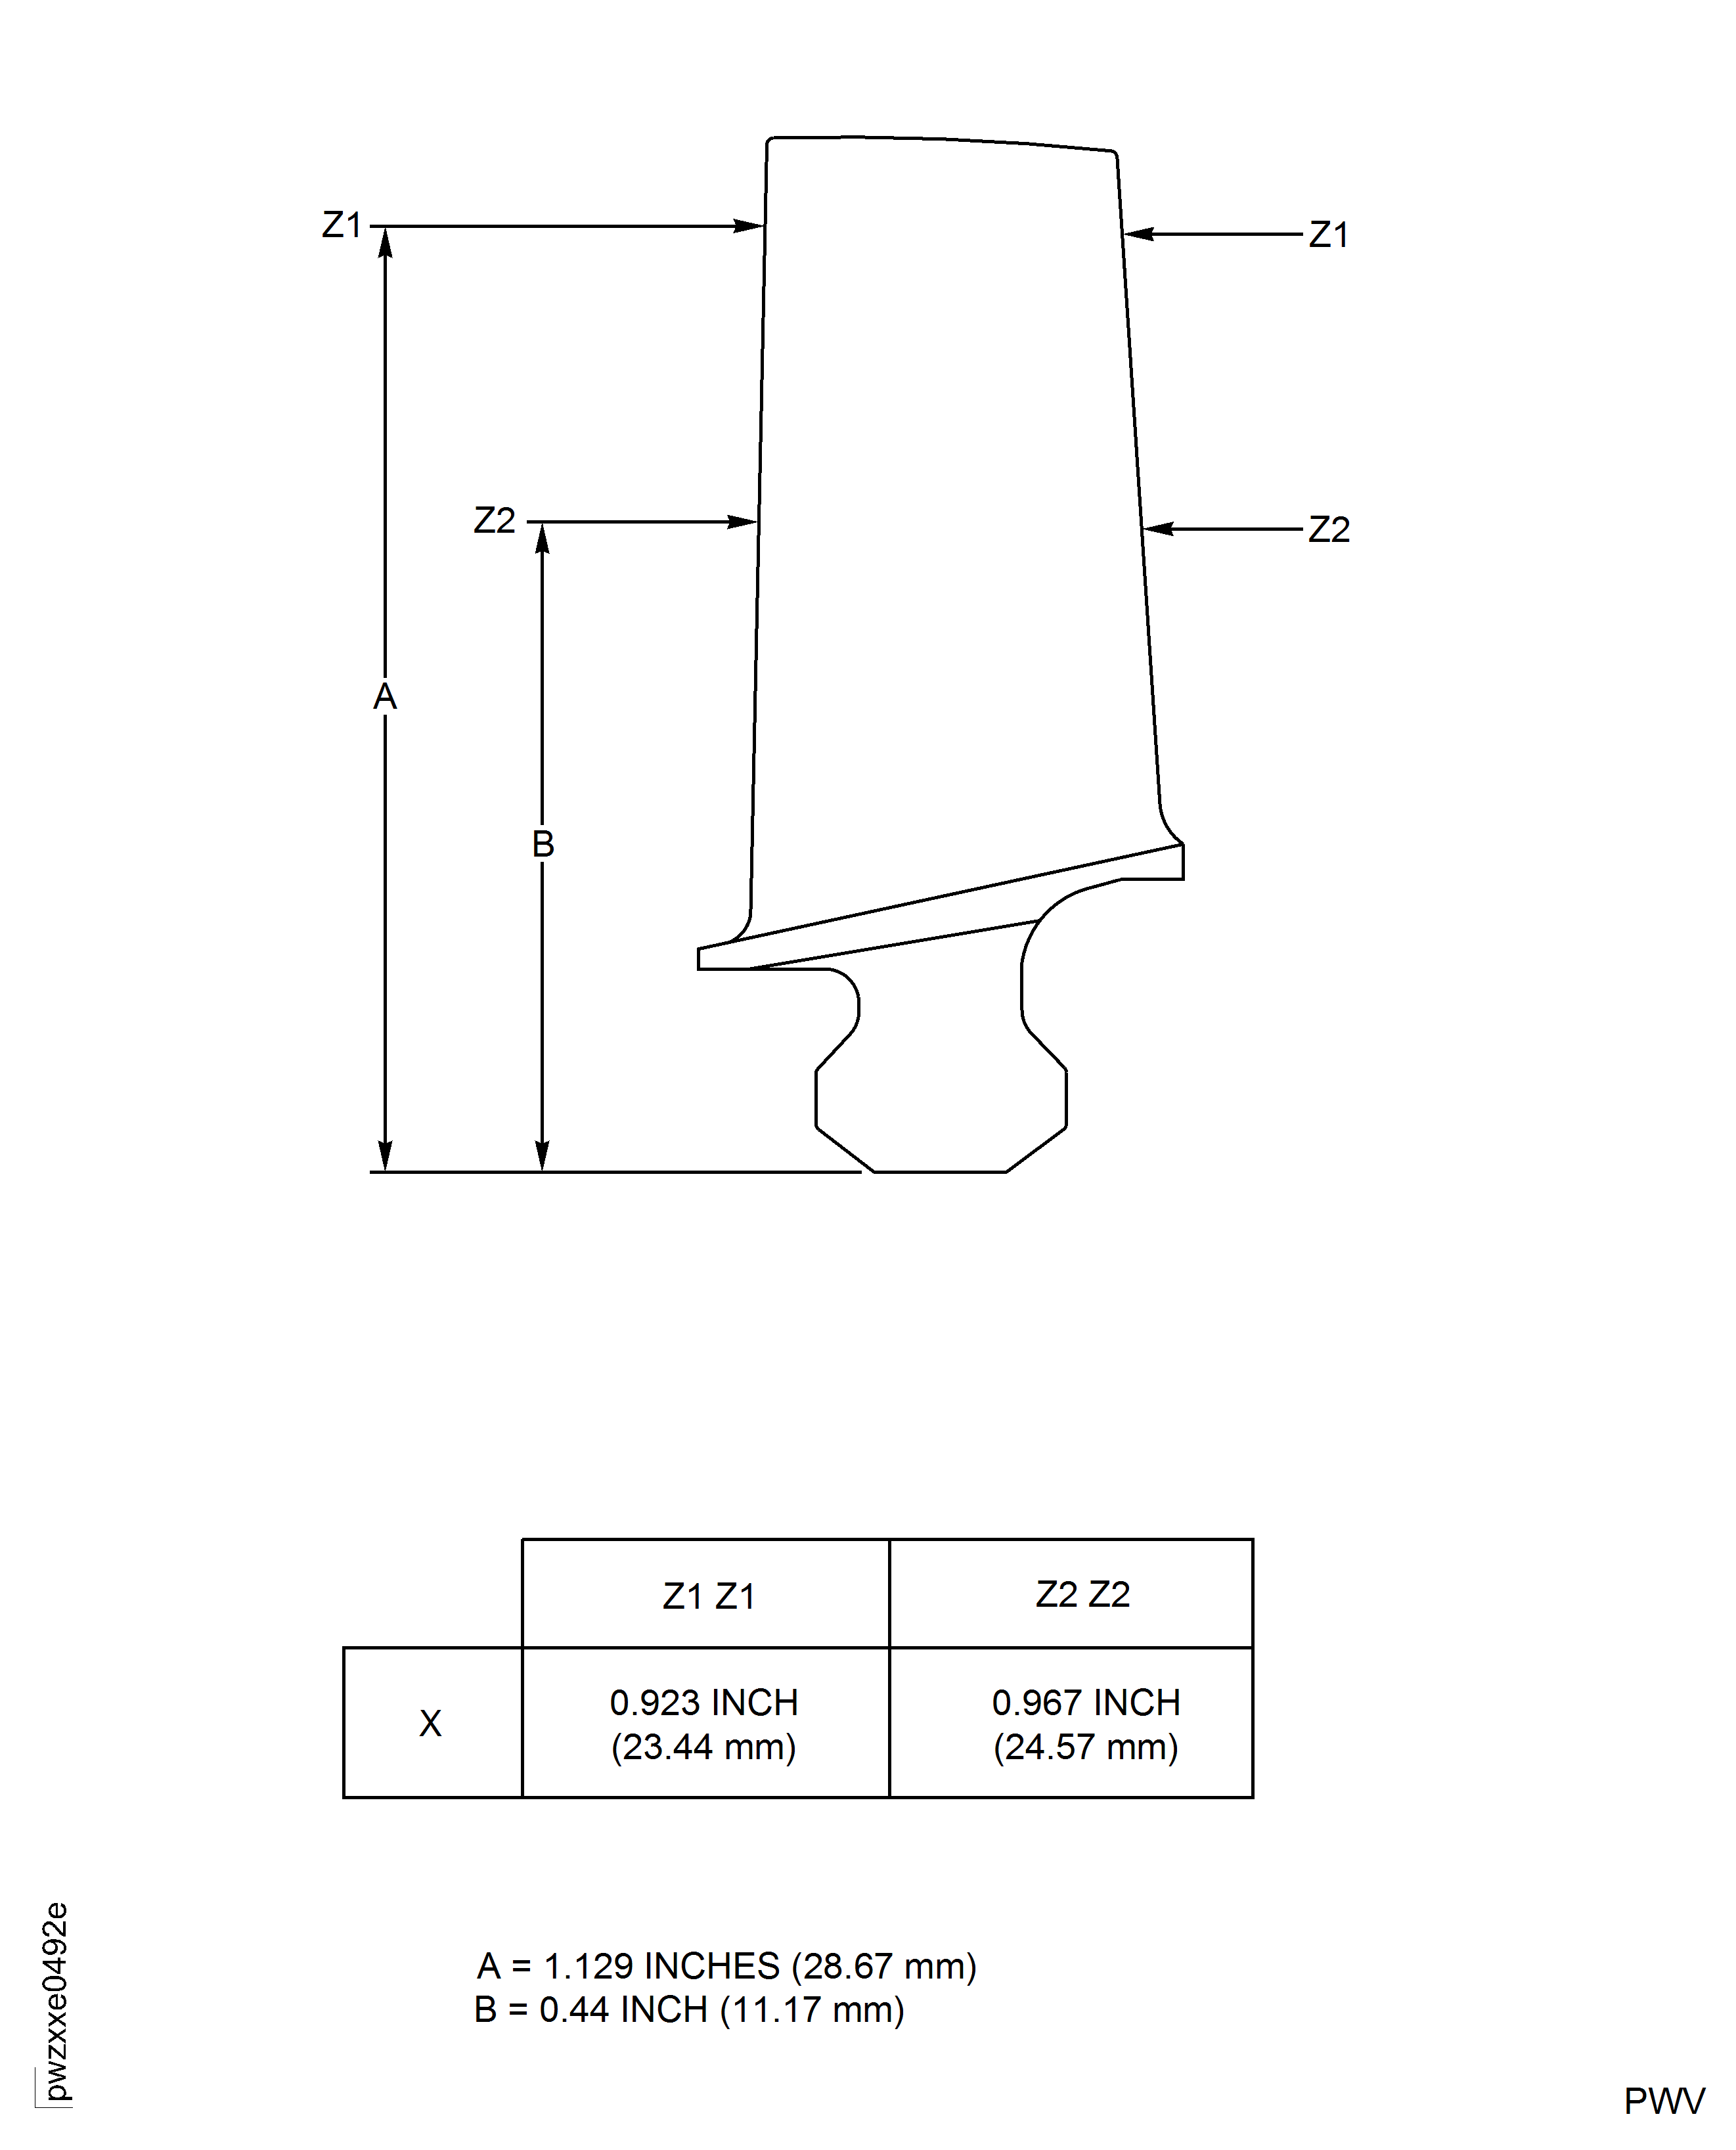
Figure: Stage 11 Rotor Blades - Measure Blade Length "X"
Stage 11 Rotor Blades - Measure Blade Length "X"
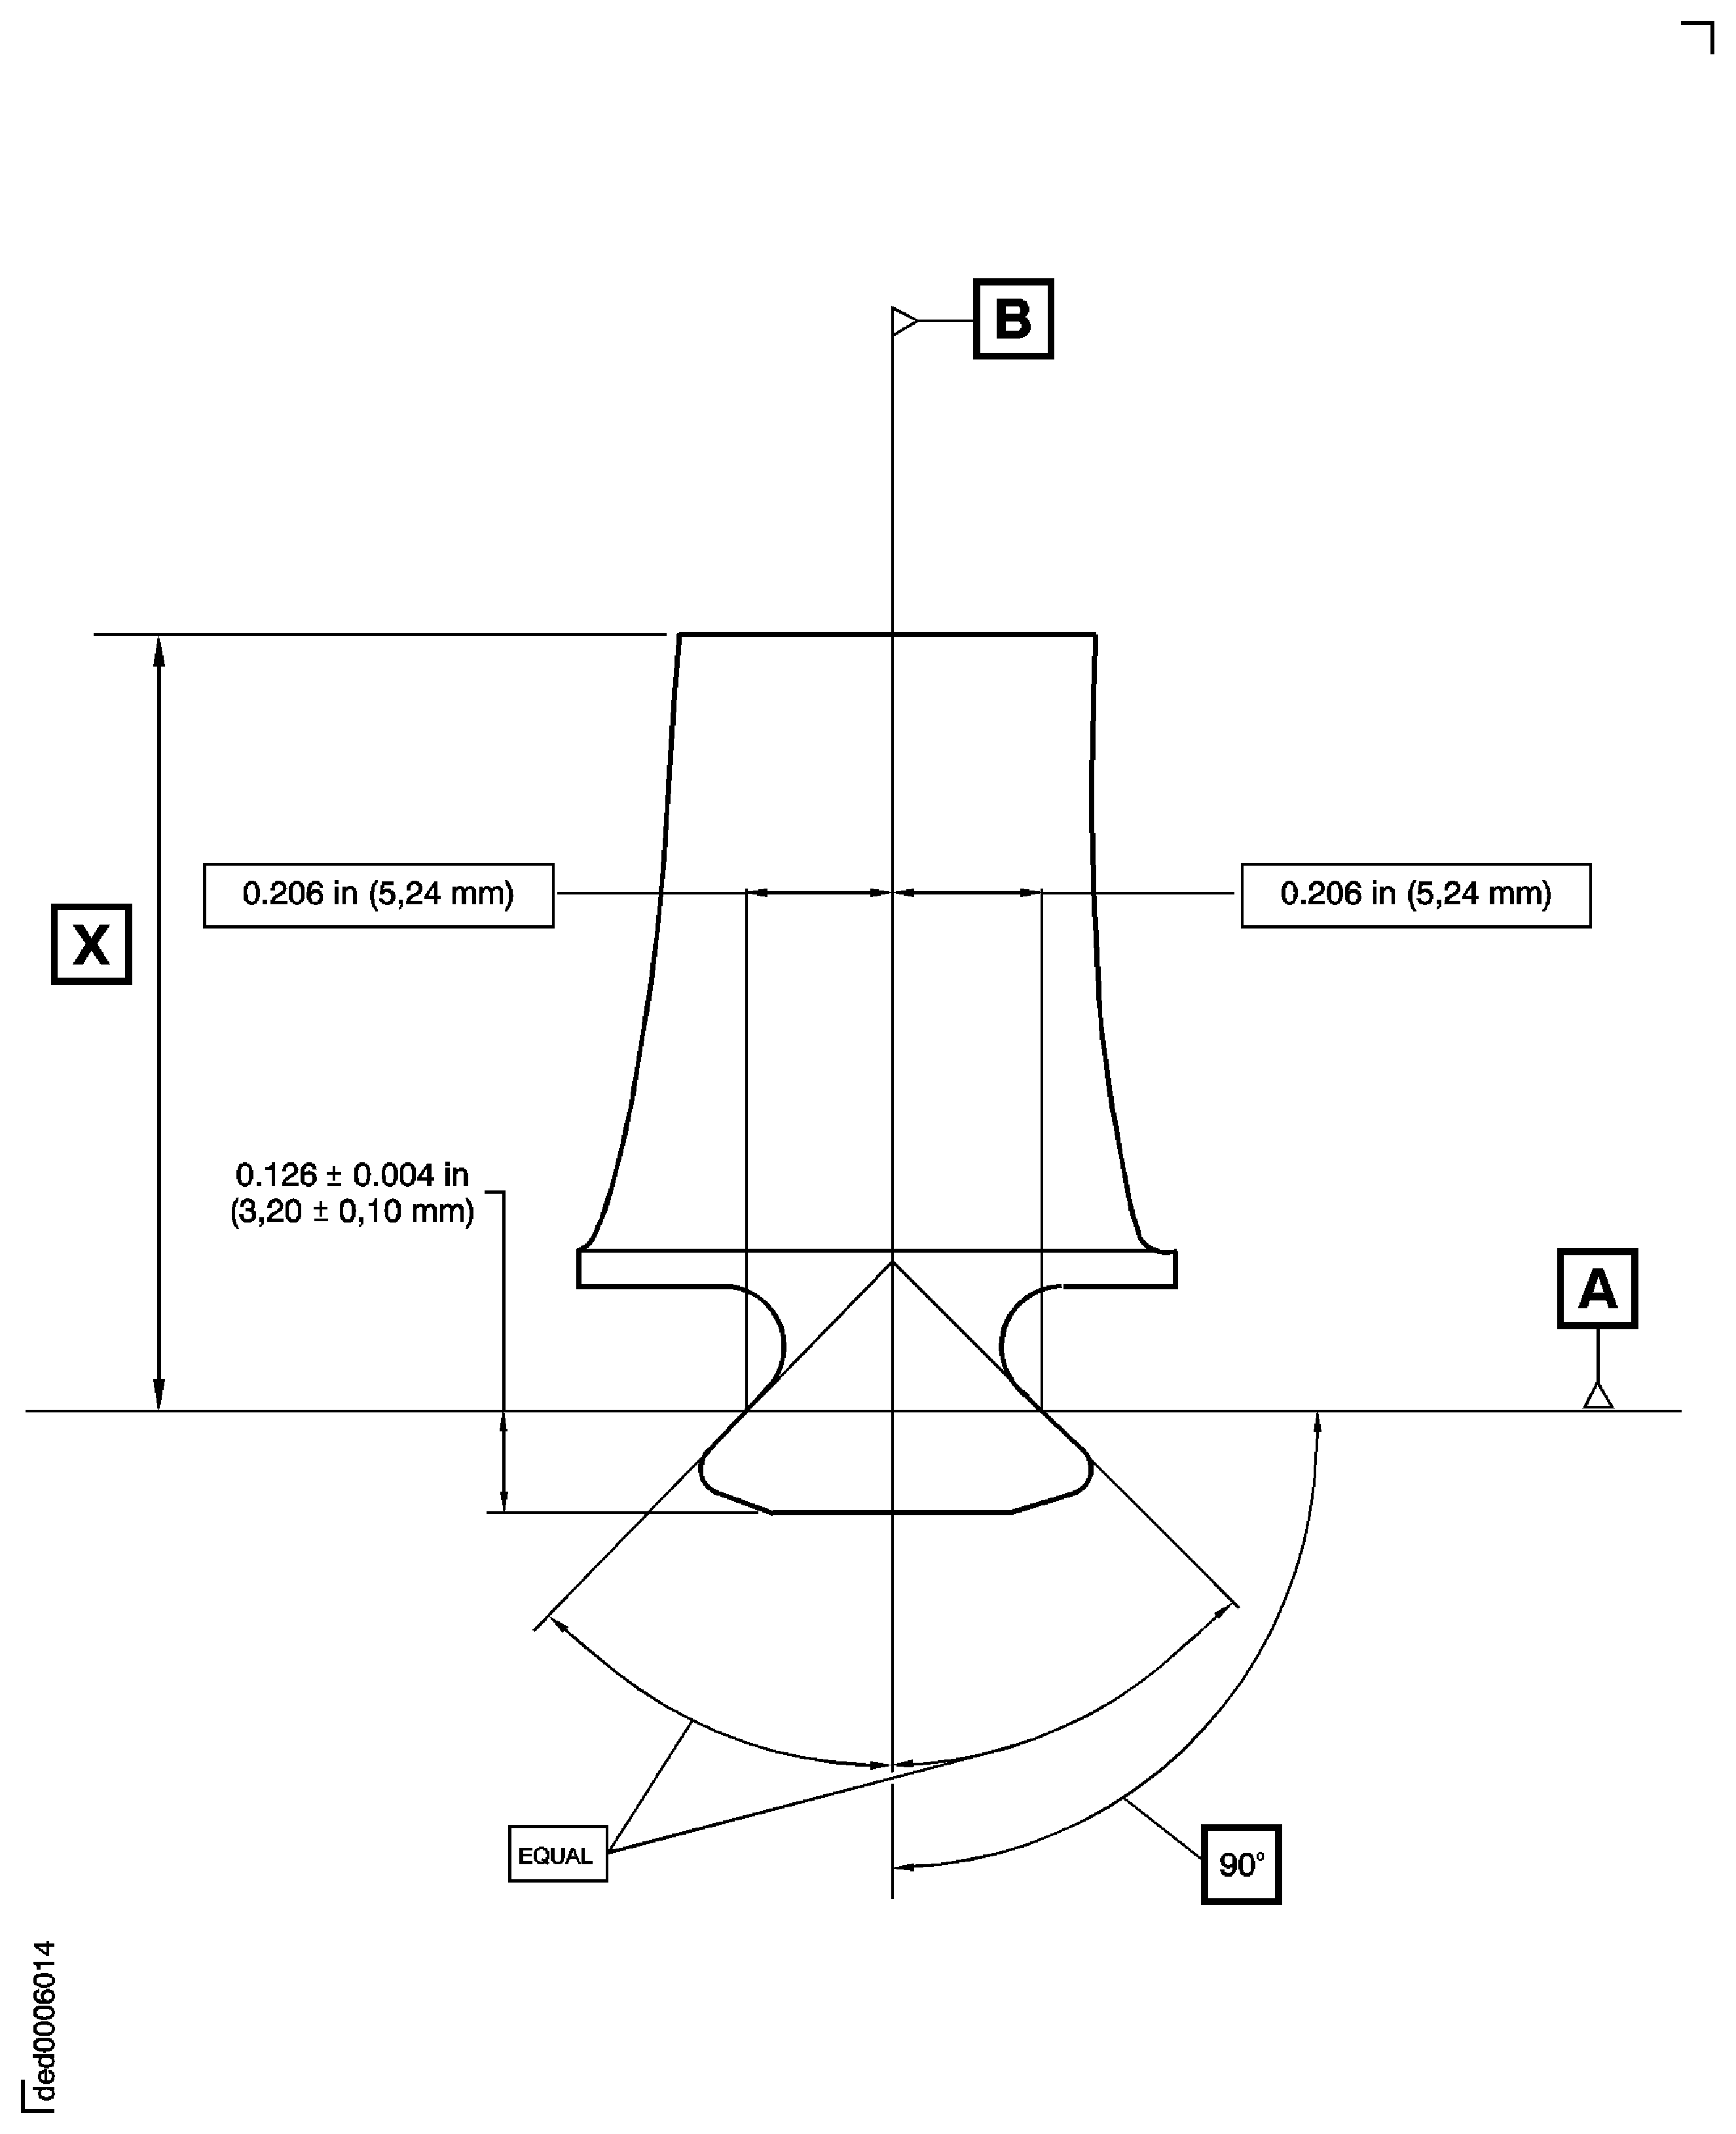
Figure: Stage 11 Rotor Blade - Dovetail End Faces and Corners
Stage 11 Rotor Blade - Dovetail End Faces and Corners
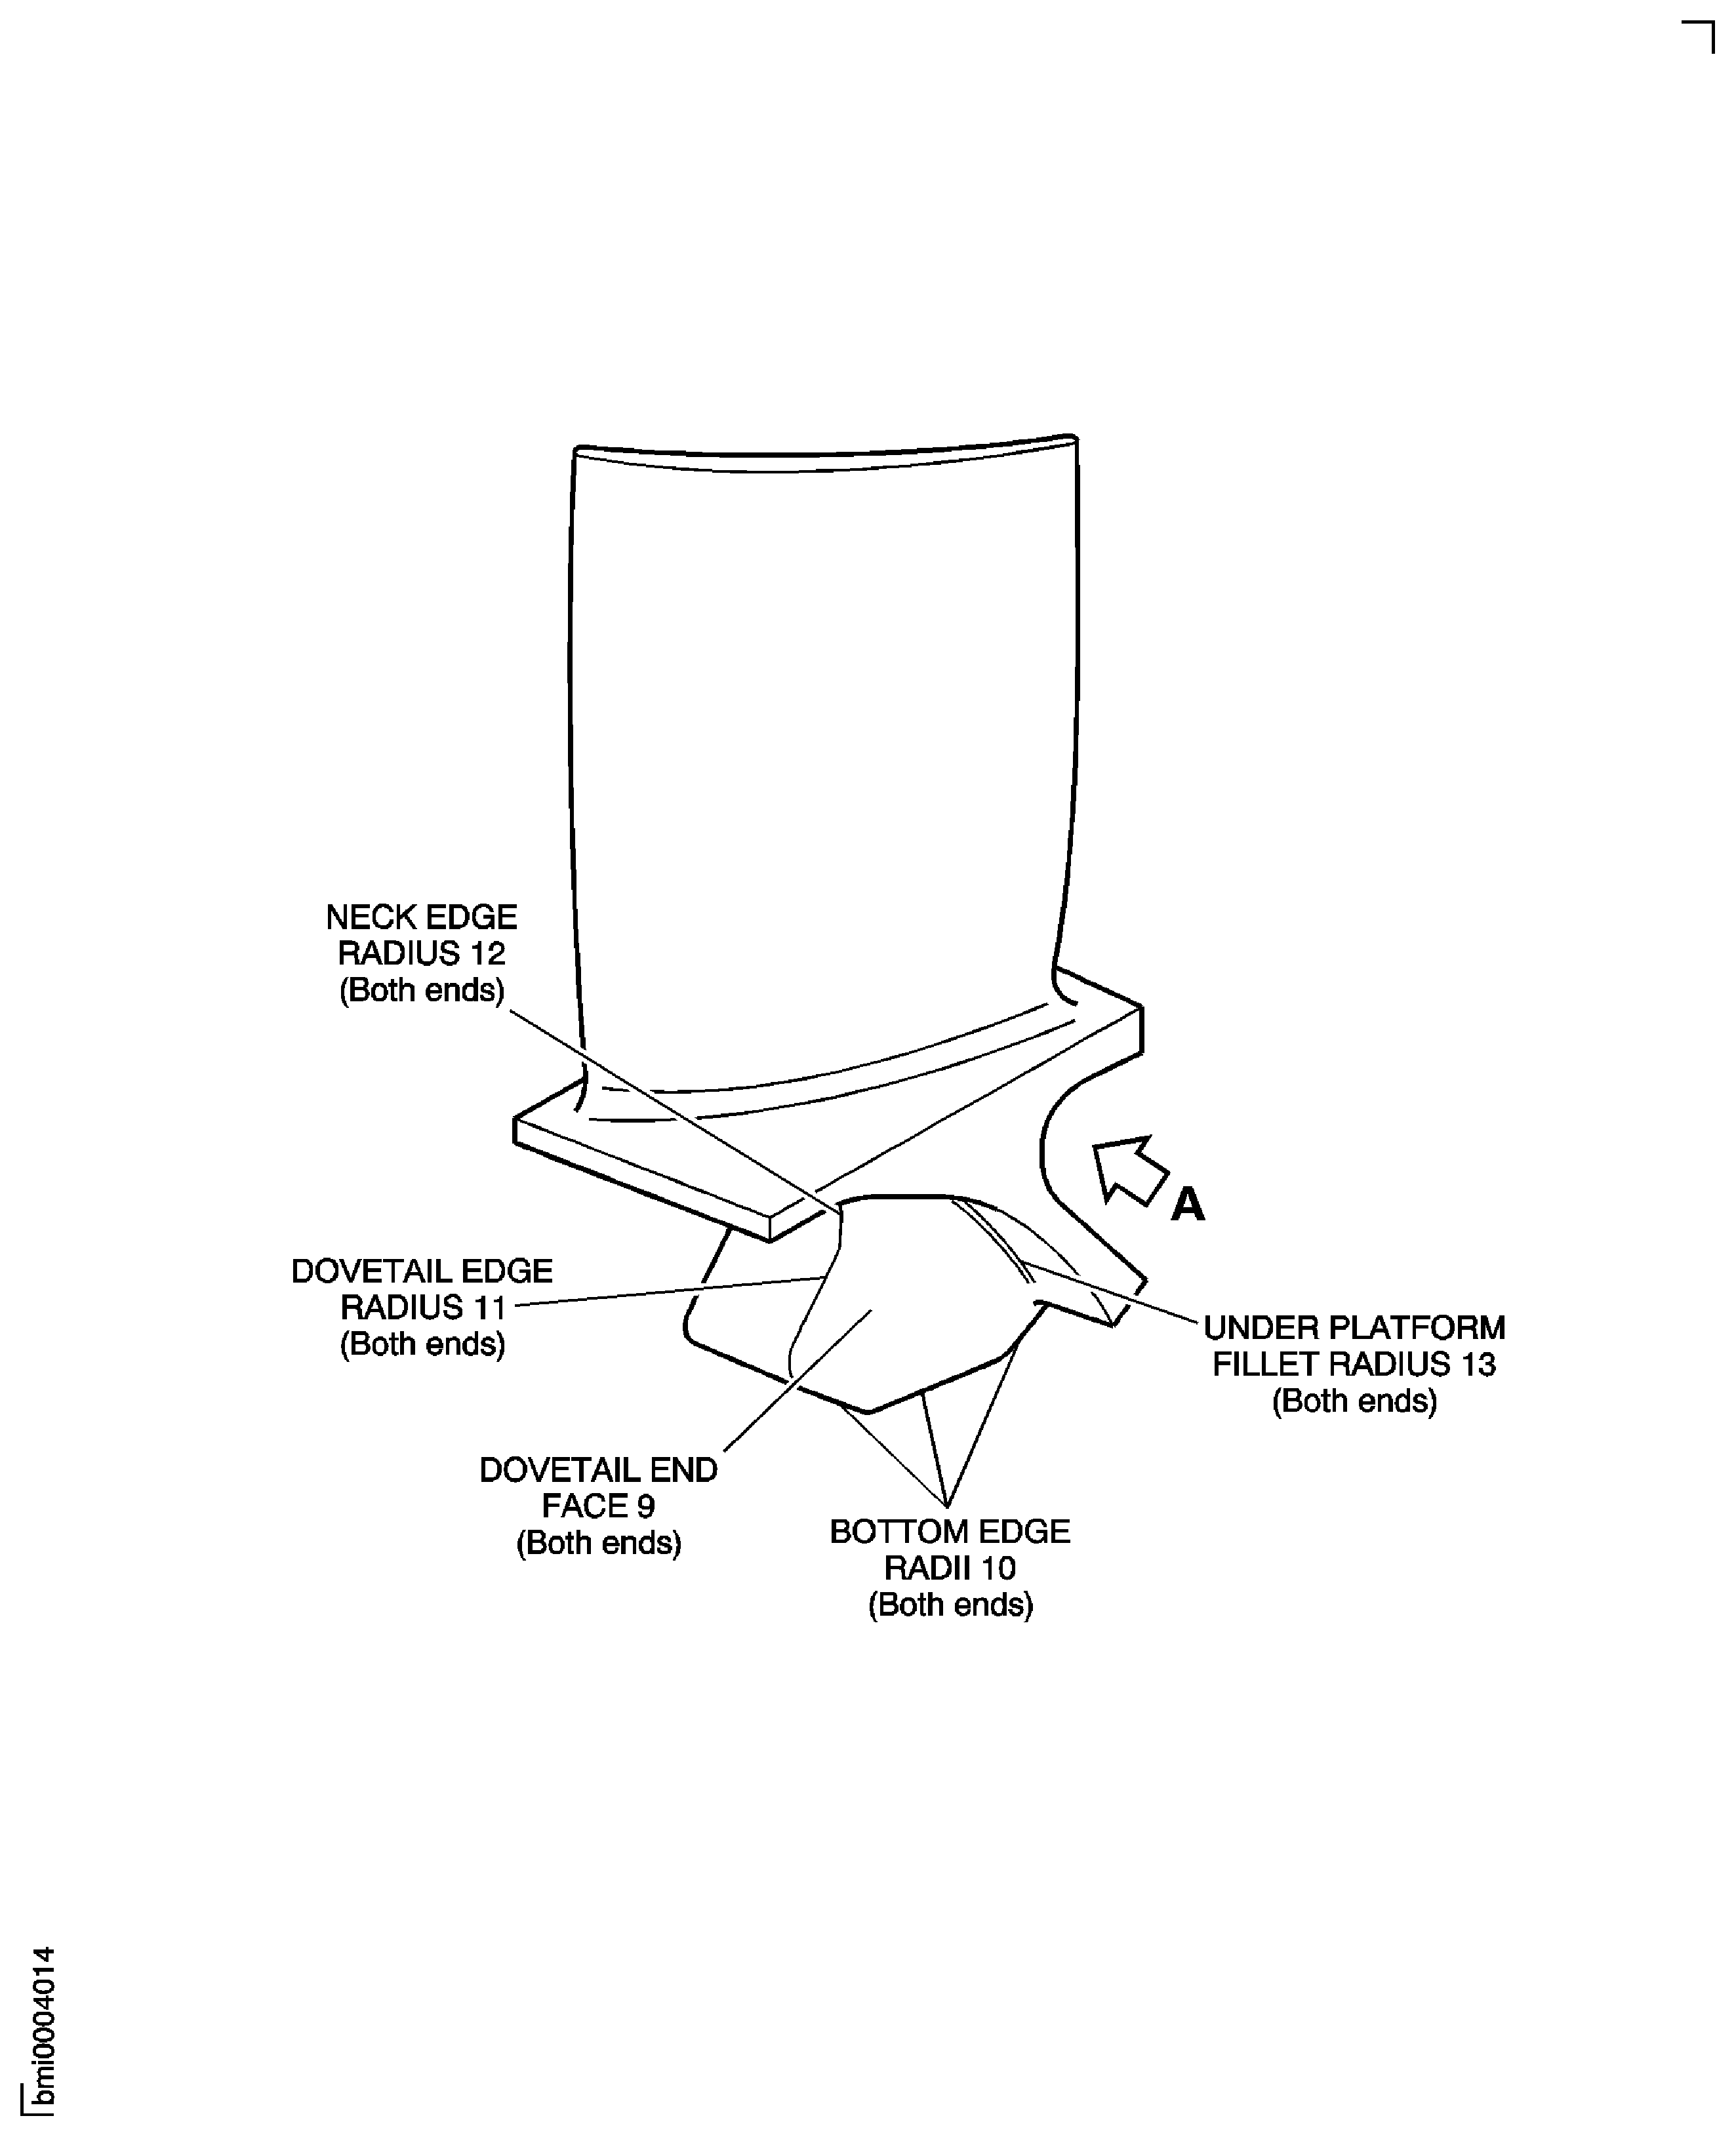
Figure: Stage 11 Rotor Blade - Dovetail End Faces and Corners for Scoring
Stage 11 Rotor Blade - Dovetail End Faces and Corners for Scoring
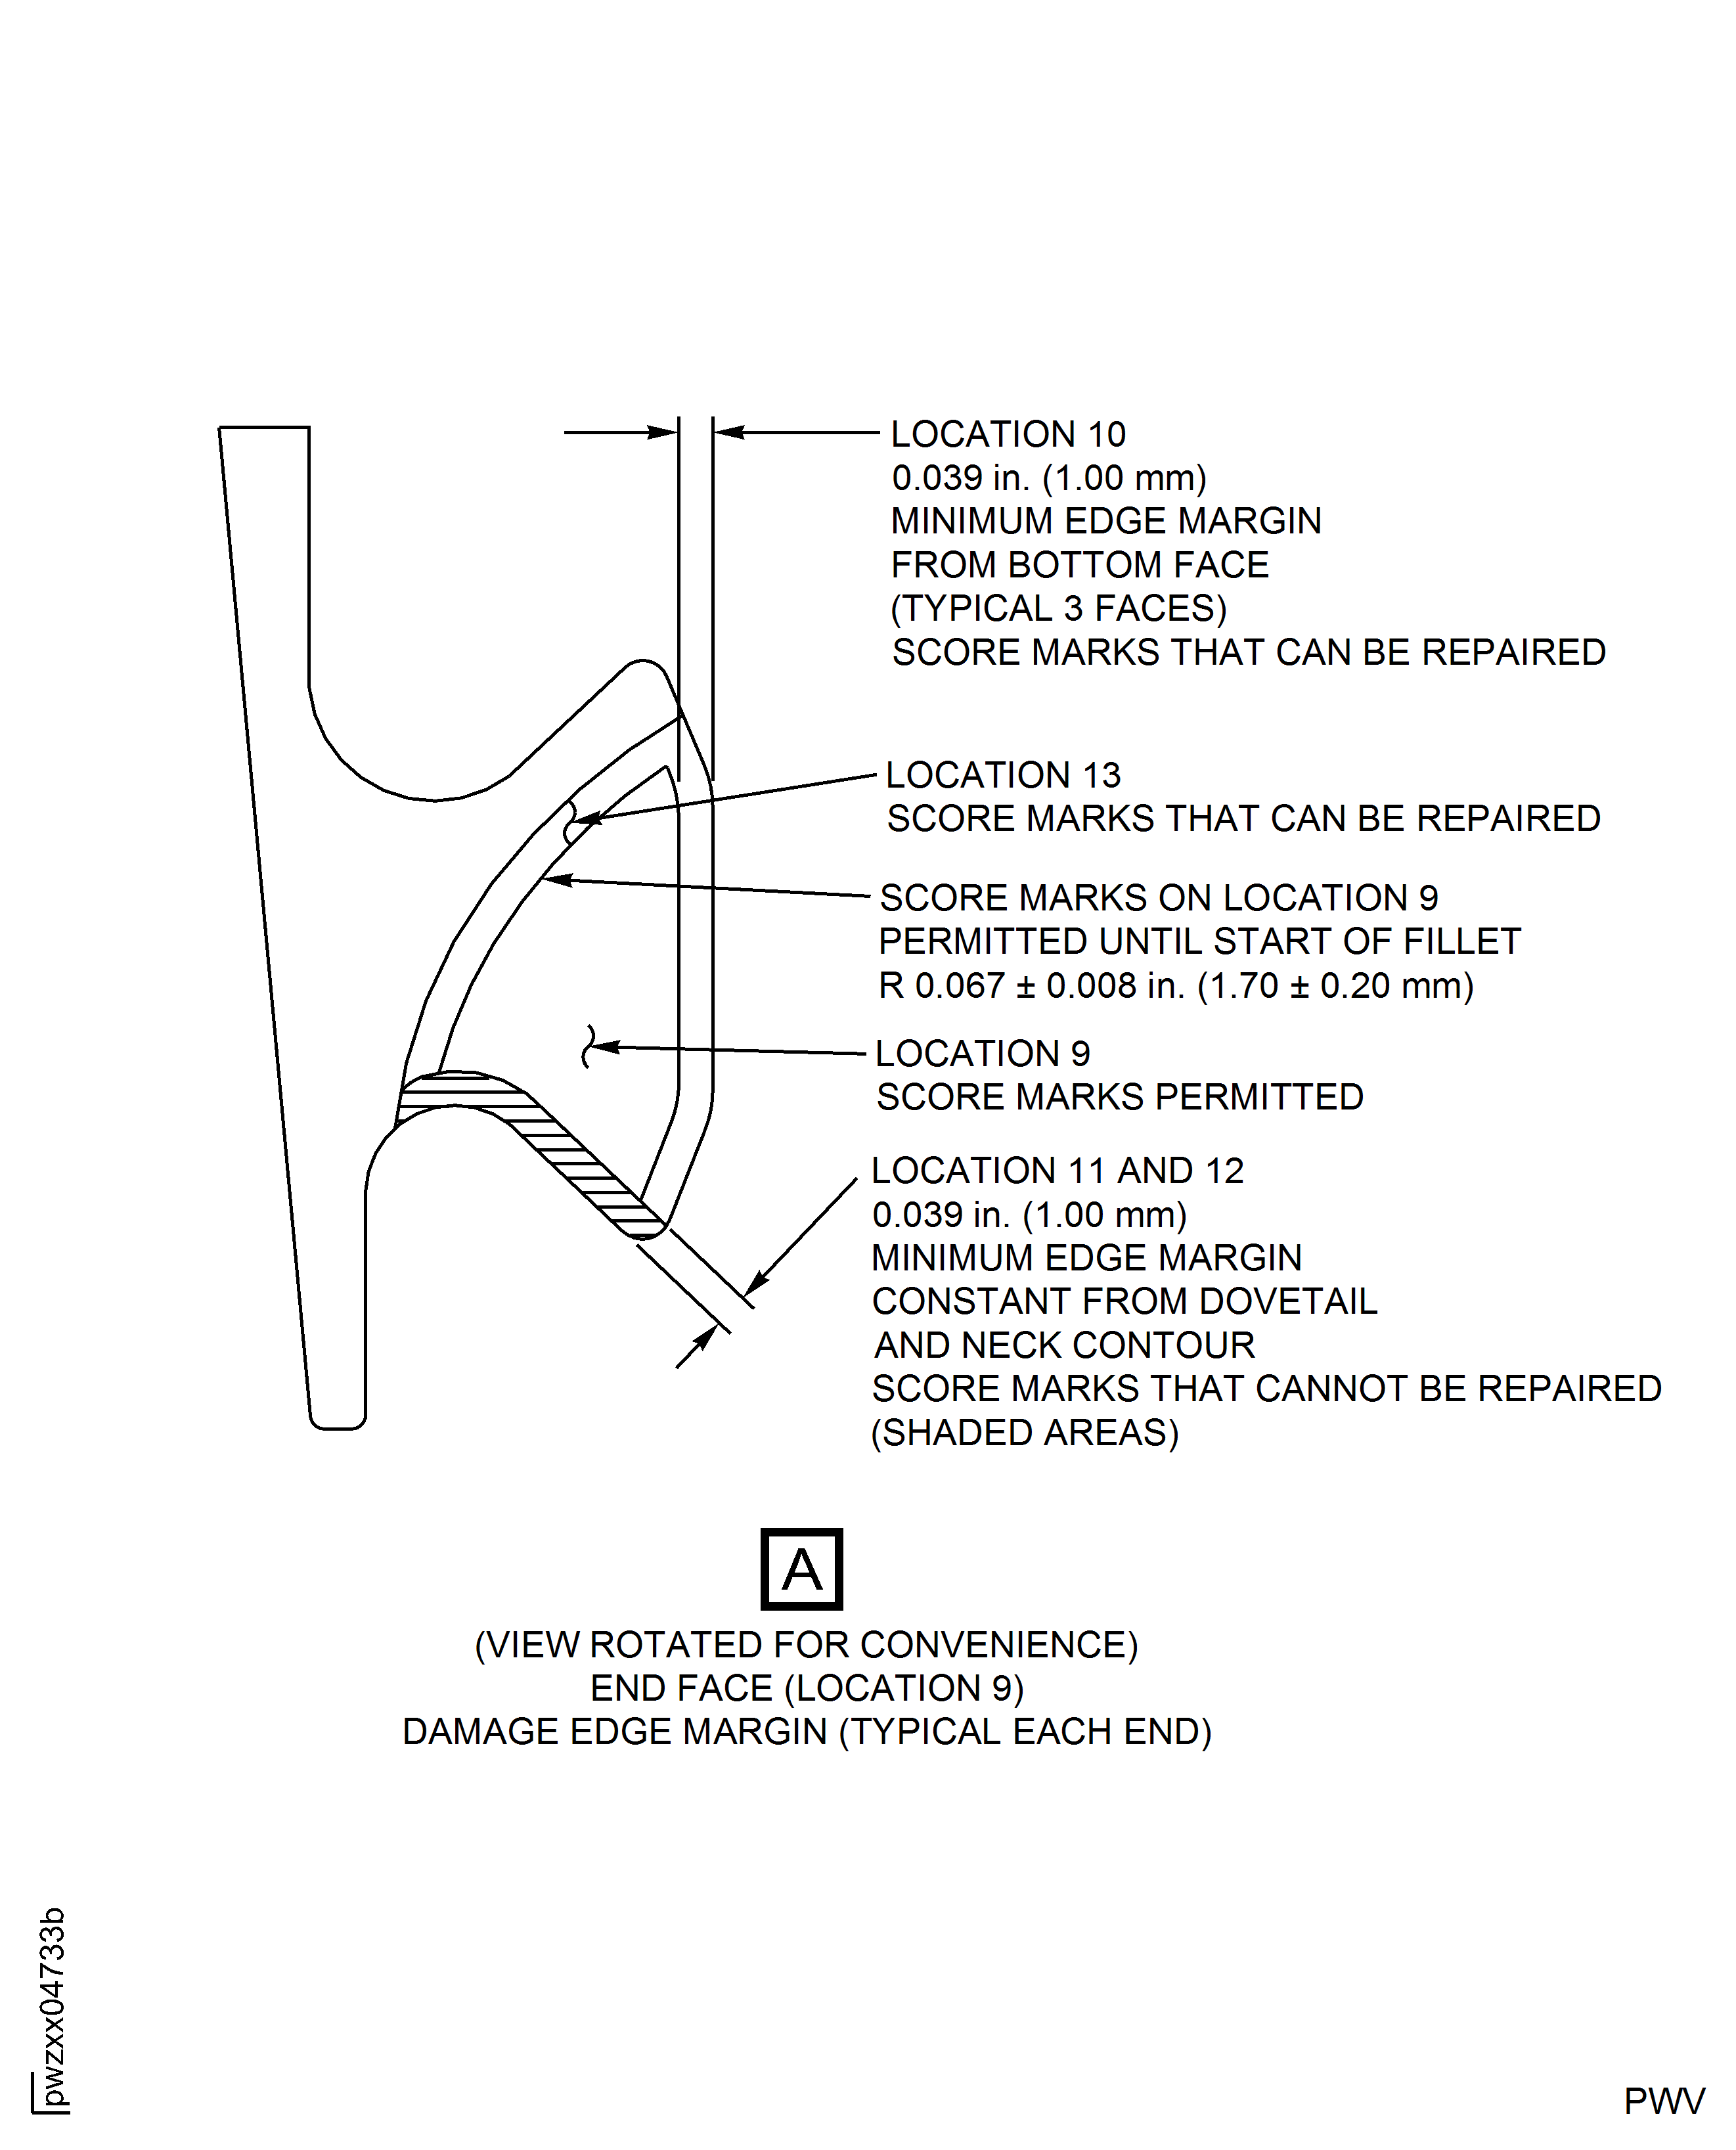
Figure: Stage 11 Rotor Blade - Dovetail End Faces, Bottom Face and Corners for Part Marking and Repair Symbol Location
Stage 11 Rotor Blade - Dovetail End Faces, Bottom Face and Corners for Part Marking and Repair Symbol Location

