Export Control
EAR Export Classification: Not subject to the EAR per 15 C.F.R. Chapter 1, Part 734.3(b)(3), except for the following Service Bulletins which are currently published as EAR Export Classification 9E991: SBE70-0992, SBE72-0483, SBE72-0580, SBE72-0588, SBE72-0640, SBE73-0209, SBE80-0024 and SBE80-0025.Copyright
© IAE International Aero Engines AG (2001, 2014 - 2021) The information contained in this document is the property of © IAE International Aero Engines AG and may not be copied or used for any purpose other than that for which it is supplied without the express written authority of © IAE International Aero Engines AG. (This does not preclude use by engine and aircraft operators for normal instructional, maintenance or overhaul purposes.).Applicability
All
Common Information
TASK 72-41-15-300-055 HP Compressor Stage 3 To 12 Rotor Blades - Weld Repair The Airfoil Tip - Repair - 055 (VRS6534)
Effectivity
FIG/ITEM | PART NO. | SERVICE BULLETIN | ASSEMBLY |
|---|---|---|---|
01-200 | 6A8688 | 72-0561 | A |
01-500 | 6A8738 | 72-0560 | B |
01-800 | 6B1346 | 72-0587 | C |
02-170 | 6A8797 | 72-0560 | D |
02-185 | 6A8798 | 72-0560 | D |
02-200 | 6A8732 | 72-0560 | D |
02-215 | 6A8732 | 72-0560 | D |
02-216 | 6B1494 | 70-1006 | D |
02-217 | 6A8733 | 72-0560 | D |
02-270 | 6A8743 | 72-0560 | E |
02-285 | 6A8744 | 72-0560 | E |
02-300 | 6A8741 | 72-0560 | E |
02-315 | 6A8741 | 72-0560 | E |
02-316 | 6B1495 | 70-1006 | E |
02-317 | 6A8742 | 72-0560 | E |
02-370 | 6A8747 | 72-0560 | F |
02-385 | 6A8748 | 72-0560 | F |
02-400 | 6A8745 | 72-0560 | F |
02-415 | 6A8745 | 72-0560 | F |
02-416 | 6B1496 | 70-1006 | F |
02-417 | 6A8746 | 72-0560 | F |
02-470 | 6A8751 | 72-0561 | G |
02-485 | 6A8752 | 72-0561 | G |
02-500 | 6A8749 | 72-0561 | G |
02-515 | 6A8749 | 72-0561 | G |
02-517 | 6A8750 | 72-0561 | G |
02-570 | 6A8755 | 72-0561 | H |
02-585 | 6A8756 | 72-0561 | H |
02-600 | 6A8753 | 72-0561 | H |
02-615 | 6A8753 | 72-0561 | H |
02-617 | 6A8754 | 72-0561 | H |
02-670 | 6A8759 | 72-0561 | J |
02-685 | 6A8760 | 72-0561 | J |
02-700 | 6A8757 | 72-0561 | J |
02-715 | 6A8757 | 72-0561 | J |
02-717 | 6A8758 | 72-0561 | J |
02-770 | 6A8763 | 72-0561 | K |
02-785 | 6A8764 | 72-0561 | K |
02-800 | 6A8761 | 72-0561 | K |
02-815 | 6A8761 | 72-0561 | K |
02-817 | 6A8762 | 72-0561 | K |
Material of Component
PART IDENT | RR SYMBOL | MATERIAL |
|---|---|---|
HP Compressor Rotor Blade(s) - Assemblies A, B, C, D, E and F | TAF or TDY or TDX | Titanium Alloy |
HP Compressor Rotor Blade(s) - Assemblies G, H, J and K | QMP | Nickel Alloy |
General Data
This TASK gives the procedure to Repair the Airfoil Tip of the HP Compressor Stage 3 to 12 Rotor Blades by Welding.
This TASK must only be applied when the instruction to do so is given in the relevant inspection /check, refer to EM Section 72-41-15.
This repair cannot be applied to Assembly B and C components which have the rubber sealing strip attached.
Discard the blades if, during the weld procedure, arcing has occurred onto any part of the blade.
This repair can be reapplied to the HP Compressor Stage 3 to 12 Rotor Blades if;
The minimum airfoil chord width dimensions are within the limits given in the relevant inspection/check
The component is within the repairable limits as given in Repair Scheme, Repair, VRS6510 TASK 72-41-15-300-040 (REPAIR-040).
The component is within the repairable limits as given in the Repair Scheme, Repair, VRS6151 TASK 72-41-15-300-041 (REPAIR-041), for Assemblies A, B, C and D.
The component is within the repairable limits as given in the Repair Scheme, Repair, VRS6152 TASK 72-41-15-300-043 (REPAIR-043), for Assemblies E and F.
At least one sample blade per stage must be repaired at the same time as the HP Compressor Rotor Blade(s) being repaired. The sample blade(s) will be used for a metallurgical quality control assessment of the repair process. The sample blade(s) must go through the complete repair process, to the point where they are sectioned, for the results to reflect the process applied to the components which are to be returned to service.
Where reference is made to a SUBTASK within a TASK in the form "TASK, SUBTASK" the operator must read and apply the complete TASK. The SUBTASK is listed only when the TASK gives options for the processing of the component. The specified SUBTASK instructs what option must be used during application of the TASK for the successful completion of the Repair Scheme VRS6534.
TASKS identified by SPM TASK are in the Standard Practices Manual (SPM).
Where necessary refer to the following figures for the relevant assembly, unless otherwise specified;
Price and availability.
Refer to International Aero Engines (IAE).
NOTE
NOTE
NOTE
Preliminary Requirements
Pre-Conditions
| Action/Condition | Data Module/Technical Publication |
|---|---|
| Make sure that all the necessary cleaning and inspection procedures are done before this repair. |
Support Equipment
| Name | Manufacturer | Part Number / Identification | Quantity | Remark |
|---|---|---|---|---|
| Abrasive Blast Equipment | LOCAL | Abrasive Blast Equipment | ||
| Argonarc Welding Equipment | LOCAL | Argonarc Welding Equipment | ||
| Chemical cleaning equipment | LOCAL | Chemical cleaning equipment | ||
| Dimensional inspection equipment | LOCAL | Dimensional inspection equipment | ||
| Grinding Machine | LOCAL | Grinding machine | ||
| Hardness Tester | LOCAL | Hardness Tester | ||
| Heat Treatment Equipment | LOCAL | Heat Treatment Equipment | ||
| Penetrant Crack Test Equipment | LOCAL | Penetrant crack test equipment | ||
| Radiographic Equipment | LOCAL | Radiographic Equipment | ||
| Standard workshop tools | LOCAL | Standard workshop tools | ||
| Vibro-engraving equipment | LOCAL | Vibro-engraving equipment |
Consumables, Materials and Expendables
| Name | Manufacturer | Part Number / Identification | Quantity | Remark |
|---|---|---|---|---|
| CoMat 01-103 FERRIC CHLORIDE HEXAHYDRATE | K6835 | CoMat 01-103 | ||
| CoMat 02-001 ADHESIVE TAPE (MASKING) | LOCAL | CoMat 02-001 | ||
| CoMat 03-195 WELDING WIRE TITANIUM | LOCAL | CoMat 03-195 | ||
| CoMat 03-284 WELDING FILLER WIRE, NiBASE | LOCAL | CoMat 03-284 | ||
| CoMat 03-285 TITANIUM WELD WIRE | IE306 | CoMat 03-285 | ||
| CoMat 03-348 WELDING WIRE | LOCAL | CoMat 03-348 | ||
| CoMat 05-003 ABRASIVE MEDIUM ALUMINUM OXIDE, 120/220 GRADE | X222X | CoMat 05-003 | ||
| CoMat 05-140 ABRASIVE STONE SILICON CARBIDE | LOCAL | CoMat 05-140 | ||
| CoMat 06-022 FLUORESCENT PENETRANT (POST-EMULSIFIED ULTRA HIGH SENSITIVITY) | X222X | CoMat 06-022 |
Spares
NONESafety Requirements
NONEProcedure
The source demonstration requirements of this repair means that any facility not authorized to accomplish this repair either utilize the authorized repair vendors listed below or contact the IAE repair services group to determine if a qualification program can be initiated at their facility.
IAE International Aero Engines AG
400 Main Street
Mail Stop 121-10
East Hartford CT 06118
ATTN: Manager, Tech Services
The designation by IAE of an Authorised Repair Vendor indicated that the Repair Vendor has demonstrated the necessary capability to enable it to carry out the listed repair work. However, IAE makes no warranty or representation concerning the qualifications or quality standards of the Repair Vendors to carry out the repair work and accepts no responsibility for any work that may be carried out by a Repair Vendor other than when IAE is listed as the Repair Vendor.
Repair Facilities
Refer to Repair, VRS6635 TASK 72-41-15-300-053 (REPAIR-053).
Remove the clapper coat.
SUBTASK 72-41-15-330-001 Remove the Clapper Coating - Assembly A
Refer to the relevant figures as listed in Paragraph
Reject.
If the component is beyond the repairable limit of VRS6150:
Continue with the repair.
If the component is within the repairable limits of VRS6150:
Inspect for the repair identification symbol from the repair scheme VRS6150 on the blade(s).
Examine the HP Compressor Rotor Blade(s) (all Assemblies) for previous applications of the surface finish repair VRS6150.
Reject.
If the component is beyond the repairable limit of VRS6151:
Continue with the repair.
If the component is within the repairable limit of VRS6151:
Inspect for the repair identification symbol from the repair scheme VRS6151 on the blade(s).
Examine the Assembly A, B, C and D HP Compressor Rotor Blade(s) for previous applications of the shot peening repair VRS6151.
Reject.
If the component is beyond the repairable limit of VRS6152:
Continue with the repair.
If the component is within the repairable limit of VRS6152:
Inspect the repair identification symbol from the repair scheme VRS6152 on the blade(s).
Examine the Assembly E and F HP Compressor Rotor Blade(s) for previous applications of the shot peening repair VRS6152:
Make sure that the HP Compressor Rotor Blade(s) can be repaired.
Examine the HP Compressor Rotor Blade(s).
SUBTASK 72-41-15-220-001 Examine the Blades to be Repaired
Refer to the relevant figures as listed in Paragraph
Refer to for the approved vendor in Step or use Standard workshop tools.
Remove the minimum quantity of material necessary to remove the damage.
Continue to remove material until all the damage is removed.
Make sure that all the damage is removed and the area is made smooth into the adjacent material.
Remove the damage from the HP Compressor Rotor Blade tip(s)
SUBTASK 72-41-15-350-001 Remove the Damage from the HP Compressor Rotor Blade(s) Tip

CAUTION
TITANIUM COMPONENT (ASSEMBLIES A, B, C, D, E AND F) - YOU MUST USE SILICON CARBIDE TYPE ABRASIVE WHEELS, STONES AND PAPERS TO DRESS, BLEND AND POLISH THIS COMPONENT.
CAUTION
TITANIUM COMPONENT (ASSEMBLIES A, B, C, D, E AND F) - AVOID BUILD-UP OF HEAT BY APPLYING ONLY GENTLE PRESSURE AND KEEPING THE TOOL SPEED AS LOW AS POSSIBLE.
CAUTION
TITANIUM COMPONENT (ASSEMBLIES A, B, C, D, E AND F) - YOU MUST MAKE SURE THAT NO SPARKS ARE PRODUCED WHEN YOU DRESS MATERIAL.
CAUTION
TITANIUM COMPONENT (ASSEMBLIES A, B, C, D, E AND F) - IF THE MATERIAL SHOWS A CHANGE IN COLOR, TO DARKER THAN A LIGHT STRAW COLOR, THE COMPONENT IS TO BE REJECTED.Refer to the relevant figures as listed in Paragraph.
Repeat the repair from Step.
If any of the damage has not been removed:
Continue with the repair.
If all of the damage has been removed:
Make sure that the damage has been removed.
Visually inspect the HP Compressor Rotor Blade(s).
Reject.
If the HP Compressor Rotor Blade(s) cannot be restored to its original height with a weld buildup of maximum 0.060 in. (1.52 mm):
Record the dimensions of the component(s) and continue with the repair.
If the HP Compressor Rotor Blade(s) can be restored to its original height with a weld buildup of 0.060 in. (1.52 mm) maximum:
Dimensionally inspect the HP Compressor Rotor Blade(s).
SUBTASK 72-41-15-220-002 Visually and Dimensionally Inspect
Refer to SPM TASK 70-11-08-300-503.
Hydrofluoric/Nitric acid swab etch the repair area on the HP Compressor Rotor Blade(s).
SUBTASK 72-41-15-110-001 Swab Etch the Repair Area - Assemblies A, B, C, D, E and F
Refer to the SPM TASK 70-11-39-300-503, SUBTASK 70-11-39-300-001.
Cold ferric chloride swab etch the repair area on the HP Compressor Rotor Blade(s).
SUBTASK 72-41-15-110-002 Swab Etch the Repair Area - Assembly G, H, J and K
Refer to the SPM TASK 70-23-04-230-501.
Continue with the repair.
If no cracking is detected:
Reject.
If cracking is detected:
Inspect for cracking at the repair area on the HP Compressor Rotor Blade(s) using fluorescent penetrant inspection.
SUBTASK 72-41-15-230-001 Fluorescent Penetrant Inspect
Refer to the relevant figures as listed in Paragraph.
Mask the areas of the blade not to be vapour blasted.
Refer to the SPM TASK 70-12-01-120-501.
Vapour blast the repair area on the HP Compressor Rotor Blade(s).
Remove and discard the masking tape.
SUBTASK 72-41-15-120-001 Vapour Blast the Repair Area

CAUTION
ABRASIVE BLASTING IS A PROCESS OF EROSION THAT CAN DAMAGE ENGINE PARTS. YOU MUST TAKE CARE NOT TO CAUSE DAMAGE TO THE ENGINE PARTS.Refer to SPM TASK 70-11-03-300-503.
NOTE
The HP Compressor Rotor Blade(s) must be fully clean before you do Step.
Chemically clean the HP Compressor Rotor Blade(s) by non-aqueous degreasing.
SUBTASK 72-41-15-110-003 Chemically Clean
Refer to the relevant figures as listed in Paragraph.
Refer to for the approved vendor in Step or use Standard workshop tools.
Refer to the SPM TASK 70-31-02-310-501-001.
For Assemblies A, B and C:
For Assemblies D and E:
For Assembly F:
For Assemblies G, H, J and K:
Ensure sufficient weld filler is built up to allow machining to the given dimensions.
Make sure there is full gas coverage around the weld area.
Use locally manufactured chills as necessary.
NOTE
An increase in blade length of up to a maximum of 0.060 in. (1.52 mm) is permitted by this repair.
Weld repair the HP Compressor Rotor Blade(s) at the identified locations.
SUBTASK 72-41-15-310-001 Argonarc Weld Repair the HP Compressor Rotor Blade Tips

CAUTION
YOU MUST PREVENT ARCING ONTO THE BLADE DURING THE WELDING PROCESS.Refer to the SPM TASK 70-31-02-310-501-001. Use Heat Treatment Equipment.
Heat treat at a temperature of 1283 deg F. to 1301 deg F. (695 deg C. to 705 deg C.) for 2 hours. Cool to room temperature in a reducing atmosphere
For Assemblies A, B and C:
Heat treat at a temperature of 1103 deg F (595 deg C.) for 4 hours in an vacuum or argon atmosphere. Cool to room temperature in a reducing atmosphere.
For Assemblies D and E:
Heat-treat at 1157 deg F (625 deg C.) for 2 hours in a vacuum or reducing atmosphere. Cool to room temperature in a reducing atmosphere.
For Assembly F:
Heat-treat at 1400 deg F. (760 deg C) for 2 hours in a vacuum or reducing atmosphere. Cool at a rate of 100 deg F (56 deg C.) per hour to 1150 deg F (621 deg. C.) and hold for 4 hours. Cool to room temperature in a reducing atmosphere.
For Assemblies G, H, J and K:
Use heat treatment equipment.
Heat-treat the HP Compressor Rotor Blades in a vacuum or a reducing atmosphere.
SUBTASK 72-41-15-370-001 Heat-treat the HP Compressor Rotor Blades
Refer to the relevant figures as listed in Paragraph.
Refer to Paragraph.
Use the sample blade that was repaired with the HP Compressor Rotor Blade(s) that are to be returned to service.
Quarantine the repaired components. Contact IAE technical services for information how to proceed with the repaired components.
Include the repair scheme number, the results of the hardness check and the number of sample blades tested in the initial communication.
NOTE
If more than 10 percent of the sample blades have a hardness variation of more than 30 HV then the cause of the hardness variation needs to be investigated and resolved before applying VRS6534 to any other components.
If more than 10 percent of the additional sample blades have a hardness variation of more than 30 HV:
Continue with the repair.
If less than 10 percent of the additional sample blades have a hardness variation of more than 30 HV:
Further samples must be tested for the variation in hardness. Use additional sample blades that were repaired with the components to be returned to service.
If the sample blade has a hardness variation of more than 30 HV:
Continue with the repair
If the sample blade has a hardness variation of less than 30 HV:
The hardness variation across the welded area, the heat affected zone and the base material must be less than 30 HV.
For Assemblies A, B, C, D, E and F do a hardness check on a longitudinal cross-section of the sample blade.
Quarantine the repaired components. Contact IAE technical services for information how to proceed.
Include the repair scheme number, the results of the hardness check and the number of sample blades tested in the initial communication.
NOTE
If the additional sample blade(s) have a hardness of less than 361 HV then the cause of the hardness variation needs to be investigated and resolved before applying VRS6534 to any other components.
If the hardness of the additional sample blades are below 361 HV:
Continue with the repair.
If the hardness of the additional sample blade(s) are above 361HV:
Additional sample blades should be selected for metallurgical assessment.
If the hardness value of the sample blade is below 361 HV:
Continue with the repair.
If the hardness of the sample blade is above 361 HV:
Use one of the sample blades repaired with the HP Compressor Stage 3 to 12 Rotor Blades to be returned to service. The hardness of the repaired area and heat affected zone must not be less than 361HV.
For Assemblies G, H, J and K do a hardness check on a longitudinal cross-section of the sample blade.
SUBTASK 72-41-15-220-003 Do a Hardness Check
Refer to the relevant figures as listed in Paragraph.
Use a Grinding Machine.
Grind the HP Compressor Rotor Blade(s) to restore the blade height.
Refer to the approved vendors in Step for special tooling and machines required to restore the airfoil contour or use Standard workshop tools.
Restore the HP Compressor Rotor Blade(s) airfoil contour.
Dress the HP Compressor Rotor Blade(s) tip to remove burrs and any raised material.
SUBTASK 72-41-15-350-002 Machine the Component to Height and Restore the Airfoil Contour

CAUTION
TITANIUM COMPONENT (ASSEMBLIES A, B, C, D, E AND F) - YOU MUST USE SILICON CARBIDE TYPE ABRASIVE WHEELS, STONES AND PAPERS TO DRESS, BLEND AND POLISH THIS COMPONENT.
CAUTION
TITANIUM COMPONENT (ASSEMBLIES A, B, C, D, E AND F) - AVOID BUILD UP OF HEAT BY APPLYING ONLY GENTLE PRESSURE AND KEEPING THE TOOL SPEED AS LOW AS POSSIBLE
CAUTION
TITANIUM COMPONENT (ASSEMBLIES A, B, C, D, E AND F) - YOU MUST MAKE SURE THAT NO SPARKS ARE PRODUCED WHEN YOU DRESS THE COMPONENT.
CAUTION
TITANIUM COMPONENT (ASSEMBLIES A, B, C, D, E AND F) - IF THE MATERIAL SHOWS A CHANGE IN COLOUR TO DARKER THAN A LIGHT STRAW COLOUR THE COMPONENT MUST BE REJECTED.Refer to the relevant figures as listed in Paragraph.
Reject.
If there are signs of arcing anywhere on the component:
Continue with the repair.
If there are no signs of arcing anywhere on the component:
Electrical arcing from the welding process is not acceptable anywhere on the blade.
Visually inspect the HP Compressor Rotor Blade(s) for signs of electrical arcing.
Reject.
If there is any scratches or scores on the airfoil surface:
Continue with the repair.
If there is no scratches or scores on the airfoil surface:
Inspect the HP Compressor Rotor Blade(s) for evidence of scratching or scoring as a result of the repair.
Visually inspect the airfoil surface.
Repeat the repair from Step.
If the airfoil contour at the blade tip does not blend smoothly with the surrounding material:
Reject.
If the airfoil contour at the blade tip is not within the given limits:
Continue with the repair.
If the airfoil contour at the blade tip is within the given limits and blends smoothly with the surrounding material:
The tip contour must be smooth with the adjacent material and within the given limits.
Visually inspect the airfoil contour.
Compare the blade height dimensions from before and after the repair, refer to the record made during Step.
The weld material must be contained within the given limits.
Reject.
If the welded material is not contained within 0.060 in. (1.52 mm) of the blade tip:
Reject.
If the blade height is less than the given limits:
Repeat the repair from Step.
If the blade height is greater than the given limits:
Continue with the repair.
If the blade height is within the given limits and the weld is contained within 0.060 in. (1.52 mm) of the blade tip:
NOTE
An increase in blade height by welding up to a maximum of 0.060 in. (1.52 mm) is permitted by this repair.
Dimensionally inspect the HP Compressor Rotor Blade(s) height:
SUBTASK 72-41-15-220-004 Visually and Dimensionally Inspect the HP Compressor Rotor Blade(s)
DELETED.
SUBTASK 72-41-15-350-003 Polish the HP Compressor Rotor Blade Airfoil Surface and Contour - Stages 3 to 12
Refer to the relevant figures as listed in Paragraph.
Make sure that HP Compressor Rotor Blade satisfies the minimum chord width requirements as given in the relevant inspection procedures (identified by the applicable part number) located in section 72-41-15.
Reject.
If the repaired HP Compressor Rotor Blade(s) is less than the minimum chord width:
Continue with the repair.
If the repaired HP Compressor Rotor Blade(s) is equal to or greater than the minimum chord width:
Dimensionally inspect the chord width of the repaired HP Compressor Rotor Blade(s).
SUBTASK 72-41-15-220-005 Dimensionally Inspect
Refer to SPM TASK 70-11-08-300-503, SUBTASK 70-11-08-300-001.
Hydrofluoric/Nitric acid swab etch the repair area on the HP Compressor Rotor Blade(s).
SUBTASK 72-41-15-110-004 Swab Etch the Repair Area - Assemblies A, B, C, D, E and/or F
Refer to SPM TASK 70-11-39-300-503, SUBTASK 70-11-39-300-001.
Cold ferric chloride swab etch the repair area on the HP Compressor Rotor Blade(s).
SUBTASK 72-41-15-110-005 Swab Etch the Repair Area - Assembly G, H, J and K
Refer to SPM TASK 70-23-04-230-501.
Continue with the repair.
If no cracking is detected:
Reject.
If cracking is detected:
Inspect for cracking on the HP Compressor Rotor Blade(s) using fluorescent penetrant inspection.
SUBTASK 72-41-15-230-002 Fluorescent Penetrant Inspect
Refer to SPM TASK 70-26-01-260-501 and to the approved vendors in Step for the appropriate data card and radiographic inspection parameters.
Reject.
If the component shows evidence of cracking:
Reject.
If there is a pore(s) with a diameter greater than 0.006 in. (0.15 mm) in the weld:
Reject.
If there are pores with a diameter less than 0.006 in. (0.15 mm) that are less than 0.200 in. (5.08 mm) apart:
Reject.
If there are pores with a diameter less than 0.006 in. (0.15 mm) and the pores break the surface of the component:
Reject.
If there are pores with a diameter less than 0.006 in. (0.15 mm) that are less than 0.04 in. (1.00 mm) from the leading or trailing edge:
Continue with the repair.
If there is no cracking and there are no pores with a diameter greater than 0.006 in. (0.1 5mm), there are no pores that are less than 0.200 in. (5.08 mm) apart, no pores that break the surface of the airfoil and no pores that are less than 0.04 in. (1.00 mm) from the leading and trailing edge(s):
Radiographically inspect the repair area of the HP Compressor Rotor Blade(s).
SUBTASK 72-41-15-260-001 Radiographically Inspect the Repair Area
Repair VRS6150, TASK 72-41-15-300-040 (REPAIR-040).
Restore the HP Compressor Rotor Blade(s) airfoil surface condition.
SUBTASK 72-41-15-380-001 Restore the Airfoil Surface Condition
Refer to the repair VRS6151, TASK 72-41-15-300-041 (REPAIR-041).
For Assemblies A, B, C, and D:
Refer to the repair VRS6152, TASK 72-41-15-300-043 (REPAIR-043).
For Assemblies E and F:
Shotpeen the dovetail root of the repaired HP Compressor Rotor Blade(s).
SUBTASK 72-41-15-380-002 Shotpeen the Dovetail Root - Assemblies A, B, C, D, E and F
Refer to Repair, VRS6236 TASK 72-41-15-300-035 (REPAIR-035) or Repair, VRS9297 TASK 72-41-15-300-058 (REPAIR-058).
Apply the coating to the HP Compressor Rotor Blade(s) clapper contact faces.
SUBTASK 72-41-15-340-001 Apply the Clapper Coating - Assembly A
Refer to Repair, VRS6214, TASK 72-41-15-300-031 (REPAIR-031).
For Assembly B:
Refer to Repair, VRS6215, TASK 72-41-15-300-032 (REPAIR-032).
For Assembly C:
Apply the rubber seal strips to the HP Compressor Rotor Blade(s).
SUBTASK 72-41-15-360-001 Apply the Rubber Sealing Strips - Assemblies B and C
Refer to Repair, VRS6486, TASK 72-41-15-300-046 (REPAIR-046).
For Assemblies A, B and C:
Refer to Repair, VRS6495, TASK 72-41-15-300-049 (REPAIR-049).
For Assemblies D:
Refer to Repair, VRS6496, TASK 72-41-15-300-050 (REPAIR-050).
For Assemblies E:
Refer to Repair, VRS6497, TASK 72-41-15-300-051 (REPAIR-051).
For Assemblies F:
Apply the dry film lubricant to the HP Compressor Rotor Blade(s) root(s).
SUBTASK 72-41-15-380-003 Apply the Dry Film Lubricant - Assemblies A, B, C, D, E and F
For Assembly D, E and F, refer to Figure.
NOTE
If the HP Compressor Rotor Blade(s) is already identified with the repair scheme identification symbol from a previous repair application, further identification is not necessary.For Assembly G, H, J and K, refer to Figure.
For Assembly A, B and C, refer to Figure.
Refer to SPM TASK 70-09-00-400-501.
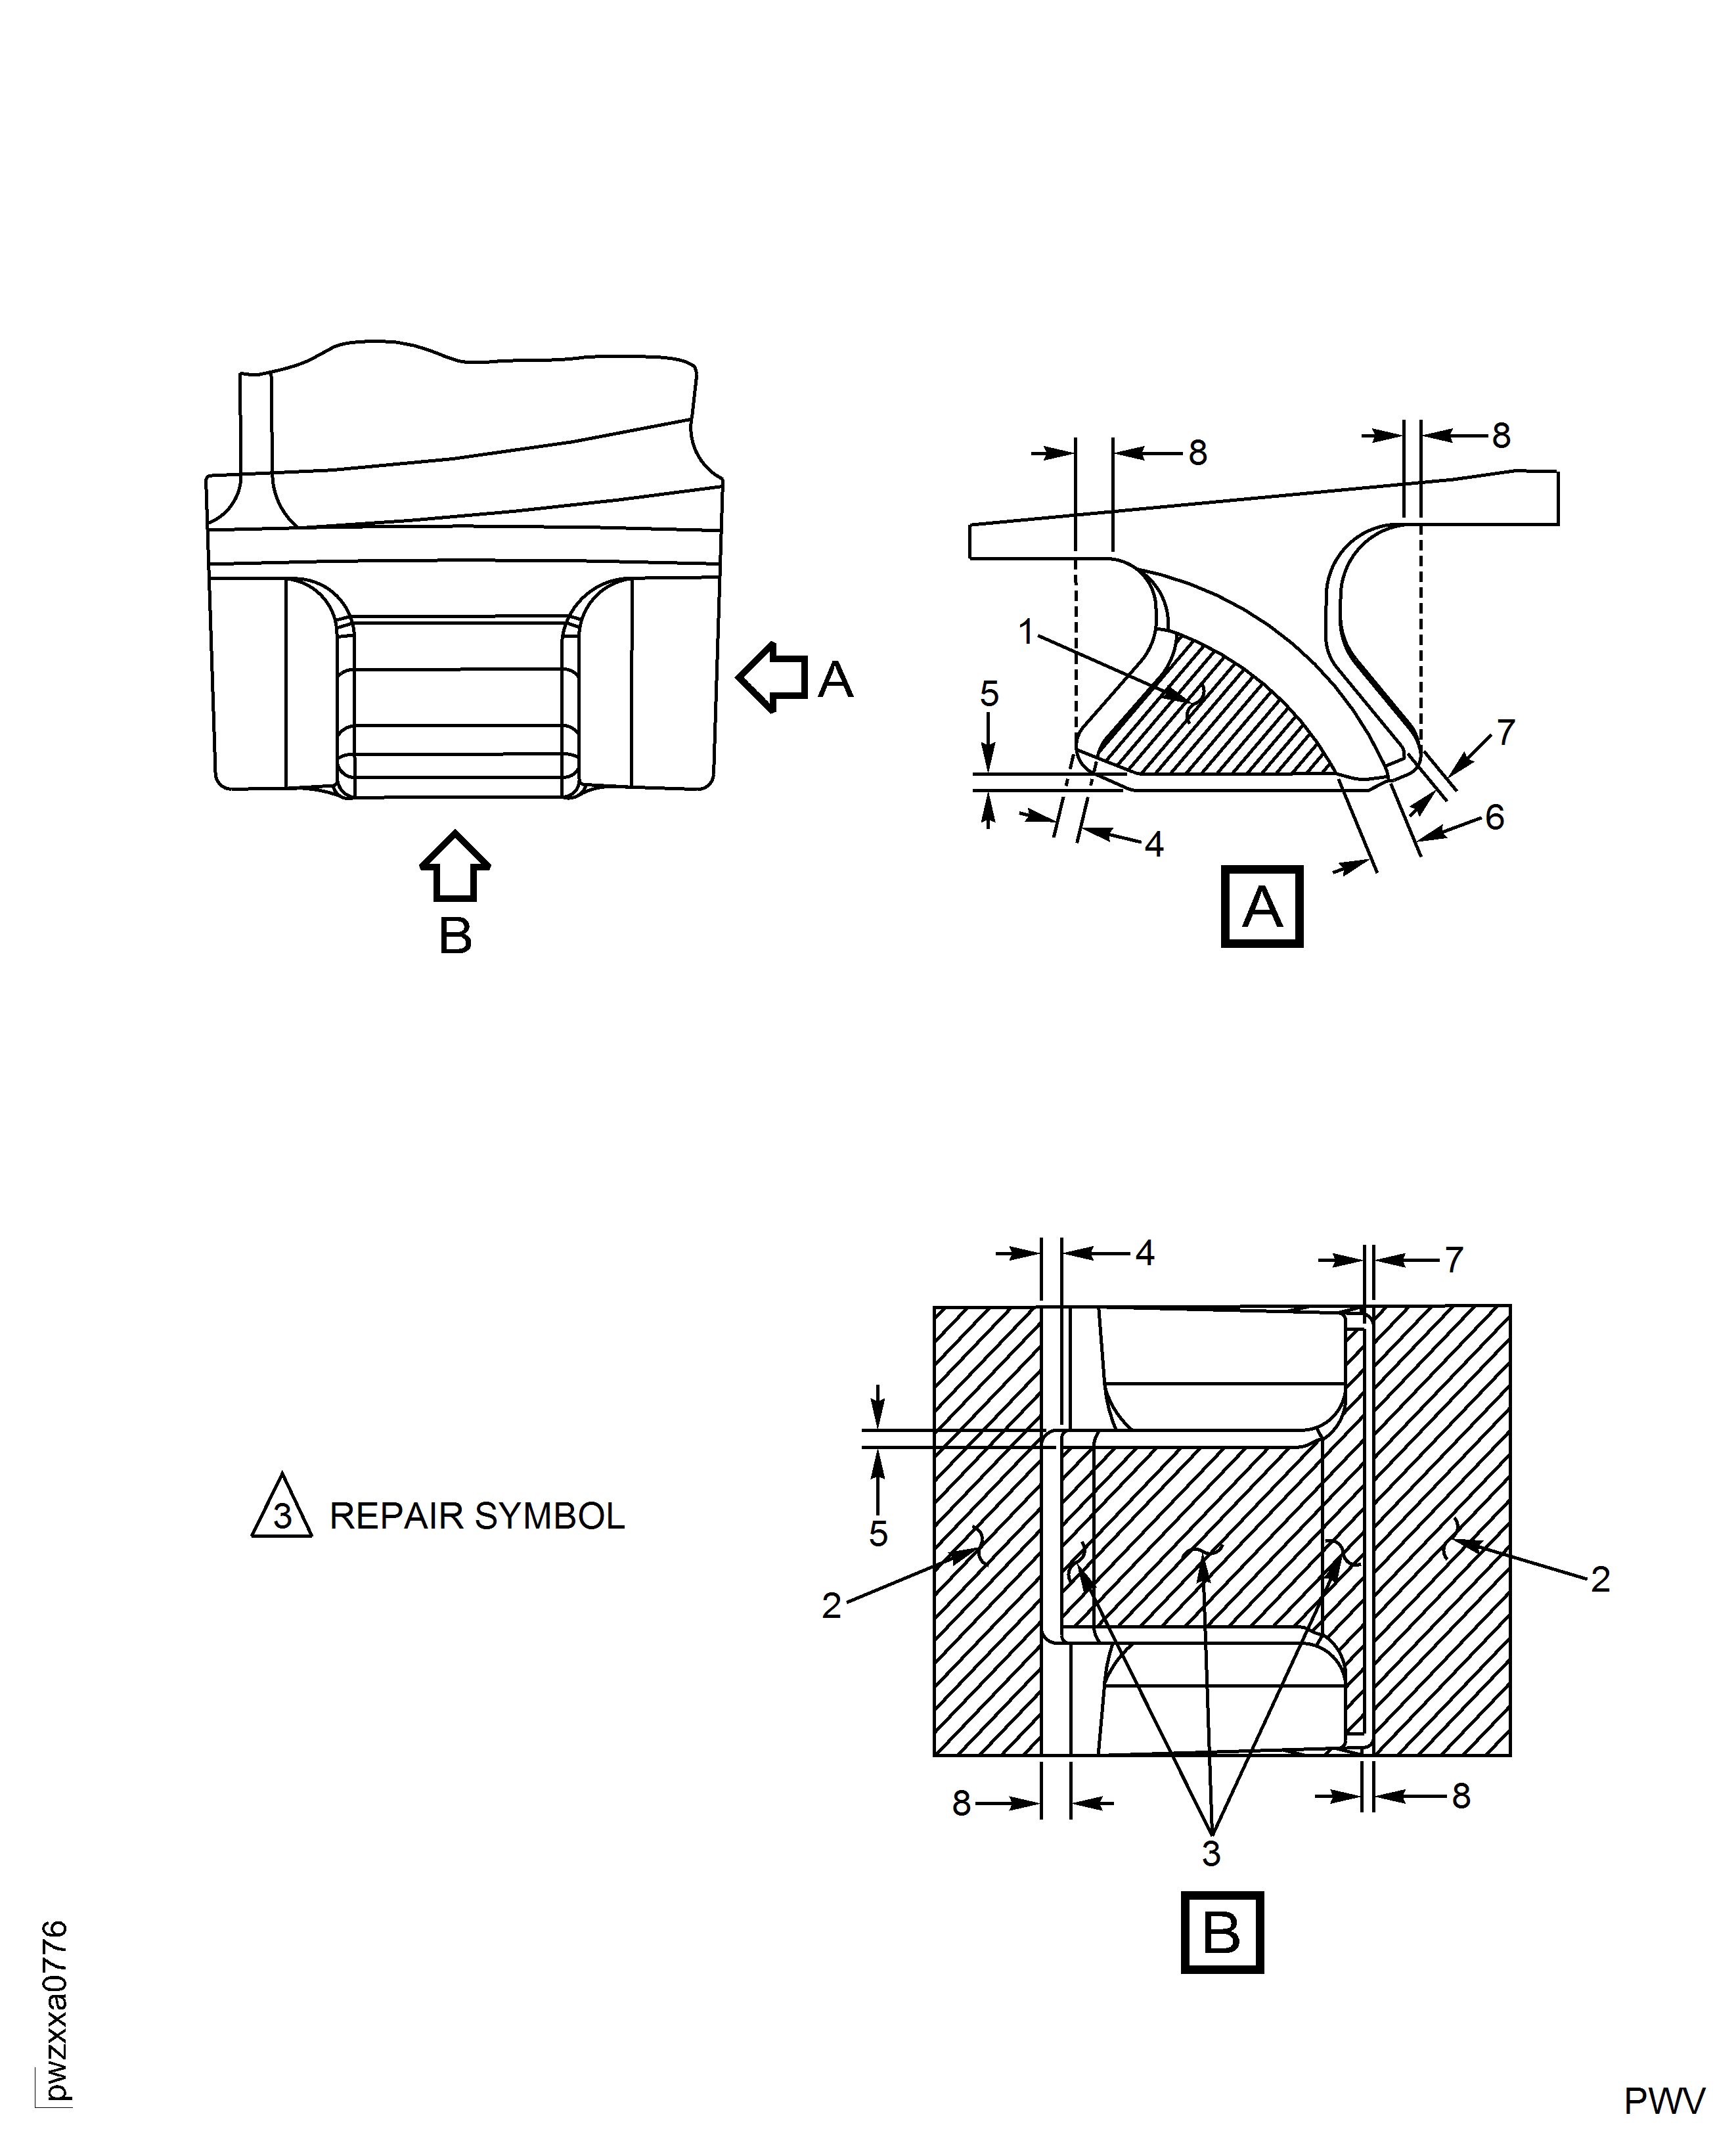
Mark the number 3 inside a triangle using the vibration peen method.
Mark the repair symbol at one of the indicated location(s) on the HP Compressor Rotor Blade(s).
Remove raised material, burrs and/or sharp edges at the vibro-peen marking area.
SUBTASK 72-41-15-350-004 Identify the Repair

CAUTION
DO NOT VlBRO-ENGRAVE ON THE BLADE AIRFOIL OR LOCATION FACES.
Figure: HP Compressor Stage 3 Rotor Blade (Assembly A) - Repair Details and Dimensions
HP Compressor Stage 3 Rotor Blade (Assembly A) - Repair Details and Dimensions
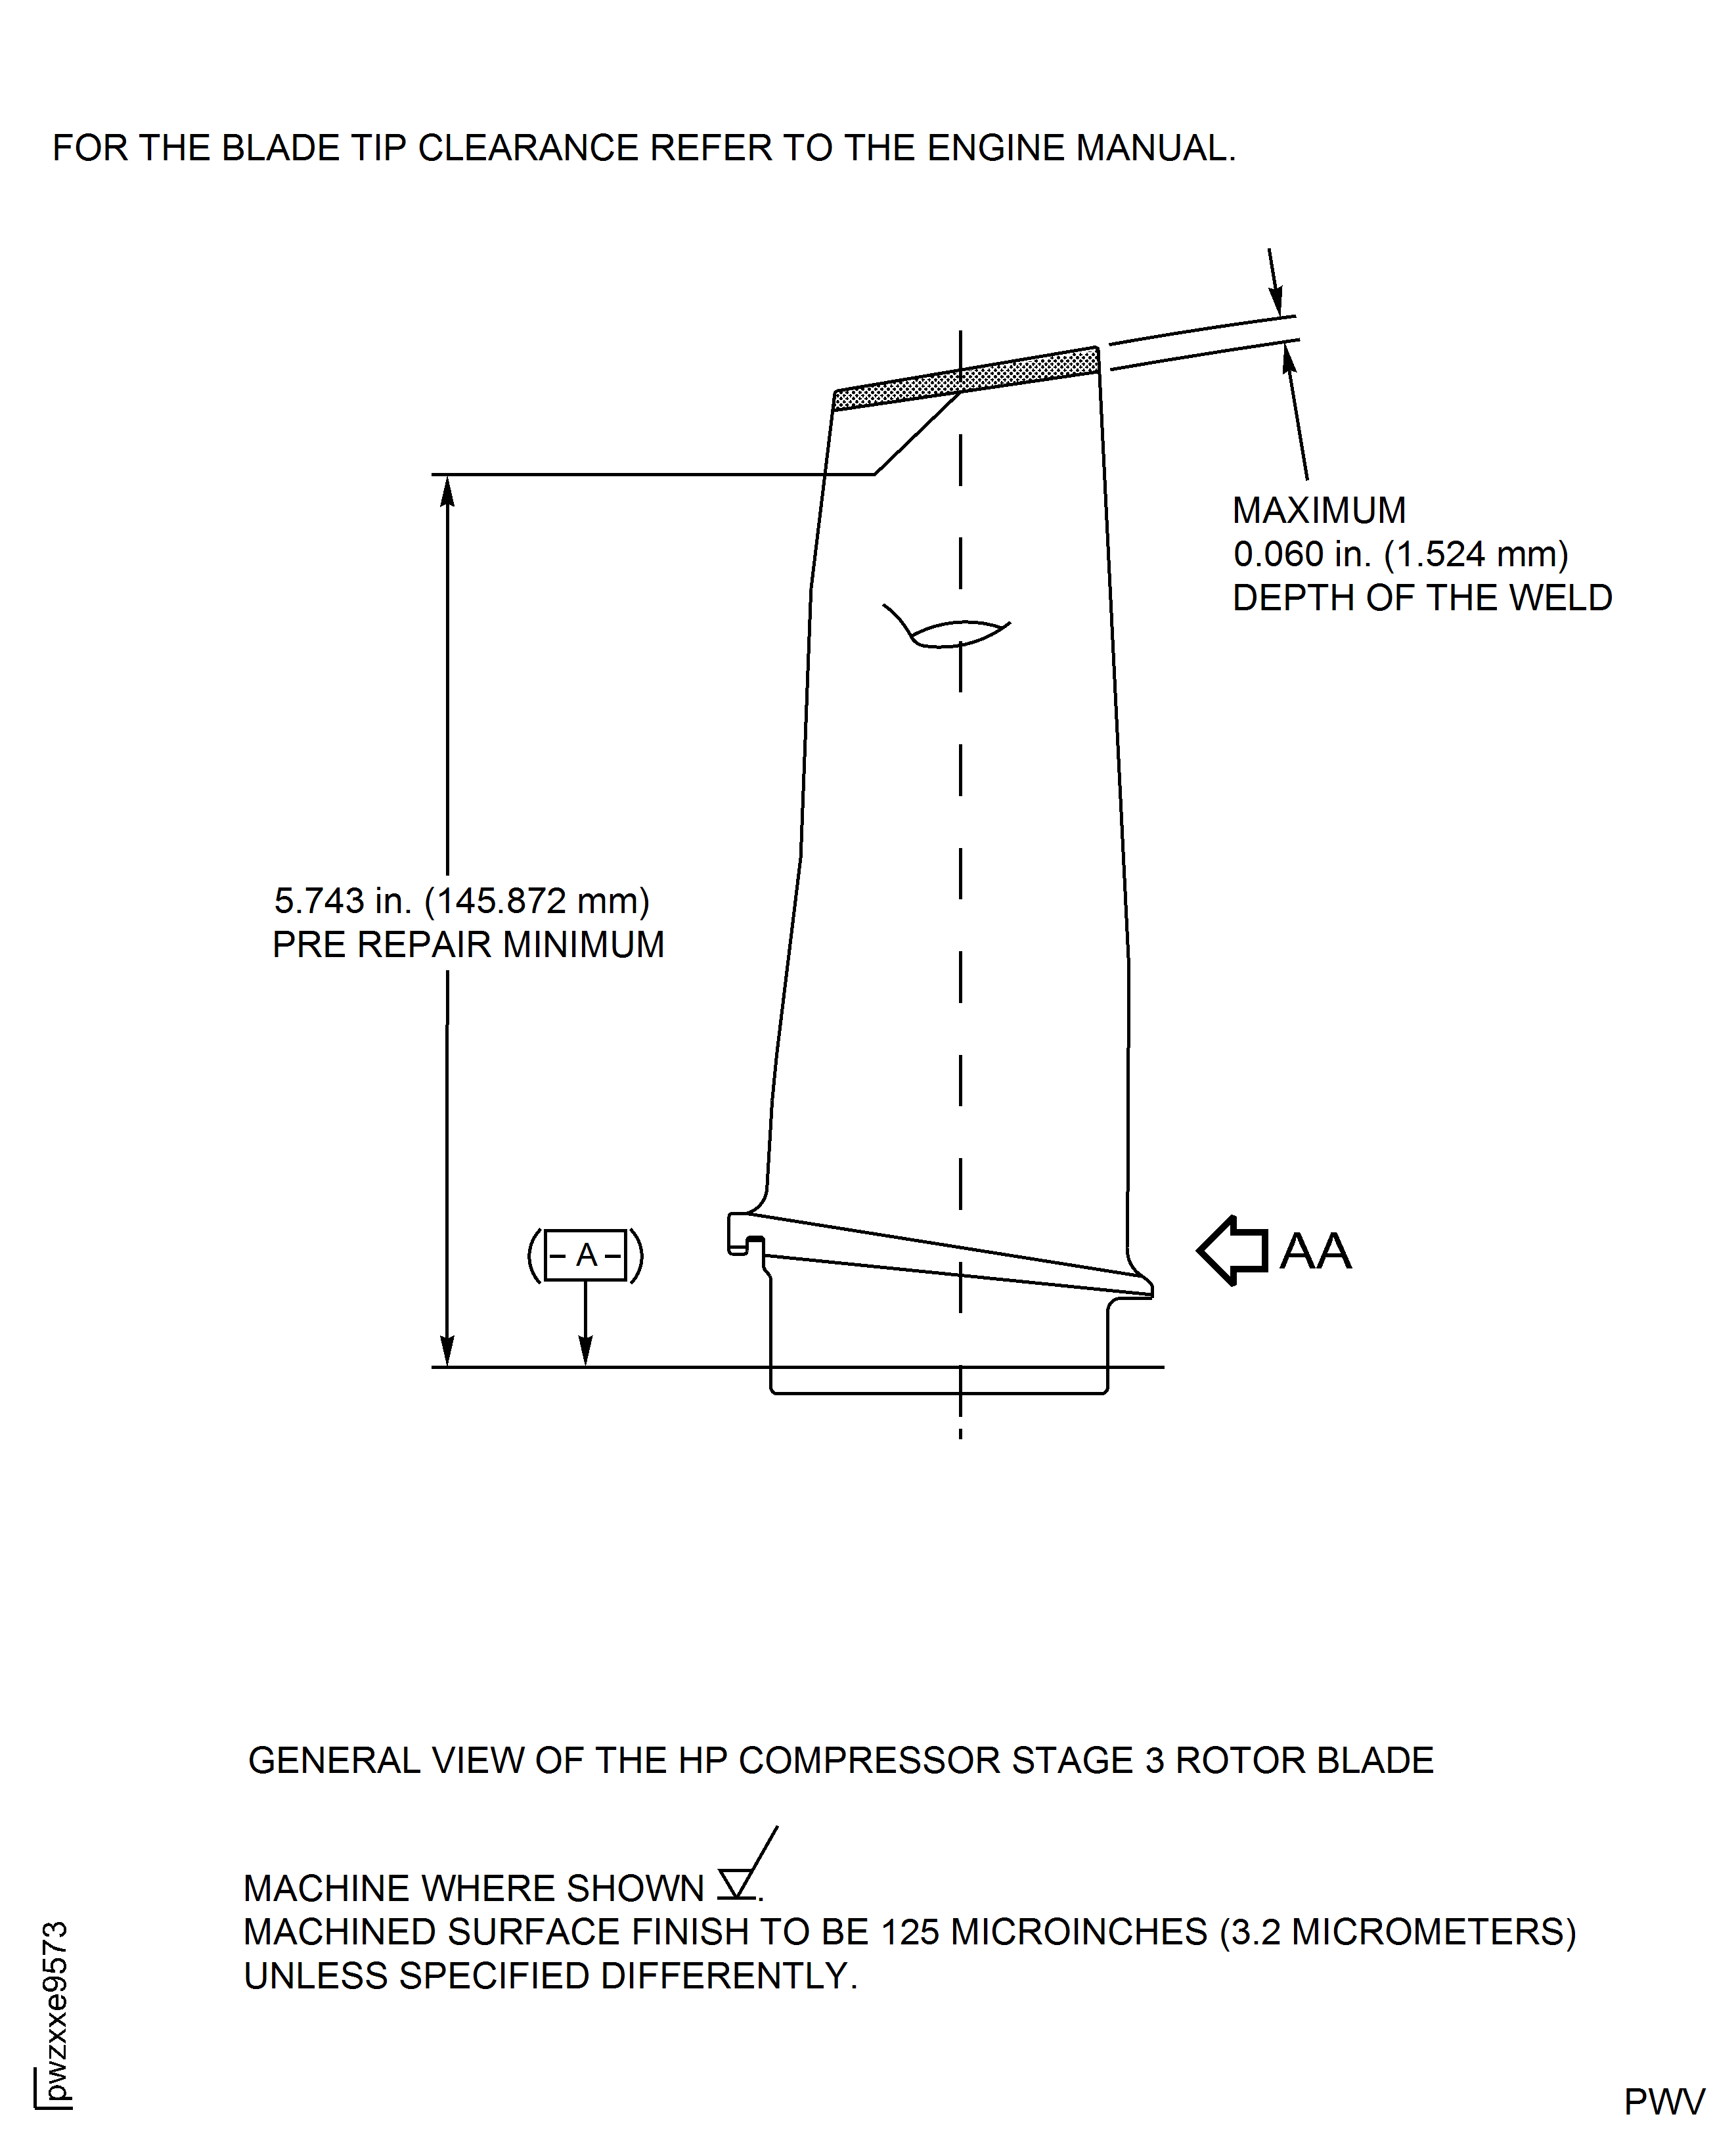
Figure: HP Compressor Stage 3 Rotor Blade (Assembly A) - Repair Details and Dimensions
HP Compressor Stage 3 Rotor Blade (Assembly A) - Repair Details and Dimensions
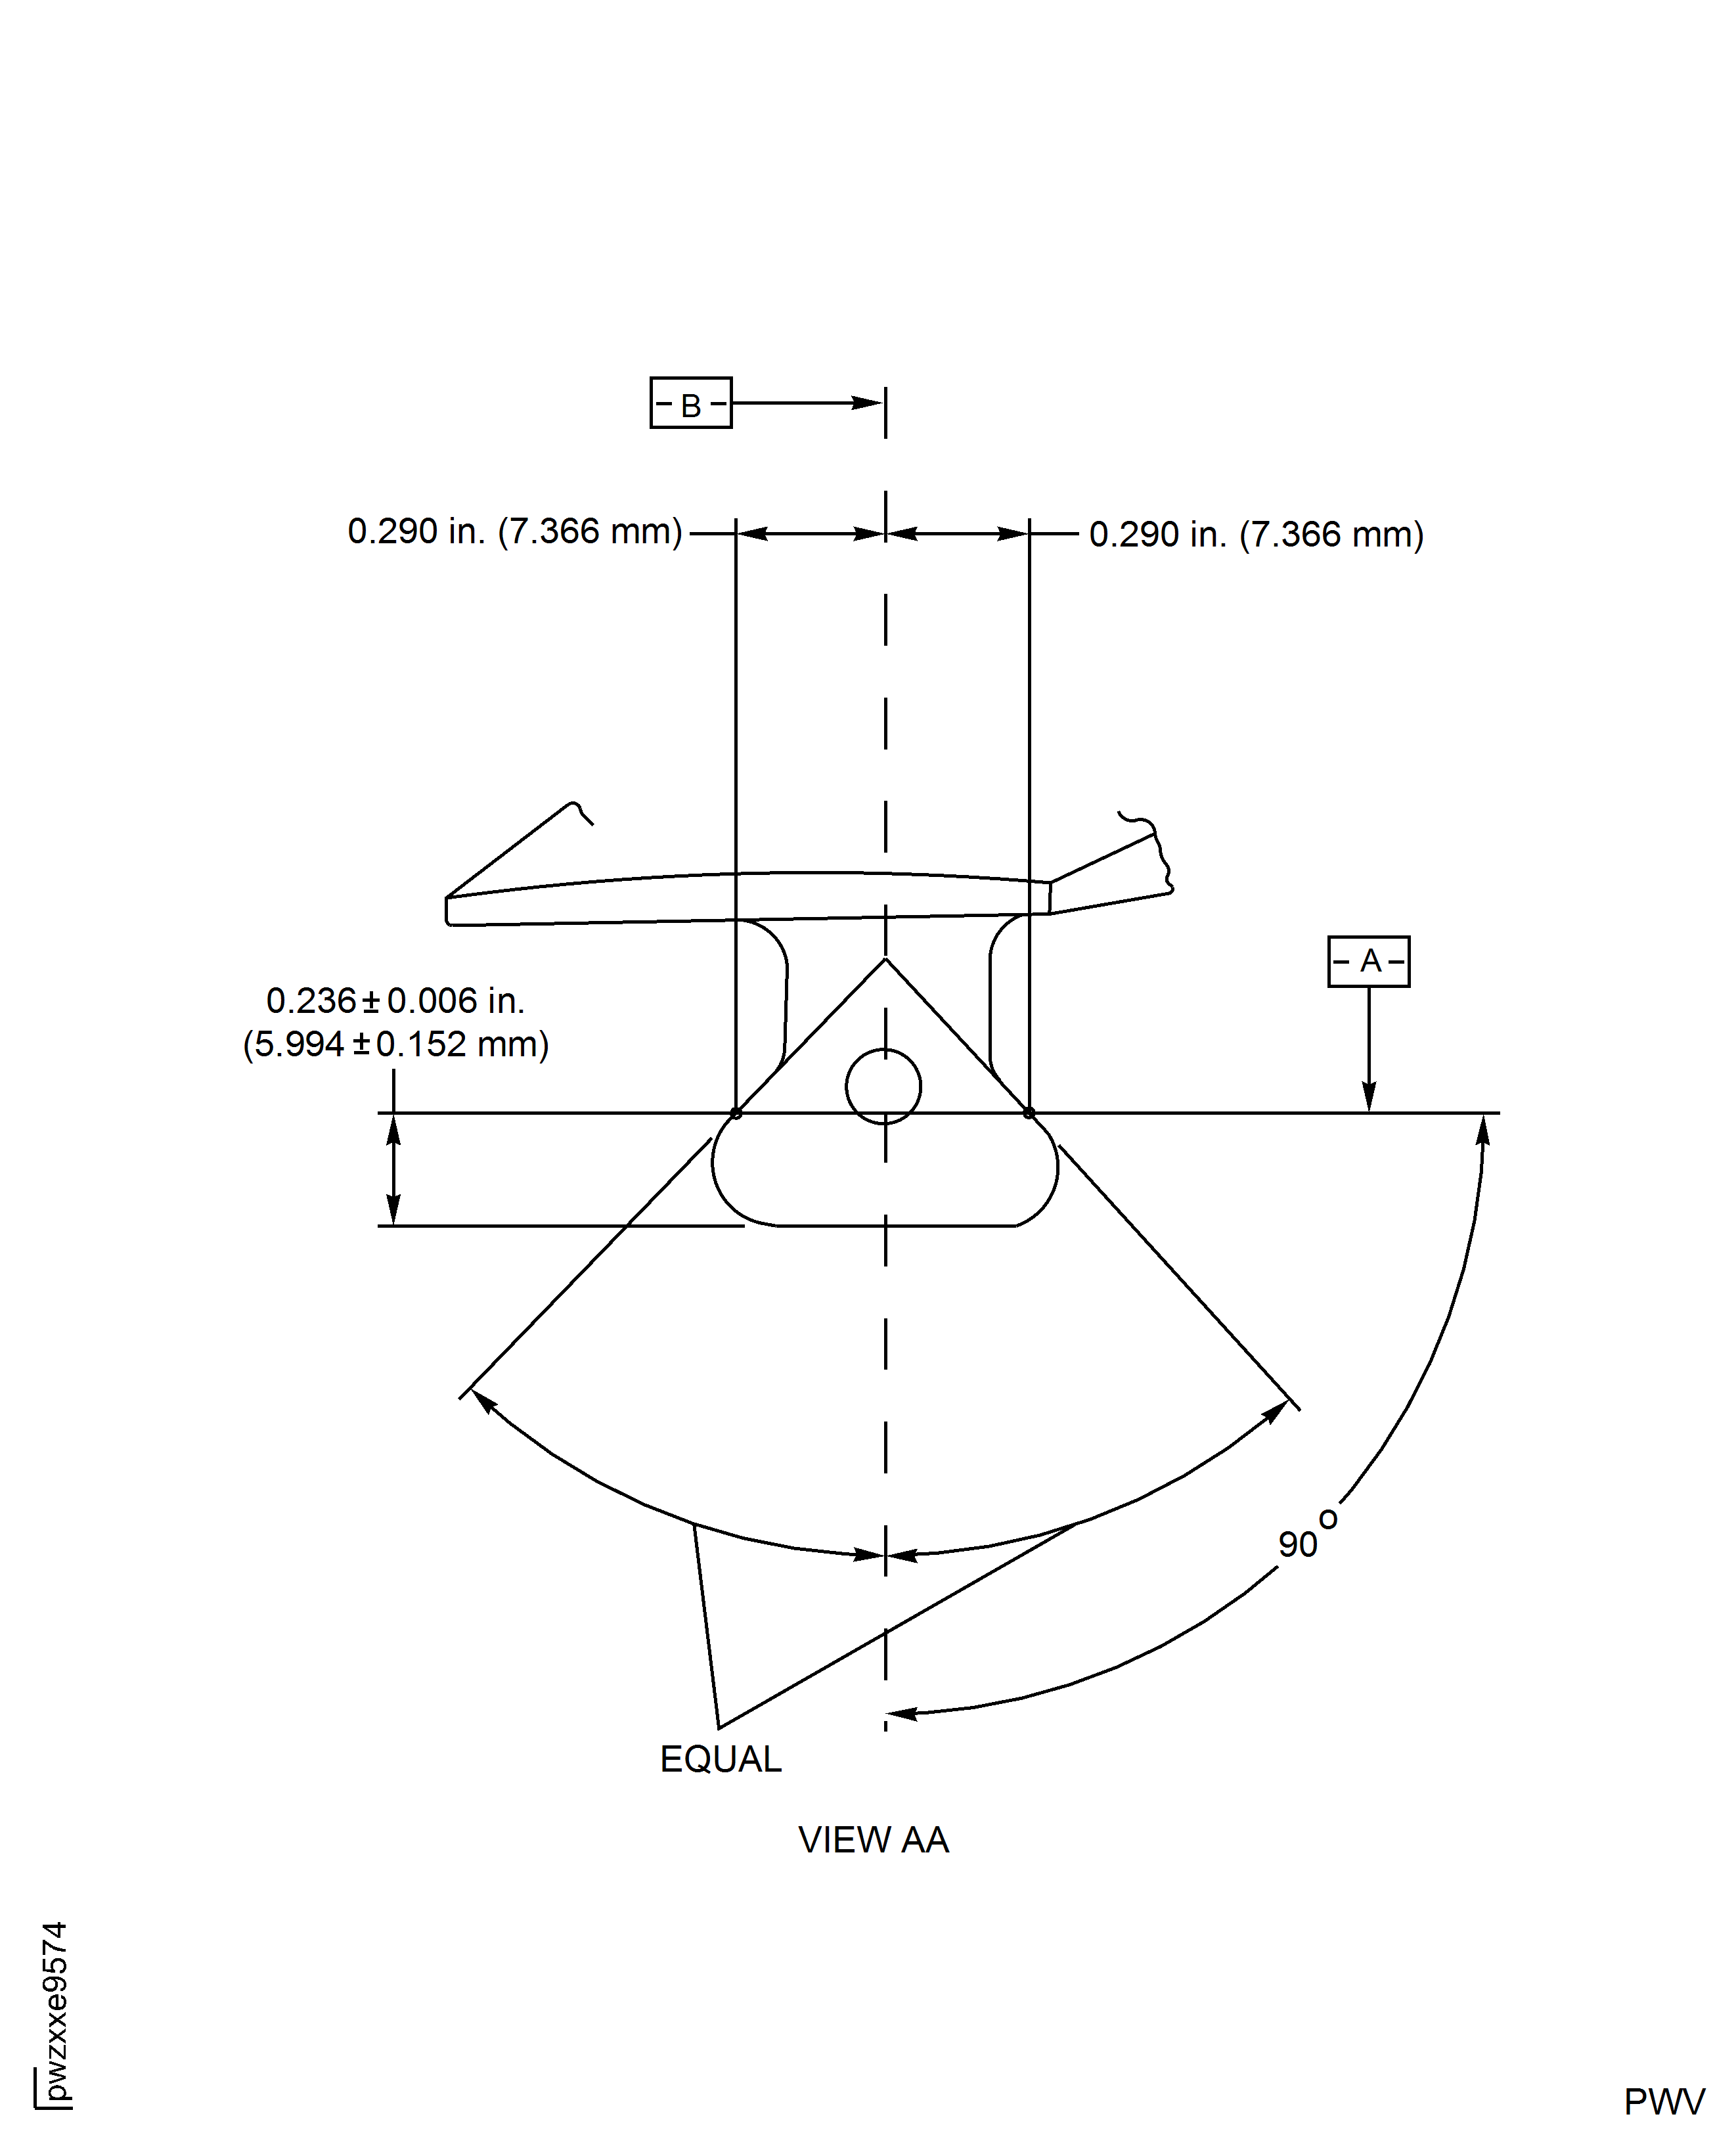
Figure: HP Compressor Stage 3 Rotor Blade (Assembly A) - Repair Details and Dimensions
HP Compressor Stage 3 Rotor Blade (Assembly A) - Repair Details and Dimensions
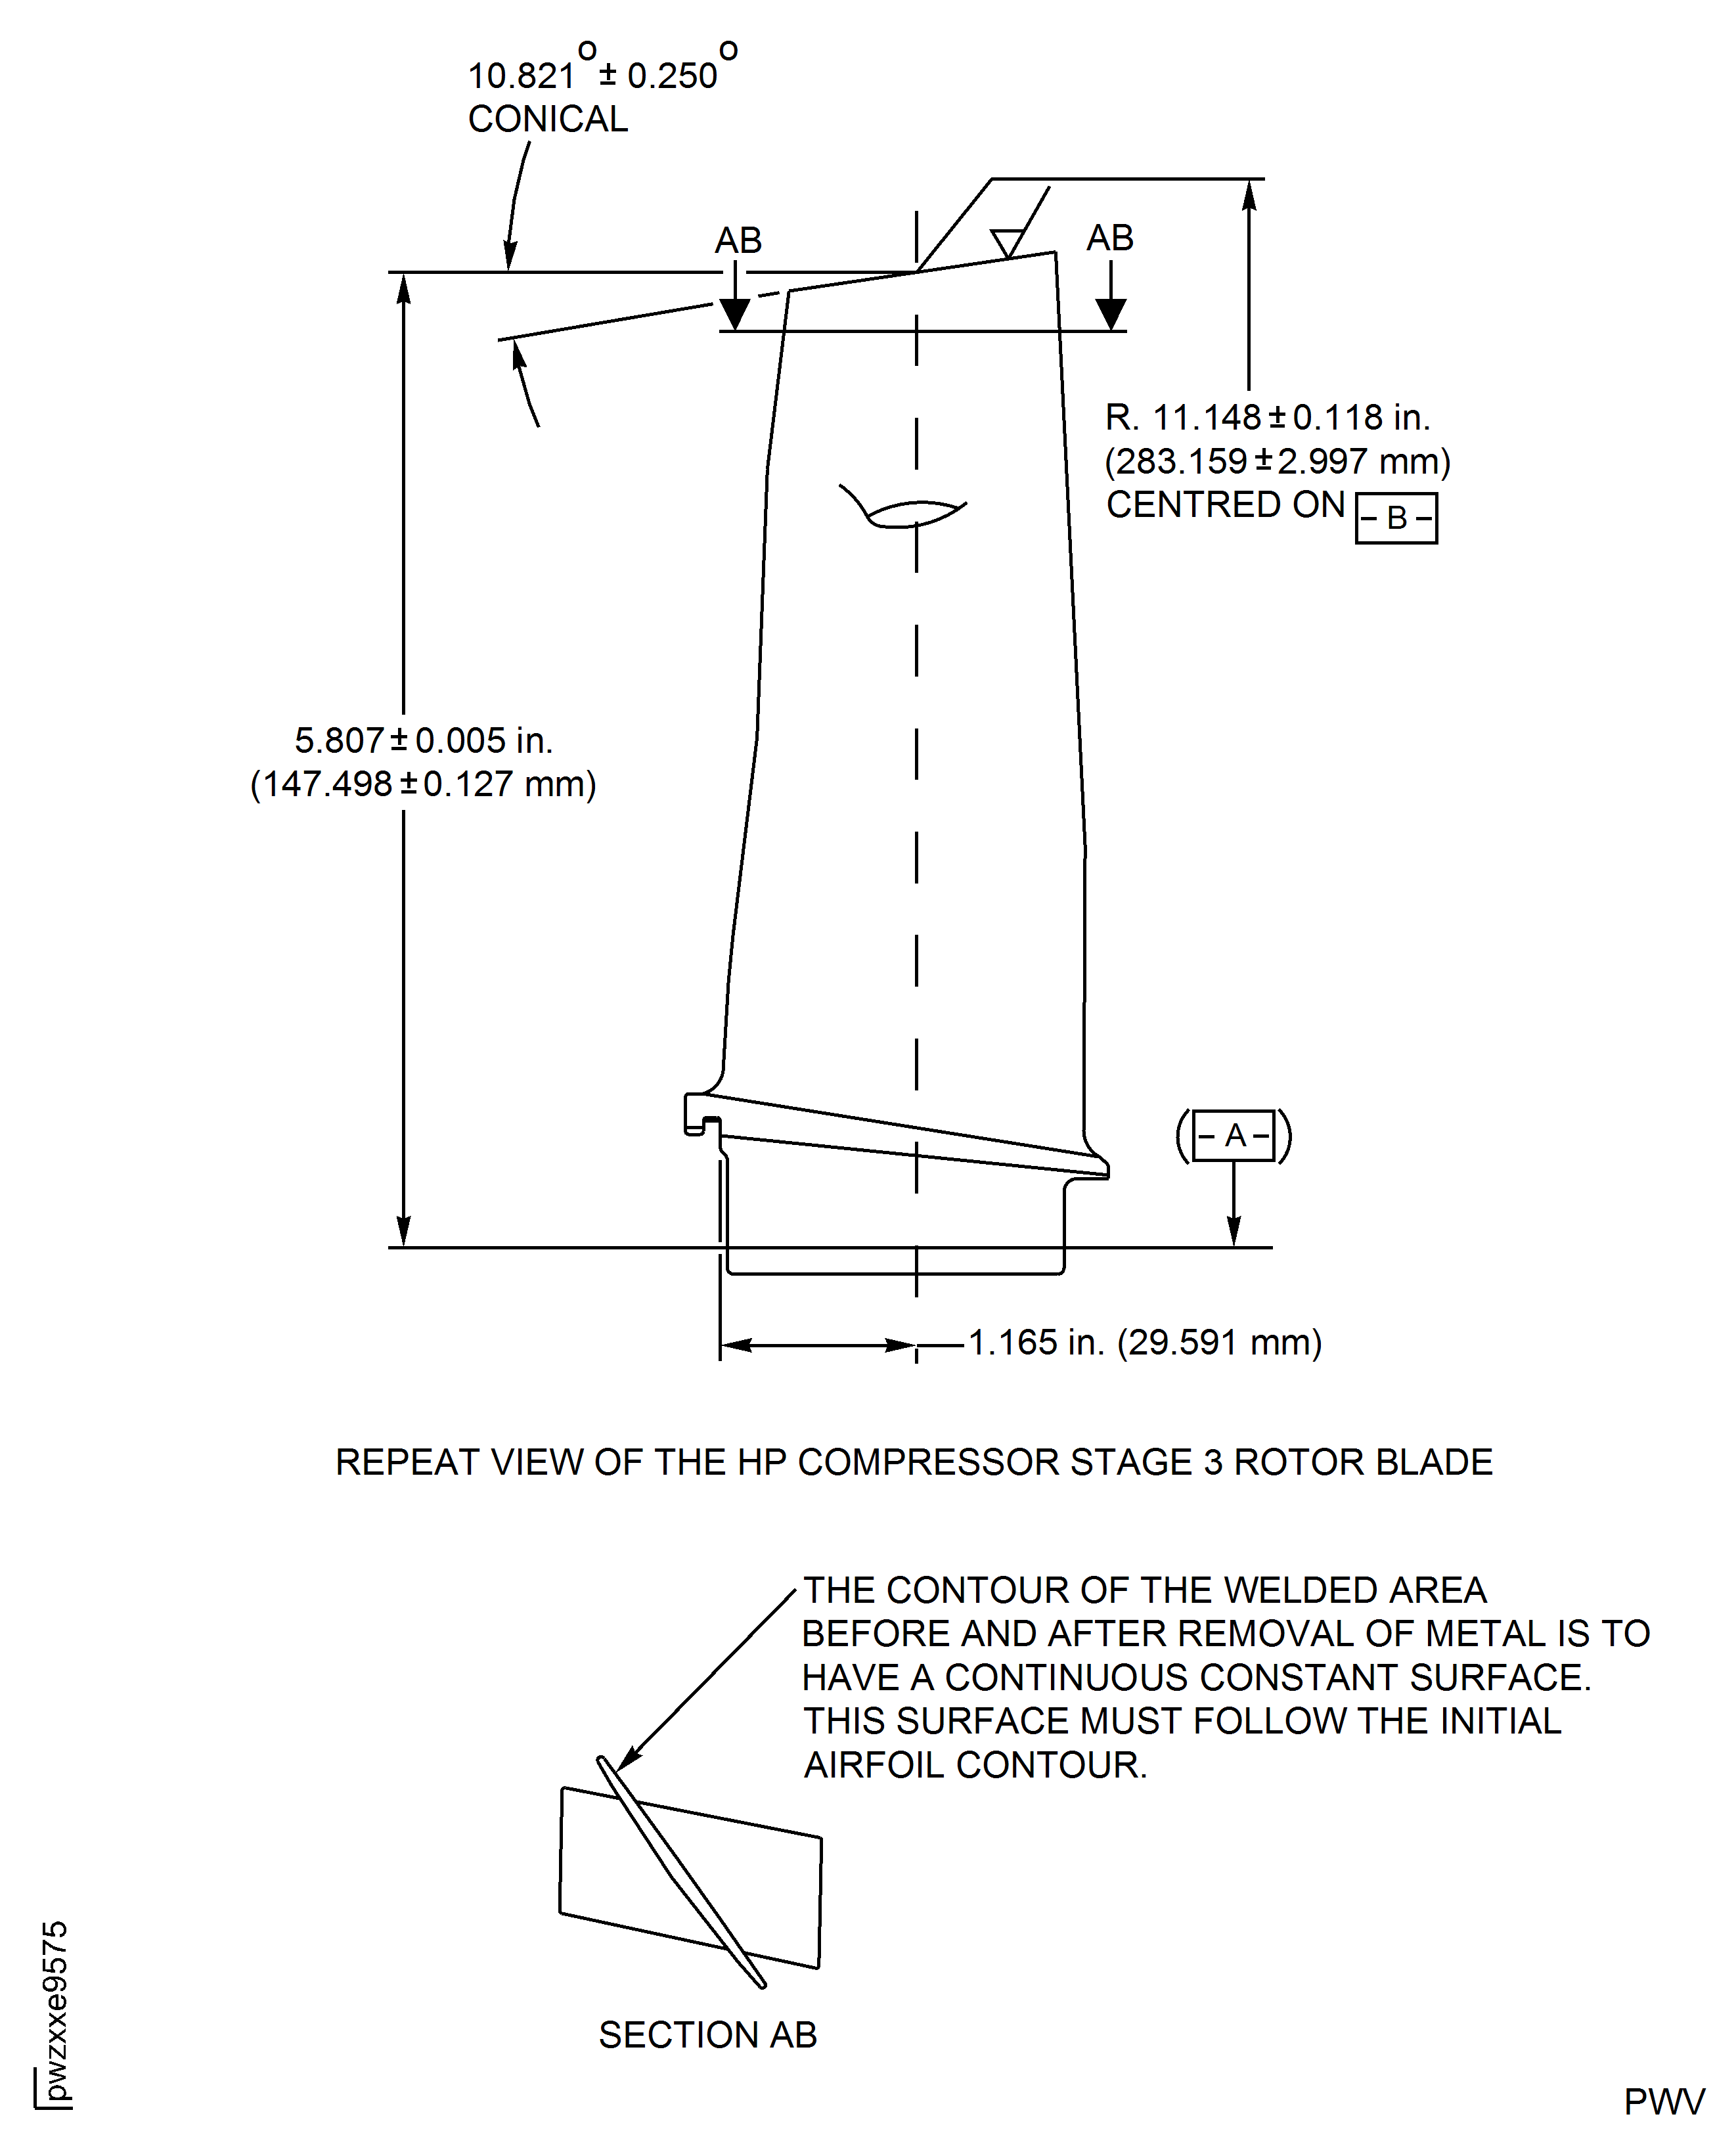
Figure: HP Compressor Stage 4 Rotor Blade (Assembly B) - Repair Details and Dimensions
HP Compressor Stage 4 Rotor Blade (Assembly B) - Repair Details and Dimensions
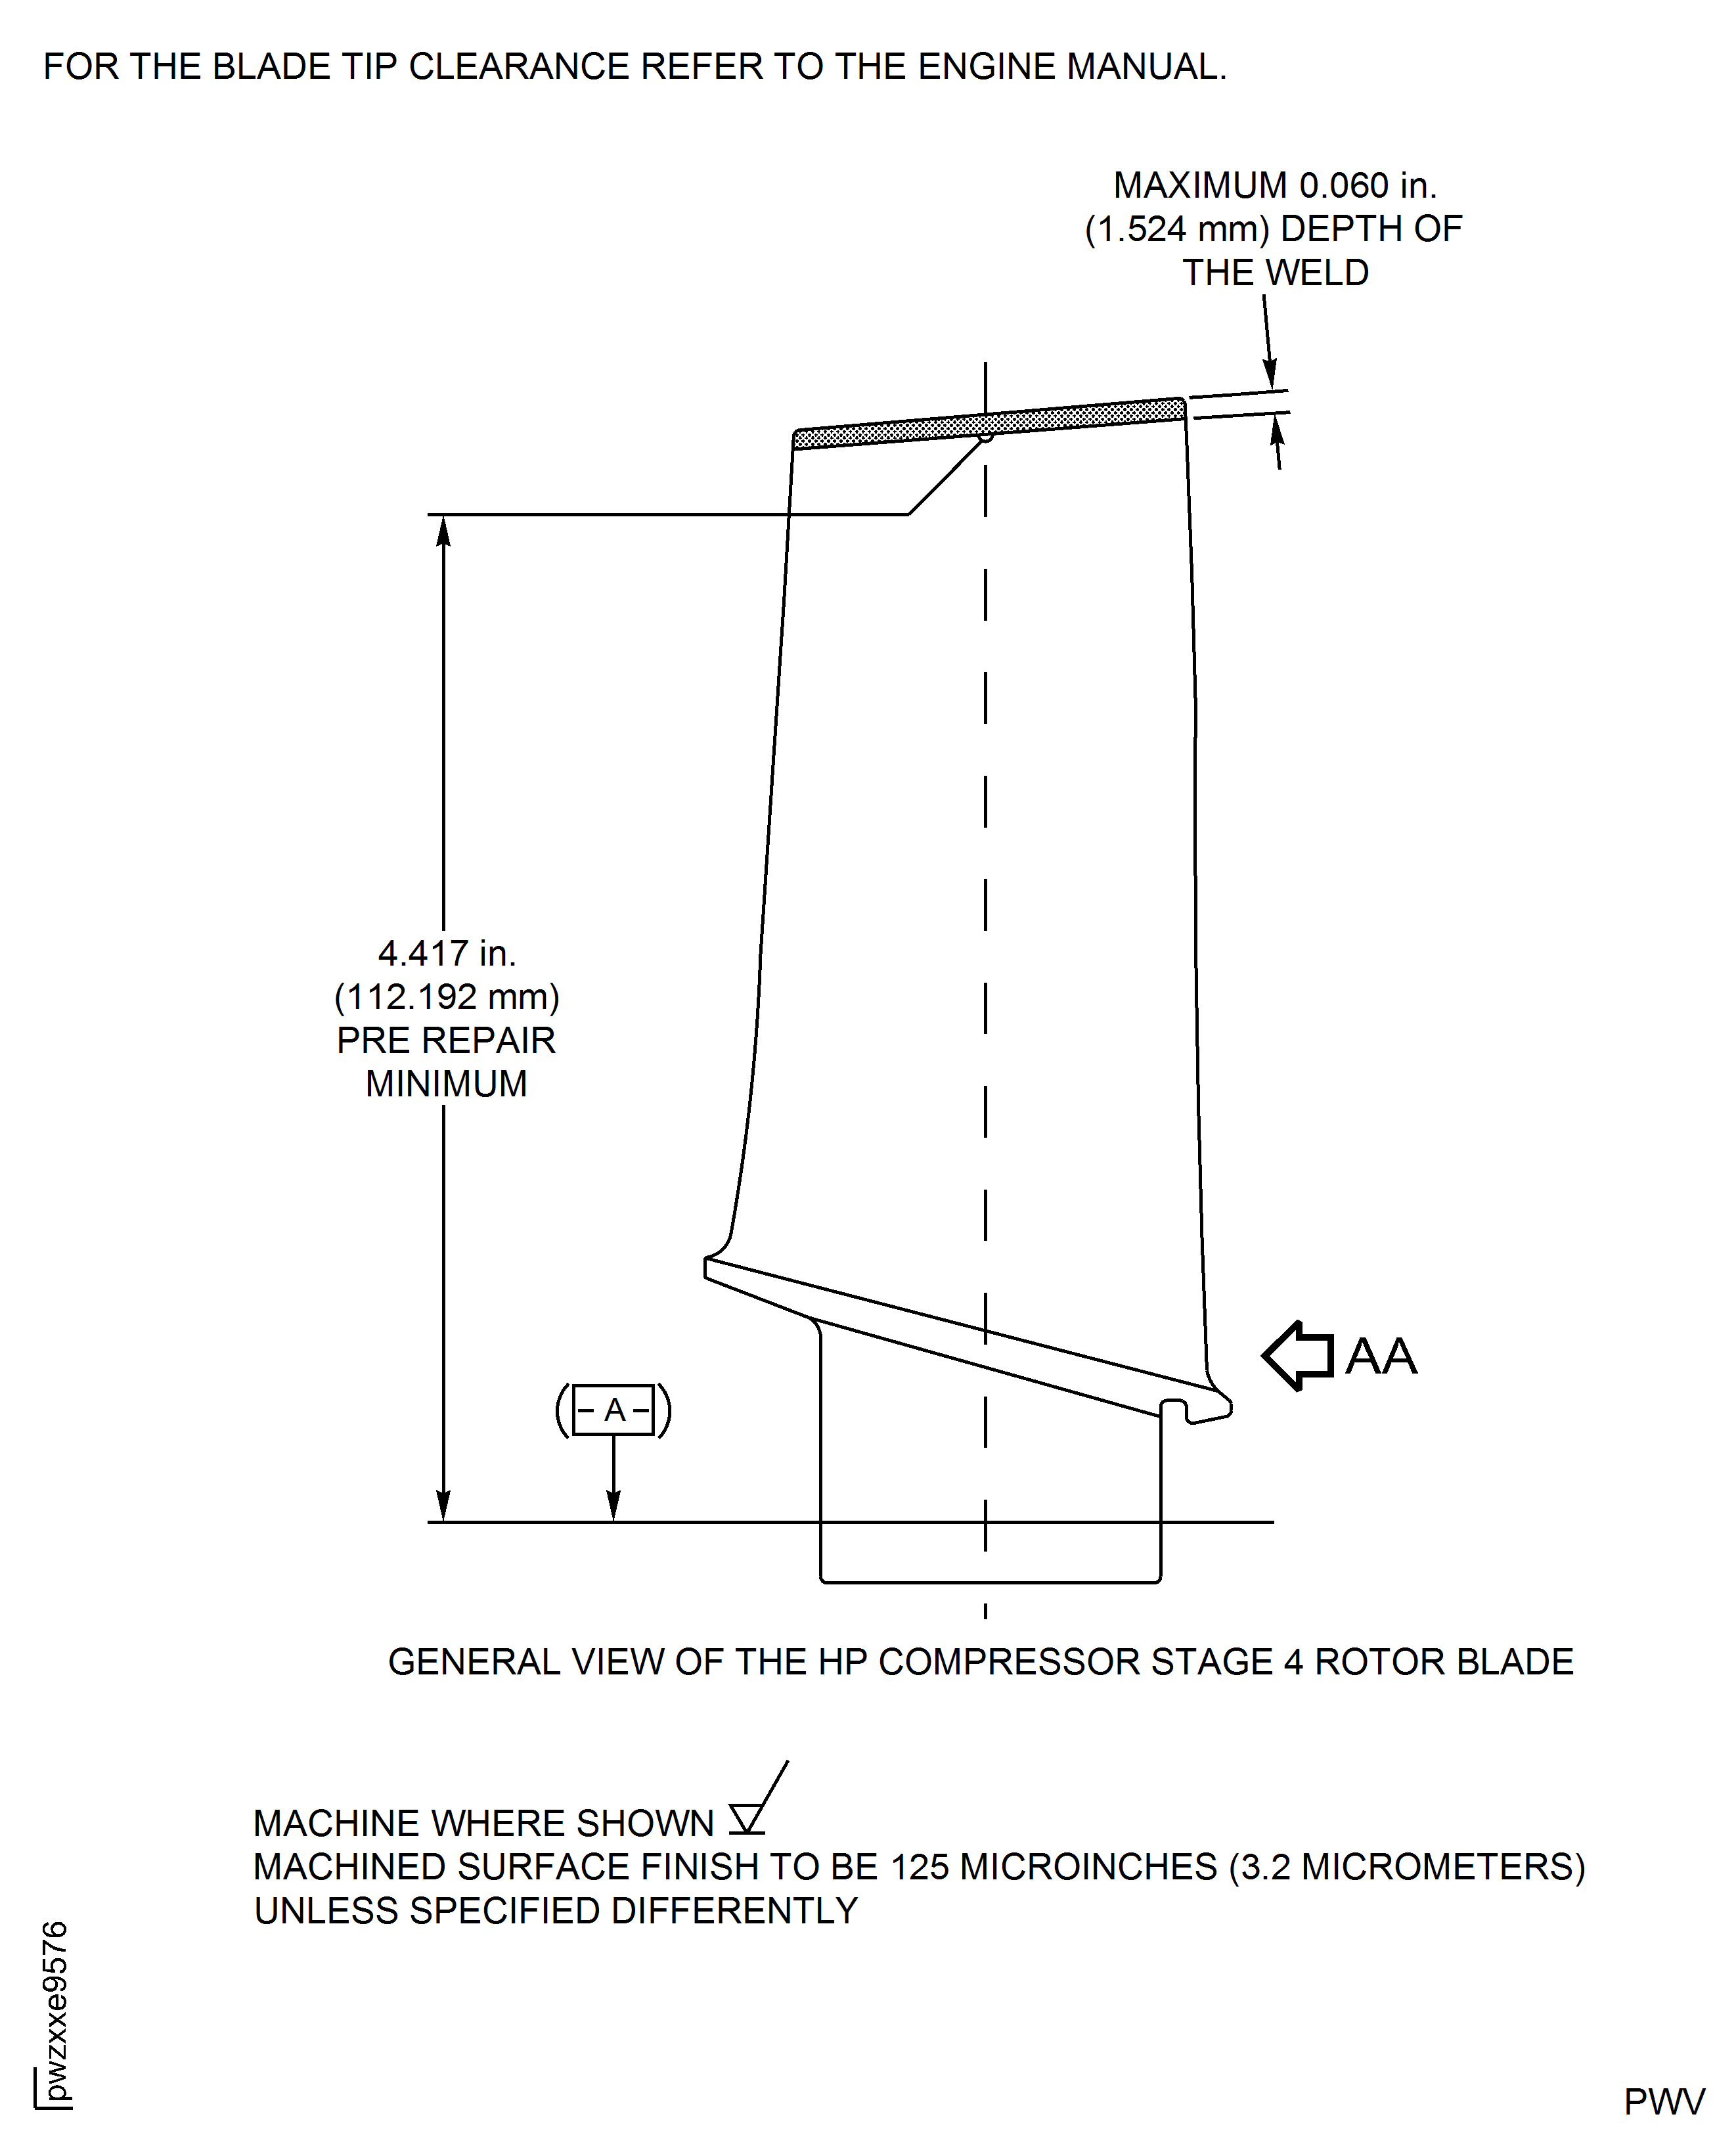
Figure: HP Compressor Stage 4 Rotor Blade (Assembly B) - Repair Details and Dimensions
HP Compressor Stage 4 Rotor Blade (Assembly B) - Repair Details and Dimensions
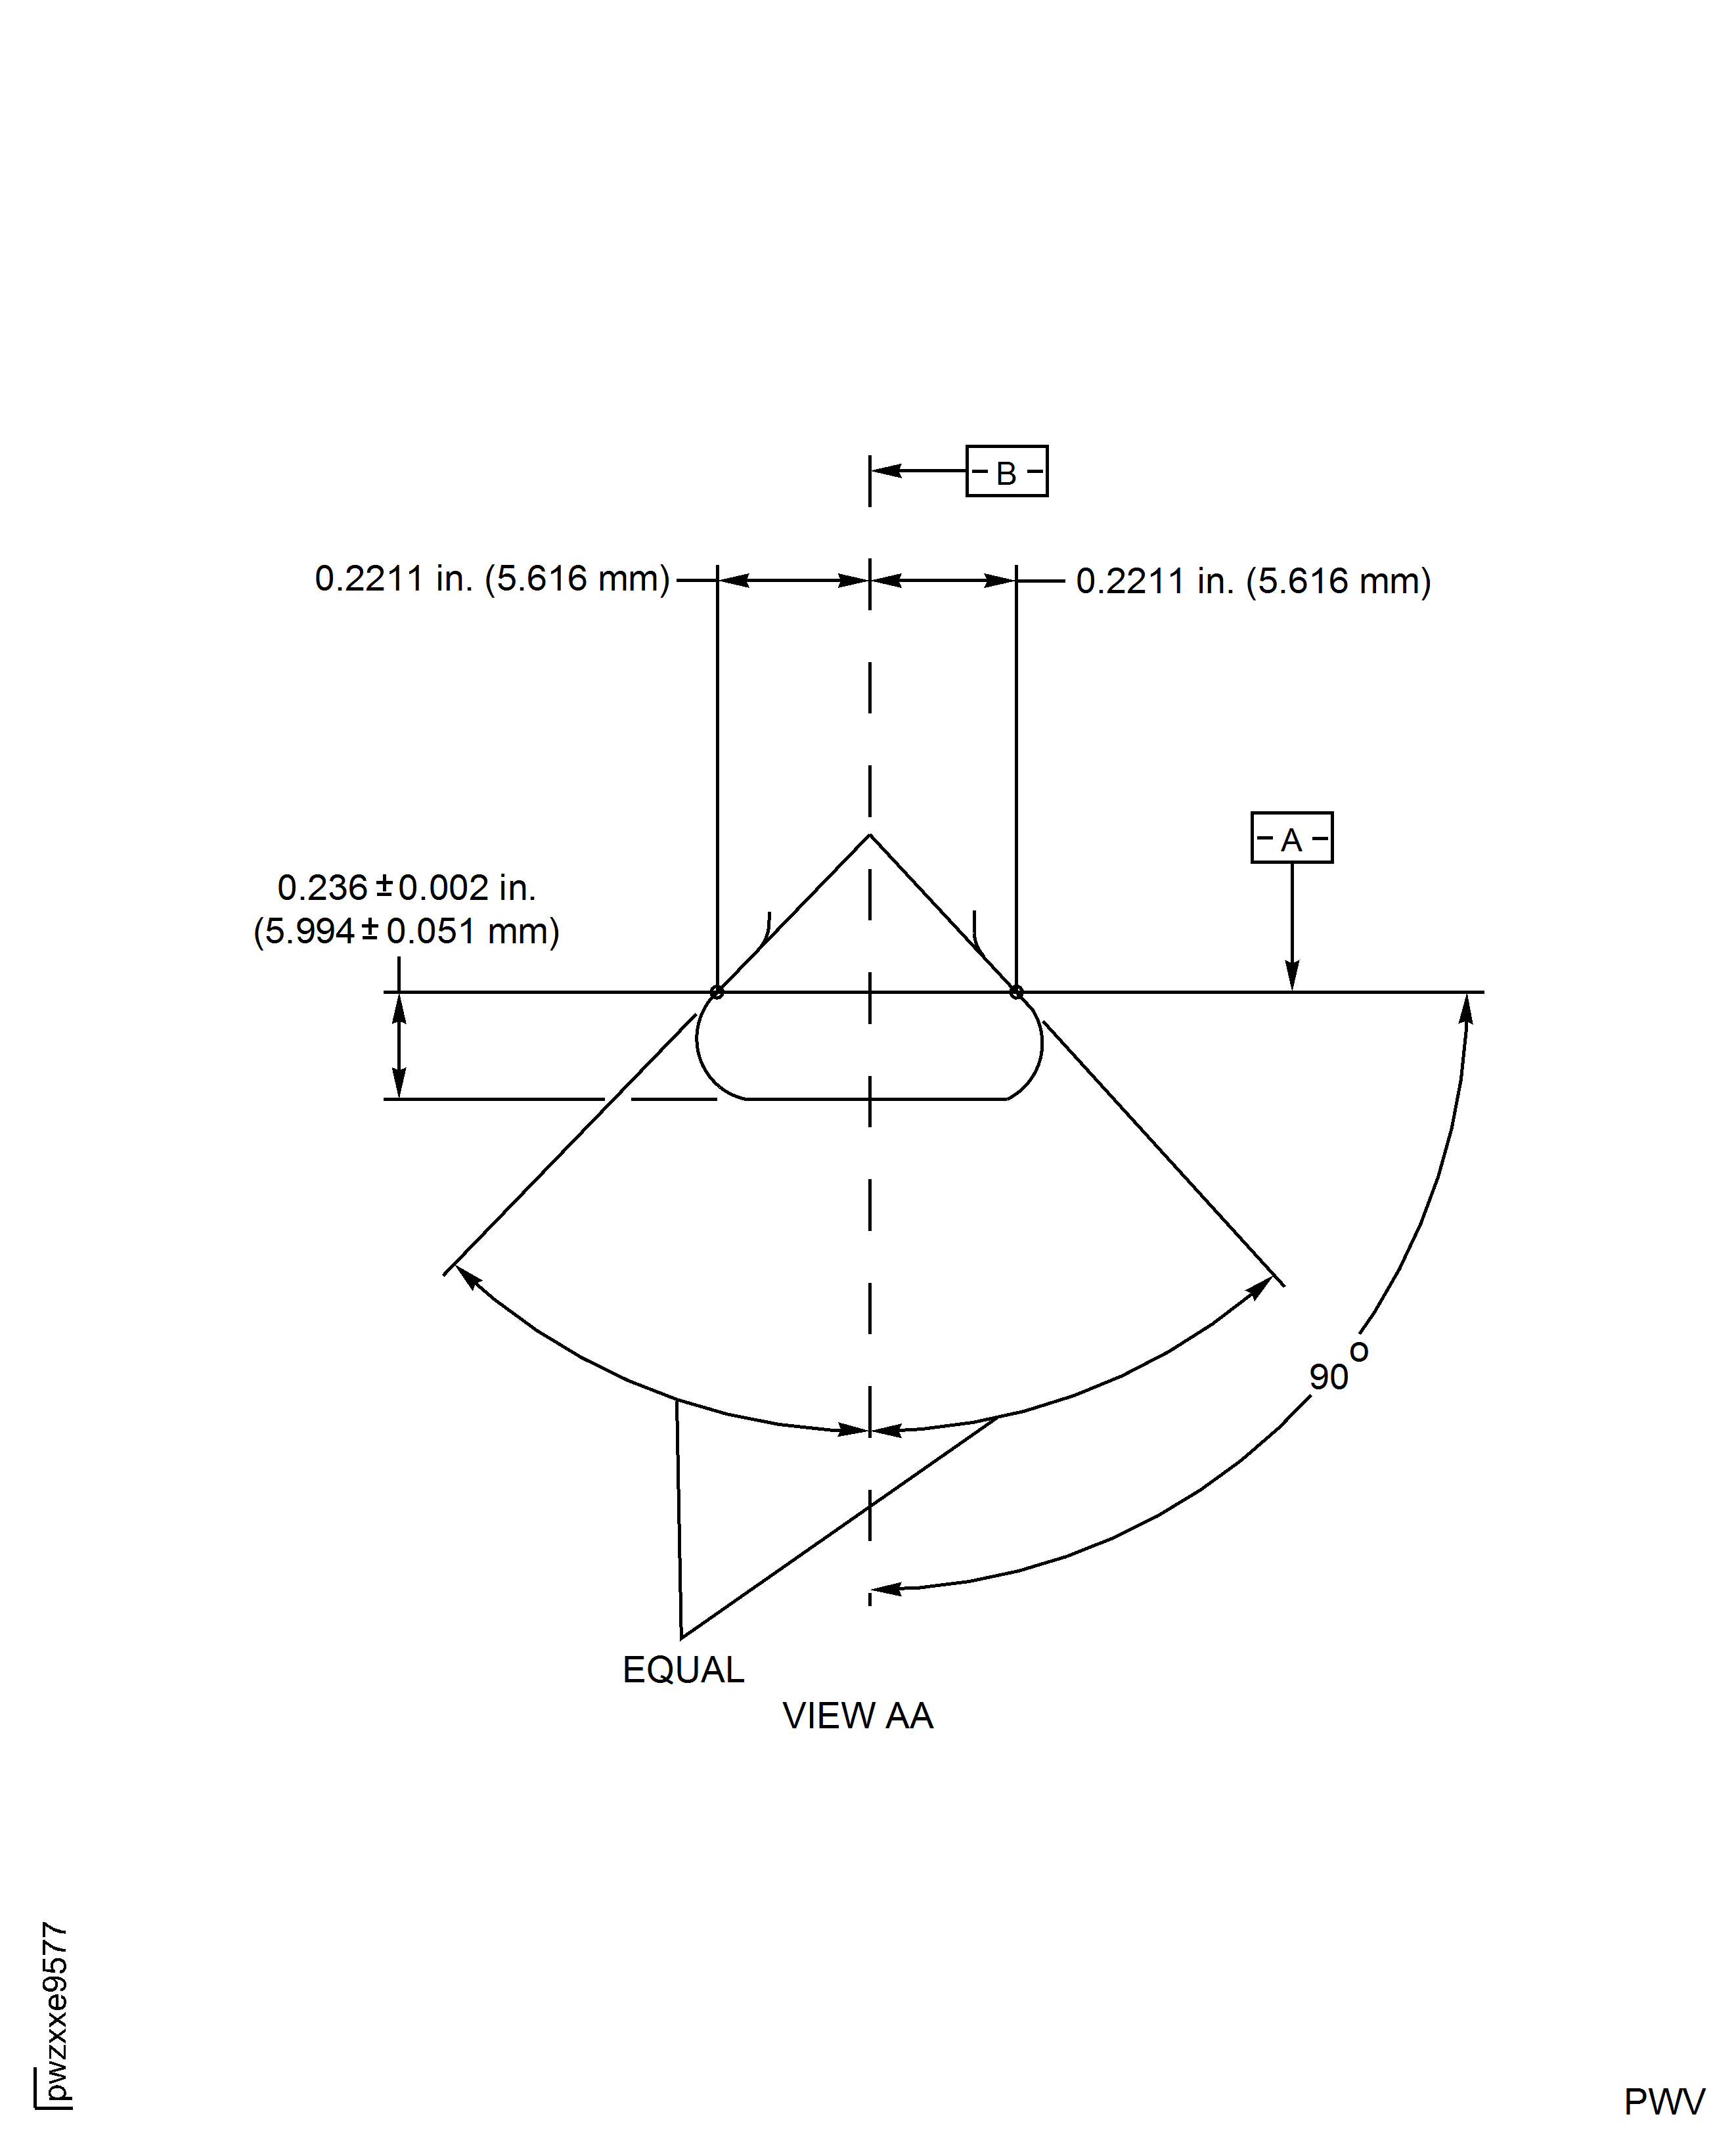
Figure: HP Compressor Stage 4 Rotor Blade (Assembly B) - Repair Details and Dimensions
HP Compressor Stage 4 Rotor Blade (Assembly B) - Repair Details and Dimensions
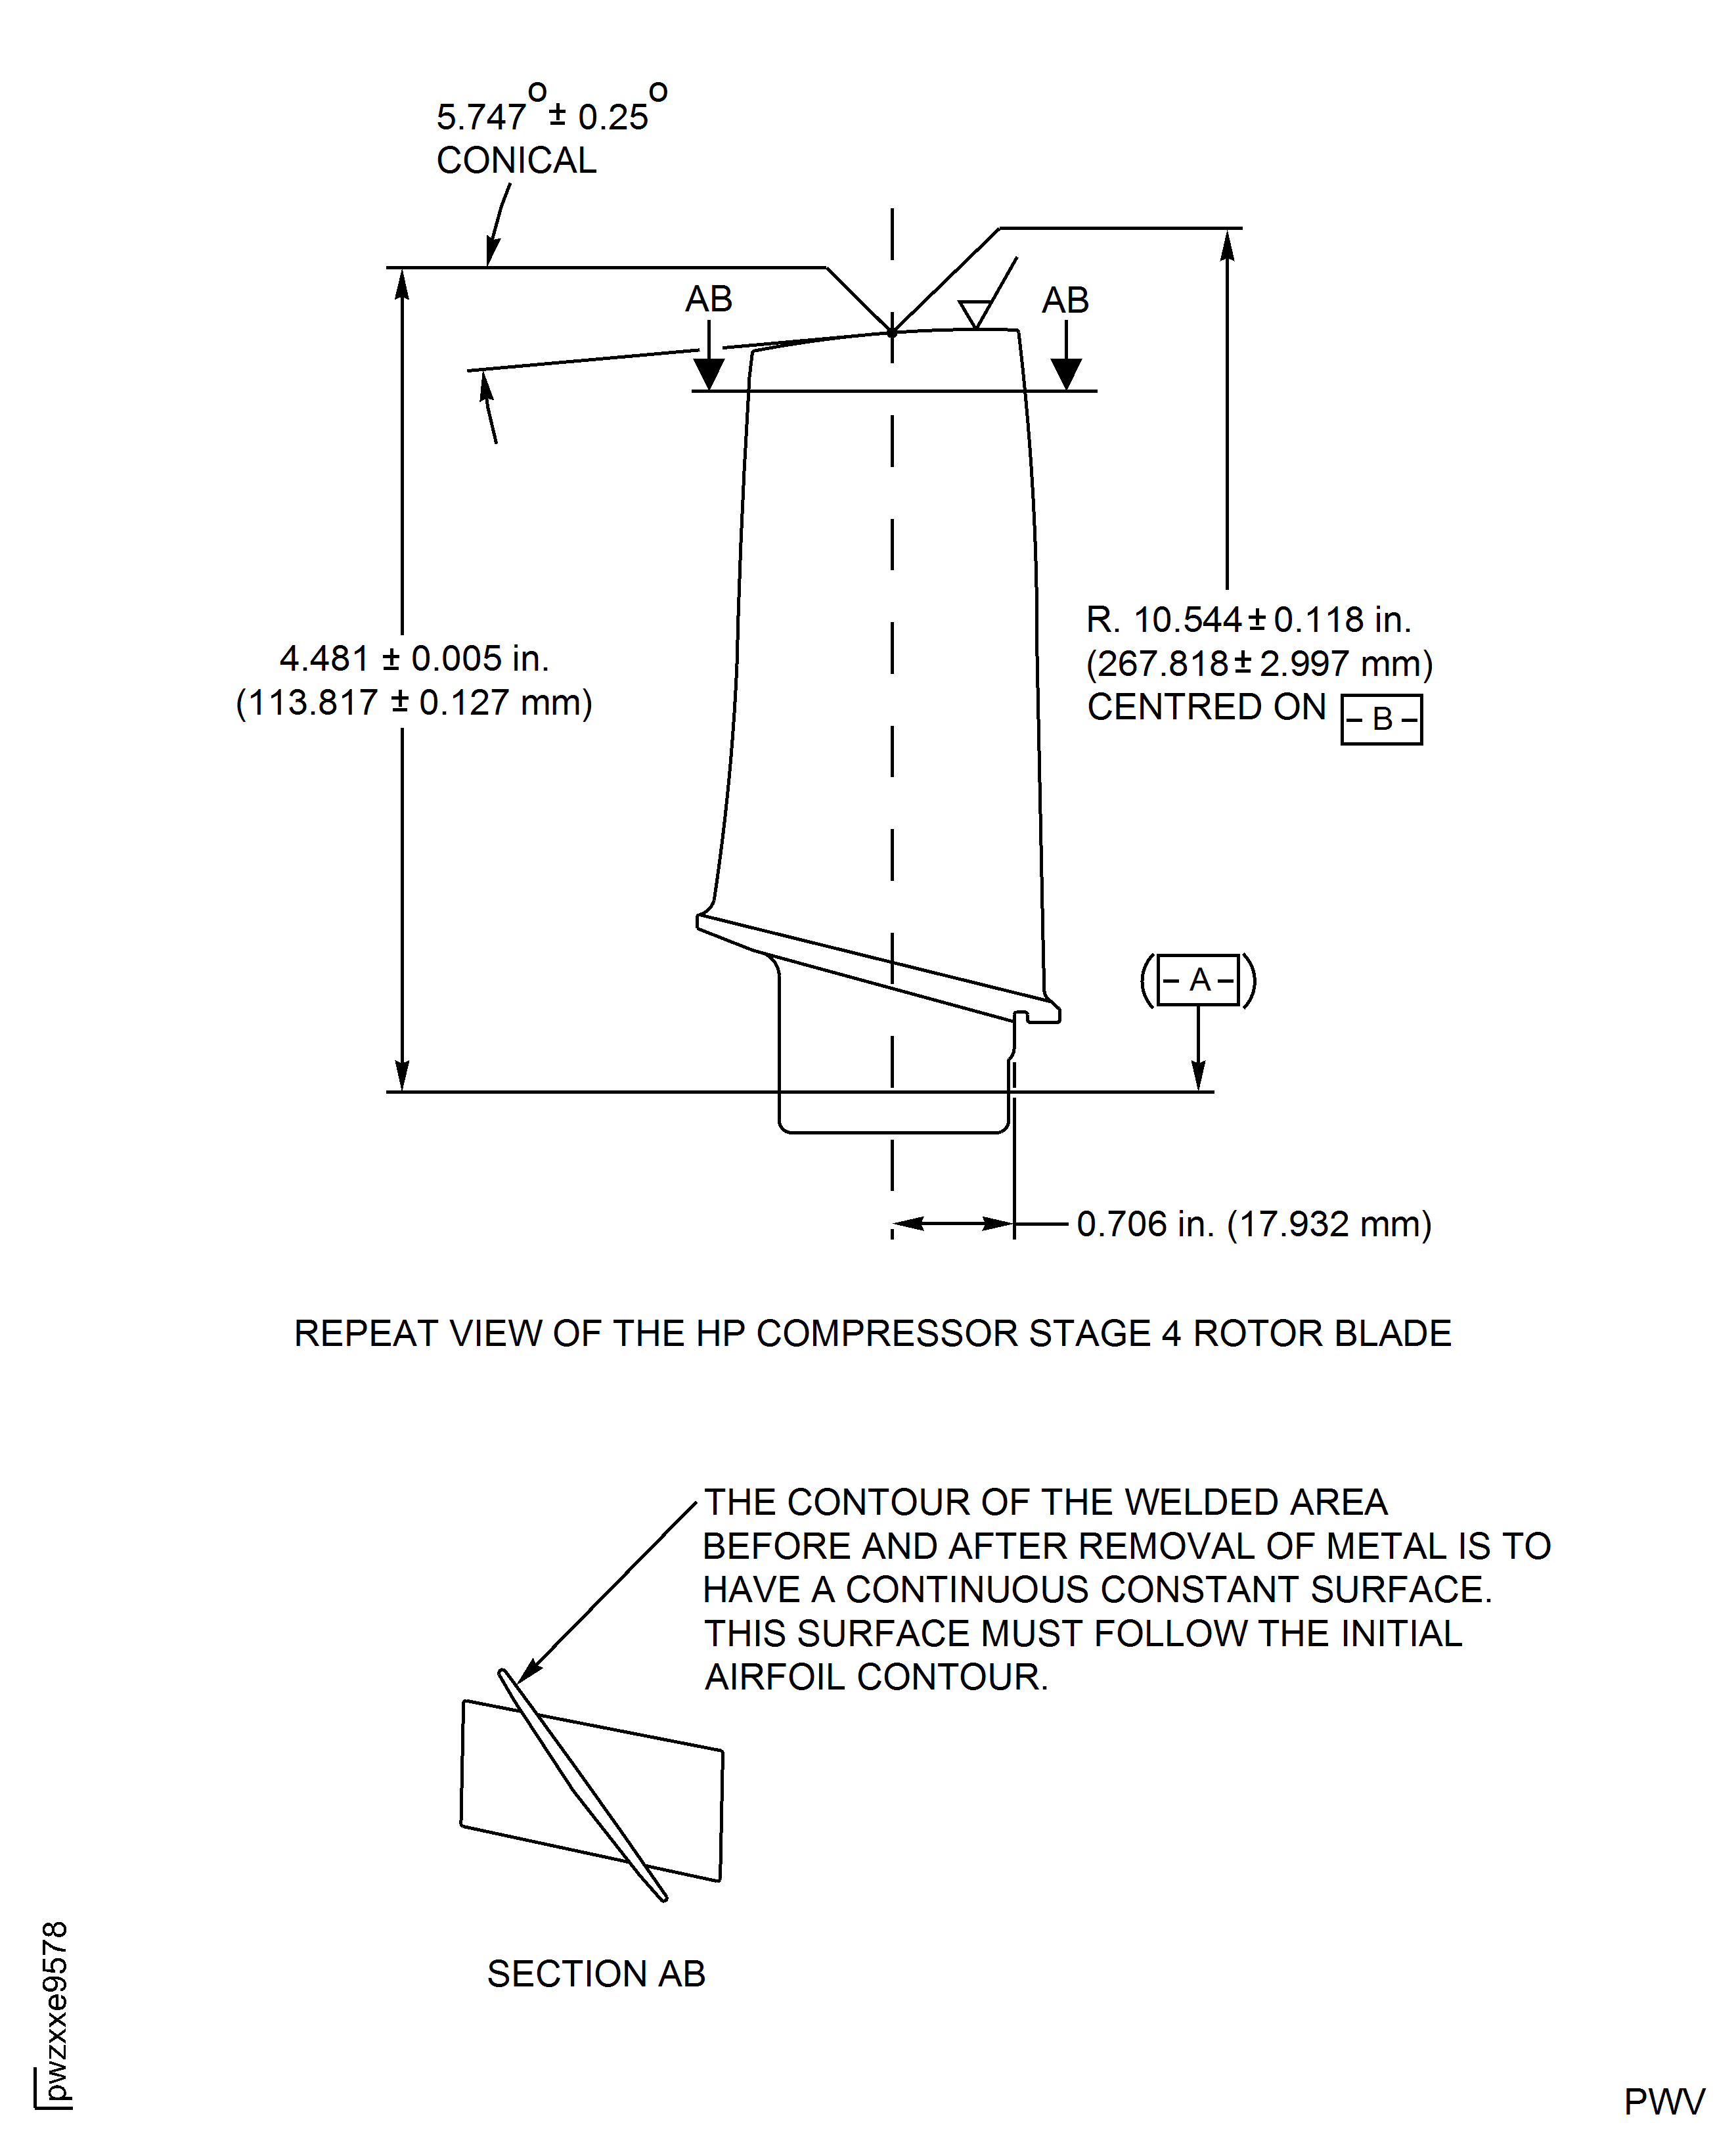
Figure: HP Compressor Stage 5 Rotor Blade (Assembly C) - Repair Details and Dimensions
HP Compressor Stage 5 Rotor Blade (Assembly C) - Repair Details and Dimensions
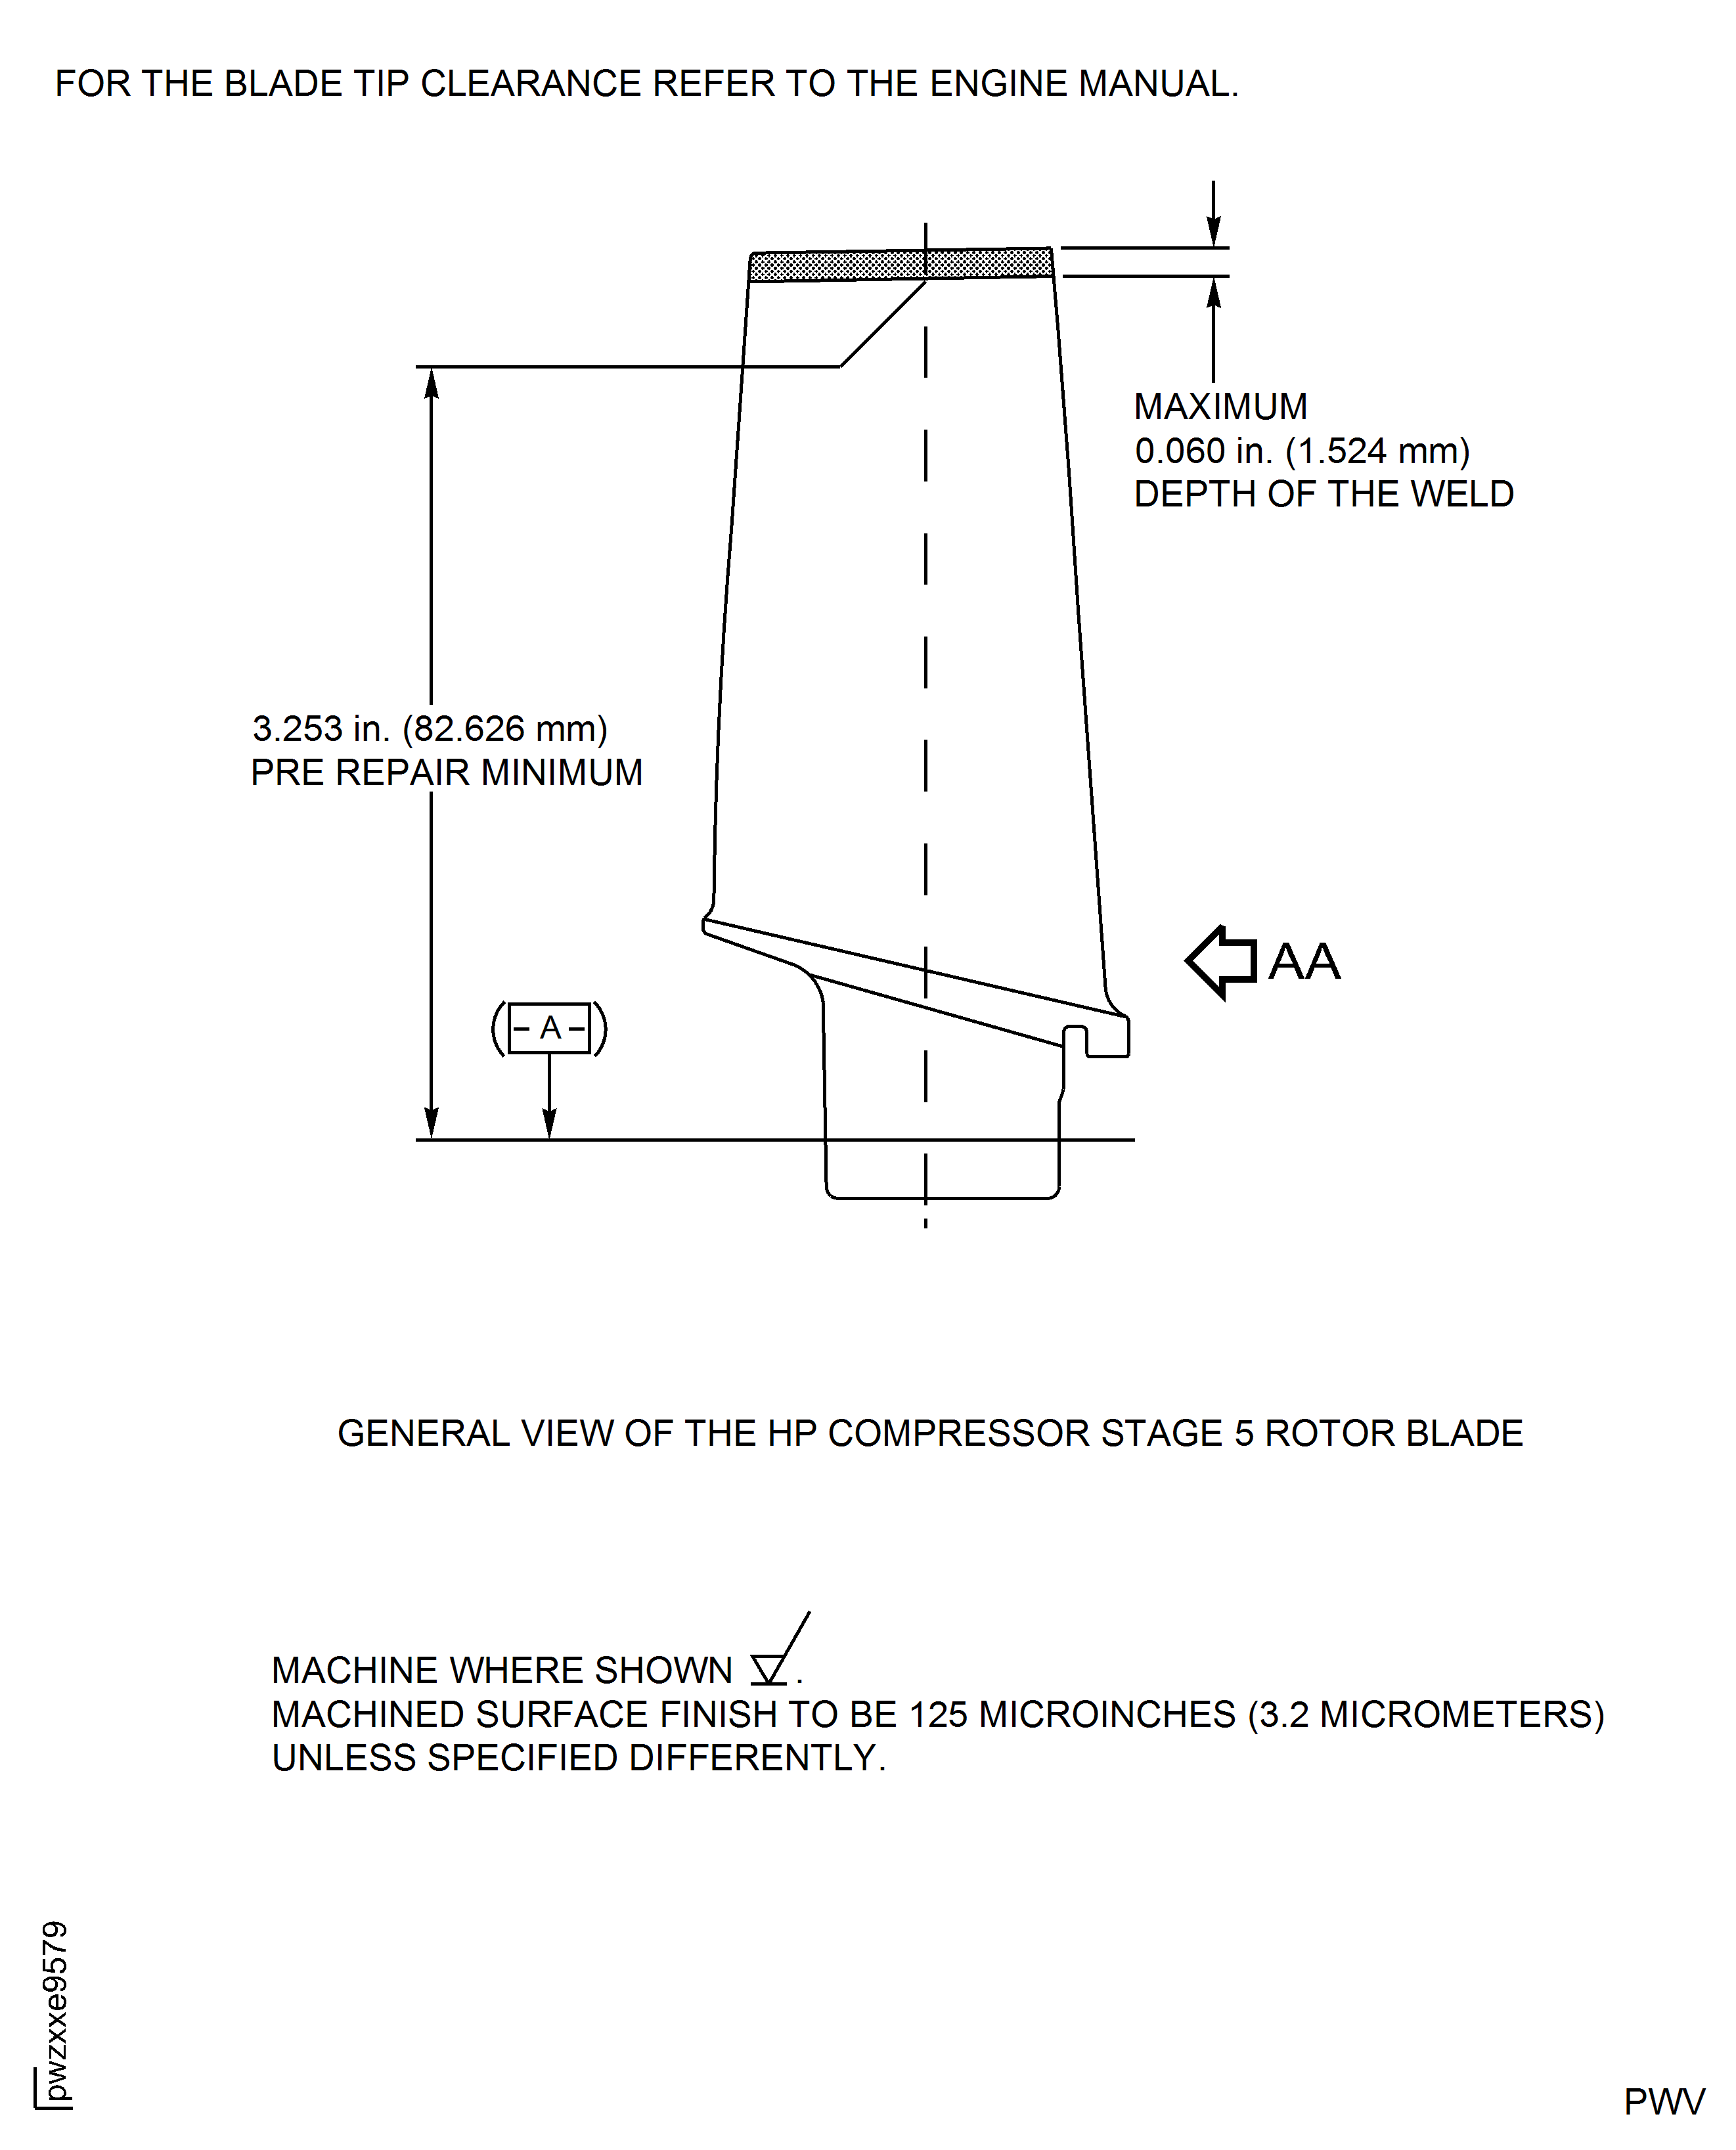
Figure: HP Compressor Stage 5 Rotor Blade (Assembly C) - Repair Details and Dimensions
HP Compressor Stage 5 Rotor Blade (Assembly C) - Repair Details and Dimensions
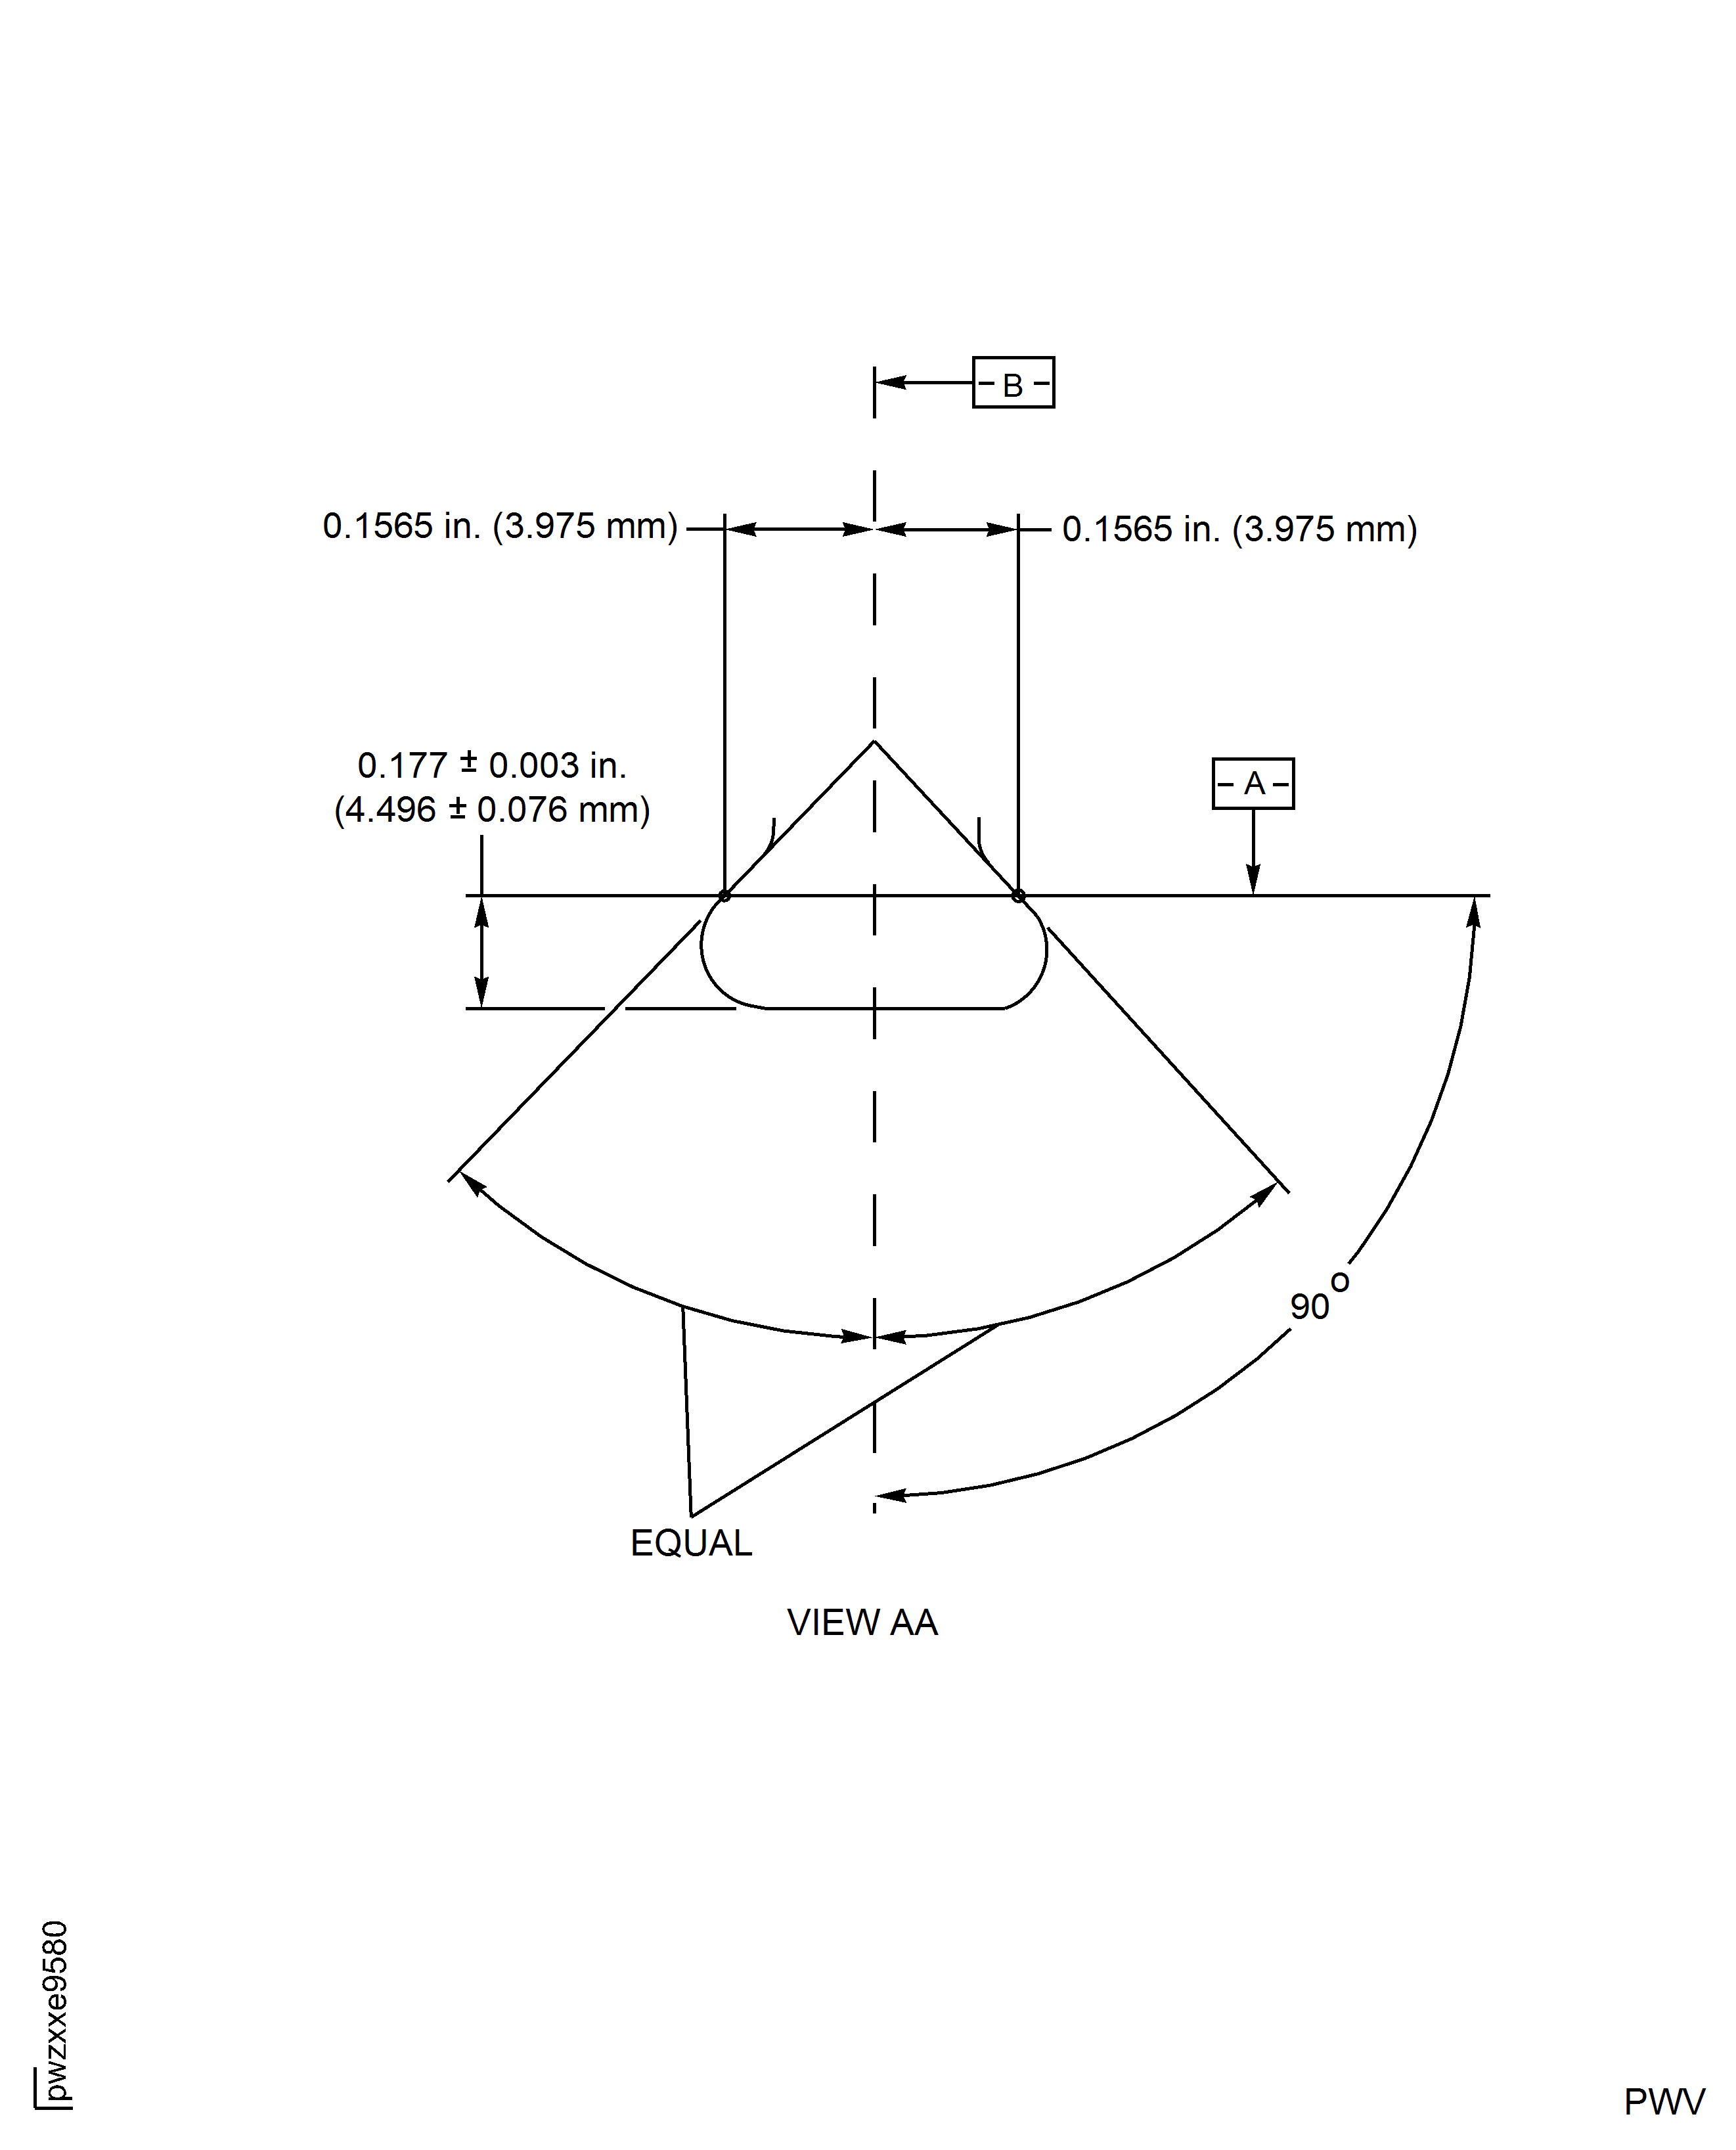
Figure: HP Compressor Stage 5 Rotor Blade (Assembly C) - Repair Details and Dimensions
HP Compressor Stage 5 Rotor Blade (Assembly C) - Repair Details and Dimensions
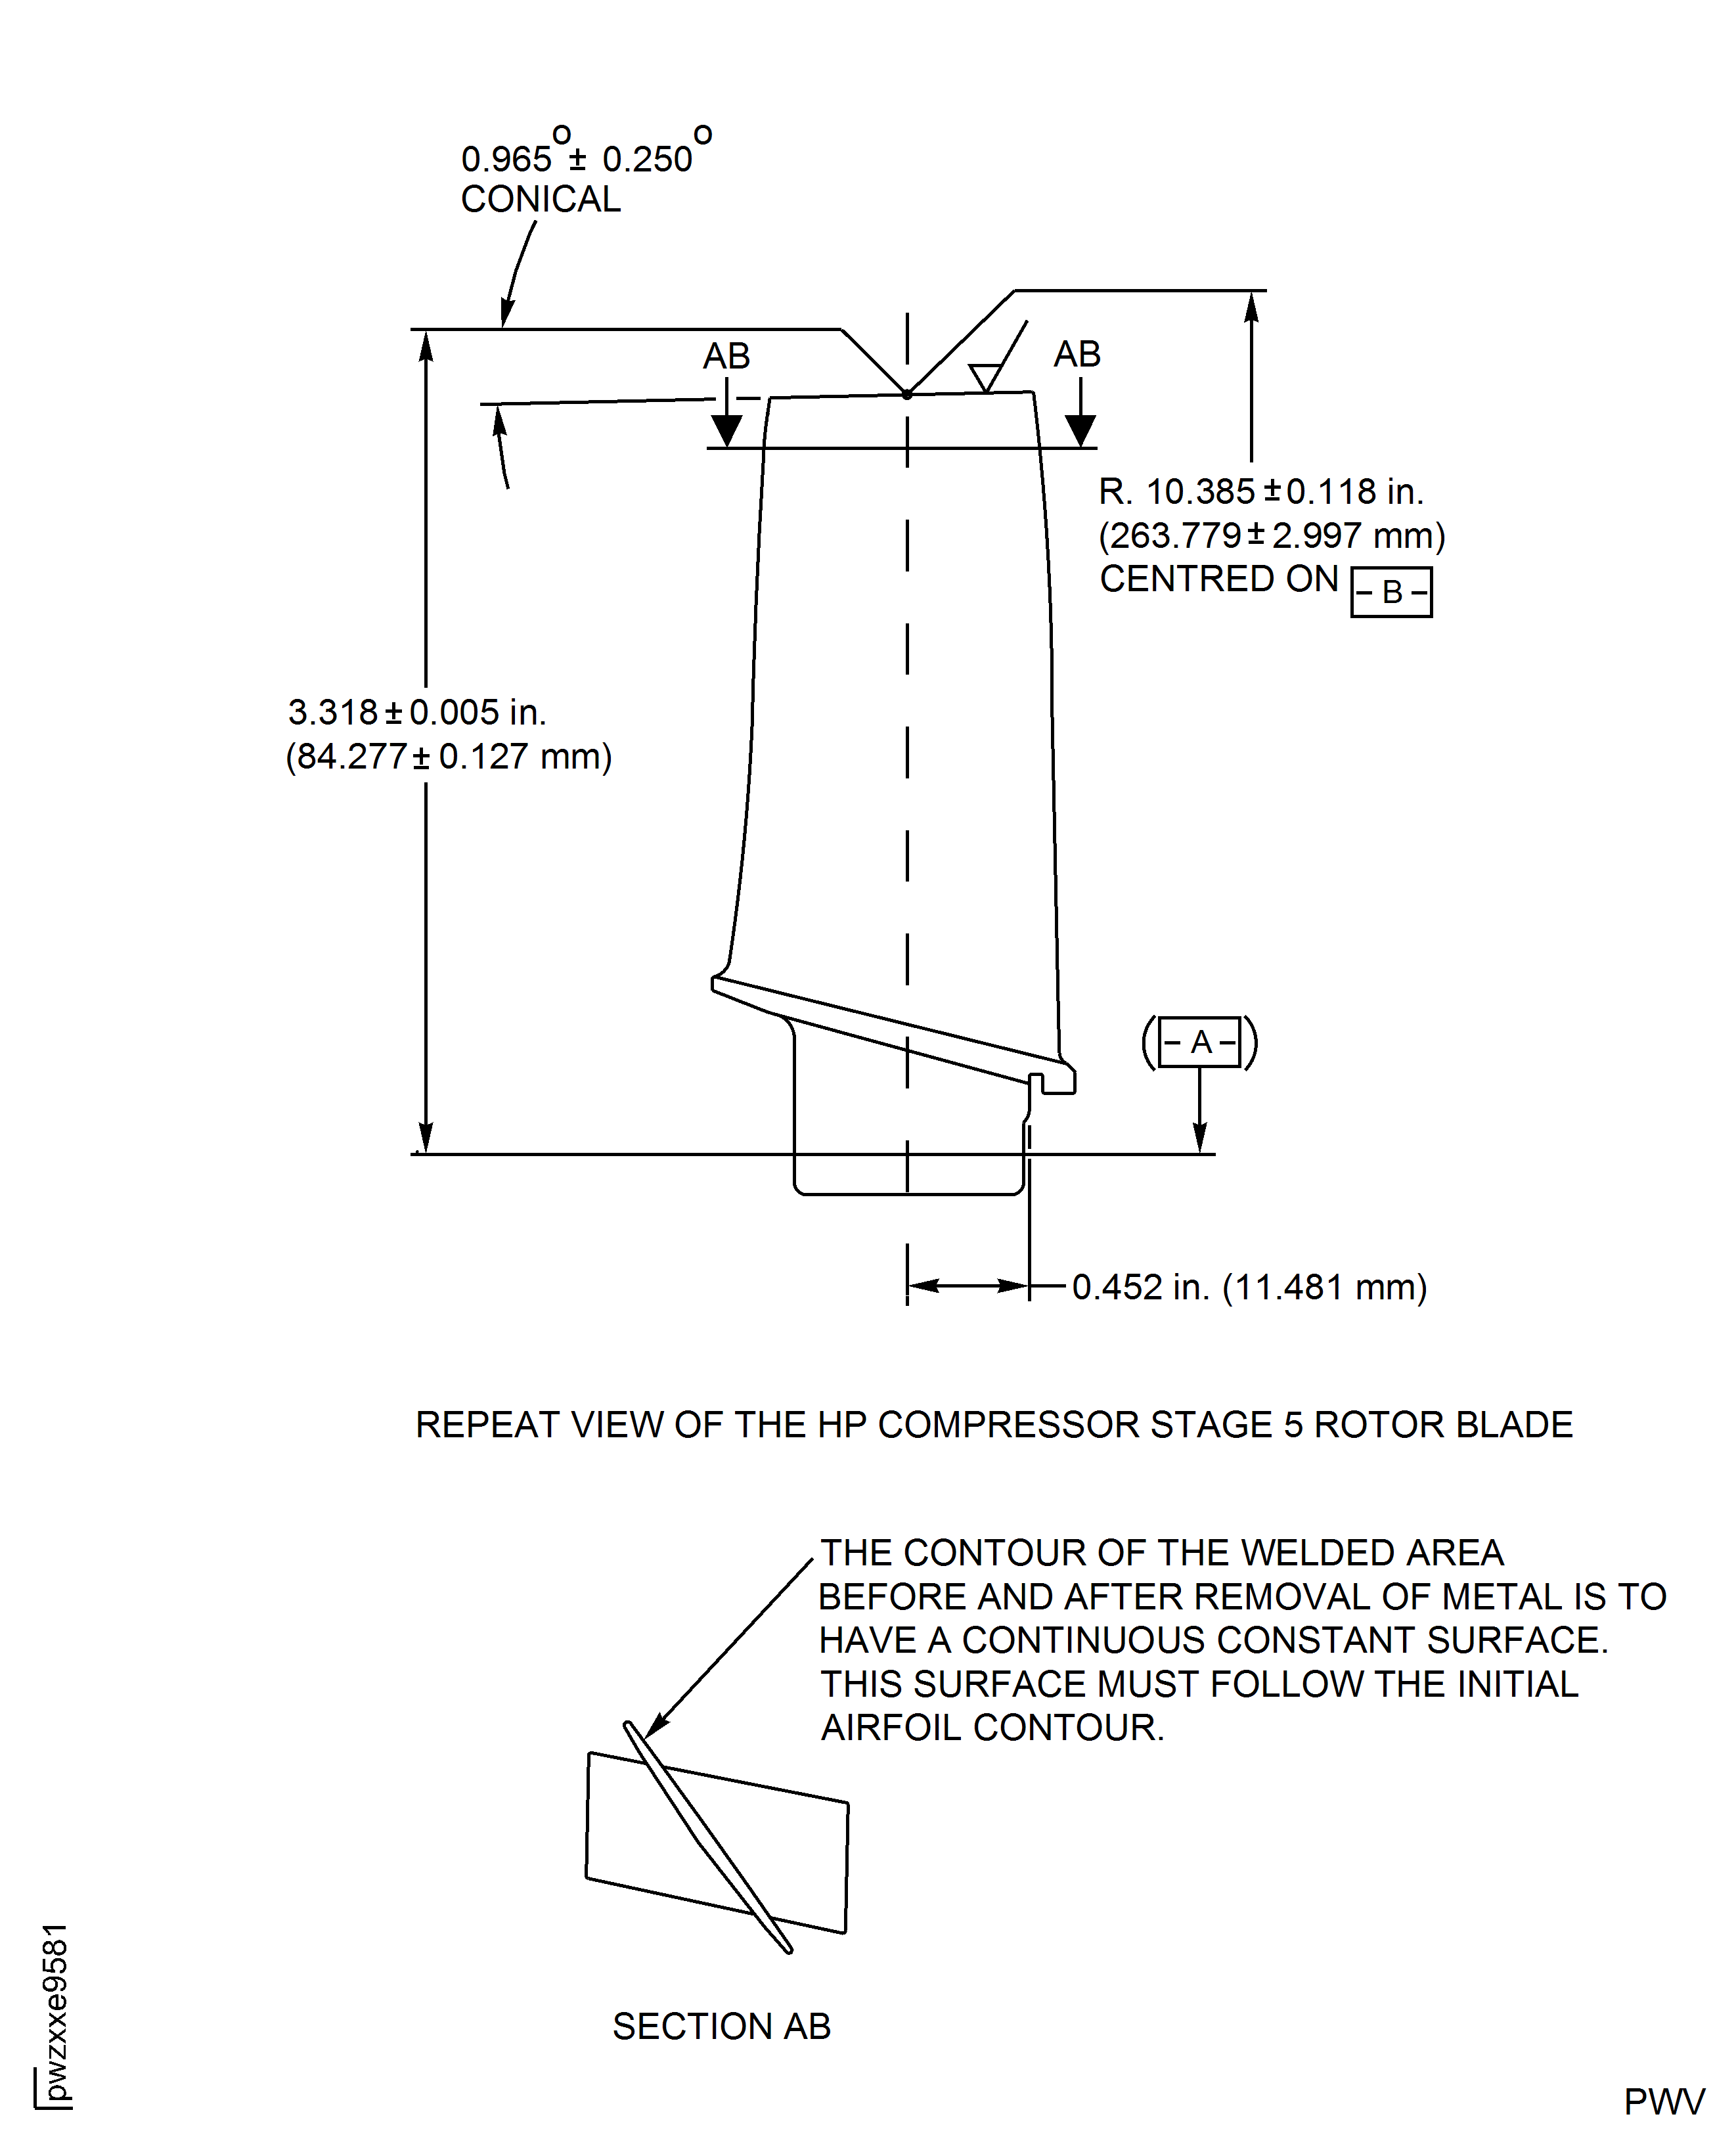
Figure: HP Compressor Stage 6 Rotor Blade (Assembly D) - Repair Details and Dimensions
HP Compressor Stage 6 Rotor Blade (Assembly D) - Repair Details and Dimensions
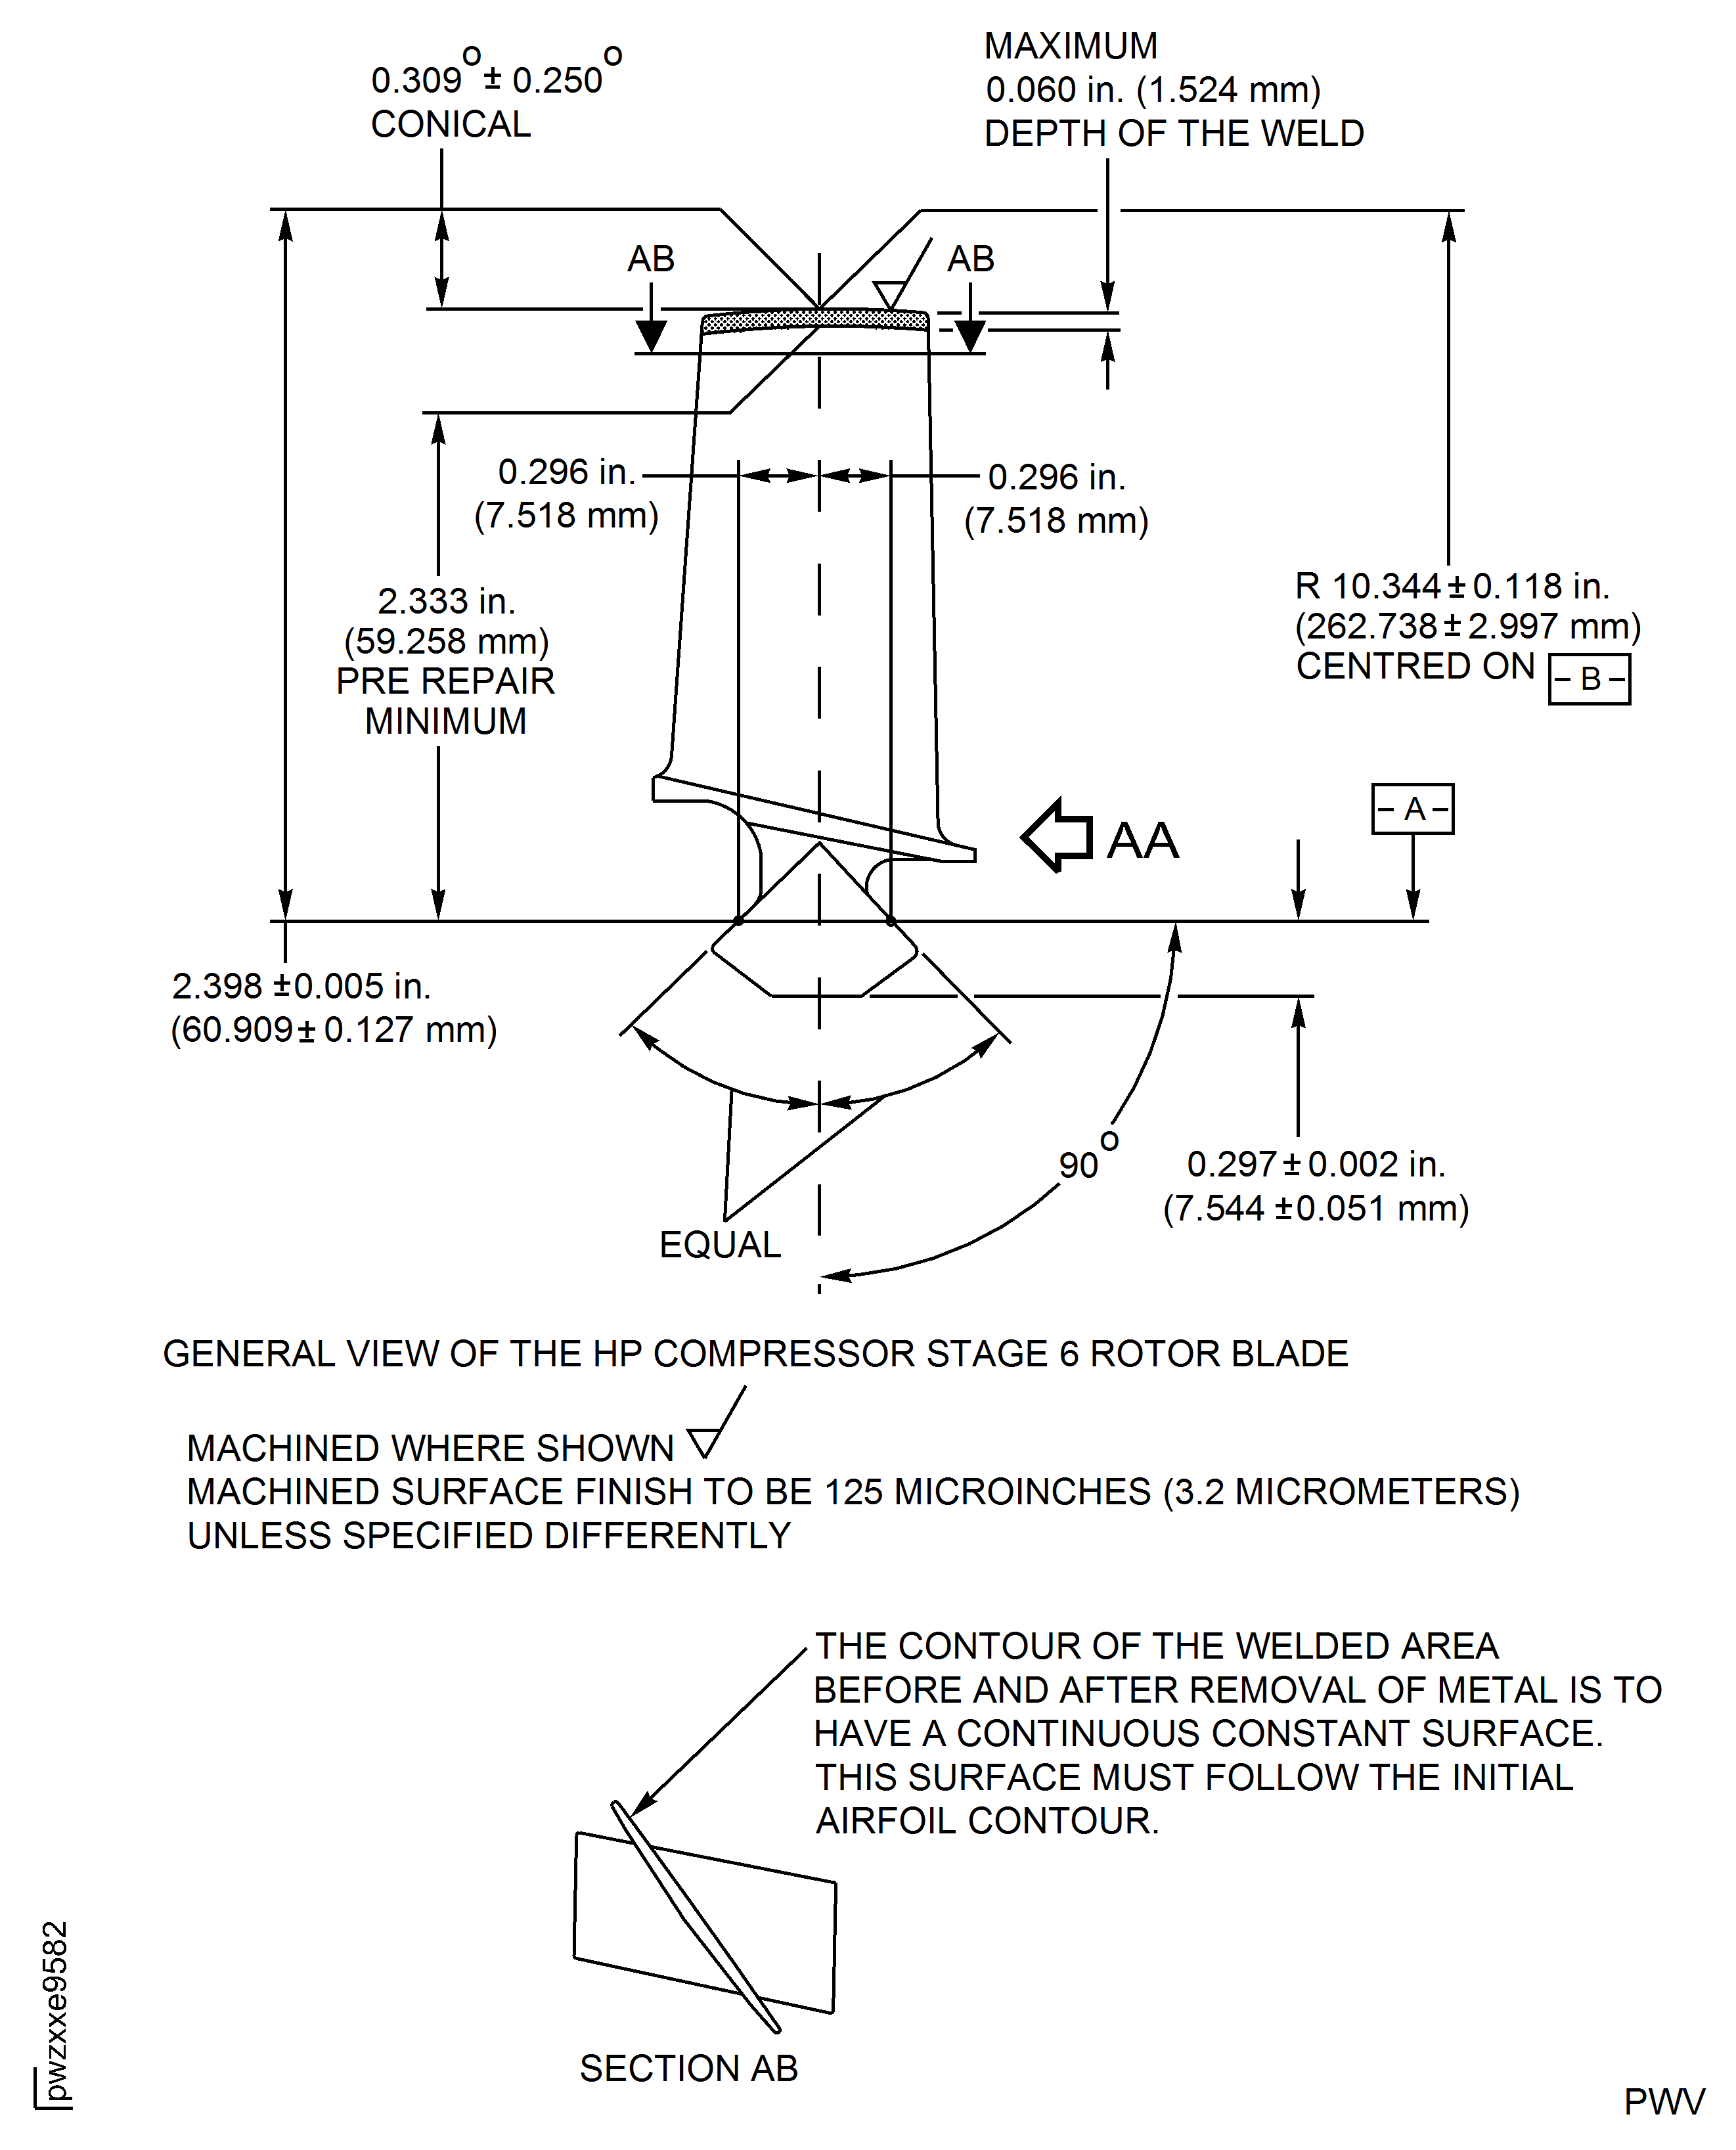
Figure: HP Compressor Stage 6 Rotor Blade (Assembly D) - Repair Details and Dimensions
HP Compressor Stage 6 Rotor Blade (Assembly D) - Repair Details and Dimensions
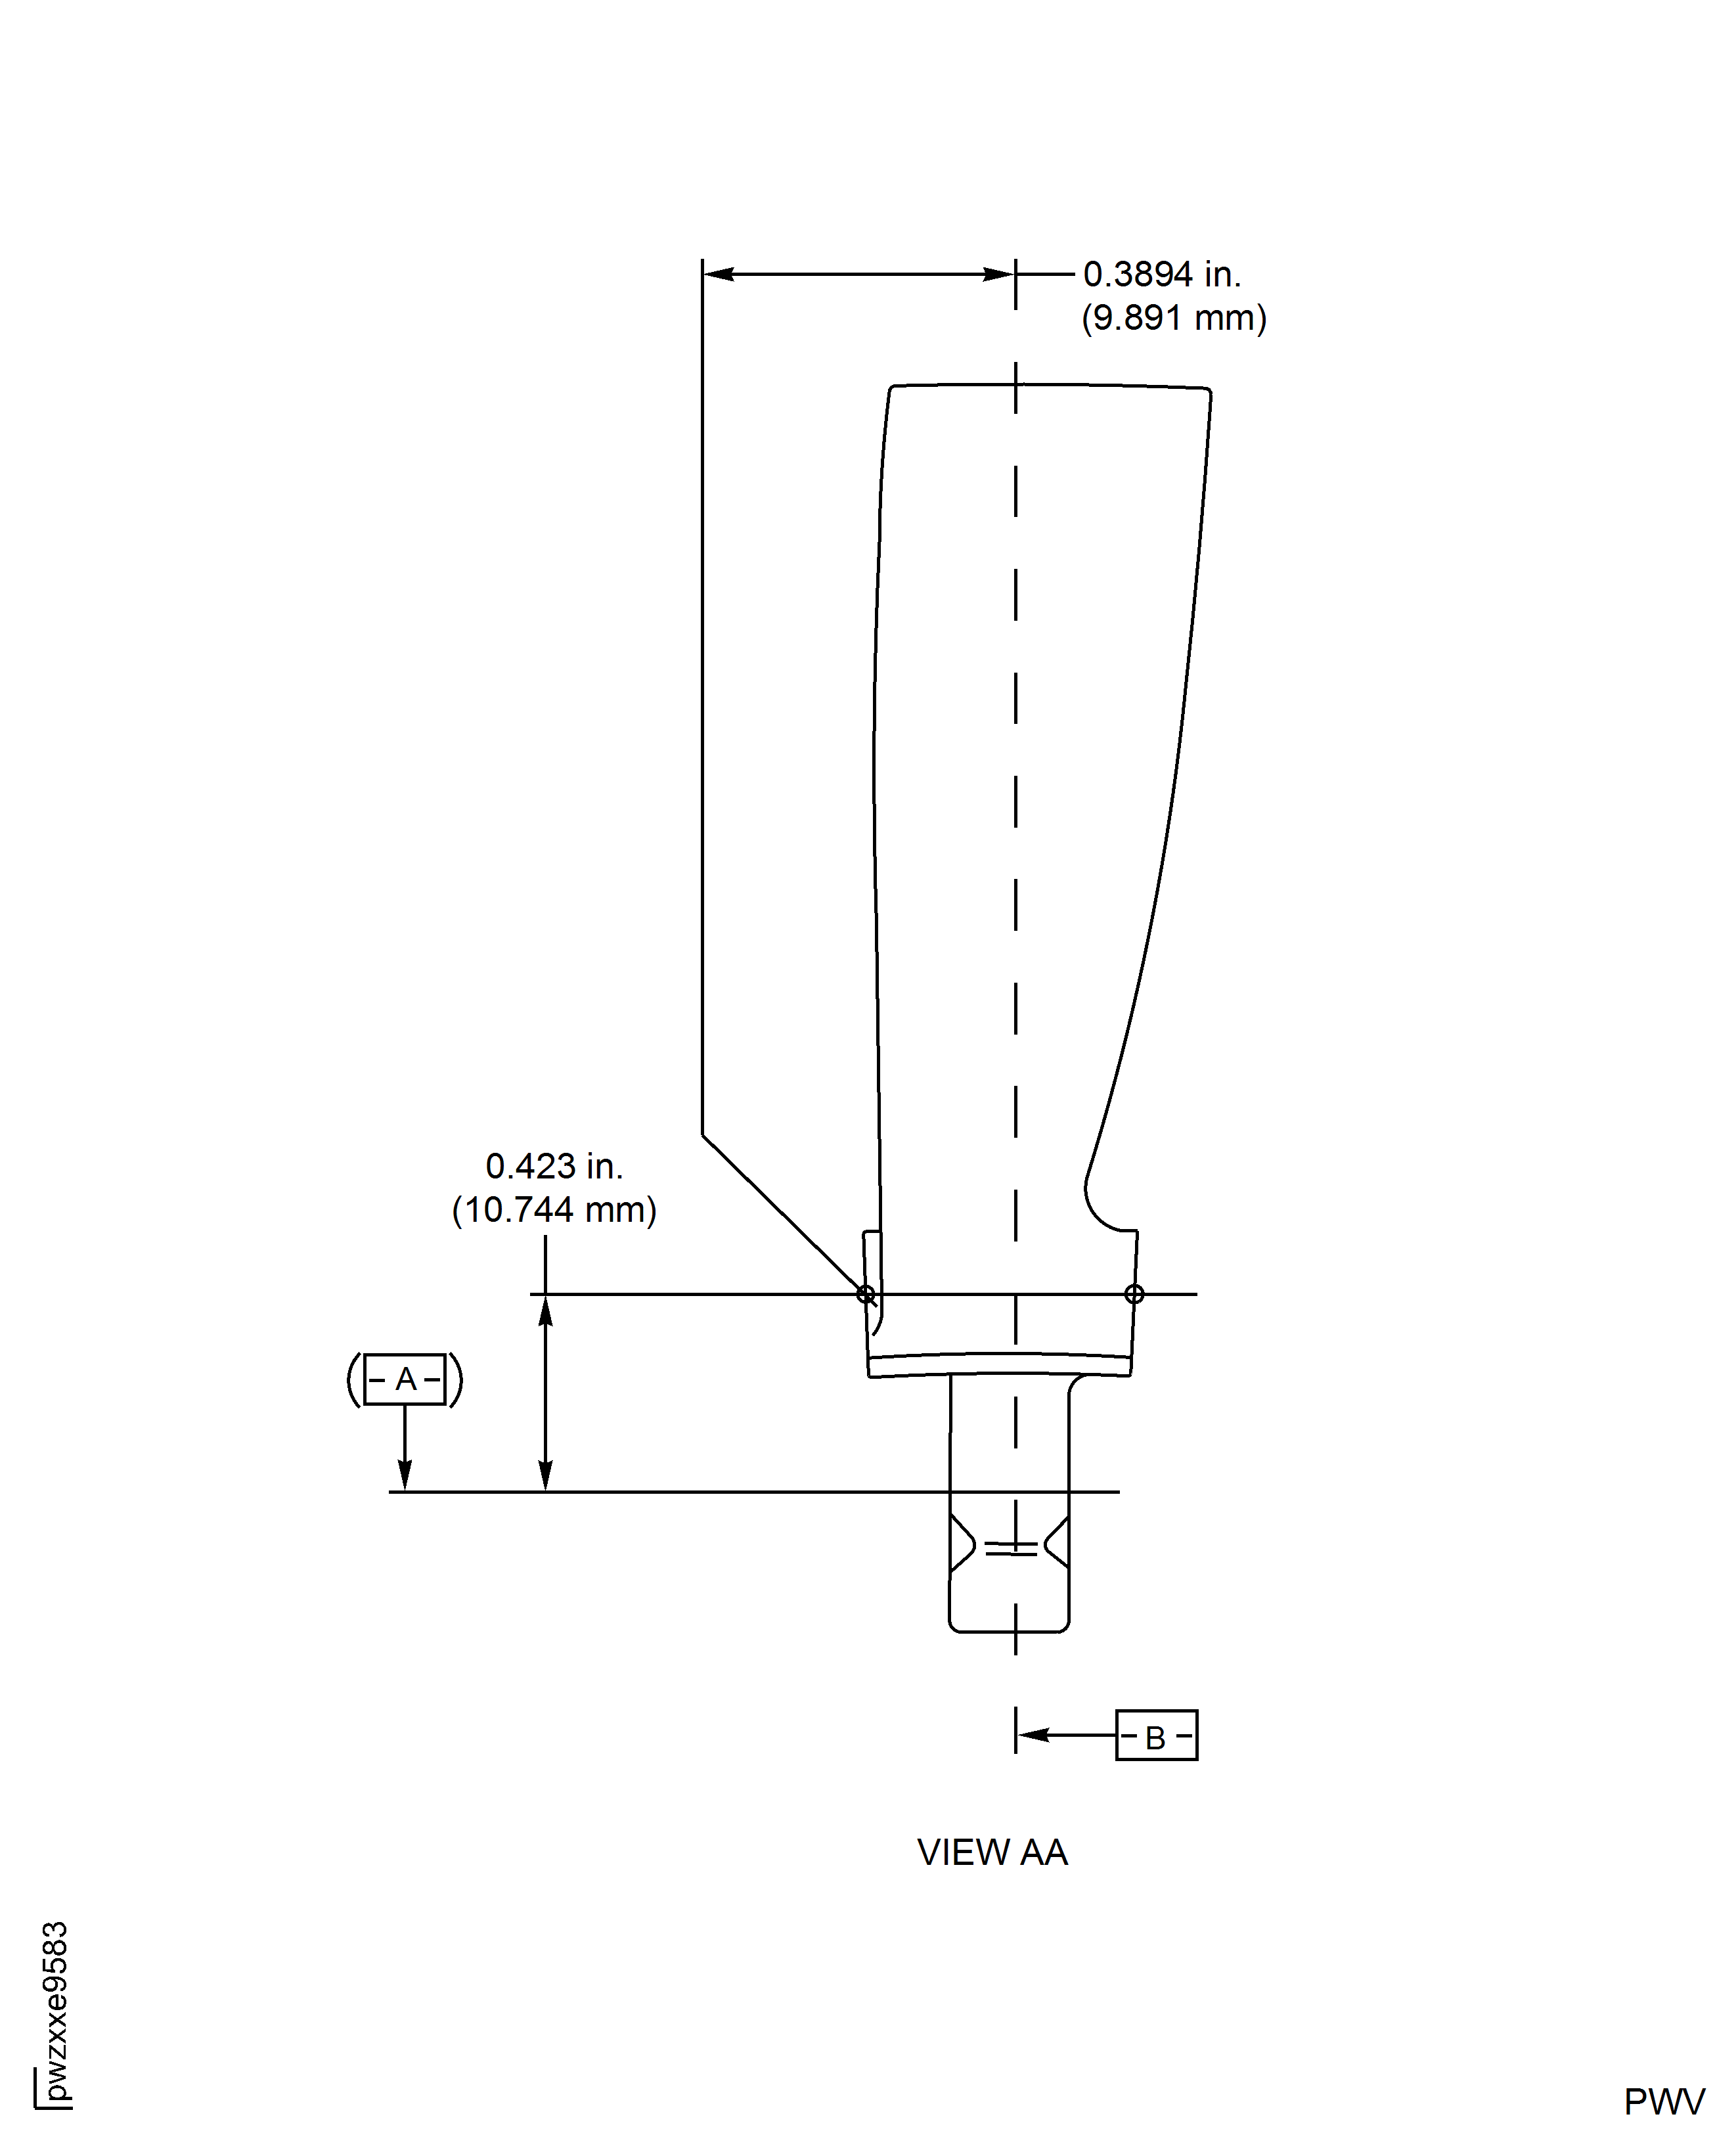
Figure: HP Compressor Stage 7 Rotor Blade (Assembly E) - Repair Details and Dimensions
HP Compressor Stage 7 Rotor Blade (Assembly E) - Repair Details and Dimensions
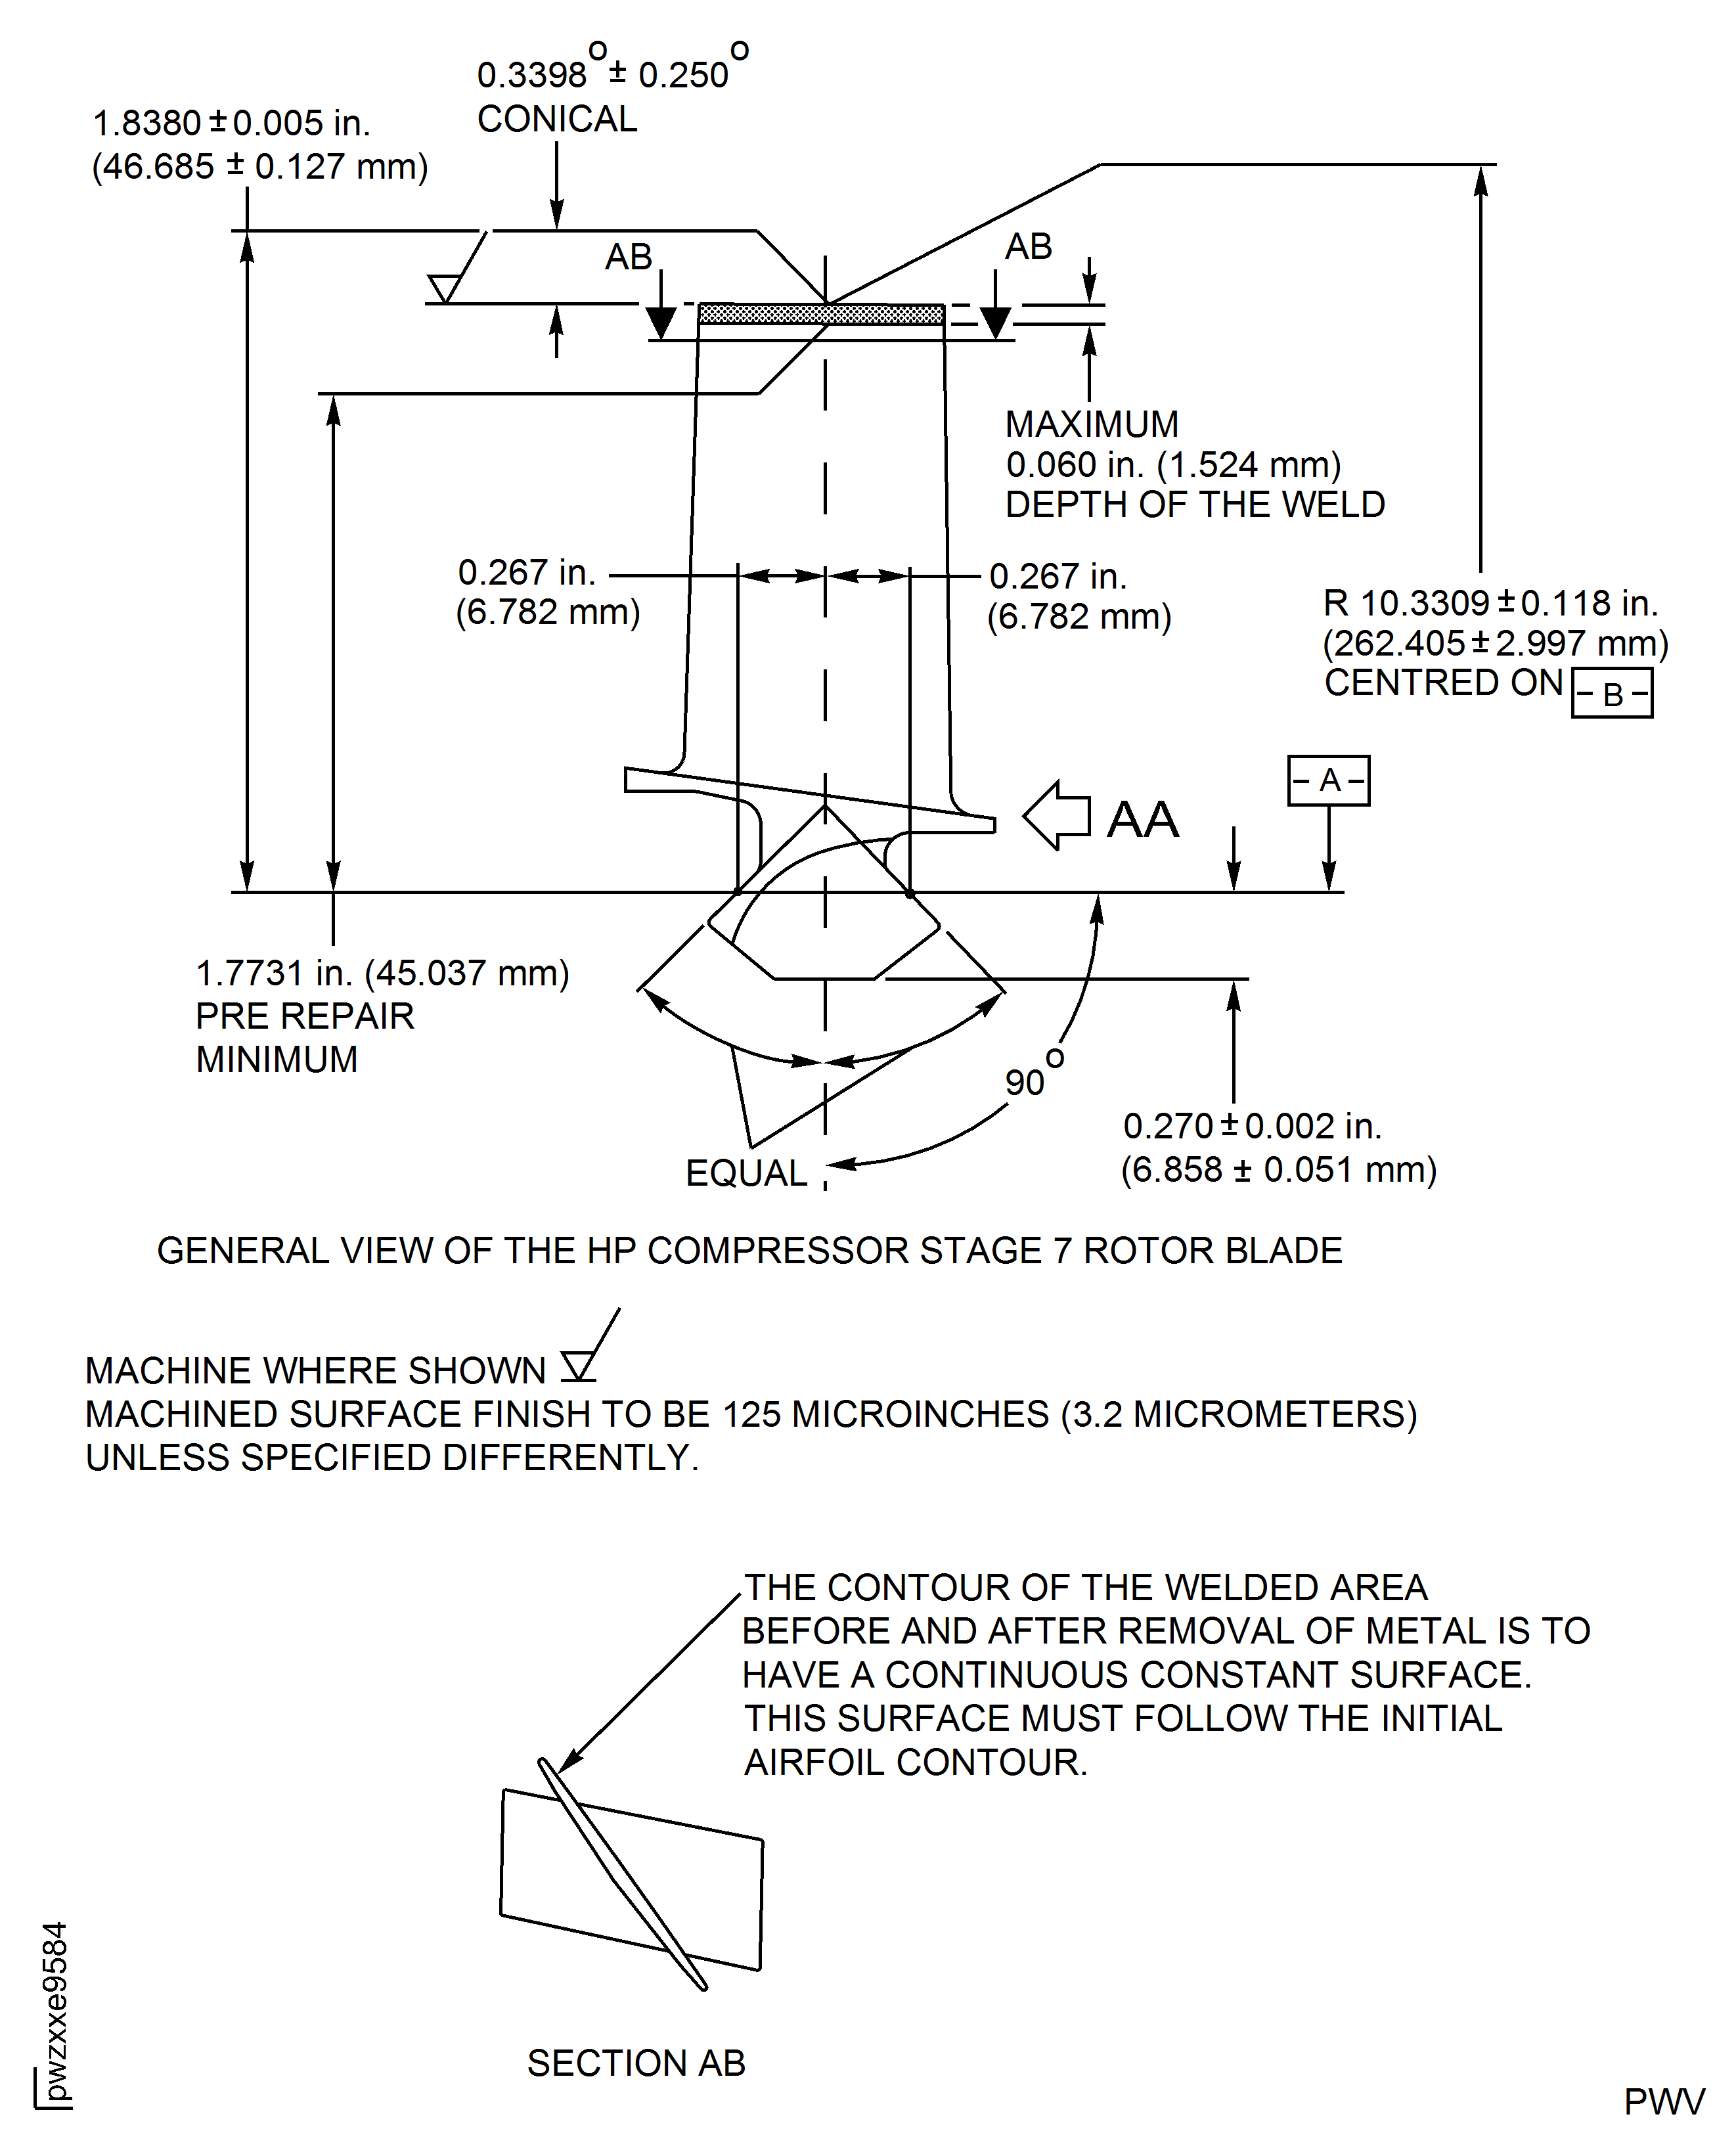
Figure: HP Compressor Stage 7 Rotor Blade (Assembly E) - Repair Details and Dimensions
HP Compressor Stage 7 Rotor Blade (Assembly E) - Repair Details and Dimensions
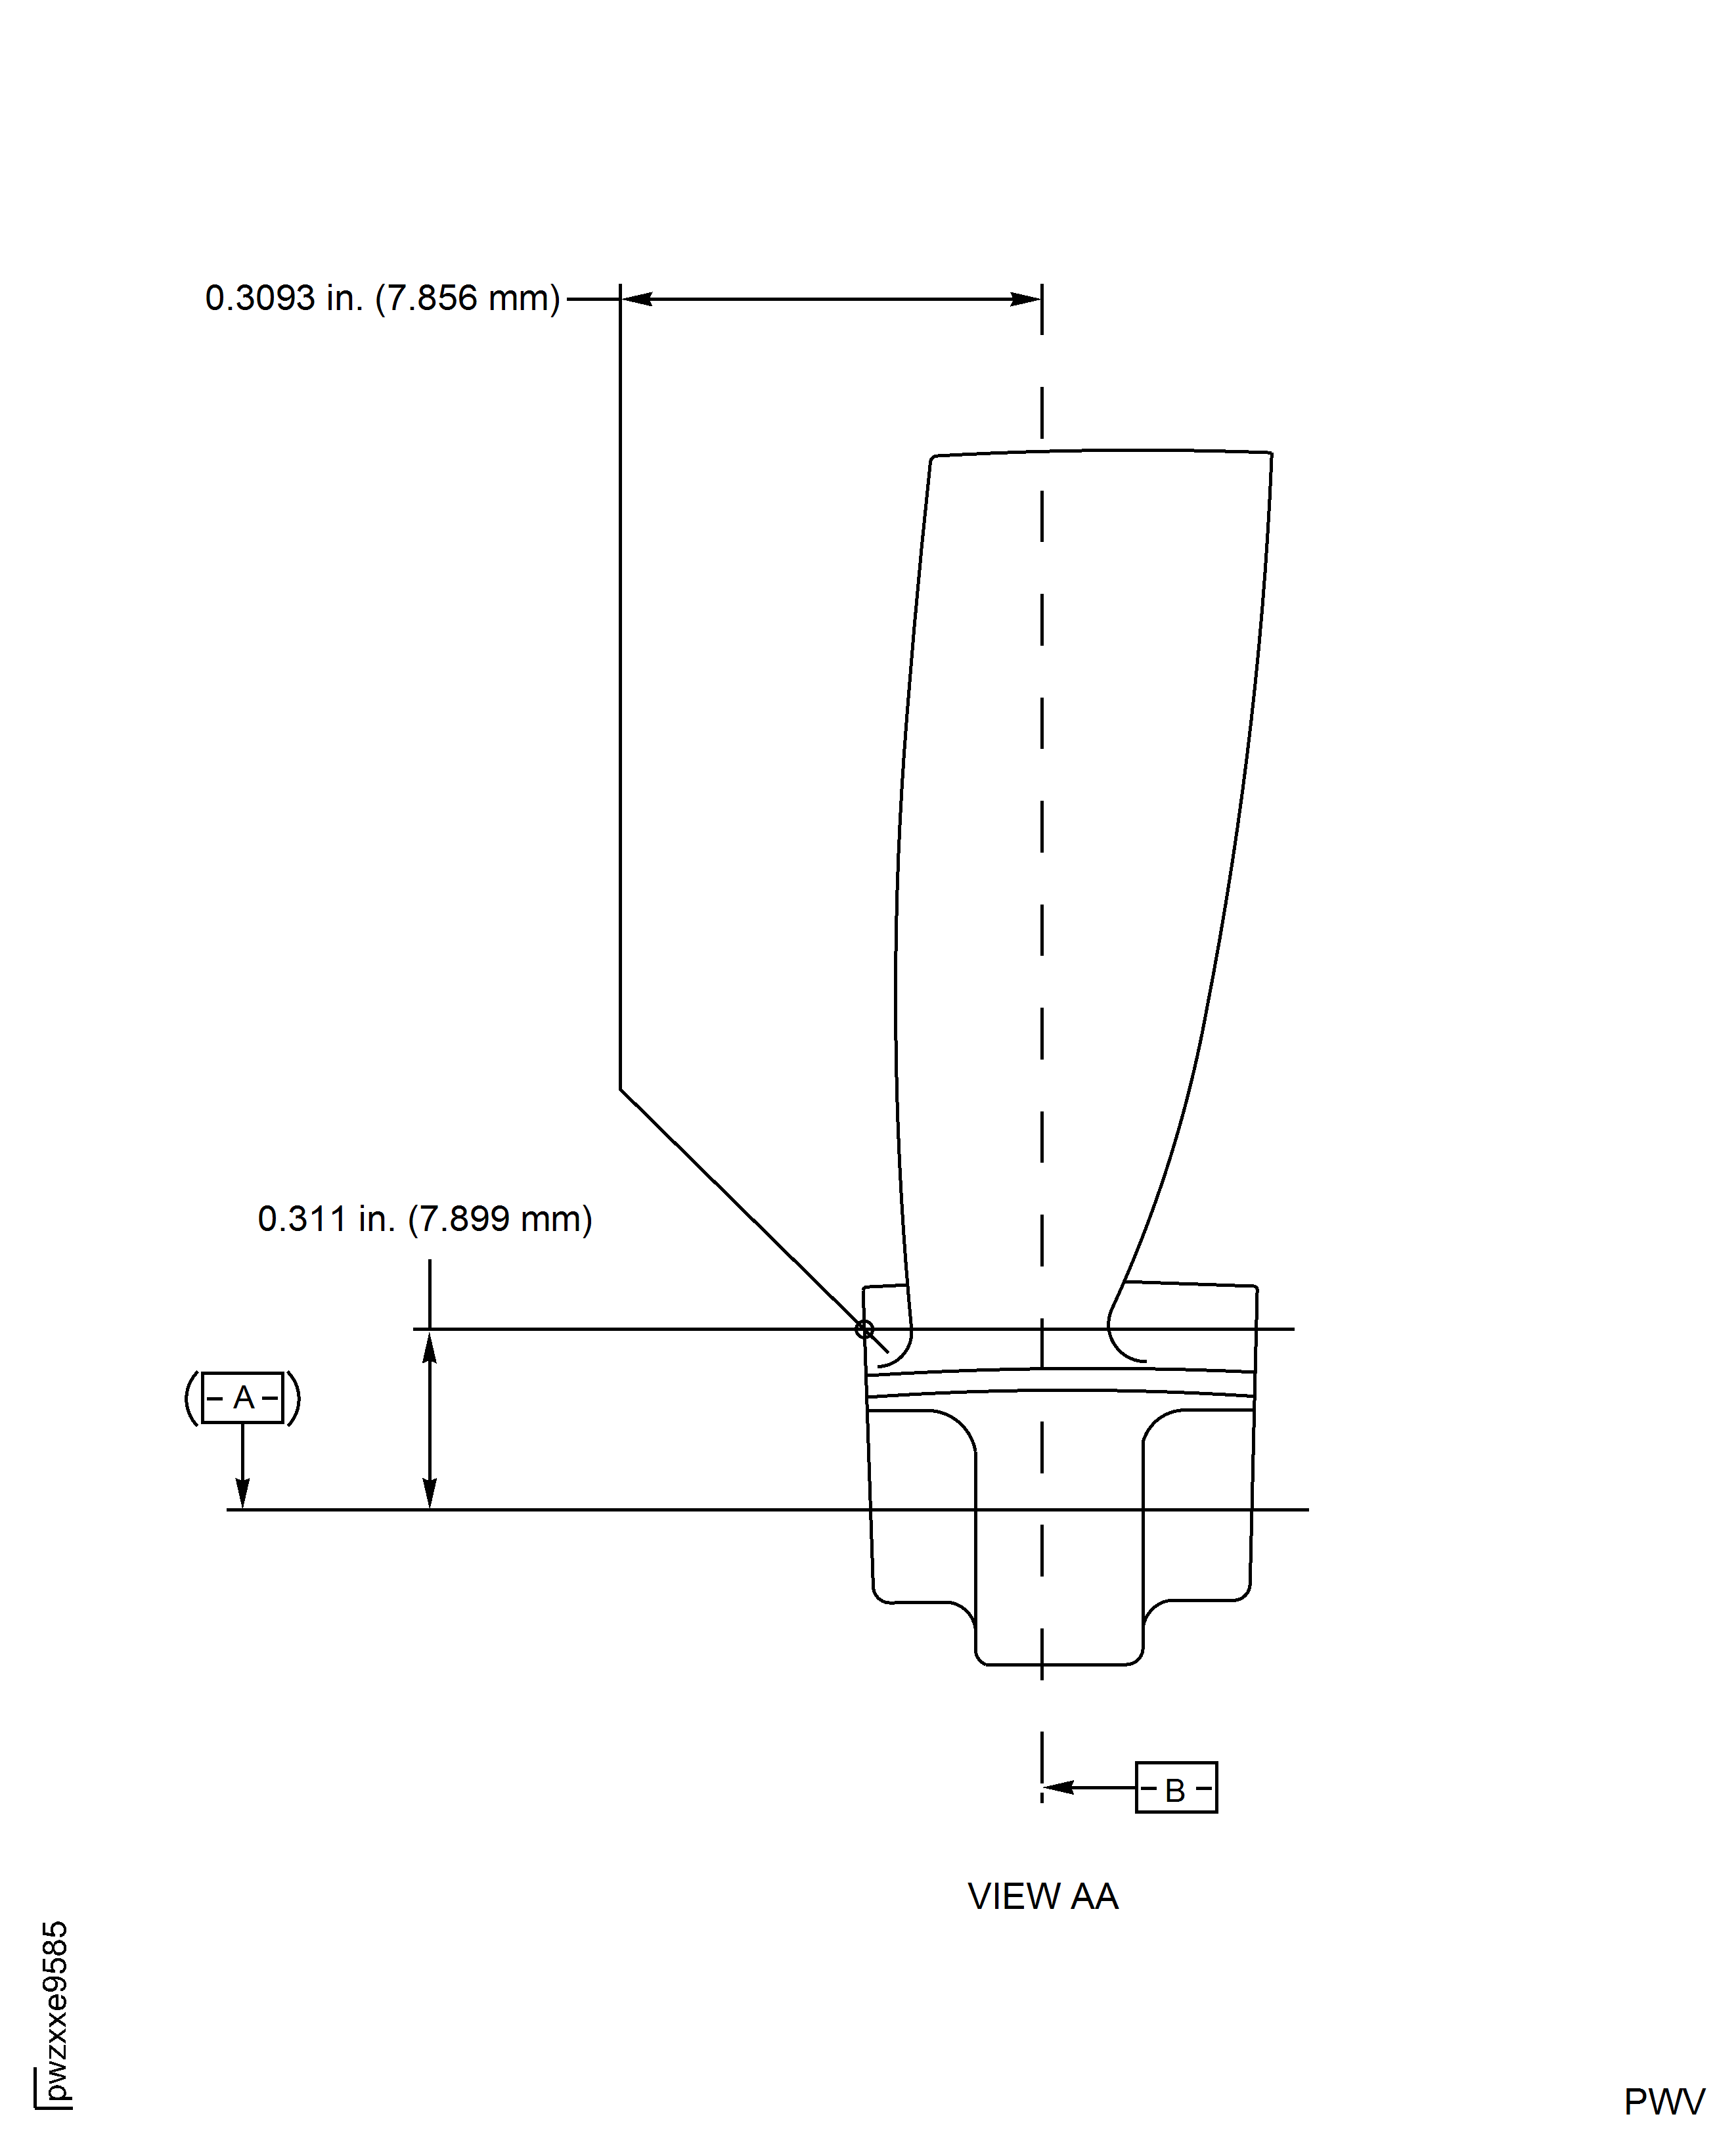
Figure: HP Compressor Stage 8 Rotor Blade (Assembly F) - Repair Details and Dimensions
HP Compressor Stage 8 Rotor Blade (Assembly F) - Repair Details and Dimensions
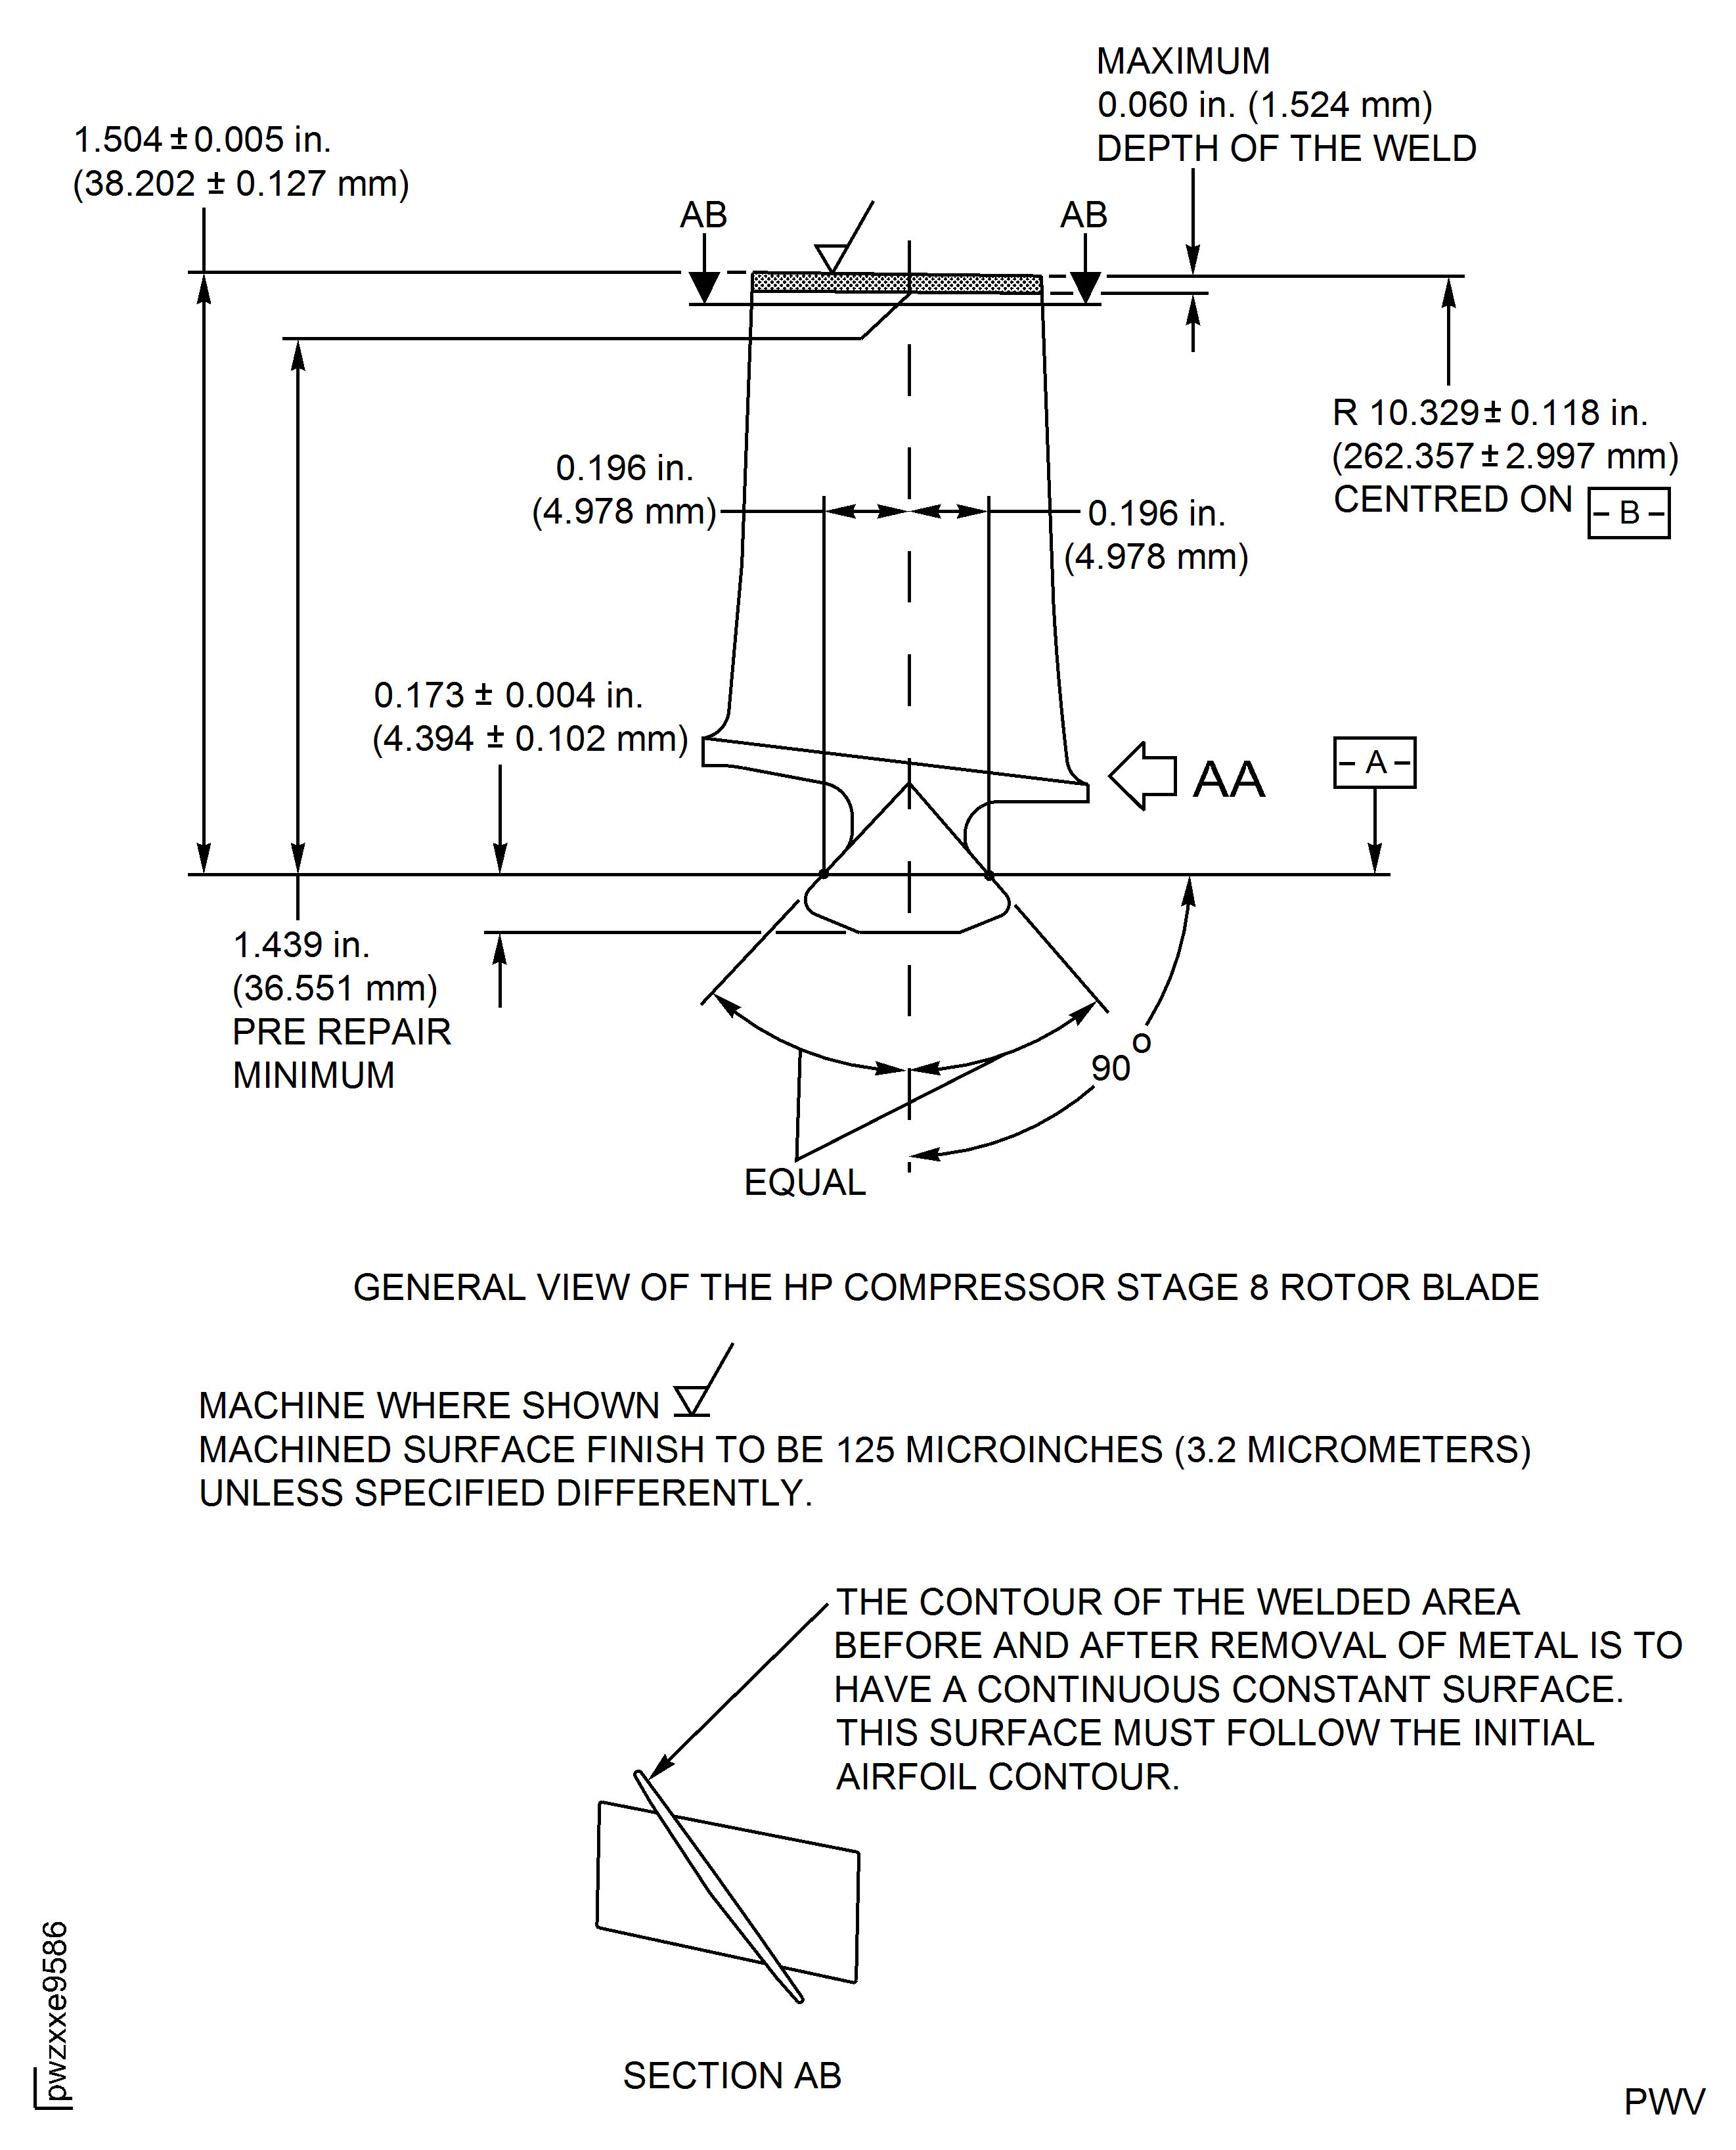
Figure: HP Compressor Stage 8 Rotor Blade (Assembly F) - Repair Details and Dimensions
HP Compressor Stage 8 Rotor Blade (Assembly F) - Repair Details and Dimensions
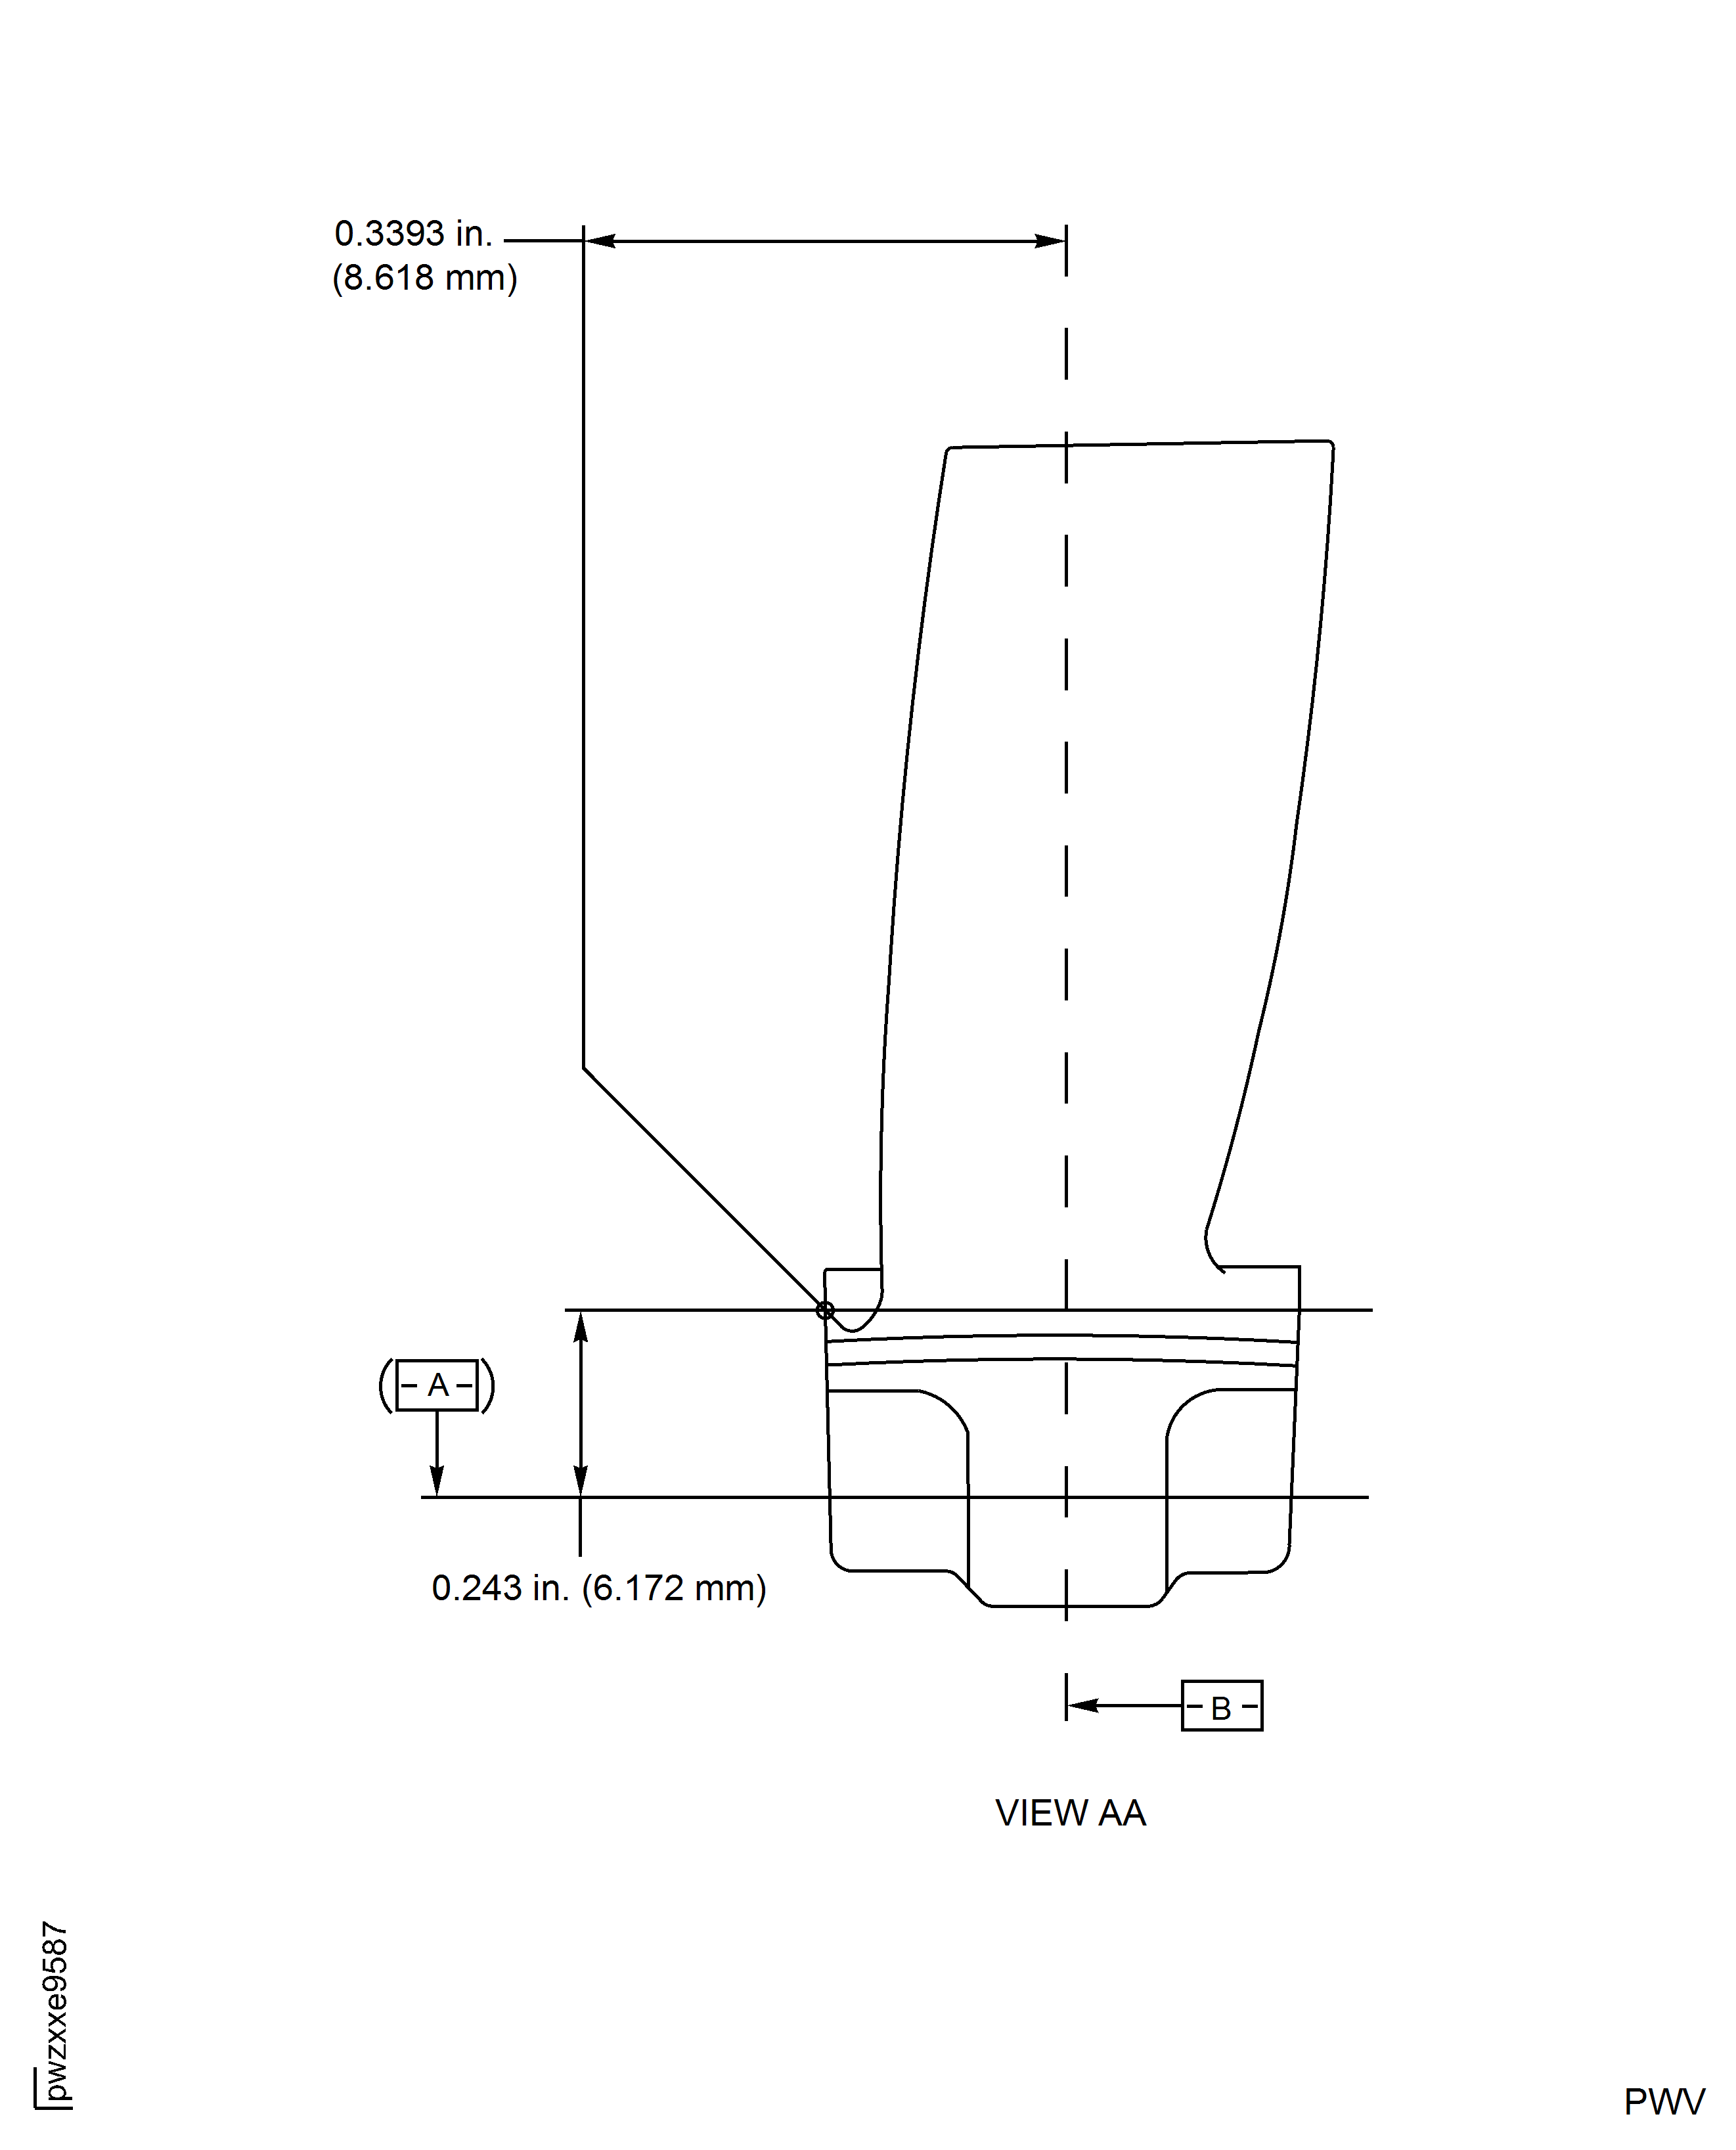
Figure: HP Compressor Stage 9 Rotor Blade (Assembly G) - Repair Details and Dimensions
HP Compressor Stage 9 Rotor Blade (Assembly G) - Repair Details and Dimensions
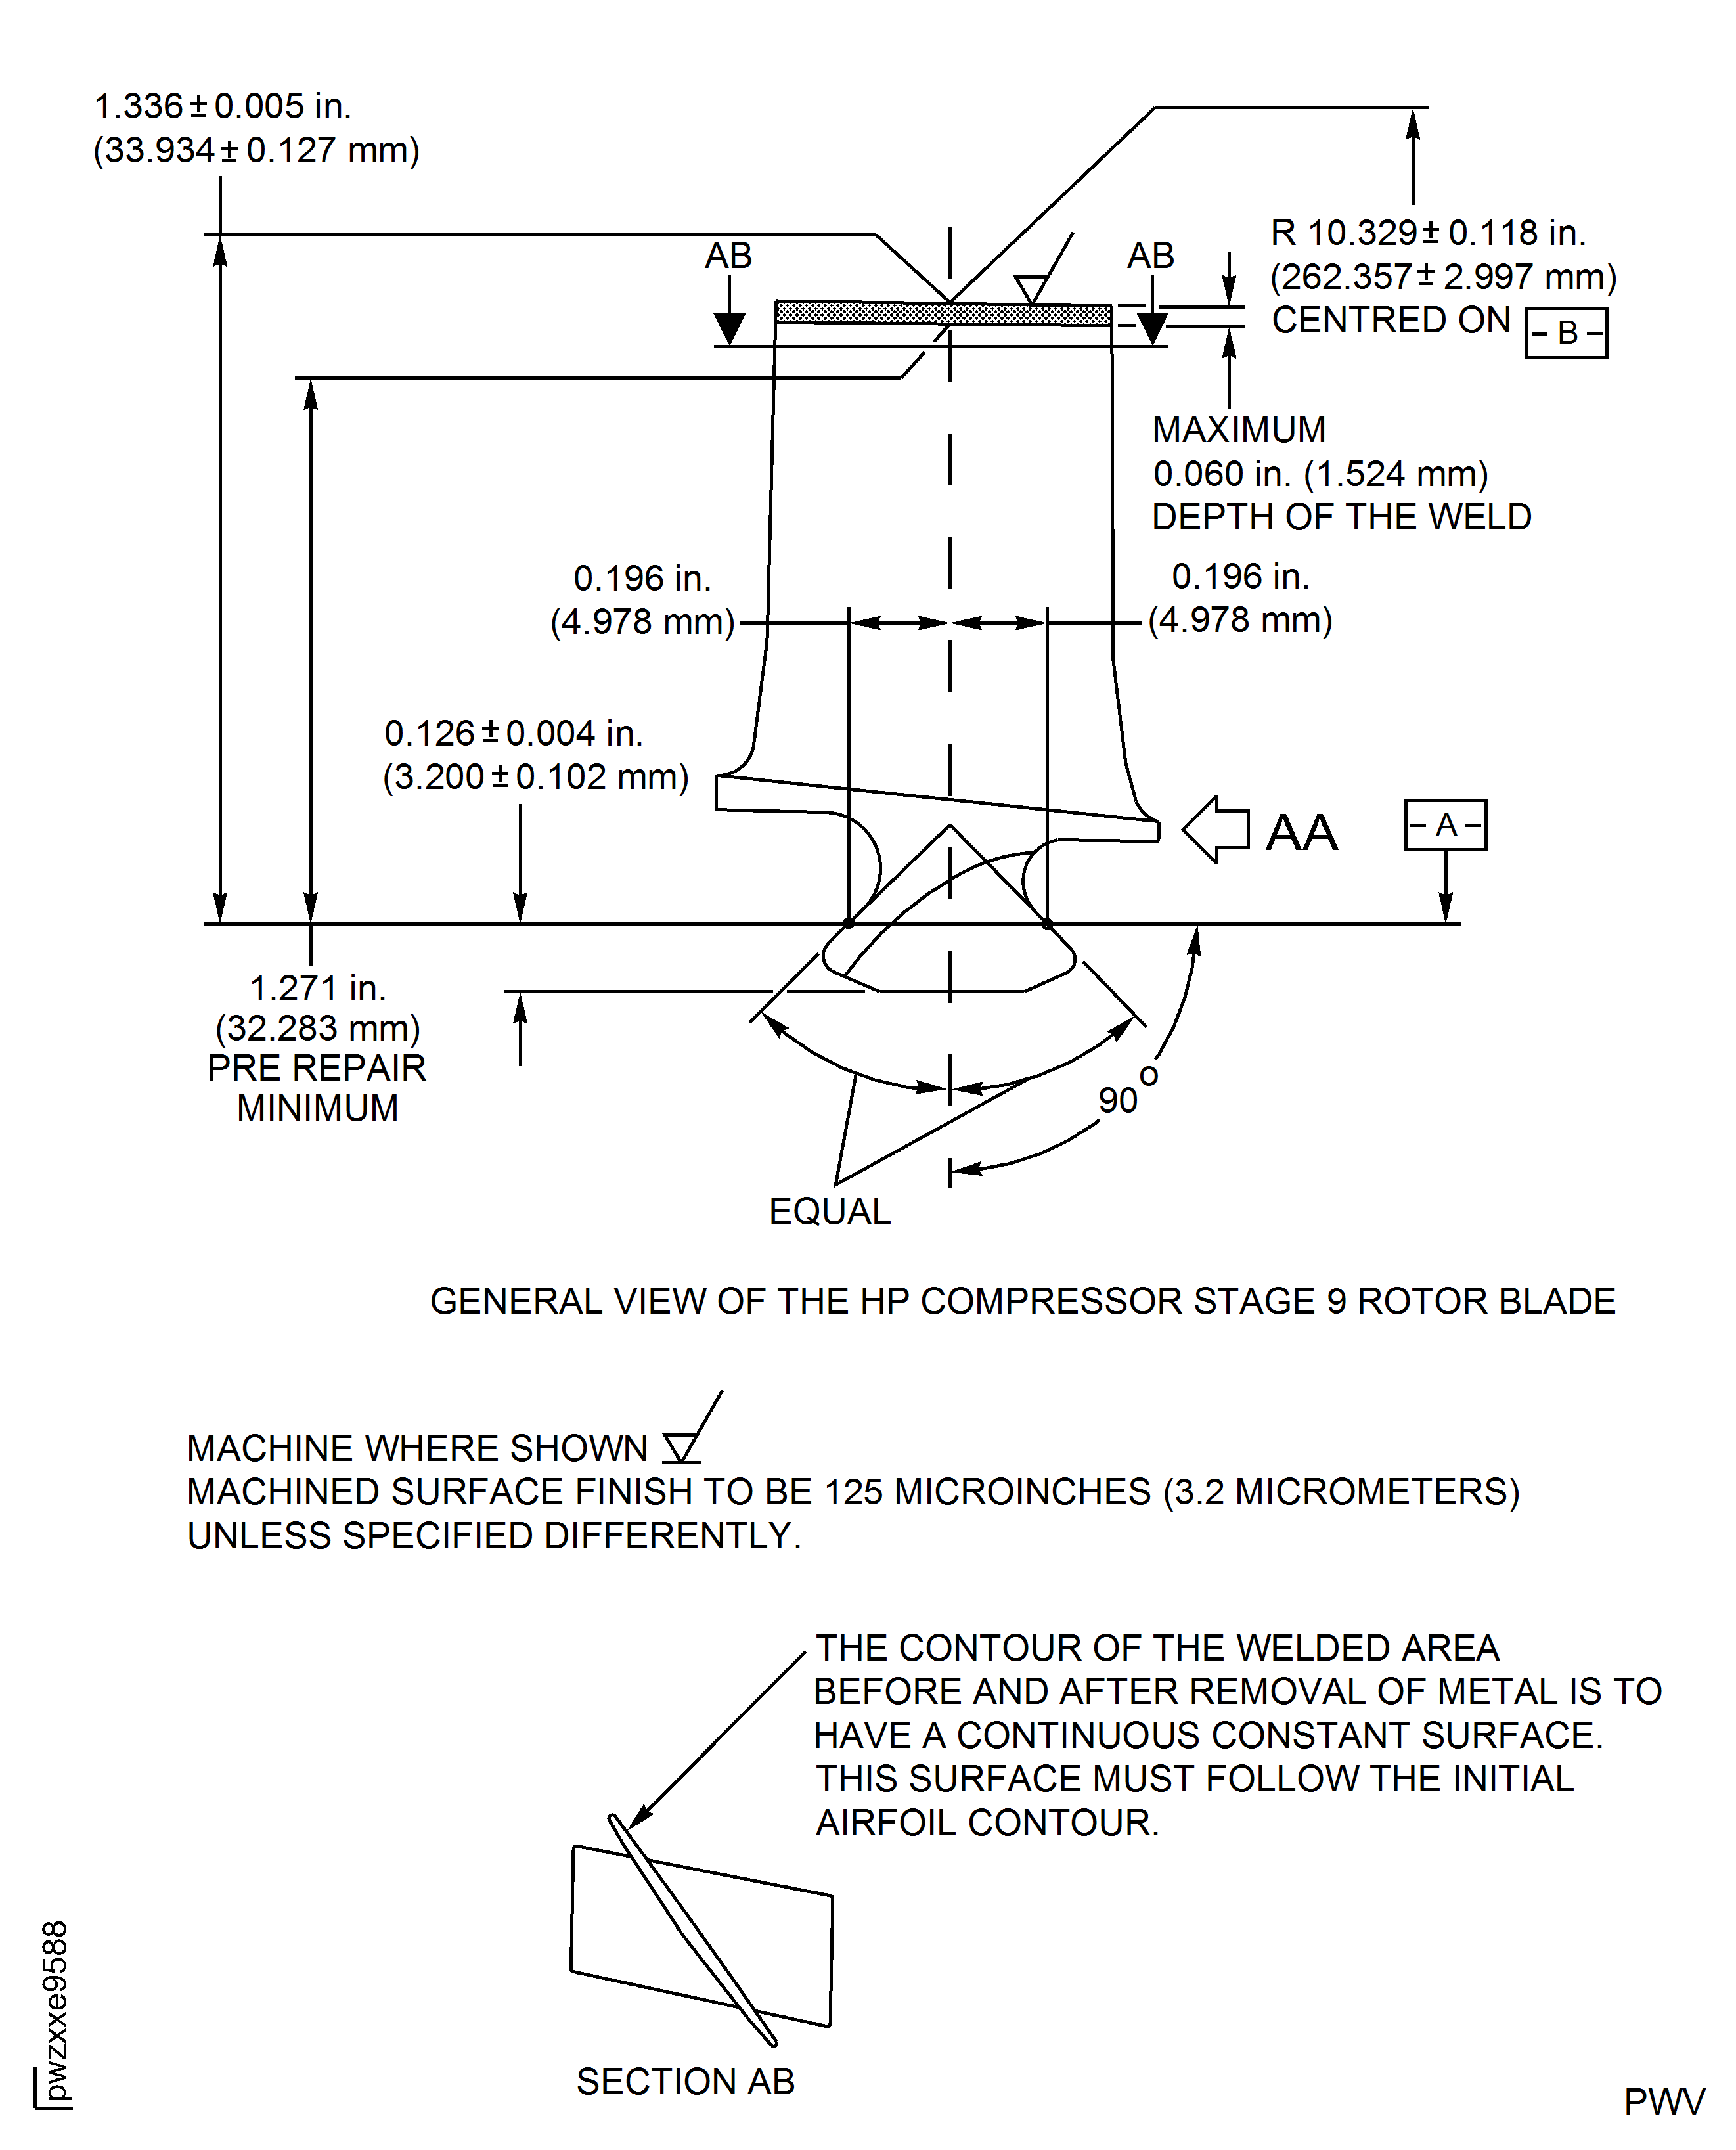
Figure: HP Compressor Stage 9 Rotor Blade (Assembly G) - Repair Details and Dimensions
HP Compressor Stage 9 Rotor Blade (Assembly G) - Repair Details and Dimensions
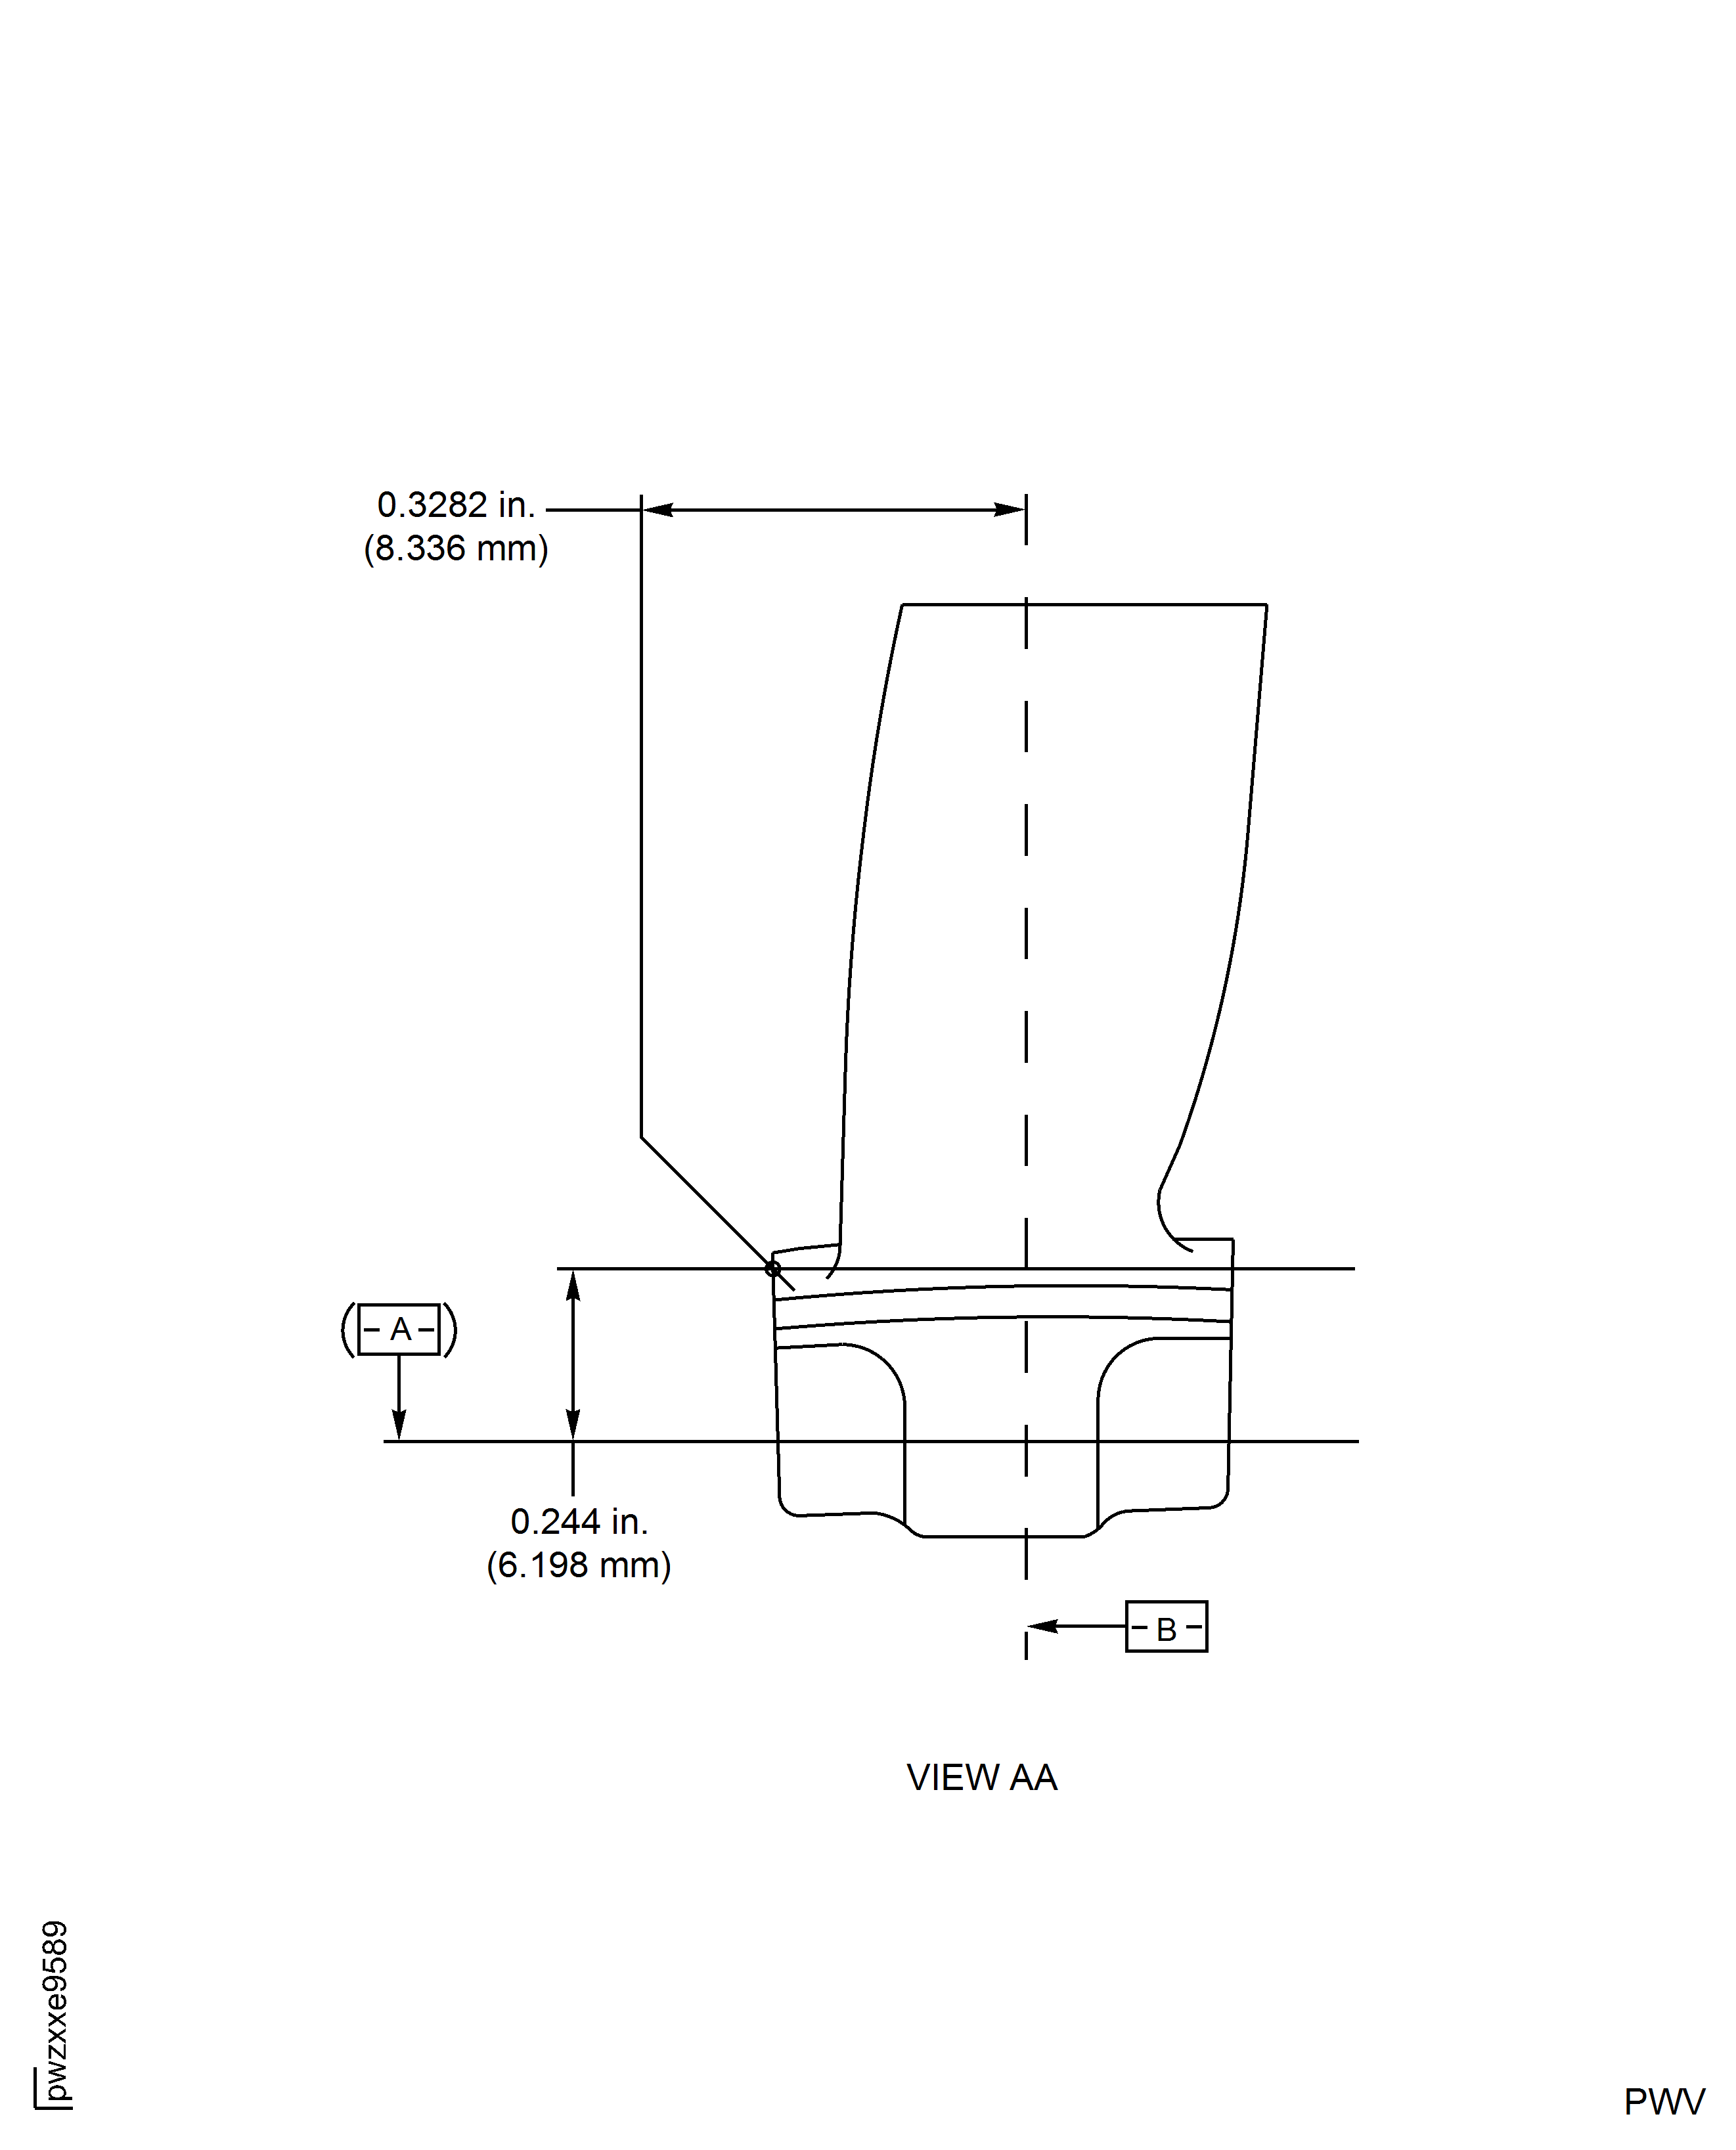
Figure: HP Compressor Stage 10 Rotor Blade (Assembly H) - Repair Details and Dimensions
HP Compressor Stage 10 Rotor Blade (Assembly H) - Repair Details and Dimensions
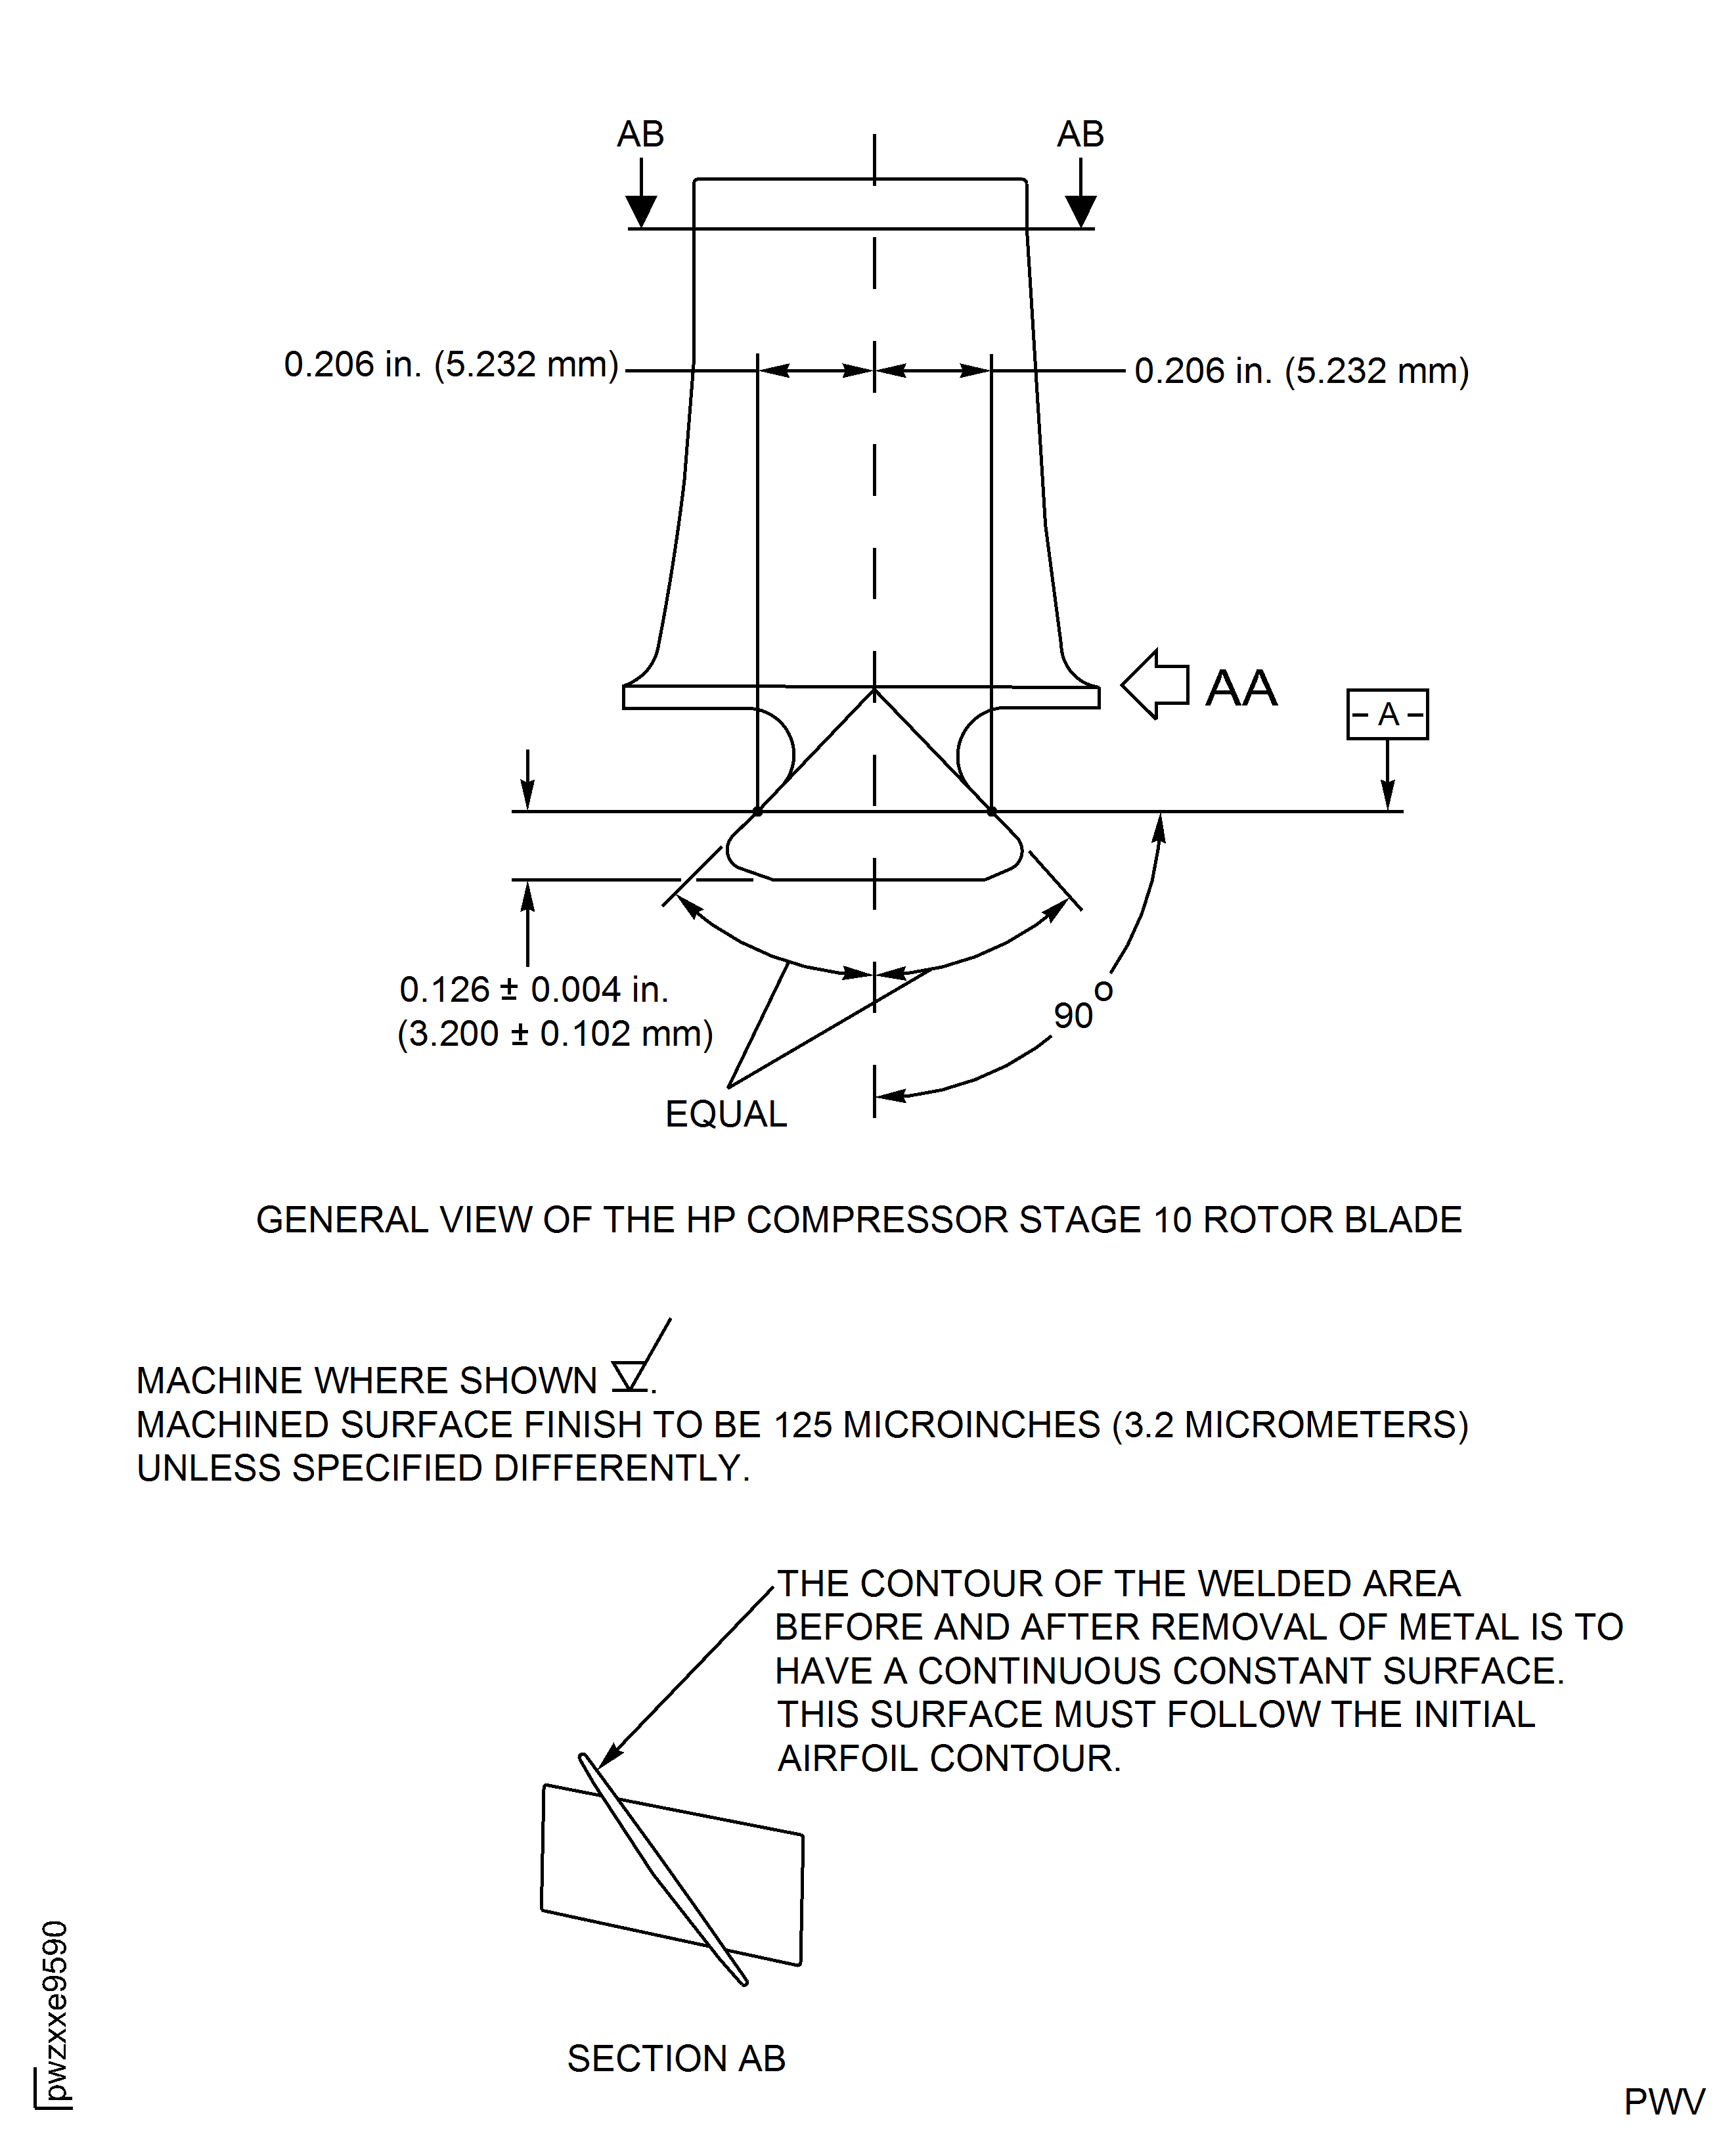
Figure: HP Compressor Stage 10 Rotor Blade (Assembly H) - Repair Details and Dimensions
HP Compressor Stage 10 Rotor Blade (Assembly H) - Repair Details and Dimensions
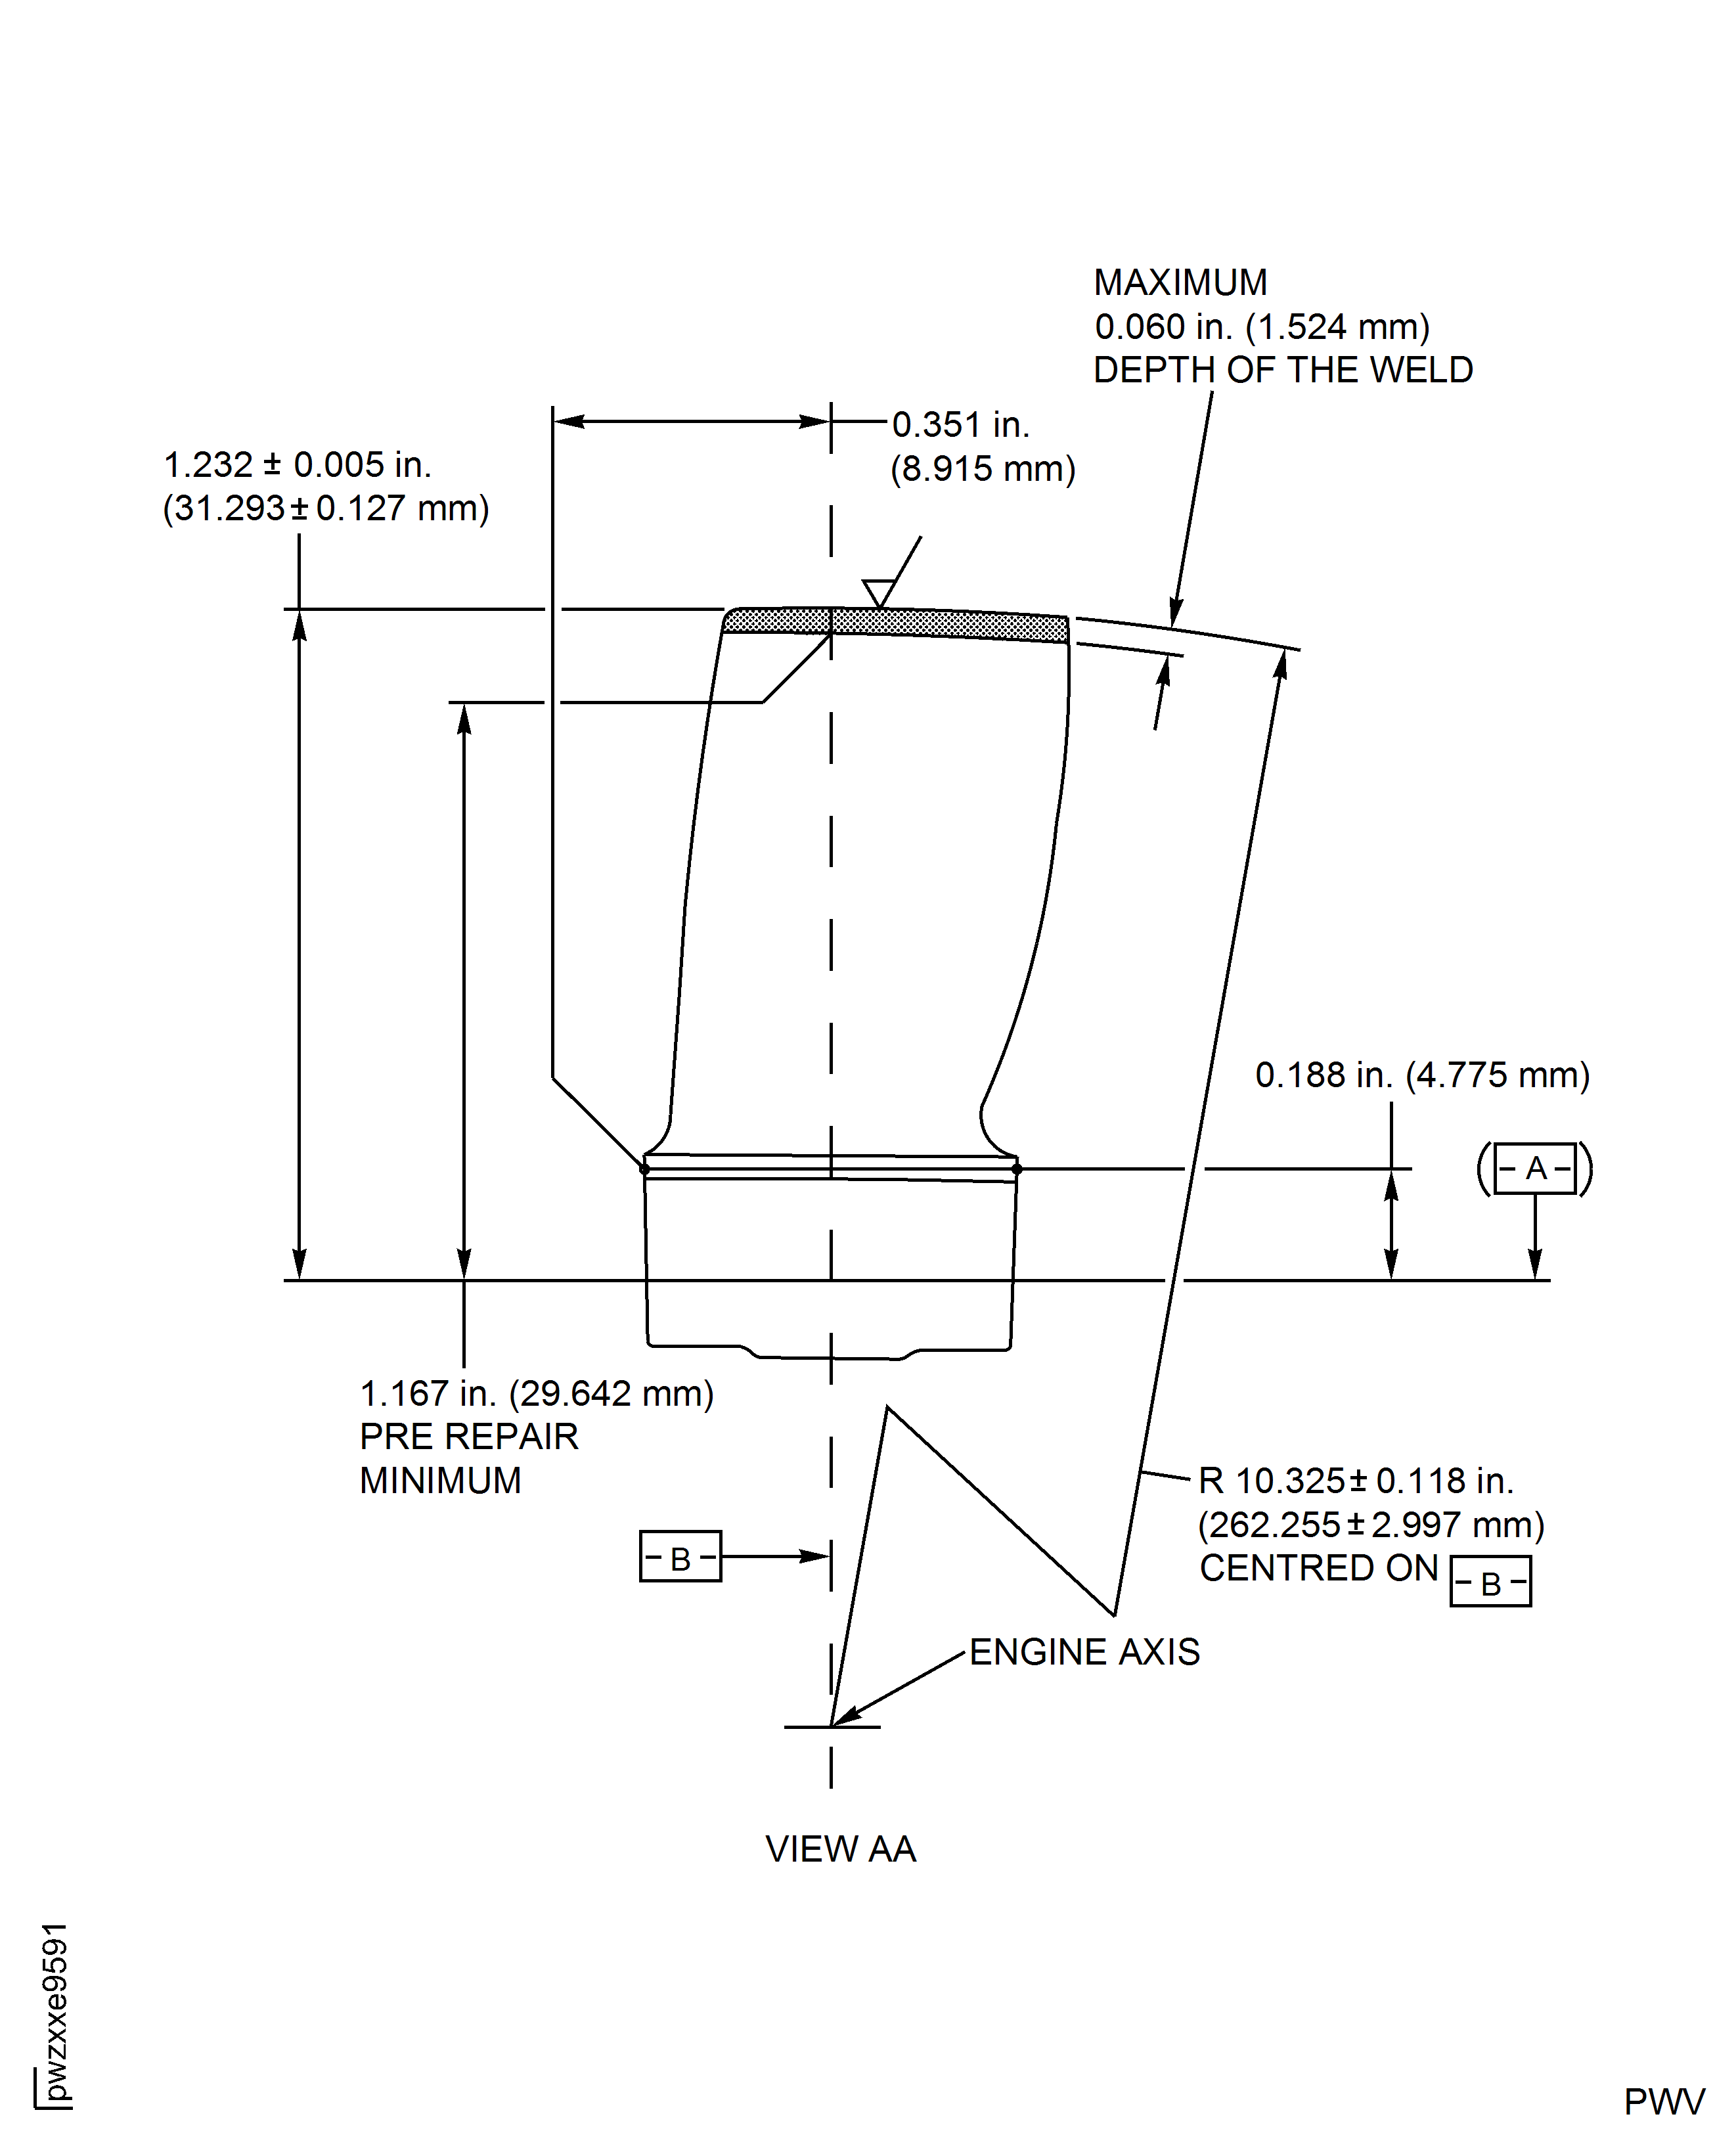
Figure: HP Compressor Stage 11 Rotor Blade (Assembly J) - Repair Details and Dimensions
HP Compressor Stage 11 Rotor Blade (Assembly J) - Repair Details and Dimensions
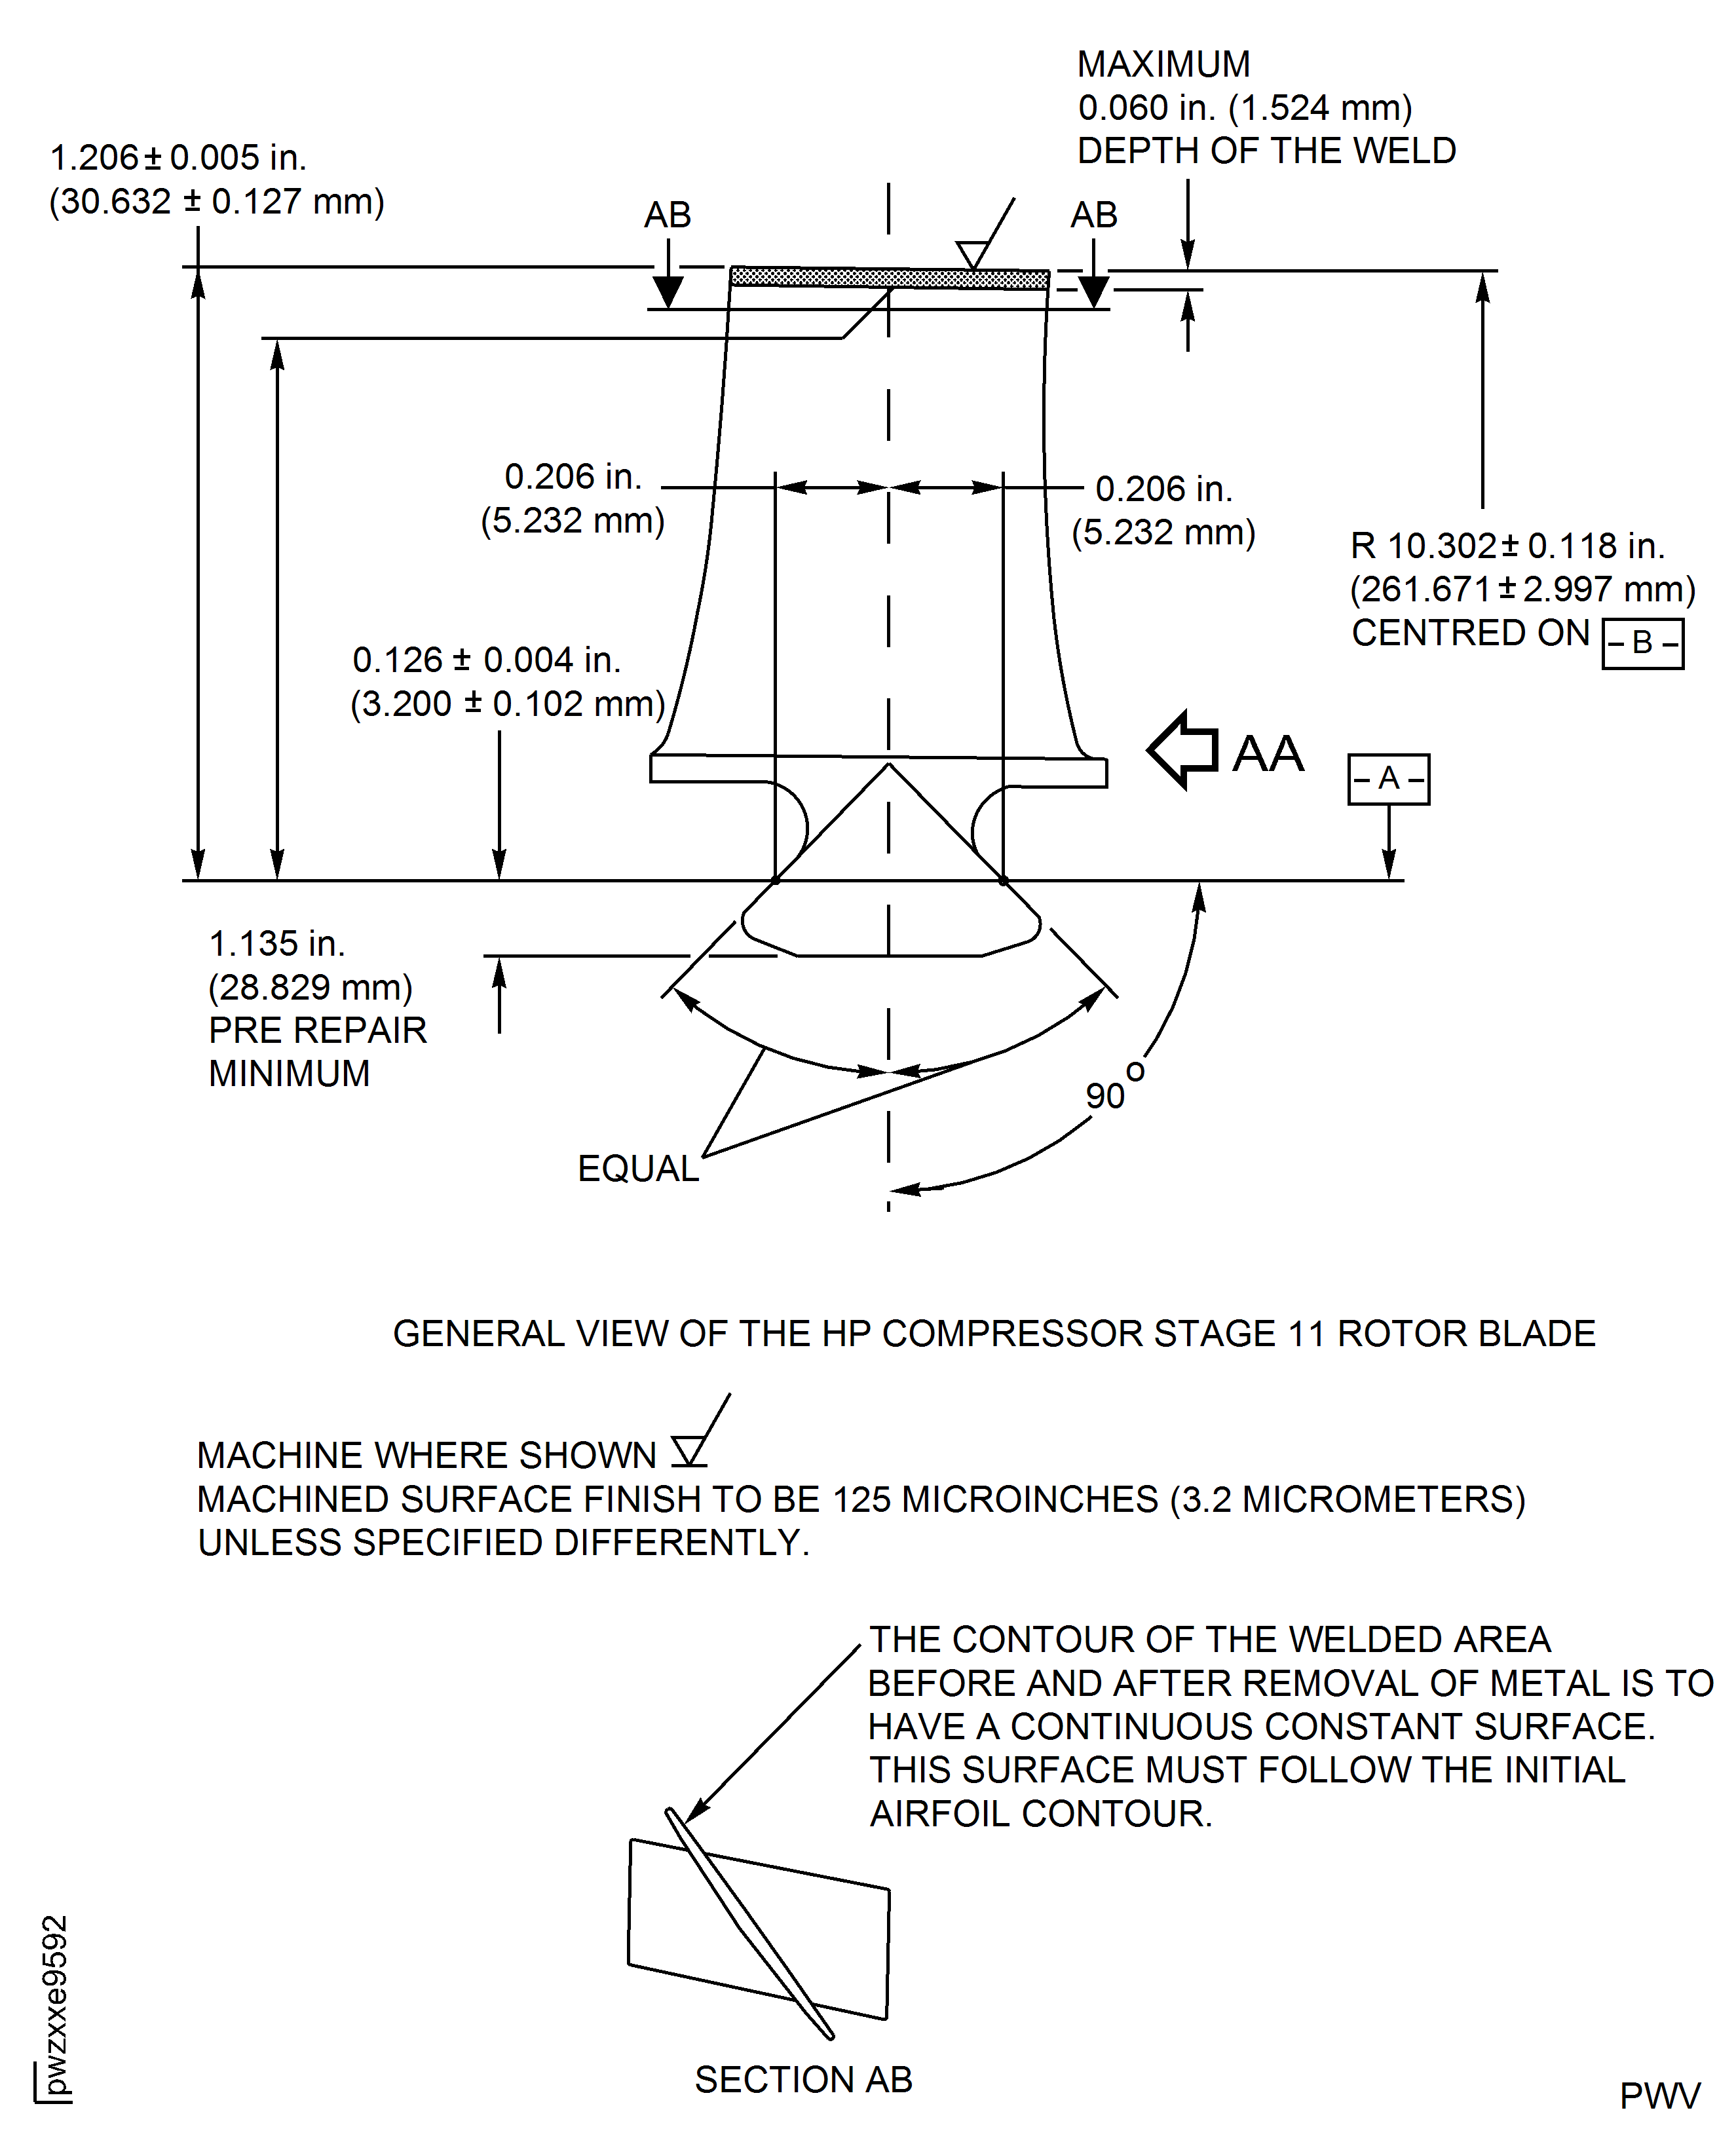
Figure: HP Compressor Stage 11 Rotor Blade (Assembly J) - Repair Details and Dimensions
HP Compressor Stage 11 Rotor Blade (Assembly J) - Repair Details and Dimensions
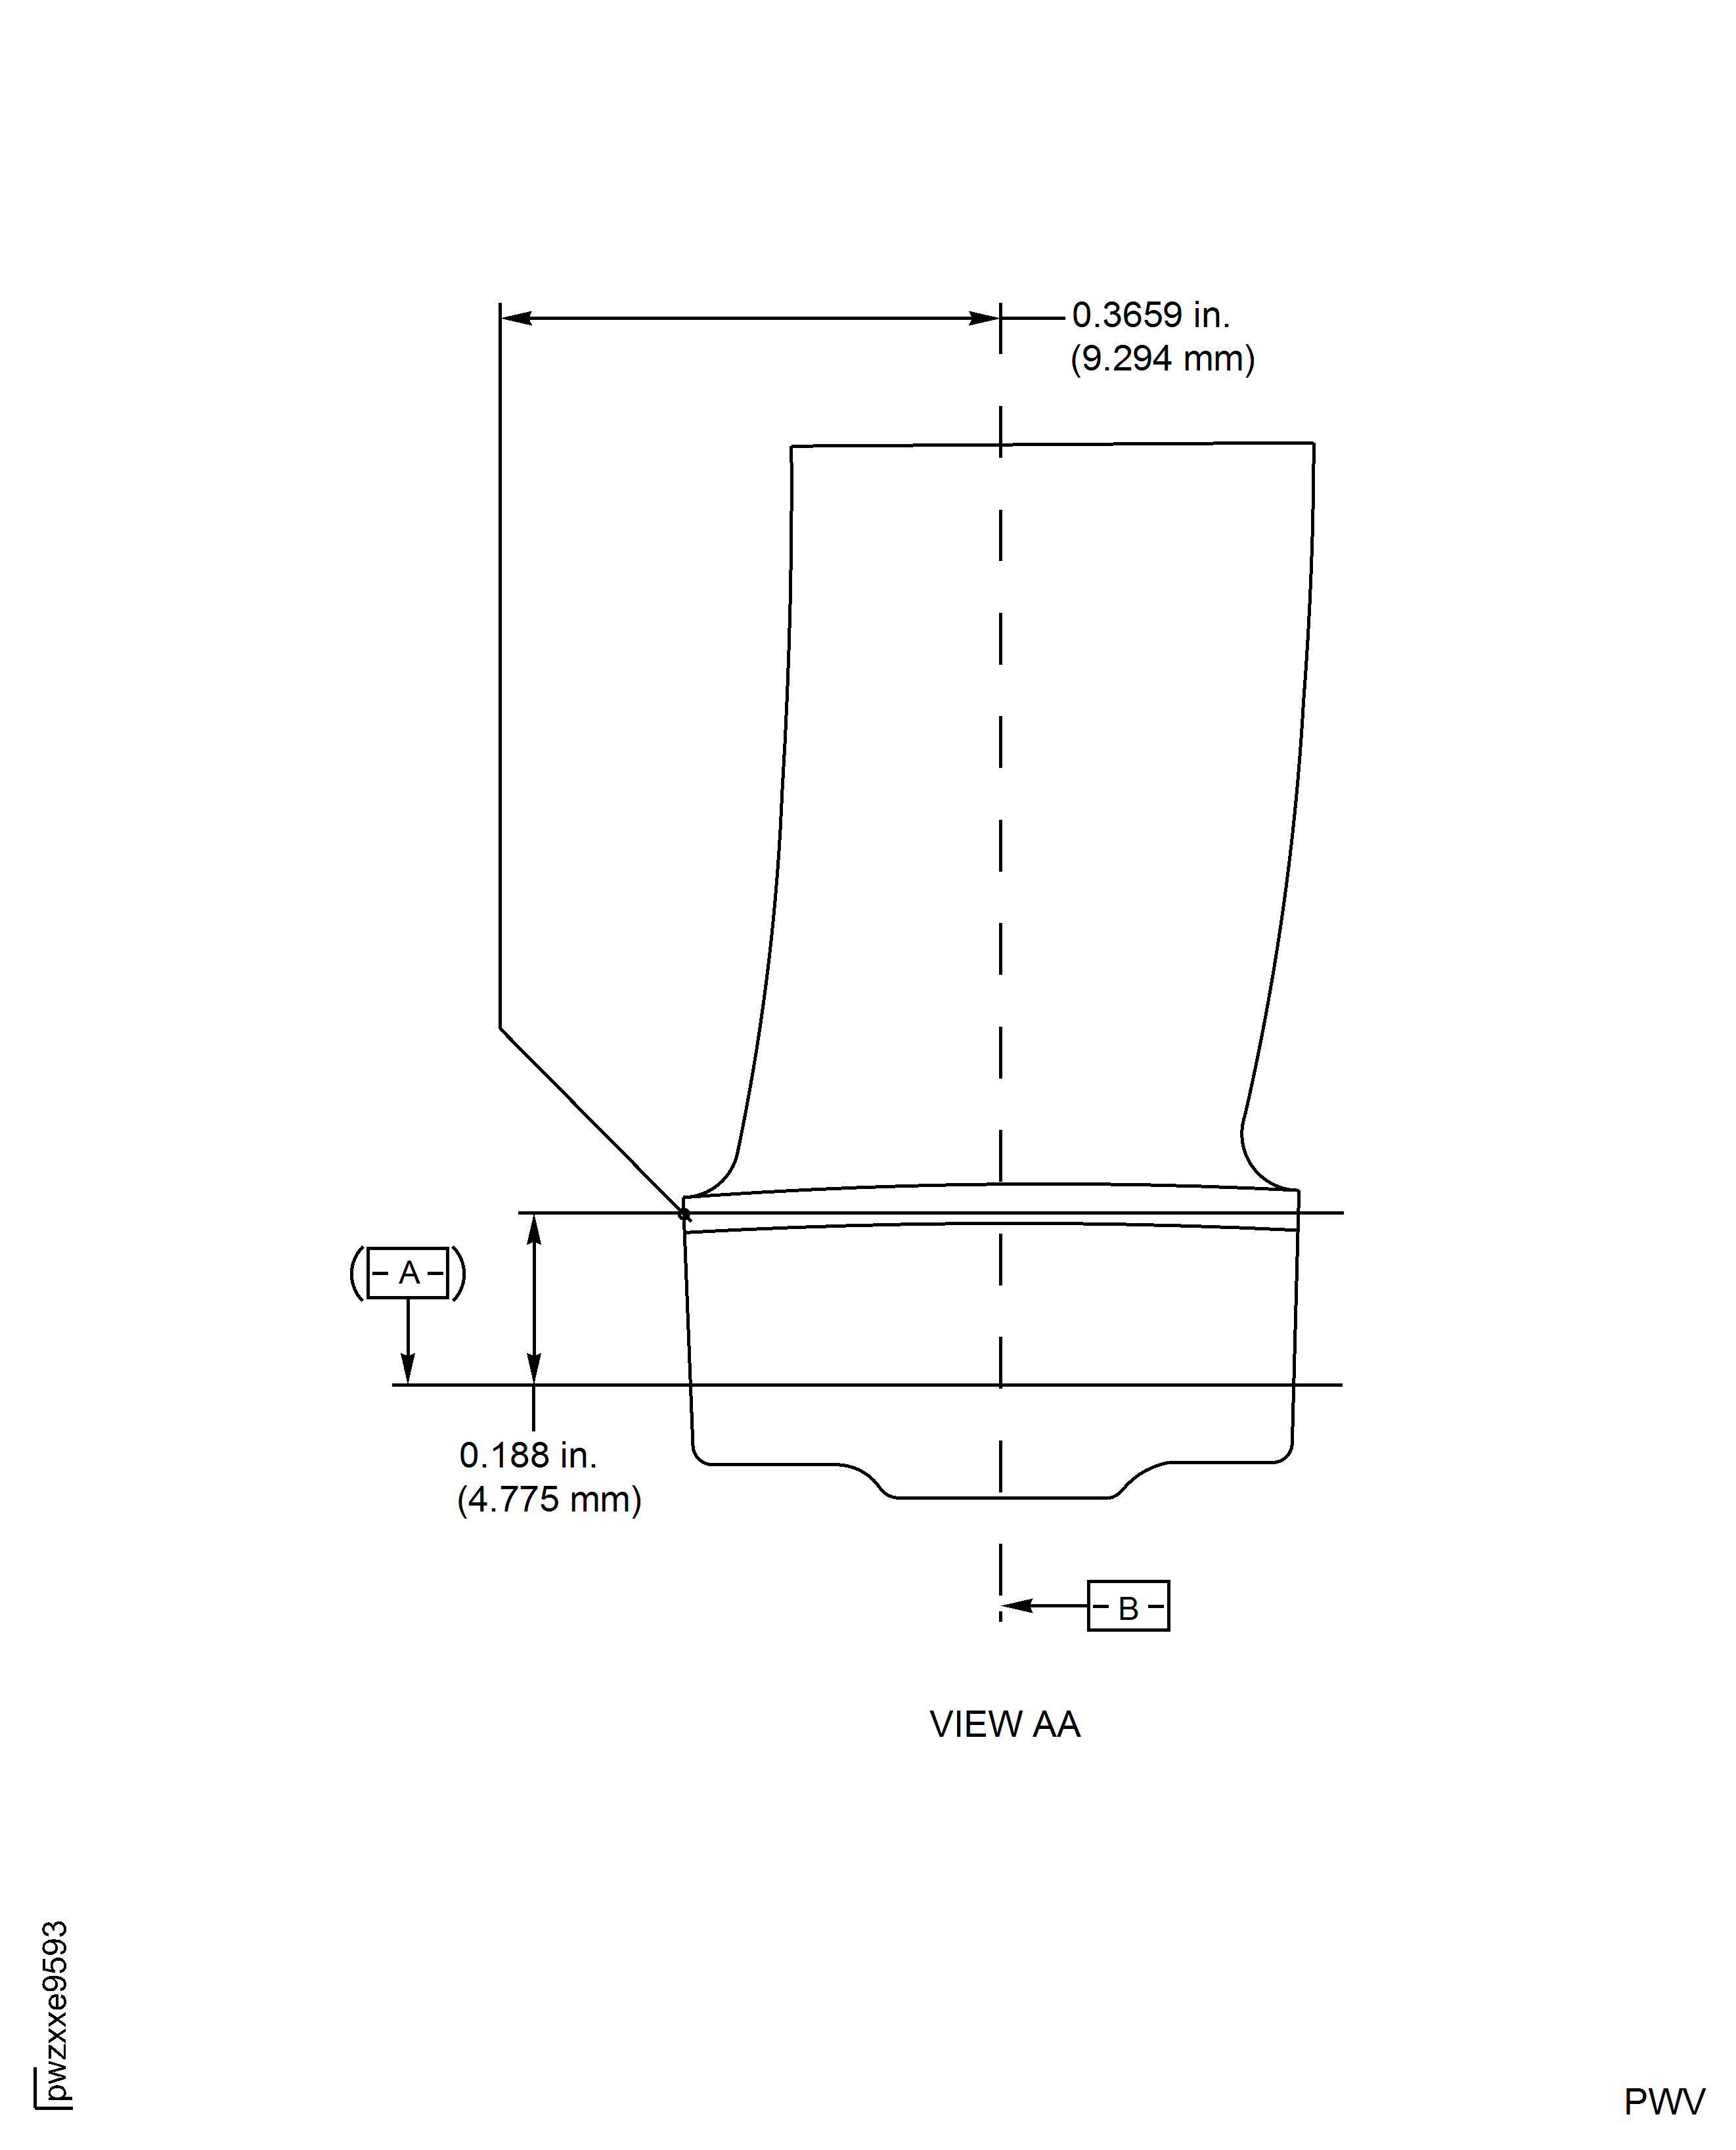
Figure: HP Compressor Stage 12 Rotor Blade (Assembly K) - Repair Details and Dimensions
HP Compressor Stage 12 Rotor Blade (Assembly K) - Repair Details and Dimensions
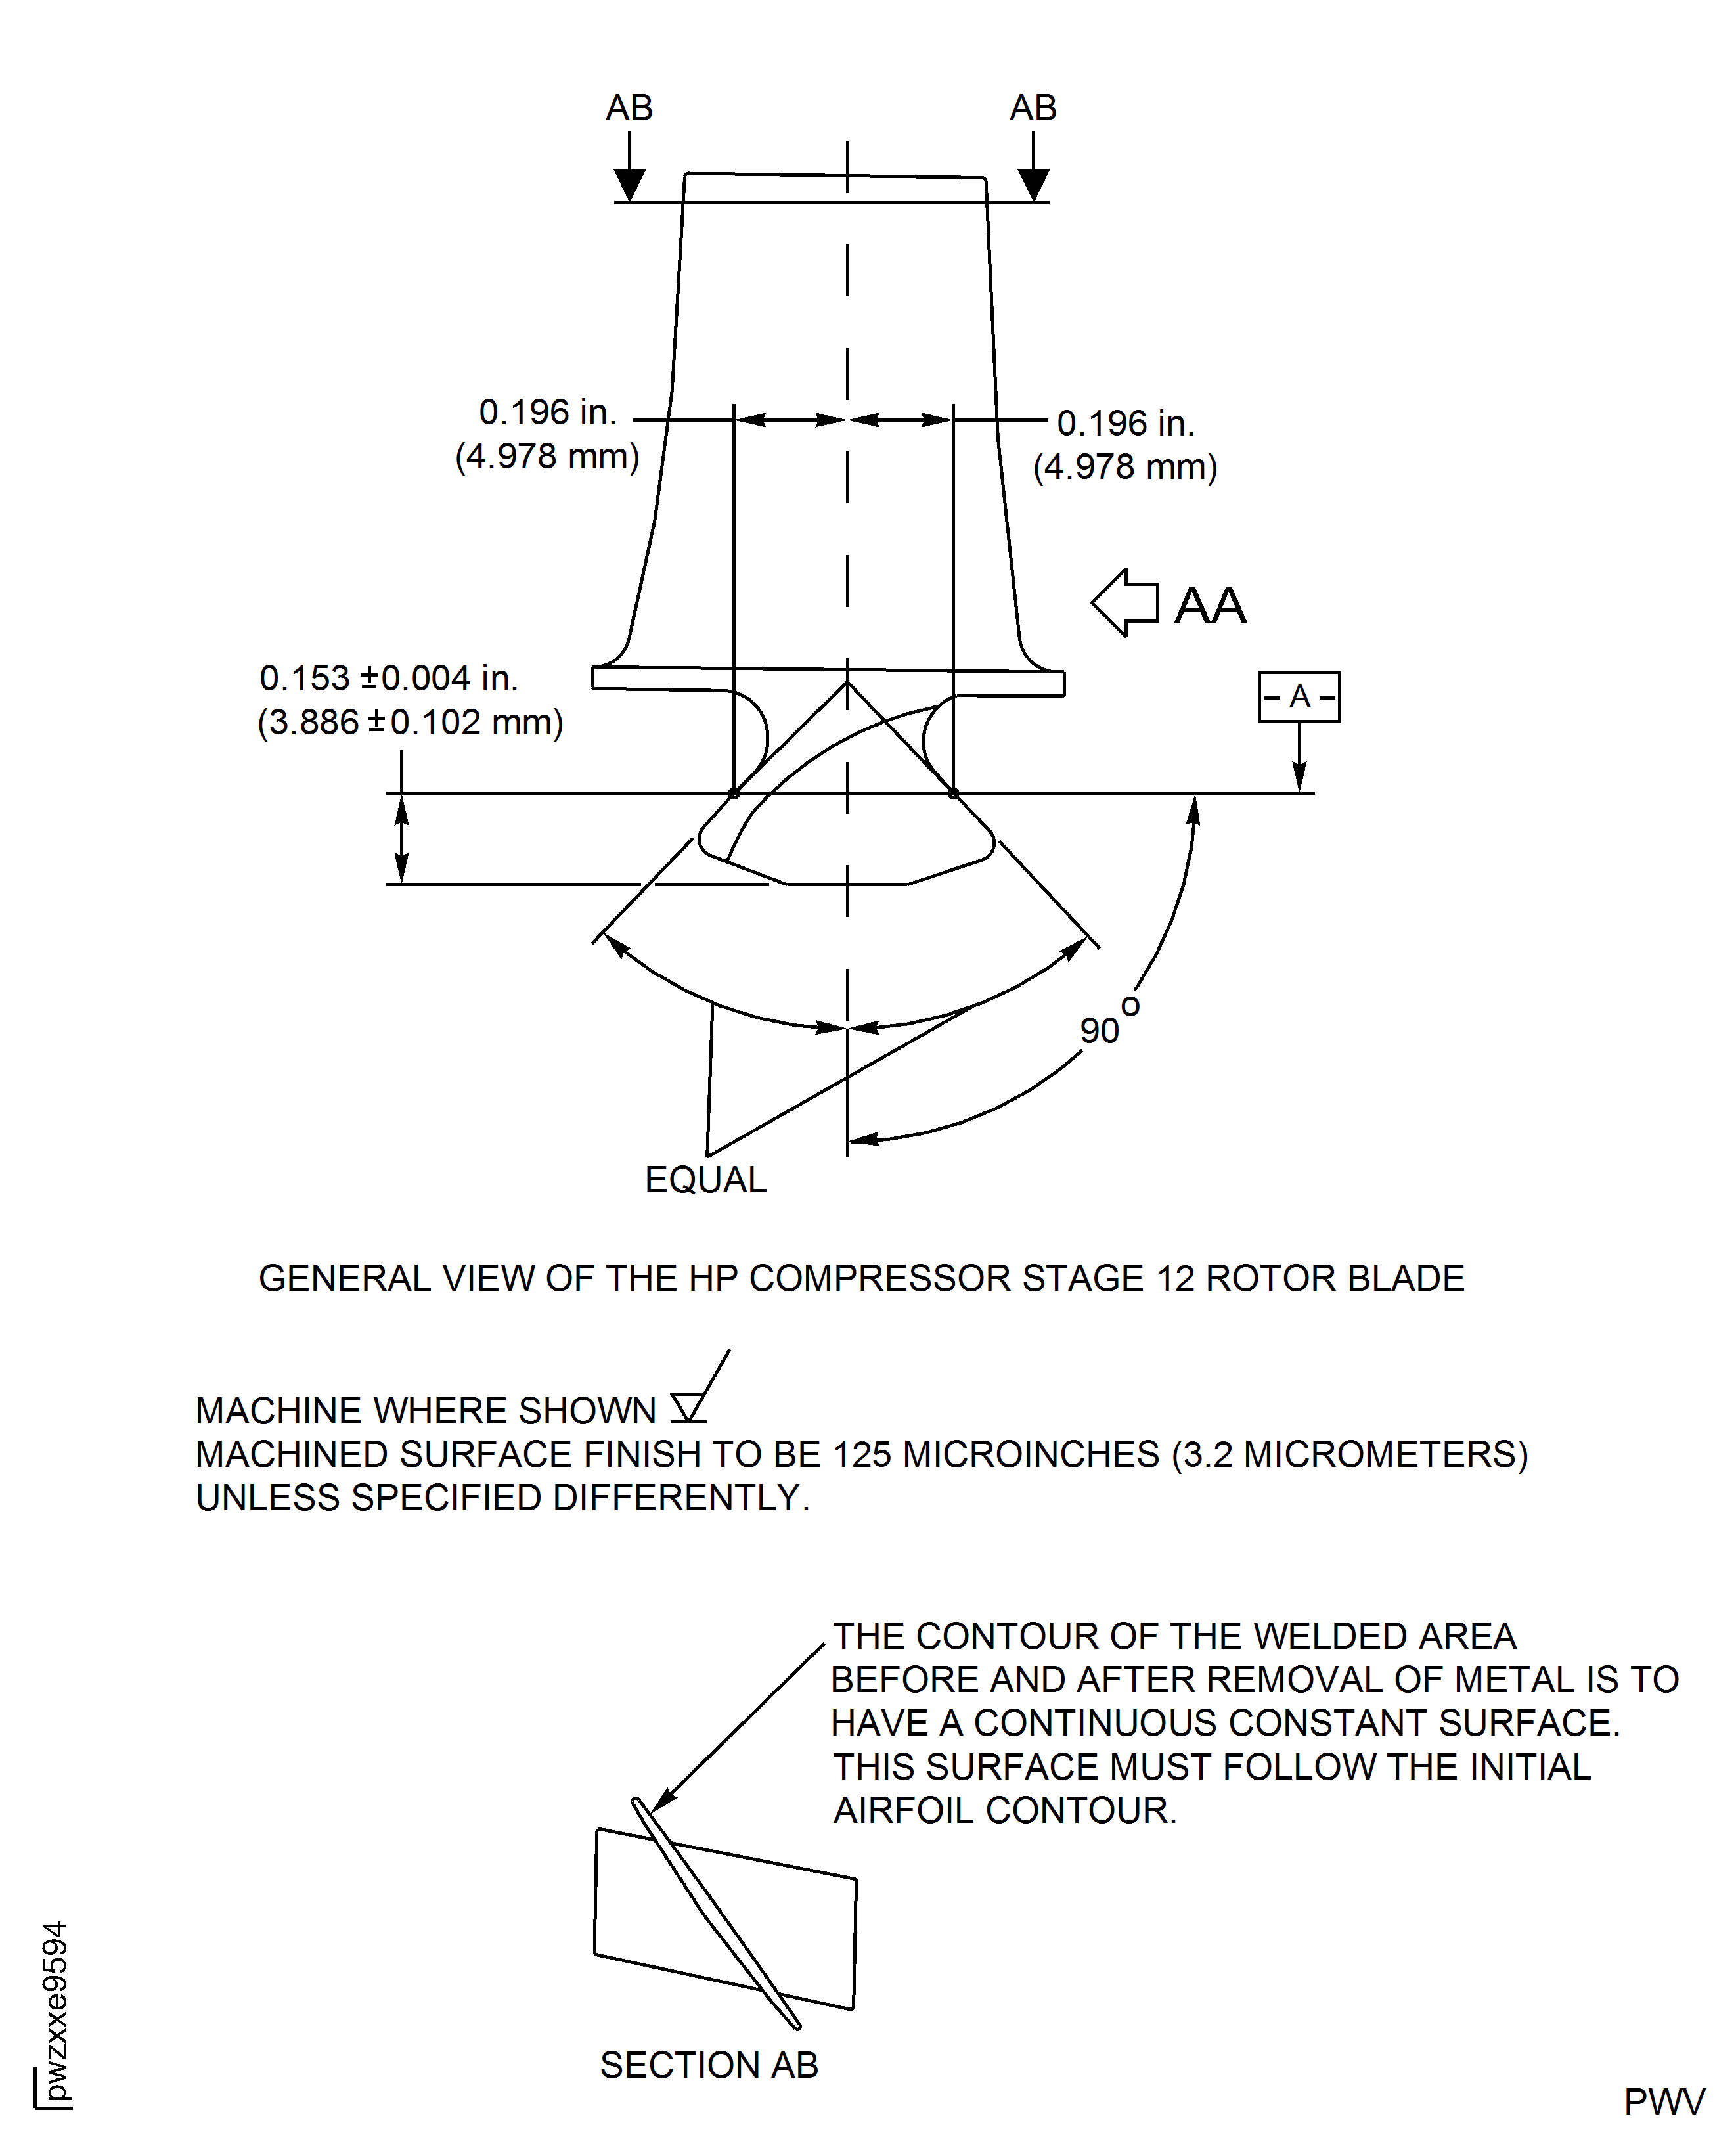
Figure: HP Compressor Stage 12 Rotor Blade (Assembly K) - Repair Details and Dimensions
HP Compressor Stage 12 Rotor Blade (Assembly K) - Repair Details and Dimensions
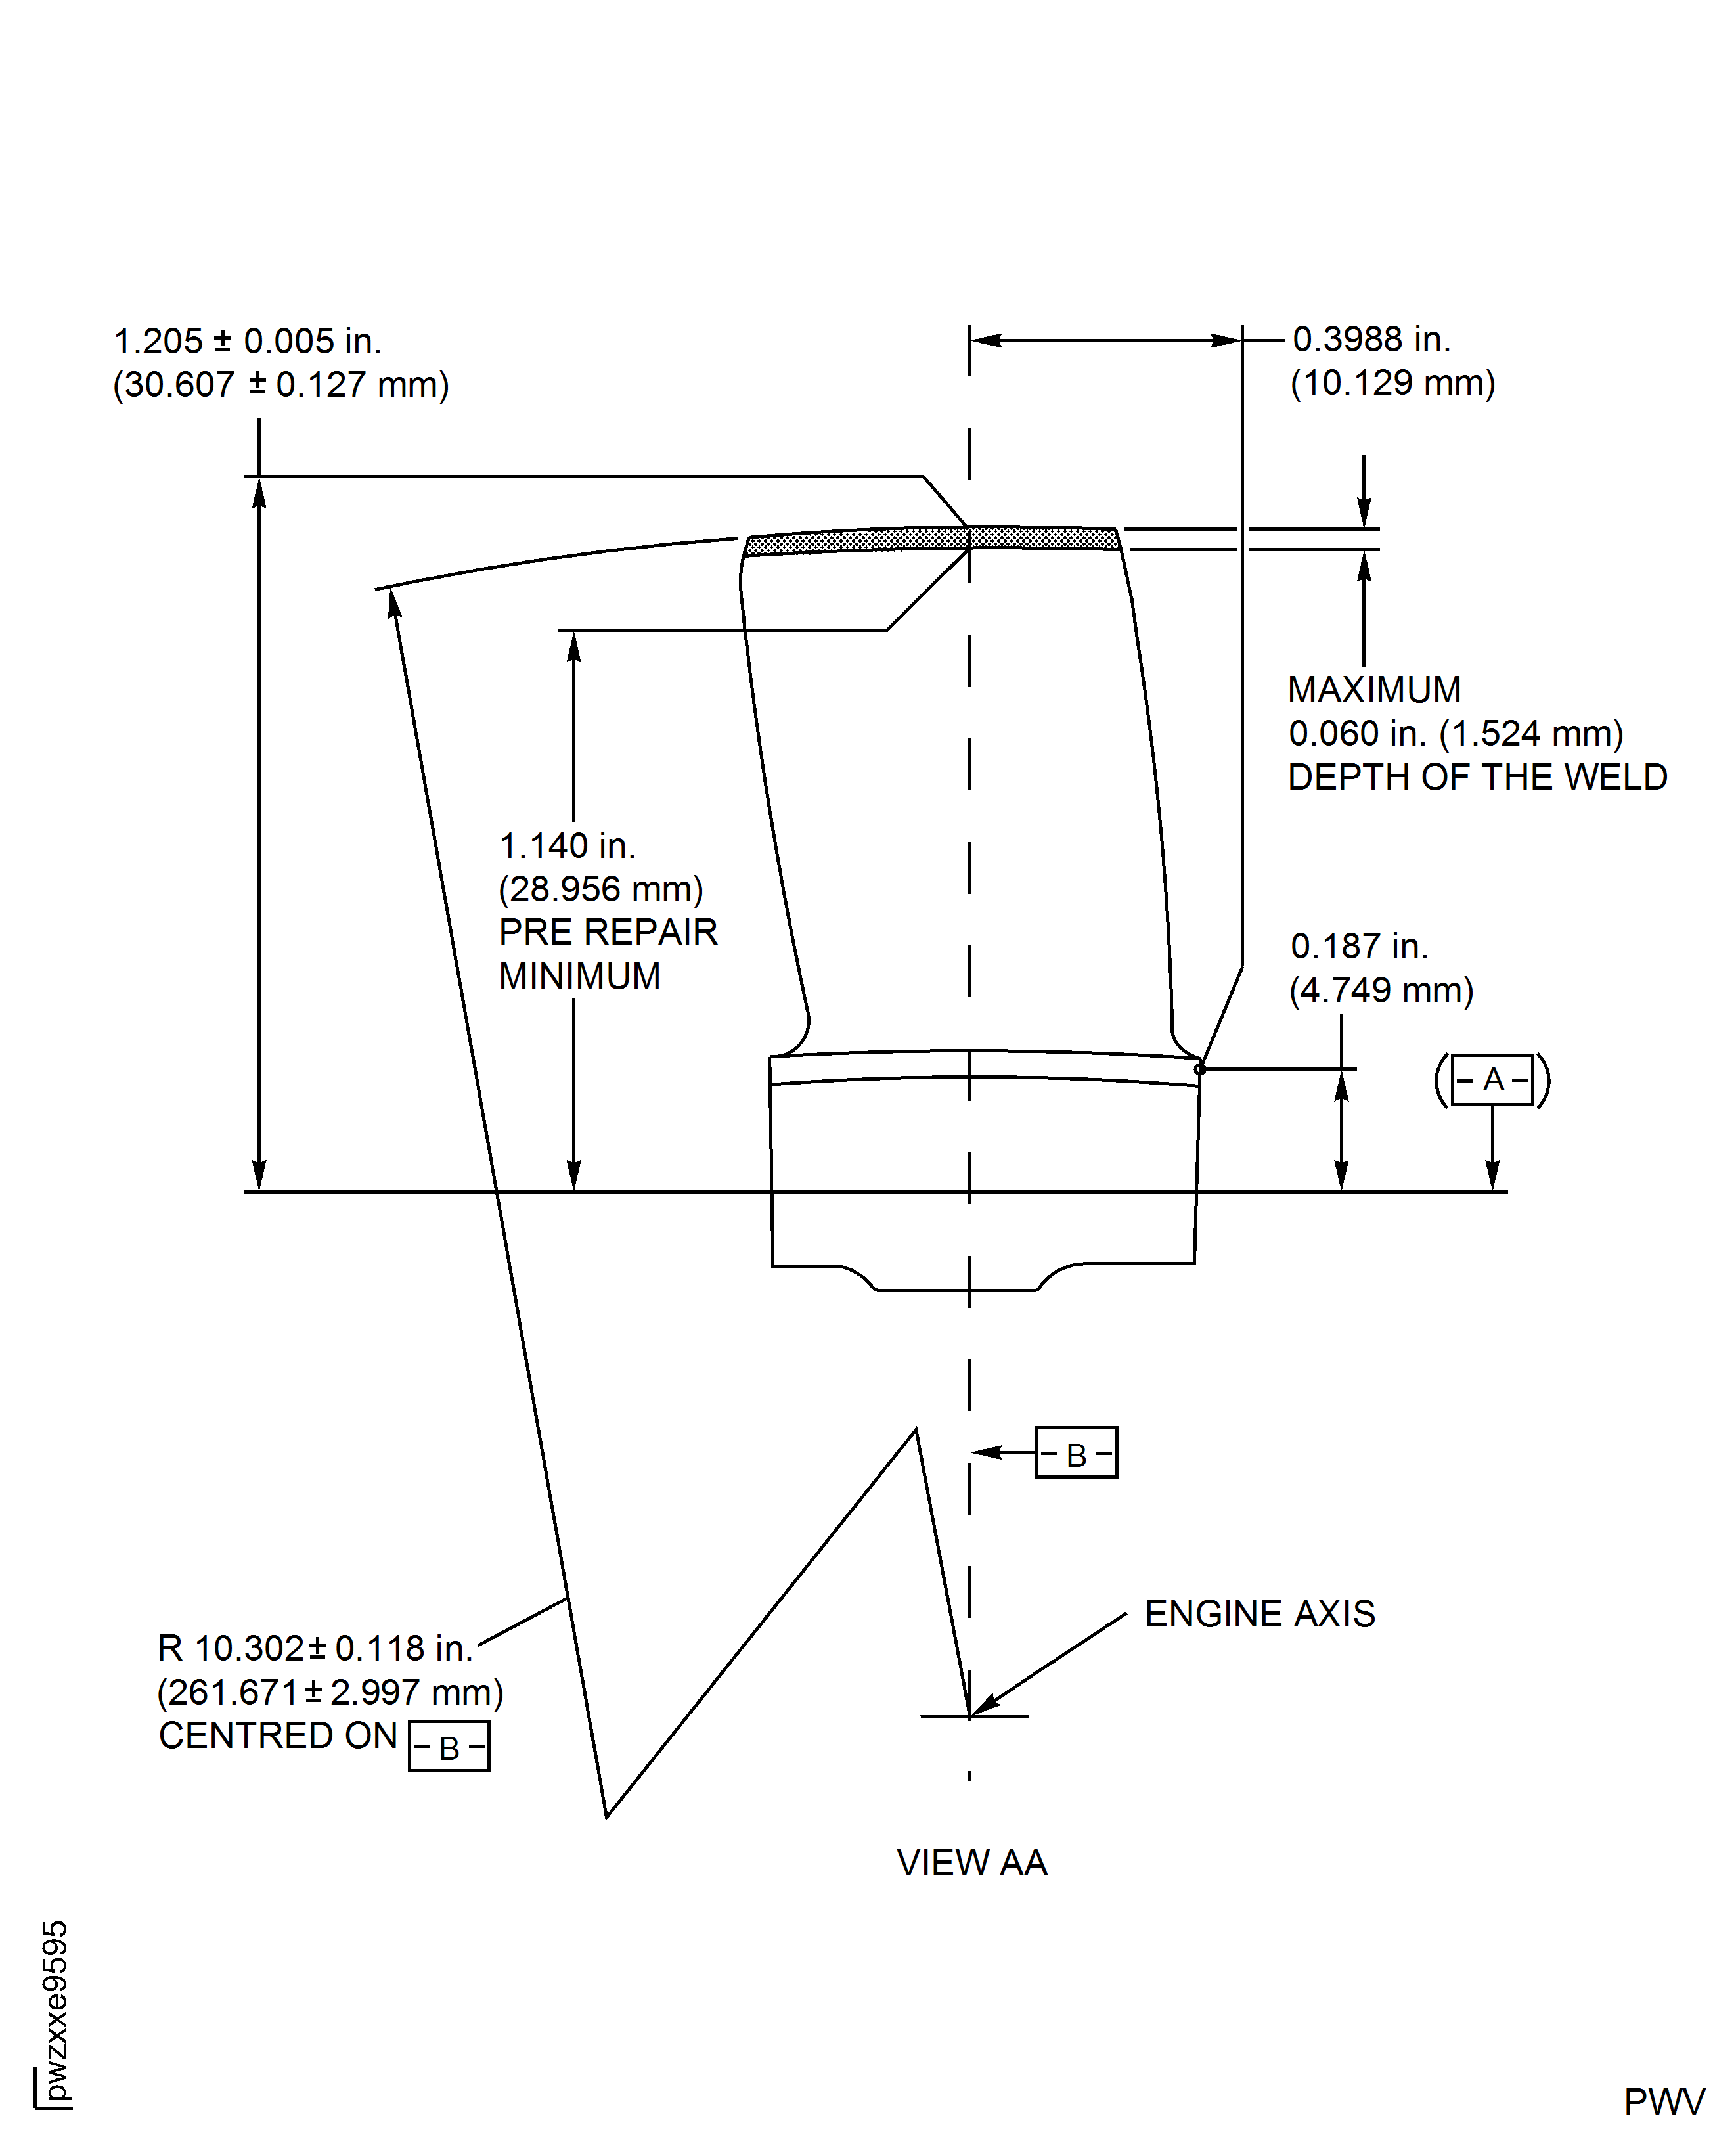
Figure: HP Compressor Stage 3 to 5 Rotor Blades (Assembly A to C) - Repair Details and Dimensions
HP Compressor Stage 3 to 5 Rotor Blades (Assembly A to C) - Repair Details and Dimensions
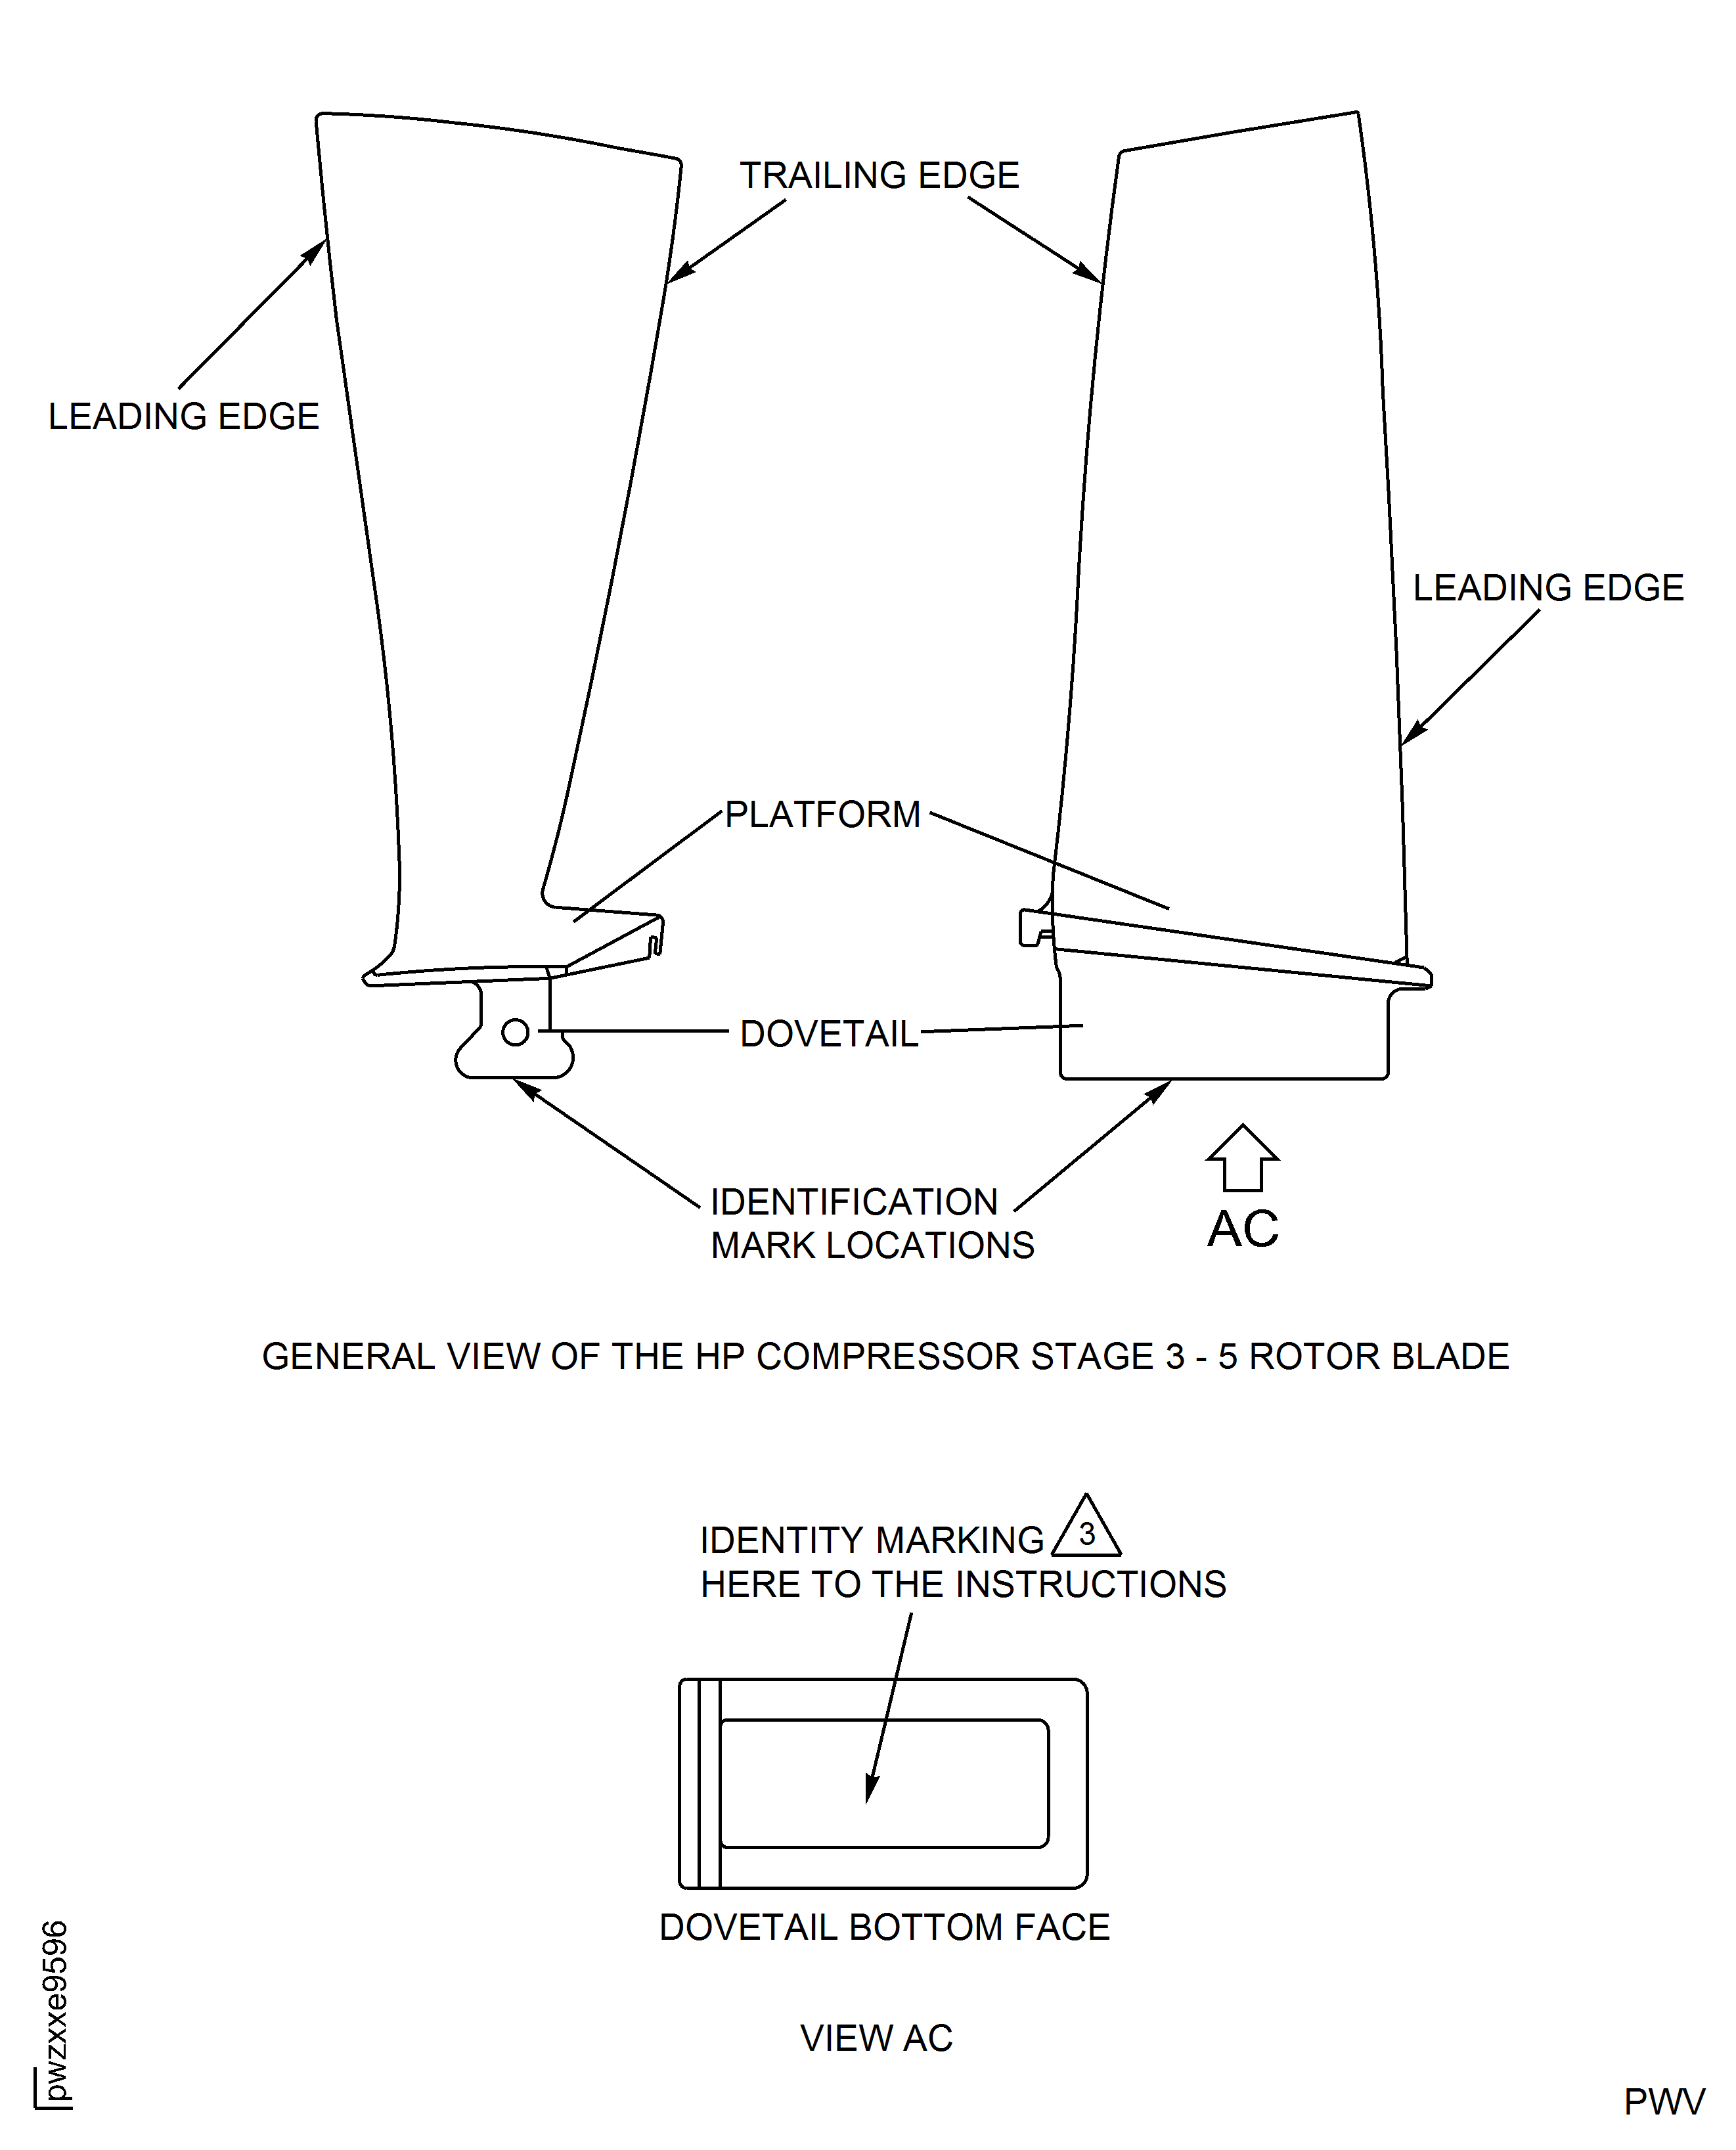
Figure: HP Compressor Stage 6 To 8 Rotor Blades (Assembly D To F) - Repair Details And Dimensions
HP Compressor Stage 6 To 8 Rotor Blades (Assembly D To F) - Repair Details And Dimensions
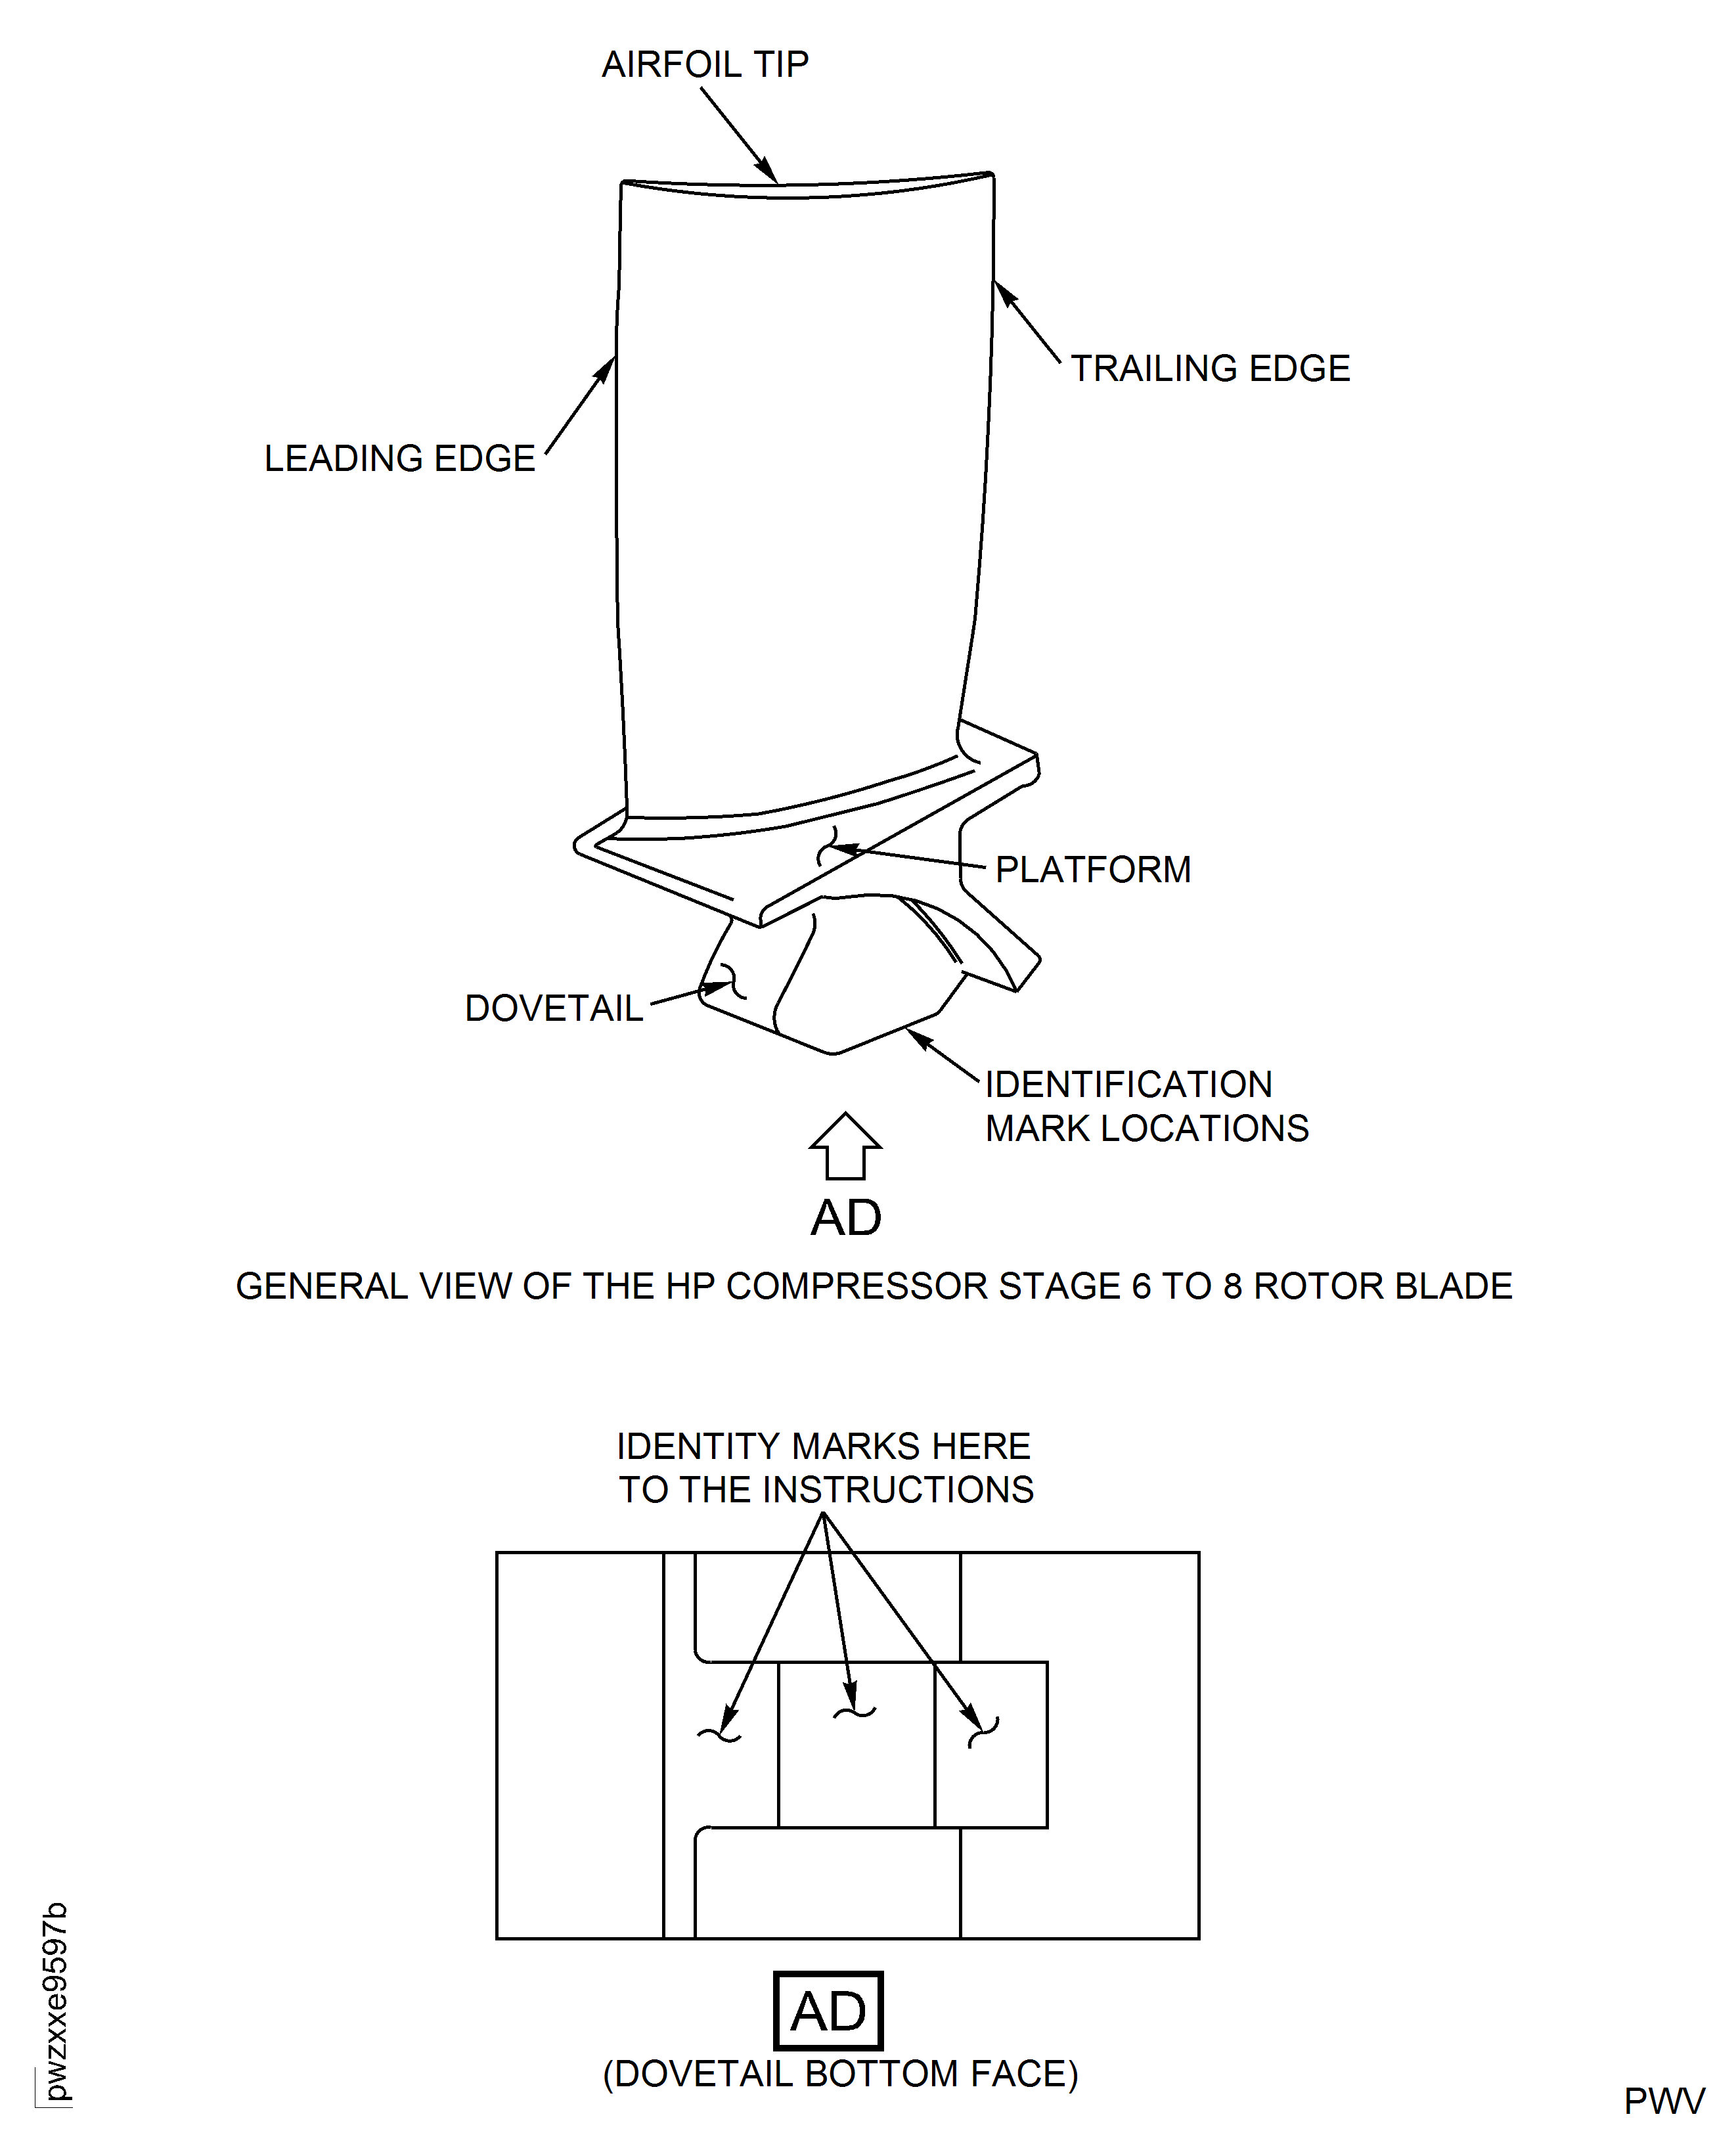
Figure: HP Compressor Stage 3 to 12 Rotor Blades (All Assemblies) - Repair Details and Dimensions
HP Compressor Stage 3 to 12 Rotor Blades (All Assemblies) - Repair Details and Dimensions
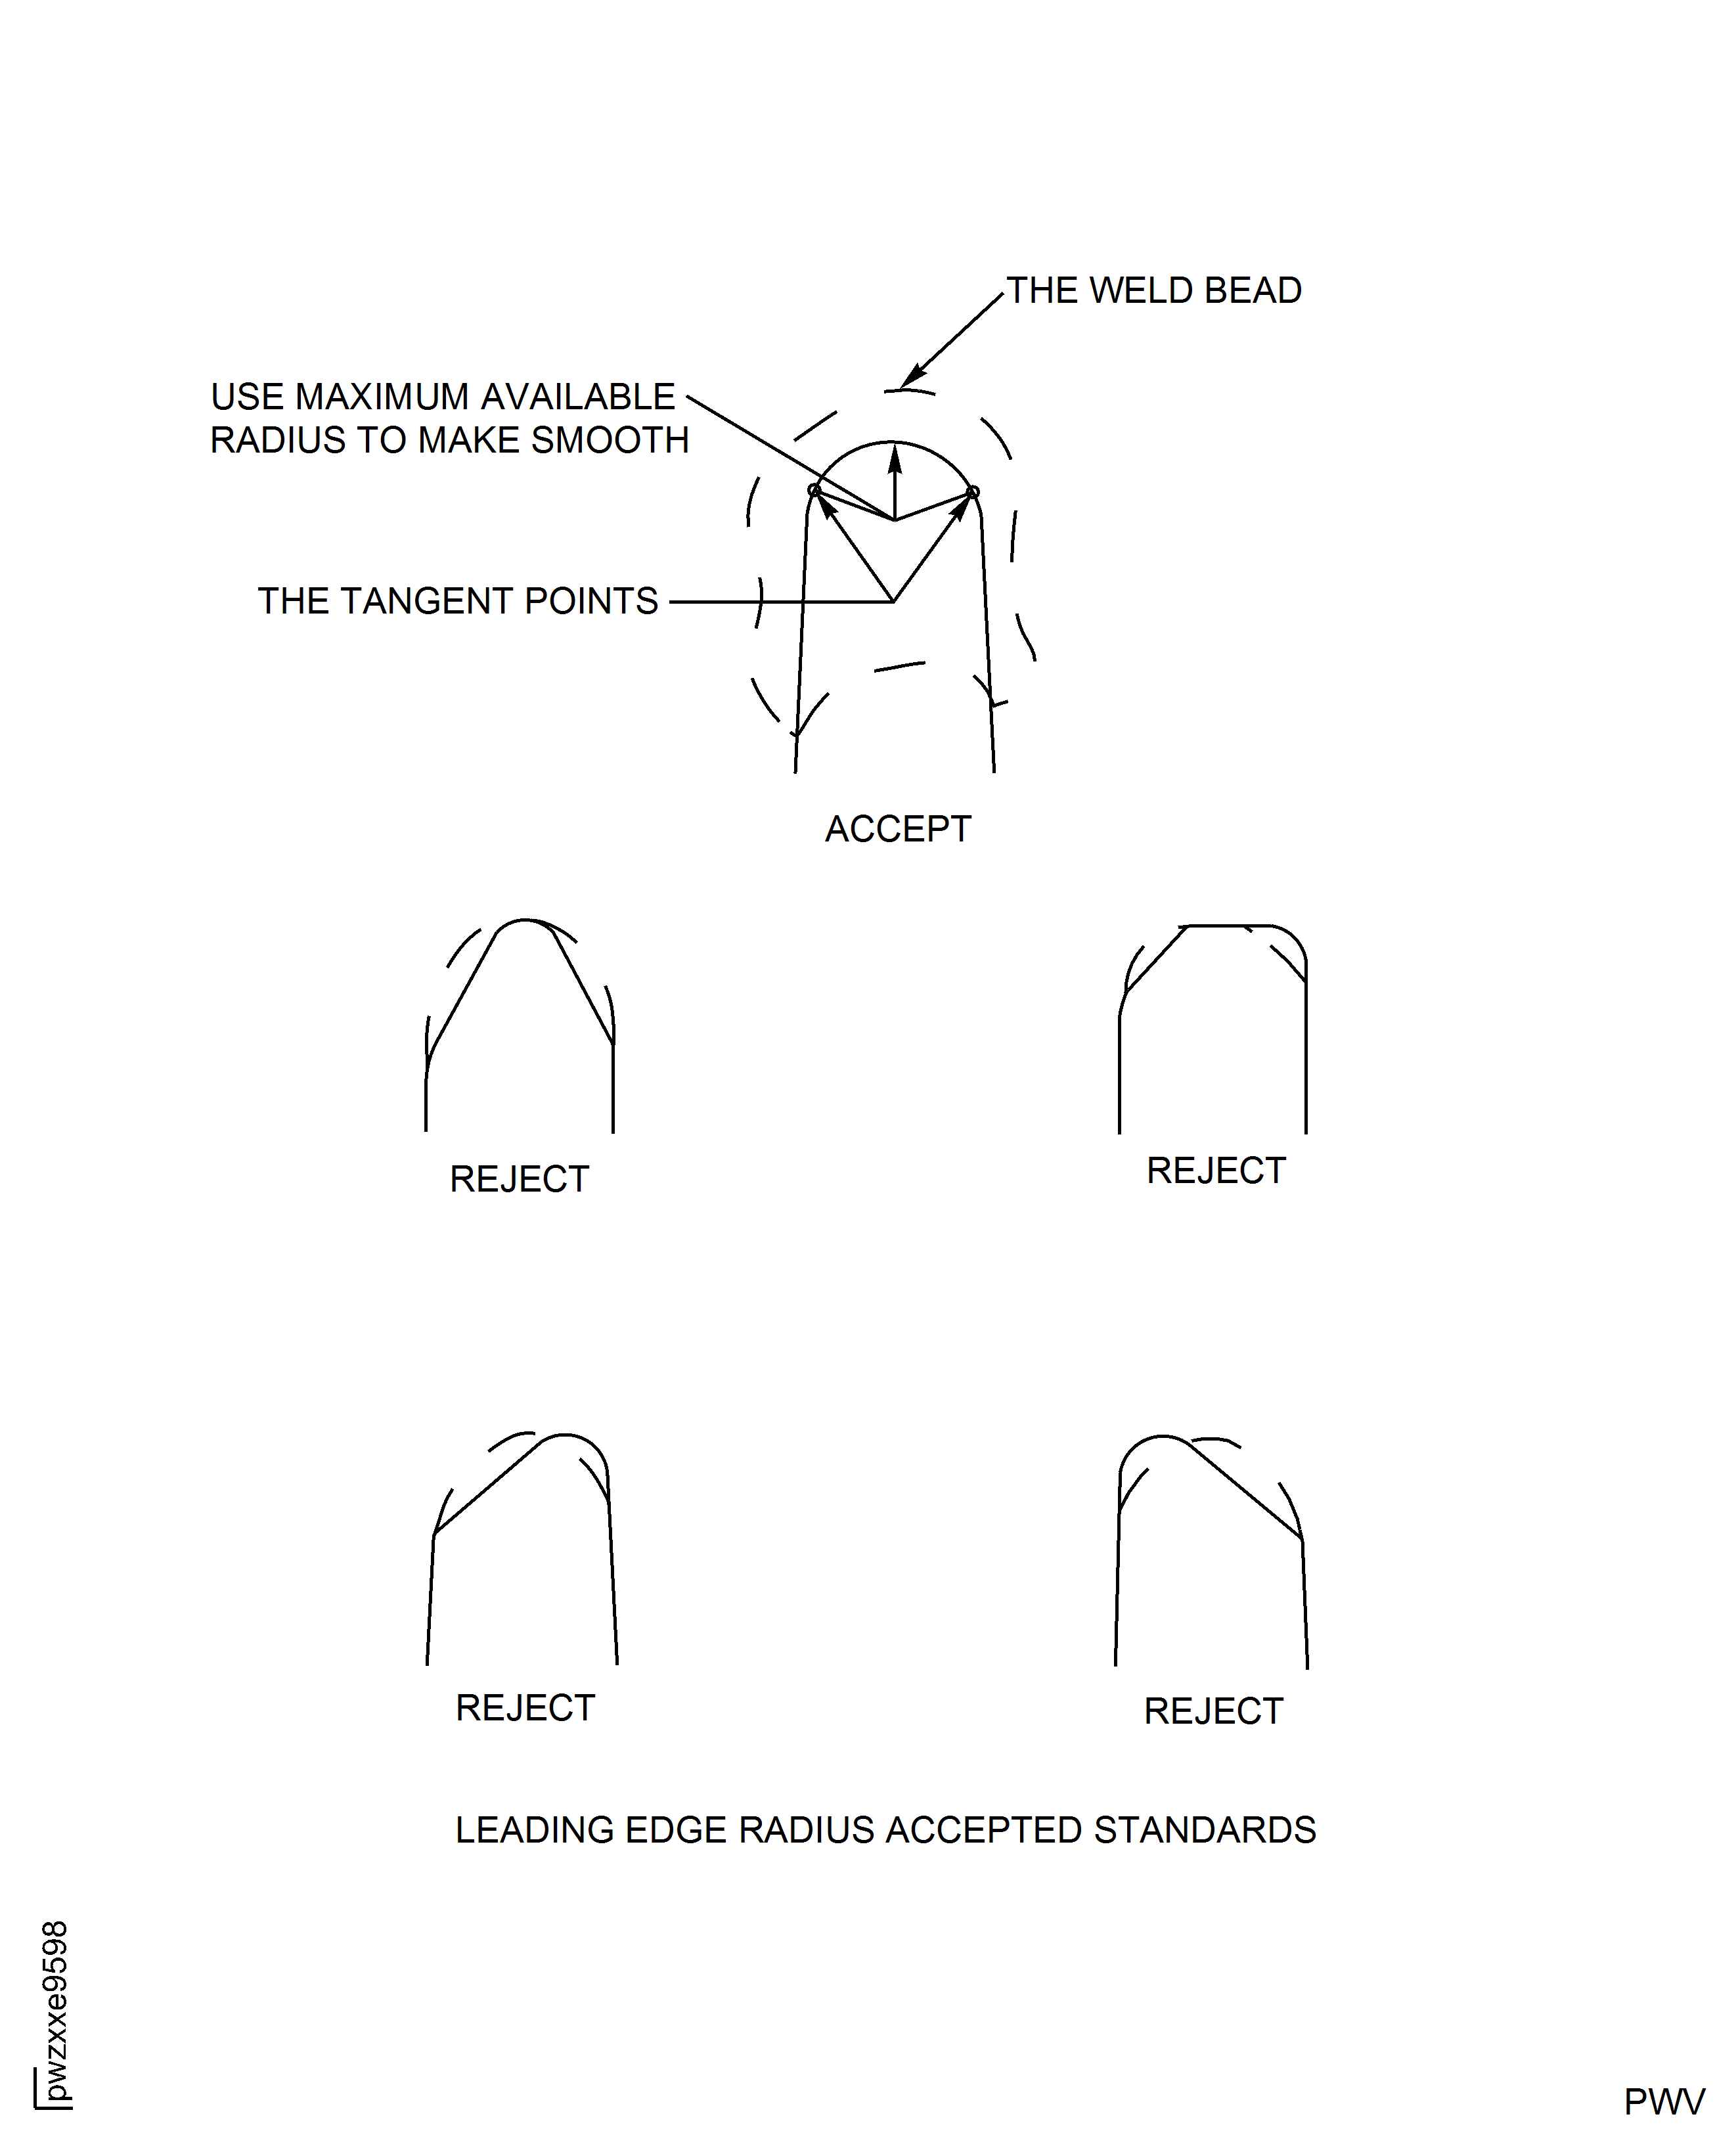
Figure: HP Compressor Stage 3 to 12 Rotor Blades (Assembly A to E and J) - Repair Details and Dimensions
HP Compressor Stage 3 to 12 Rotor Blades (Assembly A to E and J) - Repair Details and Dimensions
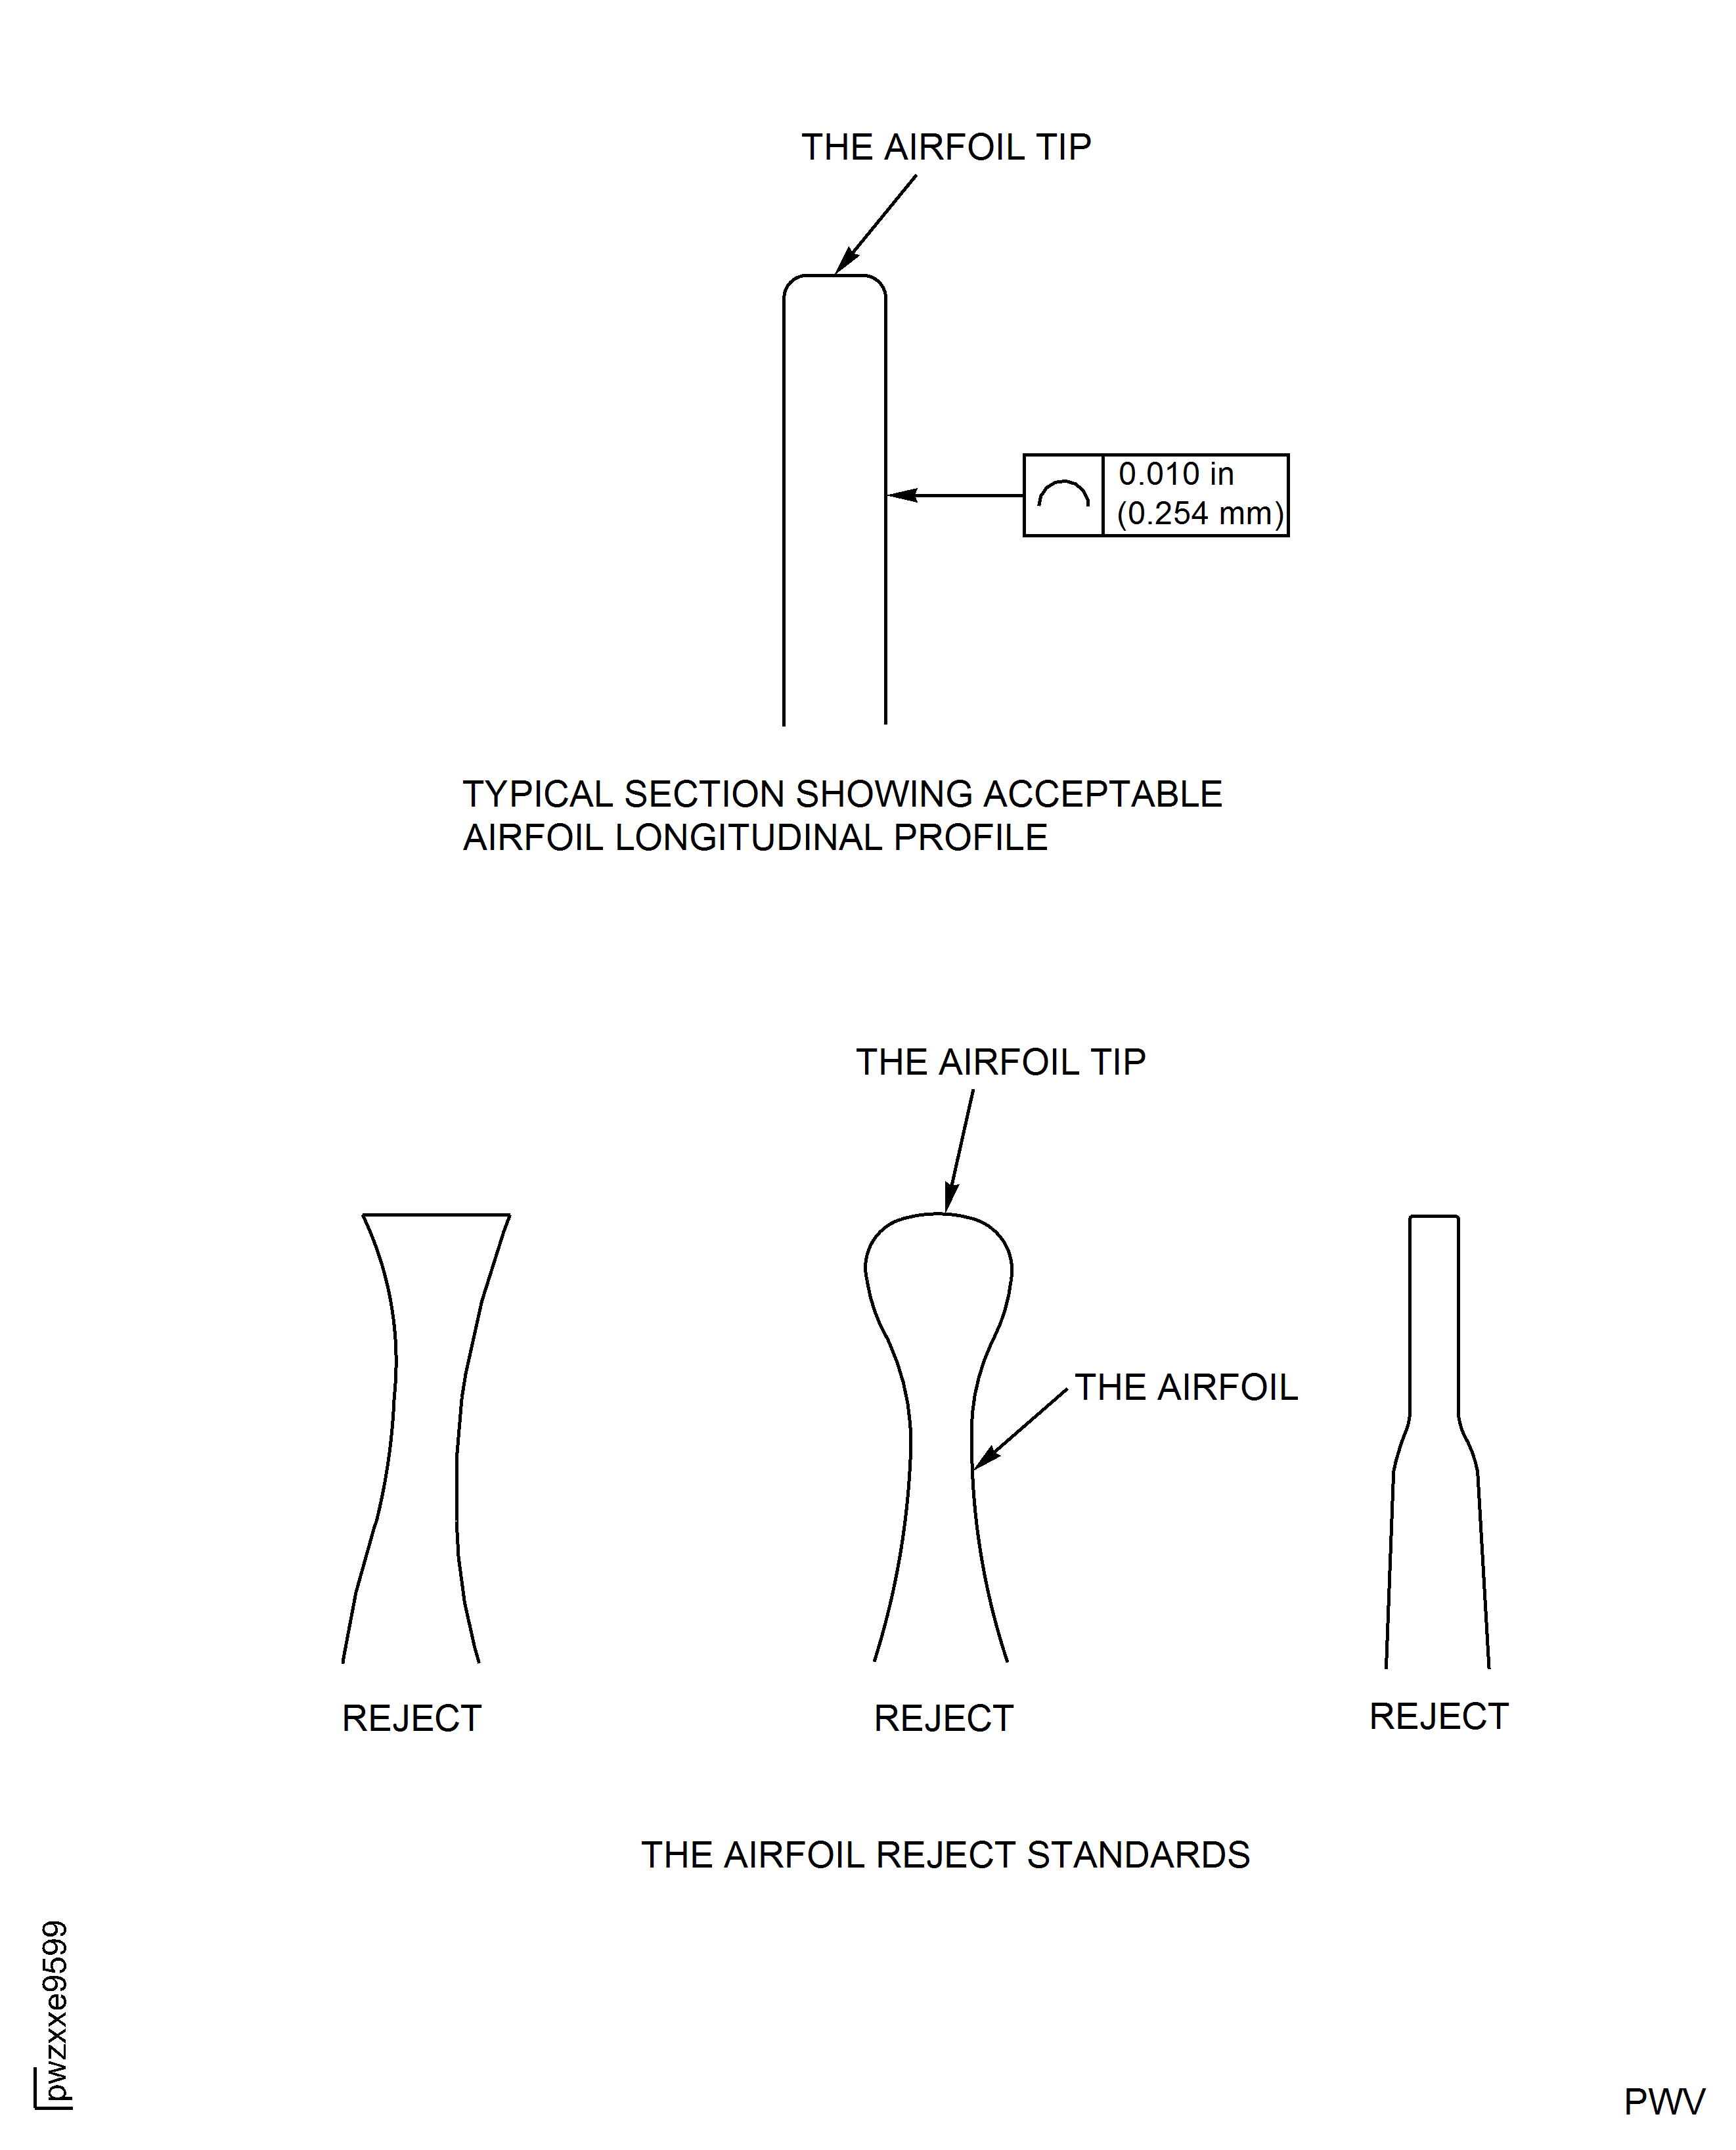
Figure: HP Compressor Stage 3 to 12 Rotor Blades (Assembly F to H and K) - Repair Details and Dimensions
HP Compressor Stage 3 to 12 Rotor Blades (Assembly F to H and K) - Repair Details and Dimensions
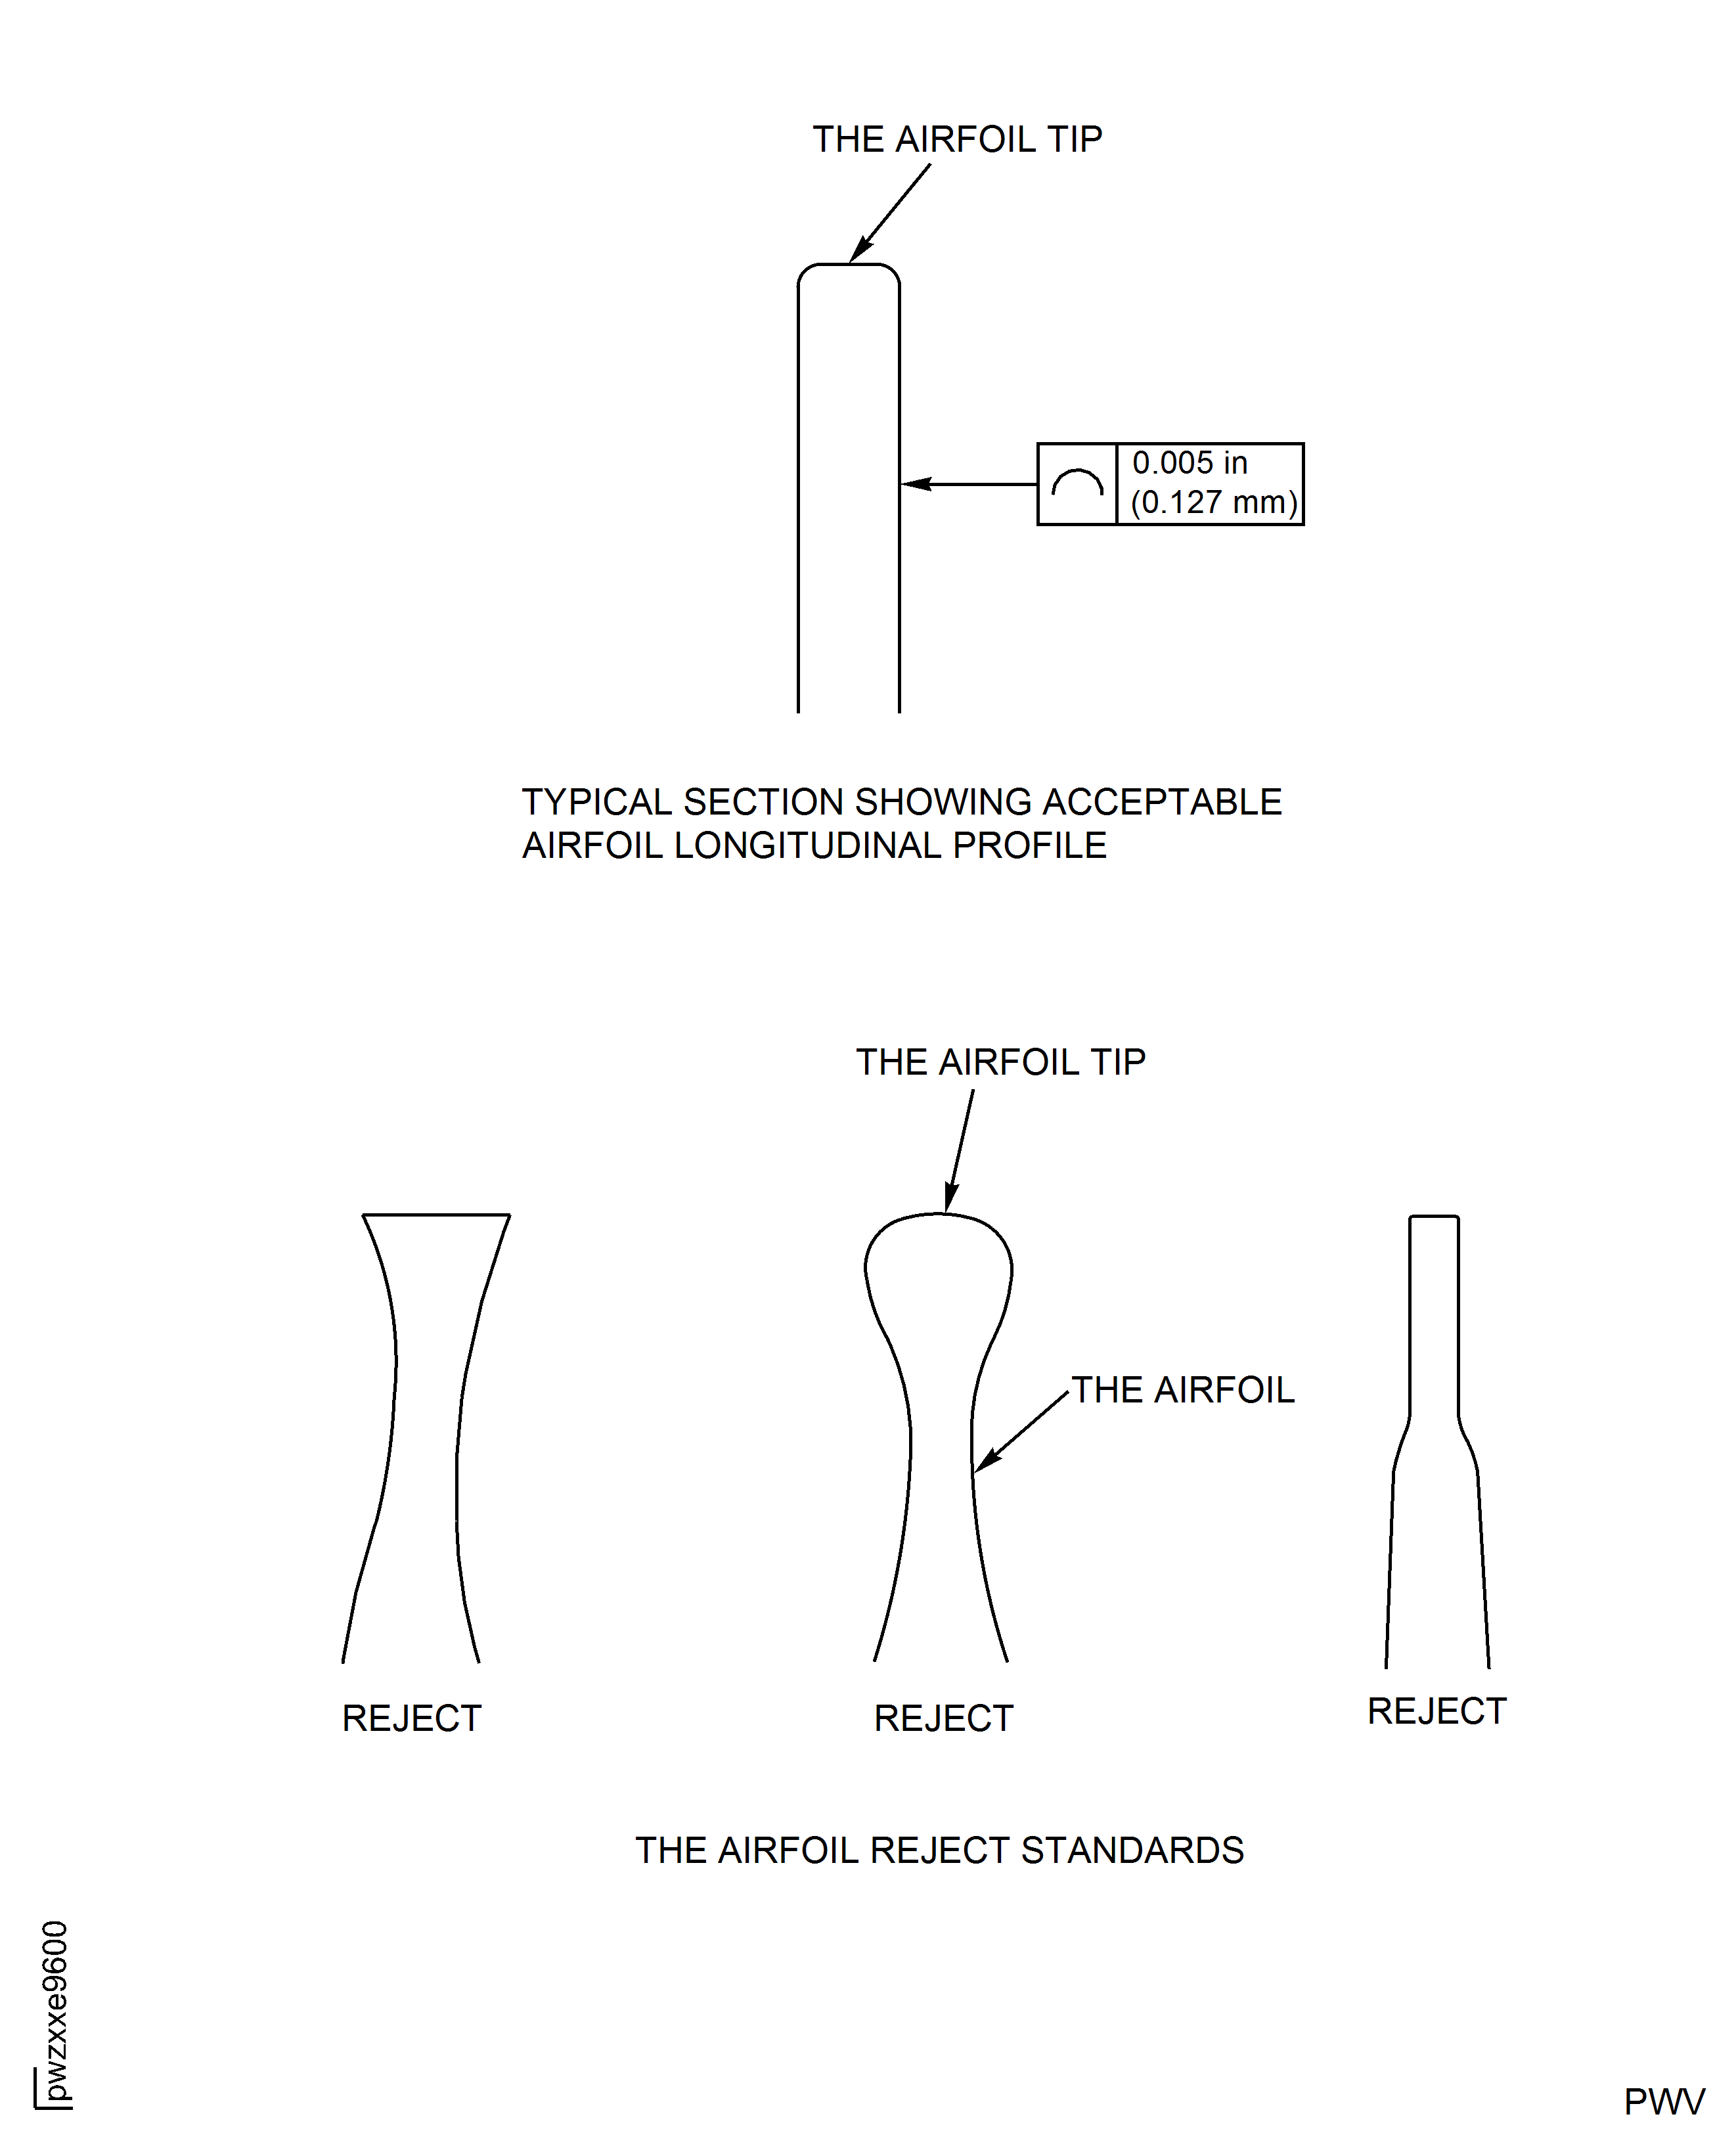
Figure: HP Compressor Stage 9 To 12 Rotor Blades (Assembly G To K) - Repair Marking Zones
HP Compressor Stage 9 To 12 Rotor Blades (Assembly G To K) - Repair Marking Zones
