Export Control
EAR Export Classification: Not subject to the EAR per 15 C.F.R. Chapter 1, Part 734.3(b)(3), except for the following Service Bulletins which are currently published as EAR Export Classification 9E991: SBE70-0992, SBE72-0483, SBE72-0580, SBE72-0588, SBE72-0640, SBE73-0209, SBE80-0024 and SBE80-0025.Copyright
© IAE International Aero Engines AG (2001, 2014 - 2021) The information contained in this document is the property of © IAE International Aero Engines AG and may not be copied or used for any purpose other than that for which it is supplied without the express written authority of © IAE International Aero Engines AG. (This does not preclude use by engine and aircraft operators for normal instructional, maintenance or overhaul purposes.).Applicability
All
Common Information
TASK 72-42-61-300-003 Outer Combustion Chamber Liner - Weld Repair The Hood And Outer Shell, Repair-003 (VRS3091)
Effectivity
FIG/ITEM | PART NO. |
|---|---|
01-501 | 2A0550-01 |
01-501 | 2A1383 |
01-501 | 2A1385 |
01-501 | 2A1399 |
01-501 | 2A1618 |
01-501 | 2A1620 |
01-501 | 2A2013 |
01-501 | 2A2032 |
01-501 | 2A2723-01 |
01-501 | 2A2837-01 |
01-501 | 2A3345-01 |
01-501 | 2A3345-001 |
01-501 | 2A3345-002 |
01-501 | 2A3345-003 |
01-501 | 2A3345-004 |
01-501 | 2A3347-01 |
01-501 | 2A3347-001 |
01-501 | 2A3347-002 |
01-501 | 2A3347-003 |
01-501 | 2A3347-004 |
01-501 | 2A3347-005 |
01-501 | 2A3439-01 |
01-501 | 2A3439-001 |
01-501 | 2A3439-002 |
01-501 | 2A3439-003 |
01-501 | 2A3439-004 |
01-501 | 2A3439-005 |
01-501 | 2A3439-006 |
01-501 | 2A3439-007 |
01-501 | 2A3439-008 |
01-501 | 2A3440-01 |
01-501 | 2A3440-001 |
01-501 | 2A3440-002 |
01-501 | 2A3440-003 |
01-501 | 2A3440-004 |
01-501 | 2A3440-005 |
01-501 | 2A3440-006 |
01-501 | 2A3440-007 |
01-501 | 2A3441-01 |
01-501 | 2A3441-001 |
01-501 | 2A3441-002 |
01-501 | 2A3441-003 |
01-501 | 2A3441-004 |
01-501 | 2A3441-005 |
01-501 | 2A3441-006 |
01-501 | 2A3441-007 |
01-501 | 2A3441-008 |
01-501 | 2A3442-01 |
01-501 | 2A3442-001 |
01-501 | 2A3442-002 |
01-501 | 2A3442-003 |
01-501 | 2A3442-004 |
01-501 | 2A3442-005 |
01-501 | 2A3442-006 |
01-501 | 2A3442-007 |
01-501 | 2A3442-008 |
01-501 | 2A4284-01 |
01-501 | 2A4309-01 |
01-501 | 2A4312-01 |
01-501 | 2A4314-01 |
01-501 | 2A4314-001 |
01-520 | 2A2711-01 |
Material of component
DESCRIPTION | SYMBOL | MATERIAL |
|---|---|---|
Combustion chamber outer liner | - | Hastelloy X/Inconel 625 |
General
Price and availability - refer to IAE.
The practices and processes referred to in the procedure by the TASK numbers are in SPM.
NOTE
Preliminary Requirements
Pre-Conditions
NONESupport Equipment
| Name | Manufacturer | Part Number / Identification | Quantity | Remark |
|---|---|---|---|---|
| Bore mill | LOCAL | Bore mill | (Optional) | |
| Cut-off wheel | LOCAL | Cut-off wheel | (hand held) | |
| Laser drill | LOCAL | Laser drill | Laserdyne 780 or equivalent (Optional) | |
| Lathe | LOCAL | Lathe | (6 inch minimum) (Optional) | |
| Milling machine | LOCAL | Milling machine | Omnimill Series 80 or equivalent (Optional) |
Consumables, Materials and Expendables
| Name | Manufacturer | Part Number / Identification | Quantity | Remark |
|---|---|---|---|---|
| DELETED | X111X | DELETED | ||
| CoMat 02-182 METAL FOIL TAPE | 76381 | CoMat 02-182 | ||
| CoMat 03-197 WELDING FILLER WIRE | LOCAL | CoMat 03-197 | ||
| CoMat 03-287 WELDING FILLER WIRE | LOCAL | CoMat 03-287 | ||
| CoMat 03-334 IN 625 SHEET STOCK | LOCAL | CoMat 03-334 | ||
| CoMat 03-335 HASTELLOY X SHEET STOCK | LOCAL | CoMat 03-335 | ||
| CoMat 03-494 INCONEL 625 SHEET STOCK, 0.041 - 0.046 INCH THICK | LOCAL | CoMat 03-494 | ||
| CoMat 06-072 DYE | 0AM53 | CoMat 06-072 |
Spares
| Name | Manufacturer | Part Number / Identification | Quantity | Remark |
|---|---|---|---|---|
| NUT, OPTION - .190 DIA | 0AM53 | 4W0001 | AR | 01-780 |
Safety Requirements
NONEProcedure
Refer to Repair, VRS3092 TASK 72-42-61-300-004 (REPAIR-004), Repair, VRS3094 TASK 72-42-61-300-006 (REPAIR-006), Repair, VRS3095 TASK 72-42-61-300-007 (REPAIR-007), Repair, VRS3096 TASK 72-42-61-300-008 (REPAIR-008) or Repair, VRS3540 TASK 72-42-61-300-015 (REPAIR-015).
Remove the liner segments, the combustion chamber retaining bolt bushings, the access cover, the fuel nozzle guides and the bulkhead segments.
SUBTASK 72-42-61-350-055 Remove the Detail Parts from the Combustion Chamber Outer Liner
Refer to Figure.
Refer to the SPM TASK 70-11-03-300-503, SPM TASK 70-11-01-300-503 or SPM TASK 70-12-01-120-501.
Moderately clean or vapor blast the liner to remove debris and fragments.
SUBTASK 72-42-61-110-053 Clean the Damaged Combustion Chamber Outer Liner
Refer to the SPM TASK 70-23-03-230-501 or SPM TASK 70-23-08-230-501 and SPM TASK 70-23-05-230-501.
Make sure you examine all surfaces in addition to the damaged areas.
Cracks associated with the hood/bulkhead cooling holes are permitted as is up to 0.020 in. (0.508 mm) in length.
Cooling holes are 0.042 in. (1.0668 mm) diameter reference.
Fluorescent penetrant inspect the liner.
If the areas are only in the hood/bulkhead and each area is less than 0.100 sq in. (65 sq mm), do the procedure in Step.
If the areas are only in the hood/bulkhead and one or more areas are more than 0.100 sq in. (65 sq mm), do the procedure in Step.
If the areas are only in the shell and each area is less than 0.070 sq in. (45 sq mm), do the procedure in Step.
If the areas are only in the shell and one or more areas are more than 0.070 sq in. (45 sq mm), do the procedure in Step.
If the areas are only in the rear seal and each area is less than 0.100 sq in. (65 sq mm), do the procedure in Step.
Optional: Solution heat treat of the combustion chamber liner.
Solution heat treat the inner liner by SPM TASK 70-37-24-370-501 at operator discretion.
If the areas cross the hood/bulkhead and the shell and each area is less than 0.070 sq in. (45 sq mm), do the procedure in Step.
If the areas cross the hood/bulkhead and the shell and one or more areas are more than 0.070 sq in. (45 sq mm), do the procedure in Step.
If the areas cross the shell and the rear seal and each area is less than 0.070 sq in. (45 sq mm), do the procedure in Step.
Examine for the locations and dimensions of the areas where you removed material.
SUBTASK 72-42-61-230-051 Examine the Damaged Combustion Chamber Outer Liner
Refer to the SPM TASK 70-31-13-310-501, IAE 16-3.
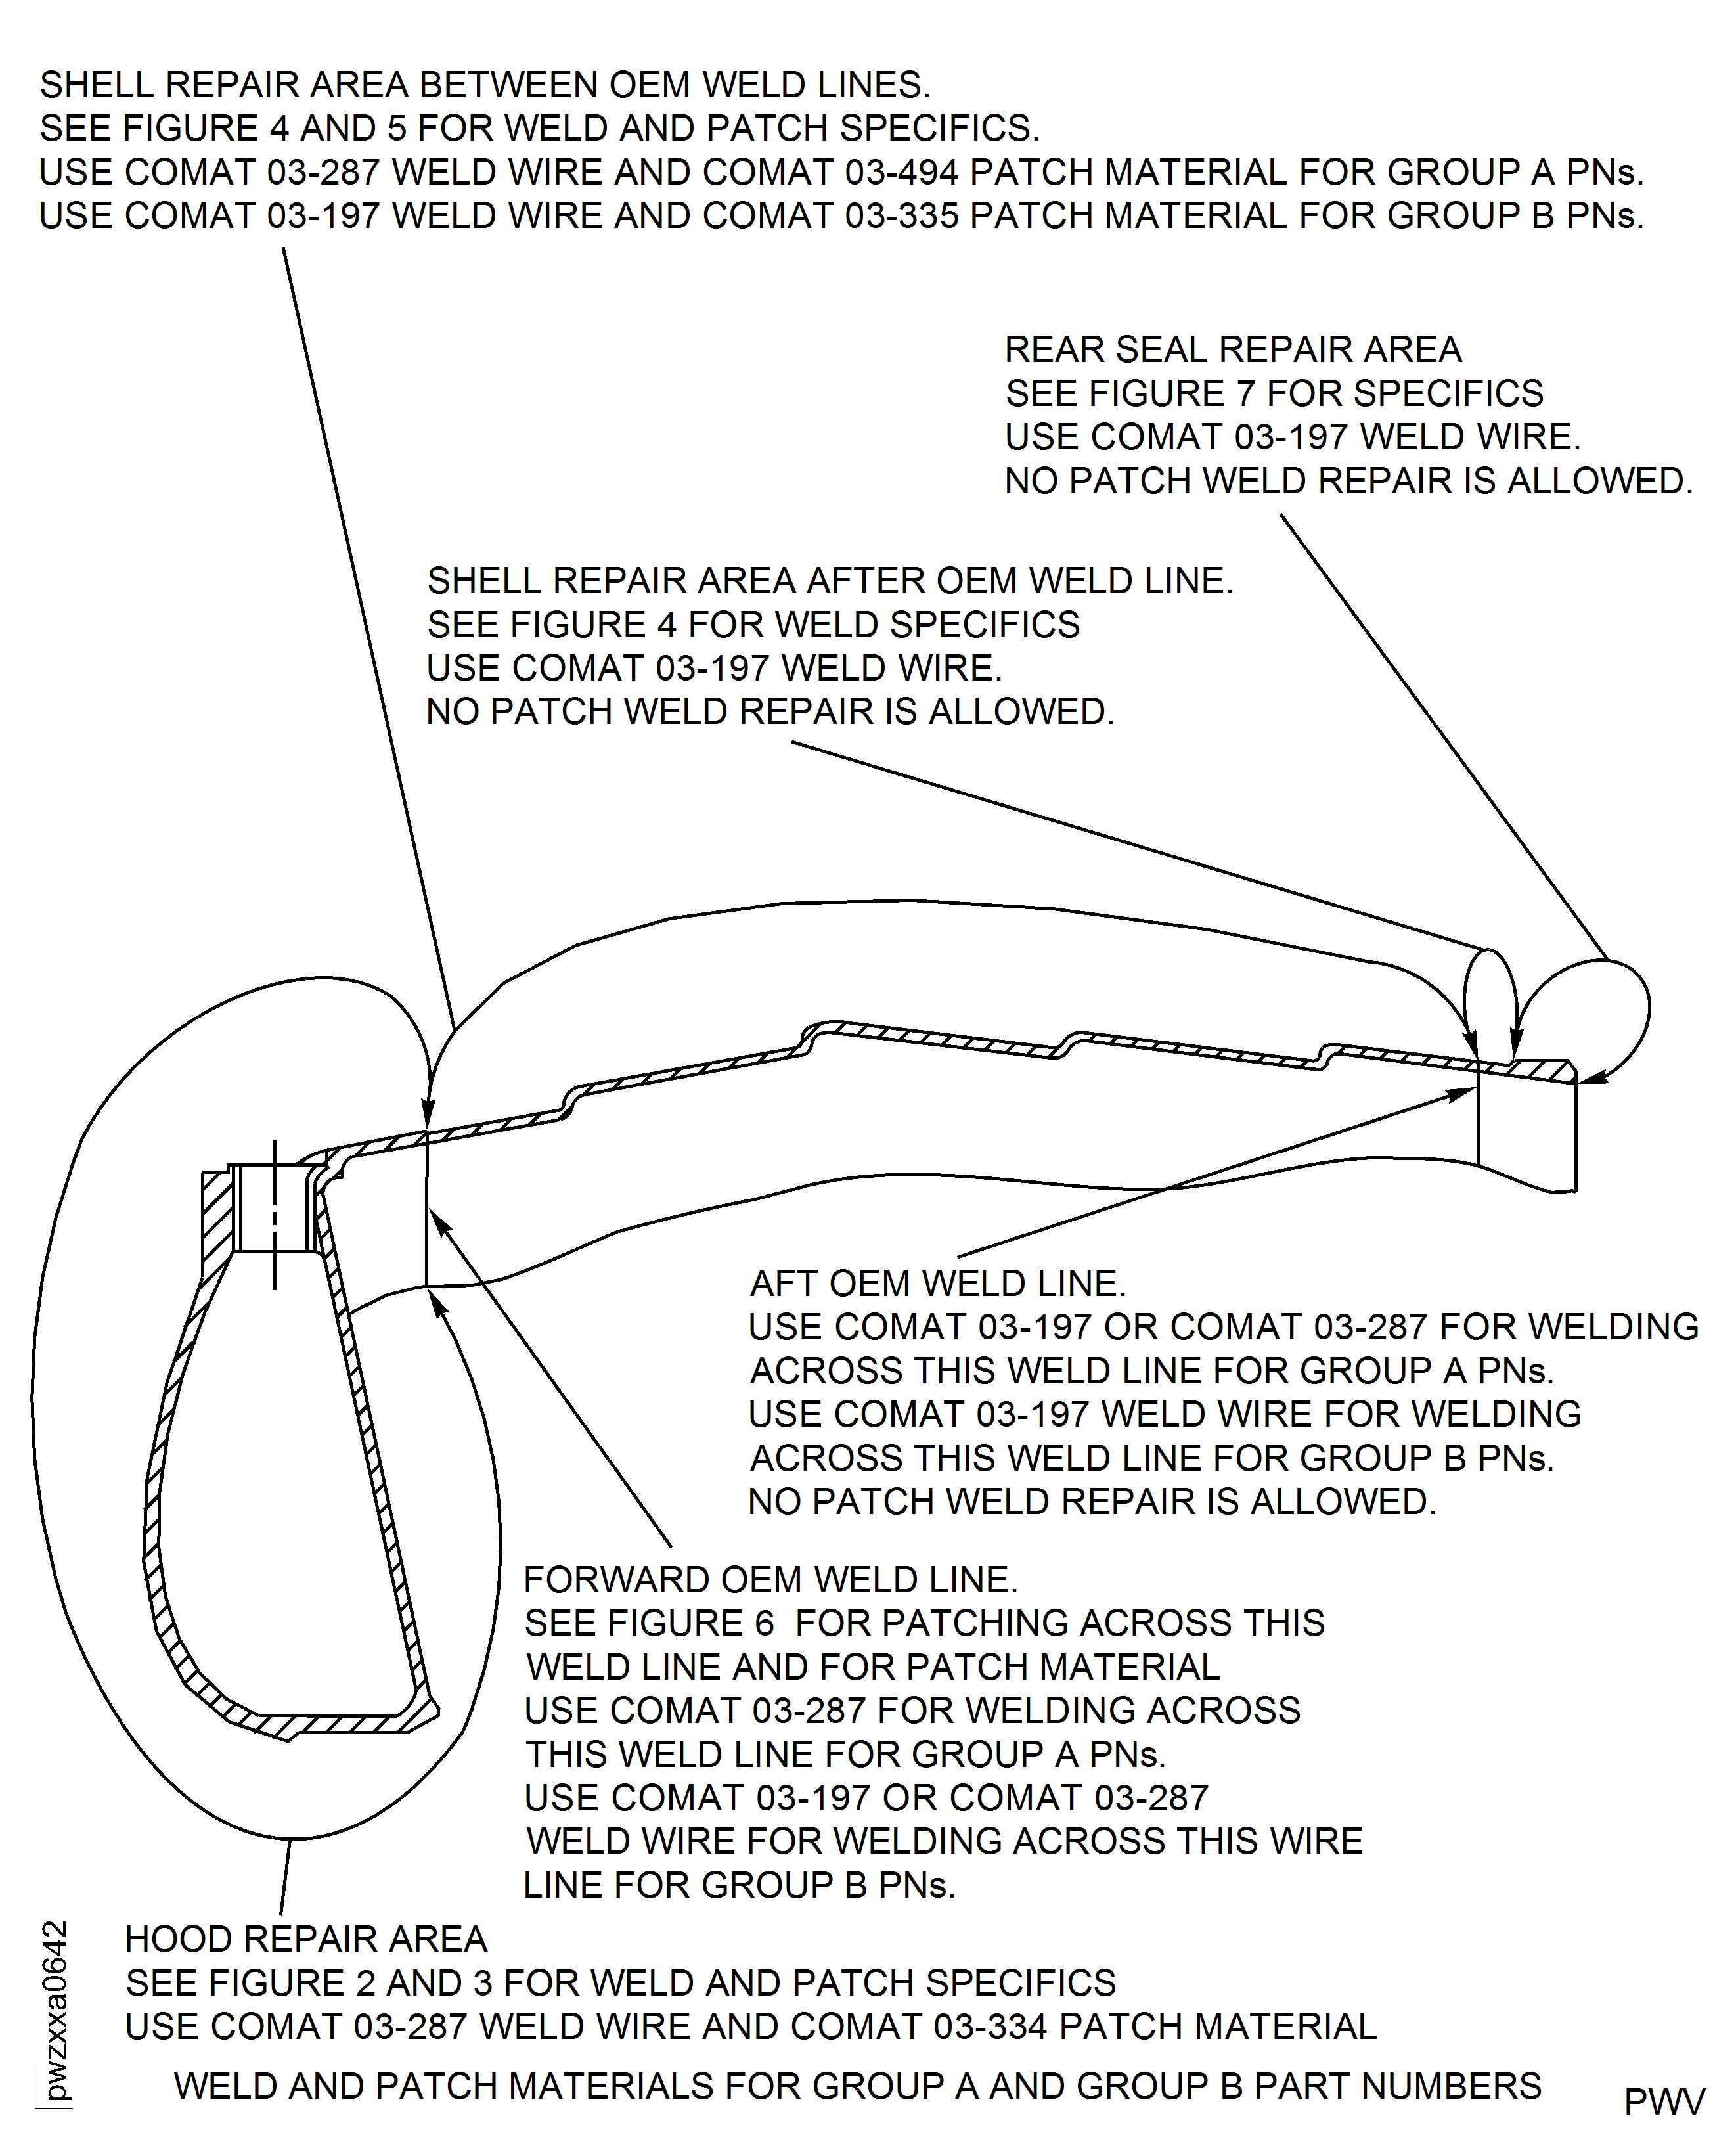
Use the applicable CoMat welding filler wire.
Refer to Figure.
The total area of all weld repairs must not be more than 2.5 sq in. (1613 sq mm). The contour of the welded areas must be in 0.020 in. (0.508 mm) on both sides of perfect form. Cold work of the hood/bulkhead to restore the form is not recommended.
Remove and apply the coating again if coating overlaps the area to be weld repaired.
Weld repair the prepared areas.
Refer to Step.
Locally stress-relieve the liner after weld repair.
SUBTASK 72-42-61-310-051 Weld Repair the Hood/Bulkhead
Refer to the SPM TASK 70-31-13-310-501, IAE 16-3.
Use the applicable CoMat welding filler wire.
Refer to Figure.
Refer to Figurefor weld areas. Cold work of the hood/bulkhead to restore the form is not recommended.
Tack the patch in place and weld.
Refer to Step.
Locally stress-relieve the liner after weld repair.
SUBTASK 72-42-61-310-054 Patch Weld Repair the Hood/Bulkhead
Refer to the SPM TASK 70-31-13-310-501, IAE 16-3.
Use the applicable CoMat welding filler wire.
Refer to Figure.
The total area of all weld repairs must not be more than 1.0 sq in. (645 sq mm). The contour of the welded areas must be in 0.020 in. (0.508 mm) on both sides of perfect forms.
Weld repair the prepared areas.
Refer to Figure.
Finish the weld on the inside in 0.010 in. (0.254 mm) above or 0.005 in. (0.127 mm) below the base material. Finish the weld on the outside in 0.010 in. (0.254 mm) above the base metal.
Refer to Step.
Locally stress-relieve the liner after weld repair.
Refer to Step.
Make sure that all details are removed. It is recommended that the mount pins, the front seal and the rear seal be held in a fixture to prevent distortion.
Cold work the shell to restore the form if necessary.
Stress-relieve the entire liner again if you cold worked the liner.
SUBTASK 72-42-61-310-055 Weld Repair the Shell
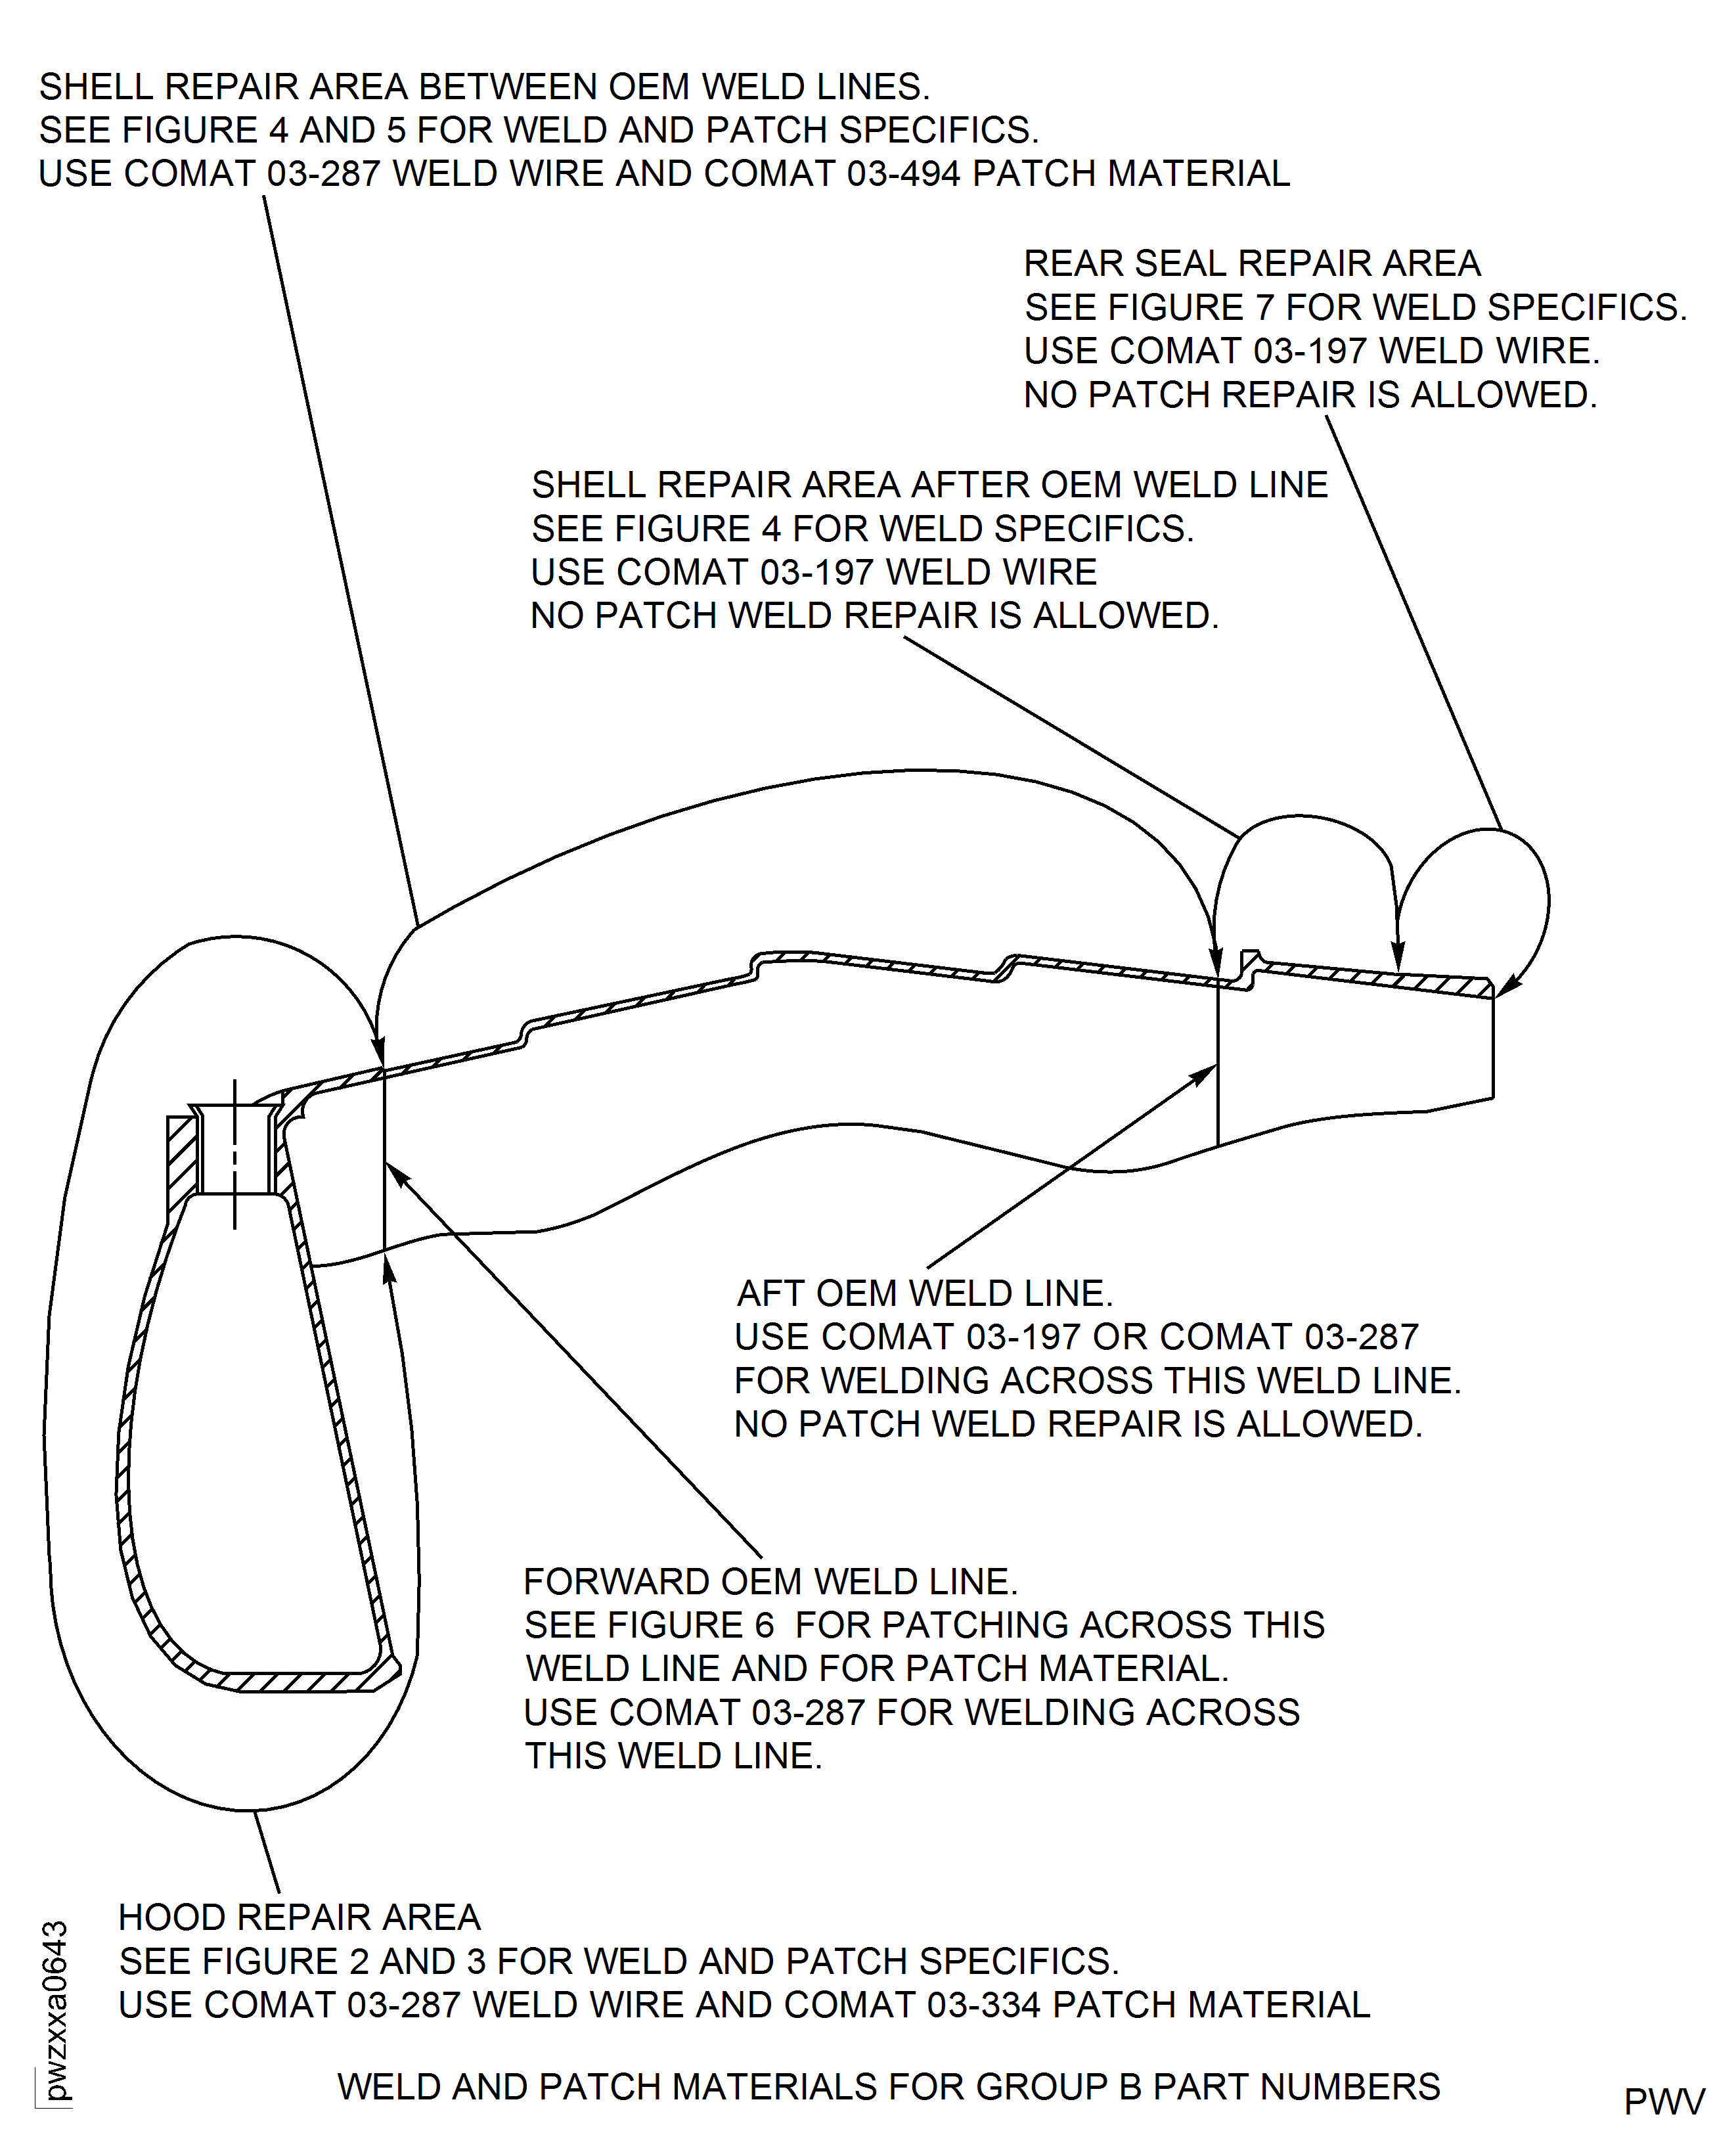
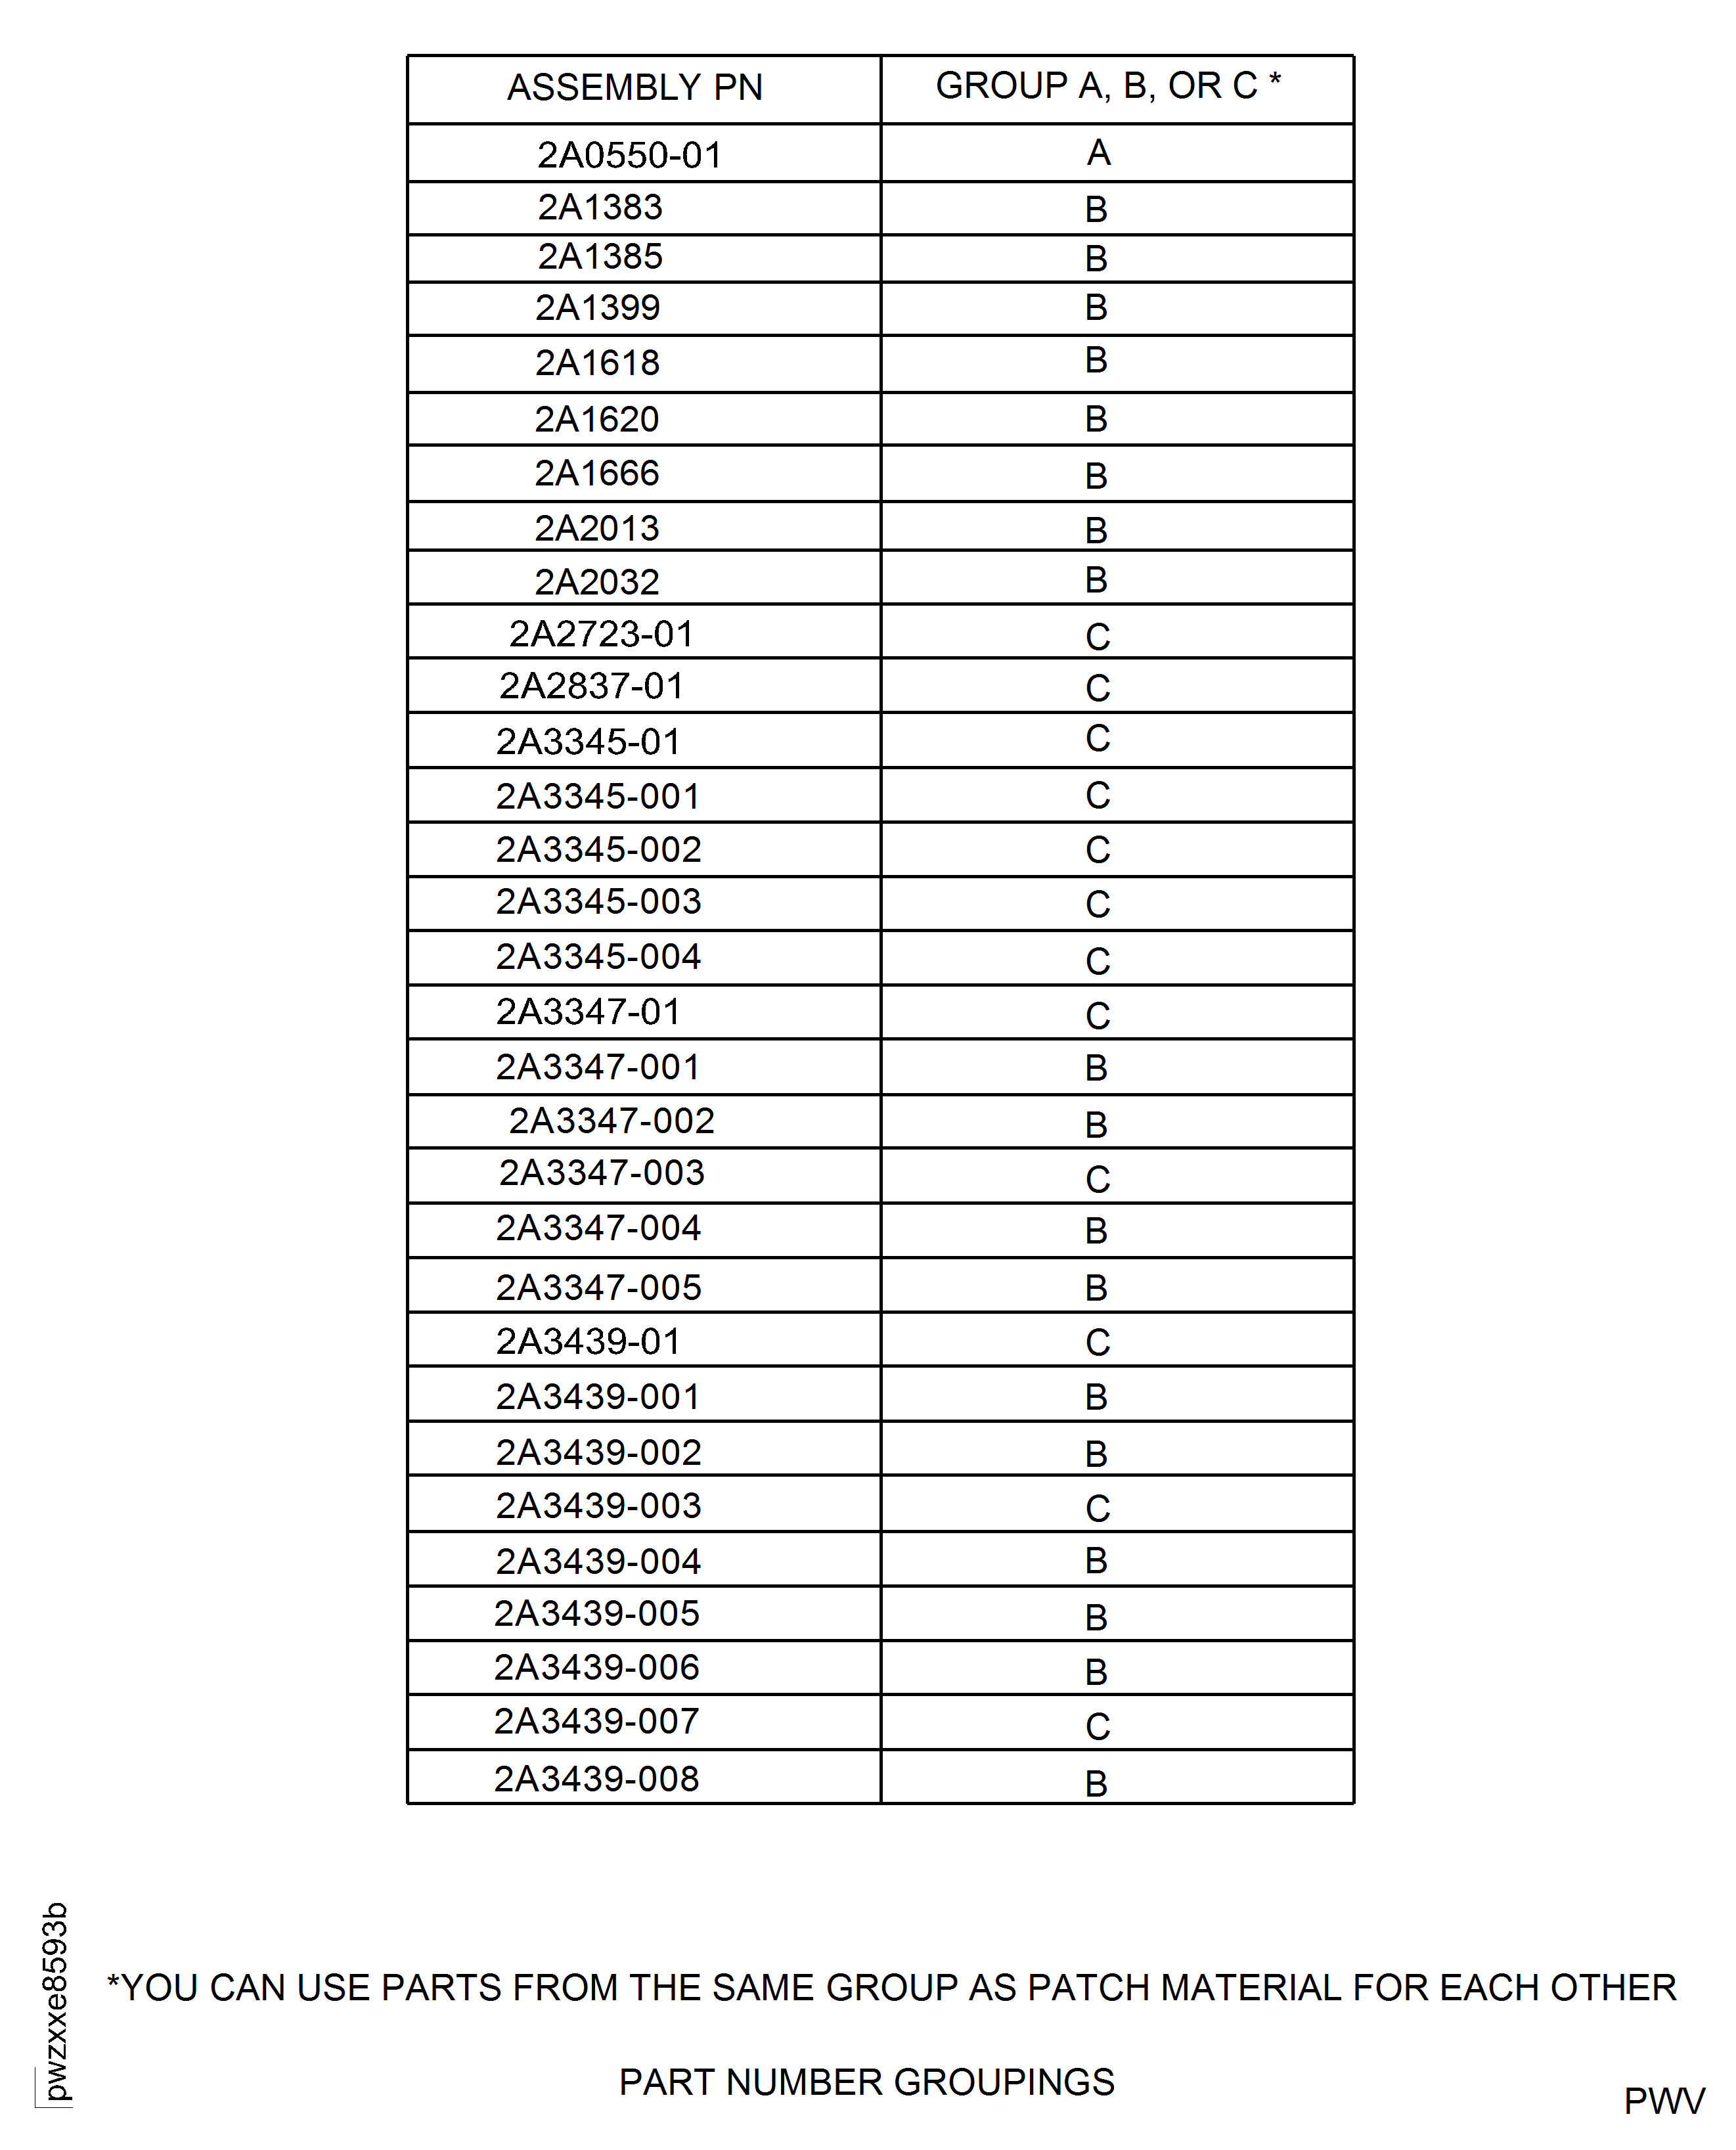
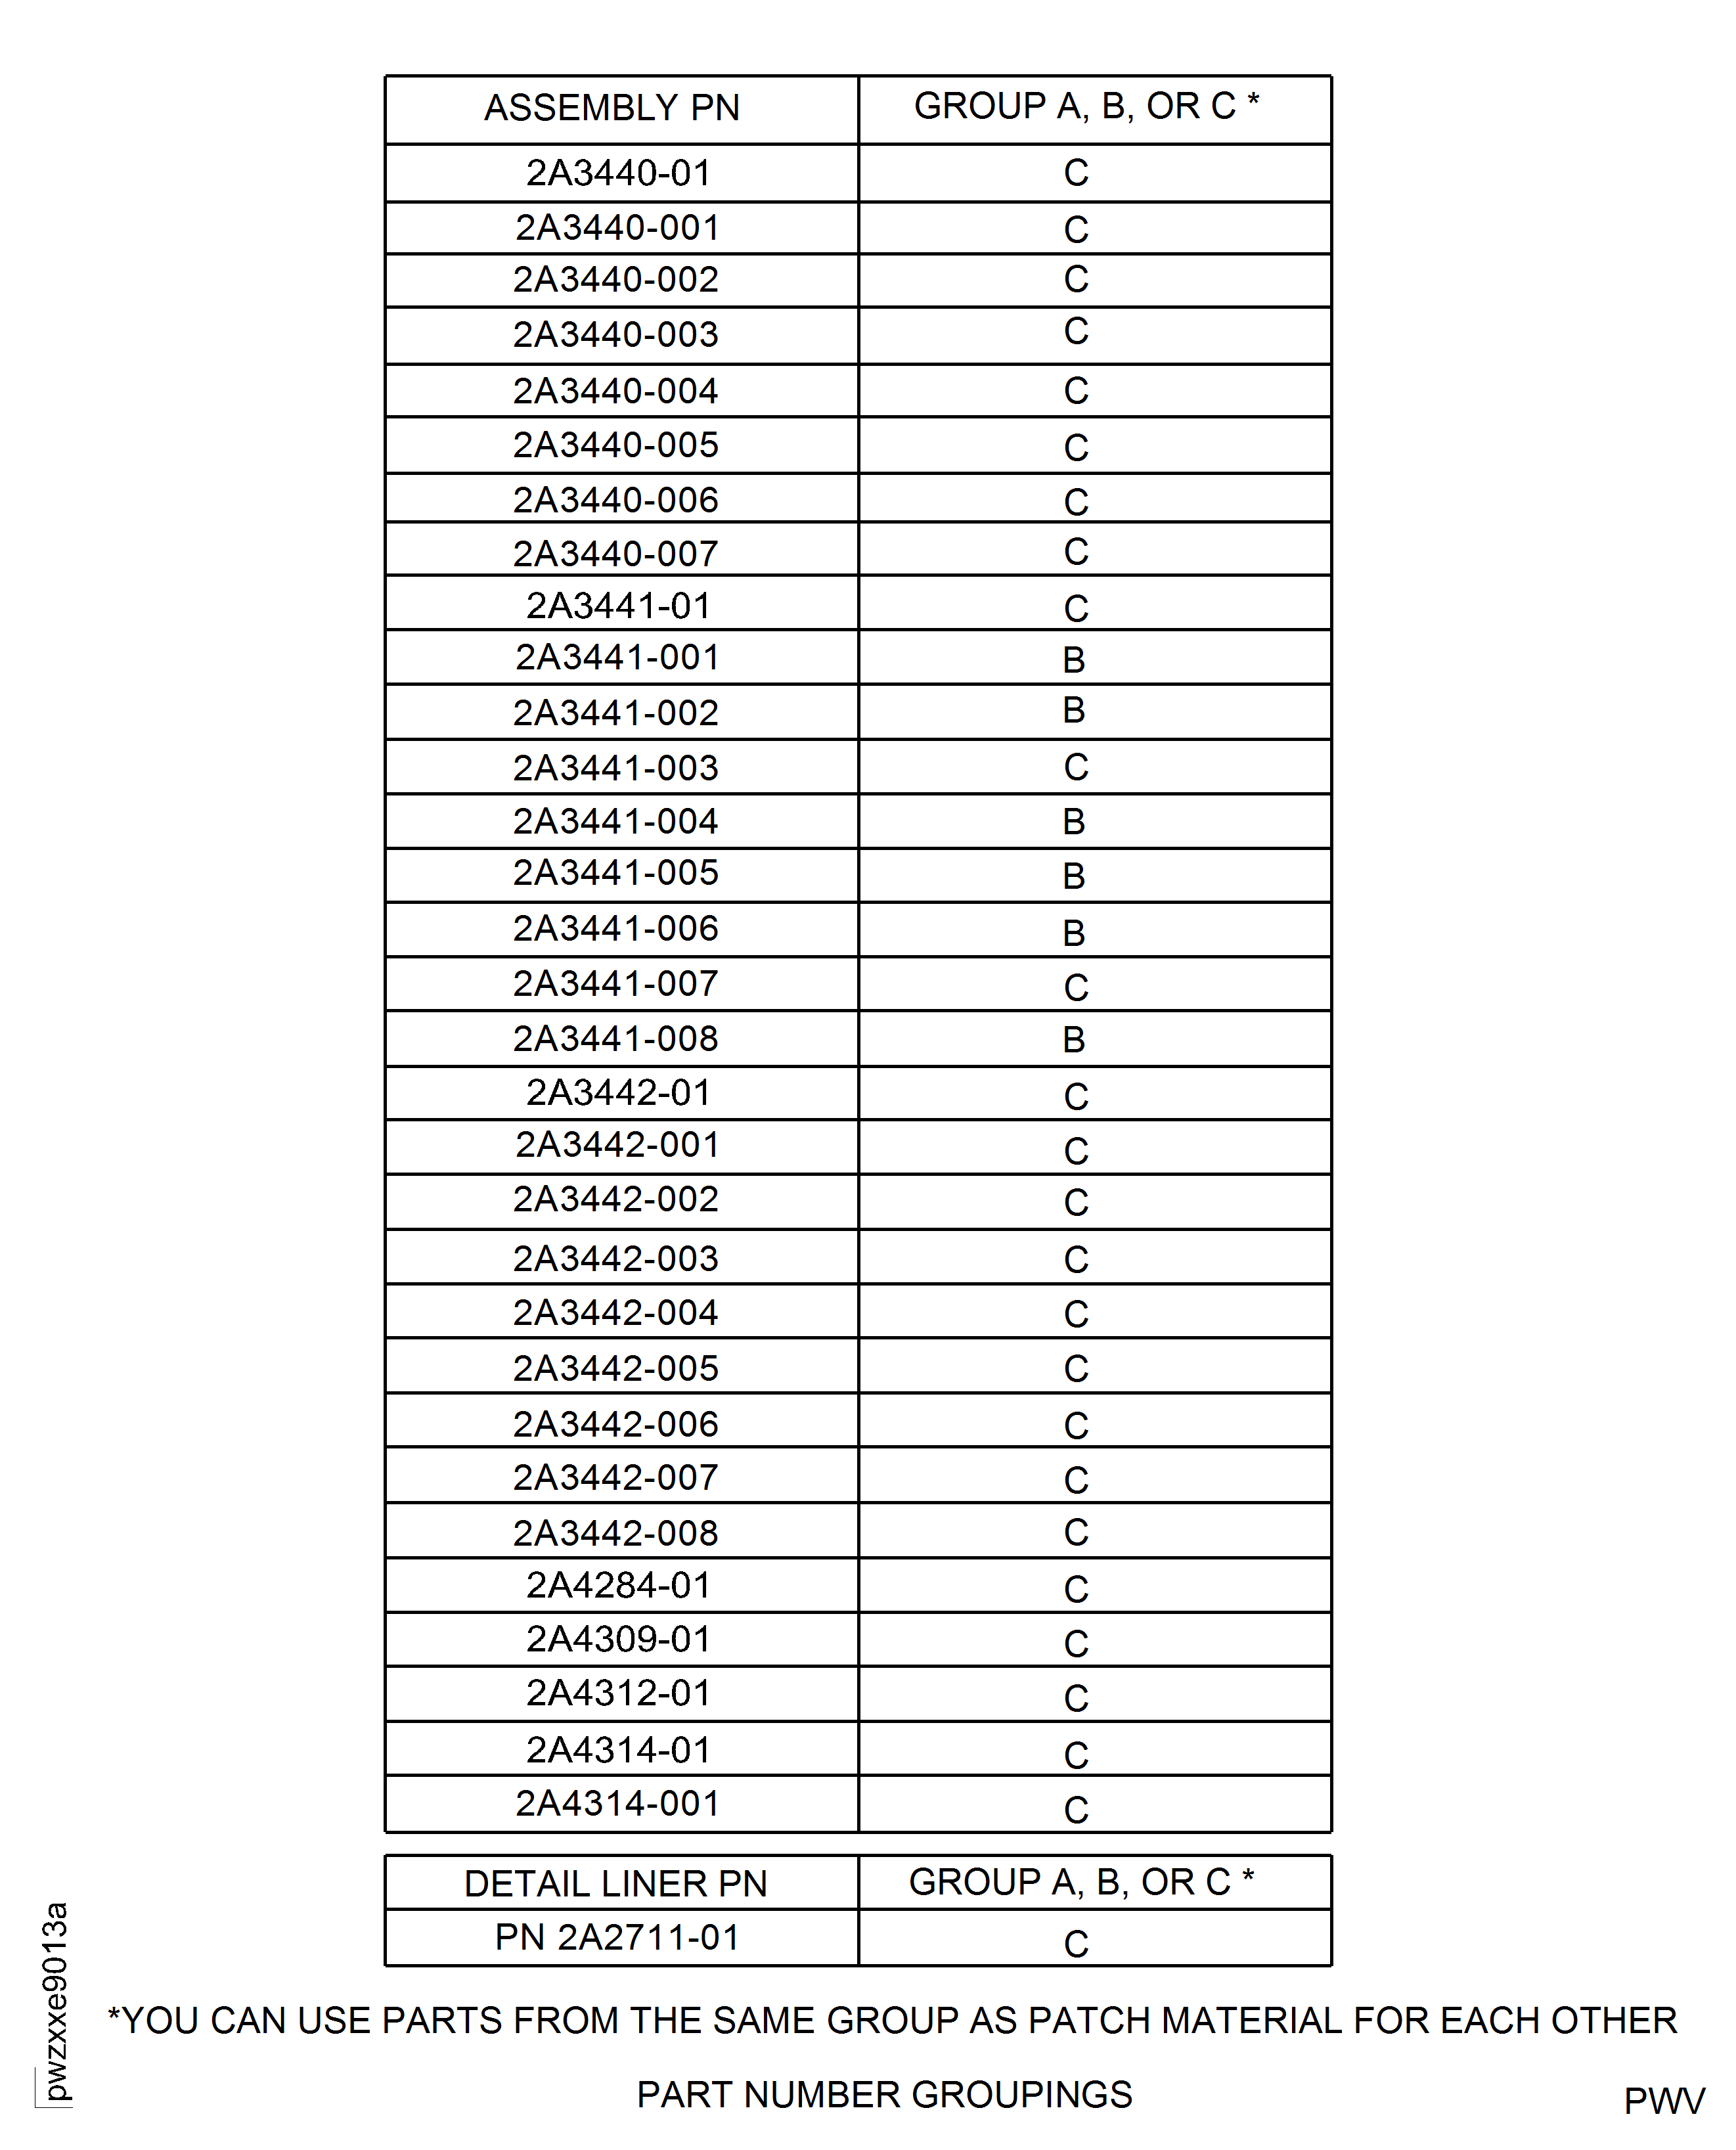
Refer to Figure for the applicable CoMat patch material and part number grouping.
It is permissible to use sheet stock, or obtain replacement patch from a donor shell.
Sheet stock may not be used to patch repair across liner rows.
Replacement patch obtained must be from the same liner row as the repair area. The same pattern of cooling holes, attachment stud holes, and dilution holes, must be maintained. Size and separation of the holes on the replacement patch must be consistent with that of the adjacent unrepaired area of the salvaged part.
The contour of the patch must be in 0.020 in. (0.51 mm) on both sides of perfect form.
Cut a patch for the area to be repaired.
Refer to SPM TASK 70-31-13-310-501.
Use rotary austenitic stainless steel wire brush or silicon carbide abrasive wheels to remove oxides and prepare the repair area and patch for weld.
Refer to SPM TASK 70-11-26-300-503, wipe method.
Clean the repair area and patch.
Refer to the SPM TASK 70-31-13-310-501, IAE 16-3.
Use the manual gas tungsten arc welding method (GTAW-MA).
Refer to Figure for welding filler wire and part number requirements.
Tack the patch in place and weld.
Refer to Figure.
Evidence of tack-welding after finishing is acceptable.
Finish the weld on the inside in 0.010 in. (0.25 mm) above or 0.005 in. (0.13 mm) below the base material. Finish the weld on the outside in 0.010 in. (0.25 mm) above the base material.
Refer to SPM TASK 70-11-26-300-503, wipe method.
Clean the repair area
Refer to Step.
Stress-relieve the liner after weld repair.
Refer to Step.
Make sure that all details are removed. It is recommended that the mount pins, the front seal and the rear seal be held in a fixture to prevent distortion.
Stress-relieve the entire liner again if you cold worked the liner.
Refer to Step.
Fluorescent penetrant inspect the part.
SUBTASK 72-42-61-310-056 Patch Weld Repair the Shell
Refer to Repair, VRS3100 TASK 72-42-61-300-010 (REPAIR-010).
Remove the coating from the rear seal land.
Refer to the SPM TASK 70-31-13-310-501, IAE 16-3.
Use the applicable CoMat welding filler wire.
Refer to Figure.
The total area of all weld repairs must not be more than 1.0 sq in. (645 sq mm). The contour of the welded areas must be in 0.020 in. (0.508 mm) on both sides of perfect form.
Weld repair the prepared areas.
Refer to Figure.
Finish the weld on the inside in 0.010 in. (0.254 mm) above or 0.005 in. (0.127 mm) below the base material. If the weld goes into the seal surface, machine the entire surface to a diameter of 26.114 to 26.120 in. (663.296 to 663.448 mm).
Refer to Step.
Stress-relieve the liner after weld repair.
Refer to Repair, VRS3099 TASK 72-42-61-300-009 (REPAIR-009).
If necessary, resize the seal land diameter.
Refer to Repair, VRS3100 TASK 72-42-61-300-010 (REPAIR-010).
If the area you repaired goes into the OD seal surface, a coating thickness of 0.003 to 0.006 in. (0.077 to 0.152 mm) must be maintained.
Restore the coating.
SUBTASK 72-42-61-310-057 Weld Repair the Rear Seal Land
Refer to the SPM TASK 70-31-13-310-501,IAE 16-3.
Use the applicable CoMat welding filler wire.
Refer to Figure.
The total area of all weld repairs must not be more than 1.0 sq in. (645 sq mm). The contour of the welded areas must be in 0.020 in. (0.508 mm) on both sides of perfect form. Cold work of the hood/bulkhead and the shell to restore the form is not recommended.
Weld repair the prepared areas.
Refer to Step.
Locally stress-relieve the liner after weld repair.
SUBTASK 72-42-61-310-058 Weld Repair Across the OEM Weld Line Between the Hood/Bulkhead and the Shell
Refer to Figure.
The contour of the patches must be in 0.020 in. (0.508 mm) on both sides of perfect form.
Cut and form two patches for the prepared areas of both the hood/bulkhead and the shell.
The contour of the patch must be in 0.020 in. (0.508 mm) on both sides of perfect form.
Use CoMat 03-334 IN 625 SHEET STOCK, or obtain replacement patch material from a donor shell for the full area to be repaired.
(Optional) Cut, form and machine a single patch.
Refer to Figure.
Make sure there is a gap of 0.015 in. (0.381 mm) maximum at all edges when you put the patch into the repair area.
Refer to the SPM TASK 70-31-13-310-501, IAE 16-3.
Trim the patches as necessary so that there is a 0.015 in. (0.381 mm) gap maximum from all edges.
If you use two patches, tack weld them together.
Refer to the SPM TASK 70-31-13-310-501, IAE 16-3.
If the single optional patch is used, weld the patch to the prepared area.
Refer to Figure.
Finish the weld on the inside in 0.010 in. (0.254 mm) above or 0.005 in. (0.127 mm) below the base material. Finish the weld on the outside in 0.010 in. (0.254 mm) above the base material.
SUBTASK 72-42-61-310-059 Patch Weld Repair Across the OEM Weld Line Between the Hood/Bulkhead and the Shell
Refer to Repair, VRS3100 TASK 72-42-61-300-010 (REPAIR-010).
Remove the coating.
Refer to the SPM TASK 70-31-13-310-501, IAE 16-3.
Use applicable welding filler wire.
Refer to Figure.
The total area of all weld repairs must not be more than 1.0 sq in. (645 sq mm). The contour of the welded areas must be in 0.020 in. (0.508 mm) on both sides of perfect form.
Weld repair the prepared areas.
Refer to Figure.
Finish the weld on the inside in 0.010 in. (0.254 mm) above or 0.005 in. (0.127 mm) below the base material. If the weld goes into the seal surface, machine the entire surface to a diameter of 26.114 to 26.120 in. (663.296 to 663.448 mm).
Refer to Step.
Locally stress-relieve the liner after weld repair.
Refer to Repair, VRS3099 TASK 72-42-61-300-009 (REPAIR-009).
If necessary, resize the seal land diameter.
Refer to Repair, VRS3100 TASK 72-42-61-300-010 (REPAIR-010).
If the area you repaired goes into the OD seal surface, a coating thickness of 0.003 to 0.006 in. (0.077 to 0.152 mm) must be maintained.
Restore the coating.
SUBTASK 72-42-61-310-060 Weld Repair Across the OEM Weld Line Between the Shell and the Rear Seal
Refer to the SPM TASK 70-37-04-370-501 for the atmosphere.

CAUTION
HYDROGEN ATMOSPHERE IS NOT PERMITTED IF PWA 53-5 COATING IS NOT REMOVED FROM THE PART.Put the part in a cool, 500 deg F (260 deg C) maximum furnace.
Use SPM TASK 70-37-24-370-501.
It is permitted to stress relieve the outer liner. This stress relief may be done instead of the stress relief requirements in steps 15.A. to 15.G. above.
SUBTASK 72-42-61-370-051 Stress-Relieve the Outer Liner
NOTE
Stress-relief at temperatures higher than 1200 deg F (648.9 deg C) of finish machined steel, nickel and cobalt alloy parts must be done in a suitable protective atmosphere or must be followed by a suitable acid cleaning or descaling. Cooling rates must be selected to minimize distortion.Use CoMat 06-072 DYE to mark the locations of the hole rows and the angular locations.
Use existing holes as a reference to locate the holes.
SUBTASK 72-42-61-350-080-001 Install Cooling and Segment Attachment Holes (Manual Method)
Refer to the SPM TASK 70-21-01-220-501.
Examine the areas that you welded.
Refer to TASK 72-42-61-200-000 (INSPECTION/CHECK-000).
Examine the dimensions of the outer liner.
SUBTASK 72-42-61-220-132 Examine the Combustion Chamber Outer Liner After Repair
Refer to the SPM TASK 70-23-03-230-501 or SPM TASK 70-23-08-230-501.
Fluorescent penetrant inspect the entire part.
SUBTASK 72-42-61-230-054 Fluorescent Penetrant Inspect the Combustion Chamber Outer Lining
Refer to TASK 72-42-61-200-000 (INSPECTION/CHECK-000).
Inspect the hardcoat of the front inside diameter seal and the rear outside diameter seal.
SUBTASK 72-42-61-220-133 Examine the Hardcoat on the Front Inside Diameter Seal and the Rear Outside Diameter Seal of the Combustion Chamber Outer Liner
Refer to Repair, VRS3092 TASK 72-42-61-300-004 (REPAIR-004), Repair, VRS3094 TASK 72-42-61-300-006 (REPAIR-006), Repair, VRS3095 TASK 72-42-61-300-007 (REPAIR-007), Repair, VRS3096 TASK 72-42-61-300-008 (REPAIR-008) or Repair, VRS3450 TASK 72-42-61-300-015 (REPAIR-015).
NOTE
If you patch repaired the shell, inspect for distortion between the segments after you install the segments. Refer to TASK 72-42-61-200-000.
Install the liner segments, the combustion chamber retaining bolt bushings, the access cover, the fuel nozzle guides and the bulkhead segments.
SUBTASK 72-42-61-350-056 Install the Detail Parts to the Combustion Chamber Outer Liner
Figure: Repair Details and Dimensions
Repair Details and Dimensions
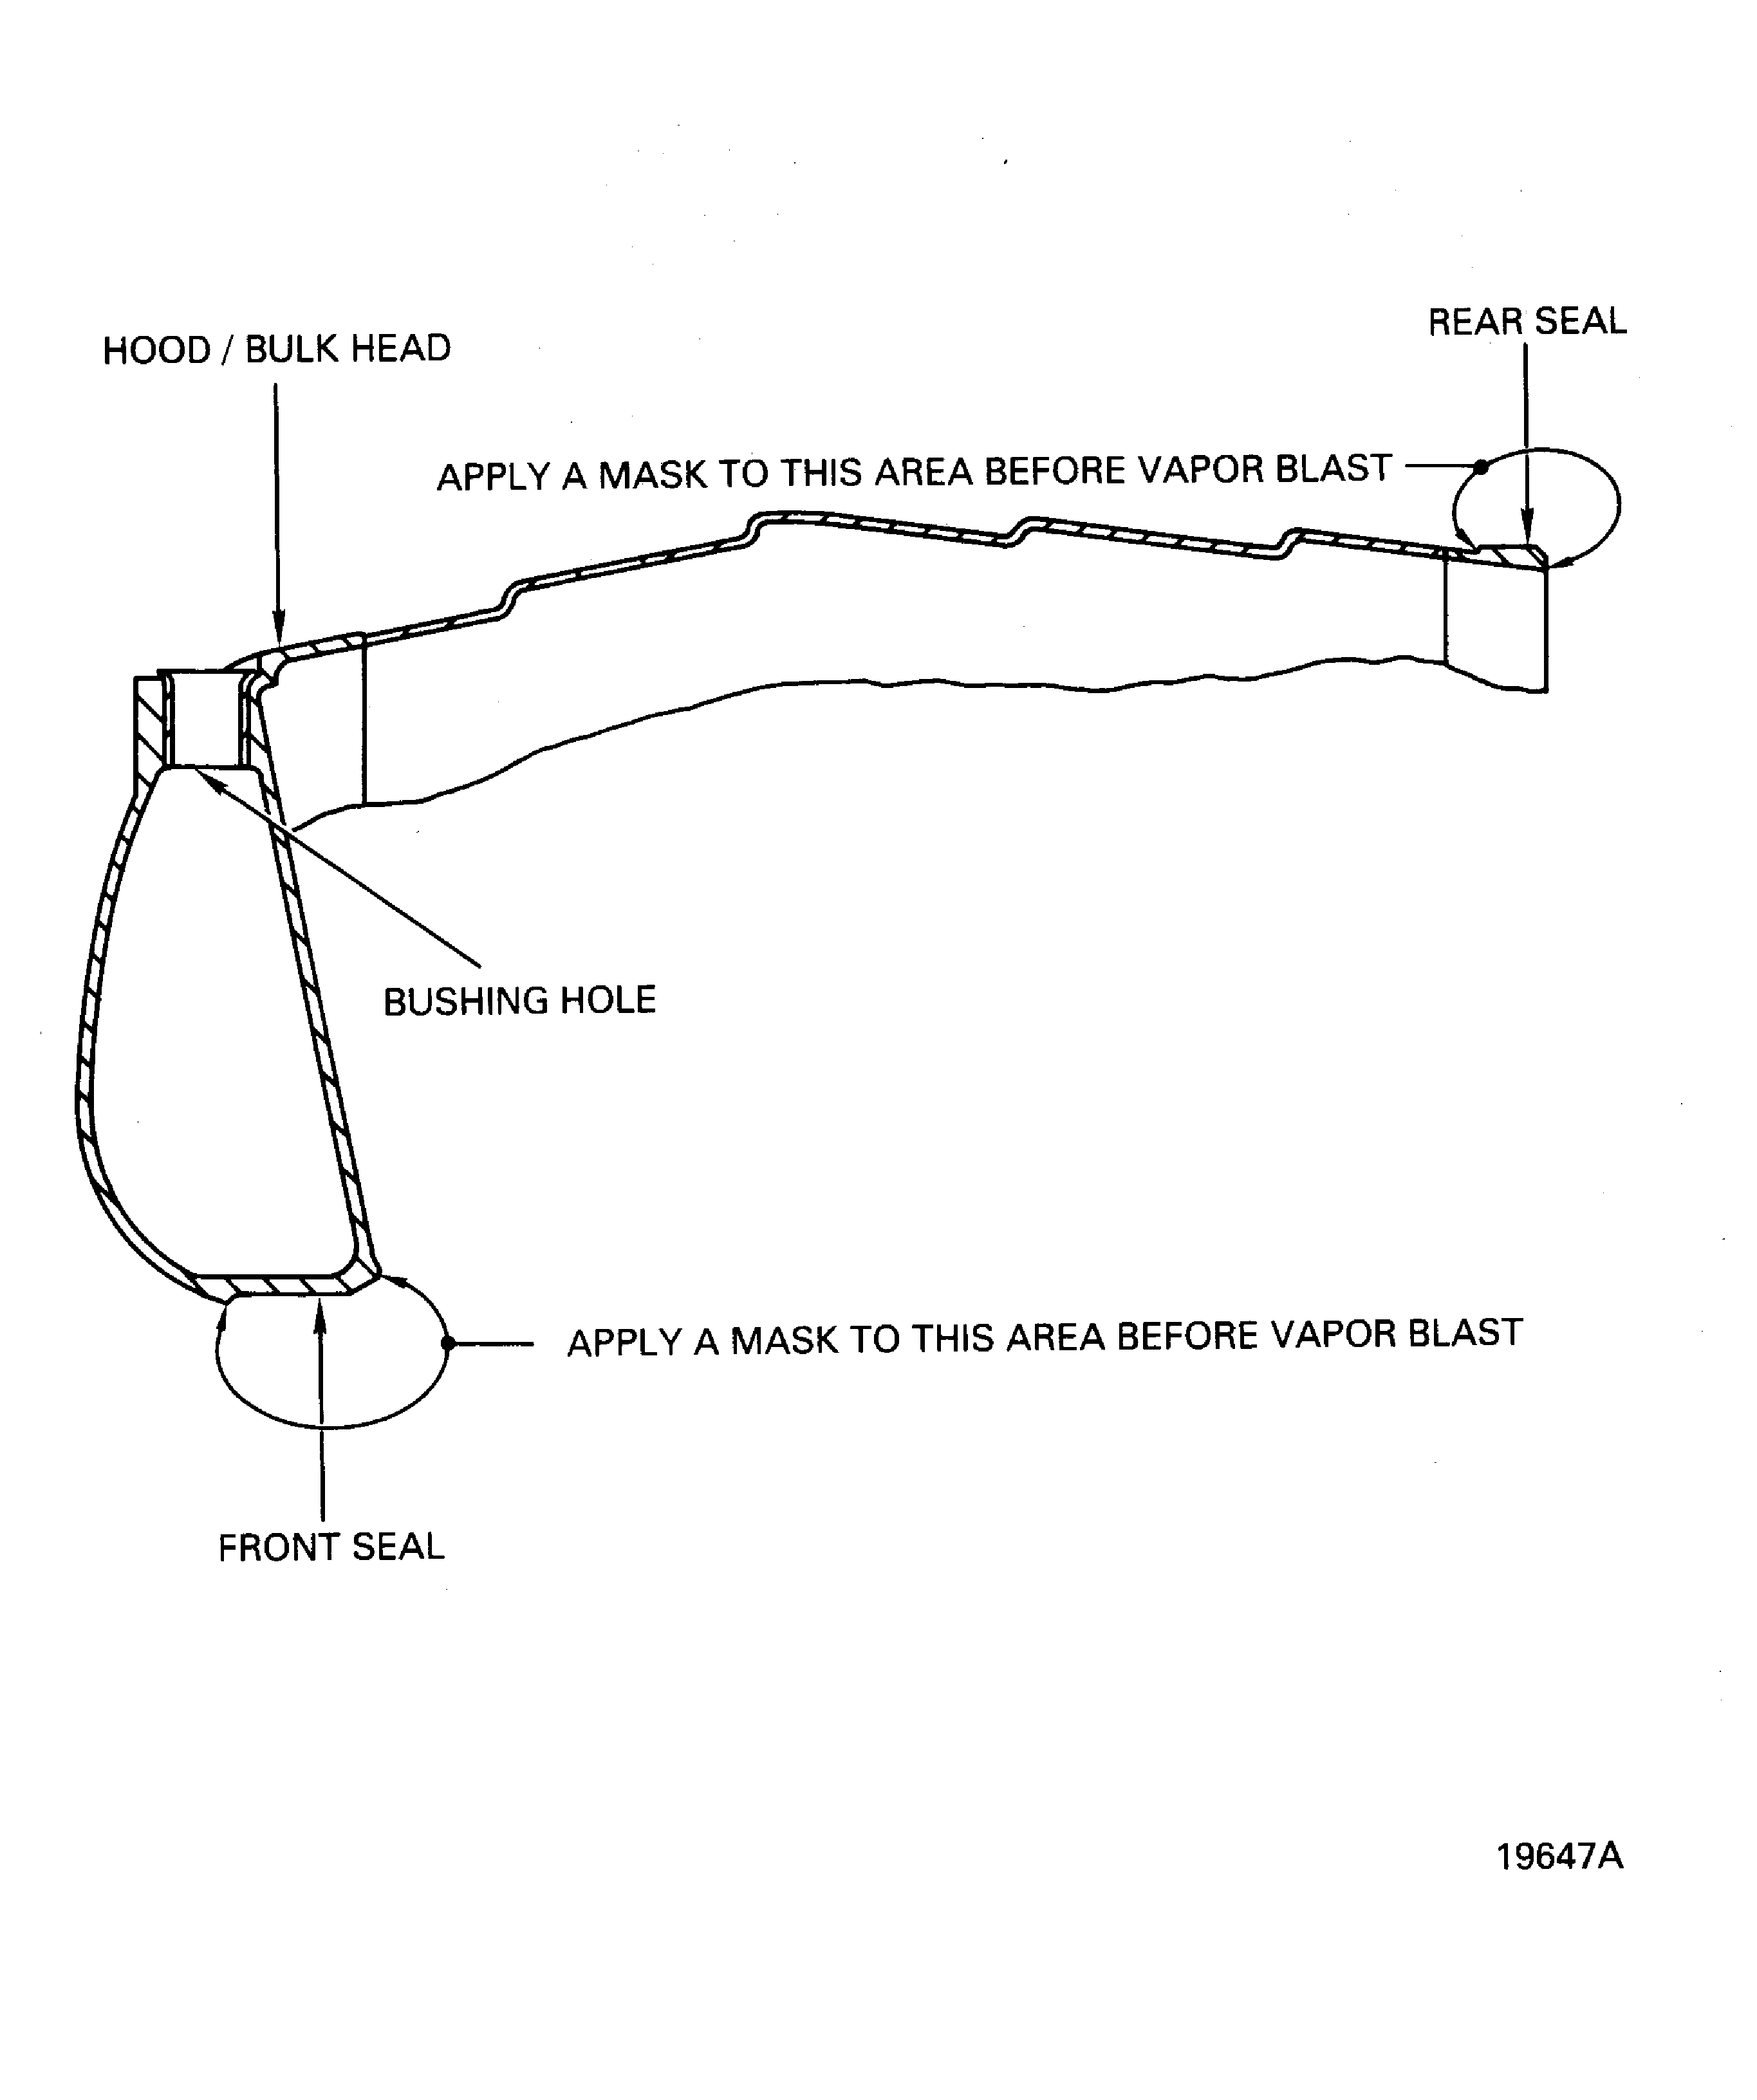
Figure: Repair Details and Dimensions
Repair Details and Dimensions
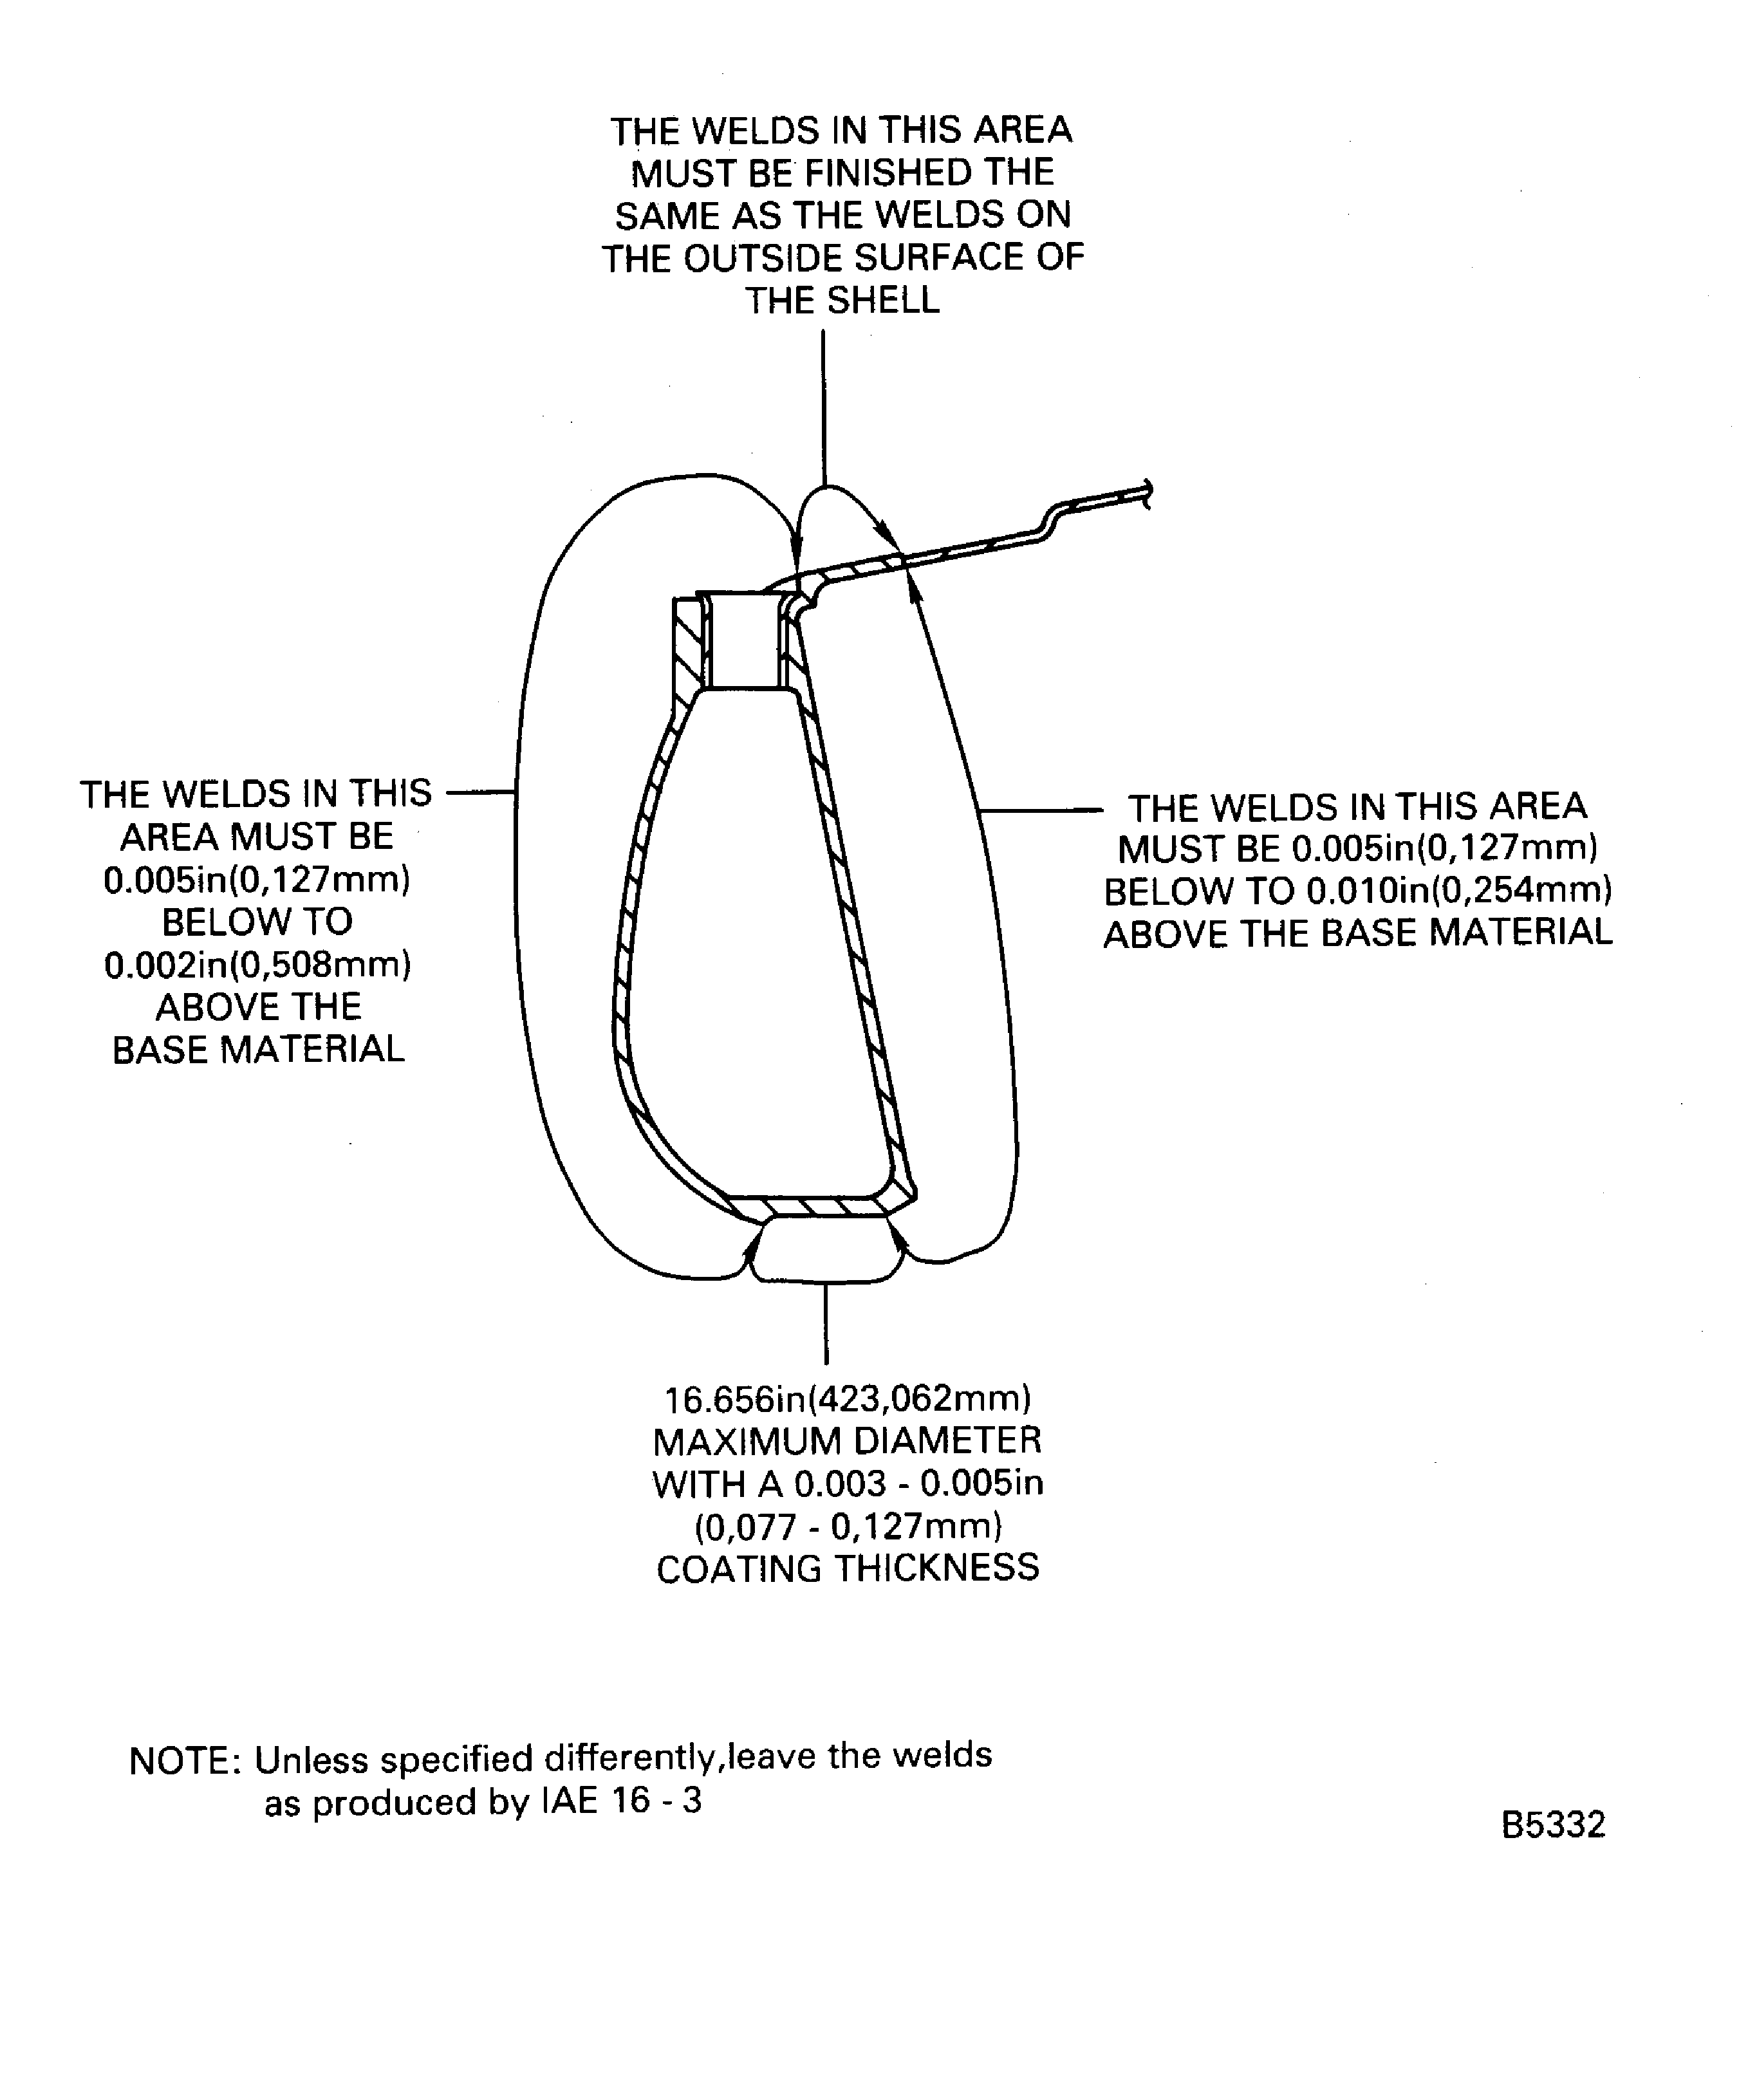
Figure: Repair Details and Dimensions
Repair Details and Dimensions

Figure: Repair Details and Dimensions
Repair Details and Dimensions

Repair Details and Dimensions
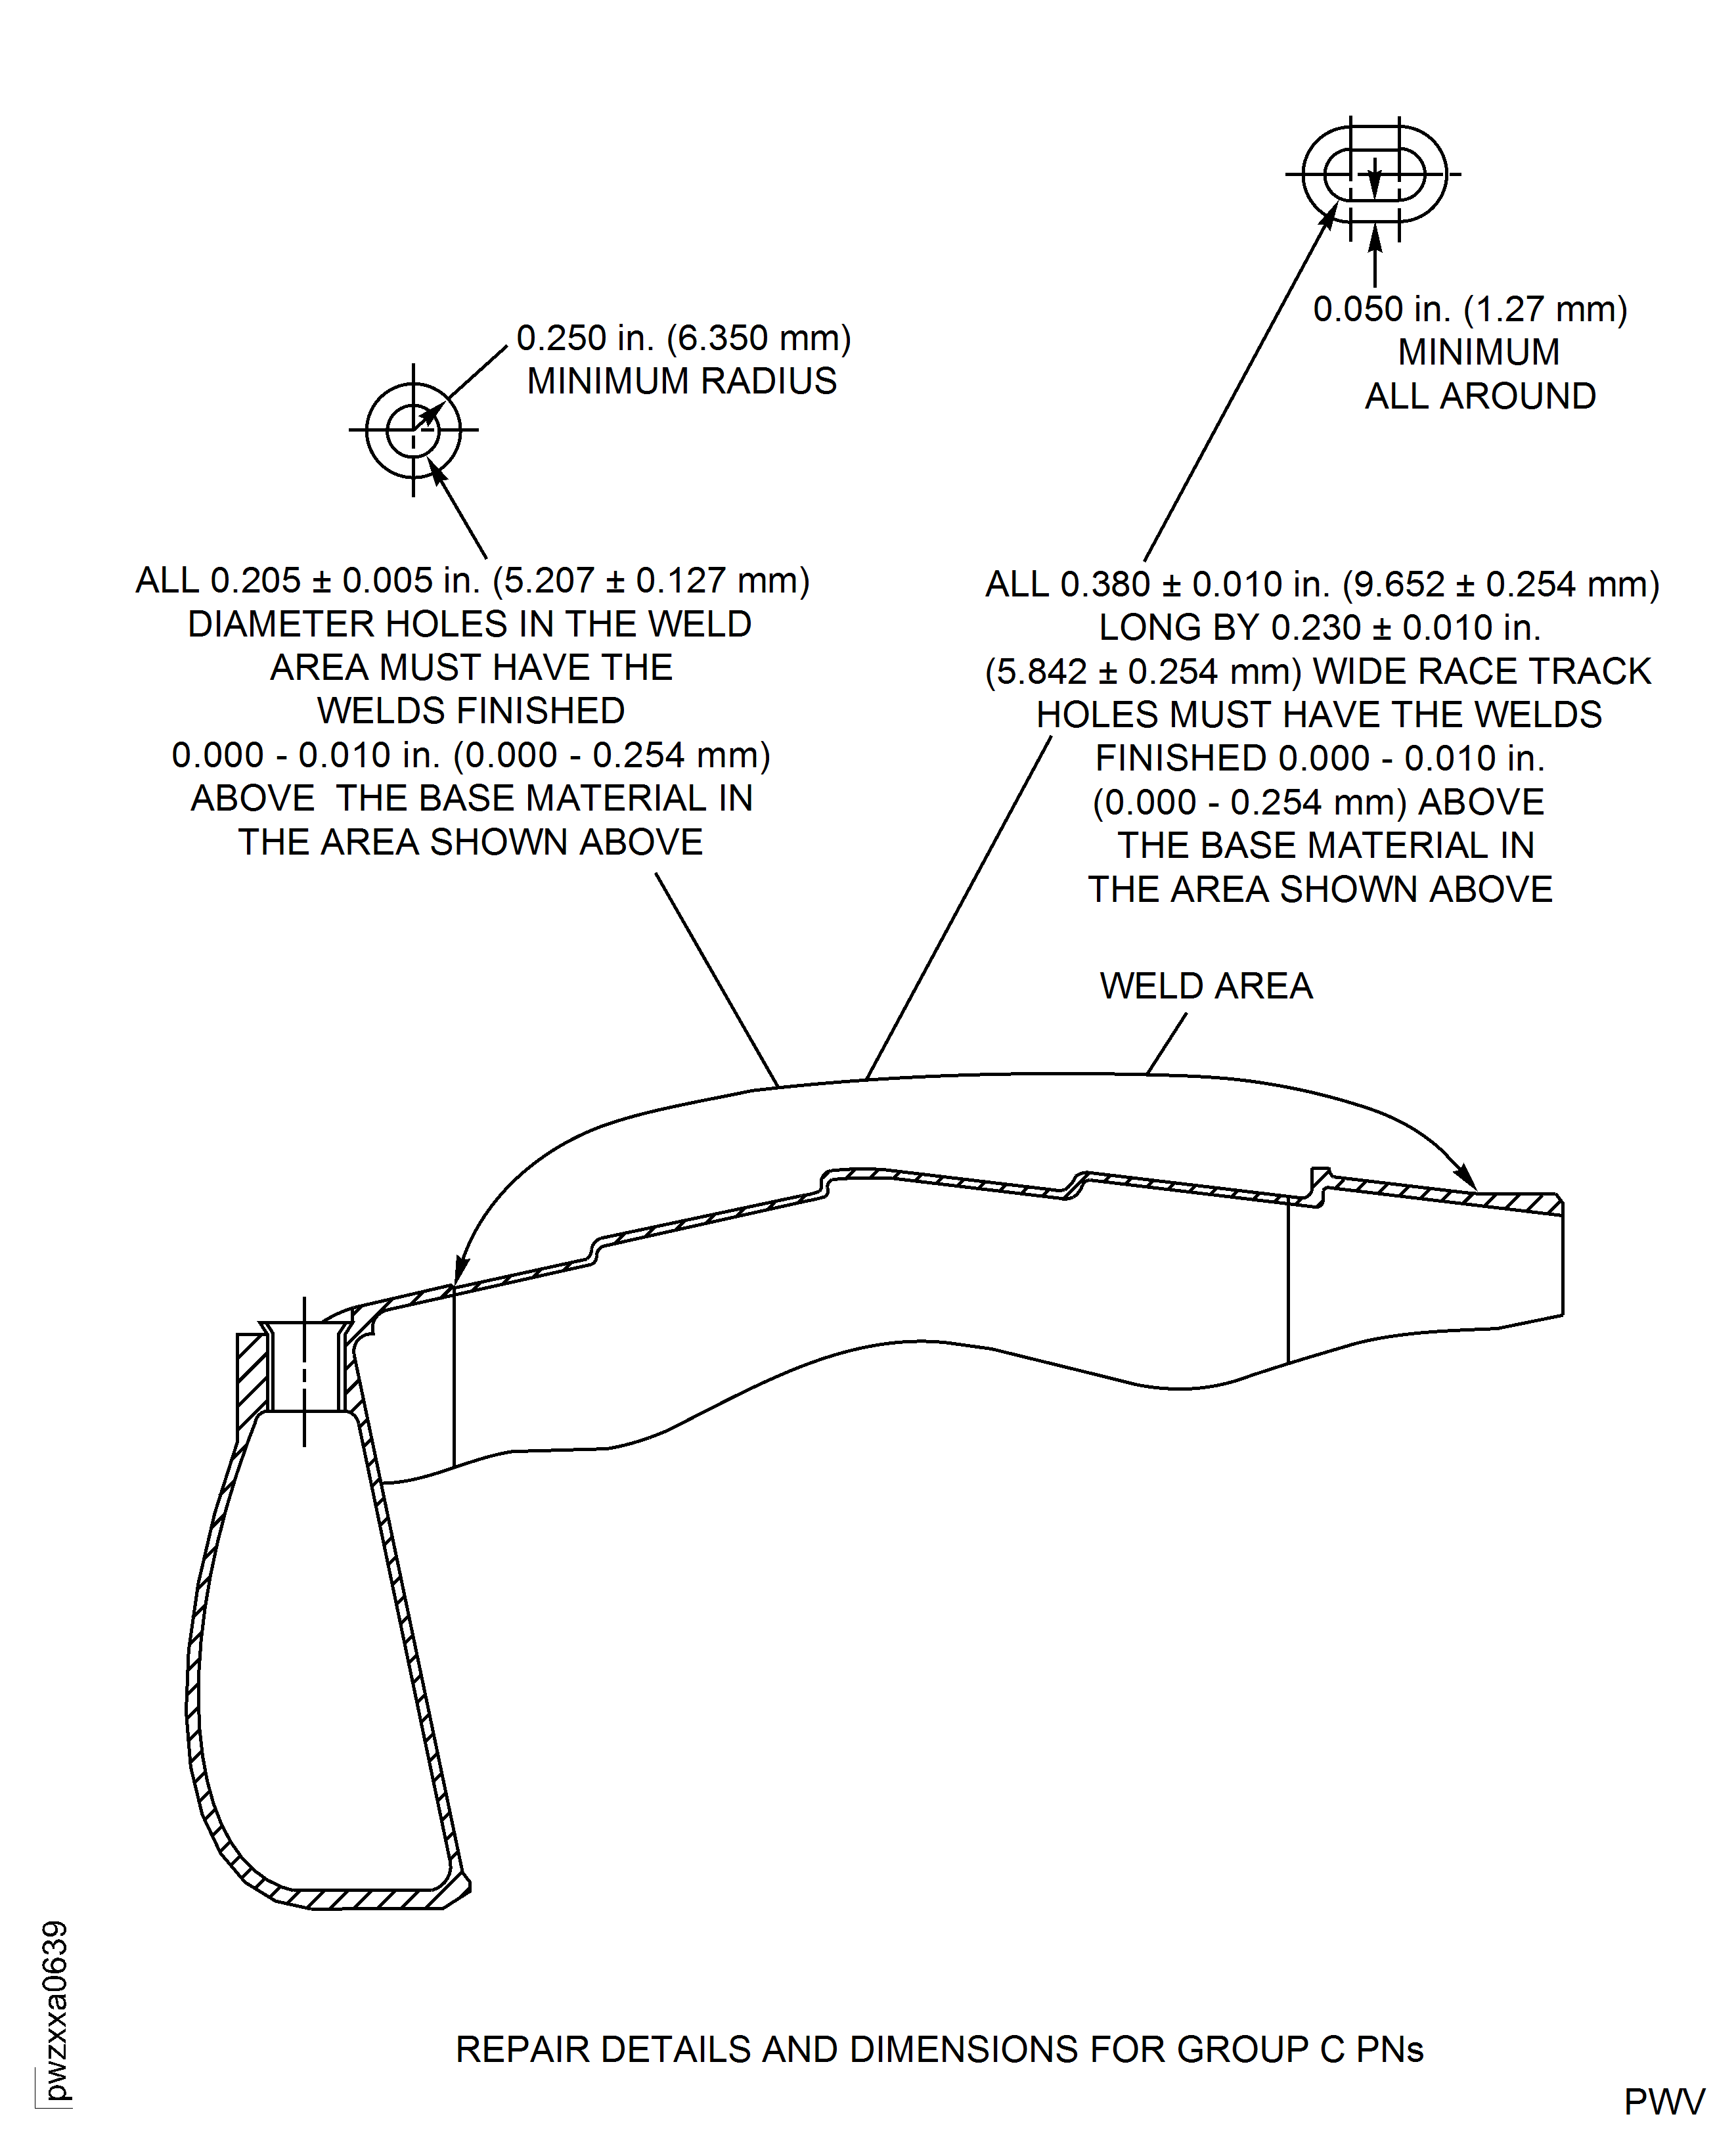
Figure: Repair Details and Dimensions
Repair Details and Dimensions

Repair Details and Dimensions

Figure: Repair Details and Dimensions
Repair Details and Dimensions
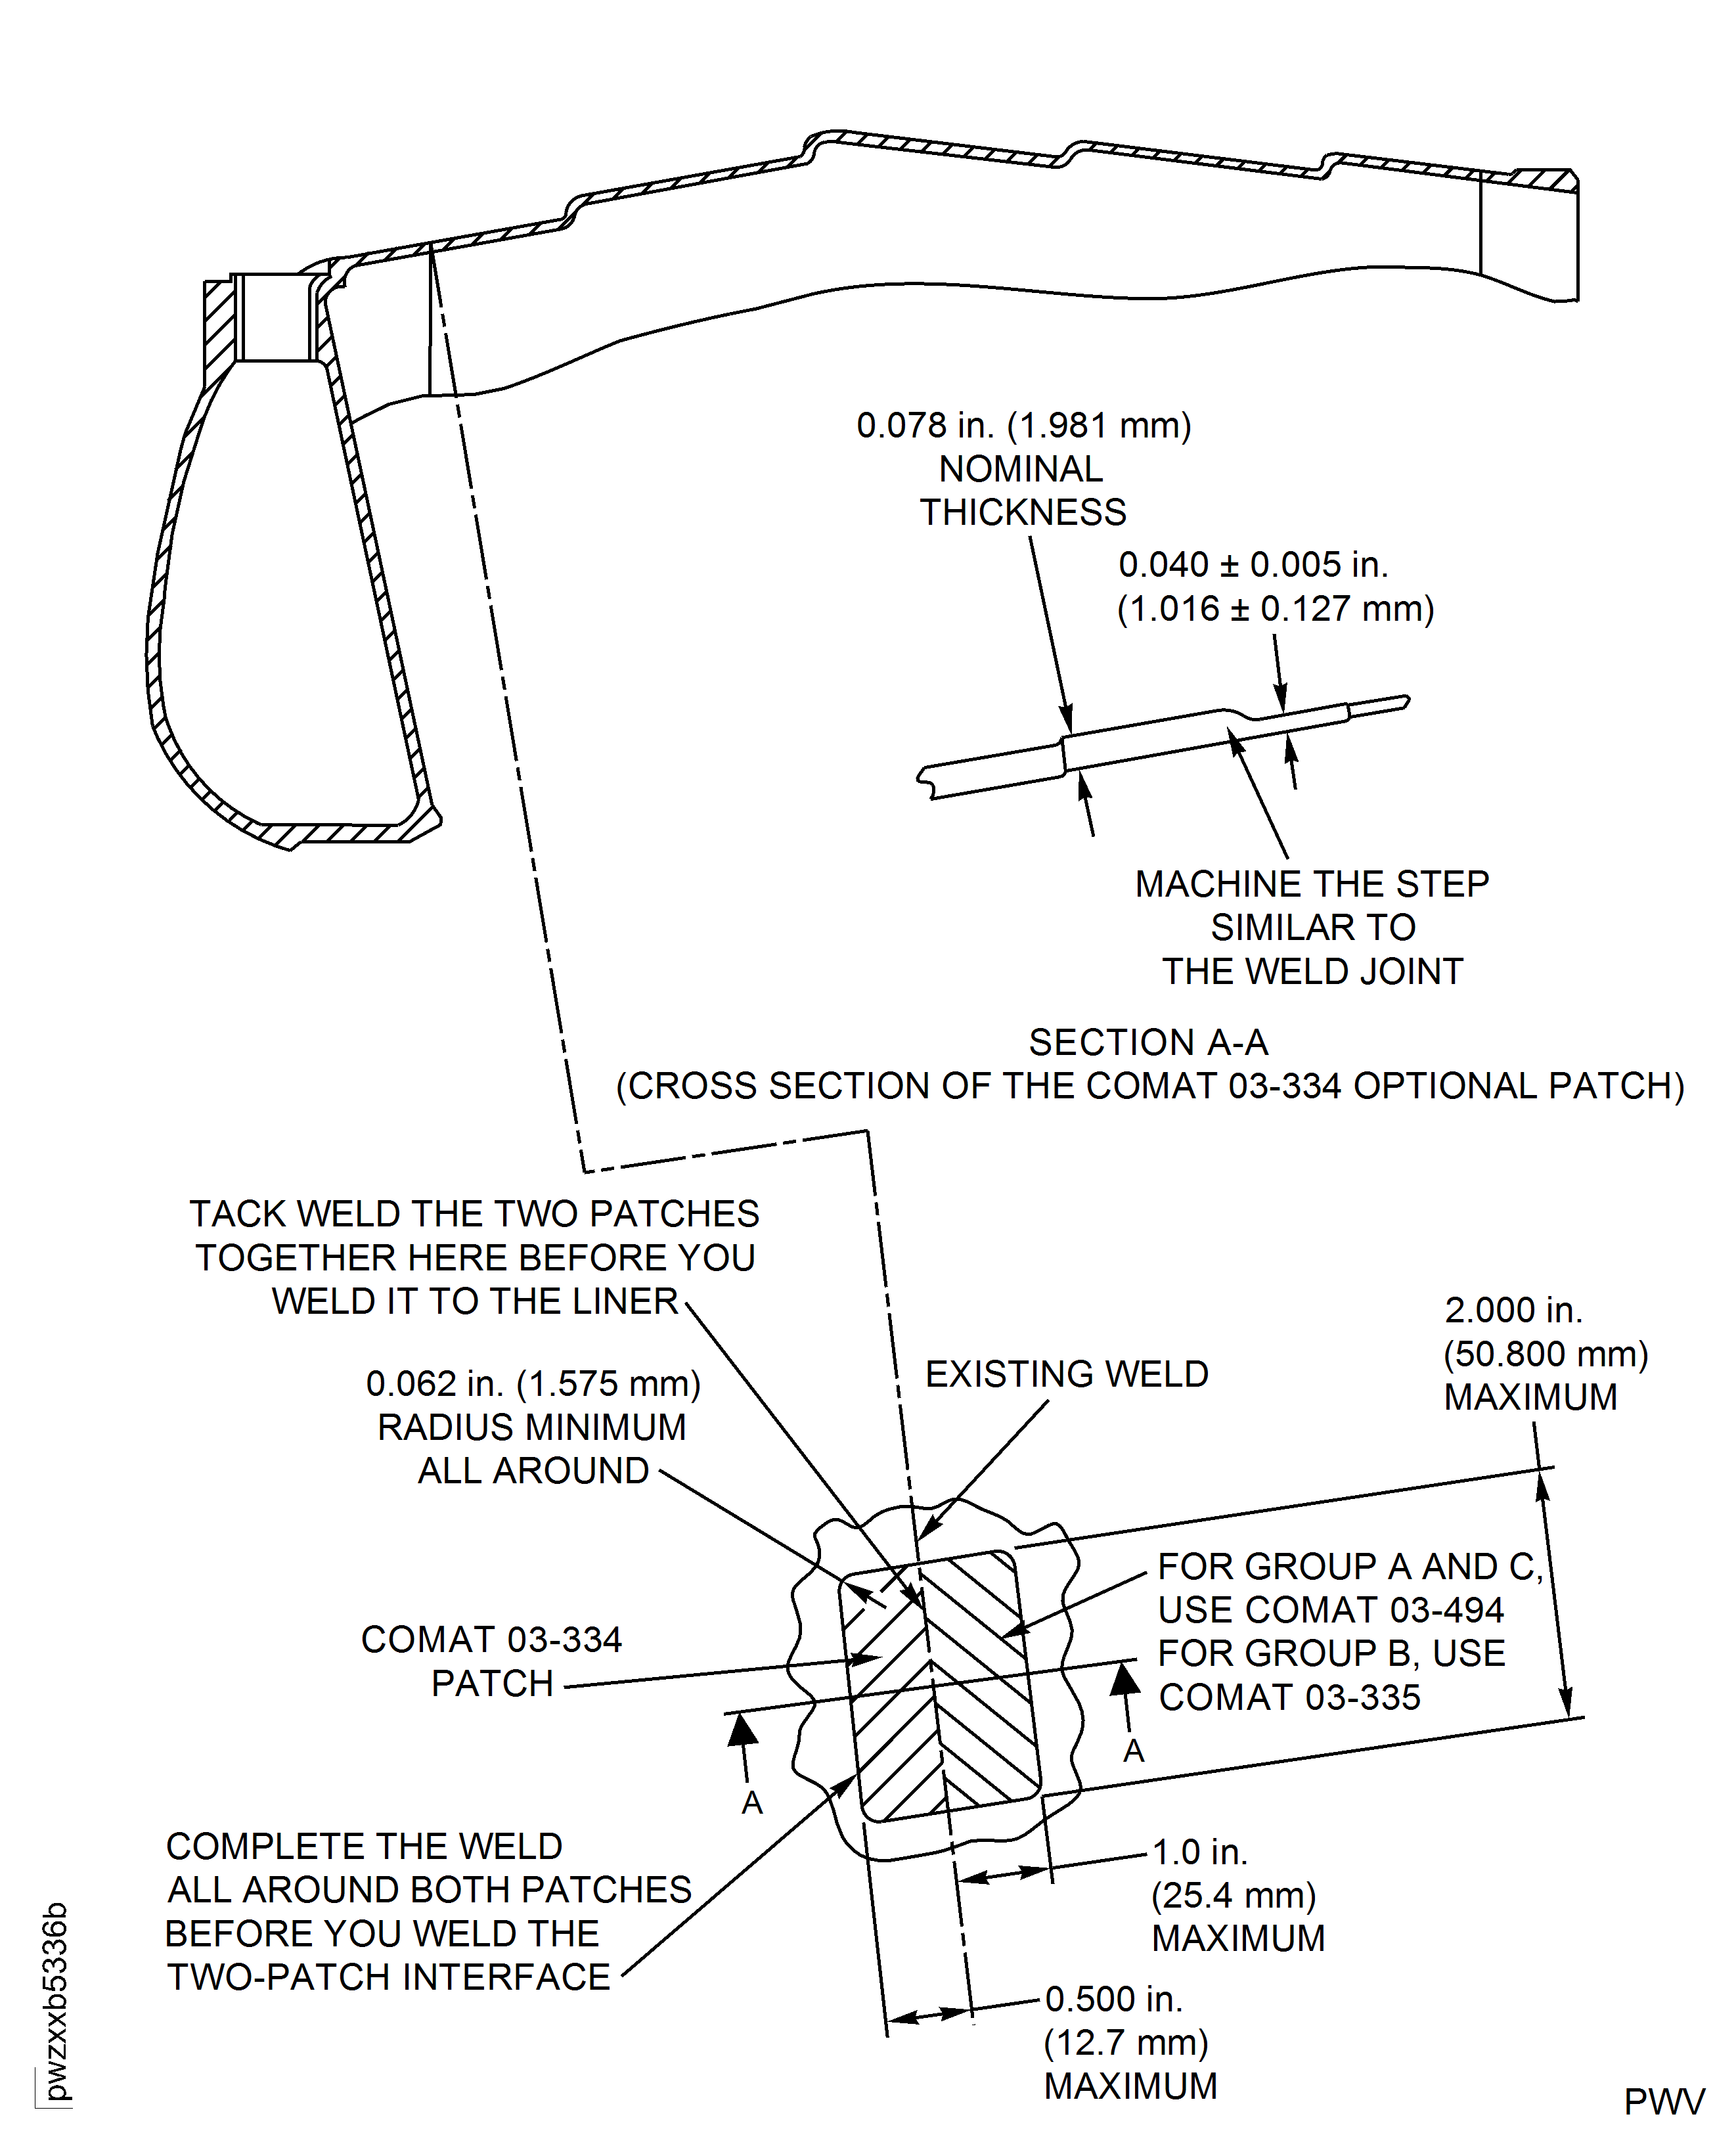
Figure: Repair Details and Dimensions
Repair Details and Dimensions

Repair Details and Dimensions

Figure: Repair Details and Dimensions
Repair Details and Dimensions
Repair Details and Dimensions
Repair Details and Dimensions
Repair Details and Dimensions
