Export Control
EAR Export Classification: Not subject to the EAR per 15 C.F.R. Chapter 1, Part 734.3(b)(3), except for the following Service Bulletins which are currently published as EAR Export Classification 9E991: SBE70-0992, SBE72-0483, SBE72-0580, SBE72-0588, SBE72-0640, SBE73-0209, SBE80-0024 and SBE80-0025.Copyright
© IAE International Aero Engines AG (2001, 2014 - 2021) The information contained in this document is the property of © IAE International Aero Engines AG and may not be copied or used for any purpose other than that for which it is supplied without the express written authority of © IAE International Aero Engines AG. (This does not preclude use by engine and aircraft operators for normal instructional, maintenance or overhaul purposes.).Applicability
All
Common Information
TASK 72-43-20-200-001 No. 4 Bearing Seal Ring Holder - Examine, Inspection-001
General
This TASK gives the procedure for the inspection of the No. 4 bearing seal ring holder.
Fig/item numbers in parentheses in the procedure agree with those used in the IPC.
The policy that is necessary for inspection is given in the SPM TASK 70-20-00-200-501.
All the parts must be cleaned before any part is examined. Refer to the SPM TASK 70-10-00-100-501.
This procedure for those parts which must have a crack test is given in SUBTASK 72-43-20-230-051. Do the test before the part is visually examined.
Do not discard any part until you are sure there are no repairs available. Refer to the instructions in Repair before a discarded part is used again or oversize parts are installed.
Parts which should be discarded can be held although no repair is available. The repair of a discarded part could be shown to be necessary at a later date.
All parts must be examined to make sure that all the repairs have been completed satisfactorily.
The practices and processes referred to in the procedure by the TASK numbers are in the SPM.
References
Refer to the SPM for data on these items.
Definitions of Damage, SPM TASK 70-02-02-350-501
Inspection of Parts, SPM TASK 70-20-01-200-501
Surface Texture, SPM TASK 70-35-09-350-501
Some data on these items is contained in this TASK. For more data on these items refer to the SPM.
Method of Testing for Crack Indications
Chemical Processes
Surface Protection
Preliminary Requirements
Pre-Conditions
NONESupport Equipment
| Name | Manufacturer | Part Number / Identification | Quantity | Remark |
|---|---|---|---|---|
| Stylus | LOCAL | Stylus | 0.032 in. (0.813 mm) diameter ball tip |
Consumables, Materials and Expendables
NONESpares
NONESafety Requirements
NONEProcedure
Clean the part. Refer to TASK 72-43-20-100-000 (CLEANING-000).
Do the crack test on the part that is given below. Use the applicable penetrant inspection procedure.
PART IDENT
TASK/SUBTASK
No. 4 bearing seal ring holder
SPM TASK 70-23-01-230-501 (Dip or spray)
SUBTASK 72-43-20-230-051-001 Examine the No. 4 Bearing Seal Ring Holder (01-060) for Cracks
Clean the part. Refer to TASK 72-43-20-100-000 (CLEANING-000).
Do the test for cracks on the part that is given below. Use the applicable penetrant inspection procedure.
PART IDENT
TASK/SUBTASK
No. 4 bearing seal ring holder
SPM TASK 70-23-02-230-501 (Dip or spray)
SUBTASK 72-43-20-230-051-002 Examine the No. 4 Bearing Seal Ring Holder (01-060) for Cracks
Refer to: Figure
Repair, VRS3122 TASK 72-43-20-300-005 (REPAIR-005)
Damage
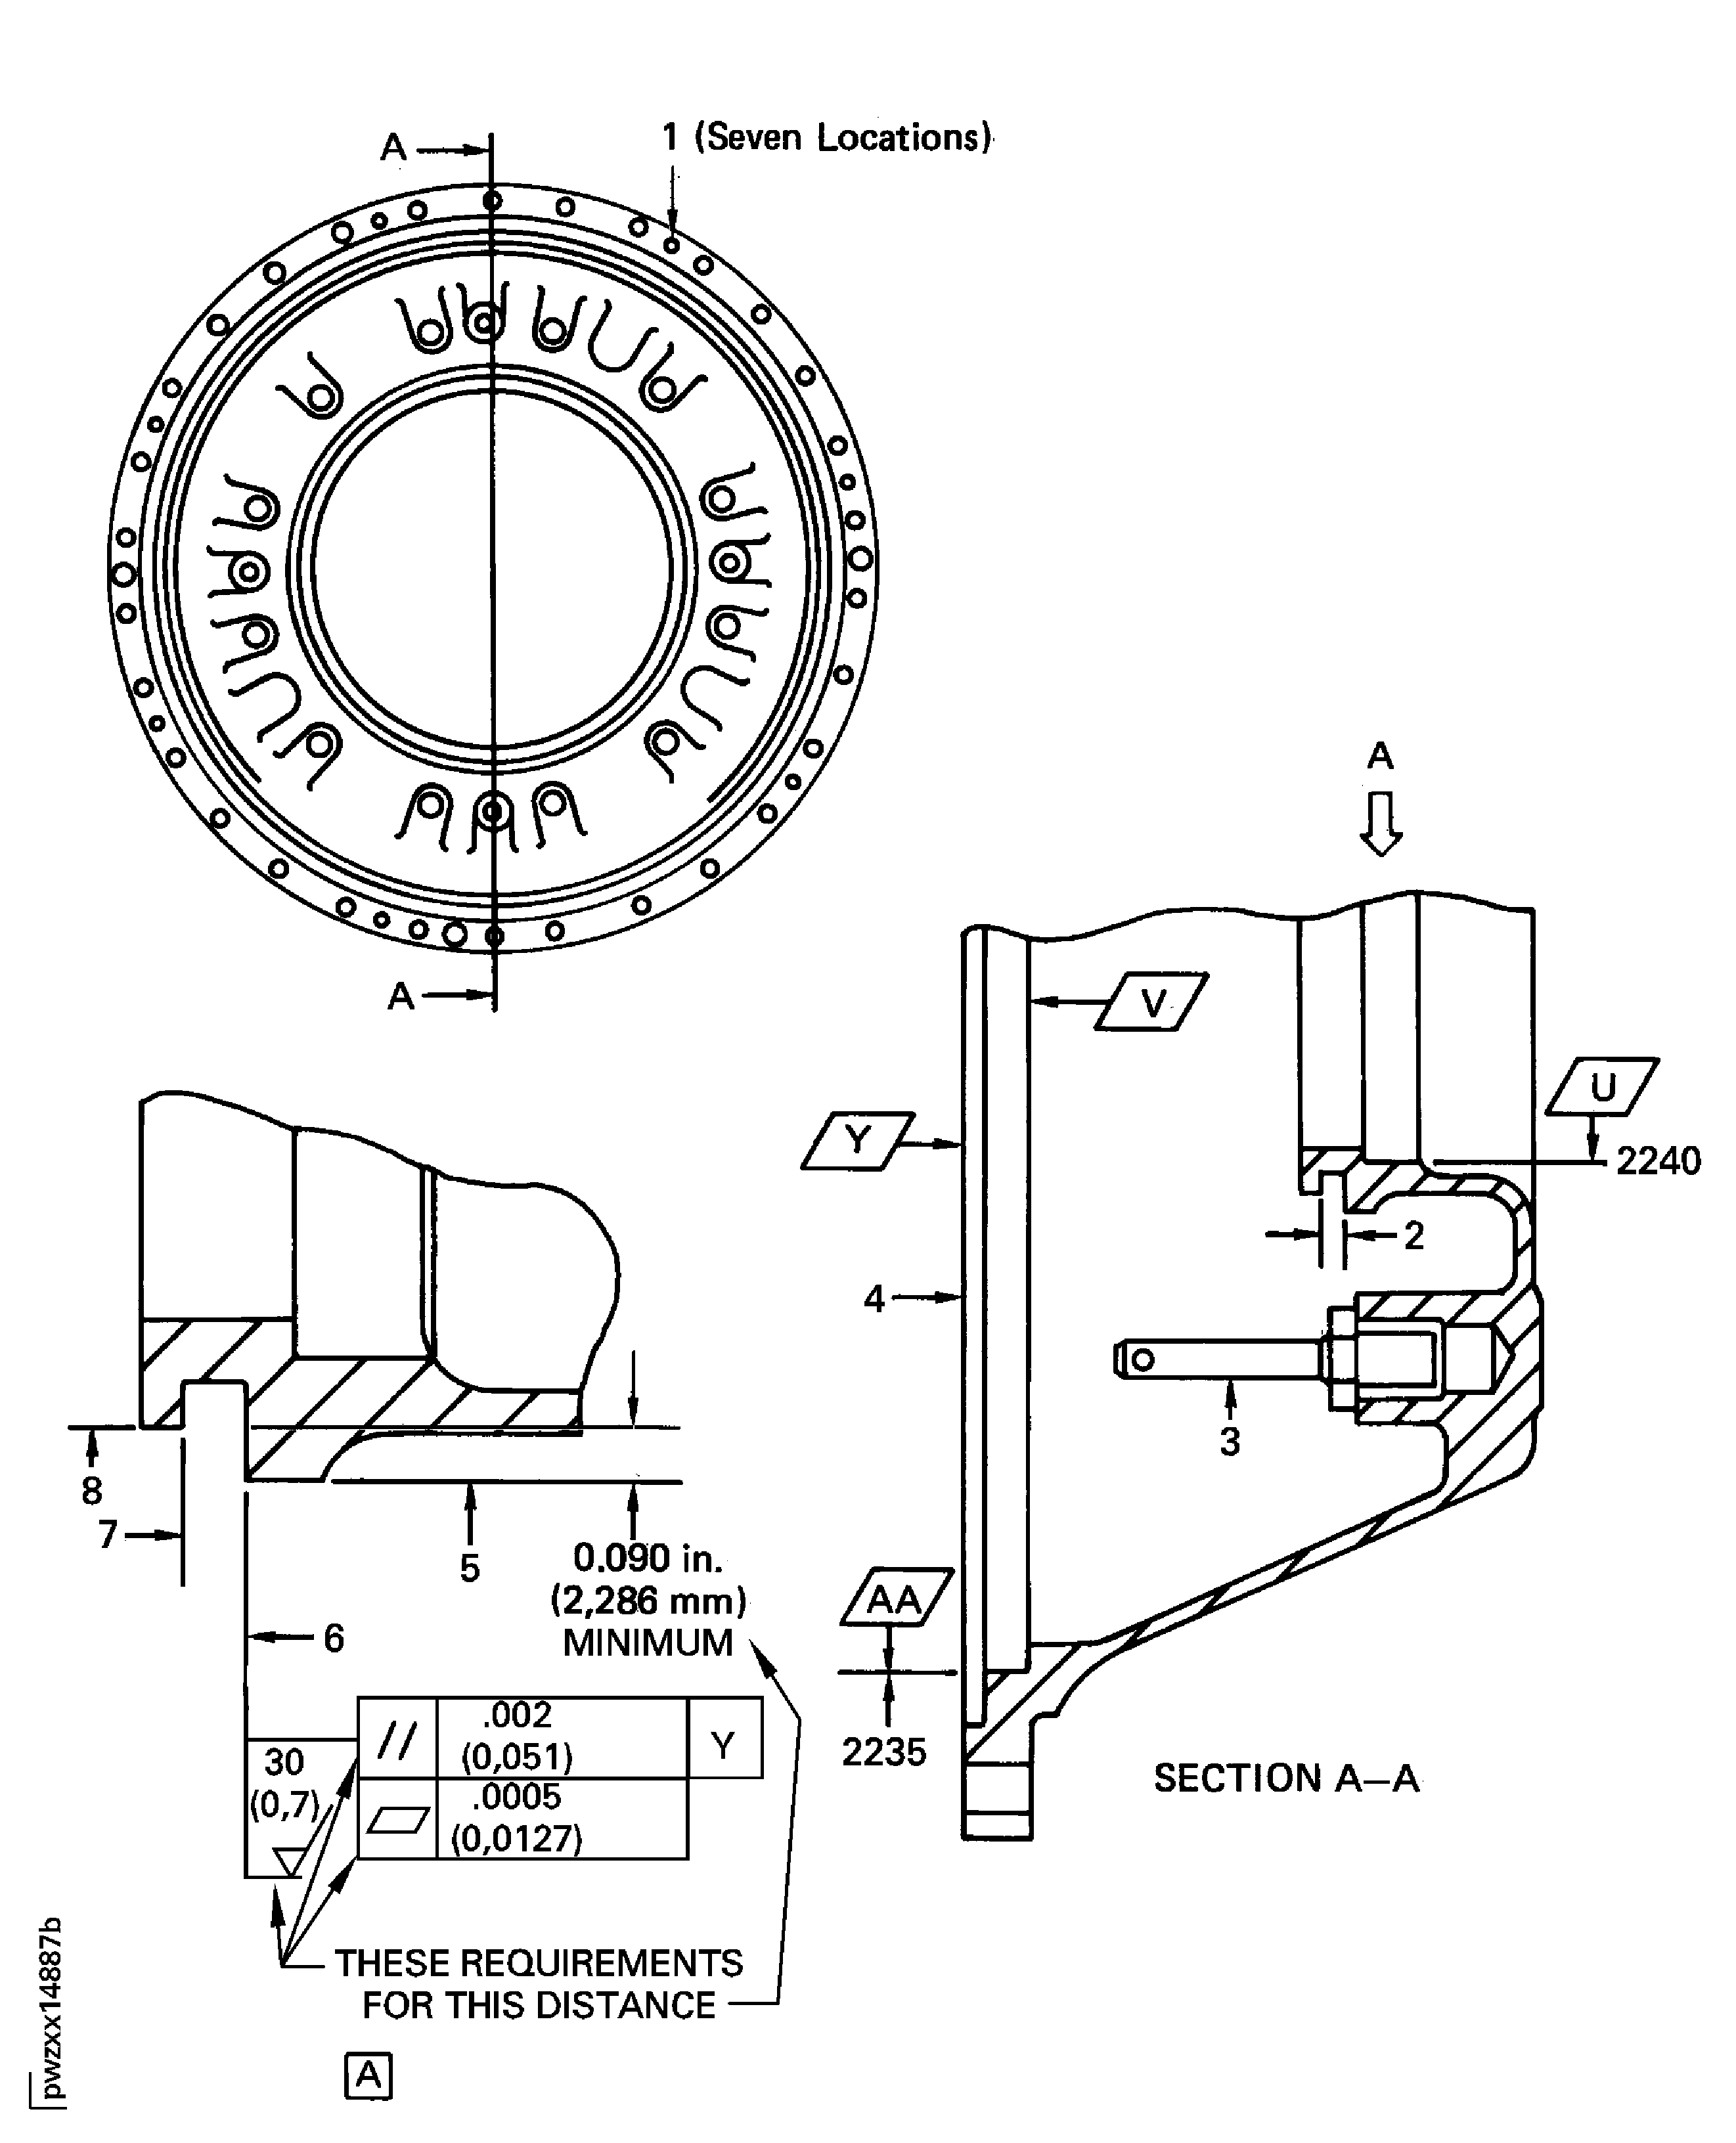
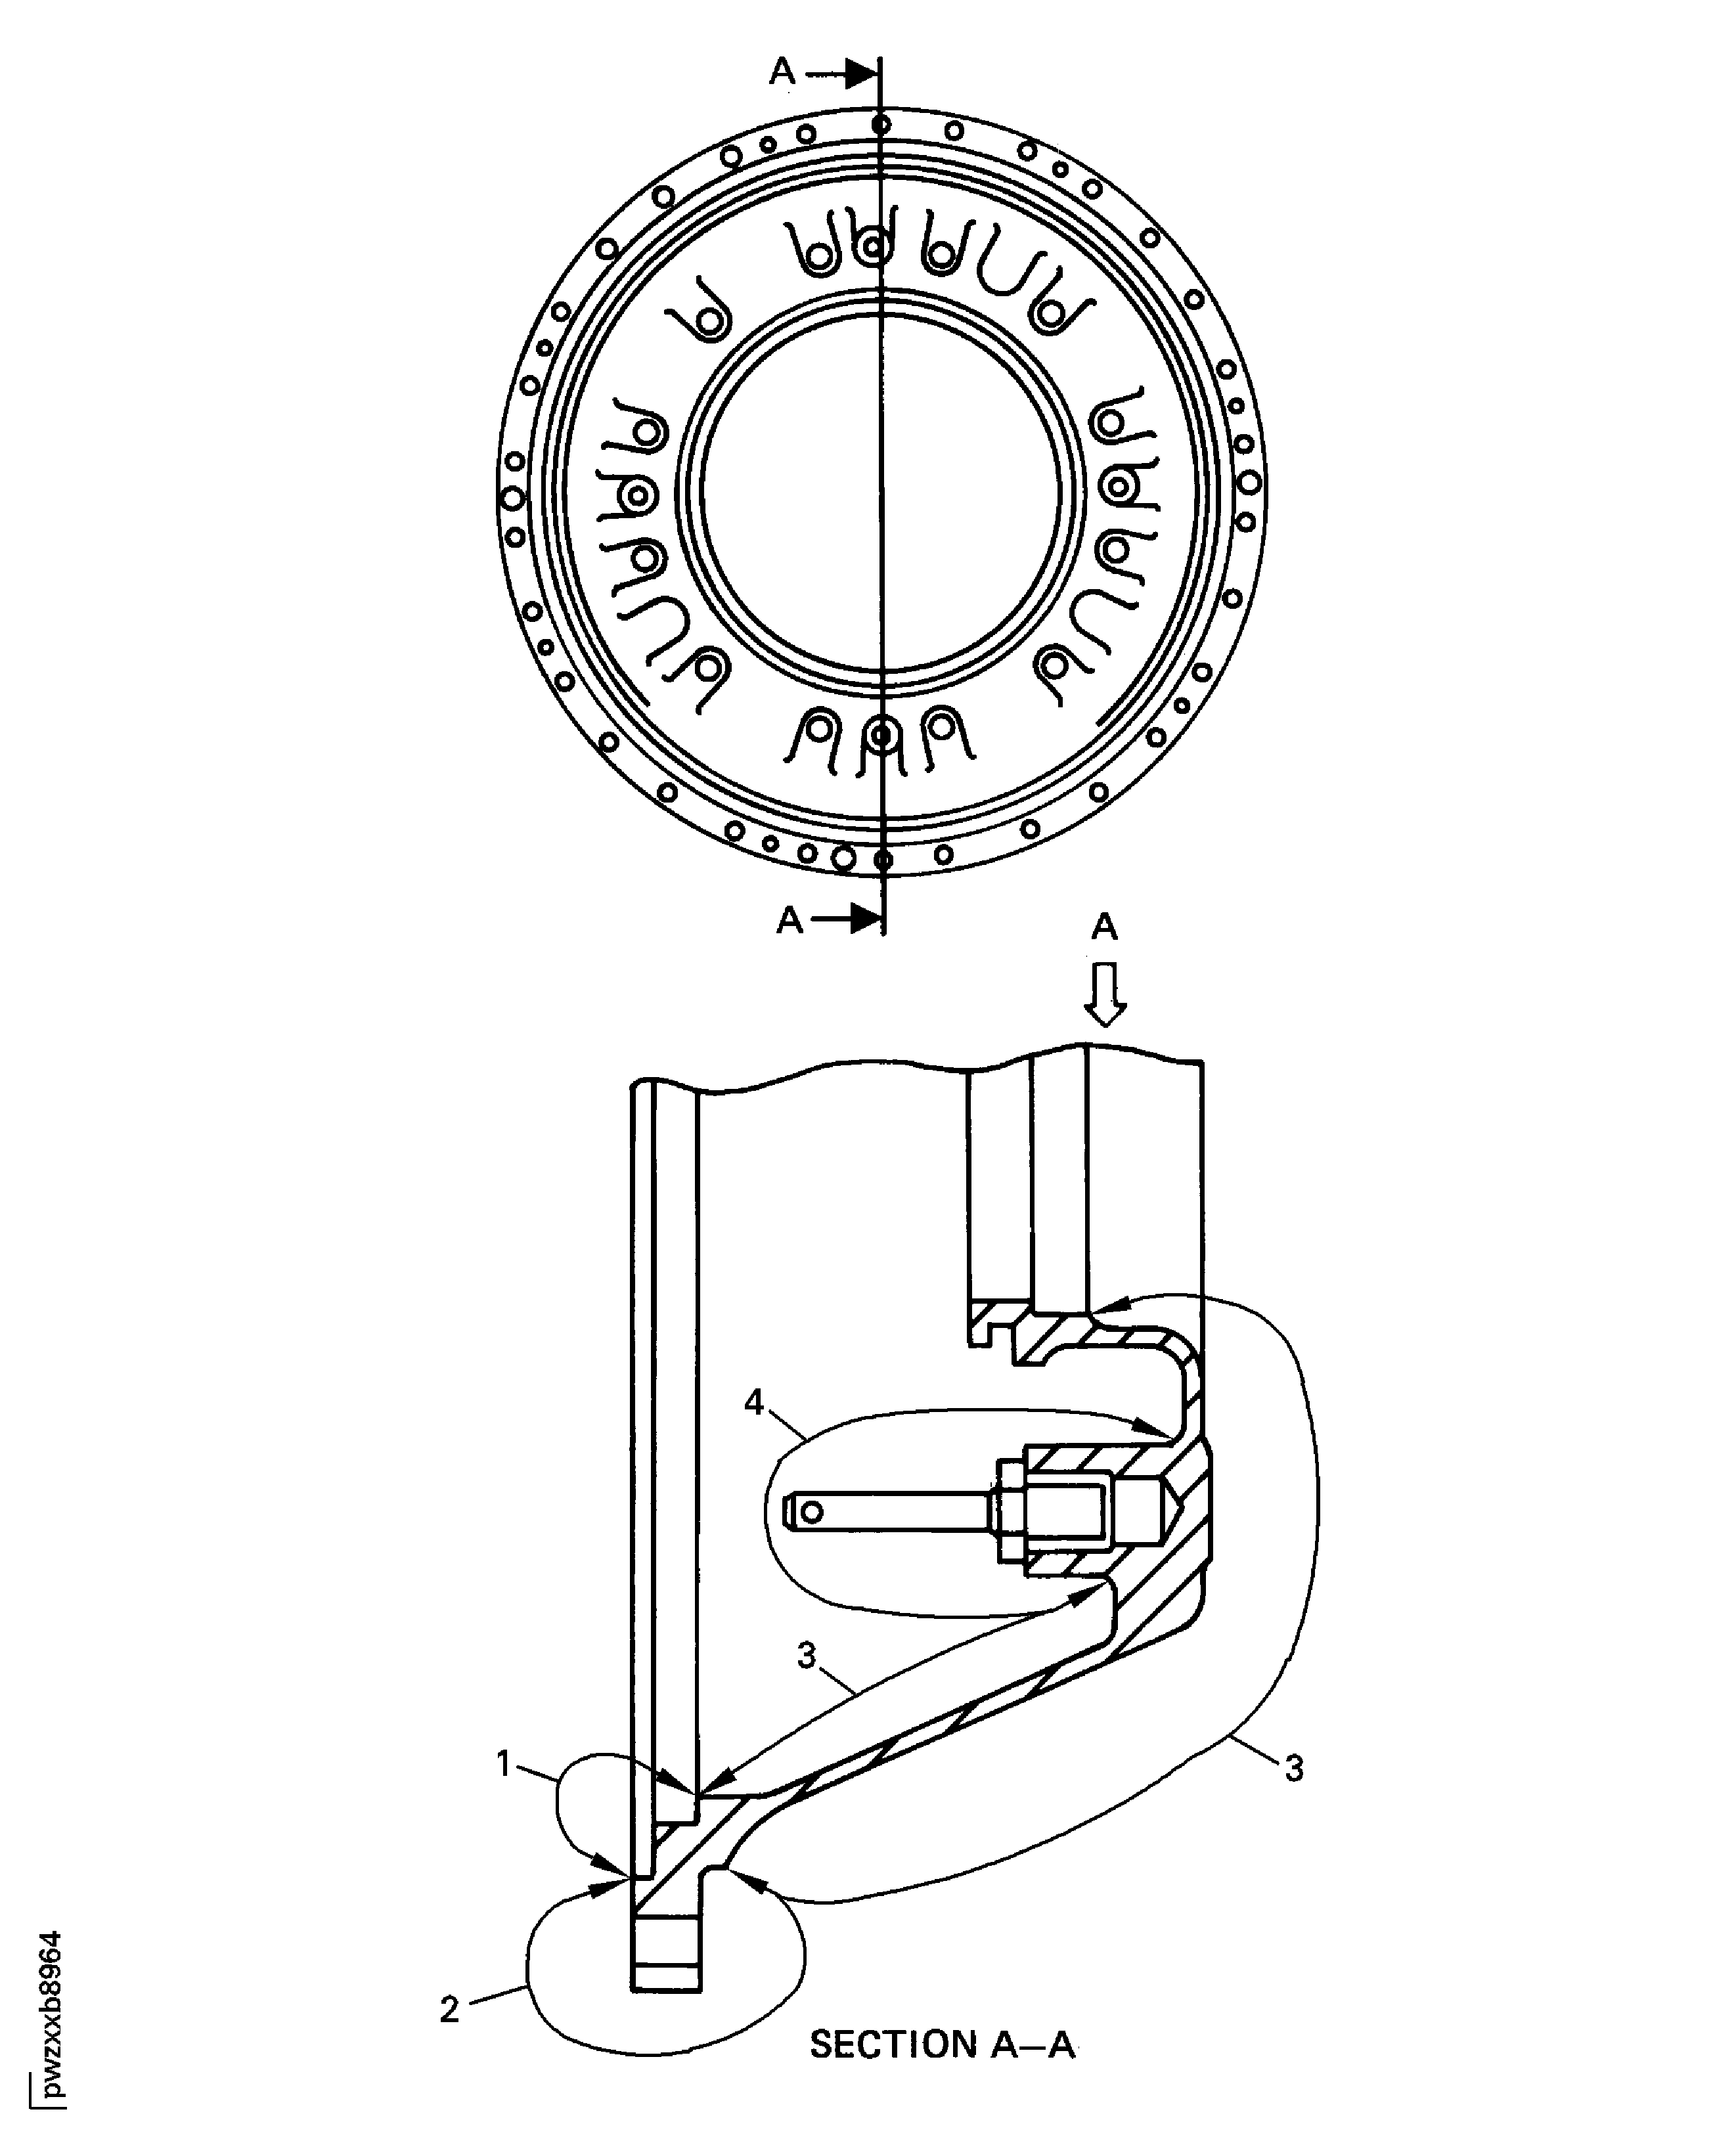
Examine the seal ring holder at location 1 for damage on the outer flange threads (seven locations).
SUBTASK 72-43-20-220-058 Examine the No. 4 Bearing Seal Ring Holder (01-060) for Damage on the Outer Flange Threads
Refer to: Figure
Repair, VRS3110 TASK 72-43-20-300-001 (REPAIR-001)
Bent, loose or carbon build-up
Examine the seal ring holder at location 3 for bent, loose or carbon build-up on the pins (four locations).
SUBTASK 72-43-20-220-059 Examine the No. 4 Bearing Seal Ring Holder (01-060) for Bent, Loose, or Carbon Build-Up on the No. 4 Bearing Seal Pins
Refer to: Figure
Repair, VRS3118 TASK 72-43-20-300-003 (REPAIR-003)
Other than (a)
Wear.
Examine the seal ring holder at locations 6 and 7 for wear on each side of the groove.
SUBTASK 72-43-20-220-060 Examine the No. 4 Bearing Seal Ring Holder (01-060) for Wear on Each Side of the Seal Ring Groove
Refer to: Figure
Repair, VRS3118 TASK 72-43-20-300-003 (REPAIR-003)
Other than (a)
Width.
Examine the seal ring holder at location 2 for the width of the groove.
SUBTASK 72-43-20-220-061 Examine the No. 4 Bearing Seal Ring Holder (01-060) for the Width of the Seal Ring Groove
Refer to: Figure
Repair, VRS3118 TASK 72-43-20-300-003 (REPAIR-003)
Other than (a)
Surface finish of the groove over the surface covered by the 0.090in. (2.286 mm) dimension.
Examine the seal ring holder at location 6 between locations 5 and 8 for the surface finish of the seal ring rear face. Refer to the SPM TASK 70-35-09-350-501.
Repair, VRS3118 TASK 72-43-20-300-003 (REPAIR-003)
Other than (a)
Parallelism of the groove at the 0.090in. (2.286 mm) dimension.
Examine the seal ring holder for the parallelism of the seal ring groove rear face at location 6 to be parallel with the face at location 4.
SUBTASK 72-43-20-220-062 Examine the No. 4 Bearing Seal Ring Holder (01-060) for the Surface Finish and the Parallelism of the Seal Ring Groove Rear Face
Refer to: Figure.
NOTE
If the measured diameter in a free condition is not satisfactory, a held condition is permitted. All dimensions apply when Surface Y is flat by 0.002 in. (0.051 mm) and Diameters AA and U maintain a clearance envelope of 10.887 in. (276.53 mm) and 6.050 in. (153.67 mm) respectively in a free or held condition. Hold the seal ring holder only on surfaces Y and V and Diameters AA and U.Repair, VRS3795 TASK 72-43-20-300-019 (REPAIR-019)
Other than (a)
Front flange inner diameter.
Examine the seal ring holder at location 2235 for the front flange inner diameter.
Repair, VRS3797 TASK 72-43-20-300-018 (REPAIR-018)
Other than (a)
Rear inner diameter.
Examine the seal ring holder at location 2240 for the rear inner diameter.
SUBTASK 72-43-20-220-063 Examine the No. 4 Bearing Seal Ring Holder (01-060) for the Inner Diameters
Refer to: Figure.
Repair, VRS3629 TASK 72-43-20-300-012 (REPAIR-012) or Repair, VRS3662 TASK 72-43-20-300-014 (REPAIR-014)
Other than (a)
Diameter.
Examine the seal support assembly at location 5 for the piston ring groove land.
SUBTASK 72-43-20-220-064 Examine the No. 4 Bearing Seal Support Assembly (01-060) for the Diameter
Refer to: Figure
Repair, VRS3667 TASK 72-43-20-300-015 (REPAIR-015).
Stylus hesitates on the areas with damage.
Use a stylus with a 0.032 in. (0.813 mm) diameter ball tip to examine the seal ring holder for burrs, nicks, dents and scratches.
SUBTASK 72-43-20-220-087 Examine the No. 4 Bearing (Rear) Seal Ring Holder (01-060) for Damage
Figure: No. 4 Bearing Seal Ring Holder Inspection Locations
No. 4 Bearing Seal Ring Holder Inspection Locations

Figure: No. 4 Bearing Seal Ring Holder Inspection
No. 4 Bearing Seal Ring Holder Inspection

