Export Control
EAR Export Classification: Not subject to the EAR per 15 C.F.R. Chapter 1, Part 734.3(b)(3), except for the following Service Bulletins which are currently published as EAR Export Classification 9E991: SBE70-0992, SBE72-0483, SBE72-0580, SBE72-0588, SBE72-0640, SBE73-0209, SBE80-0024 and SBE80-0025.Copyright
© IAE International Aero Engines AG (2001, 2014 - 2021) The information contained in this document is the property of © IAE International Aero Engines AG and may not be copied or used for any purpose other than that for which it is supplied without the express written authority of © IAE International Aero Engines AG. (This does not preclude use by engine and aircraft operators for normal instructional, maintenance or overhaul purposes.).Applicability
V2500-A5
Common Information
TASK 72-45-00-200-002-H00 HPT Stage 2 Air Seal - Examine, Inspection-002
General
This TASK gives the procedure for the inspection of the stage 2 HPT air seal. For the other parts of the HP turbine rotor and stator assembly, refer to TASK 72-45-00-200-000 (INSPECTION-000).
Fig/item numbers in parentheses in the procedure agree with those used in the IPC.
The policy that is necessary for the inspection is given in the SPM TASK 70-20-00-200-501.
The practices and processes referred to in the procedure by the TASK numbers are in the SPM.
All the parts must be cleaned before any part is examined. Refer to the TASK 72-45-00-100-000 (CLEANING-000).
All parts must be visually examined for damage, corrosion and wear. Any defects that are not identified in the procedure must be referred to IAE.
The procedure for those parts which must have a crack test is given in Step. Do the test before the part is visually examined.
A** following repair referenced in this inspection indicates that the repair is not yet published in the current revision of the manual and the part must be rejected. Contact IAE for additional information concerning FAA approved repair date.
Do not discard any part until you are sure there are no repairs available. Refer to the instructions in Repair before a discarded part is used again or oversize parts are installed.
Parts which should be discarded can be held although no repair is available. The repair of a discarded part could be shown to be necessary at a later date.
All parts must be examined to make sure that all repairs have been completed satisfactorily.
References
Refer to the SPM for data on these items.
Definitions of Damage, SPM TASK 70-02-02-350-501
Record and Control of the Lives of Parts, SPM TASK 70-05-00-220-501
Inspection of Parts, SPM TASK 70-20-00-200-501
Some data on these items is contained in this TASK. For more data on these items refer to the SPM.
Method of Testing for Crack Indications
Chemical Processes
Surface Protection
Preliminary Requirements
Pre-Conditions
NONESupport Equipment
| Name | Manufacturer | Part Number / Identification | Quantity | Remark |
|---|---|---|---|---|
| Balancing equipment | LOCAL | Balancing equipment |
Consumables, Materials and Expendables
NONESpares
NONESafety Requirements
CAUTION
Procedure
Clean the part. Refer to TASK 72-45-00-100-000 (CLEANING-000).
NOTE
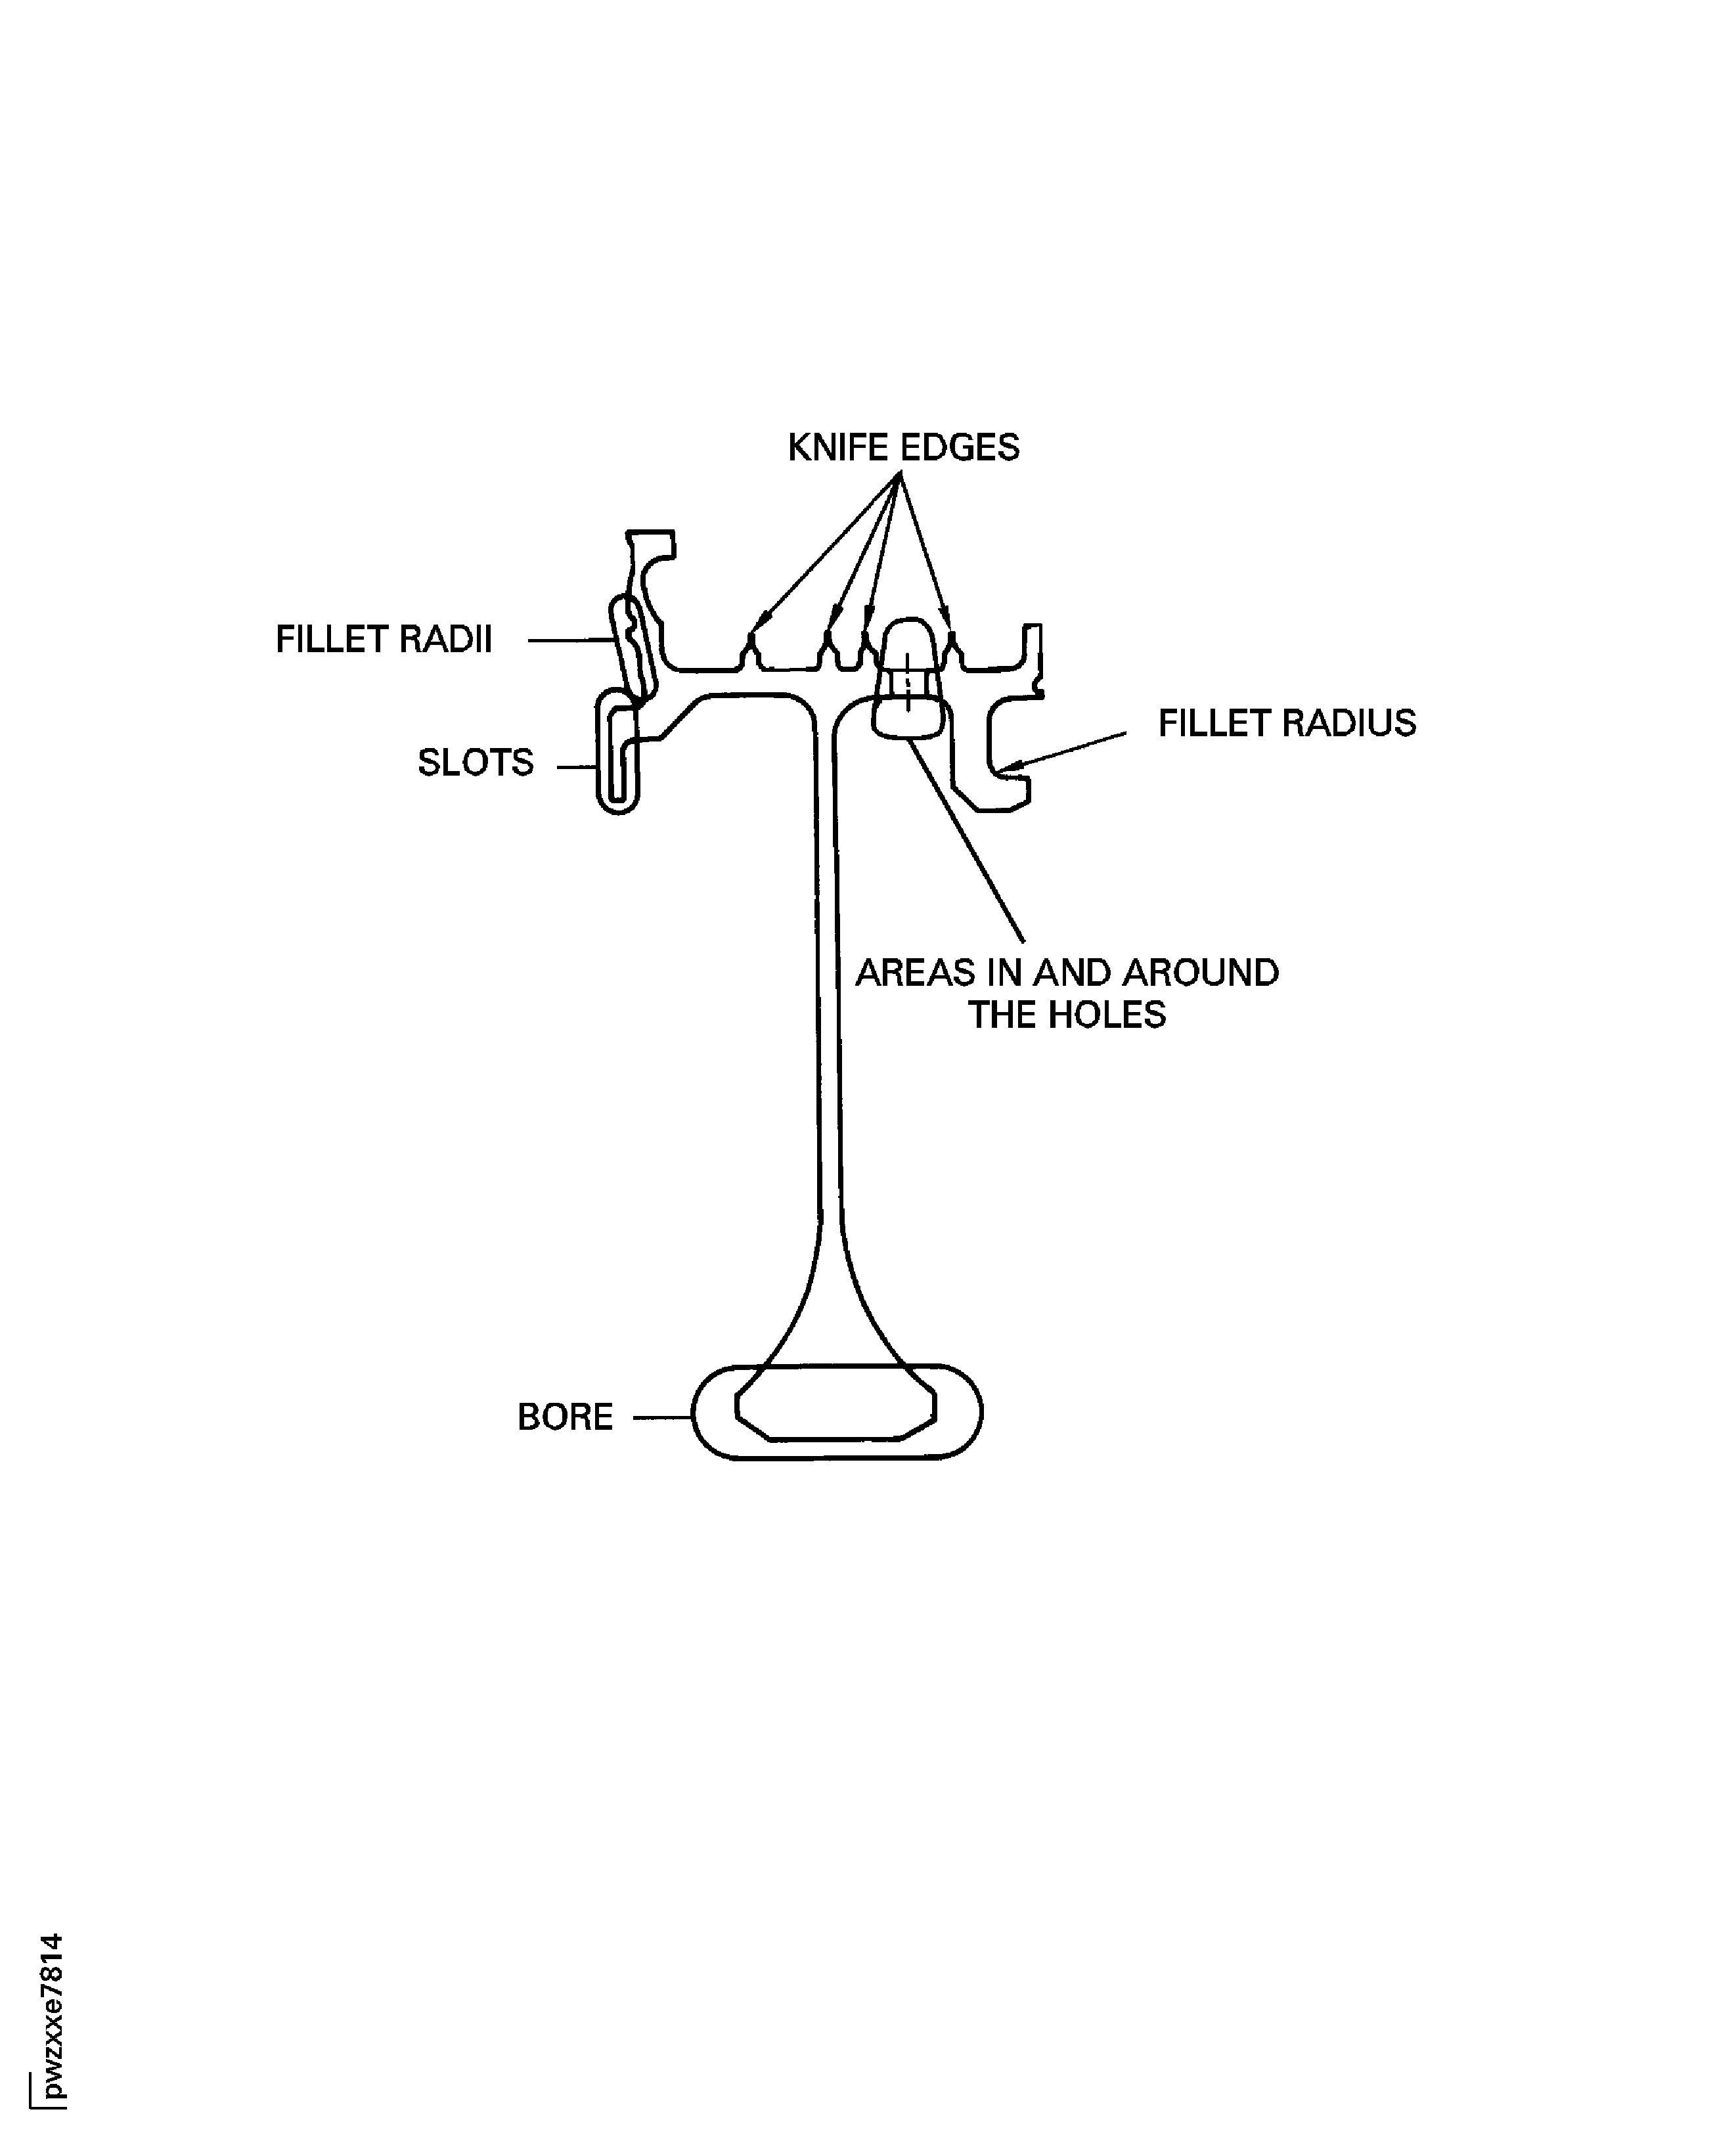
When you inspect the seal for cracks make sure you check the important areas. These areas are shown in Figure.Repair, VRS3207 TASK 72-45-00-300-004 (REPAIR-004)
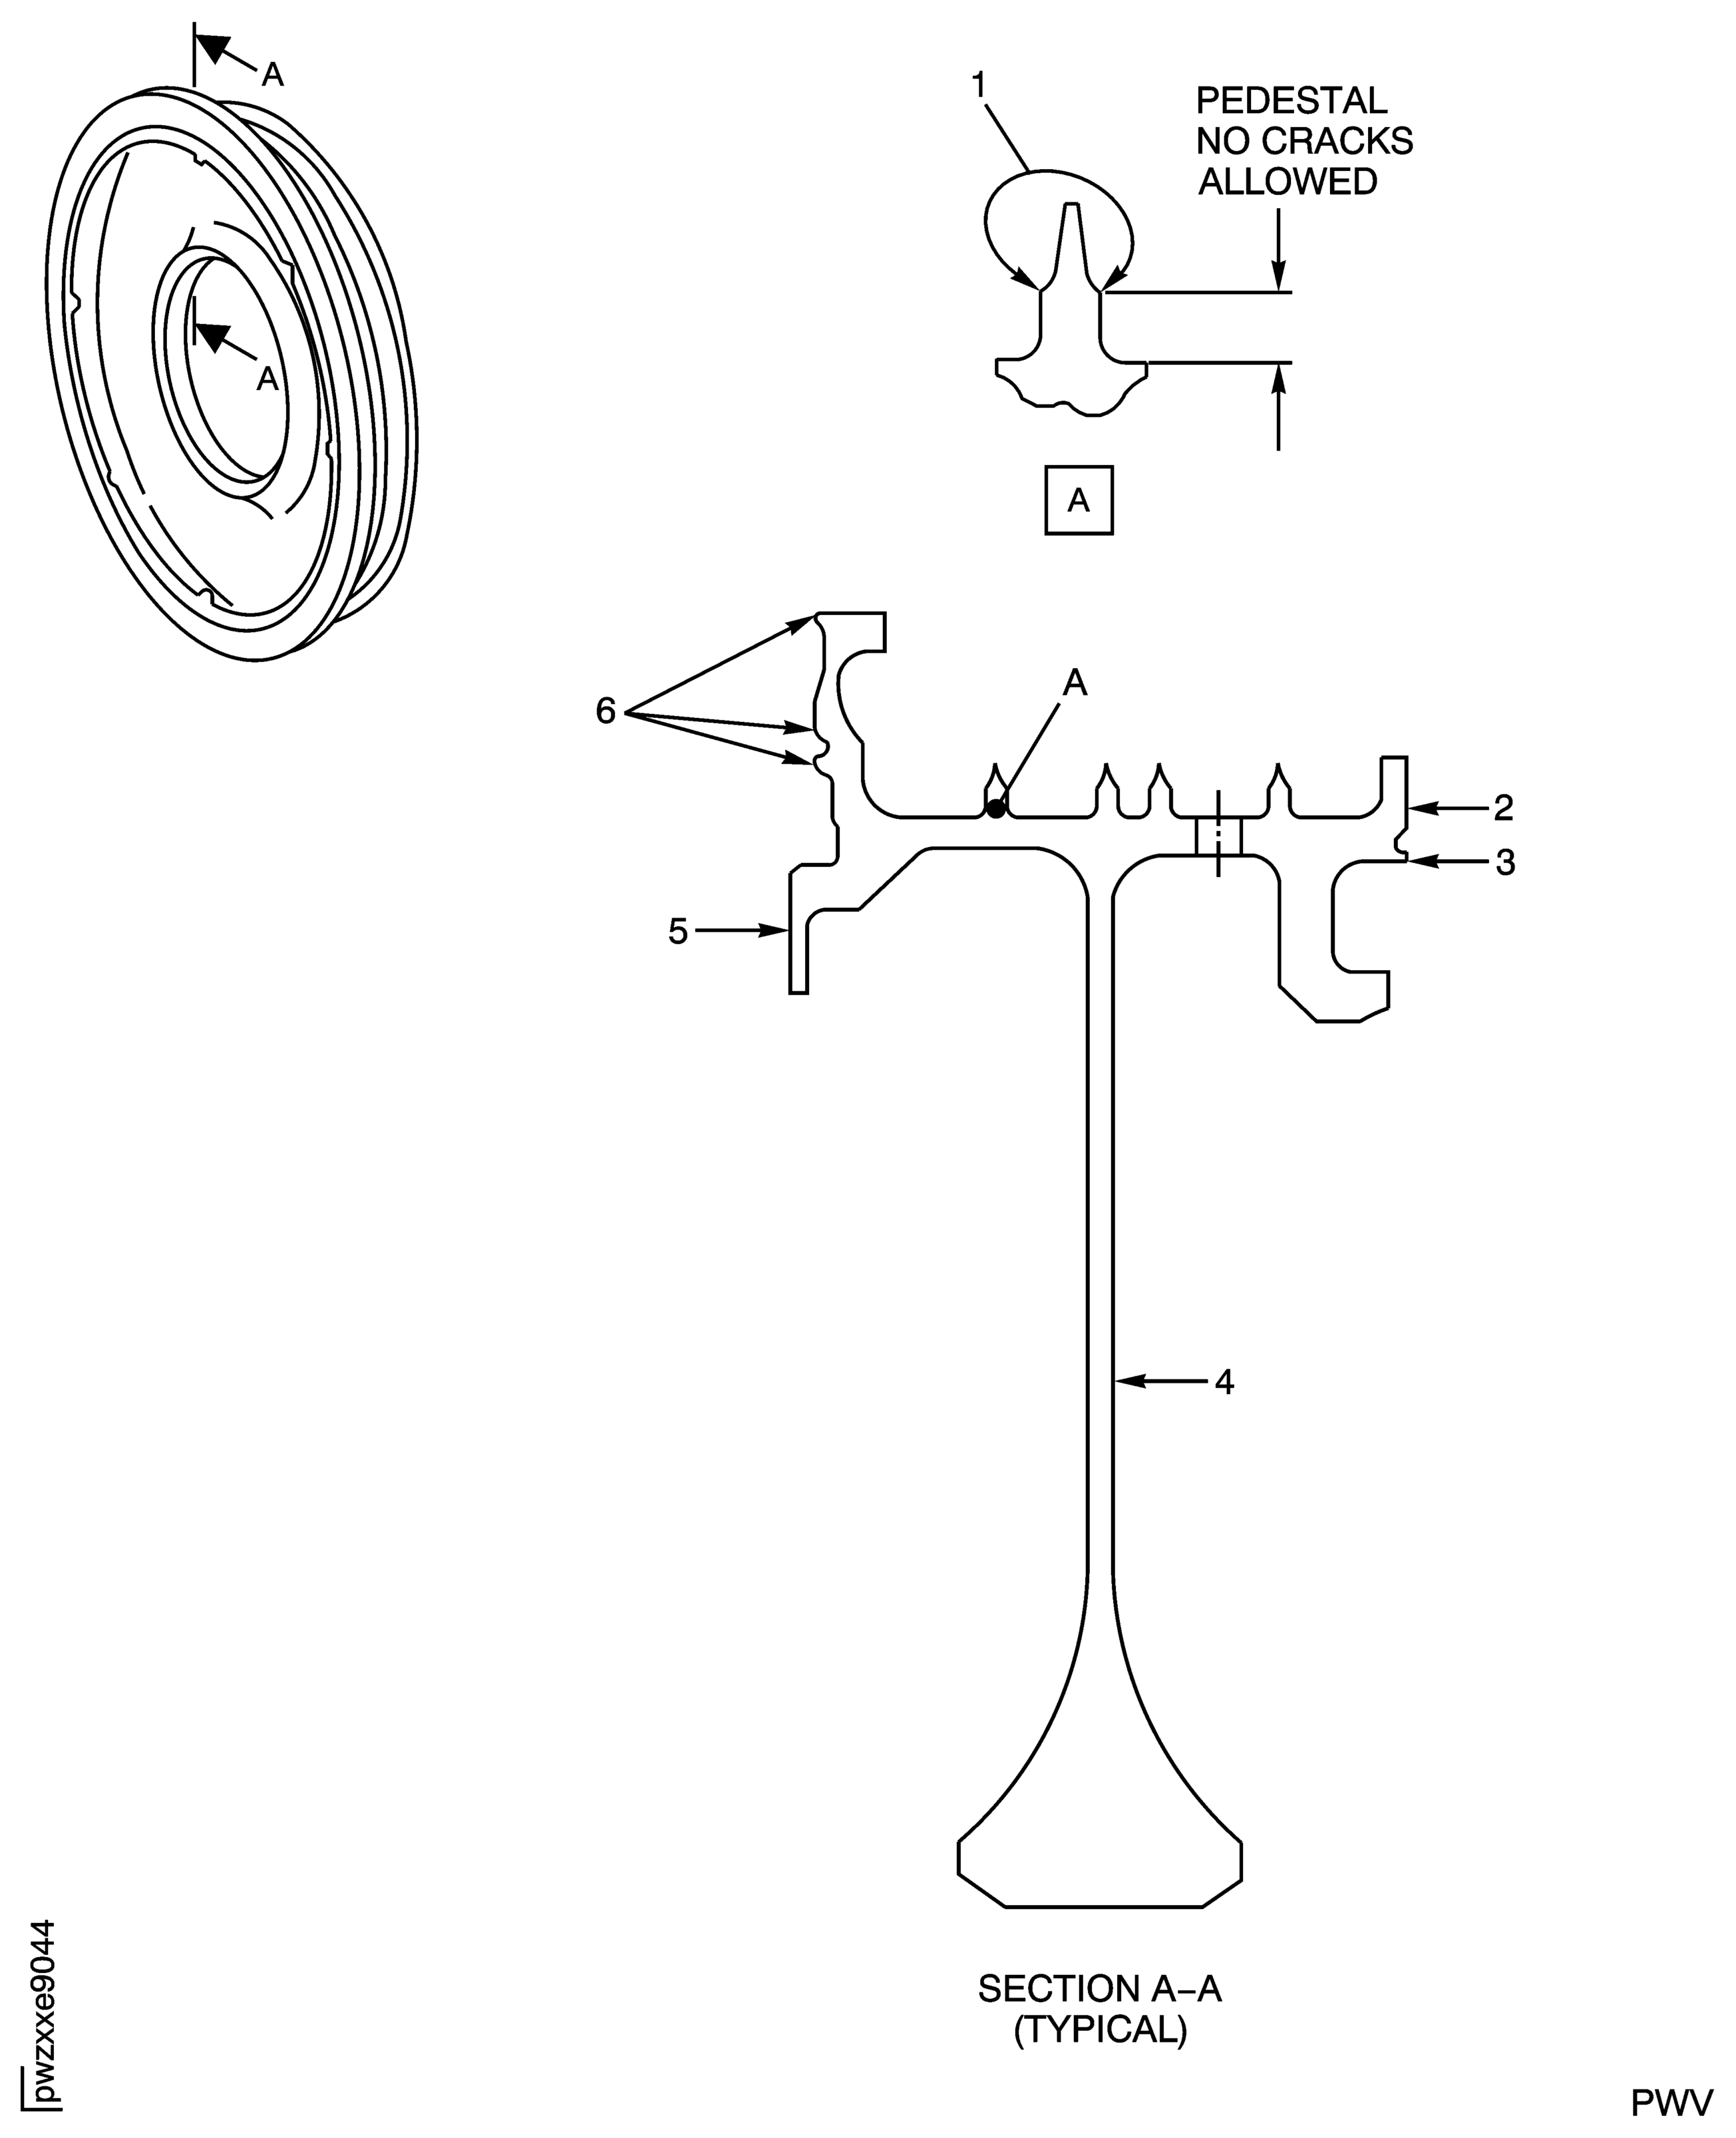
Cracks that go into the base metal at the knife-edges, location 1
Reject
NOTE
If the crack originates at the fillet radius (outer diameter side) and extends through to the inner diameter side, reject the HPT stage 1 hub HPT Stage 1 Hub (72-45-11, 01-011) and HPT stage 1air seal - rear ENGINE-STAGE 1 AIR SEAL (REAR) (72-45-15, 01-020).
Cracks found in the front filled radius (location 8)
Do the test for cracks on the part that is given below. Carefully examine filled radii, the knife-edge seals at location 1, the web at location 4 and the tab at location 5. Use the applicable penetrant procedure.
PART
TASK/SUBTASK
Stage 2 HPT air seal
SPM TASK 70-23-04-230-501 (Dip or spray)
SUBTASK 72-45-00-230-063 Examine the Stage 2 HPT Air Seal (01-080) for Cracks
Repair, VRS3208 TASK 72-45-00-300-002 (REPAIR-002)
Scratches, nicks, dents or corrosion
Examine the air seal for scratches, nicks, dents and corrosion.
SUBTASK 72-45-00-200-152 Examine the Stage 2 HPT Air Seal (01-080) for Scratches, Nicks, Dents and Corrosion
Repair, VRS3209 TASK 72-45-00-300-003 (REPAIR-003) or VRS3207 TASK 72-45-00-300-004 (REPAIR-004)
Other than (a)
Chipped coating.
Repair, VRS3209 TASK 72-45-00-300-003 (REPAIR-003) or VRS3207 TASK 72-45-00-300-004 (REPAIR-004)
If the cracks do not look like they go into the base metal
Repair, VRS3207 TASK 72-45-00-300-004 (REPAIR-004)
Cracks that go into the knife-edge base metal
Cracked coating.
Examine the air seal at location 1, for chipped or cracked plasma spray coating on the knife-edge seal (5 locations).
SUBTASK 72-45-00-220-153 Examine the Stage 2 HPT Air Seal (01-080) for Chipped or Cracked Plasma Spray Coating on the Knife-Edge Seals
Repair, VRS3208 TASK 72-45-00-300-002 (REPAIR-002)
Wear
Examine the air seal at location 3, for wear on the rear contact face.
Repair, VRS3208 TASK 72-45-00-300-002 (REPAIR-002)
Other than (1)
Examine the airseal at location 2, for wear on the rear contact face.
SUBTASK 72-45-00-220-154 Examine the Stage 2 HPT Air Seal (01-080) for Wear on the Rear Contact Faces
Repair, VRS3208 TASK 72-45-00-300-002 (REPAIR-002) and/or VRS3211 TASK 72-45-00-300-006 (REPAIR-006)
Other than (a)
Wear.
Examine the air seal at location 6, for wear on the front contact faces (3 locations).
SUBTASK 72-45-00-220-156 Examine the Stage 2 HPT Air Seal (01-080) for Wear on the Front Contact Faces
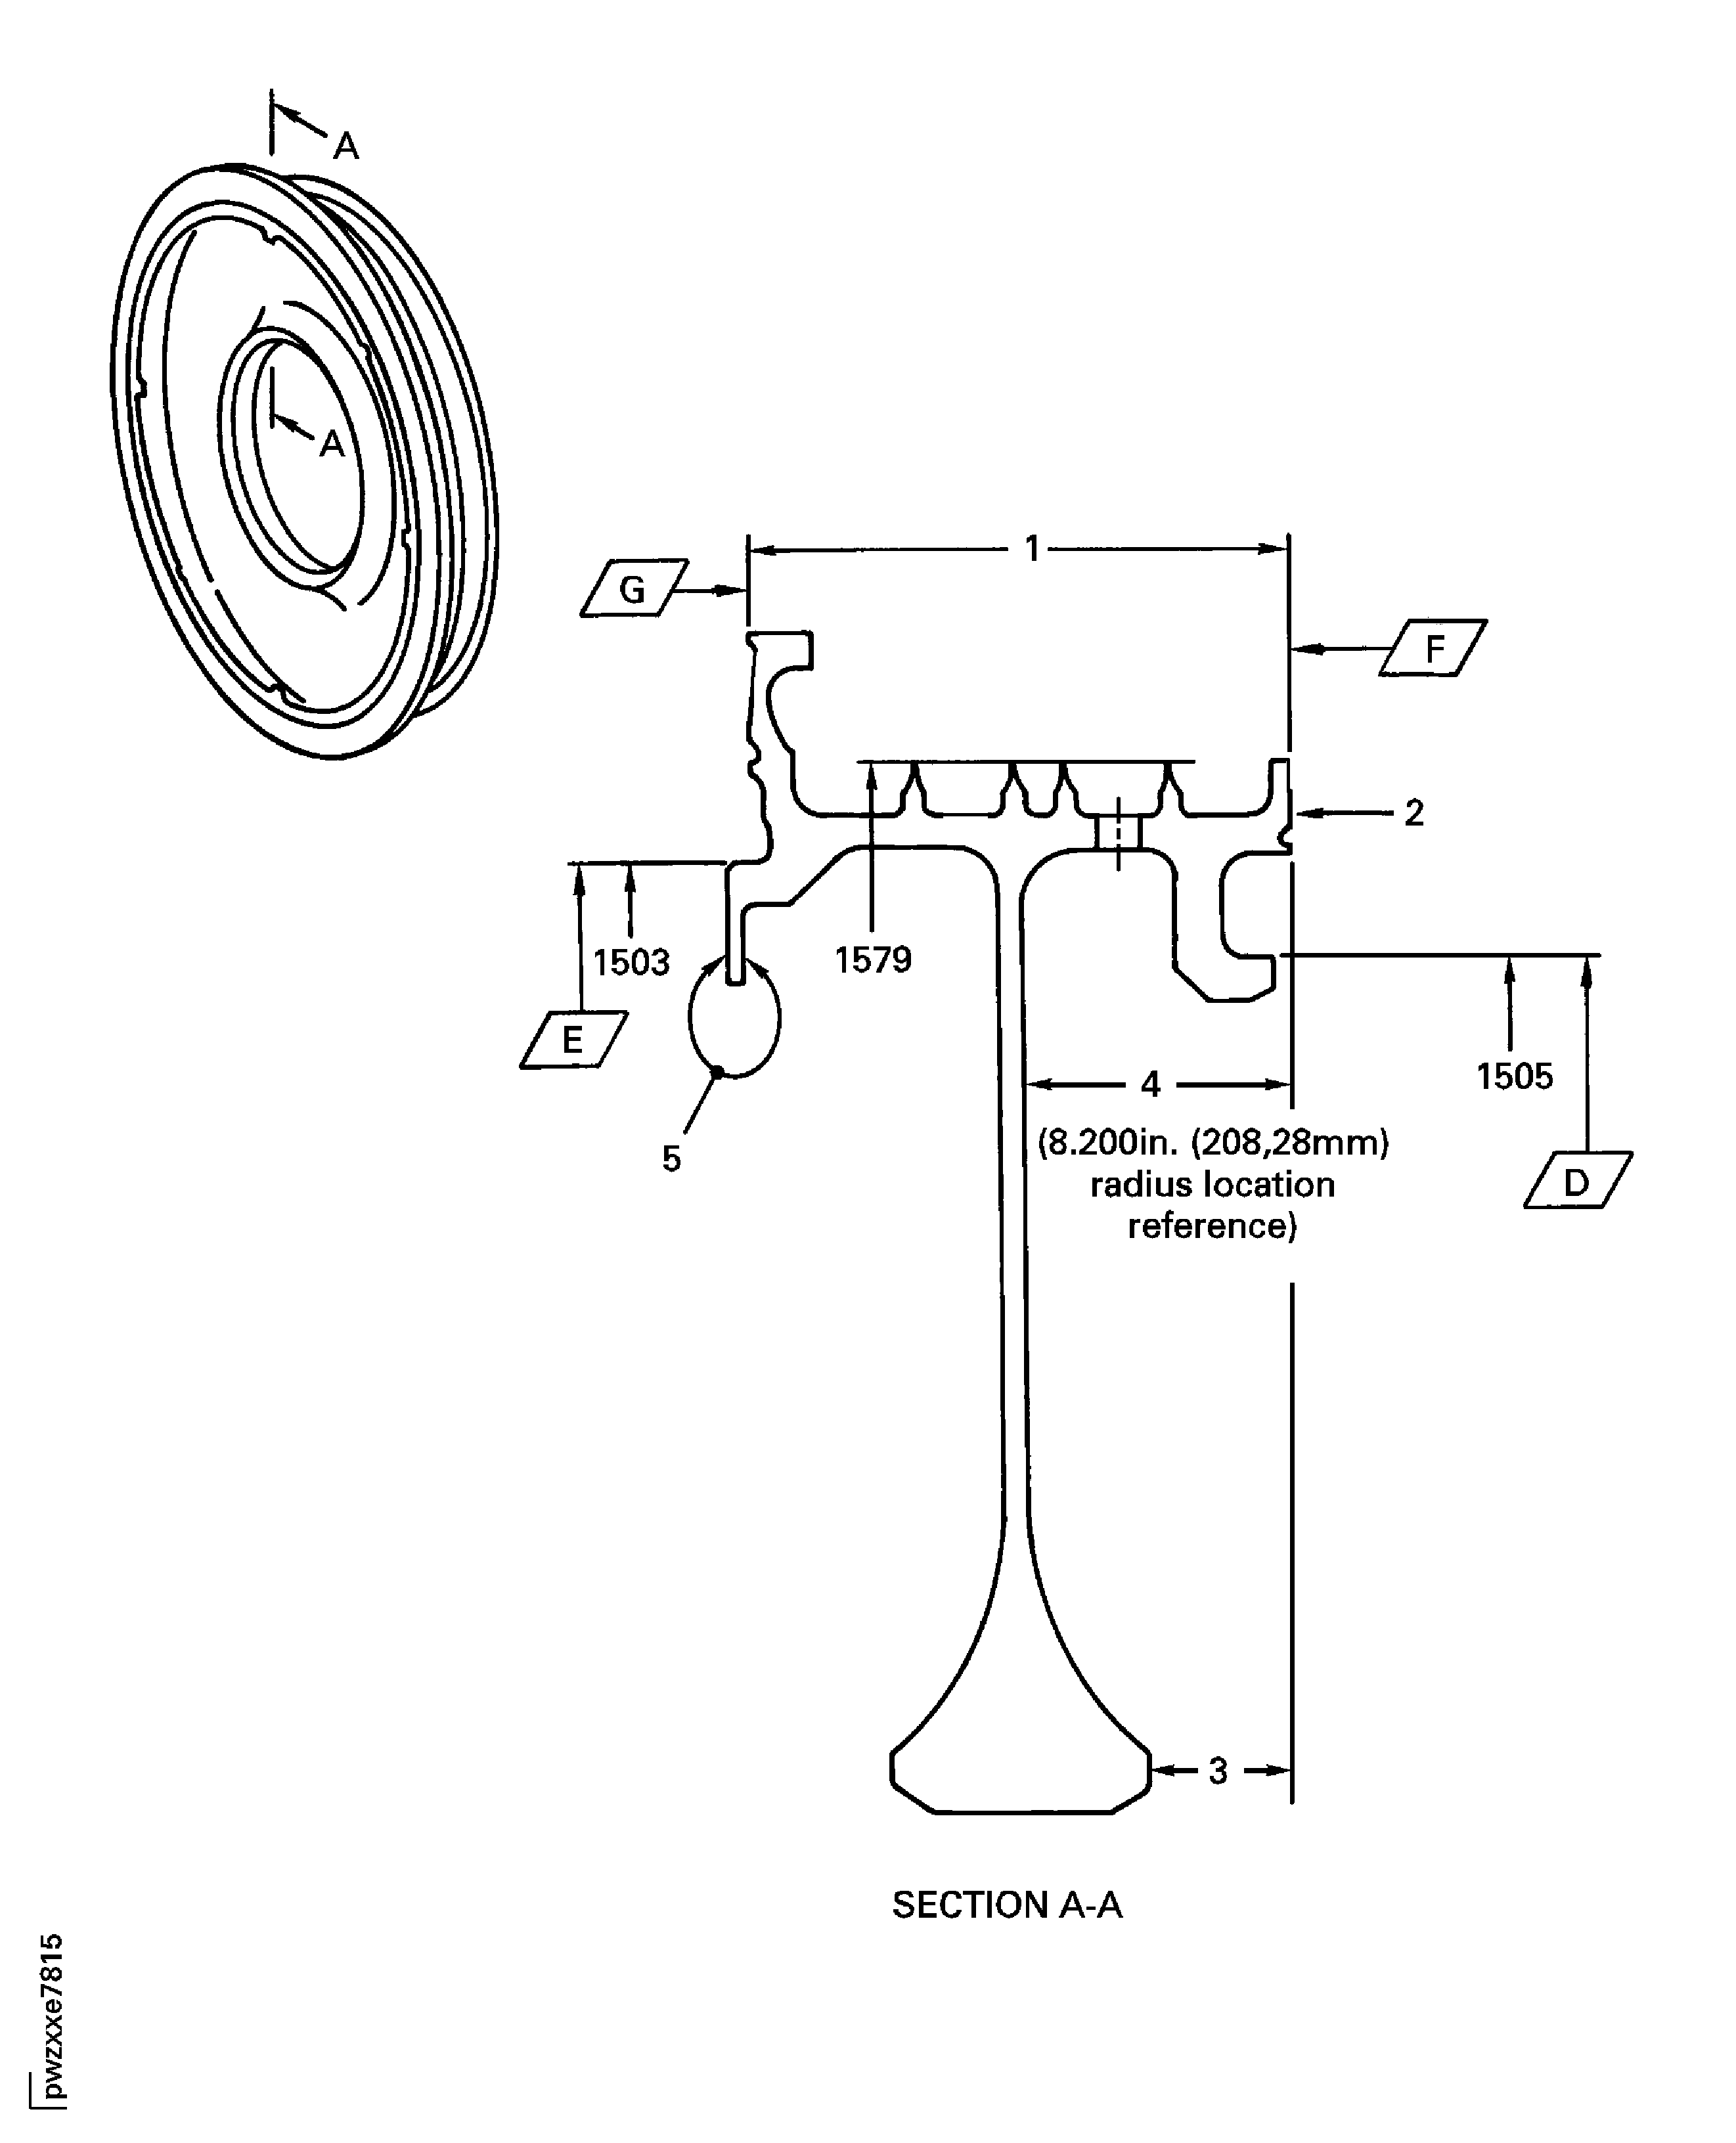
Refer to Figure.
NOTE
If the measured axial length in a free condition is not satisfactory, a held condition is permitted. All dimensions apply when Surfaces F and G are flat by 0.002 in. (0.051 mm), Diameter D maintains a clearance envelope of 17.136 in. (435.254 mm) diameter, and Diameter E maintains a clearance envelope of 18.127 in. (460.426 mm) diameter in a free or held condition. Hold the air seal only on Surfaces F and G and Diameters D and E.
SUBTASK 72-45-00-220-157 Examine the Stage 2 HPT Air Seal (01-080) for the Axial Length
Refer to Figure
Accept
NOTE
This part can be used only if the mating part has a diameter that will result in fit of reference No. 1505. Refer to TASK 72-45-00-430-001-C00 (ASSEMBLY, CONFIG-003).
If the diameter is between 17.126 and 17.1355 in. (435.000 and 435.242 mm)
Examine the air seal at location 1505, for wear on the rear flange diameter.
Repair, VRS3209 TASK 72-45-00-300-003 (REPAIR-003) and VRS3207 TASK 72-45-00-300-004 (REPAIR-004)
Other than (1)
Examine the air seal at location 1579, for wear on the knife-edge seal diameters (4 locations).
Accept
NOTE
This part can be used only if the mating part has a diameter that will result in fit of reference No. 1503. Refer to TASK 72-45-00-430-001-C00 (ASSEMBLY, CONFIG-003).
If the diameter is between 18.117 and 18.1265 in. (460.172 and 460.413 mm)
Repair, VRS3210 TASK 72-45-00-300-008 (REPAIR-008)
Other than (1)
Examine the air seal at location 1503, for wear on the front flange diameter.
SUBTASK 72-45-00-220-158 Examine the Stage 2 HPT Air Seal (01-080) for Wear on the Rear Flange Diameter, the Knife-edge Seal Diameters, and the Front Flange Diameter
NOTE
If the measured diameters in a free condition are not satisfactory, a held condition is permitted. All dimensions apply when Surfaces F and G are flat by 0.002 in. (0.051 mm), Diameters D maintains a clearance envelope of 17.136 in. (435.254 mm) diameter, and Diameter E maintains a clearance envelope of 18.127 in. (460.426 mm) diameter in a free or held condition. Hold the air seal only Surfaces F and G and Diameters D and E.Refer to Figure
Do not install the air seal if the total number of engine cycles is more than the maximum cycles given in TASK 05-10-01-200-001-B00 (GROUP A PARTS LIVES, CONFIG-002) or TASK 05-10-01-200-001-C00 (GROUP A PARTS LIVES, CONFIG-003).
SUBTASK 72-45-00-220-159 Examine the Stage 2 HPT Air Seal (01-080) for the Engine Cycles of the Part
Refer to Figure.
Reject.
Do inspection of HPT for possible oil ignition event. Refer to TASK 72-45-00-200-801. Report all findings to IAE Technical Services.
Other than Step.
Bore drop dimension.
Examine the air seal at location 3 for the bore drop dimension.
SUBTASK 72-45-00-220-160 Examine the Stage 2 HPT Air Seal (01-080) for the Bore Drop Dimension
Refer to Figure.
Do inspection of HPT for possible oil ignition event. Refer to TASK 72-45-00-200-801. Report all findings to IAE Technical Services.
Soot or oil
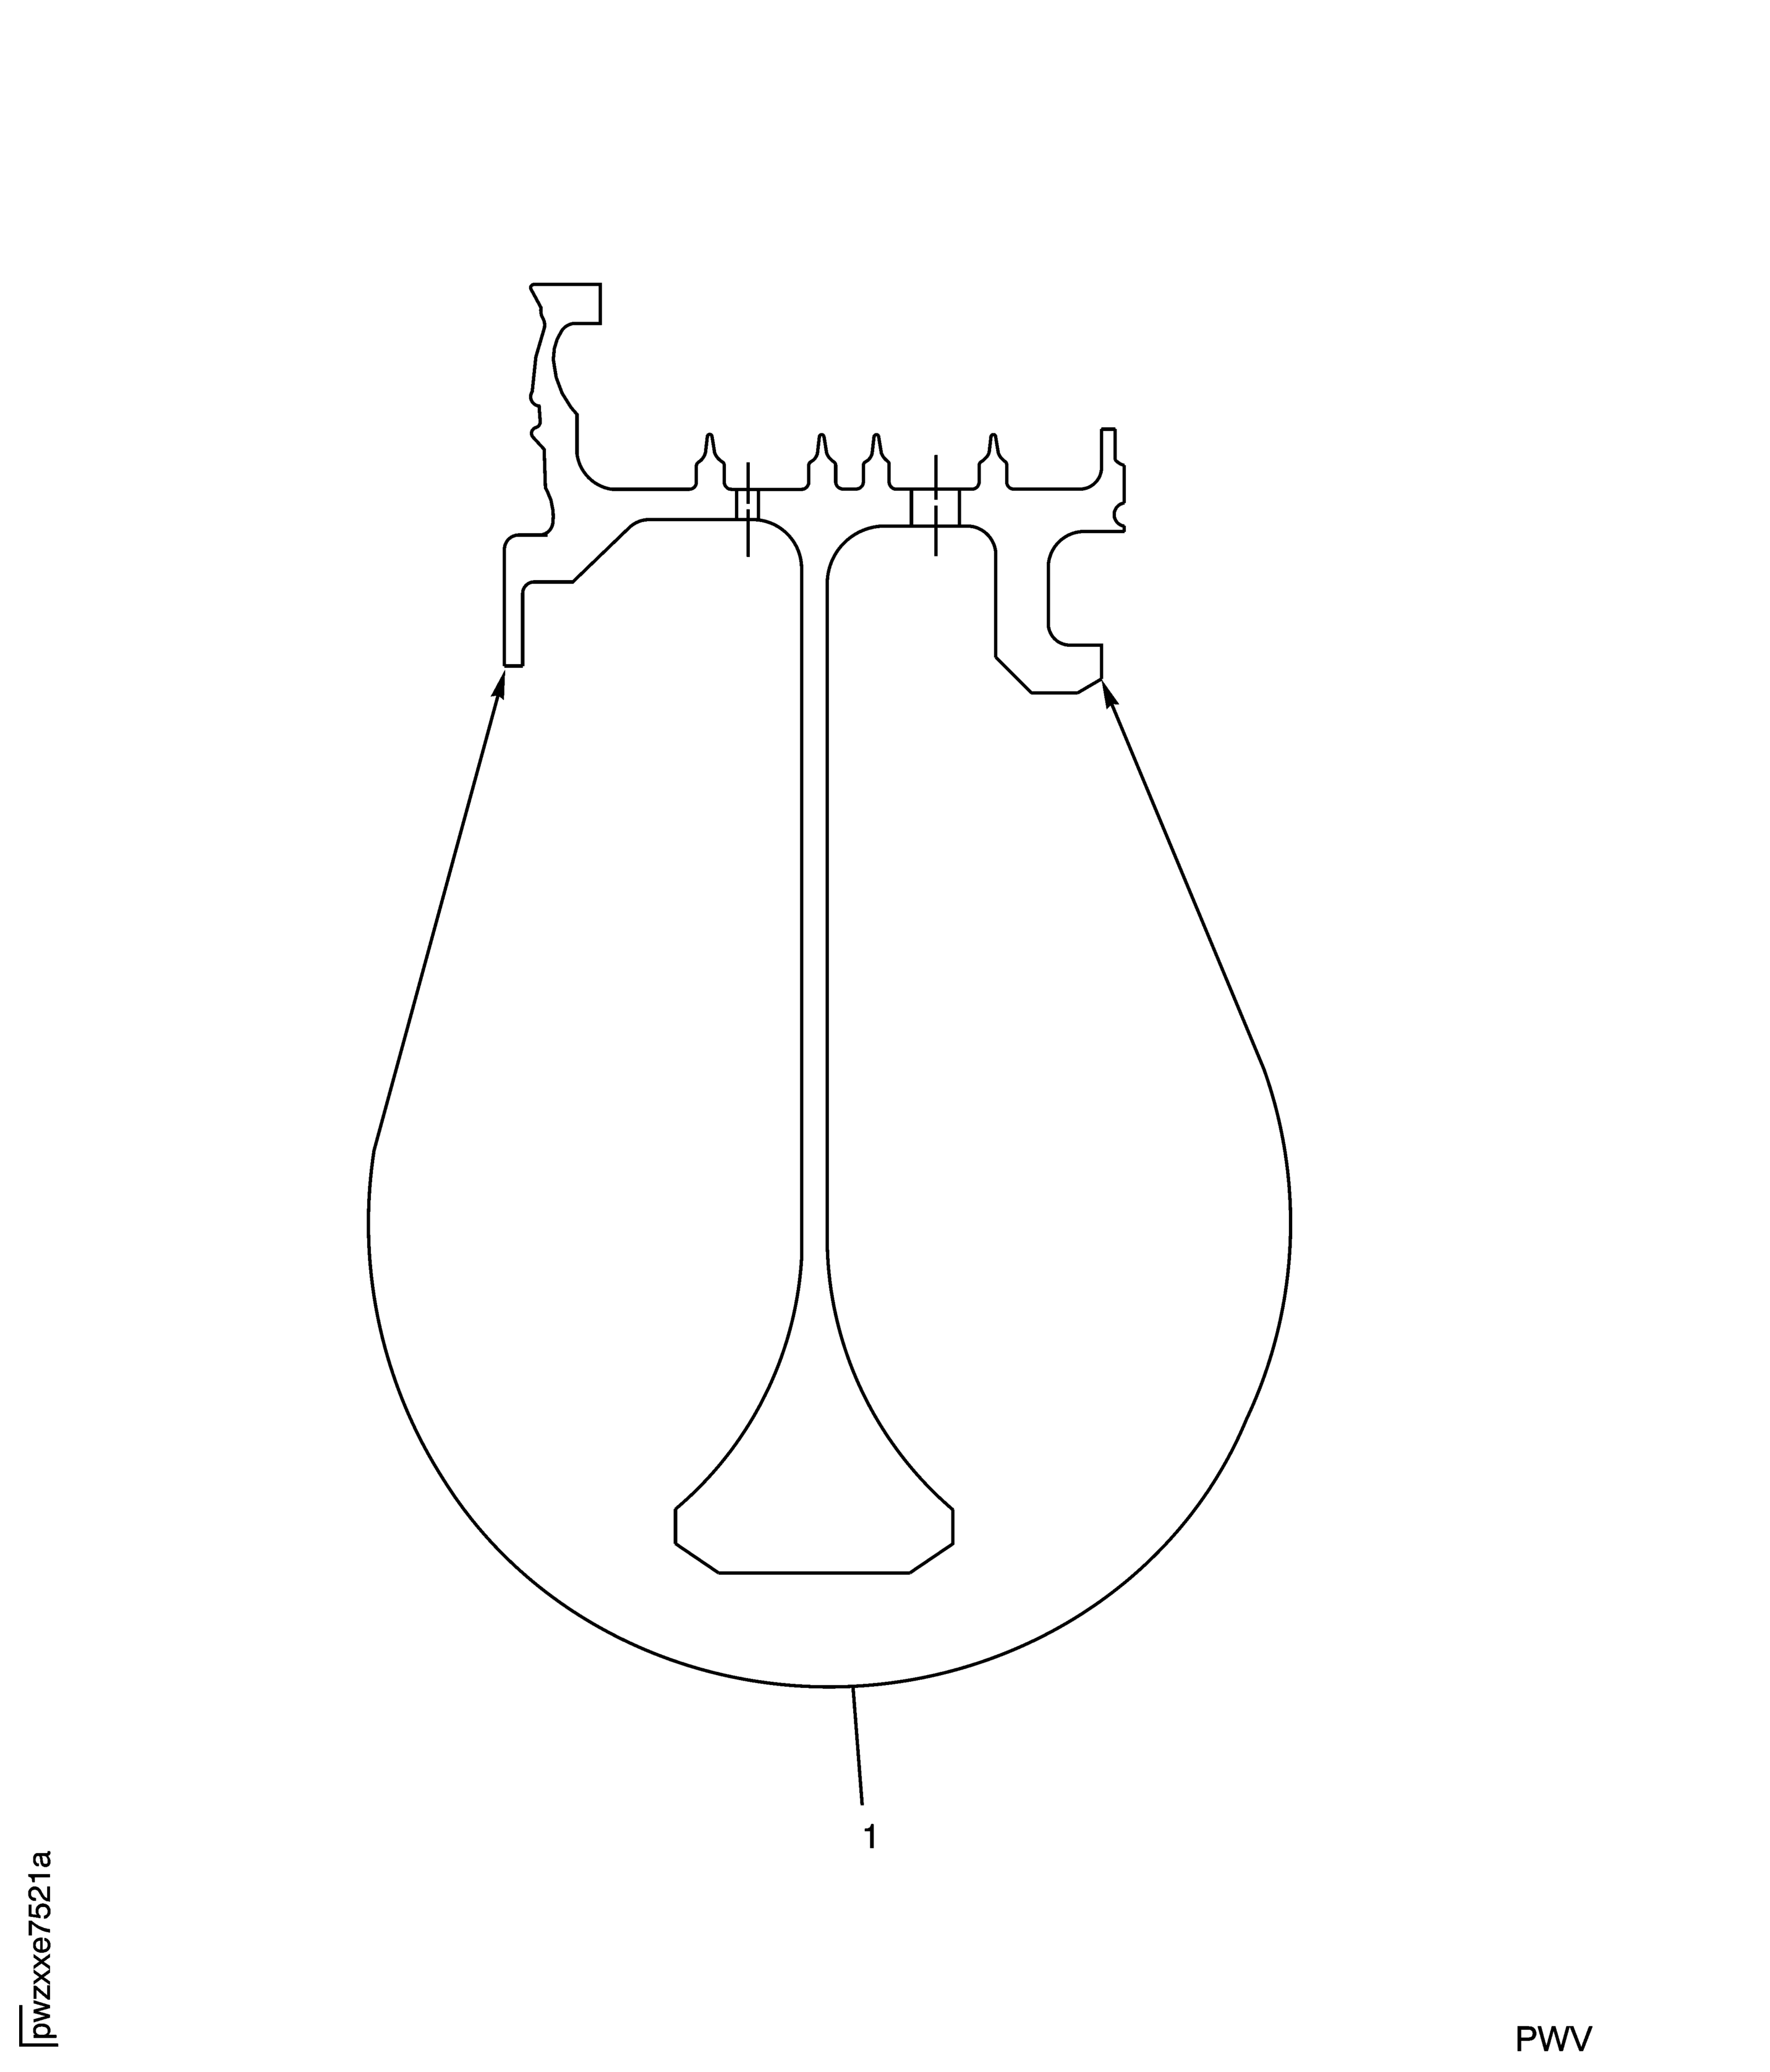
Examine the air seal for soot and oil at location 1.
SUBTASK 72-45-00-220-232 Examine the Stage 2 HPT Air Seal (01-080) for Soot and Oil

CAUTION
MAKE SURE THAT YOU DO THIS INSPECTION BEFORE YOU CLEAN THE PART OR CLEANING PROCEDURE WILL REMOVE THE INDICATION OF SOOT AND OIL.Refer to Figure.
Do inspection of HPT for possible oil ignition event. Refer to TASK 72-45-00-200-801. Report all findings to IAE Technical Services.
Wear marks.
Examine the air seal for wear marks on the bore.
SUBTASK 72-45-00-220-233 Examine the Stage 2 HPT Air Seal (01-080) for Wear Marks on the Bore
Figure: Stage 2 HPT Air Seal Inspection Locations
Sheet 1

Figure: Stage 2 HPT Air Seal Inspection Locations
Sheet 2

Figure: Stage 2 HPT Air Seal Inspection Locations
Stage 2 HPT Air Seal Inspection Locations

Figure: Stage 2 HPT Air Seal Inspection Locations
Stage 2 HPT Air Seal Inspection Locations

