Export Control
EAR Export Classification: Not subject to the EAR per 15 C.F.R. Chapter 1, Part 734.3(b)(3), except for the following Service Bulletins which are currently published as EAR Export Classification 9E991: SBE70-0992, SBE72-0483, SBE72-0580, SBE72-0588, SBE72-0640, SBE73-0209, SBE80-0024 and SBE80-0025.Copyright
© IAE International Aero Engines AG (2001, 2014 - 2021) The information contained in this document is the property of © IAE International Aero Engines AG and may not be copied or used for any purpose other than that for which it is supplied without the express written authority of © IAE International Aero Engines AG. (This does not preclude use by engine and aircraft operators for normal instructional, maintenance or overhaul purposes.).Applicability
V2500-A5
Common Information
TASK 72-45-00-430-001-C00 HP Turbine (HPT) Rotor And Stator Assembly - Assemble The HPT Rotor And Stator Assembly, Assembly-001
General
Fig/item numbers in parentheses in the procedure agree with those used in the IPC. Only the primary Fig/item numbers are used. For the service bulletin alpha variants refer to the IPC.
For all parts identified in a different Chapter/Section/Subject, the applicable Chapter/Section/Subject comes before the Fig/item number.
For standard torque data and procedures, refer to SPM TASK 70-41-00-400-501, SPM TASK 70-41-00-400-501 and SPM TASK 70-41-01-400-501.
Special torque data and assembly tolerances are included in the procedure.
Lubricate all threads and abutment faces of nuts and bolts with CoMat 10-077 APPROVED ENGINE OILS, unless other lubricants are referred to in the procedure.
To identify, lubricate and install seal rings, refer to SPM TASK 70-64-02-640-501.
The number for each radial location must be identified in a clockwise direction. These start at the engine top position when you look from the rear of the engine, unless stated differently in the procedure.
NOTE
NOTE
Preliminary Requirements
Pre-Conditions
NONESupport Equipment
| Name | Manufacturer | Part Number / Identification | Quantity | Remark |
|---|---|---|---|---|
| IAE 1F10026 Hydraulic hand pump | 0AM53 | IAE 1F10026 | 1 | |
| IAE 1F10052 Two cables sling | 0AM53 | IAE 1F10052 | 1 | |
| IAE 1P16028 Build stand | 0AM53 | IAE 1P16028 | 1 | |
| IAE 1P16046 Removal/Installation fixture | 0AM53 | IAE 1P16046 | 1 | |
| IAE 1P16047 Hydraulic adapter | 0AM53 | IAE 1P16047 | 1 | |
| IAE 1P16051 Clamp | 0AM53 | IAE 1P16051 | 1 | |
| IAE 1P16052 Spline aligner | 0AM53 | IAE 1P16052 | 1 | |
| IAE 1P16063 Fixture | 0AM53 | IAE 1P16063 | 1 | |
| IAE 1P16173 Lift sling | 0AM53 | IAE 1P16173 | 1 | |
| IAE 1P16220 Heater | 0AM53 | IAE 1P16220 | 1 | |
| IAE 1P16543 Removal/Installation fixture | 0AM53 | IAE 1P16543 | 1 | |
| IAE 1P17022 Removal/installation jaws assembly | 0AM53 | IAE 1P17022 | 1 | |
| IAE 1P17026 Lift fixture | 0AM53 | IAE 1P17026 | 1 | |
| IAE 1P17030 Blade retainer | 0AM53 | IAE 1P17030 | 1 | |
| IAE 1P17758 Protective cover | 0AM53 | IAE 1P17758 | 1 | |
| IAE 6F10027 Heater control unit | 0AM53 | IAE 6F10027 | 1 |
Consumables, Materials and Expendables
| Name | Manufacturer | Part Number / Identification | Quantity | Remark |
|---|---|---|---|---|
| CoMat 01-573 WAX BLEND, PARAFFIN | 24269 | CoMat 01-573 | ||
| CoMat 06-073 INK, METAL MARKING | LOCAL | CoMat 06-073 | ||
| CoMat 10-077 APPROVED ENGINE OILS | X333X | CoMat 10-077 | ||
| DELETED | LOCAL | DELETED |
Safety Requirements
NONEProcedure
Refer to Figure.
Reference clearance at location 1500. If required use the data written as a note in TASK 72-45-31-200-000 (INSPECTION/CHECK).
Table 1. Fits and Clearances (all dimensions are in inches) NEW PART
WORN PART
DIMENSIONS
DIMENSIONS
PART IDENT
Size
Clearance
Non-select
REJECT IF
MORE THAN
LOCATION 1500
Stage 2 Turbine Hub ENGINE-STAGE 2 TURBINE HUB (72-45-31, 01-011), Location Diameter
Stage 2 HPT Heatshield ENGINE-STAGE 2 TURBINE HUB (72-45-31, 01-020), Bore
Stage 2 Turbine Hub Location Diameter
5.520
Clear
Clear
5.524
0.002
0.002
Stage 2 HPT Heatshield Bore
5.526
0.012
0.012
5.532
Clear
Clear
Table 2. Fits and Clearances (all dimensions are in millimeters) NEW PART
WORN PART
DIMENSIONS
DIMENSIONS
PART IDENT
Size
Clearance
Non-select
REJECT IF
MORE THAN
LOCATION 1500
Stage 2 Turbine Hub ENGINE-STAGE 2 TURBINE HUB (72-45-31, 01-011), Location Diameter
Stage 2 HPT Heatshield ENGINE-STAGE 2 TURBINE HUB (72-45-31, 01-020), Bore
Stage 2 Turbine Hub Location Diameter
140.208
Clear
Clear
140.310
0.050
0.050
Stage 2 HPT Heatshield Bore
140.360
0.300
0.300
140.513
Clear
Clear
SUBTASK 72-45-00-220-117 Reference Fits and Clearances of the Stage 1 Turbine Hub and the Stage 2 HPT Heatshield at Location 1500
Refer to Figure.
Reference clearance/interference at location 1503. If required, use the data written as a note in TASK 72-45-11-200-000 (INSPECTION-000) and TASK 72-45-00-200-000 (INSPECTION-000).
Table 3. Fits and Clearances (all dimensions are in inches) NEW PART
WORN PART
DIMENSIONS
DIMENSIONS
PART IDENT
Size
Clearance
Non-select
REJECT IF
MORE THAN
LOCATION 1503
Stage 1 Turbine Hub HPT Stage 1 Hub (72-45-11, 01-011), Location Diameter
Stage 2 HPT Air Seal HP Turbine (HPT) Rotor And Stator Assembly (72-45-00, 01-080), Location Diameter
Stage 1 Turbine Hub Location Diameter
18.122
Intf
Intf
18.118
0.008
0.008
Stage 2 HPT Air Seal Location Diameter
18.126
0.000
0.000
18.122
Clear
Clear
Table 4. Fits and Clearances (all dimensions are in millimeters) NEW PART
WORN PART
DIMENSIONS
DIMENSIONS
PART IDENT
Size
Clearance
Non-select
REJECT IF
MORE THAN
LOCATION 1503
Stage 1 Turbine Hub HPT Stage 1 Hub (72-45-11, 01-011), Location Diameter
Stage 2 HPT Air Seal HP Turbine (HPT) Rotor And Stator Assembly (72-45-00, 01-080), Location Diameter
Stage 1 Turbine Hub Location Diameter
460.298
Intf
Intf
460.198
0.203
0.203
Stage 2 HPT Air Seal Location Diameter
460.400
0.000
0.000
460.298
Clear
Clear
SUBTASK 72-45-00-220-103-A00 Reference Fits and Clearances of the Stage 1 Turbine Hub and Stage 2 HP Turbine Air Seal at Location 1503 (Pre SBE 72-0207)
SBE 72-0207: New Stage 2 HPT Airseal.
Refer to Figure.
Reference clearance/interference at location 1503. If required, use the data written as a note in TASK 72-45-11-200-000 (INSPECTION-000) and TASK 72-45-00-200-000 (INSPECTION-000).
Table 5. Fits and Clearances (all dimensions are in inches) NEW PART
WORN PART
DIMENSIONS
DIMENSIONS
PART IDENT
Size
Clearance
Non-select
REJECT IF
MORE THAN
LOCATION 1503
Stage 1 Turbine Hub HPT Stage 1 Hub (72-45-11, 01-011), Location Diameter
Stage 2 HPT Air Seal HP Turbine (HPT) Rotor And Stator Assembly (72-45-00, 01-080), Location Diameter
Stage 1 Turbine Hub Location Diameter
18.122
Intf
Intf
18.118
0.008
0.0085
Stage 2 HPT Air Seal Location Diameter
18.126
0.000
0.0005
18.122
Clear
Clear
Table 6. Fits and Clearances (all dimensions are in millimeters) NEW PART
WORN PART
DIMENSIONS
DIMENSIONS
PART IDENT
Size
Clearance
Non-select
REJECT IF
MORE THAN
LOCATION 1503
Stage 1 Turbine Hub HPT Stage 1 Hub (72-45-11, 01-011), Location Diameter
Stage 2 HPT Air Seal HP Turbine (HPT) Rotor And Stator Assembly (72-45-00, 01-080), Location Diameter
Stage 1 Turbine Hub Location Diameter
460.298
Intf
Intf
460.198
0.203
0.216
Stage 2 HPT Air Seal Location Diameter
460.400
0.000
0.0127
460.298
Clear
Clear
SUBTASK 72-45-00-220-103-B00 Reference Fits and Clearances of the Stage 1 Turbine Hub and Stage 2 HP Turbine Air Seal at Location 1503 (SBE 72-0207)
Refer to Figure.
Reference clearance/interference at location 1505. If required, use the data written as a note in TASK 72-45-00-200-000 (INSPECTION-000) and TASK 72-45-31-200-000 (INSPECTION-000).
Table 7. Fits and Clearances (all dimensions are in inches) NEW PART
WORN PART
DIMENSIONS
DIMENSIONS
PART IDENT
Size
Clearance
Non-select
REJECT IF
MORE THAN
LOCATION 1505
Stage 2 HPT Air Seal HP Turbine (HPT) Rotor And Stator Assembly (72-45-00, 01-080), Location Diameter
Stage 2 Turbine Hub ENGINE-STAGE 2 TURBINE HUB (72-45-31, 01-011), Location Diameter
Stage 2 HPT Air Seal Location Diameter
17.131
Intf
Intf
17.135
0.001
0.001
Stage 2 Turbine Hub Location Diameter
17.134
0.010
0.010
17.138
Clear
Clear
Table 8. Fits and Clearances (all dimensions are in millimeters) NEW PART
WORN PART
DIMENSIONS
DIMENSIONS
PART IDENT
Size
Clearance
Non-select
REJECT IF
MORE THAN
LOCATION 1505
Stage 2 HPT Air Seal HP Turbine (HPT) Rotor And Stator Assembly (72-45-00, 01-080), Location Diameter
Stage 2 Turbine Hub ENGINE-STAGE 2 TURBINE HUB (72-45-31, 01-011), Location Diameter
Stage 2 HPT Air Seal Location Diameter
435.127
Intf
Intf
435.229
0.025
0.025
Stage 2 Turbine Hub Location Diameter
435.204
0.254
0.254
435.305
Clear
Clear
SUBTASK 72-45-00-220-104-A00 Reference Fits and Clearances of the Stage 2 HP Turbine Air Seal and Stage 2 Turbine Hub at Location 1505 (Pre SBE 72-0145 and Pre SBE 72-0207)
Refer to Figure.
SBE 72-0145: Provide New Stage 2 Turbine Rotor Hub with Increased Front Mating Diameter.
Reference clearance at location 1505. If required, use the data written as a note in TASK 72-45-00-200-000 (INSPECTION-000) and TASK 72-45-31-200-000 (INSPECTION-000).
Table 9. Fits and Clearances (all dimensions are in inches) NEW PART
WORN PART
DIMENSIONS
DIMENSIONS
PART IDENT
Size
Clearance
Non-select
REJECT IF
MORE THAN
LOCATION 1505
Stage 2 HPT Air Seal HP Turbine (HPT) Rotor And Stator Assembly (72-45-00, 01-080), Location Diameter
Stage 2 Turbine Hub ENGINE-STAGE 2 TURBINE HUB (72-45-31, 01-011), Location Diameter
Stage 2 HPT Air Seal Location Diameter
17.131
Clear
Clear
17.135
0.011
0.011
Stage 2 Turbine Hub Location Diameter
17.146
0.019
0.020
17.150
Clear
Clear
Table 10. Fits and Clearances (all dimensions are in millimeters) NEW PART
WORN PART
DIMENSIONS
DIMENSIONS
PART IDENT
Size
Clearance
Non-select
REJECT IF
MORE THAN
LOCATION 1505
Stage 2 HPT Air Seal HP Turbine (HPT) Rotor And Stator Assembly (72-45-00, 01-080), Location Diameter
Stage 2 Turbine Hub ENGINE-STAGE 2 TURBINE HUB (72-45-31, 01-011), Location Diameter
Stage 2 HPT Air Seal Location Diameter
435.127
Clear
Clear
435.229
0.279
0.279
Stage 2 Turbine Hub Location Diameter
435.509
0.483
0.508
435.610
Clear
Clear
SUBTASK 72-45-00-220-104-B00 Reference Fits and Clearances of the Stage 2 HP Turbine Air Seal and Stage 2 Turbine Hub at Location 1505 (SBE 72-0145 and Pre SBE 72-0207)
Refer to Figure.
SBE 72-0207: New Stage 2 HPT Airseal.
Reference clearance/interference at location 1505. If required, use the data written as a note in TASK 72-45-00-200-000 (INSPECTION-000) and TASK 72-45-31-200-000 (INSPECTION-000).
Table 11. Fits and Clearances (all dimensions are in inches) NEW PART
WORN PART
DIMENSIONS
DIMENSIONS
PART IDENT
Size
Clearance
Non-select
REJECT IF
MORE THAN
LOCATION 1505
Stage 2 HPT Air Seal HP Turbine (HPT) Rotor And Stator Assembly (72-45-00, 01-080), Location Diameter
Stage 2 Turbine Hub ENGINE-STAGE 2 TURBINE HUB (72-45-31, 01-011), Location Diameter
Stage 2 HPT Air Seal Location Diameter
17.131
Intf
Intf
17.135
0.001
0.0015
Stage 2 Turbine Hub Location Diameter
17.134
0.010
0.010
17.138
Clear
Clear
Table 12. Fits and Clearances (all dimensions are in millimeters) NEW PART
WORN PART
DIMENSIONS
DIMENSIONS
PART IDENT
Size
Clearance
Non-select
REJECT IF
MORE THAN
LOCATION 1505
Stage 2 HPT Air Seal HP Turbine (HPT) Rotor And Stator Assembly (72-45-00, 01-080), Location Diameter
Stage 2 Turbine Hub ENGINE-STAGE 2 TURBINE HUB (72-45-31, 01-011), Location Diameter
Stage 2 HPT Air Seal Location Diameter
435.127
Intf
Intf
435.229
0.025
0.038
Stage 2 Turbine Hub Location Diameter
435.204
0.254
0.254
435.305
Clear
Clear
SUBTASK 72-45-00-220-104-C00 Reference Fits and Clearances of the Stage 2 HP Turbine Air Seal and Stage 2 Turbine Hub at Location 1505 (Pre SBE 72-0145 and SBE 72-0207)
SBE 72-0207: New Stage 2 HPT Airseal.
SBE 72-0145: Provide New Stage 2 Turbine Rotor Hub with Increased Front Mating Diameter.
Refer to Figure.
Reference clearance at location 1505. If required, use the data written as a note in TASK 72-45-00-200-000 (INSPECTION-000) and TASK 72-45-31-200-000 (INSPECTION-000).
Table 13. Fits and Clearances (all dimensions are in inches) NEW PART
WORN PART
DIMENSIONS
DIMENSIONS
PART IDENT
Size
Clearance
Non-select
REJECT IF
MORE THAN
LOCATION 1505
Stage 2 HPT Air Seal HP Turbine (HPT) Rotor And Stator Assembly (72-45-00, 01-080), Location Diameter
Stage 2 Turbine Hub ENGINE-STAGE 2 TURBINE HUB (72-45-31, 01-011), Location Diameter
Stage 2 HPT Air Seal Location Diameter
17.131
Clear
Clear
17.135
0.011
0.0105
Stage 2 Turbine Hub Location Diameter
17.146
0.019
0.020
17.150
Clear
Clear
Table 14. Fits and Clearances (all dimensions are in millimeters) NEW PART
WORN PART
DIMENSIONS
DIMENSIONS
PART IDENT
Size
Clearance
Non-select
REJECT IF
MORE THAN
LOCATION 1505
STAGE 2 HPT Air Seal HP Turbine (HPT) Rotor And Stator Assembly (72-45-00, 01-080), Location Diameter
Stage 2 Turbine Hub ENGINE-STAGE 2 TURBINE HUB (72-45-31, 01-011), Location Diameter
Stage 2 HPT Air Seal Location Diameter
435.127
Clear
Clear
435.229
0.279
0.267
Stage 2 Turbine Hub Location Diameter
435.509
0.483
0.508
435.610
Clear
Clear
SUBTASK 72-45-00-220-104-D00 Reference Fits and Clearances of the Stage 2 HP Turbine Air Seal and Stage 2 Turbine Hub at Location 1505 (SBE 72-0145 and SBE 72-0207)
Refer to Figure.
Reference clearance at location 1515. If required, use the data written as a note in TASK 72-45-11-200-001-C00 (INSPECTION-001) and TASK 72-45-31-200-001-C00 (INSPECTION-001).
Table 15. Fits and Clearances (all dimensions are in inches) NEW PART
WORN PART
DIMENSIONS
DIMENSIONS
PART IDENT
Size
Clearance
Non-select
REJECT IF
MORE THAN
LOCATION 1515
Stage 2 HPT Heatshield ENGINE-STAGE 2 TURBINE HUB (72-45-31, 01-020), Location Diameter
Stage 1 HPT Hub HPT Stage 1 Hub (72-45-11, 01-011), Location Diameter
Stage 2 HPT Heat Shield Location Diameter
5.735
Clear
Clear
5.745
0.008
0.008
Stage 1 HPT Hub Location Diameter
5.753
0.028
0.028
5.763
Clear
Clear
Table 16. Fits and Clearances (all dimensions are in millimeters) NEW PART
WORN PART
DIMENSIONS
DIMENSIONS
PART IDENT
Size
Clearance
Non-select
REJECT IF
MORE THAN
Stage 2 HPT Heatshield ENGINE-STAGE 2 TURBINE HUB (72-45-31, 01-020), Location Diameter
Stage 1 Hub HPT Stage 1 Hub (72-45-11, 01-011), Location Diameter
Stage 2 HPT Heat Shield Location Diameter
145.669
Clear
Clear
145.923
0.203
0.203
Stage 1 Hub Location Diameter
146.126
0.711
0.711
146.380
Clear
Clear
SUBTASK 72-45-00-220-105 Reference Fits and Clearances of the Stage 2 HPT Heat Shield and Stage 1 HPT Hub at Location 1515.
Refer to Figure.
NOTE
The fit at this location has been calculated. Parts were measured before they were assembled to get this fit. Refer to TASK 72-45-10-440-001-C00 (ASSEMBLY, CONFIG-003).
SUBTASK 72-45-00-220-106 Reference Fits and Clearances of the Stage 1 HP Turbine Air Seal (Rear) Stage 1 HP Turbine Blade and Stage 1 Turbine Hub at Location 1552
Refer to Figure.
Measure the clearance at location 1575 after assembly.
Table 17. Fits and Clearances (all dimensions are in inches) NEW PART
WORN PART
DIMENSIONS
DIMENSIONS
PART IDENT
Size
Clearance
Non-select
REJECT IF
MORE THAN
LOCATION 1575
Stage 2 Turbine Rotor Assembly Blade Tip
Clearance
0.050 To 0.059 Average Clearance
NOTE
Axis of Turbine Case and Vane Assembly is 0.010 below the engine centerline.Table 18. Fits and Clearances (all dimensions are in millimeters) NEW PART
WORN PART
DIMENSIONS
DIMENSIONS
PART IDENT
Size
Clearance
Non-select
REJECT IF
MORE THAN
LOCATION 1575
Stage 2 Turbine Rotor Assembly Blade Tip
Clearance
1.270 To 1.499 Average Clearance
NOTE
Axis of Turbine Case and Vane Assembly is 0.254 below the engine centerline.
SUBTASK 72-45-00-220-107 Reference Fits and Clearances of the Stage 2 Turbine Rotor Assembly Blade Tip at Location 1575
Refer to Figure.
Measure the clearance at location 1576 after assembly.
Table 19. Fits and Clearances (all dimensions are in inches) NEW PART
WORN PART
DIMENSIONS
DIMENSIONS
PART IDENT
Size
Clearance
Non-select
REJECT IF
MORE THAN
LOCATION 1576
Stage 1 Turbine Rotor Assembly Blade Tip
Clearance
0.030 to 0.061 average clearance
NOTE
Axis Of Turbine Case And Vane Assembly Is 0.010 Below The Engine Centerline.Table 20. Fits and Clearances (all dimensions are in millimeters) NEW PART
WORN PART
DIMENSIONS
DIMENSIONS
PART IDENT
Size
Clearance
Non-select
REJECT IF
MORE THAN
LOCATION 1576
Stage 1 Turbine Rotor Assembly Blade Tip
Clearance
0.760 to 1.550 average clearance
NOTE
Axis Of Turbine Case And Vane Assembly Is 0.254 Below The Engine Centerline.
SUBTASK 72-45-00-220-108 Reference Fits and Clearances of the Stage 1 Turbine Rotor Assembly Blade Tip at Location 1576
Refer to Figure.
Reference clearance at location 1577. If required, use the data written as a note in TASK 72-45-32-200-000 (INSPECTION-000) and TASK 72-45-20-200-000 (INSPECTION-000).
Table 21. Fits and Clearances (all dimensions are in inches) NEW PART
WORN PART
DIMENSIONS
DIMENSIONS
PART IDENT
Size
Clearance
Non-select
REJECT IF
MORE THAN
LOCATION 1577
Stage 2 Turbine Rotor Assembly
Seal Tip Radial Clearance
Clear
0.010
0.064
Clear
NOTE
Axis Of Turbine Case And Vane Assembly Is 0.010 Below The Engine Centerline.Table 22. Fits and Clearances (all dimensions are in millimeters) NEW PART
WORN PART
DIMENSIONS
DIMENSIONS
PART IDENT
Size
Clearance
Non-select
REJECT IF
MORE THAN
LOCATION 1577
Stage 2 Turbine Rotor Assembly
Seal Tip Radial Clearance
Clear
0.254
1.626
Clear
NOTE
Axis Of Turbine Case And Vane Assembly Is 0.254 Below The Engine Centerline.
SUBTASK 72-45-00-220-109 Reference Fits and Clearances of the Stage 2 Turbine Rotor Assembly Seal Tip at Location 1577
Refer to Figure.
Reference clearance at location 1578. If required, use the data written as a note in TASK 72-45-14-200-000 (INSPECTION-000) and TASK 72-45-20-200-000 (INSPECTION-000).
Table 23. Fits and Clearances (all dimensions are in inches) NEW PART
WORN PART
DIMENSIONS
DIMENSIONS
PART IDENT
Size
Clearance
Non-select
REJECT IF
MORE THAN
LOCATION 1578
Stage 1 Turbine Rotor Assembly
Seal Tip Radial Clearance
Clear
0.026
0.076
Clear
NOTE
Axis Of Turbine Case And Vane Assembly Is 0.010 Below The Engine Centerline.Table 24. Fits and Clearances (all dimensions are in millimeters) NEW PART
WORN PART
DIMENSIONS
DIMENSIONS
PART IDENT
Size
Clearance
Non-select
REJECT IF
MORE THAN
LOCATION 1578
Stage 1 Turbine Rotor Assembly
Seal Tip Radial Clearance
Clear
0.66
1.93
Clear
NOTE
Axis Of Turbine Case And Vane Assembly Is 0.254 Below The Engine Centerline.
SUBTASK 72-45-00-220-110 Reference Fits and Clearances of the Stage 1 Turbine Rotor Assembly Seal Tip at Location 1578
Refer to Figure.
Reference clearance at location 1579. If required, use the data written as a note in TASK 72-45-00-200-000 (INSPECTION-000) and Measure the stage 2 vane inner honeycomb seal diameter. To find the clearance subtract the stage 2 knife-edge seal diameter from the stage 2 vane inner honeycomb seal diameter.
Table 25. Fits and Clearances (all dimensions are in inches) NEW PART
WORN PART
DIMENSIONS
DIMENSIONS
PART IDENT
Size
Clearance
Non-select
REJECT IF
MORE THAN
LOCATION 1579
Stage 2 HPT Air Seal Tip Radial
Clearance
Clear
Clear
0.026
0.026
0.063
0.069
Clear
Clear
NOTE
Axis Of Turbine Case And Vane Assembly Is 0.010 Below The Engine Centerline.Table 26. Fits and Clearances (all dimensions are in millimeters) NEW PART
WORN PART
DIMENSIONS
DIMENSIONS
PART IDENT
Size
Clearance
Non-select
REJECT IF
MORE THAN
LOCATION 1579
Stage 2 HPT Air Seal Tip Radial
Clearance
Clear
Clear
0.66
0.66
1.60
1.753
Clear
Clear
NOTE
Axis Of Turbine Case And Vane Assembly Is 0.254 Below The Engine Centerline.
SUBTASK 72-45-00-220-111 Reference Fits and Clearances of the Stage 2 HP Turbine Air Seal Tip at Location 1579
Refer to Figure.
Remove the IAE 1P17030 Blade retainer 1 off from the rear side of the turbine rotor assembly.
SUBTASK 72-45-00-430-087 Remove the Blade Retainer from the Stage 1 Turbine Rotor Assembly
Get dimension AA from the Stage 1 Turbine Rotor Assembly paperwork.
NOTE
You must inspect the Stage 2 HP Turbine airseal for bore axial position before you install it again. Refer to TASK 72-45-00-200-000 (INSPECTION/CHECK-000).
Find dimension AC by these steps:
Find the No. 4 bearing spacer HP Turbine (HPT) Rotor And Stator Assembly (72-45-00, 01-061 thru HP Turbine (HPT) Rotor And Stator Assembly 01-070) thickness and get the correct class.
Use dimension AD and make a selection from the table given in Figure for the No. 4 bearing spacer class.
NOTE
This procedure is not necessary if the engine number is marked on the spacer.Mark V and the five numbers (V-XXXXX) of the engine number on the spacer adjacent to the part number. Use the vibration peen method. Refer to SPM TASK 70-09-00-400-501.
SUBTASK 72-45-00-430-088 Find the Thickness of the Spacer (Dimension AD)
Make a temporary mark with CoMat 06-073 INK, METAL MARKING on the Stage 2 HPT air seal and on the Stage 1 Turbine Rotor Assembly. Refer to SPM TASK 70-09-00-400-501.
SUBTASK 72-45-00-430-089 Find the Locations for the Stack of the Stage 1 Turbine Rotor Assembly, the Stage 2 HP Air Seal and the Stage 2 Turbine Rotor Assembly
Put the stage 2 HPT air seal HP Turbine (HPT) Rotor And Stator Assembly (72-45-00, 01-080) on a work bench with the larger outer diameter flange up.
Hold the seal in position with CoMat 01-573 WAX BLEND, PARAFFIN. Remove the wax that is not necessary.
Install the stage 1 and 2 seal HP Turbine (HPT) Rotor And Stator Assembly (72-45-00, 01-100).
Install the IAE 1P16220 Heater 1 off on the rear side of the stage 1 turbine rotor assembly, Figure.
Connect the IAE 6F10027 Heater control unit 1 off to the heater.
SUBTASK 72-45-00-430-090 Install the Stage 2 HPT Air Seal
NOTE
If ten or more of the HPT Stage 2 vane ring inner segments HPT Stage 2 Ring Segment And Vane Cluster (72-45-24, 02-120 and/or HPT Stage 2 Ring Segment And Vane Cluster72-45-24, 02-320) have new honeycomb, the stage 2 air seal must be new or have the knife edge coating reapplied (per VRS3209) to prevent knife edge cracking.Refer to Figure.
SUBTASK 72-45-00-430-091 Do a Check to Make Sure the Stage 2 HPT Air Seal is Installed Correctly
Refer to Figure.
SUBTASK 72-45-00-430-092 Install the No. 4 Bearing Spacer
Measure the thickness of the plug flange at dimension J on the IAE 1P16052 Spline aligner 1 off.
Adjust the center adapter on the build stand to set dimension H plus or minus 0.005 in. (0.127 mm), Figure.
Adjust the center adapter on the IAE 1P16028 Build stand 1 off.
NOTE
Measure the thickness in three locations and average.
SUBTASK 72-45-00-430-093 Set the Stage 1 Turbine Rotor Assembly Build Stand
Install the plug of the IAE 1P16052 Spline aligner 1 off to the inner diameter of the Stage 1 Turbine Rotor Assembly at the small end. Thread the lift assembly in to the opposite end until the bar is tight against the rear face of the rotor hub.
Attach a hoist to the lift assembly. Lift the Stage 1 Rotor Assembly from the support and install the Stage 1 Rotor Assembly into the IAE 1P16028 Build stand 1 off with the plug detail positioned in to the center adapter on the stand.
Make a mark on the front surface of the spline plug to show the centerline location of one of the 14 internal slots. Use CoMat 06-073 INK, METAL MARKING. Refer to SPM TASK 70-09-00-400-501, Figure.
SUBTASK 72-45-00-430-094 Install the Stage 1 Turbine Rotor Assembly with the Airseal to the Build Stand
Refer to Figure.
Remove the IAE 1P17758 Protective cover 1 off from the rear flange of the case and Vane Assembly.
Attach the IAE 1P16173 Lift sling 1 off to the rear flange of the HP Turbine Case and Vane Assembly. Secure with the spacers and the nuts.

CAUTION
BE CAREFUL WHEN YOU INSTALL THE CASE AND VANE ASSEMBLY OVER THE STAGE 1 TURBINE ROTOR ASSEMBLY. DAMAGE TO THE KNIFE-EDGE SEALS ON THE STAGE 2 HPT AIR SEAL AND STAGE 1 HPT BLADE TIPS COULD OCCUR.Lower the case and vane assembly in to position over the Stage 1 Rotor Assembly. Remove the sling and the hoist from the case and vane assembly.
SUBTASK 72-45-00-430-095 Install the HP Turbine Case and Vane Assembly
Hold the seal in position with CoMat 01-573 WAX BLEND, PARAFFIN. Remove the wax that is not necessary.
Install the stage 1 and 2 seal HP Turbine (HPT) Rotor And Stator Assembly (72-45-00, 01-040).
SUBTASK 72-45-00-430-096 Install the Stage 1 and 2 Seal on the Stage 2 HPT Air Seal
Refer to Figure.
Install the hook assemblies that remain by the procedure given in Step.
Prepare the IAE 1P16063 Fixture 1 off.
SUBTASK 72-45-00-430-097 Install the Retaining Fixture to the Stage 2 Turbine Rotor Assembly
Turn the three jaws on the IAE 1P17026 Lift fixture 1 off inward.
SUBTASK 72-45-00-430-098 Install the Lift Fixture to the Rear of the Stage 2 HP Turbine Rotor
Refer to Figure.
SUBTASK 72-45-00-430-099 Install the Stage 2 Turbine Rotor Assembly
Refer to Figure.
SUBTASK 72-45-00-430-100 Remove the Lift Fixture
Refer to Figure.
SUBTASK 72-45-00-430-101 Remove the Retaining Fixture
Refer to Figure.
Install the IAE 1P16046 Removal/Installation fixture or IAE 1P16543 Removal/Installation fixture 1 off.
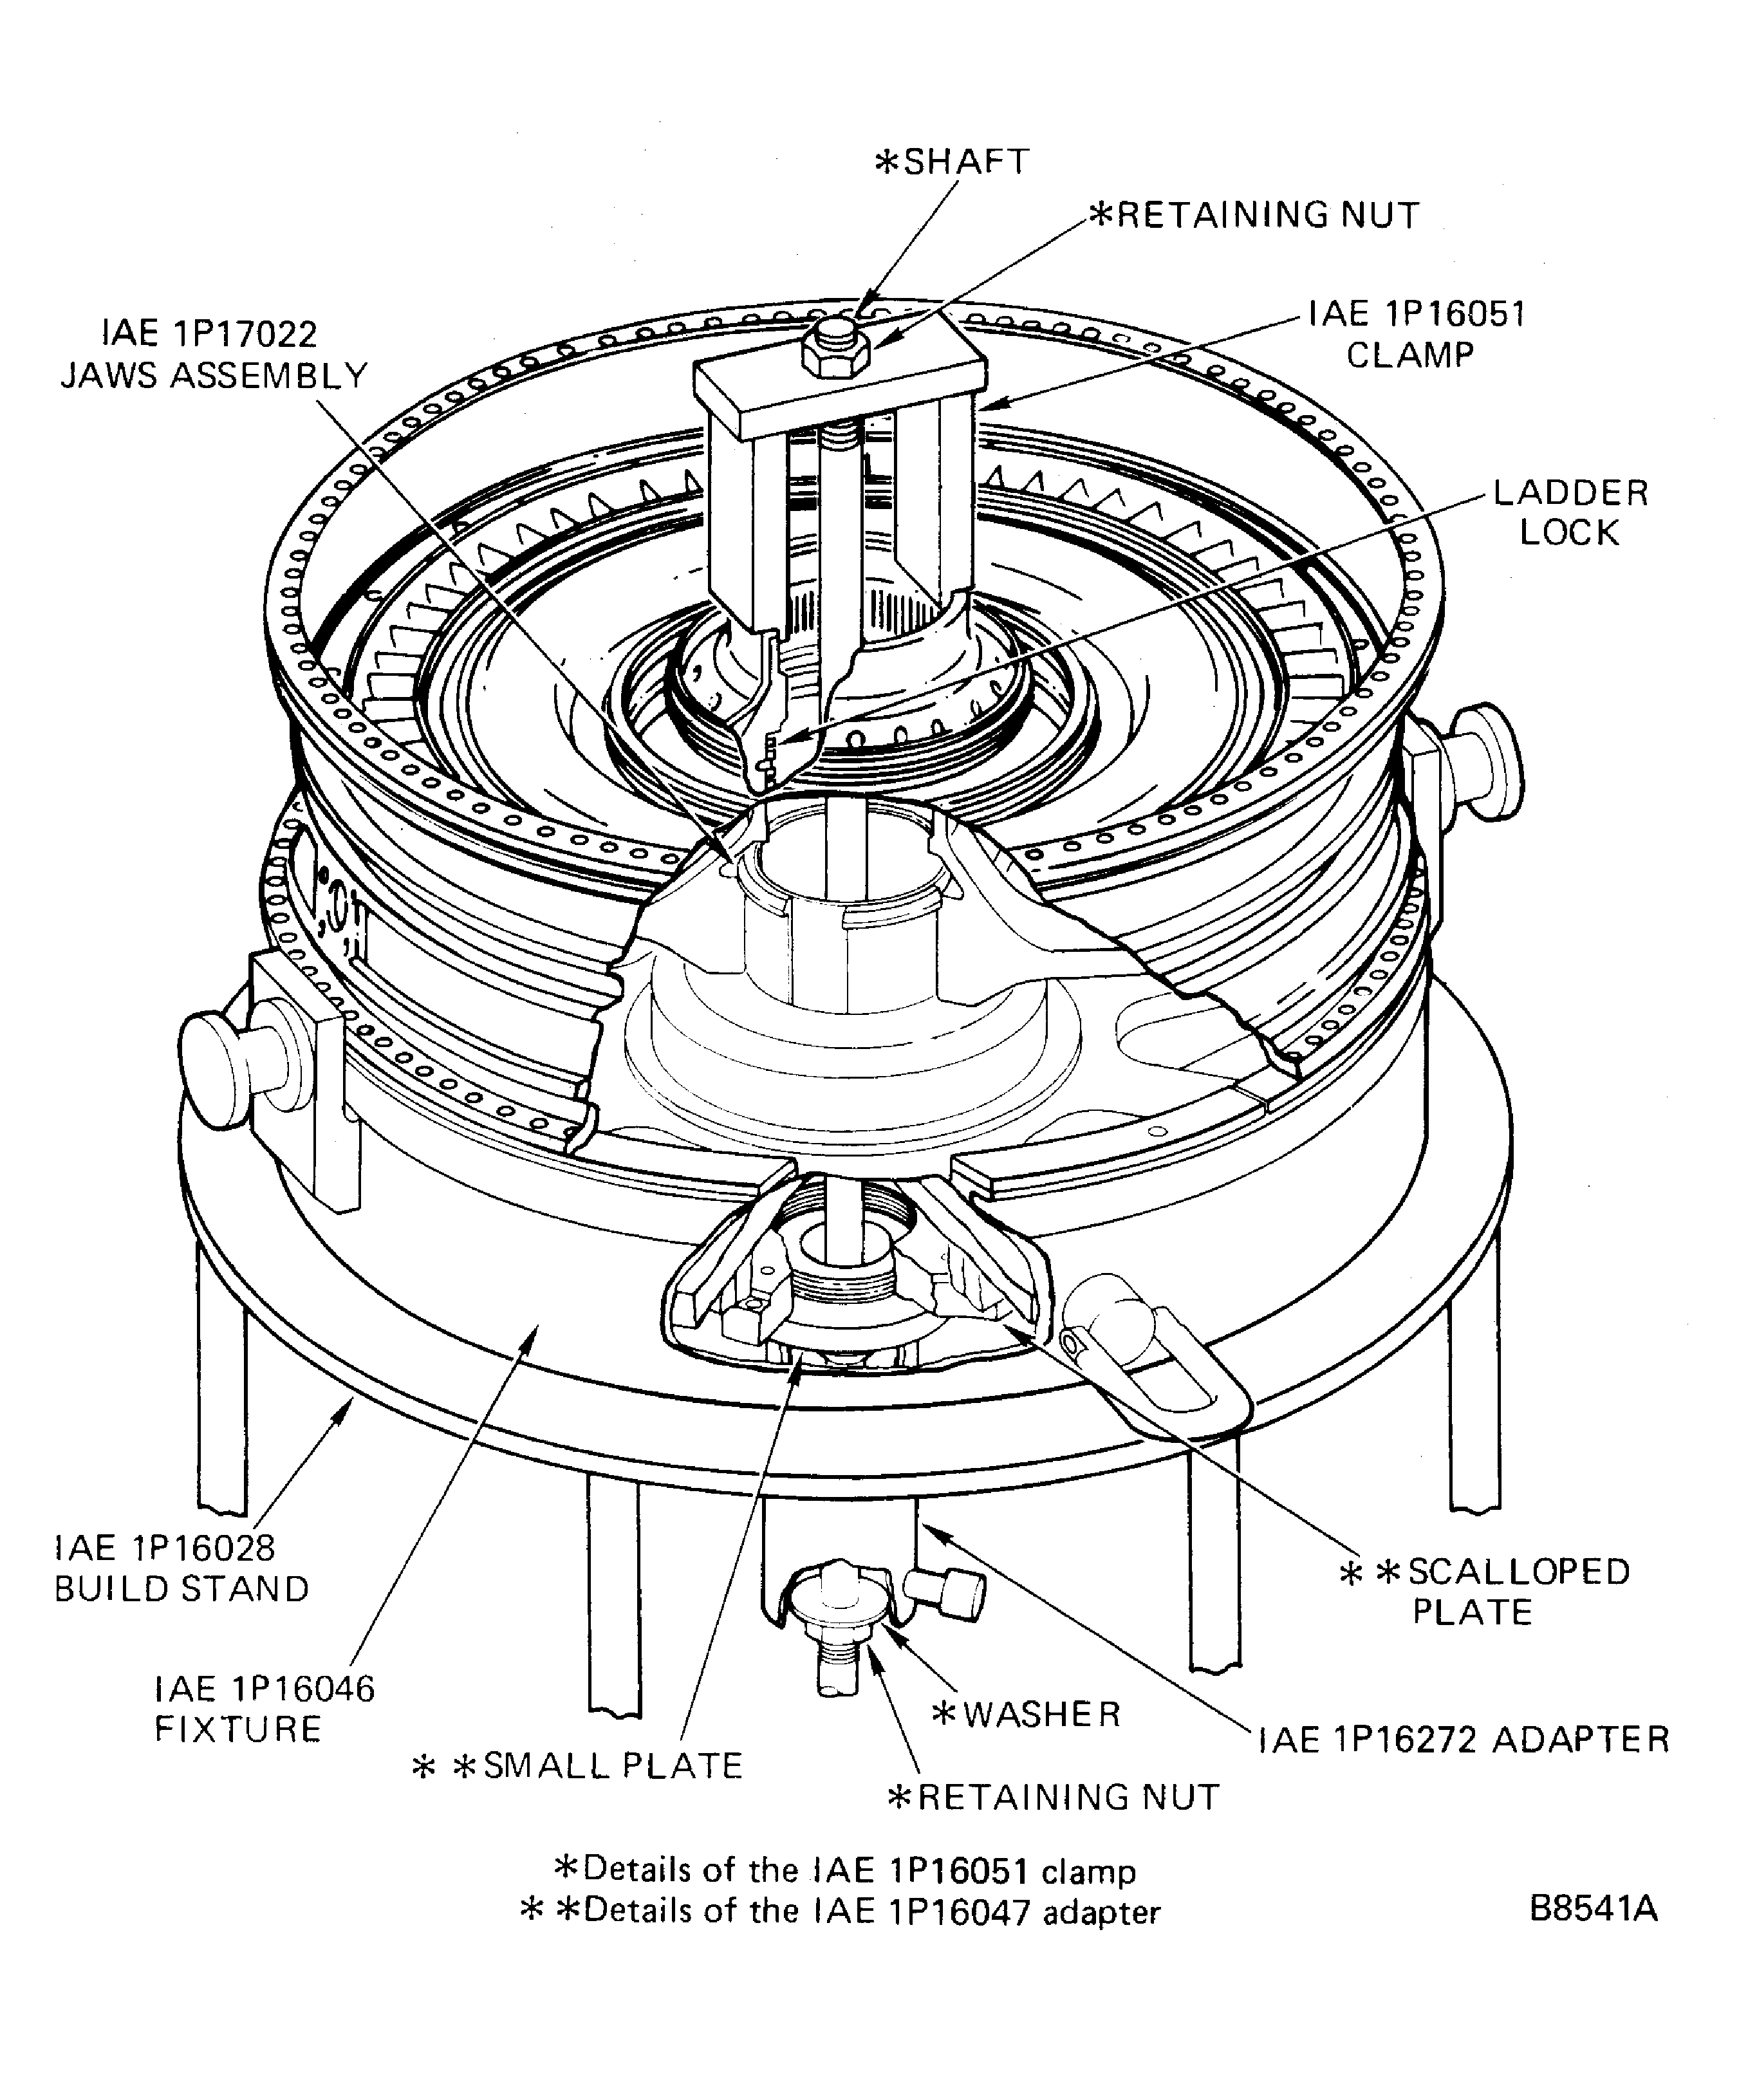
Install the IAE IAE 1P17022 Removal/installation jaws assembly 1 off.
SUBTASK 72-45-00-430-102 Install the Tooling to Position the HP Turbine Rotor and Stator Assembly
Install the shaft of the IAE 1P16047 Hydraulic adapter 1 off into the plug of the spline aligner in the center locator of the build stand, Figure.
Attach the IAE 1F10052 Two cables sling 1 off to a hoist and to the lifting spools on the fixture, Figure.
SUBTASK 72-45-00-430-103 Turn the HP Turbine Rotor and Stator Assembly to the Front End Up Position
Refer to Figure.
Install the IAE 1P16047 Hydraulic adapter 1 off over the clamp shaft with the threaded end down and attach with a washer and retaining nut.
Attach the IAE 1F10026 Hydraulic hand pump 1 off to the hydraulic cylinder and operate to move the hubs together.
Install the IAE 1P16051 Clamp 1 off and the hydraulic cylinder.
SUBTASK 72-45-00-430-104 Install the Ladder Lock
Refer to Figure
If the dimension AG is not in limits the turbine must be disassembled. Refer to TASK 72-45-00-030-001-B00 (DISASSEMBLY-0001).
SUBTASK 72-45-00-430-105 Dimension Check to Make Sure the Spacer is the Correct Thickness
Figure: HP Turbine Rotor and Stator Assembly - Fits and Clearances
HP Turbine Rotor and Stator Assembly - Fits and Clearances
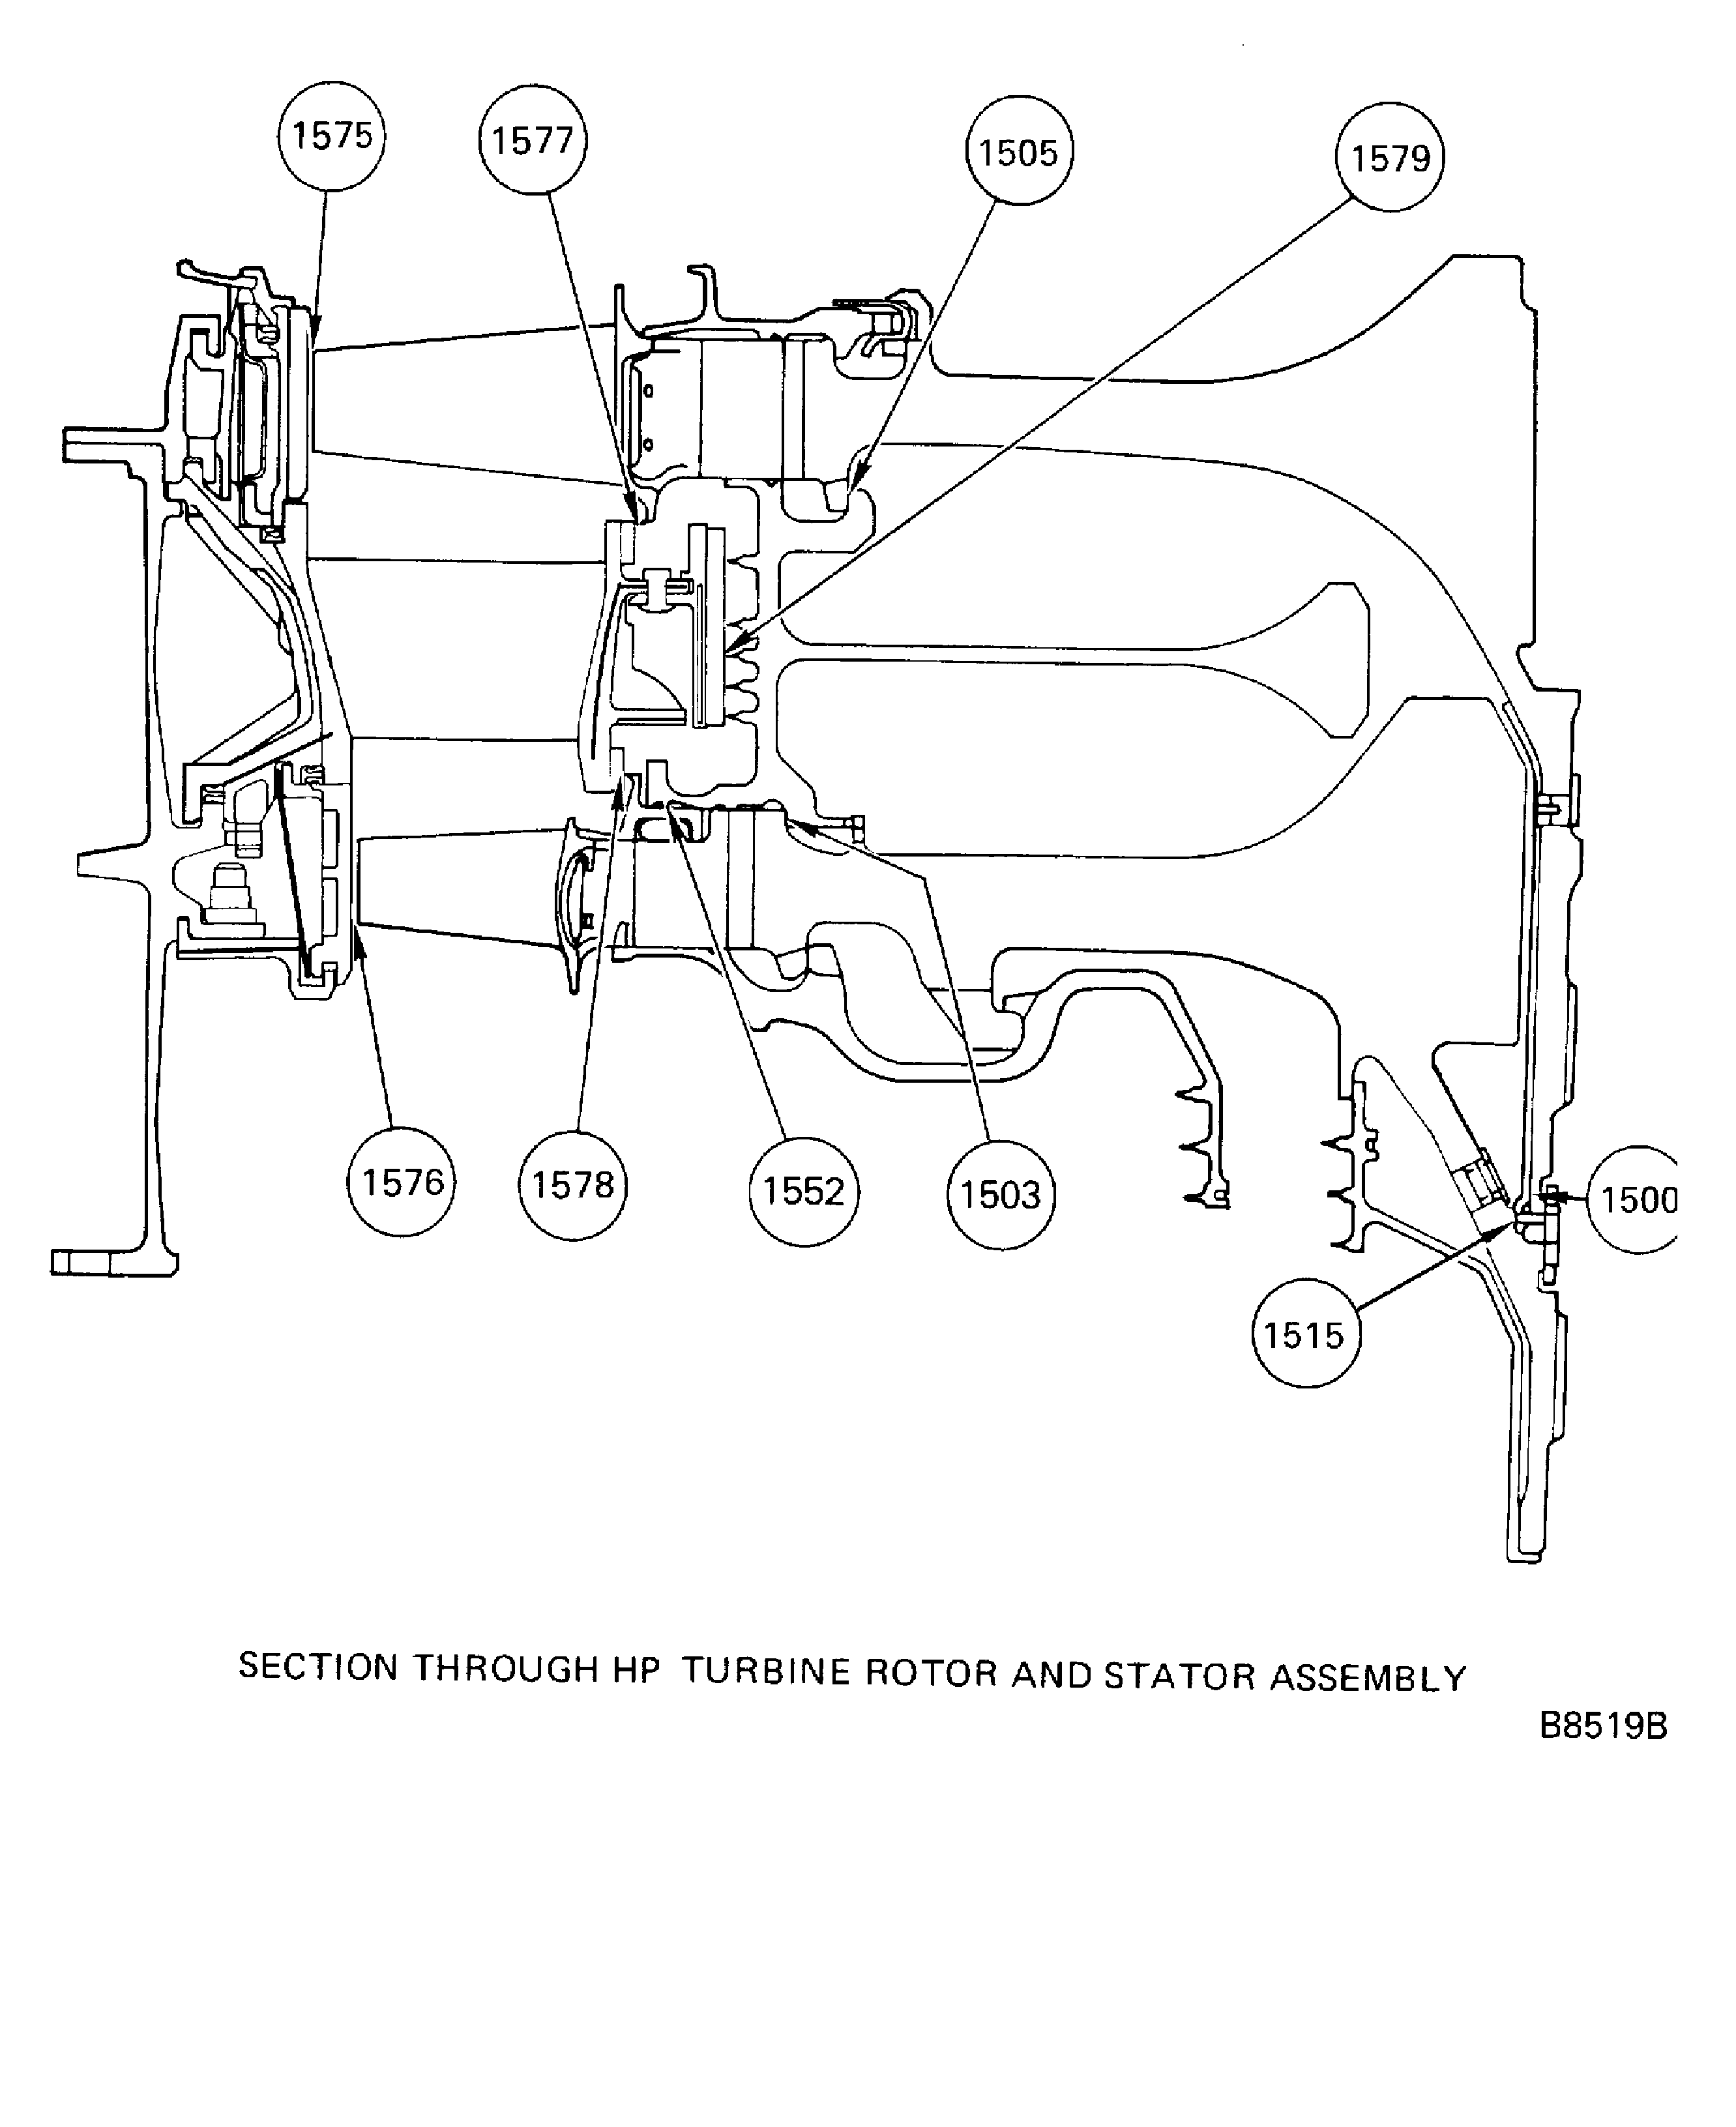
Figure: Remove the IAE 1P17030 Blade Retainer
Remove the IAE 1P17030 Blade Retainer
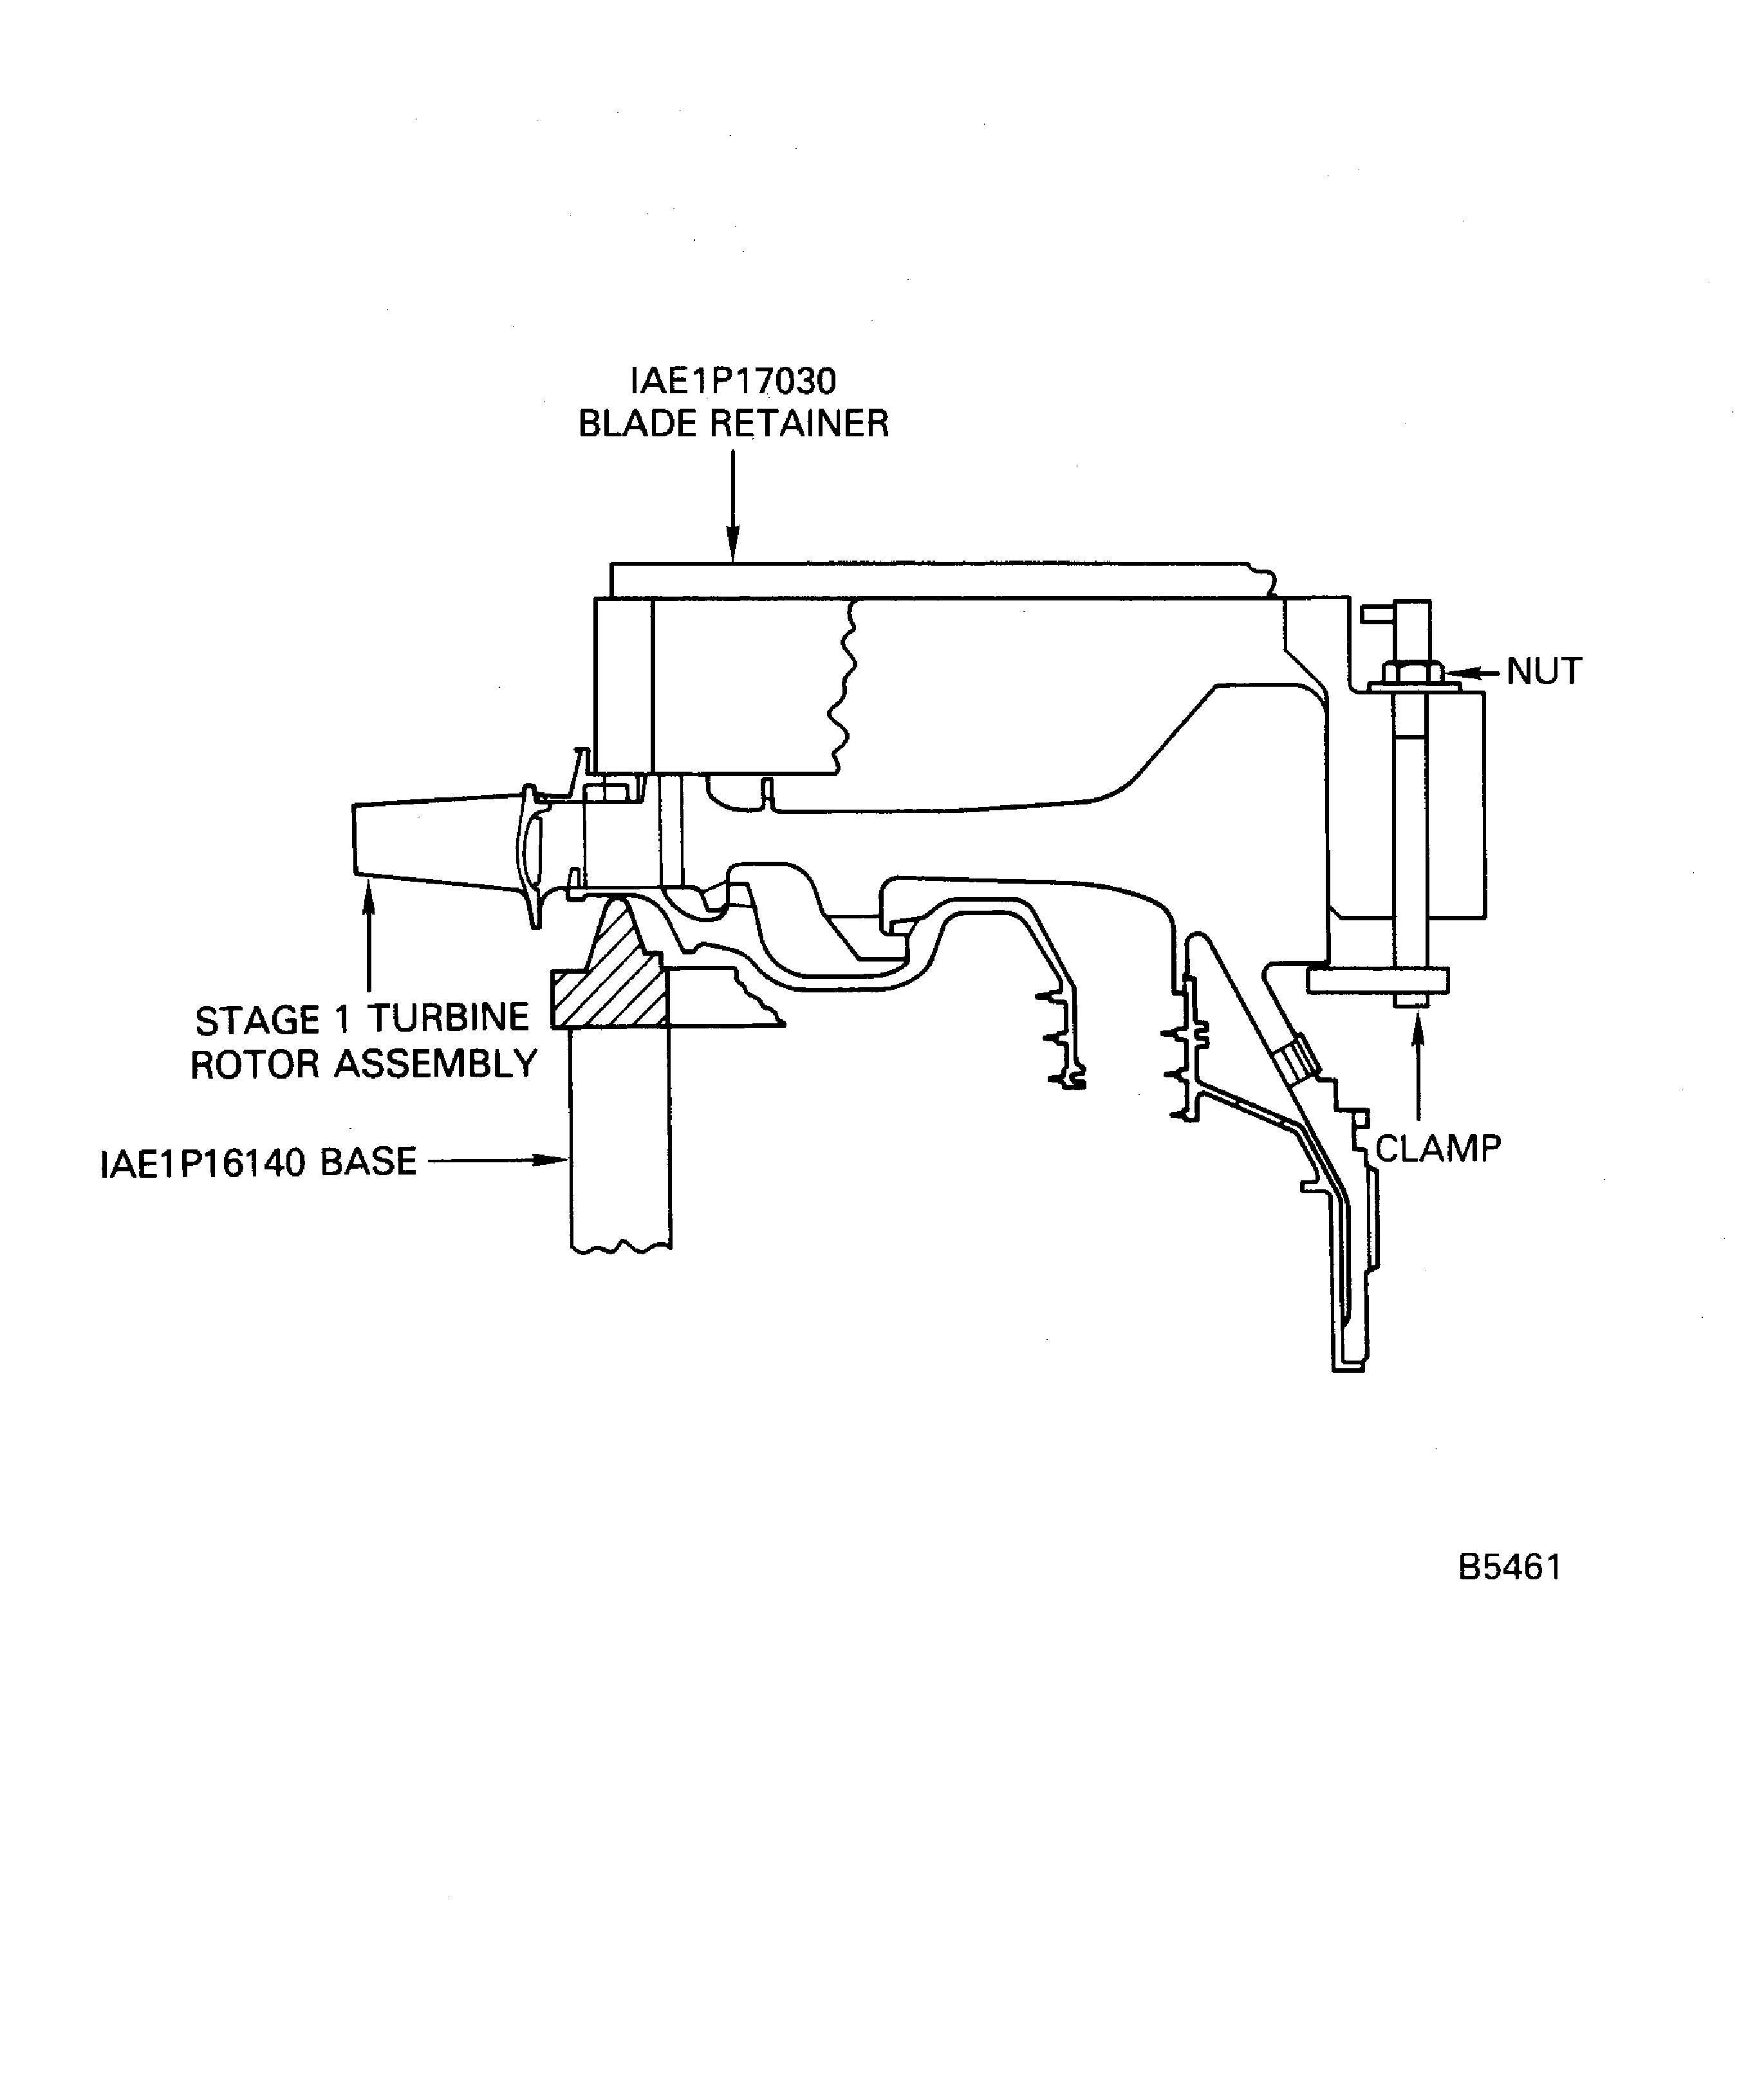
Figure: Dimensions Necessary to Find the Thickness of the Spacer
Dimensions Necessary to Find the Thickness of the Spacer
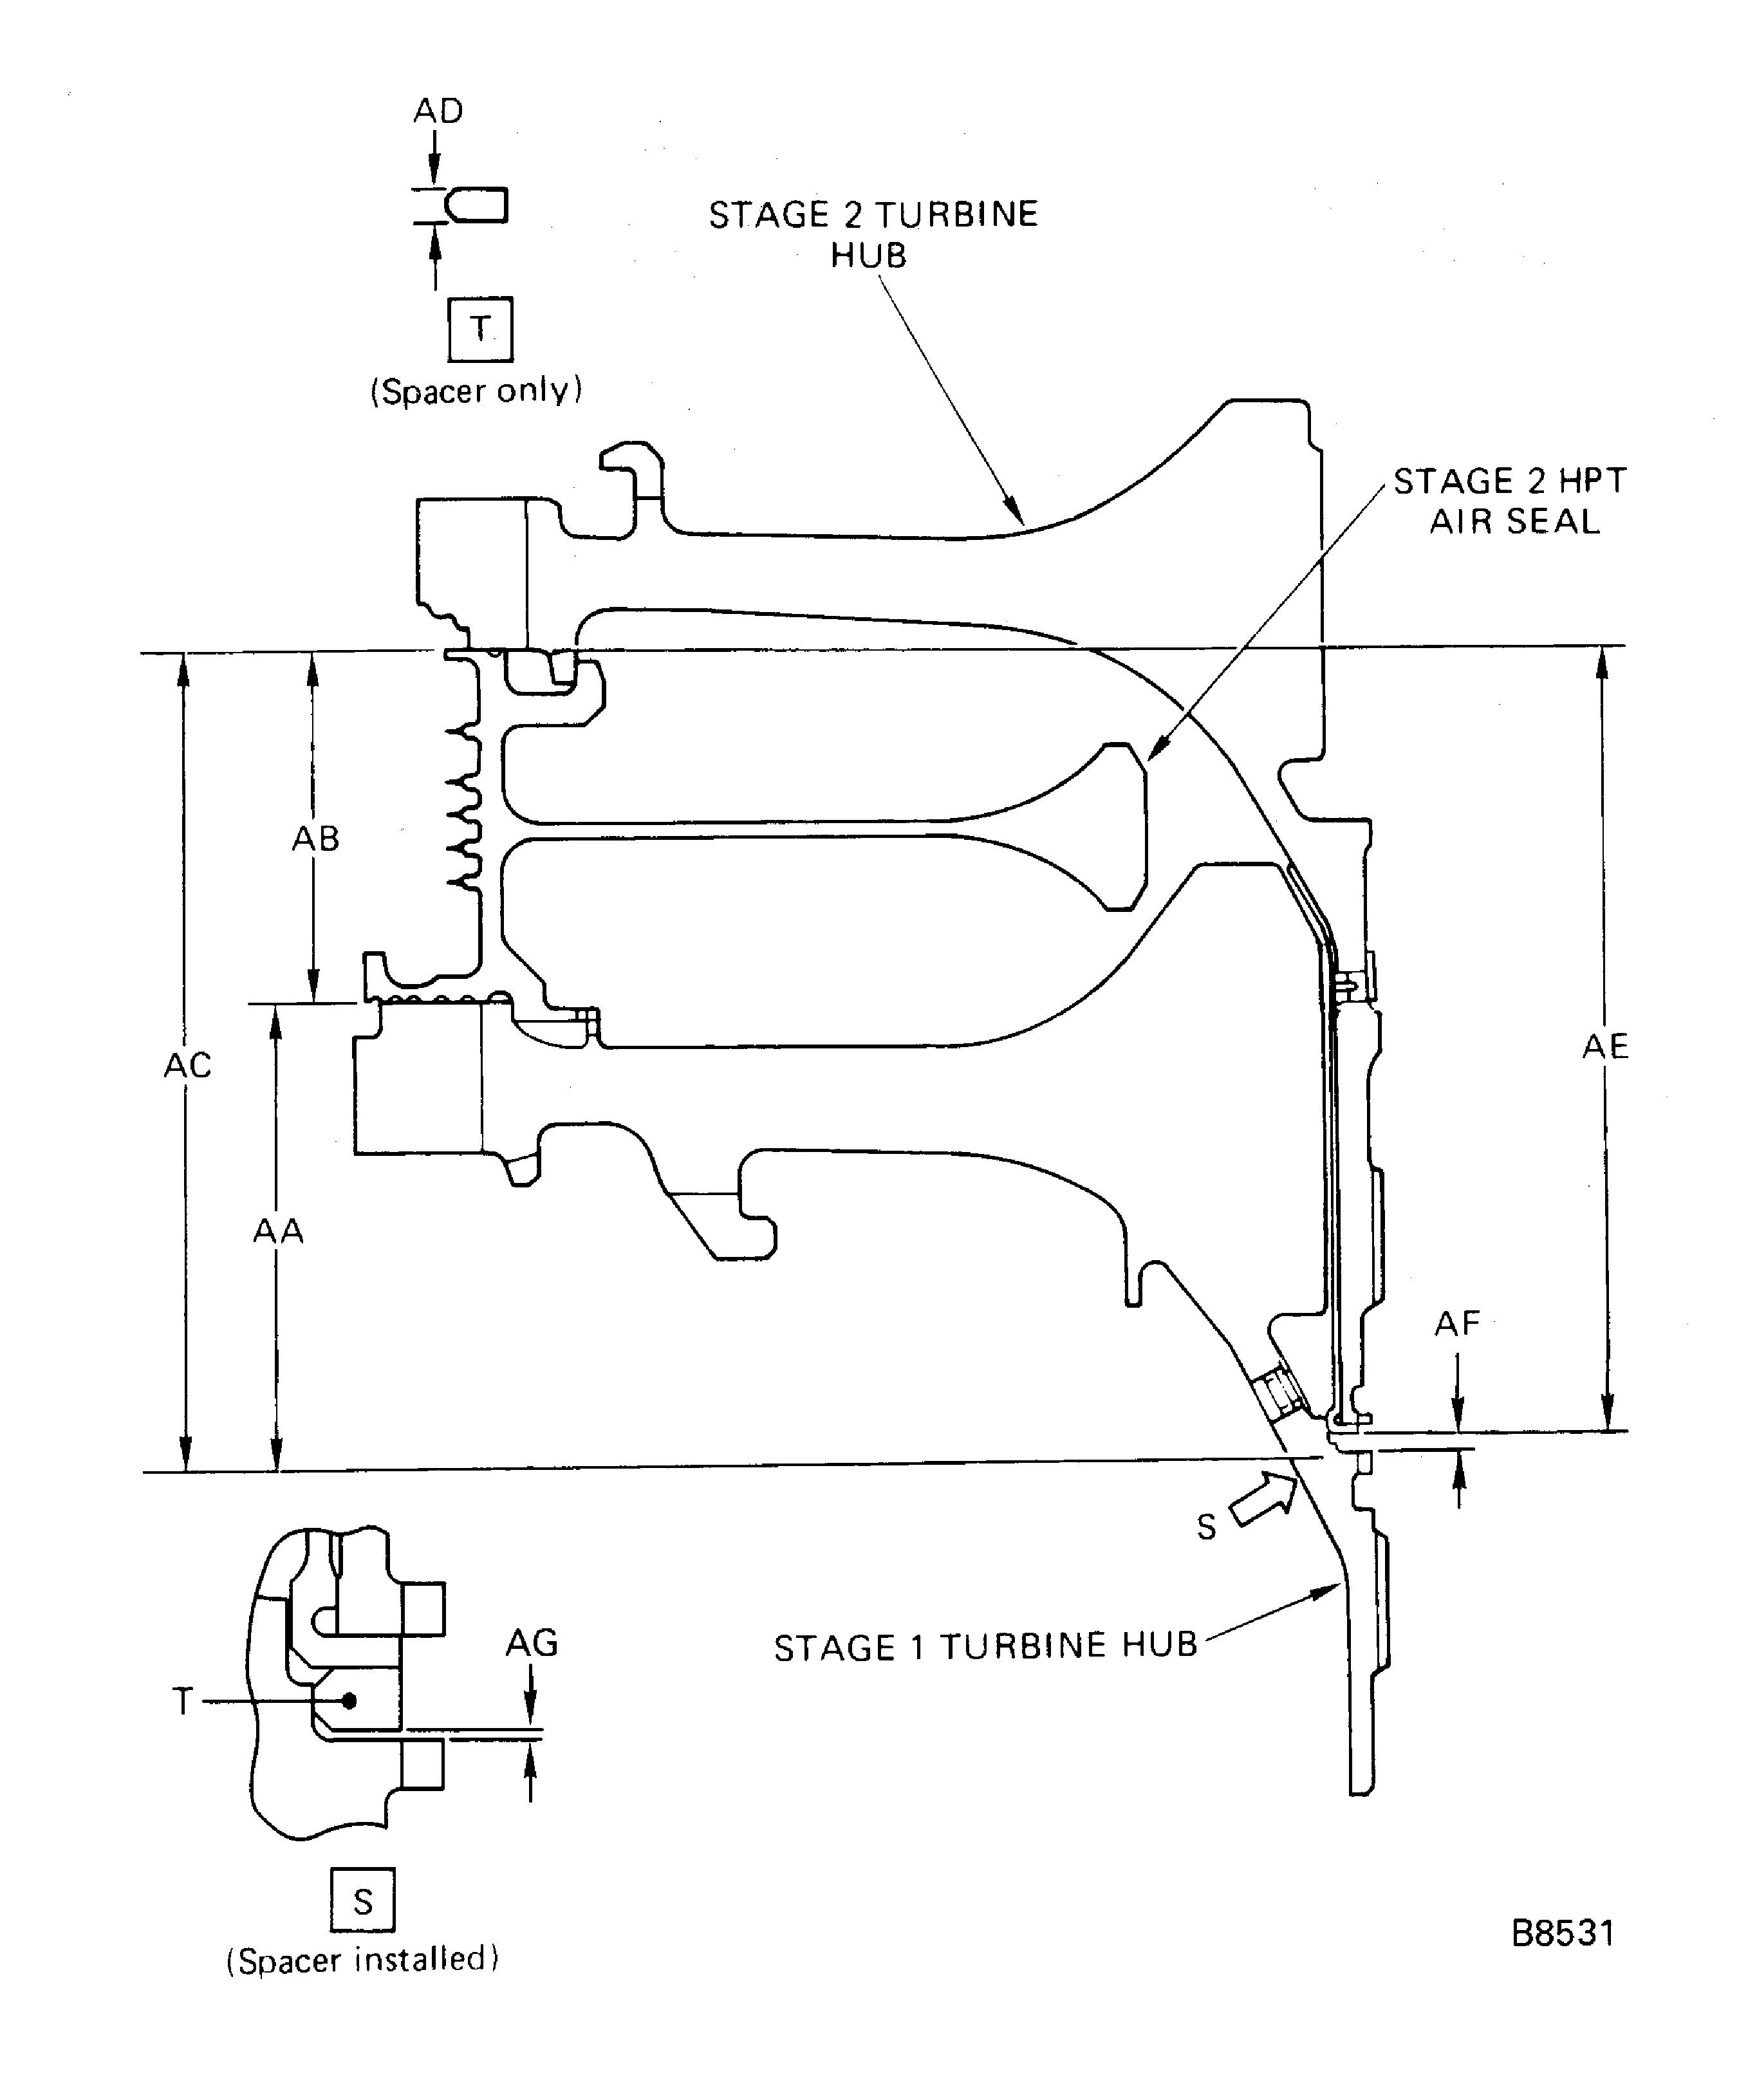
Figure: Thickness of No. 4 Bearing Spacer
Thickness of No. 4 Bearing Spacer
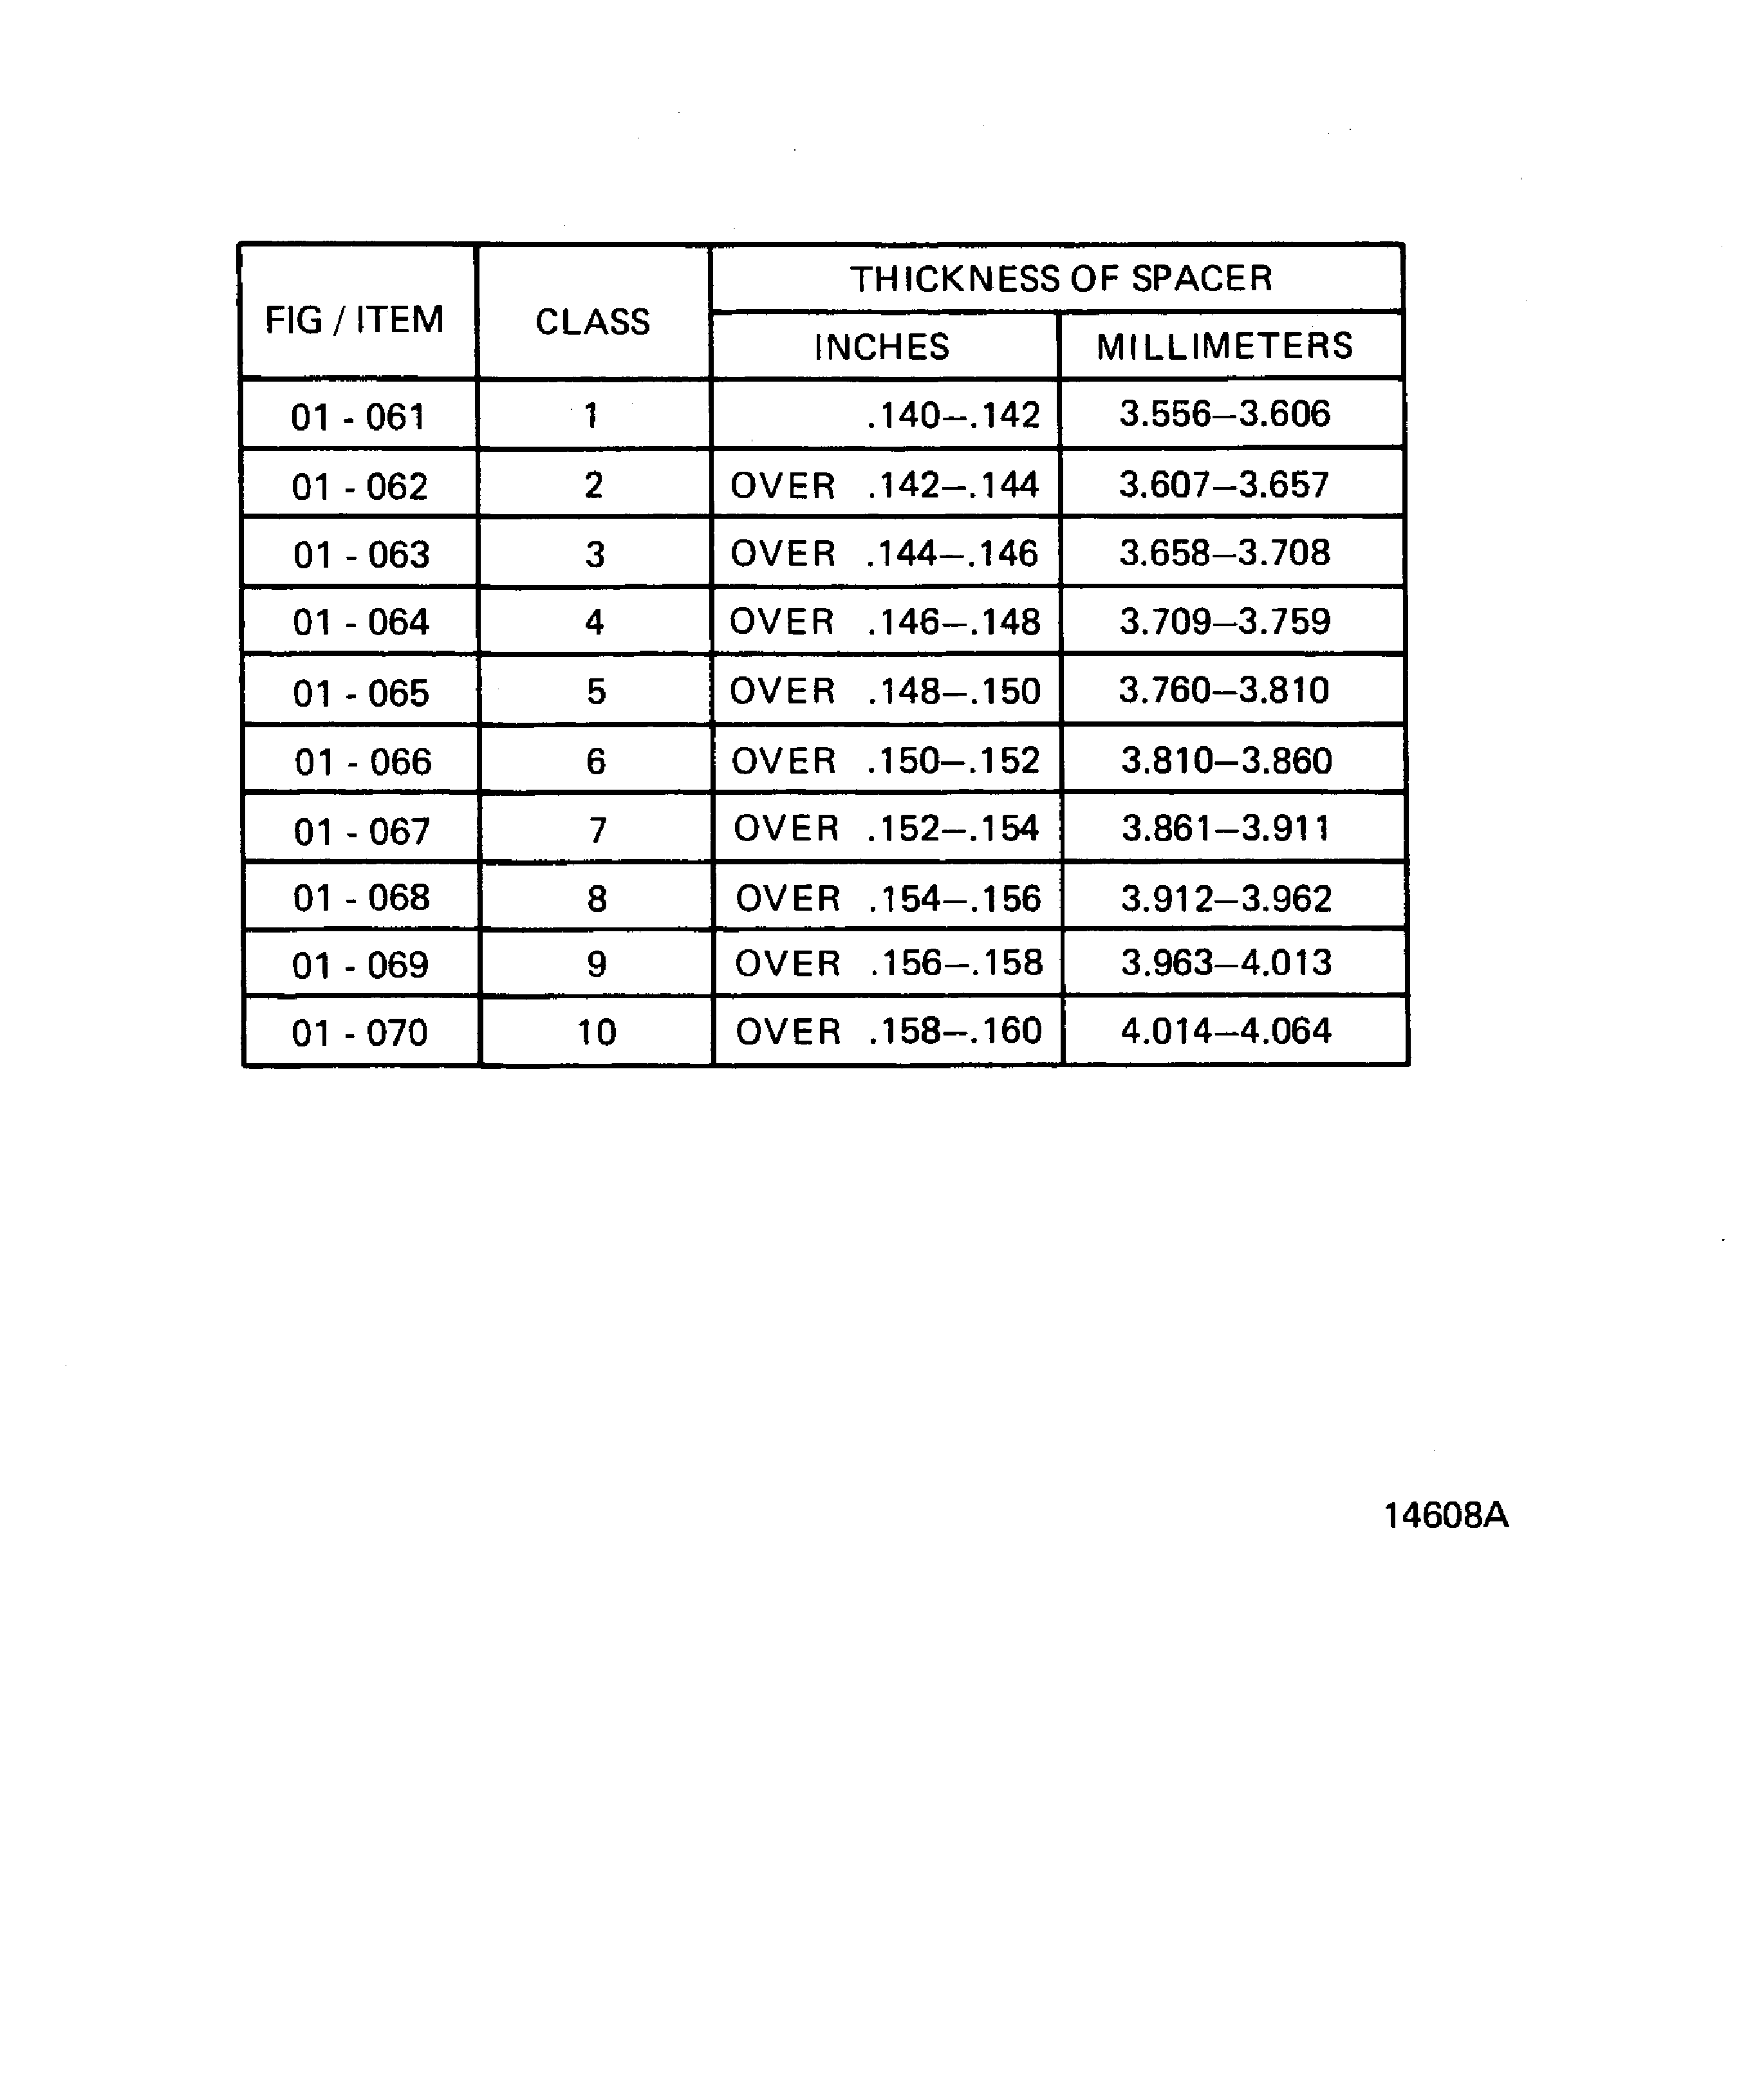
Figure: Installation of the Stage 2 HPT Air Seal
Installation of the Stage 2 HPT Air Seal
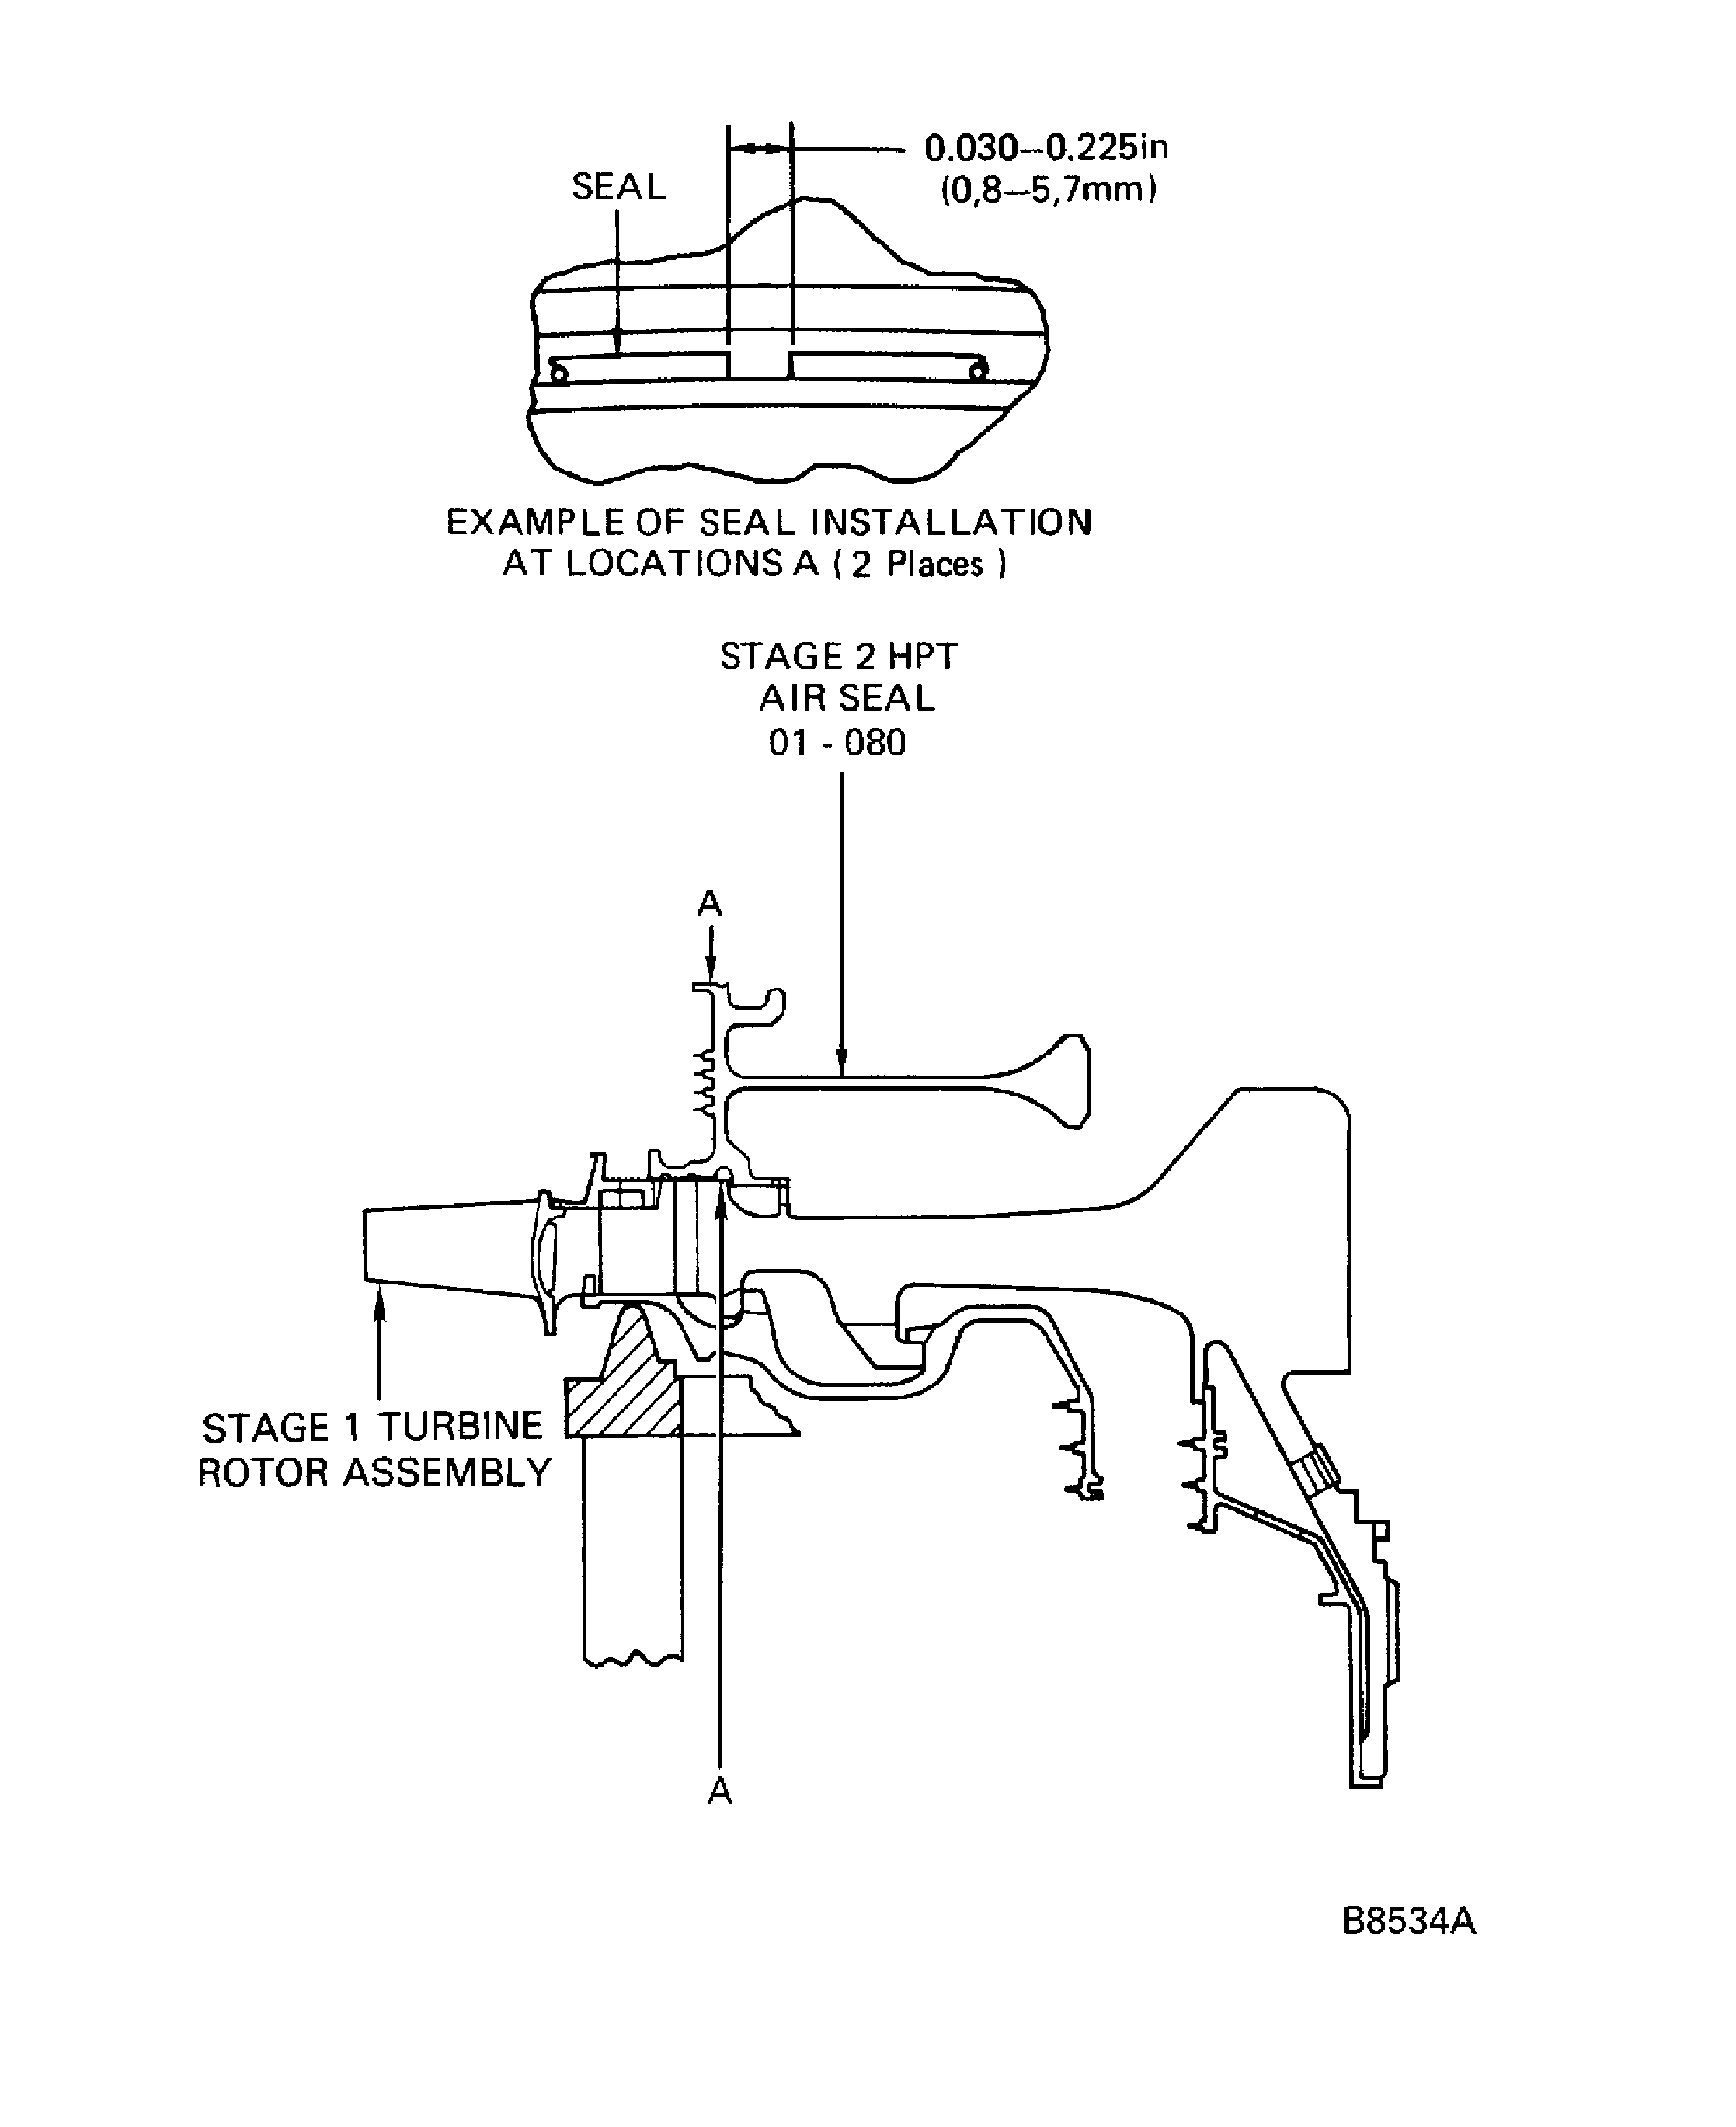
Figure: Stage 1 HP Turbine Rotor Heater Installation
Stage 1 HP Turbine Rotor Heater Installation
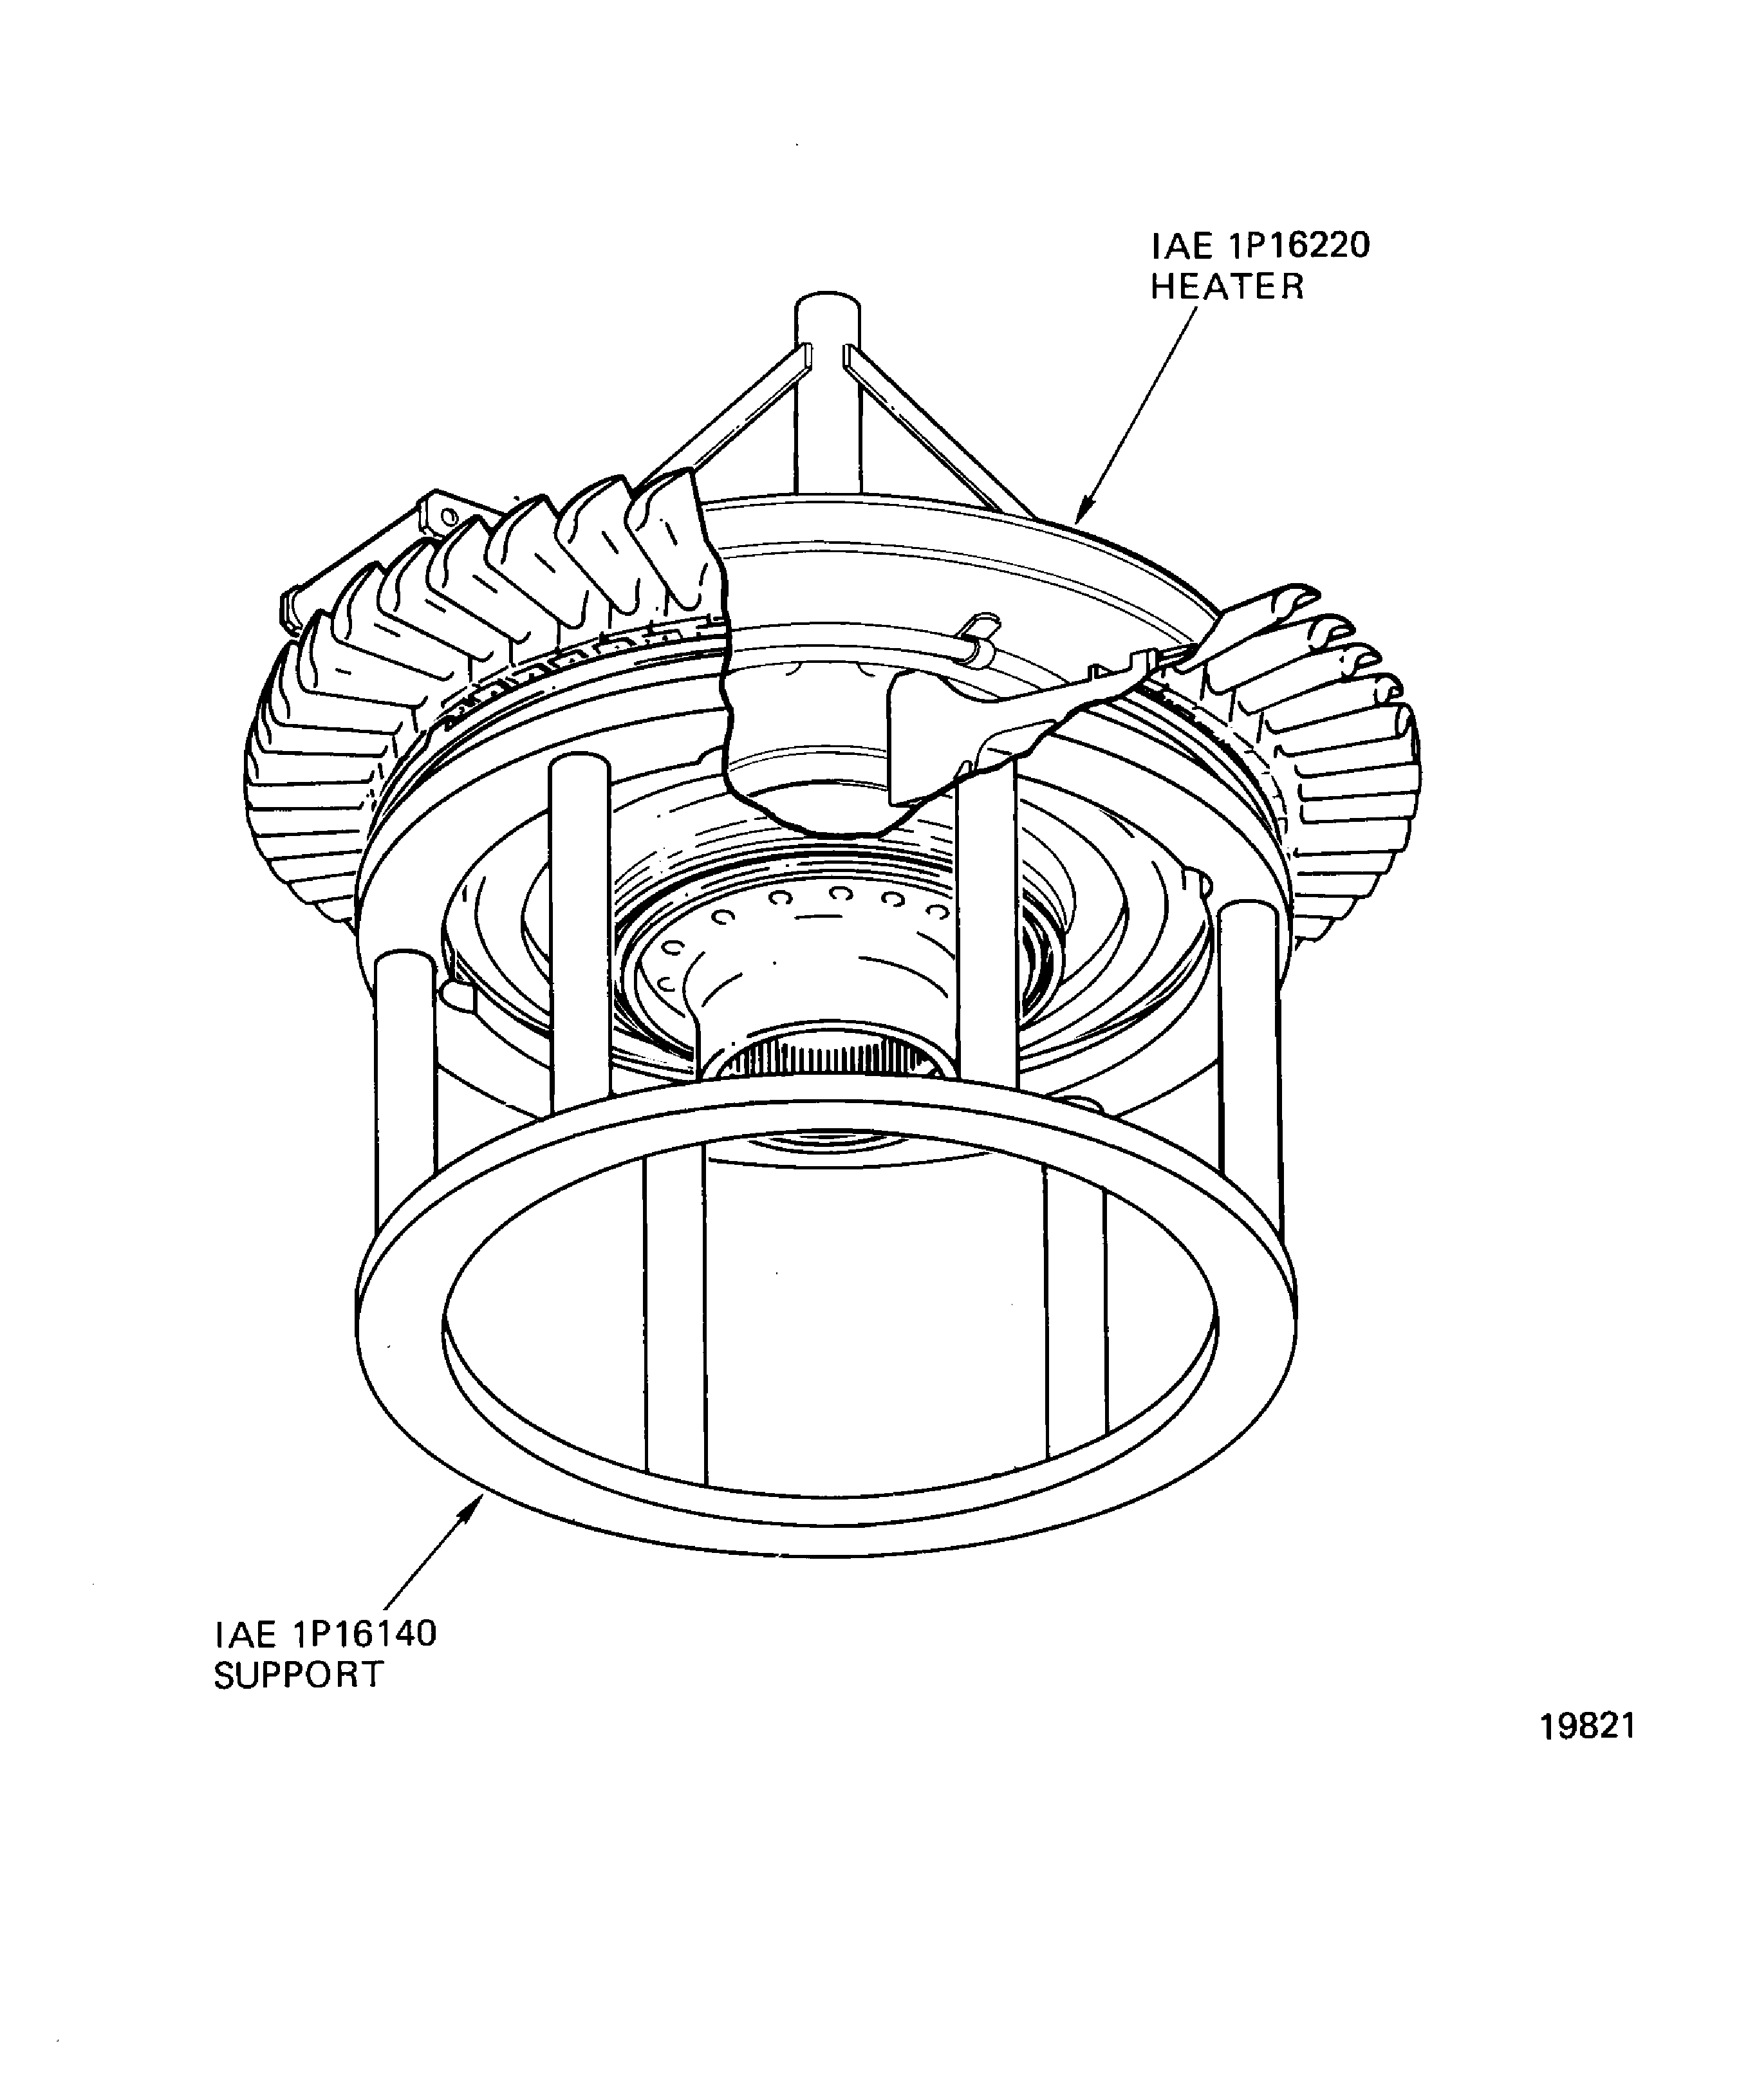
Figure: Install the Stage 2 HPT Air Seal
Install the Stage 2 HPT Air Seal
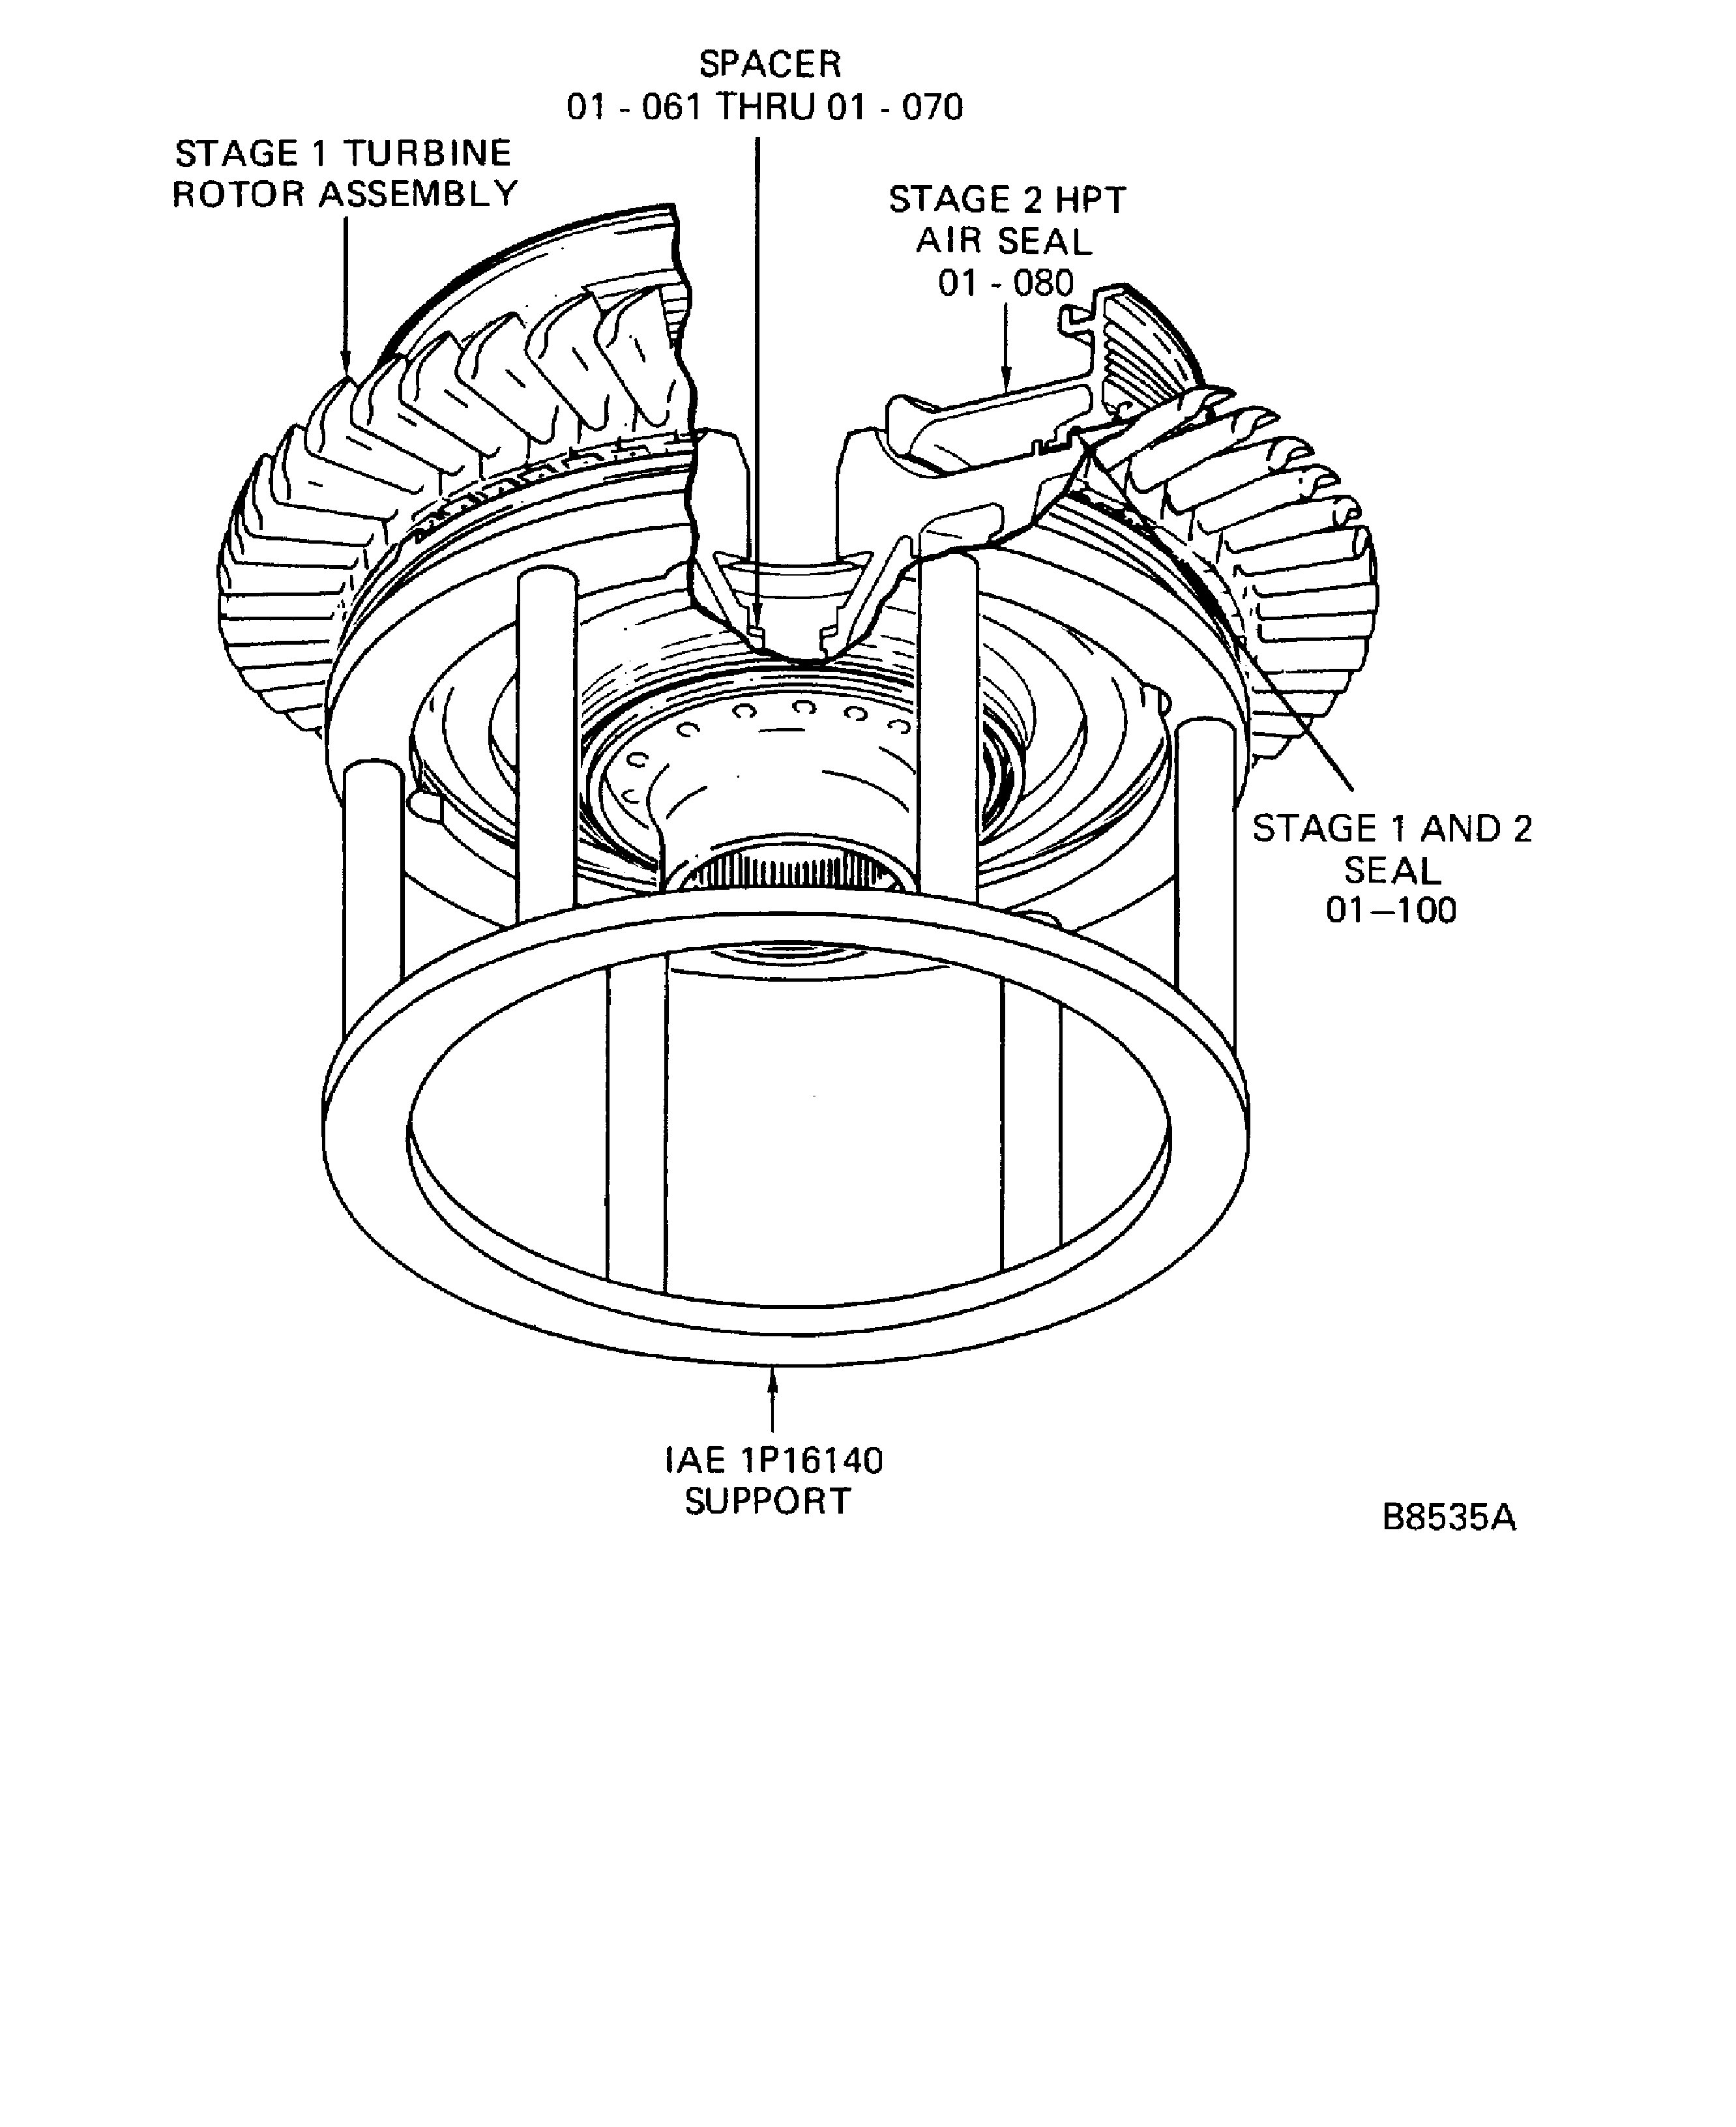
Figure: Stage 1 Turbine Rotor Assembly and Stage 2 HPT Air Seal
Stage 1 Turbine Rotor Assembly and Stage 2 HPT Air Seal
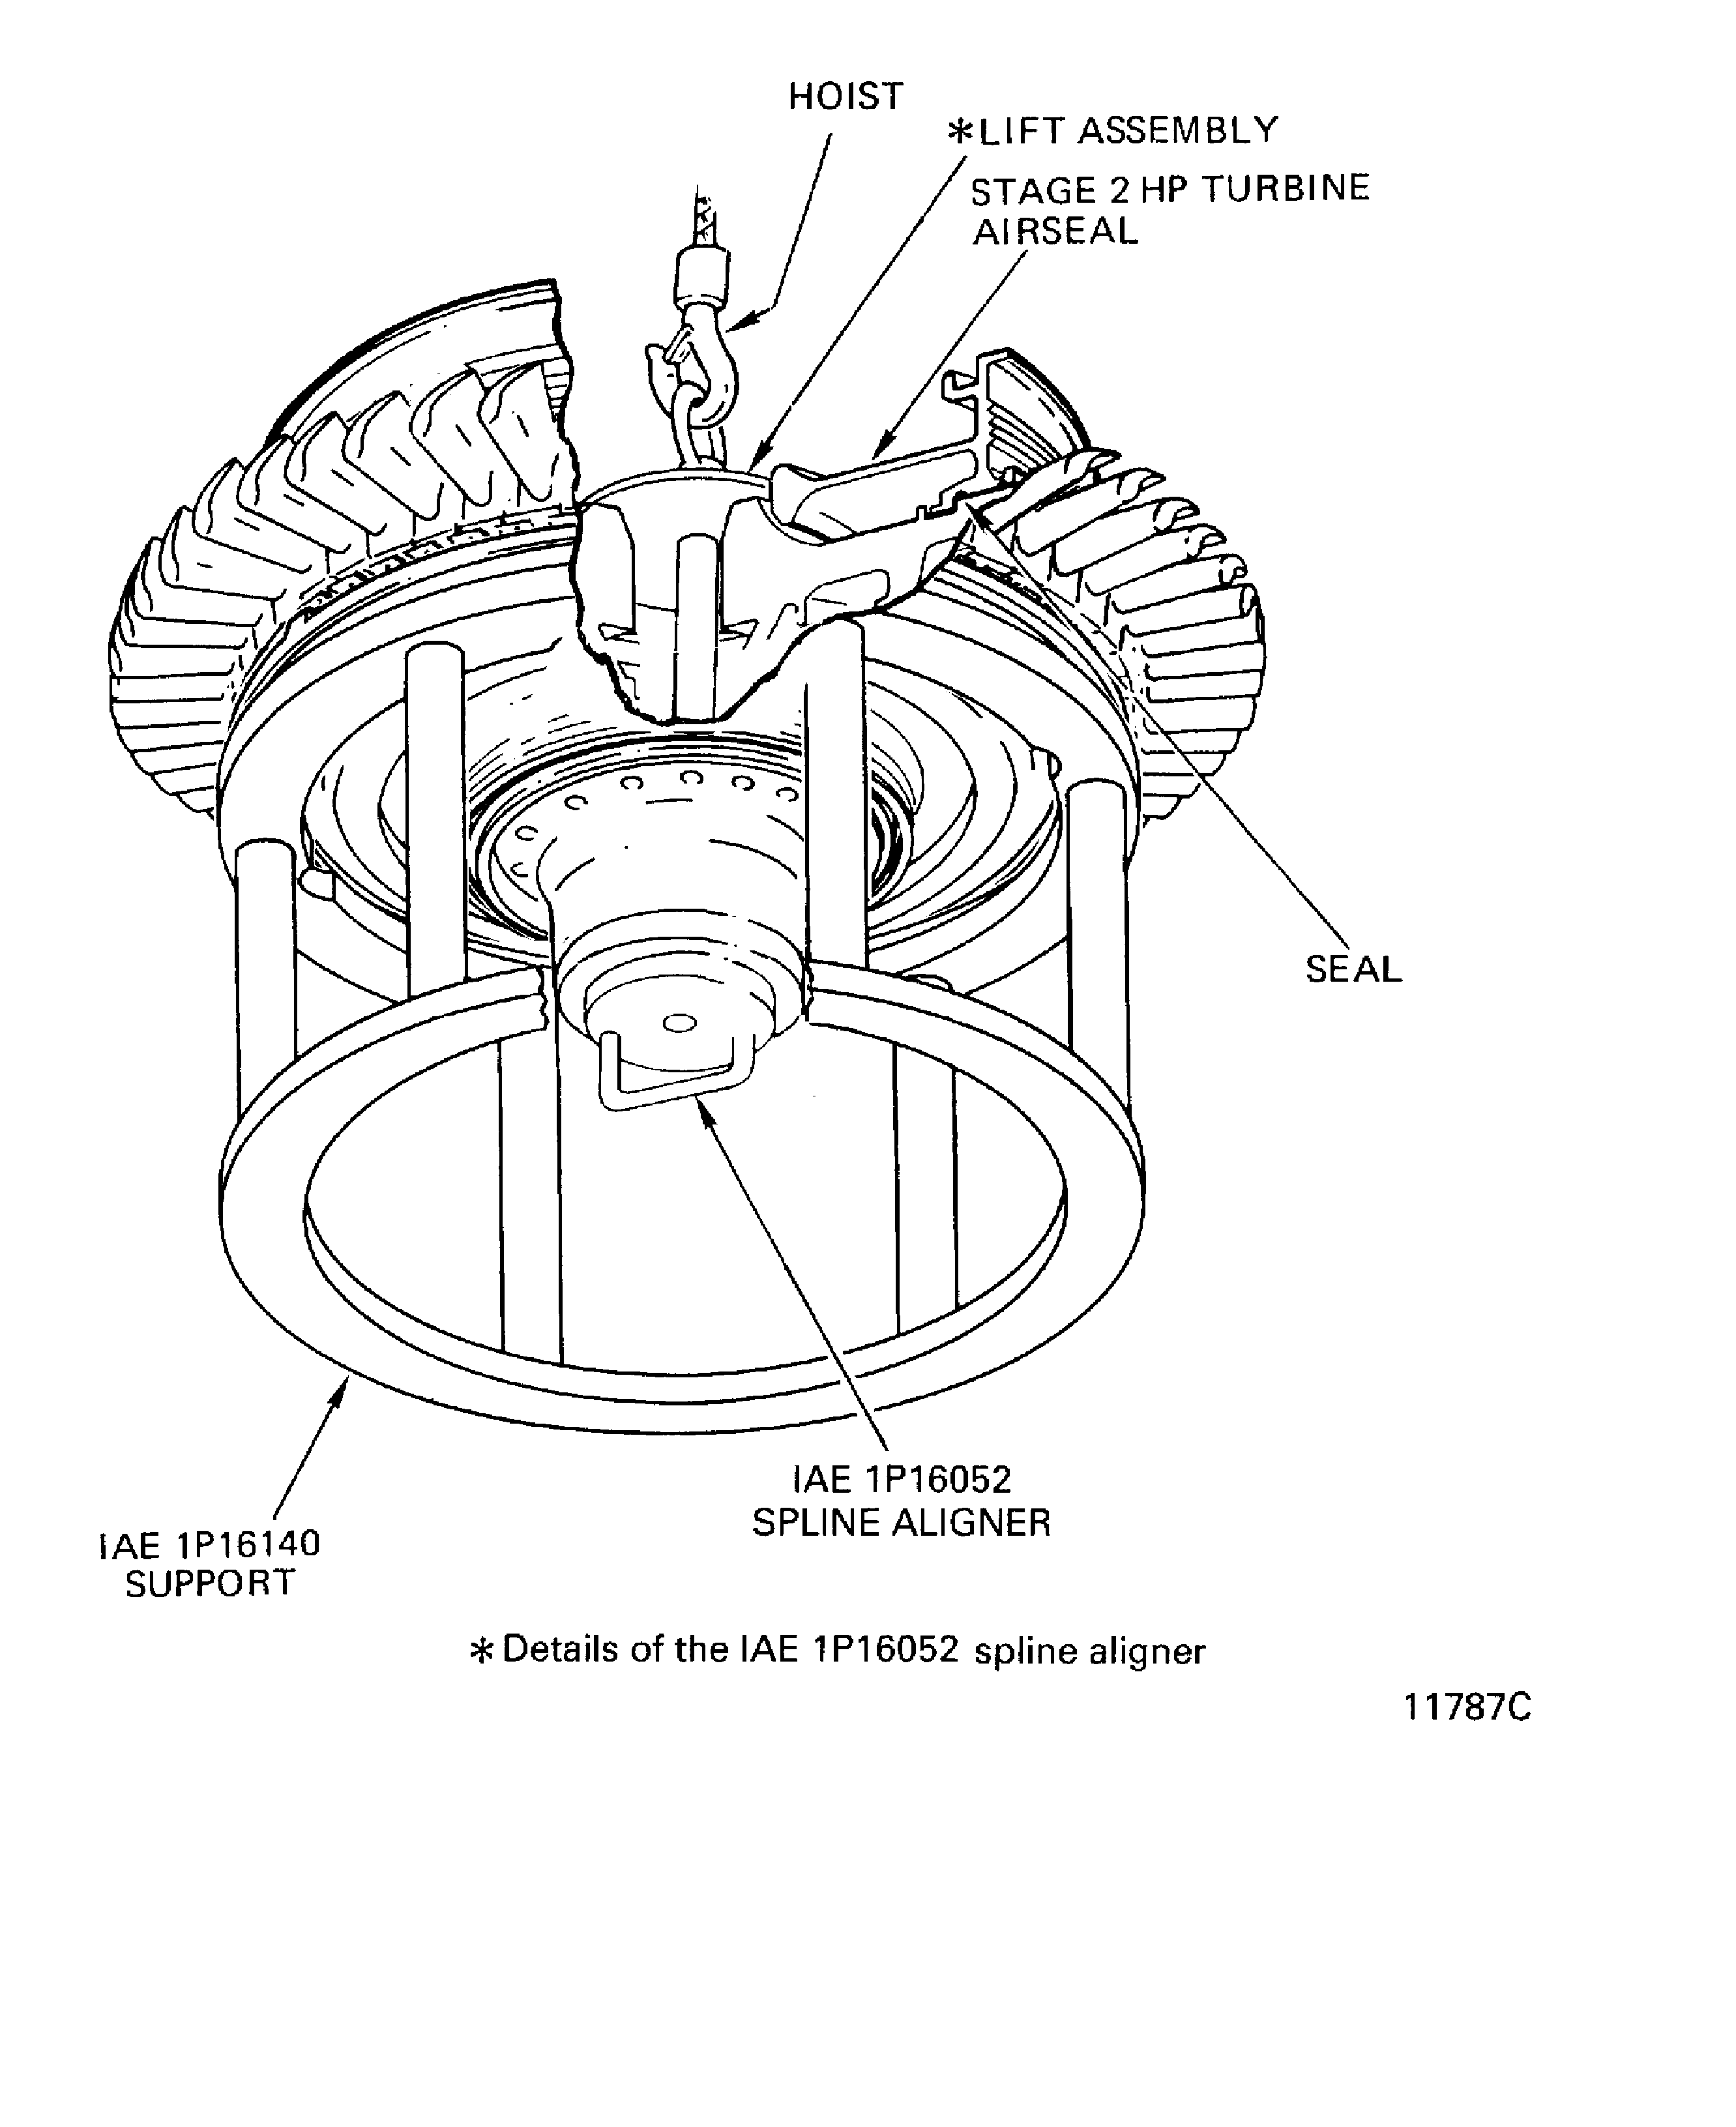
Figure: Install the Stage 1 Turbine Rotor Assembly and the Stage 2 HPT Air Seal in to the Build Stand
Install the Stage 1 Turbine Rotor Assembly and the Stage 2 HPT Air Seal in to the Build Stand
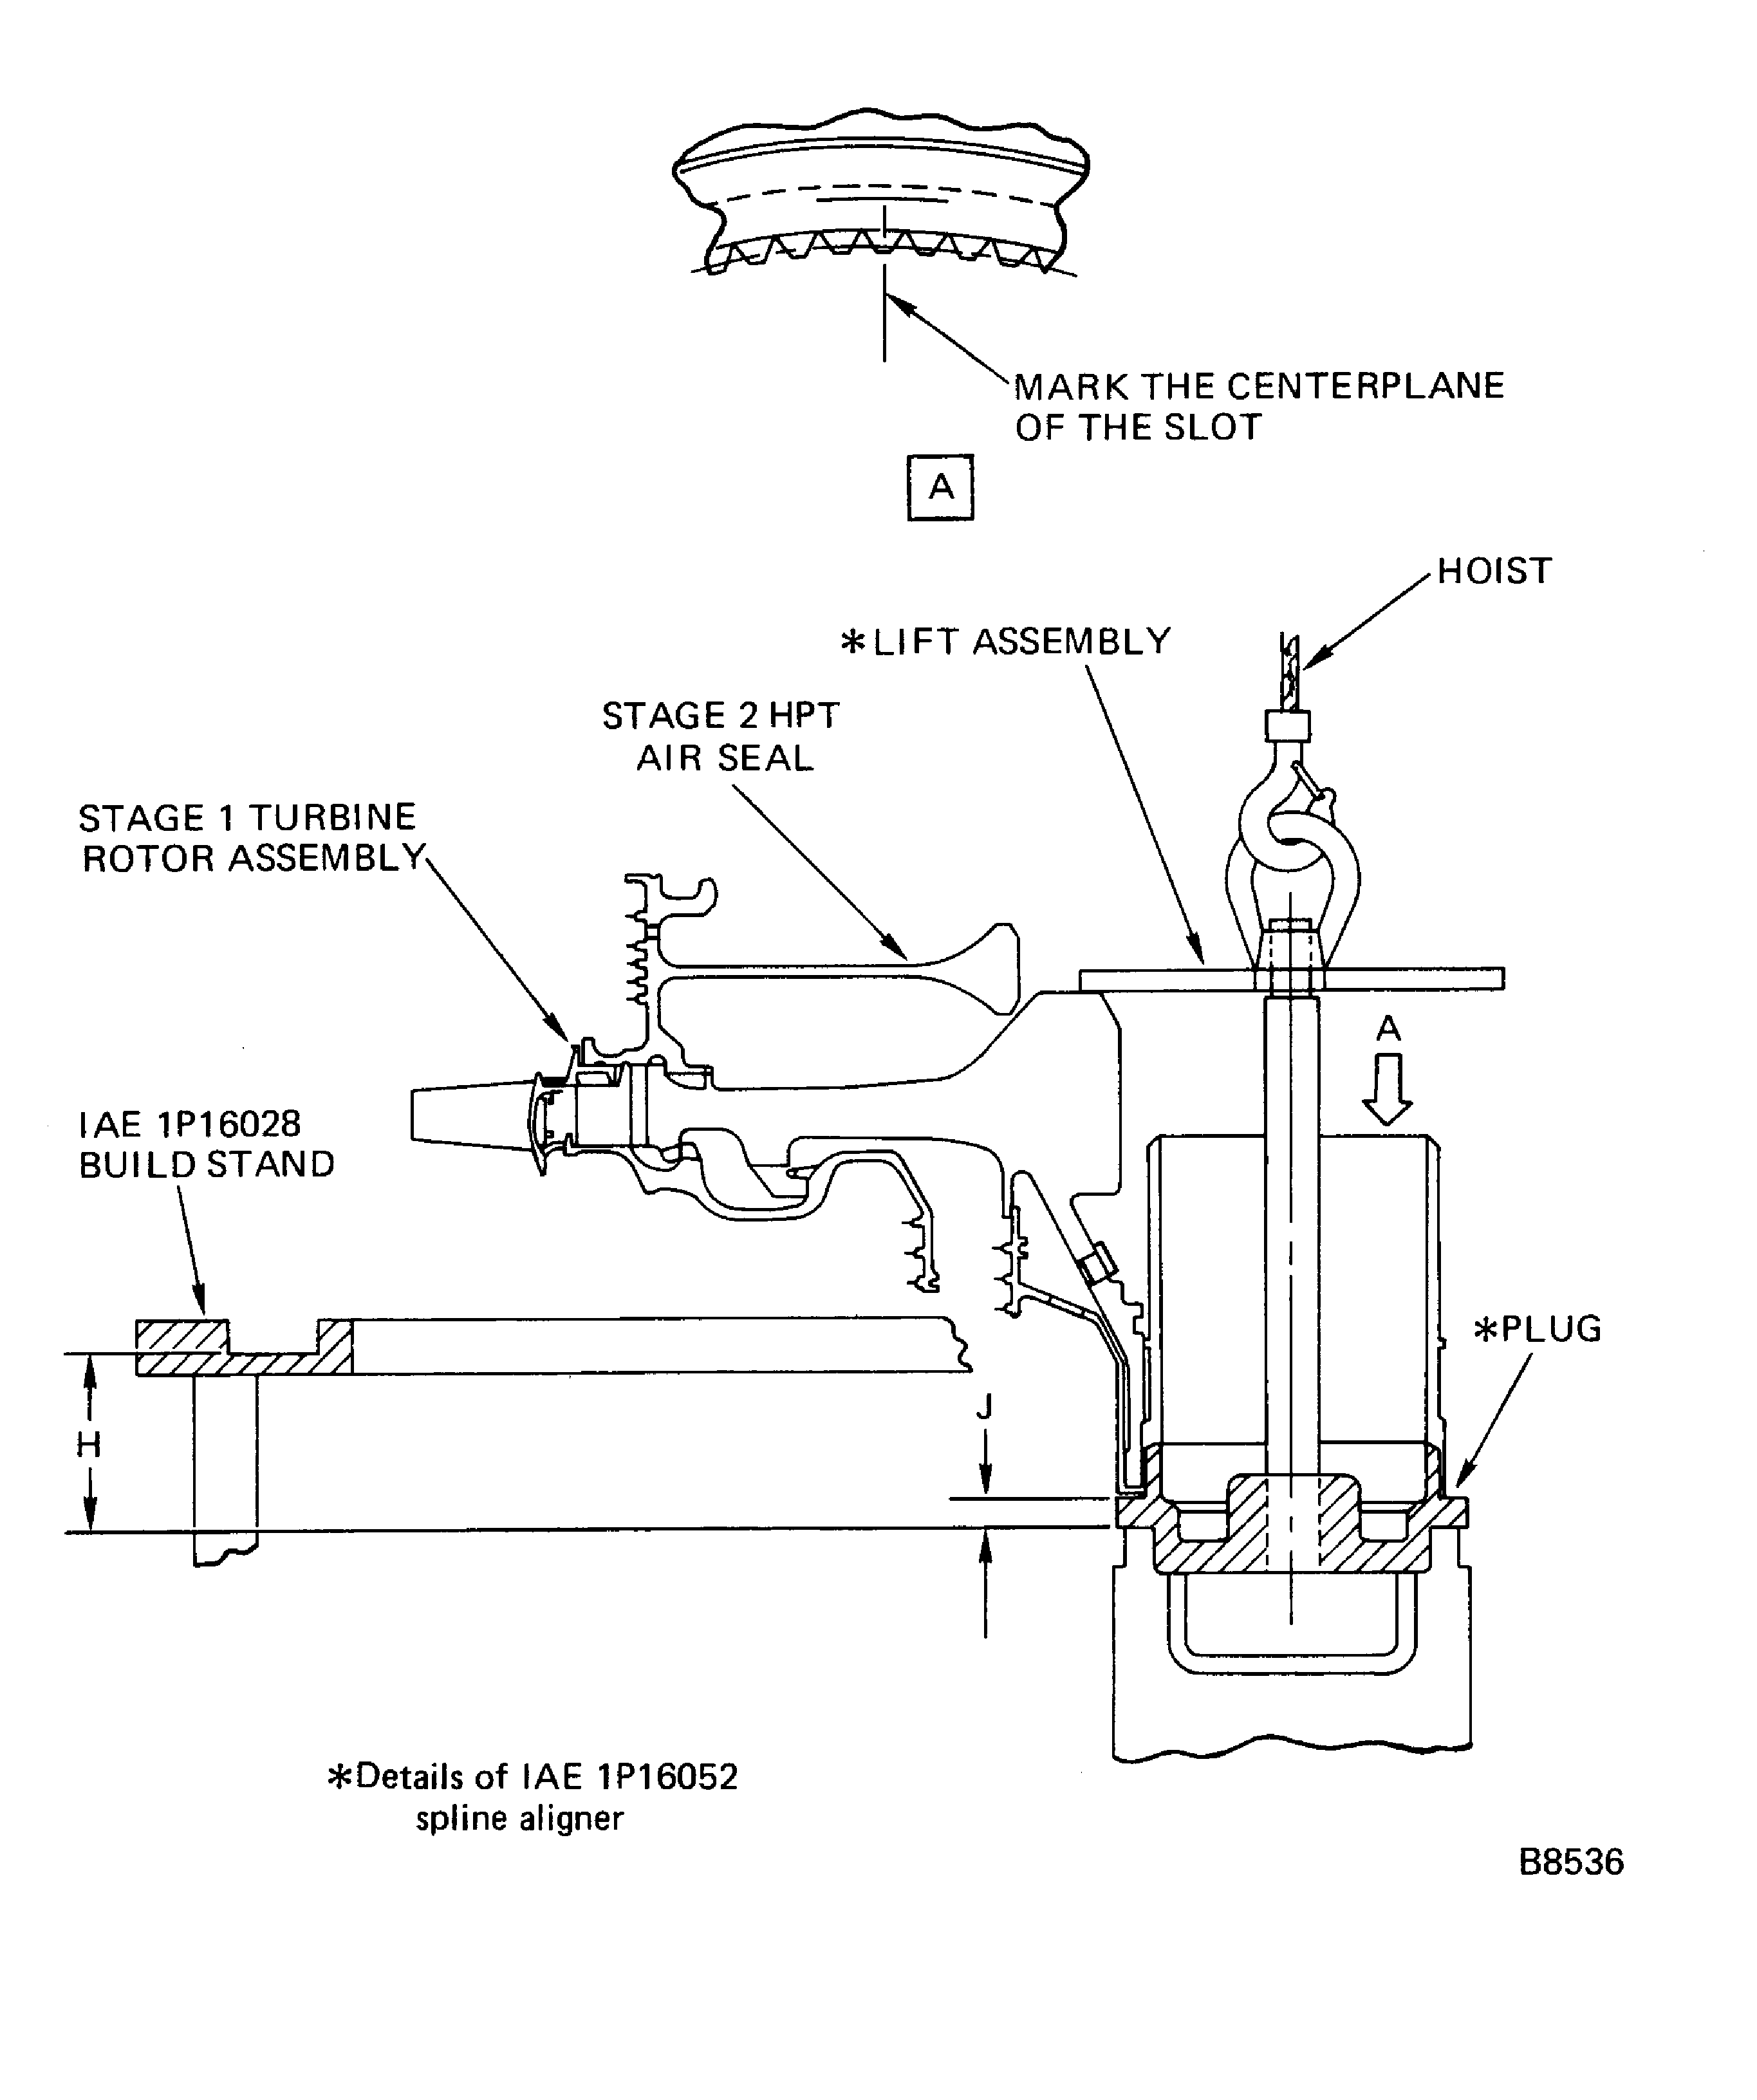
Figure: Install the HP Turbine Case and Vane Assembly
Install the HP Turbine Case and Vane Assembly
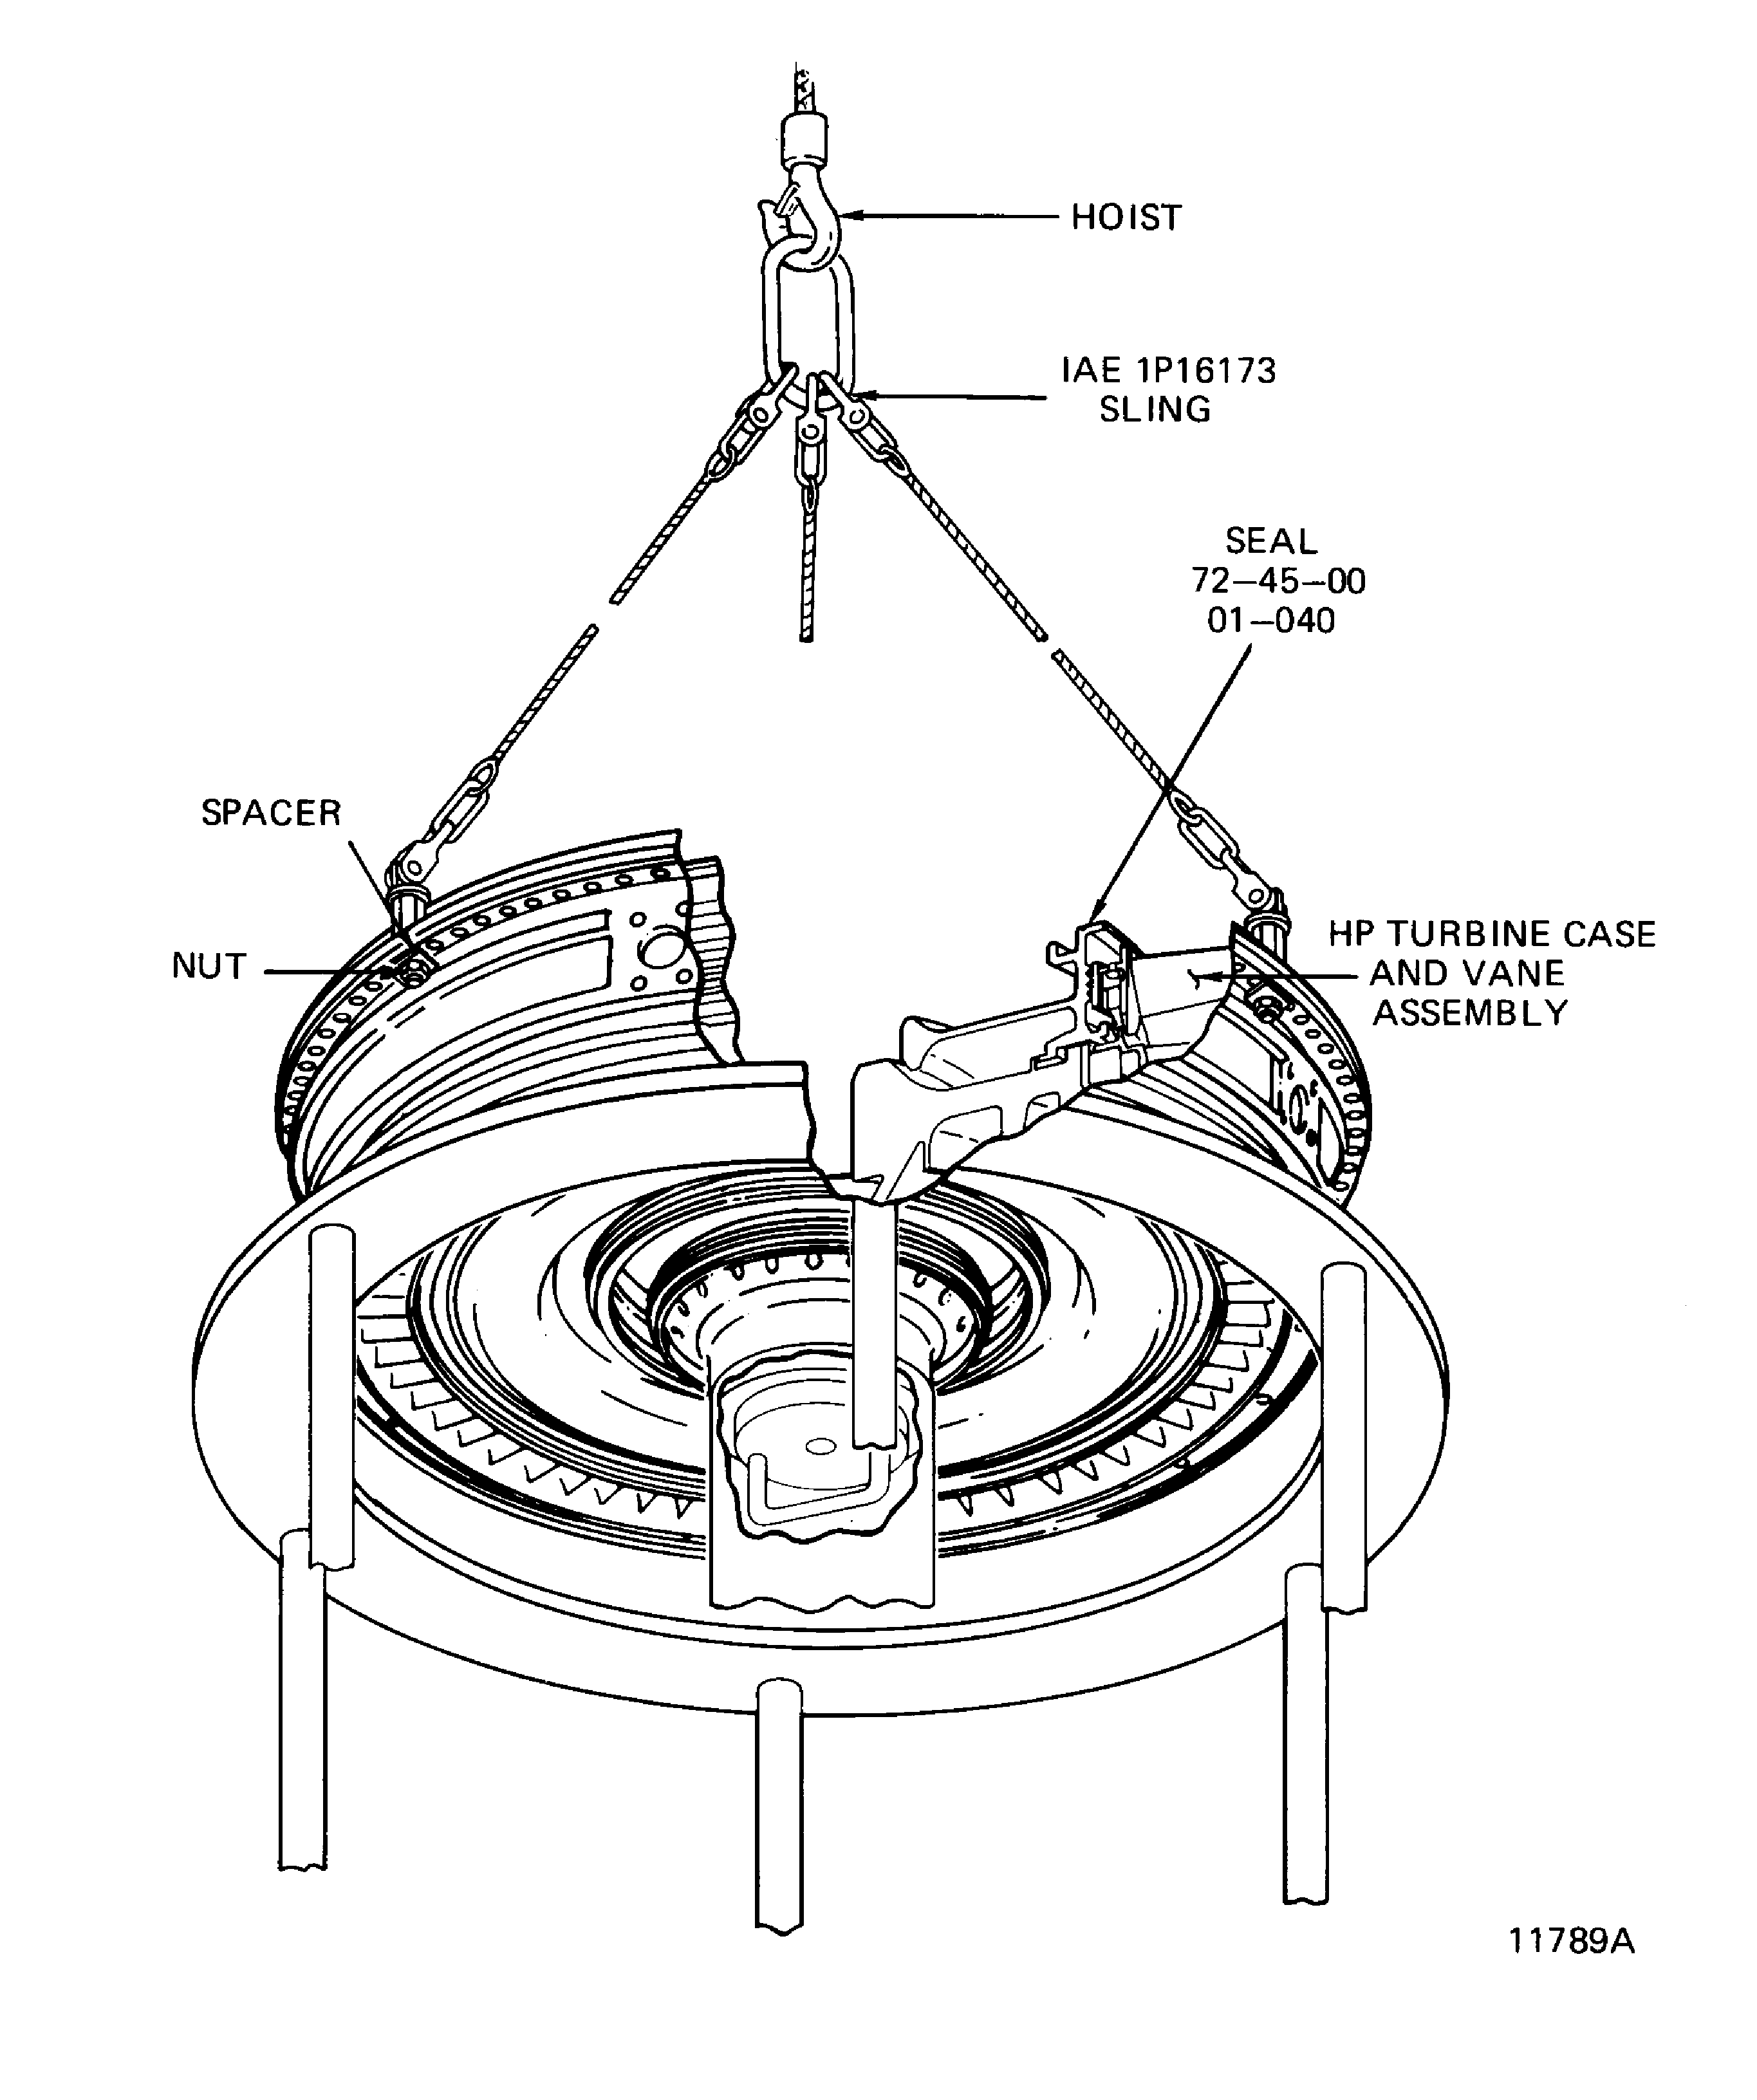
Figure: IAE 1P16063 Retaining Fixture Installation
IAE 1P16063 Retaining Fixture Installation
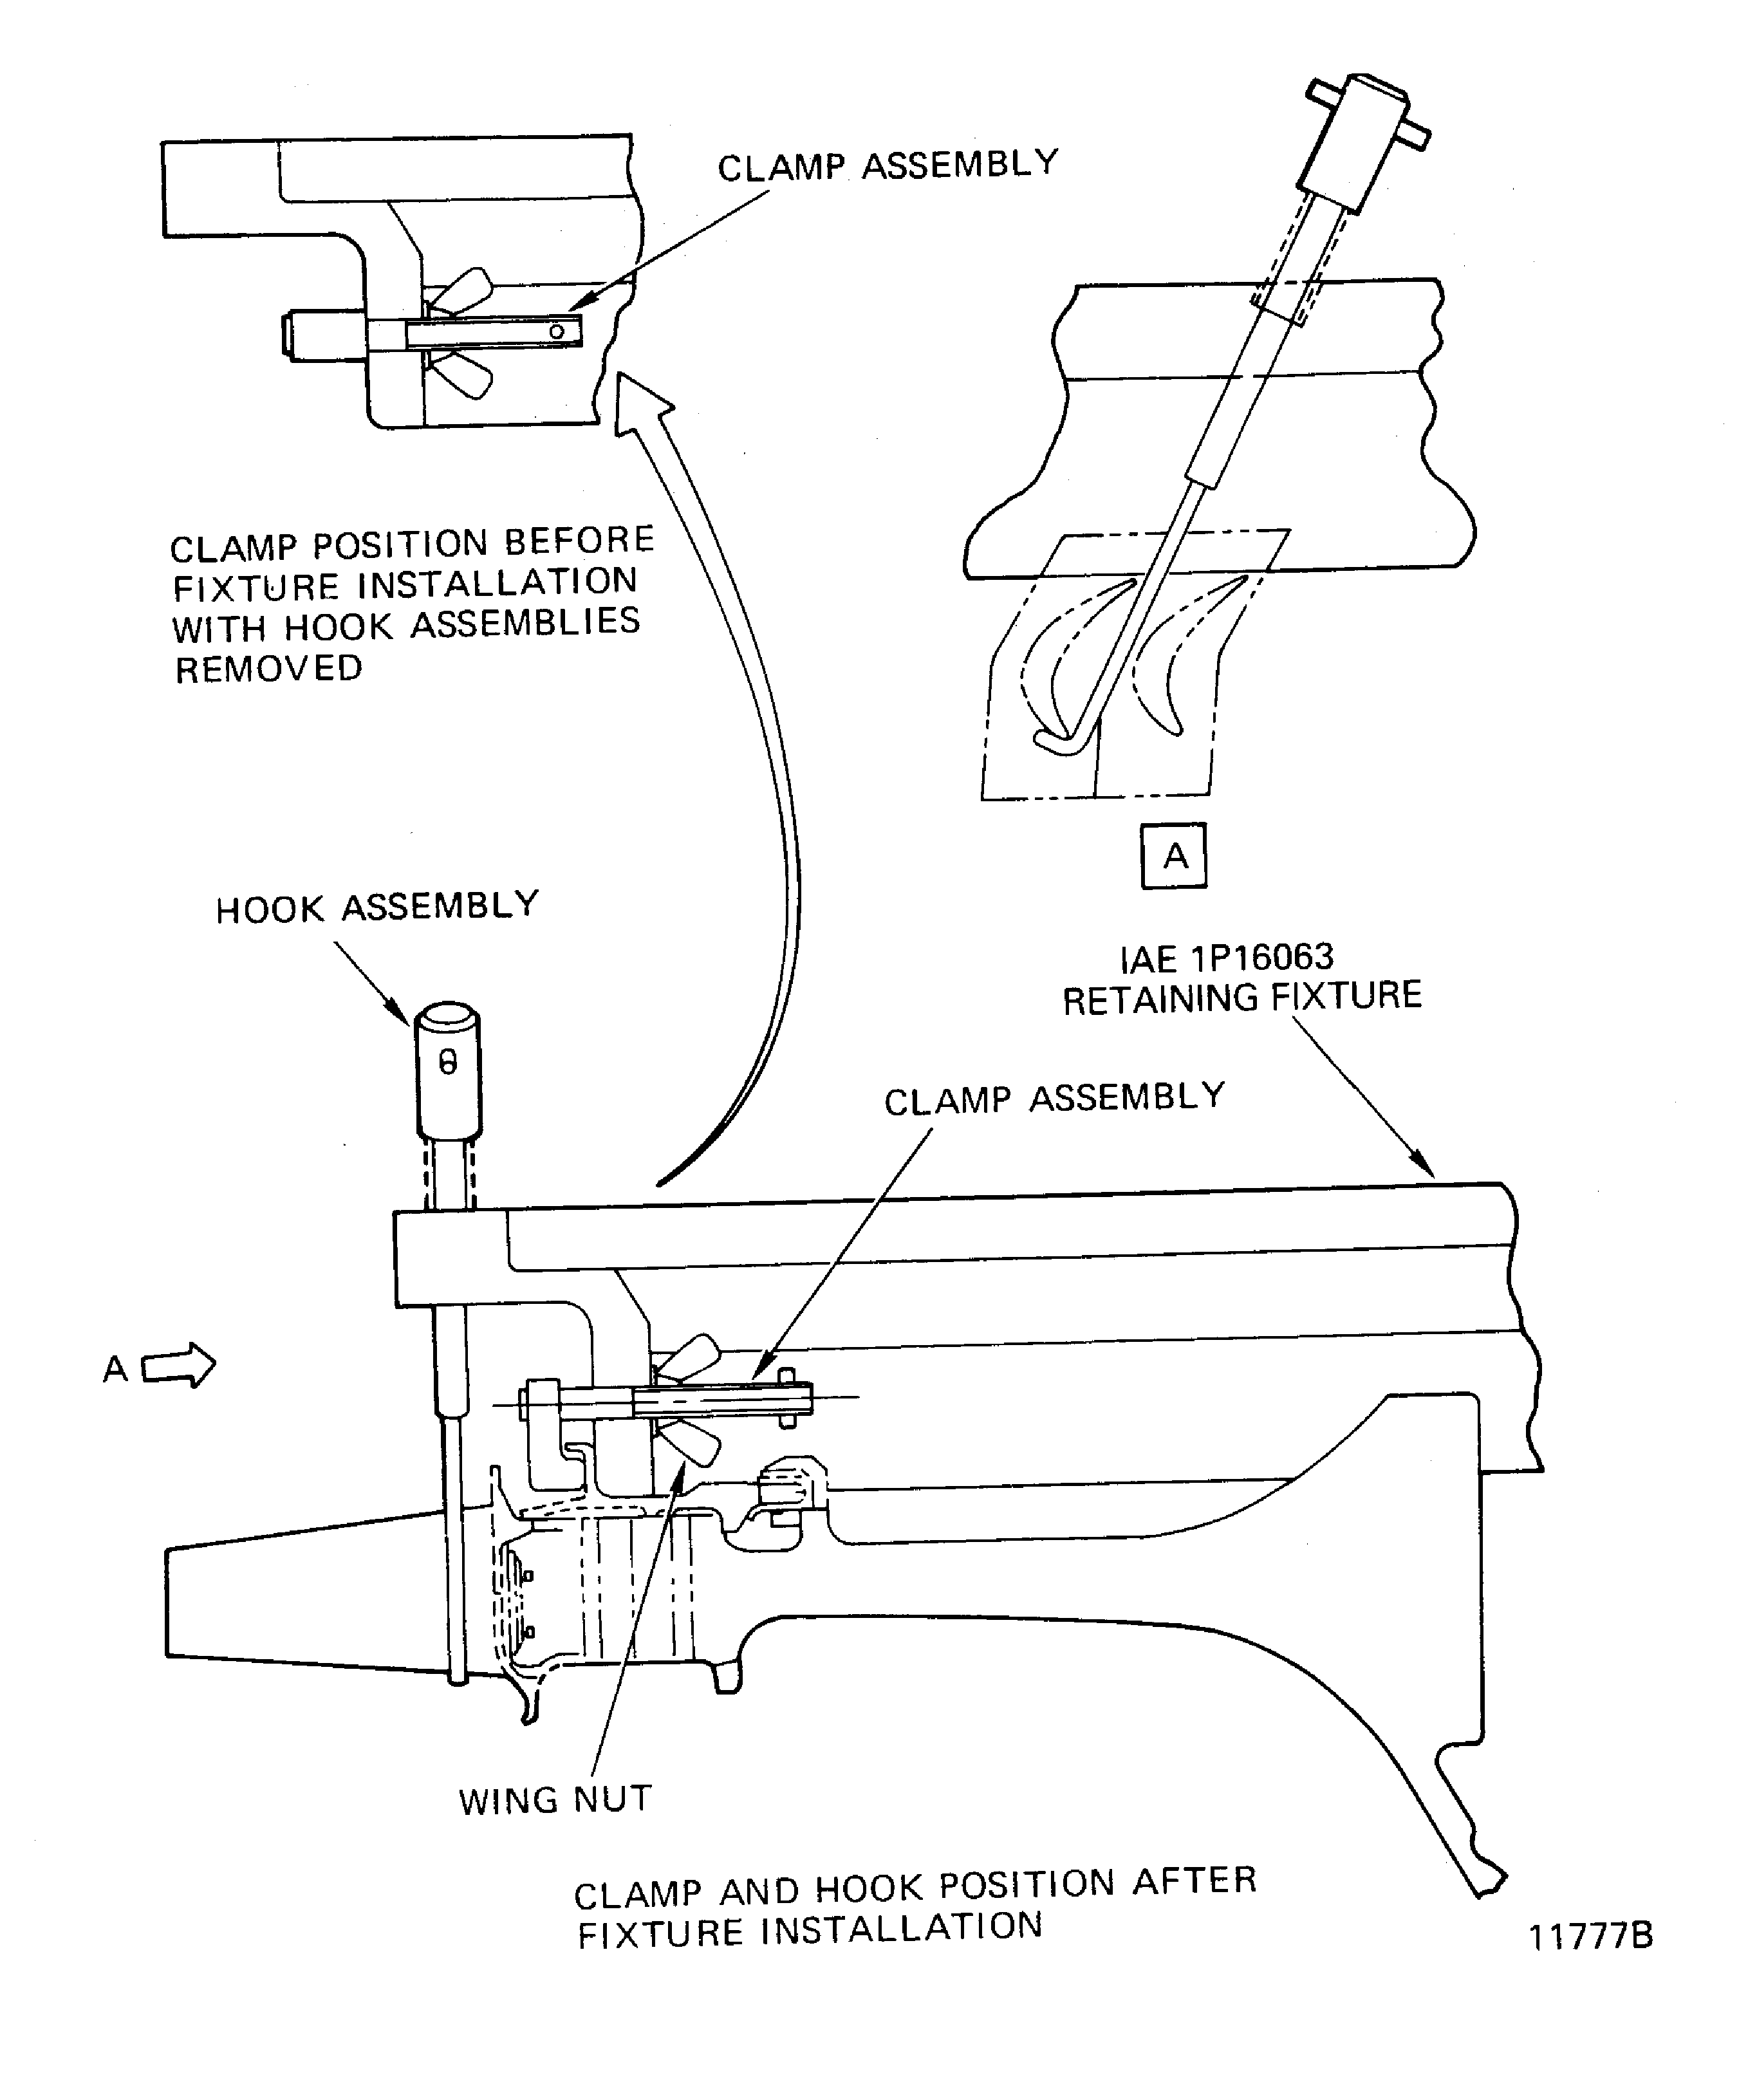
Figure: IAE 1P17026 Lift Fixture Installation
IAE 1P17026 Lift Fixture Installation
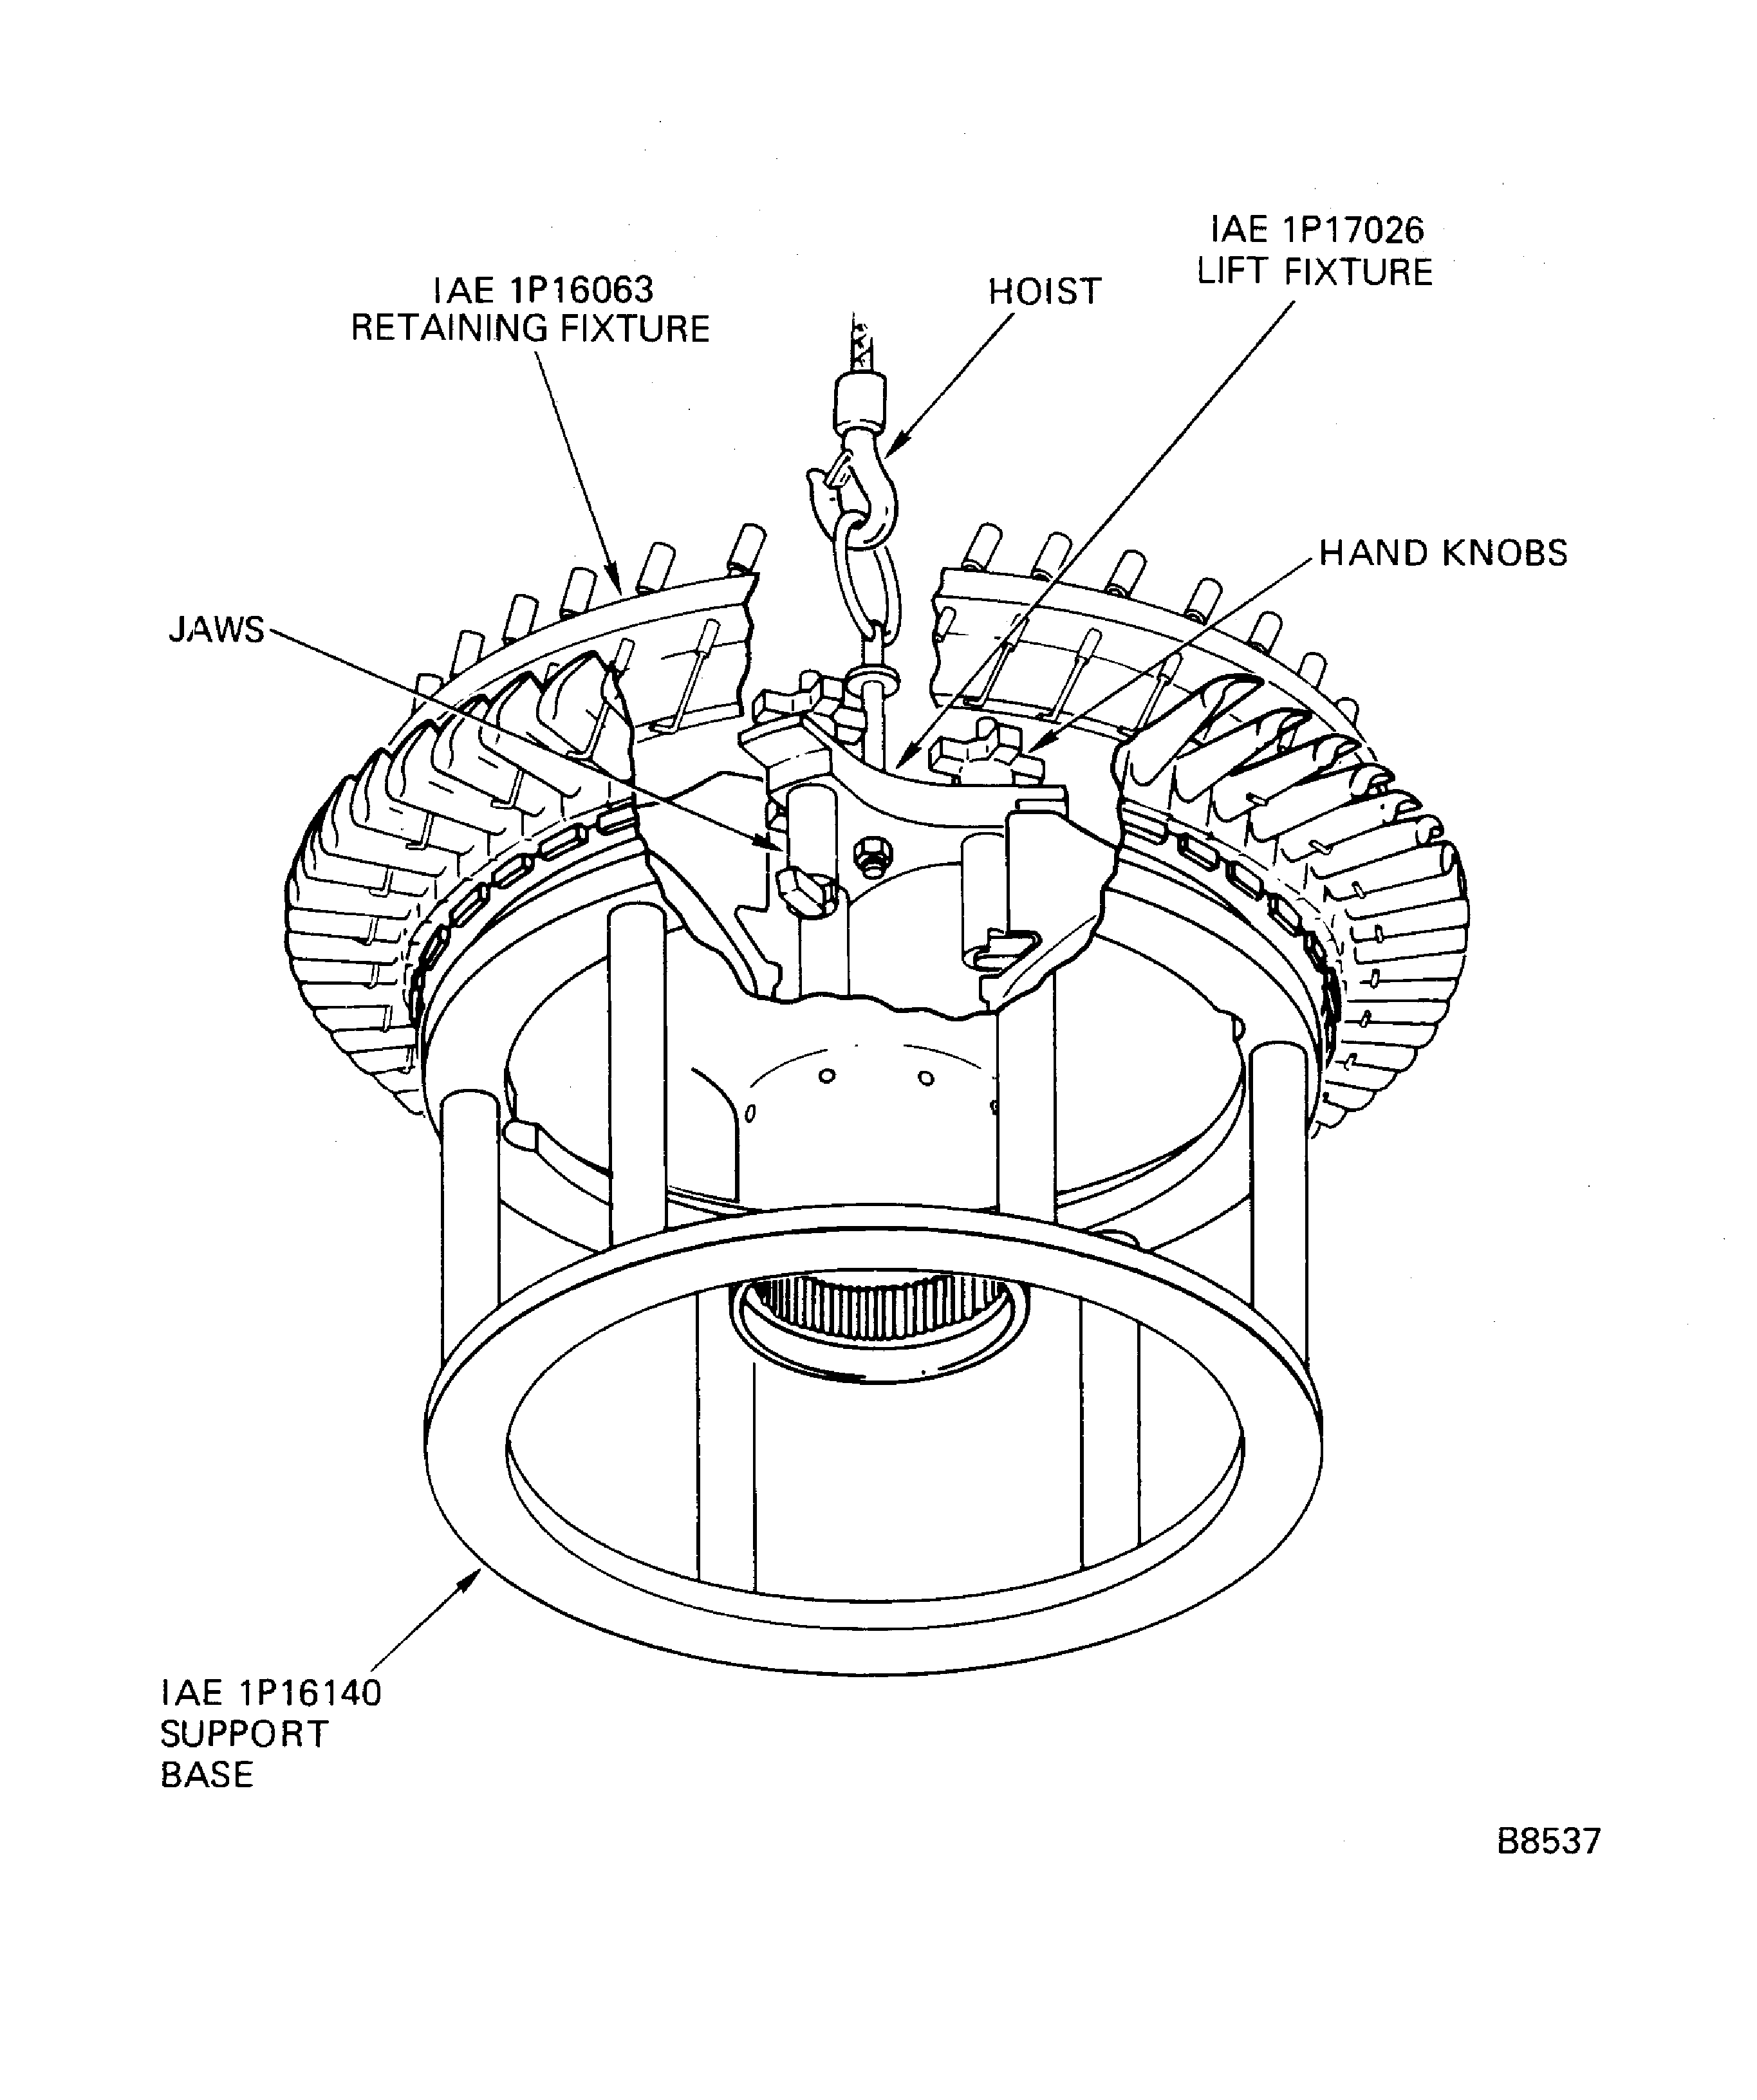
Figure: Install the Stage 2 Turbine Rotor Assembly
Install the Stage 2 Turbine Rotor Assembly
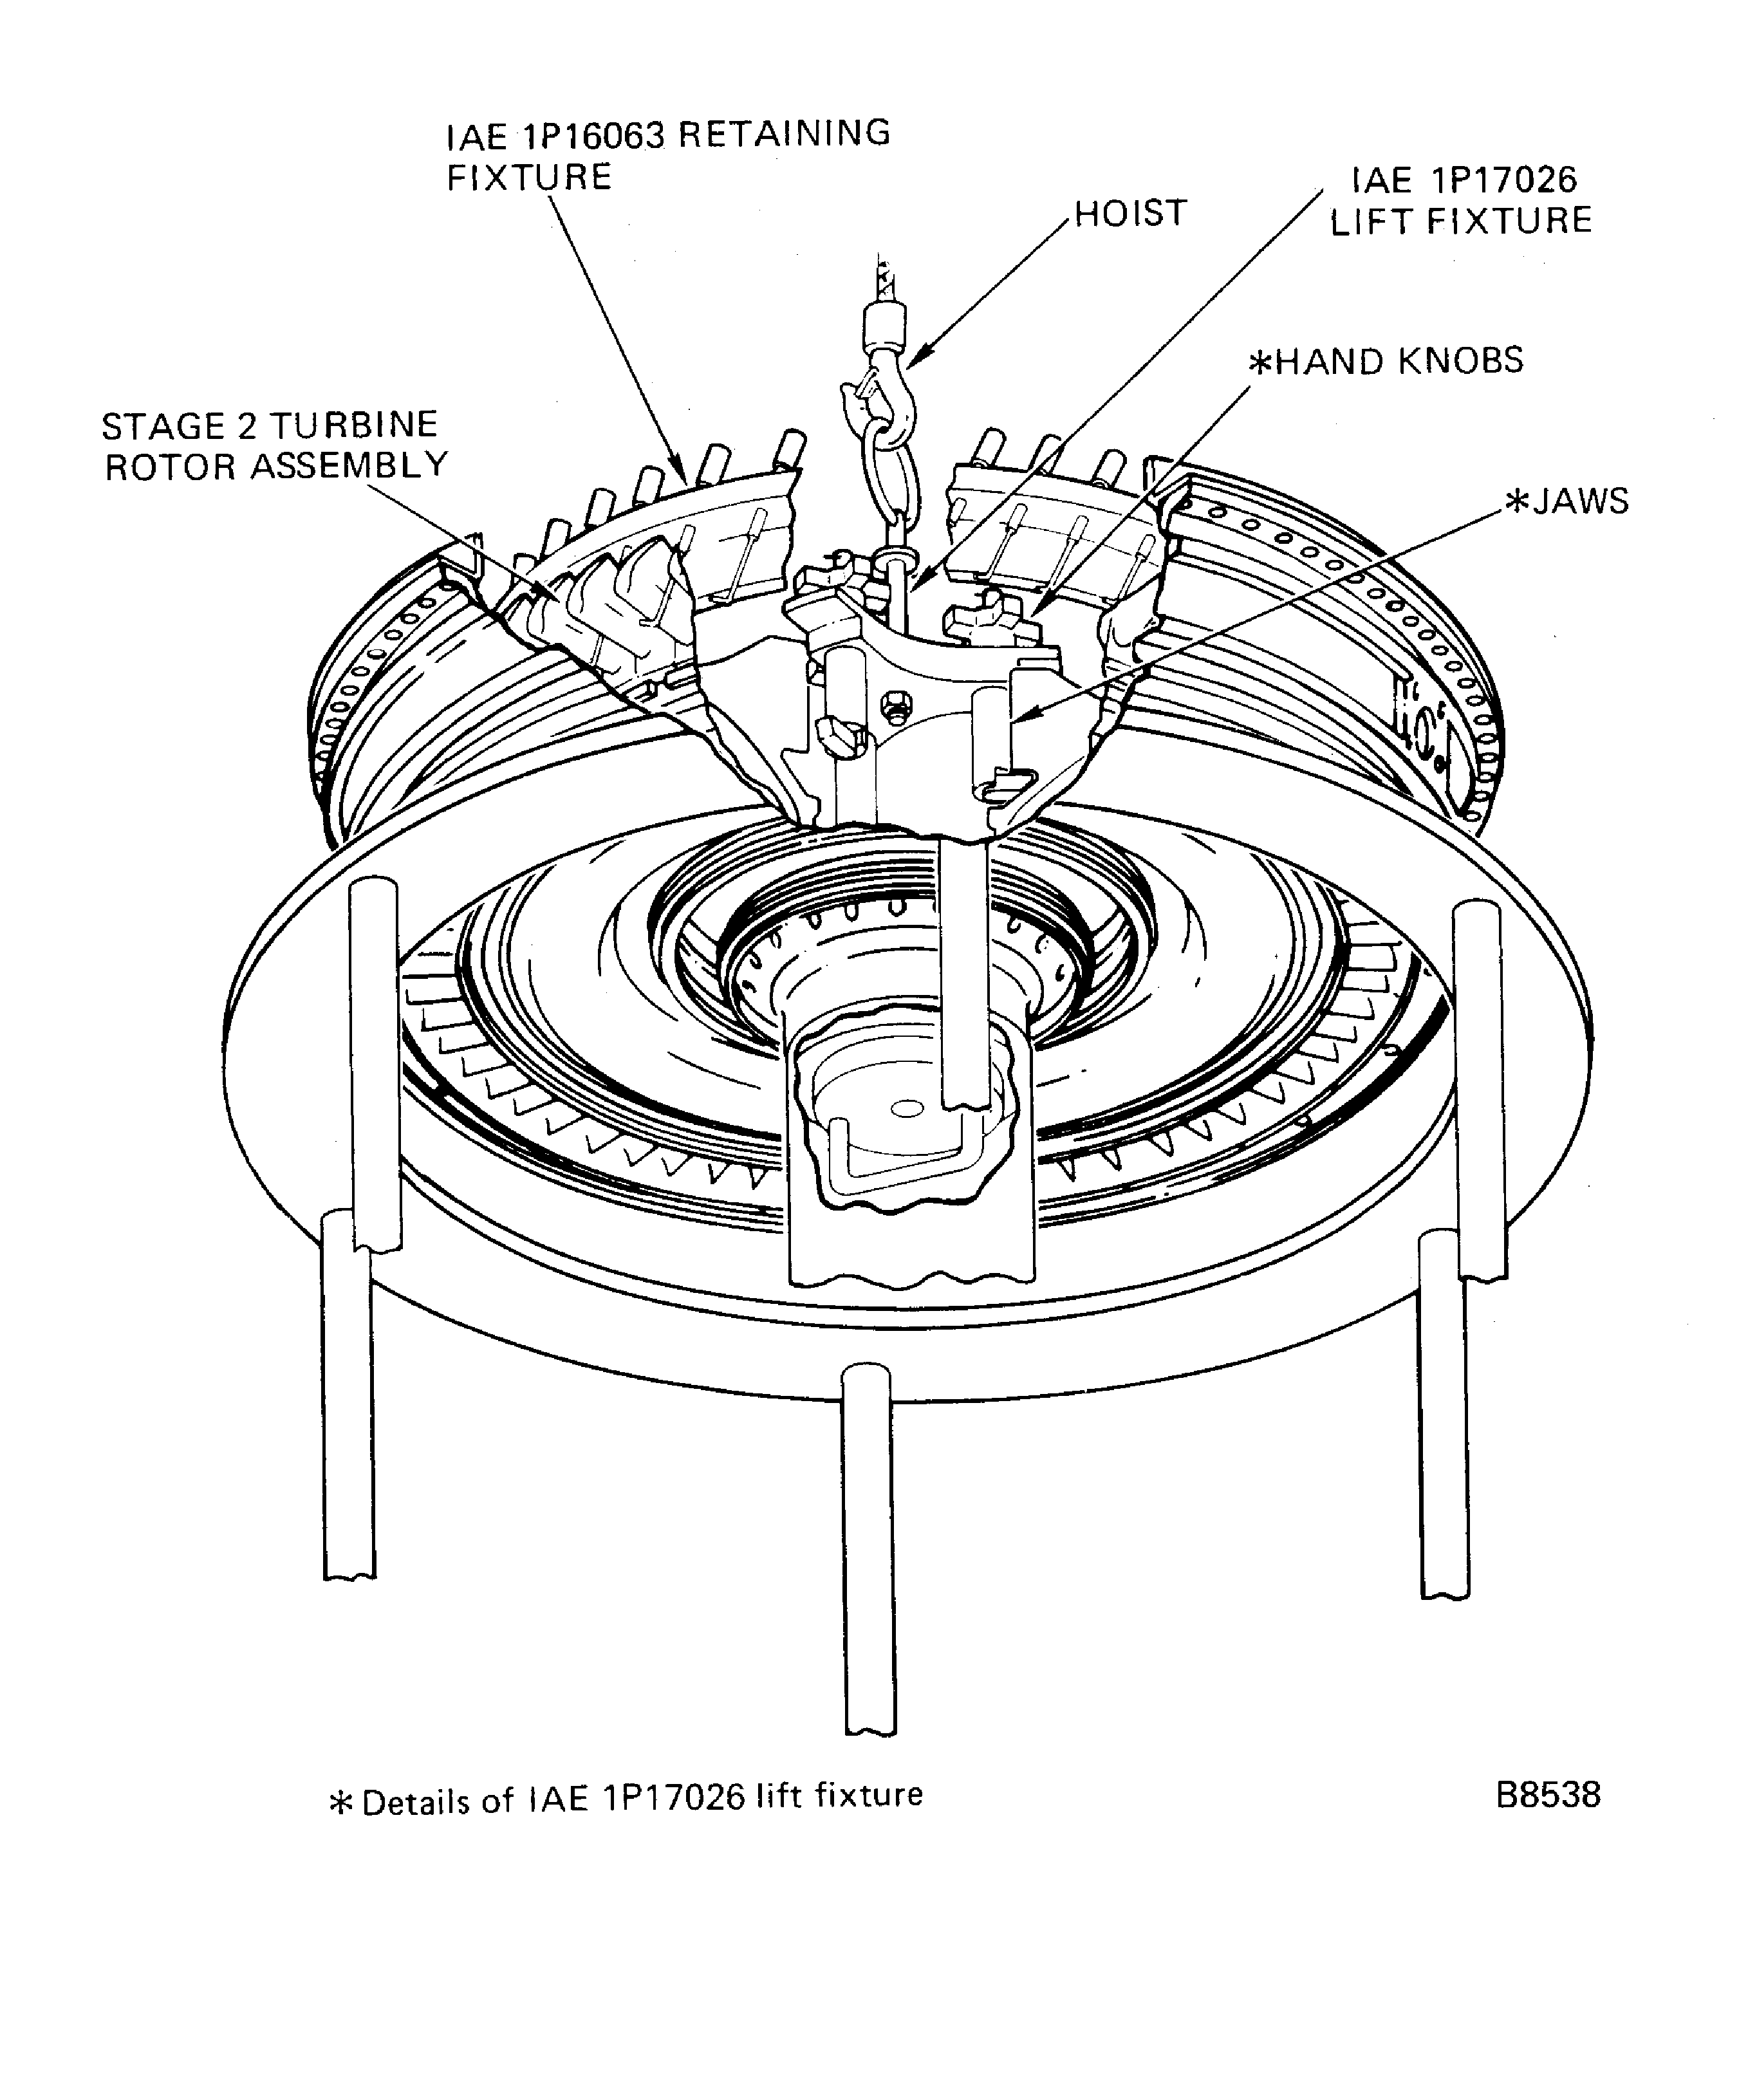
Figure: Installation Tooling for the HP Turbine Rotor and Stator Assembly
Installation Tooling for the HP Turbine Rotor and Stator Assembly
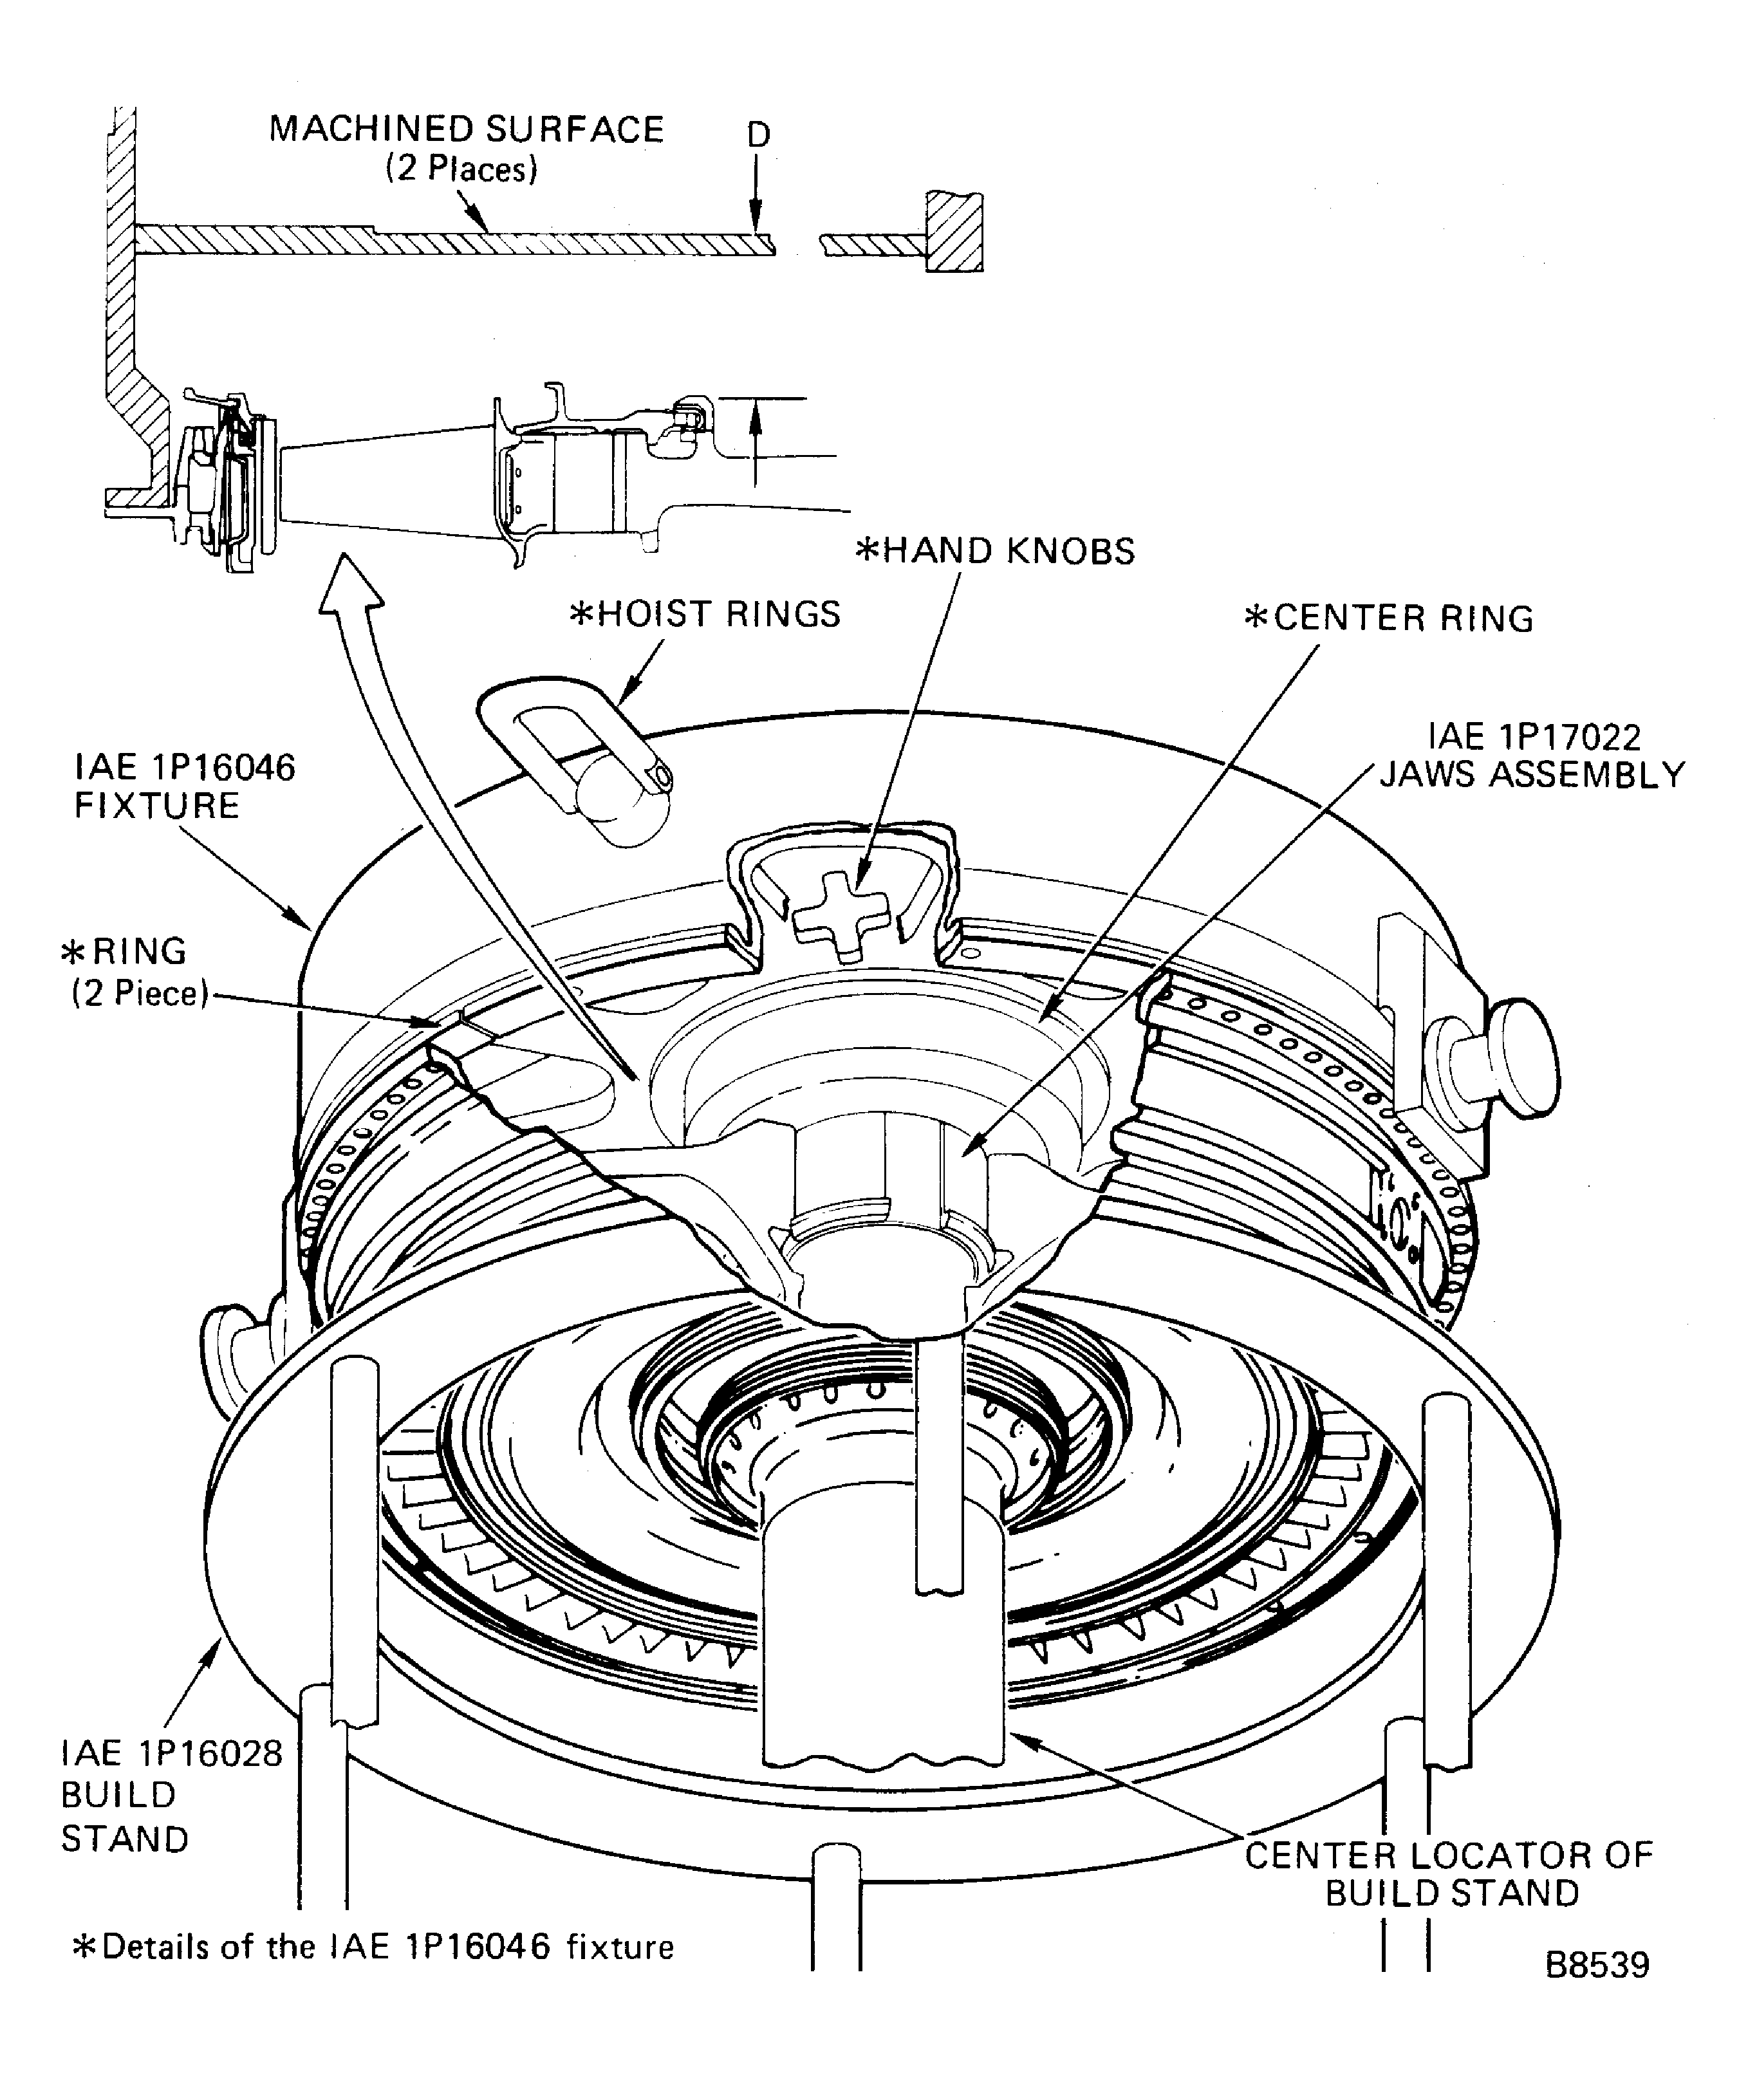
Figure: Prepare to Turn the HP Turbine Rotor and Stator Assembly
Prepare to Turn the HP Turbine Rotor and Stator Assembly
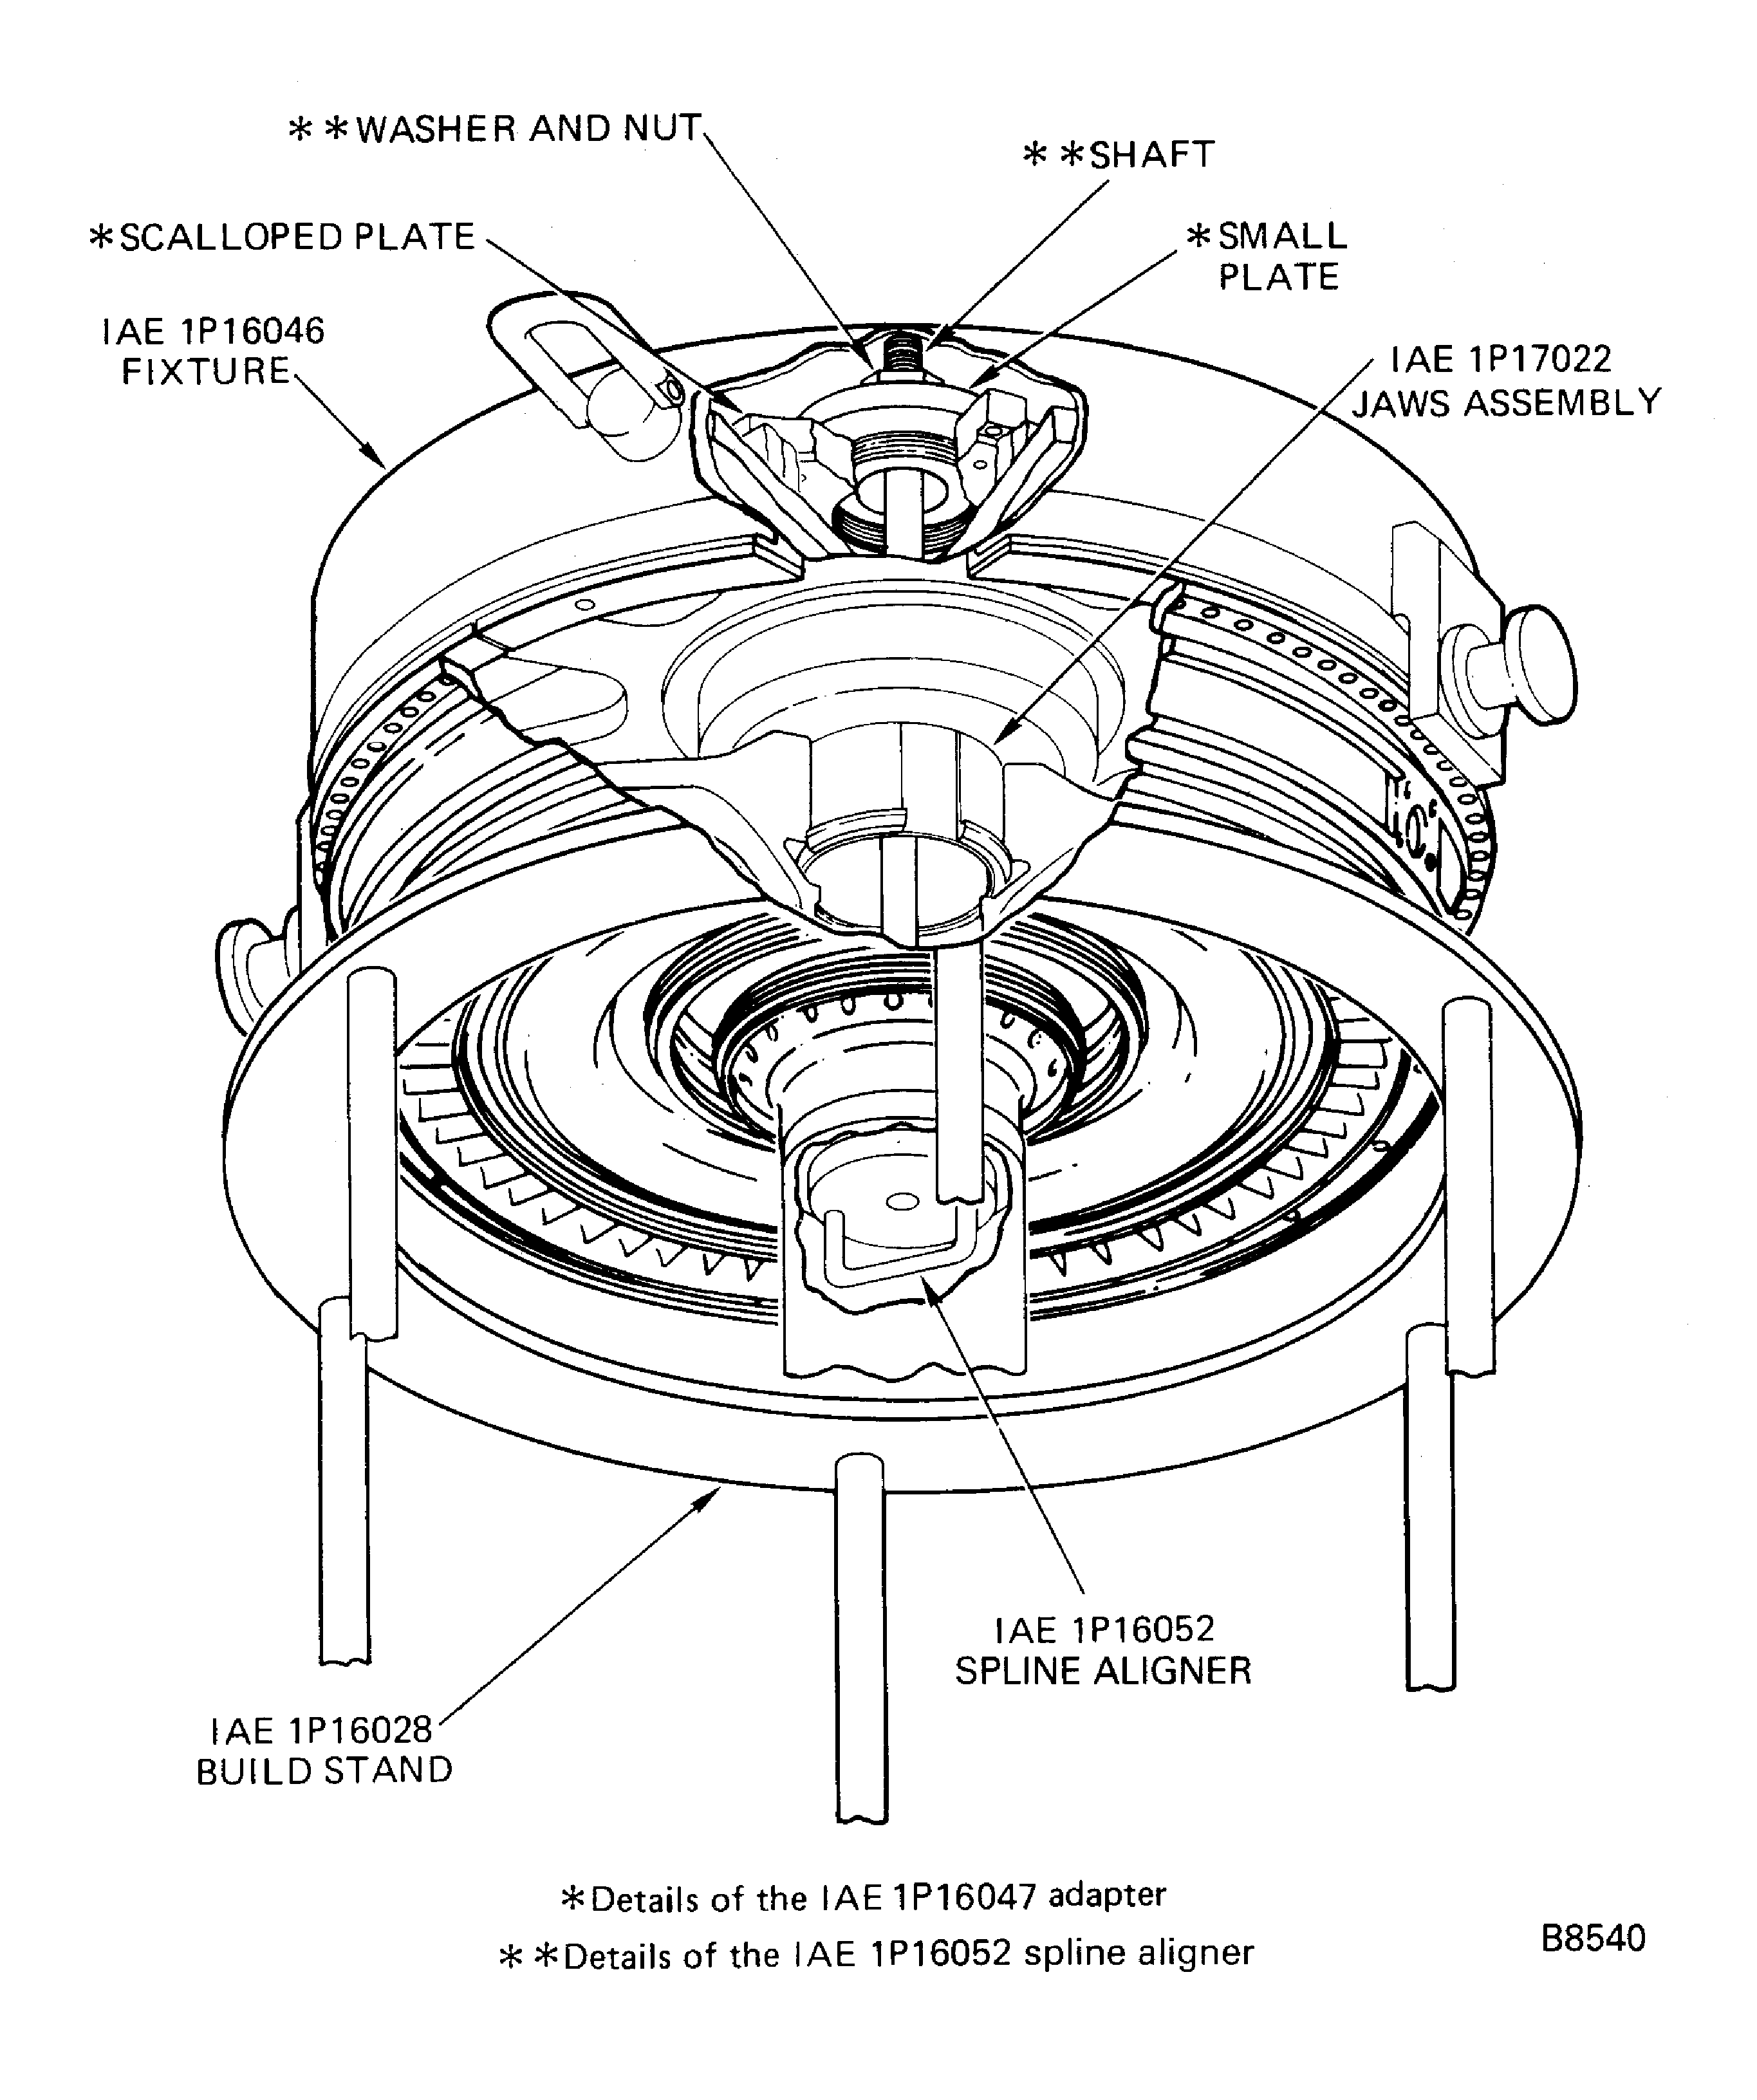
Figure: Turn the HP Turbine Rotor and Stator Assembly
Turn the HP Turbine Rotor and Stator Assembly
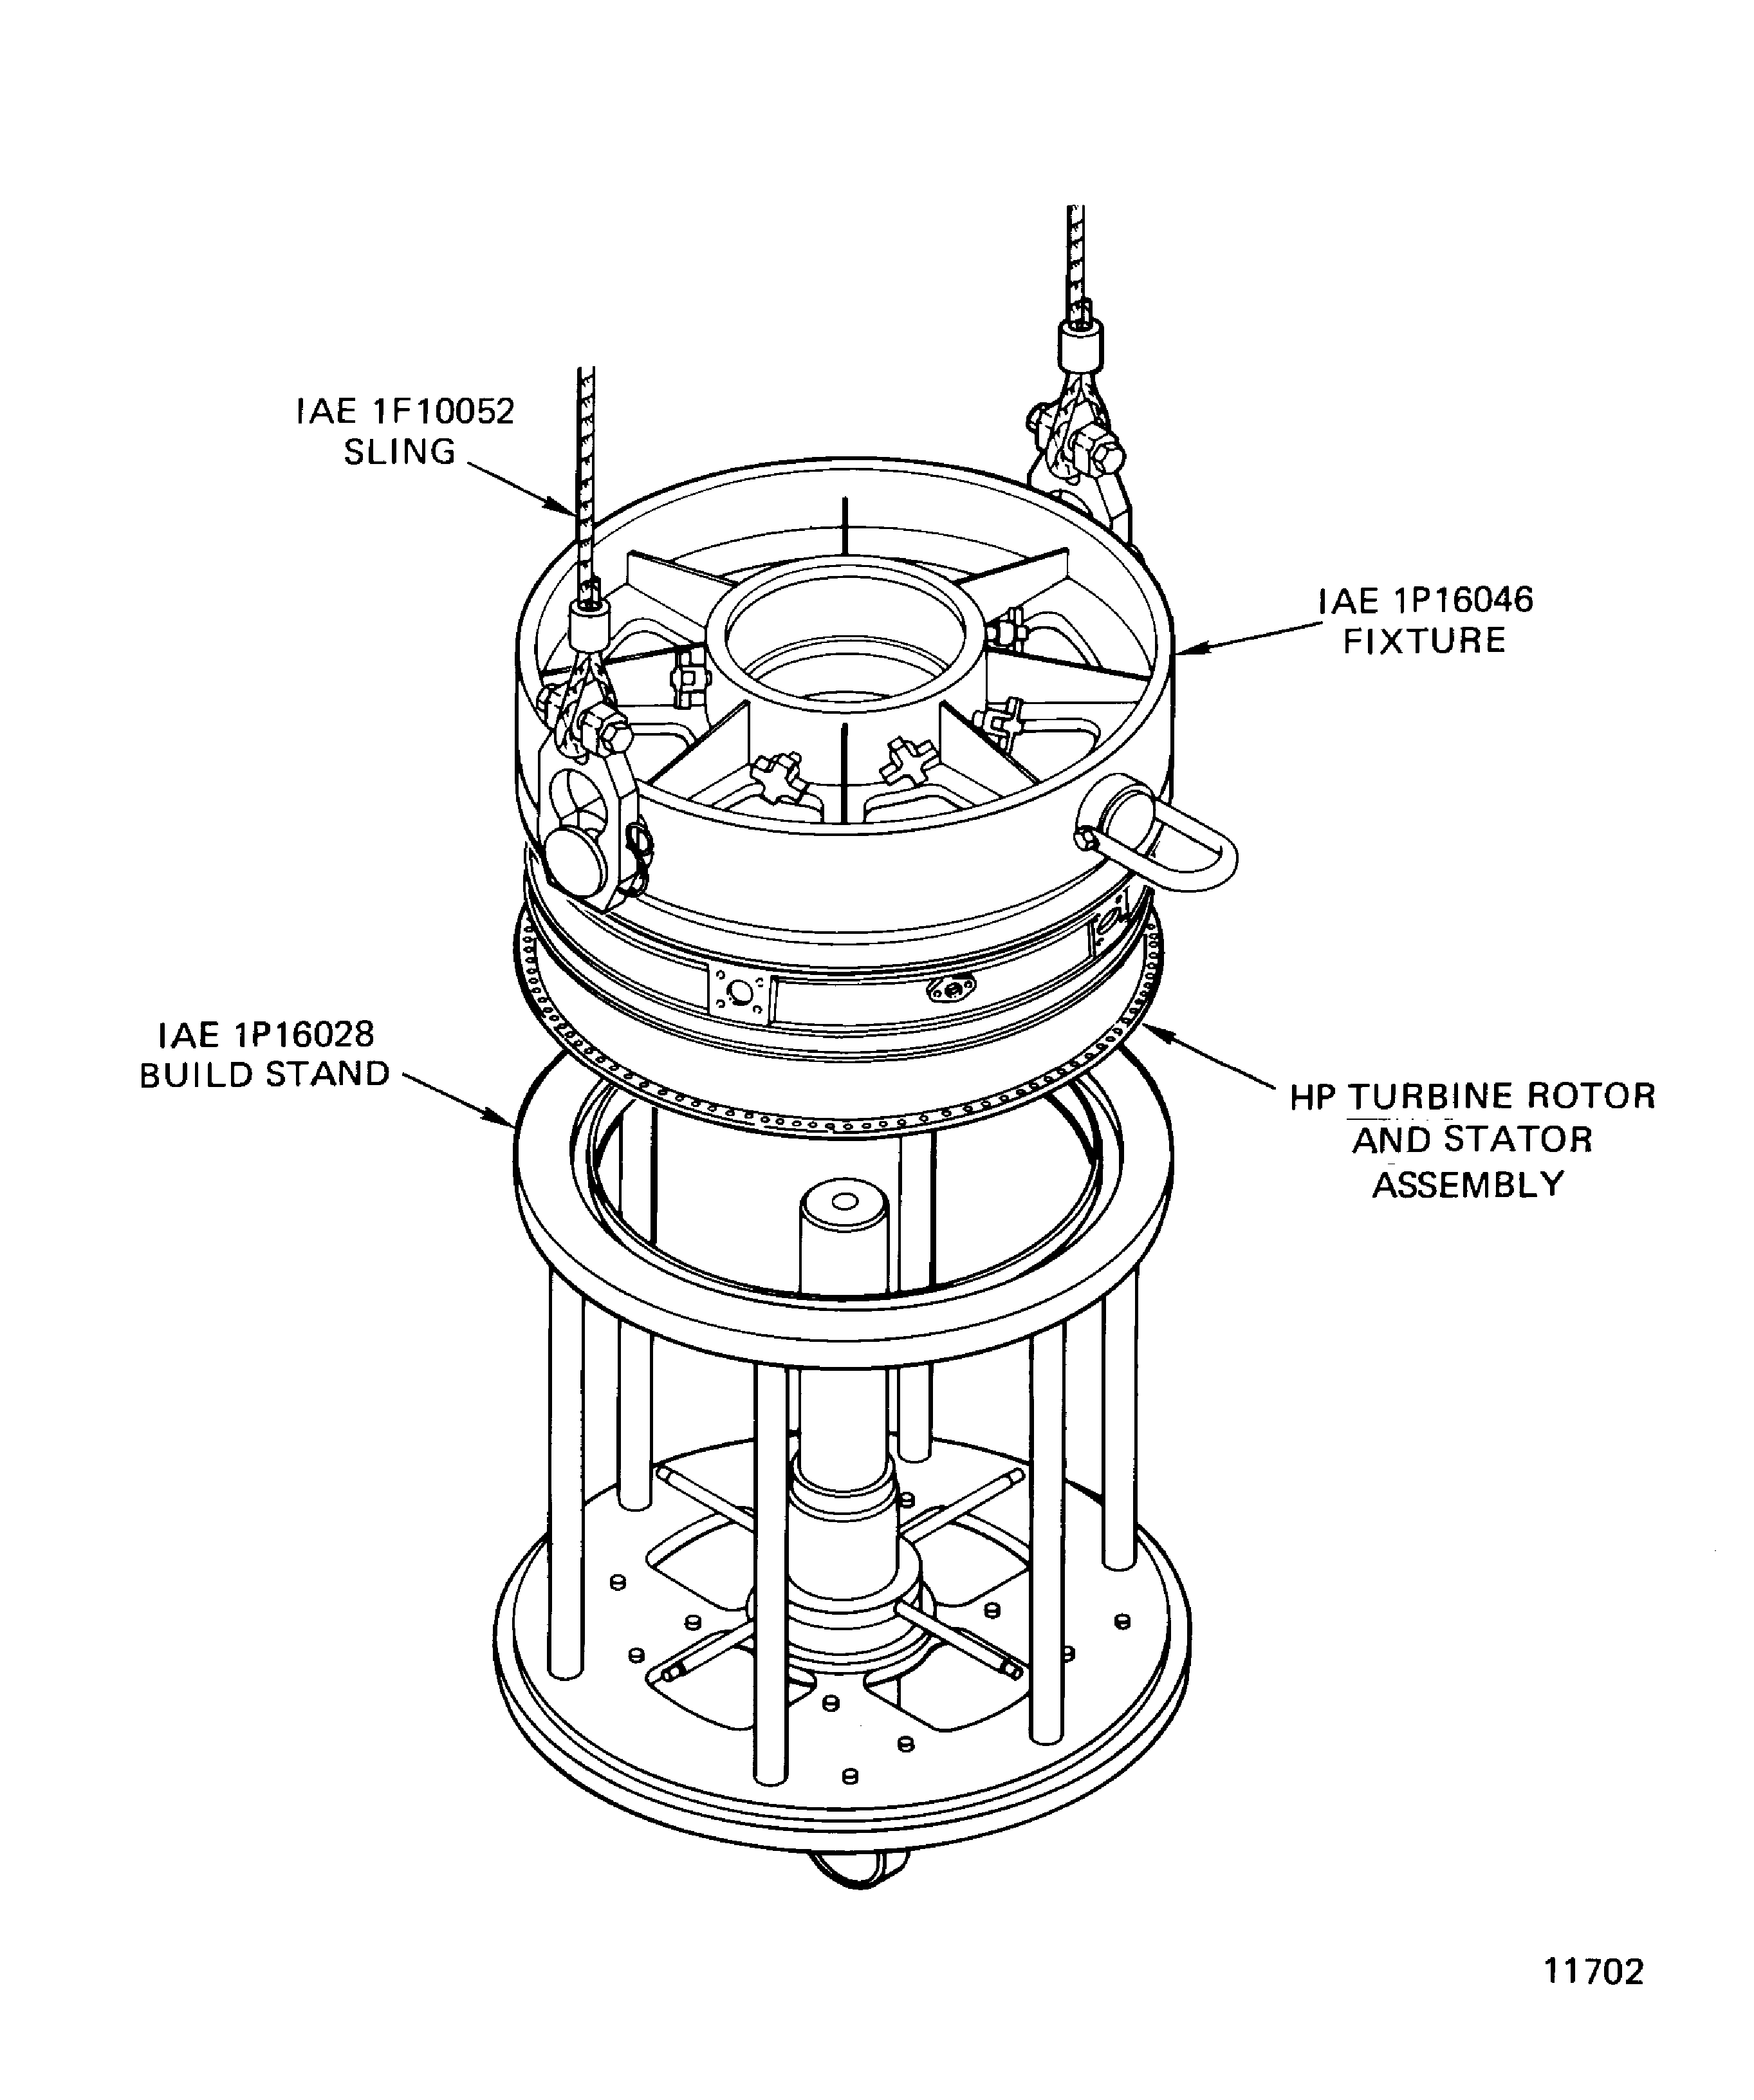
Figure: HP Turbine Rotor and Stator Assembly Clamp Installation
HP Turbine Rotor and Stator Assembly Clamp Installation
