Export Control
EAR Export Classification: Not subject to the EAR per 15 C.F.R. Chapter 1, Part 734.3(b)(3), except for the following Service Bulletins which are currently published as EAR Export Classification 9E991: SBE70-0992, SBE72-0483, SBE72-0580, SBE72-0588, SBE72-0640, SBE73-0209, SBE80-0024 and SBE80-0025.Copyright
© IAE International Aero Engines AG (2001, 2014 - 2021) The information contained in this document is the property of © IAE International Aero Engines AG and may not be copied or used for any purpose other than that for which it is supplied without the express written authority of © IAE International Aero Engines AG. (This does not preclude use by engine and aircraft operators for normal instructional, maintenance or overhaul purposes.).Applicability
All
Common Information
TASK 72-45-11-200-001-D00 HPT Stage 1 Hub - Examine, Inspection-001
General
This TASK gives the procedure for the inspection of the Stage 1 turbine hub.
Fig/Item numbers in parentheses in the procedure agree with those used in the IPC.
The policy that is necessary for inspection is given in SPM TASK 70-20-00-200-501.
All the parts must be cleaned before any part is examined. Refer to TASK 72-45-11-100-000 (CLEANING-000).
All parts must be visually examined for damage, corrosion and wear. Any defects that are not identified in the procedure must be referred to IAE.
The procedure for those parts which must have a crack test is given in Step. Do the test before the part is visually examined.
Do not discard any part until you are sure there are no repairs available. Refer to the instructions in Repair before a discarded part is used again or oversize parts are installed.
Parts which should be discarded can be held although no repair is available. The repair of a discarded part could be shown to be necessary at a later date.
All parts must be examined to make sure that all the repairs have been completed satisfactorily.
The practices and processes referred to in the procedure by the TASK numbers are in SPM.
References
Refer to SPM for data on these items.
Definitions of Damage, SPM TASK 70-02-02-350-501.
Record and Control of the Lives of Parts, SPM TASK 70-05-00-220-501.
Marking of Parts, SPM TASK 70-09-00-400-501.
Inspection of Parts, SPM TASK 70-20-00-200-501.
Some data on these items is contained in this TASK. For more data on these items refer to SPM.
Method of Testing for Crack Indications.
Chemical Processes.
Surface Protection.
Preliminary Requirements
Pre-Conditions
NONESupport Equipment
NONEConsumables, Materials and Expendables
NONESpares
NONESafety Requirements
NONEProcedure
Accept.
No soot or oil.
Do inspection of HPT for possible oil ignition event. Refer to TASK 72-45-00-200-801. Report all findings to IAE Technical Services.
Soot or oil.
Examine the Stage 1 HPT Hub for soot and oil.
SUBTASK 72-45-11-220-121 Examine the Stage 1 HPT Hub for Soot and Oil

CAUTION
MAKE SURE THAT YOU DO THIS INSPECTION BEFORE YOU CLEAN THE PART OR CLEANING PROCEDURE WILL REMOVE THE INDICATION OF SOOT AND OIL.Refer to Figure.
Do inspection of HPT for possible oil ignition event. Refer to TASK 72-45-00-200-801. Report all findings to IAE Technical Services.
Wear marks.
Examine the bore for wear at Location 18.
SUBTASK 72-45-11-220-111 Examine the Stage 1 HPT Hub (01-010) or (01-011) for Wear Marks on the Aft Side.
Refer to Figure.
Clean the Part. Refer to the TASK 72-45-11-100-000 (CLEANING-000).
NOTE
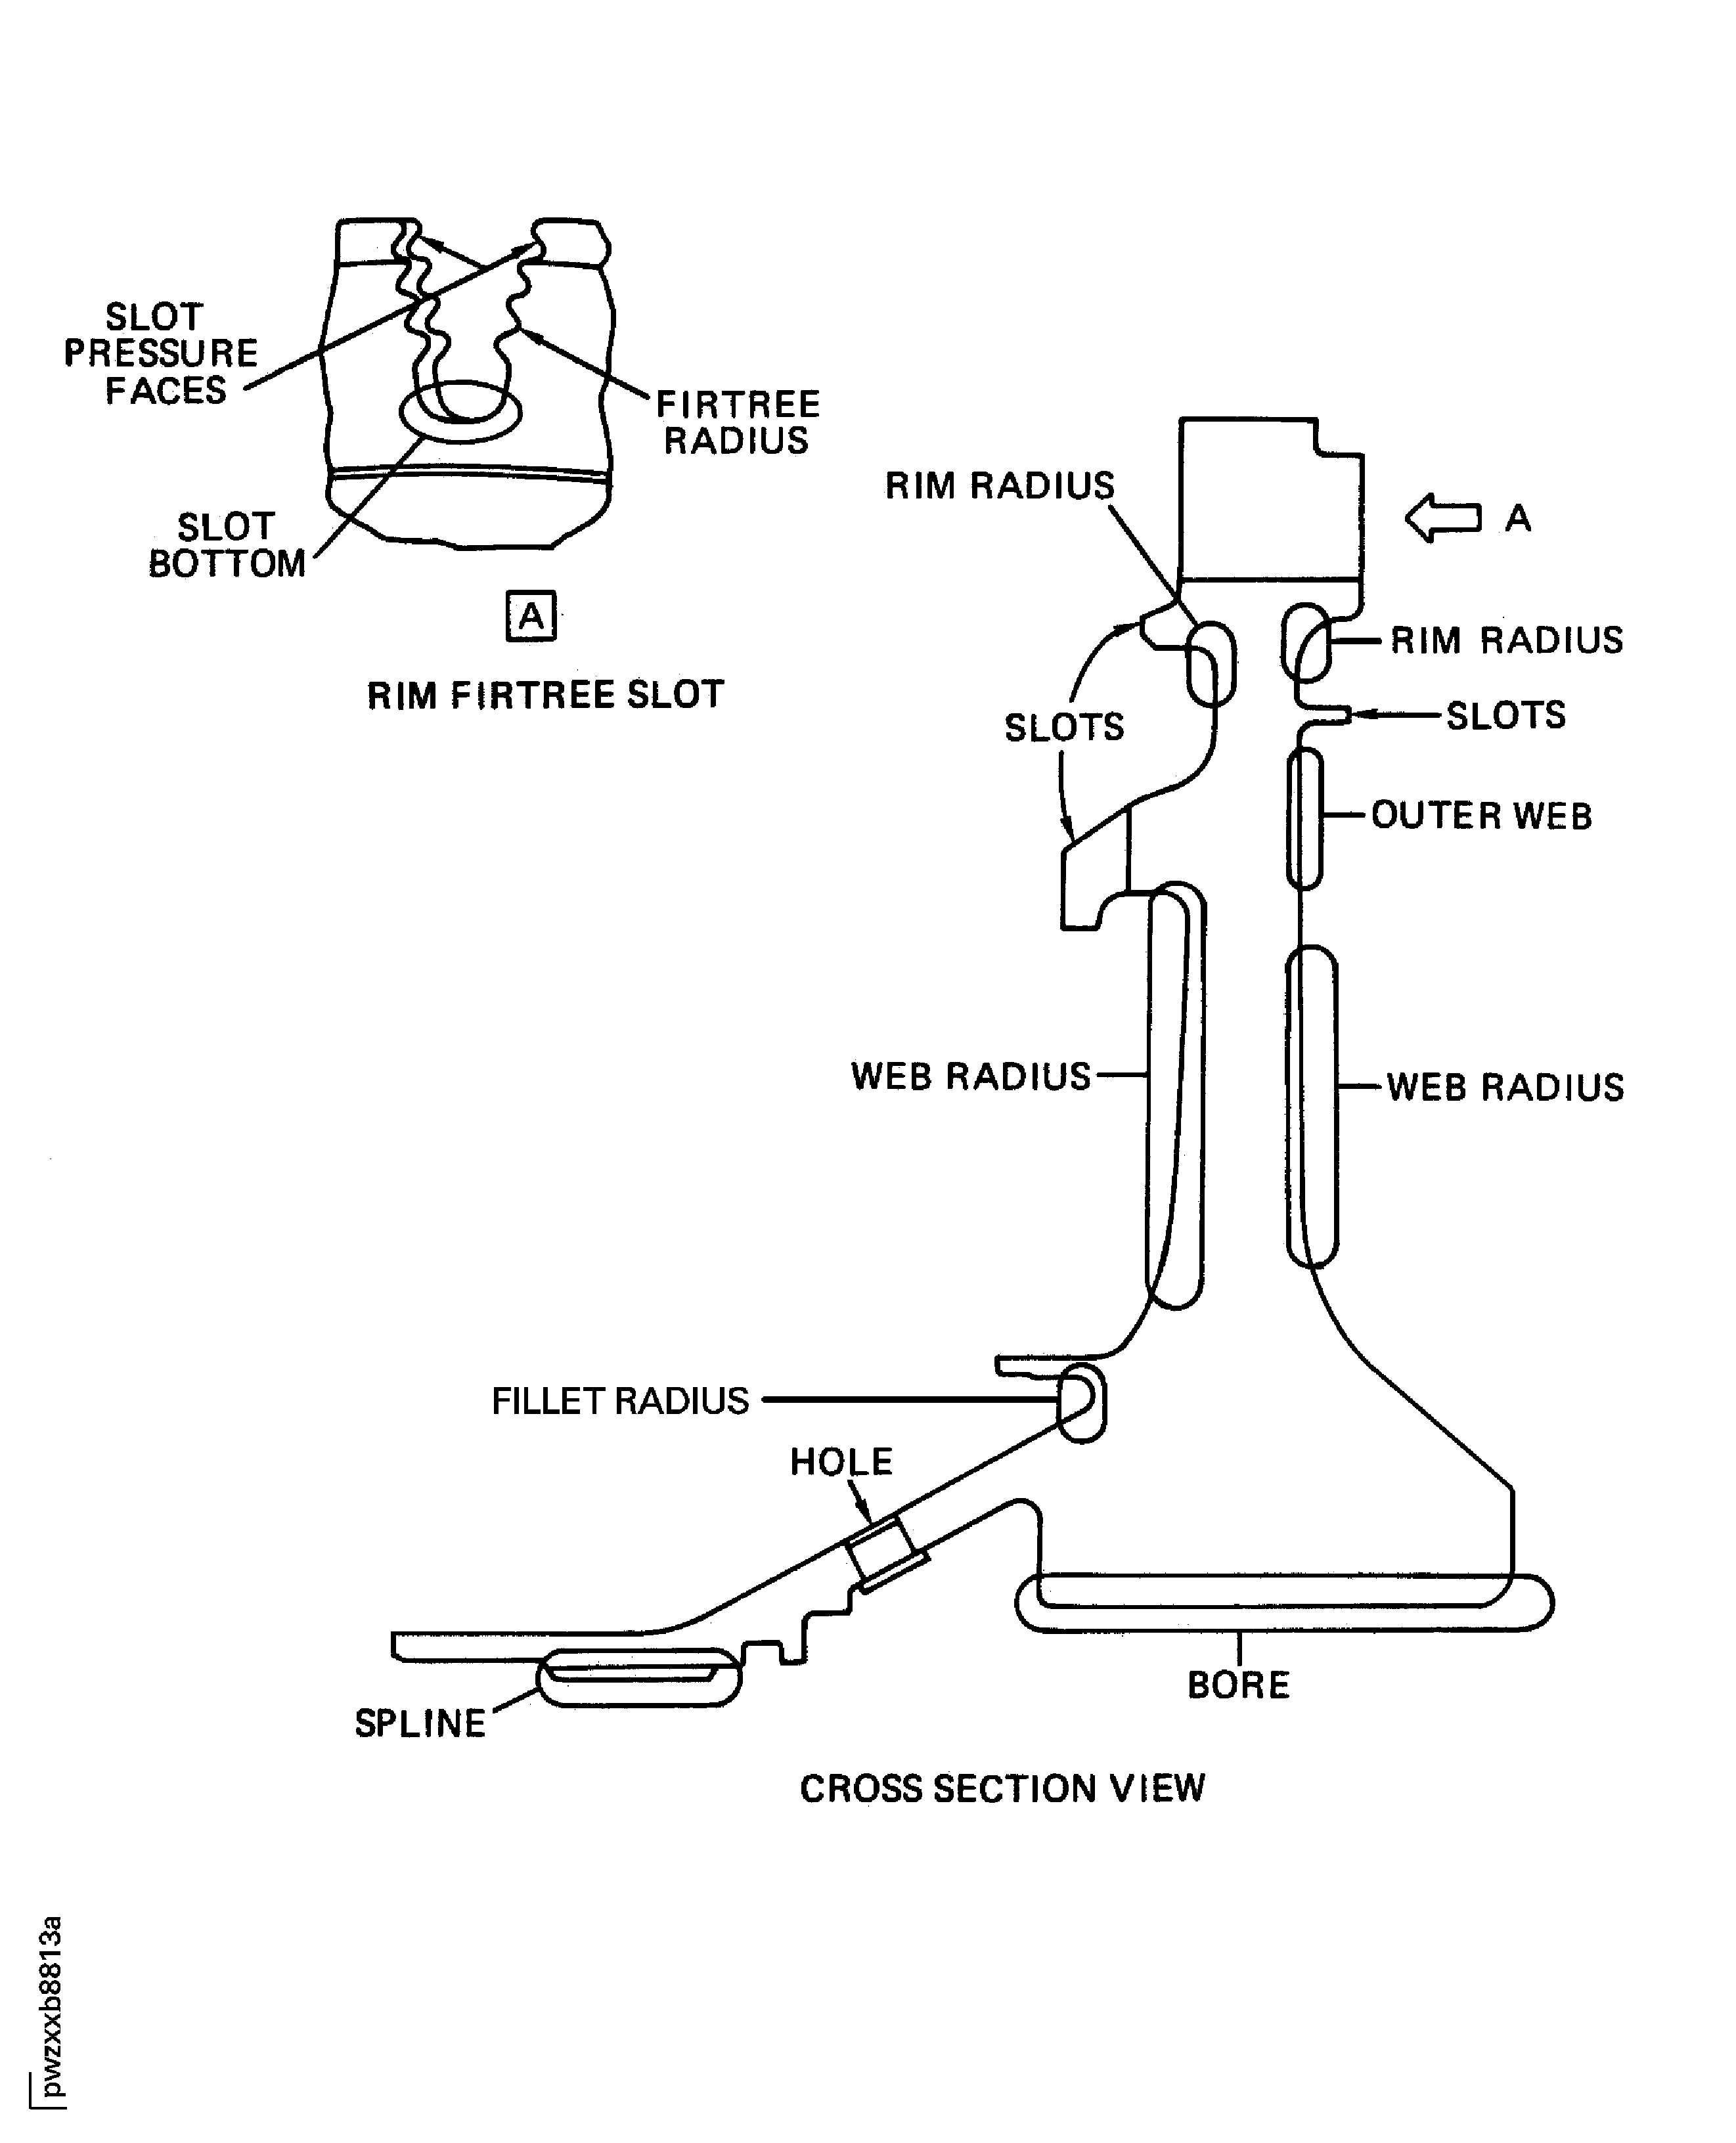
Make sure you check the important areas for cracks, when you inspect the hub. These areas are shown in Figure.
SUBTASK 72-45-11-230-055-001 Examine the Stage 1 Turbine Hub (01-011) for Cracks
Refer to Figure.
Refer to TASK 72-45-11-200-003 (INSPECTION-003).
Do a dimensional check of the stage 1 turbine hub blade slot pressure face contact surface.
SUBTASK 72-45-11-250-012 Examine the Stage 1 Turbine Hub (01-011) Blade Slot Pressure Face by Eddy Current Inspection
Refer to Figure.
Repair, VRS3184 TASK 72-45-11-300-001 (REPAIR-001).
Damage more than Step.
Examine the turbine hub for corrosion, dents, nicks and scratches on all the surfaces except blade slots.
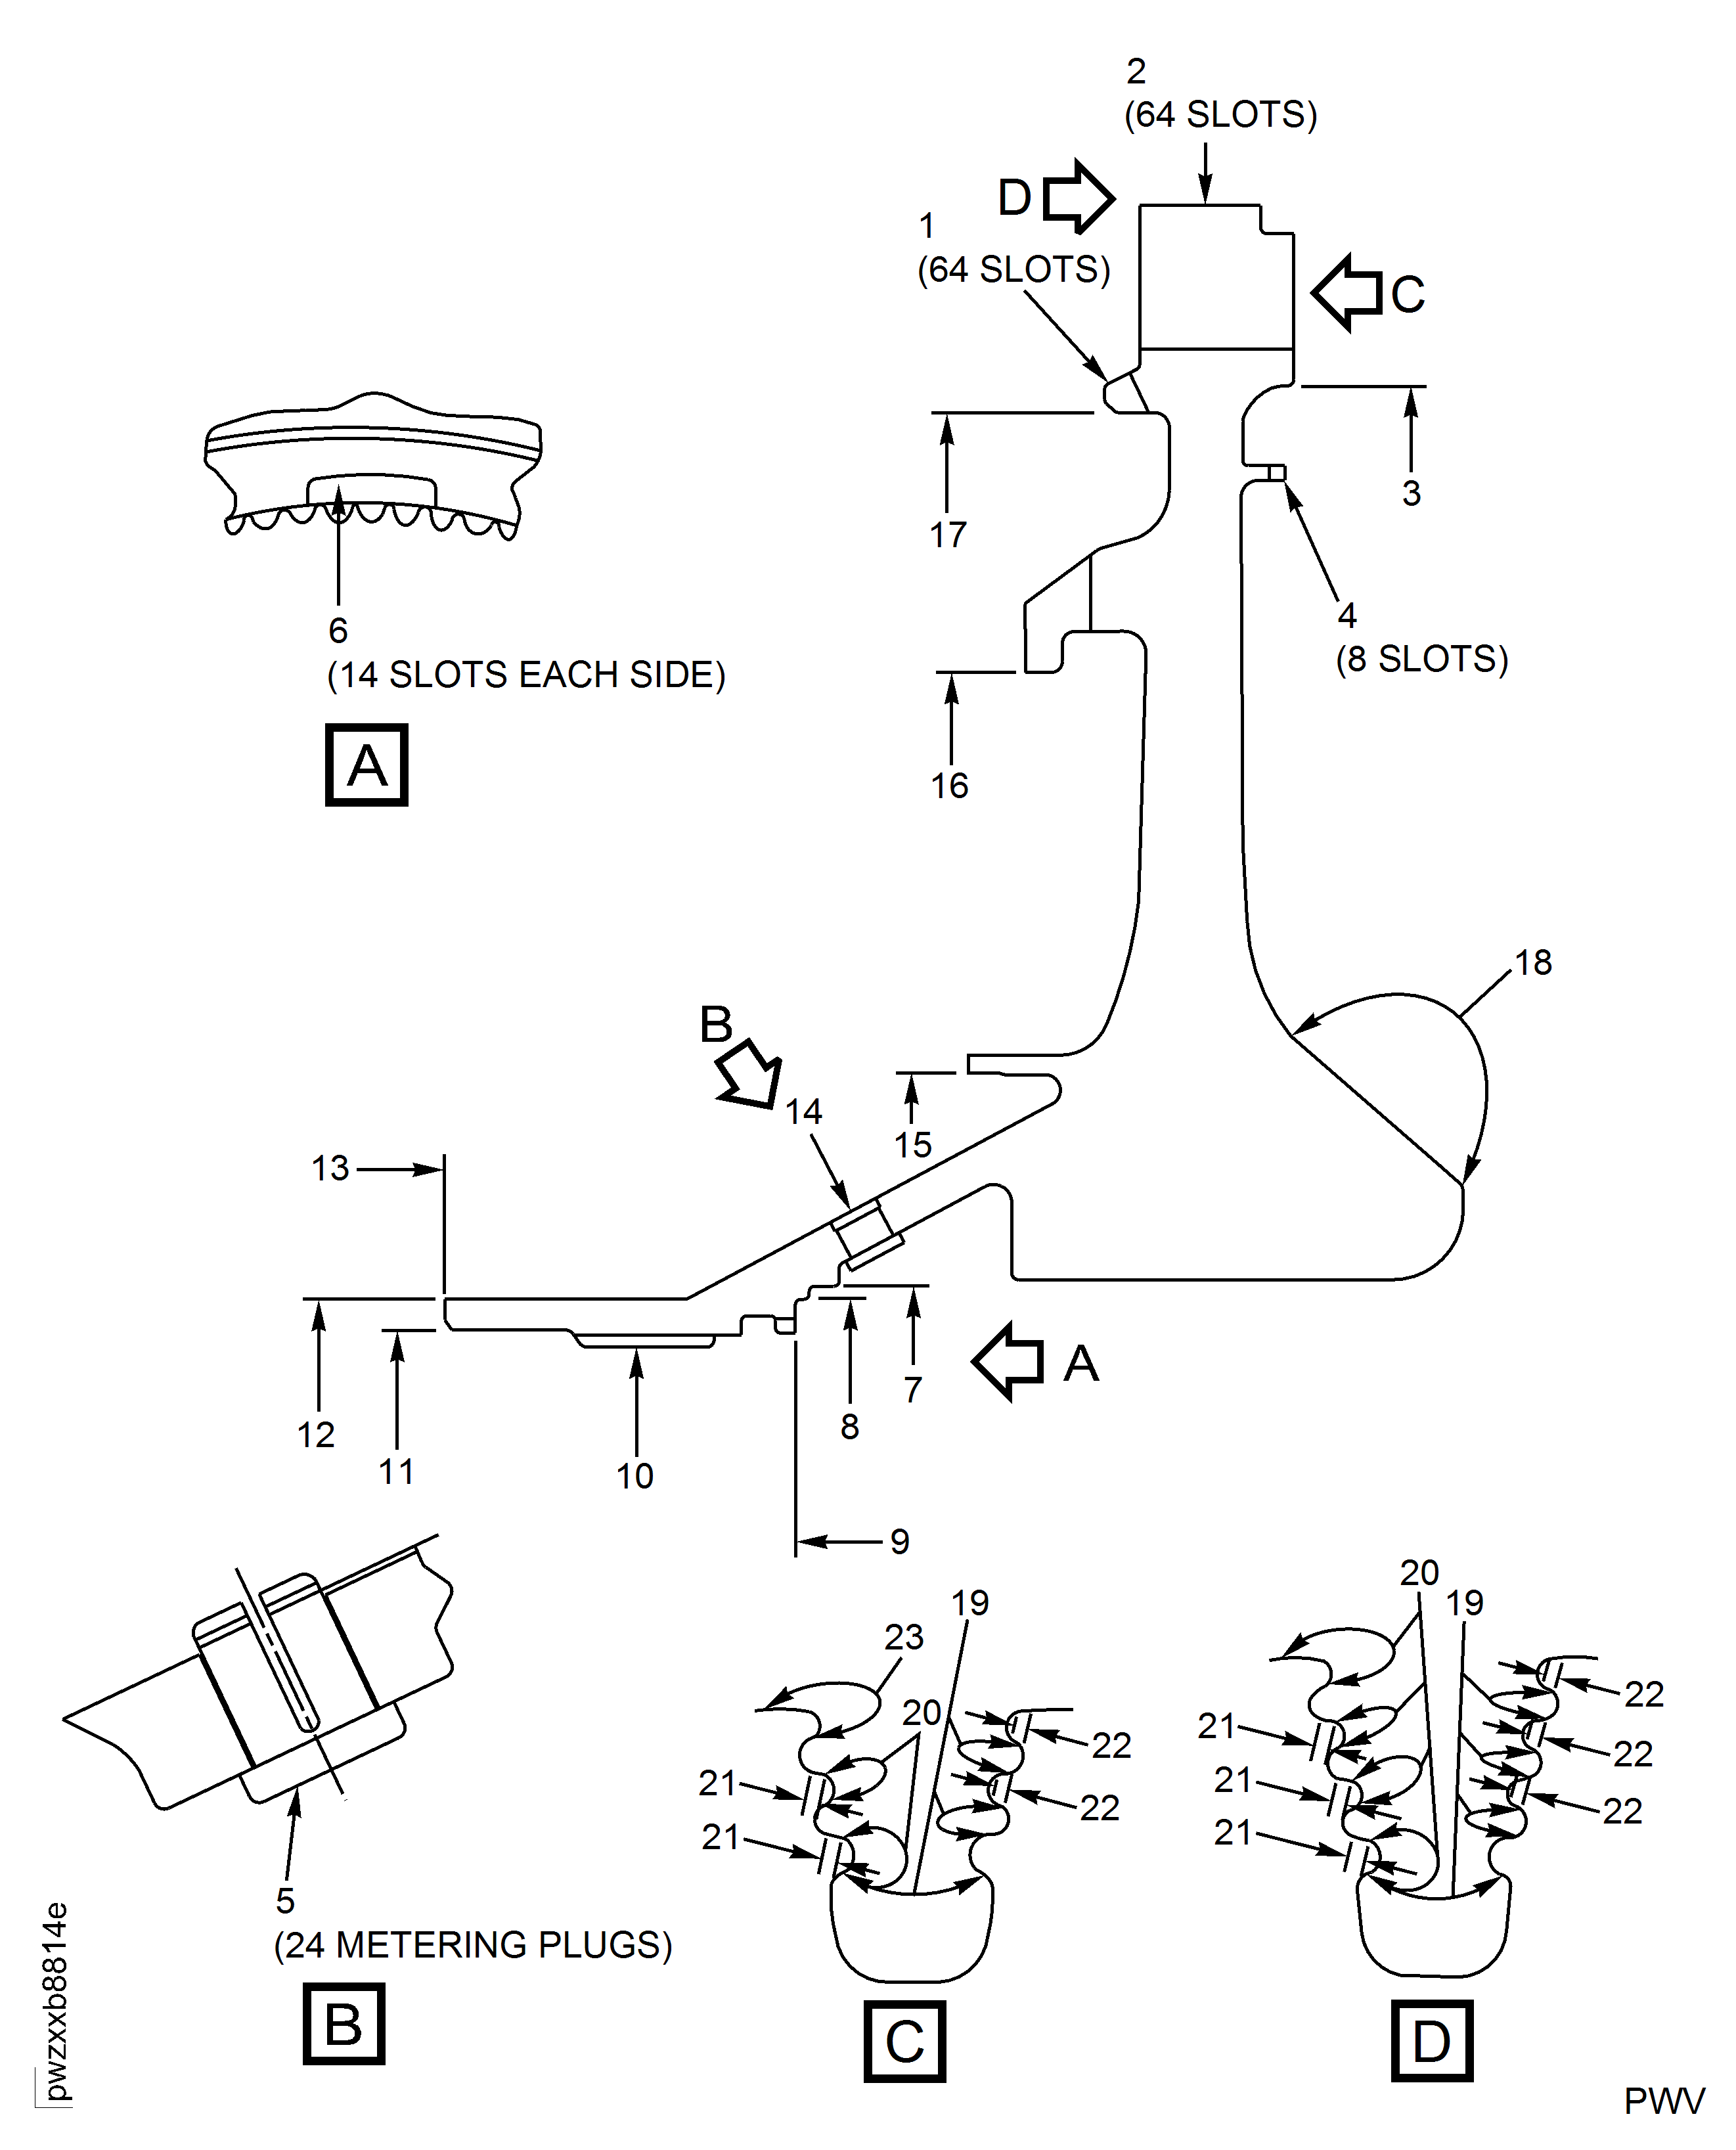
Damage up to 0.001 in. (0.025 mm) in depth is permitted in area 19 fillet radii and slot bottom. No blending permitted.
Damage up to 0.001 in. (0.025 mm) in depth is permitted in area 20. Blend up to 0.007 in. (0.18 mm) to remove surface damage. Refer to repair, VRS3184 TASK 72-45-11-300-001 (REPAIR-001).
Damage up to 0.003 in. (0.08 mm) in depth is permitted in area 21, with no raised material or sharp edges. No blending permitted.
Damage up to 0.003 in. (0.08 mm) in depth is permitted in area 22 pressure face, with no raised material or sharp edges. No blending permitted.
Damage up to 0.004 in. (0.10 mm) is acceptable without repair in area 23. Blend up to 0.010 in. (0.25 mm) to remove surface damage. Refer to repair, VRS3184 TASK 72-45-11-300-001 (REPAIR-001).
Corrosion, dents, nicks and scratches.
Tool marks are not permitted in area 19 fillet radii and slot bottom and area 22 pressure face. This does not include slot bottom mismatches. This does not Include fretting or contact wear. Refer to Tooling card IAE2P16631 for example of tool marks and example of slot bottom mismatches. If any of these unacceptable conditions are observed, remove hub from service and report the finding to IAE Customer Technical Service.
If tool mark cannot be confirmed, examine by Tooling card IAE2P16669. Sources listed below are approved to do this inspection.
Northeast Overhaul and Repair
40 New Park Drive
Berlin, CT 06037
USA
Or
Christchurch Engine Center
115 Orchard Road
Christchurch 8051
New Zealand
Tool marks up to 0.003 in. (0.08 mm) in area 20, 21 and 23 are permitted.
Inspect blade slots for tool marks.
Examine the turbine hub for corrosion, dents, nicks, scratches and tool marks in the blade slots.
SUBTASK 72-45-11-220-095 Examine the Stage 1 Turbine Hub (01-011) for Corrosion, Dents, Nicks, Scratches and Blade Slot Tool Marks
Refer to Figure.
Repair, VRS3184 TASK 72-45-11-300-001 (REPAIR-001).
Distorted, fretted and galled.
Examine the turbine hub for distorted, fretted and galled diameters at Locations 3, 7, 8, 11, 12, 15, 16 and 17.
SUBTASK 72-45-11-220-096 Examine the Stage 1 Turbine Hub (01-011) for Distorted, Fretted and Galled Diameters
Refer to Figure.
Repair, VRS3507 TASK 72-45-11-300-014 (REPAIR-014).
Other than Step.
Examine the turbine hub at Location 9, for dents, nicks, scratches, fretted, galled and wear on the axial stack surface.
Repair, VRS3509 TASK 72-45-11-300-016 (REPAIR-016).
Other than Step.
Examine the turbine hub at Location 13, for dents, nicks, scratches, fretted, galled and wear on the axial stack surface.
SUBTASK 72-45-11-220-097 Examine the Stage 1 Turbine Hub (01-011) for Dents, Nicks, Scratches, Fretted, Galled and Wear on the Axial Stack Surfaces
Refer to Figure.
Repair, VRS3184 TASK 72-45-11-300-001 (REPAIR-001).
Wear or damage more than Step.
Holes at Location 14.
Examine the turbine hub for dents, nicks, scratches and wear at the locations that follow.
SUBTASK 72-45-11-220-098 Examine the Stage 1 Turbine Hub (01-011) for Dents, Nicks, Scratches and Wear on all the Blade Slots, Seal Slots, Hub Lock Slots and Holes
Refer to Figure.
Repair, VRS3184 TASK 72-45-11-300-001 (REPAIR-001).
Fretted, galled, corrosion and wear.
Examine the turbine hub for fretted, galled, corrosion and wear on the spline at Location 10.
SUBTASK 72-45-11-220-099 Examine the Stage 1 Turbine Hub (01-011) for Fretted, Galled, Corrosion and Wear on the Spline
Refer to Figure.
Accept part for select fit only.
NOTE
This part can be used only if the mating part has a diameter that will result in fit of reference No. 1503. Refer to TASK 72-45-00-430-001-C00 (ASSEMBLY-001, CONFIG-003).
If the dimension is between 18.115 in. and 18.118 in. (460.121 mm and 460.197 mm) or between 18.122 in. and 18.124 in. (460.299 mm and 460.350 mm).
Repair, VRS3707 TASK 72-45-11-300-021 (REPAIR-021).
If the dimension is 18.102 in. to 18.117 in. (459.79 mm to 460.17 mm).
Repair, VRS3707 TASK 72-45-11-300-021 (REPAIR-021).
If the dimension is 18.115 in. to 18.1175 in. (460.121 mm to 460.185 mm) and does not meet fit limits.
Repair, VRS3605 TASK 72-45-11-300-019 (REPAIR-019).
For PN 2A1101, PN 2A1801, PN 2A2201 and PN 2A2801 only: If the dimension is more than 18.1225 in. (460.3115 mm) and does not meet select fit for limits.
Repair, VRS3840 TASK 72-45-11-300-023 (REPAIR-023).
For PN 2A5001 only: If the dimension is more than 18.120 in. (460.248 mm) and does not meet fit limits.
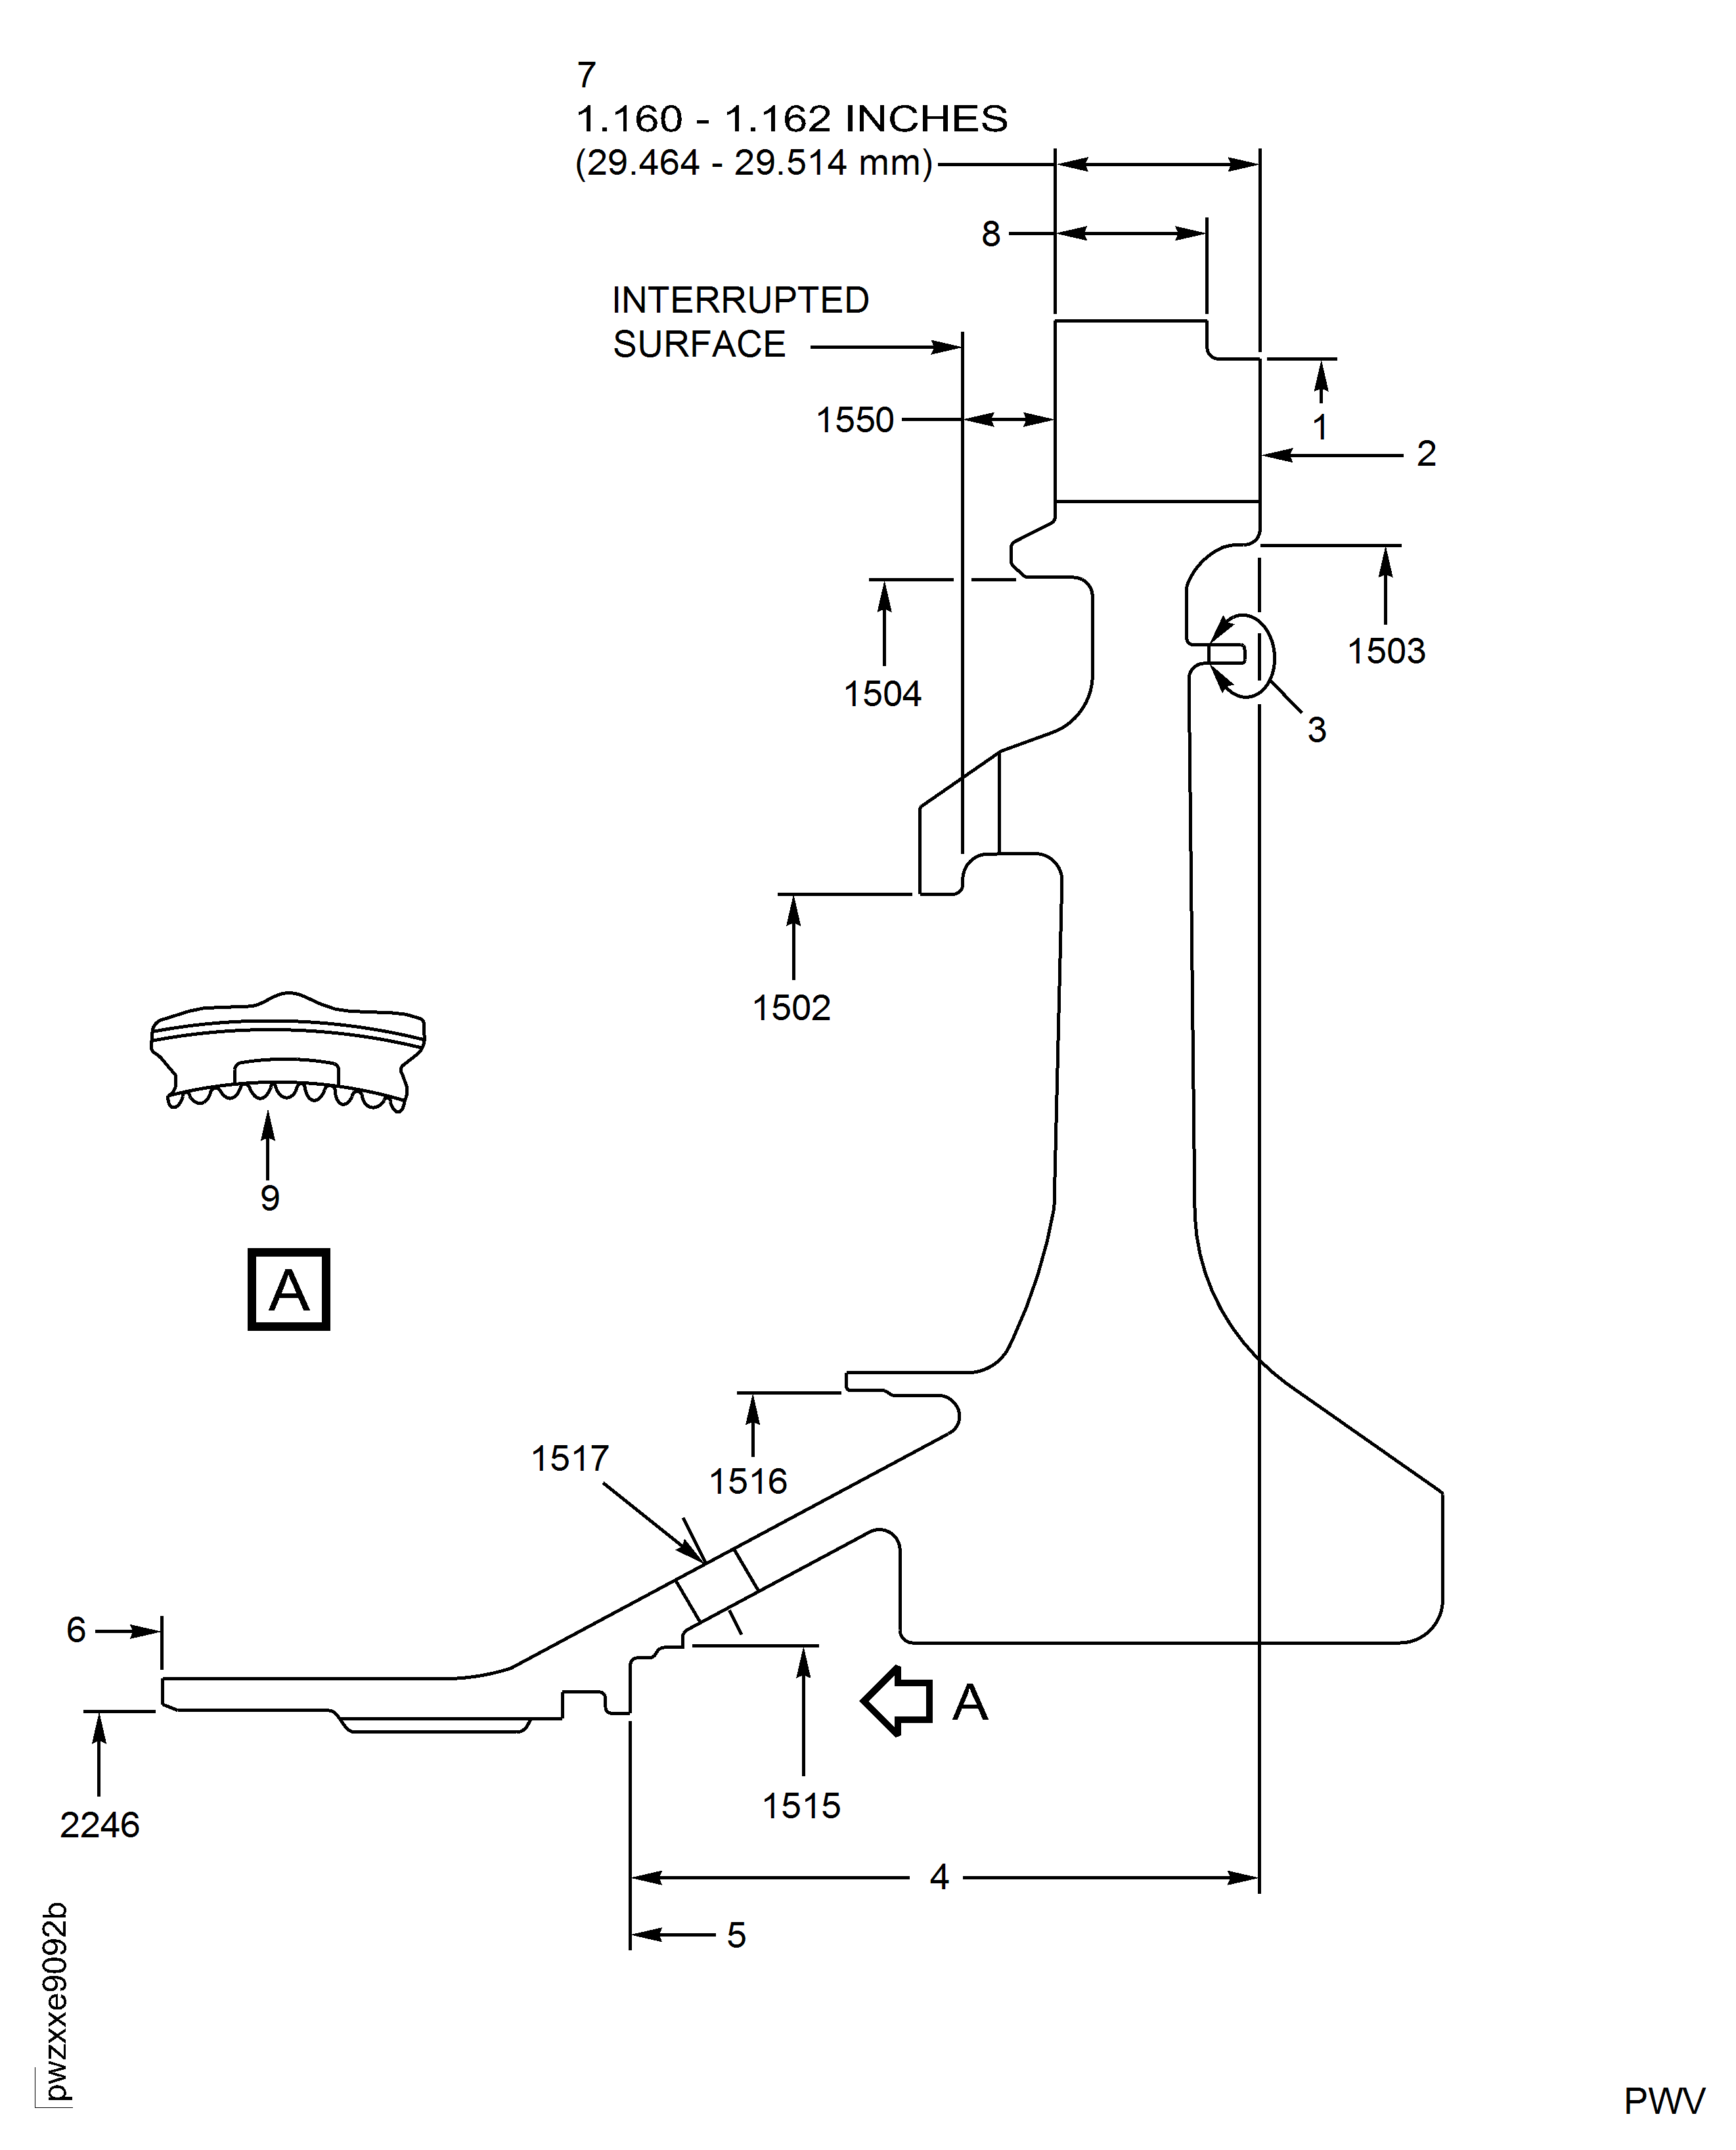
Examine the turbine hub at Location 1503, for the rear outer diameter.
Write down the dimension of the diameter.
NOTE
This part can be used only if the mating part has a diameter that will result in fit of reference No. 1504. Refer to TASK 72-45-10-440-001 (ASSEMBLY).
If the select fit dimension is between 17.758 in. and 17.768 in. (451.053 mm and 451.307 mm).
Other than Step.
Examine the turbine hub at Location 1504, for the front outer diameter.
To accept, the dimension must be in 14.1605 in. and 14.1615 in. (359.676 mm and 359.702 mm), it is necessary to take a measurement at eight locations and the tolerance among those measurements must be in 0.004 in. (0.102 mm) and the assembly fit at Location 1502 is 0.002 in. (0.051 mm) clearance to 0.006 in. (0.152 mm) interference.
If the dimension is between 14.1605 in. and 14.1667 in. (359.676 mm and 359.834 mm).
Examine the turbine hub at Location 1502, for the front outer diameter.
Accept part for select fit only. This part can be used only if the mating part has a diameter that will result in fit of reference No. 1516. Refer to TASK 72-45-10-440-001-C00 (ASSEMBLY-001) or TASK 72-45-10-440-001-D00 (ASSEMBLY-001).
Write down the dimension of the diameter.
For PN 2A2801 and 2A5001 only: If the dimension is between 8.6165 in. and 8.618 in. (218.859 and 218.897 mm) or between 8.624 in. and 8.627 in. (219.049 and 219.126 mm), it is necessary to take a diameter measurement at 8 locations and the tolerance among these measurements must be within 0.002 in. (0.051 mm).
Examine the turbine hub at Location 1516, for the front inner diameter.
Accept part for select fit only.
Write down the dimension of the diameter.
NOTE
You can use this part only, if the mating part has a diameter that will result in fit of reference No. 2246. Refer to TASK 72-00-45-420-001-B01 (INSTALLATION-001), TASK 72-00-45-420-001-B02 (INSTALLATION-002), or TASK 72-40-00-430-006-B00 (ASSEMBLY-006).
If the dimension is between 5.100 in. and 5.101 in. (129.54 mm and 129.565 mm) or between 5.102 in. and 5.1025 in. (129.591 mm and 129.603 mm).
Examine the turbine hub at Location 2246, for the front inner diameter.
Reject.
NOTE
Fit limits at Location 1517 are applicable for PNs 2A5001 and 2A2801 that has incorporated SB 72-0451. Post SBE 72-0511 hubs do not have metering plugs.
Other than Step.
Examine the turbine hub at Location 1515, for the heat shield diameter.
SUBTASK 72-45-11-220-101 Examine the Stage 1 Turbine Hub (01-011) Diameters
Refer to Figure.
Repair, VRS3507 TASK 72-45-11-300-014 (REPAIR-014) or VRS3509 TASK 72-45-11-300-016 (REPAIR-016).
Other than Step.
Other than Step, examine the surfaces at Location 5 and 6.
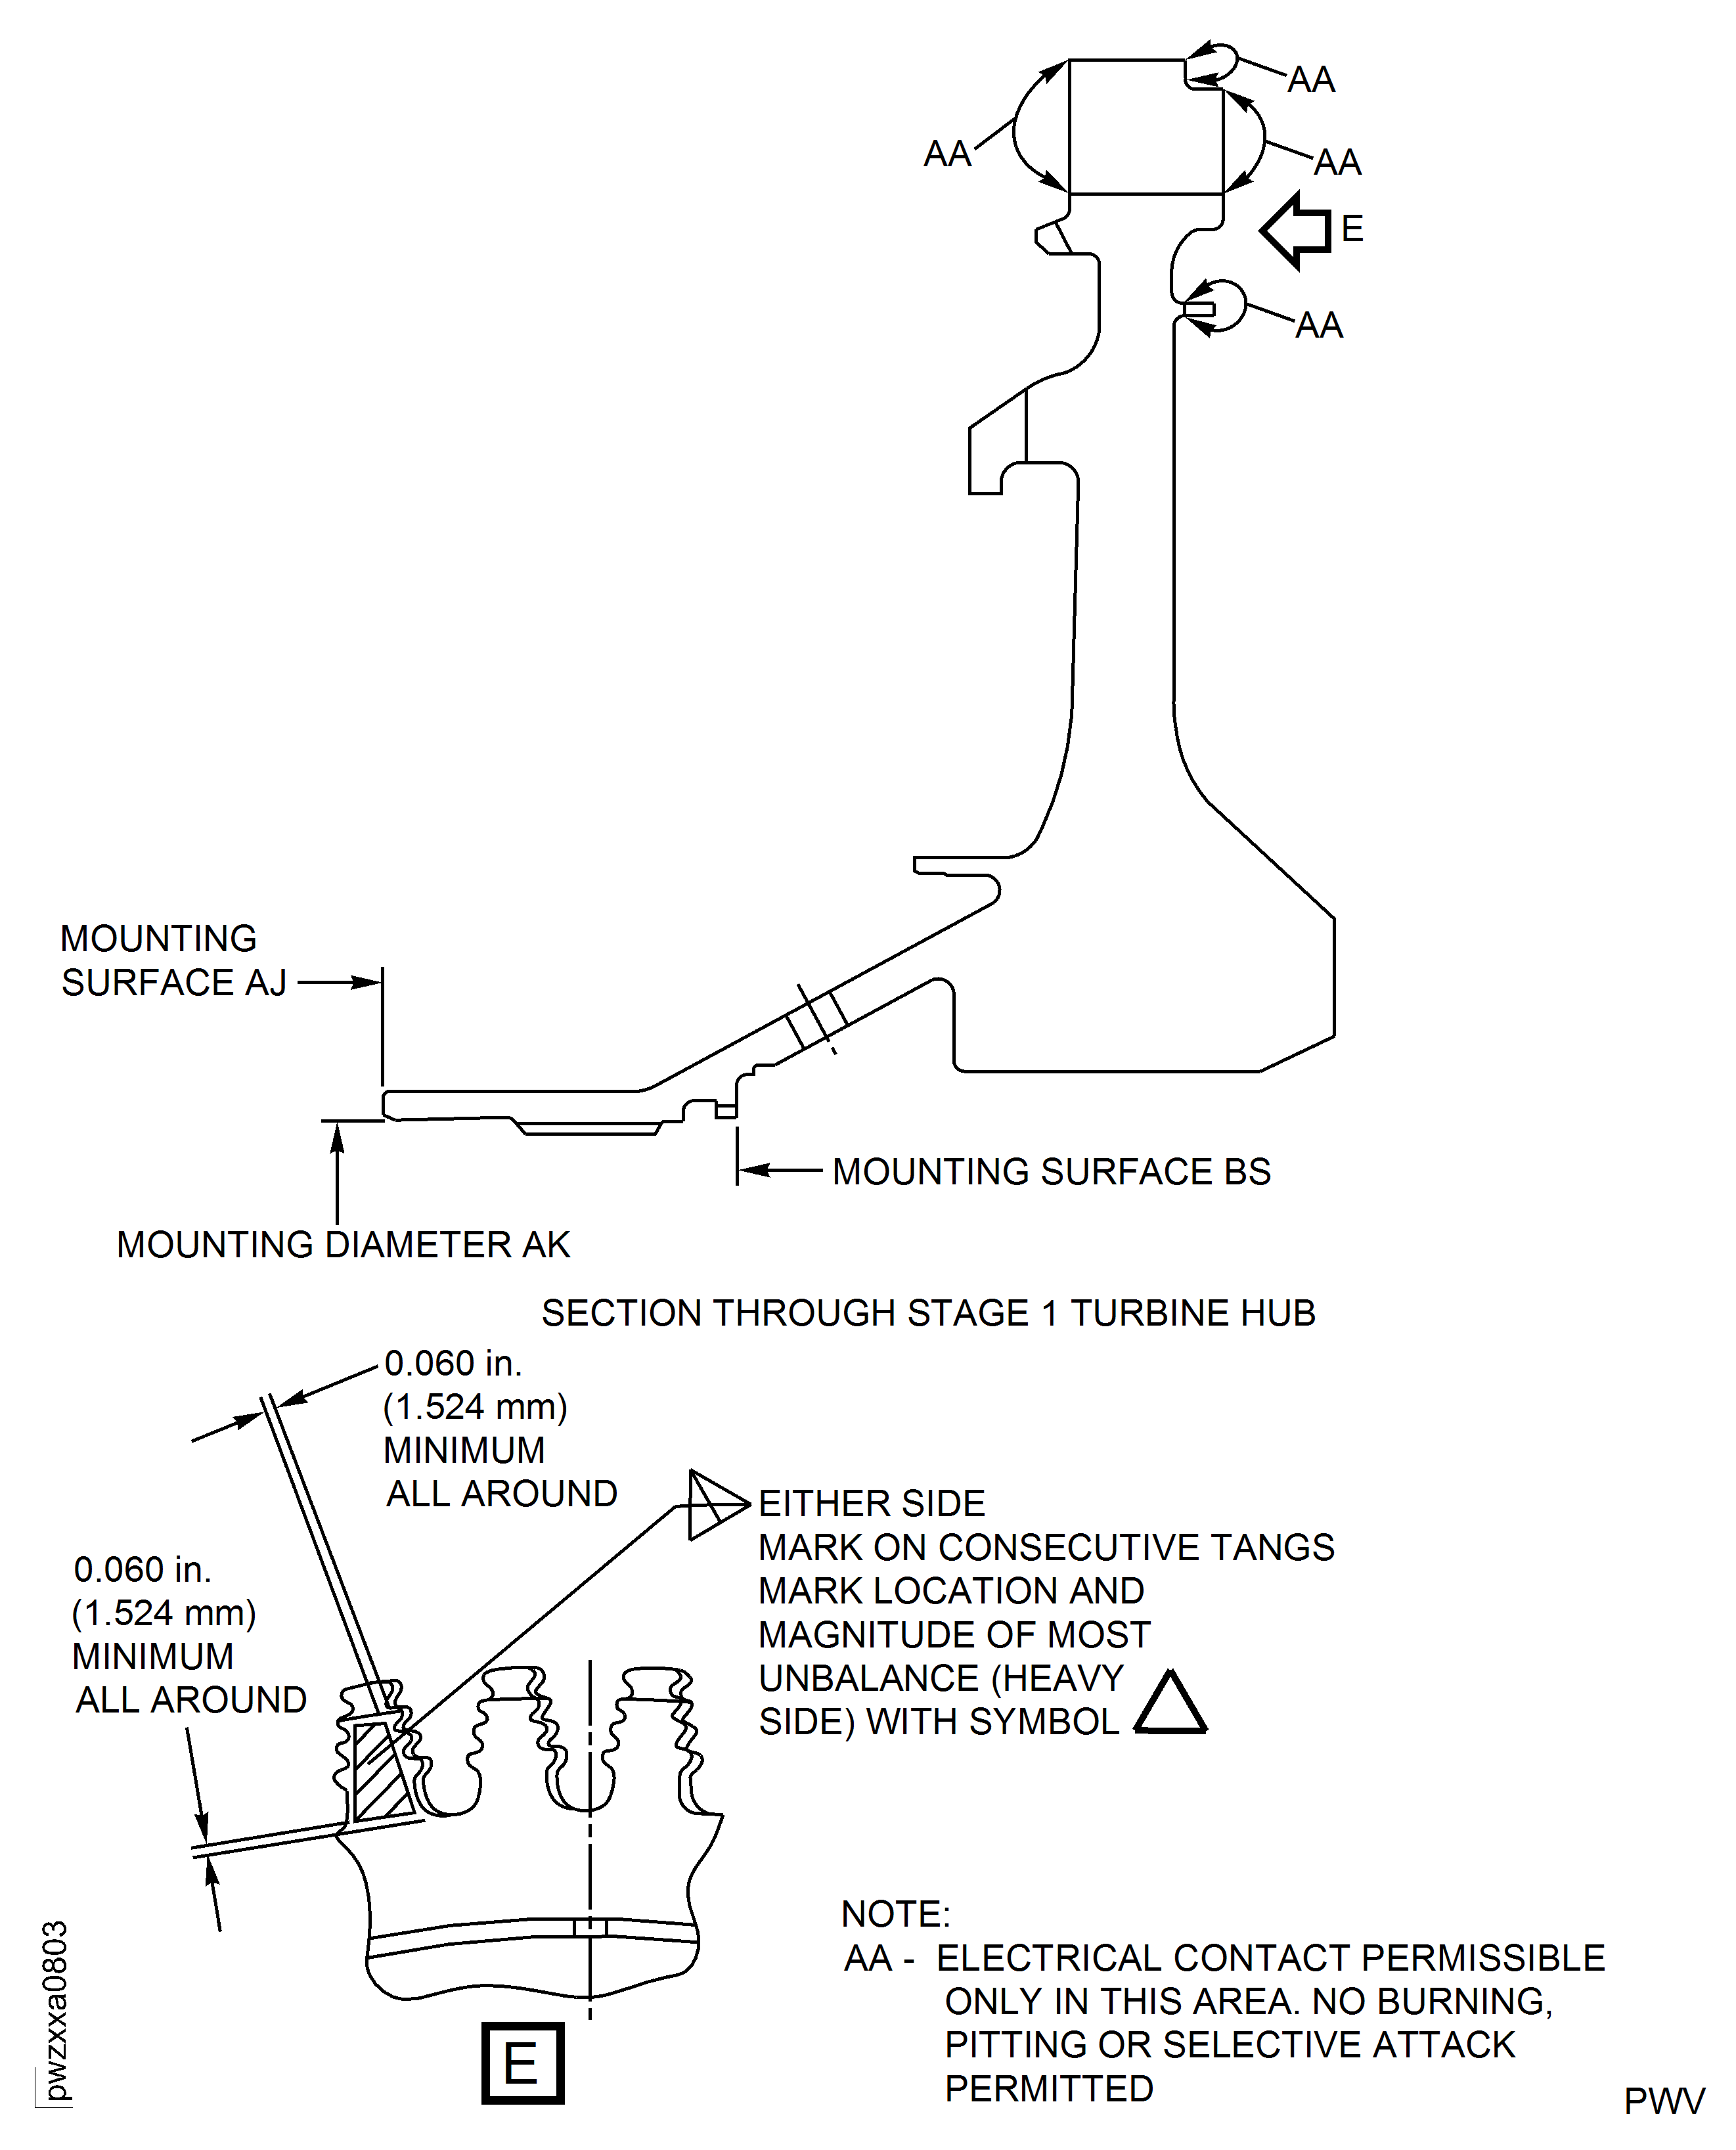
Make a mark on the turbine hub at Location 2, refer to SPM TASK 70-09-00-400-501. Electrical contact is only permitted at Location 3.
If Step is accepted, mark the turbine hub at Location 2 with the new axial dimension written in Step, followed with the letter A.
Examine the turbine hub for the axial length dimension.
SUBTASK 72-45-11-220-103 Examine the Stage 1 Turbine Hub (01-011) for Axial Length

CAUTION
USE ONLY THE SPECIFIED PIN DIAMETER. INCORRECT PIN DIAMETER WILL CAUSE AN UNSATISFACTORY MEASUREMENT.Refer to Figure.
NOTE
The length of the pins cannot extend more than the distance of the worn area. If the pins extend into an area that is not worn, the measurement is unsatisfactory.More than Step.
Examine the turbine hub for the spline tooth wear at Location 9. Use two pins 0.090 in. (2.286 mm) in diameter.
SUBTASK 72-45-11-220-104 Examine the Stage 1 Turbine Hub (01-011) for the Spline Dimension
Refer to Figure.
Mark the turbine hub by SPM TASK 70-09-00-400-501 at Location 2. The electrical contact is only permitted at Location 3.
Mark the new cycle time of the part on the turbine hub. Refer to SPM TASK 70-05-00-220-501.
SUBTASK 72-45-11-220-105 Examine the Stage 1 Turbine Hub (01-011) for the Cycle Time of the Part
Refer to Figure.
Accept.
If the dimension is between 1.159 in. and 1.160 in. (29.438 mm and 29.464 mm) and the final assemble fit at Location 1552 is in limits as given in Subtask 72-45-10-220-106 or Subtask 72-45-10-220-069 of TASK 72-45-10-440-001-D00 (ASSEMBLY-001), and that dimensions in TASK 72-45-12-200-001-D00, Location 3 are from 0.0115 in. to 0.0155 in. (0.2921 mm to 0.3937 mm).
Do a dimensional inspection to examine the hub width dimension at Location 7.
Accept.
If the dimension is between 0.883 in. and 0.884 in. (22.428 mm and 22.453 mm) and the final assemble fit at Location 1552 is in limits as given in Subtask 72-45-10-220-106 or Subtask 72-45-10-220-069 of TASK 72-45-10-440-001-D00 (ASSEMBLY-001), and that dimensions in TASK 72-45-12-200-001-D00, Location 3 are from 0.0115 in. to 0.0155 in. (0.2921 mm to 0.3937 mm).
Do a dimensional inspection at 8 locations equal distance apart to examine the hub width dimension at Location 8.
SUBTASK 72-45-11-220-113 Examine the Stage 1 Turbine Hub (01-011) for Hub Width Dimensions
Refer to Figure.
Examine the turbine hub for the balancing mark.
NOTE
Do Step, if balancing mark on the part is not available.Refer to Figure.
Install the Balance Fixture on a Vertical Balance Machine. Use appropriate fixture.
Install the Stage 1 Turbine Hub into the Fixture. Use appropriate fixture.
Constraint contact permitted only on Diameter AK and Surfaces AJ and BS. Use appropriate fixture.
Do a check for balance machine calibration.
Turn the Stage 1 Turbine Hub at 900 rpm.
Mark location and magnitude of the most heavy unbalance (heavy side) with the symbol on consecutive tangs. Refer to SPM TASK 70-09-00-400-501, Procedures to Make Permanent Identification And Location Marks. Use deep electrolytic etch method.
Balance the Stage 1 Turbine Hub.
SUBTASK 72-45-11-220-123 Examine the Stage 1 Turbine Hub (01-011) for the Balancing Mark
Figure: Stage 1 Turbine Hub Important FPI Inspection Locations
Stage 1 Turbine Hub Important FPI Inspection Locations

Figure: Stage 1 Turbine Hub Inspection Locations
Stage 1 Turbine Hub Inspection Locations

Figure: Stage 1 Turbine Hub Inspection Locations
Stage 1 Turbine Hub Inspection Locations

Figure: Balance And Mark The Stage 1 Turbine Hub
Balance And Mark The Stage 1 Turbine Hub

