Export Control
EAR Export Classification: Not subject to the EAR per 15 C.F.R. Chapter 1, Part 734.3(b)(3), except for the following Service Bulletins which are currently published as EAR Export Classification 9E991: SBE70-0992, SBE72-0483, SBE72-0580, SBE72-0588, SBE72-0640, SBE73-0209, SBE80-0024 and SBE80-0025.Copyright
© IAE International Aero Engines AG (2001, 2014 - 2021) The information contained in this document is the property of © IAE International Aero Engines AG and may not be copied or used for any purpose other than that for which it is supplied without the express written authority of © IAE International Aero Engines AG. (This does not preclude use by engine and aircraft operators for normal instructional, maintenance or overhaul purposes.).Applicability
V2500-A5
Common Information
TASK 72-40-00-430-006-B00 HP System Module - Install The HPT Assembly (Vertical) - Method 2, Assembly-006
General
Fig/item numbers in parentheses in the procedure agree with those used in the IPC. Only the primary Fig/item numbers are used. For the service bulletin alpha variants refer to the IPC.
For all parts identified in a different Chapter/Section/Subject, the applicable Chapter/Section/Subject comes before the Fig/item number.
For standard torque data and procedures, refer to SPM TASK 70-41-00-400-501 and SPM TASK 70-41-02-400-501.
Special torque data and assembly tolerances are included in this procedure.
Lubricate all threads and abutment faces of nuts and bolts with CoMat 10-077 APPROVED ENGINE OILS, unless other lubricants are referred to in the procedure.
To identify, lubricate and install seal rings, refer to SPM TASK 70-44-01-400-501.
The number for each radial location must be identified in a clockwise direction. Use CoMat 06-153 FELT TIP MARKER, RAPID DRYING, CoMat 06-153 FELT TIP MARKER, RAPID DRYING or CoMat 06-158 MARKER, EXTRA FINE POINT(BLACK). These start at the engine top position when you look from the rear of the engine, unless stated differently in the procedure. Refer to SPM TASK 70-09-00-400-501.
Transportation covers/blanks must be removed immediately before the installation of the components.
NOTE
NOTE
NOTE
Preliminary Requirements
Pre-Conditions
NONESupport Equipment
| Name | Manufacturer | Part Number / Identification | Quantity | Remark |
|---|---|---|---|---|
| IAE 1F10015 Hydraulic wrench | 0AM53 | IAE 1F10015 | 1 | (alternative to IAE 1F10016) |
| IAE 1F10016 Mechanical wrench | 0AM53 | IAE 1F10016 | 1 | (alternative to IAE 1F10015) |
| IAE 1F10026 Hydraulic hand pump | 0AM53 | IAE 1F10026 | 1 | |
| IAE 1F10052 Two cables sling | 0AM53 | IAE 1F10052 | 1 | |
| IAE 6F10027 Heater control unit | 0AM53 | IAE 6F10027 | 1 | |
| IAE 1P16011 Wrench | 0AM53 | IAE 1P16011 | 1 | |
| IAE 1P16040 Heater | 0AM53 | IAE 1P16040 | 1 | |
| IAE 1P16046 Removal/Installation fixture | 0AM53 | IAE 1P16046 | 1 | |
| IAE 1P16060 Protective cover | 0AM53 | IAE 1P16060 | 1 | (alternative to IAE 1P17758) |
| IAE 1P16123 Drift | 0AM53 | IAE 1P16123 | 1 | (superseded by IAE 1P16470) |
| IAE 1P16272 Adapter | 0AM53 | IAE 1P16272 | 1 | |
| IAE 1P16284 Hand wrench | 0AM53 | IAE 1P16284 | 1 | |
| IAE 1P16341 Torque adapter | 0AM53 | IAE 1P16341 | 1 | |
| IAE 1P16470 Drift | 0AM53 | IAE 1P16470 | 1 | (supersedes IAE 1P16123) |
| IAE 1P16543 Removal/Installation fixture | 0AM53 | IAE 1P16543 | 1 | |
| IAE 1P17017 Puller | 0AM53 | IAE 1P17017 | 1 | |
| IAE 1P17022 Removal/installation jaws assembly | 0AM53 | IAE 1P17022 | 1 | |
| IAE 1P17023 Torque adapter | 0AM53 | IAE 1P17023 | 1 | |
| IAE 1P17025 Adapter | 0AM53 | IAE 1P17025 | 1 | |
| IAE 1P17047 Adapter | 0AM53 | IAE 1P17047 | 1 | |
| IAE 1P17509 Protective cover | 0AM53 | IAE 1P17509 | 1 | |
| IAE 1P17515 Gage | 0AM53 | IAE 1P17515 | 1 | |
| IAE 1P17758 Protective cover | 0AM53 | IAE 1P17758 | 1 | (alternative to IAE 1P16060) |
Consumables, Materials and Expendables
| Name | Manufacturer | Part Number / Identification | Quantity | Remark |
|---|---|---|---|---|
| CoMat 06-153 FELT TIP MARKER, RAPID DRYING | LOCAL | CoMat 06-153 | ||
| CoMat 06-153X FELT TIP MARKER, RAPID DRYING, FINE POINT, BLACK, TRACE ELEMENT CERTIFIED | 86874 | CoMat 06-153X | ||
| CoMat 06-158 MARKER, EXTRA FINE POINT(BLACK) | 0AM53 | CoMat 06-158 | ||
| CoMat 10-077 APPROVED ENGINE OILS | X333X | CoMat 10-077 | ||
| CoMat 10-129 ANTI-SEIZE PASTE | 34568 | CoMat 10-129 |
Spares
NONESafety Requirements
NONEProcedure
Reference clearance at location 2225. If required, use the data written as a note in TASK 72-41-13-200-001-C00, TASK 72-41-13-200-001-D00 (INSPECTION-001) and TASK 72-40-00-200-005 (INSPECTION-005).
Table 1. Fits and Clearances (all dimensions are in inches) NEW PART
WORN PART
DIMENSIONS
DIMENSIONS
PART IDENT
Size
Clearance
(Non-(select)
REJECT IF
MORE THAN
LOCATION 2225
HPC Drive Turbine Shaft HPC Rear Shaft And Heatshield Assembly (72-41-13, 01-850), Journal Diameter
No. 4 Bearing Spacer ENGINE-ATTACH PARTS & FITTINGS-HP SYSTEM (72-40-00, 03-003 thru ENGINE-ATTACH PARTS & FITTINGS-HP SYSTEM 03-035), Bore
HPC Drive Turbine Shaft Journal Diameter
5.107
Clear
5.108
0.003
Spacer Bore
5.111
0.006
5.113
Clear
Table 2. Fits and Clearances (all dimensions are in millimeters) NEW PART
WORN PART
DIMENSIONS
DIMENSIONS
PART IDENT
Size
Clearance
(Non-select)
REJECT IF
MORE THAN
LOCATION 2225
HPC Drive Turbine Shaft HPC Rear Shaft And Heatshield Assembly (72-41-13, 01-850), Journal Diameter
No. 4 Bearing Spacer ENGINE-ATTACH PARTS & FITTINGS-HP SYSTEM (72-40-00, 03-003 thru ENGINE-ATTACH PARTS & FITTINGS-HP SYSTEM 03-035), Bore
HPC Turbine Drive Shaft Journal Diameter
129.718
Clear
129.743
0.077
Spacer Bore
129.819
0.152
129.870
Clear
SUBTASK 72-40-00-220-124 Reference Fits and Clearances of the HP Turbine Rotor and Stator Assembly at Location 2225
Reference interference at location 2246. If required, use the data written as a note in TASK 72-45-11-200-001-D00 (INSPECTION-001) and TASK 72-41-13-200-001-C00, TASK 72-41-13-200-001-D00 (INSPECTION-001).
Table 3. Fits and Clearances (all dimensions are in inches) NEW PART
WORN PART
DIMENSIONS
DIMENSIONS
PART IDENT
Size
Clearance
(Non-select)
REJECT IF
MORE THAN
LOCATION 2246
Front Turbine Hub HPT Stage 1 Hub (72-45-11, 01-011), Bore
HPC Drive Turbine Shaft HPC Rear Shaft And Heatshield Assembly (72-41-13, 01-850), Location Diameter
Hub Bore
5.102
Intf
5.101
0.005
Shaft Location Diameter
5.108
0.007
5.107
Intf
Table 4. Fits and Clearances (all dimensions are in millimeters) NEW PART
WORN PART
DIMENSIONS
DIMENSIONS
PART IDENT
Size
Clearance
(Non-select)
REJECT IF
MORE THAN
LOCATION 2246
Front Turbine Hub HPT Stage 1 Hub (72-45-11, 01-011), Bore
HPC Drive Turbine Shaft HPC Rear Shaft And Heatshield Assembly (72-41-13, 01-850), Location Diameter
Hub Bore
129.590
Intf
129.565
0.127
Shaft Location Diameter
129.743
0.177
129.718
Intf
SUBTASK 72-40-00-220-125 Reference Fits and Clearances of the HP Turbine Rotor and Stator Assembly at Location 2246
Reference interference at location 2249. If required, use the data written as a note in TASK 72-41-13-200-001-C00, TASK 72-41-13-200-001-D00 (INSPECTION-001) and TASK 72-45-31-200-001-D00 (INSPECTION-001).
Table 5. Fits and Clearances (all dimensions are in inches) NEW PART
WORN PART
DIMENSIONS
DIMENSIONS
PART IDENT
Size
Clearance
(Select)
REJECT IF
MORE THAN
LOCATION 2249
HPC Drive Turbine Shaft HPC Rear Shaft And Heatshield Assembly (72-41-13, 01-850), Location Diameter
Stage 2 Turbine Hub ENGINE-STAGE 2 TURBINE HUB (72-45-31, 01-010), Bore
Shaft Location Diameter
4.842
Intf
4.842
Intf
4.841
0.005
4.841
0.0046
Hub Bore
4.836
0.007
4.8364
0.007
4.835
Intf
4.8345
Intf
Table 6. Fits and Clearances (all dimensions are in millimeters) NEW PART
WORN PART
DIMENSIONS
DIMENSIONS
PART IDENT
Size
Clearance
(Select)
REJECT IF
MORE THAN
LOCATION 2249
HPC Drive Turbine Shaft HPC Rear Shaft And Heatshield Assembly (72-41-13, 01-850), Location Diameter
Stage 2 Turbine Hub ENGINE-STAGE 2 TURBINE HUB (72-45-31, 01-010), Bore
Shaft Location Diameter
122.987
Intf
122.987
Intf
122.962
0.125
122.962
0.117
Hub Bore
122.834
0.177
122.844
0.177
122.809
Intf
122.796
Intf
SUBTASK 72-40-00-220-128 Reference Fits and Clearances of the HP Turbine Rotor and Stator Assembly at Location 2249
Reference clearance at location 2250. If required, use the data written as a note in TASK 72-41-13-200-001-C00, TASK 72-41-13-200-001-D00 (INSPECTION-001) and TASK 72-40-00-200-011 (INSPECTION-011).
Table 7. Fits and Clearances (all dimensions are in inches) NEW PART
WORN PART
DIMENSIONS
DIMENSIONS
PART IDENT
Size
Clearance
(Non-select)
REJECT IF
MORE THAN
LOCATION 2250
HPC Drive Turbine Shaft HPC Rear Shaft And Heatshield Assembly (72-41-13, 01-850), Thread Diameter
HPC Drive Turbine Nut ENGINE-ATTACH PARTS & FITTINGS-HP SYSTEM (72-40-00, 04-020), Thread Diameter
Shaft Thread Major Diameter
4.8020
4.8080
Nut Thread Minor Diameter
4.6939
4.6999
Table 8. Fits and Clearances (all dimensions are in millimeters) NEW PART
WORN PART
DIMENSIONS
DIMENSIONS
PART IDENT
Size
Clearance
(Non-select)
REJECT IF
MORE THAN
LOCATION 2250
HPC Drive Turbine Shaft HPC Rear Shaft And Heatshield Assembly (72-41-13, 01-850), Thread Diameter
HPC Drive Turbine Nut ENGINE-ATTACH PARTS & FITTINGS-HP SYSTEM (72-40-00, 04-020), Thread Diameter
Shaft Thread Major Diameter
121.971
122.123
Nut Thread Minor Diameter
119.225
119.377
SUBTASK 72-40-00-220-129 Reference Fits and Clearances of the HP Turbine Rotor and Stator Assembly at Location 2250
Reference interference at location 2253. If required, use the data written as a note in TASK 72-45-21-200-001 (INSPECTION-001) and TASK 72-44-10-200-001-C00, TASK 72-44-10-200-001-D00 (INSPECTION-001).
Table 9. Fits and Clearances (all dimensions are in inches) NEW PART
DIMENSIONS
WORN PART
DIMENSIONS
REJECT IF
PART IDENT
Size
Clearance
(Non-select)
MORE THAN
LOCATION 2253
Turbine Case Assembly HPT Case And Related Parts (72-45-21, 01-010), Location Diameter
Stage 1 HPT Support Assembly HPT Stage 1 Support Assembly And Support Seal (72-44-10, 01-010), Location Diameter
Case Assembly Location Diameter
28.233
28.227
Intf
0.002
28.233
28.222
Intf
0.002
Support Assembly Location Diameter
28.241
28.235
0.014
Intf
28.241
28.230
0.019
Intf
Table 10. Fits and Clearances (all dimensions are in millimeters) NEW PART
DIMENSIONS
WORN PART
DIMENSIONS
REJECT IF
PART IDENT
Size
Clearance
(Non-select)
MORE THAN
LOCATION 2253
Turbine Case Assembly HPT Case And Related Parts (72-45-21, 01-010), Location Diameter
Stage 1 HPT Support Assembly HPT Stage 1 Support Assembly And Support Seal (72-44-10, 01-010), Location Diameter
Case Assembly Location Diameter
717.118
716.966
Intf
0.050
717.118
716.839
Intf
0.483
Support Assembly Location
Diameter
717.321
717.169
0.360
Intf
717.321
717.040
0.360
Intf
SUBTASK 72-40-00-220-130 Reference Fits and Clearances of the HP Turbine Rotor and Stator Assembly at Location 2253
Reference interference at location 5624. If required, use the data written as a note in TASK 72-50-21-200-001-B00, TASK 72-50-21-200-001-C00, TASK 72-50-21-200-001-D00 (INSPECTION-001) and TASK 72-45-27-200-002-B00 (INSPECTION-002).
Table 11. Fits and Clearances (all dimensions are in inches) NEW PART
WORN PART
DIMENSIONS
DIMENSIONS
PART IDENT
Size
Clearance
(Non-select)
REJECT IF
MORE THAN
LOCATION 5624
LPT Case Assembly LPT Case, Heat Shields, And Seal Segments (72-50-21, 01-010), Location Diameter
Stage 2 HPT Support Assembly ENGINE-STAGE 2 HPT SUPPORT ASSEMBLY (72-45-27, 01-010), Location Diameter
Case Diameter
28.533
Intf
28.527
0.002
Support Diameter
28.541
0.014
28.535
Intf
Table 12. Fits and Clearances (all dimensions are in millimeters) NEW PART
WORN PART
DIMENSIONS
DIMENSIONS
PART IDENT
Size
Clearance
(Non-select)
REJECT IF
MORE THAN
LOCATION 5624
LPT Case Assembly LPT Case, Heat Shields, And Seal Segments (72-50-21, 01-010), Location Diameter
Stage 2 HPT Support Assembly ENGINE-STAGE 2 HPT SUPPORT ASSEMBLY (72-45-27, 01-010), Location Diameter
Case Diameter
724.738
Intf
724.586
0.05
Support Diameter
724.941
0.36
724.789
Intf
SUBTASK 72-40-00-220-131 Reference Fits and Clearances of the HP Turbine Rotor and Stator Assembly at Location 5624
Reference clearance at location 5623. If required, use the data written as a note in TASK 72-45-33-200-001-C00 (INSPECTION-001) and TASK 72-50-24-200-001-A00 (INSPECTION-001).
Table 13. Fits and Clearances (all dimensions are in inches) NEW PART
WORN PART
DIMENSIONS
DIMENSIONS
PART IDENT
Size
Clearance
(Non-select)
REJECT IF
MORE THAN
LOCATION 5623
Stage 2 Blade Retaining Plate HPT Stage 2 Blade Retaining Plate And Related Parts (72-45-33, 01-020), Knife-edge Outside Diameter
Inner Turbine Duct LPT Inner Diffuser Duct And Related Parts (72-50-24, 01-010), Inside Diameter
Knife-edge Outside Diameter
19.807
Clear
19.812
0.084
Turbine Duct Inside Diameter
19.896
0.118
19.925
Clear
Table 14. Fits and Clearances (all dimensions are in millimeters) NEW PART
WORN PART
DIMENSIONS
DIMENSIONS
PART IDENT
Size
Clearance
(Non-select)
REJECT IF
MORE THAN
LOCATION 5623
Stage 2 Blade Retaining Plate HPT Stage 2 Blade Retaining Plate And Related Parts (72-45-33, 01-020), Knife-edge Outside Diameter
Inner Turbine Duct LPT Inner Diffuser Duct And Related Parts (72-50-24, 01-010), Inside Diameter
Knife-edge Outside Diameter
503.098
Clear
503.224
2.135
Turbine Duct Inside Diameter
505.360
3.002
506.100
Clear
SUBTASK 72-40-00-220-132 Reference Fits and Clearances of the HP Turbine Rotor and Stator Assembly at Location 5623
Reference clearance at location 2256. If required, use the data written as a note in TASK 72-44-60-200-001 (INSPECTION-001) and TASK 72-45-11-200-001-D00 (INSPECTION-001).
Table 15. Fits and Clearances (all dimensions are in inches) NEW PART
WORN PART
DIMENSIONS
DIMENSIONS
PART IDENT
Size
Clearance
(Non-select)
REJECT IF
MORE THAN
LOCATION 2256
Radial Clearance Stage 1 HPT Duct Segment ENGINE-STAGE 1 HPT SEGMENT (72-44-60, 01-010)
Stage 1 HPT Hub HPT Stage 1 Hub (72-45-11, 01-011) and blade HPT Stage 1 Blade And Related Parts (72-45-14, 01-010) Assembly
Stage 1 HPT Duct Segment
10.693
Clear
10.735
0.047
Stage 1 HPT Hub and Blade Assembly
10.782
0.103
10.796
Clear
Table 16. Fits and Clearances (all dimensions are in millimeters) NEW PART
WORN PART
DIMENSIONS
DIMENSIONS
PART IDENT
Size
Clearance
(Non-select)
REJECT IF
MORE THAN
LOCATION 2256
Radial Clearance Stage 1 HPT Duct Segment ENGINE-STAGE 1 HPT SEGMENT (72-44-60, 01-011)
Stage 1 HPT Hub HPT Stage 1 Hub (72-45-11, 01-010) And Blade HPT Stage 1 Blade And Related Parts (72-45-14, 01-010) Assembly
Stage 1 HPT Duct Segment
271.60
Clear
272.67
1.19
Stage 1 HPT Hub And Blade Assembly
273.86
2.62
274.22
Clear
SUBTASK 72-40-00-220-133 Reference Fits and Clearances of the HP Turbine Rotor and Stator Assembly at Location 2256
Reference clearance at location 2257. If required, use the data written as a note in TASK 72-45-12-200-001-D00 (INSPECTION-001) and TASK 72-44-50-200-001-C00 (INSPECTION-001).
Table 17. Fits and Clearances (all dimensions are in inches) NEW PART
WORN PART
DIMENSIONS
DIMENSIONS
PART IDENT
Size
Clearance
(Non-select)
REJECT IF
MORE THAN
LOCATION 2257
Stage 1 and 2 HPT Air Seal ENGINE-STAGE 1 HPT AIR SEAL (OUTER) (72-45-12, 01-040), Knife-edge Outside Diameter
Stage 1 HPT Cooling Duct Assembly HPT Stage 1 Cooling (TOBI) Duct And Duct Deflector (72-44-50, 01-010), Seal Land Inside Diameter
Knife Edge OD
11.381
Clear
11.397
0.018
Seal Land ID
11.415
0.064
11.445
Clear
Table 18. Fits and Clearances (all dimensions are in millimeters) NEW PART
WORN PART
DIMENSIONS
DIMENSIONS
PART IDENT
Size
Clearance
(Non-select)
REJECT IF
MORE THAN
LOCATION 2257
Stage 1 and 2 HPT Air Seal ENGINE-STAGE 1 HPT AIR SEAL (OUTER) (72-45-12, 01-040), Knife-edge Outside Diameter
Stage 1 HPT Cooling Duct Assembly HPT Stage 1 Cooling (TOBI) Duct And Duct Deflector (72-44-50, 01-010), Seal Land Inside Diameter
Knife-edge OD
289.08
Clear
289.48
0.46
Seal Land ID
289.94
1.63
290.70
Clear
SUBTASK 72-40-00-220-134 Reference Fits and Clearances of the HP Turbine Rotor and Stator Assembly at Location 2257
Reference clearance at location 2258. If required, use the data written as a note in TASK 72-45-12-200-001-D00 (INSPECTION-001) and TASK 72-44-50-200-001-C00 (INSPECTION-001).
Table 19. Fits and Clearances (all dimensions are in inches) NEW PART
WORN PART
DIMENSIONS
DIMENSIONS
PART IDENT
Size
Clearance
(Non-select)
REJECT IF
MORE THAN
LOCATION 2258
Stage 1 And 2 HPT Air Seal ENGINE-STAGE 1 HPT AIR SEAL (OUTER) (72-45-12, 01-040), Knife-edge Outside Diameter
Stage 1 HPT Cooling Duct Assembly HPT Stage 1 Cooling (TOBI) Duct And Duct Deflector (72-44-50, 01-010), Seal Land Inside Diameter
Knife-edge OD
11.481
Clear
11.497
0.018
Seal Land ID
11.515
0.064
11.545
Clear
Table 20. Fits and Clearances (all dimensions are in millimeters) NEW PART
WORN PART
DIMENSIONS
DIMENSIONS
PART IDENT
Size
Clearance
(Non-select)
REJECT IF
MORE THAN
LOCATION 2258
Stage 1 And 2 HPT Air Seal ENGINE-STAGE 1 HPT AIR SEAL (OUTER) (72-45-12, 01-040), Knife-edge Outside Diameter
Stage 1 HPT Cooling Duct Assembly HPT Stage 1 Cooling (TOBI) Duct And Duct Deflector (72-44-50, 01-010), Seal Land Inside Diameter
Knife-edge OD
291.62
Clear
292.02
0.46
Seal Land ID
292.48
1.63
293.24
Clear
SUBTASK 72-40-00-220-135 Reference Fits and Clearances of the HP Turbine Rotor and Stator Assembly at Location 2258
Reference clearance at location 2259. If required, use the data written as a note in TASK 72-45-12-200-001-D00 (INSPECTION-001) and TASK 72-44-50-200-001-C00 (INSPECTION-001).
Table 21. Fits and Clearances (all dimensions are in inches) NEW PART
WORN PART
DIMENSIONS
DIMENSIONS
PART IDENT
Size
Clearance
(Non-select)
REJECT IF
MORE THAN
LOCATION 2259
Stage 1 And 2 HPT Air Seal ENGINE-STAGE 1 HPT AIR SEAL (OUTER) (72-45-12, 01-040), Knife-edge Outside Diameter
Stage 1 HPT Cooling Duct Assembly HPT Stage 1 Cooling (TOBI) Duct And Duct Deflector (72-44-50, 01-010), Seal Land Inside Diameter
Knife-edge OD
11.581
Clear
11.597
0.018
Seal Land ID
11.615
0.064
11.645
Clear
Table 22. Fits and Clearances (all dimensions are in millimeters) NEW PART
WORN PART
DIMENSIONS
DIMENSIONS
PART IDENT
Size
Clearance
(Non-select)
REJECT IF
MORE THAN
LOCATION 2259
Stage 1 And 2 HPT Air Seal ENGINE-STAGE 1 HPT AIR SEAL (OUTER) (72-45-12, 01-040), Knife-edge Outside Diameter
Stage 1 HPT Cooling Duct Assembly HPT Stage 1 Cooling (TOBI) Duct And Duct Deflector (72-44-50, 01-010), Seal Land Inside Diameter
Knife-edge OD
294.16
Clear
294.56
0.46
Seal Land ID
295.02
1.63
295.78
Clear
SUBTASK 72-40-00-220-136 Reference Fits and Clearances of the HP Turbine Rotor and Stator Assembly at Location 2259
Refer to Figure.
Reference clearance at location 2260. If required, use the data written as a note in TASK 72-45-13-200-001-C00 (INSPECTION-001-003) and TASK 72-44-50-200-001-C00 (INSPECTION-001).
Table 23. Fits and Clearances (all dimensions are in inches) NEW PART
WORN PART
DIMENSIONS
DIMENSIONS
PART IDENT
Size
Clearance
(Non-select)
REJECT IF
MORE THAN
LOCATION 2260
Stage 1 HPT Air Seal HPT Stage 1 Rotating Inner Air Seal And Damper (72-45-13, 01-020), Outside Diameter
Stage 1 HPT Cooling Duct Assembly HPT Stage 1 Cooling (TOBI) Duct And Duct Deflector (72-44-50, 01-010), Seal Land Inside Diameter
Knife-edge OD
8.927
Clear
8.921
Clear
8.933
0.022
8.933
0.022
Seal Land ID
8.955
0.038
8.955
0.038
8.965
Clear
8.965
Clear
Table 24. Fits and Clearances (all dimensions are in millimeters) NEW PART
WORN PART
DIMENSIONS
DIMENSIONS
PART IDENT
Size
Clearance
(Non-select)
REJECT IF
MORE THAN
LOCATION 2260
Stage 1 HPT Air Seal HPT Stage 1 Rotating Inner Air Seal And Damper (72-45-13, 01-020), Outside Diameter
Stage 1 HPT Cooling Duct Assembly HPT Stage 1 Cooling (TOBI) Duct And Duct Deflector (72-44-50, 01-010), Seal Land Inside Diameter
Knife-edge OD
226.746
Clear
226.593
Clear
226.898
0.56
226.898
0.56
Seal Land ID
227.46
0.97
227.46
0.97
227.71
Clear
227.71
Clear
SUBTASK 72-40-00-220-137 Reference Fits and Clearances of the HP Turbine Rotor and Stator Assembly at Location 2260 (Pre SBE 72-0180)
NOTE
There is no SBE 72-0180 condition at this location.Reference clearance at location 2261. If required, use the data written as a note in TASK 72-45-13-200-001-C00 (INSPECTION-001) and TASK 72-44-50-200-001-C00 (INSPECTION-001).
Table 25. Fits and Clearances (all dimensions are in inches) NEW PART
WORN PART
DIMENSIONS
DIMENSIONS
PART IDENT
Size
Clearance
(Non-select)
REJECT IF
MORE THAN
LOCATION 2261
Stage 1 HPT Air Seal HPT Stage 1 Rotating Inner Air Seal And Damper (72-45-13, 01-020), Outside Diameter
Stage 1 HPT Cooling Duct Assembly HPT Stage 1 Cooling (TOBI) Duct And Duct Deflector (72-44-50, 01-010), Seal Land Inside Diameter
Knife-edge OD
9.027
Clear
9.021
Clear
9.033
0.022
9.033
0.022
Seal land ID
9.055
0.038
9.055
0.038
9.065
Clear
9.065
Clear
Table 26. Fits and Clearances (all dimensions are in millimeters) NEW PART
WORN PART
DIMENSIONS
DIMENSIONS
PART IDENT
Size
Clearance
(Non-select)
REJECT IF
MORE THAN
LOCATION 2261
Stage 1 HPT Air Seal HPT Stage 1 Rotating Inner Air Seal And Damper (72-45-13, 01-020), Outside Diameter
Stage 1 HPT Cooling Duct Assembly HPT Stage 1 Cooling (TOBI) Duct And Duct Deflector (72-44-50, 01-010), Seal Land Inside Diameter
Knife-edge OD
229.286
Clear
229.133
Clear
229.438
0.56
229.438
0.056
Seal Land ID
230.00
0.97
230.00
0.097
230.25
Clear
230.25
Clear
SUBTASK 72-40-00-220-138 Reference Fits and Clearances of the HP Turbine Rotor and Stator Assembly at Location 2261 (Pre SBE 72-0511)
Reference clearance at Location 2261. If required, use the data written as a note in TASK 72-45-13-200-000 (INSPECTION-000) and TASK 72-44-50-200-000 (INSPECTION-000).
Table 27. Fits and Clearances (all dimensions are in inches) NEW PART
WORN PART
DIMENSIONS
DIMENSIONS
PART IDENT
Size
Clearance
(Non-select)
REJECT IF
MORE THAN
LOCATION 2261
Stage 1 HPT Airseal HPT Stage 1 Rotating Inner Airseal And Damper HPT Stage 1 Rotating Inner Air Seal And Damper (72-45-13, 01-020), Outside Diameter
Stage 1 HPT Cooling Duct Assembly HPT Stage 1 Cooling (TOBI) Duct And Duct Deflector HPT Stage 1 Cooling (TOBI) Duct And Duct Deflector (72-44-50, 01-010), Seal Land Inside Diameter
Knife-edge Outside Diameter
9.031
Clear
9.025
Clear
9.037
0.018
9.037
0.018
Seal Land Inside Diameter
9.055
0.034
9.055
0.034
9.065
Clear
9.065
Clear
Table 28. Fits and Clearances (all dimensions are in millimeters) NEW PART
WORN PART
DIMENSIONS
DIMENSIONS
PART IDENT
Size
Clearance
(Non-select)
REJECT IF
MORE THAN
LOCATION 2261
Stage 1 HPT Airseal HPT Stage 1 Rotating Inner Airseal And Damper HPT Stage 1 Rotating Inner Air Seal And Damper (72-45-13, 01-020), Outside Diameter
Stage 1 HPT Cooling Duct Assembly HPT Stage 1 Cooling (TOBI) Duct And Duct Deflector HPT Stage 1 Cooling (TOBI) Duct And Duct Deflector (72-44-50, 01-010), Seal Land Inside Diameter
Knife-edge Outside Diameter
229.39
Clear
229.24
Clear
229.54
0.457
229.54
0.457
Seal Land Inside Diameter
230.00
0.864
230.00
0.864
230.25
Clear
230.25
Clear
SUBTASK 72-40-00-220-160 Reference Fits and Clearances of the HP Turbine Rotor and Stator Assembly at Location 2261 (SBE 72-0511)
Reference clearance at location 2262. If required, use the data written as a note in TASK 72-45-13-200-001-C00 (INSPECTION-001) and TASK 72-45-13-200-001-C00TASK 72-40-00-430-006-B00 (INSPECTION-001).
Table 29. Fits and Clearances (all dimensions are in inches) NEW PART
WORN PART
DIMENSIONS
DIMENSIONS
PART IDENT
Size
Clearance
(Non-select)
REJECT IF
MORE THAN
LOCATION 2262
Stage 1 HPT Air Seal HPT Stage 1 Rotating Inner Air Seal And Damper (72-45-13, 01-020), Outside Diameter
Stage 1 HPT Cooling Duct Assembly HPT Stage 1 Cooling (TOBI) Duct And Duct Deflector (72-44-50, 01-010), Seal Land Inside Diameter
Knife-edge OD
9.127
Clear
9.121
Clear
9.133
0.022
9.133
0.022
Seal Land ID
9.155
0.038
9.155
0.038
9.165
Clear
9.165
Clear
Table 30. Fits and Clearances (all dimensions are in millimeters) NEW PART
WORN PART
DIMENSIONS
DIMENSIONS
PART IDENT
Size
Clearance
(Non-select)
REJECT IF
MORE THAN
LOCATION 2262
Stage 1 HPT Air Seal HPT Stage 1 Rotating Inner Air Seal And Damper (72-45-13, 01-020), Outside Diameter
Stage 1 HPT Cooling Duct Assembly HPT Stage 1 Cooling (TOBI) Duct And Duct Deflector (72-44-50, 01-010), Seal Land Inside Diameter
Knife-edge OD
231.826
Clear
231.673
Clear
231.978
0.56
231.978
0.56
Seal Land ID
232.54
0.97
232.54
0.97
232.79
Clear
232.79
Clear
SUBTASK 72-40-00-220-139 Reference Fits and Clearances of the HP Turbine Rotor and Stator Assembly at Location 2262 (Pre SBE 72-0511)
Reference clearance at Location 2262. If required, use the data written as a note in TASK 72-45-13-200-000 (INSPECTION-000) and TASK 72-44-50-200-000 (INSPECTION-000).
Table 31. Fits and Clearances (all dimensions are in inches) NEW PART
WORN PART
DIMENSIONS
DIMENSIONS
PART IDENT
Size
Clearance
(Non-select)
REJECT IF
MORE THAN
LOCATION 2262
Stage 1 HPT Airseal HPT Stage 1 Rotating Inner Airseal And Damper HPT Stage 1 Rotating Inner Air Seal And Damper (72-45-13, 01-020), Outside Diameter
Stage 1 HPT Cooling Duct Assembly HPT Stage 1 Cooling (TOBI) Duct And Duct Deflector HPT Stage 1 Cooling (TOBI) Duct And Duct Deflector (72-44-50, 01-010), Seal Land Inside Diameter
Knife-edge Outside Diameter
9.131
Clear
9.125
Clear
9.137
0.018
9.137
0.018
Seal Land Inside Diameter
9.155
0.034
9.155
0.034
9.165
Clear
9.165
Clear
Table 32. Fits and Clearances (all dimensions are in millimeters) NEW PART
WORN PART
DIMENSIONS
DIMENSIONS
PART IDENT
Size
Clearance
(Non-select)
REJECT IF
MORE THAN
LOCATION 2262
Stage 1 HPT Airseal HPT Stage 1 Rotating Inner Airseal And Damper ( HPT Stage 1 Rotating Inner Air Seal And Damper (72-45-13, 01-020), Outside Diameter
Stage 1 HPT Cooling Duct Assembly HPT Stage 1 Cooling (TOBI) Duct And Duct Deflector HPT Stage 1 Cooling (TOBI) Duct And Duct Deflector (72-44-50, 01-010), Seal Land Inside Diameter
Knife-edge Outside Diameter
231.93
Clear
231.78
Clear
232.08
0.457
232.08
0.457
Seal Land Inside Diameter
232.54
0.864
232.54
0.864
232.79
Clear
232.79
Clear
SUBTASK 72-40-00-220-165 Reference Fits and Clearances of the HP Turbine Rotor and Stator Assembly at Location 2262 (SBE 72-0511)
Install the IAE 1P16046 Removal/Installation fixture or IAE 1P16543 Removal/Installation fixture 1 off.
Measure the distance from the two machined areas of the fixture to the rear flange of the stage 2 hub. Use a depth vernier, Figure.
Check to see if the HP Turbine Rotor And Stator Assembly is in the proper running position.
NOTE
Make sure when you take the measurements that the vernier does not go into the slots that are located on the hub flange.
Install the IAE 1P17022 Removal/installation jaws assembly 1 off.
Install the scalloped plate detail of the IAE 1P16272 Adapter 1 off to the rear inner flange of the fixture.
Attach the IAE 1F10052 Two cables sling 1 off to the turn spools on the fixture.
SUBTASK 72-40-00-430-055-B00 Install the Tooling to the HP Turbine Rotor and Stator Assembly
If the C - B calculation results in a class 9 or 10 spacer - Install a class 11 spacer.
If the C - B calculation results in a class spacer that is less than 9 - Install a class 10 spacer.
If the C - B calculation results in a class 13 or 14 spacer - Install a class 12 spacer.
If the C - B calculation results in a class spacer that is more than 14 - Install a class 13 spacer.
Use the guidelines for correct bearing tolerances that follow so you can meet the final assembly check.
Usually, the necessary spacer will be a class 11 or 12. After you subtract dimension B from dimension C, if a different class is necessary, check the measurements and do the calculation again.
Subtract dimension B from dimension C and the result will be the required No. 4 bearing spacer dimension.
After you have machined the spacer, mark the new class number at the location shown in Figure. Cross off old class marking. Refer to SPM TASK 70-09-00-400-501. Use vibration peen method. Remove high metal.
If the correct class is not available, you can machine a larger (numerically higher) class spacer to a smaller (numerically lower) class spacer as follows:
Find the correct class of the spacer ENGINE-ATTACH PARTS & FITTINGS-HP SYSTEM (72-40-00, 03-003 thru ENGINE-ATTACH PARTS & FITTINGS-HP SYSTEM (03-035) to be used, from the table in Figure.
Position the spacer with the IAE 1P16470 Drift 1 off.
Install the spacer over the HP Compressor rear hub with the puller groove to the rear of the engine, Figure.
Apply CoMat 10-129 ANTI-SEIZE PASTE to the mating surface on the HP Compressor rear hub, Figure. Wipe off excess paste.
SUBTASK 72-40-00-430-090 Get the No. 4 Bearing Spacer Dimension
Refer to Figure.
Remove the pin and remove the cover from the IAE 1P16040 Heater 1 off.

CAUTION
REMOVE THE THERMOCOUPLE FROM THE HEATER BEFORE THE HP TURBINE ROTOR AND STATOR ASSEMBLY IS INSTALLED. IF THIS IS NOT DONE, DAMAGE TO THE THERMOCOUPLE MAY RESULT.Turn the HP Turbine Rotor And Stator Assembly to the front end down position and lower on to the heater until the case flange rests on the heater flange.
Attach the heater to the IAE 6F10027 Heater control unit 1 off. Heat the HP Turbine Rotor And Stator Assembly to 400°F (204°C).
SUBTASK 72-40-00-430-091 Install the HP Turbine Rotor and Stator Assembly on to the Heater
Refer to Figure.
Remove the puller rod if it is on the end of the IAE 1P17017 Puller 1 off.

CAUTION
YOU MUST MAKE SURE THE JAWS ARE FULLY EXTENDED TO THE LIMIT TO PREVENT DAMAGE TO THE ENGINE PARTS.Hold the shaft at the wrench flats and turn the capscrew in to extend the jaws. Jaws will be fully extended when capscrew can no longer move freely.
NOTE
The detail 33 puller rod of IAE 1P17017 Puller must be used with IAE 1P16272 Adapter.
Install the puller to the HP Compressor Rear Hub.
SUBTASK 72-40-00-430-092 Install the Puller in to the HP Compressor Rear Hub
The hub splines are correctly engaged if the distance T is 0.625 in. (15.875 mm) or less, Figure.
Make sure the splines are engaged correctly.
Align the dowel pin in the case flange with the offset hole in the Diffuser Case flange and the Stage 1 HP Turbine Support Assembly and align the Stage 1 Turbine Hub Splines with the splines on the HP Compressor rear hub.
Install the threaded plate detail of the IAE 1P16272 Adapter 1 off over the puller rod and in to the scalloped plate detail of the adapter, Figure.
Attach the IAE 1F10026 Hydraulic hand pump 1 off to the hydraulic cylinder.
SUBTASK 72-40-00-430-093 Install the HP Turbine Rotor and Stator Assembly to the HP Compressor Rear Hub
Install the IAE 1P17509 Protective cover 1 off to the rear flange of the HP Turbine Rotor And Stator Assembly.
NOTE
The bearing retaining nut must be stripped and silver plated when you install or remove the nut more than five times or engine operation has occurred. Refer to Repair, VRS1298 TASK 72-32-54-300-003 (Repair-003).Apply CoMat 10-129 ANTI-SEIZE PASTE to the mating surface of the bearing retaining nut ENGINE-ATTACH PARTS & FITTINGS-HP SYSTEM (72-40-00,04-020).
Engage the slots of the retaining nut with the teeth of the IAE 1P16284 Hand wrench 1 off and install the bearing nut. Wipe off excess paste.
Install IAE 1P17023 Torque adapter 1 off in the slots of the bearing retaining nut.
Install the scalloped plate of the IAE 1P16272 Adapter 1 off over the puller rod and into the rear inner flange of the fixture.
Install the IAE 1P16341 Torque adapter 1 off over the hydraulic cylinder and engage the four pins in the flange holes of the torque adapter.
Connect the IAE 1F10026 Hydraulic hand pump 1 off to the hydraulic cylinder.
If necessary to get the correct torque, remove the torque adapter and position the adapter into a new set of four holes in the IAE 1P17023 Torque adapter 1 off to provide the proper clearance with the hydraulic cylinder connector.
Install a torque wrench into the rear of the torque adapter and torque the retaining nut to 500 lbfin (56.492 Nm).
NOTE
Keep the hydraulic load applied when you move the torque adapter to a new set of holes.Loosen the wingnuts on the four clamp assemblies on the IAE 1P17025 Adapter or IAE 1P17047 Adapter 1 off.
Install the IAE 1P16011 Wrench 1 off through the adapter to engage the retaining nut splines.
NOTE
You can use IAE 1F10016 Mechanical wrench mechanical wrench as an alternative to IAE 1F10015 Hydraulic wrench.Attach a hoist to the IAE 1F10015 Hydraulic wrench 1 off and install over the wrench.
Install the tools to do the last bearing retaining nut torque.

CAUTION
THE NO. 4 BEARING LOCK CAN BE INSTALLED IN THREE DIFFERENT POSITIONS WHEN YOU LOOK FROM THE REAR OF THE ENGINE. IF THE LOCK IS NOT INSTALLED IN THE CORRECT POSITION, THE BEARING RETAINING NUT CAN BECOME LOOSE.NOTE
This position will keep the bearing retaining nut at the correct torque.Position and install the clockwise side of the rear lock tabs nearest to the counterclockwise side of the tabs on the bearing and install the lock.
Install the No. 4 Bearing lock ENGINE-ATTACH PARTS & FITTINGS-HP SYSTEM (72-40-00, 04-060).
SUBTASK 72-40-00-430-095 Install the Bearing Retaining Nut
Install the IAE 1P17515 Gage 1 off on the rear flange of the HP Turbine Rotor And Stator Assembly.
Install the IAE 1P16060 Protective cover 1 off, or the IAE 1P17758 Protective cover 1 off, to the rear of the HP Turbine Rotor And Stator Assembly.
SUBTASK 72-40-00-430-096 Check the HP Turbine Assembly Running Distance
Figure: Pre SBE 72-0180: The HP Turbine Rotor and Stator Assembly - Fits and Clearances
Pre SBE 72-0180: The HP Turbine Rotor and Stator Assembly - Fits and Clearances

Figure: Pre SBE 72-0180: The HP Turbine Rotor and Stator Assembly - Fit and Clearances
Pre SBE 72-0180: The HP Turbine Rotor and Stator Assembly - Fit and Clearances

Figure: SBE 72-0180: The HP Turbine Rotor and Stator Assembly - Fits and Clearances
SBE 72-0180: The HP Turbine Rotor and Stator Assembly - Fits and Clearances
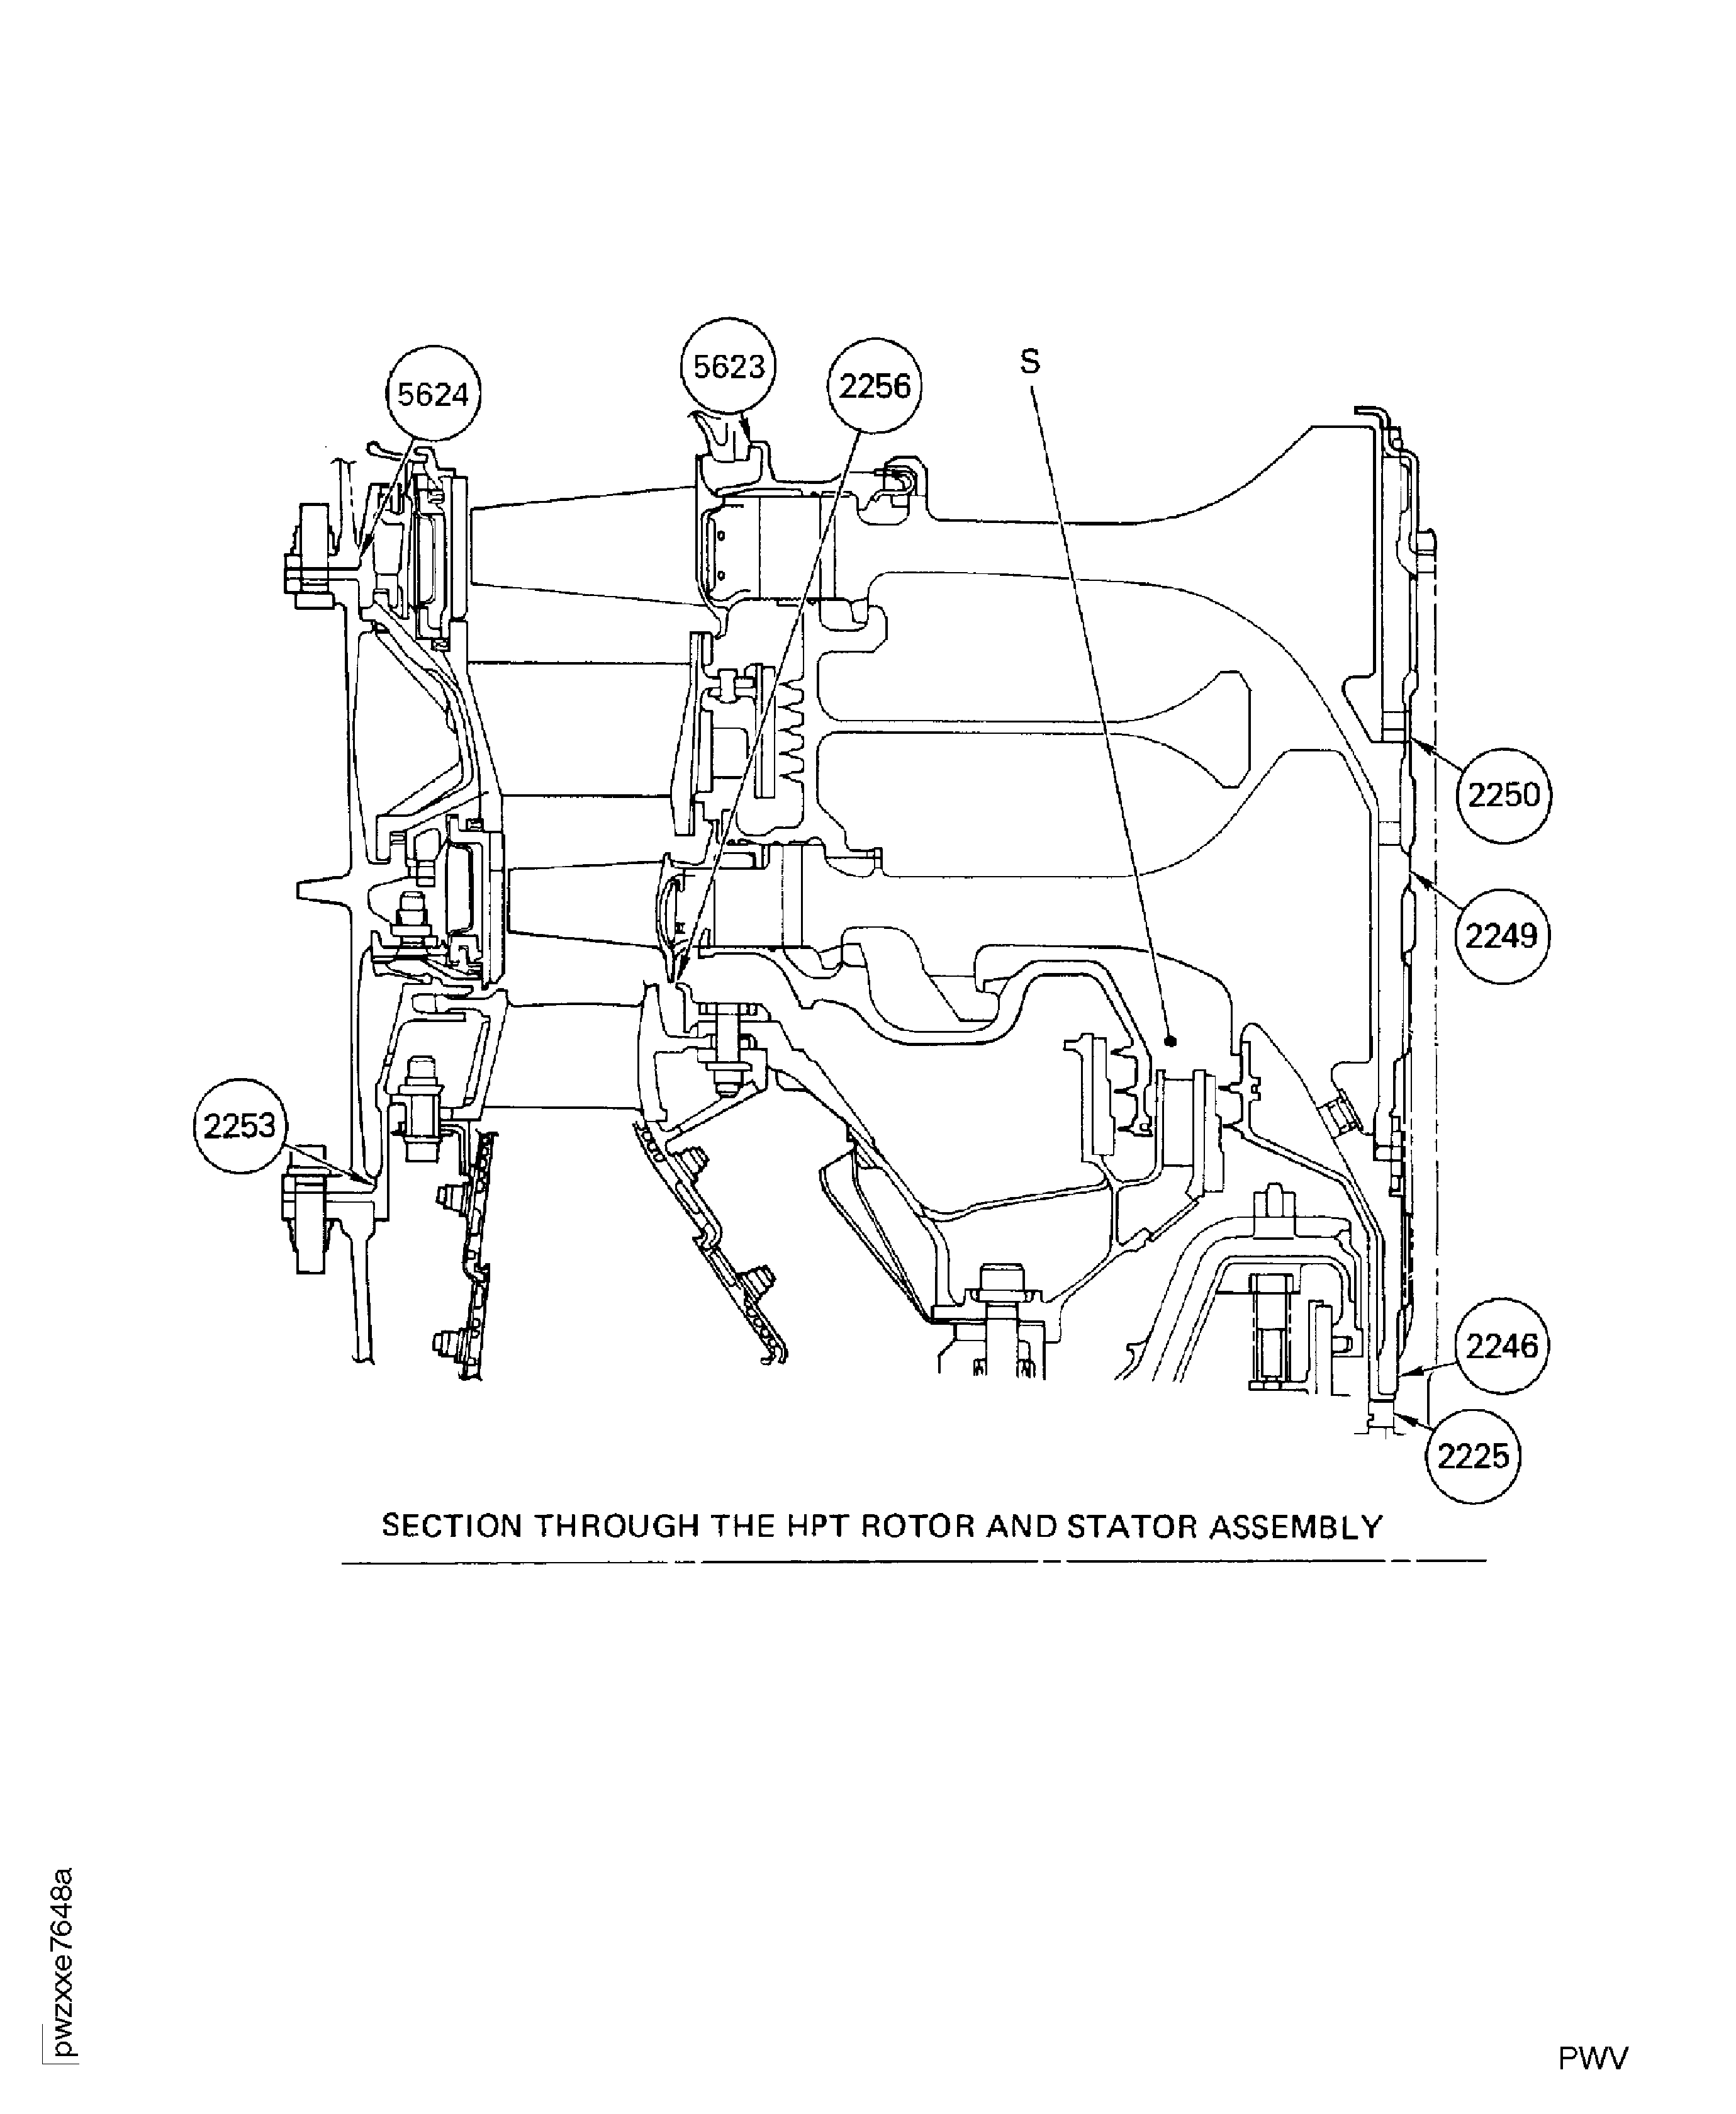
Figure: SBE 72-0180: The HP Turbine Rotor and Stator Assembly - Fits and Clearances
SBE 72-0180: The HP Turbine Rotor and Stator Assembly - Fits and Clearances
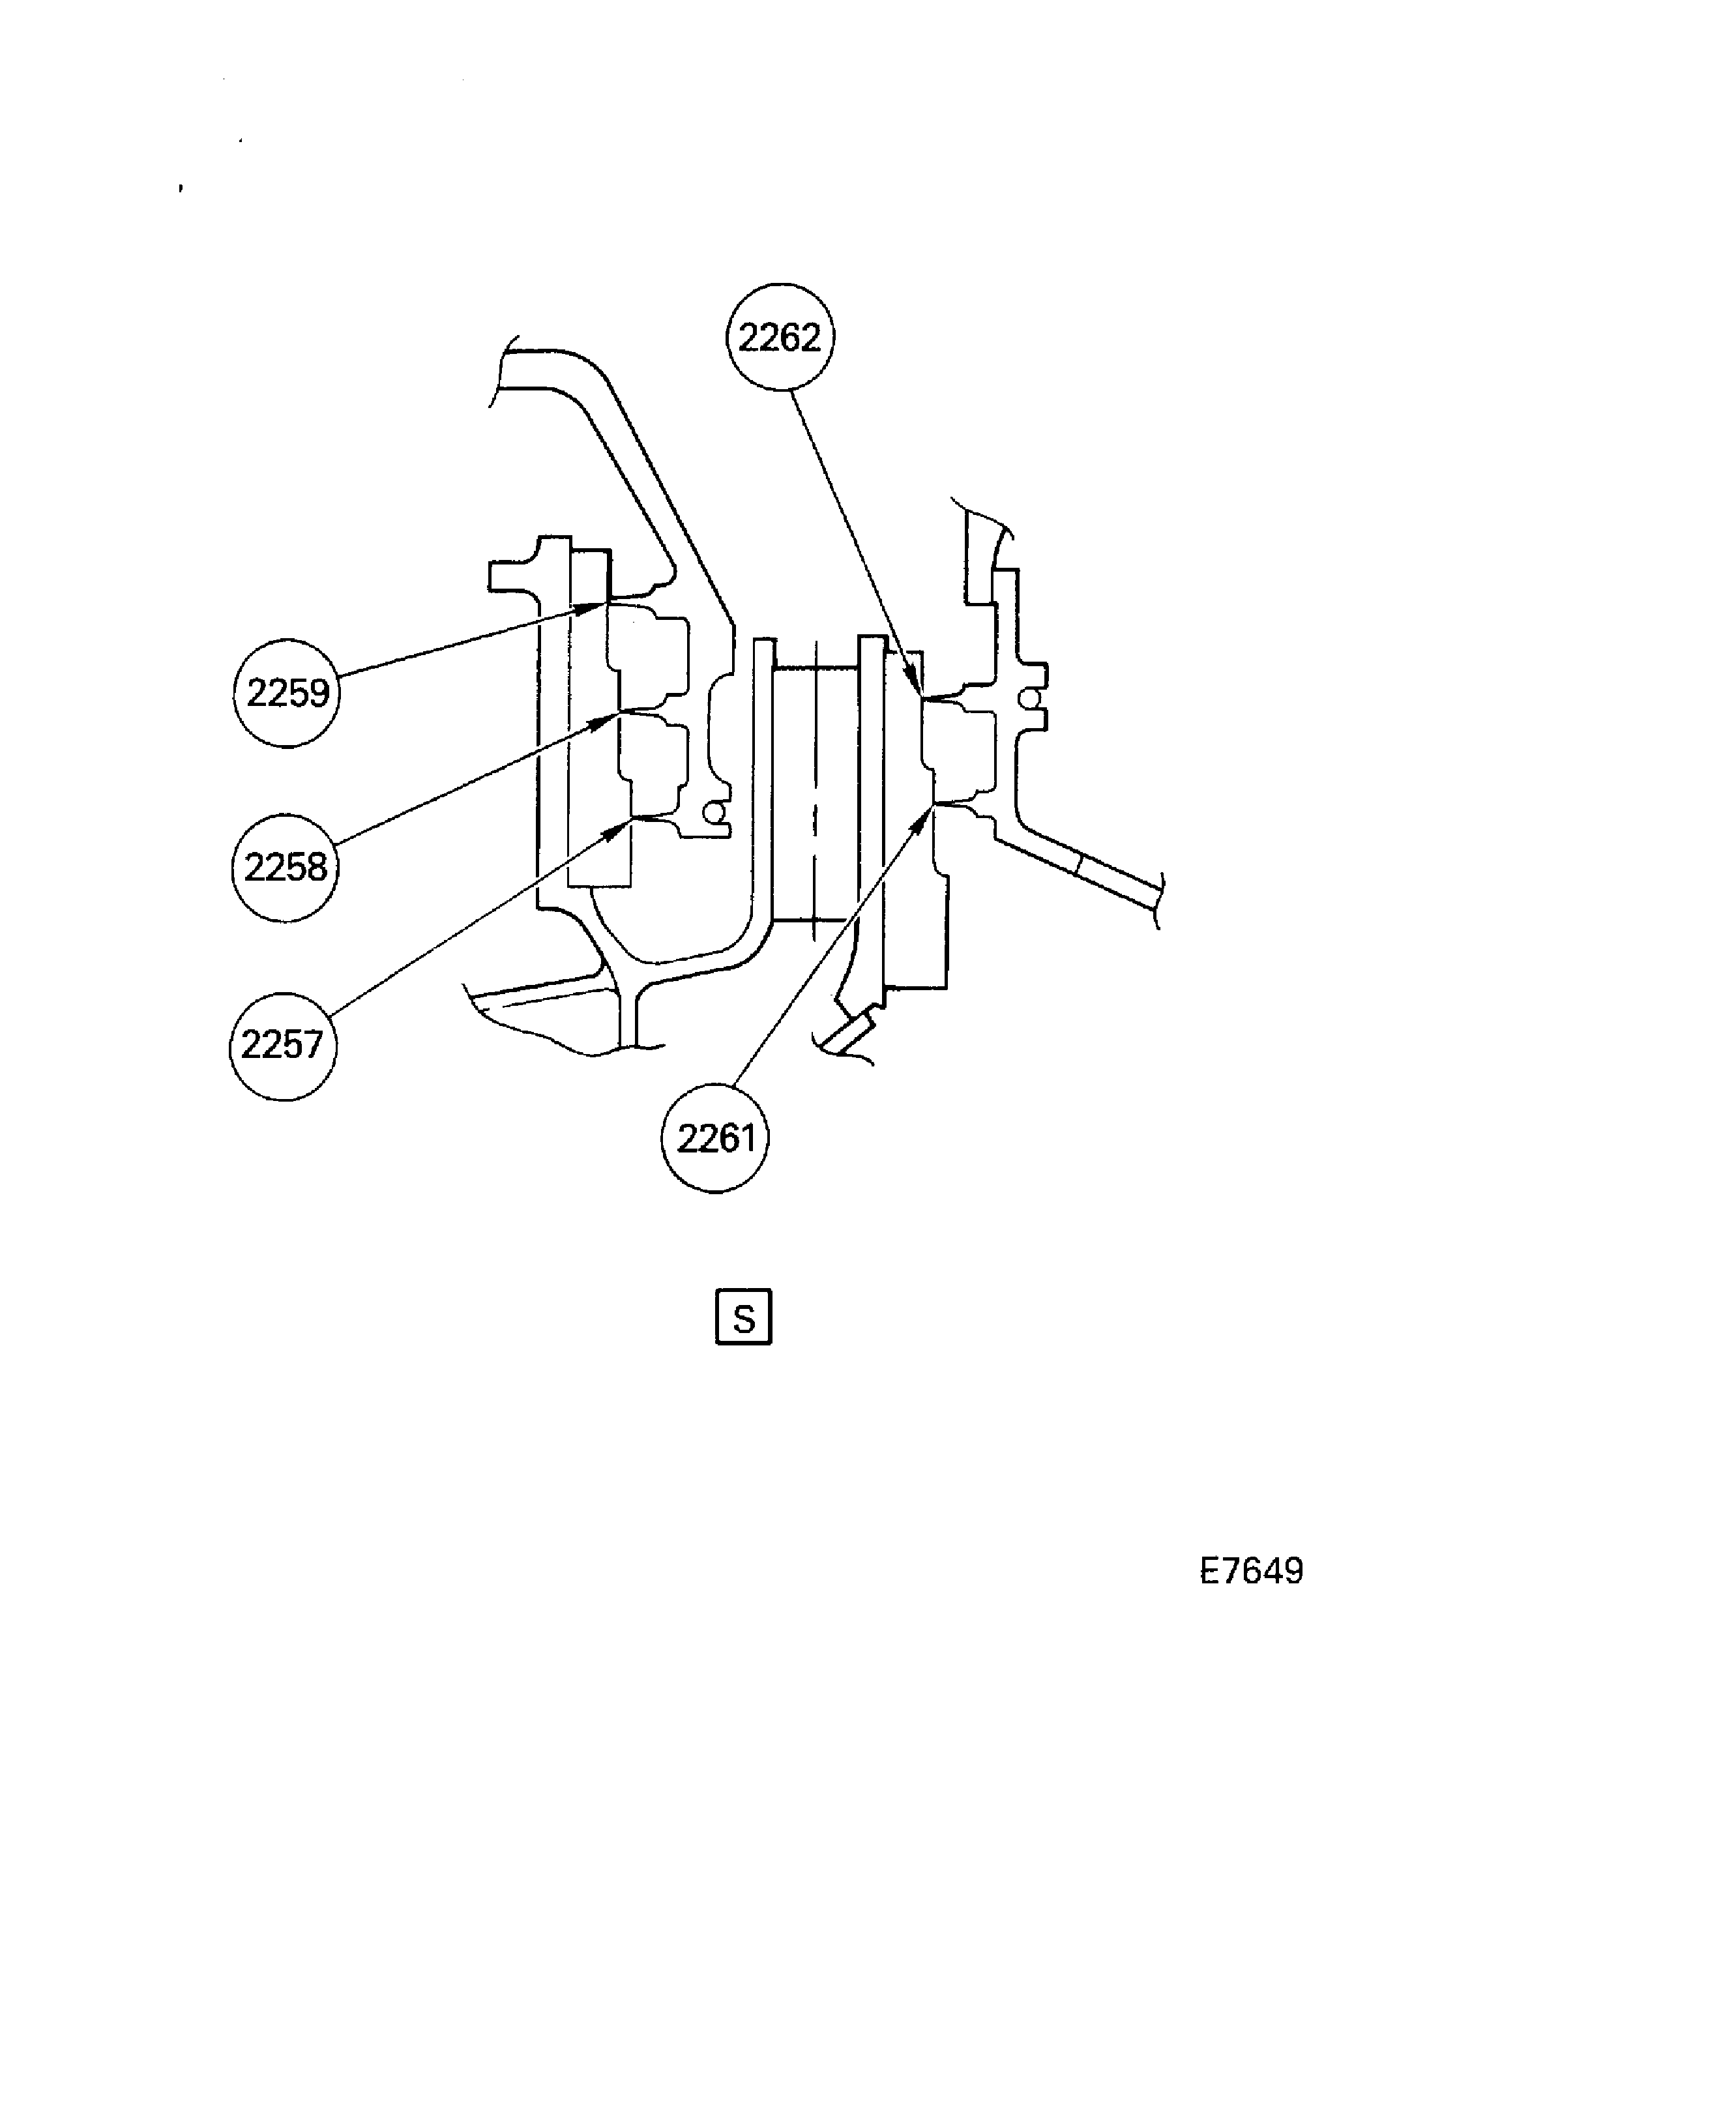
Figure: HP Turbine Assembly and Related Parts
HP Turbine Assembly and Related Parts

Figure: Installation Tooling for the HP Turbine Assembly
Installation Tooling for the HP Turbine Assembly
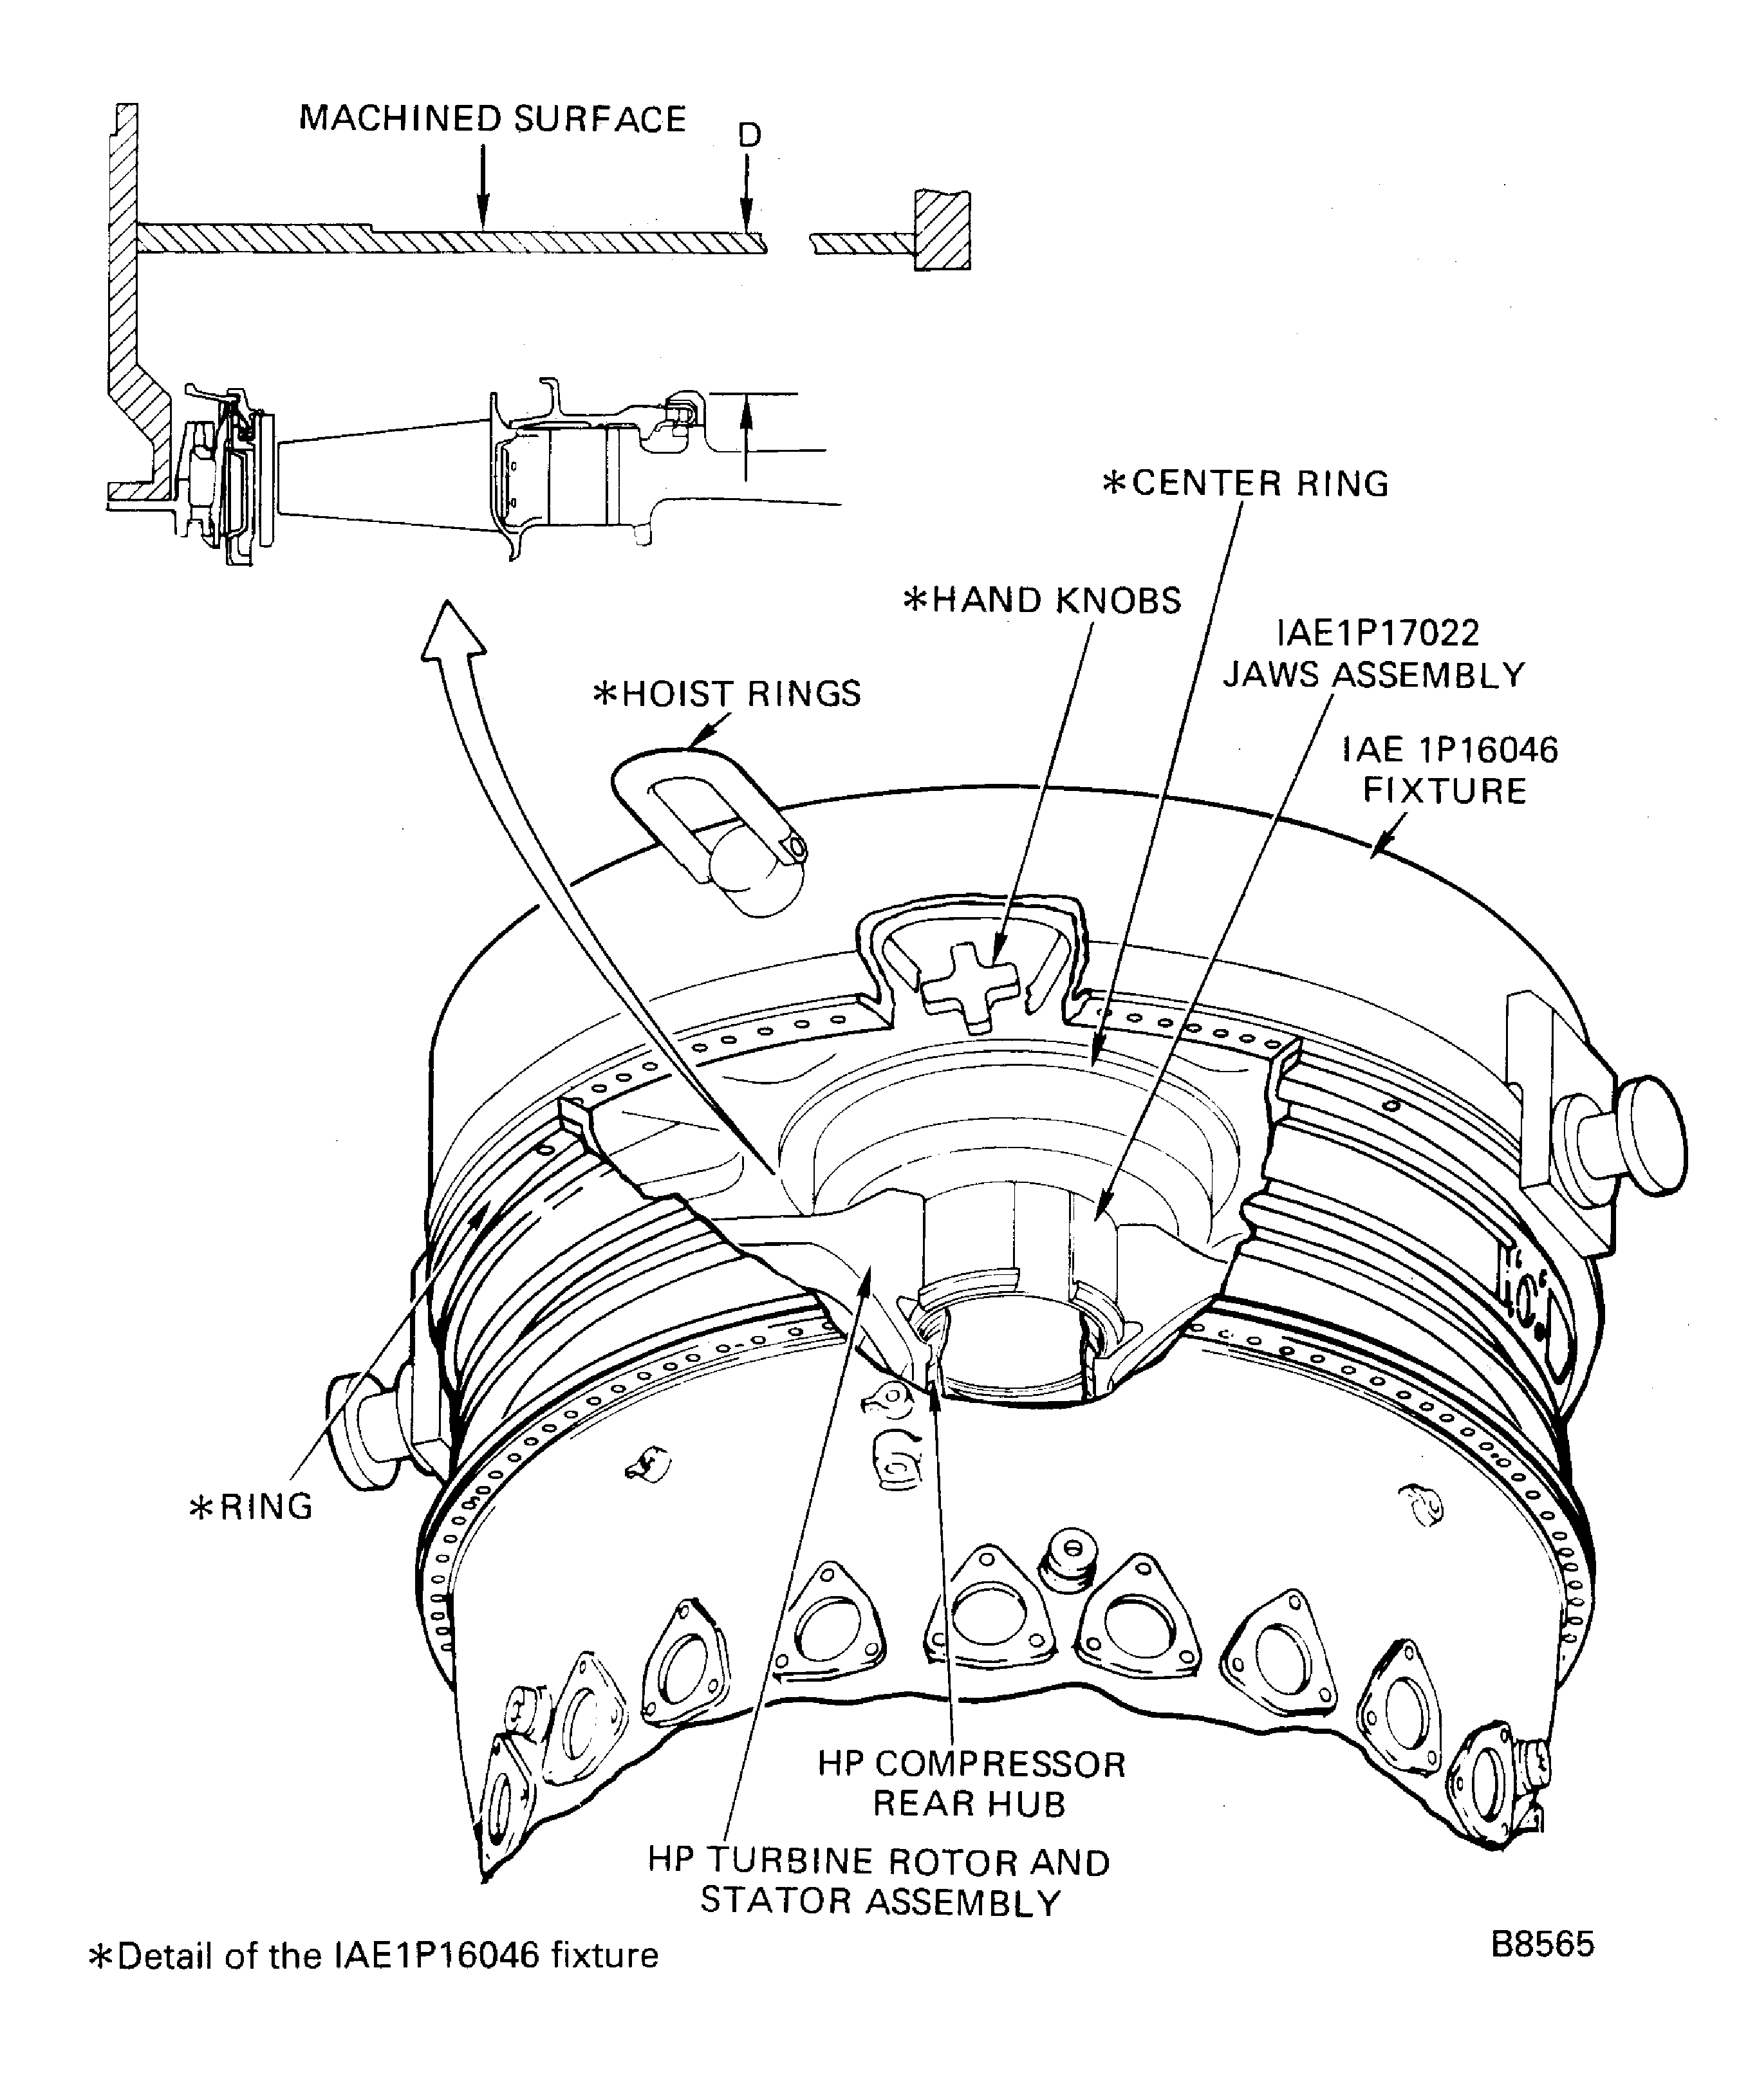
Figure: Pre SBE 72-0180: HP Turbine Assembly Dimensions
Pre SBE 72-0180: HP Turbine Assembly Dimensions

Figure: SBE 72-0180: HP Turbine Assembly Dimensions
SBE 72-0180: HP Turbine Assembly Dimensions

Figure: Thickness of Spacer
Thickness of Spacer
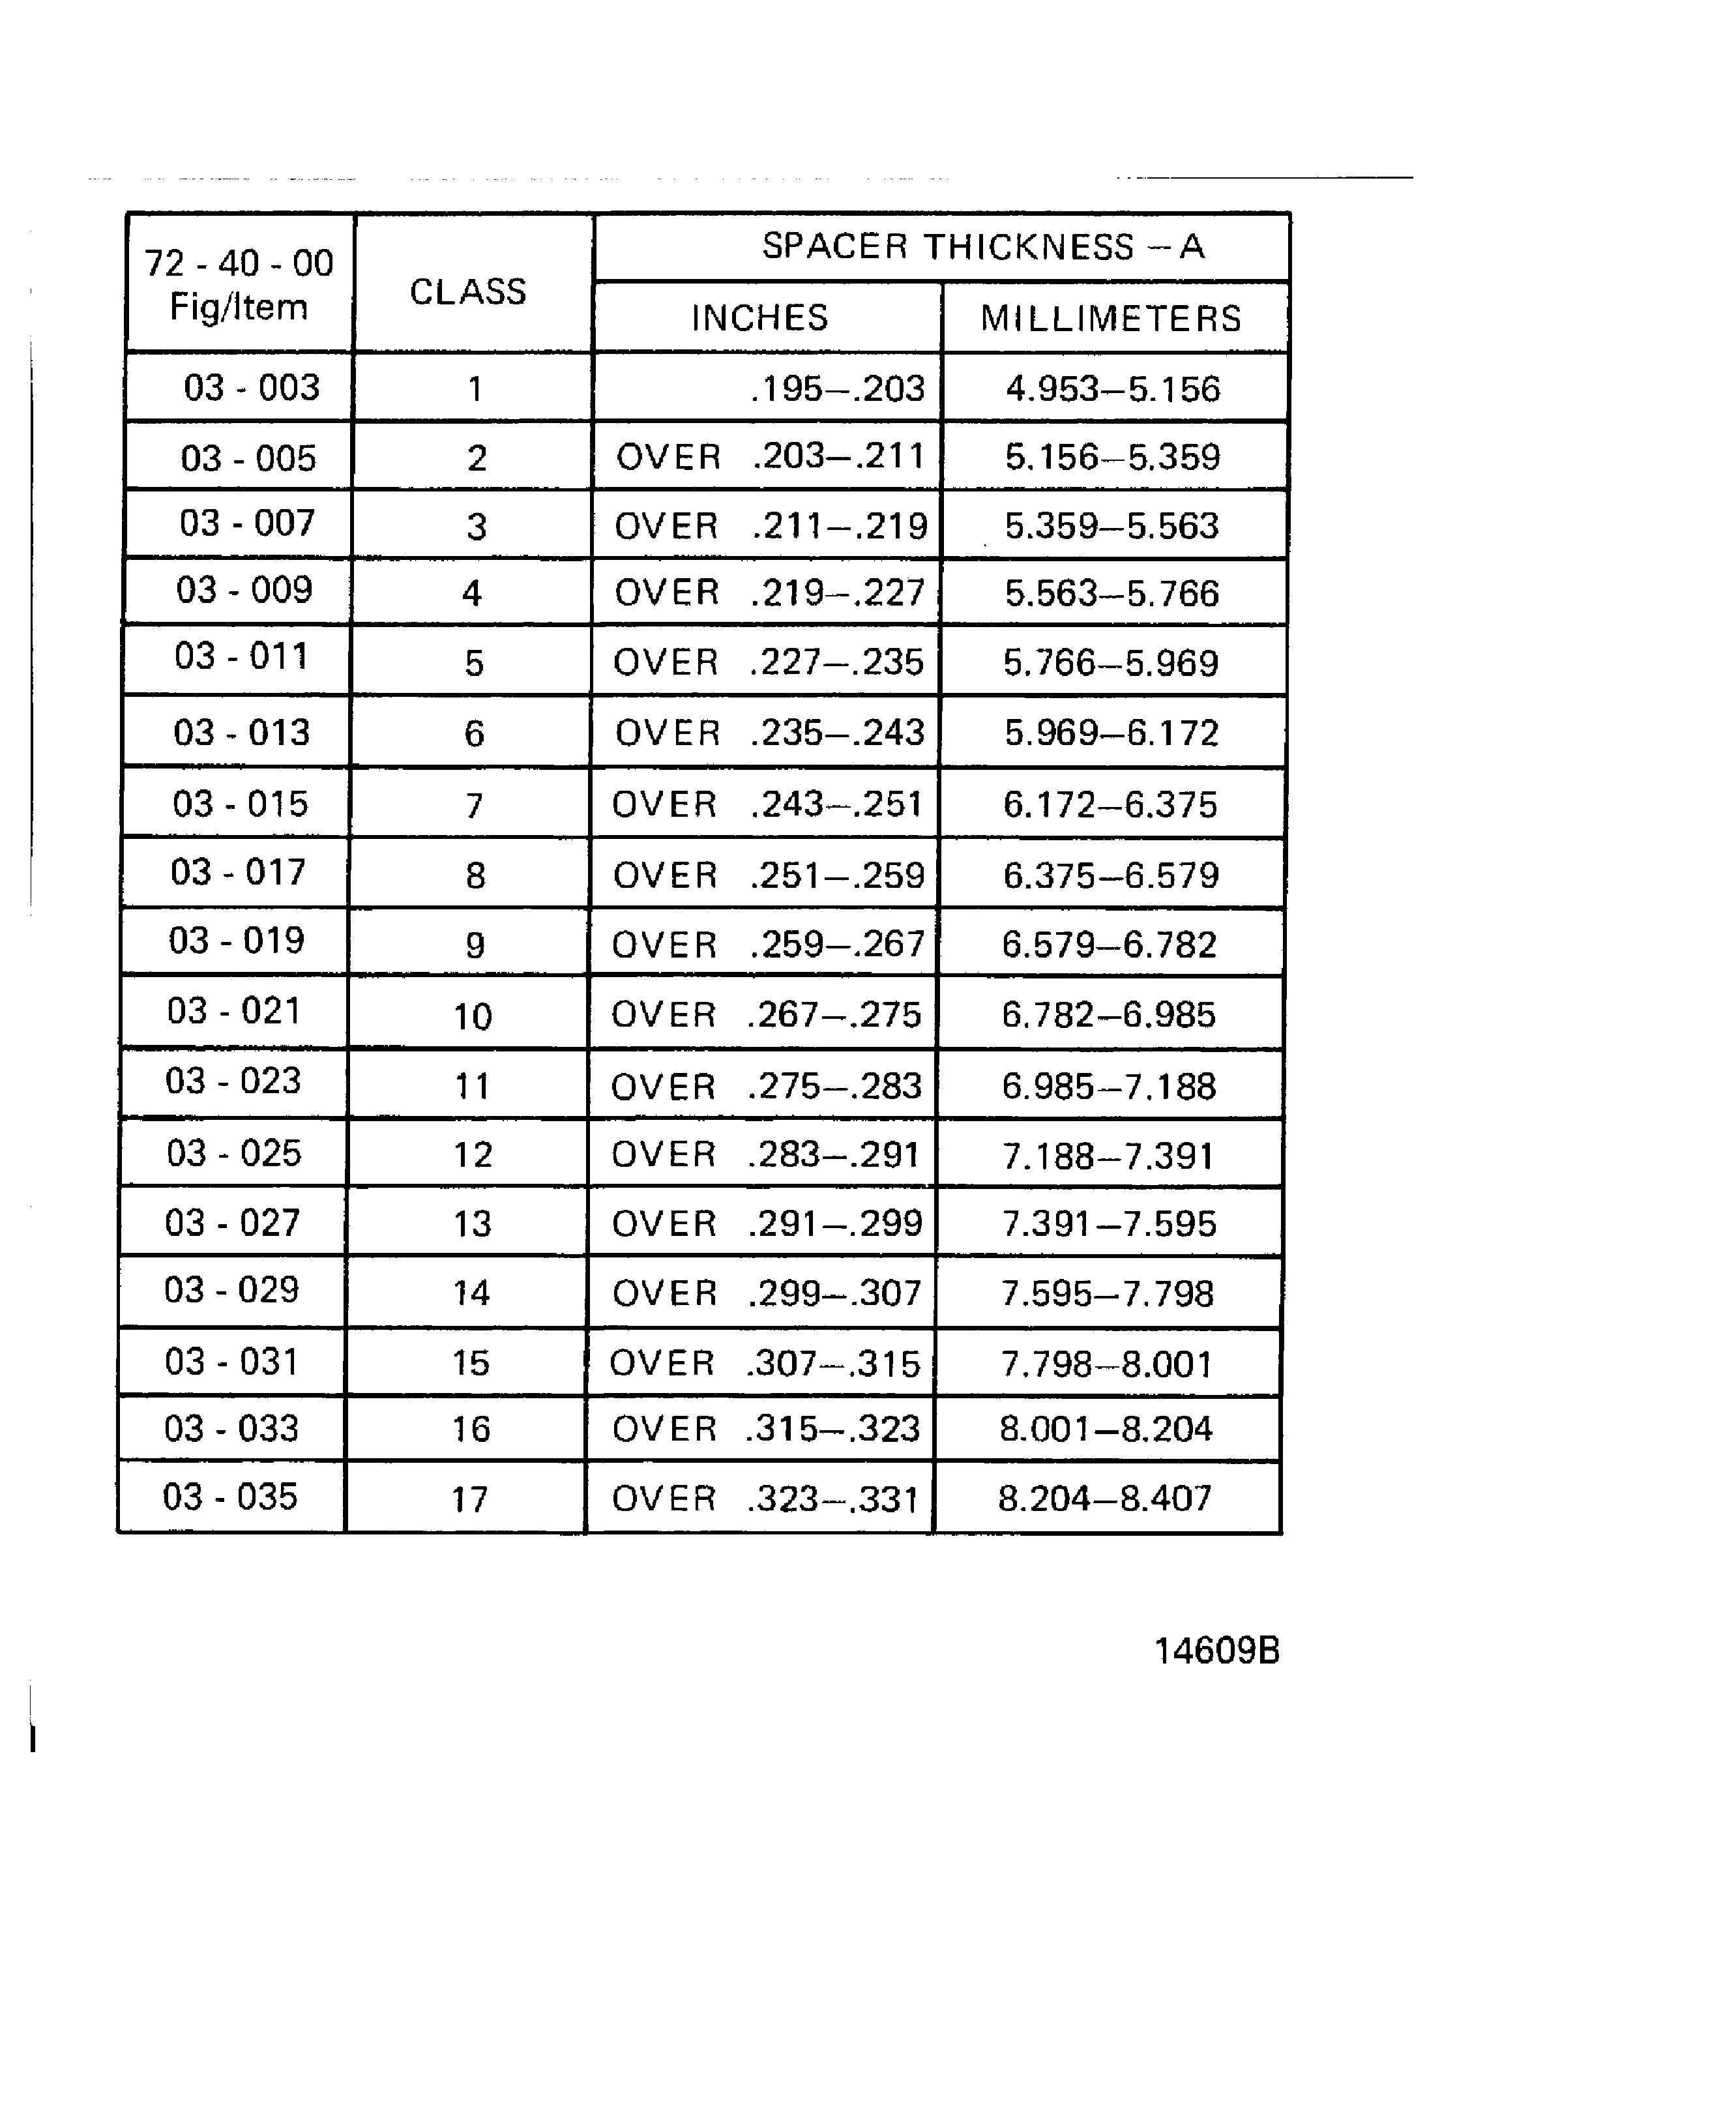
Figure: Machine the Thickness of the Spacer
Machine the Thickness of the Spacer
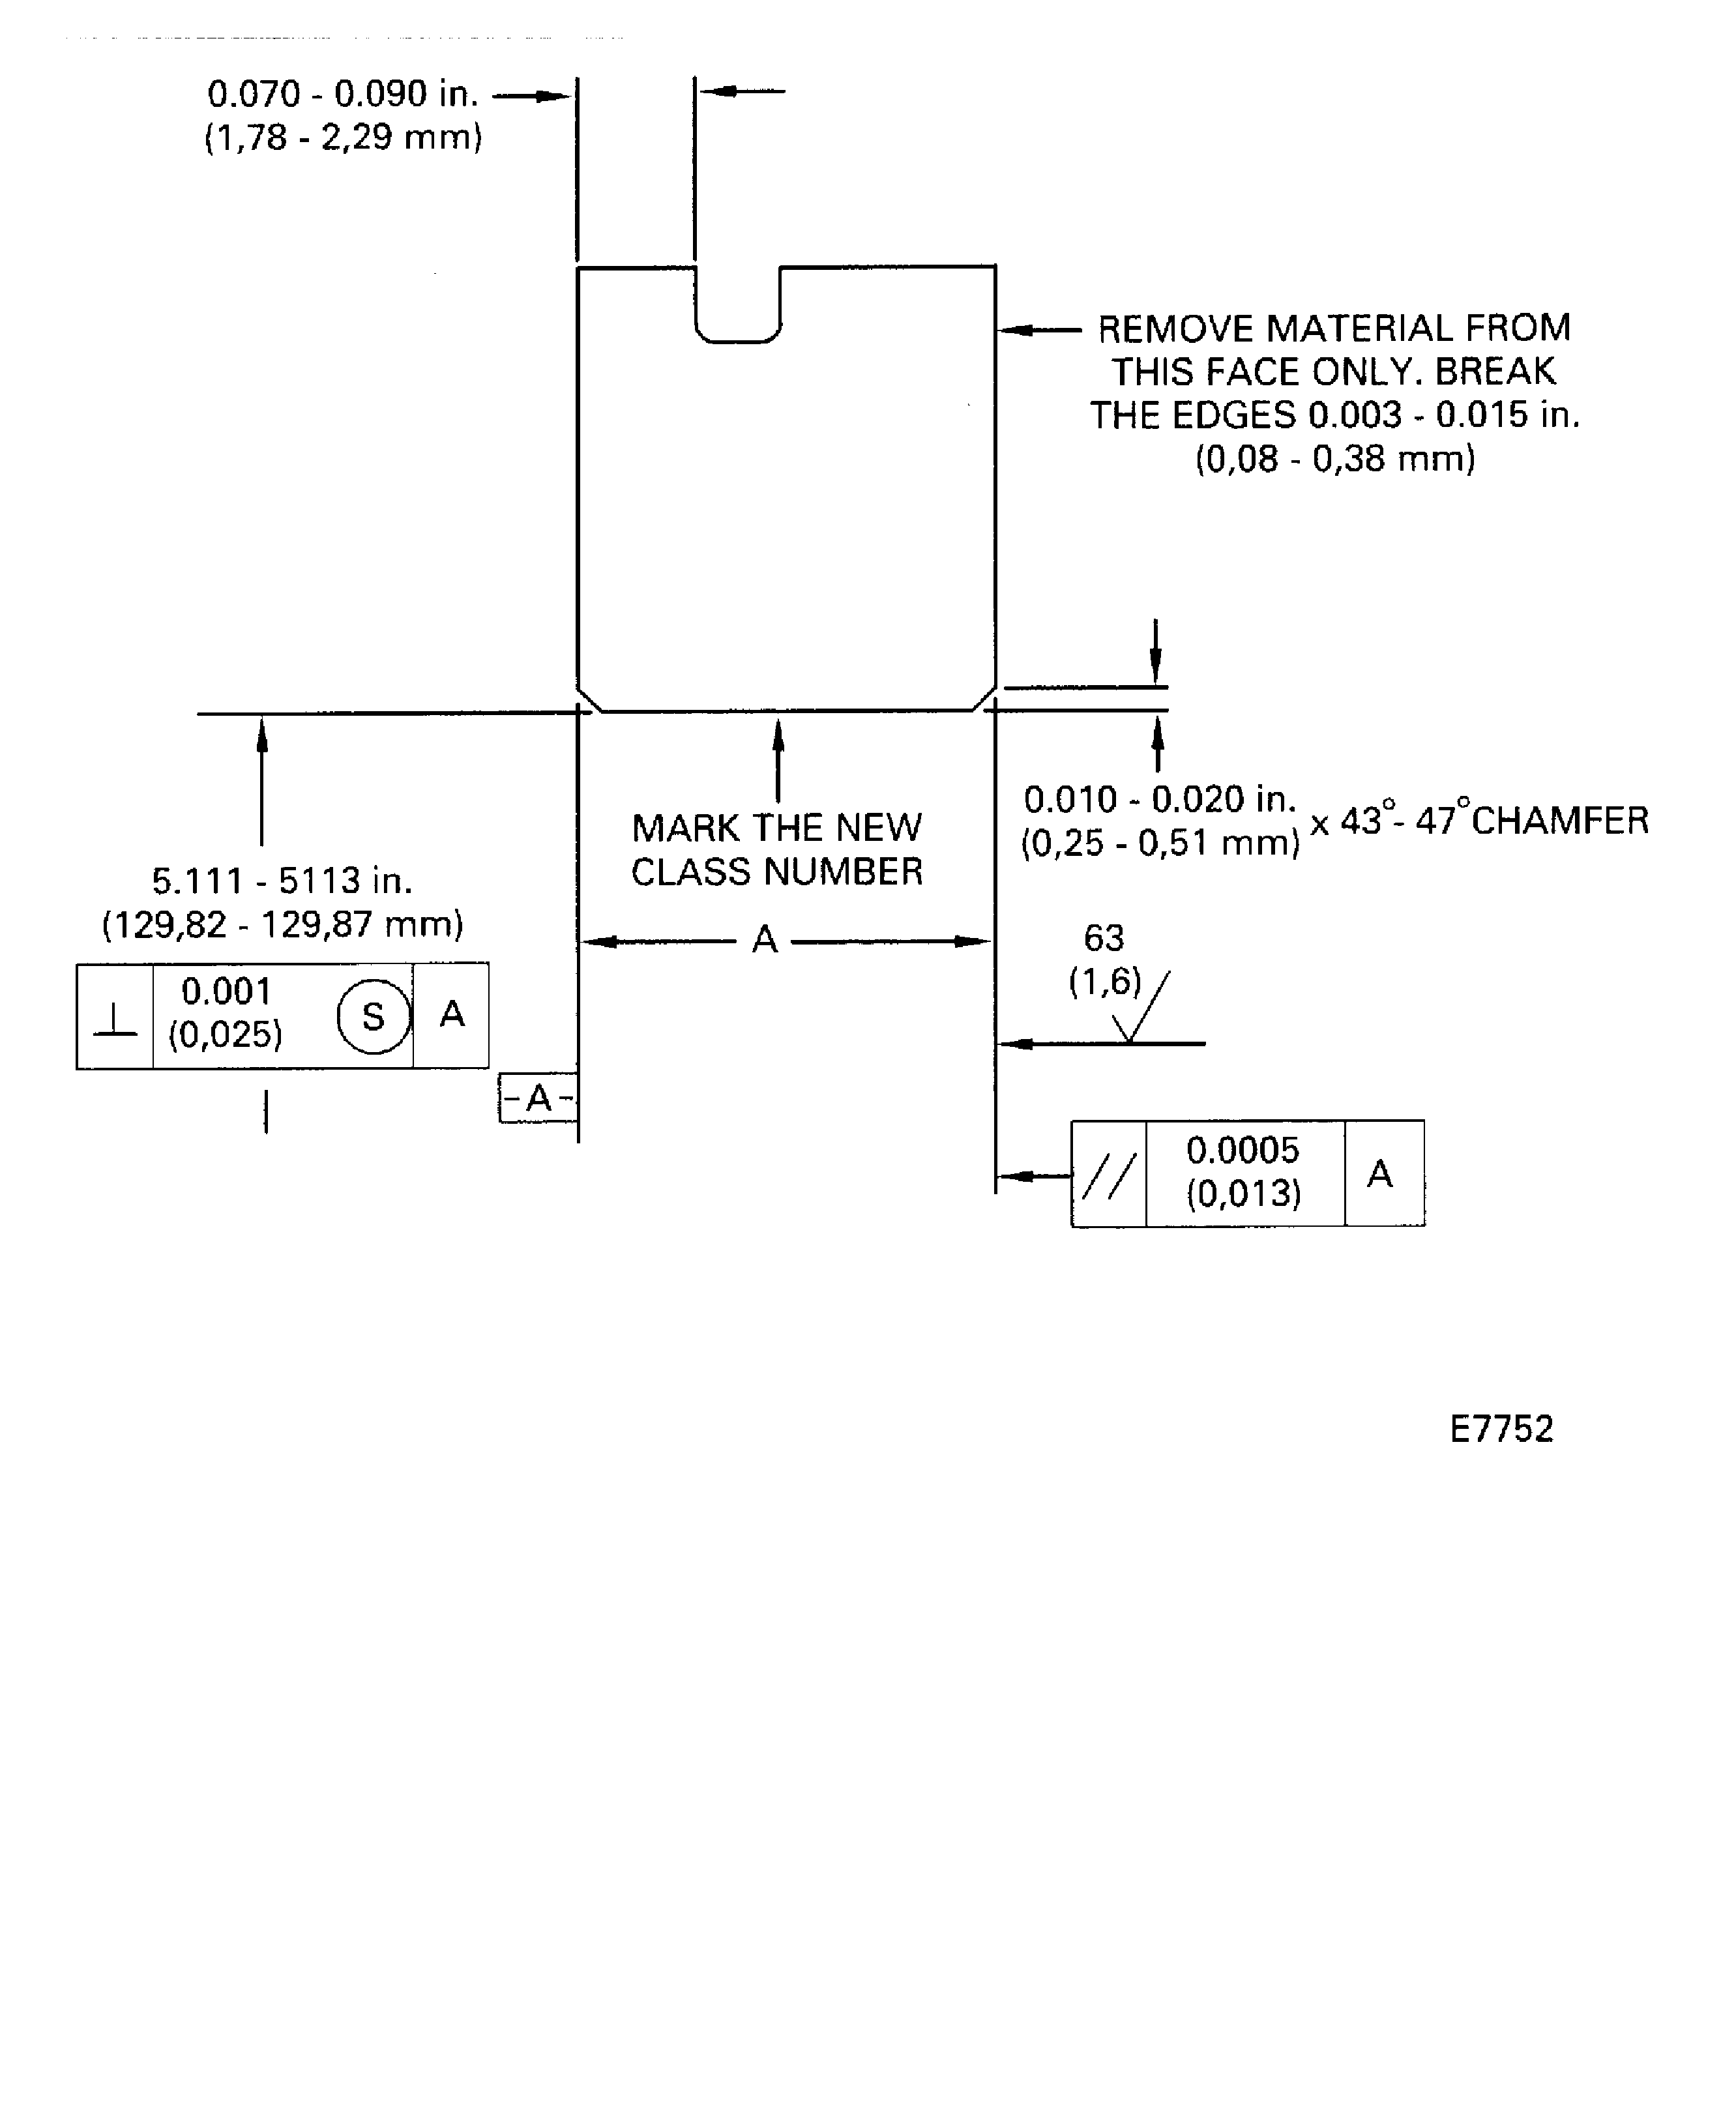
Figure: No. 4 Bearing Spacer Installation
No. 4 Bearing Spacer Installation

Figure: Engine Dimension
Engine Dimension

Figure: Install the HP Turbine Assembly on to the Heater
Install the HP Turbine Assembly on to the Heater
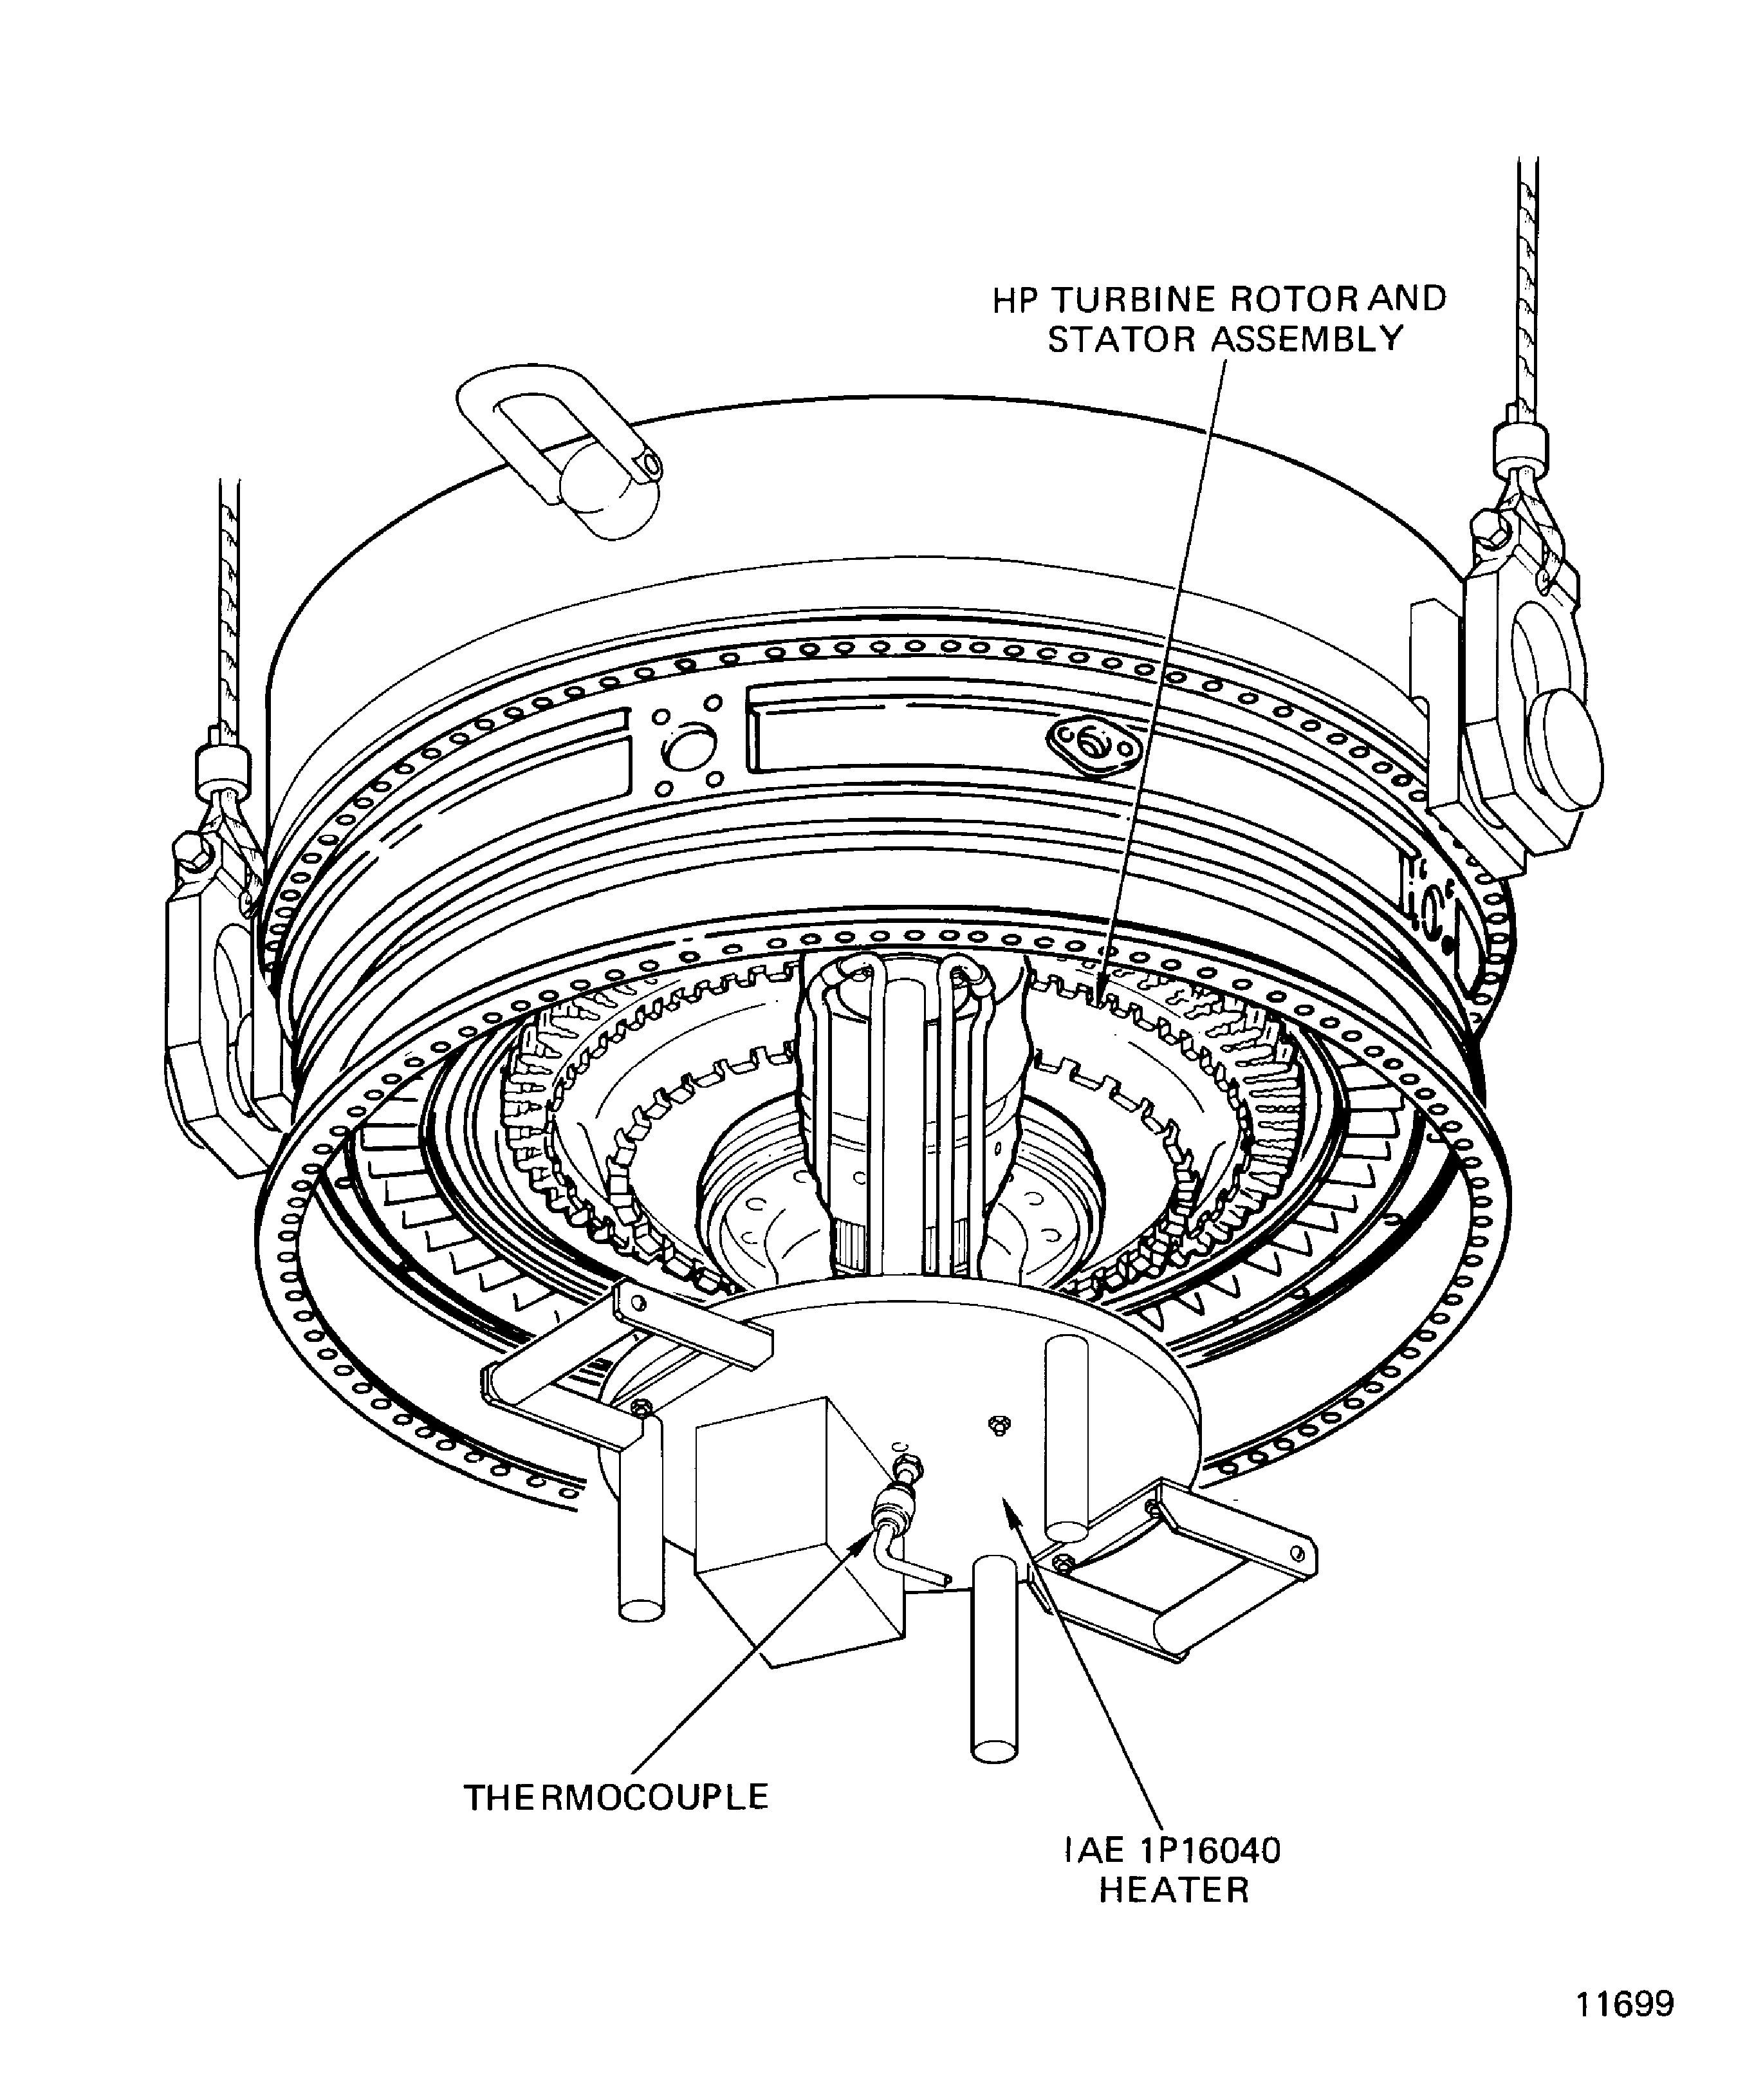
Figure: Puller Installed in HP Compressor Rear Hub
Puller Installed in HP Compressor Rear Hub

Figure: Install the HP Turbine Assembly to the Engine
Install the HP Turbine Assembly to the Engine

Figure: Bearing Retaining Nut
Bearing Retaining Nut

Figure: Install the Bearing Retaining Nut Tooling
Install the Bearing Retaining Nut Tooling

Figure: Retaining Nut Tooling
Retaining Nut Tooling

Figure: Hydraulic Wrench Package
Hydraulic Wrench Package

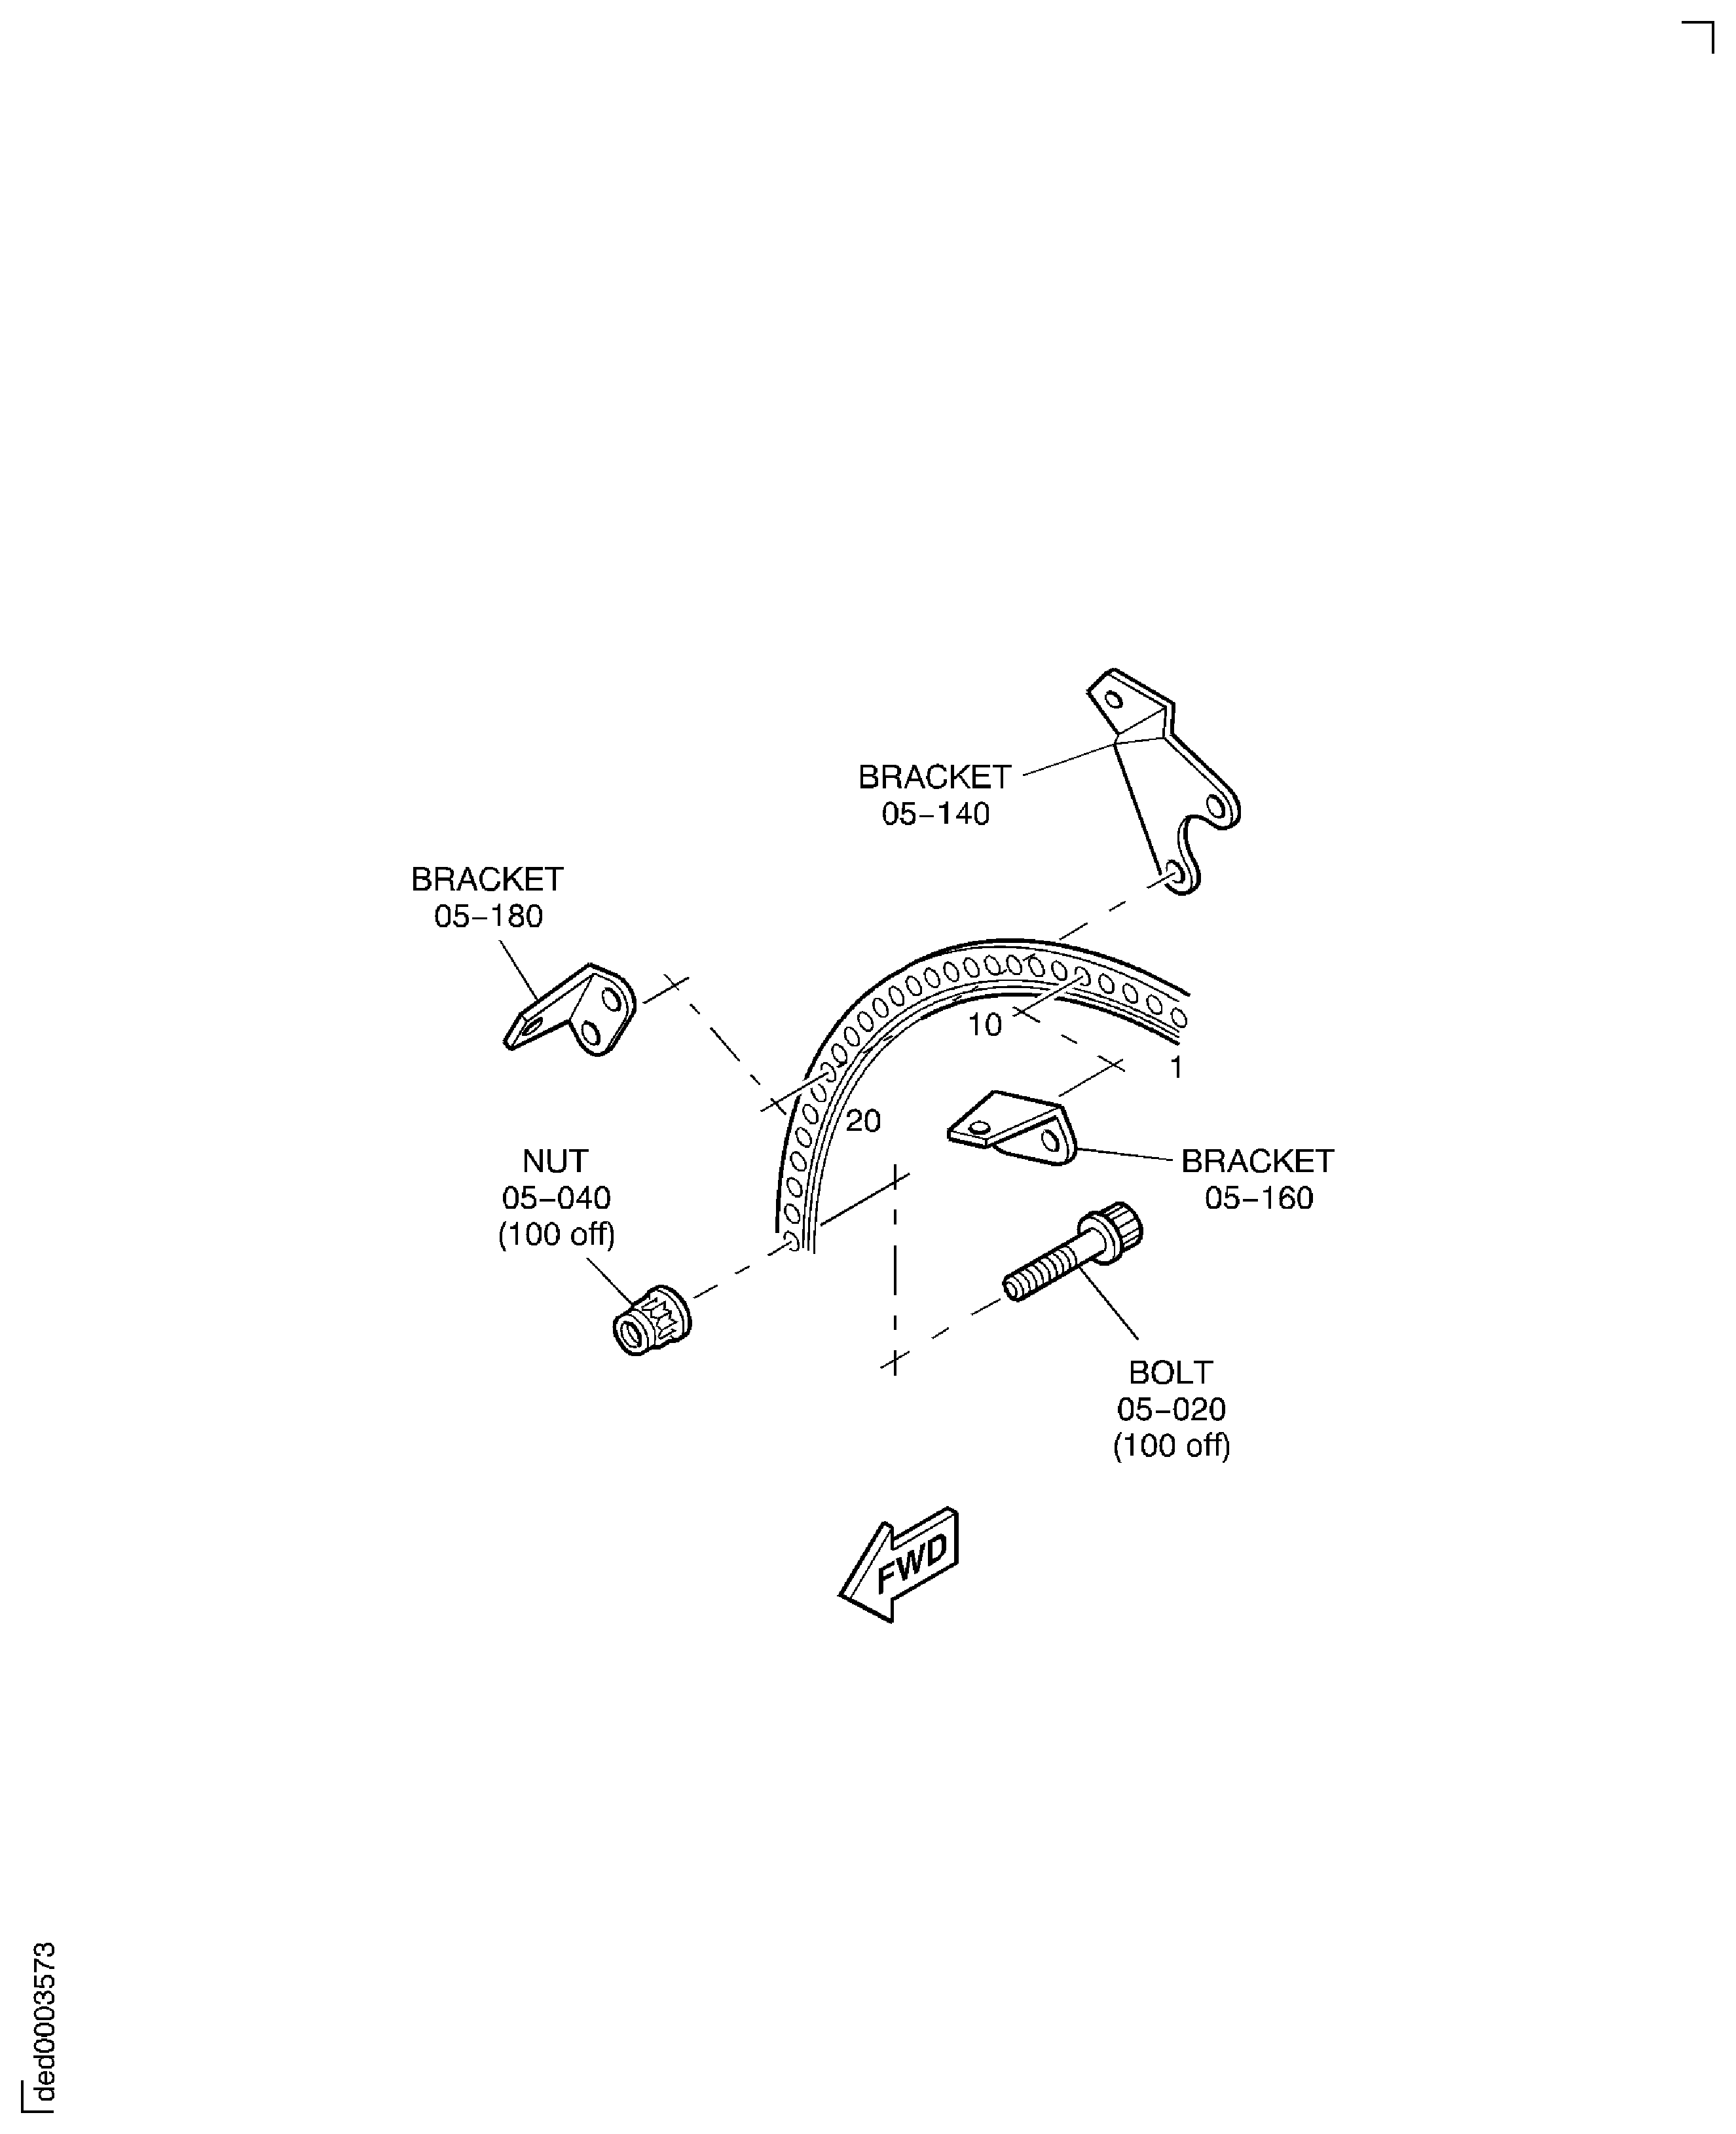
Figure: Install the Brackets to the HP Turbine Case Front Flange
Install the Brackets to the HP Turbine Case Front Flange
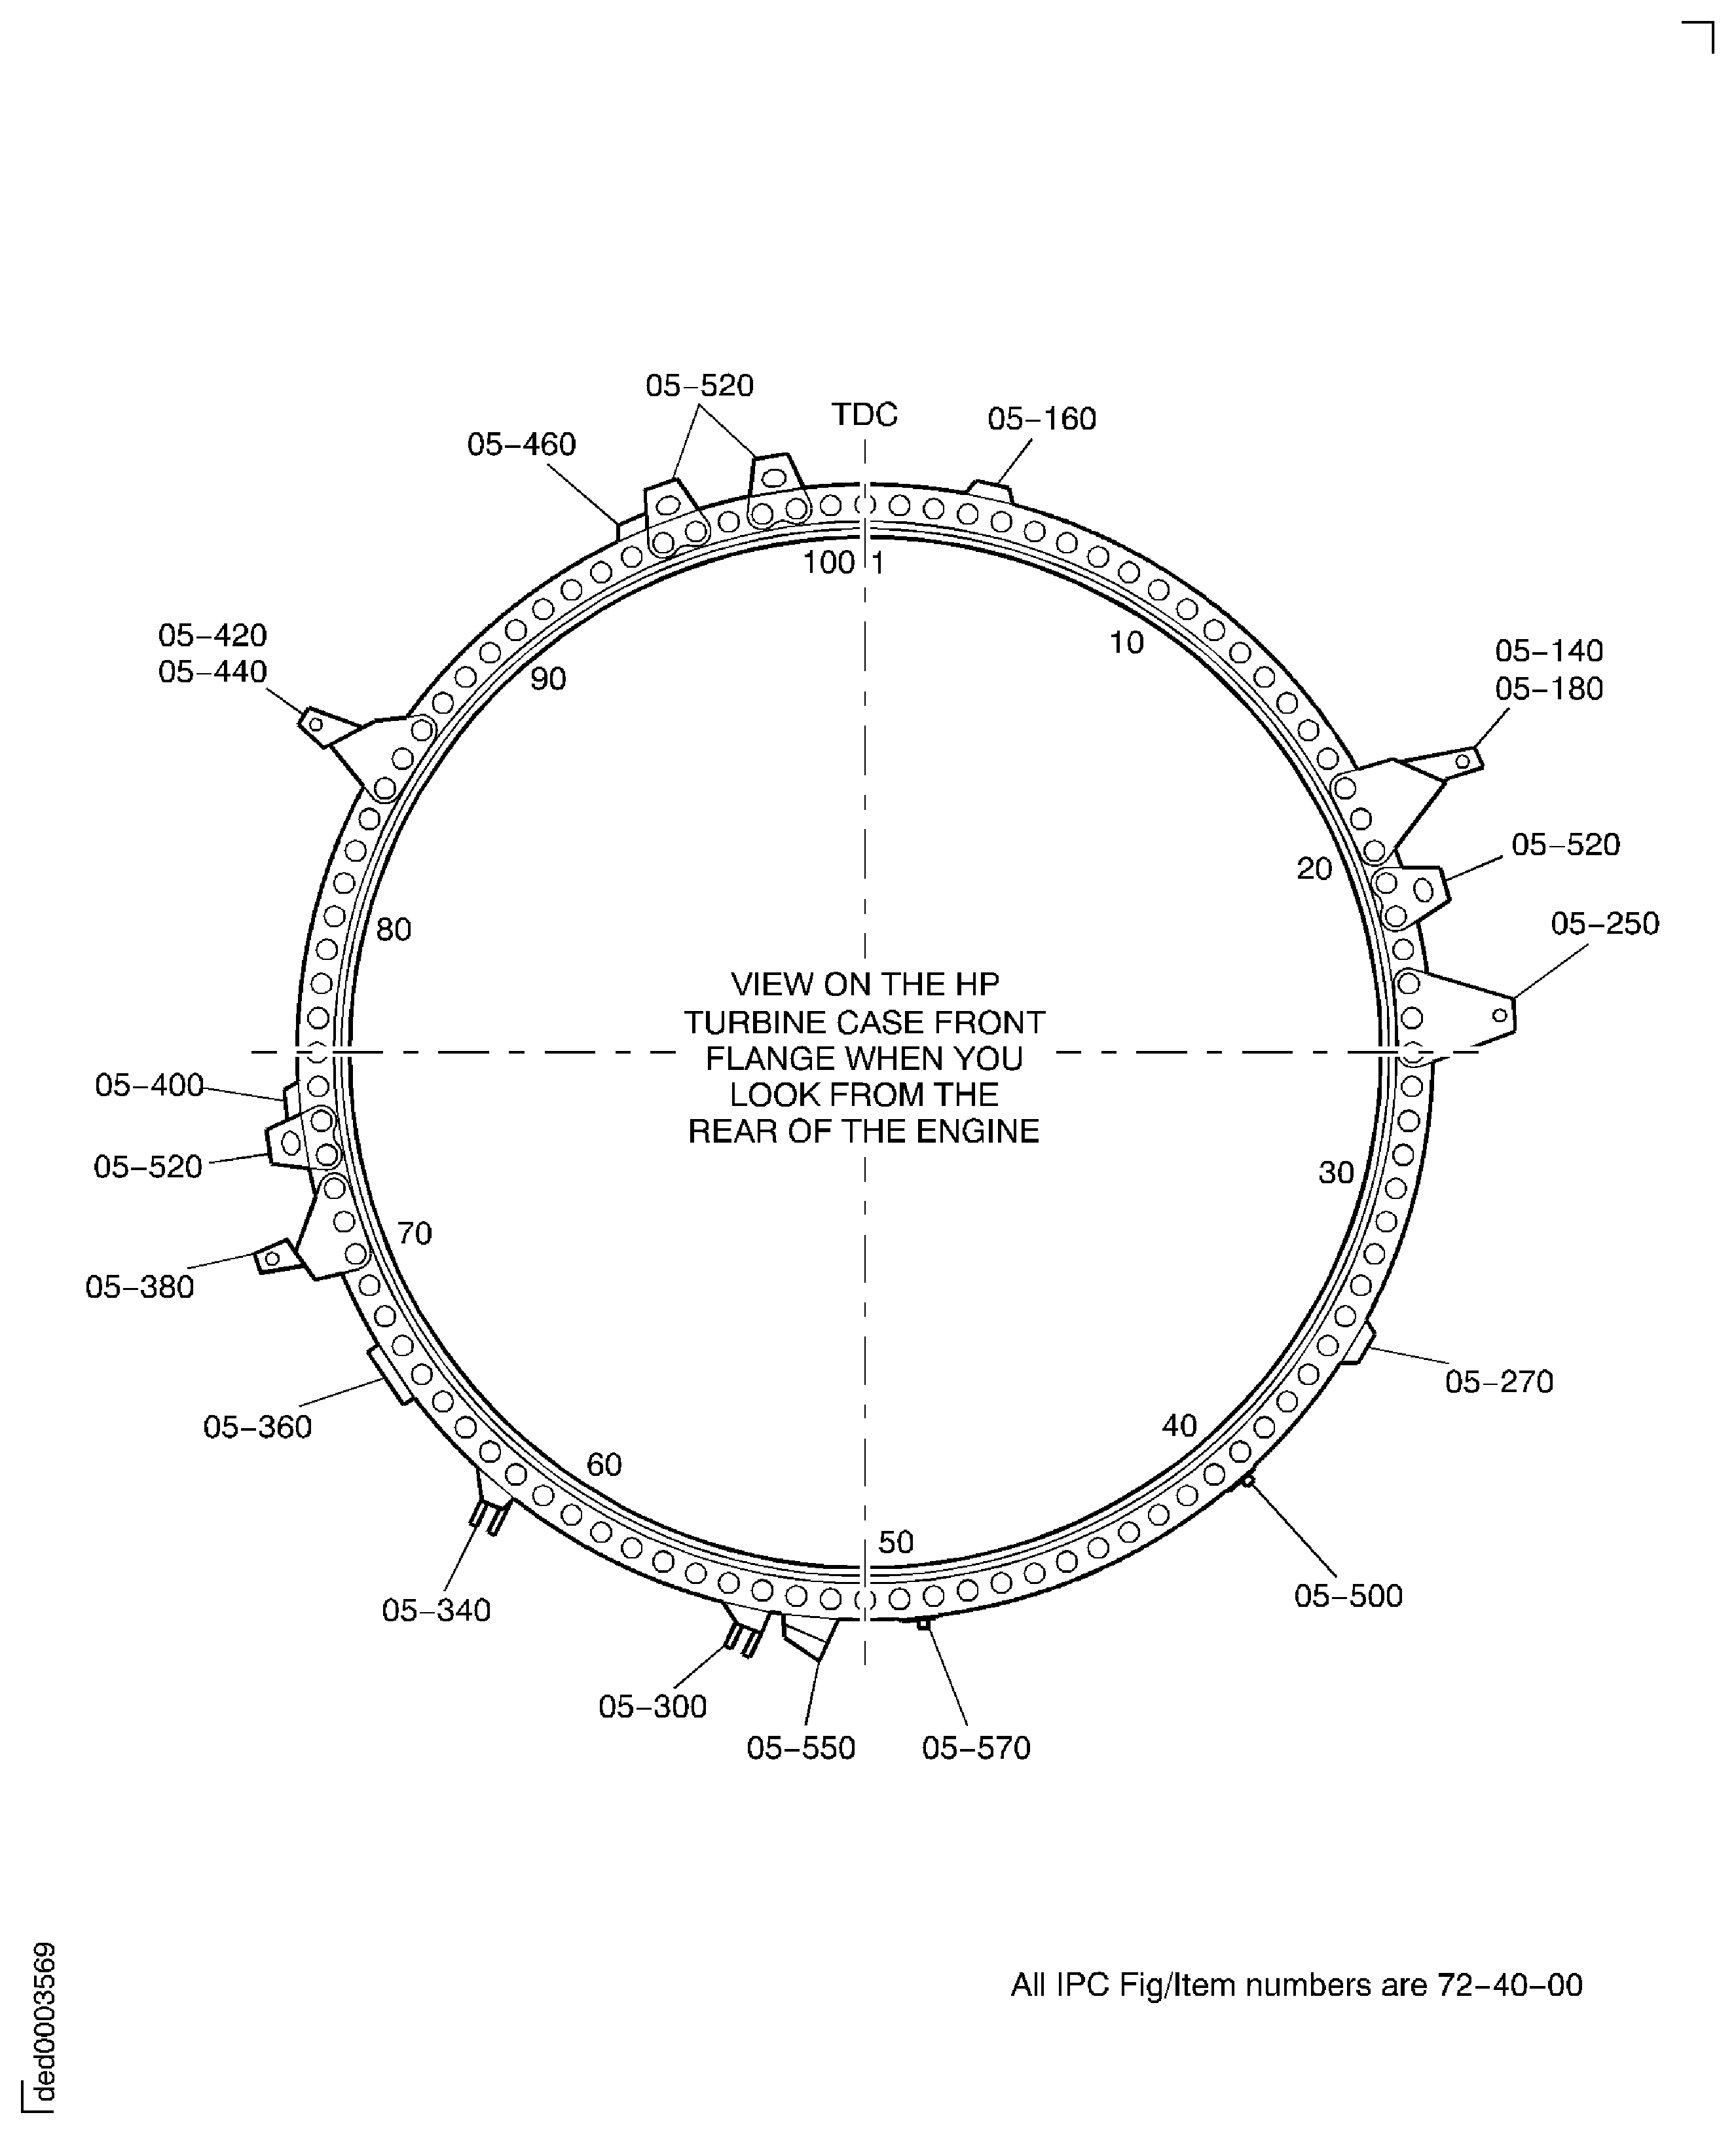
Figure: Install the Brackets to the HP Turbine Case Front Flange
Install the Brackets to the HP Turbine Case Front Flange
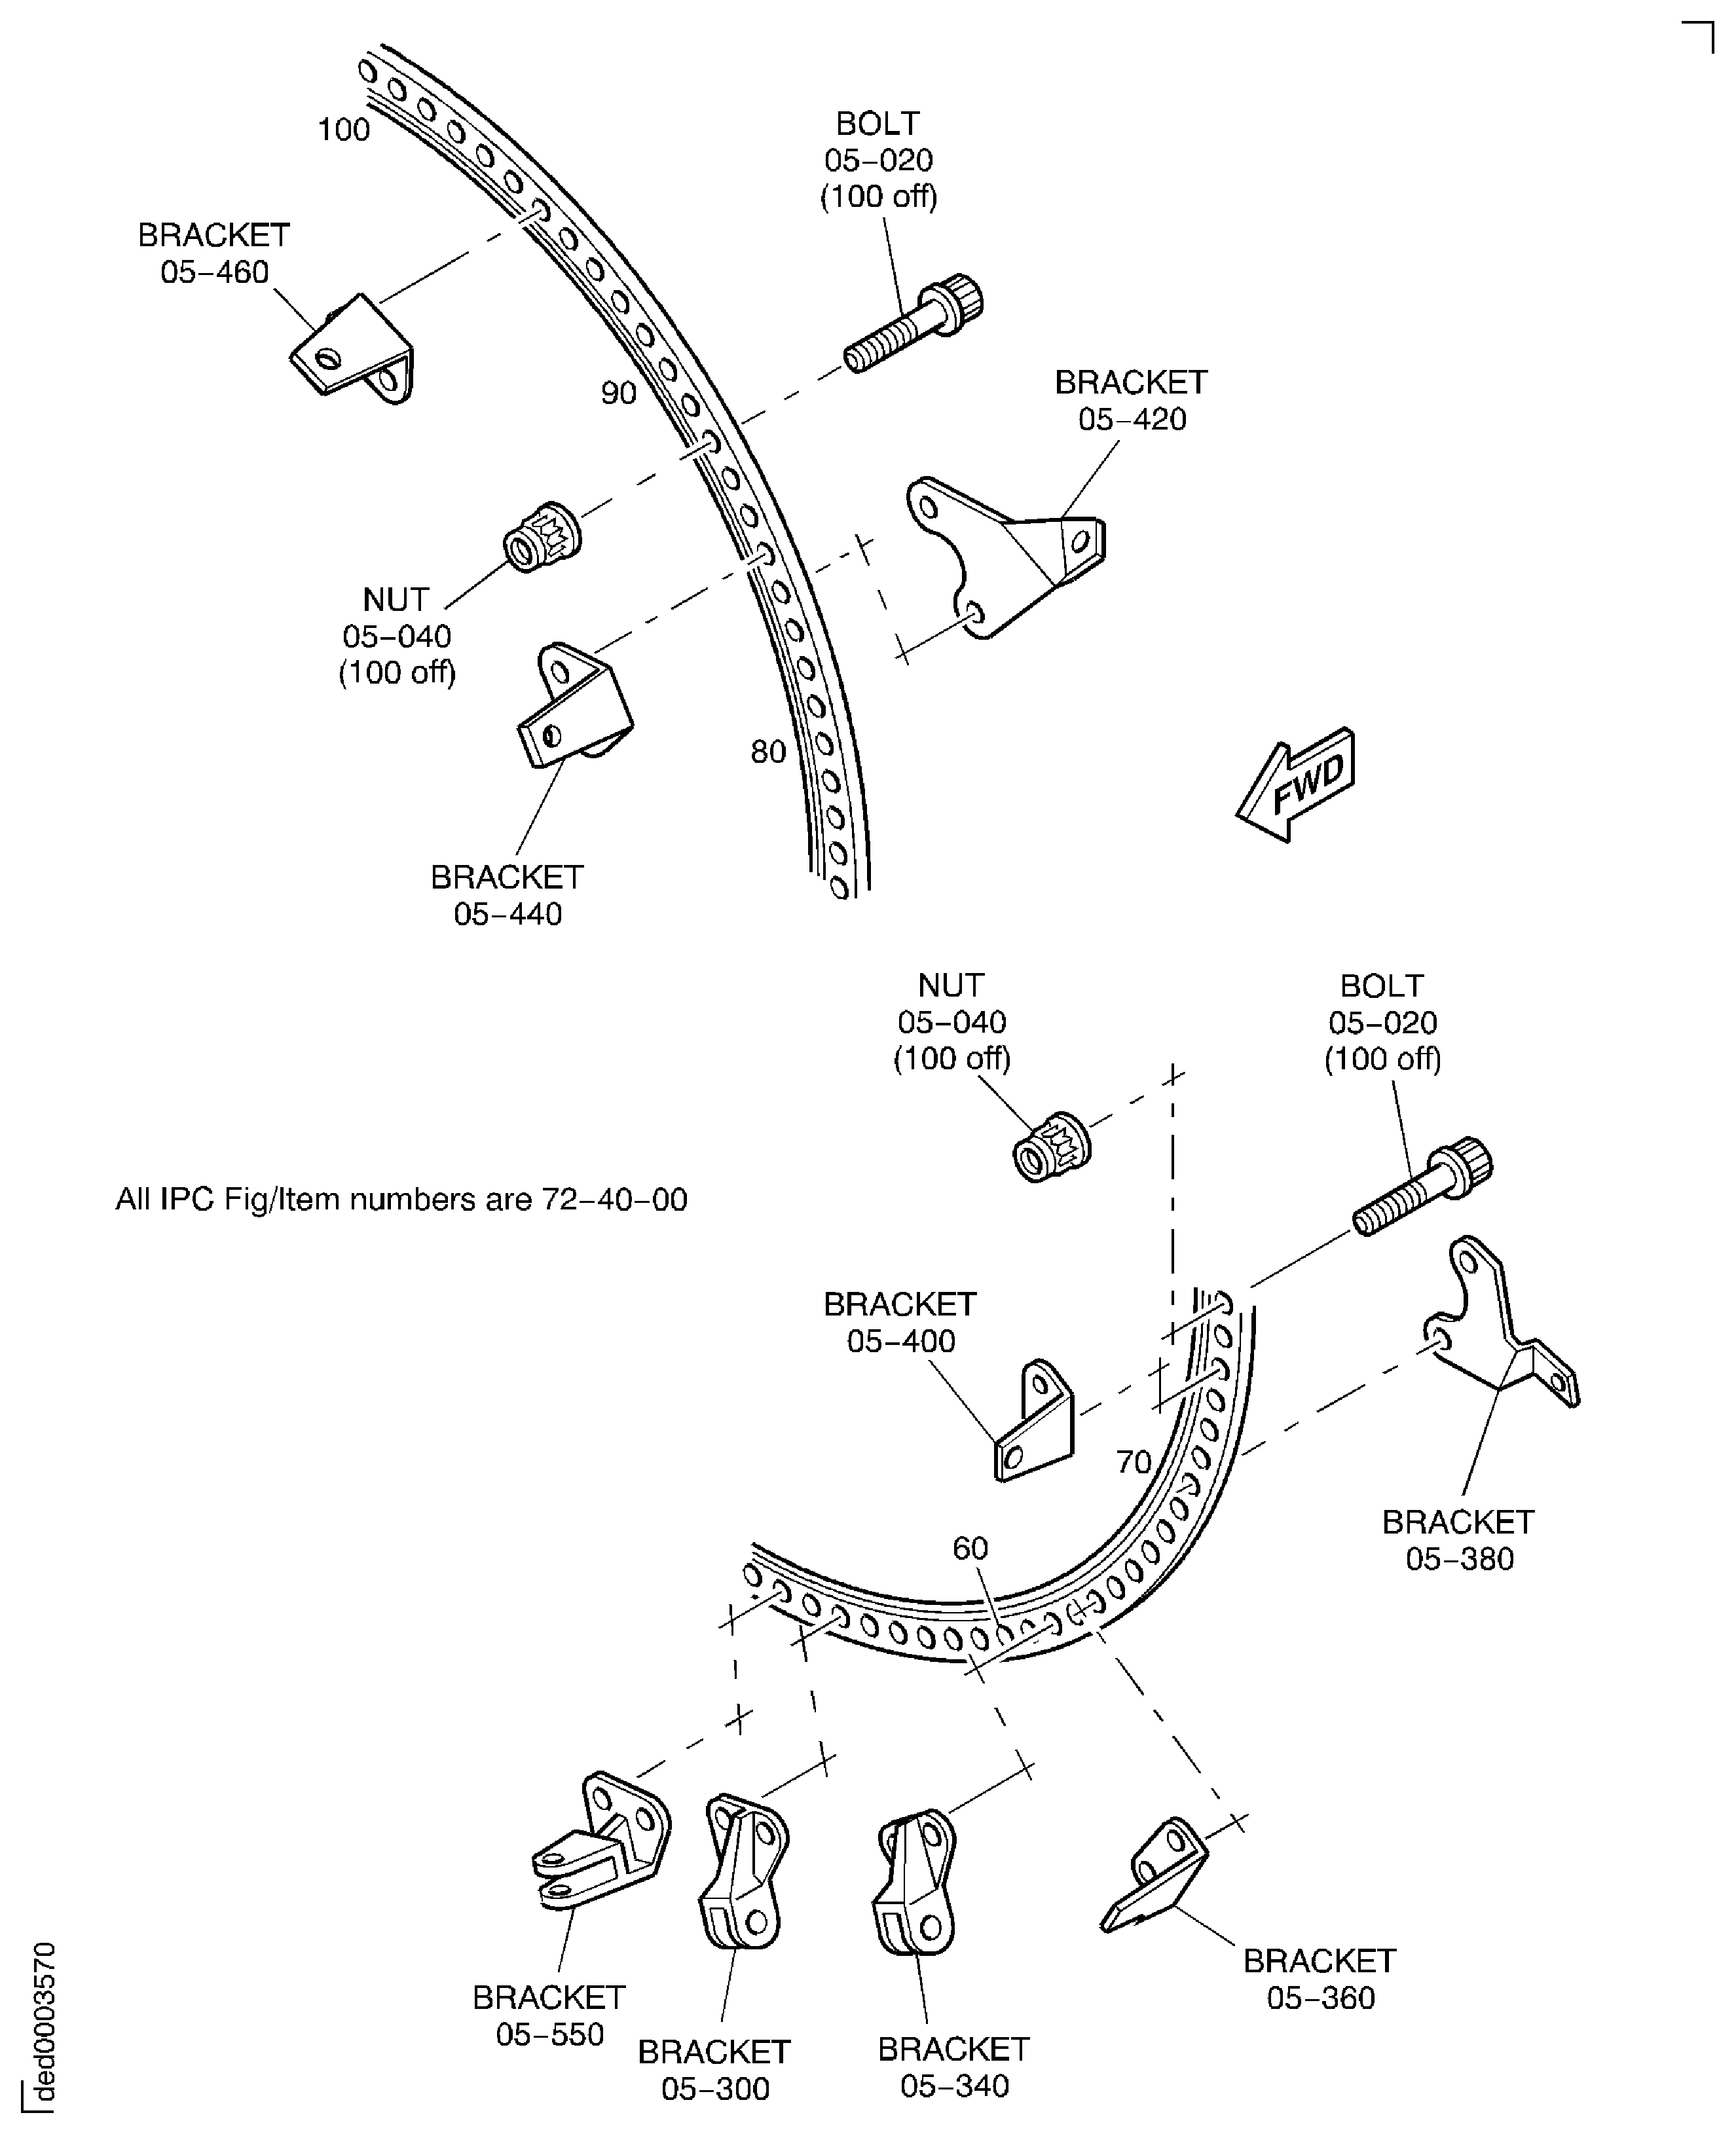
Figure: Install the Brackets to the HP Turbine Case Front Flange
Install the Brackets to the HP Turbine Case Front Flange
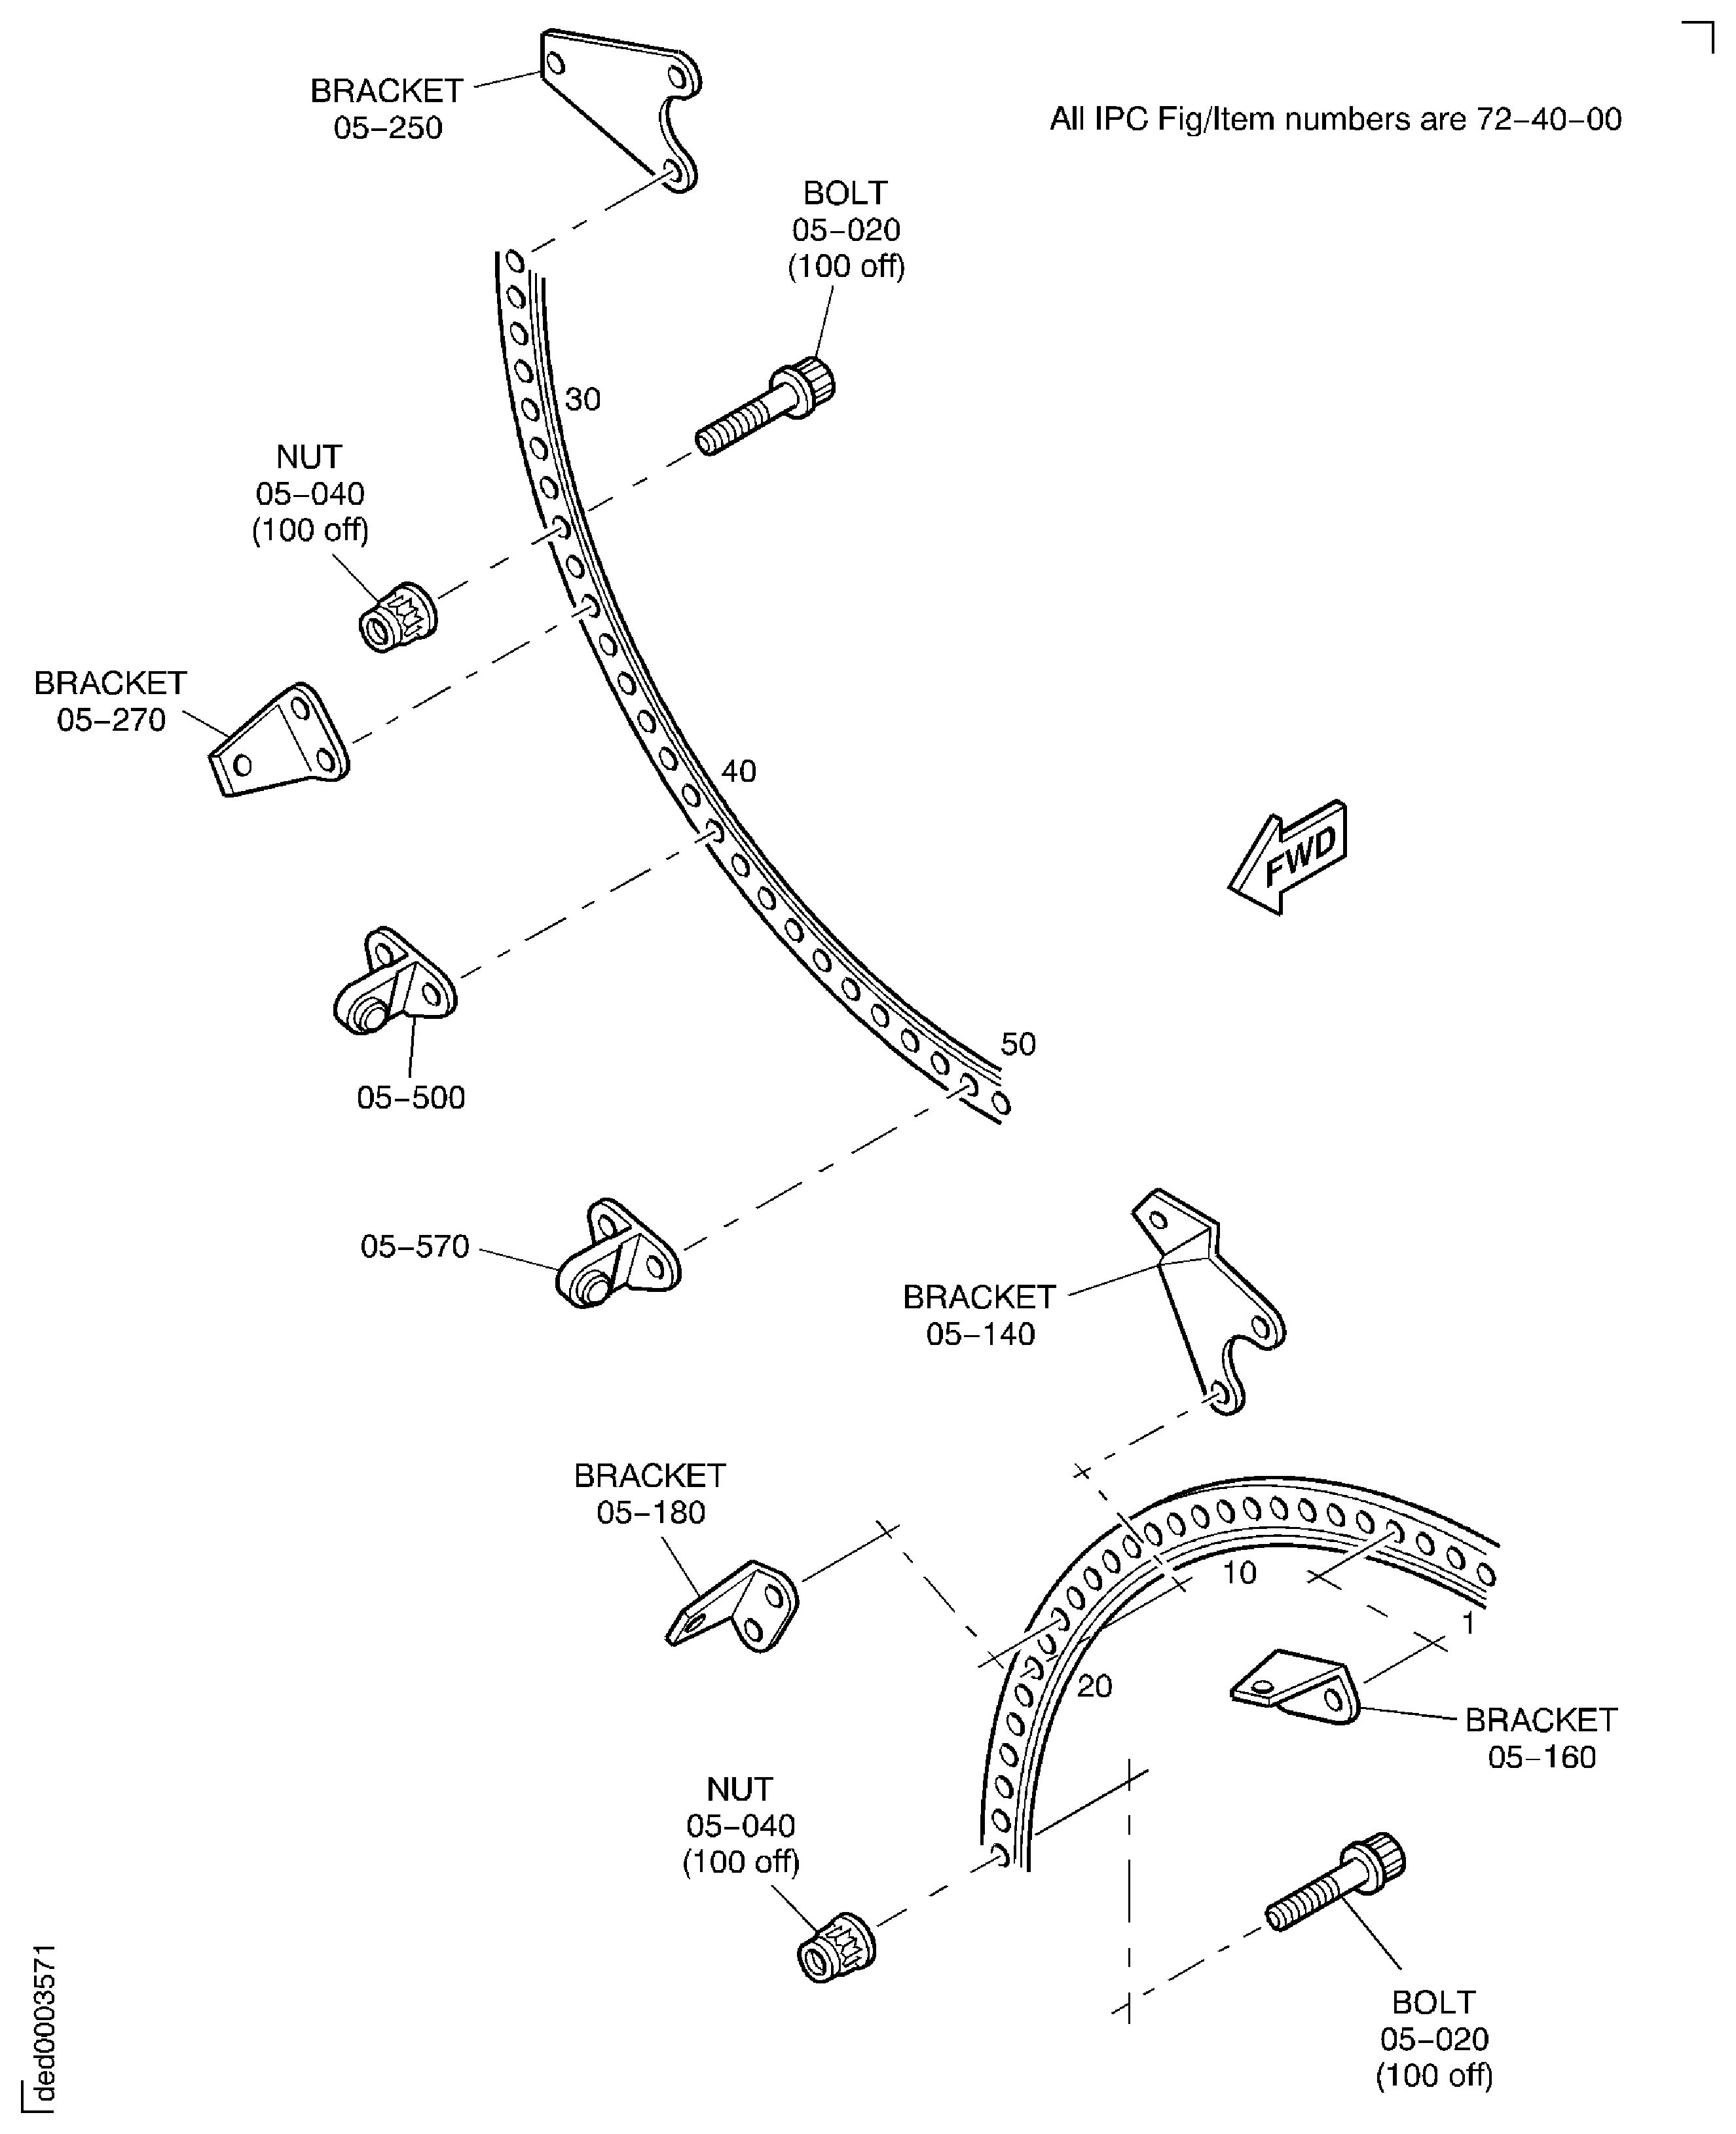
Figure: Install the Brackets to the HP Turbine Case Front Flange
Install the Brackets to the HP Turbine Case Front Flange
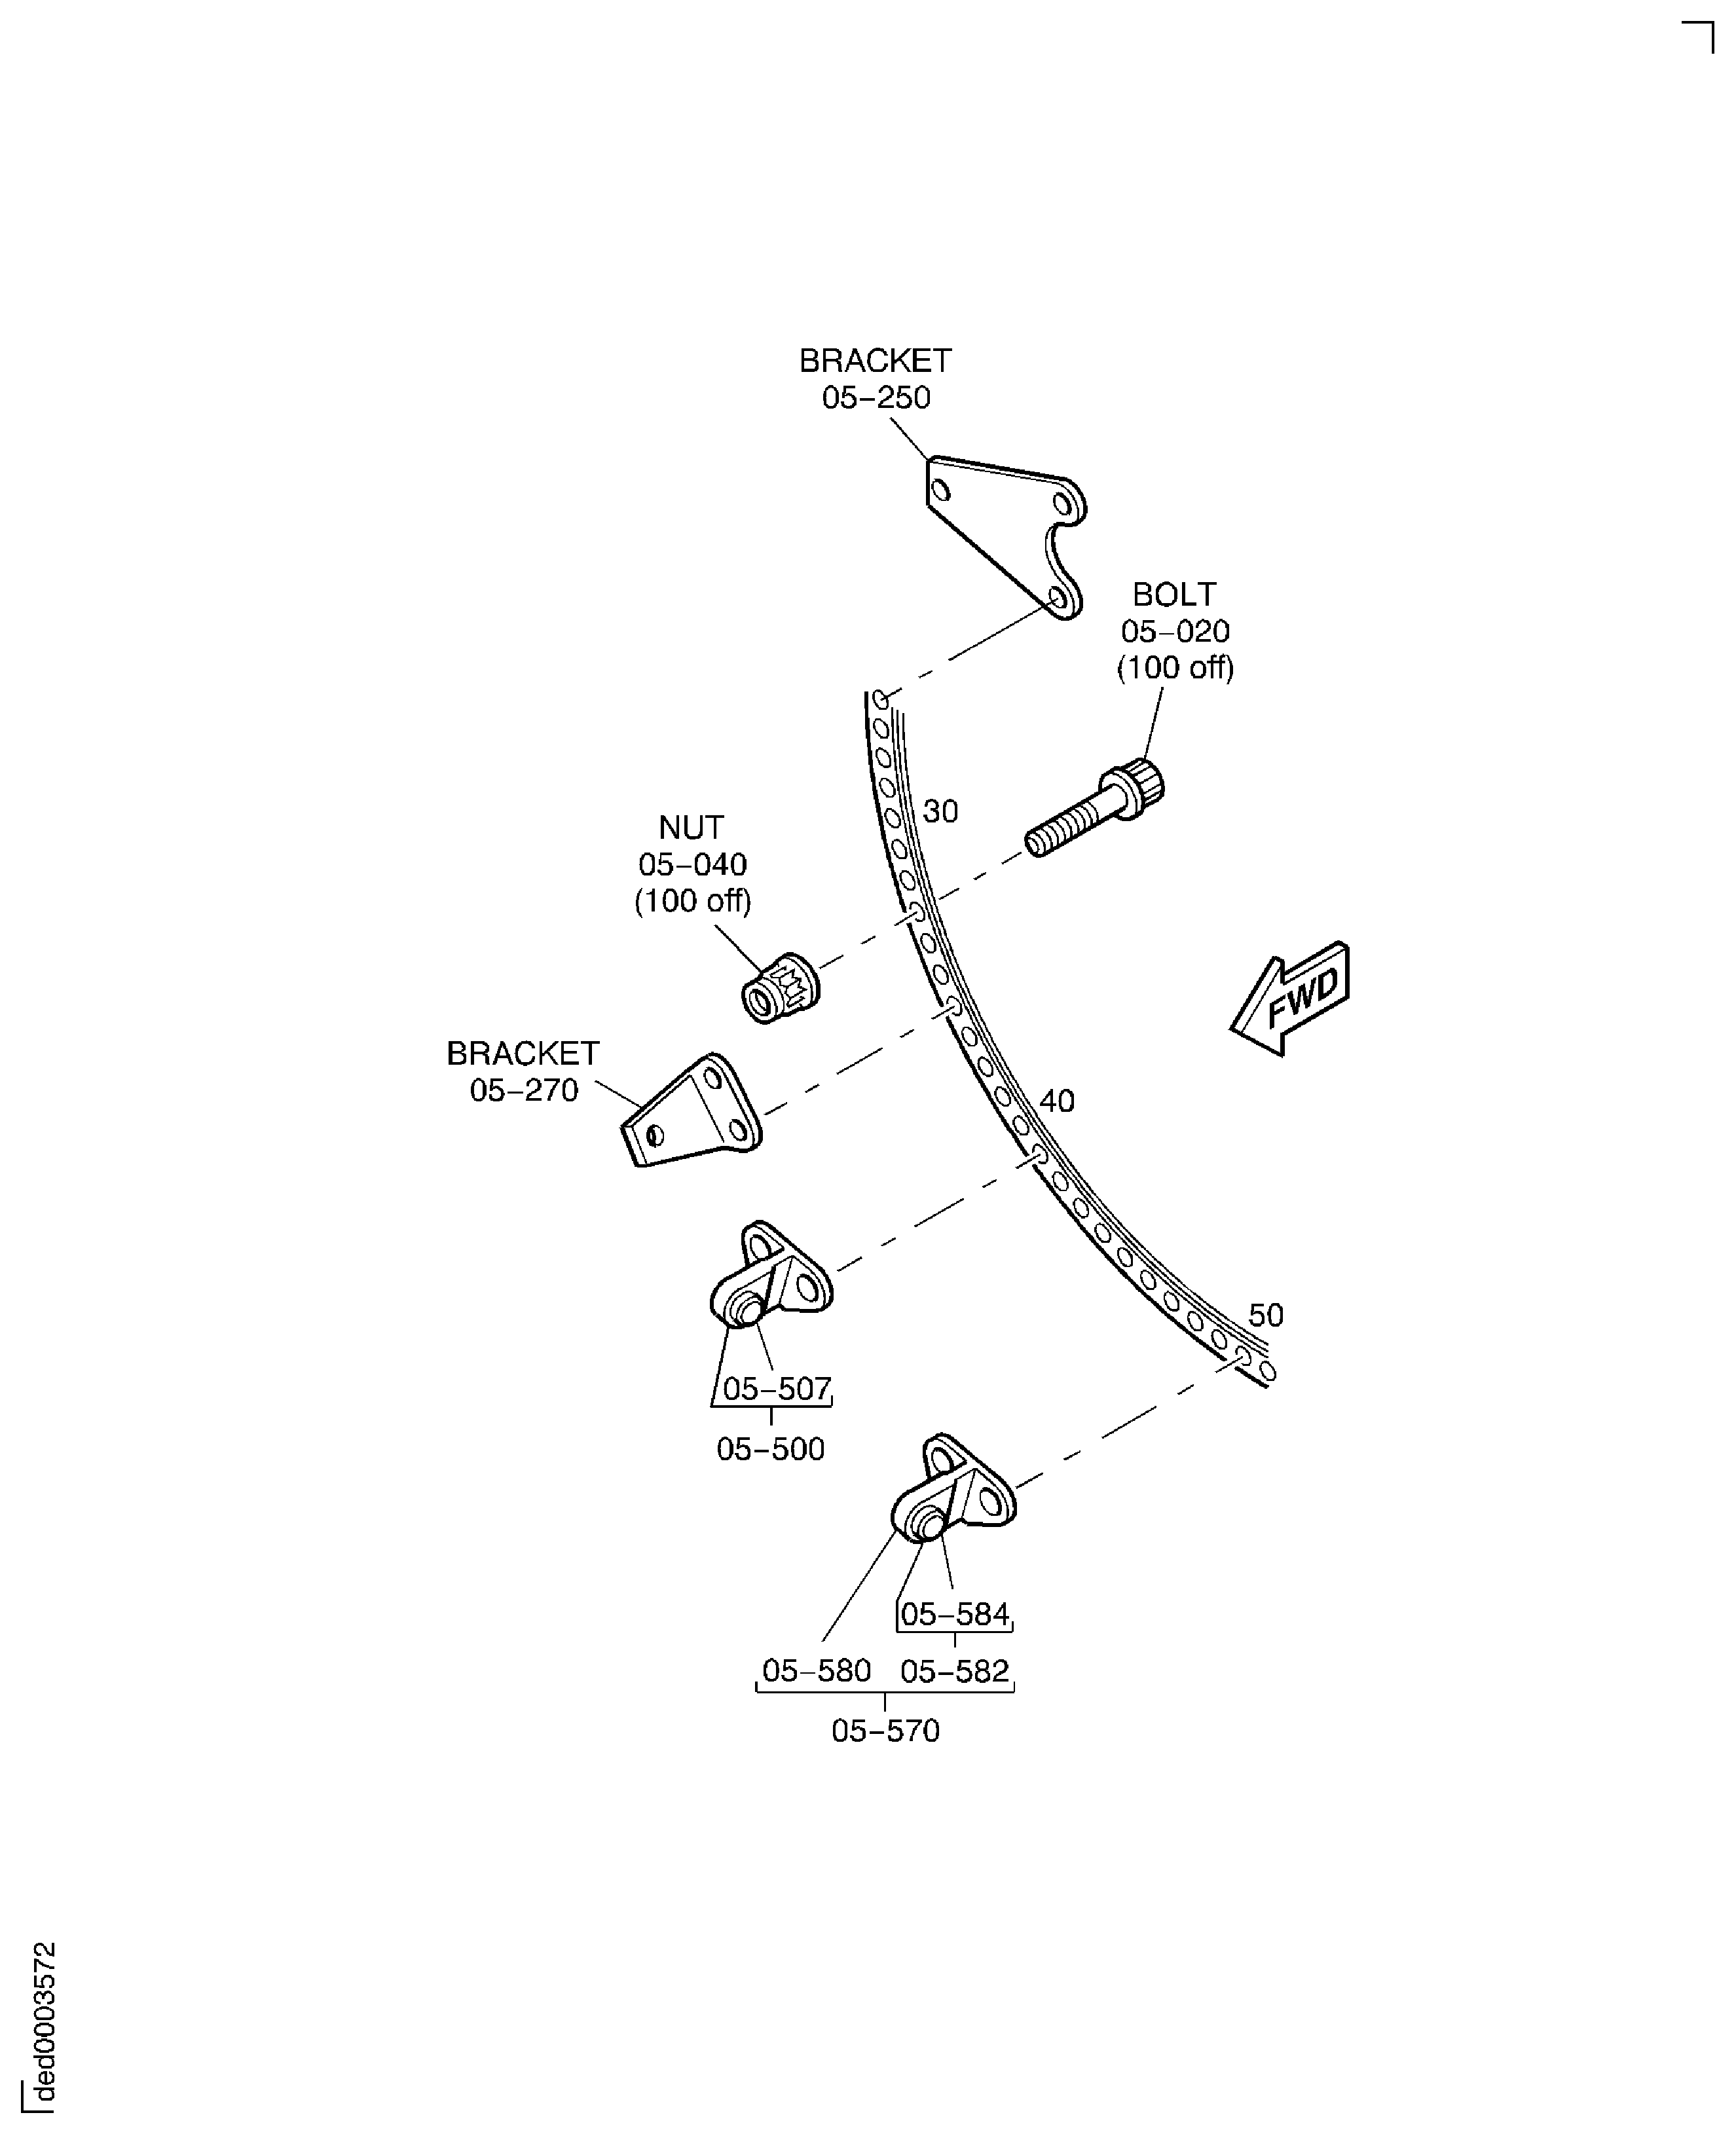
Figure: Install the Brackets to the HP Turbine Case Front Flange
Install the Brackets to the HP Turbine Case Front Flange
