Export Control
EAR Export Classification: Not subject to the EAR per 15 C.F.R. Chapter 1, Part 734.3(b)(3), except for the following Service Bulletins which are currently published as EAR Export Classification 9E991: SBE70-0992, SBE72-0483, SBE72-0580, SBE72-0588, SBE72-0640, SBE73-0209, SBE80-0024 and SBE80-0025.Copyright
© IAE International Aero Engines AG (2001, 2014 - 2021) The information contained in this document is the property of © IAE International Aero Engines AG and may not be copied or used for any purpose other than that for which it is supplied without the express written authority of © IAE International Aero Engines AG. (This does not preclude use by engine and aircraft operators for normal instructional, maintenance or overhaul purposes.).Applicability
All
Common Information
TASK 72-45-21-200-001 HPT Case - Examine, Inspection-001
Effectivity
FIG/ITEM | PART NO. |
|---|---|
01-010 | 2A0250 |
01-010 | 2A0250SL87VA156 |
01-010 | 2A1591 |
01-010 | 2A1591SL87VA156 |
01-010 | 2A1600 |
01-010 | 2A1600SL114902 |
General
This TASK gives the procedure for the inspection of the turbine case assembly. For other turbine case assembly parts, refer to TASK 72-45-21-200-000 (INSPECTION-000).
Fig/item numbers in parentheses in the procedure agree with those used in the IPC.
The policy that is necessary for check is given in the SPM TASK 70-20-01-200-501.
All the parts must be cleaned before any part is examined. Refer to the SPM TASK 70-11-03-300-503.
All parts must be visually examined for damage, corrosion and wear. Any defects that are not identified in the procedure must be referred to IAE.
The procedure for those which must have a crack test is given in Step. Do the test before the part is visually examined. Limits for cracks are given in the SUBTASK for each part.
A ** following repair in this inspection indicates that the repair is not yet published in the current revision of the manual and the part must be rejected. Contact IAE for additional information concerning FAA approved repair date.
Do not discard any part until you are sure there are no repairs available. Refer to the instructions in Repair before a discarded part is used again or oversize parts are installed.
Parts which should be discarded can be held although no repair is available. The repair of a discarded part could be shown to be necessary at a later date.
All parts must be examined to make sure that all repairs have been completed satisfactorily.
The practices and processes referred to in the procedure by the TASK numbers are in the SPM.
References
Refer to the SPM for data on these items.
Definitions of Damage, SPM TASK 70-02-02-350-501
Inspection of Parts, SPM TASK 70-20-01-200-501.
Some data on these items is contained in this TASK. For more data on these items refer to the SPM.
Method of Testing for Crack Indications.
Chemical Processes.
Surface Protection.
Preliminary Requirements
Pre-Conditions
NONESupport Equipment
NONEConsumables, Materials and Expendables
NONESpares
NONESafety Requirements
NONEProcedure
Clean the parts. Refer to TASK 72-45-21-100-000 (CLEANING-000).
Repair, VRS1487 TASK 72-45-21-300-010 (REPAIR-010)
NOTE
Use VRS1487 if the cracks increase radially outward from the bolt hole surface. Cracks occur at the bolt hole inner diameter surface are not repairable by VRS1487.
Radially outward cracking from front flange bolt hole.
Other than in Step.
Cracked
SUBTASK 72-45-21-230-051 Examine the Turbine Case Assembly (01-010) for Cracks
Repair, VRS1472 TASK 72-45-21-300-001 (REPAIR-001).
If the depth is between 0.005 and 0.010 in. (0.13 and 0.25 mm).
Nicks
Repair, VRS1472 TASK 72-45-21-300-001 (REPAIR-001).
If the depth is between 0.005 in. and 0.010 in. (0.13 and 0.25 mm).
Dents
Repair, VRS1472 TASK 72-45-21-300-001 (REPAIR-001).
If the depth is between 0.005 and 0.010 in. (0.13 and 0.25 mm).
Scratches
Repair, VRS1472 TASK 72-45-21-300-001 (REPAIR-001).
If the depth is between 0.005 and 0.010 in. (0.13 and 0.25 mm).
Pit.
Reject.
Other than Step.
Erosion.
Examine the surface.
SUBTASK 72-45-21-220-053 Examine the Turbine Case Assembly (01-010) Surface
Refer to Figure.
Repair, VRS1472 TASK 72-45-21-300-001 (REPAIR-001).
If the depth is between 0.005 and 0.010 in. (0.13 and 0.25 mm).
Nicks.
Repair, VRS1472 TASK 72-45-21-300-001 (REPAIR-001)
If the depth is between 0.005 and 0.010 in. (0.13 and 0.25 mm)
Dents.
Repair, VRS1472 TASK 72-45-21-300-001 (REPAIR-001).
If the depth is between 0.005 and 0.010 in. (0.13 and 0.25 mm).
Scratches
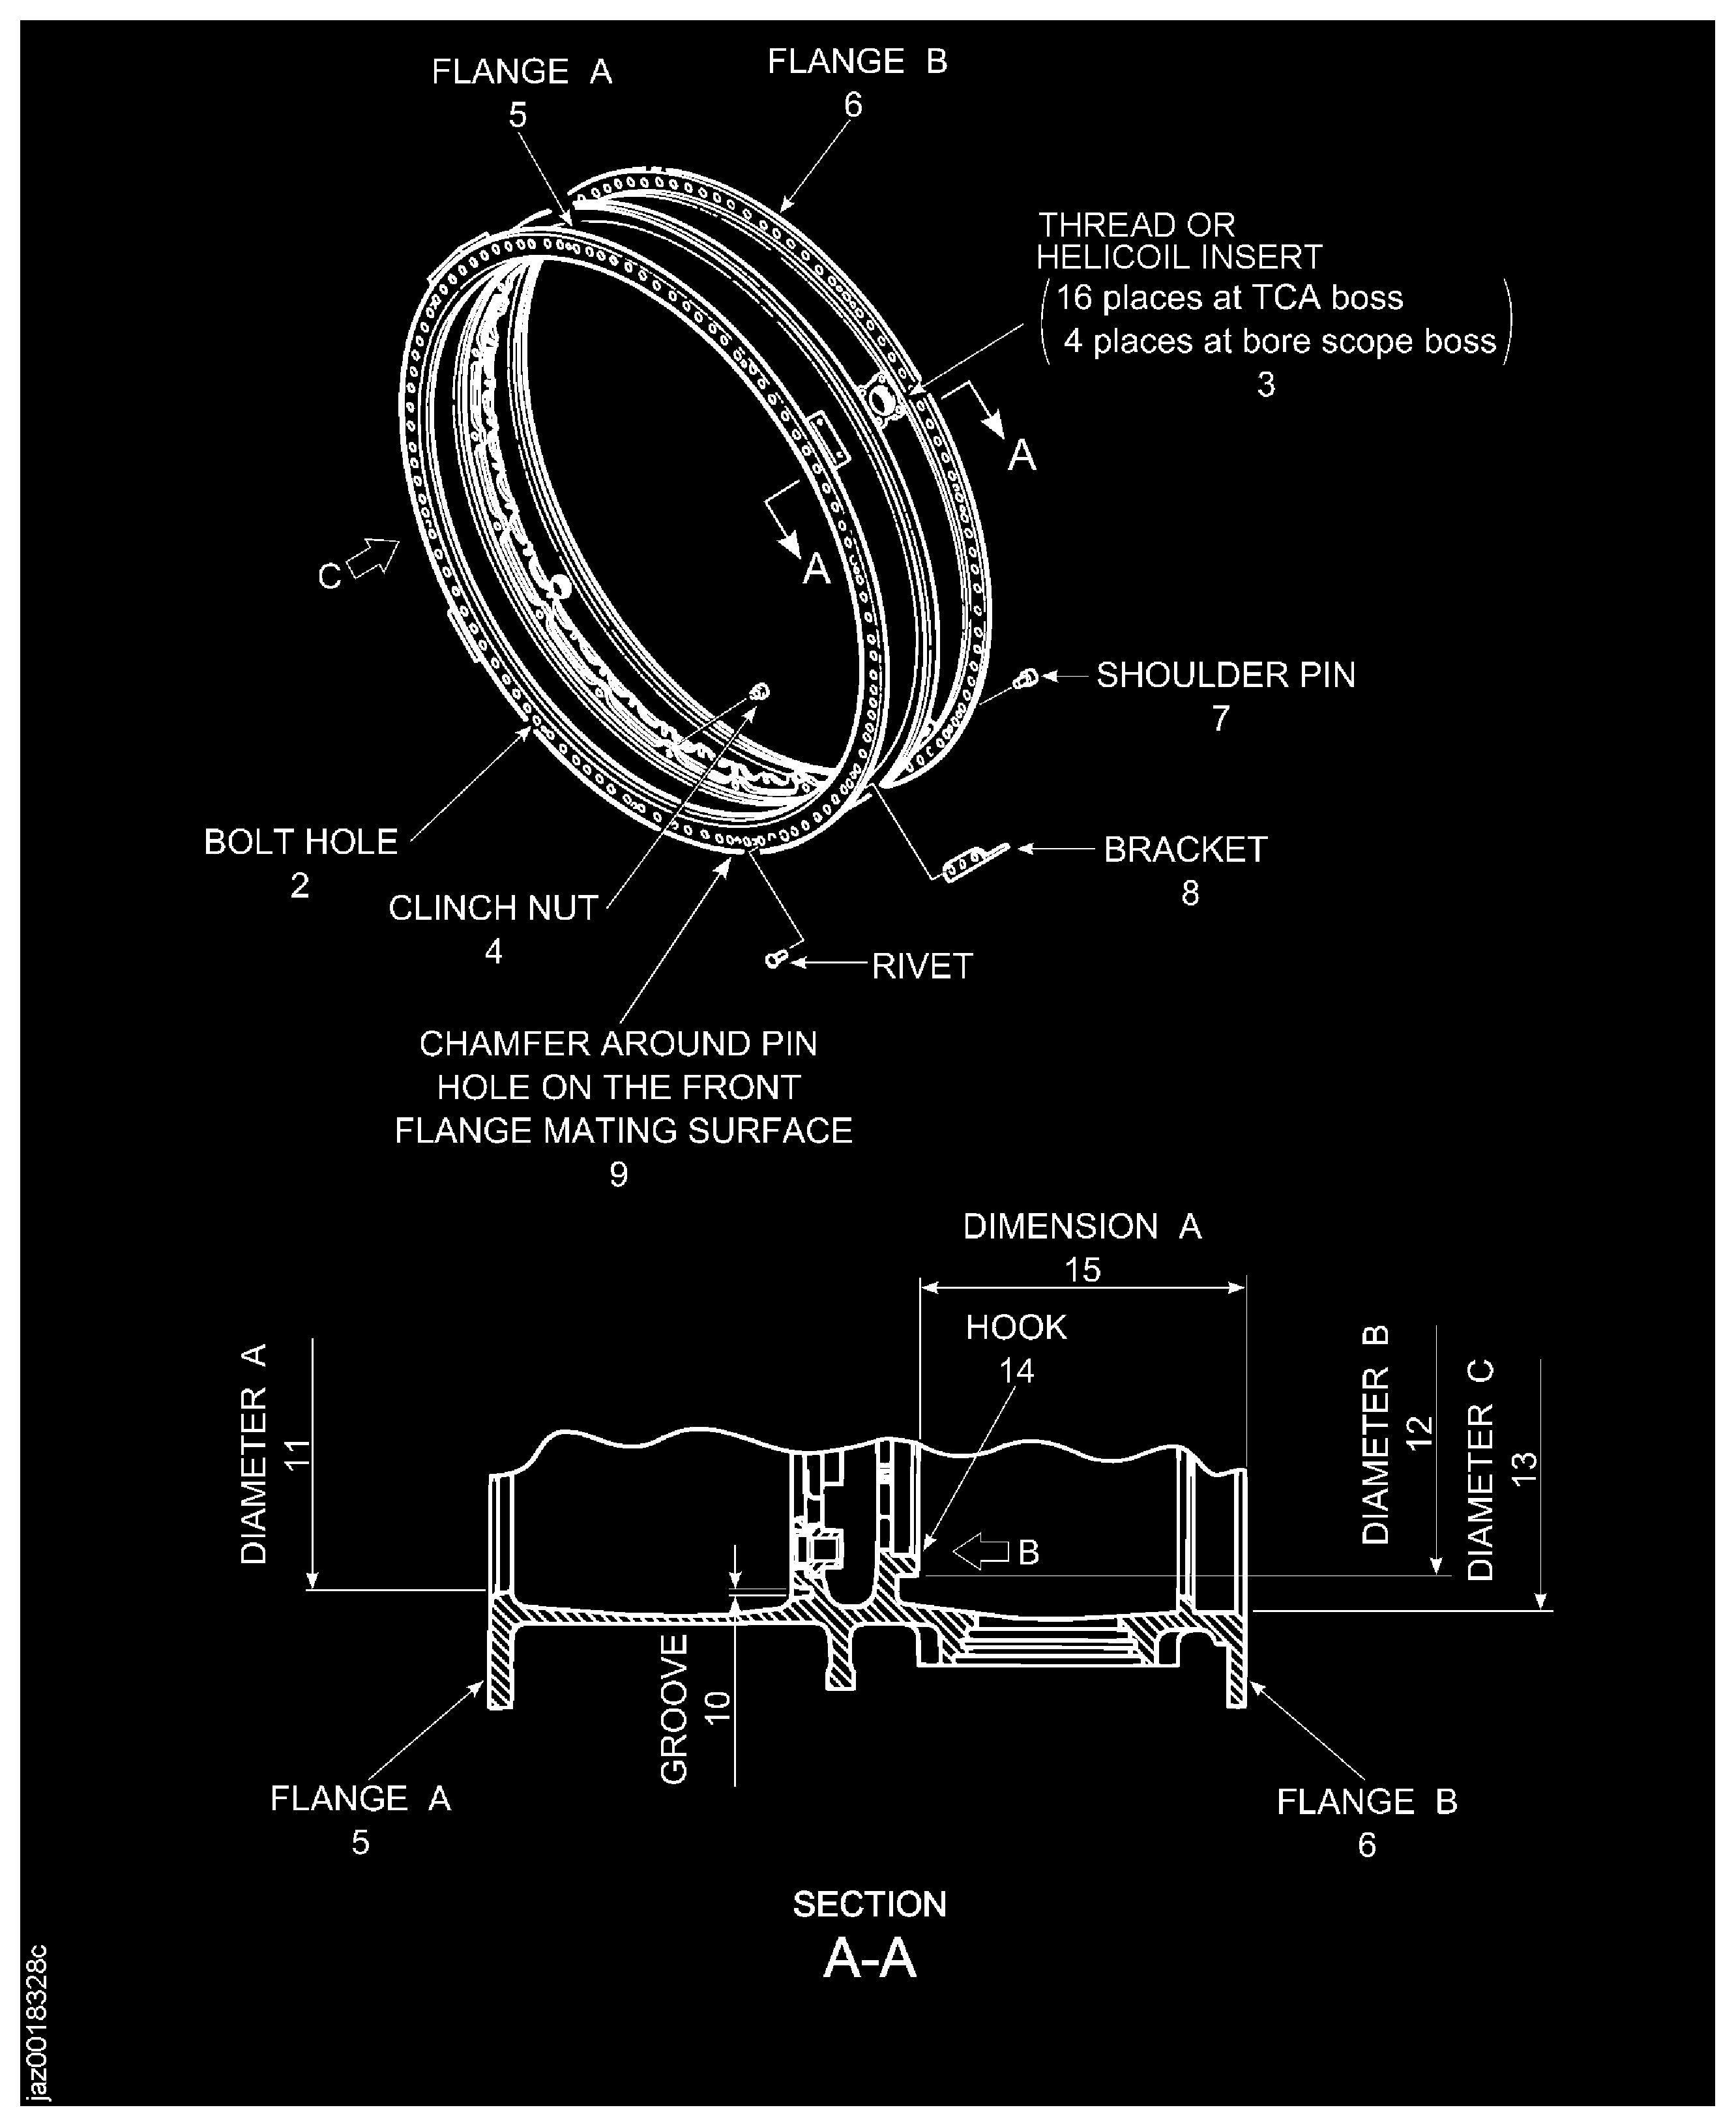
Examine the bolt holes at location 2.
SUBTASK 72-45-21-220-055 Examine the Turbine Case Assembly (01-010) Bolt Holes
Refer to Figure.
Refer to repair, VRS1985 TASK 72-45-21-300-012 (REPAIR-012).
Damage
Examine the threads of borescope boss at location 3.
Refer to repair, VRS1986 TASK 72-45-21-300-013 (REPAIR-013).
Damage
Examine the threads of TCA boss at location 3.
Refer to repair, VRS1987 TASK 72-45-21-300-014 (REPAIR-014).
Loose, missing or with the internal thread damaged
Examine the insert of borescope boss at location 3.
NOTE
This step is applicable to installed insert in VRS1985.Refer to repair, VRS1988 TASK 72-45-21-300-015 (REPAIR-015).
Loose, missing or with the internal thread damaged
Examine the insert of TCA boss at location 3.
NOTE
This step is applicable to installed insert in VRS1986.
SUBTASK 72-45-21-220-056 Examine the Turbine Case Assembly (01-010) Threads/Helicoil Insert
Refer to Figure.
Repair, VRS1476 TASK 72-45-21-300-002 (REPAIR-002).
Replace the clinch nut.
Replace the clinch nut at location 4.
SUBTASK 72-45-21-220-057 Replace the Turbine Case Assembly (01-010) Clinch Nut
Refer to Figure.
SUBTASK 72-45-21-220-058 Examine the Turbine Case Assembly (01-010) Flanges for Flatness
Refer to Figure.
Repair, VRS1478 TASK 72-45-21-300-005 (REPAIR-005).
Sheared off.
Repair, VRS1478 TASK 72-45-21-300-005 (REPAIR-005).
Bent
Repair, VRS1478 TASK 72-45-21-300-005 (REPAIR-005).
Missing
Repair, VRS1478 TASK 72-45-21-300-005 (REPAIR-005).
Loose fit.
Examine the locating pin at location 7.
SUBTASK 72-45-21-220-059 Examine the Turbine Case Assembly (01-010) Locating Pin
Refer to Figure.
Repair, VRS1480 TASK 72-45-21-300-006 (REPAIR-006).
Broken
Repair, VRS1480 TASK 72-45-21-300-006 (REPAIR-006).
Bent
Repair, VRS1480 TASK 72-45-21-300-006 (REPAIR-006).
Damaged
Repair, VRS1480 TASK 72-45-21-300-006 (REPAIR-006).
Loosened rivet
Examine the bracket at location 8.
SUBTASK 72-45-21-220-060 Examine the Turbine Case Assembly (01-010) Bracket
Refer to Figure.
SUBTASK 72-45-21-220-061 Examine the Turbine Case Assembly (01-010) First Stage Duct Support Grooves
Refer to Figure.
Accept the part for select fit only.
NOTE
This part can be used only if the mating part has a diameter that will result in a fit of reference No. 2253. Refer TASK 72-00-45-420-001 (INSTALLATION-001) and TASK 72-40-00-430-006 (INSTALLATION-006).
From 28.222 in. to 28.233 in. (716.839 mm to 717.118 mm) in average inner diameter.
Repair, VRS1471 TASK 72-45-21-300-003 (REPAIR-003).
More than 28.233 in. (717.118 mm) and less than 28.253 in. (717.626 mm) in average inner diameter.
Worn/Shrink.
Reject
NOTE
Diameter B applies when front of flange A and rear surface of flange B are flat with 0.001 in. (0.025 mm) and diameter A and C are around within 0.007 in. (0.178 mm) in free state or constrained.
Constraint contact allowed only on flange A, front and rear surface, flange B, front and rear surface, diameter A and diameter C.
More than Step.
Out of roundness in free state.
Diameter A at location 11 (Reference No. 2253).
Other than Step.
Worn/Shrink.
Diameter B at location 12.
Accept the part for select fit only.
NOTE
This part can be used only if the mating part has a diameter that will result in a fit of reference No. 1510. Refer to ASSEMBLY-02 TASK 72-45-20-440-002.
From 28.572 in. to 28.583 in. (725.729 mm to 726.008 mm) in average inner diameter
Repair, VRS1482 TASK 72-45-21-300-008 (REPAIR-008)
More than 28.583 in. and less than 28.603 in. (726.008 mm and 726.516 mm) in average inner diameter
Worn/Shrink.
More than in Step
Out of roundness in free state.
Diameter C at location 13 (Reference No. 1510)
Examine the snap diameter.
SUBTASK 72-45-21-220-062 Examine the Turbine Case Assembly (01-010) Snap Diameters
Repair, VRS1486 TASK 72-45-21-300-009 (REPAIR-009).
Other than in Step.
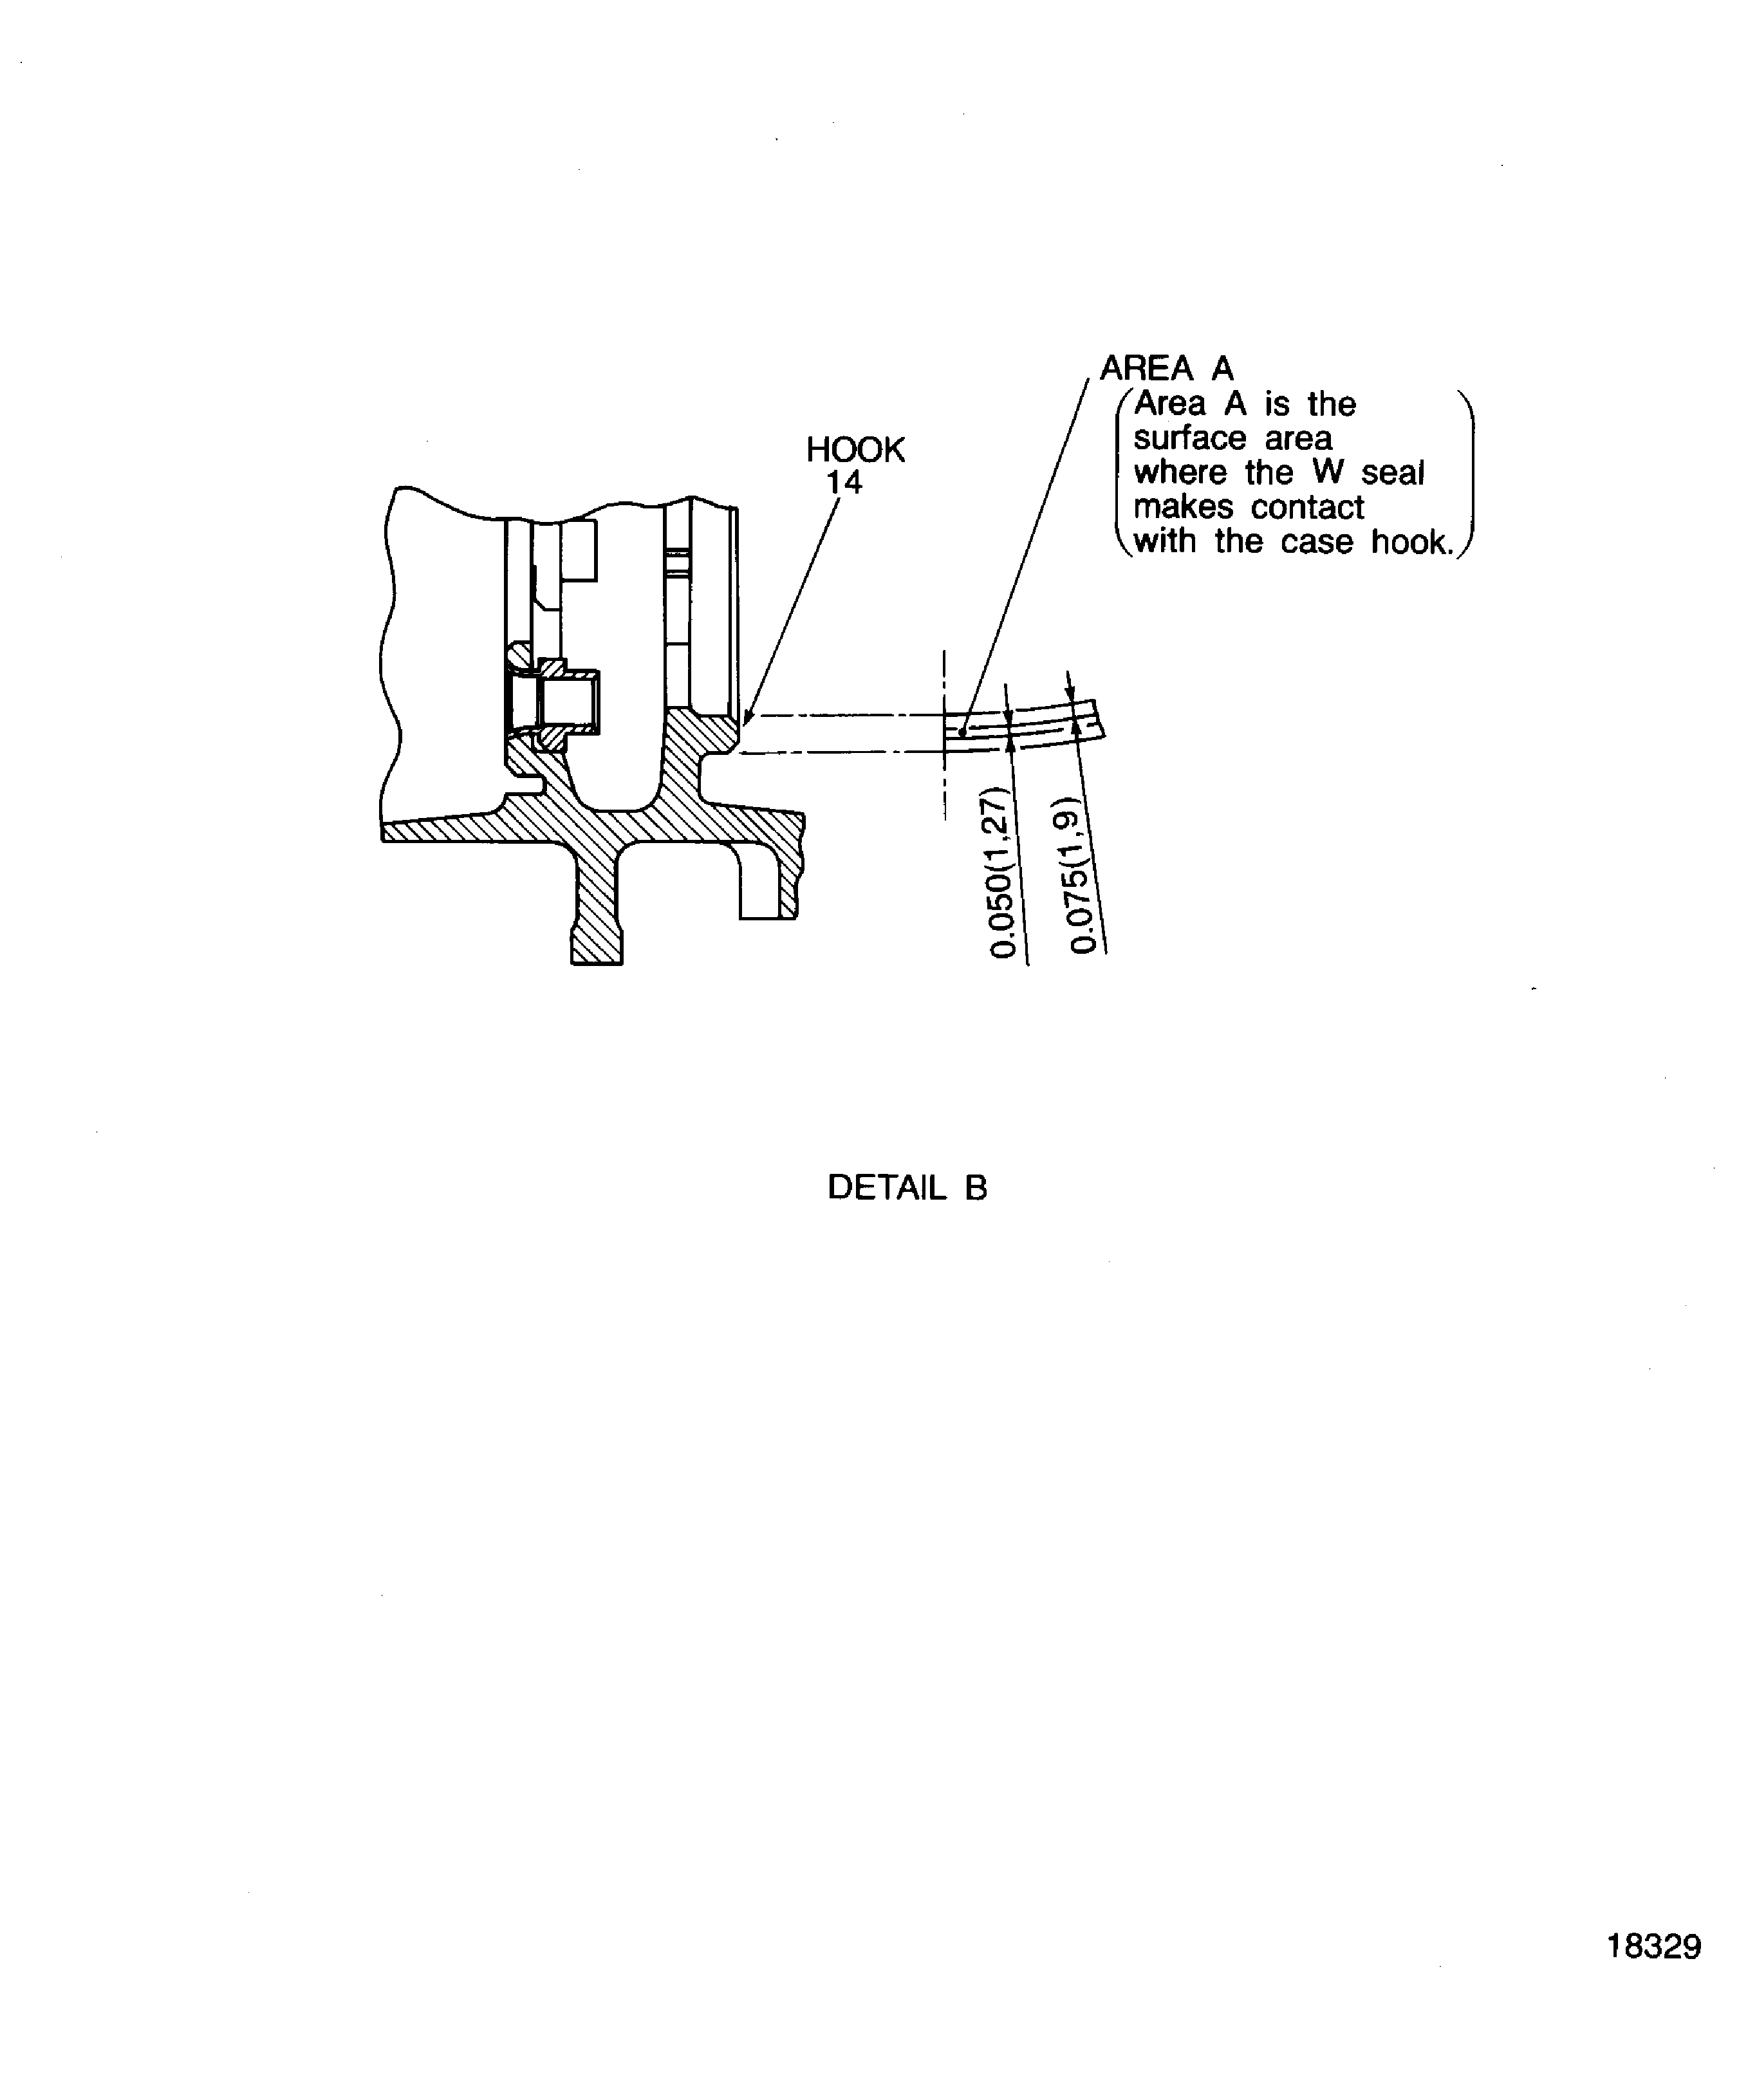
Inside area A zone.
Chipping
Examine the hook at location 14.
SUBTASK 72-45-21-220-063 Examine the Turbine Case Assembly (01-010, Part No.2A1591 only) Hook
Refer to Figure.
Repair, VRS1486 TASK 72-45-21-300-009 (REPAIR-009).
Greater than 2.953 in. (75.006 mm) and less than or equal to 2.961 in. (75.209 mm) in dimension A.
Worn
Examine the hook at location 15.
SUBTASK 72-45-21-220-066 Examine the Turbine Case Assembly (01-010) Hook
Refer to Figure.
Repair, VRS1472 TASK 72-45-21-300-001 (REPAIR-001).
Nicks, Dents and Scratches.
Examine the chamfer around pin hole on the front flange mating surface at location 9.
SUBTASK 72-45-21-220-067 Examine the Turbine Case Assembly (01-010) Chamfer Around Pin Hole on the Front Flange Mating Surface
Figure: Inspection of the turbine case assembly
Inspection of the turbine case assembly

Figure: Inspection of the turbine case assembly
Inspection of the turbine case assembly

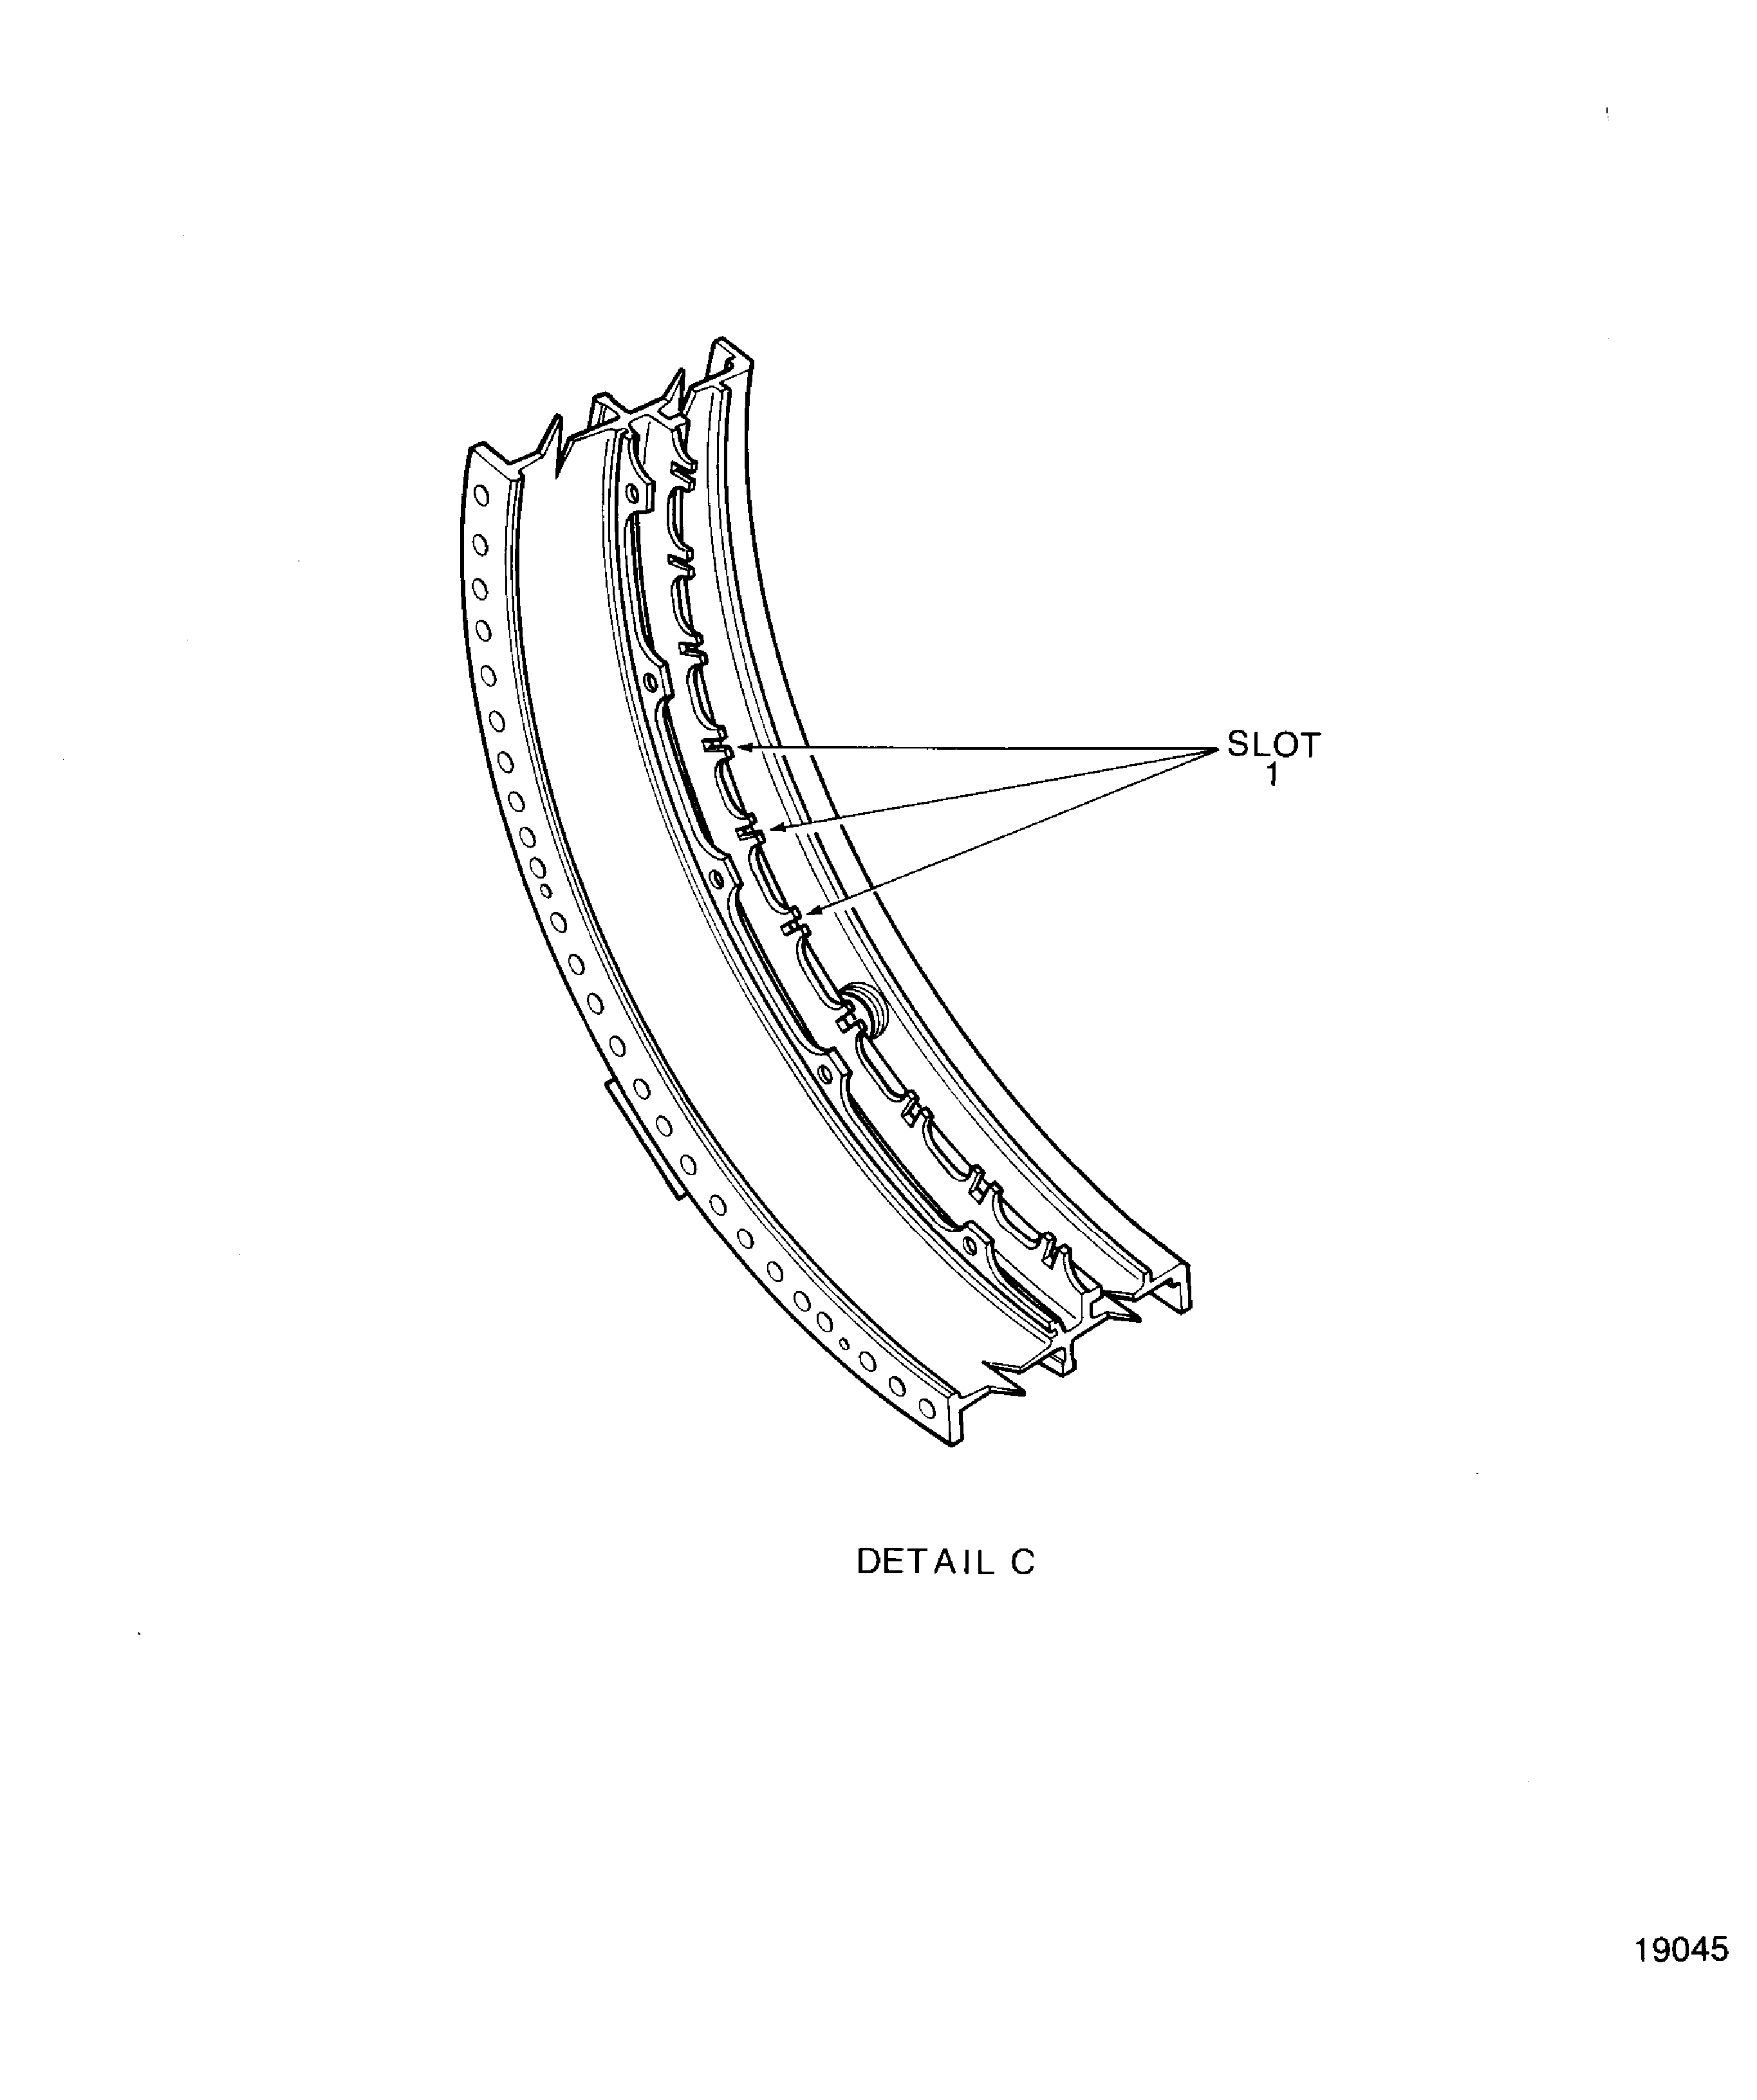
Figure: Inspection of the turbine assembly
Inspection of the turbine assembly

