Export Control
EAR Export Classification: Not subject to the EAR per 15 C.F.R. Chapter 1, Part 734.3(b)(3), except for the following Service Bulletins which are currently published as EAR Export Classification 9E991: SBE70-0992, SBE72-0483, SBE72-0580, SBE72-0588, SBE72-0640, SBE73-0209, SBE80-0024 and SBE80-0025.Copyright
© IAE International Aero Engines AG (2001, 2014 - 2021) The information contained in this document is the property of © IAE International Aero Engines AG and may not be copied or used for any purpose other than that for which it is supplied without the express written authority of © IAE International Aero Engines AG. (This does not preclude use by engine and aircraft operators for normal instructional, maintenance or overhaul purposes.).Applicability
All
Common Information
TASK 72-45-33-200-001-C00 HPT Stage 2 Blade Retaining Plate - Examine, Inspection-001
General
This TASK gives the procedure for the inspection of the stage 2 HPT blade retaining plate. For the other parts of the stage 2 HPT blade retaining plate, refer to TASK 72-45-33-200-000 (INSPECTION-000).
Fig/item numbers in parentheses in the procedure agree with those used in the IPC.
The policy that is necessary for inspection is given in SPM TASK 70-20-00-200-501.
All the parts must be cleaned before any part is examined. Refer to SPM TASK 70-10-00-100-501.
All parts must be visually examined for damage, corrosion and wear. Any defects that are not identified in the procedure must be referred to IAE.
The procedure for those parts which must have a crack test is given in SUBTASK 72-45-33-230-055. Do not test before the part is visually examined.
Do not discard any part until you are sure there are no repairs available. Refer to the instructions in repair before a discarded part is used again or oversize parts are installed.
Parts which should be discarded can be held although no repair is available. The repair of a discarded part could be shown to be necessary at a later date.
All parts must be examined to make sure that all the repairs have been completed satisfactorily.
The practices and processes referred to in the procedure by the TASK numbers are in SPM.
References
Refer to SPM for data on these items.
Definitions of Damage, SPM TASK 70-02-02-350-501.
Record and Control of the Lives of Parts, SPM TASK 70-05-00-220-501.
Inspection of Parts, SPM TASK 70-20-01-200-501.
Some data on these items is contained in this TASK. For more data on these items refer to SPM.
Method of Testing for Crack Indications.
Chemical Processes.
Surface Protection.
Preliminary Requirements
Pre-Conditions
NONESupport Equipment
NONEConsumables, Materials and Expendables
NONESpares
NONESafety Requirements
NONEProcedure
Clean the part. Refer to TASK 72-45-33-100-000 (CLEANING-000).
NOTE
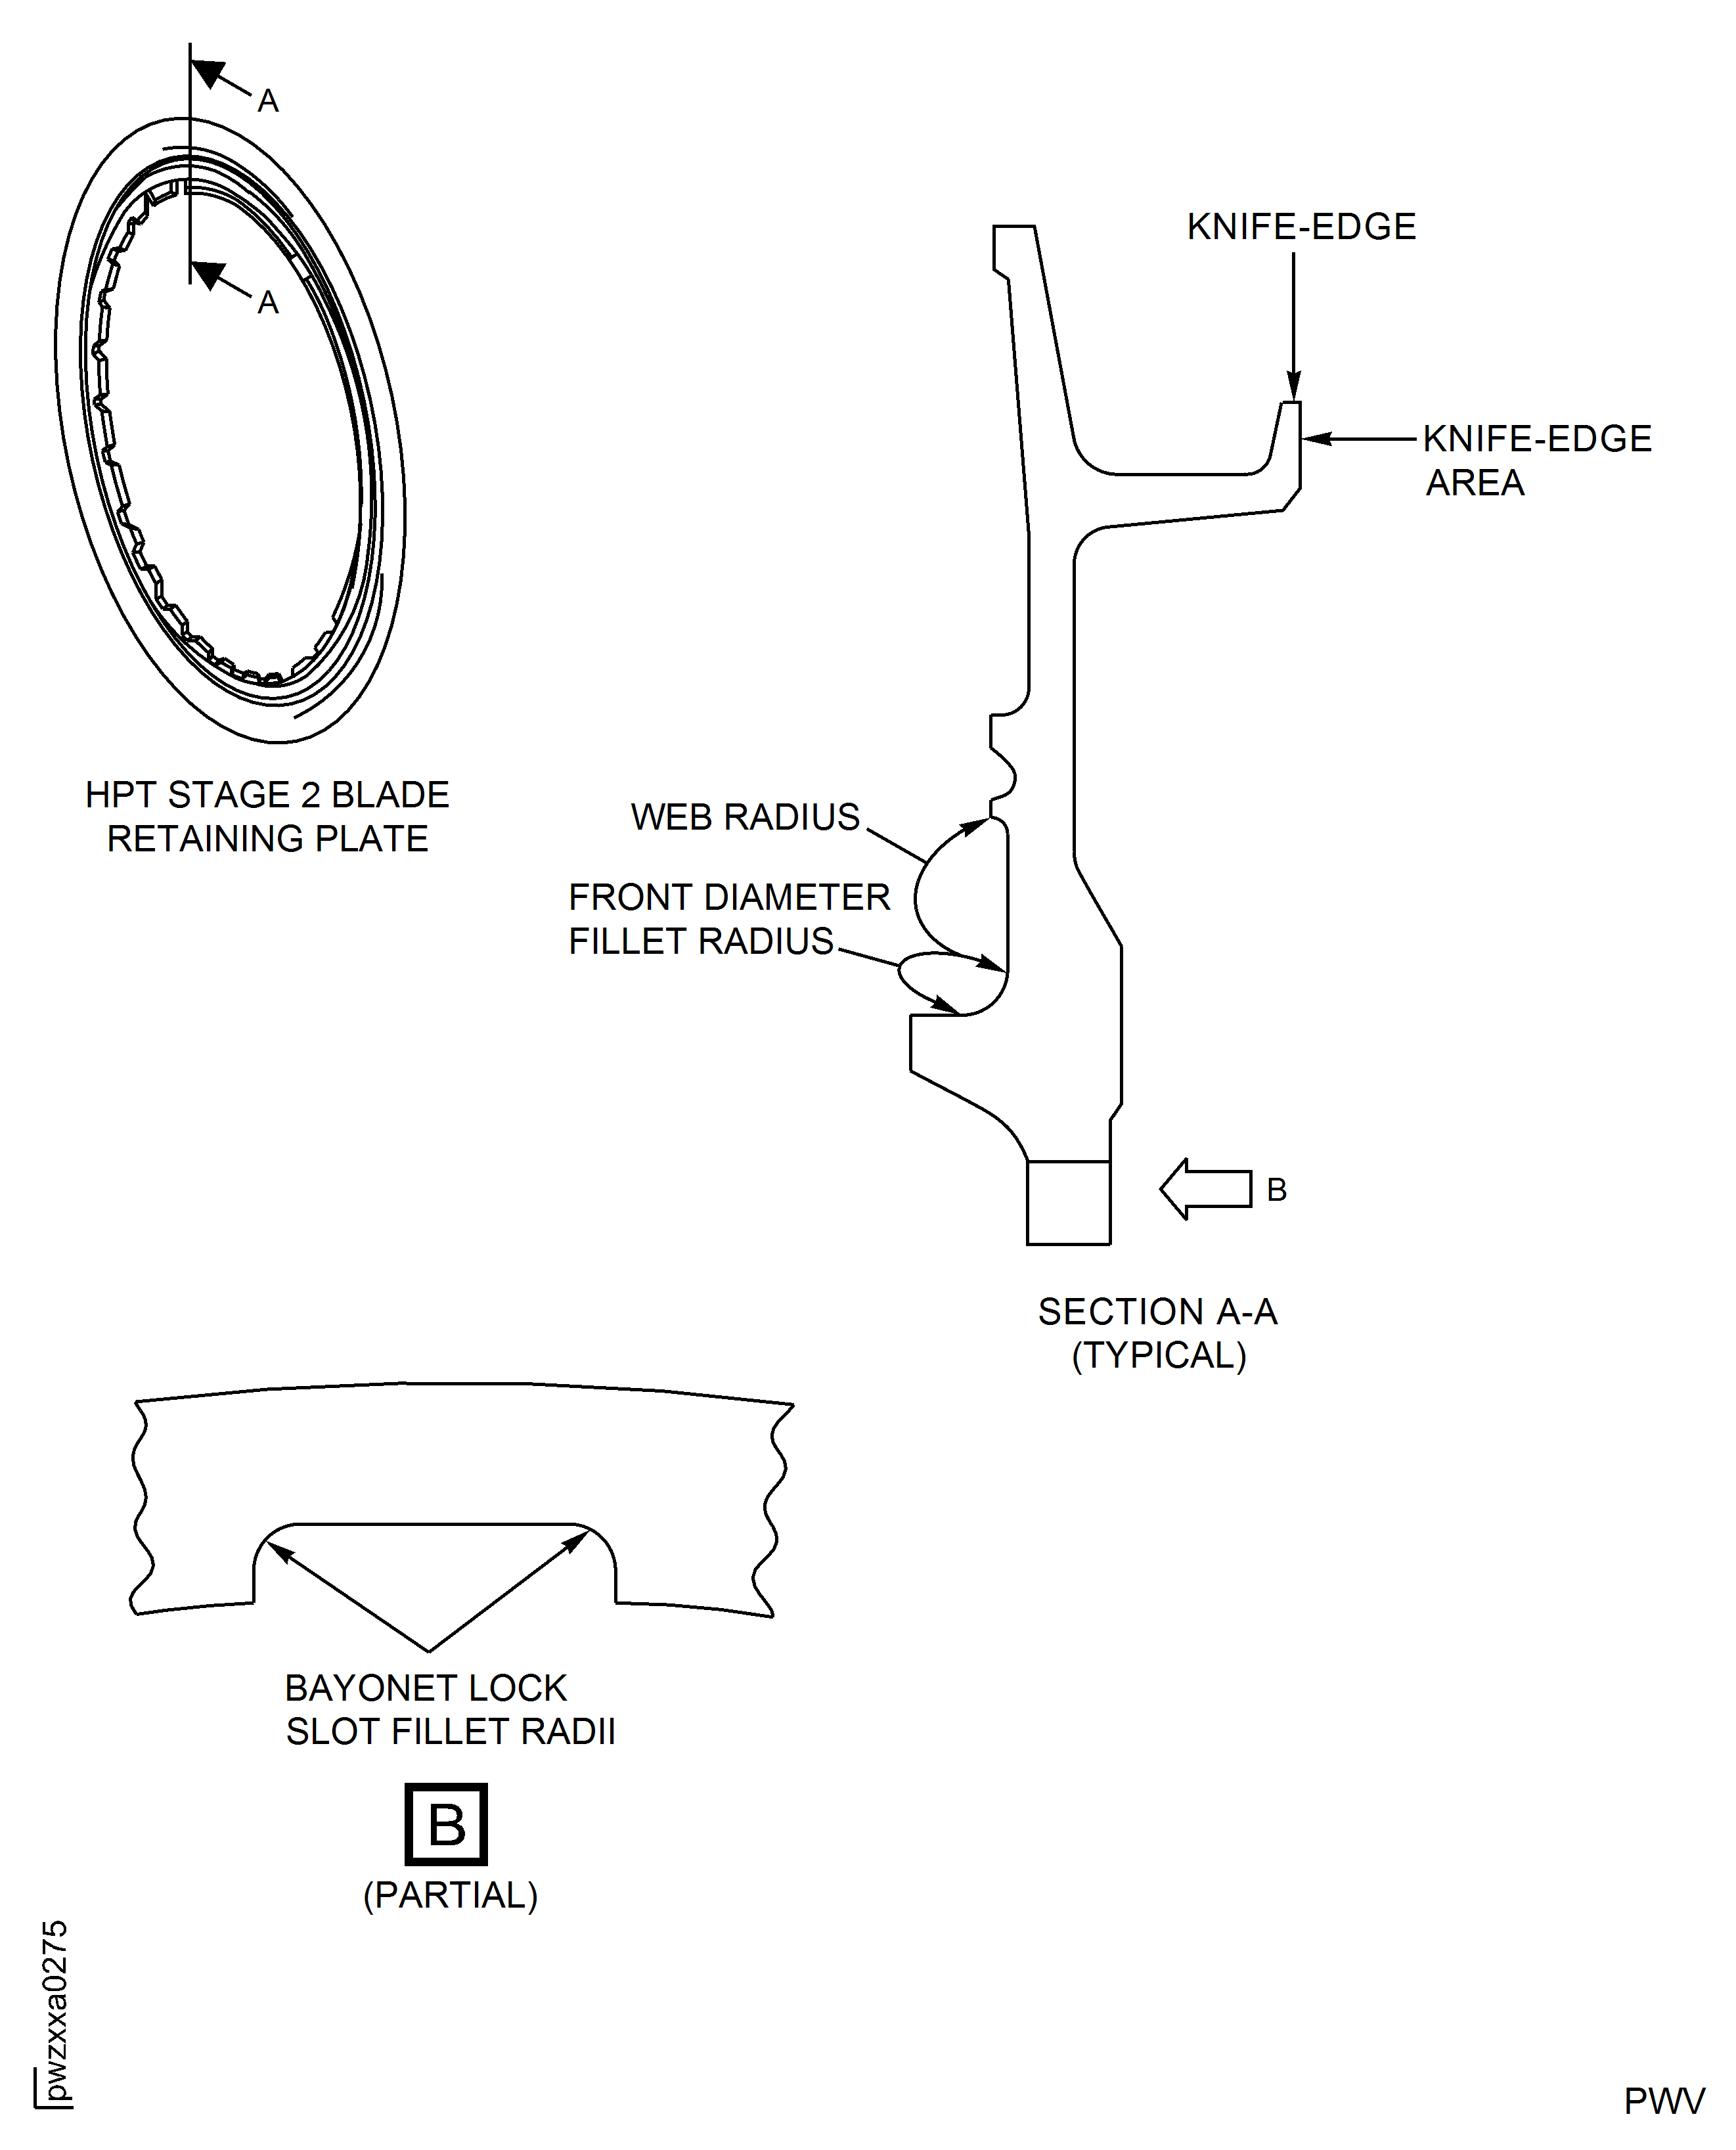
When you inspect the blade retaining plate for cracks, make sure the areas shown in Figure are examined.Do the crack test on the part that is given below. Look carefully at areas around the front diameter fillet radius, web radius, the knife-edge area, and the bayonet lock slot fillet radii. Use the applicable penetrant inspection procedure.
PART IDENT
TASK/SUBTASK
Stage 2 HPT blade retaining plate
(Dip or Spray)
SUBTASK 72-45-33-230-055-001 Examine the Stage 2 HPT Blade Retaining Plate (01-020) for Cracks
Refer to Figure.
Repair, VRS3255 TASK 72-45-33-300-002 (REPAIR-002).
Other than Step.
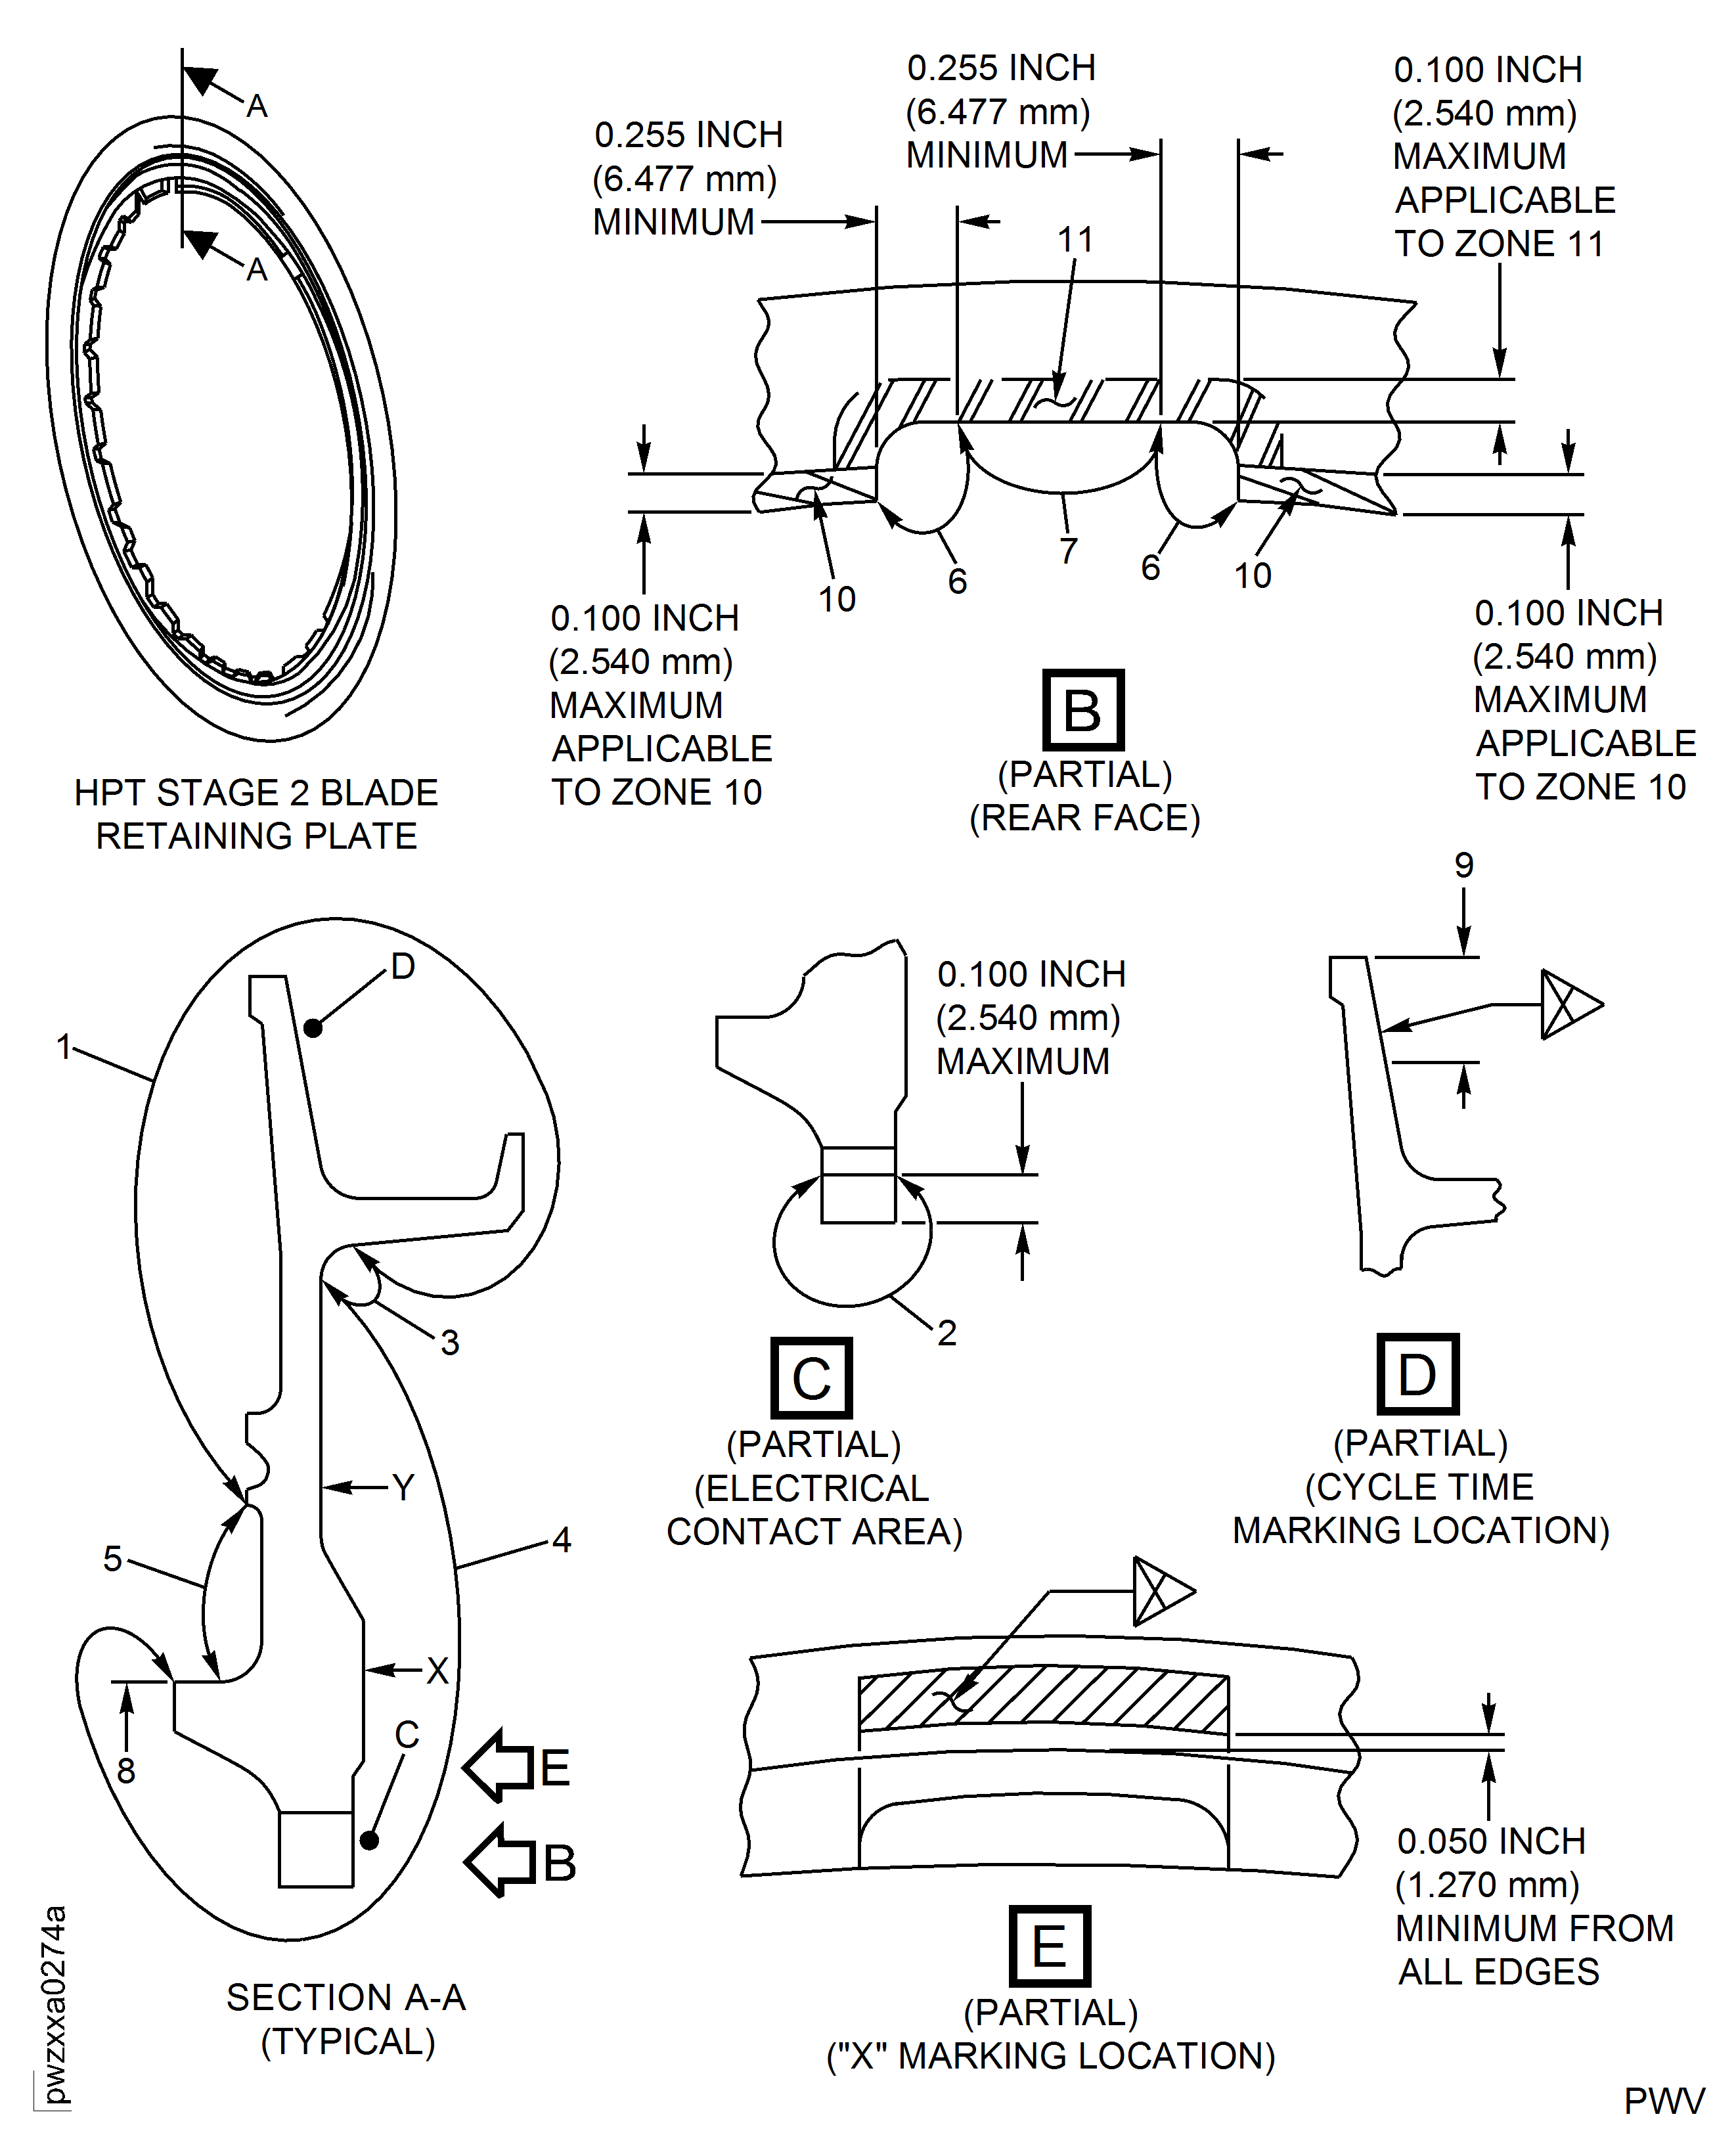
Locations 1, 3 and 4.
Reject.
Surface damage and wear.
Location 5.
Accept and mark the slot with "X" by the procedure given in the SPM TASK 70-09-00-400-501. Marking must be accomplished with only deep electrolytic etch, vibration peen, or deep dot peen.
No raised material allowed.
Dents, nicks, tool marks, galling and wear up to 0.001 in. (0.026 mm) in depth at Location 6 for PNs 2A2097, 2A3426 and 2A3437.
Repair, VRS3255 TASK 72-45-33-300-002 (REPAIR-002).
Other than Step for PNs 2A2097 and 2A3426.
Repair, VRS3255 TASK 72-45-33-300-002 (REPAIR-002) or Repair, VRS3856 TASK 72-45-33-300-007 (REPAIR-006).
Other than Step for PN 2A3437.
Location 6.
NOTE
Deleted.Accept and mark the slot with "X" by the procedure given in the SPM TASK 70-09-00-400-501. Marking must be accomplished with only deep electrolytic etch, vibration peen, or deep dot peen.
No raised material allowed.
Dents, nicks, tool marks, galling and wear up to 0.002 in. (0.051 mm) in depth in Location 7.
Repair, VRS3255 TASK 72-45-33-300-002 (REPAIR-002).
Other than Step for PNs 2A2097 and 2A3426.
Repair, VRS3255 TASK 72-45-33-300-002 (REPAIR-002) or Repair, VRS3856 TASK 72-45-33-300-007 (REPAIR-006).
Other than Step for PN 2A3437.
Location 7.
NOTE
Deleted.Repair, VRS3255 TASK 72-45-33-300-002 (REPAIR-002).
Galling.
Diameter 8.
Repair, VRS3255 TASK 72-45-33-300-002 (REPAIR-002) or Repair, VRS3853 TASK 72-45-33-300-008 (REPAIR-008).
Other than Step.
Location 10.
Accept and mark the slot with "X" by the procedure given in the SPM TASK 70-09-00-400-501. Marking must be accomplished with only deep electrolytic etch, vibration peen, or deep dot peen.
No raised material allowed.
Dents, nicks, tool marks, galling and wear up to 0.001 in. (0.026 mm) in depth at Location 11.
Repair, VRS3255 TASK 72-45-33-300-002 (REPAIR-002) or Repair, VRS3853 TASK 72-45-33-300-008 (REPAIR-008).
Other than Step.
Location 11.
Surface damage and wear.
SUBTASK 72-45-33-220-095 Examine the Stage 2 HPT Blade Retaining Plate (01-020) for Surface Damage and Wear
Refer to Figure.
Repair, VRS3255 TASK 72-45-33-300-002 (REPAIR-002).
Corrosion.
Examine the retaining plate surfaces for corrosion.
SUBTASK 72-45-33-220-096 Examine the Stage 2 HPT Blade Retaining Plate (01-020) Surfaces for Corrosion
Refer to Figure.
Repair, VRS3323 TASK 72-45-33-300-003 (REPAIR-003).
Other than Step.
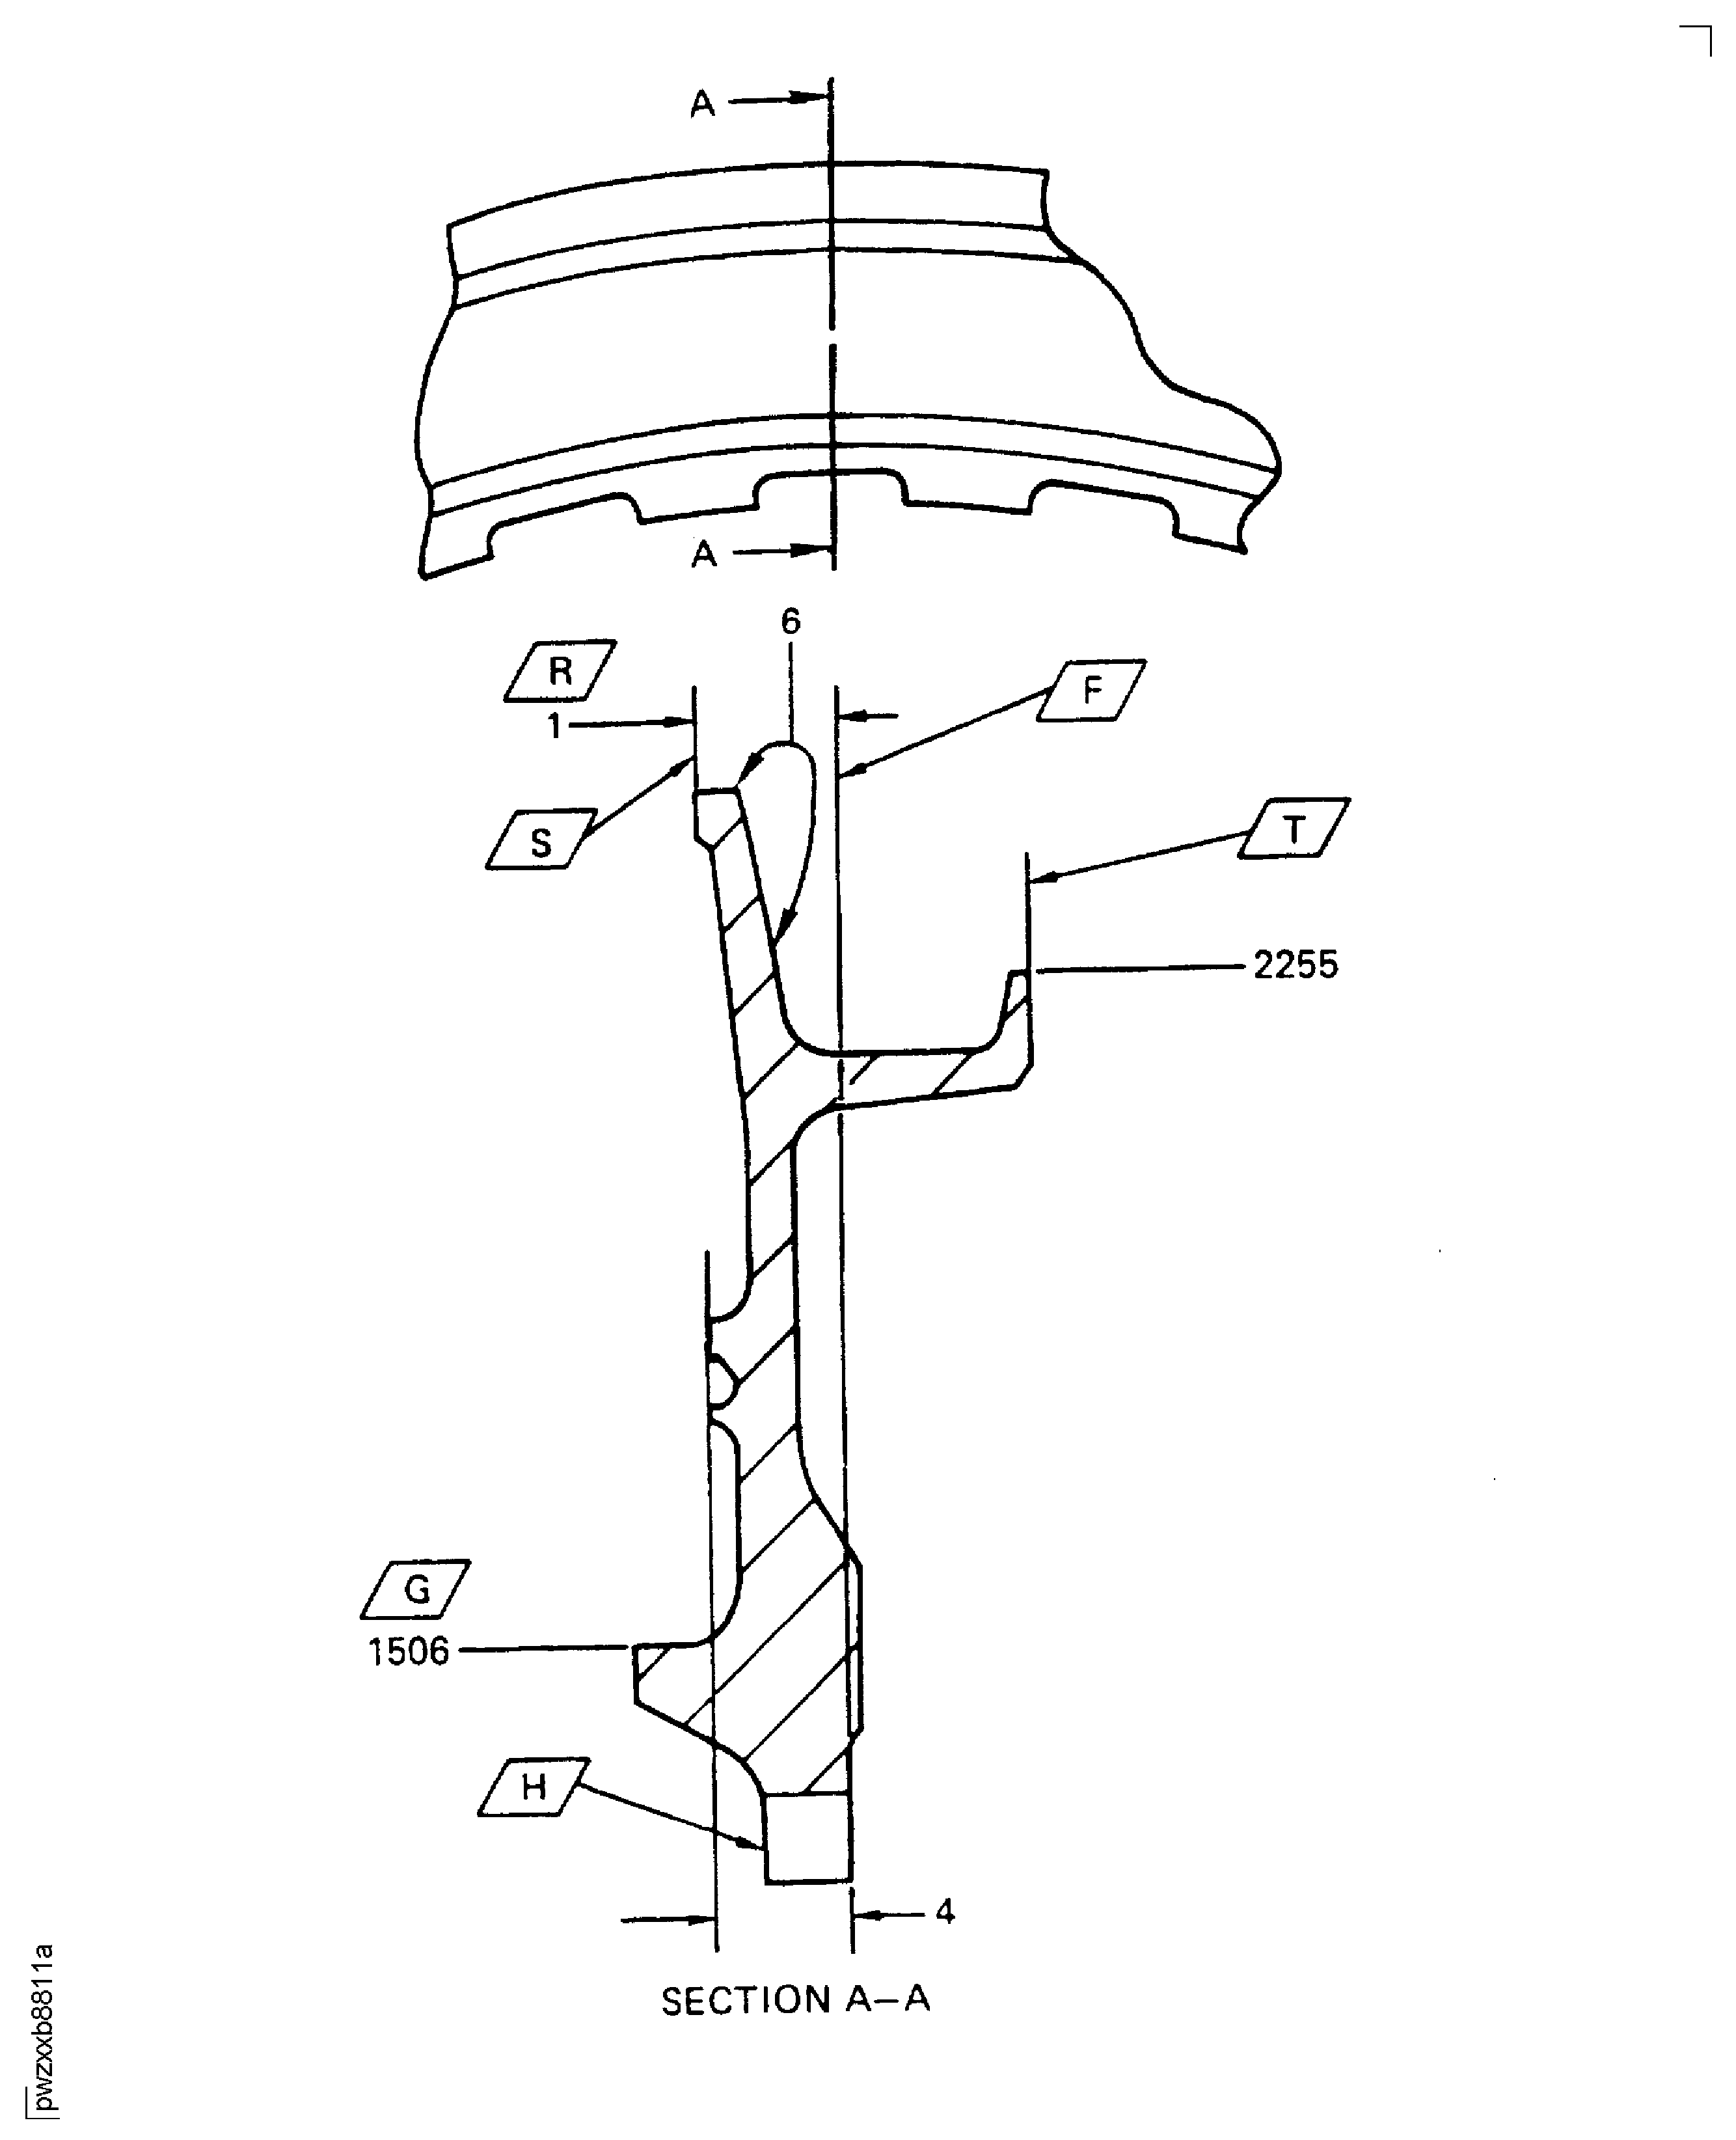
Examine the retaining plate at Location 1506, for the front diameter.
SUBTASK 72-45-33-220-081 Examine the Stage 2 HPT Blade Retaining Plate (01-020) Front Diameter
NOTE
If the measured diameter in a free condition is not satisfactory, a held condition is permitted. The dimensions apply when Surface F is flat by 0.001 in. (0.025 mm) and Diameter G maintains a clearance envelope of 17.215 in. (437.261 mm) in a free or held condition. Hold the part only on Surfaces F, H, S, T and Diameter G.NOTE
Do not make the part straight.Refer to Figure.
If the measured diameter in a free condition is not satisfactory, a held condition is permitted. All dimensions apply when Surface F is flat by 0.001 in. (0.025 mm) and Diameter G maintains a clearance envelope of 17.215 in. (437.261 mm) in a free or held condition. Hold the blade retaining plate only on Surfaces F, H, S, T and Diameter G.
Do not make the part straight.
Write down the dimension of the diameter.
NOTE
This part can be used only if the mating part has a diameter that will result in fit of reference No. 5623. Refer to TASK 72-00-45-420-001-B01 (INSTALLATION-001) or TASK 72-00-45-420-001-B02 (INSTALLATION-002).
If the knife-edge seal diameter is between 19.797 in. and 19.812 in. (502.84 mm and 503.22 mm).
NOTE
Examine the retaining plate Location 2255, knife-edge seal diameter.
SUBTASK 72-45-33-220-082 Examine the Stage 2 HPT Blade Retaining Plate (01-020) Knife-Edge Seal Diameter
If the measured diameter in a free condition is not satisfactory, a held condition is permitted. The dimensions apply when Surface F is flat by 0.001 in. (0.025 mm) and Diameter G maintains a clearance envelope of 17.215 in. (437.261 mm) in a free or held condition. Hold the part only on Surfaces F, H, and Diameter G.
The dimension between the outer diameter front contact surface and the bayonet slot rear surface at Location 4 is the 0.232 in. and 0.242 in. (5.89 mm and 6.15 mm) dimension. Location 2 is the 0.360 in. and 0.370 in. (9.14 mm and 9.40 mm) dimension.
Do not make the part straight.
Refer to Figure.
Repair, VRS3515 TASK 72-45-33-300-004 (REPAIR-004) or Repair, VRS3843 TASK 72-45-33-300-006 (REPAIR-006).
Examine the retaining plate at Location 1, for the dimension between the outer diameter front contact surface and the bayonet slot rear surface.
SUBTASK 72-45-33-220-083 Examine the Stage 2 HPT Blade Retaining Plate (01-020) Dimension Between the Outer Diameter Front Contact Surface and the Bayonet Slot Rear Surface
NOTE
If the measured diameter in a free condition is not satisfactory, a held condition is permitted. The dimensions apply when Surface F is flat by 0.001 in. (0.03 mm) and Diameter G maintains a clearance envelope of 17.215 in. (437.26 mm) in a free or held condition. Hold the part only on Surfaces F, H, and Diameter G.
Do not make the part straight.
Refer to Figure.
SUBTASK 72-45-33-220-084 Examine the Stage 2 HPT Blade Retaining Plate (01-020) Dimension Between the Inner Diameter Front Contact Surface and the Bayonet Slot Rear Surface
NOTE
Use deep electrolytic etch, vibration peen (manual or mechanical), or deep dot peen method to mark the part. Refer to SPM TASK 70-09-00-400-501.
Make a mark for the new cycle time of the parts on the blade retaining plate.
SUBTASK 72-45-33-220-085 Examine the Stage 2 HPT Blade Retaining Plate (01-020) for the Cycle Time of the Part
Figure: Stage 2 HPT Blade Retaining Plate Inspection Locations
Stage 2 HPT Blade Retaining Plate Inspection Locations

Figure: Stage 2 HPT Blade Retaining Plate, Important FPI Inspection Locations
Stage 2 HPT Blade Retaining Plate, Important FPI Inspection Locations

Figure: Stage 2 HPT Blade Retaining Plate Inspection Locations
Stage 2 HPT Blade Retaining Plate Inspection Locations

