Export Control
EAR Export Classification: Not subject to the EAR per 15 C.F.R. Chapter 1, Part 734.3(b)(3), except for the following Service Bulletins which are currently published as EAR Export Classification 9E991: SBE70-0992, SBE72-0483, SBE72-0580, SBE72-0588, SBE72-0640, SBE73-0209, SBE80-0024 and SBE80-0025.Copyright
© IAE International Aero Engines AG (2001, 2014 - 2021) The information contained in this document is the property of © IAE International Aero Engines AG and may not be copied or used for any purpose other than that for which it is supplied without the express written authority of © IAE International Aero Engines AG. (This does not preclude use by engine and aircraft operators for normal instructional, maintenance or overhaul purposes.).Applicability
All
Common Information
TASK 72-45-13-200-001-H00 HPT Stage 1 Rotating Inner Air Seal - Examine, Inspection-001
General
This TASK gives the procedure for the inspection of the Stage 1 HPT Air Seal. For the other parts of the Stage 1 HPT Air Seal (inner), refer to TASK 72-45-13-200-000 (INSPECTION-000).
Fig/item numbers in parentheses in the procedure agree with those used in the IPC.
The policy that is necessary for inspection is given in SPM TASK 70-20-00-200-501.
All the parts must be cleaned before any part is examined. Refer to TASK 72-45-13-100-000 (CLEANING-000).
All parts must be visually examined for damage, corrosion and wear. Any defects that are not identified in the procedure must be referred to IAE.
The procedure for those parts which must have a crack test is given in Step. Do the test before the part is visually examined.
Do not discard any part until you are sure there are no repairs available. Refer to the instructions in repair before a discarded part is used again or oversize parts are installed.
Parts which should be discarded can be held although no repair is available. The repair of a discarded part could be shown to be necessary at a later date.
All parts must be examined to make sure that all the repairs have been completed satisfactorily.
The practices and processes referred to in the procedure by the TASK numbers are in SPM.
References
Refer to SPM for data on these items.
Definitions of Damage, SPM TASK 70-02-02-350-501.
Record and Control of the Lives of Parts, SPM TASK 70-05-00-220-501.
Inspection of Parts, SPM TASK 70-20-01-200-501.
Some data on these items is contained in this TASK. For more data on these items refer to SPM.
Method of Testing For Crack Indications.
Chemical Processes.
Surface Protection.
Preliminary Requirements
Pre-Conditions
NONESupport Equipment
NONEConsumables, Materials and Expendables
NONESpares
NONESafety Requirements
NONEProcedure
Accept.
No soot or oil.
Do inspection of HPT for possible oil ignition event. Refer to TASK 72-45-00-200-801. Report all findings to IAE Technical Services.
Soot or oil.

CAUTION
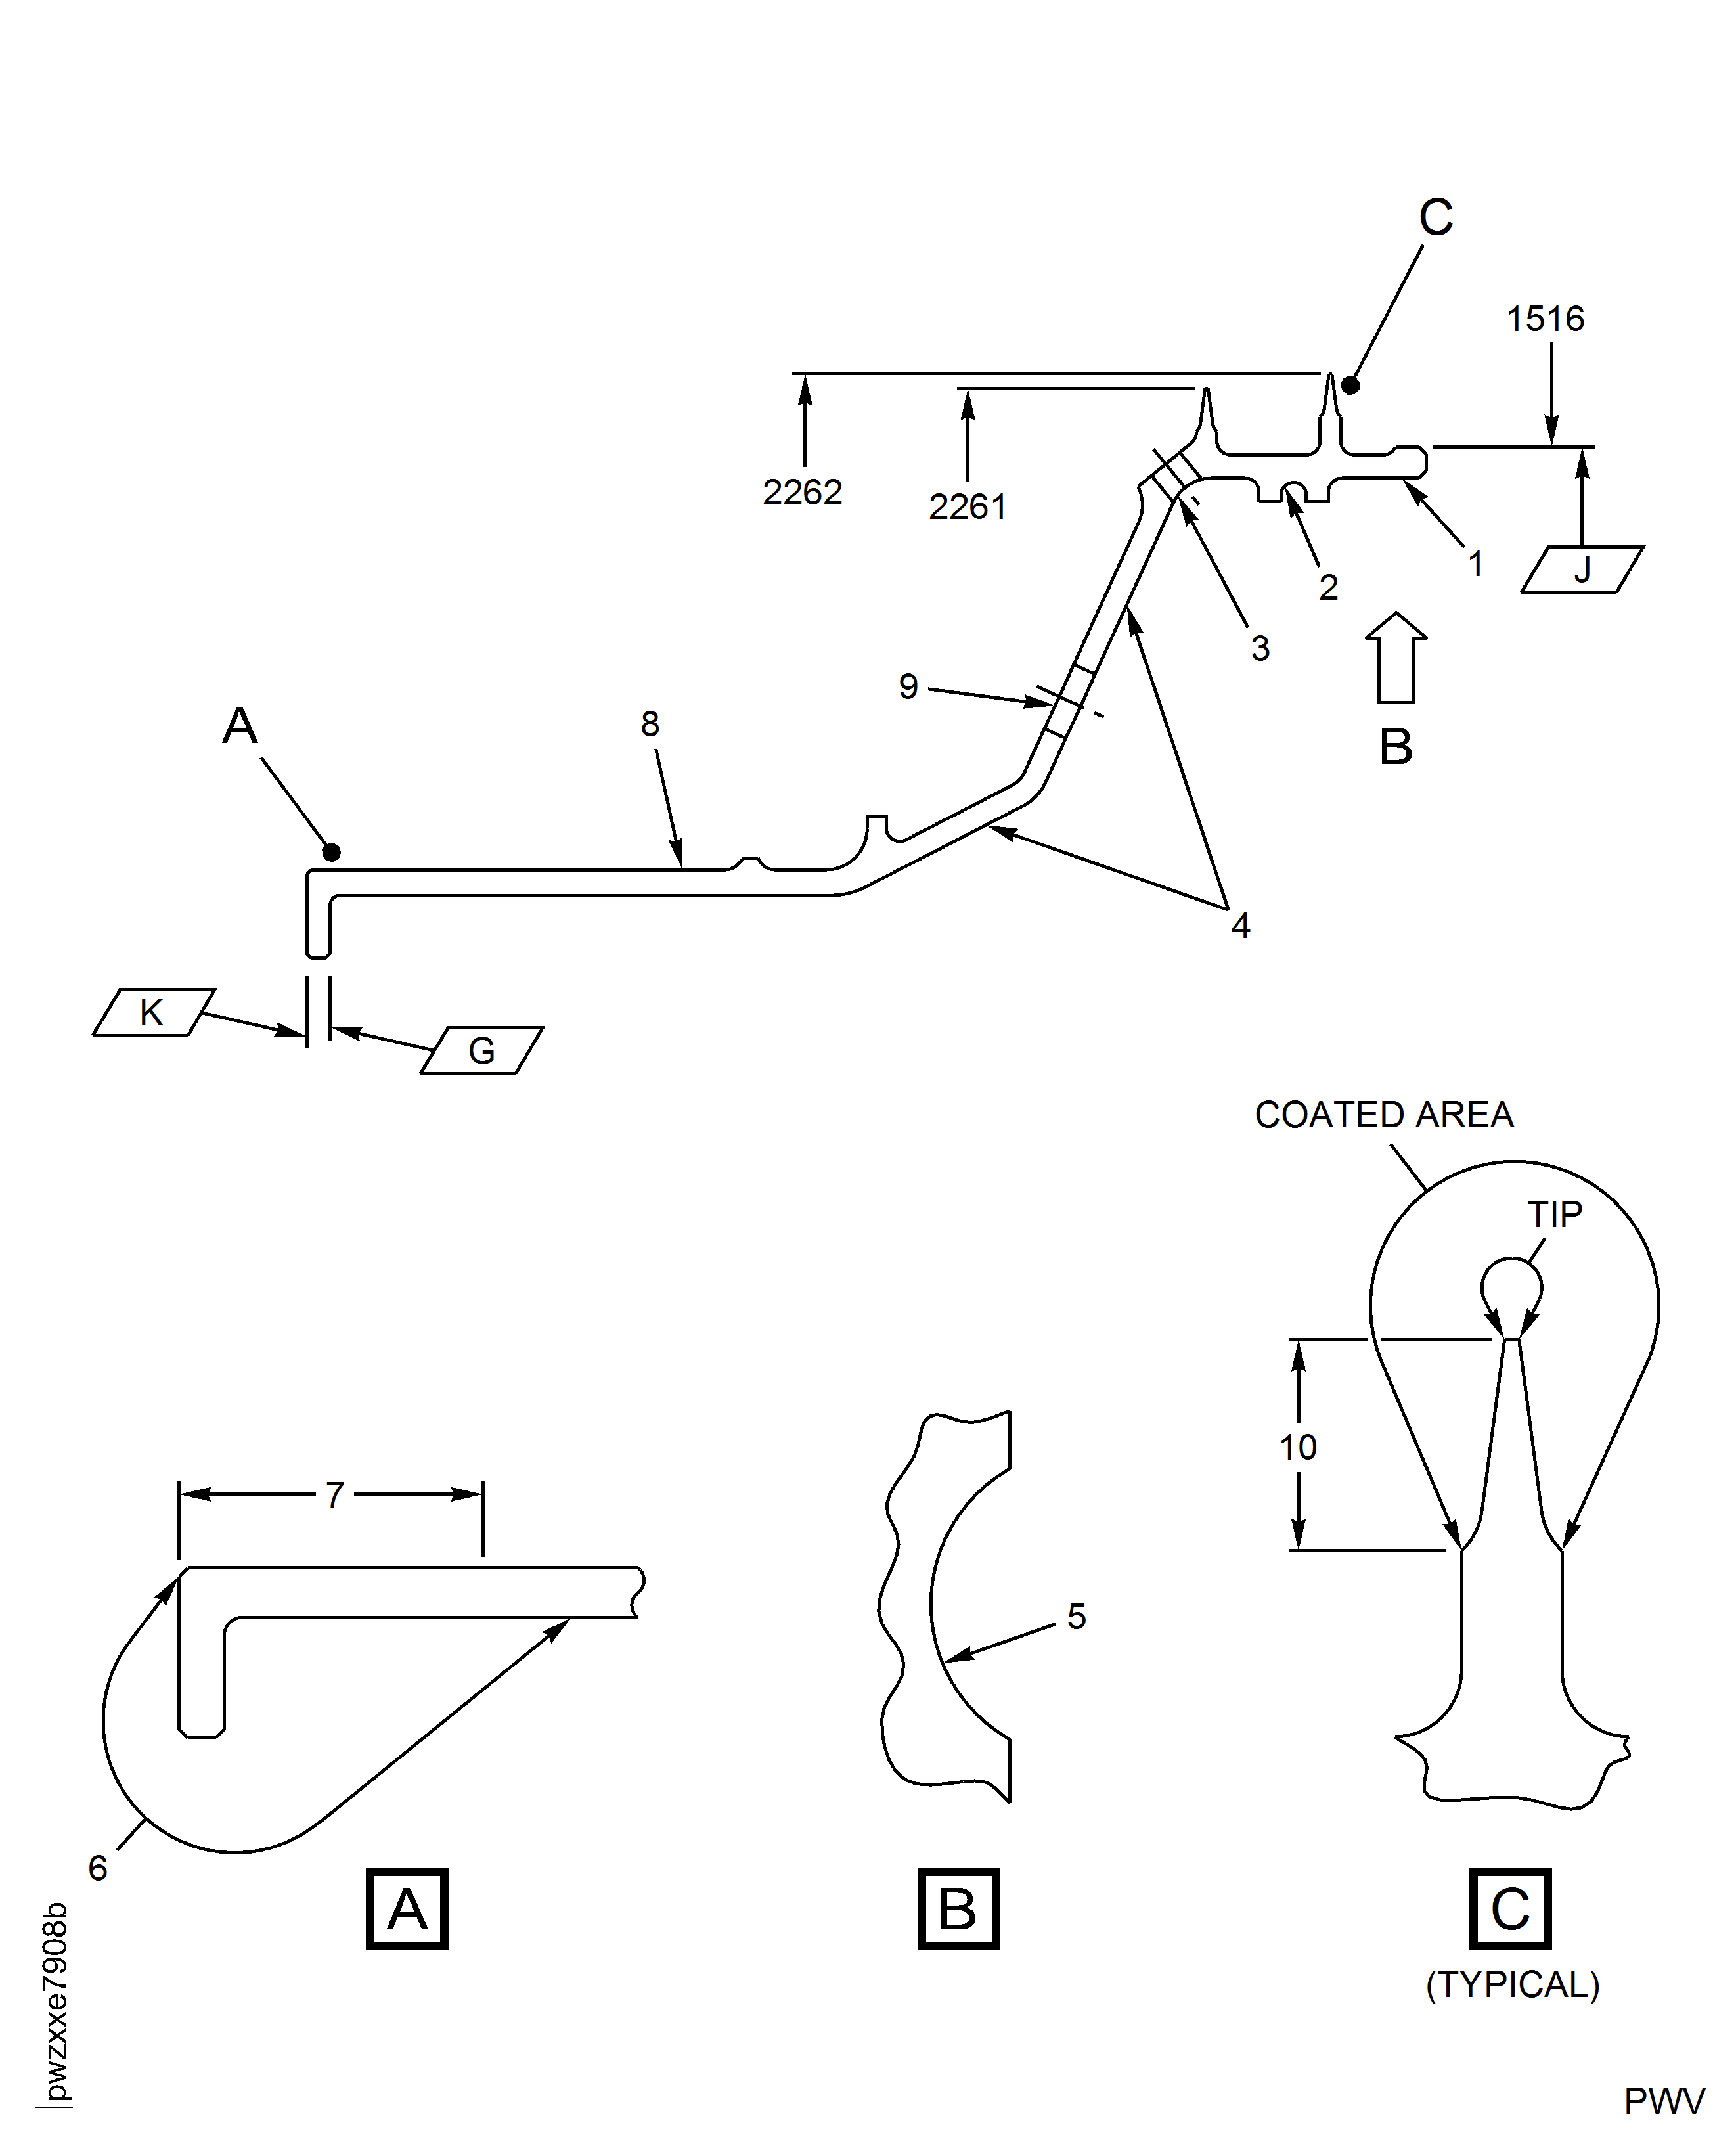
MAKE SURE THAT YOU DO THIS INSPECTION BEFORE YOU CLEAN THE PART OR CLEANING PROCEDURE WILL REMOVE THE INDICATION OF SOOT AND OIL.Examine the Stage 1 HPT air seal at Locations 8 and 9 for soot and oil.
SUBTASK 72-45-13-230-142 Examine the Stage 1 HPT Air Seal (01-020) for Soot and Oil
Clean the part. Refer to TASK 72-45-13-100-000 (CLEANING-000).
NOTE
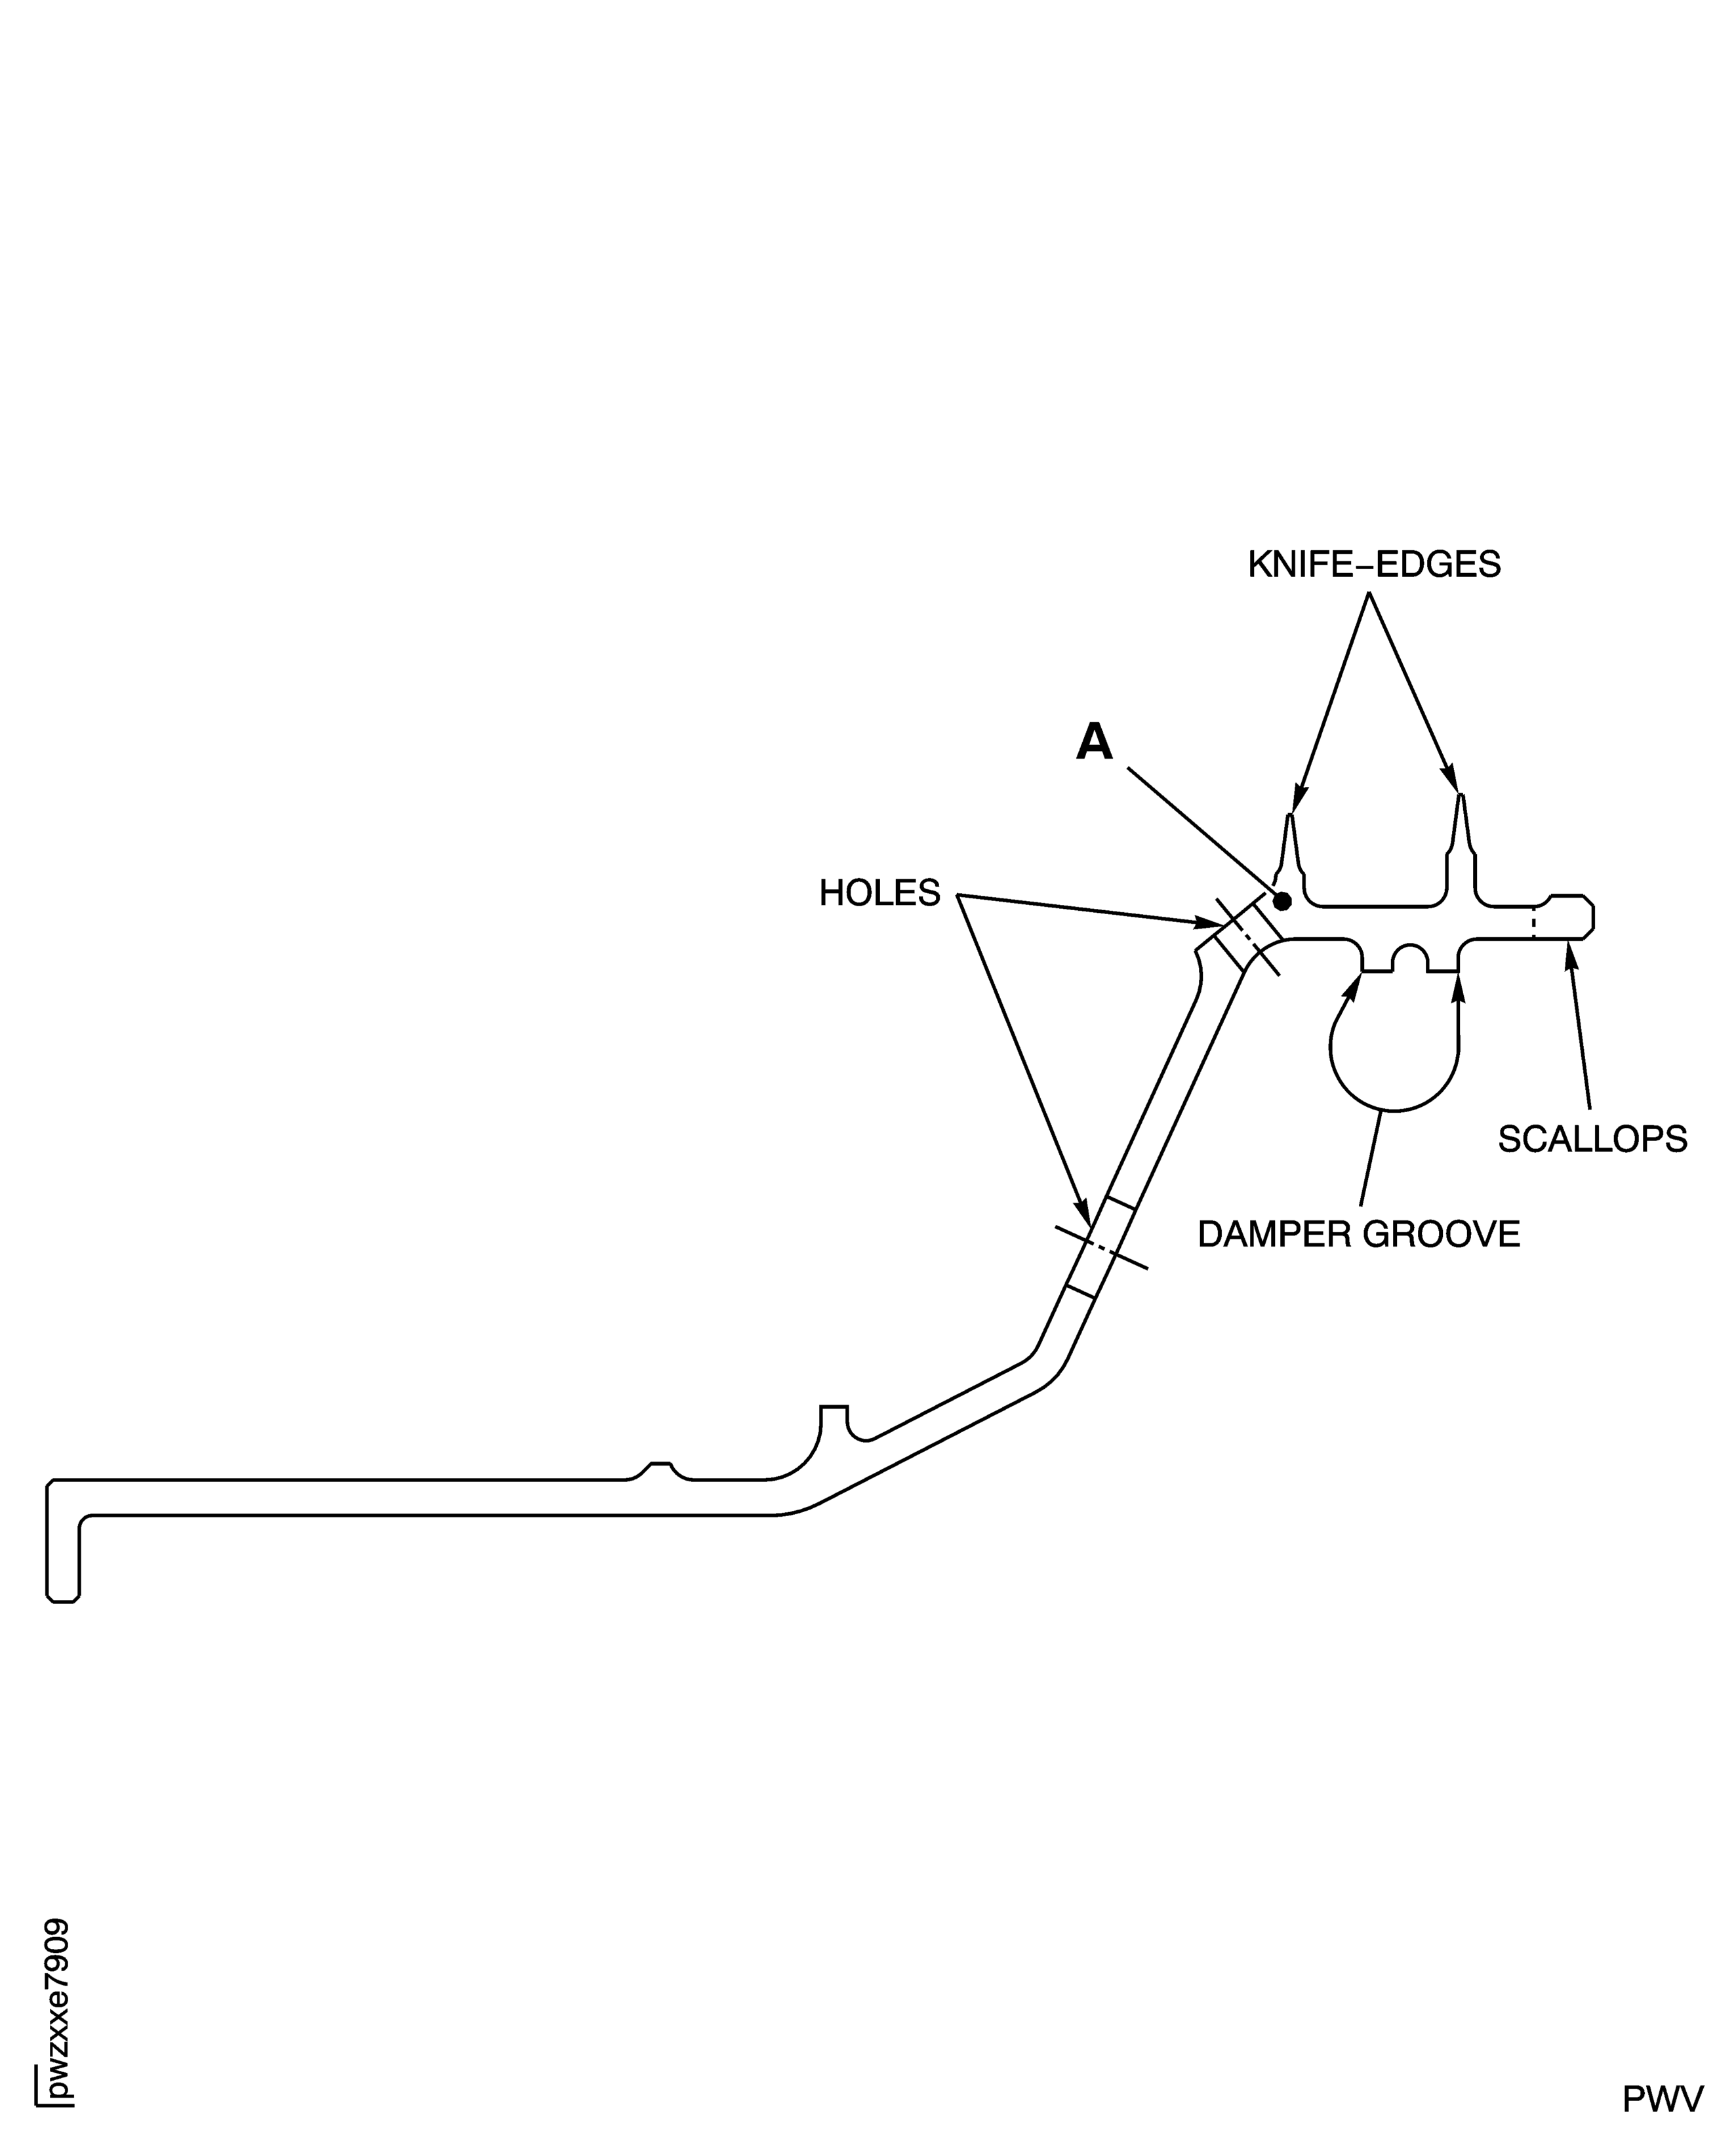
When you inspect the air seal for cracks make sure you check the important areas. These are shown in Figure.Do the test for cracks on the part that is given below. Use the applicable penetrant inspection procedure. Look carefully at the area around the holes, Location 3 (2 positions) and Location 9 (24 positions), the scallops, Location 5 and the knife-edges.
PART IDENT
TASK/SUBTASK
Stage 1 HPT Air Seal.
(Dip or Spray)
SUBTASK 72-45-13-230-059 Examine the Stage 1 HPT Air Seal (01-020) for Cracks
Refer to Figure.
Repair, VRS3199 TASK 72-45-13-300-001 (REPAIR-001).
Corrosion, dents, nicks and scratches.
Examine the Stage 1 HPT Air Seal surfaces for corrosion, dents, nicks and scratches, but do not include Location 2.
SUBTASK 72-45-13-220-125 Examine the Stage 1 HPT Air Seal (01-020) Surfaces for Corrosion, Dents, Nicks and Scratches
Refer to Figure.
Repair, VRS3199 TASK 72-45-13-300-001 (REPAIR-001).
Galling.
Examine the Stage 1 HPT Air Seal front flange, Location 6, for galling.
SUBTASK 72-45-13-220-126 Examine the Stage 1 HPT Air Seal (01-020) Front Flange for Galling
Refer to Figure.
Repair, VRS3199 TASK 72-45-13-300-001 (REPAIR-001).
Contact with other parts.
Examine the Stage 1 HPT Air Seal for signs of contact with other parts on the inside and outside of the conical and straight surfaces, Locations 1, 4 and 8.
SUBTASK 72-45-13-220-127 Examine the Stage 1 HPT Air Seal (01-020) for Signs of Contact with Other Parts on the Inside and Outside of the Conical and Straight Surfaces
Refer to Figure.
Repair, VRS3199 TASK 72-45-13-300-001 (REPAIR-001).
Damage, corrosion, dents, nicks, scratches and rolled edges.
Examine the Stage 1 HPT Air Seal knife-edges for damage, corrosion, dents, nicks, scratches and rolled edges.
SUBTASK 72-45-13-220-129 Examine the Stage 1 HPT Air Seal (01-020) Knife-Edges for Damage, Corrosion, Dents, Nicks, Scratches and Rolled Edges
Refer to Figure.
Repair, VRS3199 TASK 72-45-13-300-001 (REPAIR-001).
Galling.
Examine the Stage 1 HPT Air Seal, Location 1516, rear diameter for galling.
SUBTASK 72-45-13-220-130 Examine the Stage 1 HPT Air Seal (01-020) Rear Diameter for Galling
Refer to Figure.
NOTE
If the measured diameter in a free condition is not satisfactory, a held condition is permitted. All dimensions apply when surface K is flat by 0.002 in. (0.05 mm) and diameter J maintains a clearance envelope of 8.636 in. (219.354 mm) diameter in a free or held condition. Hold the Air Seal only on surfaces G and K and diameter J.Repair, VRS3198 TASK 72-45-13-300-002 (REPAIR-002).
Other than Step.
Examine the Stage 1 HPT Air Seal, Location 1516, for the rear diameter.
SUBTASK 72-45-13-220-131 Examine the Stage 1 HPT Air Seal (01-020) for the Rear Diameter
Refer to Figure.
Write down the dimension of the diameter.
NOTE
This part can be used only if the mating part has a diameter that will result in fit of reference No. 2261. Refer to TASK 72-40-00-430-006-B00 (ASSEMBLY-006).
If the knife-edge diameter is between 9.025 in. and 9.037 in. (229.24 mm and 229.54 mm).
Repair, VRS3199 TASK 72-45-13-300-001 (REPAIR-001).
NOTE
Refer to Repair, VRS3199 TASK 72-45-13-300-001 (REPAIR-001) for the acceptable limits of the missing material.
If the knife-edge diameter is less than 9.025 in. (229.24 mm) locally, for less than 25 percent of the circumference.
Repair, VRS3723 TASK 72-45-13-300-005 (REPAIR-005).
Examine the Stage 1 HPT Air Seal, Location 2261, for the knife-edge diameter.
Write down the dimension of the diameter.
NOTE
This part can be used only if the mating part has a diameter that will result in fit of reference No. 2262. Refer to TASK 72-40-00-430-006-B00 (ASSEMBLY-006).
If the knife-edge diameter is between 9.125 in. and 9.137 in. (231.775 mm and 232.080 mm).
Repair, VRS3199 TASK 72-45-13-300-001 (REPAIR-001).
NOTE
Refer to Repair, VRS3199 TASK 72-45-13-300-001 (REPAIR-001) for the acceptable limits of the missing material.
If the knife-edge diameter is less than 9.125 in. (231 .775 mm) locally, for less than 25 percent of the circumference.
Repair, VRS3723 TASK 72-45-13-300-005 (REPAIR-005).
Examine the Stage 1 HPT Air Seal, Location 2262, for the knife-edge diameter.
SUBTASK 72-45-13-220-132 Examine the Stage 1 HPT Air Seal (01-020) for the Diameter of the Knife-Edges
NOTE
Coating will be on the air seal only if the air seal was repaired before by VRS3723.
Refer to Figure.
Repair, VRS3723 TASK 72-45-13-300-005, (REPAIR-005).
More than Step.
Examine the seal at Location 10 (both sides) for chipping.
SUBTASK 72-45-13-220-133 Examine the Stage 1 HPT Air Seal (01-020) for Coating Chipping
Refer to Figure.
Make a permanent mark by the procedures given in SPM TASK 70-09-00-400-501.
Use the vibration peen method, the dot peen, deep method or the electrolytic etch, deep method.
Make a mark on the air seal at Location 7, which is located not more than 0.300 in. (7.62 mm) from the front of the front flange.
Make a mark on the new cycle time of the part on the air seal.
SUBTASK 72-45-13-220-134 Examine the Stage 1 HPT Air Seal (01-020) for the Cycle Time of the Part
Figure: Stage 1 HPT Air Seal Inspection Locations
Stage 1 HPT Air Seal Inspection Locations

Figure: Stage 1 HPT Air Seal Important FPI Locations
Stage 1 HPT Air Seal Important FPI Locations

