Export Control
EAR Export Classification: Not subject to the EAR per 15 C.F.R. Chapter 1, Part 734.3(b)(3), except for the following Service Bulletins which are currently published as EAR Export Classification 9E991: SBE70-0992, SBE72-0483, SBE72-0580, SBE72-0588, SBE72-0640, SBE73-0209, SBE80-0024 and SBE80-0025.Copyright
© IAE International Aero Engines AG (2001, 2014 - 2021) The information contained in this document is the property of © IAE International Aero Engines AG and may not be copied or used for any purpose other than that for which it is supplied without the express written authority of © IAE International Aero Engines AG. (This does not preclude use by engine and aircraft operators for normal instructional, maintenance or overhaul purposes.).Applicability
All
Common Information
TASK 72-50-53-300-091 Turbine Exhaust Case Assembly - Front Flange Locating Pin Hole - Weld Repair, Repair-091 (VRS3859)
Effectivity
FIG/ITEM | PART NO. |
|---|---|
21-300 | 2A1209-01 |
21-300 | 2A2620-01 |
21-300 | 2A3111-01 |
21-300 | 2A3183-01 |
21-300 | 2A3183-101 |
21-300 | 2A3455-01 |
21-300 | 2A4258-01 |
21-300 | 2A4263-01 |
Material of component
PART IDENT | SYMBOL | MATERIAL |
|---|---|---|
Turbine Exhaust Case | - | Corrosion and heat resistant steel |
General
Price and availability - refer to IAE
The practices and processes referred to in the procedure by the TASK numbers are in the SPM.
NOTE
Preliminary Requirements
Pre-Conditions
NONESupport Equipment
NONEConsumables, Materials and Expendables
| Name | Manufacturer | Part Number / Identification | Quantity | Remark |
|---|---|---|---|---|
| CoMat 03-378 WELDING WIRE | LOCAL | CoMat 03-378 |
Spares
NONESafety Requirements
NONEProcedure
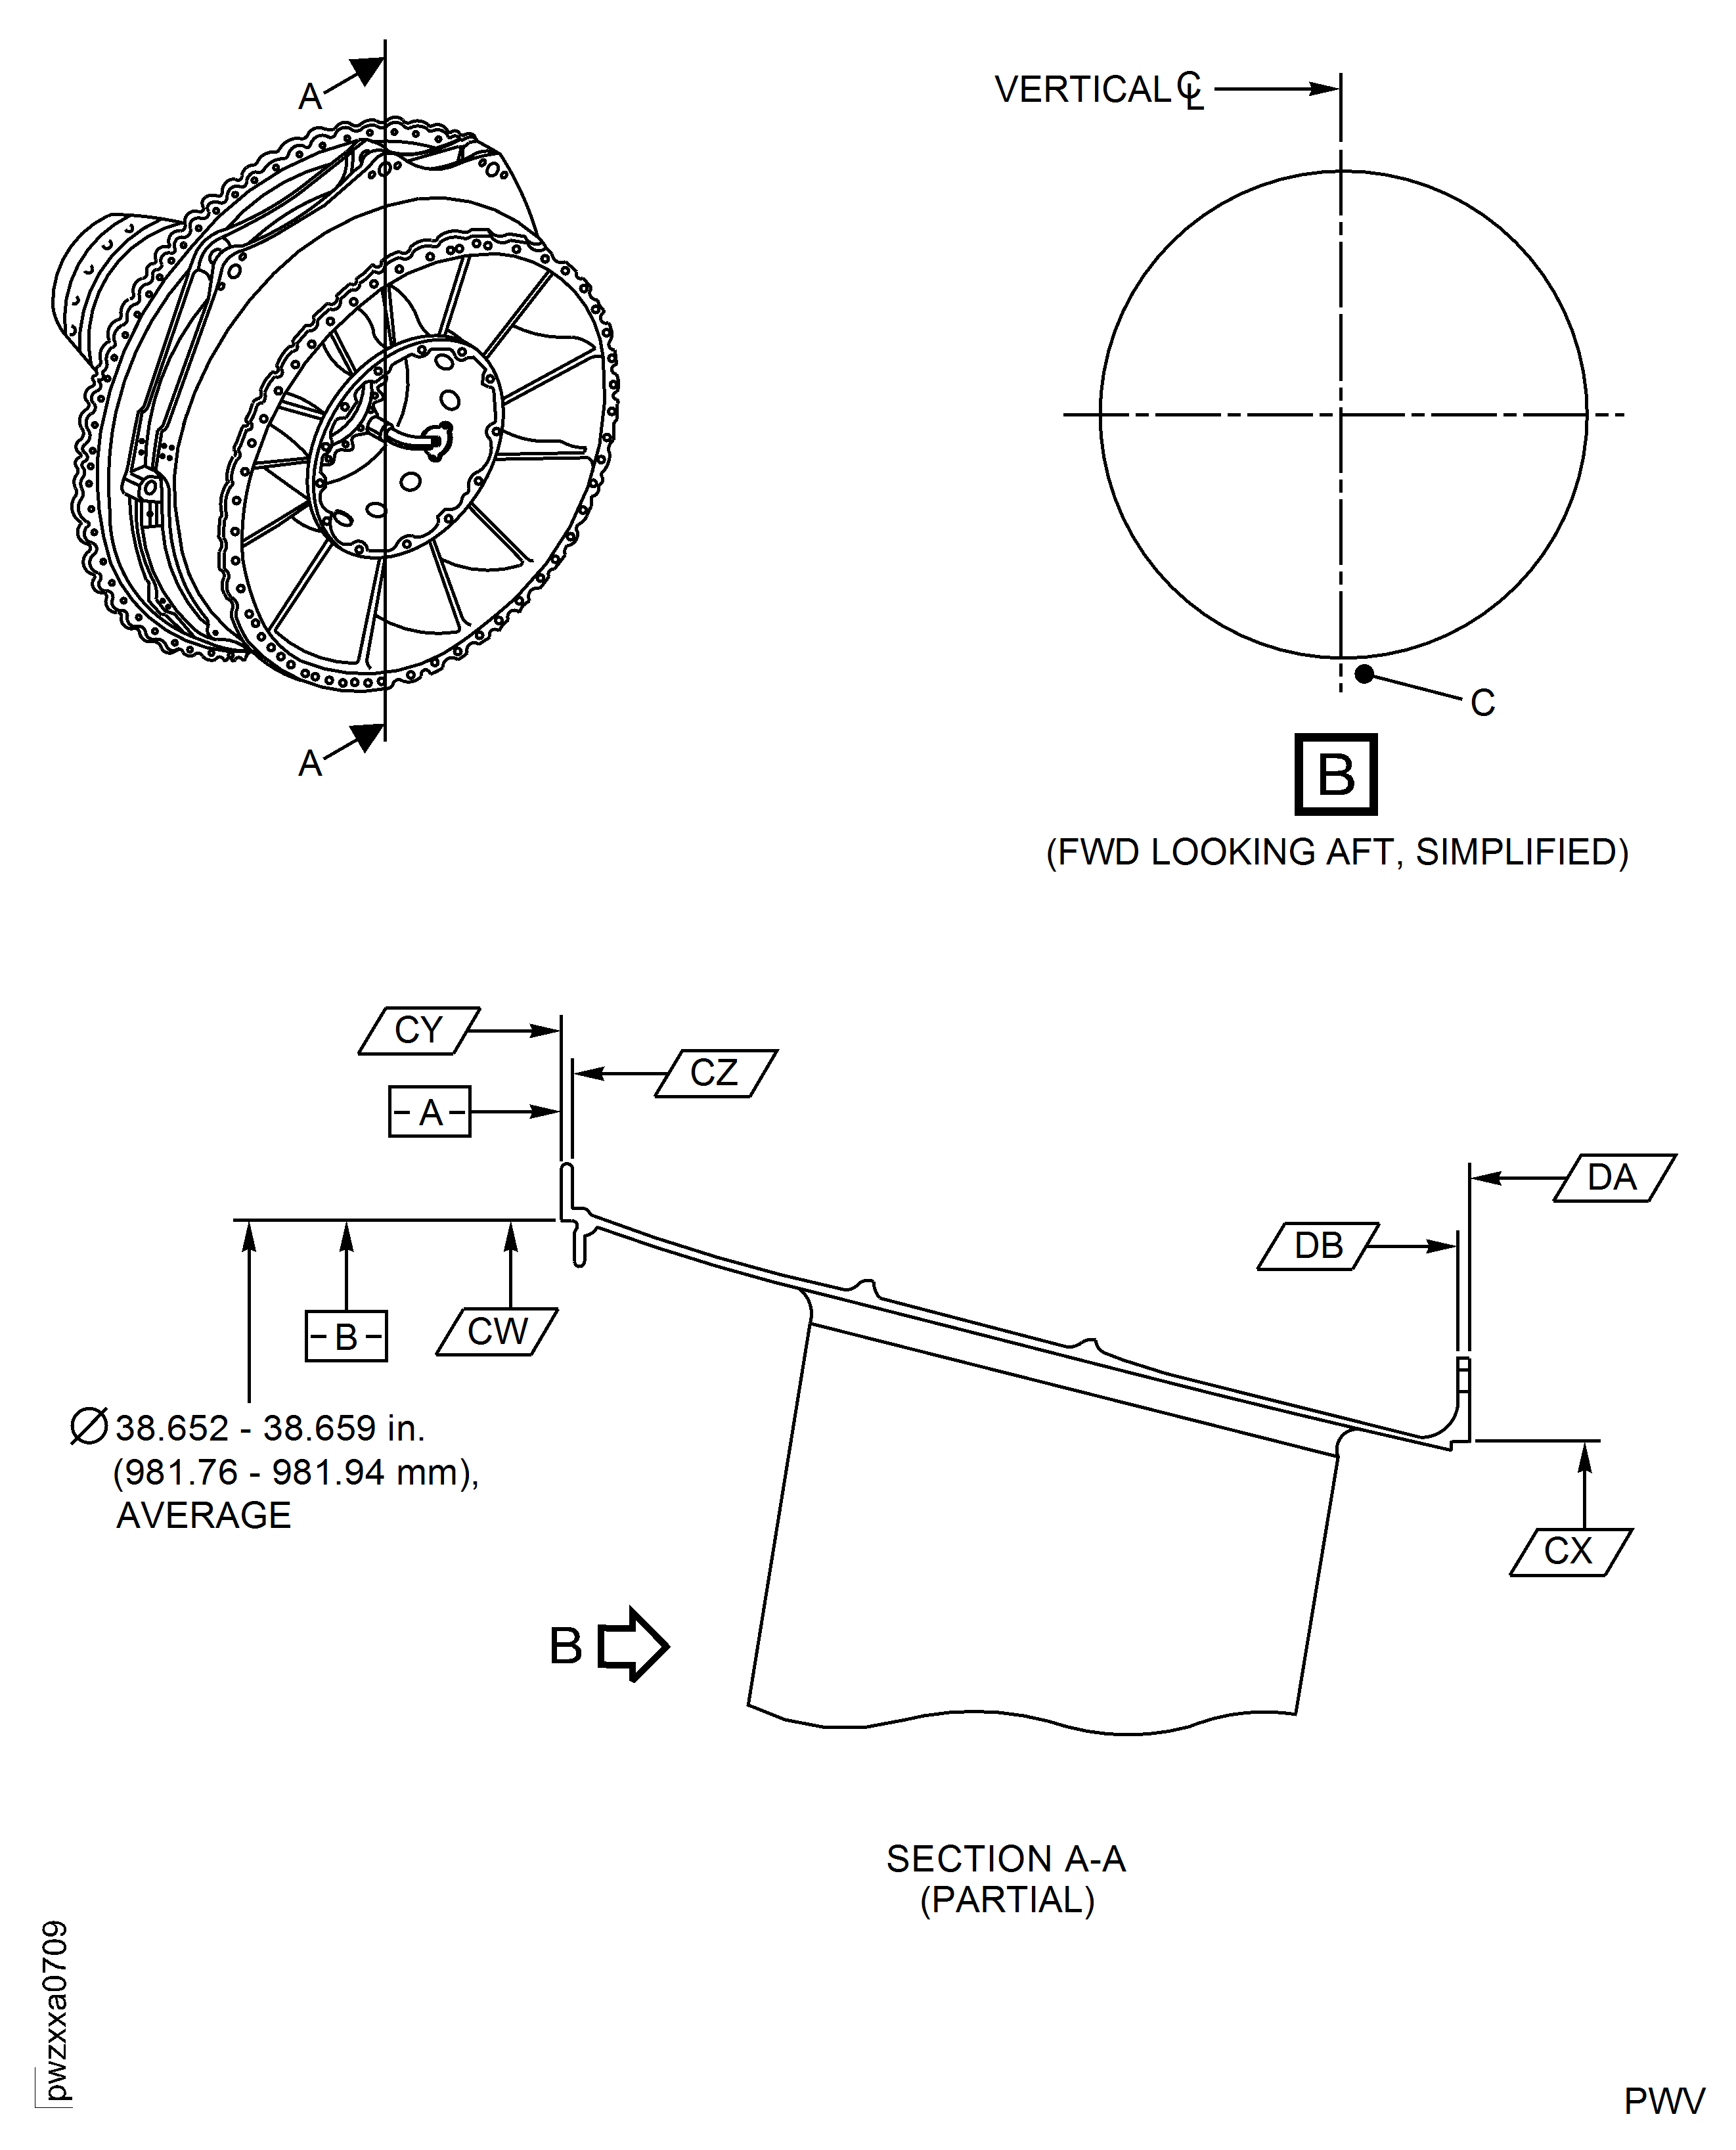
Refer to Figure.
Use rotary austenitic stainless steel wire brush or silicon carbide abrasive wheel to remove oxides and prepare the repair area for weld. Refer to SPM TASK 70-31-13-310-501.
Refer to SPM TASK 70-11-26-300-503.
Clean thoroughly the area to be welded and the adjacent heat-affected area.
SUBTASK 72-50-53-350-231 Clean the Areas of the Turbine Exhaust Case to be Repaired
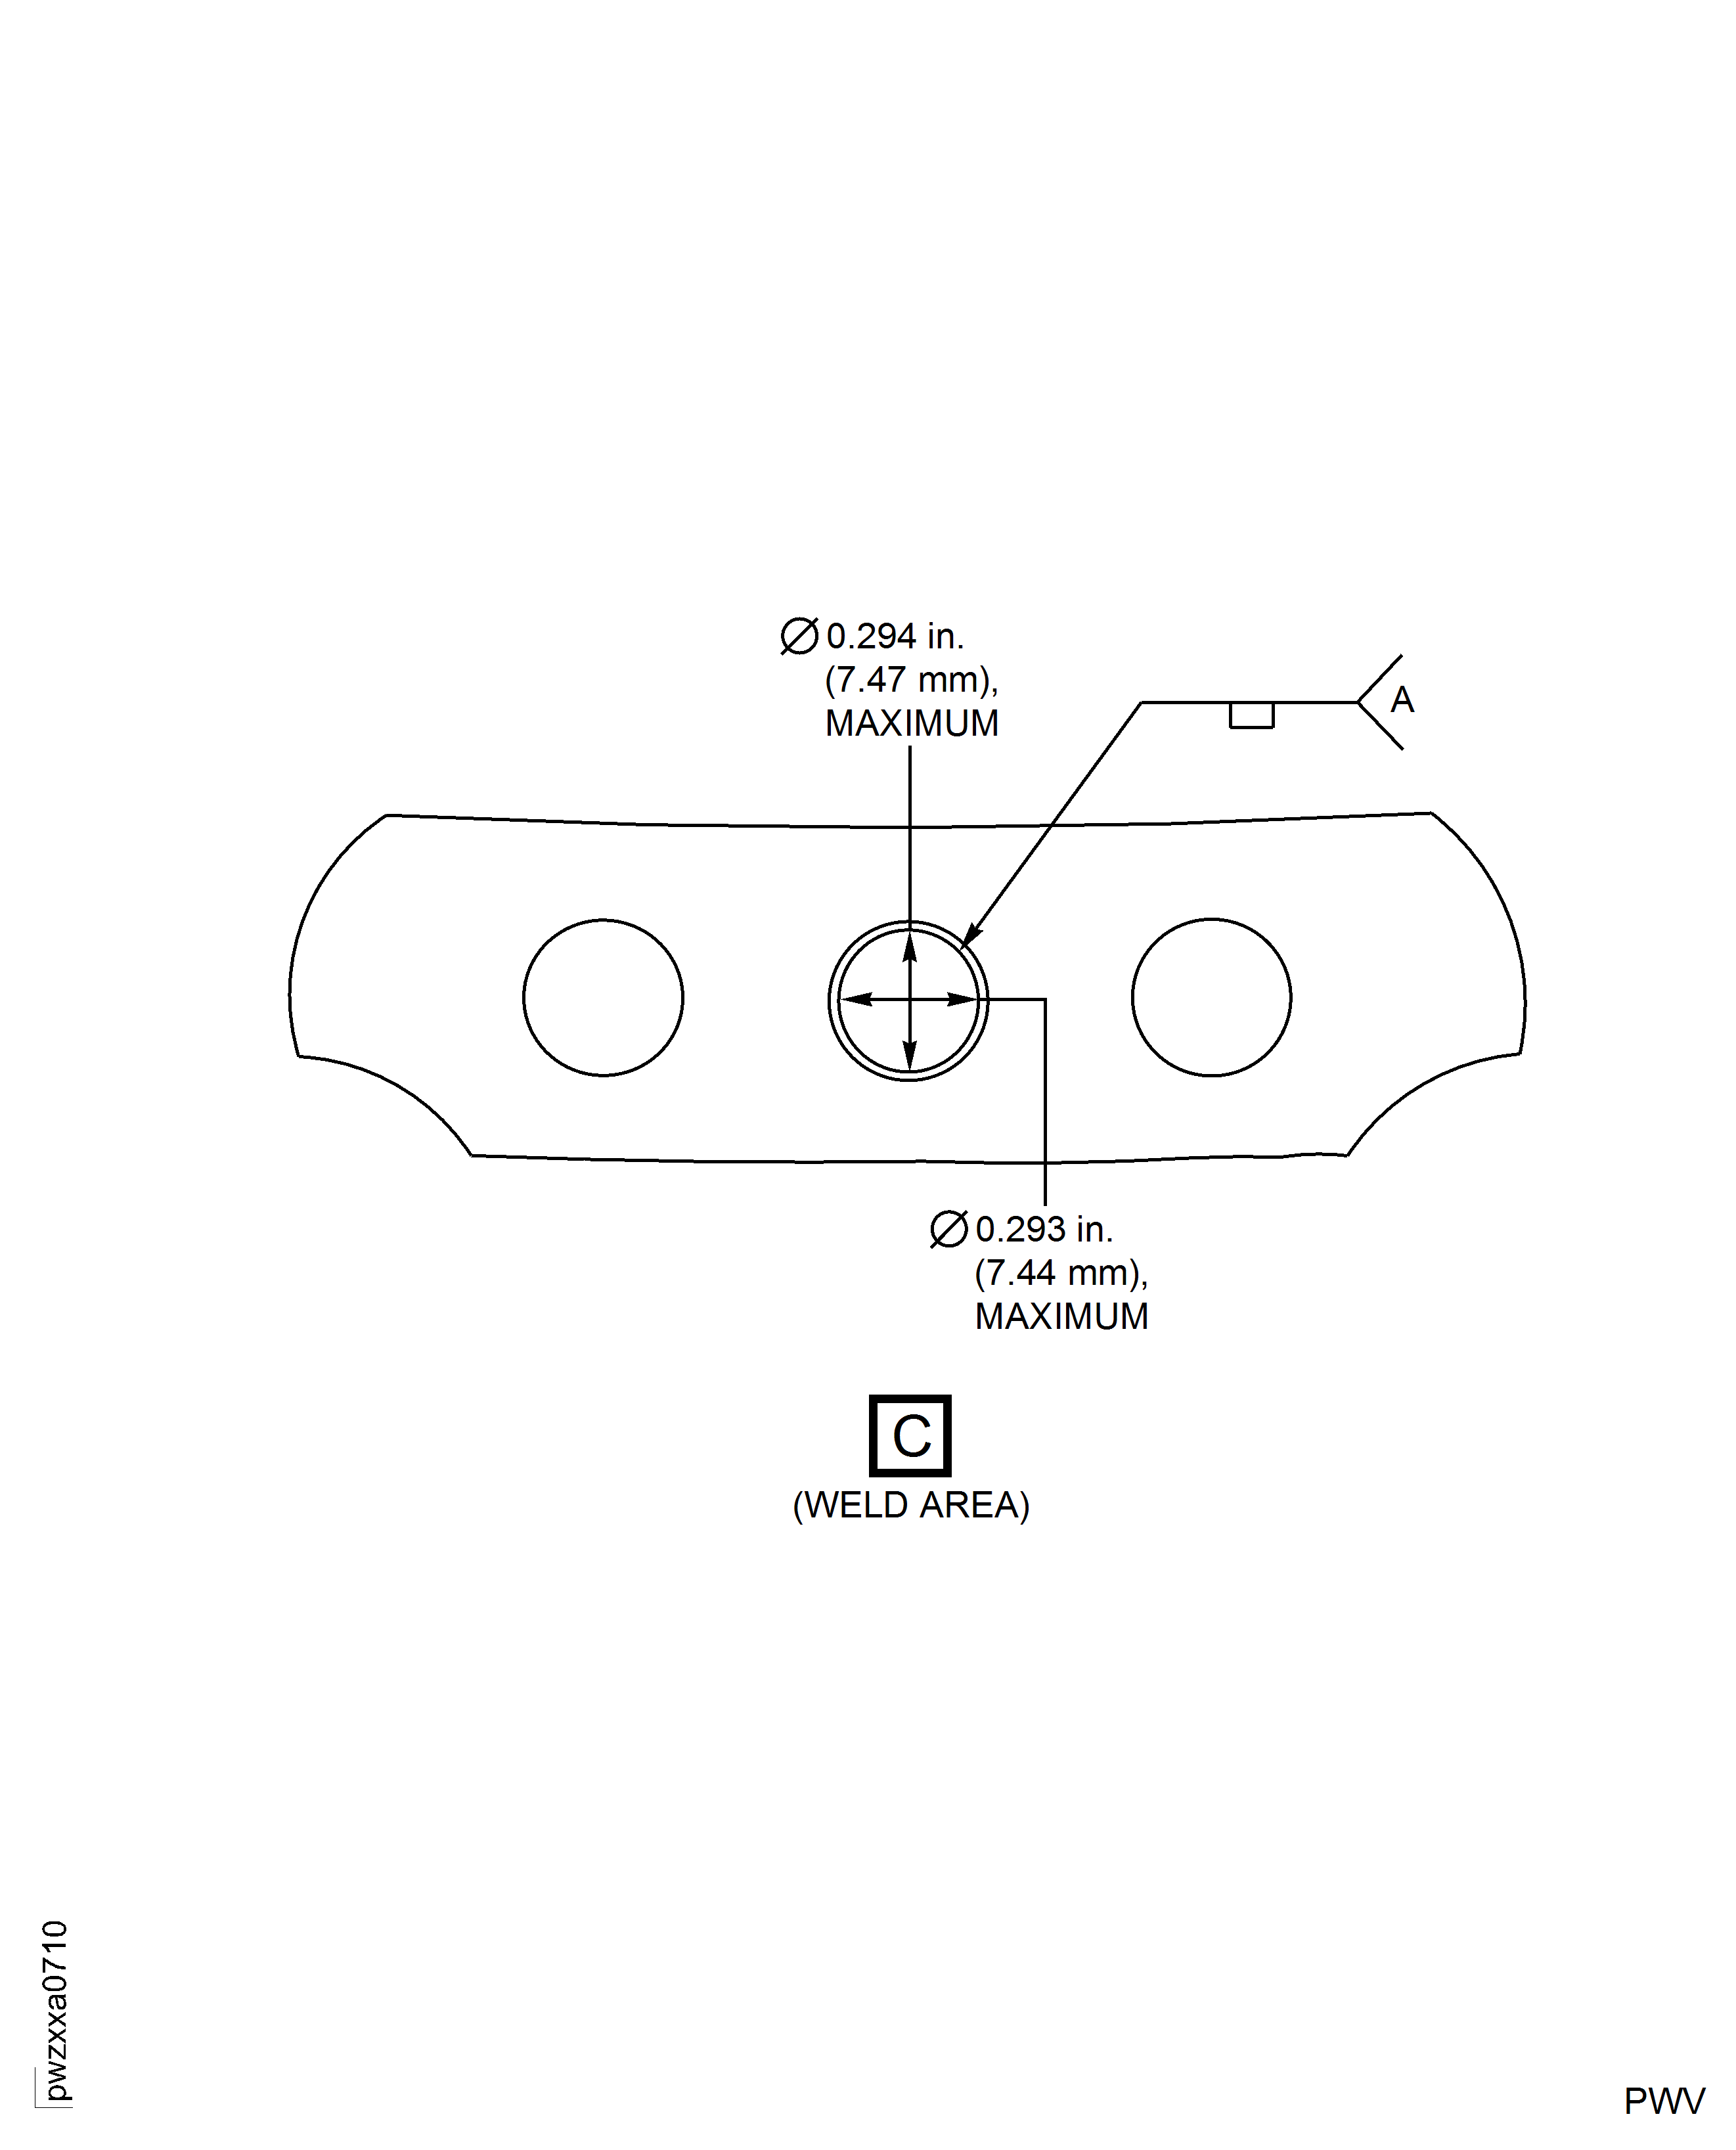
Refer to Figure.
Weld build-up the repair area.
Use CoMat 03-378 WELDING WIRE and the GTAW-MA method. Refer to SPM TASK 70-31-13-310-501 (IAE 16-2).
SUBTASK 72-50-53-310-092 Weld the Repair Area
Refer to SPM TASK 70-37-13-370-501, Cycle 6A.
Locally stress relieve the case.
Repair, VRS3014 TASK 72-50-53-300-046 (REPAIR-046) or Repair, VRS5392 TASK 72-50-53-300-008 (REPAIR-008).
Remove the helicoils at the bearing compartment cover and helicoils at the bearing jumper tube boss.
Repair, VRS3019 TASK 72-50-53-300-054 (REPAIR-054) or Repair, VRS5413 TASK 72-50-53-300-029 (REPAIR-029).
Remove the 13 nut plates at the inner rear flange.
Repair, VRS3256 TASK 72-50-53-300-069 (REPAIR-069).
Remove the three nut plates at the carbon seal flange.
Remove any nickel plating by the applicable repairs.
Refer to the SPM TASK 70-37-13-370-501, Cycle 6A.
Oven stress-relieve the case.
Oven stress relieve the case.
Stress relieve the case by one of the following methods:
SUBTASK 72-50-53-370-109 Stress Relieve the Turbine Exhaust Case
Hardness must be 30 to 38 HRC or equivalent.
Hardness check must be away from the weld and heat affected zone.
Hardness check must be within the stress-relief area if a local stress-relief was performed.
Do a hardness check on the surfaces adjacent to the repair area.
SUBTASK 72-50-53-220-287 Do a Hardness Check
Refer to SPM TASK 70-11-03-300-503.
Clean the part.
SUBTASK 72-50-53-110-219 Clean the Part
No cracks or indications are allowed.
Refer to SPM TASK 70-23-05-230-501, high sensitivity.
If a local stress relief was performed, do a local fluorescent penetrant inspection of the repair area.
No cracks or indications are allowed.
Refer to SPM TASK 70-23-08-230-501.
If a full furnace stress relief was performed, do a full fluorescent penetrant inspection of the part.
SUBTASK 72-50-53-230-155 Do an FPI of the Repair Area
Repair, VRS3014 TASK 72-50-53-300-046 (REPAIR-046) or Repair, VRS5392 TASK 72-50-53-300-008 (REPAIR-008).
Install the helicoils at the bearing compartment cover and helicoils at the bearing jumper tube boss.
Repair, VRS3019 TASK 72-50-53-300-054 (REPAIR-054) or Repair, VRS5413 TASK 72-50-53-300-029 (REPAIR-029).
Install the 13 nut plates at the inner rear flange.
Repair, VRS3256 TASK 72-50-53-300-069 (REPAIR-069).
Install the three nut plates at the carbon seal flange.
SUBTASK 72-50-53-350-232 Install all Details if Removed
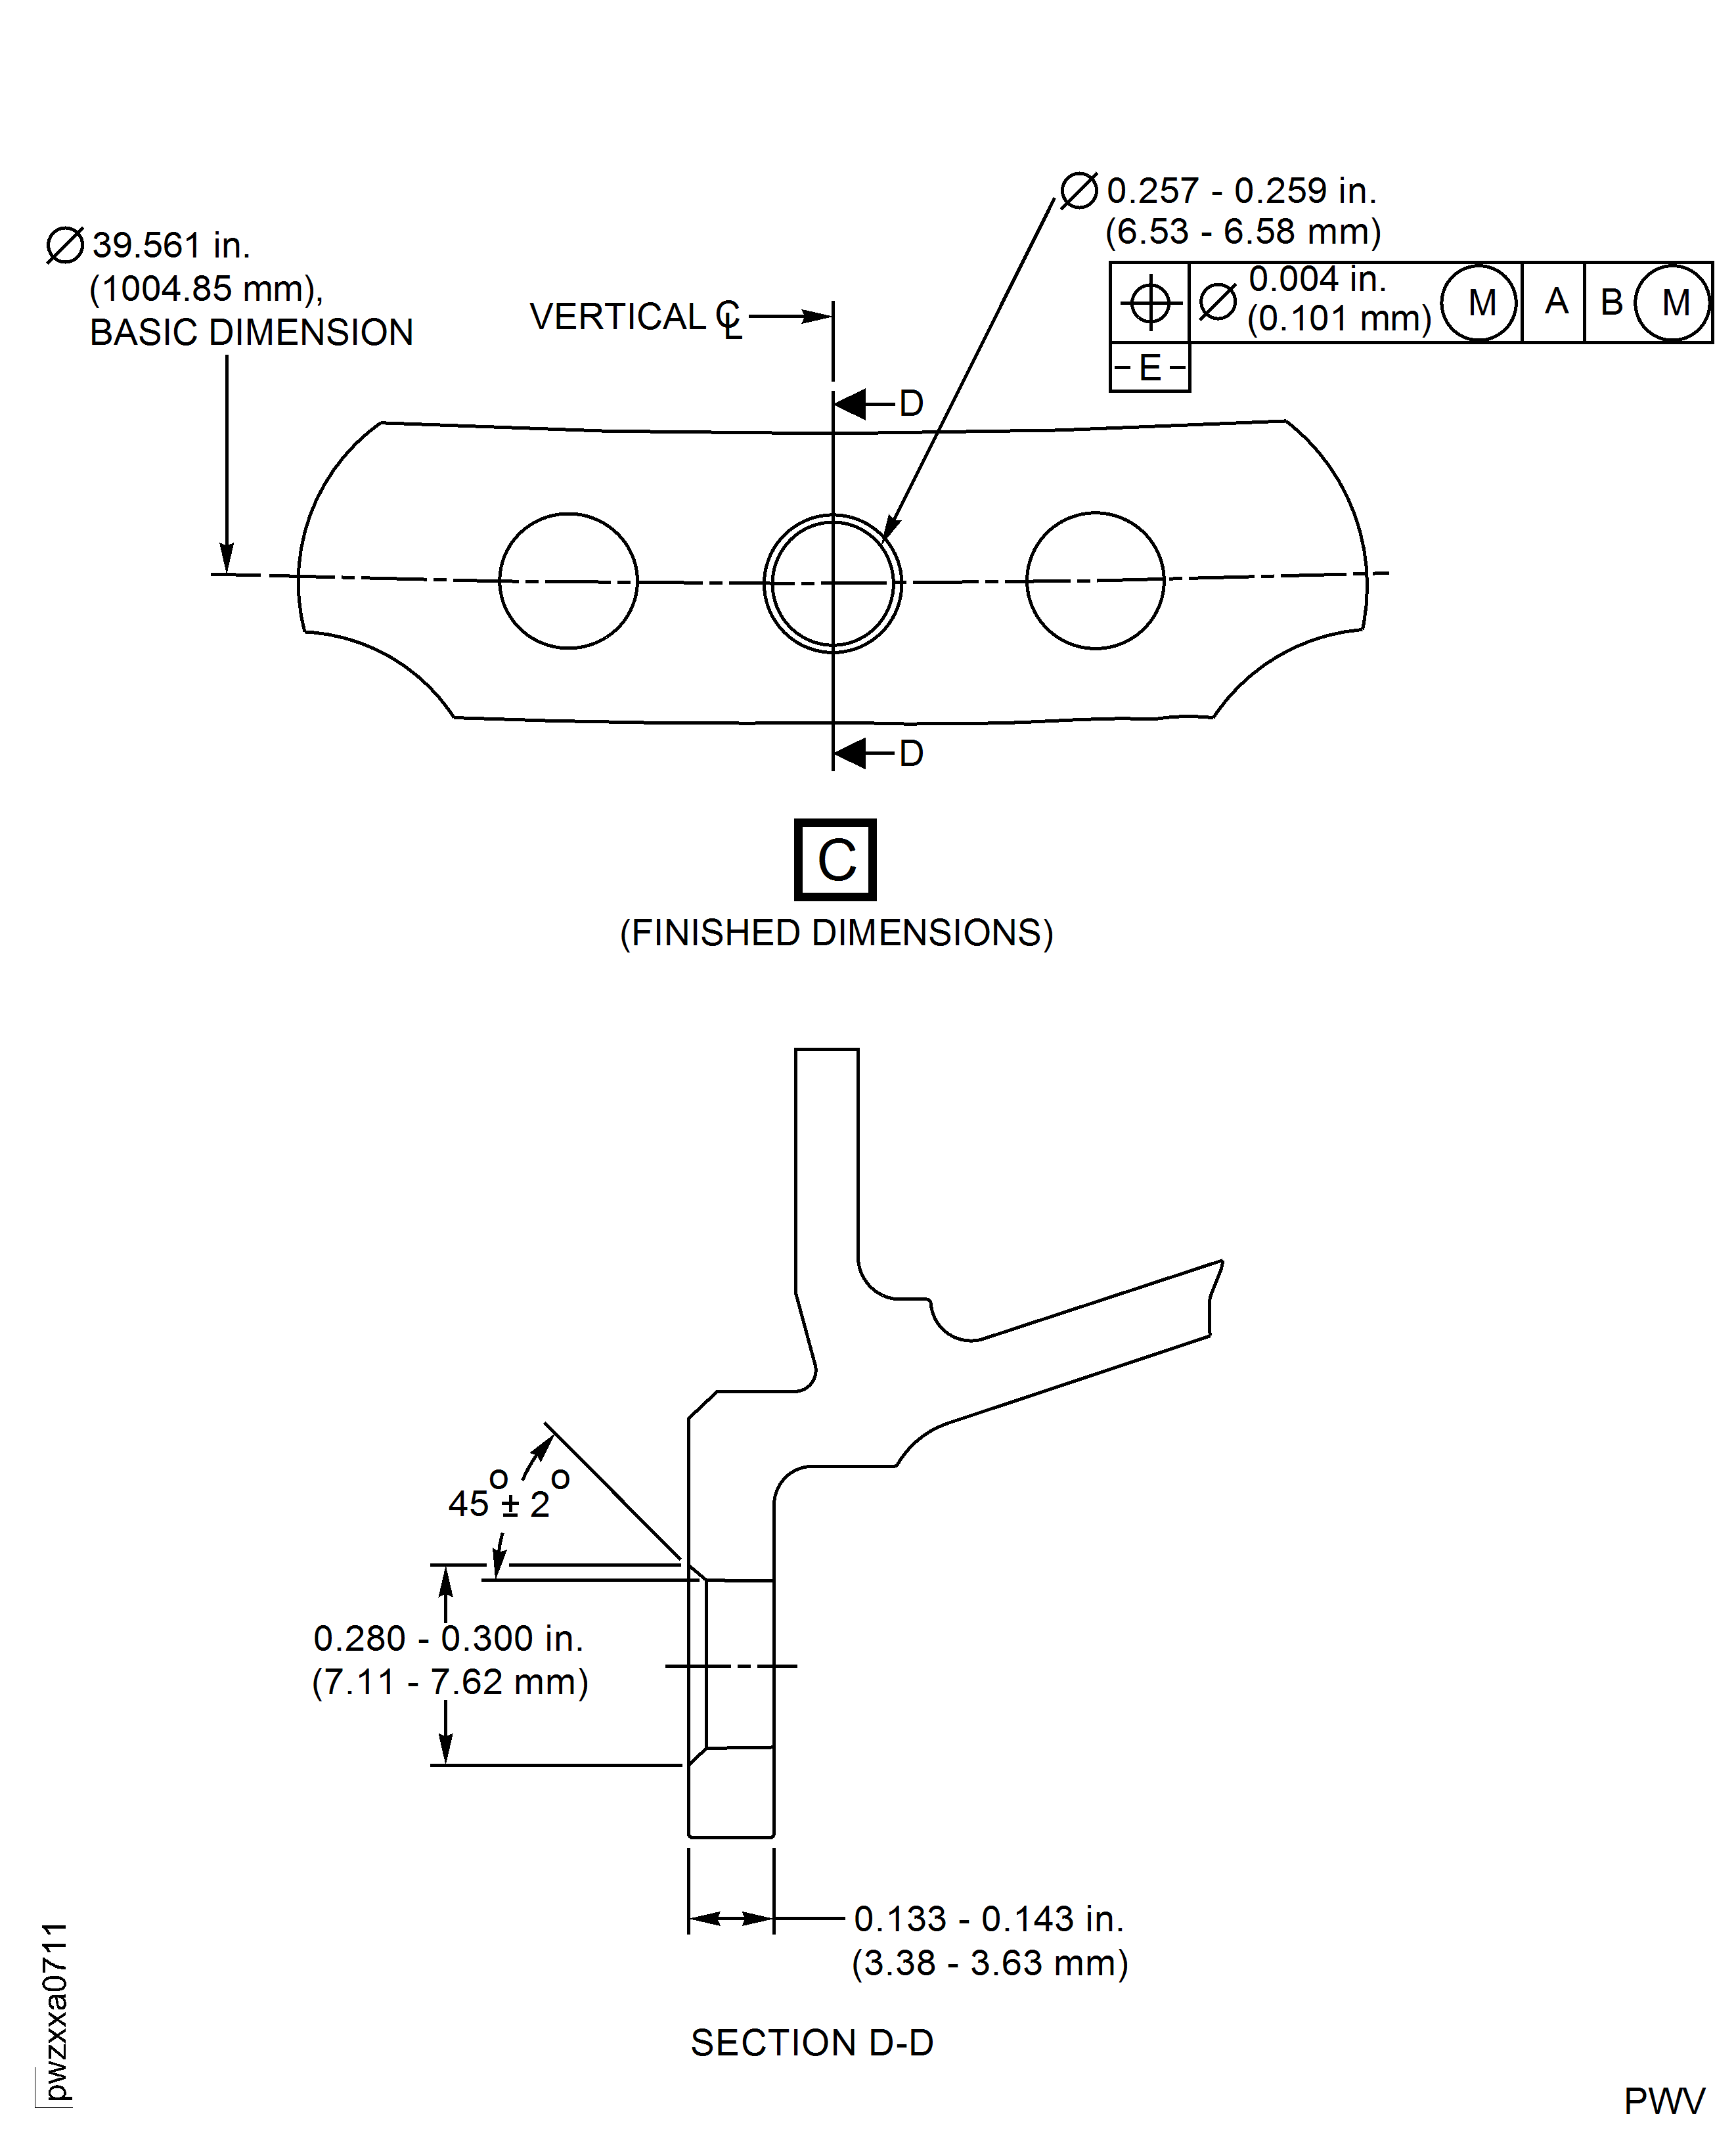
Refer to Figure.
Do a dimensional inspection of the part.
SUBTASK 72-50-53-220-288 Do a Dimensional Inspection
Figure: Turbine Exhaust Case - Repair Zone
Turbine Exhaust Case - Repair Zone

Figure: Turbine Exhaust Case - Weld Area
Turbine Exhaust Case - Weld Area

Figure: Turbine Exhaust Case - Finish Dimensions
Turbine Exhaust Case - Finish Dimensions

