TASK 72-32-00-430-008-A00 LPC/Intermediate Case Module - Install The LPC Bleed Duct, Booster Stage Bleed Valve And Actuating Mechanism, And Right And Left Rod Assemblies, Assembly-008 - Pre SBE 72-0233

DMC:V2500-A1-72-32-0000-08A-710A-B|Issue No:003.00|Issue Date:2017-03-23

Export Control

EAR Export Classification: Not subject to the EAR per 15 C.F.R. Chapter 1, Part 734.3(b)(3), except for the following Service Bulletins which are currently published as EAR Export Classification 9E991: SBE70-0992, SBE72-0483, SBE72-0580, SBE72-0588, SBE72-0640, SBE73-0209, SBE80-0024 and SBE80-0025.

Copyright

© IAE International Aero Engines AG (2001, 2014 - 2021) The information contained in this document is the property of © IAE International Aero Engines AG and may not be copied or used for any purpose other than that for which it is supplied without the express written authority of © IAE International Aero Engines AG. (This does not preclude use by engine and aircraft operators for normal instructional, maintenance or overhaul purposes.).

Applicability

V2500-A1 AND Pre SBE 72-0233

Common Information

TASK 72-32-00-430-008-A00 LPC/Intermediate Case Module - Install The LPC Bleed Duct, Booster Stage Bleed Valve And Actuating Mechanism, And Right And Left Rod Assemblies, Assembly-008 - Pre SBE 72-0233

General

Fig/item numbers in parentheses in the procedure agree with those used in the IPC. Only the primary Fig/item numbers are used. For the service bulletin alpha variants refer to the IPC.

For all parts identified in a different Chapter/Section/Subject, the applicable Chapter/Section/Subject comes before the Fig/item number.

For standard torque data and procedures, refer to the SPM TASK 70-41-00-400-501, SPM TASK 70-41-01-400-501 and SPM TASK 70-41-02-400-501.

Special torque data is identified with the symbol * after the torque value.

Lubricate all threads and abutment faces of nuts and bolts with CoMat 10-077 APPROVED ENGINE OILS, unless other lubricants are referred to in the procedure.

To identify and install tab washers, refer to the SPM TASK 70-42-03-400-501.

The number for each radial location must be identified in a clockwise direction. These start at the engine top position when you look from the rear of the engine, unless stated differently in the procedure.

The No. 1 Strut, which is the top position strut of the Fan Frame Assembly, is identified by the five pressure tubes on the No. 1 Strut leading edge.

This TASK gives the procedure to install the LP Compressor Bleed Duct, the Booster Stage Bleed Valve and actuating mechanism, LP Compressor Stage 2.5 Vane and the right and left rod assemblies. For the other LP Compressor/Intermediate Case Module parts, refer to TASK 72-32-00-430-000 (ASSEMBLY-000).

NOTE

To identify the consumable materials refer to the PCI.

NOTE

Special tools are identified in the procedure by the tool primary number.

Preliminary Requirements

Pre-Conditions

NONE

Support Equipment

NameManufacturerPart Number / IdentificationQuantityRemark
IAE 1J12209 Installation holder0AM53IAE 1J122091
IAE 1J12444 Setting fixture0AM53IAE 1J124441

(alternative to IAE 1J12513)

IAE 1J12314 Dummy ring0AM53IAE 1J123141
IAE 1J12513 Setting fixture0AM53IAE 1J125131

(alternative to IAE 1J12444)

Consumables, Materials and Expendables

NameManufacturerPart Number / IdentificationQuantityRemark
CoMat 01-124 ISOPROPYL ALCOHOLLOCALCoMat 01-124
CoMat 04-004 JOINTING COMPOUND, LIGHT GRADELOCALCoMat 04-004
CoMat 10-038 PETROLEUM JELLYLOCALCoMat 10-038
CoMat 10-077 APPROVED ENGINE OILSLOCALCoMat 10-077

Spares

NameManufacturerPart Number / IdentificationQuantityRemark
Retaining ring2
Washer1
Washer1

Safety Requirements

NONE

Procedure

    1. SUBTASK 72-32-00-220-110-A00 Reference Fits and Clearance of the Pin and the Pin Hole of the Power Arm at Location 0439 (Pre SBE 72-0133)

    2. Refer to Figure.

    3. Reference dimensions at location 0439. If required, use the data written as a note in TASK 72-32-00-200-000 (INSPECTION-000) and TASK 72-32-71-200-000 (INSPECTION-000).

      Table 1. Fits and Clearances (all dimensions are in inches)

      NEW PART

      WORN PART

      DIMENSIONS

      DIMENSIONS

      PART IDENT

      Size

      Clearance

      (Non-select)

      REJECT IF

      MORE THAN

      LOCATION 0439

      Pin Hole Of The Power Arm ENGINE-BLEED VALVE SUPPORT AND ARMS (72-32-71, 01-300)

      Pin Outside Diameter

      0.2475

      0.2480

      0.0031

      Pin Hole Of The Power Arm Bore Diameter

      0.2500

      0.2506

      0.0020

      Table 2. Fits and Clearances (all dimensions are in millimeters)

      NEW PART

      WORN PART

      DIMENSIONS

      DIMENSIONS

      PART IDENT

      Size

      Clearance

      (Non-select)

      REJECT IF

      MORE THAN

      LOCATION 0439

      Pin Hole Of The Power Arm ENGINE-BLEED VALVE SUPPORT AND ARMS (72-32-71, 01-300)

      Pin Outside Diameter

      6.285

      6.300

      0.080

      Pin Hole Of The Power Arm Bore Diameter

      6.350

      6.365

      0.050

    1. SUBTASK 72-32-00-220-110-B00 Reference Fits and Clearance of the Pin and the Pin Hole of the Power Arm at Location 0439 (SBE 72-0133)

    2. Refer to Figure.

    3. SBE 72-0133: LPC Bleed Valve linkage system with improved durability.

    4. Reference dimensions at location 0439. If required, use the data written as a note in TASK 72-32-00-200-000 (INSPECTION-000) and TASK 72-32-71-200-000 (INSPECTION-000).

      Table 3. Fits and Clearances (all dimensions are in inches)

      NEW PART

      WORN PART

      DIMENSIONS

      DIMENSIONS

      PART IDENT

      Size

      Clearance

      (Non-select)

      REJECT IF

      MORE THAN

      LOCATION 0439

      Pin Hole Of The Power Arm ENGINE-BLEED VALVE SUPPORT AND ARMS (72-32-71, 01-300)

      Pin Outside Diameter

      0.2489

      0.2495

      0.0017

      Pin Hole Of The Power Arm Bore Diameter

      0.2500

      0.2506

      0.0005

      Table 4. Fits and Clearances (all dimensions are in millimeters)

      NEW PART

      WORN PART

      DIMENSIONS

      DIMENSIONS

      PART IDENT

      Size

      Clearance

      (Non-select)

      REJECT IF

      MORE THAN

      LOCATION 0439

      Pin Hole Of The Power Arm ENGINE-BLEED VALVE SUPPORT AND ARMS (72-32-71, 01-300)

      Pin Outside Diameter

      6.322

      6.337

      0.043

      Pin Hole Of The Power Arm Bore Diameter

      6.350

      6.365

      0.013

    1. SUBTASK 72-32-00-430-118 Apply Jointing Compound to the Mating Faces on the Fan Frame

    2. Refer to Figure.

    3. Make sure that the Fan Frame is installed, vertically with the front end up, on the turnover stand. Refer to TASK 72-32-00-430-007-A00 (ASSEMBLY-000).

    4. Make sure that the Fan Frame is vertical with the front end up.

    5. Use a clean cloth made moist with CoMat 01-124 ISOPROPYL ALCOHOL to clean the area A on the Fan Frame.

    6. Apply CoMat 04-004 JOINTING COMPOUND, LIGHT GRADE with a stiff brush to the area A.

      NOTE

      Install the LP Compressor Bleed Duct to the Fan Frame before the jointing compound becomes dry.
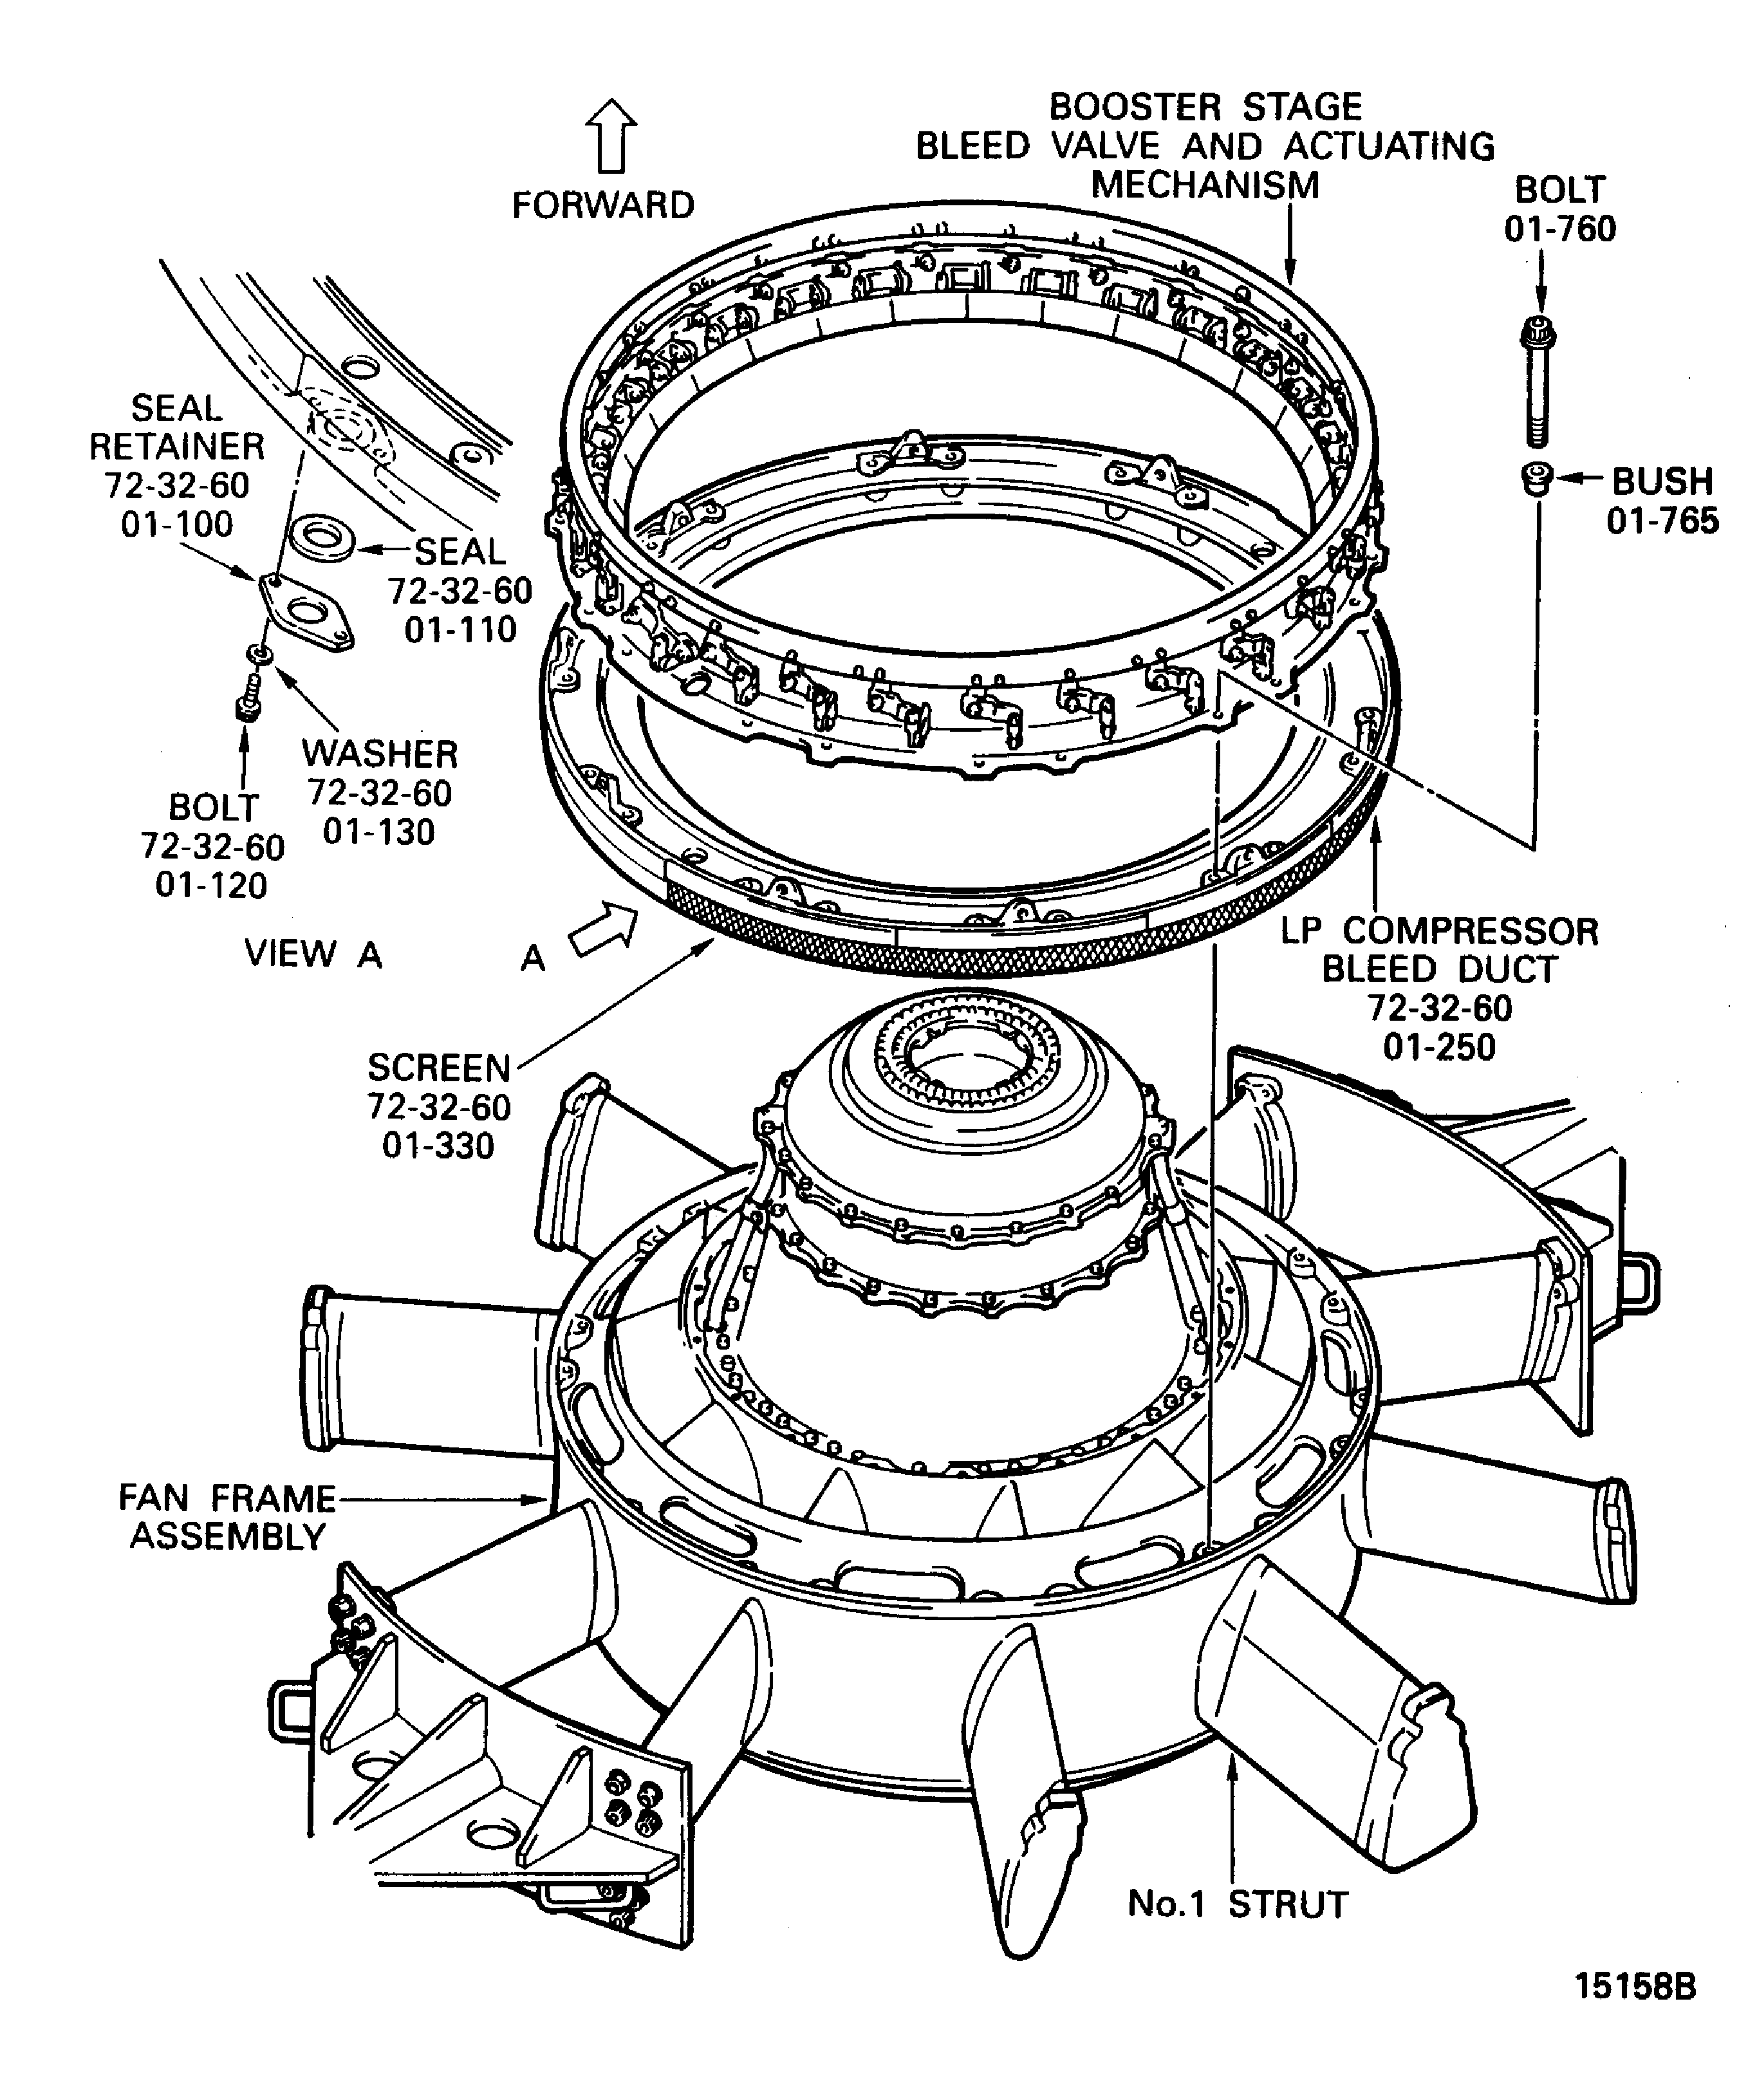
    1. SUBTASK 72-32-00-430-119 Install the LP Compressor Bleed Duct on to the Fan Frame

    2. Refer to Figure, Figure and Figure.

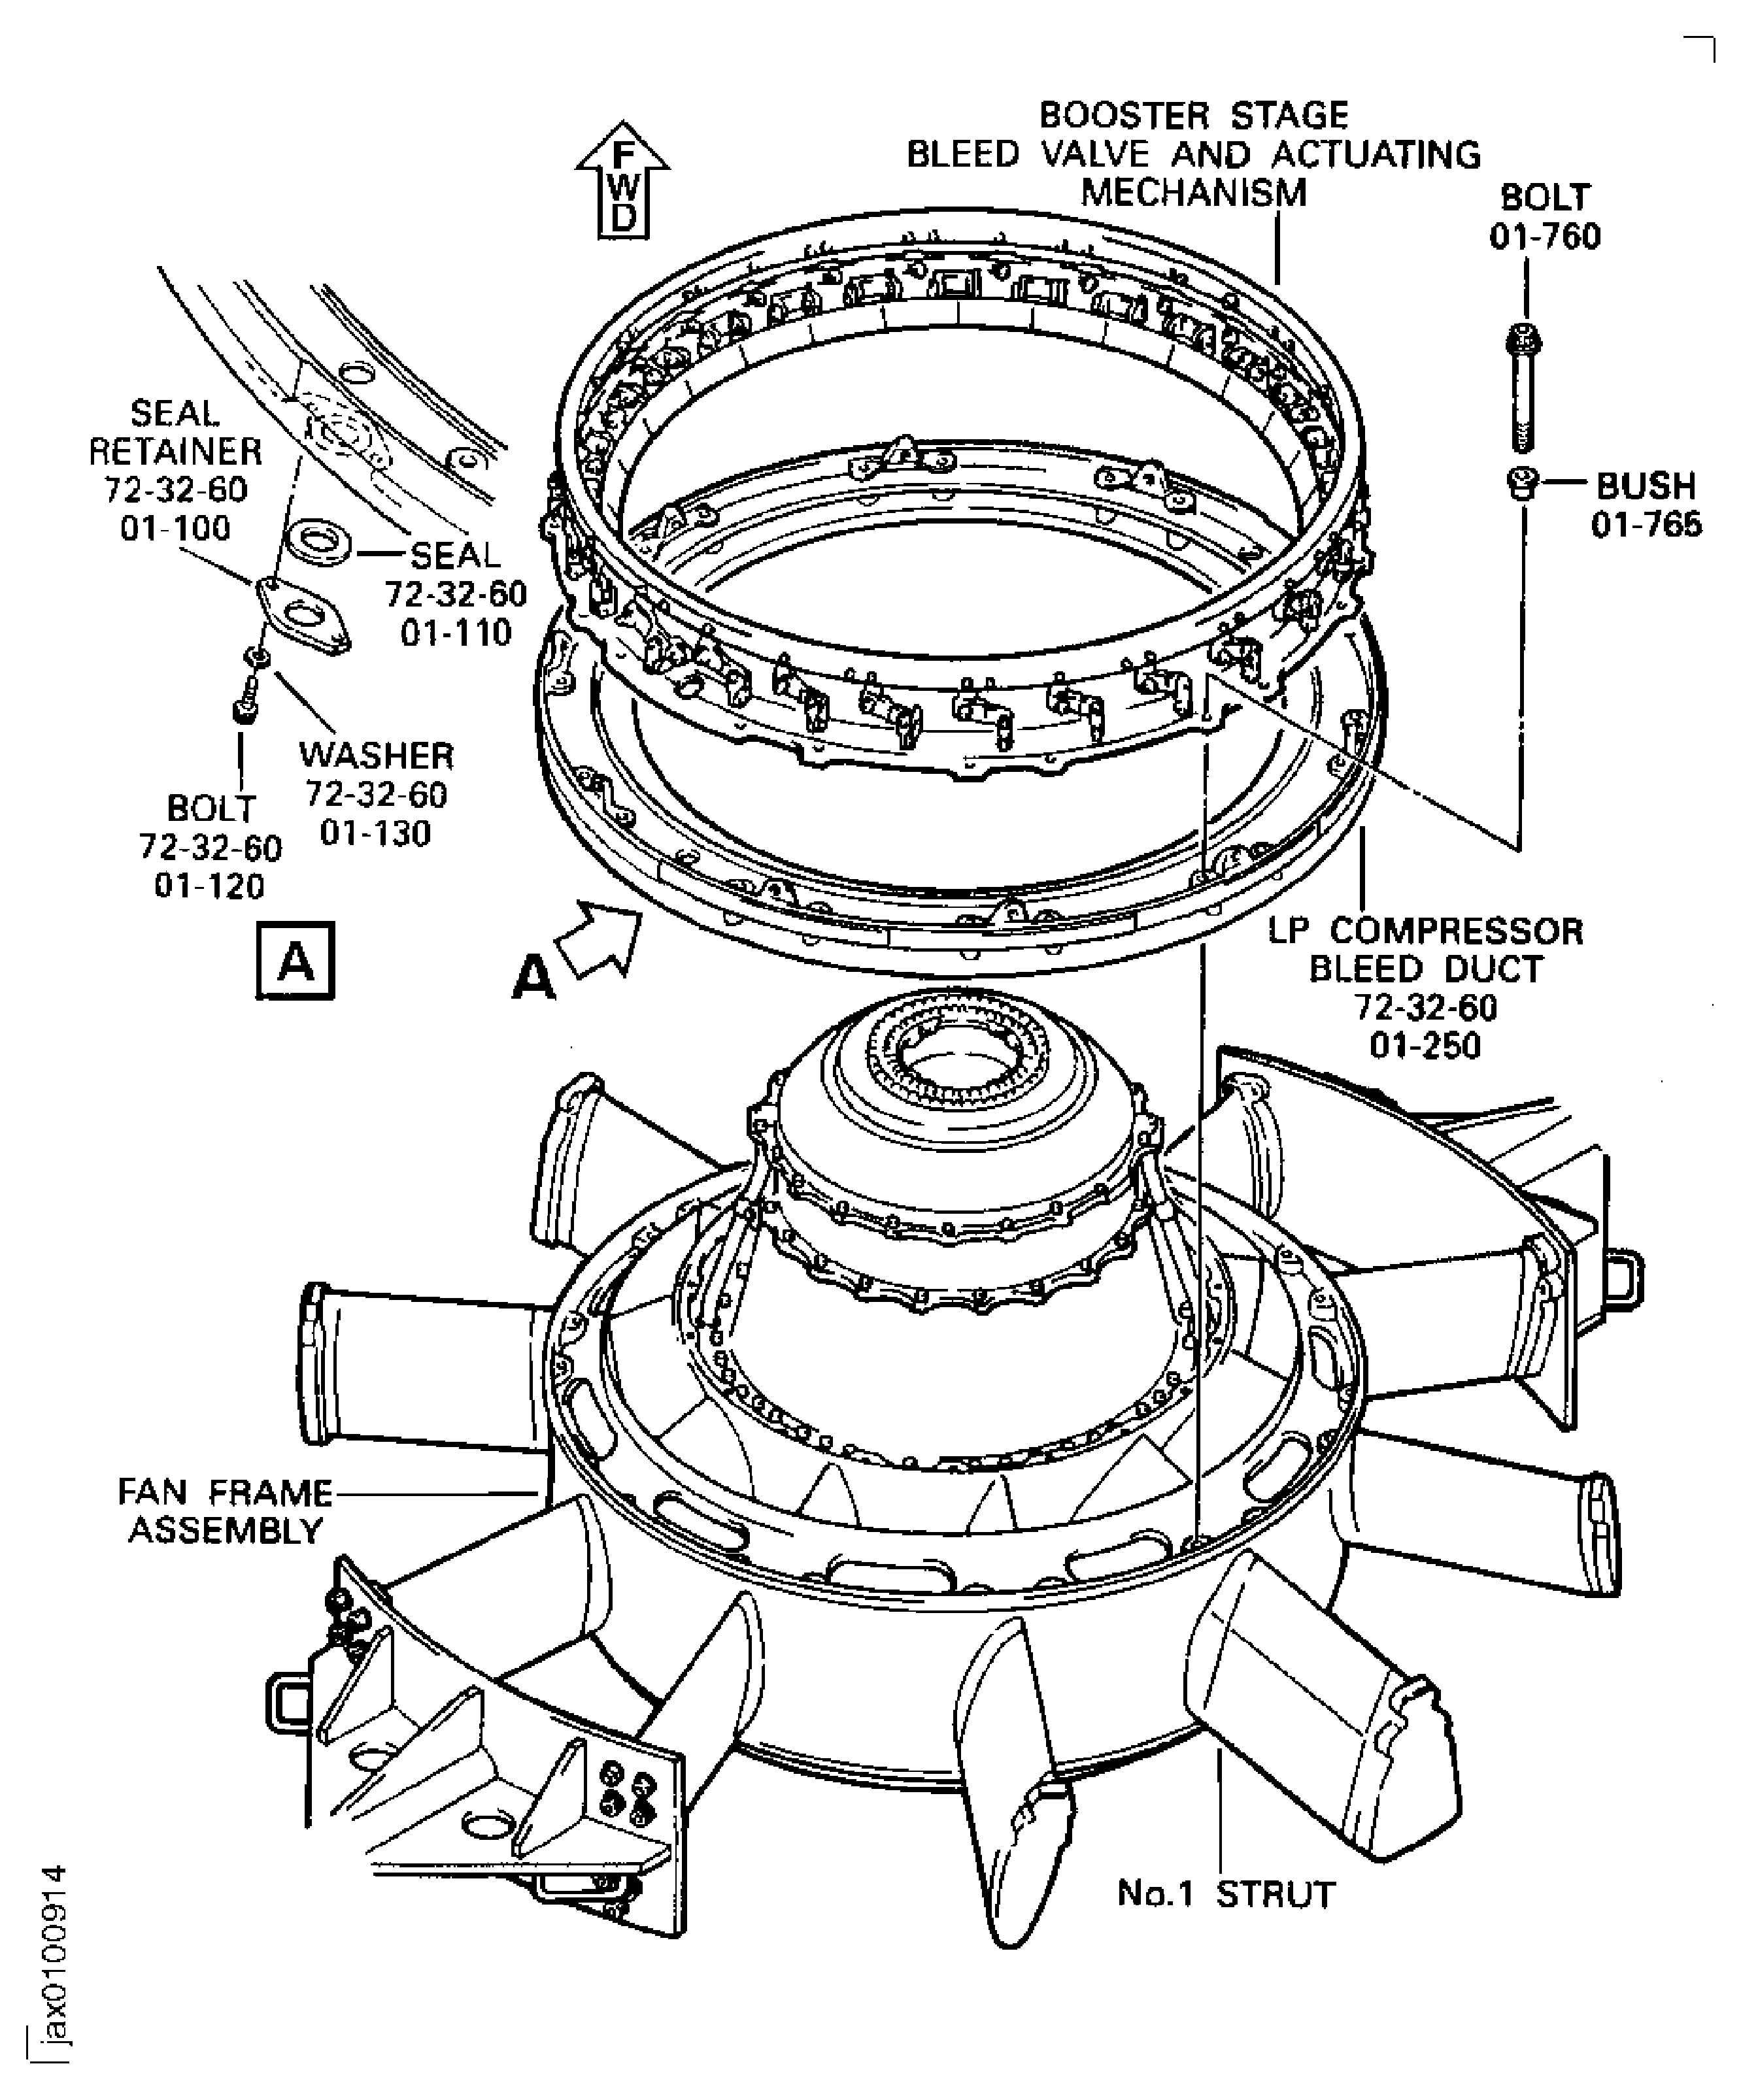
      1. Attach the two seals ENGINE-BOOSTER STAGE BLEED VALVE OUTLET CASE (72-32-60, 01-110) to the LP Compressor Bleed Duct ENGINE-BOOSTER STAGE BLEED VALVE OUTLET CASE (72-32-60, 01-250), Figure and Figure.

      2. Put the LP Compressor Bleed Duct on a work bench with the rear end up.

      3. Put the two seals into the two recesses in the LP Compressor Bleed Duct.

      4. Put the two seal retainers ENGINE-BOOSTER STAGE BLEED VALVE OUTLET CASE (72-32-60, 01-100) on to the seals.

      5. Safety the seals and the seal retainers with the four washers ENGINE-BOOSTER STAGE BLEED VALVE OUTLET CASE (72-32-60, 01-130) and bolts ENGINE-BOOSTER STAGE BLEED VALVE OUTLET CASE (72-32-60, 01-120). Torque the bolts to 85 lbfin to 105 lbfin (10.00 Nm to 12.00 Nm).

    3. Pre SBE 72-0595: Attach the five screens ENGINE-BOOSTER STAGE BLEED VALVE OUTLET CASE (72-32-60, 01-330) on to the LP Compressor Bleed Duct in a clockwise direction from nine o'clock position to three o'clock position when you look from the rear of the engine.

    4. Lubricate the outer face on the rubber seal on the Fan Frame Front Lip with CoMat 10-038 PETROLEUM JELLY, Figure.

      1. Install the LP Compressor Bleed Duct on to the Fan Frame, Figure and Figure.

      2. Turn the LP Compressor Bleed Duct vertically with the front end up.

      3. Align the TOP mark of the LP Compressor Bleed Duct with the top position (No. 1 Strut) of the Fan Frame.

      4. Put the LP Compressor Bleed Duct on to the Fan Frame.

    1. SUBTASK 72-32-00-430-120 Install the Booster Stage Bleed Valve and Actuating Mechanism (Actuating Mechanism) on to the LP Compressor Bleed Duct

    2. Refer to Figure.

    3. Align the TOP mark of the actuating mechanism with the TOP mark of the LP Compressor Bleed Duct.

    4. Put the actuating mechanism on to the LP Compressor Bleed Duct.

    5. Put the 20 bushes (01-765) into the holes in the actuating mechanism.

    6. Install the 20 bolts (01-760) into the threads in the Fan Frame Assembly through the bushes.

    7. Torque the bolts to 85 lbfin to 105 lbfin (10.00 Nm to 12.00 Nm).

    1. SUBTASK 72-32-00-430-121 Turn the Fan Frame Horizontally with the No. 1 Strut Up

    2. Refer to Figure.

    3. Release the lock pin from the holes in the handle and the support C of the turnover stand.

    4. Turn the handle to set the Fan Frame horizontally with the No. 1 Strut up.

    5. Install the lock pin into position to lock the handle.

      NOTE

      Make sure that the hole in the support C and one of the eight holes in the handle are aligned. If necessary, turn the handle to align the two holes.
    1. SUBTASK 72-32-00-430-122 Install the Right and Left Rod Assemblies

    2. Refer to Figure and Figure.

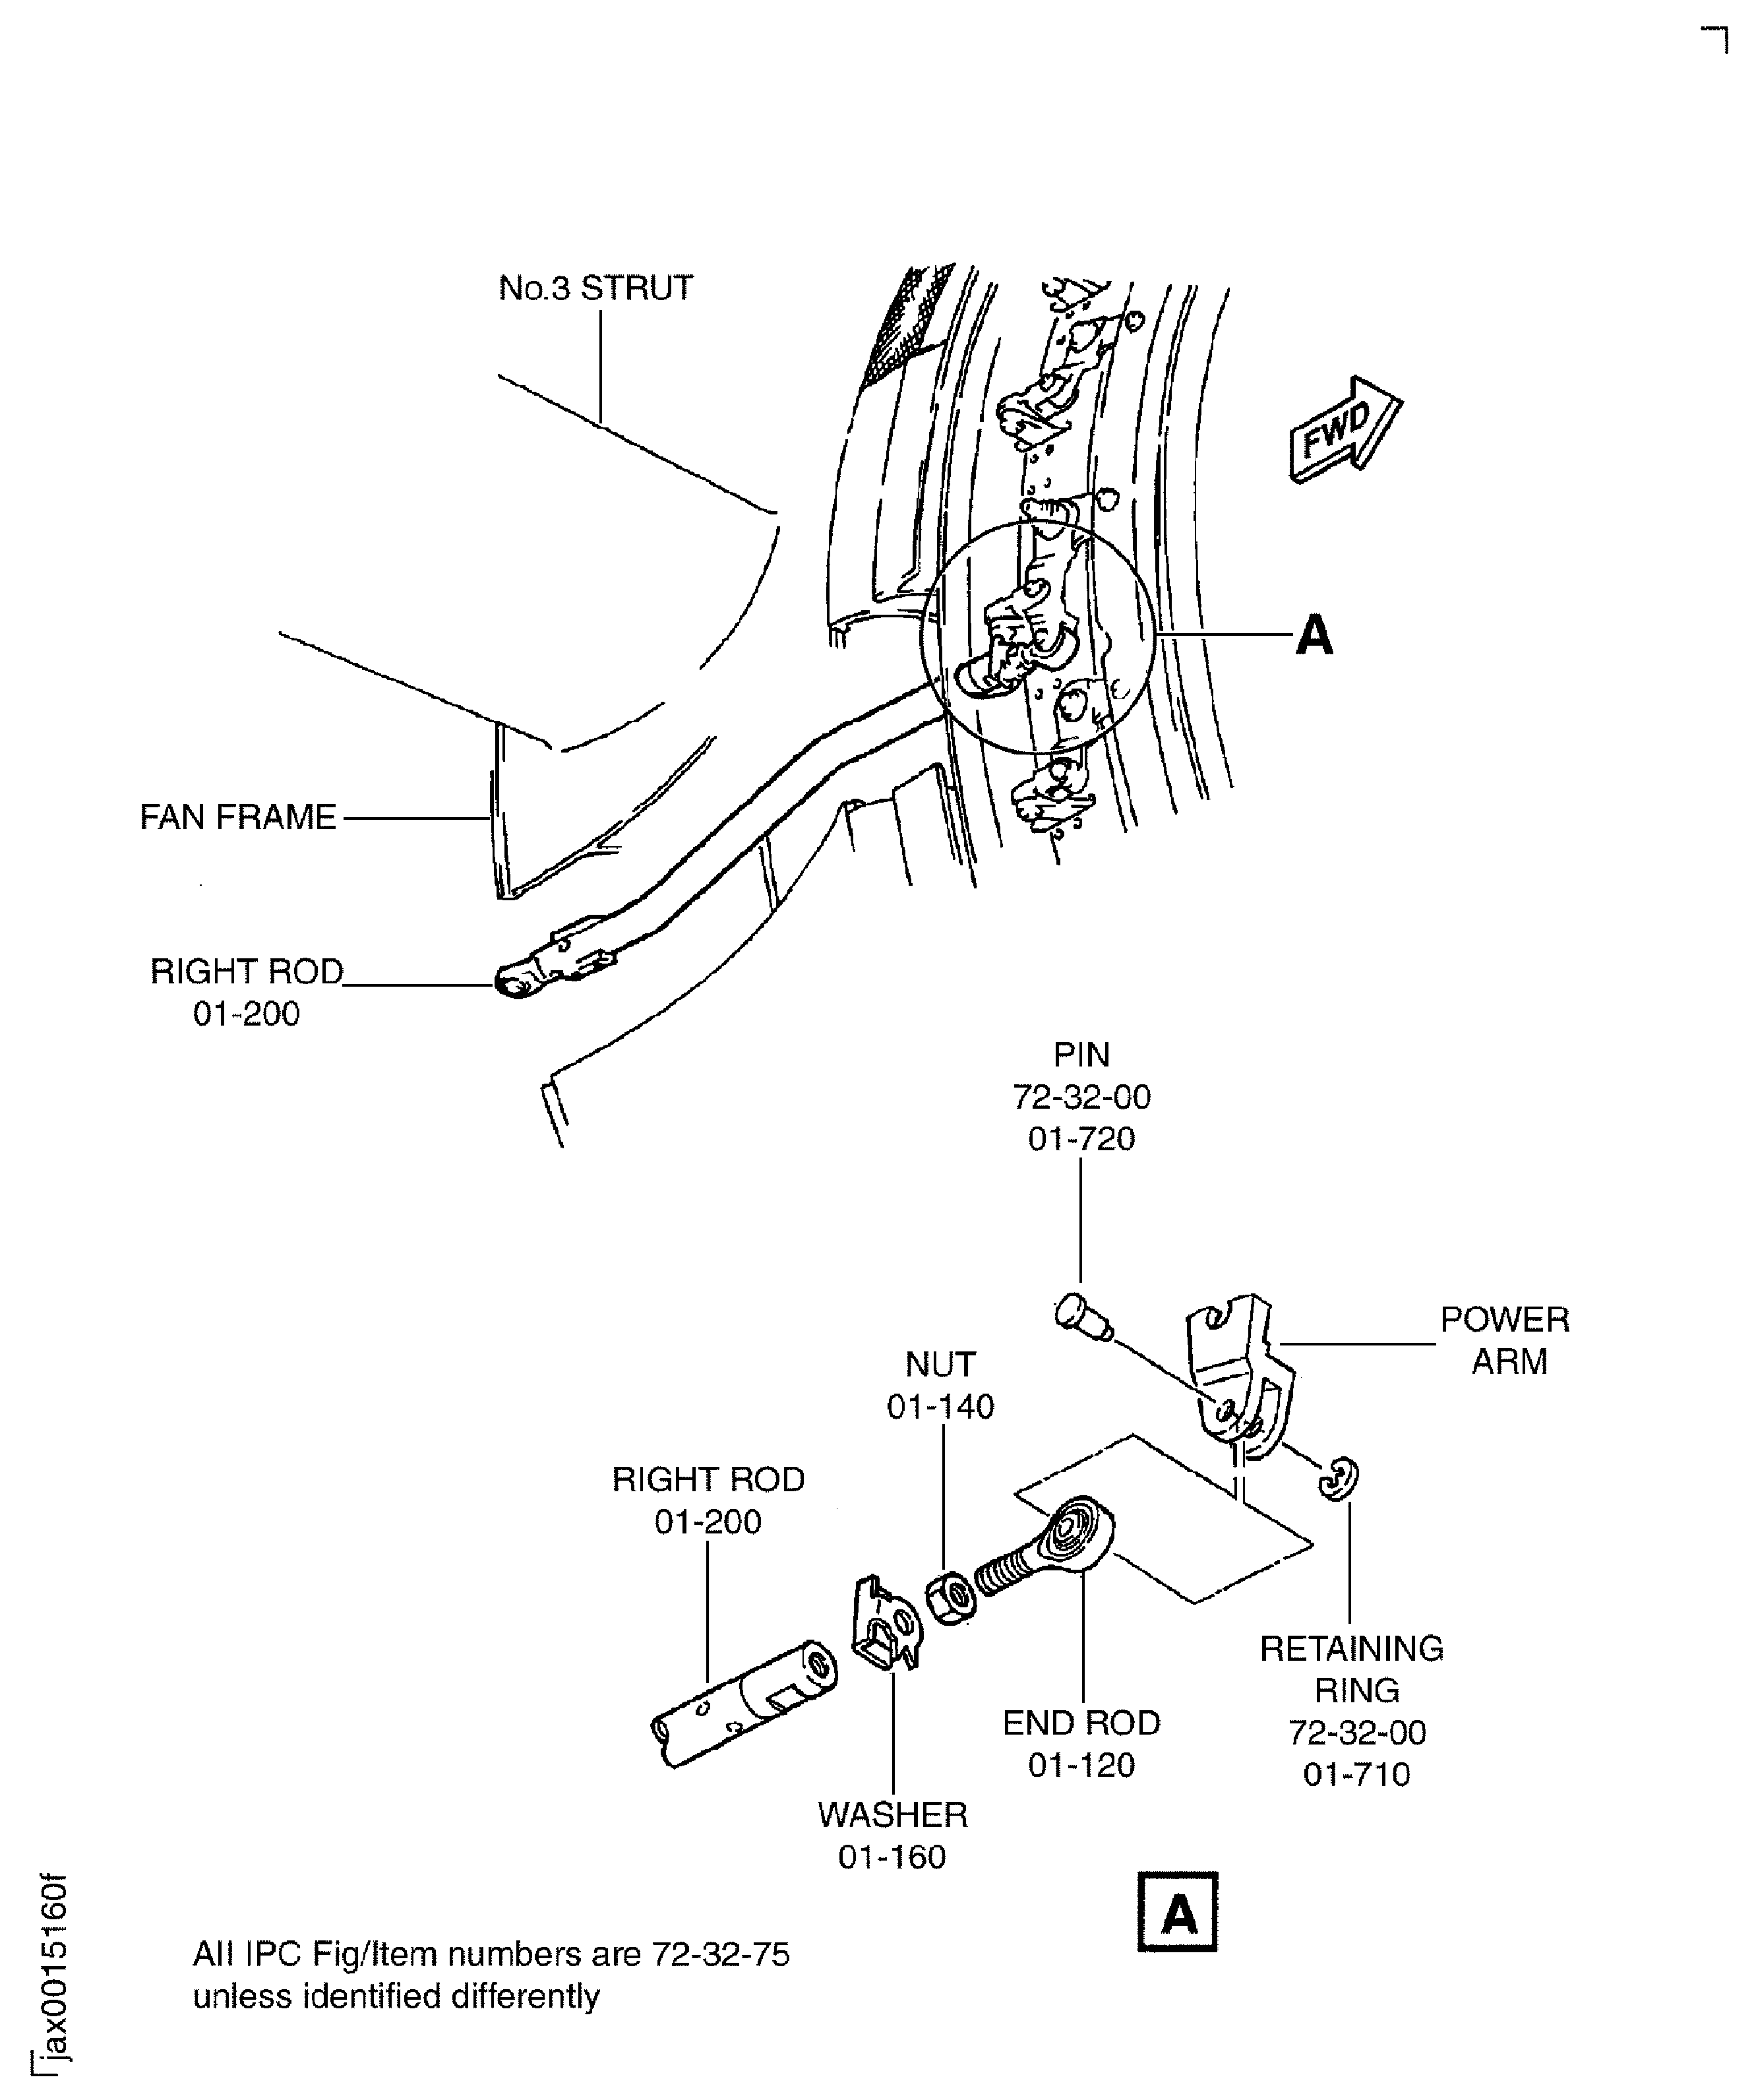
    3. Put the right rod ENGINE-BLEED VALVE ACTUATING ROD ASSEMBLY (72-32-75, 01-200) into position in the Fan Frame at 3 o'clock position.

      NOTE

      Identify the right rod by the mark RIGHT written on it.
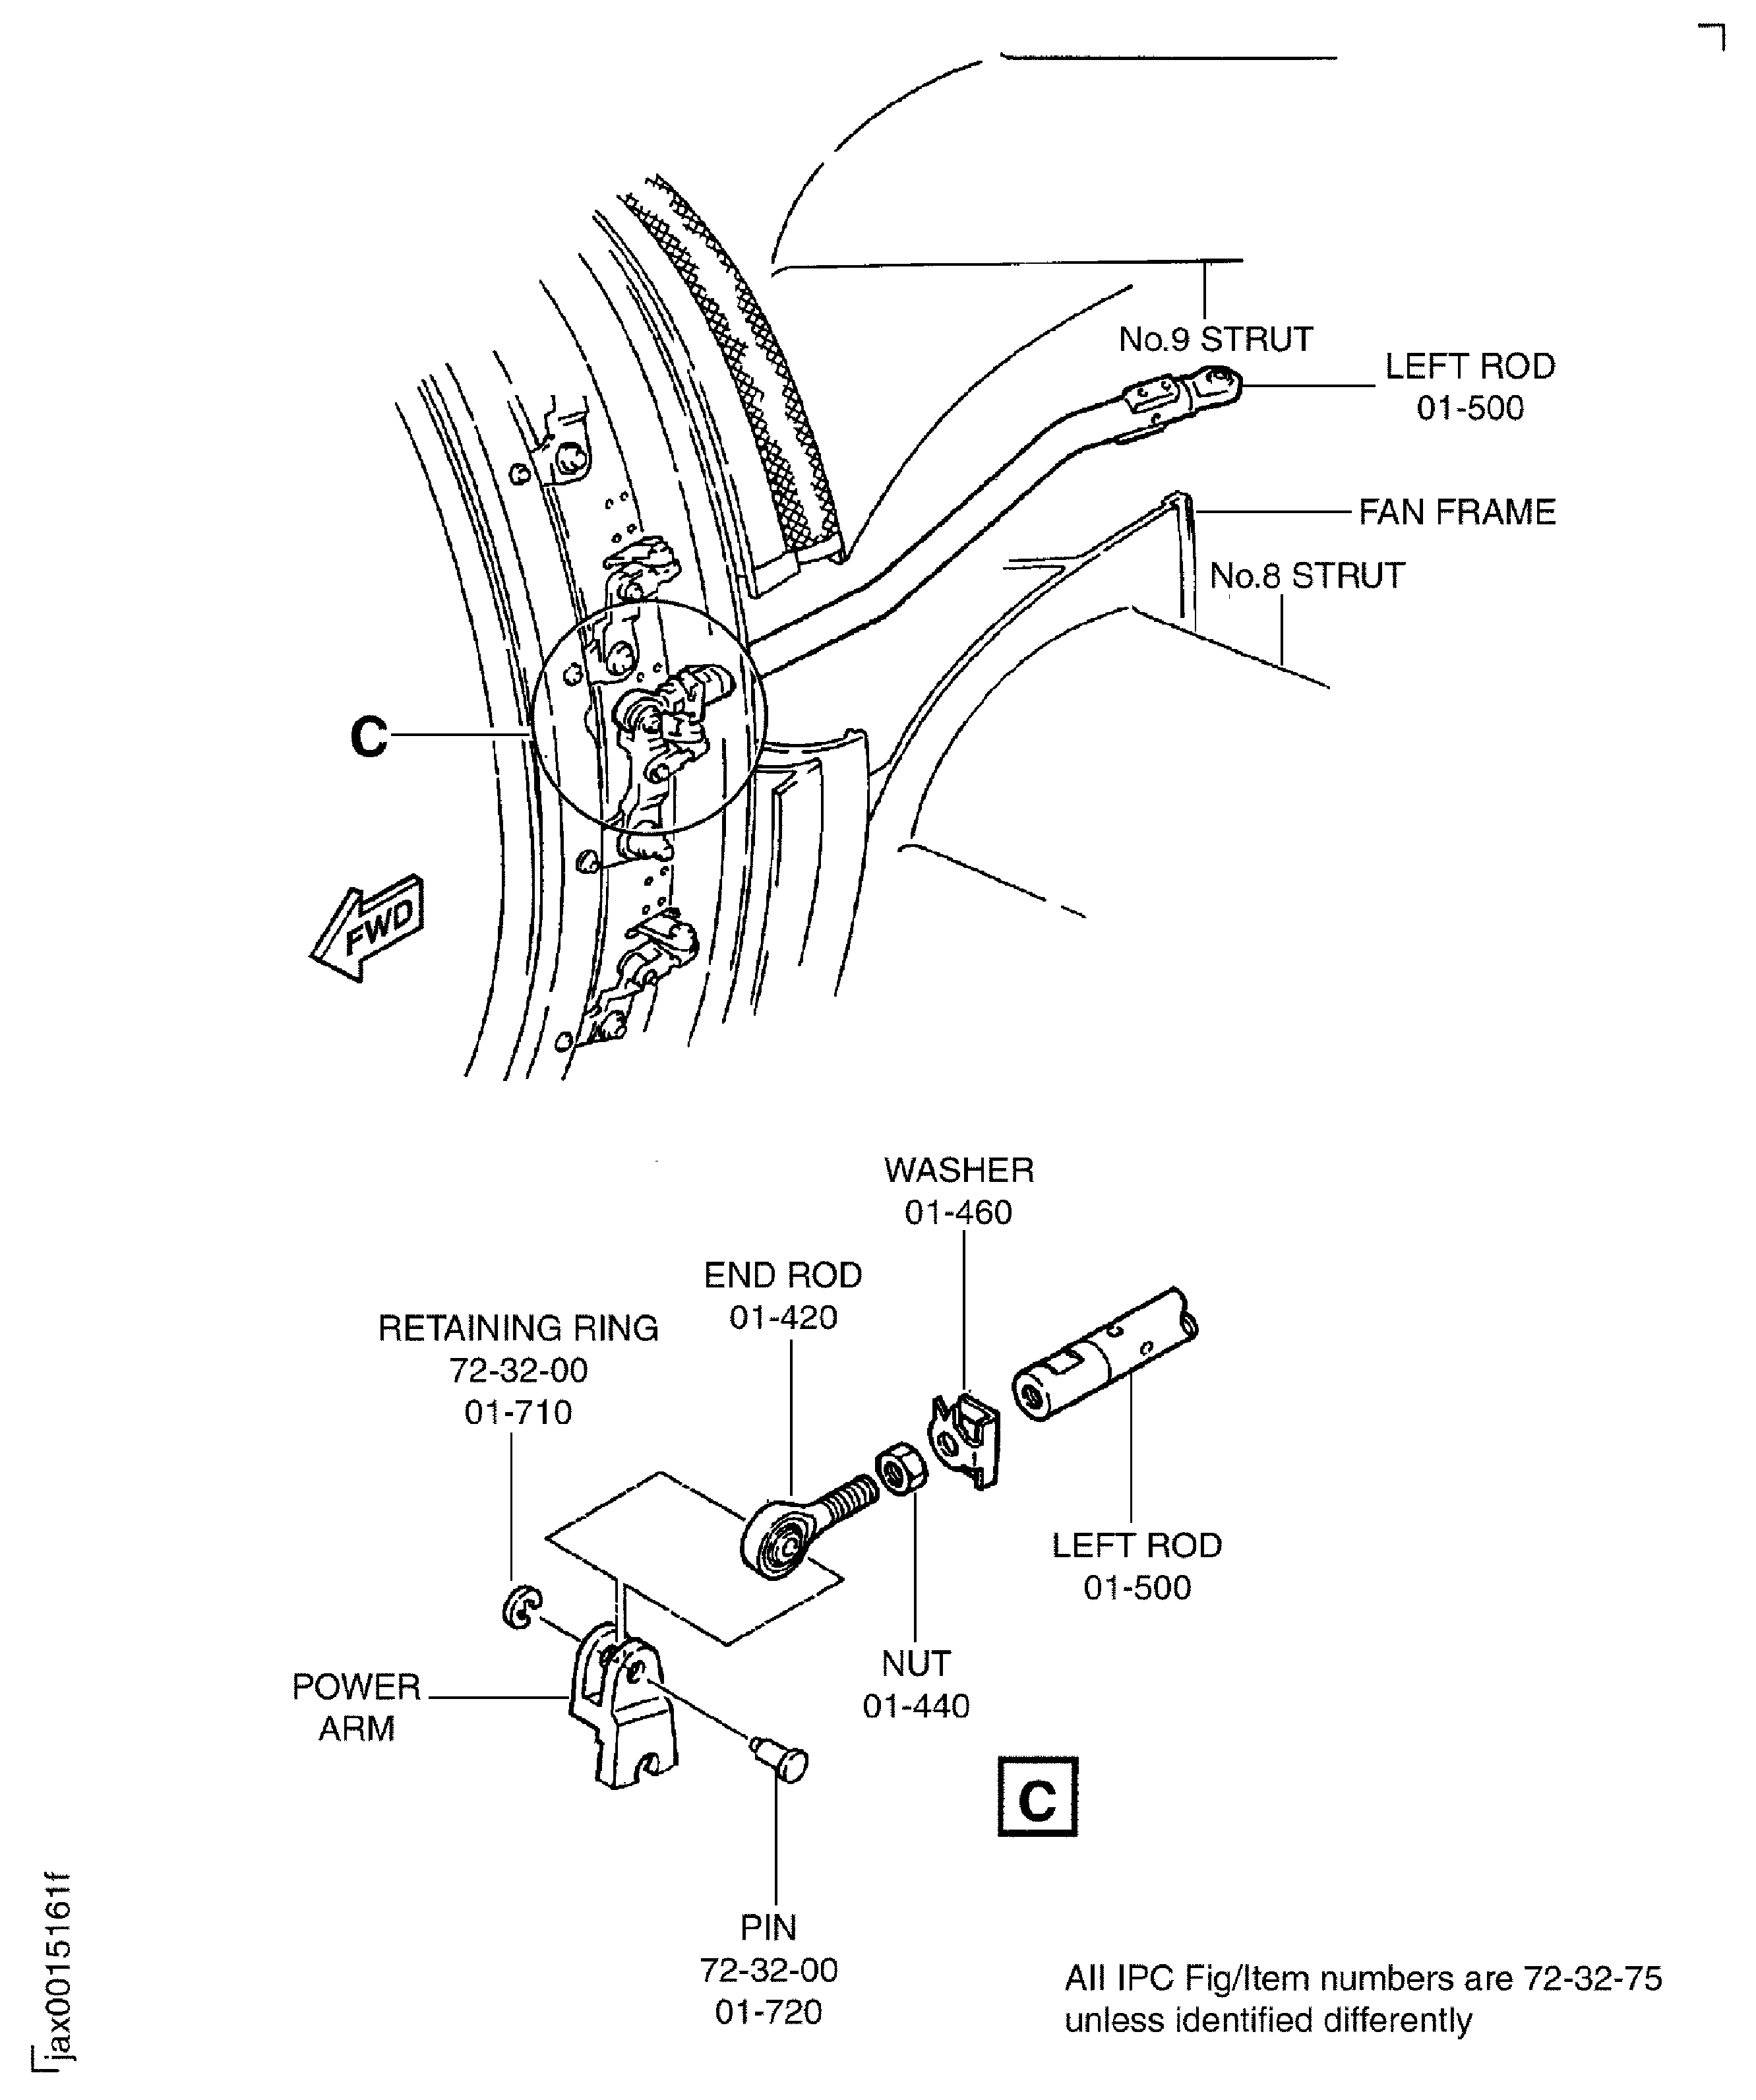
    4. Put the left rod ENGINE-BLEED VALVE ACTUATING ROD ASSEMBLY (72-32-75, 01-500) into position in the Fan Frame at 9 o'clock position.

      NOTE

      Identify the left rod by the mark LEFT written on it.
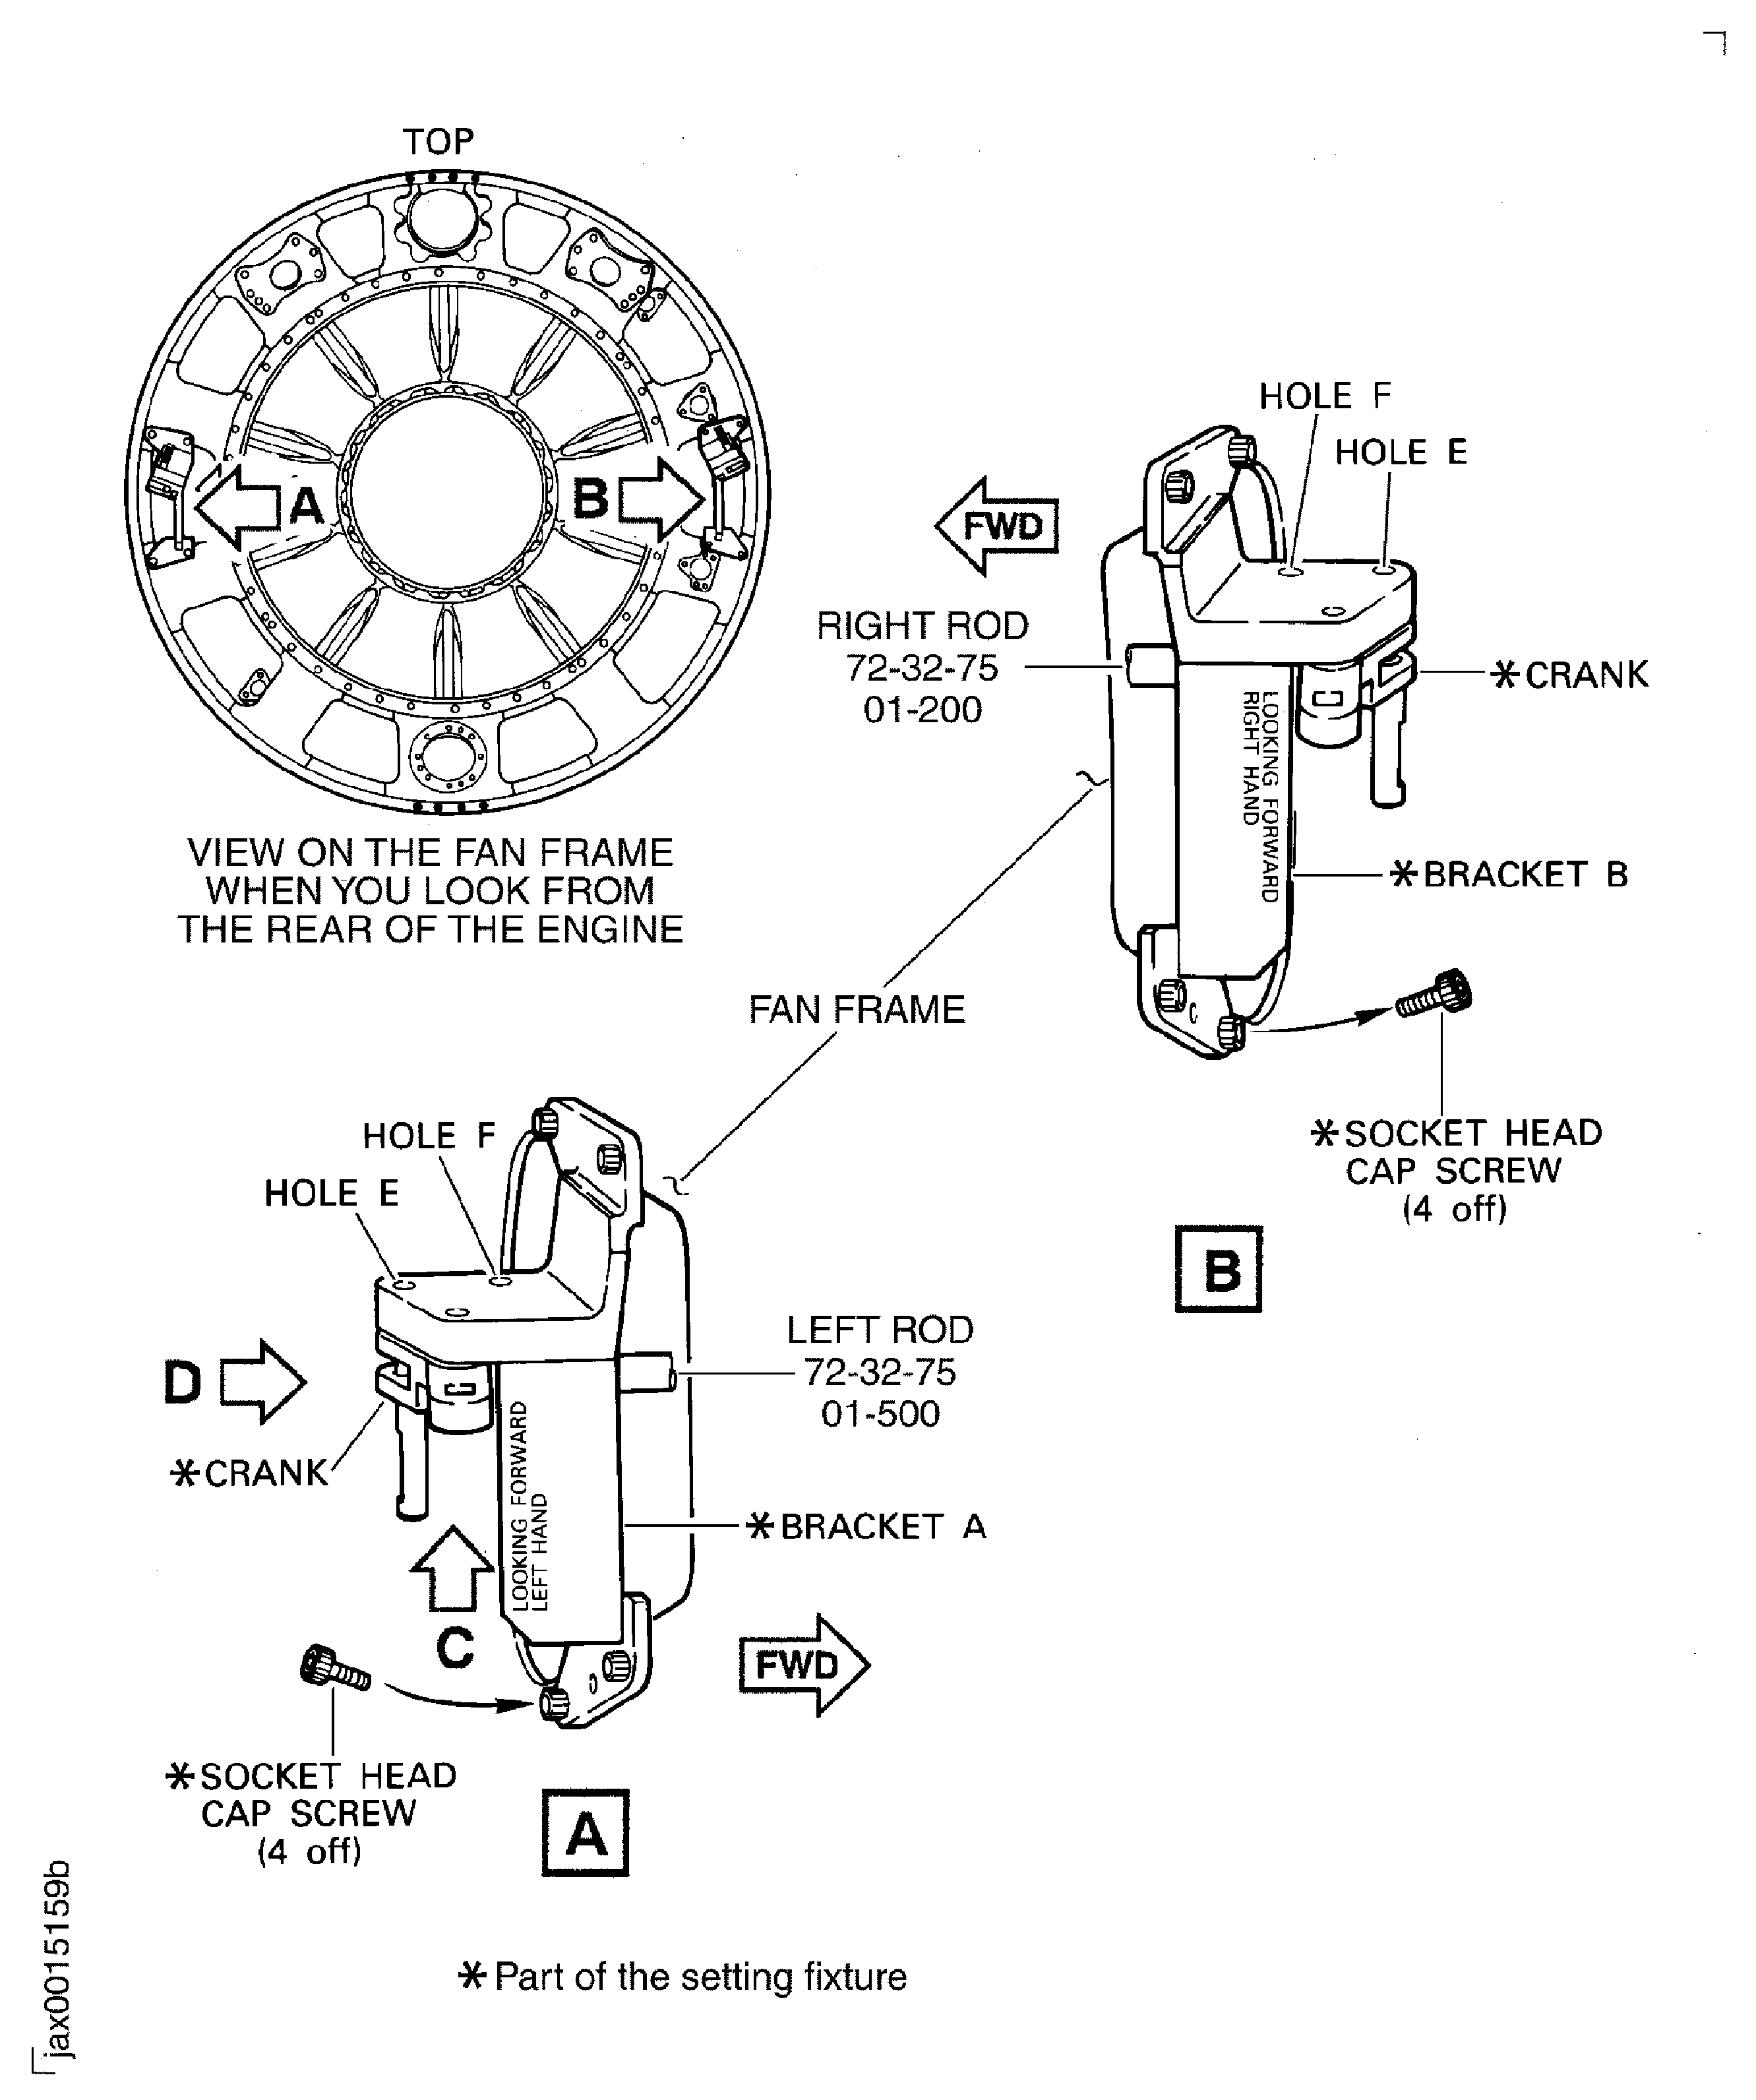
    1. SUBTASK 72-32-00-430-123-001 Install the Setting Fixture (IAE 1J 12444) and the Dummy Ring - Method 1

    2. Refer to Figure, Figure and Figure.

      1. Install the brackets A and B (part of IAE 1J12444 Setting fixture 1 off) on to the Fan Frame, Figure.

      2. Align the two aligning holes in each bracket with the aligning pins on the Fan Frame.

      3. Attach the brackets to the Fan Frame. Safety each bracket with the four socket head cap screws (part of the setting fixture). Tighten the socket head cap screws.

      1. Connect the right and left rod assemblies to the brackets, Figure. Figure and Figure.

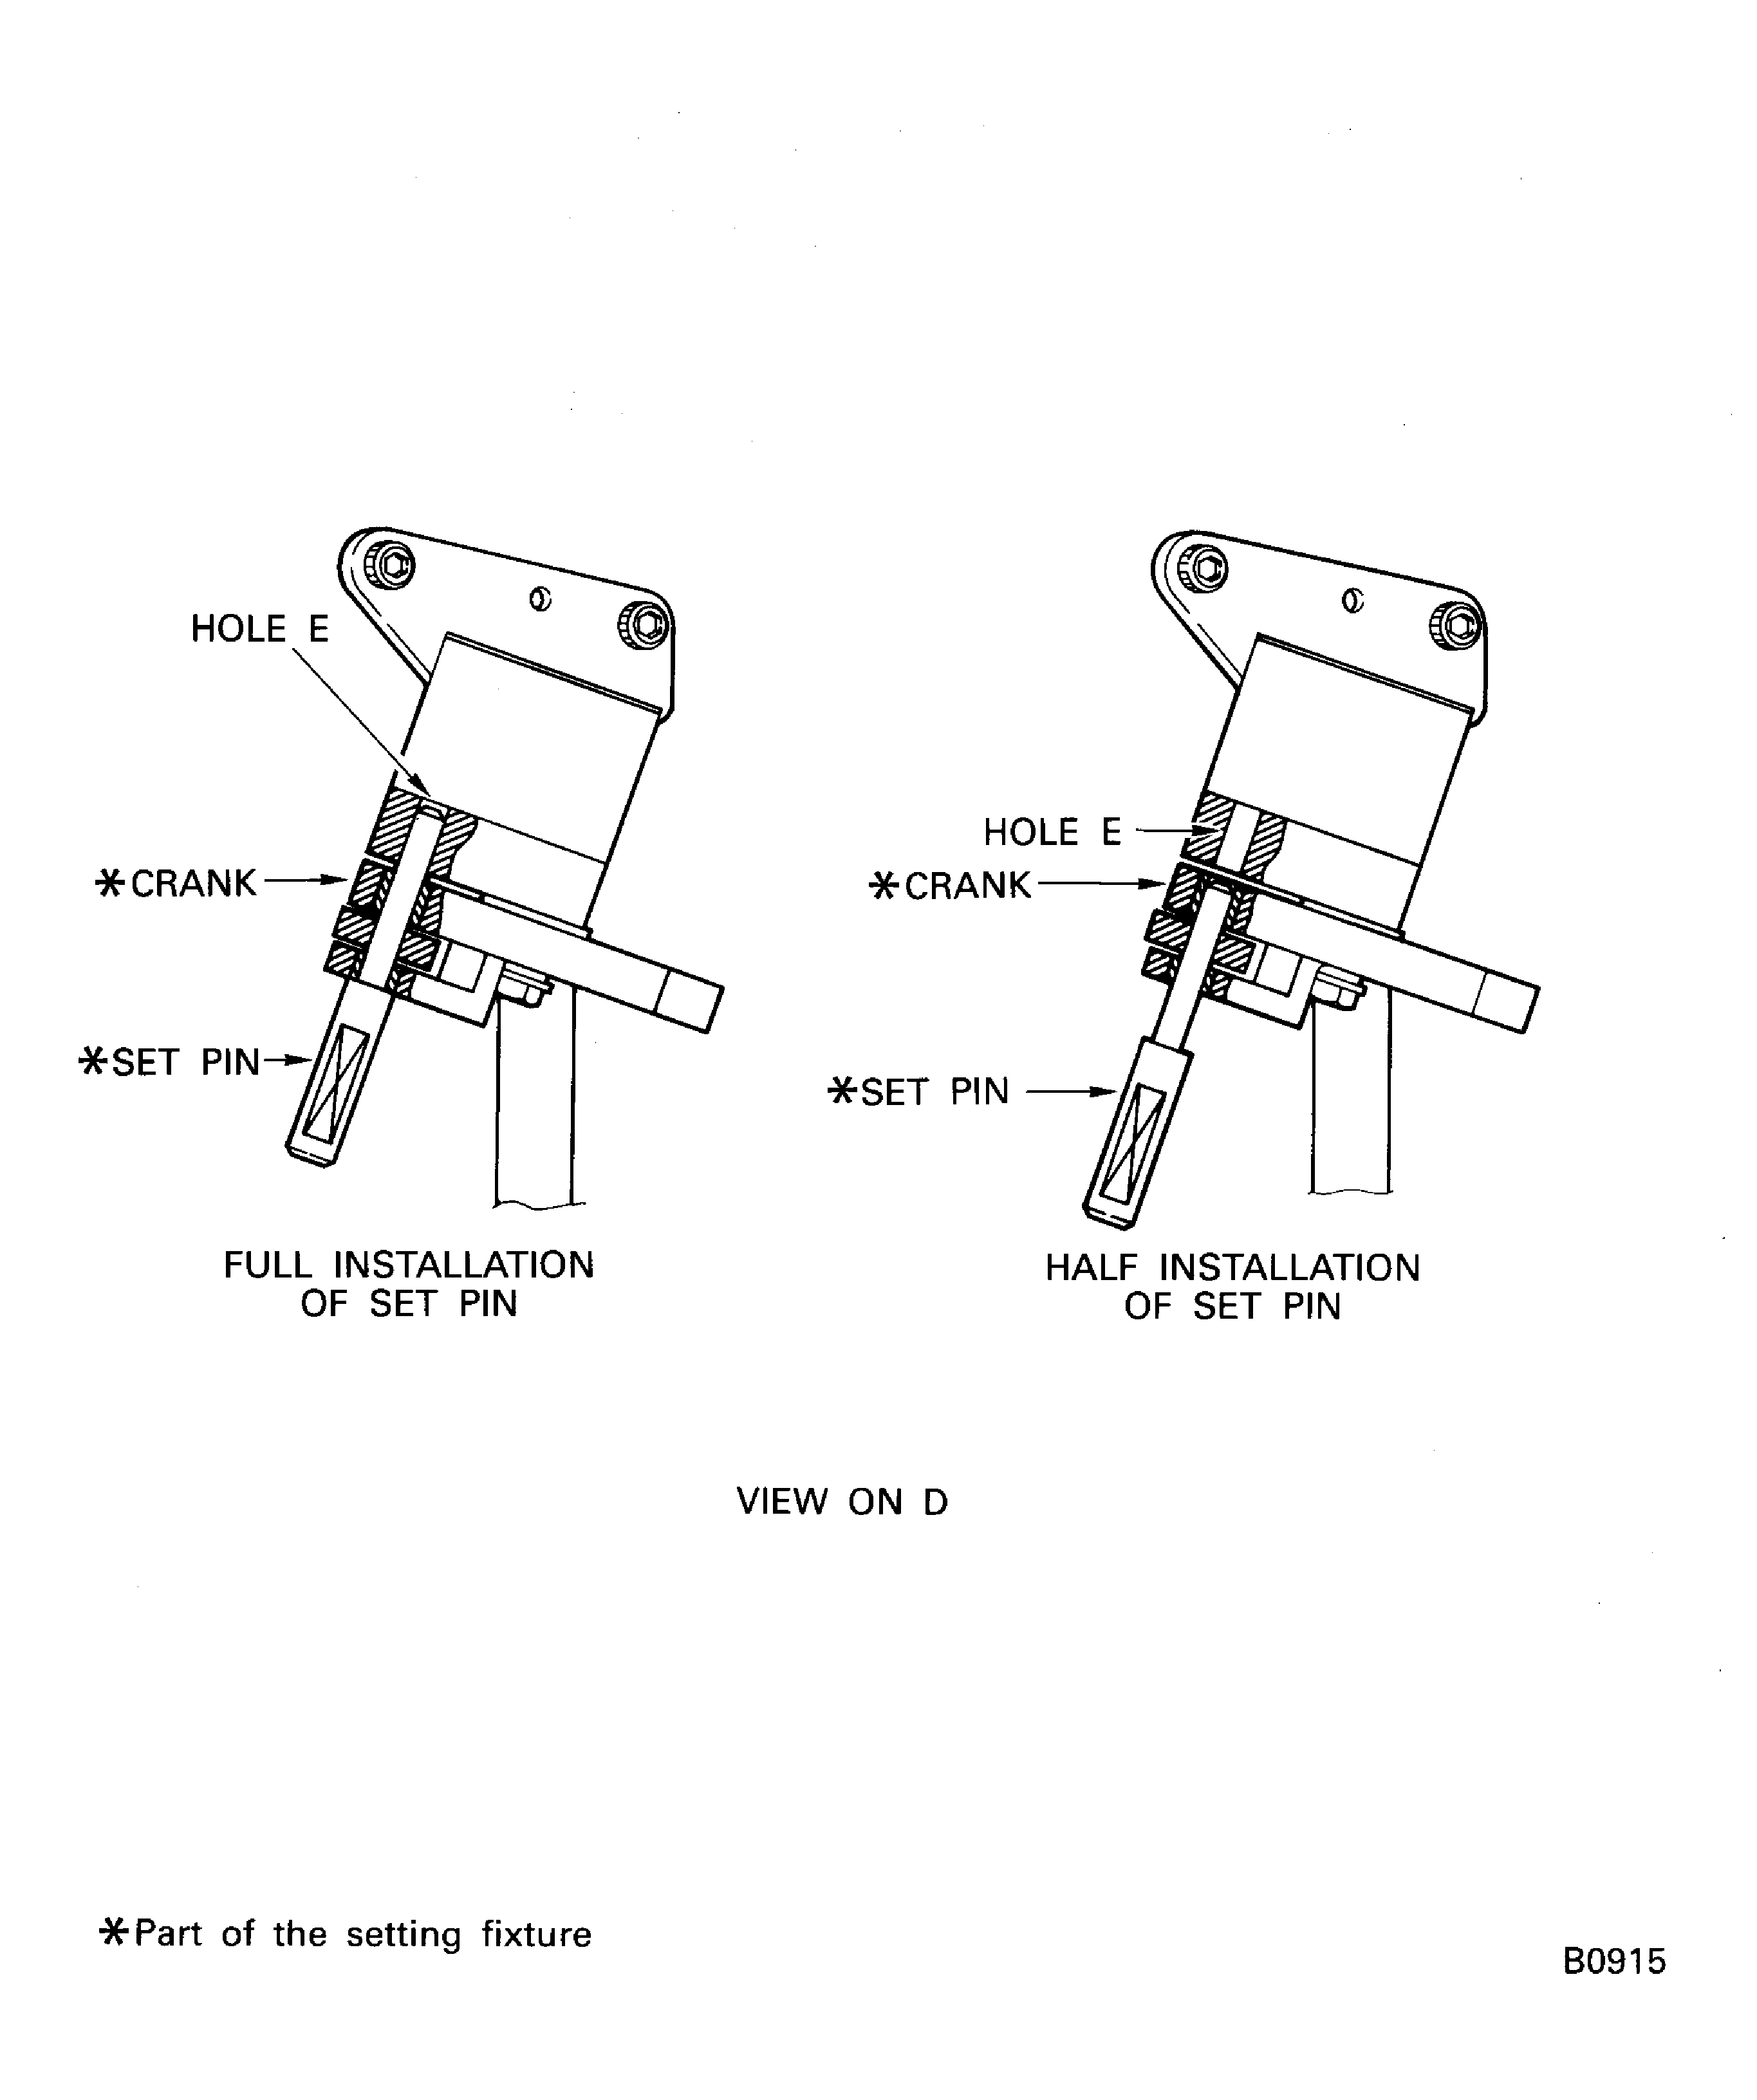
      2. Align the hole in the crank with the hole E in each bracket.

      3. Align each rod assembly rear hole with the holes in the crank and the bracket.

      4. Make full installation of set pins.

      1. Install IAE 1J12314 Dummy ring 1 off into the Booster Stage Bleed Valve and actuating mechanism (actuating mechanism), Figure.

      2. Put the dummy ring into the actuating mechanism.

      3. Align the 10 holes in the dummy ring with the holes in the actuating mechanism.

      4. Install the 10 bushes (01-670) and bolts (01-660) into the holes.

      5. Torque the bolts to 57* lbfin to 63* lbfin (6.48* Nm to 7.08* Nm).

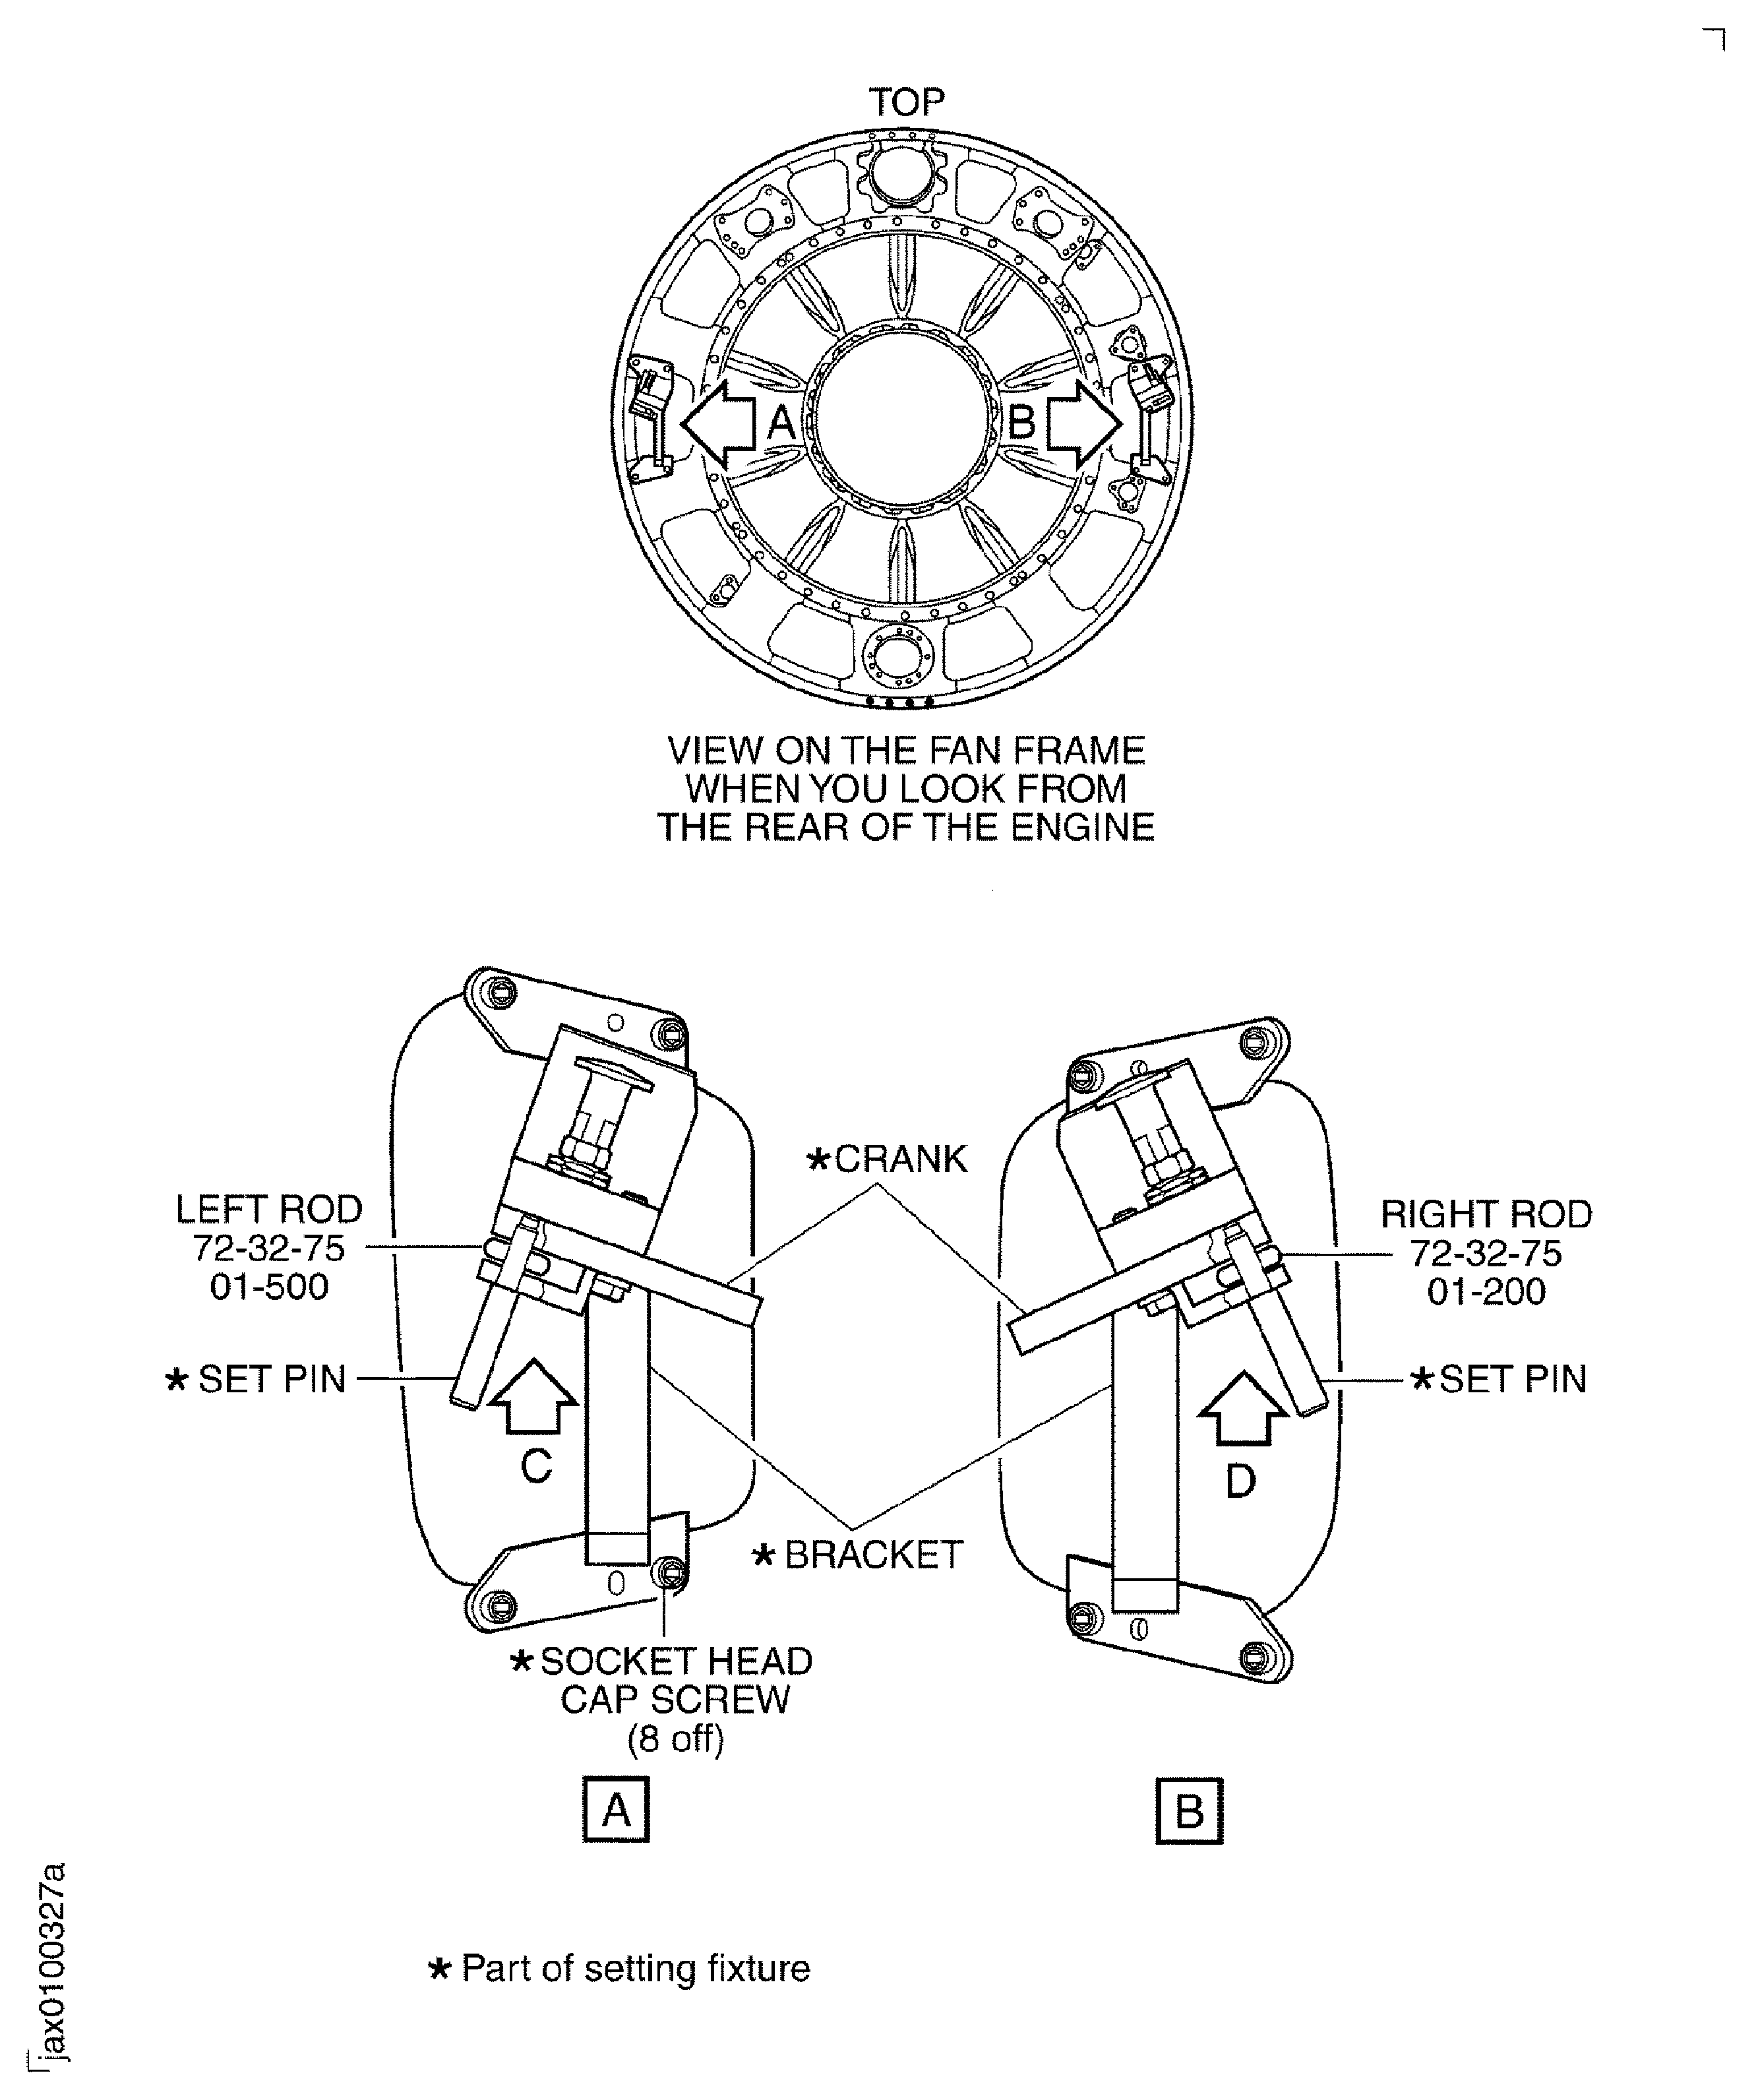
    1. SUBTASK 72-32-00-430-123-002 Install the Setting Fixture (IAE 1J 12513) and the Dummy Ring - Method 2

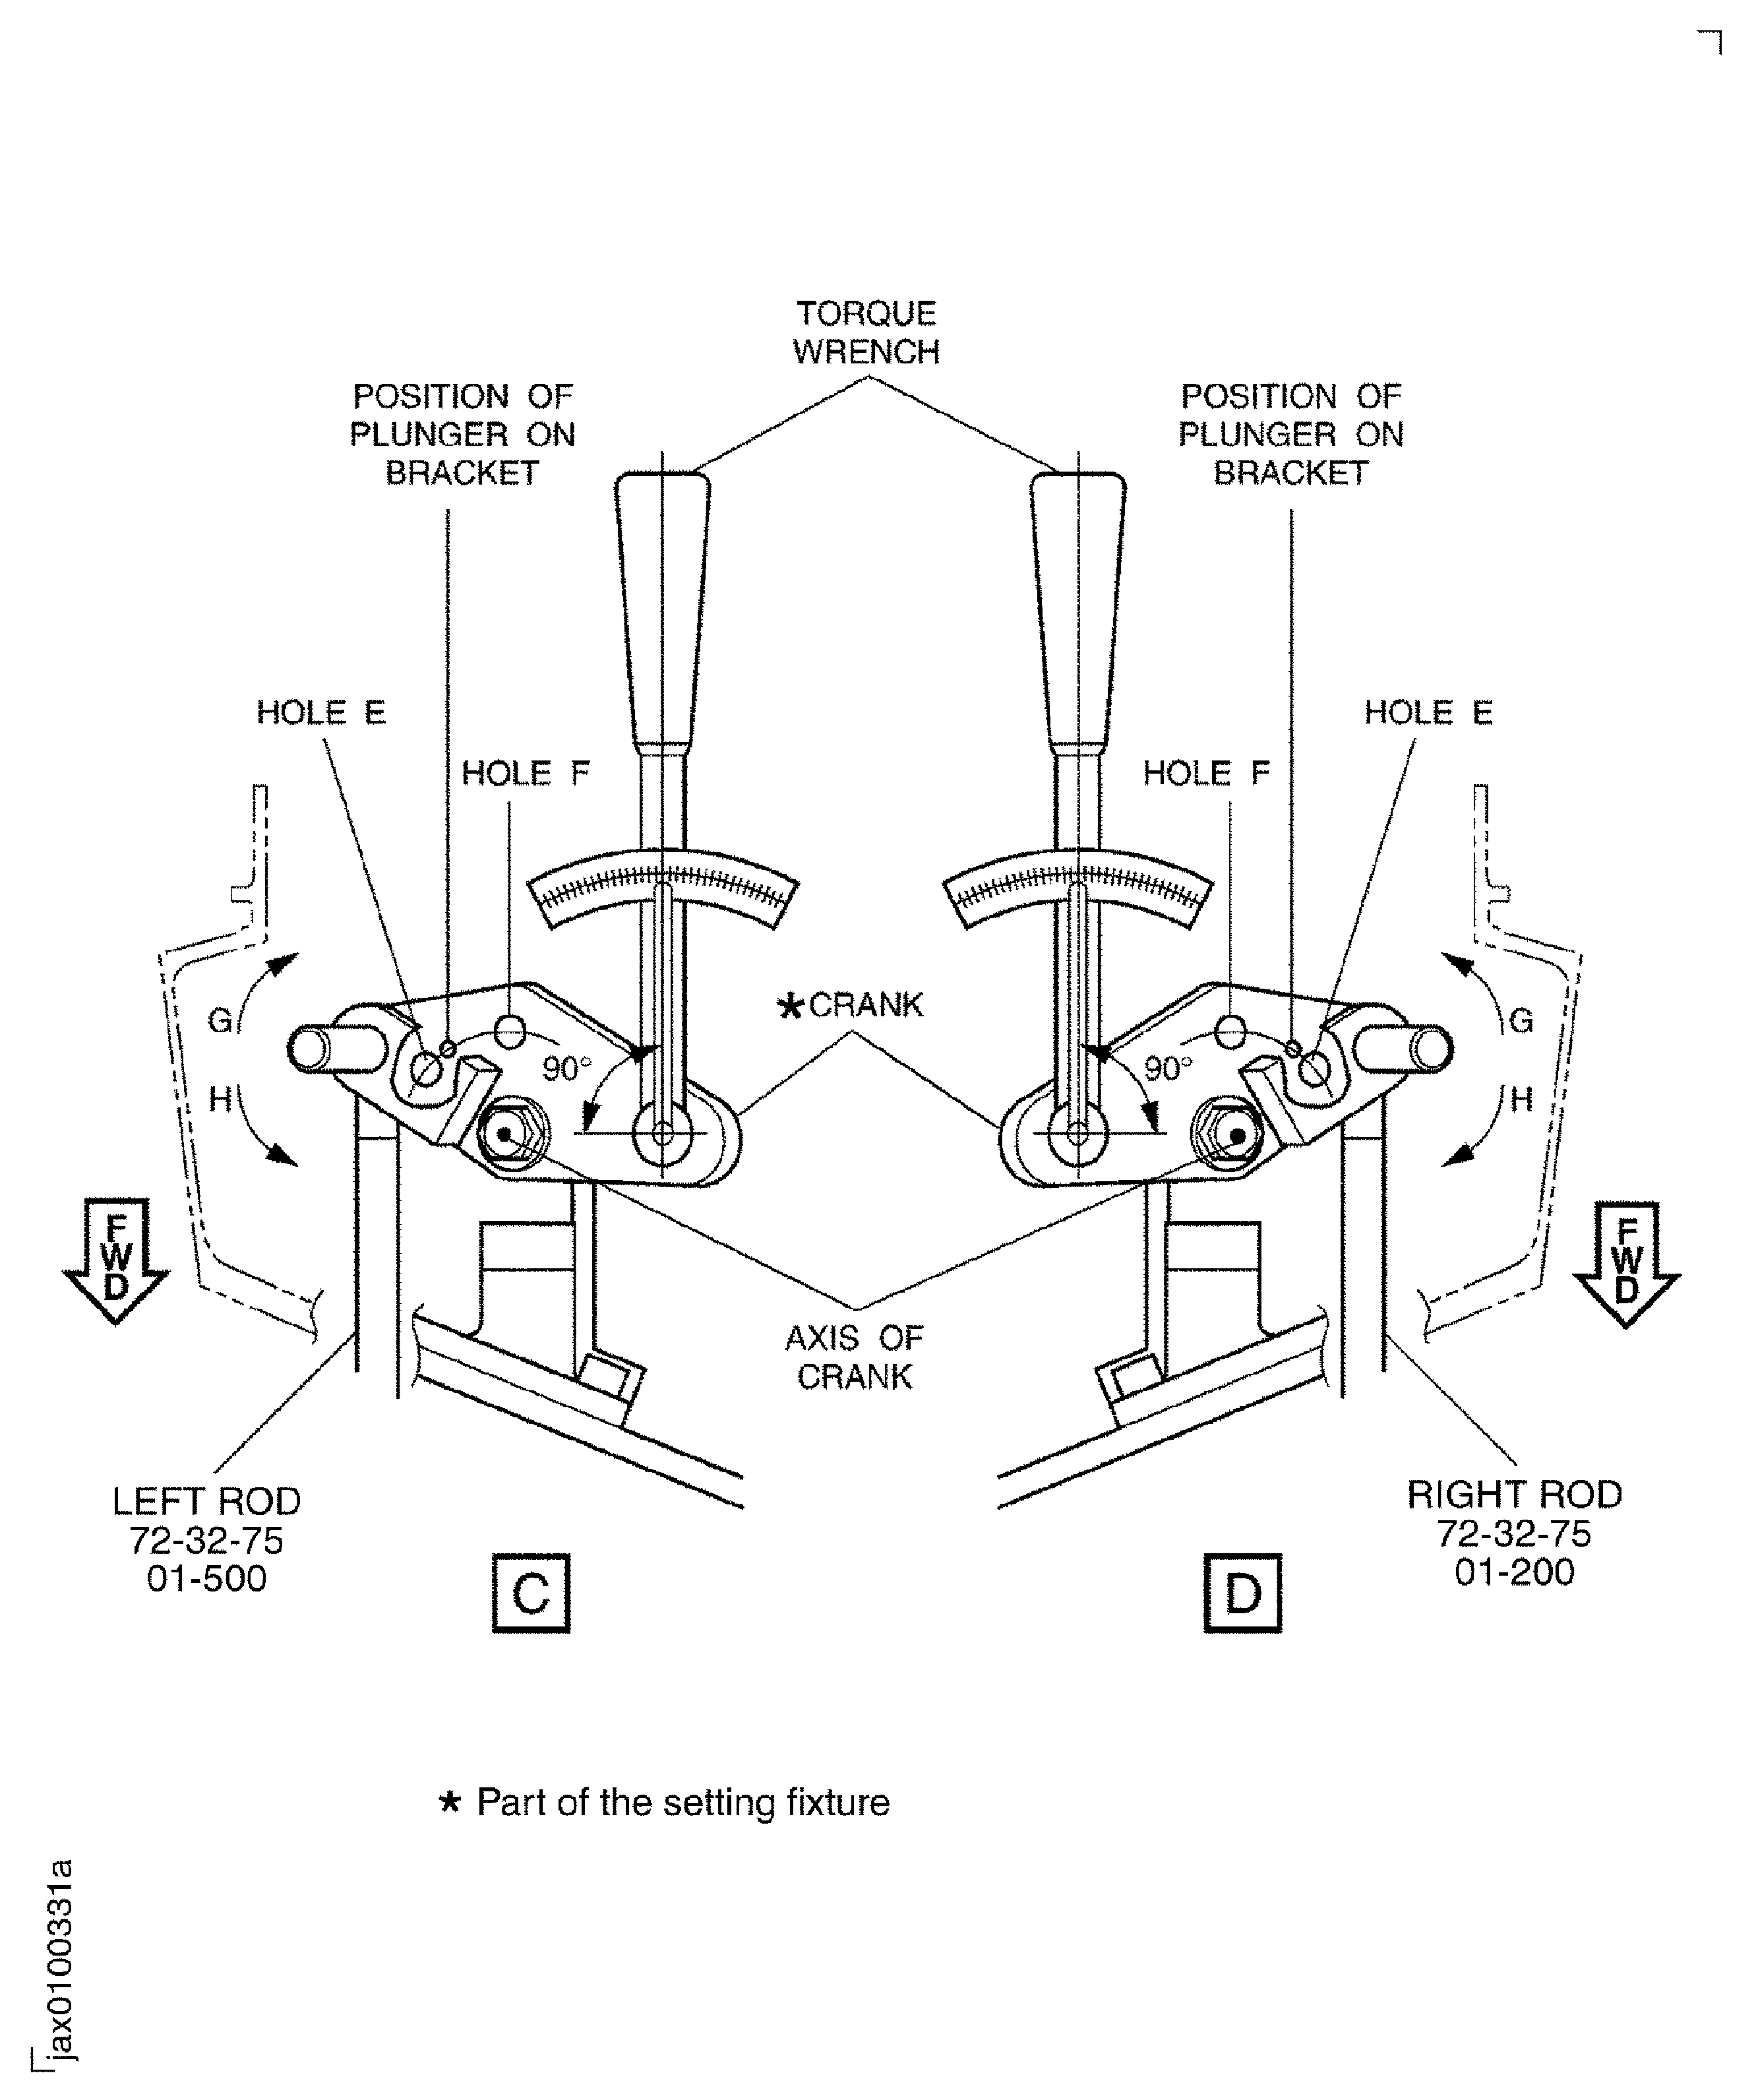
    2. Refer to Figure, Figure and Figure.

      1. Install the two brackets (part of IAE 1J12513 Setting fixture 1 off) on to the Fan Frame.

      2. Align the two aligning holes in each bracket with the aligning pins on the Fan Frame.

      3. Attach the brackets to the Fan Frame. Safety each bracket with the four socket head cap screws (part of the setting fixture). Tighten the socket head cap screws.

    3. Set the plungers to the locked position.

      1. Connect the right and left rod assemblies to the cranks of the setting fixture.

      2. Align each rod assembly rear hole with the holes in each crank.

      3. Safety each rod assembly with the set pin.

      1. Install IAE 1J12314 Dummy ring 1 off into the Booster Stage Bleed Valve and actuating mechanism (actuating mechanism), Figure.

      2. Put the dummy ring into the actuating mechanism.

      3. Align the 10 holes in the dummy ring with the holes in the actuating mechanism.

      4. Install the 10 bushes (01-670) and bolts (01-660) into the holes.

      5. Torque the bolts to 57* lbfin to 63* lbfin (6.48* Nm to 7.08* Nm).

    1. SUBTASK 72-32-00-430-124 Install the End Rods

    2. Refer to Figure, Figure, Figure, Figure and Figure.

      1. Install the two end rods ENGINE-BLEED VALVE ACTUATING ROD ASSEMBLY (72-32-75, 01-120) and ENGINE-BLEED VALVE ACTUATING ROD ASSEMBLY (72-32-75, 01-420) into the Rod Assemblies, Figure and Figure.

      2. Install ENGINE-BLEED VALVE ACTUATING ROD ASSEMBLY (72-32-75, 01-160) and ENGINE-BLEED VALVE ACTUATING ROD ASSEMBLY (72-32-75, 01-460) washer 2 off on to the rods.

      3. Install the two nuts ENGINE-BLEED VALVE ACTUATING ROD ASSEMBLY (72-32-75, 01-140) and ENGINE-BLEED VALVE ACTUATING ROD ASSEMBLY (72-32-75, 01-440) on to the end rods. Turn the nuts until they are at front end of the threads on the end rods.

      4. Install the end rods into the threaded holes in the rods through the washers.

        NOTE

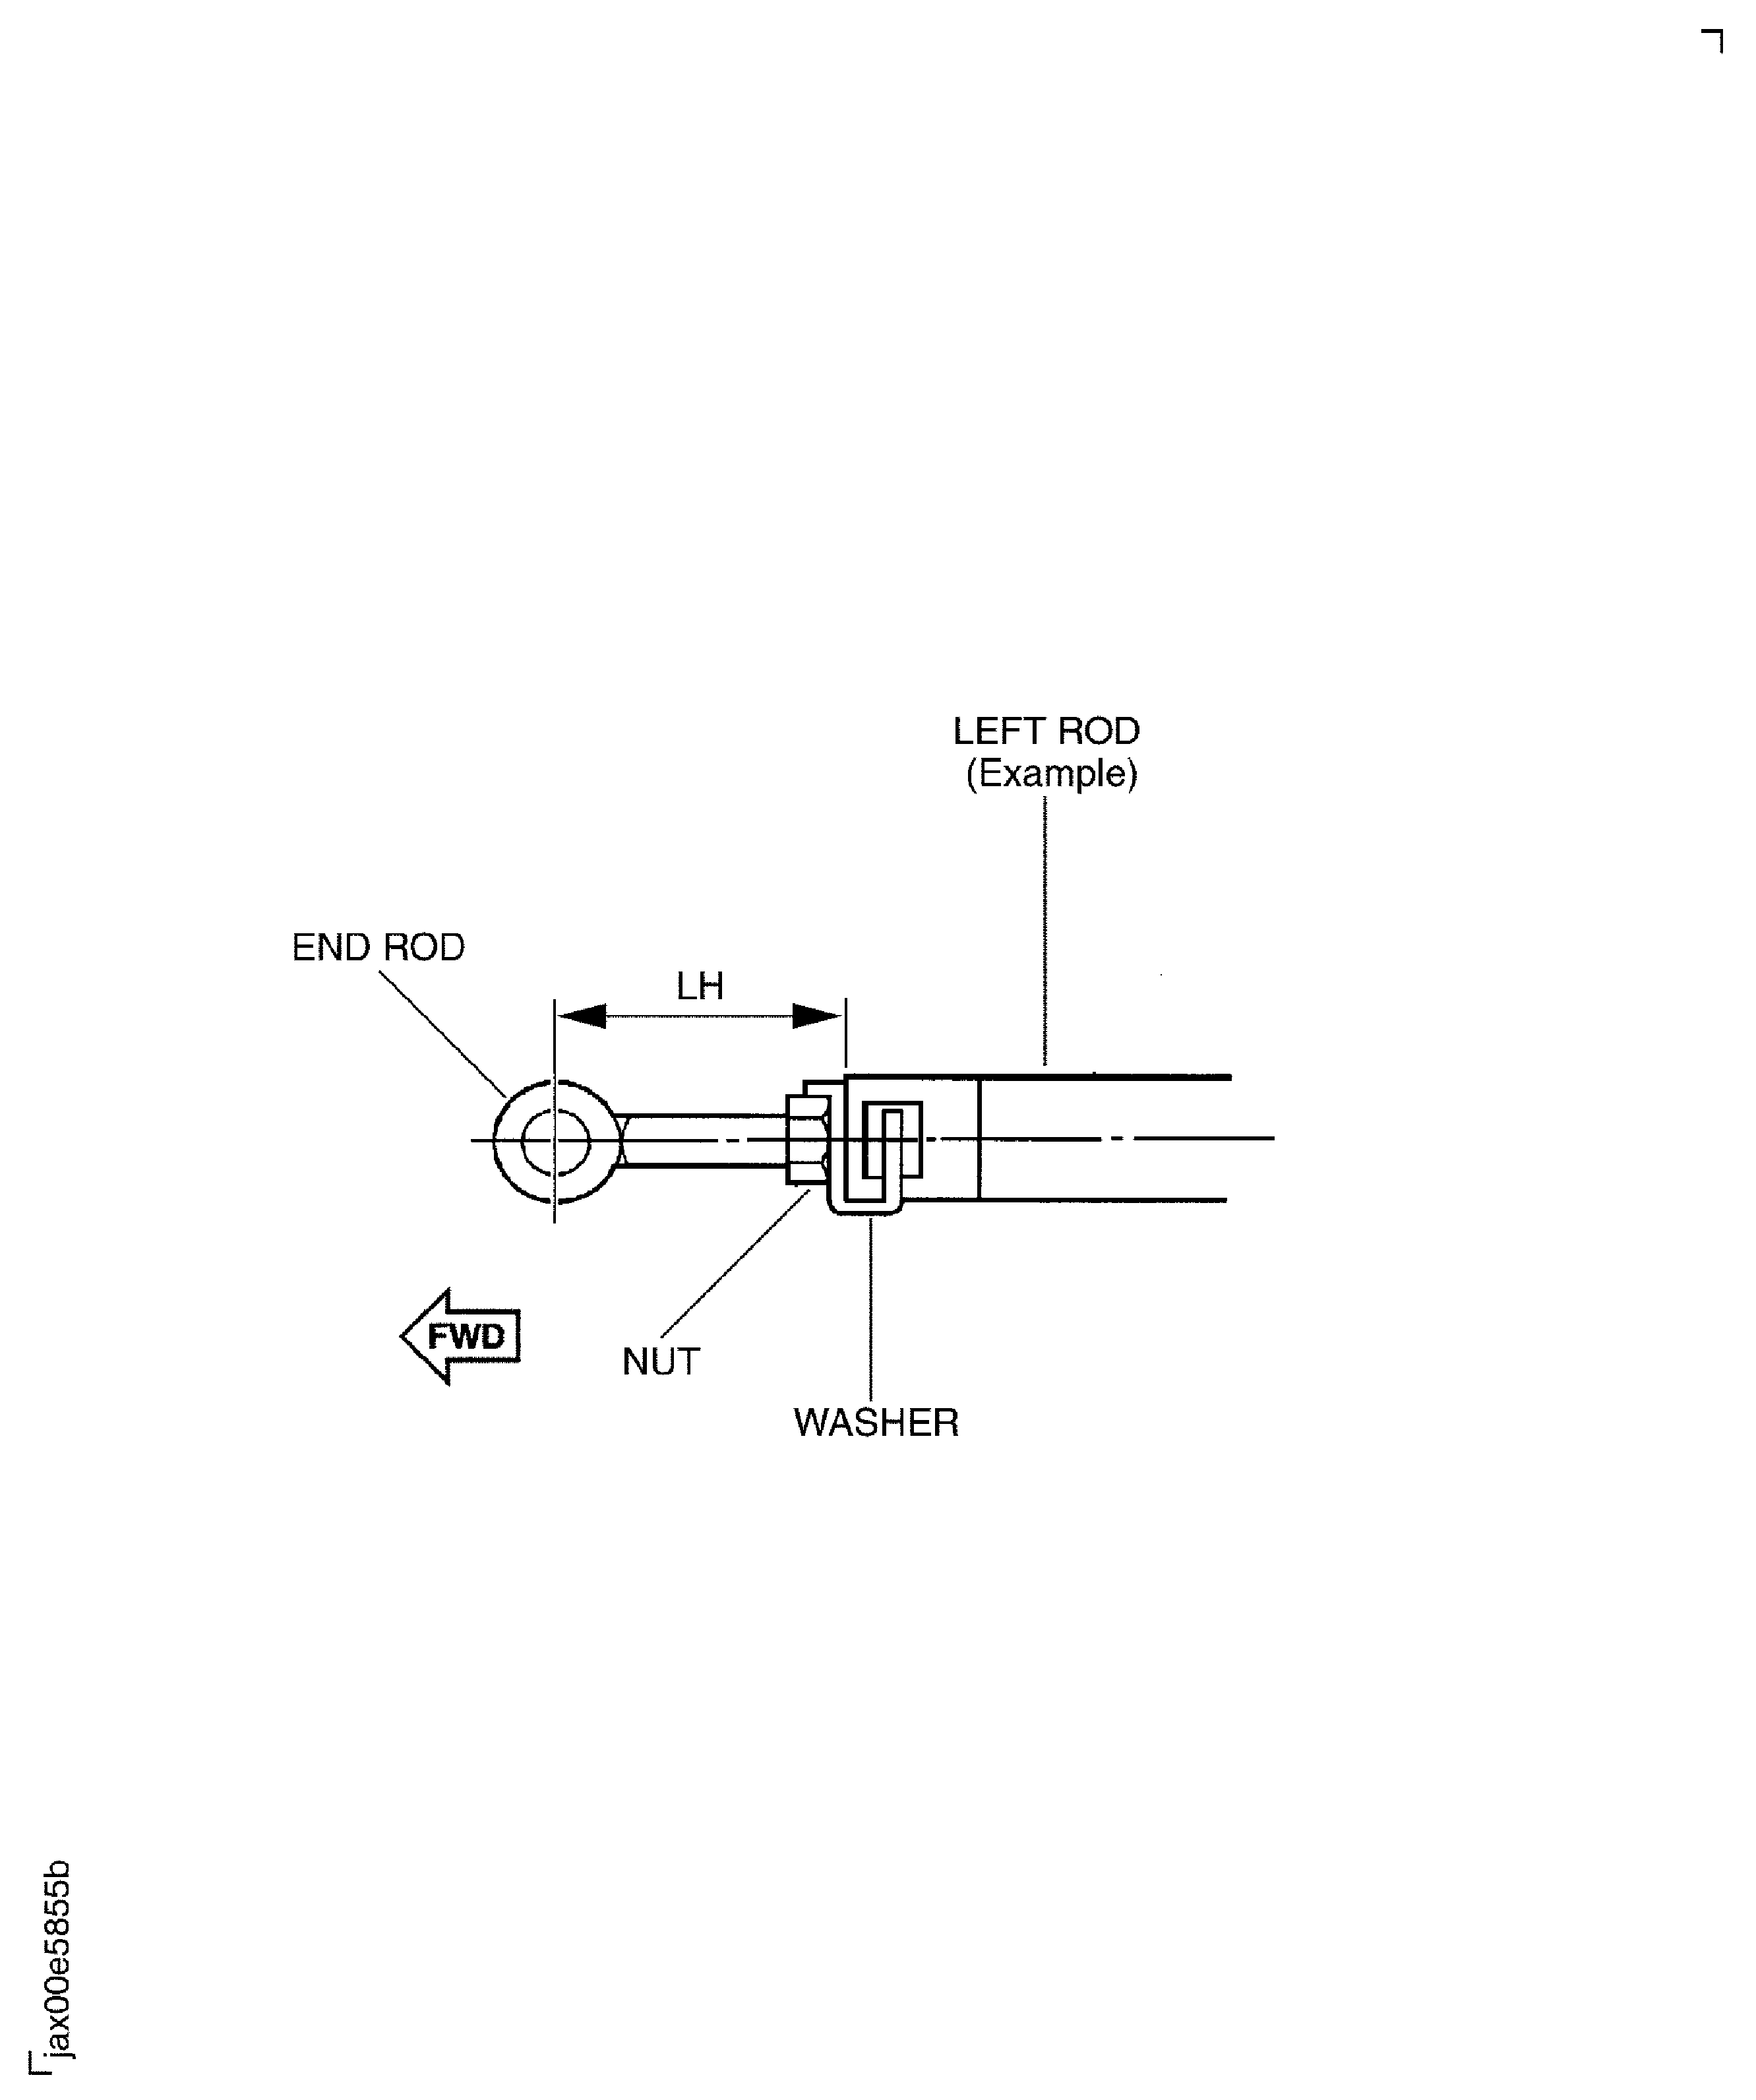
        Set the length (LH) of end rods to approximately 1.0 in. (25.4 mm), Figure
        Do not bend the tabs of the washers.
        Tighten the nuts lightly.
      1. Connect the end rods to the power arms, Figure and Figure.

      2. Turn the power arms so that the bleed valves touch the rubber seal.

      3. Install the two pins (01-720) into the holes in the power arms and the end rods.

        NOTE

        Do not install the retaining rings in this SUBTASK.
    1. SUBTASK 72-32-00-430-297-A01 Adjust the Length of the Rod Assemblies with Setting Fixture (IAE 1J12444) - Method - 1 (Pre SBE 72-0031)

    2. Refer to Figure, Figure, Figure, Figure and Figure.

    3. Make half installation of the set pins Figure and Figure.

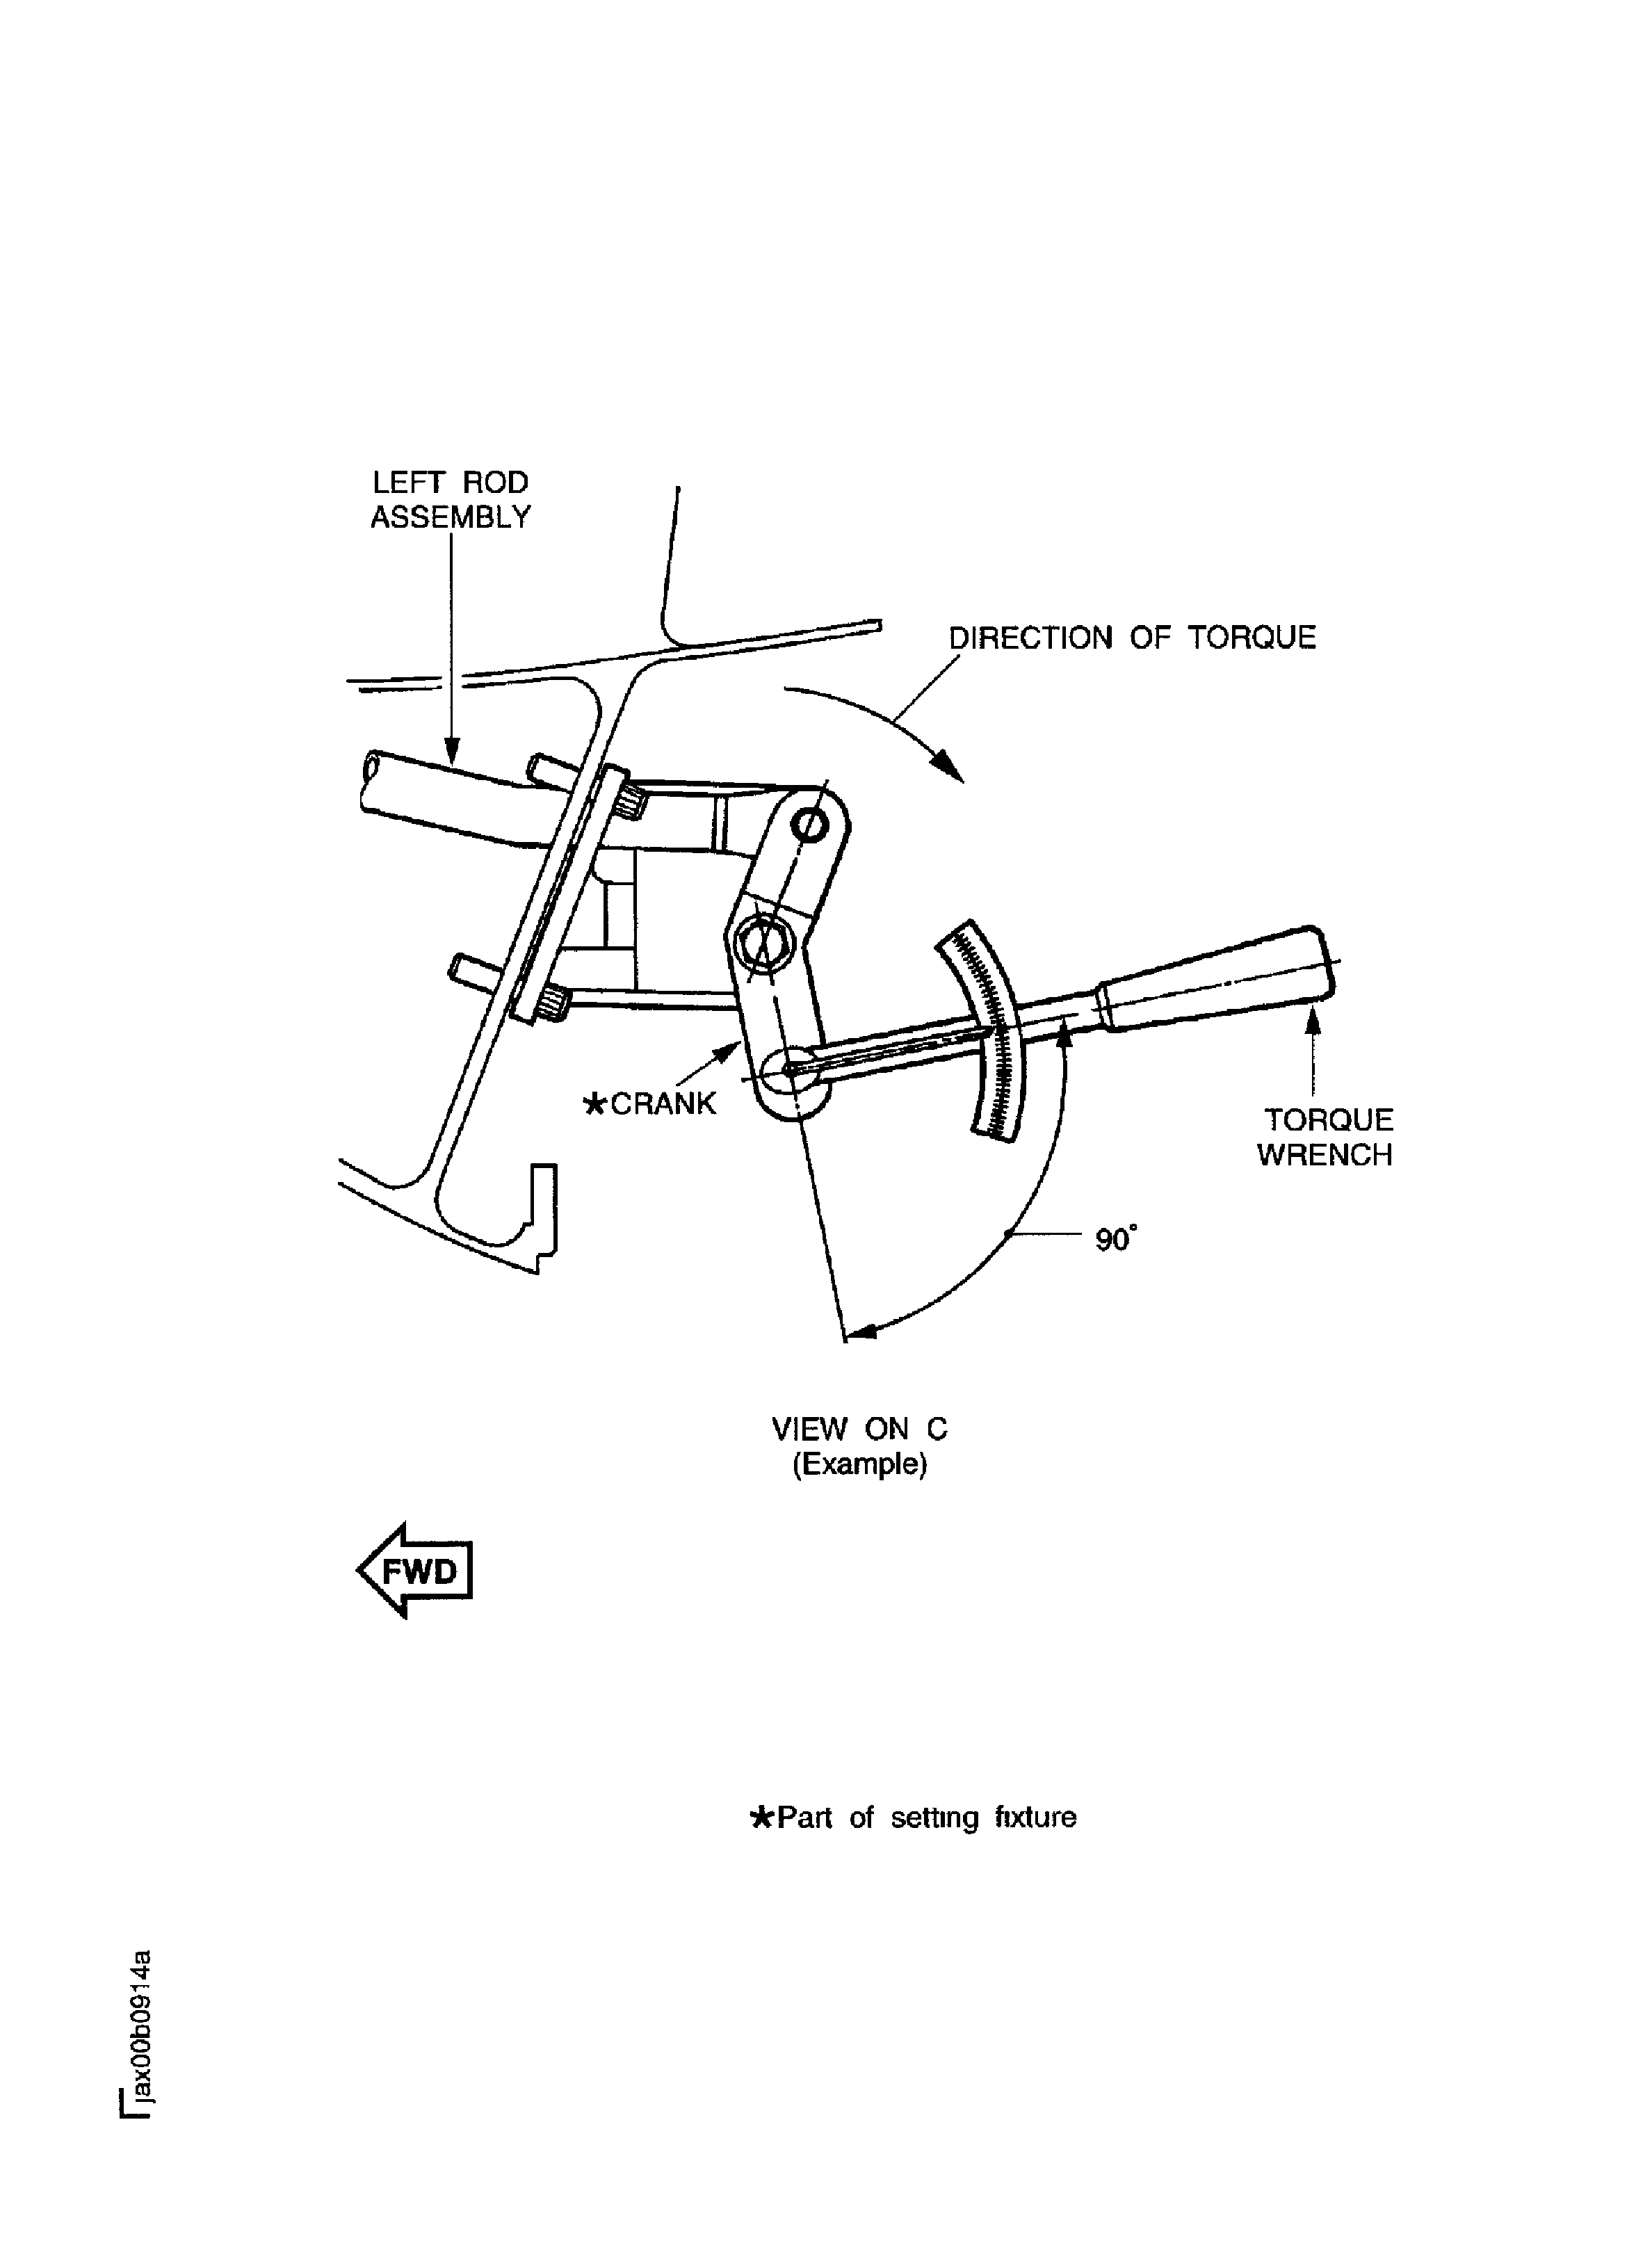
    4. Torque the right and left cranks with the torque wrench at the same time to align the rod rear holes with hole E of the cranks.

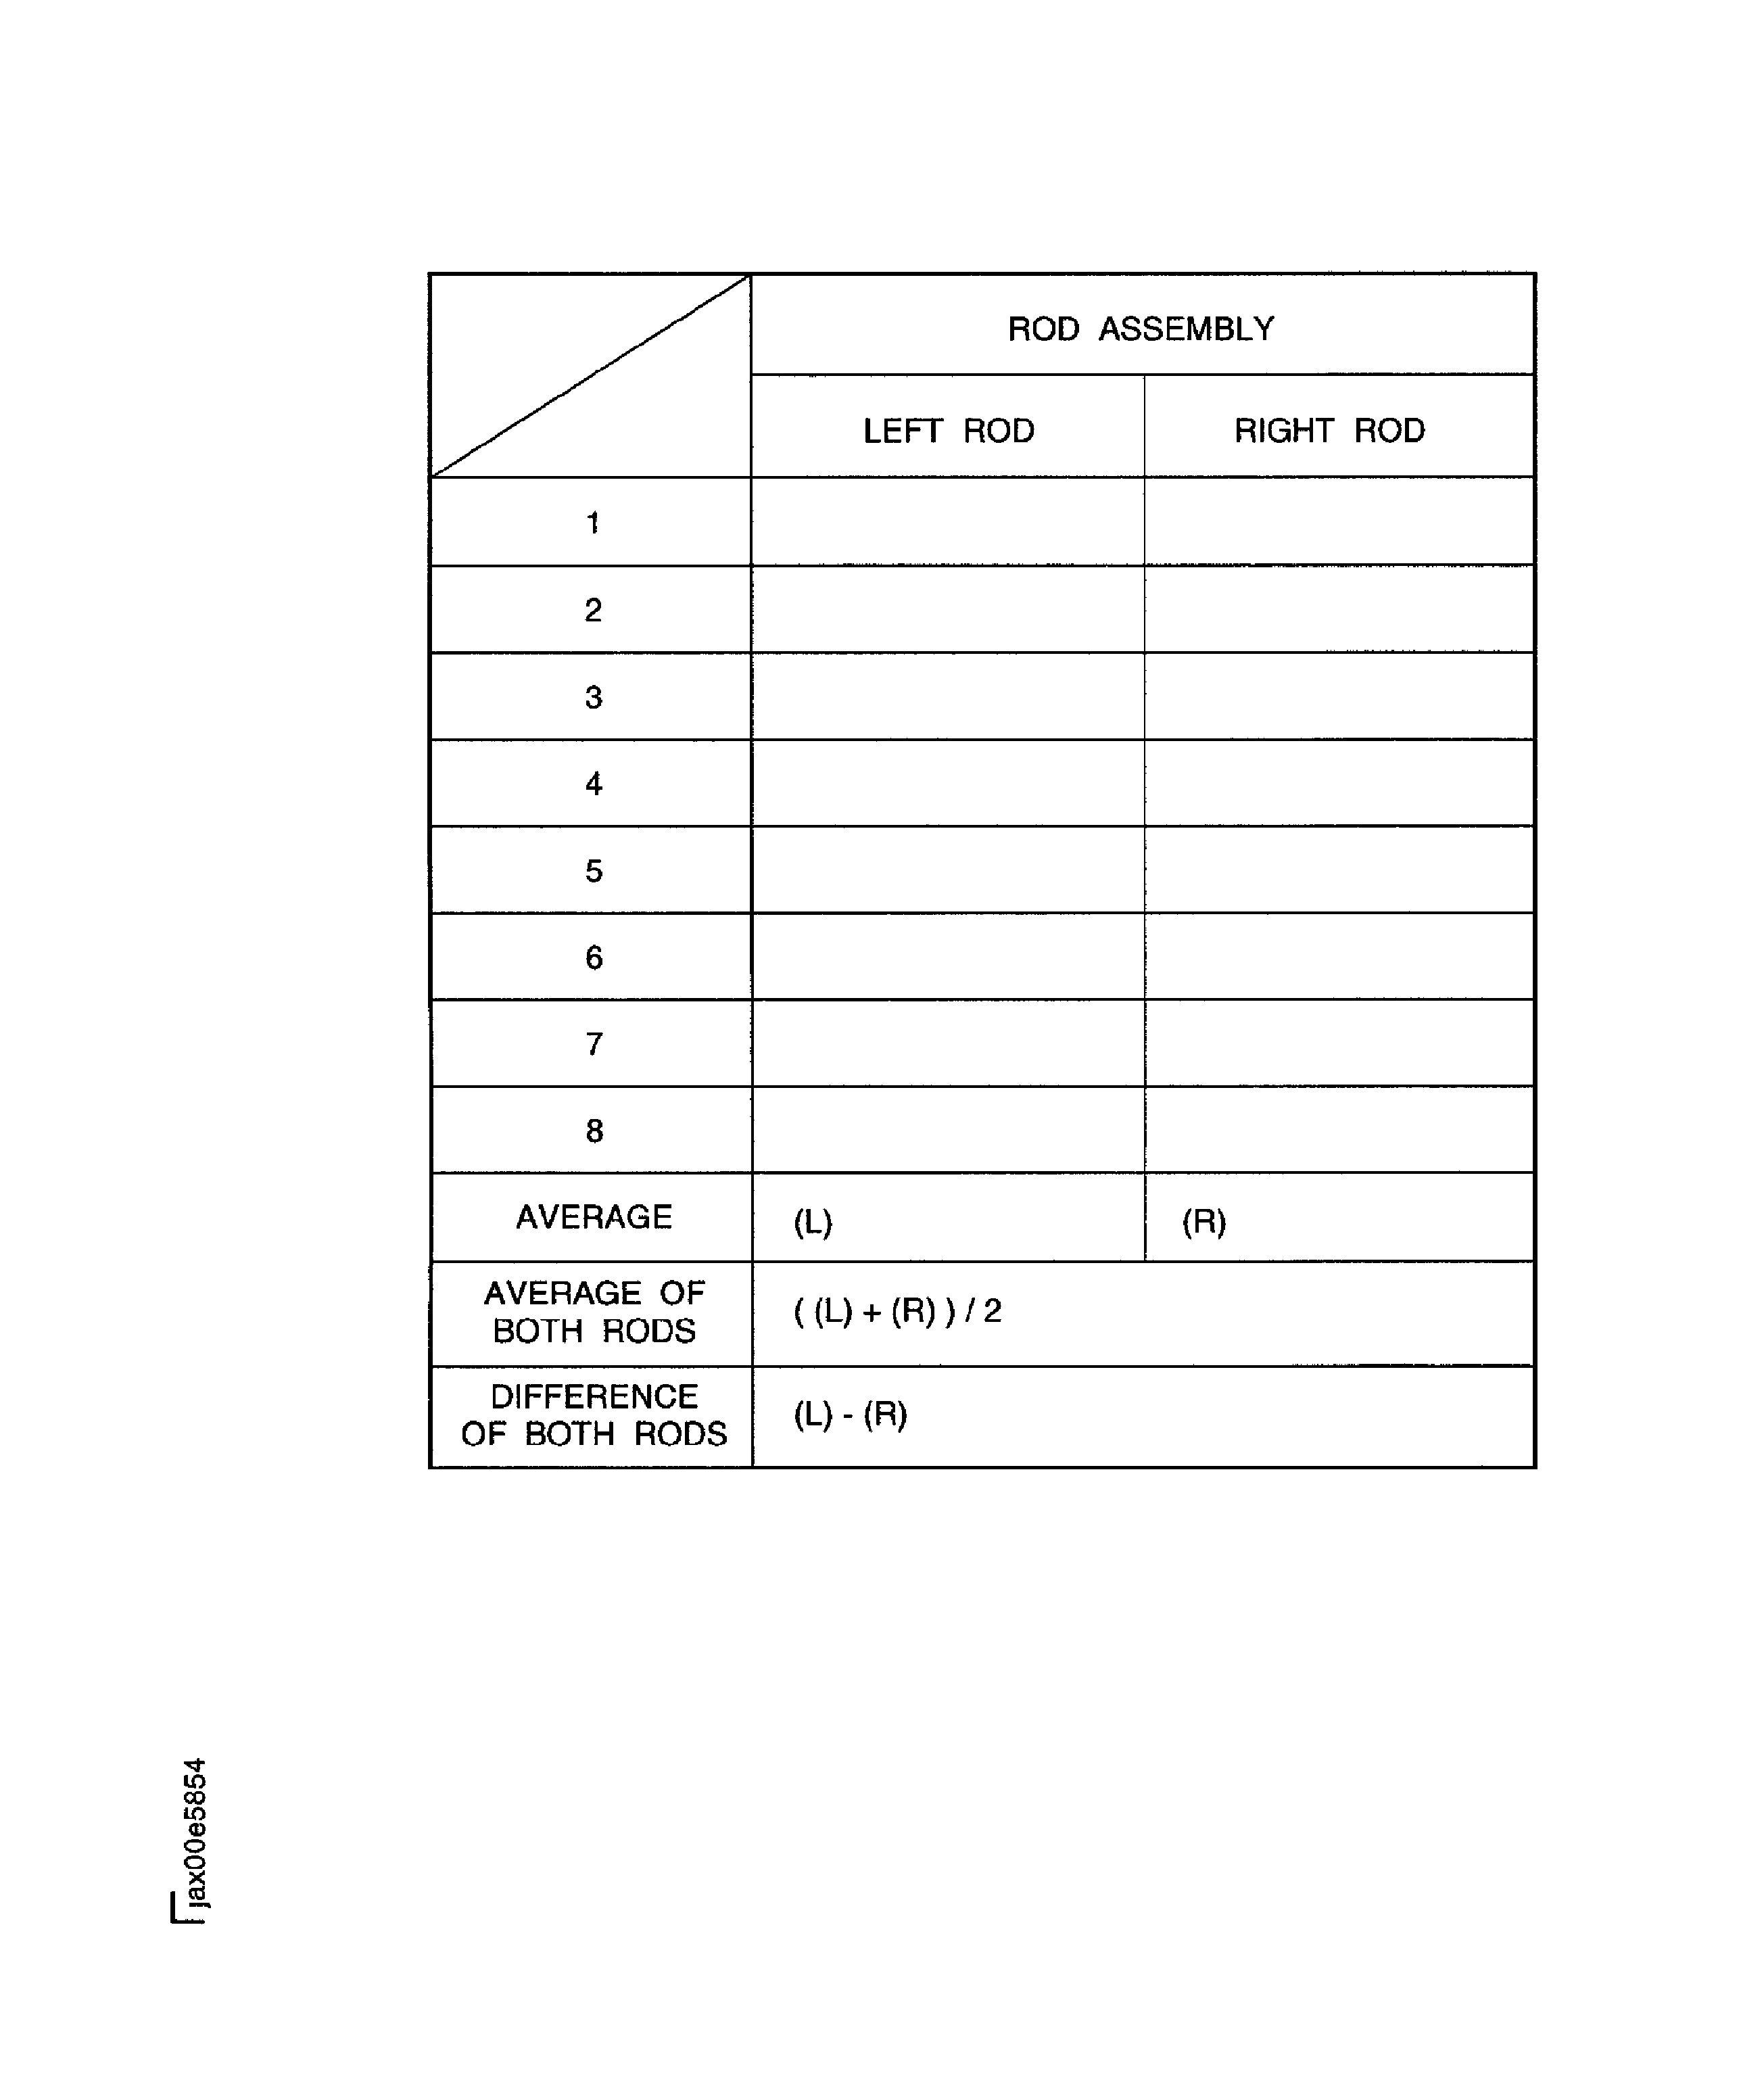
    5. Measure the torque values of both torque wrenches necessary to do Step and write them down, Figure.

      1. Release the tension on the rods.

      2. Make half installation of the set pins.

      3. Loosen torque of the cranks.

    6. Do Step thru Step eight times.

      1. Make sure that the torque values are in the limits that follow:

      2. Average (L) of left rod is 172 lbfin to 256 lbfin.

      3. Average (R) of right rod is 172 lbfin to 256 lbfin.

      4. Average of (L) and (R) is 193 lbfin to 235 lbfin.

      5. Difference between (L) and (R) is -42 lbfin to 42 lbfin.

    7. If the torque values are in the limits, go to Step.

      1. If the torque values are not in the limits, change the length (LH) of the end rods until the torque values are in the limits.

      2. Disconnect the end rods from the power arms, Figure and Figure.

      3. Change the length LH of the end rods, Figure.

        NOTE

        If you need larger torque value, decrease the length LH. If you need smaller torque value, increase the length LH.
      4. Connect the end rods to the power arms. Refer to Step.

      5. Go to Step.

    8. Disconnect the end rods from the power arms.

    9. Turn the end rods one complete turn (360 degrees) to increase length (LH) of the end rods.

    10. Connect the end rods to the power arms with the pin.

    11. Install a new (01-710) retaining rings on to the pins with IAE 1J12209 Installation holder 1 off.

    12. Torque the nuts to 119* lbfin to 131* lbfin (13.42* Nm to 14.82* Nm), Figure and Figure.

    13. Bend the tabs of the washers to safety the nuts, Figure and Figure. Refer to the SPM TASK 70-42-03-400-501.

    1. SUBTASK 72-32-00-430-297-A02 Adjust the Length of the Rod Assemblies with Setting Fixture (IAE 1J12513) - Method 2 (Pre SBE 72-0031)

    2. Refer to Figure, Figure, Figure and Figure.

      1. Align the holes E of the cranks with the plungers, Figure.

      2. Set the plungers to the released position.

      3. Turn the cranks with the torque wrenches until holes E are aligned with the plungers. Make sure that they are engaged.

        NOTE

        Each plunger goes in the hole E when they are correctly aligned.
      1. Measure the torque value of each crank assembly to cause tension of the left rod assembly.

      2. Pull the knob of the plunger on the left hand bracket to put the plunger out of the hole E. Turn the crank a few degrees in direction H.

        NOTE

        Keep the plunger on the right hand bracket in the hole E while you do Step.
      3. Slowly turn the left hand crank in direction G with the torque wrench until the hole E is aligned with the plunger. Read the torque value of the wrench when the plunger goes into the hole E.

      4. Pull the knob of the plunger on the left hand crank to put the plunger out of hole E. Turn the left hand crank a few degrees in direction G.

      5. Slowly turn the left hand crank in direction H with the torque wrench until hole E is aligned with the plunger. Read the torque value of the wrench when the plunger goes into the hole E.

      6. Calculate the average torque values in steps Step and Step and write it on the record sheet, Figure.

      1. Measure the torque value of the cranks necessary to cause tension of the right rod assembly.

        NOTE

        Keep the plunger of the left hand bracket in the hole E while you do Step.
      2. Measure the torque of the right hand crank with the same procedure as Step.

      3. Write the average of the measure torque on the record sheet, Figure.

    3. Pull the knobs of both plungers and loosen torque of the cranks to release the tension on the rod assemblies.

    4. Do Step thru Step eight times.

      1. Make sure that the torque values are in the limits that follow:

      2. Average (L) of left rod is 172 lbfin to 256 lbfin.

      3. Average (R) of the right rod is 172 lbfin to 256 lbfin.

      4. Average (L) and (R) is 193 lbfin to 235 lbfin.

      5. Difference between (L) and (R) is -42 lbfin to 42 lbfin.

    5. If the torque values are in the limits go to Step.

      1. If the torque values are not in the limits, adjust the length LH of the end rods until the torque values are in the limits.

      2. Disconnect the end rods from the powers arms, Figure and Figure.

      3. Change the length LH of the end rods, Figure.

        NOTE

        If you need larger torque value, decrease the length LH. If you need smaller torque value, increase the length LH.
      4. Connect the end rods to the power arms. Refer to Step.

      5. Go to Step.

    6. Disconnect the end rods from the power arms, Figure and Figure.

    7. Turn the end rods one complete turn (360 degrees) to increase the length (LH) of the end rods.

    8. Connect the end rods to the power arms with the pins.

    9. Install a new (01-710) retaining ring on to the pins withn IAE 1J12209 Installation holder 1 off.

    10. Torque the nuts to 119* lbfin to 131* lbfin (13.42* Nm to 14.82* Nm), Figure and Figure.

    11. Bend the tabs of the washers to safety the nuts. Refer to the SPM TASK 70-42-03-400-501.

    1. SUBTASK 72-32-00-430-297-B01 Adjust the Length of the Rod Assemblies with Setting Fixture (IAE 1J12444) Method - 1 (SBE 72-0031)

      SBE 72-0031: Addition of a seal to the Bleed Valve.

    2. Refer to Figure, Figure, Figure and Figure.

    3. Make half installation of the set pins, Figure and Figure.

    4. Torque the right and left cranks with the torque wrench at the same time to align the rod rear holes with hole E of the cranks.

    5. Measure the torque values of both torque wrenches necessary to do Step and write them down, Figure.

      1. Release the tension on the rods.

      2. Make half installation of the set pins.

      3. Loosen torque of the cranks.

    6. Do Step thru Step eight times.

      1. Make sure that the torque values are in the limits that follow:

      2. Average (L) of left rod is 172 lbfin to 256 lbfin.

      3. Average (R) of right rod is 172 lbfin to 256 lbfin.

      4. Average of (L) and (R) is 193 lbfin to 235 lbfin.

      5. Difference between (L) and (R) is -42 lbfin to 42 lbfin.

    7. If the torque values are in the limits, go to Step.

      1. If the torque values are not in the limits, change the length (LH) of the end rods until the torque values are in the limits.

      2. Disconnect the end rods from the power arms, Figure and Figure.

      3. Change the length LH of the end rods, Figure.

        NOTE

        If you need larger torque value, decrease the length LH. If you need smaller torque value, increase the length LH.
      4. Connect the end rods to the power arms. Refer to Step.

      5. Go to Step.

    8. Make sure the end rods are connected to the power arms.

    9. Install a new (01-710) retaining rings on to the pins with the IAE 1J12209 Installation holder 1 off.

    10. Torque the nuts to 119* lbfin to 131* lbfin (13.42* Nm to 14.82* Nm), Figure and Figure.

    11. Bend the tabs of the washers to safety the nuts, Figure and Figure. Refer to the SPM TASK 70-42-03-400-501.

    1. SUBTASK 72-32-00-430-297-B02 Adjust the Length of the Rod Assemblies with the Setting Fixture (IAE 1J12513) - Method 2 (SBE 72-0031)

      SBE 72-0031: Addition of a seal to the bleed valve.

    2. Refer to Figure, Figure, Figure, Figure and Figure.

      1. Align the holes E of the crank with the plungers, Figure, Figure and Figure.

      2. Set the plungers to the released position.

      3. Turn the cranks with the torque wrenches until the holes E are aligned with the plungers. Make sure that they are engaged.

        NOTE

        Each plunger goes in the hole E when they are correctly aligned.
      1. Measure the torque values of the crank necessary to cause tension of the left rod assembly.

      2. Pull the knob of the plunger on the left hand bracket to put the plunger out of hole E. Turn the crank a few degrees in direction H.

        NOTE

        Keep the plunger on the right hand bracket in the hole E while you do Step.
      3. Slowly turn the left hand crank in the direction G with the torque wrench until the hole E is align with the plunger. Read the torque value of the wrench when the plunger goes into the hole E.

      4. Pull the knob of the plunger on the left hand crank to put the plunger out of hole E. Turn the left hand crank a few degrees in the direction G.

      5. Slowly turn the left hand crank in direction H with the torque wrench until the hole E is aligned with the plunger. Read the torque value of the wrench when the plunger goes in to hole E.

      6. Calculate the average of the torque values in Step and Step and write it on the record sheet, Figure.

      1. Measure the torque values of the crank necessary to cause tension of the right rod assembly.

        NOTE

        Keep the plunger of the left hand bracket in the hole E while you do Step.
      2. Measure the torque of the right hand crank with the same procedure as Step.

      3. Write the average of the measure torque on the record sheet, Figure.

    3. Pull the knobs of both plungers and loosen torque of the cranks to release tension of the rod assemblies.

    4. Do Step thru Step eight times.

      1. Make sure that the torque values are in the limits that follow:

      2. Average (L) of the left rod is 172 lbfin to 256 lbfin.

      3. The average (R) of the right rod is 172 lbfin to 256 lbfin.

      4. Average of (L) and (R) is 193 lbfin to 235 lbfin.

      5. Difference between (L) and (R) is -42 lbfin to 42 lbfin.

    5. If the torque values are in the limits, got to Step.

      1. If the torque values are not in the limits, adjust the length LH of the end rods until the torque values are in the limits.

      2. Disconnect the end rods from the power arms, Figure andFigure.

      3. Change the length LH of the end rods, Figure.

        NOTE

        If you need larger torque value, decrease the length LH. If you need smaller torque value, increase the length LH.
      4. Connect the end rods to the power arms, refer to Step.

      5. Go to Step.

    6. Make sure the end rods are connected to the power arms.

    7. Install a new (01-710) retaining ring with IAE 1J12209 Installation holder 1 off.

    8. Torque the nuts to 119* lbfin to 131* lbfin (13.42* Nm to 14.82* Nm), Figure and Figure.

    9. Bend the tabs of the washers to safety the nuts, Figure and Figure. Refer to the SPM TASK 70-42-03-400-501.

    1. SUBTASK 72-32-00-430-298-001 Remove the Setting Fixture (IAE 1J1244) and the Dummy Ring Method - 1

    2. Refer to Figure, Figure and Figure.

      1. Remove the setting fixture from the Fan Frame.

      2. Remove the set pins which attach the end rods to the brackets A and B (part of setting fixture).

      3. Remove the eight socket head cap screws which attach the brackets to the Fan Frame. Remove the brackets A and B.

      1. Remove the dummy ring.

      2. Remove the 10 bushes and bolts.

      3. Remove the dummy ring.

    1. SUBTASK 72-32-00-430-298-002 Remove the Setting Fixture (IAE 1J12513) and the Dummy Ring - Method - 2

    2. Refer to Figure, Figure, Figure and Figure.

      1. Remove the setting fixture from the Fan Frame.

      2. Remove the set pins which attach the end rods to the brackets (part of the fixture).

      3. Remove the eight socket head cap screws which attach the brackets to the Fan Frame. Remove the brackets.

      1. Remove the dummy ring.

      2. Remove the 10 bushes and bolts.

      3. Remove the dummy ring.

  1. Figure: Locations for the Fits and Clearances

    Locations for the Fits and Clearances
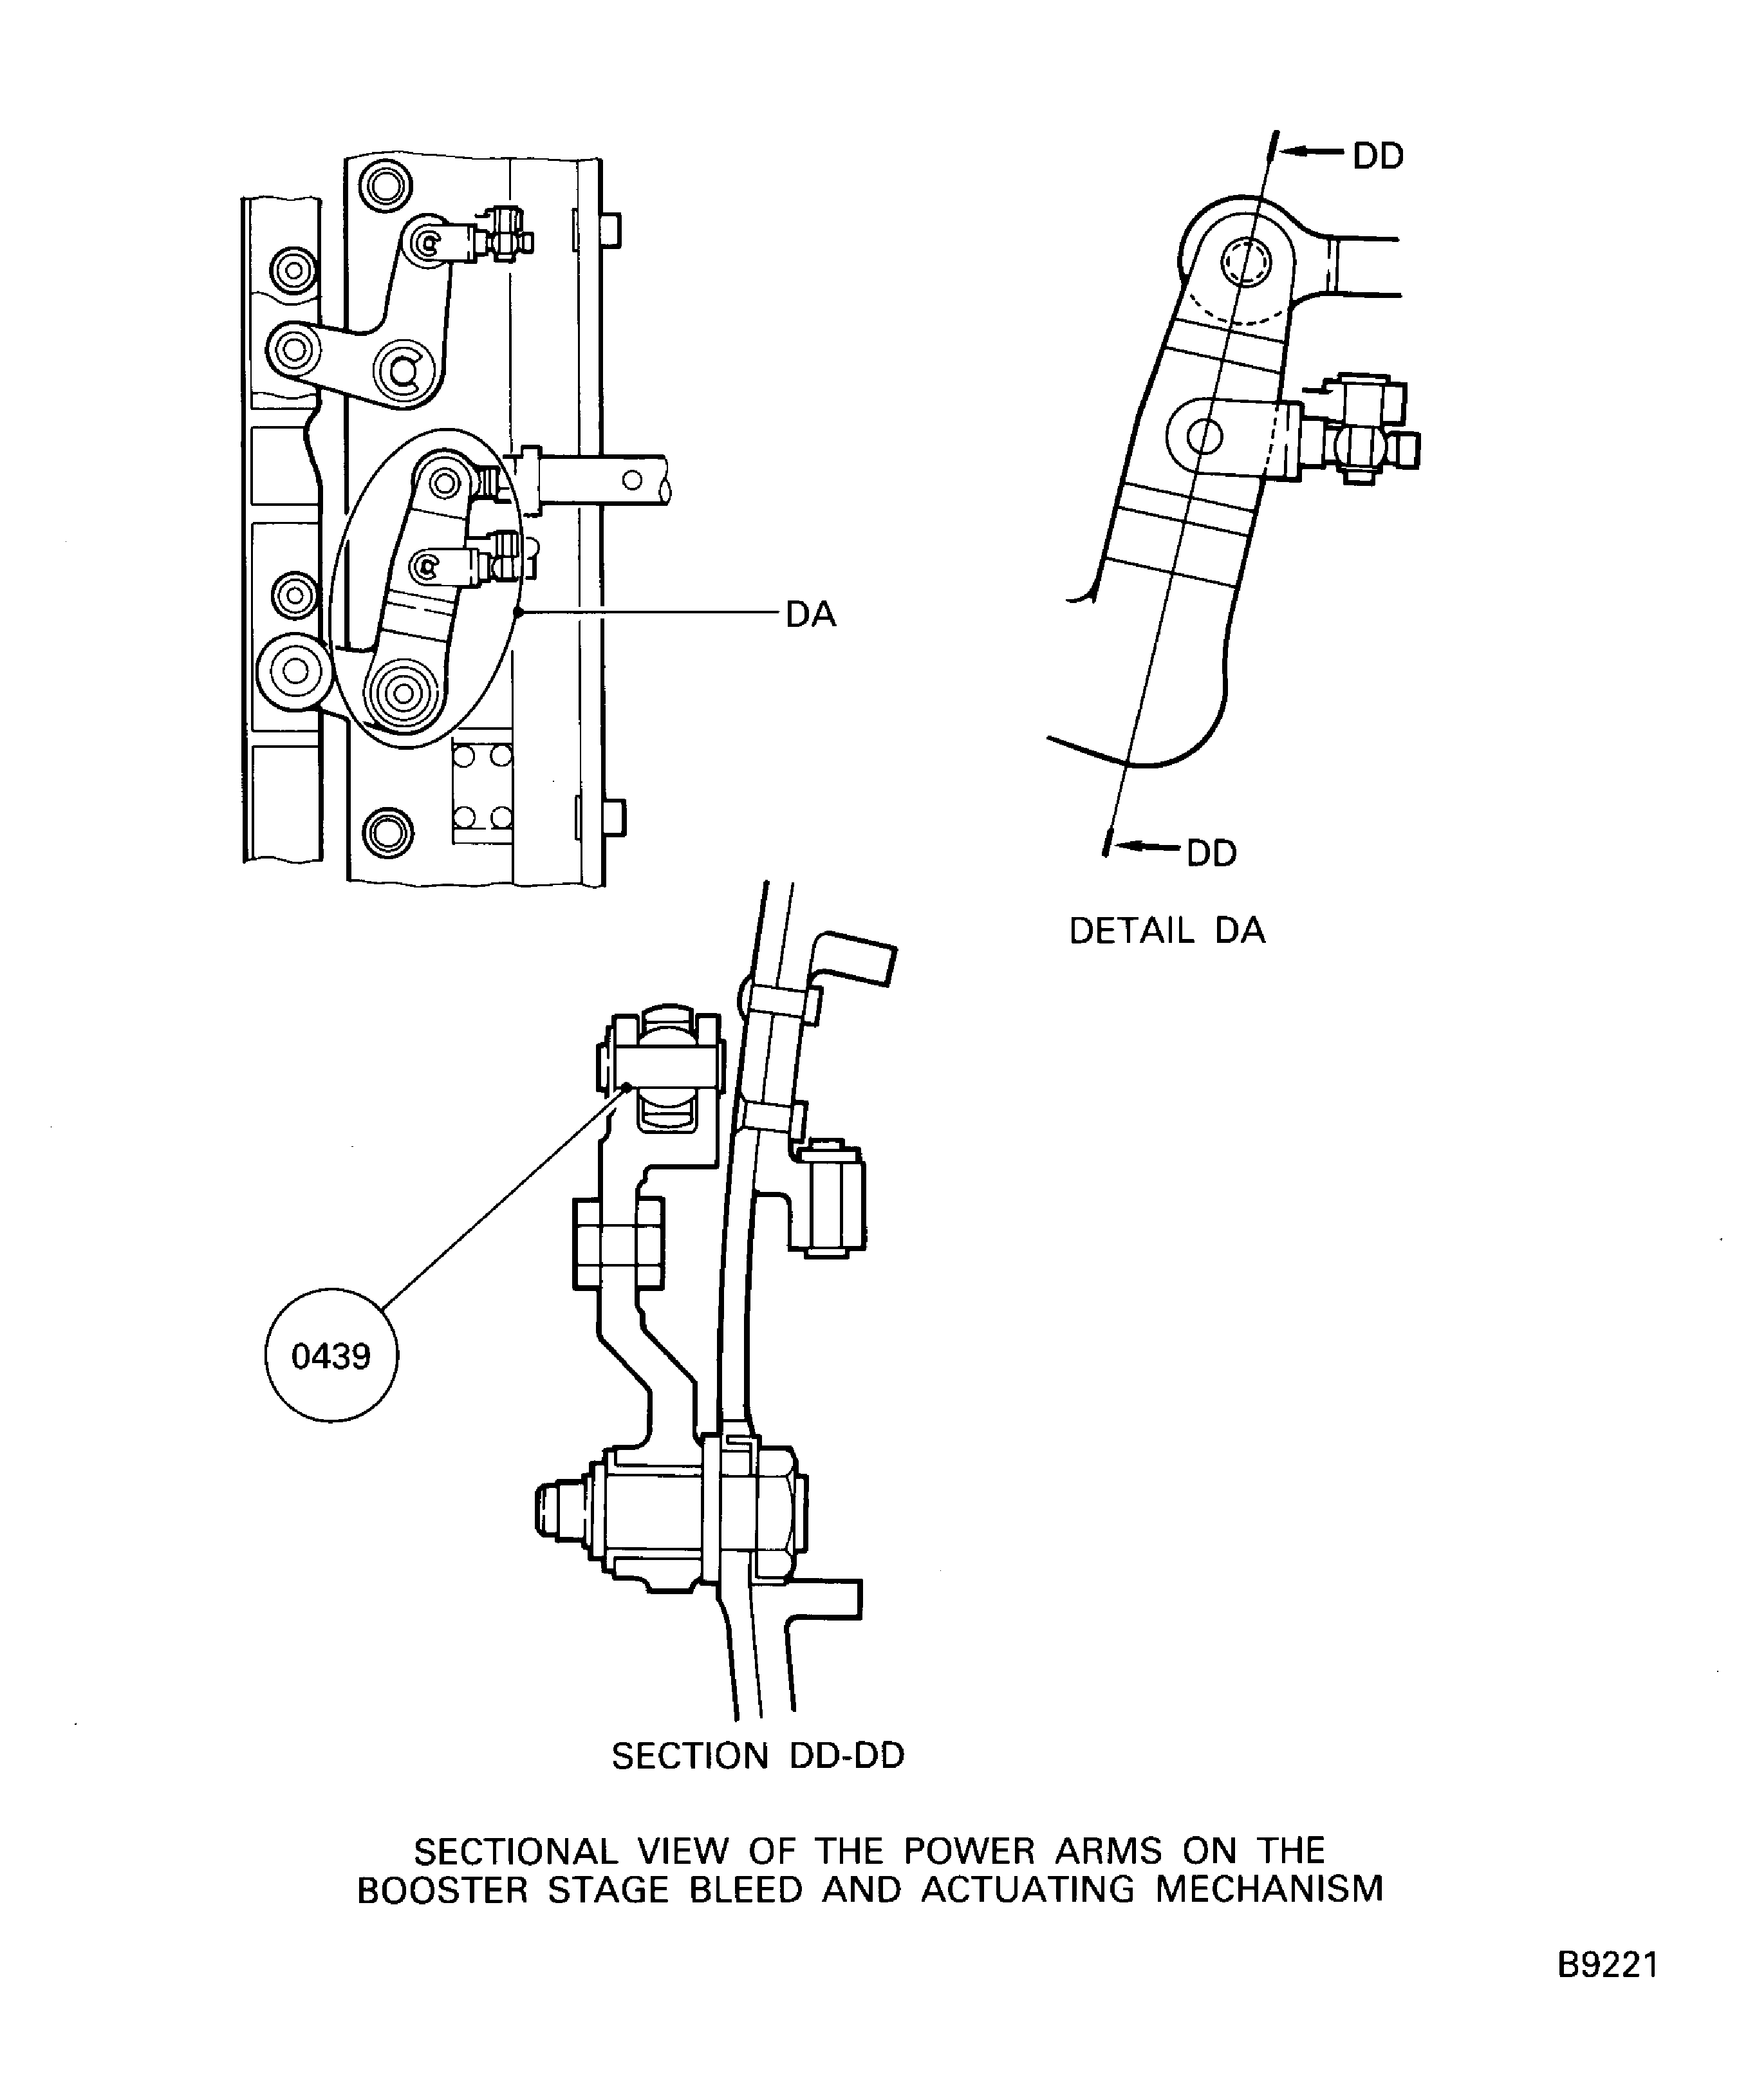
    Figure: Apply Jointing Compound to the Mating Faces on the Fan Frame Assembly

    Apply Jointing Compound to the Mating Faces on the Fan Frame Assembly
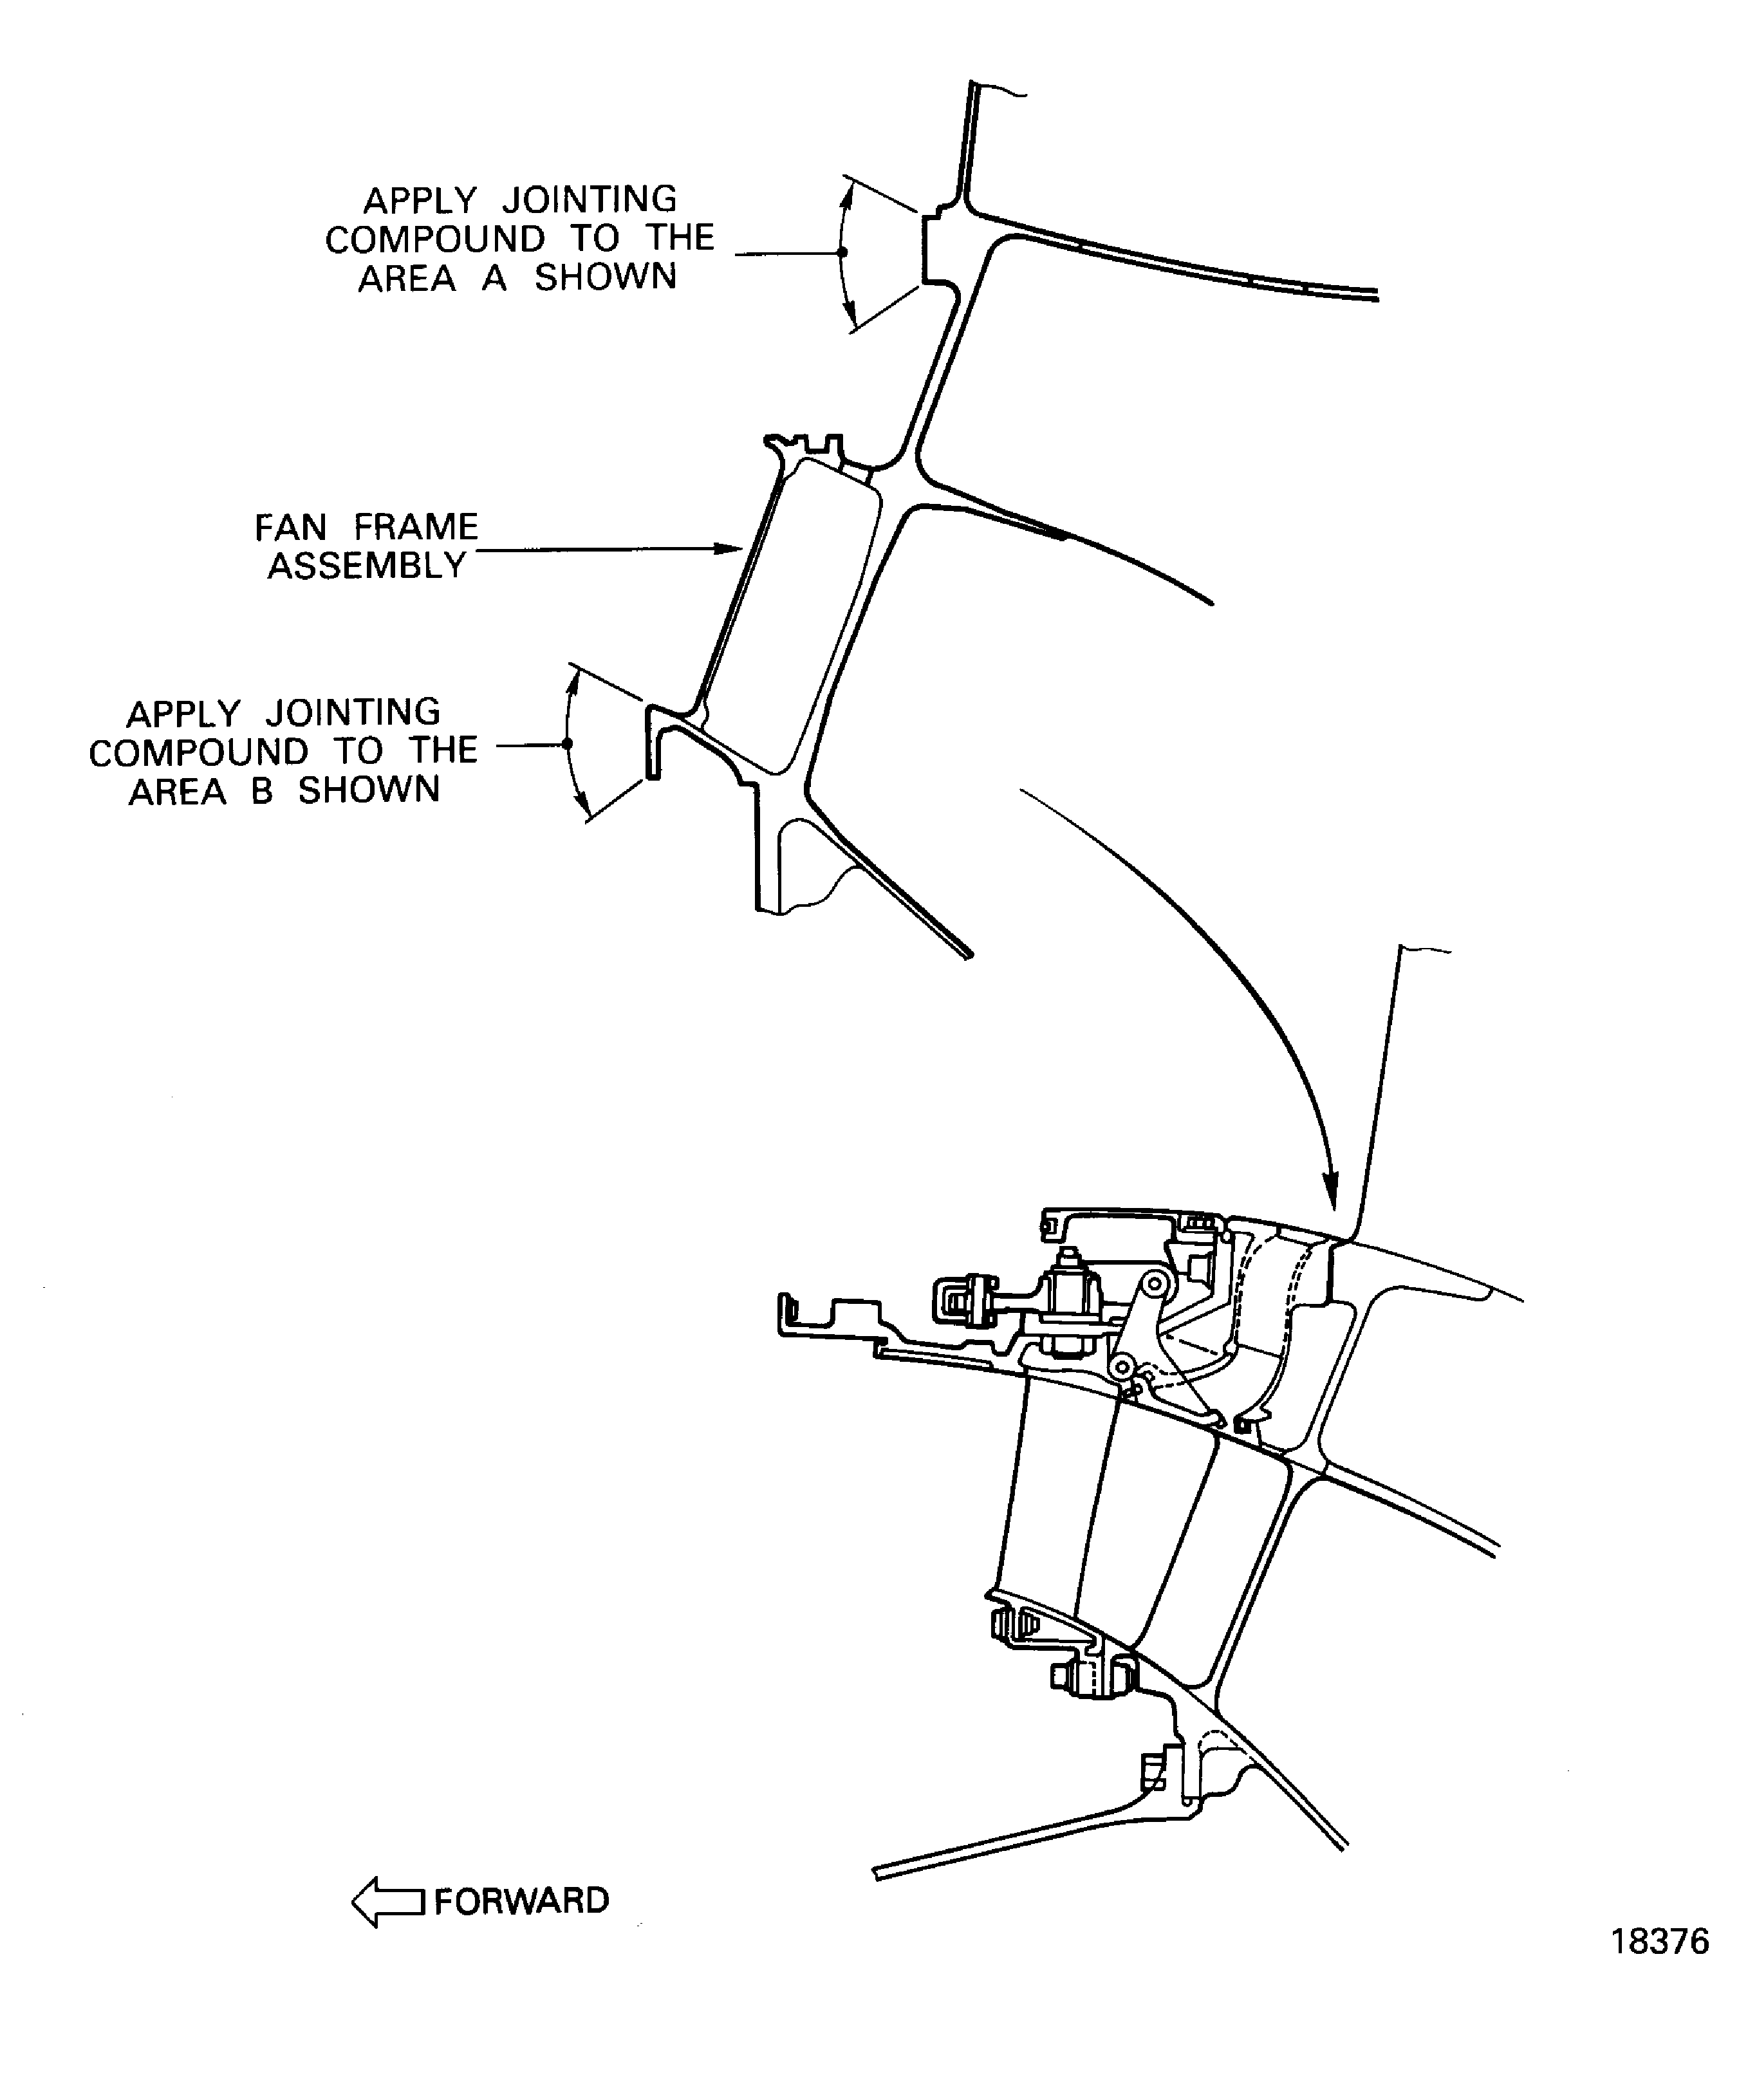
    Figure: Pre SBE 72-0595: Install the LP Compressor Bleed Duct and the Booster Stage Bleed Valve and Actuating Mechanism

    Sheet 1
    Legend
    Pre SBE 72-0595: Install the LP Compressor Bleed Duct and the Booster Stage Bleed Valve and Actuating Mechanism

    Sheet 1

    Close

    Figure: SBE 72-0595: Install the LP Compressor Bleed Duct and the Booster Stage Bleed Valve and Actuating Mechanism

    Sheet 2
    Legend
    SBE 72-0595: Install the LP Compressor Bleed Duct and the Booster Stage Bleed Valve and Actuating Mechanism

    Sheet 2

    Close

    Figure: Install the Lock Pin in to Position to Lock the Handle of the Turnover Stand

    Install the Lock Pin in to Position to Lock the Handle of the Turnover Stand
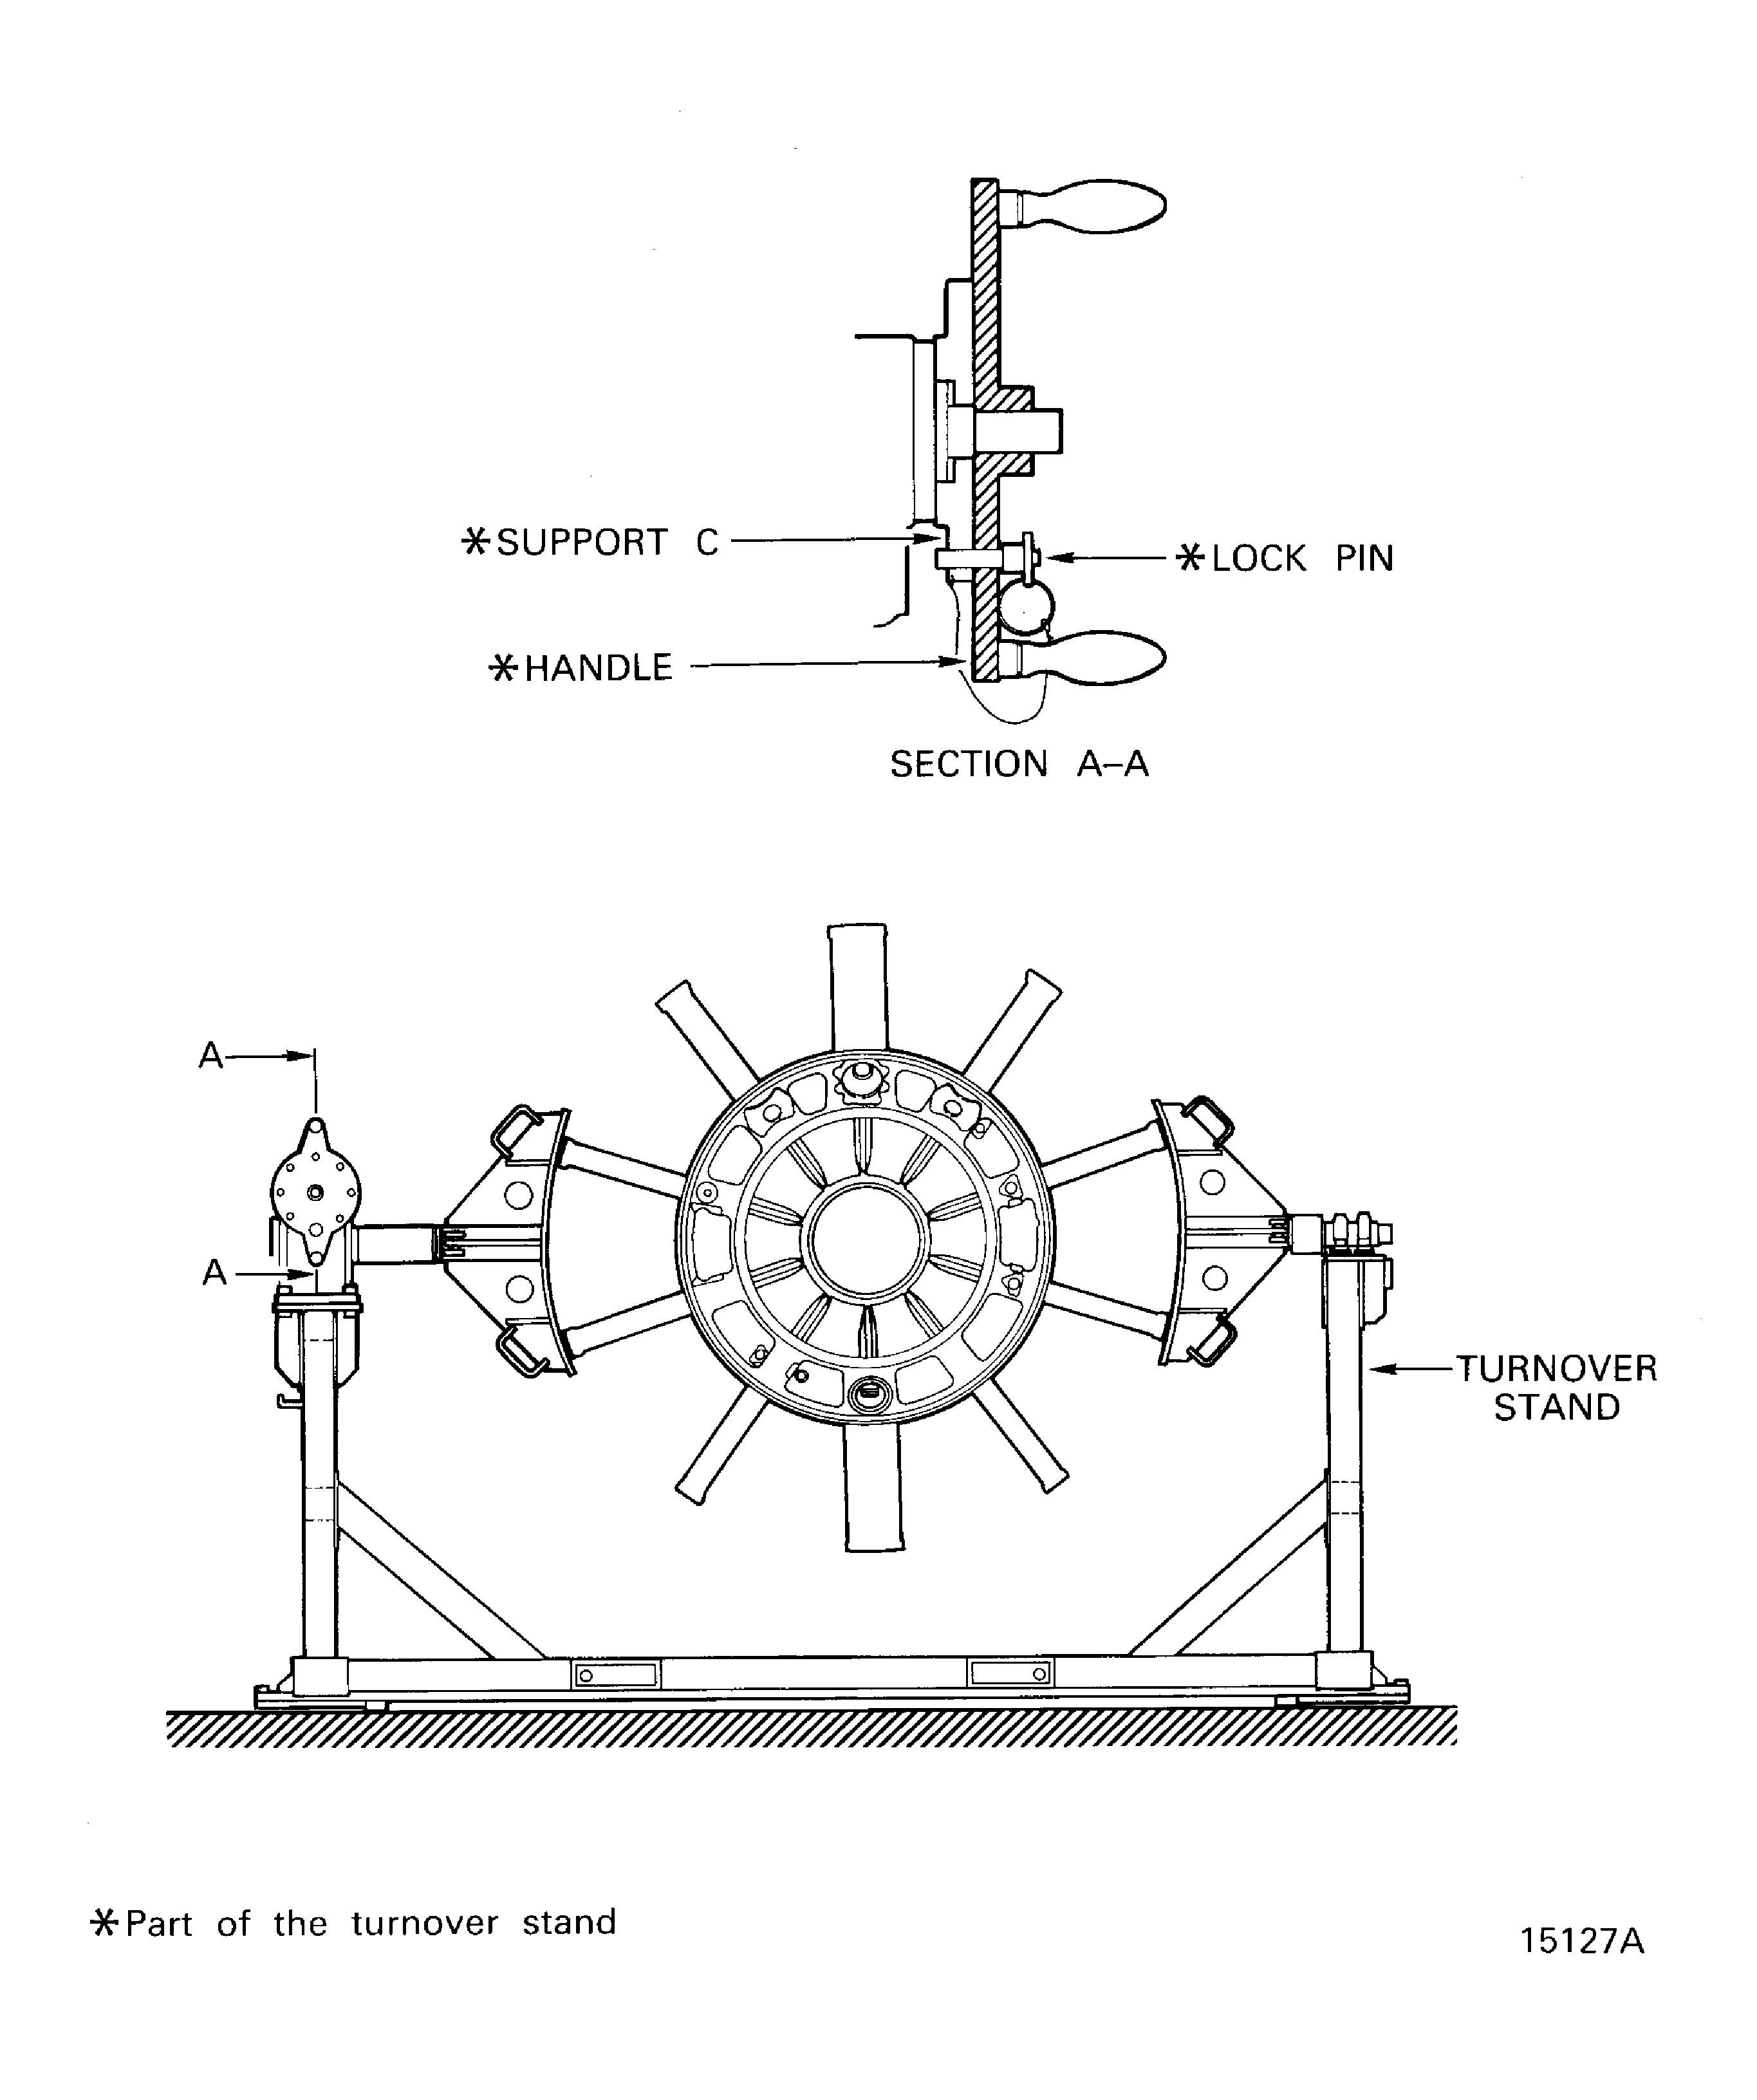
    Figure: Install the Right and Left Rod Assemblies

    Sheet 1
    Legend
    Install the Right and Left Rod Assemblies

    Sheet 1

    Close

    Figure: Install the Right and Left Rod Assemblies

    Sheet 2
    Legend
    Install the Right and Left Rod Assemblies

    Sheet 2

    Close

    Figure: Adjust the End Rods

    Sheet 3

    Legend
    Adjust the End Rods

    Sheet 3

    Close

    Figure: Install the Setting Fixture (IAE 1J12444) and Connect it to the Rod Assemblies - Method 1

    Sheet 1
    Legend
    Install the Setting Fixture (IAE 1J12444 Setting fixture) and Connect it to the Rod Assemblies - Method 1

    Sheet 1

    Close

    Figure: Install the Setting Fixture (IAE 1J12444) and Connect it to the Rod Assemblies - Method 1

    Sheet 2
    Legend
    Install the Setting Fixture (IAE 1J12444 Setting fixture) and Connect it to the Rod Assemblies - Method 1

    Sheet 2

    Close

    Figure: Install the Setting Fixture (IAE 1J12444) and Connect it to the Rod Assemblies - Method 1

    Sheet 3
    Legend
    Install the Setting Fixture (IAE 1J12444 Setting fixture) and Connect it to the Rod Assemblies - Method 1

    Sheet 3

    Close

    Figure: Install the Setting Fixture (IAE 1J12513) and Connect it to the Rod Assemblies - Method 2

    Sheet 1
    Legend
    Install the Setting Fixture (IAE 1J12513 Setting fixture) and Connect it to the Rod Assemblies - Method 2

    Sheet 1

    Close

    Figure: Install the Setting Fixture (IAE 1J12513) and Connect it to the Rod Assemblies - Method 2

    Sheet 2
    Legend
    Install the Setting Fixture (IAE 1J12513 Setting fixture) and Connect it to the Rod Assemblies - Method 2

    Sheet 2

    Close

    Figure: Install the Setting Fixture (IAE 1J12513) and Connect it to the Rod Assemblies - Method 2

    Sheet 3

    Legend
    Install the Setting Fixture (IAE 1J12513 Setting fixture) and Connect it to the Rod Assemblies - Method 2

    Sheet 3

    Close

    Figure: Install the Dummy Ring

    Install the Dummy Ring
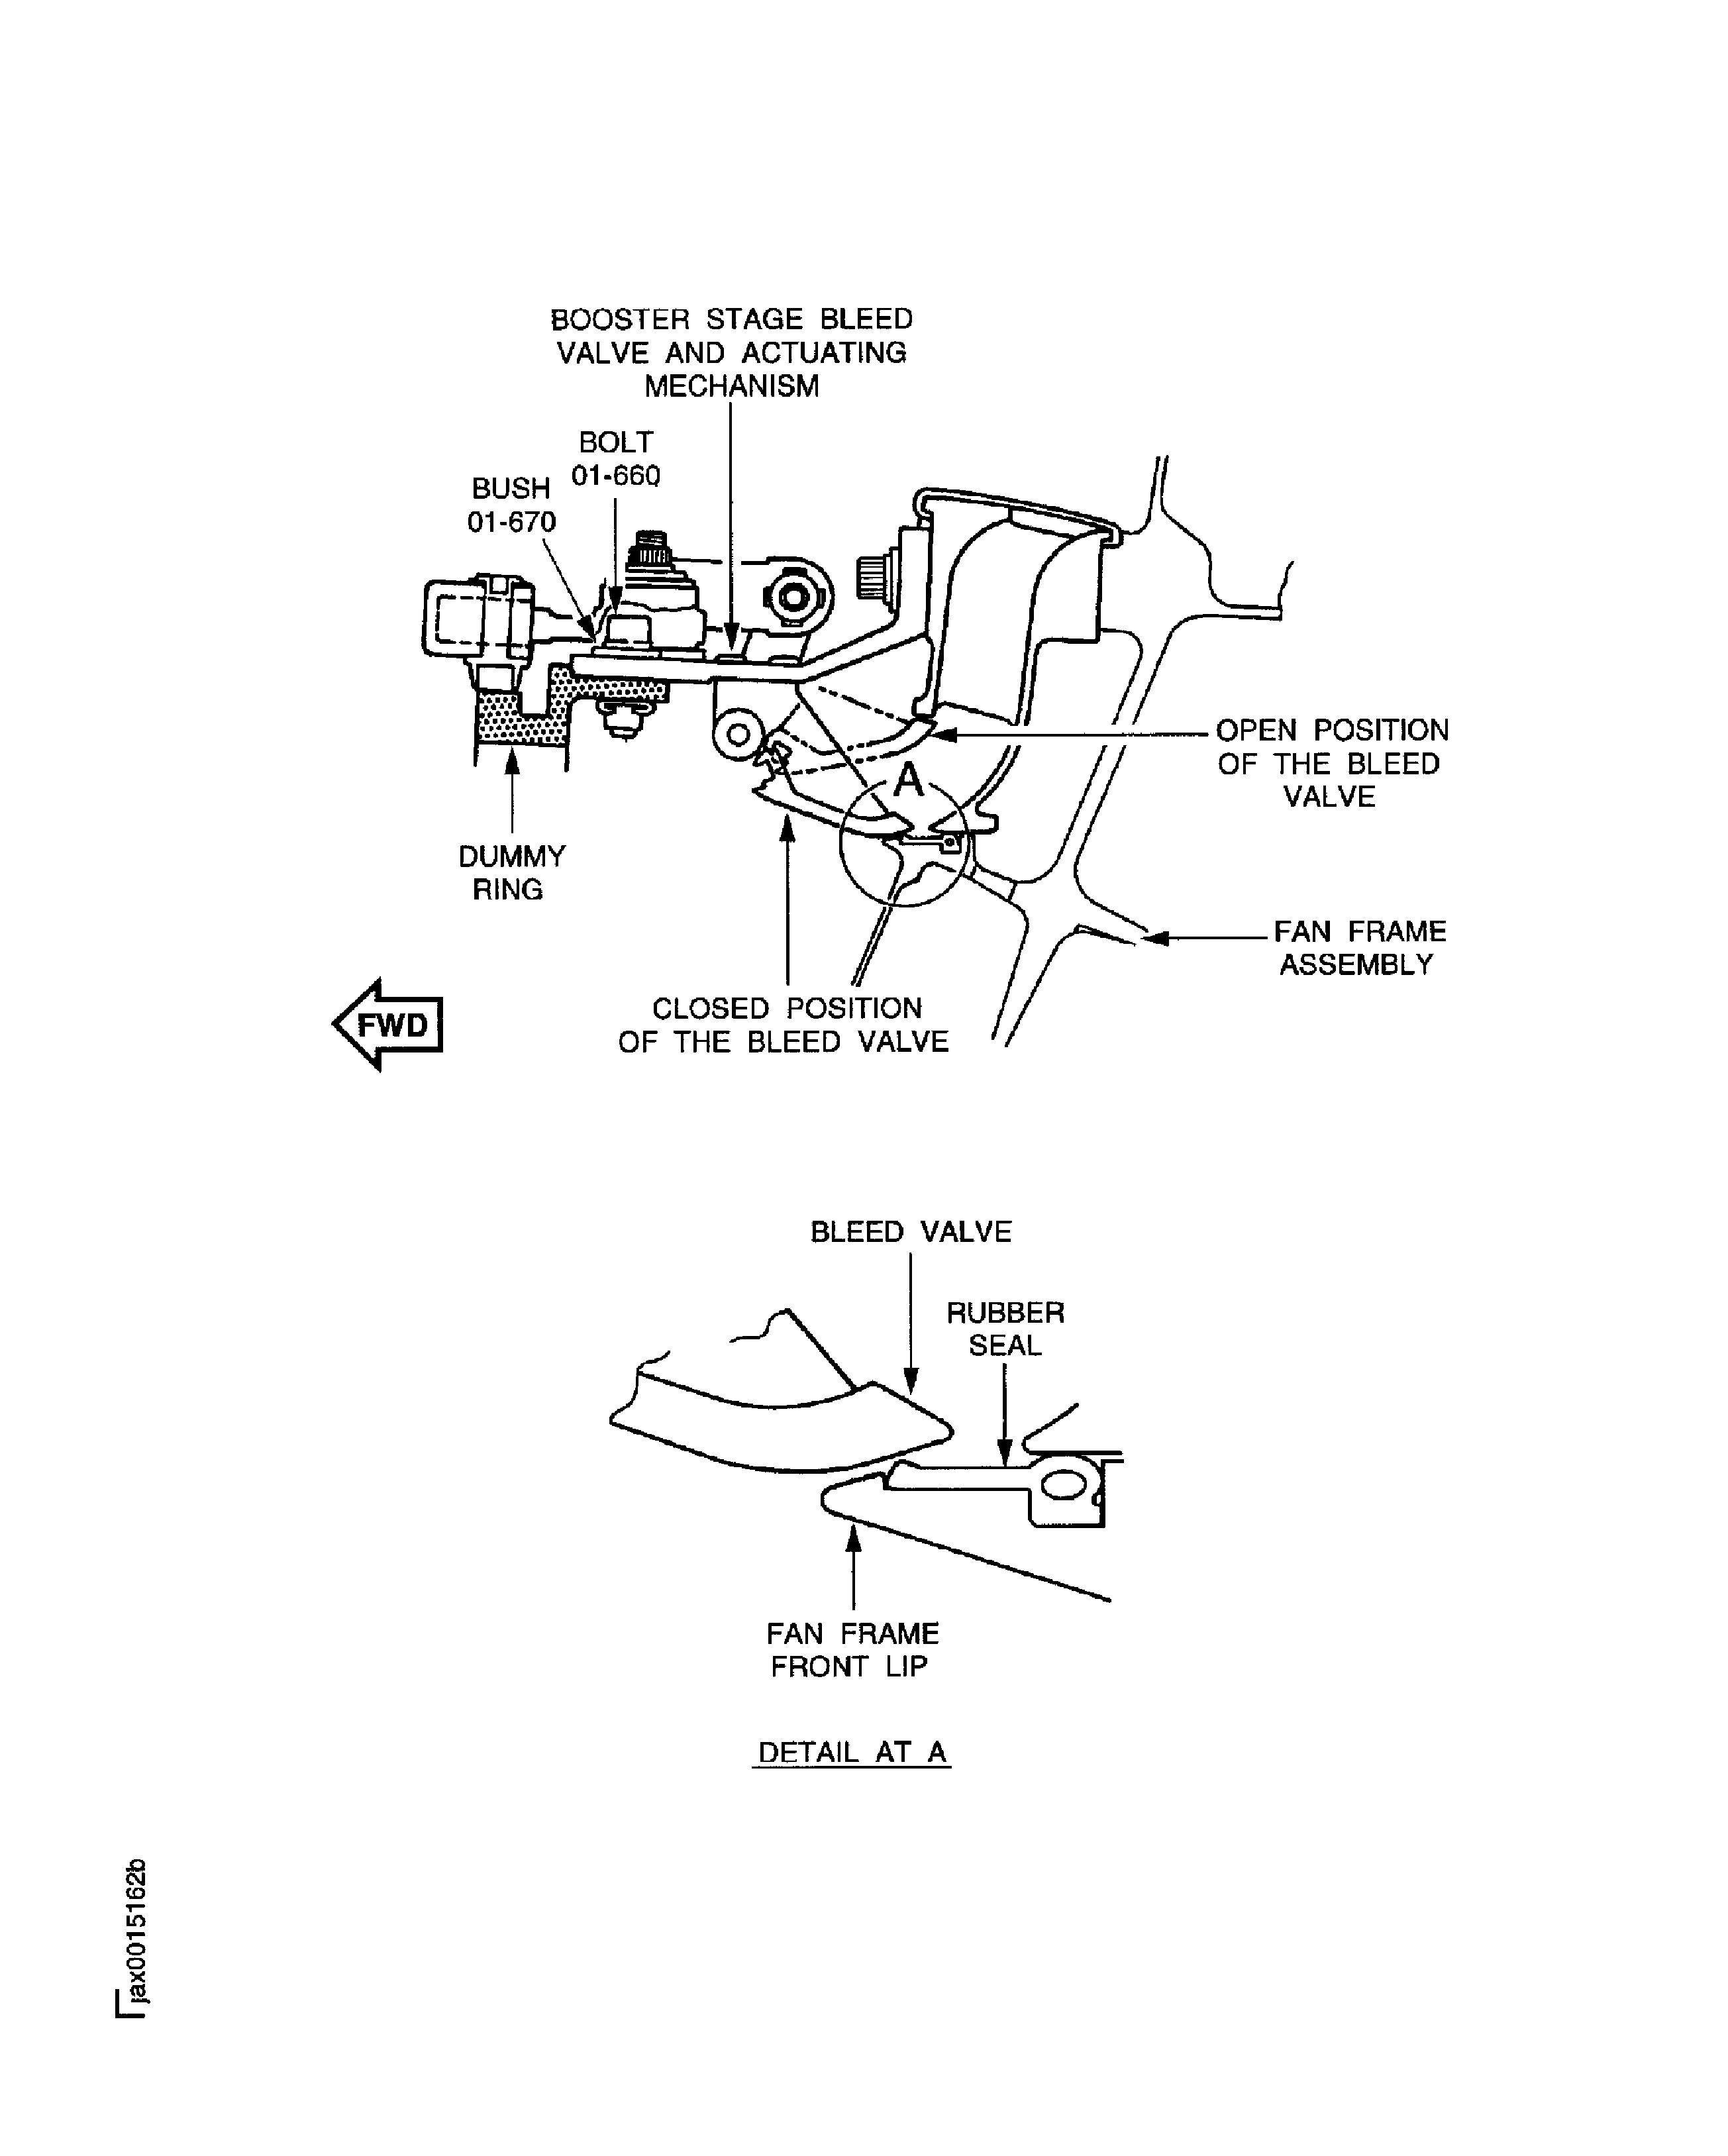
    Figure: Torque Value Record Sheet

    Torque Value Record Sheet
Requirements After Job Completion

Follow-On Conditions

NONE
Change Type:

Updated procedure, fits and clearances tables to standard format. (Editorial)

Link not Found
Manufacturer Code:0AM53
Enterprise Name:IAE INTERNATIONAL AERO ENGINES AG
BU Name:NULL
Building:SUITE 400
Street:628 HEBRON AVENUE
City:GLASTONBURY
State:CT
Zip Code:06033
Country:USA
Manufacturer Code:LOCAL
Enterprise Name:LOCALLY SUPPLIED
Link not Found
Manufacturer Code:LOCAL
Supply Number:CoMat 01-124
Type:sp01
Supply Short Name:CoMat 01-124 ISOPROPYL ALCOHOL
Supply Name:CoMat 01-124 ISOPROPYL ALCOHOL
Specification Groups:
Doc NumberType
OMAT:1/40GPR TECHNICAL GRADE
PMC 9094GPR TECHNICAL GRADE
JCR-011GPR TECHNICAL GRADE
Suppliers:
ManufacturerRemarks
LOCAL
U1185
24853
K6835
Manufacturer Code:LOCAL
Supply Number:CoMat 04-004
Type:sp01
Supply Short Name:CoMat 04-004 JOINTING COMPOUND, LIGHT GRADE
Supply Name:CoMat 04-004 JOINTING COMPOUND, LIGHT GRADE
Specification Groups:
Doc NumberType
OMAT: 4/46 (REF RR)HYLOMAR AEROGRADE (PL32), LIGHT GRADE
JCR-025 (JAEC REF)HYLOMAR AEROGRADE (PL32), LIGHT GRADE
MSRR 9055 (RR REF)HYLOMAR AEROGRADE (PL32), LIGHT GRADE
Suppliers:
ManufacturerRemarks
LOCAL
460Y4
CJ731
K3237
Manufacturer Code:K6835
Supply Number:CoMat 10-038
Type:sp01
Supply Short Name:CoMat 10-038 PETROLEUM JELLY
Supply Name:CoMat 10-038 PETROLEUM JELLY
Specification Groups:
Doc NumberType
SILKOLENE 775 CERTIFIED TO DEF STAN 91-38 GRADE PX-7 OR TO NATO S-743
Suppliers:
ManufacturerRemarks
K6835
U1757
Manufacturer Code:X333X
Supply Number:CoMat 10-077
Type:sp01
Supply Short Name:CoMat 10-077 APPROVED ENGINE OILS
Supply Name:CoMat 10-077 APPROVED ENGINE OILS
Specification Groups:
Doc NumberType
For V2500-A1/A5/D5 models - Refer to V2500 Service Bulletin ENG-79-0108
For V2500-E5 model - Refer to Service Bulletin E5-79-0001
Suppliers:
ManufacturerRemarks
X333X
Manufacturer Code:0AM53
Tool Number:IAE 1J12209
Tool Name:IAE 1J12209 Installation holder
Manufacturer Code:0AM53
Tool Number:IAE 1J12314
Tool Name:IAE 1J12314 Dummy ring
Manufacturer Code:0AM53
Tool Number:IAE 1J12444
Tool Name:IAE 1J12444 Setting fixture
Manufacturer Code:0AM53
Tool Number:IAE 1J12513
Tool Name:IAE 1J12513 Setting fixture