Export Control
EAR Export Classification: Not subject to the EAR per 15 C.F.R. Chapter 1, Part 734.3(b)(3), except for the following Service Bulletins which are currently published as EAR Export Classification 9E991: SBE70-0992, SBE72-0483, SBE72-0580, SBE72-0588, SBE72-0640, SBE73-0209, SBE80-0024 and SBE80-0025.Copyright
© IAE International Aero Engines AG (2001, 2014 - 2021) The information contained in this document is the property of © IAE International Aero Engines AG and may not be copied or used for any purpose other than that for which it is supplied without the express written authority of © IAE International Aero Engines AG. (This does not preclude use by engine and aircraft operators for normal instructional, maintenance or overhaul purposes.).Applicability
V2500-A1
Common Information
TASK 72-41-00-440-003-A00 HPC Assembly - Replace The HPC Stage 3, 4, 5 And 6 Blades - (HPC Surgical Strike Procedure), Special Procedure-003
General
This TASK gives the procedure to replace the HP compressor stage 4, 5 and 6 blades as part of the Surgical Strike workscope for -A1 series engines.
This TASK details the replacement of rotor blades by matching the residual out of balance of the replacement blades with that of the existing blades.
Fig/item numbers in parentheses in the procedure agree with those used in the IPC. Only the primary Fig/item numbers are used. For the service bulletin alpha variants refer to the IPC.
For all parts identified in a different Chapter/Section/Subject, the applicable Chapter/Section/Subject comes before the Fig/item numbers.
Overhaul processes referred to in the procedure by the TASK/SUBTASK number are in SPM.
For standard torque data and procedure refer to SPM TASK 70-41-00-400-501, SPM TASK 70-41-01-400-501 and SPM TASK 70-41-02-400-501.
Special torque data is identified with the symbol * after the torque value.
Special assembly tolerances are included in this procedure.
Lubricate all threads and mating faces of nuts and bolts with CoMat 10-077 APPROVED ENGINE OILS, unless other lubricants are referred to in the procedure.
All the curvic teeth and mating faces must be cleaned with CoMat 01-001 SOLVENT, DELETED or CoMat 01-002 SOLVENT, DELETED. before assembly. Refer to SPM TASK 70-11-01-300-503. They must also be dry assembled unless told differently in the procedure.
All of the temporary marks made in this procedure must be removed after completion of this task.
The minimum necessary equipment and requirements.
The recommended method of achieving acceptable rotor blade tip grinding using a dummy HPC rotor.
The normal overhaul Engine Manual limits apply to the tip grinding dimensions. It is necessary to make an inspection record of the final assembly tip dimensions and clearances achieved during this procedure.
Replacement blades can be tip ground in the dummy rotor before the pattern of unbalance procedure is done for the blade stage needing replacement.
The recommended type weighing machine for blade weight measurement.
The weighing machine used in this procedure must be capable of a minimum weighing accuracy of between 0.0018 oz to 0.0053 oz (0.05 g to 0.15 g).
The recommended method to balance pattern a set of rotor blades.
The blade distribution computer program VX45 or alternative program IAE 1R19842 Blade distribution computer program X45 must be used. The program will be able to match (within a tolerance) the residual out of balance left by the removal of an existing blade set with the new set.
The program will also account for fixed blade positions, such as, the locking blades and the segments between the locking blades. An example of this is seen during the platform gap setting of the stage 6 blades.
NOTE
NOTE
NOTE
Refer to TASK 72-41-00-040-000 (DISASSEMBLY-000, Pageblock-501) for the other related Surgical Strike TASKS and engine series.
Refer to TASK 72-41-00-440-000 (ASSEMBLY-000, Pageblock-1001) for the other related Surgical Strike TASKS and engine series.
NOTE
Preliminary Requirements
Pre-Conditions
NONESupport Equipment
| Name | Manufacturer | Part Number / Identification | Quantity | Remark |
|---|---|---|---|---|
| Dummy stage | LOCAL | 3 to 8 HP compressor | ||
| Dummy retaining plates | LOCAL | stages 3, 4 and 5 | ||
| Dummy lock plates | LOCAL | stages 3, 4 and 5 | ||
| Dummy set, nut and screw lock assembly | LOCAL | stage 6 (jacking screw and locknut assembly) | ||
| Moment weighing machine | LOCAL | with V2500 stage 3 blade moment weight fixtures | ||
| Weighing machine | LOCAL | |||
| WM00 (80MM INTERFACE) | LOCAL | SCHENCK WM0 | (80MM INTERFACE) | |
| WM00 (80MM INTERFACE) | LOCAL | SCHENCK WM0 | (100MM INTERFACE) and REUTLINGER THB3 (100 mm) interface | |
| IAE 1R18069 Rear anvil | 0AM53 | IAE 1R18069 | 1 | |
| IAE 1R18070 Front anvil | 0AM53 | IAE 1R18070 | 1 | |
| IAE 1R18071 Rear anvil | 0AM53 | IAE 1R18071 | 1 | |
| IAE 1R18072 Front anvil | 0AM53 | IAE 1R18072 | 1 | |
| IAE 1R18073 Rear anvil | 0AM53 | IAE 1R18073 | 1 | |
| IAE 1R18074 Front anvil | 0AM53 | IAE 1R18074 | 1 | |
| IAE 1R18076 Slave lock plates | 0AM53 | IAE 1R18076 | 1 | |
| IAE 1R18079 Drift | 0AM53 | IAE 1R18079 | ||
| IAE 1R18080 Drift | 0AM53 | IAE 1R18080 | 1 | |
| IAE 1R18082 Pliers | 0AM53 | IAE 1R18082 | 1 | |
| IAE 1R18083 Hydraulic tool | 0AM53 | IAE 1R18083 | 1 | |
| IAE 1R18084 Pliers | 0AM53 | IAE 1R18084 | 1 | |
| IAE 1R18097 Drift | 0AM53 | IAE 1R18097 | 1 | |
| IAE 1R18245 Adapter | 0AM53 | IAE 1R18245 | 1 | |
| IAE 1R18590 Socket end | 0AM53 | IAE 1R18590 | 1 | |
| IAE 1R18683 Caliper adapter | 0AM53 | IAE 1R18683 | 1 | |
| IAE 1R18911 Drill | 0AM53 | IAE 1R18911 | 1 | |
| IAE 1R18914 Setting gage | 0AM53 | IAE 1R18914 | 1 | |
| IAE 1R19767 Fixture | 0AM53 | IAE 1R19767 | 1 | |
| IAE 1R19768 20mm Spacer | 0AM53 | IAE 1R19768 | 1 | |
| IAE 1R19811 Filing fixture | 0AM53 | IAE 1R19811 | 1 | |
| IAE 1R19812 Filing fixture | 0AM53 | IAE 1R19812 | ||
| IAE 1R19813 Filing fixture | 0AM53 | IAE 1R19813 | ||
| IAE 1R19842 Blade distribution computer program X45 | 0AM53 | IAE 1R19842 |
Consumables, Materials and Expendables
| Name | Manufacturer | Part Number / Identification | Quantity | Remark |
|---|---|---|---|---|
| CoMat 01-001 SOLVENT, DELETED | X111X | CoMat 01-001 | ||
| CoMat 01-002 SOLVENT, DELETED. | X111X | CoMat 01-002 | ||
| CoMat 02-121 TEMPORARY MARKER PENCIL/CRAYON | IE304 | CoMat 02-121 | ||
| CoMat 02-122 TEMPORARY MARKER PENCIL/CRAYON | K6835 | CoMat 02-122 | ||
| CoMat 03-398 METAL SPRAYING STOPPING-OFFCOMPOUND | LOCAL | CoMat 03-398 | ||
| CoMat 07-075 HIGH-HEAT RESISTING STOVING ENAMEL | k3504 | CoMat 07-075 | ||
| CoMat 10-070 ANTI-SEIZE COMPOUND | LOCAL | CoMat 10-070 | ||
| CoMat 10-077 APPROVED ENGINE OILS | X333X | CoMat 10-077 |
Spares
| Name | Manufacturer | Part Number / Identification | Quantity | Remark |
|---|---|---|---|---|
| PLATE - LOCKING | 0AM53 | 6A1029 | 9 | (stage 3) |
| PLATE - LOCKING | 0AM53 | 6A1034 | 3 | (stage 4) |
| PLATE - LOCKING | 0AM53 | 6A1039 | 3 | (stage 5) |
Safety Requirements
NONEProcedure
NOTE
Start from this No. 1 blade slot and number the blades in a clockwise direction when you look from the rear.It is recommended that the same direction is used throughout all procedures.Use CoMat 02-121 TEMPORARY MARKER PENCIL/CRAYON or CoMat 02-122 TEMPORARY MARKER PENCIL/CRAYON to temporarily mark the stage 3 disk rim and adjacent blade. Use this correlation mark as a start point and mark each of the stage 3 blades with a number from 1 to 31.
Correlate the stage 3 blades.
With IAE 1R18079 Drift 1 off move the retaining plates around the disk to close up the space between them. This will give sufficient space to remove one blade, forwards, from the disk.
Remove the blades from the stage 3 disk.
SUBTASK 72-41-00-040-208 Remove the Stage 3 HP Compressor Blades
Refer to TASK 72-41-15-200-000.
Inspect the removed stage 3 retaining plates.
SUBTASK 72-41-00-220-199 Inspect the Stage 3 Blade Retaining Plates
Moment weigh the stage 3 compressor blades ENGINE-HP COMPRESSOR BLADES (72-41-15,01-200).
Weigh each of the particular retaining plate(s) to the nearest 0.0035 oz (0.100 g). Refer to TASK 72-41-10-440-003-B00, SUBTASK 72-41-10-440-160.
NOTE
You only need to match weigh the retaining plate(s) if it requires replacement.Weigh the stage 3 retaining plate(s).
SUBTASK 72-41-00-440-227 Moment Weigh the Removed Stage 3 Blades and Weigh the Retaining Plate(s)
Refer to Figure.
Put the resulting pattern of the stage 3 moment weights in to the blade distribution program VX45 or alternative method IAE 1R19842 Blade distribution computer program X45. The resultant residual unbalance will be a measurement in gmm at an angle from the correlation datum point.

CAUTION
MAKE SURE YOU USE THE CORRECT METHOD TO DETERMINE THE RESIDUAL UNBALANCE AND PREVENT DAMAGE TO ENGINE COMPONENTS. IT IS VERY IMPORTANT TO KNOW THAT THE BLADE SETS VECTOR IS IN THE OPPOSITE SENSE TO THE RESIDUAL UNBALANCE IN THE HP COMPRESSOR ROTOR.Record the residual unbalance, vector B. You must try to match the new set of blades with this target vector figure, refer to Step.
Determine the residual unbalance, distance A.
SUBTASK 72-41-00-440-221 Determine the Residual Unbalance of the Stage 3 Blades
Install one of the plates ENGINE-HP COMPRESSOR BLADES (72-41-15,01-050) into the two grooves.
Use IAE 1R18079 Drift 1 off to move the retaining plate around the disk in to the next blade groove.
NOTE
Install dummy retaining plates into the grooves of the disk and blades.It is not necessary to apply high heat resisting enamel to the mating surfaces of the plates during this part of the procedure.Install the stage 3 retaining plates.
Install the slave lockplates in position between the retaining plates at equal distances around the disk. Refer to Figure for an example of the slave lockplates positions.
Install (IAE 1R18076 Slave lock plates) slave lockplates9 off in to the grooves of the blades and the disk.
SUBTASK 72-41-00-440-222 Install the Replacement Stage 3 Blades in the Dummy Rotor
Use a brush to apply CoMat 03-398 METAL SPRAYING STOPPING-OFFCOMPOUND to protect the stage 3 rotor airfoils. Apply the material to approximately two thirds of the blade airfoil length when measured from the blade tips.
NOTE
The de-mineralized water must have a conductivity of 20 micro siemens.Use de-mineralized water and a cloth or brush to remove CoMat 03-398 METAL SPRAYING STOPPING-OFFCOMPOUND from the blade airfoils.
Remove the temporary surface protection from the rotor blade airfoils.
Remove the stage 3 blades from the dummy rotor, refer to the procedure in Step.
Use CoMat 02-121 TEMPORARY MARKER PENCIL/CRAYON or CoMat 02-122 TEMPORARY MARKER PENCIL/CRAYON to identify the blades.
Make sure that the new blades are marked with their positions 1 to 31 in the disk.
SUBTASK 72-41-00-040-209 Grind the Tips of the Replacement Stage 3 Blades
NOTE
This will allow the program to produce an acceptable pattern satisfactorily.Use CoMat 02-121 TEMPORARY MARKER PENCIL/CRAYON or CoMat 02-122 TEMPORARY MARKER PENCIL/CRAYON to identify the blades in an initial light-heavy-light sequence ready for assembly. Refer to Figure for an example of a light-heavy-light sequence.
Weigh and record the moment weight of each blade in its sequence in the stage.
SUBTASK 72-41-00-440-223 Weigh the Removed Stage 3 Blades
Refer to Figure.
Record the results of the initial sequence from Step in the blade distribution program VX45 or alternative method IAE 1R19842 Blade distribution computer program X45 to calculate vector C.
Record the results of vector B in the blade distribution program VX45 or alternative method IAE 1R19842 Blade distribution computer program X45, refer to Step.
Record the results.
Use CoMat 02-121 TEMPORARY MARKER PENCIL/CRAYON or CoMat 02-122 TEMPORARY MARKER PENCIL/CRAYON to identify the blades in the new sequence determined in step C.
Correlate the stage 3 blades.
SUBTASK 72-41-00-440-224 Do a Balance Patternation for the Replacement Stage 3 Blades
Apply CoMat 07-075 HIGH-HEAT RESISTING STOVING ENAMEL to the mating surfaces of the retaining plates.
Install one of the plates into the two grooves.
NOTE
You must ensure that if Repair, VRS6630 TASK 72-41-11-300-023 (REPAIR-023) has been carried out, the retaining plate is fitted centrally over any area(s) of material removed.Use IAE 1R18079 Drift 9 drift 1 off to move the retaining plate around the disc into the next blade groove.
Install the stage 3 retaining plates using previously correlated sequence.
Refer to Zone A Figure.
Examine the Clapper Abutment Faces.
NOTE
If the last lockplate overlaps a retaining plate go to Step.Install the nine stage 3 lockplates in position between the retaining plates. Use IAE 1R18079 Drift to move the lockplates and retaining plates around the disc until they touch. The lock plates must line up with a blade root. Measure the total clearance (dimension X) between a lockplate and a retaining plate.
Install a lockplate into IAE 1R19811 Filing fixture 1 off and use a file to remove metal. The minimum permitted width (dimension Y) of the stage 3 lockplate after filing is 0.315 in. (8.00 mm).
NOTE
Remove metal from the minimum number of lockplates.Remove metal from the edge opposite the extraction slot.
If it is necessary to remove metal from a lockplate to get the correct plate clearance do the steps that follow:
Apply CoMat 07-075 HIGH-HEAT RESISTING STOVING ENAMEL to the mating surfaces of the disc and the lockplates.
NOTE
The lockplates must be in line with a blade root.You must ensure that if Repair, VRS6630 TASK 72-41-11-300-023 (REPAIR-023) has been carried out, the lockplate is fitted centrally over any area(s) of material removed.Install the lockplates in position.
Install (440-114) stage 3 lockplates 9 off into the grooves of the blades and the disc.

CAUTION
YOU MUST USE THE CORRECT ANVILS AND PLIERS FOR EACH STAGE WHEN LOCKING THE LOCKPLATES.
CAUTION
LOCKPLATES THAT ARE DAMAGED IN ANY WAY DURING INSTALLATION, FOR EXAMPLE: OVER BENT, TWISTED OR NICKED SHOULD BE REPLACED WITH NEW PARTS. CORRECT ENGAGEMENT OF THE LOCKPLATES IS ESSENTIAL.Install IAE 1R18074 Front anvil 1 off and IAE 1R18073 Rear anvil 1 off into IAE 1R18084 Pliers 1 off.
Lock the stage 3 lockplates in position.
SUBTASK 72-41-00-440-225 Install the Replacement Stage 3 Blades in the HP Compressor Rotor
NOTE
Start from this No. 1 blade slot and number the blades in a clockwise direction when you look from the rear.It is recommended that the same direction is used throughout all procedures.Use CoMat 02-121 TEMPORARY MARKER PENCIL/CRAYON or CoMat 02-122 TEMPORARY MARKER PENCIL/CRAYON to temporarily mark the stage 4 disk rim and adjacent blade. Use this correlation mark as a start point and mark each of the stage 4 blades with a number from 1 to 38.
Correlate the stage 4 blades.
With IAE 1R18080 Drift 1 off move the retaining plates around the disk to close up the space between them. This will give sufficient space to remove one blade, forwards, from the disk.
Remove the blades from the stage 4 disk.
SUBTASK 72-41-00-040-182 Remove the Stage 4 HP Compressor Blades
Refer to TASK 72-41-15-200-000.
If it is necessary to discard a stage 4 retaining plate then the replacement plate must be matched weighed and correlated with the unsatisfactory plate. Refer to Step.
Inspect the removed stage 4 retaining plates ENGINE-HP COMPRESSOR BLADES (72-41-15,01-350).
SUBTASK 72-41-00-220-189 Inspect the Stage 4 Blade Retaining Plates
Weigh the stage 4 compressor blades ENGINE-HP COMPRESSOR BLADES (72-41-15, 01-500).
NOTE
You only need to match weigh the retaining plate(s) if it requires replacement.Weigh the stage 4 retaining plate(s) ENGINE-HP COMPRESSOR BLADES (72-41-15, 01-350).
SUBTASK 72-41-00-440-176 Weigh the Removed Stage 4 Blades and Retaining Plates
Refer to Figure.
Put the resulting pattern of the stage 4 mass weights in to the blade distribution program VX45 or alternative method IAE 1R19842 Blade distribution computer program X45. The resultant residual unbalance will be a measurement in grams at an angle from the correlation datum point.

CAUTION
MAKE SURE YOU USE THE CORRECT METHOD TO DETERMINE THE RESIDUAL UNBALANCE AND PREVENT DAMAGE TO ENGINE COMPONENTS. IT IS VERY IMPORTANT TO KNOW THAT THE BLADE SETS VECTOR IS IN THE OPPOSITE SENSE TO THE RESIDUAL UNBALANCE IN THE HP COMPRESSOR ROTOR.Record the residual unbalance, vector B. You must try to match the new set of blades with this target vector figure, refer to Step.
Determine the residual unbalance, distance A.
SUBTASK 72-41-00-440-177 Determine the Residual Unbalance of the Stage 4 Blades
Install one of the plates into the two grooves.
NOTE
You must ensure that if Repair, VRS6630 TASK 72-41-11-300-023 (REPAIR-023) has been carried out, the retaining plate is fitted centrally over any area(s) of material removed.Use IAE 1R18080 Drift 1 off to move the retaining plate around the disk in to the next blade groove.
NOTE
It is recommended that a dummy set of retaining plates and lockplates are used for this part of the procedure and that these parts are not re-used during subsequent compressor build operations.It is not necessary to apply high heat resisting enamel to the mating surfaces of the plates during this part of the procedure.Install the stage 4 retaining plates.
NOTE
If the last lockplate overlaps a retaining plate go to Step.Install the three stage 4 lockplates in position between the retaining plates. Use IAE 1R18080 Drift to move the lockplates and retaining plates around the disk until they touch. Measure the total clearance (dimension X) between a lockplate and a retaining plate, refer to Figure.
Install a lockplate in to IAE 1R19812 Filing fixture filing fixture 1 off and use a file to remove metal. The minimum permitted width (dimension Y) of the stage 4 lockplate after filing is 0.402 in. (10.20 mm).
NOTE
Remove metal from the minimum number of lockplates.Remove metal from the edge opposite the extraction slot.
If it is necessary to remove metal from a lockplate to get the correct plate clearance do the steps that follow:
NOTE
The lockplates must be in line with a blade root.You must ensure that if Repair, VRS6630 TASK 72-41-11-300-023 (REPAIR-023) has been carried out, the lockplate is fitted centrally over any area(s) of material removed.Install the lockplates in position.
Install ENGINE-HP COMPRESSOR BLADES (72-41-15, 01-425) stage 4 lockplates 3 off in to the grooves of the blades and the disk.

CAUTION
YOU MUST USE THE CORRECT ANVILS AND PLIERS FOR EACH STAGE WHEN LOCKING THE LOCKPLATES.
CAUTION
LOCKPLATES THAT ARE DAMAGED IN ANY WAY DURING INSTALLATION, FOR EXAMPLE: OVER BENT, TWISTED OR NICKED SHOULD BE REPLACED WITH NEW PARTS. CORRECT ENGAGEMENT OF THE LOCKPLATES IS ESSENTIAL.Install IAE 1R18072 Front anvil 1 off and IAE 1R18071 Rear anvil 1 off in to IAE 1R18084 Pliers 1 off.
Lock the stage 4 lockplates in position.
SUBTASK 72-41-00-440-178 Install the Replacement Stage 4 Blades in the Dummy Rotor
Use a brush to apply CoMat 03-398 METAL SPRAYING STOPPING-OFFCOMPOUND to protect the stage 4 rotor airfoils. Apply the material to approximately two thirds of the blade airfoil length when measured from the blade tips.
SBE 72-0370 : Grind the tips of the replacement stage 4 blades installed in the dummy HP compressor rotor using the procedures given in TASK 72-41-10-440-004-A00.
NOTE
The de-mineralized water must have a conductivity of 20 micro siemens.Use de-mineralized water and a cloth or brush to remove CoMat 03-398 METAL SPRAYING STOPPING-OFFCOMPOUND from the blade airfoils.
Remove the temporary surface protection from the rotor blade airfoils.
Remove the stage 4 blades from the dummy rotor, refer to the procedure in Step.
Use CoMat 02-121 TEMPORARY MARKER PENCIL/CRAYON or CoMat 02-122 TEMPORARY MARKER PENCIL/CRAYON to identify the blades.
Make sure that the new blades are marked with their positions 1 to 38 in the disk.
SUBTASK 72-41-00-324-003 Grind the Tips of the Replacement Stage 4 Blades (SBE 72-0370)
SBE 72-0370: HP compressor blades - introduction of increased stage 4 rotor blade tip clearance
NOTE
This will allow the program to produce an acceptable pattern satisfactorily.Use CoMat 02-121 TEMPORARY MARKER PENCIL/CRAYON or CoMat 02-122 TEMPORARY MARKER PENCIL/CRAYON to identify the blades in an initial light-heavy-light sequence ready for assembly. Refer to Figure for an example of a light-heavy-light sequence.
Weigh and record the mass of each blade in its sequence in the stage. Refer to Step.
SUBTASK 72-41-00-440-179 Weigh the Removed Stage 4 Blades
Refer to Figure.
Record the results of the initial sequence from Step in the blade distribution program VX45 or alternative method IAE 1R19842 Blade distribution computer program X45 to calculate vector C.
Record the results of vector B in the blade distribution program VX45 or alternative method IAE 1R19842 Blade distribution computer program X45, refer to Step.
Record the results.
Use CoMat 02-121 TEMPORARY MARKER PENCIL/CRAYON or CoMat 02-122 TEMPORARY MARKER PENCIL/CRAYON to identify the blades in the new sequence determined in step C.
Correlate the stage 4 blades.
SUBTASK 72-41-00-440-180 Do a Balance Patternation for the Replacement Stage 4 Blades
Apply CoMat 07-075 HIGH-HEAT RESISTING STOVING ENAMEL to the mating surfaces of the retaining plates.
Install one of the plates into the two grooves.
NOTE
You must ensure that if Repair, VRS6630 TASK 72-41-11-300-023 (REPAIR-023) has been carried out, the retaining plate is fitted centrally over any area(s) of material removed.Use IAE 1R18080 Drift 1 off to move the retaining plate around the disk in to the next blade groove.
Install the stage 4 retaining plates.
NOTE
If the last lockplate overlaps a retaining plate go to Step.Install the three stage 4 lockplates in position between the retaining plates. Use IAE 1R18080 Drift to move the lockplates and retaining plates around the disk until they touch. Measure the total clearance (dimension X) between a lockplate and a retaining plate, refer to Figure.
Install a lockplate in to IAE 1R19812 Filing fixture 1 off and use a file to remove metal. The minimum permitted width (dimension Y) of the stage 4 lockplate after filing is 0.402 in. (10.20 mm).
NOTE
Remove metal from the minimum number of lockplates.Remove metal from the edge opposite the extraction slot.
If it is necessary to remove metal from a lockplate to get the correct plate clearance do the steps that follow:
Apply CoMat 07-075 HIGH-HEAT RESISTING STOVING ENAMEL to the mating surfaces of the disk and the lockplates.
NOTE
The lockplates must be in line with a blade root.You must ensure that if Repair, VRS6630 TASK 72-41-11-300-023 (REPAIR-023) has been carried out, the lockplate is fitted centrally over any area(s) of material removed.Install the lockplates in position.
Install ENGINE-HP COMPRESSOR BLADES (72-41-15, 01-425) stage 4 lockplates 3 off in to the grooves of the blades and the disk.

CAUTION
YOU MUST USE THE CORRECT ANVILS AND PLIERS FOR EACH STAGE WHEN LOCKING THE LOCKPLATES.
CAUTION
LOCKPLATES THAT ARE DAMAGED IN ANY WAY DURING INSTALLATION, FOR EXAMPLE: OVER BENT, TWISTED OR NICKED SHOULD BE REPLACED WITH NEW PARTS. CORRECT ENGAGEMENT OF THE LOCKPLATES IS ESSENTIAL.Install IAE 1R18072 Front anvil 1 off and IAE 1R18071 Rear anvil 1 off in to IAE 1R18084 Pliers 1 off.
Lock the stage 4 lockplates in position.
SUBTASK 72-41-00-440-181 Install the Replacement Stage 4 Blades in the HP Compressor Rotor
NOTE
Start from this No. 1 blade slot and number the blades in a clockwise direction when you look from the rear.It is recommended that the same direction is used throughout all procedures.Use CoMat 02-121 TEMPORARY MARKER PENCIL/CRAYON or CoMat 02-122 TEMPORARY MARKER PENCIL/CRAYON to temporarily mark the stage 5 disk rim and adjacent blade. Use this correlation mark as a start point and mark each of the stage 5 blades with a number from 1 to 64.
Correlate the stage 5 blades.
With IAE 1R18080 Drift 1 off move the retaining plates around the disk to close up the space between them. This will give sufficient space to remove one blade, forwards, from the disk.
Remove the blades from the stage 5 disk.
SUBTASK 72-41-00-040-183 Remove the Stage 5 HP Compressor Blades
Refer to TASK 72-41-15-200-000.
If it is necessary to discard a stage 5 retaining plate then the replacement plate must be matched weighed and correlated with the unsatisfactory plate. Refer to Step.
Inspect the removed stage 5 retaining plates ENGINE-HP COMPRESSOR BLADES (72-41-15,01-650).
SUBTASK 72-41-00-220-190 Inspect the Stage 5 Blade Retaining Plates
Weigh the stage 5 compressor blades ENGINE-HP COMPRESSOR BLADES (72-41-15, 01-800).
NOTE
You only need to match weigh the retaining plate(s) if it requires replacement.Weigh the stage 5 retaining plate(s) ENGINE-HP COMPRESSOR BLADES (72-41-15, 01-650).
SUBTASK 72-41-00-440-182 Weigh the Removed Stage 5 Blades and Retaining Plates
Refer to Figure.
Put the resulting pattern of the stage 5 mass weights in to the blade distribution program VX45 or alternative method IAE 1R19842 Blade distribution computer program X45. The resultant residual unbalance will be a measurement in grams at an angle from the correlation datum point.

CAUTION
MAKE SURE YOU USE THE CORRECT METHOD TO DETERMINE THE RESIDUAL UNBALANCE AND PREVENT DAMAGE TO ENGINE COMPONENTS. IT IS VERY IMPORTANT TO KNOW THAT THE BLADE SETS VECTOR IS IN THE OPPOSITE SENSE TO THE RESIDUAL UNBALANCE IN THE HP COMPRESSOR ROTOR.Record the residual unbalance, vector B. You must try to match the new set of blades with this target vector figure, refer to Step.
Determine the residual unbalance, distance A.
SUBTASK 72-41-00-440-183 Determine the Residual Unbalance of the Stage 5 Blades
Install one of the plates into the two grooves.
NOTE
You must ensure that if Repair, VRS6630 TASK 72-41-11-300-023 (REPAIR-023) has been carried out, the retaining plate is fitted centrally over any area(s) of material removed.Use IAE 1R18080 Drift 1 off to move the retaining plate around the disk in to the next blade groove.
NOTE
It is recommended that a dummy set of retaining plates and lockplates are used for this part of the procedure and that these parts are not re-used during subsequent compressor build operations.It is not necessary to apply high heat resisting enamel to the mating surfaces of the plates during this part of the procedure.Install the stage 5 retaining plates.
NOTE
If the last lockplate overlaps a retaining plate go to Step.Install the three stage 5 lockplates in position between the retaining plates. Use IAE 1R18080 Drift to move the lockplates and retaining plates around the disk until they touch. Measure the total clearance (dimension X) between a lockplate and a retaining plate, refer to Figure.
Install a lockplate in to IAE 1R19813 Filing fixture 1 off and use a file to remove metal. The minimum permitted width (dimension Y) of the stage 5 lockplate after filing is 0.297 in. (7.64 mm).
NOTE
Remove metal from the minimum number of lockplates.Remove metal from the edge opposite the extraction slot.
If it is necessary to remove metal from a lockplate to get the correct plate clearance do the steps that follow:
NOTE
The lockplates must be in line with a blade root.You must ensure that if Repair, VRS6630 TASK 72-41-11-300-023 (REPAIR-023) has been carried out, the lockplate is fitted centrally over any area(s) of material removed.Install the lockplates in position.
Install ENGINE-HP COMPRESSOR BLADES (72-41-15, 01-725) stage 5 lockplates3 off in to the grooves of the blades and the disk.

CAUTION
YOU MUST USE THE CORRECT ANVILS AND PLIERS FOR EACH STAGE WHEN LOCKING THE LOCKPLATES.
CAUTION
LOCKPLATES THAT ARE DAMAGED IN ANY WAY DURING INSTALLATION, FOR EXAMPLE: OVER BENT, TWISTED OR NICKED SHOULD BE REPLACED WITH NEW PARTS. CORRECT ENGAGEMENT OF THE LOCKPLATES IS ESSENTIAL.Install IAE 1R18070 Front anvil 1 off and IAE 1R18069 Rear anvil 1 off in to IAE 1R18082 Pliers 1 off.
Install IAE 1R18245 Adapter 1 off between the pressure control valve and IAE 1R18083 Hydraulic tool 1 off.
Lock the stage 5 lockplates in position.
SUBTASK 72-41-00-440-184 Install the Replacement Stage 5 Blades in the Dummy Rotor
Use a brush to apply CoMat 03-398 METAL SPRAYING STOPPING-OFFCOMPOUND to protect the stage 5 rotor airfoils. Apply the material to approximately two thirds of the blade airfoil length when measured from the blade tips.
Grind the tips of the replacement stage 5 blades installed in the dummy HP compressor rotor using the procedures given in TASK 72-41-10-440-004-A00.
NOTE
The de-mineralized water must have a conductivity of 20 micro siemens.Use de-mineralized water and a cloth or brush to remove CoMat 03-398 METAL SPRAYING STOPPING-OFFCOMPOUND from the blade airfoils.
Remove the temporary surface protection from the rotor blade airfoils.
Remove the stage 5 blades from the dummy rotor, refer to the procedure in Step.
Use CoMat 02-121 TEMPORARY MARKER PENCIL/CRAYON or CoMat 02-122 TEMPORARY MARKER PENCIL/CRAYON to identify the blades.
Make sure that the new blades are marked with their positions 1 to 64 in the disk.
SUBTASK 72-41-00-324-004 Grind the Tips of the Replacement Stage 5 Blades
NOTE
This will allow the program to produce an acceptable pattern satisfactorily.Use CoMat 02-121 TEMPORARY MARKER PENCIL/CRAYON or CoMat 02-122 TEMPORARY MARKER PENCIL/CRAYON to identify the blades in an initial light-heavy-light sequence ready for assembly. Refer to Figurefor an example of a light-heavy-light sequence.
Weigh and record the mass of each blade in its sequence in the stage. Refer to Step.
SUBTASK 72-41-00-440-185 Weigh the Removed Stage 5 Blades
Refer to Figure.
Record the results of the initial sequence from Step in the blade distribution program VX45 or alternative method IAE 1R19842 Blade distribution computer program X45 to calculate vector C.
Record the results of vector B in the blade distribution program VX45 or alternative method IAE 1R19842 Blade distribution computer program X45, refer to Step.
Record the results.
Use CoMat 02-121 TEMPORARY MARKER PENCIL/CRAYON temporary marker or CoMat 02-122 TEMPORARY MARKER PENCIL/CRAYON temporary marker to identify the blades in the new sequence determined in step C.
Correlate the stage 5 blades.
SUBTASK 72-41-00-440-186 Do a Balance Patternation for the Replacement Stage 5 Blades
Apply CoMat 07-075 HIGH-HEAT RESISTING STOVING ENAMEL to the mating surfaces of the retaining plates.
Install one of the plates into the two grooves.
NOTE
You must ensure that if Repair, VRS6630 TASK 72-41-11-300-023 (REPAIR-023) has been carried out, the retaining plate is fitted centrally over any area(s) of material removed.Use IAE 1R18080 Drift 1 off to move the retaining plate around the disk in to the next blade groove.
Install the stage 5 retaining plates.
NOTE
If the last lockplate overlaps a retaining plate go to Step.Install the three stage 5 lockplates in position between the retaining plates. Use IAE 1R18080 Drift to move the lockplates and retaining plates around the disk until they touch. Measure the total clearance (dimension X) between a lockplate and a retaining plate, refer to Figure.
Install a lockplate in to IAE 1R19813 Filing fixture 1 off and use a file to remove metal. The minimum permitted width (dimension Y) of the stage 5 lockplate after filing is 0.297 in. (7.64 mm).
NOTE
Remove metal from the minimum number of lockplates.Remove metal from the edge opposite the extraction slot.
If it is necessary to remove metal from a lockplate to get the correct plate clearance do the steps that follow:
Apply CoMat 07-075 HIGH-HEAT RESISTING STOVING ENAMEL to the mating surfaces of the disk and the lockplates.
NOTE
The lockplates must be in line with a blade root.You must ensure that if Repair, VRS6630 TASK 72-41-11-300-023 (REPAIR-023) has been carried out, the lockplate is fitted centrally over any area(s) of material removed.Install the lockplates in position.
Install ENGINE-HP COMPRESSOR BLADES (72-41-15, 01-725) stage 5 lockplates 3 off in to the grooves of the blades and the disk.

CAUTION
YOU MUST USE THE CORRECT ANVILS AND PLIERS FOR EACH STAGE WHEN LOCKING THE LOCKPLATES.
CAUTION
LOCKPLATES THAT ARE DAMAGED IN ANY WAY DURING INSTALLATION, FOR EXAMPLE: OVER BENT, TWISTED OR NICKED SHOULD BE REPLACED WITH NEW PARTS. CORRECT ENGAGEMENT OF THE LOCKPLATES IS ESSENTIAL.Install IAE 1R18070 Front anvil 1 off and IAE 1R18069 Rear anvil 1 off in to IAE 1R18082 Pliers 1 off.
Install IAE 1R18245 Adapter 1 off between the pressure control valve and IAE 1R18083 Hydraulic tool 1 off.
Lock the stage 5 lockplates in position.
SUBTASK 72-41-00-440-187 Install the Replacement Stage 5 Blades in the HP Compressor Rotor
NOTE
It is recommended that one of the locking blades is used as the correlation position as a start point for the No. 1 position.Start from this No. 1 blade slot and number the blades in a clockwise or counter-clockwise direction when you look from the rear. Keep the same direction for numbering the blades through this procedure.It is recommended that the same direction is used throughout all procedures.Use CoMat 02-121 TEMPORARY MARKER PENCIL/CRAYON or CoMat 02-122 TEMPORARY MARKER PENCIL/CRAYON to temporarily mark the stage 6 disk rim and adjacent blade. Use this correlation mark as a start point and mark each of the stage 6 blades with a number from 1 to 79.
Correlate the stage 6 blades.
SUBTASK 72-41-00-040-184 Correlate the Stage 6 HP Compressor Blades
With IAE 1R18590 Socket end 1 off release the two nut and screw lock assemblies.
With IAE 1R18097 Drift 1 off move the blades around the disk until a blade can be removed through the loading slot.
NOTE
To drill out seized blade locknuts use the following tools: IAE 1R18911 Drill 1 off and IAE 1R18914 Setting gage 1 off.Each nut and screw lock assembly must be kept as a set.Correlate the nut and screw lock assemblies to their removed positions.Remove the blades from the stage 6 disk.
SUBTASK 72-41-00-040-185 Remove the Stage 6 HP Compressor Blades
Refer to TASK 72-41-15-200-000.
If it is necessary to discard a stage 6 nut and screw lock assembly then the replacement assembly must be matched weighed and correlated with the unsatisfactory assembly. Refer to Step.
Inspect the removed stage 6 nut and screw lock assemblies ENGINE-HP COMPRESSOR BLADES (72-41-15,02-165).
SUBTASK 72-41-00-220-191 Inspect the Stage 6 Nut and Screw lock assemblies
Weigh the stage 6 compressor blades ENGINE-HP COMPRESSOR BLADES (72-41-15, 02-170 , 02-185, 02-200, 02-215 and 02-217).
NOTE
You only need to match weigh the assemblies(s) if it requires replacement.Weigh the stage 6 nut and screw lock assembly ENGINE-HP COMPRESSOR BLADES (72-41-15, 02-165).
SUBTASK 72-41-00-440-188 Weigh the Removed Stage 6 Blades and Nut and Screw Lock Assemblies
Refer to Figure.
Put the resulting pattern of the stage 6 mass weights in to the blade distribution program VX45 or alternative method IAE 1R19842 Blade distribution computer program X45. The resultant residual unbalance will be a measurement in grams at an angle from the correlation datum point.

CAUTION
MAKE SURE YOU USE THE CORRECT METHOD TO DETERMINE THE RESIDUAL UNBALANCE AND PREVENT DAMAGE TO ENGINE COMPONENTS. IT IS VERY IMPORTANT TO KNOW THAT THE BLADE SETS VECTOR IS IN THE OPPOSITE SENSE TO THE RESIDUAL UNBALANCE IN THE HP COMPRESSOR ROTOR.Record the residual unbalance, vector B. You must try to match the new set of blades with this target vector figure, refer to Step.
Determine the residual unbalance, distance A.
SUBTASK 72-41-00-440-189 Determine the Residual Unbalance of the Stage 6 Blades
This method is used if the compressor disks have four locking slots for the nut and screw lock assemblies. Refer to Figure Inset 2.
Make sure each nut and screw lock assembly is kept as a set.
CoMat 02-122 TEMPORARY MARKER PENCIL/CRAYON to make a mark on the nut and screw lock assembly and on the stage 6 thru 12 compressor disks so that they can be installed in the same positions.
A selection of the 25 standard and the 25 undersize blades is used to get the correct platform build clearance.
A maximum of 25 undersize blades is permitted.
Install all but two of the standard blades in to the disk through the blade loading slot. Use IAE 1R18097 Drift 1off positioned against the blade roots to move them around the disk in a counterclockwise direction when you look from the rear.

CAUTION
YOU MUST NOT USE THE DRIFT ON THE AIRFOIL SURFACES.Install the blades in to the stage 6 disk slot of the dummy rotor.
Measure the platform build clearance, dimension A. Refer to Figure.
Use CoMat 02-121 TEMPORARY MARKER PENCIL/CRAYON or CoMat 02-122 TEMPORARY MARKER PENCIL/CRAYON to identify the two standard blades which are installed between the two pairs of locking blades.
NOTE
Find the correct selection of stage 6 compressor blades.
A full set of stage 6 compressor blades includes the IPC Fig/item numbers that follow:
2 LH locking blades ENGINE-HP COMPRESSOR BLADES (72-41-15, 02-170).
2 RH locking blades ENGINE-HP COMPRESSOR BLADES (72-41-15, 02-185).
60 Standard blades ENGINE-HP COMPRESSOR BLADES (72-41-15, 02-200).
25 Standard blades ENGINE-HP COMPRESSOR BLADES (72-41-15, 02-215).
25 Undersize blades ENGINE-HP COMPRESSOR BLADES (72-41-15, 02-217).
SUBTASK 72-41-00-440-190-A00 Find the Correct Selection of Stage 6 Blades (Pre SBE 72-0161)
NOTE
This method is used if the compressor disks have only two locking slots for the nut and screw lock assemblies. Refer to FigureInset 1.
Make sure each nut and screw lock assembly is kept as a set.
CoMat 02-122 TEMPORARY MARKER PENCIL/CRAYONto make a mark on the nut and screw lock assembly and on the stage 6 thru 12 compressor disks so that they can be installed in the same positions.
A selection of the 26 standard and the 26 undersize blades is used to get the correct platform build clearance.
A maximum of 26 undersize blades is permitted.
Install all of the standard blades in to the disk through the blade loading slot. Use IAE 1R18097 Drift 1 off positioned against the blade roots to move them around the disk in a counterclockwise direction when you look from the rear.

CAUTION
YOU MUST NOT USE THE DRIFT ON THE AIRFOIL SURFACES.Install the blades in to the stage 6 disk slot of the dummy rotor.
Measure the platform build clearance, dimension A. Refer to Figure.
Use CoMat 02-121 TEMPORARY MARKER PENCIL/CRAYON or CoMat 02-122 TEMPORARY MARKER PENCIL/CRAYON to identify all the stage 6 blades with their positions.
NOTE
Find the correct selection of stage 6 compressor blades.
A full set of stage 6 compressor blades includes the IPC Fig/item numbers that follow:
2 LH locking blades ENGINE-HP COMPRESSOR BLADES (72-41-15, 02-170).
2 RH locking blades ENGINE-HP COMPRESSOR BLADES (72-41-15, 02-185).
59 Standard blades ENGINE-HP COMPRESSOR BLADES (72-41-15, 02-200).
26 Standard blades ENGINE-HP COMPRESSOR BLADES (72-41-15, 02-215).
26 Undersize blades ENGINE-HP COMPRESSOR BLADES (72-41-15, 02-217).
SUBTASK 72-41-00-440-190-B00 Find the Correct Selection of Stages 6 Compressor Blades (SBE 72-0161)
NOTE
SBE 72-0161: HP disks and blades - Stages 7 and 8 rotor blades with damping wires and stages 6, 7 and 8 blades with anti-fret coating.
Refer to Figure

CAUTION
WHEN INSTALLING THE DAMPER WIRES, POSITION THE DAMPER WIRE SO THAT THE SPLIT LINE IS AS FAR AWAY AS POSSIBLE FROM BOTH THE BLADE LOADING SLOT AND THE LOCATION OF THE MAXIMUM LOCAL WEAR TO THE DAMPER WIRE GROOVE.NOTE
It is recommended that a dummy set of stage 6 front and rear sealing wires are used for this part of the procedure and that these parts are not re-used during subsequent compressor build operations.Install the stage 6 front sealing wire ENGINE-HP COMPRESSOR DISCS (STAGES 3-8) (72-41-11, 01-386) in to the stage 6 disk front groove of the dummy rotor.
Install the stage 6 rear sealing wire ENGINE-HP COMPRESSOR DISCS (STAGES 3-8) (72-41-11, 01-388) in to the stage 6 disk rear groove. The front and rear sealing wire joints must be 180 degrees apart.
SUBTASK 72-41-00-440-191 Install the Stage 6 Disk Sealing Wires

CAUTION
YOU MUST NOT USE THE DRIFT ON THE AIRFOIL SURFACES.NOTE
Do not install the two standard size blades which must be installed between the locking blades.Correlate the dummy rotor for the No. 1 position and the No. 1 blade.
Start from this No. 1 slot and Install the stage 6 standard and undersize blades which were selected in Step in to the disk in the identified sequence. Use IAE 1R18097 Drift 1 off to move the blades around the disk in a counterclockwise direction when you look from the rear.
NOTE
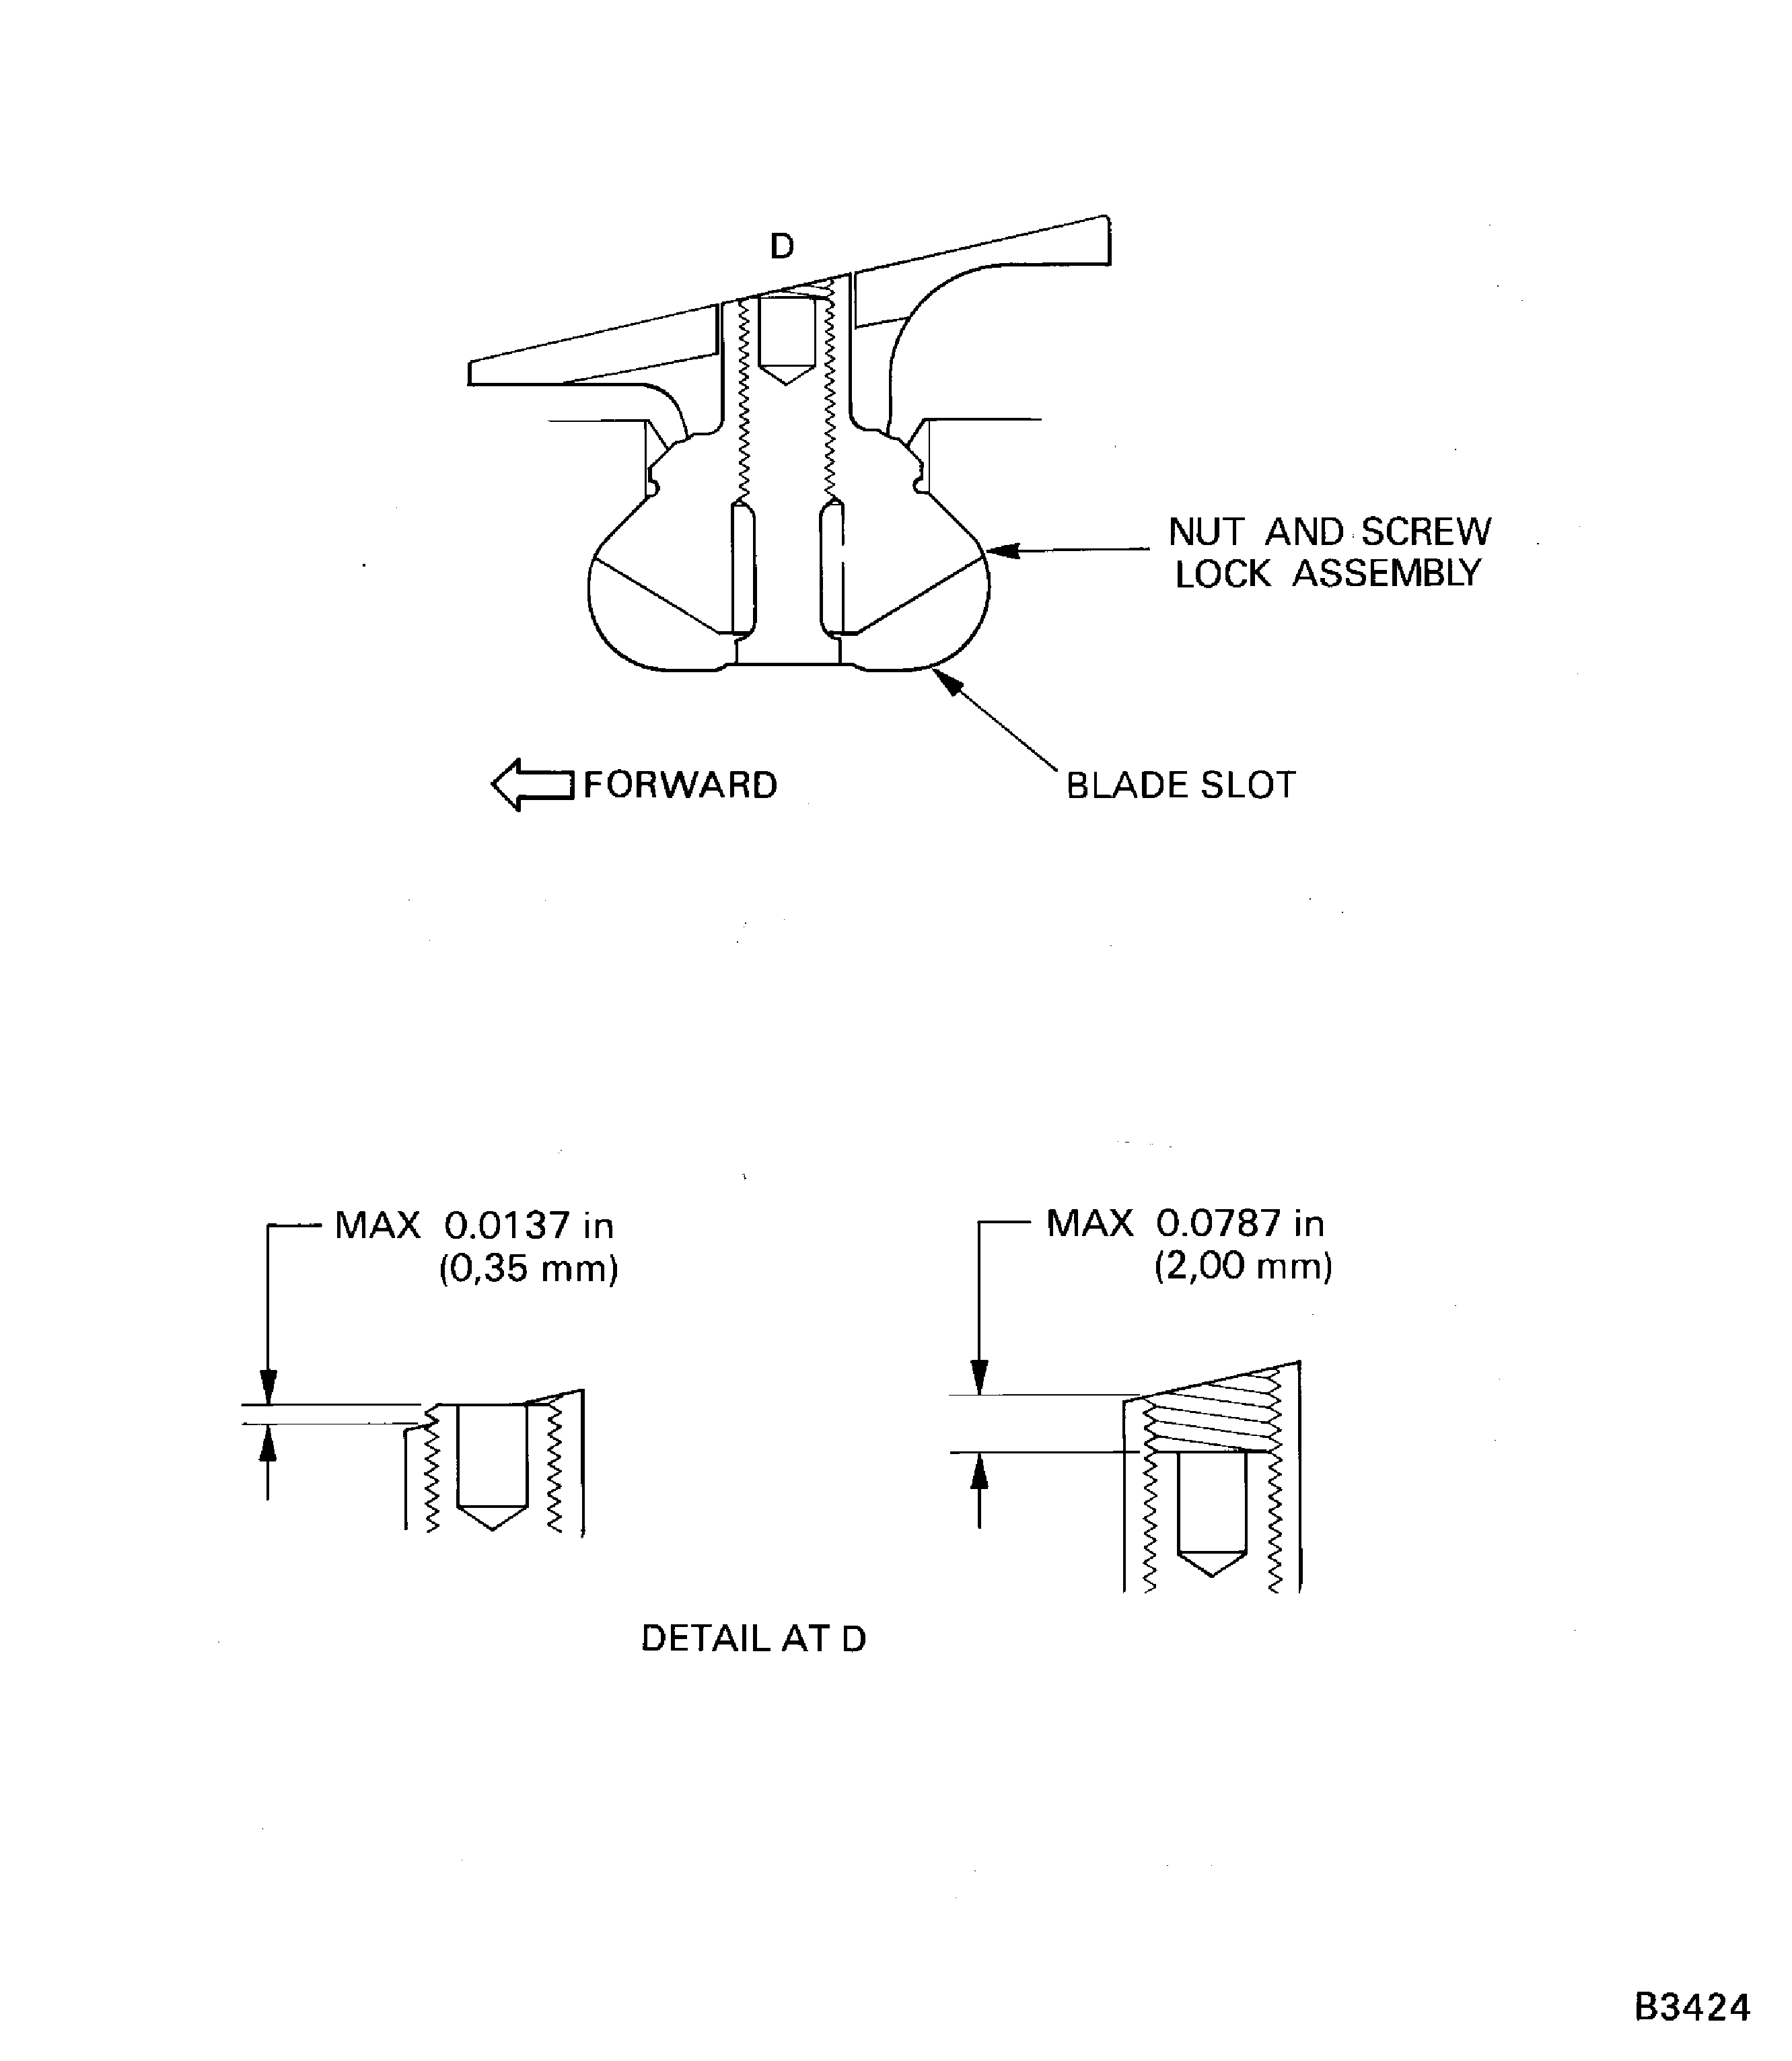
Each nut and screw lock assembly must be kept as a set.It is recommended that a dummy set of nut and screw lock assemblies are used for this part of the procedure and that these parts are not re-used during subsequent compressor build operations.It is not necessary to apply high temperature anti-seize compound to the threads of the nut and screw lock assemblies during this part of the procedure.Make sure that there is no grit or unwanted material on the threads and surfaces and then assemble the jacking screw and locknut assemblies. Make sure the bottom end of the screws are below the surface of nuts.
Prepare the jacking screw and locknut assemblies.
NOTE
The jacking screw and locknut assemblies must be installed in the outer pair of locking slots in the disk.Continue to move the blades clockwise until the nut and screw lock assemblies are in their correct position. Refer to Figure.
Use IAE 1R18590 Socket end 1 off to torque the screws to between 4 and 5 lbfin (0.45 to 0.56 Nm) above the applicable locking torque.
use IAE IAE 1R18683 Caliper adapter 1 off to make sure that the jacking screws are correctly installed.
Measure the clearance (dimension C) between the platforms of the standard size blade and the undersize blade. Refer to Figure.
NOTE
This clearance is in addition to the platform build clearance measured in Step.Make sure dimension C is not more than 0.018 in. (0.45 mm).
If an undersize blade was installed in step C.(7)(a) do the steps that follow.
Install the LH and RH locking blades, jacking screw and locknut assemblies and the two remaining standard blades. Refer to Figure.
SUBTASK 72-41-00-440-192-001 Install the Correct Selection of Replacement Stage 6 Blades for Grinding Operations
NOTE
This method is used if the compressor disk has four locking slots for the nut and screw lock assemblies. Refer to Figure Inset 2.
CAUTION
YOU MUST NOT USE THE DRIFT ON THE AIRFOIL SURFACES.Correlate the dummy rotor for the No. 1 position and the No. 1 blade.
Start from the No. 1 blade and install the stage 6 standard and undersize blades which were selected in Step in to the disk in the identified sequence. Use IAE 1R18097 Drift 1 off to move the blades around the disk in a counterclockwise direction when you look from the rear.
NOTE
Each nut and screw lock assembly must be kept as a set.It is recommended that a dummy set of nut and screw lock assemblies are used for this part of the procedure and that these parts are not re-used during subsequent compressor build operations.It is not necessary to apply high temperature anti-seize compound to the threads of the nut and screw lock assemblies during this part of the procedure.Make sure that there is no grit or unwanted material on the threads and surfaces and then assemble the jacking screw and locknut assemblies. Make sure the bottom end of the screws are below the surface of nuts.
Prepare the jacking screw and locknut assemblies.
NOTE
A blade platform joint will be in line with the center of the blade loading slot.Continue to move the blades in a clockwise direction until the jacking screw and locknut assemblies are in their correct positions. Refer to Figure.
Use IAE 1R18590 Socket end 1 off to torque the screws to between 4 and 5 lbfin (0.45 and 0.56 Nm) above the applicable locking torque.
Use IAE IAE 1R18683 Caliper adapter 1 off to make sure that the jacking screws are correctly installed.
Install the LH and RH locking blades and jacking screw and locknut assemblies.
SUBTASK 72-41-00-440-192-002 Install the Correct Selection of Stage 6 Blades for Grinding Operations, Fig Install the Correct Selection of Replacement Stage 6 Blades for Grinding Operations
NOTE
This method is used if the compressor disk has only two locking slots for the nut and screw lock assembly. Refer to Figure Inset 1.Use a brush to apply CoMat 03-398 METAL SPRAYING STOPPING-OFFCOMPOUND to protect the stage 6 rotor airfoils. Apply the material to approximately two thirds of the blade airfoil length when measured from the blade tips.
Grind the tips of the replacement stage 6 blades installed in the dummy HP compressor rotor using the procedures given in TASK 72-41-10-440-004-A00.
NOTE
The de-mineralized water must have a conductivity of 20 micro siemens.Use de-mineralized water and a cloth or brush to remove CoMat 03-398 METAL SPRAYING STOPPING-OFFCOMPOUND from the blade airfoils.
Remove the temporary surface protection from the rotor blade airfoils.
Remove the stage 6 blades from the dummy rotor, refer to the procedure in Step.
Use CoMat 02-121 TEMPORARY MARKER PENCIL/CRAYON or CoMat 02-122 TEMPORARY MARKER PENCIL/CRAYON to identify the blades.
Make sure that the new blades are marked with their positions 1 to 79 in the disk.
SUBTASK 72-41-00-324-005 Grind the Tips of the Replacement Stage 6 Blades
Put the selection of standard, undersize blades and LH and RH locking blades on a suitable work surface in a light to heavy sequence. This sequence will determine the position of the locking blades. Refer to Figure.
SUBTASK 72-41-00-440-193 Weigh the Removed Stage 6 Blades
Refer to Figure.
Record the results of the initial sequence (from Step) in the blade distribution program VX45 or alternative method IAE 1R19842 Blade distribution computer program X45 to calculate vector C.
Record the results of vector B in the blade distribution program VX45 or alternative method IAE 1R19842 Blade distribution computer program X45, refer to Step. Make sure that the position of the locking blades are fixed in the patternation sequence.
Record the results.
Choose applicable nominal and undersize blades and change their positions to get a more even distribution between the two segments. It could be necessary to fix a small segment of eight blades and let the program work with a larger segment.
If it is necessary to change the positions of the blades then make sure that the platform build clearance (dimension A) and when applicable, the clearance (dimension C), refer to Step, are satisfactory and are within acceptable limits.
If the undersize blades cannot be distributed evenly then do the following procedure.
SUBTASK 72-41-00-440-194 Do a Balance Patternation for the Replacement Stage 6 Blades
Refer to Figure

CAUTION
WHEN INSTALLING THE DAMPER WIRES, POSITION THE DAMPER WIRE SO THAT THE SPLIT LINE IS AS FAR AWAY AS POSSIBLE FROM BOTH THE BLADE LOADING SLOT AND THE LOCATION OF THE MAXIMUM LOCAL WEAR TO THE DAMPER WIRE GROOVE.Install the stage 6 front sealing wire ENGINE-HP COMPRESSOR DISCS (STAGES 3-8) (72-41-11, 01-386) in to the stage 6 disk front groove of the dummy rotor.
Install the stage 6 rear sealing wire ENGINE-HP COMPRESSOR DISCS (STAGES 3-8) (72-41-11, 01-388) in to the stage 6 disk rear groove. The front and rear sealing wire joints must be 180 degrees apart.
SUBTASK 72-41-00-440-195 Install the Stage 6 Disk Sealing Wires

CAUTION
YOU MUST NOT USE THE DRIFT ON THE AIRFOIL SURFACES.NOTE
Do not install the two standard size blades which must be installed between the locking blades.Install the stage 6 standard and undersize blades which were selected in Step in to the disk in the identified sequence. Use IAE 1R18097 Drift 1 off to move the blades around the disk in a counterclockwise direction when you look from the rear.

WARNING
WHEN YOU USE CoMat 01-001 SOLVENT, DELETED OR CoMat 01-002 SOLVENT, DELETED. YOU MUST USE THE NECESSARY PROTECTIVE CLOTHING. DO NOT GET THE SOLVENT ON YOUR SKIN OR IN YOUR EYES. YOU MUST NOT SMOKE WHEN YOU USE THE SOLVENT AS THE VAPOR CHANGES AND BECOMES TOXIC.Use CoMat 01-001 SOLVENT, DELETED or CoMat 01-002 SOLVENT, DELETED. and a cloth to clean the threads of the jacking screw and locknut assemblies.
Use a brush to apply CoMat 10-070 ANTI-SEIZE COMPOUND to the threads of the stage 6 jacking screw and locknut assemblies.
Prepare the jacking screw and locknut assemblies.
NOTE
The jacking screw and locknut assemblies must be installed in the outer pair of locking slots in the disk.Continue to move the blades clockwise until the nut and screw lock assemblies are in their correct position. Refer to Figure.
Use IAE 1R18590 Socket end 1 off to torque the screws to between 4 and 5 lbfin (0.45 to 0.56 Nm) above the applicable locking torque.
use IAE IAE 1R18683 Caliper adapter 1 off to make sure that the jacking screws are correctly installed.
Measure the clearance (dimension C) between the platforms of the standard size blade and the undersize blade. Refer to Figure.
NOTE
This clearance is in addition to the platform build clearance measured in Step.Make sure dimension C is not more than 0.018in. (0.45 mm).
If an undersize blade was installed in step C.(7)(a) do the steps that follow.
NOTE
The jacking screw and locknut assemblies must be installed in the positions they were removed from. Refer to Step.Install the LH and RH locking blades, jacking screw and locknut assemblies and the two remaining standard blades.
SUBTASK 72-41-00-440-196-001 Install the Correct Selection of Stage 6 Blades
NOTE
This method is used if the compressor disk has four locking slots for the nut and screw lock assemblies. Refer to Figure Inset 2.
CAUTION
YOU MUST NOT USE THE DRIFT ON THE AIRFOIL SURFACES.Install the stage 6 standard and undersize blades which were selected in Step in to the disk in the identified light-heavy-light sequence. Use IAE 1R18097 Drift 1 off to move the blades around the disk in a counterclockwise direction when you look from the rear.

WARNING
WHEN YOU USE CoMat 01-001 SOLVENT, DELETED OR CoMat 01-002 SOLVENT, DELETED. YOU MUST USE THE NECESSARY PROTECTIVE CLOTHING. DO NOT GET THE SOLVENT ON YOUR SKIN OR IN YOUR EYES. YOU MUST NOT SMOKE WHEN YOU USE THE SOLVENT AS THE VAPOR CHANGES AND BECOMES TOXIC.Use CoMat 01-001 SOLVENT, DELETED or CoMat 01-002 SOLVENT, DELETED. and a cloth to clean the threads of the jacking screw and locknut assemblies.
Use a brush to apply CoMat 10-070 ANTI-SEIZE COMPOUND to the threads of the stage 6 jacking screw and locknut lock assemblies.
Prepare the jacking screw and locknut assemblies.
NOTE
A blade platform joint will be in line with the center of the blade loading slot.Continue to move the blades in a clockwise direction until the jacking screw and locknut assemblies are in their correct positions. Refer to Figure.
Use IAE 1R18590 Socket end 1 off to torque the screws to between 4 and 5 lbfin (0.45 and 0.56 Nm) above the applicable locking torque.
Use IAE IAE 1R18683 Caliper adapter 1 off to make sure that the jacking screws are correctly installed.
NOTE
The jacking screws and locknuts assemblies must be installed in the positions they were removed from. Refer to Step.Install the LH and RH locking blades and jacking screw and locknut assemblies.
SUBTASK 72-41-00-440-196-002 Install the Correct Selection of Stage 6 Blades
NOTE
This method is used if the compressor disk has two locking slots for the nut and screw lock assembly. Refer to Figure Inset 1.
Figure: Measure Blade Lockplate Clearance
Sheet 1
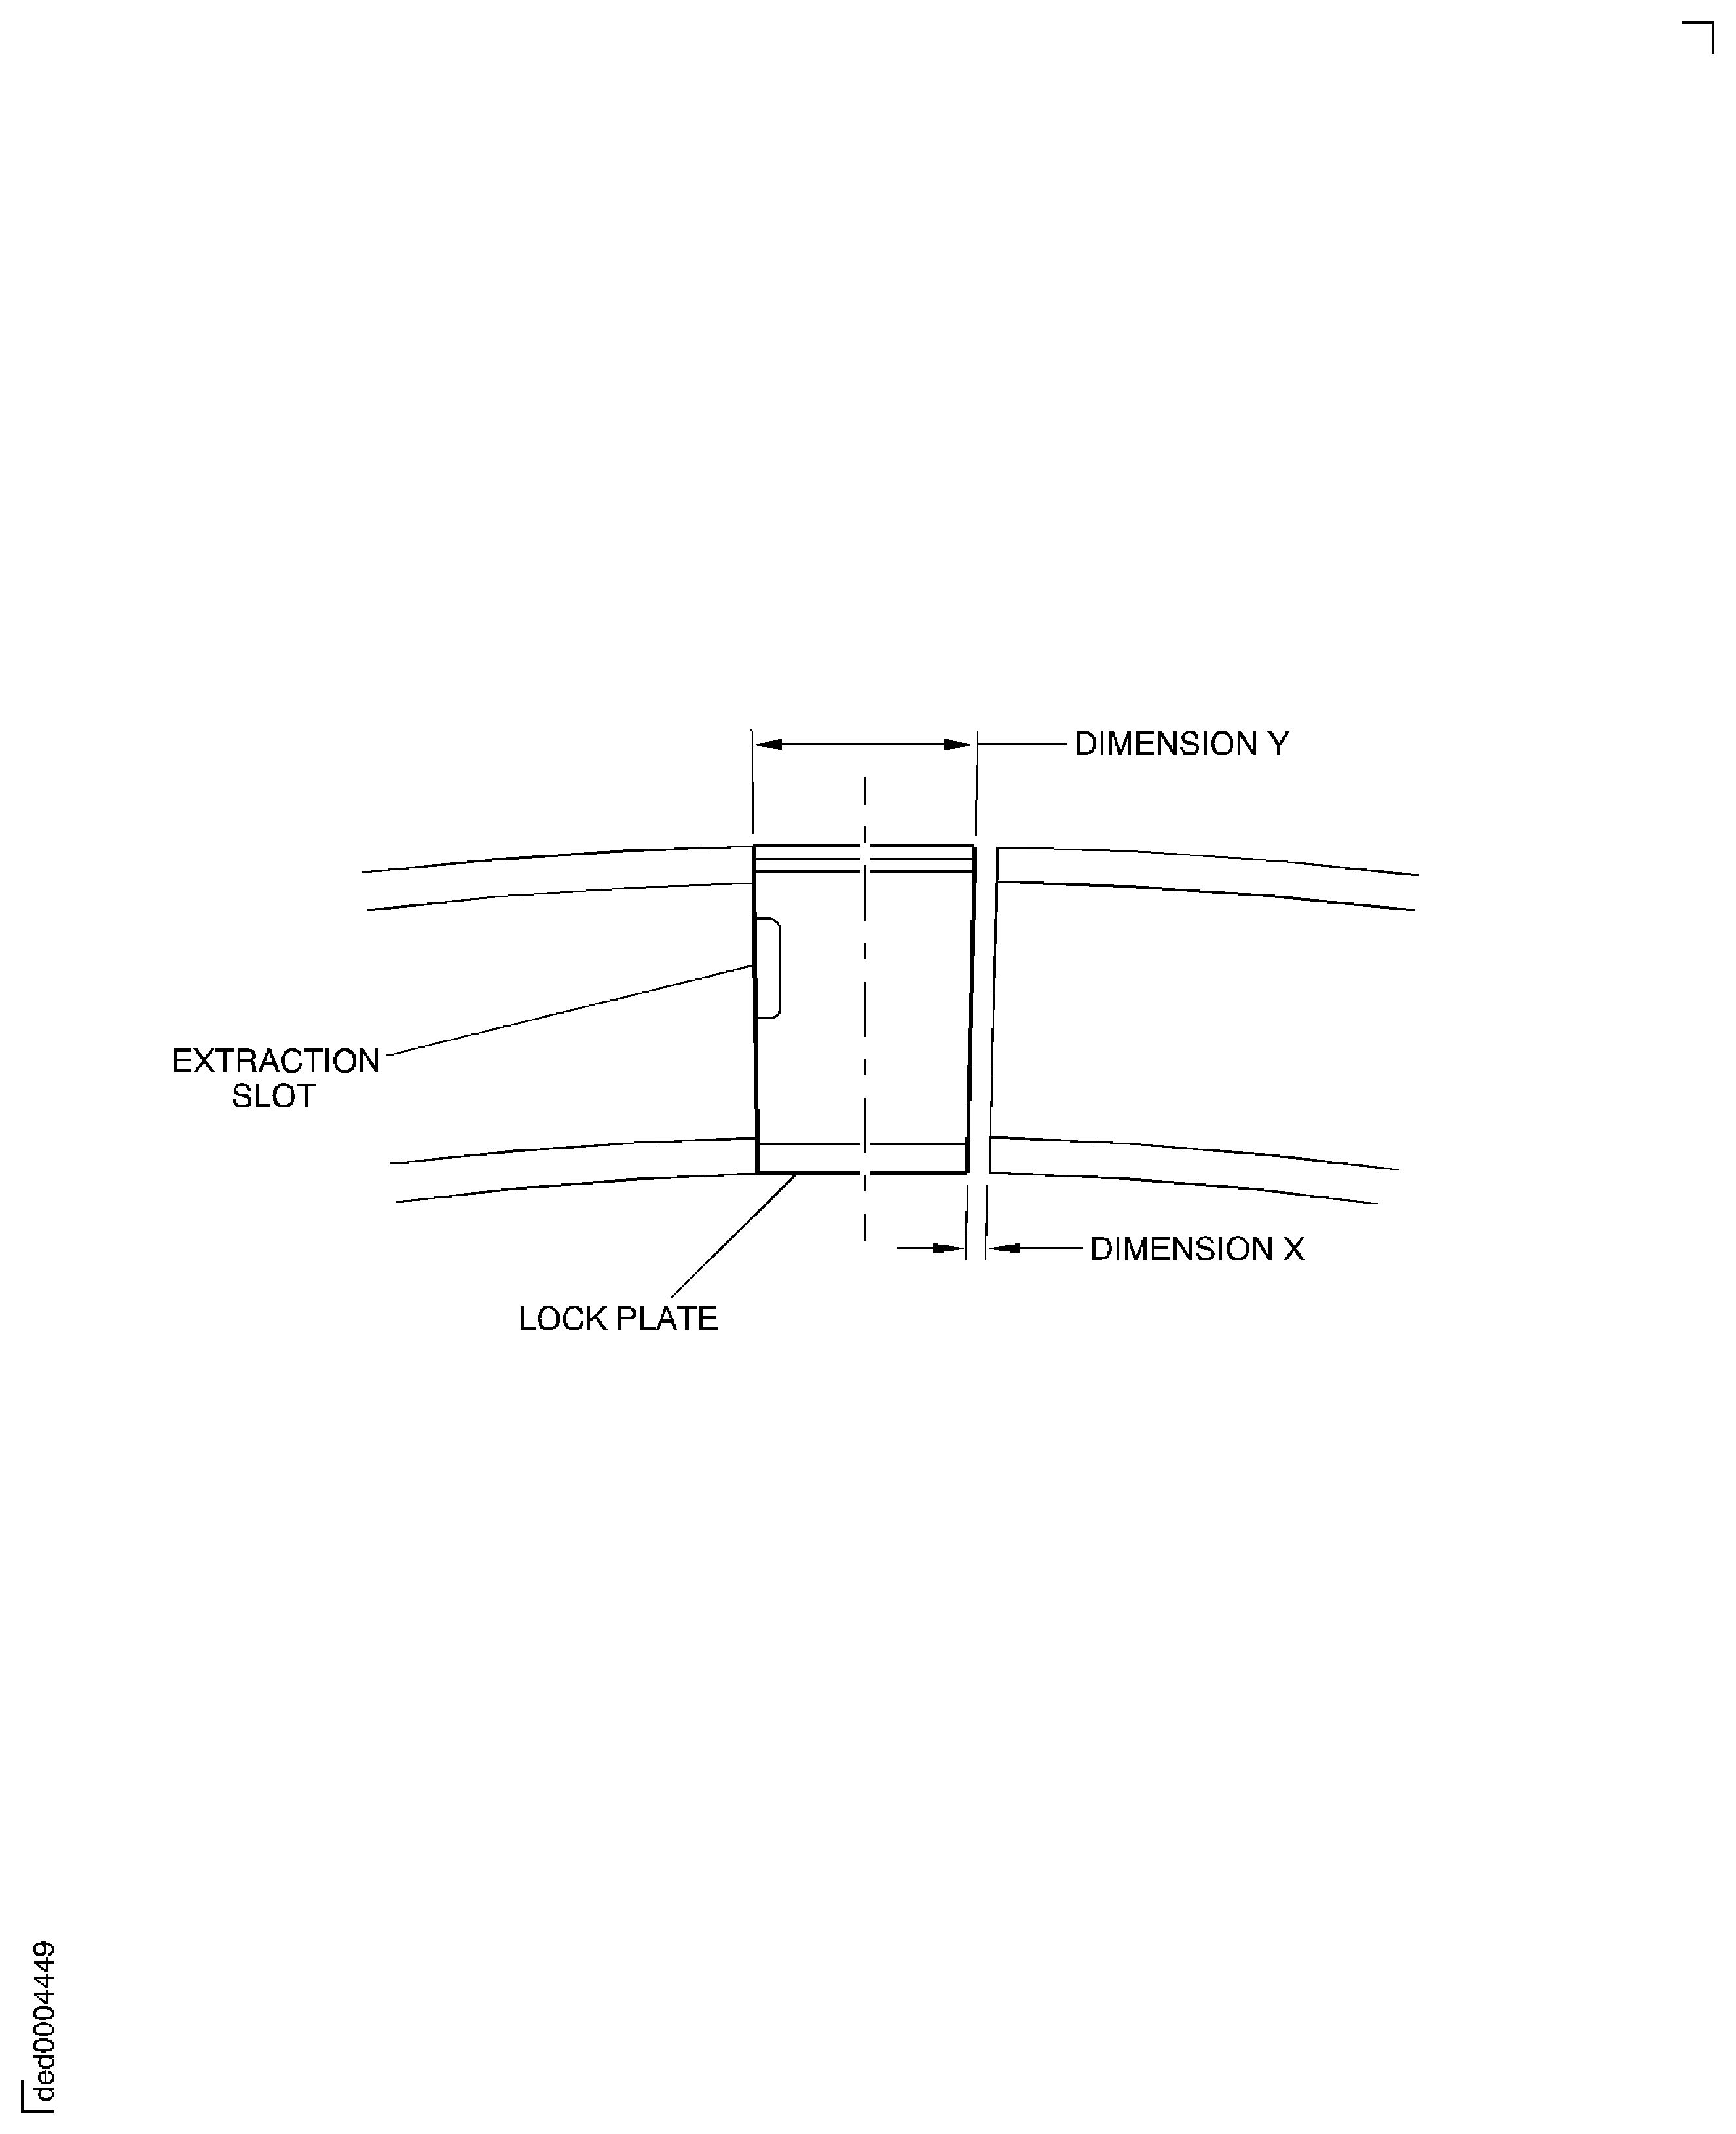
Figure: Install the stage 3 retaining plates and lockplates
Sheet 2

Figure: Examine the Clapper Abutment Faces
Sheet 3
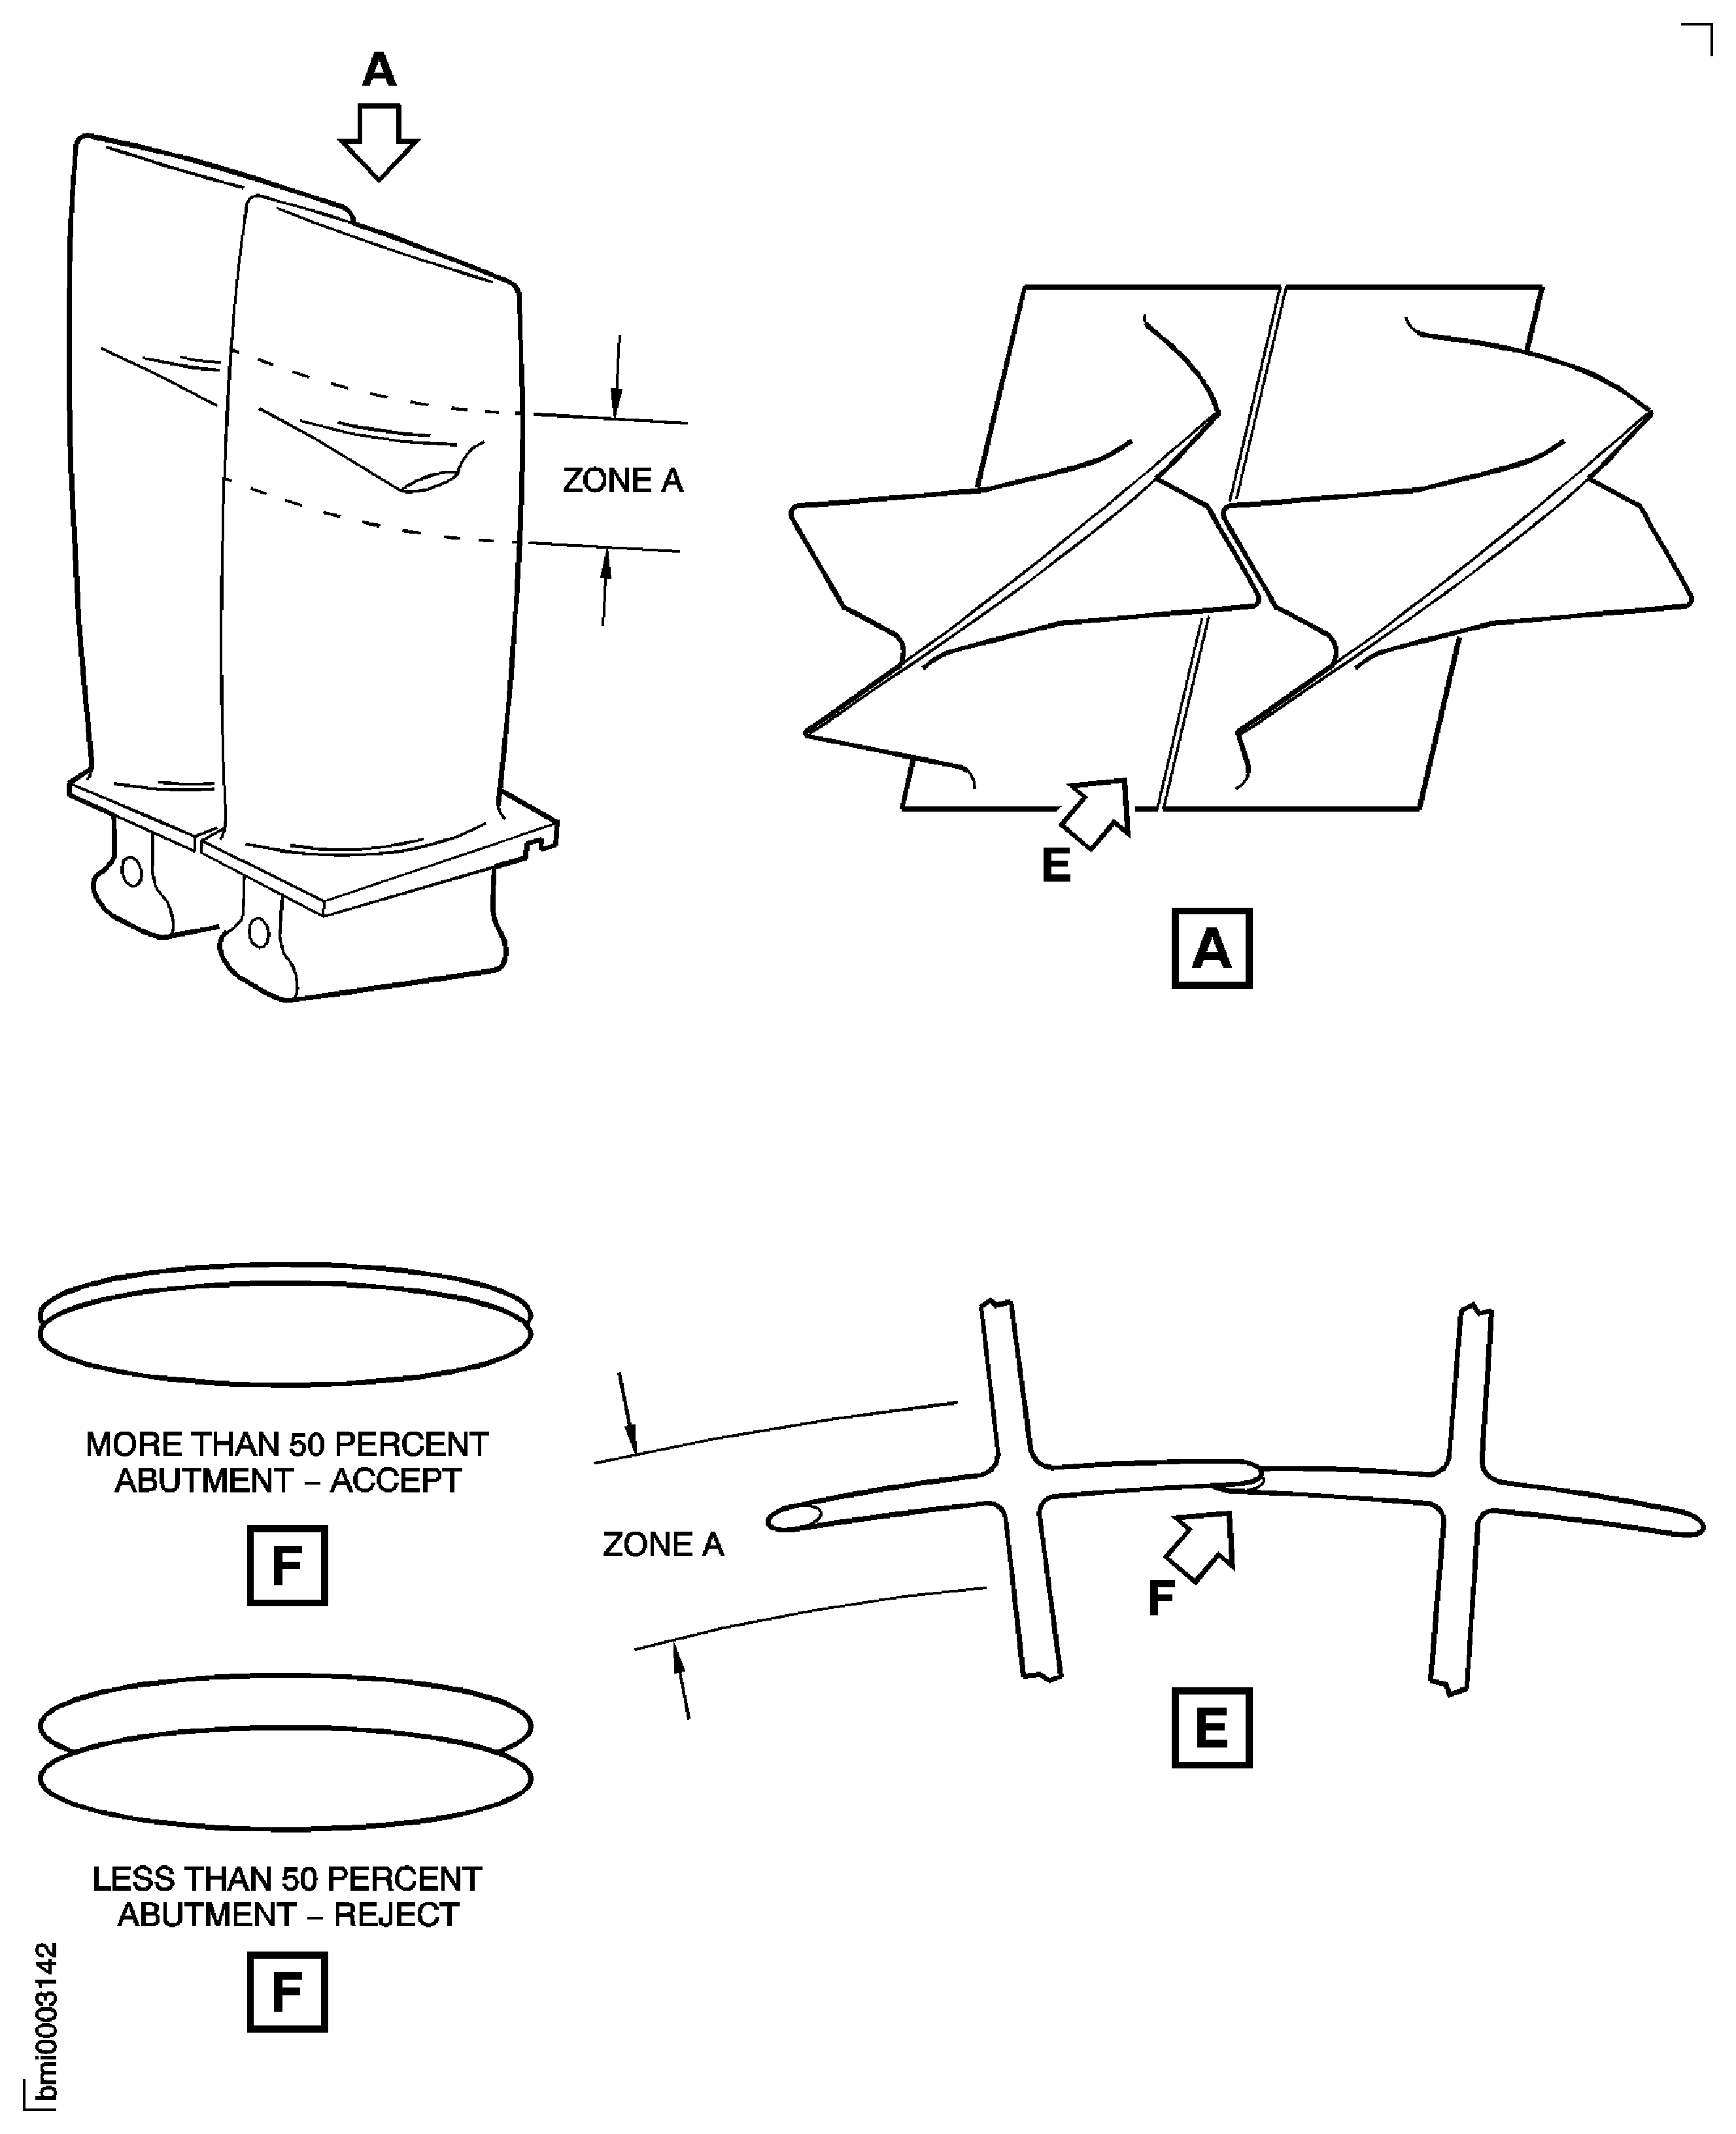
Figure: Install the stages 4 and 5 retaining plates and lockplates
Install the stages 4 and 5 retaining plates and lockplates
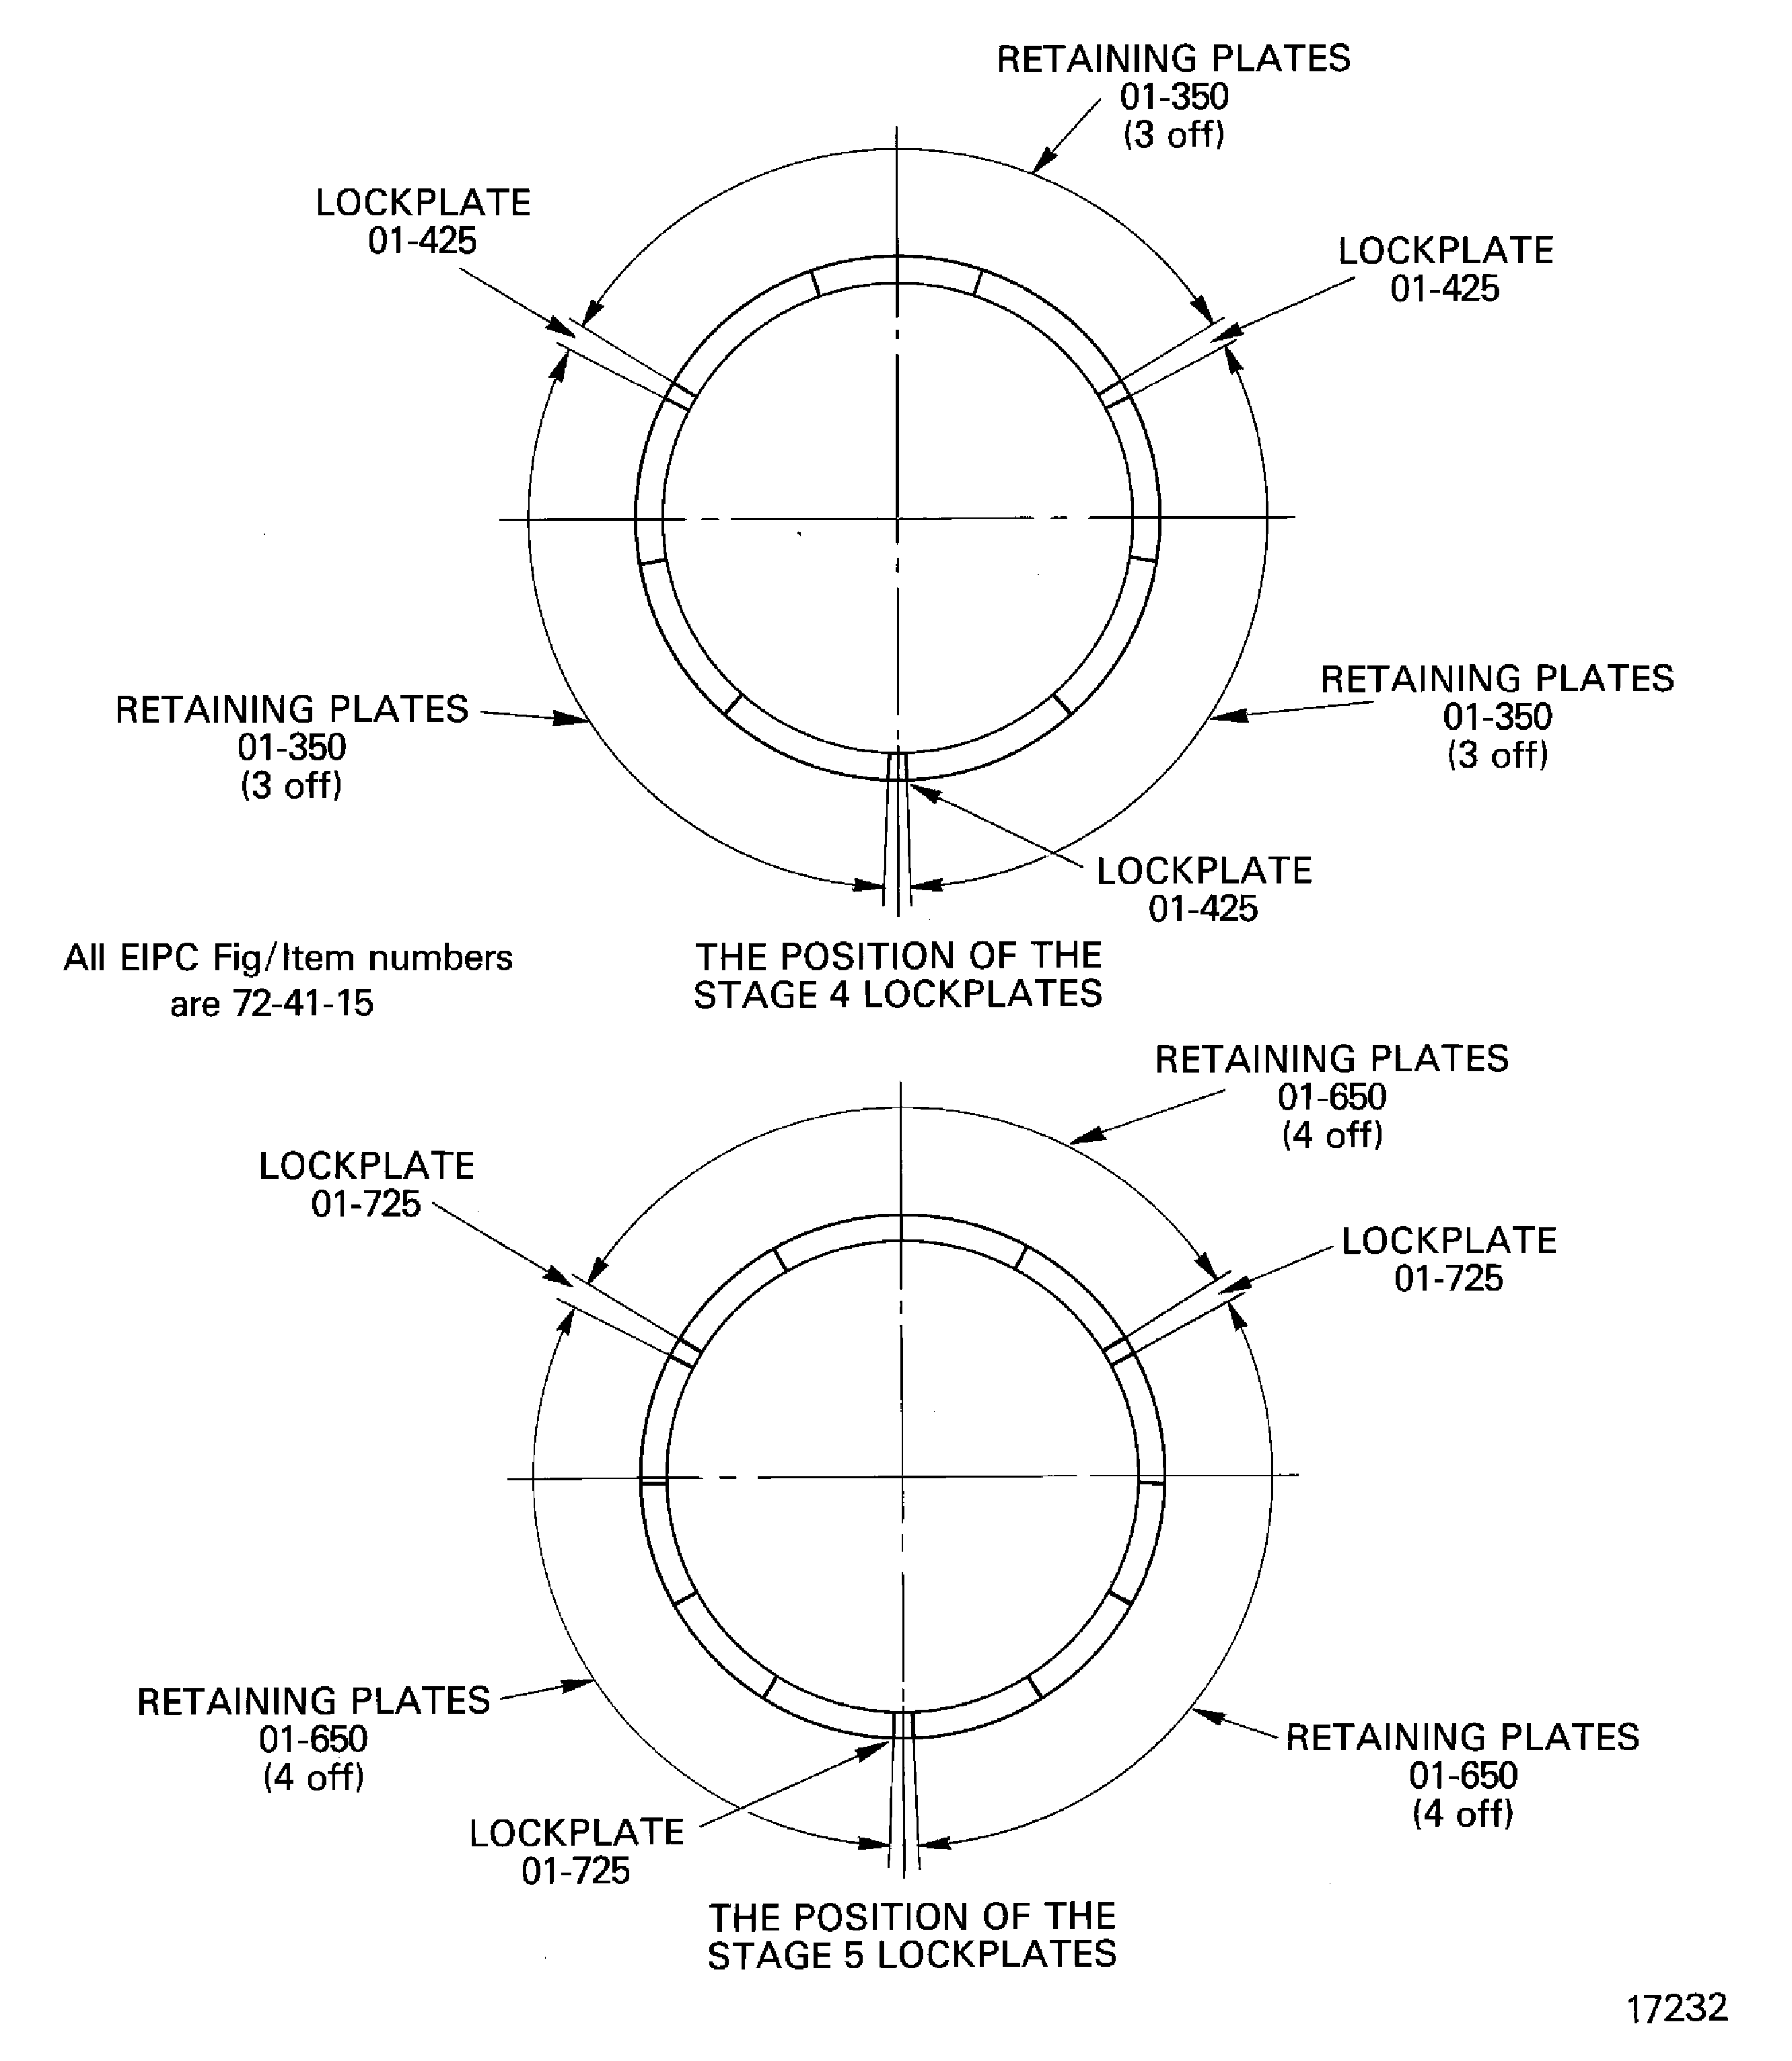
Figure: Position of retaining plates following dressing repair
Position of retaining plates following dressing repair

Figure: Lock the lockplates in position
Lock the lockplates in position
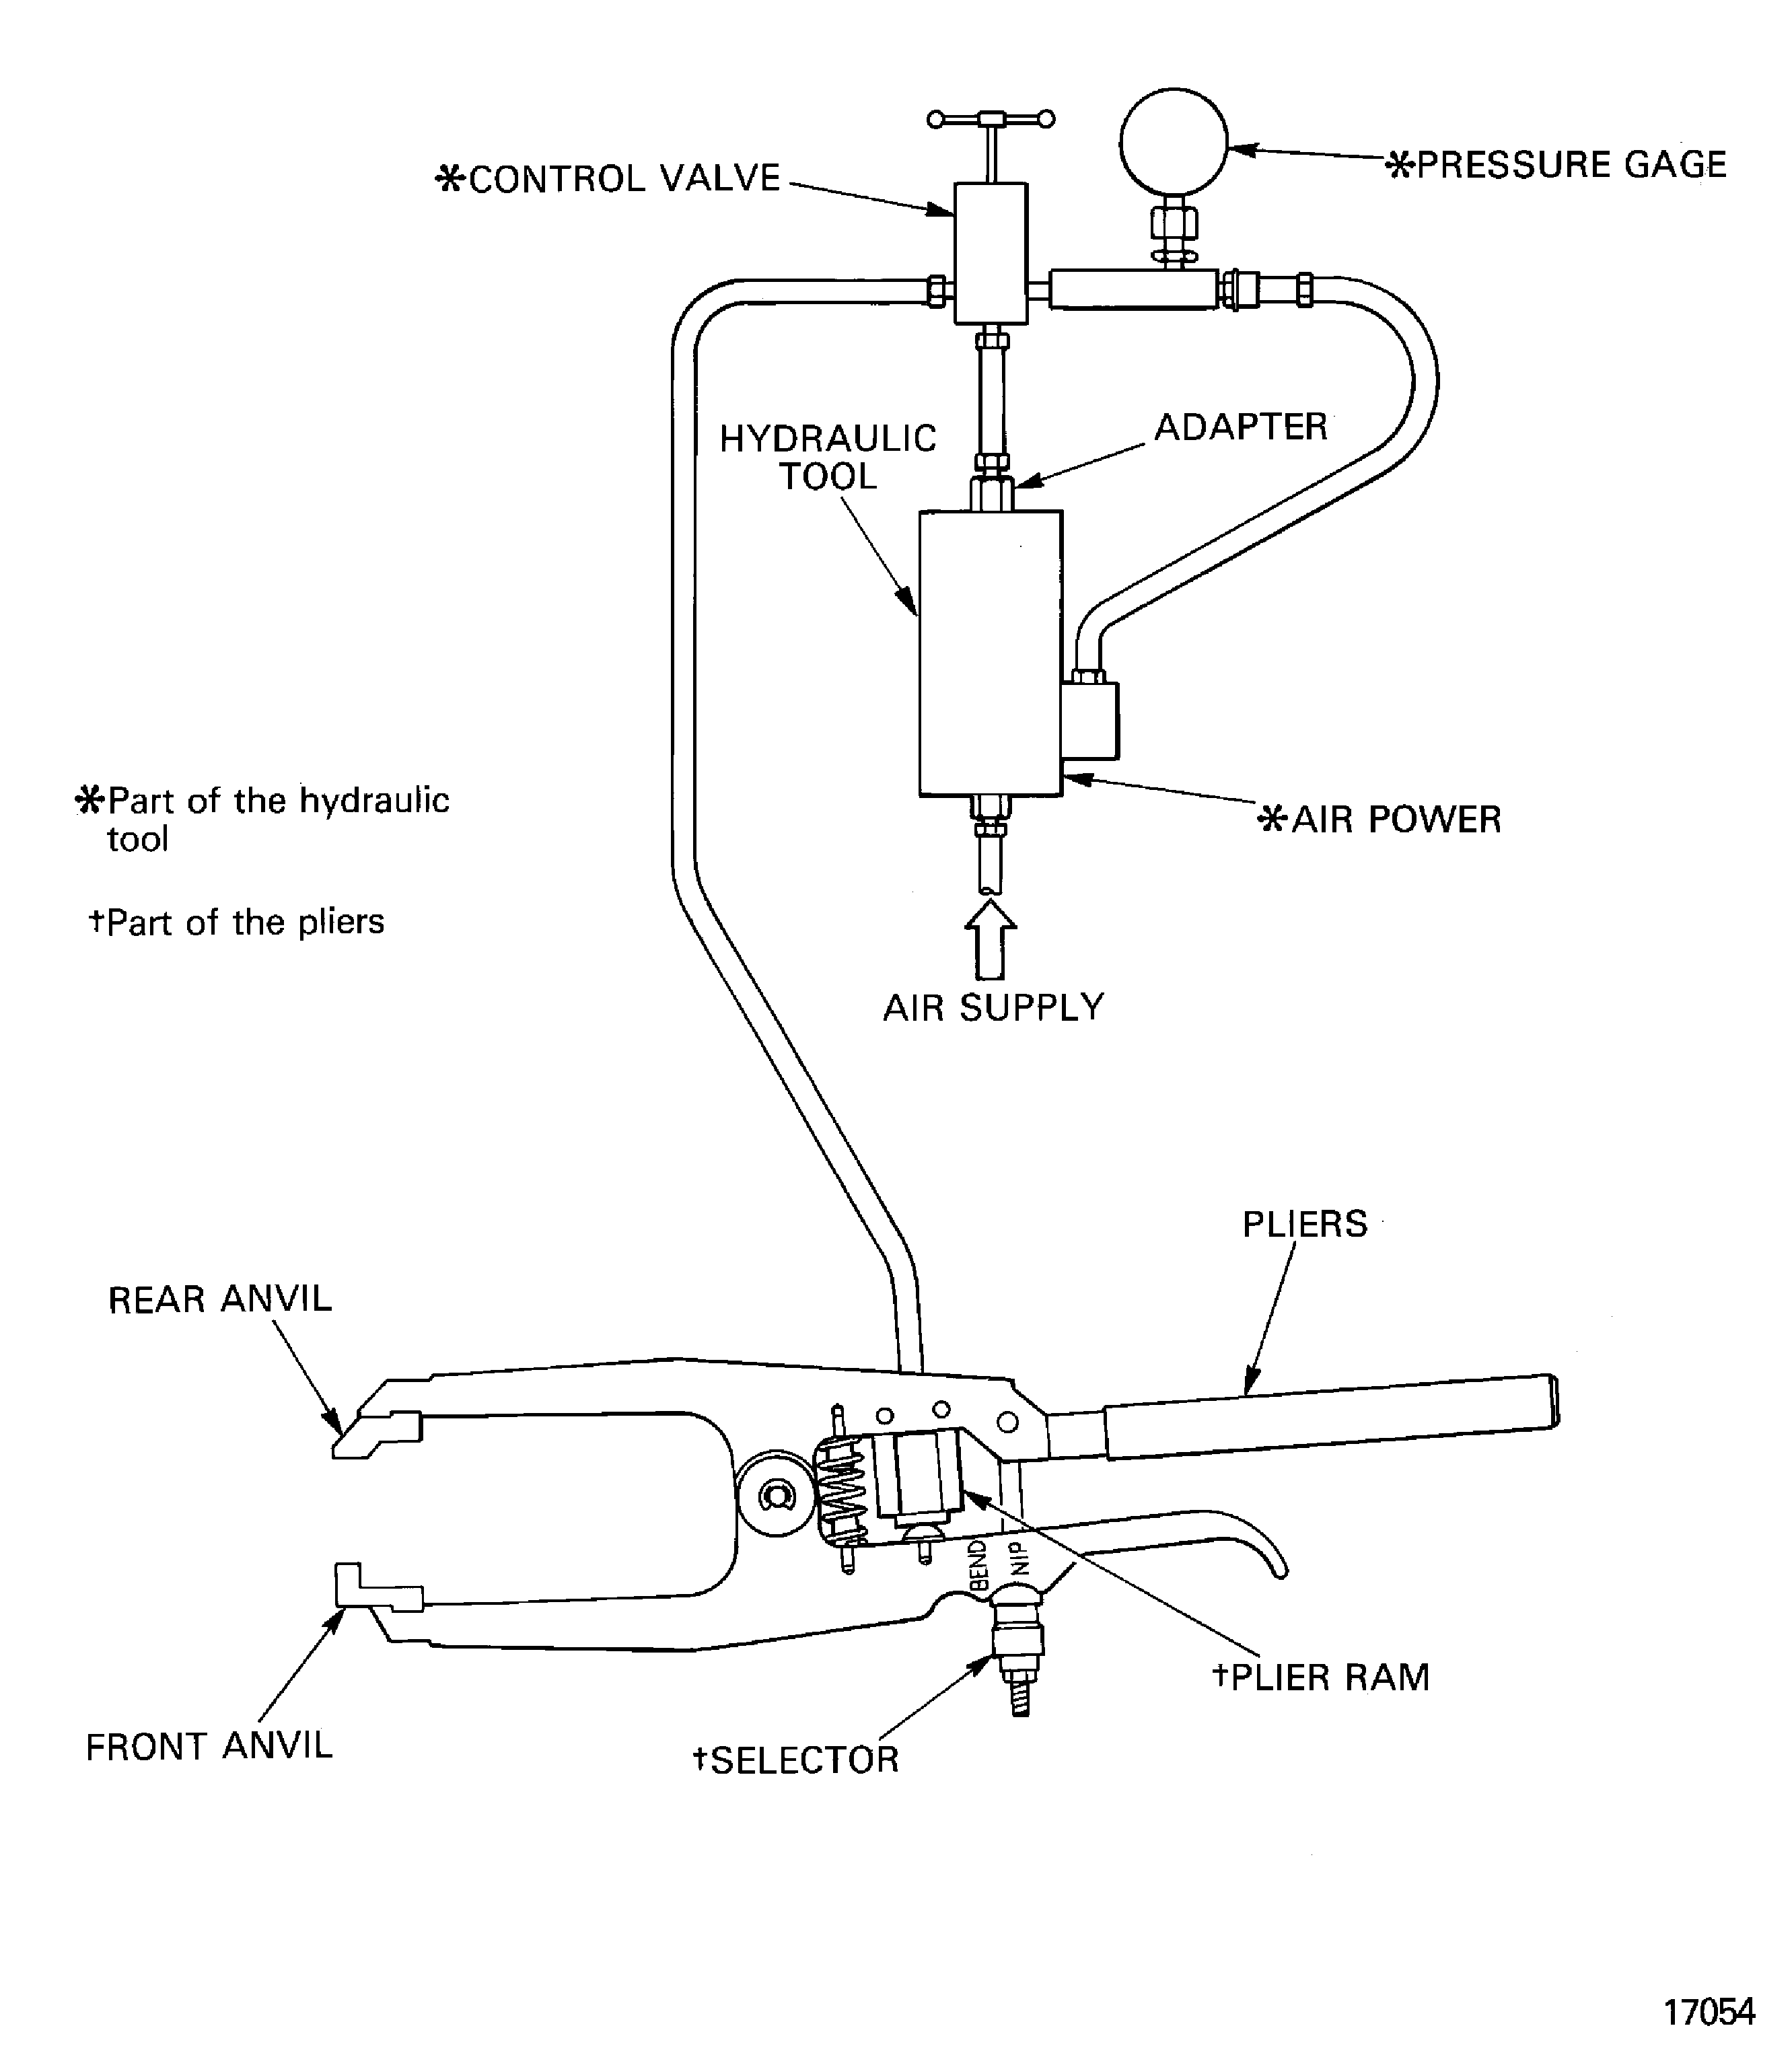
Figure: Example of a light-heavy-light sequence
Example of a light-heavy-light sequence
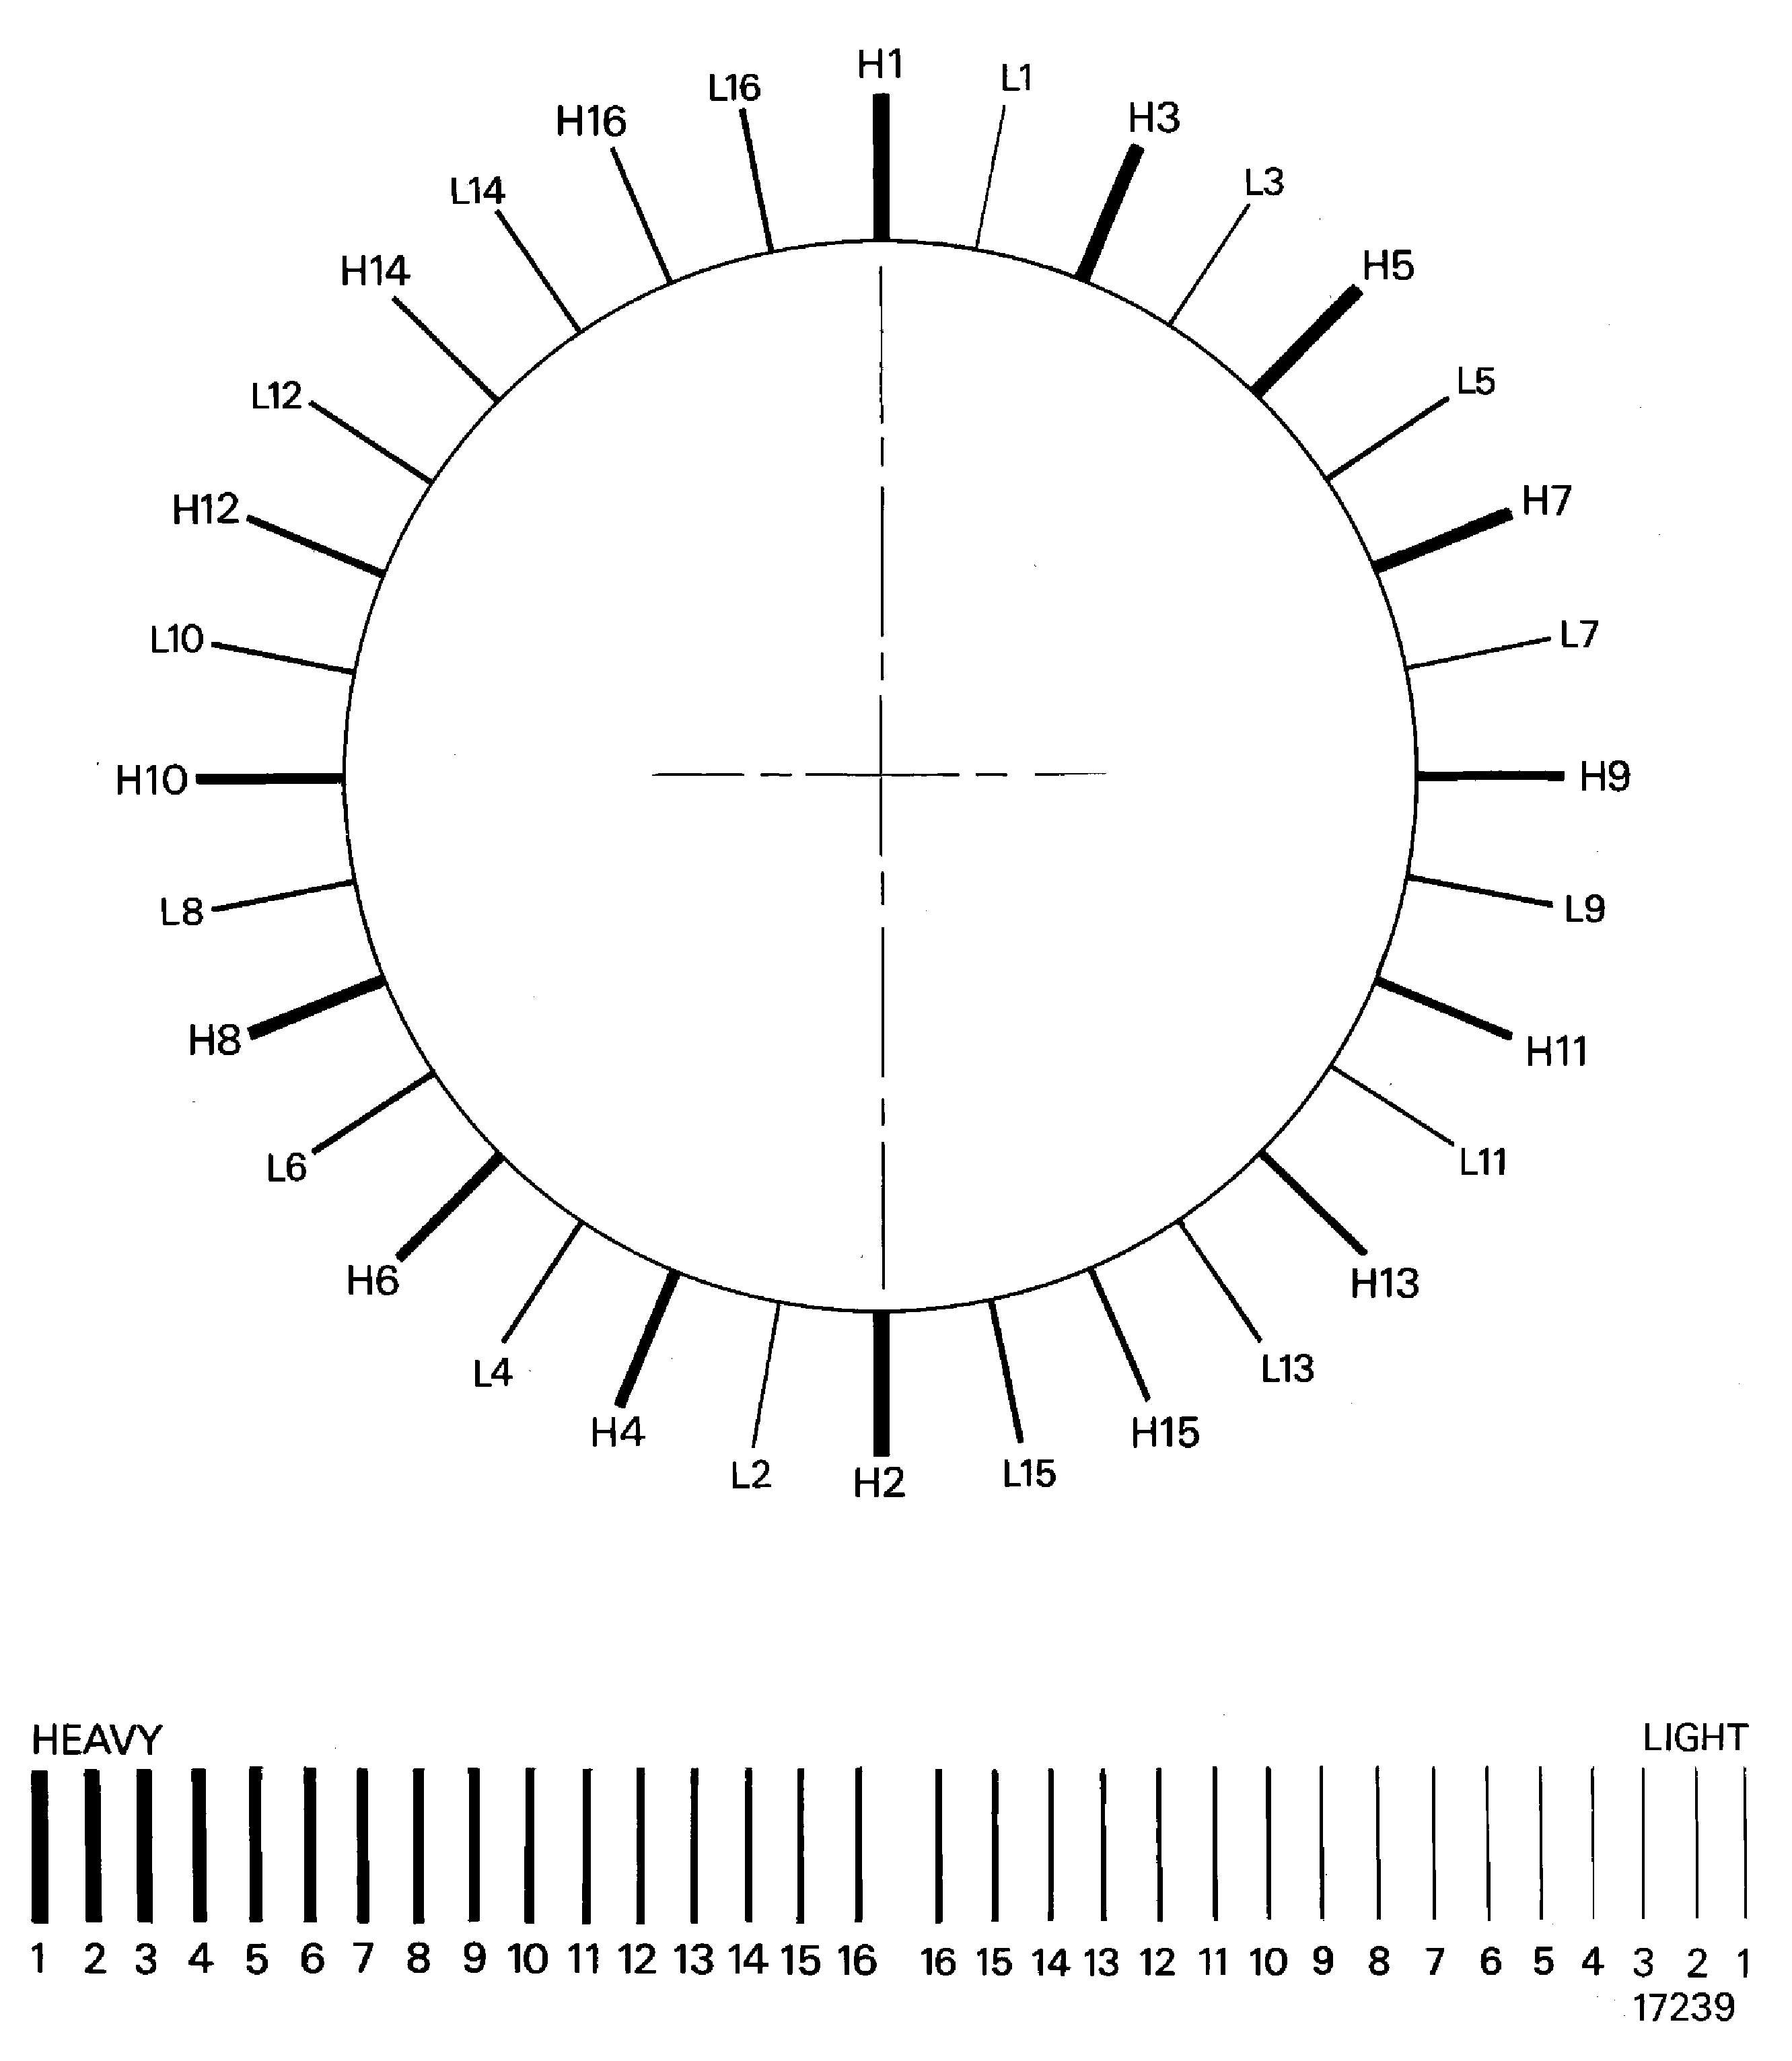
Figure: Calculate the static unbalance
Calculate the static unbalance

Figure: Example of stage 6 blade loading slot and locknut slots
Example of stage 6 blade loading slot and locknut slots
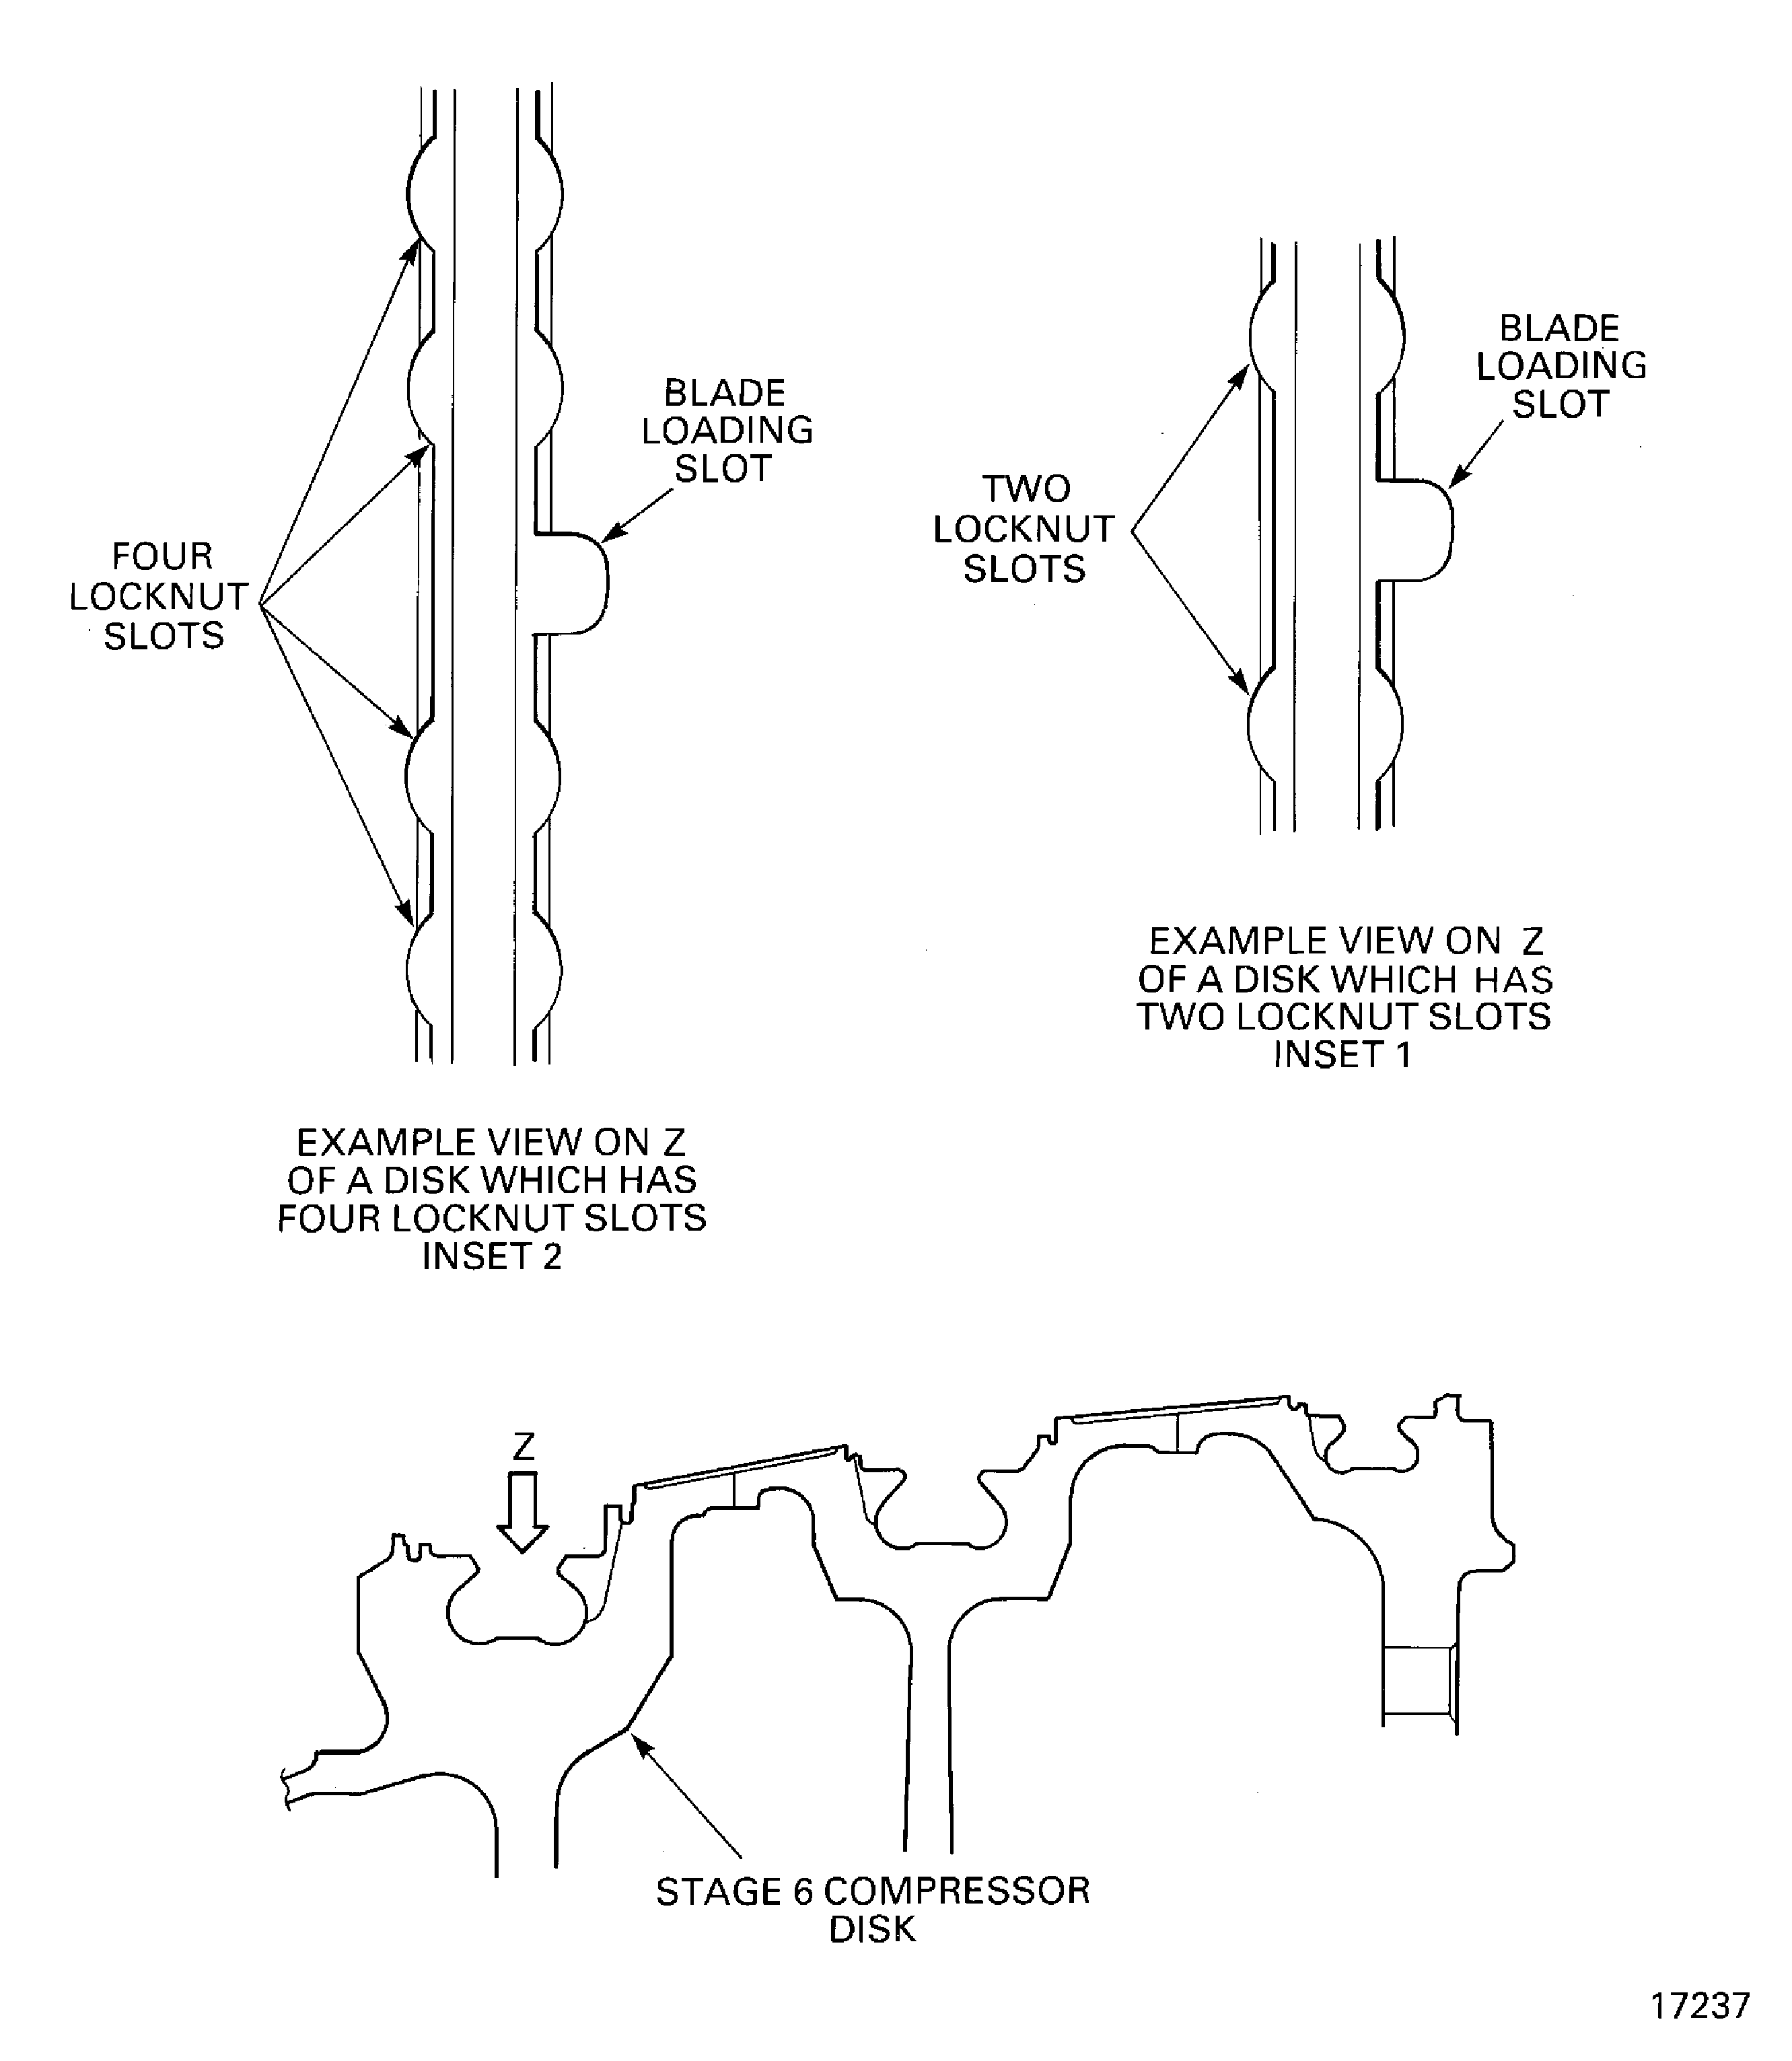
Figure: Measure the stage 6 platform build clearance
Measure the stage 6 platform build clearance
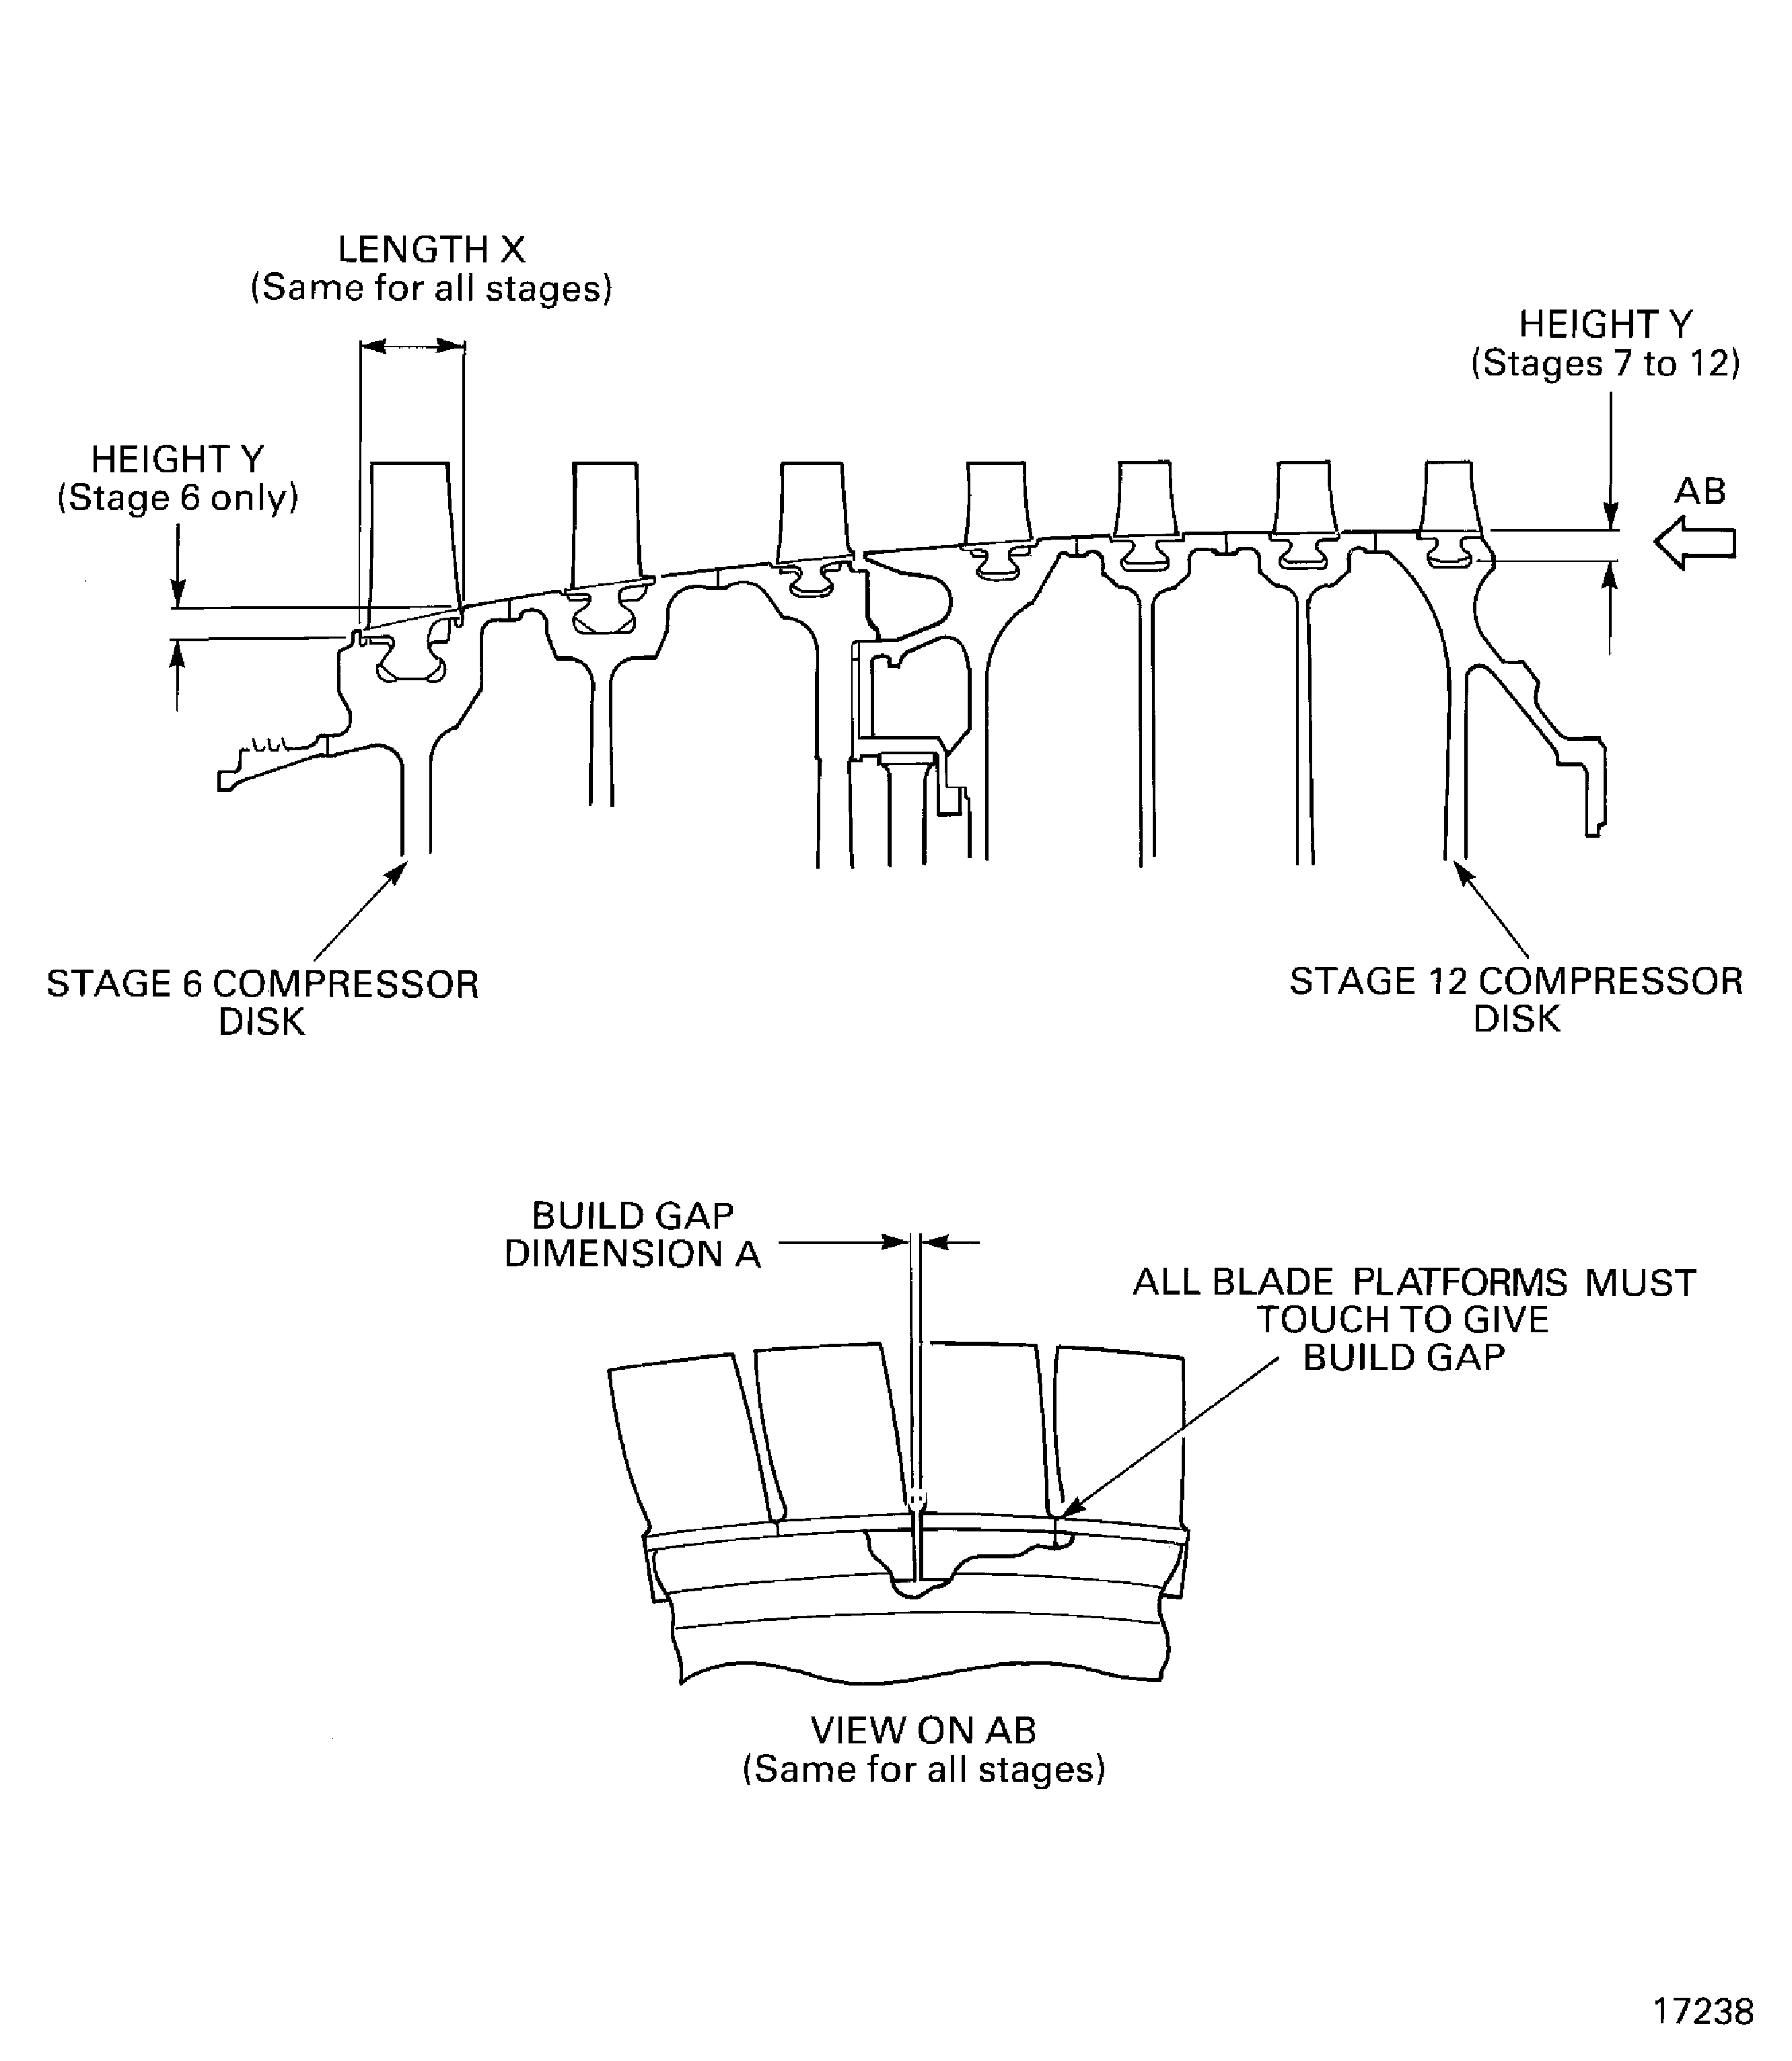
Figure: Measure the clearance (dimension C) between the undersize blade and the standard blade
Measure the clearance (dimension C) between the undersize blade and the standard blade
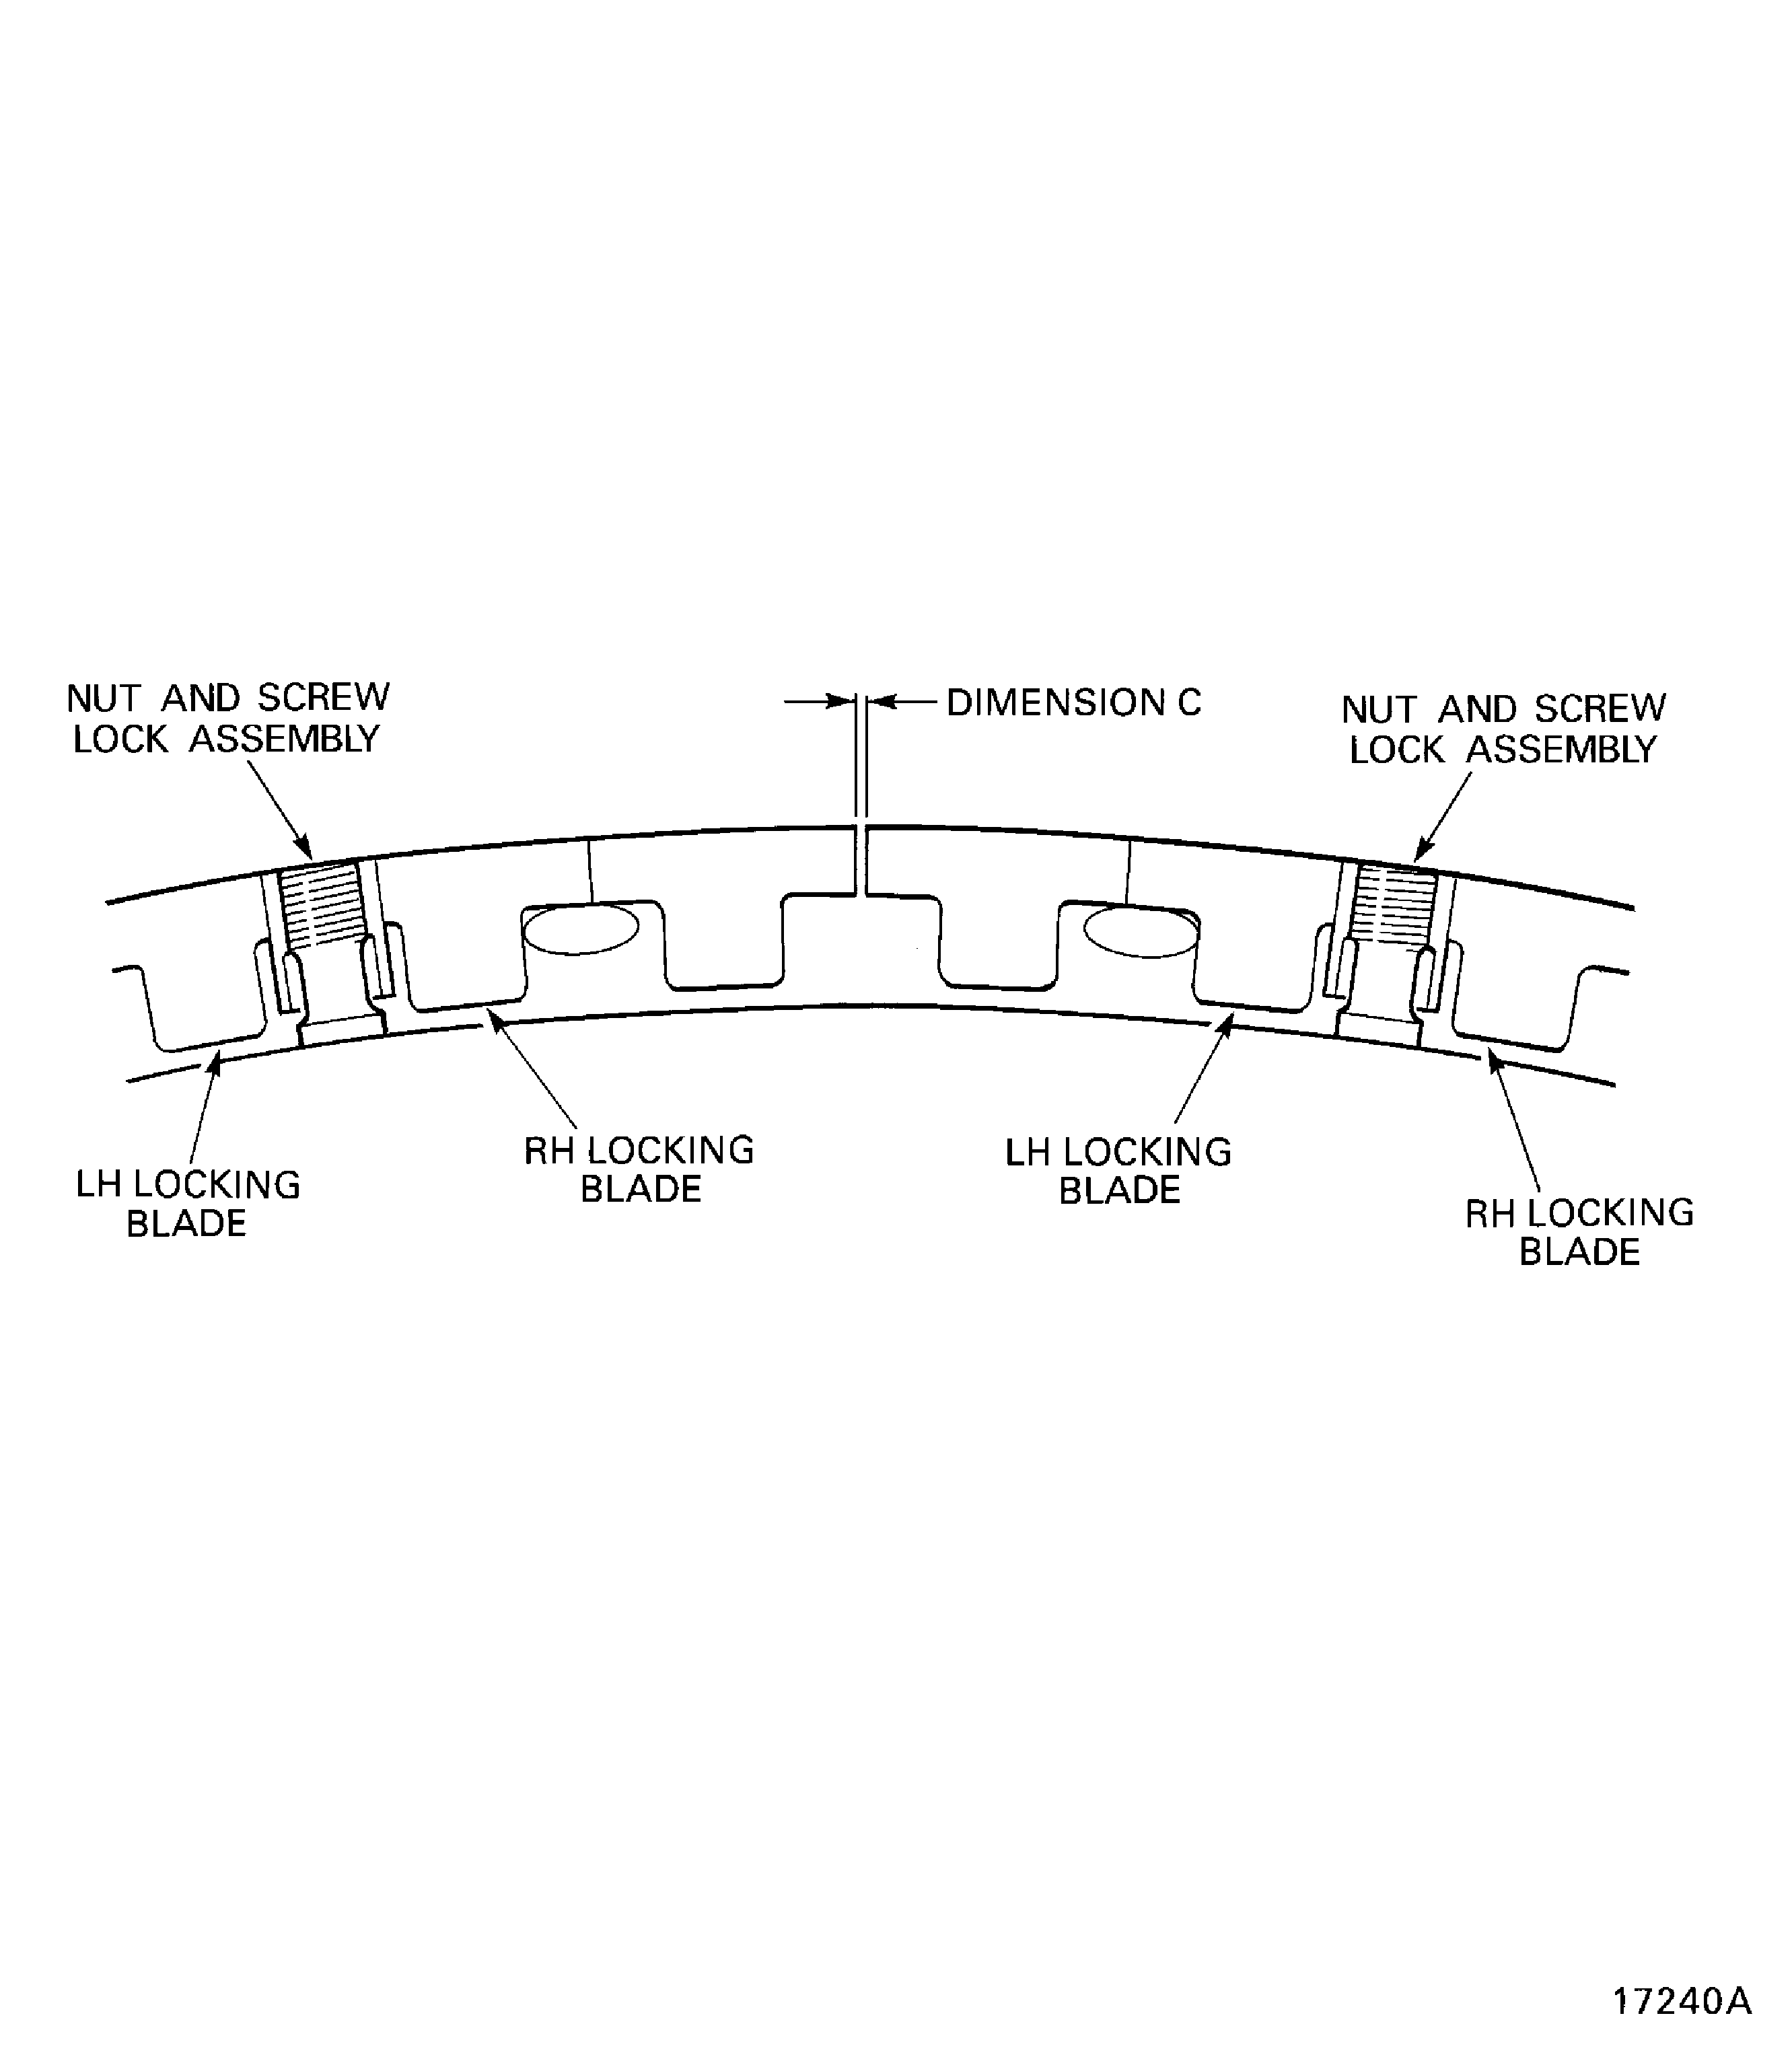
Figure: Measure the stage 6 sealing wires overlap
Measure the stage 6 sealing wires overlap
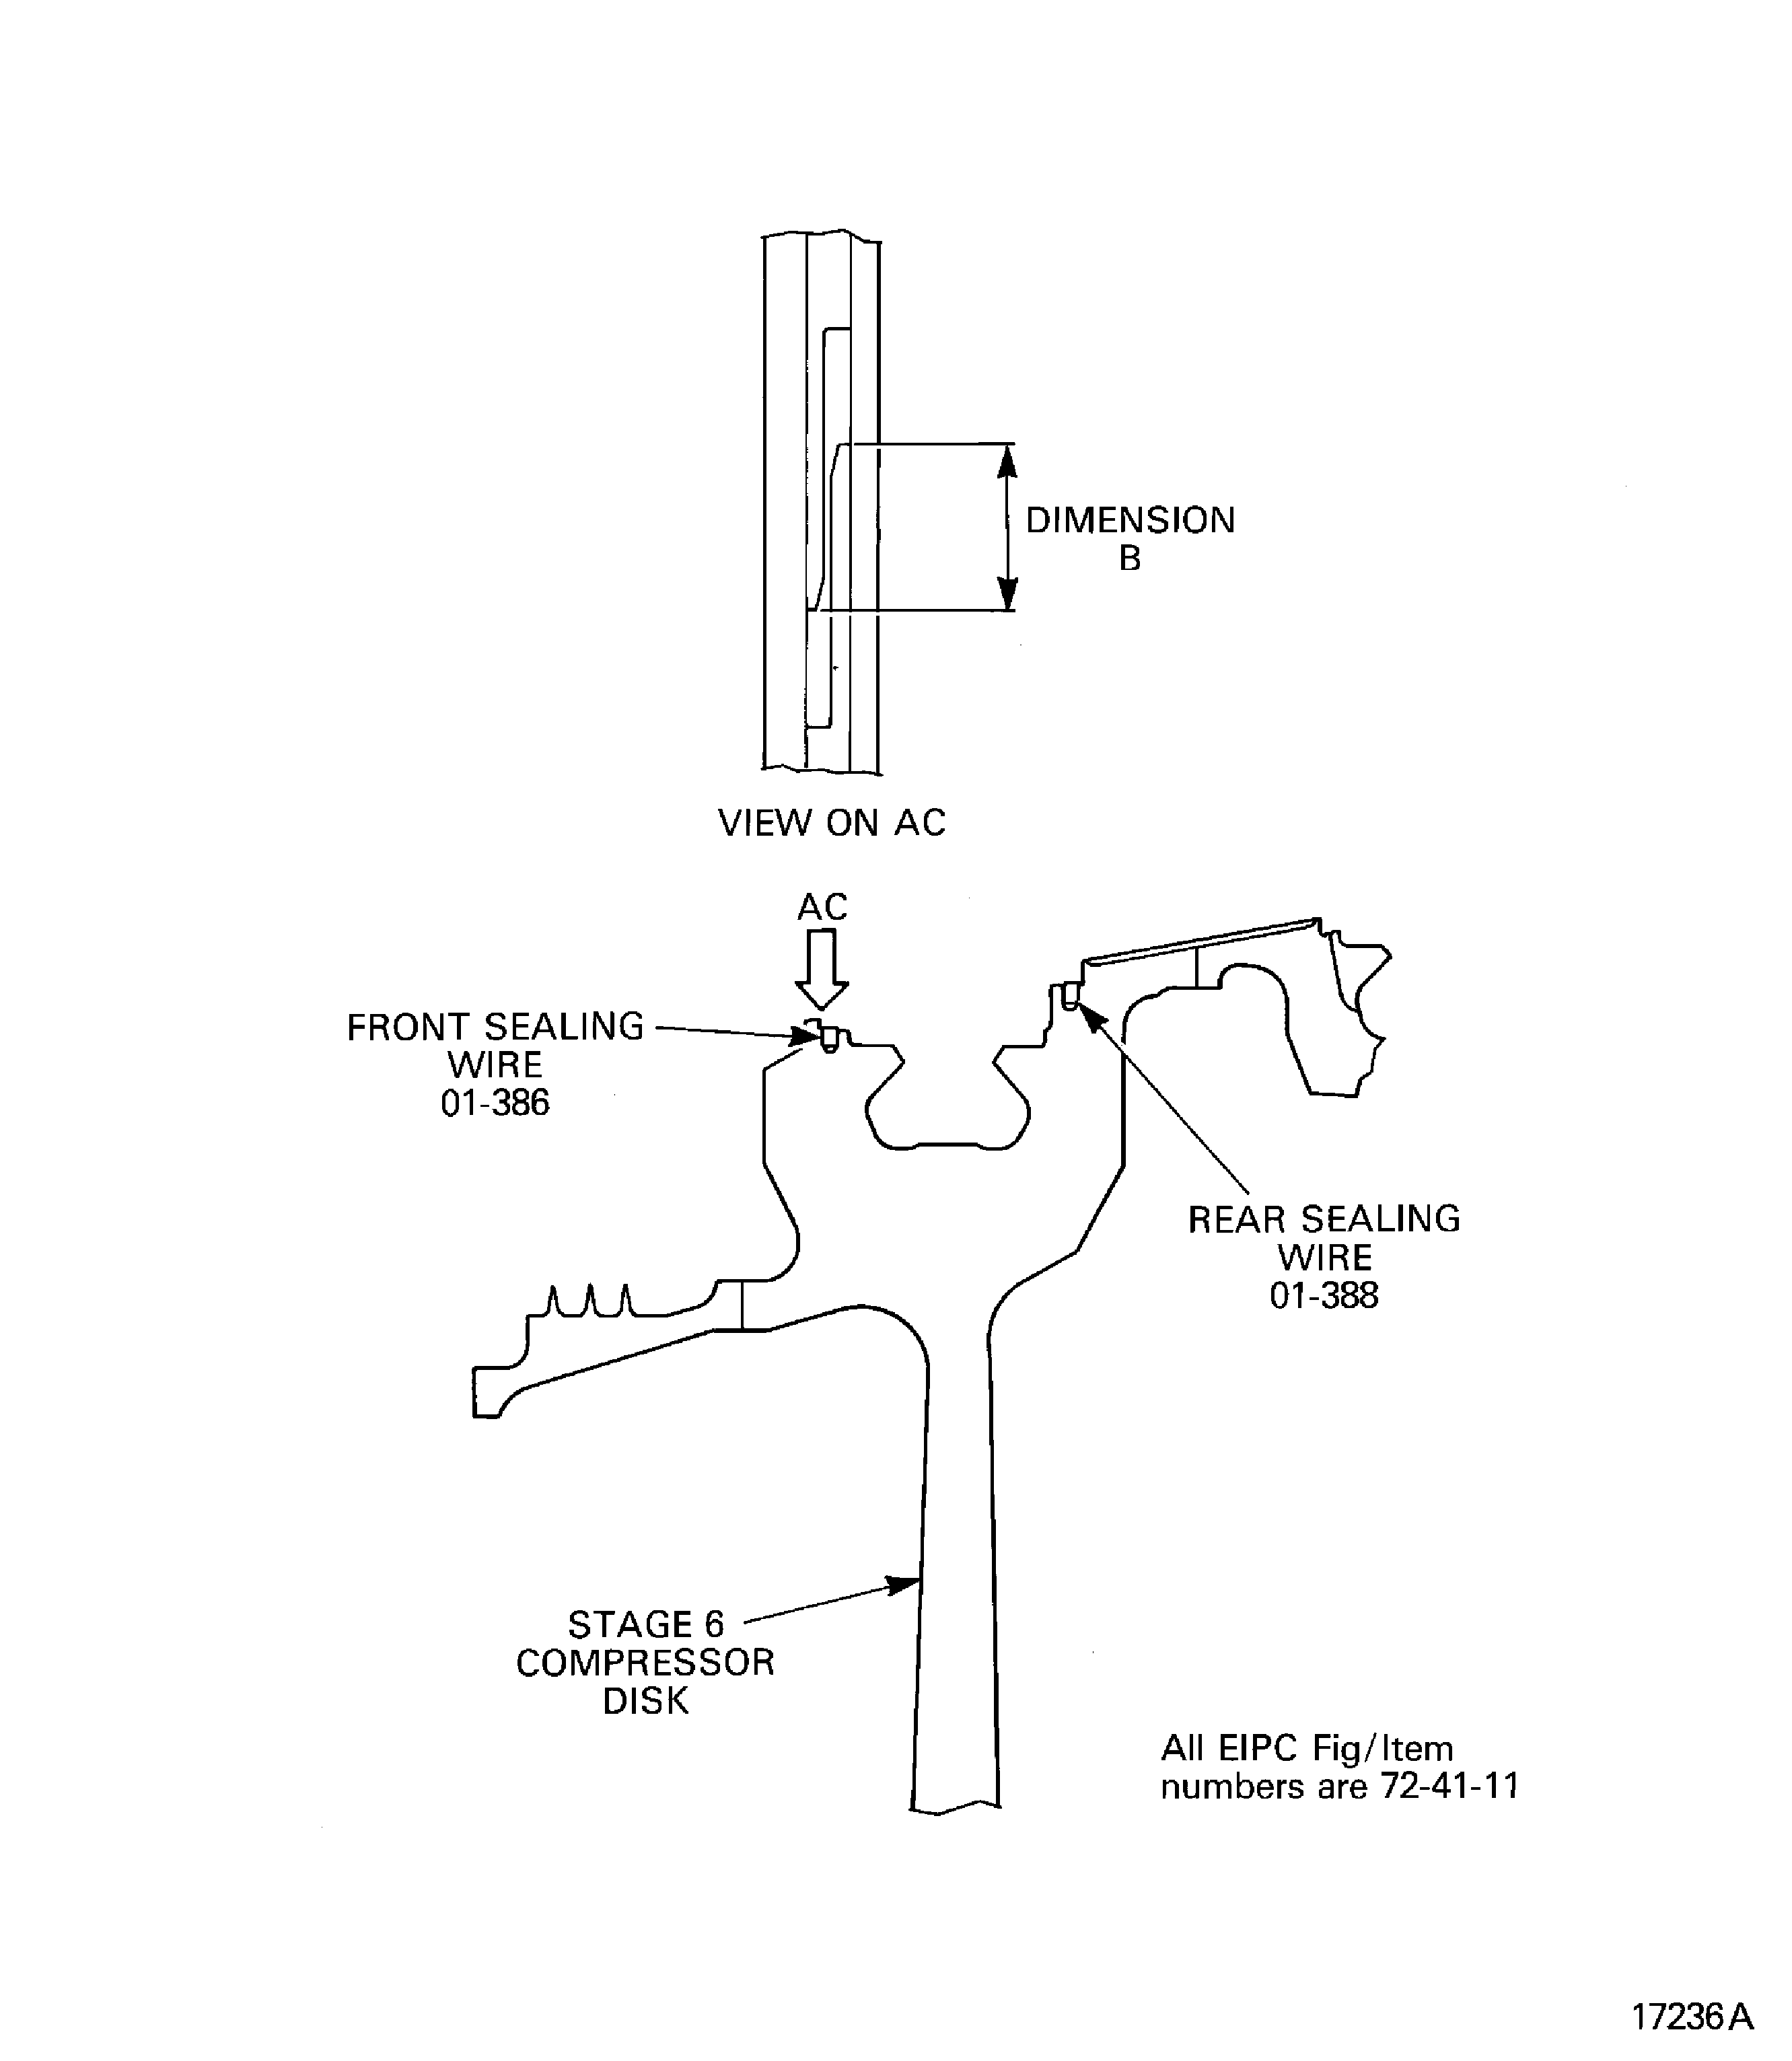
Figure: Install the nut and screw lock assemblies in to the stage 6 disk
Install the nut and screw lock assemblies in to the stage 6 disk
