Export Control
EAR Export Classification: Not subject to the EAR per 15 C.F.R. Chapter 1, Part 734.3(b)(3), except for the following Service Bulletins which are currently published as EAR Export Classification 9E991: SBE70-0992, SBE72-0483, SBE72-0580, SBE72-0588, SBE72-0640, SBE73-0209, SBE80-0024 and SBE80-0025.Copyright
© IAE International Aero Engines AG (2001, 2014 - 2021) The information contained in this document is the property of © IAE International Aero Engines AG and may not be copied or used for any purpose other than that for which it is supplied without the express written authority of © IAE International Aero Engines AG. (This does not preclude use by engine and aircraft operators for normal instructional, maintenance or overhaul purposes.).Applicability
V2500-A5
Common Information
TASK 72-32-10-440-001-B00 No. 3 Bearing Internal Gearbox, And Support Assembly - Assemble, Assembly-001
General
This TASK gives the procedure to assembly the No. 3 Bearing Internal Gearbox and Support Assembly.
Fig/item numbers in parentheses in the procedure agree with those used in the IPC. Only the primary Fig/item numbers are used. For the service bulletin alpha variants refer to the IPC.
For all parts identified in a different Chapter/Section/Subject, the applicable Chapter/Section/Subject comes before the Fig/item number.
For standard torque data and procedures, refer to the SPM TASK 70-41-00-400-501 and SPM TASK 70-41-02-400-501.
Special torque data and assembly tolerances are included in the procedure.
Special torque data is identified with the symbol * after the torque value.
Lubricate all threads and abutment faces of nuts and bolts with CoMat 10-077 APPROVED ENGINE OILS, unless other lubricants are referred to in the procedure.
To identify, lubricate and install seal rings, refer to the SPM TASK 70-64-02-640-501.
For cupwasher installation, refer to the SPM TASK 70-42-04-400-501.
The abbreviation Intf shows an interference or tight fit. This causes REJECT IF MORE THAN to become REJECT IF LESS THAN. The abbreviation Clear shows a clearance fit.
The number for each radial location must be identified in a clockwise direction. These start at the engine top position when you look from the rear of the engine, unless stated differently in the procedure.
Refer to Figure for a sectional view of the No. 3 Bearing Internal Gearbox and Support Assembly.
NOTE
NOTE
Preliminary Requirements
Pre-Conditions
NONESupport Equipment
| Name | Manufacturer | Part Number / Identification | Quantity | Remark |
|---|---|---|---|---|
| Digital depth gage | LOCAL | Digital depth gage | (Alternative to dial indicator (part of IAE 1J12356 Setting gage 1 off)) | |
| Arbor Press | LOCAL | Arbor Press | ||
| Oven | LOCAL | Oven | ||
| Heat protection gloves | LOCAL | Heat protection gloves | ||
| Thickness gage | LOCAL | Thickness gage | (feeler gage) | |
| IAE 1J12021 Lifting spacer | 0AM53 | IAE 1J12021 | 1 | |
| IAE 1J12339 Spanner wrench | 0AM53 | IAE 1J12339 | 1 | |
| IAE 1J12343 PTO bearing pusher | 0AM53 | IAE 1J12343 | 1 | |
| IAE 1J12345 Base plate | 0AM53 | IAE 1J12345 | 1 | |
| IAE 1J12346 Spanner wrench | 0AM53 | IAE 1J12346 | 1 | |
| IAE 1J12347 PTO bearing pusher | 0AM53 | IAE 1J12347 | 1 | |
| IAE 1J12353 TBD | 0AM53 | IAE 1J12353 | 1 | |
| IAE 1J12355 Spanner wrench | 0AM53 | IAE 1J12355 | 1 | |
| IAE 1J12528 Setting gage | 0AM53 | IAE 1J12528 | 1 | |
| IAE 1J12357 Spigot holder | 0AM53 | IAE 1J12357 | 1 | |
| IAE 1J12362 Work stand | 0AM53 | IAE 1J12362 | 1 | |
| IAE 1J12364 Measuring holder | 0AM53 | IAE 1J12364 | 1 | |
| IAE 1J12365 PTO bearing pusher | 0AM53 | IAE 1J12365 | 1 | |
| IAE 1J12366 Spanner wrench | 0AM53 | IAE 1J12366 | 1 | |
| IAE 1J12367 Tab bender | 0AM53 | IAE 1J12367 | 1 | |
| IAE 1J12368 Oil sleeve pusher | 0AM53 | IAE 1J12368 | 1 | |
| IAE 1J12369 PTO bearing pusher | 0AM53 | IAE 1J12369 | 1 | |
| IAE 1J12371 Dummy phonic wheel | 0AM53 | IAE 1J12371 | 1 | |
| IAE 1J12381 Tab bender | 0AM53 | IAE 1J12381 | 1 | |
| IAE 1J12382 Hydraulic seal pusher | 0AM53 | IAE 1J12382 | 1 | |
| IAE 1J12385 Backlash fixture | 0AM53 | IAE 1J12385 | 1 | |
| IAE 1J12422 Gearshaft holder | 0AM53 | IAE 1J12422 | 1 | |
| IAE 1J12447 PTO housing holder | 0AM53 | IAE 1J12447 | 1 | |
| IAE 1J12448 Restraint holder | 0AM53 | IAE 1J12448 | 1 | |
| IAE 1J12449 Installation holder | 0AM53 | IAE 1J12449 | 1 | |
| IAE 1J12188 Puller bolt | 0AM53 | IAE 1J12188 | 1 |
Consumables, Materials and Expendables
| Name | Manufacturer | Part Number / Identification | Quantity | Remark |
|---|---|---|---|---|
| CoMat 02-001 ADHESIVE TAPE (MASKING) | LOCAL | CoMat 02-001 | ||
| CoMat 06-069 MARKER | IE207 | CoMat 06-069 | ||
| CoMat 10-077 APPROVED ENGINE OILS | X333X | CoMat 10-077 |
Spares
| Name | Manufacturer | Part Number / Identification | Quantity | Remark |
|---|---|---|---|---|
| Seal ring | 1 | |||
| Seal ring | 1 | |||
| Cupwasher | 1 | |||
| Cupwasher | 1 | |||
| Seal ring | 1 | |||
| Seal ring | 1 | |||
| Seal ring | 1 | |||
| Seal ring | 1 | |||
| Seal ring | 1 | |||
| Seal ring | 1 | |||
| Seal ring | 1 | |||
| Seal ring | 1 | |||
| Lock plate | 1 |
Safety Requirements
NONEProcedure
Refer to Figure.
Reference dimensions at location 0501. If required, use the data written as the note in TASK 72-32-16-200-000 (INSPECTION-000).
Table 1. Fits and Clearances (all dimensions are in inches) NEW PART
WORN PART
DIMENSIONS
DIMENSIONS
PART IDENT
Size
Clearance
(Non-select)
REJECT IF
MORE THAN
LOCATION 0501
Bevel Gearshaft Gearbox Driven Gearshaft And Housing Assembly (72-32-16, 01-750)
Inner Roller Bearing Gearbox Driven Gearshaft And Housing Assembly (72-32-16, 01-300)
Bevel Gearshaft Outside Diameter
1.9689
Intf
1.9692
0.0004
Inner Roller Diameter Bore Diameter
1.9683
0.0009
1.9685
Intf
Table 2. Fits and Clearances (all dimensions are in millimeters) NEW PART
WORN PART
DIMENSIONS
DIMENSIONS
PART IDENT
Size
Clearance
(Non-select)
REJECT IF
MORE THAN
LOCATION 0501
Bevel Gearshaft Gearbox Driven Gearshaft And Housing Assembly (72-32-16, 01-750)
Inner Roller Bearing Gearbox Driven Gearshaft And Housing Assembly (72-32-16, 01-300)
Bevel Gearshaft Outside Diameter
50.009
Intf
50.020
0.009
Inner Roller Bearing Bore Diameter
49.994
0.026
50.000
Intf
SUBTASK 72-32-10-220-062 Reference Fits and Clearances of the Bevel Gearshaft and Inner Roller Bearing at Location 0501
Refer to Figure.
Reference dimensions at location 0505. If required, use the data written as a note in TASK 72-32-16-200-000 (INSPECTION-000).
Table 3. Fits and Clearances (all dimensions are in inches) NEW PART
WORN PART
DIMENSIONS
DIMENSIONS
PART IDENT
Size
Clearance
(Non-select)
REJECT IF
MORE THAN
LOCATION 0505
Bevel Gearshaft Gearbox Driven Gearshaft And Housing Assembly (72-32-16, 01-750)
Inner Ball Bearing Gearbox Driven Gearshaft And Housing Assembly (72-32-16, 01-600)
Bevel Gearshaft Outside Diameter
1.7720
Intf
1.7724
0.0004
Inner Ball Bearing Bore Diameter
1.7715
0.0009
1.7716
Intf
Table 4. Fits and Clearances (all dimensions are in millimeters) NEW PART
WORN PART
DIMENSIONS
DIMENSIONS
PART IDENT
Size
Clearance
(Non-select)
REJECT IF
MORE THAN
LOCATION 0505
Bevel Gearshaft Gearbox Driven Gearshaft And Housing Assembly (72-32-16, 01-750)
Inner Ball Bearing Gearbox Driven Gearshaft And Housing Assembly (72-32-16, 01-600)
Bevel Gearshaft Outside Diameter
45.009
Intf
45.020
0.009
Inner Ball Bearing Bore Diameter
44.994
0.026
45.000
Intf
SUBTASK 72-32-10-220-063 Reference Fits and Clearances of the Bevel Gearshaft and Inner Ball Bearing at Location 0505
Refer to Figure.
Reference dimensions at location 0507. If required, use the data written as the note in TASK 72-32-16-200-000 (INSPECTION-000).
Table 5. Fits and Clearances (all dimensions are in inches) NEW PART
WORN PART
DIMENSIONS
DIMENSIONS
PART IDENT
Size
Clearance
(Non-select)
REJECT IF
MORE THAN
LOCATION 0507
Bevel Gearshaft Gearbox Driven Gearshaft And Housing Assembly (72-32-16, 01-750)
Inner Roller Bearing Gearbox Driven Gearshaft And Housing Assembly (72-32-16, 01-500)
Bevel Gearshaft Outside Diameter
1.7720
Intf
1.7724
0.0004
Inner Roller Bearing Bore Diameter
1.7715
0.0009
1.7716
Intf
Table 6. Fits and Clearances (all dimensions are in millimeters) NEW PART
WORN PART
DIMENSIONS
DIMENSIONS
PART IDENT
Size
Clearance
(Non-select)
REJECT IF
MORE THAN
LOCATION 0507
Bevel Gearshaft Gearbox Driven Gearshaft And Housing Assembly (72-32-16, 01-750)
Inner Roller Bearing Gearbox Driven Gearshaft And Housing Assembly (72-32-16, 01-500)
Bevel Gearshaft Outside Diameter
45.009
Intf
45.020
0.009
Inner Roller Bearing Bore Diameter
44.994
0.026
45.000
Intf
SUBTASK 72-32-10-220-064 Reference Fits and Clearances of the Bevel Gearshaft and Inner Roller Bearing at Location 0507
Refer to Figure.
Reference dimensions at location 0117. If required, use the data written as a note in TASK 72-32-19-200-000 (INSPECTION-000).
Table 7. Fits and Clearances (all dimensions are in inches) NEW PART
WORN PART
DIMENSIONS
DIMENSIONS
PART IDENT
Size
Clearance
(Non-select)
REJECT IF
MORE THAN
LOCATION 0117
Hydraulic Ring ENGINE-HYDRAULIC SEAL ASSEMBLY (72-32-19, 01-140), Inner Diameter
Hydraulic Seal ENGINE-HYDRAULIC SEAL ASSEMBLY (72-32-19, 01-100), Outside Diameter
Hydraulic Ring Inner Diameter
4.2528
Intf
4.2520
0.0007
Hydraulic Seal Outside Diameter
4.2542
0.0022
4.2535
Intf
Table 8. Fits and Clearances (all dimensions are in millimeters) NEW PART
WORN PART
DIMENSIONS
DIMENSIONS
PART IDENT
Size
Clearance
(Non-select)
REJECT IF
MORE THAN
LOCATION 0117
Hydraulic Ring ENGINE-HYDRAULIC SEAL ASSEMBLY (72-32-19, 01-140), Inner Diameter
Hydraulic Seal ENGINE-HYDRAULIC SEAL ASSEMBLY (72-32-19, 01-100), Outside Diameter
Hydraulic Ring Inner Diameter
108.020
Intf
108.000
0.017
Hydraulic Seal Outside Diameter
108.059
0.059
108.037
Intf
SUBTASK 72-32-10-220-065 Reference Fits and Clearances of the Hydraulic Ring and the Hydraulic Seal at Location 0117
Refer to Figure.
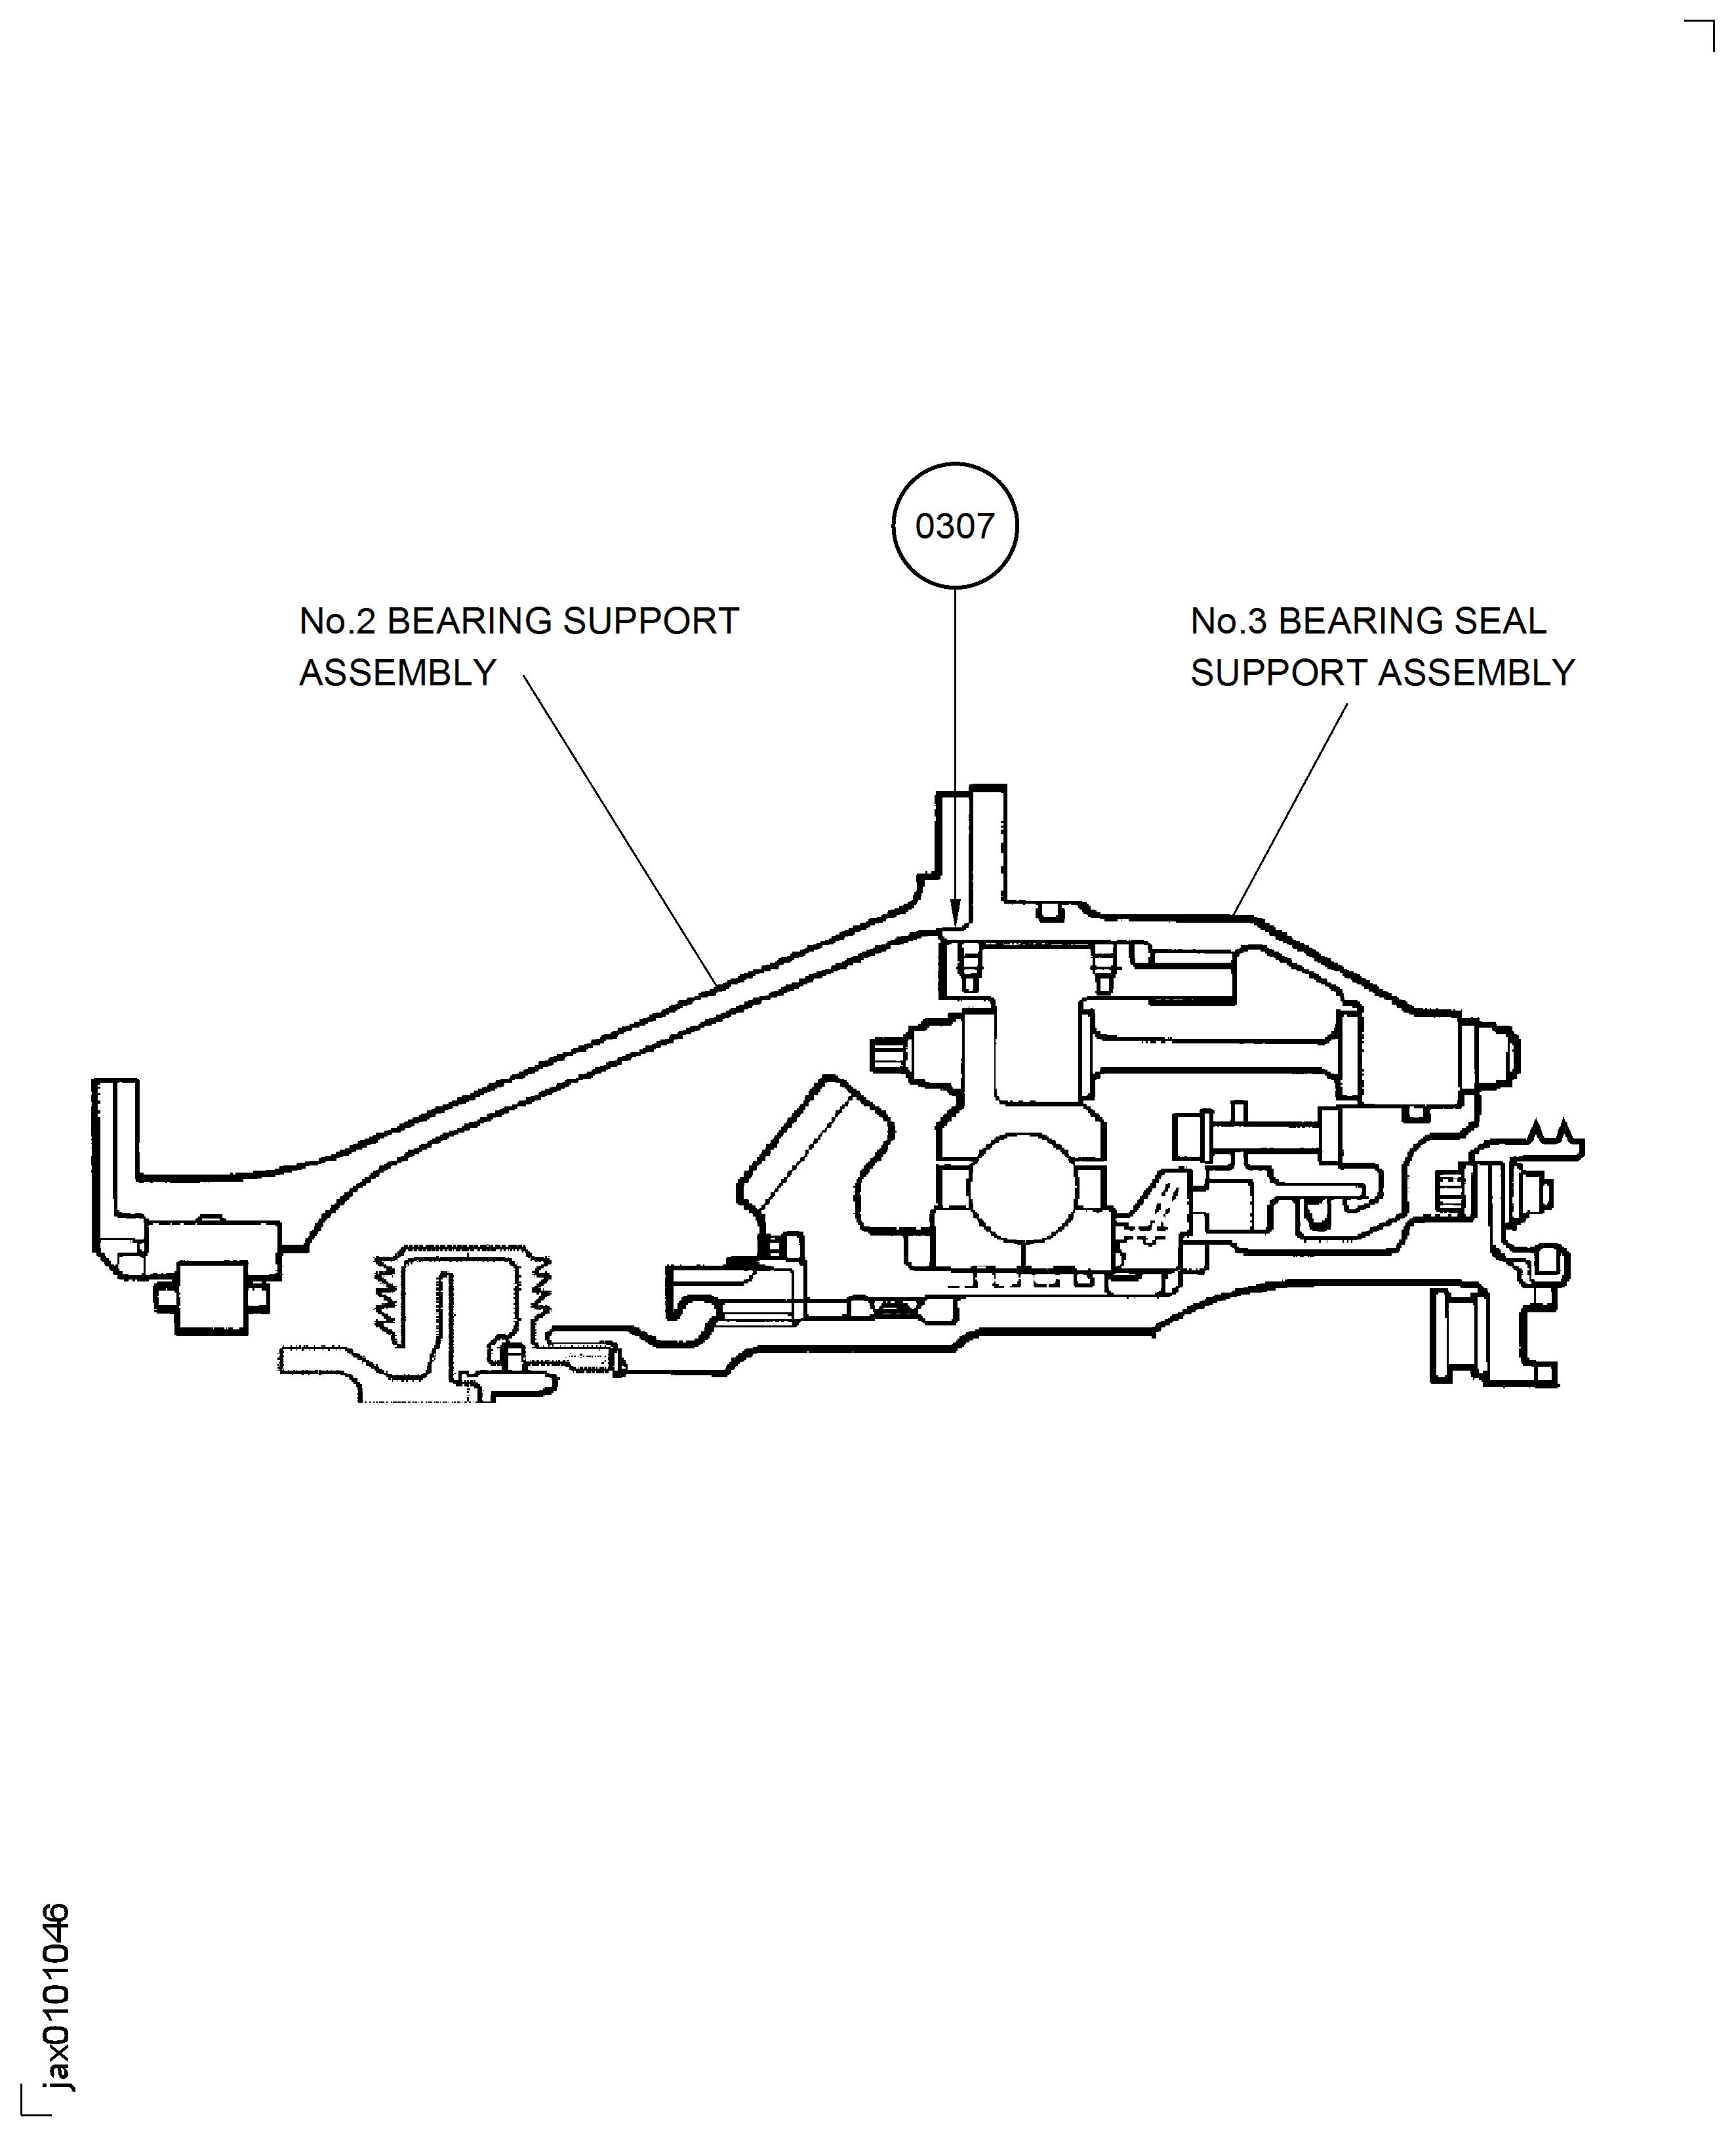
Reference dimensions at Location 0307. If required, use the data noted in TASK 72-32-17-200-000 (INSPECTION-000) and TASK 72-32-22-200-000 (INSPECTION-000).
Table 9. Fits and Clearances (all dimensions are in inches) NEW PART
WORN PART
DIMENSIONS
DIMENSIONS
PART IDENT
Size
Clearance
(Non-select)
REJECT IF
MORE THAN
LOCATION 0307
No. 2 Bearing Support No. 2 Bearing Support And Related Parts (72-32-17, 01-850)
No. 3 Bearing Seal Support ENGINE-NO.3 BEARING SEAL SUPPORT (72-32-22, 01-040)
No. 2 Bearing Support Inner Diameter
10.9798
Intf
10.9798
Intf
10.9807
0.0013
10.9807
0.0013
No. 3 Bearing Seal Support Outside Diameter
10.982
0.0062
10.982
0.0062
10.986
Intf
10.986
Intf
Table 10. Fits and Clearances (all dimensions are in millimeters) NEW PART
WORN PART
DIMENSIONS
DIMENSIONS
PART IDENT
Size
Clearance
(Non-select)
REJECT IF
MORE THAN
LOCATION 0307
No. 2 Bearing Support No. 2 Bearing Support And Related Parts (72-32-17, 01-850)
No. 3 Bearing Seal Support ENGINE-NO.3 BEARING SEAL SUPPORT (72-32-22, 01-040)
No. 2 Bearing Support Inner Diameter
278.886
Intf
278.886
Intf
278.911
0.032
278.911
0.032
No. 3 Bearing Seal Support Outside Diameter
278.943
0.158
278.943
0.158
279.044
Intf
279.044
Intf
SUBTASK 72-32-10-220-073 Reference Fits and Clearances of the No. 2 Bearing Support and the No. 3 Bearing Seal Support at Location 0307
Refer to Figure.
SUBTASK 72-32-10-440-120 Identify the No. 3 Bearing Internal Gearbox and Support Assembly (Sub-Module)
Refer to Figure.
SUBTASK 72-32-10-220-067 Find the Value of the Mounting Distance of the Bevel Gearshaft Wheel (72-32-26,01-400)
Refer to Figure.
SUBTASK 72-32-10-220-068 Measure the Thickness of the Inner Races of the No. 3 Bearing (72-32-10,01-100)
Refer to Figure.
Safety IAE 1J12357 Spigot holder 1 off to IAE 1J12345 Base plate 1 off with the four bolts (part of the spigot holder).
Cover the threads of the location spigot with CoMat 02-001 ADHESIVE TAPE (MASKING) to prevent damage to the No. 3 Bearing.
Install the No. 3 Bearing inner race rear half No. 3 Bearing (72-32-24, 01-100) to the location spigot (part of IAE 1J12528 Setting gage 1 off).
NOTE
The No. 3 Bearing and Support Assembly is assembled in TASK 72-32-20-440-001-A00 (ASSEMBLY-001) and TASK 72-32-20-440-001-B00 (ASSEMBLY-001).NOTE
The No. 3 Bearing and Support Assembly and No. 3 Bearing inner races are temporarily installed to find the adjusting washers.Install the No. 3 Bearing inner race rear half No. 3 Bearing (72-32-24, 01-100) through the location spigot on the inner race front half.
Put the No. 3 Bearing and Support Assembly on the location spigot.
NOTE
Hold the Ball and Cage Assembly together by hand when you move the No. 3 Bearing and Support Assembly because the ball and cage can release from the outer race.
CAUTION
CAREFULLY LOWER THE INNER RACE SO AS NOT TO HIT THE NO. 3 BEARING BALLS AND THE THREADS ON THE LOCATION SPIGOT. THE INNER RACE OR THE LOCATION SPIGOT CAN POSSIBLY CAUSE DAMAGE TO THE BALLS OR THE INNER RACE.Remove the adhesive tape from the location spigot.
NOTE
The Inner race front half has a step at the inner diameter. The inner race rear half has a smaller step and oil slots.
Tighten the No. 3 Bearing and Support Assembly on to the setting gage with the nut C (part of the setting gage).
SUBTASK 72-32-10-440-085 Install the No. 3 Bearing and Support Assembly (72-32-20) to the Setting Gage
Install the assembly to IAE 1J12362 Work stand 1 off.
SUBTASK 72-32-10-440-086 Install the No. 3 Bearing and Support Assembly to the Work Stand
Refer to Figure.
Lubricate the front surface of the thrust ring with CoMat 10-077 APPROVED ENGINE OILS.
Install the thrust base (part of the setting gage) and the thrust ring (part of the setting gage) to the No. 3 Bearing and Support Assembly.
SUBTASK 72-32-10-440-087 Install the Inspection Spigot (Part of the Setting Gage) to the Location Spigot
Refer to Figure.
Install the dummy gearshaft to IAE 1J12364 Measuring holder 1 off.
Lubricate the mating surface of the nut A (part of the setting gage) with the dummy bearing with CoMat 10-077 APPROVED ENGINE OILS.
Install the dummy bearing, part of the setting gage, on to the dummy gearshaft.
Install the retaining plate Gearbox Driven Gearshaft And Housing Assembly (72-32-16,01-170) on to the dummy gearshaft.
Lubricate the mating surface of the nut B (part of the setting gage) with the inner roller bearing with CoMat 10-077 APPROVED ENGINE OILS.

CAUTION
CAREFULLY INSTALL THE BEARING SO THAT THE THREADS OF THE DUMMY GEARSHAFT DO NOT CAUSE DAMAGE TO THE BEARING.Install the ball bearing Gearbox Driven Gearshaft And Housing Assembly (72-32-16,01-600) and the inner roller bearing Gearbox Driven Gearshaft And Housing Assembly (72-32-16,01-500) on to the dummy gearshaft.
SUBTASK 72-32-10-440-088 Install the PTO Bearings and the Dummy Bearing to the Dummy Gearshaft (Part of the Setting Gage)
Refer to Figure.
Safety IAE 1J12447 PTO housing holder 1 off on to the base plate with the four bolts (part of the PTO housing holder).
Put IAE 1J12347 PTO bearing pusher 1 off on the bearing.
Install the outer roller bearing to the Gearshaft Bearing Housing.
SUBTASK 72-32-10-440-089 Install the Outer Roller Bearing (72-32-16,01-240) in to the Gearshaft Bearing Housing (72-32-16, 01-150)
Refer to Figure.
Safety the retaining plate Gearbox Driven Gearshaft And Housing Assembly (72-32-16,01-170) to the Gearshaft Bearing Housing with the four bolts Gearbox Driven Gearshaft And Housing Assembly (72-32-16,01-180) and torque the bolts to 85 lbfin to 105 lbfin (10.00 Nm to 12.00 Nm).
Lightly tighten the thrust nut with IAE 1J12366 Spanner wrench 1 off.
Install the thrust nut (part of the setting gage) on to the dummy gearshaft.
SUBTASK 72-32-10-440-090 Install the Gearshaft Bearing Housing on to the Dummy Gearshaft
Refer to Figure.
SUBTASK 72-32-10-440-091 Install the Gage Arbor (Part of the Setting Gage) in to the Dummy Gearshaft
Refer to Figure.
Put the No. 2 Bearing Support No. 2 Bearing Support And Related Parts (72-32-17,01-850) on a work bench with the rear end down.
Lubricate the outer diameter surface of the dummy outer race with CoMat 10-077 APPROVED ENGINE OILS.
Safety the No. 2 Bearing retainer No. 2 Bearing Support And Related Parts (72-32-17,01-300) to the No. 2 Bearing Support with the three bolts No. 2 Bearing Support And Related Parts (72-32-17,01-320) and nuts No. 2 Bearing Support And Related Parts (72-32-17,01-310). Torque the nuts to 85 lbfin to 105 lbfin (10.00 Nm to 12.00 Nm).
SUBTASK 72-32-10-440-092 Install the Dummy Outer Race (Part of the Setting Gage) in to the No. 2 Bearing Support
Refer to Figure.
Lubricate the outer diameter surface of the dummy bearing, on the dummy gearshaft with CoMat 10-077 APPROVED ENGINE OILS.
Safety the Gearshaft Bearing Housing with the eight bolts No. 3 Bearing, Internal Gearbox, And Support Assembly (72-32-10,01-110) and torque the bolts to 85 lbfin to 105 lbfin (10.00 Nm to 12.00 Nm).
Install the Gearshaft Bearing Housing and dummy Gearshaft Assembly to the No. 2 Bearing Support.
SUBTASK 72-32-10-440-093 Assemble the Setting Gage
Find the adjusting washer of which thickness is nearest to A2. Refer to Figure.
Calculate the thickness of the adjusting washer.
Use the adjusting washer when you do TASK 72-32-20-440-001-A00 (ASSEMBLY-001) and TASK 72-32-20-440-001-B00 (ASSEMBLY-001).
SUBTASK 72-32-10-440-094 Calculate the Thickness of the Adjusting Washer-PTO (72-32-26,01-430 to 72-32-26,01-444 and 72-32-26,01-451 to 72-32-26,01-454)
Find the adjusting washer of which thickness is nearest to A1. Refer to Figure.
Calculate the thickness of the adjusting washer.
SUBTASK 72-32-10-440-095 Calculate the Thickness of the Adjusting Washer (72-32-16,01-660 to 72-32-16,01-690)
Remove the thrust nut and the thrust bearing (part of the setting gage) from the dummy gearshaft with the IAE 1J12366 Spanner wrench 1 off.
Release the Gearshaft Bearing Housing from the No. 2 Bearing Support with the three puller bolts (part of IAE 1J12188 Puller bolt 1 off).
SUBTASK 72-32-10-440-096 Remove the Gearshaft Bearing Housing and the Dummy Gearshaft assembly from the No. 2 Bearing Support
Refer to Figure.
SUBTASK 72-32-10-440-098 Remove the No. 2 Bearing Support from the No. 3 Bearing and Support Assembly
Refer to Figure.
SUBTASK 72-32-10-440-099 Remove the Dummy Outer Race from the No. 2 Bearing Support
Refer to Figure.
SUBTASK 72-32-10-440-100 Remove the Thrust Ring and the Thrust Base from the No. 3 Bearing and Support Assembly
Refer to Figure.
Cover the threads of the location spigot with CoMat 02-001 ADHESIVE TAPE (MASKING) to prevent damage to the No. 3 Bearing.
Remove the No. 3 Bearing and Support Assembly from the location spigot.
Return the No. 3 Bearing and Support Assembly to TASK 72-32-20-440-001-A00 (ASSEMBLY-001) and TASK 72-32-20-440-001-B00 (ASSEMBLY-001).
SUBTASK 72-32-10-440-102 Remove the No. 3 Bearing from the Location Spigot
Attach IAE 1J12449 Installation holder 1 off to the base plate with the four bolts and tighten the bolts.
Install the Bevel Gearshaft Gearbox Driven Gearshaft And Housing Assembly (72-32-16,01-750) on to the installation holder.
Put IAE 1J12368 Oil sleeve pusher 1 off in to the distributor and push the oil sleeve pusher with the arbor press. Push in the distributor until you can see the slot for the retaining ring of the gearshaft.
Engage the retaining ring Gearbox Driven Gearshaft And Housing Assembly (72-32-16,01-460) with the slot in the Bevel Gearshaft.
Install the distributor Gearbox Driven Gearshaft And Housing Assembly (72-32-16,01-450) in to the Bevel Gearshaft.
Push the Bearing with IAE 1J12365 PTO bearing pusher 1 off.
Put a new Gearbox Driven Gearshaft And Housing Assembly (72-32-16,01-330) cupwasher1 off and the round plain nut Gearbox Driven Gearshaft And Housing Assembly (72-32-16,01-320) on the Bevel Gearshaft.
Install the inner roller bearing Gearbox Driven Gearshaft And Housing Assembly (72-32-16,01-300) on to the Bevel Gearshaft.
Remove the Bevel Gearshaft from the installation holder and put on IAE 1J12422 Gearshaft holder 1 off.
Put IAE 1J12366 Spanner wrench 1 off on the round plain nut.
Put a correlation mark on the Bevel Gearshaft and the nut with CoMat 06-069 MARKER.
Bend on the rim of the cupwasher with IAE 1J12367 Tab bender 1 off to safety the round plain nut.
Tighten the round plain nut.
Remove the Bevel Gearshaft from the gearshaft holder and install the Bevel Gearshaft on to IAE 1J12448 Restraint holder 1 off.
Put the retaining plate Gearbox Driven Gearshaft And Housing Assembly (72-32-16,01-170) on the conical surface of the Bevel Gearshaft.
Put the selected flat adjusting washer on to the Bevel Gearshaft with IAE 1J12369 PTO bearing pusher 1 off. Refer to SUBTASK 72-32-00-440-095 for the selecting procedure.
Heat the inner races of the ball bearing Gearbox Driven Gearshaft And Housing Assembly (72-32-16,01-600) to a temperature of 302 deg F (150 deg C) in an oven for 20 minutes.
Lubricate the bearing journal of the Bevel Gearshaft which touches the inner races with CoMat 10-077 APPROVED ENGINE OILS.

WARNING
BE CAREFUL BECAUSE THE BEARING IS HOT. USE APPROVED GLOVES WHEN YOU REMOVE IT FROM THE OVEN.Remove the inner race upper half from the oven and install on to the Bevel Gearshaft.
NOTE
Refer to Step to identify the inner race halves.Heat the inner roller bearing Gearbox Driven Gearshaft And Housing Assembly (72-32-16,01-500) to a temperature of 302 deg F (150 deg C) in an oven for 20 minutes.
Lubricate the surface of the Bevel Gearshaft which touches the bearing with CoMat 10-077 APPROVED ENGINE OILS.

WARNING
BE CAREFUL BECAUSE THE BEARING IS HOT. USE APPROVED GLOVES WHEN YOU REMOVE IT FROM THE OVEN.Remove the inner roller bearing from the oven and install to the Bevel Gearshaft.
Lubricate the threads and the mating surface of the nut with CoMat 10-077 APPROVED ENGINE OILS.
Install a new Gearbox Driven Gearshaft And Housing Assembly (72-32-16,01-530) cupwasher1 off and the round plain nut on to the Bevel Gearshaft.
Put IAE 1J12346 Spanner wrench 1 off on the round plain nut.
Put correlation mark on the Bevel Gearshaft and the round plain nut with CoMat 06-069 MARKER.
Install the round plain nut Gearbox Driven Gearshaft And Housing Assembly (72-32-16,01-520) on to the Bevel Gearshaft and tighten.
Lubricate the seal ring with CoMat 10-077 APPROVED ENGINE OILS.
Install a new Gearbox Driven Gearshaft And Housing Assembly (72-32-16,01-100) seal ring1 off in to the Bevel Gearshaft.
SUBTASK 72-32-10-440-103 Assemble the Bevel Gearshaft and Bearing Assembly
Make sure that the outer roller bearing Gearbox Driven Gearshaft And Housing Assembly (72-32-16,01-240) is installed to the Gearshaft Bearing Housing.
Lubricate the outer surface of the outer race of the ball bearing and outer roller bearing with CoMat 10-077 APPROVED ENGINE OILS.
Safety the retaining plate to the Gearshaft Bearing Housing with the four bolts Gearbox Driven Gearshaft And Housing Assembly (72-32-16,01-180).
Install the Gearshaft Bearing Housing on to the Bevel Gearshaft and Bearing Assembly.
SUBTASK 72-32-10-440-104 Assemble the Internal Gearbox Driven Gear Assembly
Refer to Figure.
Lubricate the outer diameter surface of the bearing with CoMat 10-077 APPROVED ENGINE OILS.
Put the pressure pad (part of IAE 1J12343 PTO bearing pusher 1 off) in the bearing bore.
Engage the internal retaining ring Gearbox Driven Gearshaft And Housing Assembly (72-32-16,01-390) with the groove of the No. 2 Bearing Support.
Install the outer roller bearing Gearbox Driven Gearshaft And Housing Assembly (72-32-16,01-400) to the No. 2 Bearing Support.
SUBTASK 72-32-10-440-105 Install the Outer Roller Bearing (72-32-16,01-400) to the No. 2 Bearing Support
Pre SBE 72-0553: Put the shims (No. 3 Bearing, Internal Gearbox, And Support Assembly (72-32-10,01-127) to No. 3 Bearing, Internal Gearbox, And Support Assembly (72-32-10,01-130), No. 3 Bearing, Internal Gearbox, And Support Assembly (72-32-10,01-132) to No. 3 Bearing, Internal Gearbox, And Support Assembly (72-32-10,01-135) and No. 3 Bearing, Internal Gearbox, And Support Assembly (72-32-10, 01-142) to No. 3 Bearing, Internal Gearbox, And Support Assembly (72-32-10,01-145)) for fan speed probe and shims (No. 3 Bearing, Internal Gearbox, And Support Assembly (72-32-10,01-137) to No. 3 Bearing, Internal Gearbox, And Support Assembly (72-32-10,01-140)) for trim balance probe.
SBE 72-0553: Put the shims (No. 3 Bearing, Internal Gearbox, And Support Assembly (72-32-10,01-127) to No. 3 Bearing, Internal Gearbox, And Support Assembly (72-32-10,01-130), No. 3 Bearing, Internal Gearbox, And Support Assembly (72-32-10,01-132) to No. 3 Bearing, Internal Gearbox, And Support Assembly (72-32-10,01-135) and No. 3 Bearing, Internal Gearbox, And Support Assembly (72-32-10, 01-142) to No. 3 Bearing, Internal Gearbox, And Support Assembly (72-32-10,01-145)) for fan speed probe and shims (No. 3 Bearing, Internal Gearbox, And Support Assembly (72-32-10,01-136) to No. 3 Bearing, Internal Gearbox, And Support Assembly (72-32-10,01-141)) for trim balance probe.
Put the fan speed probes (ENGINE-FAN SPEED/TRIM BALANCE PROBES (72-32-18,01-100), ENGINE-FAN SPEED/TRIM BALANCE PROBES (72-32-18,01-200) and ENGINE-FAN SPEED/TRIM BALANCE PROBES (72-32-18,01-400)) and the trim balance probe ENGINE-FAN SPEED/TRIM BALANCE PROBES (72-32-18,01-300) on the pins of the mounting brackets A No. 2 Bearing Support And Related Parts (72-32-17,01-200) and B No. 2 Bearing Support And Related Parts (72-32-17,01-100).
Attach the probes to the mounting brackets with the four nuts No. 3 Bearing, Internal Gearbox, And Support Assembly (72-32-10,01-160) and the four nuts No. 3 Bearing, Internal Gearbox, And Support Assembly (72-32-10,01-170). Torque the nuts to 36 lbfin to 45 lbfin (4.00 Nm to 5.00 Nm).
Install the probes on to the mounting brackets.
Attach the two mounting brackets and the No. 2 Bearing retainer to the No. 2 Bearing Support with the bolt No. 2 Bearing Support And Related Parts (72-32-17,01-115), the bolt No. 2 Bearing Support And Related Parts (72-32-17,01-125), the two bolts No. 2 Bearing Support And Related Parts (72-32-17,01-215), the bolt No. 2 Bearing Support And Related Parts (72-32-17,01-225), the three bolts No. 2 Bearing Support And Related Parts (72-32-17,01-215), the bolt No. 2 Bearing Support And Related Parts (72-32-17,01-225), the three bolts No. 2 Bearing Support And Related Parts (72-32-17,01-320), the two bolts No. 2 Bearing Support And Related Parts (72-32-17,01-330), the two nuts No. 2 Bearing Support And Related Parts (72-32-17,01-110), the nut No. 2 Bearing Support And Related Parts (72-32-17,01-120), the two nuts No. 2 Bearing Support And Related Parts (72-32-17,01-210), the nut No. 2 Bearing Support And Related Parts (72-32-17,01-220) and the three nuts No. 2 Bearing Support And Related Parts (72-32-17,01-310). Torque the bolts and nuts to 85 lbfin to 105 lbfin (10.00 Nm to 12.00 Nm).
NOTE
Measure the clearances A over the width W of the probes.
Install IAE 1J12371 Dummy phonic wheel 1 off, the No. 2 Bearing retainer No. 2 Bearing Support And Related Parts (72-32-17,01-300) and the mounting brackets on to the No. 2 Bearing Support.
0.0236 in. to 0.0354 in. (0.600 mm to 0.900 mm).
Limit for the fan speed probes and the trim balance probe:
Pre SBE 72-0553: Make sure the clearance A is in the following limit:
0.0236 in. to 0.0354 in. (0.600 mm to 0.900 mm).
Limit for the fan speed probes:
0.067 in. to 0.075 in. (1.70 mm to 1.90 mm).
Limit for the trim balance probe:
SBE 72-0553: Make sure the clearance A is in the following limit:
SUBTASK 72-32-10-440-106 Select the Shim (Pre SBE 72-0553 and SBE 72-0553)

CAUTION
CAREFULLY INSTALL THE PROBES SO THAT THE SURFACE B IS CLEAN AND NOT DAMAGED. DAMAGE AND DIRT CAN CAUSE MALFUNCTION OF THE PROBES.Find the necessary shim thickness from Step.
Attach the selected shims and the probes on to the mounting brackets.
NOTE
Pre SBE 72-0553: Do not install more than three shims onto each pin of the mounting bracket.NOTE
SBE 72-0553: Do not install more than two shims for the new trim balance probe onto each pin of the mounting bracket.Do not install more than three shims for the fan speed probes onto the pin of the mounting bracket.Go to Step.
SUBTASK 72-32-10-440-107 Replace the Shims on to the Mounting Brackets (Pre SBE 72-0553 and SBE 72-0553)

CAUTION
DO NOT APPLY PRESSURIZED AIR TO THE INLET HOLE IN THE OIL JET. PRESSURIZED AIR CAN PUSH UNWANTED MATERIAL IN TO THE THROAT IN THE OIL JET. THE UNWANTED MATERIAL CAUSES A BLOCKAGE.DO NOT PUSH A HAND TOOL IN TO THE EXIT HOLE TO EXAMINE ITS CLEARANCE. THE HAND TOOL CAN CAUSE DAMAGE TO THE HOLE.If the air does not flow at the inlet holes, reject the oil jet.
Do a clear passage test for the oil jets No. 2 Bearing Support And Related Parts (72-32-17,01-400), No. 2 Bearing Support And Related Parts (72-32-17,01-500), No. 2 Bearing Support And Related Parts (72-32-17,01-600) and No. 2 Bearing Support And Related Parts (72-32-17,01-700).
Lubricate a new No. 2 Bearing Support And Related Parts (72-32-17,01-720) seal ring1 off and a new No. 2 Bearing Support And Related Parts (72-32-17,01-730) seal ring1 off with CoMat 10-077 APPROVED ENGINE OILS. Put the seal rings on to the grooves in the oil jet.
Put the oil jet strainer No. 2 Bearing Support And Related Parts (72-32-17,01-760) on the oil jet.
Attach the seal rings and the strainer on to the No. 2 Bearing oil jet No. 2 Bearing Support And Related Parts (72-32-17,01-700).
Lubricate a new No. 2 Bearing Support And Related Parts (72-32-17,01-620) seal ring1 off and a new No. 2 Bearing Support And Related Parts (72-32-17,01-630) seal ring1 off with CoMat 10-077 APPROVED ENGINE OILS. Put the seal rings in to the grooves in the oil jet.
Put the oil jet strainer No. 2 Bearing Support And Related Parts (72-32-17, 01-660) on the oil jet.
Attach the seal rings and the strainer on to the No. 3 Bearing oil jet No. 2 Bearing Support And Related Parts (72-32-17,01-600).
Lubricate a new No. 2 Bearing Support And Related Parts (72-32-17,01-520) seal ring1 off and a new No. 2 Bearing Support And Related Parts (72-32-17,01-530) seal ring1 off with CoMat 10-077 APPROVED ENGINE OILS. Put the seal rings in to the grooves in the oil jet.
Put the oil jet strainer No. 2 Bearing Support And Related Parts (72-32-17,01-560) on the oil jet.
Attach the seal rings and the strainer on to the bevel gear oil jet No. 2 Bearing Support And Related Parts (72-32-17,01-500).
Lubricate a new No. 2 Bearing Support And Related Parts (72-32-17,01-420) seal ring1 off and a new No. 2 Bearing Support And Related Parts (72-32-17,01-430) seal ring1 off with CoMat 10-077 APPROVED ENGINE OILS. Put the seal rings in to the grooves in the oil jet.
Put the oil jet strainer No. 2 Bearing Support And Related Parts (72-32-17,01-460) on the oil jet.
Attach the seal rings and the strainer on to the tower shaft oil jet No. 2 Bearing Support And Related Parts (72-32-17,01-400).

CAUTION
POINT THE EXIT HOLE OF THE TOWER SHAFT OIL JET IN THE CORRECT DIRECTION. IF THE HOLE IS IN AN INCORRECT DIRECTION, THE HOLE CAN NOT SUPPLY OIL TO THE BEARINGS. IT CAN CAUSE DAMAGE TO THE BEARINGS.Put the oil jets in the holes in the No. 2 Bearing Support. Exit hole of the tower shaft oil jet must point in direction X.
Attach the oil jets with the two bolts No. 2 Bearing Support And Related Parts (72-32-17,01-410), the bolt No. 2 Bearing Support And Related Parts (72-32-17,01-510) and the bolt No. 2 Bearing Support And Related Parts (72-32-17,01-710). Torque the bolts to 36 lbfin to 45 lbfin (4.00 Nm to 5.00 Nm).
Install the No. 2 Bearing oil jet, the bevel gear oil jet and the tower shaft oil jet to the No. 2 Bearing Support.
Safety the No. 3 Bearing oil jet with the bolt No. 2 Bearing Support And Related Parts (72-32-17,01-610). Torque the bolt to 85 lbfin to 105 lbfin (10.00 Nm to 12.00 Nm).
Install the No. 3 Bearing oil jet to the No. 2 Bearing Support.
SUBTASK 72-32-10-440-108 Install the Oil Jets to the No. 2 Bearing Support
Lubricate the anti-torque lug with CoMat 10-077 APPROVED ENGINE OILS.
Install the No. 2 Roller Bearing Outer No. 2 Bearing (72-32-52,01-100) in to the No. 2 Bearing Support.
Safety the Brackets and the Retainer to the Support with the bolt No. 2 Bearing Support And Related Parts (72-32-17,01-115), the bolt No. 2 Bearing Support And Related Parts (72-32-17,01-125), the two bolts No. 2 Bearing Support And Related Parts (72-32-17,01-215), the bolt No. 2 Bearing Support And Related Parts (72-32-17,01-225), the three bolts No. 2 Bearing Support And Related Parts (72-32-17,01-320), the two bolts No. 2 Bearing Support And Related Parts (72-32-17,01-330), the two nuts No. 2 Bearing Support And Related Parts (72-32-17,01-110), the nut No. 2 Bearing Support And Related Parts (72-32-17,01-120), the two nuts No. 2 Bearing Support And Related Parts (72-32-17,01-210), the nut No. 2 Bearing Support And Related Parts (72-32-17,01-220) and the three nuts No. 2 Bearing Support And Related Parts (72-32-17,01-310). Torque the bolts and the nuts to 85 lbfin to 105 lbfin (10.00 Nm to 12.00 Nm).
Attach the No. 2 Bearing Retainer, the mounting brackets and NF brackets No. 2 Bearing Support And Related Parts (72-32-17,01-150) and No. 2 Bearing Support And Related Parts (72-32-17,01-195) on to the No. 2 Bearing Support.
SUBTASK 72-32-10-440-109 Assemble the No. 2 Bearing Support Assembly
Assemble the No. 3 Bearing, Rotor Center and Support Assembly. Refer to TASK 72-32-20-440-001-A00 (ASSEMBLY-001) and TASK 72-32-20-440-001-B00 (ASSEMBLY-001).
SUBTASK 72-32-10-440-110 Assemble the No. 3 Bearing, Rotor Center and Support Assembly
Refer to Figure.
Put the hydraulic seal ENGINE-HYDRAULIC SEAL ASSEMBLY (72-32-19,01-100) on the holder (part of IAE 1J12382 Hydraulic seal pusher 1 off).
Put the Seal Ring ENGINE-HYDRAULIC SEAL ASSEMBLY (72-32-19,01-130) into the groove in the Hydraulic Seal ENGINE-HYDRAULIC SEAL ASSEMBLY (72-32-19,01-100).
Heat the Hydraulic Ring ENGINE-HYDRAULIC SEAL ASSEMBLY (72-32-19,01-140) to a temperature of 302 deg F (150 deg C) in an oven for 20 minutes.
SUBTASK 72-32-10-440-116 Assemble the Hydraulic Seal Assembly
Attach the base (part of the spanner wrench) on IAE 1J12345 Base plate with the six bolts (part of the spanner wrench).
Install No. 3 Bearing and Support Assembly to the adapter (part of IAE 1J12339 Spanner wrench 1 off).
Install IAE 1J12353 TBD 1 off onto the hydraulic seal.
Prepare the No. 3 Bearing and Support Assembly and the Hydraulic Seal Assembly for installation.
Lubricate the threaded hole of the HPC front shaft with CoMat 10-077 APPROVED ENGINE OILS.
Attach the new ENGINE-HYDRAULIC SEAL ASSEMBLY (72-32-19,01-200) lock plate 1 off to the assembly (72-32-20).
Lubricate the mating surface of the hydraulic seal and the lock plate with CoMat 10-077 APPROVED ENGINE OILS.
Install the Hydraulic Seal Assembly into the threaded hole of the HPC front shaft.
Install a torque wrench into the hole in IAE 1J12353 TBD and torque Hydraulic Seal Assembly to 2342 lbfin to 3045 lbfin (264.60 Nm to 343.80 Nm).
Install the Hydraulic Seal Assembly onto the HPC front shaft of the No. 3 Bearing and Support Assembly.
Put the spacer (part of IAE 1J12367 Tab bender 1 off) on the hydraulic seal.
Crimp the lock plate into the slots of the HPC front shaft.
Install the holder (part of the IAE 1J12367 Tab bender) on IAE 1J12345 Base plate with the four bolts (part of the tab bender).
Turn the No. 3 Bearing, Support and Hydraulic Seal Assembly.
Crimp the lock plate into the four slots with the long tab bender (part of IAE 1J12367 Tab bender) and lock Hydraulic Seal Assembly.
Crimp the lock plate into the slots of the Hydraulic Seal Assembly.
SUBTASK 72-32-10-440-111-A00 Install the Hydraulic Seal Assembly onto the No. 3 Bearing and Support Assembly (Pre SBE 72-0462)
Attach the base (part of the spanner wrench) on IAE 1J12345 Base plate 1 off with the six bolts (part of the spanner wrench).
Install No. 3 Bearing and Support Assembly to the adapter (part of IAE 1J12339 Spanner wrench 1 off).
Install IAE 1J12355 Spanner wrench 1 off onto the hydraulic seal.
Prepare the No. 3 Bearing and Support Assembly and the Hydraulic Seal Assembly for installation.
Lubricate the threaded hole of the HPC front shaft with CoMat 10-077 APPROVED ENGINE OILS.
Attach the new ENGINE-HYDRAULIC SEAL ASSEMBLY (72-32-19,01-200) lock plate 1 off to the assembly (72-32-20).
Lubricate the mating surface of the hydraulic seal and the lock plate with CoMat 10-077 APPROVED ENGINE OILS.
Install the Hydraulic Seal Assembly into the threaded hole of the HPC front shaft.
Install a torque wrench into the hole in IAE 1J12355 Spanner wrenchand torque Hydraulic Seal Assembly to 2342 lbfin to 3045 lbfin (264.60 Nm to 343.80 Nm).
Install the Hydraulic Seal Assembly onto the HPC front shaft of the No. 3 Bearing and Support Assembly.
Put the spacer (part of IAE 1J12381 Tab bender 1 off) on the hydraulic seal.
Crimp the lock plate into the slots of the HPC front shaft.
Install the holder (part of the IAE 1J12381 Tab bender) on IAE 1J12345 Base plate with the four bolts (part of the tab bender).
Turn the No. 3 Bearing, Support and Hydraulic Seal Assembly.
Crimp the lock plate into the four slots with the long tab bender (part of IAE 1J12381 Tab bender) and lock Hydraulic Seal Assembly.
Crimp the lock plate into the slots of the Hydraulic Seal Assembly.
SUBTASK 72-32-10-440-111-B00 Install the Hydraulic Seal Assembly onto the No. 3 Bearing and Support Assembly (SBE 72-0462)
Install the No. 3 Bearing, Rotor Center and Support Assembly to IAE 1J12362 Work stand 1 off.
Lubricate a new No. 3 Bearing, Internal Gearbox, And Support Assembly (72-32-10,01-200) seal ring 1 off with CoMat 10-077 APPROVED ENGINE OILS.
Install the No. 2 Bearing Support Assembly to the No. 3 Bearing, rotor center and Support Assembly.
Safety the assembly to the No. 2 Bearing Support with the eight bolts No. 3 Bearing, Internal Gearbox, And Support Assembly (72-32-10,01-110). Torque the bolts to 85 lbfin to 105 lbfin (10.00 Nm to 12.00 Nm).
Install the Internal Gearbox driven gear assembly to the No. 2 Bearing Support.
SUBTASK 72-32-10-440-112 Assemble the No. 3 Bearing Internal Gearbox and support Assembly
Loosen the hex nut (part of the backlash fixture) and the handle nut (part of the backlash fixture).
NOTE
It is needed that the clearance is at CC to pull the Bevel Gearshaft in direction G in Step.Loosen the nine bolts which attach the No. 3 Bearing Seal Assembly and IAE 1J12021 Lifting spacer to the No. 3 Bearing Seal Support.
Move the No. 3 Bearing Seal Assembly rearward to make clearance between the No. 3 Bearing Seal Assembly and the No. 3 Bearing Seal Seat.
NOTE
The lifting spacer is installed in TASK 72-32-20-440-001-A00 (ASSEMBLY-001) and TASK 72-32-20-440-001-B00 (ASSEMBLY-001).
Install IAE 1J12385 Backlash fixture 1 off to the assembly (72-32-10).
Prepare the tool to measure the backlash of the bevel gear.
Calculate the minimum allowable backlash BL min and the maximum allowable backlash BL max.
BL min (mm) = (LASH A + LASH B + 0,46) x 1,4.
BL min (in.) = BL min (mm)/25.4.
BL max (mm) = (LASH A + LASH B + 0,56) x 1,4.
BL max (in.) = BL max (mm)/25.4.
Where:
LASH A - Refer to SUBTASK 72-32-20-220-051 in TASK 72-32-20-440-001-A00 (ASSEMBLY-001) and TASK 72-32-20-440-001-B00 (ASSEMBLY-001).
LASH B - Refer to Step.
Calculate the allowable backlash of the bevel gears.
Make sure that the backlash BLA measured in Step is between the minimum allowable backlash BL min. and the maximum allowable backlash BL max.
Attach the No. 3 Bearing Seal Assembly to the No. 3 Bearing Seal Support with the nine bolts "NO.3 BEARING,ROTOR CENTRE & SUPPORT ASSY (72-32-20,01-140). Torque the bolts to 85 lbfin to 105 lbfin (10.00 Nm to 12.00 Nm).
Attach the Gearshaft Bearing Housing to the No. 2 Bearing Support with the four bolts No. 3 Bearing, Internal Gearbox, And Support Assembly (72-32-10,01-110) which are removed in Step. Torque the bolts to 85 lbfin to 105 lbfin (10.00 Nm to 12.00 Nm).
SUBTASK 72-32-10-220-069 Do a Backlash Check of the Bevel Gears
Figure: Install the No. 3 Bearing and Support Assembly to the Setting Gage
Install the No. 3 Bearing and Support Assembly to the Setting Gage

Figure: Install the No. 3 Bearing and Support Assembly to the Work Stand
Install the No. 3 Bearing and Support Assembly to the Work Stand

Figure: Install the PTO Bearings and the Dommy Bearing to the Dummy Gearshaft
Install the PTO Bearings and the Dommy Bearing to the Dummy Gearshaft

Figure: Install the Outer Roller Bearing to the Gearshaft Bearing Housing
Install the Outer Roller Bearing to the Gearshaft Bearing Housing
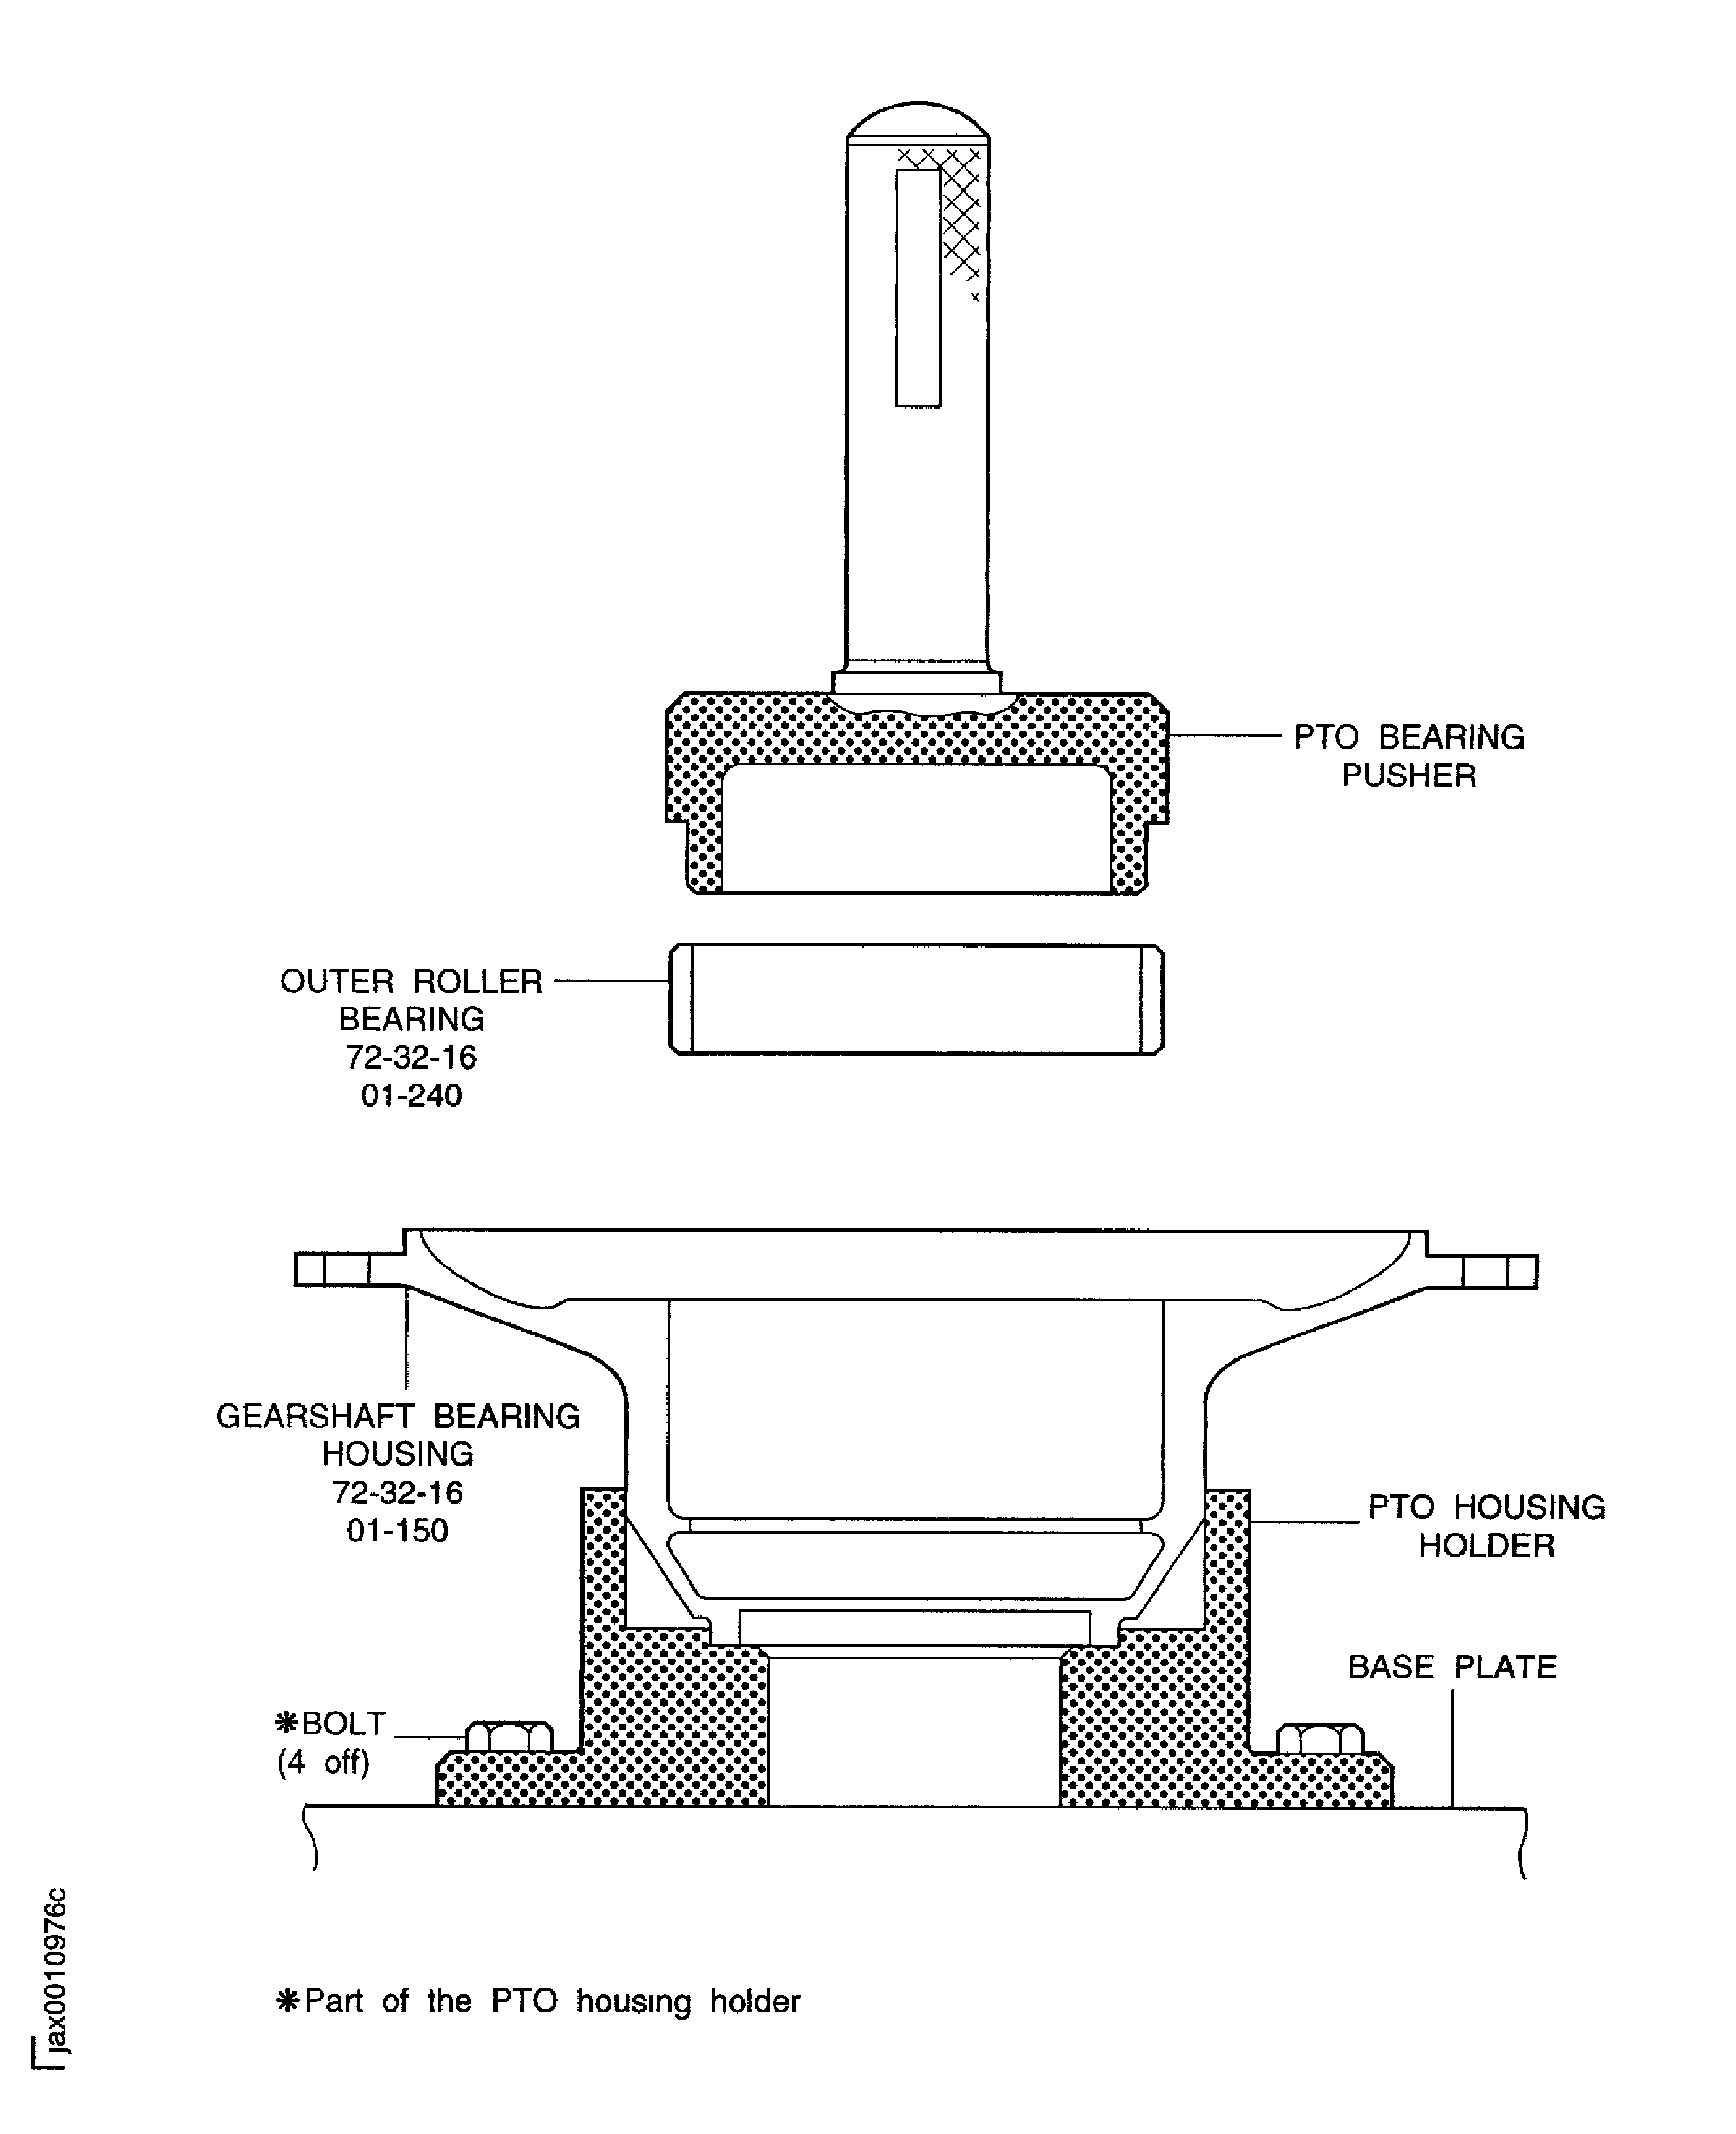
Figure: Install the Gearshaft Bearing Housing to the Dummy Gearshaft
Install the Gearshaft Bearing Housing to the Dummy Gearshaft
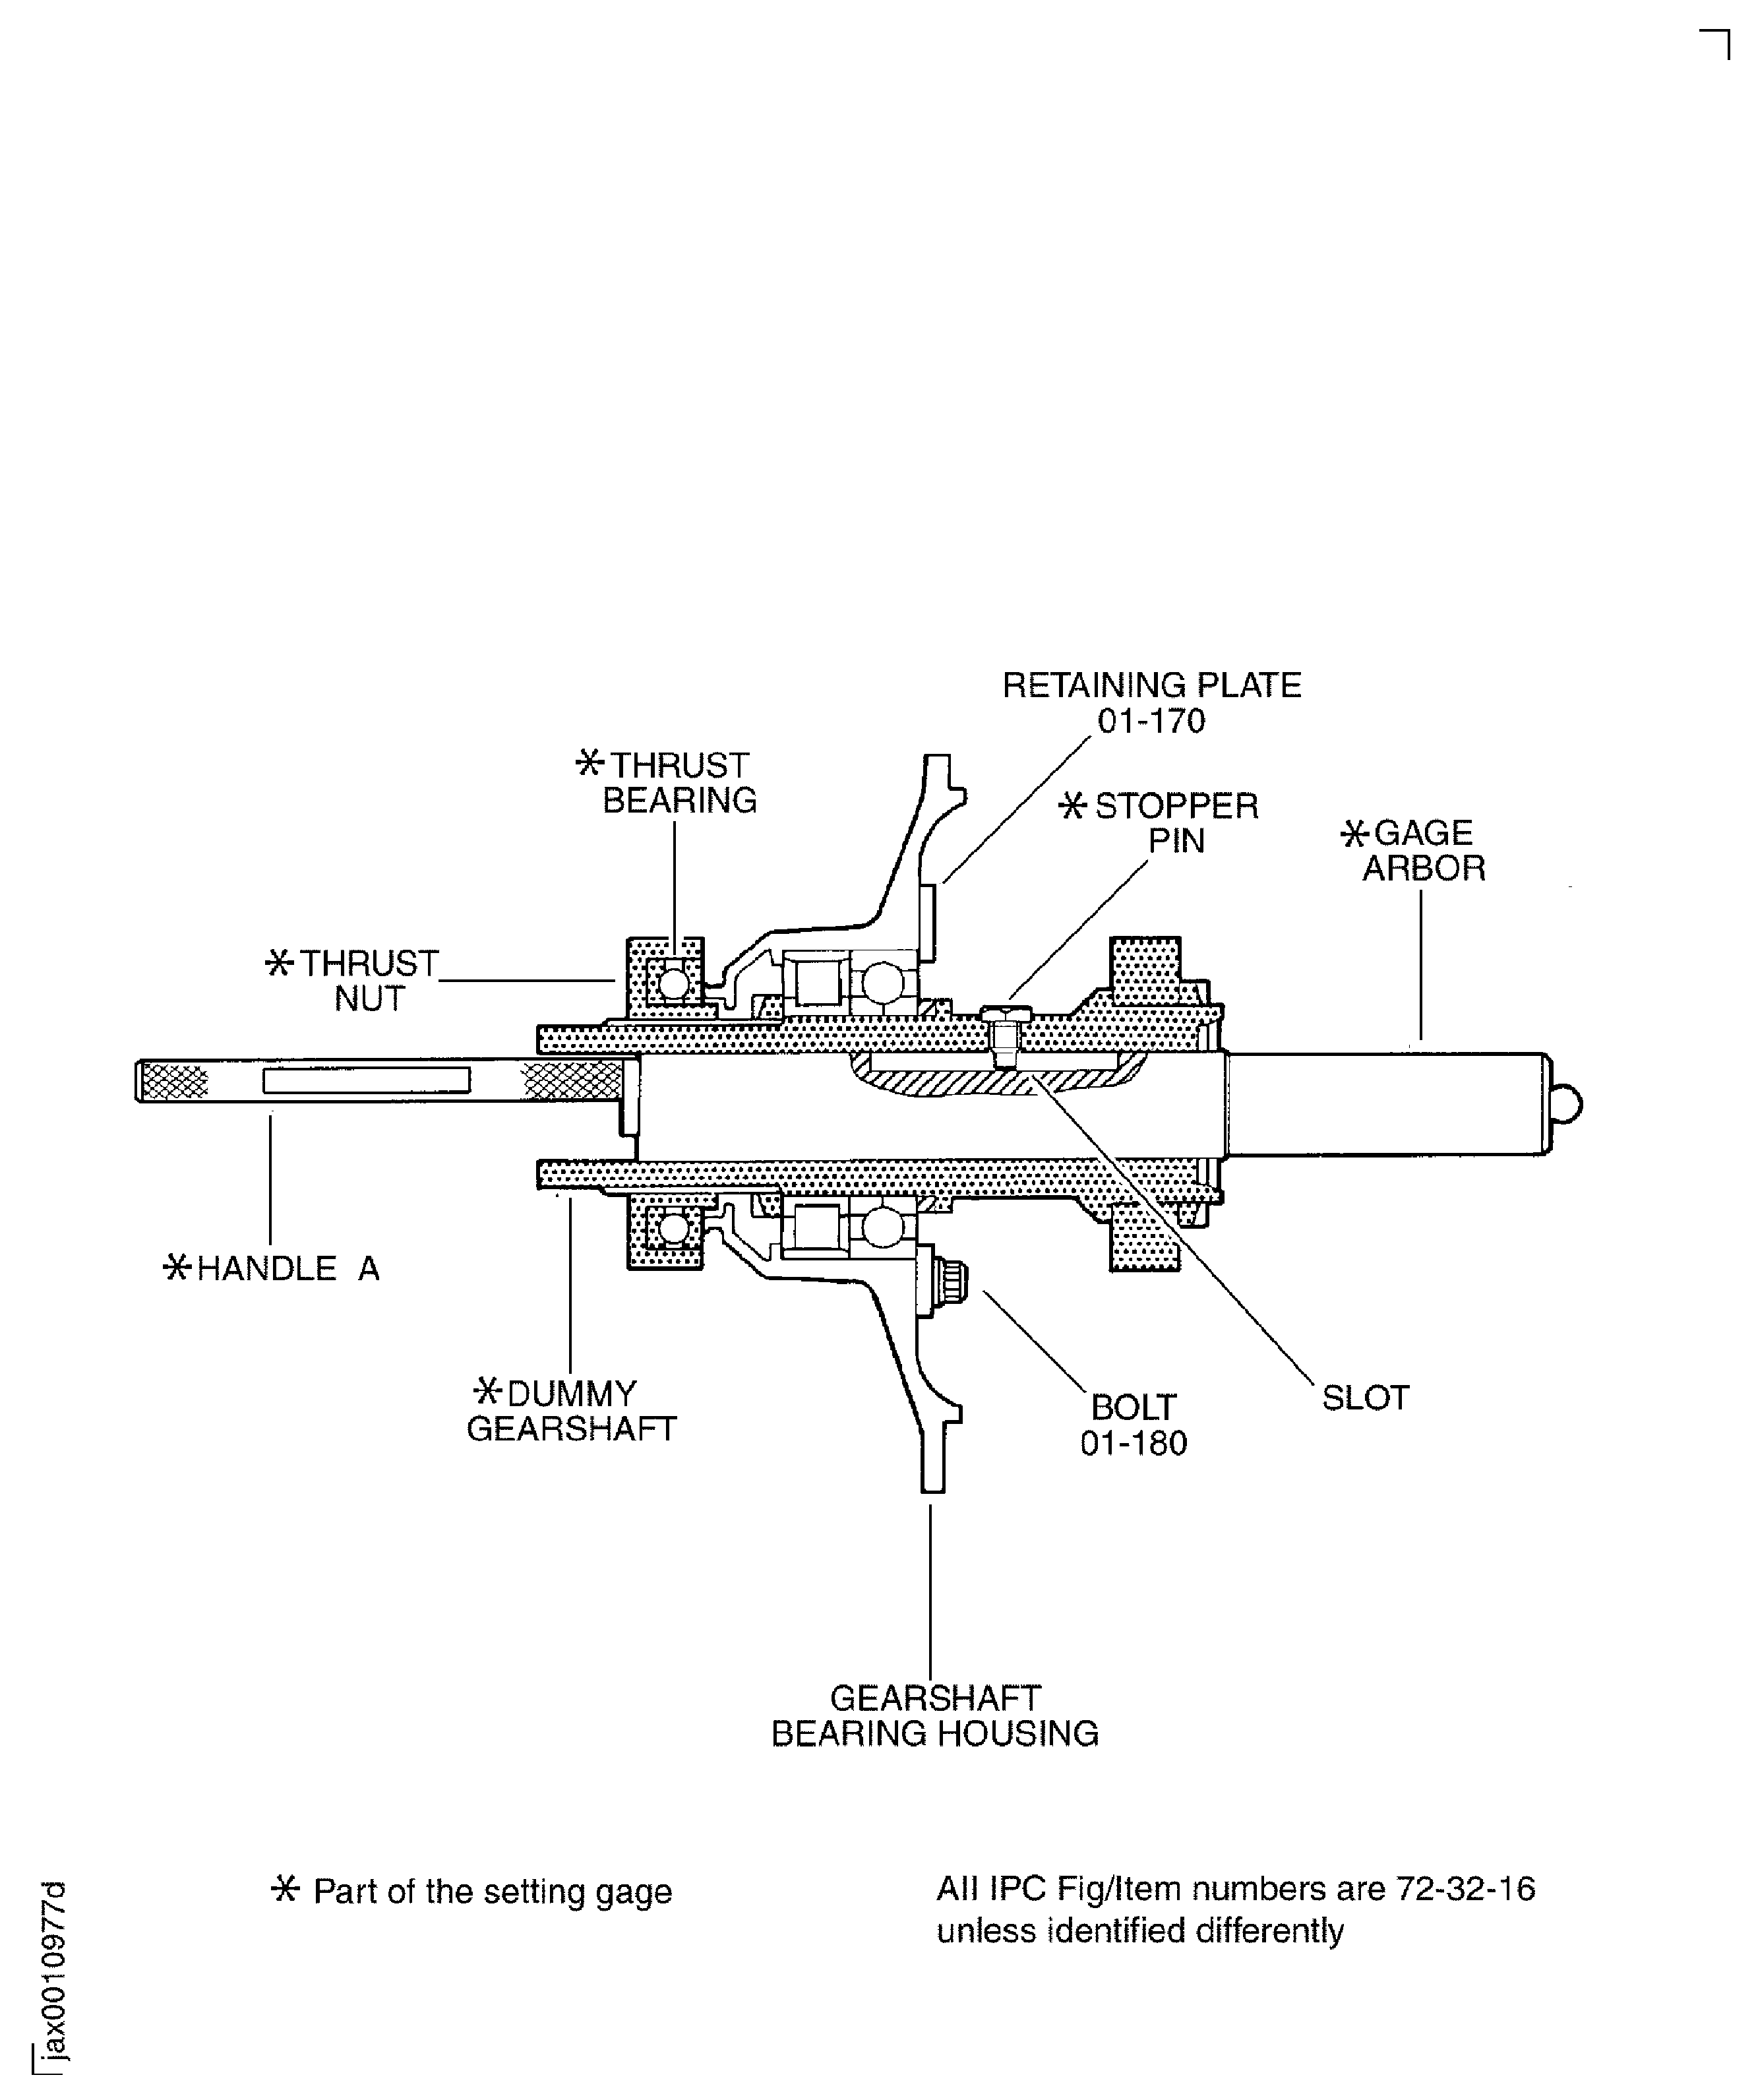
Figure: Assemble the Setting Gage
Sheet 1

Figure: Assemble the Setting Gage
Sheet 2
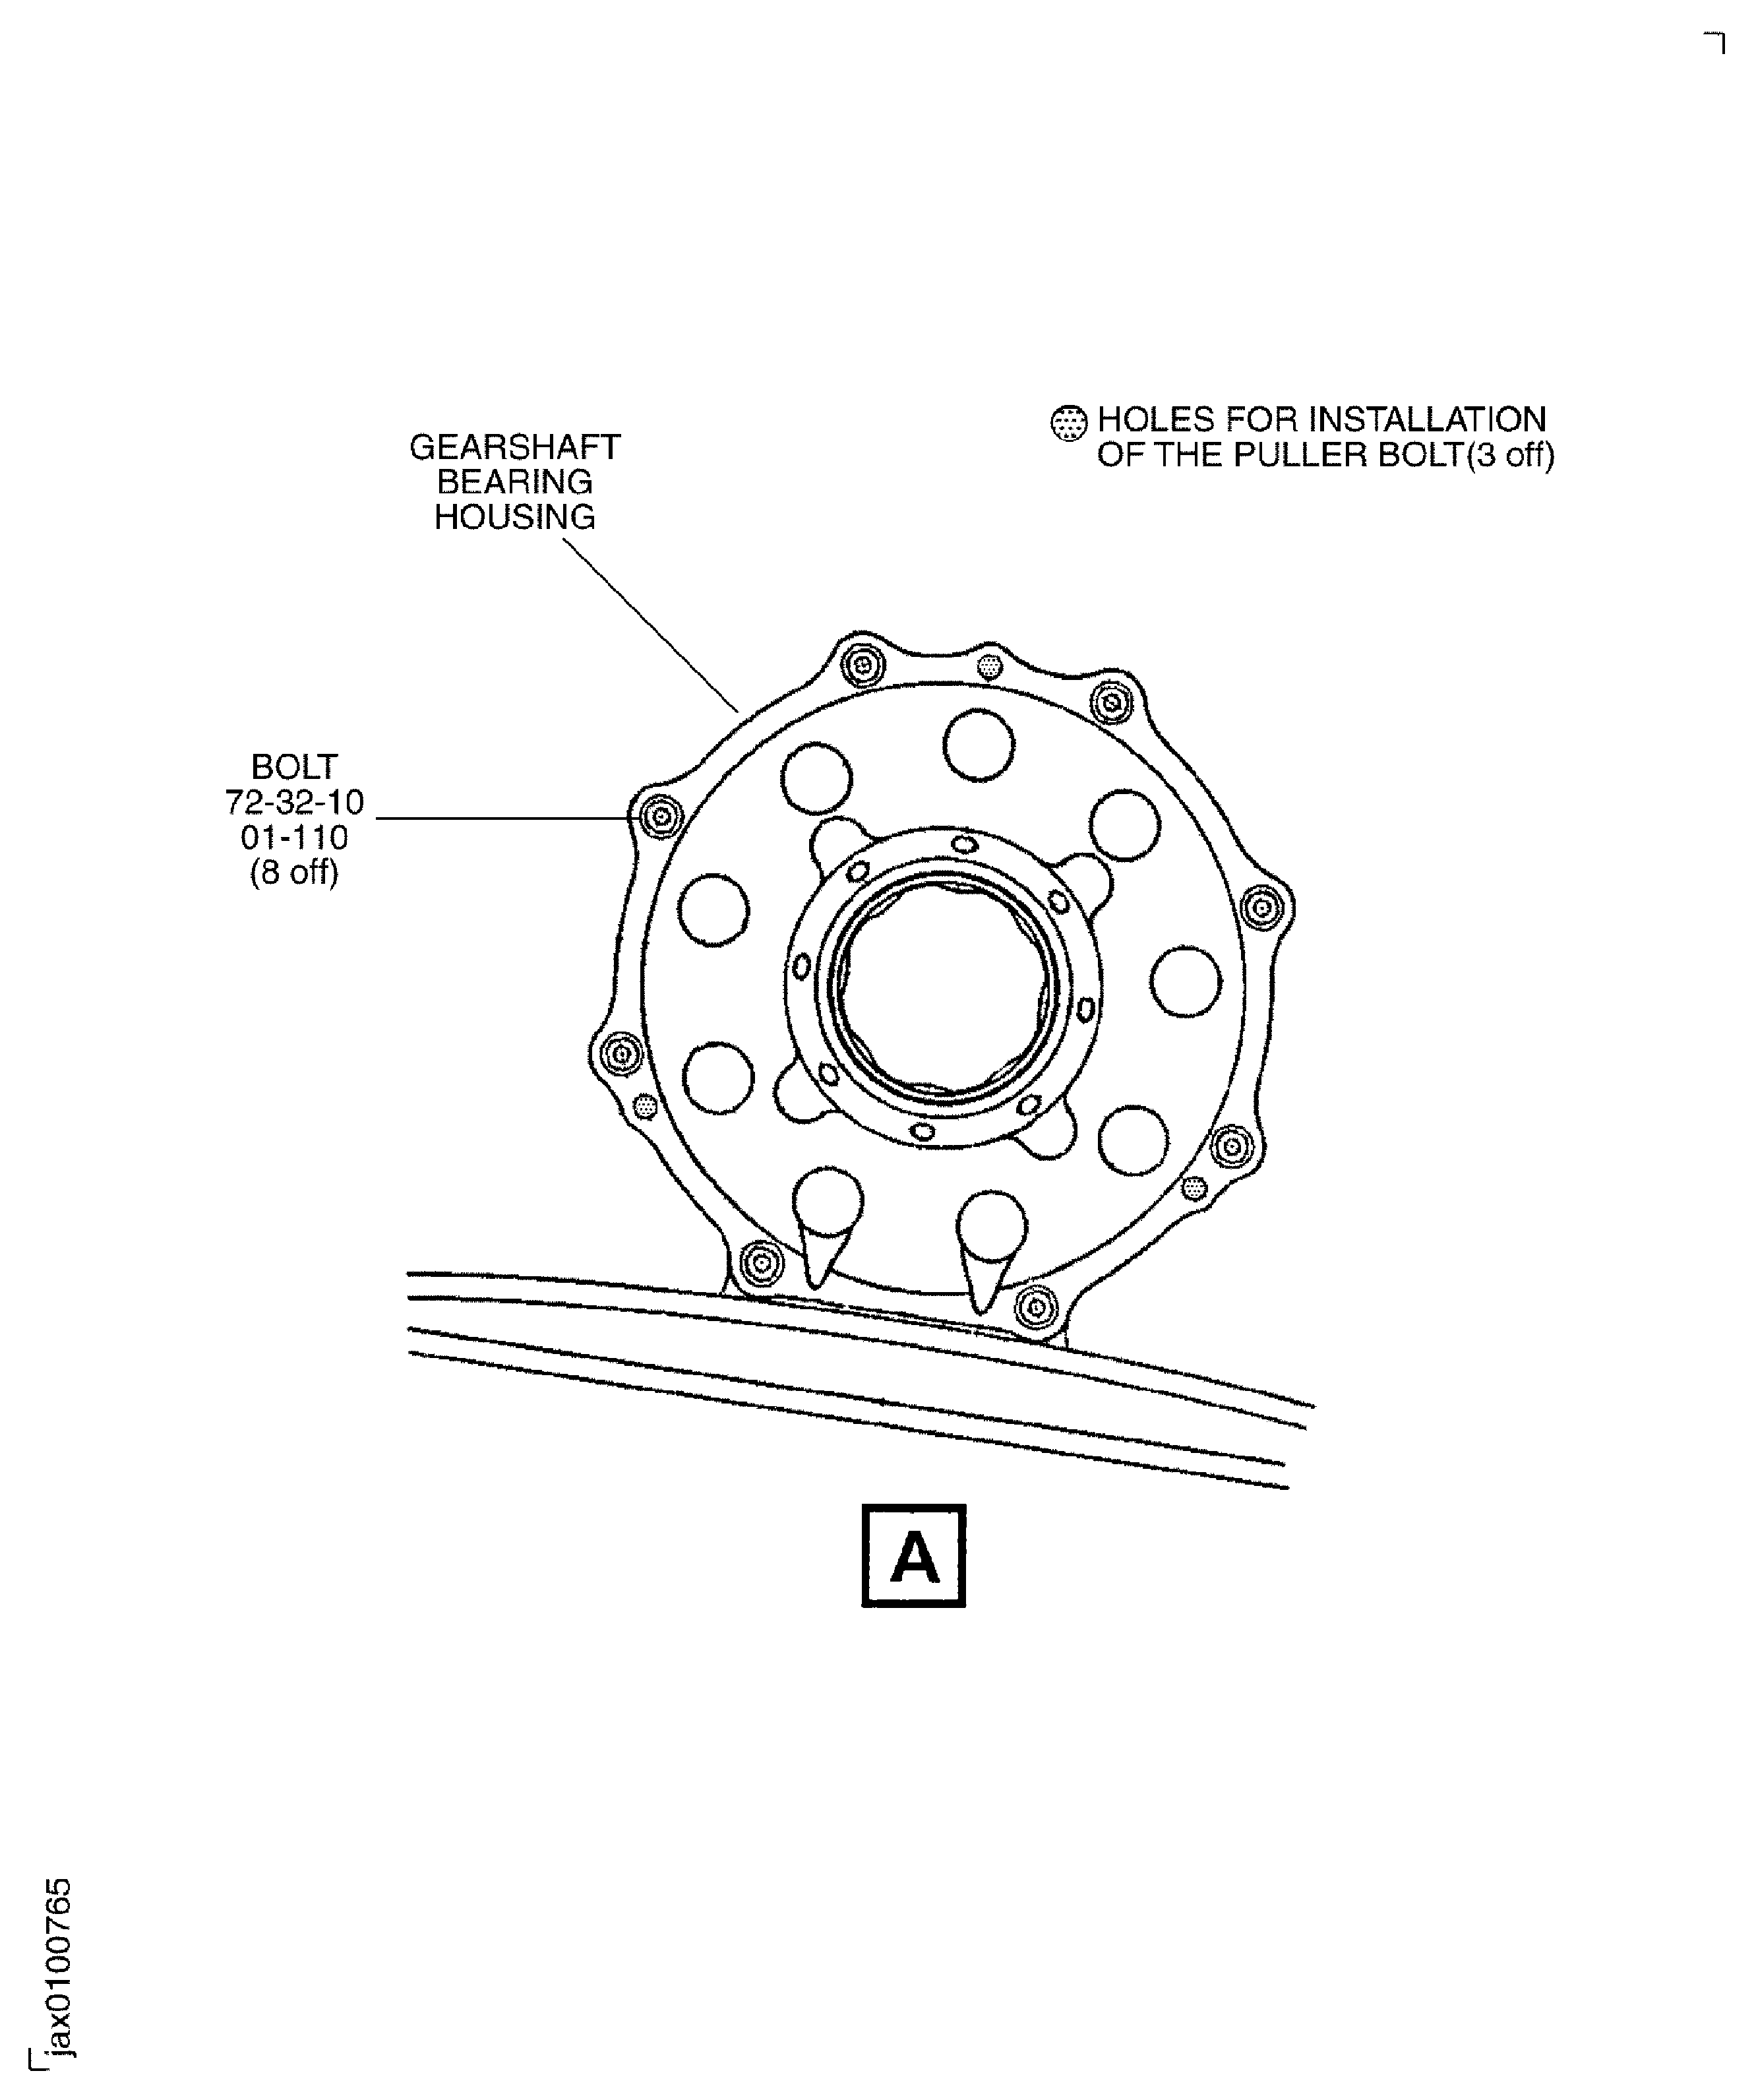
Figure: Calculate the Thickness of the Adjusting Washer-PTO
Calculate the Thickness of the Adjusting Washer-PTO
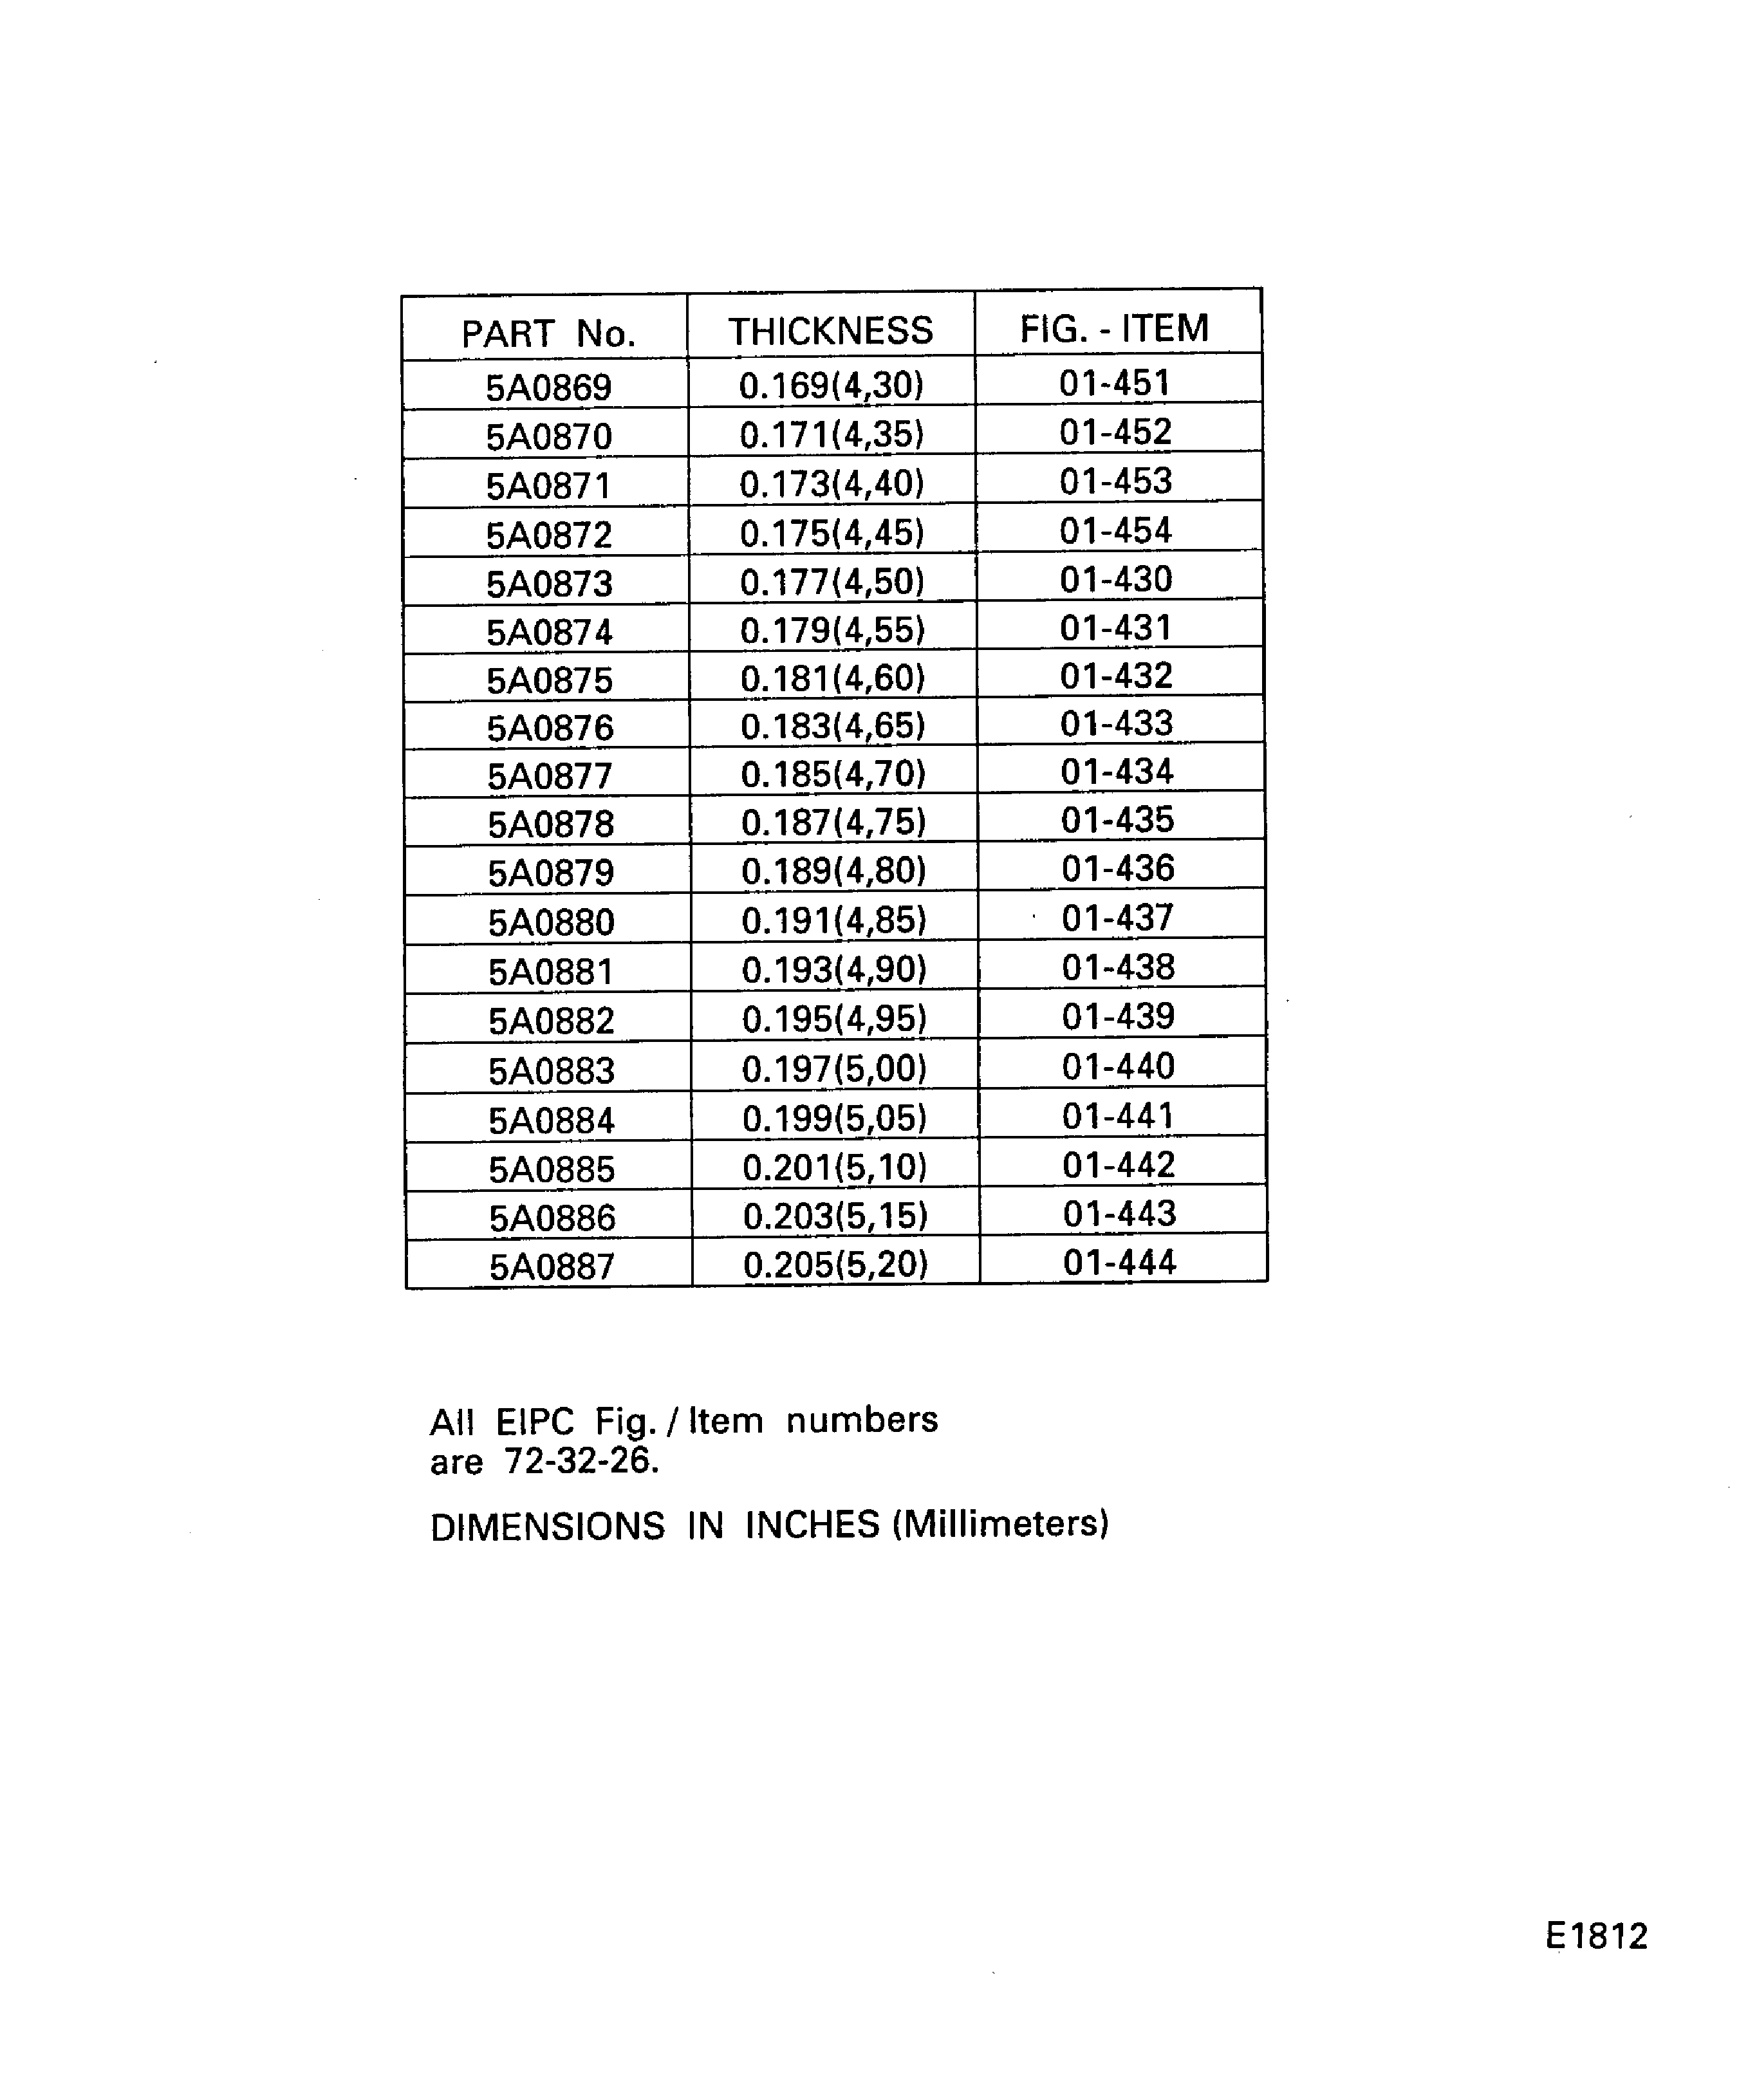
Figure: Calculate the Thickness of the Adjusting Washer
Calculate the Thickness of the Adjusting Washer
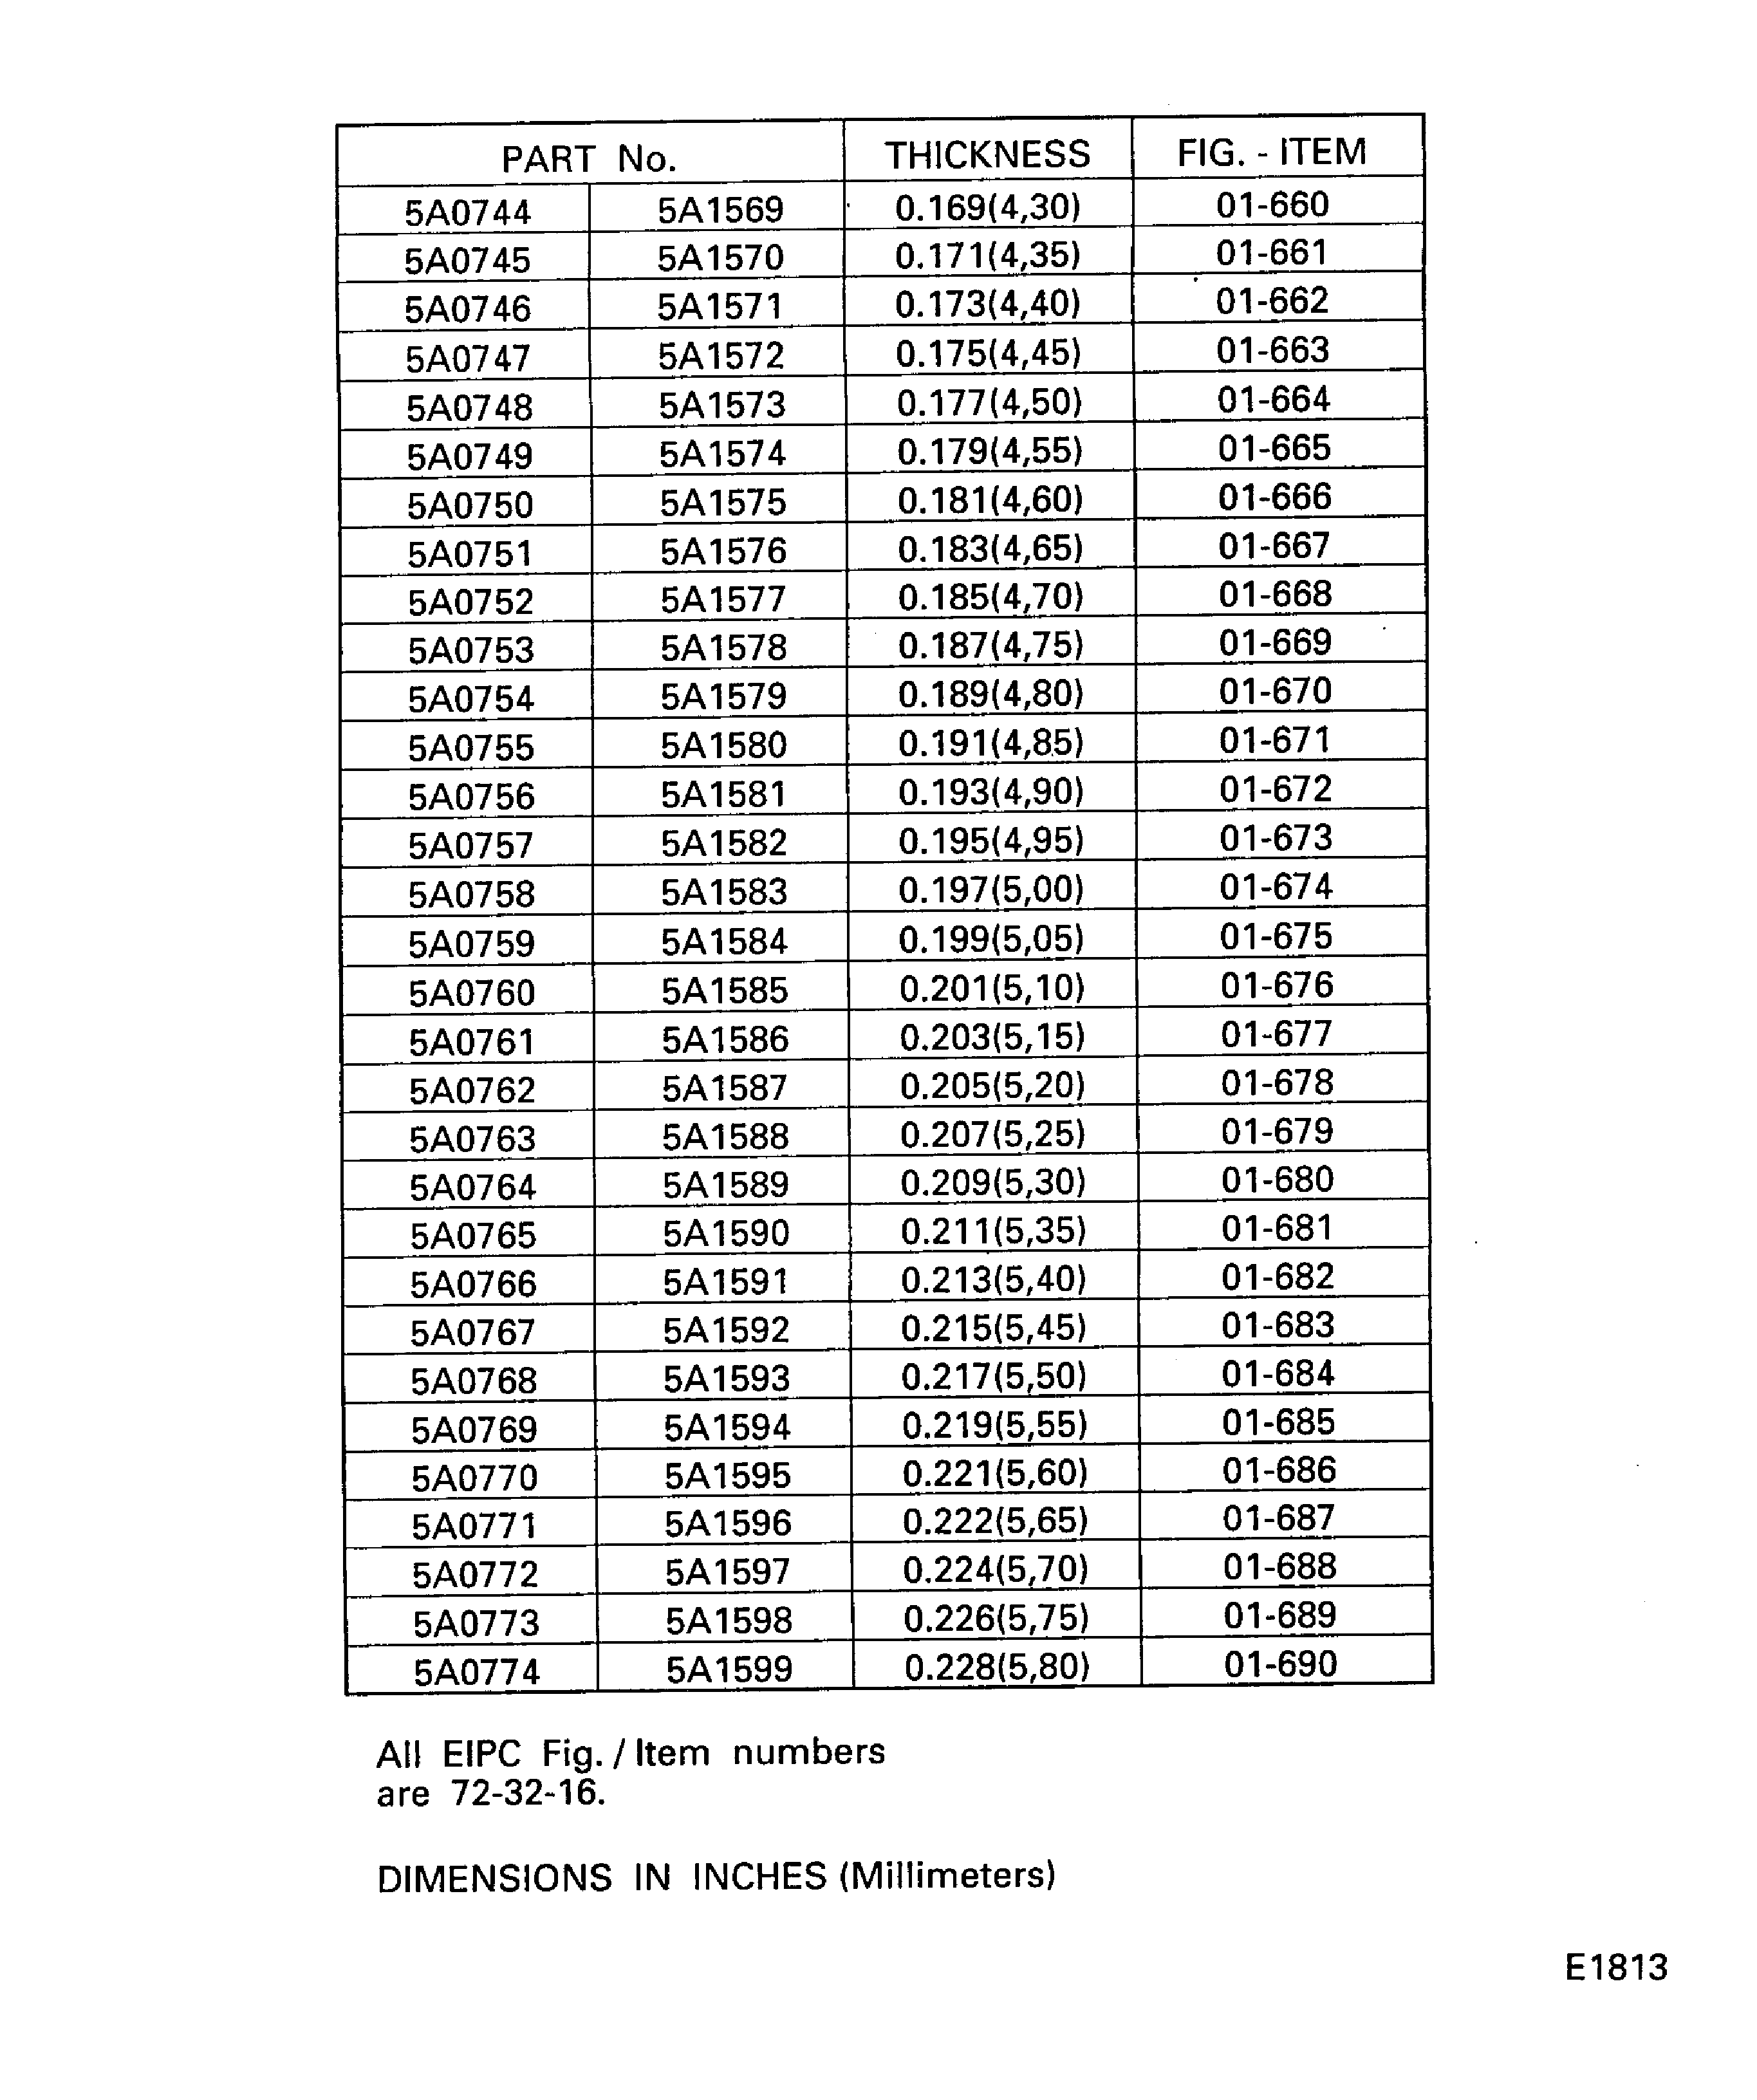
Figure: Sectional View of the Internal Gearbox Driven Gear Assembly
Sectional View of the Internal Gearbox Driven Gear Assembly

Figure: Assemble the Bevel Gearshaft and Bearing Assembly
Sheet 1

Figure: Assemble the Bevel Gearshaft and Bearing Assembly
Sheet 2

Figure: Assemble the Bevel Gearshaft and Bearing Assembly
Sheet 3

Figure: Assemble the Internal Gearbox Driven Gear Assembly
Sheet 4

Figure: Install the Outer Roller Bearing Into the No. 2 Bearing Support
Install the Outer Roller Bearing Into the No. 2 Bearing Support

Figure: Assemble the Bevel Gearshaft and Bearing Assembly
Assemble the Bevel Gearshaft and Bearing Assembly
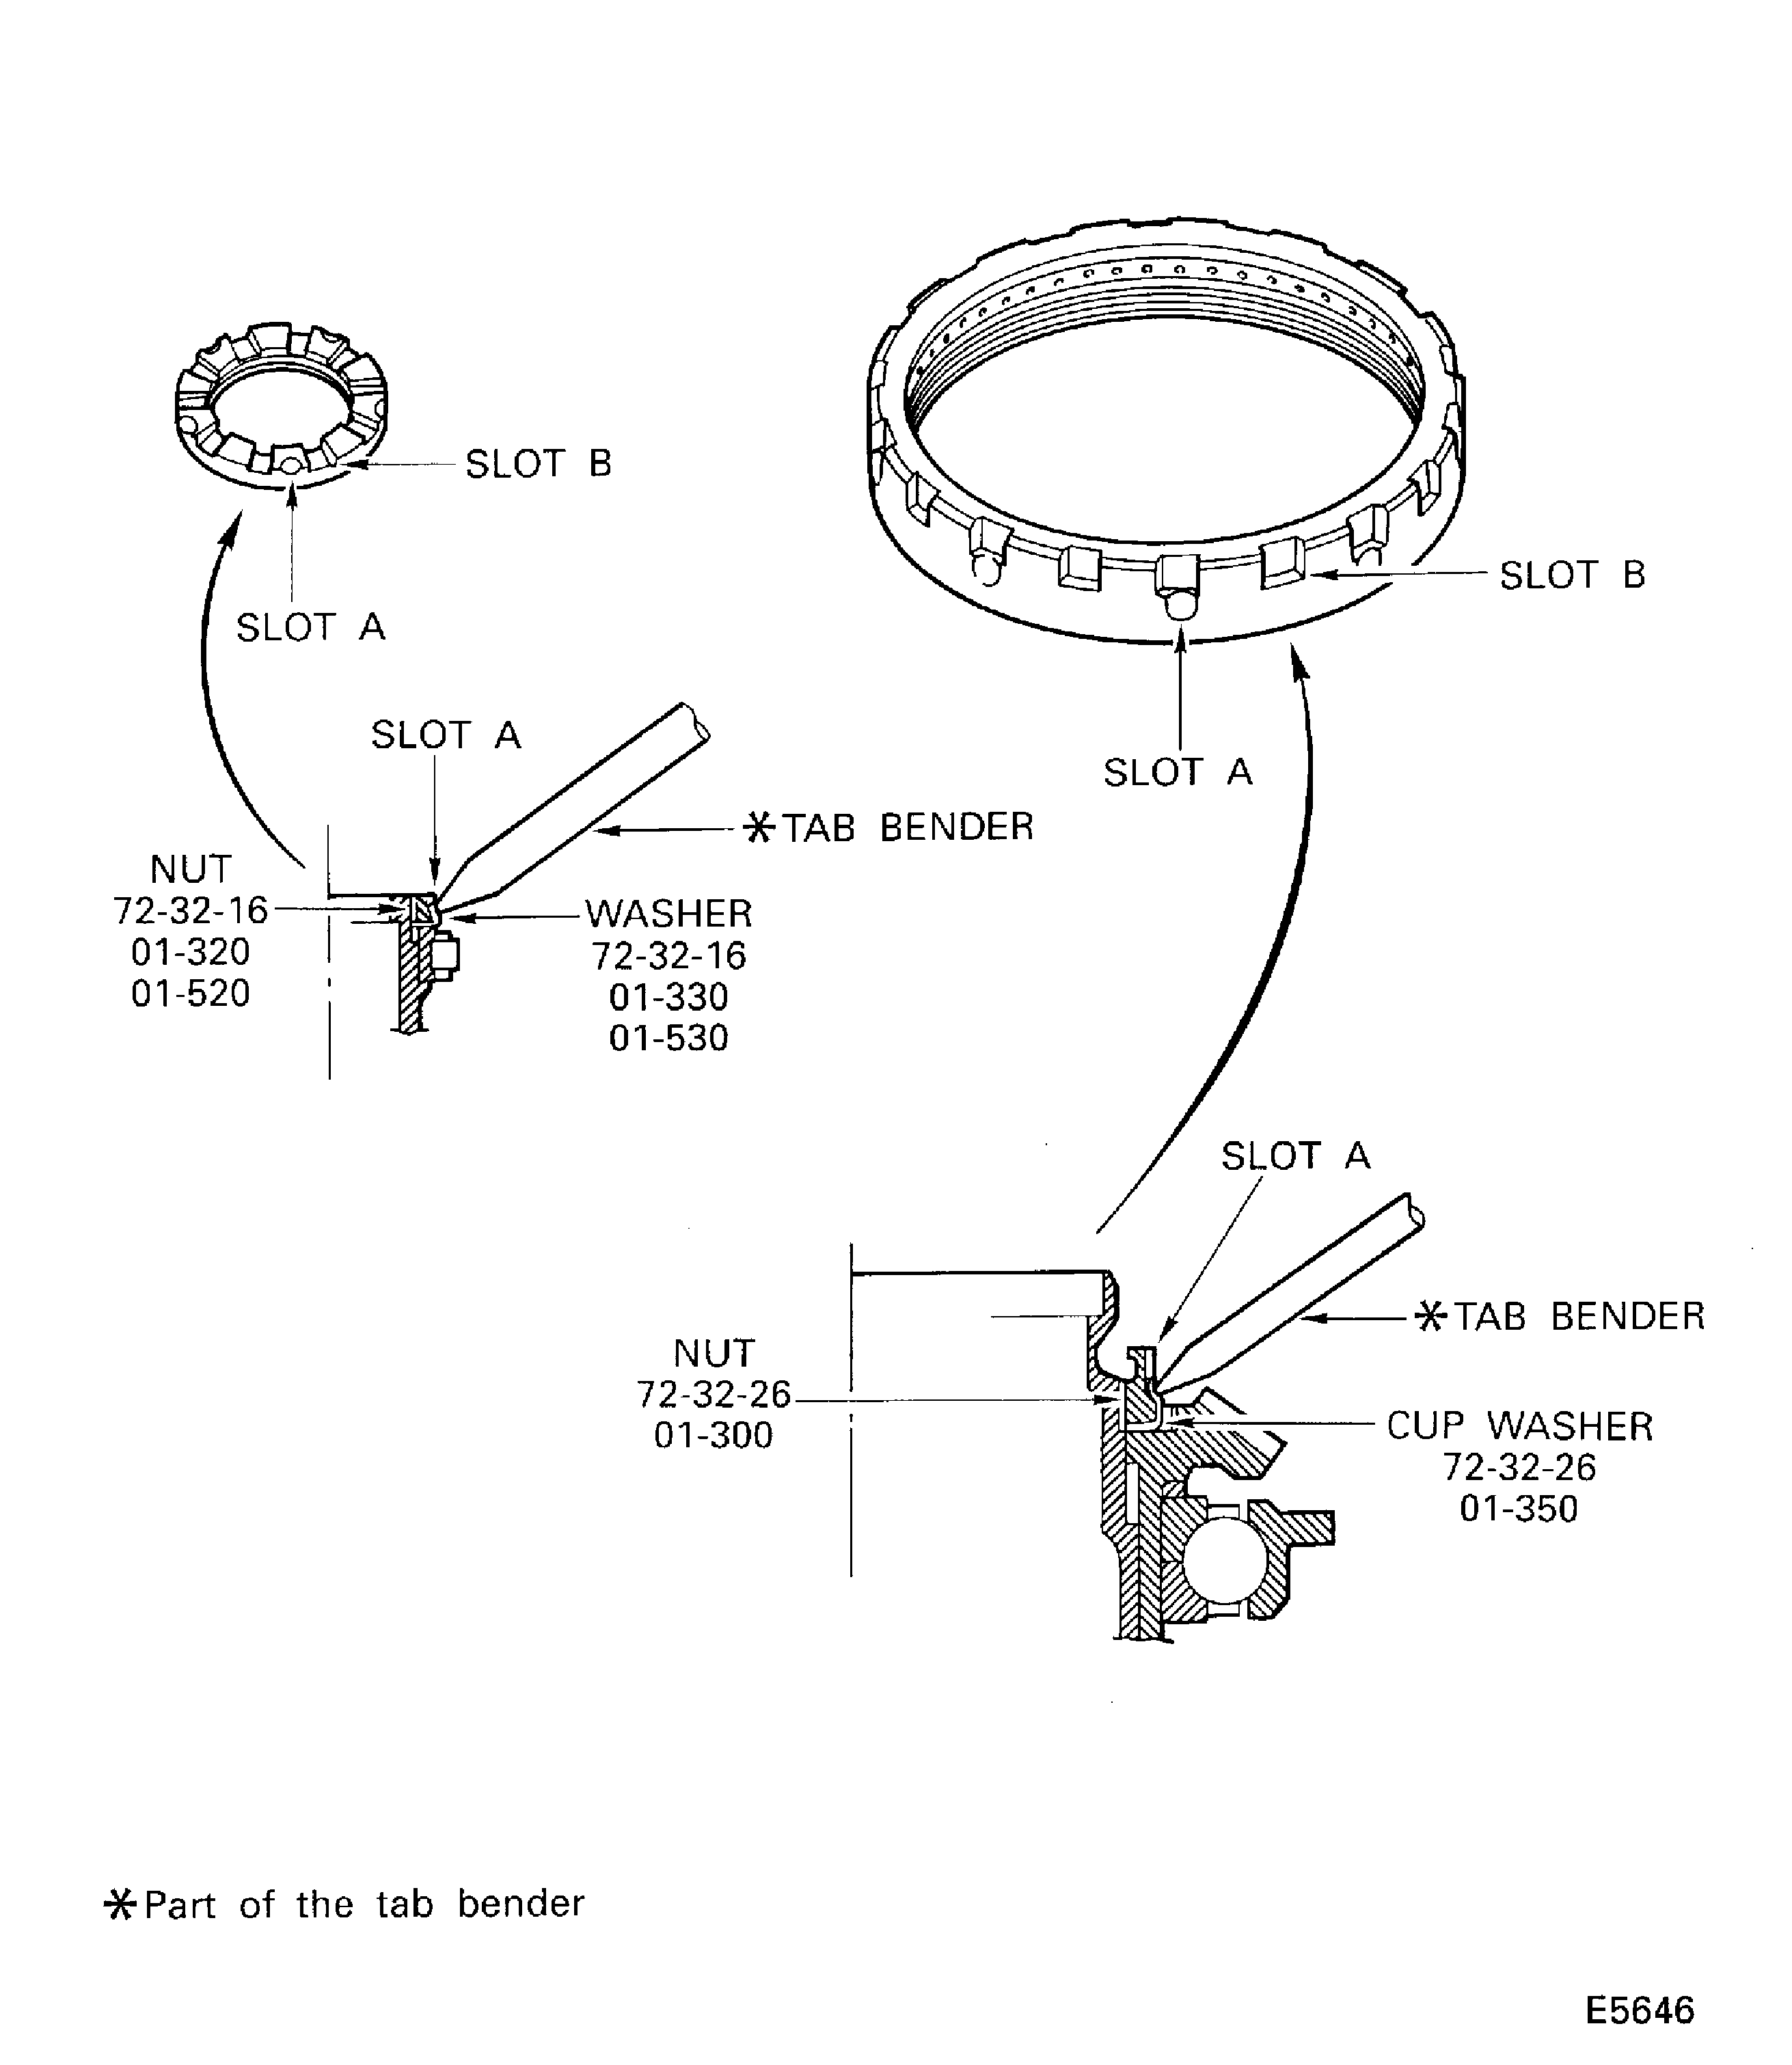
Figure: Select the Shim
Sheet 1
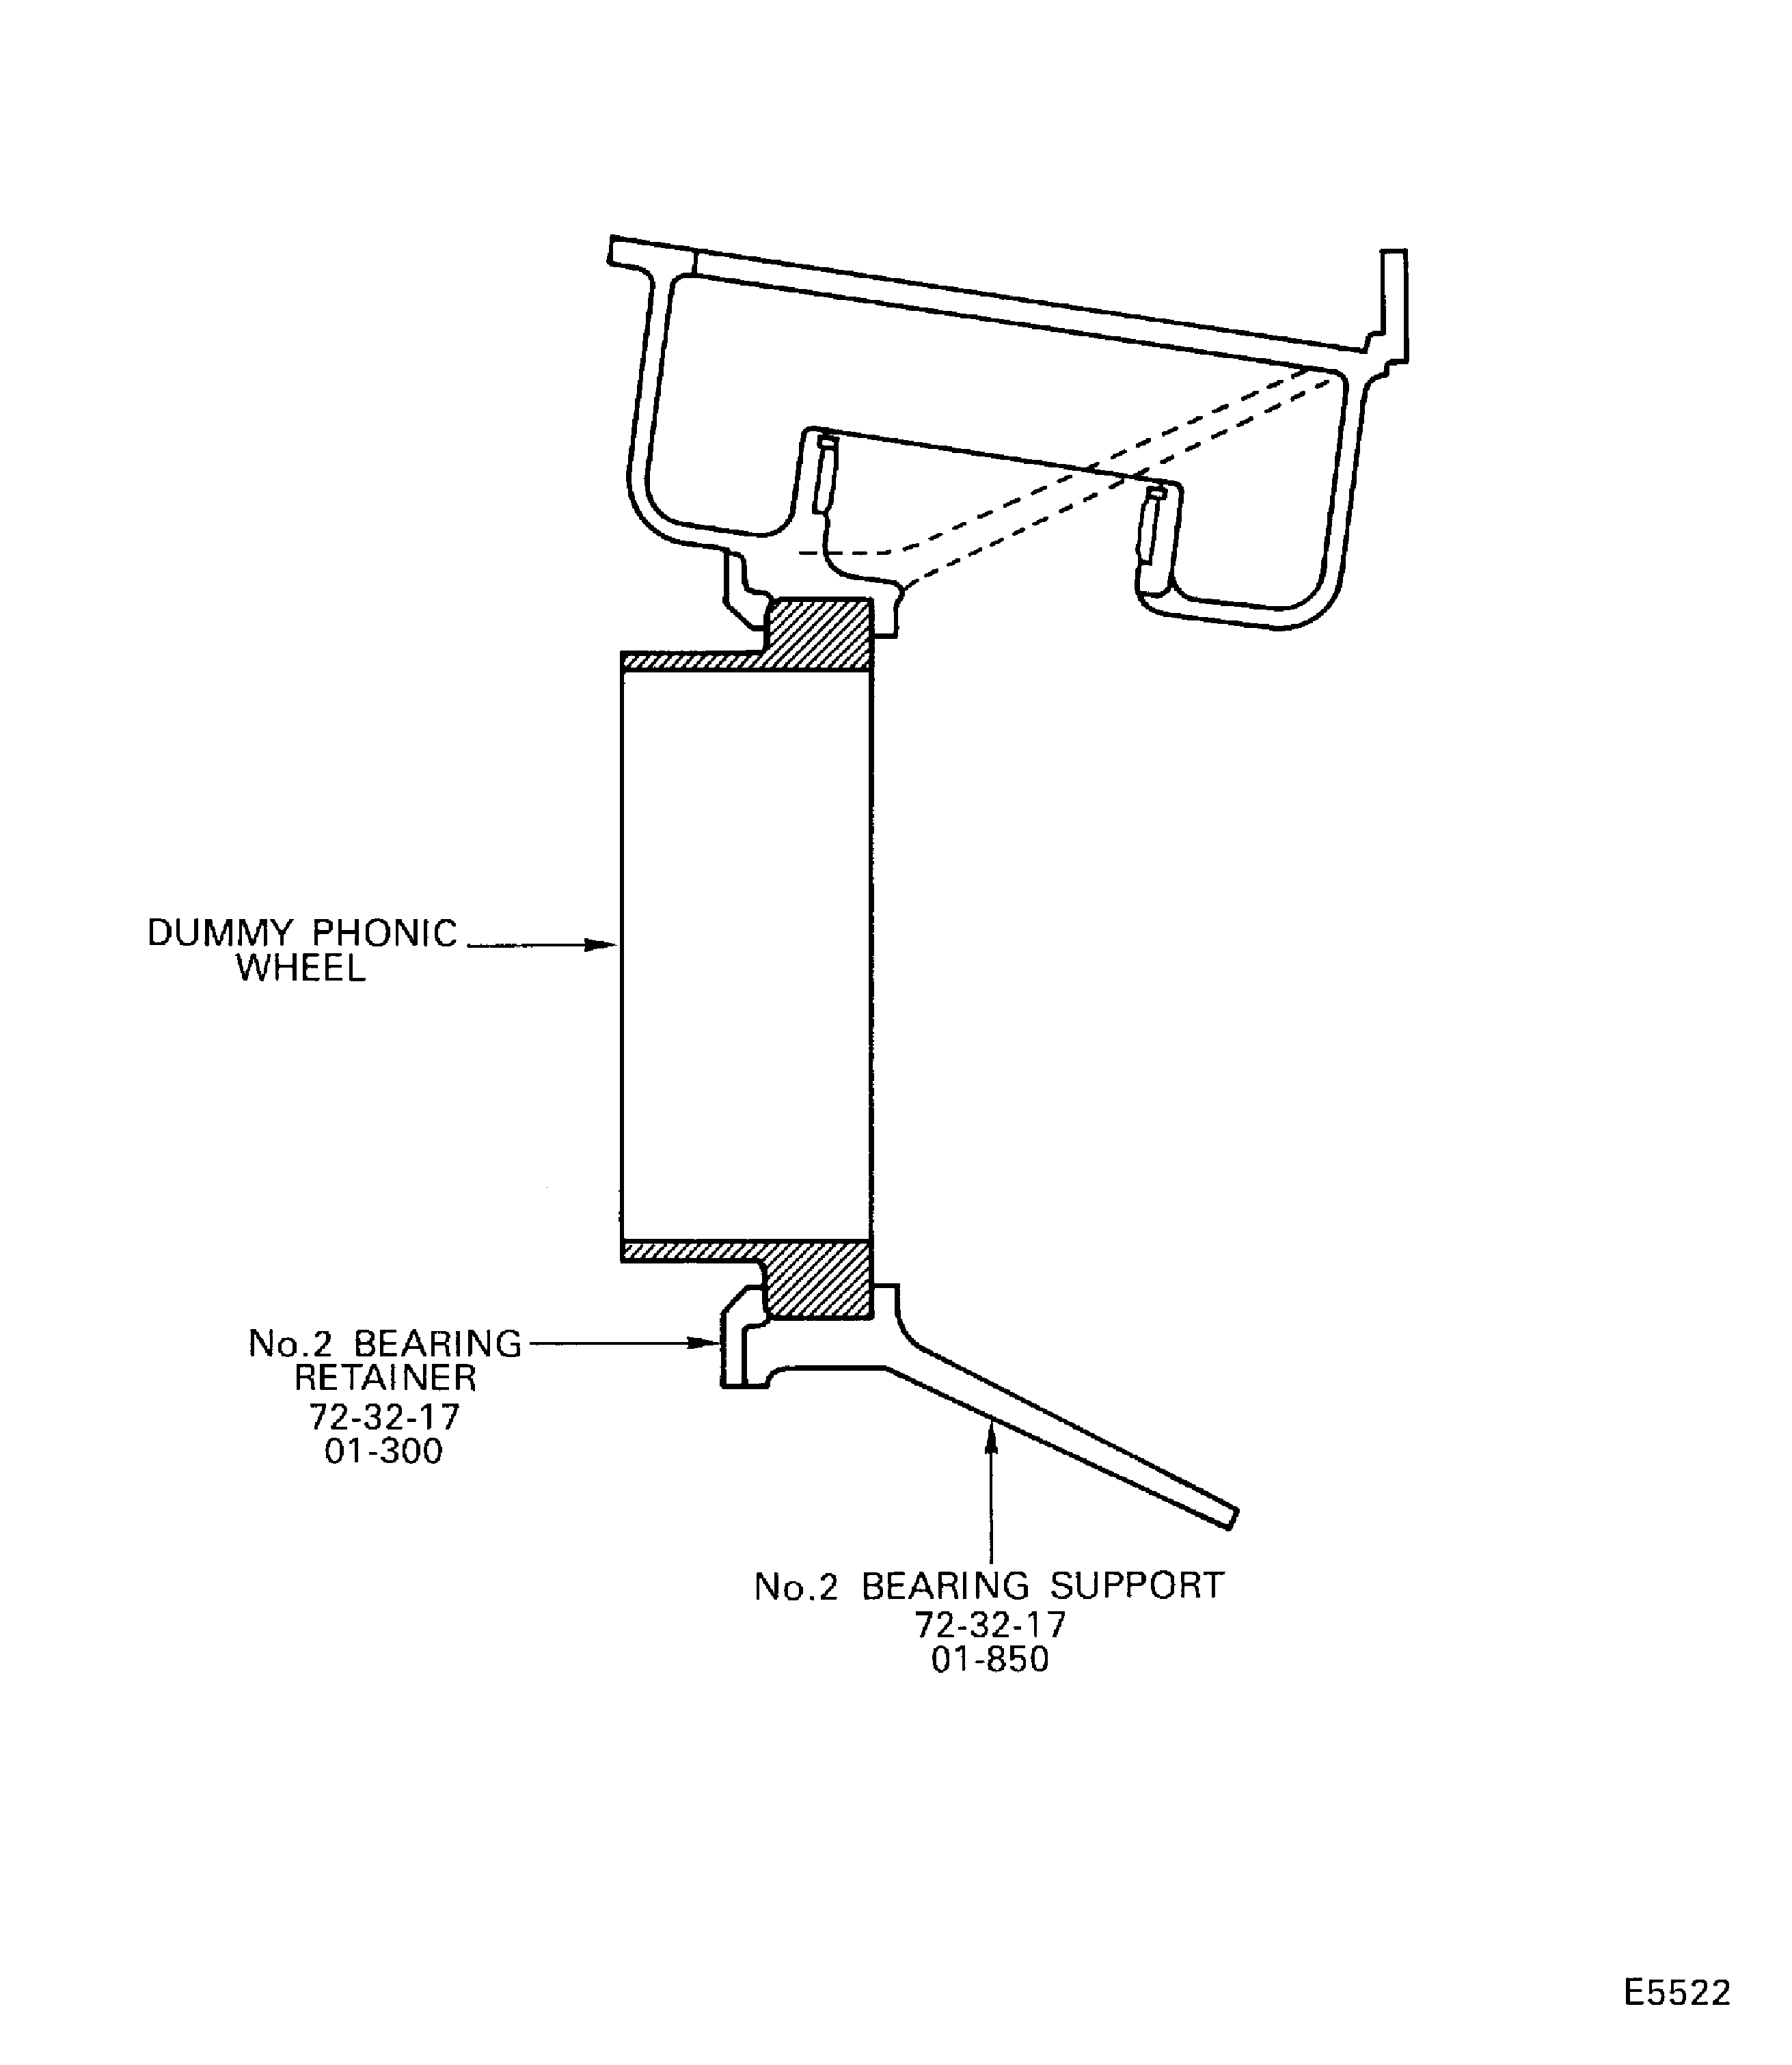
Figure: Pre SBE 72-0553: Select the Shim
Sheet 2
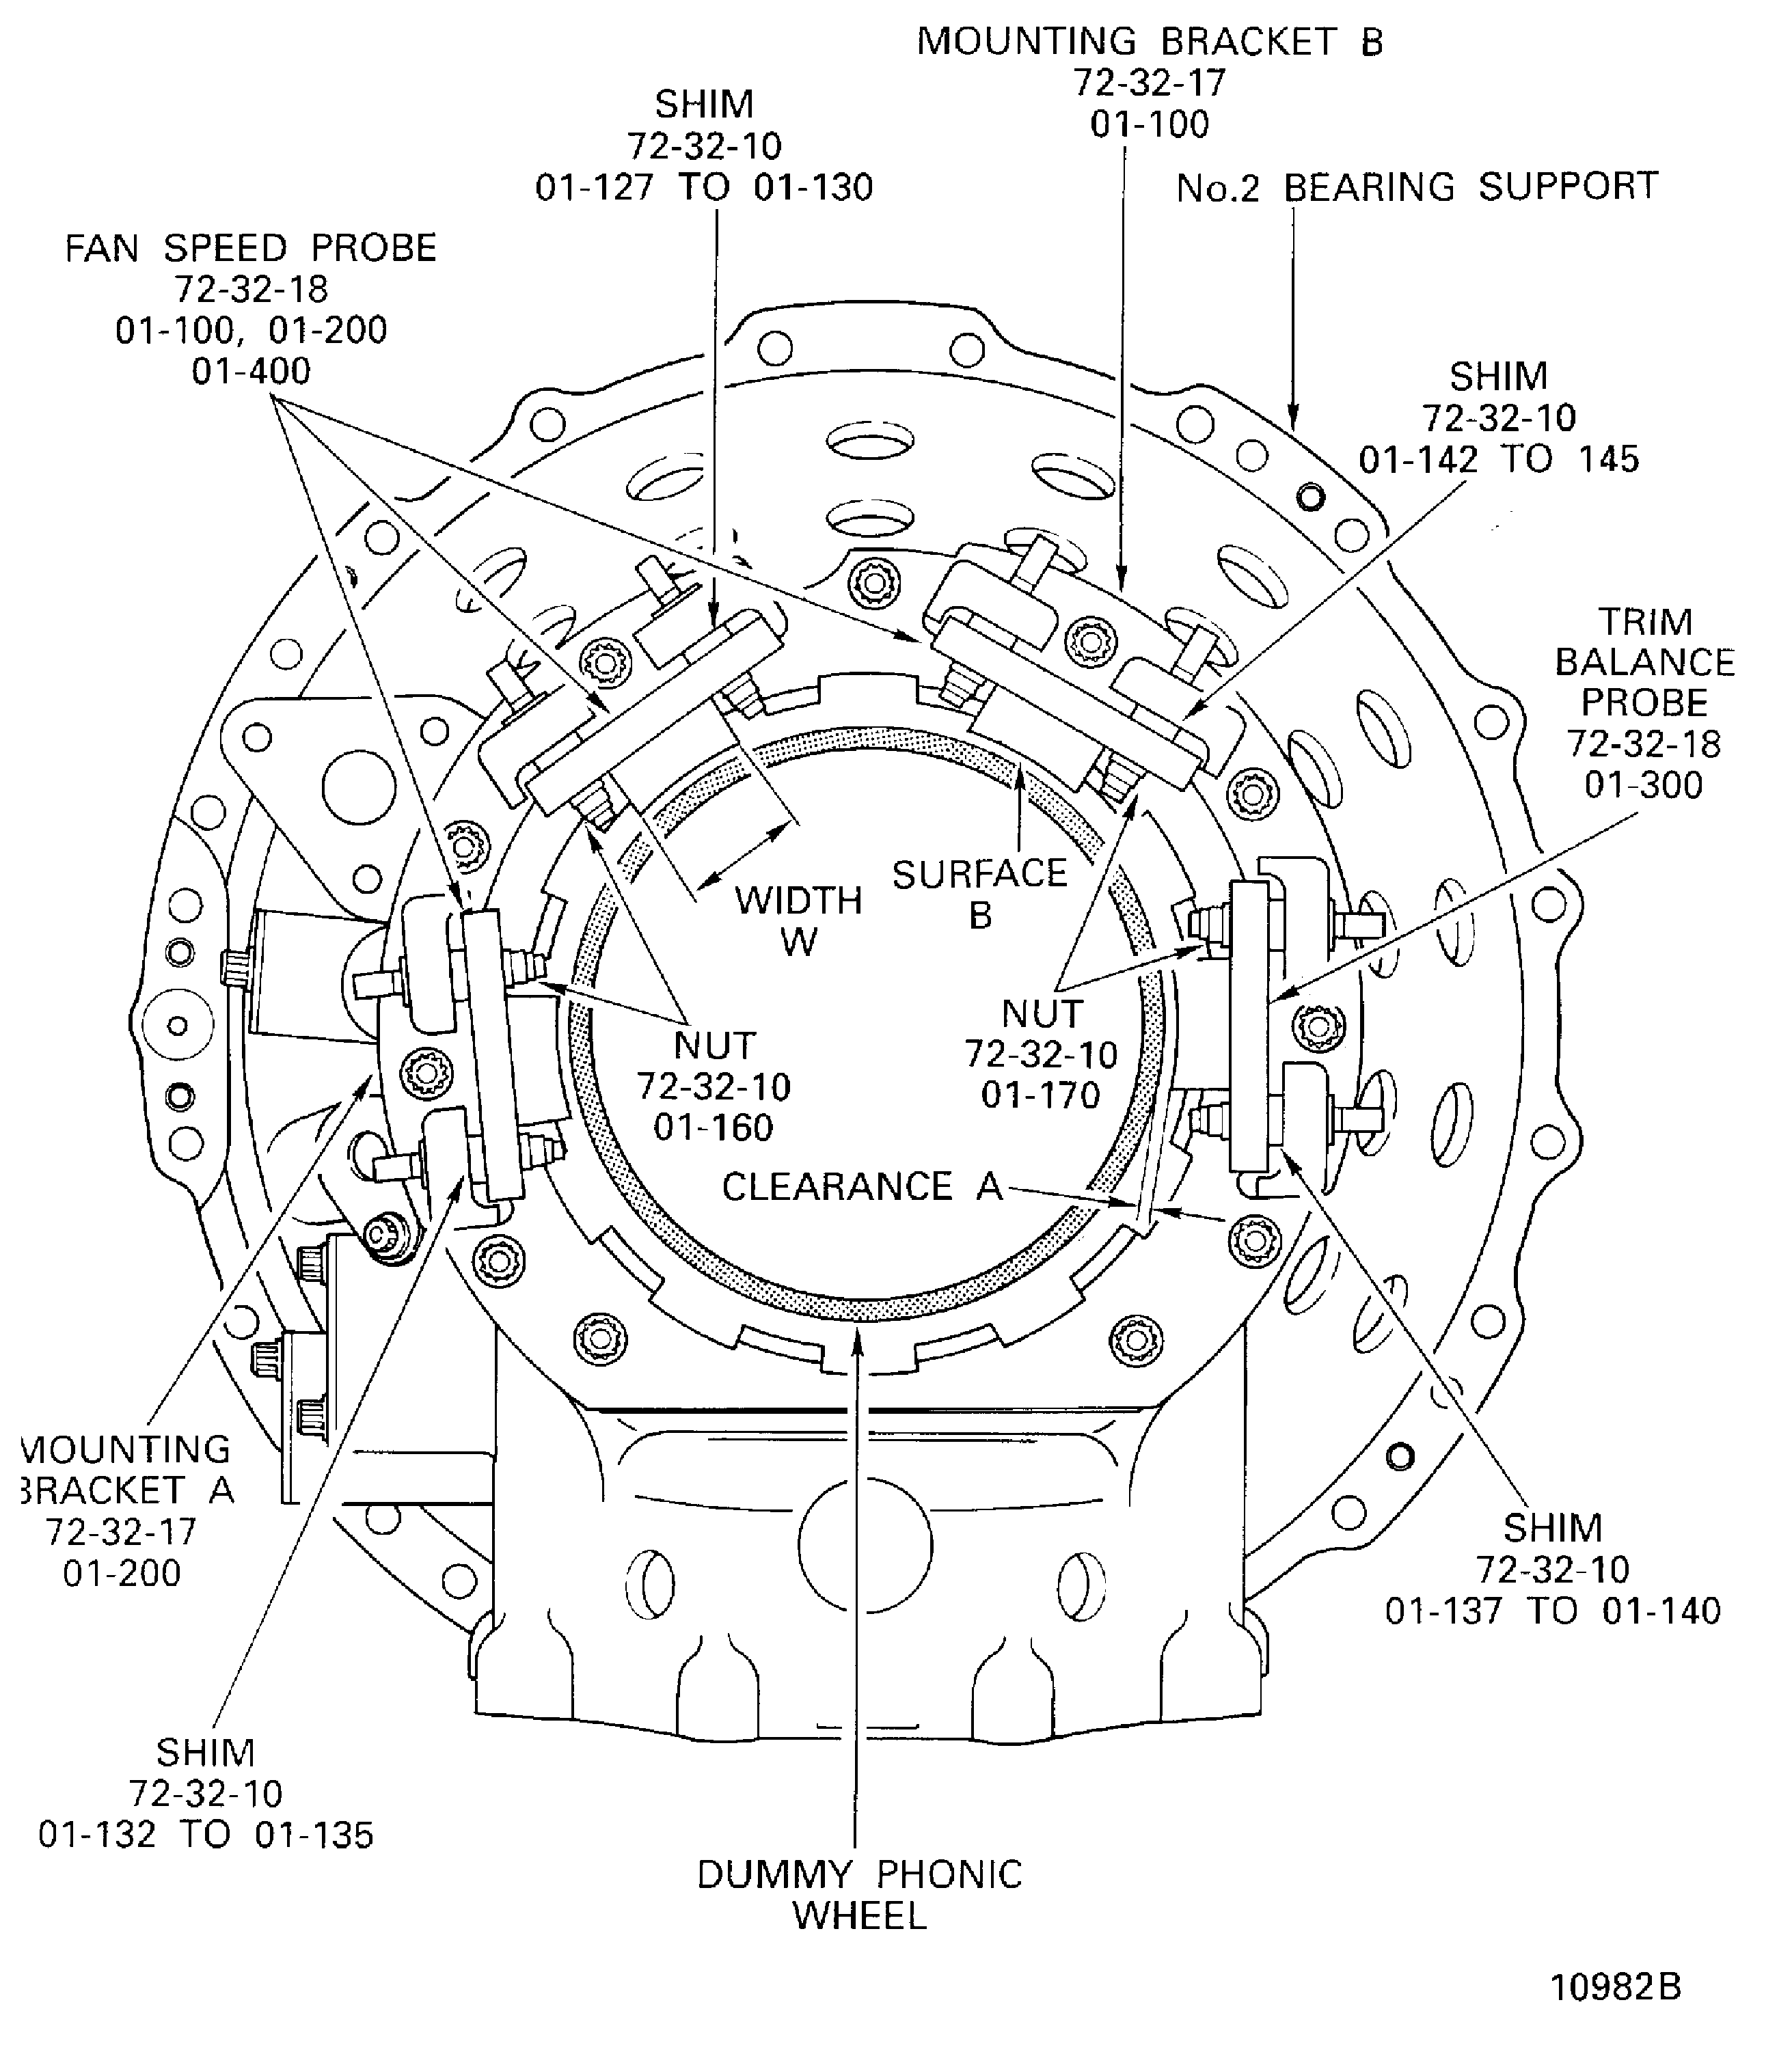
Figure: SBE 72-0553: Select the Shim
Sheet 3
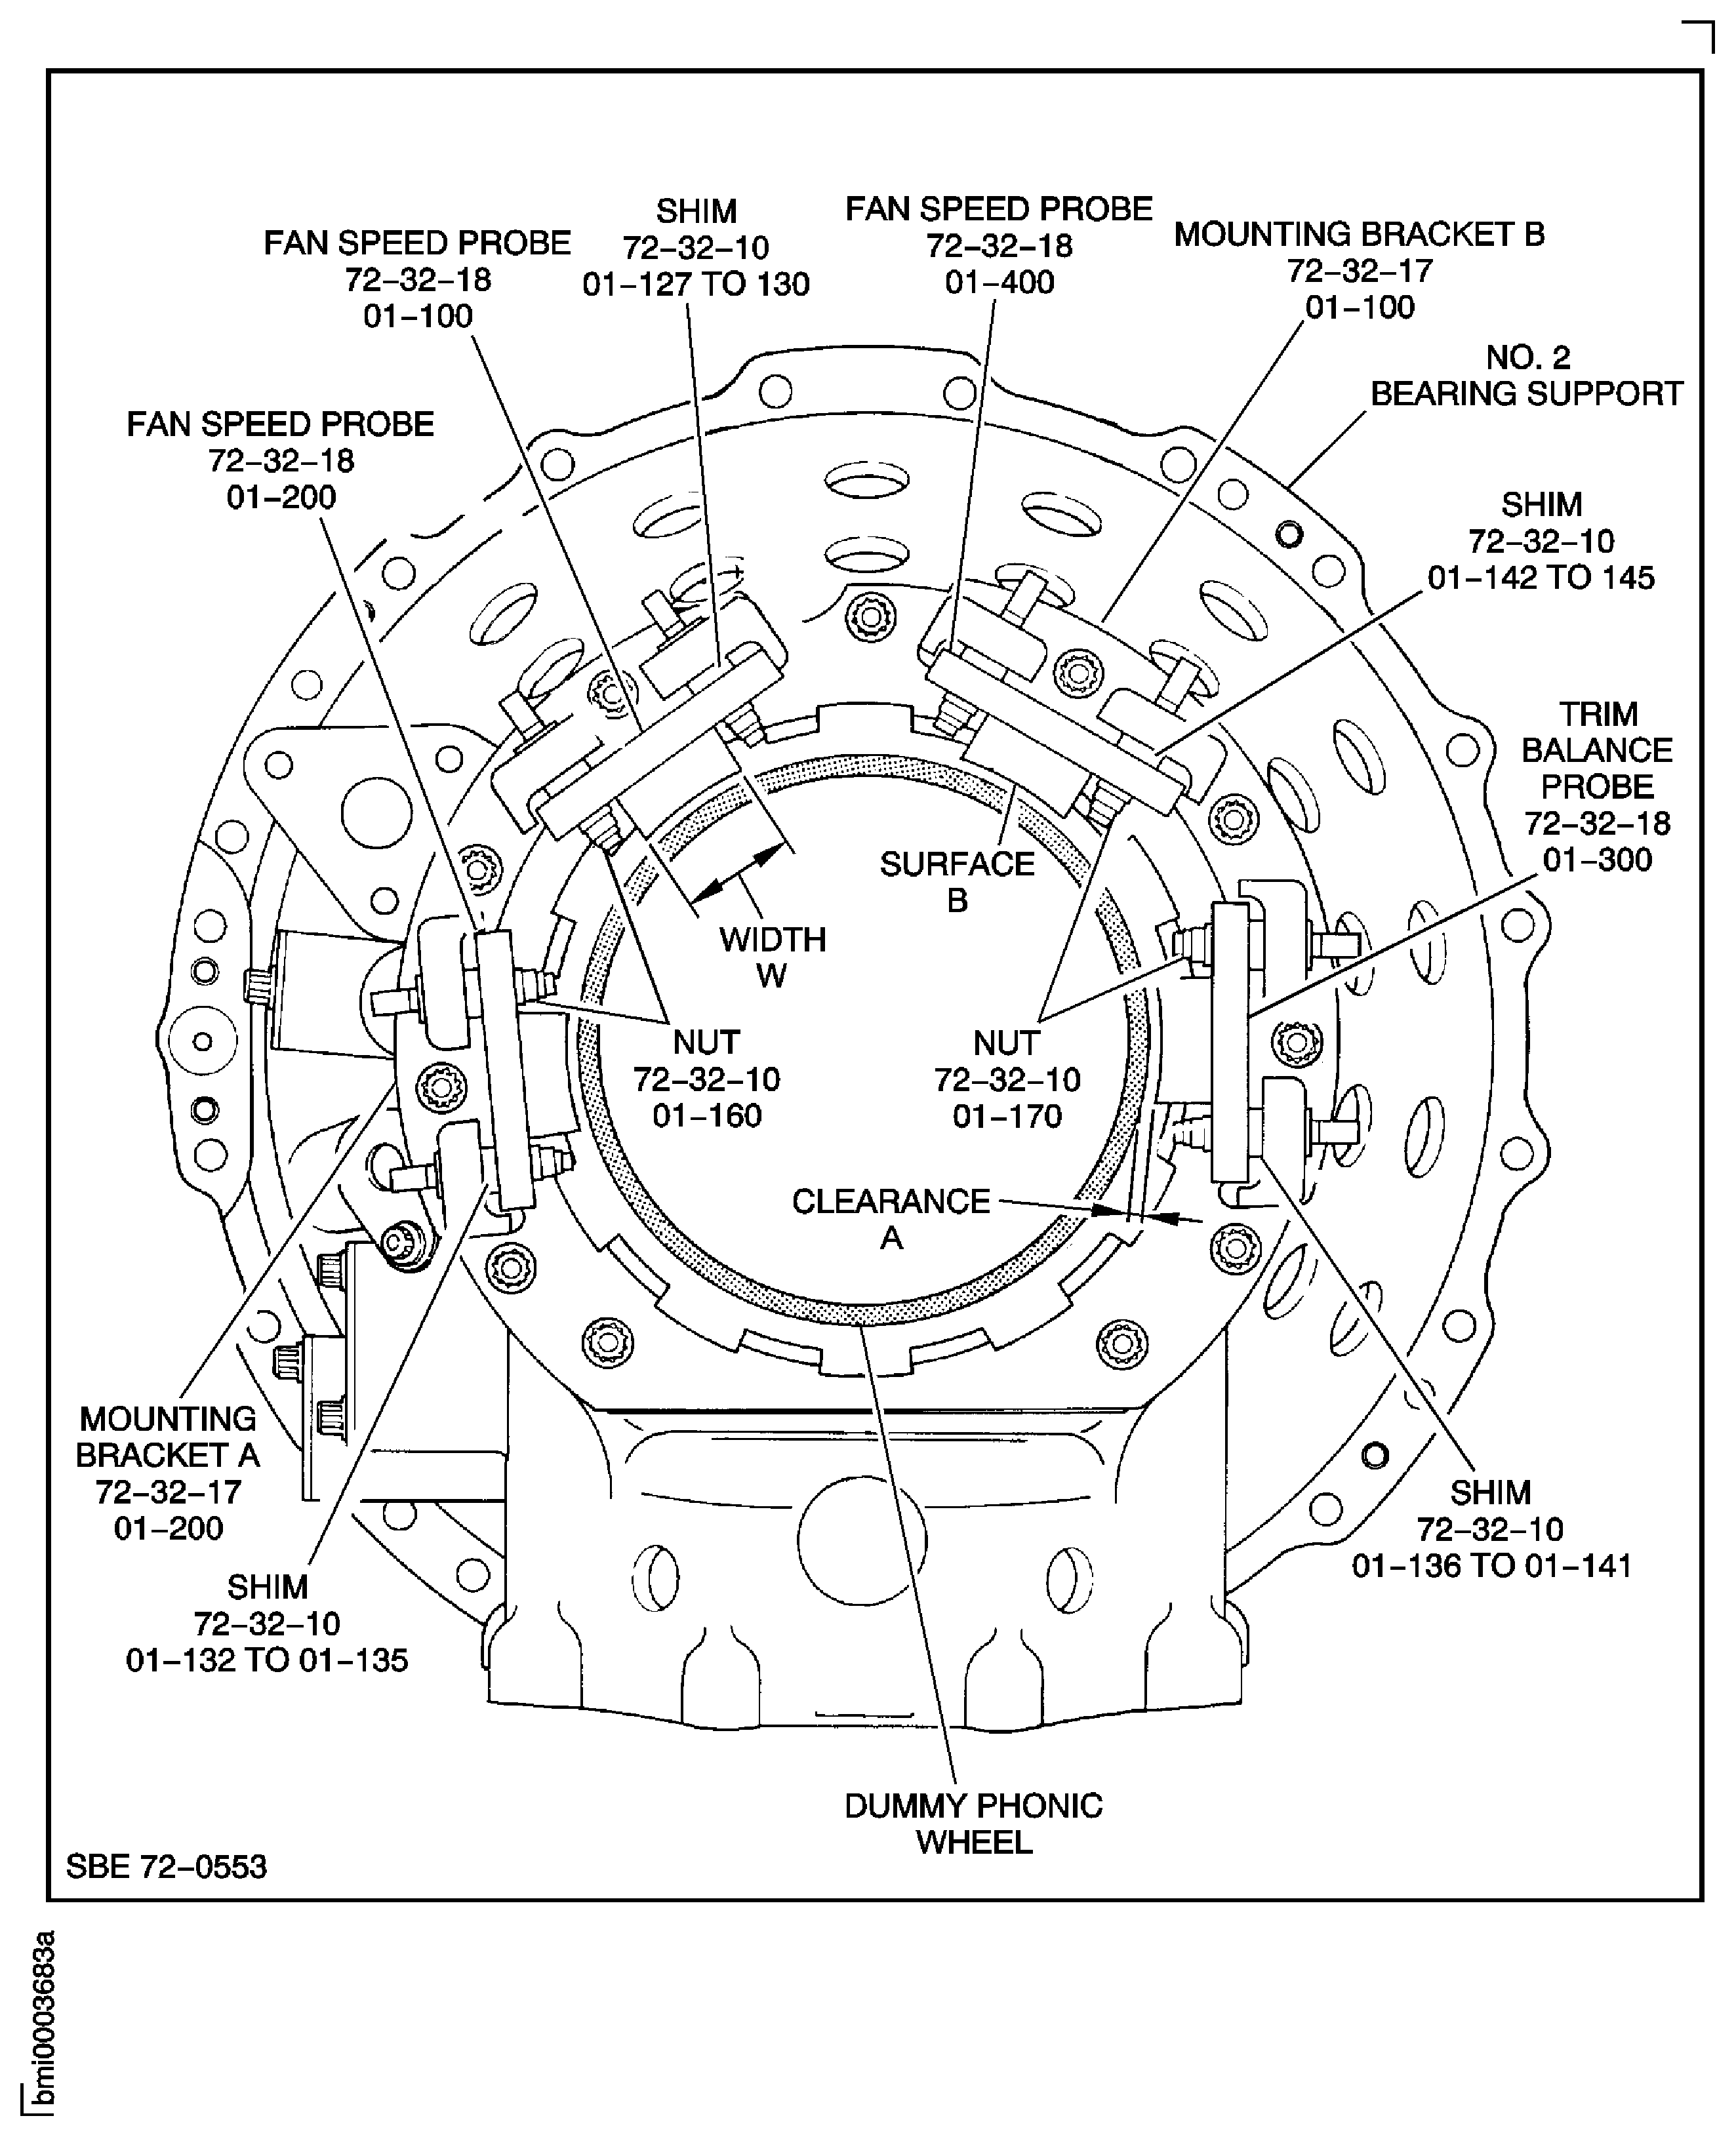
Figure: Pre SBE 72-0553: Replace the Shims on to the Mounting Brackets
Sheet 1
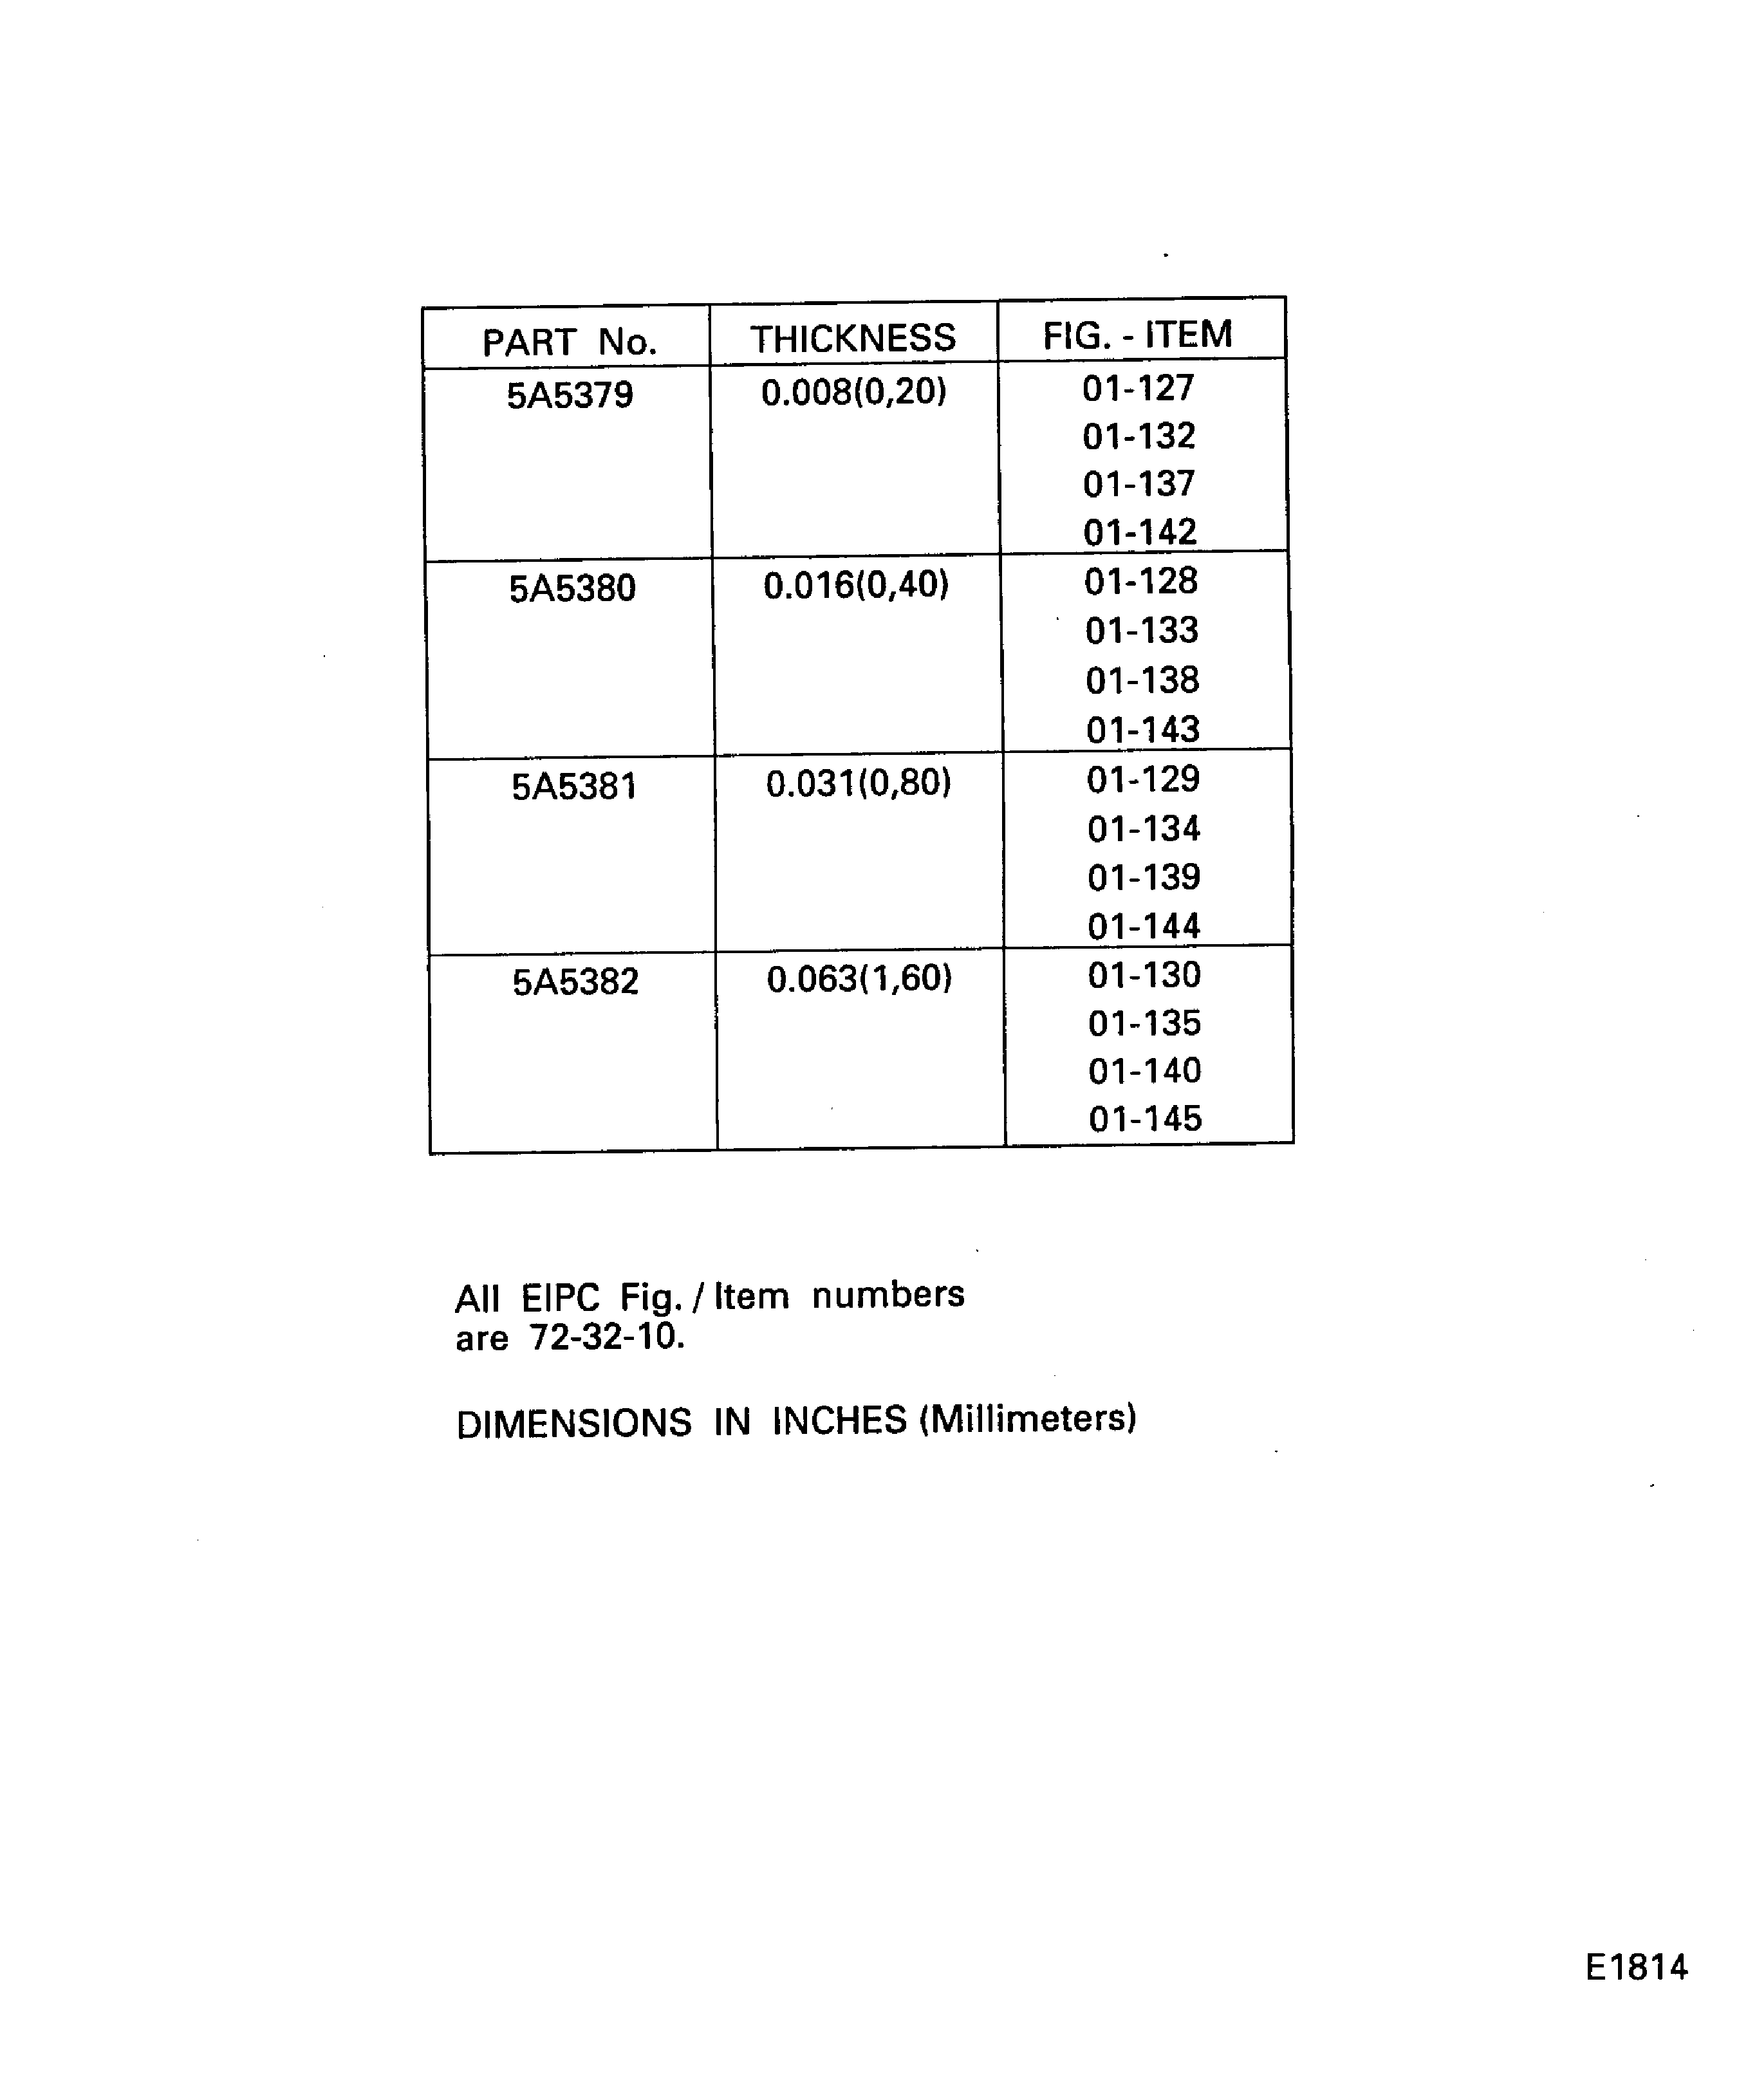
Figure: SBE 72-0553: Replace the Shims on to the Mounting Brackets
Sheet 2
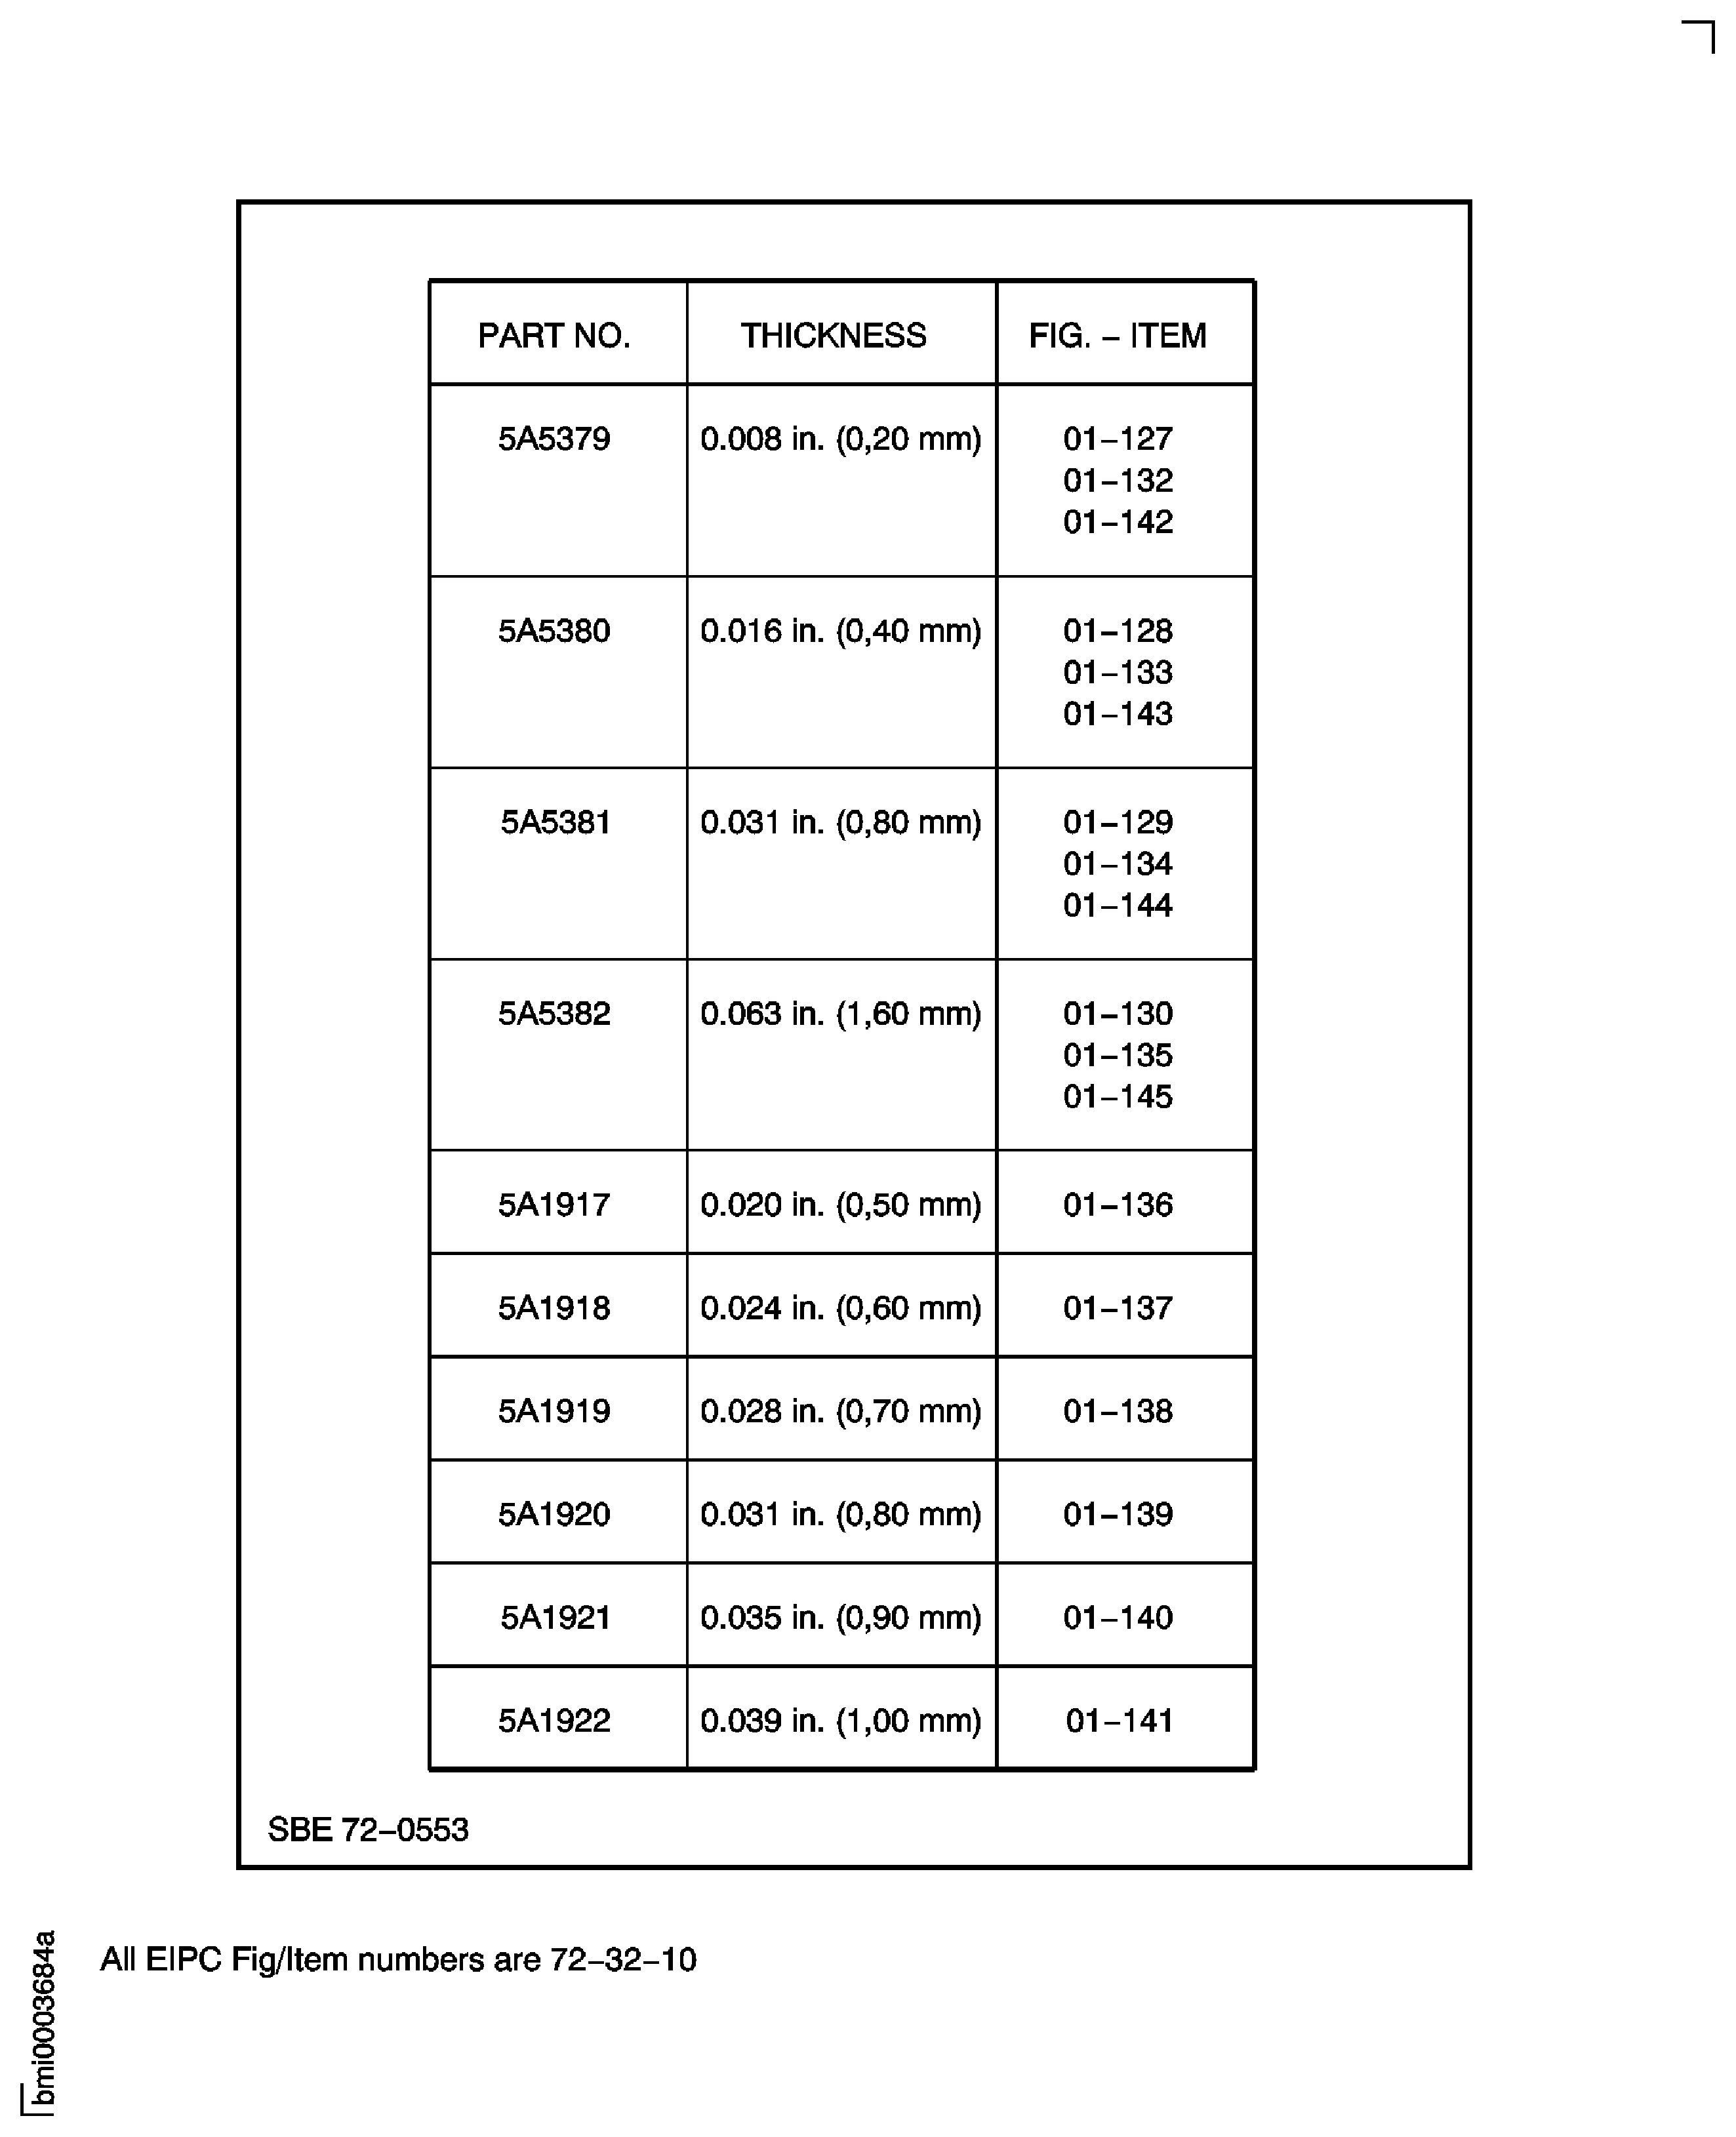
Figure: Install the Oil Jets to the No. 2 Bearing Support
Sheet 1

Figure: Install the Oil Jets to the No. 2 Bearing Support
Sheet 2
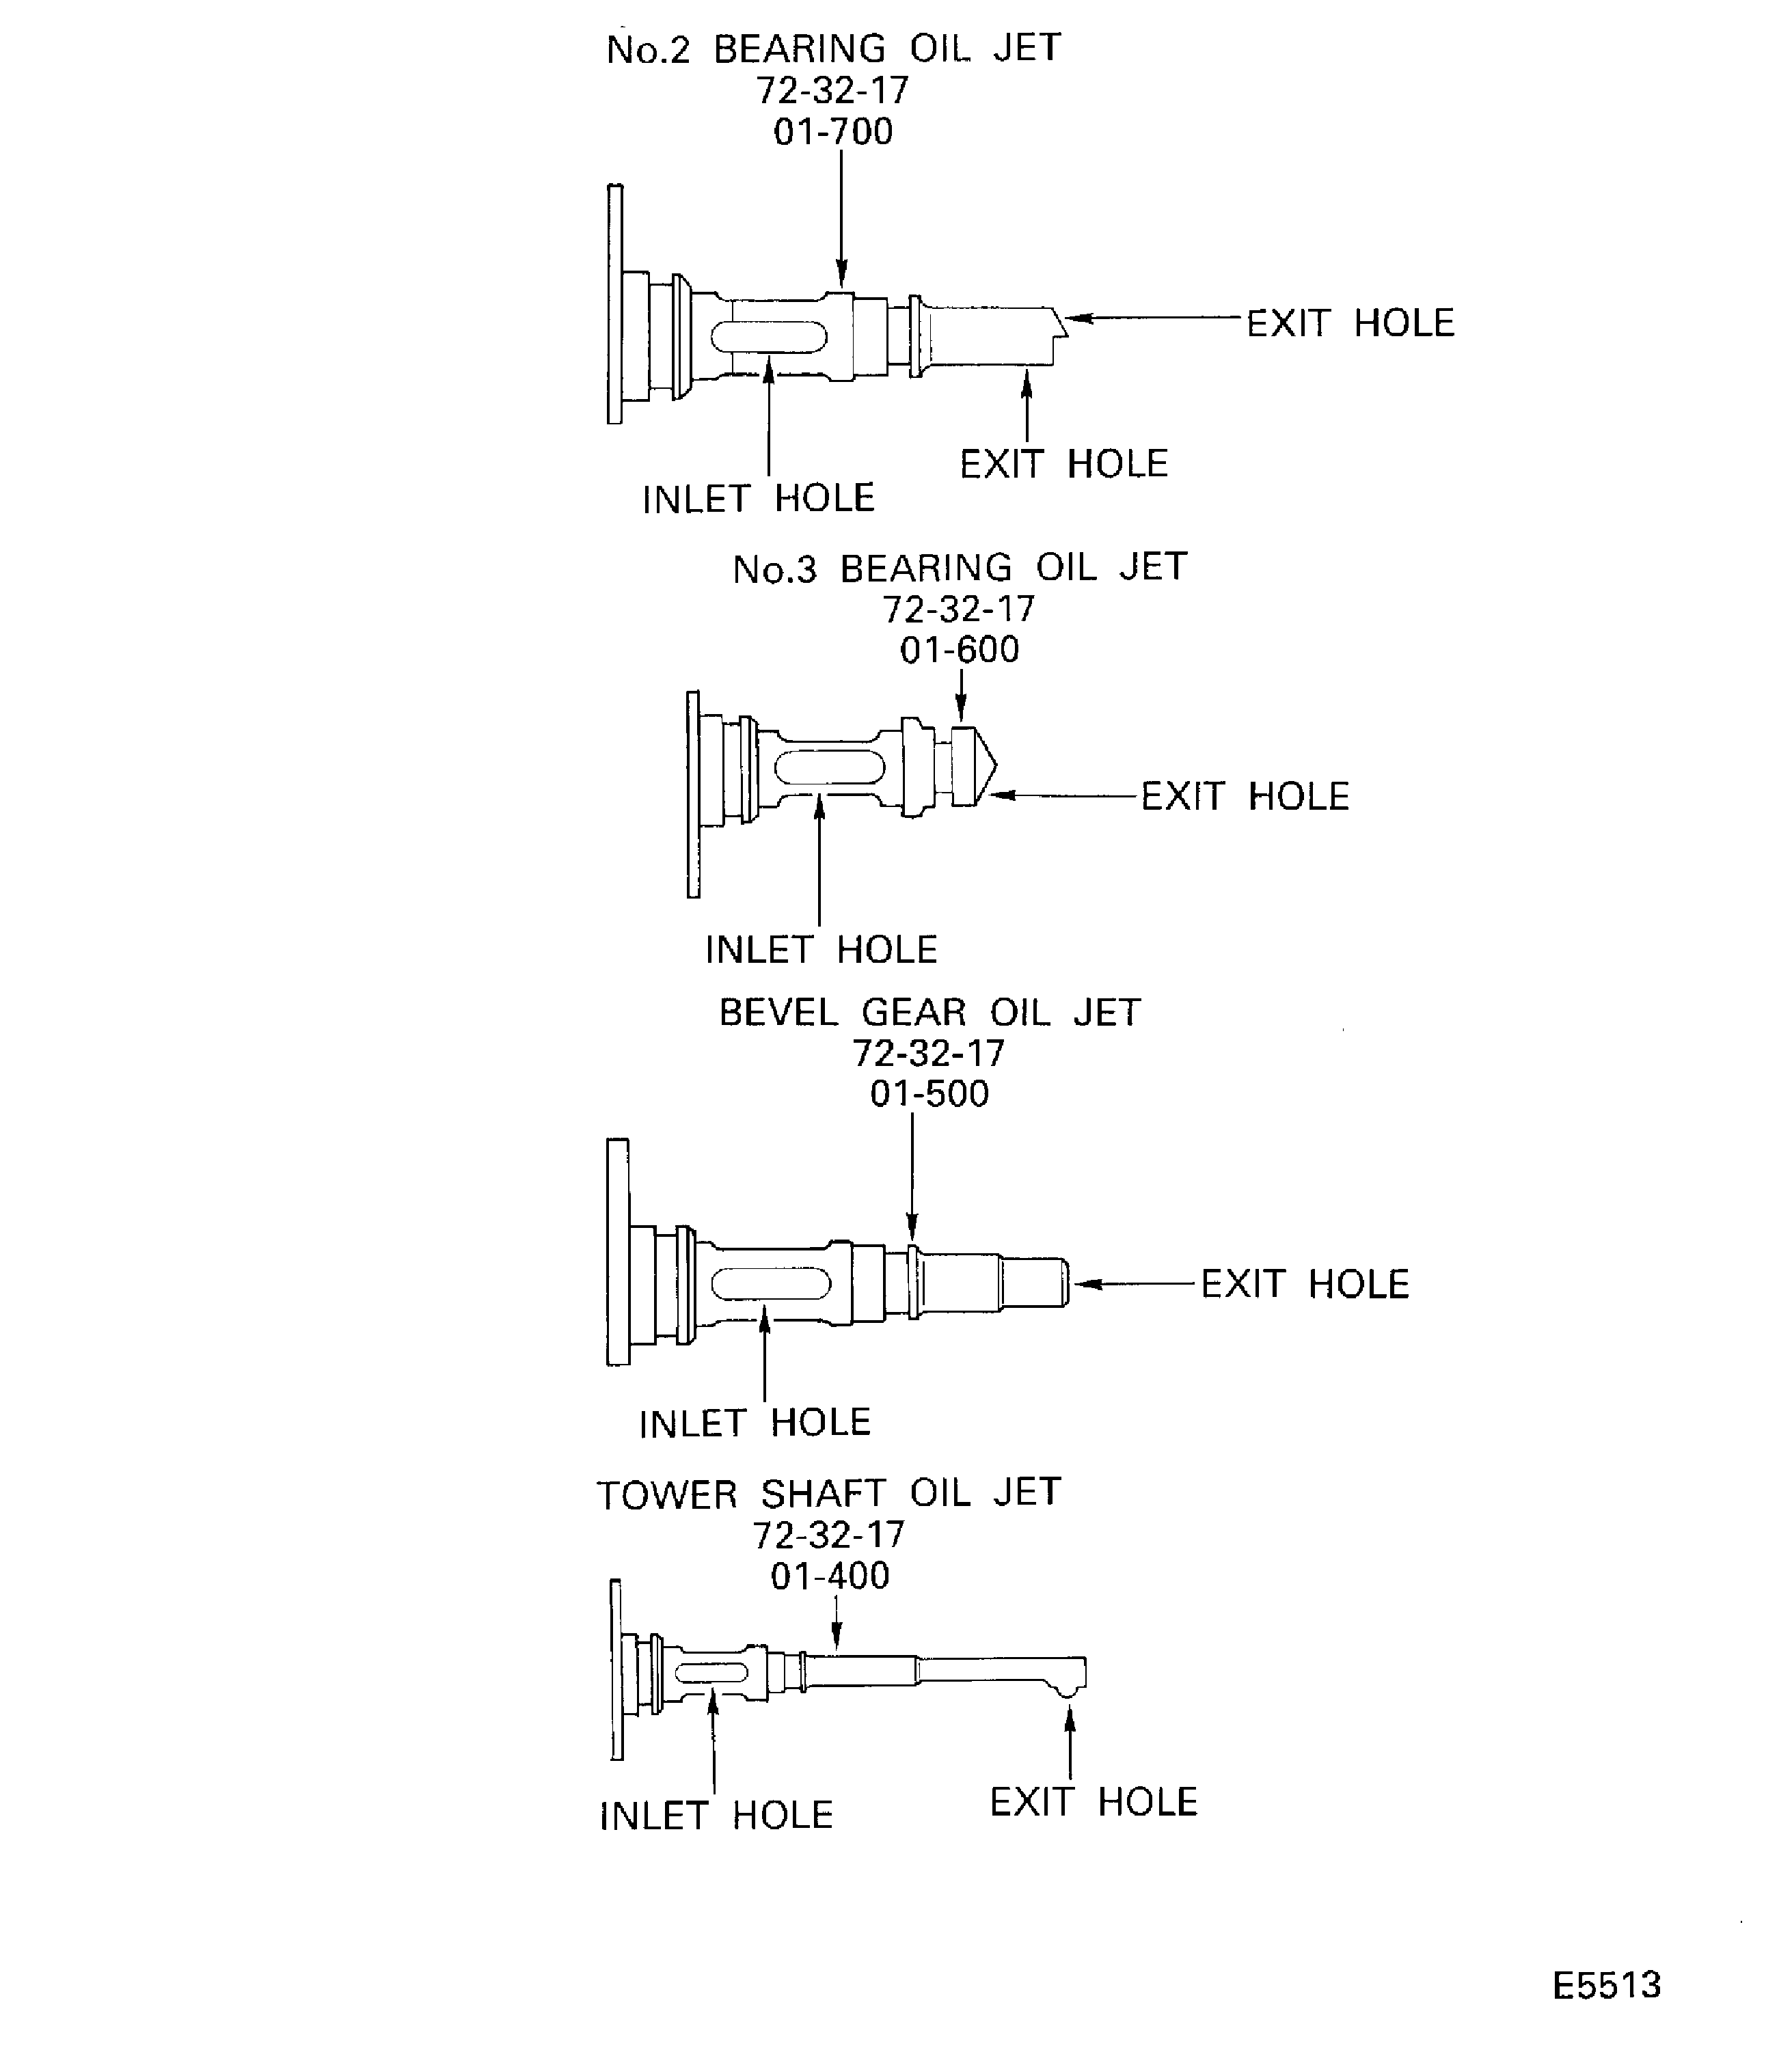
Figure: Assemble the Hydraulic Seal Assembly
Sheet 1
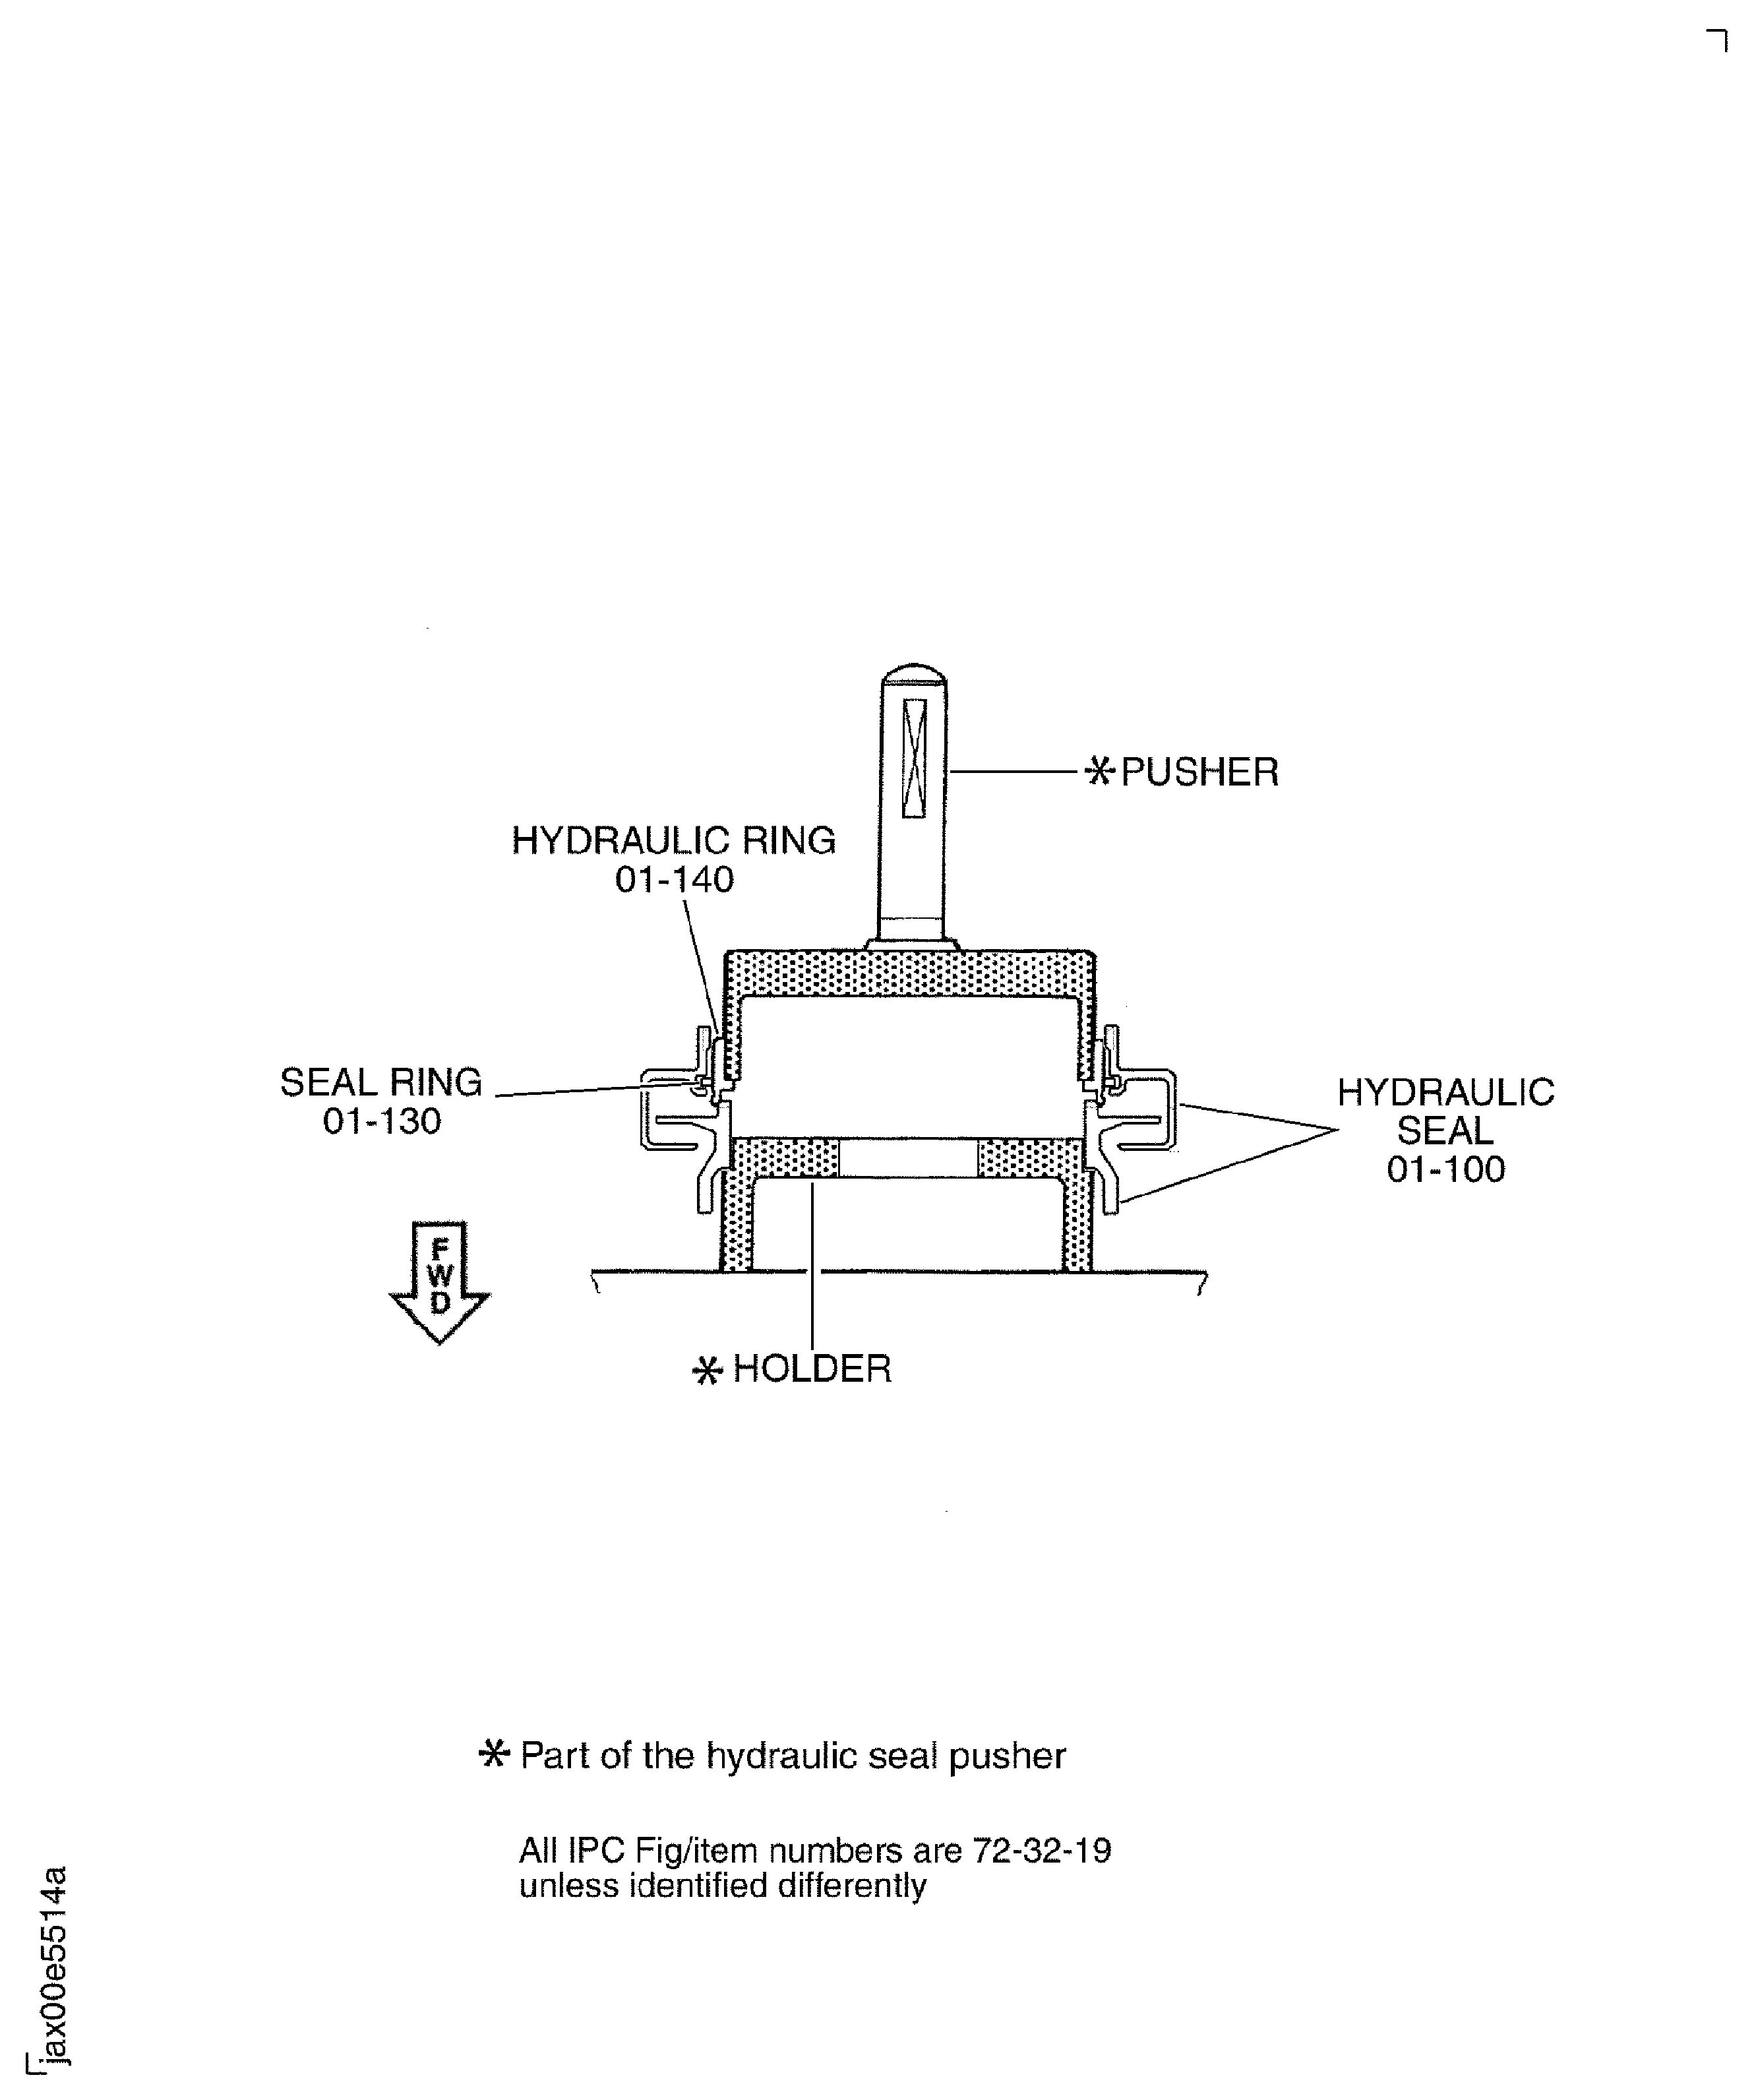
Figure: Install the Hydraulic Seal Assembly to the No. 3 Bearing and Support Assembly
Sheet 2
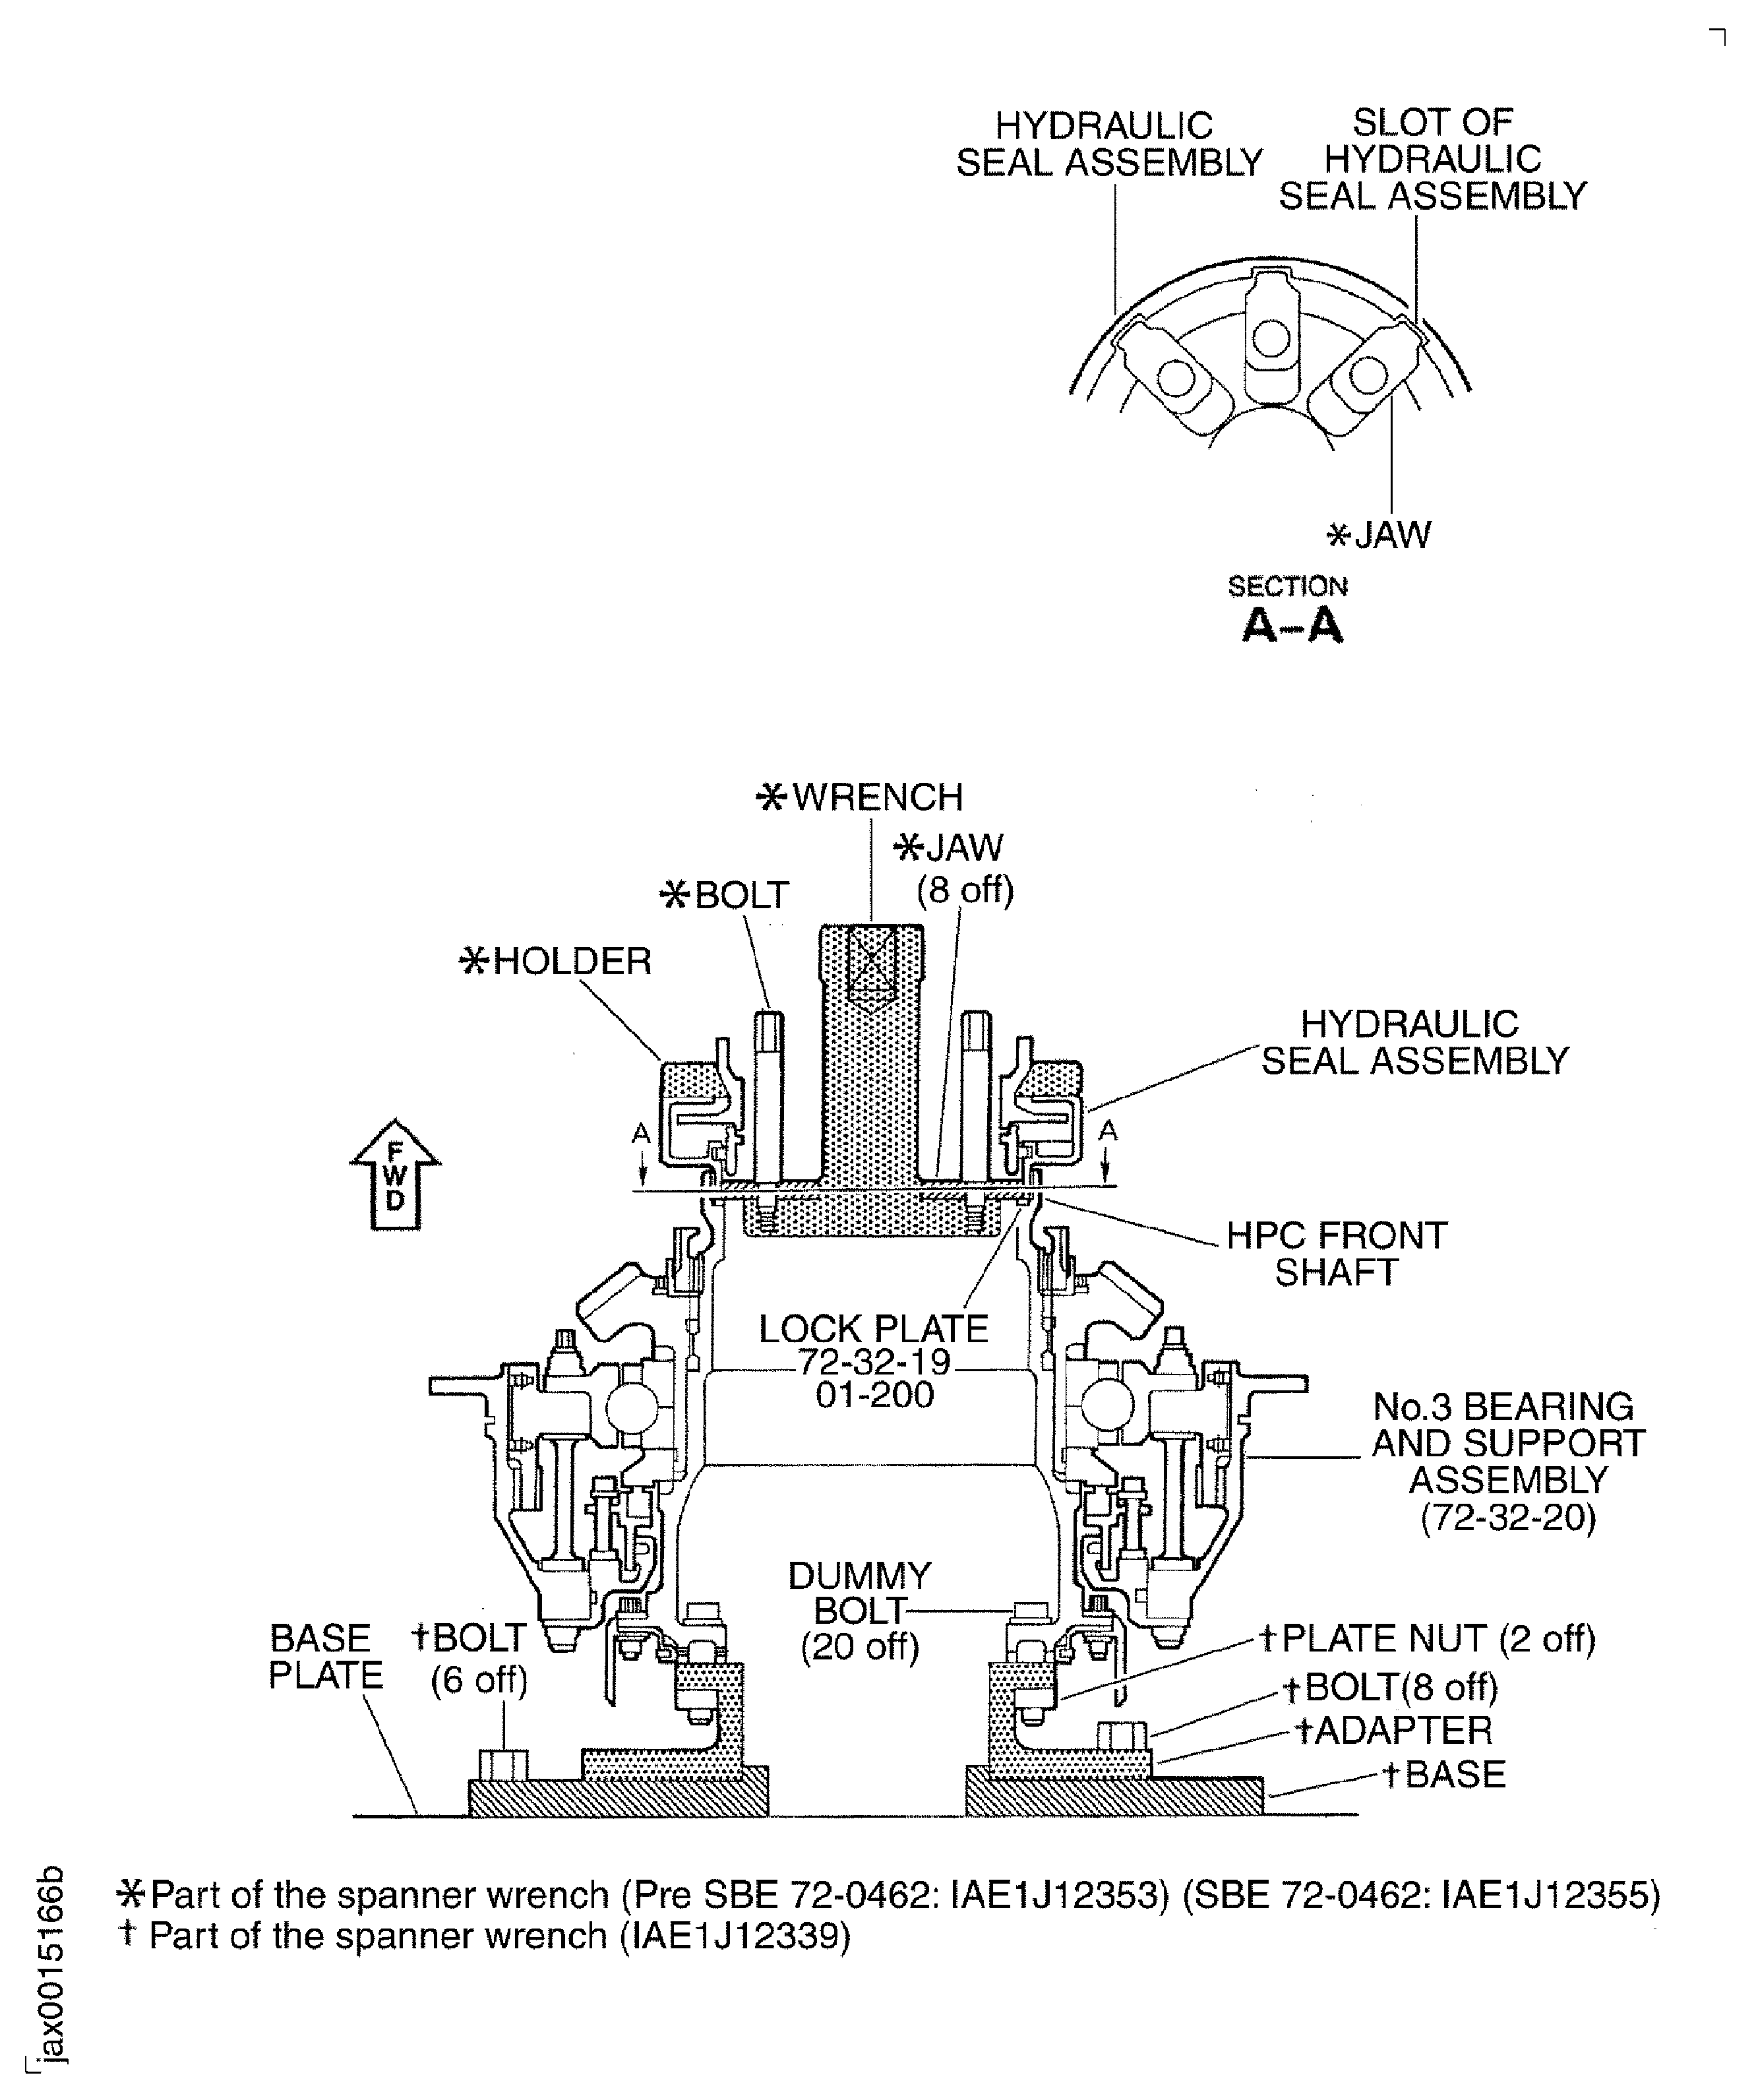
Figure: Install the Hydraulic Seal Assembly to the No. 3 Bearing and Support Assembly
Sheet 3

Figure: Pre SBE 72-0462:Install the Hydraulic Seal Assembly to the No. 3 Bearing and Support Assembly
Sheet 4

Figure: SBE 72-0462: Install the Hydraulic Seal Assembly to the No. 3 Bearing and Support Assembly
Sheet 5

Figure: Install the Hydraulic Seal Assembly to the No. 3 Bearing and Support Assembly
Sheet 6
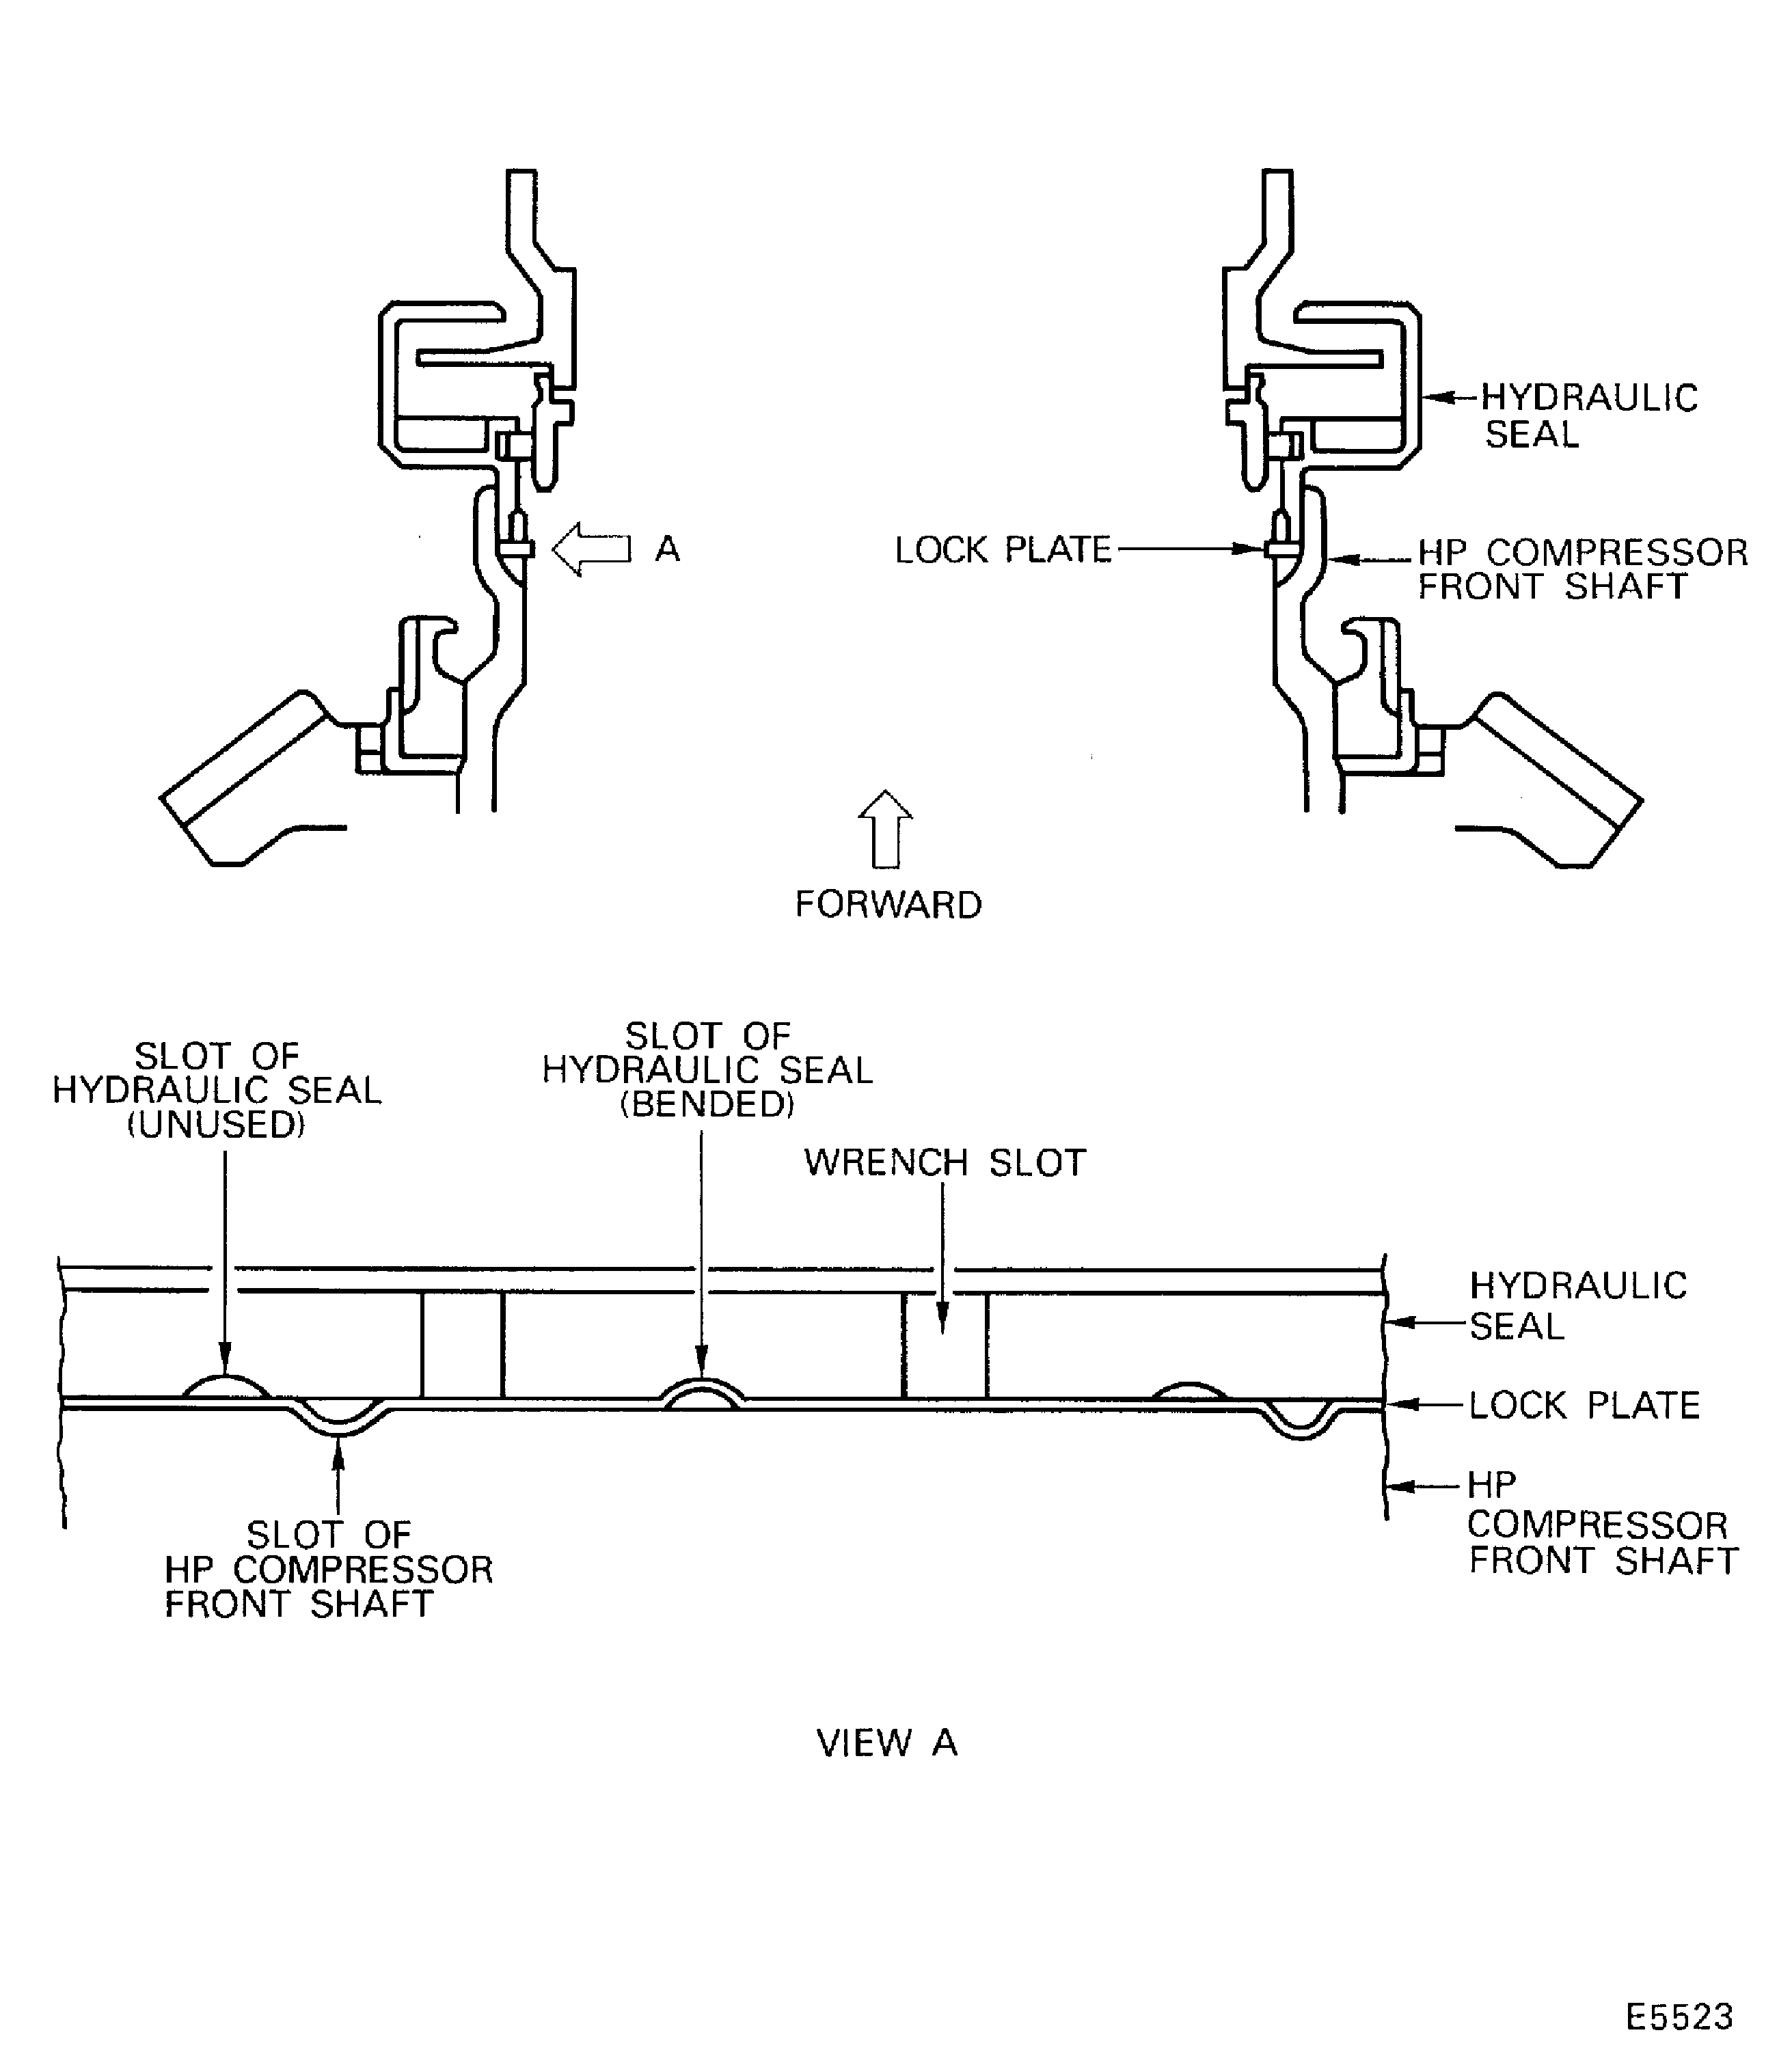
Figure: Assemble the No. 3 Bearing Internal Gearbox and Support Assembly
Assemble the No. 3 Bearing Internal Gearbox and Support Assembly

Figure: Do a Backlash Check of the Bevel Gears
Sheet 1
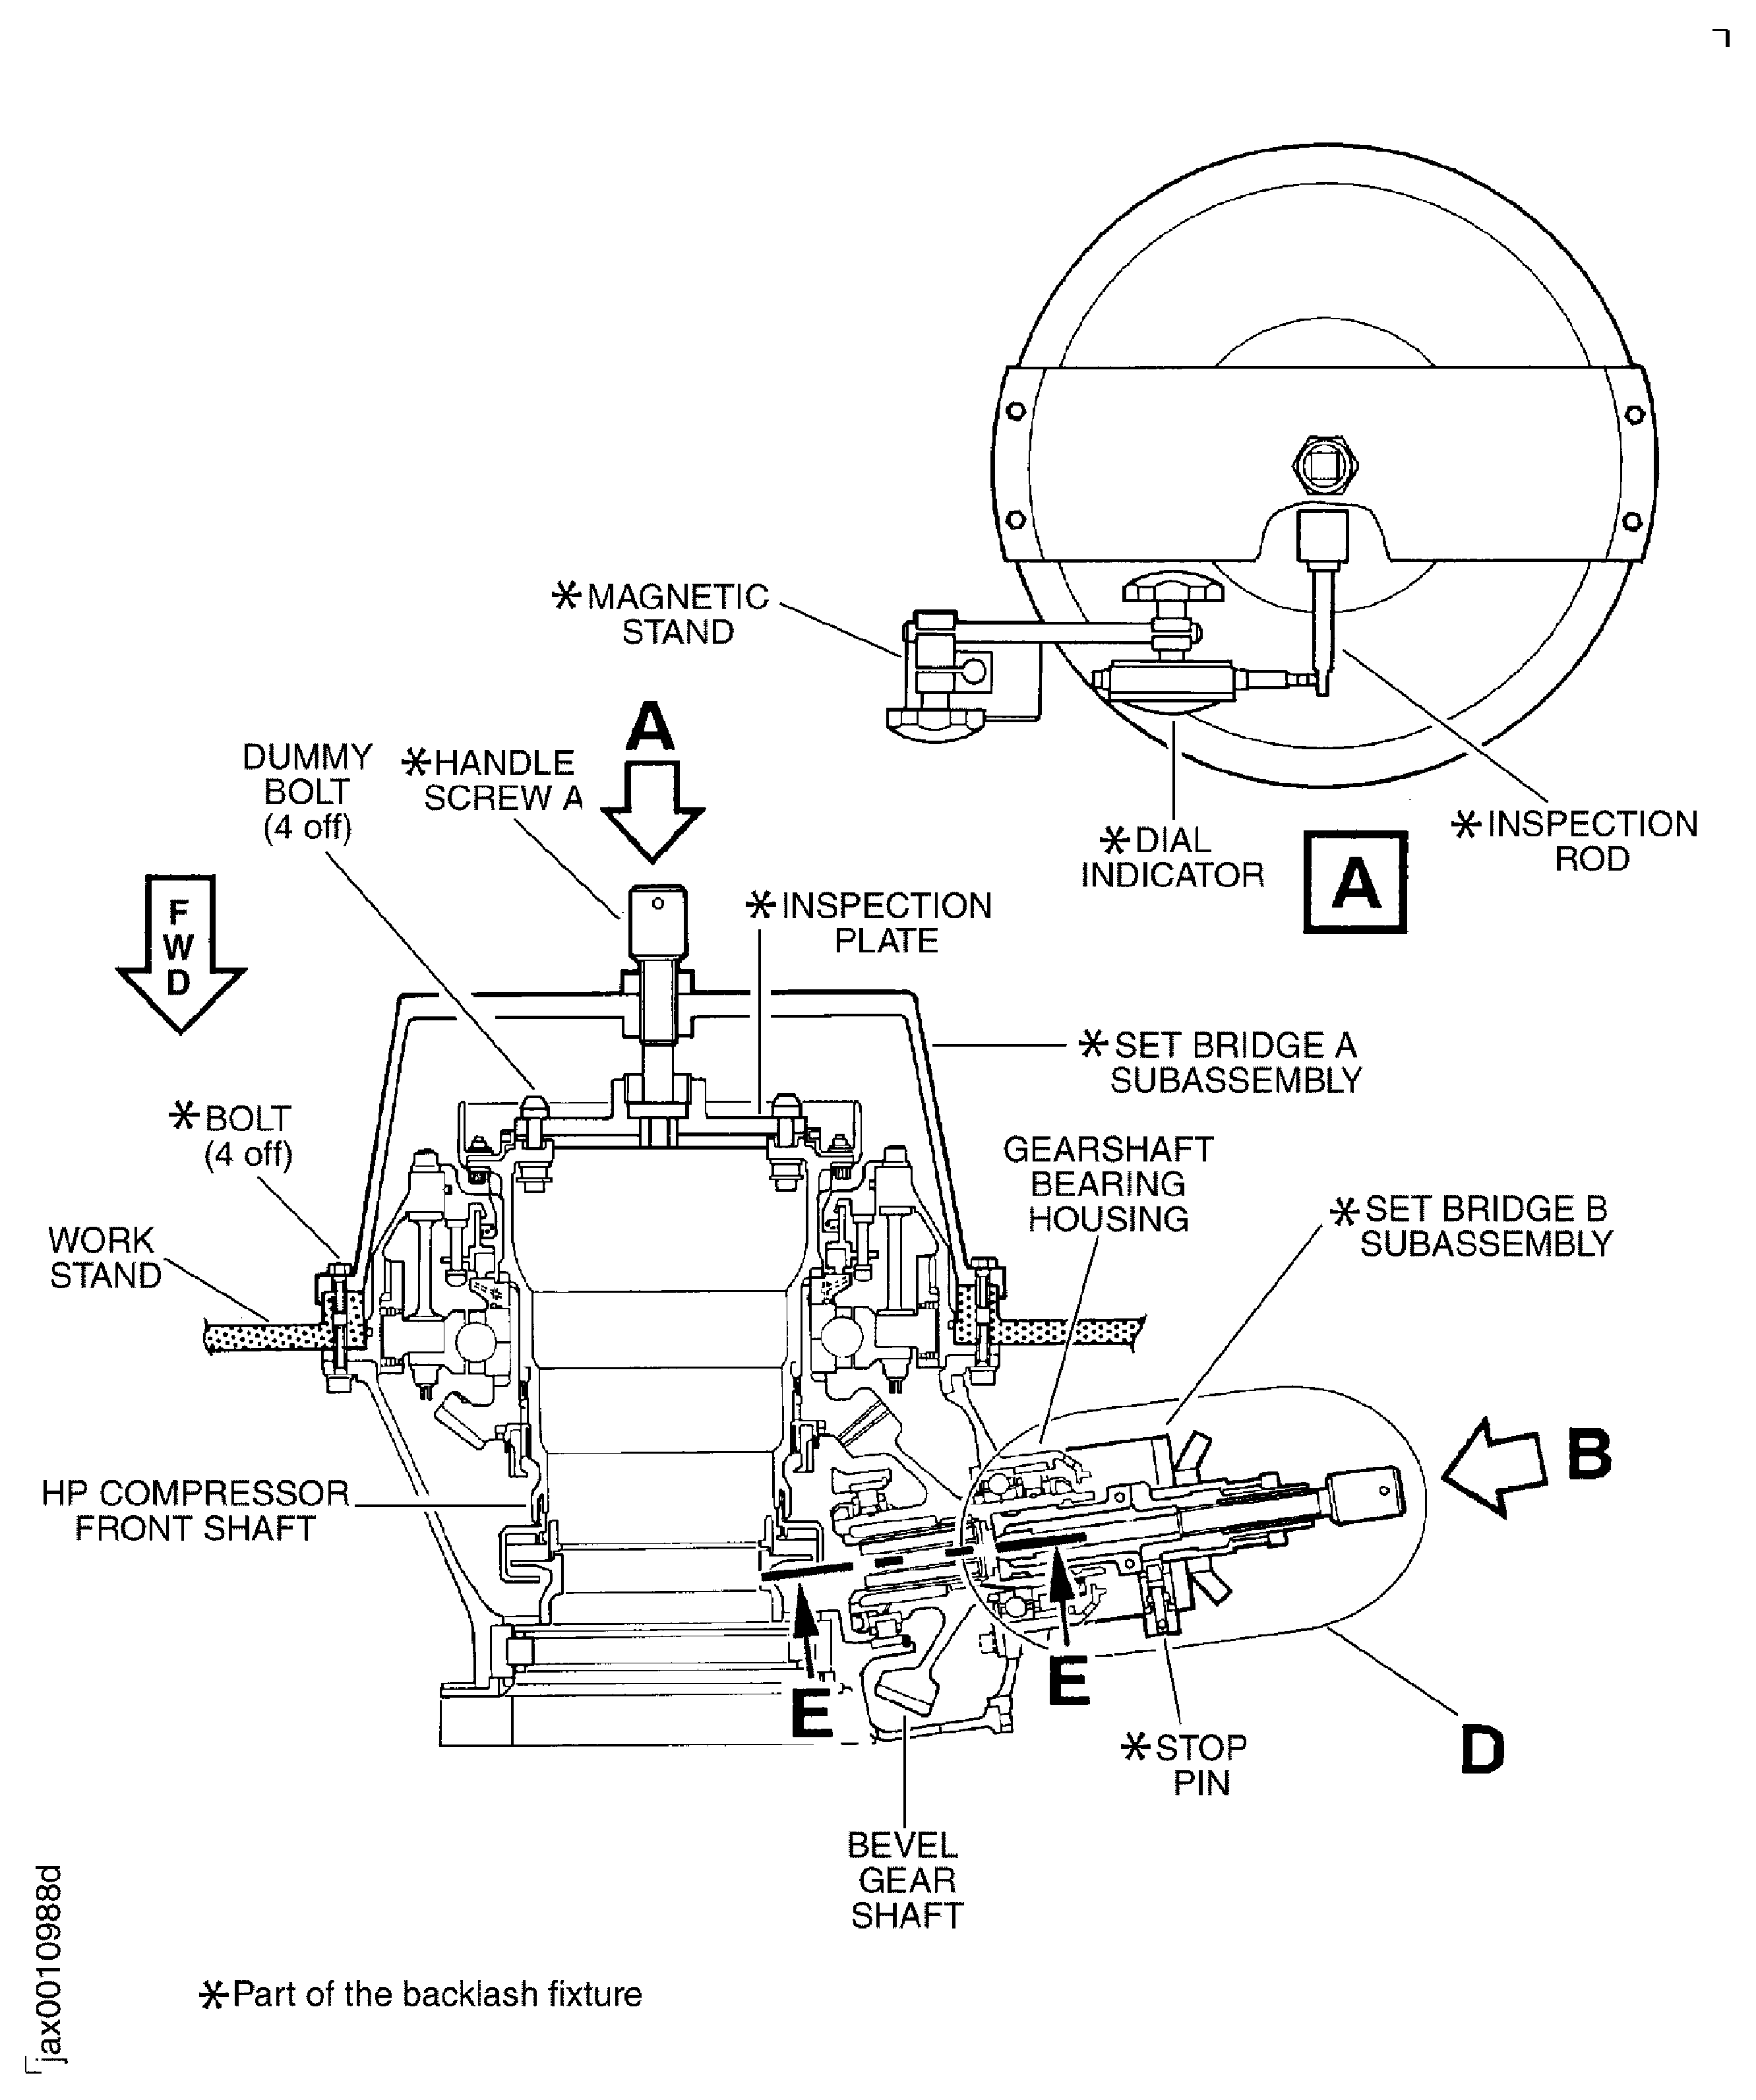
Figure: Do a Backlash Check of the Bevel Gears
Sheet 2

Figure: Do a Backlash Check of the Bevel Gears
Sheet 3
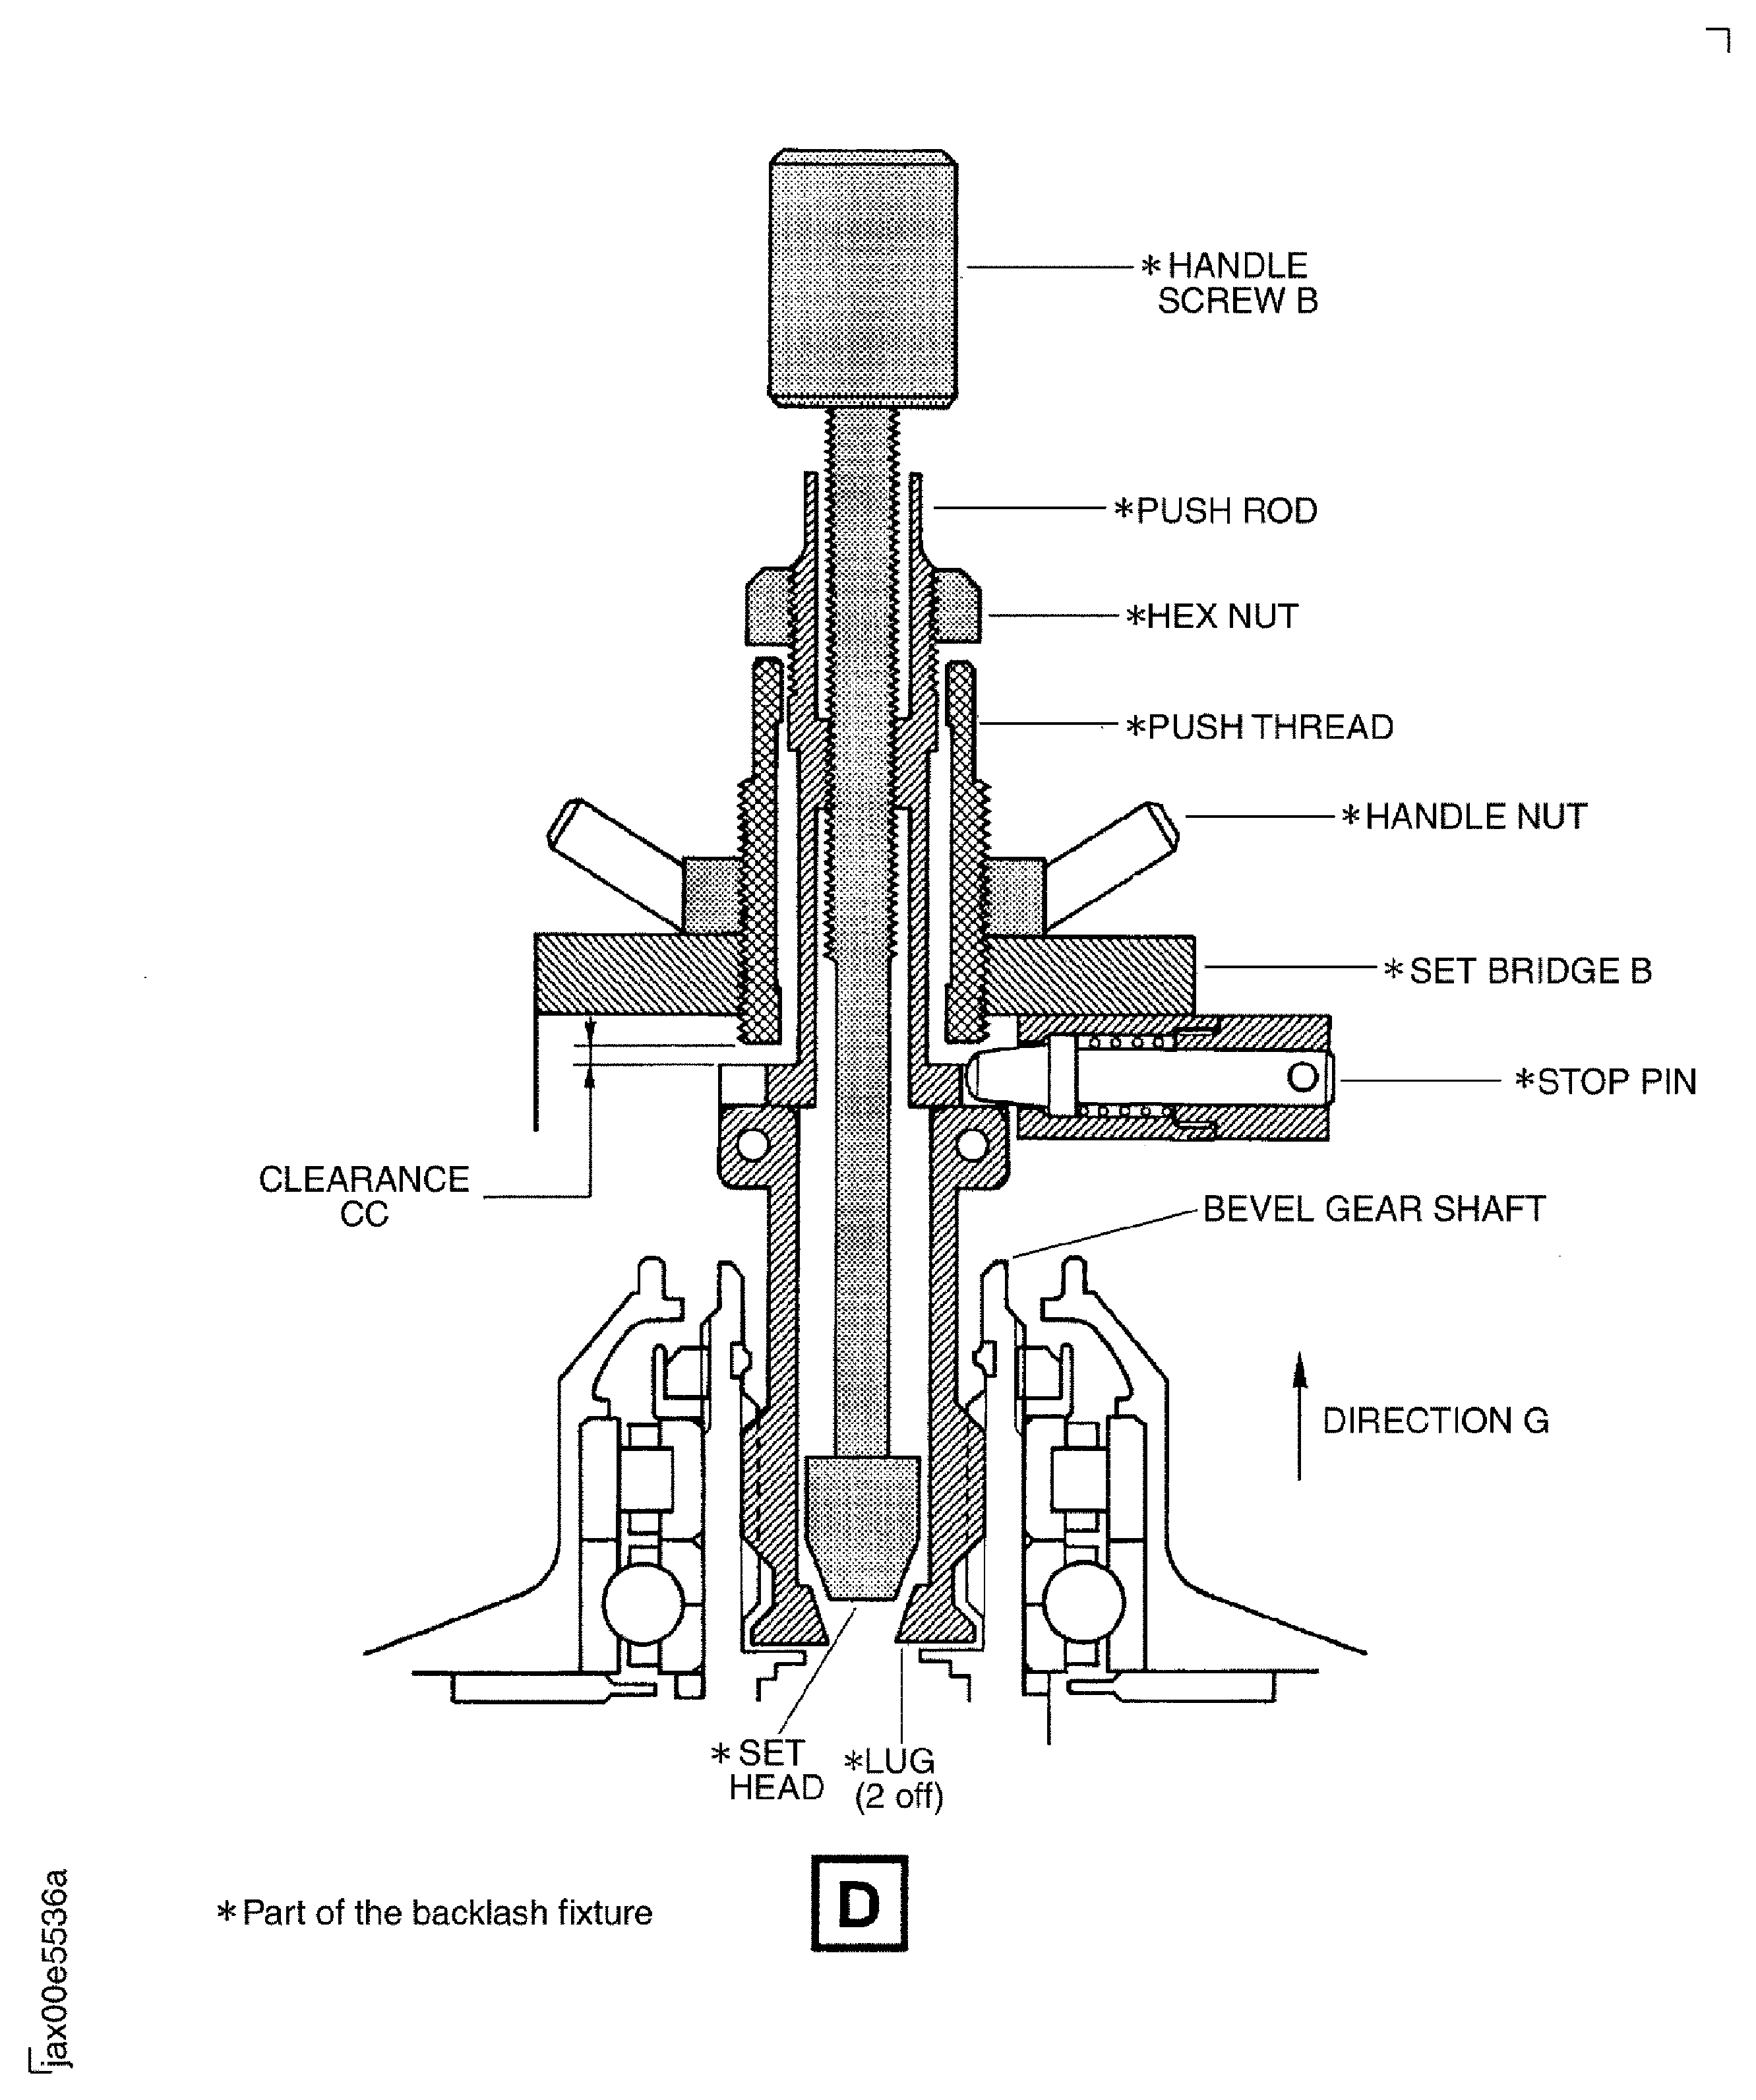
Figure: Move the No. 3 Bearing Seal Assembly
Move the No. 3 Bearing Seal Assembly
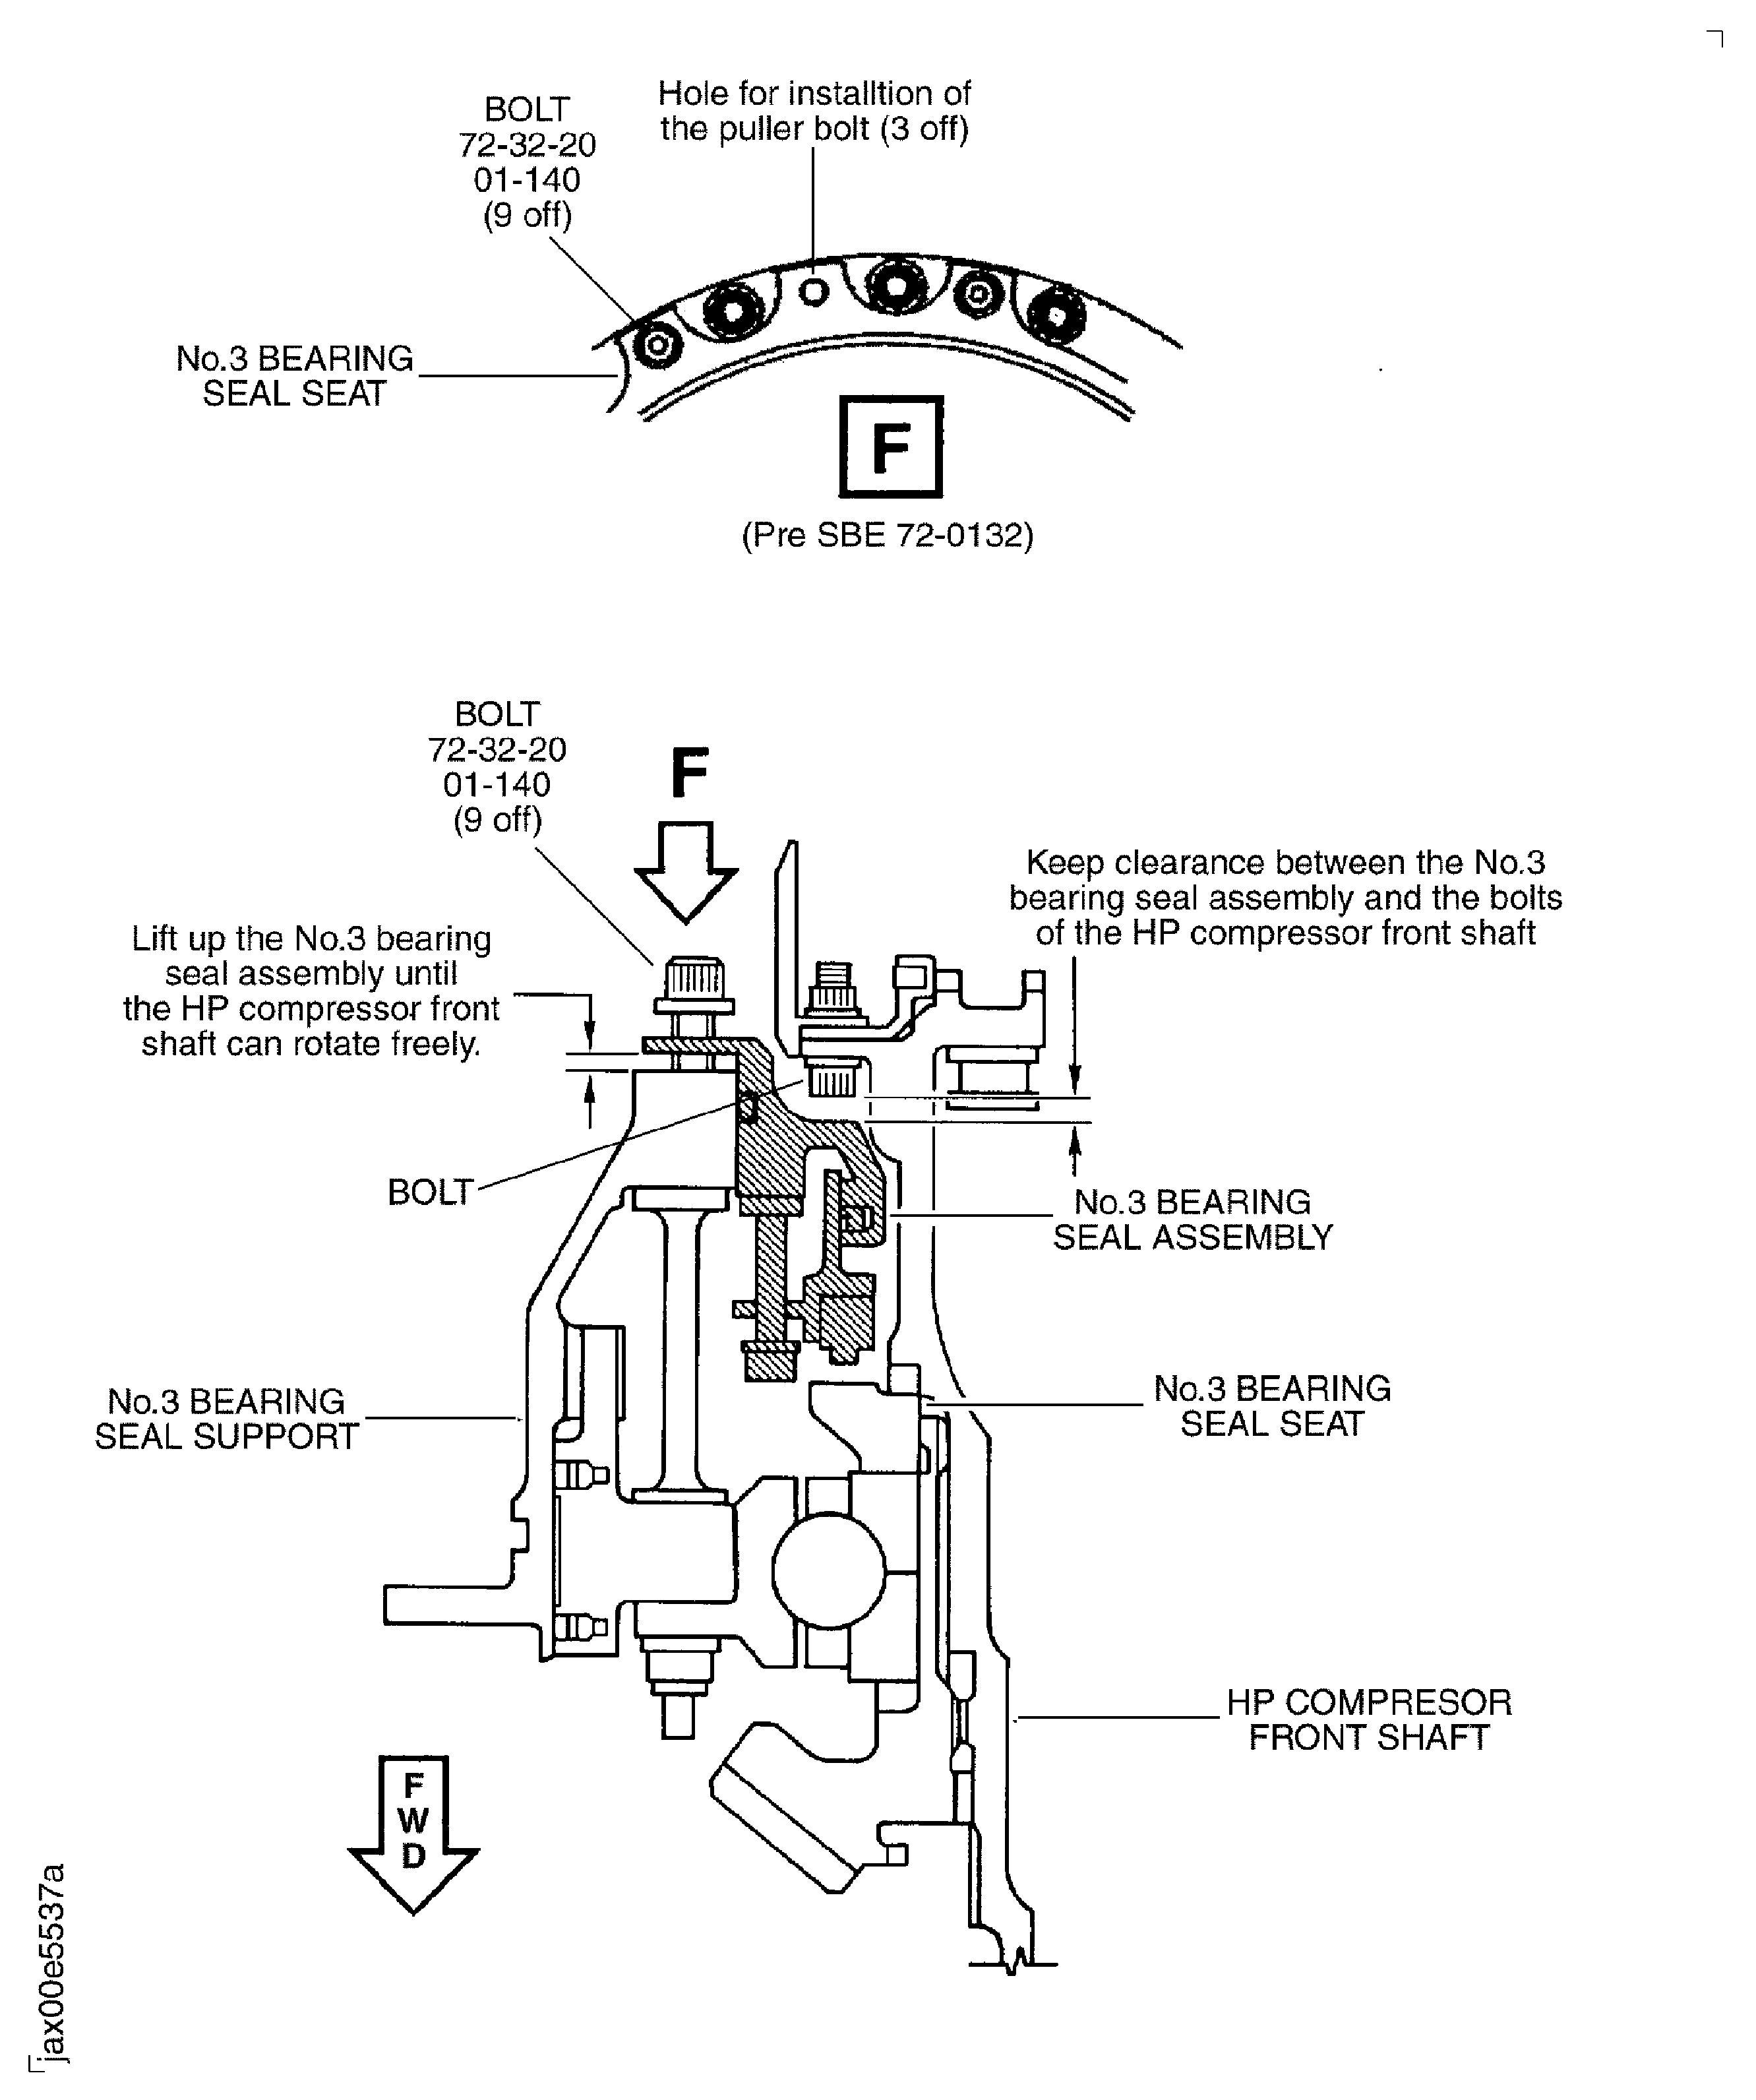
Figure: Find the Value of the LASH B and the Mounting Distance of the Bevel Gearshaft
Find the Value of the LASH B and the Mounting Distance of the Bevel Gearshaft
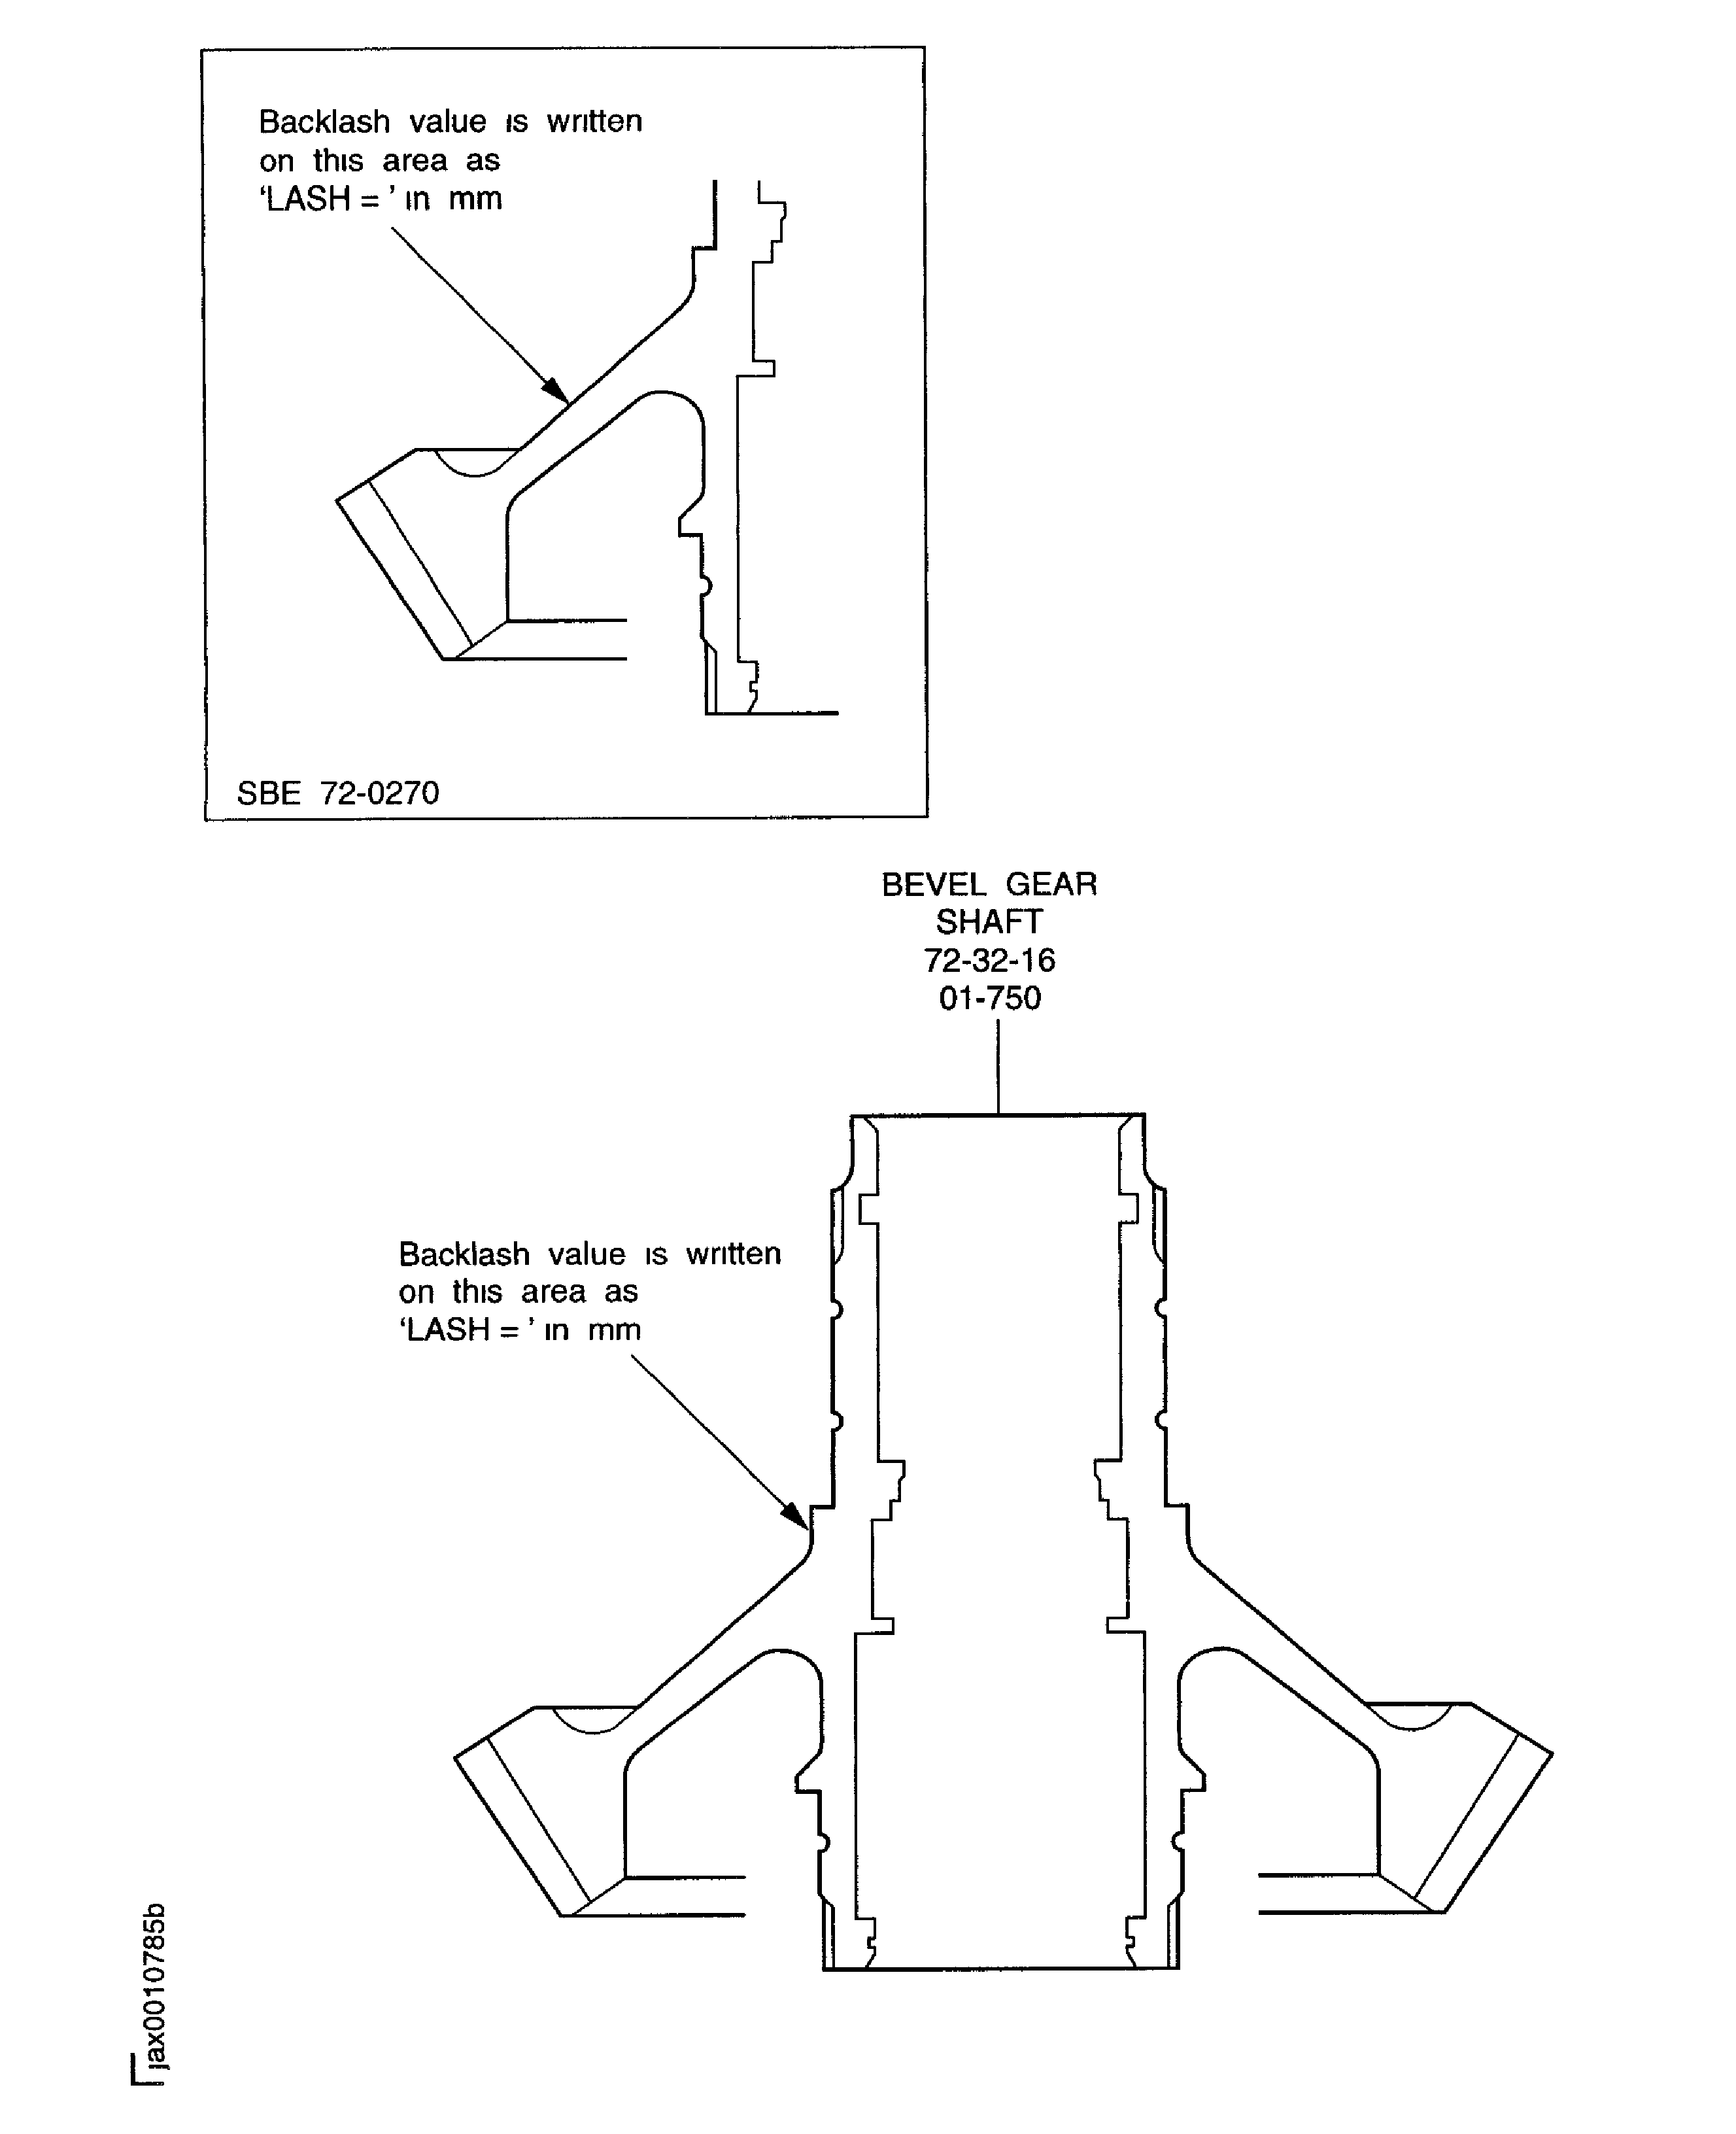
Figure: Find the Value of the LASH B and the Mounting Distance of the Bevel Gearshaft
Find the Value of the LASH B and the Mounting Distance of the Bevel Gearshaft

Figure: Find the Value of the Mounting Distance of the Bevel Gearshaft Wheel
Find the Value of the Mounting Distance of the Bevel Gearshaft Wheel
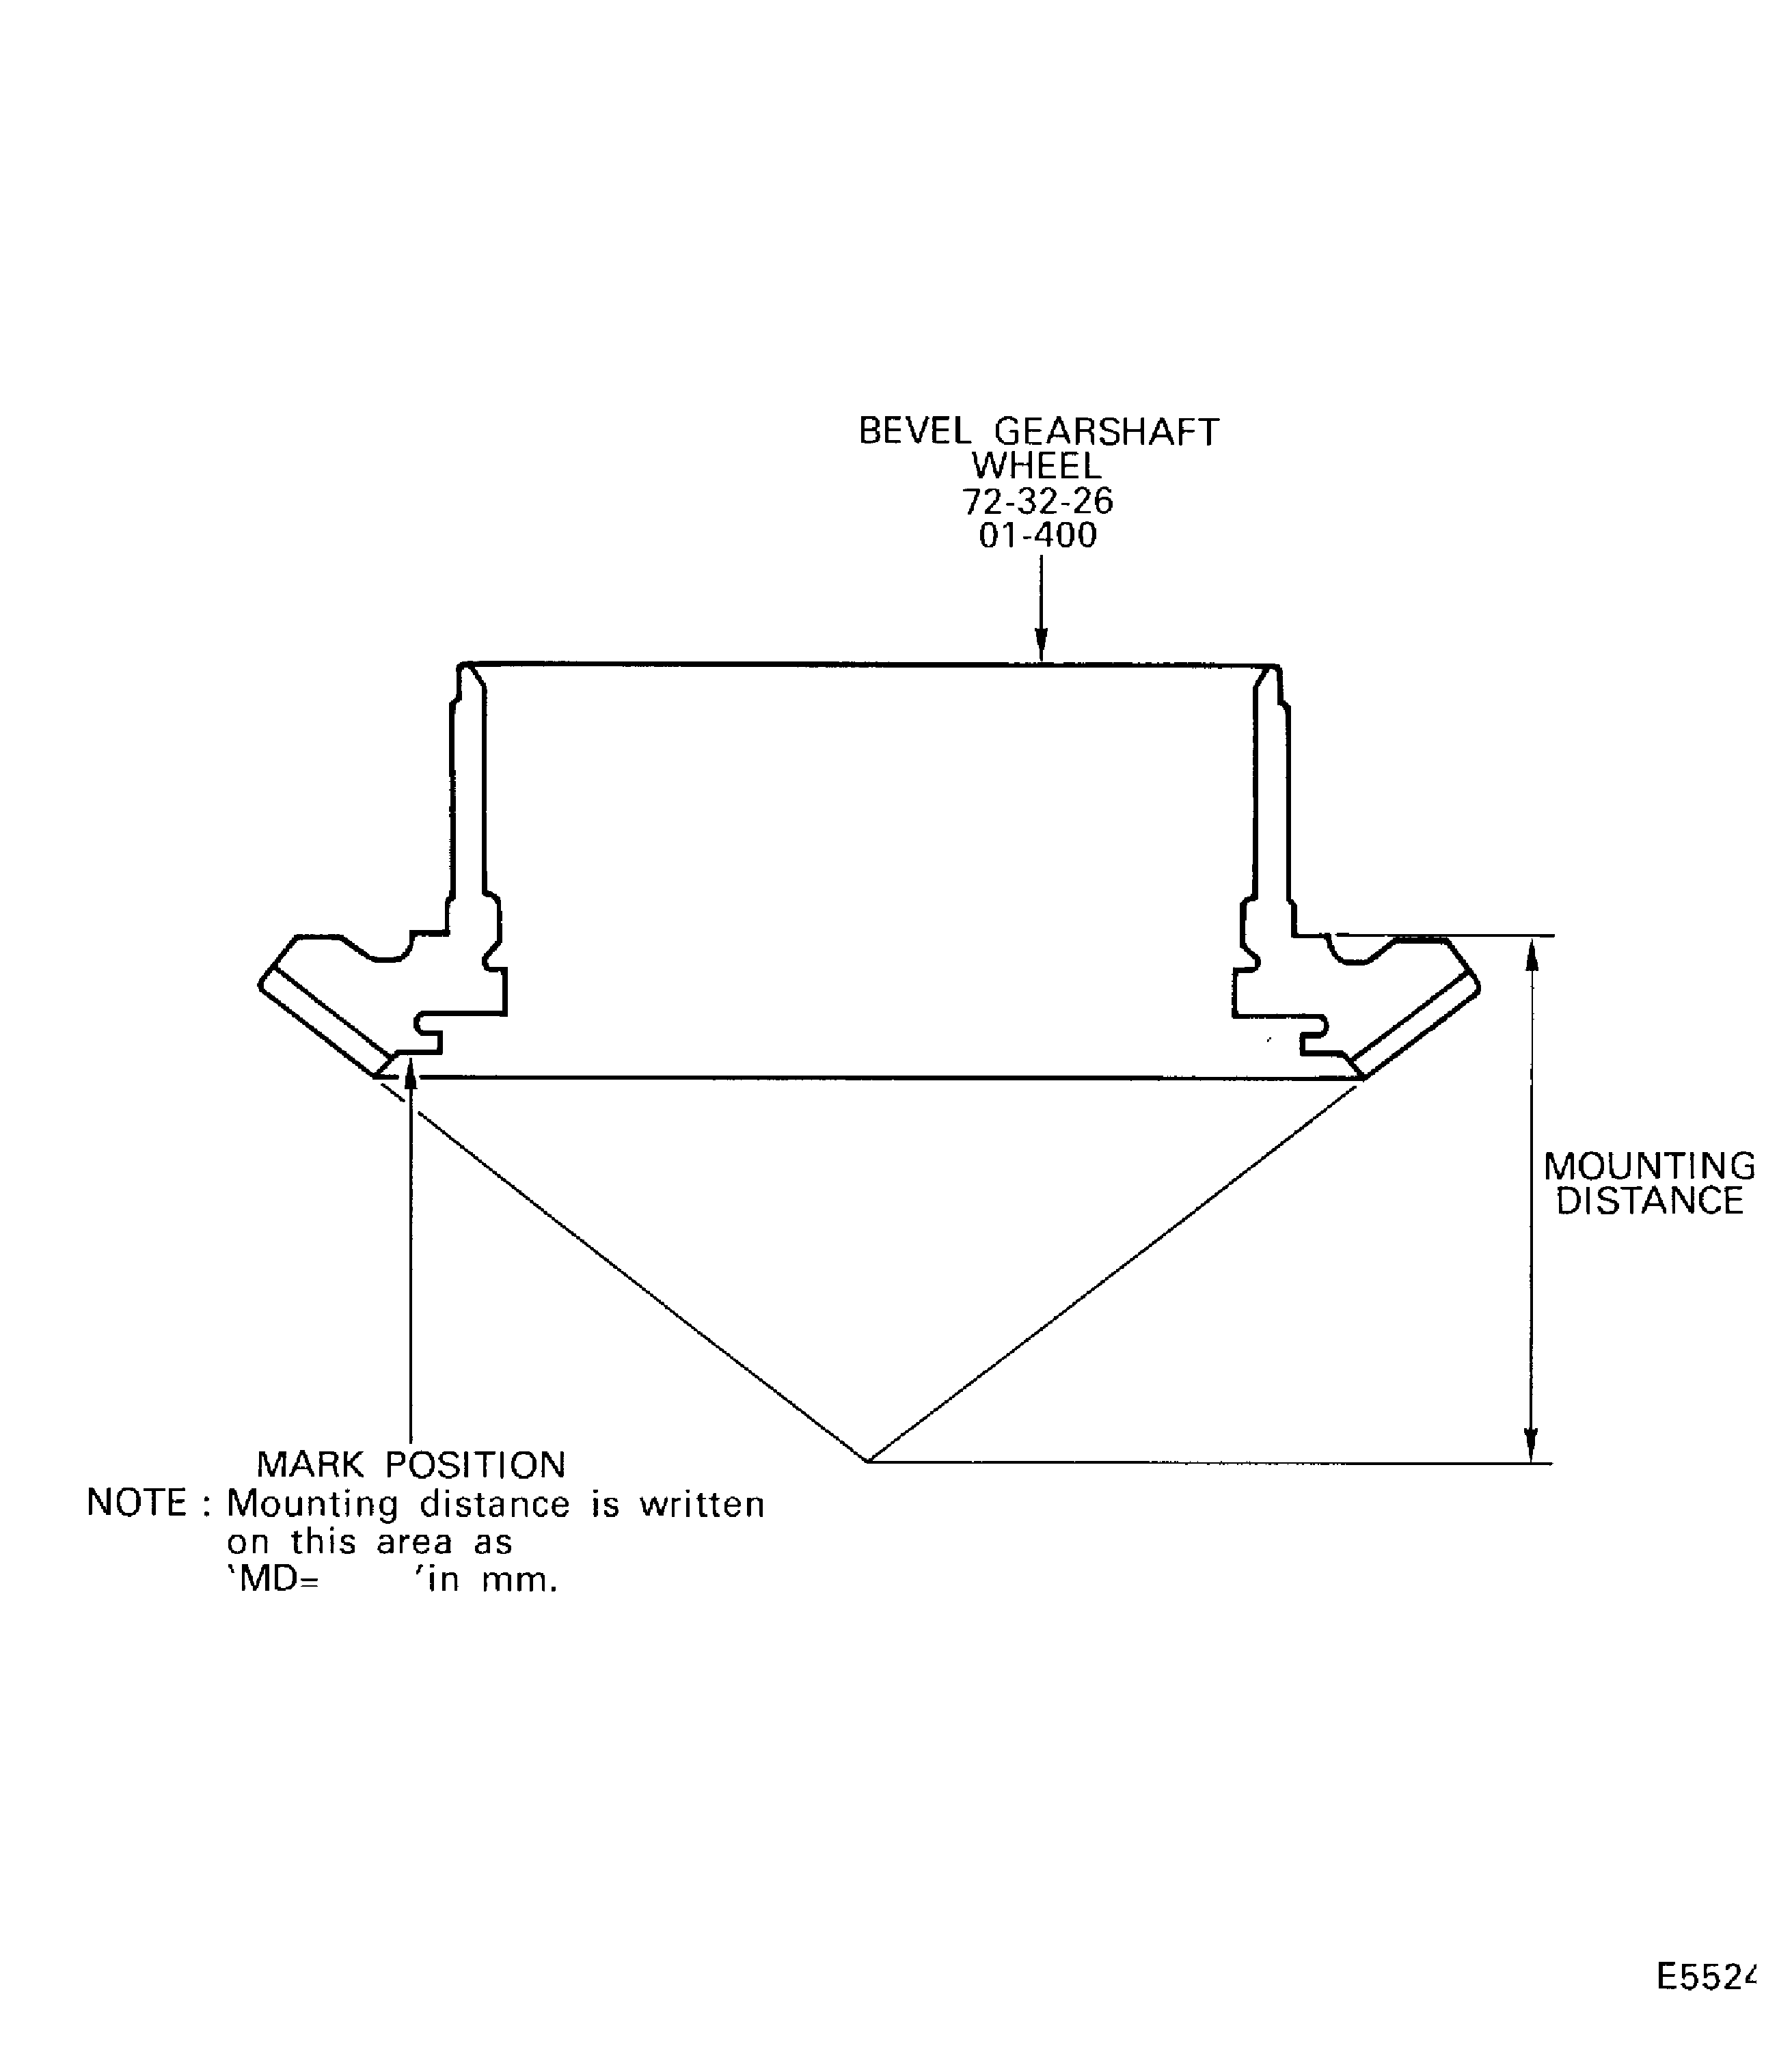
Figure: Assemble the No. 2 Bearing Support Assembly
Sheet 1

Figure: Assemble the No. 2 Bearing Support Assembly
Sheet 2
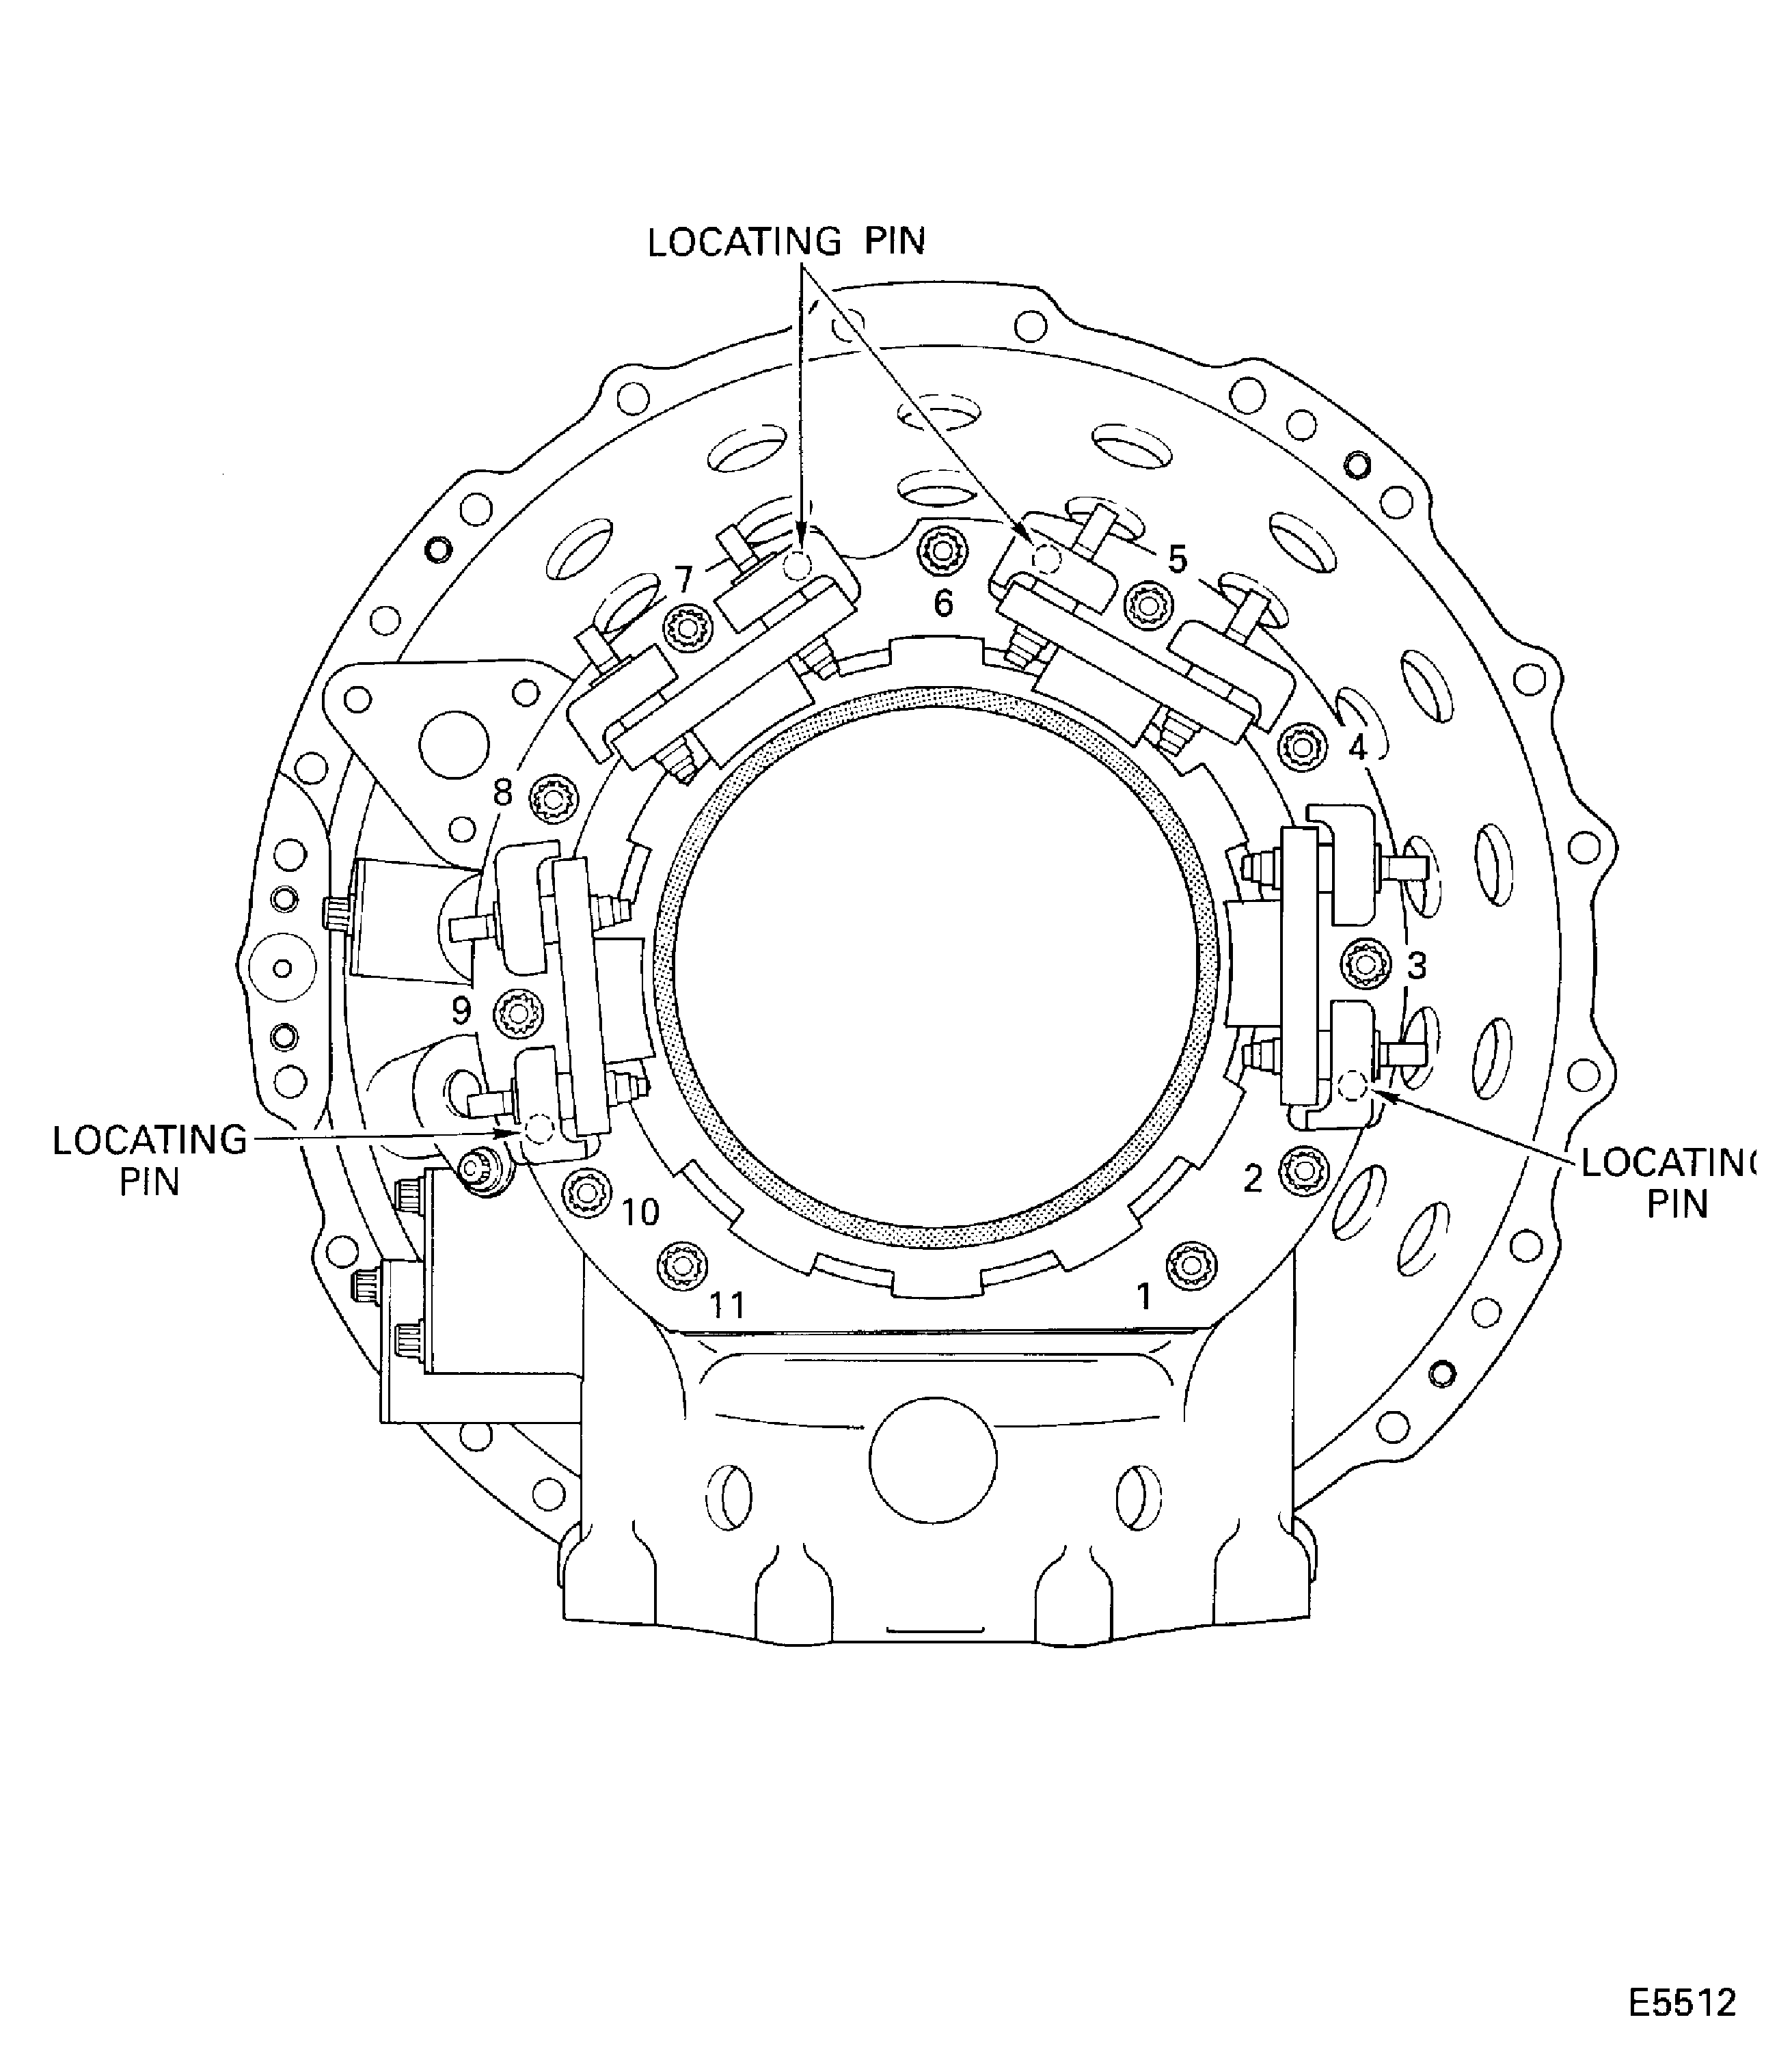
Figure: Assemble the No. 2 Bearing Support Assembly
Sheet 3
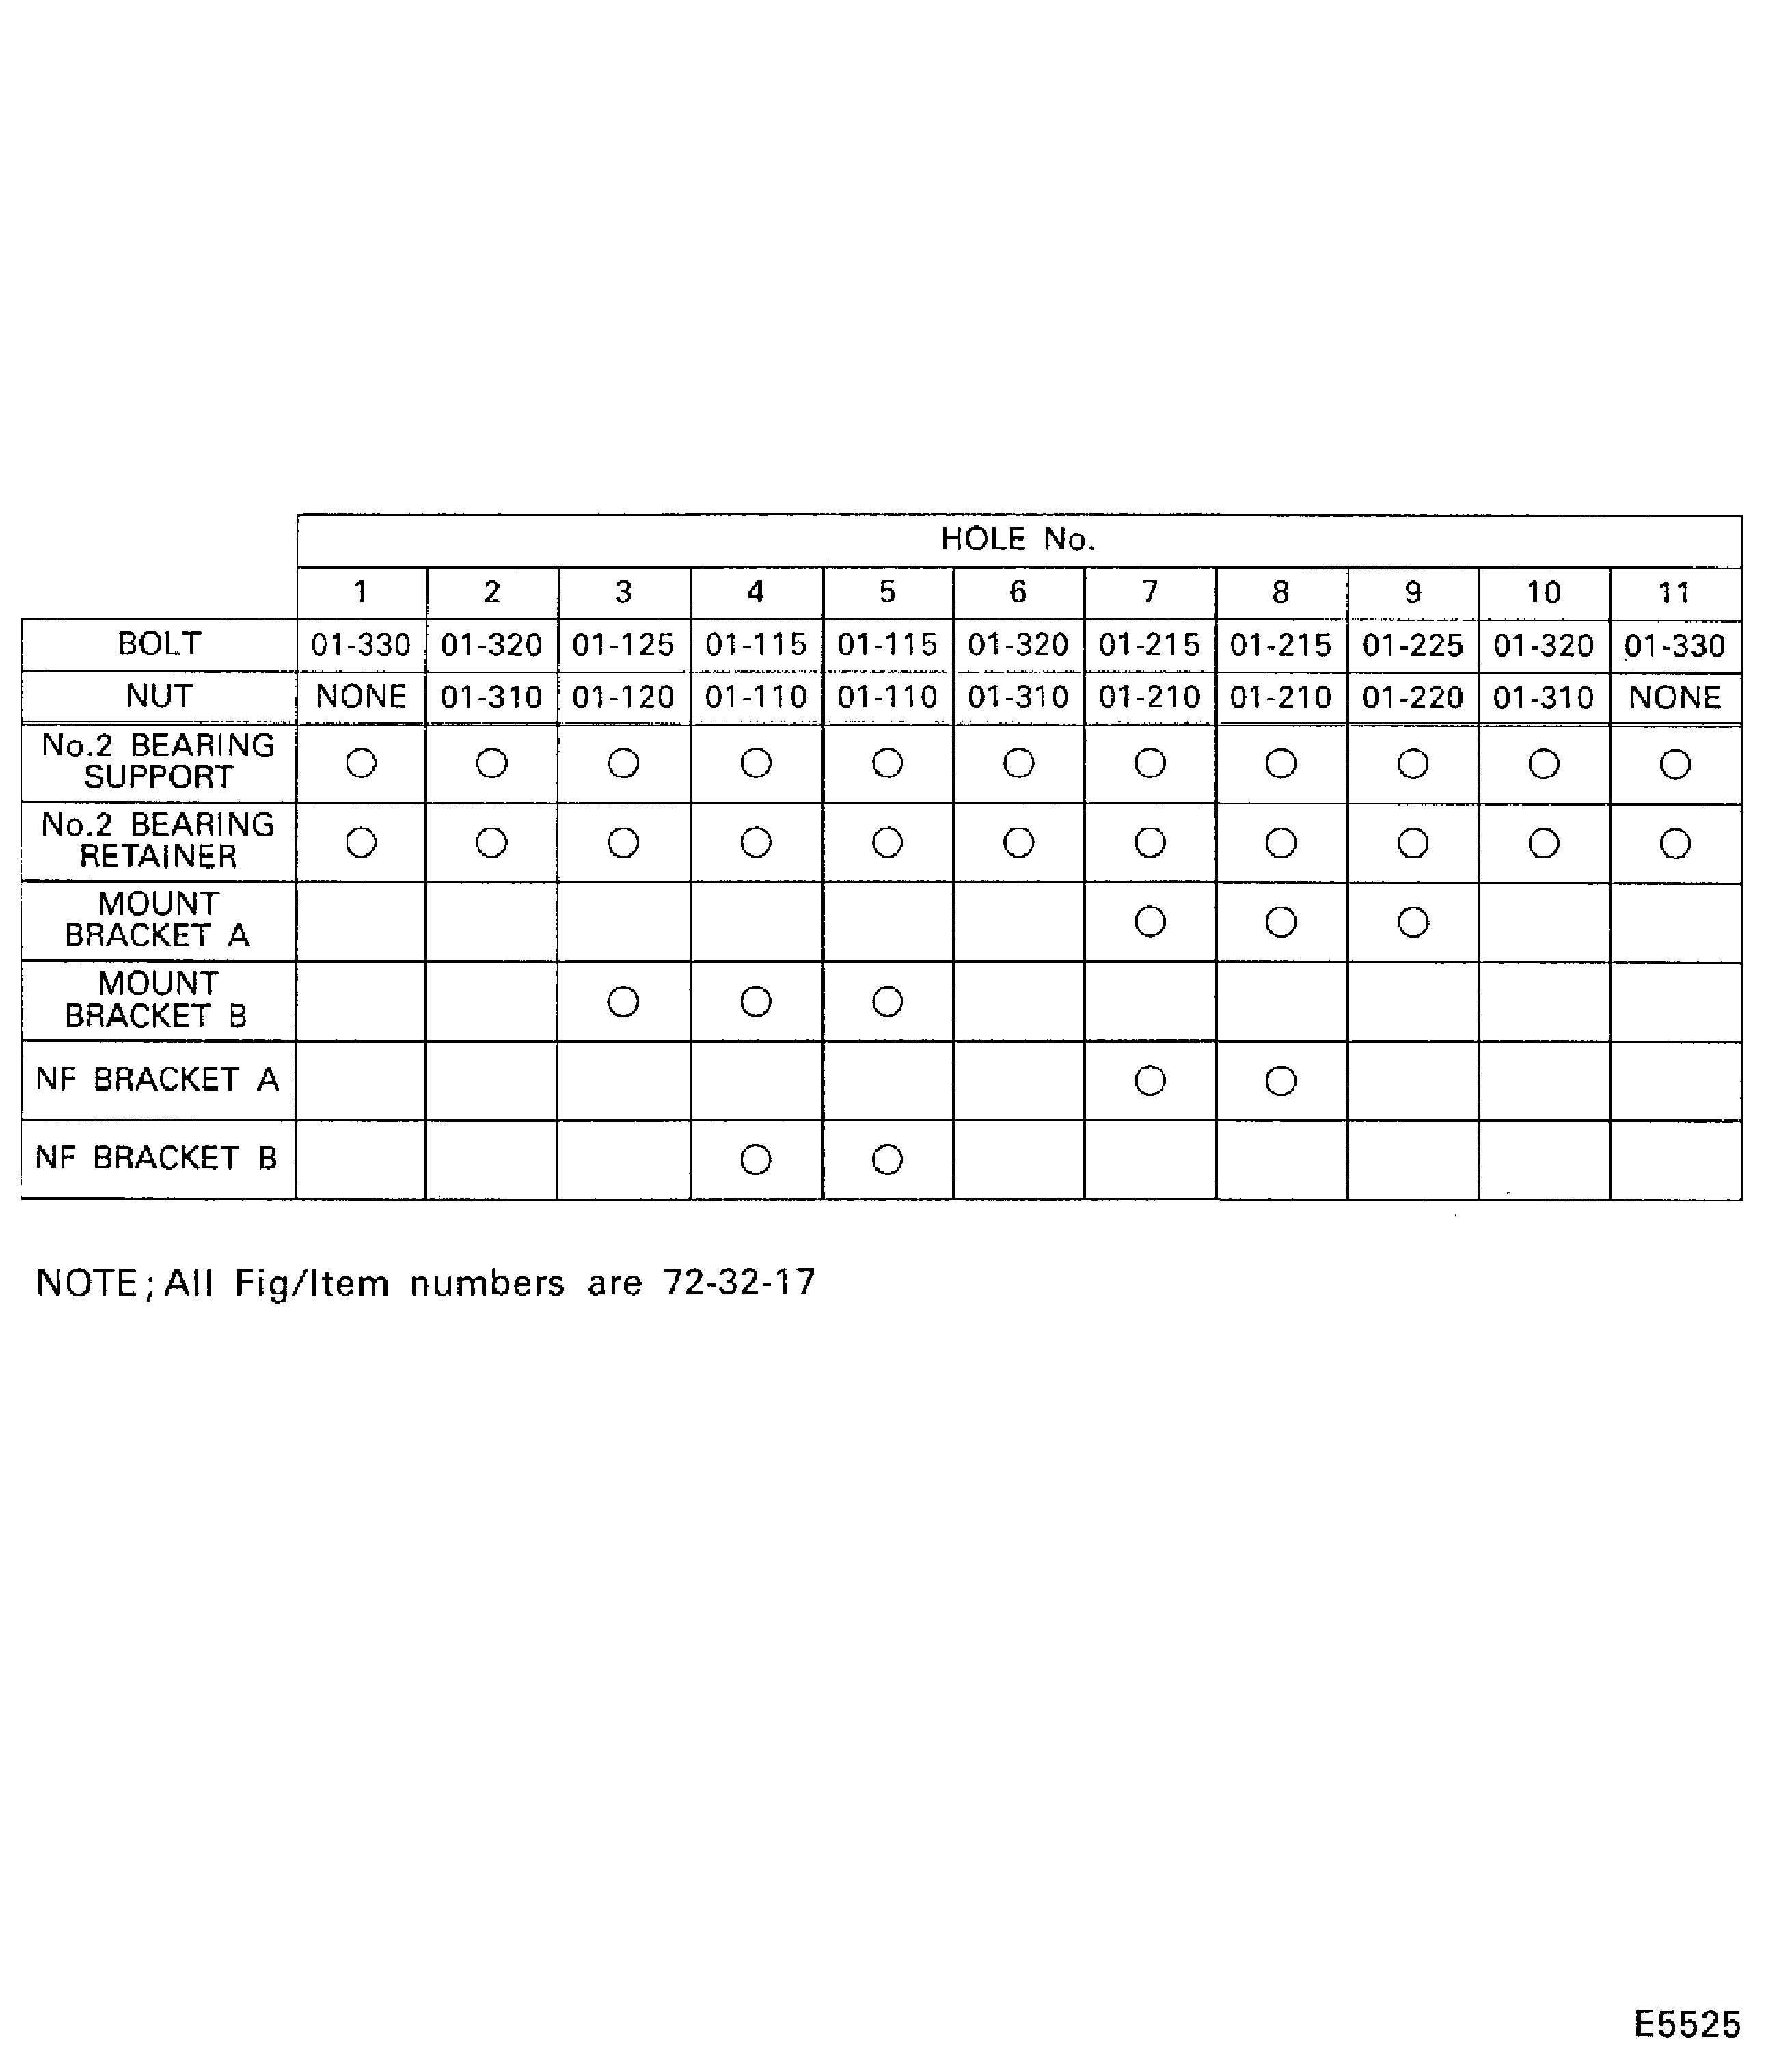
Figure: Identify the No. 3 Bearing Internal Gearbox and Support Assembly (Sub-Module)
Identify the No. 3 Bearing Internal Gearbox and Support Assembly (Sub-Module)
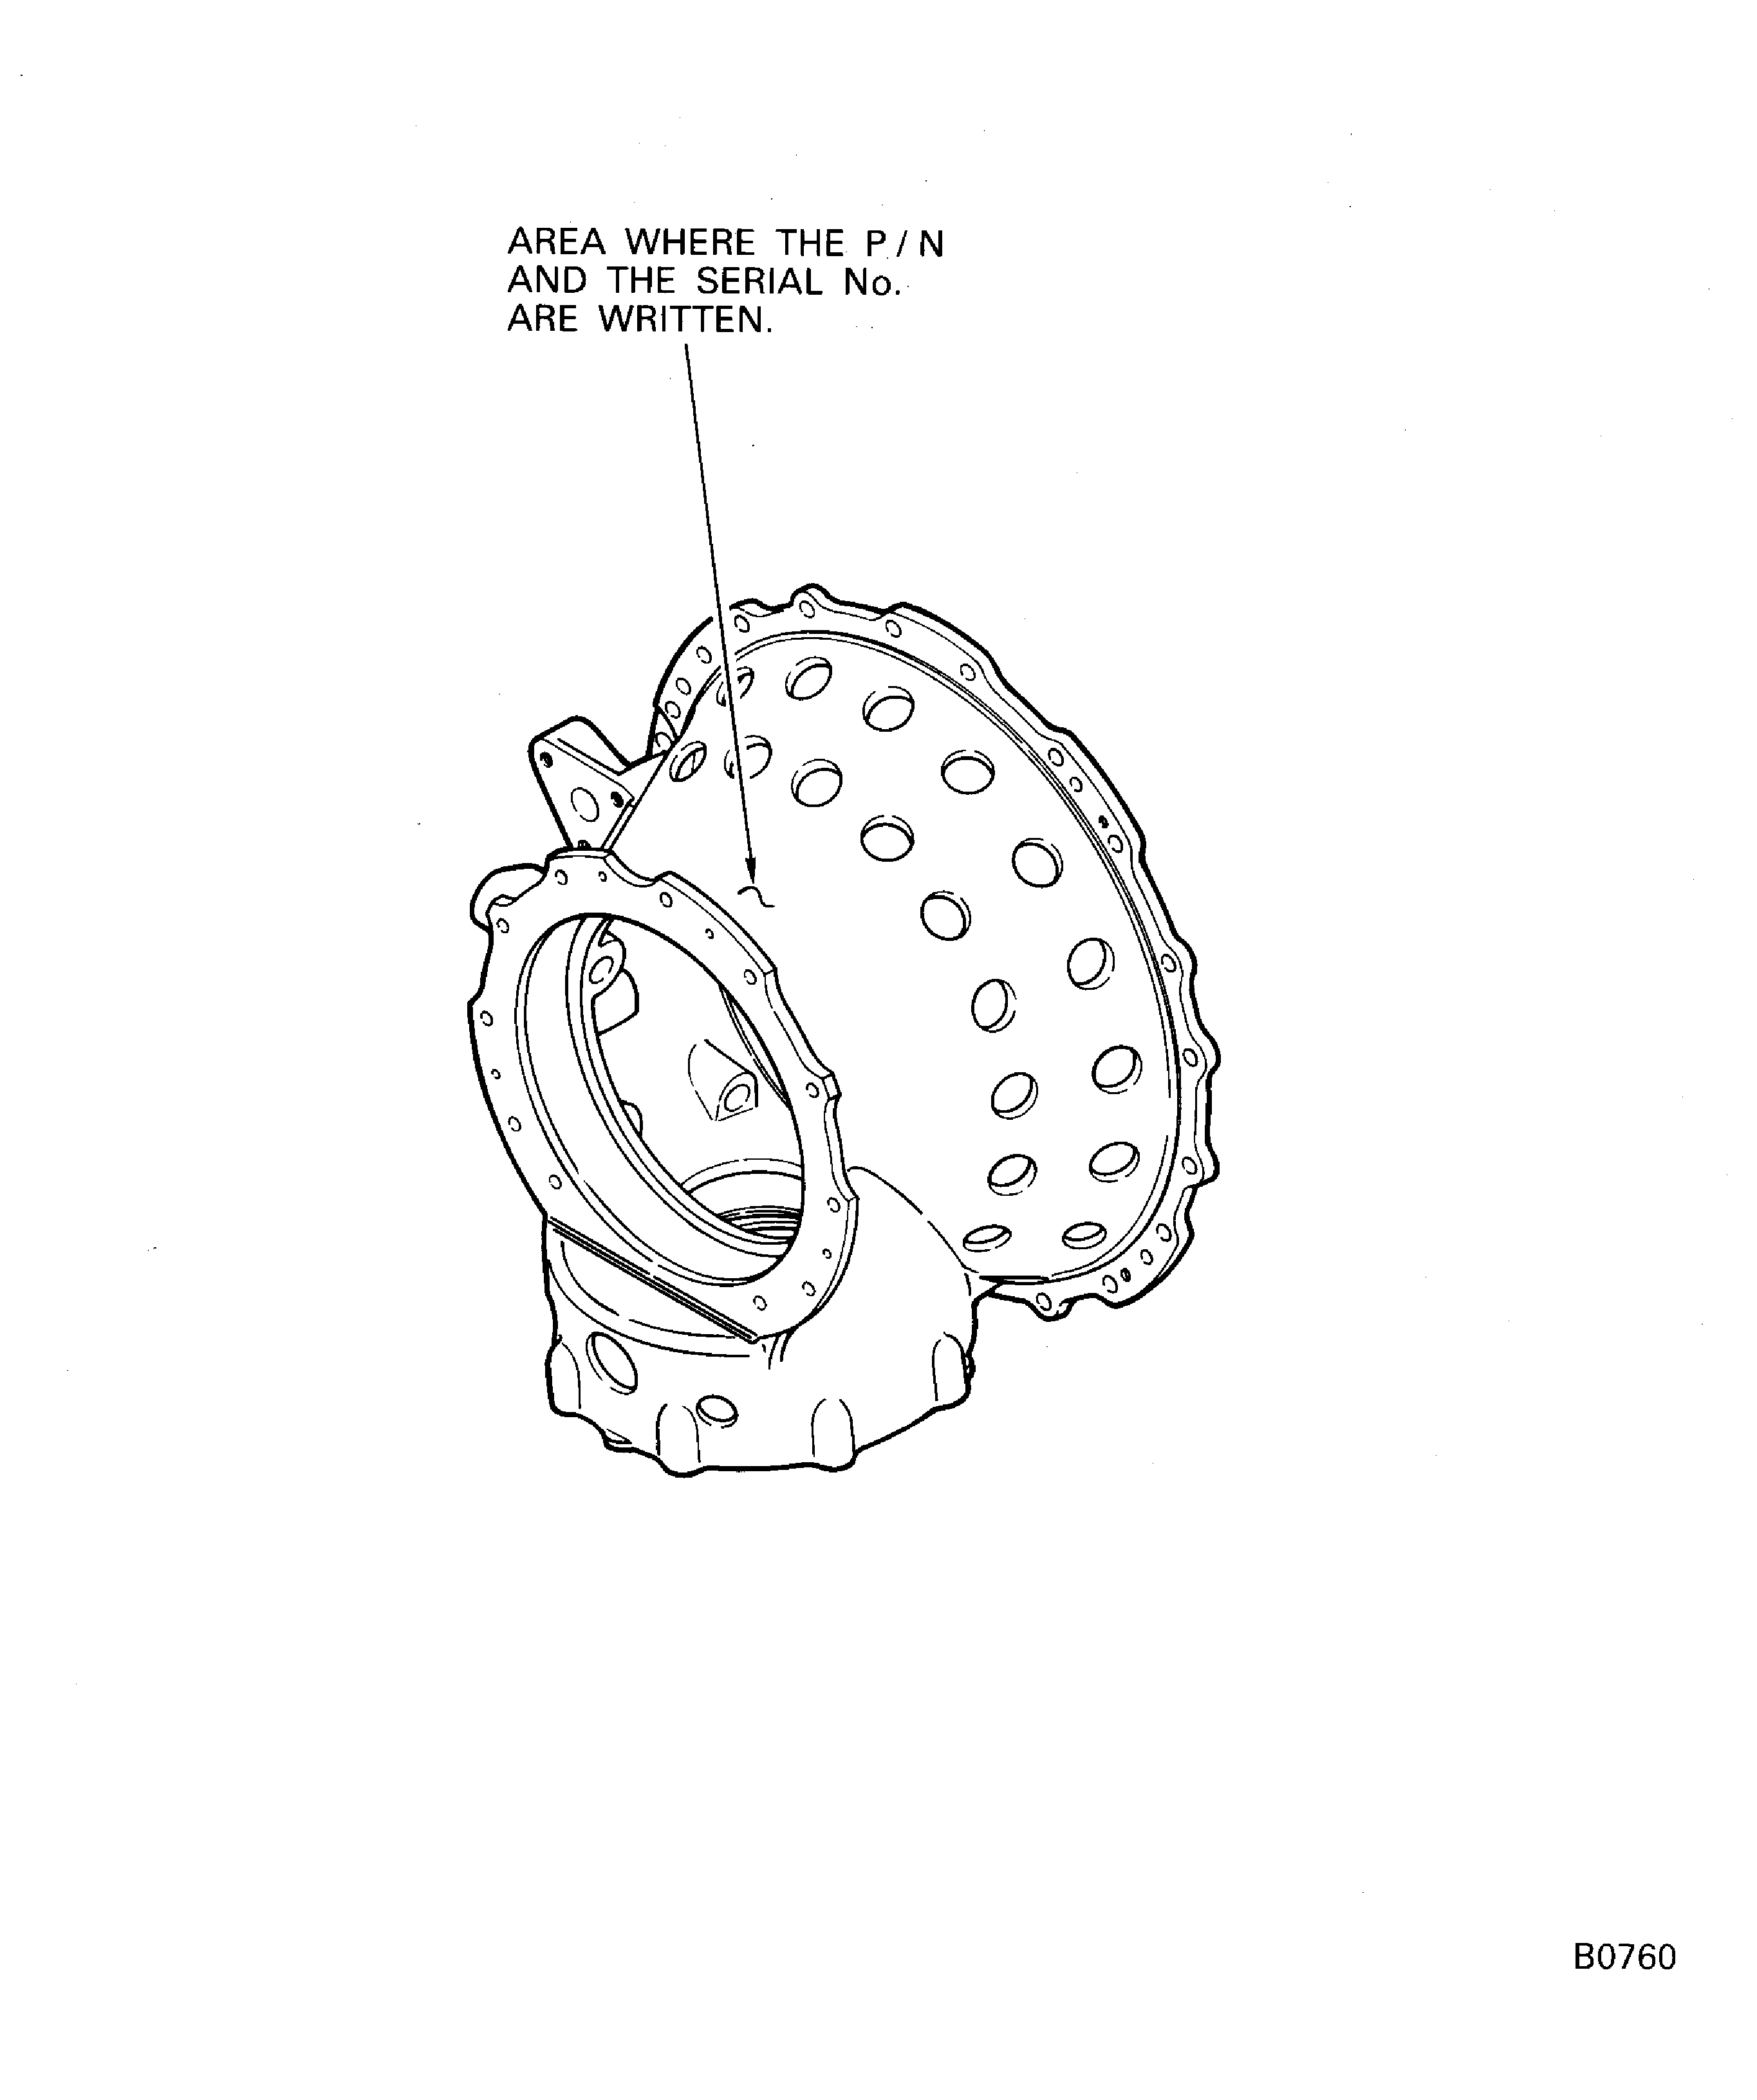
Figure: The Internal Gearbox Driven Gear Assembly Fits and Clearances
The Internal Gearbox Driven Gear Assembly Fits and Clearances

Figure: Reference Fits and Clearances of the Hydraulic Ring and the Hydraulic Seal at Location 0117
Reference Fits and Clearances of the Hydraulic Ring and the Hydraulic Seal at Location 0117
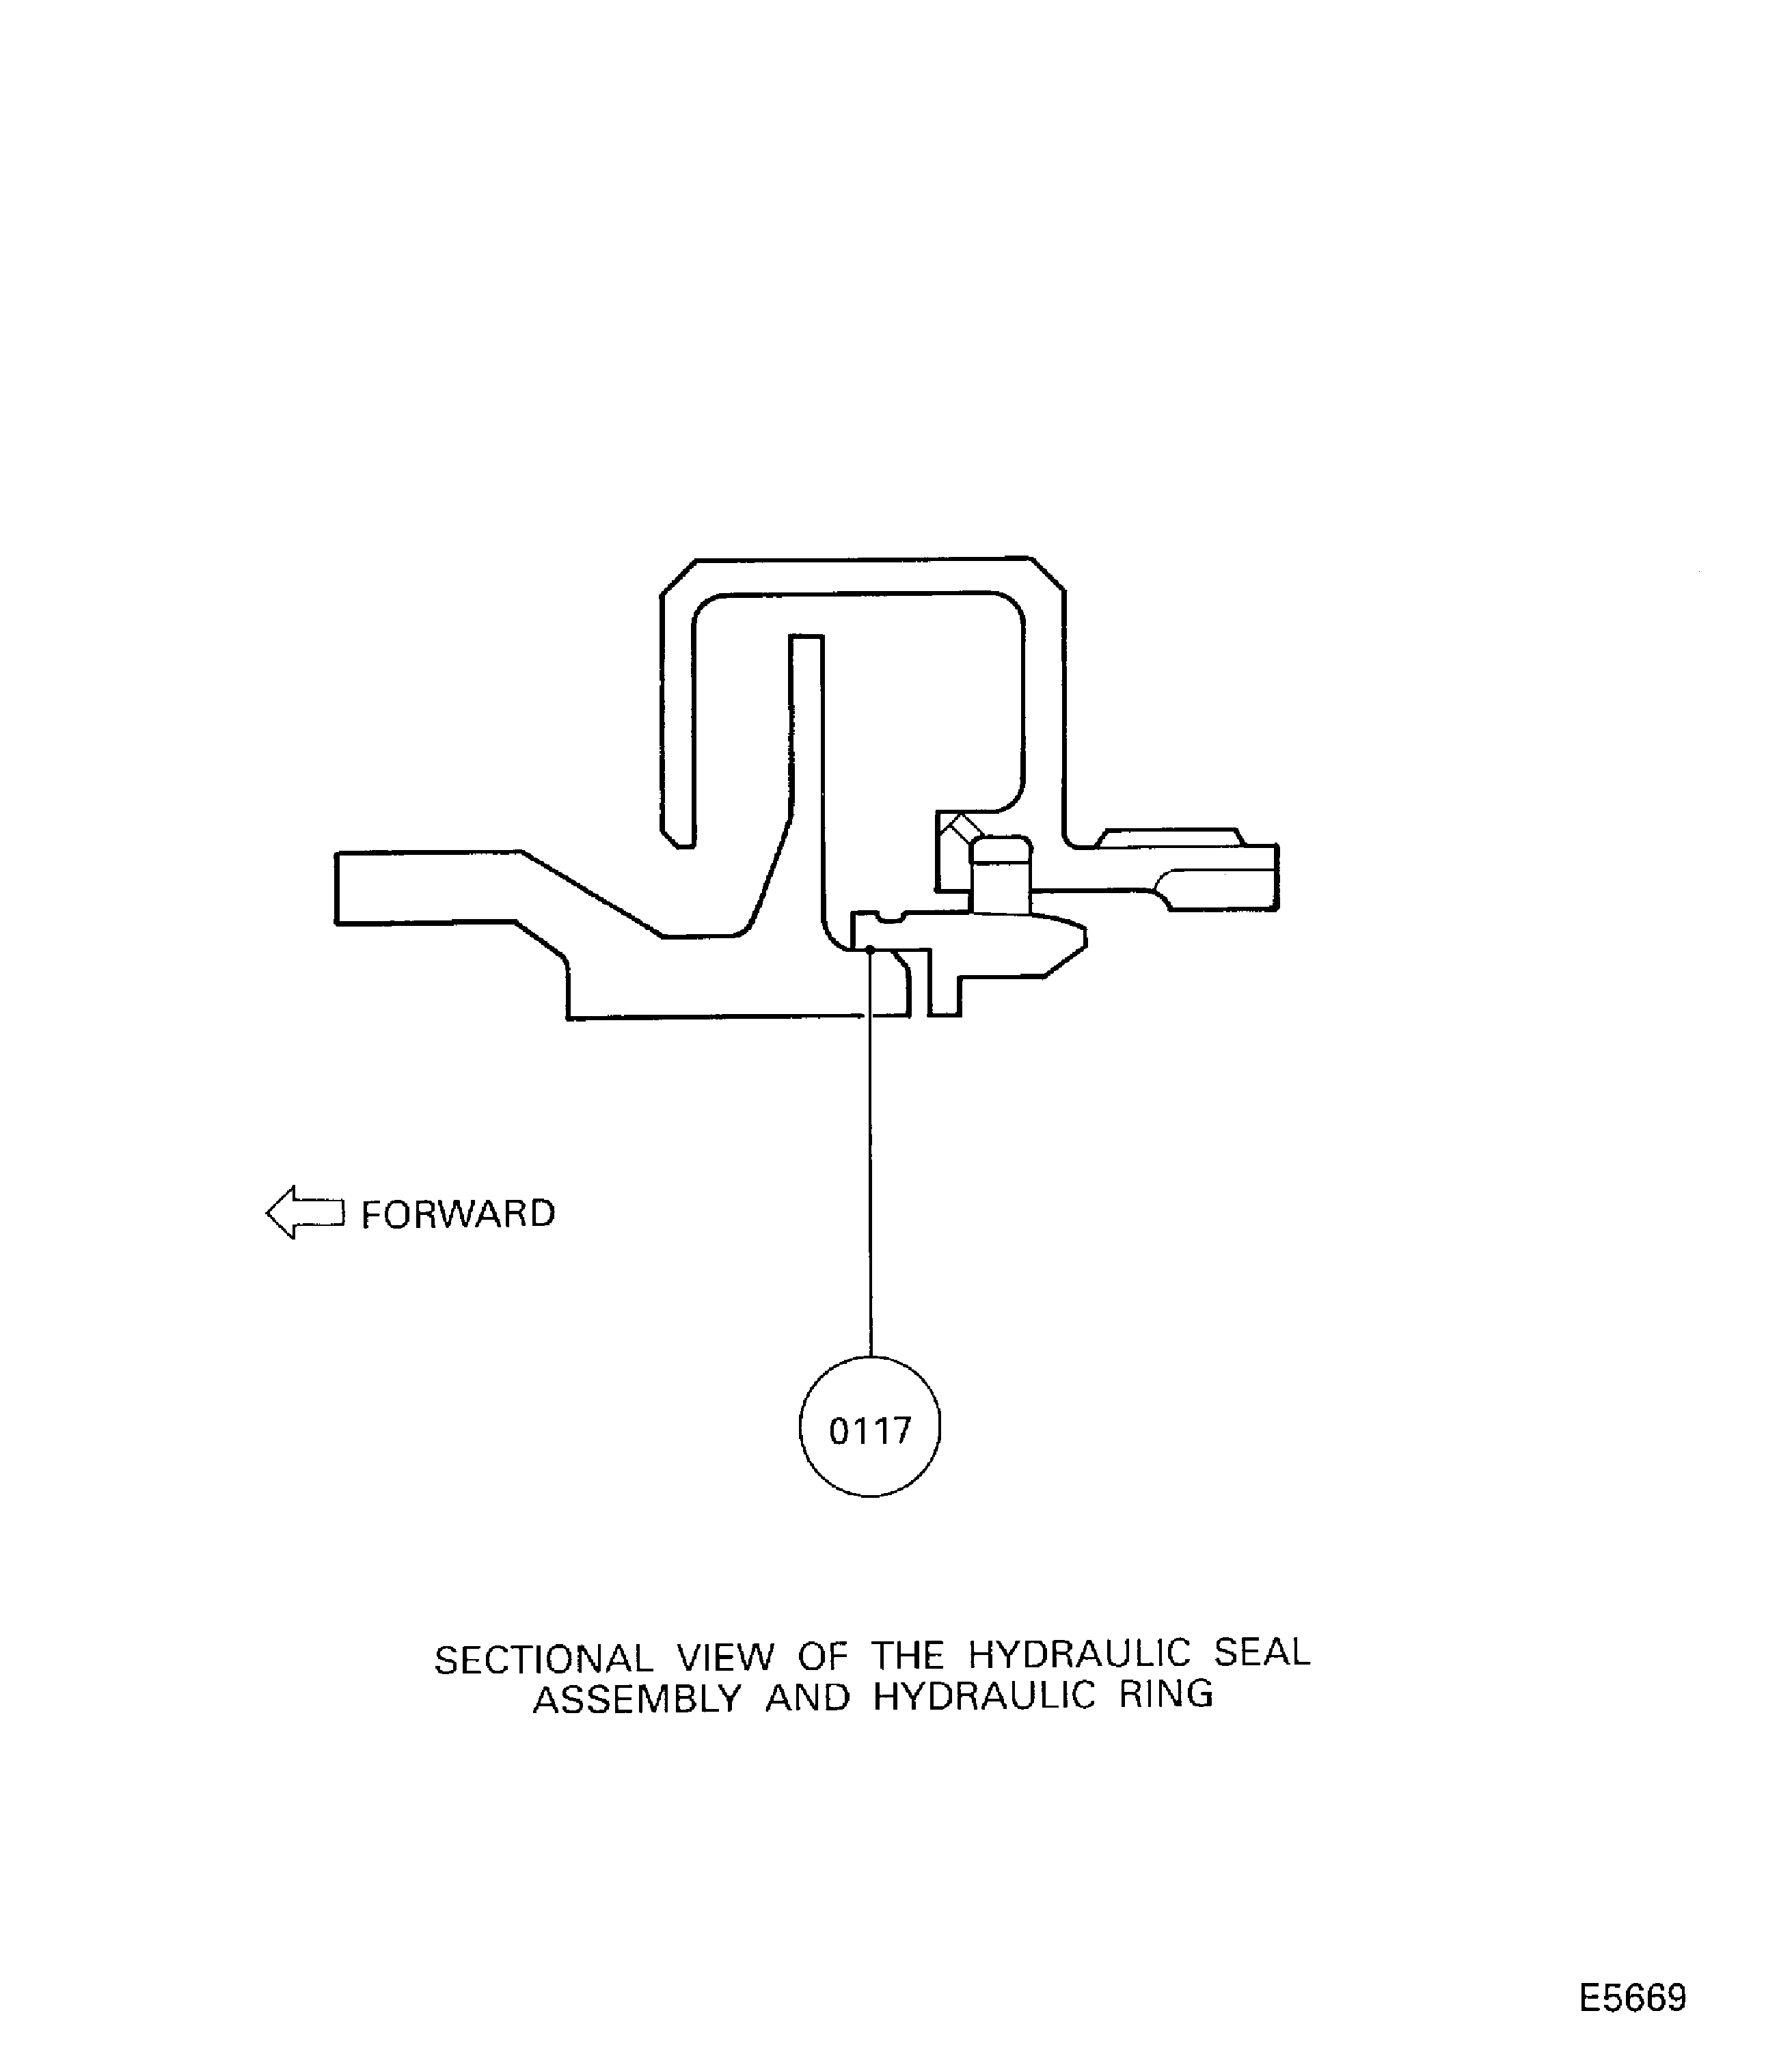
Figure: Reference Fits And Clearances Of The No. 2 Bearing Support And The No. 3 Bearing Seal Support At Location 0307
Reference Fits And Clearances Of The No. 2 Bearing Support And The No. 3 Bearing Seal Support At Location 0307
