TASK 72-32-20-440-001-B00 No. 3 Bearing, Seal, HPC Shaft, And Gearshaft Assembly - Assemble, Assembly-001

DMC:V2500-A5-72-32-2000-00A-710A-B|Issue No:006.00|Issue Date:2018-11-01

Export Control

EAR Export Classification: Not subject to the EAR per 15 C.F.R. Chapter 1, Part 734.3(b)(3), except for the following Service Bulletins which are currently published as EAR Export Classification 9E991: SBE70-0992, SBE72-0483, SBE72-0580, SBE72-0588, SBE72-0640, SBE73-0209, SBE80-0024 and SBE80-0025.

Copyright

© IAE International Aero Engines AG (2001, 2014 - 2021) The information contained in this document is the property of © IAE International Aero Engines AG and may not be copied or used for any purpose other than that for which it is supplied without the express written authority of © IAE International Aero Engines AG. (This does not preclude use by engine and aircraft operators for normal instructional, maintenance or overhaul purposes.).

Applicability

V2500-A5

Common Information

TASK 72-32-20-440-001-B00 No. 3 Bearing, Seal, HPC Shaft, And Gearshaft Assembly - Assemble, Assembly-001

General

This TASK gives the procedure to assemble the No. 3 Bearing Rotor Center and Support Assembly.

Fig/item numbers in parentheses in the procedure agree with those used in the IPC. Only the primary Fig/item numbers are used. For the service bulletin alpha variants refer to the IPC.

For all parts identified in a different Chapter/Section/Subject, the applicable Chapter/Section/Subject comes before the Fig/item number.

For standard torque data and procedures, refer to the SPM TASK 70-41-00-400-501 and SPM TASK 70-41-01-400-501.

Special torque data and assembly tolerances are included in the procedure.

Special torque data is identified with the symbol * after the torque value.

Lubricate all threads and abutment faces of nuts and bolts with approved engine oils, unless other lubricants are referred to in the procedure. For the approved engine oils and procedures, refer to the SPM TASK 70-64-00-640-501.

To identify, lubricate and install seal rings, refer to the SPM TASK 70-44-01-400-501.

For cup washer installation, refer to the SPM TASK 70-42-04-400-501.

Refer to Figure for a sectional view of a No. 3 Bearing Rotor Center and Support Assembly.

NOTE

To identify the consumable materials refer to the PCI.

NOTE

Special tools are identified in the procedure by the tool primary number.

Preliminary Requirements

Pre-Conditions

NONE

Support Equipment

NameManufacturerPart Number / IdentificationQuantityRemark
OvenLOCAL
Torque multiplierLOCALSWEENEY 8200
Hot Oil TankLOCAL
Feeler gageLOCAL
Protection coverLOCAL
Hydraulic hand pumpLOCAL
Digital depth gageLOCAL
IAE 1J12021 Lifting spacer0AM53IAE 1J120211
IAE 1J12188 Puller bolt0AM53IAE 1J121881
IAE 1J12339 Spanner wrench0AM53IAE 1J123391
IAE 1J12359 Inspection bridge0AM53IAE 1J123591
IAE 1J12367 Tab bender0AM53IAE 1J123671
IAE 1J12374 Oil flow test stand0AM53IAE 1J123741
IAE 1J12375 Oil flow check box0AM53IAE 1J123751
IAE 1J12376 Oil feed adapter0AM53IAE 1J123761
IAE 1J12378 Ratchet wrench0AM53IAE 1J123781
IAE 1J12379 Hydraulic pusher0AM53IAE 1J123791
IAE 1J12380 Hydraulic pusher0AM53IAE 1J123801
IAE 1J12383 Swash check fixture0AM53IAE 1J123831
IAE 1J12384 Swash check ring0AM53IAE 1J123841
IAE 1J12387 Work stand0AM53IAE 1J123871
IAE 1J12421 Base holder0AM53IAE 1J124211
IAE 1J12469 Leak test fixture0AM53IAE 1J124691
IAE 1J12477 Base holder0AM53IAE 1J124771
IAE 1J12478 Hydraulic pusher/puller0AM53IAE 1J124781
IAE 1J12502 No.3 bearing guide0AM53IAE 1J125021
IAE 1J12504 Ring holder0AM53IAE 1J125041
IAE 1J12505 0AM53 heater0AM53IAE 1J125051
IAE 1J12529 Measuring stretch0AM53IAE 1J125291
IAE 1J12556 Measuring block0AM53IAE 1J125561
IAE 1F10026 Hydraulic hand pump0AM53IAE 1F100261
IAE 6F10027 Heater control unit0AM53IAE 6F100271
IAE 6F10030 Vacuum test cart0AM53IAE 6F100301
IAE 1P17526 Torque sequence locator0AM53IAE 1P175261
IAE 1P17043 Knocker puller0AM53IAE 1P170431
IAE 1P17507 Spacer ring0AM53IAE 1P175071
IAE 1P17508 Build fixture0AM53IAE 1P175081

Consumables, Materials and Expendables

NameManufacturerPart Number / IdentificationQuantityRemark
CoMat 01-124 ISOPROPYL ALCOHOLLOCALCoMat 01-124
CoMat 06-069 MARKERIE207CoMat 06-069
CoMat 10-077 APPROVED ENGINE OILSX333XCoMat 10-077
CoMat 02-130 POLAR GRAPH PAPERLOCALCoMat 02-130

Spares

NameManufacturerPart Number / IdentificationQuantityRemark
PACKING - PREFORMED77445ST1946-2651
WASHER - CUP0AM535A02421

Safety Requirements

NONE

Procedure

    1. SUBTASK 72-32-20-220-060 Reference Fits and Clearances of the No. 3 Bearing Damper Assembly at Location 2400

    2. Refer to Figure.

    3. Reference the interference at location 2400. If required, use the data written as a note in TASK 72-32-21-200-000 (INSPECTION-000) and TASK 72-32-22-200-000 (INSPECTION-000).

      Table 1. Fits and Clearances (all dimensions are in inches)

      NEW PART

      WORN PART

      DIMENSIONS

      DIMENSIONS

      PART IDENT

      Size

      Clearance

      Non-select

      REJECT IF

      MORE THAN

      LOCATION 2400

      Shoulder Stud ENGINE-NO.3 BEARING HOUSING (72-32-21, 01-080)

      No. 3 Bearing Seal Support Assembly ENGINE-NO.3 BEARING SEAL SUPPORT (72-32-22, 01-040)

      Inside Diameter Seal Support Hole

      0.2795

      Intf

      0.2785

      0.000

      Stud Outside Diameter

      0.2801

      0.0016

      0.2795

      Intf

      Table 2. Fits and Clearances (all dimensions are in millimeters)

      NEW PART

      WORN PART

      DIMENSIONS

      DIMENSIONS

      PART IDENT

      Size

      Clearance

      Non-select

      REJECT IF

      MORE THAN

      LOCATION 2400

      Shoulder Stud ENGINE-NO.3 BEARING HOUSING (72-32-21, 01-080)

      No. 3 Bearing Seal Support Assembly ENGINE-NO.3 BEARING SEAL SUPPORT (72-32-22, 01-040)

      Inside Diameter Seal Support Hole

      7.099

      Intf

      7.074

      0.000

      Stud Outside Diameter

      7.114

      0.041

      7.099

      Intf

    1. SUBTASK 72-32-20-220-068 Reference Fits and Clearances of the Bevel Wheel Gearshaft and the HP Compressor Front Shaft and Seal Assembly at Location 0202

    2. Refer to Figure.

    3. Reference dimensions at location 0202. If required, use the data written as the note in TASK 72-32-23-200-000 (INSPECTION-000) and TASK 72-32-26-200-000 (INSPECTION-000).

      Table 3. Fits and Clearances (all dimensions are in inches)

      NEW PART

      WORN PART

      DIMENSIONS

      DIMENSIONS

      PART IDENT

      Size

      Clearance

      (Non-select)

      REJECT IF

      MORE THAN

      LOCATION 0202

      Bevel Wheel Gearshaft ENGINE-INTERNAL GEARBOX DRIVING GEAR (72-32-26, 01-400)

      And

      HP Compressor Front Shaft Assembly ENGINE-NO.3 BEARING ROTOR CENTRE (72-32-23, 01-745)

      Gearshaft Inside Diameter

      5.2363

      Intf

      5.2363

      Intf

      5.2369

      -0.0041

      5.2369

      -0.0041

      Shaft Outside Diameter

      5.2410

      -0.0051

      5.2410

      -0.0051

      5.2414

      Intf

      5.2414

      Intf

      Table 4. Fits and Clearances (all dimensions are in millimeters)

      NEW PART

      WORN PART

      DIMENSIONS

      DIMENSIONS

      PART IDENT

      Size

      Clearance

      (Non-select)

      REJECT IF

      MORE THAN

      LOCATION 0202

      Bevel Wheel Gearshaft ENGINE-INTERNAL GEARBOX DRIVING GEAR (72-32-26, 01-400)

      And

      HP Compressor Front Shaft Assembly ENGINE-NO.3 BEARING ROTOR CENTRE (72-32-23, 01-745)

      Gearshaft Inside Diameter

      133.000

      Intf

      133.000

      Intf

      133.018

      -0.104

      133.018

      -0.104

      Shaft Outside Diameter

      133.122

      -0.134

      133.122

      -0.134

      133.134

      Intf

      133.134

      Intf

    1. SUBTASK 72-32-20-220-069 Reference Fits and Clearances of the Bevel Wheel Gearshaft and the HP Compressor Front Shaft and Seal Assembly at Location 0207

    2. Refer to Figure.

    3. Reference dimensions at location 0207. If required, use the data written as the note in TASK 72-32-23-200-000 (INSPECTION-000) and TASK 72-32-26-200-000 (INSPECTION-000).

      Table 5. Fits and Clearances (all dimensions are in inches)

      NEW PART

      WORN PART

      DIMENSIONS

      DIMENSIONS

      PART IDENT

      Size

      Clearance

      (Non-select)

      REJECT IF

      MORE THAN

      LOCATION 0207

      Bevel Wheel Gearshaft ENGINE-INTERNAL GEARBOX DRIVING GEAR (72-32-26, 01-400)

      And

      HP Compressor Front Shaft Assembly ENGINE-NO.3 BEARING ROTOR CENTRE (72-32-23, 01-745)

      Gearshaft Inside Diameter

      5.5521

      Intf

      5.5521

      Intf

      5.5527

      -0.0026

      5.5527

      -0.0026

      Shaft Outside Diameter

      5.5553

      -0.0037

      5.5553

      -0.0037

      5.5558

      Intf

      5.5558

      Intf

      Table 6. Fits and Clearances (all dimensions are in millimeters)

      NEW PART

      WORN PART

      DIMENSIONS

      DIMENSIONS

      PART IDENT

      Size

      Clearance

      (Non-select)

      REJECT IF

      MORE THAN

      LOCATION 0207

      Bevel Wheel Gearshaft ENGINE-INTERNAL GEARBOX DRIVING GEAR (72-32-26, 01-400)

      And

      HP Compressor Front Shaft Assembly ENGINE-NO.3 BEARING ROTOR CENTRE (72-32-23, 01-745)

      Gearshaft Inside Diameter

      141.021

      Intf

      141.021

      Intf

      141.039

      -0.066

      141.039

      -0.066

      Shaft Outside Diameter

      141.105

      -0.096

      141.105

      -0.096

      141.117

      Intf

      141.117

      Intf

    1. SUBTASK 72-32-20-220-061 Find the Value of the LASH of the Bevel Wheel Gearshaft (Gearshaft) (72-32-26, 01-400)

    2. Refer to Figure.

    3. Read the value of the LASH identified as "LASH=" (in millimeters) on the gearshaft wheel.

      NOTE

      The value of the LASH is defined as the difference between the actual tooth thickness of the gearshaft wheel and the maximum permissible tooth thickness of the gearshaft.
    4. Write the value as LASH A (in millimeters) on an applicable record sheet.

    1. SUBTASK 72-32-20-440-071 Install the Shoulder Studs (72-32-21, 01-080) in to the No. 3 Bearing Housing Assembly (72-32-21, 01-020)

    2. Refer to Figure and Figure.

      NOTE

      Refer to Figure for a view of the No. 3 Bearing Damper Assembly group.
    3. Install IAE 1P17508 Build fixture 1 off in a suitable vise.

    4. Install IAE 1P17507 Spacer ring 1 off in the build fixture.

    5. Install the No. 3 Bearing Housing Assembly in the build fixture and above the spacer ring.

    6. Install the shoulder studs into the No. 3 Bearing Housing Assembly.

    7. Install one nut ENGINE-NO.3 BEARING HOUSING (72-32-21, 01-060) on the shoulder stud and tighten it with your hand.

    8. Do Step and Step again until all of the shoulder studs and nuts are installed.

    9. Tighten the nuts until the shoulder stud flanges are against the No. 3 Bearing Housing Assembly.

    10. Torque the nuts to 54* lbfin to 60* lbfin (6.101* Nm to 6.779* Nm).

    11. Loosen the nuts to release the torque.

    12. Torque the nuts again to 54* lbfin to 60* lbfin (6.101* Nm to 6.779* Nm).

    1. SUBTASK 72-32-20-220-062 Do the Clearance Check on the Shoulder Stud

    2. Refer to Figure.

    3. Use a 0.001 in. (0.02 mm) feeler gage to measure the clearance between the shoulder stud flange and the No. 3 Bearing Housing Assembly, Surface G.

    4. The feeler gage must not fit between the shoulder stud flange and the No. 3 Bearing Housing Assembly, Surface G.

    1. SUBTASK 72-32-20-440-072 Install the No. 3 Bearing Seal Support Assembly (72-32-22, 01-040) on to the No. 3 Bearing Housing Assembly

    2. Refer to Figure and Figure.

    3. Install the two seal rings ENGINE-NO.3 BEARING HOUSING (72-32-21, 01-010) into the grooves on the OD of the No. 3 Bearing Housing Assembly. Put the seal ring ends over the pins in the Housing Assembly.

    4. Install the No. 3 Bearing Seal Support Assembly onto the shoulder studs. Make sure the four anti-torque lugs on the Bearing Housing Assembly go into the four slots in the Seal Support.

    1. SUBTASK 72-32-20-440-073 Install and Torque the Nuts (72-32-22, 01-100)

    2. Refer to Figure.

    3. Install IAE 1P17526 Torque sequence locator 1 off to the No. 3 Bearing Seal Support Assembly.

    4. Install the 18 nuts to the tie rods of the shoulder stud.

      1. Torque the nuts in the sequence given in Figure and as follows:

      2. Hold the stud in position with a suitable wrench on the hexagon drive section of the shoulder stud.

      3. Torque the nuts to 54* lbfin to 60* lbfin (6.101* Nm to 6.779* Nm).

      4. Loosen the nuts to release the torque.

      5. Torque the nuts again to 54* lbfin to 60* lbfin (6.101* Nm to 6.779* Nm).

    5. Remove all the nuts ENGINE-NO.3 BEARING HOUSING (72-32-21, 01-060) and the spacer ring from the ends of the shoulder studs that go through the No. 3 Bearing Housing Assembly.

    6. Remove the torque sequence locator from the No. 3 Bearing Seal Support Assembly.

    7. Remove the No. 3 Bearing Housing Assembly from the fixture.

    8. Remove the build fixture from the vise.

    1. SUBTASK 72-32-20-220-063 Do the Clearance Check on the Shoulder Stud

    2. Refer to Figure.

    3. Use a 0.001 in. (0.02 mm) feeler gage to measure the clearance between the shoulder stud and the No. 3 Bearing Seal Support Assembly, Surface H.

    4. The feeler gage must not fit between the shoulder stud flange and the No. 3 Bearing Seal Support Assembly, Surface H.

    1. SUBTASK 72-32-20-440-074 Install the No. 3 Bearing Outer Race (72-32-24, 01-100) into the No. 3 Bearing Housing and Seal Support Assembly

    2. Refer to Figure, Figure and Figure.

    3. Move IAE 1J12477 Base holder 1 off and IAE 1J12478 Hydraulic pusher/puller 1 off to the work area.

    4. Put the No. 3 Bearing Housing and Seal Support Assembly into the oven.

    5. Increase the temperature of the oven to 300 deg F (150 deg C).

    6. Keep the oven temperature at 300 deg F (150 deg C) for 20 minutes.

      1. Put the No. 3 Bearing outer race into the No. 3 Bearing Housing and Seal Support Assembly.

      2. Loosen the nine bolts (part of the base holder) and washers (part of the base holder).

      3. Move the three supports (part of the base holder) to the center of the base (part of the base holder).

      4. WARNING

        BE CAREFUL BECAUSE THE NO. 3 BEARING HOUSING AND SEAL SUPPORT ASSEMBLY ARE HOT. USE APPROVED GLOVES WHEN YOU REMOVE IT FROM THE OVEN.

        Remove the No. 3 Bearing Housing and Seal Support Assembly from the oven.

      5. Put the No. 3 Bearing Housing and Seal Support Assembly on the supports.

      6. Move the supports to the outside of the base until the shoulder studs engage with the three slots of each support.

      7. Install the supports to the base with the nine bolts and washers.

      8. Align the 18 holes of the No. 3 Bearing outer race with the 18 shoulder studs.

      9. Put the No. 3 Bearing outer race into the No. 3 Bearing Housing and Seal Support Assembly.

      10. Install the pad (part of the hydraulic pusher/puller) and cylinder assembly (part of the hydraulic pusher/puller) on the rod (part of the base holder) and into the No. 3 Bearing outer race with the washer (part of the base holder) and the nut (parts of the base holder).

      11. Connect the hose (part of IAE 1F10026 Hydraulic hand pump 1 off) to the cylinder.

      12. Pressurize the cylinder to push the No. 3 Bearing outer race into the No. 3 Bearing Housing Assembly.

      13. Hold the pressure until the No. 3 Bearing Housing and Seal Support Assembly become cool.

      1. Install the No. 3 Bearing outer race to the No. 3 Bearing Housing and Seal Support Assembly with the 18 nuts ENGINE-NO.3 BEARING HOUSING (72-32-21, 01-060).

      2. Tighten the nuts with IAE 1J12378 Ratchet wrench 1 off.

      3. Torque the nuts to 54* lbfin to 60* lbfin (6.101* Nm to 6.779* Nm) in the sequence shown in the Figure.

      4. Loosen the nuts to release the torque.

      5. Torque the nuts to 54* lbfin to 60* lbfin (6.101* Nm to 6.779 Nm) in the sequence shown in the Figure.

      6. Release the pressure from the cylinder.

      7. Disconnect the hose and remove the hydraulic pump.

        1. Remove the hydraulic pusher/puller from the No. 3 Bearing outer race and Seal Support Assembly.

        2. Remove the nut and washer which attach the pad and cylinder assembly to the No. 3 Bearing outer race.

        3. Remove the pad and cylinder assembly from the No. 3 Bearing outer race.

    7. Refer to TASK 72-32-10-440-001-B00 (ASSEMBLY-001) for the selection of the PTO adjusting washer. On completion of the selection, continue assembly in accordance with the next SUBTASK within this TASK.

    1. SUBTASK 72-32-20-710-054 Examine the Oil Flow in the No. 3 Bearing Outer Race and Seal Support Assembly

    2. Refer to Figure.

    3. Install the O-ring (part of IAE 1J12376 Oil feed adapter) to IAE 1J12376 Oil feed adapter 1 off.

    4. Put the oil feed adapter to the oil feed port in the front face of the No. 3 Bearing Seal Support Assembly outer flange.

    5. Attach the oil feed adapter to the No. 3 Bearing Seal Support Assembly with the two bolts (part of the oil feed adapter) and nuts (part of the oil feed adapter).

    6. Put the No. 3 Bearing outer race and Seal Support Assembly into the oil flow check box.

    7. Connect the oil pressure feed hose (part of the oil flow test stand) to the oil feed adapter.

      1. Examine the oil flow of the No. 3 Bearing outer race and Seal Support Assembly. Fully close the stop valve and fully open the relief valve of the test stand.

        1. Turn on the switch of the oil flow test stand and increase the pressure and temperature to the subsequent specified value.

        2. Pressure: between 58.0 psig and 62.0 psig (400 kPa and 427 kPa).

        3. Temperature: between 150 deg F and 160 deg F (65 deg C and 71 deg C).

      2. Measure the oil flow rate and make sure that it is between 0.100 gal/min. and 0.486 gal/min. (0.38 l/min and 1.84 l/min) (0.800 lb/min and 3.888 lb/min).

      3. Reject the No. 3 Bearing outer race and Seal Support Assembly and do further inspection to find the cause, if the oil flow rate is out of the range in Step.

    8. Drain the oil and disconnect the oil pressure feed hose from the oil feed adapter.

    9. Remove the bolts and nuts which attach the oil feed adapter to the No. 3 Bearing outer race and Seal Support Assembly.

    10. Remove the oil feed adapter from the No. 3 Bearing outer race and Seal Support Assembly.

    11. Remove the No. 3 Bearing outer race and the Seal Support Assembly from the oil flow check box.

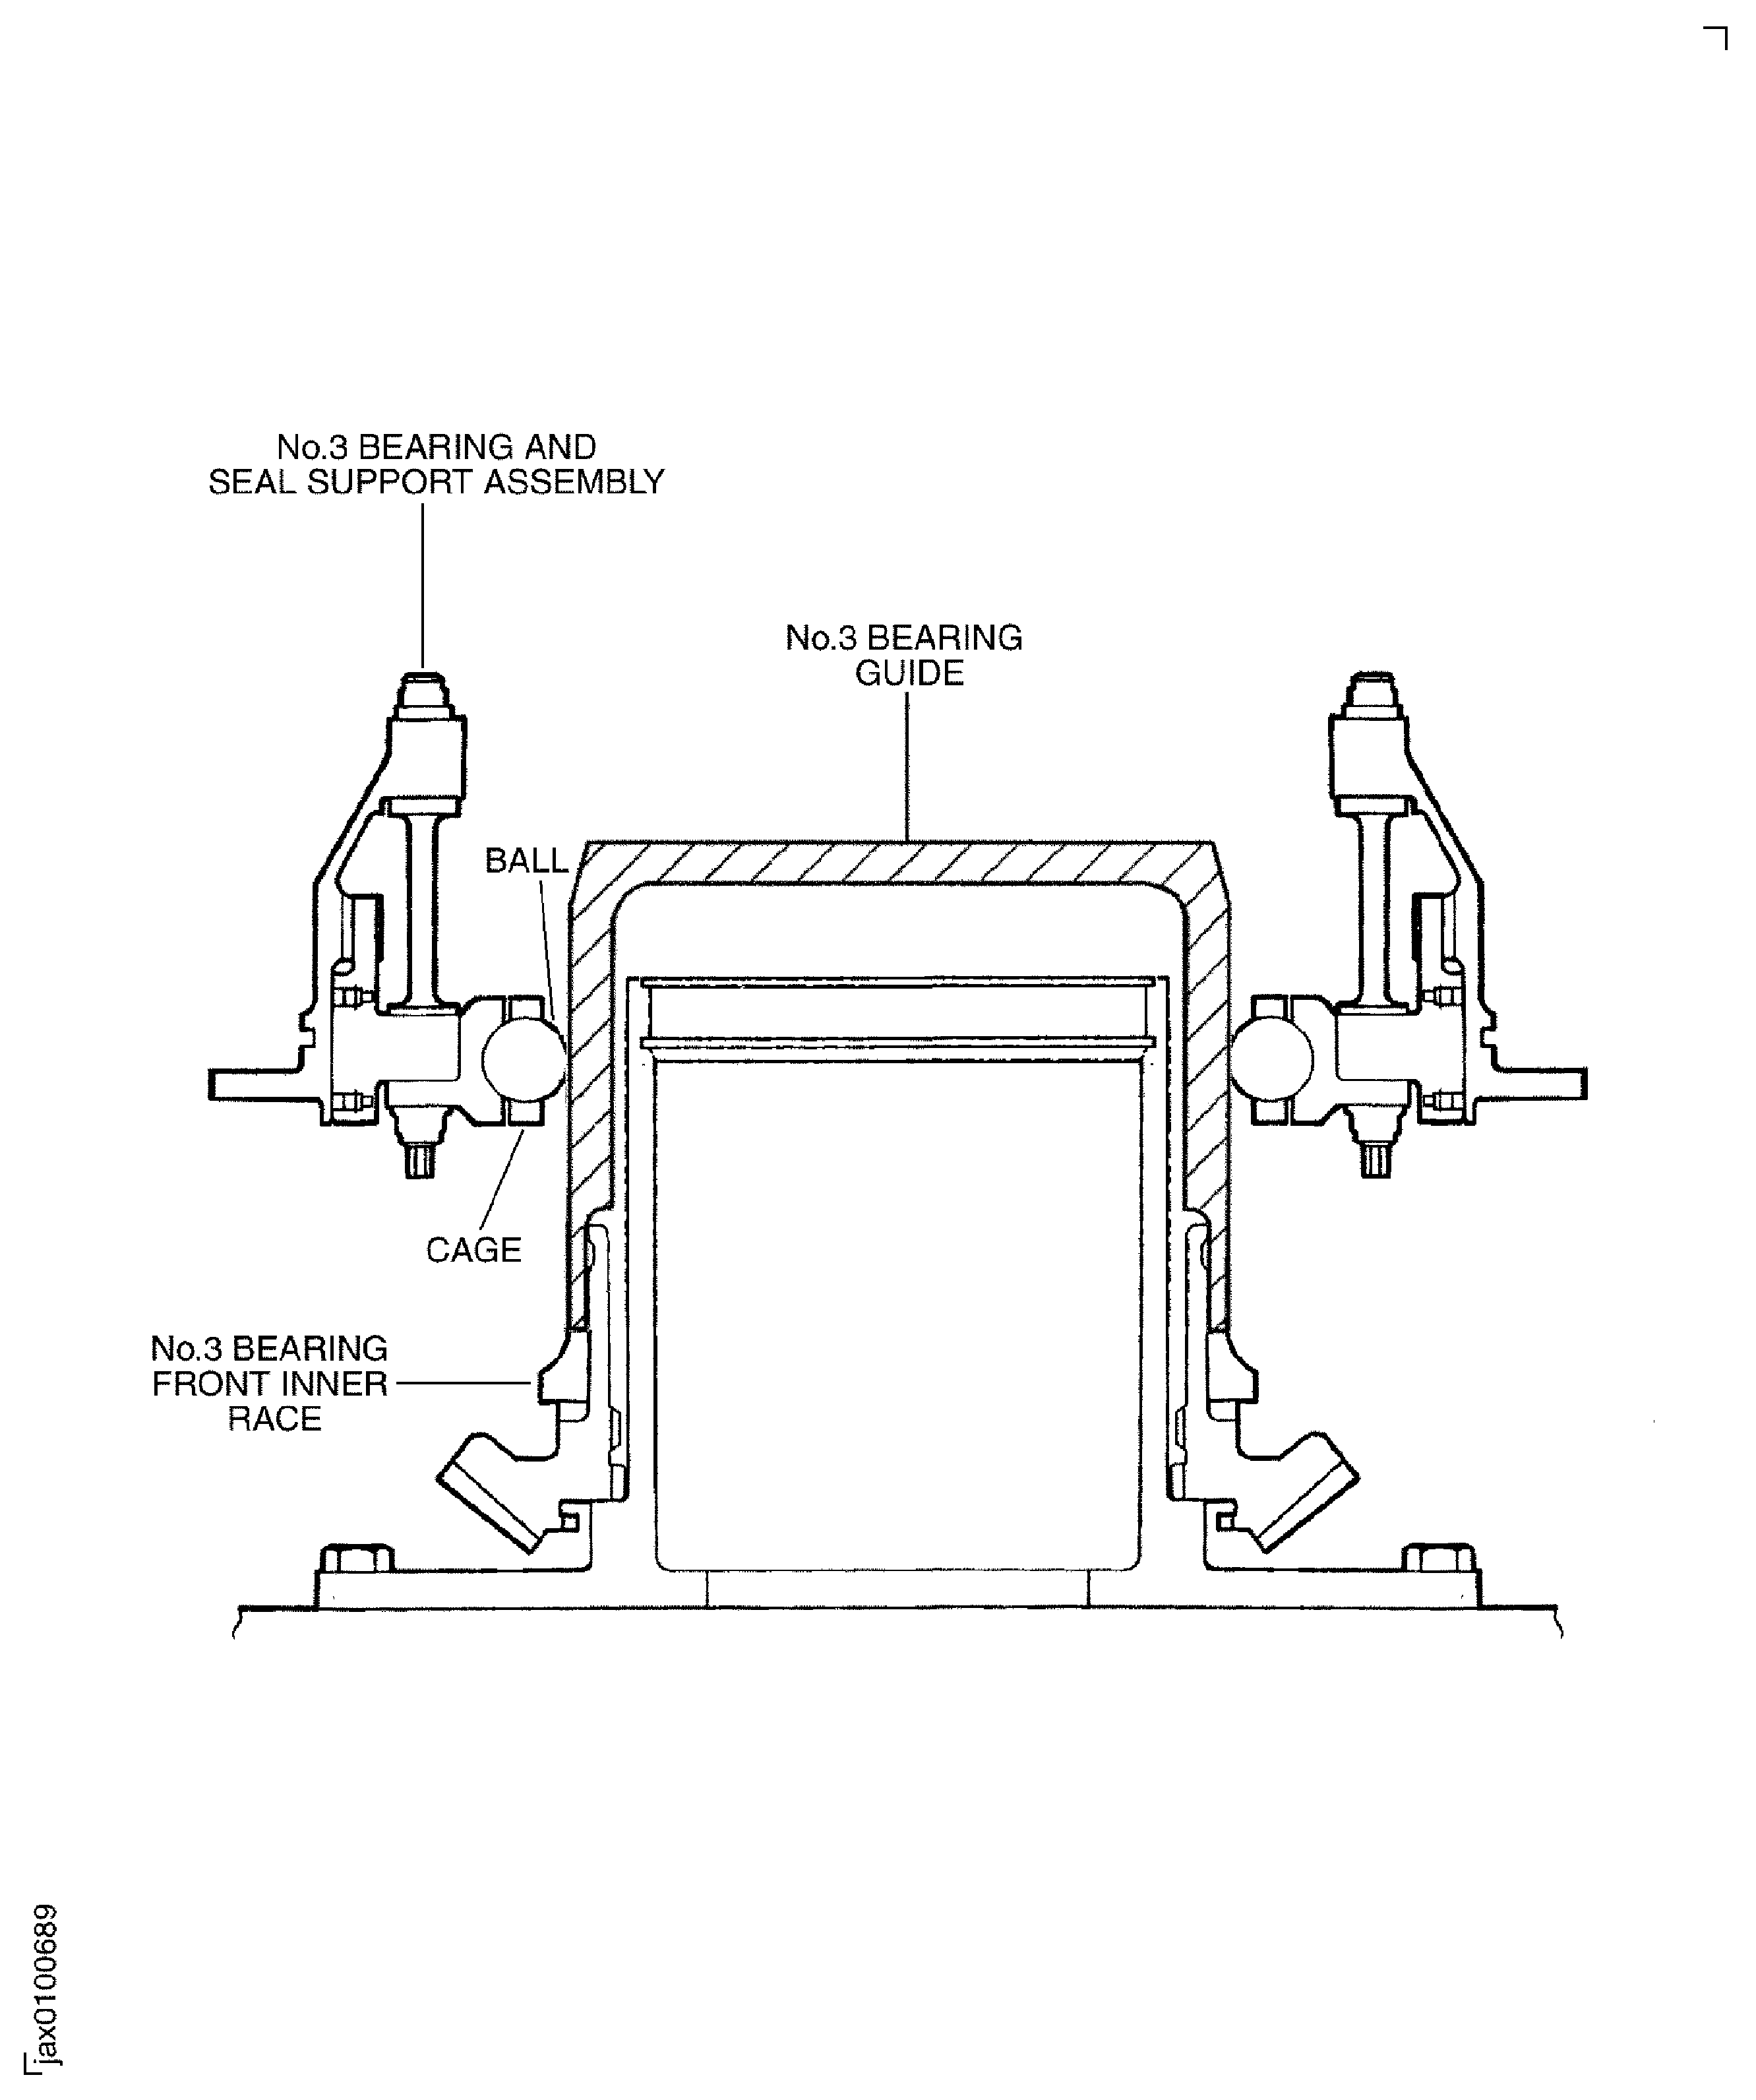
    1. SUBTASK 72-32-20-440-075 Install the No. 3 Bearing Seal Seat (72-32-25, 02-400) and the No. 3 Bearing and Seal Support Assembly to the Measuring Stretch

    2. Refer to Figure, Figure, Figure and Figure.

    3. Put the guide (part of the measuring ring) on the ring holder.

      1. Install the No. 3 Bearing Seal Seat and the No. 3 Bearing and No. 3 Seal Support Assembly on the guide.

        NOTE

        The inner race front half has a step at the inner diameter. The inner race rear half has a smaller step and oil slots. Refer to Fig. 72-32-20-990-037.
      2. Put the No. 3 Bearing Seal Seat on the guide.

        The No. 3 Bearing is a matched part. The front inner race and rear inner race halves, the cage and the outer race must all have the same serial No.

      3. Attach the No. 3 Bearing guide on the guide.

      4. Install the No. 3 Bearing Ball and Cage Assembly into the No. 3 Bearing outer race groove.

      5. Lift the No. 3 Bearing and Seal Support Assembly.

      6. Lower slowly the No. 3 Bearing and Seal Support Assembly along the No. 3 Bearing guide.

      7. Hold the No. 3 Bearing Ball and Cage Assembly together by hand and install the No. 3 Bearing and Seal Support Assembly on the No. 3 Bearing front inner race.

      8. Remove the No. 3 Bearing guide from the guide.

      9. Install the No. 3 Bearing rear inner race No. 3 Bearing (72-32-24, 01-100) on the guide.

      10. Install the No. 3 Bearing Seal Seat on the guide.

      11. Attach the No. 3 Bearing Seal Seat and No. 3 Bearing inner race with the nut (part of the measuring stretch).

      12. Tighten the nut.

      1. Install the flange (part of the measuring stretch) to the No. 3 Bearing outer race front face.

      2. Loosen the bolt (part of the measuring stretch) and the nut (part of the measuring stretch) and lift the plain washer (part of the measuring stretch) to turn the swing "C" washer (part of the measuring stretch).

      3. Turn the swing "C" washer to open the center hole of the flange.

      4. Align the hole of the flange with the lift bolt (part of the measuring stretch).

      5. Put the flange on to the No. 3 Bearing outer race front face.

      6. Turn the swing "C" washer and insert it under the plain washer.

      7. Tighten the nut and bolt to attach the flange to the No. 3 Bearing face.

    1. SUBTASK 72-32-20-440-076 Install the Fan Frame on to the Turnover Stand

    2. Refer to the TASK 72-32-00-430-001 (ASSEMBLY-001).

    1. SUBTASK 72-32-20-440-077 Turn the Fan Frame

    2. Turn the Fan Frame with the front end up. Refer to the TASK 72-32-00-430-001 (ASSEMBLY-001).

    1. SUBTASK 72-32-20-440-078 Install the No. 3 Bearing Measuring Stretch Assembly into the Fan Frame

    2. Refer to Figure, Figure, Figure and Figure.

      1. Increase the temperature of the bore of the rear-inner flange of the Fan Frame.

      2. Install IAE 1J12505 0AM53 heater 1 off on to the rear-inner flange.

      3. Connect the cables of the local heater to IAE 6F10027 Heater control unit 1 off.

      4. Increase the temperature of the rear-inner flange to 194 deg F (90 deg C).

    3. Disconnect the cables of the local heater from the heater control.

    4. WARNING

      BE CAREFUL, THE LOCAL HEATER IS HOT. USE THE APPROVED GLOVES WHEN YOU TOUCH IT.

      Remove the local heater from the Fan Frame.

    5. Attach a hoist to the lift bolt.

    6. Lift the No. 3 Bearing and inspection ring assembly and move it to the bore of the rear-inner flange of the Fan Frame.

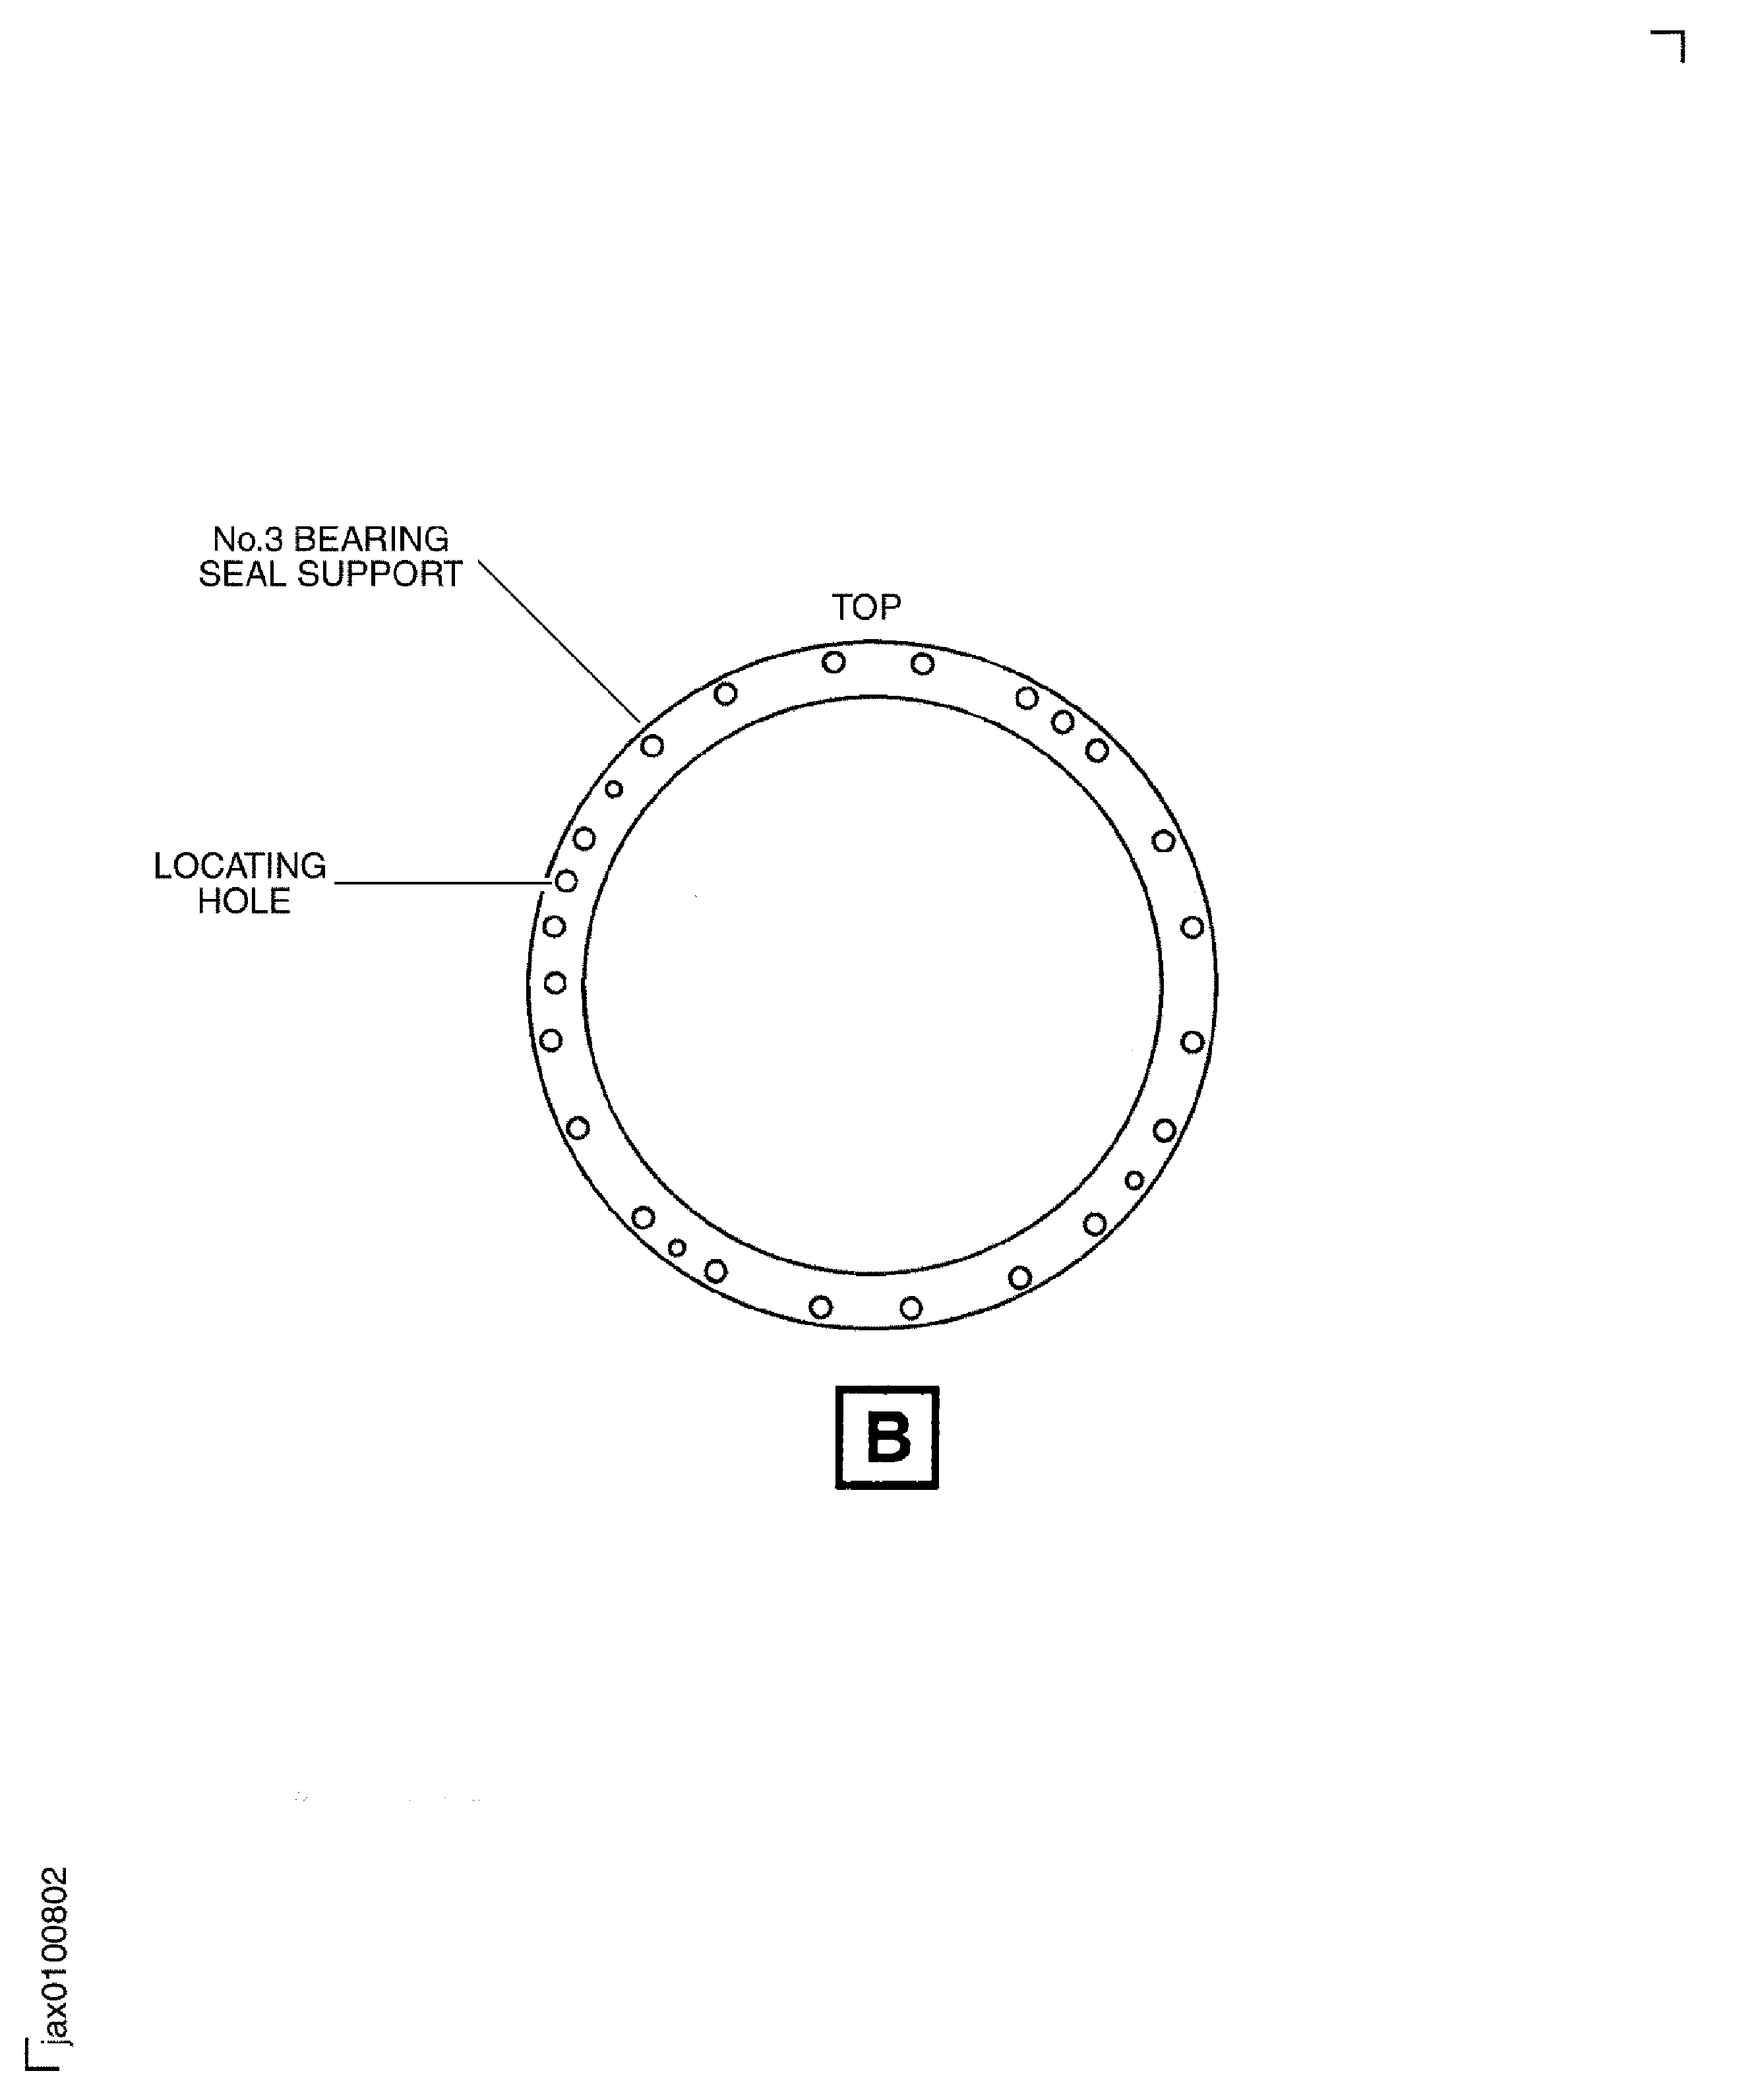
    7. Align the dowel pin on the Fan Frame with the locating hole in the No. 3 Bearing Seal Support.

    8. Install the No. 3 Bearing and measuring stretch assembly to the frame with the 20 dummy bolts. Torque the bolts to between 180 lbfin. to 220 lbfin. (20.00 Nm to 25.00 Nm).

    1. SUBTASK 72-32-20-220-064 Measure the Distance X to find the HPC Adjusting Washer Thickness

    2. Refer to Figure.

    3. Turn the Fan Frame with the rear end up. Refer to TASK 72-32-00-430-001 (ASSEMBLY-001).

    4. Install the dial gage into the gage (part of IAE 1J12359 Inspection bridge 1 off) into the clock holder (part of the inspection bridge).

    5. Hold the dial gage to the clock holder with the set screw (part of the inspection bridge).

    6. Attach the inspection bridge (part of the inspection bridge) to the rear flange of the Fan Frame.

    7. Align the clocking pin holes of the inspection bridge with the slots of the guide (part of the inspection ring) so that the clocking pin touches the No. 3 Bearing Seal Seat.

    8. Install the clocking pin (part of the inspection bridge) into the hole of the inspection bridge and touch the point of the clocking pin to the No. 3 Bearing Seal Seat.

      1. Measure the distance X.

      2. Put the clock holder with the dial gage on the outer flange of the inspection bridge.

      3. Make sure the stylus of the dial gage touches the head of the base pin (part of the inspection bridge). Adjust the dial gage to zero.

      4. Move the clock holder from the outer flange to the inner flange of the inspection bridge.

      5. Make sure the stylus of the dial gage touches the head of the clocking pin. Read the indication of the dial gage and write it on an applicable record sheet.

      6. Remove the clock holder with the dial gage and the clocking pin from the inspection bridge.

    9. Install the clocking pin into the hole which is 90 degrees apart from the initial hole. Measure the distance X. Refer to Step.

    10. Install the clocking pin into the hole which is 180 degree apart from the initial hole. Measure the distance X. Refer to Step.

    11. Install the clocking pin into the hole which is 270 degree apart from the initial hole. Measure the distance X. Refer to Step.

    12. Make sure that the difference between the maximum and the minimum of the four distances does not exceed 0.0012 in. (0.030 mm).

    13. If the four distances do not agree with those in Step, do Step through Step again.

    14. Take an average of the four distances and write it as distance X on the applicable record sheet.

    15. Remove the inspection bridge from the Fan Frame.

    1. SUBTASK 72-32-20-440-079 Find the HPC Adjusting Washer (72-32-26, 01-500 to 72-32-26, 01-510)

    2. Refer to Figure, Figure and Figure.

      NOTE

      The HPC adjusting washer is found as an initial selection in this SUBTASK. The last selection of the adjusting washer is done in TASK 72-32-00-430-011-B00 (ASSEMBLY-011).
    3. Find the pin length value K1 (in millimeters) marked on the inspection bridge.

    4. Find the pin length value K2 (in millimeters) marked on the clocking pin.

      NOTE

      The mounting distance value is marked on the outer surface of the HP Compressor front shaft.
    5. Find the mounting distance value S (in millimeters) of the HP Compressor front shaft.

    6. Find the average distance X measured in Step.

    7. Calculate the minimum valve E1 and the maximum value E2 for selection of the adjusting washer as follows:

      E1 (mm)

      =

      =

      =

      K2 + X - K1 - S - H + 28.70 - 0.13

      K2 + X - K1 - S - 0.08 + 28.70 - 0.13

      K2 + X - K1 - S + 28.49

      E2 (mm)

      =

      =

      =

      K2 + X - K1 - S - H + 28.70 + 0.13

      K2 + X - K1 - S - 0.08 + 28.70 + 0.13

      K2 + X - K1 - S + 28.75

      E1 (in.) = E (mm)/25.4.

      E2 (in.) = E (mm)/25.4.

      Where:

      H = The effect of the No. 3 Bearing fit condition difference between the clearance fit on the measuring stretch and the interference fit on the gearshaft.

    8. Find the HPC adjusting washer whose thickness is between the value E1 and the value E2.

    1. SUBTASK 72-32-20-440-080 Remove the No. 3 Bearing and Measuring Stretch Assembly from the Fan Frame

    2. Refer to Figure, Figure and Figure.

    3. Turn the Fan Frame with the front end up.

    4. Remove the 20 bolts which attach the No. 3 Bearing and measuring stretch and measuring stretch assembly to the Fan Frame.

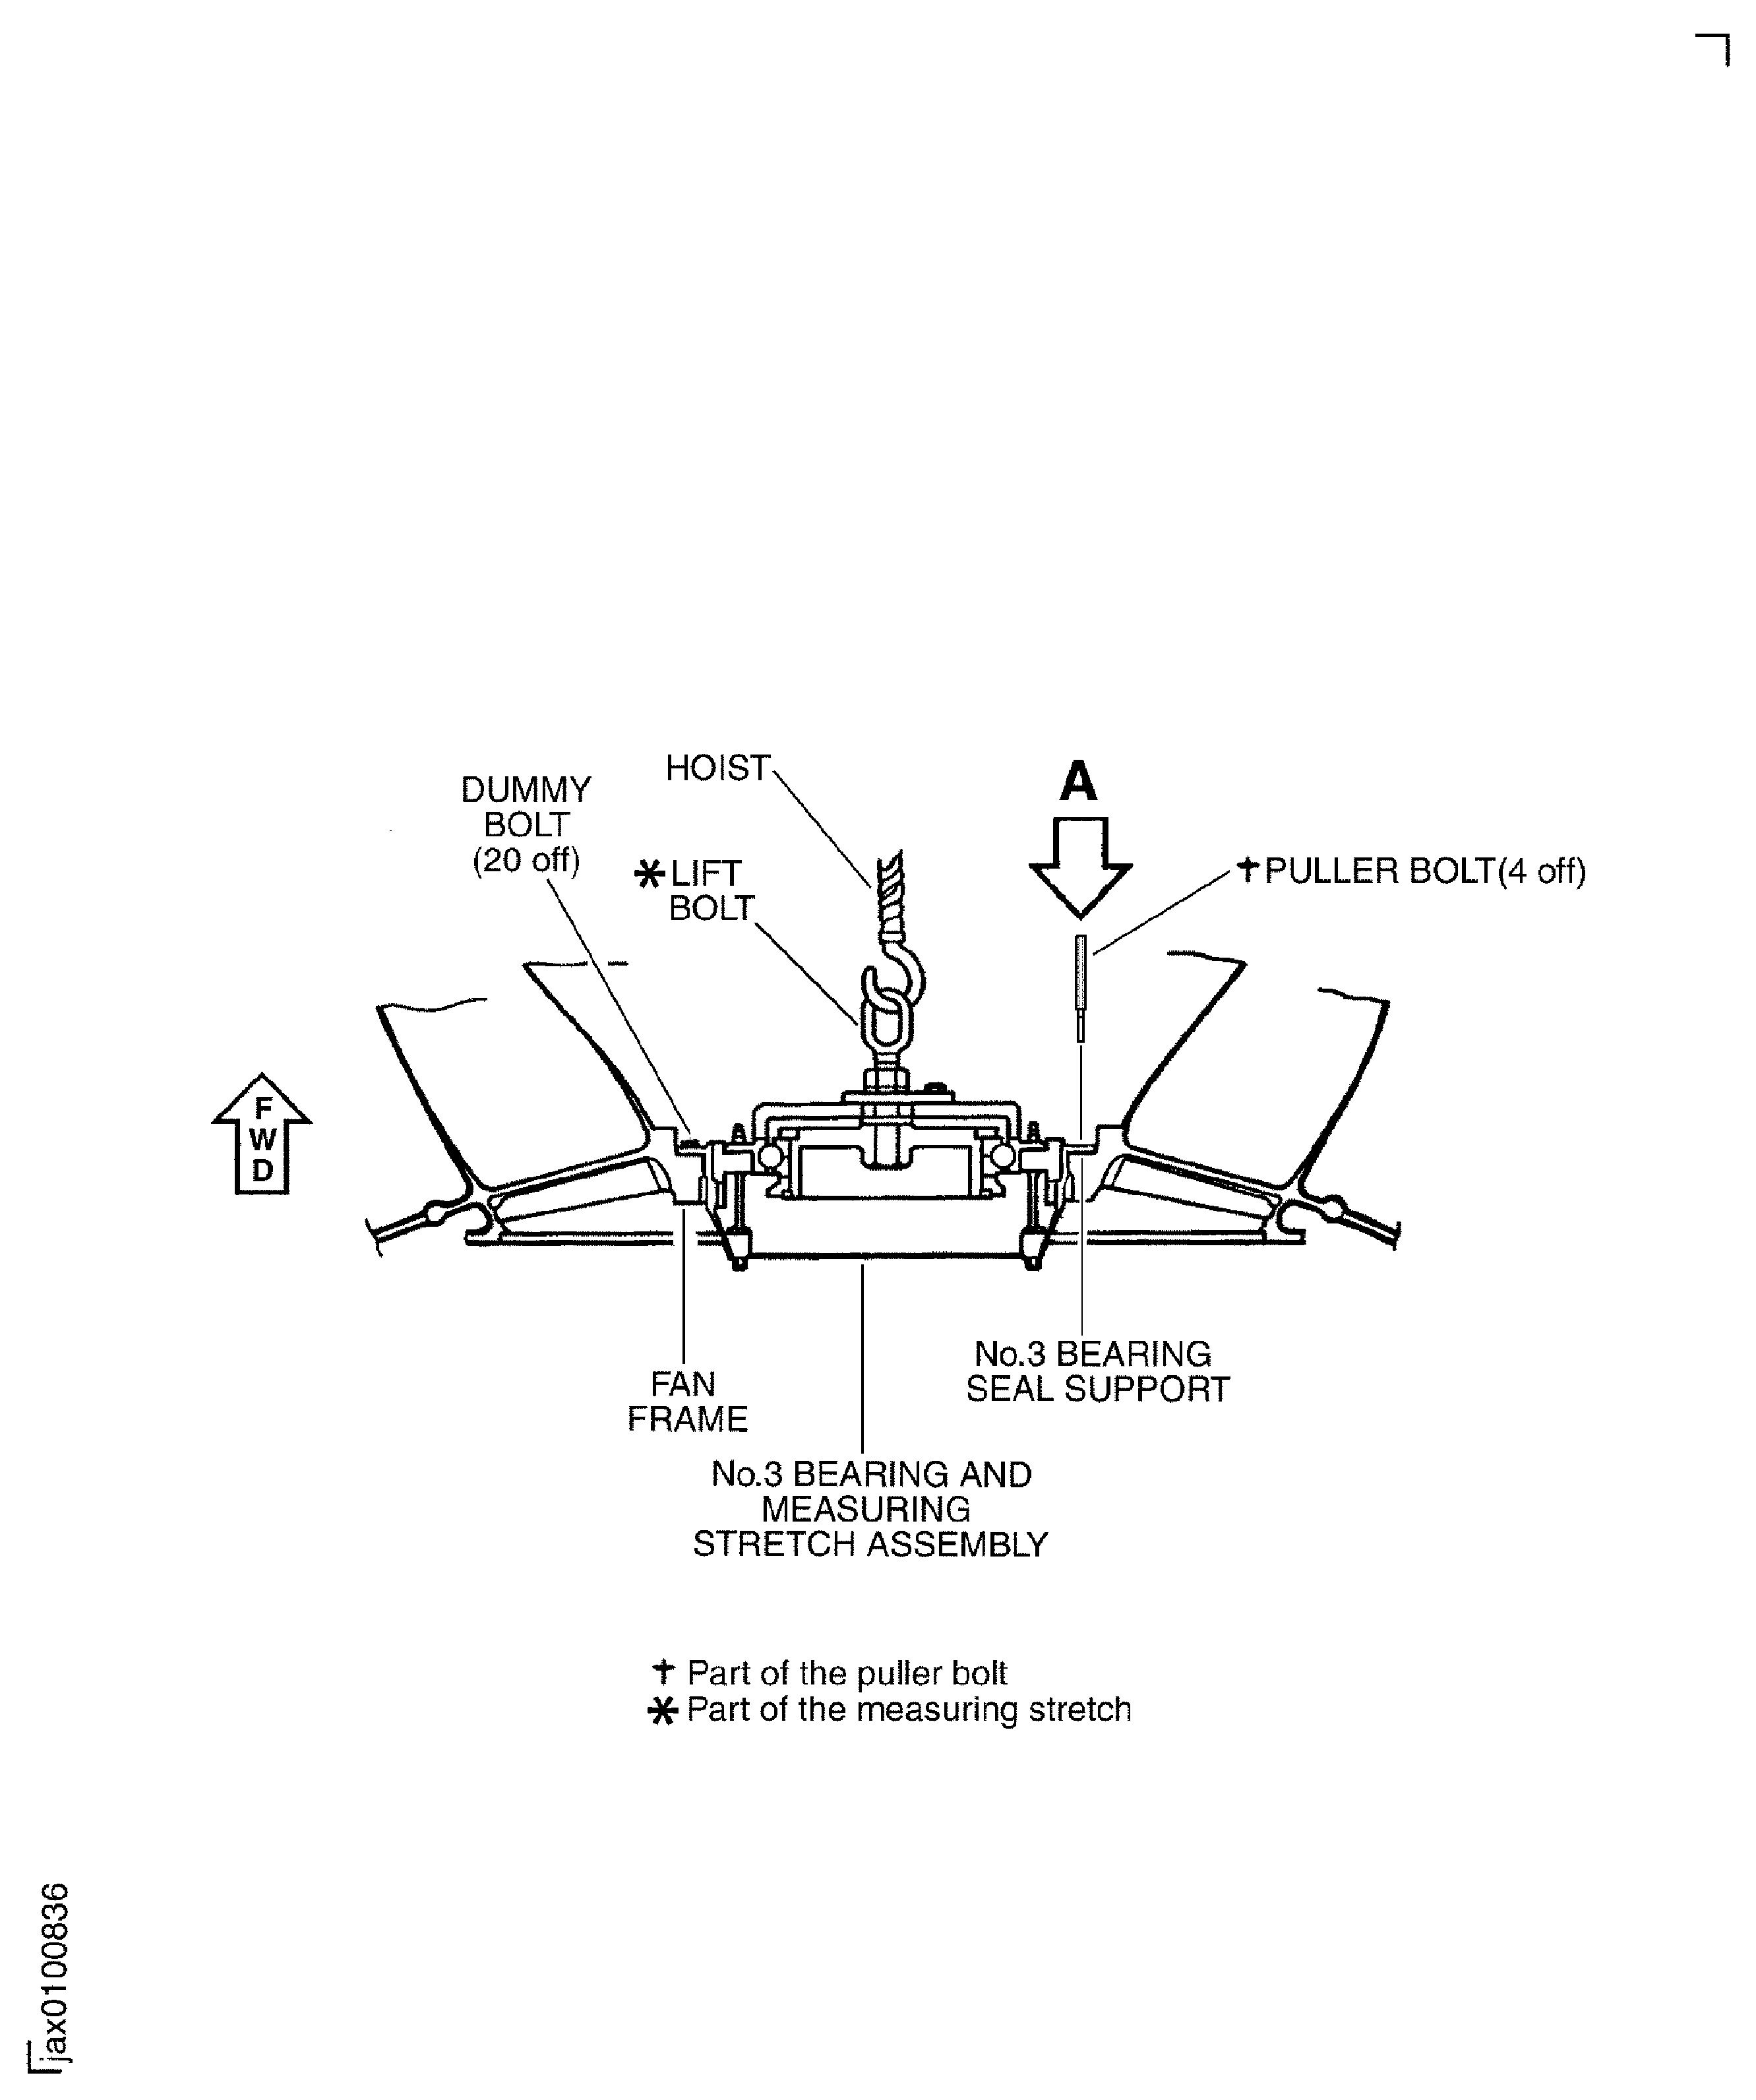
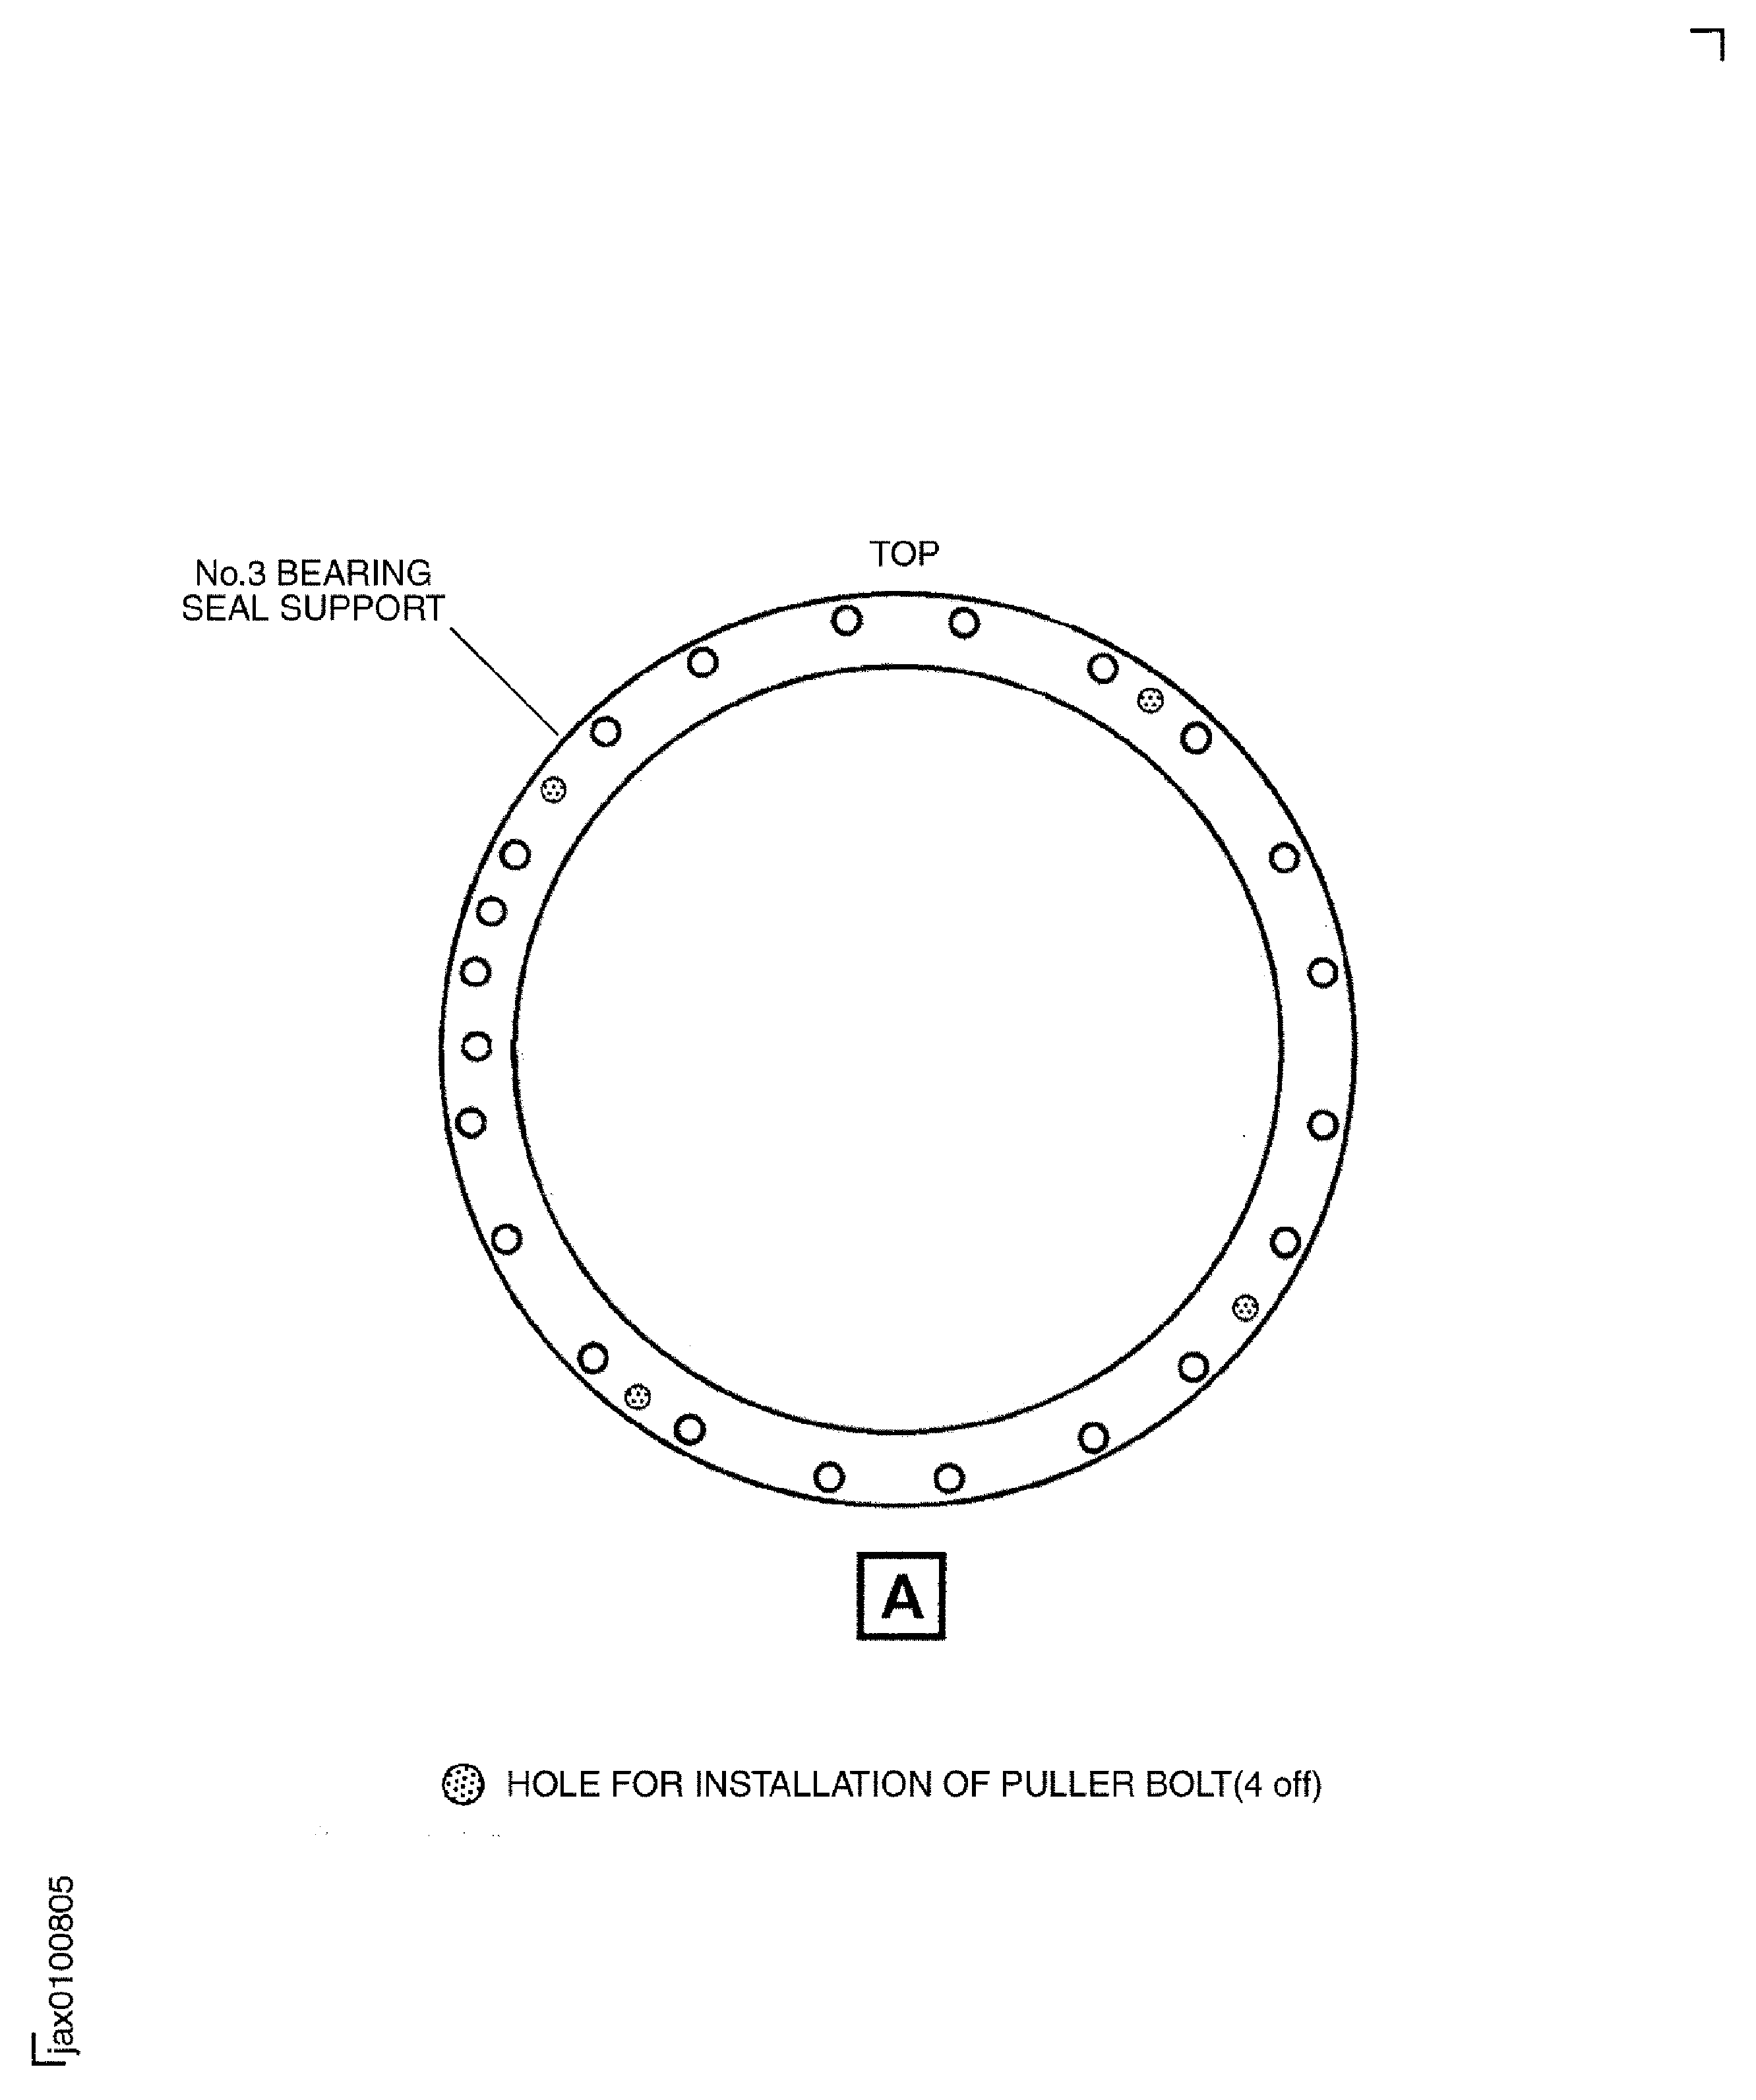
    5. Install the four puller bolts (part of IAE 1J12188 Puller bolt 1 off) into the thread holes in the outer flange of the No. 3 Bearing Seal Support.

    6. Install a hoist to the lift bolt (part of the measuring stretch).

    7. Tighten the four puller bolts equally until the No. 3 Bearing and measuring stretch assembly is released from the Fan Frame.

    8. Remove the puller bolts from the thread holes in the outer flange of the No. 3 Bearing Seal Support.

    9. Lift the No. 3 Bearing and measuring stretch assembly and put it on the ring holder on a work bench.

    10. Remove the hoist from the lift bolt.

    1. SUBTASK 72-32-20-440-081 Disassemble the No. 3 Bearing and Measuring Stretch Assembly

    2. Refer to Figure, Figure and Figure.

    3. Loosen the nut and turn the swing "C" washer until the hole of the flange is fully open.

    4. Remove the flange with the lift bolt from the guide.

    5. Remove the nut which attaches the No. 3 Bearing and No. 3 Bearing Seal Seat to the guide.

    6. Remove the No. 3 Bearing front inner race front half from the guide.

    7. Install the No. 3 Bearing guide off on to the guide.

    8. Hold the No. 3 Bearing Ball and Cage Assembly together by hand and remove the No. 3 Bearing outer race and Seal Support Assembly from the guide.

    9. Remove the No. 3 Bearing guide from the guide.

    10. Remove the No. 3 Bearing inner race rear half and the Seal Seat from the guide.

    11. Remove the guide from the ring holder.

    1. SUBTASK 72-32-20-220-065 Measure the Axial Dimensions of the No. 3 Bearing and the Related Parts

    2. Refer to Figure and Figure.

      1. Measure the axial dimensions of the No. 3 Bearing and the related parts to make sure that they are assembled correctly. Use an applicable micrometer to do this. Write the axial dimensions on an applicable record sheet.

        NOTE

        Use the PTO adjusting washer found in TASK 72-32-10-440-001-B00 (ASSEMBLY-001).
      2. Dimension A - axial dimension of the PTO adjusting washer.

      3. Dimension B - axial dimension of the No. 3 Bearing inner race front half.

      4. Dimension C - axial dimension of the No. 3 Bearing inner race rear half.

      5. Dimension D - axial dimension between mating surfaces of the No. 3 Bearing Seal Seat.

      6. Dimension E - axial dimension of the HPC adjusting washer.

      7. Dimension F - axial dimension between mating surfaces of the gearshaft. Use IAE 1J12556 Measuring block 1 off and the depth gage when you measure the dimension F.

      8. Dimension G - axial dimension between mating surfaces with the HPC adjusting washer and front surface of the HP Compressor front shaft and Seal Assembly.

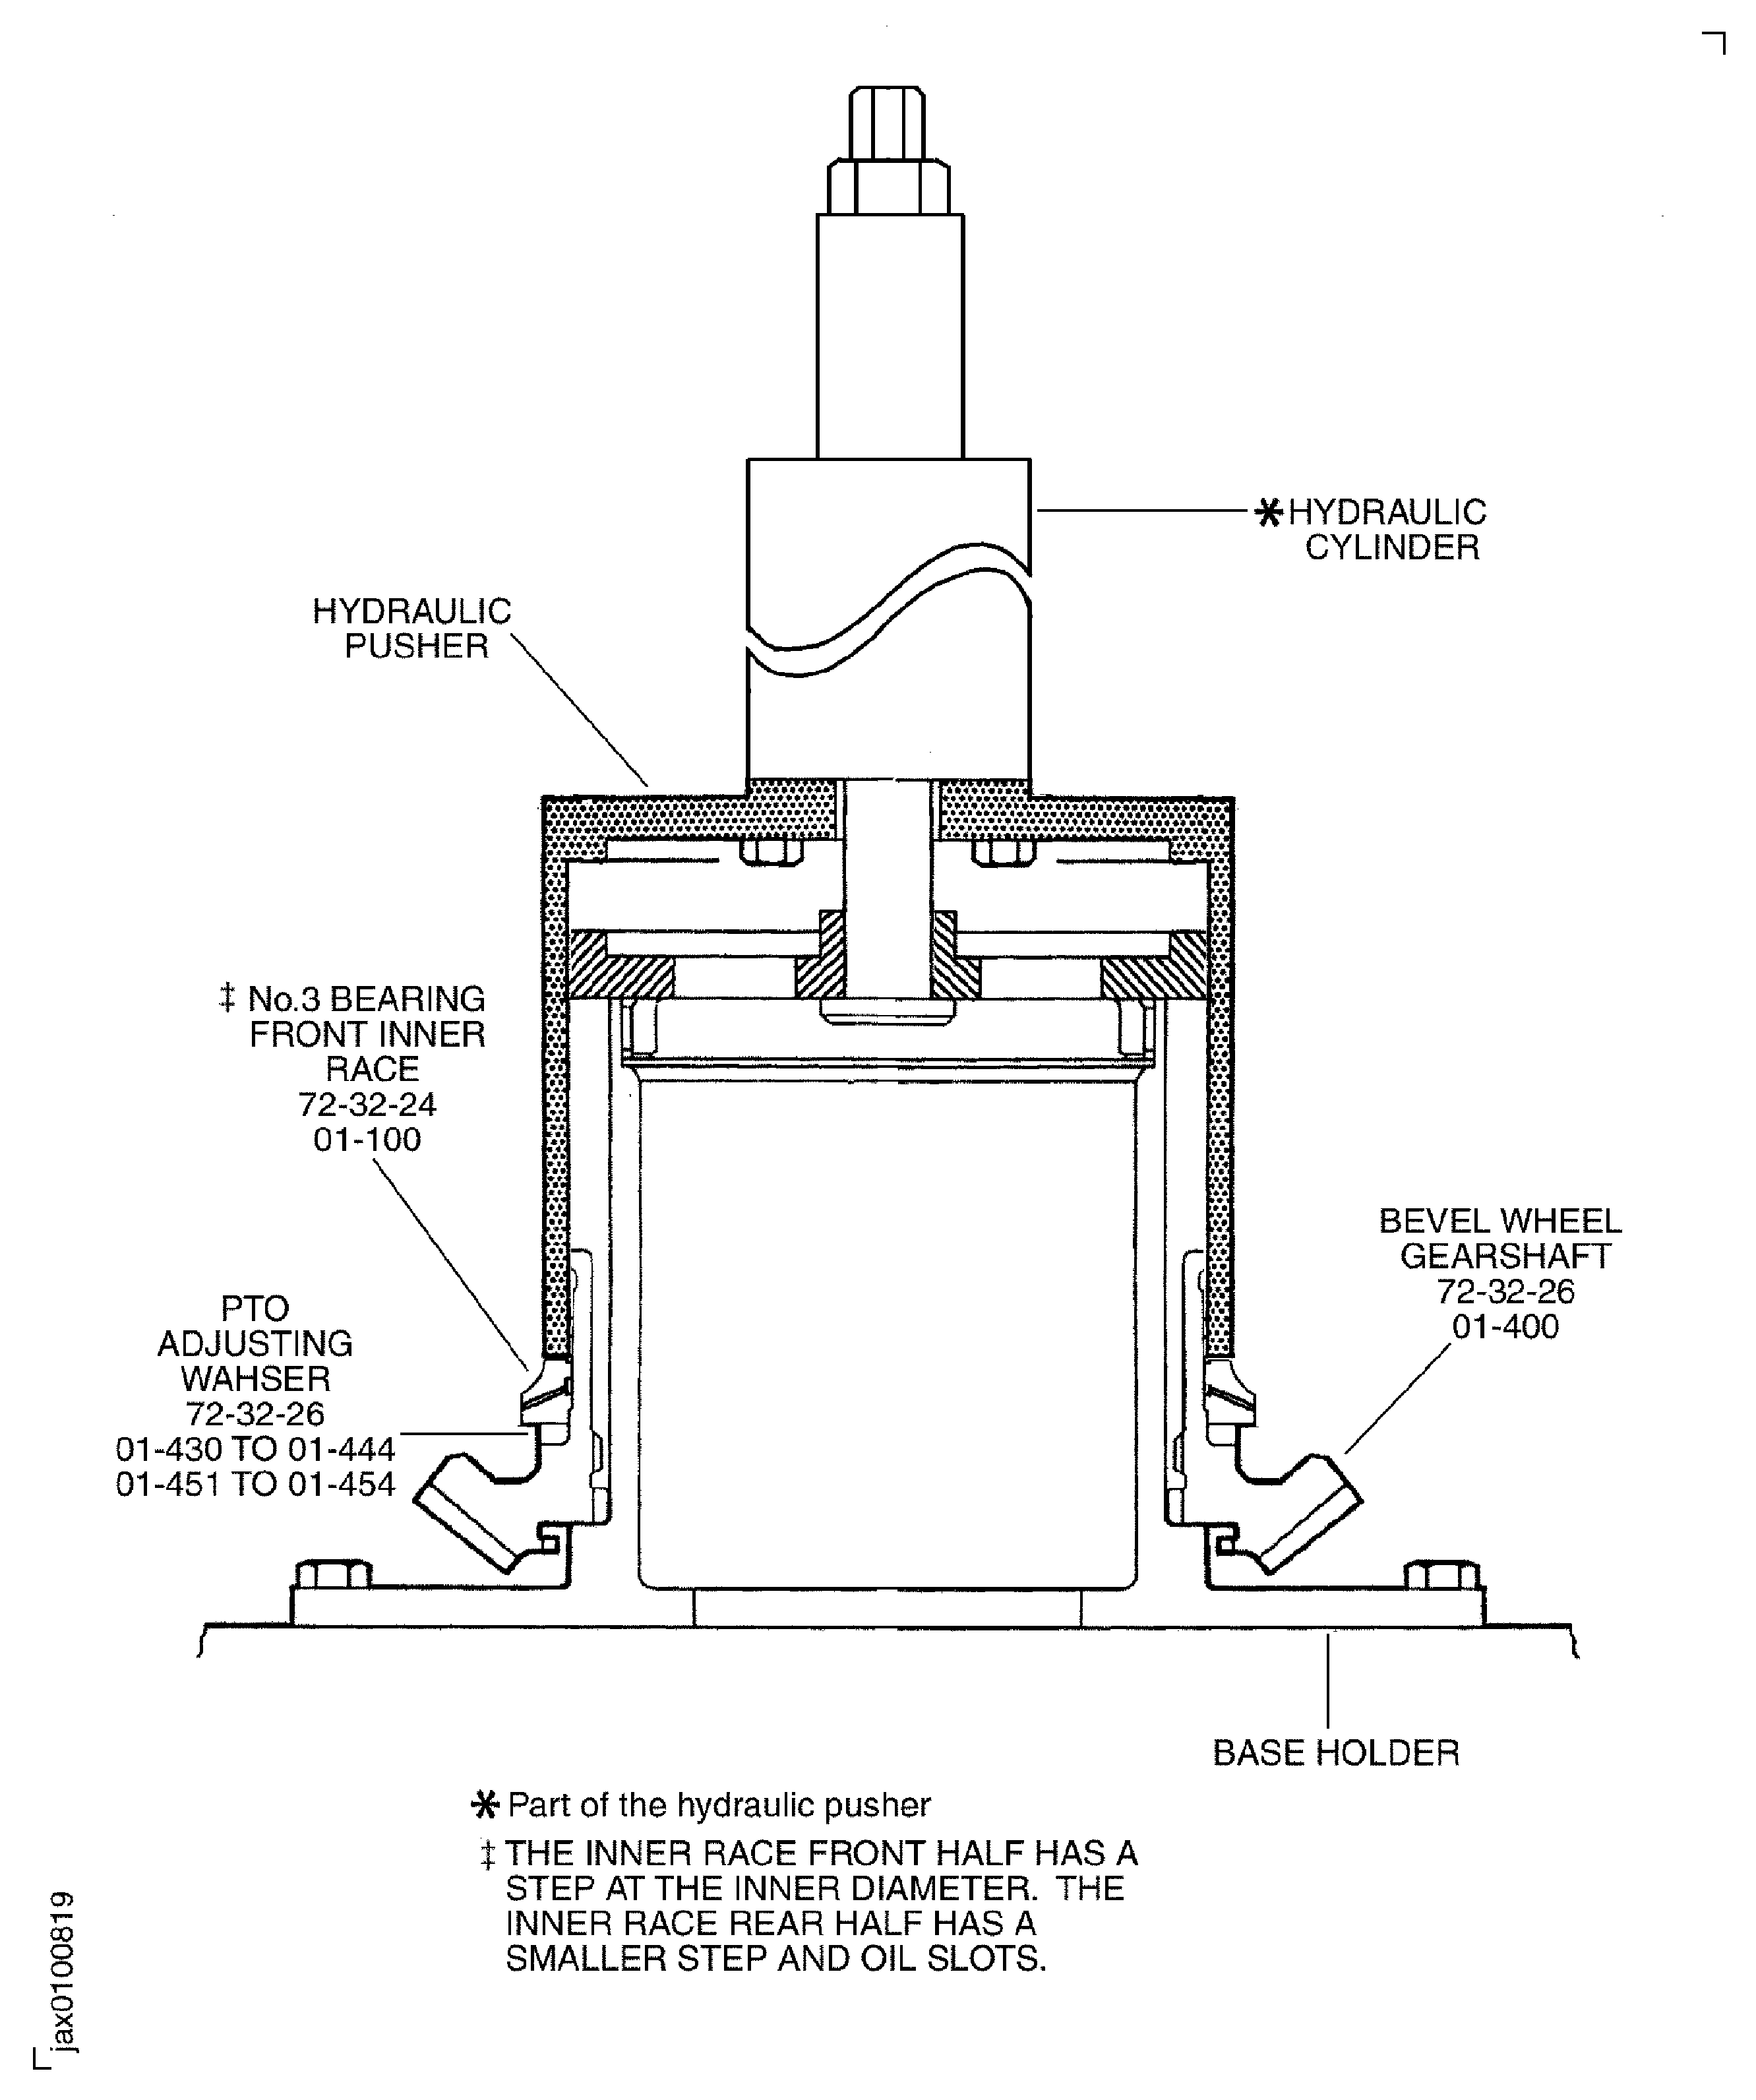
    1. SUBTASK 72-32-20-440-082 Install the PTO Adjusting Washer and the No. 3 Bearing and Seal Support Assembly on to the Gearshaft

    2. Refer to Figure, Figure and Figure.

      NOTE

      The PTO adjusting washer is found in TASK 72-32-10-440-001-B00 (ASSEMBLY-001).
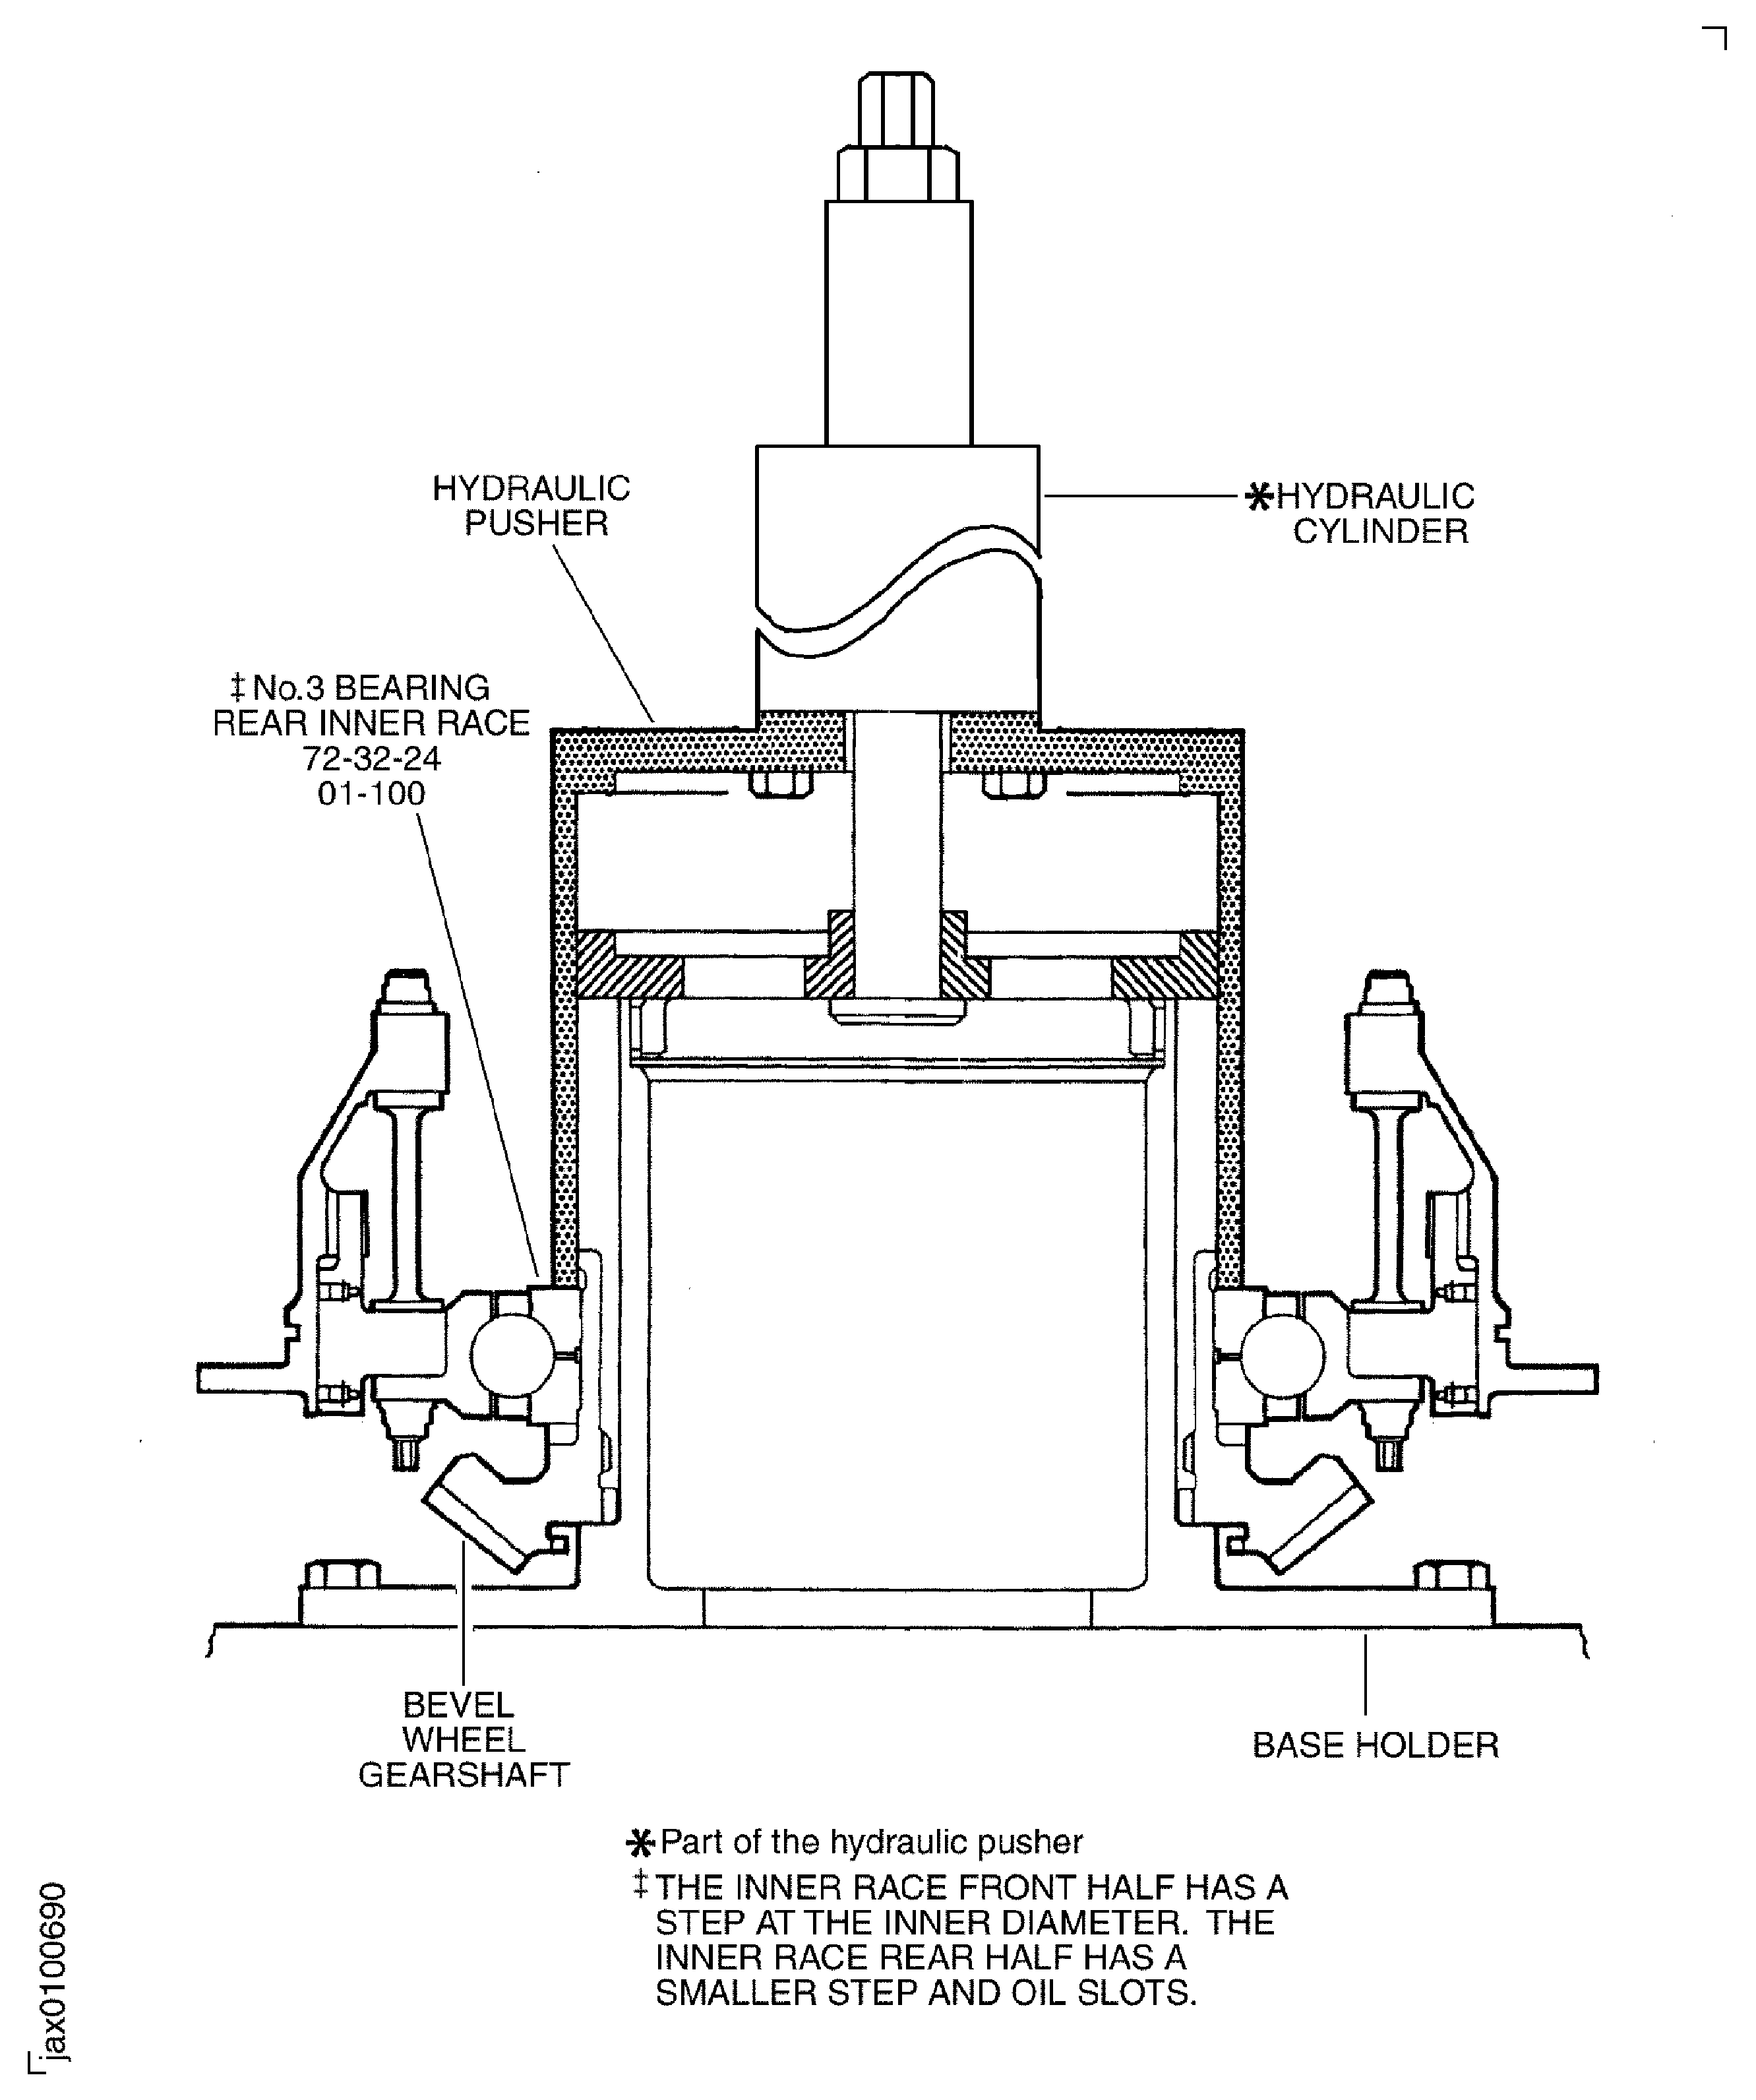
    3. Move IAE 1J12421 Base holder 1 off and IAE 1J12379 Hydraulic pusher 1 off to the work area.

    4. Install the gearshaft on to the base holder with the bevel gear end down.

    5. CAUTION

      DO NOT LET THE BEARINGS TOUCH THE BOTTOM OF THE HOT OIL TANK. A HEAVY SCREEN OR SOME RODS ATTACHED 3 IN. (76 MM) ABOVE THE BOTTOM OF THE TANK WILL KEEP HOT OIL ON ALL SIDES OF THE BEARING.

      Increase the temperature of the No. 3 Bearing inner races to 300 deg F (149 deg C) with an oven or a hot oil tank. Heat the No. 3 Bearing inner races for 20 minutes.

    6. Install the PTO adjusting washer on to the gearshaft.

    7. WARNING

      THE NO. 3 BEARING INNER RACES FRONT HALF ARE HOT. USE APPROVED GLOVES WHEN YOU REMOVE THEM FROM THE OVEN OR HOT OIL TANK.

      Remove the No. 3 Bearing inner race front half from the oven and install it on to the gearshaft.

      NOTE

      The inner race front half has a step at the inner diameter. The inner race rear half has a smaller step and oil slots.
    8. Put the hydraulic pusher on the base holder and the No. 3 Bearing inner race front half and connect the hose (part of IAE 1F10026 Hydraulic hand pump 1 off) to the cylinder (part of the hydraulic pusher).

    9. Operate the hydraulic pump and increase the oil pressure until the No. 3 Bearing inner race front half touches the PTO adjusting washer.

    10. Continue to push the No. 3 Bearing inner race front halt until the front half becomes cool.

    11. Release the pressure from the hose.

    12. Remove the hose from the hydraulic cylinder.

    13. Remove the hydraulic pusher from the No. 3 Bearing inner race front half and the base holder.

    14. Install the No. 3 Bearing guide on to the gearshaft and the No. 3 Bearing inner race front half.

      NOTE

      Hold the No. 3 Ball and Cage Assembly together by hand when you move the No. 3 Bearing and Seal Support Assembly, because the Ball and Cage Assembly can release from the outer race.
    15. Lower slowly the No. 3 Bearing and Seal Support Assembly along the No. 3 Bearing guide and install it on to the No. 3 Bearing inner race front half.

    16. Remove the No. 3 Bearing guide from the gearshaft and the No. 3 Bearing.

    17. WARNING

      THE NO. 3 BEARING INNER RACES FRONT HALF ARE HOT. USE APPROVED GLOVES WHEN YOU REMOVE THEM FROM THE OVEN OR HOT OIL TANK.

      CAUTION

      YOU MUST MAKE SURE THAT THE NO. 3 BEARING BALLS ARE IN THE CORRECT POSITION BEFORE YOU INSTALL THE REAR INNER RACE. INCORRECT POSITION CAN CAUSE DAMAGE TO THE BALLS WHEN YOU PUSH THE REAR INNER RACE.

      Remove the No. 3 Bearing inner race rear half from the oven and install it on the gearshaft.

    18. Put the hydraulic pusher on the base holder and connect the hose to the cylinder.

    19. Operate the hydraulic pump and increase the oil pressure until the No. 3 Bearing inner race front half touches the No. 3 Bearing inner race front half touches the No. 3 Bearing inner race front half.

    20. Continue to push the rear half until the No. 3 Bearing inner race rear half becomes cool.

    21. Release the pressure from the hose.

    22. Remove the hose from the hydraulic cylinder.

    23. Remove the hydraulic pusher from the No. 3 Bearing inner race rear half, the gearshaft and the base holder.

    24. Use a 0.001 in. (0.02 mm) feeler gage to measure the clearance between the adjusting washer and the bevel gear mating face. The feeler gage must not fit between the adjusting washer and the bevel gear.

    1. SUBTASK 72-32-20-440-083 Install the No. 3 Bearing, Gearshaft, Support and Seal Assembly on to the Leak Test Fixture

    2. Refer to Figure.

      NOTE

      The No. 3 Bearing Seal Assembly is assembled in TASK 72-32-25-440-001 (ASSEMBLY-001).
    3. Move IAE 1J12469 Leak test fixture 1 off to the work area.

    4. Install the seal ring A (part of the leak test fixture) in the groove in the body (part of the leak test fixture).

    5. Install the seal ring B (part of the leak test fixture) in the groove in the ring guide (part of the leak test fixture).

    6. Put the No. 3 Bearing and the Gear Assembly on the ring guide and the body.

    7. Attach the No. 3 Bearing Seal Support Assembly to the ring guide and the body with the outer clamp (part of the leak test fixture), the six bolts (part of the leak test fixture) and washers (part of the leak test fixture). Tighten the six bolts.

    8. Install the No. 3 Bearing Seal Seat No. 3 Bearing Rear Seal Assembly (72-32-25, 02-400) onto the gearshaft and the No. 3 Bearing.

    9. Lubricate the new No. 3 Bearing Rear Seal Assembly (72-32-25, 02-350) packing 1 off with CoMat 10-077 APPROVED ENGINE OILS.

    10. Install the packing in the groove in the No. 3 Bearing Seal Assembly.

    11. Attach the No. 3 Bearing Seal Assembly No. 3 Bearing Rear Seal Assembly (72-32-25, 02-100) on the No. 3 Bearing Seal Support Assembly rear flange with the nine bolts "NO.3 BEARING,ROTOR CENTRE & SUPPORT ASSY (72-32-20, 01-140).

    12. Torque the bolts to 85 lbfin to 105 lbfin (10.00 Nm to 12.00 Nm).

    13. Install the inner clamp (part of the leak test fixture) on the stud bolt (part of the leak test fixture), the body and the No. 3 Bearing Seal Seat with the nut (part of the leak test fixture) and the washer (part of the leak test fixture).

    1. SUBTASK 72-32-20-790-052 Do the Leak Test on the No. 3 Bearing Seal Assembly

    2. Refer to Figure.

    3. Move IAE 6F10030 Vacuum test cart 1 off to the work area.

    4. Connect the hose (part of the vacuum test cart) to the fitting (part of the leak test fixture).

    5. Lower the pressure of the chamber of the leak test fixture with the vacuum test cart.

    6. Set the pressure to 20 inHg (500 mmHg) and measure the volume of the leak air. Make sure that the leakage is not more than 5 ppH. Based on the ambient pressure, refer to the table below for the vacuum pressure in psia.

      Ambient Pressure of the Day (psia)

      Vacuum Pressure (psia)

      14.7

      4.9

      14.5

      4.7

      14.3

      4.5

      14.1

      4.3

      13.9

      4.1

      13.7

      3.9

      13.5

      3.7

      13.3

      3.5

      13.1

      3.3

      Vacuum pressure (psia) = Ambient pressure of the day (psia) - 9.8 psia

    7. Disconnect the hose from the fitting.

    8. Remove the six bolts and washers which attach the outer clamp to the ring guide and the No. 3 Bearing Seal Support.

    9. Remove the outer clamp from the ring guide and the No. 3 Bearing Seal Support.

    10. Remove the nut and the washer which attach the inner clamp to the stud bolt, the body and the No. 3 Bearing Seal Seat.

    11. Remove the inner clamp from the stud bolt, the body and the No. 3 Bearing Seal Seat.

    12. Remove the No. 3 Bearing, bevel gear, Support and Seal Assembly from the ring guide and the body.

    1. SUBTASK 72-32-20-440-084 Install IAE 1J12021 Lifting Spacer between the No. 3 Bearing Seal Support and No. 3 Bearing Seal Assembly

    2. Put a clean soft mat on the work bench and put the No. 3 Bearing, Gearshaft, Support and Seal Assembly onto the mat with the bevel gear end down.

      NOTE

      IAE 1J12021 Lifting spacer 1 off keeps the clearance between the flanges of the No. 3 Bearing Seal Assembly and the No. 3 Bearing Seal Support Assembly to permit the installation of a tool when you lift the No. 3 Bearing Seal Assembly.
    3. Remove the nine bolts which attach the No. 3 Bearing Seal Assembly to the No. 3 Bearing Seal Support.

      1. Pull out the No. 3 Bearing Seal Assembly from the No. 3 Bearing Seal Support.

      2. Install IAE 1P17043 Knocker puller 1 off to the No. 3 Bearing Seal Assembly.

      3. Pull out the No. 3 Bearing Seal Assembly until the clearance between the flanges of the No. 3 Bearing Seal Assembly and the No. 3 Bearing Seal Support Assembly becomes 0.098 in. (2.50 mm).

      4. Remove the knocker puller.

    4. Install the three spacers (part of the lifting spacer) into the clearance at every 120 degrees. Align the slots of the three spacers with the boltholes of the No. 3 Bearing Seal Support.

    5. Attach the No. 3 Bearing Seal Assembly and three spacers to the No. 3 Bearing Seal Support Assembly with the nine bolts. Tighten the bolts lightly.

    1. SUBTASK 72-32-20-440-085 Install the No. 3 Bearing, Gearshaft, Support and Seal Assembly to the HP Compressor Front Shaft and Seal Assembly (72-32-23, 01-700)

    2. Refer to Figure.

      NOTE

      The HP Compressor front shaft and Seal Assembly is assembled in TASK 72-32-23-440-001-A00 (ASSEMBLY-001).
      1. Prepare the tools for installation of the No. 3 Bearing, Gearshaft, Support and Seal Assembly.

      2. Move IAE 1J12339 Spanner wrench 1 off and IAE 1J12387 Work stand 1 off to the work area.

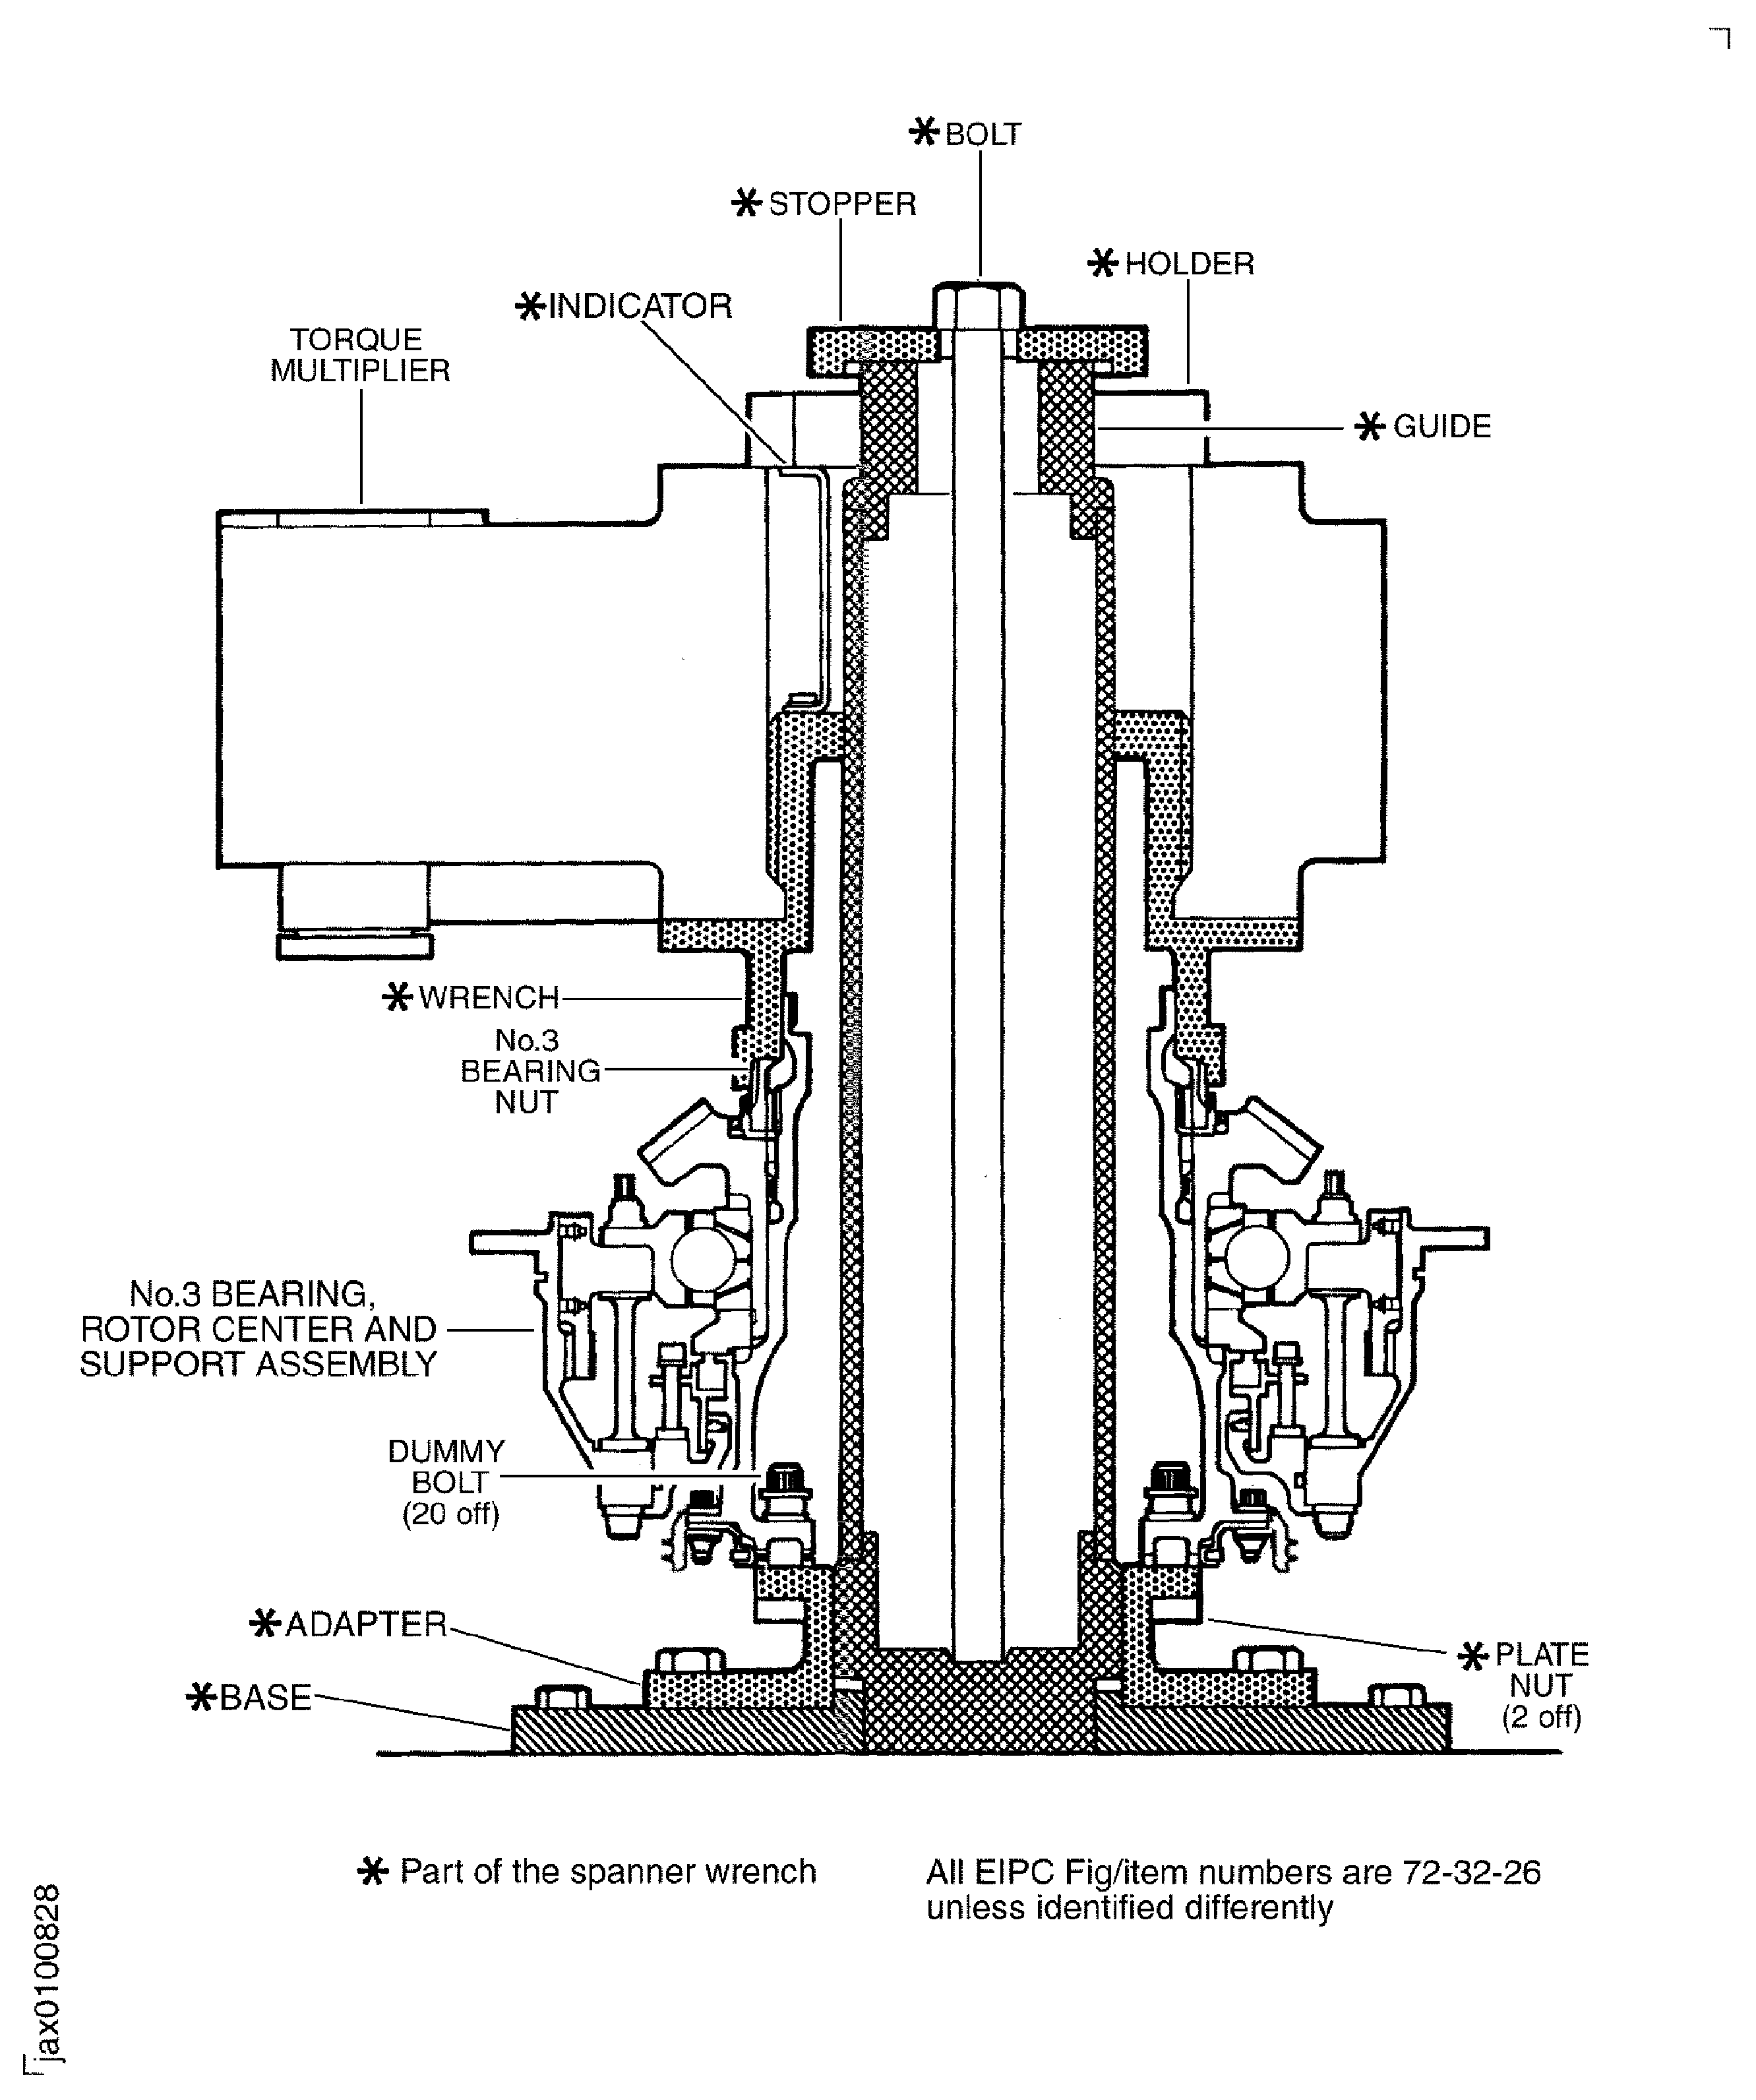
        1. Install the parts of the spanner wrench on the work stand.

        2. Install the base (part of the spanner wrench) on the work stand with the six bolts (part of the spanner wrench).

        3. Install the adapter (part of the spanner wrench) on the base with the eight bolts (part of the spanner wrench).

        1. Install the HP Compressor front shaft and Seal Assembly on the adapter.

        2. Clean the curvic teeth on the HP Compressor front shaft and the adapter.

        3. Put the HP Compressor front shaft and Seal Assembly on the adapter.

        4. Install a protection cover into the HP Compressor front shaft inner diameter to prevent damage to the inner surface of the HP Compressor front shaft while you install the 20 dummy bolts.

        5. Attach the HP Compressor front shaft and Seal Assembly on the adapter with the 20 dummy bolts and the two plate nuts (part of the spanner wrench).

    3. Install the HPC adjusting washer on the HP Compressor front shaft. The adjusting washer thickness was found in the Step.

      1. WARNING

        BE CAREFUL BECAUSE THE No. 3 BEARING, GEARSHAFT, SUPPORT AND SEAL ASSEMBLY ARE HOT. USE APPROVED GLOVES WHEN YOU REMOVE IT FROM THE HOT OIL TANK OR OVEN.

        CAUTION

        DO NOT LET THE NO. 3 BEARING, GEARSHAFT AND SEAL ASSEMBLY TOUCH THE BOTTOM OF THE HOT OIL TANK. A HEAVY SCREEN OR SOME RODS ATTACHED 3IN. (76 MM) ABOVE THE BOTTOM OF THE TANK WILL KEEP HOT OIL ON ALL SIDES OF THE NO. 3 BEARING, GEARSHAFT AND SEAL ASSEMBLY.

        Install the No. 3 Bearing, Gearshaft, Support and Seal Assembly on the HP Compressor front shaft and Seal Assembly.

      2. Increase the temperature of the No. 3 Bearing, Gearshaft, Support and Seal Assembly to 347 deg F to 356 deg F (175 deg C to 180 deg C) in a hot oil tank or oven for 90 to 120 minutes.

      3. Remove the No. 3 Bearing, Gearshaft, Support and Seal Assembly from the hot oil tank or oven.

      4. Put the No. 3 Bearing, Gearshaft, Support and Seal Assembly on the HP Compressor front shaft and Seal Assembly.

        1. Install IAE 1J12380 Hydraulic pusher 1 off on the HP Compressor front shaft and the No. 3 Bearing, Gearshaft, Support and Seal Assembly.

        2. Loosen the nut (part of the hydraulic pusher) and the washer (part of the hydraulic pusher) on the shaft (part of the hydraulic pusher).

        3. Install the shaft on the work stand.

        4. Put the end of the pusher (part of hydraulic pusher) on the front face of the gearshaft.

        5. Hold the plunger of the hydraulic clyinder (part of the hydraulic pusher) with the nut and the washer.

      5. Connect the hose (part of the hydraulic hand pump) to the hydraulic cylinder.

      6. Pressurize the cylinder and hold the pressure until the assembly becomes cool.

    4. Release the pressure, remove the hose from the cylinder and remove the hydraulic pusher from the HP Compressor front shaft and Seal Assembly.

    1. SUBTASK 72-32-20-220-066 Examine the Dimension to Make Sure that the No. 3 Bearing and the Related Parts Assembled Correctly

    2. Refer to Figure.

    3. Measure the axial dimension Y with an applicable depth gage. Dimension Y is from the front surface of the HP Compressor front shaft to the front mating surface of the gearshaft.

      1. Examine the difference between the sum of the dimensions of the individual parts and the assembled dimension.

      2. Calculate the assembled dimension YC from the individual parts dimensions A, B, C, D, E, F and G. Refer to the Step.

        YC = G - A - B - C - D - E - F.

      3. Examine YC and Y. Make sure the difference between YC and Y is not more than 0.00079 in. (0.0200 mm).

    4. If the difference is more than 0.00079 in. (0.0200 mm), disassemble the assembly and return to Step. For the disassembly procedure, refer to TASK 72-32-20-040-001 (DISASSEMBLY-001).

    1. SUBTASK 72-32-20-440-086 Assemble the No. 3 Bearing, Gearshaft, Support and Seal Assembly to the HP Compressor Front Shaft and Seal Assembly with the No. 3 Bearing Nut

    2. Refer to Figure, Figure and Figure.

    3. Align the tang of the new Gearbox Driving Bevel Gearshaft And Related Parts (72-32-26, 01-350) cup washer 1 off with the slot of the gearshaft.

    4. Install the cup washer in the gearshaft.

    5. Install the No. 3 Bearing nut Gearbox Driving Bevel Gearshaft And Related Parts (72-32-26, 01-300) in the cup washer.

      1. Torque the No. 3 Bearing nut.

      2. Install the guide (part of the spanner wrench) into the base.

      3. Align the 18 teeth of the wrench (part of the spanner wrench) with the 18 slots of the No. 3 Bearing nut and install the wrench on to the No. 3 Bearing nut.

      4. Lift and transfer the torque multiplier with the use of a hoist to the work area.

      5. Align the teeth of the spline in the torque multiplier with the teeth of the spline on the wrench.

      6. Install the torque multiplier to the wrench and clamp it with the holder (part of the spanner wrench), the stopper (parts of the spanner wrench) and the bolt (parts of the spanner wrench).

      7. Install the torque wrench on to the torque multiplier.

      8. Torque the No. 3 Bearing nut to 14500 lbfin (1640 Nm).

      9. Decrease the torque to 0 lbfin (0 Nm).

      10. Torque the No. 3 Bearing nut to 14500 lbfin (1640 Nm). Mark the turning angle of the torque multiplier output shaft on the indicator (parts of the spanner wrench).

        NOTE

        The output torque of the SWEENEY 8200 torque multiplier is 10.7 times of the input torque, as follows: input torque 1762 lbfin (199 Nm) output torque 18850 lbfin (2130 Nm) or, input torque 1355 lbfin (153 Nm) output torque 14500 lbfin (1640 Nm).
      11. Increase the torque on the No. 3 Bearing nut to 18850 lbfin (2130 Nm).

      12. Decrease the torque to 0 lbfin (0 Nm).

      13. Torque the No. 3 Bearing nut to 14500 lbfin (1640 Nm).

      14. Check the angular position of the output shaft of the torque multiplier and confirm it is within 1 degree from the mark made in Step.

      15. Torque the No. 3 Bearing nut to 18850 lbfin (2130 Nm).

      16. Remove the bolt, the stopper and the holder from the spanner wrench and then remove the torque multiplier.

      17. Remove the wrench from the No. 3 Bearing nut.

      18. Remove the guide from the base.

        1. Remove the No. 3 Bearing Rotor Center and Support Assembly from the adapter.

        2. Loosen the 20 dummy bolts which attach the HP Compressor front shaft and Seal Assembly to the adapter.

        3. Remove the 20 dummy bolts and the two plate nuts.

        4. Remove the No. 3 Bearing Rotor Center and Support Assembly from the adapter.

    1. SUBTASK 72-32-20-440-087 Prepare the Swash and Concentricity Check of the Curvic Coupling of the HP Compressor Front Shaft

    2. Refer to Figure and Figure.

    3. Move IAE 1J12383 Swash check fixture 1 off and IAE 1J12384 Swash check ring 1 off to the work area.

    4. Turn the No. 3 Bearing Rotor Center and Support Assembly with the rear end up.

    5. Install the No. 3 Bearing Rotor Center and Support Assembly into the swash check fixture and attach it with the 10 bolts. Tighten the bolts.

    6. Check the clearance between the mating surfaces of the No. 3 Bearing Seal Support Assembly and the swash check fixture with a 0.0008 in. (0.02 mm) feeler gage. The feeler gage must not fit between the two flanges.

      NOTE

      You cannot turn the HP Compressor front shaft by hand if the No. 3 Bearing Seal Assembly contacts the No. 3 Bearing Seal Seat.
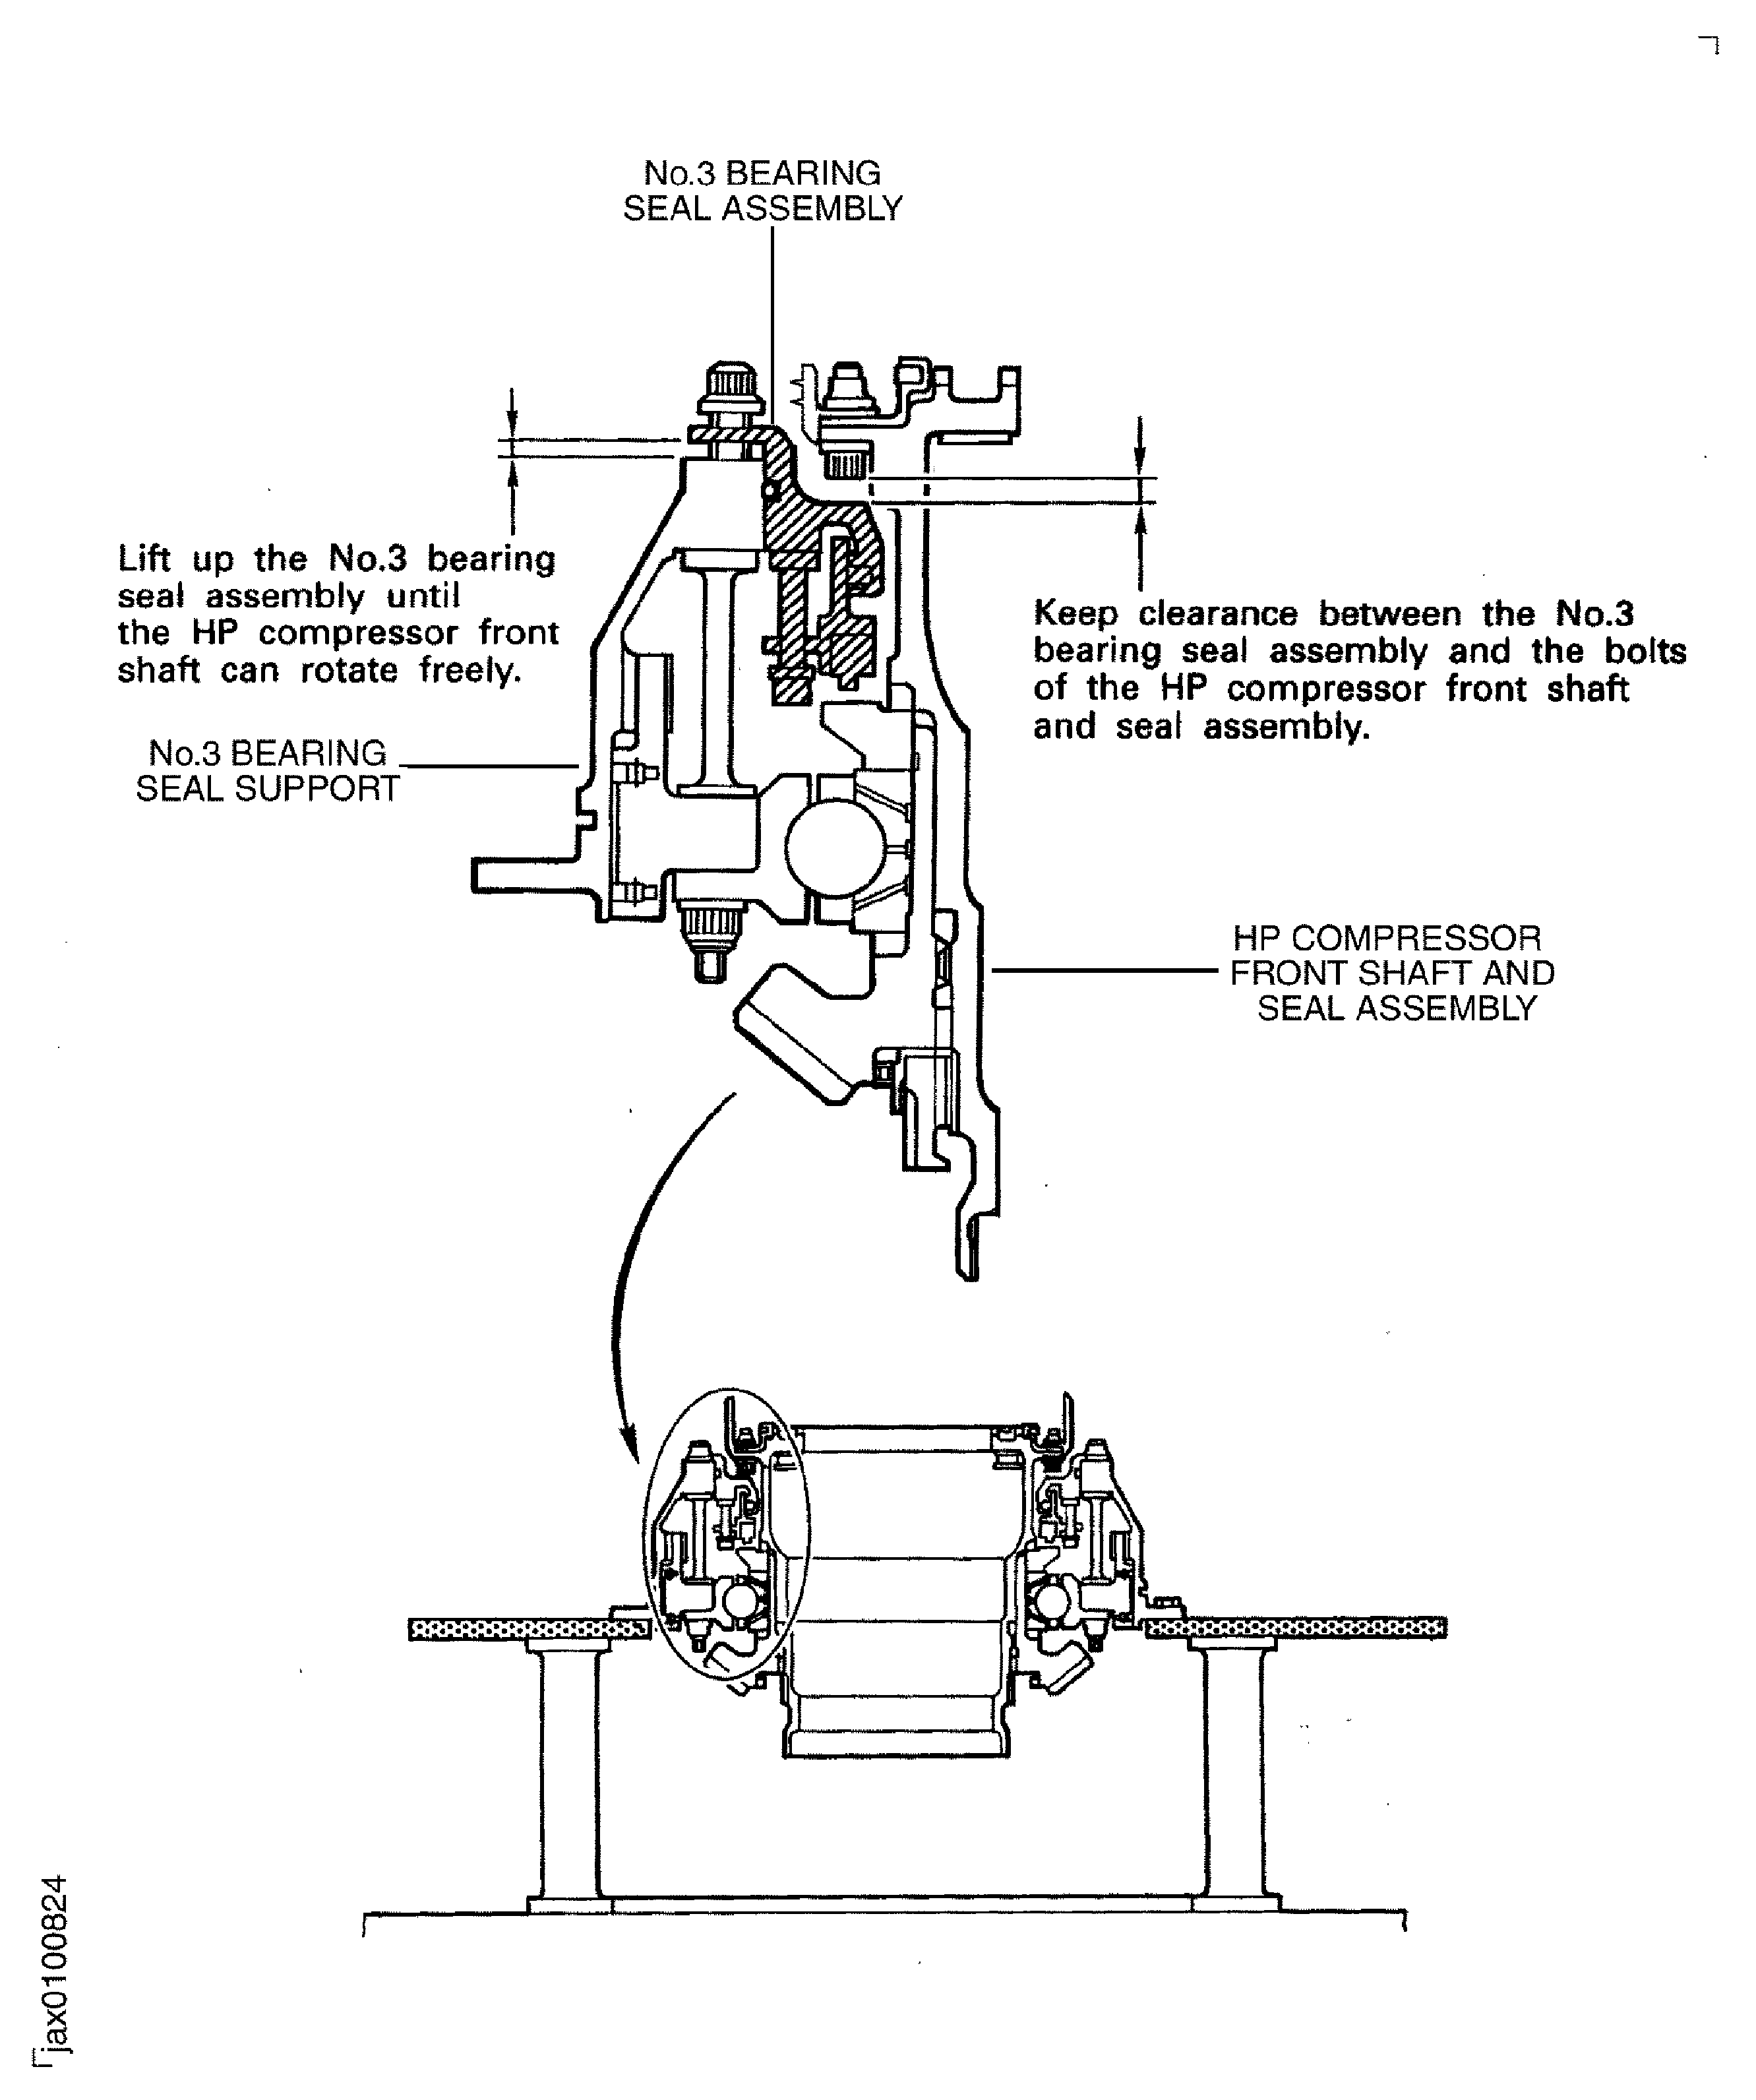
      1. Lift the No. 3 Bearing Seal Assembly from the No. 3 Bearing Seal Support.

      2. Loosen the nine bolts which attach the No. 3 Bearing Seal Assembly and the lifting spacer to the No. 3 Bearing Seal Support Assembly.

      3. Lift the No. 3 Bearing Seal Assembly until the HP Compressor front shaft and Seal Assembly can rotate freely, or the No. 3 Bearing Seal Assembly touches the bolts of HP Compressor front shaft and Seal Assembly. Use a screwdriver made from copper when you lift the No. 3 Bearing Seal Assembly.

      4. Remove the three lifting spacers.

    7. Clean the curvic coupling teeth on the swash check ring and the HP Compressor front shaft with a clean cloth made moist with CoMat 01-124 ISOPROPYL ALCOHOL.

    8. Install the swash check ring on the curvic coupling of the HP Compressor front shaft and Seal Assembly.

      1. Attach the swash check ring with the 20 dummy bolts and nuts.

      2. Tighten all the bolts lightly.

      3. Torque the bolts to 65 lbfin to 75 lbfin (7.3 Nm to 8.5 Nm) in the sequence shown in the Figure.

      4. Torque the bolts to 127 lbfin to 143 lbfin (14.4 Nm to 16.2 Nm) in the same sequence.

    1. SUBTASK 72-32-20-220-067 Examine the Swash and the Concentricity of the Curvic Coupling of the HP Compressor Front Shaft

    2. Refer to Figure, Figure and Figure.

    3. Use CoMat 06-069 MARKER to identify the position of the HP Compressor front shaft in relation to the swash check ring. Make a correlation mark between the HP Compressor front shaft and the swash check ring curvic couplings inner diameters. Refer to TASK 70-09-01-400-501.

      1. Use a dial indicator and a magnetic base to measure the swash of face B1 and the concentricity of diameter A1.

        NOTE

        When you turn the swash check ring, turn the inner diameter of the ring to prevent unwanted movement of the swash check ring.
      2. Measure the swash at the 12 equally spaced positions.

      3. Calculate the FIR and the angle of the swash. Make a mark on CoMat 02-130 POLAR GRAPH PAPER to show the FIR and angle and identify it as S1.

      4. Measure the concentricity at the 12 equally spaced positions.

      5. Calculate the FIR and the angle of the concentricity. Make a mark on the polar graph paper to show the FIR and angle, and identify it as R1.

      1. Turn the swash check ring 180 degrees in relation to the HP Compressor front shaft.

      2. Remove the 20 bolts and nuts from the swash check ring and the HP Compressor front shaft.

      3. Turn the swash check ring through 180 degrees.

      4. Install the swash check ring on to the HP Compressor front shaft. Refer to Step.

    4. Measure the swash and concentricity, refer to Step. Identify the swash as S2 and the concentricity as R2 on the polar graph paper.

      1. Calculate the correct swash and concentricity values. Refer to Fig. 72-32-20-990-086.

      2. Make a line between the points S1 and S2. Make a mark at the middle position between the points S1 and S2. Identify this point as S3.

      3. Make a line between the points R1 and R2. Make a mark at the middle position between the points R1 and R2. Identify this point as R3.

      4. Make a line between the point S3 and the center of the polar graph paper.

      5. Make a line between the point R3 and the center of the polar graph paper.

        NOTE

        The distance G0 between the point S1 or S2 and the point S3 shows the swash error in the tools.
      6. The distance H0 between the center of the polar graph paper and the point S3 shows the correct swash of the HP Compressor front shaft.

      7. Write down the quantity and angle of the correct swash.

        NOTE

        The distance J0 between the points R1 or R2 and the point R3 shows the concentricity error in the tools.
      8. The distance Z0 between the center of the polar graph and the point R3 shows the correct concentricity of the HP Compressor front shaft.

      9. Write down the quantity and angle of the correct concentricity.

    5. The maximum permitted swash and concentricity are 0.0010 in. (0.025 mm). If the swash and/or concentricity is more than this value then, reject the No. 3 Bearing Rotor Center and Support Assembly and do a further inspection to find the cause.

    1. SUBTASK 72-32-20-440-088 Attach the No. 3 Bearing Seal Assembly to the No. 3 Bearing Seal Support Assembly

    2. Install the three spacers (part of the lifting spacer) into the clearance at every 120 degrees. Align the slots of the three spacers with the bolts which attach the No. 3 Bearing Seal Assembly to the No. 3 Bearing Seal Support.

      NOTE

      The lifting spacer must remain in the No. 3 Bearing Rotor Center and Support Assembly until the backflash check of the bevel gears is completed in TASK 72-32-20-440-001-B00 (ASSEMBLY-001).
    3. Attach the No. 3 Bearing Seal Assembly and three spacers to the No. 3 Bearing Seal Support with the nine bolts. Tighten the bolts lightly.

    4. Remove the No. 3 Bearing Rotor Center and Support Assembly from the swash check fixture.

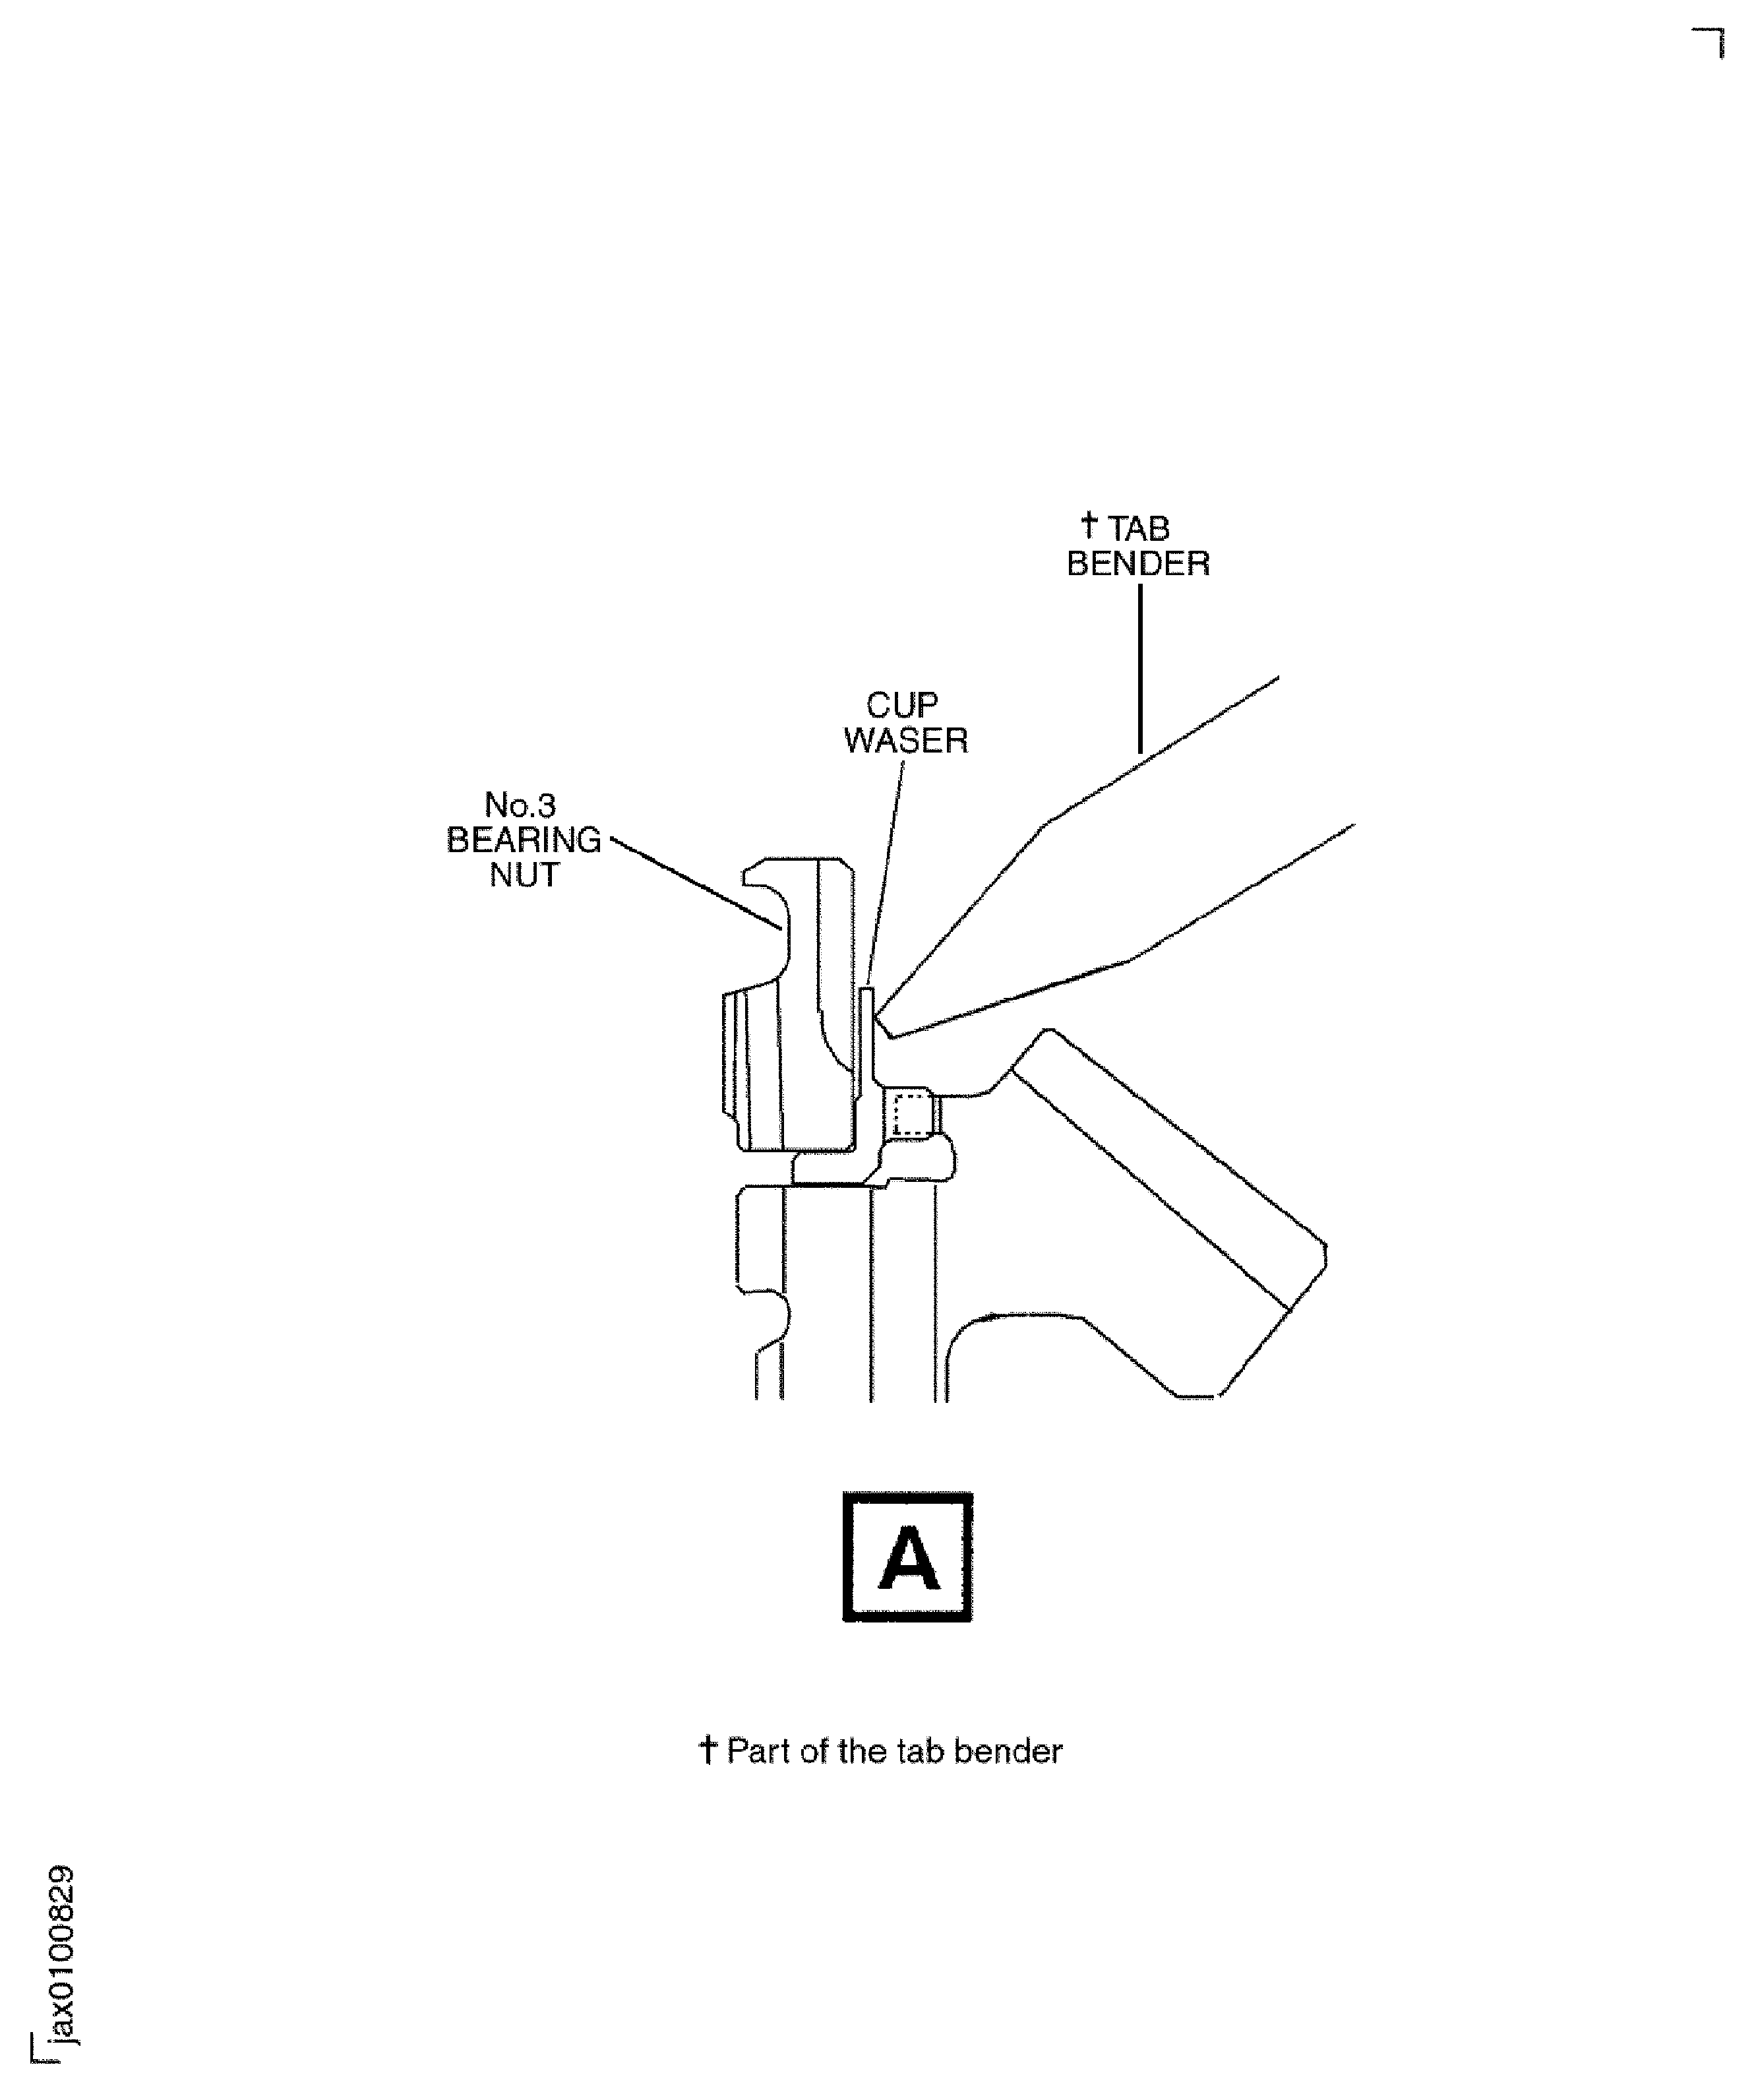
    1. SUBTASK 72-32-20-440-089 Bend the Cup Washer into the Groove of the No. 3 Bearing Nut

    2. Refer to Figure and Figure.

    3. Turn the No. 3 Bearing Rotor Center and Support Assembly on the work bench from the rear end up to the front end up.

    4. Install the protection cover into the HP Compressor front shaft inner diameter.

    5. Install the No. 3 Bearing Rotor Center and Support Assembly on the adapter (part of spanner wrench) and attach it with the 20 dummy bolts and two plate nuts (part of the spanner wrench).

    6. Bend the front part of the cup washer into the groove of the No. 3 Bearing nut with the tab bender (Part of IAE 1J12367 Tab bender 1 off).

    7. Examine the bent part of the cup washer and make sure it has no damage.

    8. Remove the 20 dummy bolts and the protection cover.

    9. Remove the No. 3 Bearing Rotor Center and Support Assembly from the adapter and put it on a pallet.

  1. Figure: Sectional View of the No. 3 Bearing Rotor Center and Support Assembly

    Sectional View of the No. 3 Bearing Rotor Center and Support Assembly
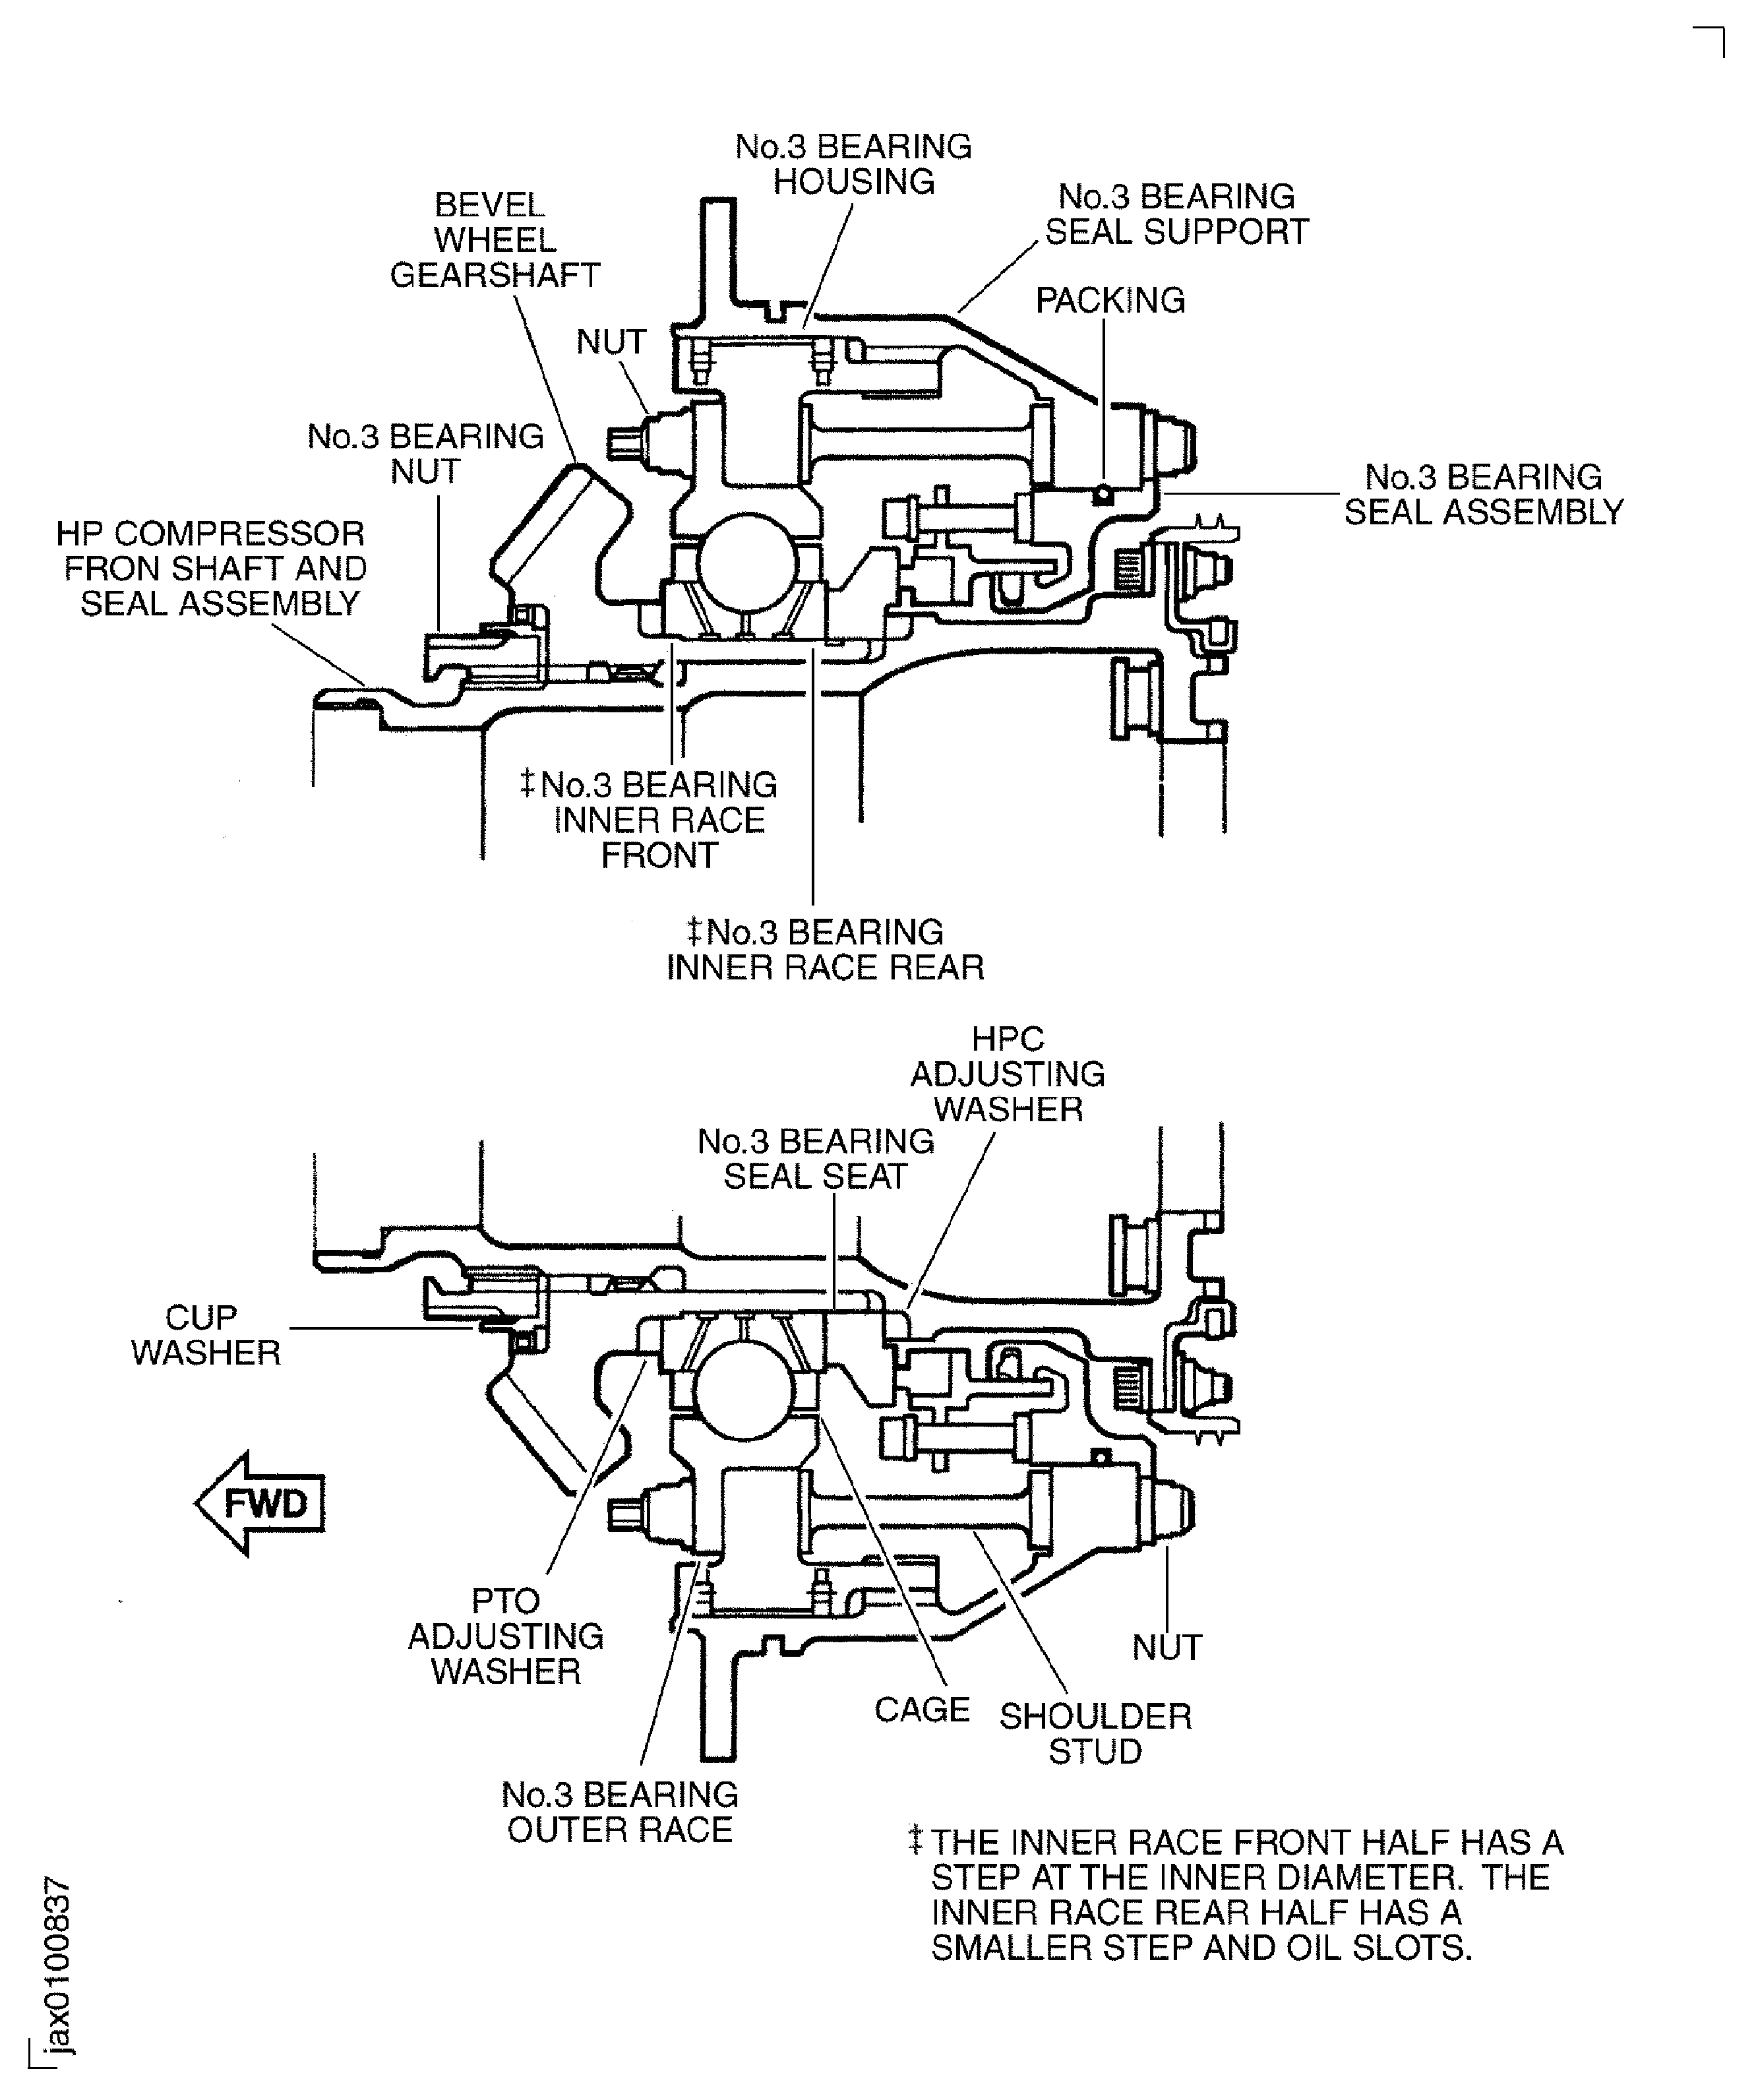
    Figure: Reference Fits and Clearances of the No. 3 Bearing Damper Assembly at Location 2400

    Reference Fits and Clearances of the No. 3 Bearing Damper Assembly at Location 2400

    Figure: Reference Fits and Clearances of the Bevel Wheel Gearshaft and the HP Compressor Front Shaft and Seal Assembly at Location 0202 and 0207
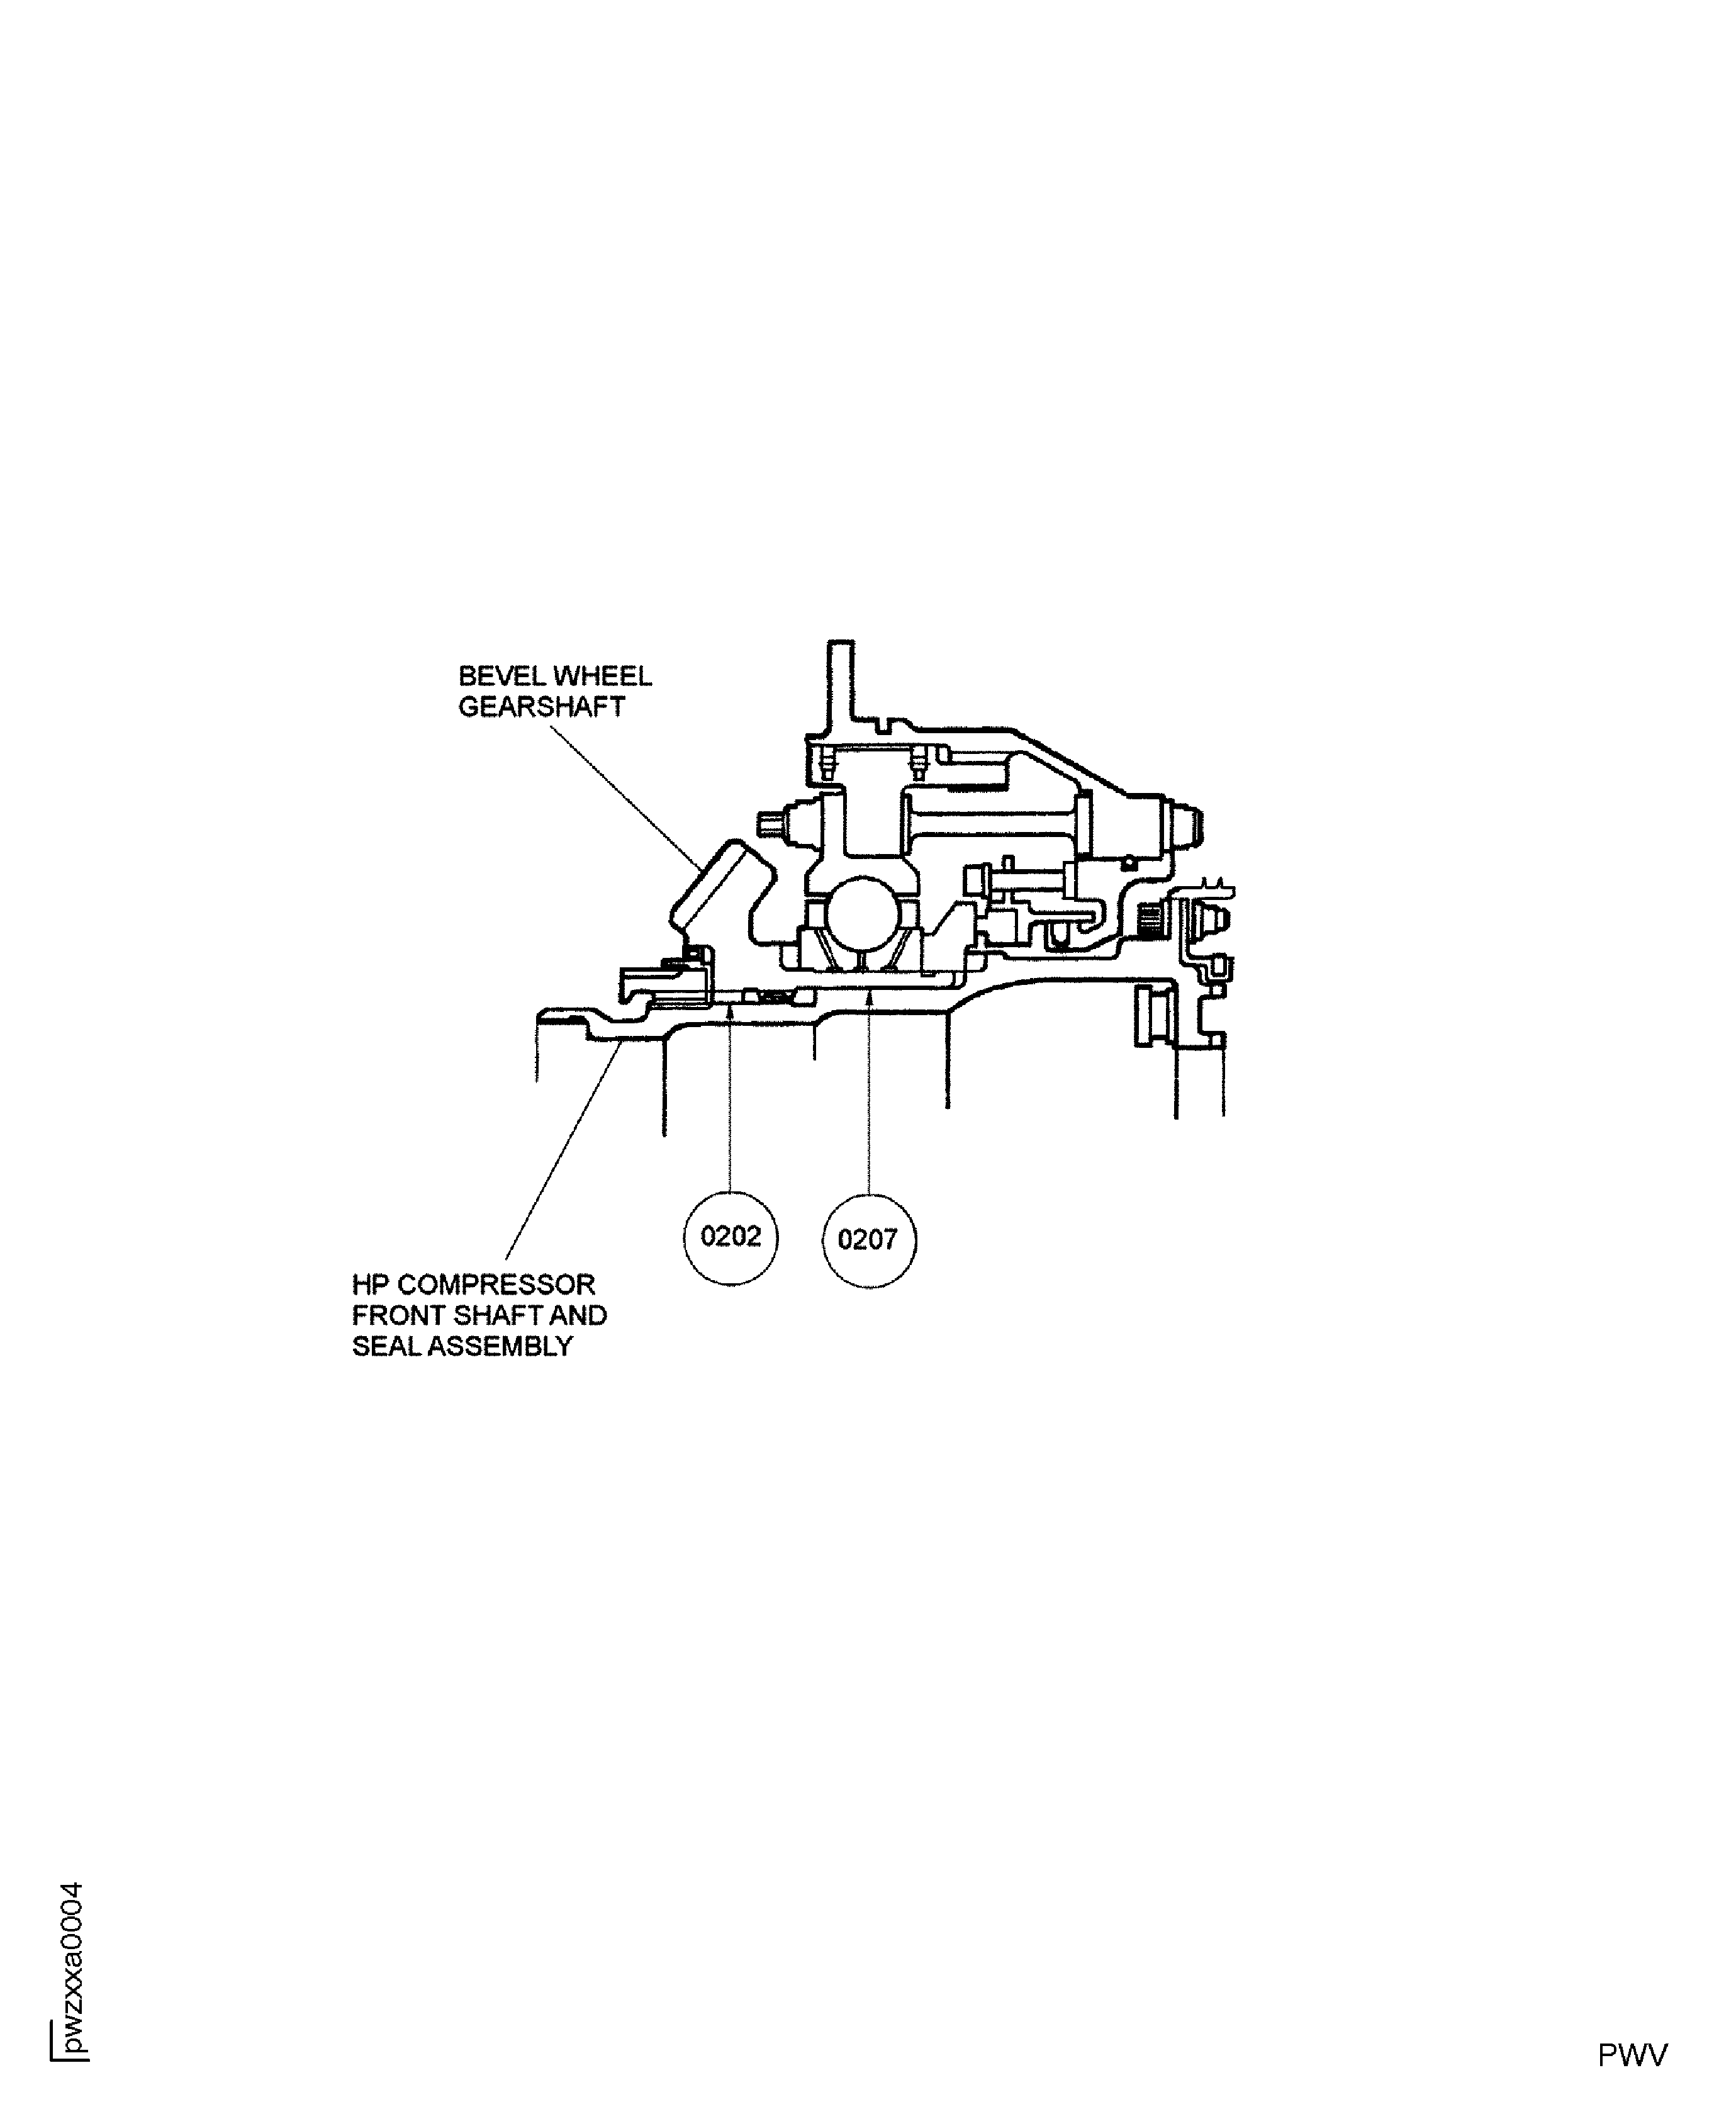
    Reference Fits and Clearances of the Bevel Wheel Gearshaft and the HP Compressor Front Shaft and Seal Assembly at Location 0202 and 0207

    Figure: Find the Value of the LASH of the Bevel Wheel Gearshaft

    Find the Value of the LASH of the Bevel Wheel Gearshaft

    Figure: Install the Shoulder Studs in to the No. 3 Bearing Housing

    Install the Shoulder Studs in to the No. 3 Bearing Housing
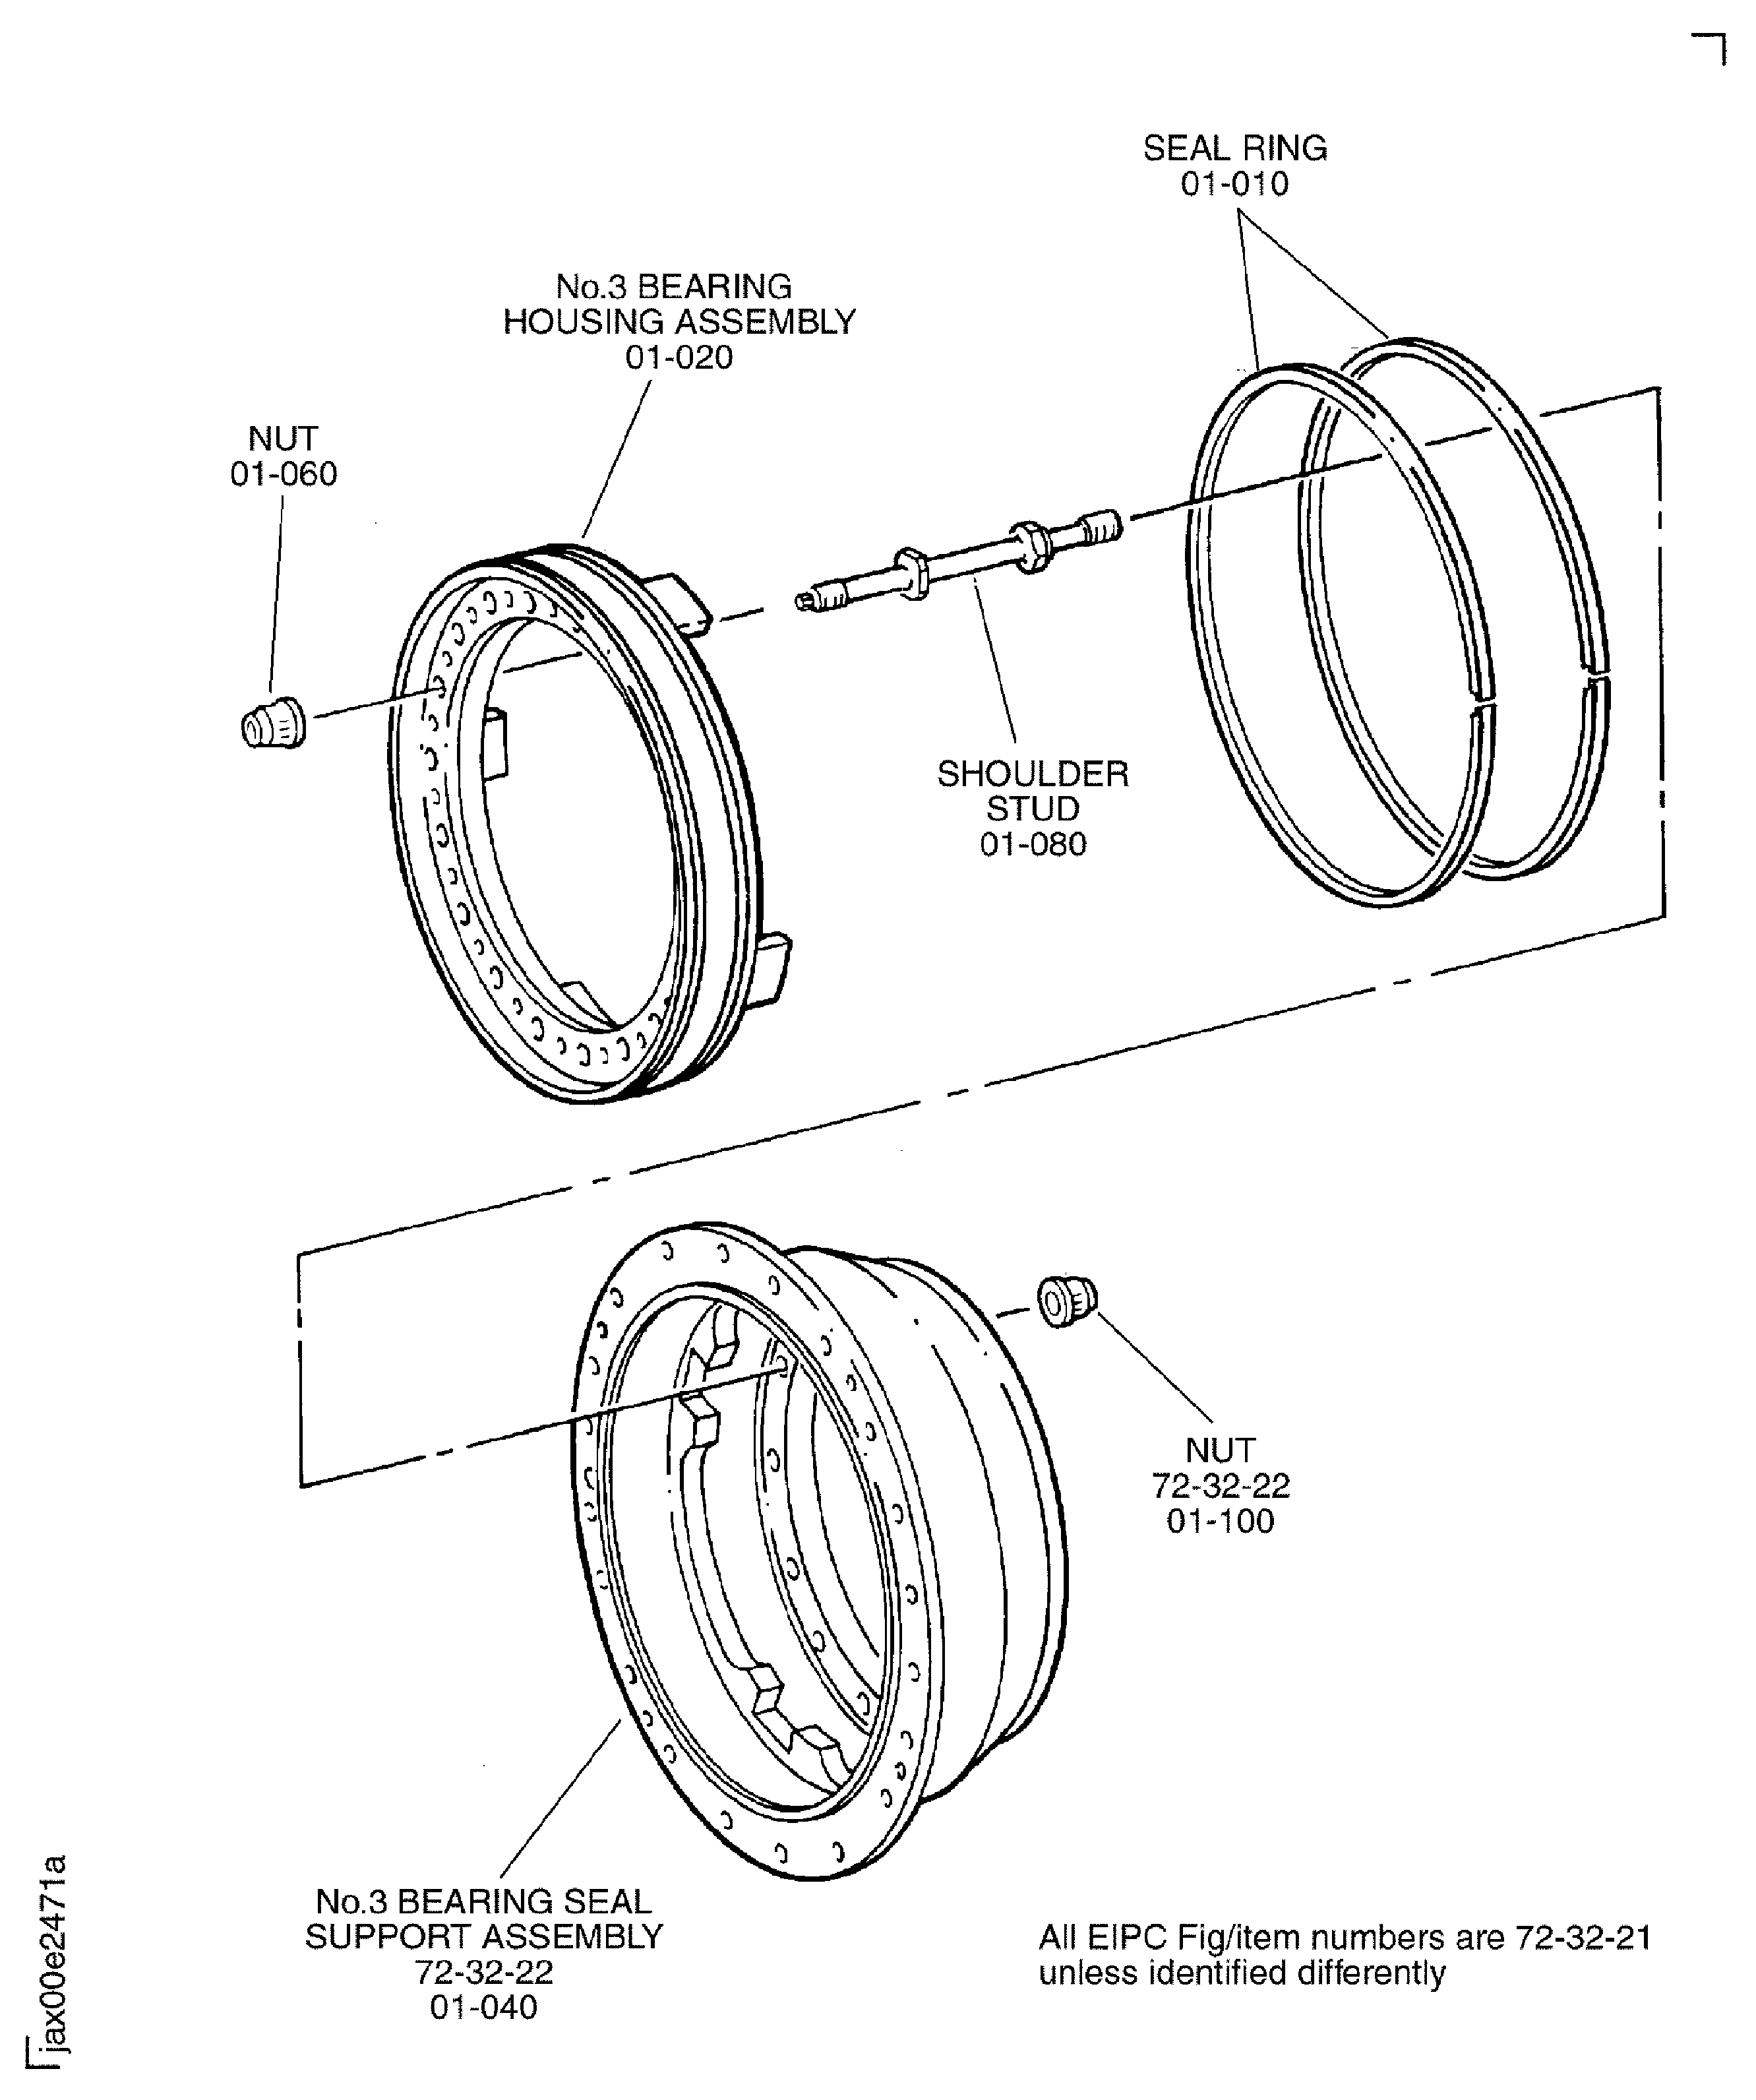
    Figure: Install the Shoulder Studs in to the No. 3 Bearing Housing

    Install the Shoulder Studs in to the No. 3 Bearing Housing
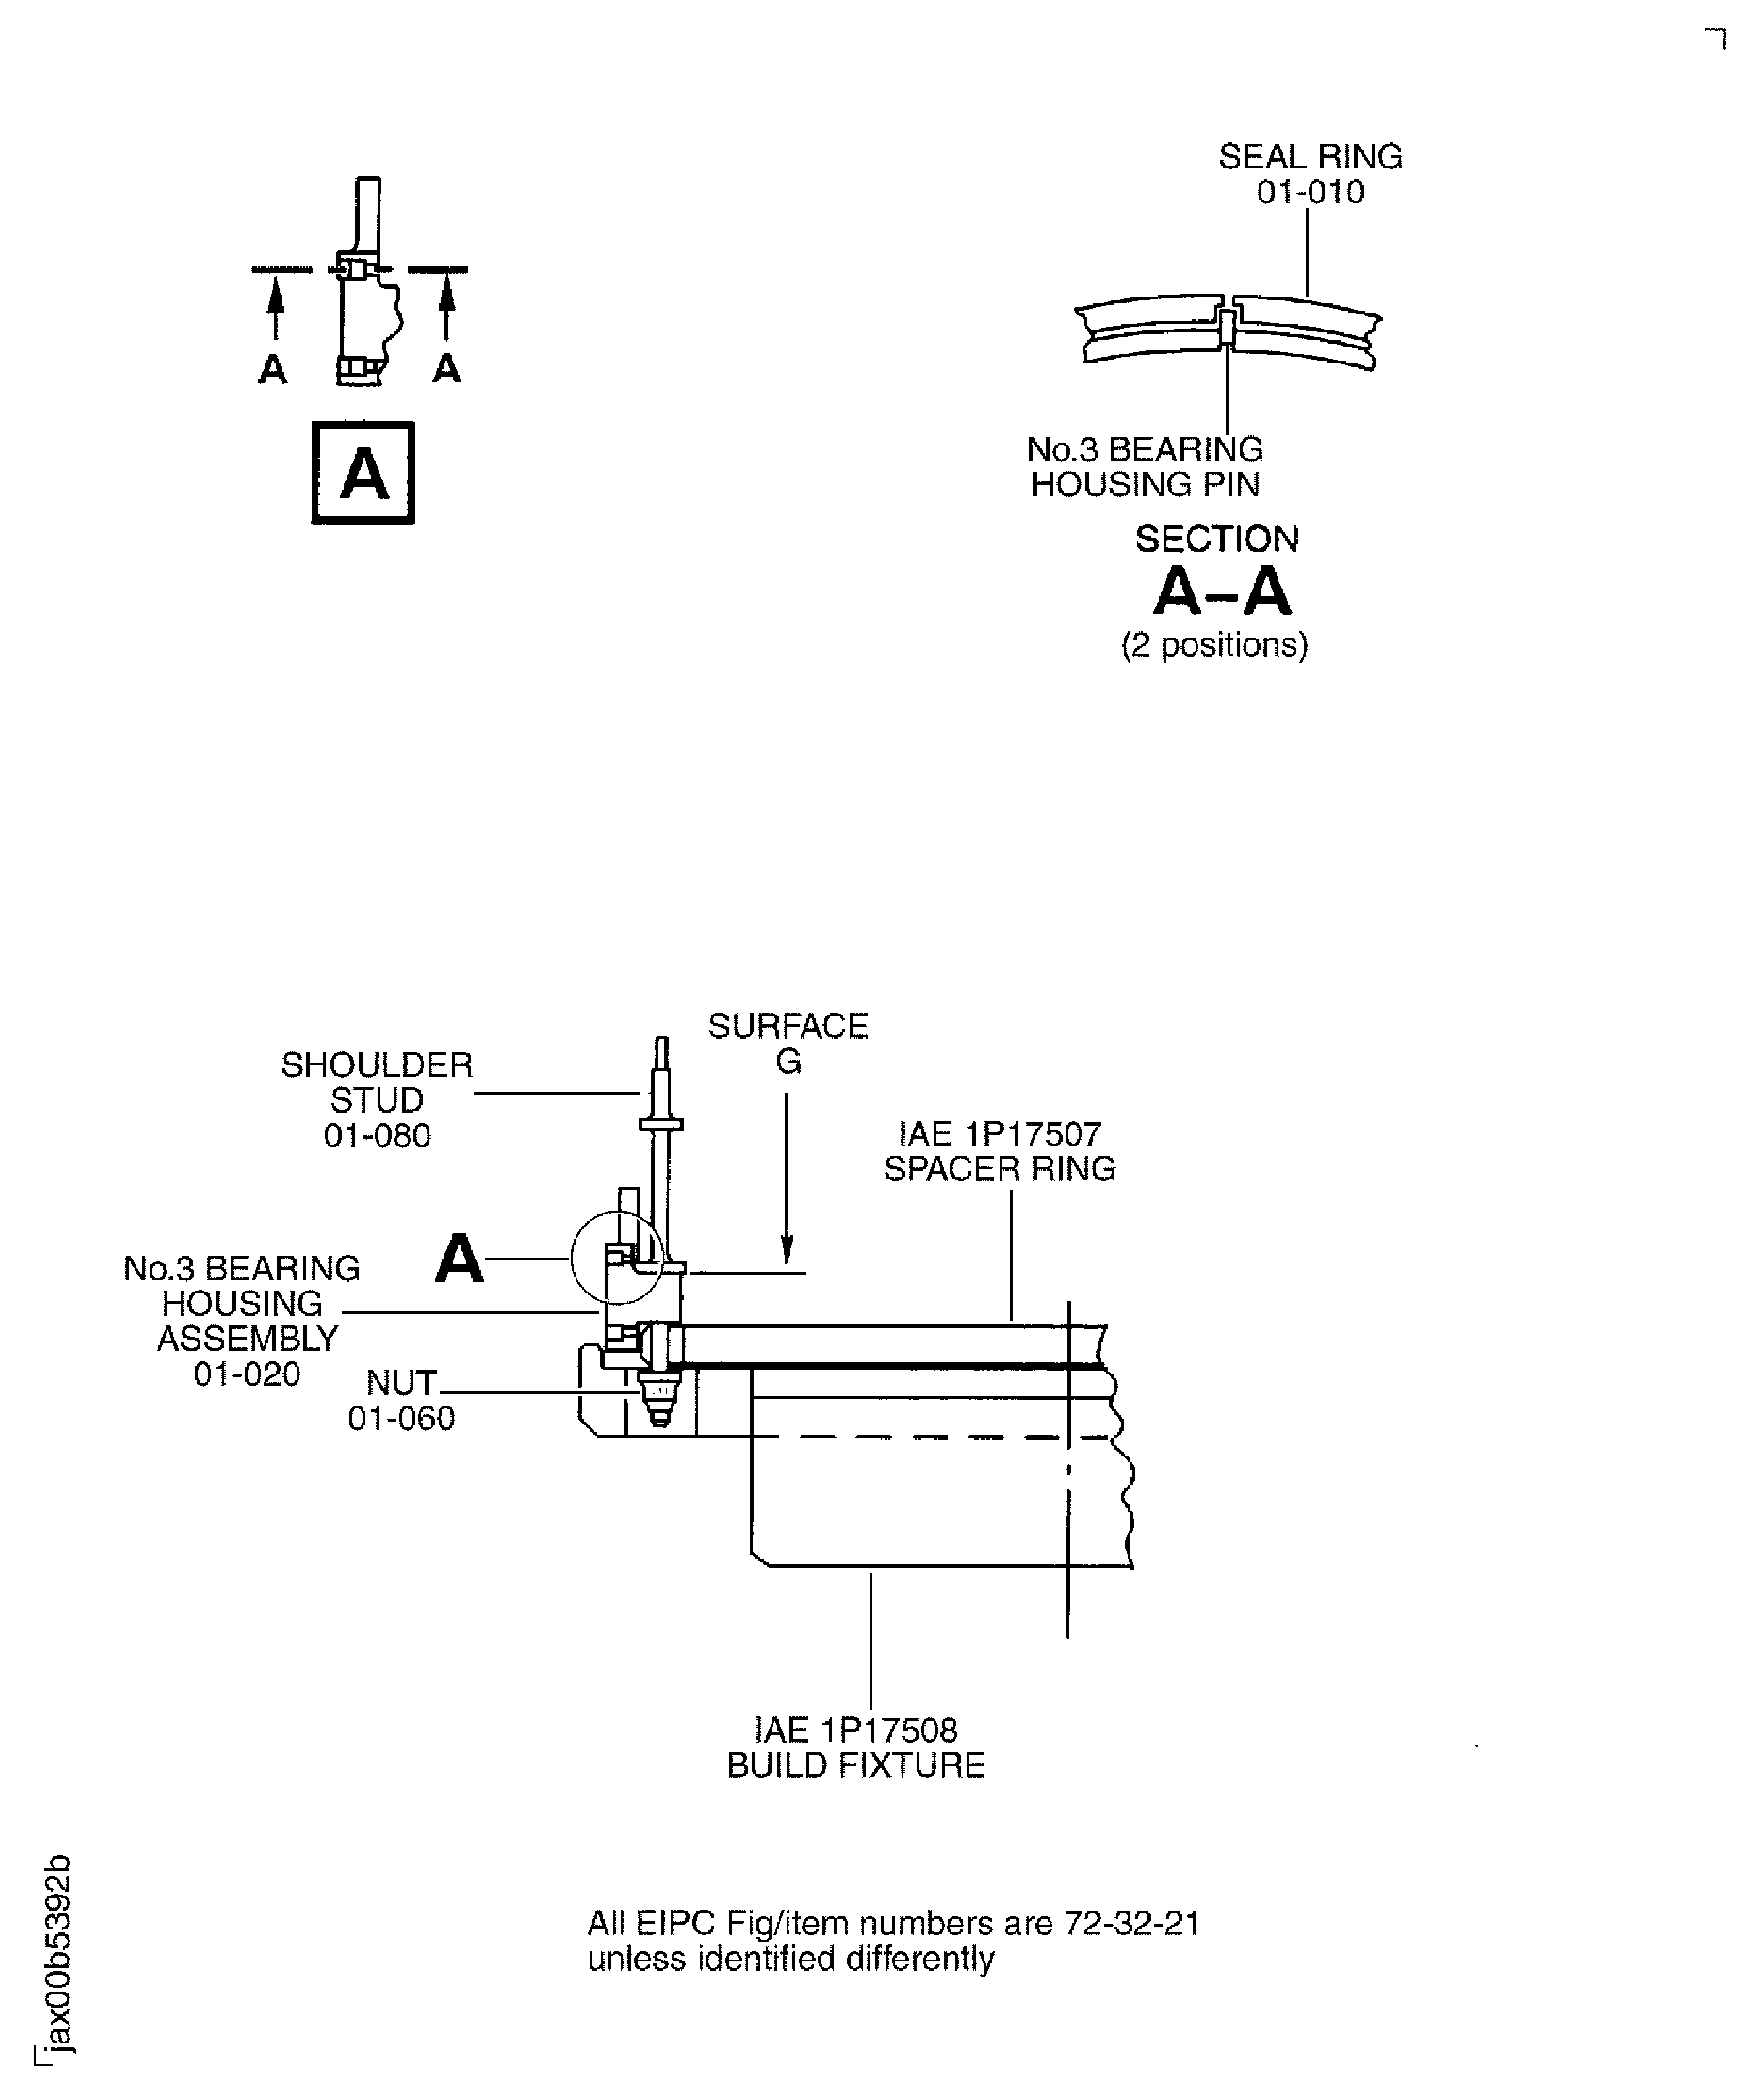
    Figure: Torque the Nuts which Hold the Shoulder Studs to the No. 3 Bearing Seal Support Assembly

    Torque the Nuts which Hold the Shoulder Studs to the No. 3 Bearing Seal Support Assembly

    Figure: Install the No. 3 Bearing Outer Race in to the No. 3 Bearing Housing and Seal Support Assembly

    Install the No. 3 Bearing Outer Race in to the No. 3 Bearing Housing and Seal Support Assembly
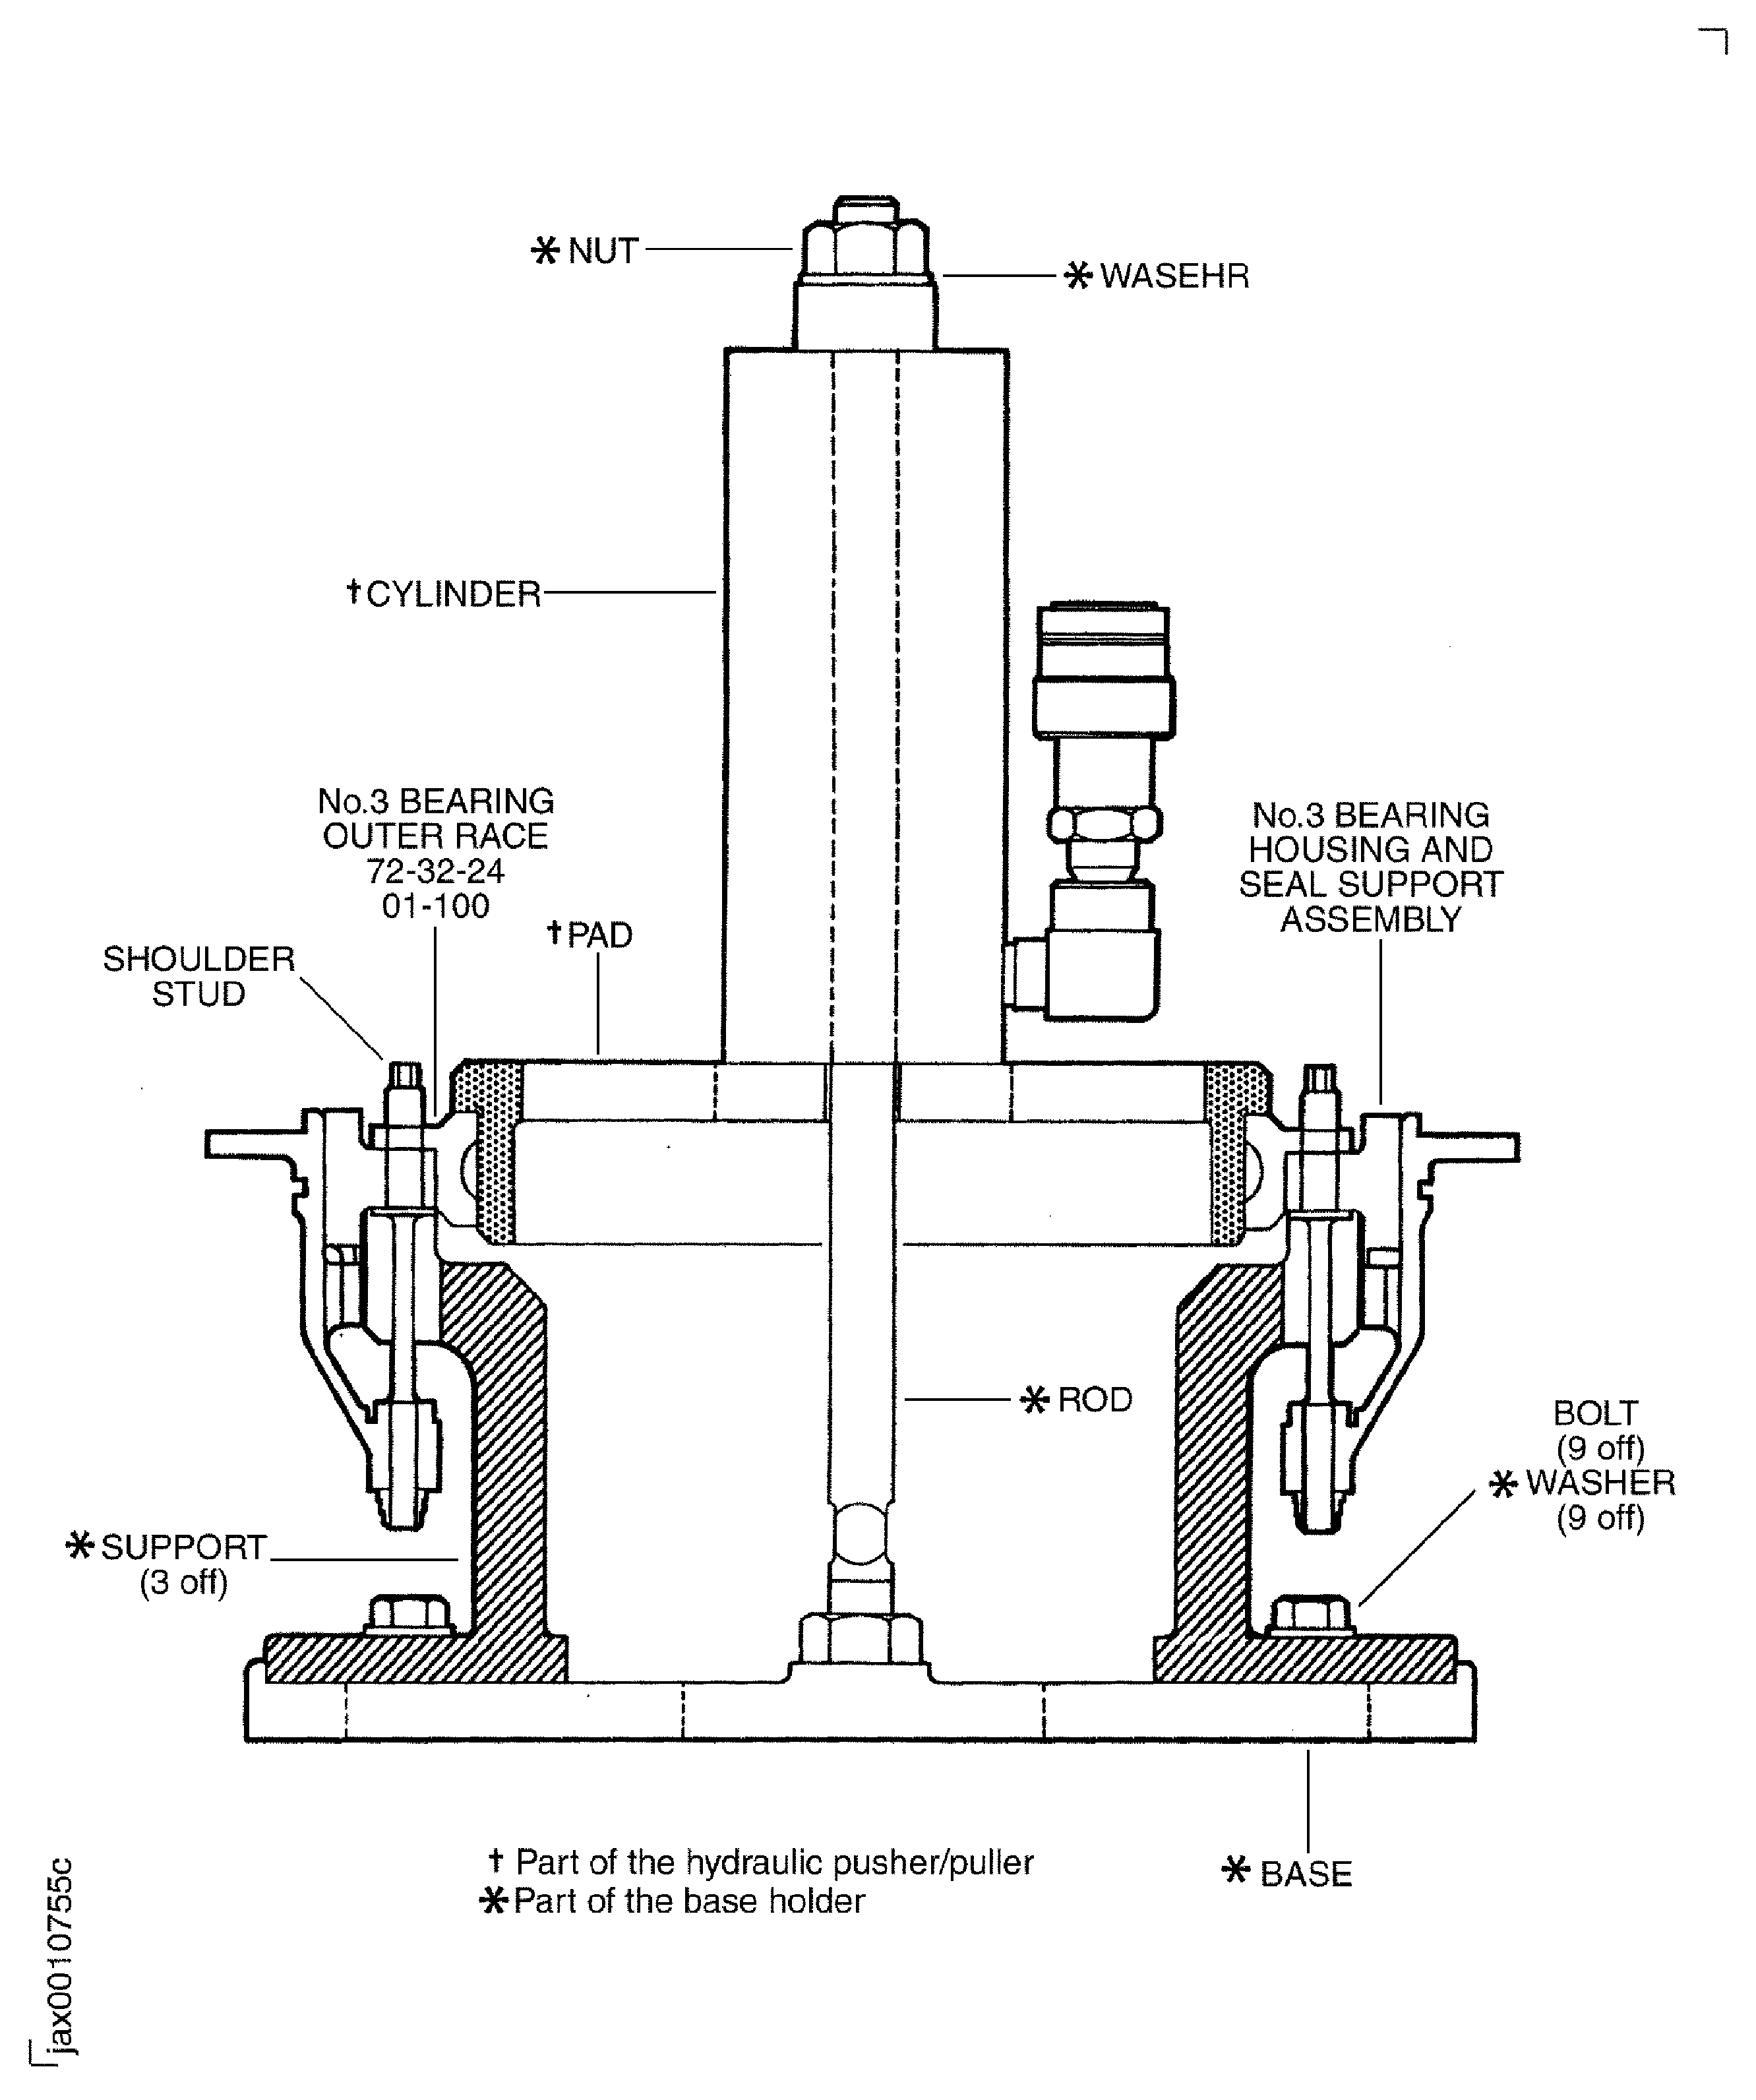
    Figure: Install the No. 3 Bearing Outer Race in to the No. 3 Bearing Housing and Seal Support Assembly

    Install the No. 3 Bearing Outer Race in to the No. 3 Bearing Housing and Seal Support Assembly

    Figure: Examine the Oil Flow in the No. 3 Bearing Outer Race and Seal Support Assembly

    Examine the Oil Flow in the No. 3 Bearing Outer Race and Seal Support Assembly
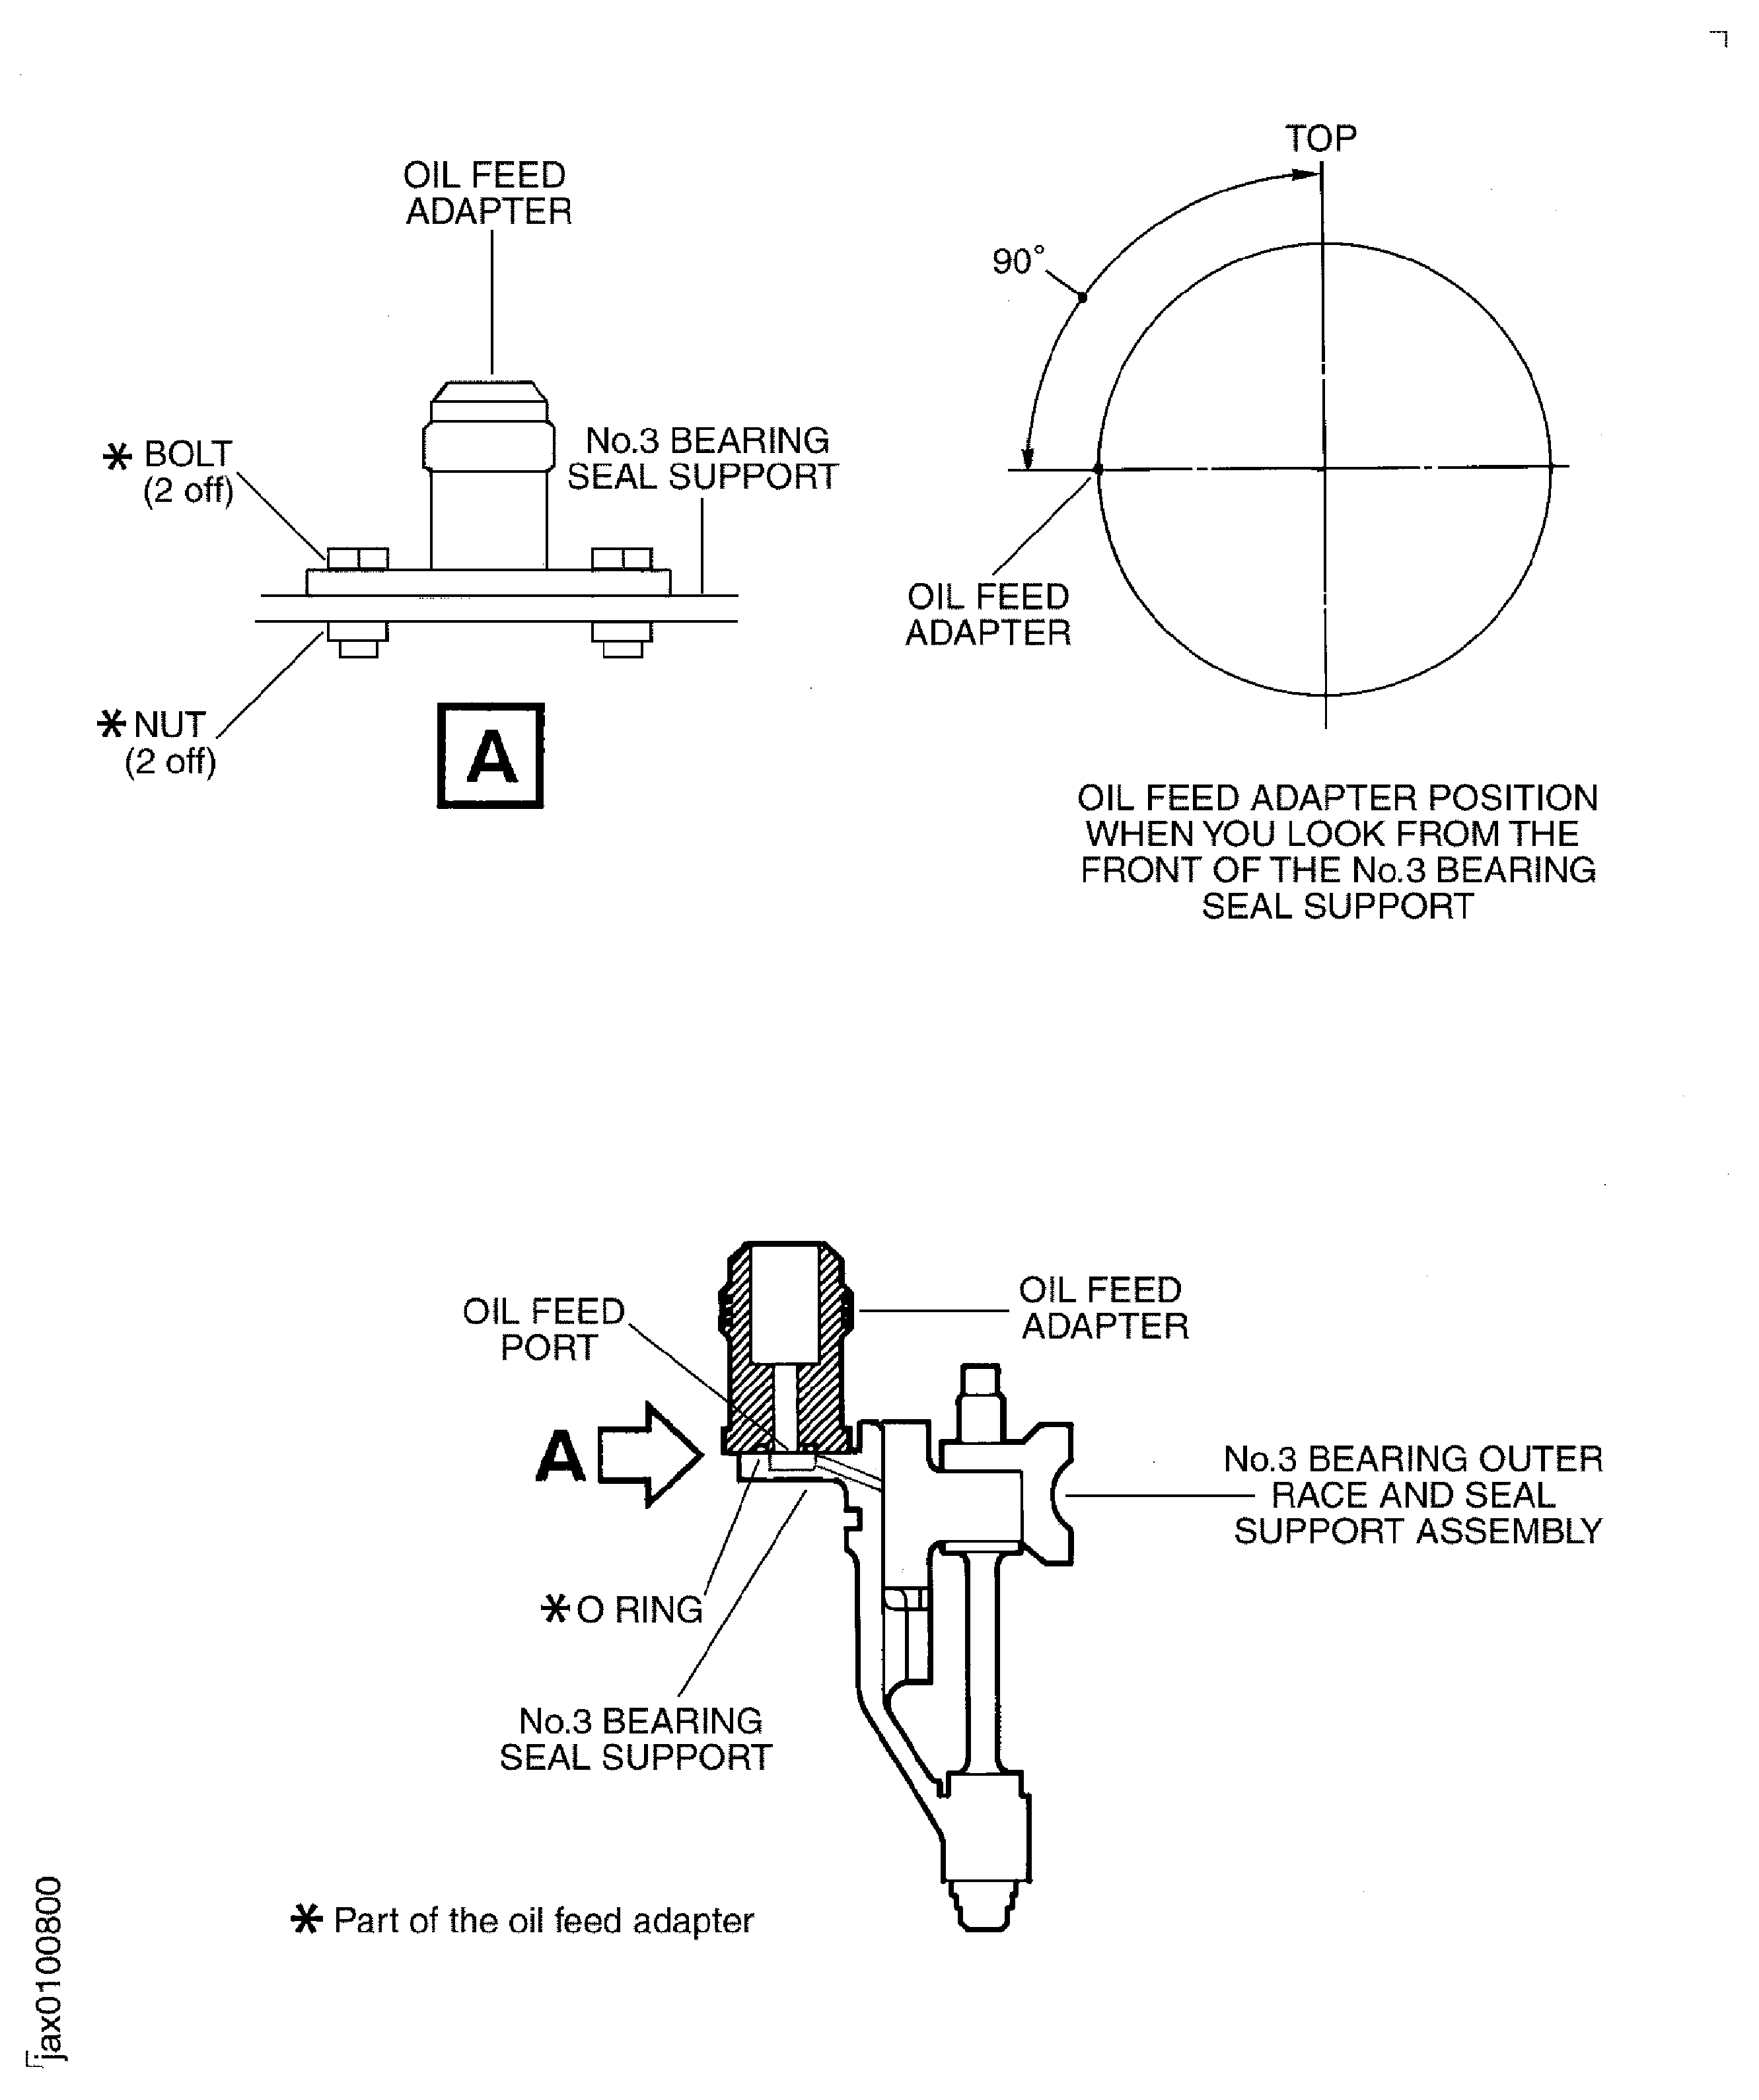
    Figure: Install the No. 3 Bearing and Seal Seat to the Measuring Stretch

    Sheet 1

    Legend
    Install the No. 3 Bearing and Seal Seat to the Measuring Stretch

    Sheet 1

    Close

    Figure: Install the No. 3 Bearing and Seal Seat to the Measuring Stretch

    Sheet 2

    Legend
    Install the No. 3 Bearing and Seal Seat to the Measuring Stretch

    Sheet 2

    Close

    Figure: Install the No. 3 Bearing and Seal Seat to the Measuring Stretch

    Sheet 3
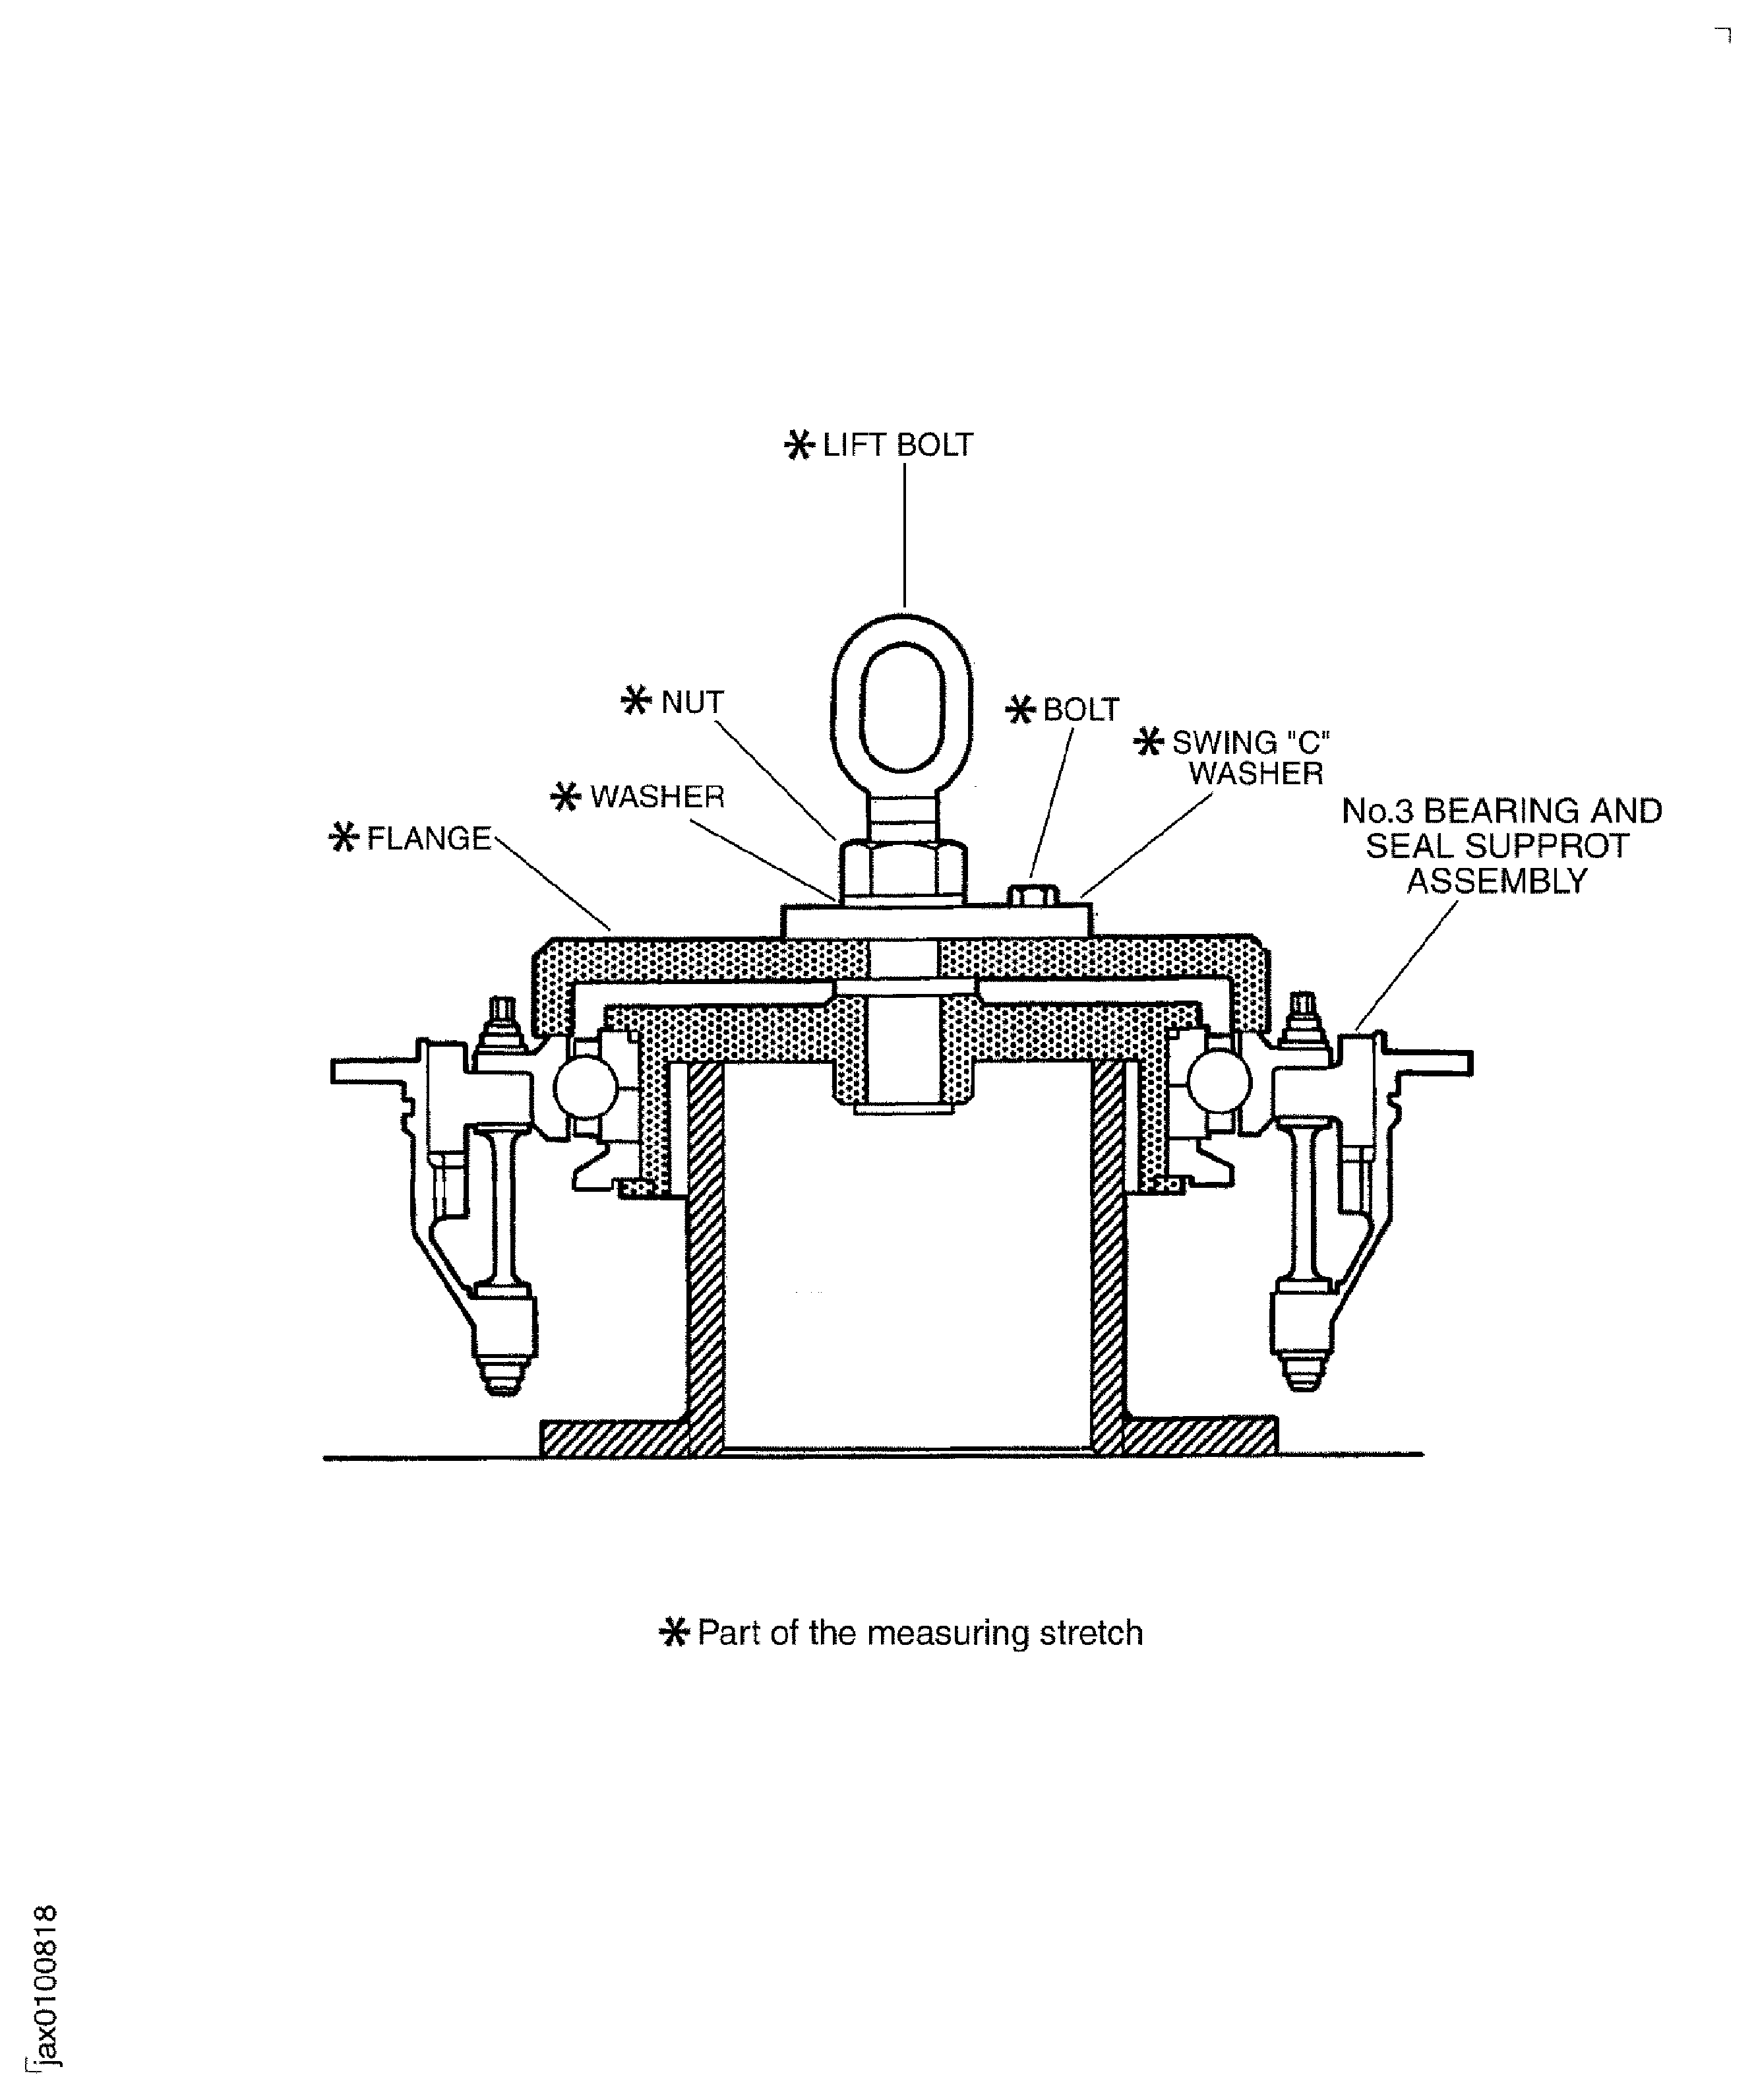
    Legend
    Install the No. 3 Bearing and Seal Seat to the Measuring Stretch

    Sheet 3

    Close

    Figure: No. 3 Bearing and Support Assembly

    No. 3 Bearing and Support Assembly

    Figure: Install the No. 3 Bearing and Measuring Stretch Assembly in to the Fan Frame Assembly

    Install the No. 3 Bearing and Measuring Stretch Assembly in to the Fan Frame Assembly

    Figure: Install the No. 3 Bearing and Measuring Stretch Assembly in to the Fan Frame Assembly

    Sheet 1

    Legend
    Install the No. 3 Bearing and Measuring Stretch Assembly in to the Fan Frame Assembly

    Sheet 1

    Close

    Figure: Install the No. 3 Bearing and Measuring Stretch Assembly in to the Fan Frame Assembly

    Sheet 2
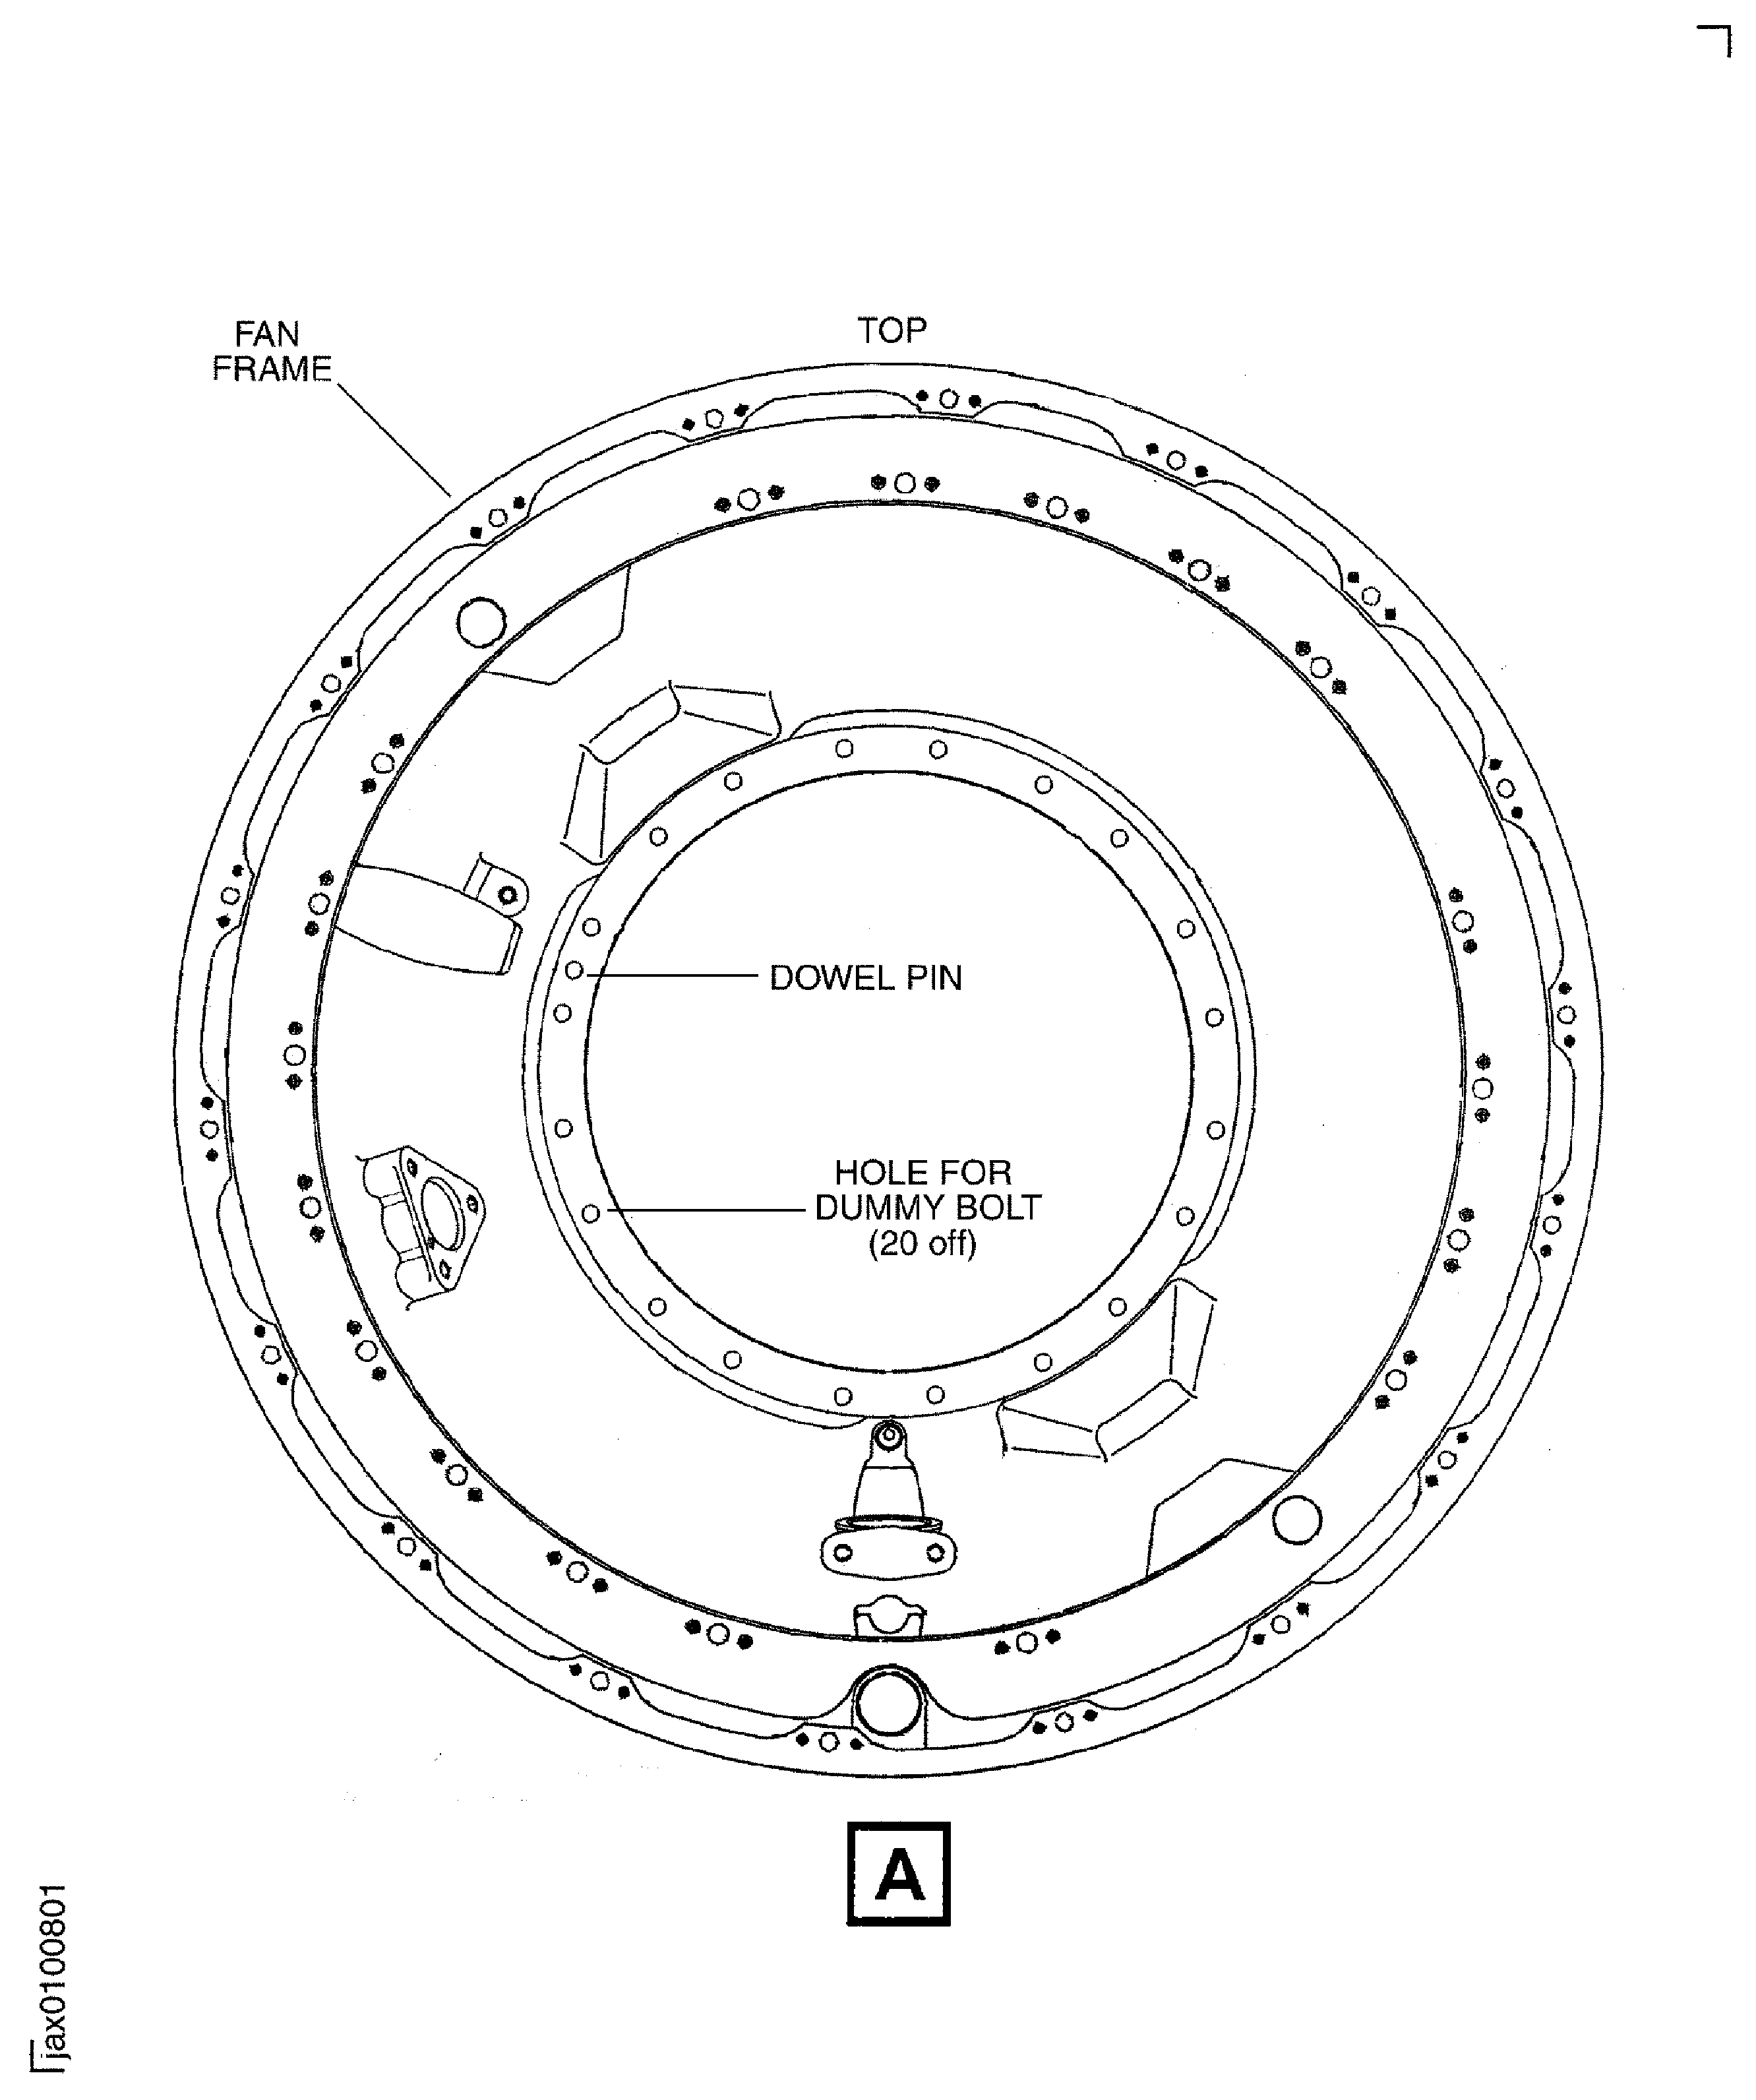
    Legend
    Install the No. 3 Bearing and Measuring Stretch Assembly in to the Fan Frame Assembly

    Sheet 2

    Close

    Figure: Install the No. 3 Bearing and Measuring Stretch Assembly in to the Fan Frame

    Sheet 3
    Legend
    Install the No. 3 Bearing and Measuring Stretch Assembly in to the Fan Frame

    Sheet 3

    Close

    Figure: Measure the Distance X to Find the Adjusting Washer Thickness

    Measure the Distance X to Find the Adjusting Washer Thickness

    Figure: Find the HPC Adjusting Washer

    Find the HPC Adjusting Washer

    Figure: Find the HPC Adjusting Washer

    Find the HPC Adjusting Washer
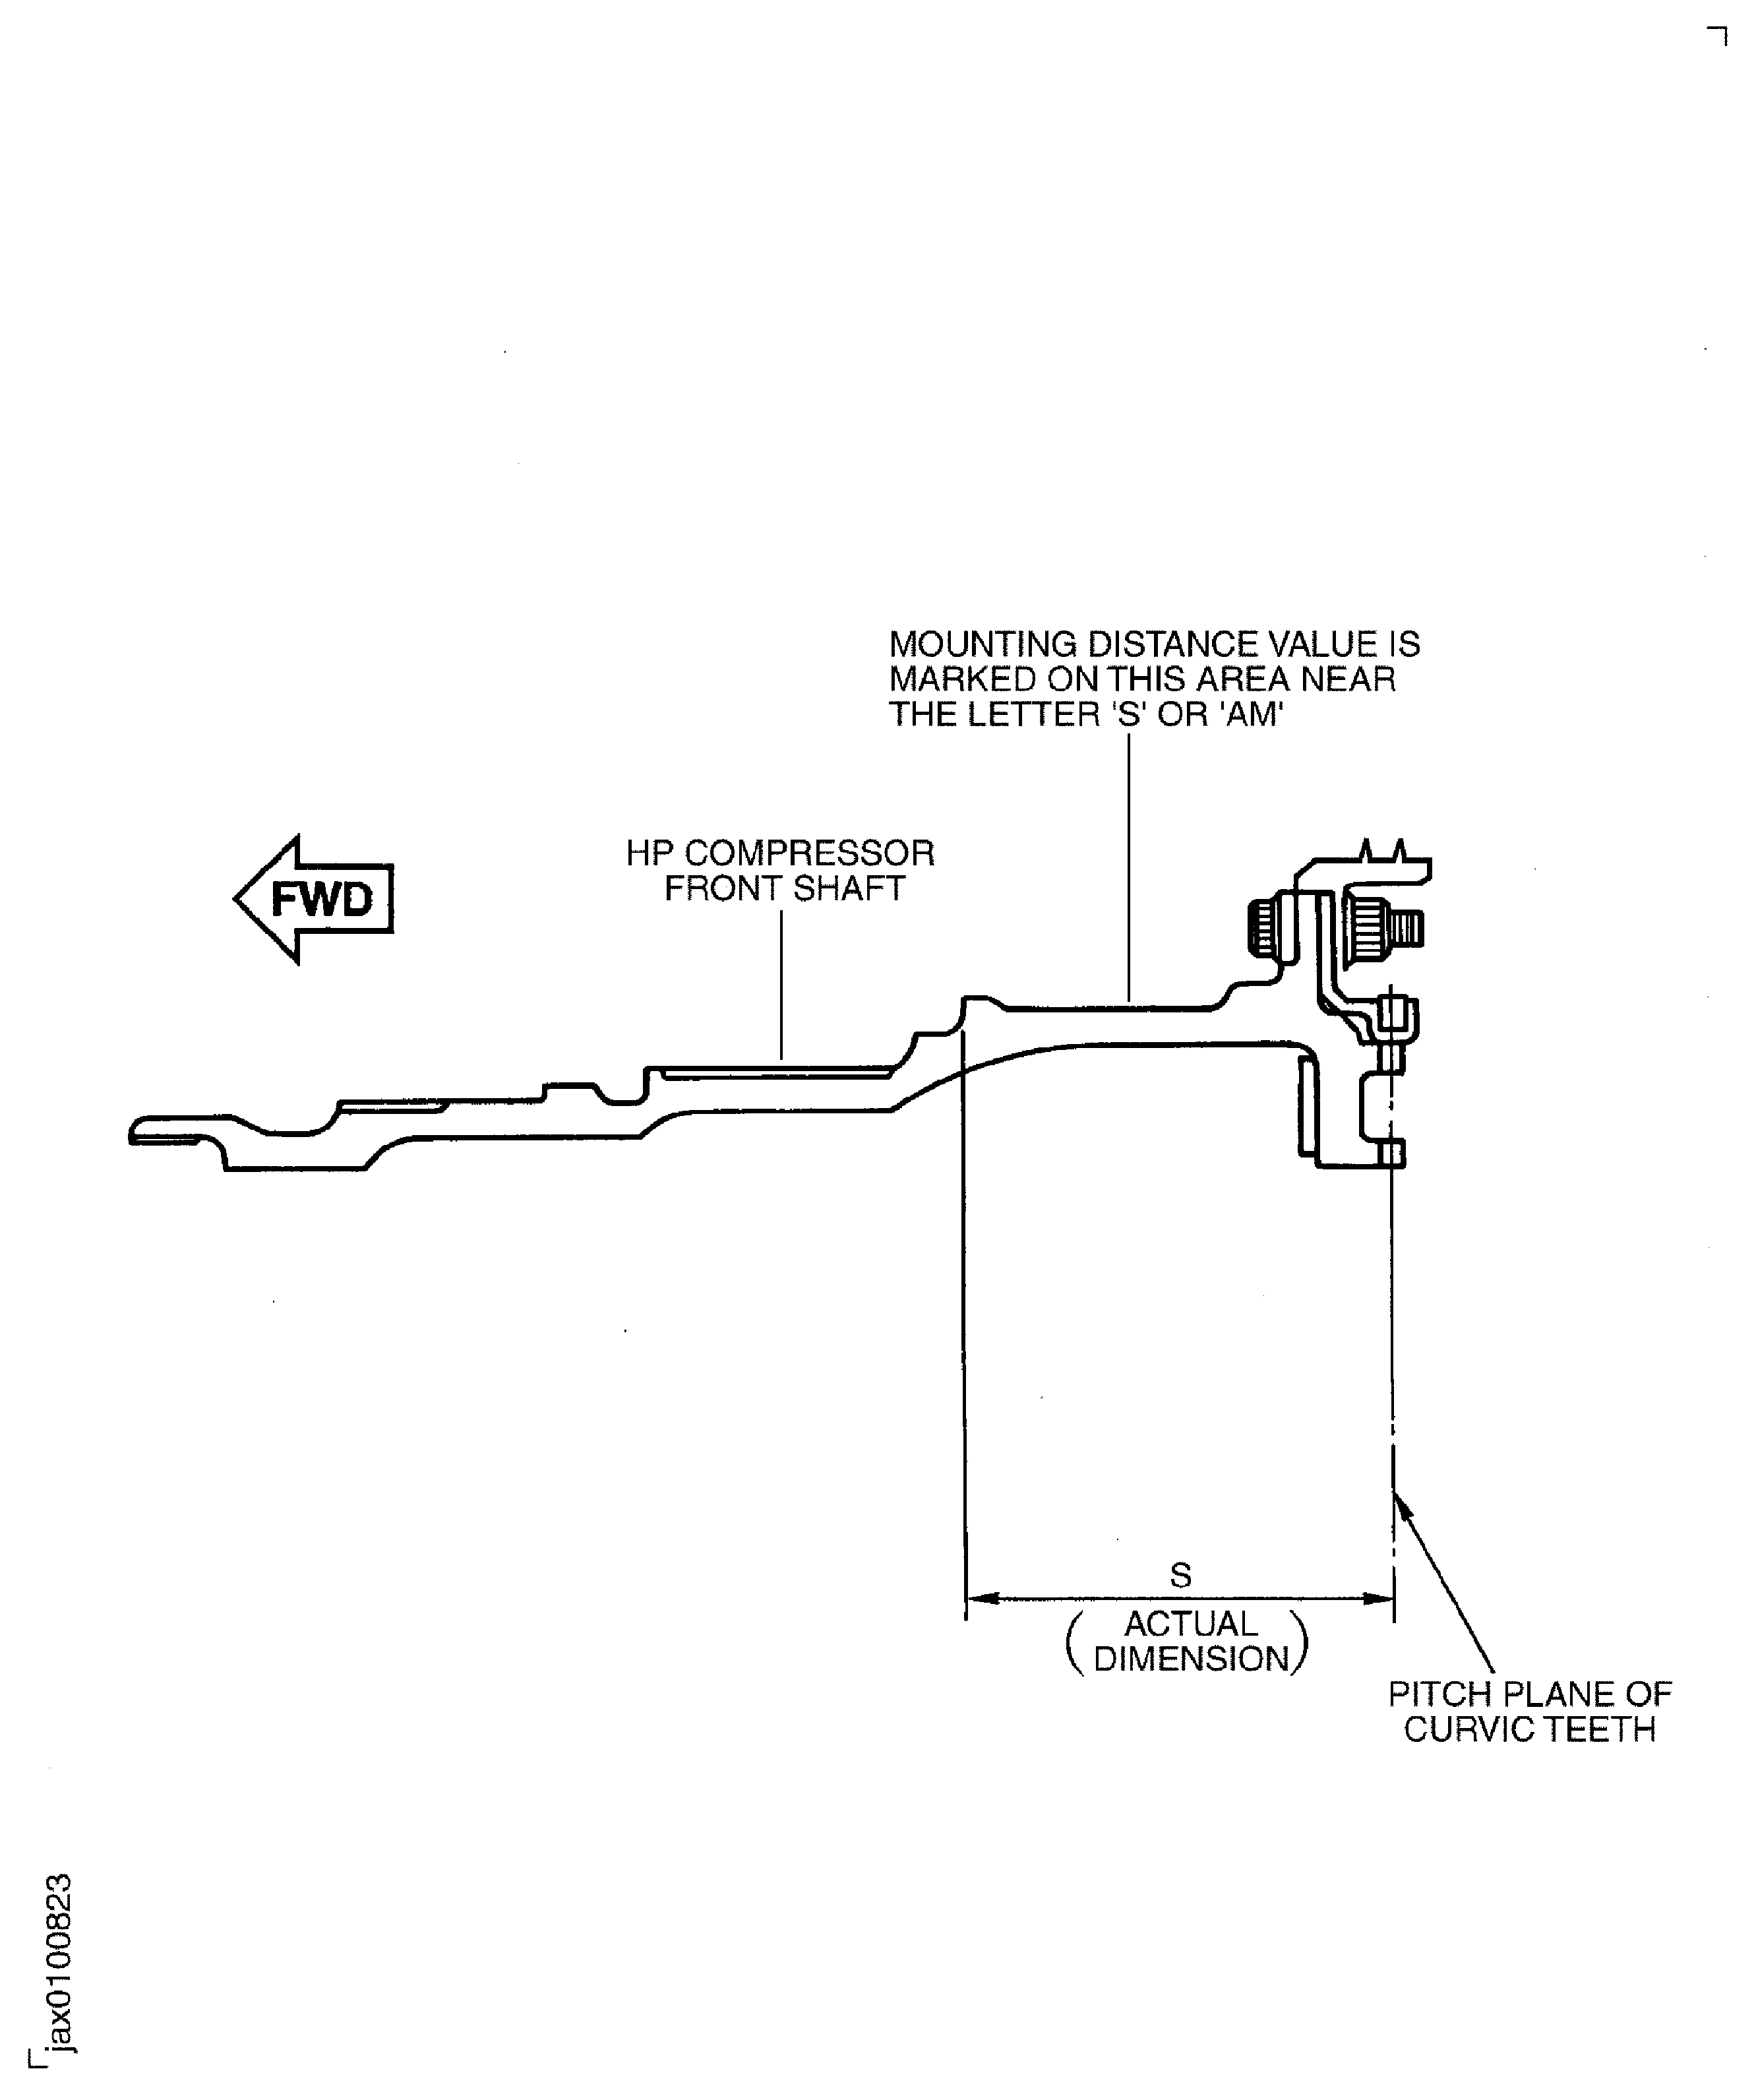
    Figure: Find the HPC Adjusting Washer

    Find the HPC Adjusting Washer

    Figure: Remove the No. 3 Bearing and Measuring Stretch Assembly from the Fan Frame

    Sheet 1
    Legend
    Remove the No. 3 Bearing and Measuring Stretch Assembly from the Fan Frame

    Sheet 1

    Close

    Figure: Remove the No. 3 Bearing and Measuring Stretch Assembly from the Fan Frame

    Sheet 2
    Legend
    Remove the No. 3 Bearing and Measuring Stretch Assembly from the Fan Frame

    Sheet 2

    Close

    Figure: Measure the Axial Dimensions of the No. 3 Bearing and the Related Parts

    Measure the Axial Dimensions of the No. 3 Bearing and the Related Parts
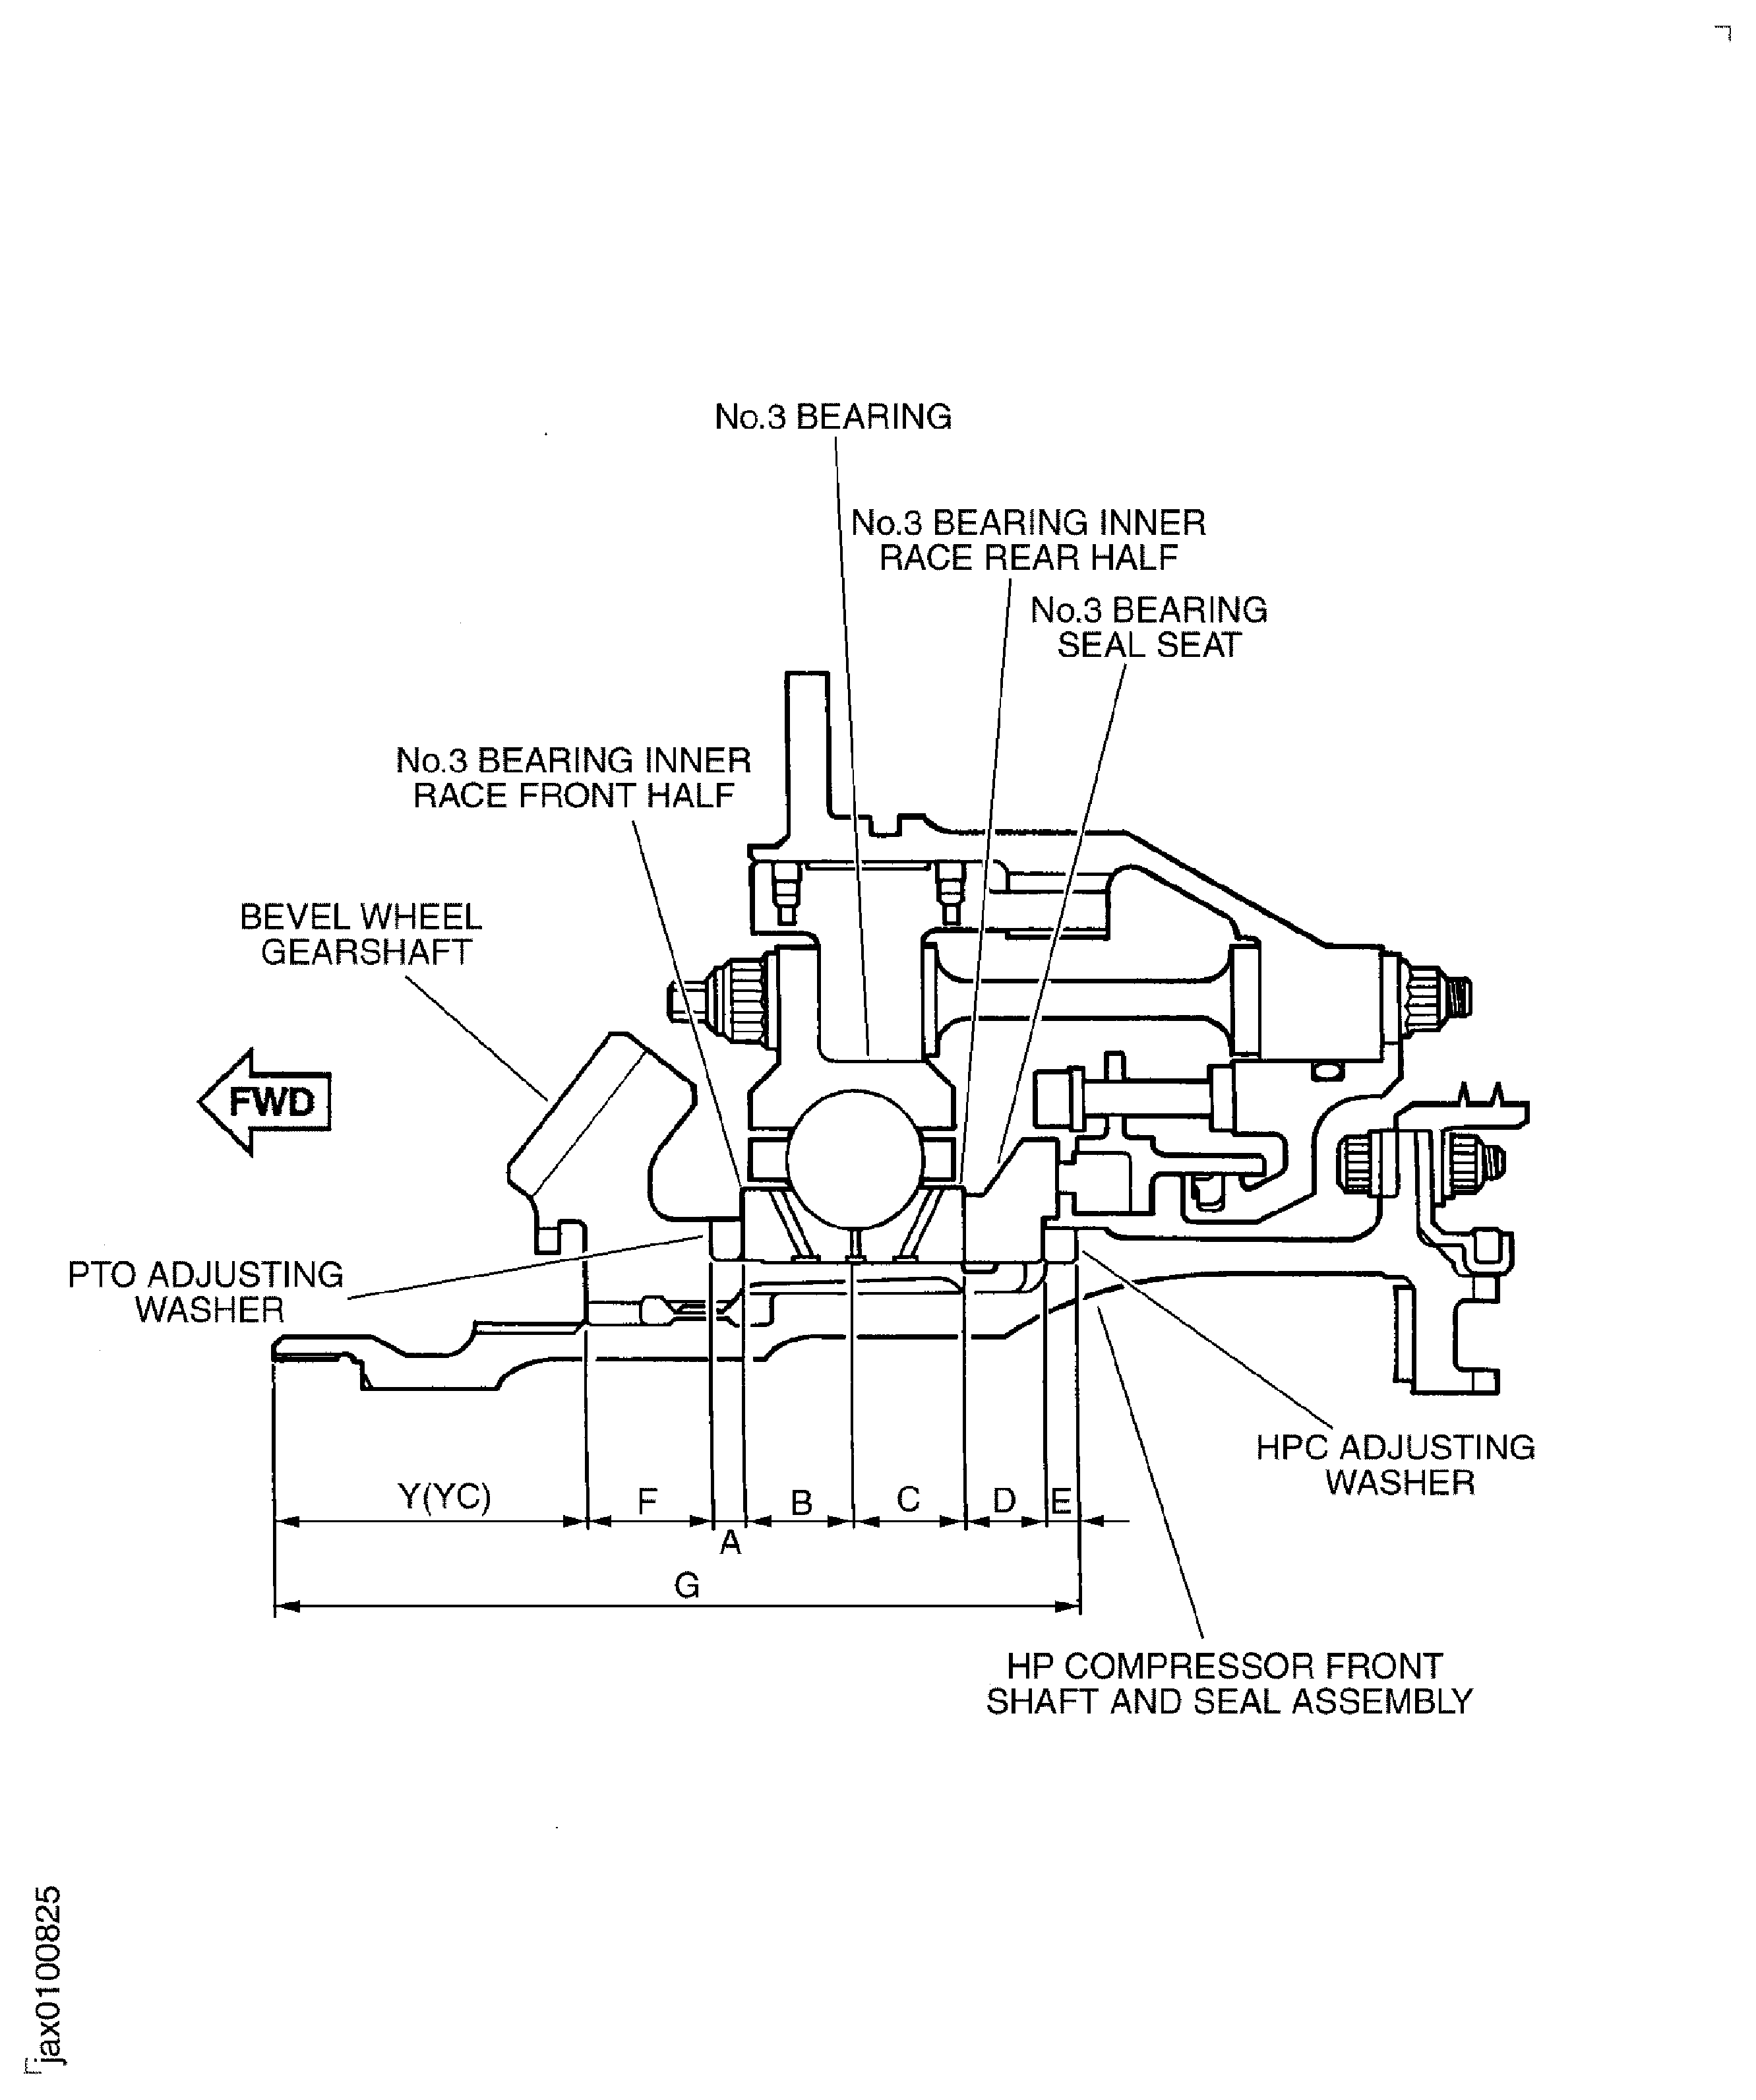
    Figure: Measure the Axial Dimension F between Mating Surfaces of the Bevel Wheel Gearshaft

    Measure the Axial Dimension F between Mating Surfaces of the Bevel Wheel Gearshaft
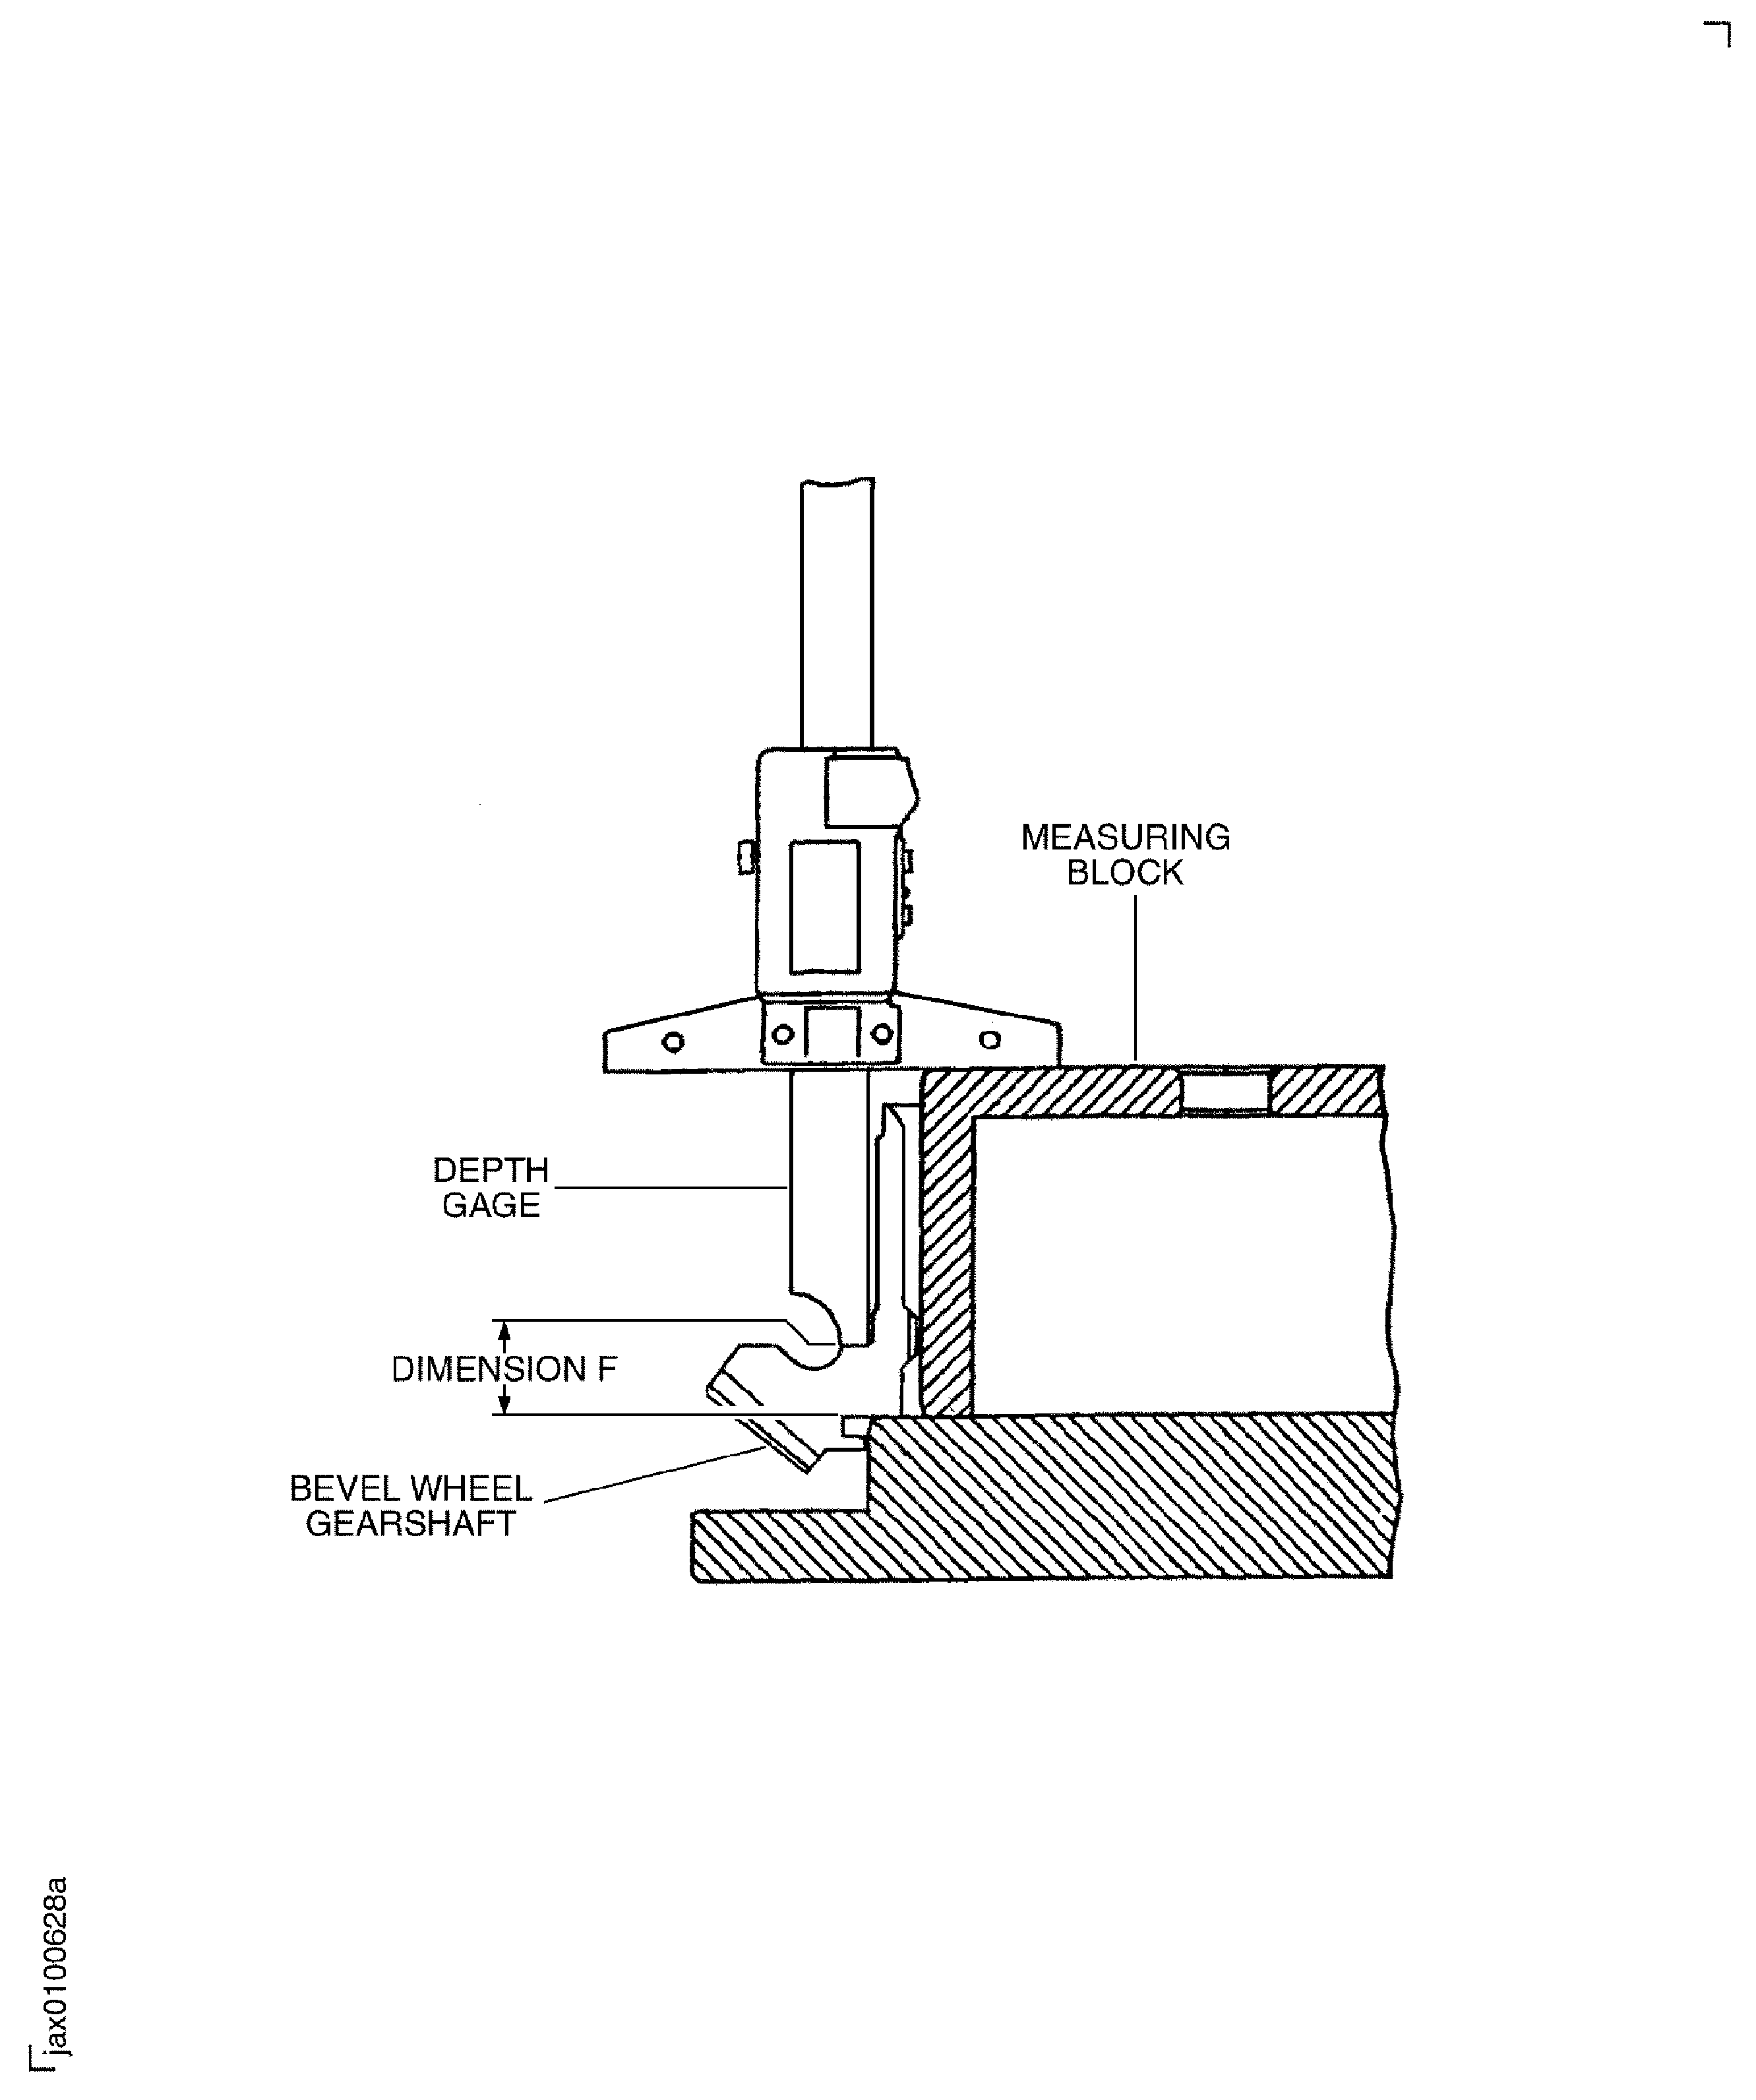
    Figure: Install the No. 3 Bearing and Seal Support Assembly on the Bevel Wheel Gearshaft

    Sheet 1
    Legend
    Install the No. 3 Bearing and Seal Support Assembly on the Bevel Wheel Gearshaft

    Sheet 1

    Close

    Figure: Install the No. 3 Bearing and Seal Support Assembly on the Bevel Wheel Gearshaft

    Sheet 2
    Legend
    Install the No. 3 Bearing and Seal Support Assembly on the Bevel Wheel Gearshaft

    Sheet 2

    Close

    Figure: Install the No. 3 Bearing and Seal Support Assembly on the Bevel Wheel Gearshaft

    Sheet 3
    Legend
    Install the No. 3 Bearing and Seal Support Assembly on the Bevel Wheel Gearshaft

    Sheet 3

    Close

    Figure: Install the No. 3 Bearing and Bevel Gear Assembly on to the Leak Test Fixture

    Install the No. 3 Bearing and Bevel Gear Assembly on to the Leak Test Fixture

    Figure: Install the No. 3 Bearing, Gearshaft, Support and Seal Assembly on the HP Compressor Front Shaft and Seal Assembly

    Install the No. 3 Bearing, Gearshaft, Support and Seal Assembly on the HP Compressor Front Shaft and Seal Assembly

    Figure: Assemble the No. 3 Bearing, Gearshaft, Support and Seal Assembly to the HP Compressor Front Shaft and Seal Assembly with the No. 3 Bearing Nut

    Sheet 1

    Legend
    Assemble the No. 3 Bearing, Gearshaft, Support and Seal Assembly to the HP Compressor Front Shaft and Seal Assembly with the No. 3 Bearing Nut

    Sheet 1

    Close

    Figure: Assemble the No. 3 Bearing, Gearshaft, Support and Seal Assembly to the HP Compressor Front Shaft and Seal Assembly with the No. 3 Bearing Nut

    Sheet 2

    Legend
    Assemble the No. 3 Bearing, Gearshaft, Support and Seal Assembly to the HP Compressor Front Shaft and Seal Assembly with the No. 3 Bearing Nut
    Sheet 2

    Close

    Figure: Assemble the No. 3 Bearing, Gearshaft, Support and Seal Assembly to the HP Compressor Front Shaft and Seal Assembly with the No. 3 Bearing Nut

    Assemble the No. 3 Bearing, Gearshaft, Support and Seal Assembly to the HP Compressor Front Shaft and Seal Assembly with the No. 3 Bearing Nut

    Figure: Swash and Concentricity Check on the Curvic Coupling

    Sheet 1

    Legend
    Swash and Concentricity Check on the Curvic Coupling

    Sheet 1

    Close

    Figure: Swash and Concentricity Check on the Curvic Coupling

    Sheet 2
    Legend
    Swash and Concentricity Check on the Curvic Coupling

    Sheet 2

    Close

    Figure: Calculate the Correct Swash and Concentricity Values

    Calculate the Correct Swash and Concentricity Values
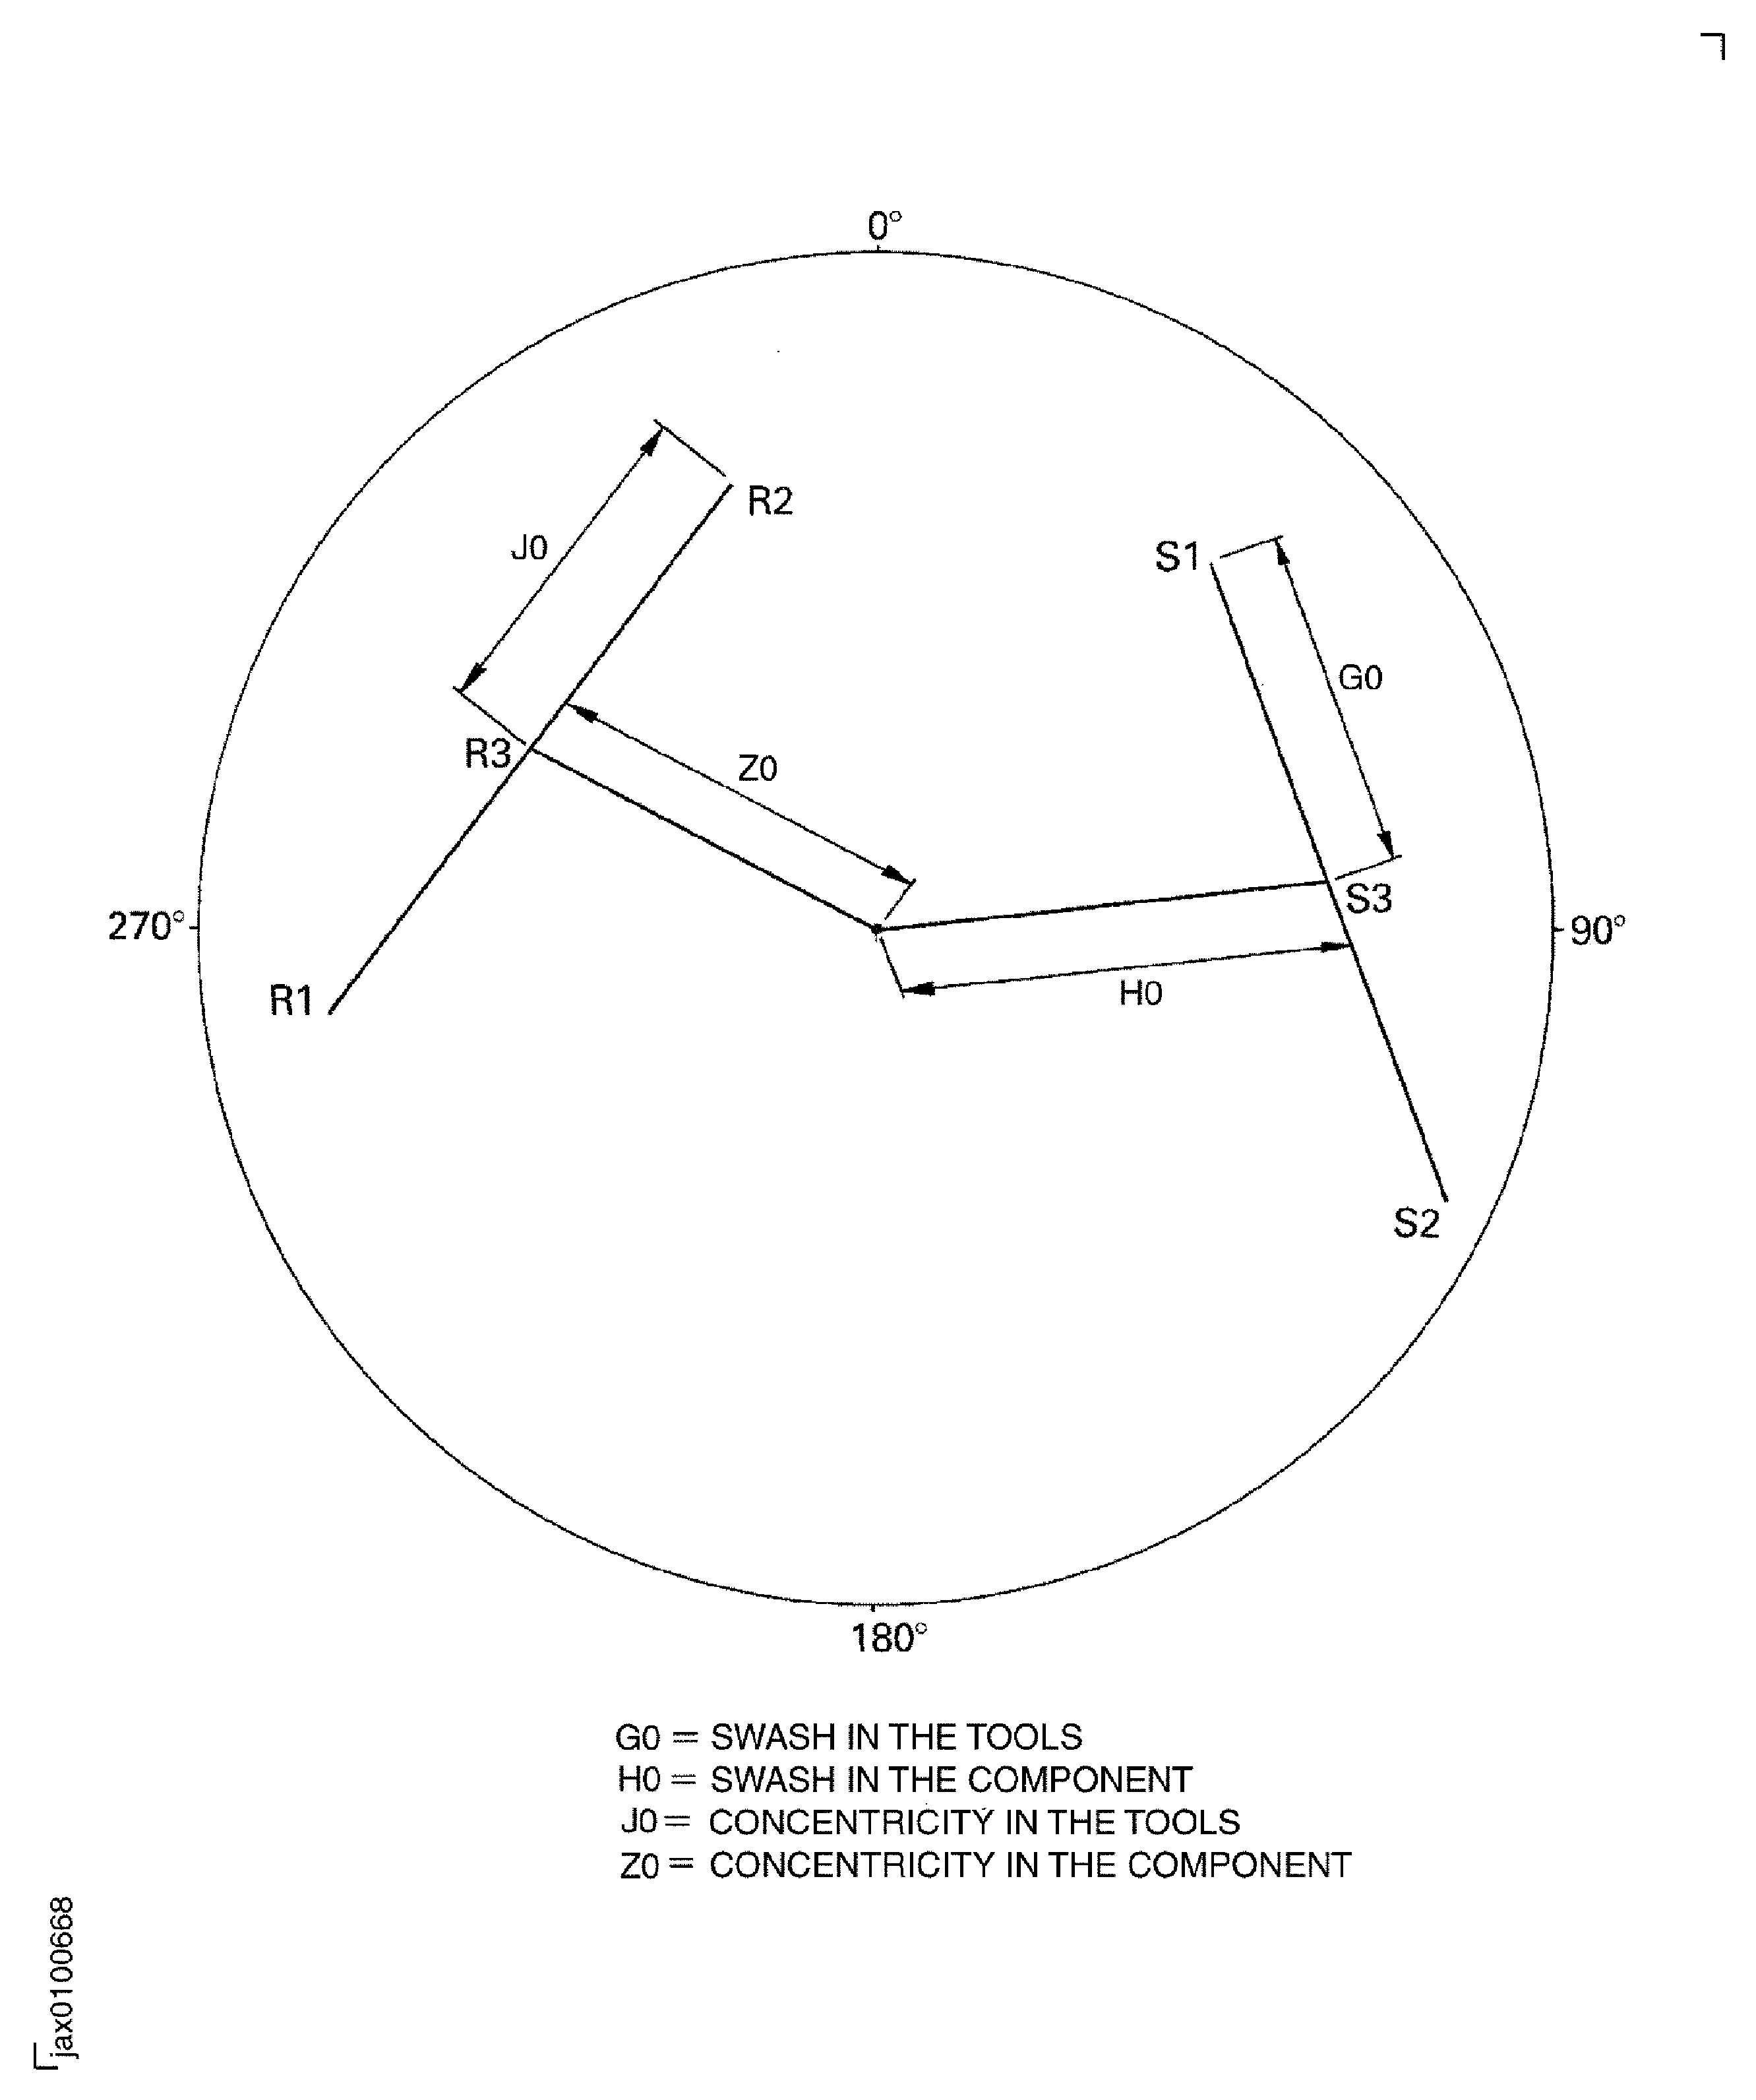
    Figure: Bend the Cup Washer into the Groove of the No. 3 Bearing Nut

    Bend the Cup Washer into the Groove of the No. 3 Bearing Nut
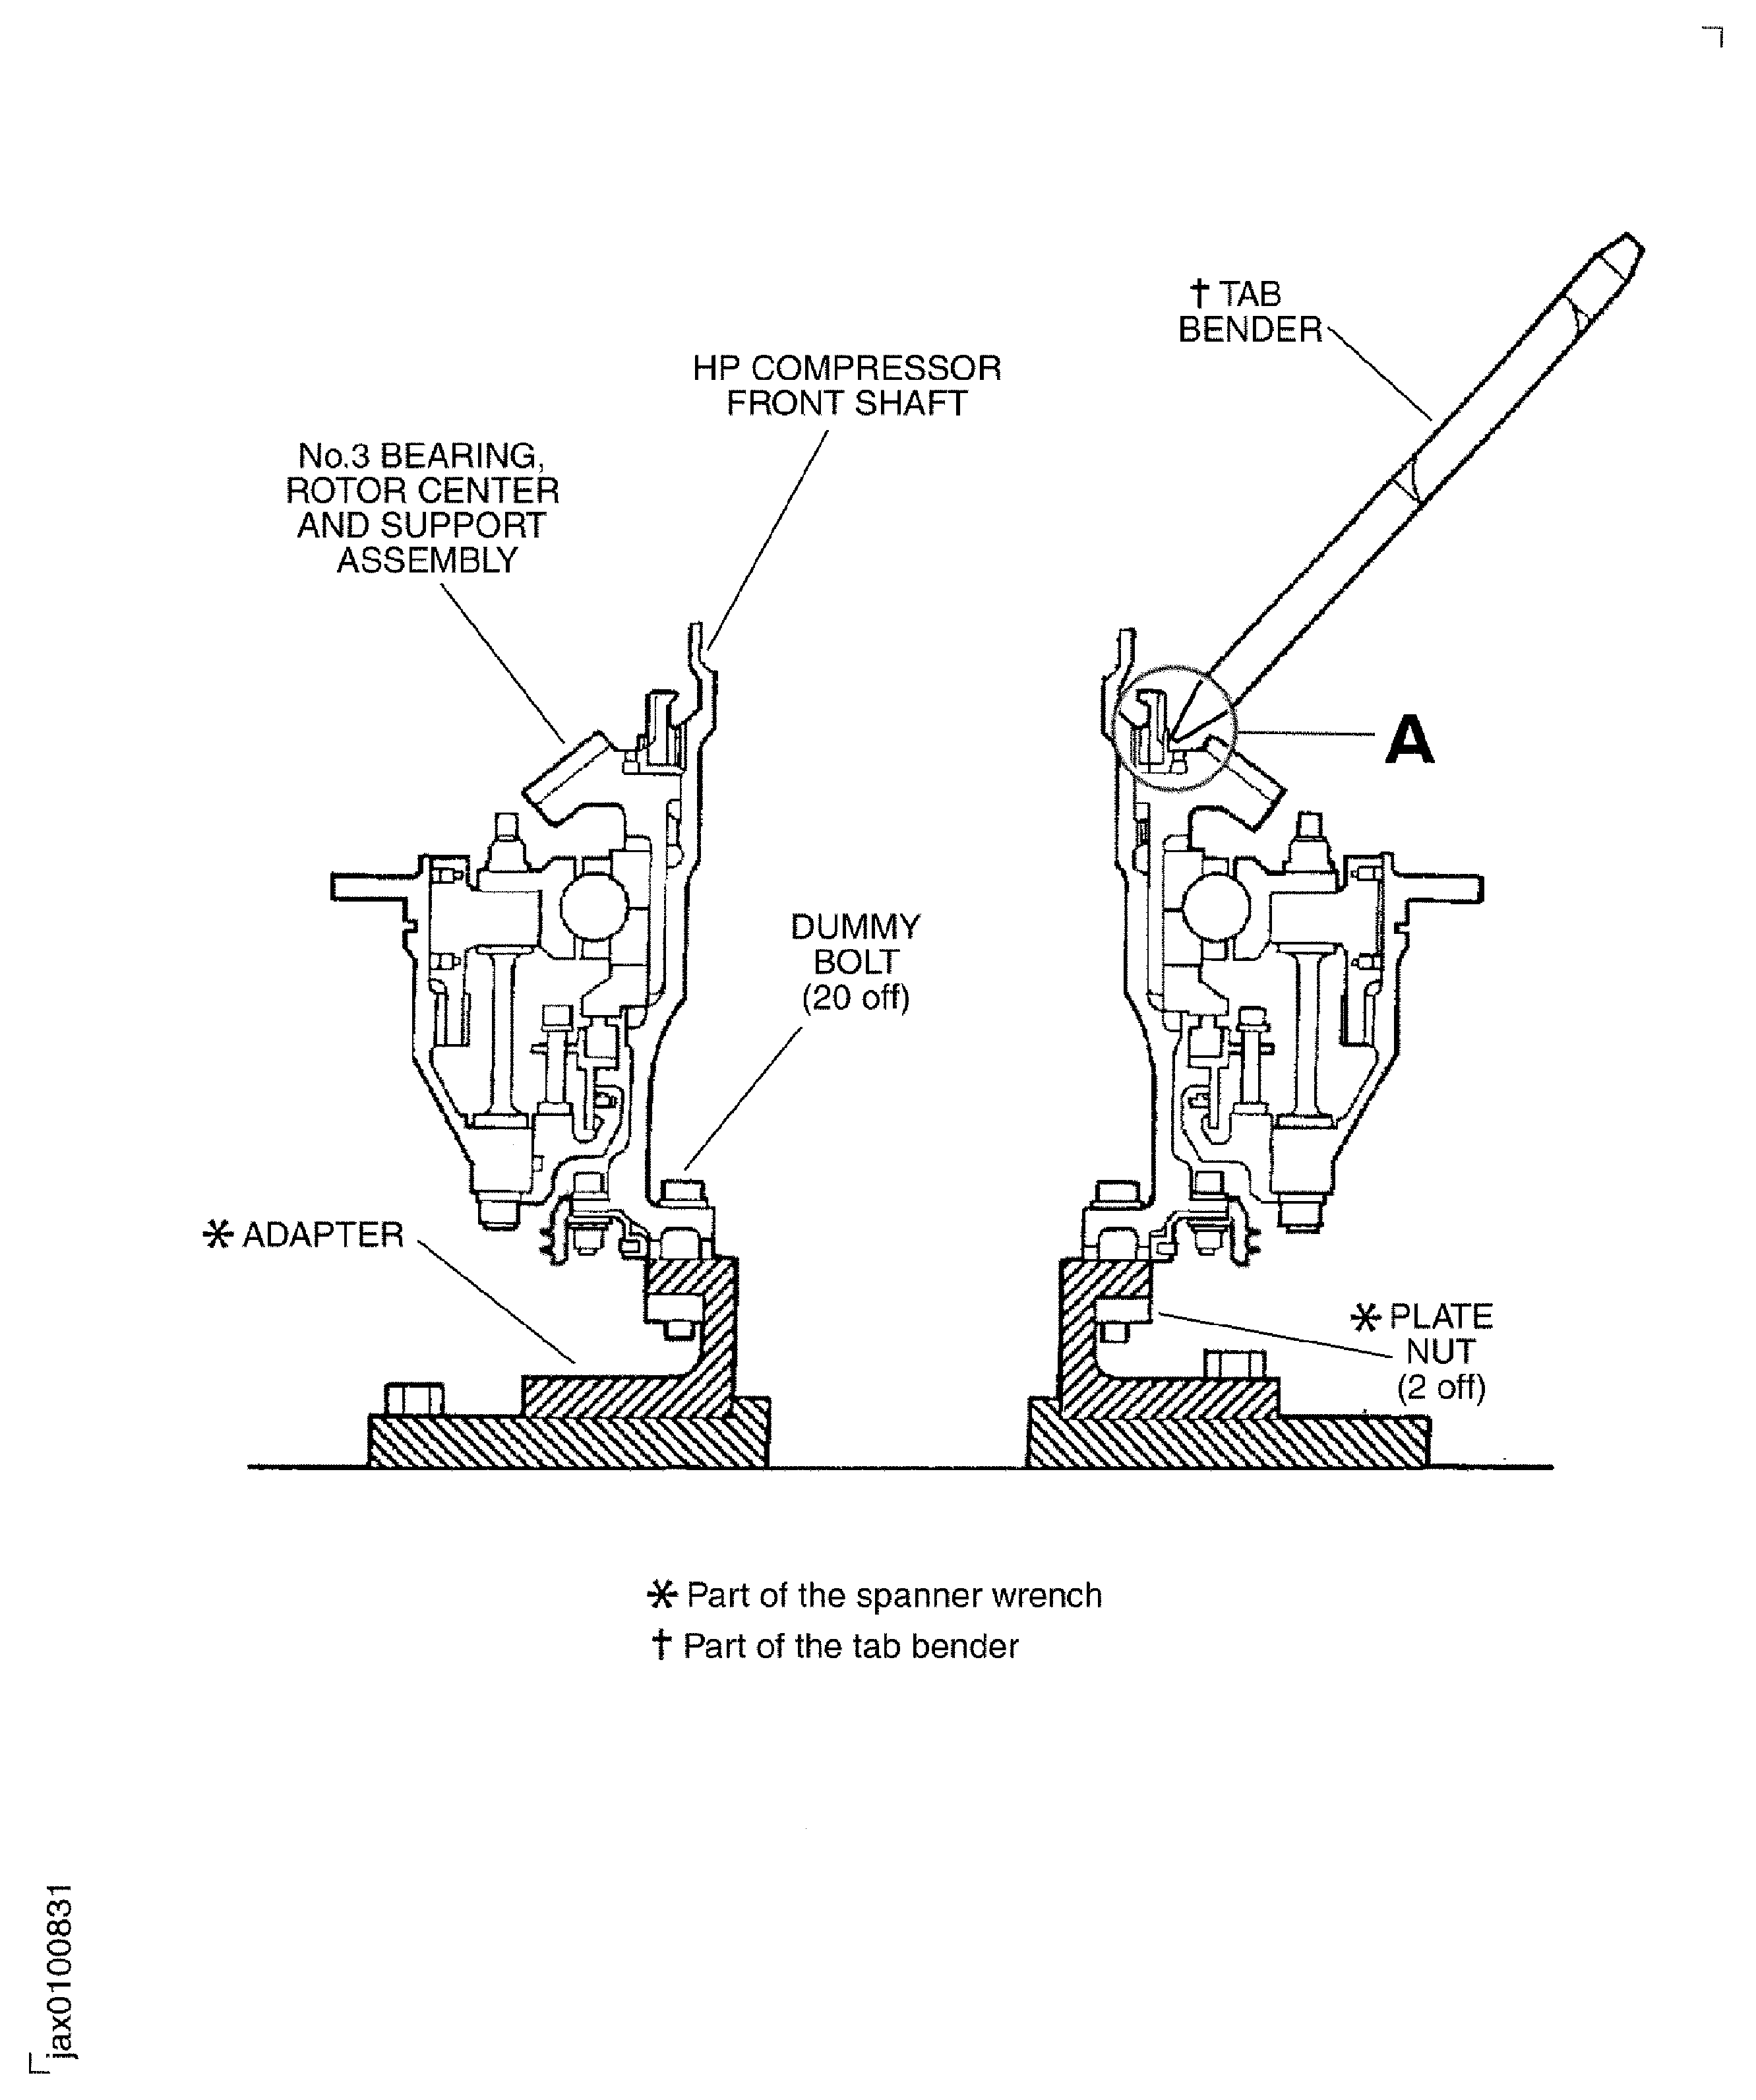
    Figure: Bend the Cup Washer into the Groove of the No. 3 Bearing Nut

    Bend the Cup Washer into the Groove of the No. 3 Bearing Nut
Requirements After Job Completion

Follow-On Conditions

NONE
Change Type:

Correct torque value in SUBTASK 72-32-20-440-074 (CAS-25412-N1B6X6)

Manufacturer Code:0AM53
Enterprise Name:IAE INTERNATIONAL AERO ENGINES AG
BU Name:NULL
Building:SUITE 400
Street:628 HEBRON AVENUE
City:GLASTONBURY
State:CT
Zip Code:06033
Country:USA
Manufacturer Code:77445
Enterprise Name:PRATT AND WHITNEY
BU Name:PRATT & WHITNEY
Street:400 MAIN STREET
City:EAST HARTFORD
Country:USA
Phone Number:8605657700
Manufacturer Code:IE207
Enterprise Name:DELETED, REFER TO 16956
Manufacturer Code:LOCAL
Enterprise Name:LOCALLY SUPPLIED
Manufacturer Code:X333X
Enterprise Name:REFER TO V2500 SB ENG-79-0108
Part Number:5A0242
Part Name:WASHER - CUP
Manufacturer Code:0AM53
Part Number:ST1946-265
Part Name:PACKING - PREFORMED
Manufacturer Code:77445
Manufacturer Code:LOCAL
Supply Number:CoMat 01-124
Type:sp01
Supply Short Name:CoMat 01-124 ISOPROPYL ALCOHOL
Supply Name:CoMat 01-124 ISOPROPYL ALCOHOL
Specification Groups:
Doc NumberType
OMAT:1/40GPR TECHNICAL GRADE
PMC 9094GPR TECHNICAL GRADE
JCR-011GPR TECHNICAL GRADE
Suppliers:
ManufacturerRemarks
LOCAL
U1185
24853
K6835
Manufacturer Code:LOCAL
Supply Number:CoMat 02-130
Type:sp01
Supply Short Name:CoMat 02-130 POLAR GRAPH PAPER
Supply Name:CoMat 02-130 POLAR GRAPH PAPER
Specification Groups:
Doc NumberType
POLAR GRAPH PAPER
Suppliers:
ManufacturerRemarks
LOCAL
Manufacturer Code:IE207
Supply Number:CoMat 06-069
Type:sp01
Supply Short Name:CoMat 06-069 MARKER
Supply Name:CoMat 06-069 MARKER
Specification Groups:
Doc NumberType
OMAT:262TMARKS-A-LOT
JCR-085MARKS-A-LOT
Suppliers:
ManufacturerRemarks
IE207
Manufacturer Code:X333X
Supply Number:CoMat 10-077
Type:sp01
Supply Short Name:CoMat 10-077 APPROVED ENGINE OILS
Supply Name:CoMat 10-077 APPROVED ENGINE OILS
Specification Groups:
Doc NumberType
For V2500-A1/A5/D5 models - Refer to V2500 Service Bulletin ENG-79-0108
For V2500-E5 model - Refer to Service Bulletin E5-79-0001
Suppliers:
ManufacturerRemarks
X333X
Manufacturer Code:0AM53
Tool Number:IAE 1F10026
Tool Name:IAE 1F10026 Hydraulic hand pump
Manufacturer Code:0AM53
Tool Number:IAE 1J12021
Tool Name:IAE 1J12021 Lifting spacer
Manufacturer Code:0AM53
Tool Number:IAE 1J12188
Tool Name:IAE 1J12188 Puller bolt
Manufacturer Code:0AM53
Tool Number:IAE 1J12339
Tool Name:IAE 1J12339 Spanner wrench
Manufacturer Code:0AM53
Tool Number:IAE 1J12359
Tool Name:IAE 1J12359 Inspection bridge
Manufacturer Code:0AM53
Tool Number:IAE 1J12367
Tool Name:IAE 1J12367 Tab bender
Manufacturer Code:0AM53
Tool Number:IAE 1J12374
Tool Name:IAE 1J12374 Oil flow test stand
Manufacturer Code:0AM53
Tool Number:IAE 1J12375
Tool Name:IAE 1J12375 Oil flow check box
Manufacturer Code:0AM53
Tool Number:IAE 1J12376
Tool Name:IAE 1J12376 Oil feed adapter
Manufacturer Code:0AM53
Tool Number:IAE 1J12378
Tool Name:IAE 1J12378 Ratchet wrench
Manufacturer Code:0AM53
Tool Number:IAE 1J12379
Tool Name:IAE 1J12379 Hydraulic pusher
Manufacturer Code:0AM53
Tool Number:IAE 1J12380
Tool Name:IAE 1J12380 Hydraulic pusher
Manufacturer Code:0AM53
Tool Number:IAE 1J12383
Tool Name:IAE 1J12383 Swash check fixture
Manufacturer Code:0AM53
Tool Number:IAE 1J12384
Tool Name:IAE 1J12384 Swash check ring
Manufacturer Code:0AM53
Tool Number:IAE 1J12387
Tool Name:IAE 1J12387 Work stand
Manufacturer Code:0AM53
Tool Number:IAE 1J12421
Tool Name:IAE 1J12421 Base holder
Manufacturer Code:0AM53
Tool Number:IAE 1J12469
Tool Name:IAE 1J12469 Leak test fixture
Manufacturer Code:0AM53
Tool Number:IAE 1J12477
Tool Name:IAE 1J12477 Base holder
Manufacturer Code:0AM53
Tool Number:IAE 1J12478
Tool Name:IAE 1J12478 Hydraulic pusher/puller
Manufacturer Code:0AM53
Tool Number:IAE 1J12502
Tool Name:IAE 1J12502 No.3 bearing guide
Manufacturer Code:0AM53
Tool Number:IAE 1J12504
Tool Name:IAE 1J12504 Ring holder
Manufacturer Code:0AM53
Tool Number:IAE 1J12505
Tool Name:IAE 1J12505 0AM53 heater
Manufacturer Code:0AM53
Tool Number:IAE 1J12529
Tool Name:IAE 1J12529 Measuring stretch
Manufacturer Code:0AM53
Tool Number:IAE 1J12556
Tool Name:IAE 1J12556 Measuring block
Manufacturer Code:0AM53
Tool Number:IAE 1P17043
Tool Name:IAE 1P17043 Knocker puller
Manufacturer Code:0AM53
Tool Number:IAE 1P17507
Tool Name:IAE 1P17507 Spacer ring
Manufacturer Code:0AM53
Tool Number:IAE 1P17508
Tool Name:IAE 1P17508 Build fixture
Manufacturer Code:0AM53
Tool Number:IAE 1P17526
Tool Name:IAE 1P17526 Torque sequence locator
Manufacturer Code:0AM53
Tool Number:IAE 6F10027
Tool Name:IAE 6F10027 Heater control unit
Manufacturer Code:0AM53
Tool Number:IAE 6F10030
Tool Name:IAE 6F10030 Vacuum test cart
Manufacturer Code:LOCAL
Tool Number:SWEENEY 8200
Tool Name:Torque multiplier
Link not Found