Export Control
EAR Export Classification: Not subject to the EAR per 15 C.F.R. Chapter 1, Part 734.3(b)(3), except for the following Service Bulletins which are currently published as EAR Export Classification 9E991: SBE70-0992, SBE72-0483, SBE72-0580, SBE72-0588, SBE72-0640, SBE73-0209, SBE80-0024 and SBE80-0025.Copyright
© IAE International Aero Engines AG (2001, 2014 - 2021) The information contained in this document is the property of © IAE International Aero Engines AG and may not be copied or used for any purpose other than that for which it is supplied without the express written authority of © IAE International Aero Engines AG. (This does not preclude use by engine and aircraft operators for normal instructional, maintenance or overhaul purposes.).Applicability
All
Common Information
TASK 72-41-12-200-002-B00 HPC Stage 9 - 12 Drum Disk - Examine, Inspection-002
General
This TASK gives the procedure for the inspection of the rear HPC disks.
Fig/Item numbers in parentheses in the procedure agree with those used in the IPC. Only the primary Fig/item numbers are used. For the service bulletin alpha variants refer to the IPC.
The practices and processes referred to in the procedure by the TASK/SUBTASK numbers are in SPM.
The policy that is necessary for inspection is given in SPM TASK 70-20-01-200-501.
All the parts must be cleaned before any part is examined. Refer to SPM TASK 70-10-00-100-501.
All parts must be visually examined for damage, corrosion and wear. Any defects that are not identified in the procedure must be referred to IAE.
Do not discard any part until you are sure there are no repairs available. Refer to the instructions in the Repair before a discarded part is used again or oversize parts are installed.
Parts which should be discarded can be held although no repair is available. The repair of a discarded part could be shown to be necessary at a subsequent date.
All parts must be examined to make sure that all the repairs have been completed satisfactorily.
References
Refer to SPM for data on these items:
Definition of Damage, SPM TASK 70-02-02-350-501,
Recording and Control of the Lives of Parts, SPM TASK 70-05-00-220-501,
Inspection of parts, SPM TASK 70-20-01-200-501.
Some data on these items are contained in this TASK. For more data on these items refer to SPM:
Method of Testing for Crack Indications,
Chemical Processes,
Surface Protection.
NOTE
Preliminary Requirements
Pre-Conditions
NONESupport Equipment
NONEConsumables, Materials and Expendables
| Name | Manufacturer | Part Number / Identification | Quantity | Remark |
|---|---|---|---|---|
| CoMat 02-005 ADHESIVE TAPE (MASKING) | LOCAL | CoMat 02-005 |
Spares
NONESafety Requirements
CAUTION
Procedure
NOTE
The examination of the whole component using Ultra High Sensitivity Fluorescent Penetrant is required.Clean the Part. Refer to the TASK 72-41-12-100-000 (CLEANING-000).
SUBTASK 72-41-12-230-060 Examine the Rear HPC Disk for Cracks
Clean the parts. Refer to TASK 72-41-12-100-000 (CLEANING-000).
Mask the areas adjacent to inspection locations with CoMat 02-005 ADHESIVE TAPE (MASKING). This will prevent glare during inspection from Fluorescent Penetrant which may have soaked into the ceramic.
Do a focus inspection of the Rear HPC Disk for cracks according to TASK 72-41-12-200-004, Subtask 72-41-12-230-079.
SUBTASK 72-41-12-230-081 Inspect the Rear HPC Disk for Cracks
Refer to Figure.
Other than Step.
Examine the disk at Locations 1, 2 and 4 for damage.
Repair, VRS6087 TASK 72-41-12-300-016 (REPAIR-016).
Other than Step.
Examine the disk at Locations 3 and 5 for damage.
SUBTASK 72-41-12-220-076 Examine the Rear HPC Disk for Damage on the Front Slots
Refer to Figure.
Repair, VRS6087 TASK 72-41-12-300-016 (REPAIR-016).
Examine the disk at Location 6 for damage on the front flange.
SUBTASK 72-41-12-220-077 Examine the Rear HPC Disk for Damage on the Front Flange and Bent Segments
Refer to Figure.
Repair, VRS6087 TASK 72-41-12-300-016 (REPAIR-016).
Other than Step.
Examine the disk at Location 1 for damage in the vent holes.
SUBTASK 72-41-12-220-080 Examine the Rear HPC Disk for Damage in the Vent Holes
Refer to Figure.
Repair, VRS6087 TASK 72-41-12-300-016 (REPAIR-016).
Examine the disk at Locations 2, 4, 13 and 15 for damage.
For Locations 3 and 16, other than Step
Repair, VRS6087 TASK 72-41-12-300-016 (REPAIR-016).
For Locations 12, 14 and 17, other than Step.
Examine the disk at Locations 3, 12, 14, 16 and 17 for damage.
Other than Step.
Examine the disk at Location 5, 7, 9 and 11 for damage.
Accept.
Inner cavity weld spatter.
Weld spatter.
SUBTASK 72-41-12-220-081 Examine the Rear HPC Disk for Internal Damage
Refer to Figure.
Repair, VRS6136 TASK 72-41-12-300-019 (REPAIR-019).
Not more than 0.002 in. (0.05 mm) in depth
More than in Step.
Galled.
Examine the slots at zone A.
Zone A
-
Dovetail slot bedding area plus 0.050 in. (1.27 mm) below the bottom limit and the complete length of the slot on both sides
NOTE
All disks that have been used in service will have bedding areas that are easy to see.Repair, VRS6136 TASK 72-41-12-300-019 (REPAIR-019).
More than in Step.
Galled or fretted.
Repair, VRS6136 TASK 72-41-12-300-019 (REPAIR-019).
Not more than 0.002 in. (0.05 mm) in depth.
More than in Step.
Scored, nicked or dented.
Examine the slots at zone B.
Zone B
-
The area in the center of the dovetail slot
Repair, VRS6136 TASK 72-41-12-300-019 (REPAIR-019).
Not more than 0.002 in. (0.05 mm) in depth.
More than in Step.
Galled or fretted.
Repair, VRS6136 TASK 72-41-12-300-019 (REPAIR-019).
Not more than 0.0010 in. (0.025 mm) in depth.
More than in Step.
Scored, nicked or dented.
Examine the slots at Zone C.
Zone C
-
The blade loading and blade locking slot(s) and an area around it, on all surfaces of the dovetail, 0.040 in. (1.00 mm) away from the edges of the slot(s).
Repair, VRS6136 TASK 72-41-12-300-019 (REPAIR-019).
Not more than 0.0050 in. (0.127 mm).
More than in Step.
Scored, nicked, dented, galled or fretted.
Examine the slots at Zone E.
Zone E
-
The remaining areas of the disk around the dovetail slots that are not in Zones A and C.
SUBTASK 72-41-12-220-117 Examine the Rear HPC Disk (72-41-12,01-600) for Damage in the Blade Slots, the Loading Slots and the Locking Slots
Refer to Figure.
Repair, VRS6008 TASK 72-41-12-300-015 (REPAIR-015).
Other than Step.
Chipped.
Repair, VRS6008 TASK 72-41-12-300-015 (REPAIR-015).
Other than Step.
Pitted.
Repair, VRS6008 TASK 72-41-12-300-015 (REPAIR-015).
Other than Step.
Scratched.
Repair, VRS6008 TASK 72-41-12-300-015 (REPAIR-015).
Loose coating or blisters.
Repair, VRS6008 TASK 72-41-12-300-015 (REPAIR-015).
Other than Step.
Rub track.
Examine the disk at Location 1 for damage on the stage 8 ceramic rub strip.
Repair, VRS6008 TASK 72-41-12-300-015 (REPAIR-015).
Other than Step.
Chipped.
Repair, VRS6008 TASK 72-41-12-300-015 (REPAIR-015).
Other than Step.
Pitted.
Repair, VRS6008 TASK 72-41-12-300-015 (REPAIR-015).
Other than Step.
Scratched.
Repair, VRS6008 TASK 72-41-12-300-015 (REPAIR-015).
Loose coating or blisters.
Repair, VRS6008 TASK 72-41-12-300-015 (REPAIR-015).
Other than Step.
Rub track.
Examine the disk at Location 2 for damage on the stage 9 ceramic rub strip.
Repair, VRS6008 TASK 72-41-12-300-015 (REPAIR-015).
Other than Step.
Chipped.
Repair, VRS6008 TASK 72-41-12-300-015 (REPAIR-015).
Other than Step.
Pitted.
Repair, VRS6008 TASK 72-41-12-300-015 (REPAIR-015).
Other than Step.
Scratched.
Repair, VRS6008 TASK 72-41-12-300-015 (REPAIR-015).
Loose coating or blisters.
Repair, VRS6008 TASK 72-41-12-300-015 (REPAIR-015).
Other than Step.
Rub track.
Examine the disk at Location 3 for damage on the stage 10 ceramic rub strip.
Repair, VRS6008 TASK 72-41-12-300-015 (REPAIR-015).
Other than Step.
Chipped.
Repair, VRS6008 TASK 72-41-12-300-015 (REPAIR-015).
Other than Step.
Pitted.
Repair, VRS6008 TASK 72-41-12-300-015 (REPAIR-015).
Other than Step.
Scratched.
Repair, VRS6008 TASK 72-41-12-300-015 (REPAIR-015).
Loose coating or blisters.
Repair, VRS6008 TASK 72-41-12-300-015 (REPAIR-015).
Other than Step.
Rub track.
Examine the disk at Location 4 for damage on the stage 11 ceramic rub strip.
SUBTASK 72-41-12-220-083 Examine the Rear HPC Disk for Damage on the Ceramic Rub Strips
Refer to Figure.
Repair, VRS6134 TASK 72-41-12-300-017 (REPAIR-017).
Other than Step.
Examine the disk at Location 1 for the front outside diameter.
Repair, VRS6137 TASK 72-41-12-300-020 (REPAIR-020).
Other than Step.
Examine the disk at Location 2 for the rear outside diameter.
Repair, VRS6135 TASK 72-41-12-300-018 (REPAIR-018).
Other than Step.
Examine the disk at Location 3 for the front inside diameter.
SUBTASK 72-41-12-220-084-A00 Examine the Rear HPC Disk (6A7545) for the Diameters (Pre SBE 72-0377)
Refer to Figure.
Repair, VRS6134 TASK 72-41-12-300-017 (REPAIR-017).
Other than Step.
Examine the disk at Location 1 for the front outside diameter.
Repair, VRS6137 TASK 72-41-12-300-020 (REPAIR-020).
Other than Step.
Examine the disk at Location 2 for the rear outside diameter.
Repair, VRS6135 TASK 72-41-12-300-018 (REPAIR-018).
Other than Step.
Examine the disk at Location 3 for the front inside diameter.
SUBTASK 72-41-12-220-084-B00 Examine the Rear HPC Disk (6A7574) for the Diameters (SBE 72-0377)

CAUTION
DO NOT USE A PI TAPE TO MEASURE THE DIAMETERS, THE DIAMETERS ARE ON A CONICAL SURFACE.Refer to Figure.
Repair, VRS6008 TASK 72-41-12-300-015 (REPAIR-015).
Other than Step.
Examine the disk at Location 1 for the outside diameter of the stage 8 ceramic rub strip.
Repair, VRS6008 TASK 72-41-12-300-015 (REPAIR-015).
Other than Step.
Examine the disk at Location 2 for the outside diameter of the stage 9 ceramic rub strip.
Repair, VRS6008 TASK 72-41-12-300-015 (REPAIR-015).
Other than Step.
Examine the disk at Location 3 for the outside diameter of the stage 10 ceramic rub strip.
Repair, VRS6008 TASK 72-41-12-300-015 (REPAIR-015).
Other than Step.
Examine the disk at Location 4 for the outside diameter of the stage 11 ceramic rub strip.
SUBTASK 72-41-12-220-085 Examine the Rear HPC Disk for the Outside Diameters
Figure: Rear HPC Disk Inspection Locations -Front Flange Slots
Rear HPC Disk Inspection Locations -Front Flange Slots
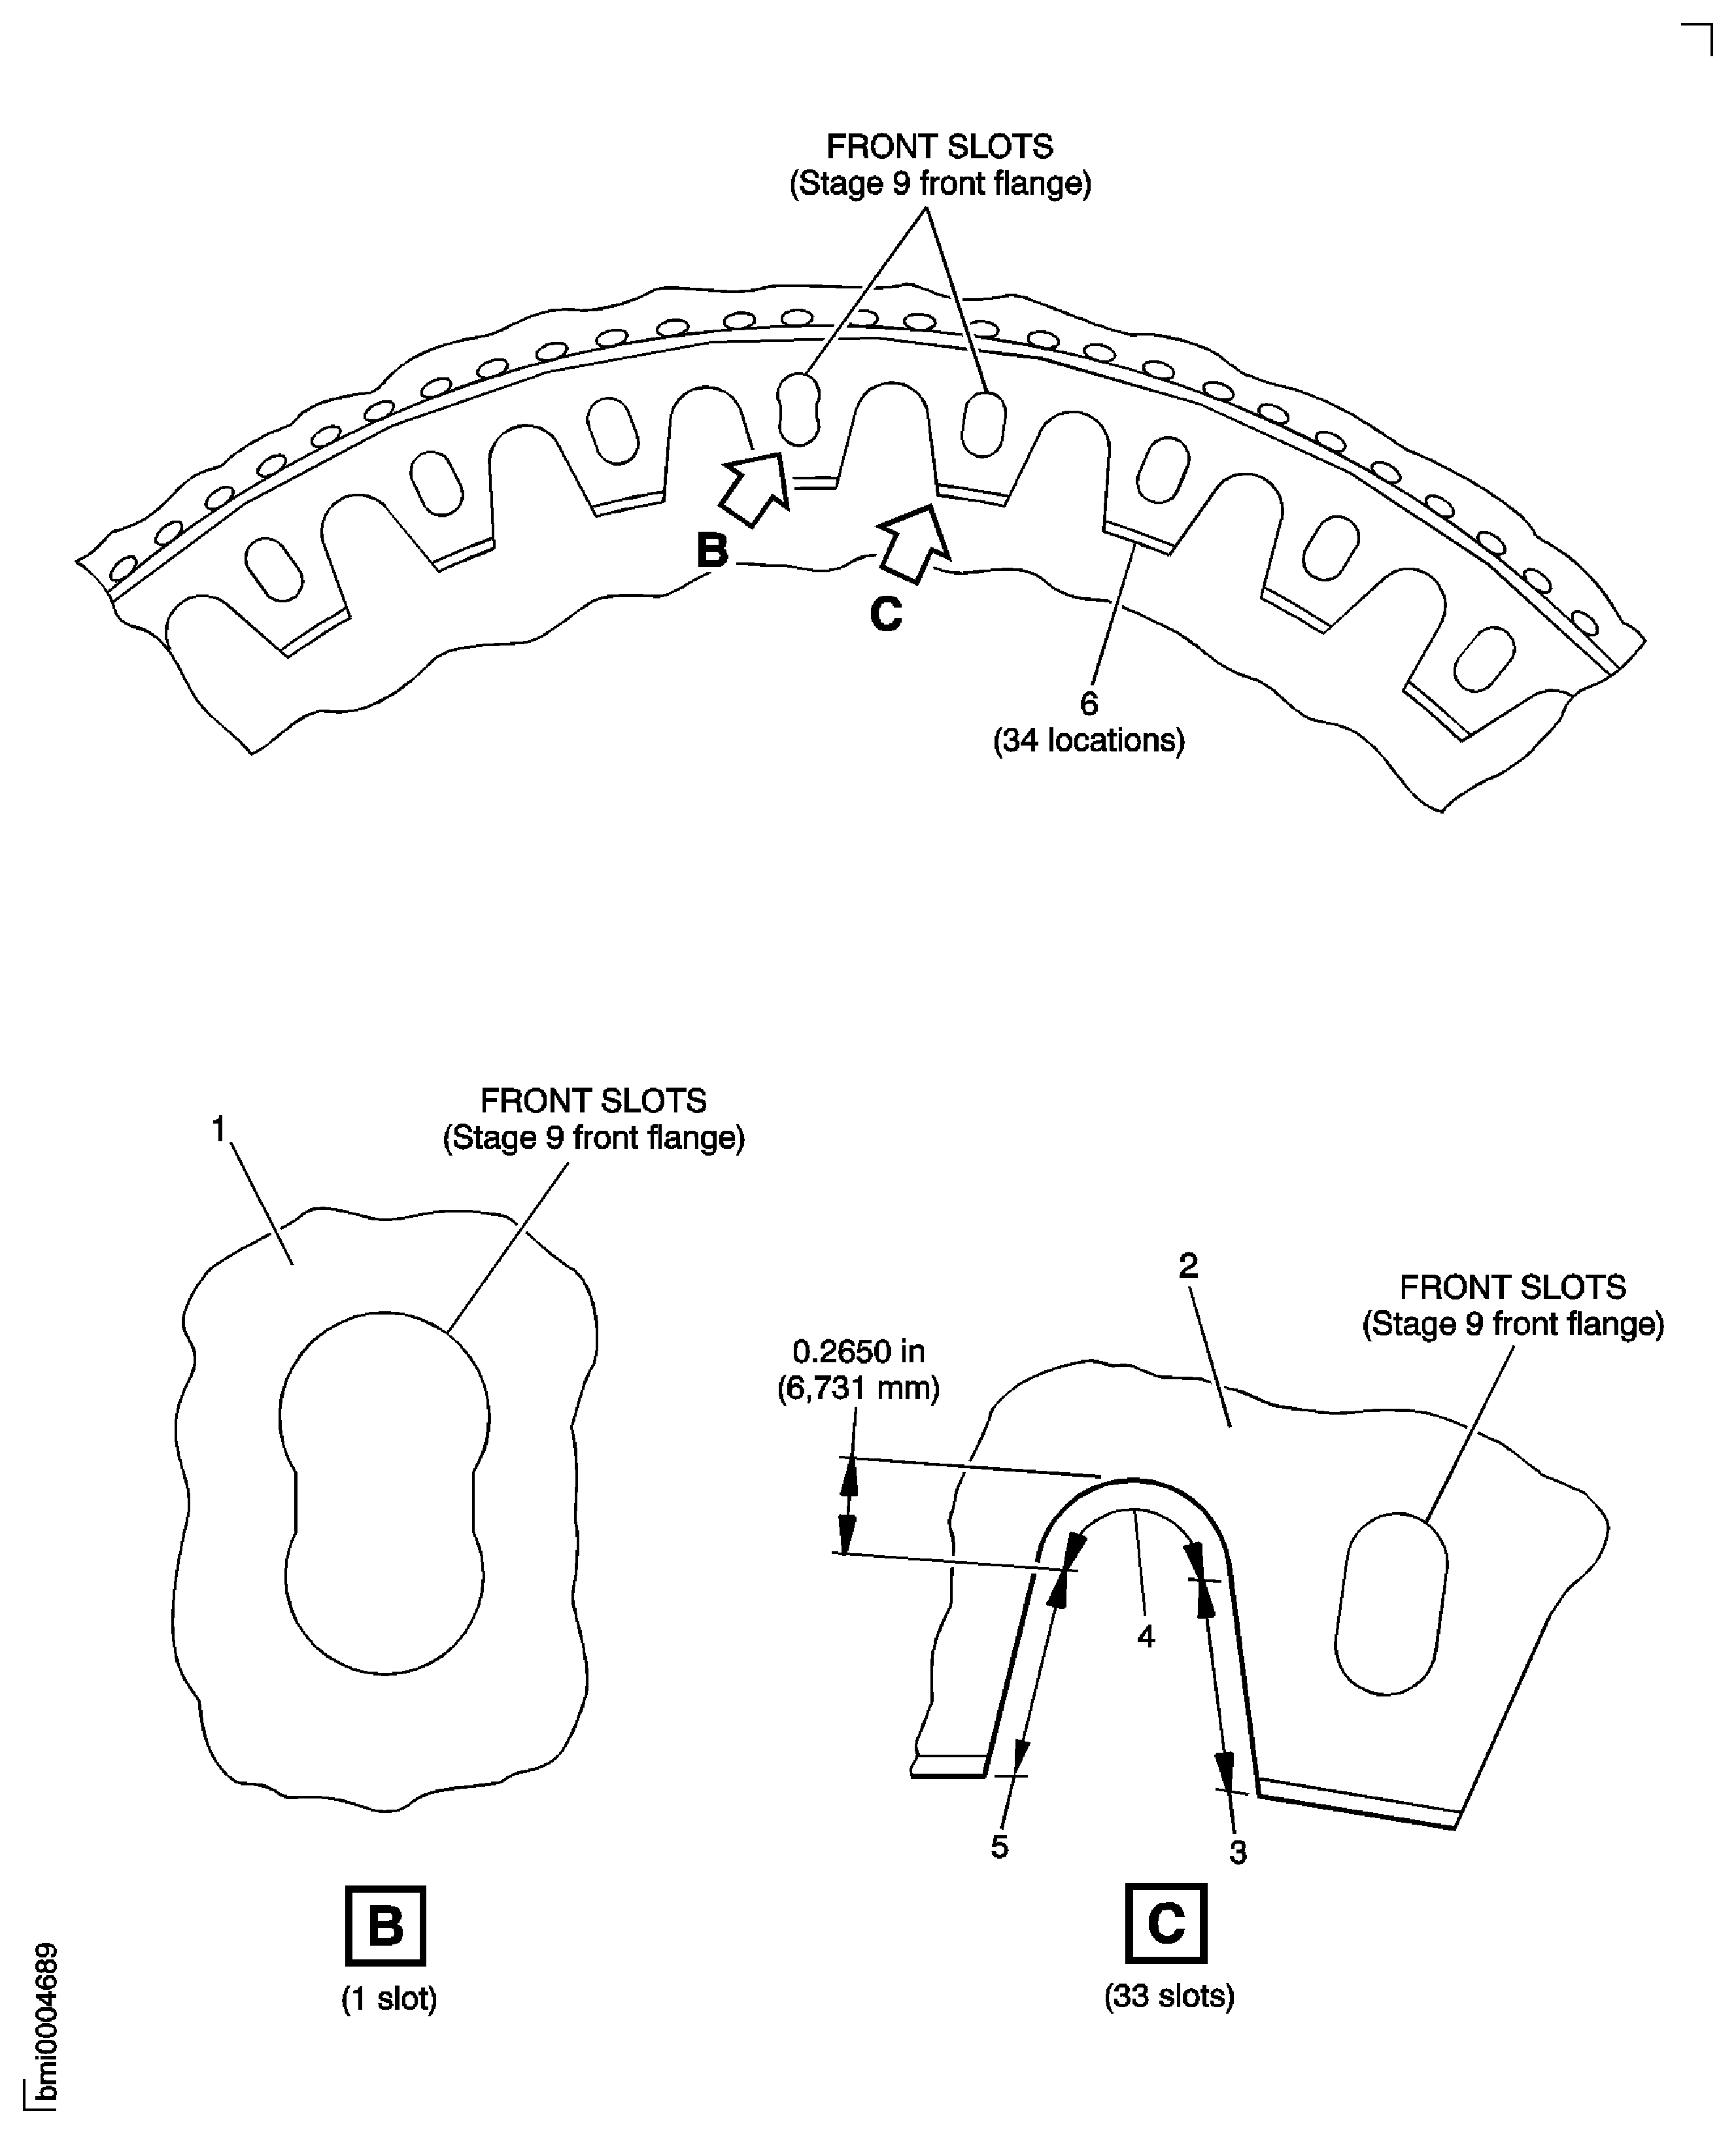
Figure: Rear HPC Disk Inspection Locations - Rear Bolt Holes
Rear HPC Disk Inspection Locations - Rear Bolt Holes
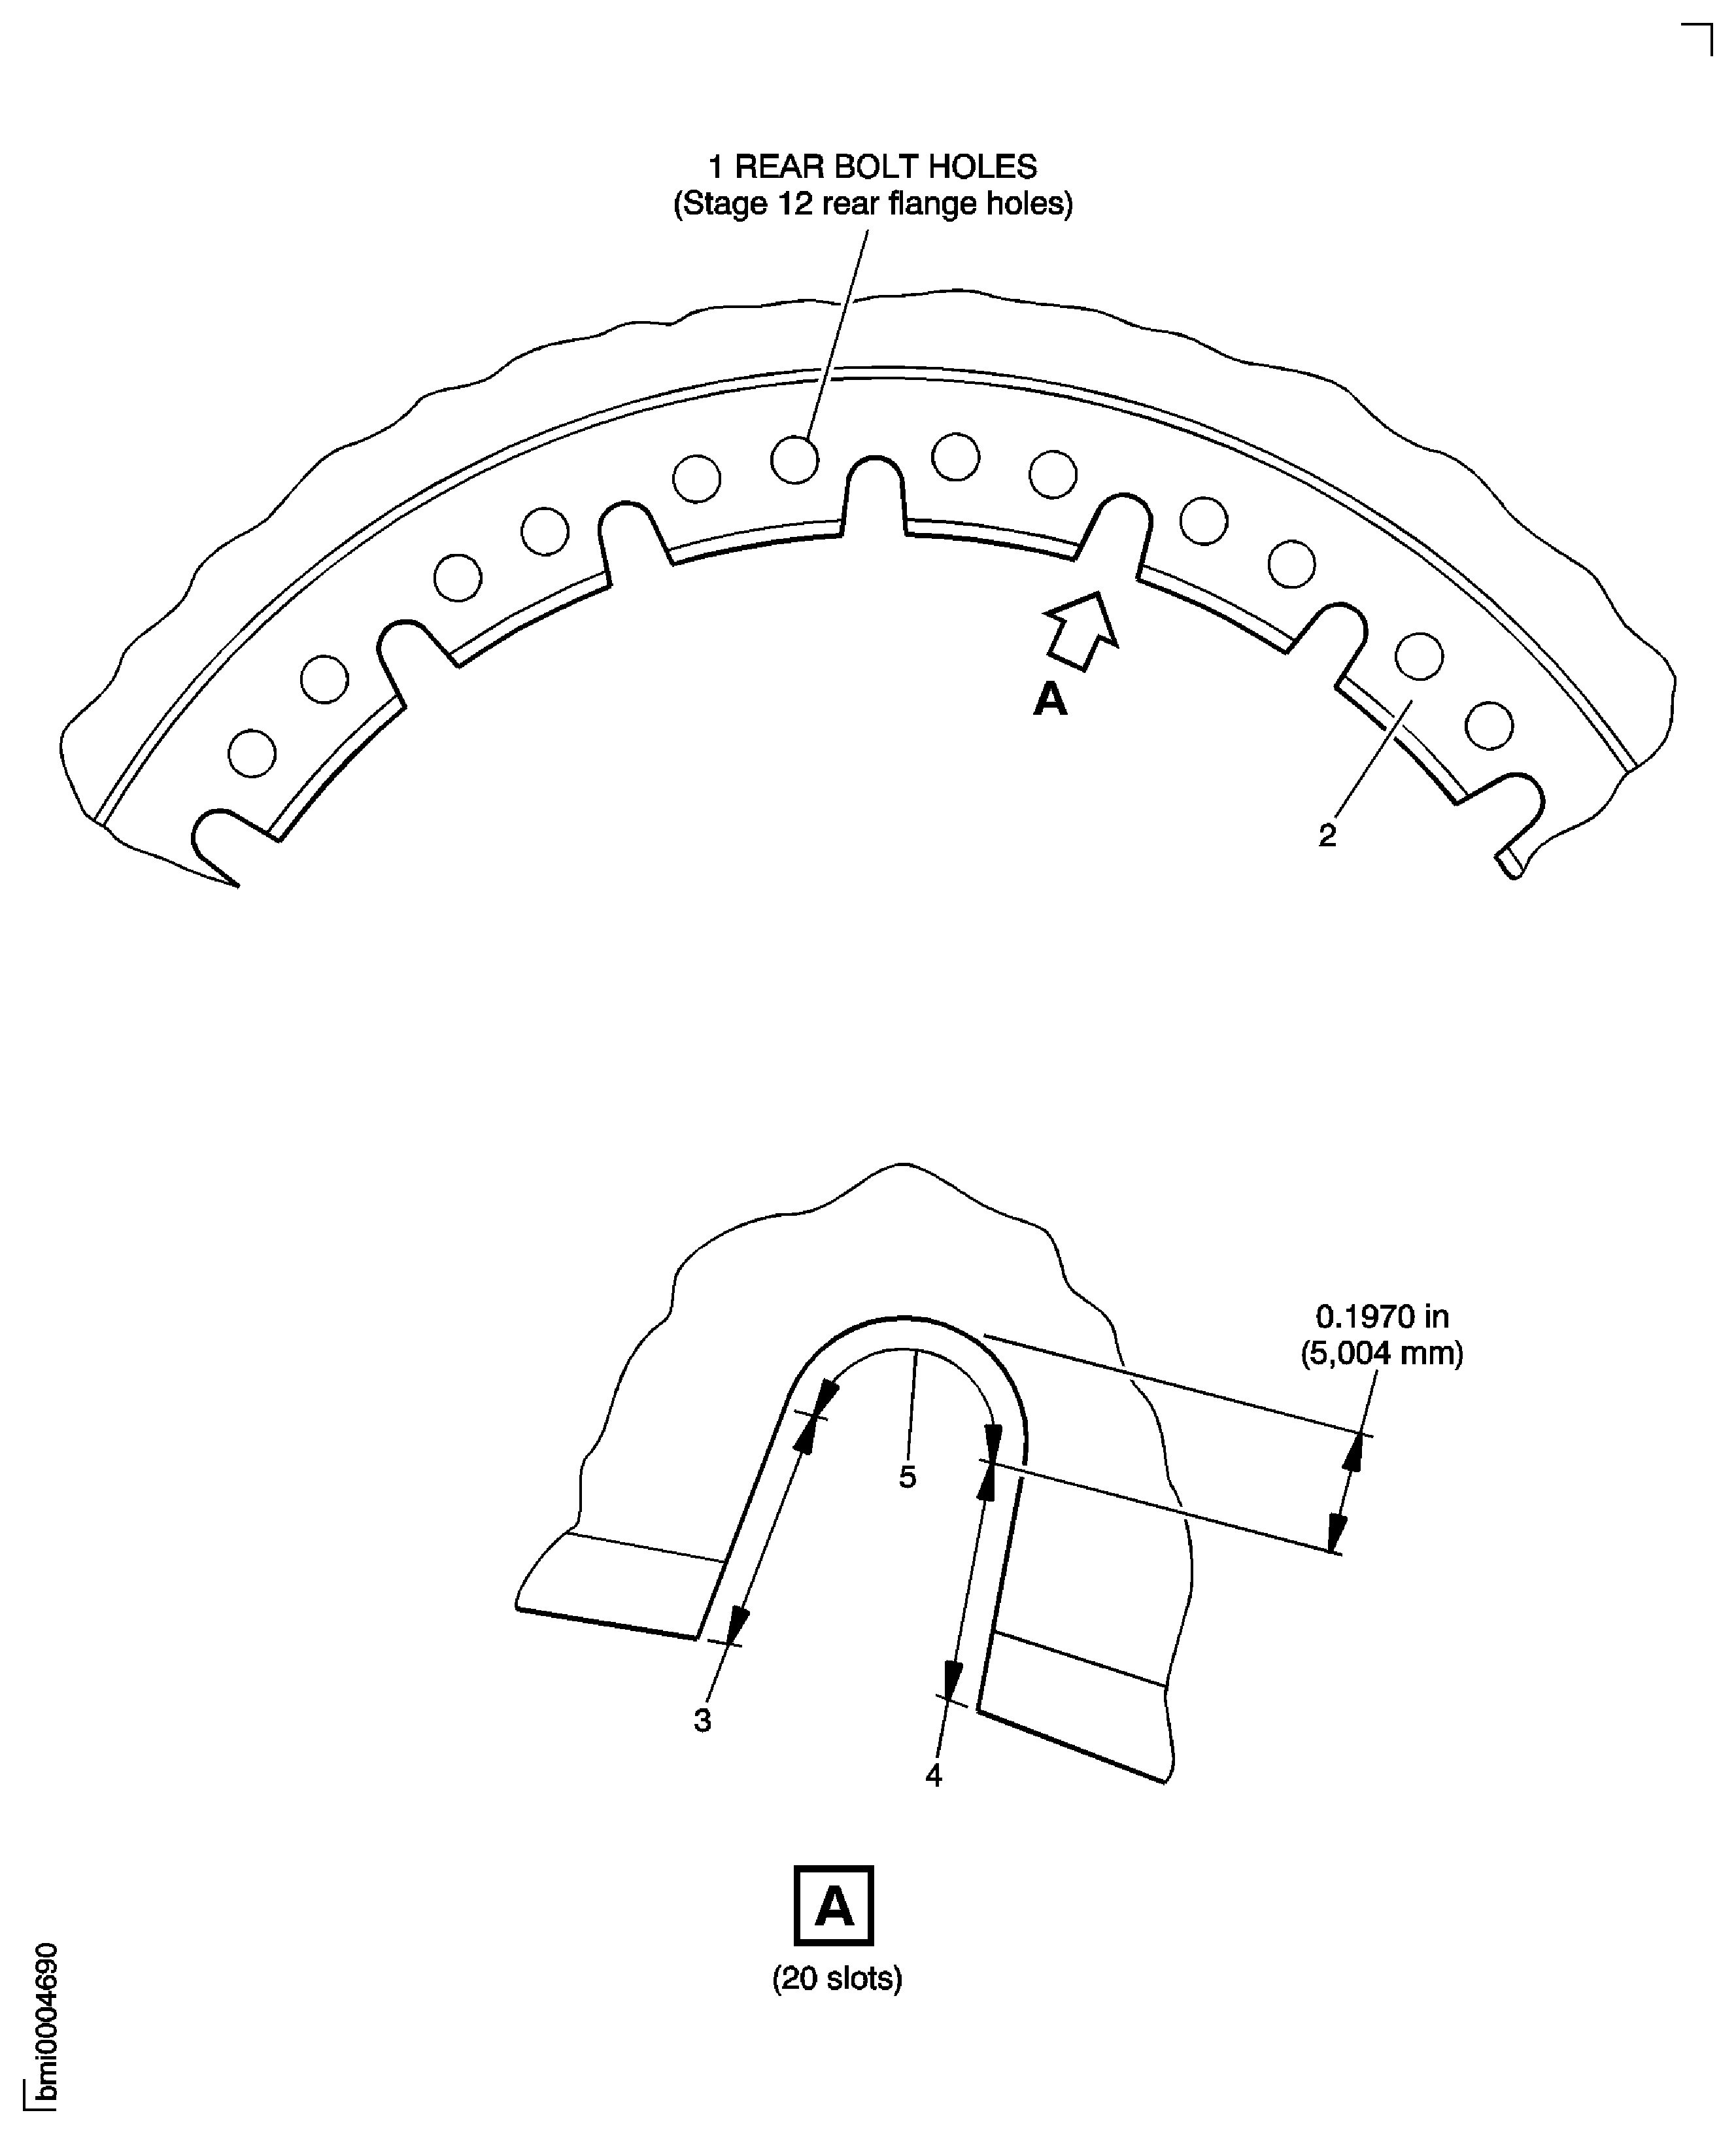
Figure: Rear HPC Disk Inspection Locations
Rear HPC Disk Inspection Locations
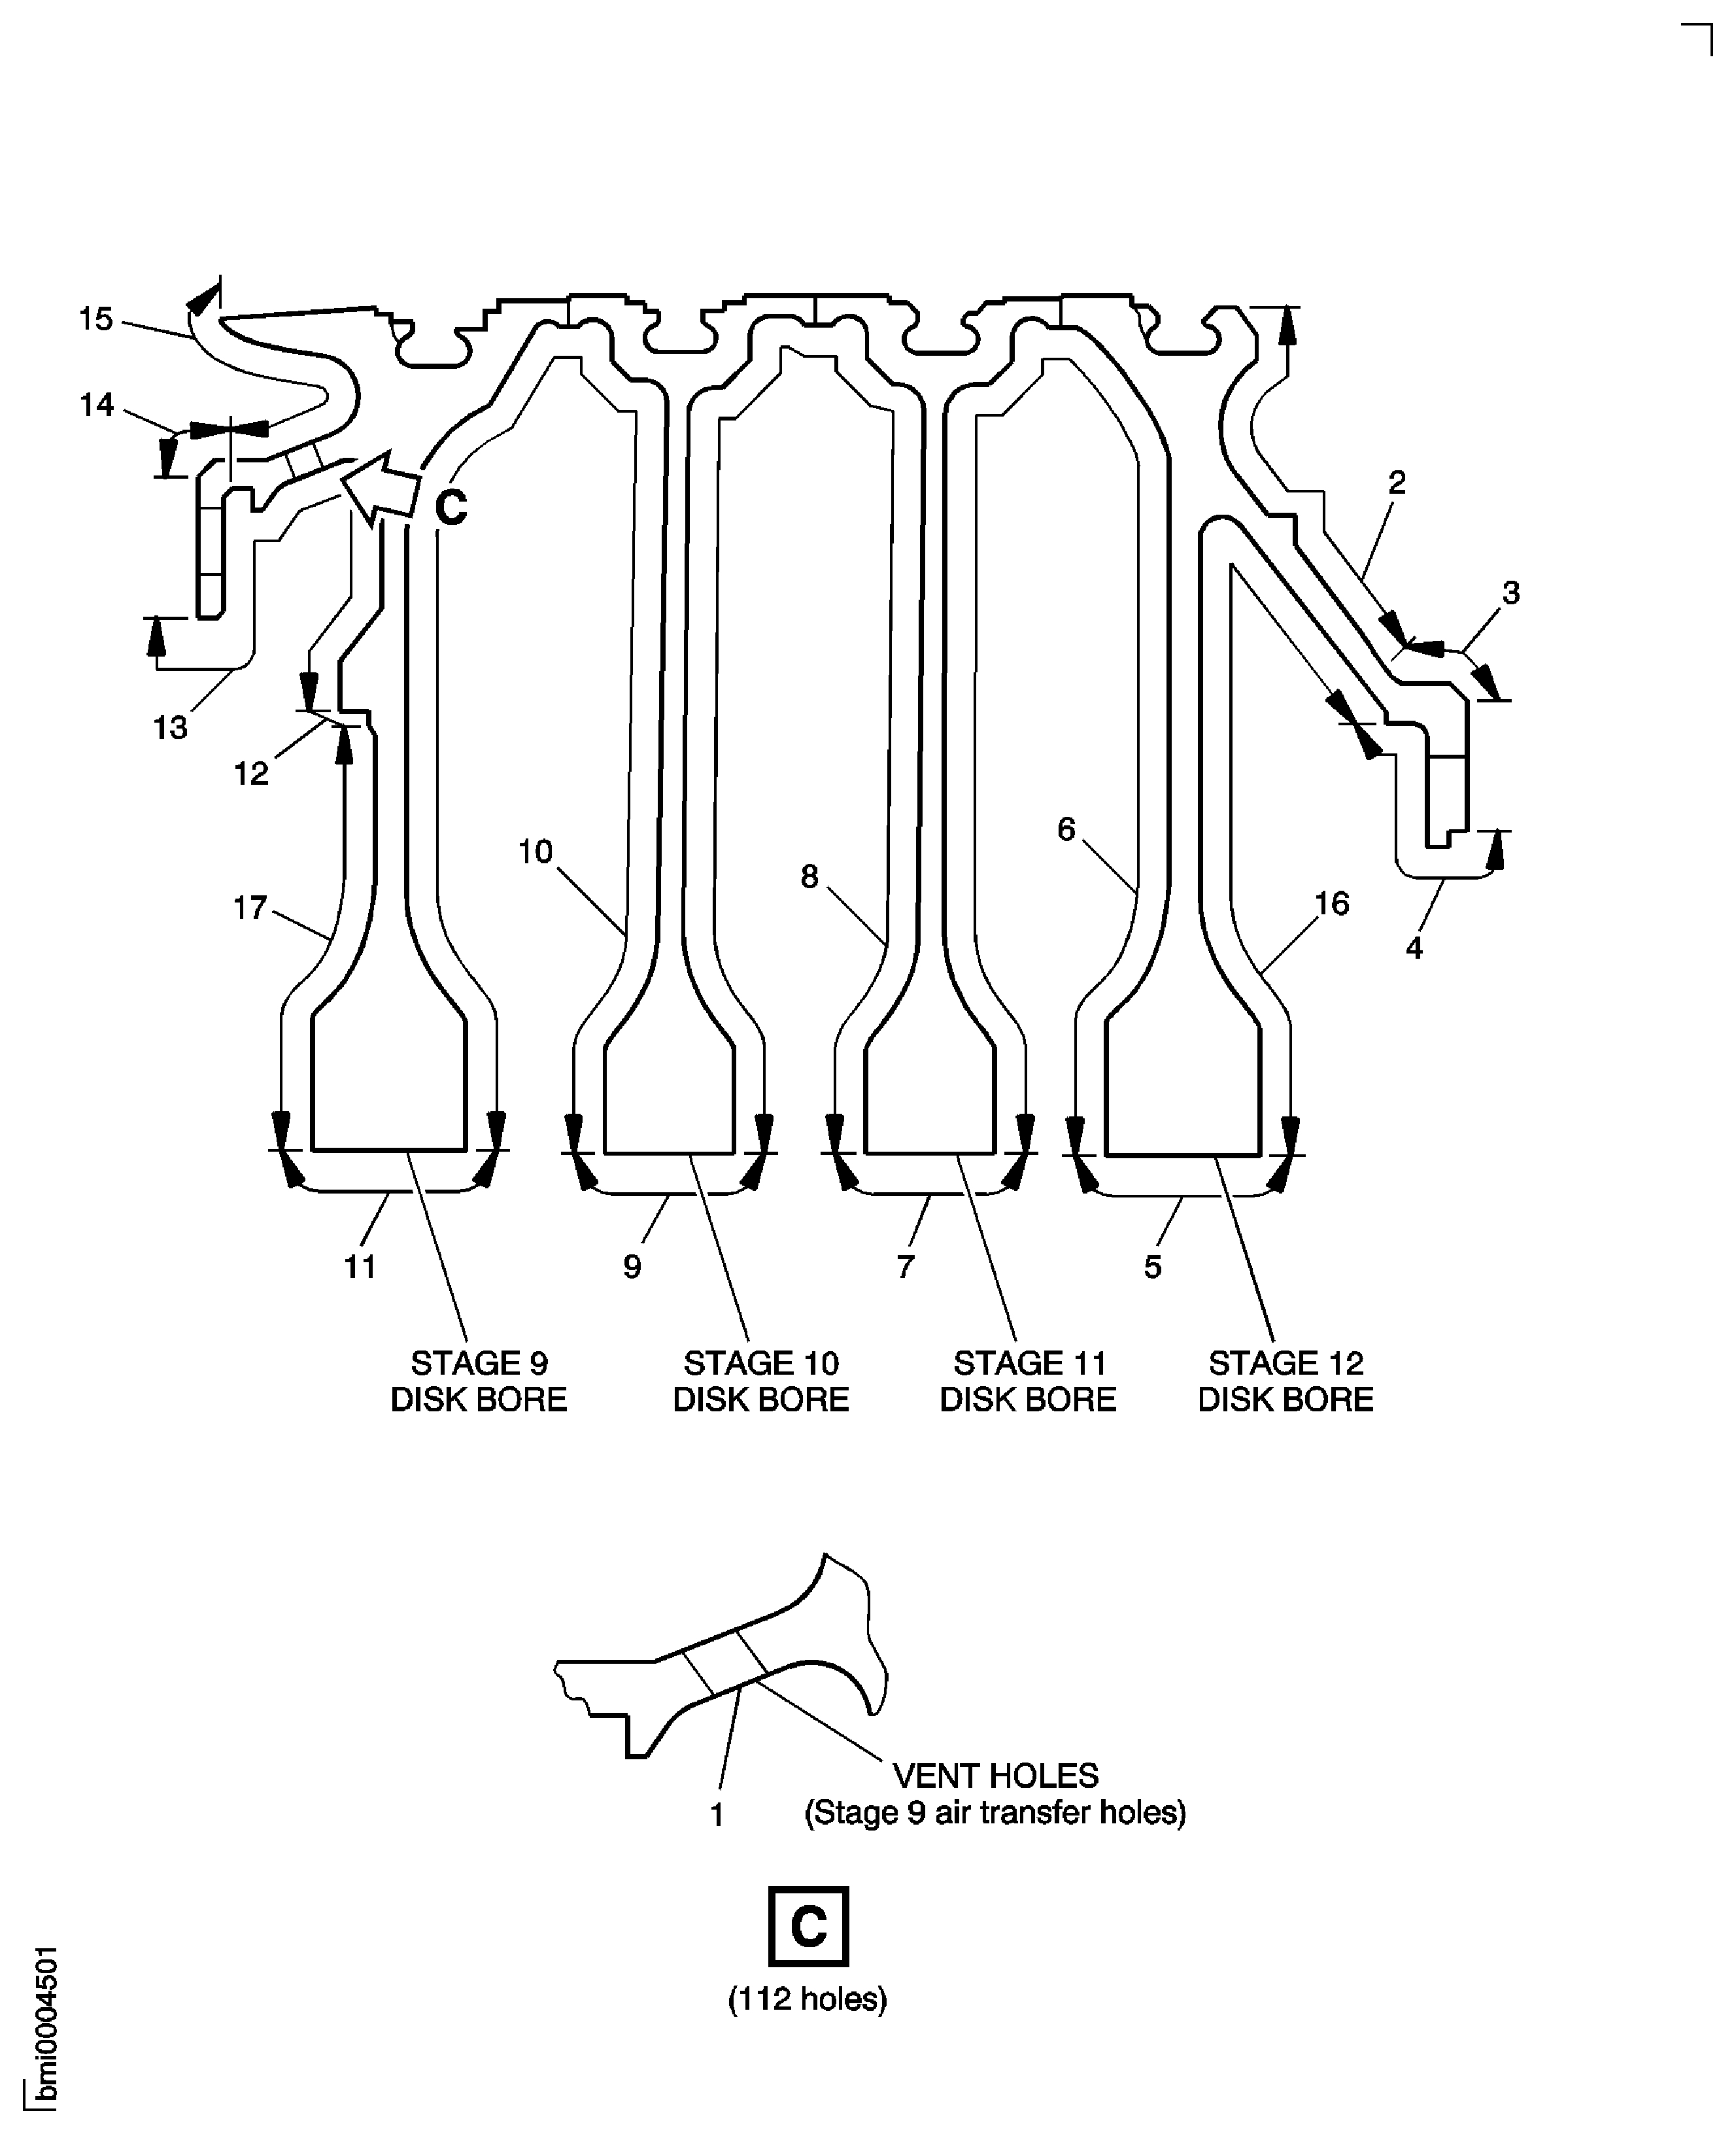
Figure: Focused Inspection - Blade Loading and Locking Slots Stages 9, 10, 11 and 12
Focused Inspection - Blade Loading and Locking Slots Stages 9, 10, 11 and 12

Figure: Rear HPC Disk Inspection Locations
Rear HPC Disk Inspection Locations
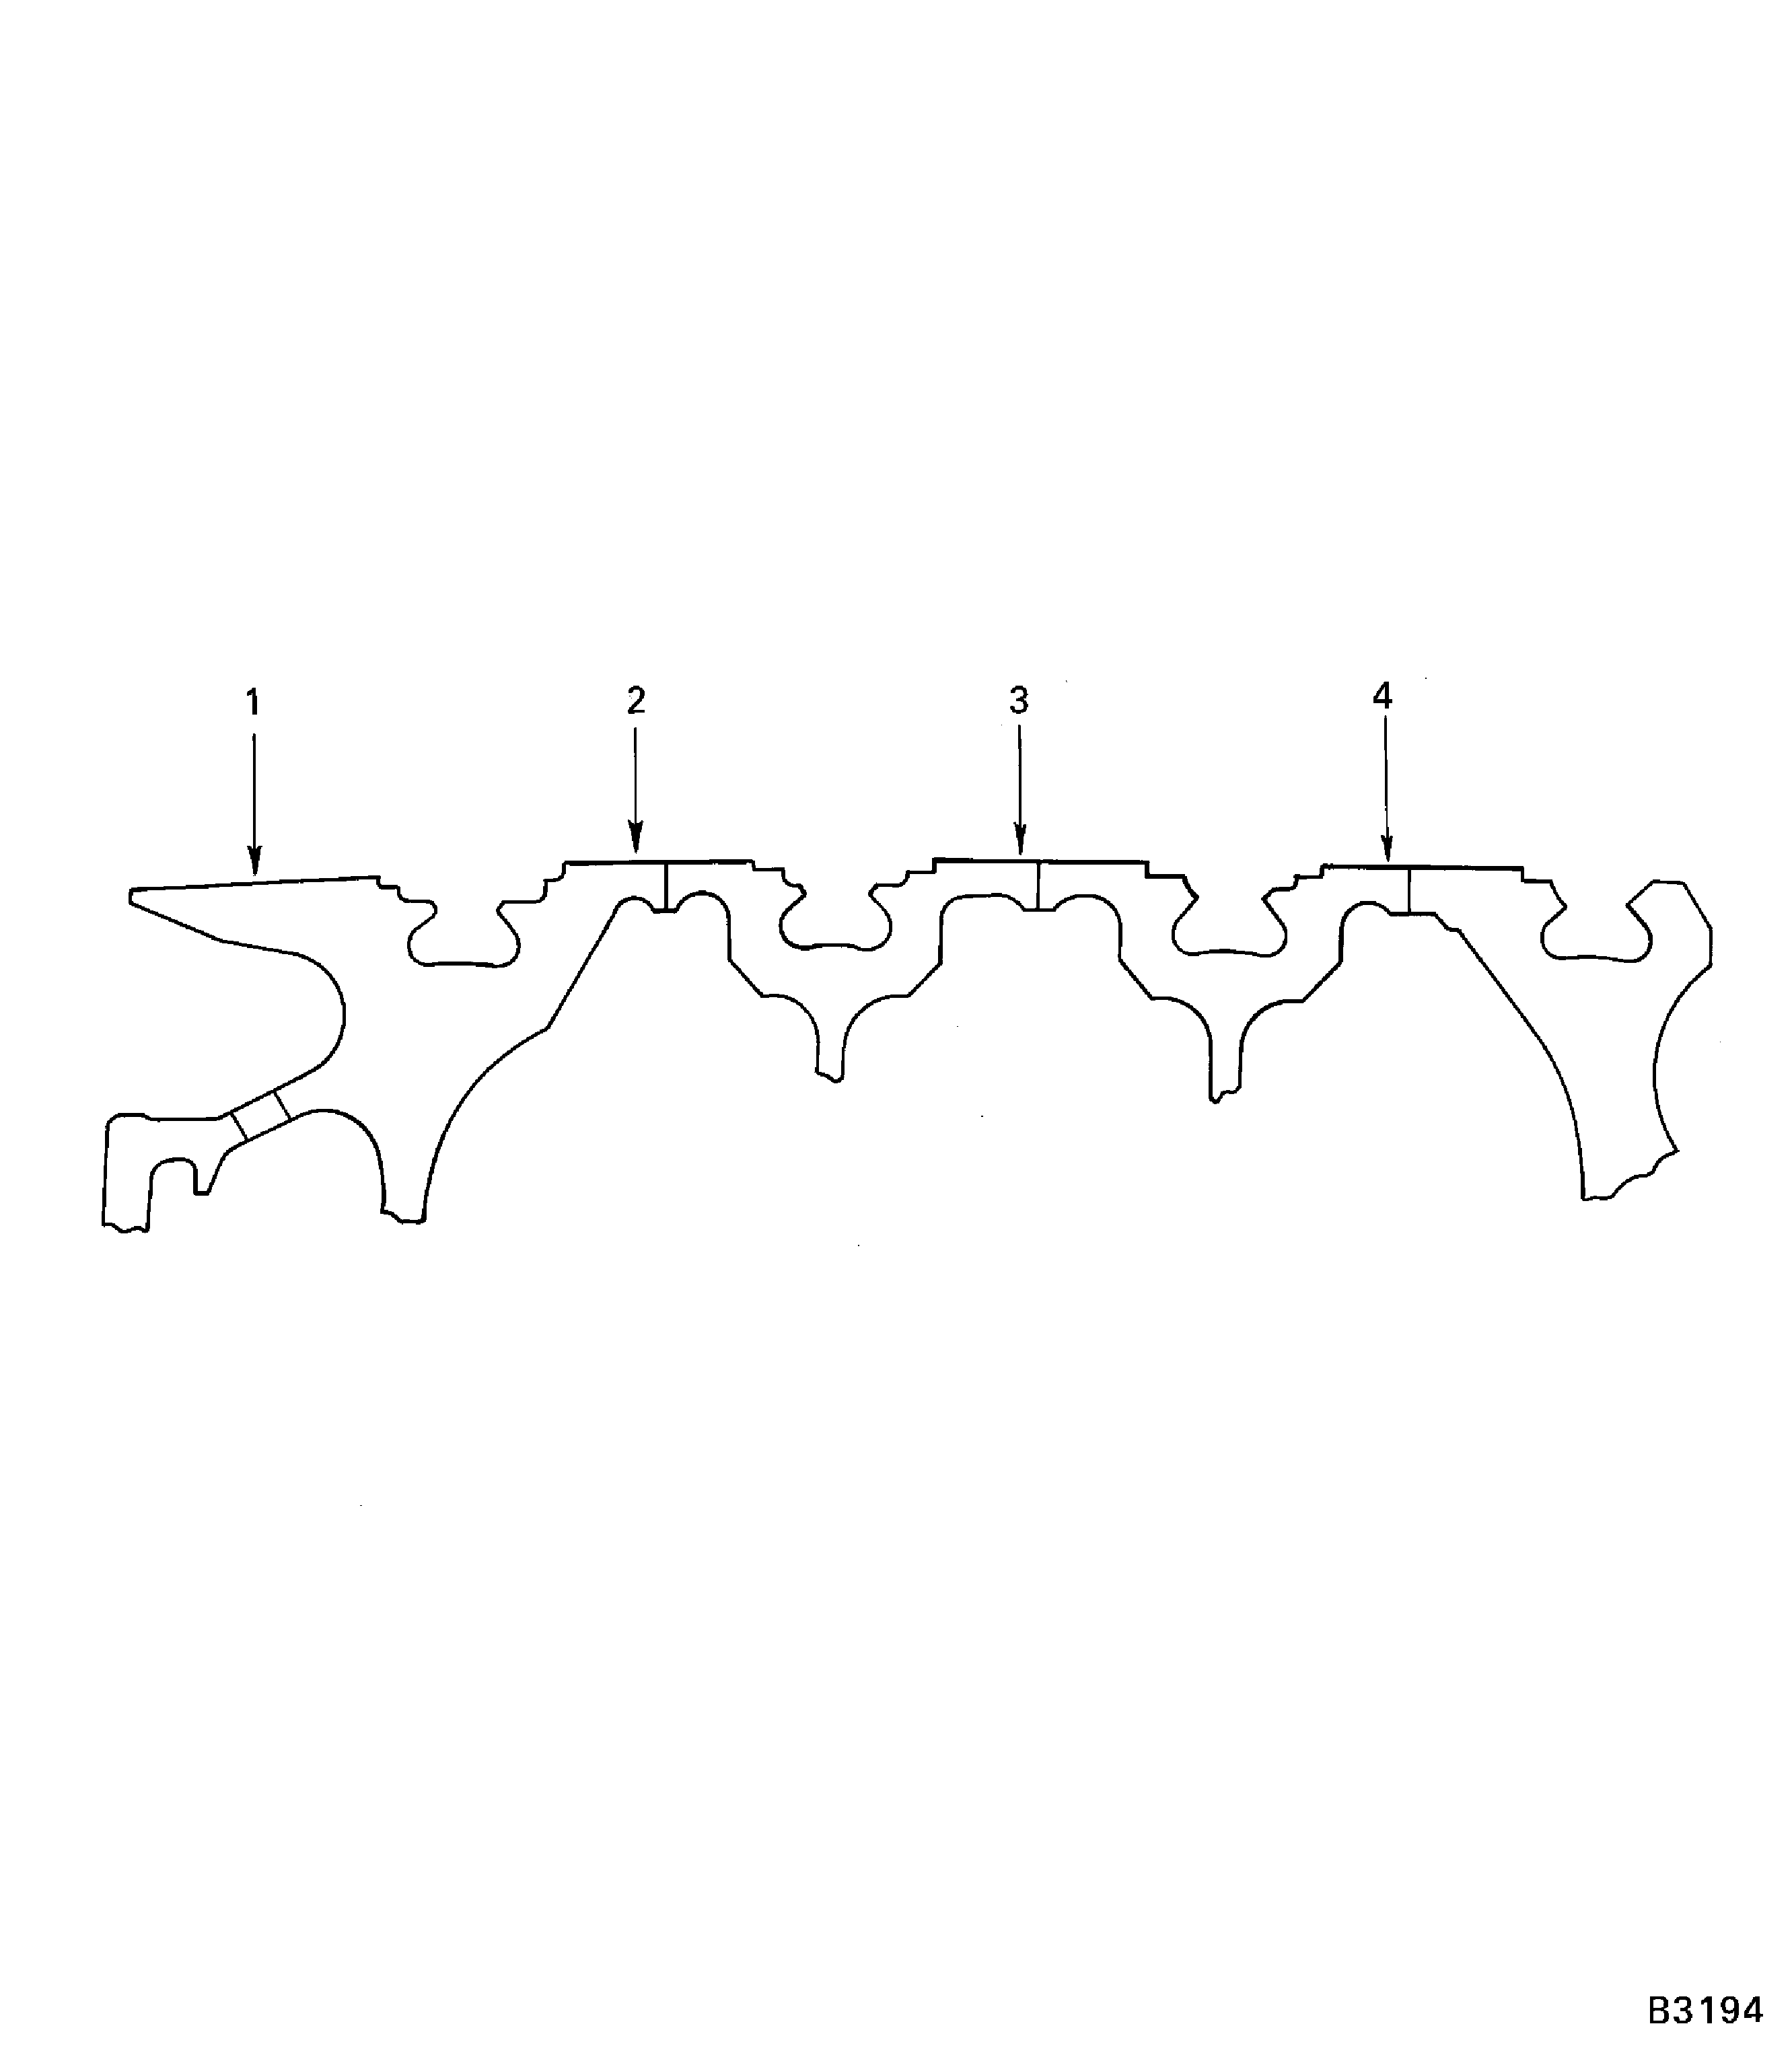
Figure: Rear HPC Disk Inspection Locations
Rear HPC Disk Inspection Locations
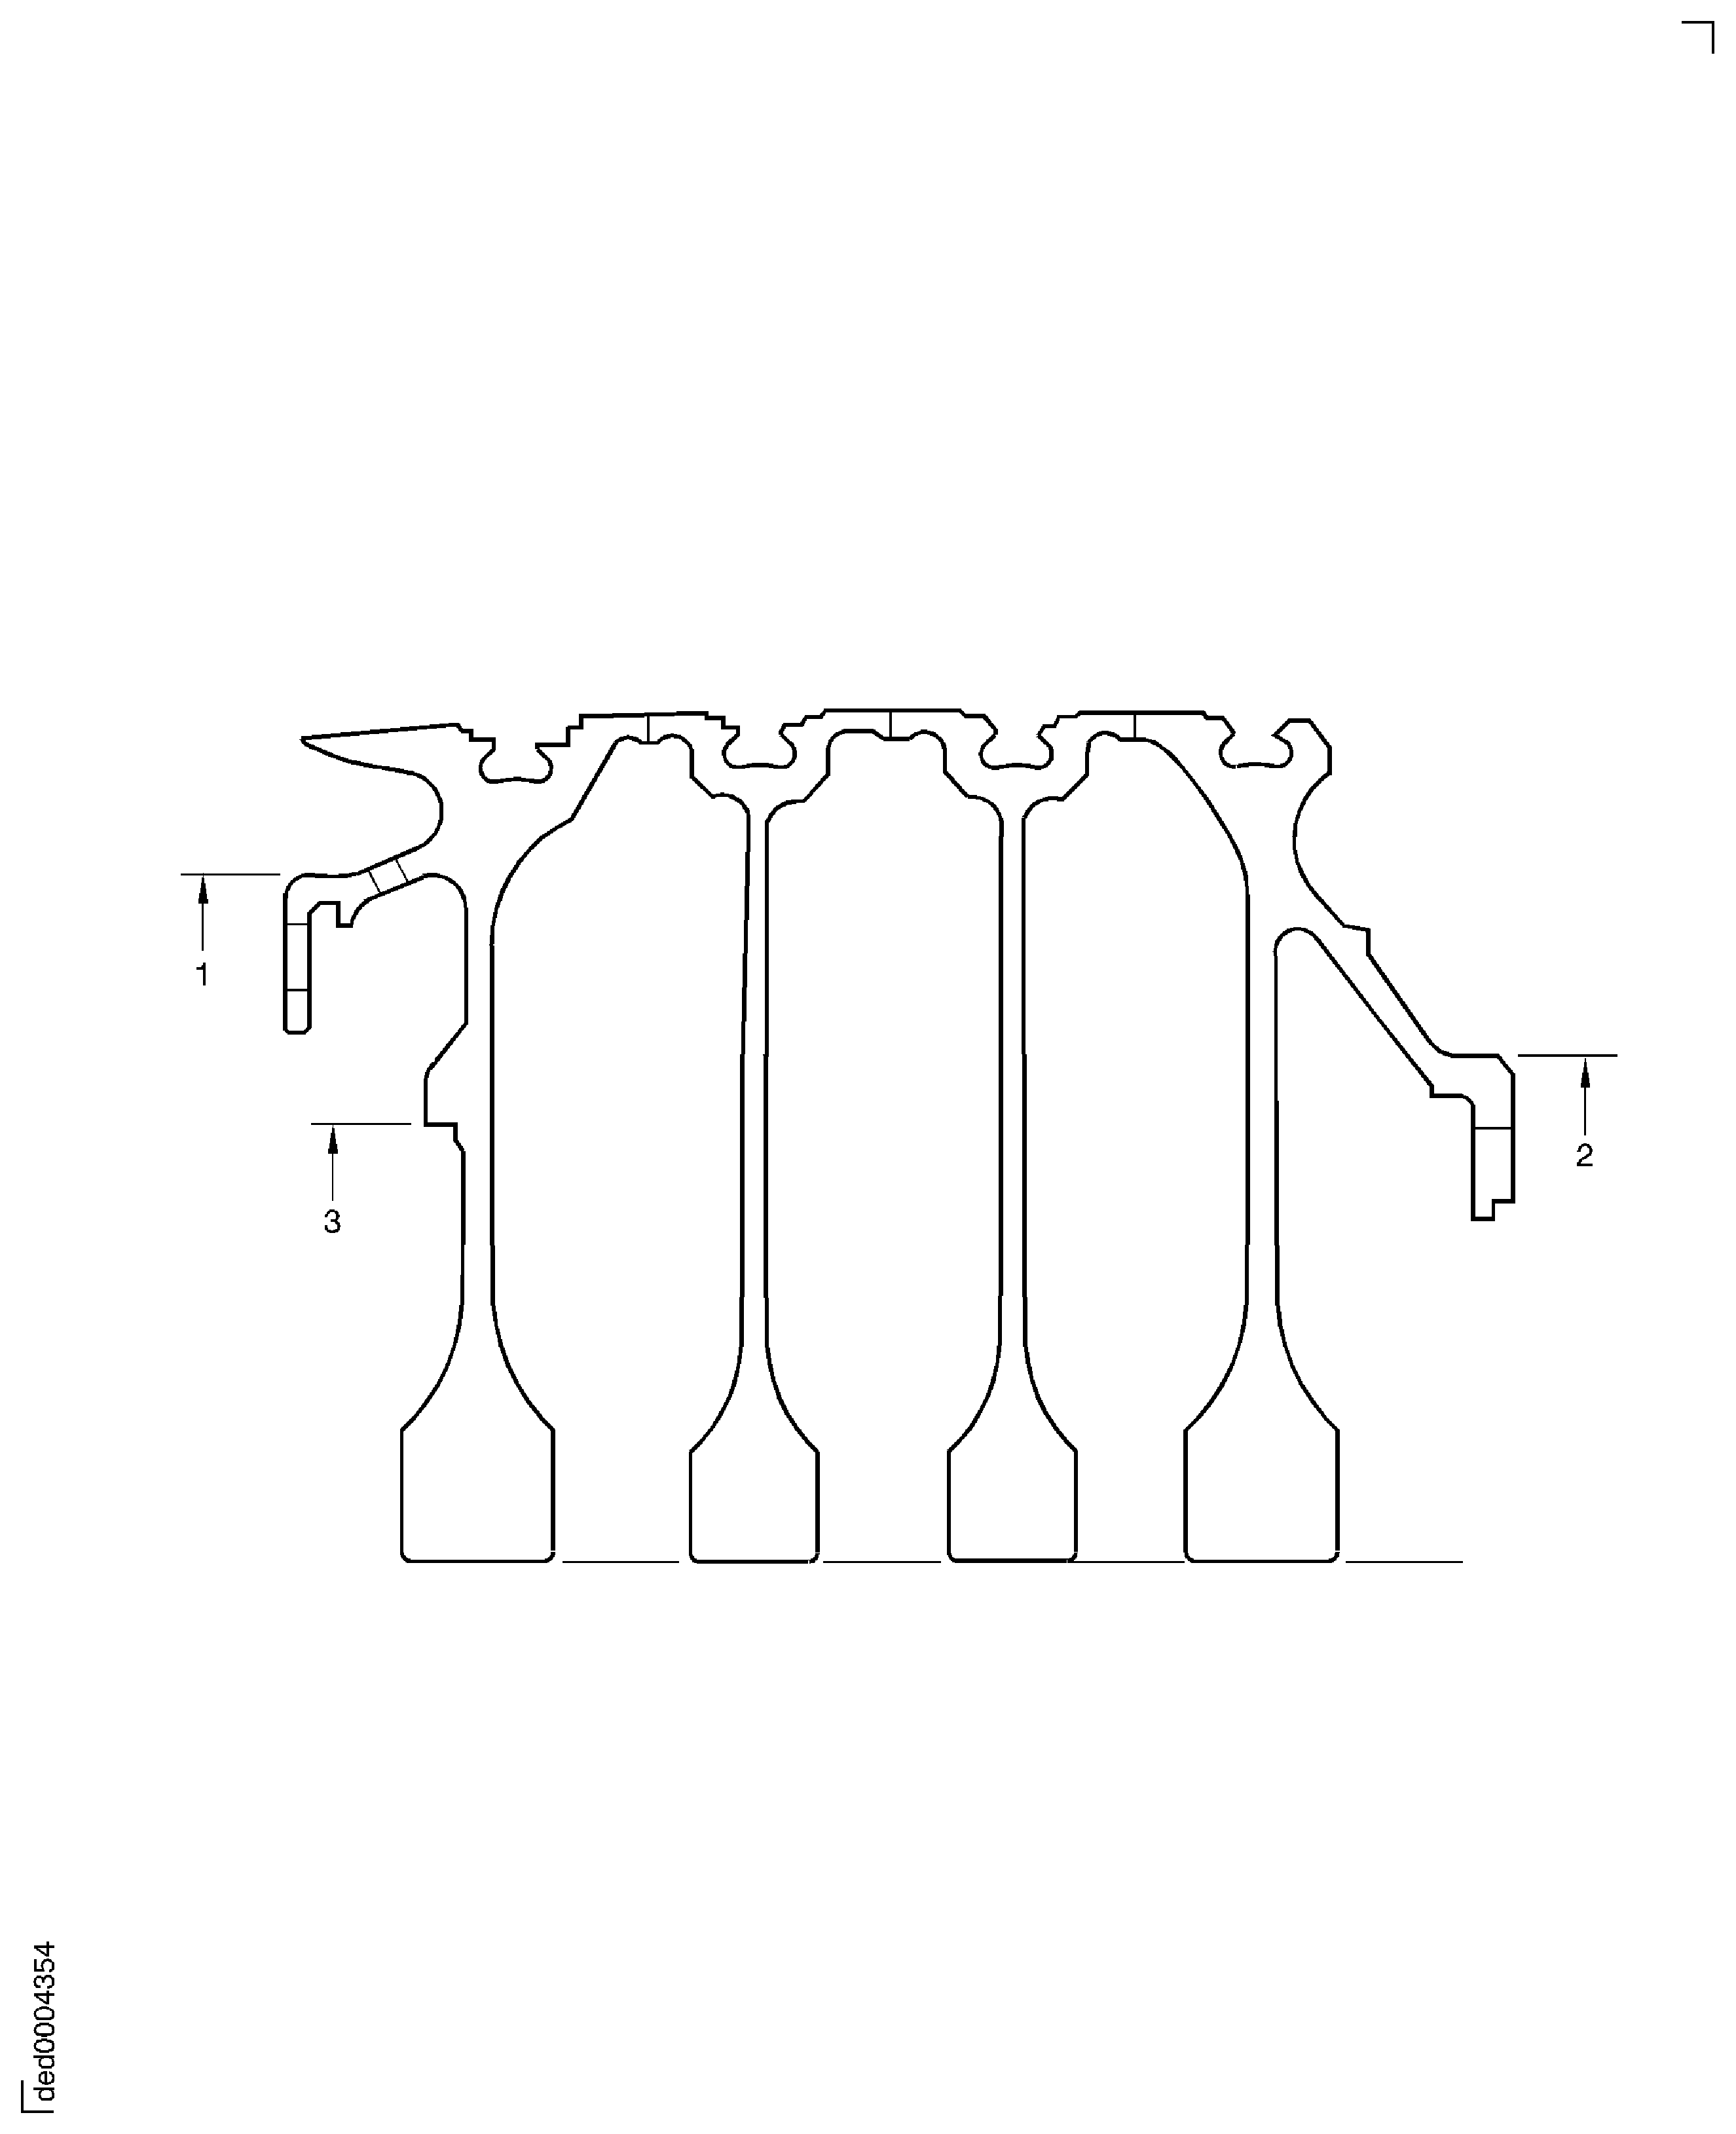
Figure: Rear HPC Disk Inspection Locations
Rear HPC Disk Inspection Locations
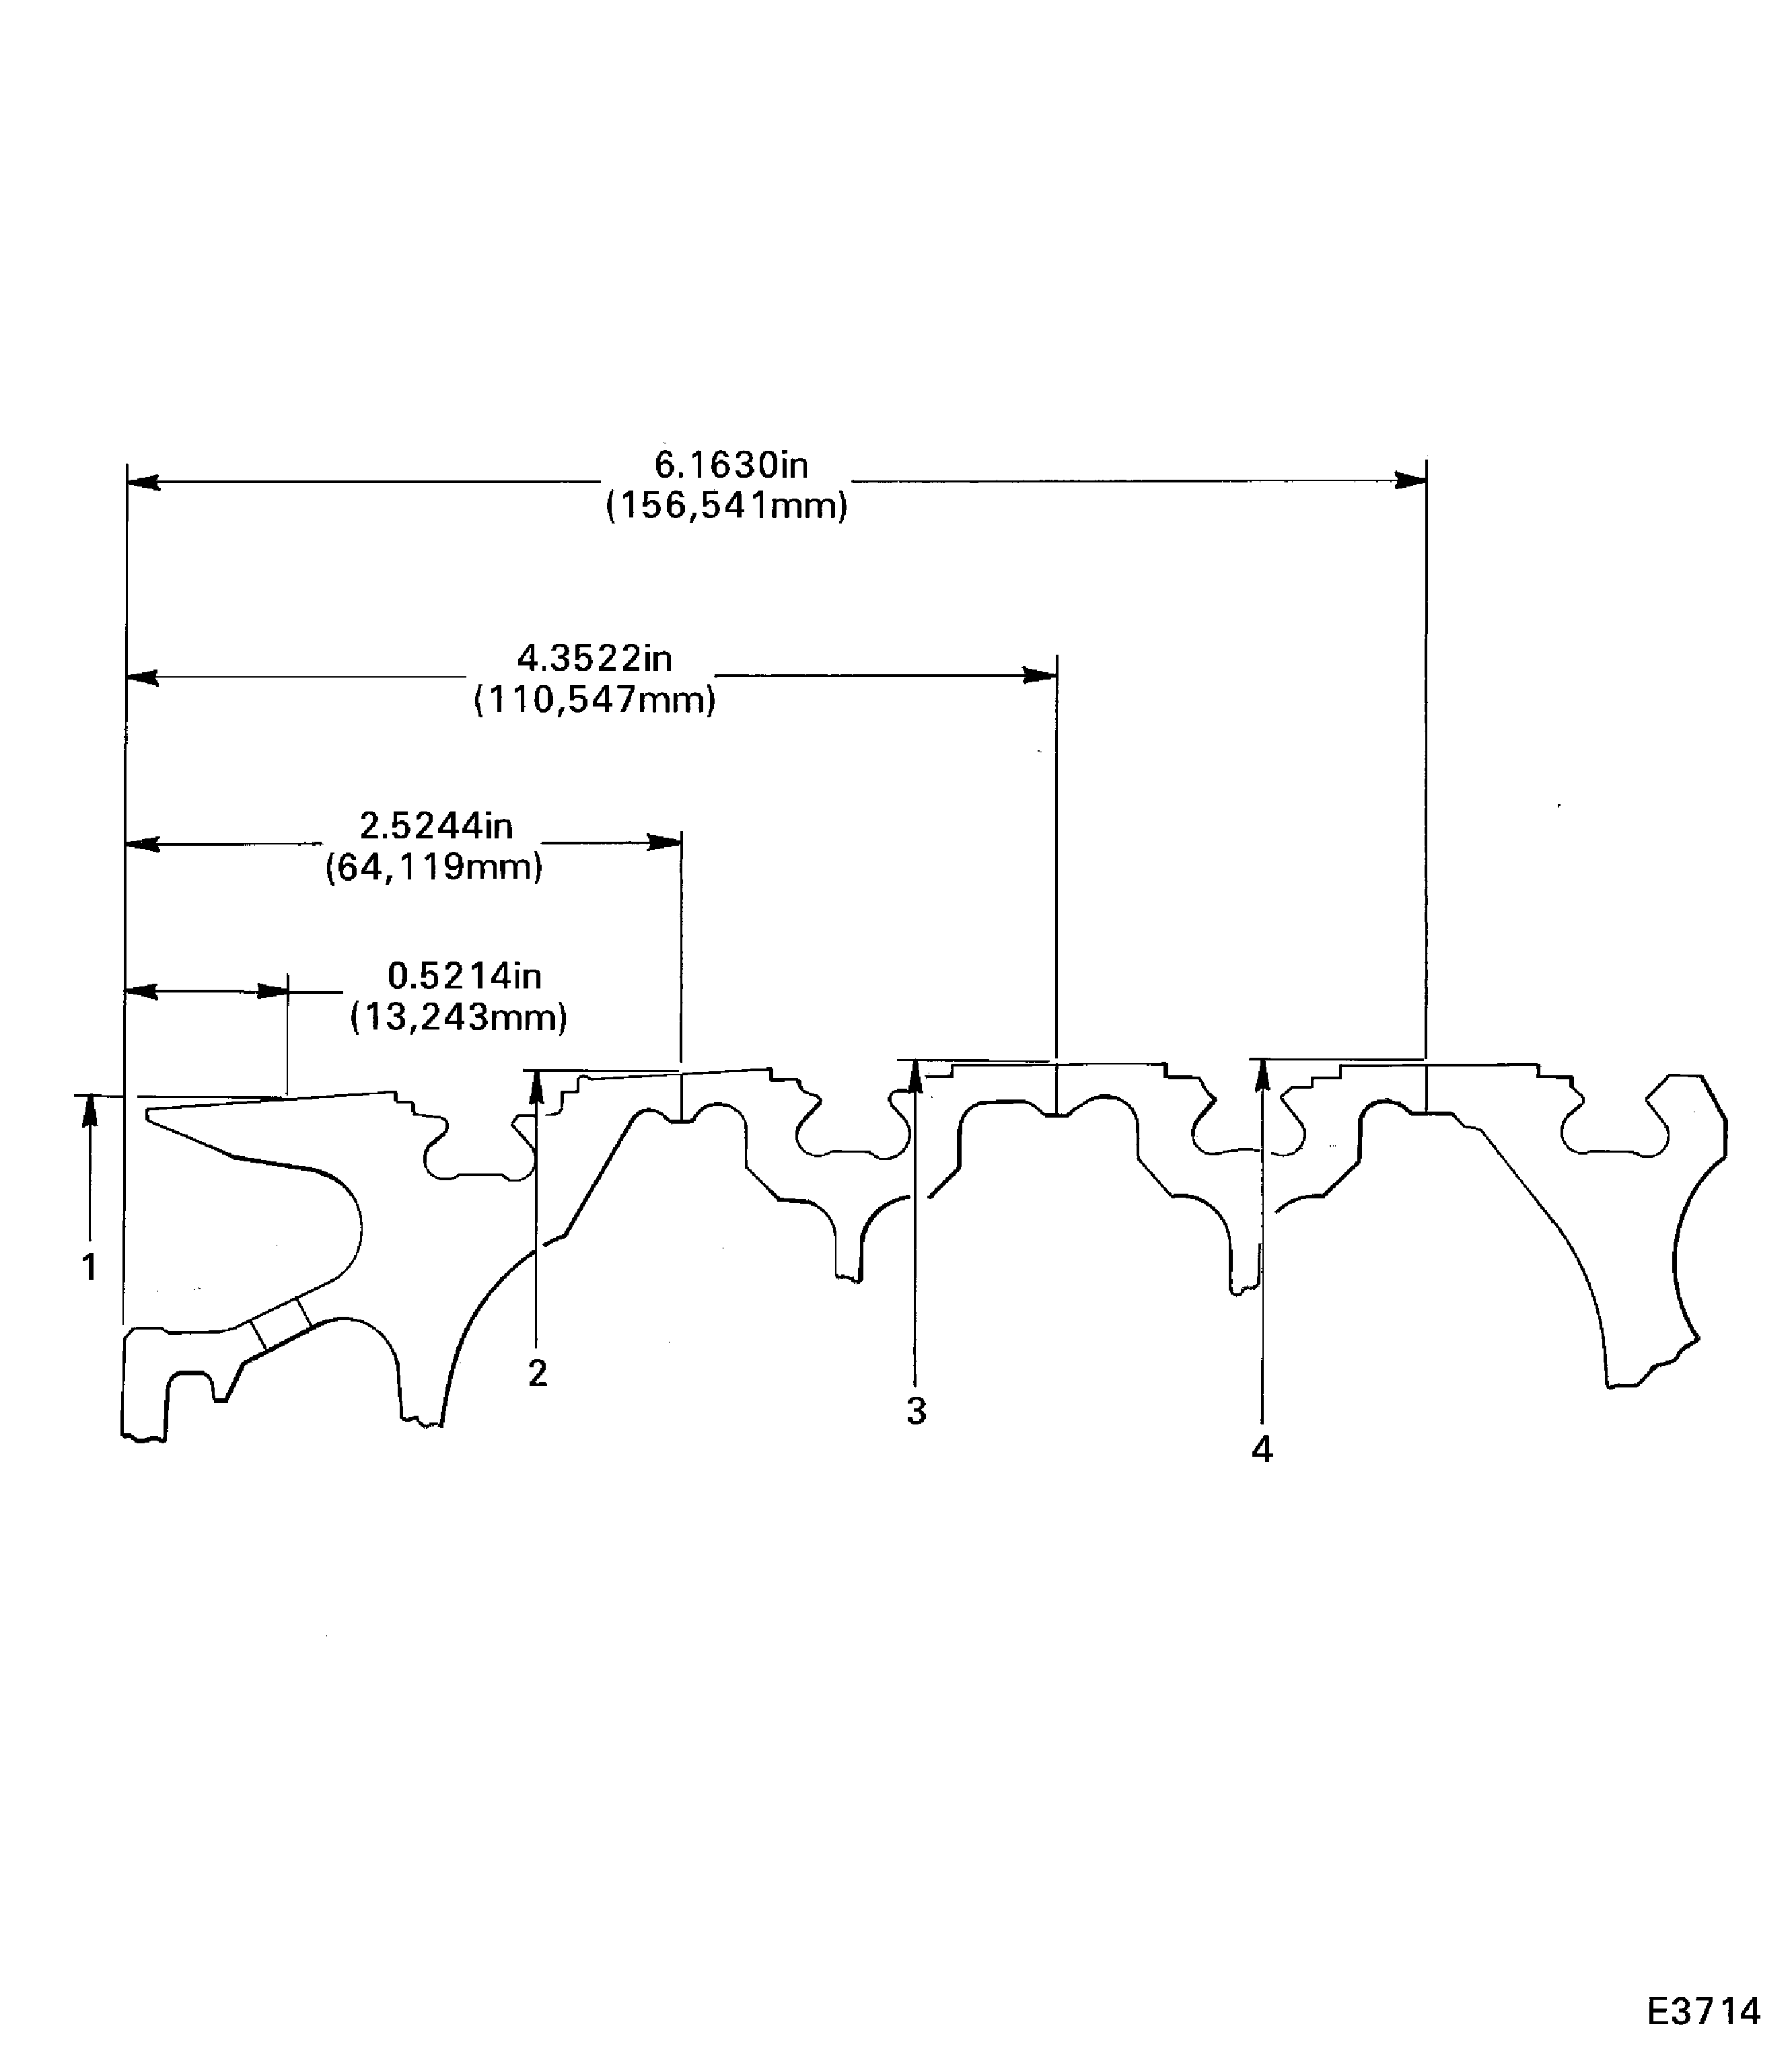
Figure: Focused Inspection - Stages 9, 10, 11 and 12 Disks Bore and Stage 9 Air Transfer Holes (Vent Holes)
Focused Inspection - Stages 9, 10, 11 and 12 Disks Bore and Stage 9 Air Transfer Holes (Vent Holes)

Figure: Focused Inspection - Blade Loading and Locking Slots Stages 9, 10, 11 and 12
Focused Inspection - Blade Loading and Locking Slots Stages 9, 10, 11 and 12

Figure: Focused Inspection - Front Flange Slots
Focused Inspection - Front Flange Slots

Figure: Focused Inspection - Rear Bolt Holes
Focused Inspection - Rear Bolt Holes

