Export Control
EAR Export Classification: Not subject to the EAR per 15 C.F.R. Chapter 1, Part 734.3(b)(3), except for the following Service Bulletins which are currently published as EAR Export Classification 9E991: SBE70-0992, SBE72-0483, SBE72-0580, SBE72-0588, SBE72-0640, SBE73-0209, SBE80-0024 and SBE80-0025.Copyright
© IAE International Aero Engines AG (2001, 2014 - 2021) The information contained in this document is the property of © IAE International Aero Engines AG and may not be copied or used for any purpose other than that for which it is supplied without the express written authority of © IAE International Aero Engines AG. (This does not preclude use by engine and aircraft operators for normal instructional, maintenance or overhaul purposes.).Applicability
All
Common Information
TASK 72-41-23-300-023 HPC Rear Outer Case - Repair By Skim Machining And Local Dressing, Repair-023 (VRS6528)
Effectivity
FIG/ITEM | PART NO. | ASSEMBLY |
|---|---|---|
02-400 | 6A4154 | A |
02-400 | 6A5495 | A |
02-400 | 6A5682 | A |
02-400 | 6A8162 | A |
02-400 | 6B1427 | A |
General
This repair must only be done when the instruction to do so is given in the relevant inspection procedures (identified by the applicable part number) located in section 72-41-23.
This TASK gives the procedure to repair the surface damage on the HP compressor rear outer case by machining and dressing.
TASKs identified by SPM TASK are in the Standard Practices Manual (SPM).
Price and Availability
Refer to International Aero Engines
Related Repairs
Repair the HP Compressor Rear Outer Case by Replacing the Surface Protection, refer to repair, VRS6178 TASK 72-41-23-300-003 (REPAIR-003).
Replace Worn Location Pins in the HP Compressor Rear Outer Case Assembly, refer to repair, VRS6278 TASK 72-41-23-300-021 (REPAIR-021).
Replace Damaged Shank Nuts in the HP Compressor Rear Outer Case Assembly, refer to repair, VRS6279 TASK 72-41-23-300-011 (REPAIR-011).
Repair Damaged Helicoil or Thinwall Insert(s) in the HP Compressor Rear Outer Case Assembly by replacement, refer to repair, VRS6306 TASK 72-41-23-300-019 (REPAIR-019).
NOTE
NOTE
It is possible that some materials in the consumable materials chart cannot be used for some or all of the necessary applications. Before you use the materials, make sure the types, quantities and applications of the materials necessary are legally permitted in your location. All persons must obey all applicable federal, state, local and provincial laws and regulations when it is necessary to work with these materials.
To identify the consumable materials refer to the Overhaul Processes and Consumables Index (PCI).
Other necessary consumable materials are referred to in the SPM TASKS.
Check if the part has been identified with VRS6528, to indicate previous accomplishment of this repair.
If so, ensure damage surface(s) have sufficient machining allowance to permit damage removal.
If not, proceed with the following repair procedure.
Preliminary Requirements
Pre-Conditions
| Action/Condition | Data Module/Technical Publication |
|---|---|
| Make sure that all the cleaning and inspection procedures are done before the repair. |
Support Equipment
NONEConsumables, Materials and Expendables
NONESpares
NONESafety Requirements
NONEProcedure
Repair, VRS6306 TASK 72-41-23-300-019 (REPAIR-019).
Remove the thinwall insert(s).
SUBTASK 72-41-23-350-098 Remove the Thinwall Inserts from Duct and Borescope Port Bosses
Repair, VRS6279 TASK 72-41-23-300-011 (REPAIR-011).
Remove the shank nuts.
SUBTASK 72-41-23-350-099 Remove the Shank Nuts
Repair, VRS6278 TASK 72-41-23-300-021 (REPAIR-021).
Remove the dowel pins.
SUBTASK 72-41-23-350-100 Remove the Location Pins (Dowel)
Refer to SPM TASK 70-23-02-230-501.
Cracks are not permitted.
Do a local penetrant crack test of the repaired area(s).
SUBTASK 72-41-23-230-093 Do a Crack Test
Accept.
If all pitting and/or damage is removed.
Continue machining bore diameter up to 0.360 in. (9.14 mm).
If all pitting and/or damage is removed.
Restore the oversized hole(s). Refer to Repair, VRS9525 TASK 72-41-23-300-020 (REPAIR-020).
If pitting and/or damage is still evident.
Reject.
If pitting and/or damage is still evident.
Machine to maximum hole sizes specified.
For Stage 7 borescope holes located at 151 degrees and 149.100 degrees.
Accept.
If all pitting and/or damage is removed.
Reject.
If pitting and/or damage is still evident.
Machine to maximum hole sizes specified.
For all other borescope hole locations
Machine the damaged borescope bores.
SUBTASK 72-41-23-350-103 Machine the Surface Damage on Duct and Borescope Port Bosses, Assembly A
Refer to SPM TASK 70-11-03-300-503.
Chemically clean the part.
SUBTASK 72-41-23-110-089 Chemically Clean
Refer to repair, VRS6306 TASK 72-41-23-300-019 (REPAIR-019).
Use thinwall inserts AS52761 and/or AS52762 as shown.
Install the new inserts.
NOTE
Reduction of installed insert depth relative to boss face is permitted due to machining operation (Step).
SUBTASK 72-41-23-350-104 Install the New Inserts, Assembly A
If surface damage is removed, continue from Step.
Remove the remaining damages by dressing and blending. Refer to Step.
If surface damage is not removed from either front outer flange - inner face, rear outer flange - inner face, boroscope duct boss faces, duct boss faces.
If surface damage is not removed from other machined areas, reject.
Do a visual inspection of the repaired area(s).
SUBTASK 72-41-23-220-184 Examine the Machine Repaired Area(s), Assembly A
Refer to SPM TASK 70-35-03-300-501.
The maximum depth of the blend repair area(s) to be 0.004 in. (0.10 mm).
The diameter of the repaired area(s) to be 50 times the depth.
Blend only the following faces to criteria specified.
Maximum 1 off blend per 2 off bolt hole pitch.
It is not permitted for blend to breakout of flange face inner diameter.
Front and rear outer flange end faces.
Maximum 1 off blend per 2 off bolt hole pitch.
It is permitted for blend to breakout of flange face outer diameter and/or into bolt holes.
Front and rear outer flange inner faces.
Locally blend to remove the indication of surface damage from machined repaired area(s).
SUBTASK 72-41-23-350-105 Remove the Remaining Damage by Dressing and Blending, Assembly A
If surface damage is removed , continue from Step.
If surface damage is not removed from other machined areas, reject.
Do a visual inspection of the dressed area(s).
SUBTASK 72-41-23-220-185 Examine the Blend Repaired Area(s), Assembly A
Refer to SPM TASK 70-11-03-300-503.
Chemically clean the part.
SUBTASK 72-41-23-110-090 Chemically Clean
Refer to SPM TASK 70-23-02-230-501.
Cracks are not permitted.
Do a penetrant crack test of the repaired area(s).
SUBTASK 72-41-23-230-094 Do a crack Test
Surface damage or corrosion remains evident.
Dressing criteria is not accomplished, refer to Step.
Reject part if:
Do a visual and dimensional inspection of the repaired area(s).
SUBTASK 72-41-23-220-186 Examine the Repair, Assembly A
Repair, VRS6279 TASK 72-41-23-300-011 (REPAIR-011).
Install the new shank nuts.
SUBTASK 72-41-23-350-106 Install the New Shank Nuts
Repair, VRS6278 TASK 72-41-23-300-021 (REPAIR-021).
Install the new location pins (dowel).
SUBTASK 72-41-23-350-107 Install the New Location Pins (Dowel)
Refer to SPM TASK 70-09-00-400-501, SUBTASK 70-09-00-400-001.
Vibration peen VRS6528 adjacent to the part number.
SUBTASK 72-41-23-350-108 Identify the Repair
Refer to repair, VRS6178 TASK 72-41-23-300-003 (REPAIR-003).
Apply the surface protection.
SUBTASK 72-41-23-380-060 Re-apply the Surface Protection
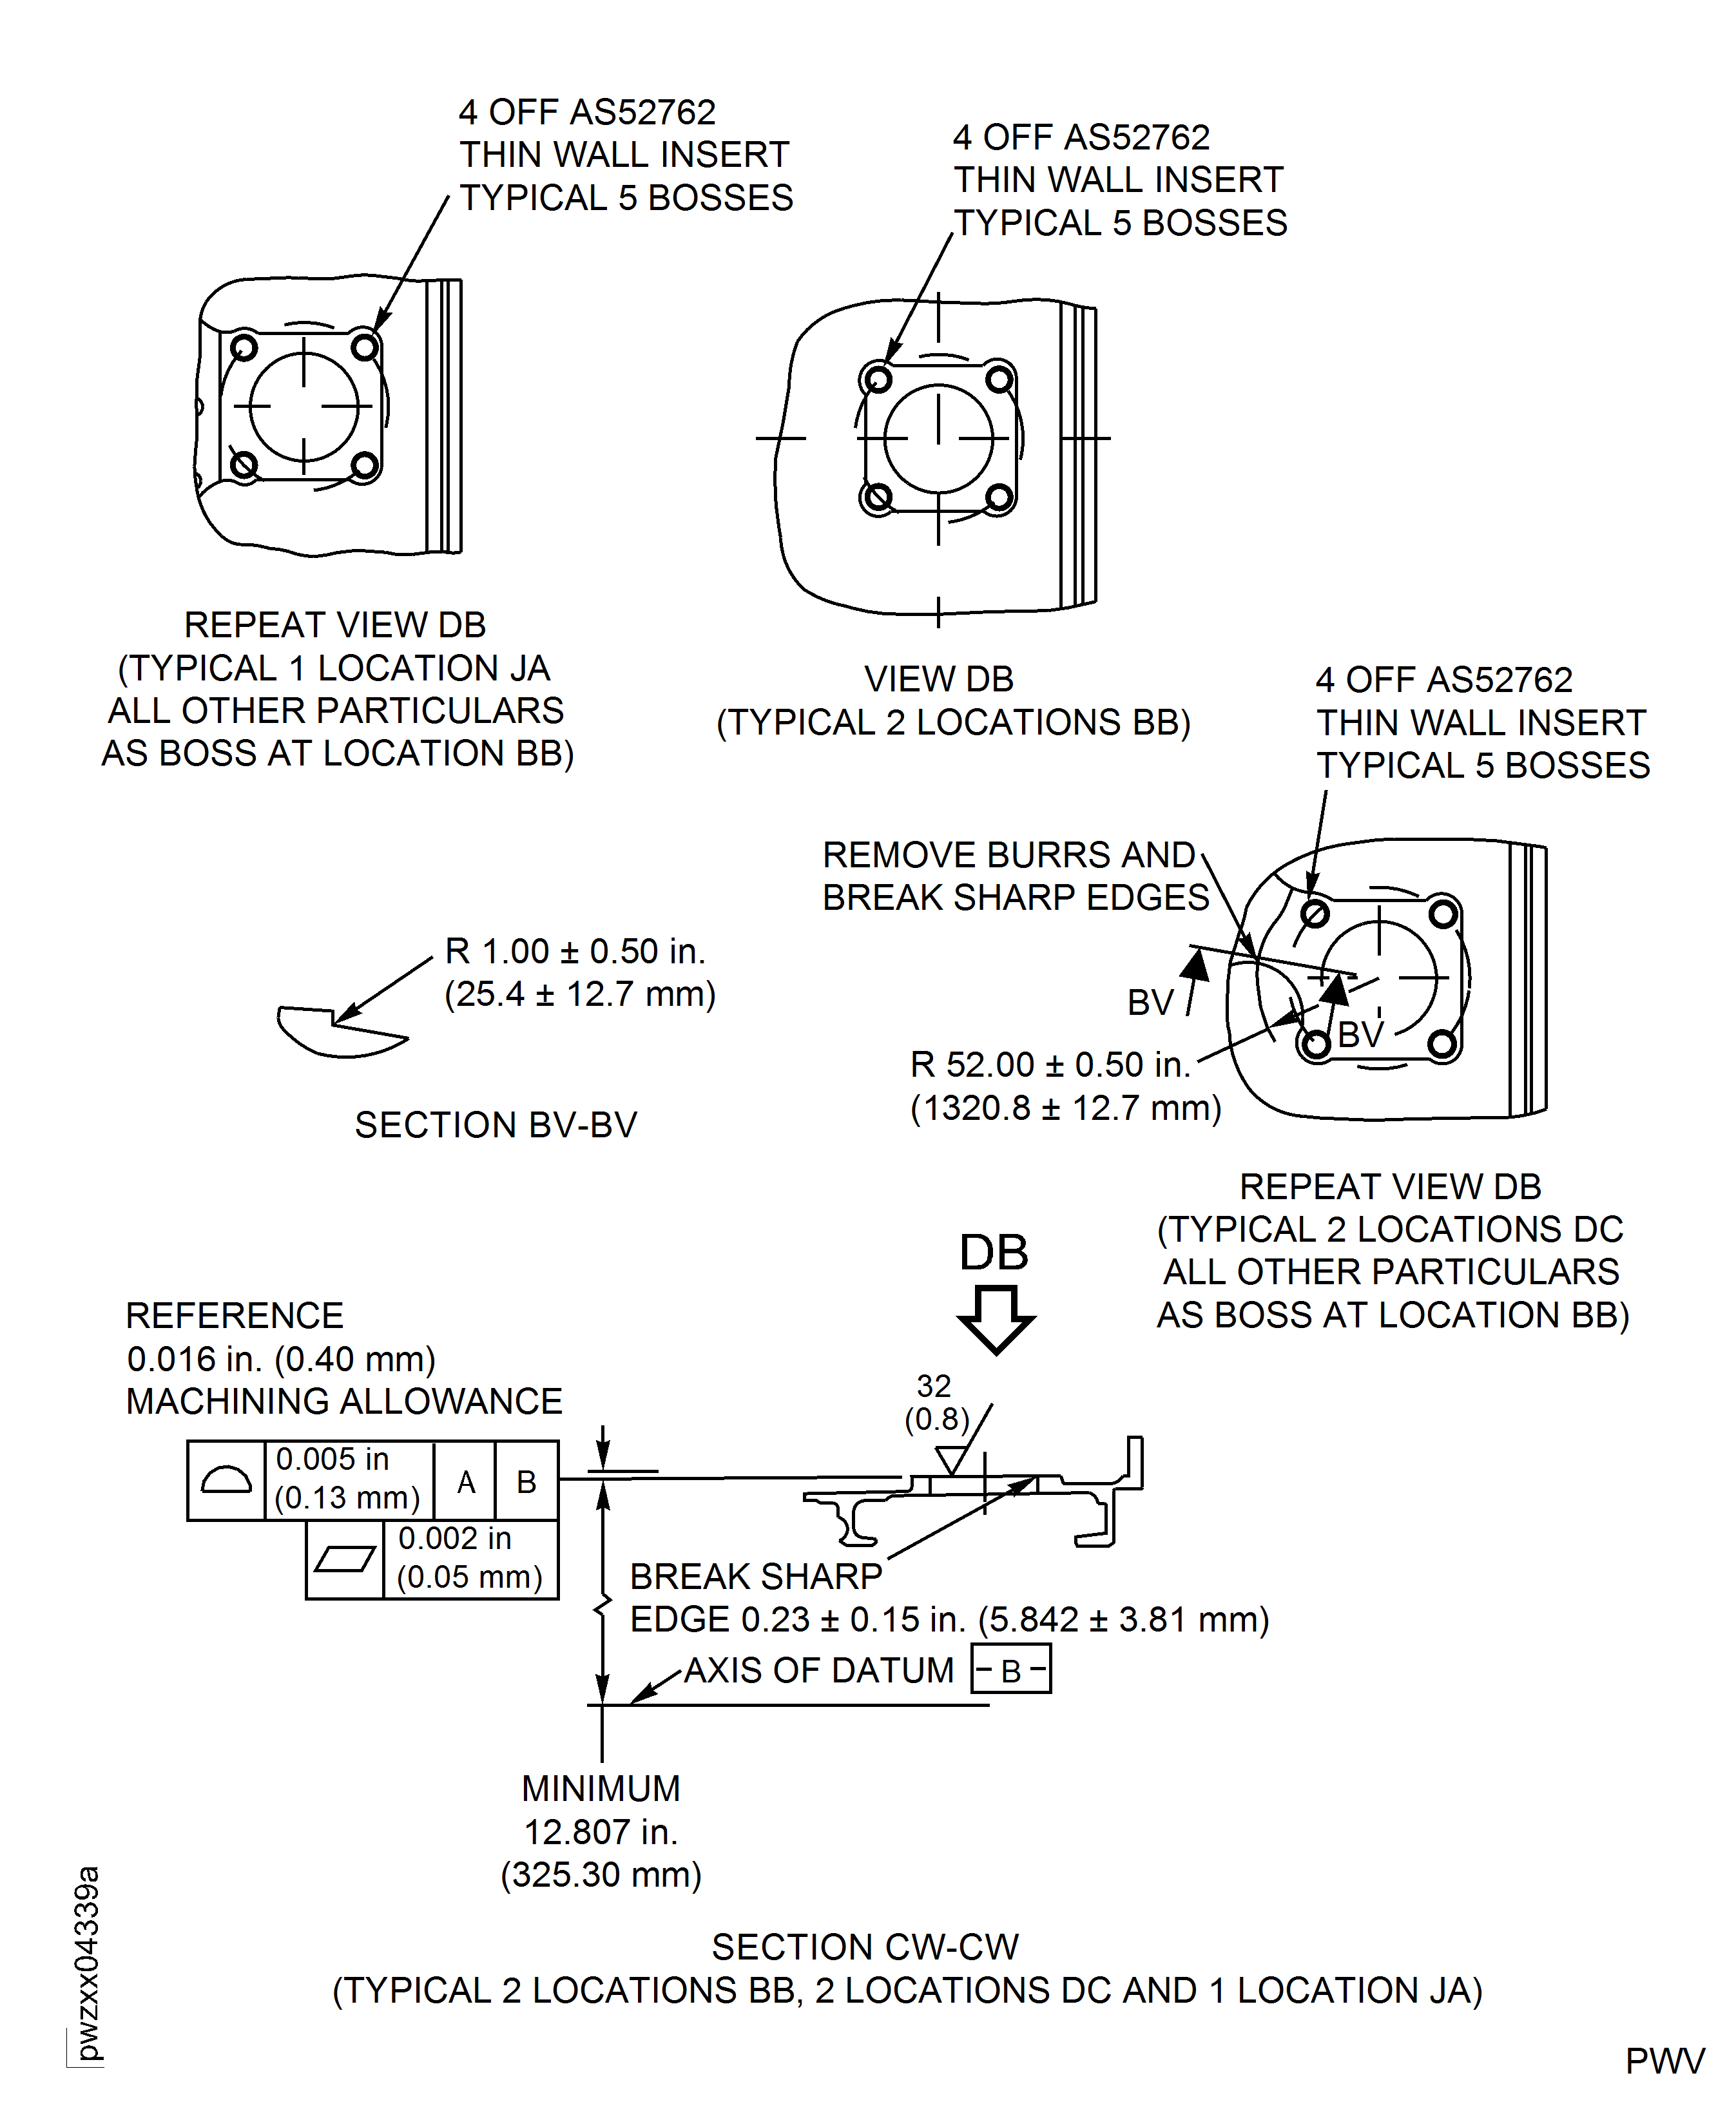
Figure: Repair Details and Dimensions - Assembly A
Sheet 1
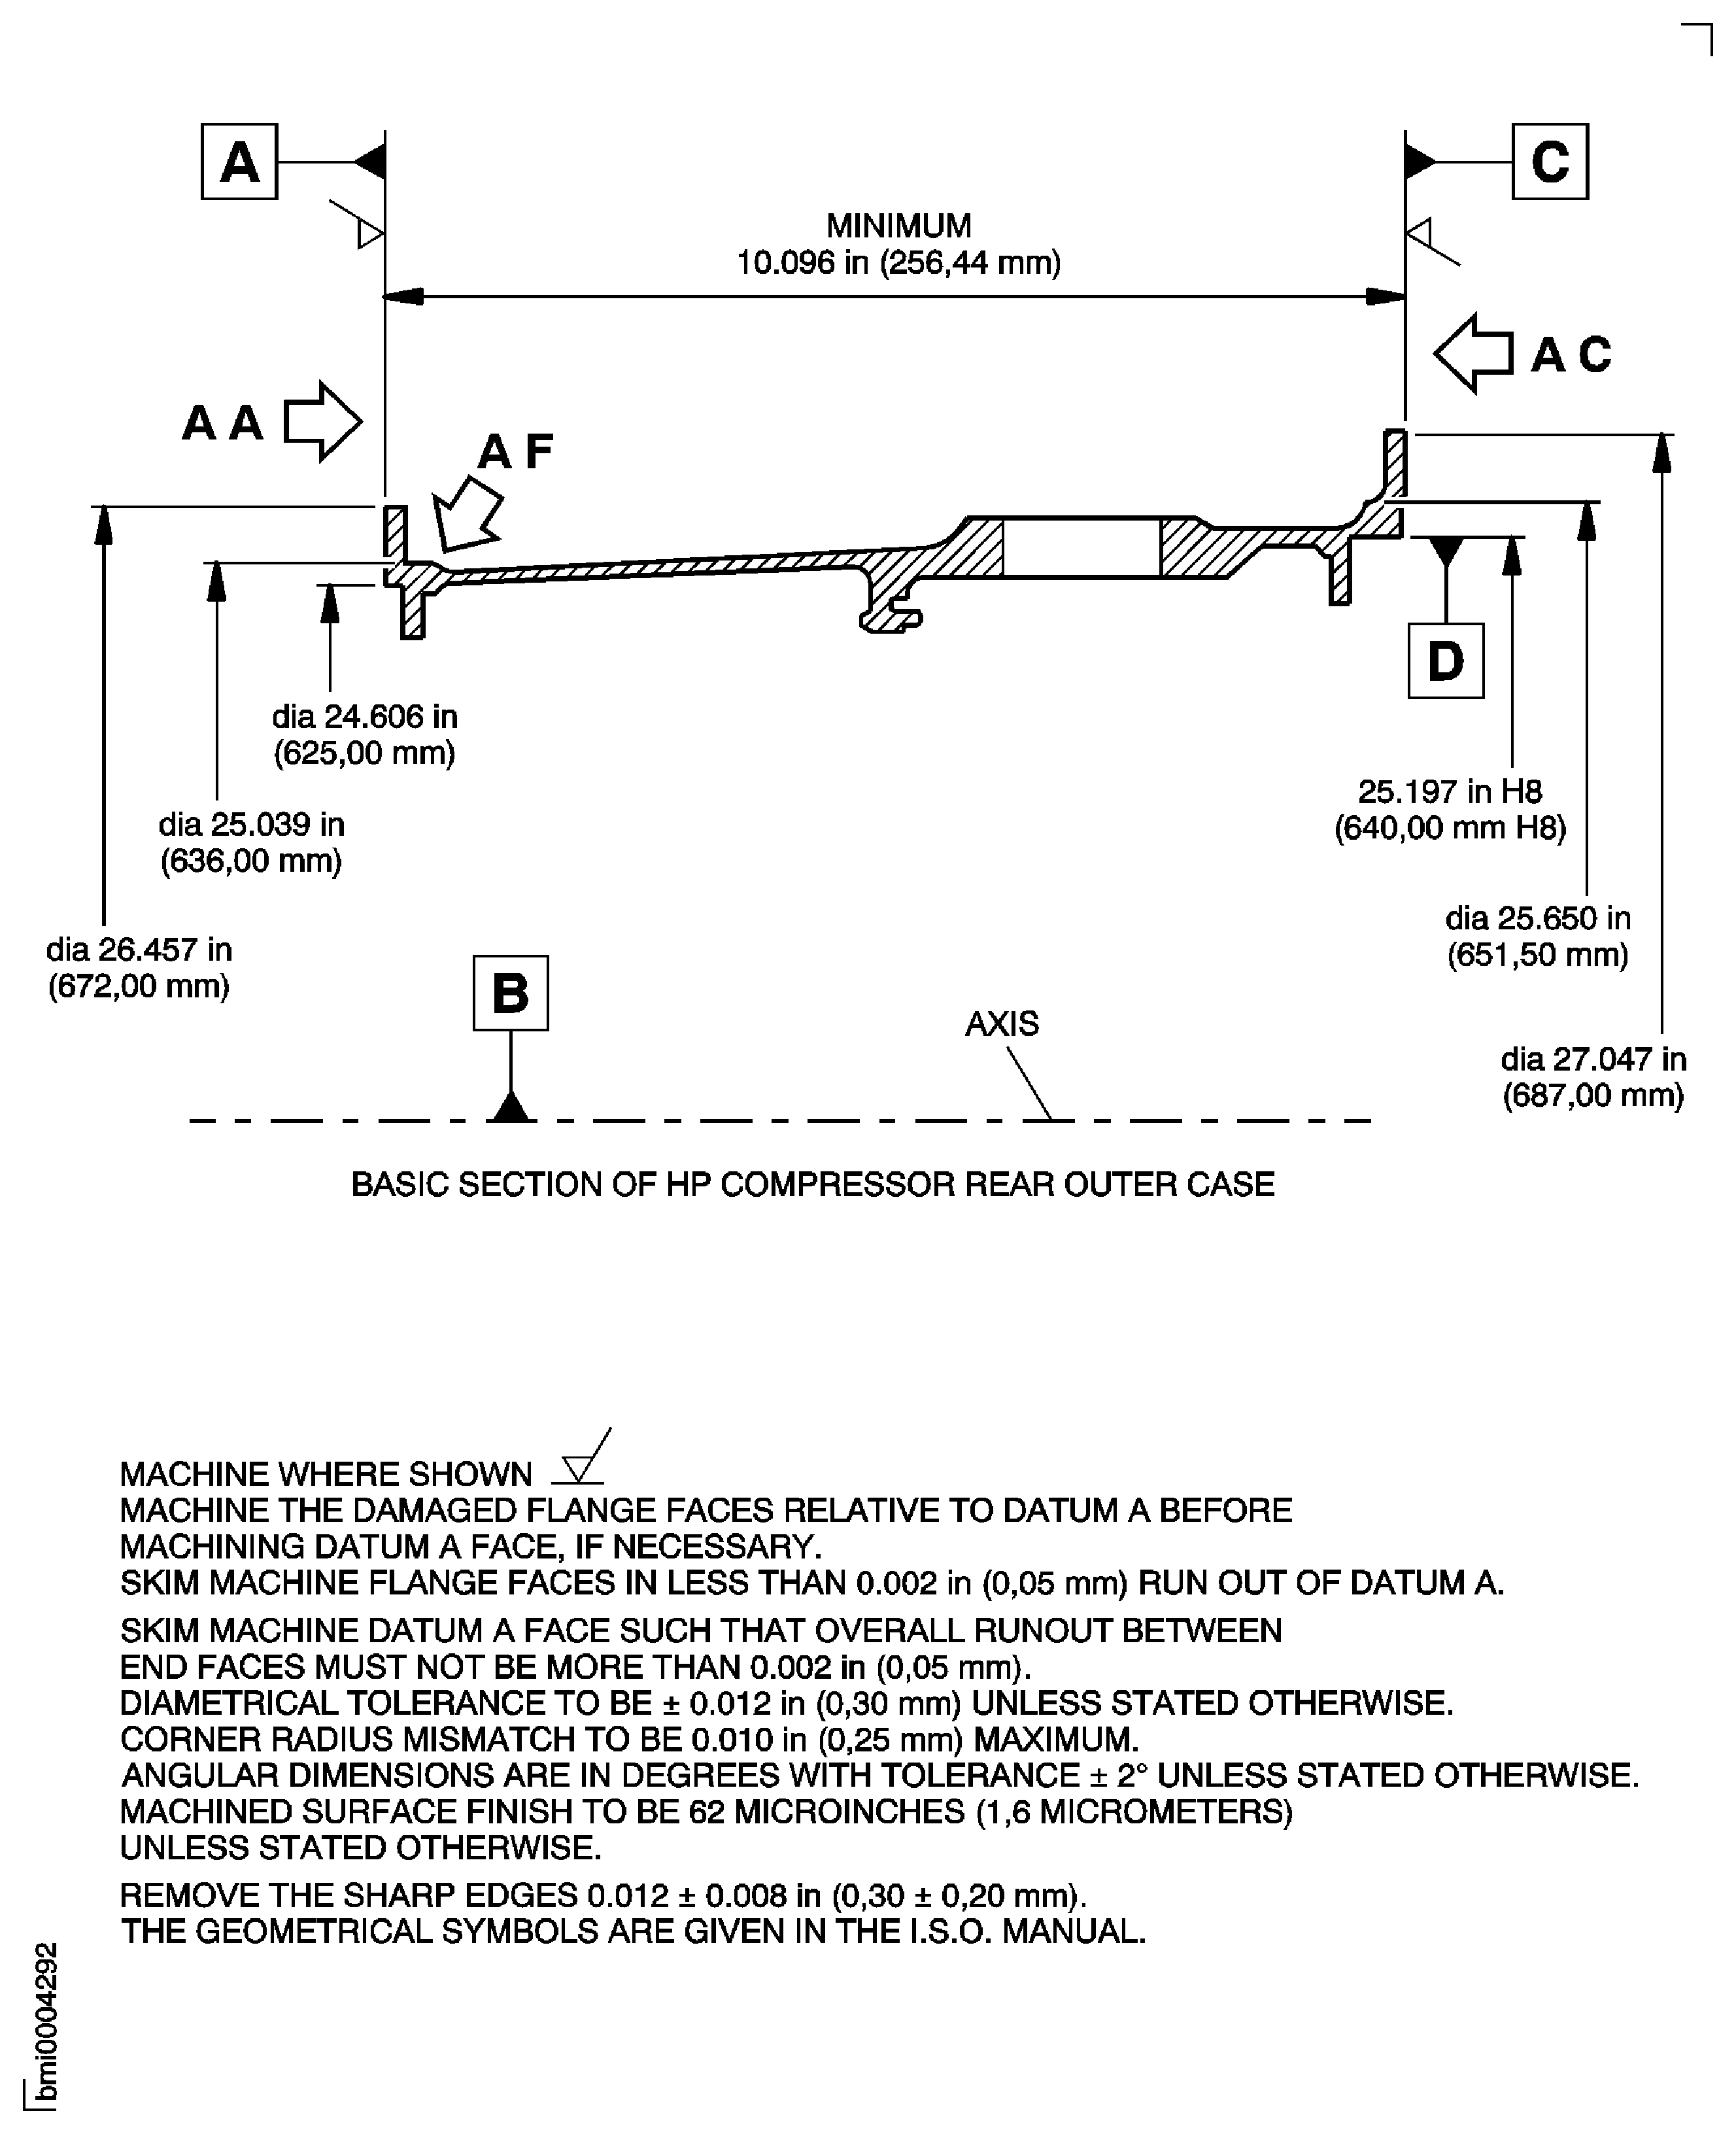
Figure: Repair Details and Dimensions - Assembly A
Sheet 2
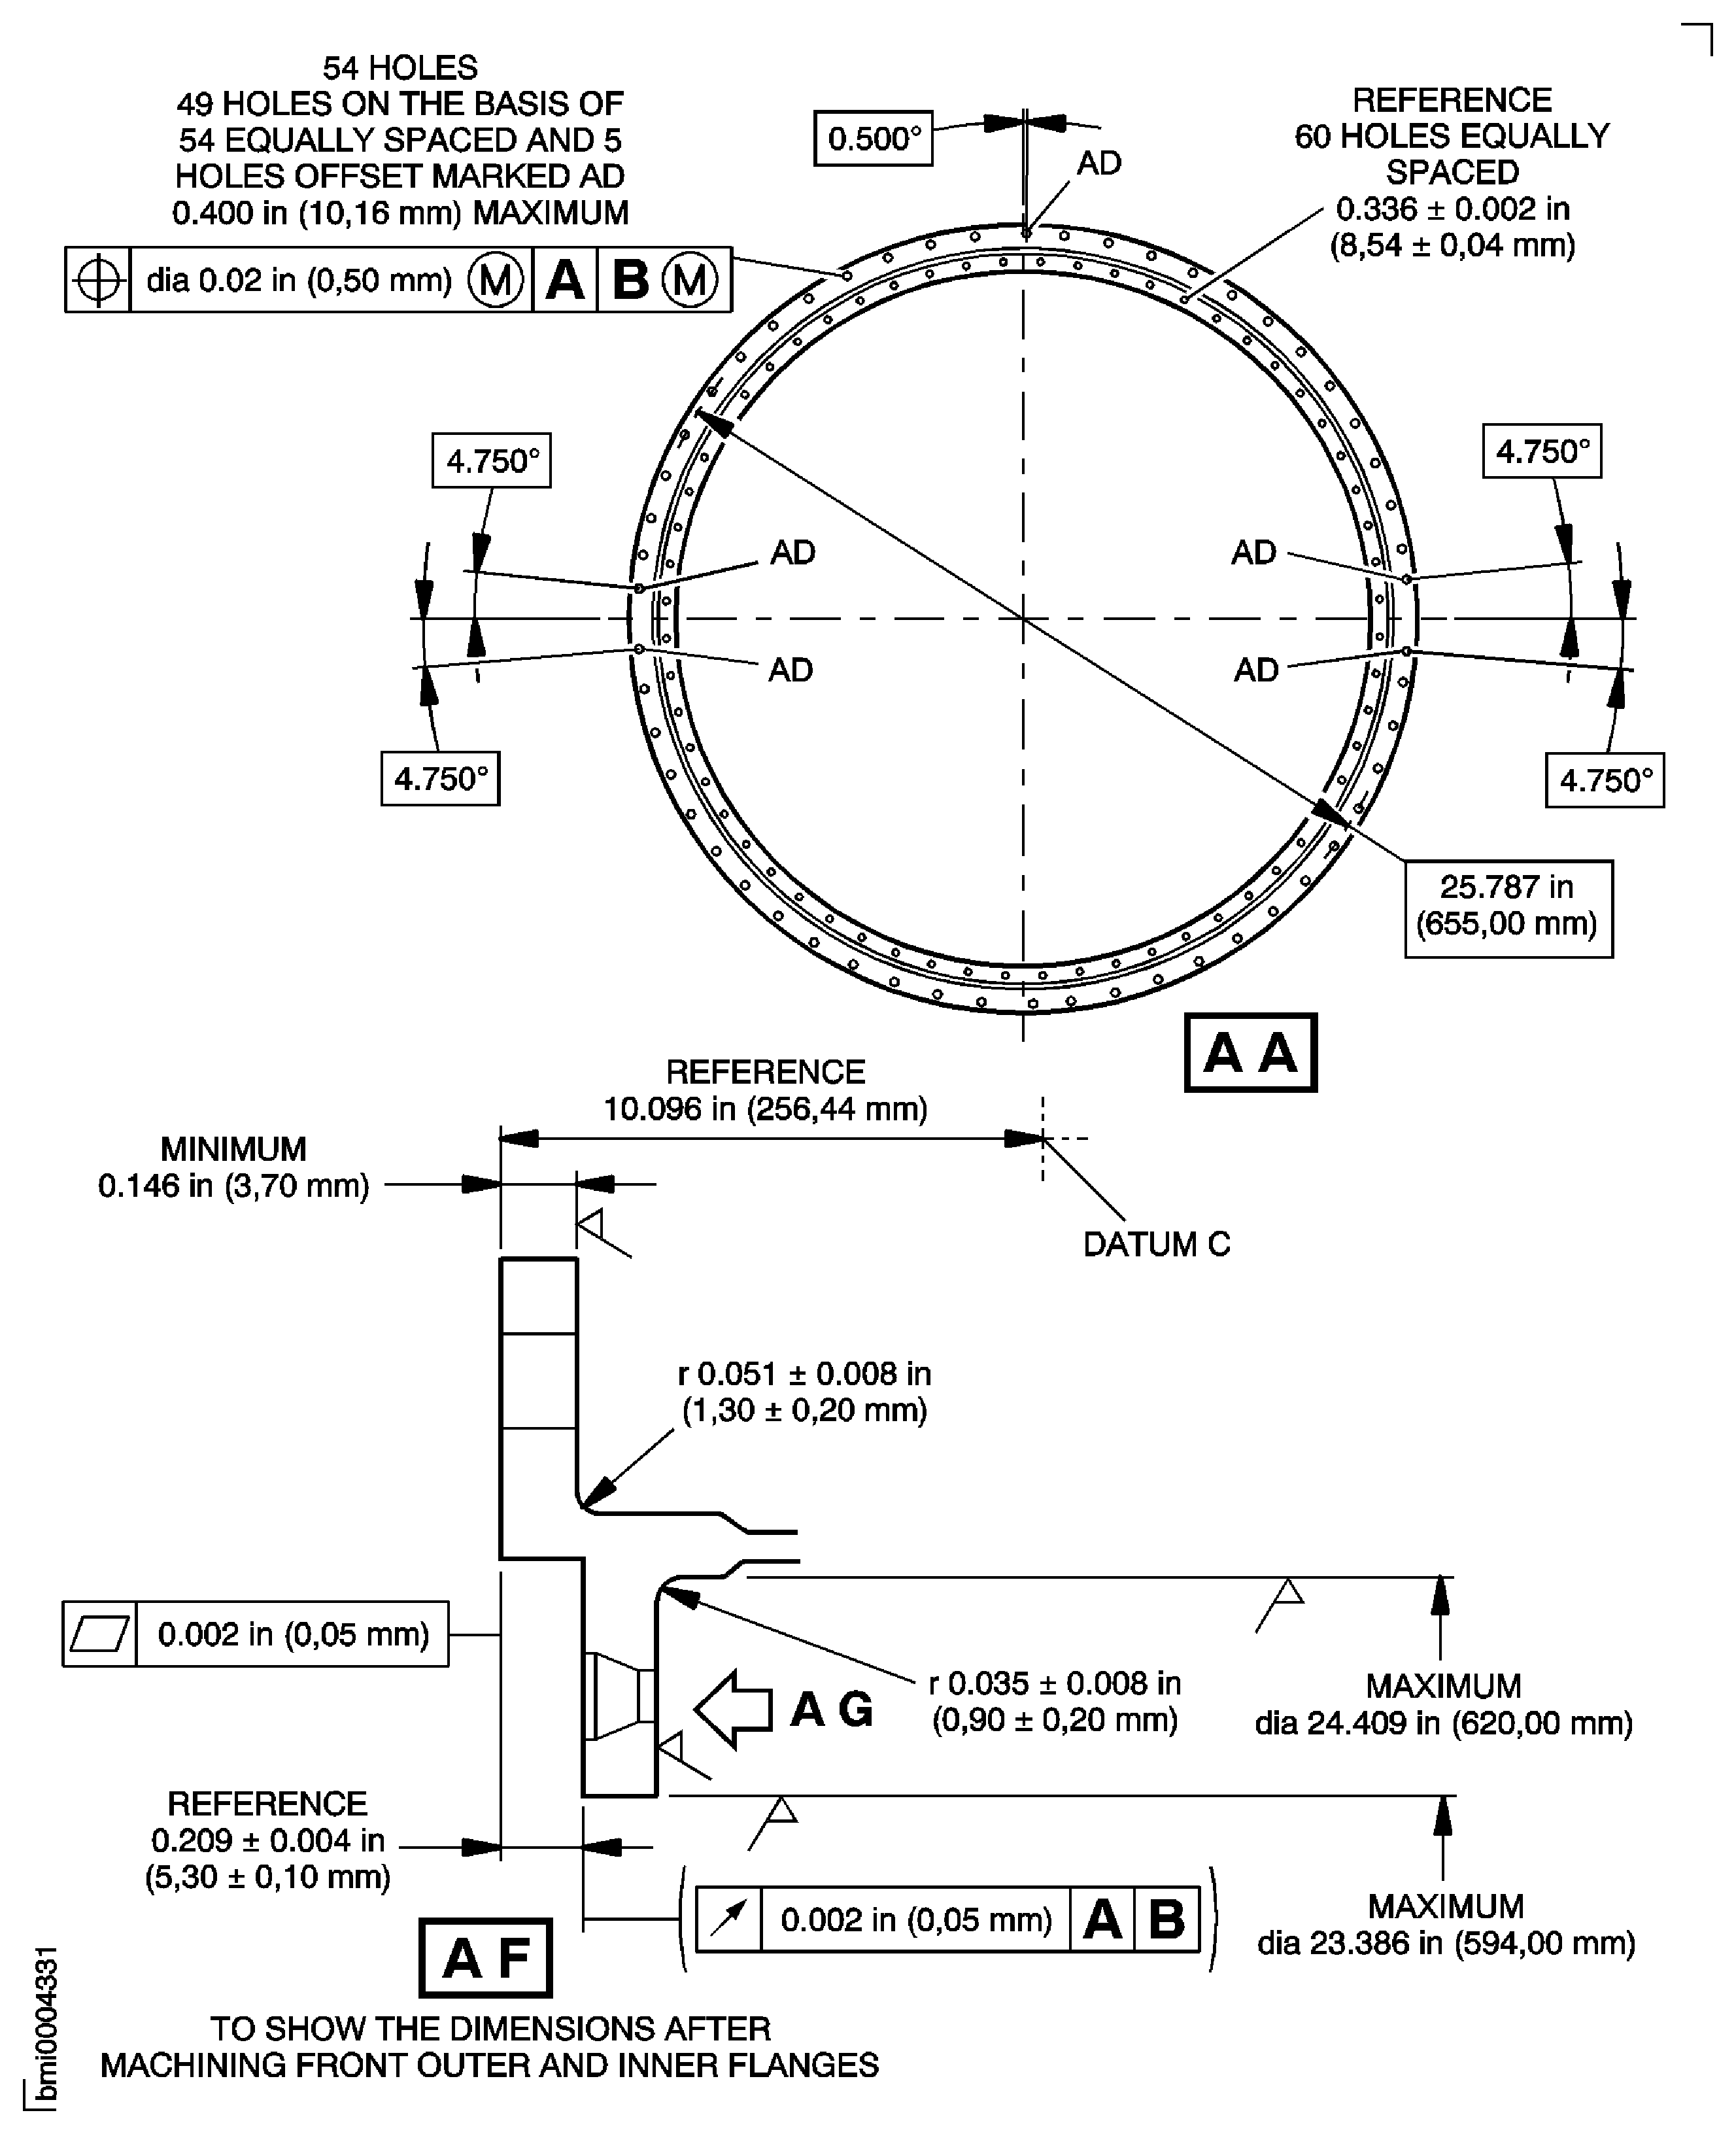
Figure: Repair Details and Dimensions - Assembly A
Sheet 3
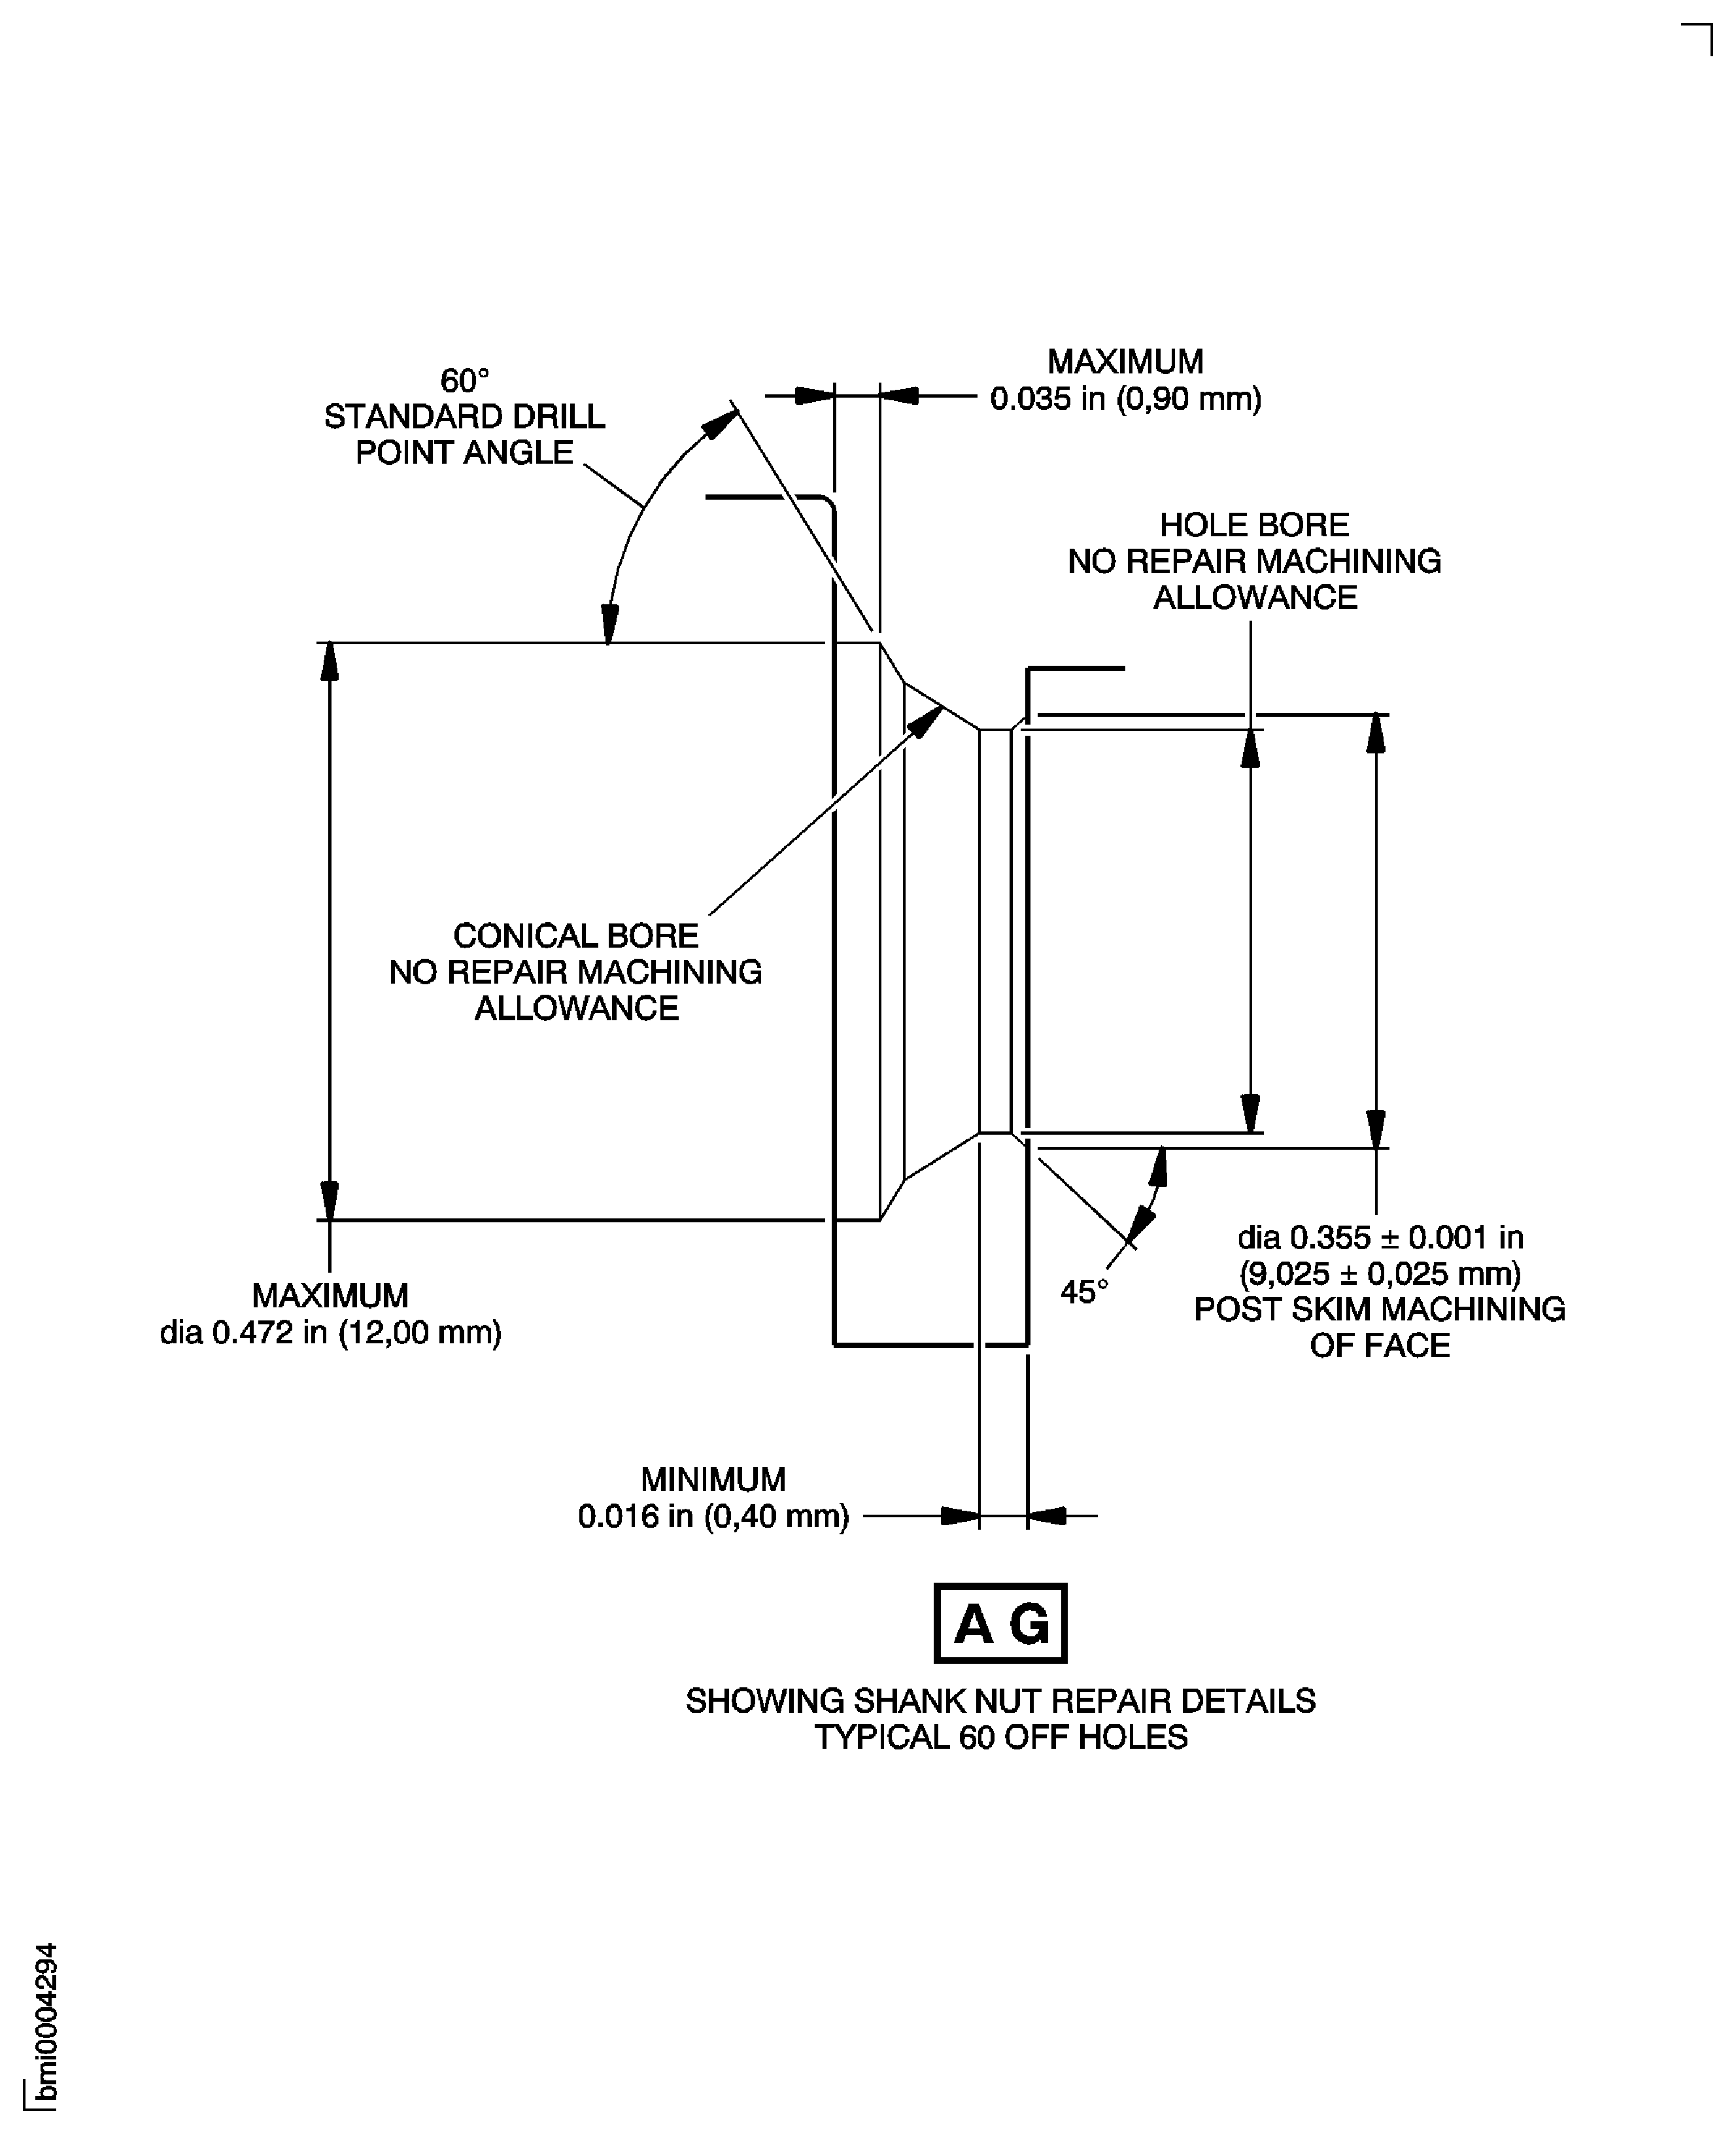
Figure: Repair Details and Dimensions - Assembly A
Sheet 4
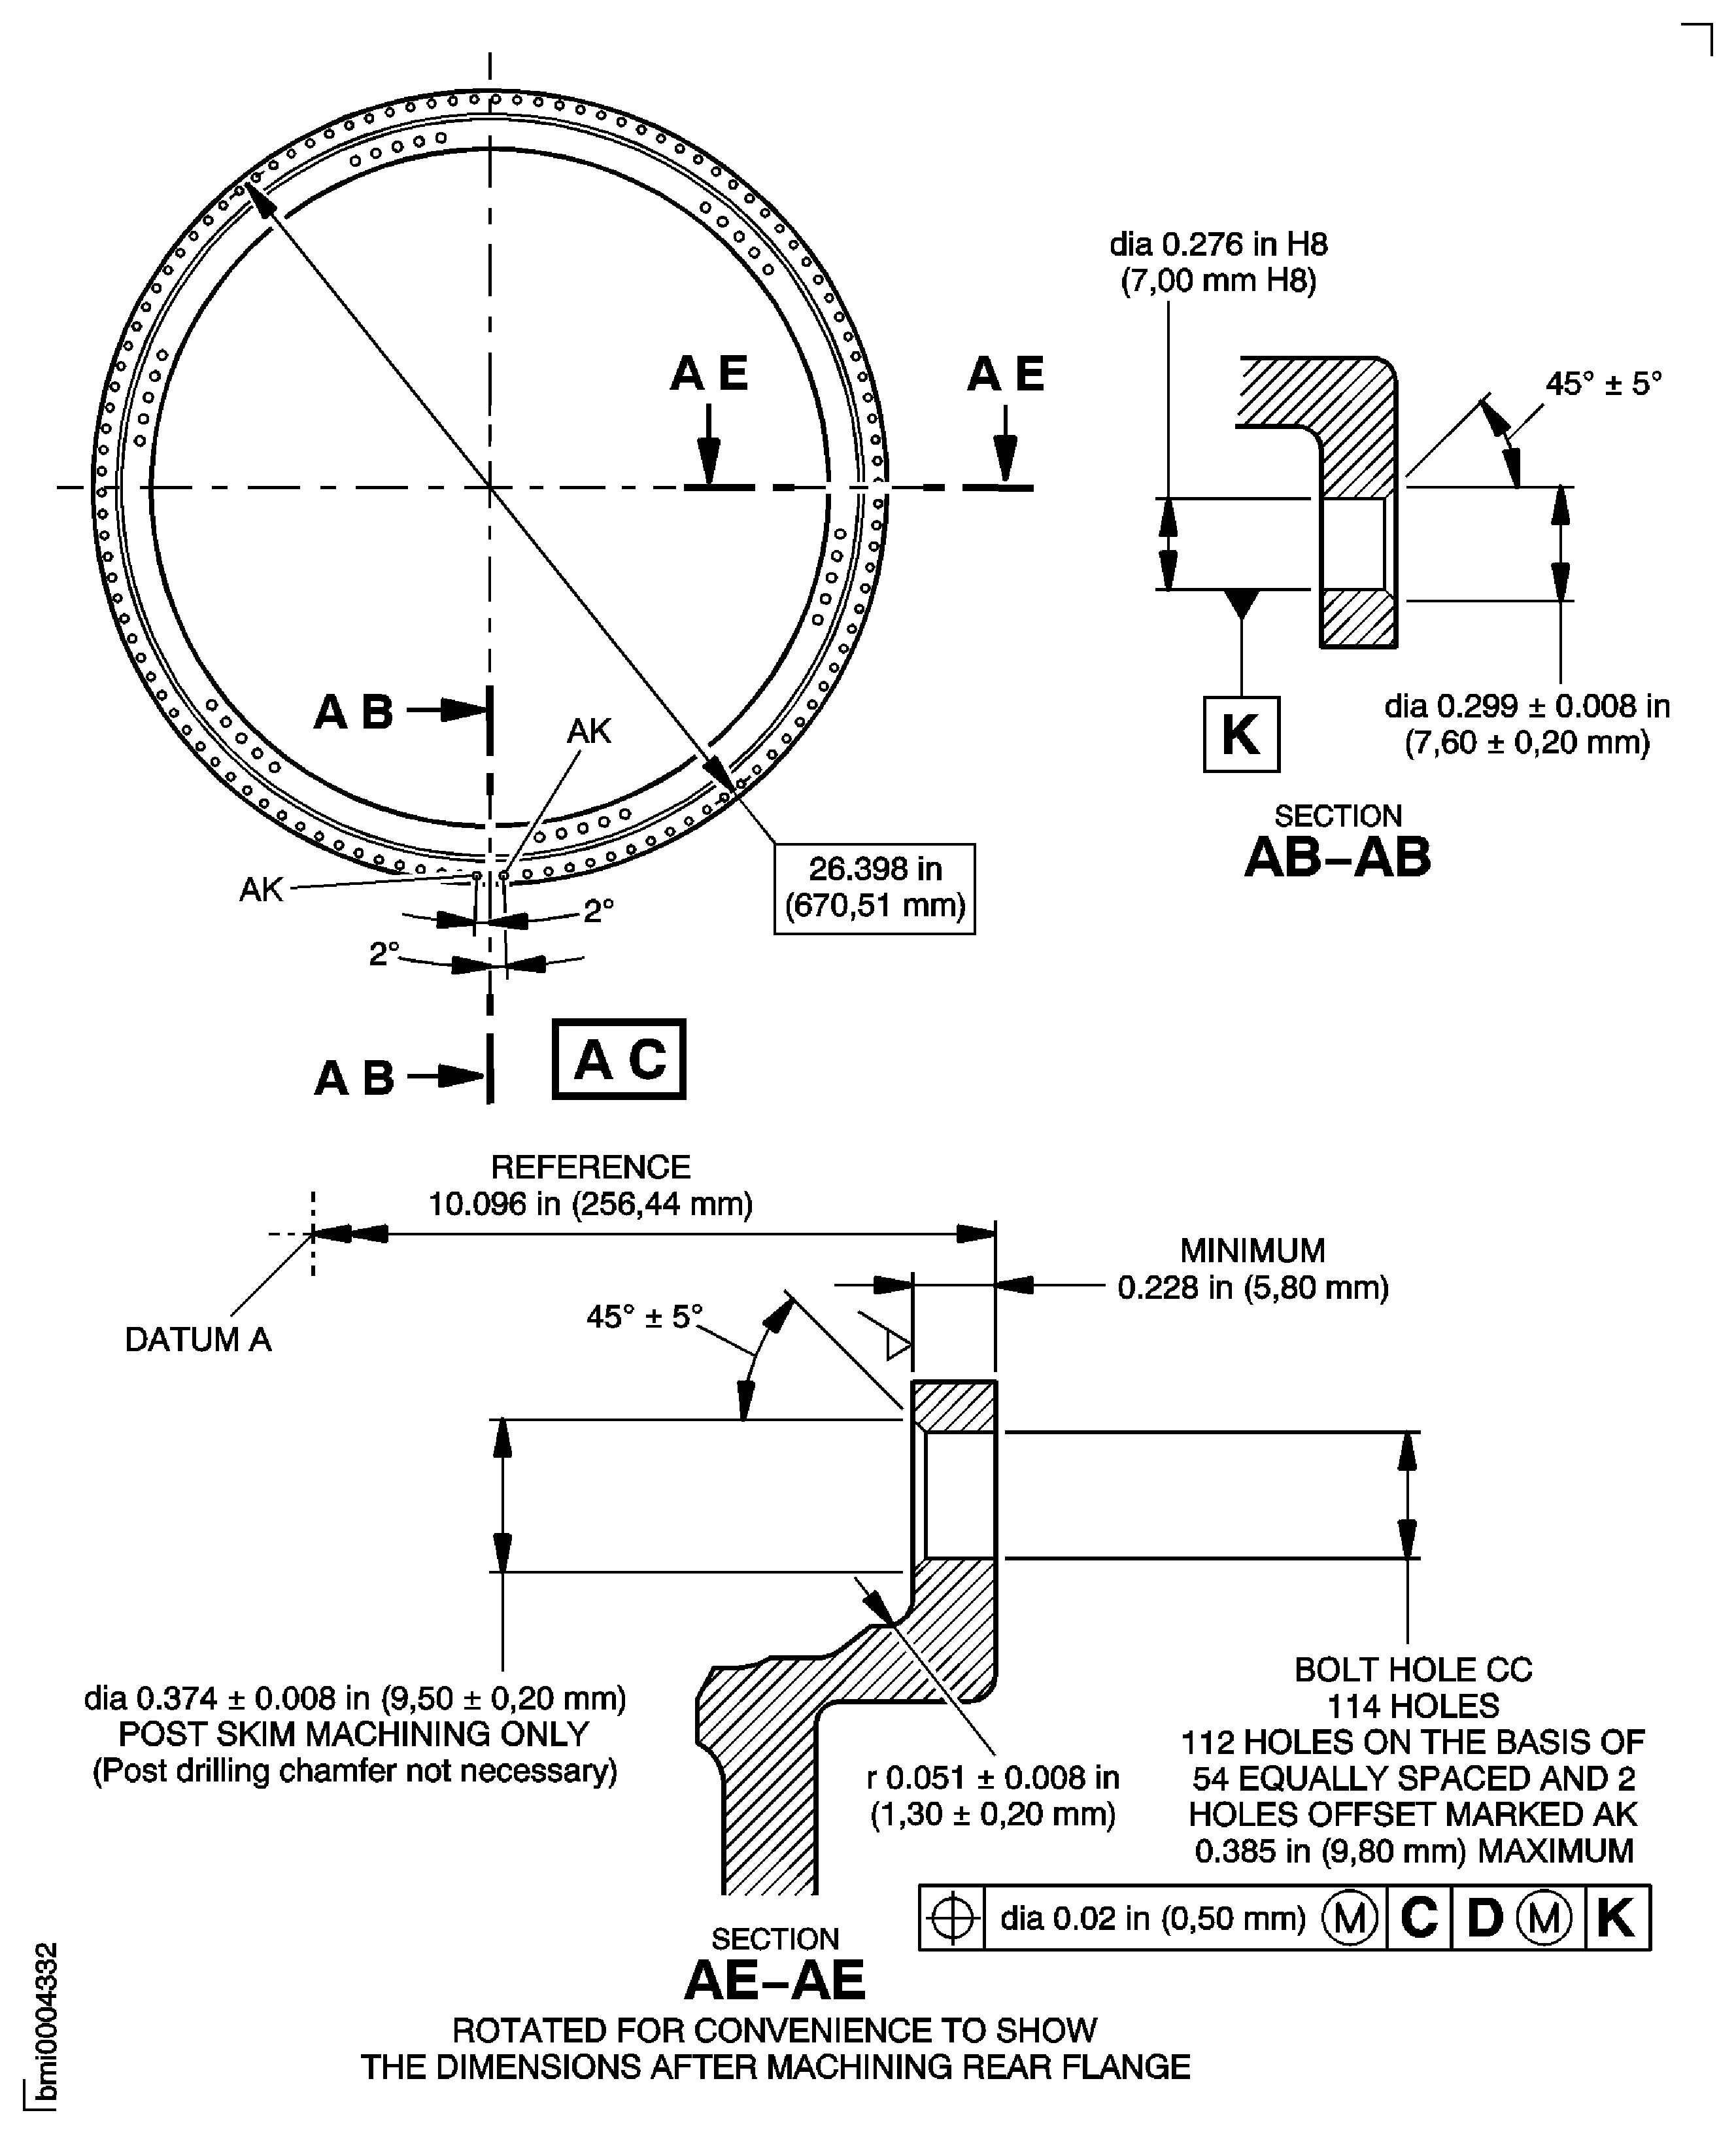
Figure: Repair Details and Dimensions - Assembly A
Sheet 1
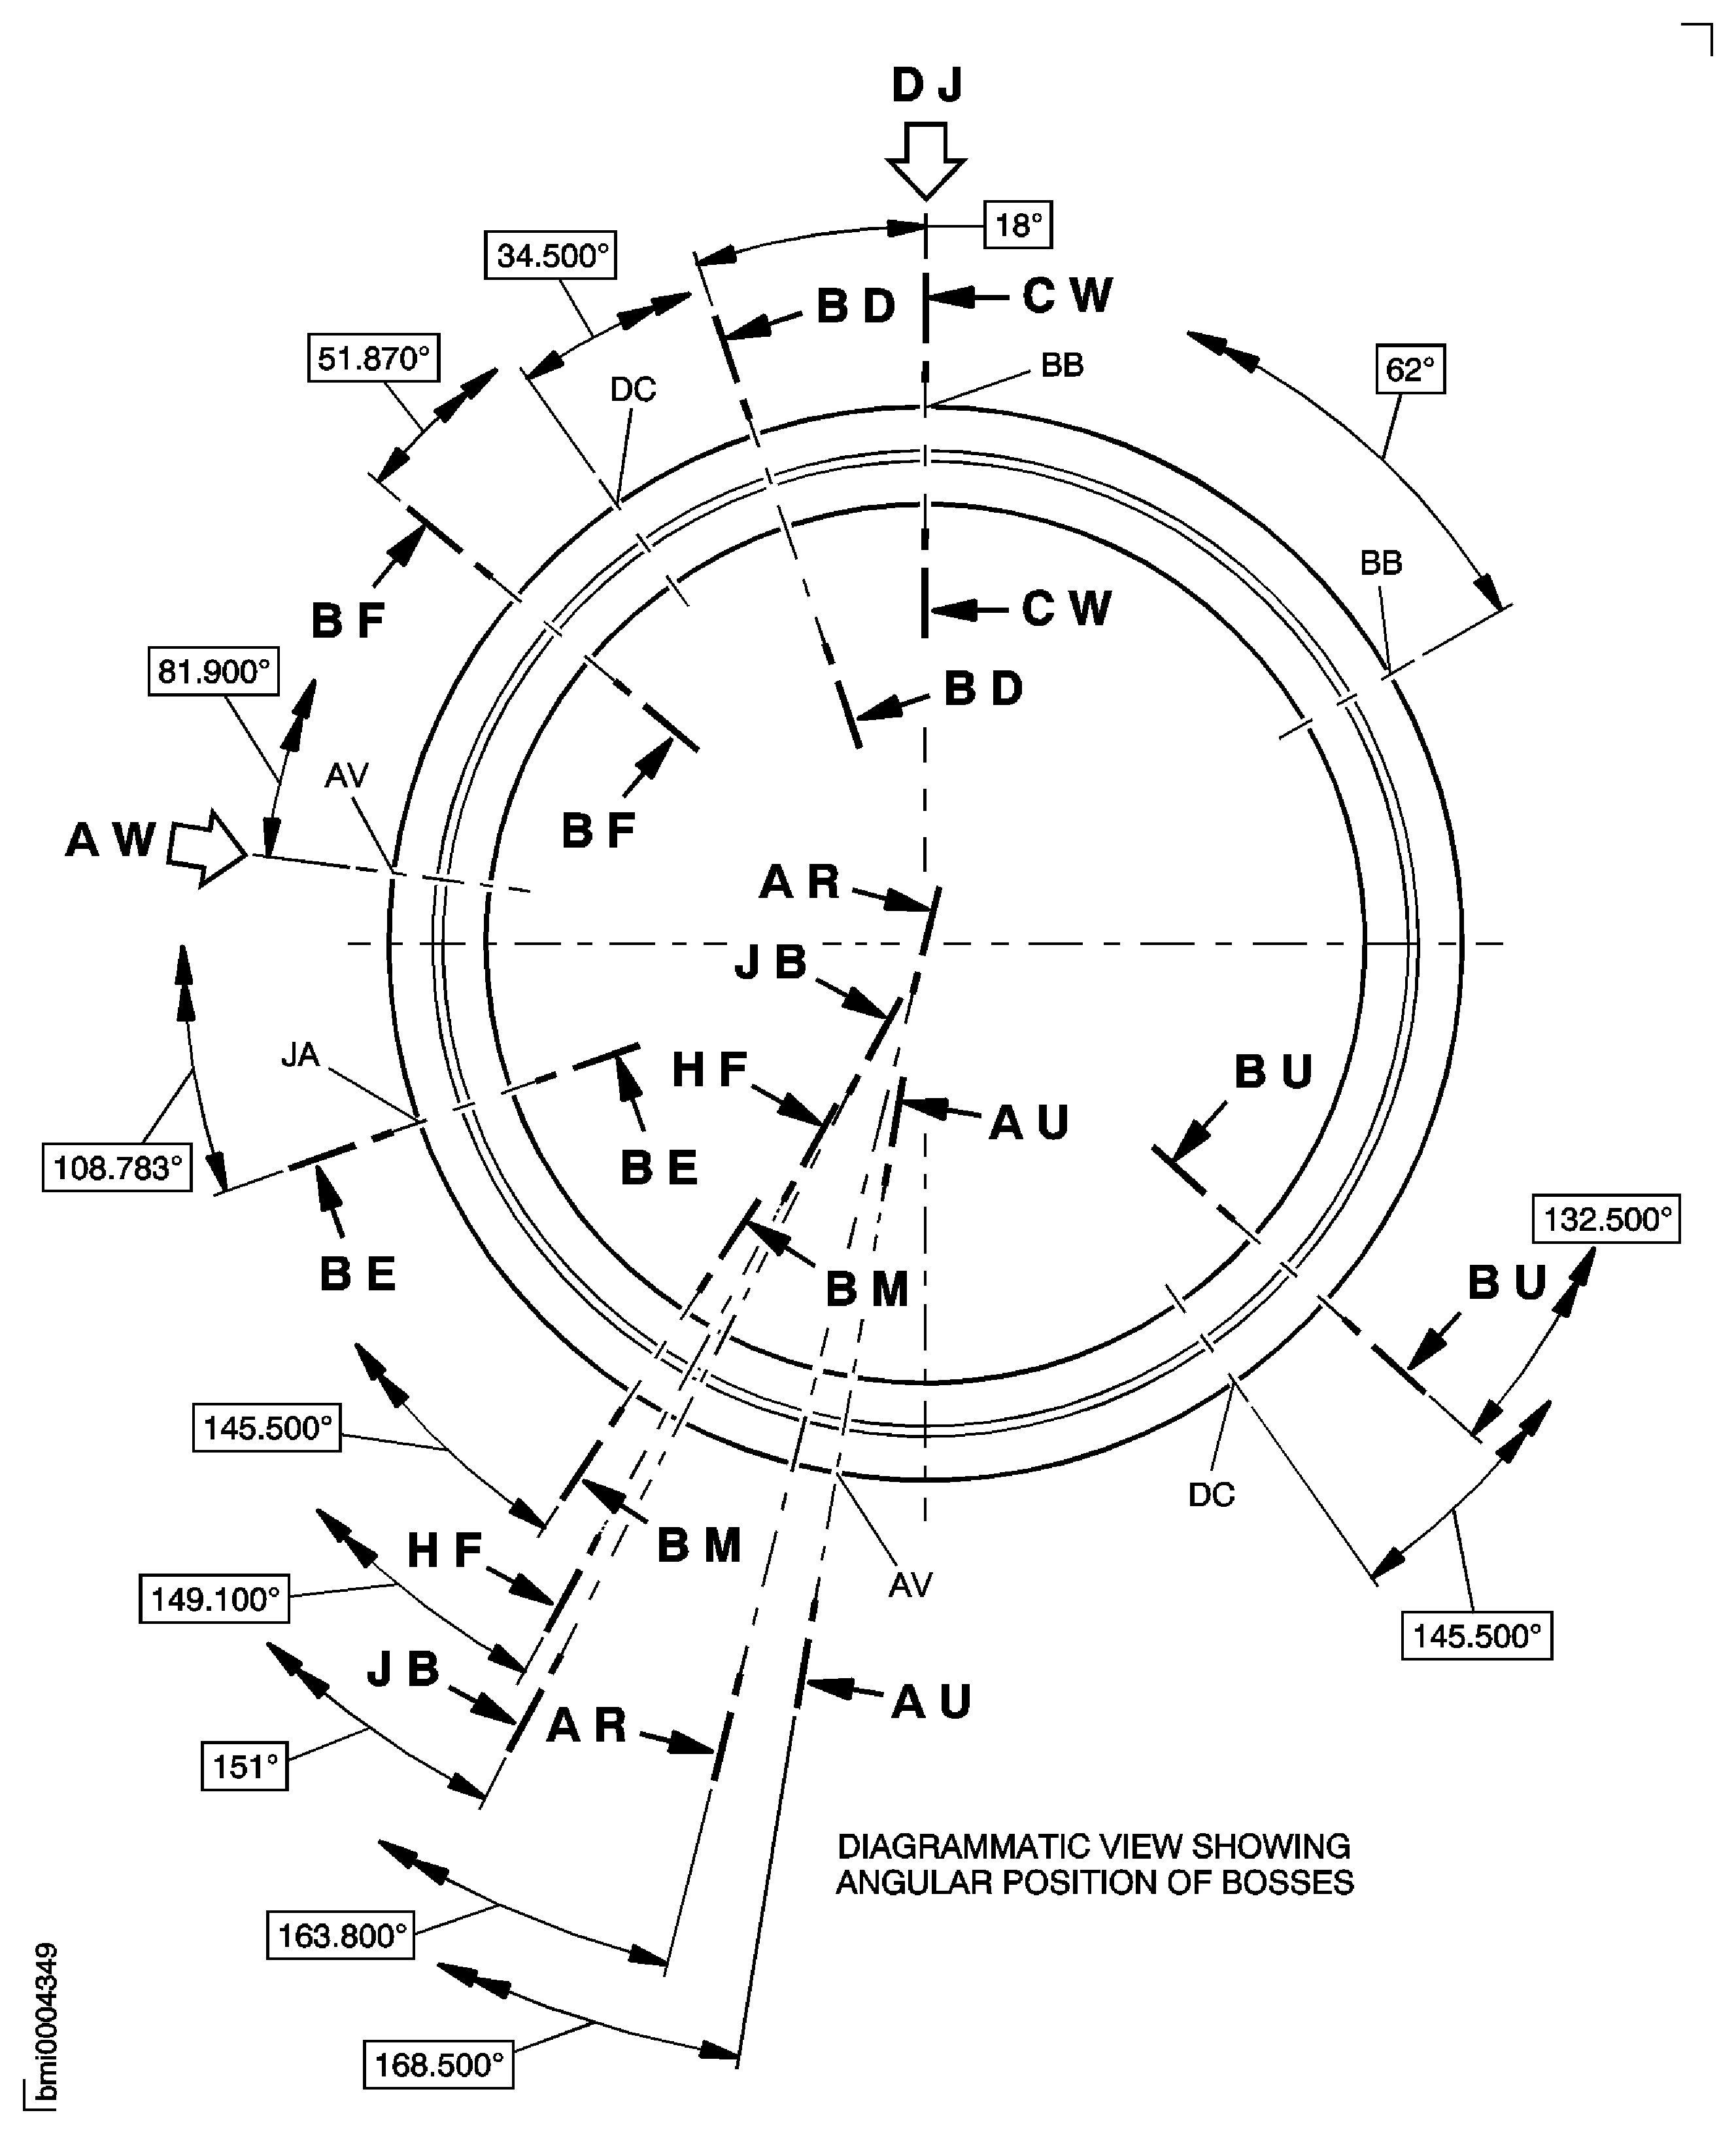
Figure: Repair Details and Dimensions - Assembly A
Sheet 2
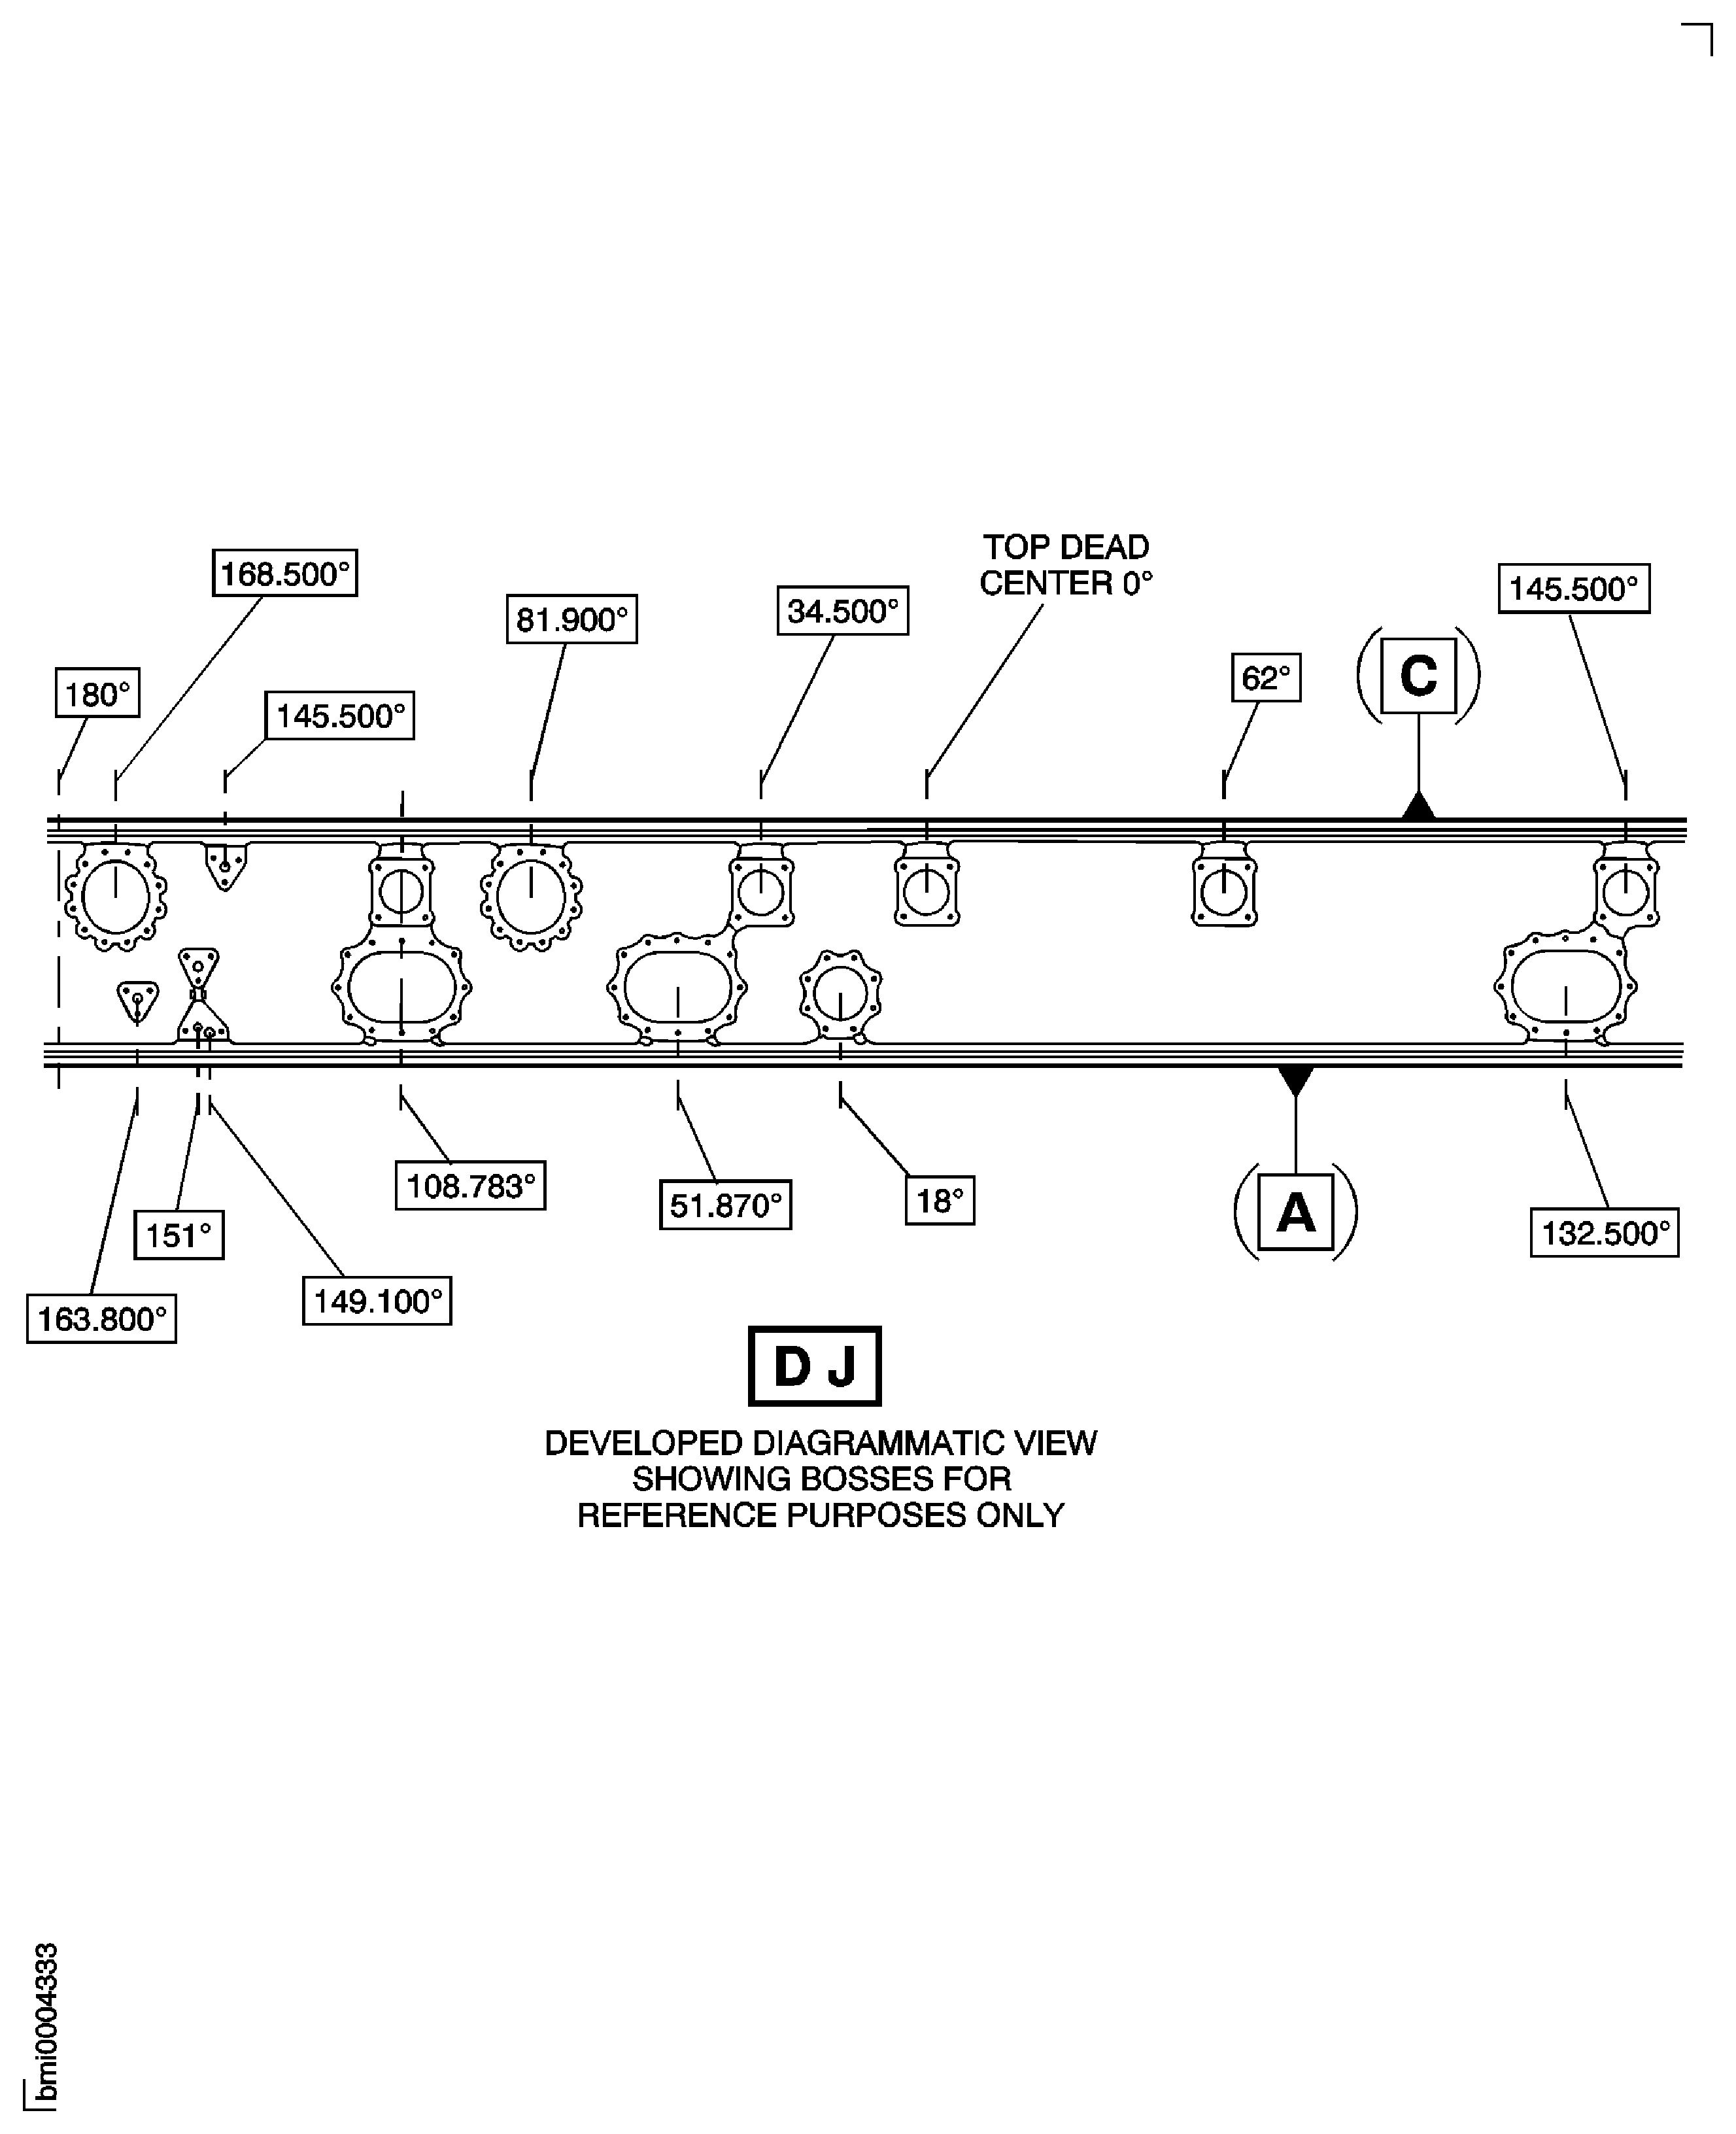
Figure: Repair Details and Dimensions - Assembly A
Sheet 3
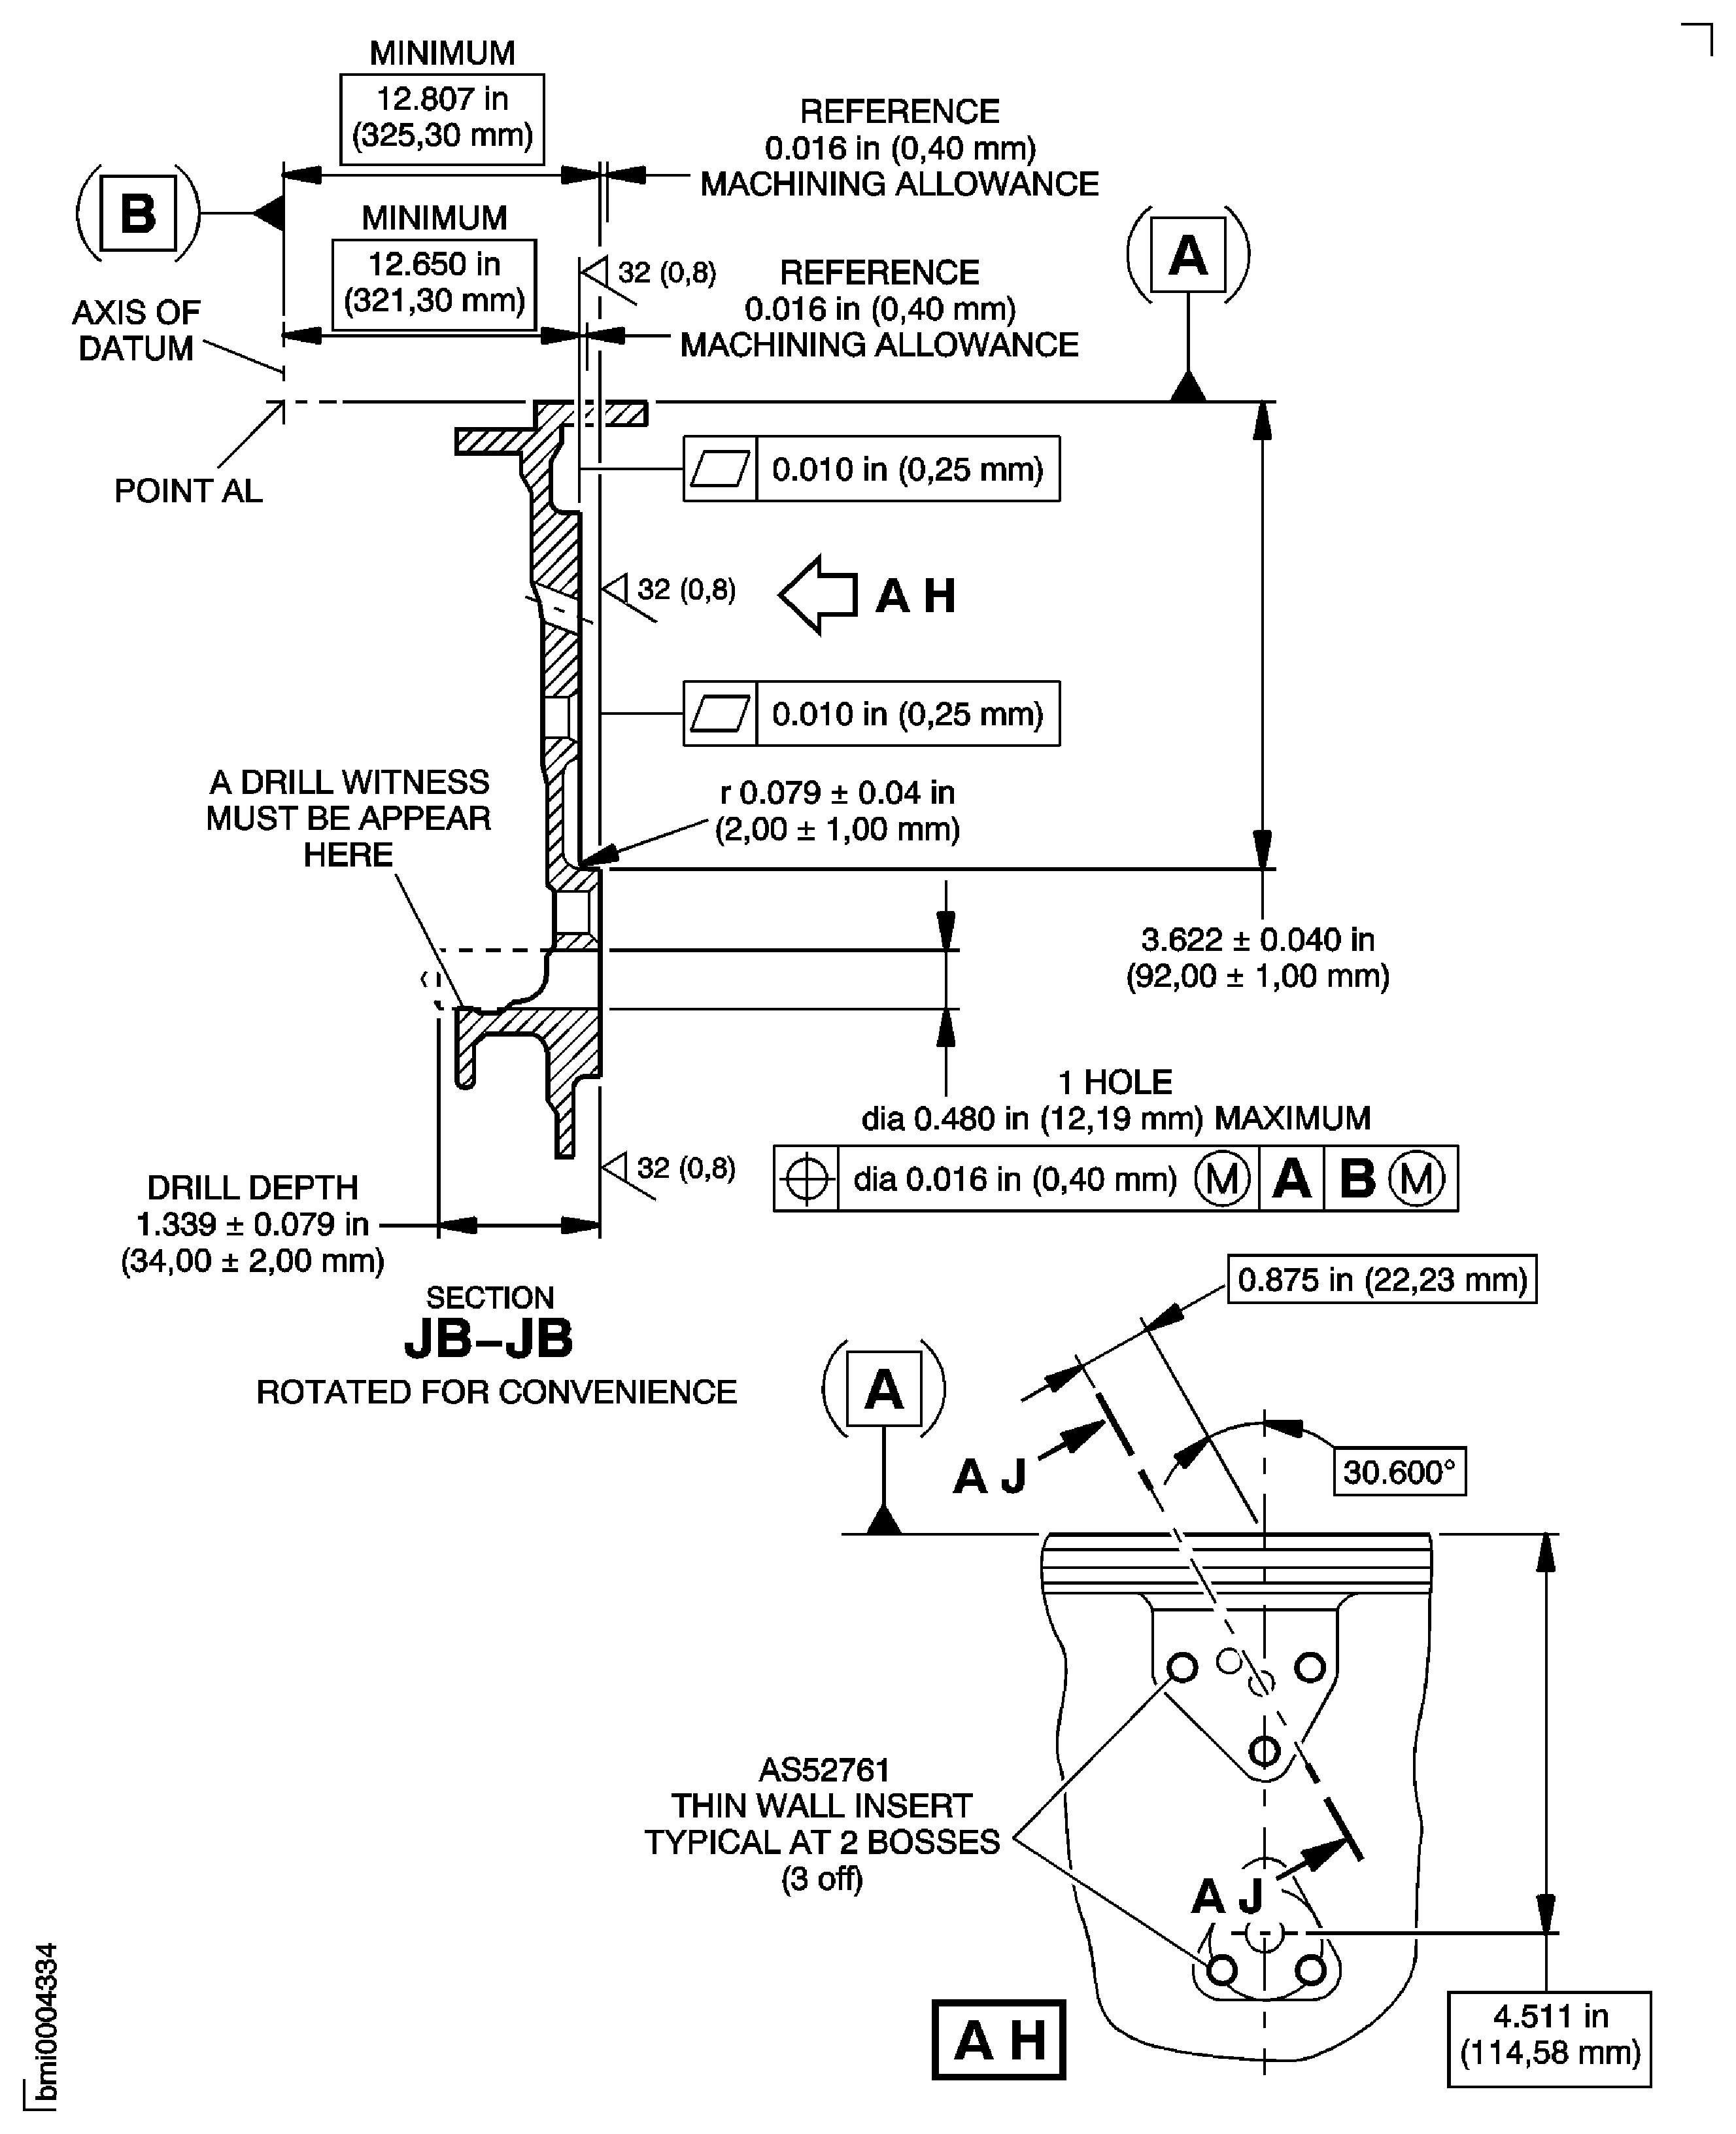
Figure: Repair Details and Dimensions - Assembly A
Sheet 4
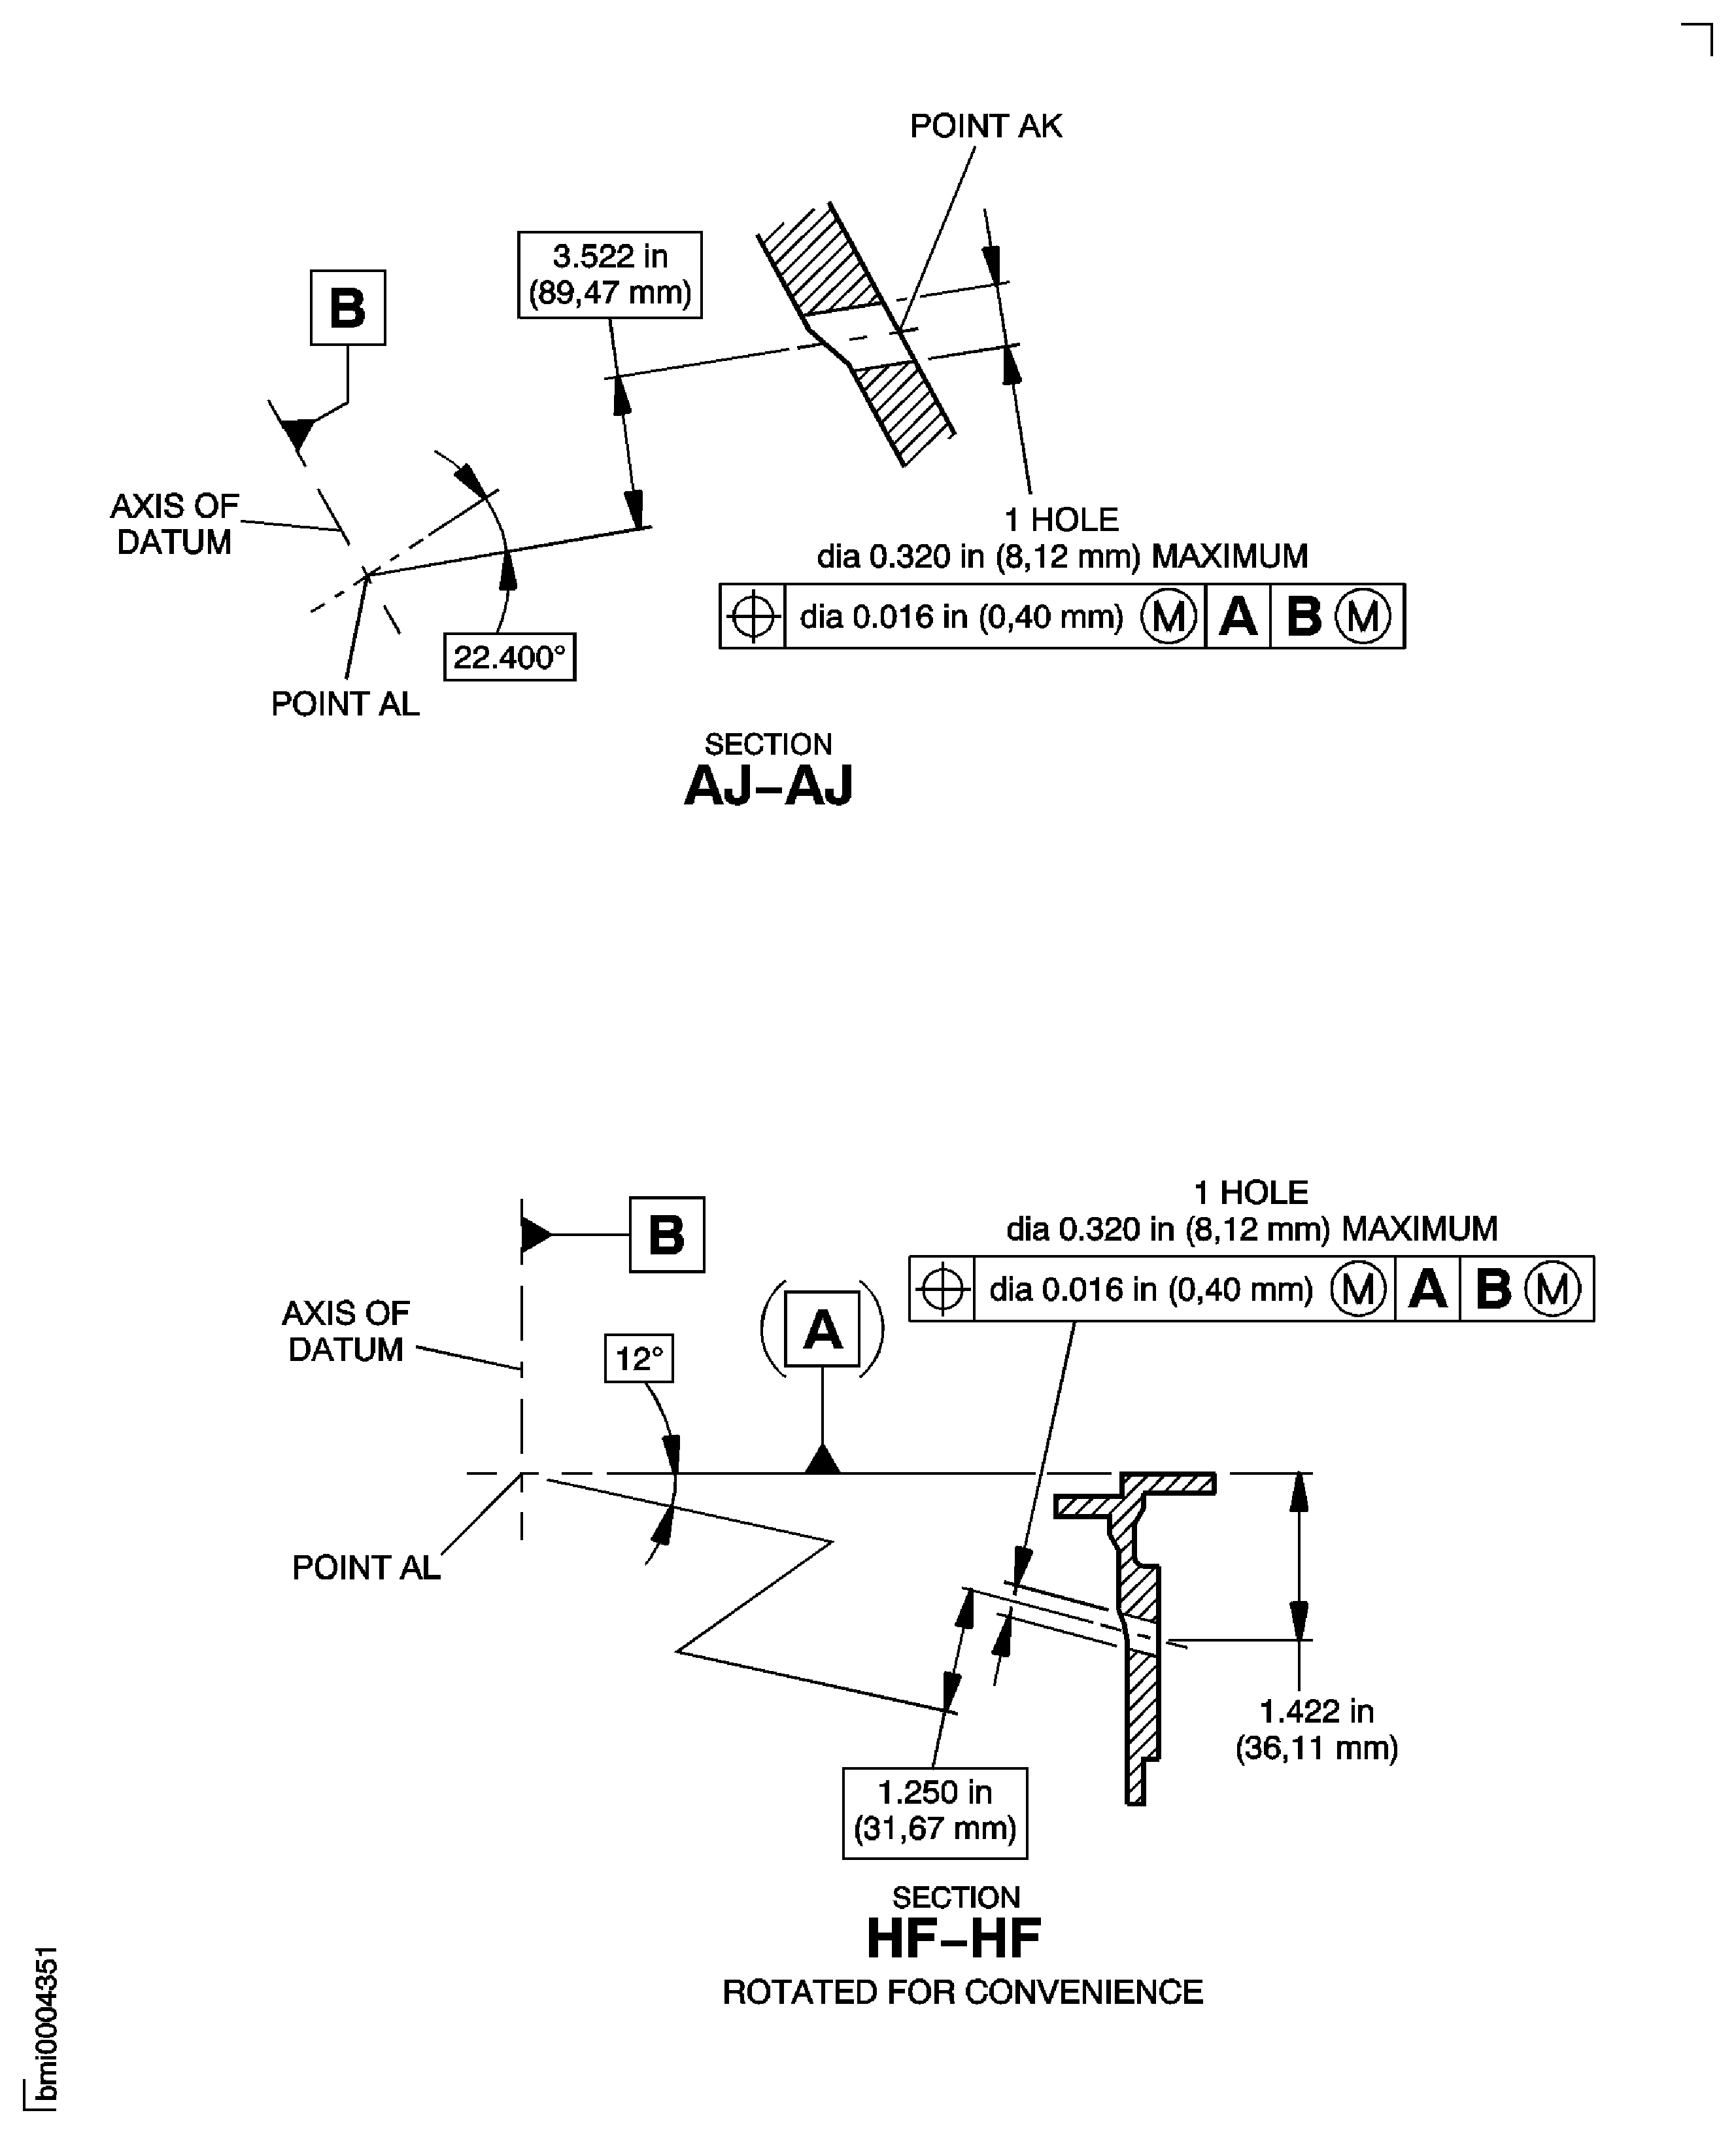
Figure: Repair Details and Dimensions - Assembly A
Sheet 5
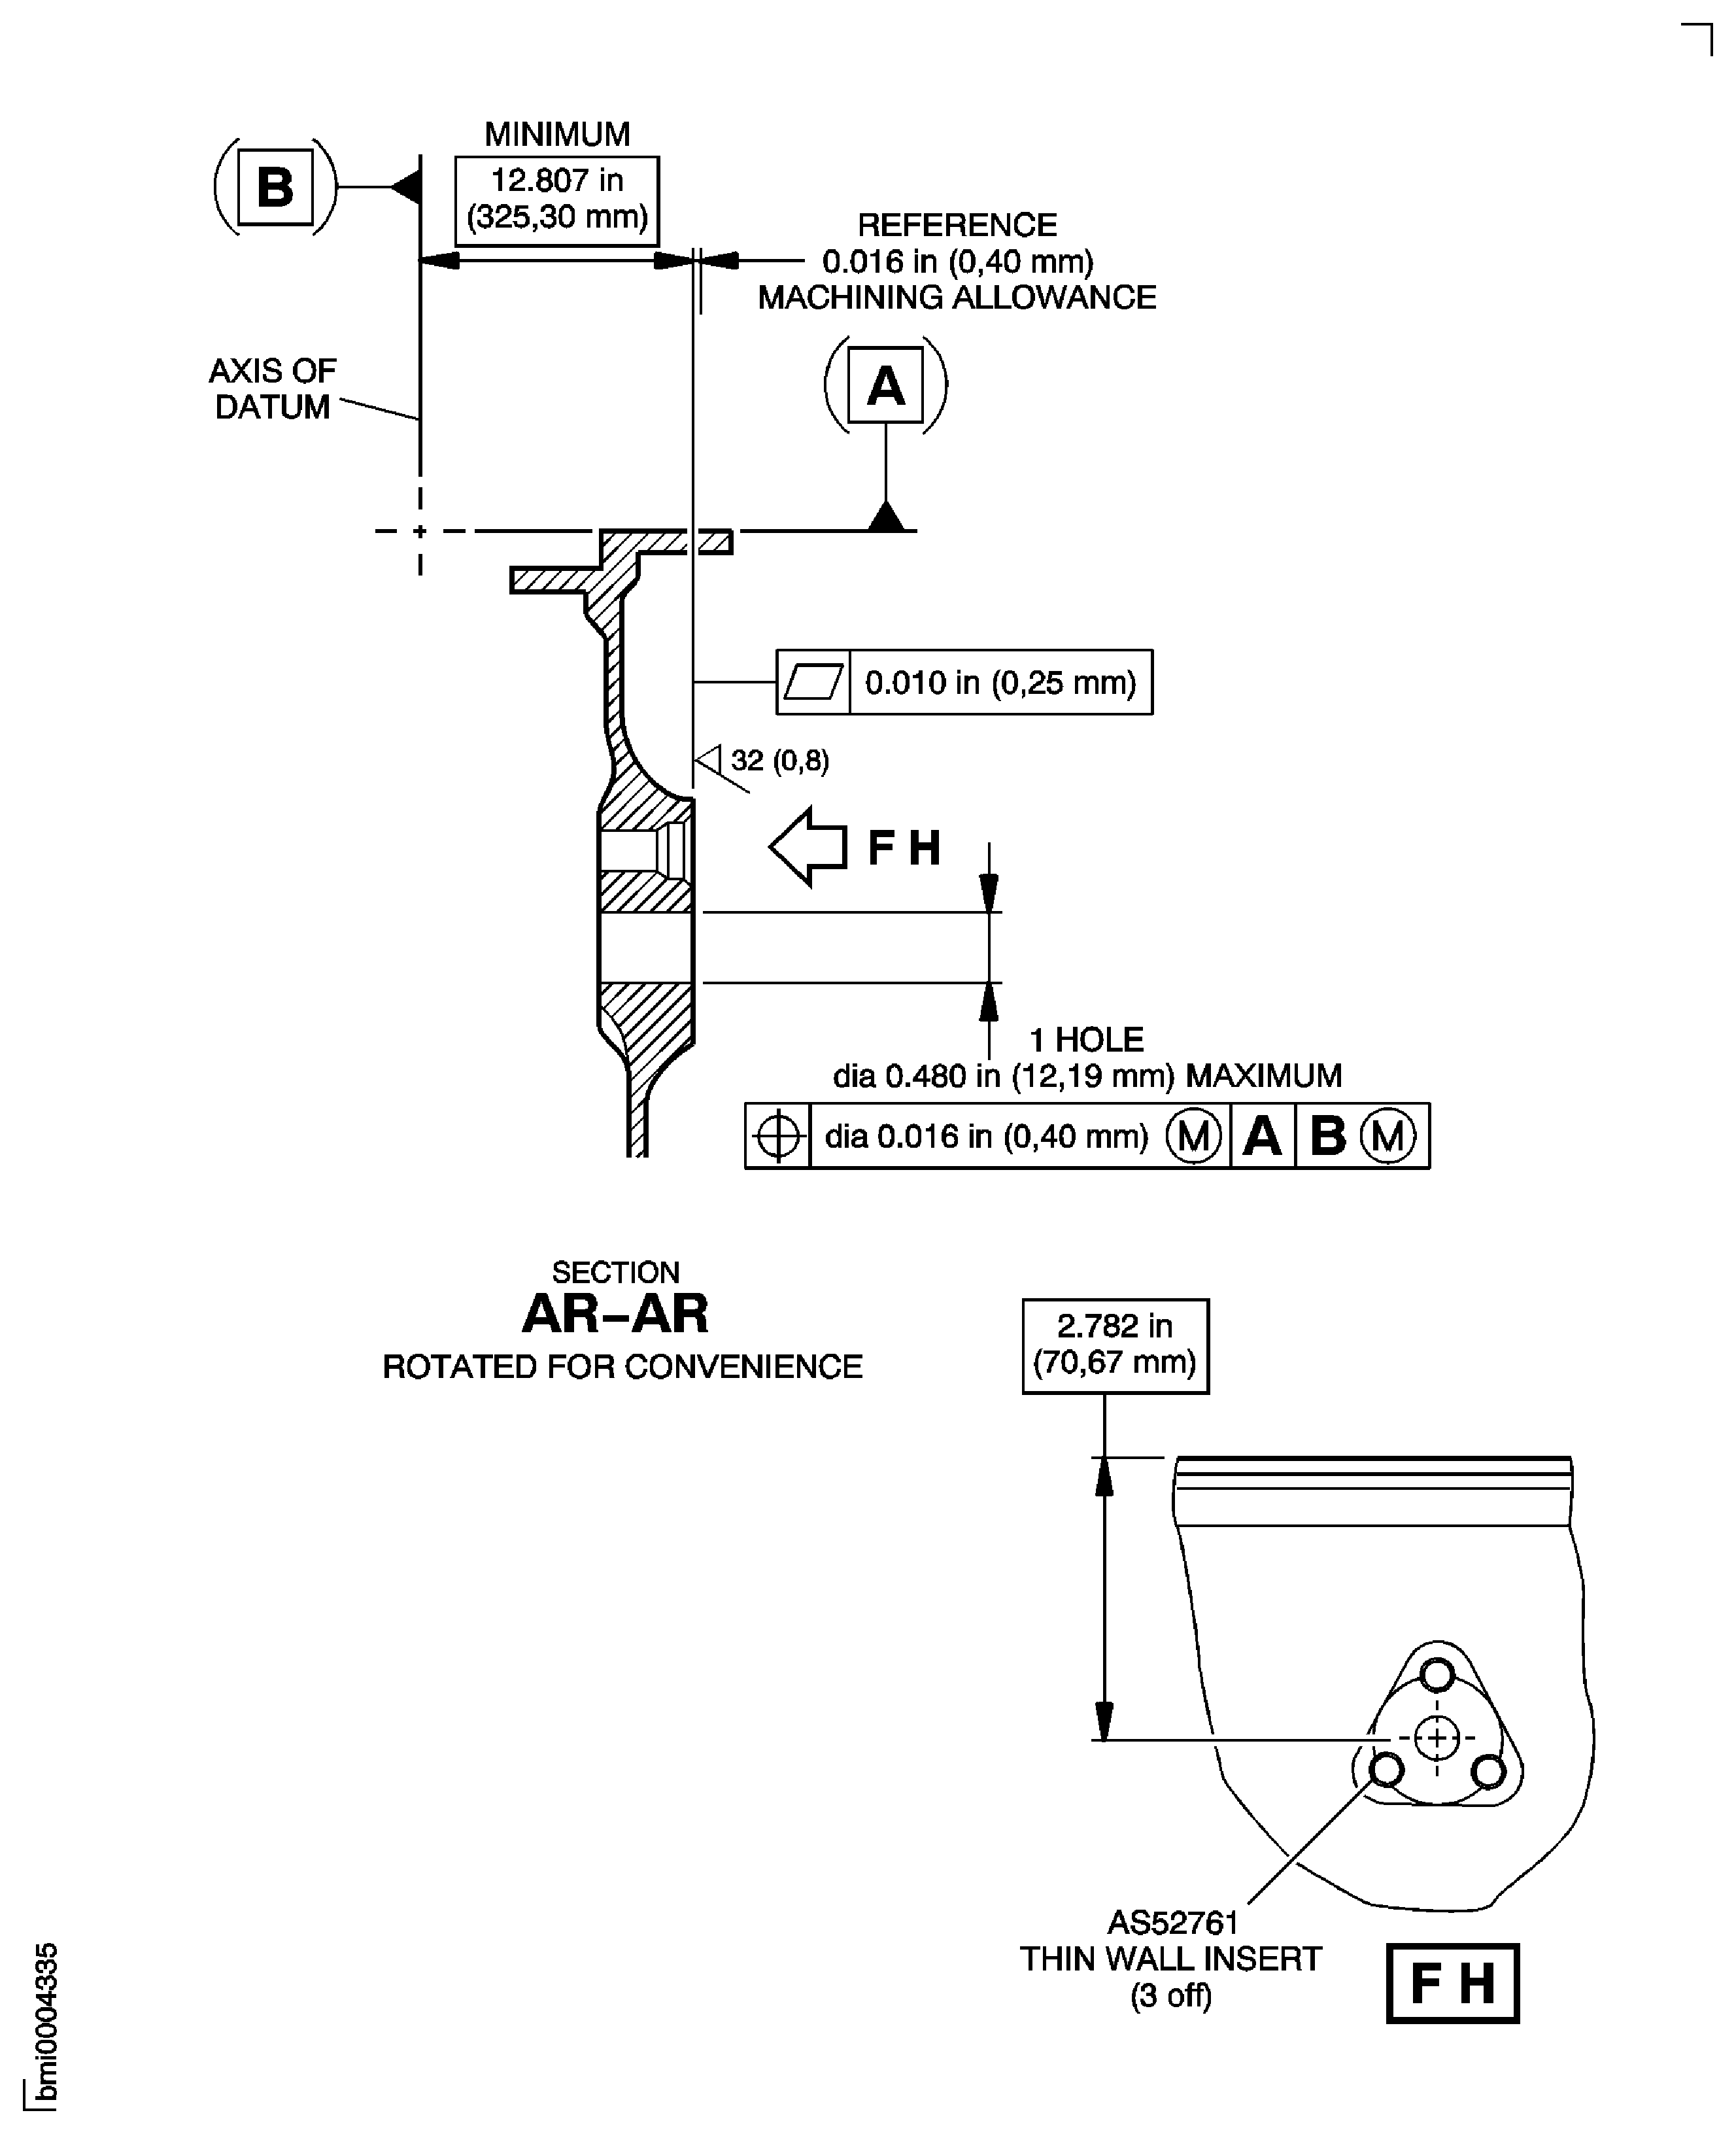
Figure: Repair Details and Dimensions - Assembly A
Sheet 6
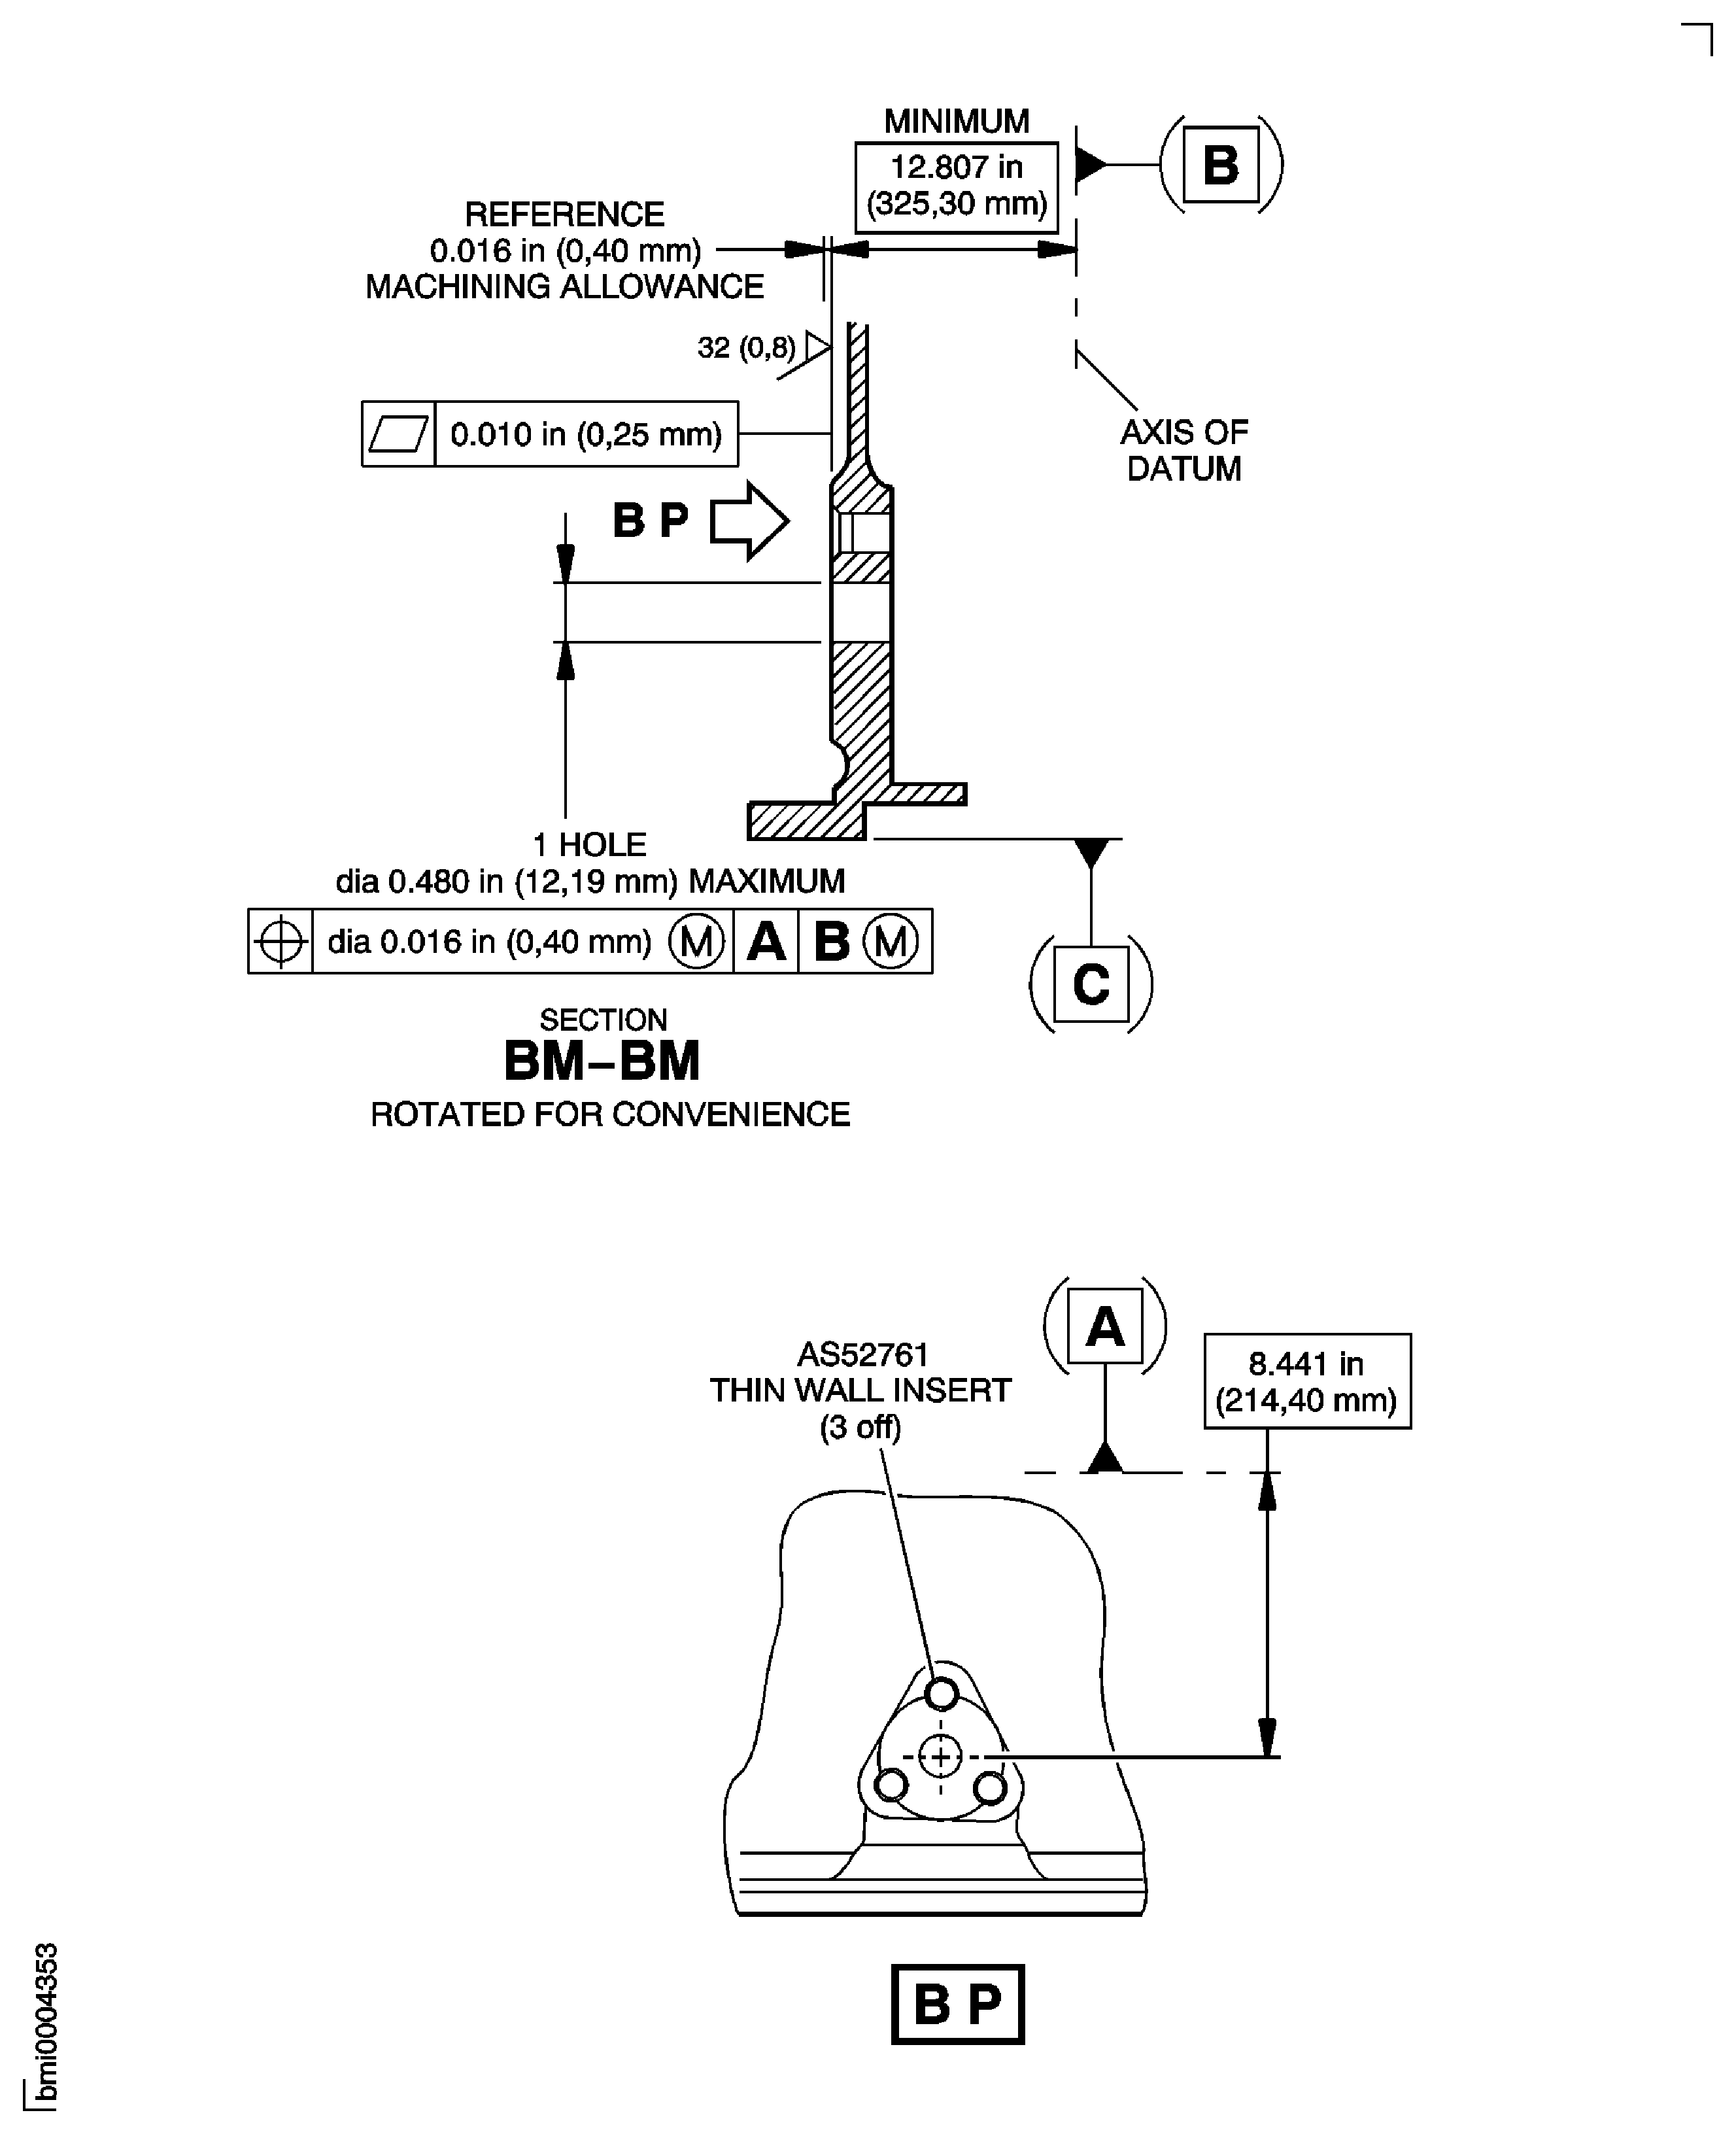
Figure: Repair Details and Dimensions - Assembly A
Sheet 7
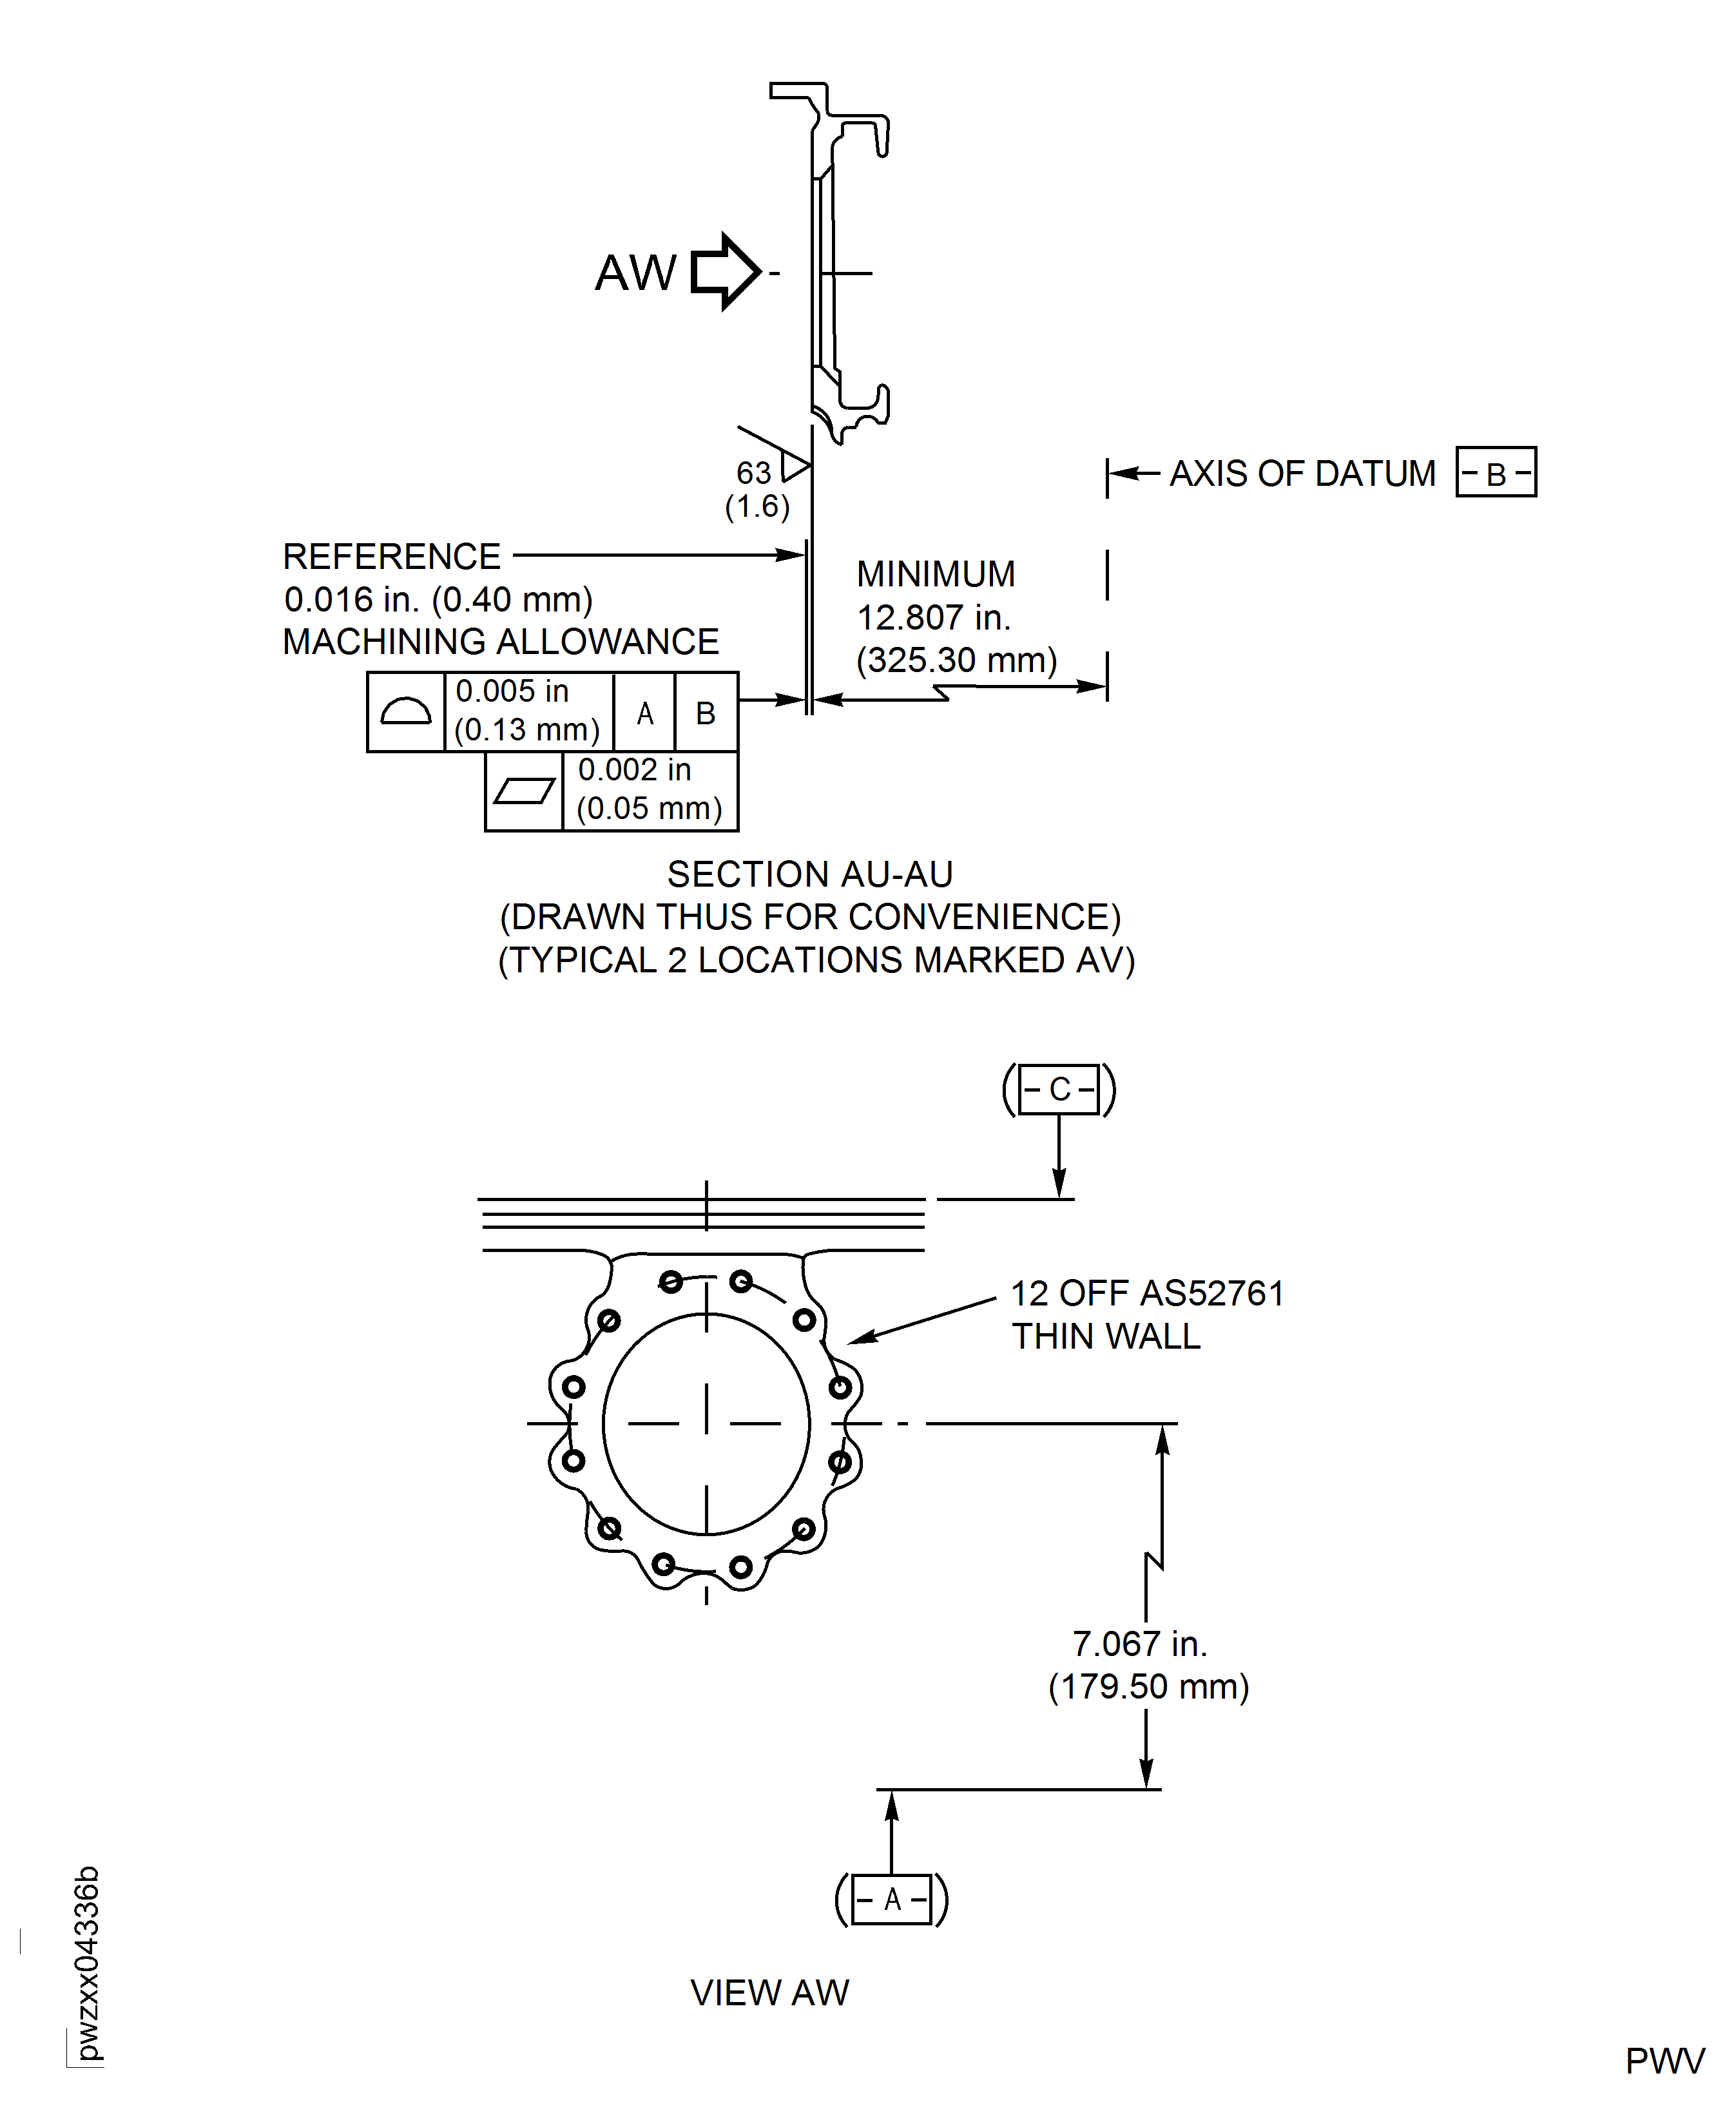
Figure: Repair Details and Dimensions - Assembly A
Sheet 8
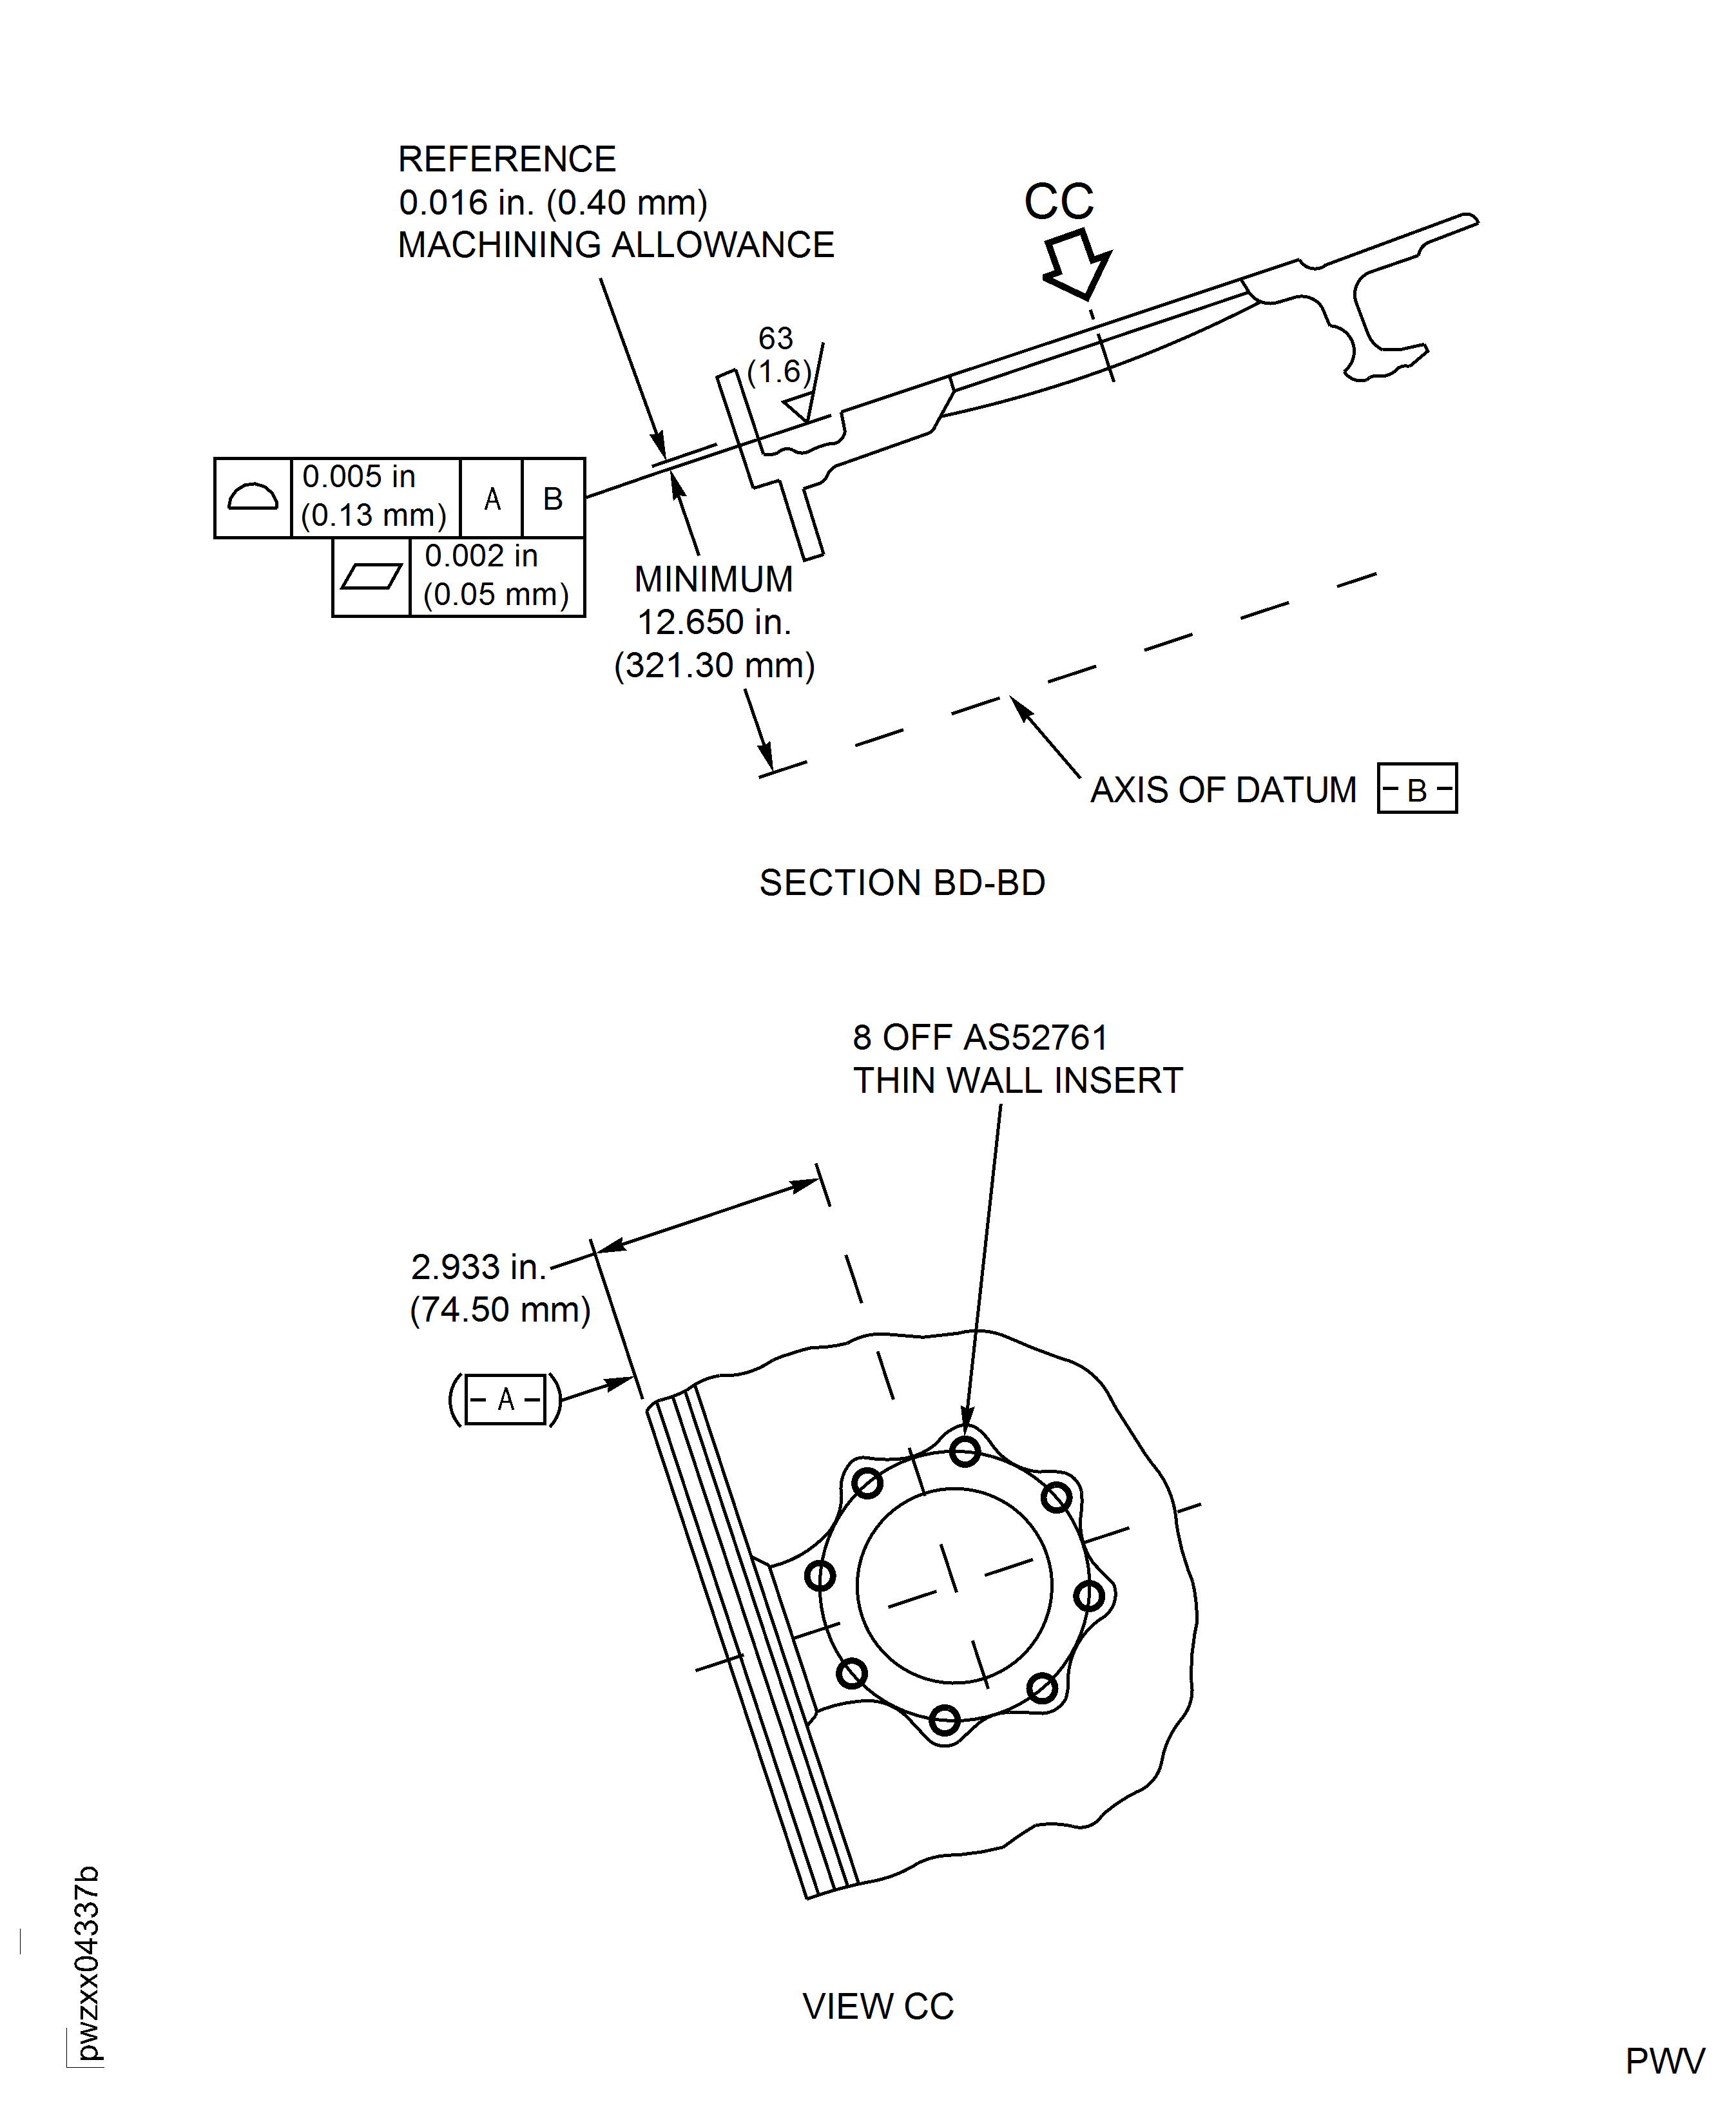
Figure: Repair Details and Dimensions - Assembly A
Sheet 9
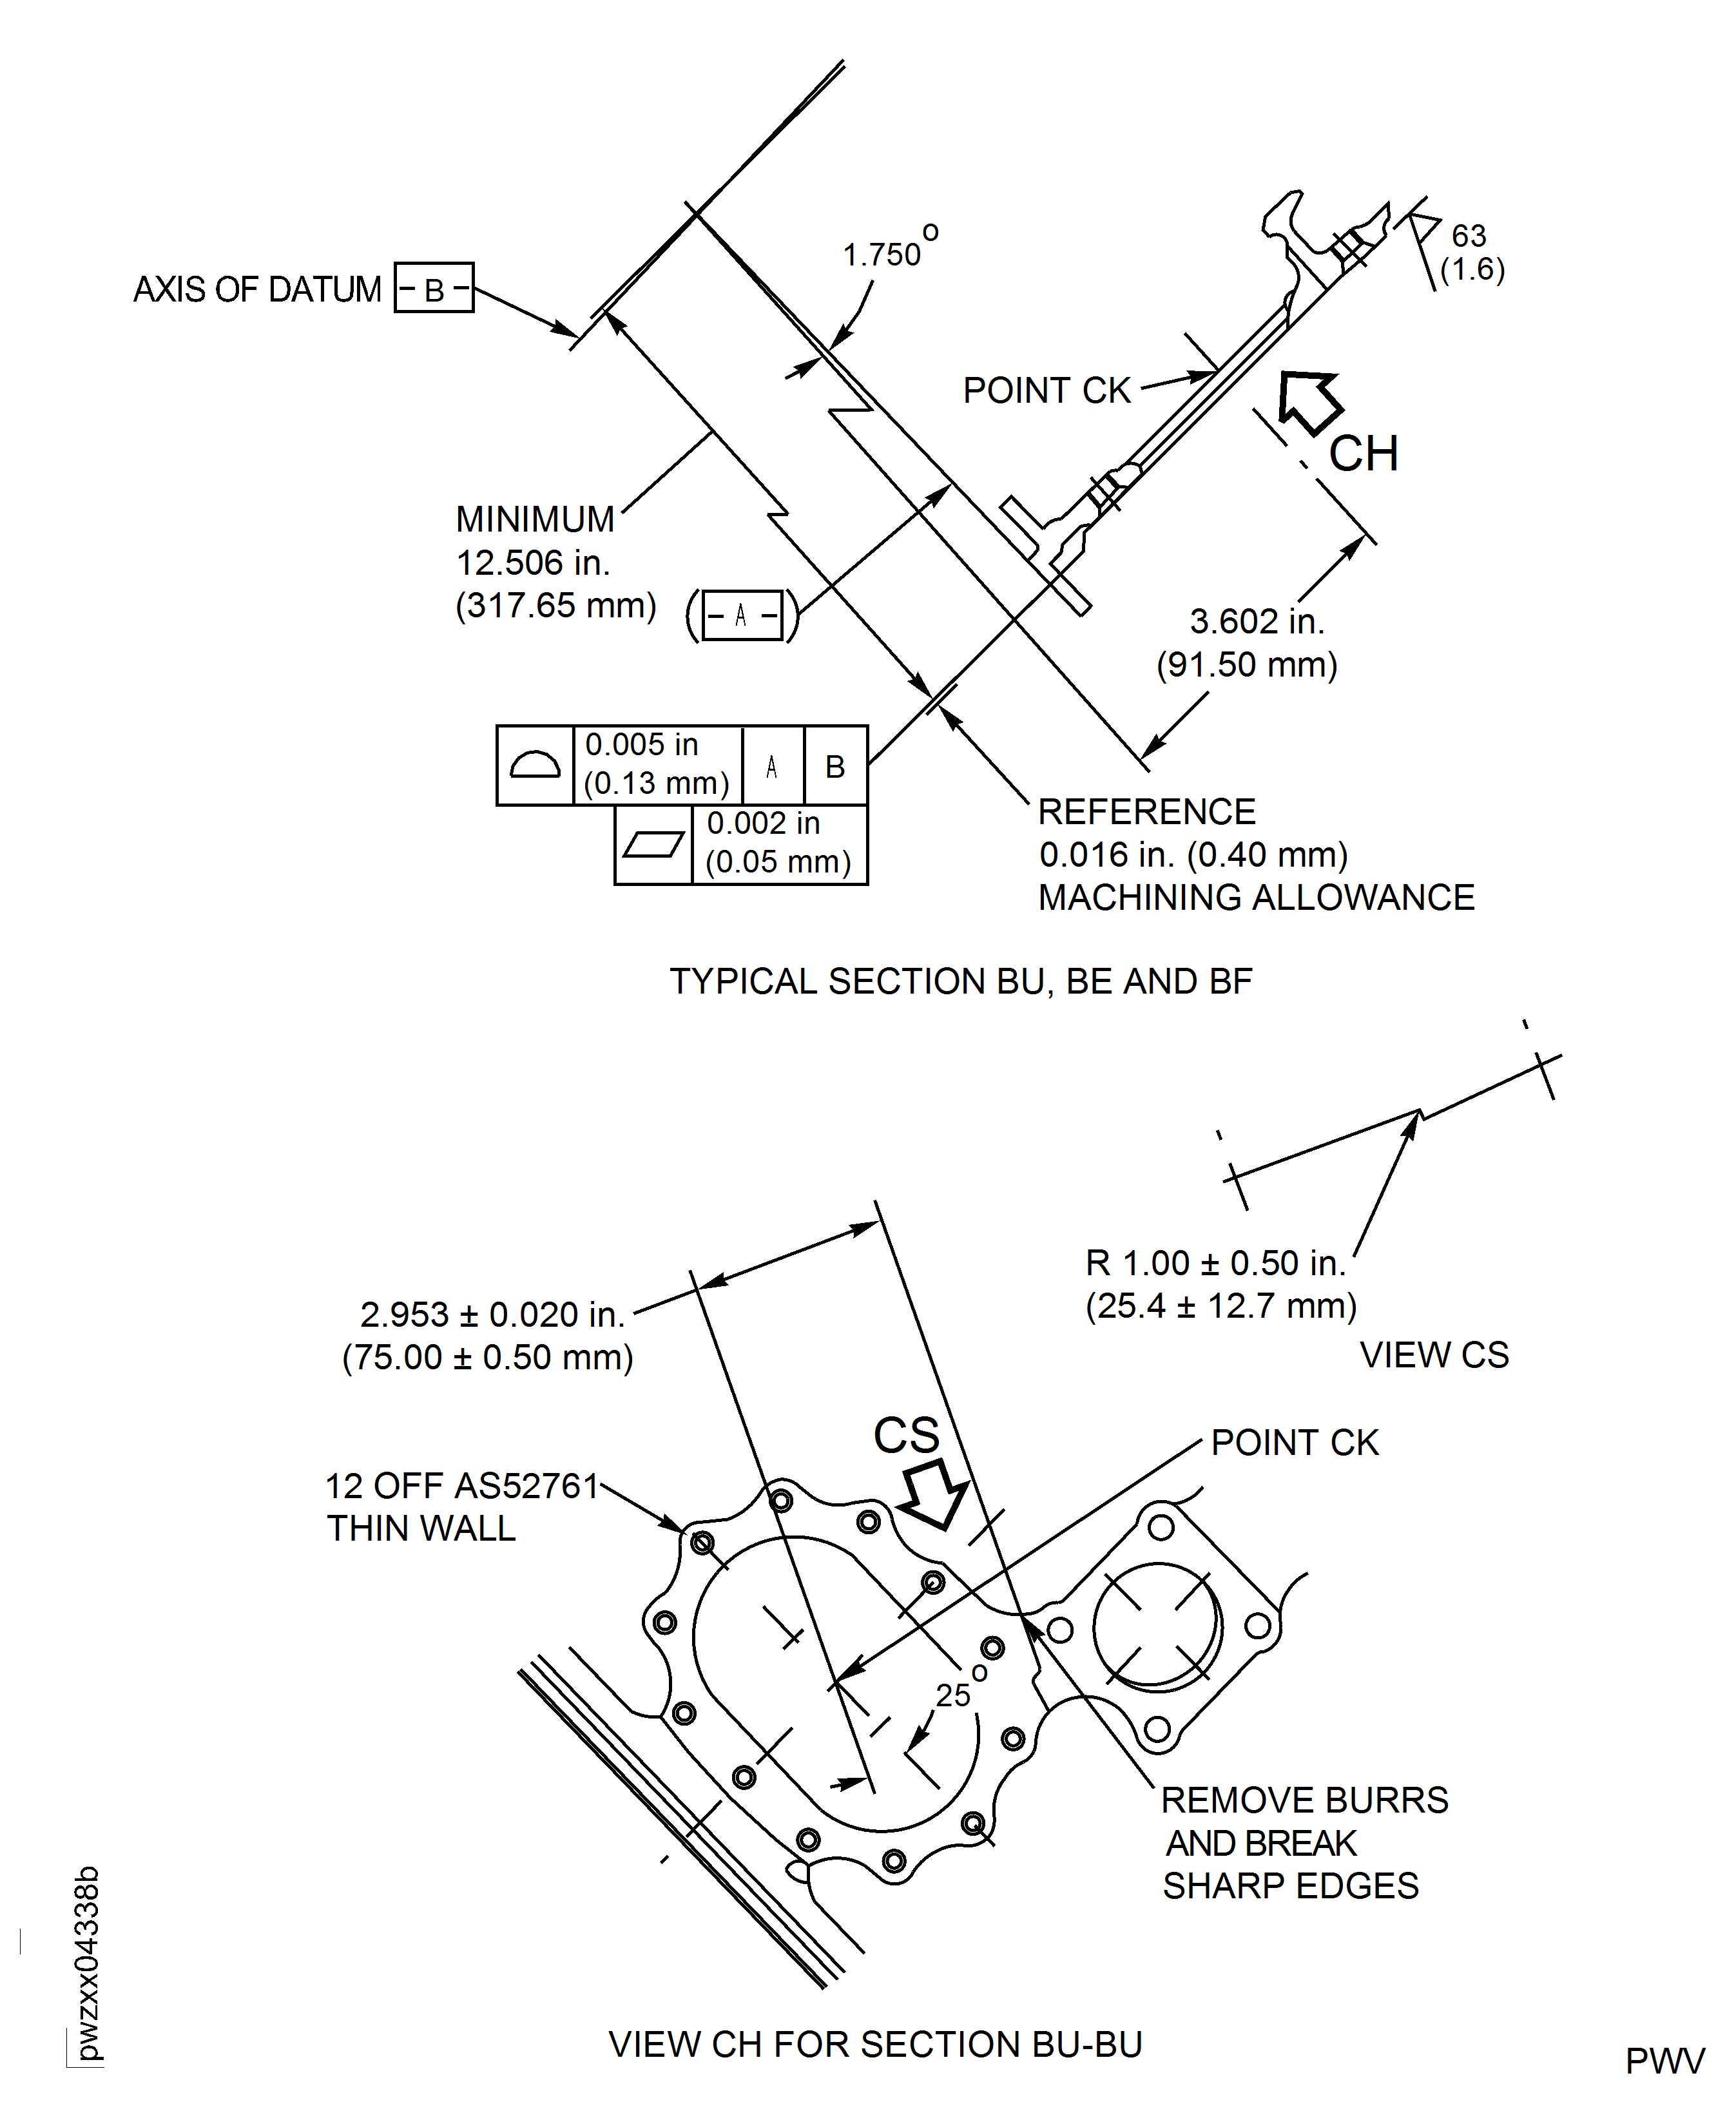
Figure: Repair Details and Dimensions - Assembly A
Sheet 10
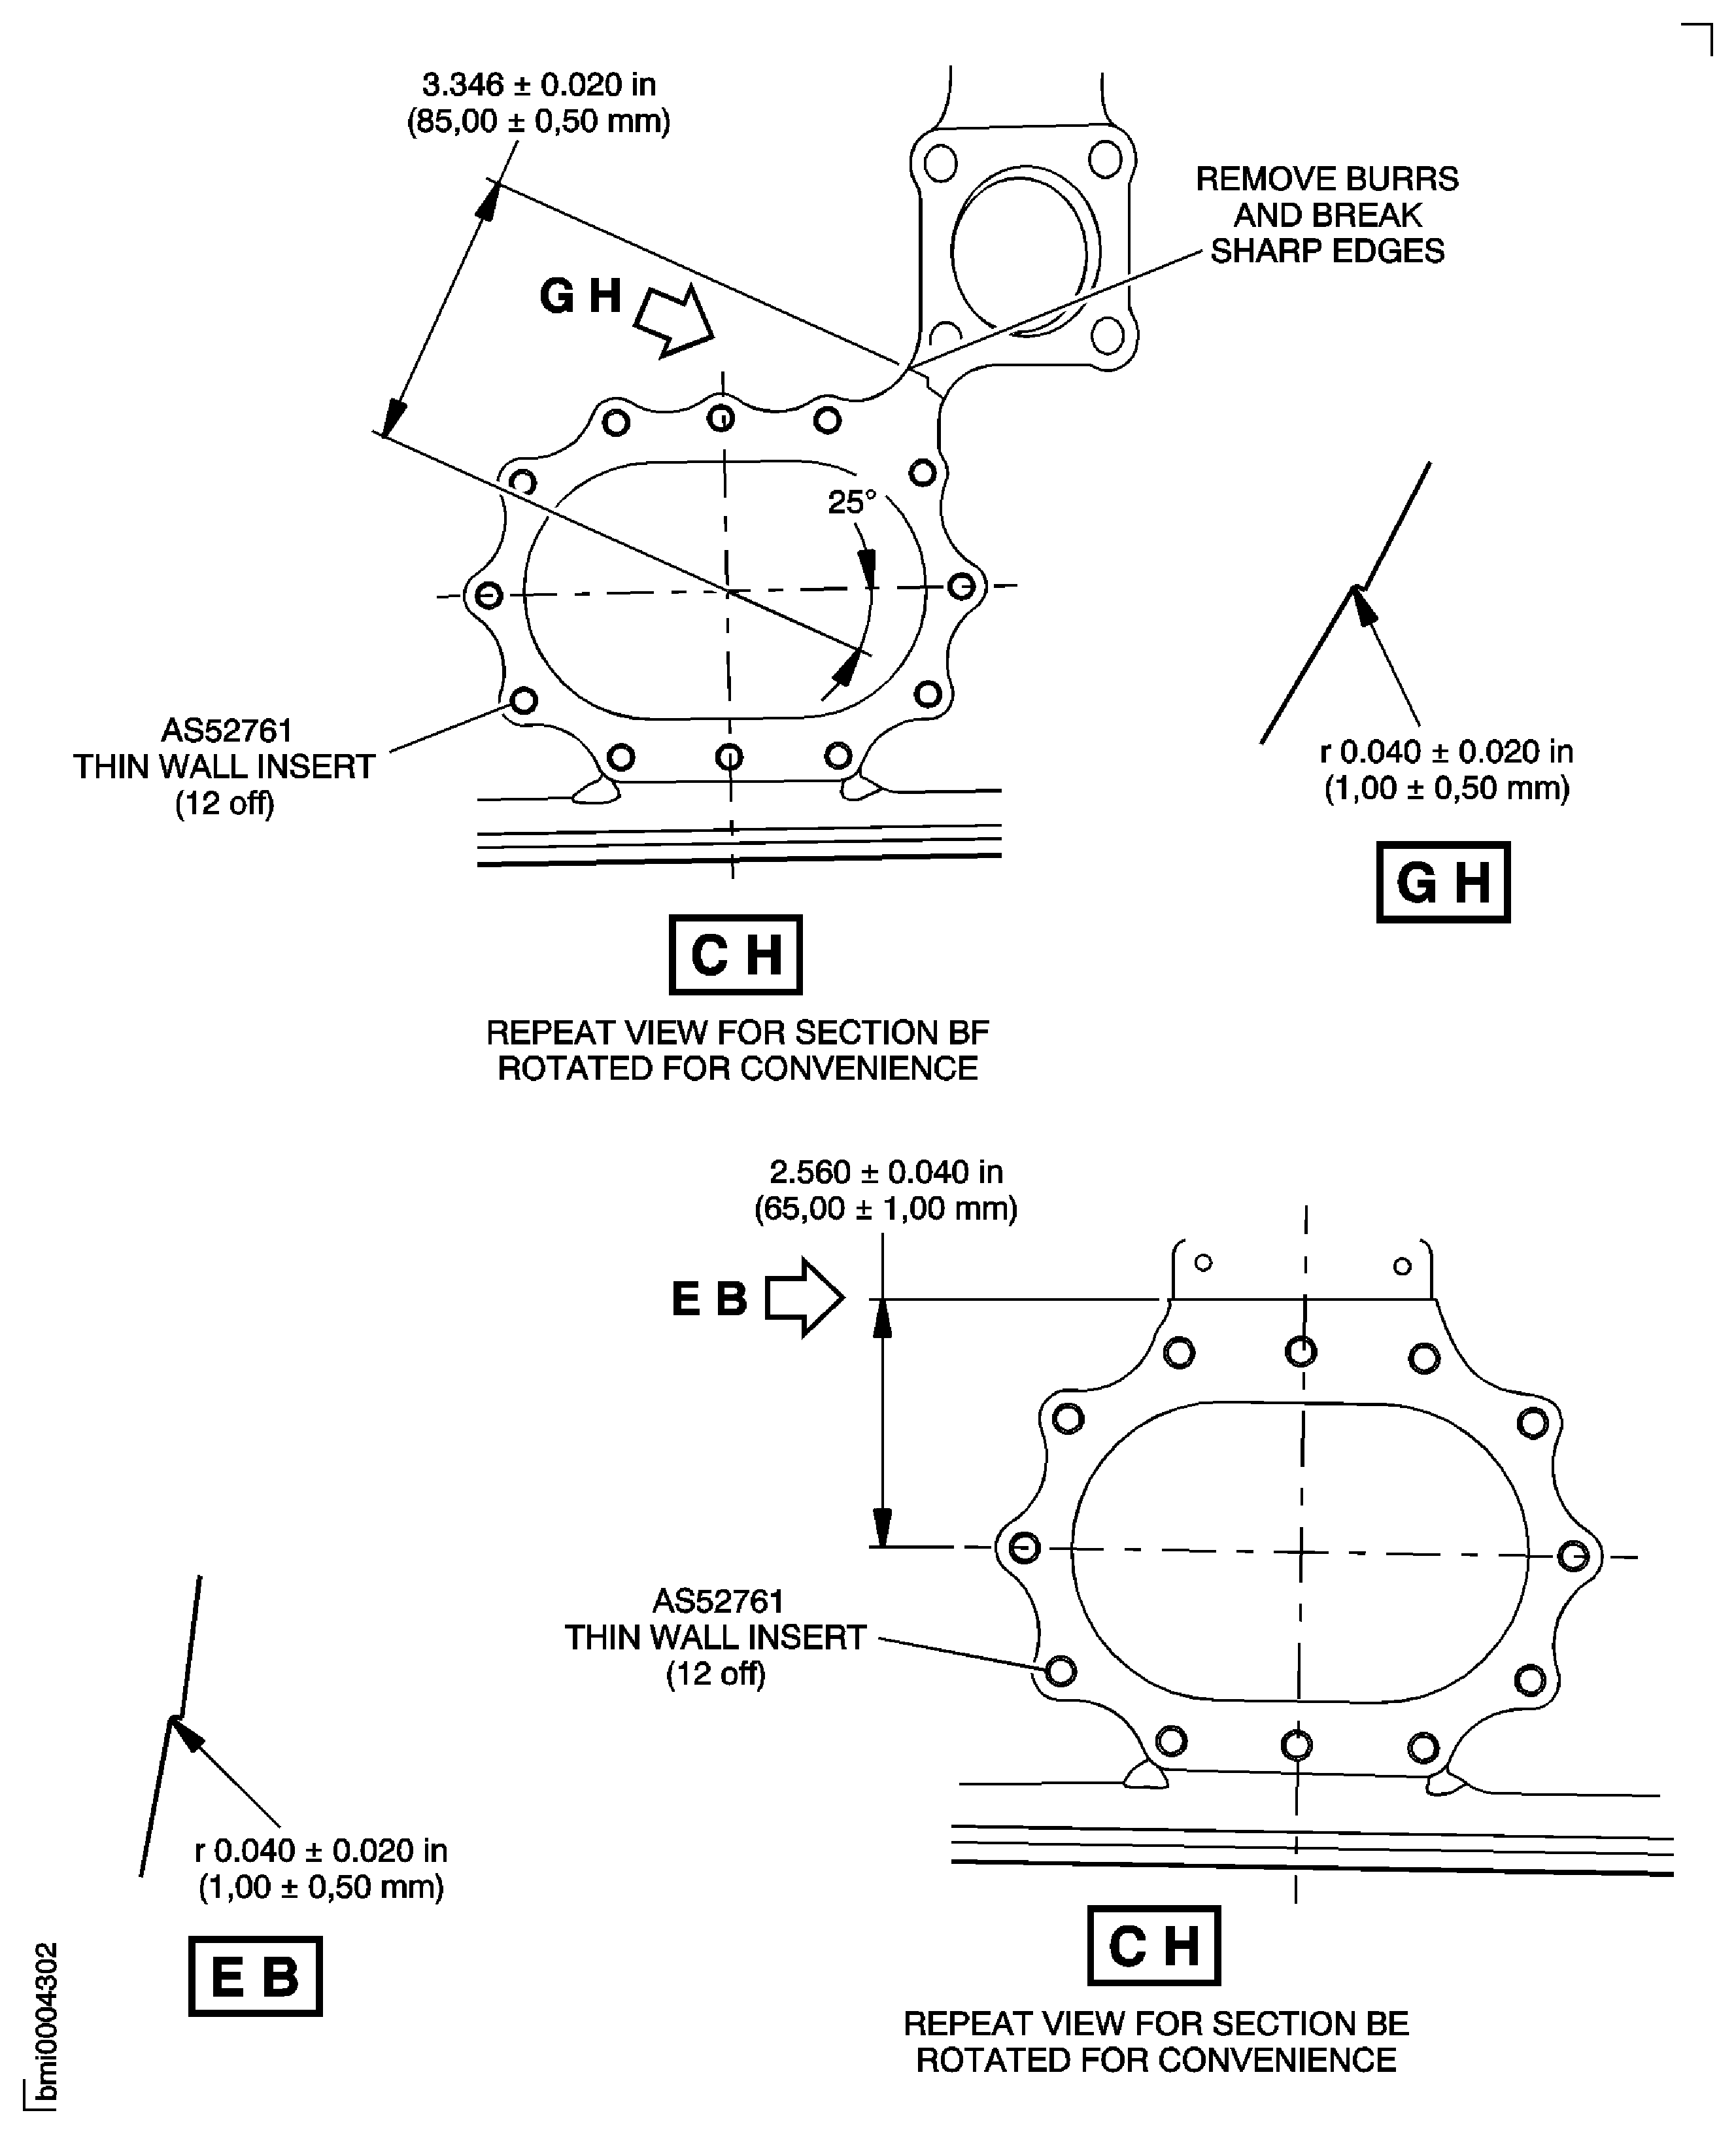
Figure: Repair Details and Dimensions - Assembly A
Sheet 11
