Export Control
EAR Export Classification: Not subject to the EAR per 15 C.F.R. Chapter 1, Part 734.3(b)(3), except for the following Service Bulletins which are currently published as EAR Export Classification 9E991: SBE70-0992, SBE72-0483, SBE72-0580, SBE72-0588, SBE72-0640, SBE73-0209, SBE80-0024 and SBE80-0025.Copyright
© IAE International Aero Engines AG (2001, 2014 - 2021) The information contained in this document is the property of © IAE International Aero Engines AG and may not be copied or used for any purpose other than that for which it is supplied without the express written authority of © IAE International Aero Engines AG. (This does not preclude use by engine and aircraft operators for normal instructional, maintenance or overhaul purposes.).Applicability
All
Common Information
TASK 72-60-22-200-003 Starter Drive Gear - Examine, Inspection-003
General
This TASK gives the procedure for the inspection of the starter drive gear. For the other parts of the starter drive gear assembly, refer to TASK 72-60-22-200-000 (INSPECTION/CHECK-000).
Fig/item numbers in parentheses in the procedure agree with those used in the IPC.
The policy that is necessary for inspection is given in the SPM TASK 70-20-01-200-501.
All the parts must be cleaned before any part is examined. Refer to the SPM TASK 70-11-03-300-503.
All parts must be visually examined for damage, corrosion and wear. Any defects that are not identified in the procedure must be referred to IAE.
The procedure for those parts which must have a crack test is given in the SPM TASK 70-23-00-230-501. Do the test before the part is visually examined. Limits for cracks are given in the SUBTASK for each part.
Do not discard any part until you are sure there are no repairs available. Refer to the instructions in repair before a discarded part is used again or oversize parts are installed.
Parts which should be discarded can be held although no repair is available. The repair of a discarded part could be shown to be necessary at a later date.
All parts must be examined to make sure that all the repairs have been completed satisfactorily.
The practices and processes referred to in the procedure by the TASK/SUBTASK numbers are in the SPM.
References
Refer to the SPM for data on these items:
Definitions of Damage, SPM TASK 70-02-02-350-501
Record and Control of the Lives of Parts, SPM TASK 70-05-00-220-501
Inspection of Parts, SPM TASK 70-20-00-200-501.
Some data on these items is contained in this TASK. For more data on these items refer to the SPM:
Method of Testing for Crack Indications,
Chemical Processes,
Surface Protection.
Preliminary Requirements
Pre-Conditions
NONESupport Equipment
| Name | Manufacturer | Part Number / Identification | Quantity | Remark |
|---|---|---|---|---|
| Demagnetizing unit | LOCAL | Demagnetizing unit | ||
| Hardness tester | LOCAL | Hardness tester | ||
| Magnetizing unit | LOCAL | Magnetizing unit | ||
| Workshop inspection equipment | LOCAL | Workshop inspection equipment |
Consumables, Materials and Expendables
NONESpares
NONESafety Requirements
NONEProcedure
Clean the parts. Refer to the TASK 72-60-22-100-000 (CLEANING-000).
SUBTASK 72-60-22-240-053 Do a Crack Test on the Starter Drive Gear (Magnetic)
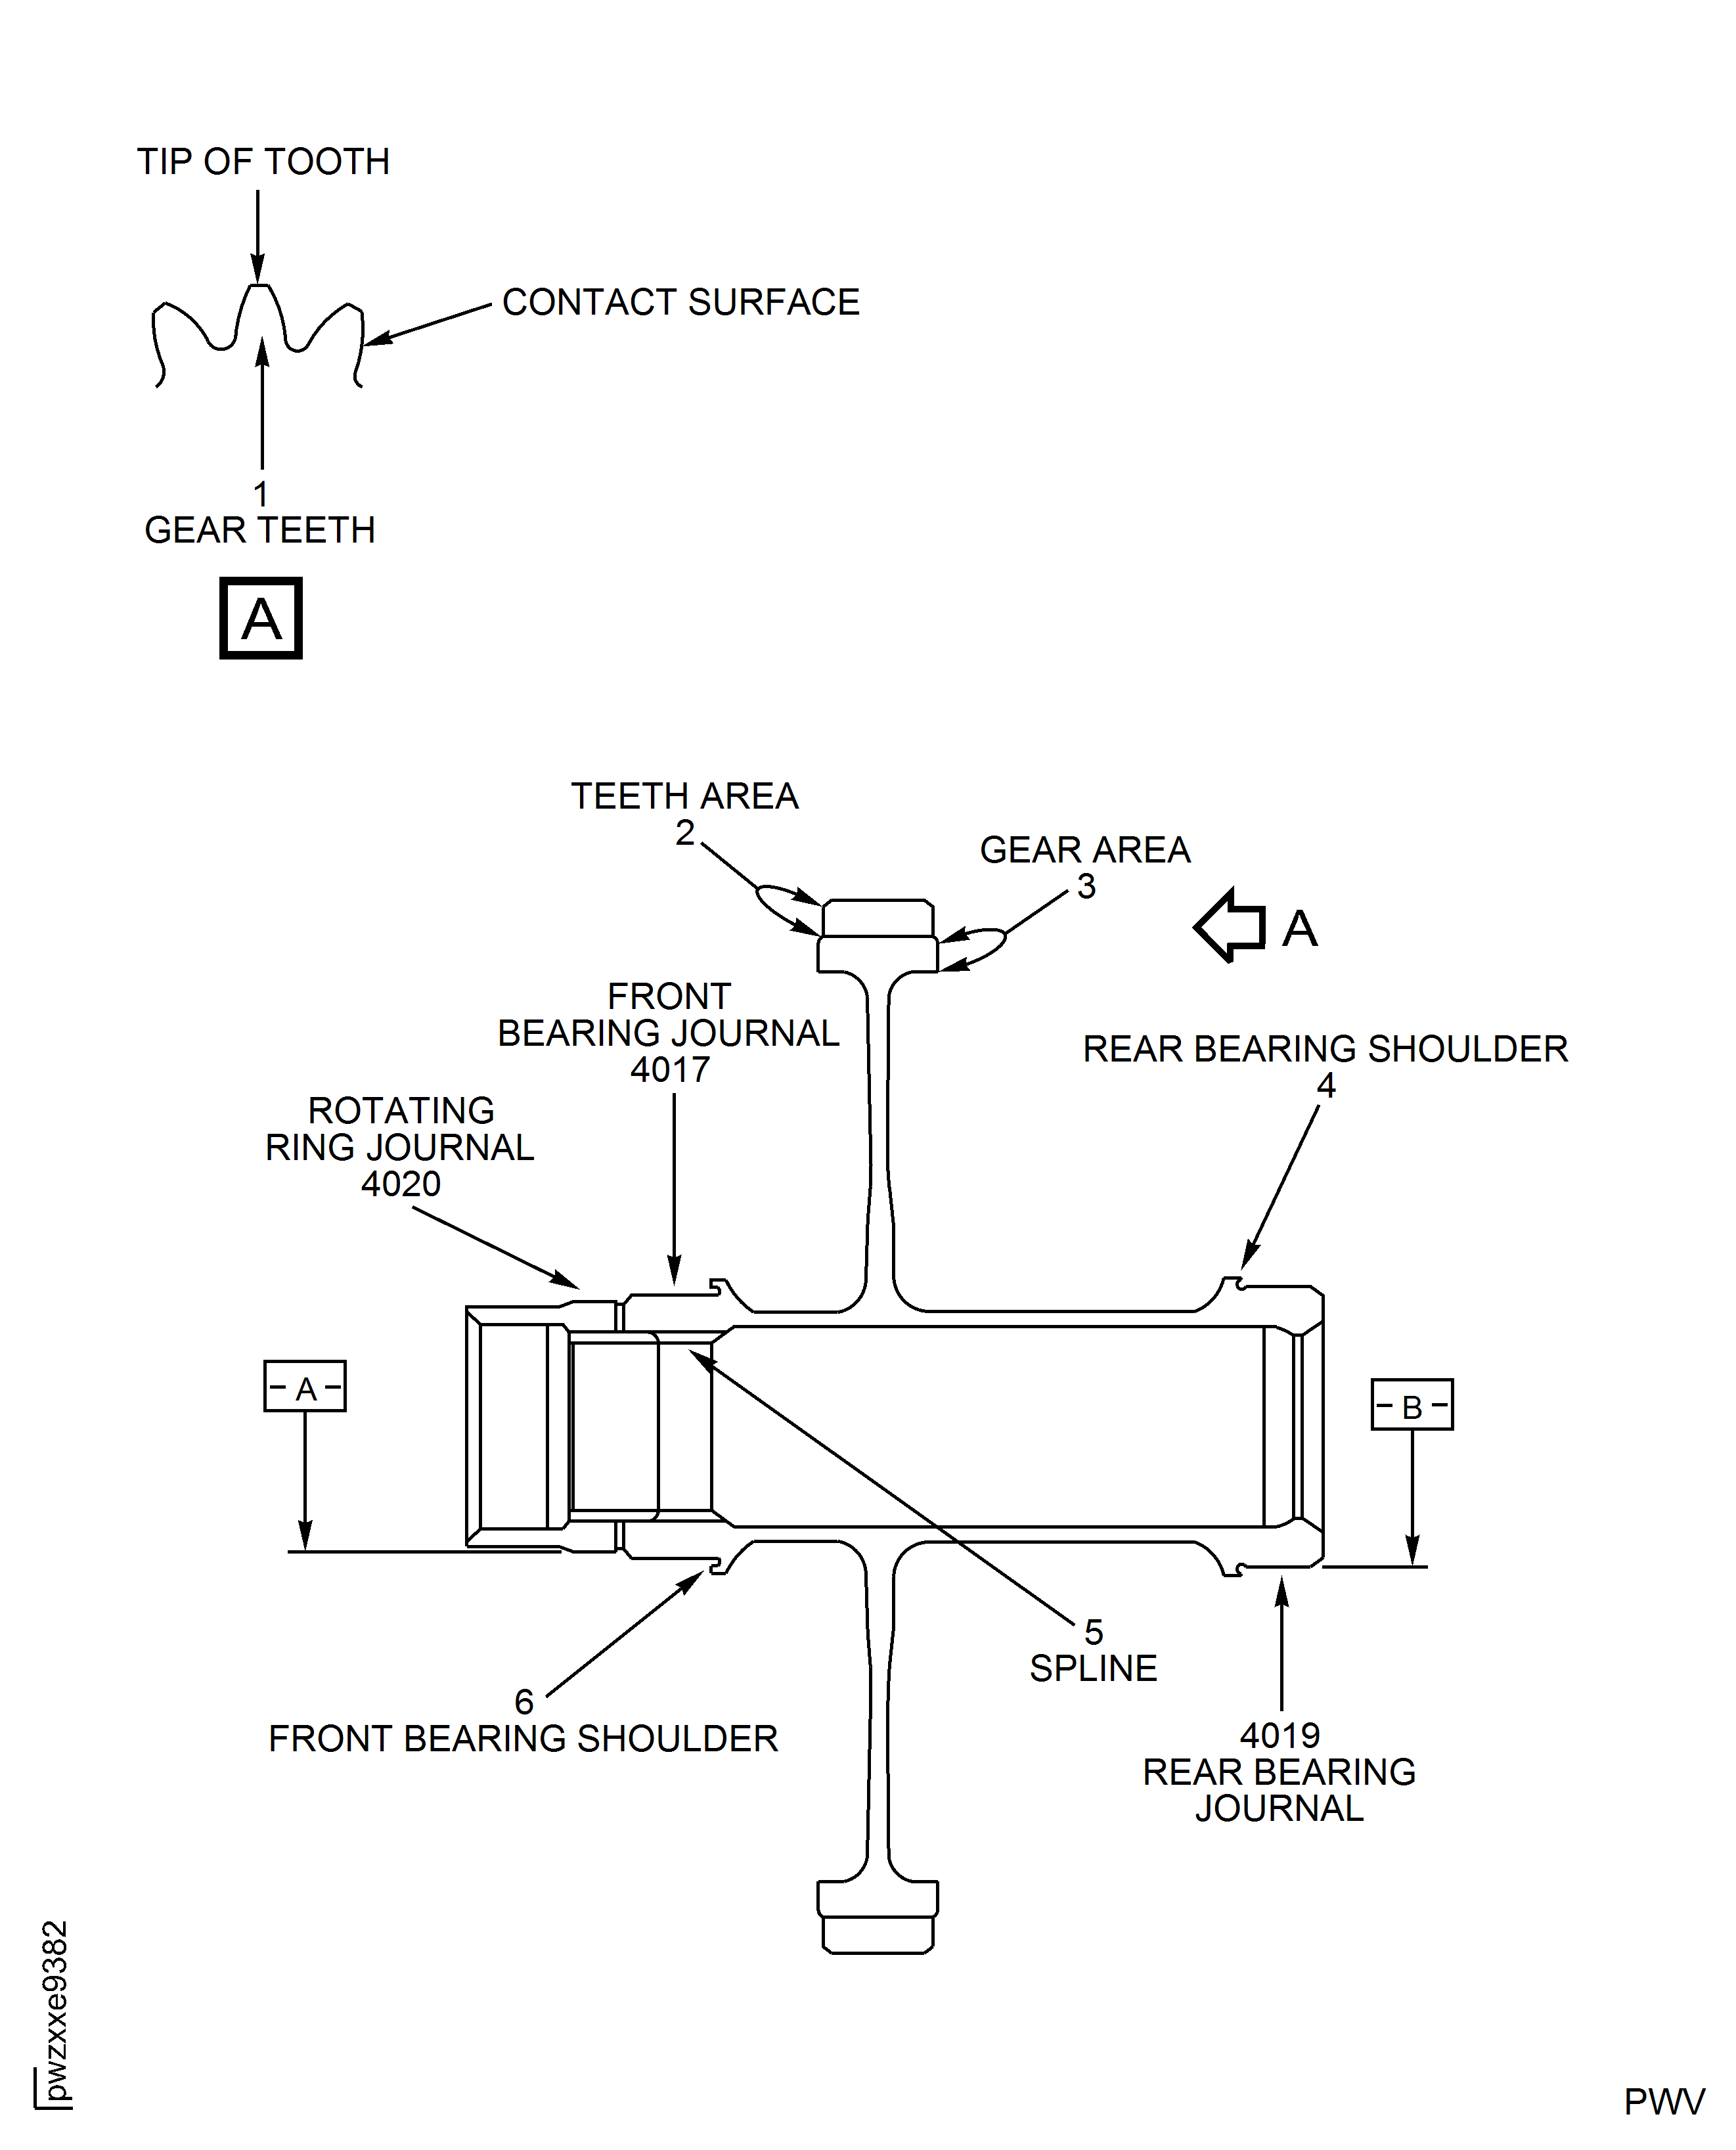
Refer to Figure.
Repair, VRS5127 TASK 72-60-22-300-014 (REPAIR-014).
More than Step
Nicks on the tip of tooth.
Repair, VRS5127 TASK 72-60-22-300-014 (REPAIR-014).
Superficial damage
Damage on the engagement surface.
SUBTASK 72-60-22-220-060 Examine the Starter Drive Gear Gear Teeth, Location 1
Refer to Figure.
Repair, VRS5131 TASK 72-60-22-300-018 (REPAIR-018).
More than Step
Runout.
SUBTASK 72-60-22-220-061 Examine the Starter Drive Gear Rear Bearing Shoulder, Location 4
Refer to Figure.
Repair, VRS5132 TASK 72-60-22-300-019 (REPAIR-019)
Less than 1.6526 in. (41.975 mm)
Diameter.
Repair, VRS5132 TASK 72-60-22-300-019 (REPAIR-019)
More than Step
Runout.
SUBTASK 72-60-22-220-062 Examine the Starter Drive Gear Rotating Ring Journal, Location 4020
Refer to Figure.
Repair, VRS5127 TASK 72-60-22-300-014 (REPAIR-014)
Superficial damage
Spline teeth.
SUBTASK 72-60-22-220-063 Examine the Starter Drive Gear Spline, Location 5
Refer to Figure.
Repair, VRS5127 TASK 72-60-22-300-014 (REPAIR-014).
Scratches not more than 0.008 in. (0.20 mm) in depth
Repair, VRS5128 TASK 72-60-22-300-015 (REPAIR-015), Repair, VRS5129 TASK 72-60-22-300-016 (REPAIR-016).
Scratches more than 0.008 in. (0.20 mm) in depth
Damage on the surface.
SUBTASK 72-60-22-220-064 Examine the Starter Drive Gear Rear and Front Bearing Journals, Location 4019 and 4017
Refer to Figure.
Repair, VRS5128 TASK 72-60-22-300-015 (REPAIR-015)
Less than 1.7340 in. (44.043 mm)
Diameter.
Repair, VRS5128 TASK 72-60-22-300-015 (REPAIR-015)
More than Step
Runout.
SUBTASK 72-60-22-220-065 Examine the Starter Drive Gear Rear Bearing Journal, Location 4019
Refer to Figure.
Repair, VRS5130 TASK 72-60-22-300-017 (REPAIR-017)
More than Step
Runout.
SUBTASK 72-60-22-220-066 Examine the Starter Drive Gear Front Bearing Shoulder, Location 6
Refer to Figure.
Repair, VRS5129 TASK 72-60-22-300-016 (REPAIR-016).
Less than 1.7730 in. (45.043 mm)
Diameter.
Repair, VRS5129 TASK 72-60-22-300-016 (REPAIR-016).
More than Step
Runout.
SUBTASK 72-60-22-220-067 Examine the Starter Drive Gear Front Bearing Journal, Location 4017
Figure: Locations - Starter Drive Gear
Locations - Starter Drive Gear

