TASK 72-41-30-440-009-C00 HPC Front Case And Vane Assembly - Measure The HPC Front Cases, Assembly-009 - SBE 72-0564 (SelectOne Production Standard)

DMC:V2500-A5-72-41-3000-08B-710A-B|Issue No:001.00|Issue Date:2013-11-01

Export Control

EAR Export Classification: Not subject to the EAR per 15 C.F.R. Chapter 1, Part 734.3(b)(3), except for the following Service Bulletins which are currently published as EAR Export Classification 9E991: SBE70-0992, SBE72-0483, SBE72-0580, SBE72-0588, SBE72-0640, SBE73-0209, SBE80-0024 and SBE80-0025.

Copyright

© IAE International Aero Engines AG (2001, 2014 - 2021) The information contained in this document is the property of © IAE International Aero Engines AG and may not be copied or used for any purpose other than that for which it is supplied without the express written authority of © IAE International Aero Engines AG. (This does not preclude use by engine and aircraft operators for normal instructional, maintenance or overhaul purposes.).

Applicability

Post SBE 72-0564 (SELECTONE PRODUCTION STANDARD)

Common Information

TASK 72-41-30-440-009-C00 HPC Front Case And Vane Assembly - Measure The HPC Front Cases, Assembly-009 - SBE 72-0564 (SelectOne Production Standard)

General

This TASK gives the procedure to measure the HP compressor front cases. The subsequent TASKS give the procedure to assemble the HP compressor front case only for engines, which have SBE 72-0564 (SelectOne Production Standard) incorporated.

TASK 72-41-30-440-001-C00 (ASSEMBLY-001, CONFIG-003) Install the HP Compressor Stage 4 and 5 Rotor Path Rings and Stage 6 Rotor Ring Segments

TASK 72-41-30-440-002-B00 (ASSEMBLY-002, CONFIG-002) Measure and then Machine the Stage 6 Stator Vanes and the Stage 4, 5 and 6 Rotor Path Rings.

TASK 72-41-30-440-003-C00 (ASSEMBLY-003, CONFIG-003) Install the Inlet Guide Vanes.

TASK 72-41-30-440-004-C00 (ASSEMBLY-004, CONFIG-003) Install the Stage 3 VSV.

TASK 72-41-30-440-005-C00 (ASSEMBLY-005, CONFIG-003) Install the Stage 4 VSV.

TASK 72-41-30-440-006-C00 (ASSEMBLY-006, CONFIG-003) Install the Stage 5 VSV.

TASK 72-41-30-440-007-B00 (ASSEMBLY-007, CONFIG-002) Install the Stage 6 Stator Vanes.

TASK 72-41-30-440-008-C00 (ASSEMBLY-008, CONFIG-003) Install the Inlet Guide Vane and the Stage 3 to 5 Bridge Pieces.

TASK 72-41-30-440-010-C00 (ASSEMBLY-010, CONFIG-003) Disassemble the HP Compressor Front Cases.

TASK 72-41-30-440-011-C00 (ASSEMBLY-011, CONFIG-003) Check and Set VSV System with Optimized Build and Setting Clearances.

Fig/item numbers in parentheses in the procedure agree with those used in the EIPC. Only the primary Fig/item numbers are used. For the service bulletin alpha variants refer to the EIPC.

For all parts identified in a different Chapter/Section/Subject, the applicable Chapter/Section/Subject comes before the Fig/item number.

For standard torque data and procedures, refer to the SPM TASK 70-41-00-400-501, SPM TASK 70-41-01-400-501 and SPM TASK 70-41-02-400-501.

Special torque data and assembly tolerances are included in the procedure.

Lubricate all threads and touch faces of nuts and bolts with CoMat 10-077 APPROVED ENGINE OILS, unless other lubricants are referred to in the procedure.

To identify, lubricate and install seal rings, refer to the SPM TASK 70-44-01-400-501.

After assembly apply CoMat 07-038 AIR DRYING ENAMEL to any damaged surface protection, joint flanges and parts used to attach. Use the correct color of the air drying enamel. Refer to the SPM TASK 70-63-02-380-501.

The number for each radial location must be identified in a clockwise direction. These start at the engine top position when you look from the rear of the engine, unless stated differently in the procedure.

Refer to Figure for a sectional view of the HP compressor front case.

NOTE

To identify the consumable materials refer to the PCI.

NOTE

Special tools are identified in the procedure by the tool primary number.

Preliminary Requirements

Pre-Conditions

NONE

Support Equipment

NameManufacturerPart Number / IdentificationQuantityRemark
IAE 1R18031 Checking fixture0AM53IAE 1R180311
IAE 1R18032 Transducer carrier0AM53IAE 1R180321
IAE 1R18033 Gage mounting plate0AM53IAE 1R180331
IAE 1R18034 Roller anil0AM53IAE 1R180341
IAE 1R18040 Setting button0AM53IAE 1R180401
IAE 1R18042 Transducer carrier0AM53IAE 1R180421
IAE 1R18202 Support stand0AM53IAE 1R182021
IAE 1R18205 Lifting tool0AM53IAE 1R182051
IAE 1R18233 Foot support0AM53IAE 1R182331
IAE 1R18531 Measuring sleeve0AM53IAE 1R185311
IAE 1R18533 Setting base0AM53IAE 1R185331
IAE 1R18701 Indexing plate0AM53IAE 1R187011
IAE 1R18702 Set up drawing0AM53IAE 1R187021
IAE 1R18722 Setting button0AM53IAE 1R187221
IAE 1R18777 Distance sleeve0AM53IAE 1R187771
IAE 1R18778 Distance sleeve0AM53IAE 1R187781
IAE 1R18779 Distance sleeve0AM53IAE 1R187791
IAE 1R18780 Distance sleeve0AM53IAE 1R187801
IAE 1R18781 Distance sleeve0AM53IAE 1R187811

Consumables, Materials and Expendables

NameManufacturerPart Number / IdentificationQuantityRemark
CoMat 07-038 AIR DRYING ENAMELK3504CoMat 07-038
CoMat 10-077 APPROVED ENGINE OILSLOCALCoMat 10-077

Spares

NONE

Safety Requirements

NONE

Procedure

    1. SUBTASK 72-41-30-440-238 Install the Stage 4 and Stage 5 Actuating Control Rod Connectors

    2. Refer to Figure.

      1. Install the stage 4 drive bracket HPC Variable Stator Vane Actuation System (72-41-34,04-360).

      2. Put the stage 4 drive bracket into position on the stage 4 lower actuating ring HPC Variable Stator Vane Actuation System (72-41-34,04-540).

      3. Install the two bolts HPC Variable Stator Vane Actuation System (72-41-34,04-362) to attach the stage 4 drive bracket to the stage 4 lower actuating ring.

      4. Torque the two bolts to 36 to 45 lbfin (4.00 to 5.00 Nm).

      1. Install the stage 5 drive bracket HPC Variable Stator Vane Actuation System (72-41-34,05-360).

      2. Put the stage 5 drive bracket into position on the stage 5 lower actuating ring HPC Variable Stator Vane Actuation System (72-41-34,05-540).

      3. Install the two bolts HPC Variable Stator Vane Actuation System (72-41-34,05-362) to attach the stage 5 drive bracket to the stage 5 lower actuating ring.

      4. Torque the two bolts to 36 to 45 lbfin (4.00 to 5.00 Nm).

    1. SUBTASK 72-41-30-440-239 Assemble the Checking Fixture, the Support Stand and the Foot Support

    2. Refer to Figure.

    3. Put IAE 1R18202 Support stand 1 off, on to the IAE 1R18233 Foot support 1 off. Install the attachment pin to attach the support stand to the foot support.

    4. Attach a suitable hoist to the lifting eyes on IAE 1R18031 Checking fixture 1 off.

    5. Lift the checking fixture on to the support stand. Align the six holes in the support stand and the checking fixture.

    6. Install the six attachment bolts to attach the checking fixture to the support stand. Tighten the six attachment bolts.

    7. Remove the hoist.

    1. SUBTASK 72-41-30-440-240 Install the HP Compressor Front Case on to the Checking Fixture

      CAUTION

      MAKE SURE THE TOOL FACES AND COMPONENT FACES THAT TOUCH ARE CLEAN AND ARE NOT DAMAGED. DIRTY OR DAMAGED SURFACES CAN CAUSE INCORRECT INDICATIONS AND CAN DAMAGE COMPONENTS.
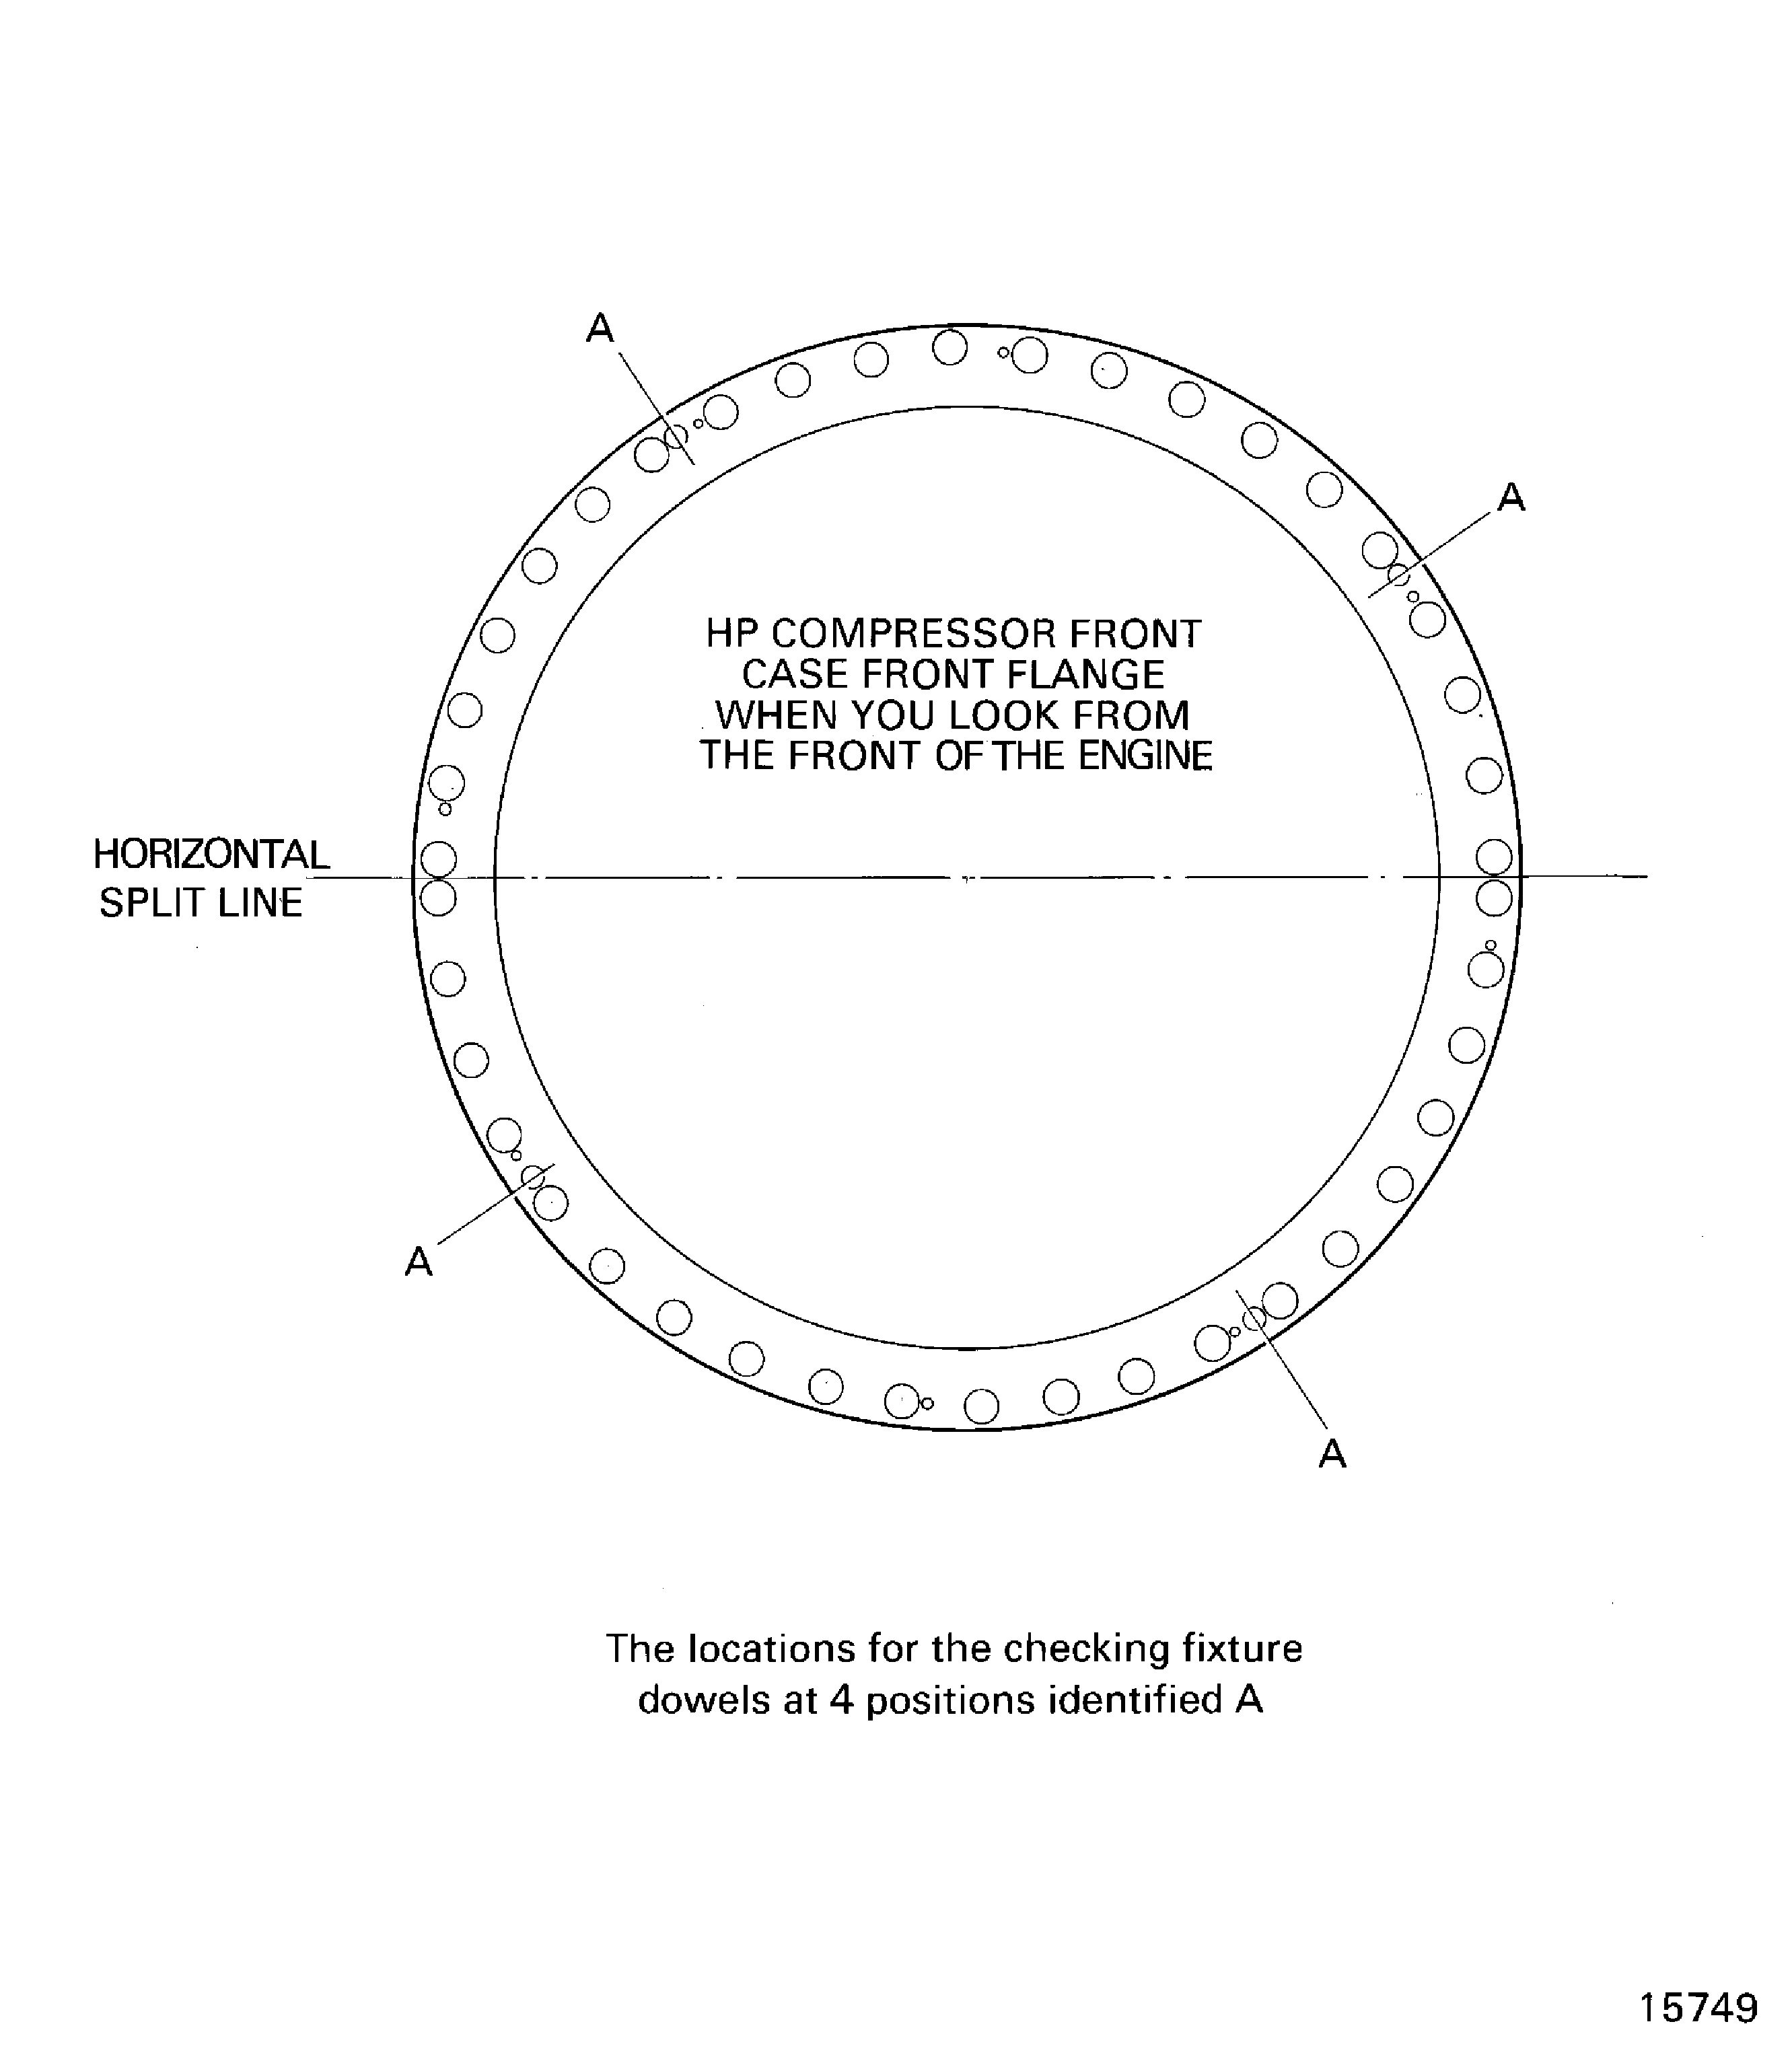
    2. Refer to Figure, Figure and Figure.

      NOTE

      Optional procedure to measure the HP compressor forward case rotor path linings, and stage 6 stator vane tip radius, is to use a 3 axis measurement machine.
      1. Install IAE 1R18205 Lifting tool 1 off, on to the HP compressor front case rear flange.

      2. Release the six adjusting screws on the two clamps.

      3. Remove the six bolts and washers which attach the two clamps to the lifting fixture. Remove the two clamps.

      4. Use a hoist and lift the lifting fixture on the HP compressor front case rear flange. Align the lifting fixture with the HP compressor front case rear flange.

      5. Put the two clamps in position on the lifting fixture and the HP compressor front case rear flange. Align the slots in the clamps with the holes in the lifting fixture.

      6. Install the six bolts and washers to attach the two clamps to the lifting fixture. Tighten the six bolts sufficiently to hold the clamps in their positions.

      7. Tighten the six adjusting screws to lift the clamps until they touch the HP compressor front case rear flange.

      8. Tighten the six bolts to safety the two clamps to the lifting fixture.

      1. Install the HP compressor front case on the checking fixture.

      2. Use the hoist attached to the lifting fixture.

      3. Lift the HP compressor front case and carefully put it in to position on the checking fixture. Align the four dowels and the eight studs on the checking fixture with the correct holes in the HP compressor case front flange.

      4. Install the eight washers and nuts on to the eight studs. Tighten the nuts to safety the assembly.

      1. Remove the lifting fixture.

      2. Release the six adjusting screws which adjust the two clamps.

      3. Remove the six bolts and washers which attach the two clamps to the lifting fixture.

      4. Remove the two clamps.

      5. Use the hoist and remove the lifting fixture.

    1. SUBTASK 72-41-30-440-241 Assemble the Tools to Measure the Rotor Path Radii

      CAUTION

      MAKE SURE THE TOOL FACES AND COMPONENT FACES THAT TOUCH ARE CLEAN AND ARE NOT DAMAGED. DIRTY OR DAMAGED SURFACES CAN CAUSE INCORRECT INDICATIONS AND CAN DAMAGE COMPONENTS.
    2. Refer to Figure.

    3. Install IAE 1R18034 Roller anil 1 off in to the transducer, part of IAE 1R18032 Transducer carrier 1 off.

      1. Install the transducer carrier in IAE 1R18033 Gage mounting plate 1 off.

      2. Remove the two handknobs and the two plates from the transducer carrier.

      3. Install the transducer carrier in to the slot in the gage mounting plate.

      4. Install the two plates and the two handknobs removed in step C.(1).

      5. Tighten the two handknobs.

    4. Install IAE 1R18701 Indexing plate 1 off in to its location in IAE 1R18533 Setting base 1 off.

    5. Align the stage 3 rotor path hole in the indexing plate with the setting button location in the setting base.

    6. Install IAE 1R18722 Setting button 1 off through the stage 3 rotor path hole in the indexing plate and in to the setting button slot in the setting base.

      1. Install the gage mounting plate with the transducer carrier on to the pillar of the setting base.

      2. Carefully put the assembly in to position on the pillar of the setting base and align the roller anvil with the setting button.

      3. Release the two handknobs on the transducer carrier and move the transducer carrier until the roller anvil touches the setting button.

      4. When the roller anvil touches the setting button tighten the two handknobs.

    7. Connect the transducer electrical connection to the measuring instrument.

      1. Adjust the position of the transducer carrier.

      2. Set the measuring instrument to zero.

      3. Release the two handknobs and continue to move the transducer carrier until the measuring instrument shows a value of 0.100 in. (2.54 mm).

      4. Tighten the two handknobs.

      5. Set the measuring instrument to zero.

      1. Make sure the transducer carrier operates correctly.

      2. Pull the puller on the transducer carrier radially in. Turn the puller through 90 degrees. This will lock the transducer carrier away from the setting button.

      3. Pull the handknob on top of the transducer carrier vertically up.

      4. Turn the transducer carrier through 90 degrees.

      5. Turn the transducer carrier to its initial position.

      6. Lock the transducer carrier in its initial position with the handknob released in step J.(2).

      7. Move the puller, locked in step J.(1), to its initial position. This will release the transducer carrier in to its initial position.

      8. With the transducer carrier in its initial position make sure the measuring instrument shows a value of zero.

      9. Do steps J.(1) to (7) three times to make sure the tools operate correctly.

      10. The tools are now set to measure the stage 3 rotor path radius.

    1. SUBTASK 72-41-30-220-459 Dimensionally Measure the Stage 3 Rotor Path Radius

      CAUTION

      MAKE SURE THE TOOL FACES AND COMPONENT FACES THAT TOUCH ARE CLEAN AND ARE NOT DAMAGED. DIRTY OR DAMAGED SURFACES CAN CAUSE INCORRECT INDICATIONS AND CAN DAMAGE TOOL FACES.
    2. Refer to Figure and Figure.

    3. Install IAE 1R18777 Distance sleeve 1 off on to the pillar of IAE 1R18031 Checking fixture 1 off.

      1. Install the gage mounting plate and the transducer carrier on to the pillar of the checking fixture. Refer to IAE 1R18702 Set up drawing 1 off.

      2. Pull the puller on the transducer carrier radially in and turn the puller through 90 degrees. This will lock the transducer carrier away from the setting button.

      3. Pull the handknob on top of the transducer carrier vertically up.

      4. Turn the transducer carrier through 90 degrees.

      5. Put the gage mounting plate and transducer carrier on to the checking fixture pillar.

      6. Carefully lower the gage mounting plate and transducer carrier through the stator vanes and on to the distance sleeve.

      7. Tighten the turnscrew part of the gage mounting plate, in to the stage 3 location groove in the checking fixture pillar.

      8. Turn the transducer carrier to its initial position.

      9. Lock the transducer carrier in its initial position with the handknob released in step D.(2).

      10. Move the puller locked in step D.(1) to its initial position. This will release the transducer carrier in to its initial position.

        NOTE

        Oversize radii are shown on the measuring instrument by a minus value. Undersize radii are shown by a plus value.
      1. Measure the stage 3 rotor path radius.

      2. Turn the HP compressor front case and the checking fixture.

      3. Write down the minimum and the maximum measuring instrument values. These should be between plus 0.002 to minus 0.002 in. (plus 0.05 to minus 0.05 mm).

      1. Remove the gage mounting plate and transducer carrier from the checking fixture.

      2. Do steps D.(1) to (3) to set the transducer carrier before it is removed.

    4. Remove the distance sleeve from the pillar of the checking fixture.

    1. SUBTASK 72-41-30-440-242 Set the Tools to Measure the Stage 4 Rotor Path Ring Radius

      CAUTION

      MAKE SURE THE TOOL FACES AND COMPONENT FACES THAT TOUCH ARE CLEAN AND ARE NOT DAMAGED. DIRTY OR DAMAGED SURFACES CAN CAUSE INCORRECT INDICATIONS AND CAN DAMAGE TOOL FACES.
    2. Refer to Figure.

    3. Remove IAE 1R18722 Setting button 1 off from the setting button location in IAE 1R18533 Setting base 1 off.

    4. Turn IAE 1R18701 Indexing plate 1 off and align the stage 4 rotor path hole with the setting button location in the setting base.

    5. Install the setting button through the stage 4 rotor path hole in the indexing plate and in to the setting button location in the setting base.

      1. Install IAE 1R18033 Gage mounting plate 1 off and IAE 1R18032 Transducer carrier 1 off on to the pillar of the setting base.

      2. Carefully put the assembly in to position on the pillar of the setting base and align the roller anvil with the setting button.

      3. Release the two handknobs on the transducer carrier and move the transducer carrier until the roller anvil touches the setting button.

      4. When the roller anvil touches the setting button tighten the two handknobs.

      1. Adjust the position of the transducer carrier.

      2. Set the measuring instrument to zero.

      3. Release the two handknobs and continue to move the transducer carrier until the measuring instrument shows a value of 0.100 in. (2.54 mm).

      4. Tighten the two handknobs.

      5. Set the measuring instrument to zero.

      1. Make sure the transducer carrier operates correctly.

      2. Pull the puller on the transducer carrier radially in and turn the puller through 90 degrees. This will lock the transducer carrier away from the setting button.

      3. Pull the handknob on top of the transducer carrier vertically up.

      4. Turn the transducer carrier through 90 degrees.

      5. Turn the transducer carrier to its initial position.

      6. Lock the transducer carrier in its initial position with the handknob released in step G.(2).

      7. Move the puller locked in step G.(1) to its initial position. This will release the transducer carrier in to its initial position.

      8. With the transducer carrier in its initial position make sure the measuring instrument shows a value of zero.

      9. Do steps G.(1) to (7) three times to make sure the tools operate correctly.

    6. The tools are now set to measure the stage 4 rotor path ring radius.

    1. SUBTASK 72-41-30-220-460 Dimensionally Measure the Stage 4 Rotor Path Ring Radius

      CAUTION

      MAKE SURE THE TOOL FACES AND COMPONENT FACES THAT TOUCH ARE CLEAN AND ARE NOT DAMAGED. DIRTY OR DAMAGED SURFACES CAN CAUSE INCORRECT INDICATIONS AND CAN DAMAGE TOOL FACES.
    2. Refer to Figure and Figure.

    3. Install IAE 1R18778 Distance sleeve 1 off on to the pillar of IAE 1R18031 Checking fixture 1 off.

      1. Install the gage mounting plate and the transducer carrier on to the pillar of the checking fixture. Refer to IAE 1R18702 Set up drawing 1 off.

      2. Pull the puller on the transducer carrier radially in and turn the puller through 90 degrees. This will lock the transducer carrier away from the setting button.

      3. Pull the handknobs on top of the transducer carrier vertically up.

      4. Turn the transducer carrier through 90 degrees.

      5. Put the gage mounting plate and transducer carrier on to the checking fixture pillar.

      6. Carefully lower the gage mounting plate and transducer carrier through the stator vanes and on to the distance sleeve.

      7. Tighten the turnscrew part of the mounting plate, in to the stage 4 location groove in the checking fixture pillar.

      8. Turn the transducer carrier to its initial position.

      9. Lock the transducer carrier in its initial position with the handknob released in step D.(2).

      10. Move the puller, locked in step D.(1) to its initial position. This will release the transducer carrier in to its initial position.

        NOTE

        Oversize radii are shown on the measuring instrument by a minus value. Undersize radii are shown by a plus value.
      1. Measure the stage 4 rotor path ring radius.

      2. Turn the HP compressor front case and the checking fixture.

      3. Write down the minimum and the maximum measuring instrument values. These should be between plus 0.002 to minus 0.002 in. (plus 0.05 to minus 0.05 mm).

      1. Remove the gage mounting plate and the transducer carrier from the checking fixture.

      2. Do steps D.(1) to (3) to set the transducer carrier before it is removed.

    4. Remove the distance sleeve from the pillar of the checking fixture.

    1. SUBTASK 72-41-30-440-243 Set the Tools to Measure the Stage 5 Rotor Path Ring Radius

      CAUTION

      MAKE SURE THE TOOL FACES AND COMPONENT FACES THAT TOUCH ARE CLEAN AND ARE NOT DAMAGED. DIRTY OR DAMAGED SURFACES CAN CAUSE INCORRECT INDICATIONS AND CAN DAMAGE TOOL FACES.
    2. Refer to Figure.

    3. Remove IAE 1R18722 Setting button 1 off from the setting button location in IAE 1R18533 Setting base 1 off.

    4. Turn IAE 1R18701 Indexing plate 1 off and align the stage 5 rotor path hole with the setting button location in the setting base.

    5. Install the setting button through the stage 5 rotor path hole in the indexing plate and in to the setting button location in the setting base.

      1. Install IAE 1R18033 Gage mounting plate 1 off and IAE 1R18032 Transducer carrier 1 off on to the pillar of the setting base.

      2. Carefully put the assembly in to position on the pillar of the setting base and align the roller anvil with the setting button.

      3. Release the two handknobs which attach the transducer carrier to the gage mounting plate and move the transducer carrier until the roller anvil touches the setting button.

      4. When the roller anvil touches the setting button, tighten the two handknobs.

      1. Adjust the position of the transducer carrier.

      2. Set the measuring instrument to zero.

      3. Release the two handknobs and continue to move the transducer carrier until the measuring instrument shows a value of 0.100 in. (2.54 mm).

      4. Tighten the two handknobs.

      5. Set the measuring instrument to zero.

      1. Make sure the transducer carrier operates correctly.

      2. Pull the puller on the transducer carrier radially in and turn the puller through 90 degrees. This will lock the transducer carrier away from the setting button.

      3. Pull the handknobs on top of the transducer carrier vertically up.

      4. Turn the transducer carrier through 90 degrees.

      5. Turn the transducer carrier to its initial position.

      6. Lock the transducer carrier in its initial position with the handknob released in step G.(2).

      7. Move the puller, locked in step G.(1), to its initial position. This will release the transducer carrier in to its initial position.

      8. With the transducer carrier in its initial position, make sure the measuring instrument shows a value of zero.

      9. Do steps G.(1) to (7) three times to make sure the tools operate correctly.

    6. The tools are now set to measure the stage 5 rotor path ring radius.

    1. SUBTASK 72-41-30-220-461 Dimensionally Measure the Stage 5 Rotor Path Ring Radius

      CAUTION

      MAKE SURE THE TOOL FACES AND COMPONENT FACES THAT TOUCH ARE CLEAN AND ARE NOT DAMAGED. DIRTY OR DAMAGED SURFACES CAN CAUSE INCORRECT INDICATIONS AND CAN DAMAGE TOOL FACES.
    2. Refer to Figure and Figure.

    3. Install IAE 1R18779 Distance sleeve 1 off on to the pillar of IAE 1R18031 Checking fixture 1 off.

      1. Install the gage mounting plate and the transducer carrier on to the pillar of the checking fixture. Refer to IAE 1R18702 Set up drawing 1 off.

      2. Pull the puller on the transducer carrier radially in and turn the puller through 90 degrees. This will lock the transducer carrier away from the setting button.

      3. Pull the handknobs on top of the transducer carrier vertically up.

      4. Turn the transducer carrier through 90 degrees.

      5. Put the gage mounting plate and transducer carrier on to the checking fixture pillar.

      6. Carefully lower the gage mounting plate and transducer carrier through the stator vanes and on to the distance sleeve.

      7. Tighten the turnscrew part of the mounting plate, in to the stage 5 location groove in the checking fixture pillar.

      8. Turn the transducer carrier to its initial position.

      9. Lock the transducer carrier in its initial position with the handknob released in step D.(2).

      10. Move the puller, locked in step D.(1) to its initial position. This will release the transducer carrier in to its initial position.

        NOTE

        Oversize radii are shown on the measuring instrument by a minus value. Undersize radii are shown by a plus value.
      1. Measure the stage 5 rotor path ring radius.

      2. Turn the HP compressor front case and the checking fixture.

      3. Write down the minimum and the maximum measuring instrument values. These should be between plus 0.002 to minus 0.002 in. (plus 0.05 to minus 0.05 mm).

      1. Remove the gage mounting plate and the transducer carrier from the checking fixture.

      2. Do steps D.(1) to (3) to set the transducer carrier before it is removed.

    4. Remove the distance sleeve from the pillar of the checking fixture.

    1. SUBTASK 72-41-30-440-244 Set the Tools to Measure the Stage 6 Rotor Path Ring Radius

      CAUTION

      MAKE SURE THE TOOL FACES AND COMPONENT FACES THAT TOUCH ARE CLEAN AND ARE NOT DAMAGED. DIRTY OR DAMAGED SURFACES CAN CAUSE INCORRECT INDICATIONS AND CAN DAMAGE TOOL FACES.
    2. Refer to Figure.

    3. Remove IAE 1R18722 Setting button 1 off from the setting button location in IAE 1R18533 Setting base 1 off.

    4. Turn IAE 1R18701 Indexing plate 1 off and align the stage 6 rotor path hole with the setting button location in the setting base.

    5. Install the setting button through the stage 6 rotor path hole in the indexing plate and in to the setting button location in the setting base.

      1. Install IAE 1R18033 Gage mounting plate 1 off and IAE 1R18032 Transducer carrier 1 off on to the pillar of the setting base.

      2. Carefully put the assembly in to position on the pillar of the setting base and align the roller anvil with the setting button.

      3. Release the two handknobs which attach the transducer carrier to the gage mounting plate and move the transducer carrier until the roller anvil touches the setting button.

      4. When the roller anvil touches the setting button, tighten the two handknobs.

      1. Adjust the position of the transducer carrier.

      2. Set the measuring instrument to zero.

      3. Release the two handknobs and continue to move the transducer carrier until the measuring instrument shows a value of 0.100 in. (2.54 mm).

      4. Tighten the two handknobs.

      5. Set the measuring instrument to zero.

      1. Make sure the transducer carrier operates correctly.

      2. Pull the puller on the transducer carrier radially in and turn the puller through 90 degrees. This will lock the transducer carrier away from the setting button.

      3. Pull the handknob on top of the transducer carrier vertically up.

      4. Turn the transducer carrier through 90 degrees.

      5. Turn the transducer carrier to its initial position.

      6. Lock the transducer carrier in its initial position with the handknob released in step G.(2).

      7. Move the puller, locked in step G.(1), to its initial position. This will release the transducer carrier in to its initial position.

      8. With the transducer carrier in its initial position, make sure the measuring instrument shows a value of zero.

      9. Do steps G.(1) to (7) three times to make sure the tools operate correctly.

    6. The tools are now set to measure the stage 6 rotor path ring radius.

    1. SUBTASK 72-41-30-220-462 Dimensionally Measure the Stage 6 Rotor Path Ring Radius

      CAUTION

      MAKE SURE THE TOOL FACES AND COMPONENT FACES THAT TOUCH ARE CLEAN AND ARE NOT DAMAGED. DIRTY OR DAMAGED SURFACES CAN CAUSE INCORRECT INDICATIONS AND CAN DAMAGE TOOL FACES.
    2. Refer to Figure and Figure.

    3. Install IAE 1R18780 Distance sleeve 1 off on to the pillar of IAE 1R18031 Checking fixture 1 off.

      1. Install the gage mounting plate and the transducer carrier on to the pillar of the checking fixture. Refer to IAE 1R18702 Set up drawing 1 off.

      2. Pull the puller on the transducer carrier radially in and turn the puller through 90 degrees. This will lock the transducer carrier away from the setting button.

      3. Pull the handknobs on top of the transducer carrier vertically up.

      4. Turn the transducer carrier through 90 degrees.

      5. Put the gage mounting plate and transducer carrier on to the checking fixture pillar.

      6. Carefully lower the gage mounting plate and transducer carrier through the stator vanes and on to the distance sleeve.

      7. Tighten the turnscrew part of the mounting plate, in to the stage 6 location groove in the checking fixture pillar.

      8. Turn the transducer carrier to its initial position.

      9. Lock the transducer carrier in its initial position with the handknob released in step D.(2).

      10. Move the puller, locked in step D.(1) to its initial position. This will release the transducer carrier in to its initial position.

        NOTE

        Oversize radii are shown on the measuring instrument by a minus value. Undersize radii are shown by a plus value.
      1. Measure the stage 6 rotor path ring radius.

      2. Turn the HP compressor front case and the checking fixture.

      3. Write down the minimum and the maximum measuring instrument values. These should be between plus 0.002 to minus 0.002 in. (plus 0.05 to minus 0.05 mm).

      1. Remove the gage mounting plate and the transducer carrier from the checking fixture.

      2. Do steps D.(1) to (3) to set the transducer carrier before it is removed.

    4. Remove the distance sleeve from the pillar of the checking fixture.

    5. Remove the IAE 1R18722 Setting button from the indexing plate and the setting base.

    1. SUBTASK 72-41-30-440-245 Set the Tools to Measure the Stage 6 Stator Vane Tip Radius

      CAUTION

      MAKE SURE THE TOOL FACES AND COMPONENT FACES THAT TOUCH ARE CLEAN AND ARE NOT DAMAGED. DIRTY OR DAMAGED SURFACES CAN CAUSE INCORRECT INDICATIONS AND CAN DAMAGE TOOL FACES.
    2. Refer to Figure.

    3. Turn the IAE 1R18701 Indexing plate 1 off and align the stage 6 stator vane tip hole in the indexing plate with the setting button location in the IAE 1R18533 Setting base 1 off.

    4. Install IAE 1R18040 Setting button 1 off through the stage 6 stator vane tip hole in the indexing plate and into the setting button location in the setting base.

    5. Install IAE 1R18531 Measuring sleeve 1 off onto the pillar of the setting base.

      1. Set the transducer.

      2. Put IAE 1R18042 Transducer carrier 1 off on to the pillar of the setting base.

      3. Connect the transducer electrical lead to the measuring instrument.

      4. Loosen the clamp which attaches the transducer to the transducer carrier.

      5. Adjust the transducer position until the anvil touches the setting button. Set the measuring instrument to zero. Continue to move the transducer until the measuring instrument shows a value of 0.100 in. (2.54 mm). Again set the measuring instrument to zero.

      6. Tighten the clamp which attaches the transducer to the transducer carrier. The transducer is set to measure the stage 6 stator vane tip radius.

    1. SUBTASK 72-41-30-220-463 Measure the Stage 6 Stator Vane Tip Radius

    2. Refer to Figure and Figure.

      1. Assemble the tools to measure the stage 6 stator vane tip radius.

      2. Install IAE 1R18781 Distance sleeve 1 off on to the pillar of IAE 1R18031 Checking fixture 1 off.

      3. Remove IAE 1R18042 Transducer carrier 1 off from the setting base.

      4. Install the transducer carrier on to the pillar and distance sleeve on the checking fixture. Refer to IAE 1R18702 Set up drawing 1 off.

    3. Calculate the stage 6 stator vane tip radius as given in TASK 72-41-30-440-002-B00.

      1. Use the value found in step C. to calculate the value to be read on the measuring instrument. Zero on the measuring instrument gives a radius of 8.6398 in. (219.450 mm), this is the tool setting radius.

      2. Calculate the measuring instrument value to be read as follows:

        Instrument value = A-B

        where, A = Tool setting radius = 8.6398 in. (219.450 mm)

        B = Stator vane tip radius (calculated in step C.)

        Example 1, where B = 8.6396 in.

        Instrument value = 8.6398 - 8.6396

        = 0.002 in.

        Example 2, where B = 8.6401 in.

        Instrument value = 8.6398 - 8.6401

        = -0.003 in.

    4. Turn the checking fixture and HP compressor front case and align the anvil on to the stage 6 stator vane tip at the position number 1.

      NOTE

      Oversize radii are shown on the measuring instrument by a minus value. Undersize radii are shown by a plus value.
    5. Measure and write down the stage 6 stator vane tip radius. The measuring instrument should read the instrument value calculated in step C. plus 0.0015 to minus 0.0015 in. (plus 0.04 to minus 0.04 mm).

    6. Turn the checking fixture and HP compressor front case and align the anvil on to the stage 6 stator vane tip at the position number 2.

    7. Measure and write down the stage 6 stator vane tip radius at the positions 2 to 84 as given in steps E. and F.

    1. SUBTASK 72-41-30-220-464 Measure the Clearances between the Rotor Path Ring Segments at the Split Line Flange

    2. Refer to Figure.

    3. Measure the HP compressor stage 4 rotor path ring HP COMPRESSOR SPLIT CASE (72-41-31,01-690) split line clearances. The split line clearance (DIM A) must not be less than 0.0063 in. (0.161 mm).

    4. Measure the HP compressor stage 5 rotor path ring HP COMPRESSOR SPLIT CASE (72-41-31,01-695) split line clearances. The split line clearance (DIM B) must not be less than 0.0084 in. (0.213 mm).

    5. Measure the HP compressor stage 6 rotor path ring HP COMPRESSOR SPLIT CASE (72-41-31,01-705) split line clearances. The split line clearance (DIM C) must not be less than 0.0109 in. (0.277 mm).

  1. Figure: View through the HP Compressor Front Case
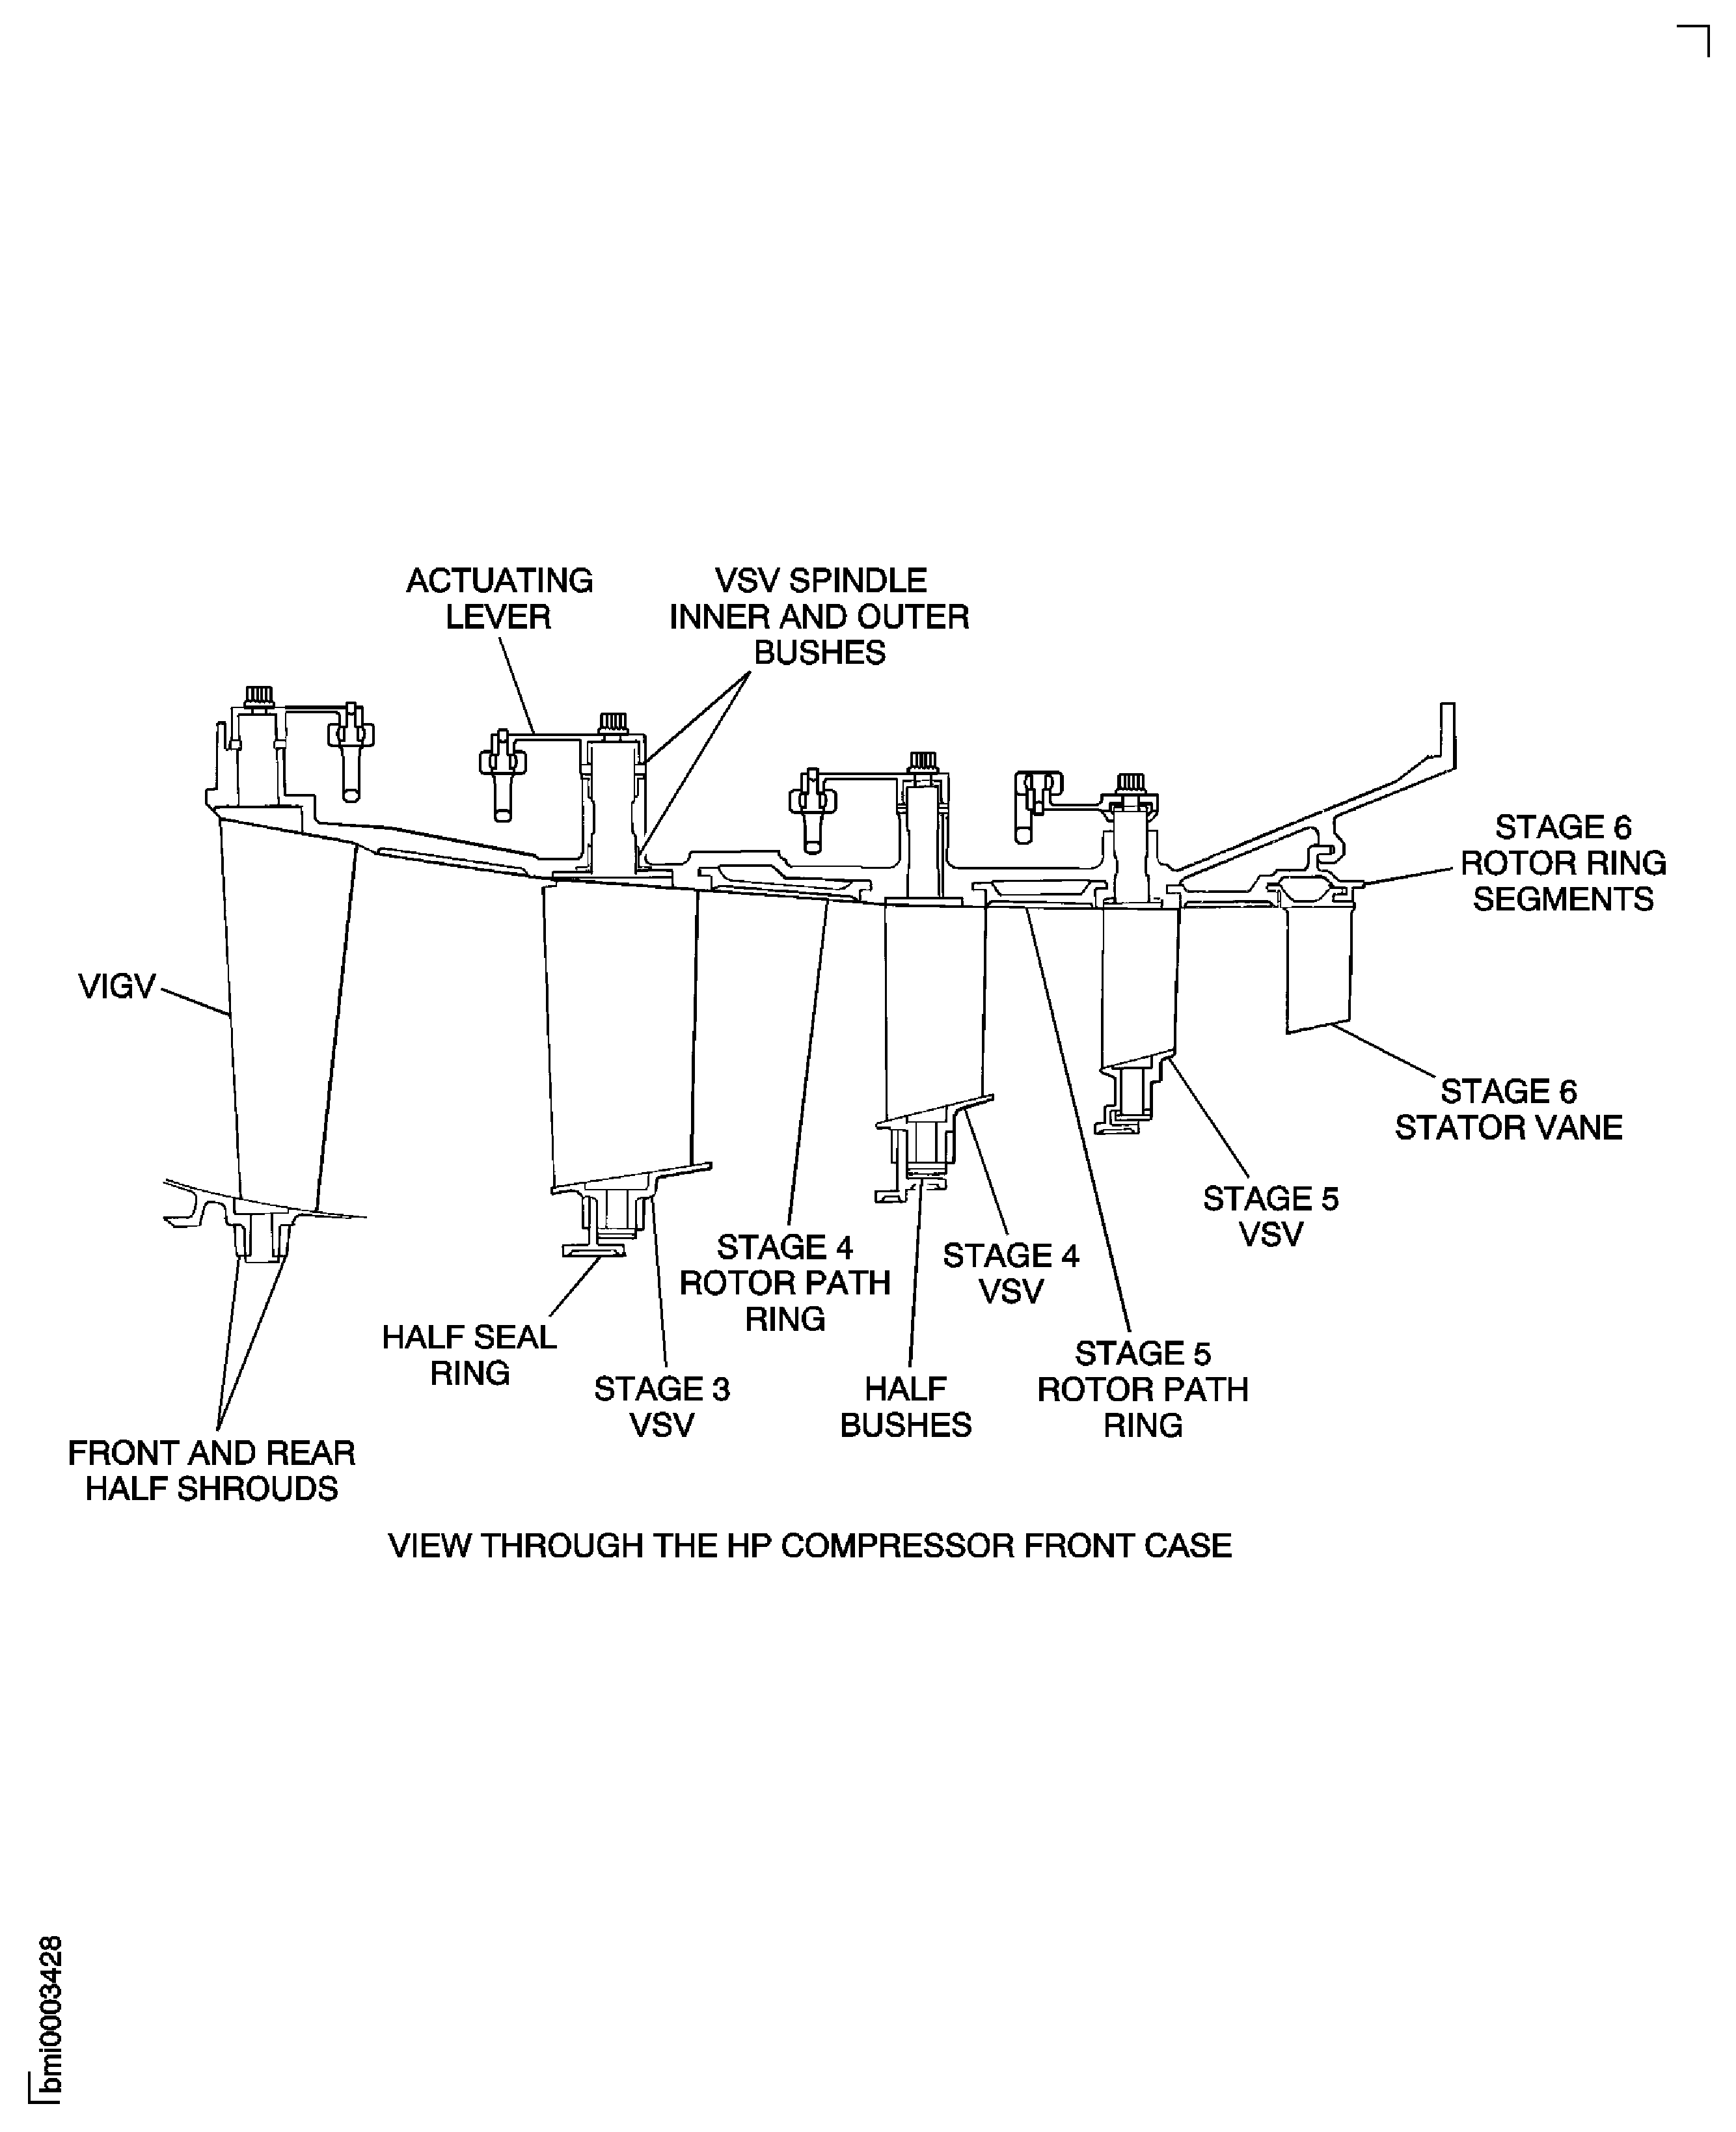
    View through the HP Compressor Front Case

    Figure: Install the Stage 4 and Stage 5 Drive Brackets

    Install the Stage 4 and Stage 5 Drive Brackets
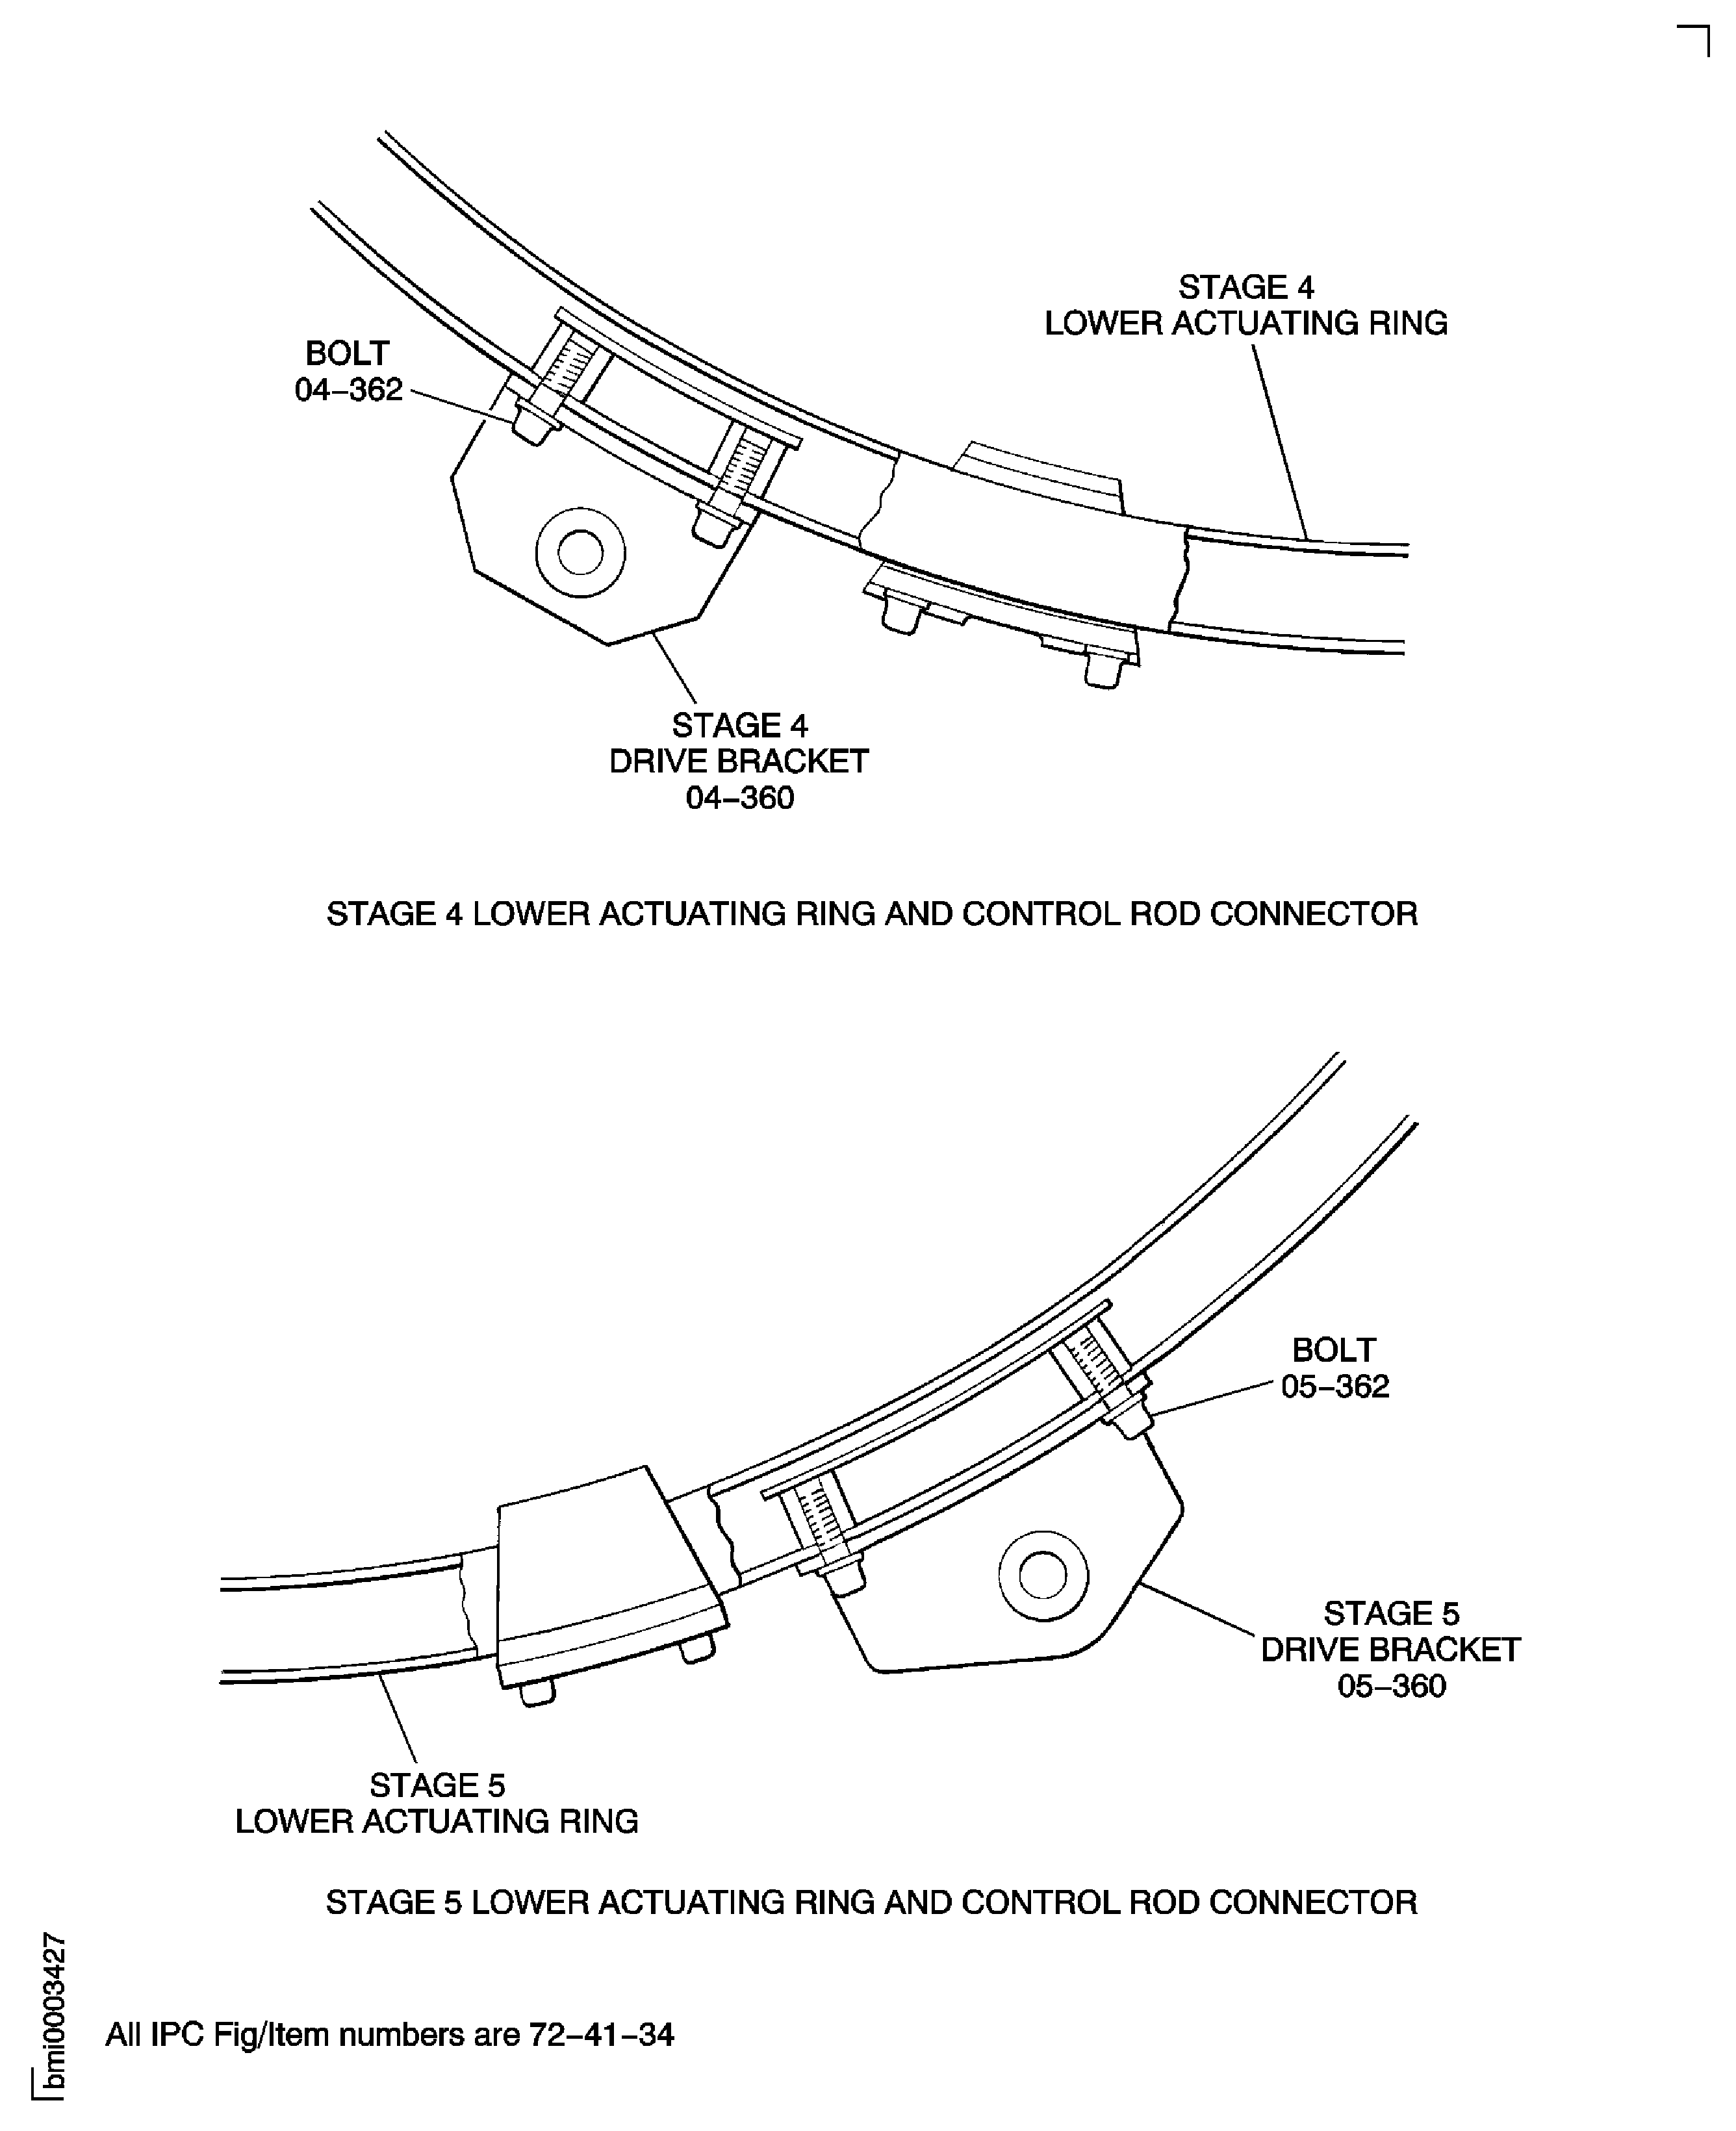
    Figure: Assemble the Checking Fixture, the Support Stand and the Foot Support

    Assemble the Checking Fixture, the Support Stand and the Foot Support
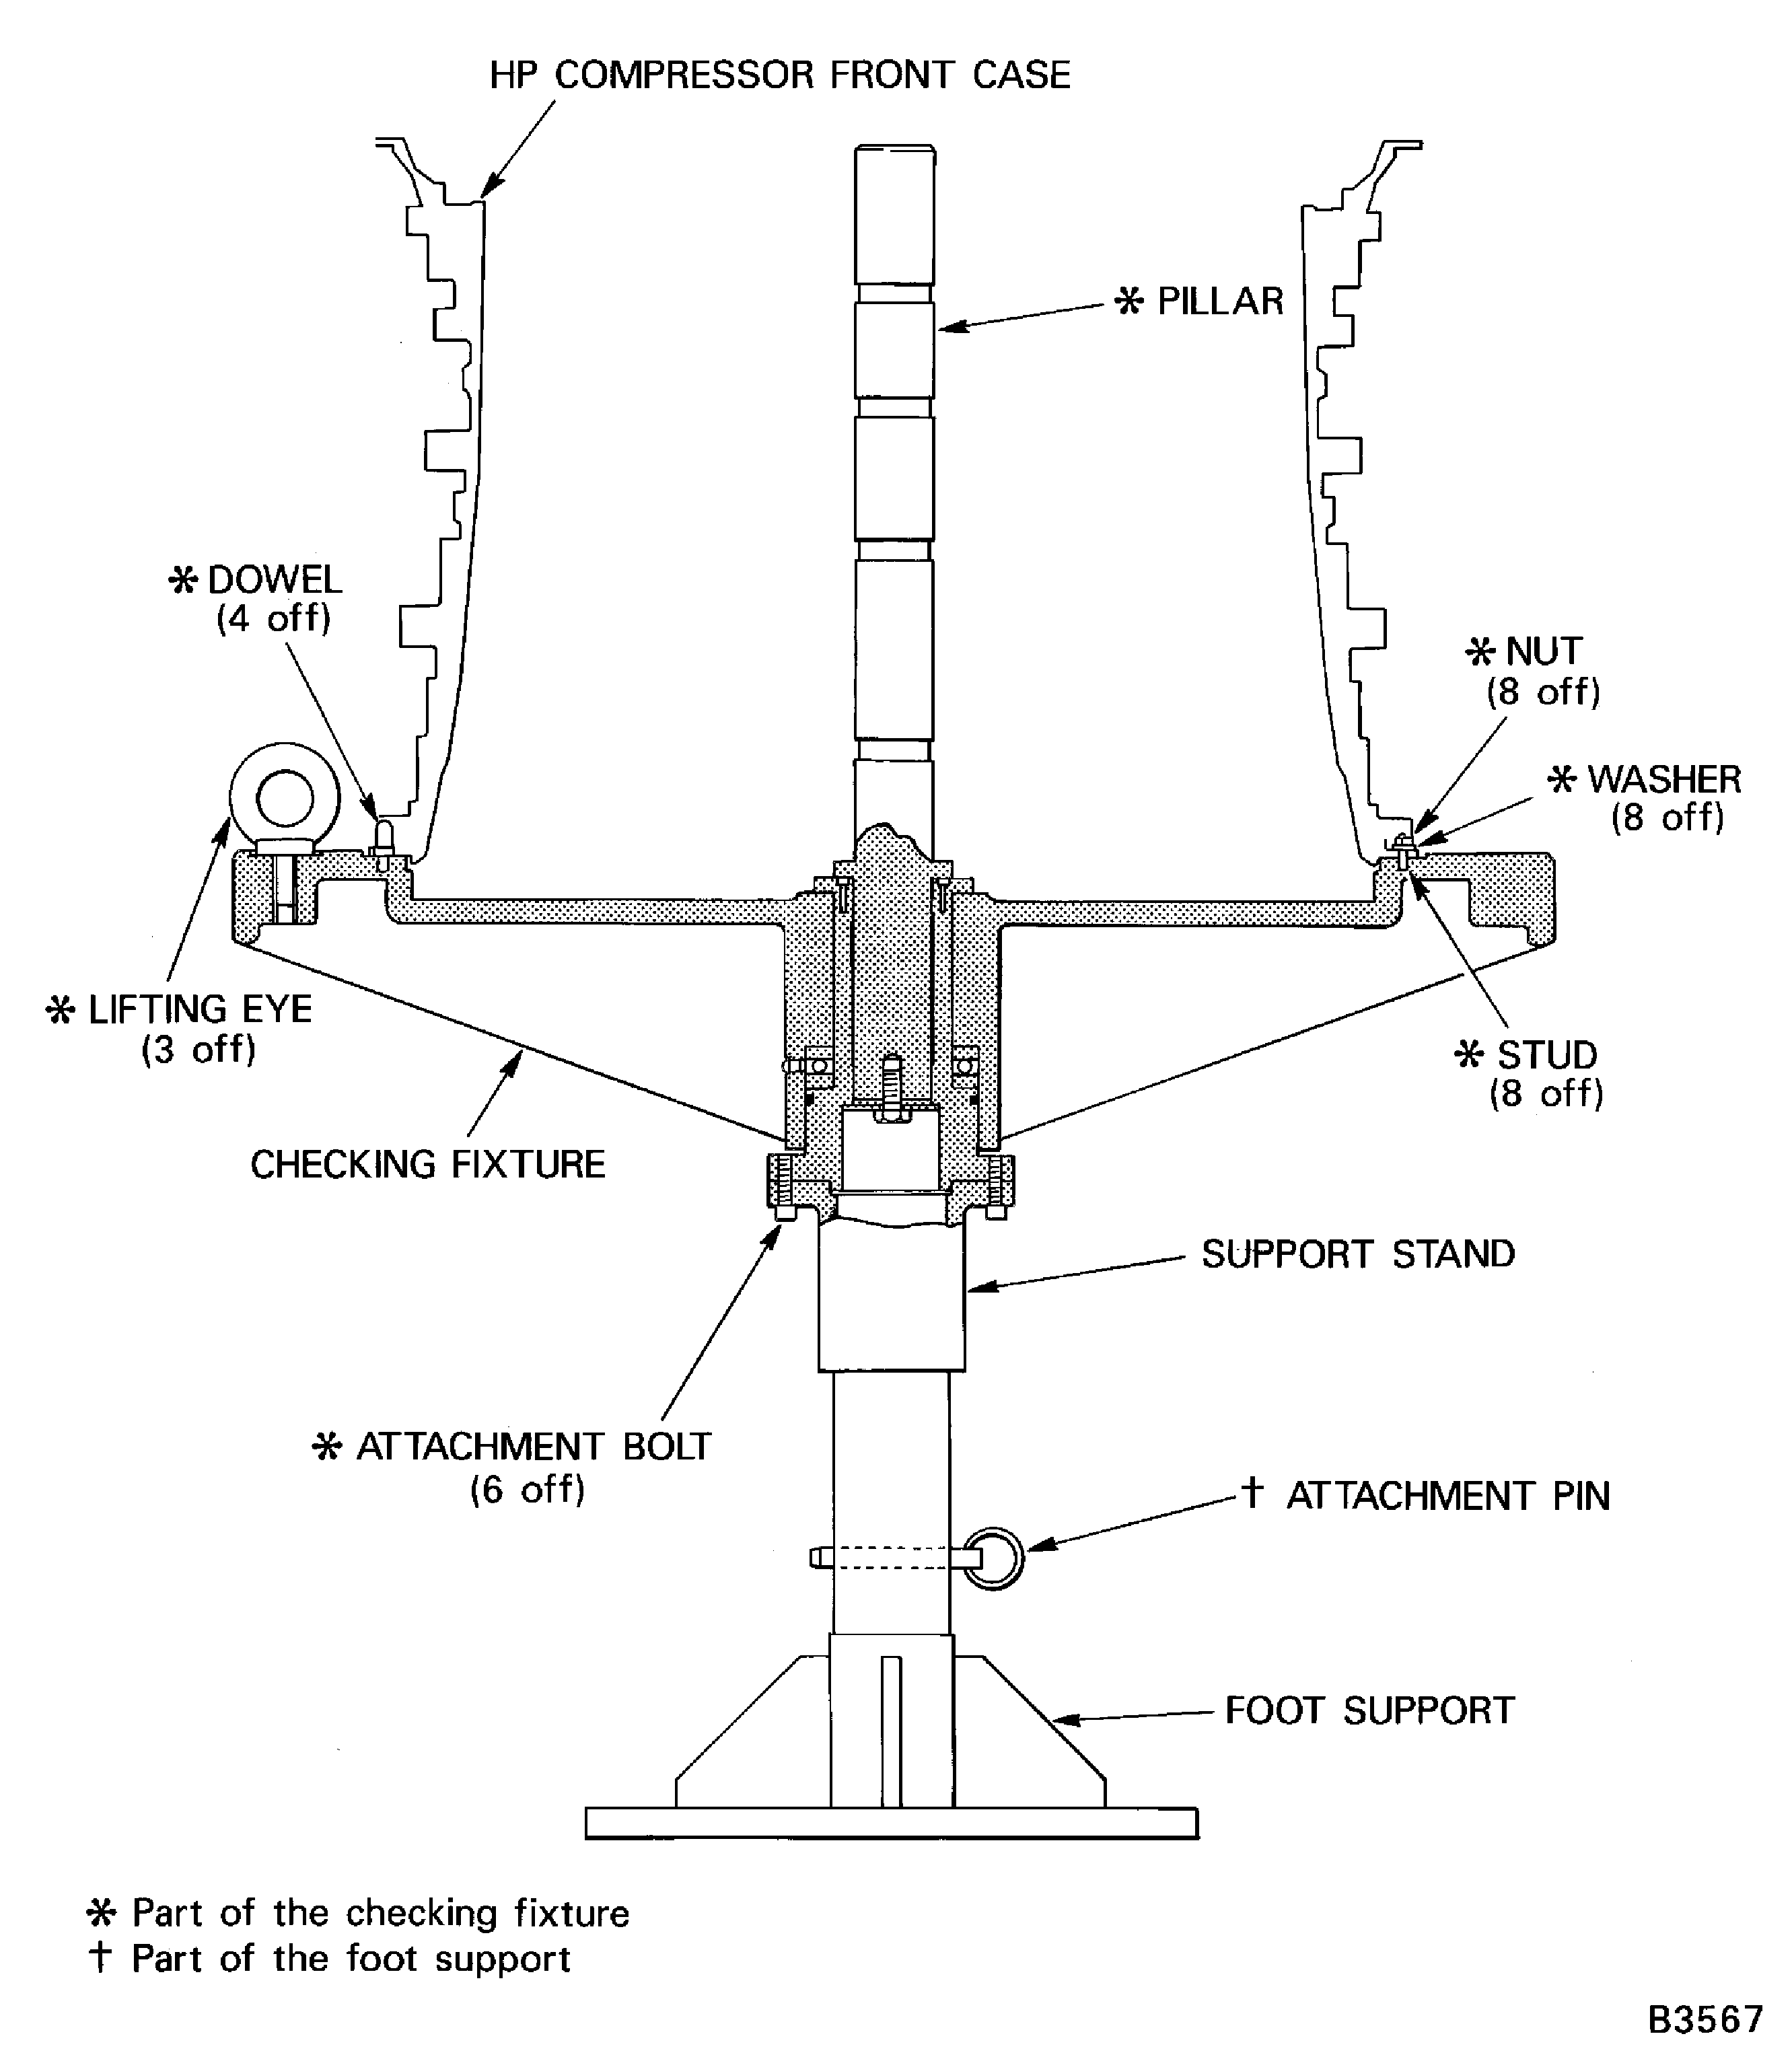
    Figure: Install the HP Compressor Front Cases on the Checking Fixture

    Sheet 1
    Legend
    Install the HP Compressor Front Cases on the Checking Fixture

    Sheet 1

    Close

    Figure: Install the HP Compressor Front Cases on the Checking Fixture

    Sheet 2

    Legend
    Install the HP Compressor Front Cases on the Checking Fixture

    Sheet 2

    Close

    Figure: Assemble the Tools to Measure the Rotor Path Radii

    Assemble the Tools to Measure the Rotor Path Radii
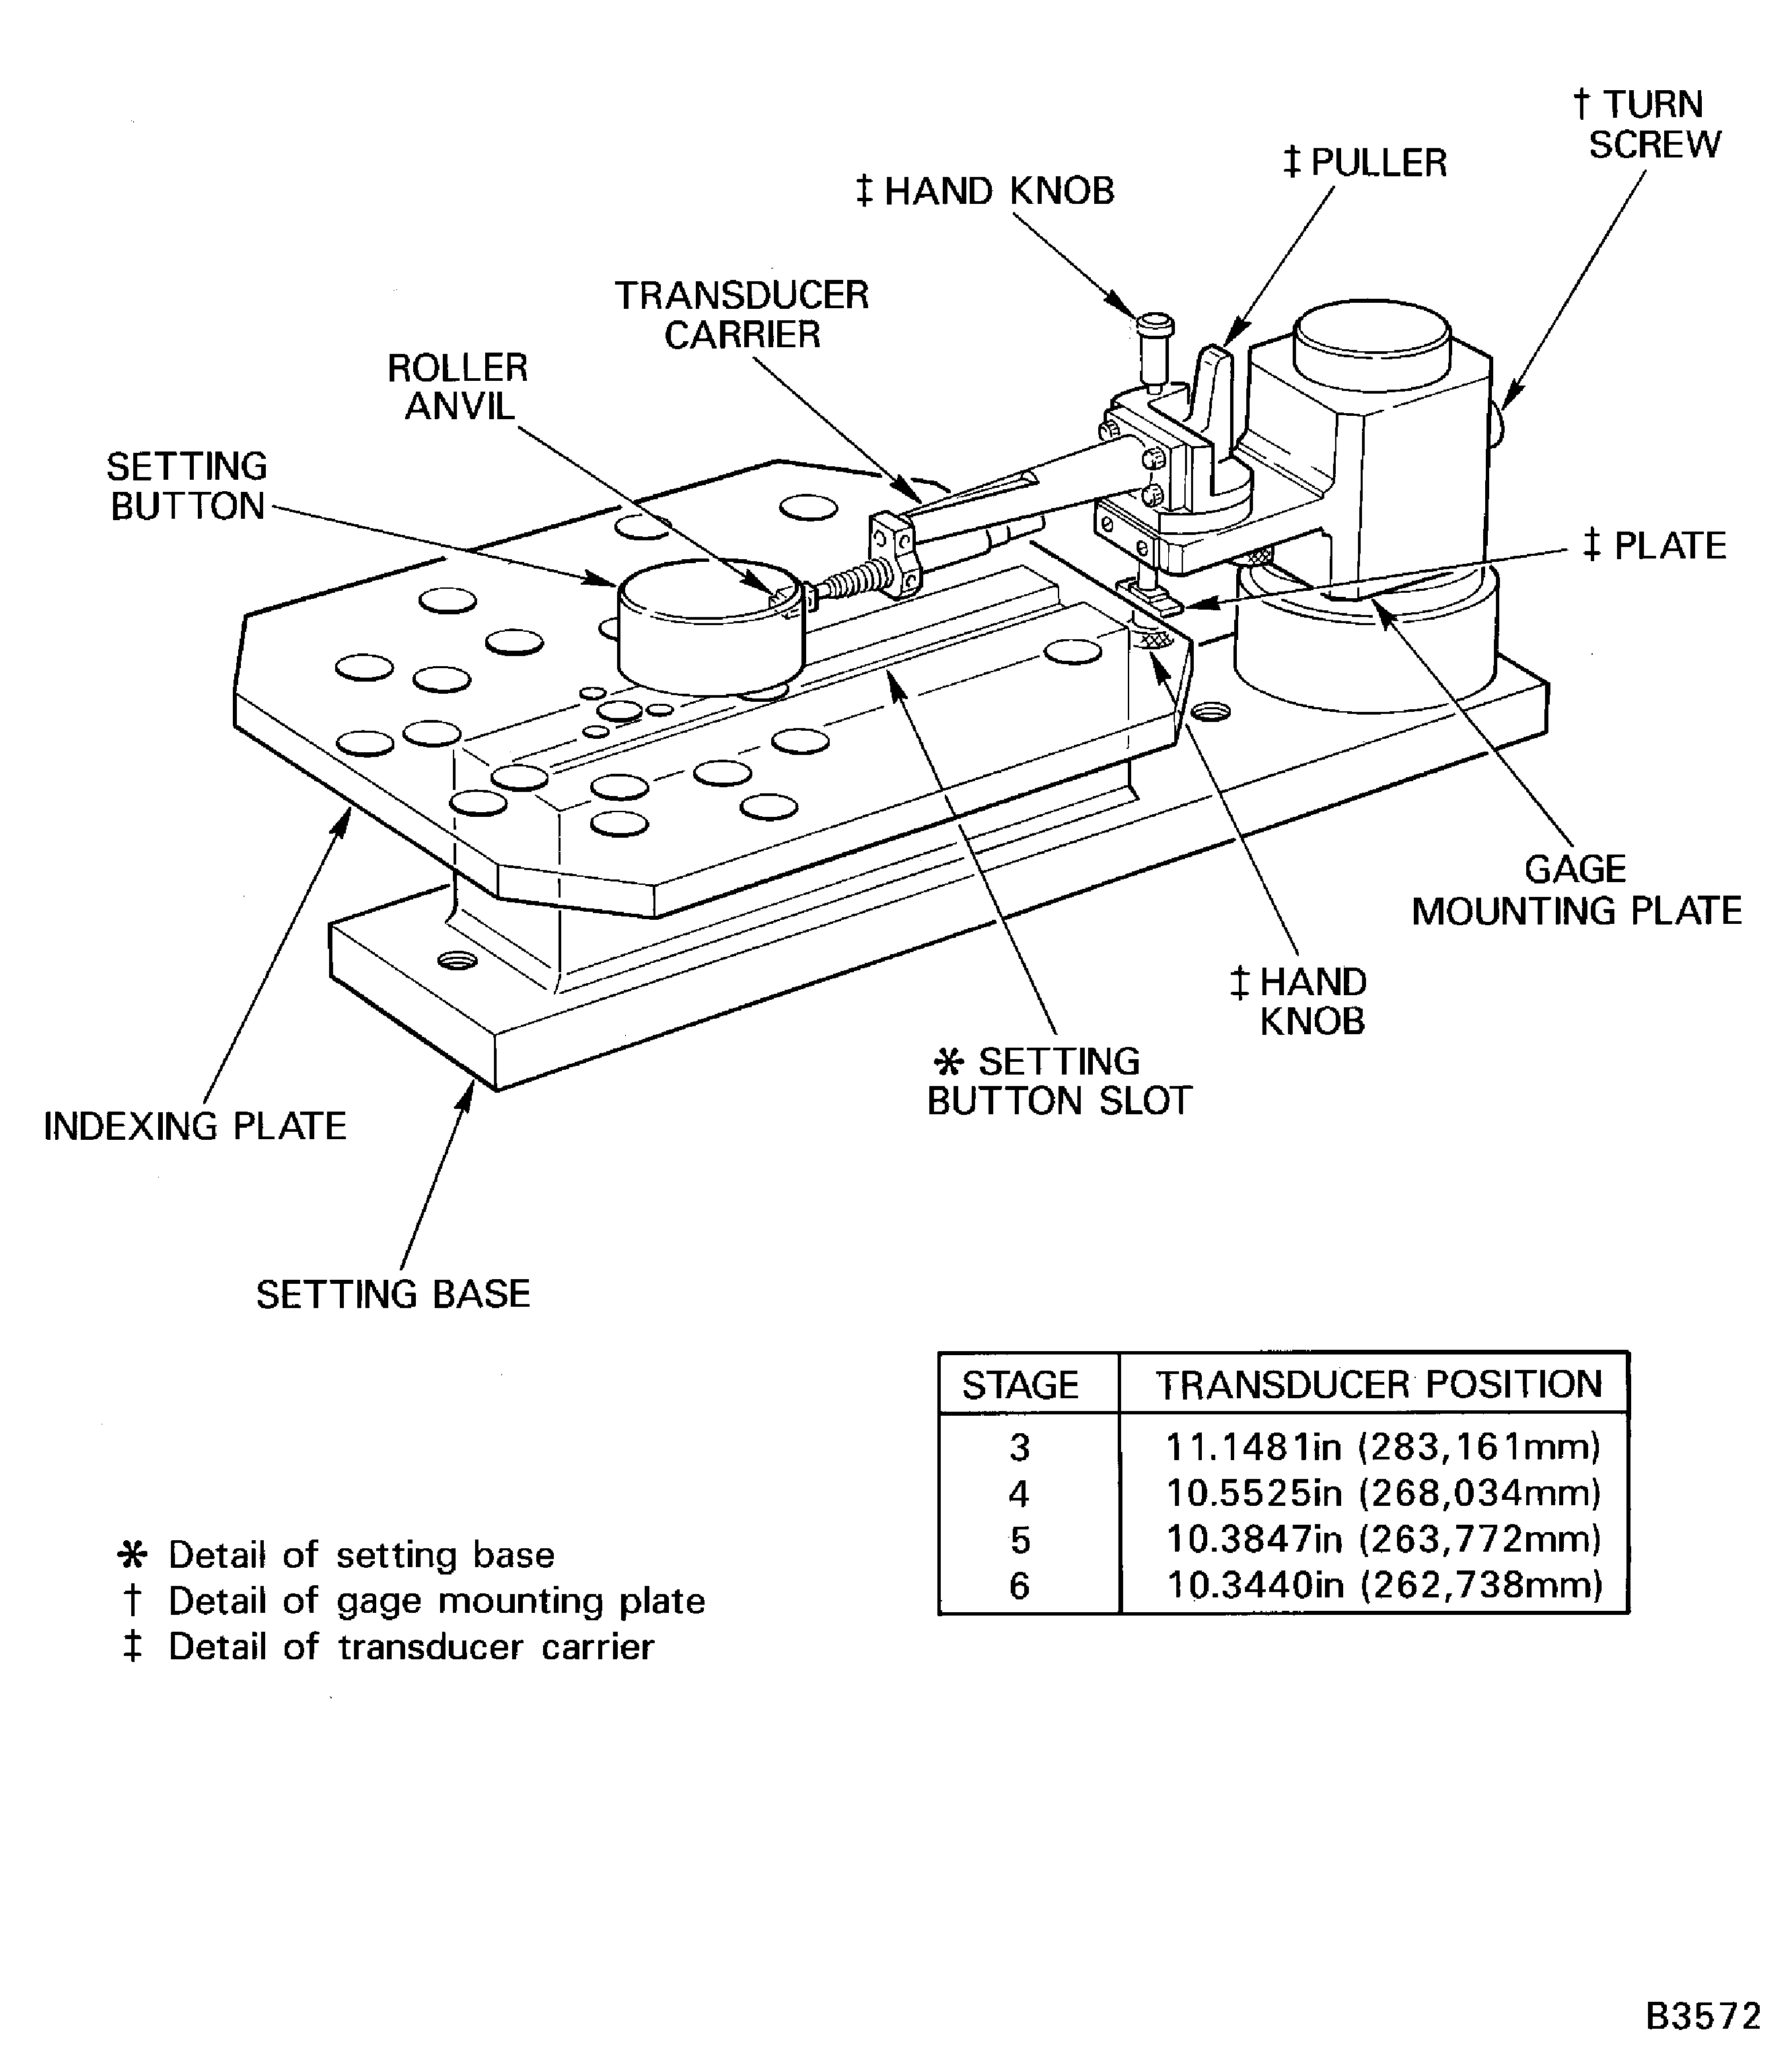
    Figure: Measure the Rotor Path Radii

    Measure the Rotor Path Radii

    Figure: Assemble the Tools to Measure the Stage 6 Stator Vane Tip Radius

    Assemble the Tools to Measure the Stage 6 Stator Vane Tip Radius

    Figure: Measure the Stage 6 Stator Vane Tip Radius

    Measure the Stage 6 Stator Vane Tip Radius

    Figure: Measure the Rotor Path Ring Split Line Clearances

    Measure the Rotor Path Ring Split Line Clearances

Requirements After Job Completion

Follow-On Conditions

NONE
Manufacturer Code:0AM53
Enterprise Name:IAE INTERNATIONAL AERO ENGINES AG
BU Name:NULL
Building:SUITE 400
Street:628 HEBRON AVENUE
City:GLASTONBURY
State:CT
Zip Code:06033
Country:USA
Manufacturer Code:K3504
Enterprise Name:INDESTRUCTIBLE PAINT CO LTD
BU Name:NULL
Street:25 PENTOS DRIVE
City:SPARKHILL
Province:BIRMINGHAM
Zip Code:B11 3TA
Country:GREAT BRITAIN
Phone Number:44-121-7022485
Fax Number:44-121-7784338
Email:sales@indestructible.co.uk
Internet:www.indestructible.co.uk
Manufacturer Code:LOCAL
Enterprise Name:LOCALLY SUPPLIED
Manufacturer Code:00BB6
Supply Number:CoMat 07-038
Type:sp01
Supply Short Name:CoMat 07-038 AIR DRYING ENAMEL
Supply Name:CoMat 07-038 AIR DRYING ENAMEL
Specification Groups:
Doc NumberType
OMAT:7/22B (RR REF)IP9138 R1
JCR-029 (JAEC REF)
Suppliers:
ManufacturerRemarks
00BB6
K3504
Manufacturer Code:X333X
Supply Number:CoMat 10-077
Type:sp01
Supply Short Name:CoMat 10-077 APPROVED ENGINE OILS
Supply Name:CoMat 10-077 APPROVED ENGINE OILS
Specification Groups:
Doc NumberType
For V2500-A1/A5/D5 models - Refer to V2500 Service Bulletin ENG-79-0108
For V2500-E5 model - Refer to Service Bulletin E5-79-0001
Suppliers:
ManufacturerRemarks
X333X
Manufacturer Code:0AM53
Tool Number:IAE 1R18031
Tool Name:IAE 1R18031 Checking fixture
Manufacturer Code:0AM53
Tool Number:IAE 1R18032
Tool Name:IAE 1R18032 Transducer carrier
Manufacturer Code:0AM53
Tool Number:IAE 1R18033
Tool Name:IAE 1R18033 Gage mounting plate
Manufacturer Code:0AM53
Tool Number:IAE 1R18034
Tool Name:IAE 1R18034 Roller anil
Manufacturer Code:0AM53
Tool Number:IAE 1R18040
Tool Name:IAE 1R18040 Setting button
Manufacturer Code:0AM53
Tool Number:IAE 1R18042
Tool Name:IAE 1R18042 Transducer carrier
Manufacturer Code:0AM53
Tool Number:IAE 1R18202
Tool Name:IAE 1R18202 Support stand
Manufacturer Code:0AM53
Tool Number:IAE 1R18205
Tool Name:IAE 1R18205 Lifting tool
Manufacturer Code:0AM53
Tool Number:IAE 1R18233
Tool Name:IAE 1R18233 Foot support
Manufacturer Code:0AM53
Tool Number:IAE 1R18531
Tool Name:IAE 1R18531 Measuring sleeve
Manufacturer Code:0AM53
Tool Number:IAE 1R18533
Tool Name:IAE 1R18533 Setting base
Manufacturer Code:0AM53
Tool Number:IAE 1R18701
Tool Name:IAE 1R18701 Indexing plate
Manufacturer Code:0AM53
Tool Number:IAE 1R18702
Tool Name:IAE 1R18702 Set up drawing
Manufacturer Code:0AM53
Tool Number:IAE 1R18722
Tool Name:IAE 1R18722 Setting button
Manufacturer Code:0AM53
Tool Number:IAE 1R18777
Tool Name:IAE 1R18777 Distance sleeve
Manufacturer Code:0AM53
Tool Number:IAE 1R18778
Tool Name:IAE 1R18778 Distance sleeve
Manufacturer Code:0AM53
Tool Number:IAE 1R18779
Tool Name:IAE 1R18779 Distance sleeve
Manufacturer Code:0AM53
Tool Number:IAE 1R18780
Tool Name:IAE 1R18780 Distance sleeve
Manufacturer Code:0AM53
Tool Number:IAE 1R18781
Tool Name:IAE 1R18781 Distance sleeve