Export Control
EAR Export Classification: Not subject to the EAR per 15 C.F.R. Chapter 1, Part 734.3(b)(3), except for the following Service Bulletins which are currently published as EAR Export Classification 9E991: SBE70-0992, SBE72-0483, SBE72-0580, SBE72-0588, SBE72-0640, SBE73-0209, SBE80-0024 and SBE80-0025.Copyright
© IAE International Aero Engines AG (2001, 2014 - 2021) The information contained in this document is the property of © IAE International Aero Engines AG and may not be copied or used for any purpose other than that for which it is supplied without the express written authority of © IAE International Aero Engines AG. (This does not preclude use by engine and aircraft operators for normal instructional, maintenance or overhaul purposes.).Applicability
All
Common Information
TASK 72-00-41-200-001 HPC Assembly - Examine, Inspection-001
General
This TASK gives the procedure for the inspection of HP compressor cases and rotor assembly below soft time as given in the Engine Management Program. Where applicable the inspections are done as well as those given in the interface inspections. Refer to TASK 72-00-40-220-001, TASK 72-00-40-220-002-A00 or TASK 72-00-40-220-002-B00 and HPC rotor inspection (TASK 72-41-10-200-001-A00 and TASK 72-41-10-200-001-B00) to make sure the module can be put back into service to prevent further module disassembly.
The policy that is necessary for inspection is given in SPM TASK 70-20-01-200-501.
Visually examine the module for any indication of "In Service" defects before cleaning. If any defects are found, refer to IAE Technical Services.
Visually examine for cracks at modular level given in this procedure. The part must be cleaned, before this visual inspection.
The practices and processes referred to in the procedure by the TASK/SUBTASK number are in SPM.
References
Refer to SPM for data on these items:
Definition of Damage, SPM TASK 70-02-02-350-501,
Inspection of Parts, SPM TASK 70-20-01-200-501.
NOTE
Preliminary Requirements
Pre-Conditions
NONESupport Equipment
NONEConsumables, Materials and Expendables
NONESpares
NONESafety Requirements
NONEProcedure
Refer to SPM TASK 70-11-03-300-503.
Remove the grease by aqueous cleaning.
SUBTASK 72-00-41-110-001 Remove the Grease
Refer to TASK 72-00-40-200-001.
Examine the curvic coupling bolt.
SUBTASK 72-00-41-220-001 Examine the Curvic Coupling Bolt
Reject.
More than Step.
Wear marks, scored, scratched and fretted.
V2500-A1: Pre SBE 72-0027 Stages 3, 4, 5 and 6 Rotor Path Ring Slots AF.
Reject.
More than Step.
Wear marks, scored, scratched and fretted.
V2500-A1: Pre SBE 72-0027 Stages 3, 4, 5 and 6 Rotor Path Ring Slot Faces BD.
Reject.
More than Step.
Wear marks, scored, scratched and fretted.
V2500-A1: SBE 72-0027 Stages 5 and 6 Rotor Path Ring Slots AF.
Reject.
More than Step.
Wear marks, scored, scratched and fretted.
V2500-A1: SBE 72-0027 Stages 5 and 6 Rotor Path Ring Slot Faces BD.
Reject.
More than Step.
Wear marks, scored, scratched and fretted.
V2500-A5: Stages 4, 5 and 6 Rotor Path Ring Slots AF.
Reject.
More than Step.
V2500-A5: Stages 4, 5 and 6 Rotor Path Ring Slot Faces BD.
SUBTASK 72-00-41-220-038 Examine the Rotor Path Ring Slot Faces BD and Rotor Path Ring Slot AF
Refer to Figure.
Remove the damage. Refer to SPM TASK 70-35-03-300-501
Less than 0.005 in. (0.13 mm) in depth
More than Step
Scored or with burred edges.
SUBTASK 72-00-41-220-003 Examine the HP Compressor Front Cases Split Line Bolt Holes at Location 6
Refer to Figure.
Remove the damage. Refer to SPM TASK 70-35-03-300-501.
More Step and less than 0.005 in. (0.13 mm)
More than Step
Scored, Scratched or Galled.
SUBTASK 72-00-41-220-004 Examine the HP Compressor Front Cases Front and Rear Flanges at Location 7
Refer to Figure.
Remove the damage. Refer to SPM TASK 70-35-03-300-501
Less than 0.005 in. (0.13 mm)
More than Step
Scored or with burred edges.
SUBTASK 72-00-41-220-005 Examine the HP Compressor Front Cases Location Bolt Holes at Location 8
Repair, VRS6521 TASK 72-00-41-300-002 (REPAIR-002)
Broken, loose, worn, crossed thread or stripped thread
SUBTASK 72-00-41-220-006 Examine the HP Compressor Front Cases Screw Thread Inserts
Refer to Figure.
Remove the damage. Refer to SPM TASK 70-35-03-300-501
More than in Step and less than 0.005 in. (0.13 mm)
More than in Step
Scored or scratched.
SUBTASK 72-00-41-220-007 Examine the HP Compressor Front Cases Blank Access, Stage 3 and 5 Borescope Access at Locations 9, 10 and 15
V2500-A1: Examine the rear flange of HP compressor rear outer case at location 1, refer to TASK 72-00-40-220-002-A00, SUBTASK 72-00-40-220-058.
V2500-A5: Examine the rear flange of HP compressor rear outer case at location 1, refer to TASK 72-00-40-220-002-B00, SUBTASK 72-00-40-220-117.
SUBTASK 72-00-41-220-008 Examine the Rear Flange of the HP Compressor Rear Outer Case at Location 1
Refer to Figure.
SUBTASK 72-00-41-220-009 A5 TASK: Examine Stage 6 Segment Anti-Rotation Stop Pin at Location 19
Visually examine the VIGV at location 2, refer to TASK 72-00-40-220-001, SUBTASK 72-00-40-220-052.
SUBTASK 72-00-41-220-010 Visually Examine the VIGV at Location 2
Visually examine the VIGV inner shroud seal diameter at location 3, refer to TASK 72-00-40-220-001, SUBTASK 72-00-40-220-053.
SUBTASK 72-00-41-220-011 Visually Examine the VIGV Inner Shroud Seal Diameter at Location 3
Refer to Figure.
SUBTASK 72-00-41-220-039 Examine the Stages 3, 4 and 5 Half Ring Seal Linings at Location X
Visually examine the VIGV and the VSV mechanism at location 7, refer to TASK 72-00-40-220-001, SUBTASK 72-00-40-220-057.
SUBTASK 72-00-41-220-012 Visually Examine the VIGV and the VSV Mechanism at Location 7
Make the edges smooth. Refer to SPM TASK 70-35-03-300-501
Not more than 0.100 in. (2.54 mm) in width and any length at the split line if there is no loss of adhesion to the backing material and the accumulative loss of coating per stage is not more than 0.38 sq in. (250 0 sq mm)
More than in Step
Loss of coating (chipping, detachment and flaking) in location 1.
SUBTASK 72-00-41-220-041 Examine the Stage 3 Rotor Path Lining at Location Y
Make the edges smooth. Refer to SPM TASK 70-35-03-300-501
Not more than 0.100 in. (2.54 mm) in width and any length at the split line if there is no loss of adhesion to the backing material and the accumulative loss of coating per stage is not more than 0.38 sq in. (250.0 sq mm)
More than in Step
Loss of coating (chipping, detachment and flaking) in location 1
More than in Step
Scored or gouged
SUBTASK 72-00-41-220-070 Examine the Stage 4 and Stage 5 Rotor Path Lining Segments at Location Z
Refer to Figure.
Repair, VRS6522 TASK 72-00-41-300-003 (REPAIR-003)
More than in Step and in the limits of VRS6522
Nicked or torn.
Zone B.
Repair, VRS6522 TASK 72-00-41-300-003 (REPAIR-003)
More than eight vanes with nicks or tears in the limits above
Quantity.
SUBTASK 72-00-41-220-044 Examine the Variable Inlet Guide Vanes
Refer to Figure.
Repair, VRS6522 TASK 72-00-41-300-003 (REPAIR-003)
More than in Step and in the limits of VRS6522
Nicked or torn.
Zone A.
Repair, VRS6522 TASK 72-00-41-300-003 (REPAIR-003)
More than in Step and in the limits of VRS6522
Nicked or torn.
Zone B.
Repair, VRS6522 TASK 72-00-41-300-003 (REPAIR-003)
More than four vanes with nicks or tears in the limits above
Quantity.
SUBTASK 72-00-41-220-045 Examine the Stage 3 HP Compressor VSVs
Refer to Figure.
Repair, VRS6522 TASK 72-00-41-300-003 (REPAIR-003)
More than in Step and in the limits of VRS6522
Nicked or torn.
Zone A.
Repair, VRS6522 TASK 72-00-41-300-003 (REPAIR-003)
More than in Step and in the limits of VRS6522
Nicked or torn.
Zone B.
Repair, VRS6522 TASK 72-00-41-300-003 (REPAIR-003)
More than five vanes with nicks or tears in the limits above
Quantity.
SUBTASK 72-00-41-220-046 Examine the Stage 4 HP Compressor VSVs
Refer to Figure.
Repair, VRS6522 TASK 72-00-41-300-003 (REPAIR-003)
More than in Step and in the limits of VRS6522
Nicked or torn.
Zone B.
Repair, VRS6522 TASK 72-00-41-300-003 (REPAIR-003)
More than 21 vanes with nicks or tears in the limits above
Quantity.
SUBTASK 72-00-41-220-066 Examine the Stage 5 HP Compressor VSVs
Repair, VRS6522 TASK 72-00-41-300-003 (REPAIR-003)
More than in Step and in the limits of VRS6522
Nicked or torn.
Zone A.
Repair, VRS6522 TASK 72-00-41-300-003 (REPAIR-003)
More than in Step and in the limits of VRS6522
Nicked or torn.
Zone B.
Repair, VRS6522 TASK 72-00-41-300-003 (REPAIR-003)
More than 14 vanes with nicks or tears in the limits above
Quantity.
SUBTASK 72-00-41-220-047 Examine the Stage 6 HP Compressor VSVs or Fix Vanes
Measure the stage 6 VSV bushing wear, refer to TASK 72-00-40-220-001, SUBTASK 72-00-40-220-137.
SUBTASK 72-00-41-220-018 A1 TASK: Measure the Stage 6 VSV Bushing Wear
V2500 A1: Refer to TASK 72-00-40-700-001-A00.
V2500 A5: Refer to TASK 72-00-40-700-001-B00.
SUBTASK 72-00-41-220-019Check the Variable Inlet Guide Vane (VIGV) And Variable Stator Vane (VSV) Actuating Mechanism
Visually examine the front face of the stage 3 HP compressor disk at Location 4, refer to TASK 72-00-40-220-001, SUBTASK 72-00-40-220-054.
SUBTASK 72-00-41-220-020 Visually Examine the Front Face of the Stage 3 HP Compressor Disk at Location 4
Visually examine the stage 3 HP compressor curvic coupling inner seal diameter at location 5, refer to TASK 72-00-40-220-001, SUBTASK 72-00-40-220-055.
SUBTASK 72-00-41-220-021 Visually Examine the Stage 3 HP Compressor Curvic Coupling Inner Seal Diameter at Location 5
Visually examine the stage 3 HP compressor curvic coupling at location 6, refer to TASK 72-00-40-220-001, SUBTASK 72-00-40-220-056.
SUBTASK 72-00-41-220-022 Visually Examine the Stage 3 HP Compressor Curvic Coupling at Location 6
V2500 A1: Refer to TASK 72-41-10-200-001-A00.
V2500 A5: Refer to TASK 72-41-10-200-001-B00.
SUBTASK 72-00-41-220-023 Examine the HP Compressor Rotor Blades
Refer to Figure.
V2500 A1: Examine the disk at the stage 8, 9, 10, and 11 ceramic liners, refer to TASK 72-41-10-200-001-A00, SUBTASK 72-41-10-210-052 and SUBTASK 72-41-10-210-053.
V2500 A5: Examine the disk at the stage 8, 9, 10, and 11 ceramic liners, refer to TASK 72-41-10-200-001-B00, SUBTASK 72-41-10-210-055.
SUBTASK 72-00-41-220-024 Examine the Disk at the Stage 8, 9, 10 and 11 Ceramic Liners
V2500 A1: Examine the stage 12 HP compressor disk at location 3, refer to TASK 72-00-40-220-002-A00, SUBTASK 72-00-40-220-060.
V2500 A5: Examine the stage 12 HP compressor disk at location 3, refer to TASK 72-00-40-220-002-B00, SUBTASK 72-00-40-220-119.
SUBTASK 72-00-41-220-025 Examine the Stage 12 HP Compressor Disk at Location 3
Pre SBE 72-0041: Refer to TASK 72-00-40-220-002-A00, SUBTASK 72-00-40-220-061-A00.
Post SBE 72-0041: Refer to TASK 72-00-40-220-002-A00, SUBTASK 72-00-40-220-061-B00.
V2500 A1: Examine the HP compressor shaft rotating seal diameter at location 4:
V2500 A5: Examine the HP compressor shaft rotating seal diameter at location 4, refer to TASK 72-00-40-220-002-B00, SUBTASK 72-00-40-220-120.
SUBTASK 72-00-41-220-026 Examine the HP Compressor Shaft Rotating Seal Diameter at Location 4
Examine the HP compressor rotating air seals at locations 1401A, 1401B and 1401C, refer to TASK 72-00-40-220-002-A00, SUBTASK 72-00-40-220-062.
V2500 A5: Examine the HP compressor rotating air seals at locations 1401A, 1401B and 1401C, refer to TASK 72-00-40-220-002-B00, SUBTASK 72-00-40-220-121.
SUBTASK 72-00-41-220-027-A00 A1 Task: Examine the HP Compressor Rotating Air Seals at Locations 1401A, 1401B and 1401C
Refer to Figure.
Examine the HP compressor rotating air seals at locations 1401A, 1401B, 1401C and 1401D, refer to TASK 72-00-40-220-002-B00, SUBTASK 72-00-40-220-121.
SUBTASK 72-00-41-220-027-B00 A5 Task: Examine the HP Compressor Rotating Air Seals at Locations 1401A, 1401B, 1401C and 1401D
V2500 A1: Examine the HP compressor shaft location diameter at location 5, refer to TASK 72-00-40-220-002-A00, SUBTASK 72-00-40-220-063.
V2500 A5: Examine the HP compressor shaft location diameter at location 5, refer to TASK 72-00-40-220-002-B00, SUBTASK 72-00-40-220-122.
SUBTASK 72-00-41-220-028 Examine the HP Compressor Shaft Location Diameter at Location 5
V2500 A1: Examine the HP compressor shaft bearing location diameter at location 6, refer to TASK 72-00-40-220-002-A00, SUBTASK 72-00-40-220-064.
V2500 A5: Examine the HP compressor shaft bearing location diameter at location 6, refer to TASK 72-00-40-220-002-B00, SUBTASK 72-00-40-220-123.
SUBTASK 72-00-41-220-029 Examine the HP Compressor Shaft Bearing Location Diameter at Location 6
V2500 A1: Examine the HP compressor shaft snap diameter at location 7, refer to TASK 72-00-40-220-002-A00, SUBTASK 72-00-40-220-065.
V2500 A5: Examine the HP compressor shaft snap diameter at location 7, refer to TASK 72-00-40-220-002-B00, SUBTASK 72-00-40-220-124.
SUBTASK 72-00-41-220-030 Examine the HP Compressor Shaft Snap Diameter at Location 7
V2500 A1: Examine the HP compressor shaft splines at location 8, refer to TASK 72-00-40-220-002-A00, SUBTASK 72-00-40-220-066.
V2500 A5: Examine the HP compressor shaft splines at location 8, refer to TASK 72-00-40-220-002-B00, SUBTASK 72-00-40-220-125.
SUBTASK 72-00-41-220-031 Examine the HP Compressor Shaft Splines at Location 8
V2500 A1: Examine the HP compressor shaft snap diameter at location 9, refer to TASK 72-00-40-220-002-A00, SUBTASK 72-00-40-220-079.
V2500 A5: Examine the HP compressor shaft snap diameter at location 9, refer to TASK 72-00-40-220-002-B00, SUBTASK 72-00-40-220-126.
SUBTASK 72-00-41-220-032 Examine the HP Compressor Shaft Snap Diameter at Location 9
V2500 A1: Examine the HP compressor shaft diameter at location 10, refer to TASK 72-00-40-220-002-A00, SUBTASK 72-00-40-220-080.
V2500 A5: Examine the HP compressor shaft diameter at location 10, refer to TASK 72-00-40-220-002-B00, SUBTASK 72-00-40-220-127.
SUBTASK 72-00-41-220-033 Examine the HP Compressor Shaft Diameter at Location 10
V2500 A1: Examine the HP compressor shaft threads at location 11, refer to TASK 72-00-40-220-002-A00, SUBTASK 72-00-40-220-081.
V2500 A5: Examine the HP compressor shaft threads at location 11, refer to TASK 72-00-40-220-002-B00, SUBTASK 72-00-40-220-128.
SUBTASK 72-00-41-220-034 Examine the HP Compressor Shaft Threads at Location 11
V2500 A1: Examine the HP compressor shaft slots at location 12, refer to TASK 72-00-40-220-002-A00, SUBTASK 72-00-40-220-082.
V2500 A5: Examine the HP compressor shaft slots at location 12, refer to TASK 72-00-40-220-002-B00, SUBTASK 72-00-40-220-129.
SUBTASK 72-00-41-220-035 Examine the HP Compressor Shaft Slots at Location 12
V2500 A1: Examine the HP compressor shaft heatshield at location 13, refer to TASK 72-00-40-220-002-A00, SUBTASK 72-00-40-220-083.
V2500 A5: Examine the HP compressor shaft heatshield at location 13, refer to TASK 72-00-40-220-002-B00, SUBTASK 72-00-40-220-130.
SUBTASK 72-00-41-220-036 Examine the HP Compressor Shaft Heatshield at Location 13
V2500 A1: Examine the HP compressor shaft ring nut at location 14, refer to TASK 72-00-40-220-002-A00, SUBTASK 72-00-40-220-084.
V2500 A5: Examine the HP compressor shaft ring nut at location 14, refer to TASK 72-00-40-220-002-B00, SUBTASK 72-00-40-220-131.
SUBTASK 72-00-41-220-037Examine the HP Compressor Shaft Ring Nut at Location 14
Repair, VRS6518 TASK 72-00-41-300-001 (REPAIR-001).
Broken, loose, worn, crossed thread or stripped thread
SUBTASK 72-00-41-220-068 Examine the HP Compressor Rear Case Screw Thread Inserts
Refer to SPM TASK 70-38-21-380-501, SUBTASK 70-38-21-380-010.
Damage areas on the outer surface not more than 0.090 sqin. (58.06 sqmm).
More than Step.
SUBTASK 72-00-41-220-069 Examine the HP Compressor Rear Outer Case Surface Protection

CAUTION
BEFORE YOU DO THE TOUCH UP REPAIR OF THE HP COMPRESSOR REAR OUTER CASE SURFACE, INSTALL MECHANICAL BLANKING PLATES TO THE AREAS OF THE CASE NOT TO BE COATED TO PREVENT CONTAMINATION OR FOREIGN MATERIAL TO ENTER THE ENGINE.Accept.
NOTE
The HPC module may return to service with missing tabs from the tab washers. The tabs are only necessary to aid installation of the washer. However, the bores of the HPC rear shaft, HPT module and LPT module should be examined to make sure that no secondary damage has occurred. In addition the LP Shaft should be examined for secondary damage.
Missing tabs.
SUBTASK 72-00-41-220-055 Examine the HP Compressor Shaft Washer at Location AA
Figure: HP Compressor Front Cases - Inspection Locations
HP Compressor Front Cases - Inspection Locations
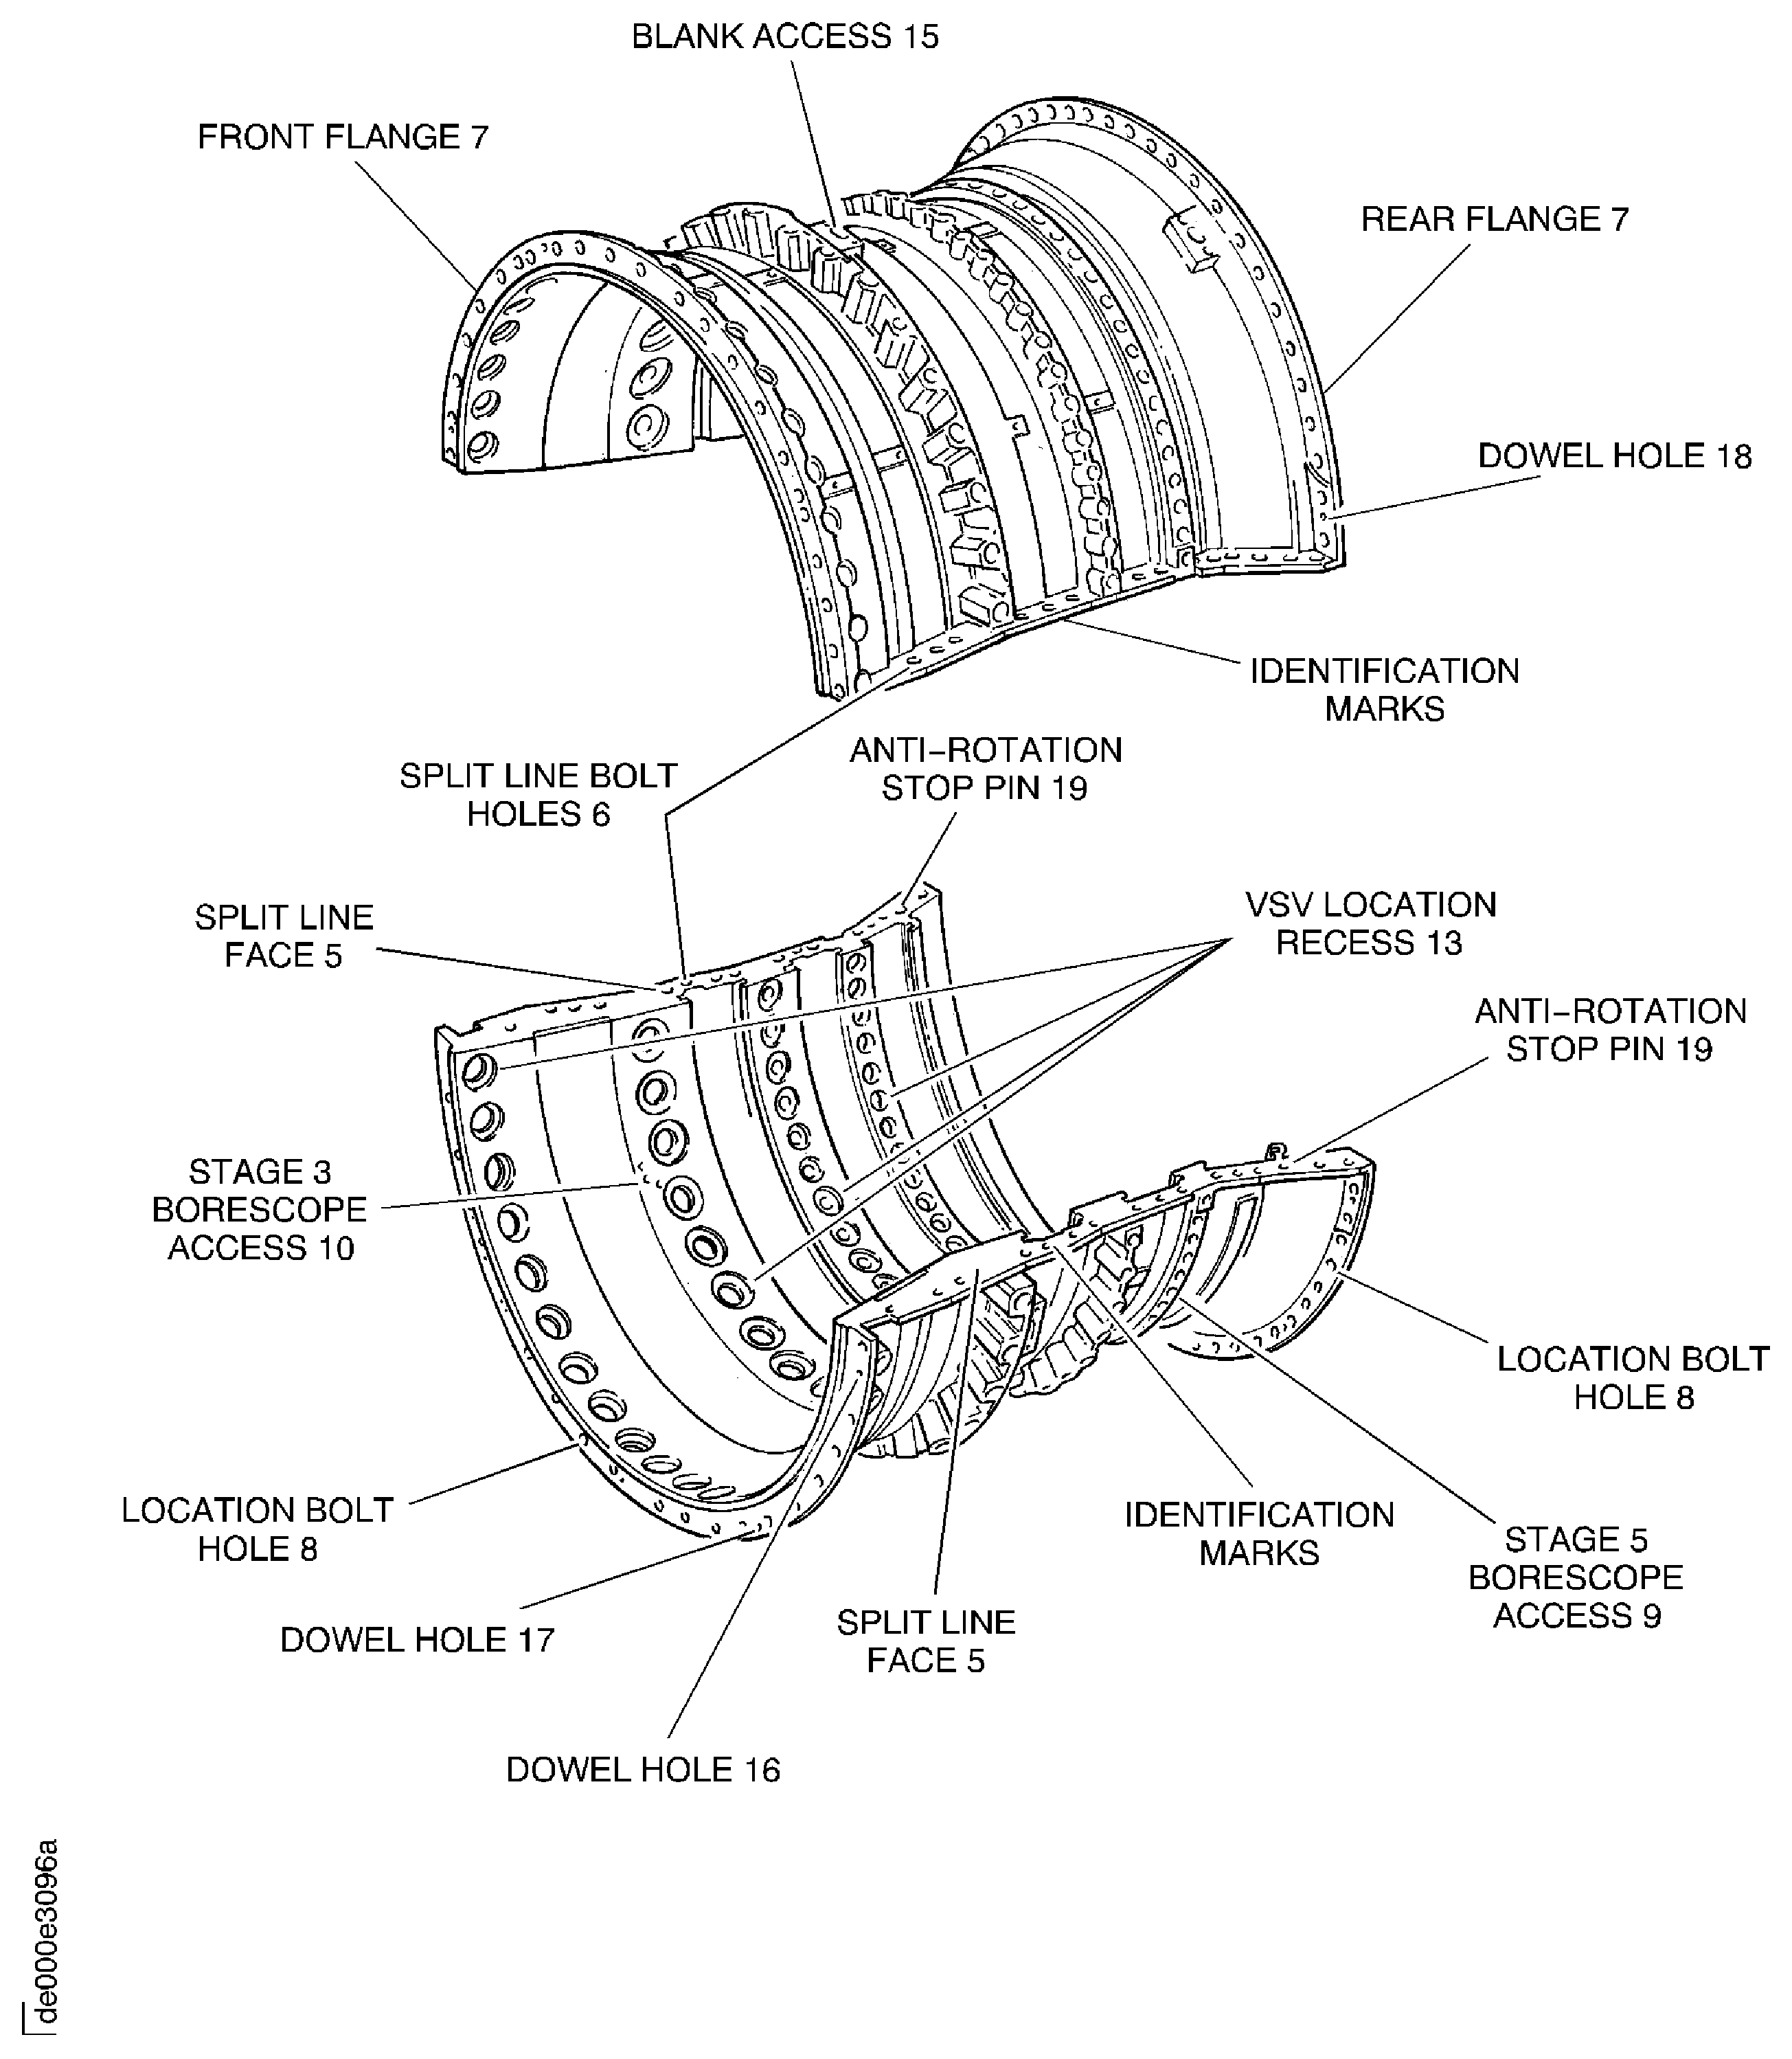
Figure: V2500-A1: Locations at Interface C-41
V2500-A1: Locations at Interface C-41
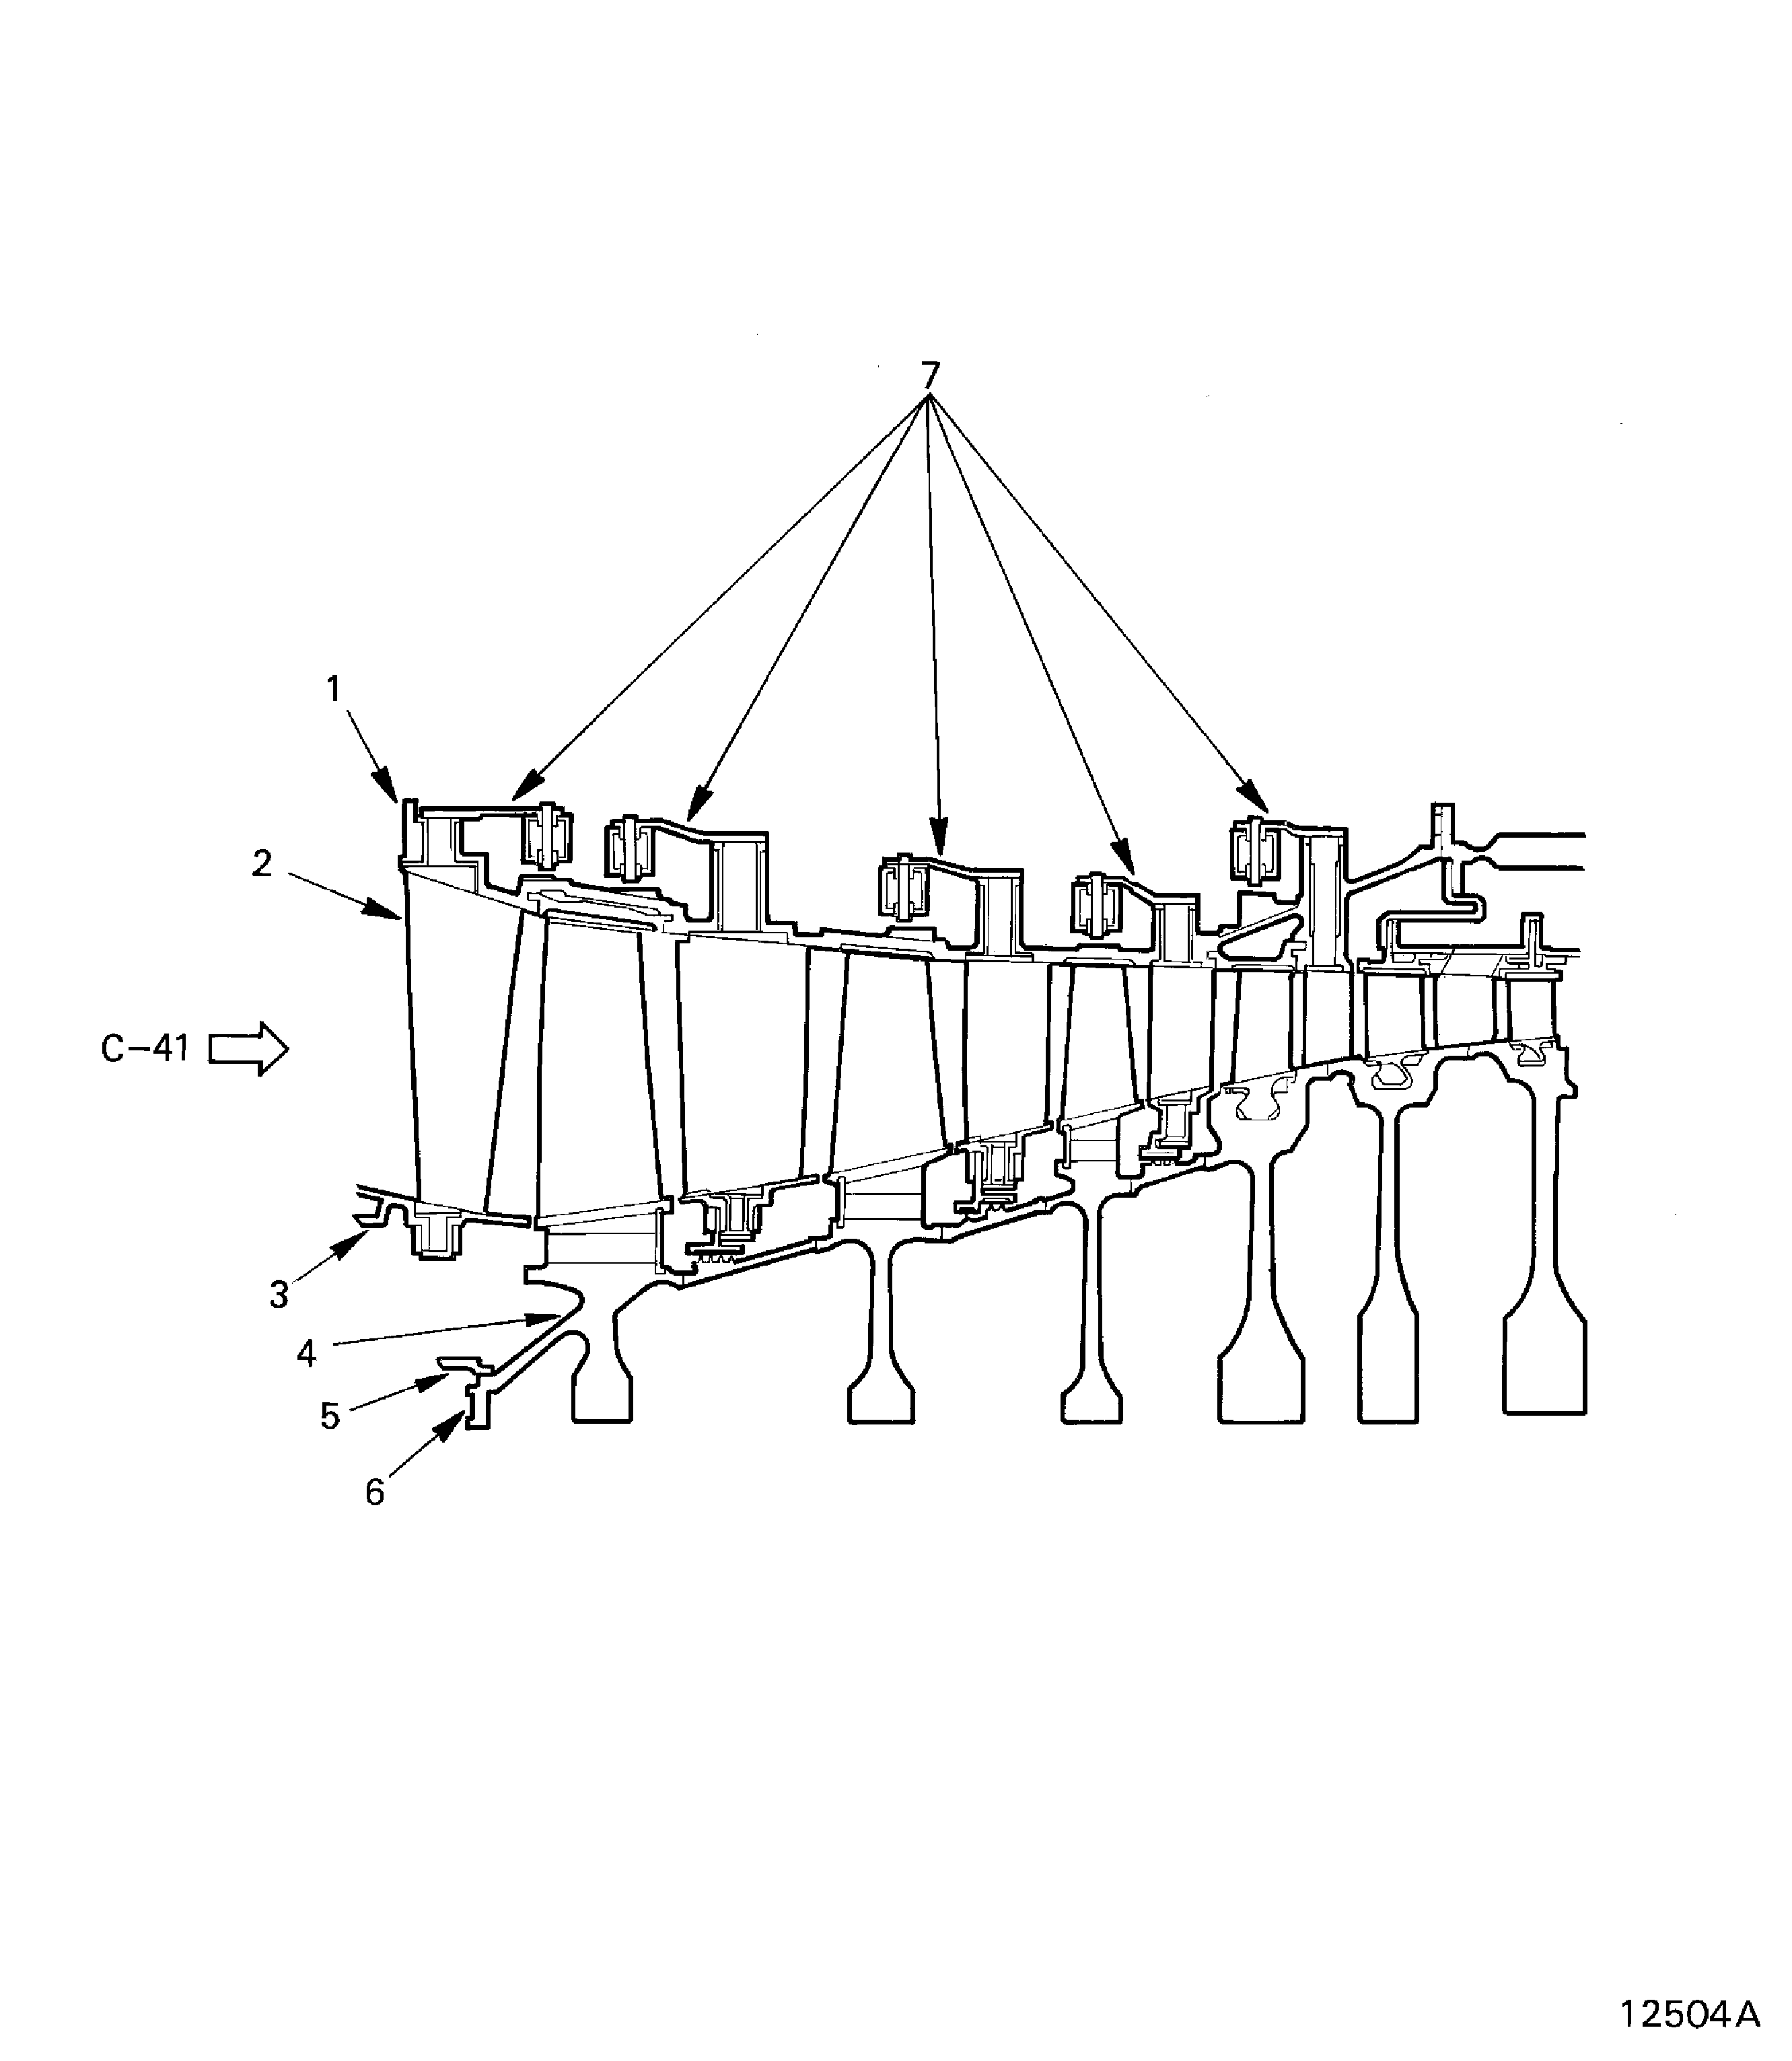
Figure: V2500-A5: Locations at Interface C-41
V2500-A5: Locations at Interface C-41

Figure: V2500-A1 Pre SBE 72-0041: Locations at Interface H-41 Rear Face
V2500-A1 Pre SBE 72-0041: Locations at Interface H-41 Rear Face
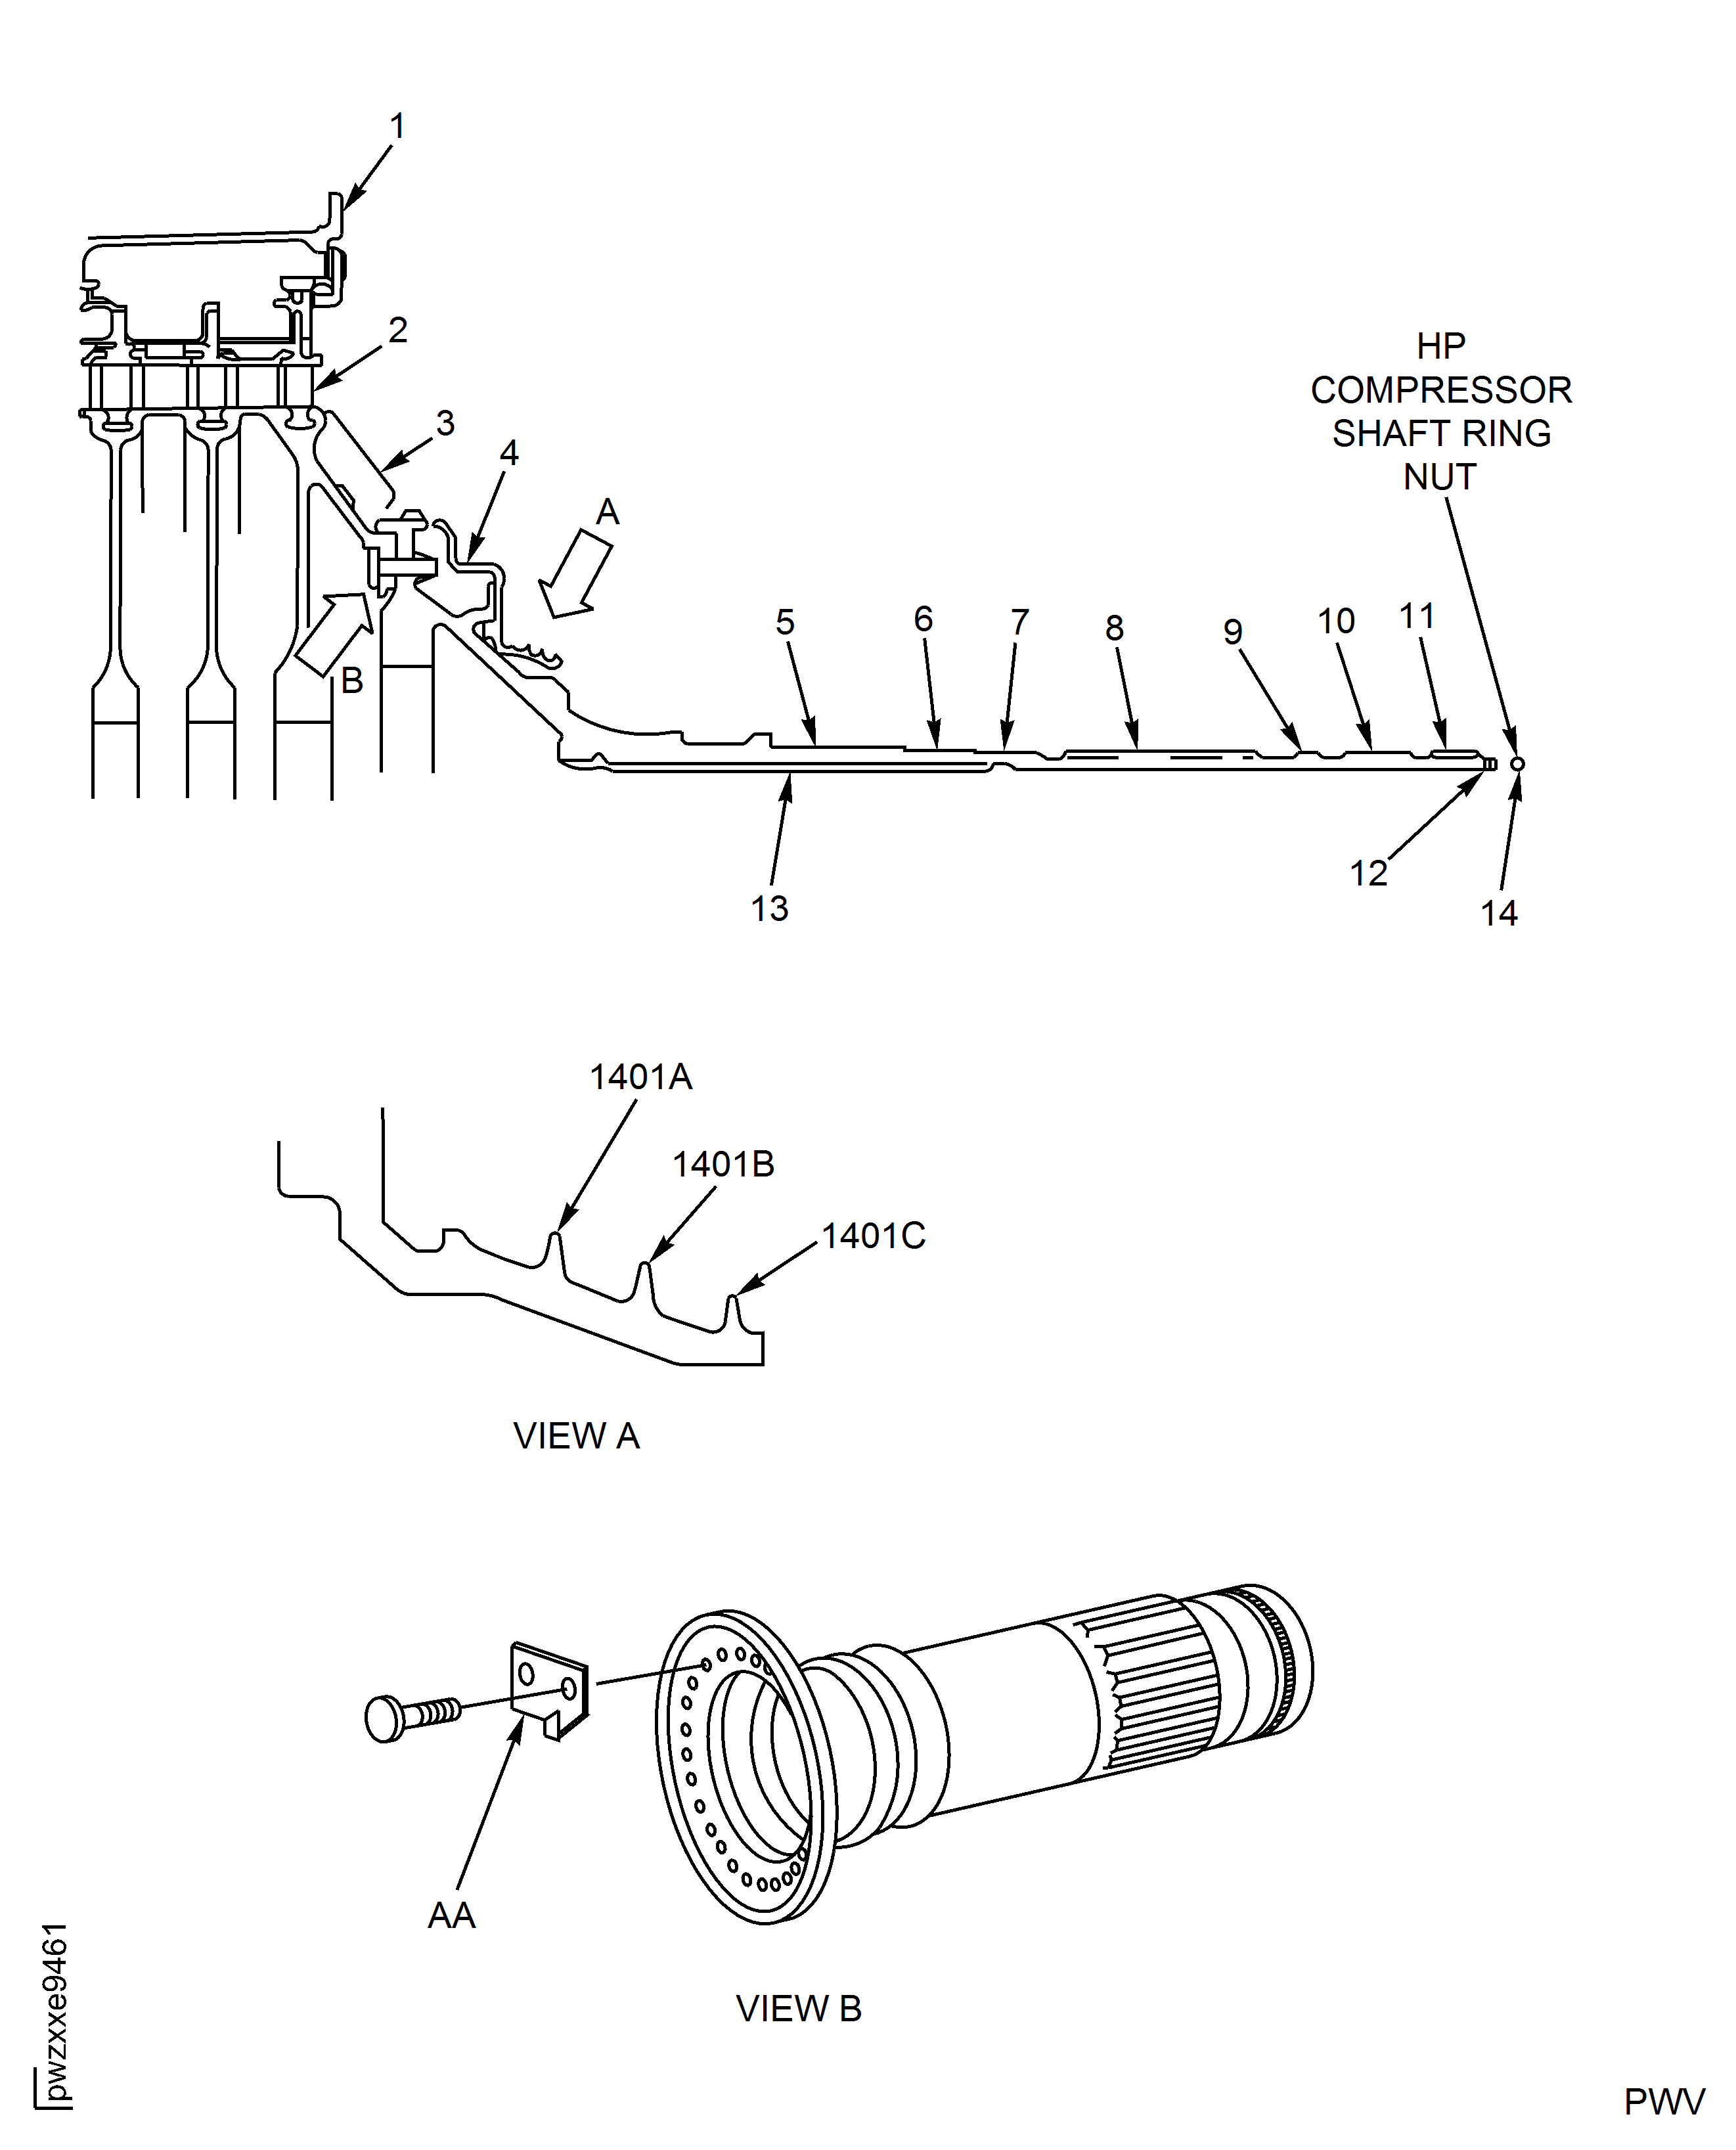
Figure: V2500-A1, SBE 72-0041: Locations at Interface H-41 Rear Face
V2500-A1, SBE 72-0041: Locations at Interface H-41 Rear Face
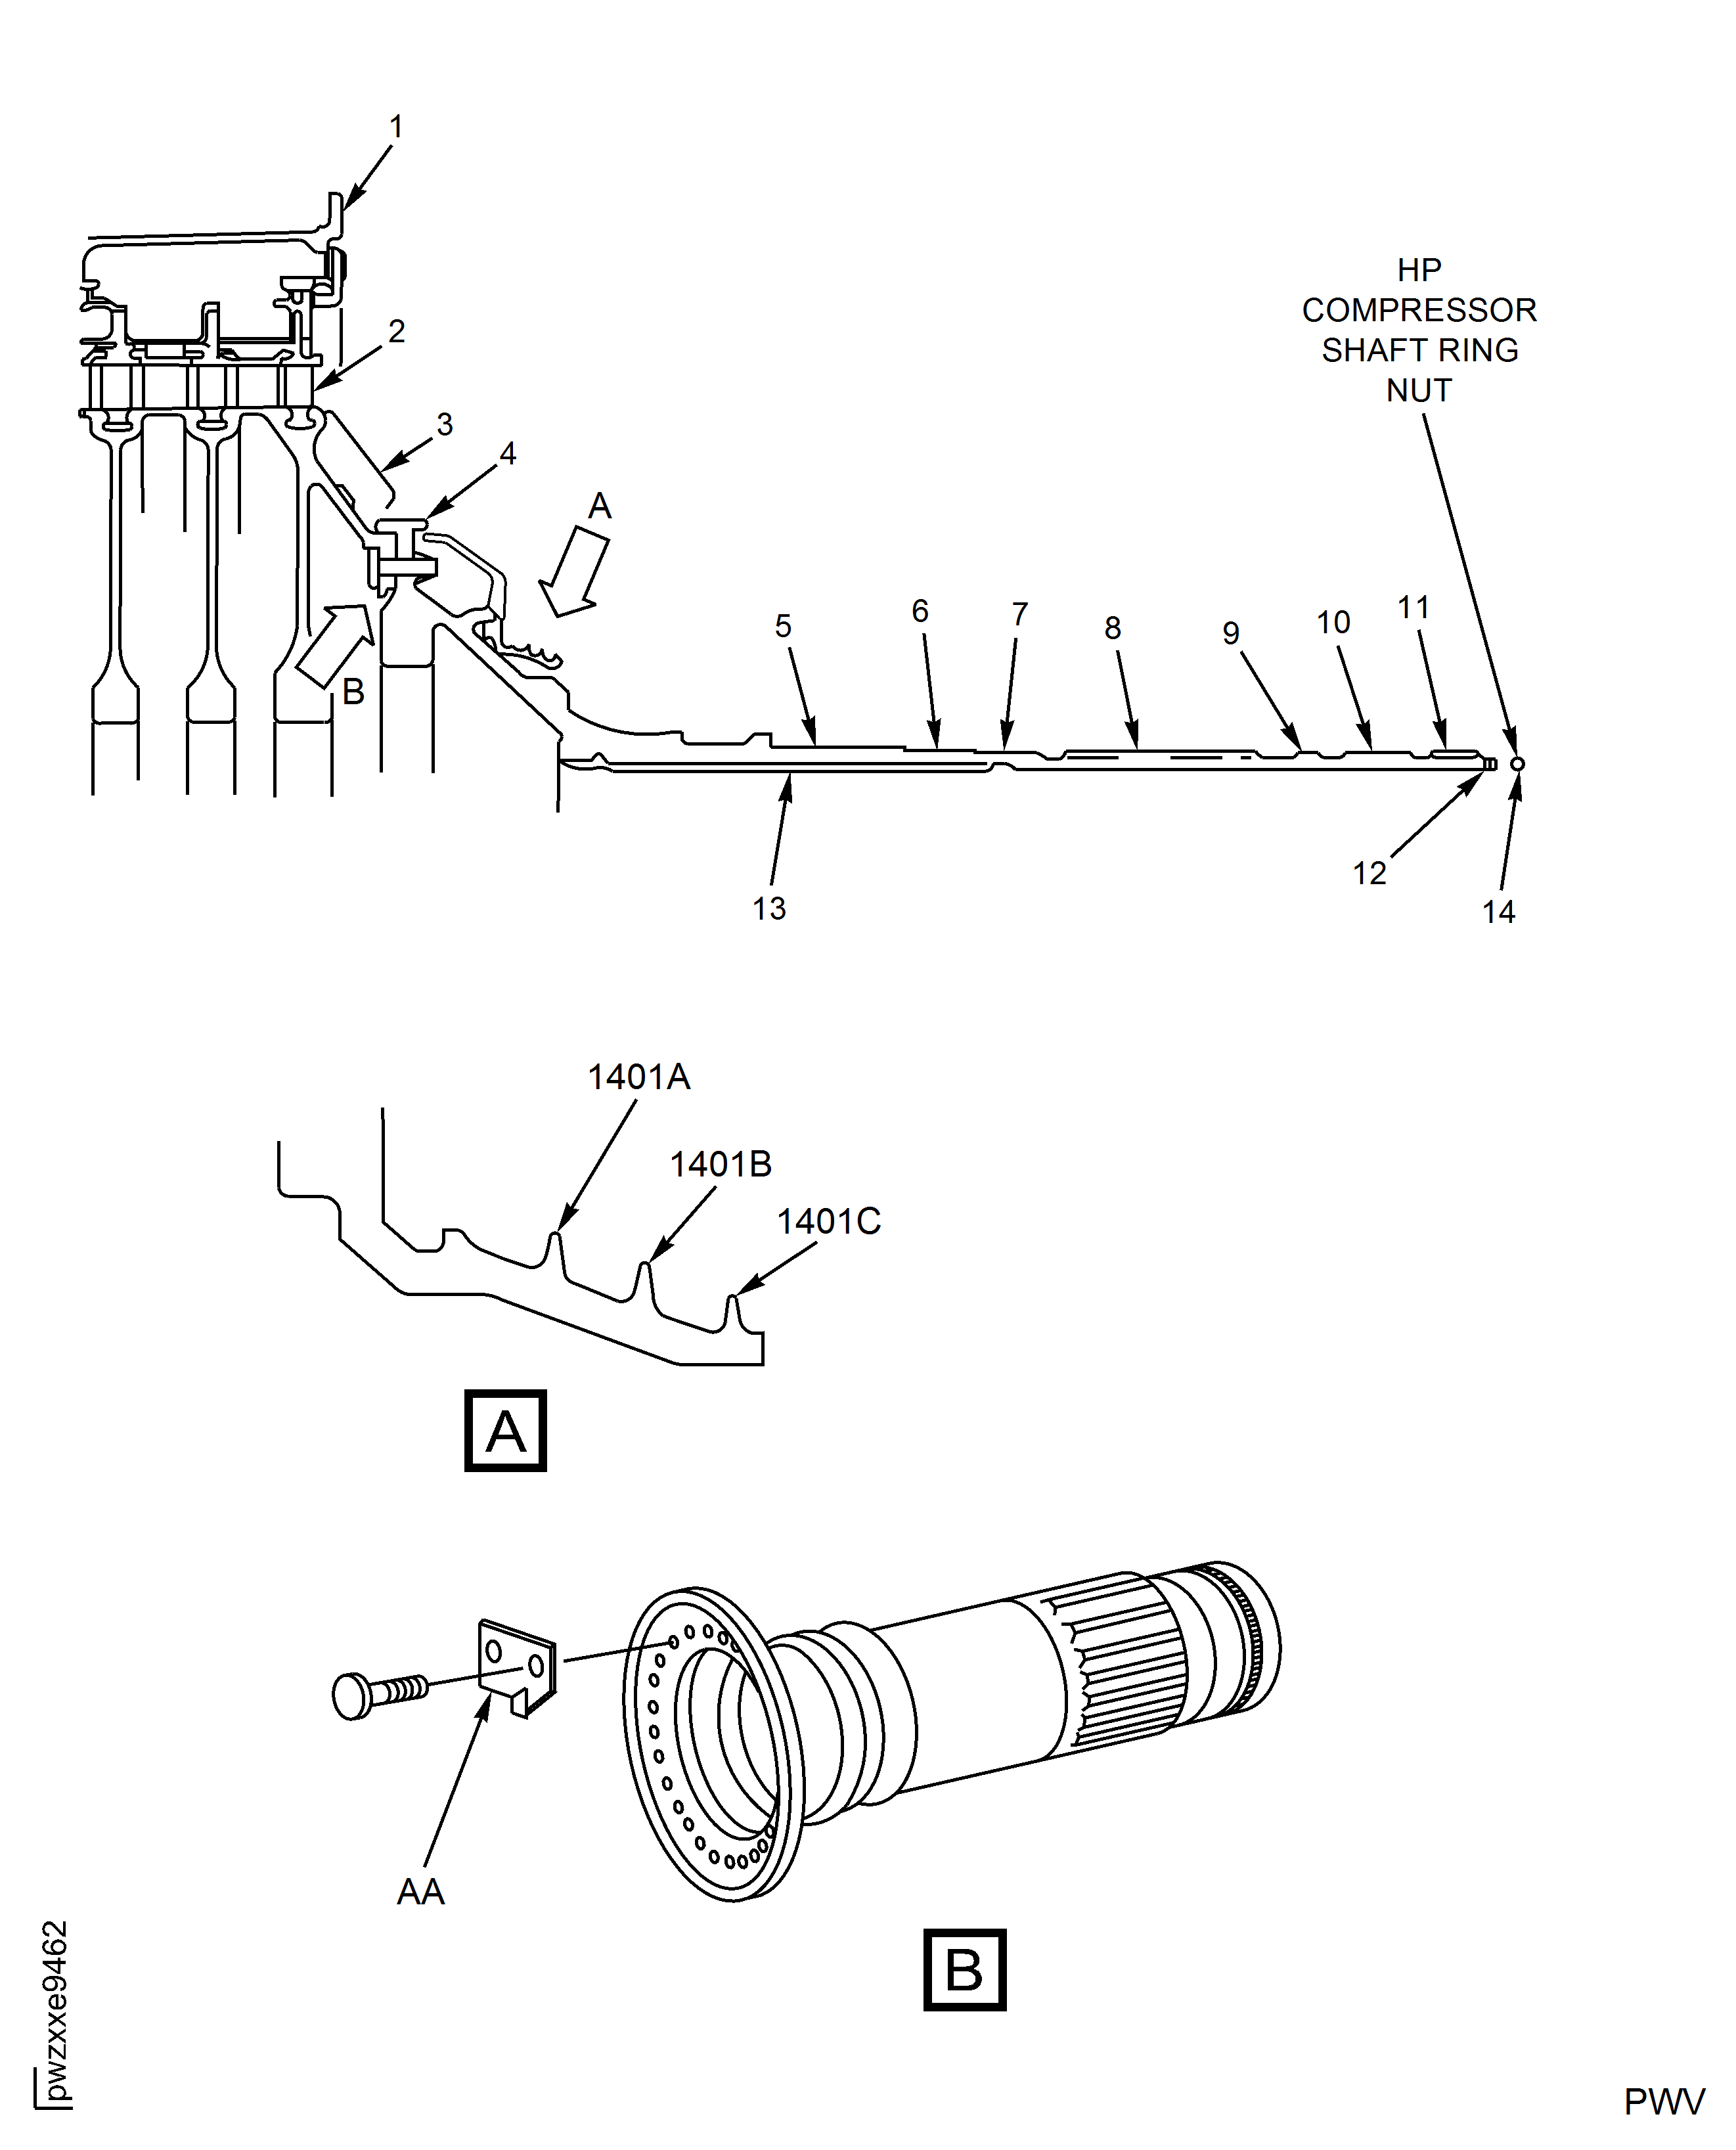
Figure: V2500-A5: Locations at Interface H-41
V2500-A5: Locations at Interface H-41
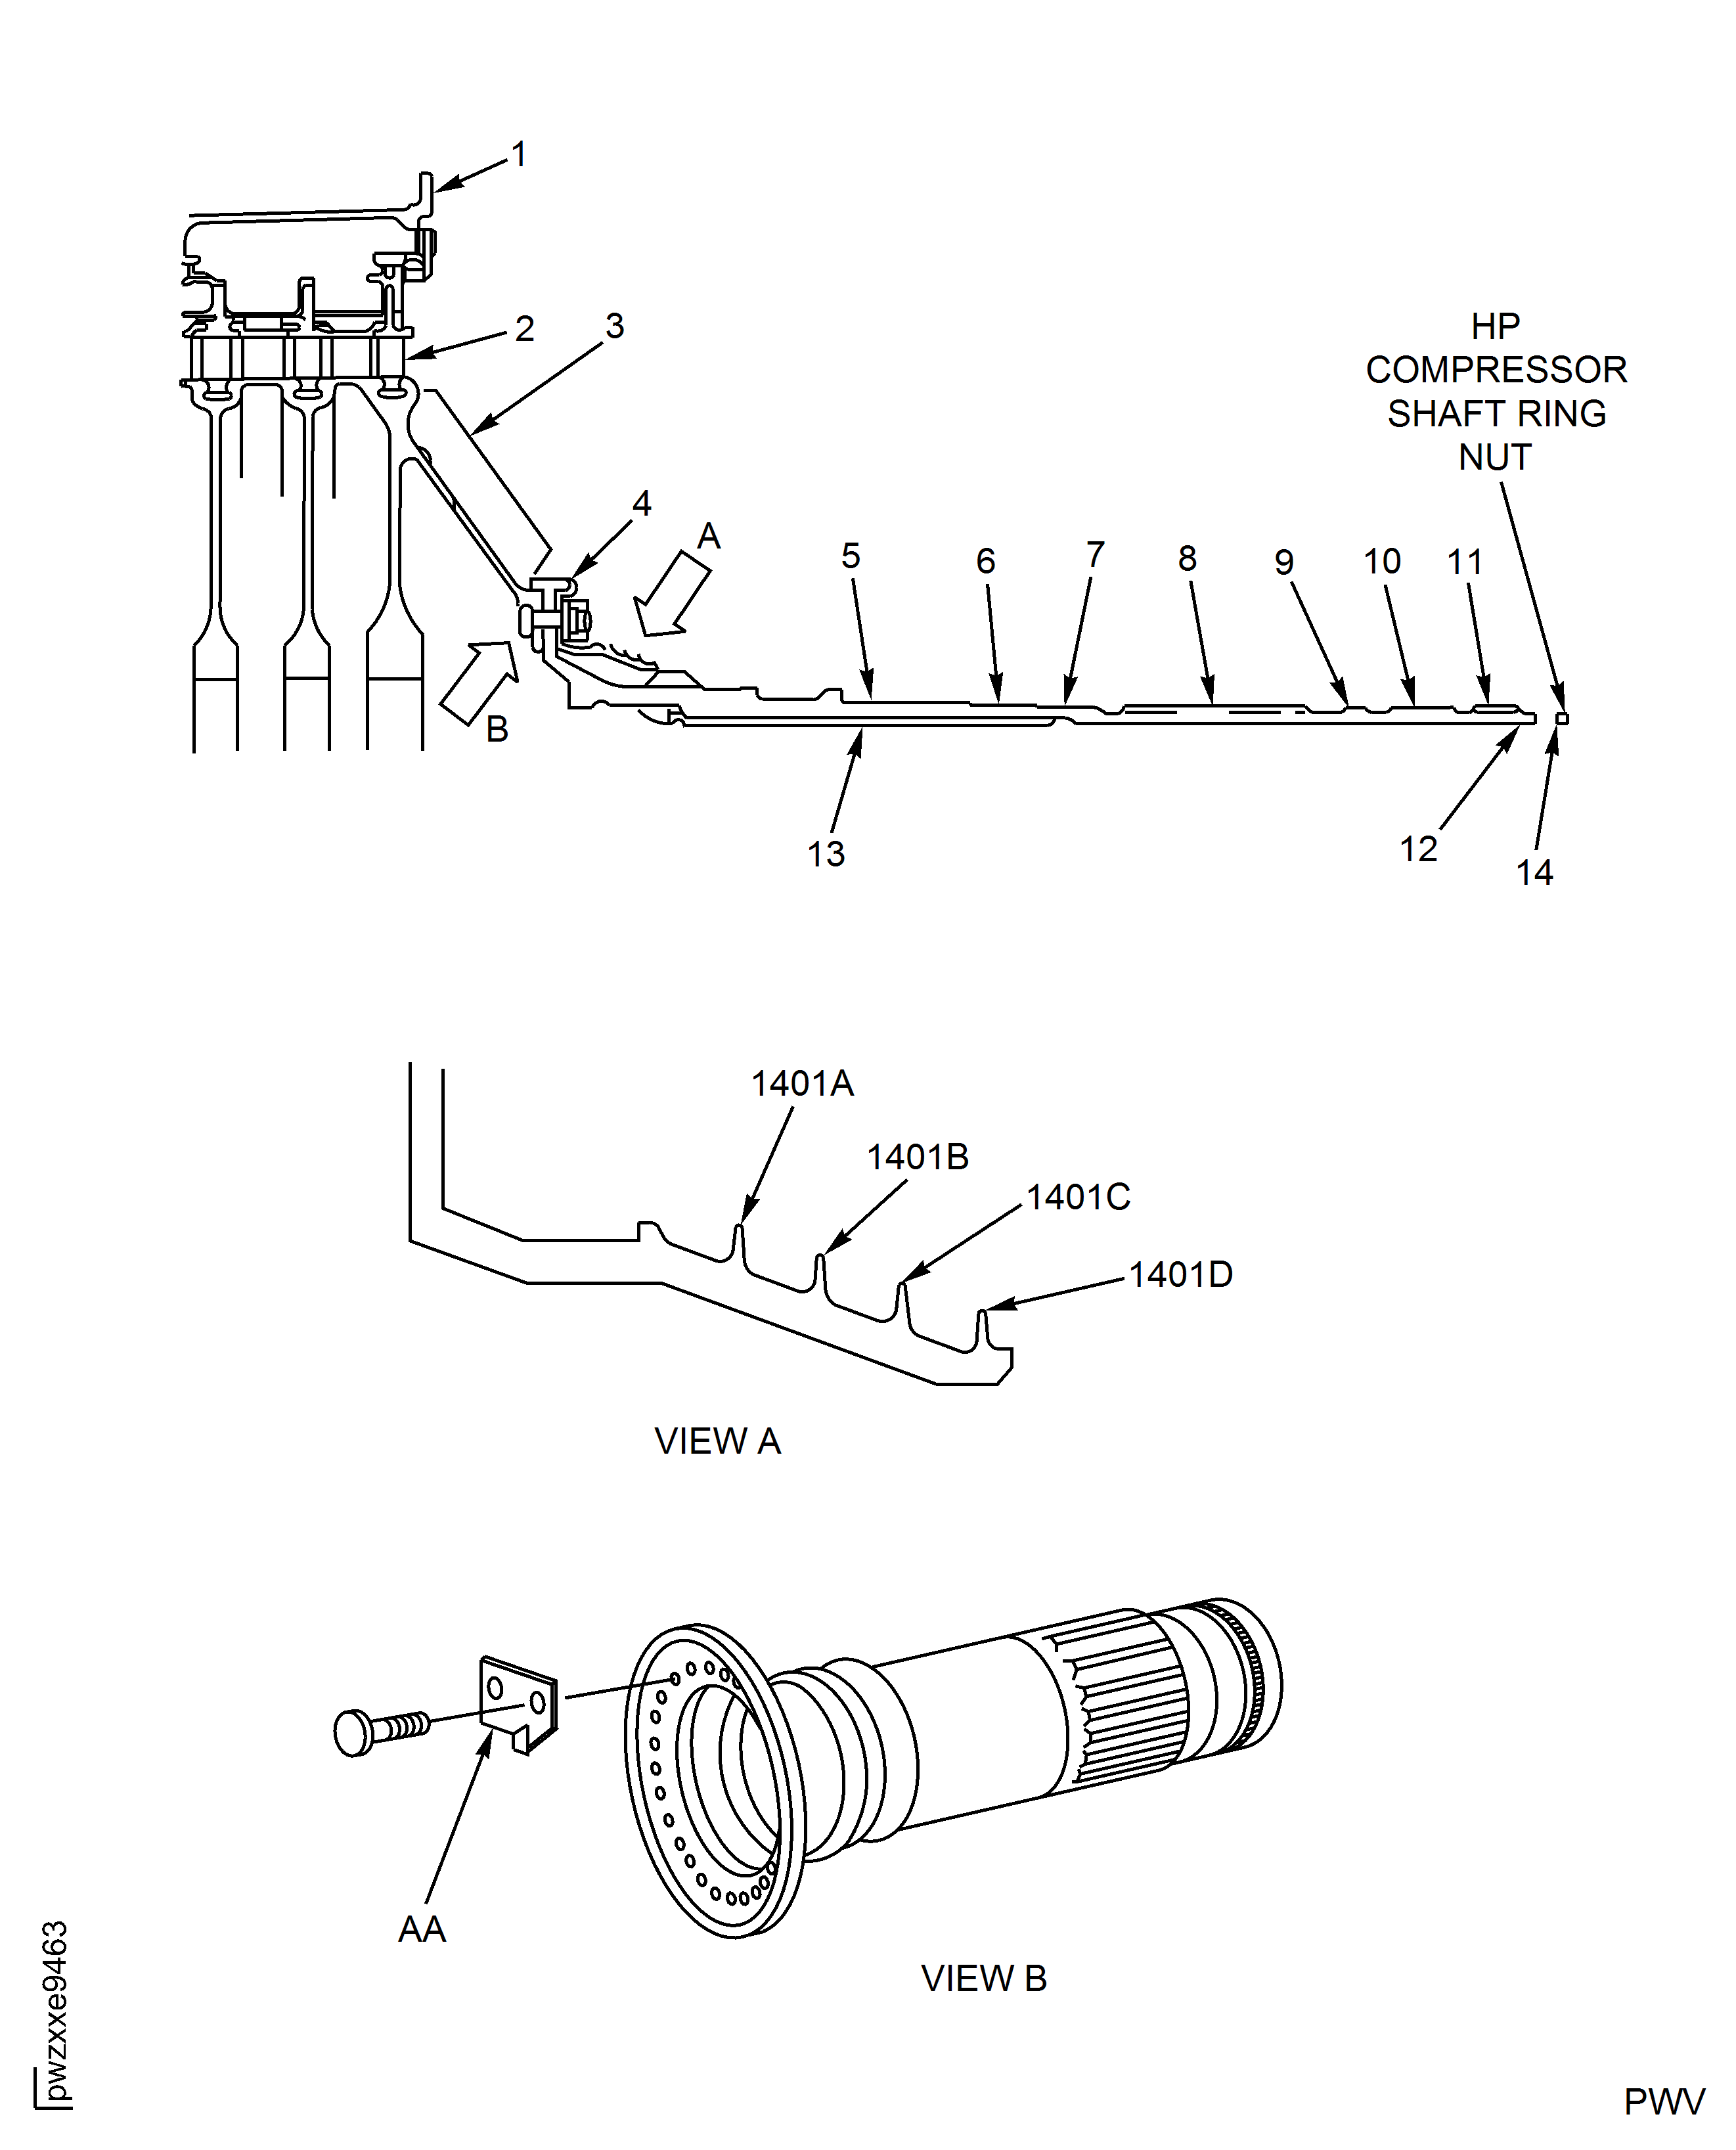
Figure: Stages 8, 9, 10 and 11 Ceramic Vane Rub Strips
Stages 8, 9, 10 and 11 Ceramic Vane Rub Strips
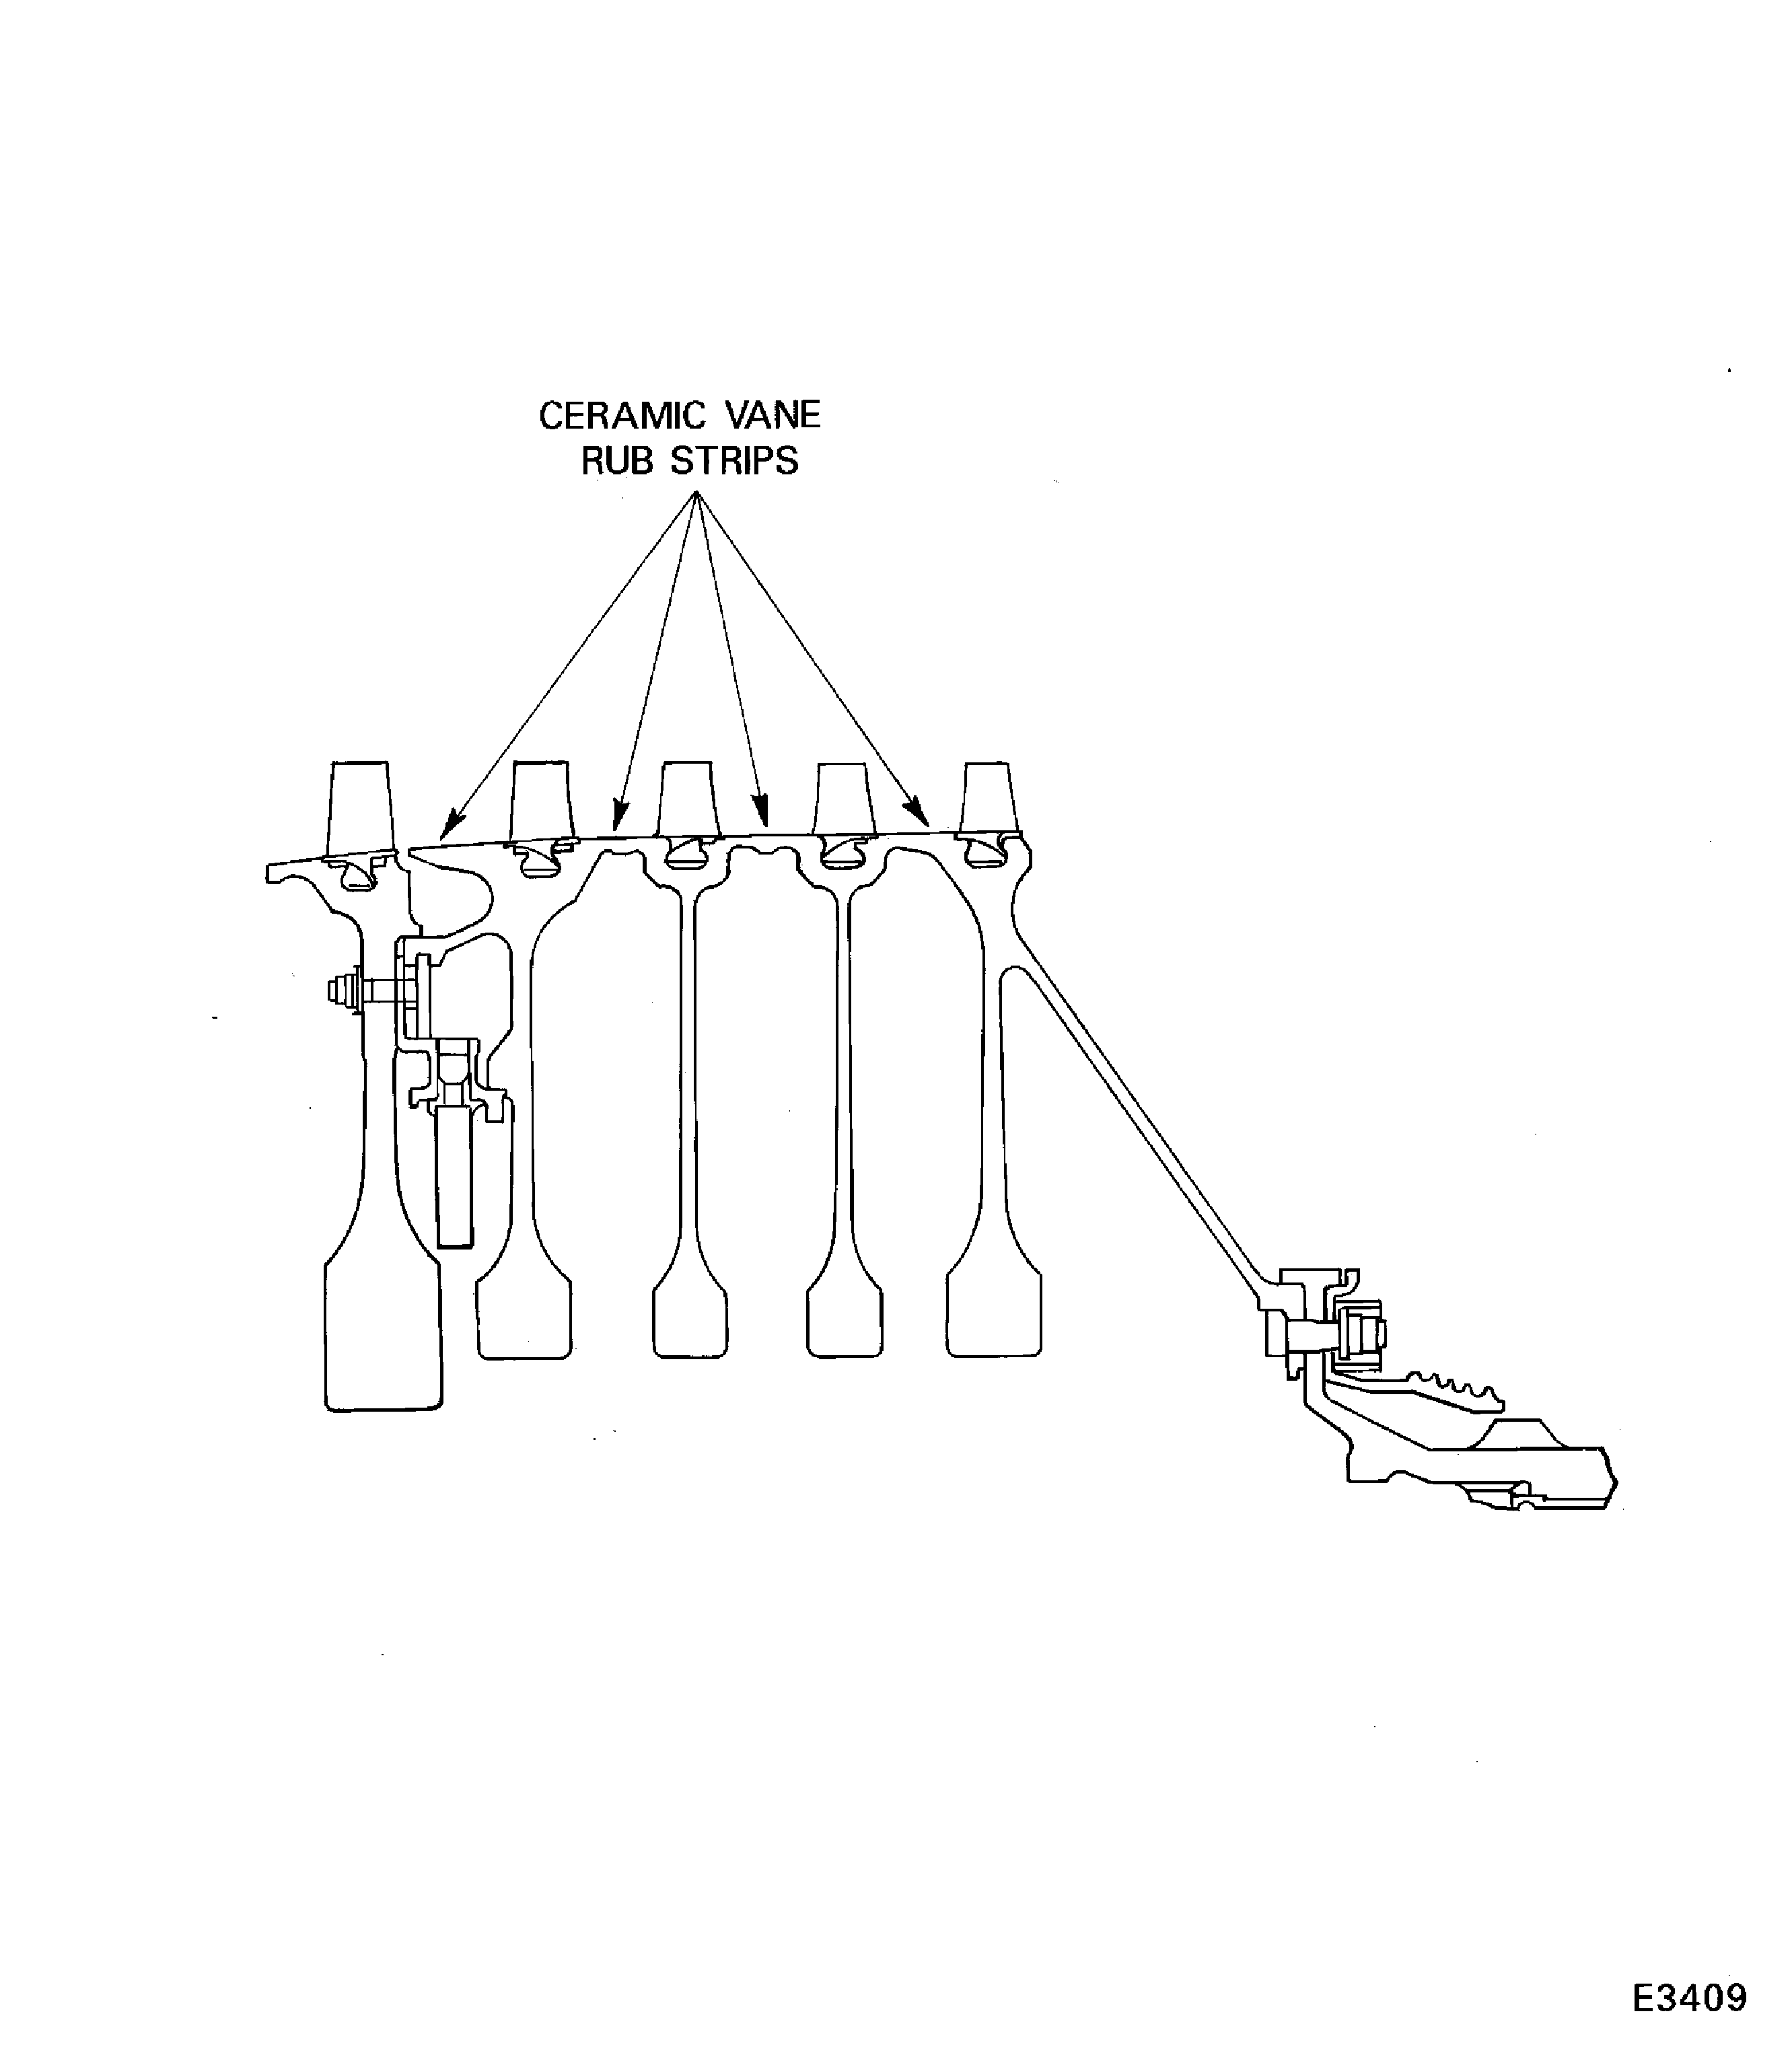
Figure: Front Case Bearing Pads - Inspection Locations
Front Case Bearing Pads - Inspection Locations
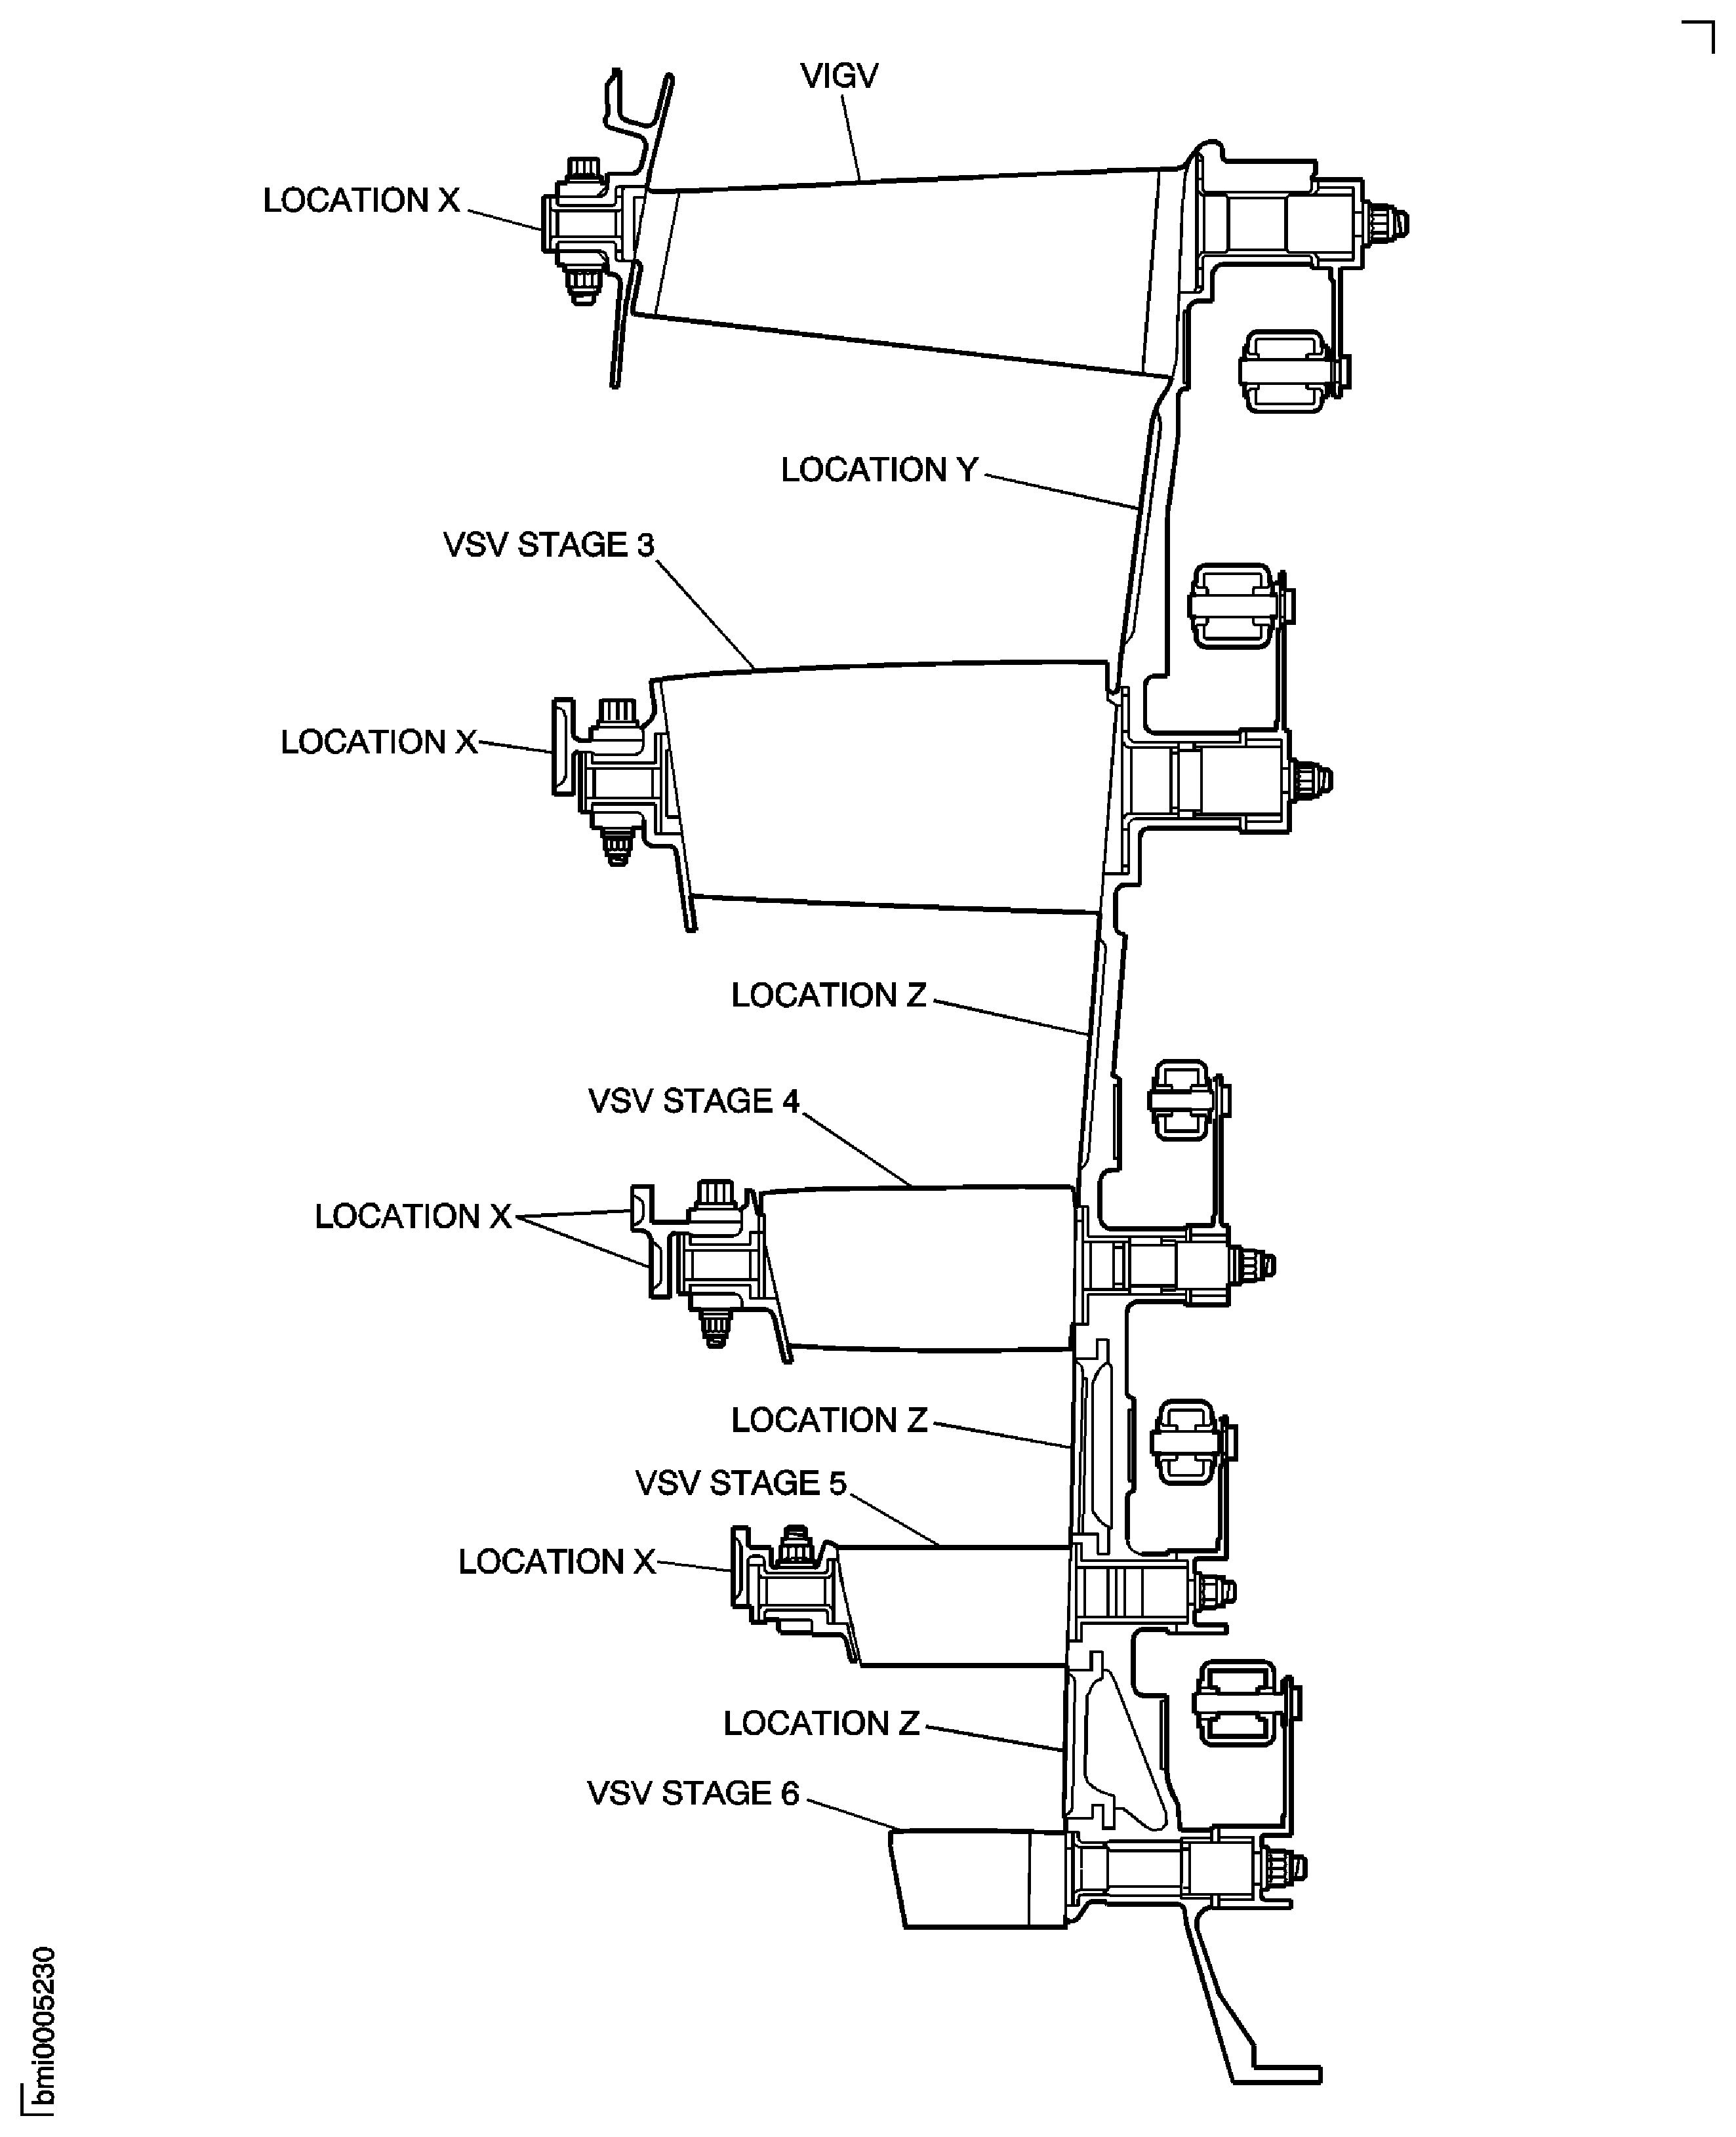
Figure: Split Line Ring Slots Face (in Assembled Condition)
Split Line Ring Slots Face (in Assembled Condition)
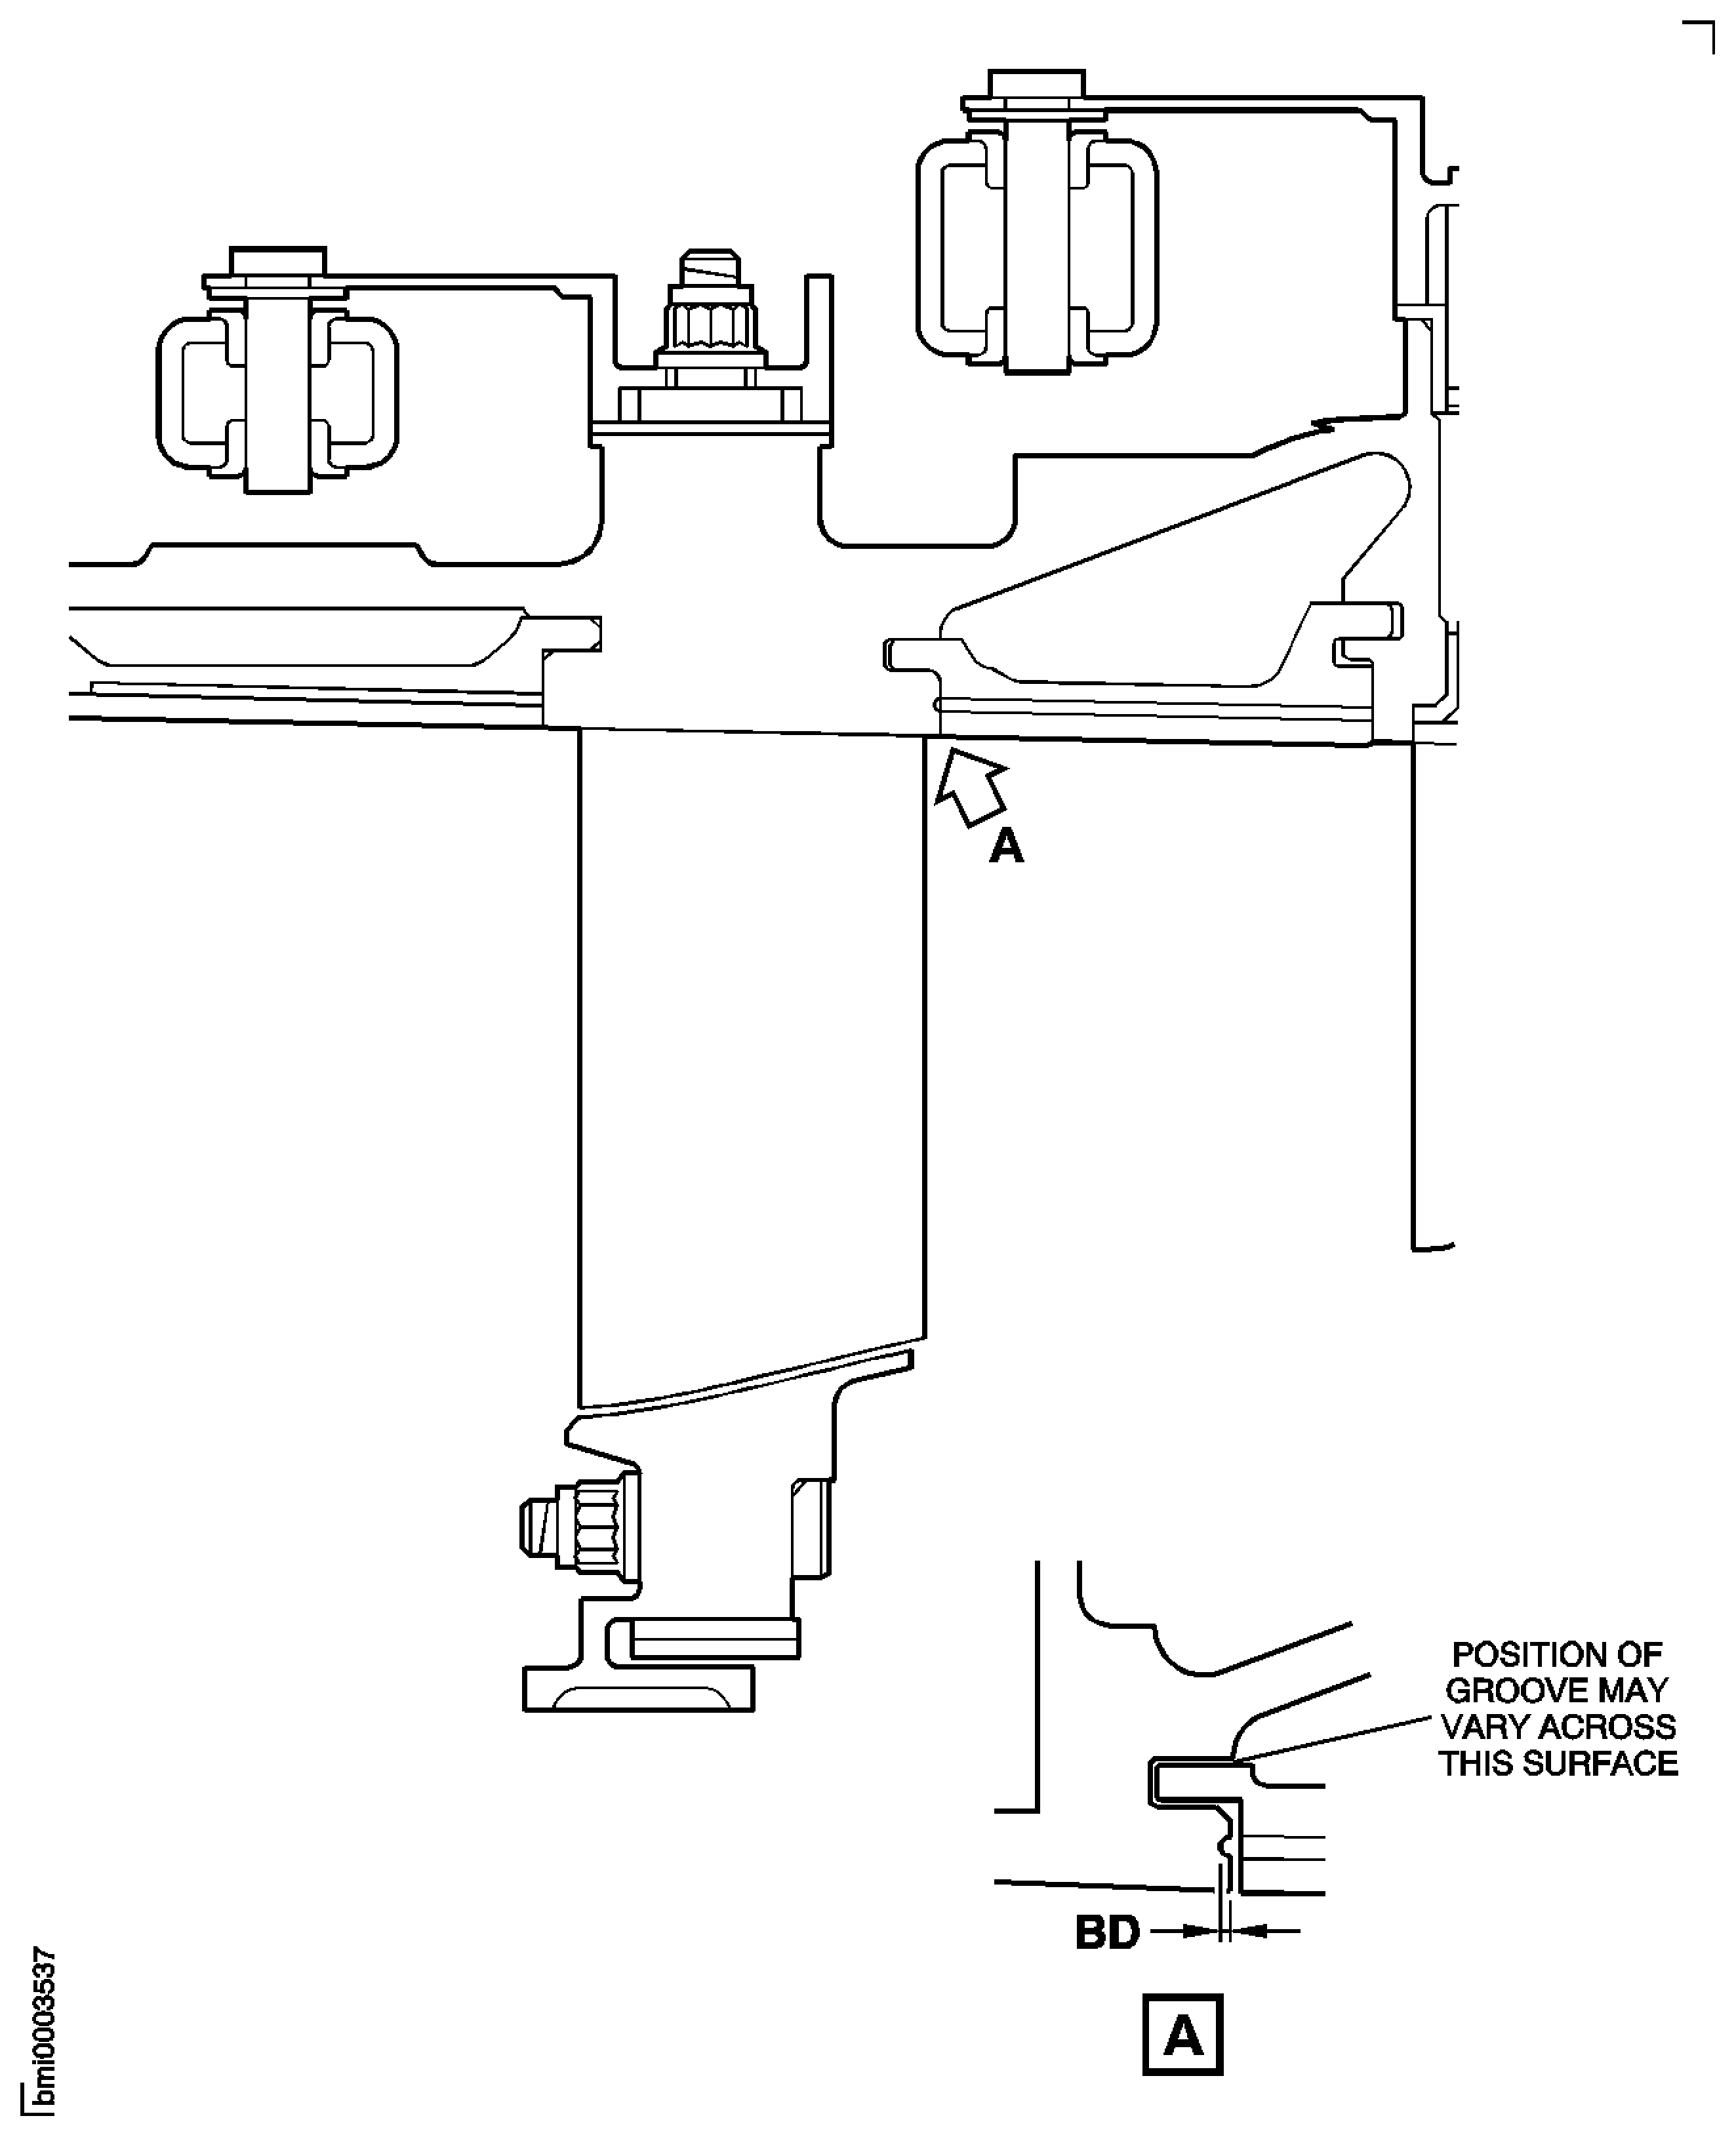
Figure: V2500-A1, Pre SBE 72-0027: Rotor Path Ring Slots AF and Slot Faces BD
V2500-A1, Pre SBE 72-0027: Rotor Path Ring Slots AF and Slot Faces BD
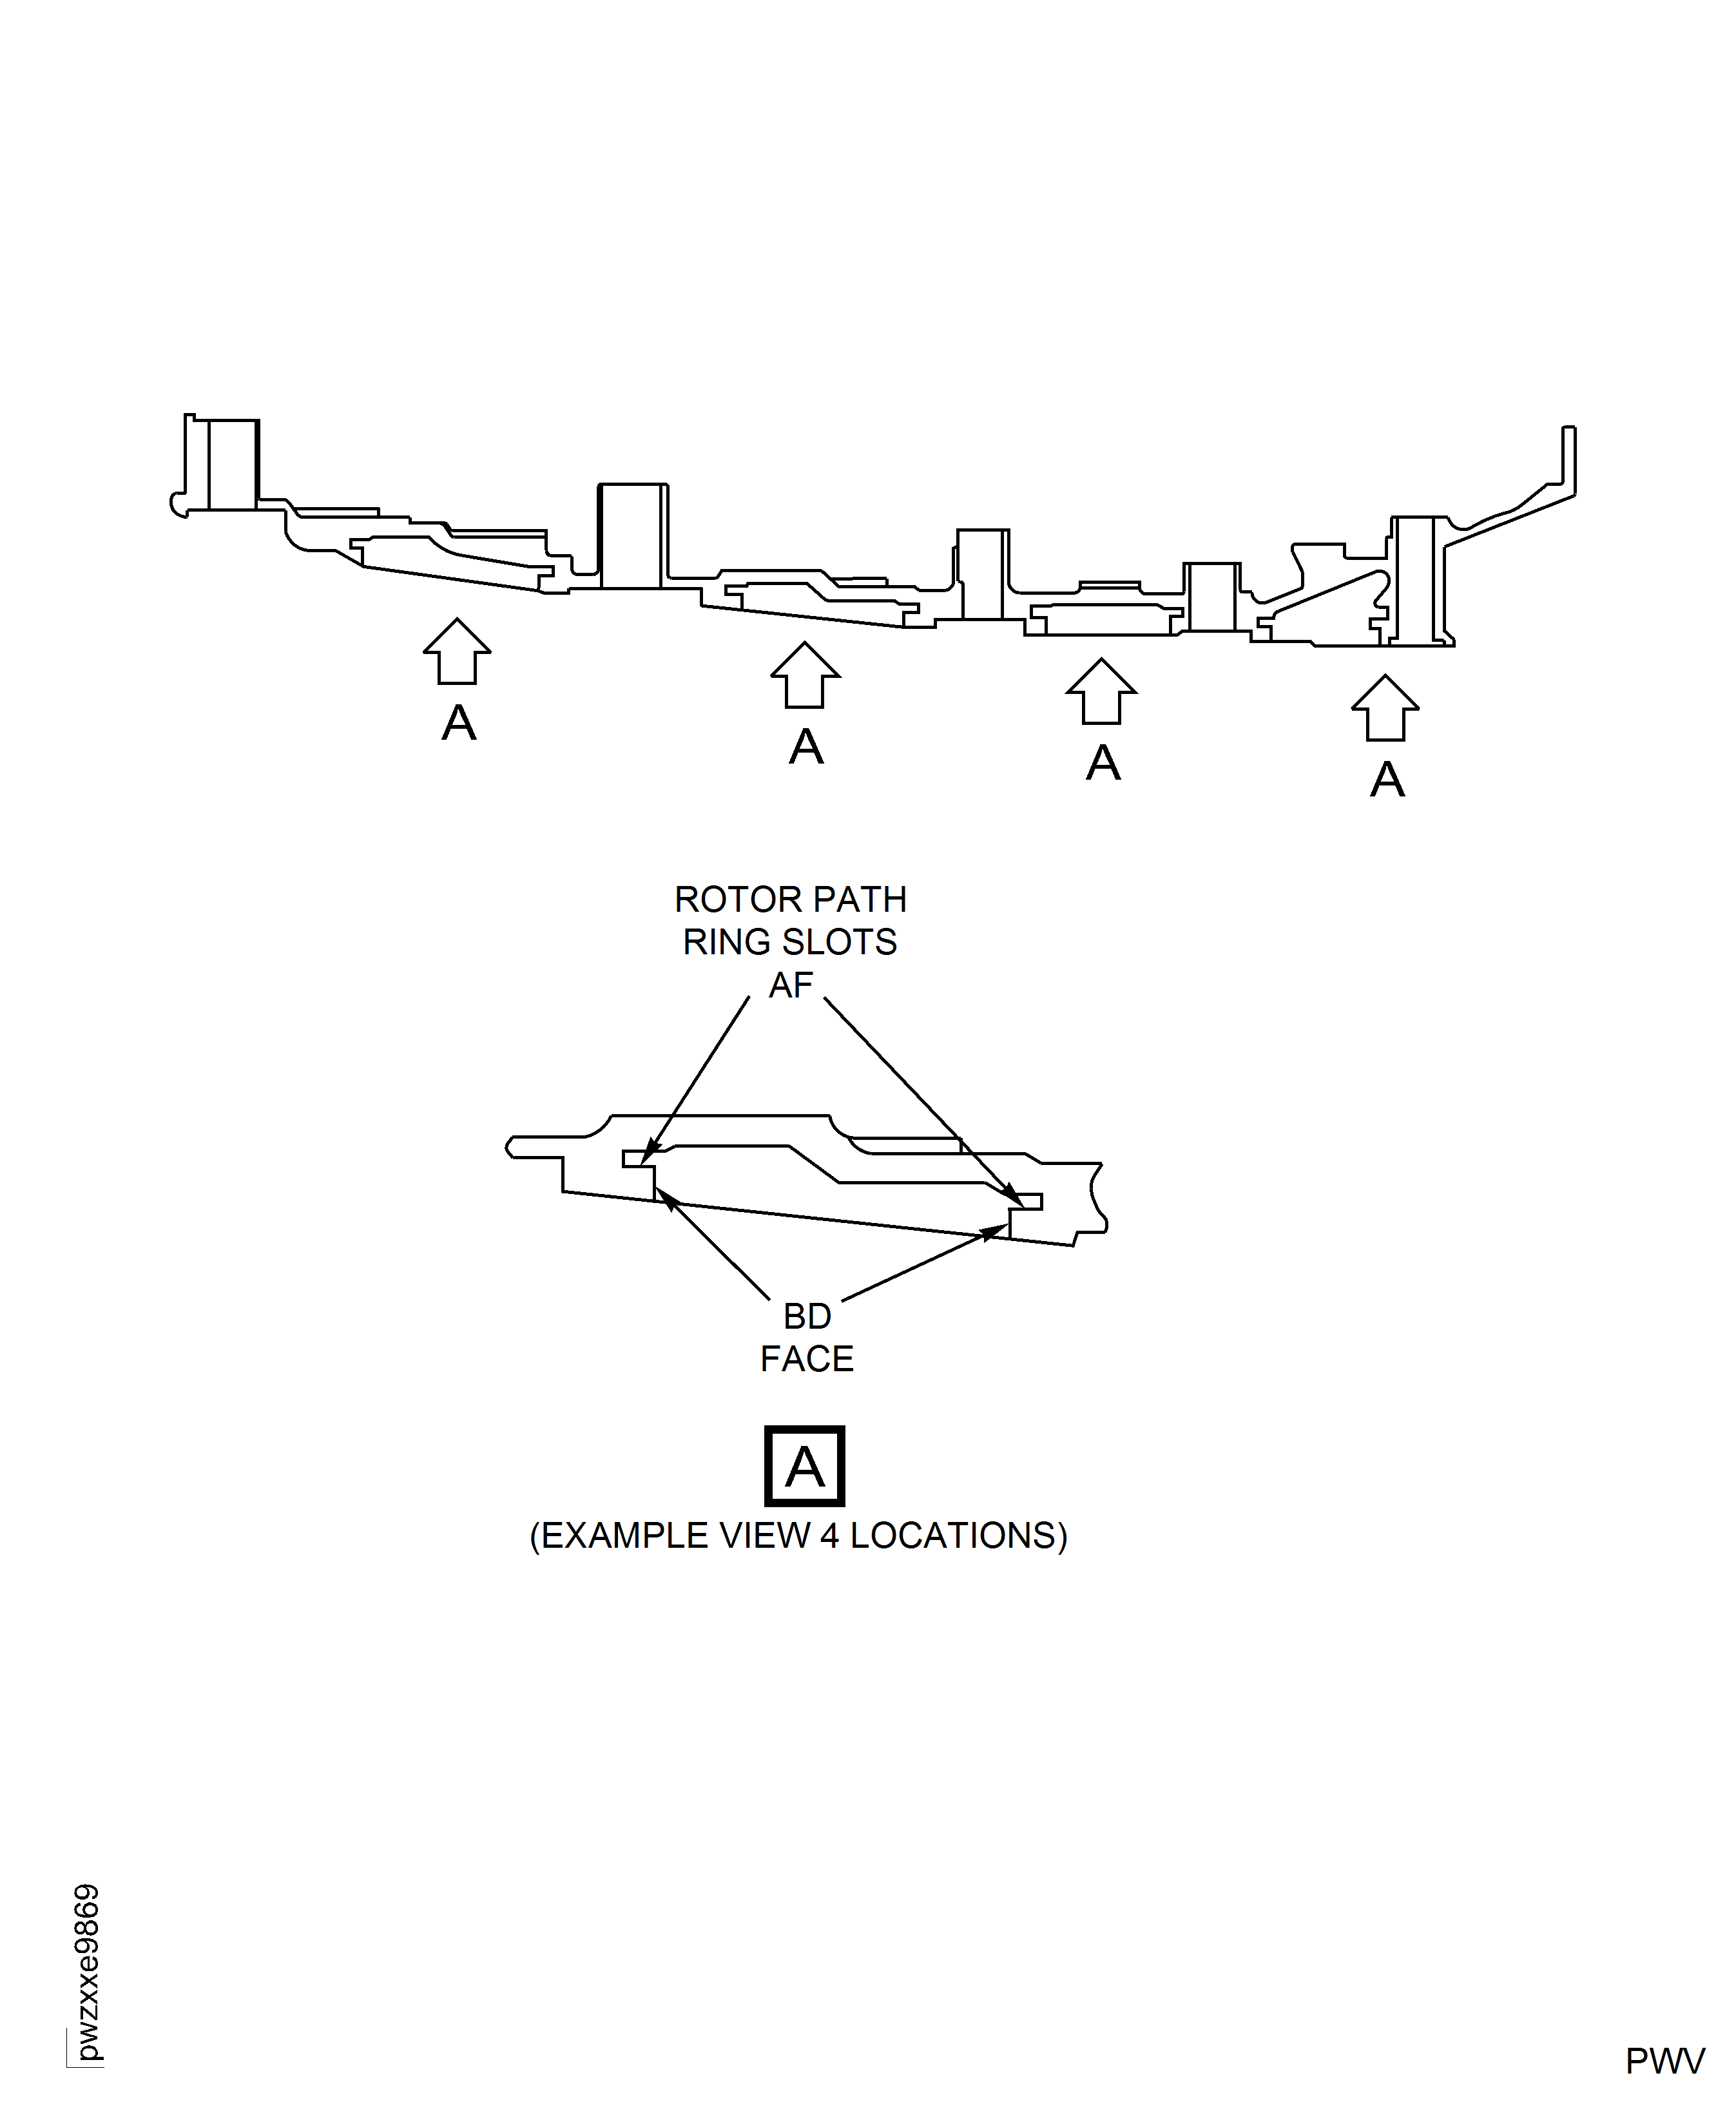
Figure: V2500-A1, Pre SBE 72-0027: Rotor Path Ring Slots AF and Slot Faces BD
V2500-A1, Pre SBE 72-0027: Rotor Path Ring Slots AF and Slot Faces BD
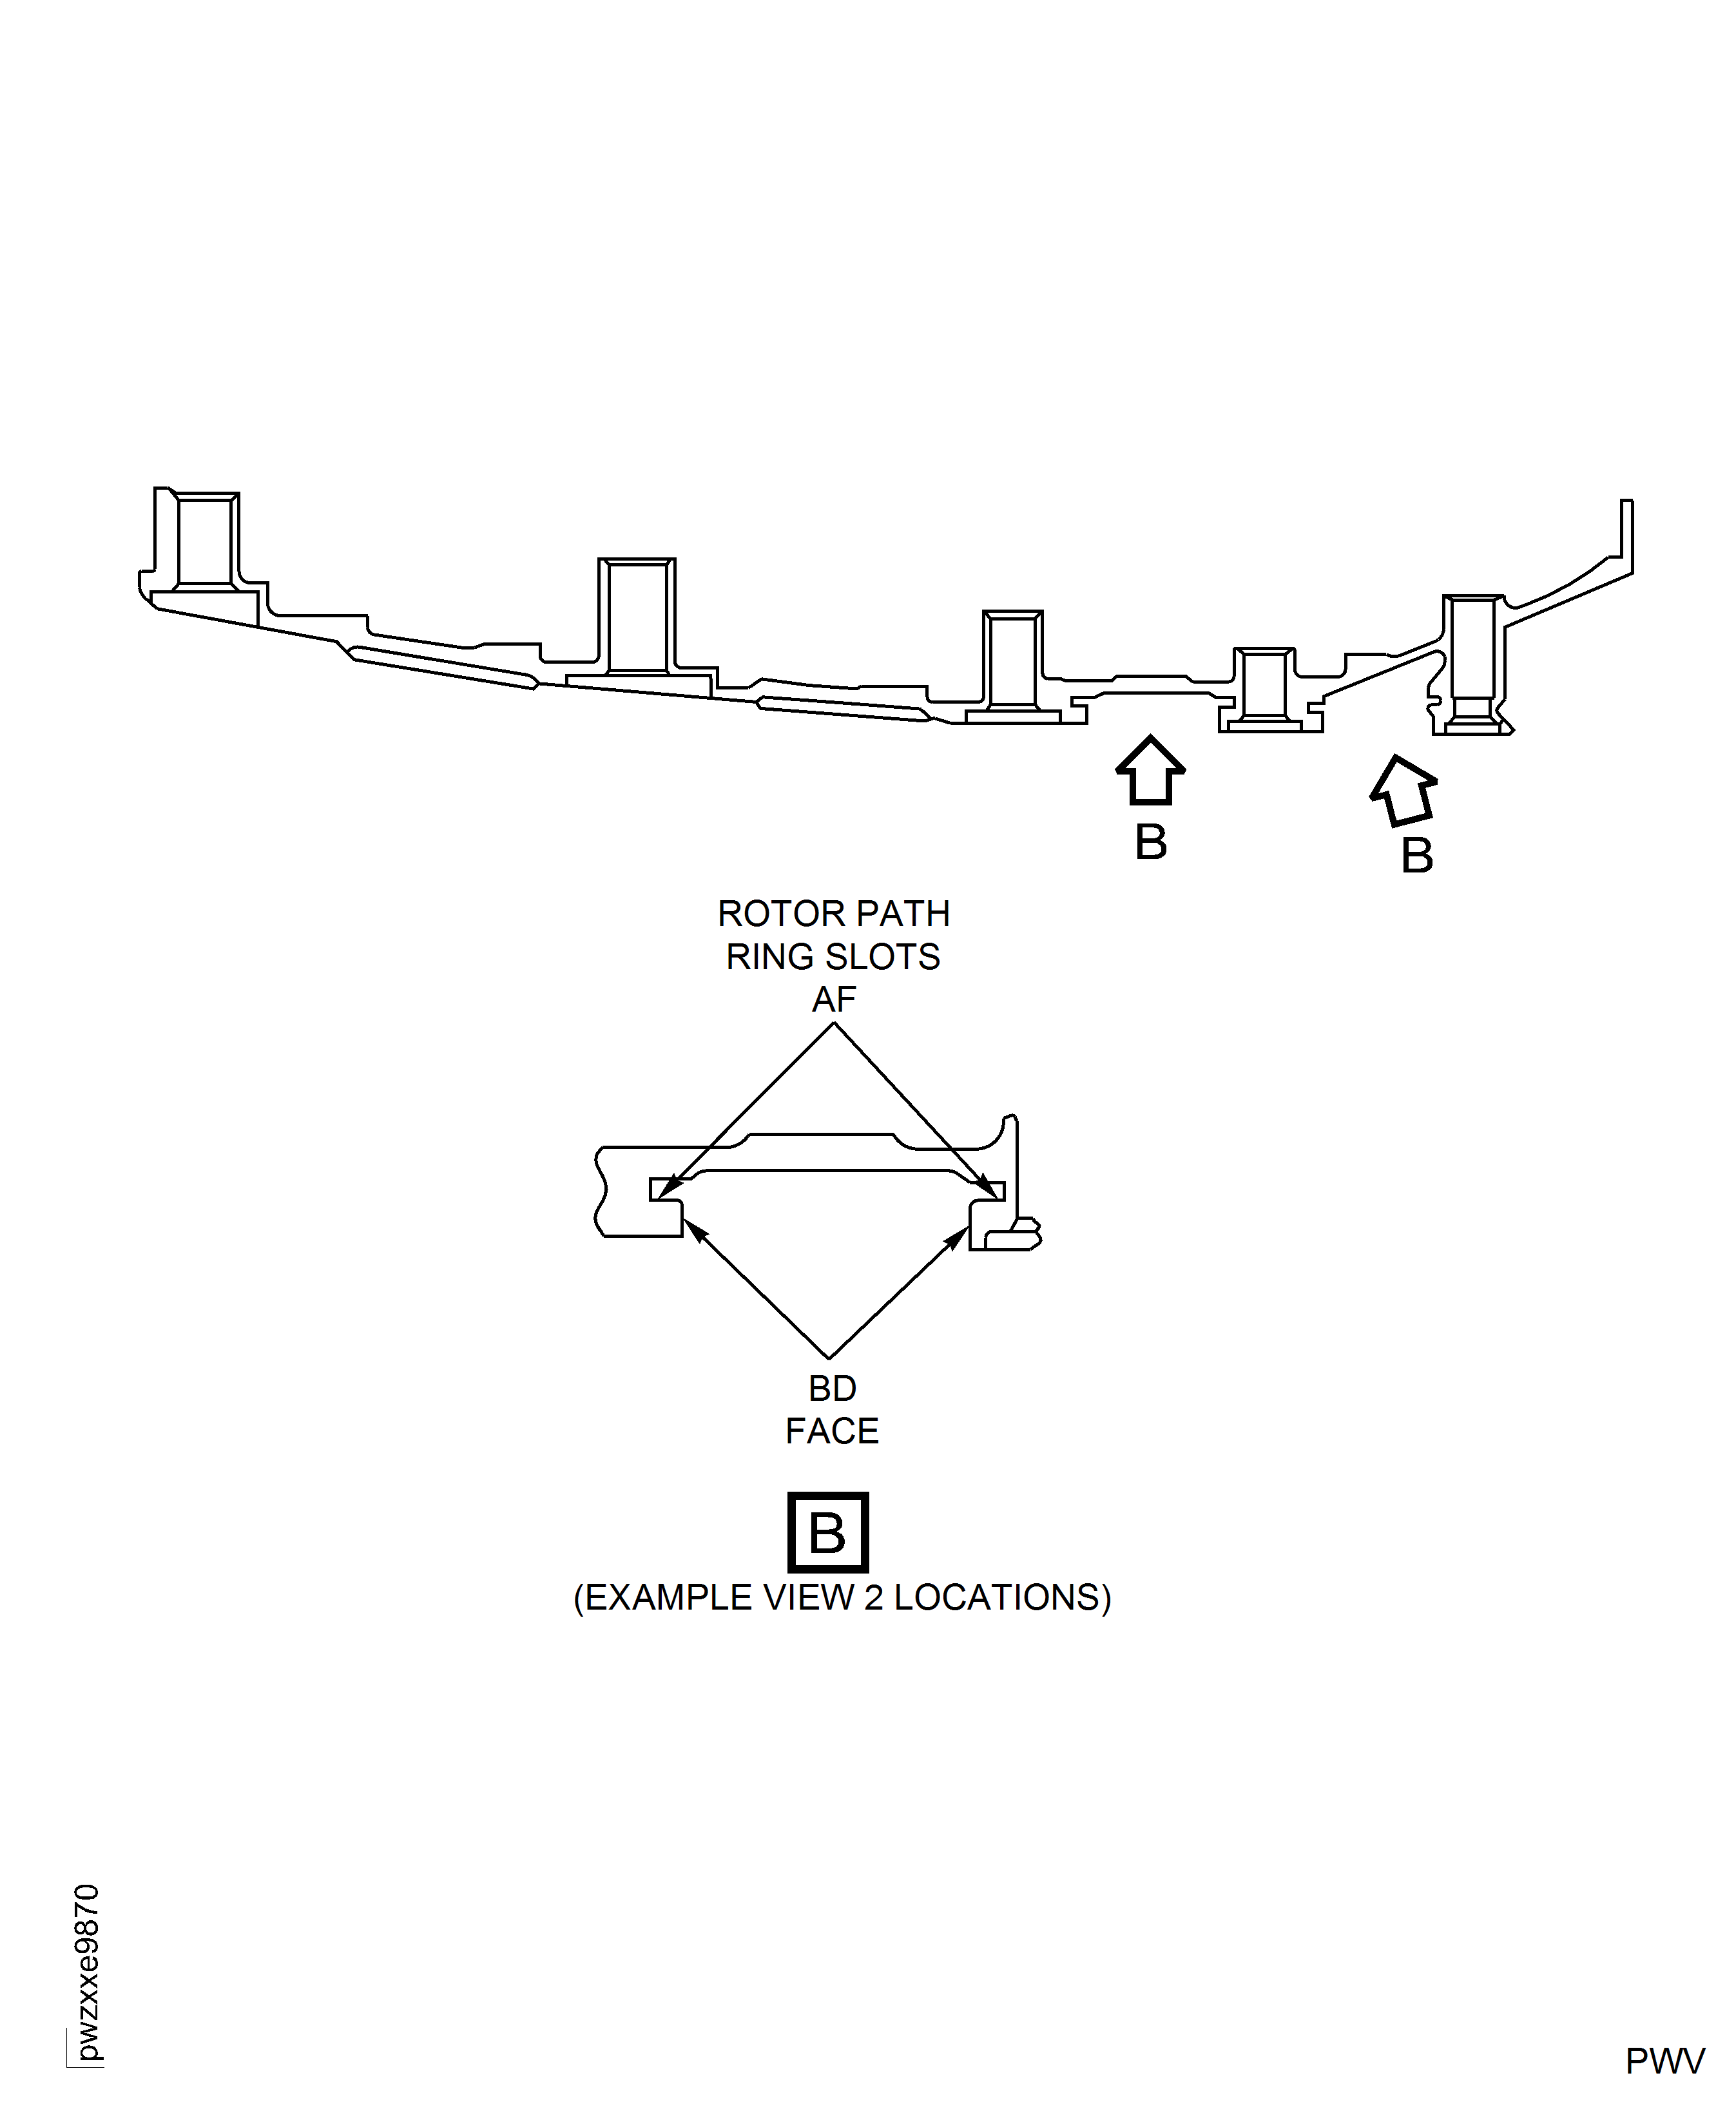
Figure: V2500-A5, Rotor Path Ring Slots AF and Slot Faces BD
V2500-A5, Rotor Path Ring Slots AF and Slot Faces BD
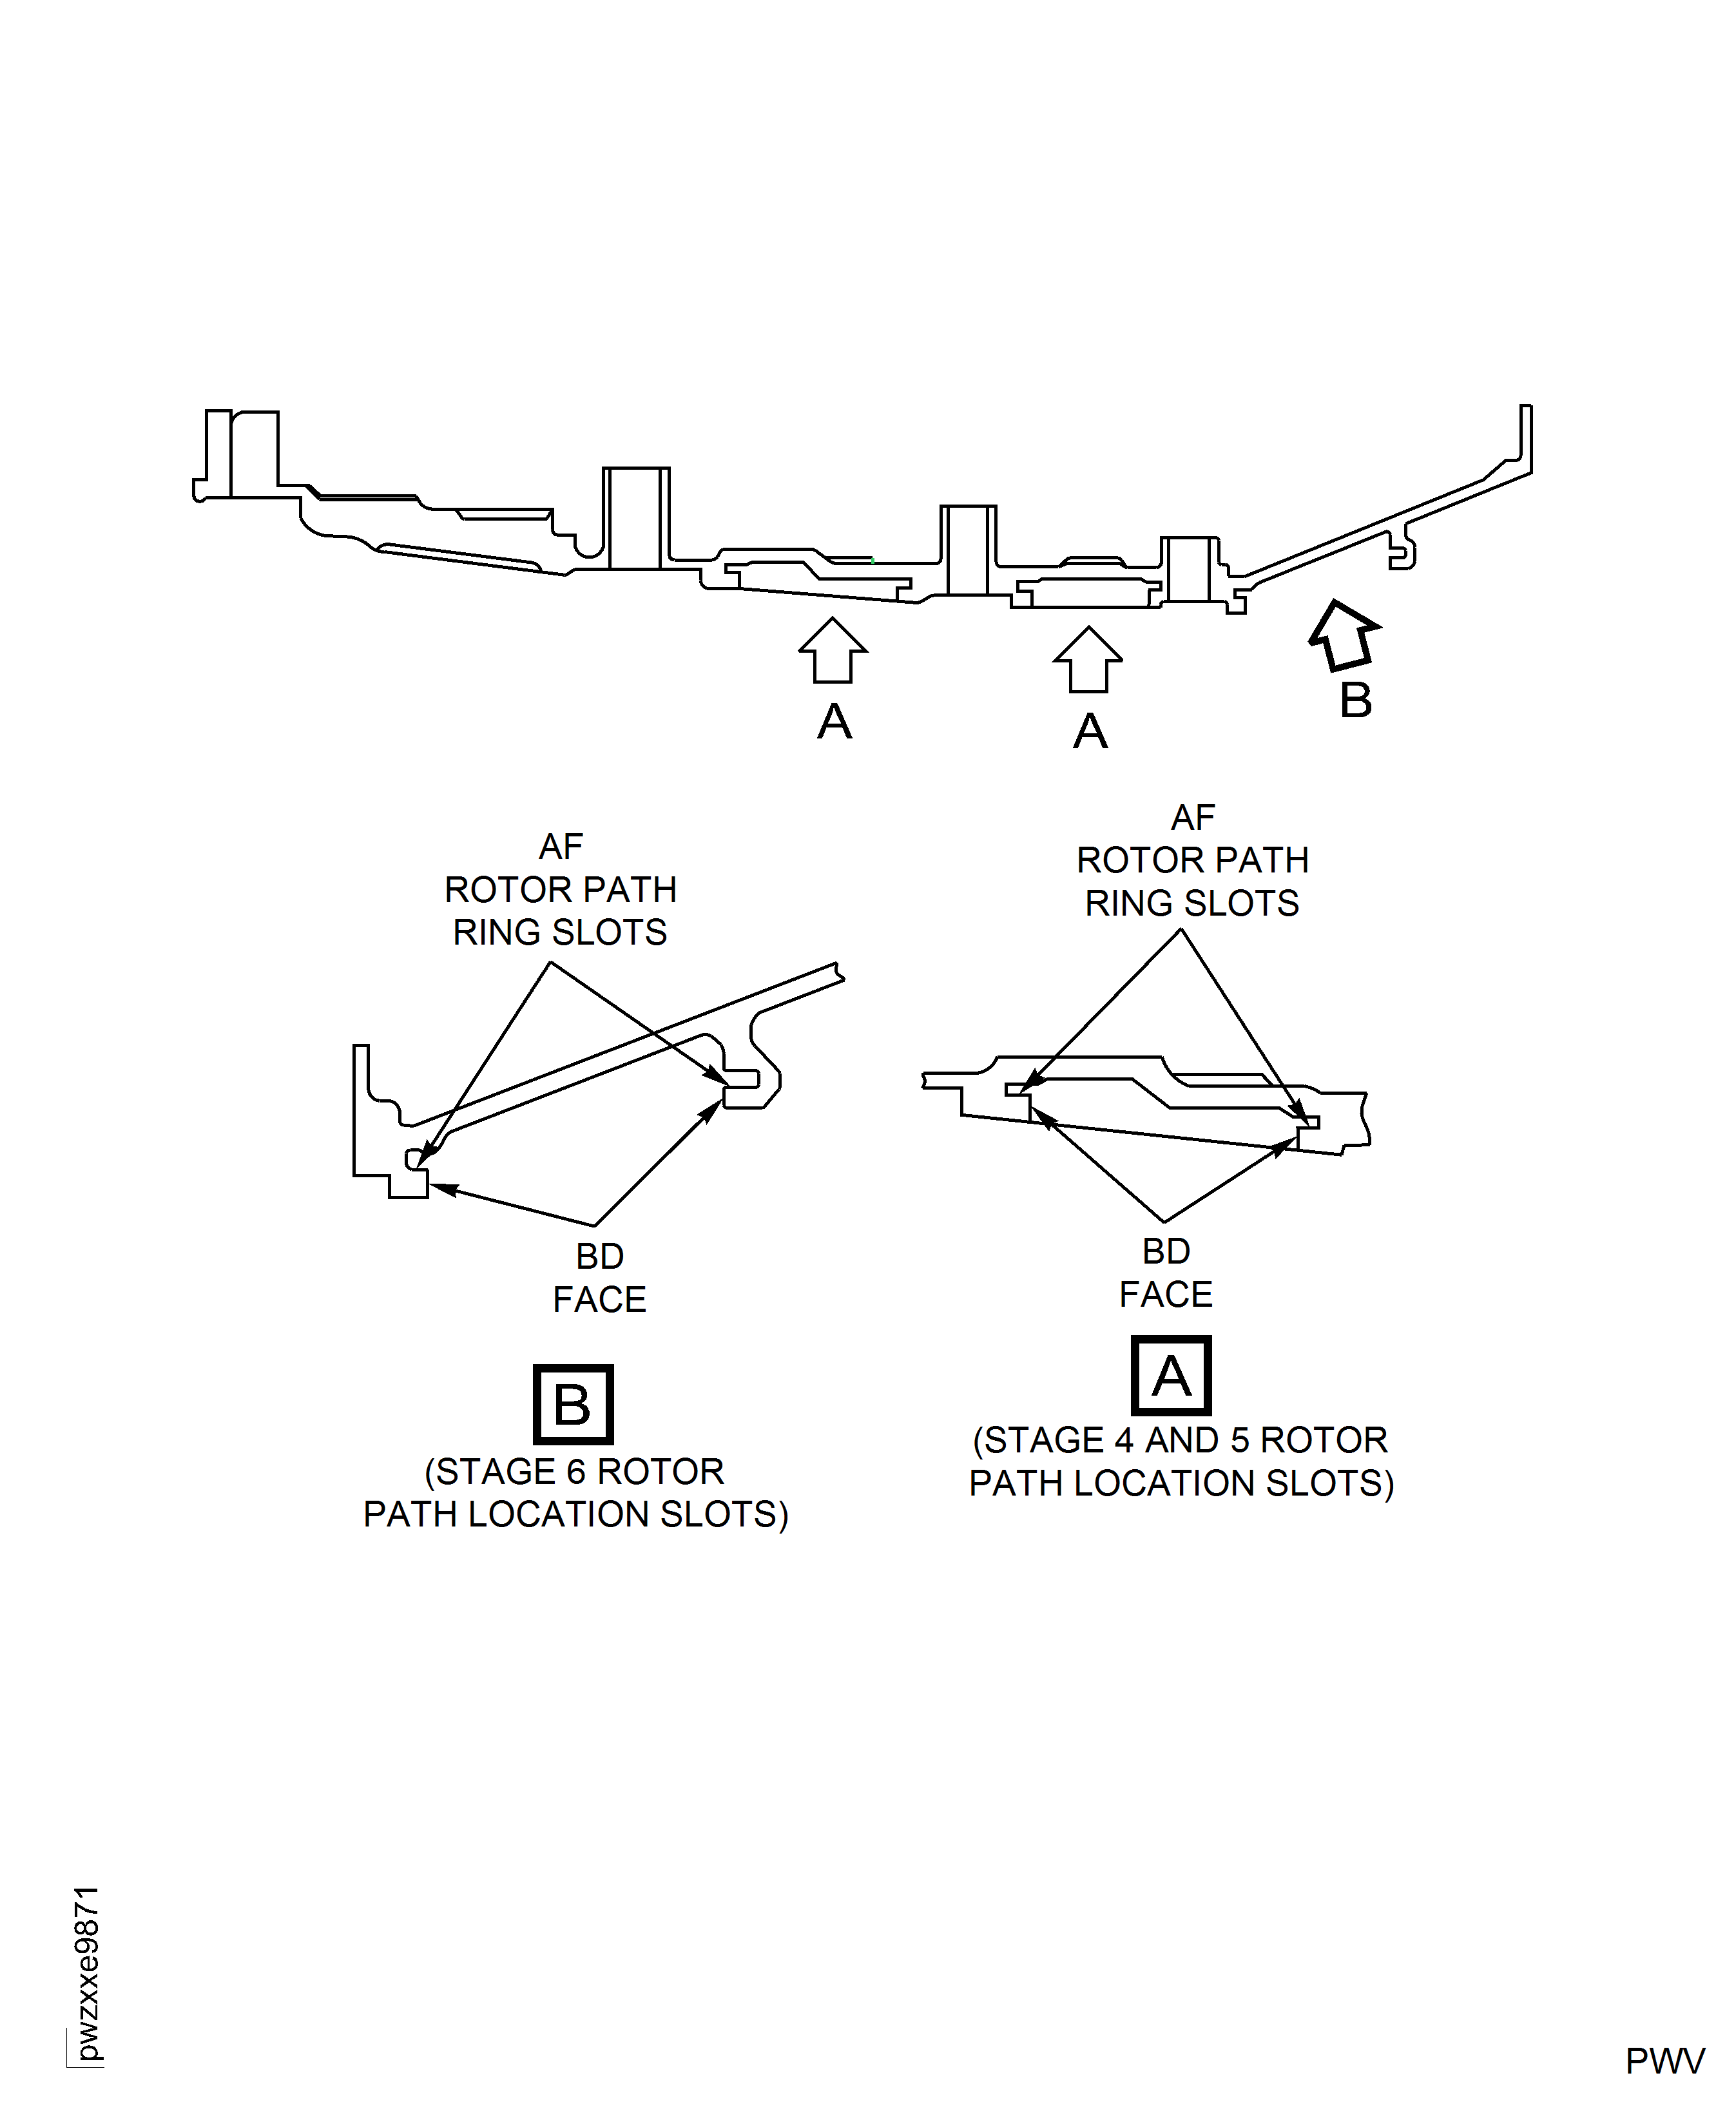
Figure: Spindle Wear Inspection
Spindle Wear Inspection
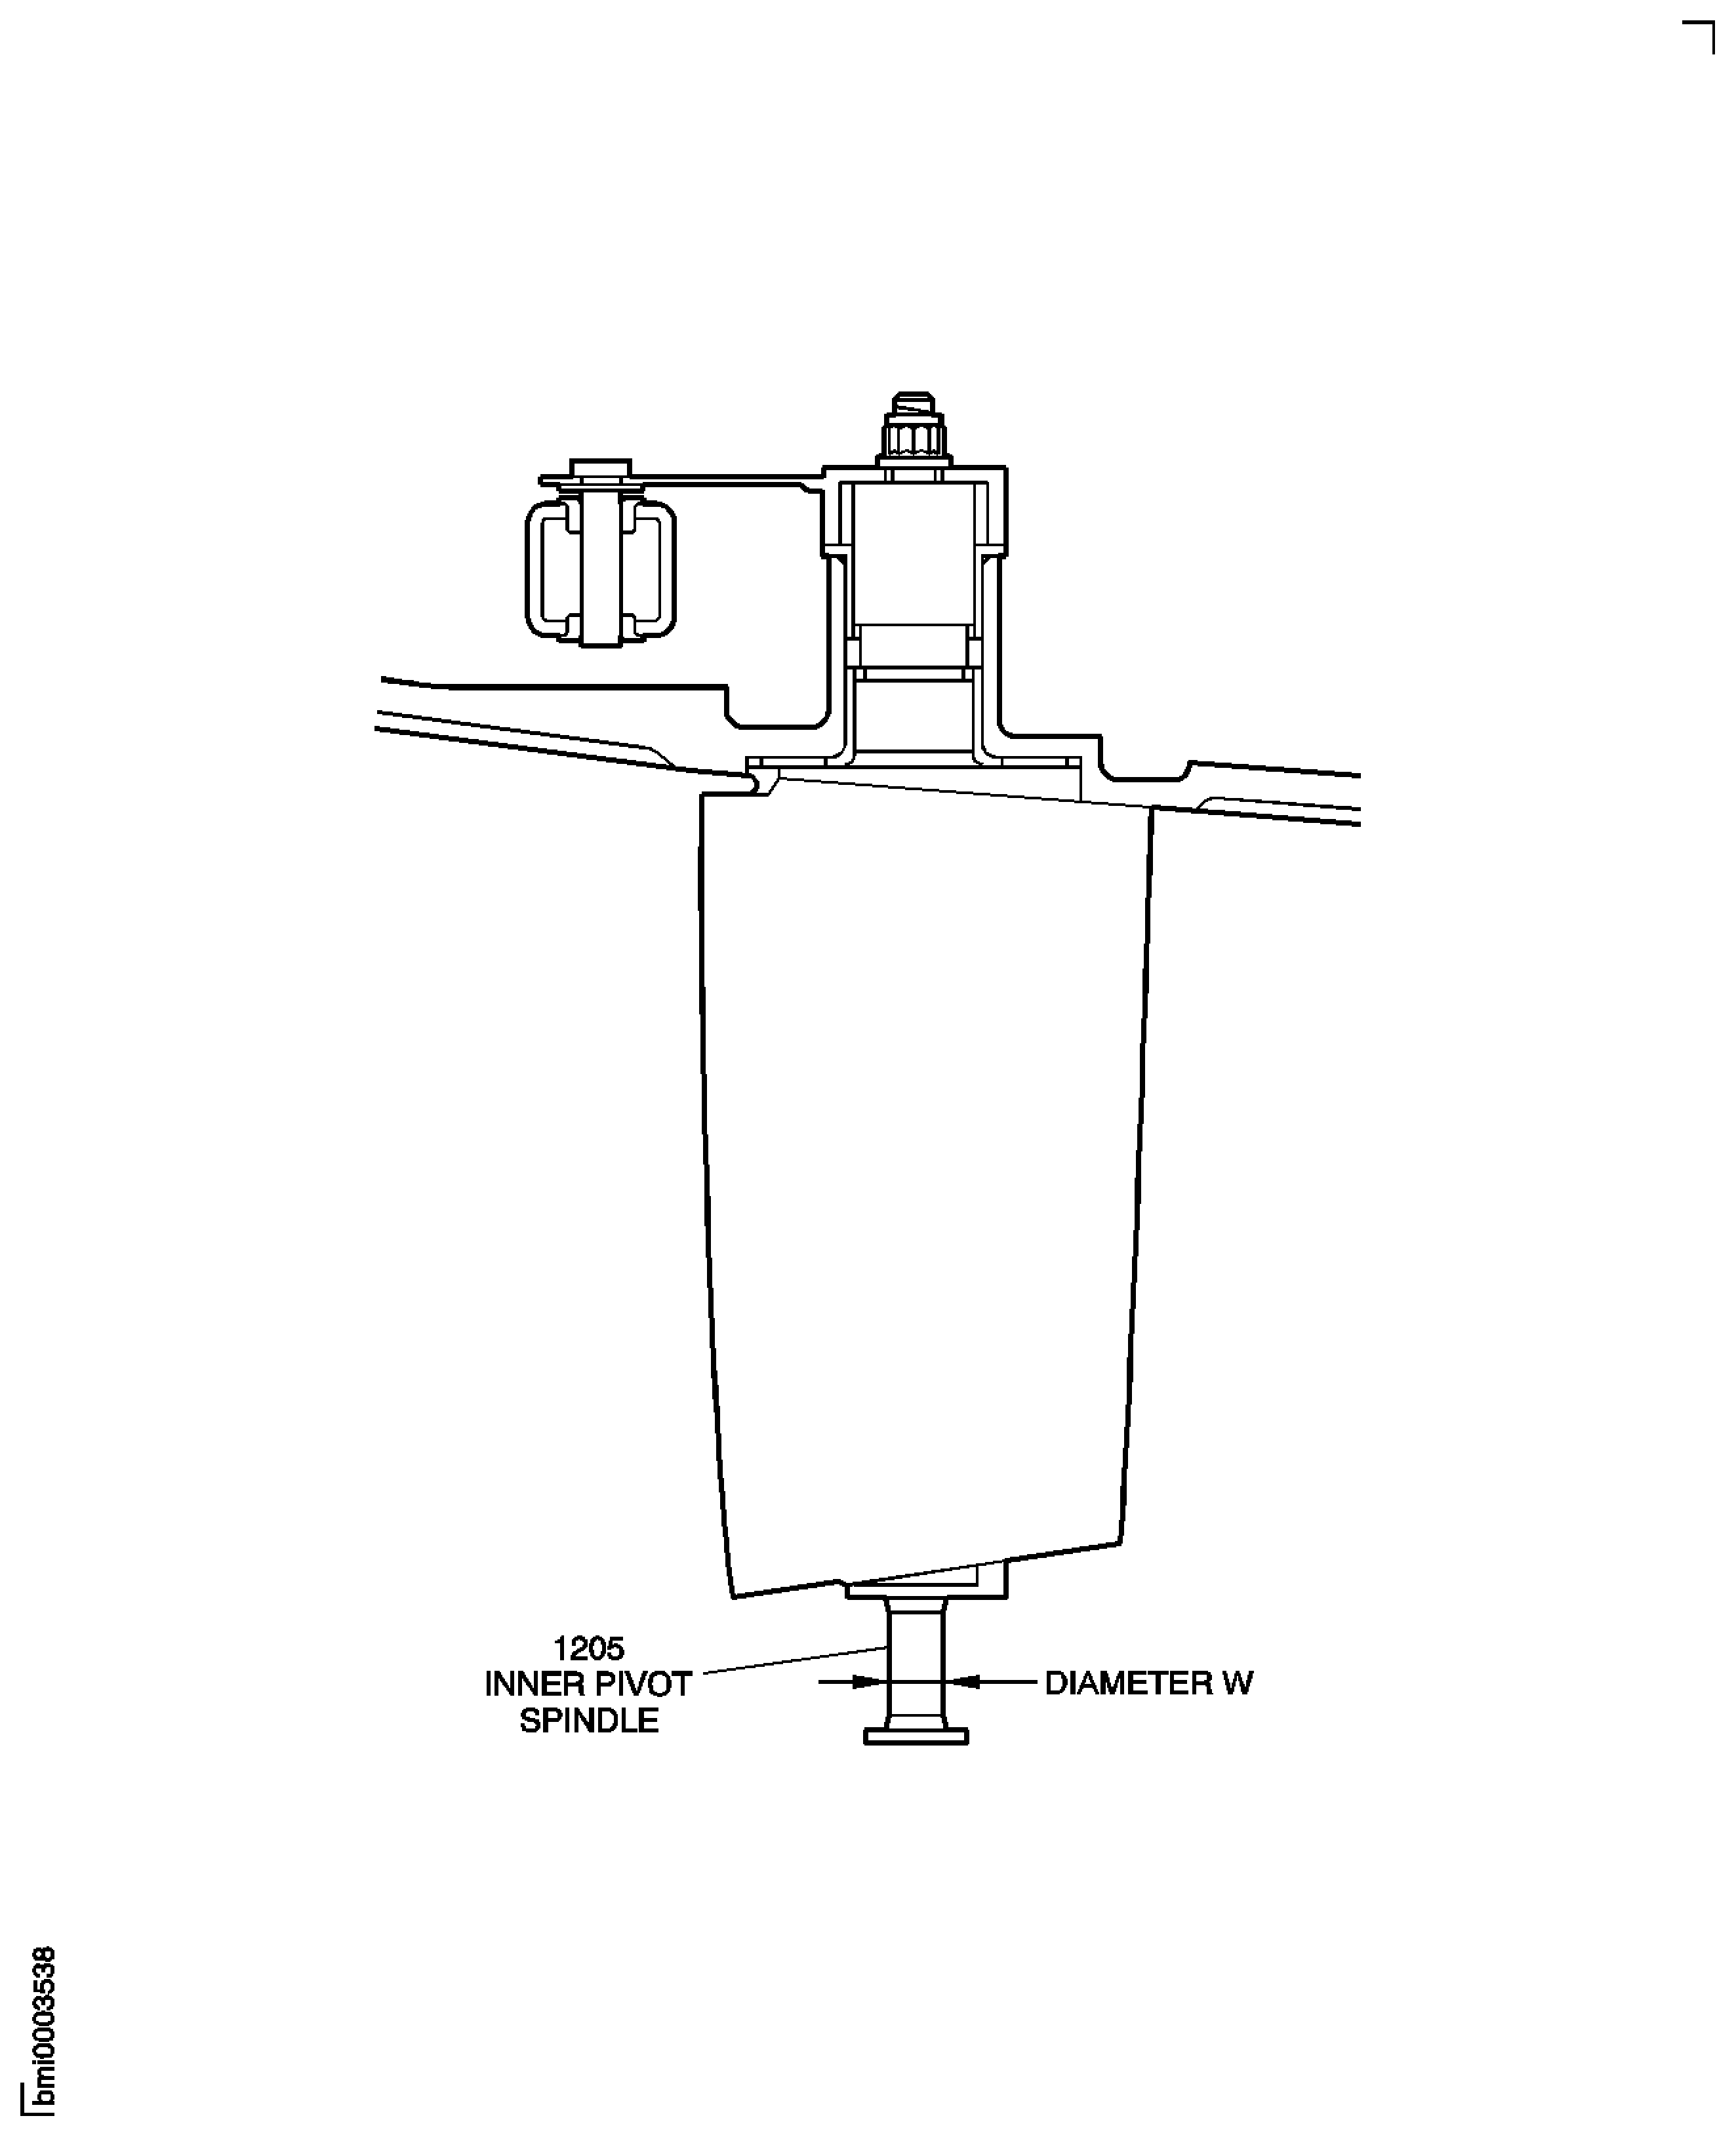
Figure: Variable Inlet Guide Vane Zones
Variable Inlet Guide Vane Zones
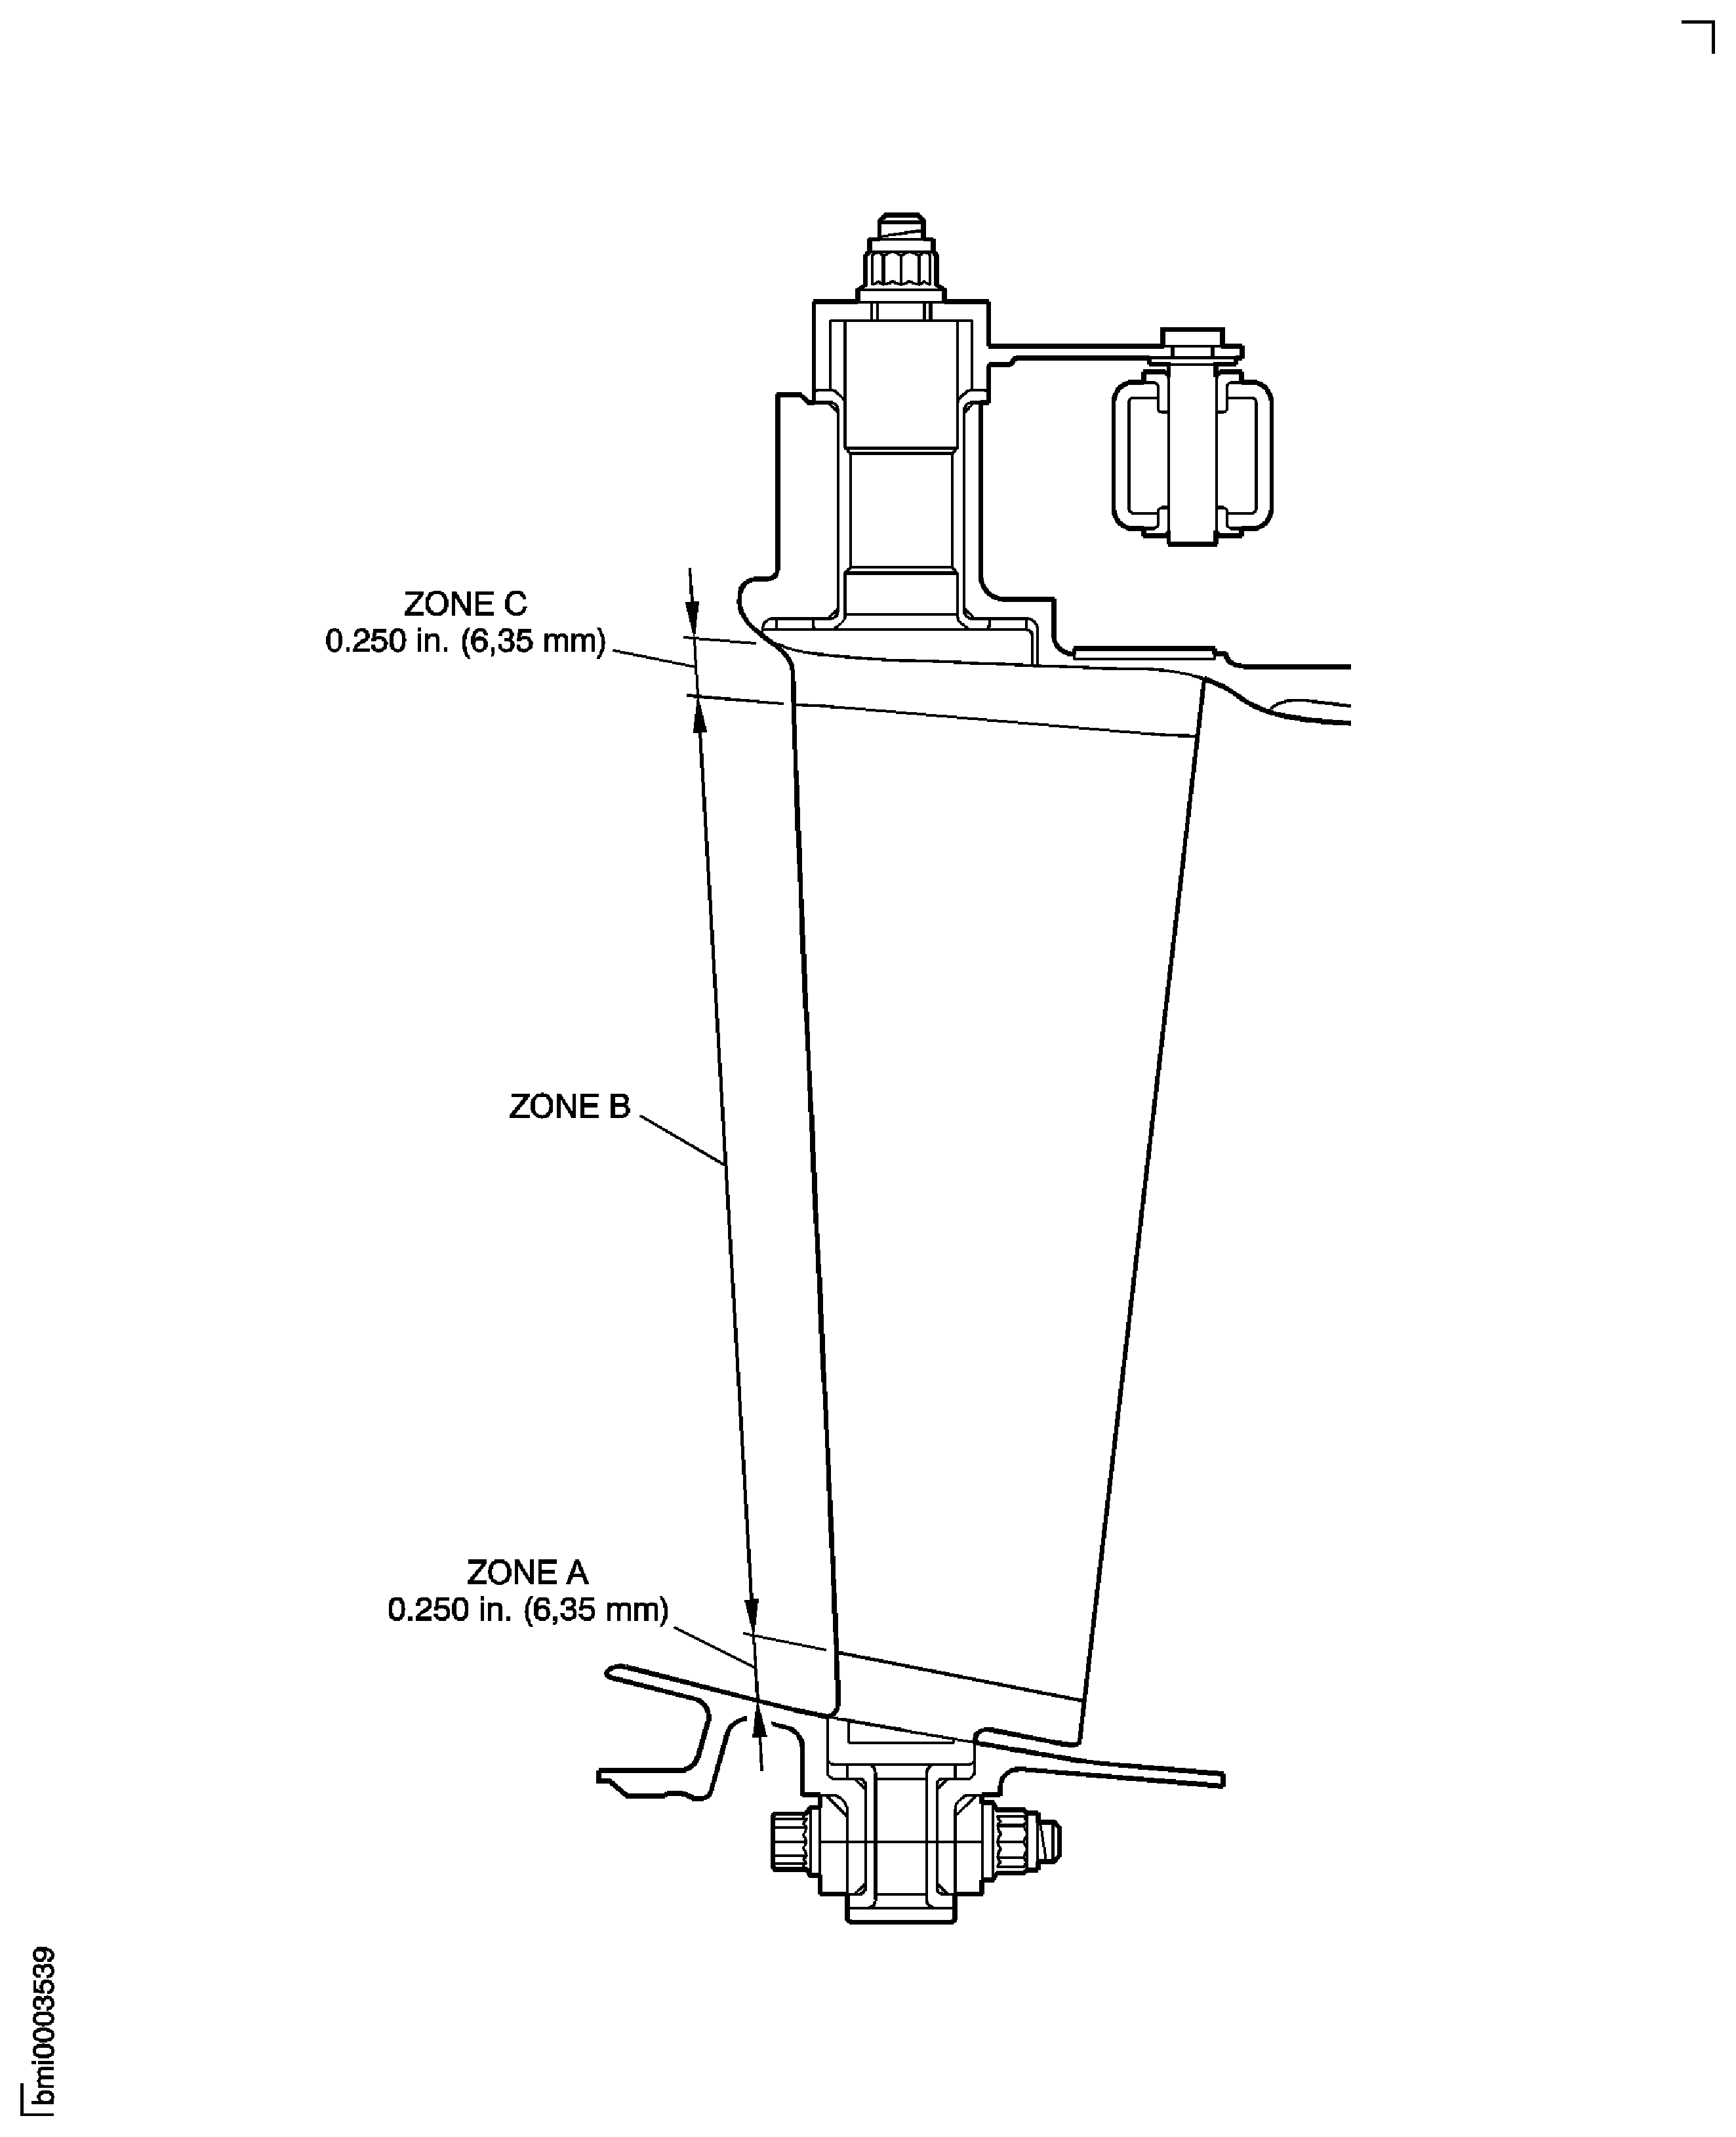
Figure: Stage 3 to 5 Variable Stator Vane Zone
Stage 3 to 5 Variable Stator Vane Zone
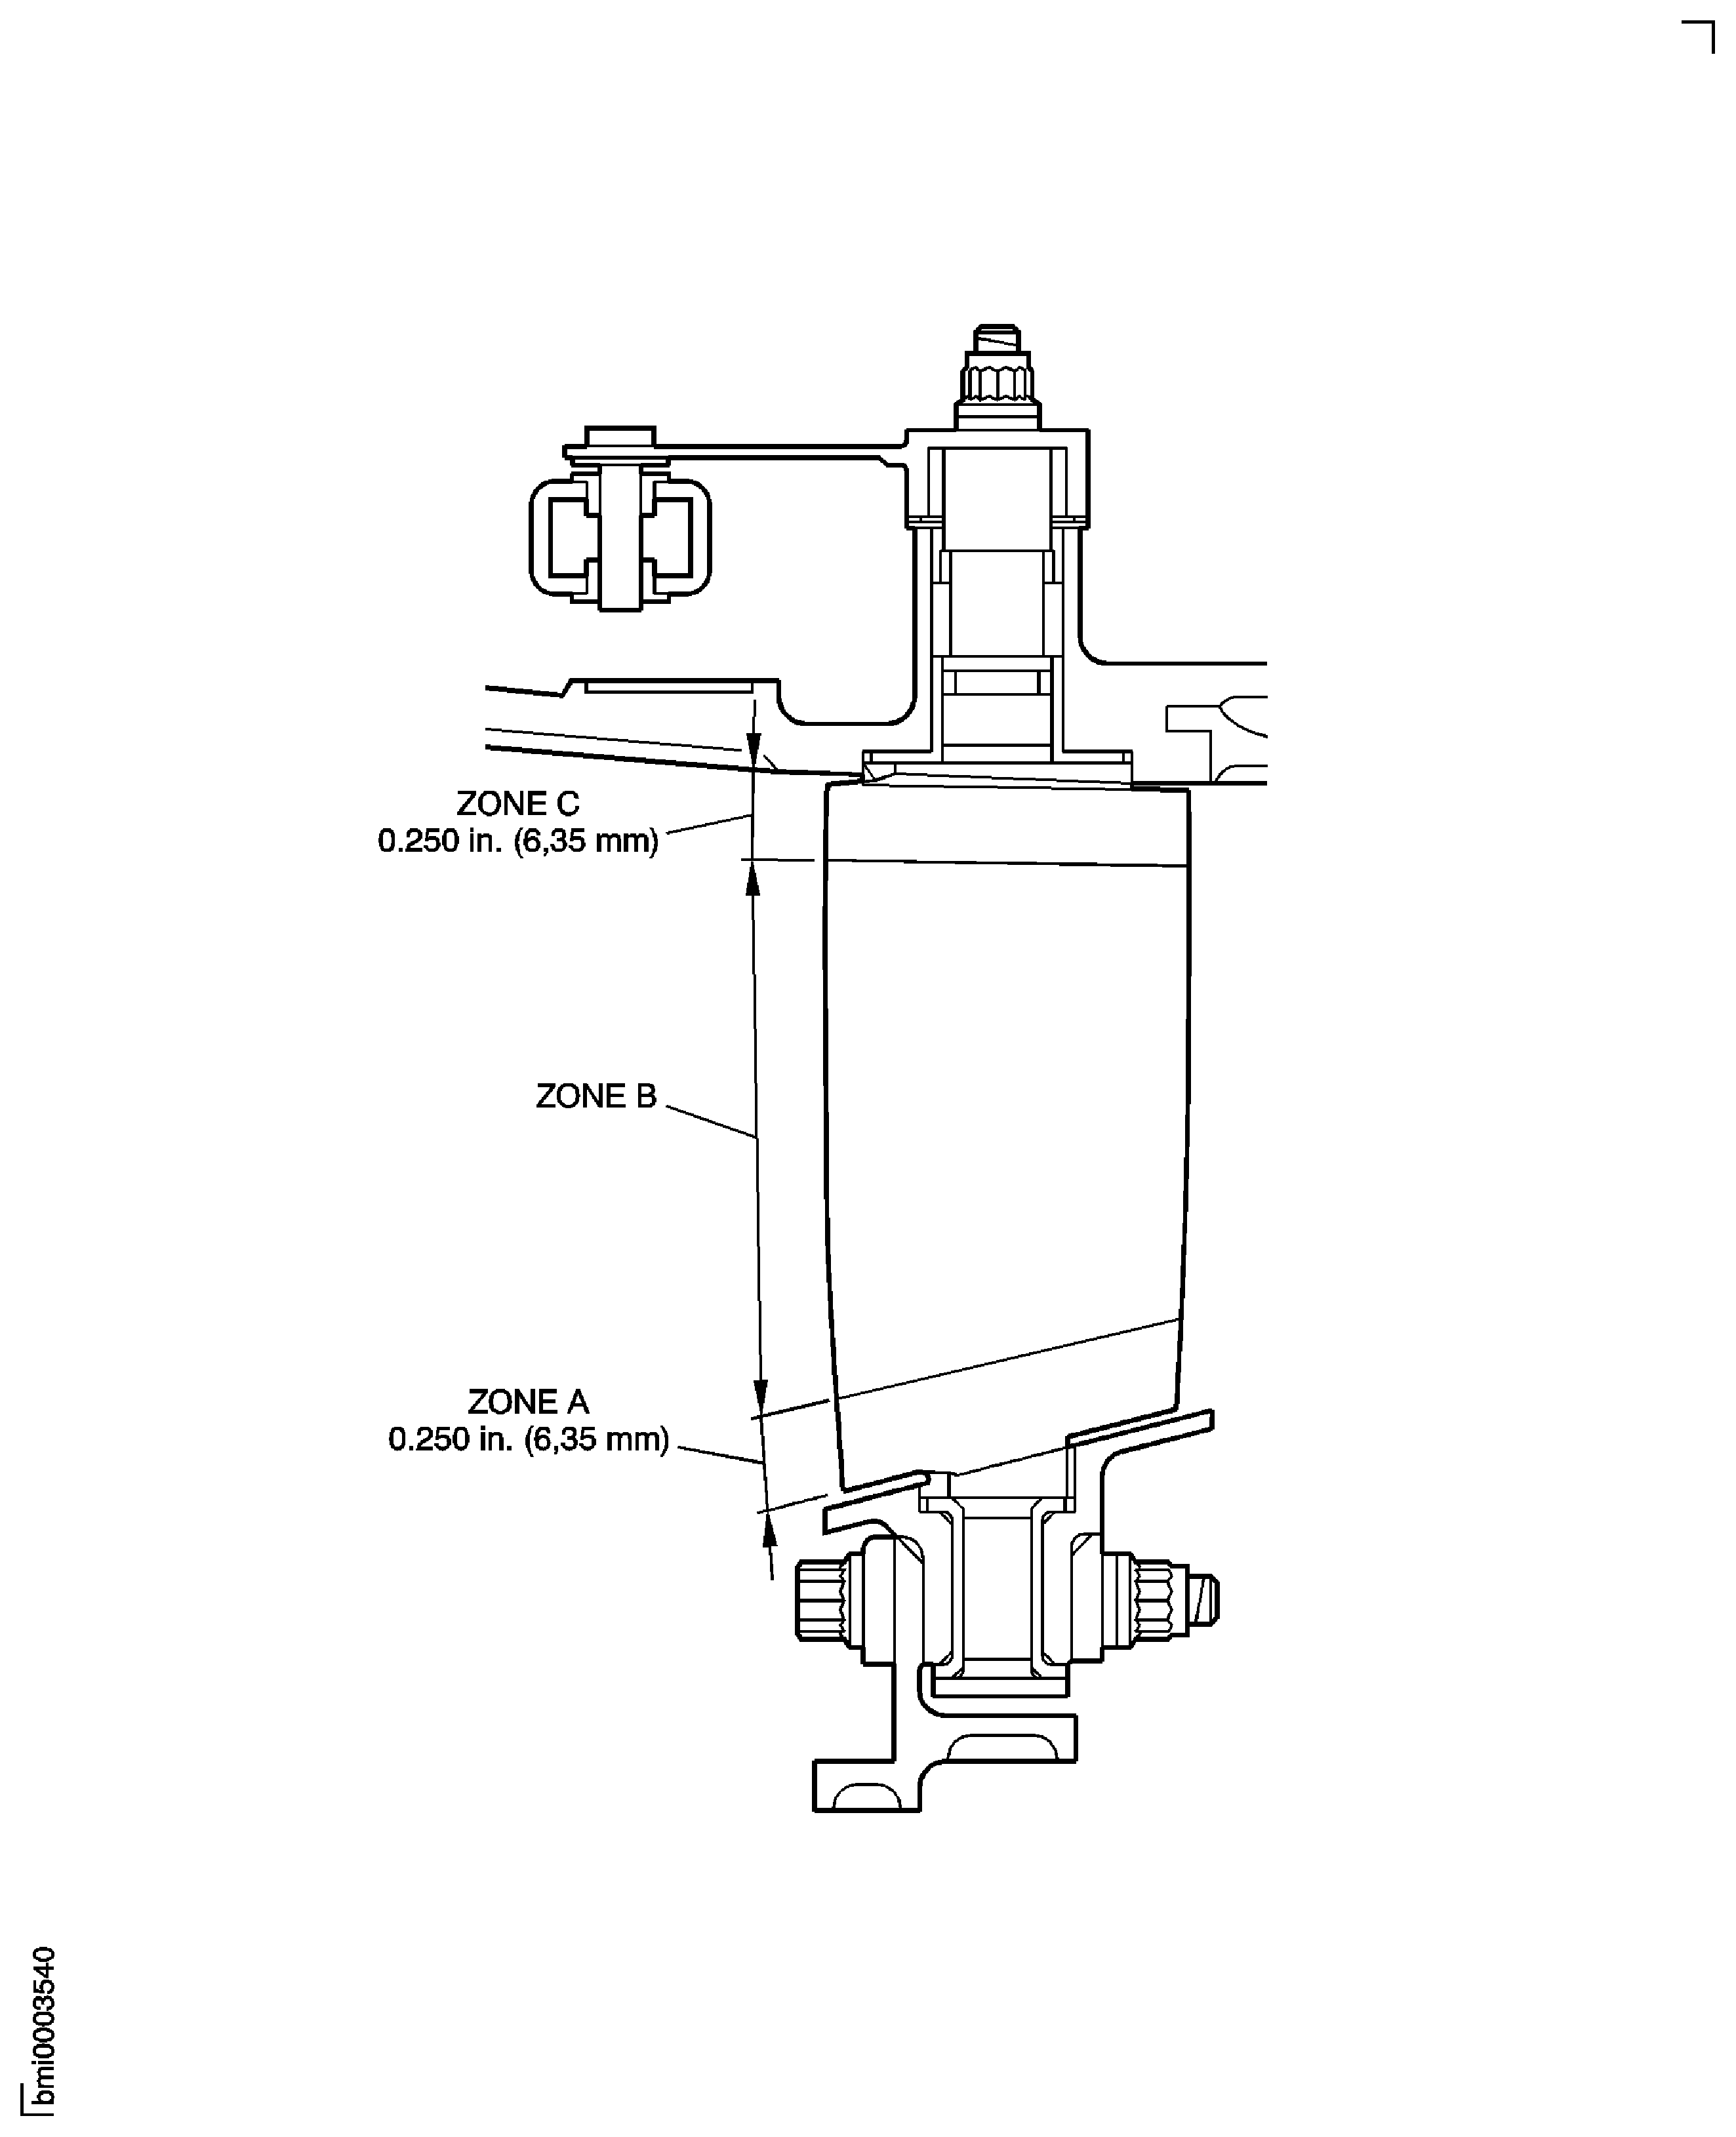
Figure: Stage 6 Variable Stator Vane Zone
Stage 6 Variable Stator Vane Zone
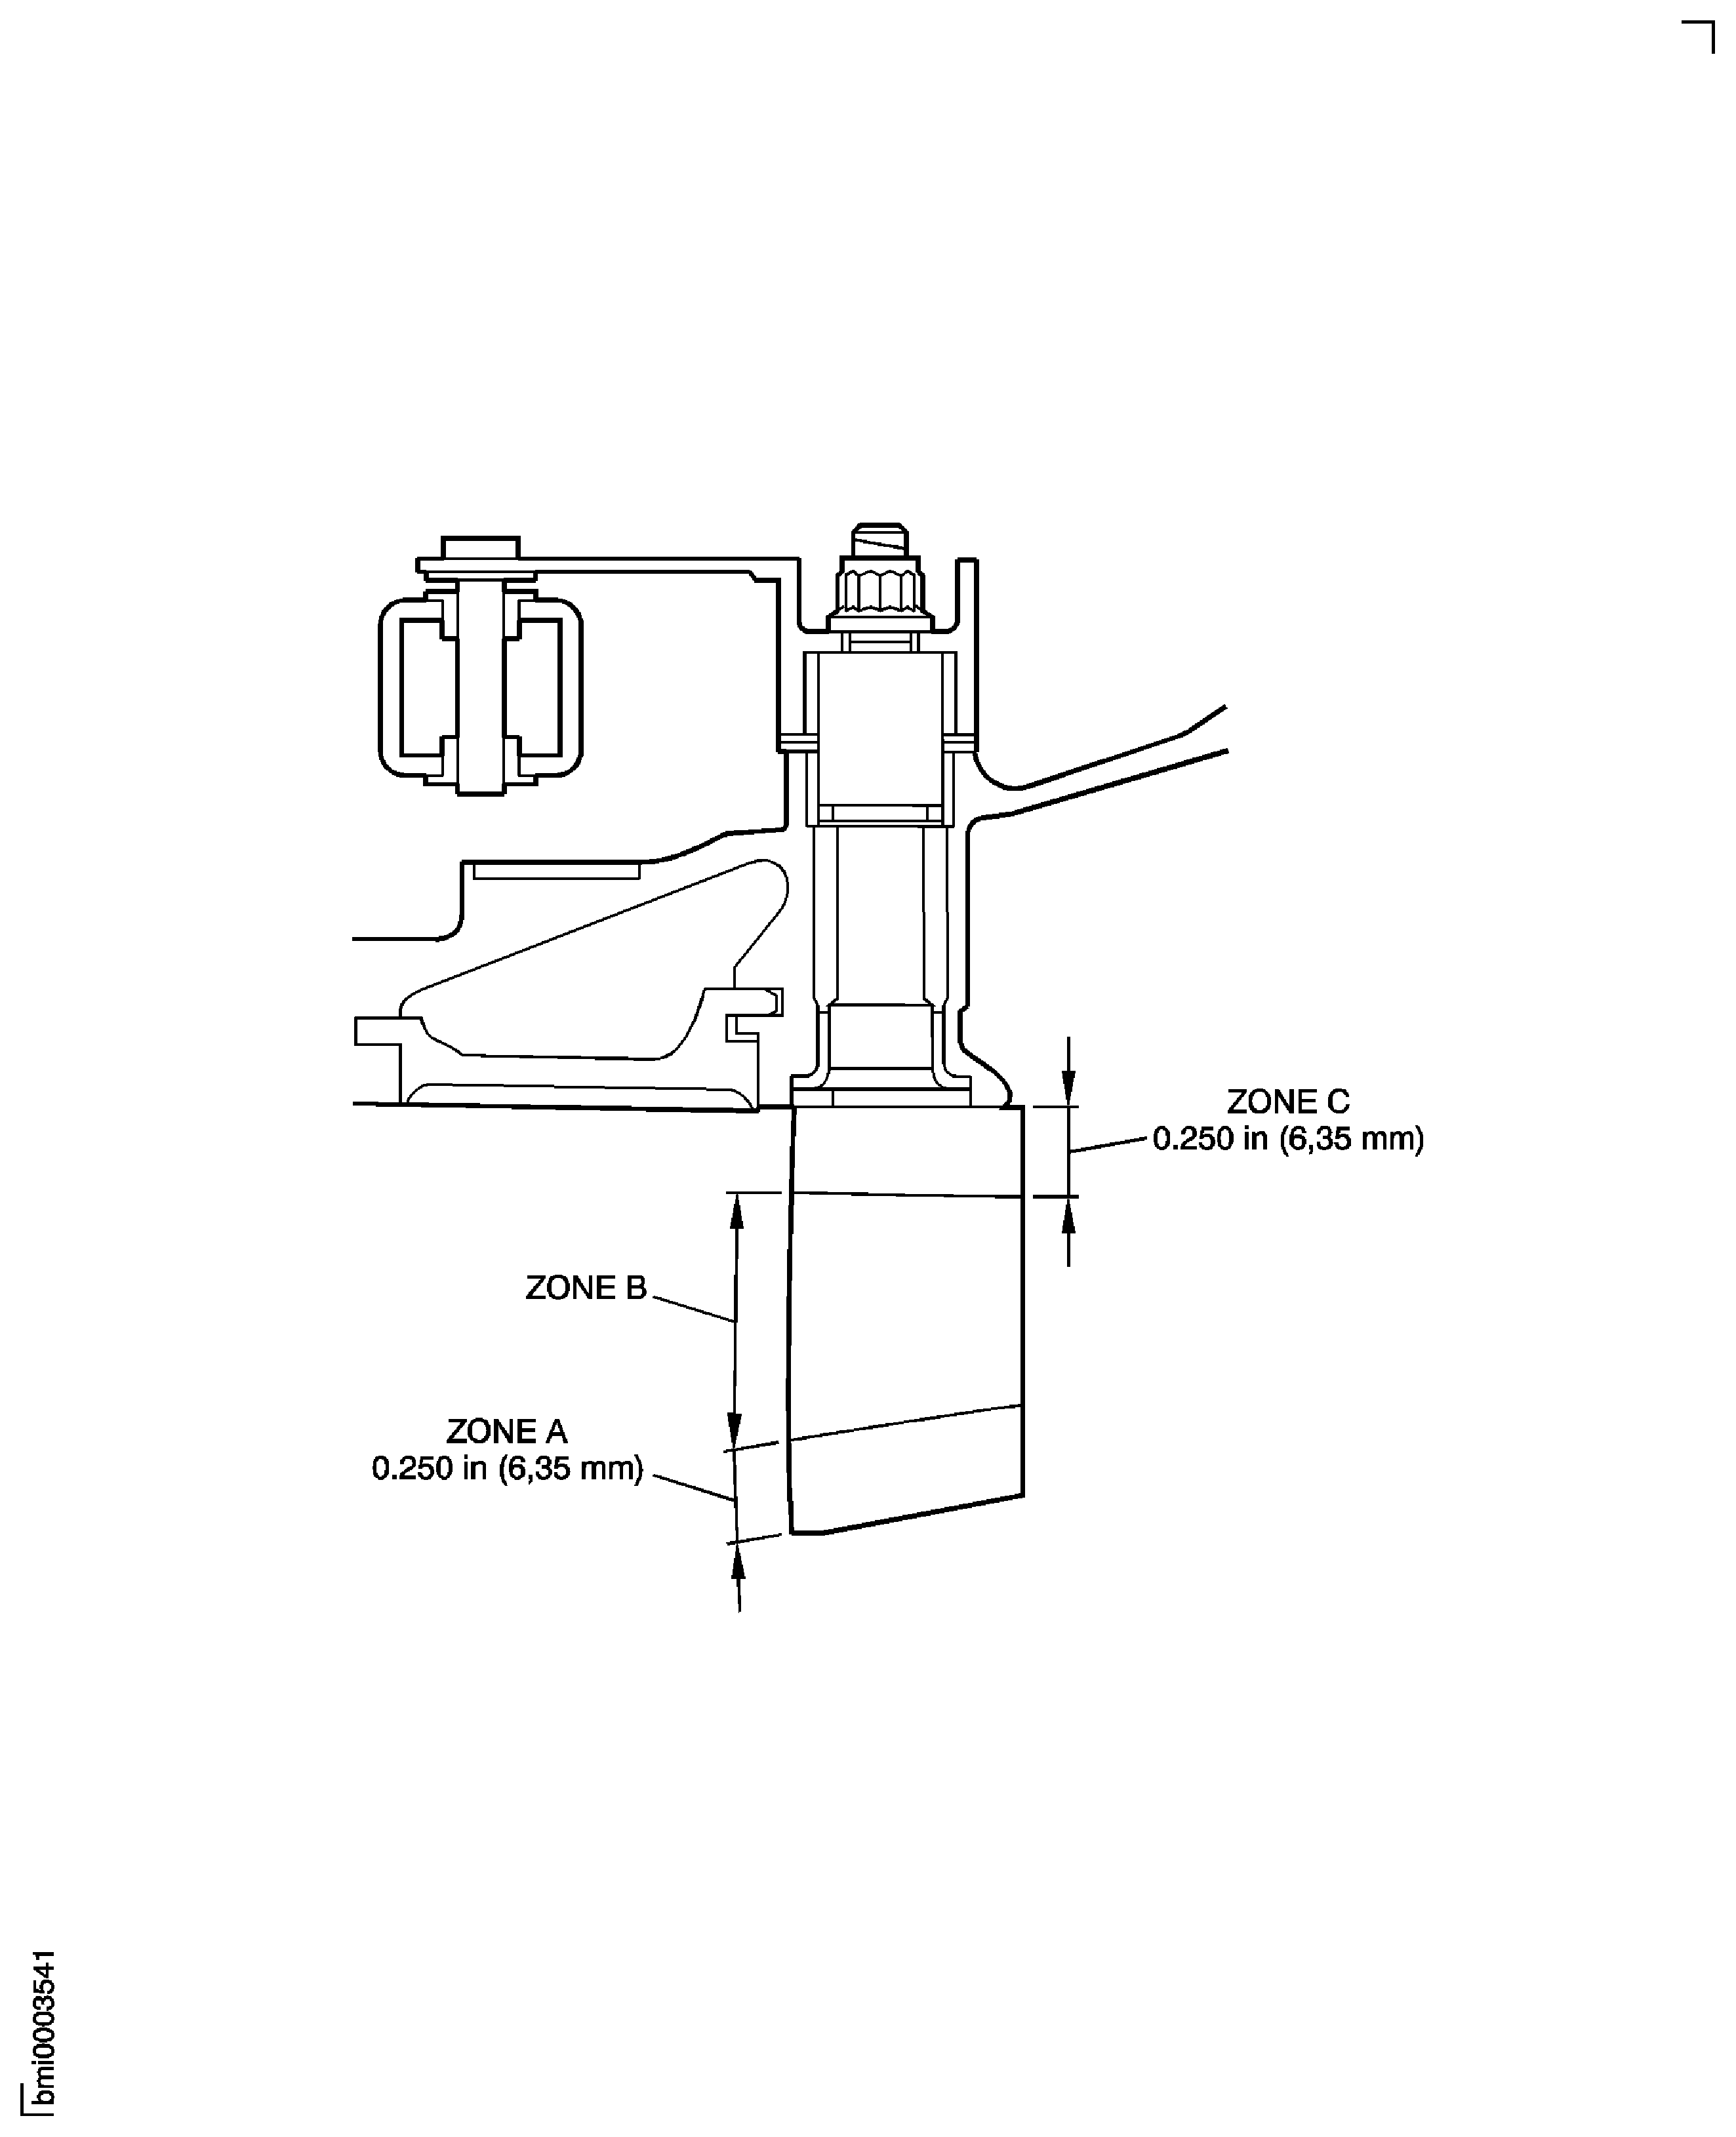
Figure: Stage 6 Vane Zones
Stage 6 Vane Zones
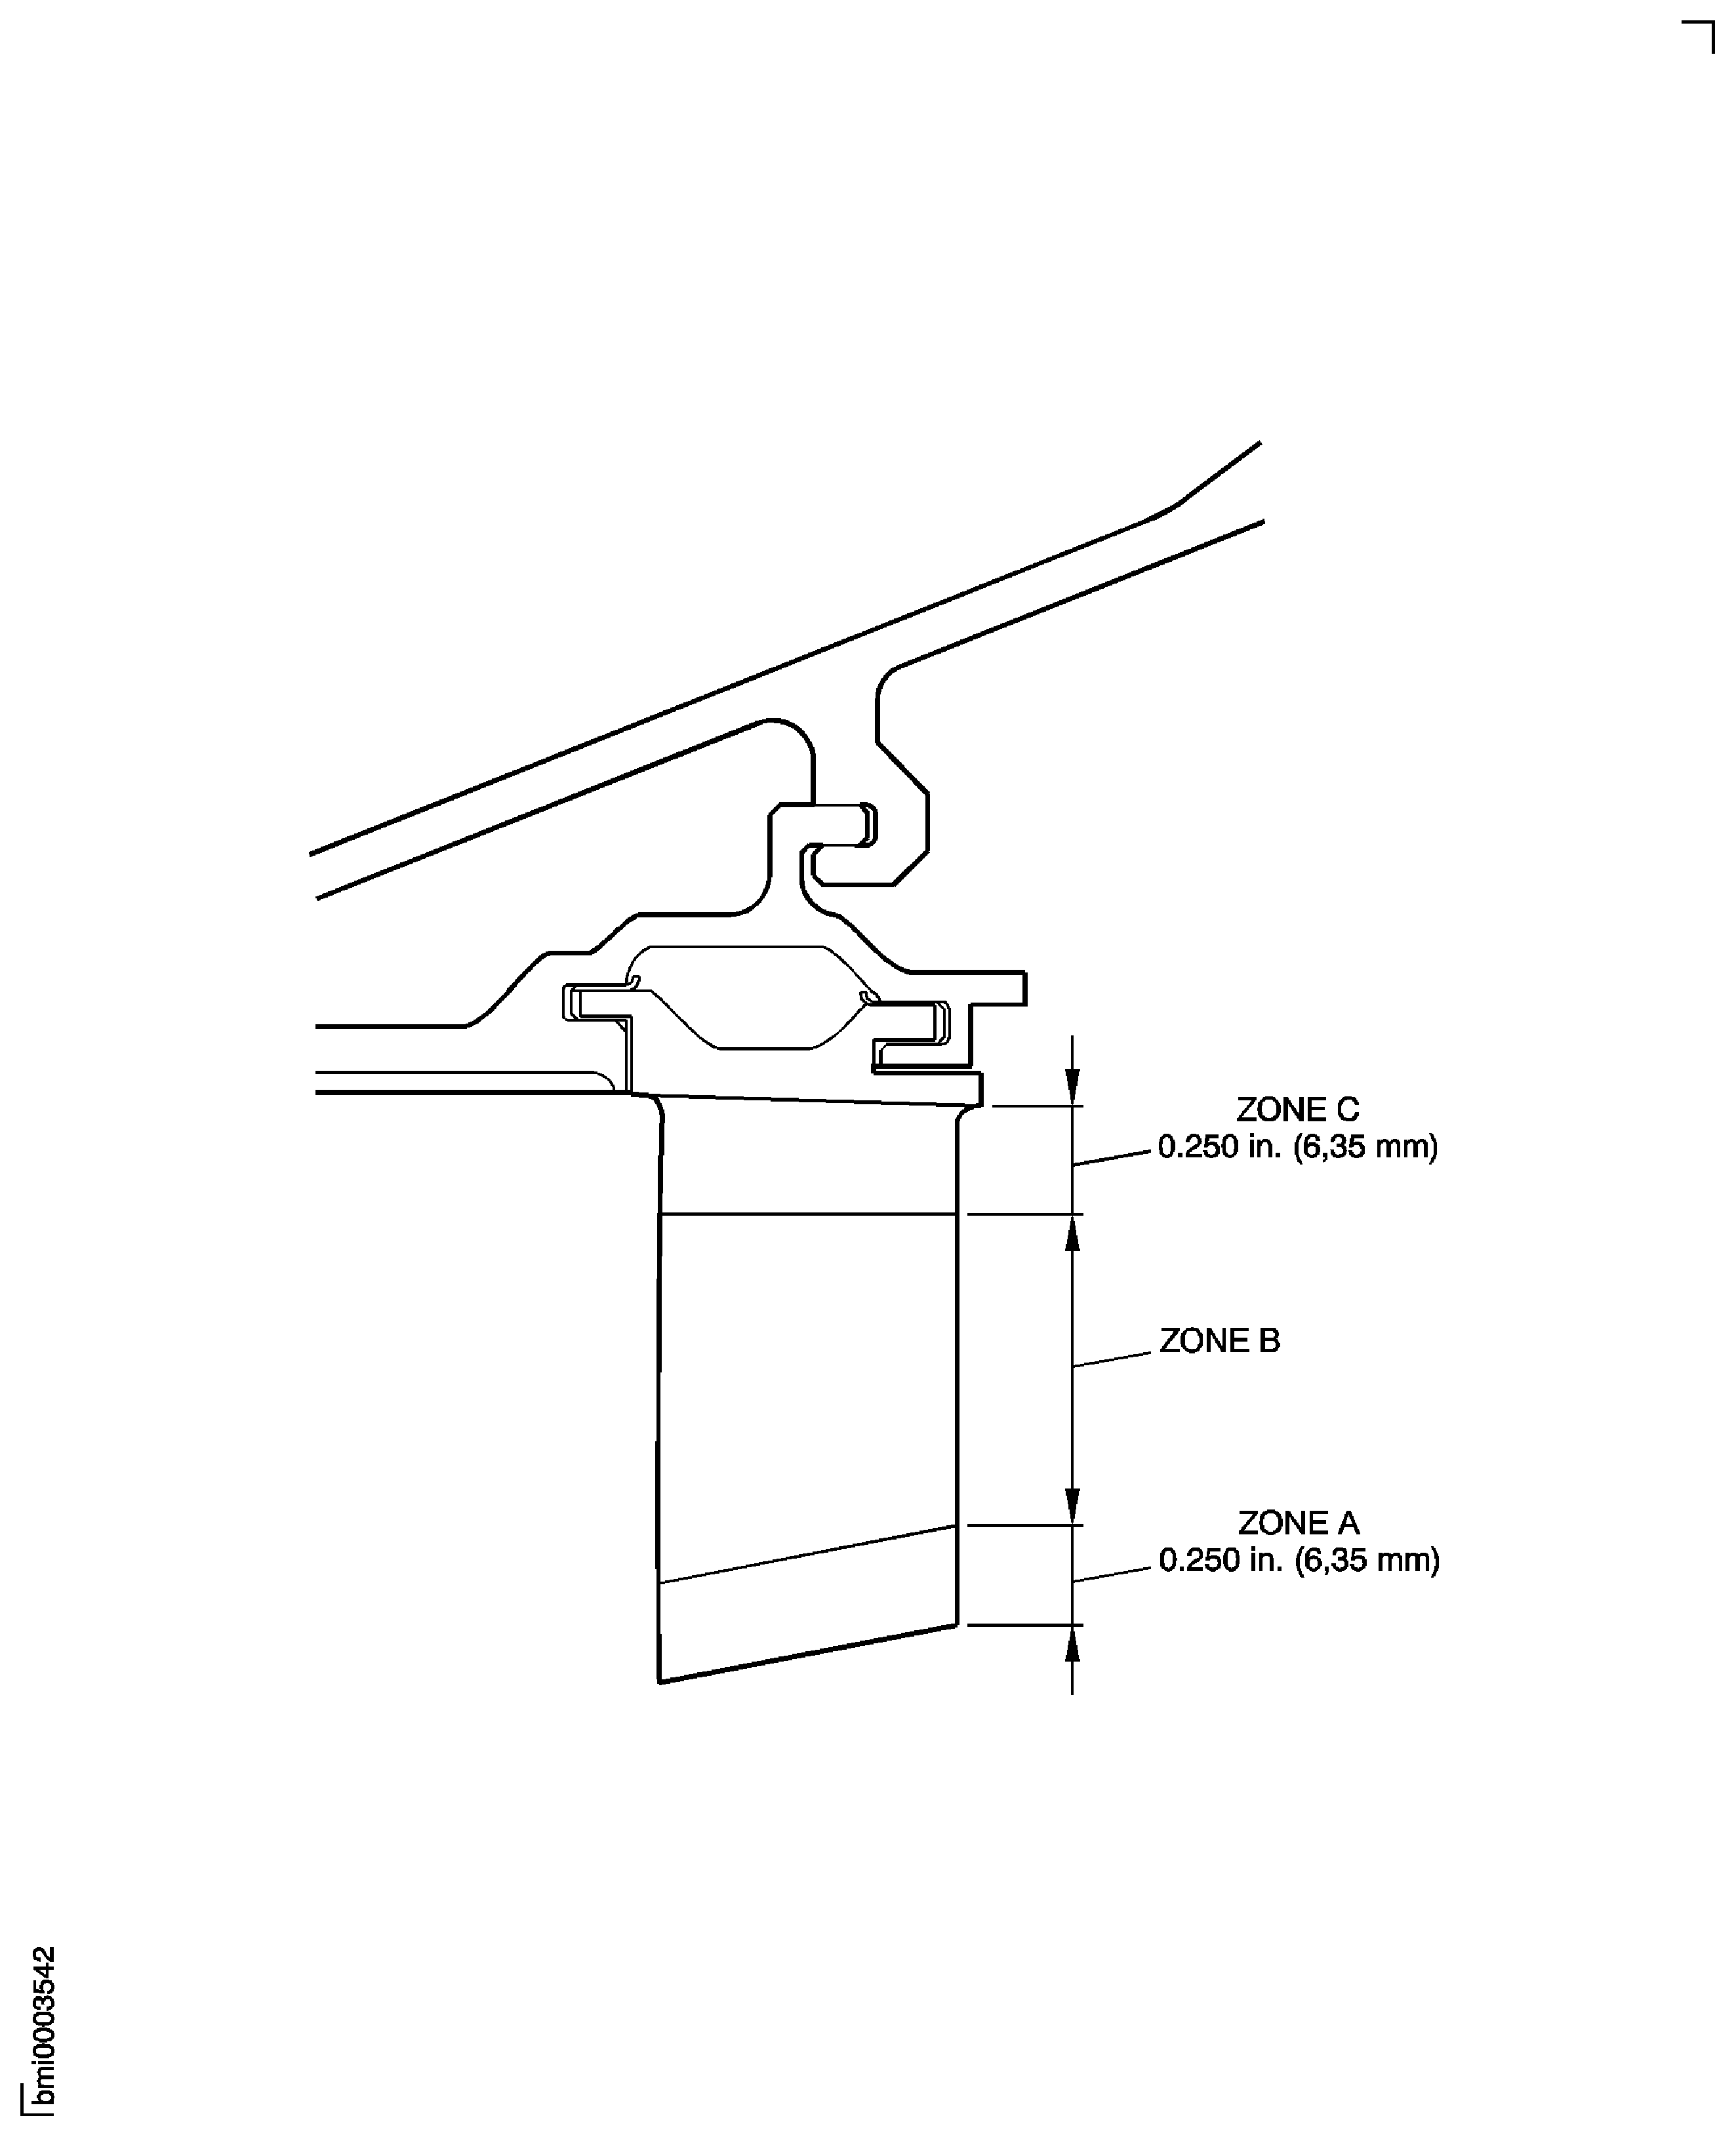
Figure: Rotor Path Lining Segments Areas
Rotor Path Lining Segments Areas
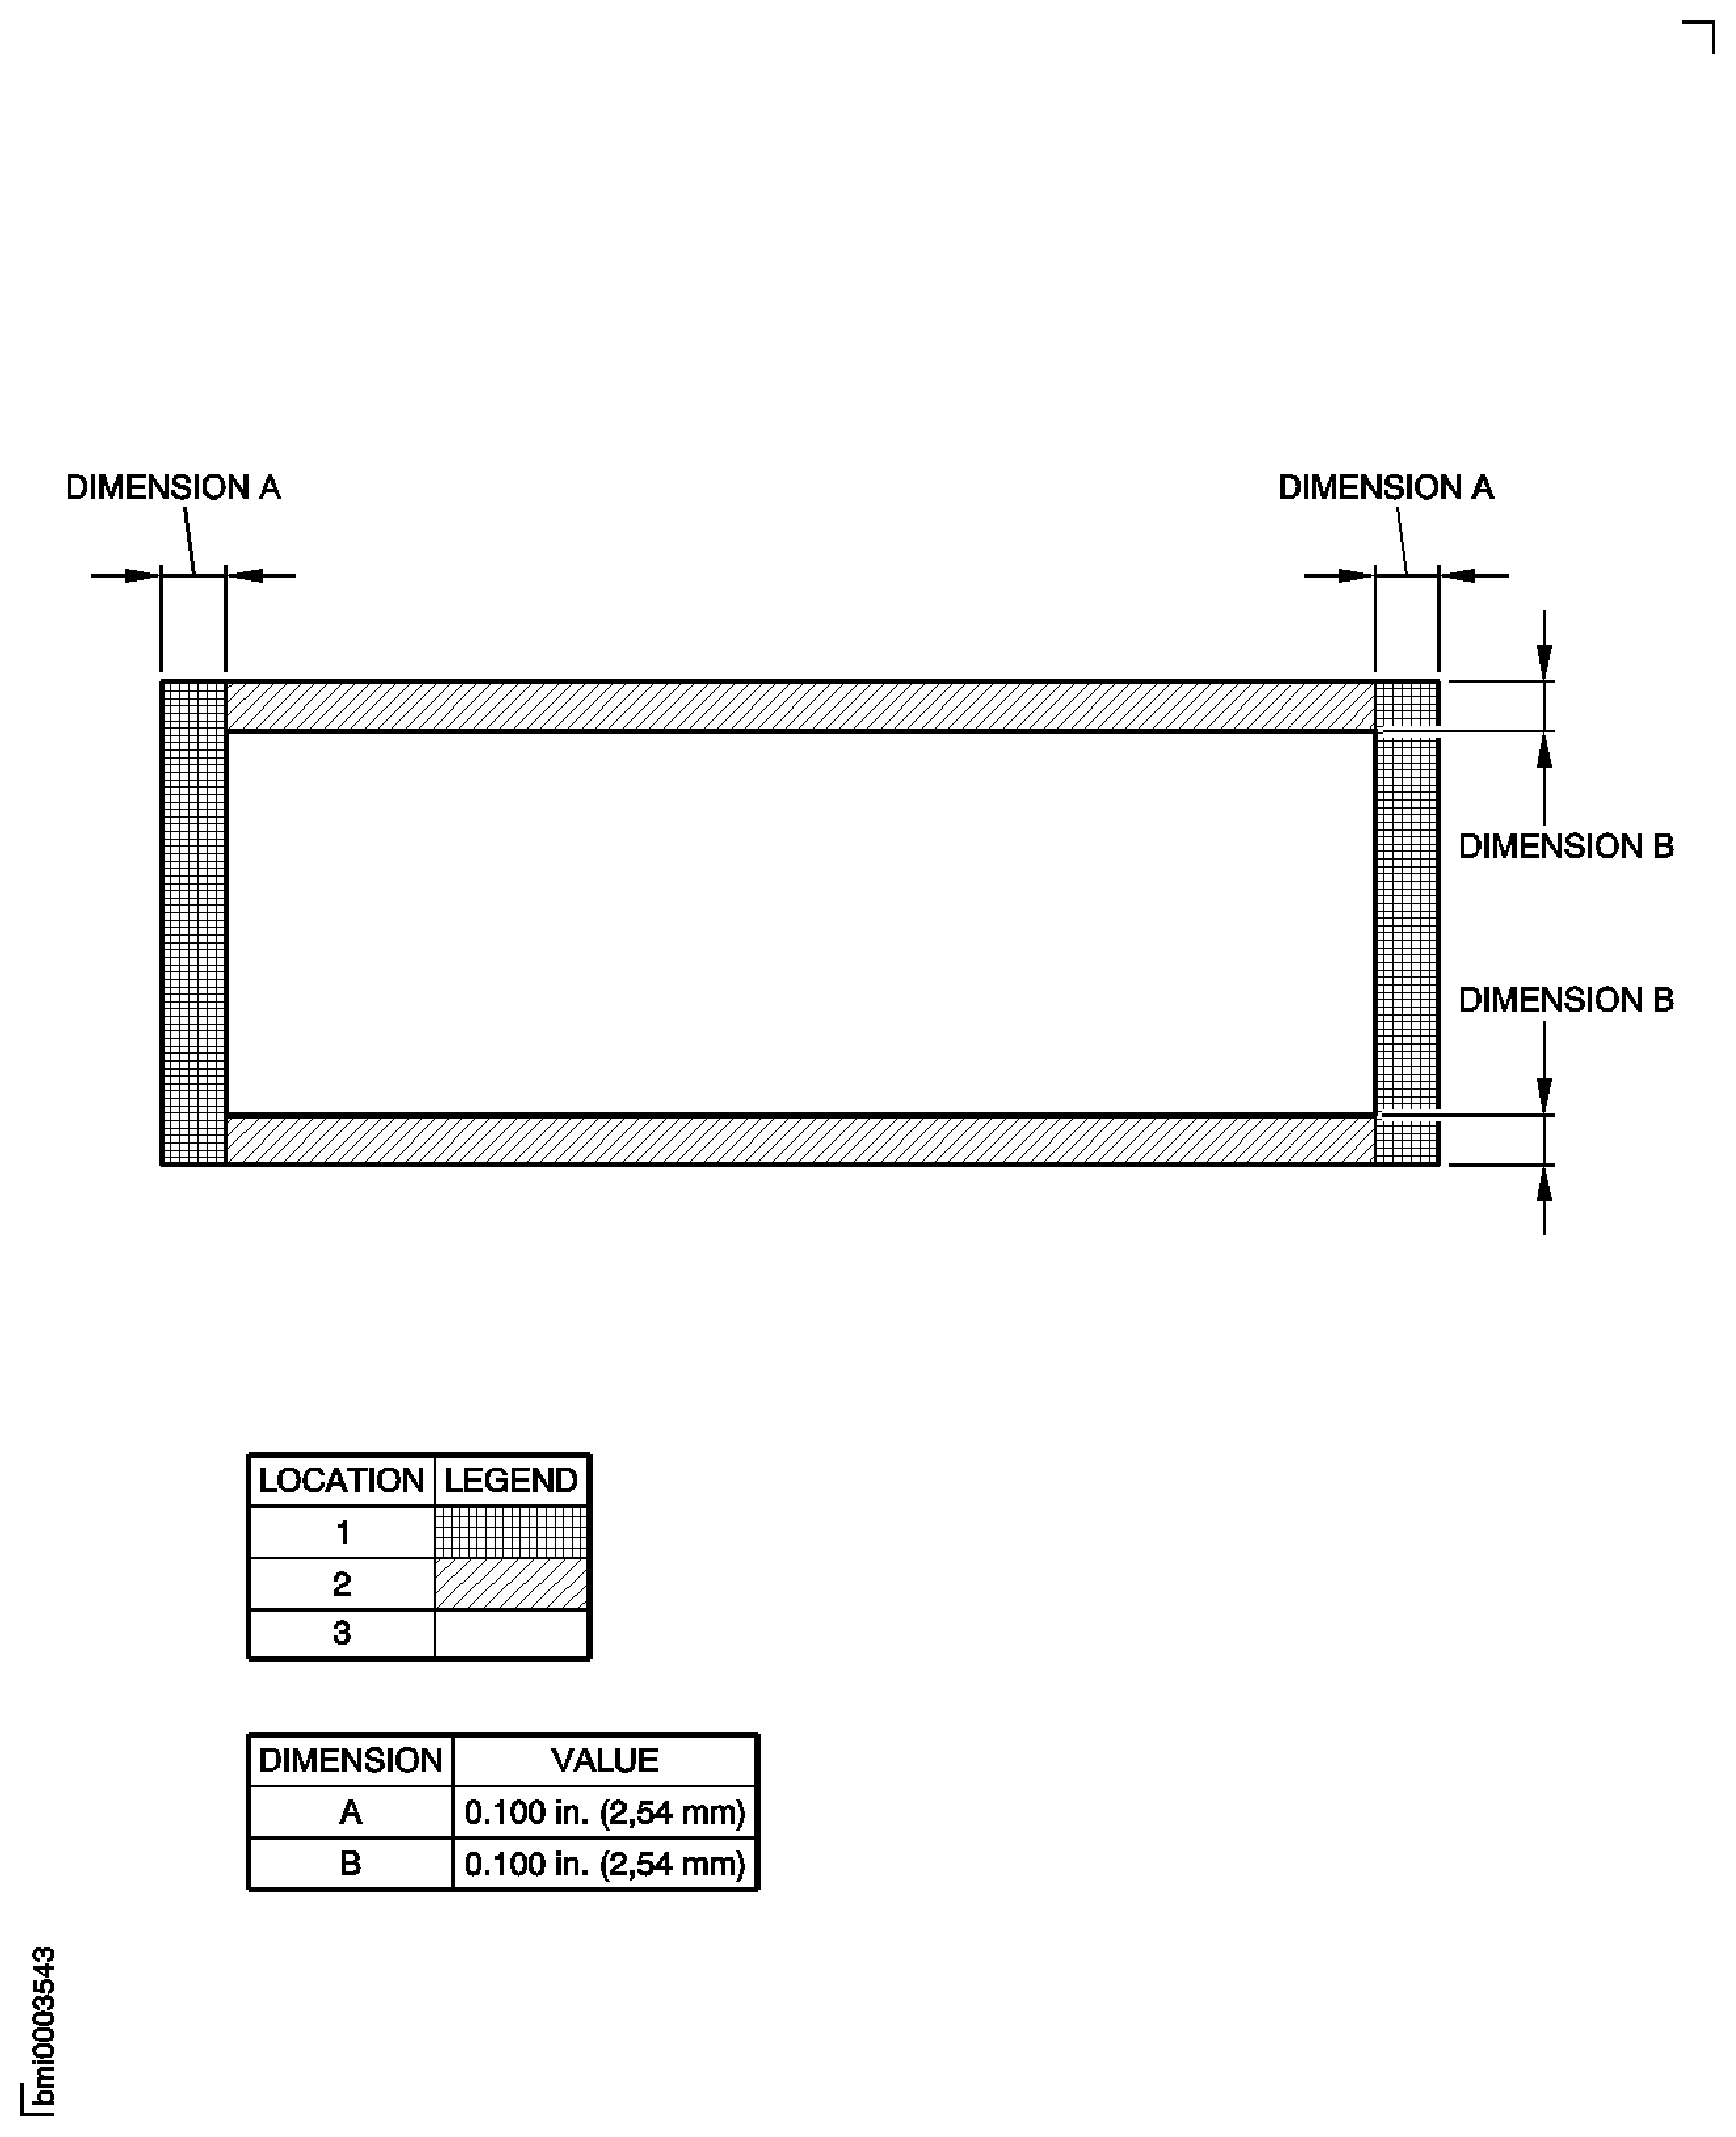
Figure: HP Compressor Rear Shaft Inner Bore - Inspection Location
HP Compressor Rear Shaft Inner Bore - Inspection Location
