Export Control
EAR Export Classification: Not subject to the EAR per 15 C.F.R. Chapter 1, Part 734.3(b)(3), except for the following Service Bulletins which are currently published as EAR Export Classification 9E991: SBE70-0992, SBE72-0483, SBE72-0580, SBE72-0588, SBE72-0640, SBE73-0209, SBE80-0024 and SBE80-0025.Copyright
© IAE International Aero Engines AG (2001, 2014 - 2021) The information contained in this document is the property of © IAE International Aero Engines AG and may not be copied or used for any purpose other than that for which it is supplied without the express written authority of © IAE International Aero Engines AG. (This does not preclude use by engine and aircraft operators for normal instructional, maintenance or overhaul purposes.).Applicability
All
Common Information
TASK 72-44-10-300-028HPT Stage 1 Support Assembly - Plasma Coat The Center Flange Forward Face, Repair-028 (VRS3818)
Effectivity
FIG/ITEM PART NO. | |
|---|---|
01-010 | 2A1292 |
01-010 | 2A1358 |
01-010 | 2A1664 |
01-010 | 2A2703 |
01-010 | 2A3360 |
01-010 | 2A3367 |
01-010 | 2A3896 |
01-010 | 2A4027 |
01-010 | 2A4085 |
General
NOTE
NOTE
Price and availability - Refer to IAE
Make sure that all cleaning and inspection procedures are done before this repair.
The practices and processes referred to in the procedure by the TASK numbers are in the SPM.
NOTE
Preliminary Requirements
Pre-Conditions
NONESupport Equipment
NONEConsumables, Materials and Expendables
NONESpares
NONESafety Requirements
NONEProcedure
Refer to SPM TASK 70-15-01-160-501.
Remove all the coating by water jet strip procedure.
Refer to SPM TASK 70-32-07-100-501.
Remove all the coating by grinding.
Refer to SPM TASK 70-32-07-100-501.
Do a machine or grind operation to remove all wear.
SUBTASK 72-44-10-330-001 Remove the Damage or Wear and all Coating from the Center Flange Forward Face by one or more of the procedures that follow.
Refer to the SPM TASK 70-11-03-300-503.
Clean the stage 1 HPT support.
Refer to SPM TASK 70-23-03-230-501 or TASK 70-23-08-230-501.
If a grind operation was performed, do a fluorescent penetrant inspect on the center flange forward face.
Do a dimensional inspection of the repair area.
SUBTASK 72-44-10-220-001 Examine the Stage 1 HPT Support
Refer to SPM TASK 70-34-18-380-501.
No coating is permitted outside the repair area.
Mask the center flange bolt holes, rivet holes, and all areas not being coated.
Refer to SPM TASK 70-34-18-380-501.
Grit blast out of repair area is not permitted.
Grit blast Center flange forward face.
Refer to SPM TASK 70-34-03-340-501. Use IAE 53-18 or IAE 53-47 coatings.
Coat to a sufficient thickness to permit finishing.
Plasma coat Center flange forward face.
Use a non metallic hand scrapper.
Remove the masking and the overspray.
SUBTASK 72-44-10-340-001 Plasma Coat the Center Flange Front Face
Refer to SPM TASK 70-32-07-100-501.
Finish coat thickness must be 0.003 - 0.022 in. (0.080 - 0.560 mm).
Finish the Center Flange Forward Face after plasma coating.
Refer to SPM TASK 70-11-03-300-503.
Clean the Stage 1 HPT Support.
SUBTASK 72-44-10-320-001 Finish the Center Flange Forward Face After Plasma Coat
Refer to SPM TASK 70-34-03-340-501.
Do a visual inspection of the plasma coat area.
Refer to Figure.
Refer to Inspection-001 TASK 72-44-10-200-001-A00 or TASK 72-44-10-200-001-B00 or TASK 72-44-10-200-001-C00 or TASK 72-44-10-200-001-D00 or TASK 72-44-10-200-001-E00 or TASK 72-44-10-200-001-F00 and Figure.
Do a dimensional inspection of the part.
SUBTASK 72-44-10-220-002 Examine the Repair
Make a permanent mark by the procedure given in SPM TASK 70-09-00-400-501.
Use the vibration peen method.
Mark VRS3818 adjacent to the part number.
SUBTASK 72-44-10-350-002 Identify the Repair
Refer to Repair-002 (VRS3272) TASK 72-44-10-300-002.
Use the vibration peen method.
Re-install the Center Flange nut plates on the Stage 1 HPT Support Assembly.
Refer to Assembly-001 TASK 72-44-10-440-001.
Re-install the Stage 1 HPT Seal on the Stage 1 HPT Support Assembly.
SUBTASK 72-44-10-350-003 Postrequisites
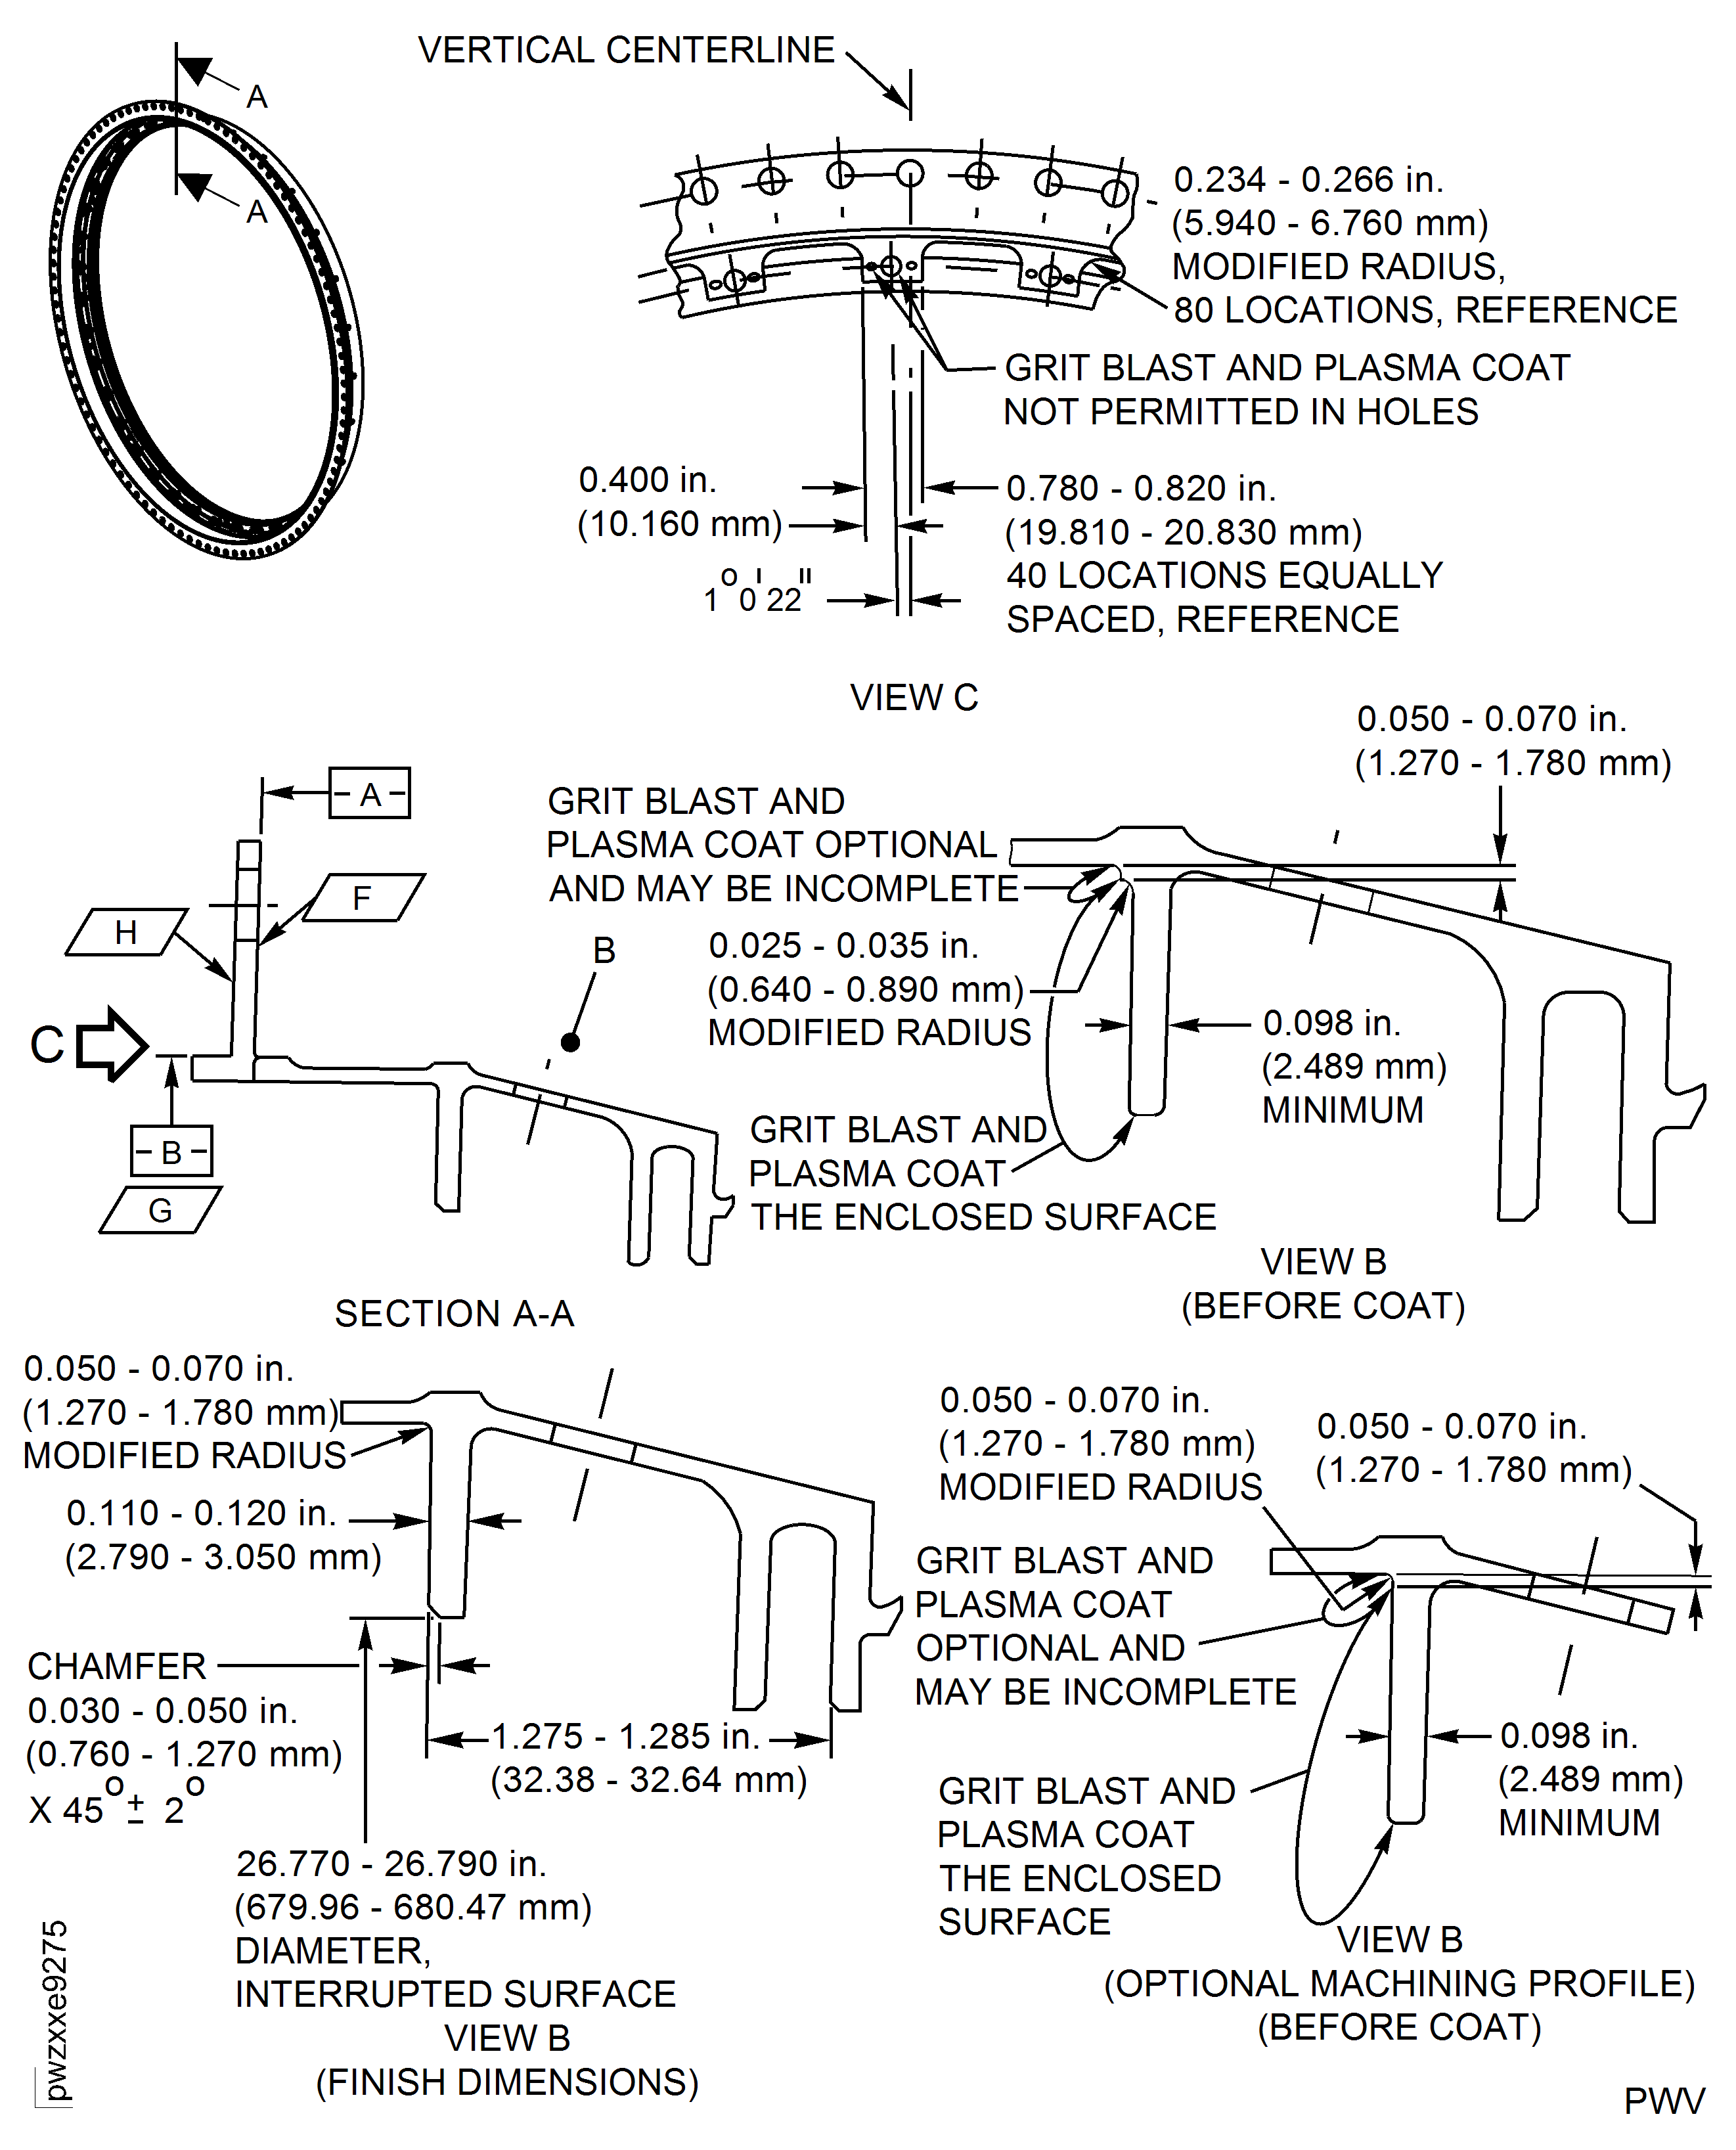
Figure: Plasma Coat the HPT 1st Stage Support Center Flange Forward Face For P/N 2A1292 Only
Plasma Coat the HPT 1st Stage Support Center Flange Forward Face For P/N 2A1292 Only

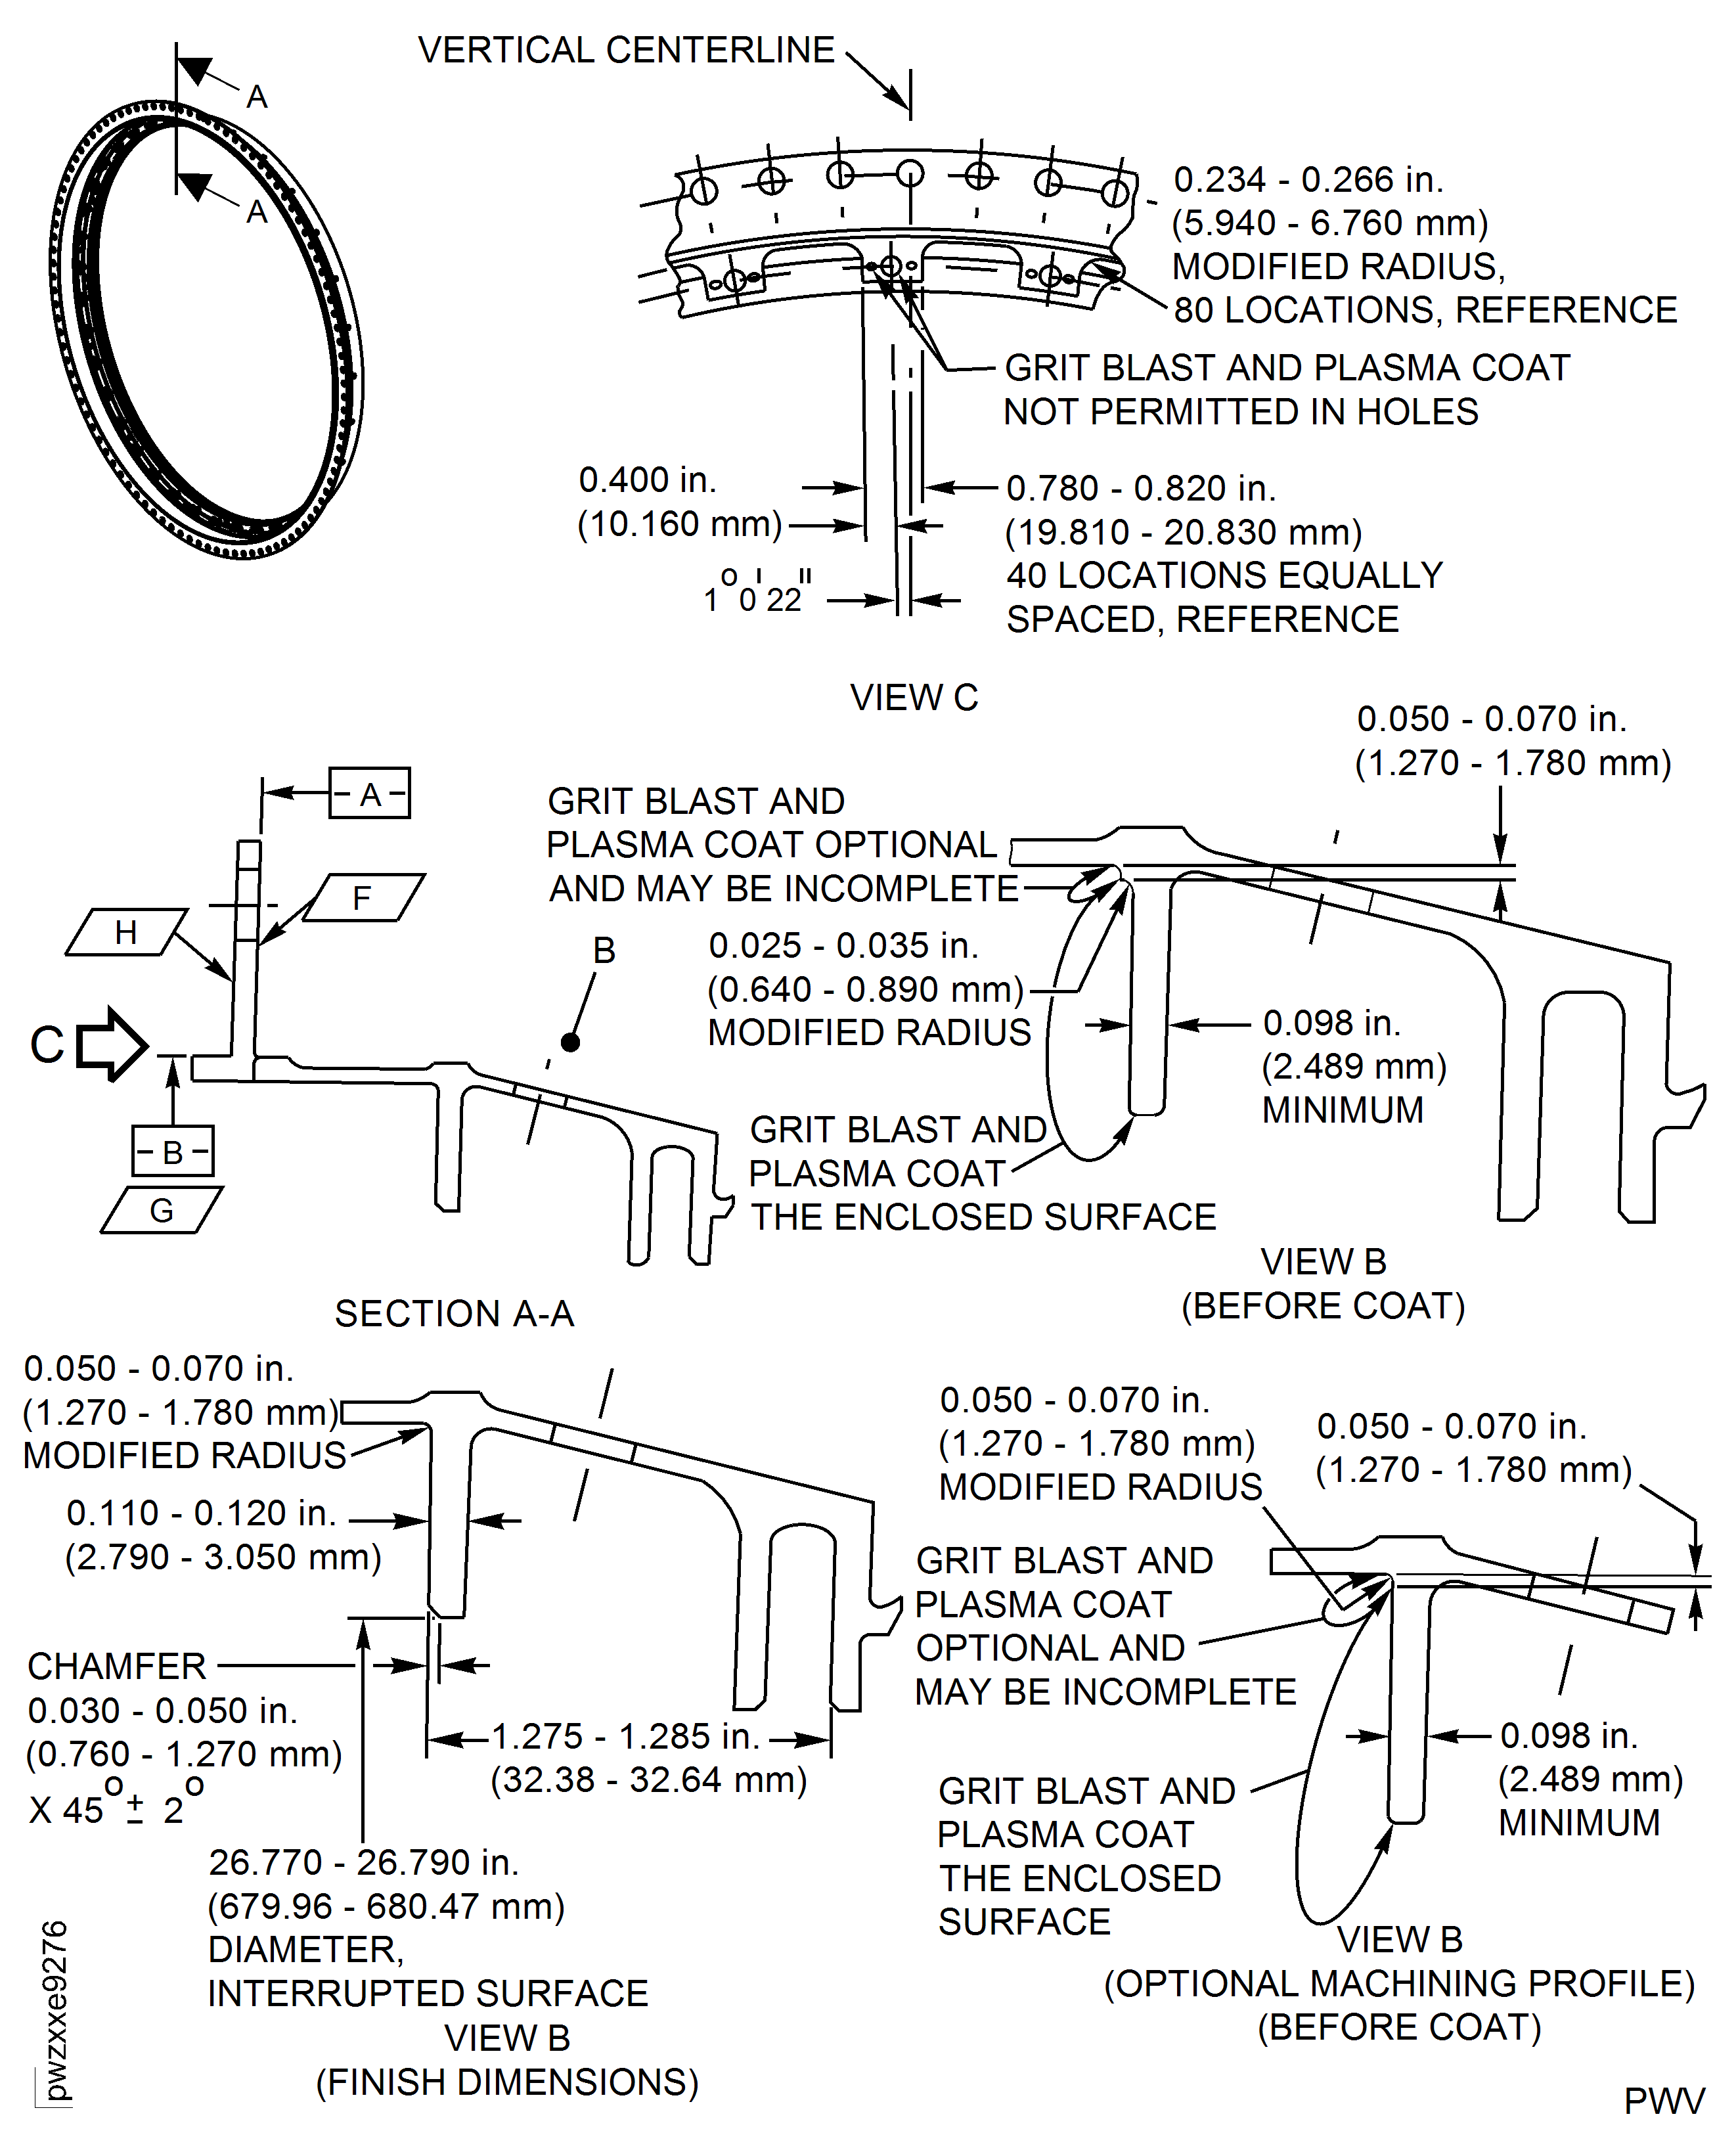
Figure: Plasma Coat the HPT 1st Stage Support Center Flange Forward Face For P/Ns 2A1358 and 2A1664 only
Plasma Coat the HPT 1st Stage Support Center Flange Forward Face For P/Ns 2A1358 and 2A1664 only

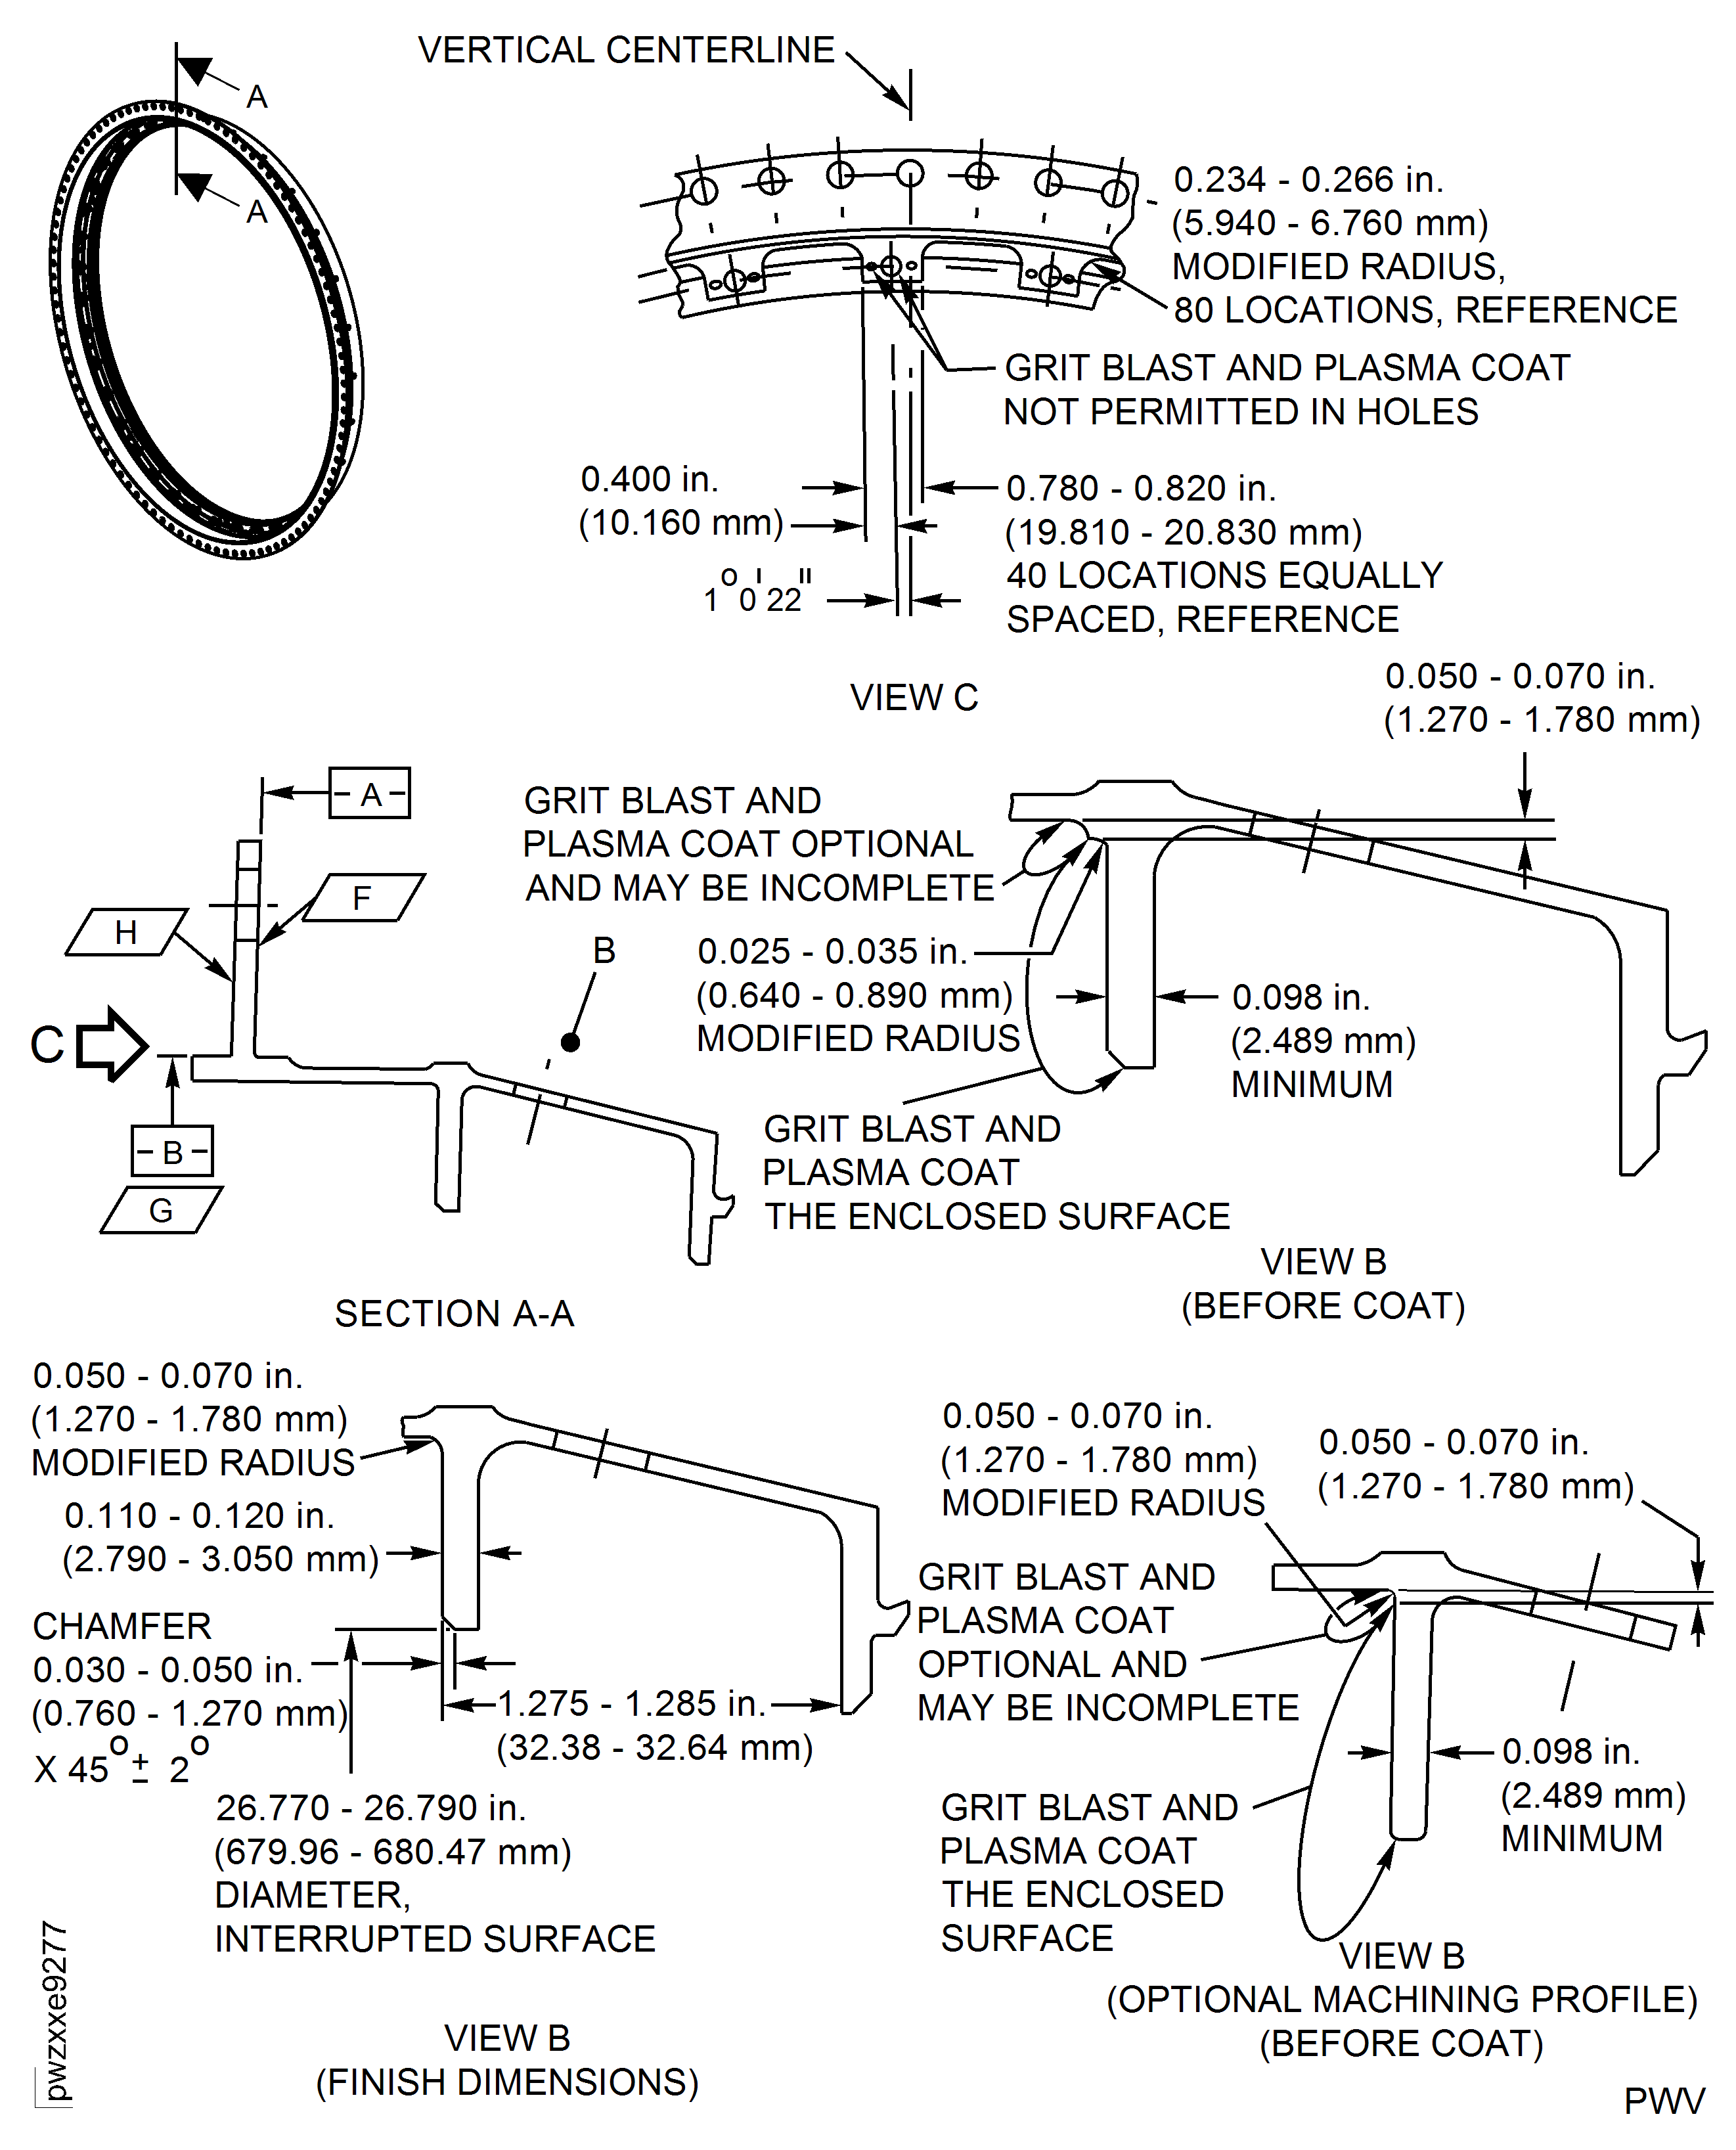
Figure: Plasma Coat the HPT 1st Stage Support Center Flange Forward Face For P/Ns 2A4085 only
Plasma Coat the HPT 1st Stage Support Center Flange Forward Face For P/Ns 2A4085 only

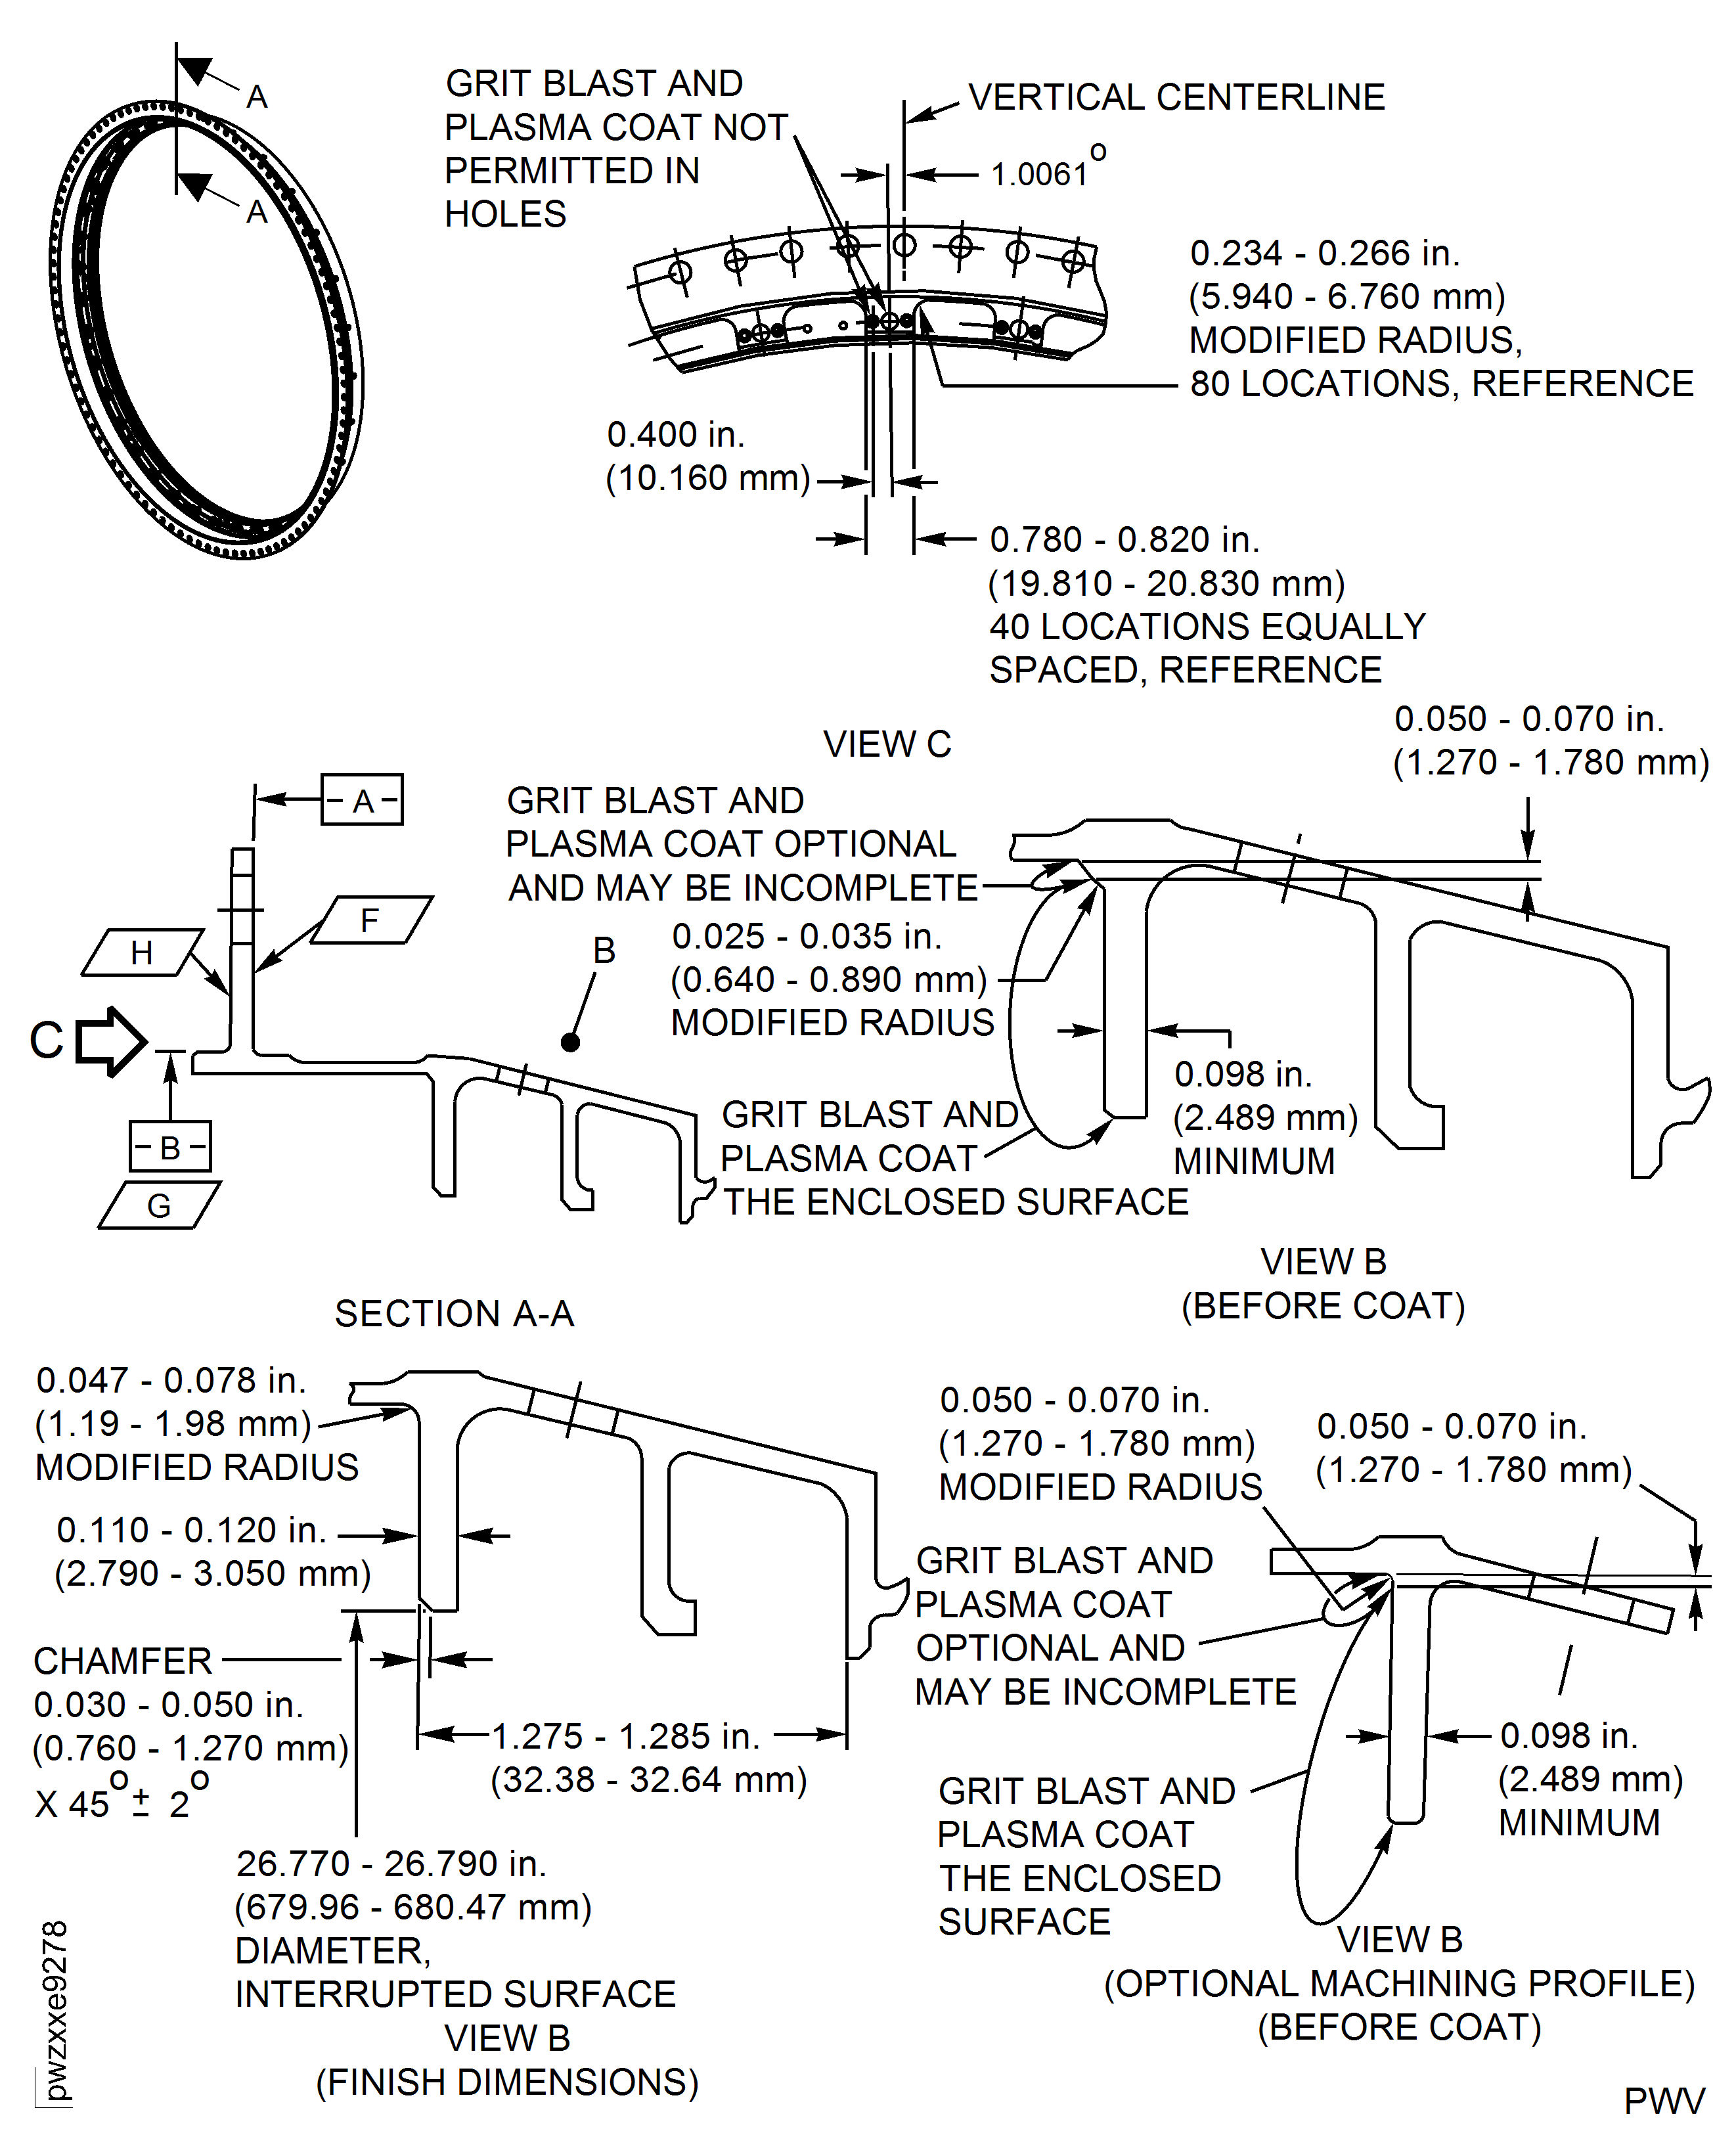
Plasma Coat the HPT 1st Stage Support Center Flange Forward Face For P/Ns 2A4085 only

