Export Control
EAR Export Classification: Not subject to the EAR per 15 C.F.R. Chapter 1, Part 734.3(b)(3), except for the following Service Bulletins which are currently published as EAR Export Classification 9E991: SBE70-0992, SBE72-0483, SBE72-0580, SBE72-0588, SBE72-0640, SBE73-0209, SBE80-0024 and SBE80-0025.Copyright
© IAE International Aero Engines AG (2001, 2014 - 2021) The information contained in this document is the property of © IAE International Aero Engines AG and may not be copied or used for any purpose other than that for which it is supplied without the express written authority of © IAE International Aero Engines AG. (This does not preclude use by engine and aircraft operators for normal instructional, maintenance or overhaul purposes.).Applicability
All
Common Information
TASK 72-44-10-200-001-B00 HPT Stage 1 Support Assembly - Examine, Inspection-001
General
This TASK gives the procedure for the inspection of the stage 1 HPT support assembly.
Fig/item numbers in parentheses in the procedure agree with those used in the IPC.
The policy that is necessary for inspection is given in the SPM TASK 70-20-00-200-501.
All the parts must be cleaned before any part is examined. Refer to the SPM TASK 70-10-00-100-501.
All the parts must be visually examined for damage, corrosion and wear. Any defects that are not identified in the procedure must be referred to IAE.
The procedure for those parts which must have a crack test is given in SUBTASK 72-44-10-230-054 and SUBTASK 72-44-10-230-055. Do the test before the part is visually examined.
A ** following repair referenced in this inspection indicates that the repair is not yet published in the current revision of the manual and the part must be rejected. Contact IAE for additional information concerning FAA approved repair date.
Do not discard any part until you are sure there are no repairs available. Refer to the instructions in Repair before a discarded part is used again or oversize parts are installed.
Parts which should be discarded can be held although no repair is available. The repair of a discarded part could be shown to be necessary at a later date.
All parts must be examined to make sure that all the repairs have been completed satisfactorily.
The practices and processes referred to in the procedure by the TASK numbers are in the SPM.
References
Refer to the SPM for data on these items.
Definitions of Damage, SPM TASK 70-02-02-350-501
Inspection of Parts, SPM TASK 70-20-00-200-501
Some data on these items is contained in this TASK. For more data on these items refer to the SPM.
Method of Testing for Crack Indications
Chemical Processes
Surface Protection
Preliminary Requirements
Pre-Conditions
NONESupport Equipment
NONEConsumables, Materials and Expendables
NONESpares
NONESafety Requirements
NONEProcedure
Refer to Figure.
Repair, VRS3272 TASK 72-44-10-300-002 (REPAIR-002)
Loose rivets and damage nut plates
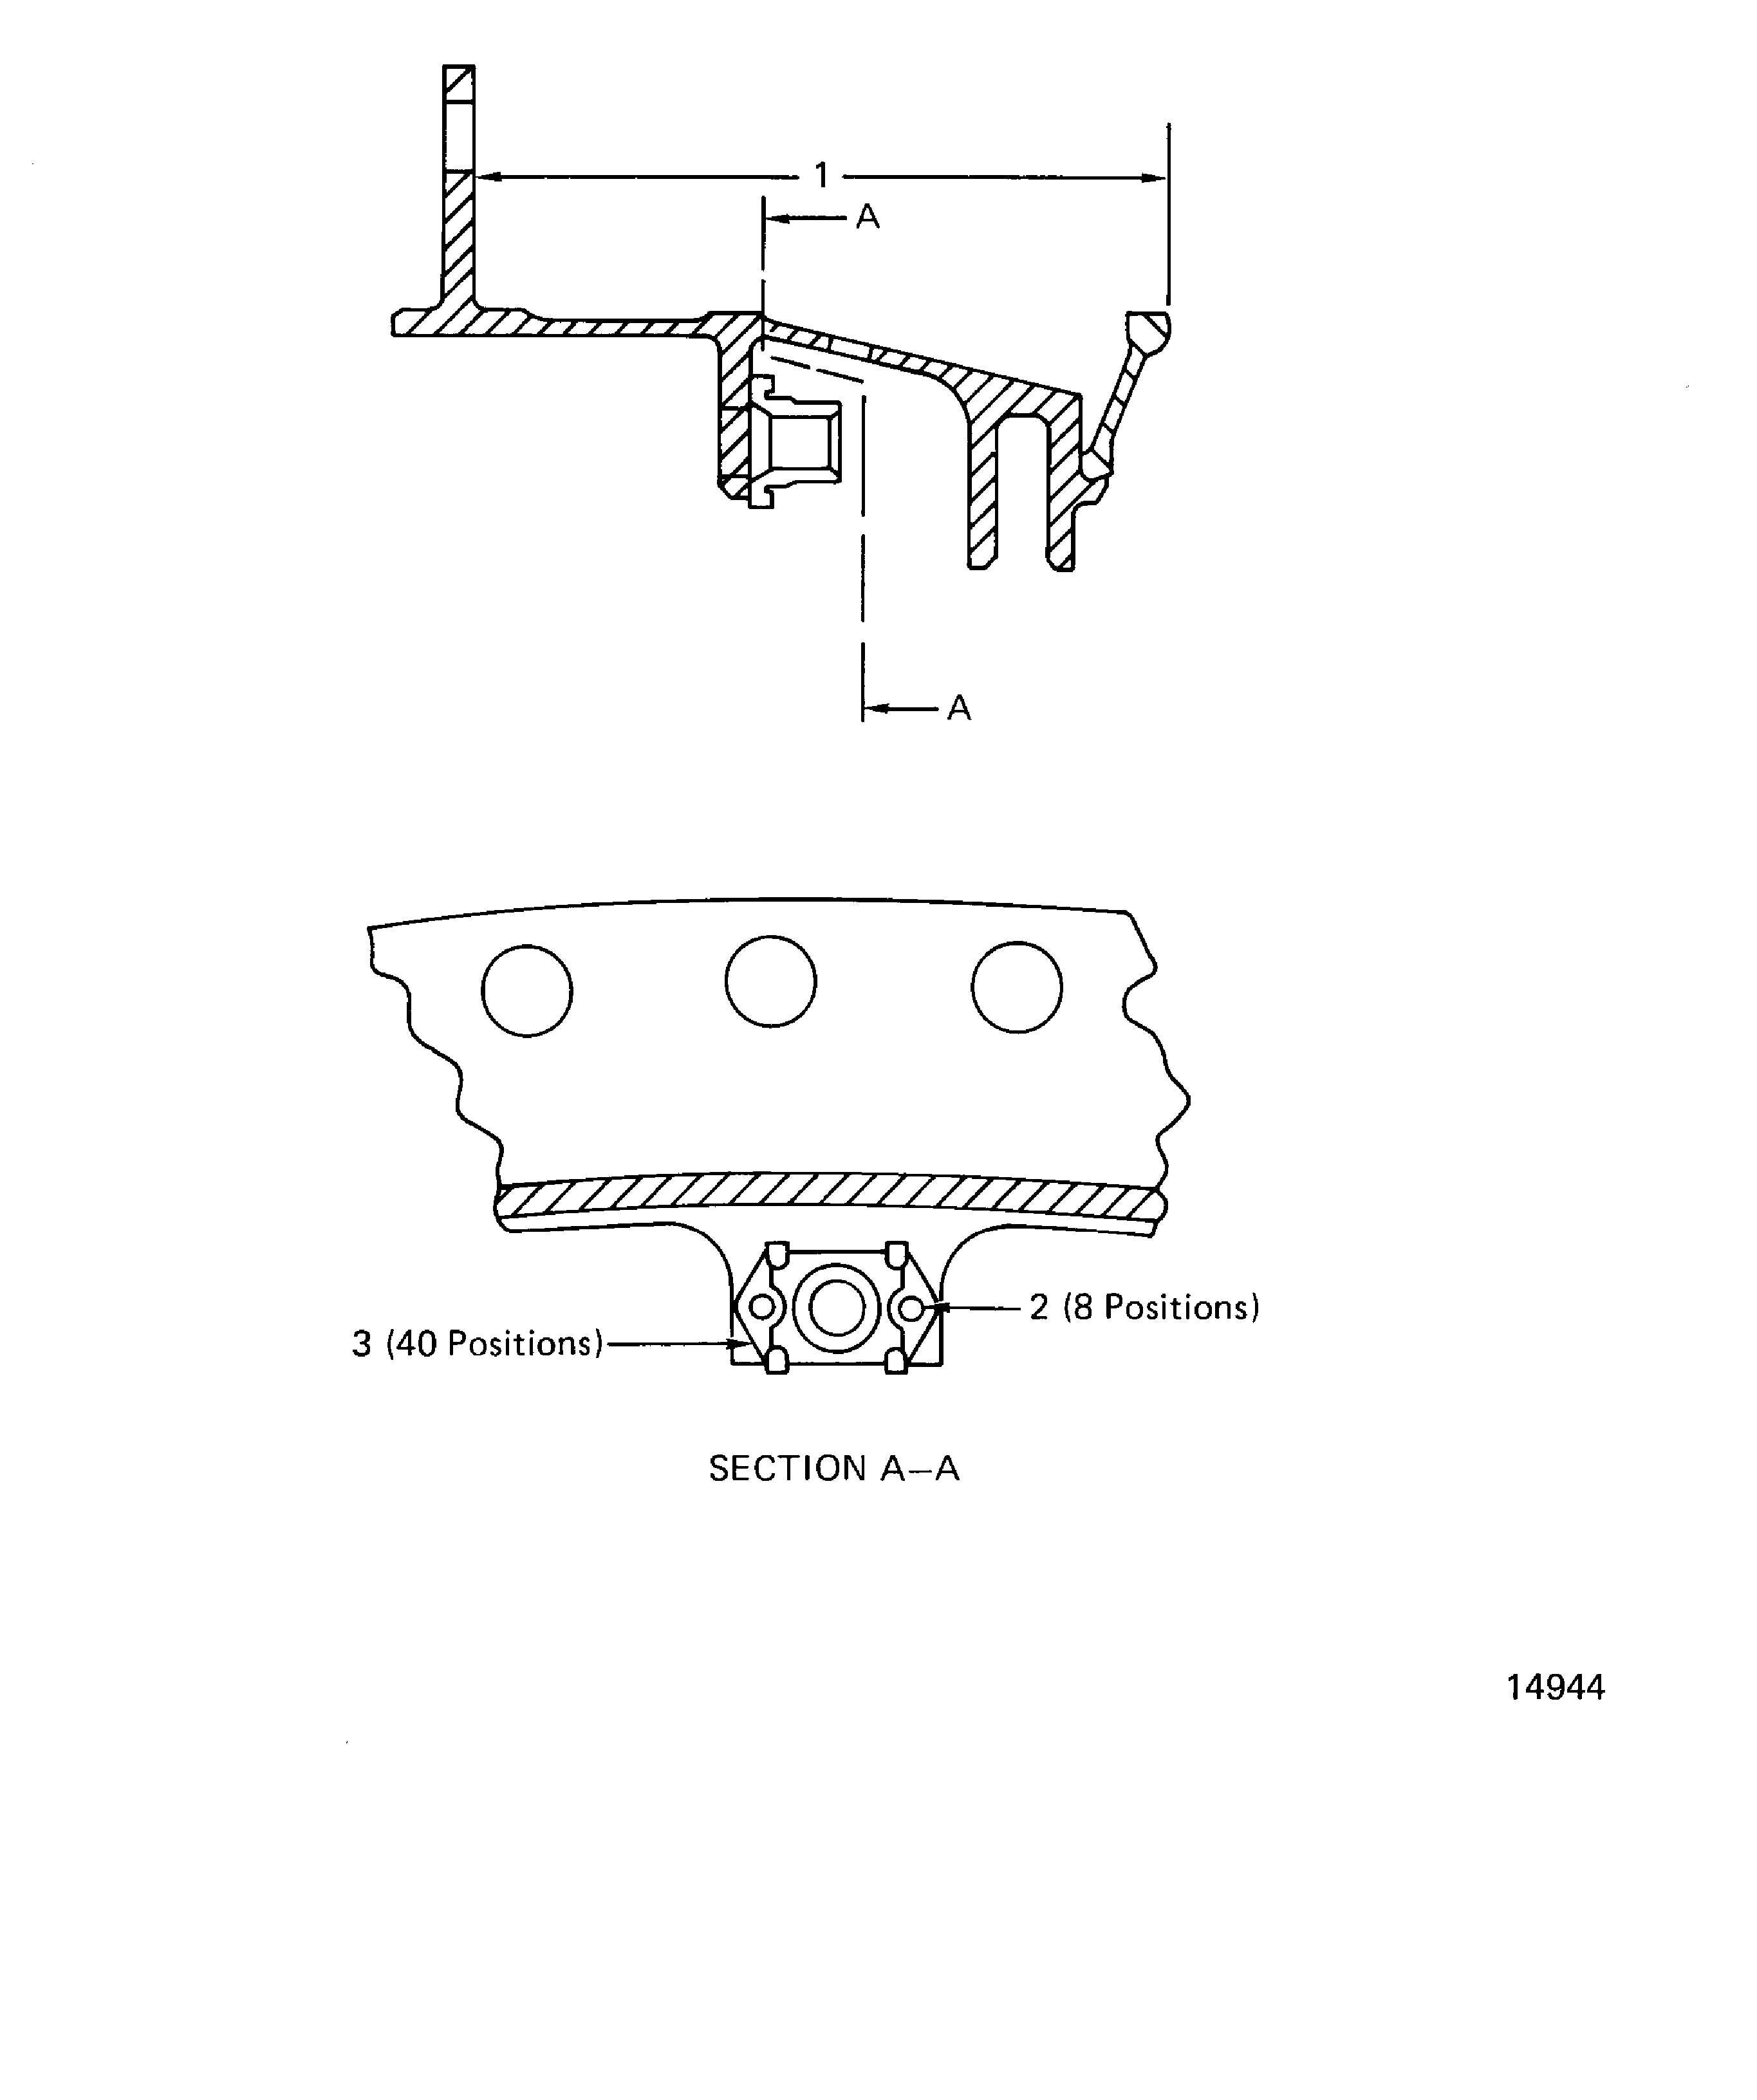
Examine the support assembly for loose nut plate rivets at location 2 and damaged nut plates at location 3.
SUBTASK 72-44-10-220-074 Examine the Stage 1 HPT Support Assembly (01-010) for Loose Nut Plate Rivets and Damaged Nut Plates with the Stage 1 HPT Seal Installed
Refer to Figure.
Replace by TASK 72-44-10-040-001 (DISASSEMBLY) and TASK 72-44-10-400-001 (ASSEMBLY)
Other than (a)
Axial dimension.
Examine the support assembly at location 1 for the axial dimension.
SUBTASK 72-44-10-220-075 Examine the Stage 1 HPT Support Assembly (01-010) for the Axial Dimension with the Stage 1 HPT Seal Installed
Remove the stage 1 HPT seal from the stage 1 HPT support assembly by the procedures given in TASK 72-44-10-040-001 (DISASSEMBLY).
SUBTASK 72-44-10-220-076 Remove the Stage 1 HPT Support Seal (01-060) from the Stage 1 HPT Support Assembly (01-010)
NOTE
The stage 1 HPT seal must be removed to do the remaining inspections.Refer to Figure.
Clean the part. Refer to TASK 72-44-10-100-000 (CLEANING-000).
Repair, VRS3650 TASK 72-44-10-300-022 (REPAIR-022)
Cracks which go outward from the bolt hole surface at location 1 that are less than 0.060 in. (1.52 mm) long
Repair, VRS3649 TASK 72-44-10-300-023 (REPAIR-023)
Cracks which go outward from the bolt hole surface at location 1 that are longer than 0.060 in. (1.52 mm)
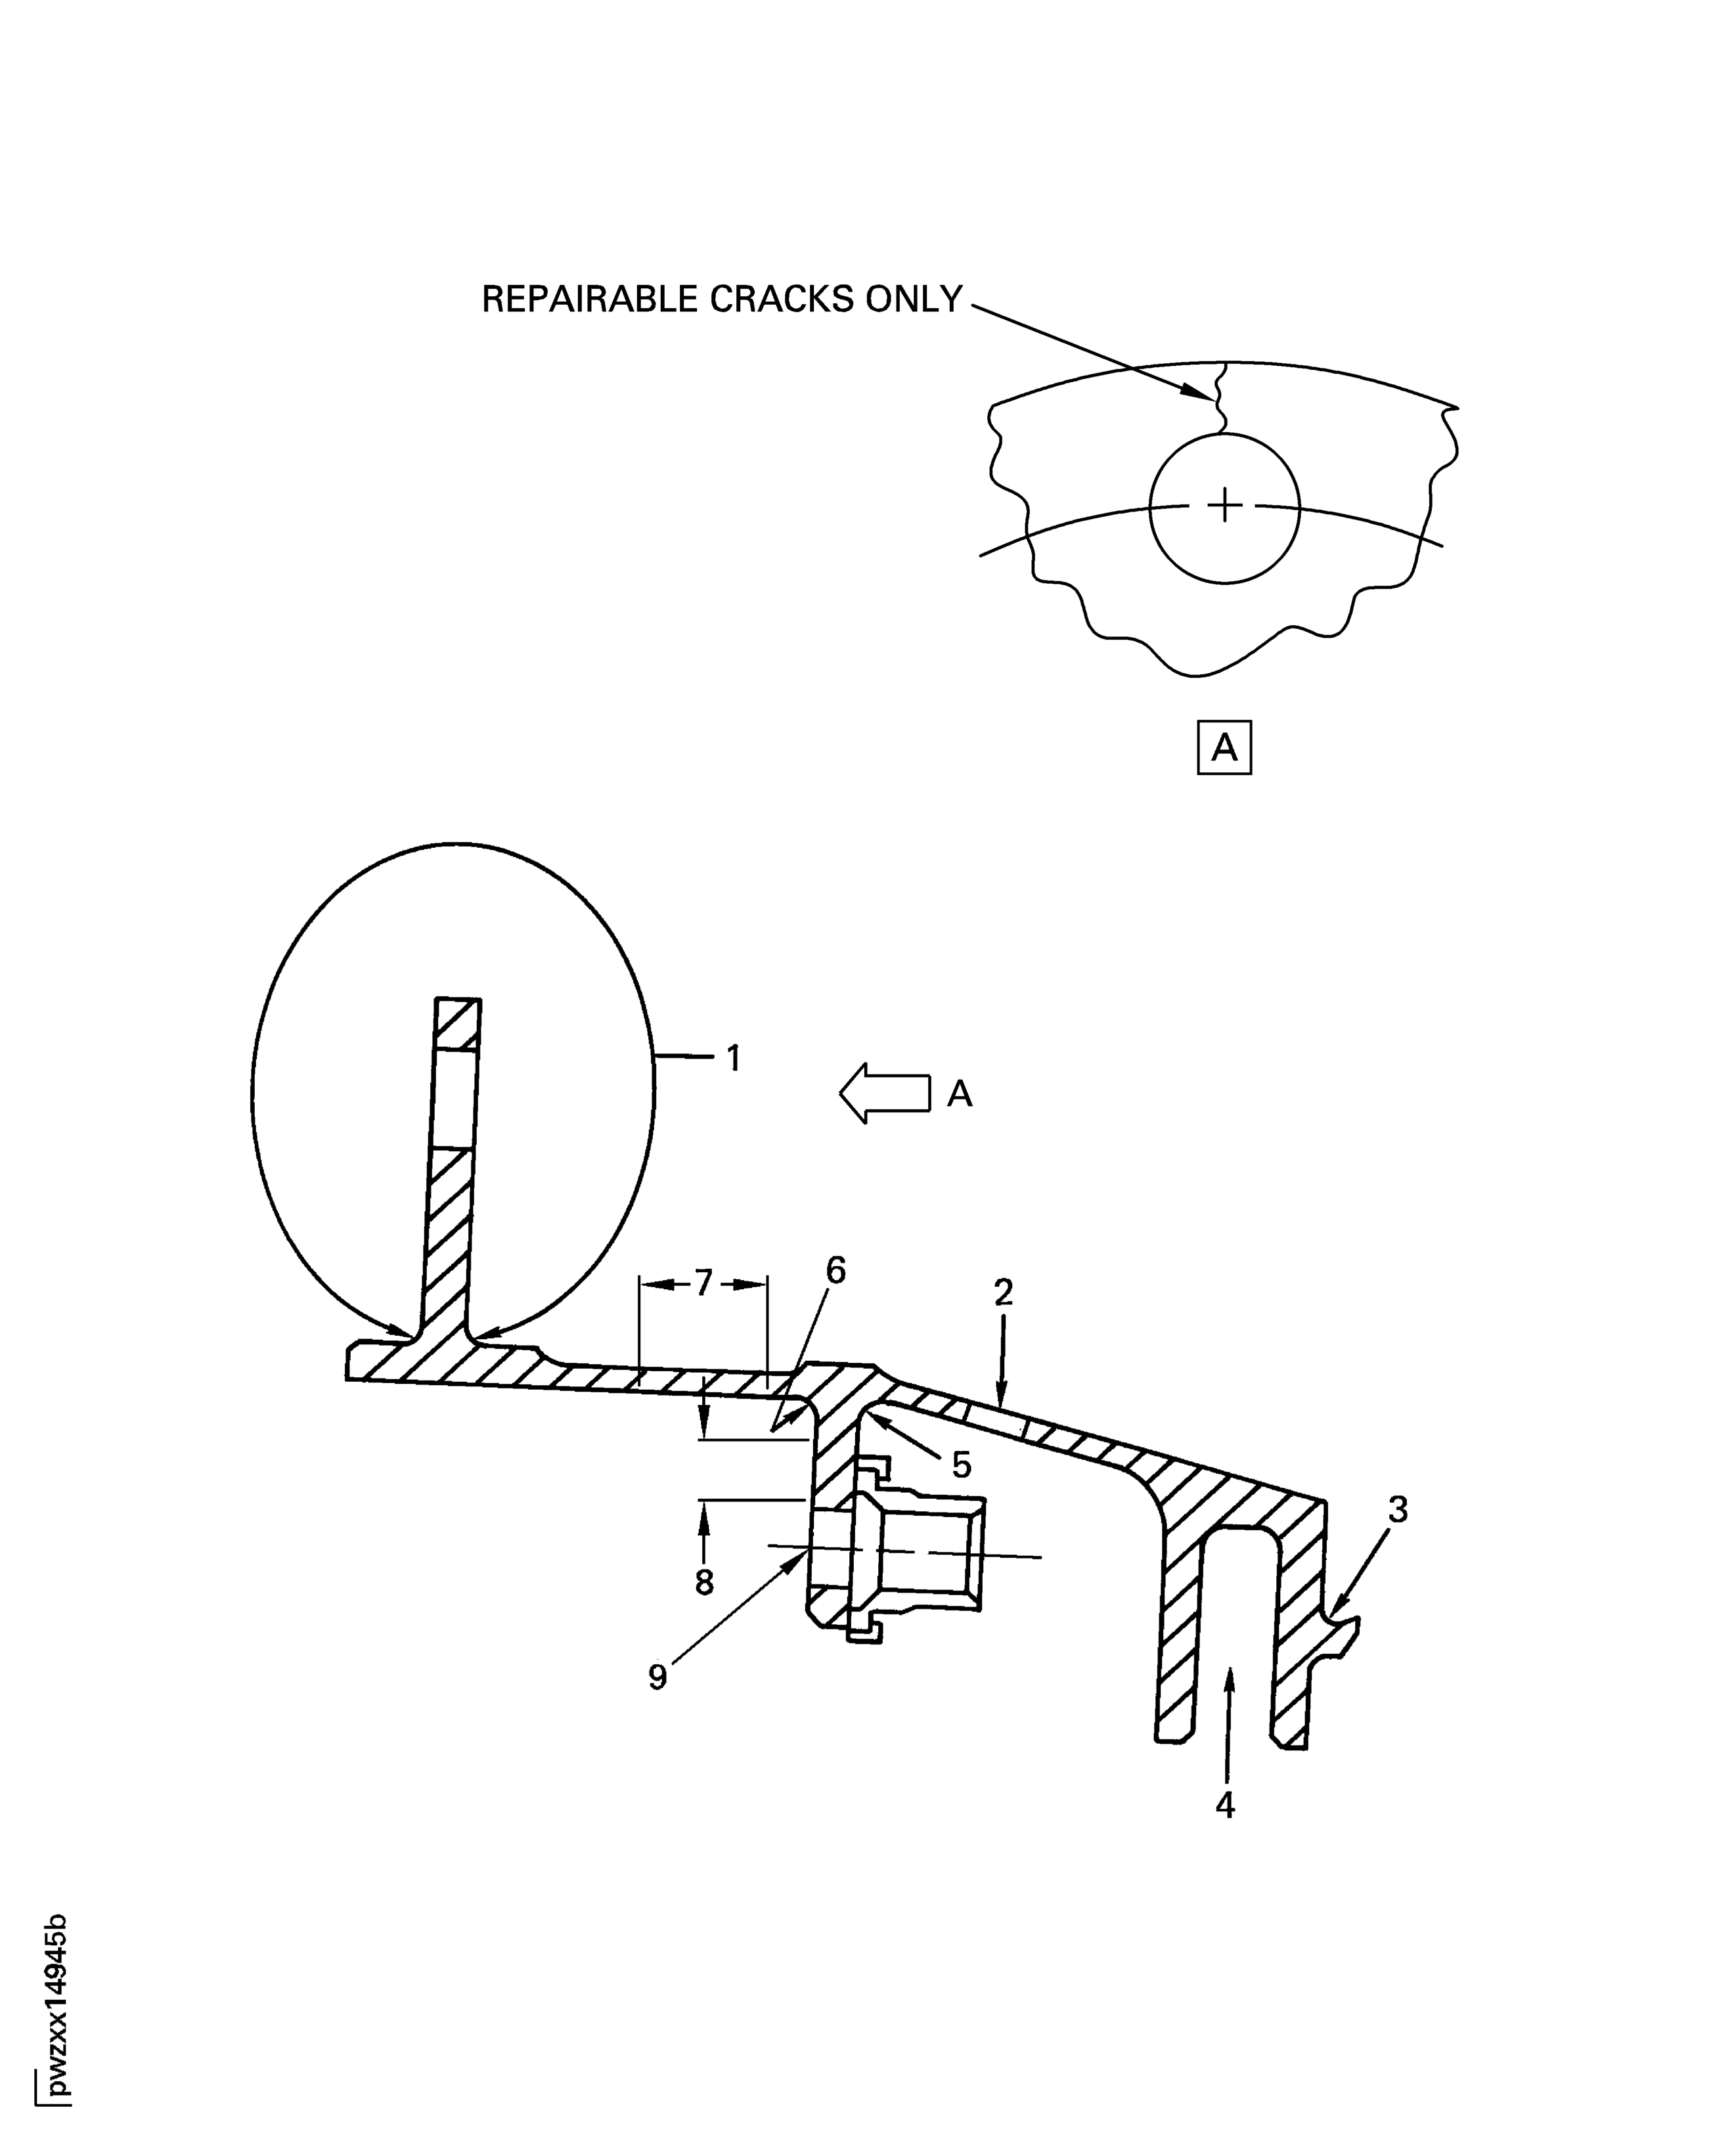
Do the test for cracks on the part that is given below. Look carefully at the bolt hole flange area at location 1, the vane groove at location 5, all the fillet radii at locations 1, 5, 6 and 7 and the rear inner diameter lip at location 4. Use the applicable penetrant inspection procedure.
PART IDENT TASK/SUBTASK
Stage 1 HPT support assembly
(Dip or Electrostatic
Spray)
SUBTASK 72-44-10-230-054-001 Examine the Stage 1 HPT Support Assembly (01-010) for Cracks
Refer to Figure.
Clean the part. Refer to TASK 72-44-10-100-000 (CLEANING-000).
Repair, VRS3650 TASK 72-44-10-300-022 (REPAIR-022)
Cracks which go outward from the bolt hole surface at location 1 that are less than 0.060 in. (1.52 mm) long
Repair, VRS3649 TASK 72-44-10-300-023 (REPAIR-023)
Cracks which go outward from the bolt hole surface at location 1 that are longer than 0.060 in. (1.52 mm)
Do the test for cracks on the part that is given below. Look carefully at the bolt hole flange area at location 1, the vane groove at location 5, all the fillet radii at locations 1, 5, 6 and 7 and the rear inner diameter lip at location 4. Use the applicable penetrant inspection procedure.
PART IDENT TASK/SUBTASK
Stage 1 HPT support assembly
(Dip or Electrostatic
Spray)
SUBTASK 72-44-10-230-054-002 Examine the Stage 1 HPT Support Assembly (01-010) for Cracks
Refer to Figure.
Repair, VRS3273 TASK 72-44-10-300-003 (REPAIR-003)
Repair, VRS3273 TASK 72-44-10-300-003 (REPAIR-003)
Not more than 0.015 in. (0.38 mm) in depth
Repair, VRS3559 TASK 72-44-10-300-019 (REPAIR-019)
Contact wear/fretting more than 0.015 in. (0.38 mm) deep at location 8. Damage must not be longer than 0.550 in. (13.97 mm) and must not extend into location 7 fillet radius
Repair, VRS3559 TASK 72-44-10-300-019 (REPAIR-019)
Contact wear/fretting more than 0.015 in. (0.38 mm) deep at location 9. Damage must not be longer than 0.200 in. (5.08 mm), must not extend into location 7 fillet radius and must not extend into location 10 bolt holes
Scratches, contact wear, nicks, surface damage (burrs).
Repair, VRS3273 TASK 72-44-10-300-003 (REPAIR-003)
Dents on the outer diameter flange at location 1
Repair, VRS3273 TASK 72-44-10-300-003 (REPAIR-003), Repair, VRS3619 TASK 72-44-10-300-024 (REPAIR-024)
Other than (a) and (b)
Dents.
Corrosion and nicks
Examine the support assembly for contact wear, corrosion, dents, nicks and scratches.
SUBTASK 72-44-10-220-077 Examine the Stage 1 HPT Support Assembly (01-010) for Contact Wear, Corrosion, Dents, Nicks and Scratches
Refer to Figure.
SUBTASK 72-44-10-220-078 Examine the Stage 1 HPT Support Assembly (01-010) for Wear on the Rear Seal Groove
Refer to Figure.
Repair, VRS3460 TASK 72-44-10-300-006 (REPAIR-006)
Plugged holes
Examine the support assembly at location 3 for plugged metering holes.
SUBTASK 72-44-10-220-079 Examine the Stage 1 HPT Support Assembly (01-010) for Plugged Metering Holes
Refer to Figure.
Repair, VRS3129 TASK 72-44-10-300-007 (REPAIR-007)
Other than (a)
Plasma coat that is chipped or not there
Examine the support assembly at location 2 for plasma spray coat that is chipped or not there.
SUBTASK 72-44-10-220-080 Examine the Stage 1 HPT Support Assembly (01-010) for Plasma Spray Coat that is Chipped or not There on the Outer Rear Diameter
Refer to Figure.
NOTE
If the measured dimensions in a free condition are not satisfactory, a held condition is permitted. All dimensions apply when Surface F is flat by 0.005 in. (0.13 mm) and Diameter G maintains a clearance envelope of 28.242 in. (717.35 mm) in a free or held condition. Hold the support assembly only on Surfaces F and H and on Diameter G.
SUBTASK 72-44-10-220-081 Examine the Stage 1 HPT Support Assembly (01-010) Rear Flange Inner Diameter for Parallelism
Refer to Figure.
NOTE
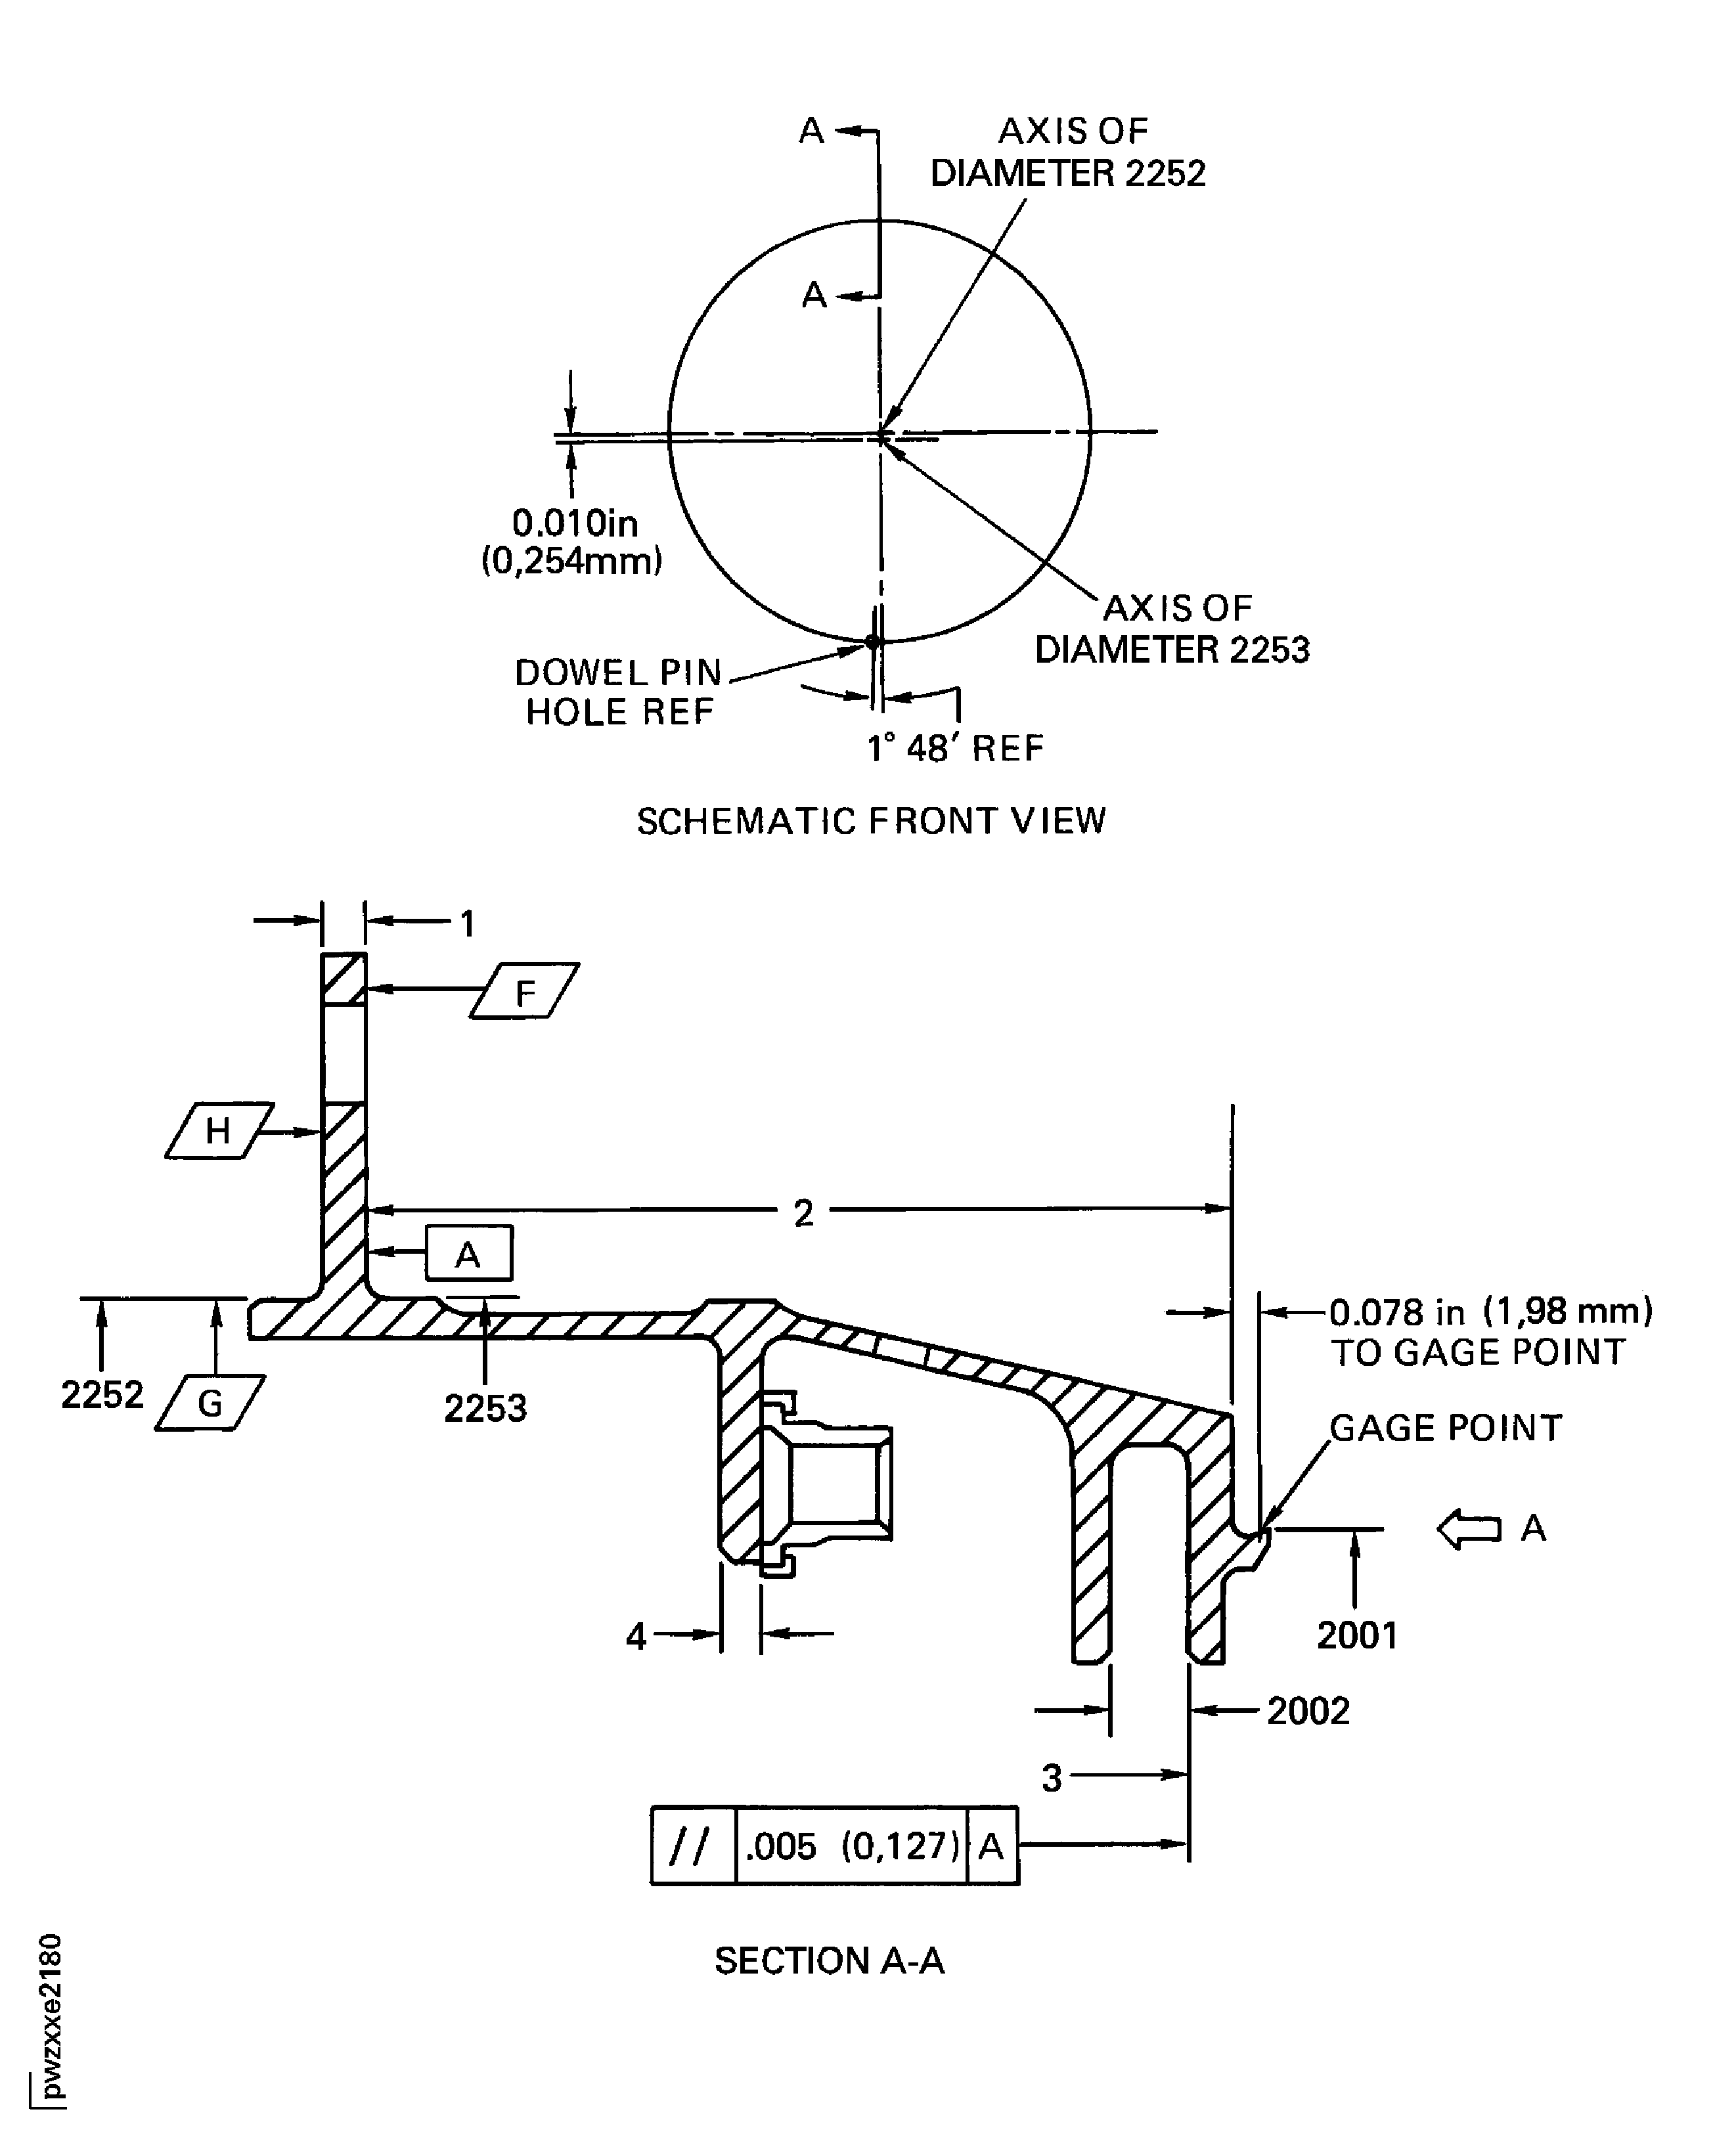
The diameters at location 2252 and 2253 are offset as shown in Figure.
If the measured dimensions in a free condition are not satisfactory, a held condition is permitted. All dimensions apply when Surface F is flat by 0.005 in. (0.13 mm) and Diameter G maintains a clearance envelope of 28.242 in. (717.35 mm) in a free or held condition. Hold the support assembly only on Surfaces F and H and on Diameter G.
Accept the part for select fit only
NOTE
This part can be used only if the mating part has a diameter that will result in a fit of Reference No.2252 and 2253. Refer to TASK 72-00-44-420-001-001 (INSTALLATION-001) and TASK 72-00-45-420-001-A01 (INSTALLATION-001, CONFIG-001).
If the diameter is between 28.230 in. and 28.241 in. (717.04 and 717.32 mm)
Repair, VRS3129 TASK 72-44-10-300-007 (REPAIR-007)
Minimum diameter 28.190 in. (716.03 mm) at location 2253
Repair, VRS3270 TASK 72-44-10-300-008 (REPAIR-008)
Minimum diameter 28.190 in. (716.03 mm) at location 2252
Examine the support assembly at locations 2252 and 2253 for the outer diameter on the front and rear flanges.
SUBTASK 72-44-10-220-082 Examine the Stage 1 HPT Support Assembly (01-010) for the Outer Diameter on the Front and Rear Flanges
Refer to Figure.
Refer to Repair-028 (VRS3818) TASK 72-44-10-300-028.
If the dimension is between 0.098 in. (2.489 mm) and less than 0.110 in. (2.794 mm)
Thickness.
Examine the support assembly at location 4 for the center flange thickness.
SUBTASK 72-44-10-220-083 Examine the Stage 1 HPT Support Assembly (01-010) for the Outer Diameter Flange and the Center Flange Thickness
Refer to Figure.
NOTE
If the measured dimensions in a free condition are not satisfactory, a held condition is permitted. All dimensions apply when Surface F is flat by 0.005 in. (0.13 mm) and Diameter G maintains a clearance envelope of 28.242 in. (717.35 mm) in a free or held condition. Hold the support assembly only on Surfaces F and H and on Diameter G.
SUBTASK 72-44-10-220-084 Examine the Stage 1 HPT Support Assembly (01-010) for the Rear Seal Diameter
Refer to Figure.
NOTE
If the measured dimensions in a free condition are not satisfactory, a held condition is permitted. All dimensions apply when Surface F is flat by 0.005 in. (0.13 mm) and Diameter G maintains a clearance envelope of 28.242 in. (717.35 mm) in a free or held condition. Hold the support assembly only on Surfaces F and H and on Diameter G.
SUBTASK 72-44-10-220-085 Examine the Stage 1 HPT Support Assembly (01-010) for the Vane Groove Width Dimension
Refer to Figure.
NOTE
If the measured dimensions in a free condition are not satisfactory, a held condition is permitted. All dimensions apply when Surface F is flat by 0.005 in. (0.13 mm) and Diameter G maintains a clearance envelope of 28.242 in. (717.35 mm) in a free or held condition. Hold the support assembly only on Surfaces F and H and on Diameter G.
SUBTASK 72-44-10-220-086 Examine the Stage 1 HPT Support Assembly (01-010) for the Axial Dimension from the Rear Face of the Front Flange to the Rear Face of the Rear Vane Groove
Clean the part. Refer to TASK 72-44-10-100-000 (CLEANING-000).
SUBTASK 72-44-10-230-055-001 Examine the Stage 1 HPT Seal (01-060) for Cracks
Clean the part. Refer to TASK 72-44-10-100-000 (CLEANING-000).
SUBTASK 72-44-10-230-055-002 Examine the Stage 1 HPT Seal (01-060) for Cracks
Refer to Figure.
Repair, VRS3271 TASK 72-44-10-300-001 (REPAIR-001)
More than 10 percent of plasma spray coating on contact face
Chipped and flaked.
Examine the stage 1 HPT seal at location 6 for chipped or flaked plasma spray coating on the rear contact face.
SUBTASK 72-44-10-220-087 Examine the Stage 1 HPT Seal (01-060) for Chipped or Flaked Plasma Spray Coating on the Rear Contact Face
Refer to Figure.
SUBTASK 72-44-10-220-088 Examine the Stage 1 HPT Seal (01-060) for Wear on the Inner Diameter
Refer to Figure.
SUBTASK 72-44-10-220-089 Examine the Stage 1 HPT Seal (01-060) for Flat and Distortion of the Original Axial Shape in a Free Condition on the Outer Diameter Rear Contact Face
Refer to Figure.
NOTE
The seal may be measured in a free or held condition. If the seal is measured in a held condition, hold the seal at Surface E. The measurement in a held condition can be done with the seal installed on the stage 1 support assembly.Repair, VRS3271 TASK 72-44-10-300-001 (REPAIR-001)
NOTE
When you use a 10X magnification glass, the coating must look more porous and rougher than the base material which will look smooth and constant.
If the dimension is less than 0.322 in. (8.18 mm)
Axial height.
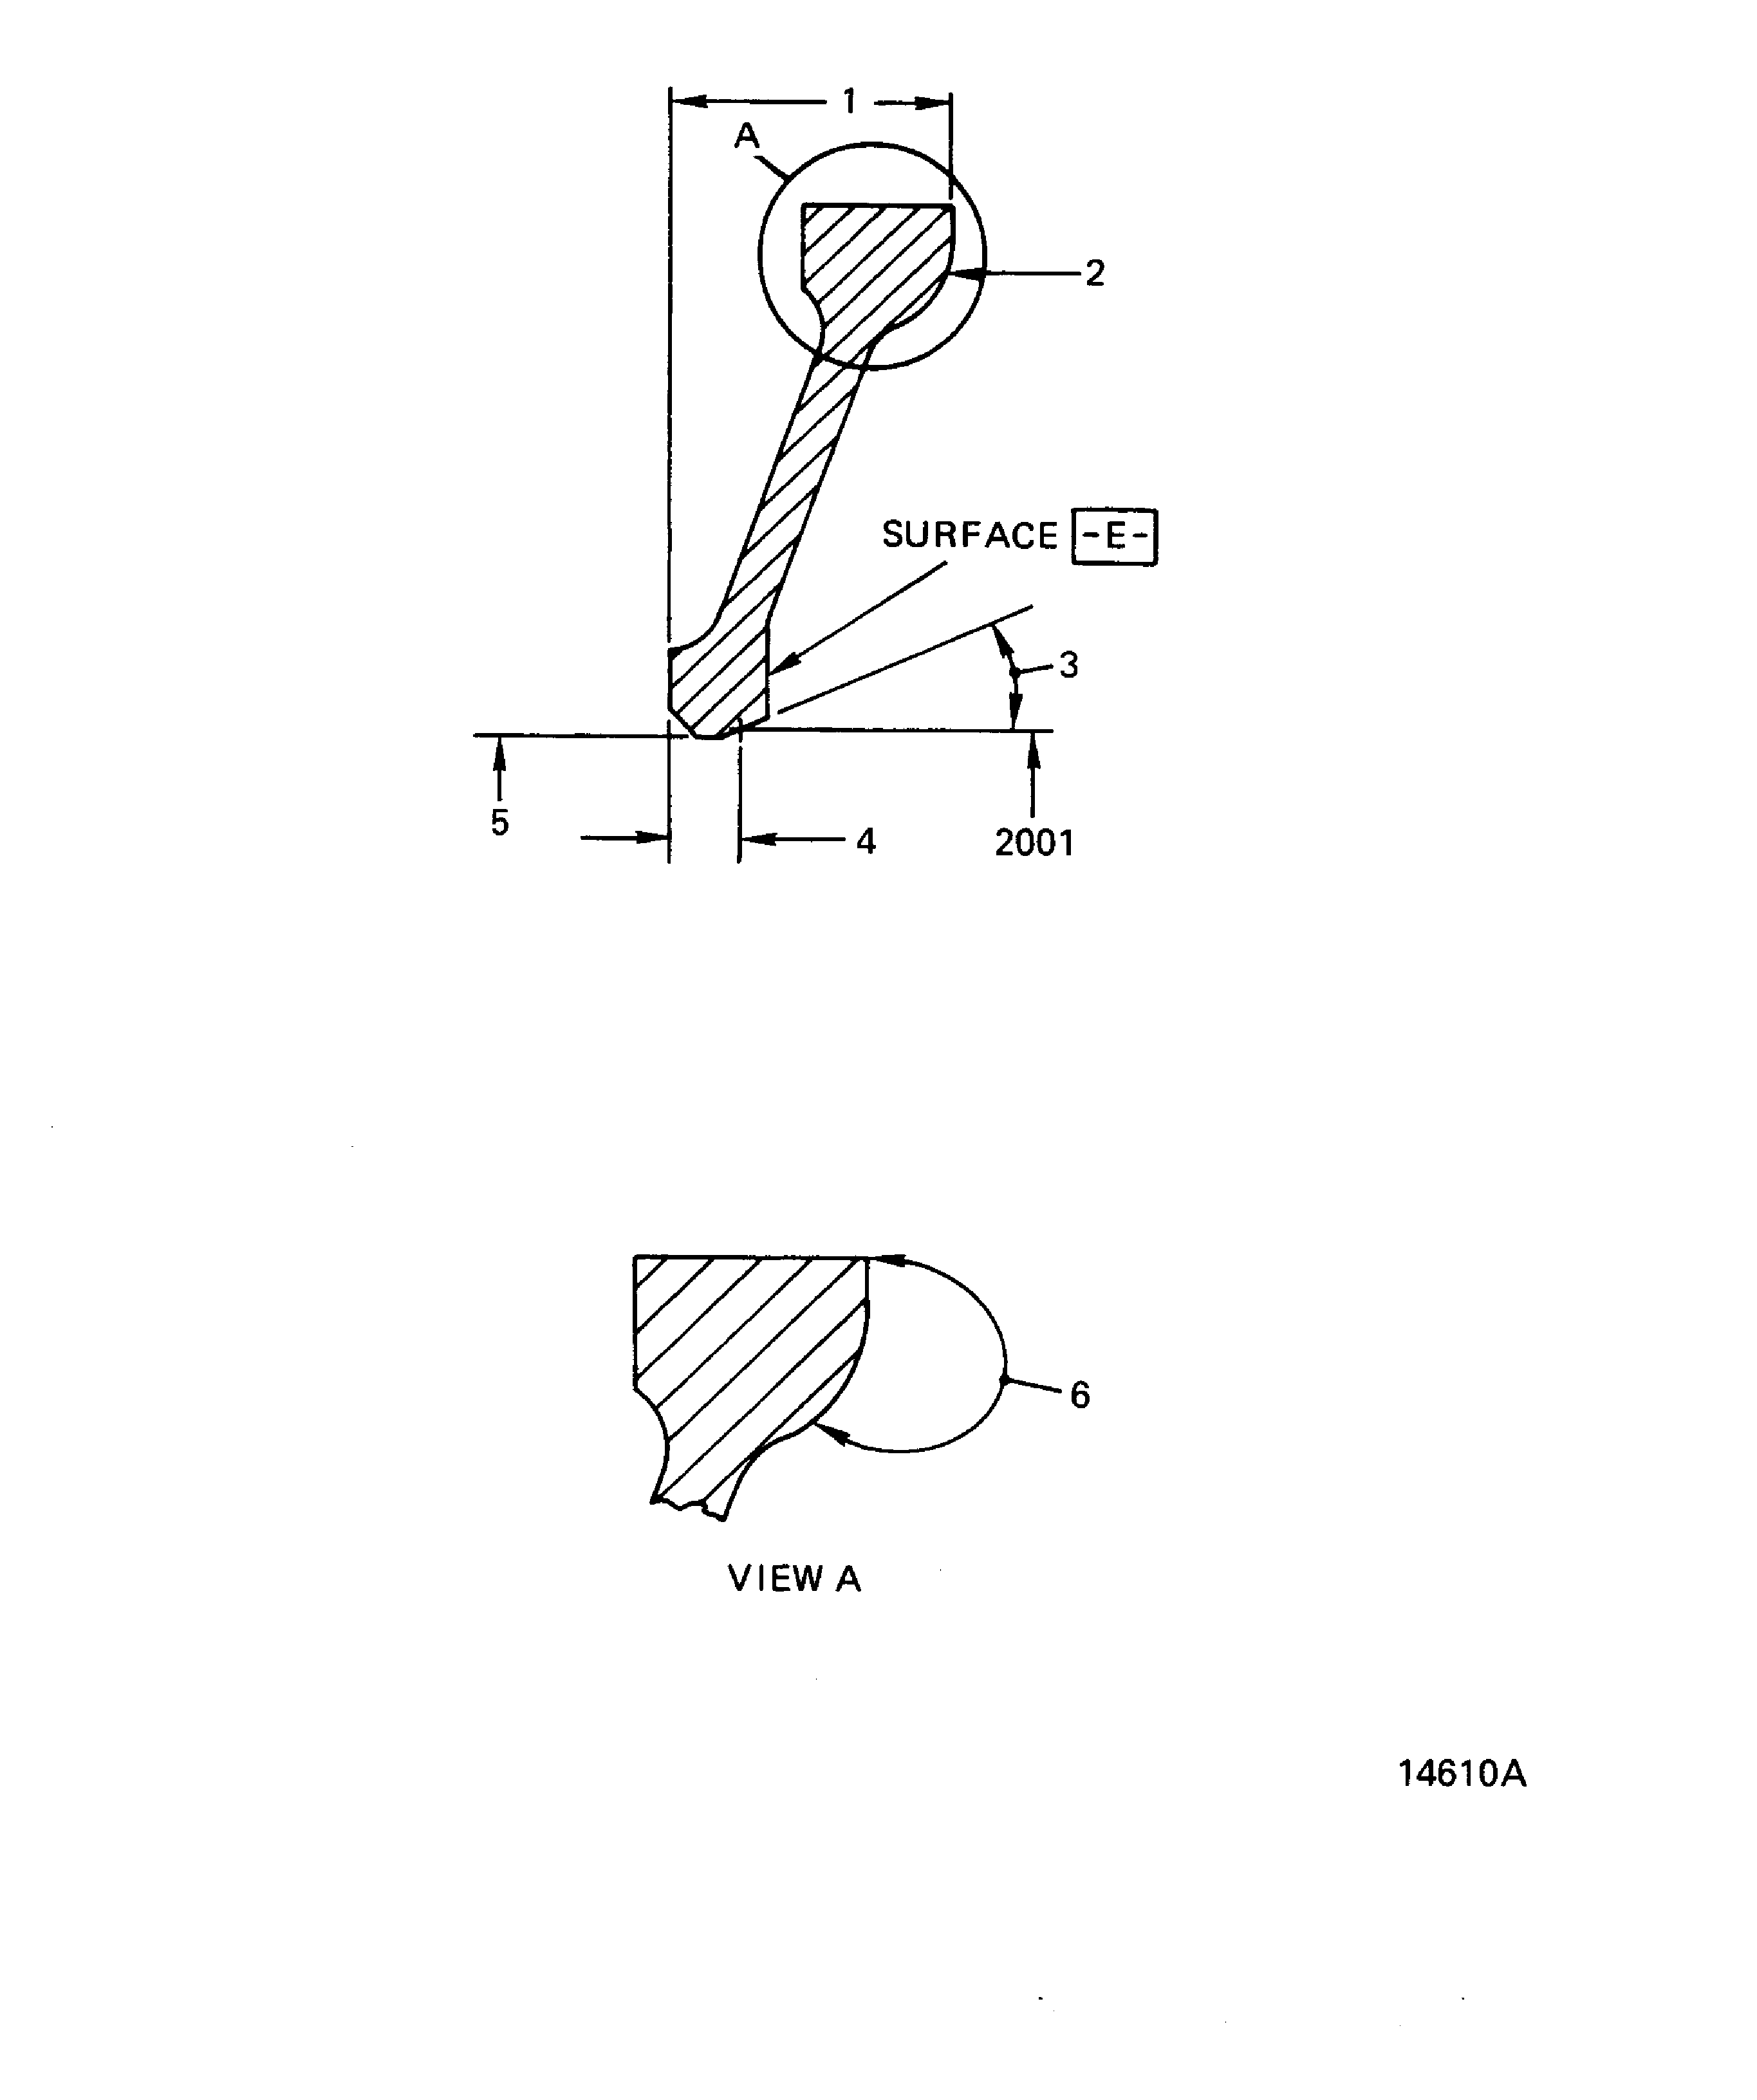
Examine the seal at location 1 for the axial height dimension on the outer diameter rear contact face.
Repair, VRS3271 TASK 72-44-10-300-001 (REPAIR-001)
Other than (a)
Wear.
Examine the seal at location 2 for wear through the coating at the seal mark that is continuous around the full circumference on the outer diameter rear contact face. Use a 10X magnification glass.
SUBTASK 72-44-10-220-090 Examine the Stage 1 HPT Seal (01-060) for the Axial Height Dimension and Wear on the Outer Diameter Rear Contact Face
Refer to Figure.
NOTE
The seal conical diameter at location 2001 is 26.960 in. to 26.964 in. (684.78 to 684.89 mm). Refer to these dimensions:Location 3 is the 24 to 26 degree radius.
Location 4 is the 0.078 in. (1.98 mm) dimension.
SUBTASK 72-44-10-220-091 Examine the Stage 1 HPT Seal (01-060) for Wear on the Inner Conical Diameter
Install the stage 1 HPT seal on the stage 1 HPT support assembly by the procedures given in TASK 72-44-10-440-001 (ASSEMBLY).
SUBTASK 72-44-10-220-092 Install the Stage 1 HPT Seal (01-060) on the Stage 1 HPT Support Assembly (01-010)
Figure: Stage 1 HPT Support Assembly Inspection Locations
Stage 1 HPT Support Assembly Inspection Locations

Figure: Stage 1 HPT Support Assembly Inspection Locations
Stage 1 HPT Support Assembly Inspection Locations

Figure: Stage 1 HPT Support Assembly Inspection Locations
Stage 1 HPT Support Assembly Inspection Locations

Figure: Stage 1 HPT Seal Inspection Locations
Stage 1 HPT Seal Inspection Locations

