Export Control
EAR Export Classification: Not subject to the EAR per 15 C.F.R. Chapter 1, Part 734.3(b)(3), except for the following Service Bulletins which are currently published as EAR Export Classification 9E991: SBE70-0992, SBE72-0483, SBE72-0580, SBE72-0588, SBE72-0640, SBE73-0209, SBE80-0024 and SBE80-0025.Copyright
© IAE International Aero Engines AG (2001, 2014 - 2021) The information contained in this document is the property of © IAE International Aero Engines AG and may not be copied or used for any purpose other than that for which it is supplied without the express written authority of © IAE International Aero Engines AG. (This does not preclude use by engine and aircraft operators for normal instructional, maintenance or overhaul purposes.).Applicability
All
Common Information
TASK 72-44-10-200-001-F00 HPT Stage 1 Support Assembly - Examine, Inspection-001
Effectivity
FIG/ITEM | PART NO. | |
|---|---|---|
01-010 | 2A4085 | |
01-060 | 2A3328 | (Detail of 2A4085) |
01-025 | 2A4088-01 | (Detail of 2A4085) |
General
This TASK gives the procedure for the inspection of the stage 1 HPT support assembly.
Fig/item numbers in parentheses in the procedure agree with those used in the IPC.
The policy that is necessary for inspection is given in SPM TASK 70-20-00-200-501.
All the parts must be cleaned before any part is examined. Refer to SPM TASK 70-10-00-100-501.
All the parts must be visually examined for damage, corrosion and wear. Any defects that are not identified in the procedure must be referred to IAE.
Do not discard any part until you are sure there are no repairs available. Refer to the instructions in Repair before a discarded part is used again or oversize parts are installed.
Parts which should be discarded can be held although no repair is available. The repair of a discarded part could be shown to be necessary at a later date.
All parts must be examined to make sure that all the repairs have been completed satisfactorily.
The practices and processes referred to in the procedure by the TASK numbers are in SPM.
References
Refer to SPM for data on these items.
Definitions of Damage, SPM TASK 70-02-02-350-501.
Inspection of Parts, SPM TASK 70-20-00-200-501.
Some data on these items is contained in this TASK. For more data on these items refer to SPM.
Method of Testing for Crack Indications:
Chemical Processes.
Surface Protection.
Preliminary Requirements
Pre-Conditions
NONESupport Equipment
NONEConsumables, Materials and Expendables
NONESpares
NONESafety Requirements
NONEProcedure
Refer to Figure.
Repair, VRS3272 TASK 72-44-10-300-002 (REPAIR-002)
Loose rivets and damaged nut plates.
Examine the support assembly for loose nut plate rivets at Location 2 and damaged nut plates at Location 3.
Repair, VRS3771 TASK 72-44-10-300-027 (REPAIR-027).
Loose or missing rivets.
Examine the support assembly for loose or missing rivets at location 5.
SUBTASK 72-44-10-220-186 Examine the Stage 1 HPT Support Assembly (01-010) for Loose Rivets and Damaged Nut Plates with the Stage 1 HPT Seal and the Brush Seal Assembly Installed
Refer to Figure.
Repair, VRS3771 TASK 72-44-10-300-027 (REPAIR-027).
Damage, wear or missing material.
Examine the brush seal for damage, wear or missing material at Location 4.
SUBTASK 72-44-10-220-187 Examine the Brush Seal (01-025) for Damage or Wear with the Stage 1 HPT Seal and the Brush Seal Assembly Installed
Repair, VRS3771 TASK 72-44-10-300-027 (REPAIR-027).
Other than Step.
Measure the bristle height above the back plate. Refer to Figure, Index 1.
Repair, VRS3771 TASK 72-44-10-300-027 (REPAIR-027).
Other than Step.
Measure the bristle pack thickness at 0.050 in. (1.270 mm) above the back plate in the undamaged areas. Areas with individual stray bristles are considered undamaged. Refer to Figure, Index 2.
Repair, VRS3771 TASK 72-44-10-300-027 (REPAIR-027).
Measure the bristle pack thickness at 0.050 in. (1.270 mm) above the back plate in the damaged areas. Damaged locations must be no longer than 2.25 inches (57.15 mm) in length and must be separated by a minimum of 1.5 inches (38.1 mm). No more than seven locations are acceptable. Refer to Figure, Index 2.
Repair, VRS3771 TASK 72-44-10-300-027 (REPAIR-027).
Other than Step.
Examine the brush seal at Location 4. Bristles shall not be burned or melted, and shall be free of weld material. Refer to Figure.
Repair, VRS3771 TASK 72-44-10-300-027 (REPAIR-027).
Other than Step.
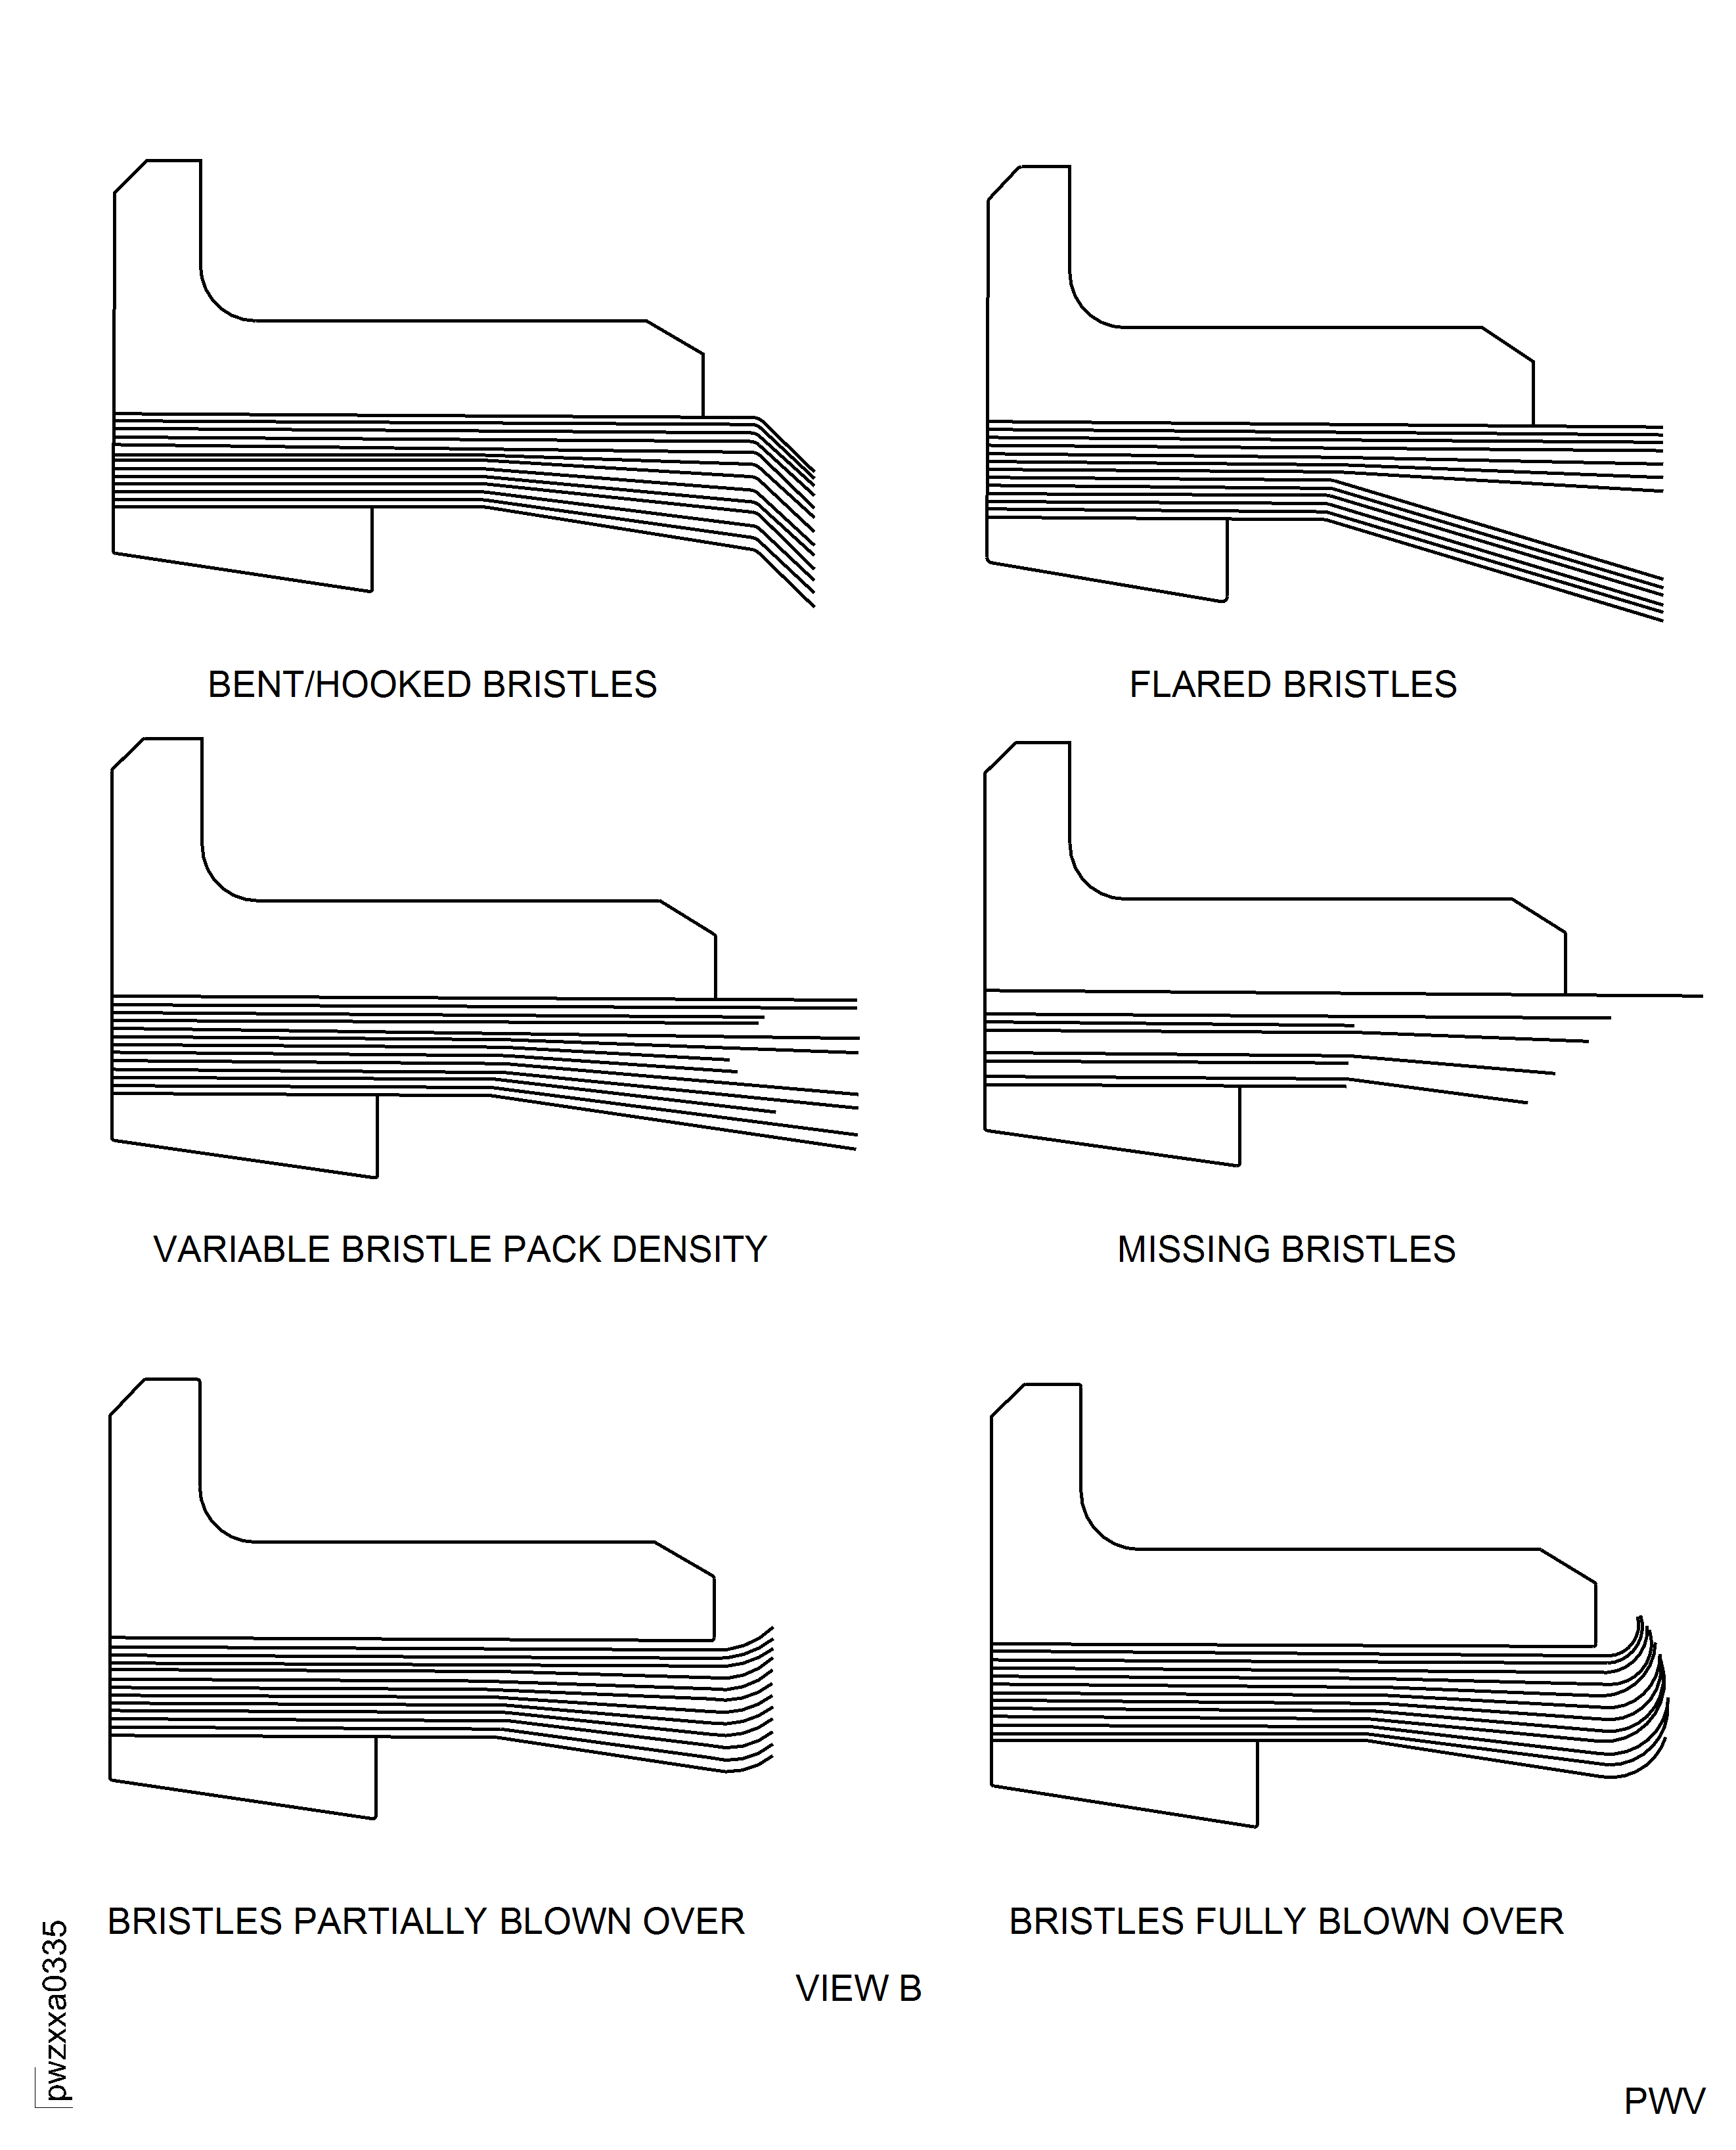
Examine the brush seal at Location 4 of Figure for bent, hooked, flared, worn, stray bristles, missing bristles, variable bristle pack density, and partial blowover. Full blowover is not acceptable. Refer to Figure.
Repair, VRS3771 TASK 72-44-10-300-027 (REPAIR-027).
Other than Step.
Examine the brush seal diameter at Location X. Refer to Figure.
Repair, VRS3851 TASK 72-44-10-300-029 (REPAIR-029).
If the diameter is not below 26.632 in. (676.453 mm).
Examine the support assembly diameter at Location Y. Refer to Figure.
SUBTASK 72-44-10-220-204 Examine the reusable brush seal (01-025) and support assembly for damage or wear, if it was removed from the assembly for cleaning
Refer to Figure.
Replace by TASK 72-44-10-040-001 (DISASSEMBLY) and TASK 72-44-10-400-001 (ASSEMBLY) or Repair, VRS3678 TASK 72-44-10-300-021 (REPAIR-021).
Other than Step.
Axial dimension.
Examine the support assembly at Location 1 for the axial dimension.
SUBTASK 72-44-10-220-188 Examine the Stage 1 HPT Support Assembly (01-010) for Axial Dimension with the Stage 1 HPT Seal Installed
Remove the Stage 1 HPT seal from the Stage 1 HPT support assembly by the procedures given in TASK 72-44-10-040-001 (DISASSEMBLY).
SUBTASK 72-44-10-040-052 Remove the Stage 1 HPT Support Seal (01-060) from the Stage 1 HPT Support Assembly (01-010)
NOTE
The stage 1 HPT seal must be removed to do the remaining inspections.Refer to Figure.
Clean the part. Refer to TASK 72-44-10-100-001 (CLEANING-000).
Repair, VRS3650 TASK 72-44-10-300-022 (REPAIR-022).
Cracks that extend outward from the front flange bolt hole surface, at location 1, which are less than 0.060 in. (1.52 mm) long
Repair, VRS3767 TASK 72-44-10-300-026 (REPAIR-026).
Cracks that extend outward from the front flange bolt hole surface, at location 1, which are greater than 0.060 in. (1.52 mm) long at a maximum of eight bolt holes within a 30 degree quadrant with a minimum 60 degree interval between quadrants.
Repair, VRS3637 TASK 72-44-10-300-020 (REPAIR-020).
Cracks at Location 11.
Do the test for cracks on the part that is given below. Look carefully at the bolt hole flange area at Location 1, the rear flange at Location 11, all the fillet radii at Locations 1, 5, 6 and 7 and the rear inner diameter lip at Location 4. Use the applicable penetrant inspection procedure.
PART IDENT
TASK/SUBTASK
Stage 1 HPT support assembly
(Dip or electrostatic spray)
SUBTASK 72-44-10-230-074 Examine the Stage 1 HPT Support Assembly (01-010) for Cracks
Refer to Figure.
Repair, VRS3273 TASK 72-44-10-300-003 (REPAIR-003).
Repair, VRS3273 TASK 72-44-10-300-003 (REPAIR-003).
Not more than 0.015 in. (0.38 mm) in depth.
Repair, VRS3559 TASK 72-44-10-300-019 (REPAIR-019).
Contact wear/fretting more than 0.015 in. (0.38 mm) deep at Location 8. Damage must not be longer than 0.550 in. (13.97 mm) and must not extend into Location 7 fillet radius.
Repair, VRS3559 TASK 72-44-10-300-019 (REPAIR-019).
Contact wear/fretting more than 0.015 in. (0.38 mm) deep at Location 9. Damage must not be longer than 0.200 in. (5.08 mm), must not extend into Location 7 fillet radius and must not extend into location 10 bolt holes.
Scratches, contact wear, nicks, surface damage (burrs).
Repair, VRS3273 TASK 72-44-10-300-003 (REPAIR-003).
Dents on the outer diameter flange at Location 1.
Repair, VRS3273 TASK 72-44-10-300-003 (REPAIR-003) or Repair, VRS3619 TASK 72-44-10-300-024 (REPAIR-024).
Dents.
Corrosion and nicks.
Examine the support assembly for contact wear, corrosion, dents, nicks and scratches.
SUBTASK 72-44-10-220-189 Examine the Stage 1 HPT Support Assembly (01-010) for Contact Wear, Corrosion, Dents and Scratches
Refer to Figure.
SUBTASK 72-44-10-220-190 Examine the Stage 1 HPT Support Assembly (01-010) for Wear on the Rear Seal Groove
Refer to Figure.
Repair, VRS3460 TASK 72-44-10-300-006 (REPAIR-006).
Plugged holes.
Examine the support assembly at Location 3 for plugged metering holes.
SUBTASK 72-44-10-220-191 Examine the Stage 1 HPT Support Assembly (01-010) for Plugged Metering Holes
Refer to Figure.
Repair, VRS3129 TASK 72-44-10-300-007 (REPAIR-007).
Other than Step.
Plasma coat that is chipped or missing.
Examine the support assembly at Location 2 for plasma spray coat that is chipped or missing.
SUBTASK 72-44-10-220-192 Examine the Stage 1 HPT Support Assembly (01-010) for Plasma Spray Coat that is Chipped or Missing on the Outer Rear Diameter
Refer to Figure.
Repair, VRS3766 TASK 72-44-10-300-025 (REPAIR-025).
Repair, VRS3766 TASK 72-44-10-300-025 (REPAIR-025)
Other than (a).
Plasma coat that is chipped or missing.
Examine the support assembly at Locations 5 and 12 for plasma spray coat that is chipped, worn or missing.
SUBTASK 72-44-10-220-193 Examine the Stage 1 HPT Support Assembly (01-010) for Plasma Spray Coat that is Chipped, Worn or Missing on the Rear Inner Flange
Refer to Figure.
NOTE
If the measured dimensions in a free condition are not satisfactory, a held condition is permitted. All dimensions apply when Surface F is flat by 0.005 in. (0.13 mm) and Diameter G maintains a clearance envelope of 28.242 in. (717.35 mm) in a free or held condition. Hold the support assembly only on Surfaces F and H and on Diameter G.Repair, VRS3766 TASK 72-44-10-300-025 (REPAIR-025).
Other than Step.
Parallel.
Examine the support assembly at Location 3 for parallelism.
SUBTASK 72-44-10-220-194 Examine the Stage 1 HPT Support Assembly (01-010) Rear Flange Inner Diameter for Parallelism
Refer to Figure.
NOTE
The diameter at location 2253 is offset as shown in FigureIf the measured dimensions in a free condition are not satisfactory, a held condition is permitted.All dimensions apply when Surface F is flat by 0.005 in. (0.13 mm) and Diameter G maintains a clearance envelope of 28.242 in. (717.35 mm) in a free or held condition.Hold the support assembly only on Surfaces F and H and on Diameter G.Repair, VRS3129 TASK 72-44-10-300-007 (REPAIR-007).
NOTE
This part can be used only if the mating part has a diameter that will result in a fit of Reference No. 2252 and 2253. Refer to TASK 72-00-44-420-001-001 (INSTALLATION-001) and TASK 72-00-45-420-001-B01 (INSTALLATION-001, CONFIG-002).Minimum diameter 28.190 in. (716.03 mm) at Location 2253.
Repair, VRS3270 TASK 72-44-10-300-008 (REPAIR-008).
Minimum diameter 28.190 in. (716.03 mm) at Location 2252.
Examine the support assembly at Locations 2252 and 2253 for the outer diameter on the front and rear flanges.
SUBTASK 72-44-10-220-195 Examine the Stage 1 HPT Support Assembly (01-010) for the Outer Diameter on the Front and Rear Flanges
Refer to Figure.
Other than Step.
Examine the support assembly at Location 1 for front flange thickness.
Refer to Repair, VRS3559 TASK 72-44-10-300-019 (Repair-019) or Repair, VRS3818 TASK 72-44-10-300-028 (Repair-028).
Other than Step.
Examine the support assembly at Location 4 for forward inner flange thickness.
SUBTASK 72-44-10-220-196 Examine the Stage 1 HPT Support Assembly (01-010) for the Outer Diameter Flange and the Forward Inner Flange Thickness
Refer to Figure.
NOTE
If the measured dimensions in a free condition are not satisfactory, a held condition is permitted. All dimensions apply when Surface F is flat by 0.005 in. (0.13 mm) and Diameter G maintains a clearance envelope of 28.242 in. (717.35 mm) in a free or held condition. Hold the support assembly only on Surfaces F and H and on Diameter G.Other than Step.
Examine the support assembly at Location 2001 at the gage point for the rear seal diameter.
SUBTASK 72-44-10-220-197 Examine the Stage 1 HPT Support Assembly (01-010) for the Rear Seal Diameter
Refer to Figure.
Other than Step.
Axial dimension.
NOTE
If the measured dimensions in a free condition are not satisfactory, a held condition is permitted. All dimensions apply when Surface F is flat by 0.005 in. (0.13 mm) and Diameter G maintains a clearance envelope of 28.242 in. (717.35 mm) in a free or held condition. Hold the support assembly only on Surfaces F and H and on Diameter G.Examine the support assembly at Location 2 for the axial dimension.
SUBTASK 72-44-10-220-198 Examine the Stage 1 HPT Support Assembly (01-010) for the Axial Dimension from the Rear Face of the Front Flange to the Rear Face of the Rear Vane Groove
Clean the part. Refer to TASK 72-44-10-100-000 (CLEANING-000).
SUBTASK 72-44-10-230-075 Examine the Stage 1 HPT Seal (01-060) for Cracks
Refer to Figure.
Repair, VRS3678 TASK 72-44-10-300-021 (REPAIR-021).
More than 10 percent of plasma spray coating on contact face.
Chipped and flaked.
Examine the Stage 1 HPT seal at Location 6 for chipped or flaked plasma spray coating on the rear contact face.
SUBTASK 72-44-10-220-199 Examine the Stage 1 HPT Seal (01-060) for Chipped or Flaked Plasma Spray Coating on the Rear Contact Face
Refer to Figure.
Other than Step.
Flat and distortion.
Examine the Stage 1 HPT seal at Location 1 for the 0.305 in. and 0.315 in. (7.75 mm and 8.00 mm) axial height shape at 25 equally spaced positions in a free condition for flat and distortion.
Other than Step
Seal mark.
Examine the seal at Location 2 for a seal mark that is continuous around the full circumference on the outer diameter rear contact face.
SUBTASK 72-44-10-220-201 Examine the Stage 1 HPT Seal (01-060) for Flat and Distortion of the Original Axial Shape in a Free Condition on the Outer Diameter Rear Contact Face
Refer to Figure.
NOTE
The seal may be measured in a free or held condition. If the seal is measured in a held condition, hold the seal at Surface E. The measurement in a held condition can be done with the seal installed on the Stage 1 Support Assembly.Repair, VRS3678 TASK 72-44-10-300-021 (REPAIR-021).
NOTE
When you use a 10X magnification glass, the coating must look more porous and rougher than the base material which will look smooth and constant.
If the dimension is less than 0.309 in. (7.85 mm).
Axial height.
Examine the Stage 1 HPT seal at Location 1 for the axial height dimension on the outer diameter rear contact face.
Repair, VRS3678 TASK 72-44-10-300-021 (REPAIR-021).
Other than Step.
Wear.
Examine the seal at Location 2 for wear through the coating at the seal mark that is continuous around the full circumference on the outer diameter rear contact face. Use a 10X magnification glass.
SUBTASK 72-44-10-220-202 Examine the Stage 1 HPT Seal (01-060) for the Axial Height Dimension and Wear on the Outer Diameter Rear Contact Face
Refer to Figure.
NOTE
The seal conical gage point diameter at Location 2001 is 26.960 in. to 26.964 in. (684.78 mm to 684.89 mm). Refer to the following dimensions:Location 3 is the 24 to 26 degree conical surface.Location 4 is the 0.078 in. (1.98 mm) gage point dimension.Other than Step.
Wear.
Examine the Stage 1 HPT seal at Location 2001 for wear on the inner conical diameter.
SUBTASK 72-44-10-220-203 Examine the Stage 1 HPT Seal (01-060) for Wear on the Inner Conical Diameter
Install the Stage 1 HPT seal on the Stage 1 HPT support assembly by the procedures given in TASK 72-44-10-440-001 (ASSEMBLY).
SUBTASK 72-44-10-440-054 Install the Stage 1 HPT Seal (01-060) on the Stage 1 HPT Support Assembly (01-010)
Install the brush seal on the Sstage 1 HPT Support Sssembly per Repair, VRS3771 TASK 72-44-10-300-027 (REPAIR-027).
SUBTASK 72-44-10-440-055 If removed for cleaning, install the brush seal on the Stage 1 HPT Support Assembly (01-010).
Figure: Stage 1 HPT Support Assembly Inspection Locations
Stage 1 HPT Support Assembly Inspection Locations
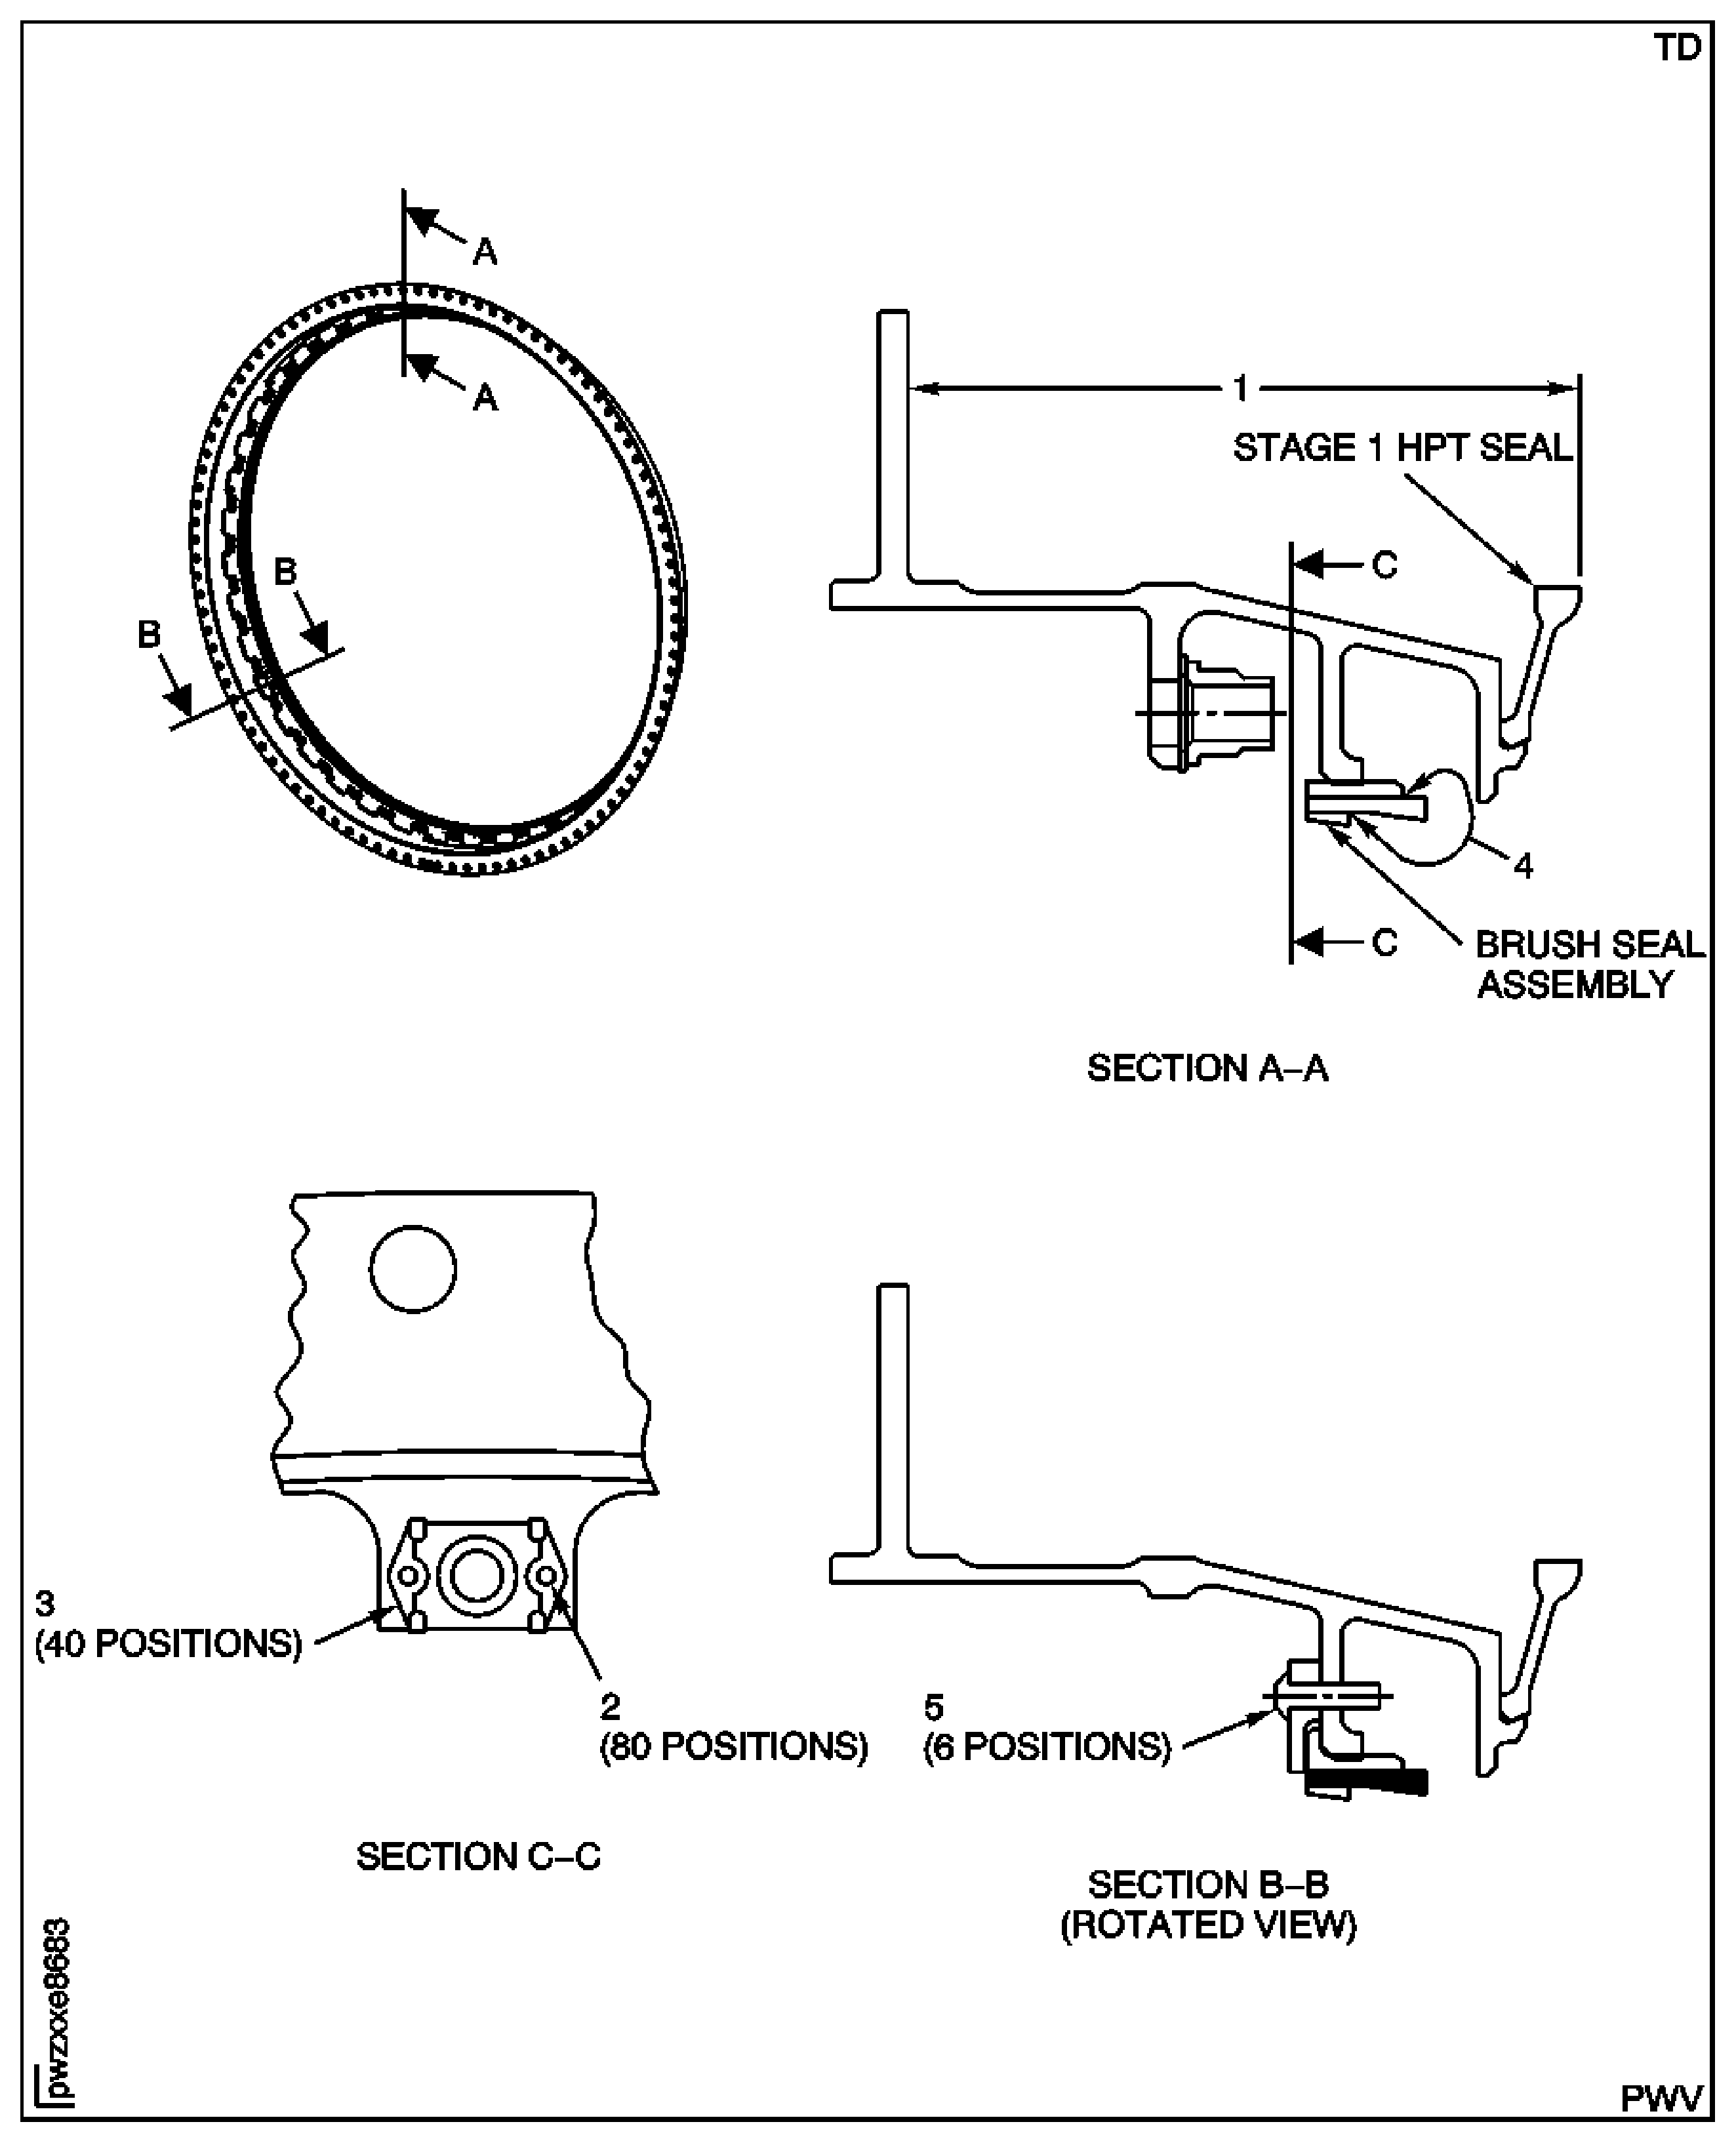
Figure: Stage 1 HPT Support Assembly Inspection Locations
Stage 1 HPT Support Assembly Inspection Locations
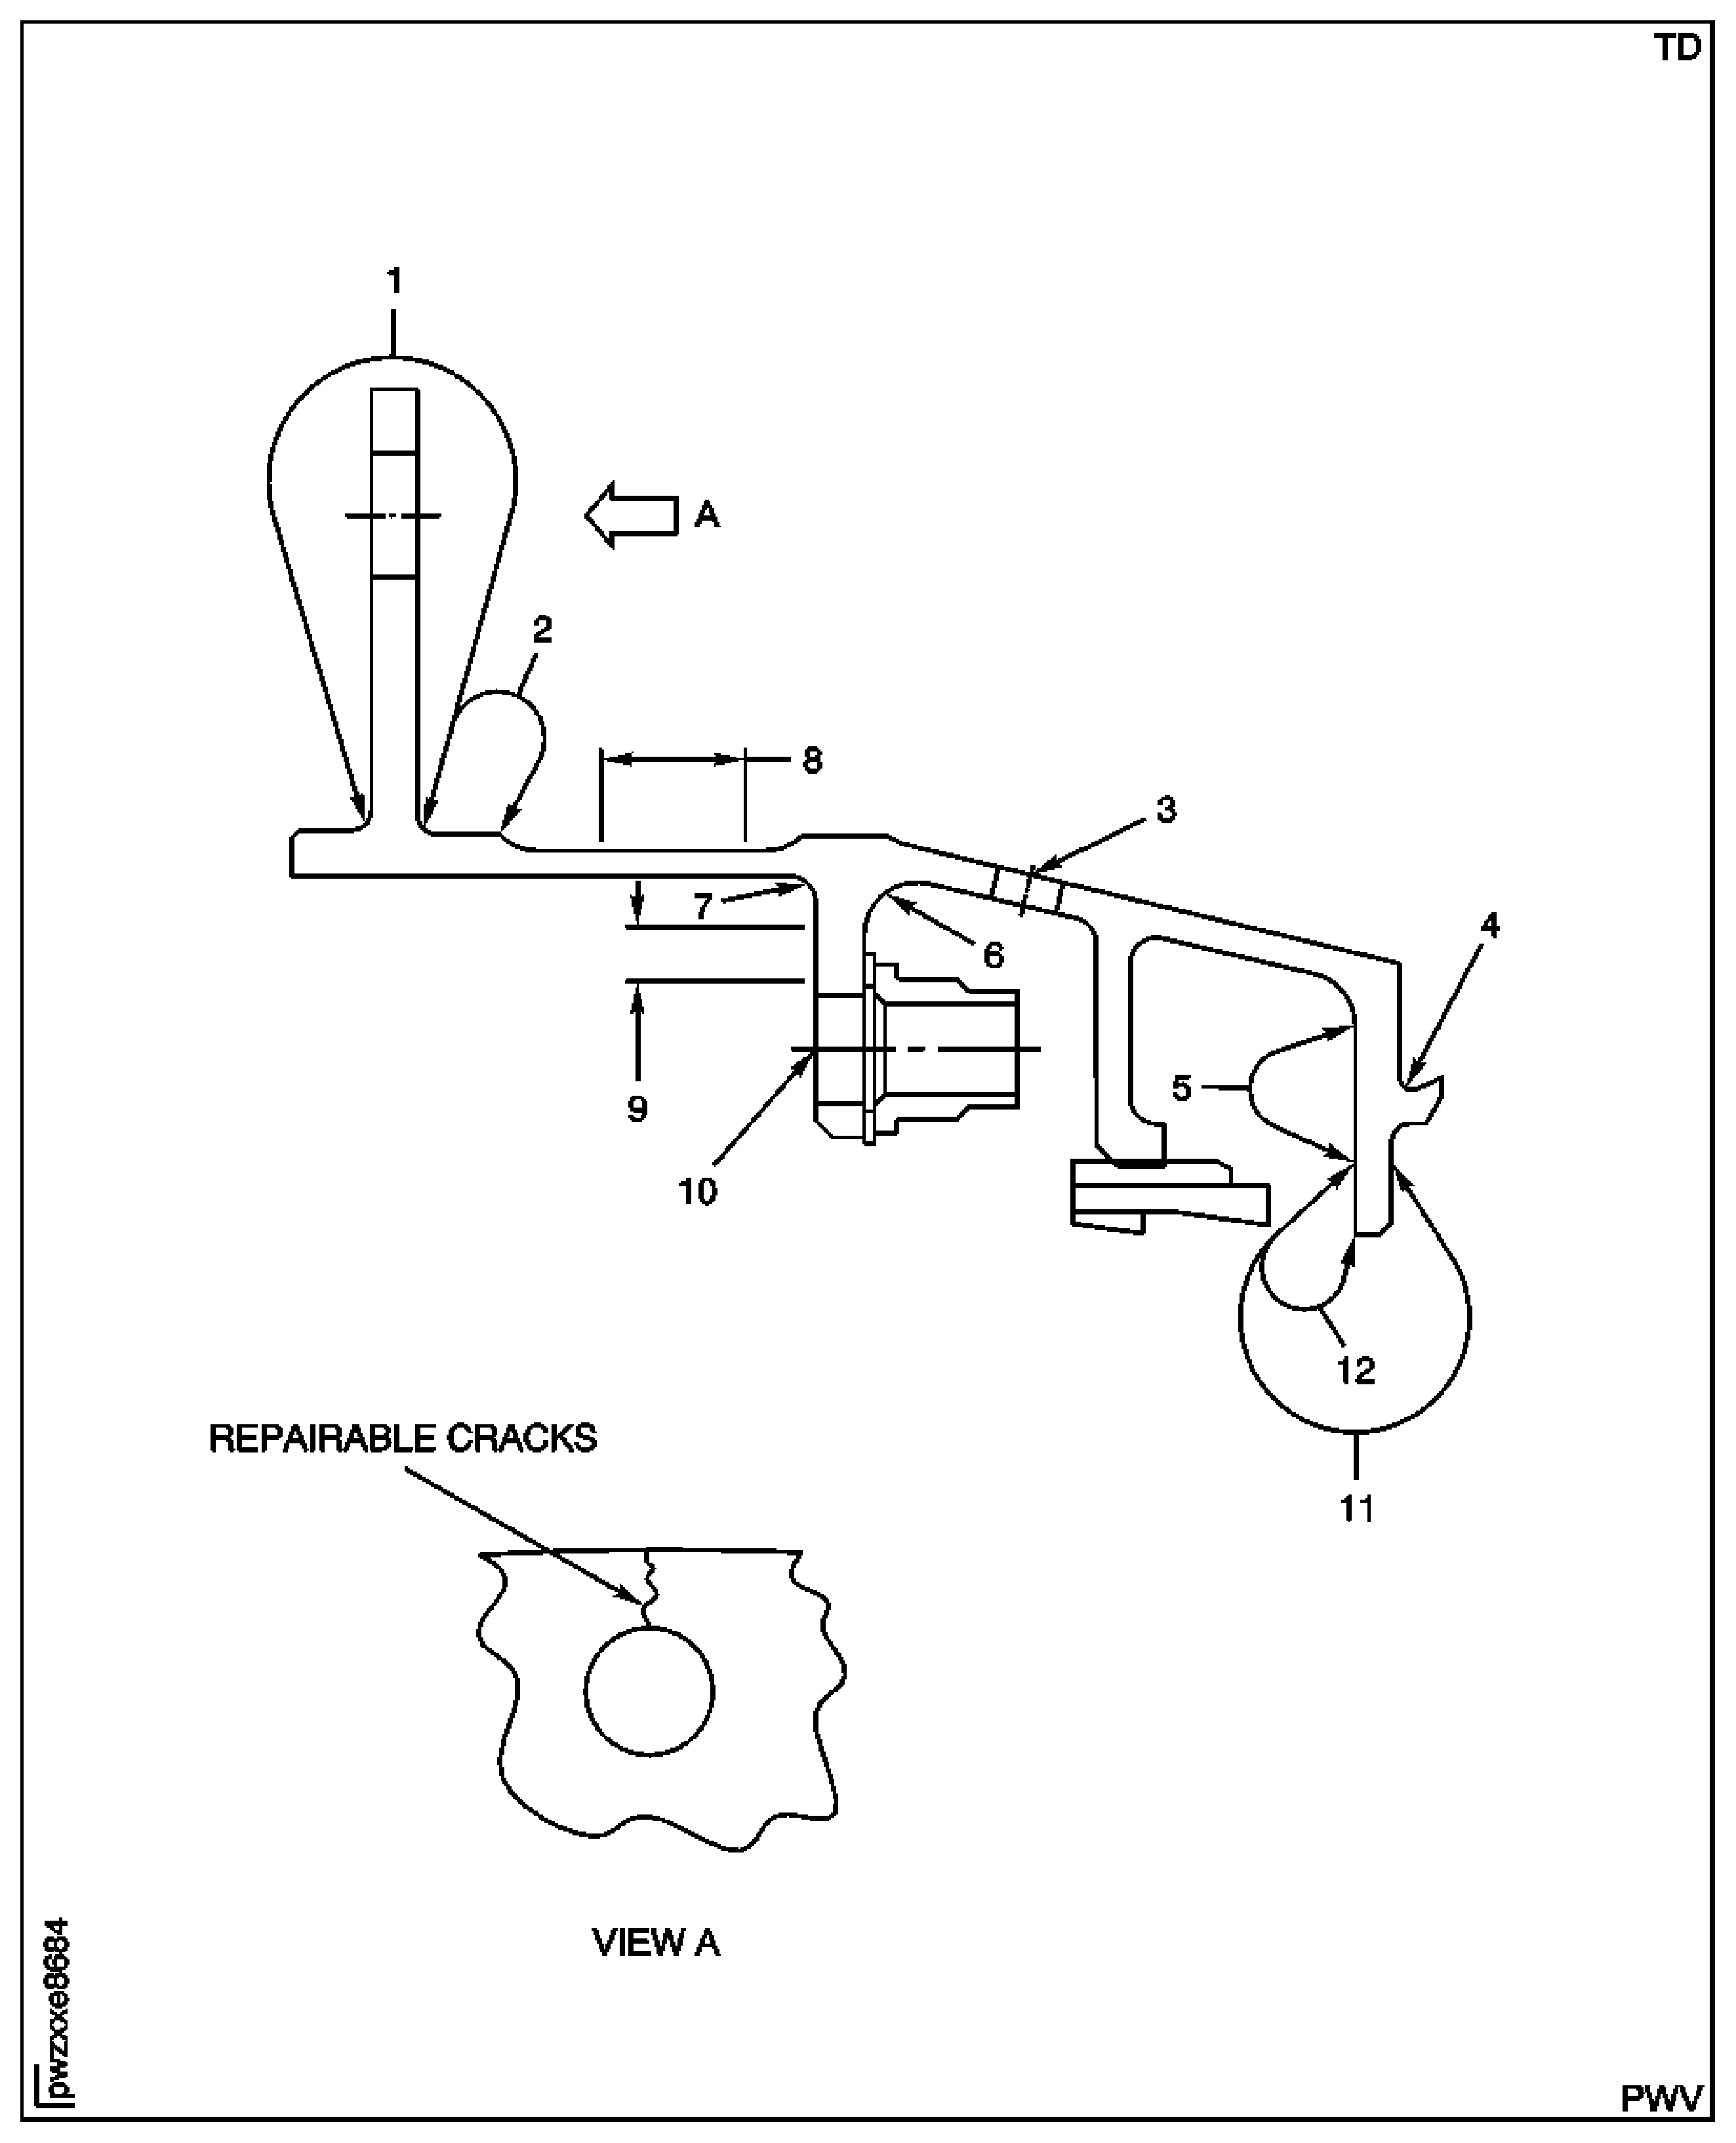
Figure: Stage 1 HPT Support Assembly Inspection Locations
Stage 1 HPT Support Assembly Inspection Locations
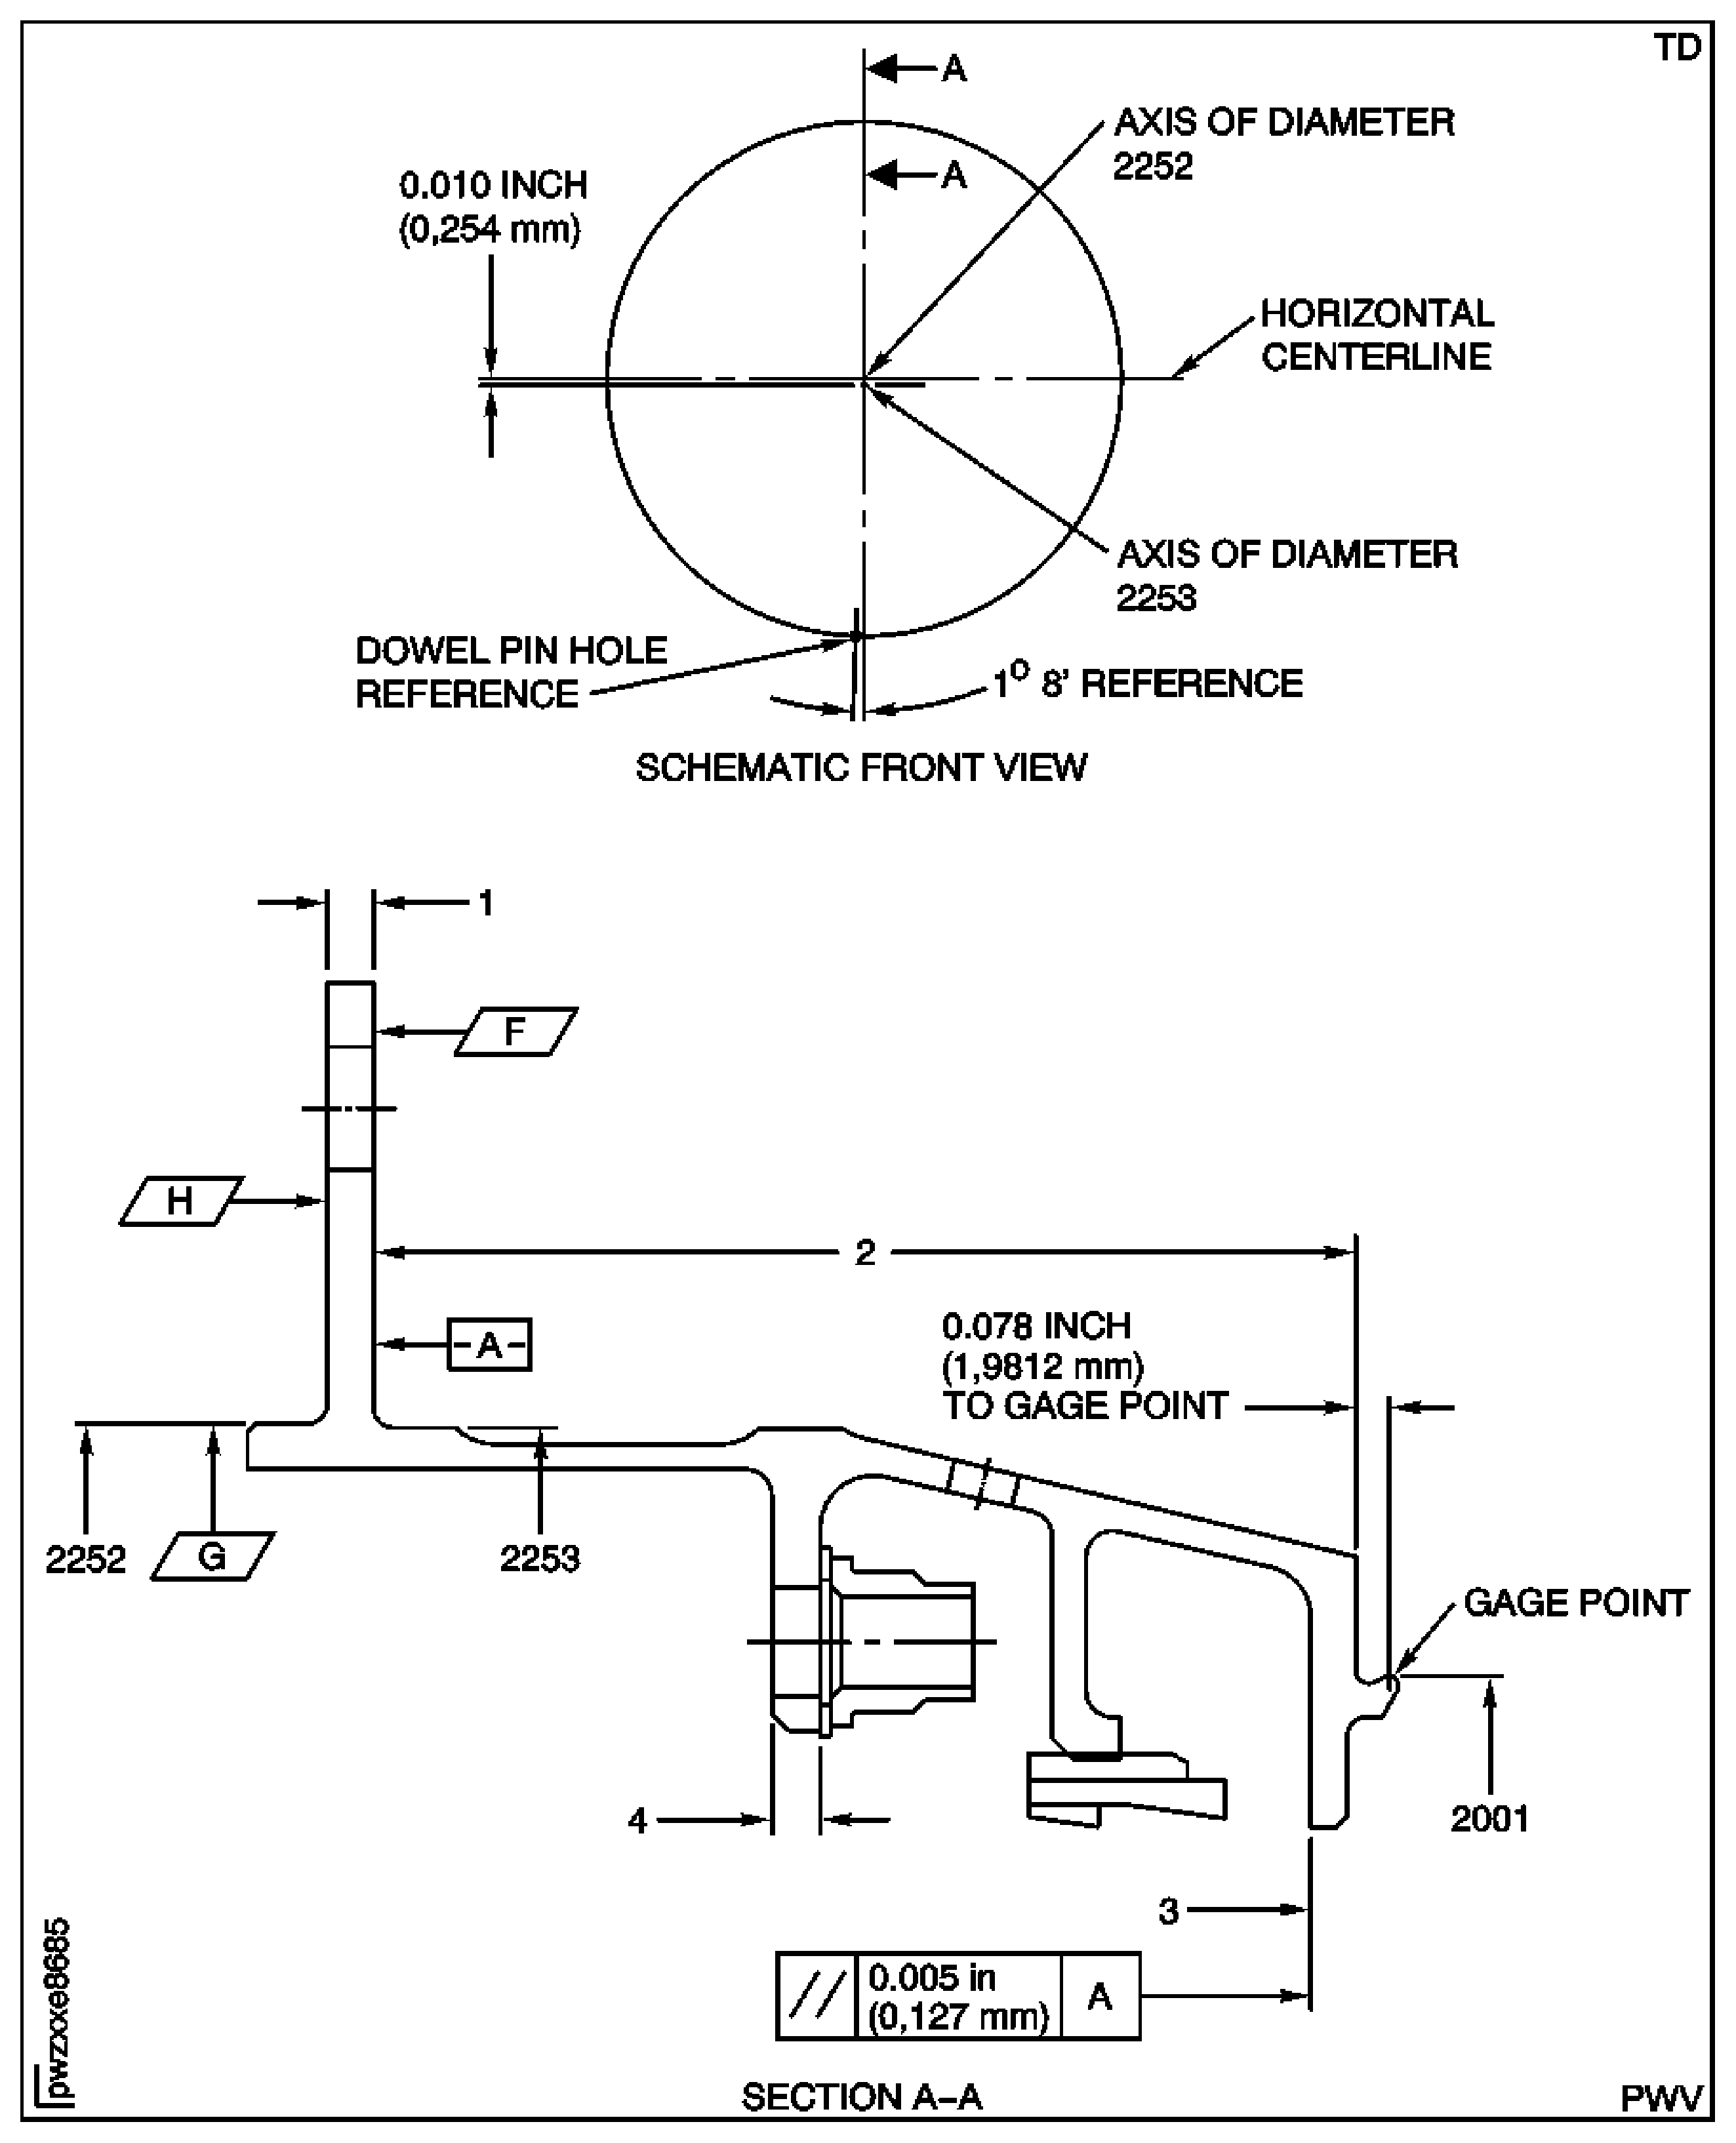
Figure: Stage 1 HPT Seal Inspection Locations
Stage 1 HPT Seal Inspection Locations
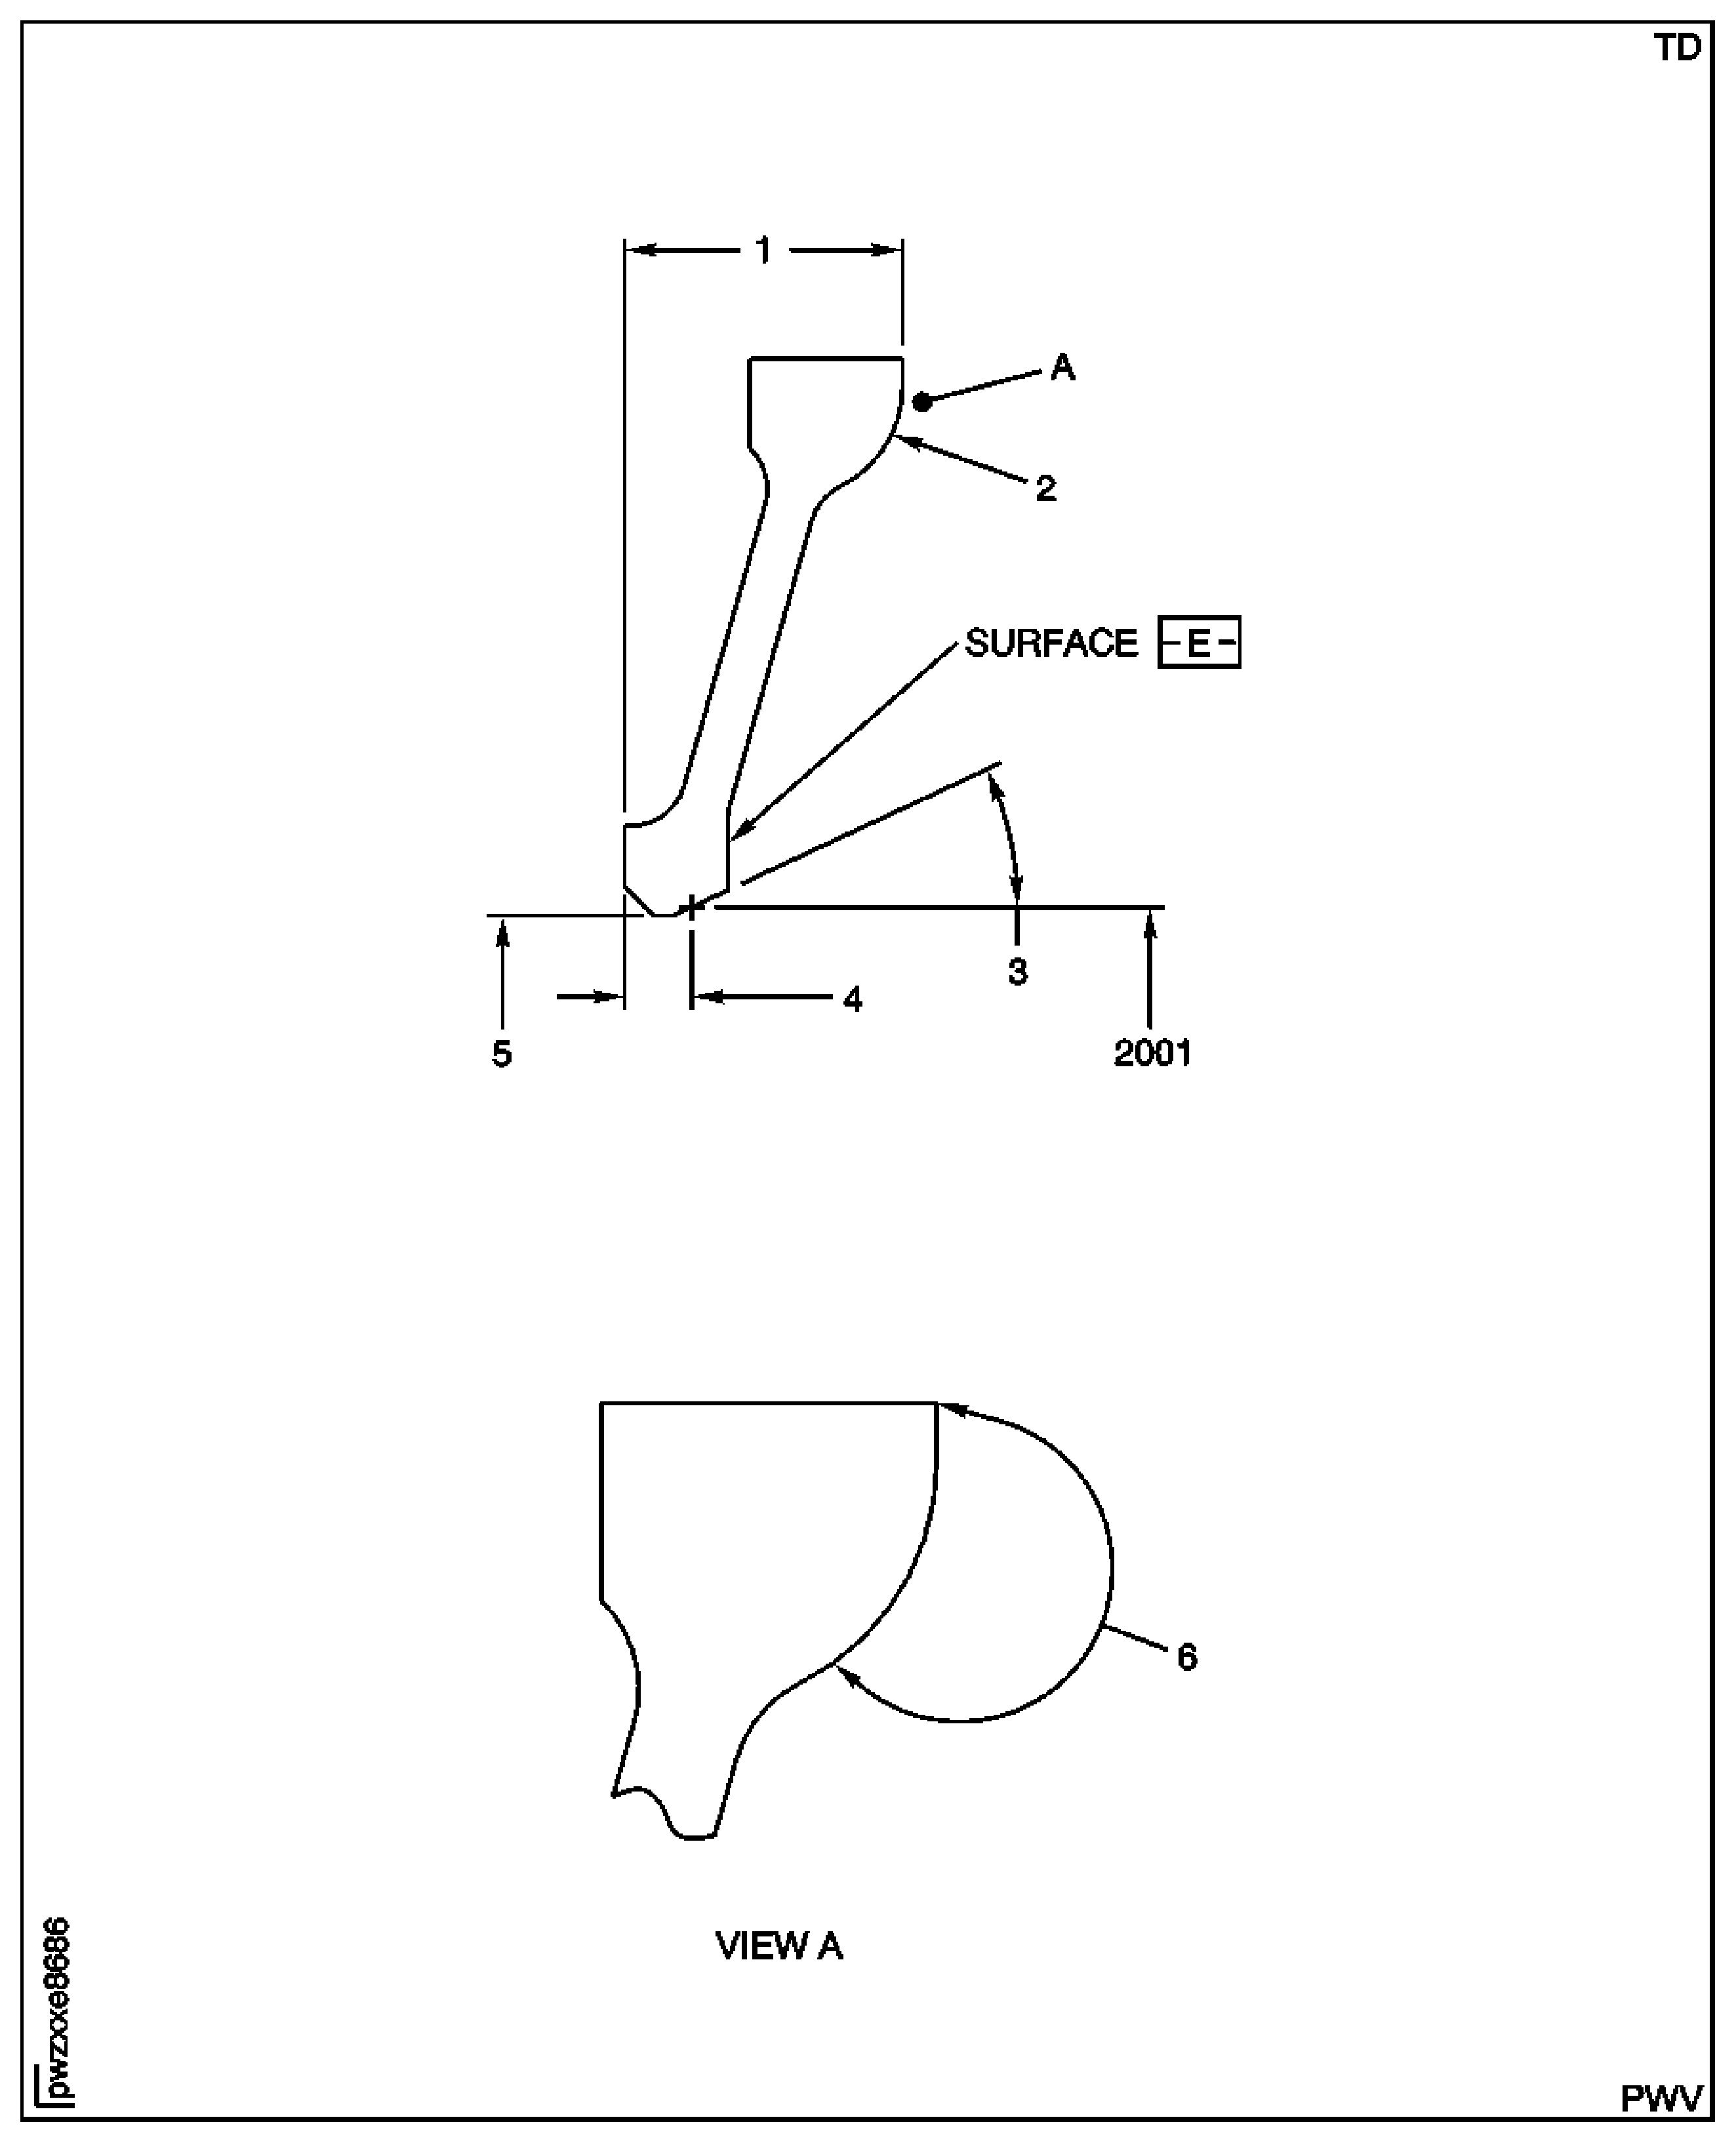
Figure: Brush Seal and Support Assembly Inspection Locations
Brush Seal and Support Assembly Inspection Locations
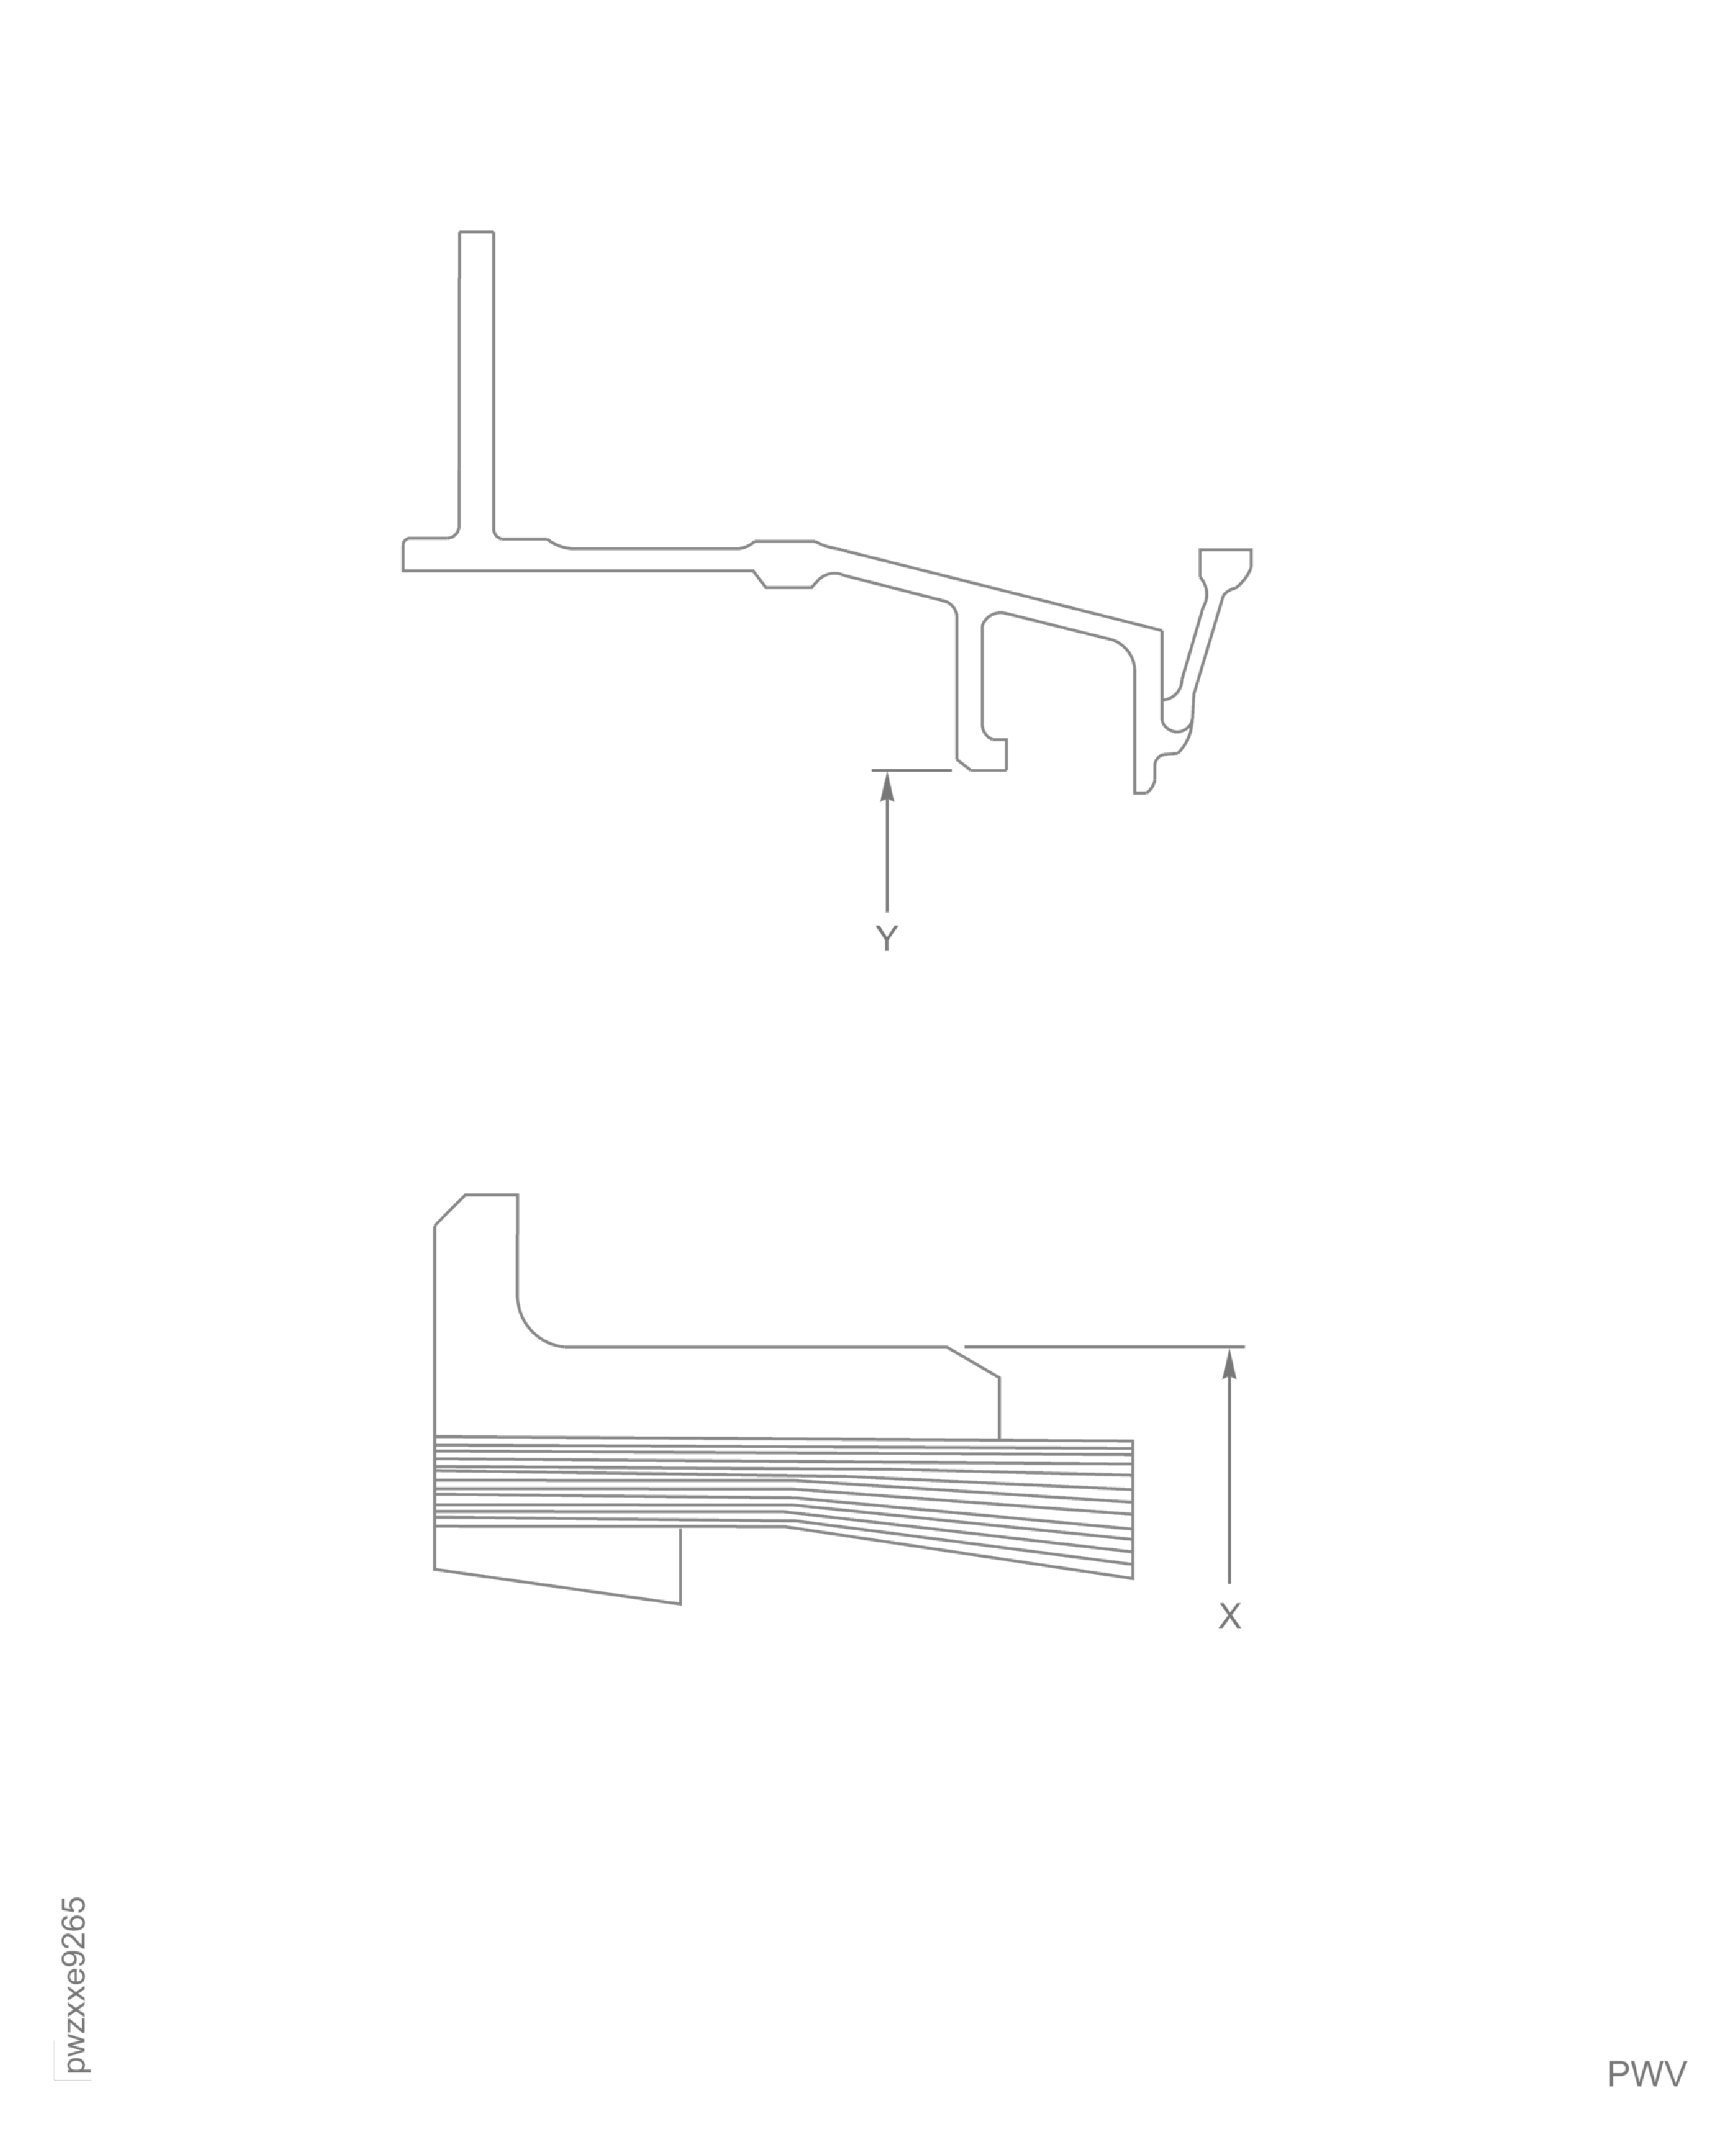
Figure: Brush Seal Inspection Locations
Brush Seal Inspection Locations
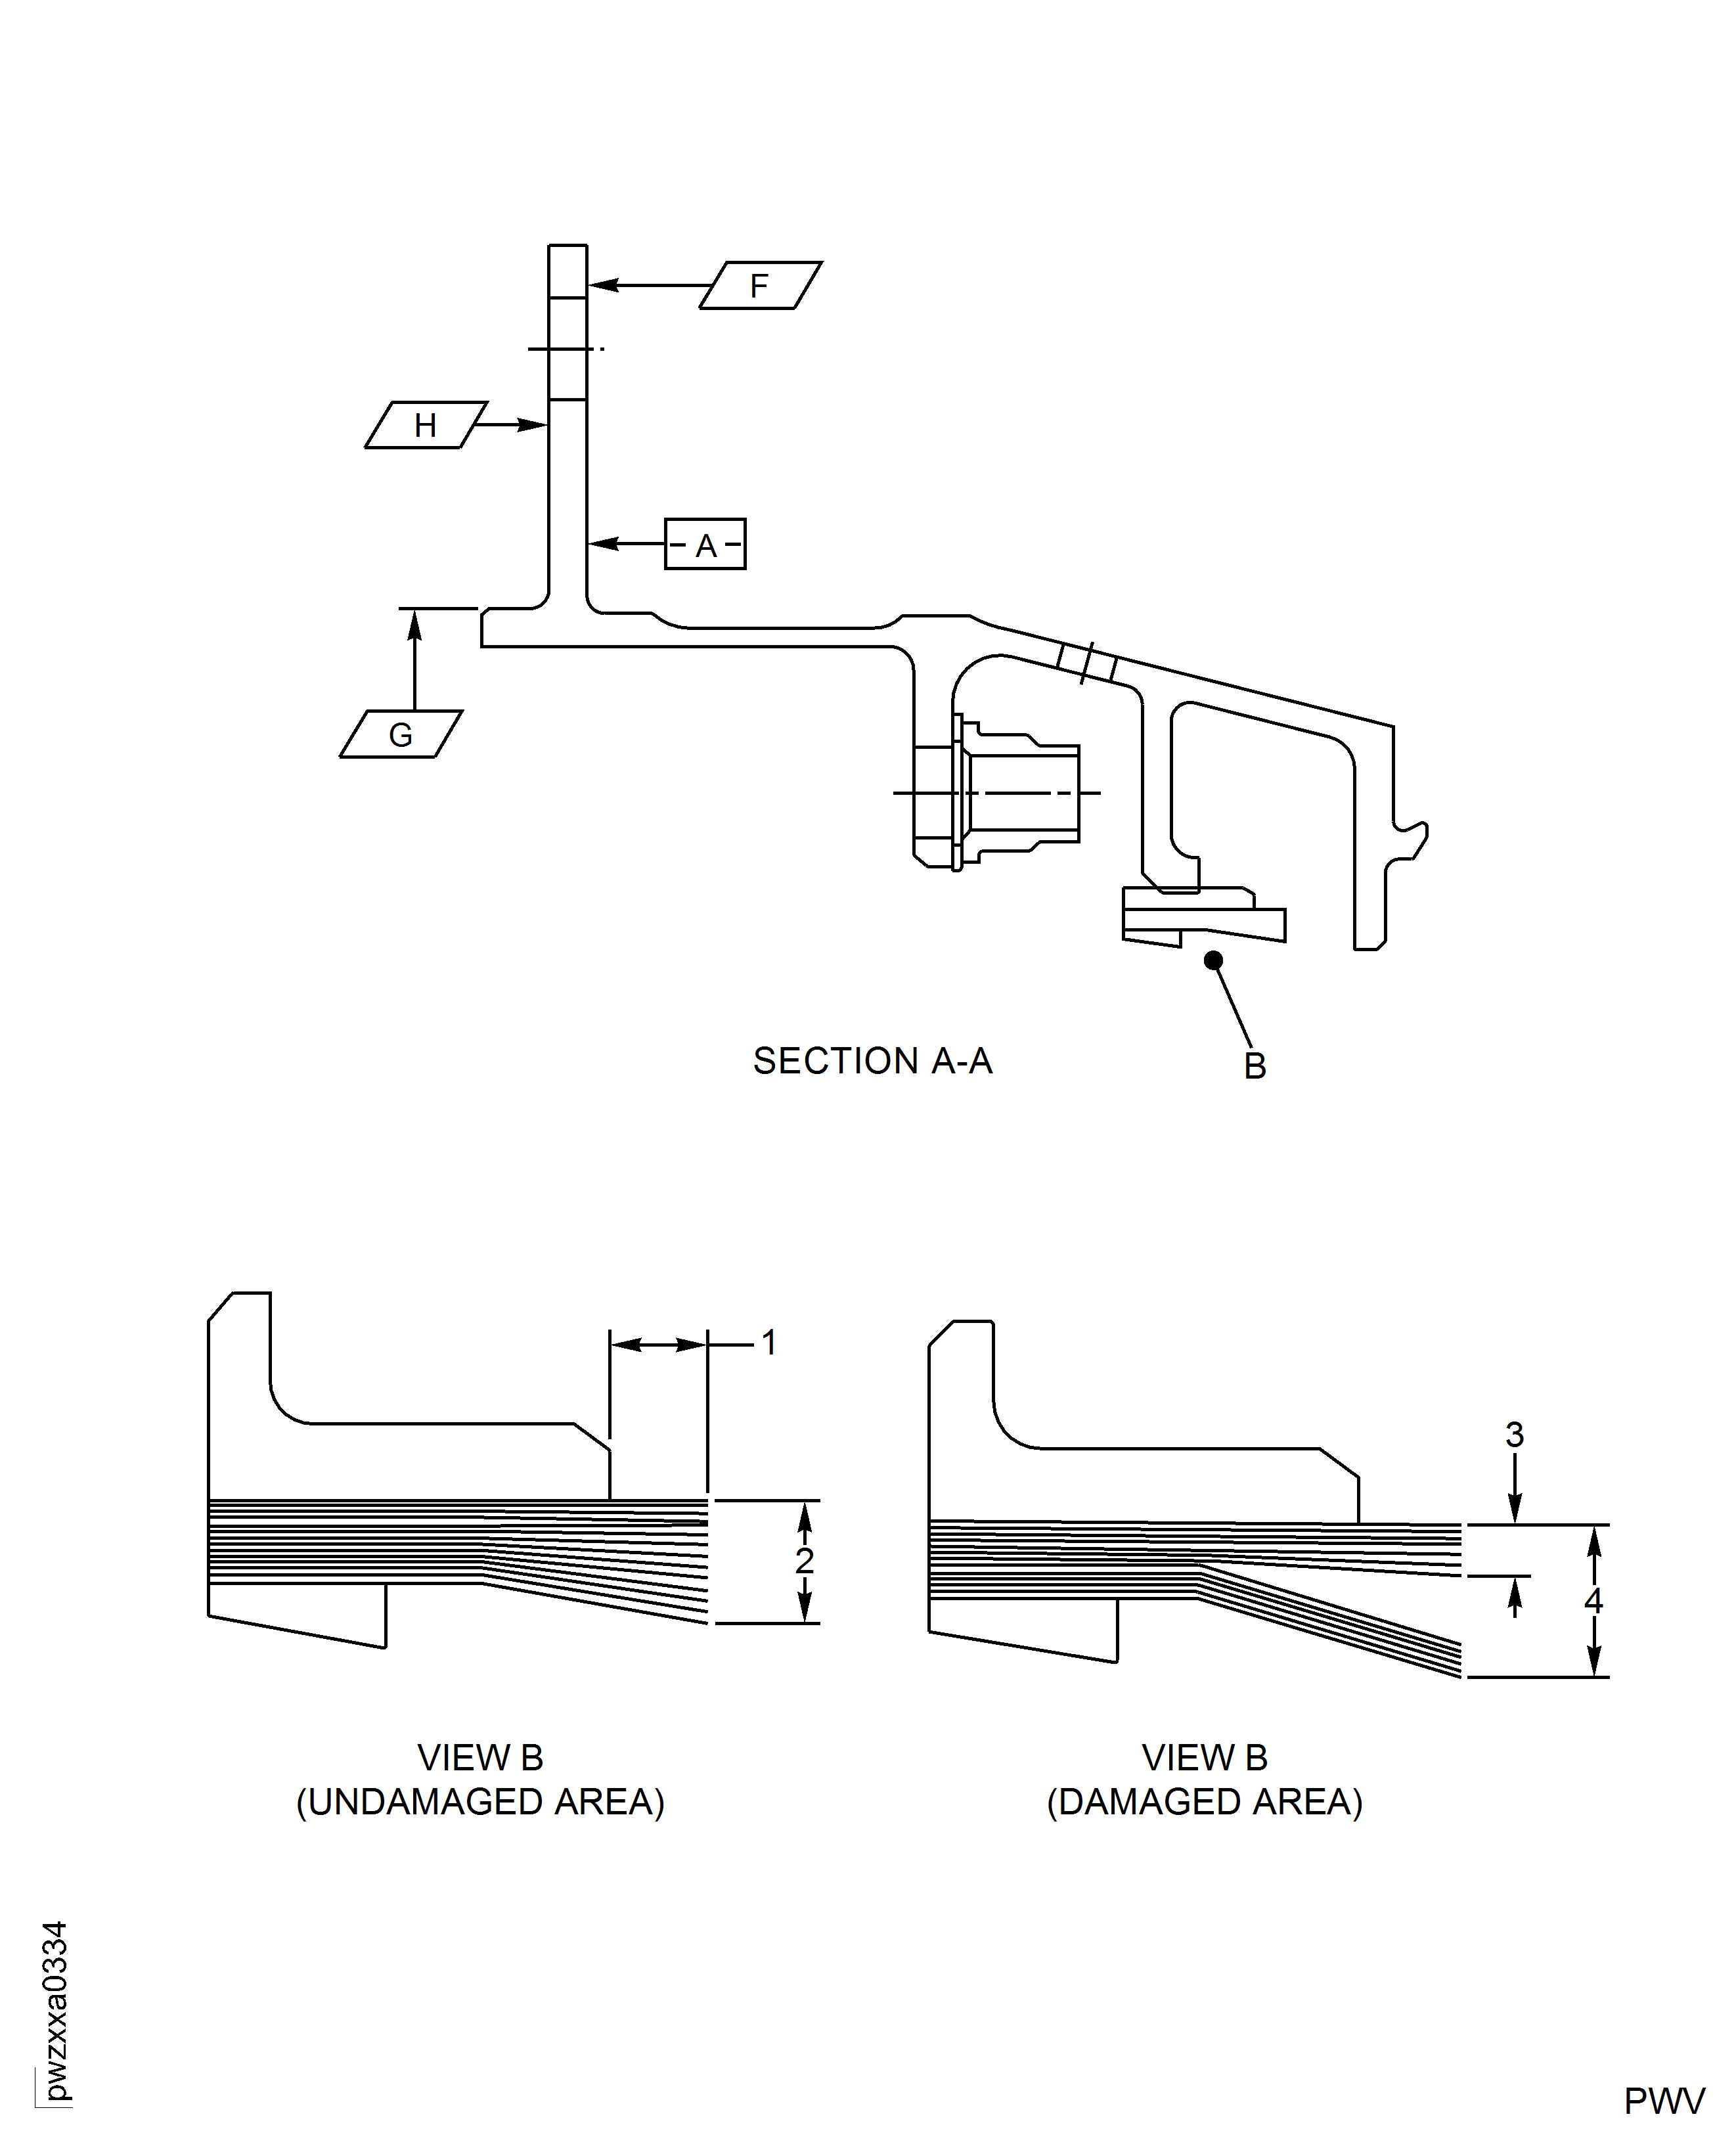
Figure: Brush Seal Inspection Conditions
Brush Seal Inspection Conditions
