Export Control
EAR Export Classification: Not subject to the EAR per 15 C.F.R. Chapter 1, Part 734.3(b)(3), except for the following Service Bulletins which are currently published as EAR Export Classification 9E991: SBE70-0992, SBE72-0483, SBE72-0580, SBE72-0588, SBE72-0640, SBE73-0209, SBE80-0024 and SBE80-0025.Copyright
© IAE International Aero Engines AG (2001, 2014 - 2021) The information contained in this document is the property of © IAE International Aero Engines AG and may not be copied or used for any purpose other than that for which it is supplied without the express written authority of © IAE International Aero Engines AG. (This does not preclude use by engine and aircraft operators for normal instructional, maintenance or overhaul purposes.).Applicability
All
Common Information
TASK 72-44-20-200-001-B01 HPT Stage 1 Vane - Examine, Inspection-001
General
This TASK gives the procedure for the inspection of the stage 1 HPT vane assembly. For the other stage 1 HPT vane cluster assembly parts refer to TASK 72-44-20-200-000 (INSPECTION-000).
Fig/item numbers in parentheses in the procedure agree with those used in the IPC.
The policy that is necessary for inspection is given in the SPM TASK 70-20-00-200-501.
All the parts must be cleaned before any part is examined. Refer to the SPM TASK 70-10-00-100-501.
All parts must be visually examined for damage, corrosion and wear. Any defects that are not identified in the procedure must be referred to IAE.
A ** following repair reference in this inspection indicates that the repair is not yet published in the current revision of the manual and the part must be rejected. Contact IAE for additional information concerning FAA approved repair date.
The procedure for those parts which must have a crack test is given in SUBTASK 72-44-20-230-054. Do the test before the part is visually examined.
Do not discard any part until you are sure there are no repairs available. Refer to the instructions in Repair before a discarded part is used again or oversize parts are installed.
Parts which should be discarded can be held although no repair available. The repair of a discarded part could be shown to be necessary at a later date.
All parts must be examined to make sure that all the repairs have been completed satisfactorily.
The practices and processes referred to in the procedure by the TASK numbers are in the SPM.
References
Refer to the SPM for data on these items.
Definition of Damages, SPM TASK 70-02-02-350-501
Cleaning, SPM TASK 70-12-09-120-501
Air flow - Turbine Blades and Vanes, SPM TASK 70-72-01-720-501
Ultrasonic Clean all Metal (But not Magnesium), SPM TASK 70-13-01-100-501
Inspection of Parts, SPM TASK 70-20-00-200-501
NOTE
NOTE
Preliminary Requirements
Pre-Conditions
NONESupport Equipment
| Name | Manufacturer | Part Number / Identification | Quantity | Remark |
|---|---|---|---|---|
| Oven | LOCAL | Oven | (air furnace) | |
| IAE 2P16407 Airflow test fixture | 0AM53 | IAE 2P16407 | 1 | |
| IAE 2P16401 Airflow test master (platform) | 0AM53 | IAE 2P16401 | 1 | |
| IAE 2P16402 Airflow test master (front) | 0AM53 | IAE 2P16402 | 1 | |
| IAE 2P16403 Airflow test master (rear) | 0AM53 | IAE 2P16403 | 1 | |
| IAE 2P16404 Airflow test insert (platform) | 0AM53 | IAE 2P16404 | 1 | |
| IAE 2P16405 Airflow test insert (front) | 0AM53 | IAE 2P16405 | 1 | |
| IAE 2P16406 Airflow test insert (rear) | 0AM53 | IAE 2P16406 | 1 |
Consumables, Materials and Expendables
| Name | Manufacturer | Part Number / Identification | Quantity | Remark |
|---|---|---|---|---|
| CoMat 02-029 MASKING TAPE (CLOTH BACKING) | 0AM53 | CoMat 02-029 | ||
| CoMat 02-030 MASKING TAPE (CLOTH BACKING) | IE479 | CoMat 02-030 |
Spares
NONESafety Requirements
NONEProcedure
Clean the part. Refer toTASK 72-44-20-100-000 (CLEANING-000).
Repair, VRS3034 TASK 72-44-20-300-024 (REPAIR-024) or Repair, VRS3638 TASK 72-44-20-300-038 (REPAIR-038)
Examine the vane assembly airfoil surfaces (concave and convex sides) for axial and radial cracks, Figure.
Repair, VRS3034 TASK 72-44-20-300-024 (REPAIR-024), or Repair, VRS3638 TASK 72-44-20-300-038 (REPAIR-038, PAGE-901).
Other than Step.
Examine the vane assembly trailing edge convex sides for cracks. Cracks are only permitted at locations 1 and 2, Figure.
Repair, VRS3034 TASK 72-44-20-300-024 (REPAIR-024), or Repair, VRS3638 TASK 72-44-20-300-038 (REPAIR-038).
Other than Step.
Examine the vane assembly leading edge for cracks at location 2, Figure.
Repair, VRS3034 TASK 72-44-20-300-024 (REPAIR-024) or, Repair, VRS3638 TASK 72-44-20-300-038 (REPAIR-038)
Other than Step.
Examine the vane assembly leading edge platform fillet area at location 1, Figure.
Repair, VRS3034 TASK 72-44-20-300-024 (REPAIR-024) or, Repair, VRS3638 TASK 72-44-20-300-038 (REPAIR-038).
Examine the vane assembly inner and outer platforms for cracks, Figure.
Repair, VRS3541 TASK 72-44-20-300-022 (REPAIR-022) or, Repair, VRS3610 TASK 72-44-20-300-036 (REPAIR-036).
Cracks
Repair, VRS3541 TASK 72-44-20-300-022 (REPAIR-022) or, Repair, VRS3610 TASK 72-44-20-300-036 (REPAIR-036)
Cracks.
Examine the vane assembly insert and impingement covers for cracks at locations 1, 2, 3 and 4, Figure.
Repair, VRS3034 TASK 72-44-20-300-024 (REPAIR-024) or, Repair, VRS3638 TASK 72-44-20-300-038 (REPAIR-038).
Other than Step.
Cracks.
Examine the vane assembly for cracks in the feather seal slot plug welds at locations 1, 2 and 3, Figure.
SUBTASK 72-44-20-230-054-002 Examine the Stage 1 HPT Vane Assembly (01-240) for Cracks
Examine the vane assembly at locations 3, 7 and 11 Figure. for burn-through or material that is not there on the airfoil and platforms.
Repair, VRS3164 TASK 72-44-20-300-015 (REPAIR-015) or Repair, VRS3607 TASK 72-44-20-300-037 (REPAIR-037)**.
Repair, VRS3154 TASK 72-44-20-300-011 (REPAIR-011).
Other than Step.
Burns and erosion.
Examine the vane assembly at locations 4, 10 and 11 Figure.or burns and erosion on the airfoil, leading and trailing edges.
Repair, VRS3154 TASK 72-44-20-300-011 (REPAIR-011).
Burns and erosion.
Examine the vane assembly at locations 3 and 7 Figure for burns and erosion on the inner and outer platforms.
Repair, VRS3154 TASK 72-44-20-300-011 (REPAIR-011).
Nicks at locations 3, 4, 7, 10 and 11.
Repair, VRS3154 TASK 72-44-20-300-011 (REPAIR-011).
Other than Step.
Dents
Examine the vane assembly for dents and nicks on the airfoil, platforms, leading and trailing edges Figure.
SUBTASK 72-44-20-220-072 Examine the Stage 1 HPT Vane Assembly (01-240) Airfoils and Platforms
Refer to Figure.
Repair, VRS3145 TASK 72-44-20-300-013 (REPAIR-013) or, Repair, VRS3606 TASK 72-44-20-300-031 (REPAIR-031) and Repair, VRS3498 TASK 72-44-20-300-021 (REPAIR-021) or, Repair, VRS3609 TASK 72-44-20-300-032 (REPAIR-032).
NOTE
Repair VRS3498 is a vendor repair only to unplug holes/slots.
Plugging
NOTE
Repair VRS3498 is a vendor repair only to unplug holes/slots.Examine the vane assembly airfoil at location 8 (each side, all around), cooling air holes and the trailing edge at location 1 cooling air slots for plugging.
Repair, VRS3145 TASK 72-44-20-300-013 (REPAIR-013) or, Repair, VRS3606 TASK 72-44-20-300-031 (REPAIR-031) and Repair, VRS3498 TASK 72-44-20-300-021 (REPAIR-021) or, Repair, VRS3609 TASK 72-44-20-300-032 (REPAIR-032).
Other than Step.
Plugging
Examine the vane assembly platforms cooling air holes for plugging at locations 6 and 7. Do not examine the holes at locations 2, 3, 4 and 5.
SUBTASK 72-44-20-220-073 Examine the Stage 1 HPT Vane Assembly (01-240) Airfoil and Platform Cooling Air Holes/Slots for Plugging
Refer to Figure.
Repair, VRS3541 TASK 72-44-20-300-022 (REPAIR-022) or, Repair, VRS3610 TASK 72-44-20-300-036 (REPAIR-036).
Plugging and unwanted material.
Examine the vane assembly for unwanted material and plugged cooling air holes on all the inserts and impingement covers at locations 1, 2, 3 and 4.
SUBTASK 72-44-20-220-074 Examine the Stage 1 HPT Vane Assembly (01-240) for Unwanted Material and Plugging on the Front and Rear Inserts and Platform Impingement Covers
Refer to Figure.
Repair, VRS3164 TASK 72-44-20-300-015 (REPAIR-015) or, Repair, VRS3607 TASK 72-44-20-300-037 (REPAIR-037)** and VRS3034 TASK 72-44-20-300-024 (REPAIR-024) or, Repair, VRS3638 TASK 72-44-20-300-038 (REPAIR-038).
Other than Step.
Examine the vane assembly platforms for chipped coating.
SUBTASK 72-44-20-220-075 Examine the Stage 1 HPT Vane Assembly (01-240) for Chipped Coating on the Platforms
Refer to Figure.
Repair, VRS3158 TASK 72-44-20-300-018 (REPAIR-018) or, Repair, VRS3592 TASK 72-44-20-300-034 (REPAIR-034) or, Repair, VRS3608 TASK 72-44-20-300-035 (REPAIR-035).
Other than Step.
Wear
Examine the vane assembly at location 2 for wear and chipped plasma spray coat.
SUBTASK 72-44-20-220-077 Examine the Stage 1 HPT Vane Assembly (01-240) for Wear and Chipped Plasma Spray Coat on the Rear Foot
Refer to Figure.
Repair, VRS3158 TASK 72-44-20-300-018 (REPAIR-018) or, Repair VRS3592 TASK 72-44-20-300-034 (REPAIR-034) or, Repair, VRS3608 TASK 72-44-20-300-035 (REPAIR-035).
Thickness
Examine the vane assembly at location 1 for thickness of the outer diameter rear foot.
SUBTASK 72-44-20-220-078 Examine the Stage 1 HPT Vane Assembly (01-240) for the Outer Diameter Rear Foot Thickness
Refer to Figure.
Repair, VRS3034 TASK 72-44-20-300-024 (REPAIR-024).
Other than Step.
Axial dimension.
Examine the vane assembly at location 2004 for axial dimension.
SUBTASK 72-44-20-220-079 Examine the Stage 1 HPT Vane Assembly (01-240) for the Axial Dimension between the Inner Diameter Platform Leading Edge and the Front Edge of the Inner Diameter Rear Foot
Refer to Figure.
Other than Step.
Wear
Examine the vane assembly at locations 1 and 2 and two sides at location 3 for wear on the contact surface.
SUBTASK 72-44-20-220-080 Examine the Stage 1 HPT Vane Assembly (01-240) for the Wear on the Platform Front Faces and Two Sides on the Rear Inner Diameter Flange Surfaces
Refer to Figure.
SUBTASK 72-44-20-220-081 Examine the Stage 1 HPT Vane Assembly (01-240) for Burned Areas and Unwanted Material on all the Feather Seal Slots
Refer to Figure.
Repair, VRS3562 TASK 72-44-20-300-025 (REPAIR-025) or Repair, VRS3612 TASK 72-44-20-300-029 (REPAIR-029).
NOTE
Wear can be on one or both sides of the mounting lug anti-rotation slot.
If the slot is a maximum of 0.422 in. (10.719 mm).
Wear.
Examine the vane at location 6 for wear on the anti-rotation slot.
SUBTASK 72-44-20-220-092 Examine the Stage 1 HPT Vane Assembly (01-240) for Wear on the Forward Outer Mounting Lug Anti-Rotation Slot
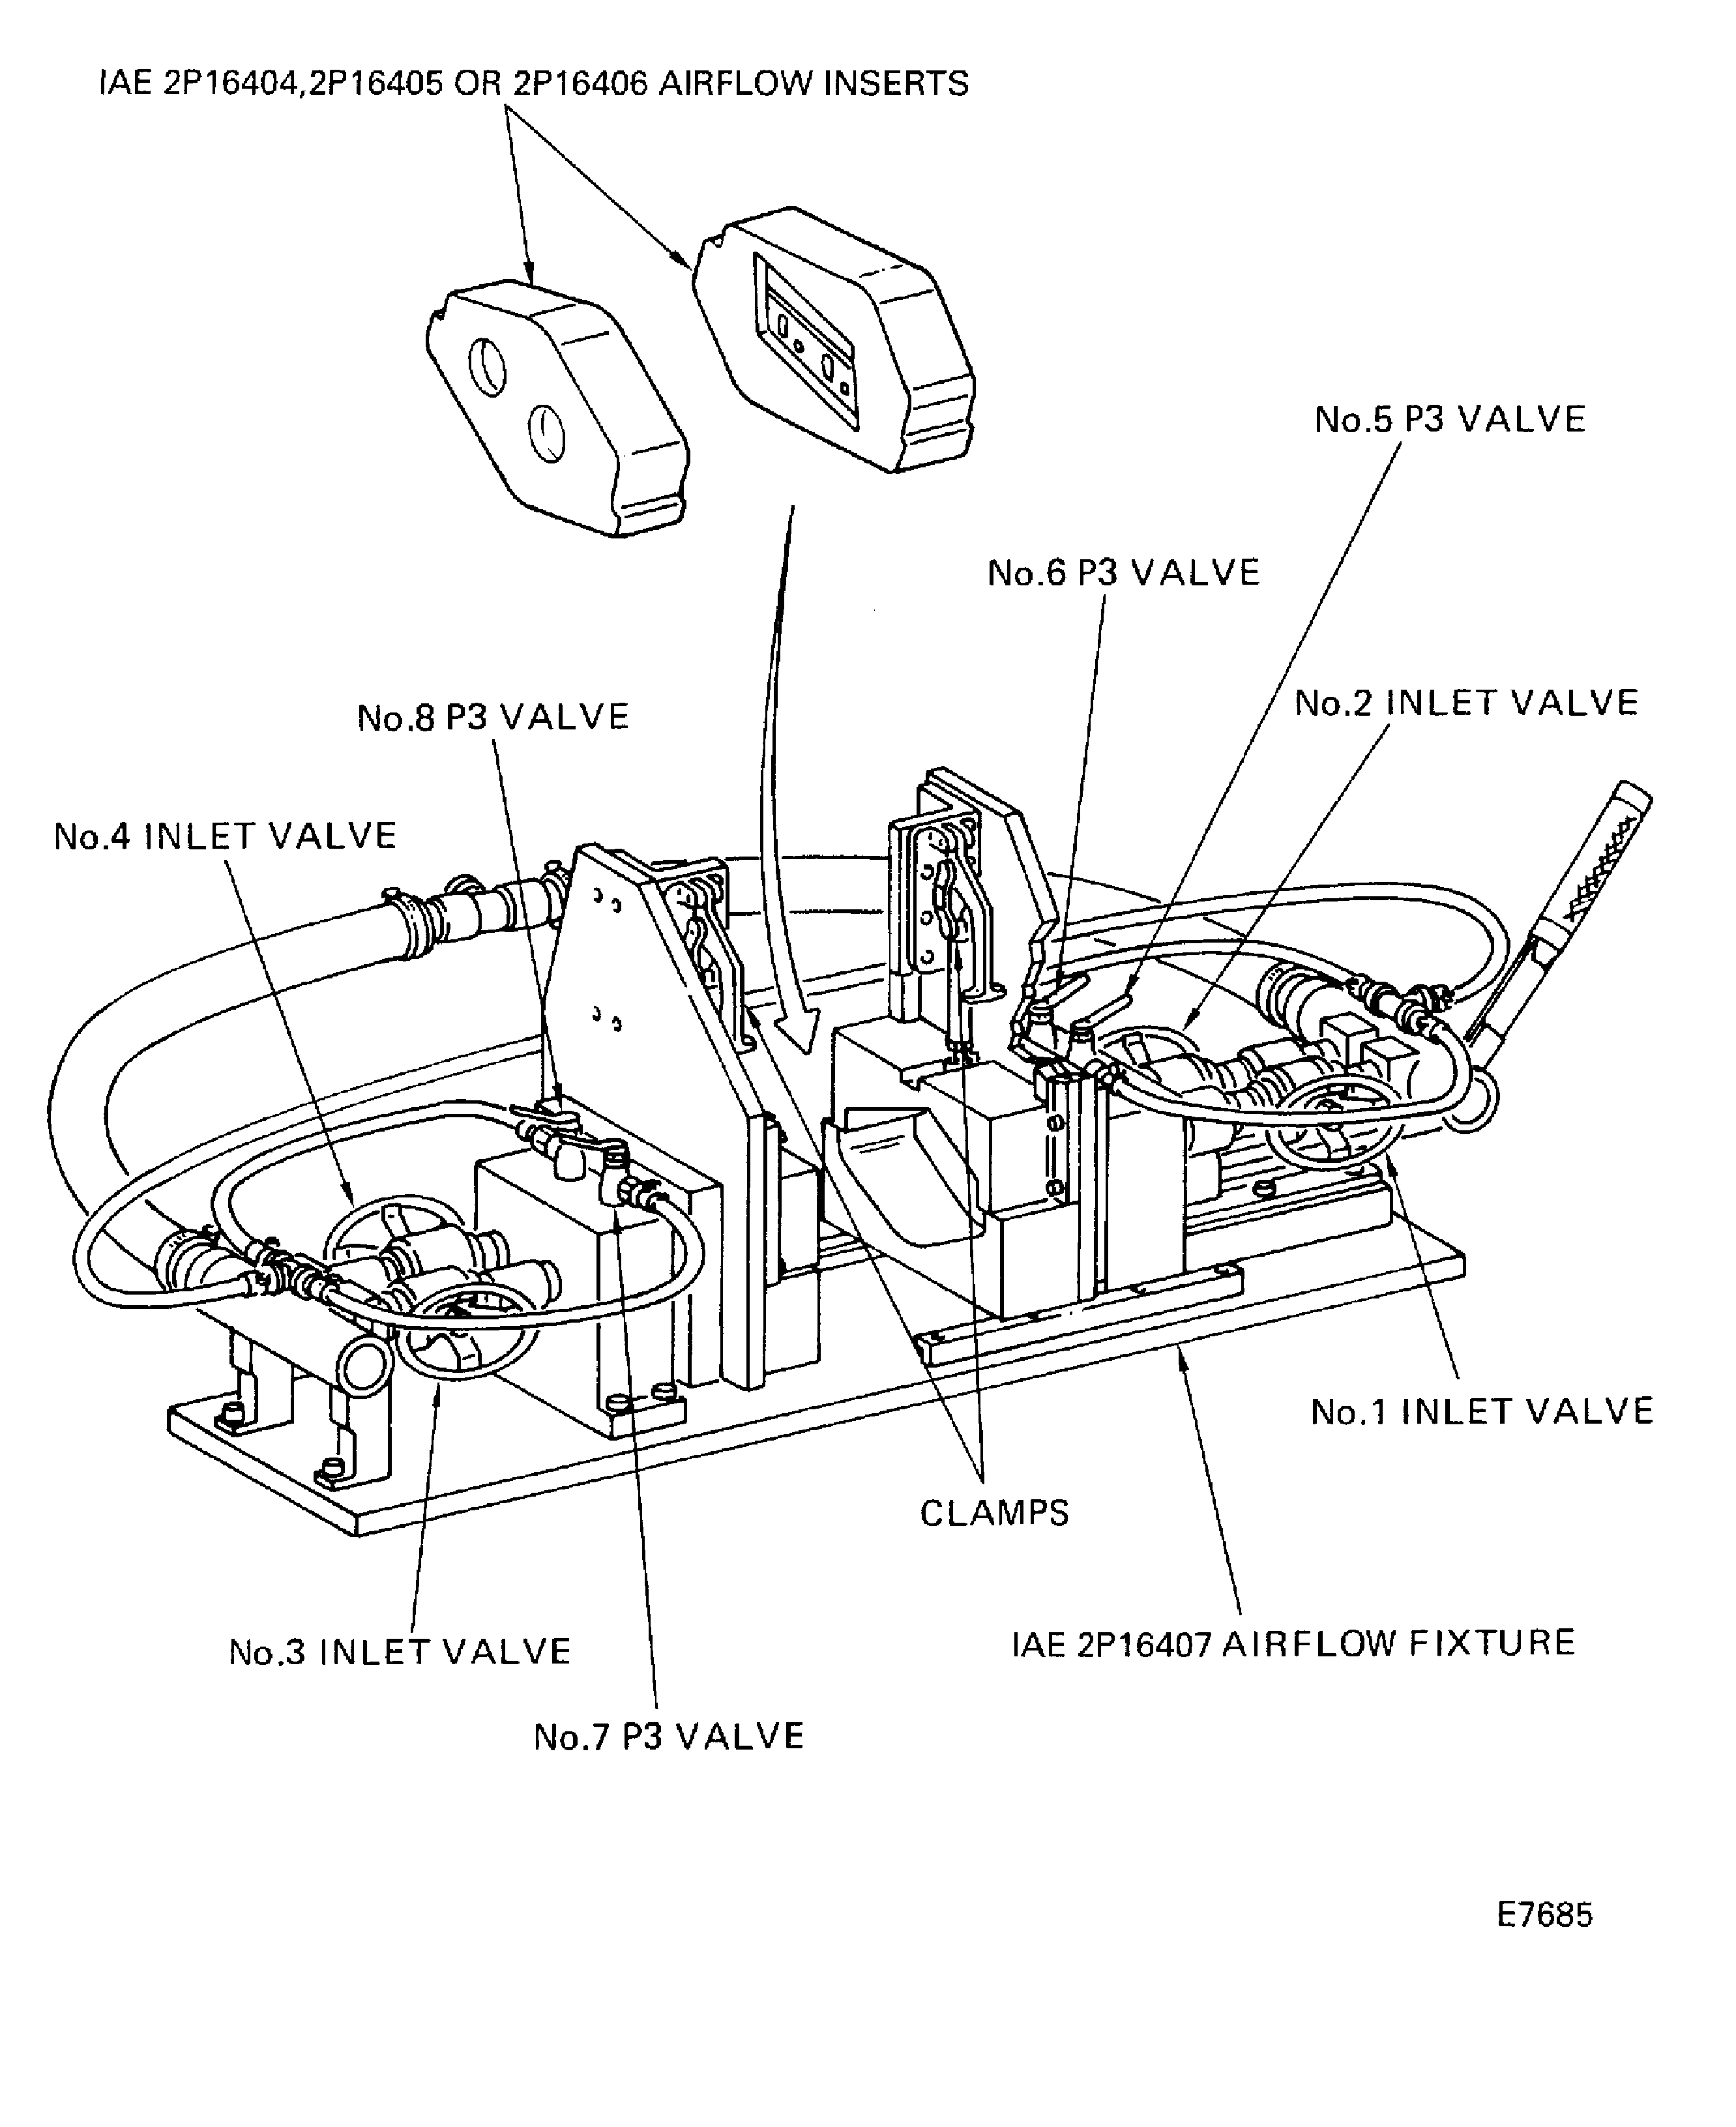
Do the airflow procedure for the stage 1 HPT vane assembly by the procedures given in the SPM TASK 70-72-01-720-501.
SUBTASK 72-44-20-280-054 Examine the Stage 1 HPT Vane Assembly (01-240) by the Airflow Check
Figure: Stage 1 HPT Vane Assembly Axial and Radial Cracks Inspection Locations
Stage 1 HPT Vane Assembly Axial and Radial Cracks Inspection Locations
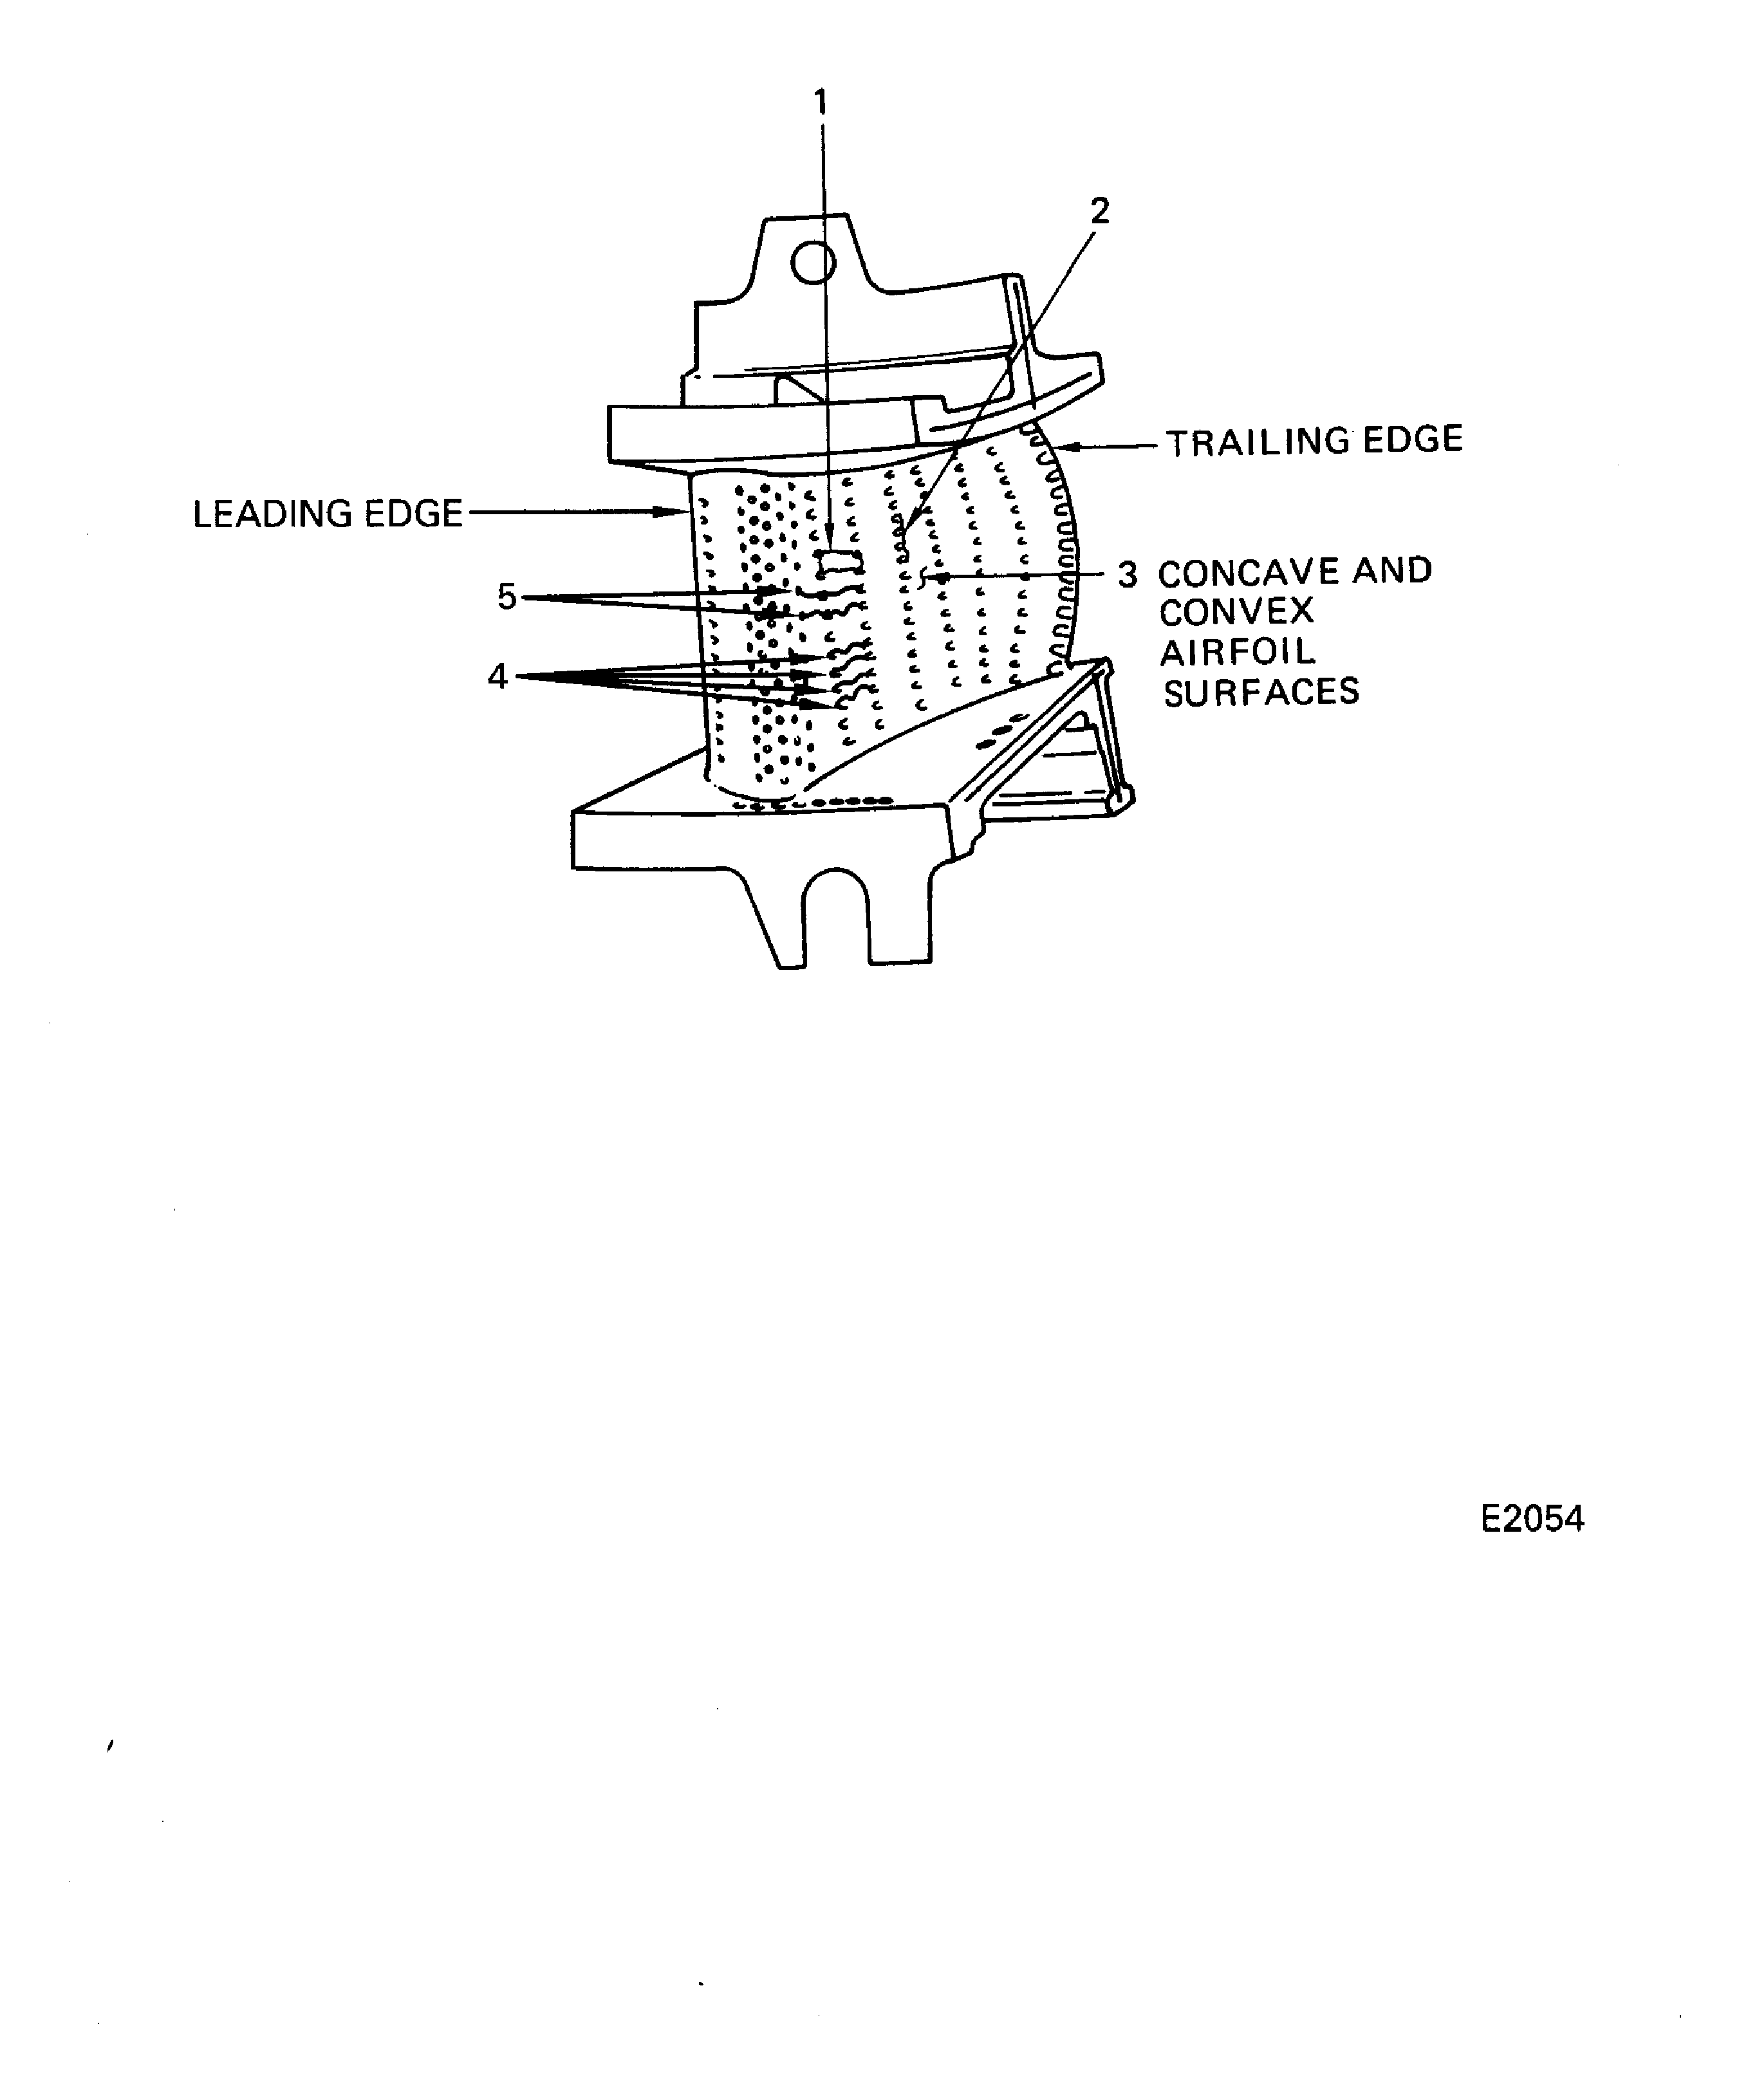
Figure: Stage 1 HPT Vane Assembly Trailing Edge Cracks (Convex Side) Inspection Locations
Stage 1 HPT Vane Assembly Trailing Edge Cracks (Convex Side) Inspection Locations
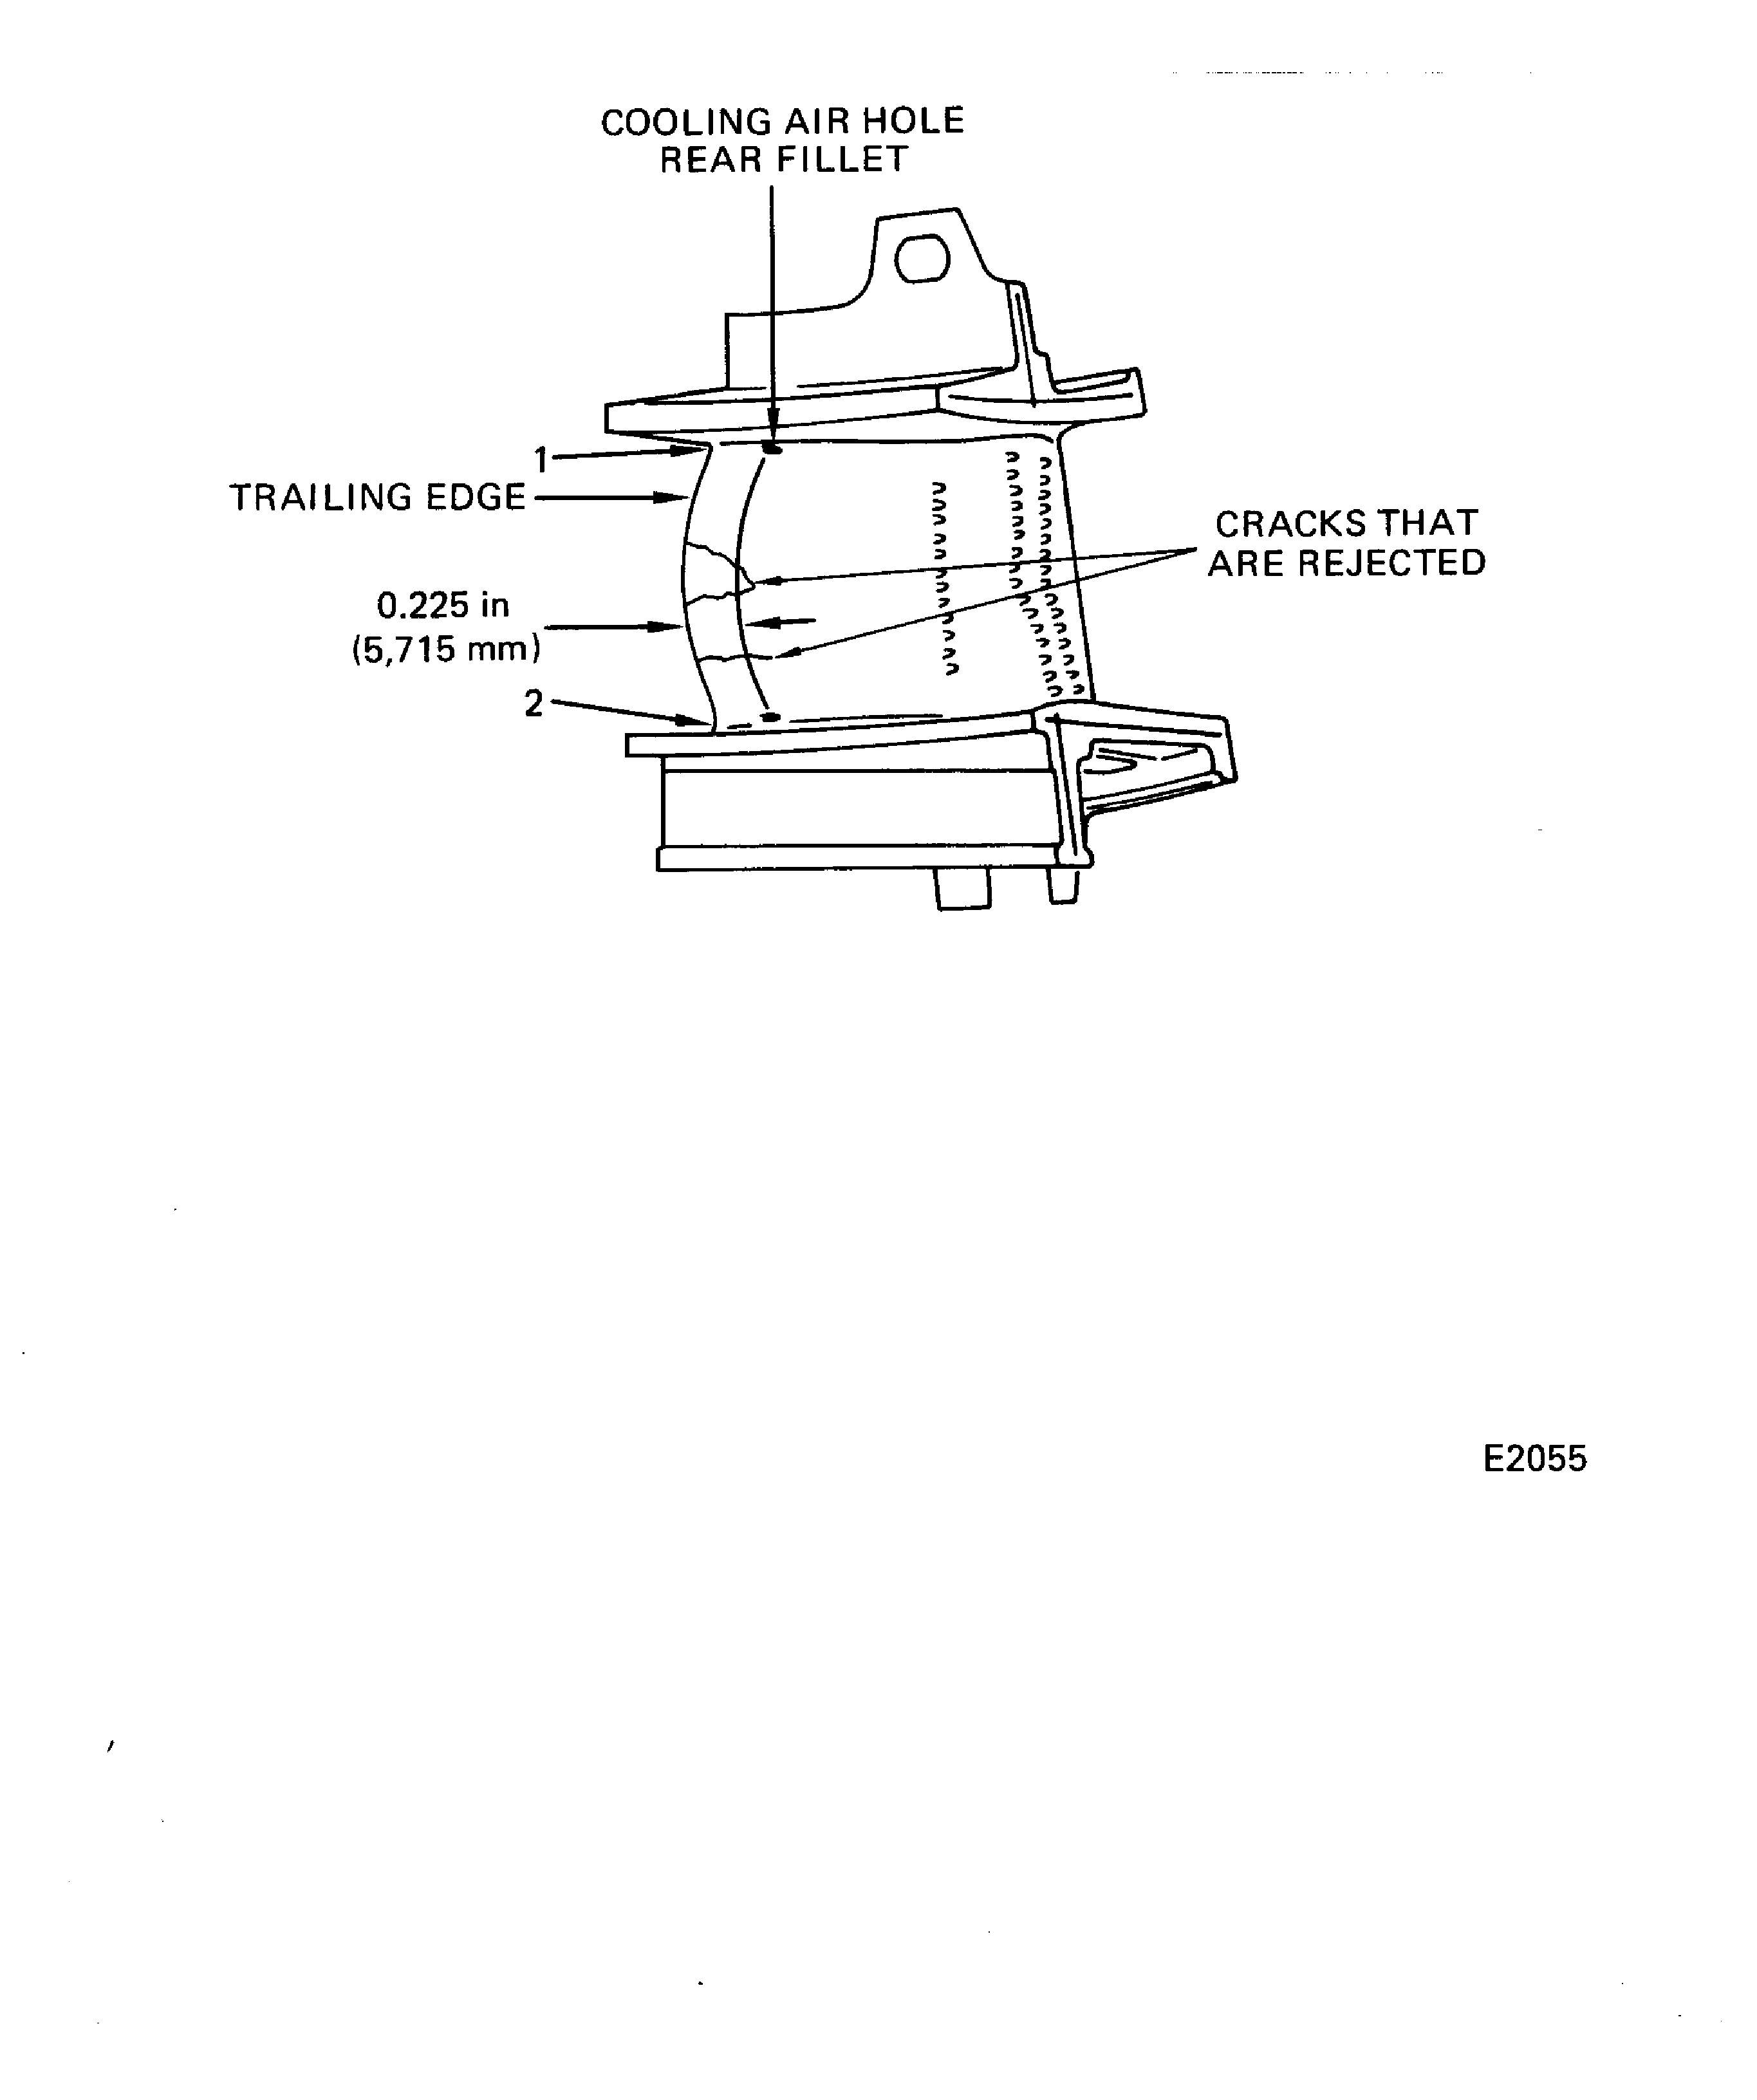
Figure: Stage 1 HPT Vane Assembly Leading Edge Cracks Inspection Locations
Stage 1 HPT Vane Assembly Leading Edge Cracks Inspection Locations
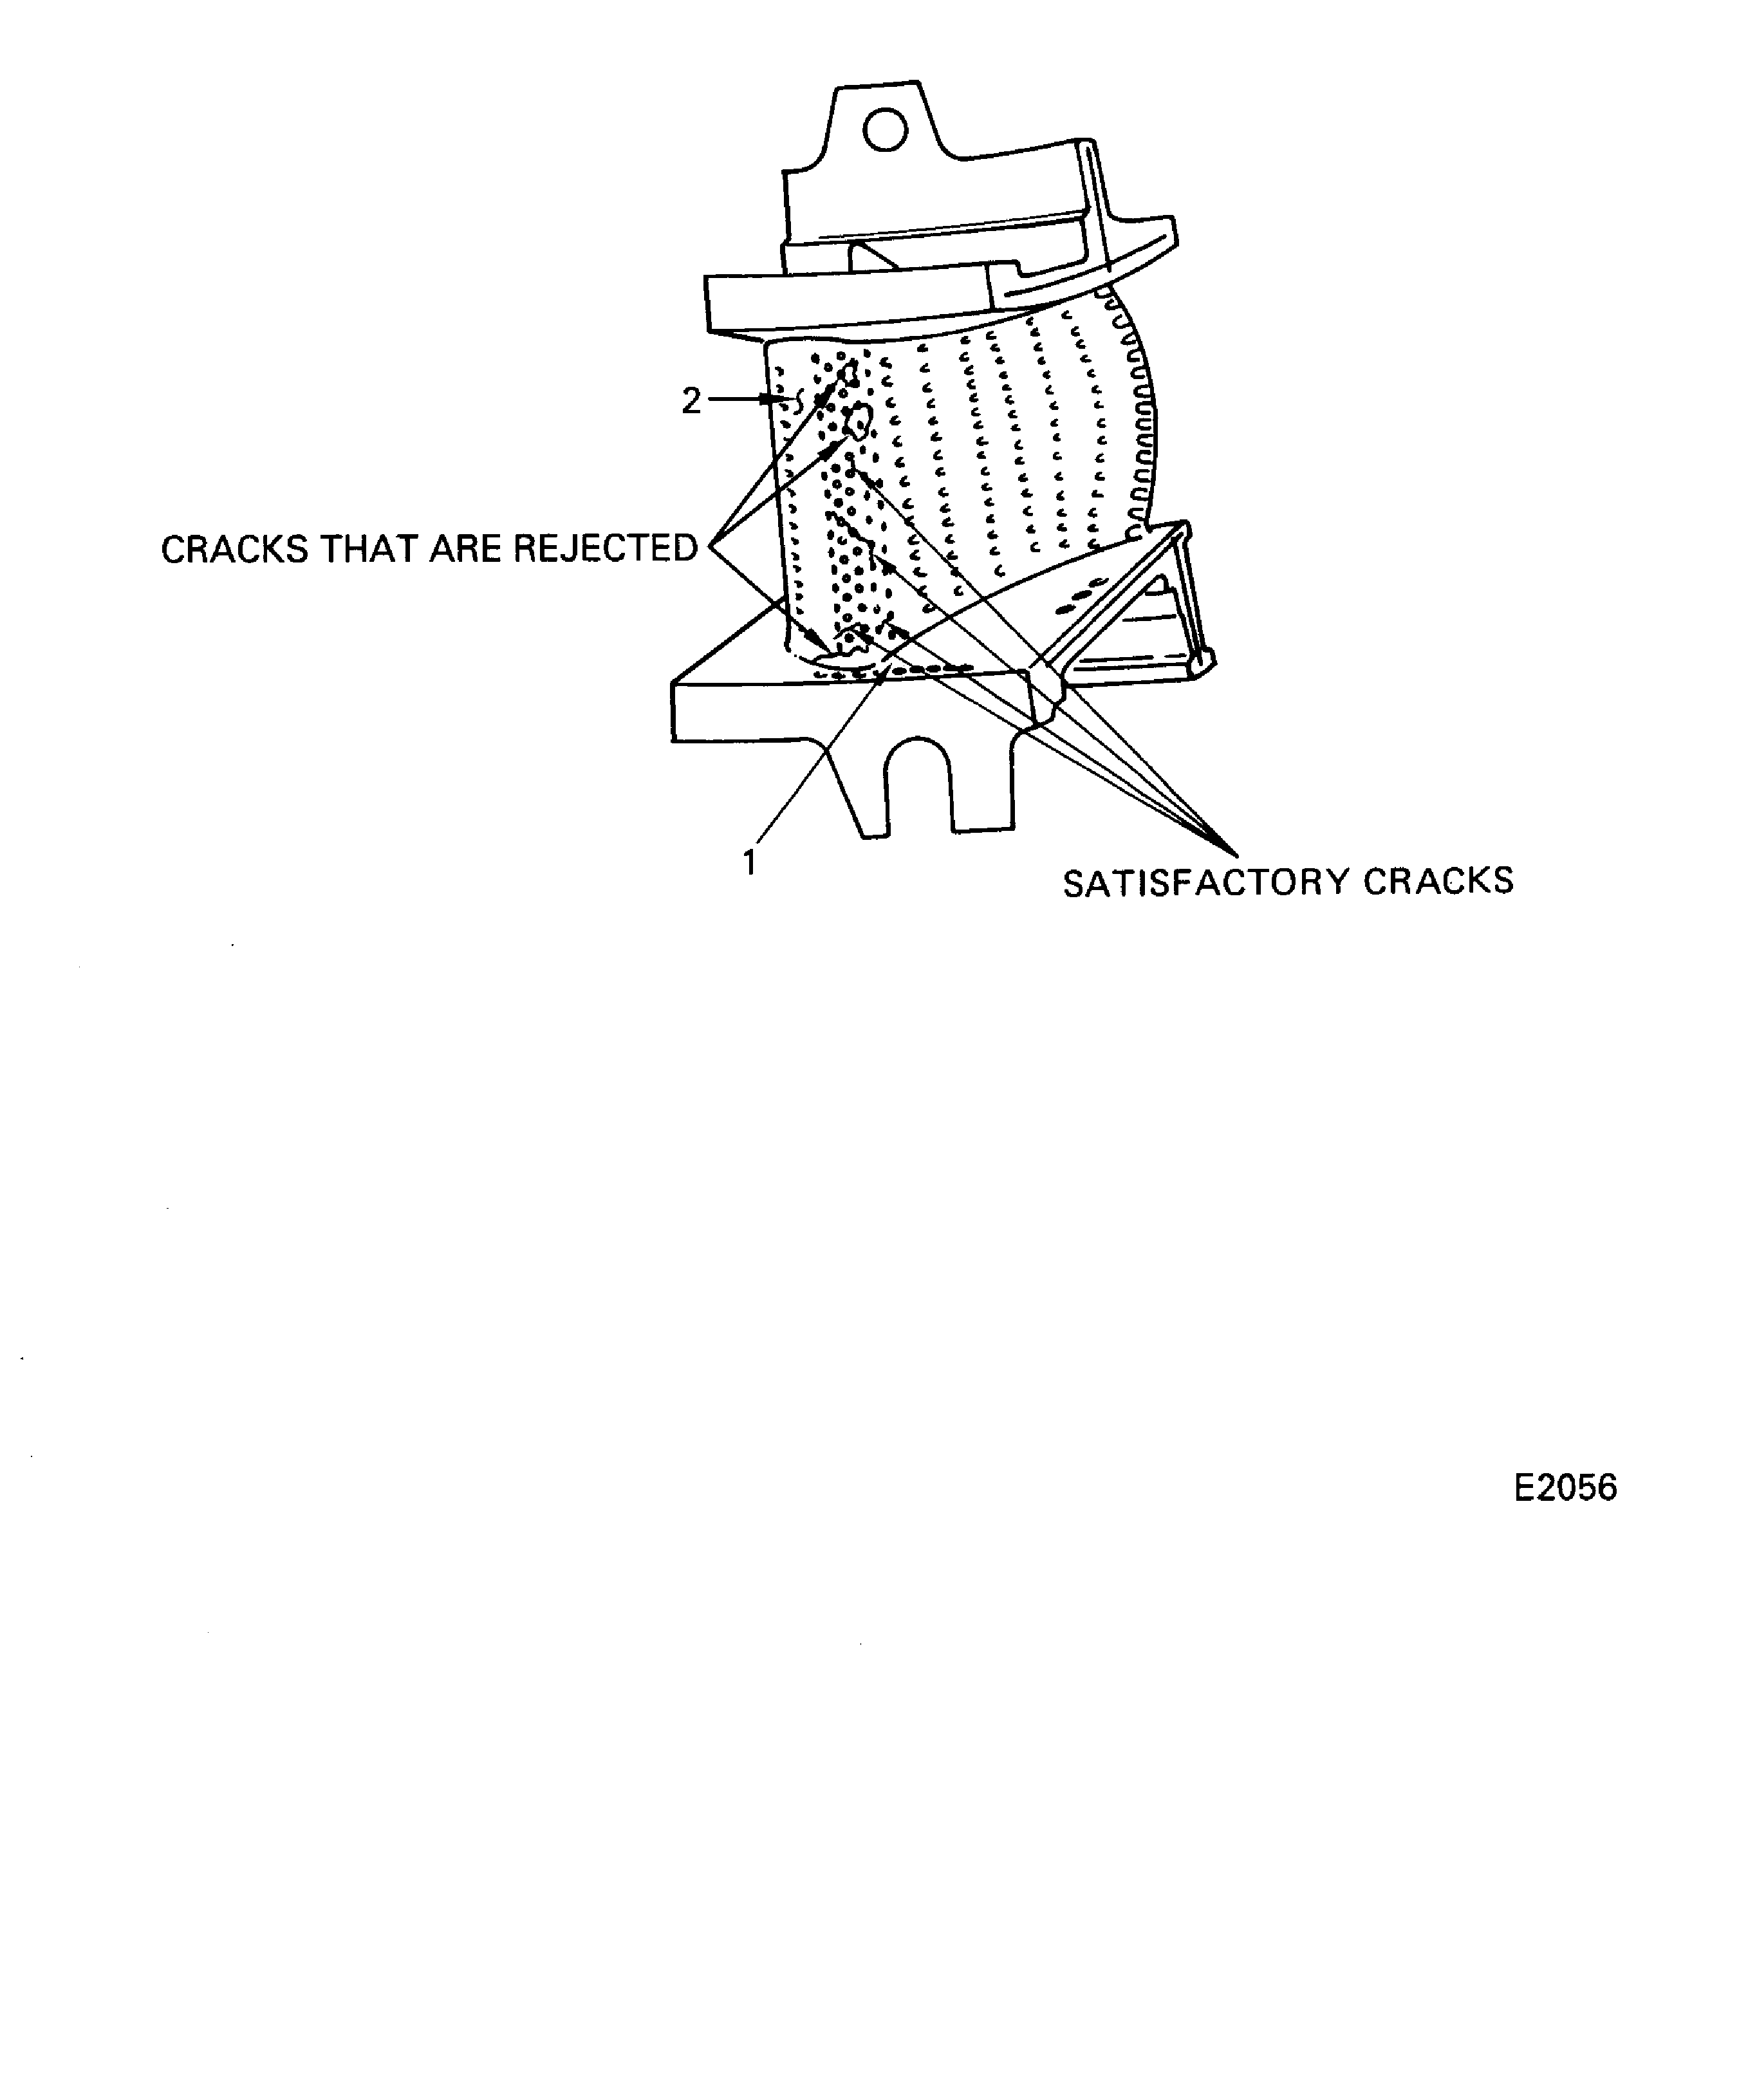
Figure: Stage 1 HPT Vane Assembly Inner and Outer Platform Cracks Inspection Location
Stage 1 HPT Vane Assembly Inner and Outer Platform Cracks Inspection Location
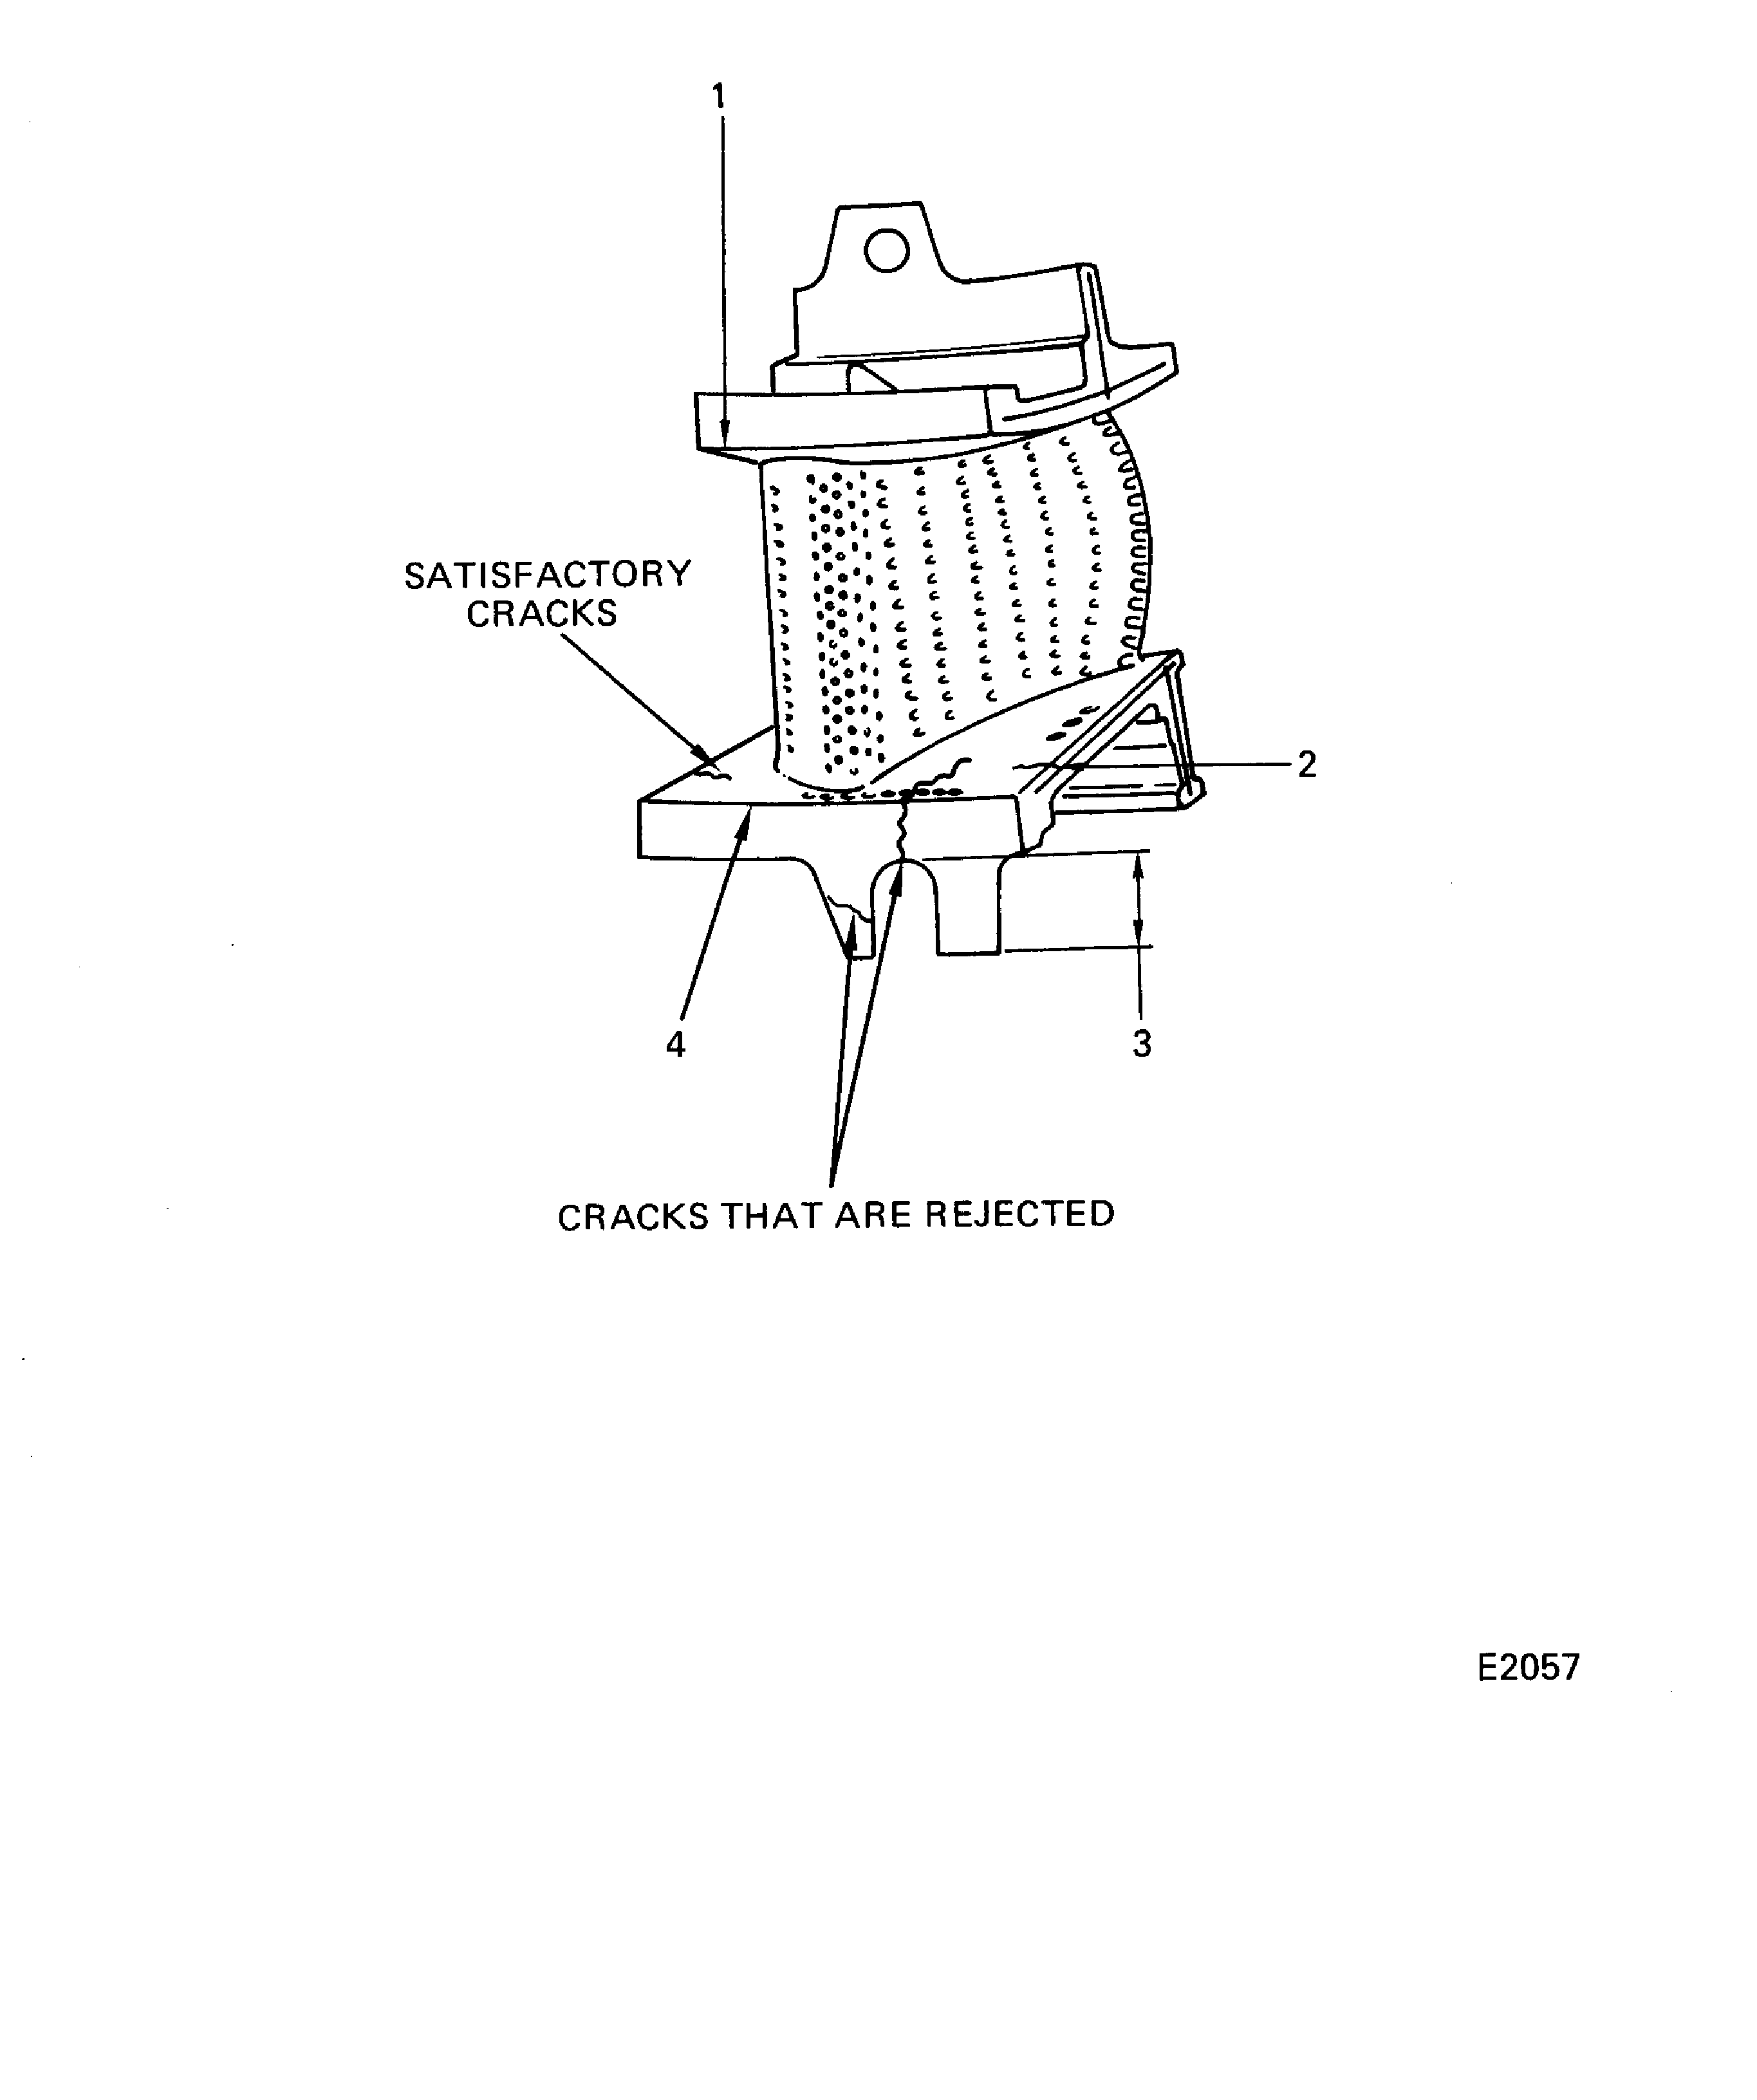
Figure: Stage 1 HPT Vane Assembly Platforms, Inserts and Impingement Cover Cracks Inspection Location
Stage 1 HPT Vane Assembly Platforms, Inserts and Impingement Cover Cracks Inspection Location
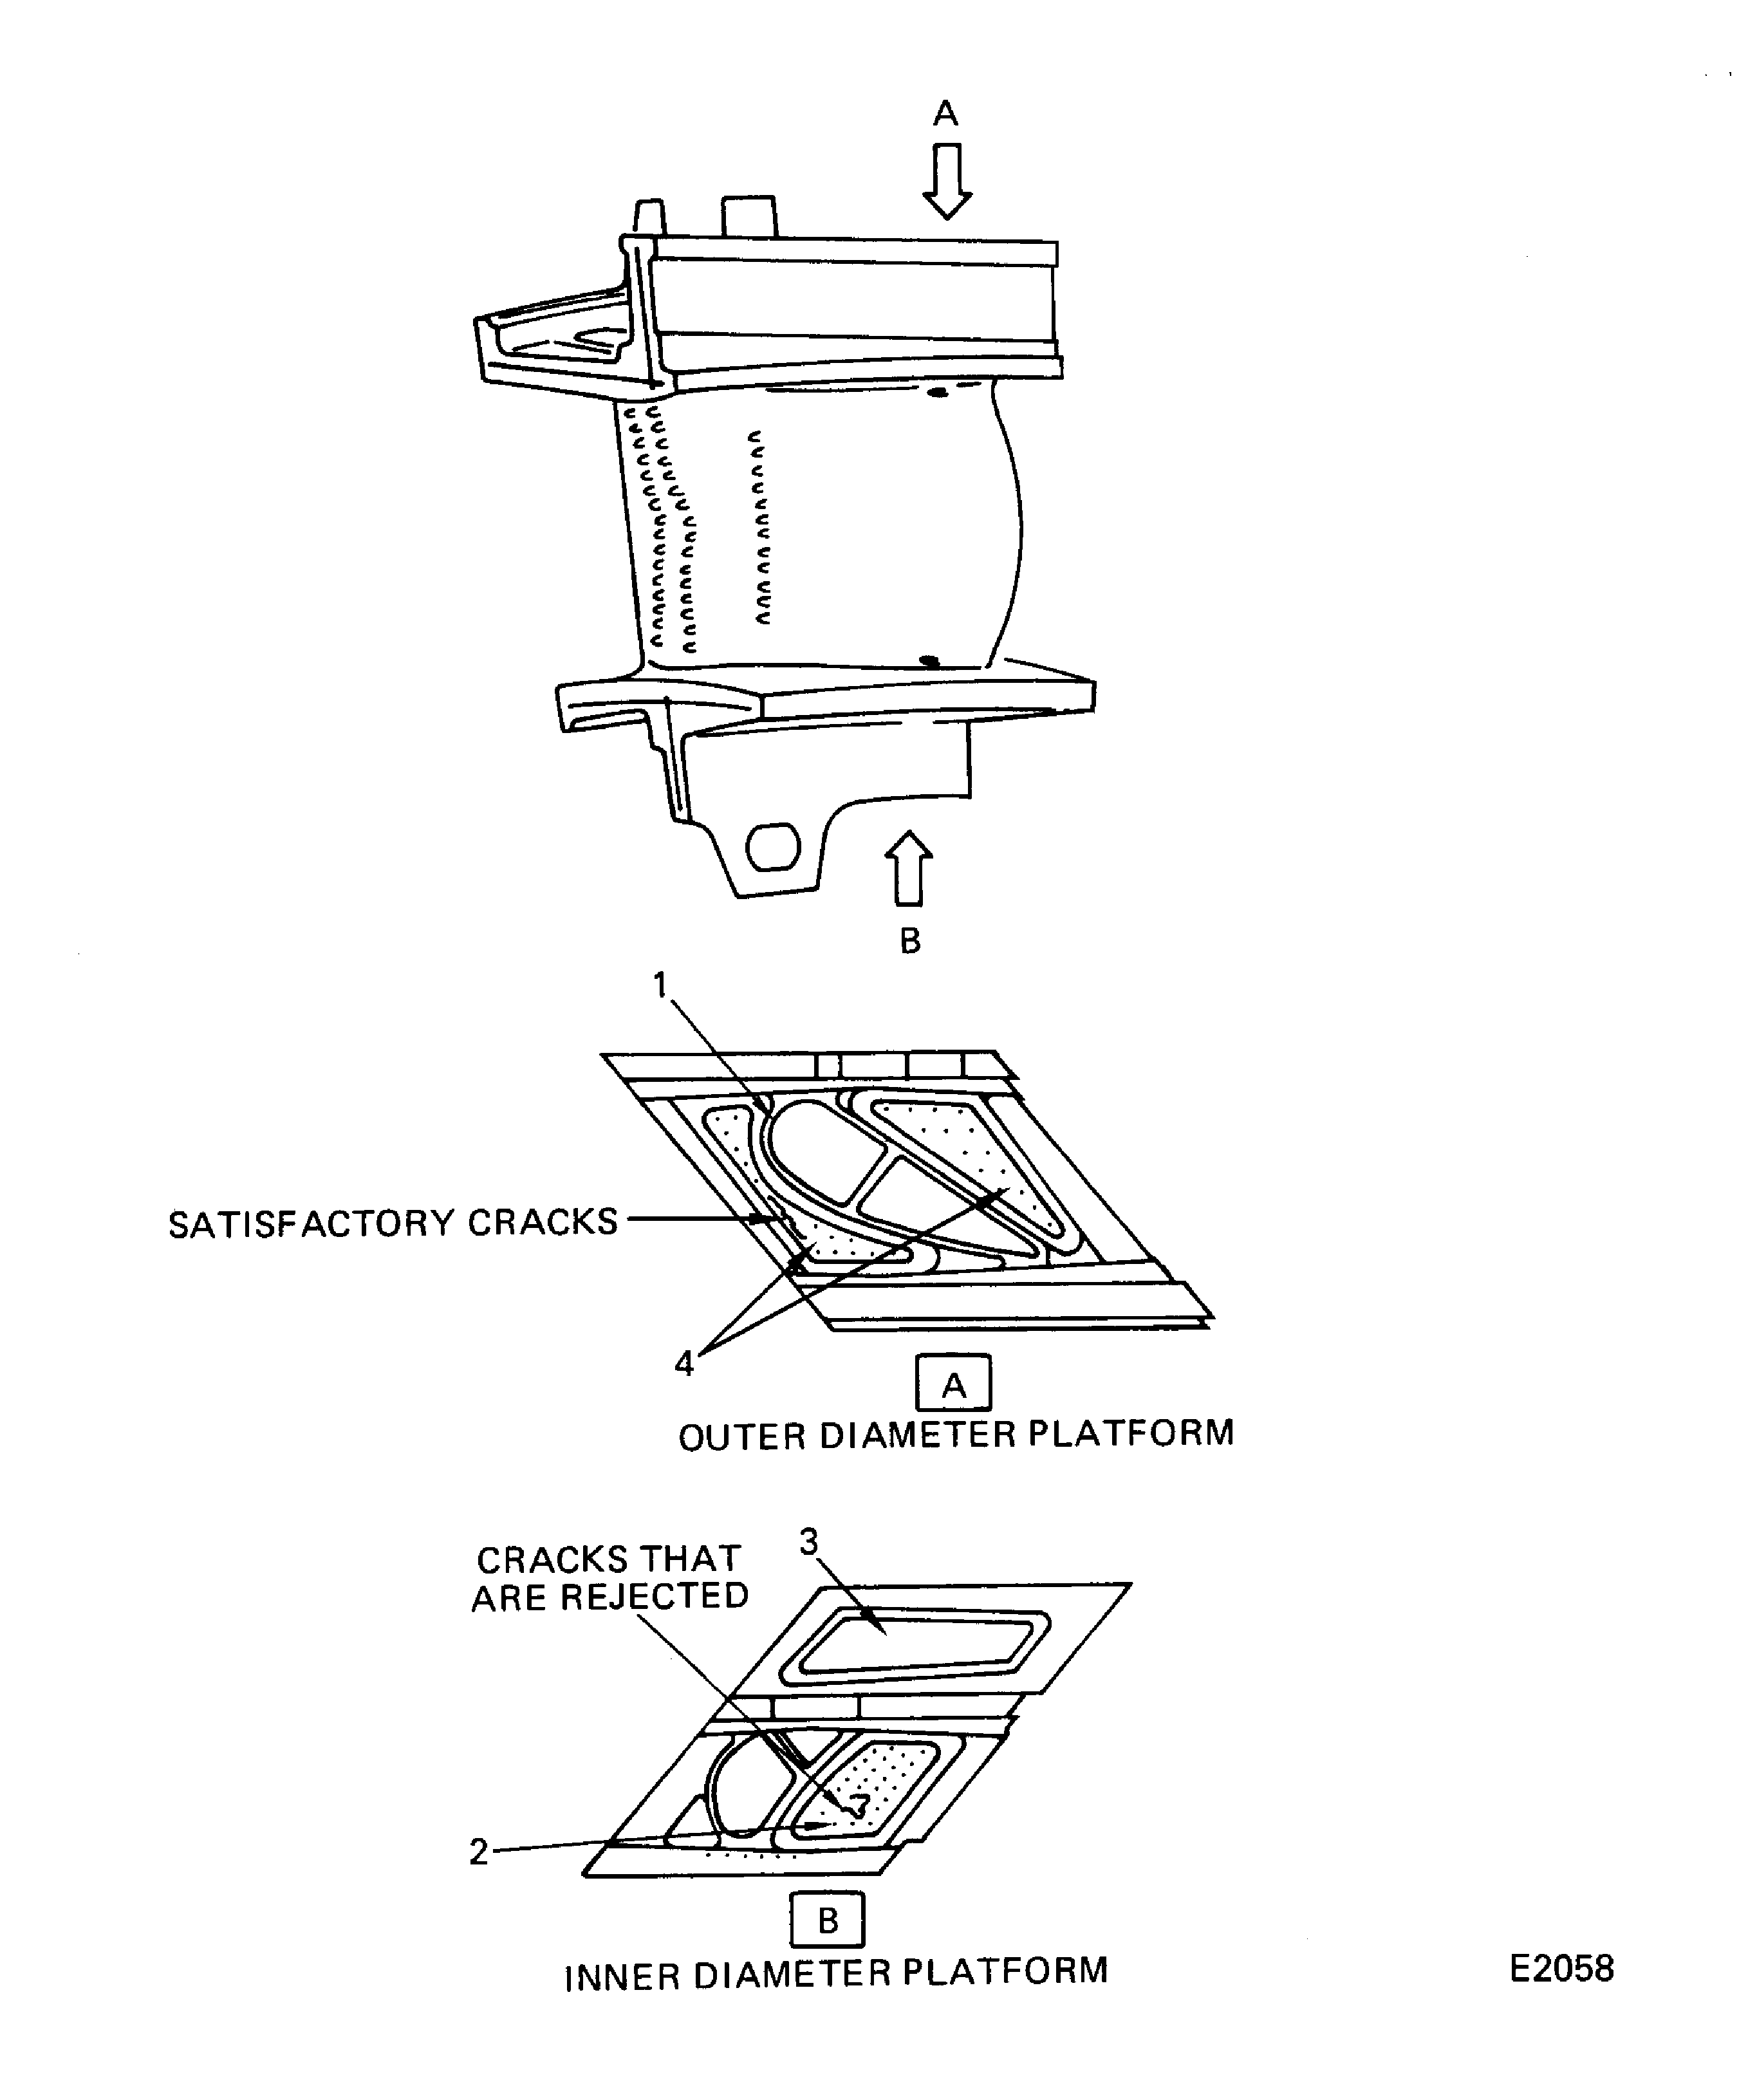
Figure: Stage 1 HPT Vane Assembly Inspection Locations
Stage 1 HPT Vane Assembly Inspection Locations
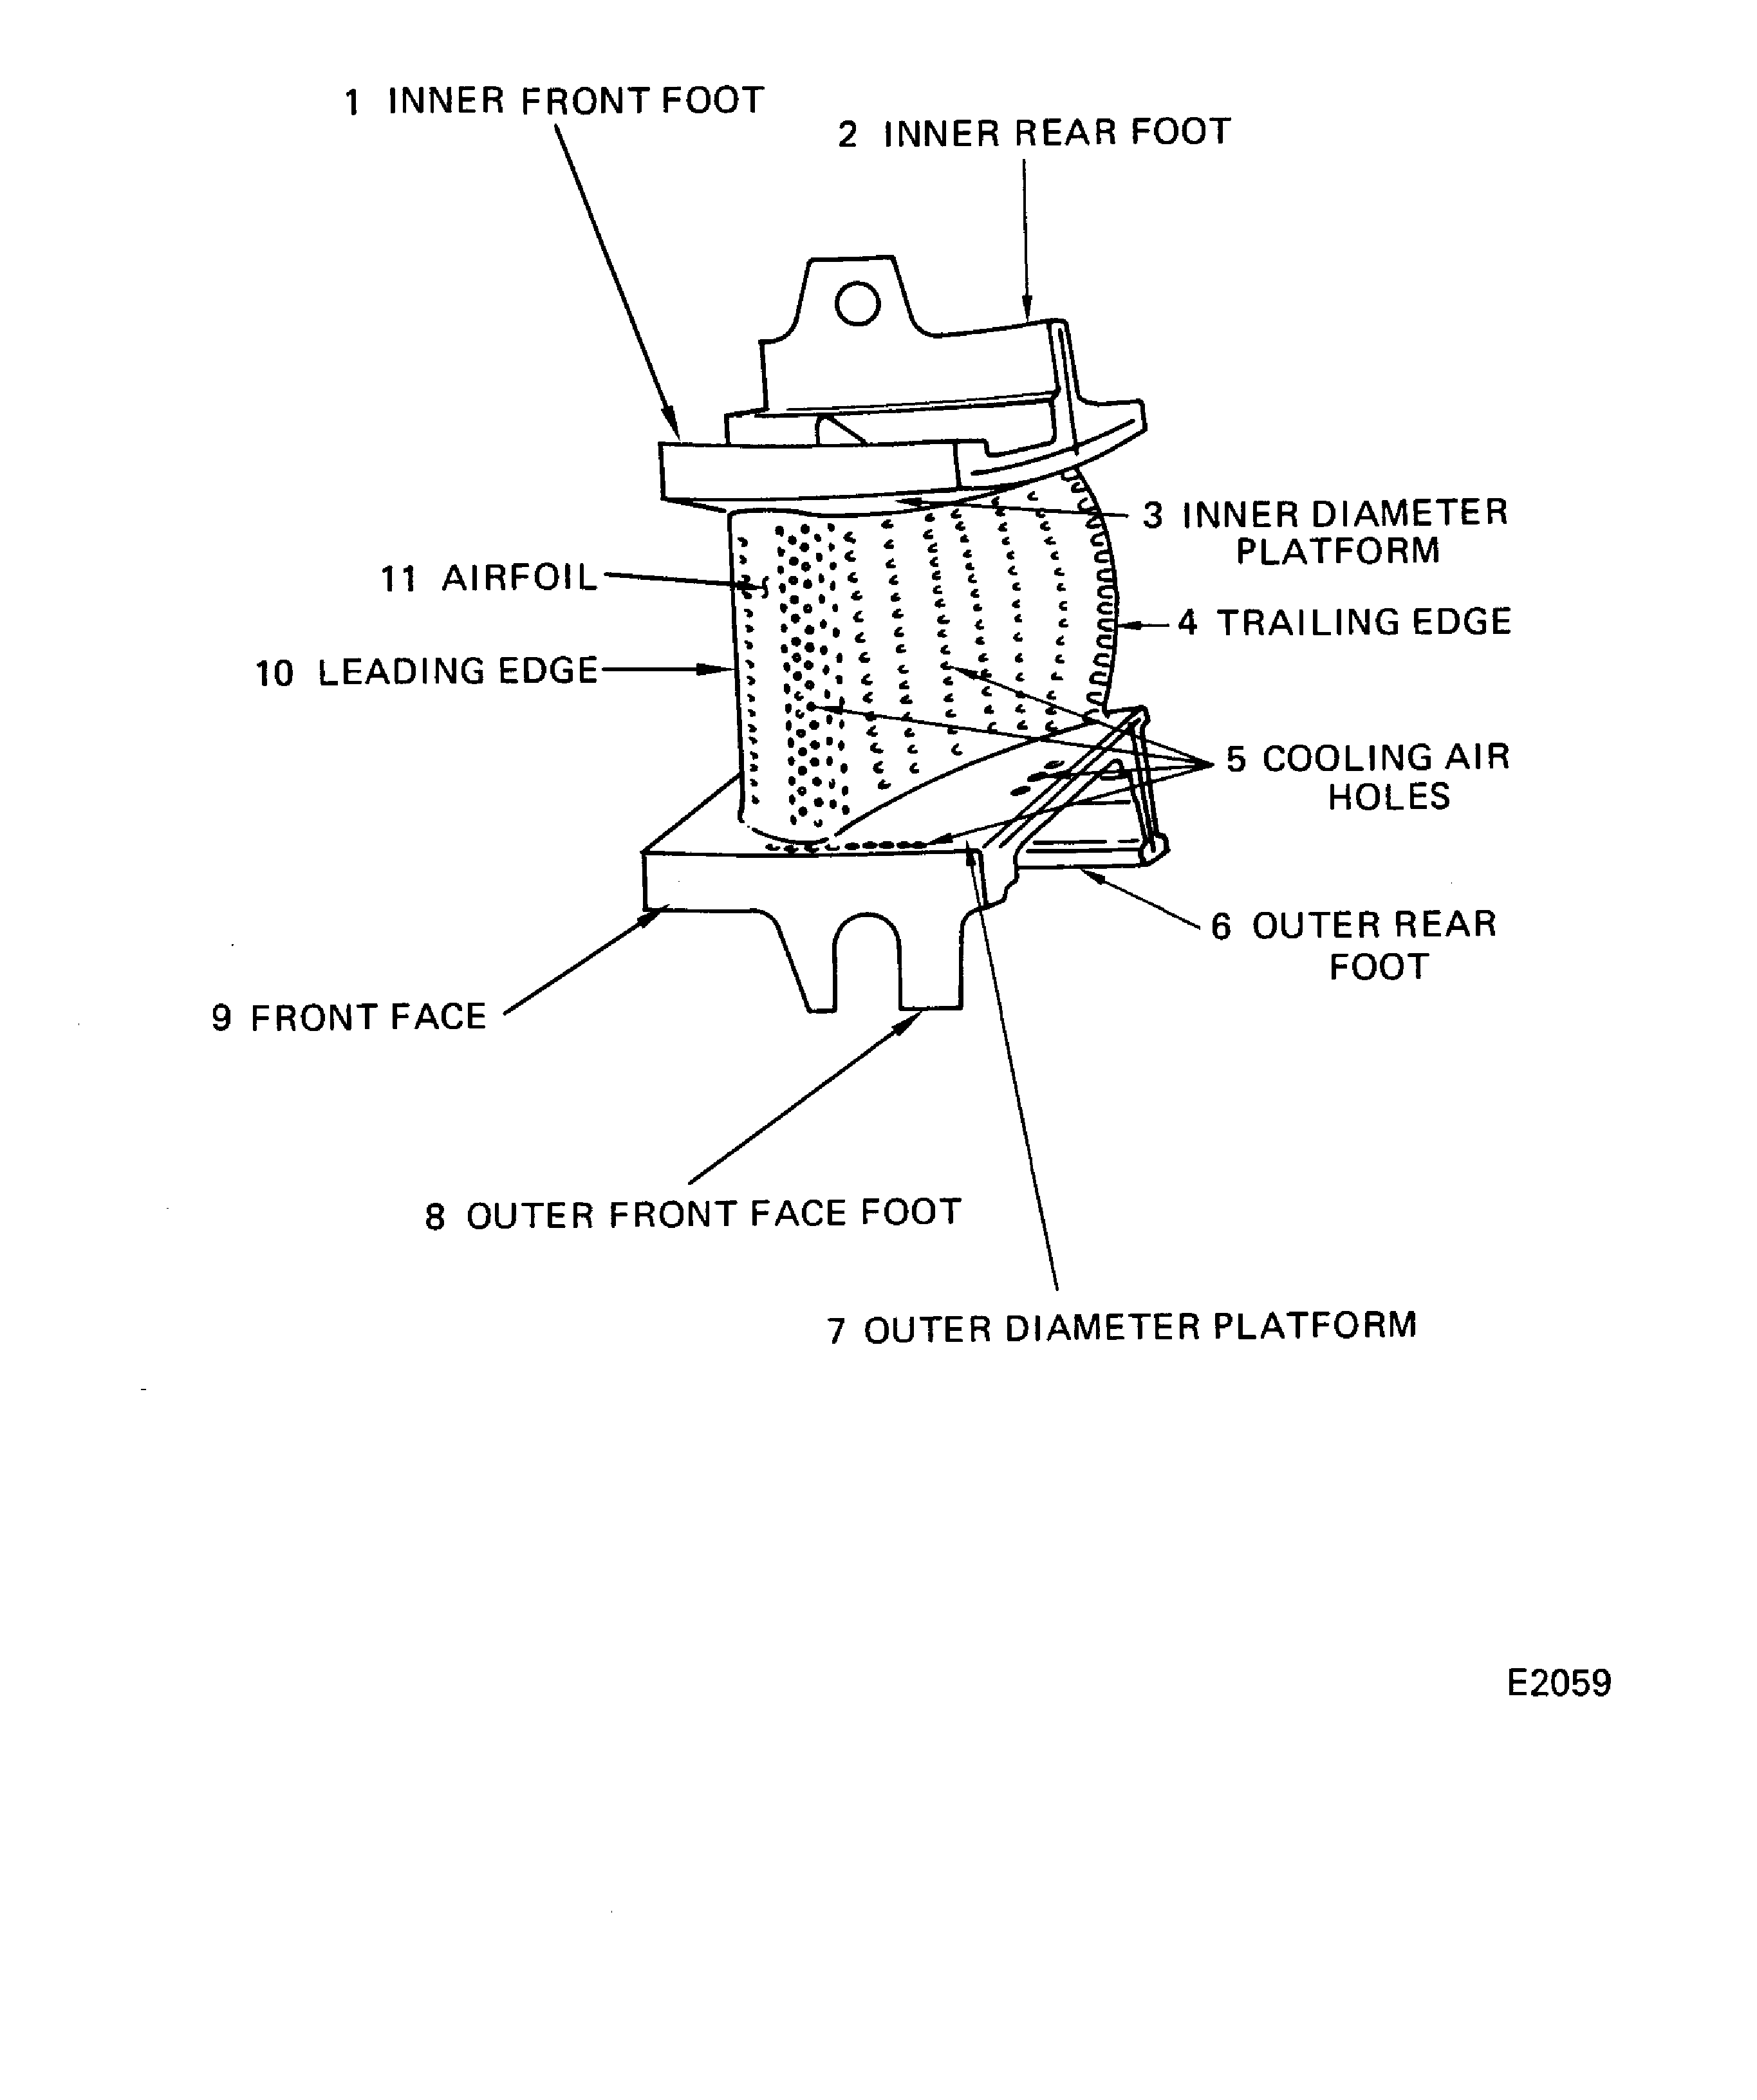
Figure: Stage 1 HPT Vane Assembly Coating Inspection
Sheet 1
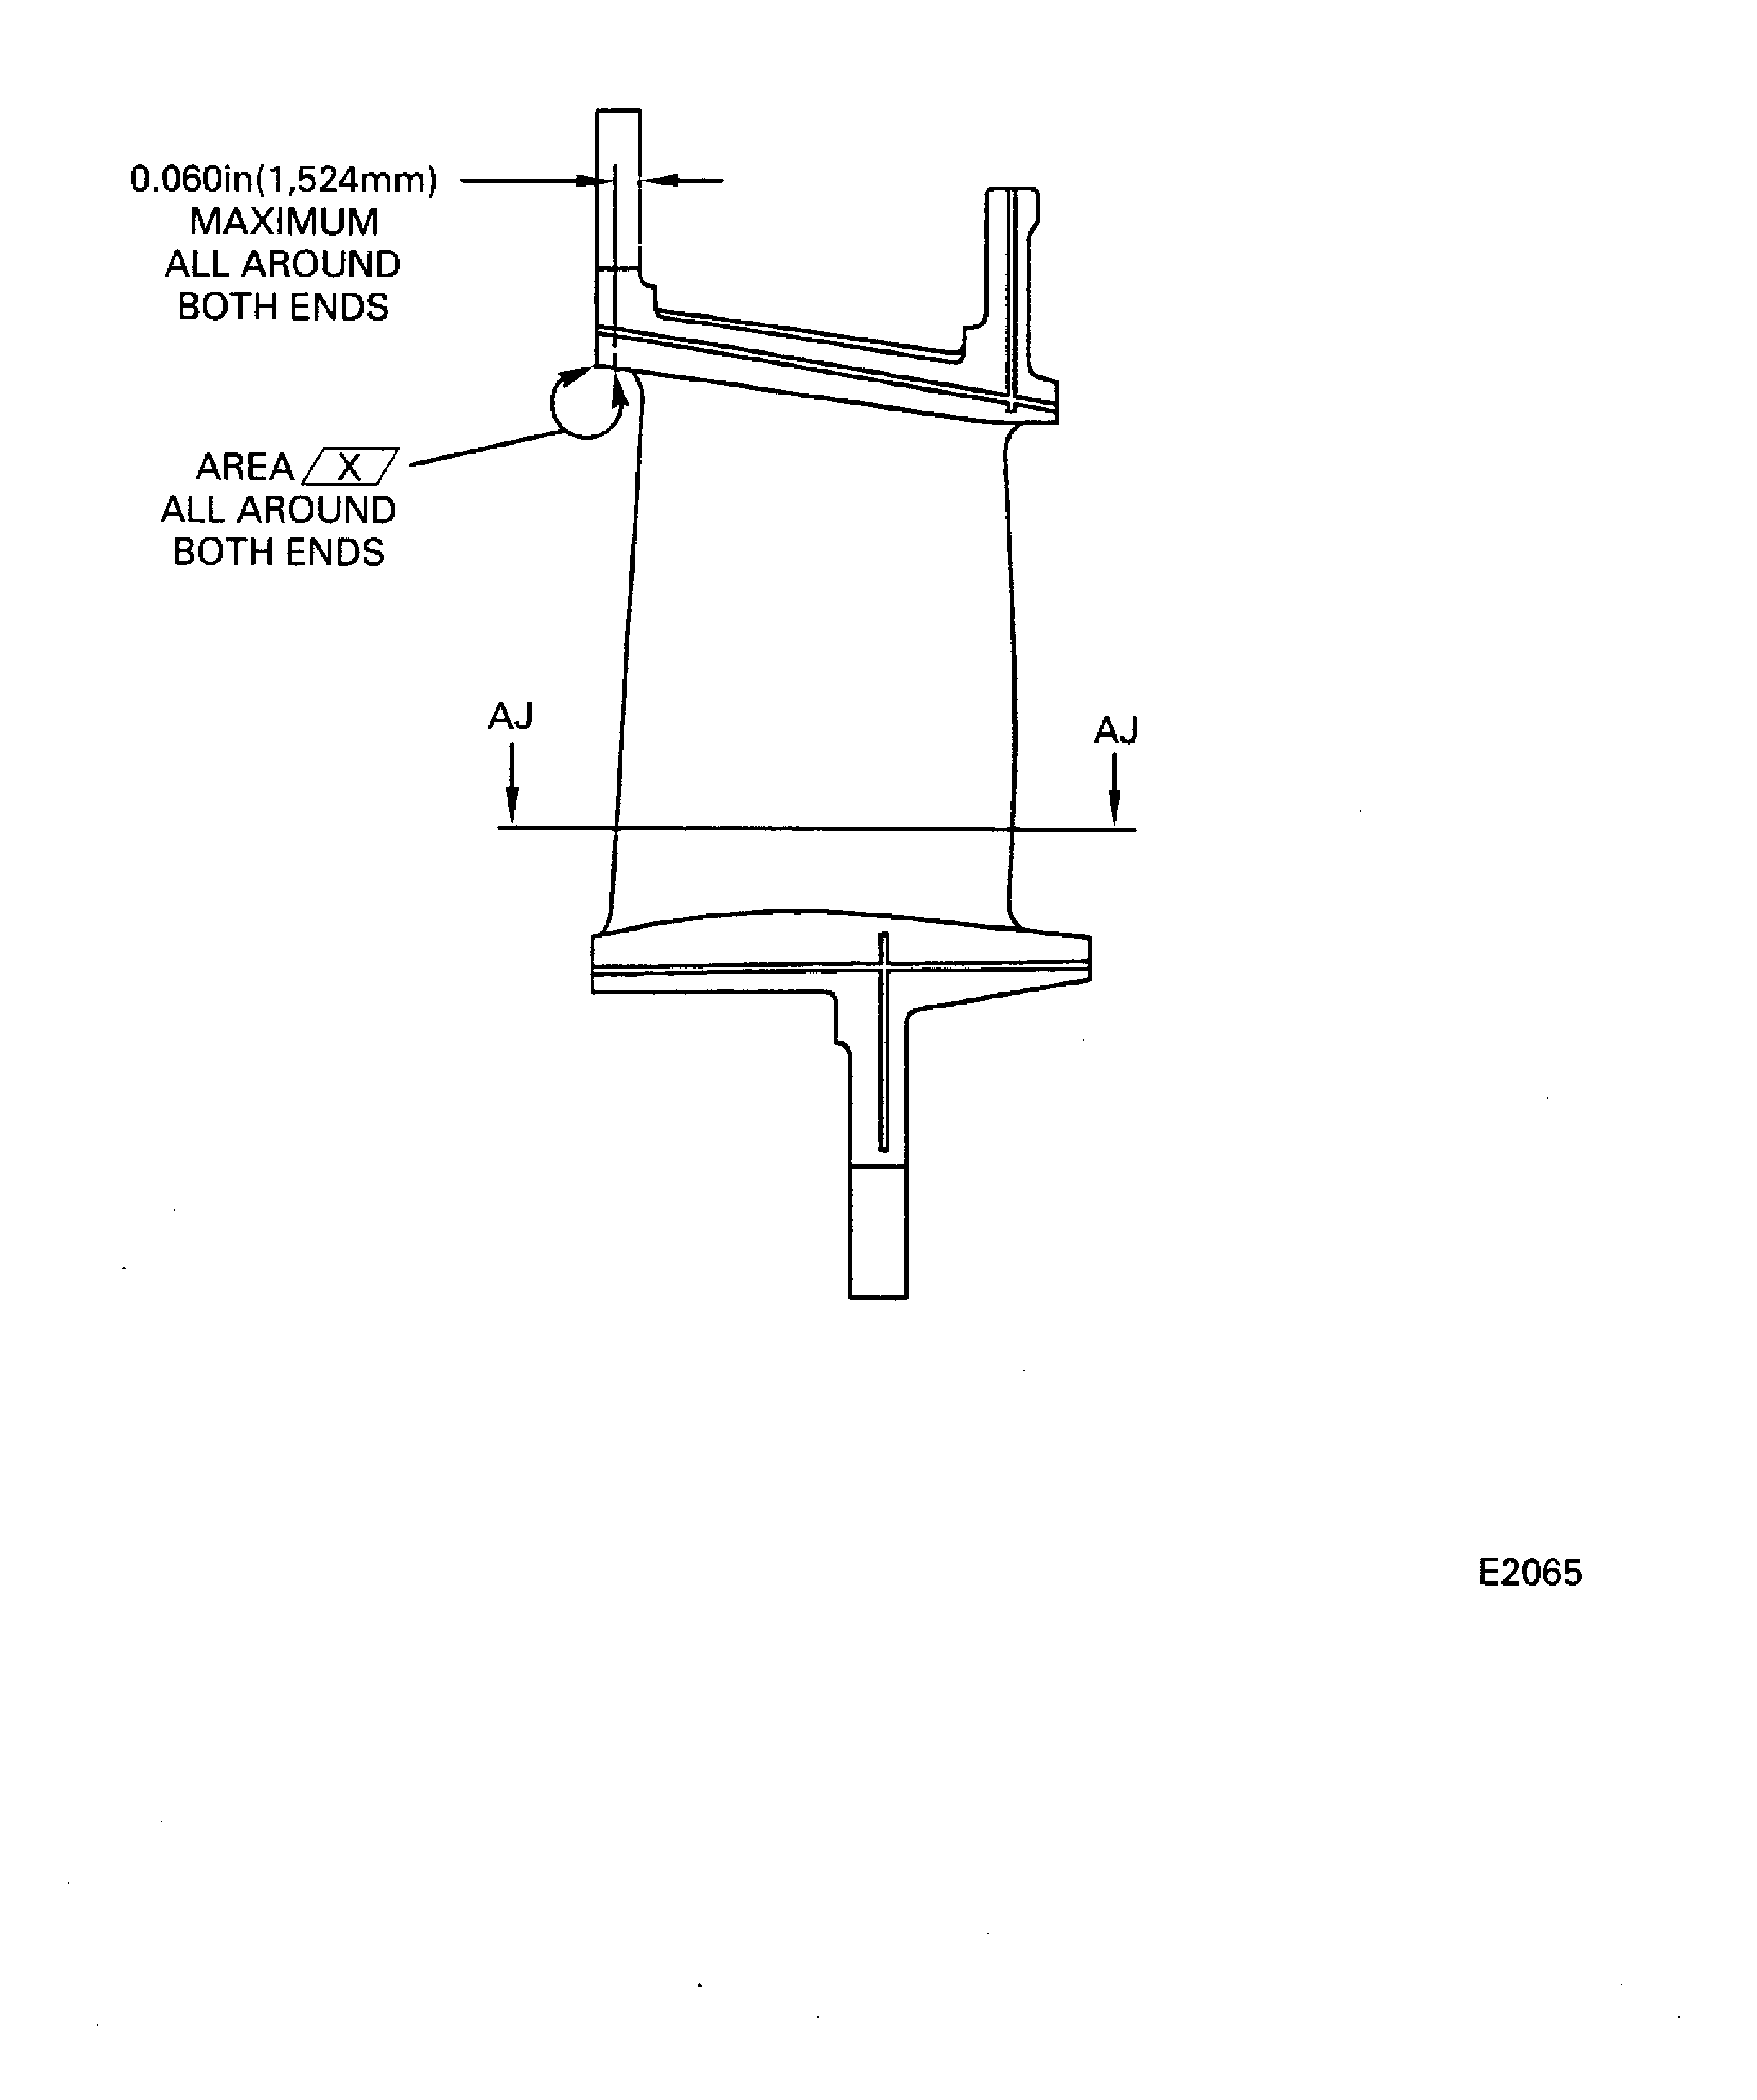
Figure: Stage 1 HPT Vane Assembly Coating Inspection
Sheet 2
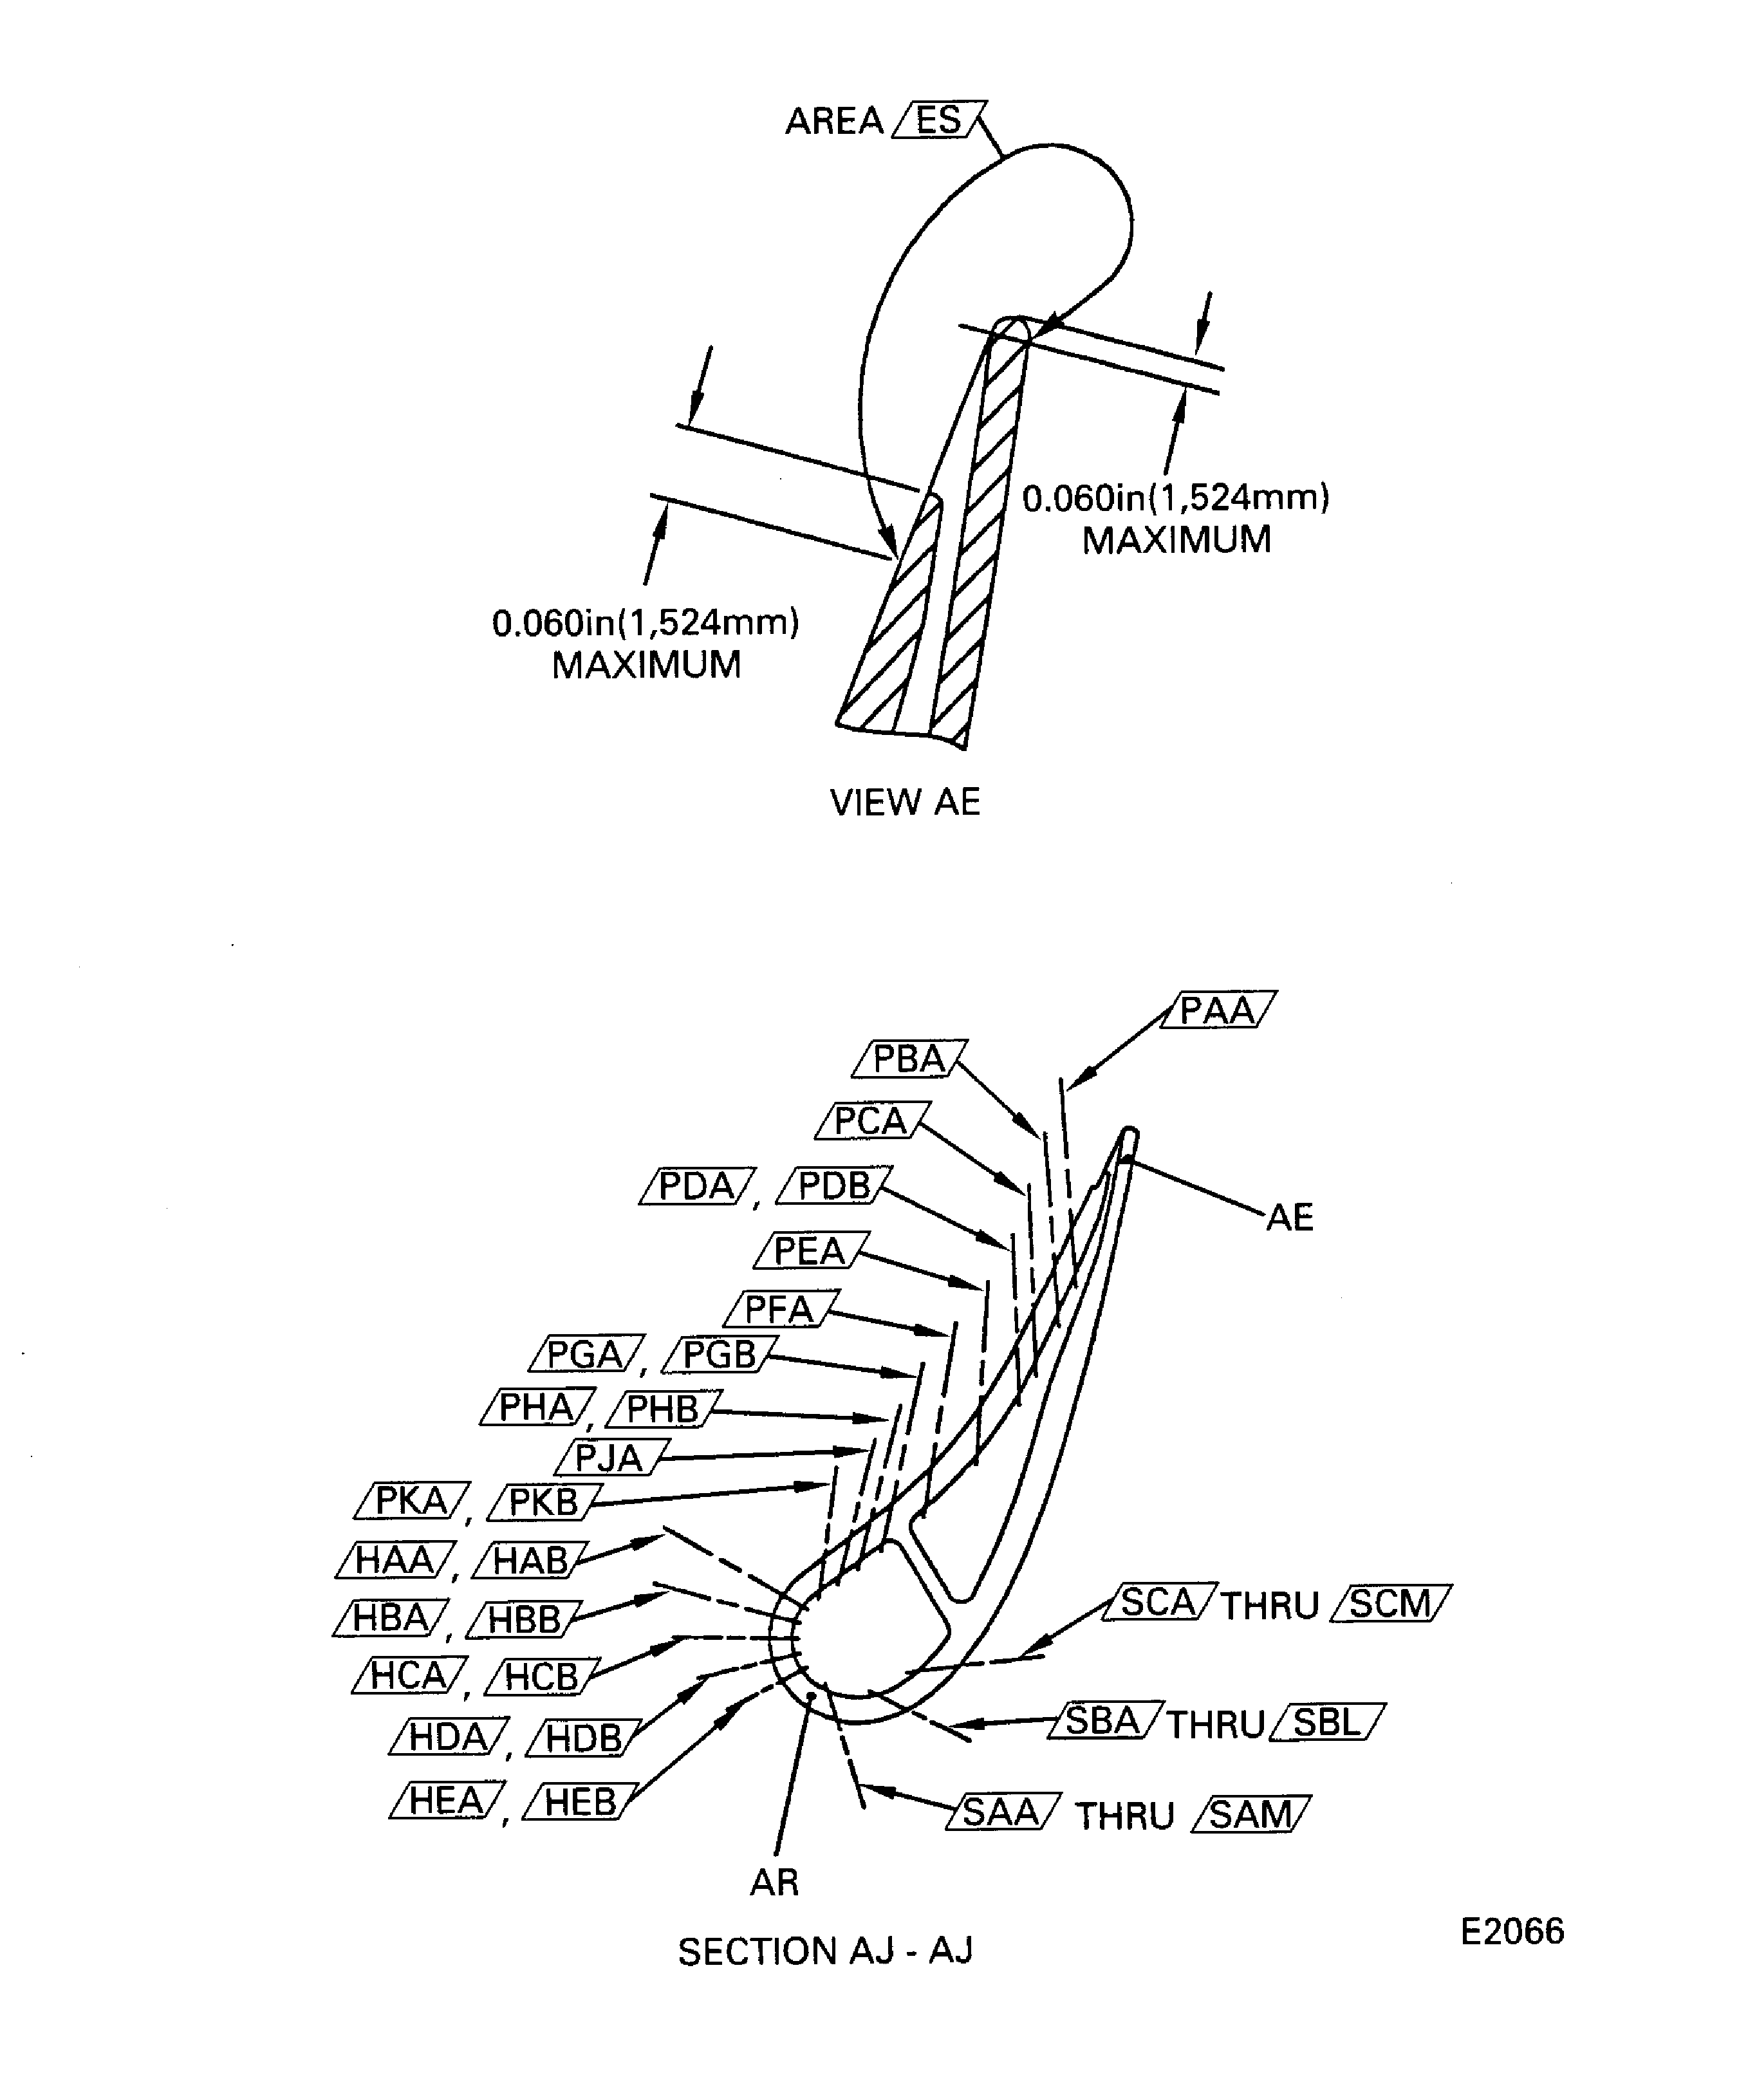
Figure: Stage 1 HPT Vane Assembly Coating Inspection
Sheet 3
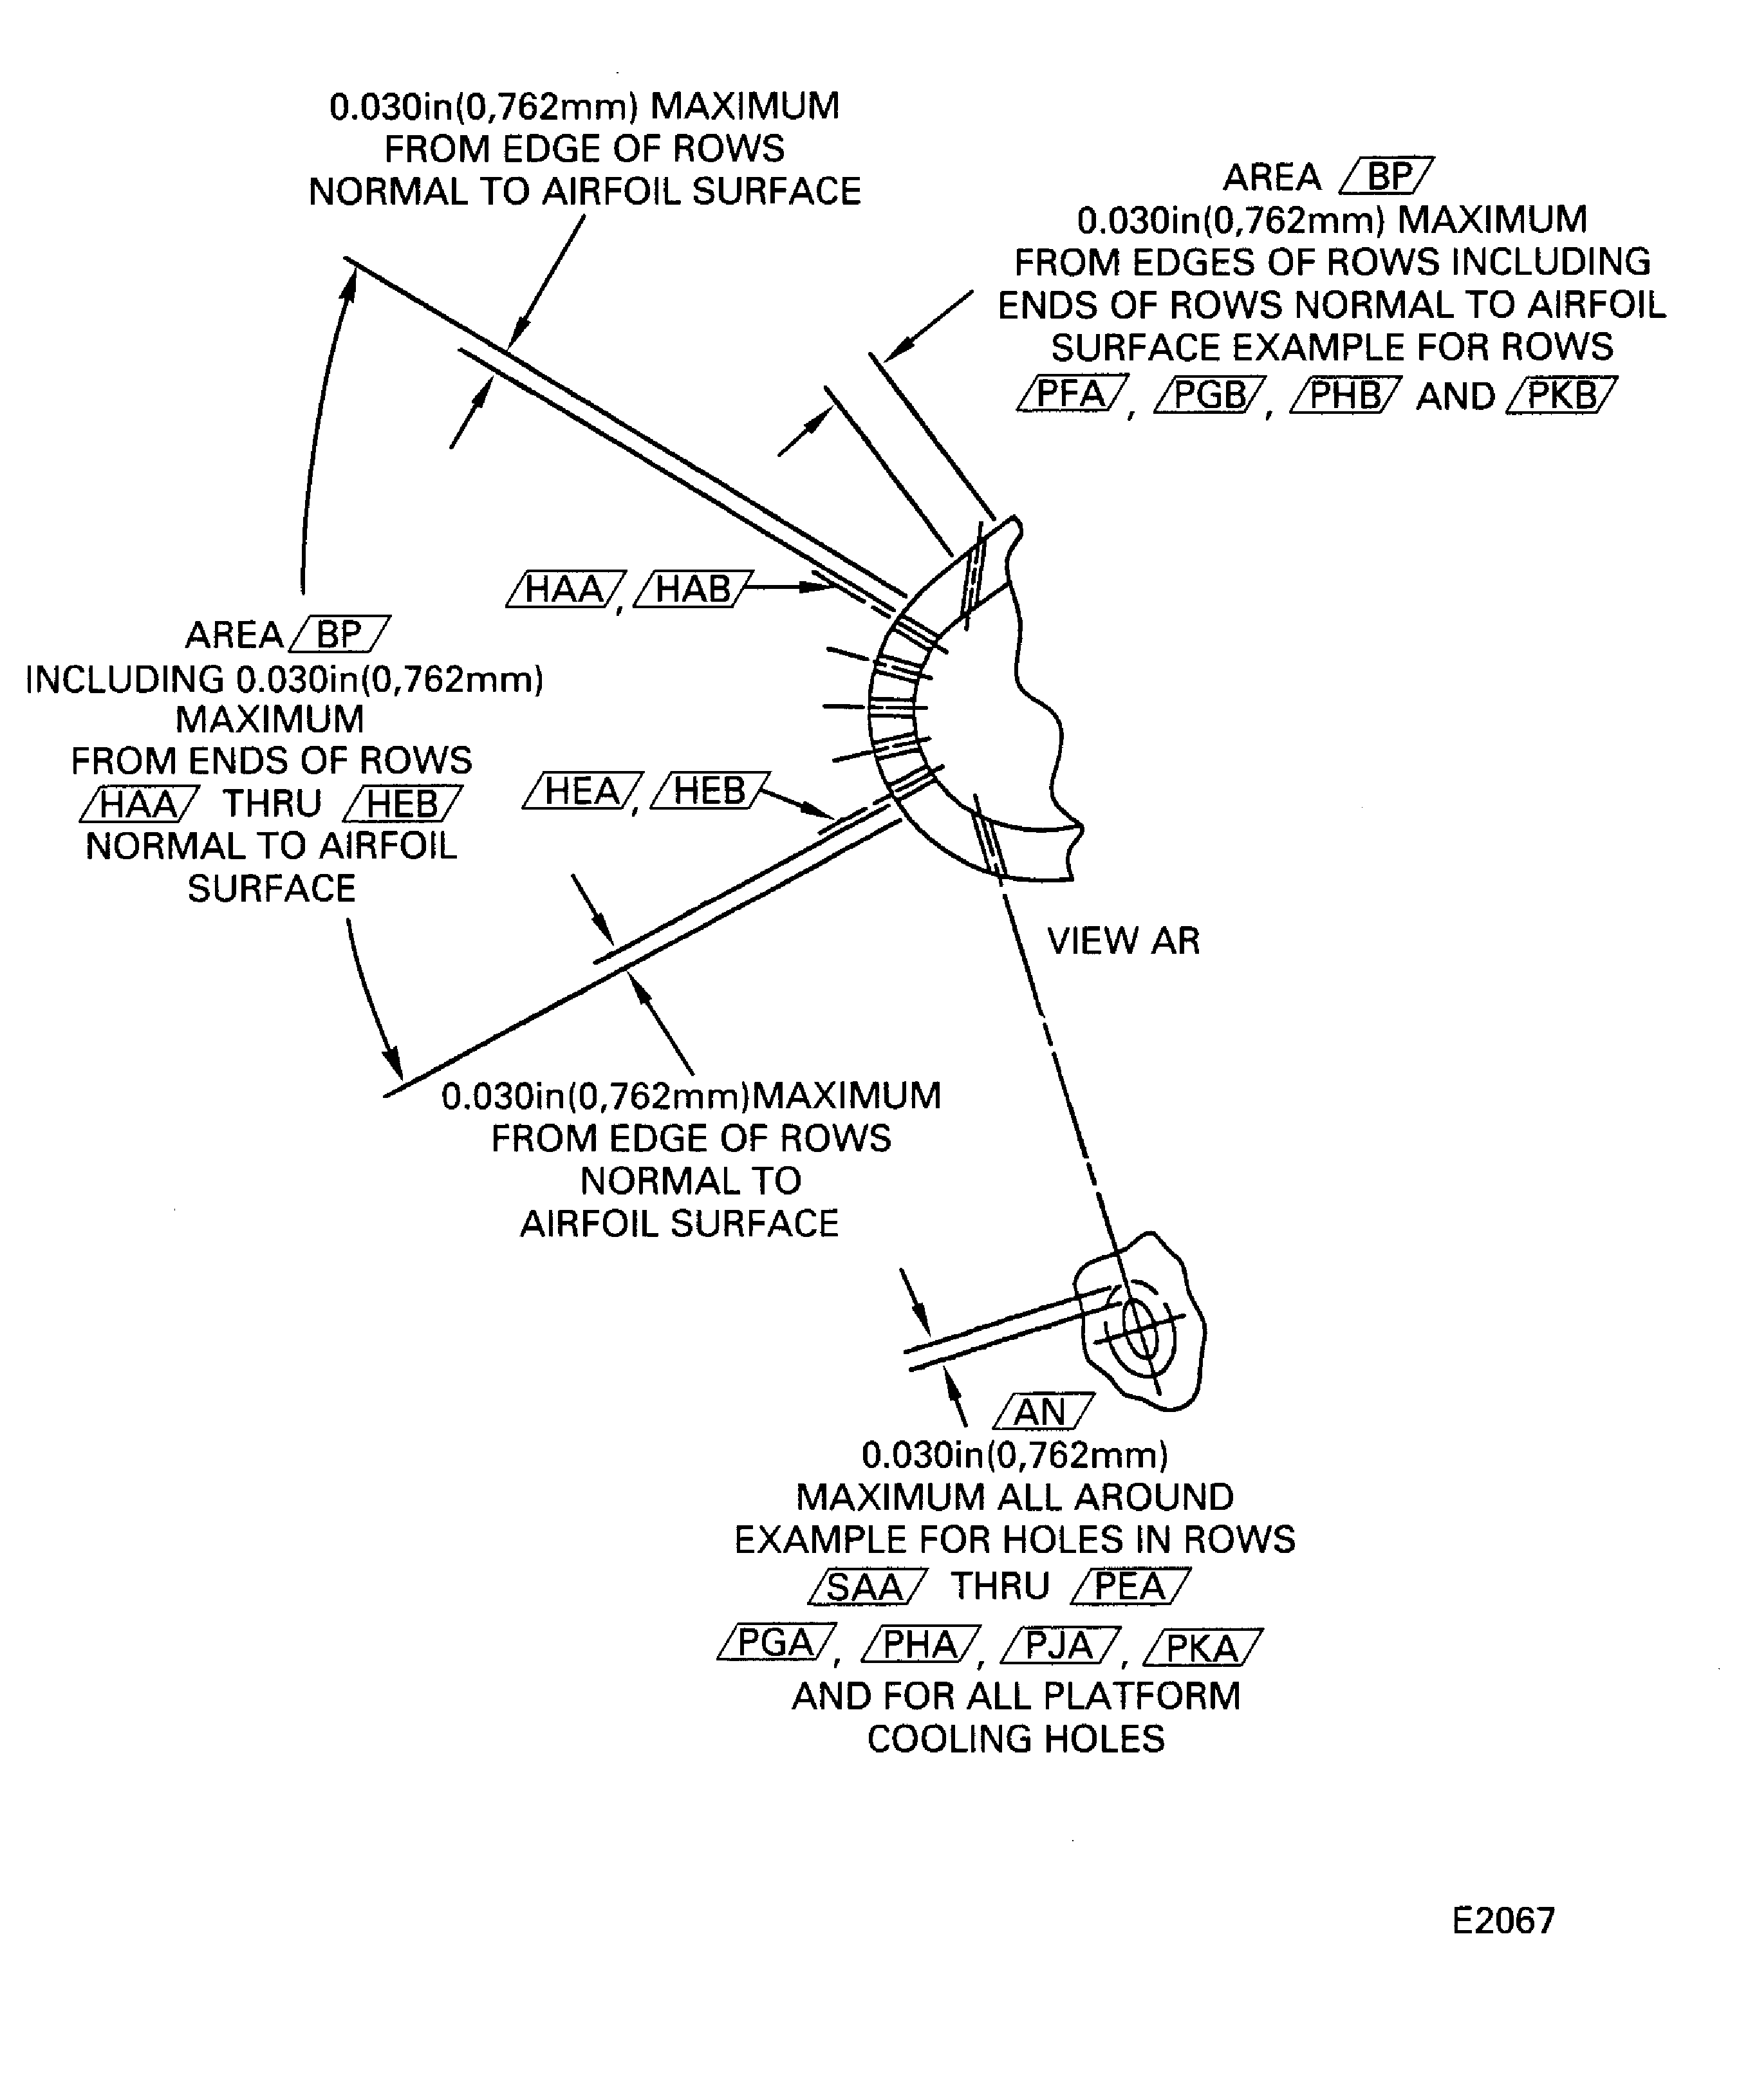
Figure: Stage 1 HPT Vane Assembly Cooling Air Holes Inspection Locations
Stage 1 HPT Vane Assembly Cooling Air Holes Inspection Locations
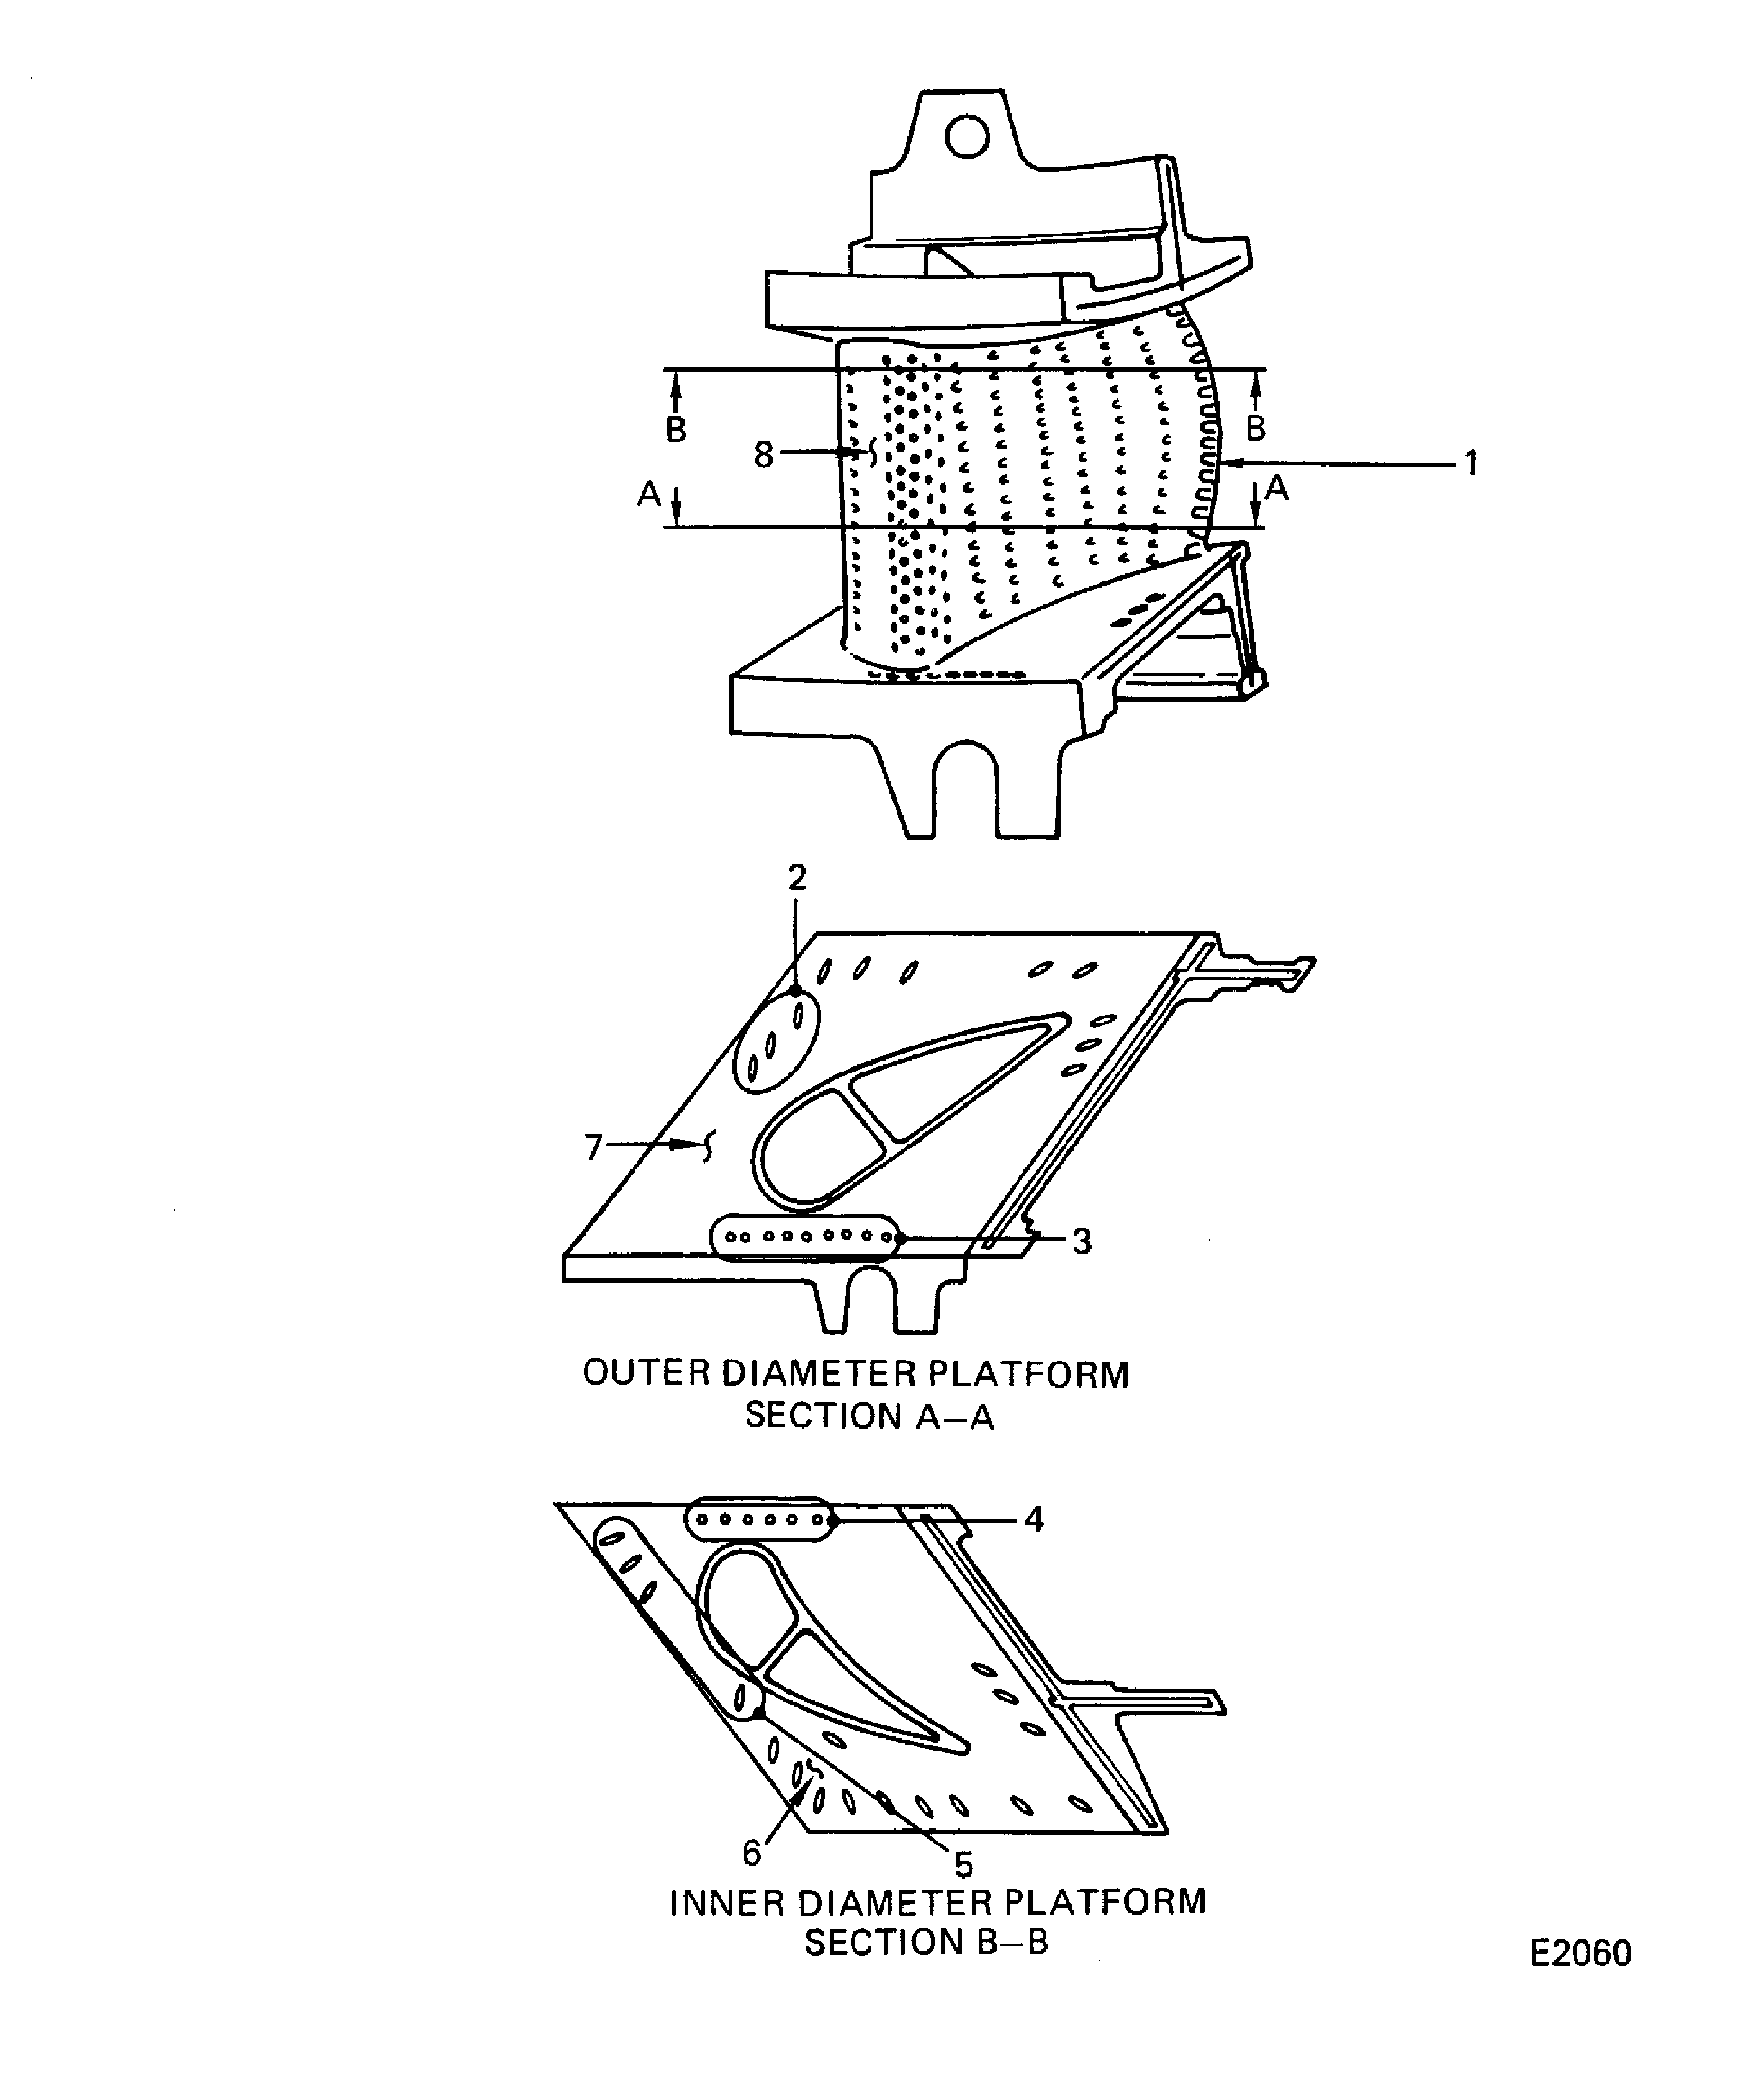
Figure: Stage 1 HPT Vane Assembly Platform Coating Inspection Locations
Stage 1 HPT Vane Assembly Platform Coating Inspection Locations
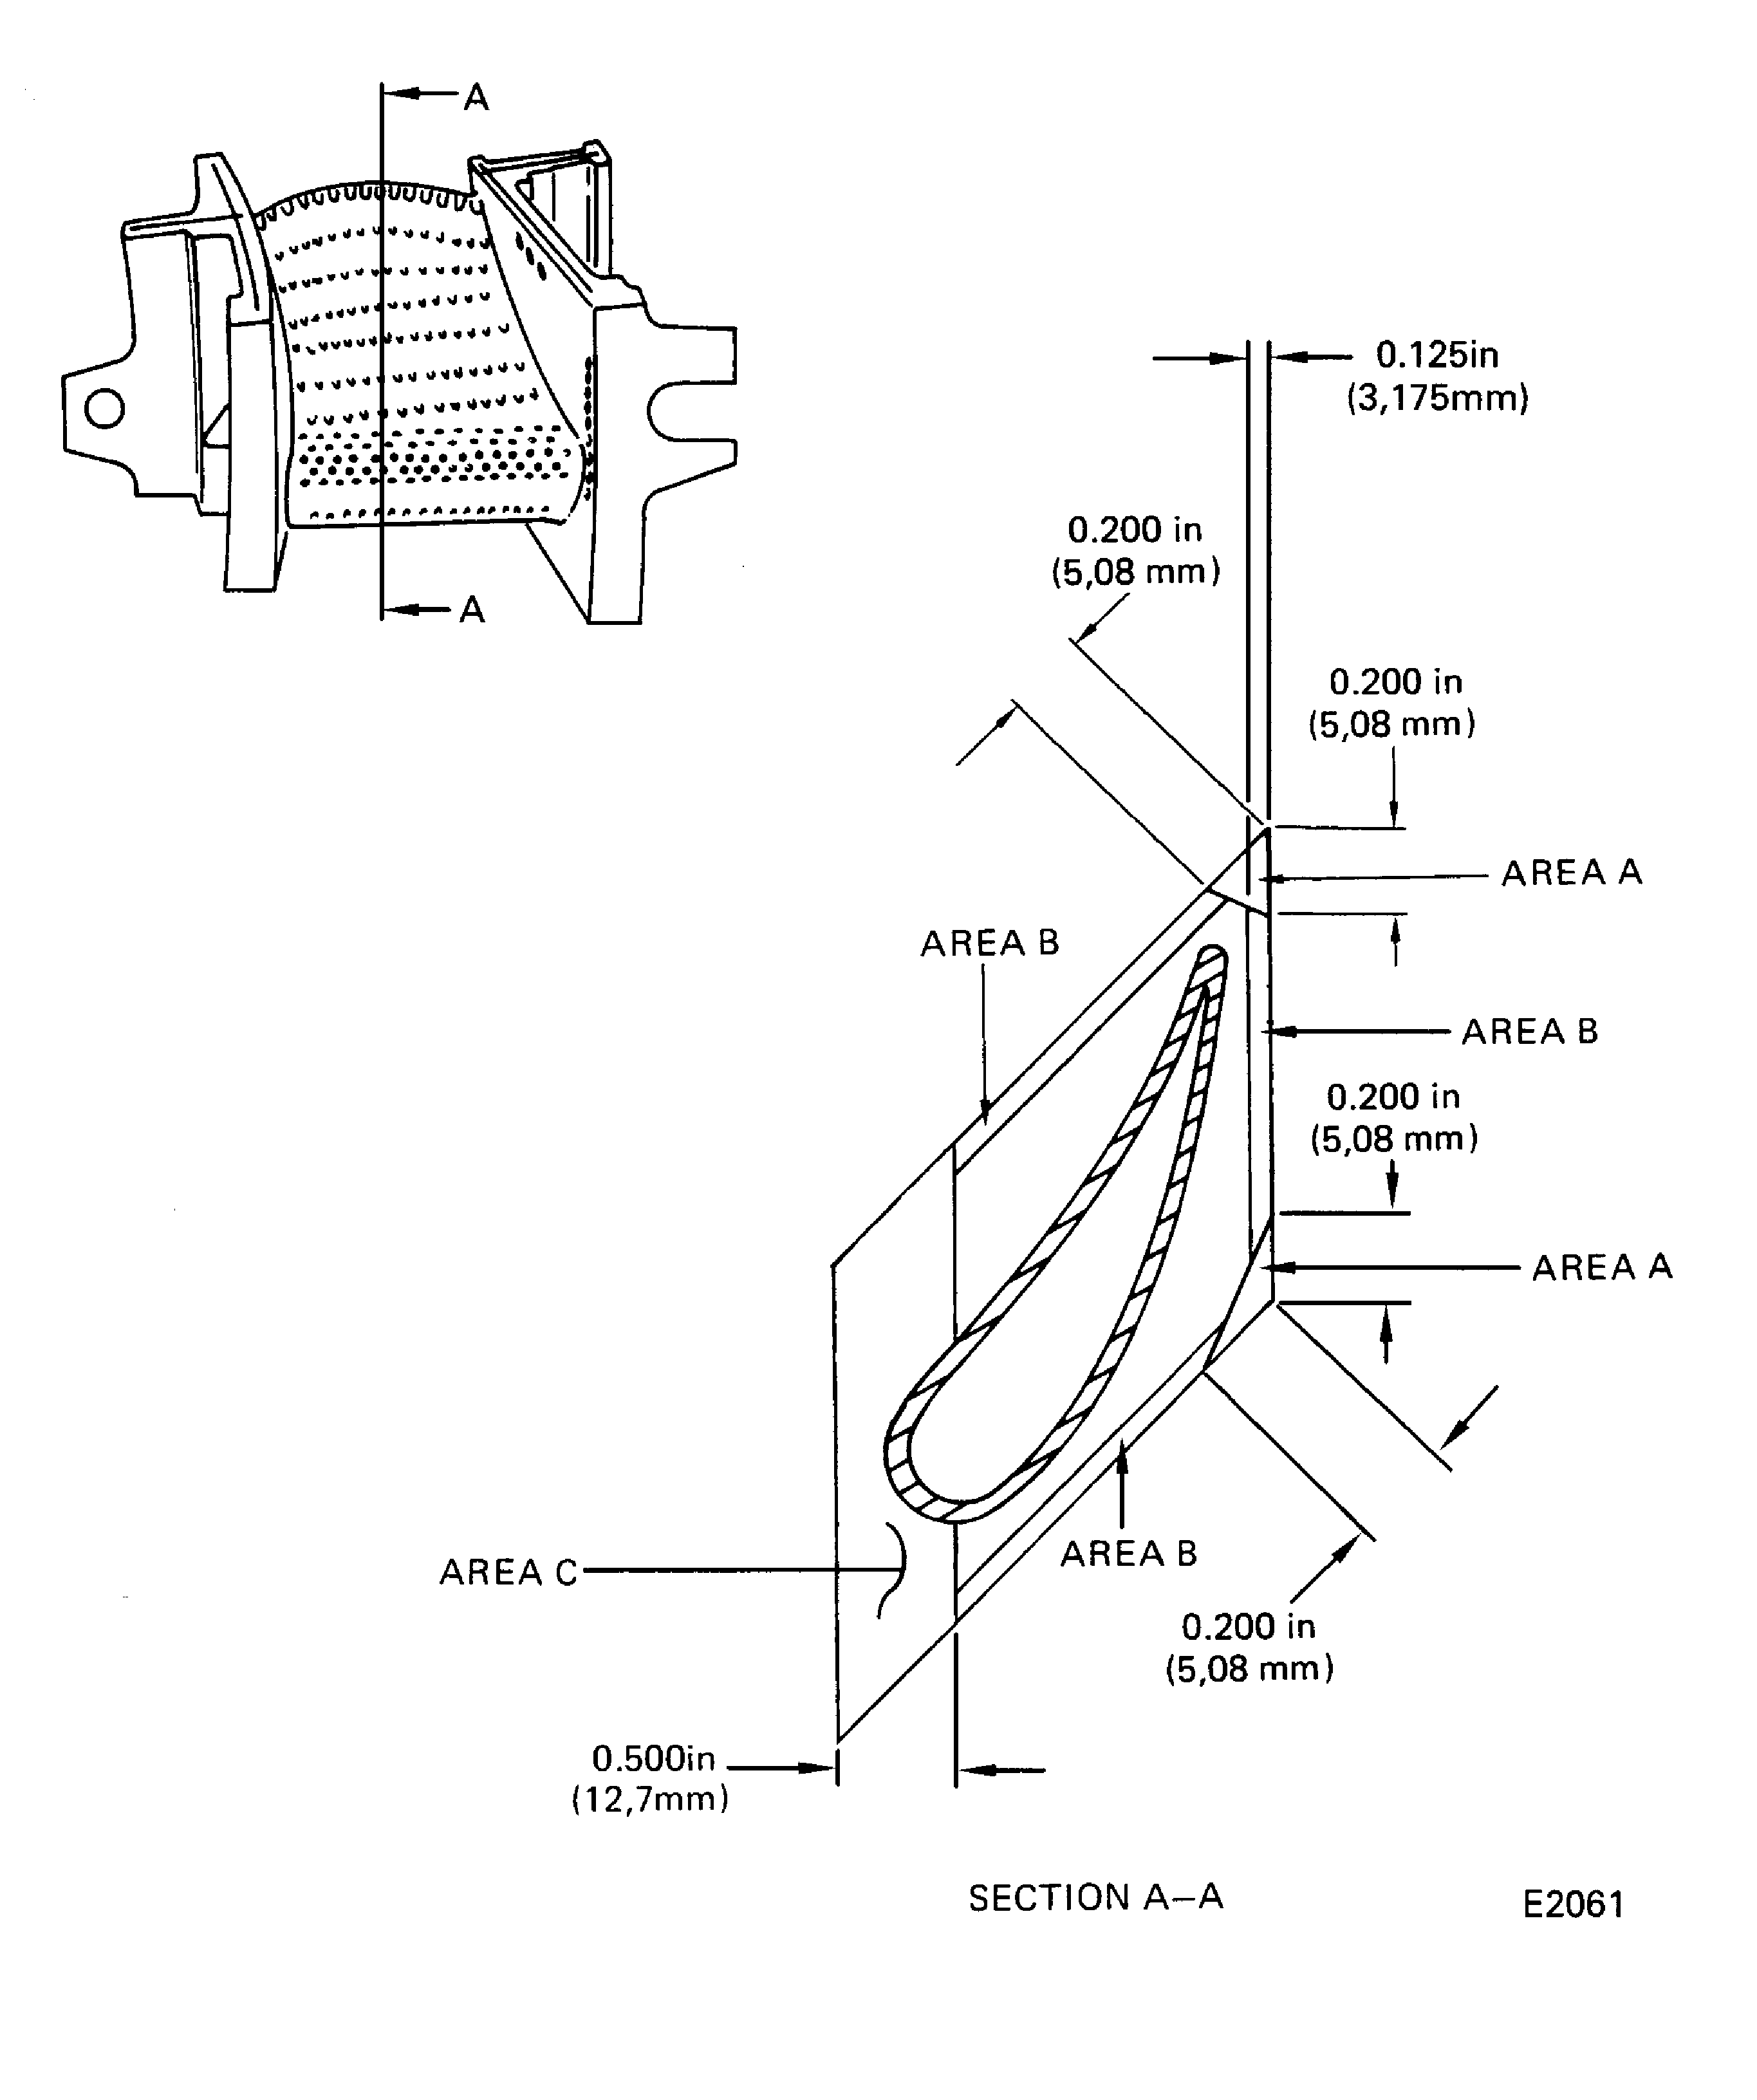
Figure: Stage 1 HPT Vane Assembly Inspection Locations
Stage 1 HPT Vane Assembly Inspection Locations
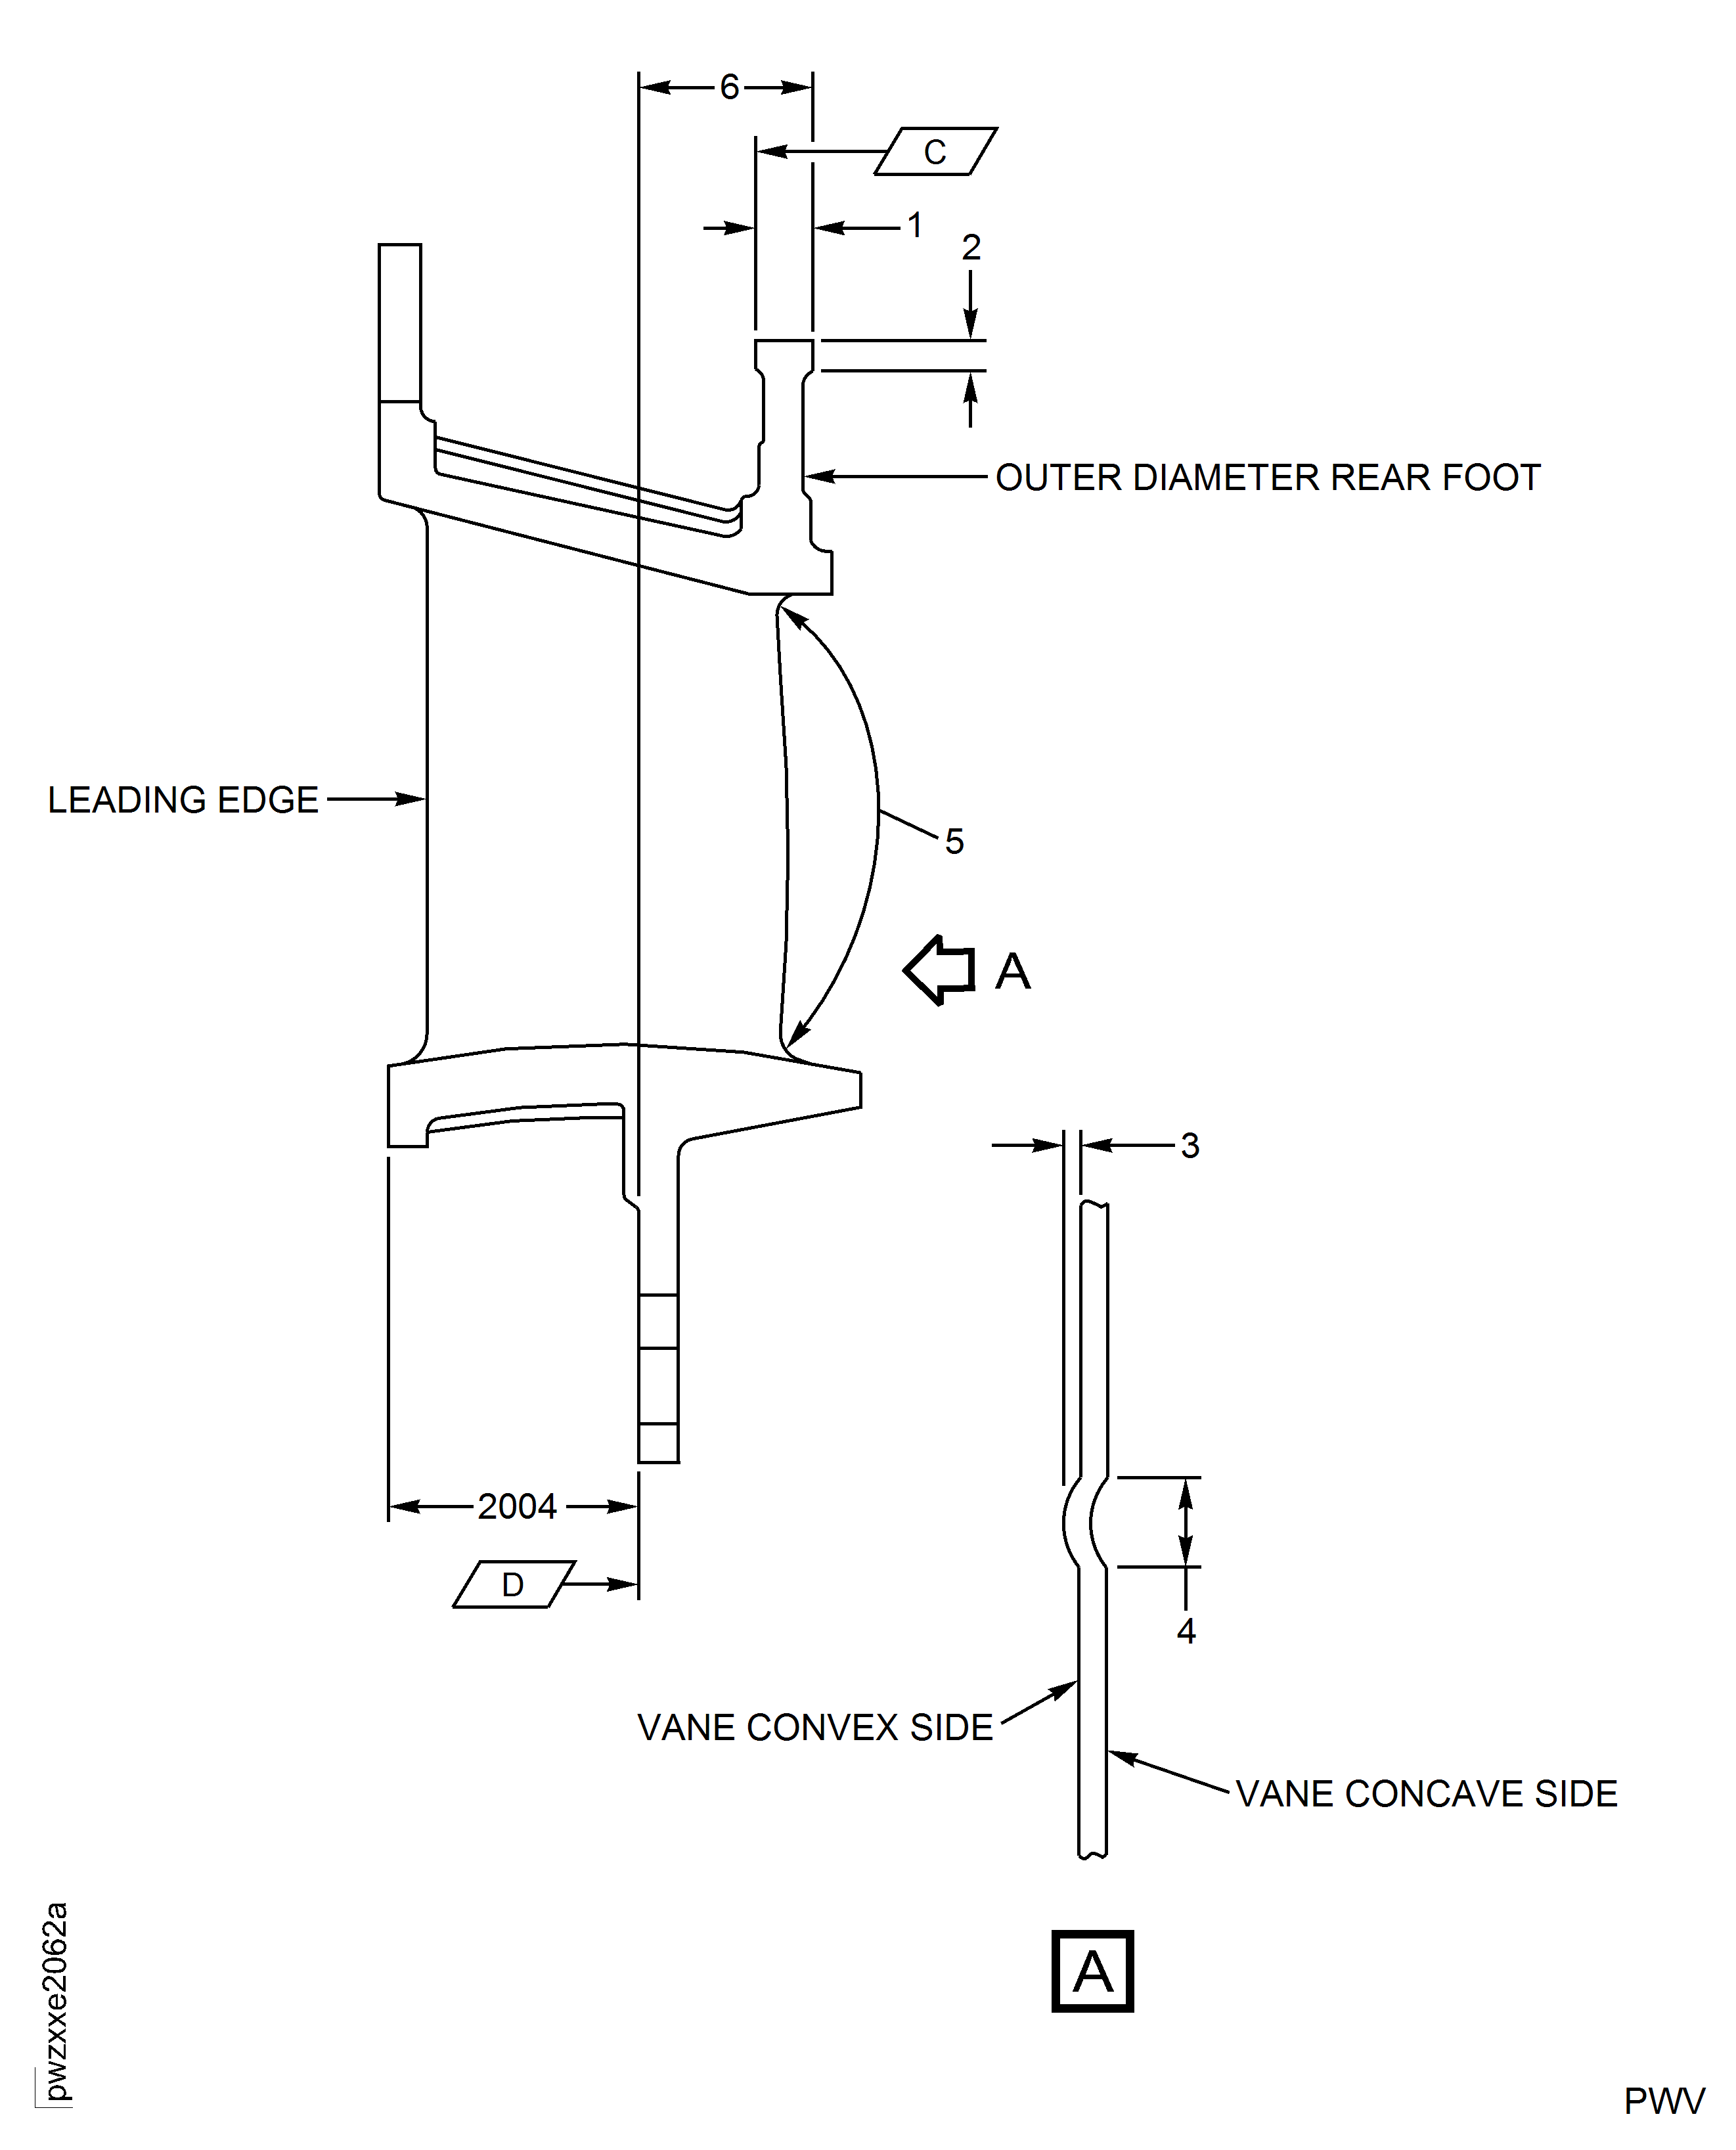
Figure: Stage 1 HPT Vane Assembly Inspection Locations
Stage 1 HPT Vane Assembly Inspection Locations
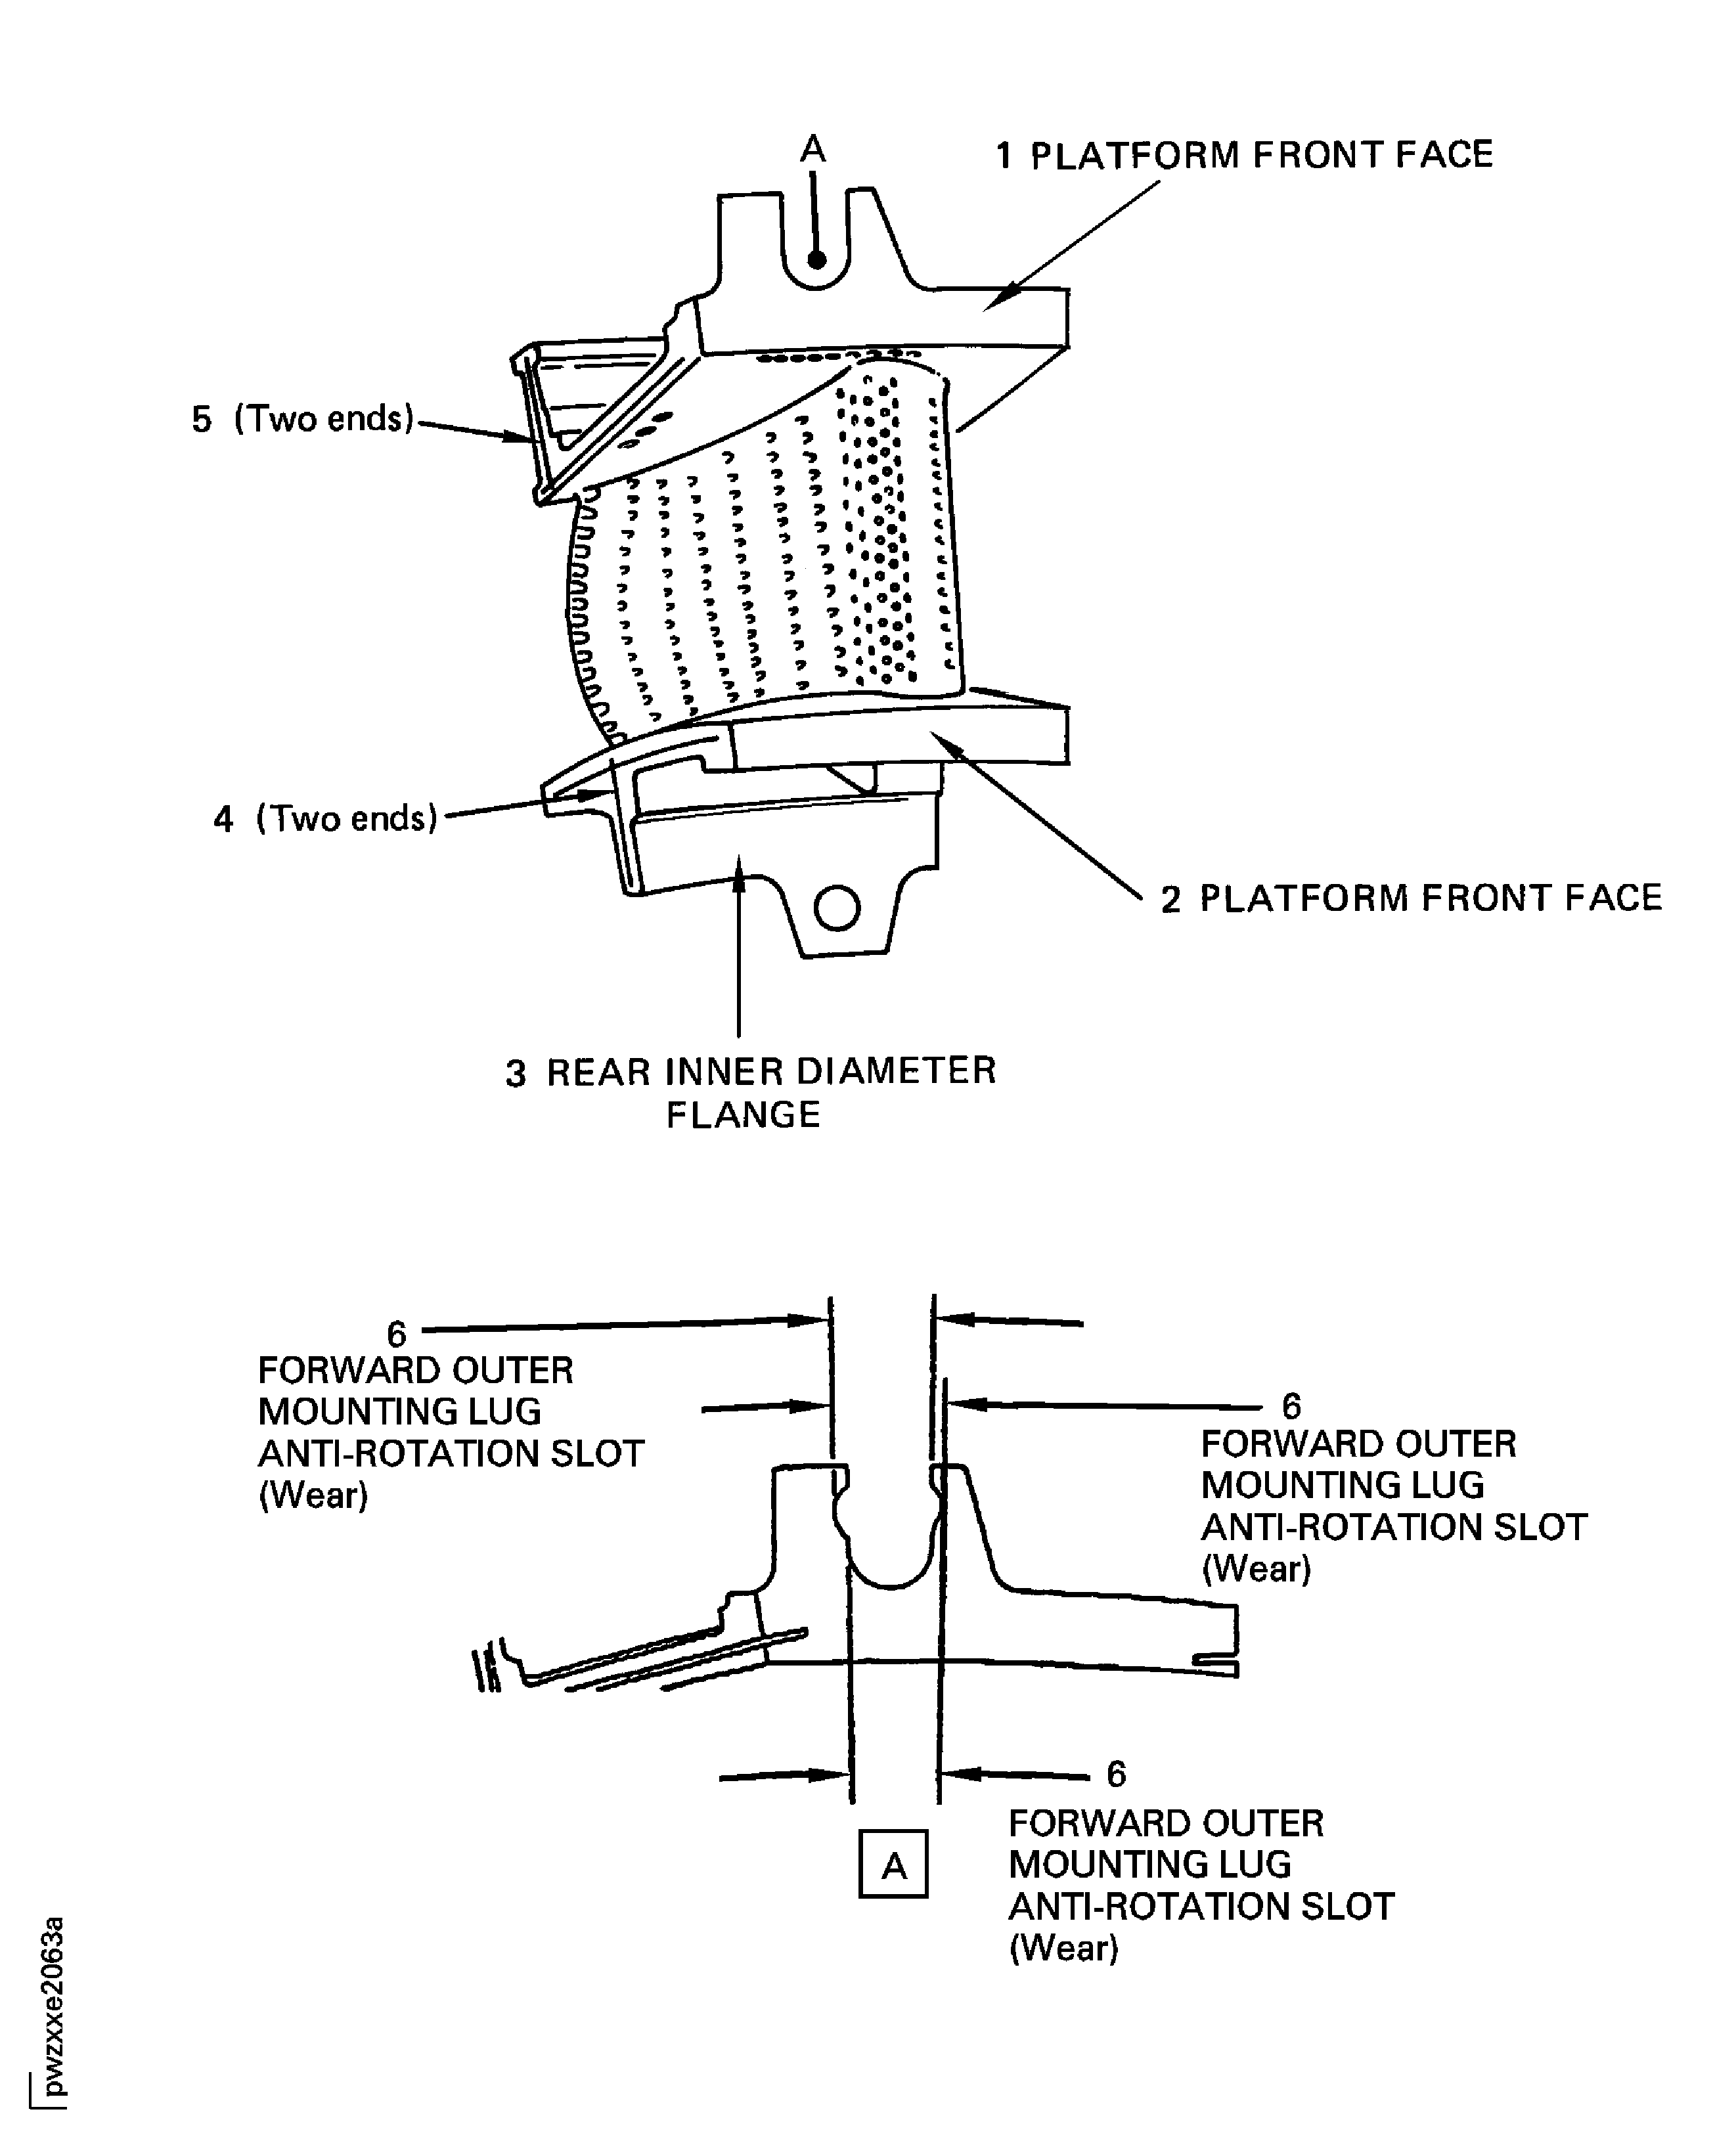
Figure: Stage 1 HPT Vane Assembly Airflow Limits Table
Stage 1 HPT Vane Assembly Airflow Limits Table
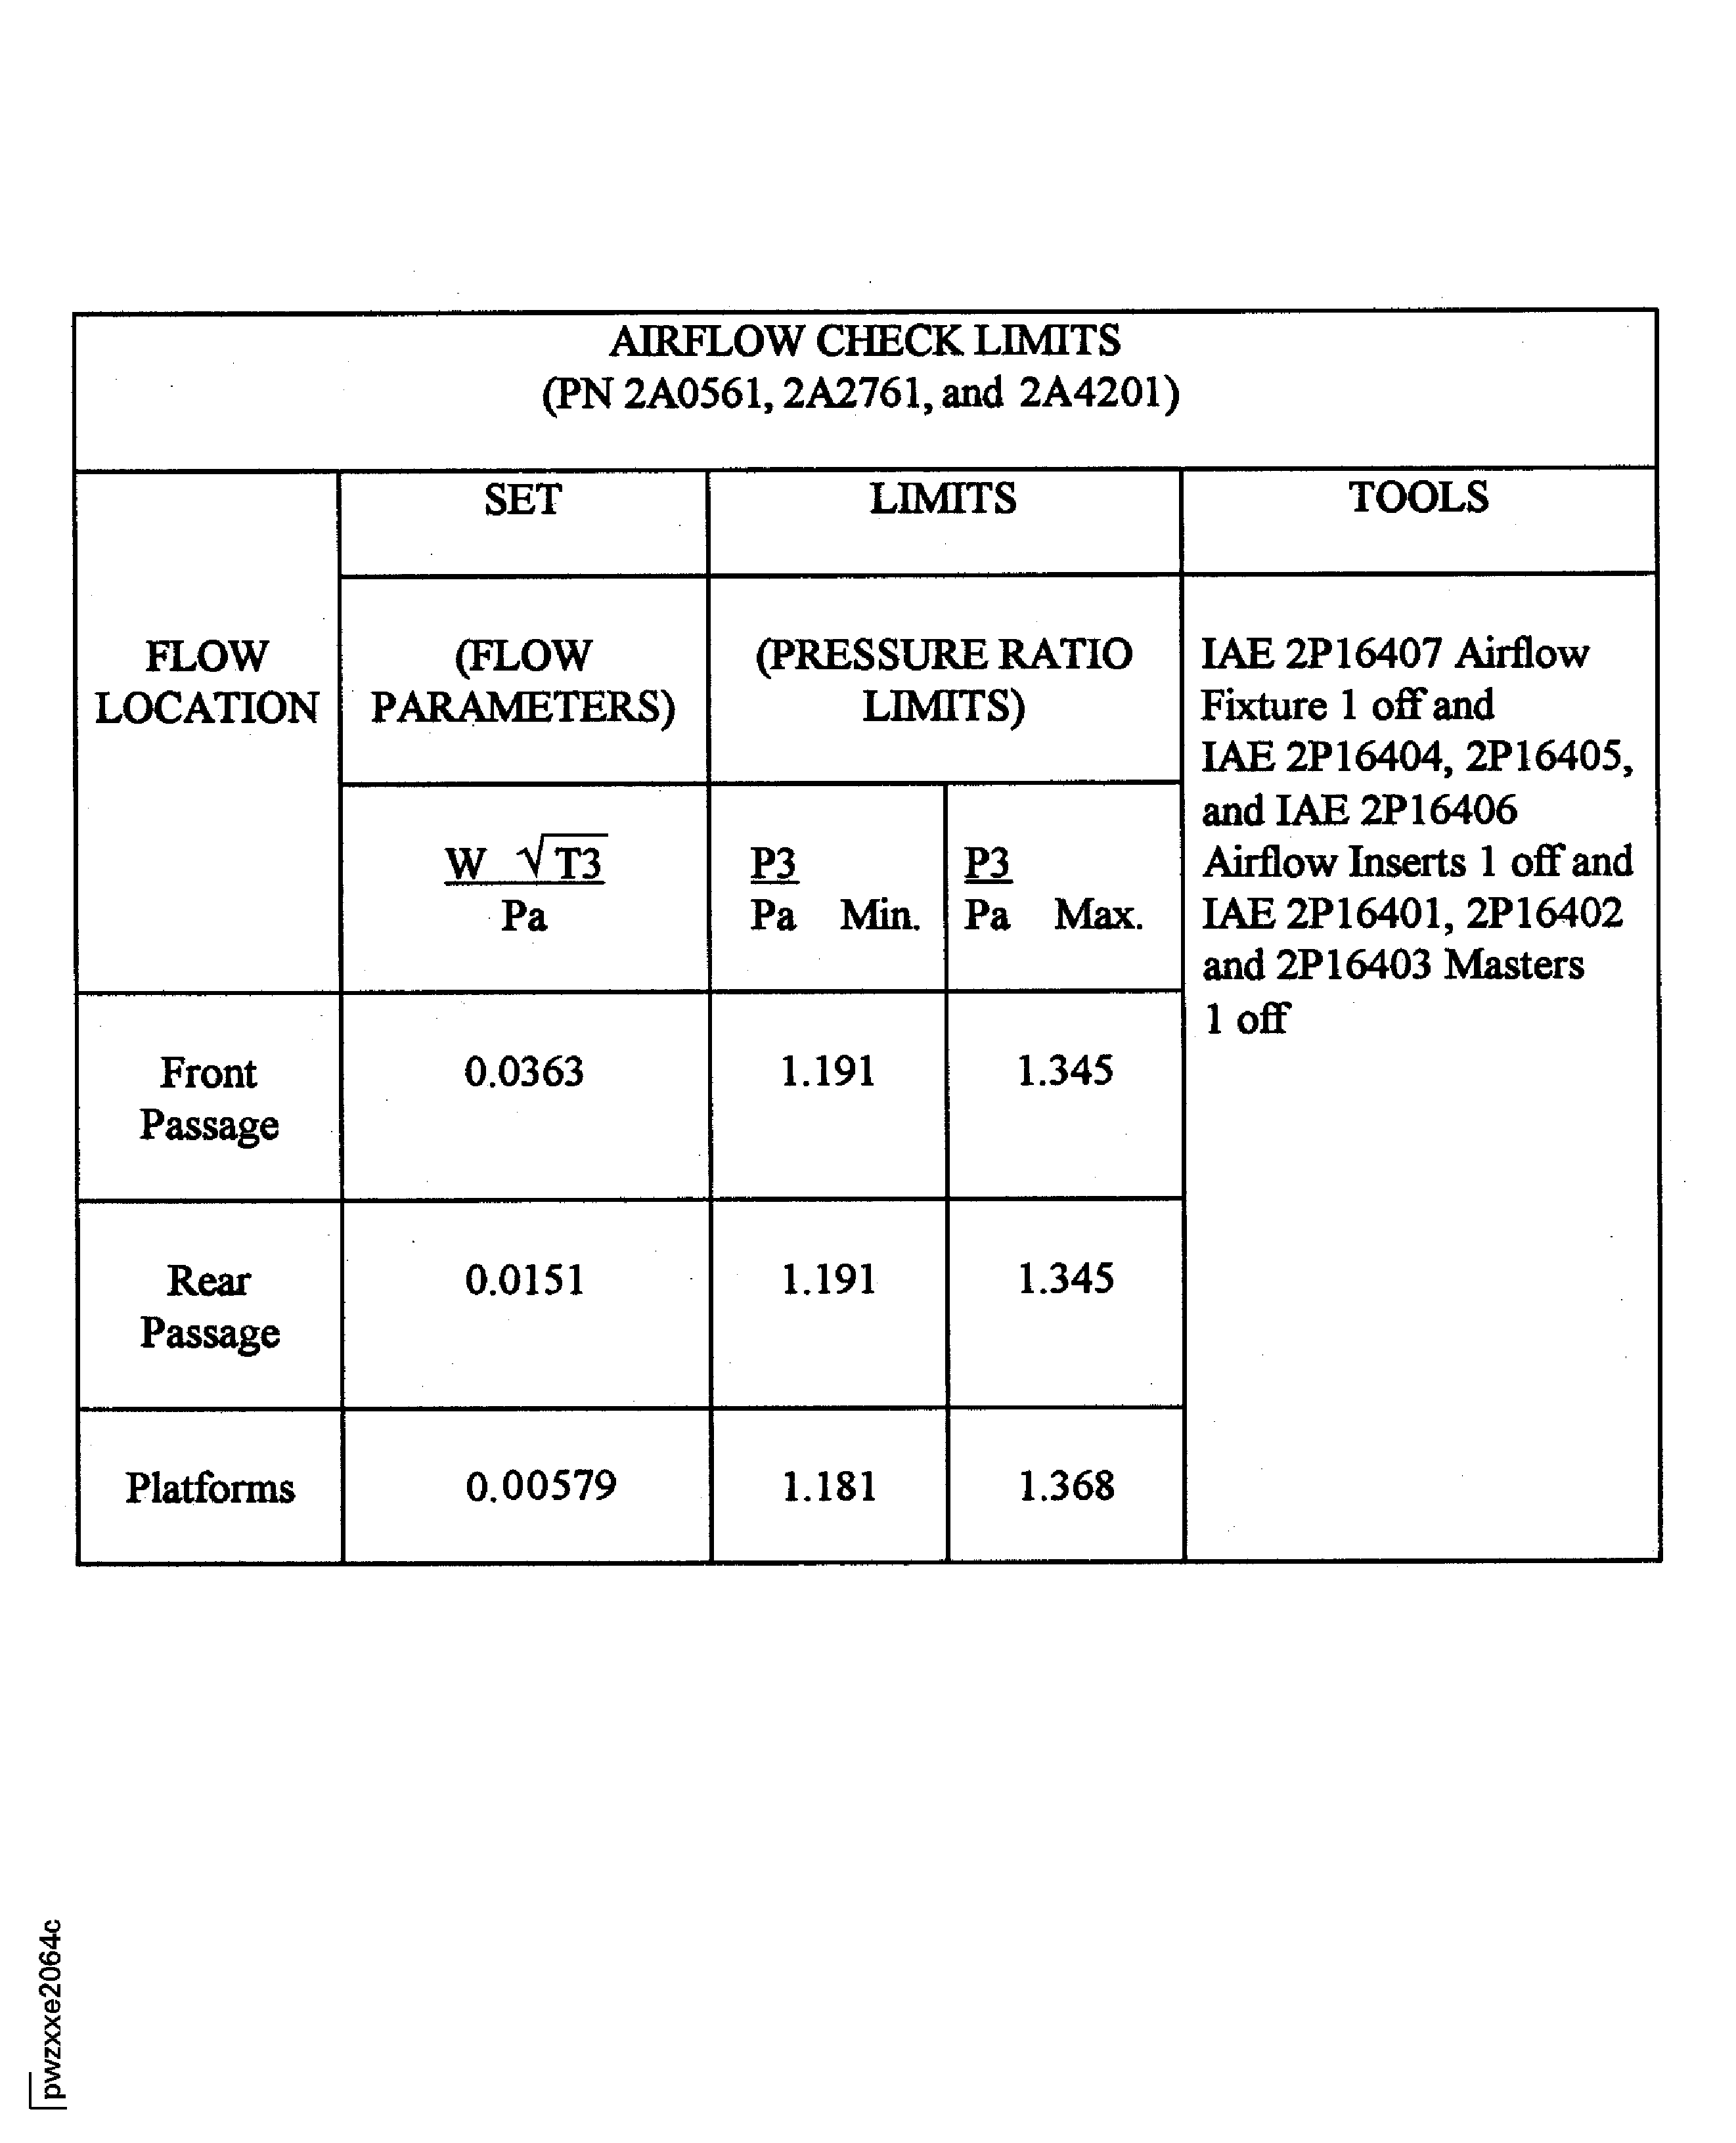
Figure: Stage 1 HPT Vane Assembly Airflow Check Tools
Stage 1 HPT Vane Assembly Airflow Check Tools
