Export Control
EAR Export Classification: Not subject to the EAR per 15 C.F.R. Chapter 1, Part 734.3(b)(3), except for the following Service Bulletins which are currently published as EAR Export Classification 9E991: SBE70-0992, SBE72-0483, SBE72-0580, SBE72-0588, SBE72-0640, SBE73-0209, SBE80-0024 and SBE80-0025.Copyright
© IAE International Aero Engines AG (2001, 2014 - 2021) The information contained in this document is the property of © IAE International Aero Engines AG and may not be copied or used for any purpose other than that for which it is supplied without the express written authority of © IAE International Aero Engines AG. (This does not preclude use by engine and aircraft operators for normal instructional, maintenance or overhaul purposes.).Applicability
All
Common Information
TASK 72-45-31-200-001-E00 HPT Stage 2 Hub - Examine, Inspection-001
General
This TASK gives the procedure for the inspection of the Stage 2 turbine hub. For the other stage 2 turbine hub parts, refer to TASK 72-45-31-200-000 (INSPECTION-000).
Fig/item numbers in parentheses in the procedure agree with those used in the IPC.
The policy that is necessary for inspection is given in SPM TASK 70-20-00-200-501.
All the parts must be cleaned before any part is examined. Refer to SPM TASK 70-10-00-100-501.
All parts must be visually examined for damage, corrosion and wear. Any defects that are not identified in the procedure must be referred to IAE.
The procedure for those parts which must have a crack test is given in Step. Do the test before the part is visually inspected.
Do not discard any part until you are sure there are no repairs available. Refer to the instructions in Repair before a discarded part is used again or oversize parts are installed.
Parts which should be discarded can be held although no repair is available. The repair of a discarded part could be shown to be necessary at a later date.
All parts must be examined to make sure that all the repairs have been completed satisfactorily.
The practices and processes referred to in the procedure by the TASK numbers are in SPM.
References
Refer to SPM for data on these items.
Definitions of Damage, SPM TASK 70-02-02-350-501.
Record and Control of the Lives of Parts, SPM TASK 70-05-00-220-501.
Marking of Parts, SPM TASK 70-09-00-400-501.
Inspection of Parts, SPM TASK 70-20-01-200-501
Some data on these items is contained in this TASK. For more data on these items refer to SPM.
Method of Testing for Crack Indications.
Chemical Processes.
Surface Protection.
Preliminary Requirements
Pre-Conditions
NONESupport Equipment
NONEConsumables, Materials and Expendables
NONESpares
NONESafety Requirements
NONEProcedure
Accept.
No soot or oil.
Do inspection of HPT for possible oil ignition event. Refer to TASK 72-45-00-200-801. Report all findings to IAE Technical Services.
Soot or oil.
Examine the Stage 2 HPT Hub for soot and oil.
SUBTASK 72-45-31-220-132 Examine the Stage 2 HPT Hub for Soot and Oil

CAUTION
MAKE SURE THAT YOU DO THIS INSPECTION BEFORE YOU CLEAN THE PART OR CLEANING PROCEDURE WILL REMOVE THE INDICATION OF SOOT AND OIL.Refer to Figure.
Clean the part. Refer to TASK 72-45-31-100-000 (CLEANING-000).
NOTE
When you inspect the stage 2 turbine hub for cracks make sure you check the important areas. These areas are shown in Figure.Do the test for cracks on the part that is given below. Carefully examine slot pressure faces, slot bottom, firtree radius, rim radius, fillet radius, web radius, bore, spline, hook, slot fillet, and face. Use the applicable penetrant inspection procedure.
PART IDENT
TASK/SUBTASK
Stage 2 turbine hub
(Dip or Spray)
SUBTASK 72-45-31-230-057 Examine the Stage 2 Turbine Hub (01-011) for Cracks
Refer to Figure.
SUBTASK 72-45-31-250-011 Examine the Stage 2 Turbine Hub (01-011) Blade Slot Pressure Face by Eddy Current Inspection
Refer to Figure.
Damage up to 0.001 in. (0.025 mm) in depth is permitted. This does not include any nonsuperficial imperfections or tool marks in the blade slots. Refer to SPM TASK 70-35-09-350-501.
Repair, VRS3238 TASK 72-45-31-300-001 (REPAIR-001).
Damage more than Step.
Corrosion, dents, nicks and scratches.
Examine the turbine hub for corrosion, nick, dents and scratches on all the surfaces except blade slots.
Damage up to 0.001 in. (0.025 mm) in depth is permitted in area 16 fillet radii and slot bottom. No blending permitted.
Damage up to 0.003 in. (0.08 mm) in depth is permitted in area 17 pressure face. No blending permitted.
Damage up to 0.003 in. (0.08 mm) in depth is permitted in area 18. No blending permitted.
Damage up to 0.001 in. (0.025 mm) in depth is permitted in area 19. Blend up to 0.007 in. (0.18 mm) to remove surface damage. Refer to repair, VRS3238 TASK 72-45-31-300-001 (REPAIR-001).
Corrosion, dents, nicks and scratches.
Tool marks are not permitted in area 16 fillet radii and slot bottom and area 17 pressure face. This does not include slot bottom mismatches. This does not include fretting or contact wear. Refer to Tooling card IAE2P16632 for example of tool marks and example of slot bottom mismatches. If any of these unacceptable conditions are observed, remove hub from service and report the finding to IAE Customer Technical Service.
If tool mark cannot be confirmed, examine by Tooling card IAE2P16667. Sources listed below are approved to do this inspection.
Northeast Overhaul and Repair
40 New Park Drive
Berlin, CT 06037
USA
Or
Christchurch Engine Center
115 Orchard Road
Christchurch 8051
New Zealand
Tool marks up to 0.003 in. (0.08 mm) in area 18 and 19 are permitted.
Inspect blade slots for tool marks.
Examine the turbine hub for corrosion, dents, nicks, scratches and tool marks in the blade slots.
SUBTASK 72-45-31-220-097 Examine the Stage 2 Turbine Hub (01-011) for Corrosion, Dents, Nicks, Scratches and Blade Slot Tool Marks
Refer to Figure.
Repair, VRS3238 TASK 72-45-31-300-001 (REPAIR-001).
Fretted and galled.
Examine the turbine hub for fretted and galled diameters at Locations 2, 8, 10 and 13.
SUBTASK 72-45-31-220-098 Examine the Stage 2 Turbine Hub (01-011) for Fretted and Galled Diameters
Refer to Figure.
Repair, VRS3238 TASK 72-45-31-300-001 (REPAIR-001).
Dents, nicks, scratches and wear.
Contact faces at Locations 1 and 8.
Repair, VRS3521 TASK 72-45-31-300-011 (REPAIR-011).
NOTE
At Location 15 (rear face of the ladder lock lug), a machined step to a maximum of 0.025 in. (0.64 mm) is permitted.
Dents, nicks, scratches and wear.
Contact face at Location 7.
Repair, VRS3238 TASK 72-45-31-300-001 (REPAIR-001) or Repair, VRS3855 TASK 72-45-31-300-015 (REPAIR-015).
Dents, nicks, scratches and wear.
Contact face at Location 11.
Examine the turbine hub for dents, nicks, scratches and wear at the locations that follow.
SUBTASK 72-45-31-220-099 Examine the Stage 2 Turbine Hub (01-011) for Dents, Nicks, Scratches and Wear on all the Blade Slots, Seal Slots, Hub Lock Slots, Holes and Contact Faces
Refer to Figure.
Repair, VRS3238 TASK 72-45-31-300-001 (REPAIR-001) or VRS3499 TASK 72-45-31-300-008 (REPAIR-008).
Fretted, galled, corrosion and wear.
Examine the turbine hub for fretted, galled, corrosion and wear on the spline at Location 9.
SUBTASK 72-45-31-220-100 Examine the Stage 2 Turbine Hub (01-011) for Fretted, Galled, Corrosion and Wear on the Spline
Refer to Figure.
Do inspection of HPT for possible oil ignition event. Refer to TASK 72-45-00-200-801. Report all findings to IAE Technical Services.
Wear marks.
Examine the bore for wear at Location 14.
SUBTASK 72-45-31-220-117 Examine the Stage 2 HPT Hub for Wear Marks on the Forward Side
Refer to Figure.
Write down the dimension of the diameter.
NOTE
This part can be used only if the mating part has a diameter that will result in fit of reference No. 1506. Refer to TASK 72-45-30-440-001-C00 (ASSEMBLY, CONFIG-003).
If the select fit dimension is between 17.2095 in. and 17.216 in. (437.121 mm and 437.29 mm).
Other than Step.
Examine the stage 2 turbine at Location 1506, for the rear outer diameter.
Write down the dimension of the diameter.
NOTE
This part can be used only if the mating part has a diameter that will result in fit of reference No. 1505. Refer to TASK 72-45-00-430-001-C00 (ASSEMBLY, CONFIG-003).
If the select fit dimension is between 17.141 in. and 17.1505 in. (435.38 mm and 435.623 mm).
Other than Step.
Examine the stage 2 turbine hub at Location 1505, for the front outer diameter.
Cylindricity within plus or minus 0.0005 in. (0.0127 mm).
Write down the dimension of the diameter.
NOTE
This part can be used only if the mating part has a diameter that will result in fit of reference No. 2249. Refer to TASK 72-00-45-420-001-B02 (INSTALLATION-002) or TASK 72-40-00-430-006-B00 (ASSEMBLY-006).
Accept part for select fit only.
If the dimension is between 4.8345 in. and 4.8364 in. (122.796 mm and 122.844 mm).
Repair, VRS3790 TASK 72-45-31-300-014 (REPAIR-014).
Examine the stage 2 turbine hub at Location 2249, for the rear inner diameter.
Other than Step.
Examine the turbine hub front inner diameter at Location 1500.
SUBTASK 72-45-31-220-101 Examine the Stage 2 Turbine Hub (01-011) Diameters
Refer to Figure.
Repair, VRS3855 TASK 72-45-31-300-015 (REPAIR-015).
Other than Step.
Examine the turbine hub for axial length at Location 1.
Repair, VRS3521 TASK 72-45-31-300-011 (REPAIR-011).
Other than Step.
Examine the turbine hub inner diameter for axial length at Location 4.
SUBTASK 72-45-31-220-102 Examine the Stage 2 Turbine Hub (01-011) for Axial Length
Refer to Figure.
More than Step.
Measure the spline tooth wear.

CAUTION
USE ONLY THE SPECIFIED PIN DIAMETER. INCORRECT PIN DIAMETER WILL CAUSE AN UNSATISFACTORY MEASUREMENT.Examine the turbine hub for the spline tooth wear at Location 6. Use two pins 0.090 in. (2.286 mm) in diameter.
SUBTASK 72-45-31-220-103 Examine the Stage 2 Turbine Hub (01-011) for the Spline Dimension
Refer to Figure.
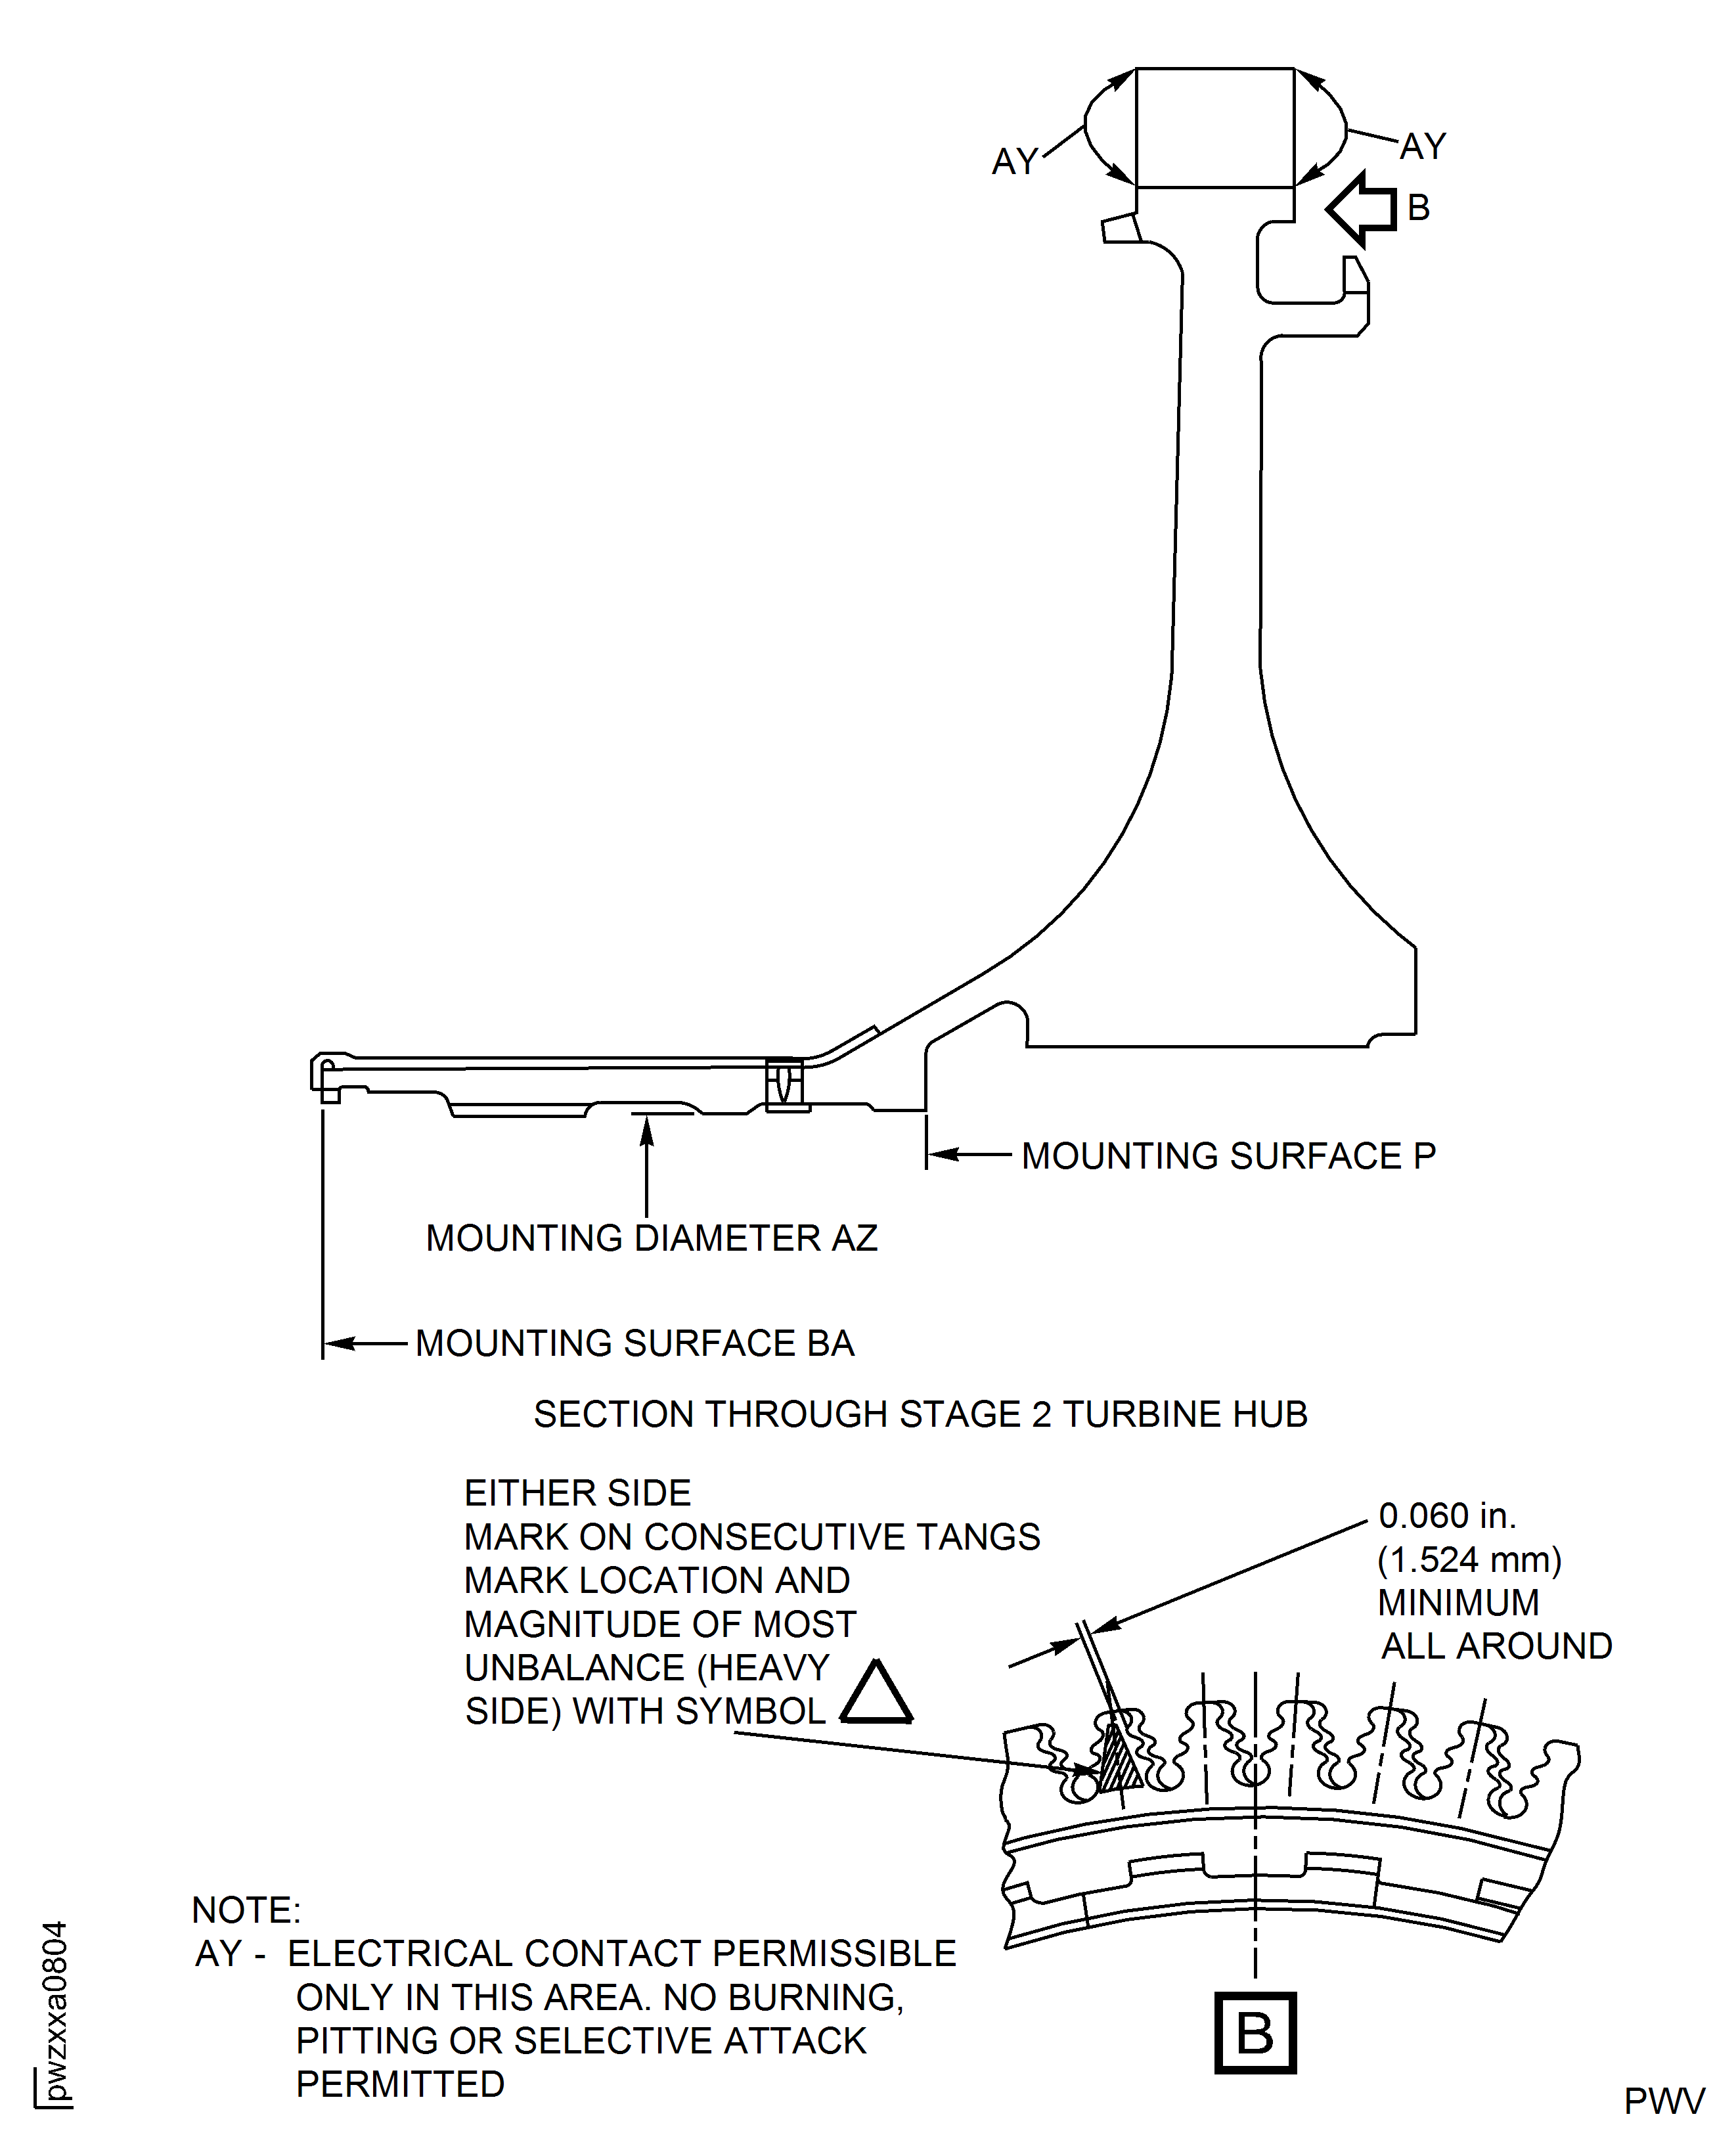
Mark the turbine hub by SPM TASK 70-09-00-400-501 at Location 3. The electrical contact is only permitted at Location 2.
Mark the new cycle time of the part on the turbine hub. Refer to SPM TASK 70-05-00-220-501.
SUBTASK 72-45-31-220-104 Examine the Stage 2 Turbine Hub (01-011) for the Cycle Time of the Part
Refer to Figure.
Repair, VRS3704 TASK 72-45-31-300-013 (REPAIR-013).
Marking of part number that penetrates below disk surface.
Examine the Stage 2 turbine hub for incorrect marking at Location 5.
SUBTASK 72-45-31-220-113 Examine the Stage 2 Turbine Hub (01-011) for Incorrect Marking Location
Refer to Figure.
Examine the turbine hub for the balancing mark.
NOTE
Do Step, if balancing mark on the part is not available.Refer to Figure.
Install the Balance Fixture on a Vertical Balance Machine. Use appropriate fixture.
Install the Stage 2 Turbine Hub into the Fixture. Use appropriate fixture.
Constraint contact permitted only on Diameter AZ and Surfaces BA and P. Use appropriate fixture.
Do a check for balance machine calibration.
Turn the Stage 2 Turbine Hub at 900 rpm.
Mark location and magnitude of the most heavy unbalance (heavy side) with the symbol on consecutive tangs. Refer to SPM TASK 70-09-00-400-501, Procedures to Make Permanent Identification And Location Marks. Use deep electrolytic etch method.
Balance the Stage 2 Turbine Hub.
SUBTASK 72-45-31-220-139 Examine the Stage 2 Turbine Hub (01-011) for the Balancing Mark
Figure: Stage 2 Turbine Hub, Important FPI Inspection Locations
Stage 2 Turbine Hub, Important FPI Inspection Locations
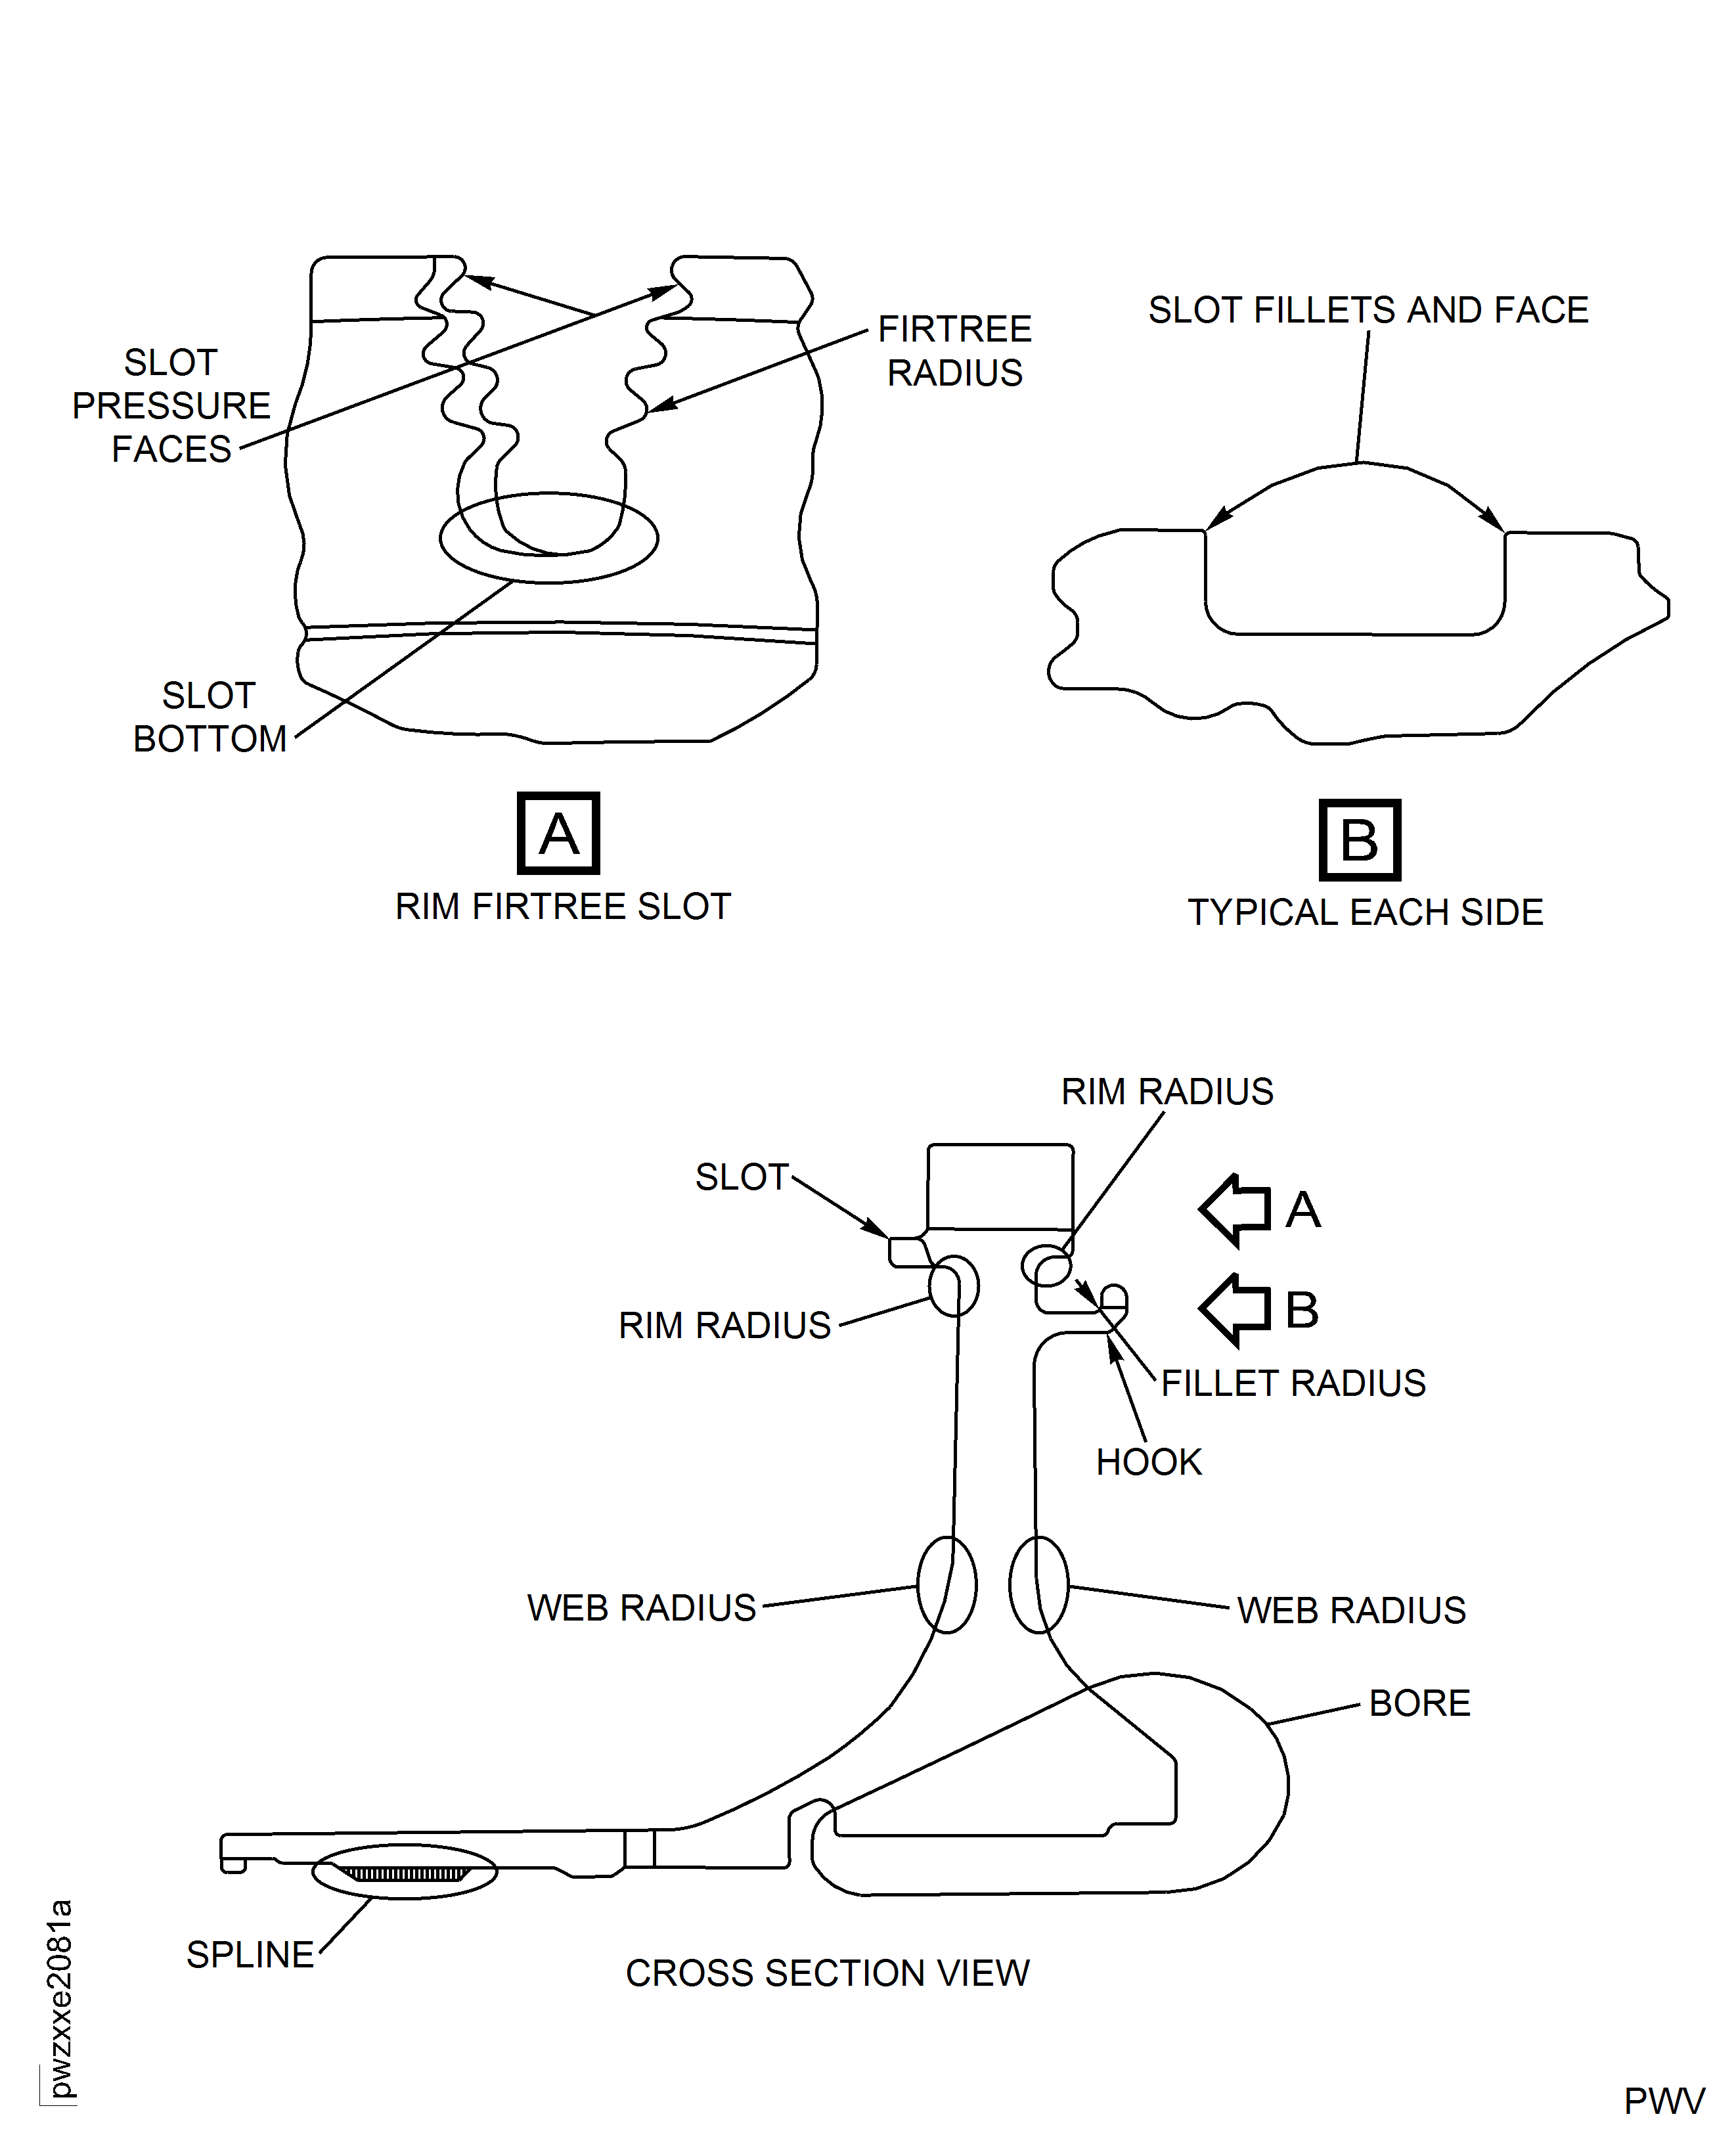
Figure: Stage 2 Turbine Hub Inspection Locations
Stage 2 Turbine Hub Inspection Locations
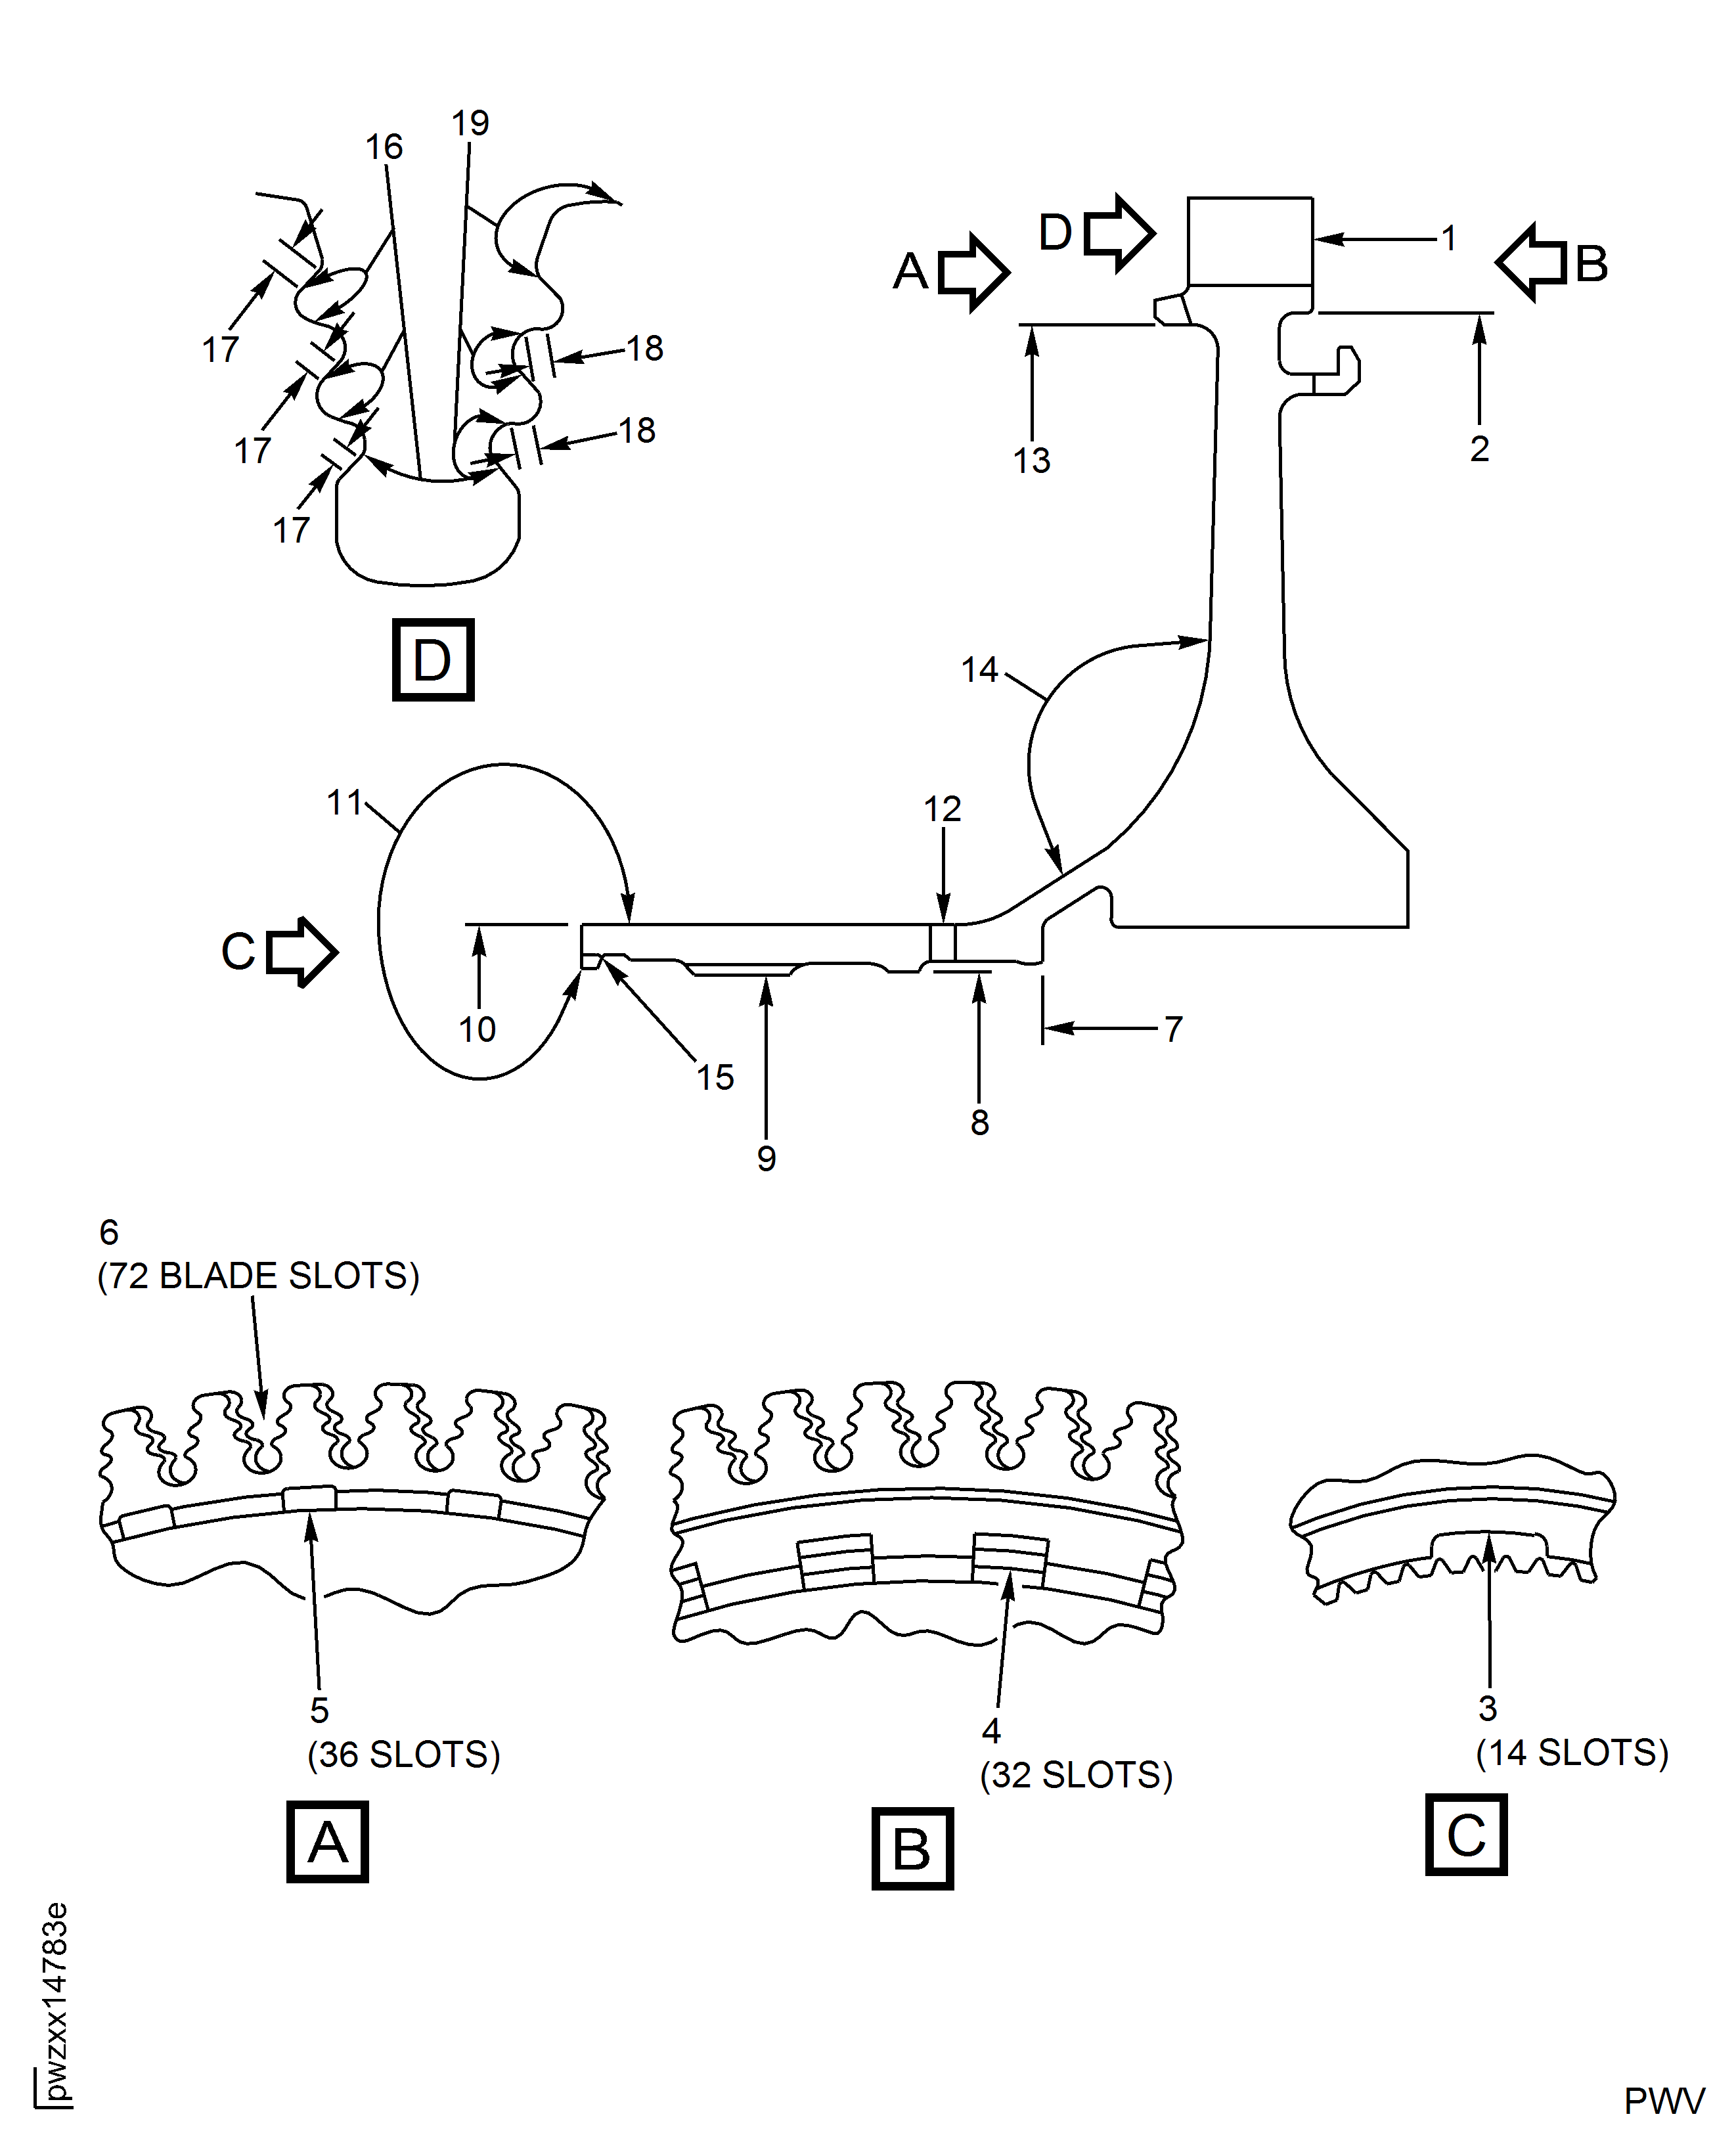
Figure: Stage 2 Turbine Hub Inspection Locations
Stage 2 Turbine Hub Inspection Locations
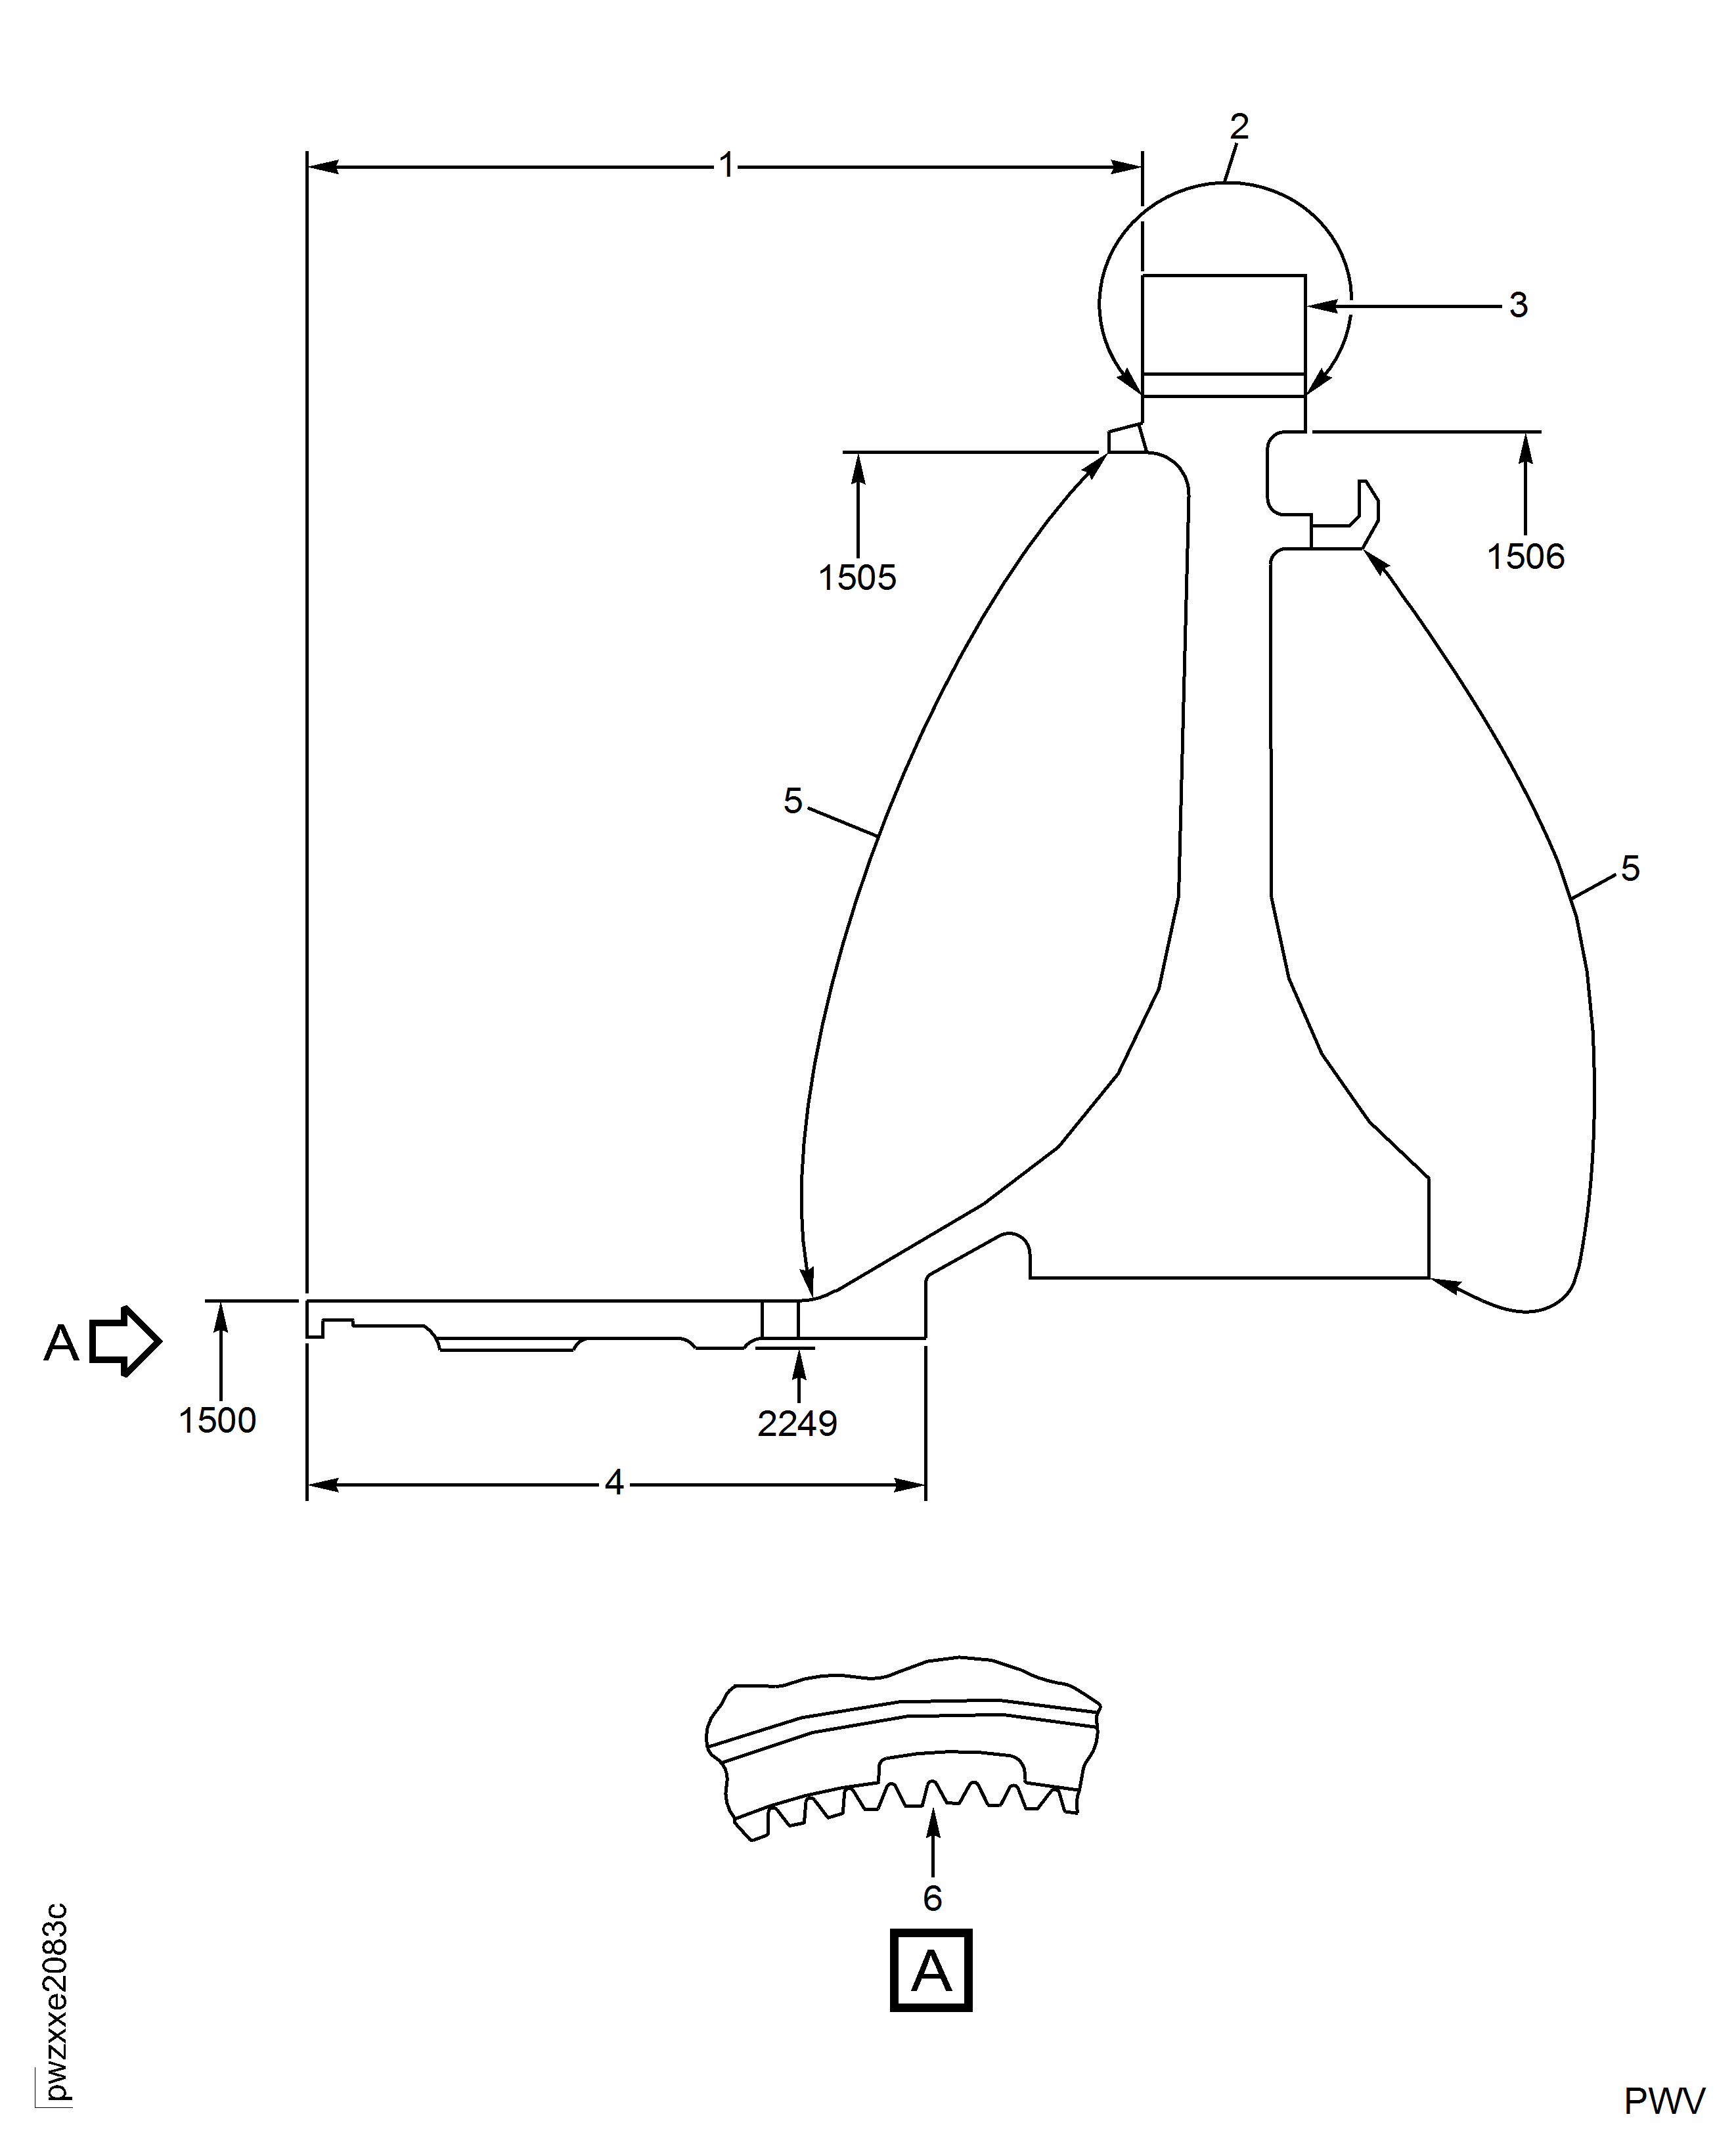
Figure: Stage 2 Turbine Hub Axial Dimension Inspection
Stage 2 Turbine Hub Axial Dimension Inspection
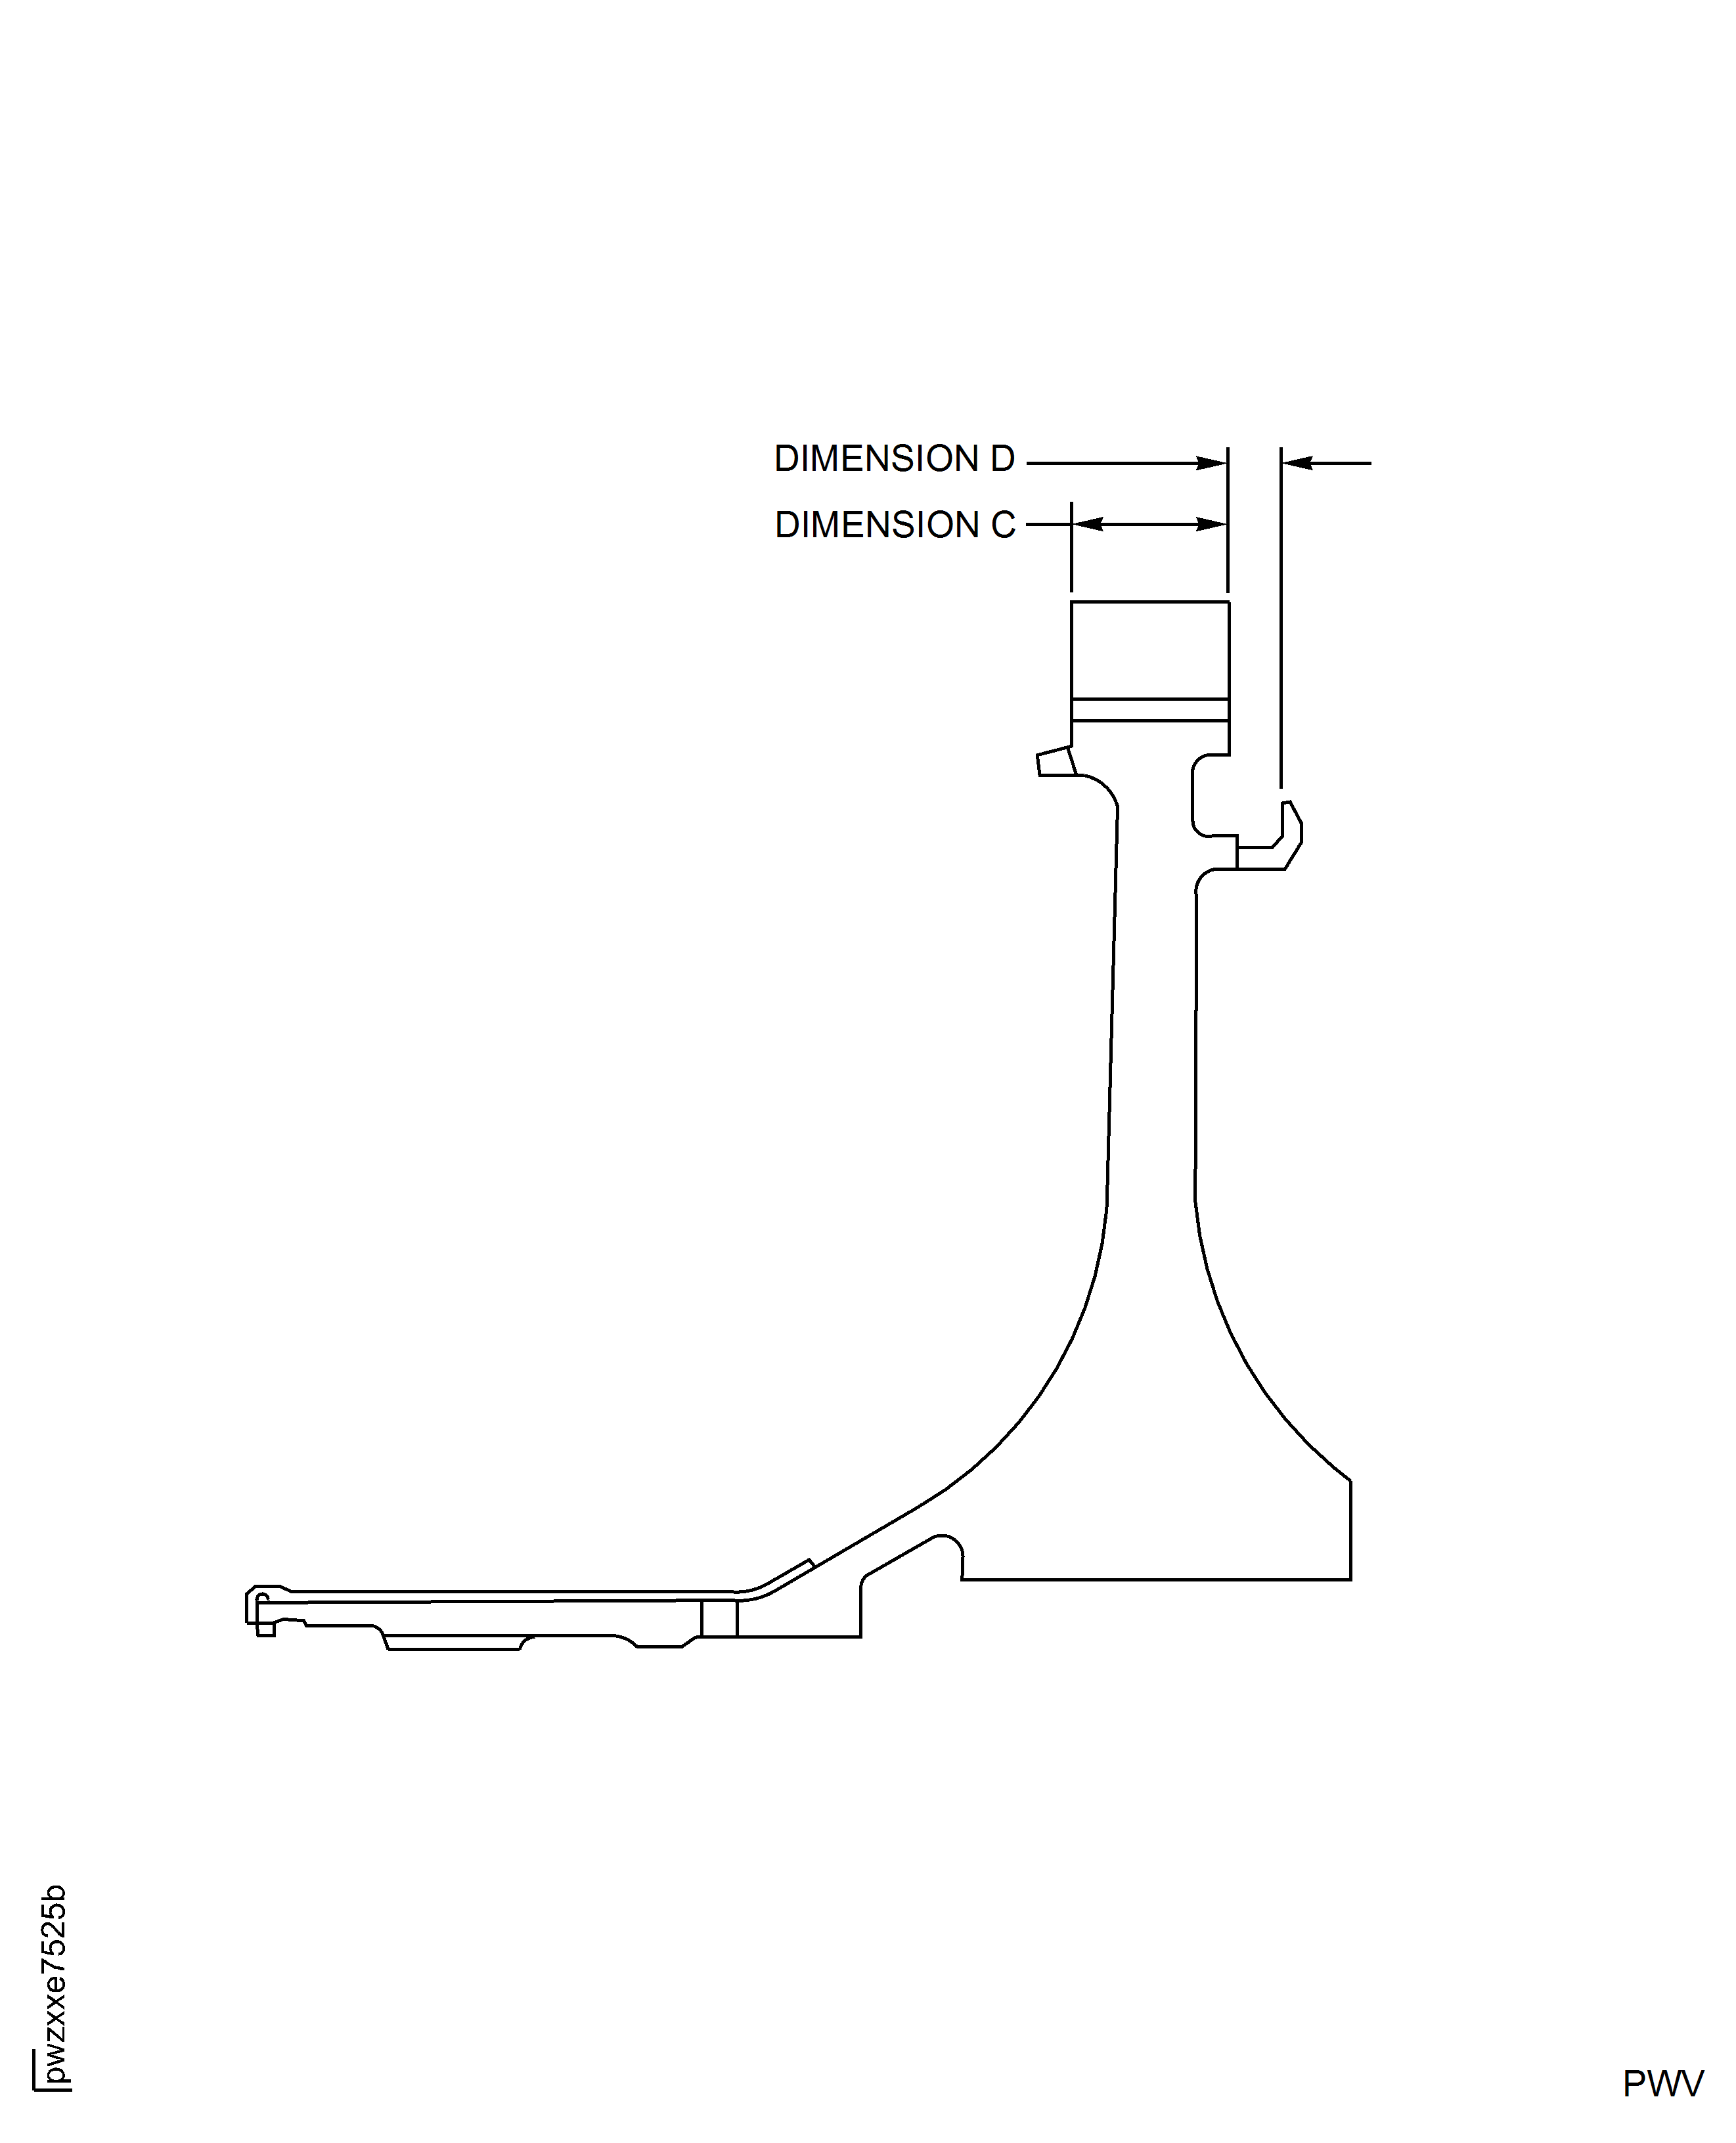
Figure: Balance And Mark The Stage 2 Turbine Hub
Balance And Mark The Stage 2 Turbine Hub
