Export Control
EAR Export Classification: Not subject to the EAR per 15 C.F.R. Chapter 1, Part 734.3(b)(3), except for the following Service Bulletins which are currently published as EAR Export Classification 9E991: SBE70-0992, SBE72-0483, SBE72-0580, SBE72-0588, SBE72-0640, SBE73-0209, SBE80-0024 and SBE80-0025.Copyright
© IAE International Aero Engines AG (2001, 2014 - 2021) The information contained in this document is the property of © IAE International Aero Engines AG and may not be copied or used for any purpose other than that for which it is supplied without the express written authority of © IAE International Aero Engines AG. (This does not preclude use by engine and aircraft operators for normal instructional, maintenance or overhaul purposes.).Applicability
All
Common Information
TASK 72-60-22-200-002 Starter Drive Gear Housing - Examine, Inspection-002
General
This TASK gives the procedure for the inspection of the starter drive housing. For the other parts of the starter drive gear assembly, refer to TASK 72-60-22-200-000.
Fig/item numbers in parentheses in the procedure agree with those used in the IPC.
The policy that is necessary for inspection is given in the SPM TASK 70-20-01-200-501.
All the parts must be cleaned before any part is examined. Refer to the SPM TASK 70-11-03-300-503.
All the parts must be visually examined for damage, corrosion and wear. Any defects that are not identified in the procedure must be referred to IAE.
The procedure for those parts which must have a crack test is given in the SPM TASK 70-23-00-230-501. Do the test before the part is visually examined. Limits for cracks are given in the SUBTASK for each part.
A ** following repair referenced in this inspection indicates that the repair is not yet published in the current revision of the manual and the part must be rejected. Contact IAE for additional information concerning FAA approved repair date.
Do not discard any part until you are sure there are no repairs available. Refer to the instructions in Repair before a discarded part is used again or oversize parts are installed.
Parts which should be discarded can be held although no repair is available. The repair of a discarded part could be shown to be necessary at a later date.
All the parts must be examined to make sure that all the repairs have been completed satisfactorily.
The practices and processes referred to in the procedure by the TASK numbers are in the SPM.
Preliminary Requirements
Pre-Conditions
NONESupport Equipment
NONEConsumables, Materials and Expendables
NONESpares
NONESafety Requirements
NONEProcedure
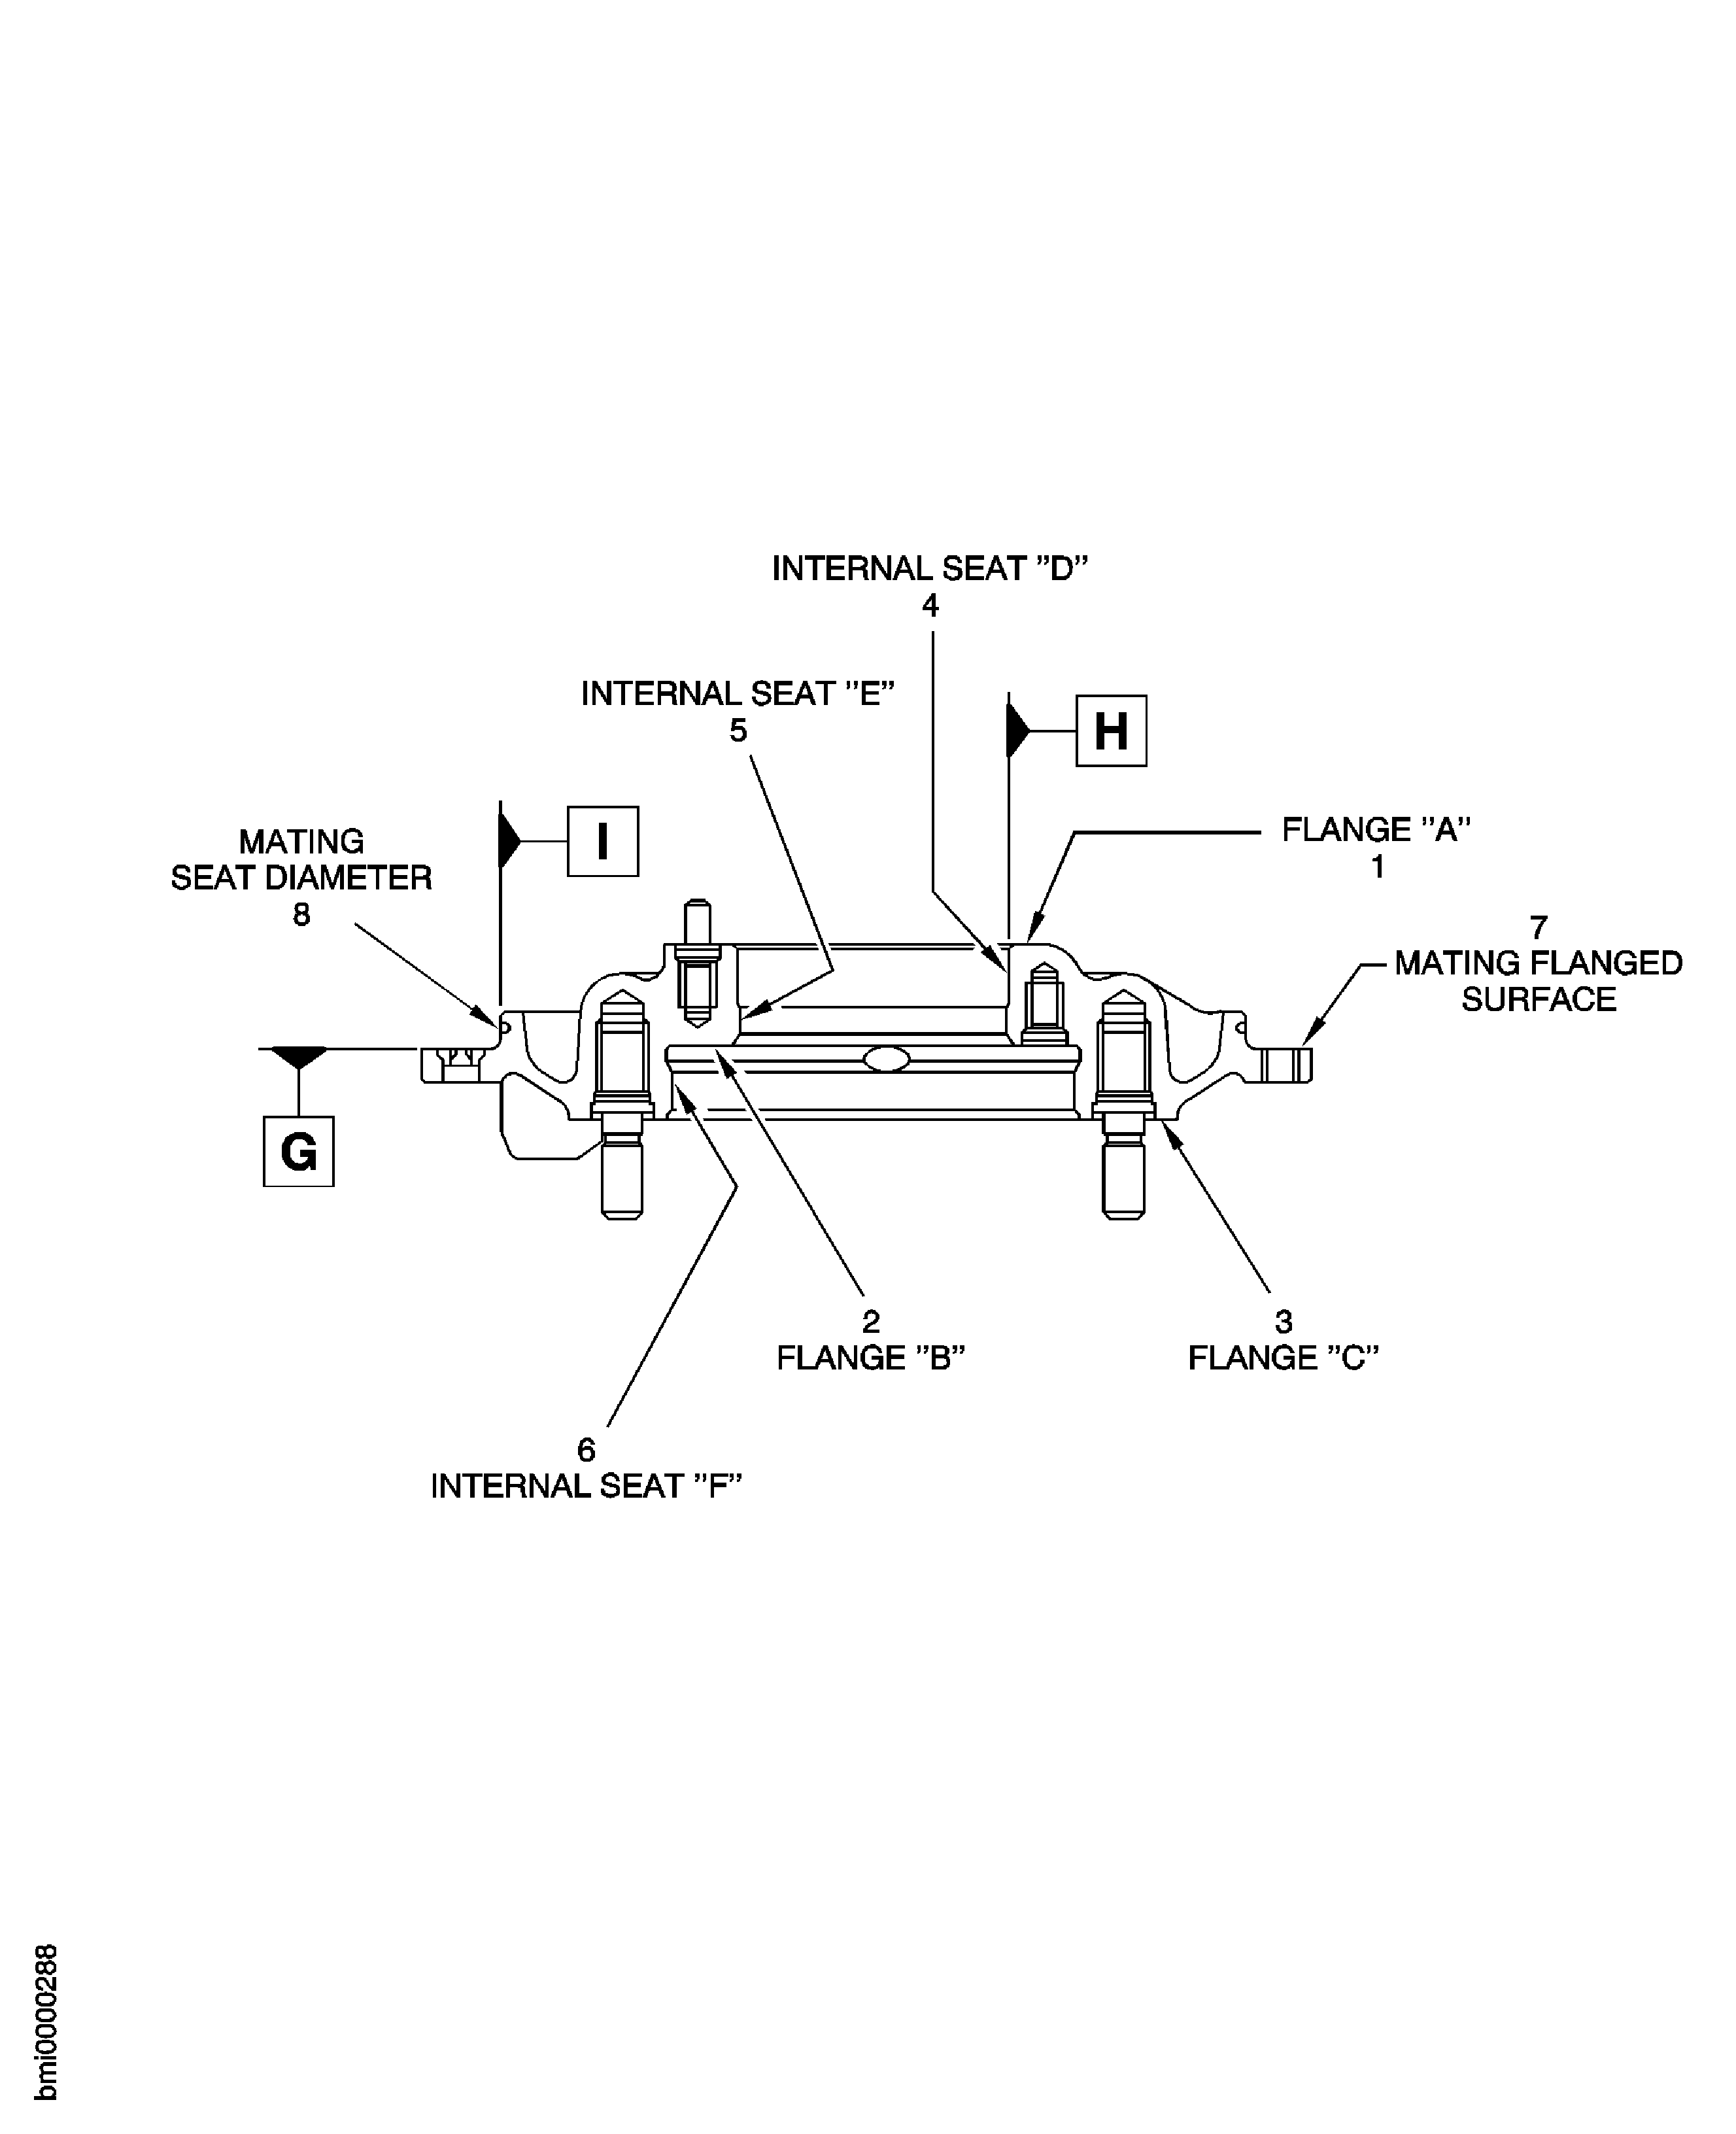
Refer to Figure.
Do the fluorescent penetrant test. Refer to SPM TASK 70-23-01-230-501.
Starter drive housing
SUBTASK 72-60-22-230-051 Penetrant Inspection of the Starter Drive Housing
Repair, VRS5023 TASK 72-60-22-300-003.
All quantity, all length if not deeper than 0.035 in. (0.89 mm).
Nicked, scored, dented or scratches
SUBTASK 72-60-22-220-056 Examine the Starter Drive Housing (01-300) Rough Surfaces
Refer to Figure.
SUBTASK 72-60-22-220-058 Examine the Starter Drive Housing (01-300) Machined Not Seal Surfaces, Location 3
Repair, VRS5024 TASK 72-60-22-300-004.
More than 0.0156 in. (0.3969 mm) radial loose. No axial movement is permitted (moved by hand).
Loose
SUBTASK 72-60-22-220-059 Examine the Starter Drive Housing (01-300) Stud
Repair, VRS5025 TASK 72-60-22-300-005.
Loose, missing or internal thread damage
SUBTASK 72-60-22-220-060 Examine the Starter Drive Housing (01-300) Screw Thread Inserts
(PRE SBE 72-0492)
Repair, VRS5328 TASK 72-60-22-300-020.
Loose, missing or internal thread damage.
SUBTASK 72-60-22-220-061 Examine the Starter Drive Housing (01-300) Inserts
Repair, VRS5695 TASK 72-60-22-300-024.
Loose, not there or with internal thread damage.
SUBTASK 72-60-22-220-062 Examine the Starter Drive Housing (01-300) Helicoil Inserts
(SBE 72-0492)
Repair, VRS5696 TASK 72-60-22-300-025.
Loose, not there or with internal thread damage.
SUBTASK 72-60-22-220-063 Examine the Starter Drive Housing (01-300) Screw Thread Inserts
(SBE 72-0492; 70-0950)
Refer to Figure.
Repair, VRS5026 TASK 72-60-22-300-006.
More than in Step.
Perpendicularity
SUBTASK 72-60-22-220-064 Examine the Starter Drive Housing (01-300) Flange A Location 1
Refer to Figure.
Repair, VRS5027 TASK 72-60-22-300-007.
More than in Step.
Parallelism
SUBTASK 72-60-22-220-065 Examine the Starter Drive Housing (01-300) H Flange B Location 2
Refer to Figure.
Repair, VRS5028 TASK 72-60-22-300-008.
More than in Step.
Parallelism
SUBTASK 72-60-22-220-066 Examine the Starter Drive Housing (01-300) I Flange C Location 3
Refer to Figure.
Repair, VRS5029 TASK 72-60-22-300-009.
More than in Step
Between 2.7561 and 2.7553 in. (70.004 and 69.985 mm).
Diameter
Repair, VRS5029 TASK 72-60-22-300-009.
More than in Step
Runout
SUBTASK 72-60-22-220-067 Examine the Starter Drive Housing (01-300) Internal Seat D Location 4
Refer to Figure.
Repair, VRS5030 TASK 72-60-22-300-010.
More than in Step
Diameter
Repair, VRS5030 TASK 72-60-22-300-010.
More than in Step
Runout
SUBTASK 72-60-22-220-068 Examine the Starter Drive Housing (01-300) Internal Seat E Location 5
Refer to Figure.
Repair, VRS5031 TASK 72-60-22-300-011.
More than in Step
Diameter
Repair, VRS5031 TASK 72-60-22-300-011.
More than in Step
Runout
SUBTASK 72-60-22-220-069 Examine the Starter Drive Housing (01-300) Internal Seat F Location 6
Refer to Figure.
Repair, VRS5032 TASK 72-60-22-300-012.
More than in Step
Planarity
SUBTASK 72-60-22-220-070 Examine the Starter Drive Housing (01-300) Mating Flanged Surface Location 7
Refer to Figure.
Repair, VRS5033 TASK 72-60-22-300-013.
Between 7.3998 and 7.3937 in. (187.954 and 187.800 mm)
Less than in Step
Diameter
Repair, VRS5033 TASK 72-60-22-300-013.
More than in Step
Perpendicularity
SUBTASK 72-60-22-220-090 Examine the Starter Drive Housing (01-300) Mating Seat Diameter Location 8
Figure: Locations - Starter Drive Housing
Locations - Starter Drive Housing

