Export Control
EAR Export Classification: Not subject to the EAR per 15 C.F.R. Chapter 1, Part 734.3(b)(3), except for the following Service Bulletins which are currently published as EAR Export Classification 9E991: SBE70-0992, SBE72-0483, SBE72-0580, SBE72-0588, SBE72-0640, SBE73-0209, SBE80-0024 and SBE80-0025.Copyright
© IAE International Aero Engines AG (2001, 2014 - 2021) The information contained in this document is the property of © IAE International Aero Engines AG and may not be copied or used for any purpose other than that for which it is supplied without the express written authority of © IAE International Aero Engines AG. (This does not preclude use by engine and aircraft operators for normal instructional, maintenance or overhaul purposes.).Applicability
All
Common Information
TASK 72-60-24-200-002 Input Gearshaft - Examine, Inspection-002
General
This TASK gives the procedure for the inspection of the gearshaft. For the other parts of the extension layshaft gear assembly, refer to TASK 72-60-24-200-000 (INSPECTION-000).
Fig/item numbers in parentheses in the procedure agree with those used in the IPC.
The policy that is necessary for inspection is given in the SPM TASK 70-20-01-200-501.
All the parts must be cleaned before any part is examined. Refer to the SPM TASK 70-11-03-300-503.
All parts must be visually examined for damage, corrosion and wear. Any defects that are not identified in the procedure must be referred to IAE.
The procedure for those parts which must have a crack test is given in the SPM TASK 70-23-00-230-501. Do the test before the part is visually examined. Limits for cracks are given in the SUBTASK for each part.
Do not discard any part until you are sure there are no repairs available. Refer to the instructions in repair before a discarded part is used again or oversize parts are installed.
Parts which should be discarded can be held although no repair is available. The repair of a discarded part could be shown to be necessary at a later date.
All parts must be examined to make sure that all the repairs have been completed satisfactorily.
The practices and processes referred to in the procedure by the TASK numbers are in the SPM.
References
Refer to the SPM for data on these items:
Definitions of Damage, SPM TASK 70-02-02-350-501,
Record and Control of the Lives of Parts, SPM TASK 70-05-00-220-501,
Inspection of Parts, SPM TASK 70-20-01-200-501.
Some data on these items is contained in this TASK. For more data on these items refer to the SPM:
Method of Testing for Crack Indications,
Chemical Processes,
Surface Protection.
Preliminary Requirements
Pre-Conditions
NONESupport Equipment
| Name | Manufacturer | Part Number / Identification | Quantity | Remark |
|---|---|---|---|---|
| Demagnetizing unit | LOCAL | Demagnetizing unit | ||
| Hardness tester | LOCAL | Hardness tester | ||
| Magnetizing unit | LOCAL | Magnetizing unit | ||
| Workshop inspection equipment | LOCAL | Workshop inspection equipment |
Consumables, Materials and Expendables
| Name | Manufacturer | Part Number / Identification | Quantity | Remark |
|---|---|---|---|---|
| CoMat 02-140 TRIANGULAR INDIA STONE, FINE GRIT | LOCAL | CoMat 02-140 |
Spares
NONESafety Requirements
NONEProcedure
Clean the parts. Refer to the TASK 72-60-24-100-000 (CLEANING-000).
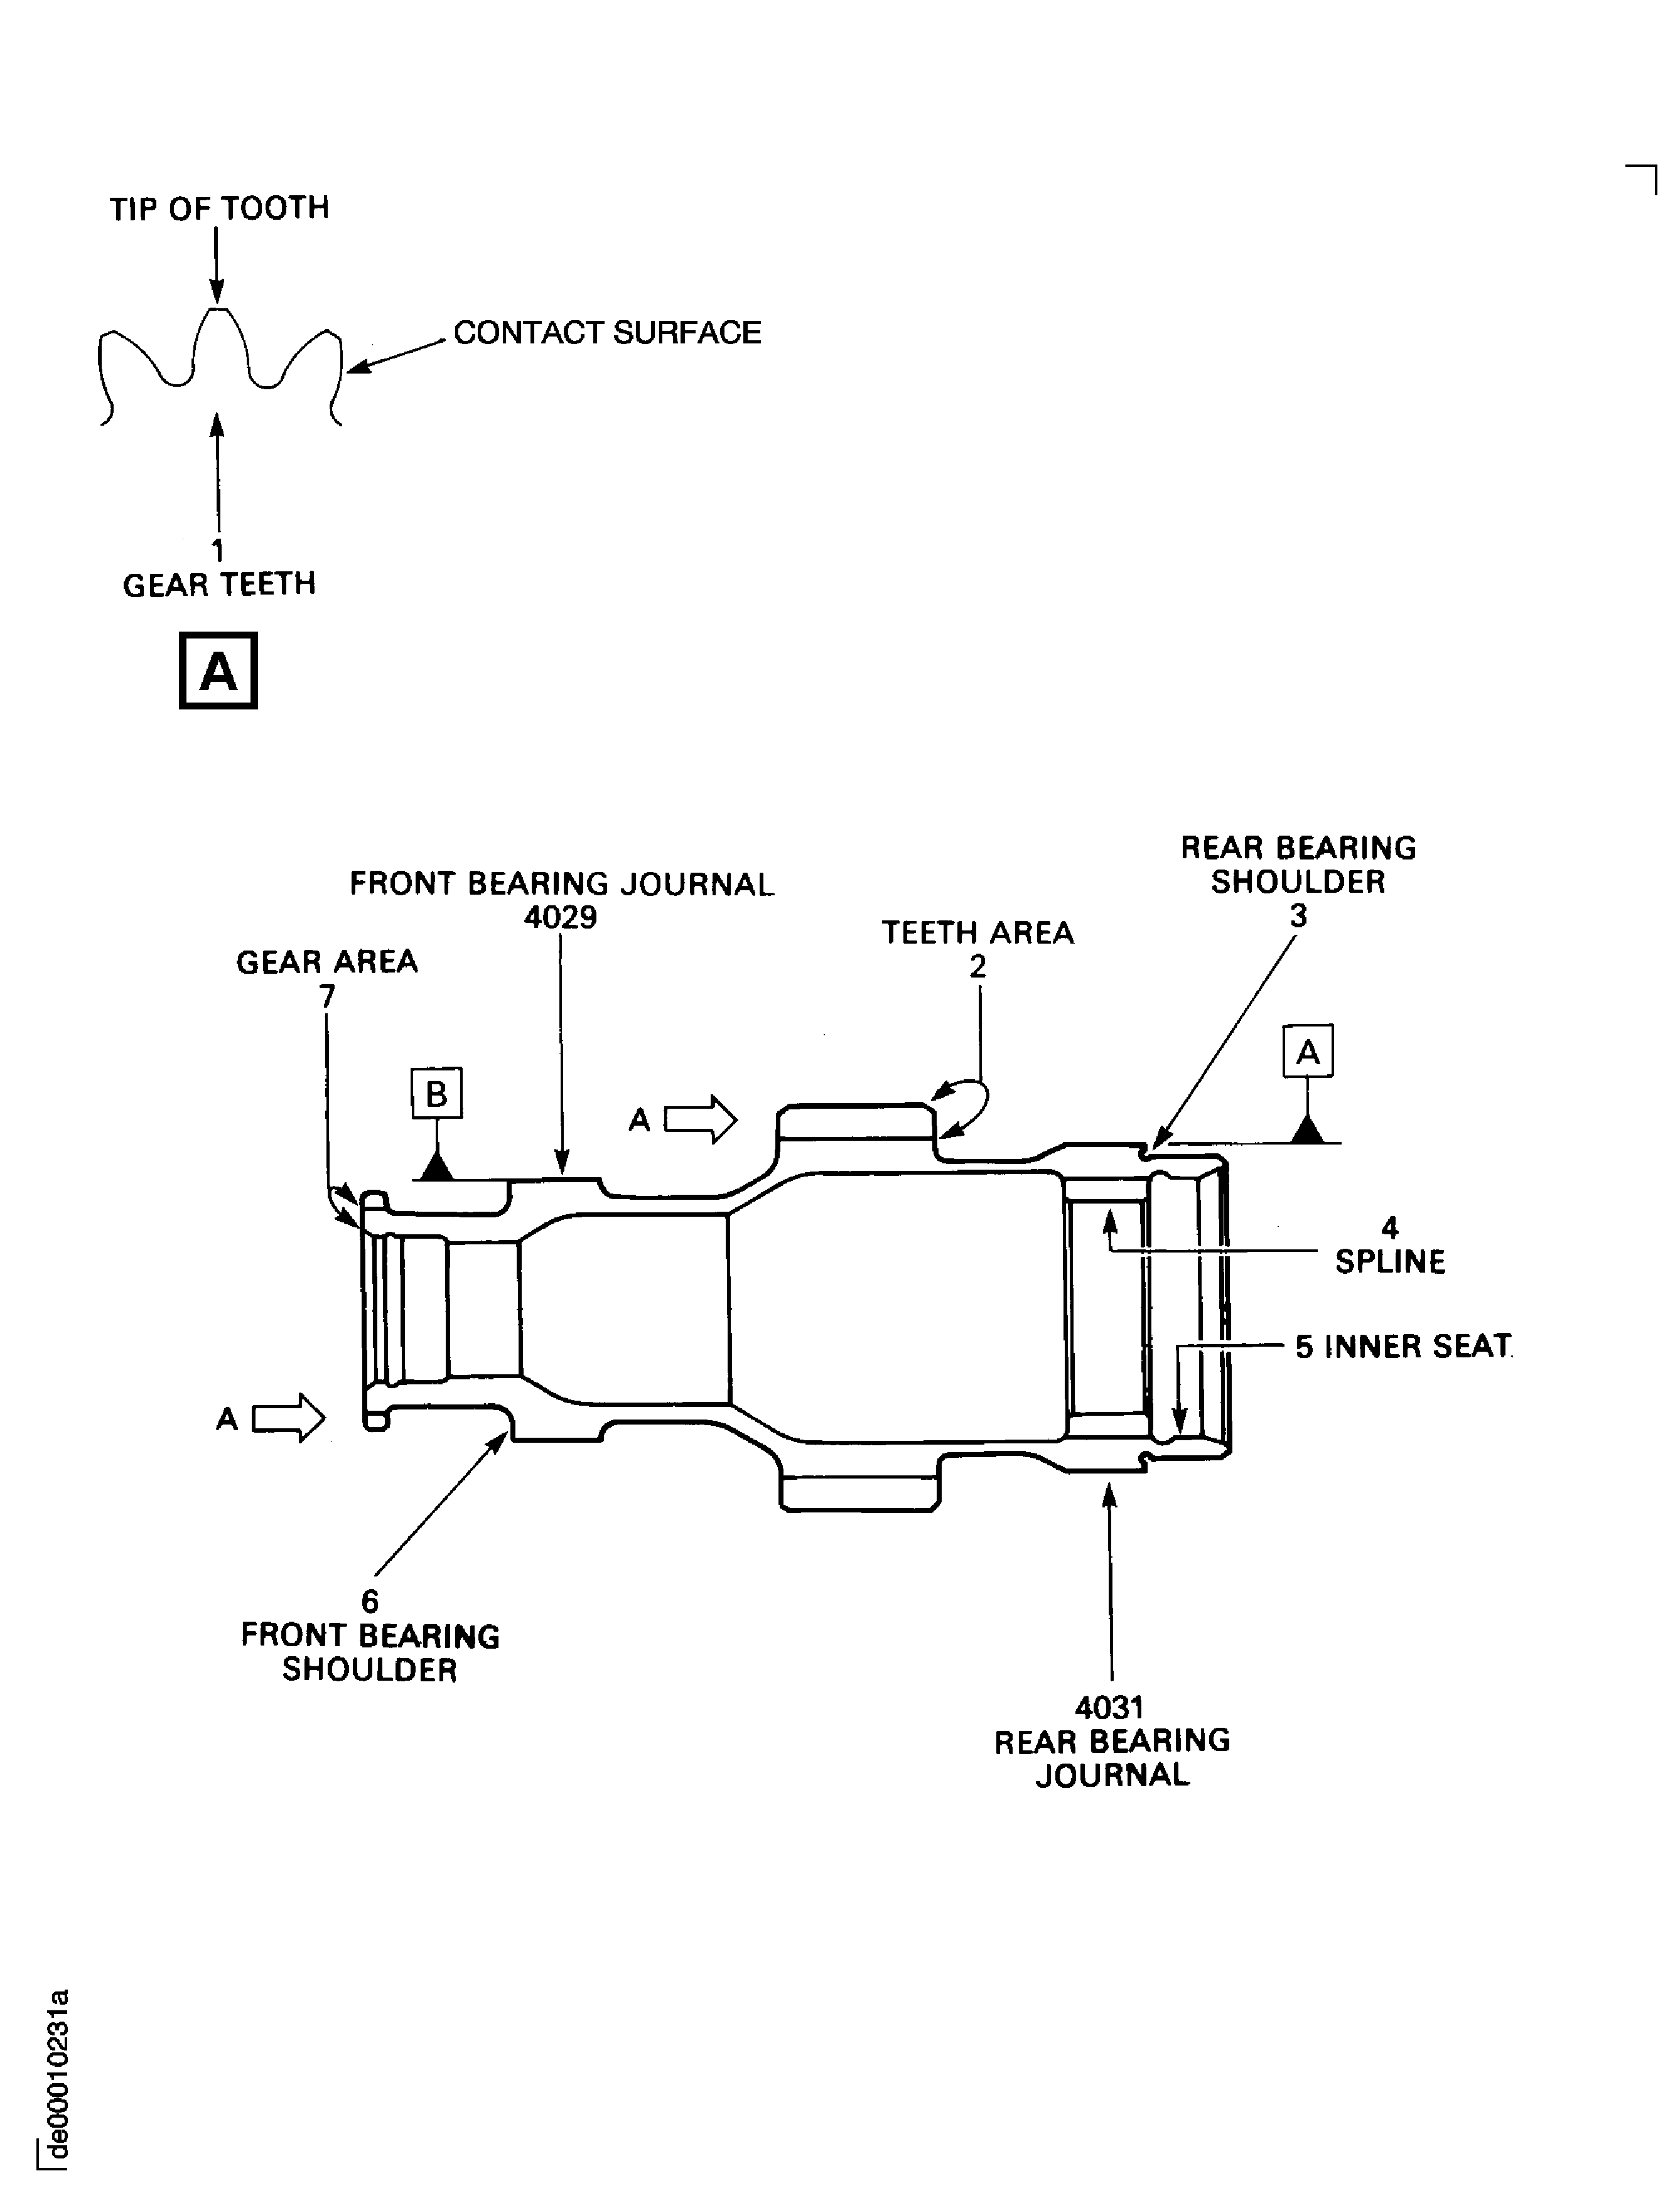
SUBTASK 72-60-24-240-051 Do a Crack Test on the Gearshaft (01-140) (Magnetic)
Refer to Figure.
Repair VRS5139, TASK 72-60-24-300-009 (REPAIR-009)
More than Step
Nicks on the tip of tooth.
Repair VRS5139, TASK 72-60-24-300-009 (REPAIR-009)
Superficial damage
Damage on the engagement surface.
SUBTASK 72-60-24-220-053 Examine the Gearshaft (72-60-24,01-140) Gear Teeth at Location 1
Refer to Figure.
Repair VRS5142, TASK 72-60-24-300-012 (REPAIR-012)
More than Step
Runout.
SUBTASK 72-60-24-220-054 Examine the Gearshaft (01-140) Rear Bearing Shoulder, Location 3
Refer to Figure.
Repair VRS5139, TASK 72-60-24-300-009 (REPAIR-009)
Superficial damages
Spline.
SUBTASK 72-60-24-220-055 Examine the Gearshaft (72-60-24,01-140) Spline at Location 4
Refer to Figure.
Repair VRS5141, TASK 72-60-24-300-011 (REPAIR-011)
More than 1.9301 in. (49.025 mm) and less than 1.9399 in. (49.275 mm)
Diameter.
Repair VRS5141, TASK 72-60-24-300-011 (REPAIR-011)
More than Step
Runout.
Accept after removal of high metal and sharp edges by blending. Refer to SPM TASK 70-35-03-300-501. Use CoMat 02-140 TRIANGULAR INDIA STONE, FINE GRIT
Not more than 0.0019 in. (0.050 mm) in depth
Repair VRS5141, TASK 72-60-24-300-011 (REPAIR-011)
More than 0.0019 in. (0.050 mm) in depth
Damage on the surface.
SUBTASK 72-60-24-220-056 Examine the Gearshaft (72-60-24,01-140) Inner Seat at Location 5
Refer to Figure.
Repair, VRS5139 TASK 72-60-24-300-009 (REPAIR-009)
Scratches not more than 0.008 in. (0.20 mm) in depth
Repair, VRS5140 TASK 72-60-24-300-010 (REPAIR-010) Repair VRS5144, TASK 72-60-24-300-014 (REPAIR-014)
Scratches more than 0.008 in. (0.20 mm) in depth
Damage on the surface.
SUBTASK 72-60-24-220-057 Examine the Gearshaft (01-140) Rear and Front Bearing Journals, Location 4031 and 4029
Refer to Figure.
Repair VRS5140, TASK 72-60-24-300-010 (REPAIR-010)
Less than 2.3643 in. (60.053 mm)
Diameter.
Repair VRS5140, TASK 72-60-24-300-010 (REPAIR-010)
More than Step
Runout.
SUBTASK 72-60-24-220-058 Examine the Gearshaft (01-140) Rear Bearing Journal, Location 4031
Refer to Figure.
Repair VRS5143, TASK 72-60-24-300-013 (REPAIR-013)
More than Step
Runout.
SUBTASK 72-60-24-220-059 Examine the Gearshaft (01-140) Front Bearing Shoulder, Location 6
Refer to Figure.
Repair VRS5144, TASK 72-60-24-300-014 (REPAIR-014)
More than Step
Runout.
SUBTASK 72-60-24-220-060 Examine the Gearshaft (01-140) Front Bearing Journal, Location 4029
Figure: Locations - Gearshaft
Locations - Gearshaft

