Export Control
EAR Export Classification: Not subject to the EAR per 15 C.F.R. Chapter 1, Part 734.3(b)(3), except for the following Service Bulletins which are currently published as EAR Export Classification 9E991: SBE70-0992, SBE72-0483, SBE72-0580, SBE72-0588, SBE72-0640, SBE73-0209, SBE80-0024 and SBE80-0025.Copyright
© IAE International Aero Engines AG (2001, 2014 - 2021) The information contained in this document is the property of © IAE International Aero Engines AG and may not be copied or used for any purpose other than that for which it is supplied without the express written authority of © IAE International Aero Engines AG. (This does not preclude use by engine and aircraft operators for normal instructional, maintenance or overhaul purposes.).Applicability
All
Common Information
TASK 79-22-41-200-413 Oil Scavenge Pump - Related Parts - Examine The Casing Assembly, Inspection-013
General
This TASK gives the procedure for the inspection of the casing assembly. For the other parts of the oil scavenge pump assembly, refer to Inspection-000 TASK 79-22-41-200-400.
The policy that is necessary for inspection is given in SPM TASK 70-20-01-200-501.
All parts must be visually examined for damage, corrosion and wear. Any defects that are not identified in the procedure must be referred to IAE.
Do not discard any part until you are sure there are no repairs available. Refer to the instructions in repair before a discarded part is used again or oversize parts are installed.
Parts which should be discarded can be held although no repair is available. The repair of a discarded part could be shown to be necessary at a later date.
All parts must be examined to make sure that all the repairs have been completed satisfactorily.
Do dimensional inspections only if the visual inspection or some other condition makes it necessary.
The practices and processes referred to in the procedure by the TASK numbers are in the SPM.
A ** following repair referenced in this inspection indicates that the repair is not yet published in the current revision of the manual and the part must be rejected. Contact IAE for additional information concerning FAA approved repair date.
References
Refer to the SPM for data on these items.
Definitions of Damage, SPM TASK 70-02-02-350-501.
Record and Control of the Lives of Parts, SPM TASK 70-05-00-220-501.
Inspection of Parts, SPM TASK 70-20-00-200-501.
Some data on these items is contained in this TASK. For more data on these items refer to the SPM.
Method of Testing for Crack Indications
Chemical Processes
Surface Protection
Preliminary Requirements
Pre-Conditions
NONESupport Equipment
| Name | Manufacturer | Part Number / Identification | Quantity | Remark |
|---|---|---|---|---|
| Workshop inspection equipment | LOCAL | Workshop inspection equipment |
Consumables, Materials and Expendables
NONESpares
NONESafety Requirements
NONEProcedure
Clean the part. Refer to Cleaning-000 TASK 79-22-41-100-400.
Reject
Cracked
Reject
Trough porosity
Casing Assembly. Refer to SPM TASK 70-23-01-230-501.
Do the test for cracks on the part that is given below.
SUBTASK 79-22-41-230-056 Do a Crack Test on the Casing Assembly (Fluorescent Penetrant)
Reject
Evident cracks
SUBTASK 79-22-41-220-125 Examine the Casing Assembly All Areas
Refer to Figure.
Repair, VRS5362 TASK 79-22-41-300-025 (REPAIR-025).
More than Step.
Nicked, scored, dented or scratched
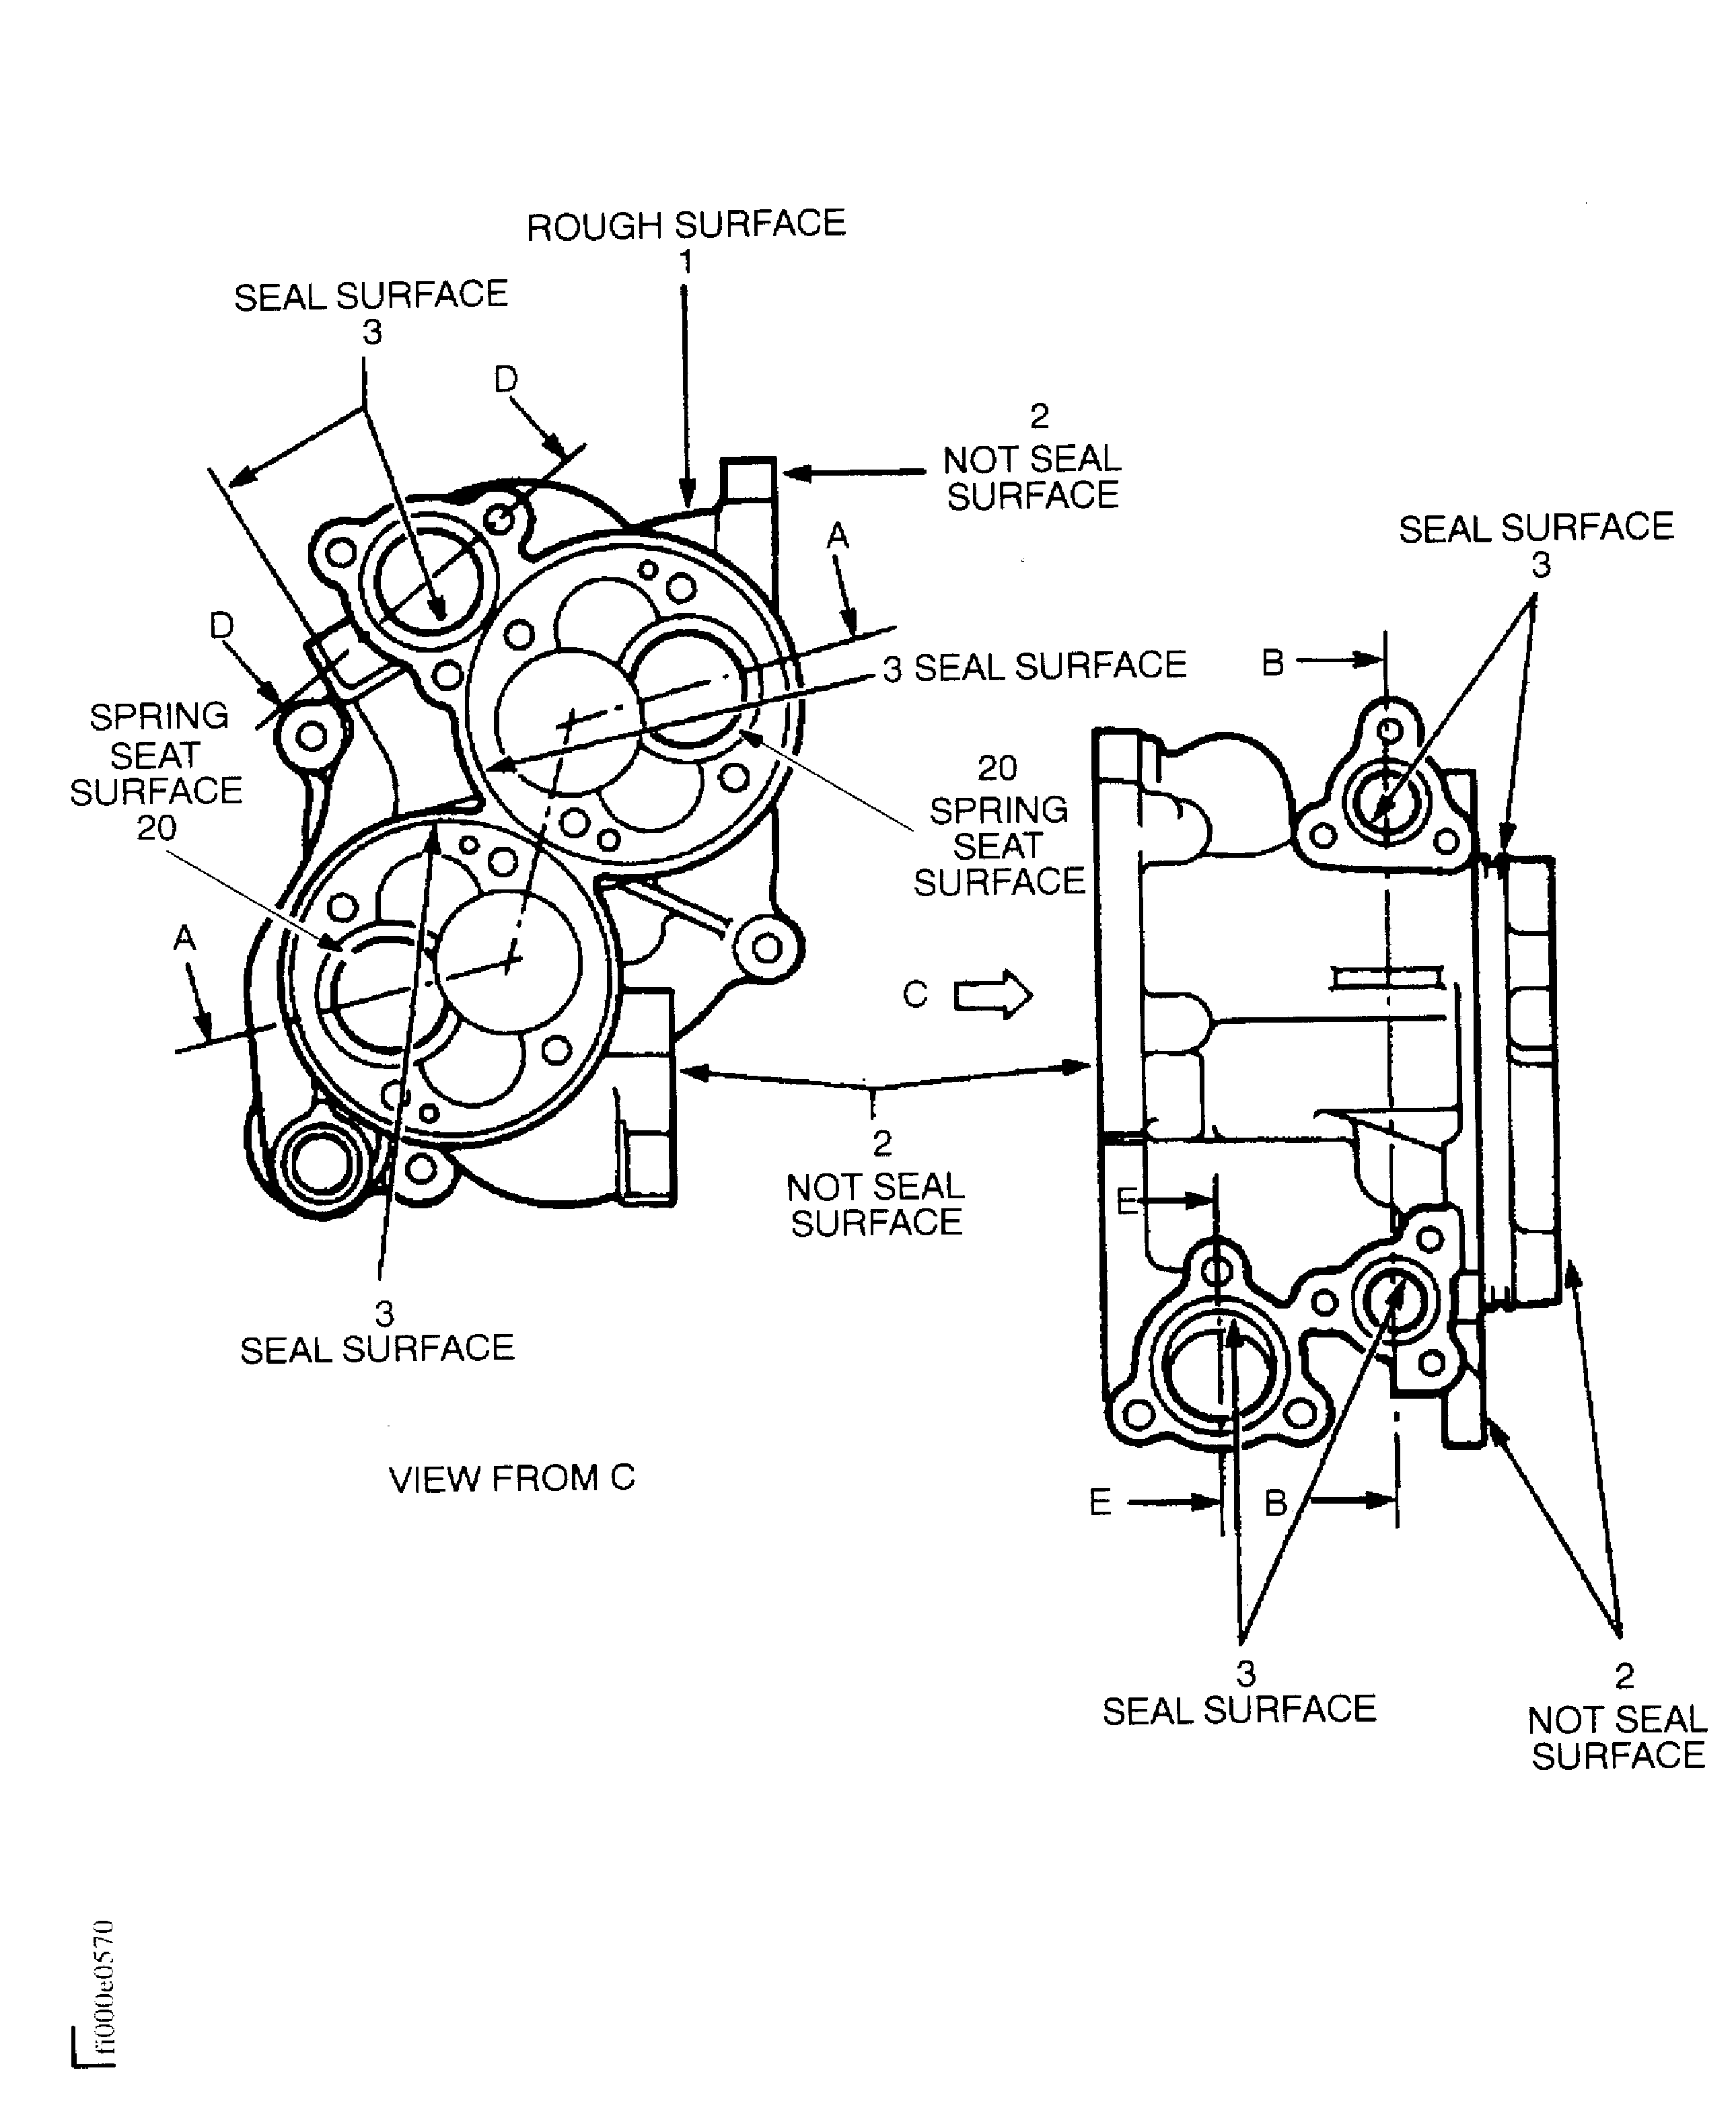
SUBTASK 79-22-41-220-126 Examine the Casing Assembly Rough Surfaces at Location 1
Refer to Figure.
Repair, VRS5362 TASK 79-22-41-300-025 (REPAIR-025).
More than Step.
Nicked, scored, dented or scratched
Reject
More than Step.
Nicked, dented corners
SUBTASK 79-22-41-220-127 Examine the Casing Assembly Machined (non-seal) Surfaces at Location 2
Refer to Figure.
Repair, VRS5362 TASK 79-22-41-300-025 (REPAIR-025).
More than Step.
Nicked, scored, dented or scratched
SUBTASK 79-22-41-220-128 Examine the Casing Assembly Machined Seal Surfaces at Location 3
Repair, VRS5363 TASK 79-22-41-300-026 (REPAIR-026).
Light corrosion or pitting
SUBTASK 79-22-41-220-129 Examine the Casing Assembly Protective Finish
Repair, VRS5364 TASK 79-22-41-300-027 (REPAIR-027).
Loose, missing or internal thread damage
SUBTASK 79-22-41-220-130 Examine the Casing Assembly Helicoil Inserts
Refer to Figure.
Accept
Between 5.0378 and 5.0362 in. (127.96 and 127.92 mm) diameter.
Repair, VRS5366 TASK 79-22-41-300-029 (REPAIR-029).
Less than 5.0362 in. (127.92 mm)
Worn
Reject
More than Step
Nicked, dented corners
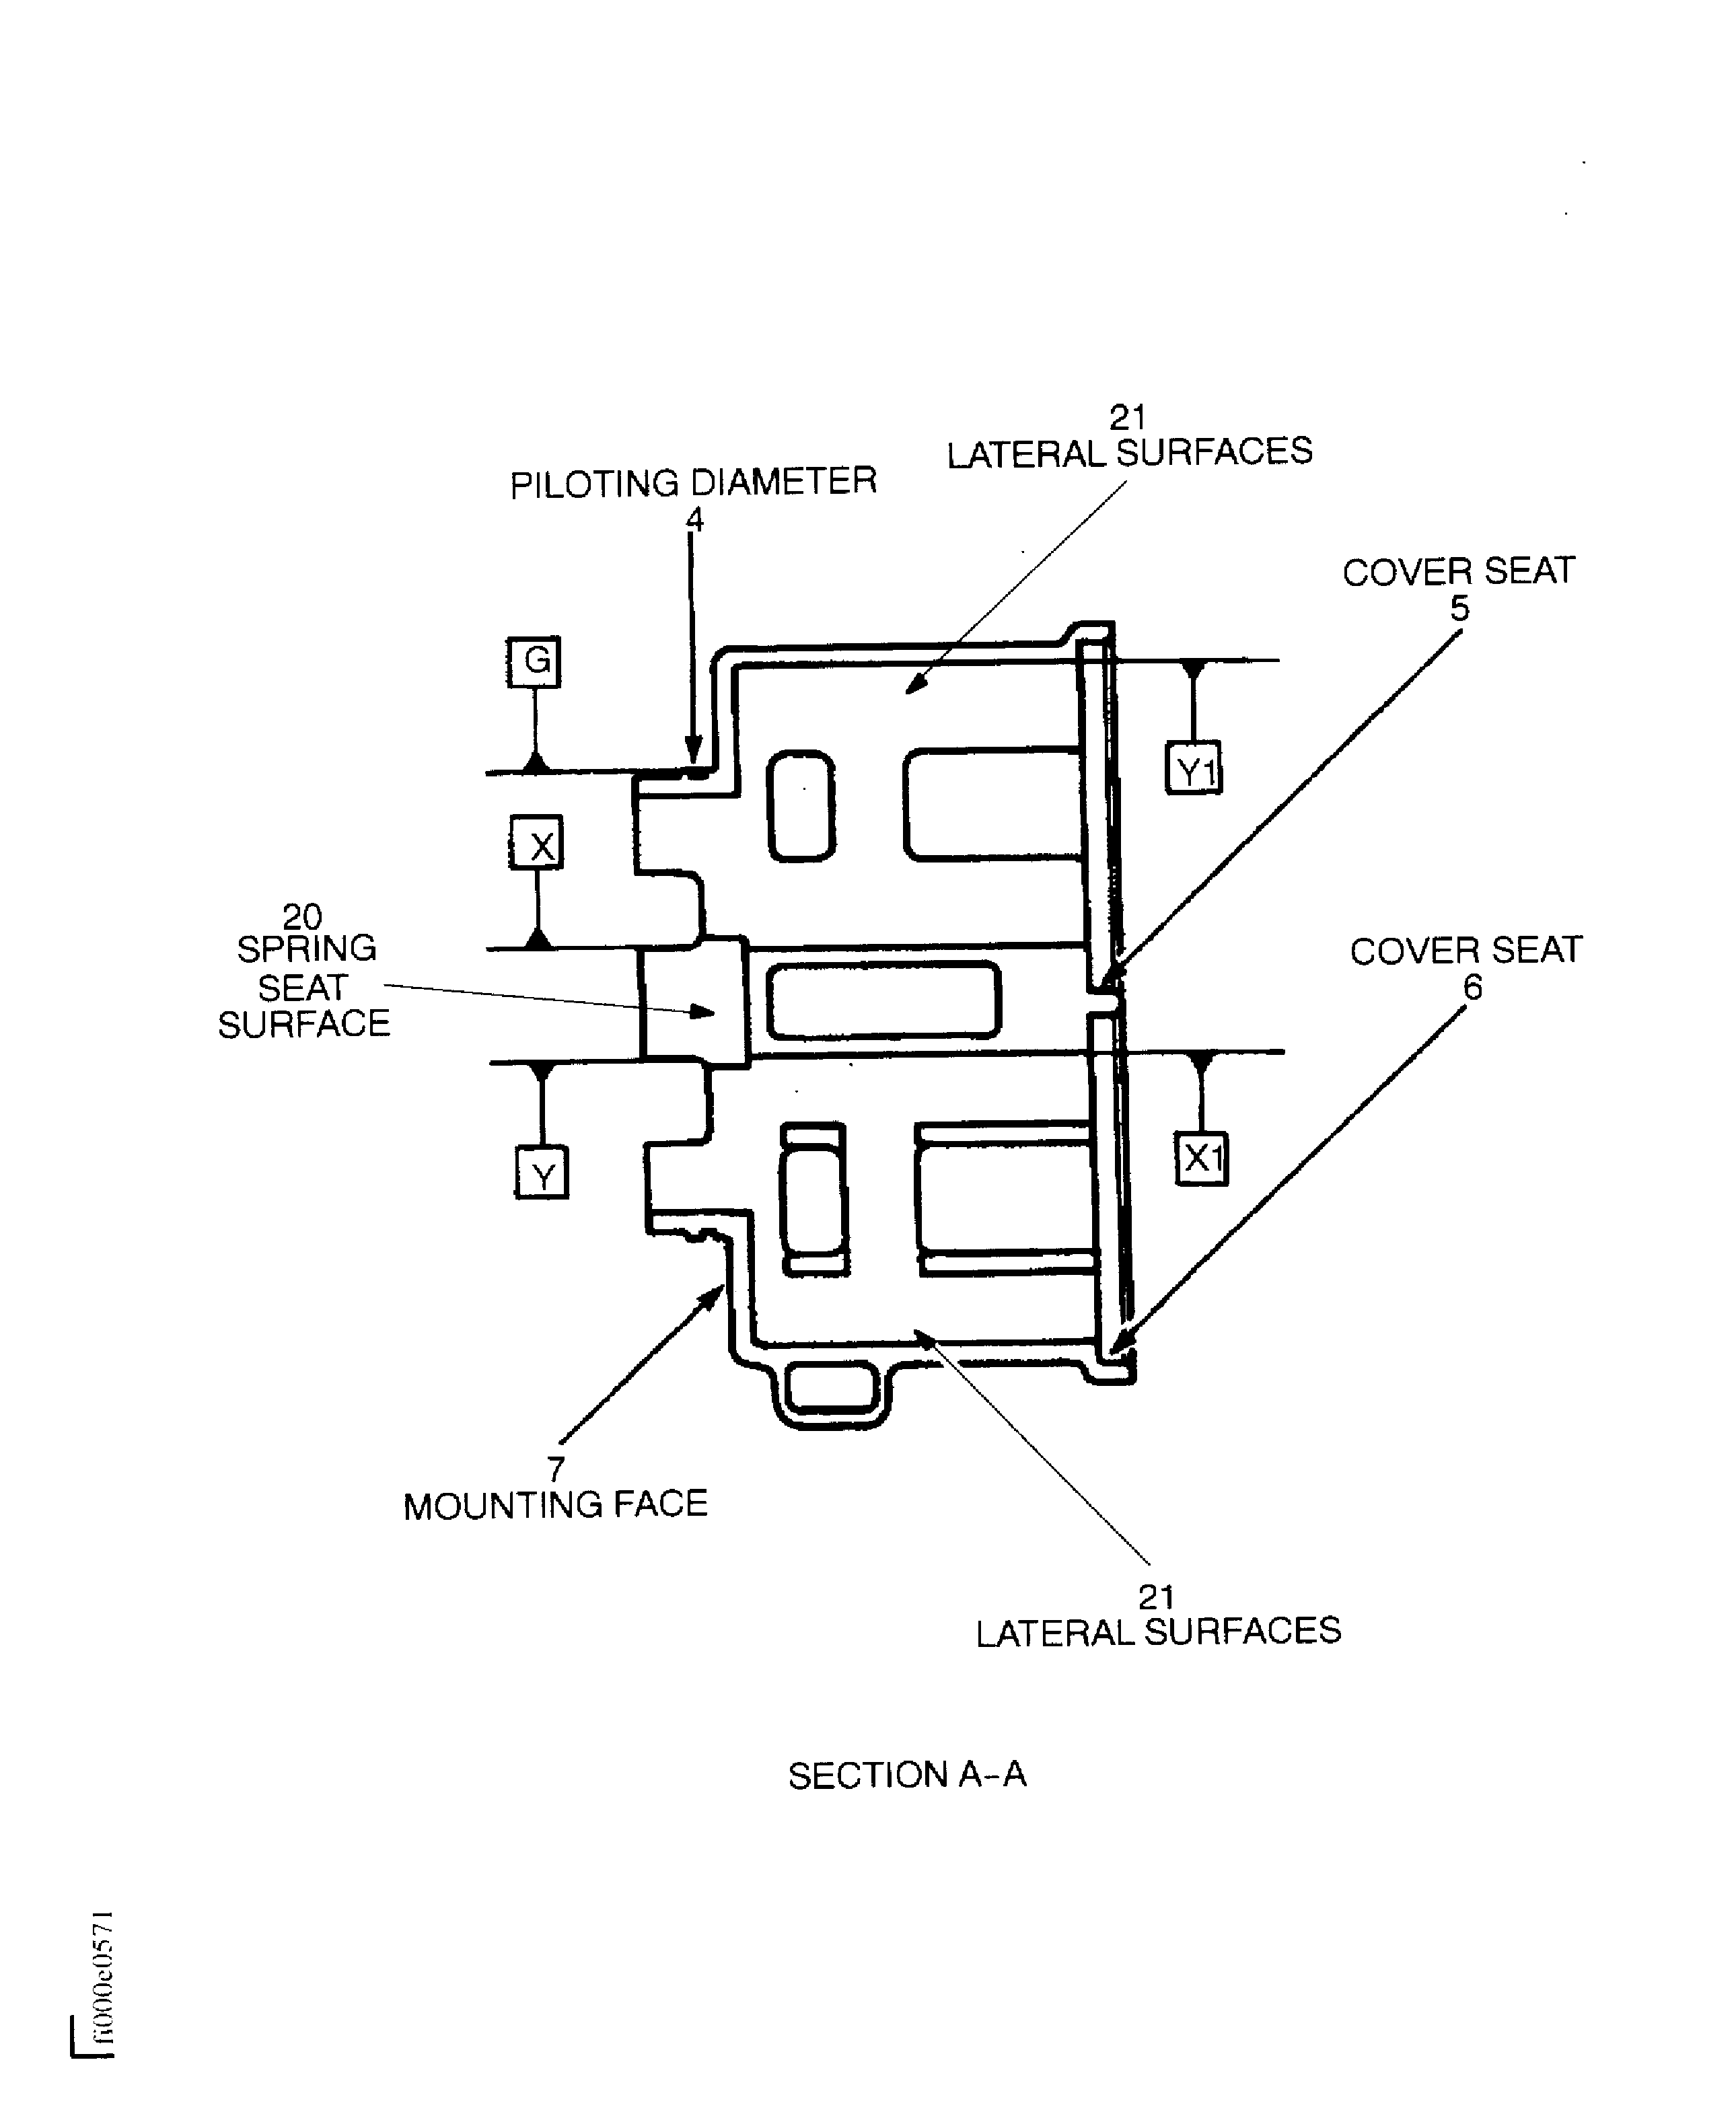
SUBTASK 79-22-41-220-132 Examine the Casing Assembly Piloting Diameter at Location 4
Refer to Figure.
Accept
Between 3.5433 and 3.5453 in. (90.00 and 90.05 mm) diameter.
Repair, VRS5367 TASK 79-22-41-300-030 (REPAIR-030).
More than 3.5453 in. (90.05 mm).
Worn
Repair, VRS5367 TASK 79-22-41-300-030 (REPAIR-030).
More than Step.
True position
SUBTASK 79-22-41-220-133 Examine the Casing Assembly Cover Seat at Location 5
Refer to Figure.
Accept
Between 3.5433 and 3.5453 in. (90.00 and 90.05 mm) diameter.
Repair, VRS5368 TASK 79-22-41-300-031 (REPAIR-031).
More than 3.5453 in. (90.05 mm).
Worn
Repair, VRS5368 TASK 79-22-41-300-031 (REPAIR-031).
More than Step.
True position
SUBTASK 79-22-41-220-134 Examine the Casing Assembly Cover Seat at Location 6
Refer to Figure.
Repair, VRS5369 TASK 79-22-41-300-032 (REPAIR-032).
More than Step.
Perpendicularity
SUBTASK 79-22-41-220-135 Examine the Casing Assembly Mounting Face at Location 7
Refer to Figure.
Repair, VRS5370 TASK 79-22-41-300-033 (REPAIR-033).
More than Step.
Perpendicularity
Reject
More than Step.
Nicked, dented corners
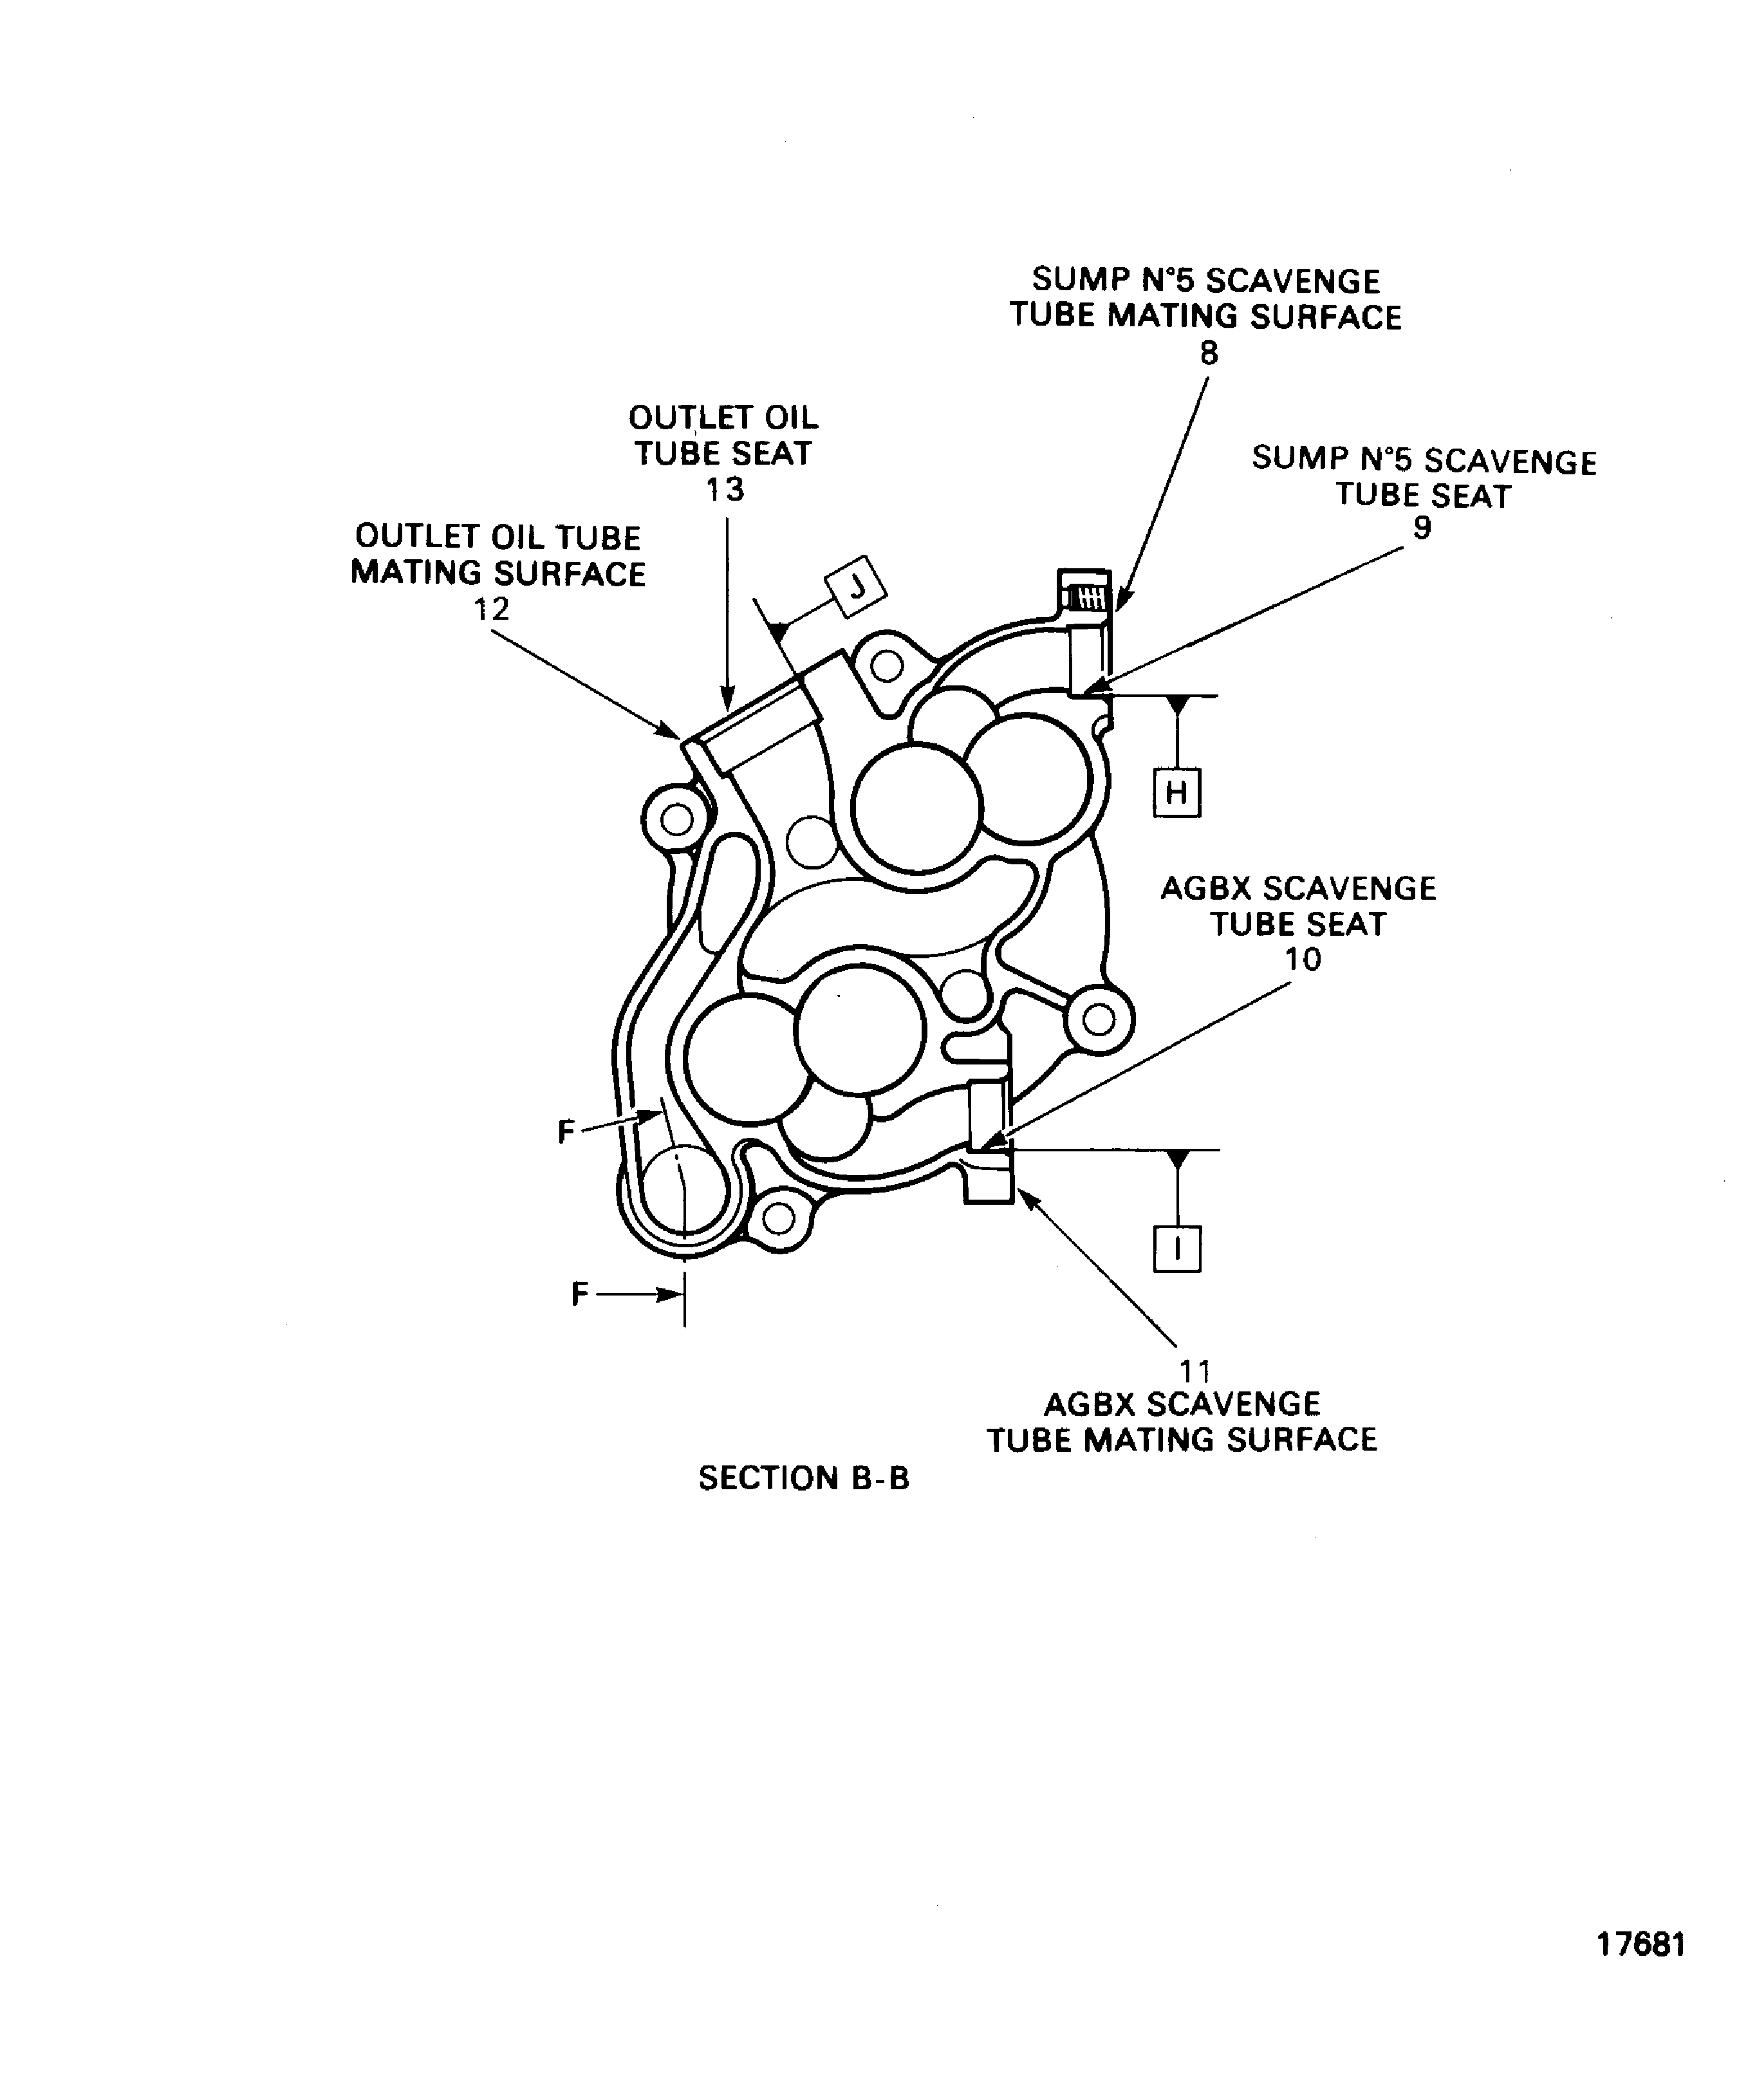
SUBTASK 79-22-41-220-136 Examine the Casing Assembly Sump No.5 Scavenge Tube Mating Surface at Location 8
Refer to Figure.
Accept
Between 0.9120 and 0.9140 in. (23.165 and 23.215 mm) diameter.
Repair, VRS5371 TASK 79-22-41-300-034 (REPAIR-034).
More than 0.9140 in. (23.215 mm).
Worn
Repair, VRS5371 TASK 79-22-41-300-034 (REPAIR-034).
More than Step.
True position
SUBTASK 79-22-41-220-137 Examine the Casing Assembly Sump No. 5 Scavenge Tube Mating Surface at Location 9
Refer to Figure.
Accept
Between 0.9120 and 0.9140 in. (23.165 and 23.215 mm) diameter.
Repair, VRS5372 TASK 79-22-41-300-035 (REPAIR-035).
More than 0.9140 in. (23.215 mm)
Worn
Repair, VRS5372 TASK 79-22-41-300-035 (REPAIR-035).
More than Step.
True position
SUBTASK 79-22-41-220-138 Examine the Casing Assembly Angle Gearbox Scavenge Tube Seat at Location 10
Refer to Figure.
Repair, VRS5373 TASK 79-22-41-300-036 (REPAIR-036).
More than Step.
Perpendicularity
Reject
More than Step.
Nicked, dented corners
SUBTASK 79-22-41-220-139 Examine the Casing Assembly Angle Gearbox Scavenge Tube Mating Surface at Location 11
Refer to Figure.
Repair, VRS5374 TASK 79-22-41-300-037 (REPAIR-037).
More than Step.
Perpendicularity
Reject
More than Step.
Nicked, dented corners
SUBTASK 79-22-41-220-140 Examine the Casing Assembly Outlet Oil Tube Mating Surface at Location 12
Refer to Figure.
Accept
Between 1.4580 and 1.4600 in. (37.033 and 37.083 mm) diameter.
Repair, VRS5375 TASK 79-22-41-300-038 (REPAIR-038).
More than 1.4600 in. (37.083 mm)
Worn
Repair, VRS5375 TASK 79-22-41-300-038 (REPAIR-038).
More than Step.
True position
SUBTASK 79-22-41-220-141 Examine the Casing Assembly Outlet Oil Tube Seat at Location 13
Refer to Figure.
Accept
Between 1.4580 and 1.4600 in. (37.033 and 37.083 mm) diameter.
Repair, VRS5376 TASK 79-22-41-300-039 (REPAIR-039).
More than 1.4600 in. (37.083 mm)
Worn
Repair, VRS5376 TASK 79-22-41-300-039 (REPAIR-039).
More than Step.
True position
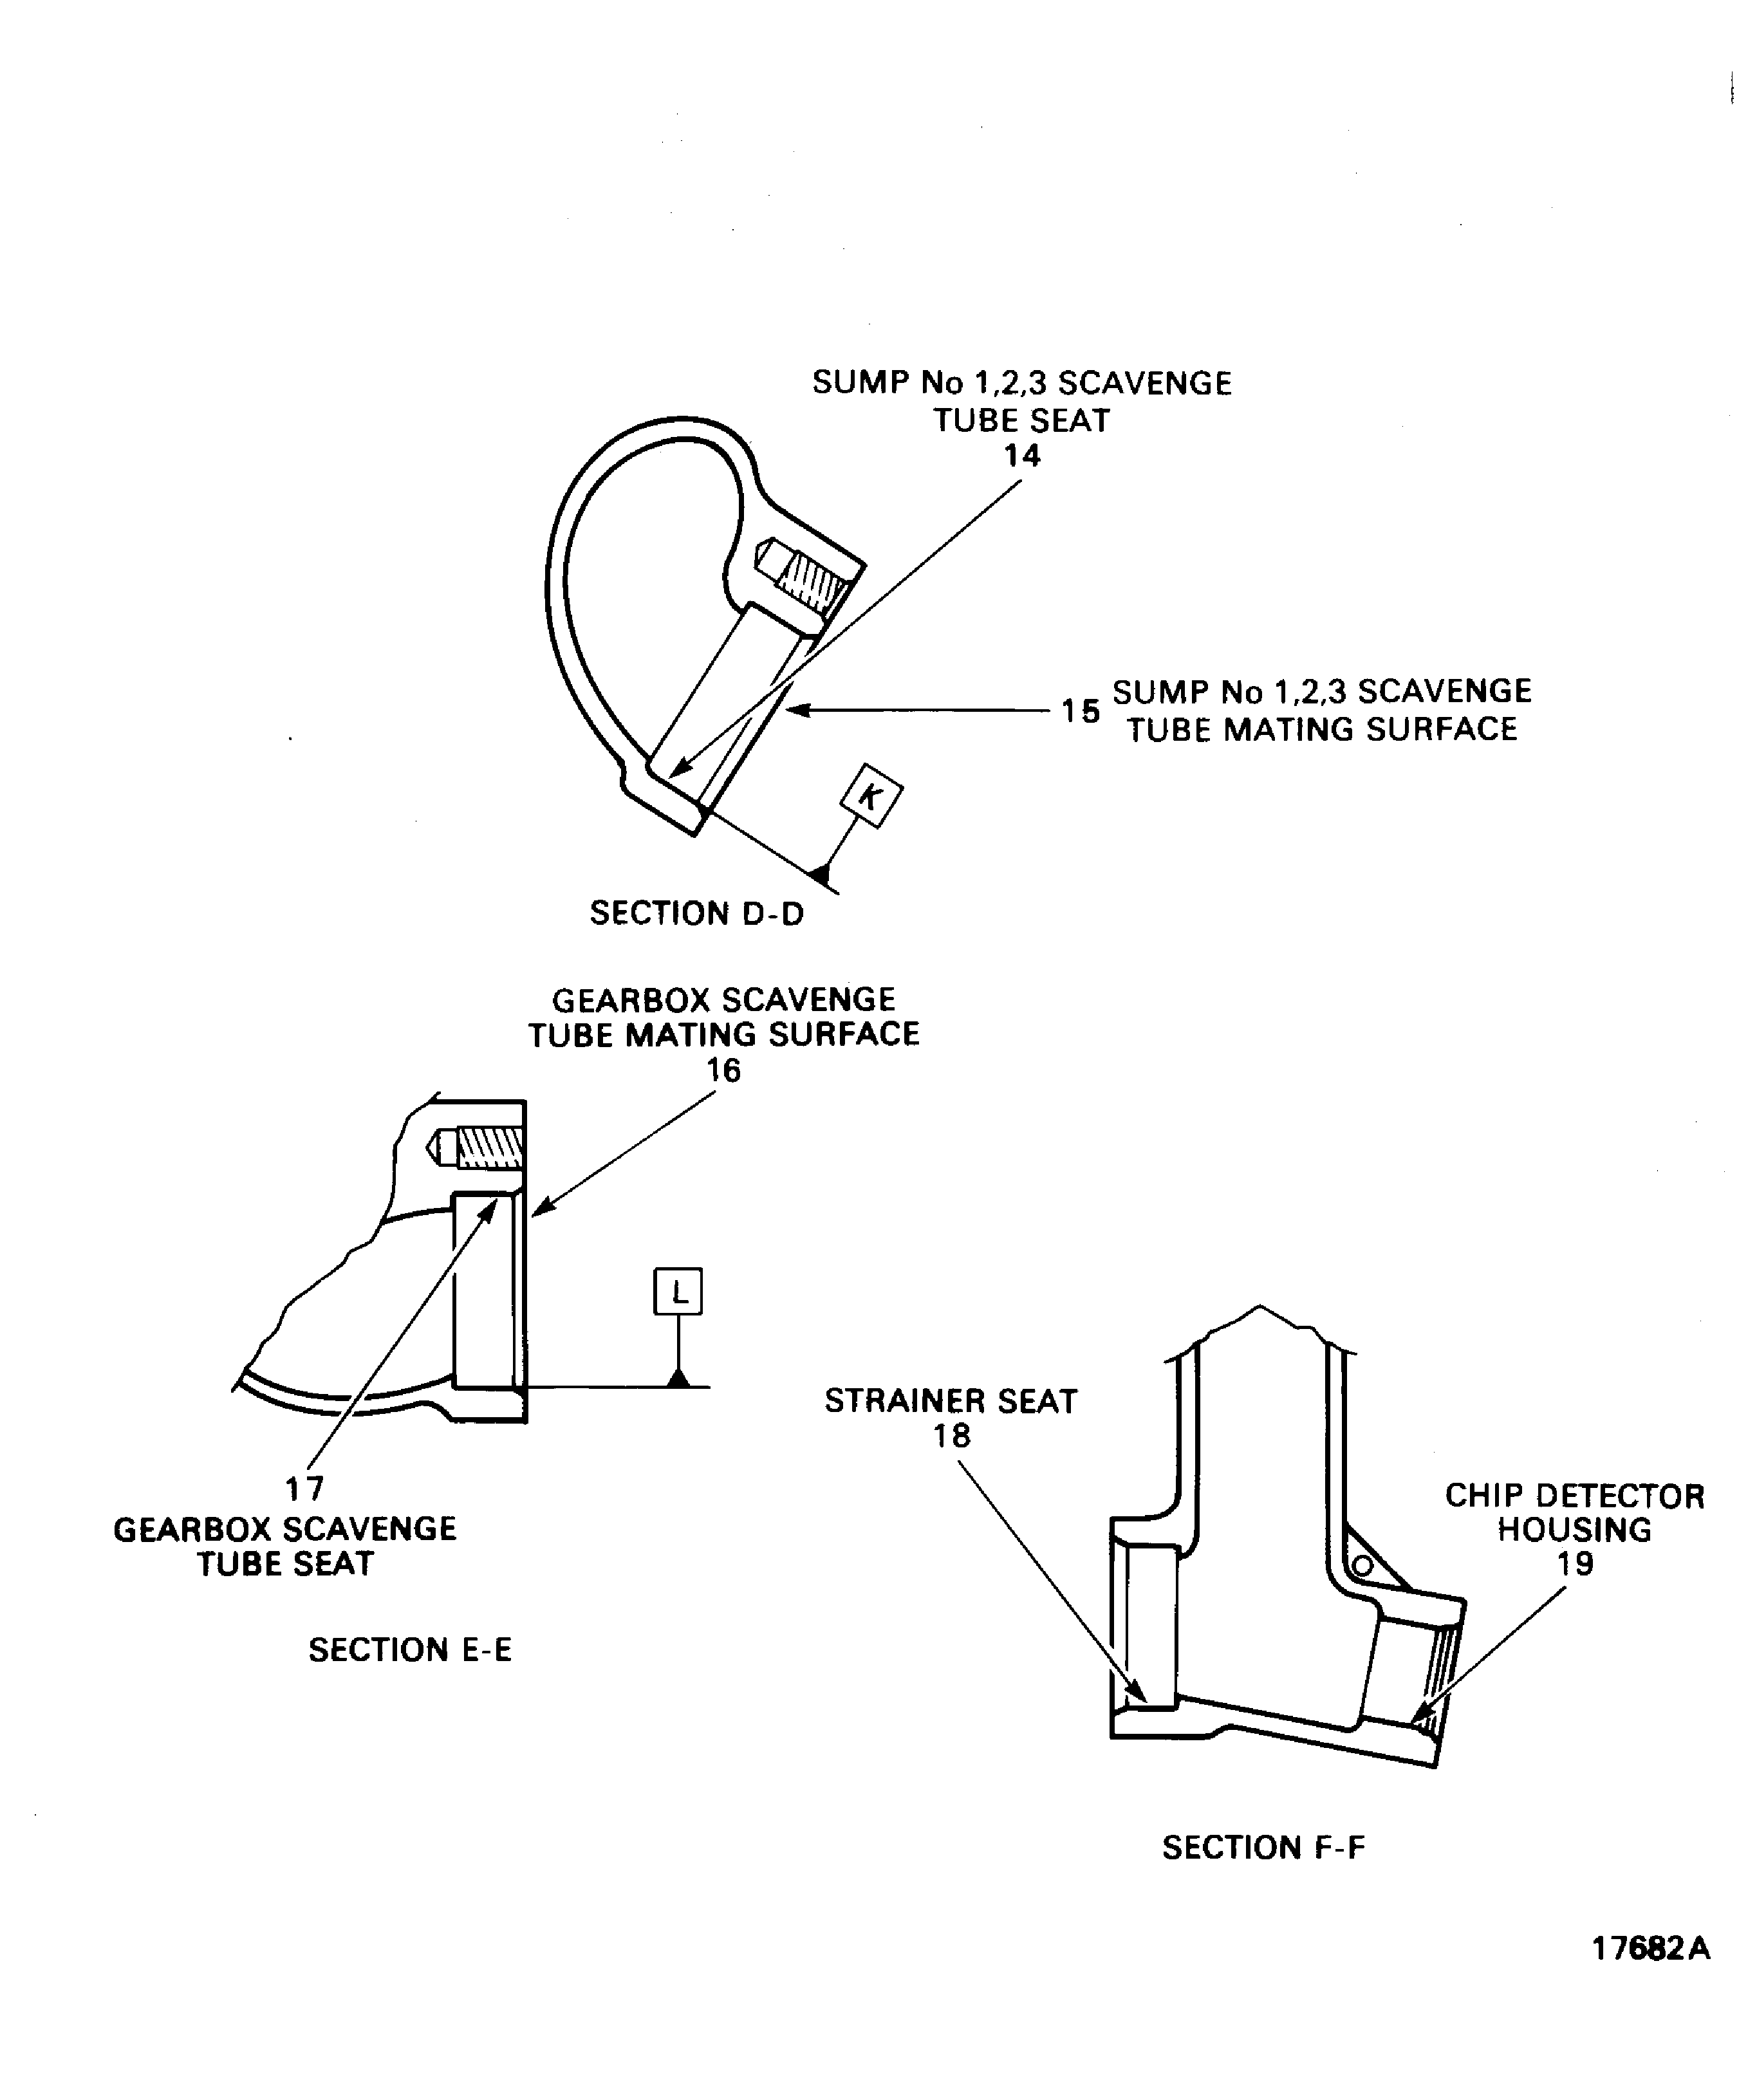
SUBTASK 79-22-41-220-142 Examine the Casing Assembly Sump Nos. 1, 2 and 3 Scavenge Tube Seat at Location 14
Refer to Figure.
Repair, VRS5377 TASK 79-22-41-300-040 (REPAIR-040).
More than Step.
Perpendicularity
Reject
More than Step.
Nicked, dented corners
SUBTASK 79-22-41-220-143 Examine the Casing Assembly Sump Nos. 1, 2 and 3 Scavenge Tube Mating Surface at Location 15
Refer to Figure.
Repair, VRS5378 TASK 79-22-41-300-041 (REPAIR-041).
More than Step.
Perpendicularity
Reject
More than Step.
Nicked, dented corners
SUBTASK 79-22-41-220-144 Examine the Casing Assembly Gearbox Scavenge Tube Mating Surface at Location 16
Refer to Figure.
Accept
Between 1.4580 and 1.4600 in. (37.033 and 37.083 mm) diameter.
Repair, VRS5379 TASK 79-22-41-300-042 (REPAIR-042).
More than 1.4600 in. (37.083 mm)
Worn
Repair, VRS5379 TASK 79-22-41-300-042 (REPAIR-042).
More than Step.
True position
SUBTASK 79-22-41-220-145 Examine the Casing Assembly Gearbox Scavenge Tube Seat at Location 17
Refer to Figure.
Accept
Between 1.2618 and 1.2638 in. (32.05 and 32.10 mm) diameter.
Repair, VRS5380 TASK 79-22-41-300-043 (REPAIR-043).
More than 1.2638 in. (32.1 mm).
Worn
Repair, VRS5380 TASK 79-22-41-300-043 (REPAIR-043).
More than Step.
True position
SUBTASK 79-22-41-220-146 Examine the Casing Assembly Gearbox Scavenge Strainer Seat at Location 18
Refer to Figure.
Repair, VRS5426 TASK 79-22-41-300-044 (REPAIR-044).
Damaged/stripped
Threads
SUBTASK 79-22-41-220-147 Examine the Casing Assembly Chip Detector Housing of Location 19
Accept
Not more than 0.059 in. (1.5 mm) in depth and the spring can be positioned on not damaged land of the seat.
Repair, VRS5683 TASK 79-22-41-300-045 (REPAIR-045).
Not more than 0.059 in. (1.5 mm) in depth and positioning as (1) is not possible.
Reject
More than Step.
Frettage localized in areas of contact with spring
SUBTASK 79-22-41-220-148 Examine the Casing Assembly Spring Seats Surfaces at Location 20
Accept
Any quantity, any length not more than 0.004 in. (0.1 mm) in depth after removal of high metal.
Repair, VRS5683 TASK 79-22-41-300-045 (REPAIR-045).
Between 0.004 in. (0.1 mm) and 0.059 in. (1.5 mm).
Reject
More than Step.
Scratches, scores, gouges
SUBTASK 79-22-41-220-149 Examine the Casing Assembly Gear Bores Lateral Machined Surfaces at Location 21
Figure: Locations on the Oil Pump Casing Assembly
Locations on the Oil Pump Casing Assembly

Locations on the Oil Pump Casing Assembly

Locations on the Oil Pump Casing Assembly

Locations on the Oil Pump Casing Assembly

