Export Control
EAR Export Classification: Not subject to the EAR per 15 C.F.R. Chapter 1, Part 734.3(b)(3), except for the following Service Bulletins which are currently published as EAR Export Classification 9E991: SBE70-0992, SBE72-0483, SBE72-0580, SBE72-0588, SBE72-0640, SBE73-0209, SBE80-0024 and SBE80-0025.Copyright
© IAE International Aero Engines AG (2001, 2014 - 2021) The information contained in this document is the property of © IAE International Aero Engines AG and may not be copied or used for any purpose other than that for which it is supplied without the express written authority of © IAE International Aero Engines AG. (This does not preclude use by engine and aircraft operators for normal instructional, maintenance or overhaul purposes.).Applicability
V2500-A5
Common Information
TASK 72-00-50-420-001-C00 LPT Module - Install The LPT Module (Horizontal) - Method 1, Installation-002
General
This TASK gives the procedure to install the LP Turbine Module in horizontal position. Other related TASKS are:
Install the LP Turbine Module without TEC by TASK 72-00-50-420-002 (INSTALLATION-003).
Install the LP Turbine Module (vertical) - Method 2 by TASK 72-00-50-420-004-C00 (INSTALLATION-005).
Turn the LP Turbine Module from horizontal to vertical (front end down) by TASK 72-00-50-560-001 (REMOVAL-003).
Fig/item numbers in parentheses in this procedure agree with those used in the IPC. Only the primary Fig/item numbers are used. For the service bulletin alpha variants refer to the IPC.
For all parts identified in a different Chapter/Section/Subject, the applicable Chapter/Section/Subject comes before the Fig/item number.
For standard torque data and procedures, refer to SPM TASK 70-41-01-400-501and SPM TASK 70-41-02-400-501.
Special torque data is identified by the symbol * after the torque value.
Special assembly tolerances are included in this procedure.
Lubricate all threads and abutment faces of nuts and bolts with CoMat 10-077 APPROVED ENGINE OILS, unless other lubricants are referred to in the procedure.
After assembly apply CoMat 07-038 AIR DRYING ENAMEL to any damaged surface protection, joint flanges and attach parts. Use the correct color of the air drying enamel. Refer to SPM TASK 70-63-02-400-501.
The number for each radial location must be identified in a clockwise direction. These start at the engine top position when you look from the rear of the engine, unless stated differently in the procedure.
Transportation covers/blanks must be removed immediately before the installation of the components.
For lockwire data and procedures refer to SPM TASK 70-42-05-400-501.
NOTE
NOTE
Preliminary Requirements
Pre-Conditions
NONESupport Equipment
| Name | Manufacturer | Part Number / Identification | Quantity | Remark |
|---|---|---|---|---|
| Dial Gage | LOCAL | Dial Gage | ||
| IAE 1F10016 Mechanical wrench | 0AM53 | IAE 1F10016 | 1 | |
| IAE 1F10026 Hydraulic hand pump | 0AM53 | IAE 1F10026 | 1 | |
| IAE 1F10052 Two cables sling | 0AM53 | IAE 1F10052 | 1 | |
| IAE 1F10058 Handling fixture | 0AM53 | IAE 1F10058 | 1 | |
| IAE 1F10080 Horizontal stand | 0AM53 | IAE 1F10080 | 1 | |
| IAE 1F10084 Support fixture | 0AM53 | IAE 1F10084 | 1 | |
| IAE 2F10418 Length gage | 0AM53 | IAE 2F10418 | 1 | |
| IAE 2F10415 Loading fixture | 0AM53 | IAE 2F10415 | 1 | |
| IAE 6F10027 Heater control unit | 0AM53 | IAE 6F10027 | 1 | |
| IAE 6F10029 Air flow test cart | 0AM53 | IAE 6F10029 | 1 | |
| IAE 6F10030 Vacuum test cart | 0AM53 | IAE 6F10030 | 1 | |
| IAE 1J12220 Hydraulic pusher/puller | 0AM53 | IAE 1J12220 | 1 | |
| IAE 1J12244 Sizing sleeve | 0AM53 | IAE 1J12244 | 1 | |
| IAE 1J12260 Spanner wrench | 0AM53 | IAE 1J12260 | 1 | |
| IAE 1J12263 Seal slider | 0AM53 | IAE 1J12263 | 1 | |
| IAE 1J12270 Guide puller | 0AM53 | IAE 1J12270 | 1 | |
| IAE 1J12271 0AM53 heater | 0AM53 | IAE 1J12271 | 1 | |
| IAE 1J12279 Grinding fixture | 0AM53 | IAE 1J12279 | 1 | |
| IAE 1J12280 Guide bar | 0AM53 | IAE 1J12280 | 1 | |
| IAE 1J12282 Expanding pliers | 0AM53 | IAE 1J12282 | 1 | |
| IAE 1J12523 Seal slider | 0AM53 | IAE 1J12523 | ||
| IAE 1M14146 Support plate | 0AM53 | IAE 1M14146 | 2 | |
| IAE 1P16354 Vacuum Test Adapter | 0AM53 | IAE 1P16354 | 1 | |
| IAE 1P16624 Slide Puller | 0AM53 | IAE 1P16624 | ||
| IAE 1P17041 Drier | 0AM53 | IAE 1P17041 | 1 | |
| IAE 1P17523 Blank-off Plate | 0AM53 | IAE 1P17523 | 1 | |
| IAE 1R18907 Expanding retainer | 0AM53 | IAE 1R18907 | 1 | |
| IAE 1R18909 Guide plug | 0AM53 | IAE 1R18909 | 1 | |
| IAE 2R18871 Inspection bridge | 0AM53 | IAE 2R18871 | 1 | |
| IAE 1J12281 0AM53 heater | 0AM53 | IAE 1J12281 |
Consumables, Materials and Expendables
| Name | Manufacturer | Part Number / Identification | Quantity | Remark |
|---|---|---|---|---|
| CoMat 02-119 LOCKWIRE | LOCAL | CoMat 02-119 | ||
| CoMat 07-038 AIR DRYING ENAMEL | 00BB6 | CoMat 07-038 | ||
| CoMat 10-045 LEAK CHECK FLUID, BUBBLES-TYPE | 03530 | CoMat 10-045 | ||
| CoMat 10-045A LEAK CHECK FLUID, BUBBLES-TYPE | LOCAL | CoMat 10-045A | ||
| CoMat 10-077 APPROVED ENGINE OILS | X333X | CoMat 10-077 | ||
| CoMat 10-129 ANTI-SEIZE PASTE | 34568 | CoMat 10-129 |
Spares
| Name | Manufacturer | Part Number / Identification | Quantity | Remark |
|---|---|---|---|---|
| Sealing ring | 1 | |||
| Packing | 1 | |||
| Packing | 3 | |||
| Packing | 1 |
Safety Requirements
NONEProcedure
Examine the HP System Module at interface D-45. Refer to TASK 72-00-45-220-001 (INSPECTION-001).
Examine the front face of the LP Turbine Module at interface D-50/10. Refer to TASK 72-00-50-220-001 (INSPECTION-001).
Examine the LP Compressor/Intermediate Case Module at interface F-32. Refer to TASK 72-00-32-220-004 (INSPECTION-004).
Examine the LP Turbine Module at interface F-50. Refer to TASK 72-00-50-220-005 (INSPECTION-005).
SUBTASK 72-00-50-210-060 Examine the Module Interfaces
Refer to Figure.
Calculate the fit at location 5624.
Table 1. Fits and Clearances (all dimensions are in inches) NEW PART
WORN PART
DIMENSIONS
DIMENSIONS
PART IDENT
Size
Clearance
(Non-select)
REJECT IF
MORE THAN
LOCATION 5624
LP Turbine Case (72-50-21, 01-010), Bore
HP Turbine Stage 2 Support Case ENGINE-STAGE 2 HPT SUPPORT ASSEMBLY (72-45-27, 01-010), Diameter
LP Turbine Case Bore
28.527
Intf
28.533
0.002
HP System Case Diameter
28.535
0.014
28.541
Table 2. Fits and Clearances (all dimensions are in millimeters) NEW PART
WORN PART
DIMENSIONS
DIMENSIONS
PART IDENT
Size
Clearance
(Non-select)
REJECT IF
MORE THAN
LOCATION 5624
LP Turbine Case (72-50-21, 01-010), Bore
HP Turbine Stage 2 Support Case ENGINE-STAGE 2 HPT SUPPORT ASSEMBLY (72-45-27, 01-010), Diameter
LP Turbine Case Bore
724.586
Intf
724.738
0.050
HP Turbine Case Diameter
724.789
0.356
724.941
SUBTASK 72-00-50-220-196 Measure that the Fits and Clearances between the LP Turbine Module and the HP System Module are in the Limits given at Location 5624. Refer to
Refer to Figure.
Calculate the clearance at location 5623.
Table 3. Fits and Clearances (all dimensions are in inches) NEW PART
WORN PART
DIMENSIONS
DIMENSIONS
PART IDENT
Size
Clearance
(Select)
REJECT IF
MORE THAN
LOCATION 5623
Inner Duct Segment LPT Inner Diffuser Duct And Related Parts (72-50-24, 01-010), Honeycomb Surface
Stage 2 HPT Blade Retaining Plate HPT Stage 2 Blade Retaining Plate And Related Parts (72-45-33, 01-020), Knife Edge Outside Diameter
Inner Duct Segment Honeycomb Surface
19.896
0.121
19.896
0.121
19.925
Clear
19.925
Clear
Knife Edge Outside Diameter
19.804
Clear
19.797
Clear
19.812
0.084
19.812
0.084
Table 4. Fits and Clearances (all dimensions are in millimeters) NEW PART
WORN PART
DIMENSIONS
DIMENSIONS
PART IDENT
Size
Clearance
(Select)
REJECT IF
MORE THAN
LOCATION 5623
Inner Duct Segment LPT Inner Diffuser Duct And Related Parts (72-50-24, 01-010), Honeycomb Surface
Stage 2 HPT Blade Retaining Plate HPT Stage 2 Blade Retaining Plate And Related Parts (72-45-33, 01-010), Knife Edge Outside Diameter
Inner Duct Segment Honeycomb Surface
505.36
3.07
505.36
3.07
506.10
Clear
506.10
Clear
Knife Edge Outside Diameter
503.10
Clear
502.84
Clear
503.22
2.13
503.22
2.13
SUBTASK 72-00-50-220-197 Measure that the Fits and Clearances between the LP Turbine Module and the HP System Module are in the Limits given at Location 5623
Refer to Figure.
Calculate the fit at location 5620.
Table 5. Fits and Clearances (all dimensions are in inches) NEW PART
WORN PART
DIMENSIONS
DIMENSIONS
PART IDENT
Size
Clearance
(Non-select)
REJECT IF
MORE THAN
LOCATION 5620
LP Stub Shaft (72-32-51, 01-350), Bore
LP Turbine Shaft LPT Shaft And Related Parts (72-50-41, 01-200), Diameter
Stub Shaft Bore
3.5433
Intf
3.5447
0.0006
LP Turbine Shaft Diameter
3.5453
0.0029
3.5462
Table 6. Fits and Clearances (all dimensions are in millimeters) NEW PART
WORN PART
DIMENSIONS
DIMENSIONS
PART IDENT
Size
Clearance
(Non-select)
REJECT IF
MORE THAN
LOCATION 5620
LP Stub Shaft (72-32-51, 01-350), Bore
LP Turbine Shaft LPT Shaft And Related Parts (72-50-41, 01-200), Diameter
Stub Shaft Bore
90.000
Intf
90.035
0.016
LP Turbine Shaft Diameter
90.051
0.073
90.073
SUBTASK 72-00-50-220-198 Measure that the Fits and Clearances between the LP Turbine Module and the LP Compressor are in the Limits given at Location 5620
Refer to Figure.
Calculate the fit at location 5621.
Table 7. Fits and Clearances (all dimensions are in inches) NEW PART
WORN PART
DIMENSIONS
DIMENSIONS
PART IDENT
Size
Clearance
(Non-select)
REJECT IF
MORE THAN
LOCATION 5621
LP Stub Shaft (72-32-51, 01-350), Bore
LP Turbine Shaft LPT Shaft And Related Parts (72-50-41, 01-200), Diameter
Stub Shaft Bore
3.9370
Intf
3.9379
0.0006
LP Turbine Shaft Diameter
3.9385
0.0023
3.9393
Table 8. Fits and Clearances (all dimensions are in millimeters) NEW PART
WORN PART
DIMENSIONS
DIMENSIONS
PART IDENT
Size
Clearance
(Non-select)
REJECT IF
MORE THAN
LOCATION 5621
LP Stub Shaft (72-32-51, 01-350), Bore
LP Turbine Shaft LPT Shaft And Related Parts (72-50-41, 01-200), Diameter
Stub Shaft Bore
100.000
Intf
100.022
0.015
LP Turbine Shaft Diameter
100.037
0.059
100.059
SUBTASK 72-00-50-220-199 Measure that the Fits and Clearances between the LP Turbine Module and the LP Compressor are in the Limits given at Location 5621
Refer to Figure.
Calculate the clearance at location 5622.
Table 9. Fits and Clearances (all dimensions are in inches) NEW PART
WORN PART
DIMENSIONS
DIMENSIONS
PART IDENT
Size
Clearance
(Non-select)
REJECT IF
MORE THAN
LOCATION 5622
Differential Seal (72-32-19, 01-100), Bore
To LP Turbine Shaft LPT Shaft And Related Parts (72-50-41, 01-200), Diameter
Seal Bore
3.9410
3.9449
0.0017
LP Turbine Shaft Diameter
3.9385
0.0064
3.9393
Table 10. Fits and Clearances (all dimensions are in millimeters) NEW PART
WORN PART
DIMENSIONS
DIMENSIONS
PART IDENT
Size
Clearance
(Non-select)
REJECT IF
MORE THAN
LOCATION 5622
Differential Seal (72-32-26, 01-110), Bore
LP Turbine Shaft LPT Shaft And Related Parts (72-50-41, 01-200), Diameter
Seal Bore
100.100
100.200
0.041
LP Turbine Shaft Diameter
100.037
0.163
100.059
SUBTASK 72-00-50-220-200 Measure that the Fits and Clearances between the LP Turbine Module and the LP Compressor are in the Limits given at Location 5622
Remove the nipple and packing from the No. 5 bearing compartment. Discard the packing.
Remove the two bolts and key washers which attach the No. 5 Bearing Packing Transfer Tube to the No. 5 Bearing Nozzle.
Install the IAE 1P16624 Slide Puller 1 off into No. 5 Bearing Packing Transfer Tube.
Move the knocker puller rearwards quickly and hit the handle to remove the No. 5 Bearing Packing Transfer Tube from the No. 5 Bearing Nozzle.
Remove the No. 5 Bearing Packing Transfer Tube and the three packings from the No. 5 Bearing Nozzle. Discard the packings.
Remove the two bolts which attach the No. 5 Bearing Nozzle.
Remove the No. 5 Bearing Nozzle and packing. Discard the packing.
SUBTASK 72-00-50-420-393 Remove the No. 5 Bearing Nozzle
Refer to Figure.
Install the IAE 1F10052 Two cables sling 1 off to the IAE 1F10058 Handling fixture 1 off.
Install the IAE 1F10084 Support fixture 1 off to the IAE 1R18907 Expanding retainer 1 off.
SUBTASK 72-00-50-420-274 Attach the LP Handling Fixture to the LP Turbine Module
Refer to Figure.
Connect the front shaft and the rear shaft of the IAE 2F10418 Length gage 1 off.
SUBTASK 72-00-50-420-275 Install the Length Gage in to the Engine
Refer to Figure.
Install the beam (part of the IAE 2F10418 Length gage) to the rear flange of the HP Turbine Case. Safety the beam to the HP Turbine Case with the eight bolts and nuts. The end of the rear shaft must be on the beam.
SUBTASK 72-00-50-420-276 Install the Beam of the Length Gage to the Rear Flange of the HP Turbine Case
Install the handle to the front end of the IAE 2F10418 Length gage 1 off.
SUBTASK 72-00-50-420-277 Install the Handle to the Length Gage
Refer to Figure.
Attach with the socket head cap screw and nut (parts of the IAE 2F10415 Loading fixture).
Attach with the socket head cap screw and nut (parts of the IAE 2F10415 Loading fixture).
Install the IAE 1R18909 Guide plug 1 off with the force gage and the bolt (parts of the IAE 2F10415 Loading fixture 1 off) to the curvic coupling of the LP Stub Shaft as follows:
Install the flange (part of the IAE 2F10415 Loading fixture 1 off) to the front flange of the Fan Case. The bolt must come out through the center hole of the flange. Attach the flange to the Fan Case with eight screws, eight nuts and 16 washers.
Install the support (part of the IAE 2F10415 Loading fixture 1 off) to the bolt and the flange.
Install the thrust bearing (part of the IAE 2F10415 Loading fixture 1 off) on to the support. Safety all together with the ring and four screws.
Install the speed ball handle (part of the IAE 2F10415 Loading fixture 1 off). Attach it to the support with two screws.
SUBTASK 72-00-50-420-278 Install the Loading Fixture to the Front Flange of the Fan Case
Refer to Figure.
NOTE
Load must be applied in rearward direction.Turn the speed ball handle of the IAE 2F10415 Loading fixture 1 off until the force gage shows the load of 900 lbf (4.0kN).
SUBTASK 72-00-50-420-279 Load the No. 1 Bearing
Refer to Figure.
SUBTASK 72-00-50-420-280 Calibrate the Zero Position on the Dial Gage
Refer to Figure.
Point the dial gage to the rear end of the IAE 2F10418 Length gage 1 off.
SUBTASK 72-00-50-420-281 Measure the Dimension C
If the calculated dimension of T is out of the limits given in Figure. the applicable adjusting ring must be machined to calculated dimension T. Refer to Figure. Use the grinding machine and IAE 1J12279 Grinding fixture grinding fixture 1 off.
SUBTASK 72-00-50-420-283 Adjust the Thickness of the Adjusting Ring
Refer to Figure.
Disassemble the speed ball handle, the ring, the thrust bearing and the support (parts of the IAE 2F10415 Loading fixture).
Remove the bolt, the force gage and the IAE 1R18909 Guide plug guide plug 1 off from the curvic coupling of the LP Stub Shaft.
SUBTASK 72-00-50-420-284 Remove the Loading Fixture from the Engine
Refer to Figure.
Remove the IAE 2F10418 Length gage 1 off from the engine.
SUBTASK 72-00-50-420-285 Remove the Length Gage from the Engine
Remove the old adjusting ring from the LP Turbine Shaft and install the new adjusting ring. Use the IAE 1J12282 Expanding pliers 1 off.
SUBTASK 72-00-50-420-286 Install the Adjusting Ring to the LP Turbine Shaft
Align the four holes in the guide (part of the IAE 1J12271 0AM53 heater local heater) with the four slots in the flange of the LP Stub Shaft.
Install IAE 1J12281 0AM53 heater 1 off together with IAE 1J12271 0AM53 heater 1 off to the stub shaft front flange as follows: Refer to Figure.
Install the guide ring A1 (part of the IAE 1J12280 Guide bar) on to the lock nut at the rear flange of the Stage 2 Turbine Disk. Refer to Figure.
Connect the two guide bars (part of the IAE 1J12280 Guide bar).
Install the IAE 1J12280 Guide bar 1 off.
SUBTASK 72-00-50-420-287 Prepare the Engine for Installation of the LP Turbine Module
Refer to Figure.
Attach the IAE 1F10052 Two cables sling 1 off to the front spool of the IAE 1F10058 Handling fixture 1 off which is installed at the LP Turbine Module.
Loosen the nut of the eye bolt (part of the IAE 1F10080 Horizontal stand 1 off).
SUBTASK 72-00-50-420-288 Remove the LP Turbine Module from the Horizontal Stand
Refer to Figure.
Remove the guide ring A1 and install the guide ring A3 (part of the IAE 1J12280 Guide bar 1 off) to the lock nut at the rear flange of the Stage 2 Turbine Disk.
SUBTASK 72-00-50-420-289 Remove the Guide Ring A1
Remove the guide ring A3 and install the guide ring A2 (part of IAE 1J12280 Guide bar 1 off) to the lock nut at the rear flange of the Stage 2 Turbine Disk. Refer to Figure.
Push the IAE 1J12271 0AM53 heater 1 off backwards, until it is against the stop position. Increase the temperature of the spline area of the LP Stub Shaft to 275 deg F to 329 deg F (135 deg C to 165 deg C). Use the IAE 6F10027 Heater control unit 1 off.
During this time remove the IAE 1M14146 Support plate 2 off from the LP Turbine Case Front Flange and the LP Turbine Shaft. Refer to Figure.
Pull the local heater forwards. Move the LP Turbine Module in to the engine, until the LP Turbine Case Front Flange touches the HP Turbine Case rear flange. Refer to Figure.
Remove the four screws and the four pins from the guide (part of the IAE 1J12271 0AM53 heater).
Remove the local heater from the LP Stub Shaft Front Mounting Flange.
Attach the outer subassembly of the hydraulic pusher/puller (which has the guide, the cylinder and the hydraulic cylinder) to the front flange of the LP Stub Shaft. The four flanges of the guide must be in line with the scallops of the LP Stub Shaft.
NOTE
Make sure that the hydraulic connection of the hydraulic cylinder is at the opposite side of the cylinder.
Install the IAE 1J12220 Hydraulic pusher/puller 1 off together with the IAE 1J12270 Guide puller 1 off to the front flange of the LP Stub Shaft as follows: Refer to Figure.
Install the IAE 1F10026 Hydraulic hand pump 1 off to the hydraulic connection of the hydraulic pusher/puller.
Pull the LP Turbine Module in correct position. Tighten the work nut pairs at the HP/LP Turbine Flanges in opposite sequence. Apply equal force all around the flange to pull them together. At the same time operate the hydraulic pump stepwise to connect the LP Turbine Shaft with the LP Stub Shaft.
NOTE
Tighten the work nuts, and operate the hydraulic pump at the same time to prevent over-loading of the handling fixture.If the HP/LP Turbine Flanges are together, loosen the two nuts which secure the IAE 1R18907 Expanding retainer 1 off to the IAE 1F10058 Handling fixture 1 off.
Loosen and remove the four screws which safety the pins to the guide of the IAE 1J12220 Hydraulic pusher/puller hydraulic pusher/puller 1 off together with the IAE 1J12270 Guide puller.
Remove the hydraulic pusher/puller from the LP Stub Shaft as follows: Refer to Figure.
Install the support B (part of the IAE 1J12260 Spanner wrench 1 off) to the retaining ring of the LP Compressor Disk. Attach the support B with four bolts. Refer to Figure.
Install the support A (part of the spanner wrench) to the curvic coupling of the LP Stub Shaft. Attach the support A with the four bolts. Refer to Figure.
Assemble the IAE 1F10016 Mechanical wrench 1 off to the spanner wrench.
Install the turbine shaft front lock nut on to the front of the LP Turbine Shaft. Refer to Figure.
Safety the front lock nut of the LP Turbine Shaft with the locking cap and the Internal Retaining Ring LPT Shaft And Related Parts (72-50-41, 01-100). Refer to Figure.

CAUTION
HOLD THE BOLTS IN THEIR POSITION IF YOU INSTALL THE NUTS ON TO THE BOLTS. DO NOT TURN THE BOLTS OR MAKE TO-AND-FRO MOVEMENTS. THE LP TURBINE CASE/HP TURBINE CASE FLANGE AND/OR THE BOLTS CAN BE DAMAGED.Torque the 84 nuts installed on the bolts which have their heads located on the HP turbine flange from 180.0 lbfin to 220.0 lbfin (20.0 Nm to 25.0 Nm).
Torque the 16 bolts which have their heads located on the LP Turbine Flange from 180.0 lbfin to 220.0 lbfin (20.0 Nm to 25.0 Nm). Safety the bolts with CoMat 02-119 LOCKWIRE.
Install the seven brackets and attach the 100 bolts and nuts, which lock the LP Turbine Case to the HP Turbine Case. Refer to Figure.
SUBTASK 72-00-50-420-290 Install the LP Turbine Module
Refer to Figure.
Turn the knob clockwise to disengage the clamps of the IAE 1R18907 Expanding retainer 1 off.
Loosen and remove the 13 screws which attach the IAE 1F10058 Handling fixture 1 off to the rear flange of the TEC.
Turn the handwheel of the IAE 1F10084 Support fixture 1 off clockwise to disengage the support from the LP Turbine Shaft.
SUBTASK 72-00-50-420-291 Remove the Handling Fixture from the LP Turbine Module
Refer to Figure.
Install three new packings NO.5 BEARING OIL JET AND FILTER (72-58-02, 01-040) and the No. 5 Bearing Packing Transfer Tube in to the No. 5 Bearing Nozzle.
Install a new packing NO.5 BEARING OIL JET AND FILTER (72-58-02, 01-080) on to the bearing nozzle.
SUBTASK 72-00-50-420-394 Install the No. 5 Bearing Nozzle
Refer to Figure.
Install the IAE 2F10415 Loading fixture 1 off on to the front flange of the Fan Case. Refer to Step.
Install the IAE 2R18871 Inspection bridge 1 off on to the flange of the Turbine Exhaust Case.
SUBTASK 72-00-50-420-292 Install the Loading Fixture and Inspection Bridge to the LP Turbine Module
Use a suitable vernier depth gage to measure the dimension P (actual). Refer to Figure.
DIM. P to be within 13.7988 in. to 13.8421 in. (350.49 mm to 351.59 mm).
SUBTASK 72-00-50-420-293 Measure the Dimension P After the Installation of the LP Turbine Module
Refer to Figure.
Remove the IAE 2F10415 Loading fixture 1 off from the front flange of the Fan Case. Refer to Step.
Remove the IAE 2R18871 Inspection bridge 1 off from the rear flange of the Turbine Exhaust Case.
SUBTASK 72-00-50-420-294 Remove the Loading Fixture and the Inspection Bridge from the LP Turbine Module
NOTE
Use of IAE 1J12263 Seal slider without IAE 1J12244 Sizing sleeve is not permitted.Put the blind cap with the rear end down LPT Shaft And Related Parts (72-50-41, 01-150) on to a work bench.
Install the IAE 1J12263 Seal slider 1 off on the blind cap.
Lubricate the new LPT Shaft And Related Parts (72-50-41, 01-160) sealing ring with CoMat 10-077 APPROVED ENGINE OILS.
Lubricate the outer diameter faces of the seal slider and the blind cap with CoMat 10-077 APPROVED ENGINE OILS.
Extend the sealing ring and install it to the blind cap as follows.
Put the IAE 1J12244 Sizing sleeve 1 off with the front end down on to the work bench.
Lubricate the inner diameter face of the sizing sleeve and the outer diameter of the sealing ring with CoMat 10-077 APPROVED ENGINE OILS.

CAUTION
DO NOT INSTALL THE BLIND CAP AND THE SEALING RING IN TO THE LP TURBINE SHAFT BEFORE B.(6). THE SEALING RING DIAMETER IS EXTENDED. THE LP TURBINE SHAFT BORE CAN CAUSE DAMAGE TO THE EXTENDED SEALING RING.Make the sealing ring diameter smaller as follows.
Install the blind cap to the LP Turbine Shaft. Use the IAE 1P17041 Drier 1 off.
Install the Internal Retaining Ring LPT Shaft And Related Parts (72-50-41, 01-100).
SUBTASK 72-00-50-420-295-A00 Install the Blind Cap to the LP Turbine Shaft (Pre SBE 72-0227)
SBE 72-0227: Provide a new blind cap with decreased seal land height
Install the IAE 1J12523 Seal slider 1 off on the blind cap.
Lubricate the sealing ring with CoMat 10-077 APPROVED ENGINE OILS.
Lubricate the outer diameter faces of the seal slider and the blind cap with CoMat 10-077 APPROVED ENGINE OILS.
Install the new LPT Shaft And Related Parts (72-50-41, 01-160) sealing ring to the blind cap LPT Shaft And Related Parts (72-50-41, 01-150) as follows:
Install the blind cap on to the LP Turbine Shaft. Use the IAE 1P17041 Drier 1 off.

CAUTION
DO NOT USE THE INTERNAL RETAINING RING P/N RR312 WITH THE BLIND CAP P/N 5A1705.Install the Internal Retaining Ring LPT Shaft And Related Parts (72-50-41, 01-100).
SUBTASK 72-00-50-420-295-C00 Install the Blind Cap to the LP Turbine Shaft (SBE 72-0227)
Refer to Figure.
Install a new packing ENGINE-NO.5 BEARING COMPARTMENT COVER (72-58-01, 20-160) on to the No. 5 Bearing Compartment Cover ENGINE-NO.5 BEARING COMPARTMENT COVER (72-58-01, 20-120).
Install the IAE 1P17523 Blank-off Plate 1 off to the No. 5 Bearing Outer Oil Feed Tube. Refer to Figure.
Install the IAE 1P16354 Vacuum Test Adapter 1 off to the No. 5 Bearing Oil Scavenge Tube Outlet with three bolts (part of the adapter). Tighten the bolts. Refer to Figure.
Attach the hose on the IAE 6F10029 Air flow test cart 1 off to the adapter.
Apply CoMat 10-045 LEAK CHECK FLUID, BUBBLES-TYPE or CoMat 10-045 LEAK CHECK FLUID, BUBBLES-TYPEA around the cover and oil tube interfaces to check for leaks. Replace the seal of any leaking interface with a new seal.
Do a leak check of the compartment cover and oil tubes.
Install the No. 5 Bearing Shields ENGINE-NO.5 BEARING COMPARTMENT COVER (72-58-01, 20-100 and ENGINE-NO.5 BEARING COMPARTMENT COVER 20-080) on to the cover. Align the bolt holes.
Treat threads and underside of head of the bolts with CoMat 10-129 ANTI-SEIZE PASTE at assembly.
SUBTASK 72-00-50-420-296 Install the No. 5 Bearing Compartment Cover
Lubricate the bolts, nuts and washers with CoMat 10-077 APPROVED ENGINE OILS.
Install the IAE 1P16354 Vacuum Test Adapter 1 off to No. 5 Bearing Outer Oil Scavenge Tube, Figure.
Lubricate the bolts, nuts and washers with CoMat 10-077 APPROVED ENGINE OILS.
Install the IAE 1P17523 Blank-off Plate 1 off to No. 5 Bearing Outer Oil Feed Tube, Figure.
SUBTASK 72-00-50-420-297 Install the Adapter and the Plate to the Turbine Exhaust Case
Refer to Figure.
Connect the hose of IAE 6F10030 Vacuum test cart 1 off of the nipple to the IAE 1P16354 Vacuum Test Adapter 1 off. Refer to Figure.
Attach the cart vacuum gage hose to the plug of the IAE 1P16354 Vacuum Test Adapter.
NOTE
Refer to manufacturer manual for the operation of the vacuum test cart.Set the air pressure at the test port to -20 inHg (-508 mmHg gage). Based on the ambient pressure, refer to table below for the vacuum pressure in psia.
Ambient Pressure of the Day (psia)
Vacuum Pressure (psia)
14.7
4.9
14.5
4.7
14.3
4.5
14.1
4.3
13.9
4.1
13.7
3.9
13.5
3.7
13.3
3.5
13.1
3.3
Vacuum pressure (psia) = Ambient pressure of the day (psia) - 9.8 psia
SUBTASK 72-00-50-420-298 Do an Evacuation Check for the No.5 Bearing Compartment
Install the module dressings. Refer to TASK 72-00-50-420-005 (INSTALLATION-007).
SUBTASK 72-00-50-420-300 Install the Module Dressings
Install the Inlet Cone. Refer to TASK 72-38-11-420-001 (INSTALLATION-001).
SUBTASK 72-00-50-420-301 Install the Inlet Cone
Figure: Fits and Clearances at Interface D-45 and D-50/10
Fits and Clearances at Interface D-45 and D-50/10

Figure: Fits and Clearances at Interface F-32 and F-50
Fits and Clearances at Interface F-32 and F-50

Figure: Attachment of the Handling Fixture and the Expanding Retainer
Attachment of the Handling Fixture and the Expanding Retainer
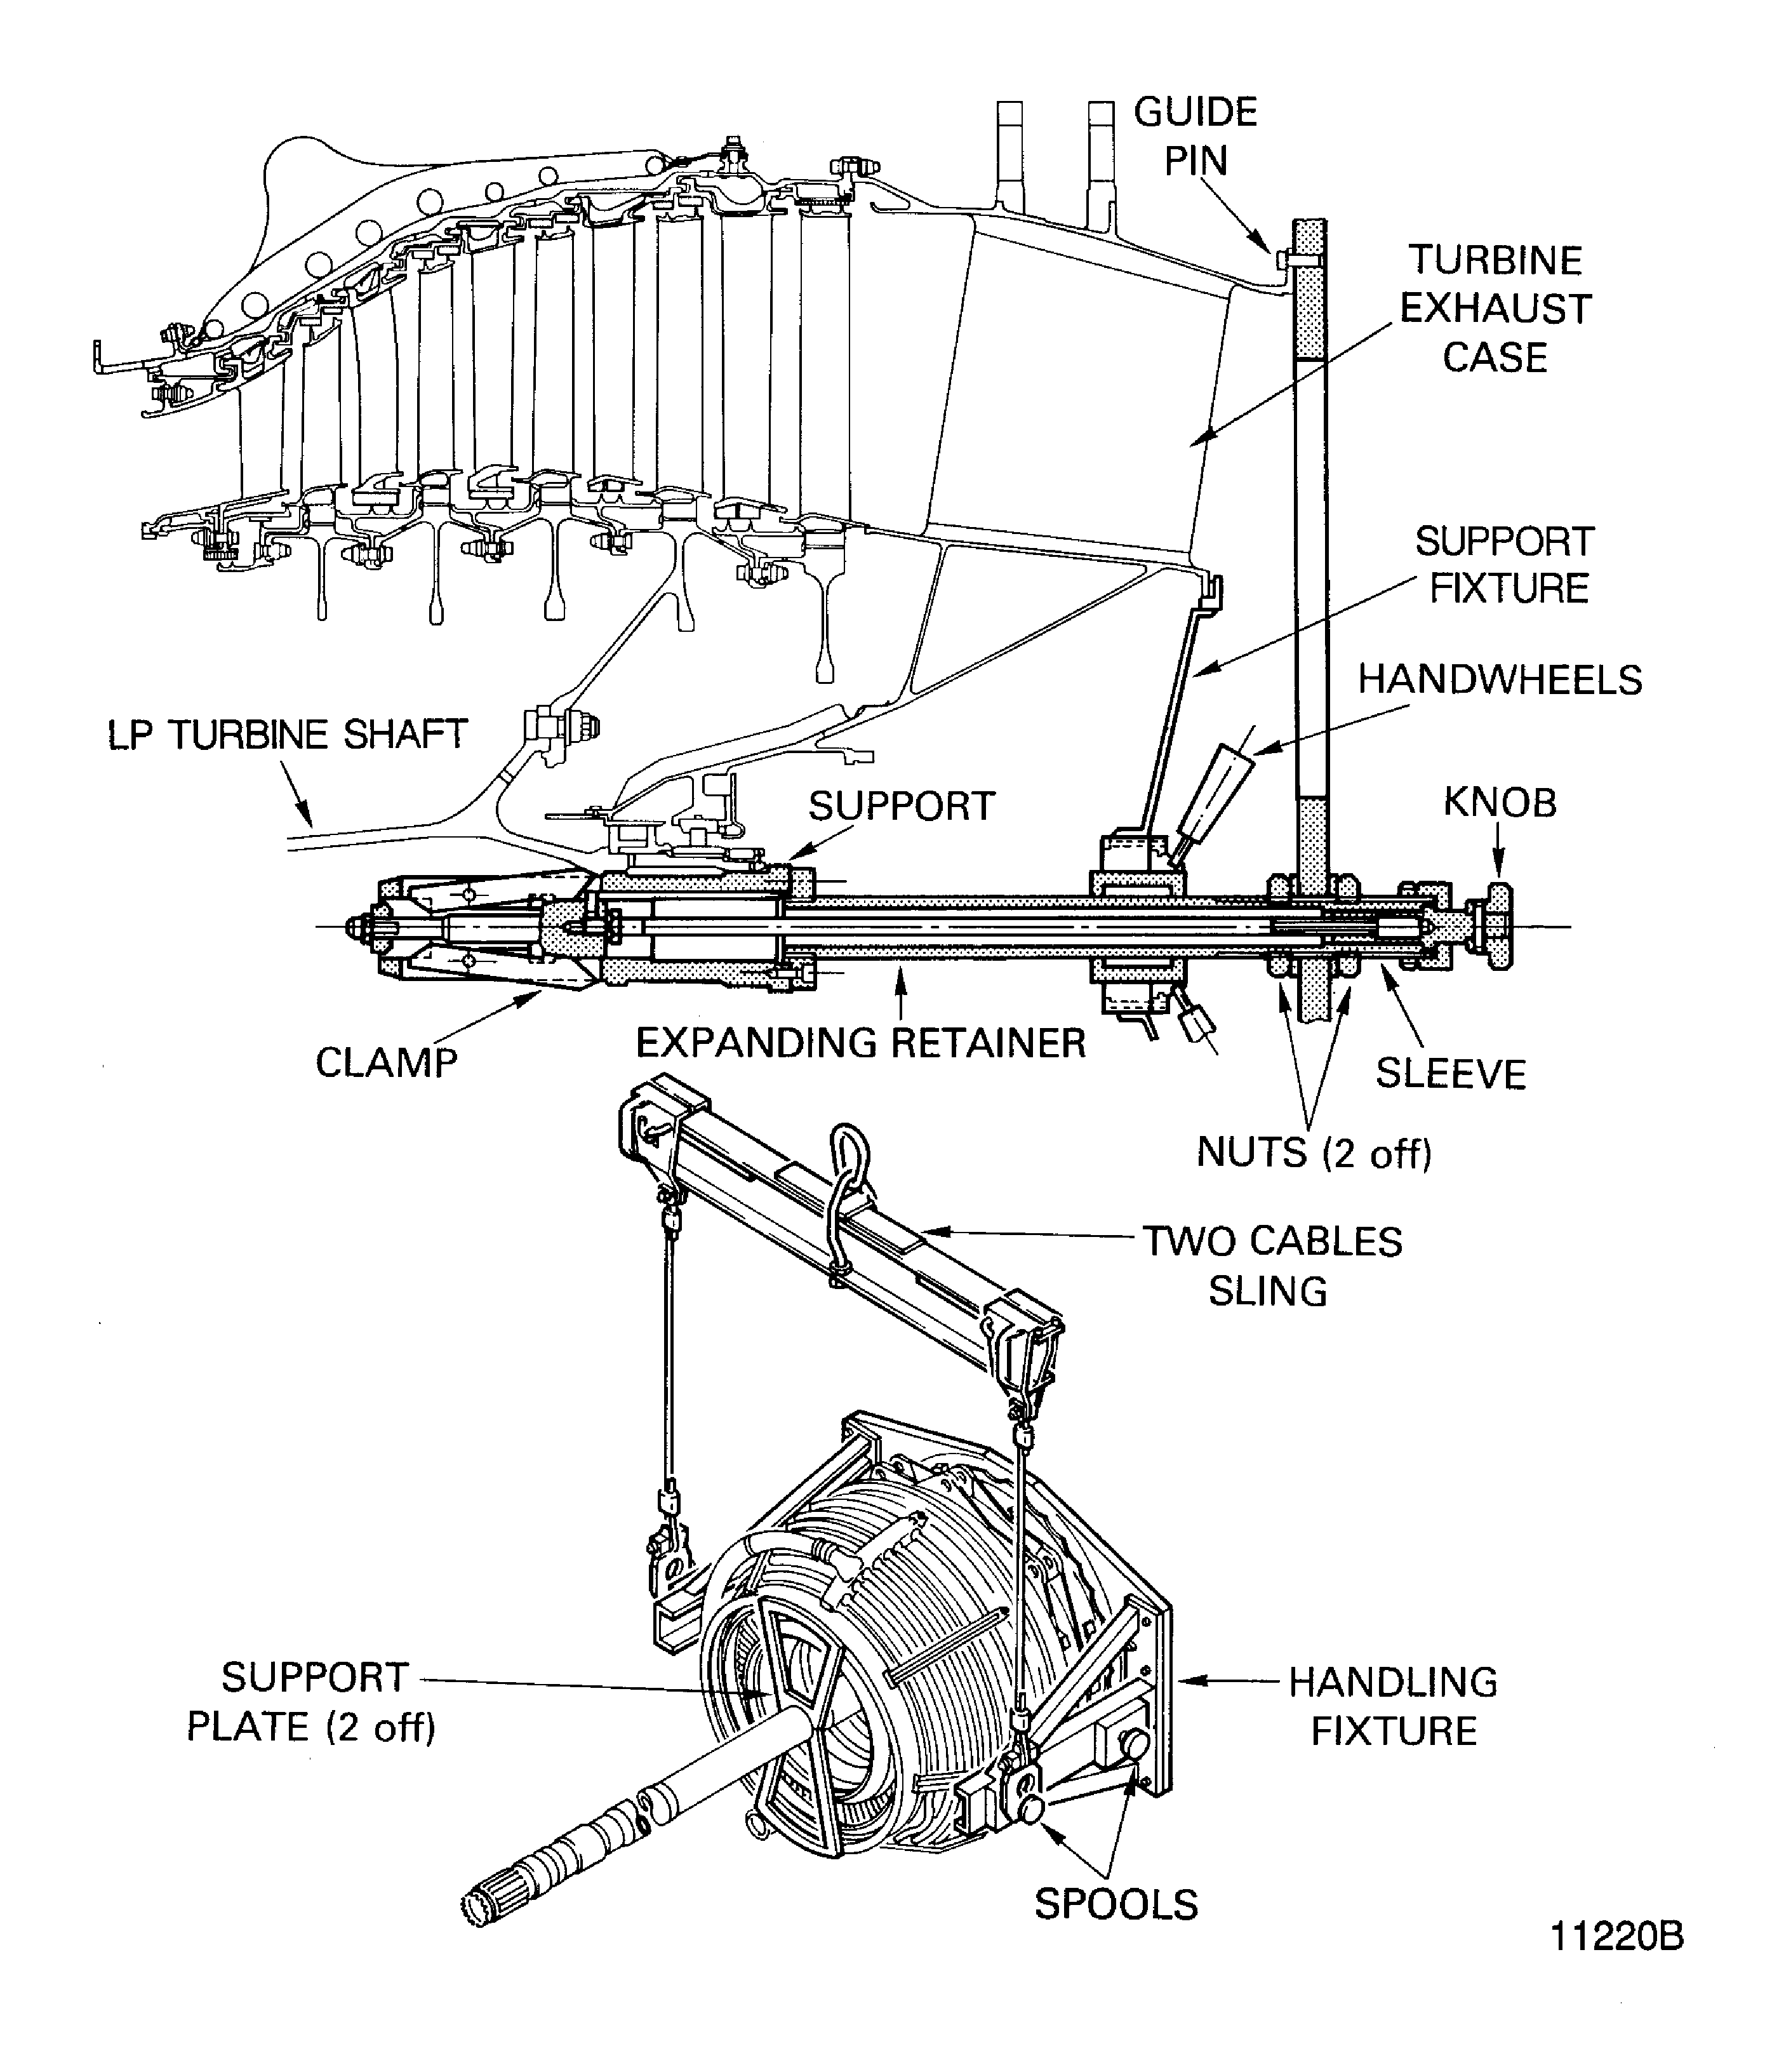
Figure: Installation of the Heater and the Guide Bar
Installation of the Heater and the Guide Bar
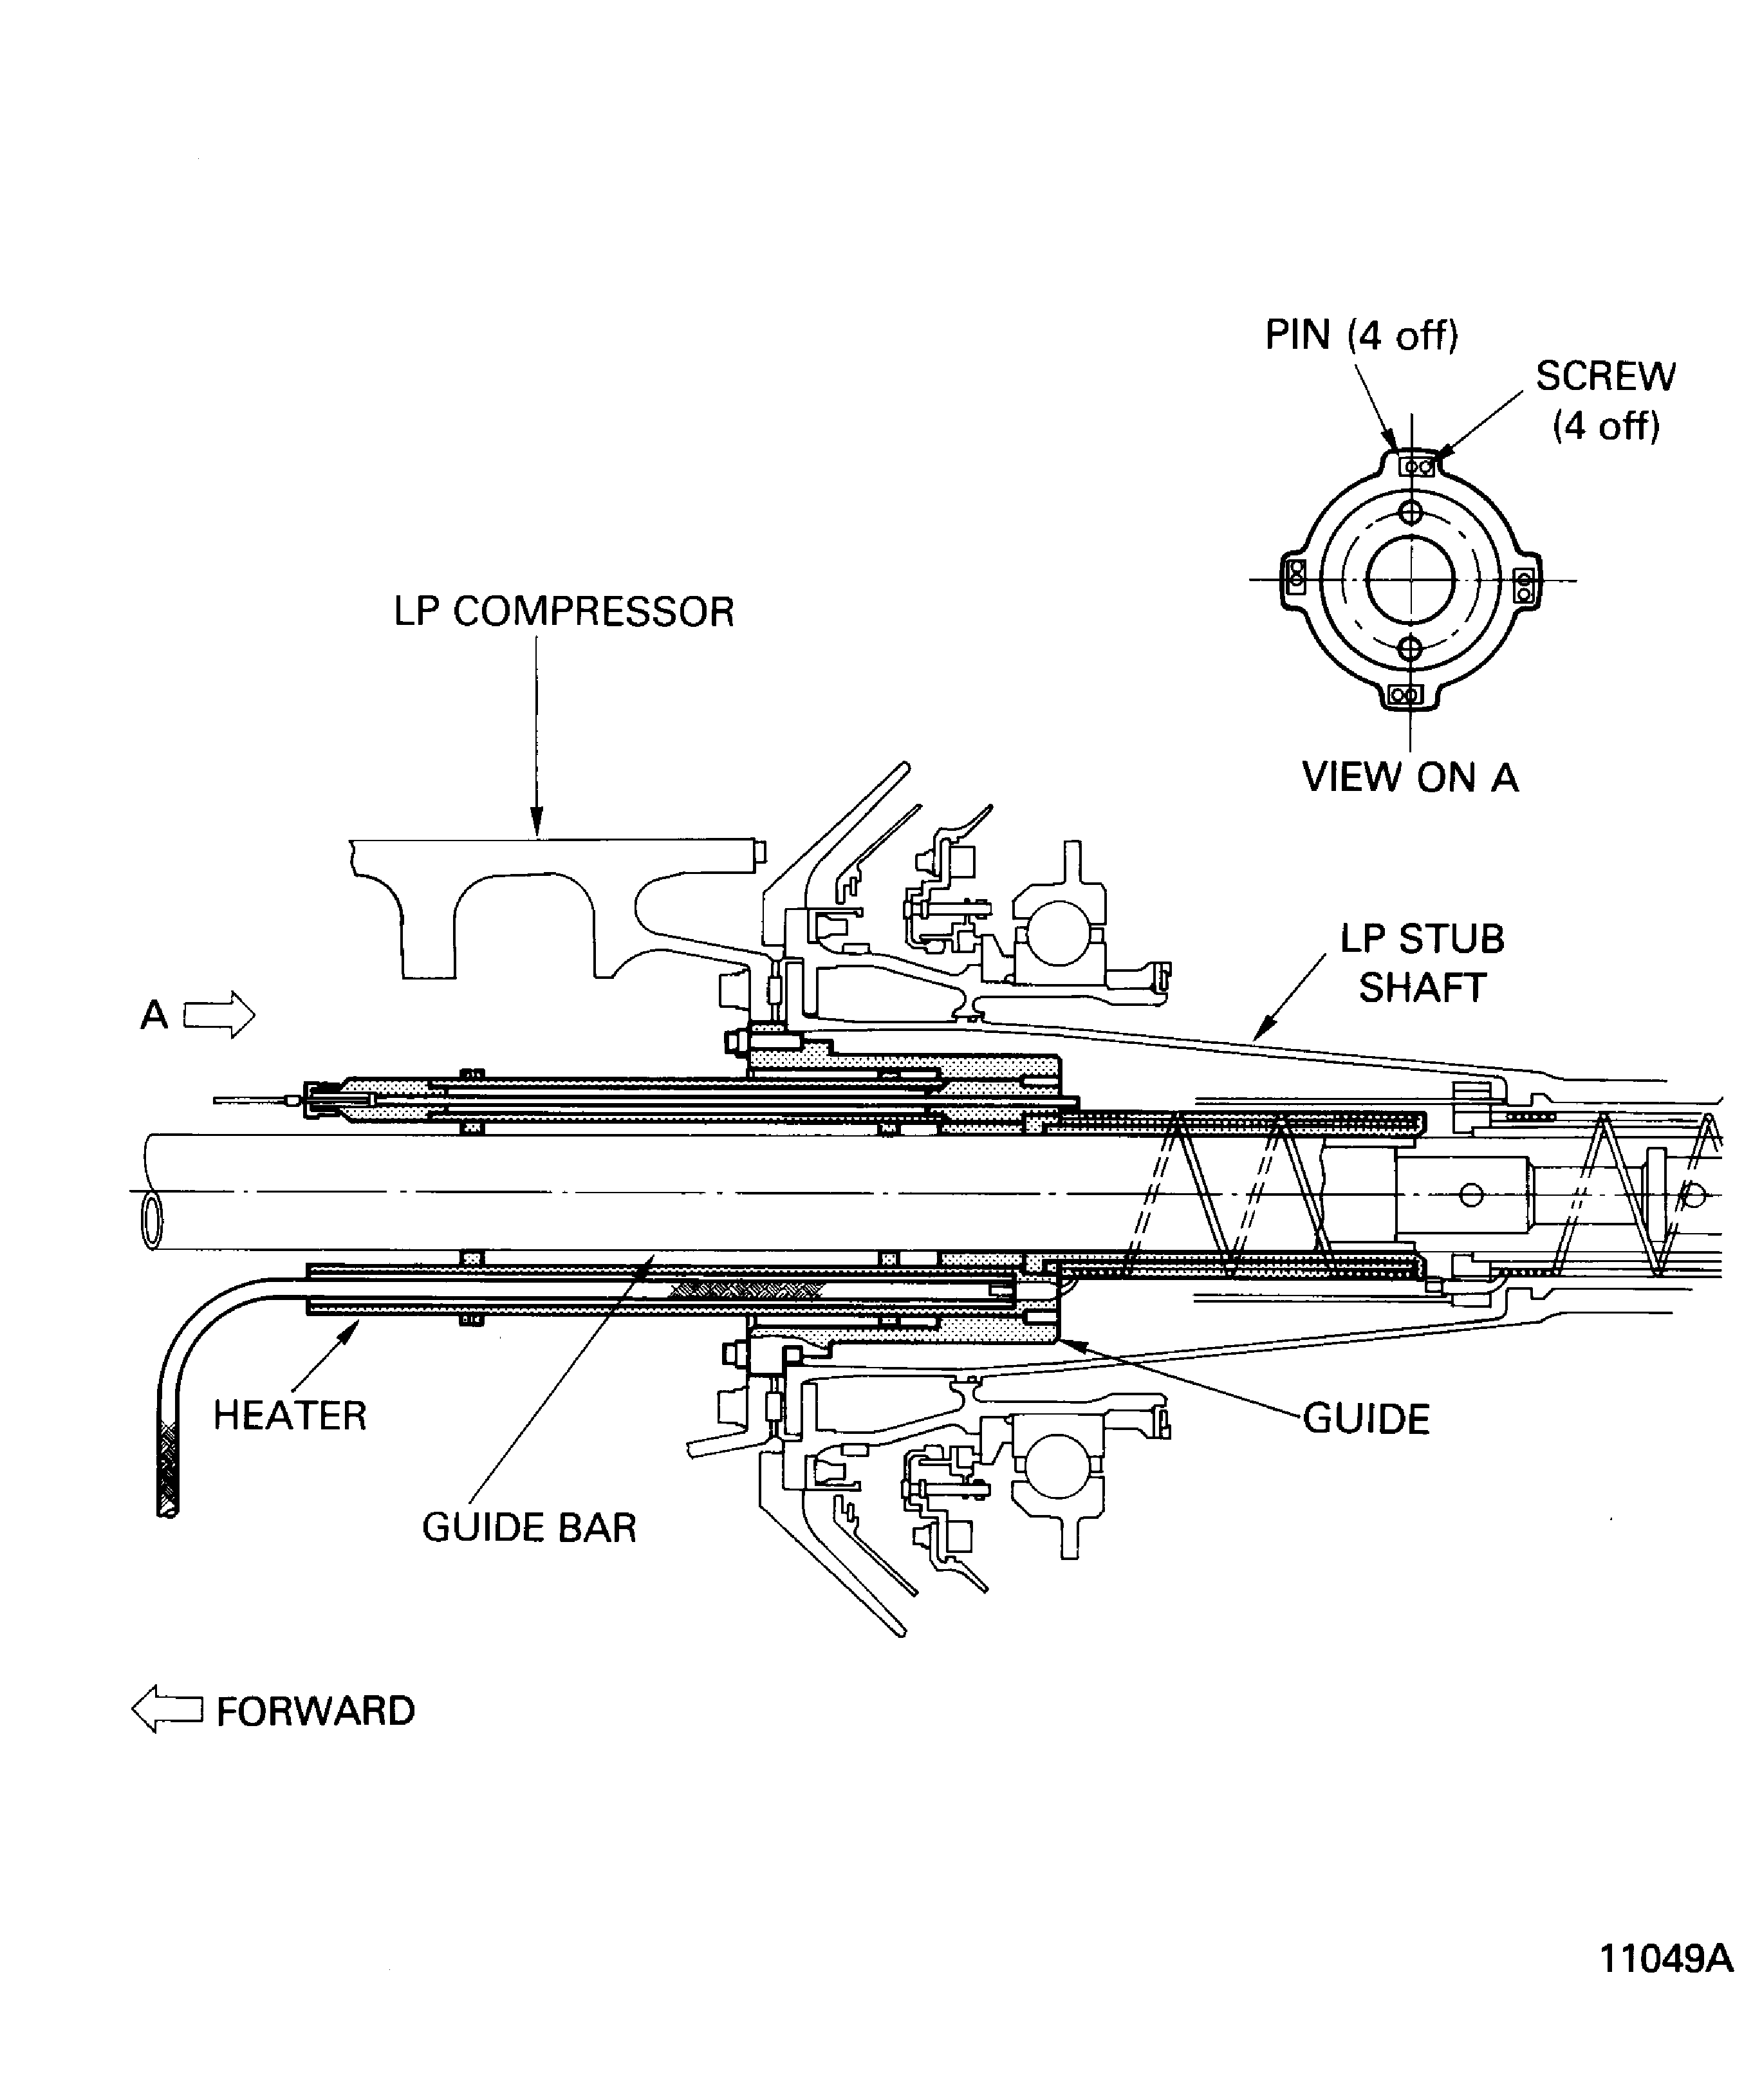
Figure: Installation of the Guide Rings
Installation of the Guide Rings

Figure: Calculate the Adjusting Ring Thickness
Sheet 1

Figure: Calculate the Adjusting Ring Thickness
Sheet 2

Figure: Calculate the Adjusting Ring Thickness
Sheet 3

Figure: Calculate the Adjusting Ring Thickness
Sheet 4
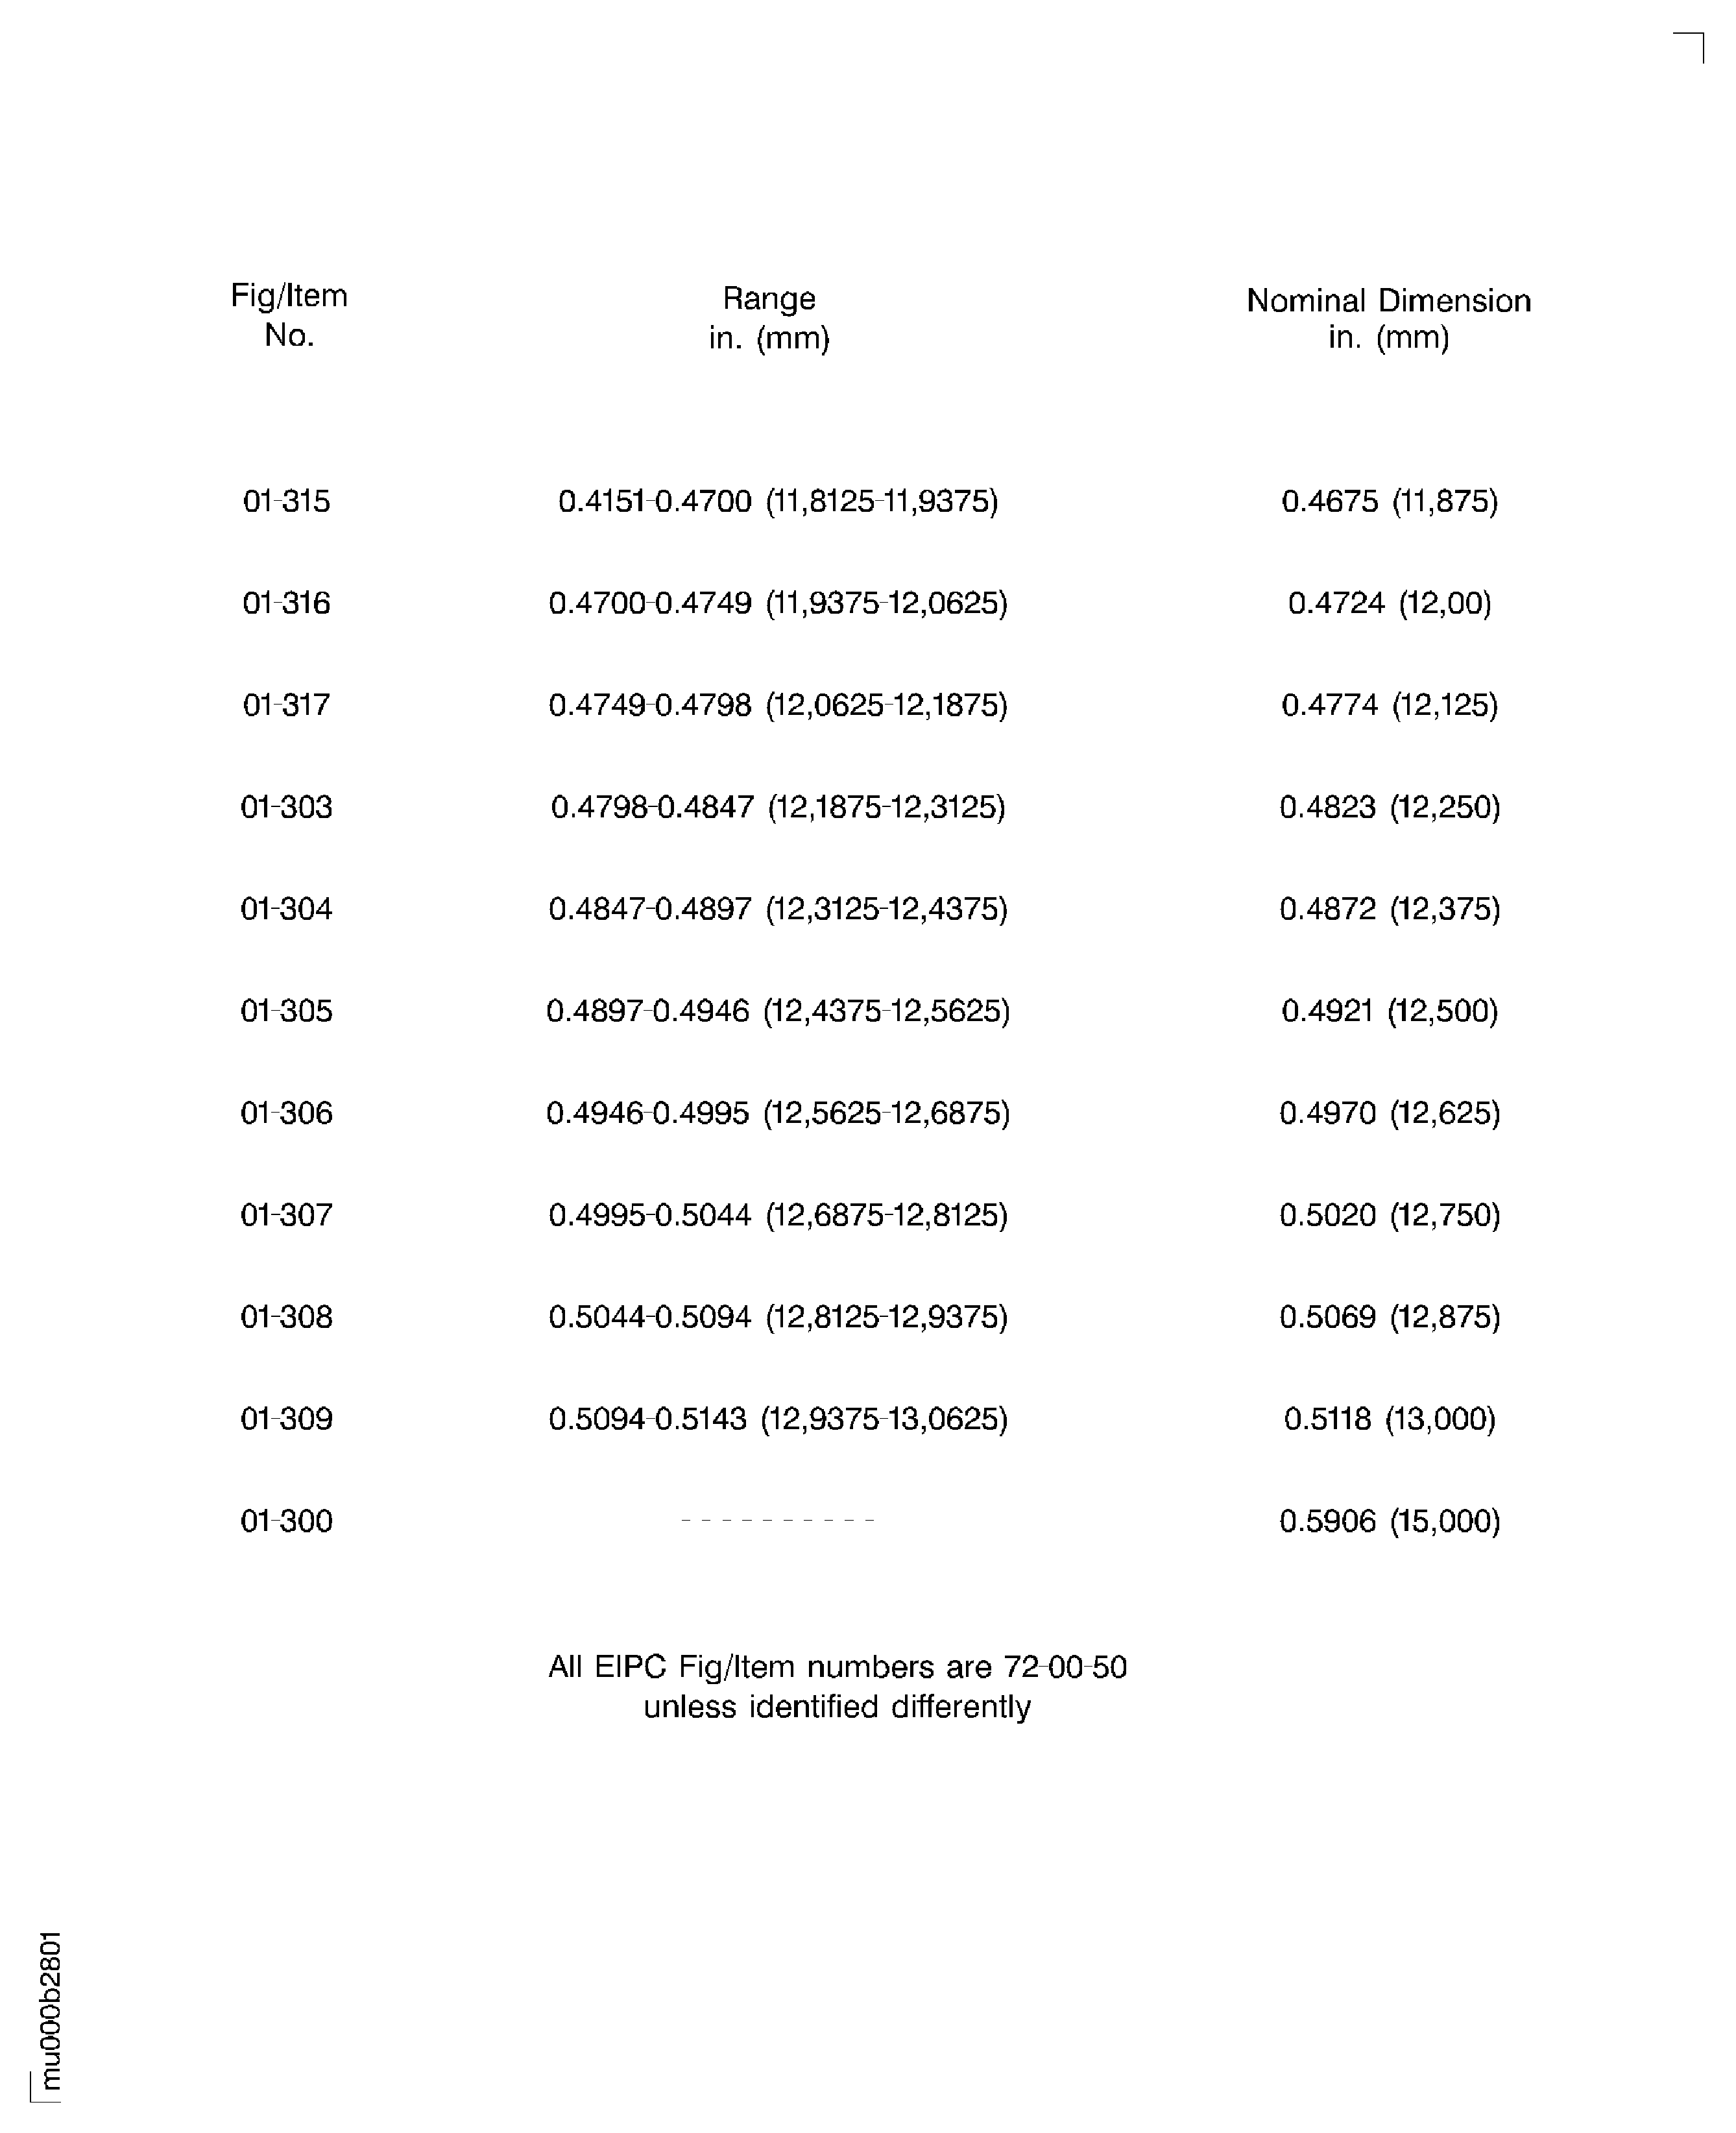
Figure: Calculate the Adjusting Ring Thickness
Sheet 5
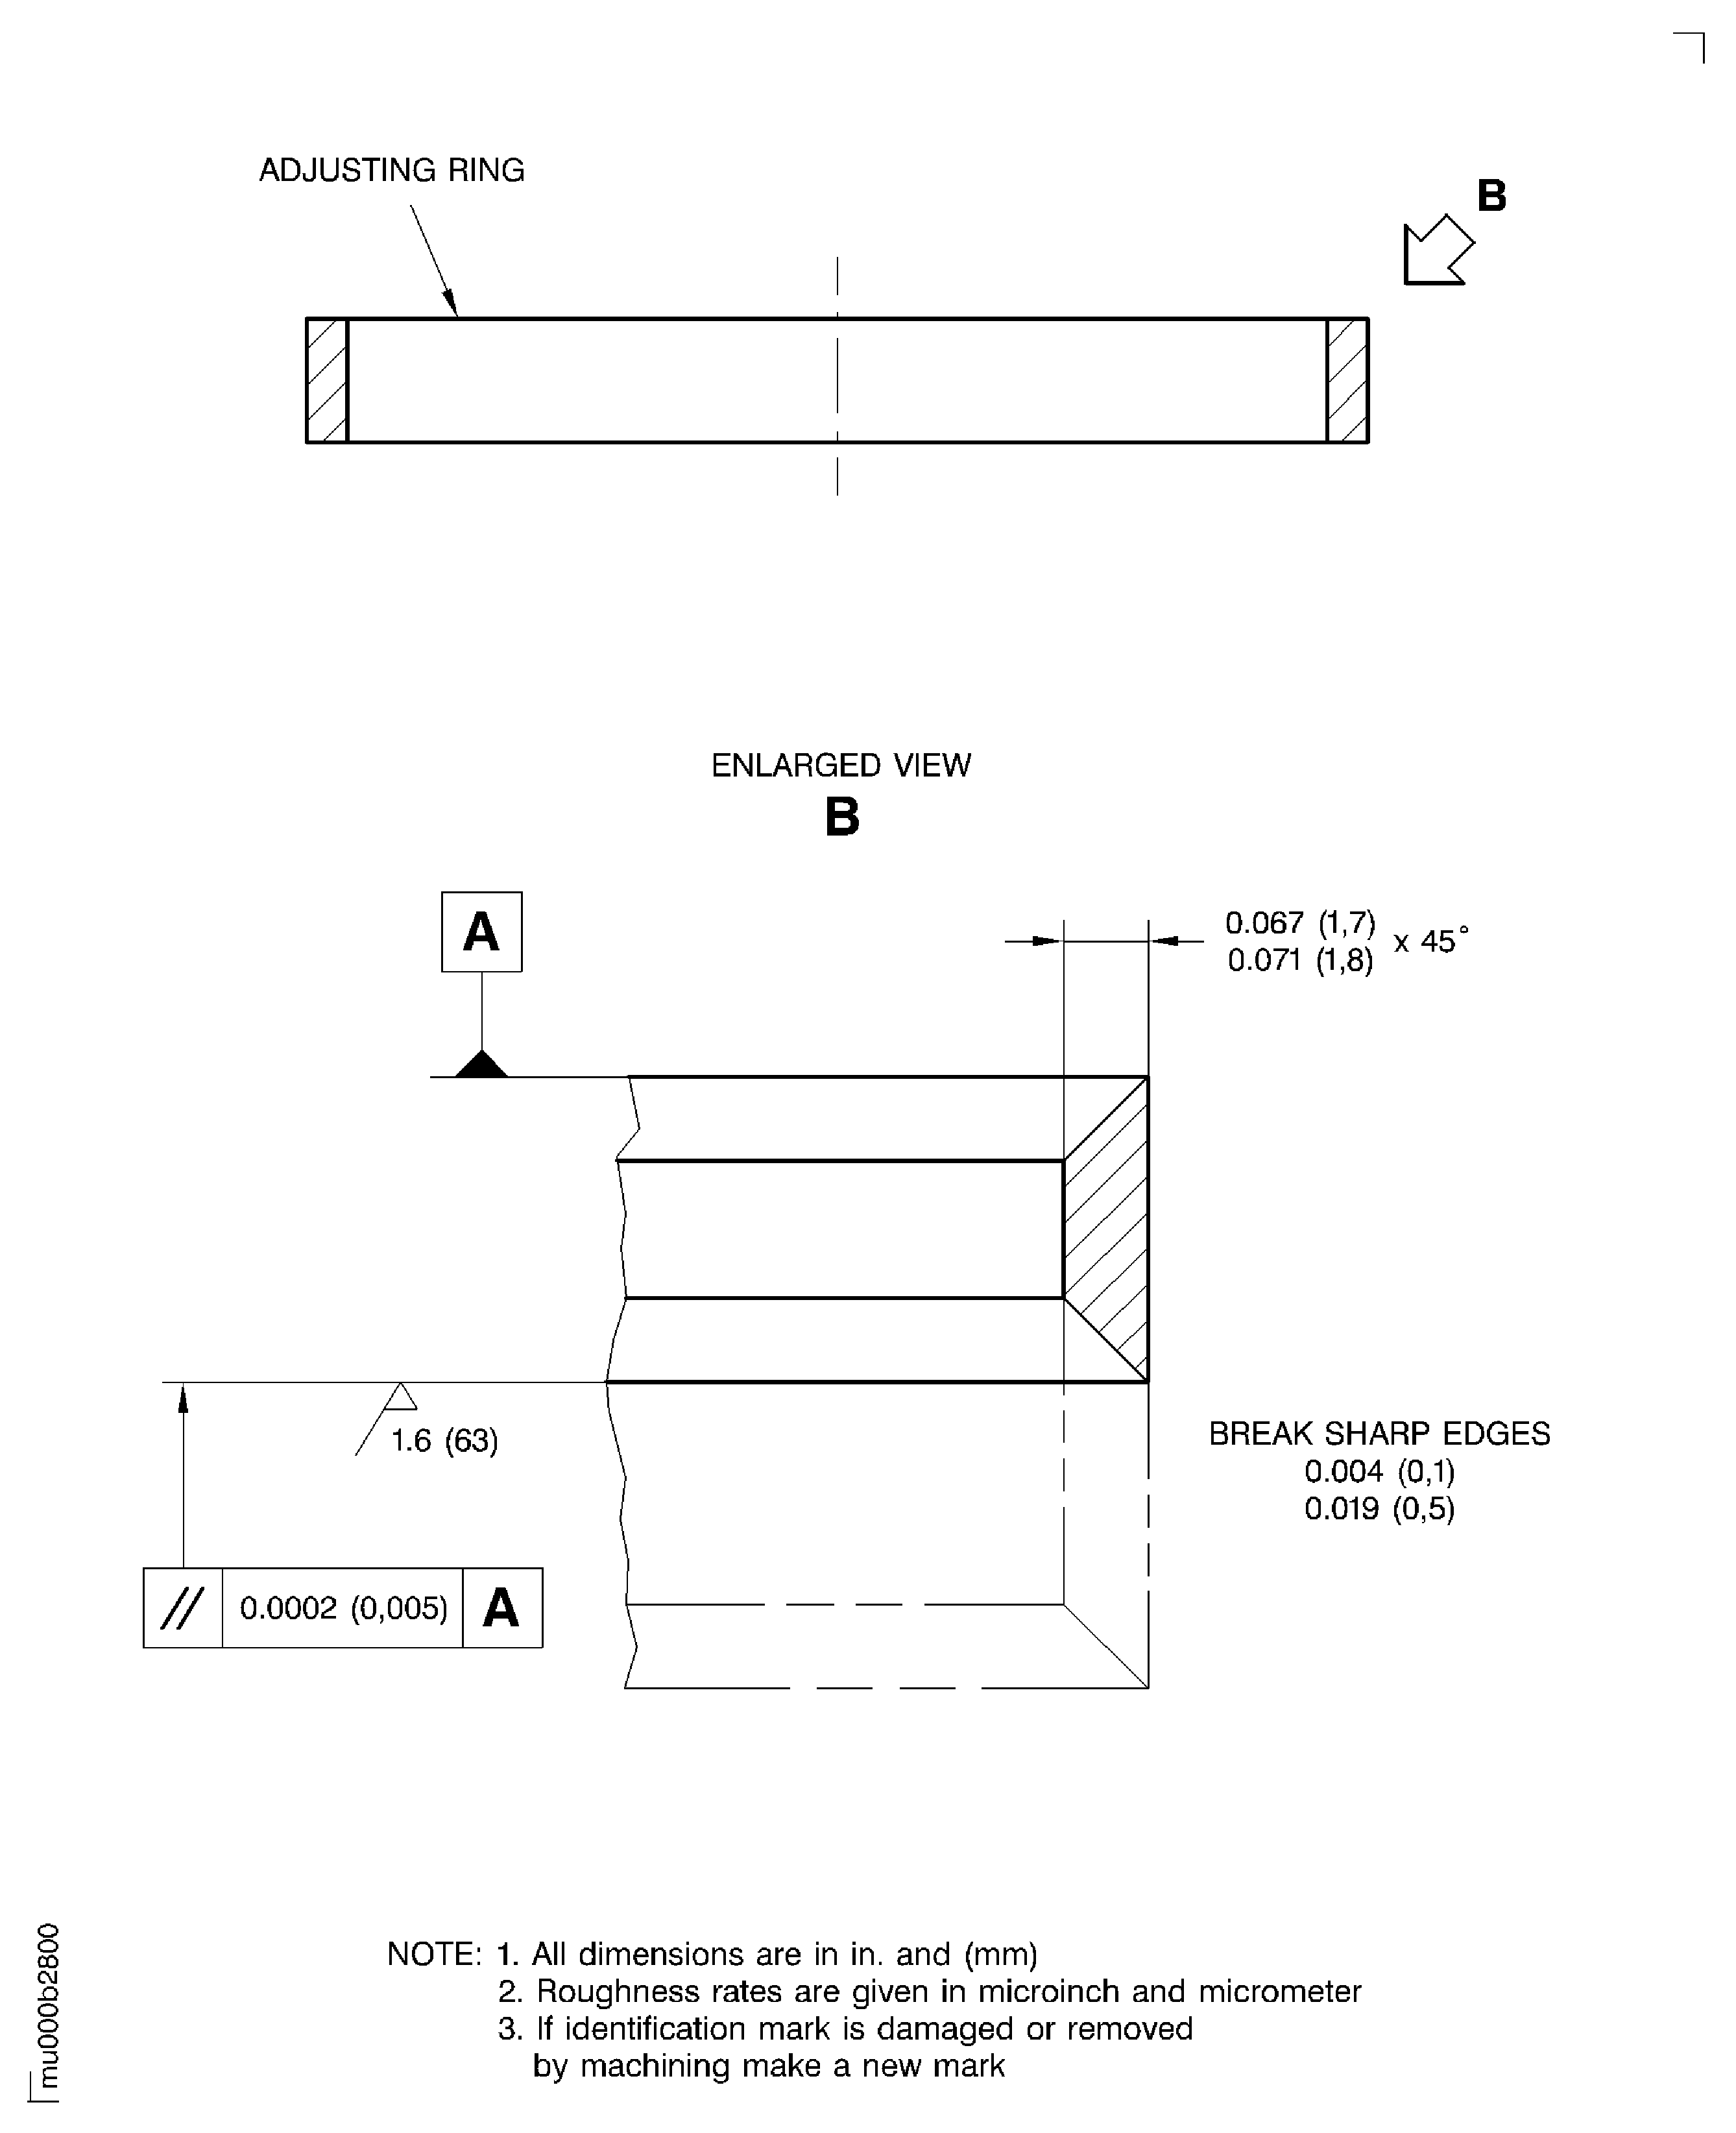
Figure: Example of a Component Dimension Record Sheet
Sheet 1

Figure: Example of a Component Dimension Record Sheet
Sheet 2
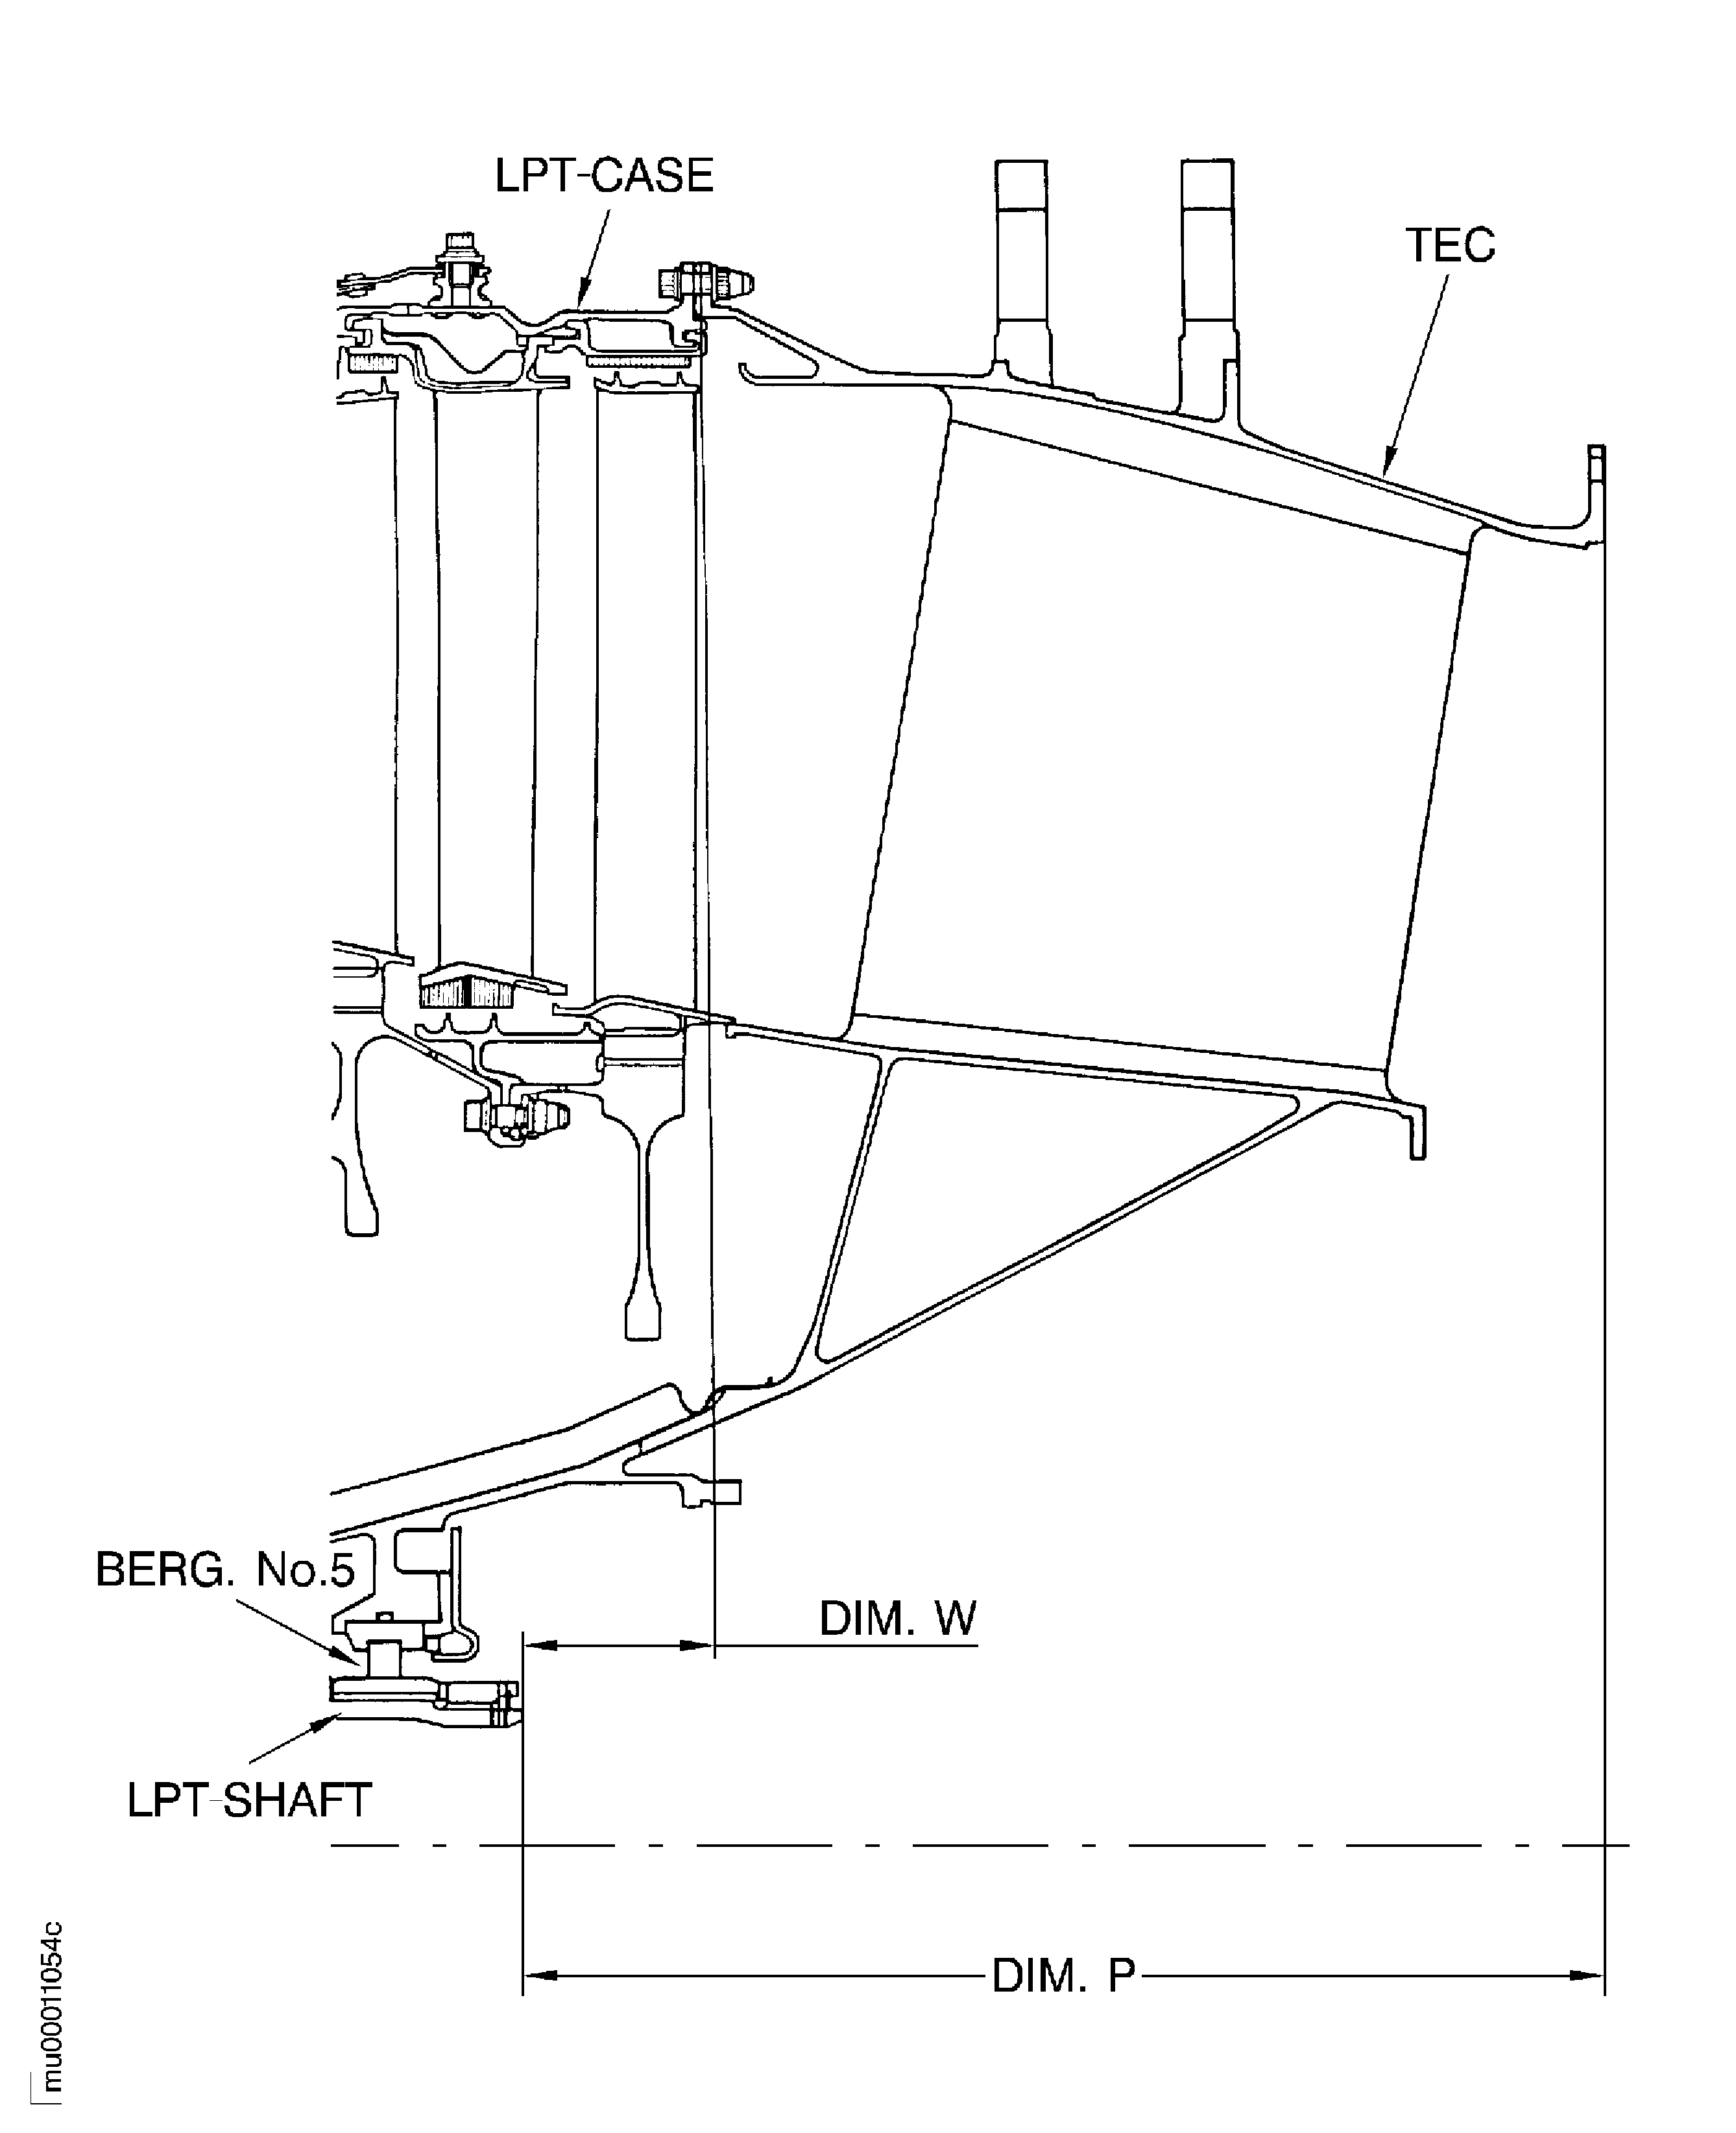
Figure: Example of a Component Dimension Record Sheet
Sheet 3
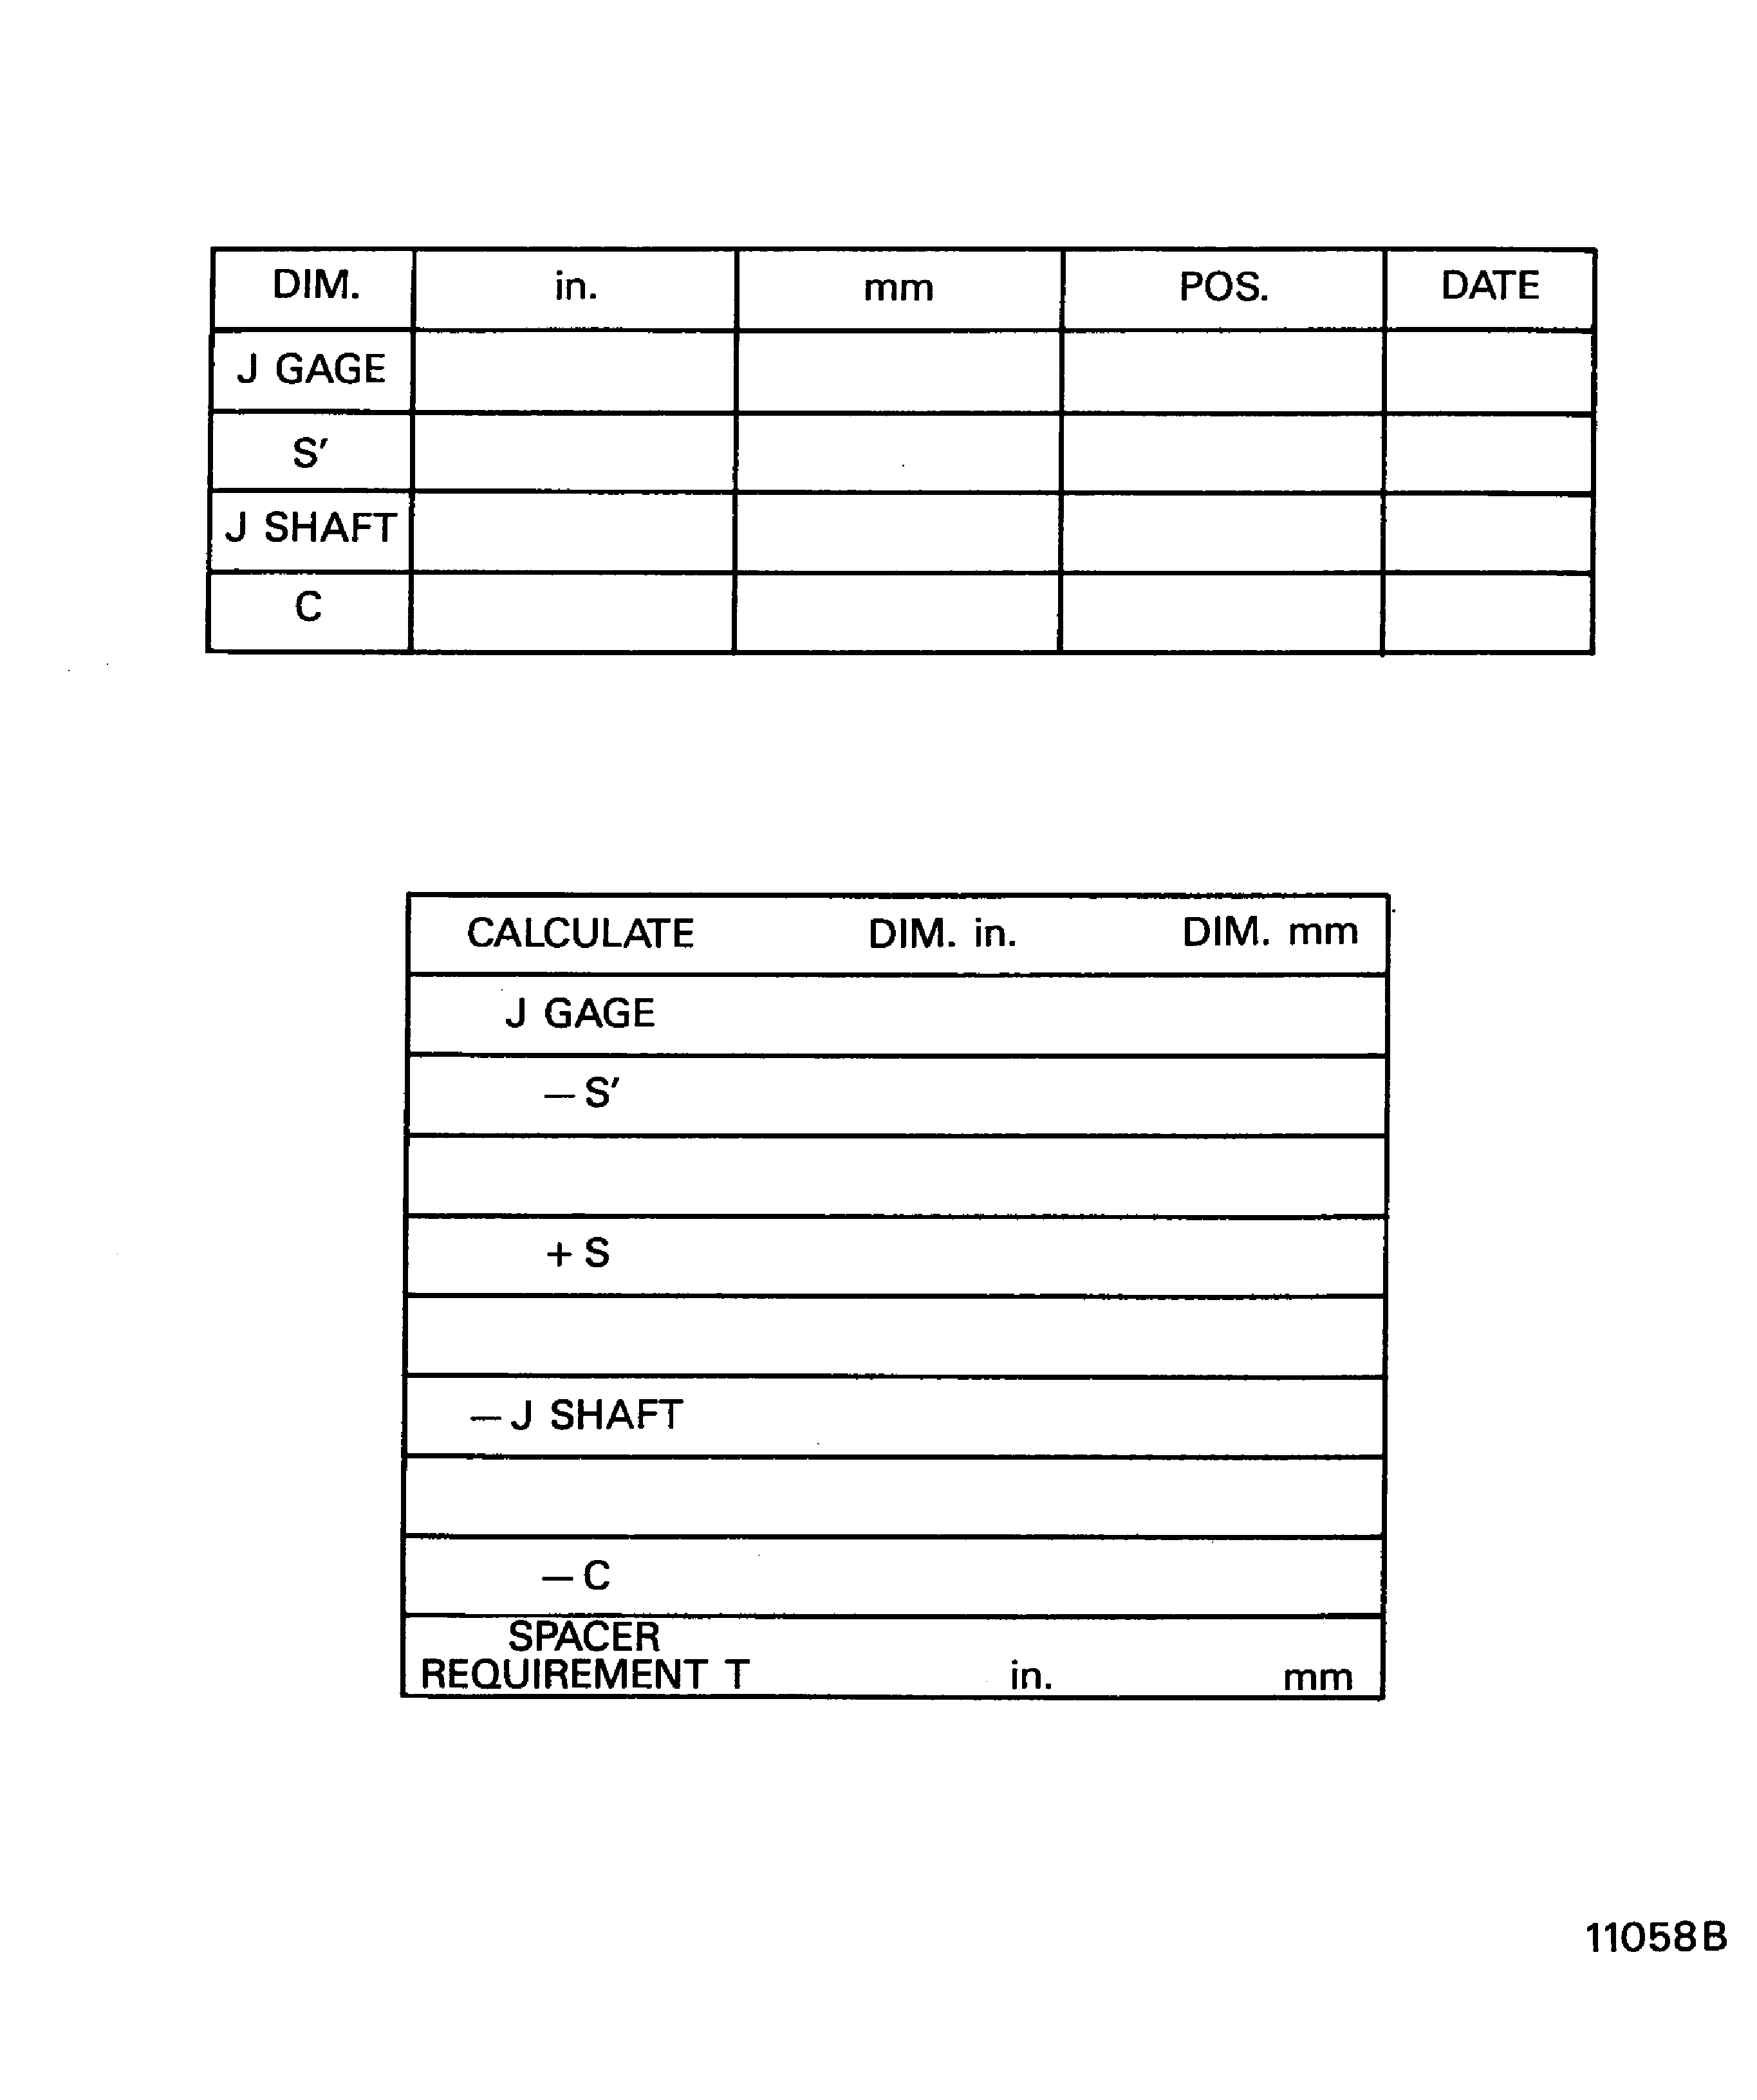
Figure: Example of a Component Dimension Record Sheet
Sheet 4
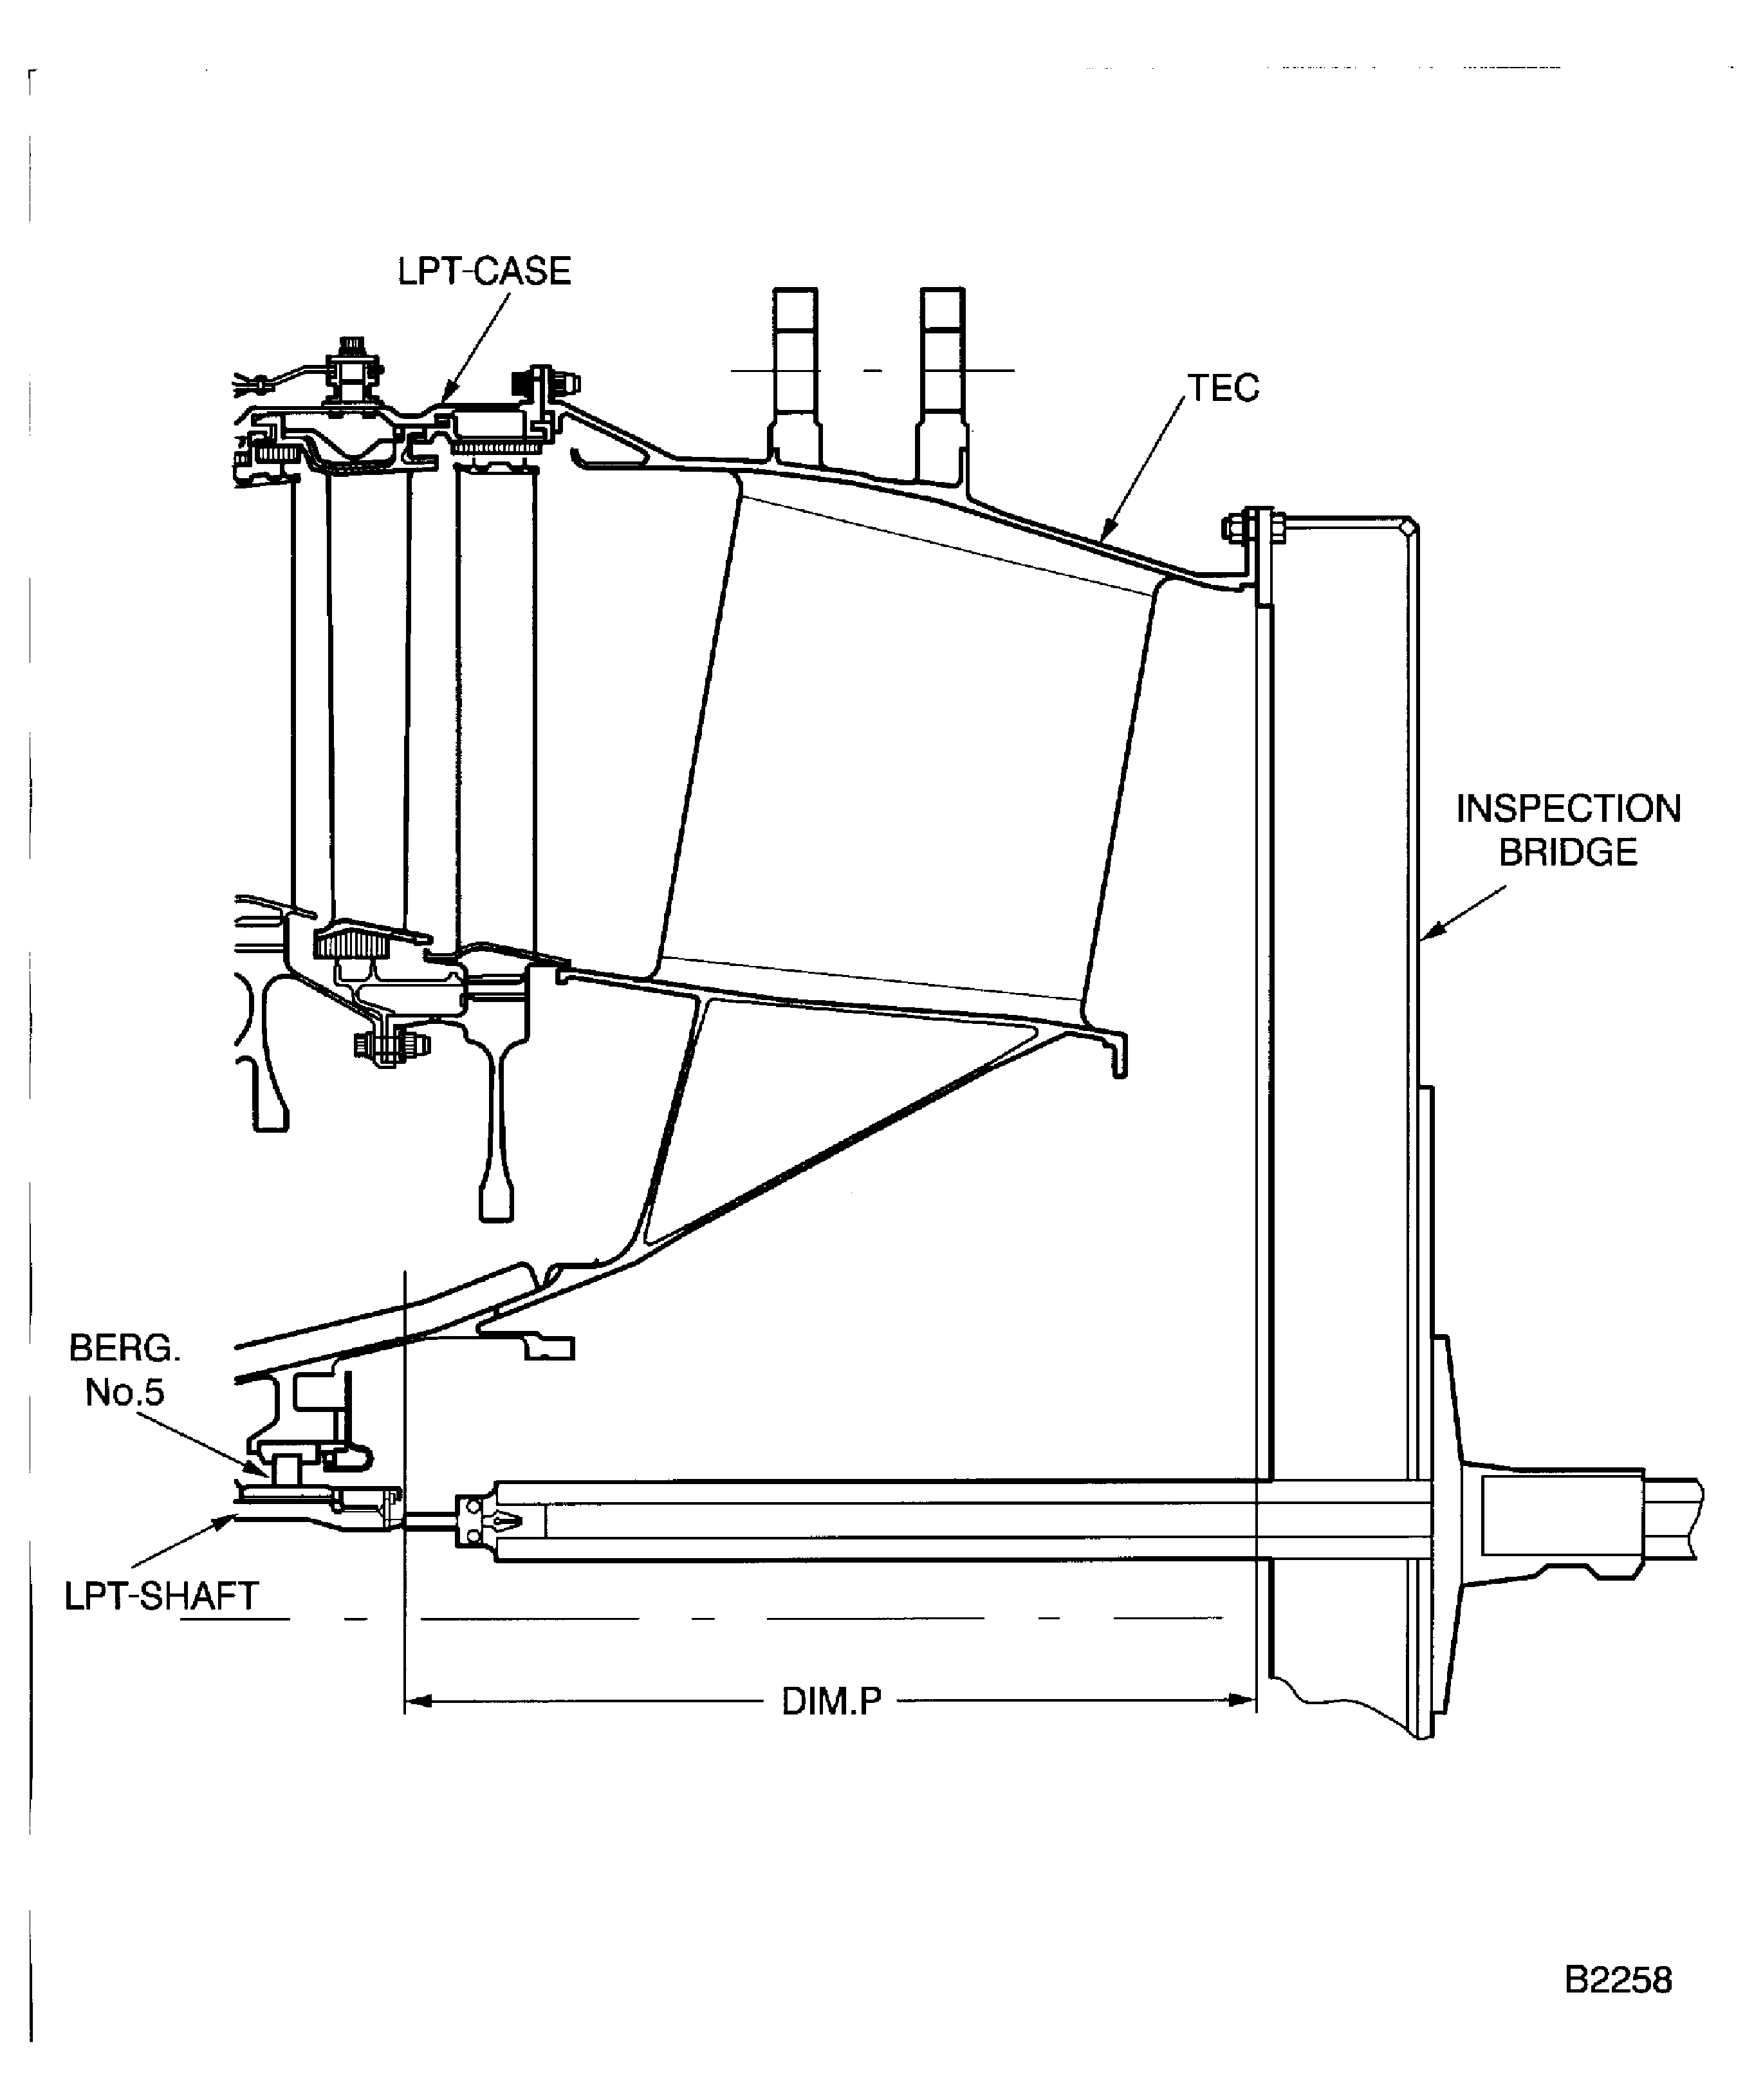
Figure: Connect the LP Shaft Front End with the LP Stub Shaft
Connect the LP Shaft Front End with the LP Stub Shaft

Figure: Install the LP Turbine Shaft Front Lock Nut
Sheet 1

Figure: Install the LP Turbine Shaft Front Lock Nut
Sheet 2
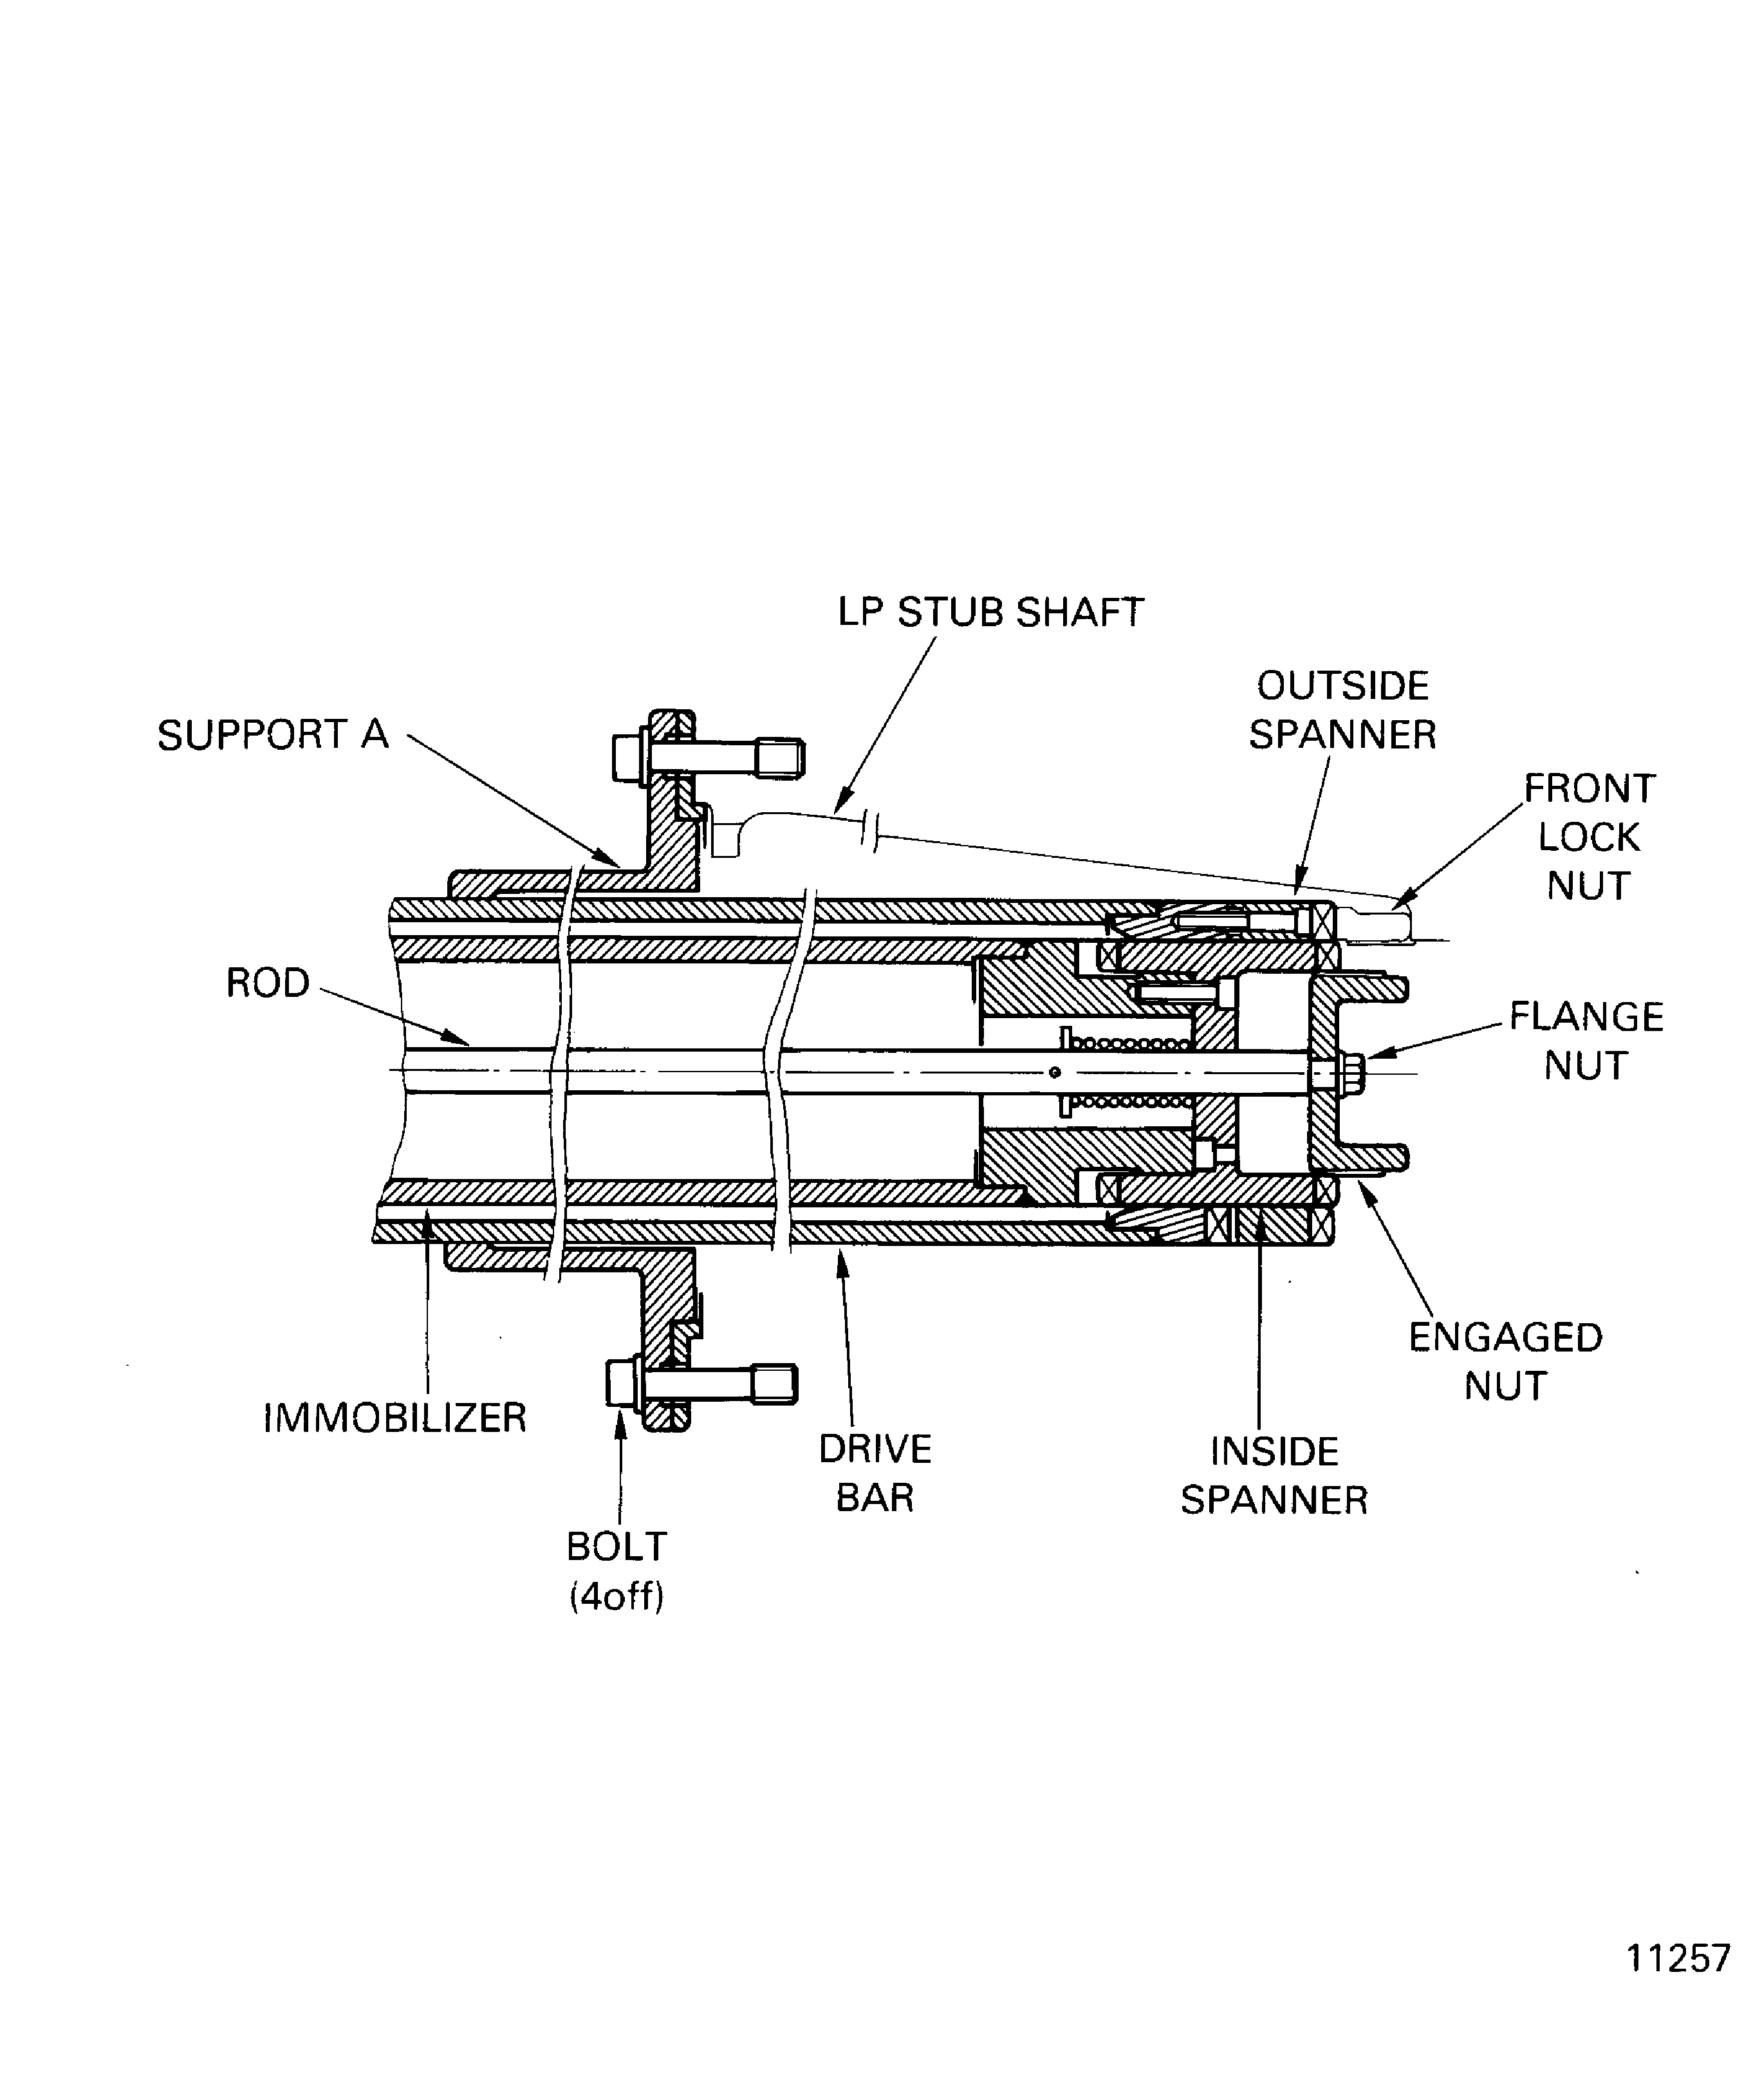
Figure: Safety the Front Lock Nut of the LP Turbine Shaft
Safety the Front Lock Nut of the LP Turbine Shaft
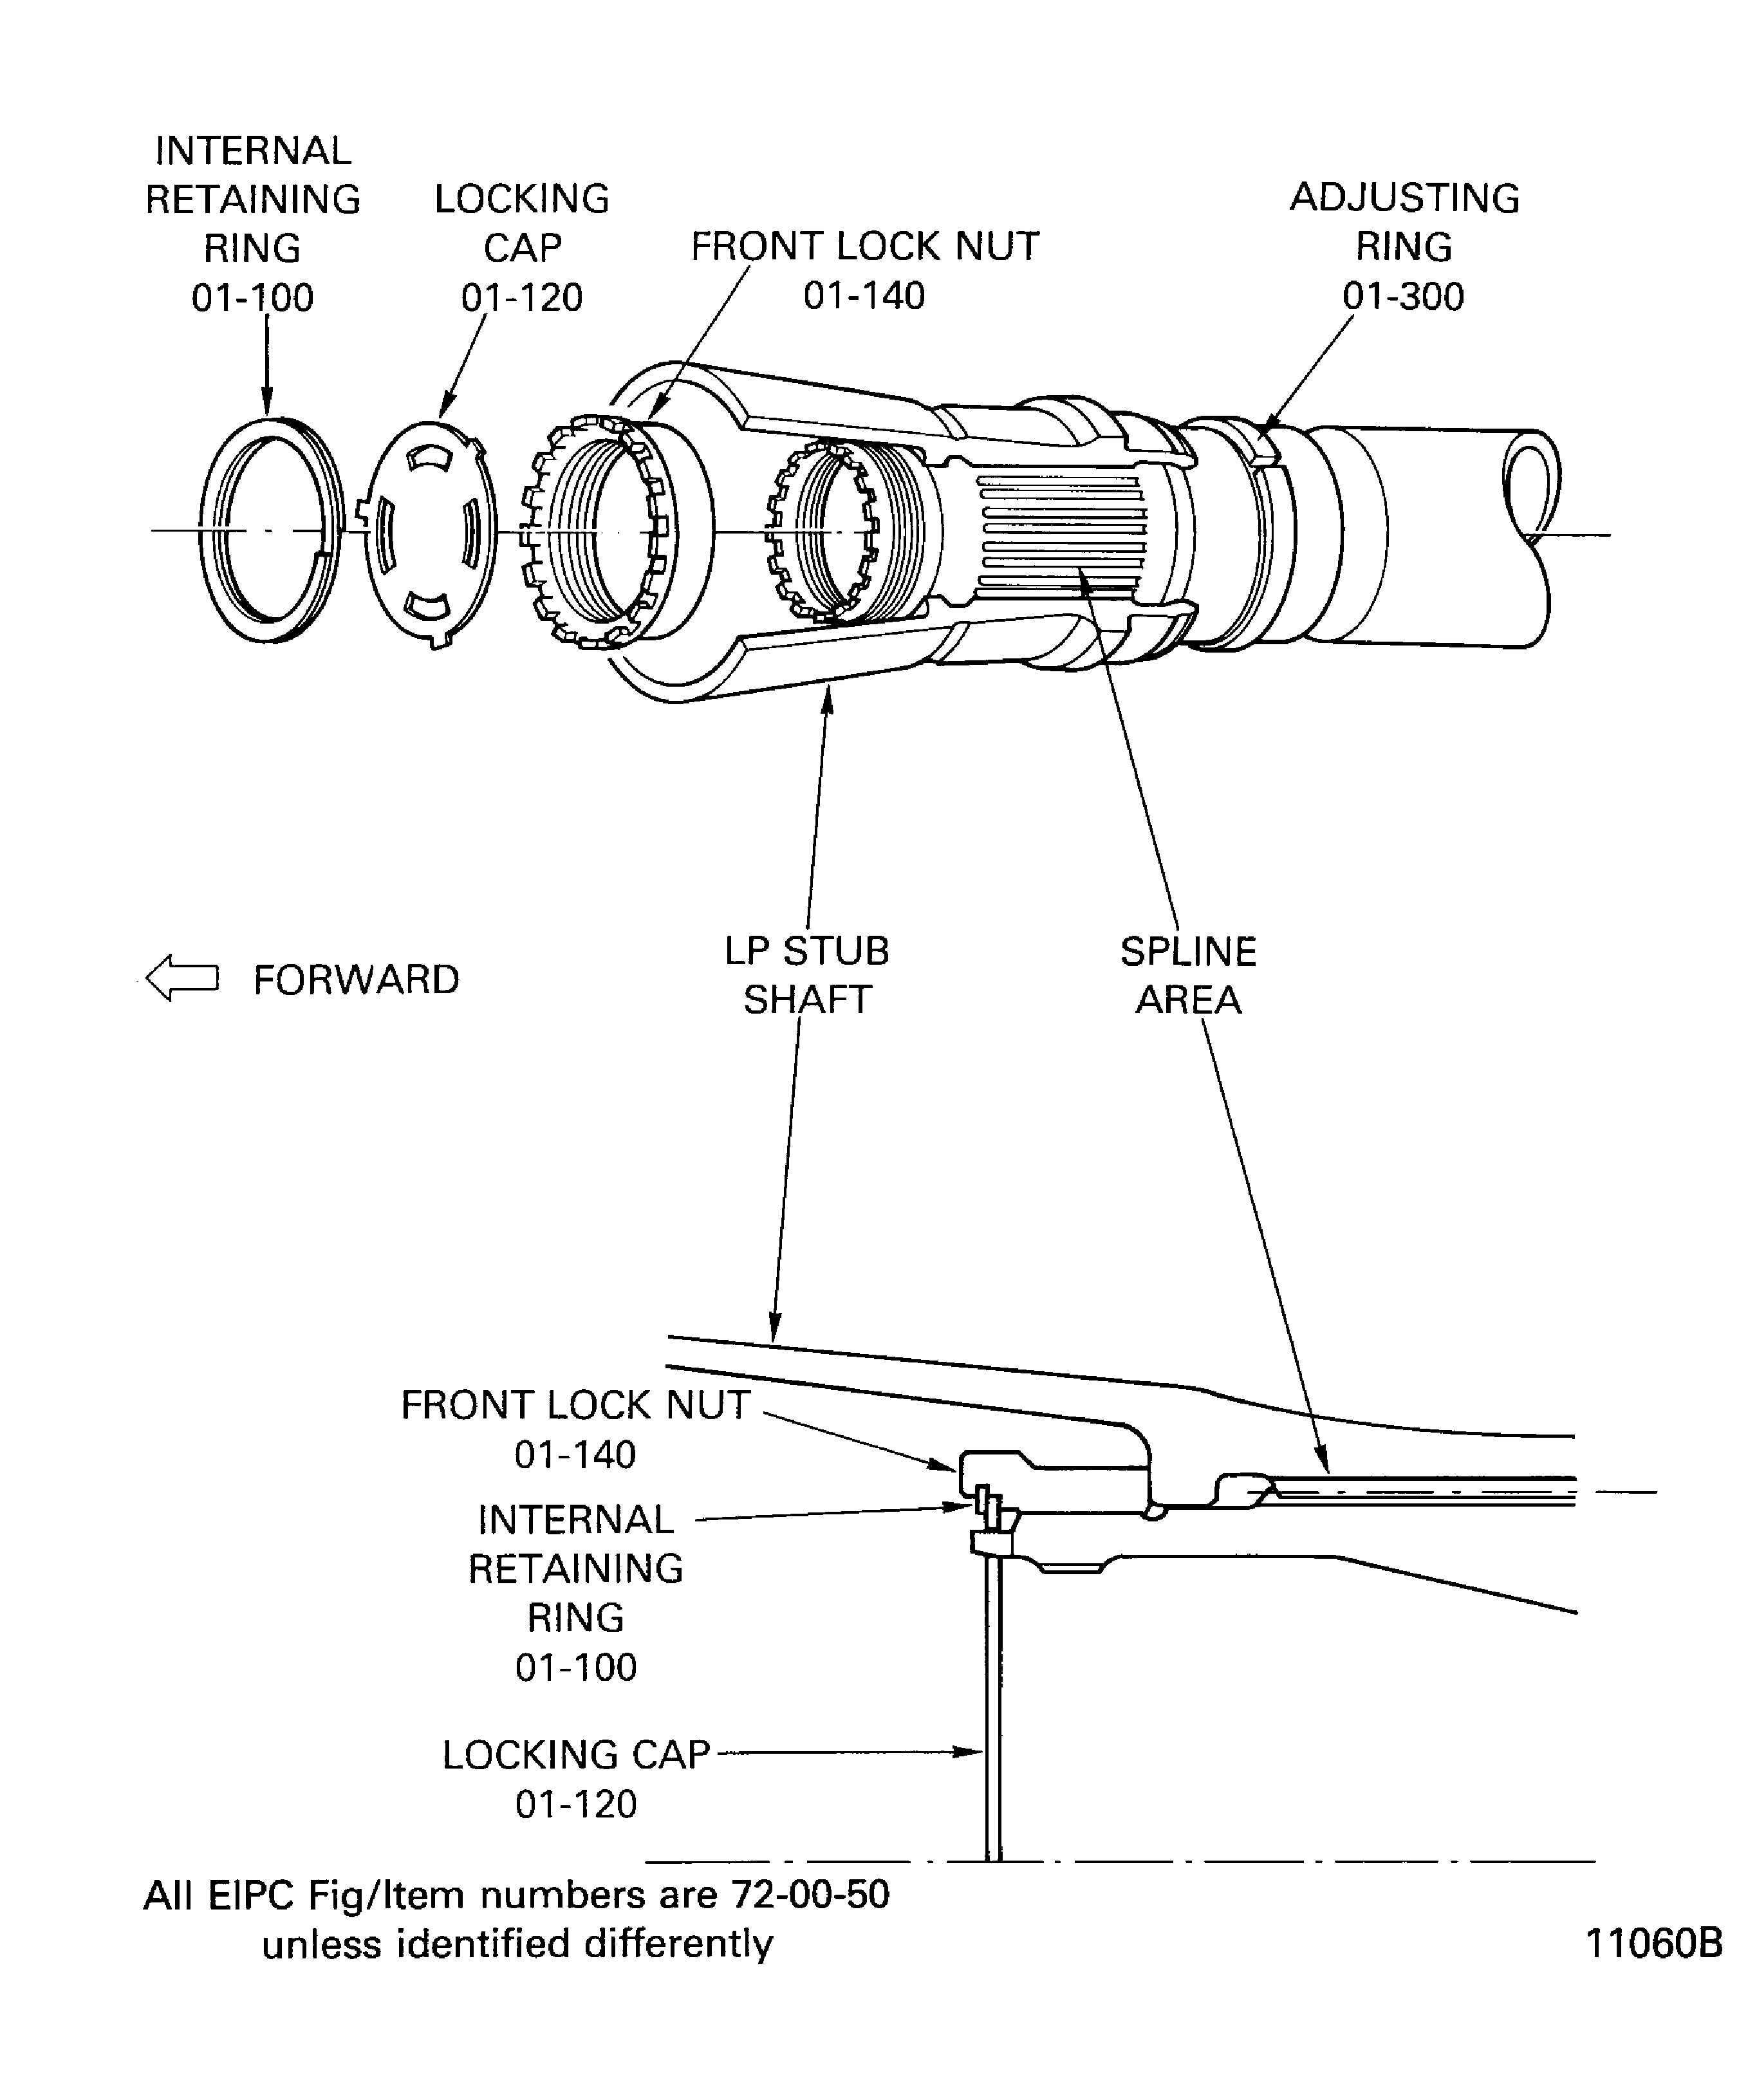
Figure: Removal of the Support Plate
Removal of the Support Plate
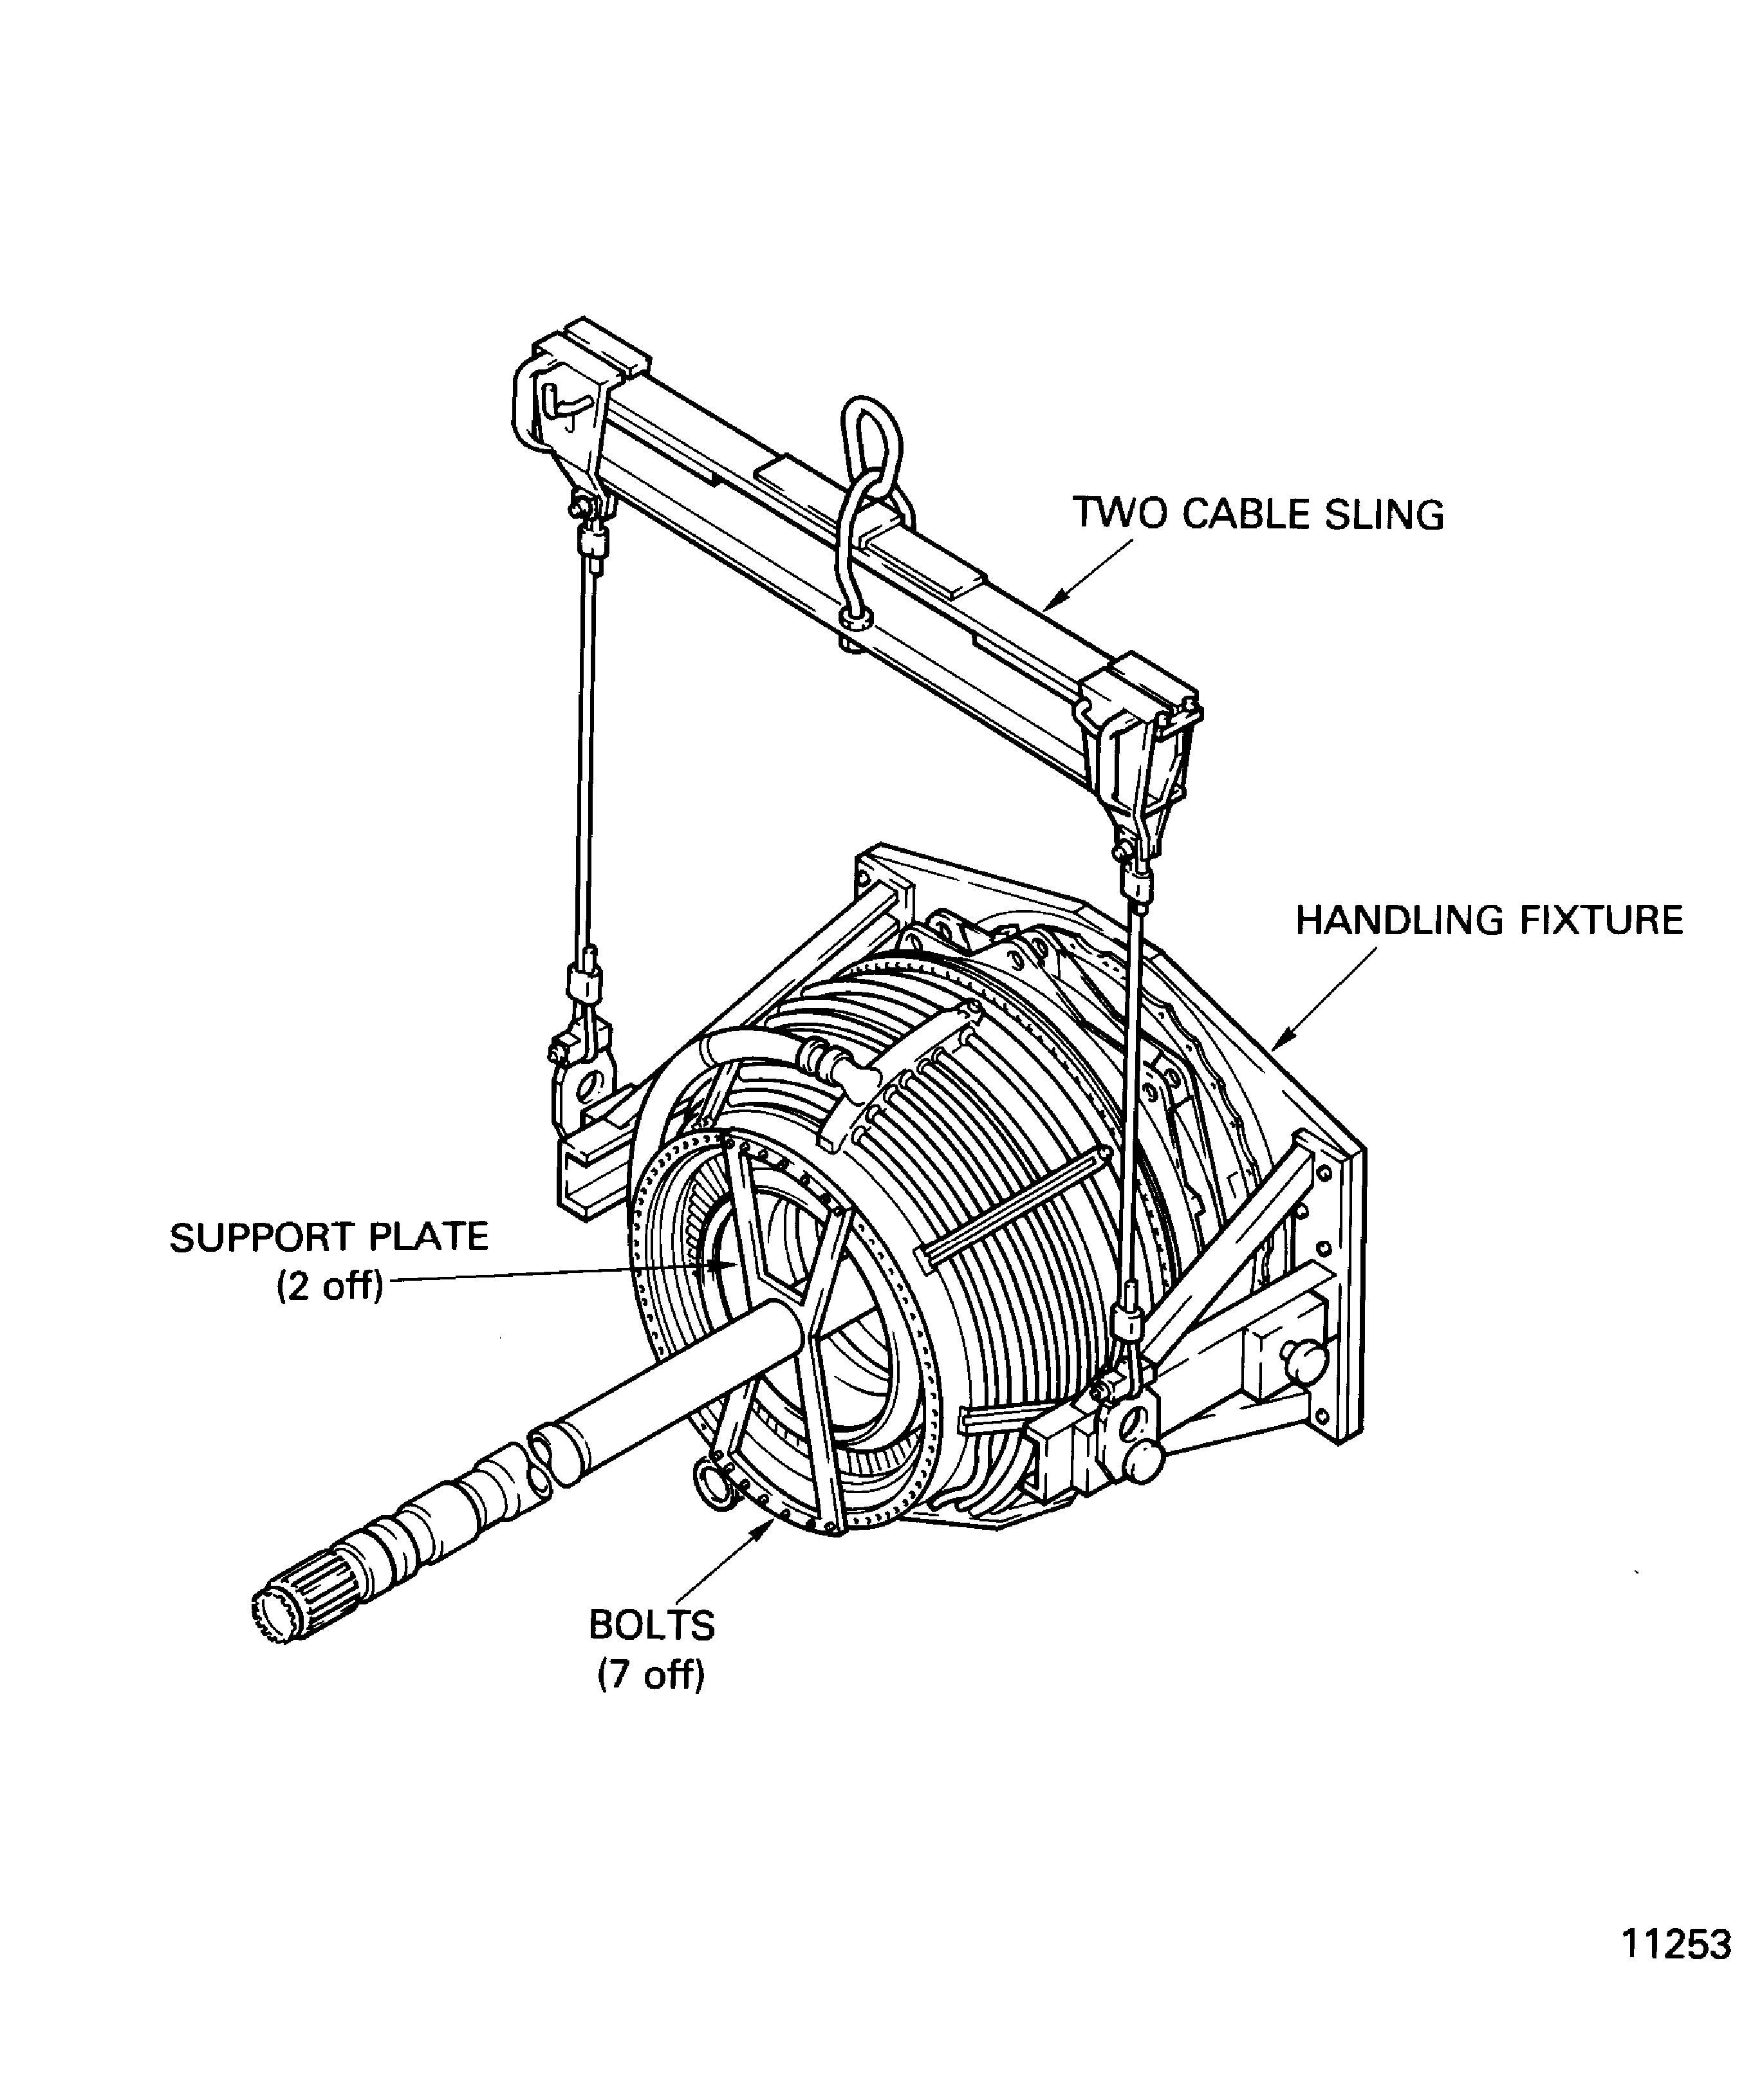
Figure: Installation of the Bolts and the Brackets at the LP Turbine Module Front Flange
Sheet 1
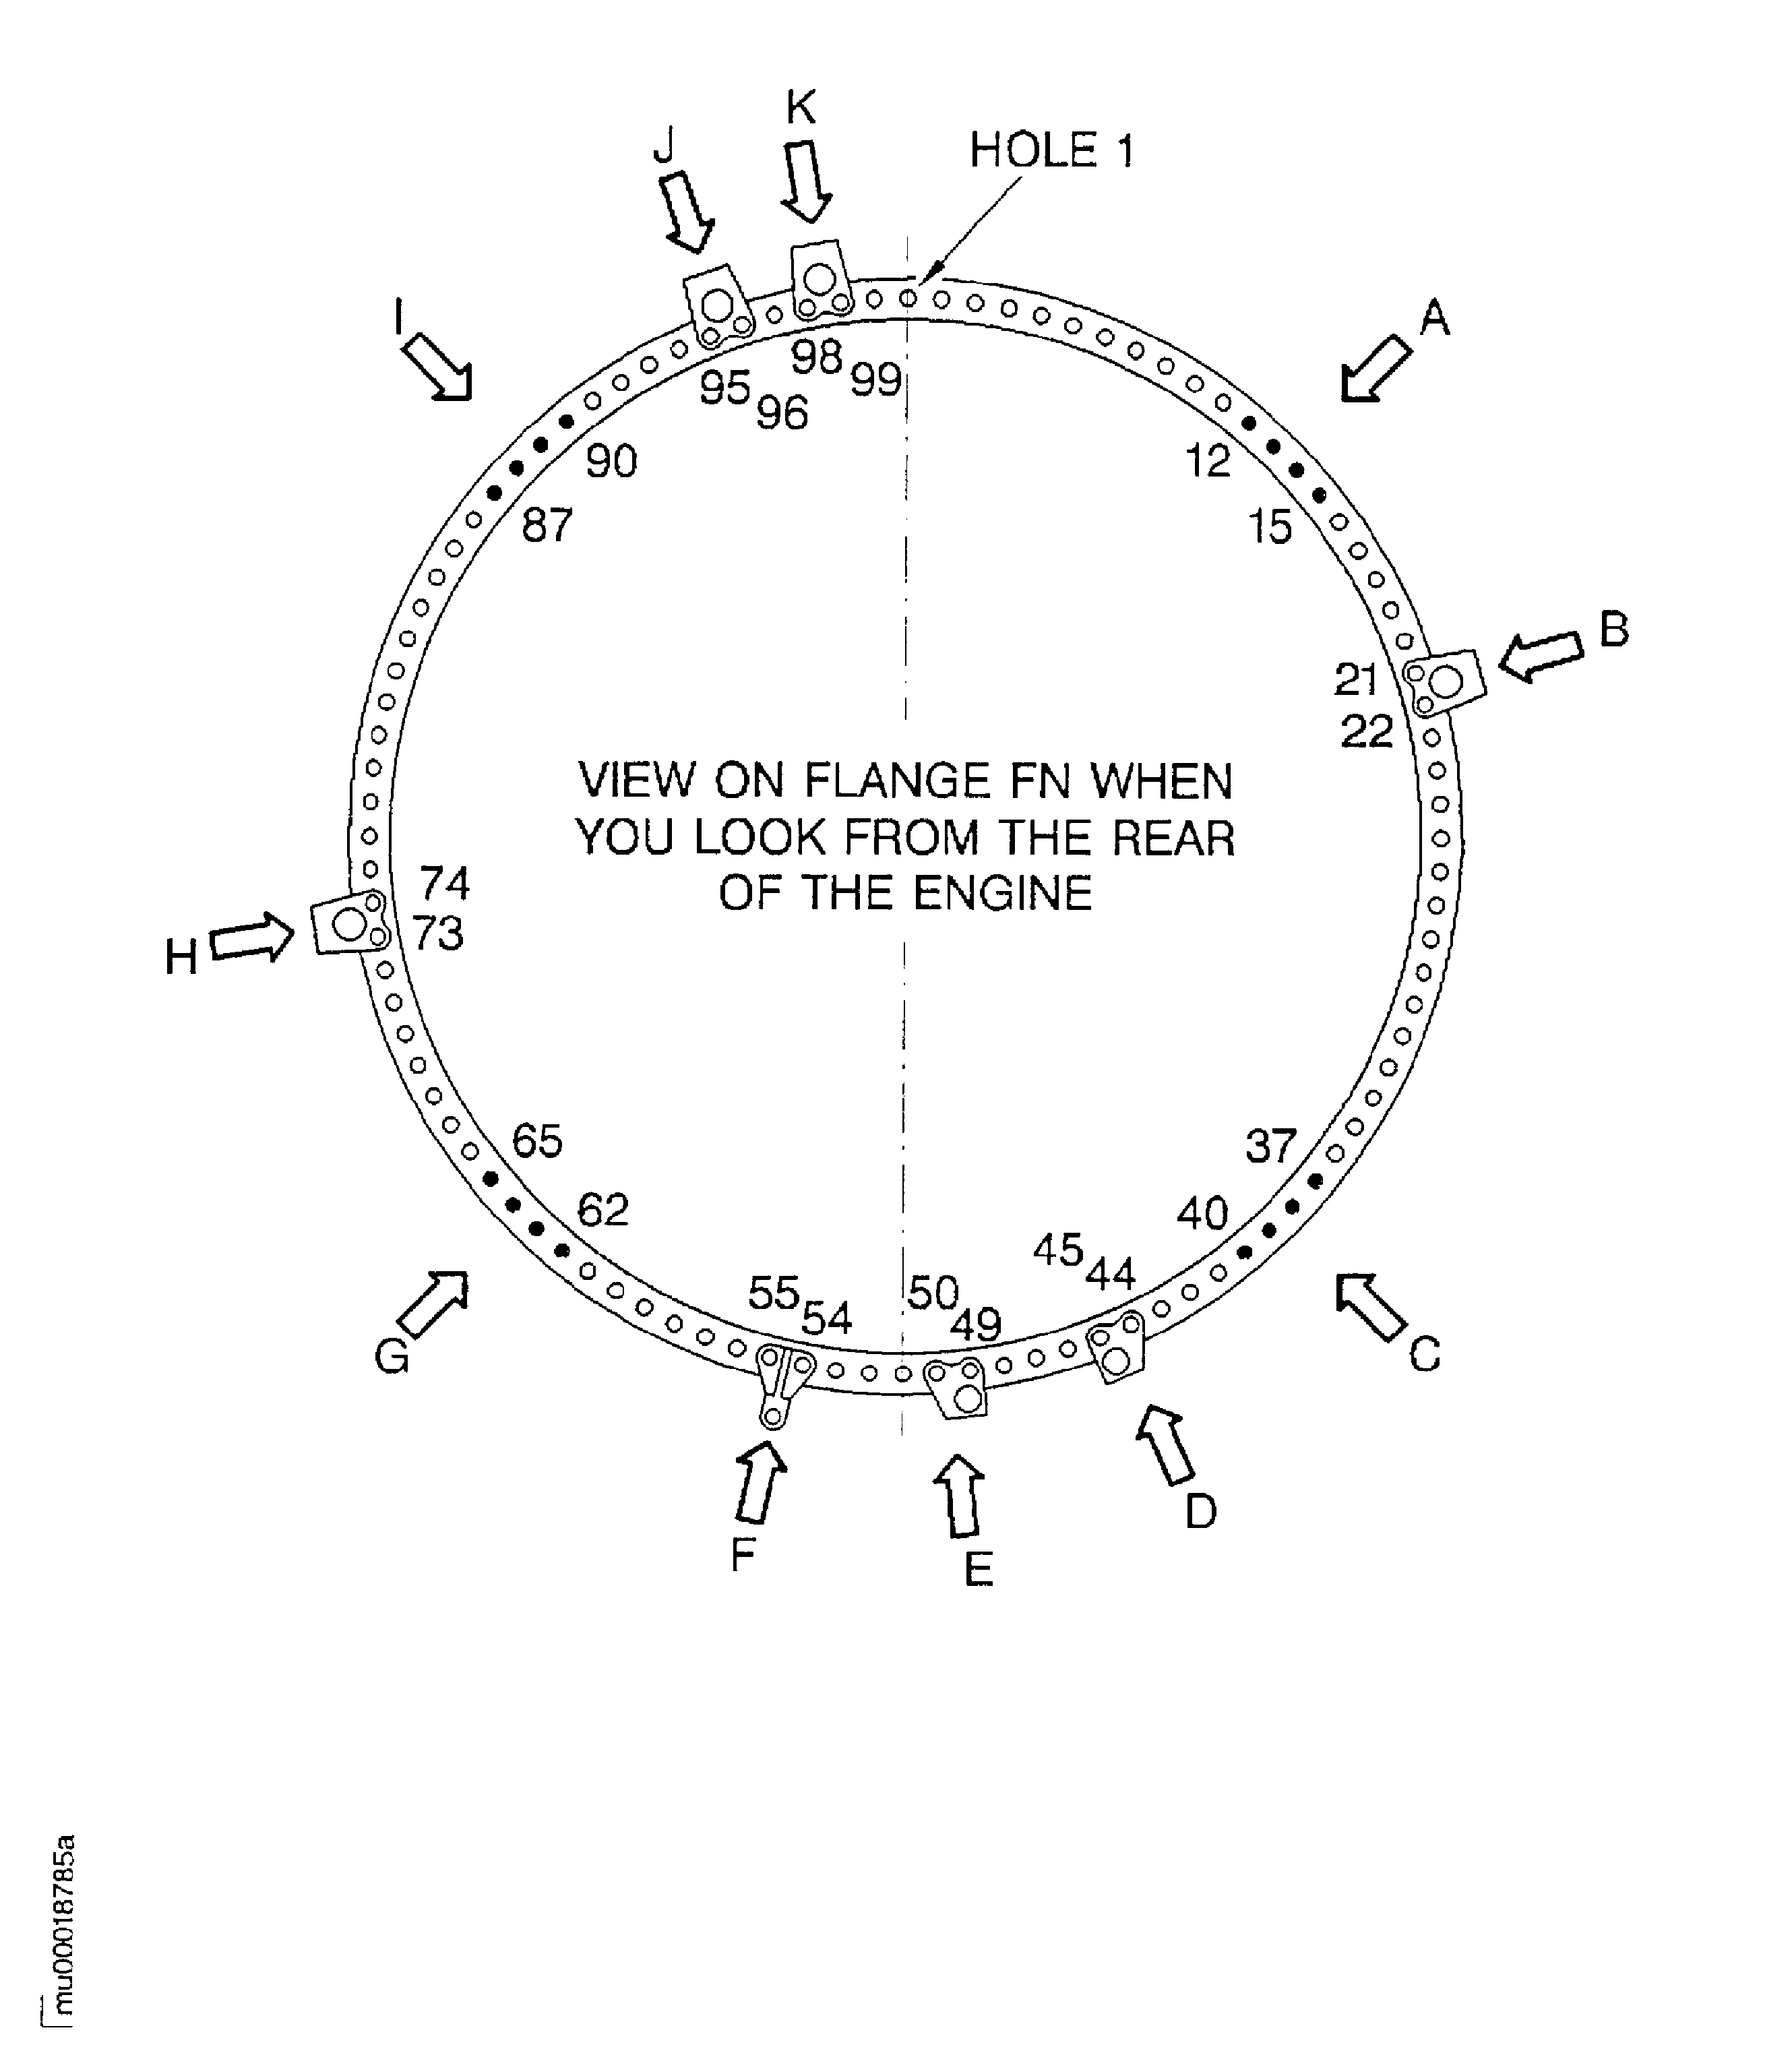
Figure: Installation of the Bolts and the Brackets at the LP Turbine Module Front Flange
Sheet 2
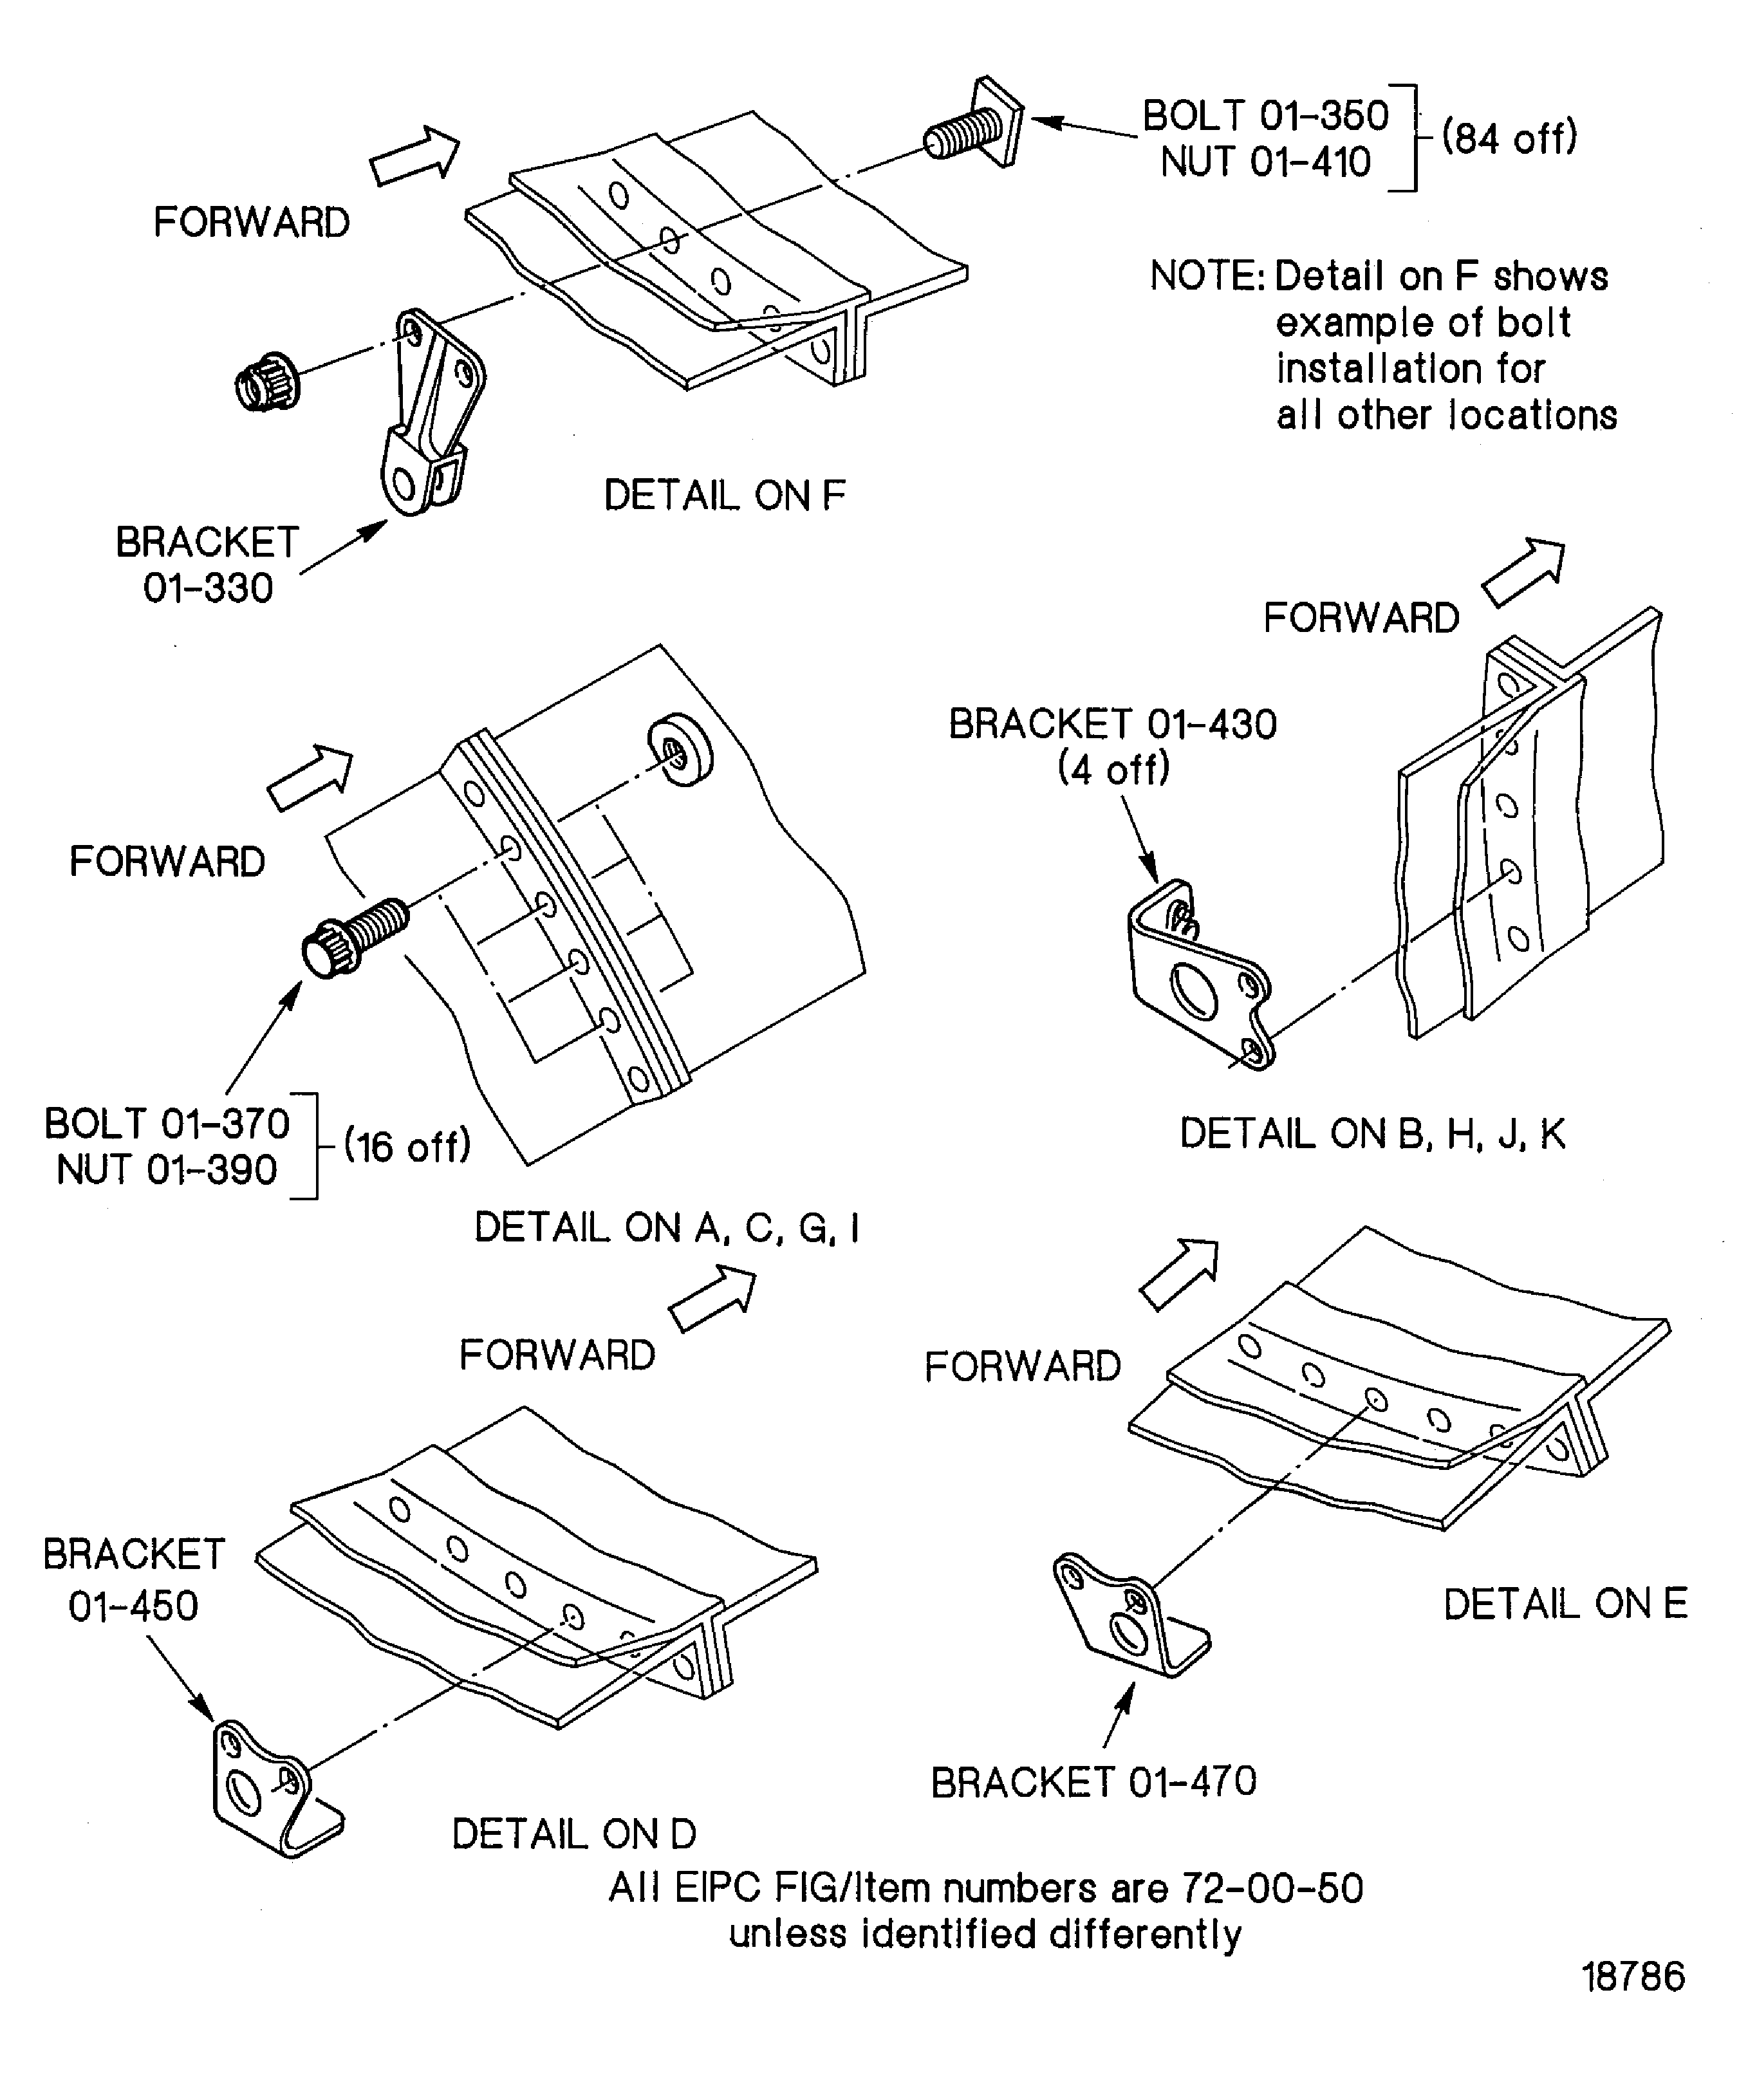
Figure: Installation of the No.5 Bearing Compartment Cover
Installation of the No.5 Bearing Compartment Cover

Figure: Install the Blind Cap
Install the Blind Cap

Figure: Remove the LP Turbine Module from the Horizontal Stand
Sheet 1
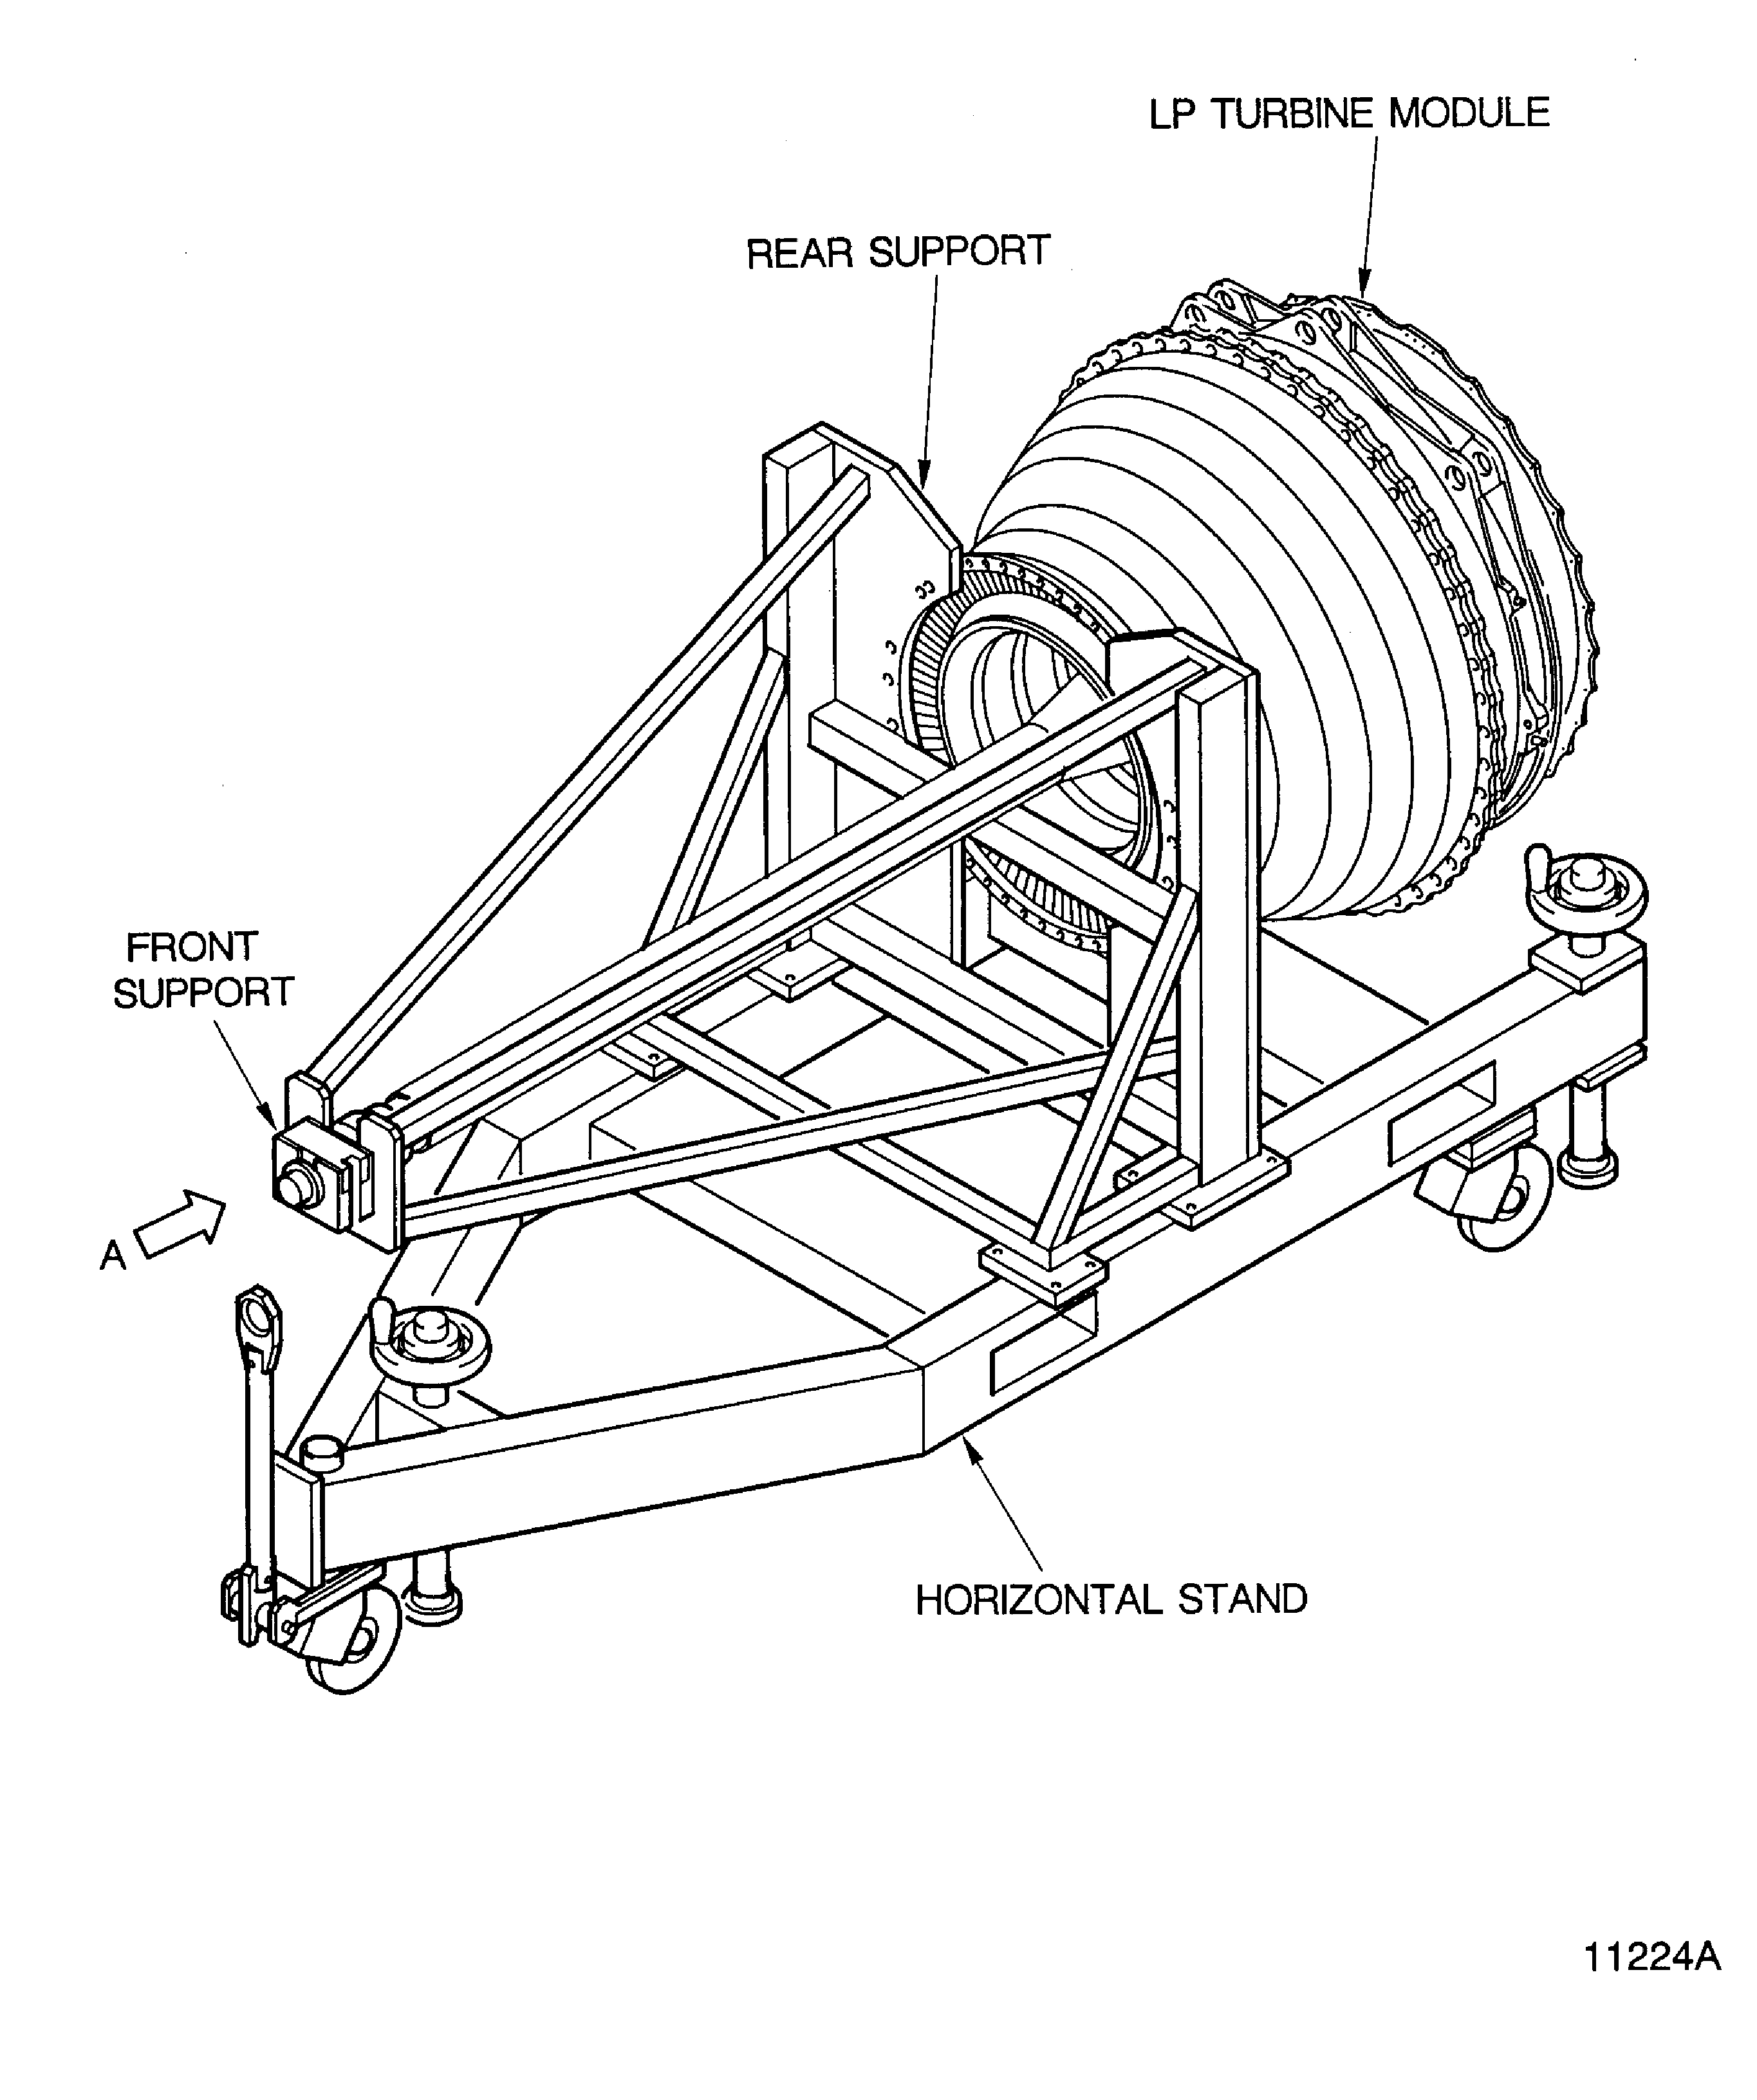
Figure: Remove the LP Turbine Module from the Horizontal Stand
Sheet 2

Figure: Installation of the Adapter to No.5 Bearing Outer Oil Scavenge Tube
Installation of the Adapter to No.5 Bearing Outer Oil Scavenge Tube
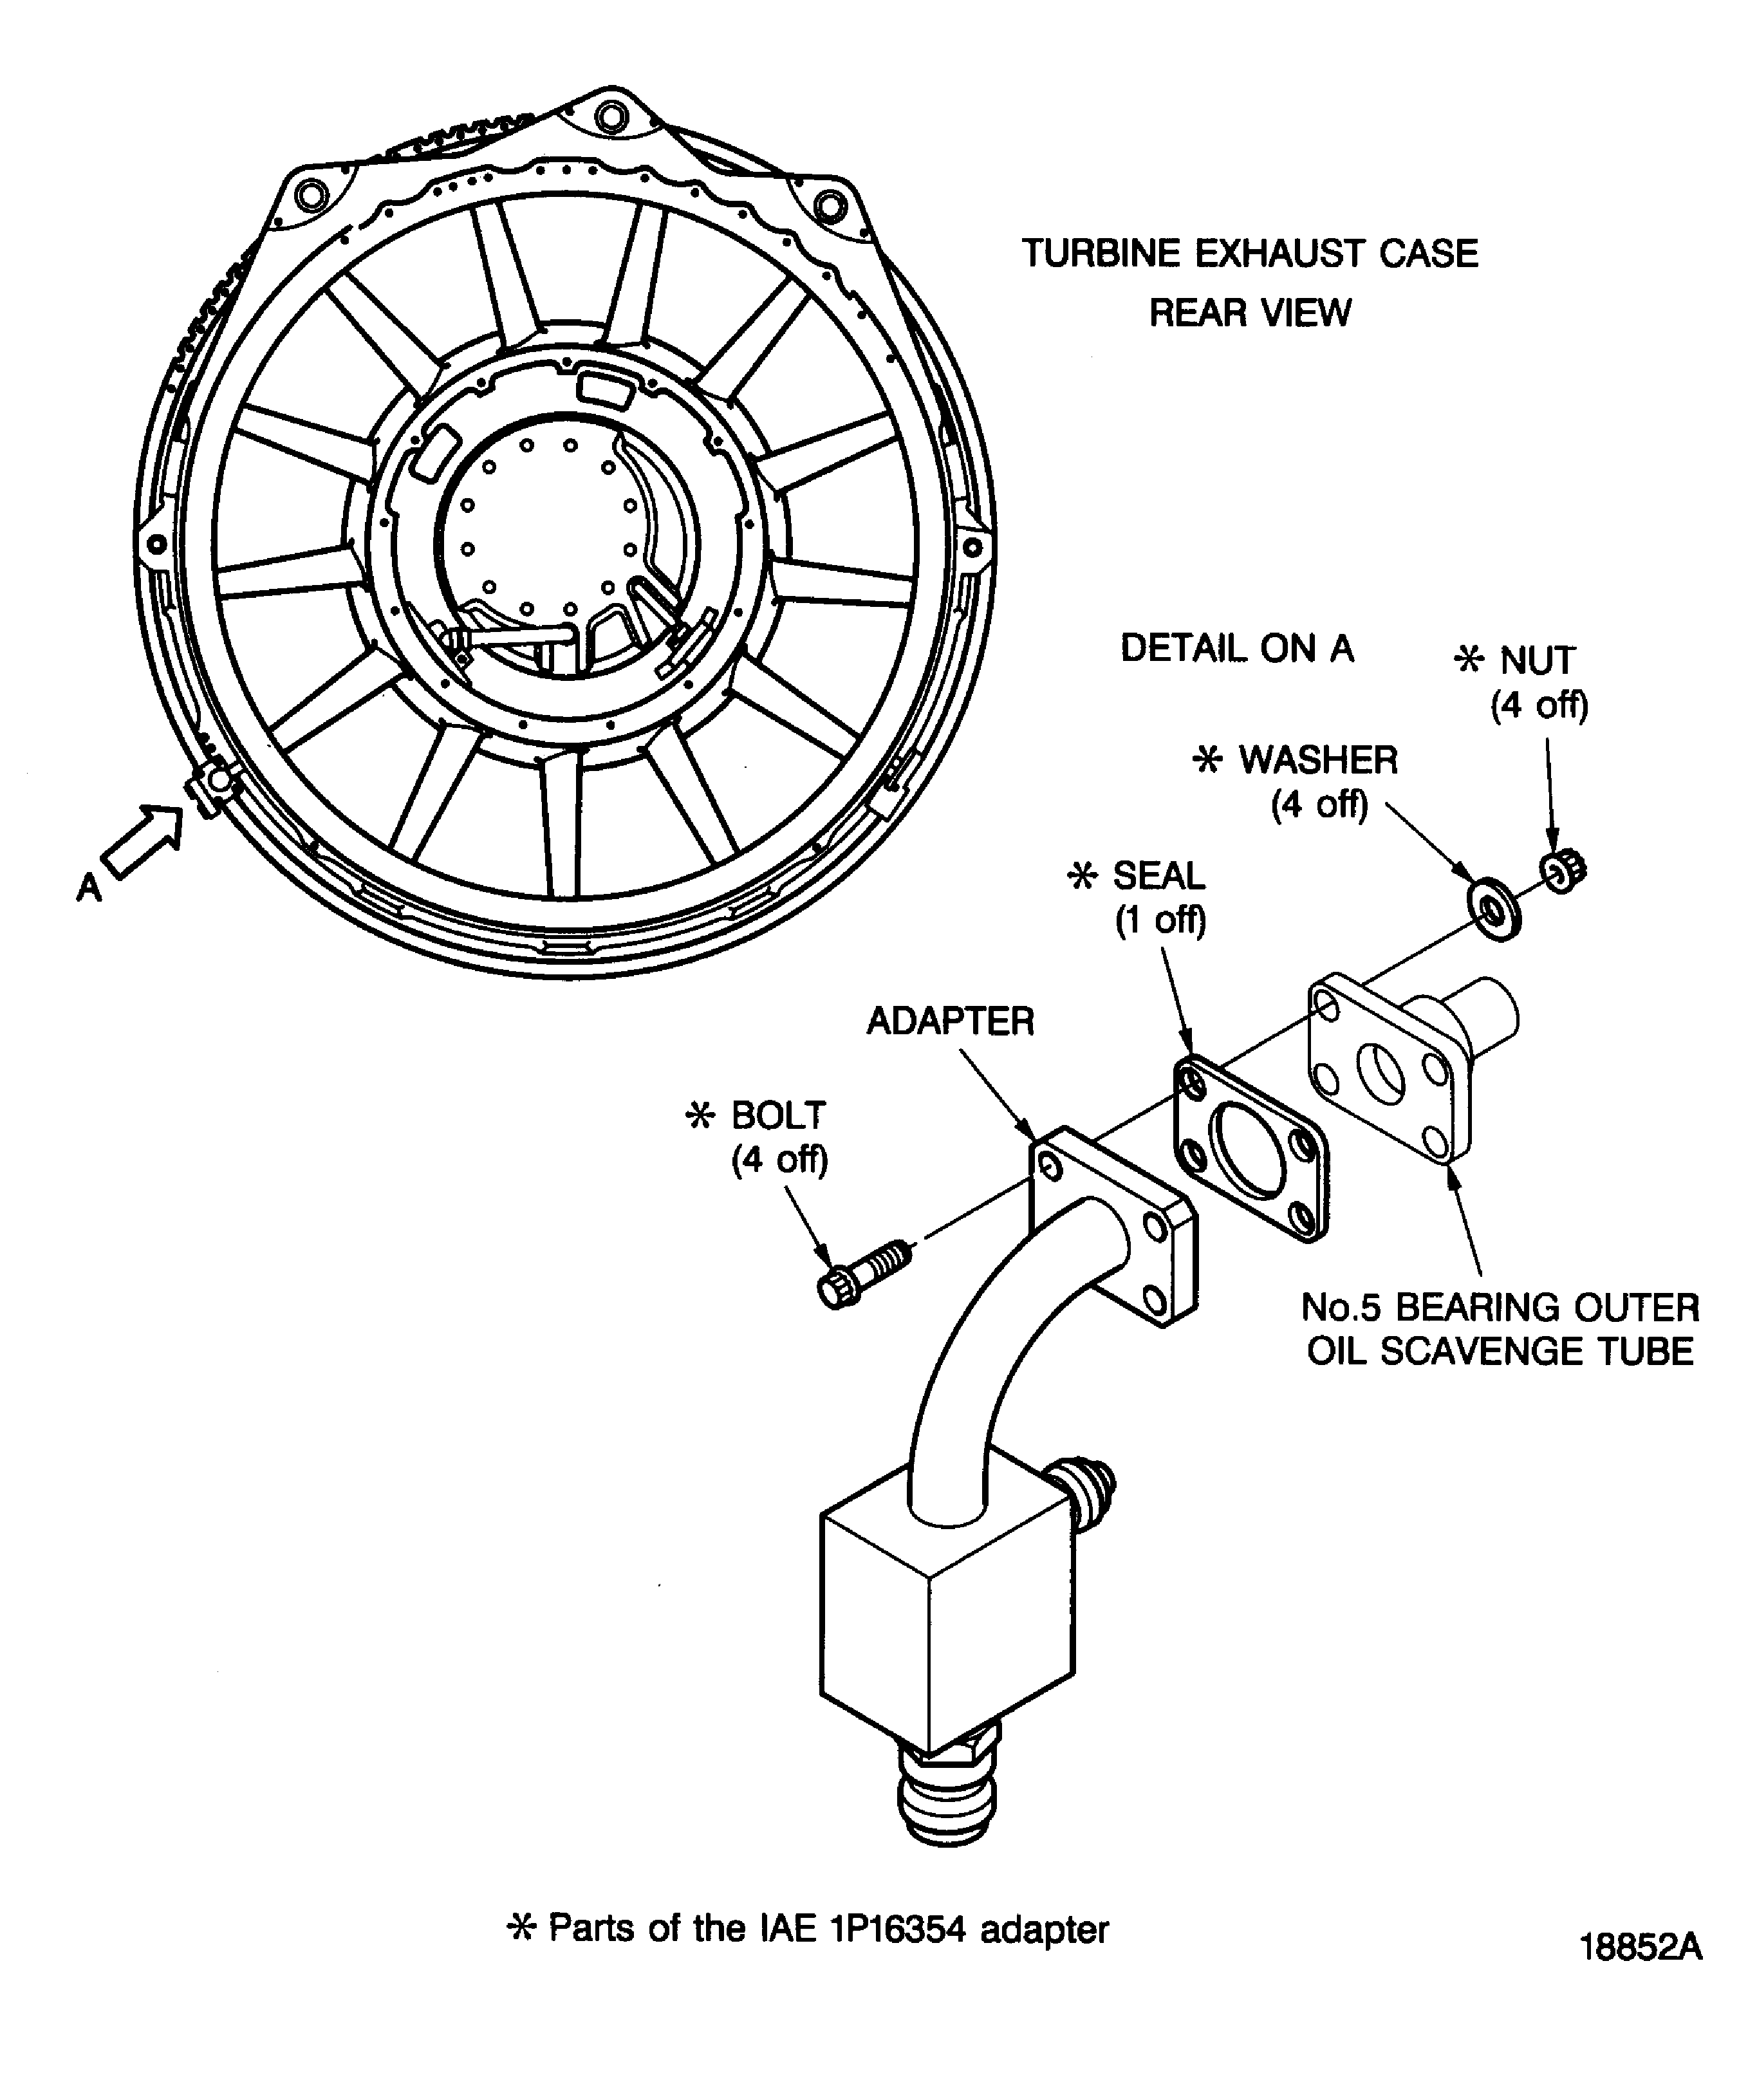
Figure: Installation of the Plate to No.5 Bearing Outer Oil Feed Tube
Installation of the Plate to No.5 Bearing Outer Oil Feed Tube

Figure: Connect the Fitting of the Vacuum Test Cart to the Adapter
Connect the Fitting of the Vacuum Test Cart to the Adapter

Figure: Install/Remove the Loading Fixture
Install/Remove the Loading Fixture
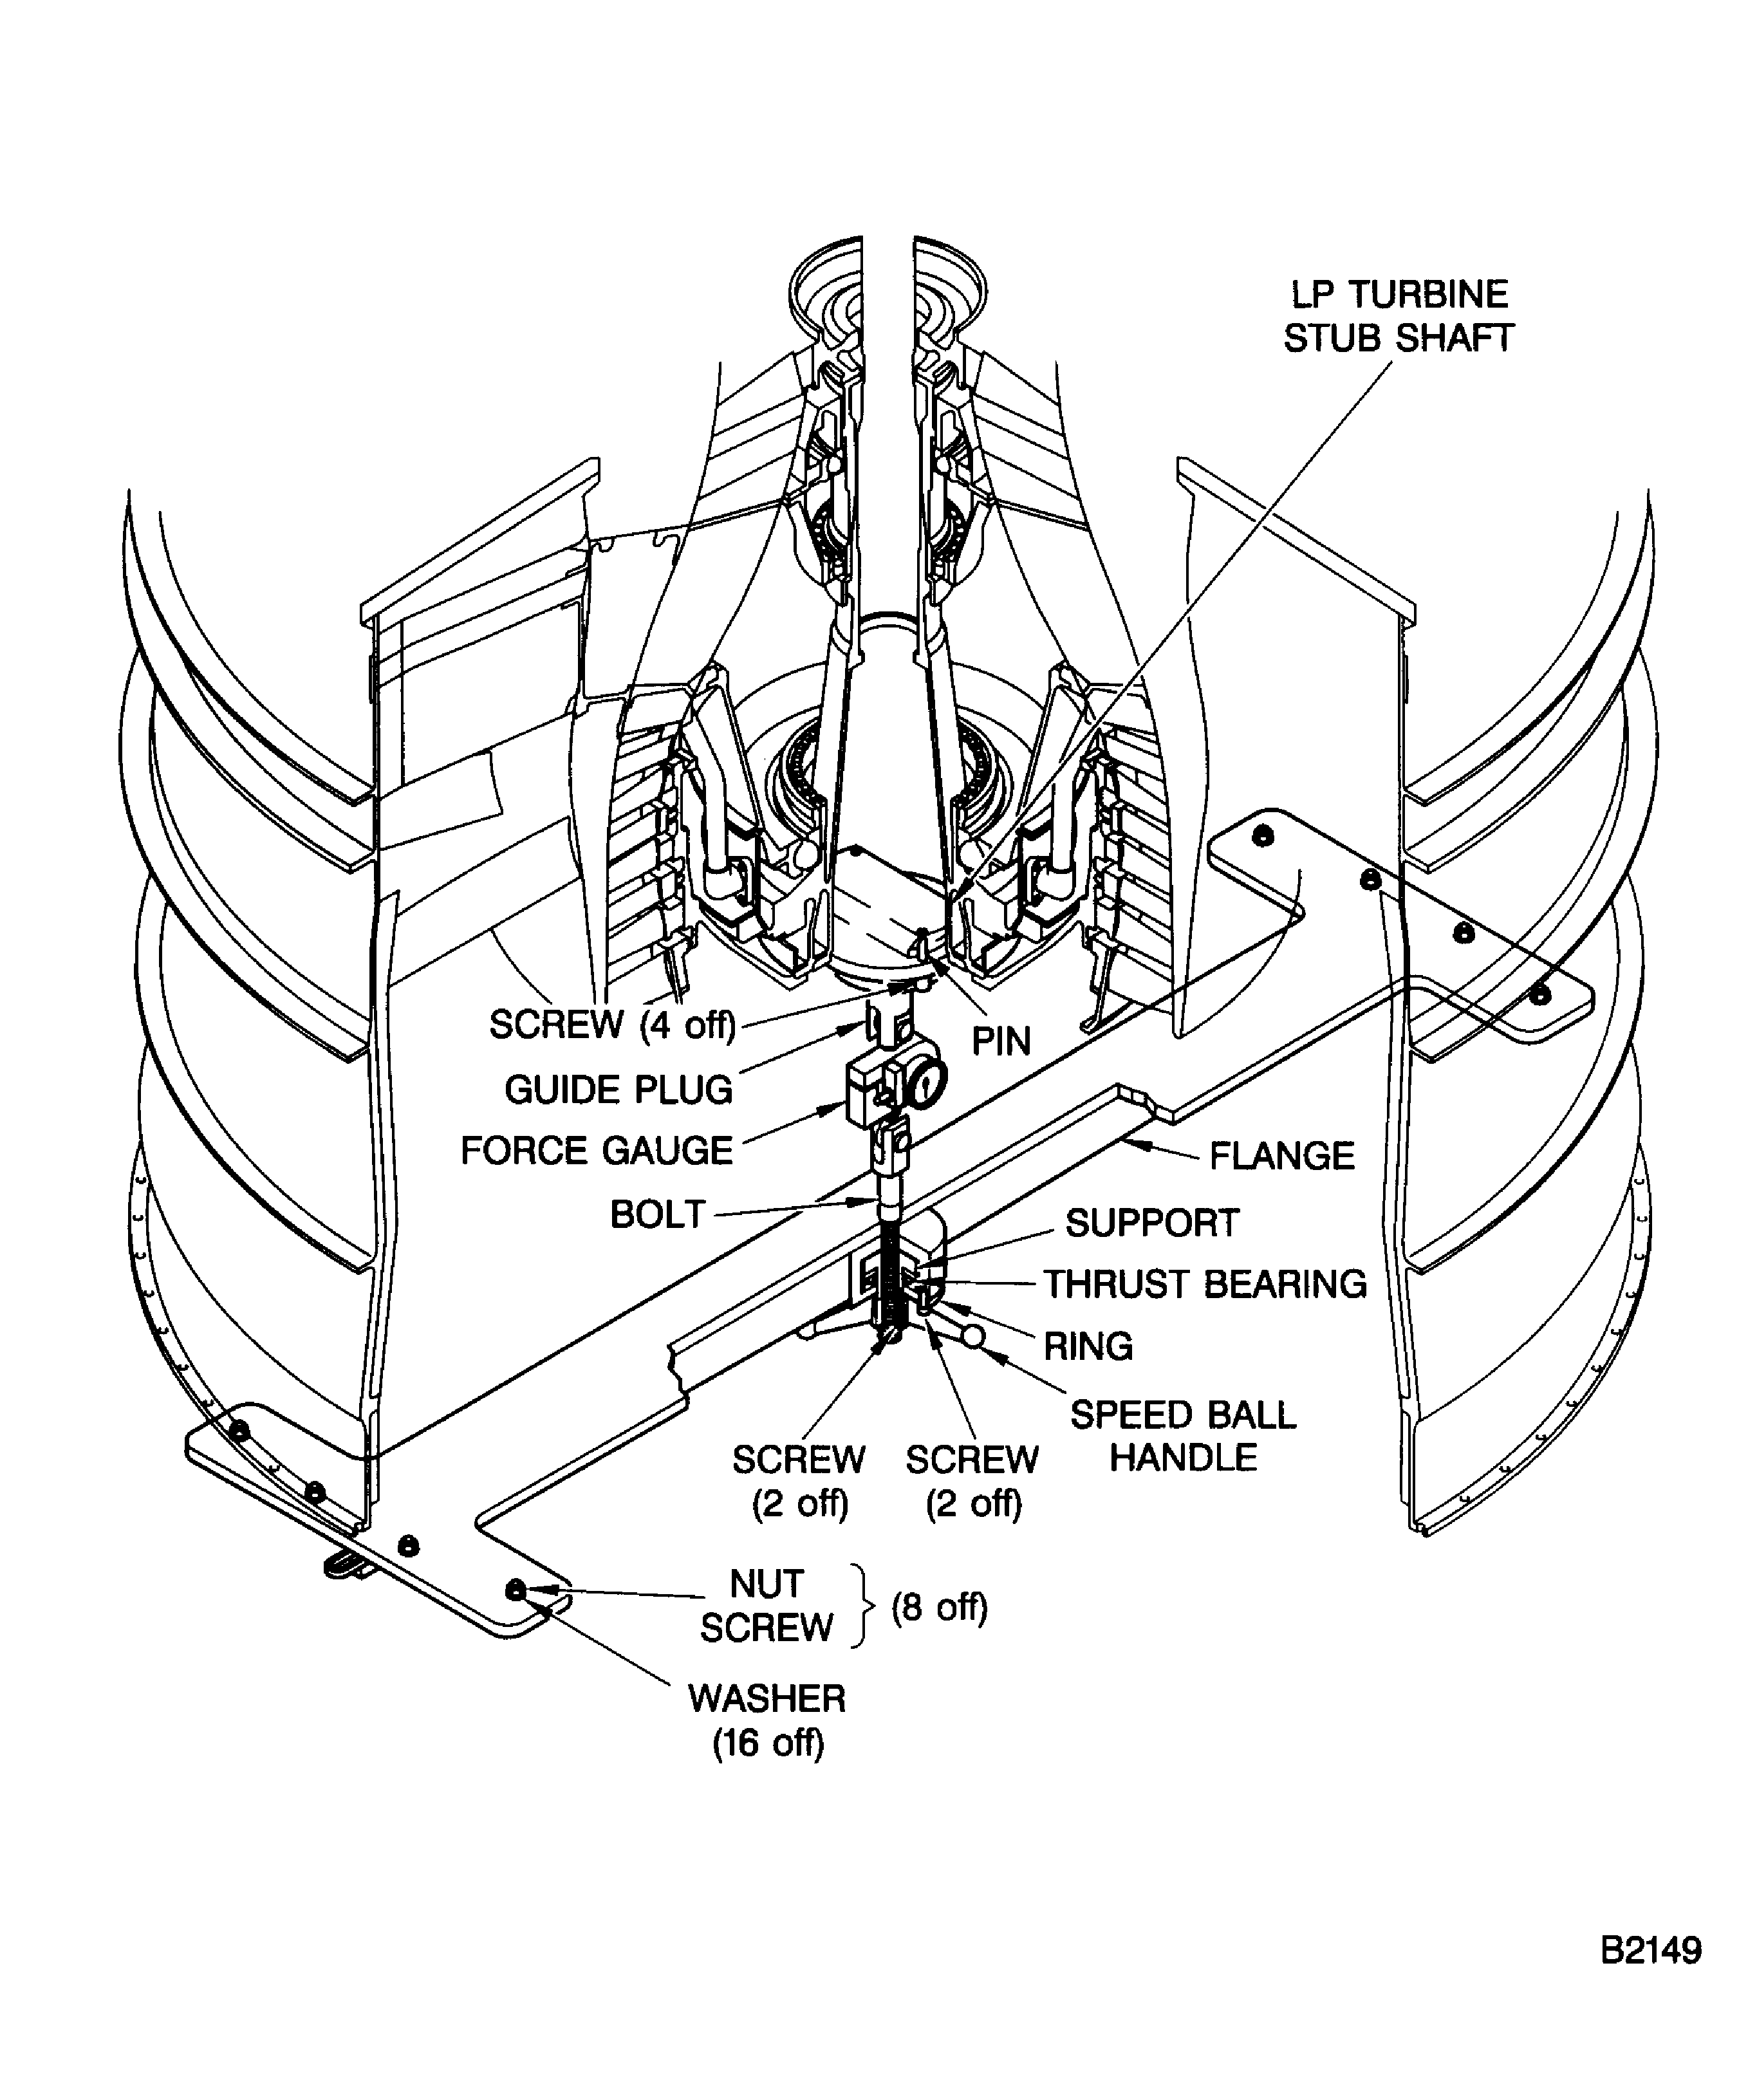
Figure: Pre SBE 72-0227: Installation of the Sealing Ring on to the Blind Cap
Sheet 1

Figure: SBE 72-0227: Installation of the Sealing Ring on to the Blind Cap
Sheet 2

Figure: Installation of the Sealing Ring on to the Blind Cap - Method 2
Sheet 3

Figure: Pre SBE 72-0227: Installation of the Sealing Ring in to the Sizing Sleeve
Pre SBE 72-0227: Installation of the Sealing Ring in to the Sizing Sleeve

Figure: Installed Condition of the Sealing Ring
Installed Condition of the Sealing Ring

Figure: Example of Incorrect Installation of the Sealing Ring onto the Blind Cap
Example of Incorrect Installation of the Sealing Ring onto the Blind Cap

Figure: Installation of Blind Cap and Retaining Ring
Installation of Blind Cap and Retaining Ring
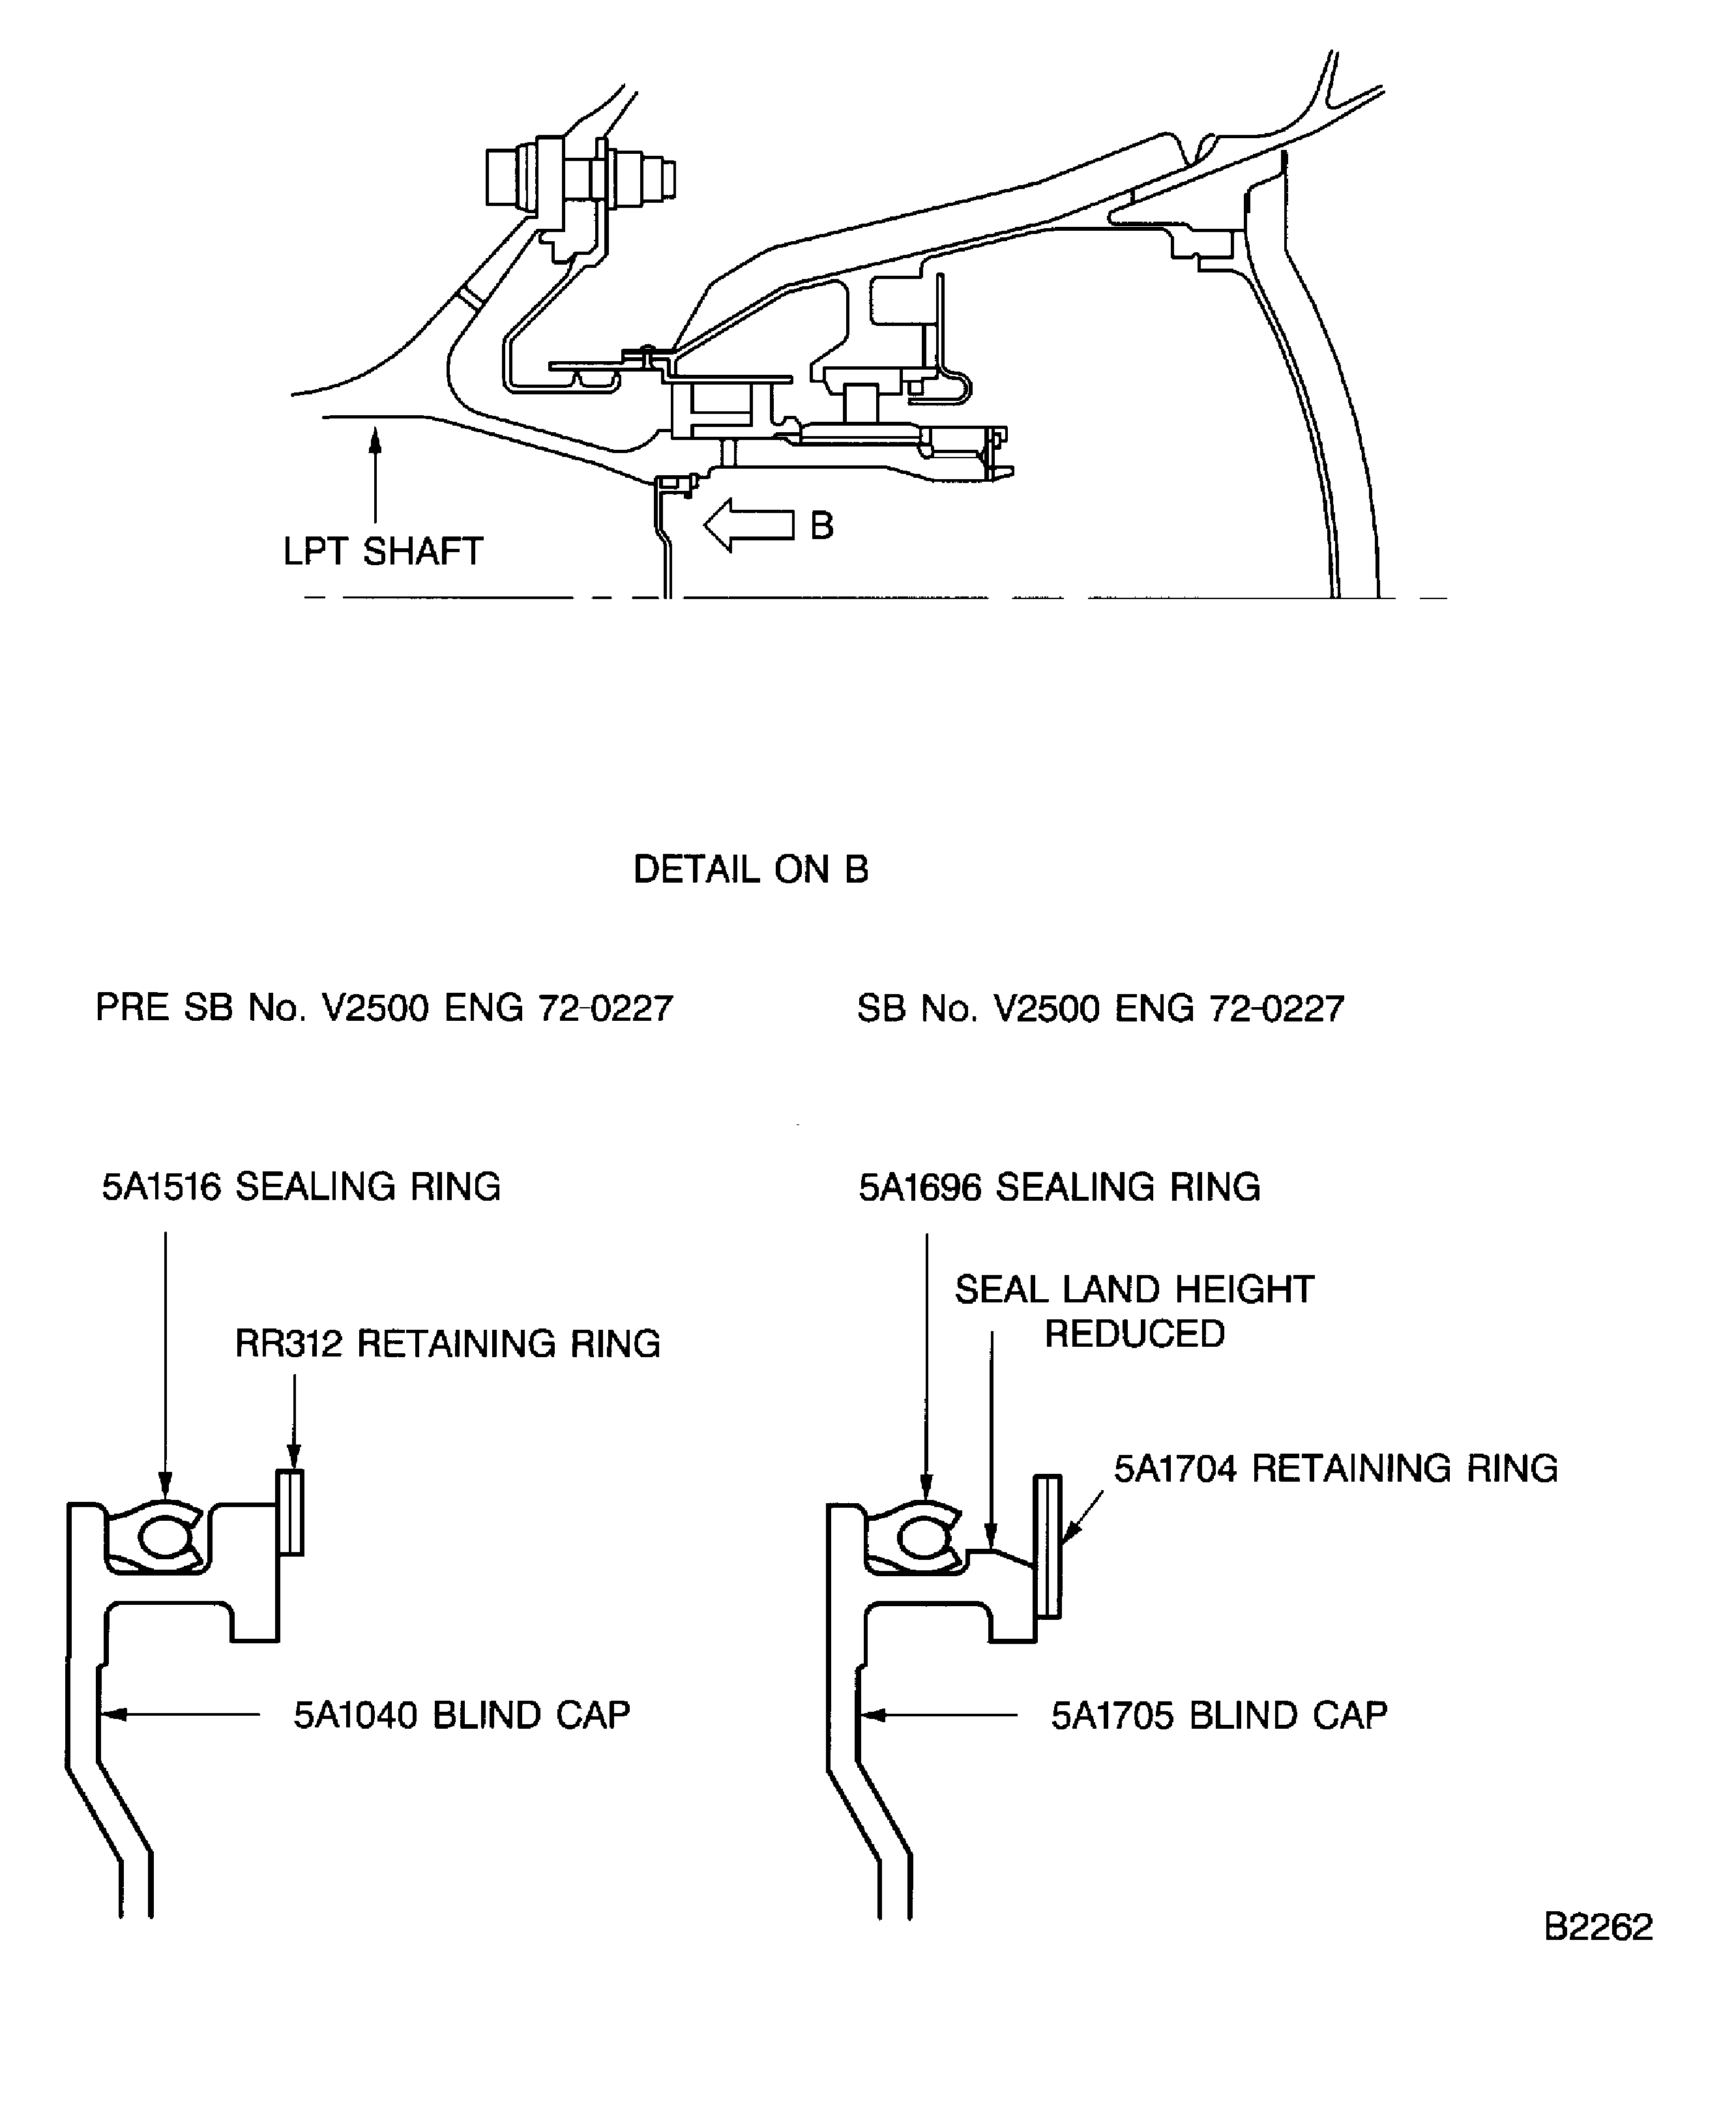
Figure: Install the No.5 Bearing Nozzle
Install the No.5 Bearing Nozzle

