Export Control
EAR Export Classification: Not subject to the EAR per 15 C.F.R. Chapter 1, Part 734.3(b)(3), except for the following Service Bulletins which are currently published as EAR Export Classification 9E991: SBE70-0992, SBE72-0483, SBE72-0580, SBE72-0588, SBE72-0640, SBE73-0209, SBE80-0024 and SBE80-0025.Copyright
© IAE International Aero Engines AG (2001, 2014 - 2021) The information contained in this document is the property of © IAE International Aero Engines AG and may not be copied or used for any purpose other than that for which it is supplied without the express written authority of © IAE International Aero Engines AG. (This does not preclude use by engine and aircraft operators for normal instructional, maintenance or overhaul purposes.).Applicability
All
Common Information
TASK 72-31-11-200-002-F00 LPC Fan Blade - Examine The LPC Fan Blade
General
This TASK gives the procedure for the inspection of the LPC rotor blade assembly. For the other LP compressor blades and fillers parts, refer to TASK 72-31-11-200-000 (INSPECTION/CHECK-000).
The policy that is necessary for inspection is given in SPM TASK 70-20-01-200-501.
All the parts must be cleaned before any part is examined. Refer to TASK 72-31-11-100-000 (CLEANING-000).
All parts must be visually examined for damage, corrosion and wear. Any defects that are not identified in the procedure must be referred to IAE.
The procedure for those parts which must have a crack test is given in Step. Do the test before the part is visually examined.
Following the crack test procedure make sure that fluorescent penetrant is thoroughly removed from fan blade root coating.
Do not discard any part until you are sure there are no repairs available. Refer to the instructions in Repair before a discarded part is used again or oversize parts are installed.
Parts which should be discarded can be held although no repair is available. The repair of a discarded part could be shown to be necessary at a later date.
All parts must be examined to make sure that all the repairs have been completed satisfactorily.
The practices and processes referred to in the procedure by the TASK numbers are in SPM.
References
Refer to SPM for data on these items.
Definitions of Damage, SPM TASK 70-02-02-350-501.
Inspection of Parts, SPM TASK 70-20-01-200-501.
Some data on these items is contained in this TASK. For more data on these items refer to SPM.
Method of Testing for Crack Indications.
Chemical Processes.
Surface Protection.
NOTE
Preliminary Requirements
Pre-Conditions
NONESupport Equipment
| Name | Manufacturer | Part Number / Identification | Quantity | Remark |
|---|---|---|---|---|
| IAE 3R19401 Perspex template c/c Assembly C and D | 0AM53 | IAE 3R19401 | 1 | |
| IAE 3R19403 Perspex template c/c Assembly C and D | 0AM53 | IAE 3R19403 | 1 |
Consumables, Materials and Expendables
NONESpares
NONESafety Requirements
NONEProcedure
Transient acoustic propagating (TAP) examine for crack. Refer to TASK 72-00-00-200-000 (INSPECTION/CHECK-000).
PART IDENT
TASK/SUBTASK
LPC rotor blade assembly
TASK 72-00-00-200-000 (INSPECTION/CHECK)
SUBTASK 72-31-11-220-175 Examine the LPC Rotor Blade Assembly (01-300) for Crack Indications
Do the eddy current inspection of the leading edge for cracks. Refer to TASK 72-00-00-200-000 (INSPECTION/CHECK).
PART IDENT
TASK/SUBTASK
LPC rotor blade assembly
TASK 72-00-00-200-000 (INSPECTION/CHECK)
SUBTASK 72-31-11-220-176 Examine the LPC Rotor Blade Assembly (01-300) for Leading Edge Cracks
Do the ultrasonic inspection of the dovetail for debond at location 6. Refer to TASK 72-00-00-200-000 (INSPECTION/CHECK).
PART IDENT
TASK/SUBTASK
LPC rotor blade assembly
TASK 72-00-00-200-000 (INSPECTION/CHECK)
SUBTASK 72-31-11-220-177 Examine the LPC Rotor Blade Assembly (01-300) for Debond at Dovetail Location
Do the C scan inspection and examine for panel defects and cracks. Refer to TASK 72-00-00-200-000 (INSPECTION/CHECK).
PART IDENT
TASK/SUBTASK
LPC rotor blade assembly
TASK 72-00-00-200-000 (INSPECTION/CHECK)
SUBTASK 72-31-11-220-178 Examine the LPC Rotor Blade Assembly (01-300) for Panel Defects
Clean the parts. Refer to TASK 72-31-11-100-000, (CLEANING-000).
SUBTASK 72-31-11-220-179 Examine the LPC Rotor Blade Assembly (01-300) for Cracks
Repair, VRS1003 TASK 72-31-11-300-008 (REPAIR-008).
Between 0.007 in. and 0.015 in. (0.17 mm and 0.38 mm).
More than in Step.
Non-critical areas.
Accept and apply Repair, VRS1724 TASK 72-31-11-300-026 (REPAIR-026).
Not more than 0.004 in. (0.10 mm) in depth.
Repair, VRS1003 TASK 72-31-11-300-008 (REPAIR-008).
More than in Step and not more than 0.012 in. (0.30mm) in depth.
More than in Step.
Critical area 1.
Repair, VRS1003 TASK 72-31-11-300-008 (REPAIR-008).
Not more than 0.007 in. (0.17 mm) in depth.
More than in Step.
Critical area 2.
Accept and apply Repair, VRS1724 TASK 72-31-11-300-026 (REPAIR-026).
Not more than 0.004 in. (0.10 mm) in depth.
Repair, VRS1003 TASK 72-31-11-300-008 (REPAIR-008).
More than in Step and not more than 0.015 in. (0.38 mm) in depth provided panel thickness is not more than 10 percent below the minimum limit given on the template after blend repair.
More than in Step.
Critical area 3.
Accept and apply Repair, VRS1724 TASK 72-31-11-300-026 (REPAIR-026).
Not more than 0.004 in. (0.10 mm) in depth.
Repair, VRS1003 TASK 72-31-11-300-008 (REPAIR-008).
More than in Step and not more than 0.015 in. (0.38 mm) in depth provided panel thickness is not more than 5 percent below the minimum limit given on the template after blend repair.
More than in Step.
Critical area 4.
Nicked, scored, scratched or dented.
Repair, VRS1025 TASK 72-31-11-300-010 (REPAIR-010).
More than in Step.
Surface finish.
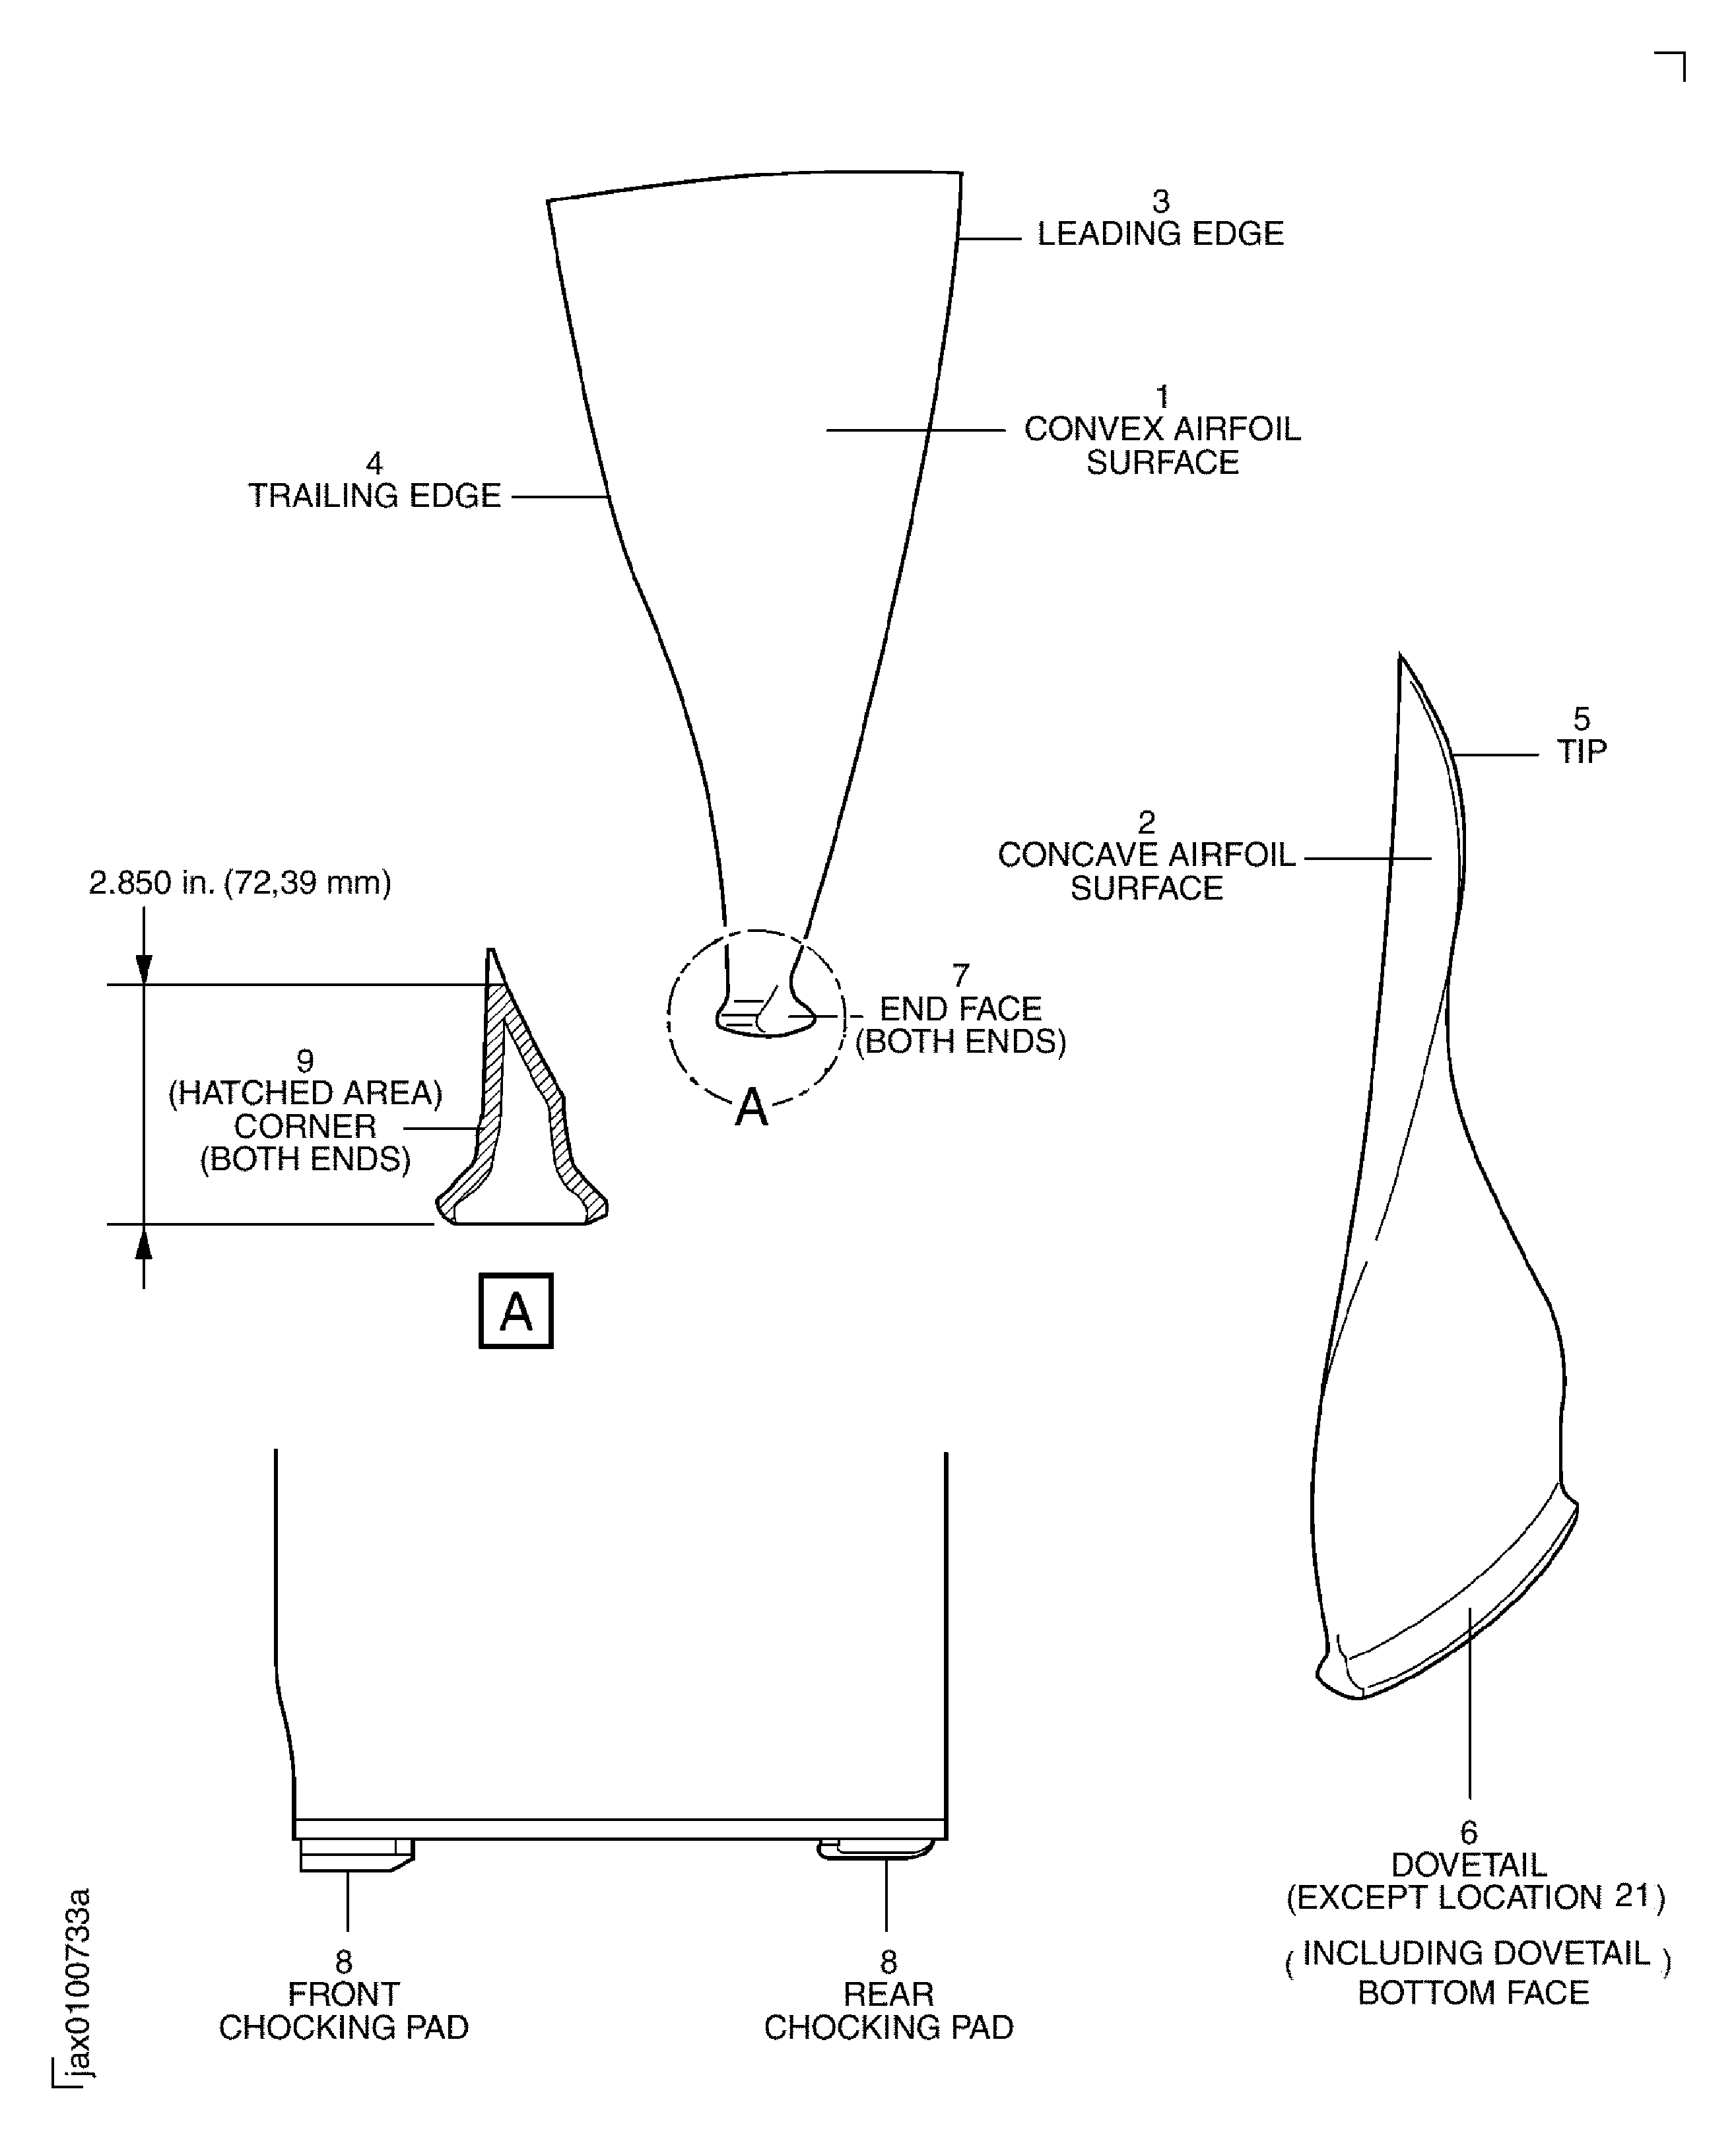
Examine the concave and convex airfoil surfaces at locations 1 and 2.
Repair, VRS1003 TASK 72-31-11-300-008 (REPAIR-008).
More than in Step.
Galled or scored.
Examine the concave and convex airfoil surfaces at locations 1 and 2 in the contact area with the annulus filler.
NOTE
This inspection gives an acceptance limit with no dressing requirement. If airfoil dressing is specified at another part of inspection, then all damage must be repaired.
SUBTASK 72-31-11-220-180 Examine the LPC Rotor Blade Assembly (01-300) Concave and Convex Airfoil Surfaces
Repair, VRS1064 TASK 72-31-11-300-030 (REPAIR-030).
Erosion not more than 0.138 in. (3.50 mm) reduction in chord.
More than in Step.
Non-critical area.
Eroded.
Repair, VRS1026 TASK 72-31-11-300-025 (REPAIR-025).
Examine the leading edge at location 3.
SUBTASK 72-31-11-220-187 Examine the LPC Rotor Blade Assembly (01-300) Leading Edge
Repair, VRS1026 TASK 72-31-11-300-025 (REPAIR-025).
Damage not in Step.
Examine the trailing edge at location 4.
SUBTASK 72-31-11-220-181 Examine the LPC Rotor Blade Assembly (01-300) Trailing Edge
Repair, VRS1026 TASK 72-31-11-300-025 (REPAIR-025).
Damaged.
Examine the blade tip at location 5.
SUBTASK 72-31-11-220-188 Examine the LPC Rotor Blade Assembly (01-300) Blade Tip
Repair, VRS1066 TASK 72-31-11-300-031 (REPAIR-031).
Less than 0.016 in. in depth.
More than in Step.
Nicked, scored, scratched or dented.
Examine the dovetail at location 6 except location 21.
Repair, VRS1067 TASK 72-31-11-300-032 (REPAIR-032).
More than in Step provided the underlying titanium is not scored.
More than in Step.
Scoring of root flank Metco 58 coating.
Repair, VRS1067 TASK 72-31-11-300-032, (REPAIR-032).
More than in Step provided the underlying titanium is not nicked or dented.
More than in Step.
Localised gouges or chips in Metco 58 coating.
Repair, VRS1067 TASK 72-31-11-300-032, (REPAIR-032).
Flaking or debond of Metco 58 from root flanks.
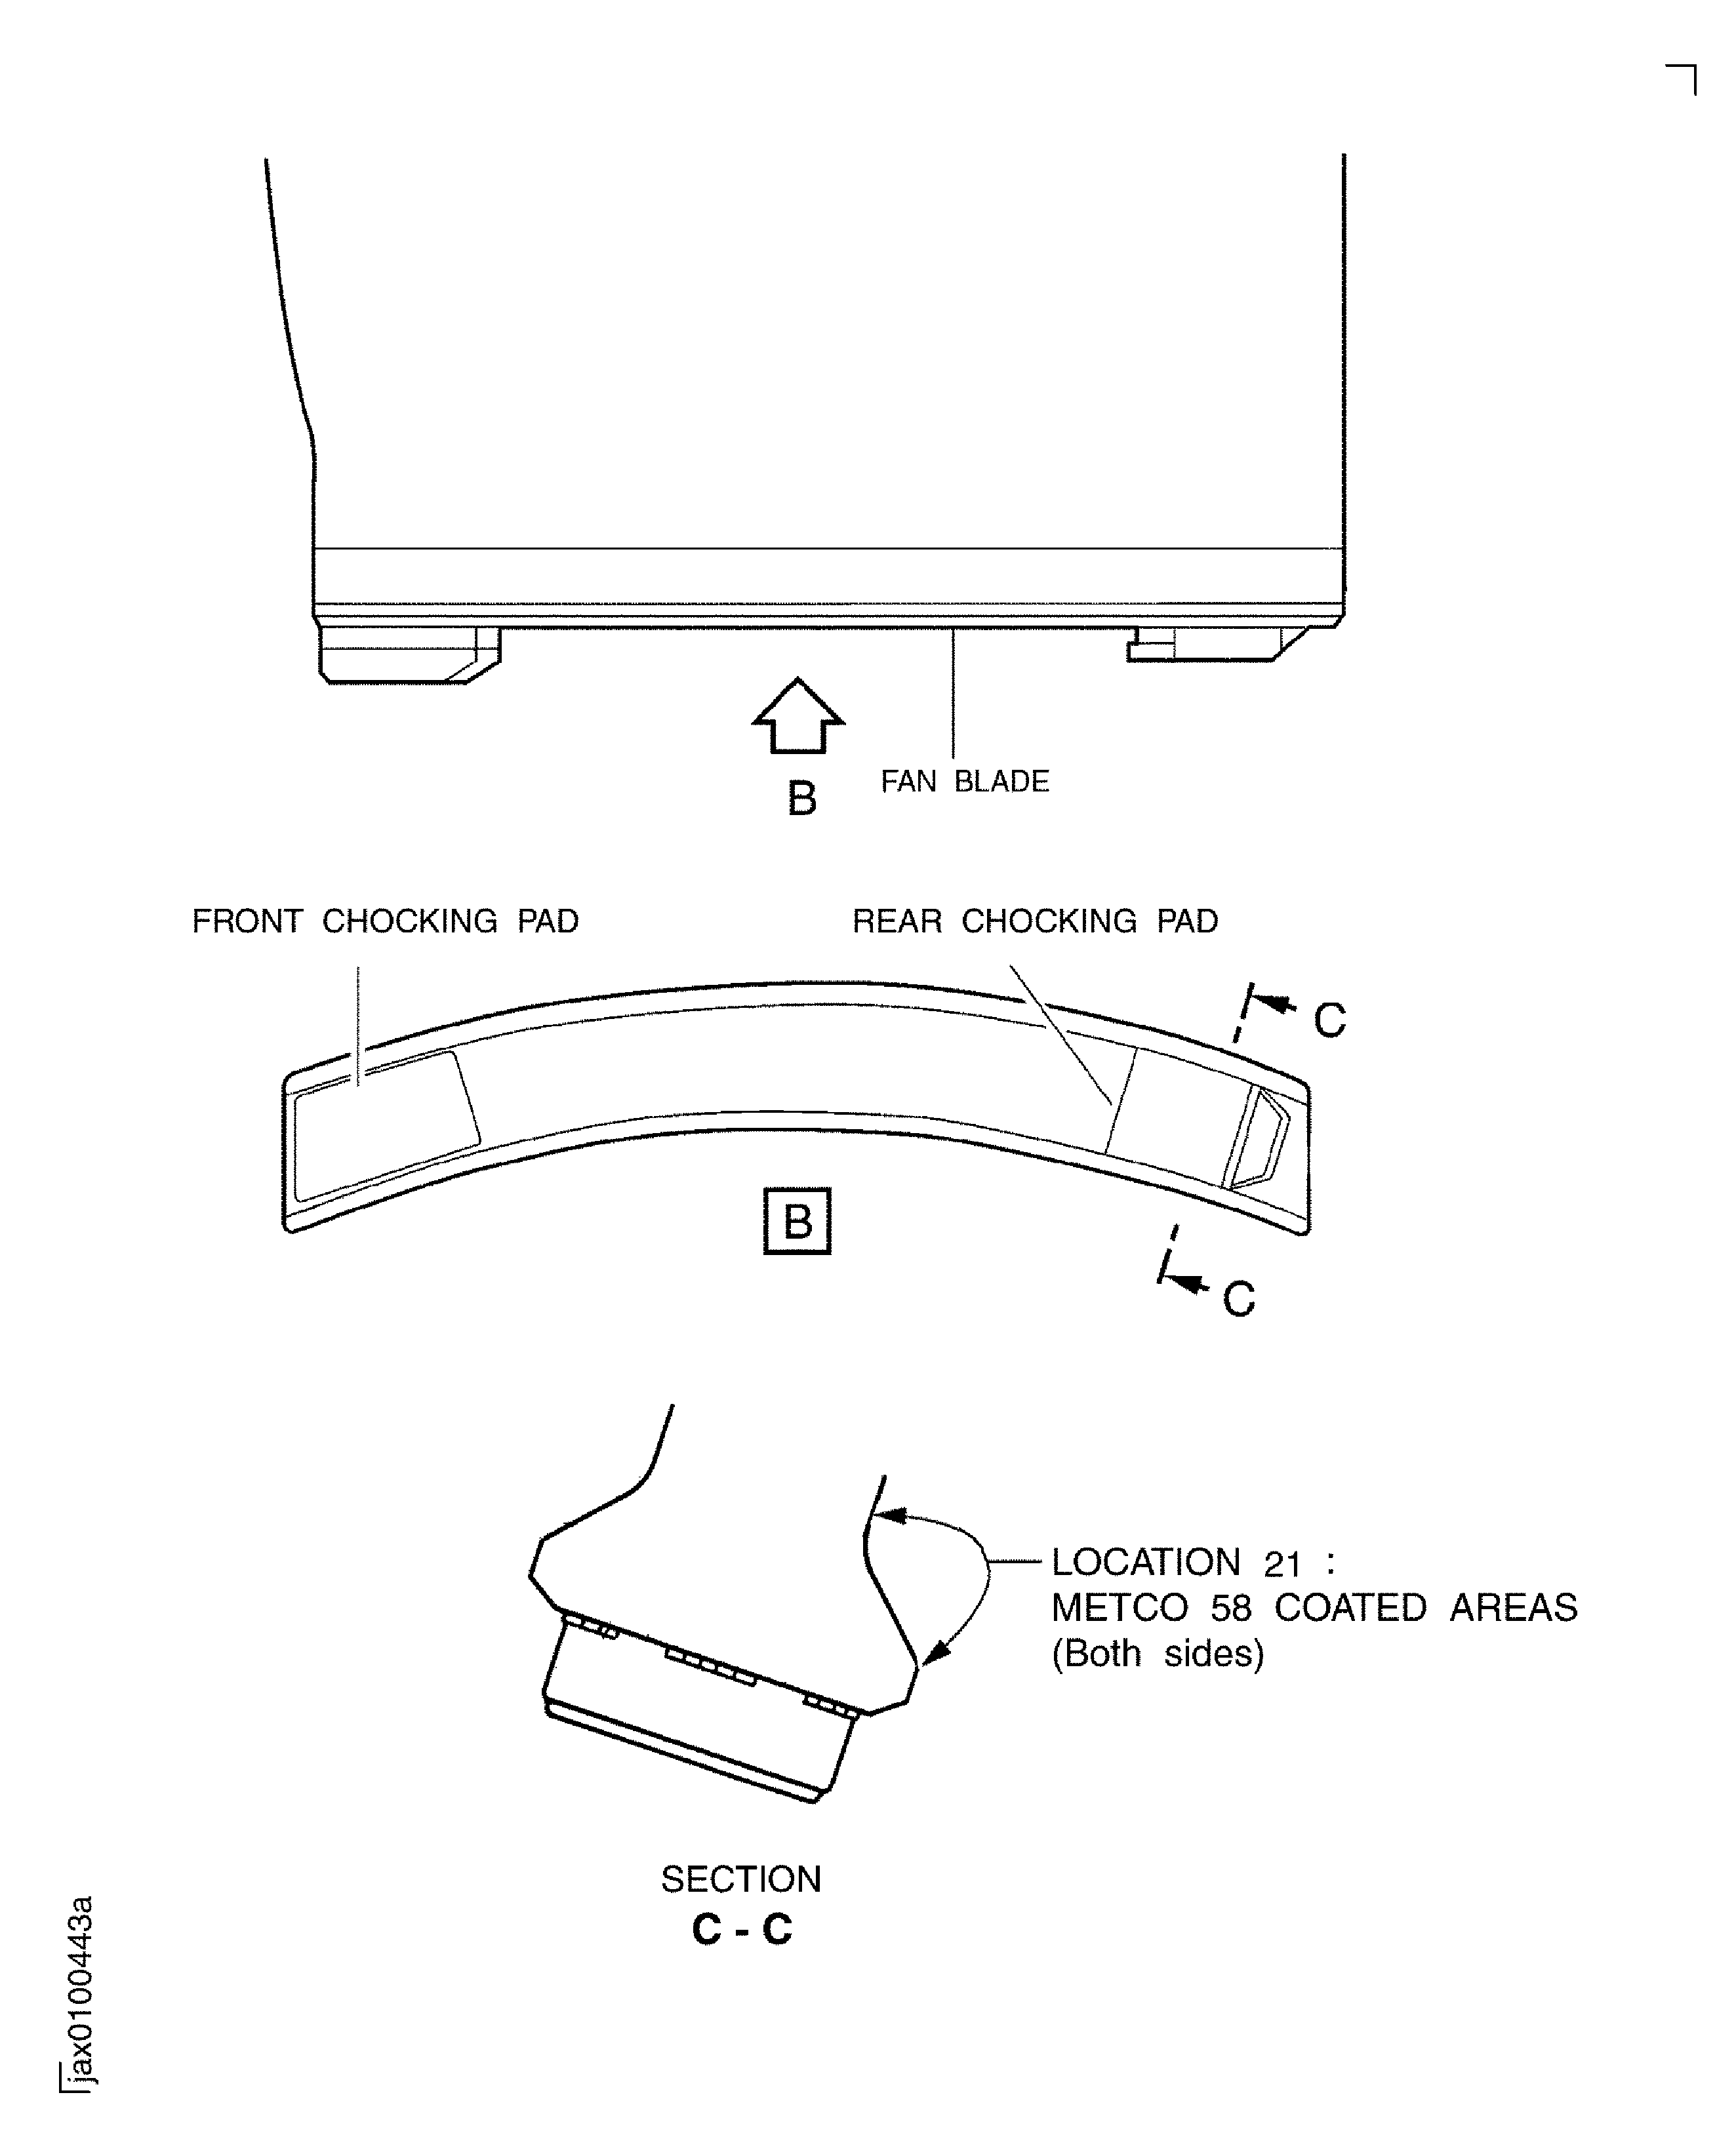
Examine the dovetail at location 21.
SUBTASK 72-31-11-220-182 Examine the LPC Rotor Blade Assembly (01-300) Dovetail

CAUTION
MAKE SURE THAT NMSB 72-0386 IS COMPLIED WITH.Repair, VRS1066 TASK 72-31-11-300-031 (REPAIR-031).
Up to 0.006 in. (0.15 mm) in depth.
More than in Step.
Nicked, scored, scratched, dented or galled.
Examine the faces at location 7.
SUBTASK 72-31-11-220-183 Examine the LPC Rotor Blade Assembly (01-300) Dovetail End Faces
Repair, VRS1022 TASK 72-31-11-300-009 (REPAIR-009).
Unbond.
Repair, VRS1022 TASK 72-31-11-300-009 (REPAIR-009).
Missing.
Examine the chocking pads at location 8.
SUBTASK 72-31-11-220-184 Examine the LPC Rotor Blade Assembly (01-300) Chocking Pads
Repair, VRS1066 TASK 72-31-11-300-031 (REPAIR-031).
Up to 0.012 in. (0.30 mm) in depth.
More than in Step.
Nicked, scored, scratched, dented or galled.
Examine the corner at location 9.
SUBTASK 72-31-11-220-185 Examine the LPC Rotor Blade Assembly (01-300) Corner
Refer to Figure.
Repair, VRS1023 TASK 72-31-11-300-021 (REPAIR 021).
On completion of all the blade repairs, apply dry film lubricant at dovetail locations.
SUBTASK 72-31-11-220-186 Apply Dry Film Lubricant at Dovetail Location
Figure: Locations on the LPC Rotor Blade Assembly
Locations on the LPC Rotor Blade Assembly

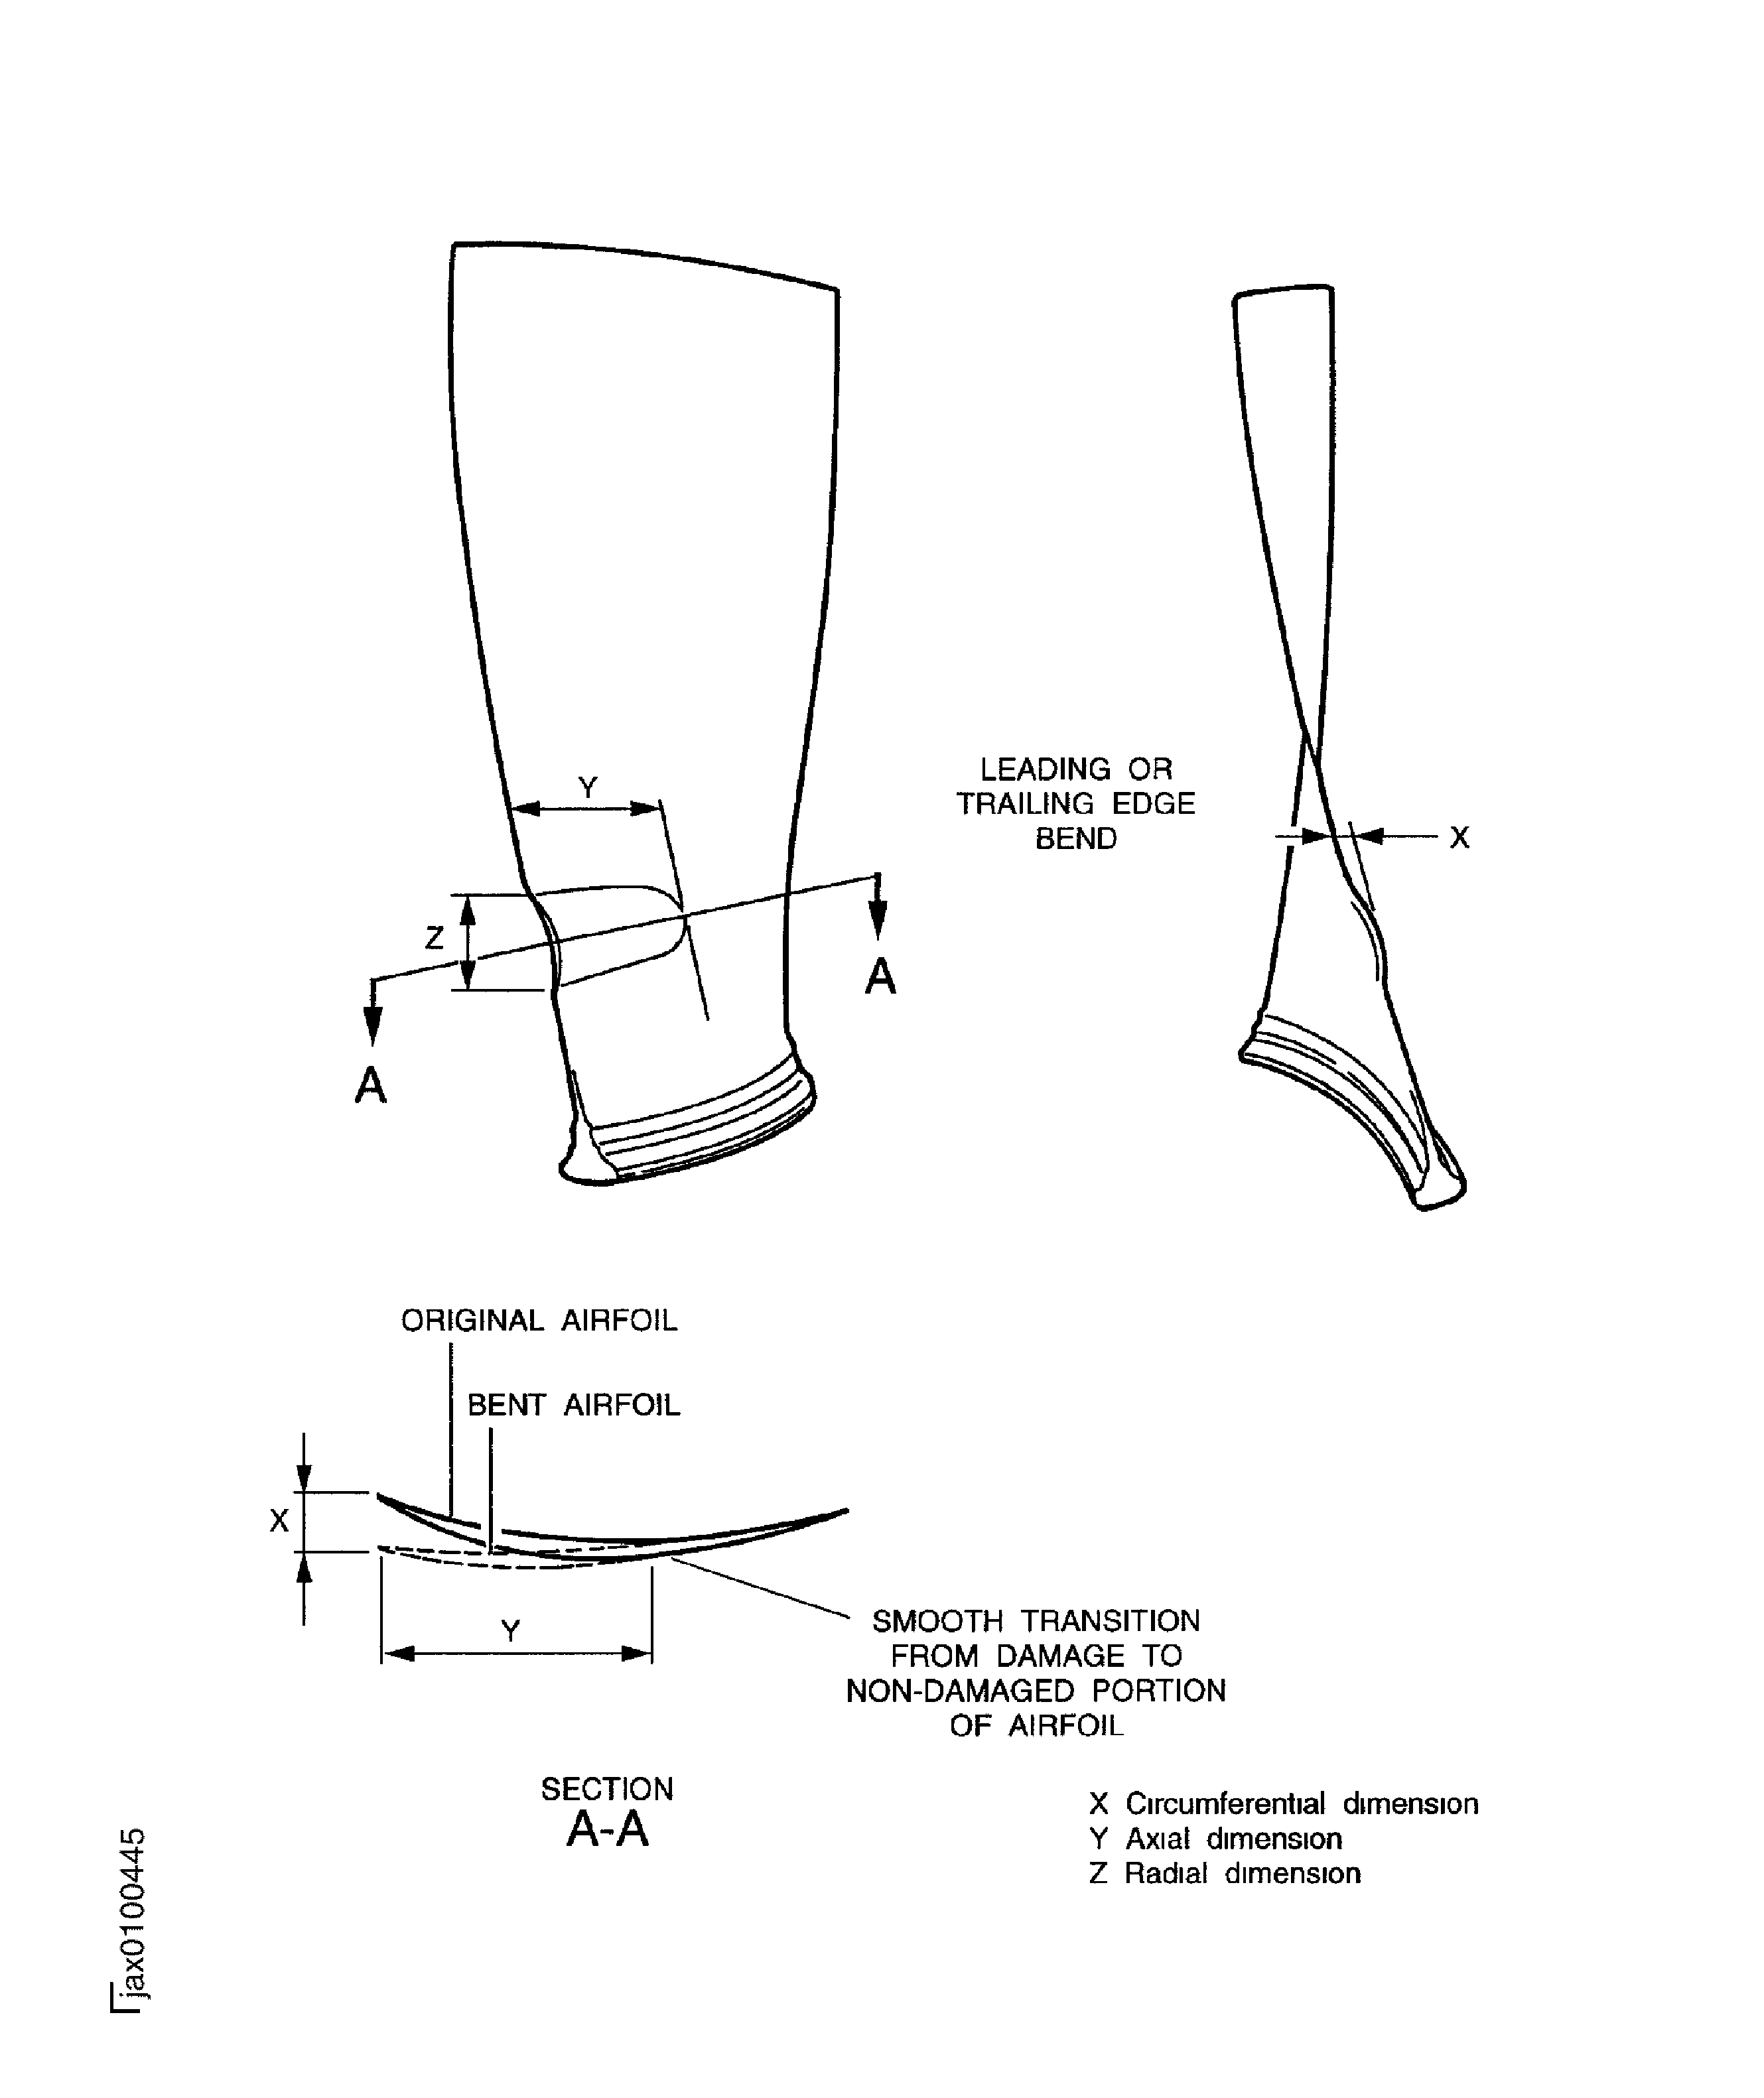
Figure: Locations on the LPC Rotor Blade Assembly
Locations on the LPC Rotor Blade Assembly

Figure: Locations on the LPC Rotor Blade Assembly
Locations on the LPC Rotor Blade Assembly

Figure: Locations on the LPC Rotor Blade Assembly
Locations on the LPC Rotor Blade Assembly

Figure: LPC Rotor Blade Assembly
LPC Rotor Blade Assembly

Figure: LPC Rotor Blade Assembly
LPC Rotor Blade Assembly

