Export Control
EAR Export Classification: Not subject to the EAR per 15 C.F.R. Chapter 1, Part 734.3(b)(3), except for the following Service Bulletins which are currently published as EAR Export Classification 9E991: SBE70-0992, SBE72-0483, SBE72-0580, SBE72-0588, SBE72-0640, SBE73-0209, SBE80-0024 and SBE80-0025.Copyright
© IAE International Aero Engines AG (2001, 2014 - 2021) The information contained in this document is the property of © IAE International Aero Engines AG and may not be copied or used for any purpose other than that for which it is supplied without the express written authority of © IAE International Aero Engines AG. (This does not preclude use by engine and aircraft operators for normal instructional, maintenance or overhaul purposes.).Applicability
All
Common Information
TASK 72-32-51-200-004 LP Stub Shaft - Examine, Inspection-004
General
This TASK gives the procedure for the inspection of the stub shaft assembly. For the other LP stub shaft and rotor center parts, refer to TASK 72-32-51-200-000 (INSPECTION-000).
The policy that is necessary for inspection is given in the SPM TASK 70-20-00-200-501.
All the parts must be cleaned before any part is examined. Refer to TASK 72-32-51-100-000 (CLEANING-000).
All the parts must be visually examined for damage, corrosion and wear. Any defects that are not identified in the procedure must be referred to IAE.
The procedure for those parts which must have a crack test is given in Step. Do the test before the part is visually examined.
Do not discard any part until you are sure there are no repairs available. Refer to the instructions in the repair before a discarded part is used again or oversize parts are installed.
Parts which should be discarded can be held although no repair is available. The repair of a discarded part could be shown to be necessary at a later date.
All the parts must be examined to make sure that all the repairs have been completed satisfactorily.
The practices and processes referred to in the procedure by the TASK/SUBTASK numbers are in the SPM.
References
Refer to the SPM for data on these items.
Definitions of Damage, SPM TASK 70-02-02-350-501
Inspection of Parts, SPM TASK 70-20-00-200-501
Some data on these items is contained in this TASK. For more data on these items refer to the SPM.
Method of Testing for Crack Indications
Chemical Processes
Surface protection
NOTE
Preliminary Requirements
Pre-Conditions
NONESupport Equipment
| Name | Manufacturer | Part Number / Identification | Quantity | Remark |
|---|---|---|---|---|
| Magnetic particle inspection equipment | LOCAL | Magnetic particle inspection equipment |
Consumables, Materials and Expendables
| Name | Manufacturer | Part Number / Identification | Quantity | Remark |
|---|---|---|---|---|
| CoMat 06-011 MAGNETIC PARTICLES, FLUORESCENT, DRY POWDER | LOCAL | CoMat 06-011 |
Spares
NONESafety Requirements
NONEProcedure
Clean the parts. Refer to TASK 72-32-51-100-000 (CLEANING-000).
SUBTASK 72-32-51-240-053 Examine the Stub Shaft Assembly (01-350) for Cracks
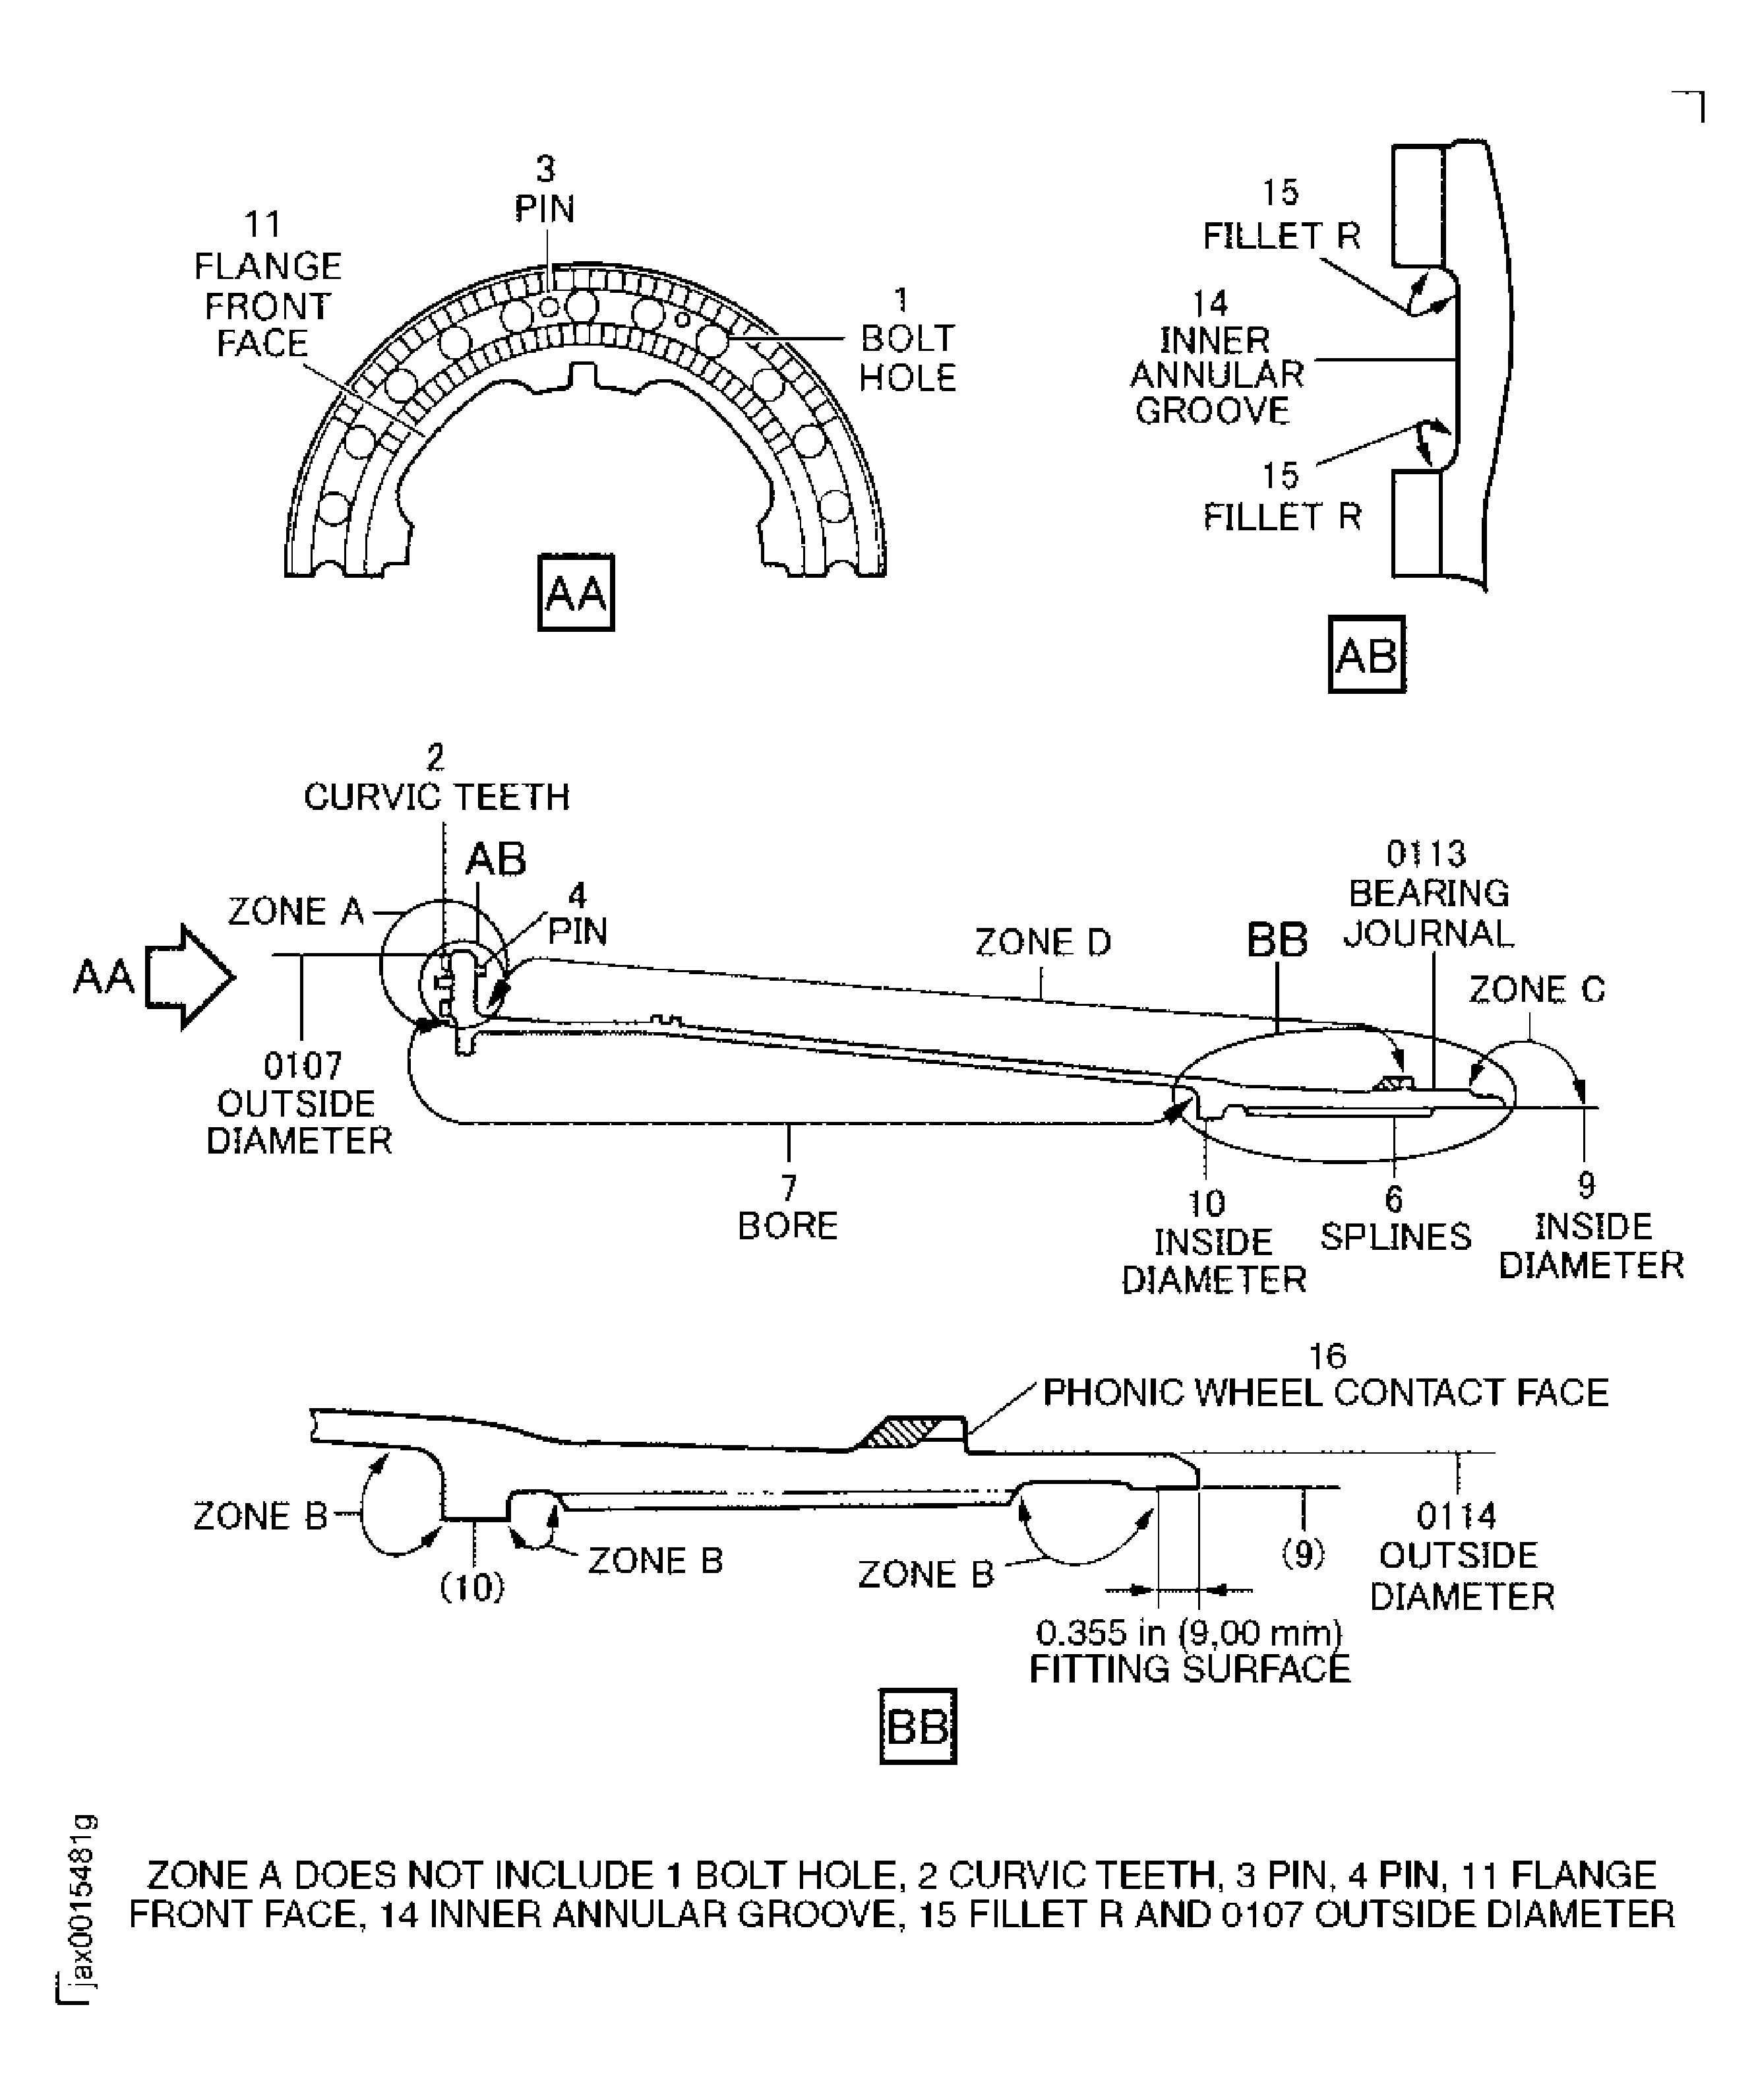
Refer to Figure.
Repair, VRS1292 TASK 72-32-51-300-008 (REPAIR-008)
Pitted
Examine the surface at zone A.
Repair, VRS1919 TASK 72-32-51-300-027 (REPAIR-027)
Pitted
Examine the surface at zone B.
Repair, VRS1292 TASK 72-32-51-300-008 (REPAIR-008)
Pitted or dented
Examine the surface at zone C.
More than in Step
Pitted.
Repair, VRS1292 TASK 72-32-51-300-008 (REPAIR-008)
Nicked or dented
Examine the surface at zone D.
SUBTASK 72-32-51-220-068 Examine the Stub Shaft Assembly (01-350) Surfaces at Zone A, B, C and D
Refer to Figure.
Repair, VRS1292 TASK 72-32-51-300-008 (REPAIR-008)
Burred or scored
Repair, VRS1292 TASK 72-32-51-300-008 (REPAIR-008)
Corroded
SUBTASK 72-32-51-220-069 Examine the Stub Shaft Assembly (01-350) Bolt Holes at Location 1
Repair, VRS1287 TASK 72-32-51-300-009 (REPAIR-009)
Galled
Repair, VRS1287 TASK 72-32-51-300-009 (REPAIR-009)
Corroded or pitted
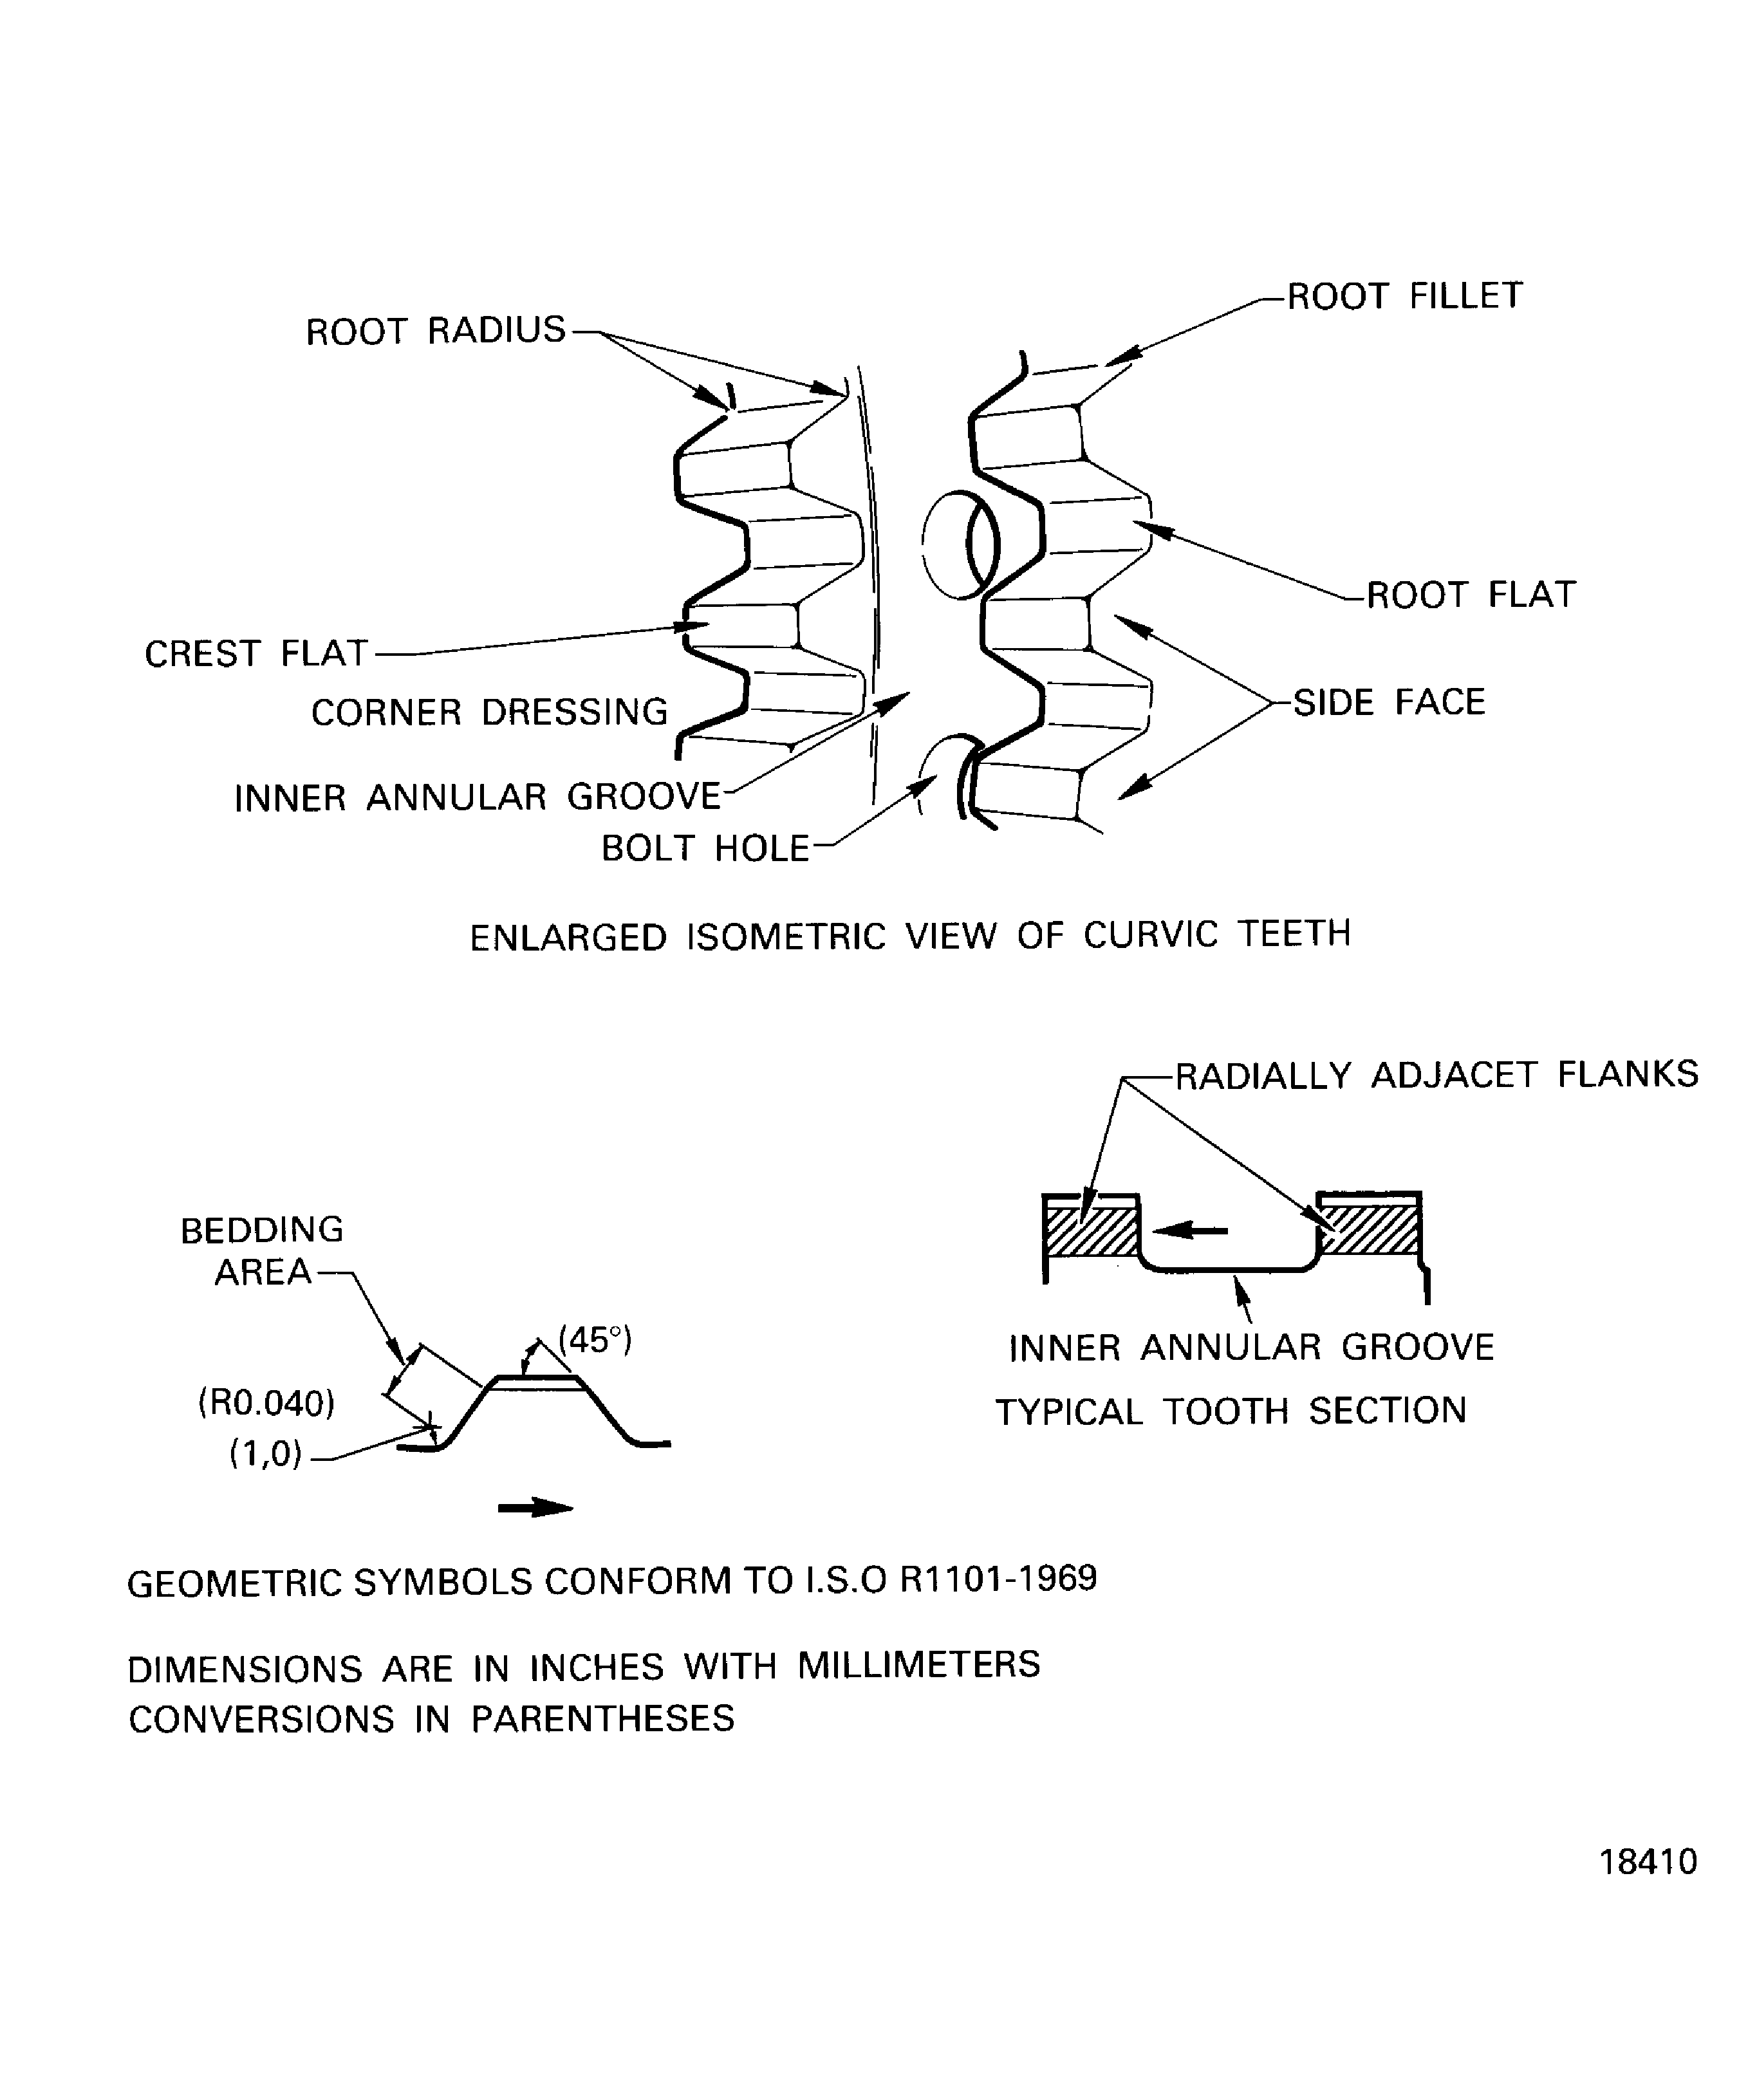
SUBTASK 72-32-51-220-070 Examine the Stub Shaft Assembly (01-350) Curvic Teeth at Location 2
Refer to Figure.
Repair, VRS1294 TASK 72-32-51-300-010 (REPAIR-010)
Worn
SUBTASK 72-32-51-220-071 Examine the Stub Shaft Assembly (01-350) Pins at Locations 3 and 4
Refer to Figure.
Repair, VRS1292 TASK 72-32-51-300-008 (REPAIR-008)
Nicked, dented or scratched
SUBTASK 72-32-51-220-169 Examine the Stub Shaft Assembly (01-350) Inner Annular Groove at Location 14
Refer to Figure.
Repair, VRS1292 TASK 72-32-51-300-008 (REPAIR-008)
Corroded or pitted
SUBTASK 72-32-51-220-170 Examine the Stub Shaft Assembly (01-350) Fillet R at Location 15
Refer to Figure.
Repair, VRS1291 TASK 72-32-51-300-011 (REPAIR-011)
Less than 4.4491 in. (113.005 mm)
Worn.
Repair, VRS1291 TASK 72-32-51-300-011 (REPAIR-011)
Galled or scored
SUBTASK 72-32-51-220-072 Examine the Stub Shaft Assembly (01-350) Bearing Journals at Location 0113
Refer to Figure.
Repair, VRS1293 TASK 72-32-51-300-012 (REPAIR-012)
Galled, scored or burred
SUBTASK 72-32-51-220-073 Examine the Stub Shaft Assembly (01-350) Splines at Location 6
Refer to Figure.
Repair, VRS1292 TASK 72-32-51-300-008 (REPAIR-008)
Tool marks
SUBTASK 72-32-51-220-074 Examine the Stub Shaft Assembly (01-350) Bore at Location 7
Refer to Figure.
Repair, VRS1911 TASK 72-32-51-300-024 (REPAIR-024)
Less than 9.8065 in. (249.084 mm)
Worn.
Repair, VRS1292 TASK 72-32-51-300-008 (REPAIR-008)
Galled or scored
SUBTASK 72-32-51-220-075 Examine the Stub Shaft Assembly (01-350) Outside Diameter at Location 0107
Refer to Figure.
Repair, VRS1910 TASK 72-32-51-300-013 (REPAIR-013)
More than 3.9378 in. (100.022 mm)
Worn.
Repair, VRS1292 TASK 72-32-51-300-008 (REPAIR-008)
Not more than 0.0039 in. (0.10 mm) in depth
Repair, VRS1292 TASK 72-32-51-300-008 (REPAIR-008)
If the damage is in 10 or less than 10 places
Repair, VRS1910 TASK 72-32-51-300-013 (REPAIR-013)
If the damage is in more than 10 places
Between 0.0039 and 0.017 in. (0.10 and 0.45 mm) in depth.
Galled or scored.
Examine the inside diameter at location 9.
Repair, VRS1910 TASK 72-32-51-300-013 (REPAIR-013)
More than 3.5446 in. (90.035 mm)
Worn.
Repair, VRS1292 TASK 72-32-51-300-008 (REPAIR-008)
Not more than 0.0039 in. (0.10 mm) in depth
Repair, VRS1292 TASK 72-32-51-300-008 (REPAIR-008)
If the damage is in 10 or less than 10 places
Repair, VRS1910 TASK 72-32-51-300-013 (REPAIR-013)
If the damage is in more than 10 places
Between 0.0039 and 0.017 in. (0.10 and 0.45 mm) in depth.
Galled or scored.
Examine the inside diameter at location 10.
SUBTASK 72-32-51-220-076 Examine the Stub Shaft Assembly (01-350) Inside Diameters at Locations 9 and 10
Refer to Figure.
Repair, VRS1291 TASK 72-32-51-300-011 (REPAIR-011)
Less than 4.4110 in. (112.037 mm)
Repair, VRS1291 TASK 72-32-51-300-011 (REPAIR-011)
Galled or scored
Worn.
SUBTASK 72-32-51-220-162 Examine the Stub Shaft Assembly (01-350) Outside Diameter at Location 0114
Refer to Figure.
Vibro-engrave the new total number at Location 11, refer to the SPM TASK 70-09-00-400-501.
Mark the new total number of engine cycles on the stub shaft.
SUBTASK 72-32-51-220-160 Examine the Stub Shaft (01-350) at Location 11 for the Engine Cycles of the Part
Refer to Figure.
Repair, VRS1295 TASK 72-32-51-300-023 (REPAIR-023) or Repair, VRS1289 TASK 72-32-51-300-014 (REPAIR-014)
Not more than 4 sqin (25.8 sqcm) in total
Repair, VRS1295 TASK 72-32-51-300-023 (REPAIR-023)
More than in Step
Examine the paint at location 12.
SUBTASK 72-32-51-220-163 Examine the Stub Shaft Assembly (01-350) Paint
Refer to Figure.
Repair, VRS1292 TASK 72-32-51-300-027 (REPAIR-027)
Not more than 0.0050 in. (0.13 mm) in depth
More than in Step
Nicked, dented or scratched.
Examine surface on groove at location 13.
SUBTASK 72-32-51-220-165 Examine the Stub Shaft Assembly (01-350) Groove for Phonic Wheel Pin at Location 13
Refer to Figure.
Repair, VRS1292 TASK 72-32-51-300-008 (REPAIR-008)
Galled or gouged
SUBTASK 72-32-51-220-171 Examine the Stub Shaft Assembly (01-350) Phonic Wheel Contact Face at Location 16
PART IDENT | PROCEDURE | CURRENT/INSPECT | TASK/SUBTASK |
|---|---|---|---|
Stub shaft assembly | TB using continuous wet simultaneous inking with CoMat 06-011 MAGNETIC PARTICLES, FLUORESCENT, DRY POWDER | 1500 amp. Stub shaft diameter. Visually inspect for longitudinal and radial defects. Check doubtful indications using low power magnification. If necessary, inspect under white light at X15 binocular | |
Solenoid coil continuous wet or simultaneous inking | 15000 A/T. Do again the magnetisation and inspection along the stub shaft length. Visually inspect for circumferential defects. Check doubtful indications using low power magnification. If necessary, inspect under white light at X15 binocular |
Figure: Location on the Stub Shaft Assembly
Location on the Stub Shaft Assembly

Figure: Locations on the Stub Shaft Assembly - Curvic Teeth
Locations on the Stub Shaft Assembly - Curvic Teeth

Figure: Locations on the Stub Shaft Assembly - Paint Area
Locations on the Stub Shaft Assembly - Paint Area

