Export Control
EAR Export Classification: Not subject to the EAR per 15 C.F.R. Chapter 1, Part 734.3(b)(3), except for the following Service Bulletins which are currently published as EAR Export Classification 9E991: SBE70-0992, SBE72-0483, SBE72-0580, SBE72-0588, SBE72-0640, SBE73-0209, SBE80-0024 and SBE80-0025.Copyright
© IAE International Aero Engines AG (2001, 2014 - 2021) The information contained in this document is the property of © IAE International Aero Engines AG and may not be copied or used for any purpose other than that for which it is supplied without the express written authority of © IAE International Aero Engines AG. (This does not preclude use by engine and aircraft operators for normal instructional, maintenance or overhaul purposes.).Applicability
All
Common Information
TASK 72-32-85-200-001-D00 Fan Case - Examine, Inspection-001
Effectivity
FIG/ITEM | PART NO. |
|---|---|
01-100 | 5W0149 |
01-100 | 5W0169 |
01-100 | 5W0172 |
01-100 | 5W0195 |
01-100 | 5W0197 |
01-100 | 5W0198 |
01-100 | 5W0218 |
01-100 | 5W0220 |
01-100 | 5W0221 |
01-100 | 5W0223 |
01-100 | 5W0225 |
01-100 | 5W0226 |
01-100 | 5W0307 |
01-100 | 5W0313 |
General
This TASK gives the procedure for the inspection of the fan case assembly.
The policy that is necessary for inspection is given in SPM TASK 70-20-10-200-501.
All parts must be cleaned before any part is examined. Refer to SPM TASK 70-10-00-100-501.
All parts must be visually examined for damage, corrosion and wear. Any defects that are not identified in the procedure must be referred to IAE.
The procedure for those parts which must have a crack test is given in Step. Do the test before the parts is visually examined. Limits for cracks are given in the SUBTASK for each part.
Do not discard any part until you are sure there are no repairs available. Refer to the instructions in repair before a discarded part is used again or oversize parts are installed.
Part which should be discarded can be held although no repair is available. The repair of a discarded part could be shown to be necessary at a later date.
All parts must be examined to make sure that all repairs have been completed satisfactorily.
The practices and processes referred to in the procedure by the TASK numbers are in SPM.
References
Refer to SPM for the data on these items
Definitions of damages, SPM TASK 70-02-02-350-501
Inspection of parts, SPM TASK 70-20-01-200-501
NOTE
NOTE
Preliminary Requirements
Pre-Conditions
NONESupport Equipment
| Name | Manufacturer | Part Number / Identification | Quantity | Remark |
|---|---|---|---|---|
| IAE 2J13056 Gage, wear | 0AM53 | IAE 2J13056 | 1 | |
| Tool tapping | LOCAL | IAE 1N20444 | 1 |
Consumables, Materials and Expendables
| Name | Manufacturer | Part Number / Identification | Quantity | Remark |
|---|---|---|---|---|
| CoMat 02-224 SILICONE ADHESIVE POLYESTERTAPE | LOCAL | CoMat 02-224 |
Spares
NONESafety Requirements
NONEProcedure
NOTE
For the method to the part, refer to SPM TASK 70-11-26-300-503.Clean the part. Refer to TASK 72-32-85-100-000 (CLEANING-000).
Do the crack test on the part that is given below. Use the applicable penetrant inspection procedure.
PART IDENT
TASK/SUBTASK
Fan case assembly
NOTE
Use CoMat 02-224 SILICONE ADHESIVE POLYESTERTAPE and polyethylene sheet to protect anti-ice impact, attrition and acoustic linings.
SUBTASK 72-32-85-230-056 Examine the Fan Case Assembly for Cracks
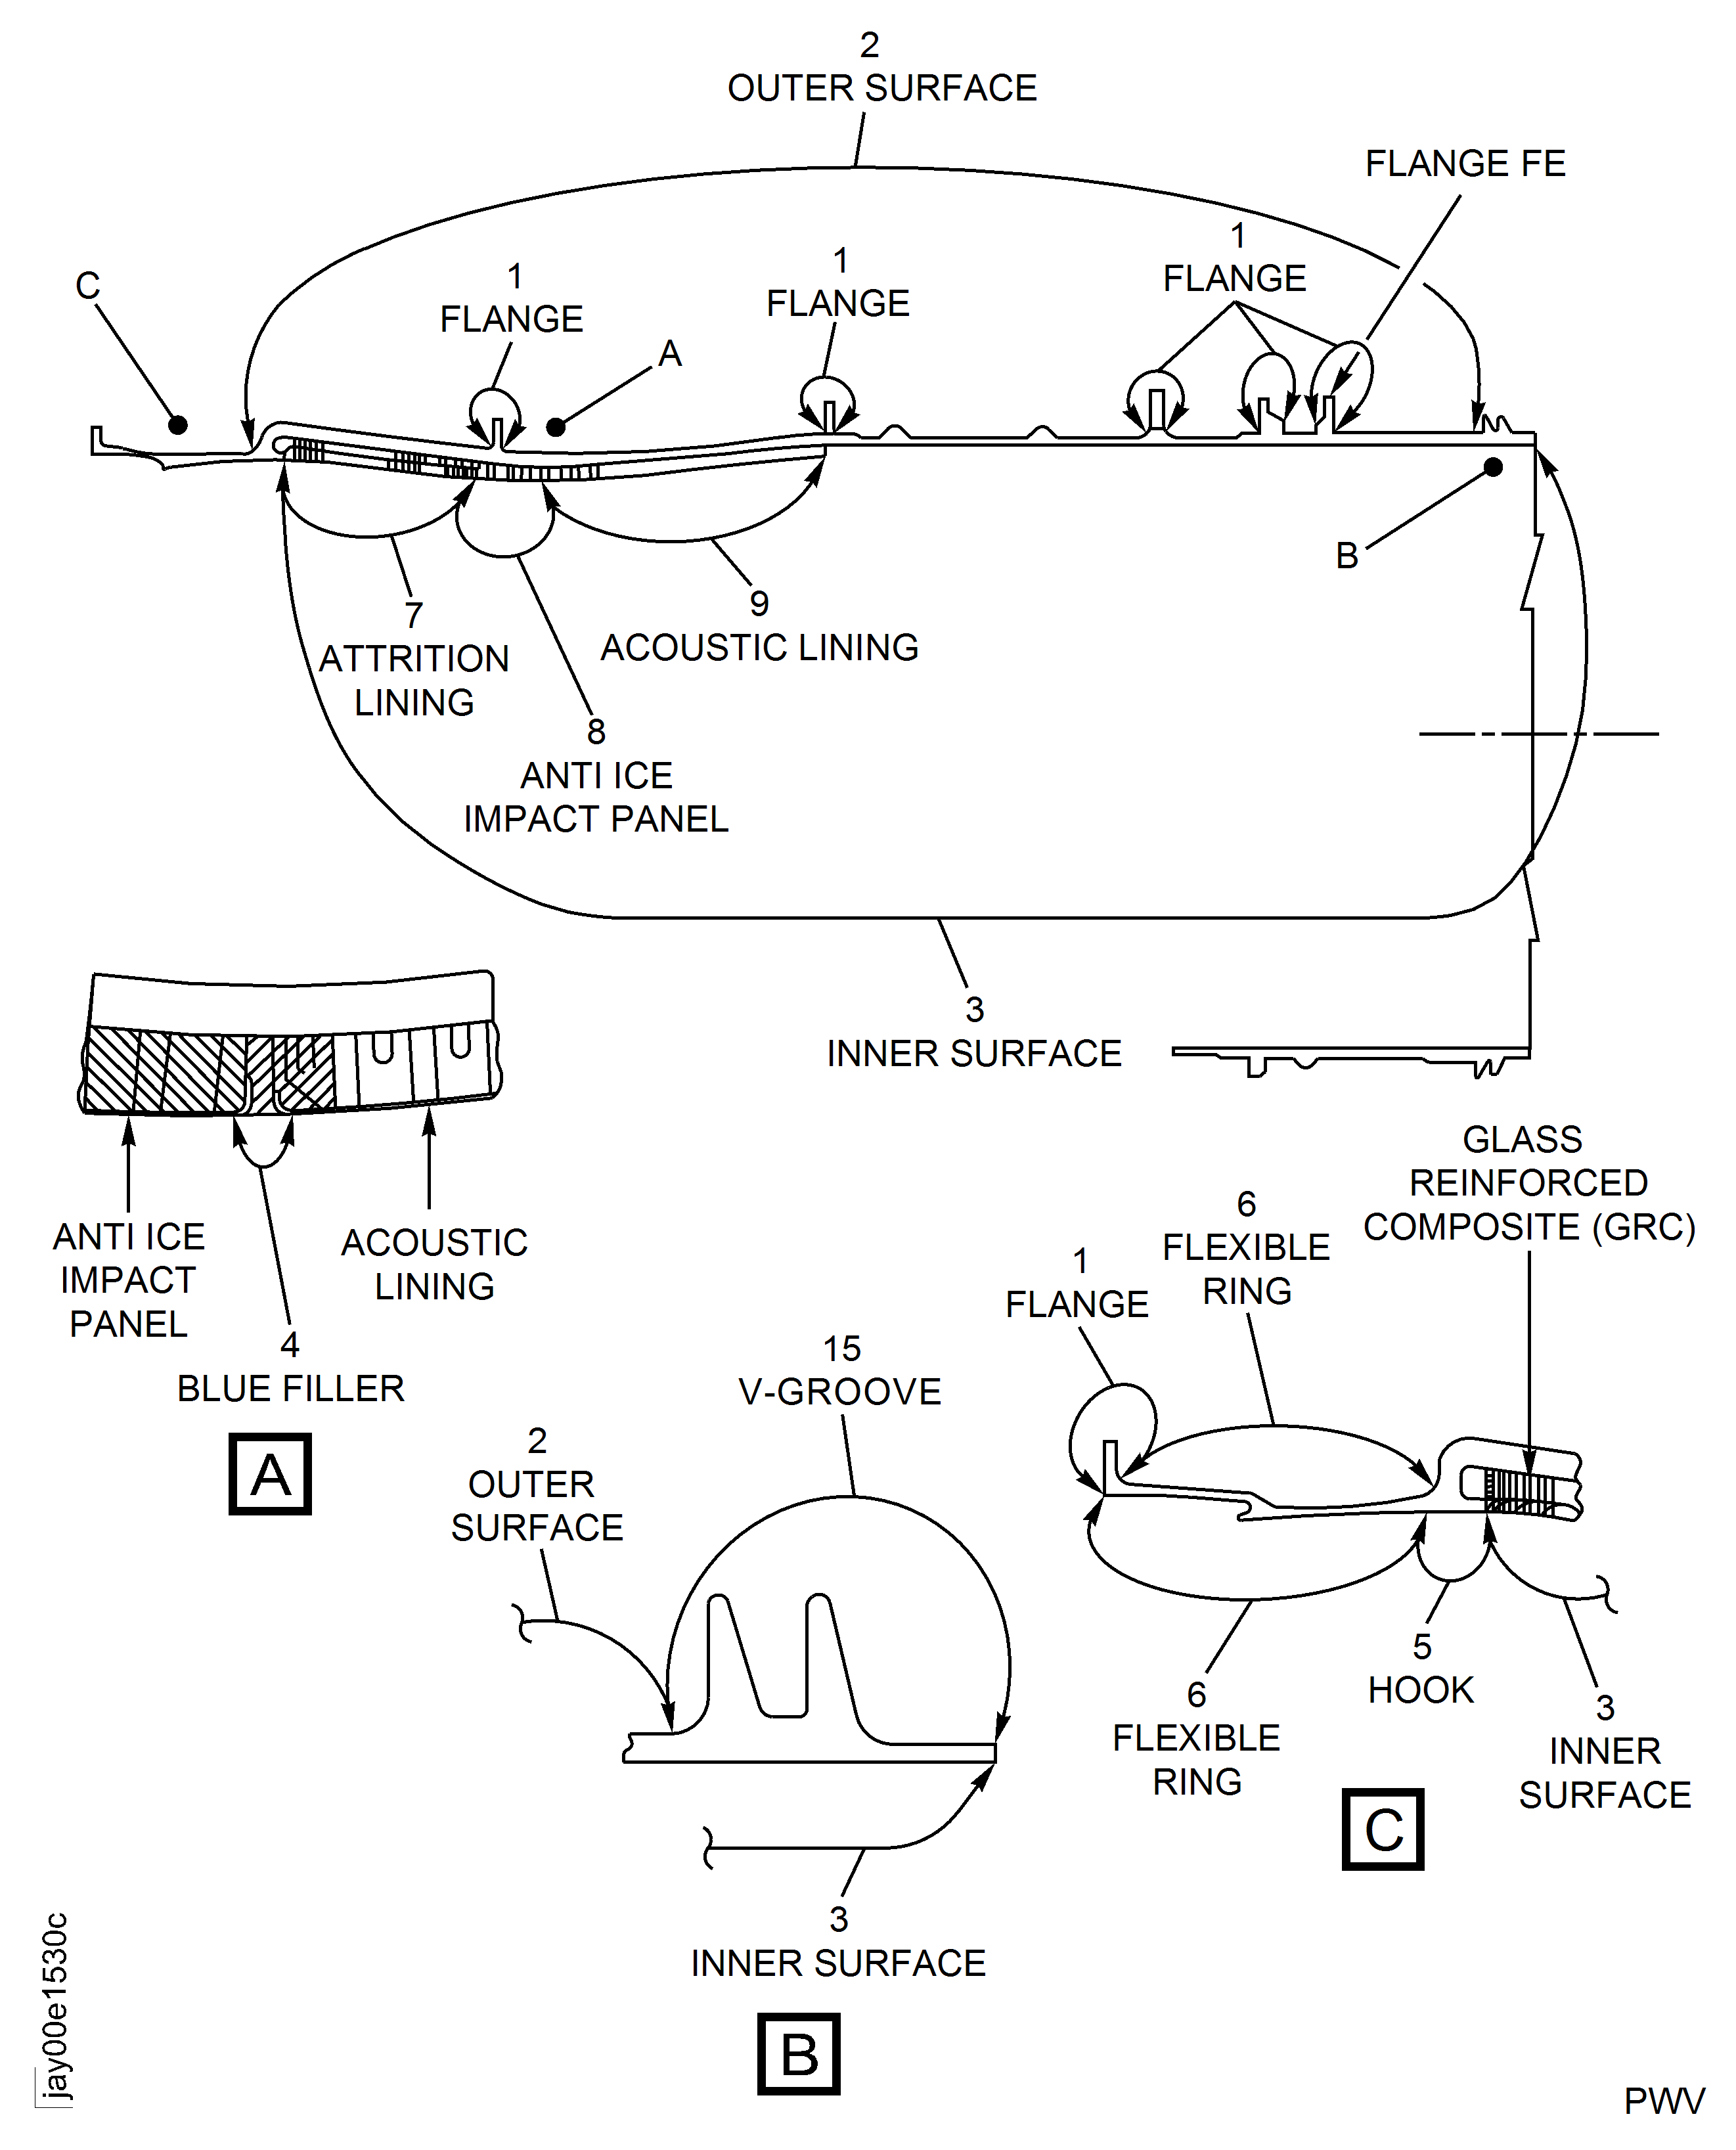
Refer to Figure.
Repair, VRS1805 TASK 72-32-85-300-042 (REPAIR-042).
Galled.
Repair, VRS1805 TASK 72-32-85-300-042 (REPAIR-042).
Bolthole edge burred.
Repair, VRS1992 TASK 72-32-85-300-058 (REPAIR-058).
Elongated bolthole due to wear at Flange FE.
NOTE
Except four holes of 0.629 inch (16.000 mm) in diameter at 3 o'clock and 9 o'clock positions and the bushing hole at Location 11.
Examine the flange at Location 1.
SUBTASK 72-32-85-220-107 Examine the Fan Case Assembly (01-100) Flange
Refer to Figure.
Repair, VRS1805 TASK 72-32-85-300-042 (REPAIR-042).
Nicked or dented.
Repair, VRS1805 TASK 72-32-85-300-042 (REPAIR-042).
Bolthole edge burred.
Examine the outer surface and inner surface at locations 2 and 3.
SUBTASK 72-32-85-220-108 Examine the Fan Case Assembly (01-100) Outer Surface and Inner Surface
Refer to Figure.
Repair, VRS1823 TASK 72-32-85-300-039 (REPAIR-039)
Erosion
Examine the blue filler at Location 4.
SUBTASK 72-32-85-220-109 Examine the Fan Case Assembly (01-100) Blue Filler
Refer to Figure.
Repair, VRS1805 TASK 72-32-85-300-042 (REPAIR-042)
Scored or dented
Examine the hook at Location 5.
SUBTASK 72-32-85-220-110 Examine the Fan Case Assembly (01-100) Hook
Refer to Figure.
Repair, VRS1805 TASK 72-32-85-300-042 (REPAIR-042).
Nicked, dented or scored.
Examine the flexible ring surface at Location 6.
SUBTASK 72-32-85-220-111 Examine the Fan Case Assembly (01-100) Flexible Ring Surface
Use IAE 2J13056 Gage, wear. Less than 0.158 in. (4.00 mm) in depth around circumference.
Repair, VRS1819 TASK 72-32-85-300-019 (REPAIR-019).
More than in Step and damaged to the depth of the Glass Reinforced Composite (GRC) layer.
Wear, Rubs.
Repair, VRS1819 TASK 72-32-85-300-019 (REPAIR-019).
Damage to the depth of the GRC layer.
Repair, VRS1820 TASK 72-32-85-300-020 (REPAIR-020).
Damaged deeper than the GRC layer and not more than 4 sqin. (25.8 sqcm) attrition lining.
Repair, VRS1840 TASK 72-32-85-300-036 (REPAIR-036).
More than in Step.
Repair, VRS1820 TASK 72-32-85-300-020 (REPAIR-020).
Damaged area is less than 20 percent of the total area of each attrition lining.
Repair, VRS1840 TASK 72-32-85-300-036 (REPAIR-036).
More than in Step.
Unbond.
NOTE
Check the attrition lining for unbond by tap testing. The attrition lining is tapped or hit lightly, with a metallic coin (not less than 1 in. (25.4 mm) ) or small metal rod with a ball end or Tool tapping. If the unbond is present directly below the point of impact, a change in pitch (hollow sound) will be emitted from the attrition lining. Plot the result of the tap test, if necessary.
Gouges, scores and dent.
Examine the attrition lining at Location 7.
SUBTASK 72-32-85-220-112 Examine the Fan Case Assembly (01-100) Attrition Lining
Refer to Figure.
Repair, VRS1821 TASK 72-32-85-300-037 (REPAIR-037).
Less than 30 percent of each anti ice impact panels.
Repair, VRS1841 TASK 72-32-85-300-038 (REPAIR-038).
More than in Step.
Tear, peeled and dent the GRC skin.
Repair, VRS1821 TASK 72-32-85-300-037 (REPAIR-037).
Less than 30 percent of each anti-ice impact panels.
Repair, VRS1841 TASK 72-32-85-300-038 (REPAIR-038).
More than in Step.
Loose, unbond.
NOTE
Check the anti-ice impact panel for unbond by tap testing. The anti-ice impact panel is tapped or hit lightly, with a metallic coin (not less than 1 in. (25,4 mm) ) or small metal rod with a ball end or Tool tapping. If the unbond is present directly below the point of impact, a change in pitch (hollow sound) will be emitted from the anti-ice impact panel. Plot the result of the tap test, if necessary.
Examine the anti ice impact panel at Location 8.
SUBTASK 72-32-85-220-113 Examine the Fan Case Assembly (01-100) Anti Ice Impact Panel
Refer to Figure.
Repair, VRS1822 TASK 72-32-85-300-040 (REPAIR-040).
Less than 20 percent of the total circumference of the acoustic linings.
Repair, VRS1842 TASK 72-32-85-300-041 (REPAIR-041).
More than in Step.
Crack, tear, score and peeled or missing perforation sheet.
Repair, VRS1822 TASK 72-32-85-300-040 (REPAIR-040).
More than Step and less than 20 percent of the total circumference of the acoustic linings.
Repair, VRS1842 TASK 72-32-85-300-041 (REPAIR-041).
More than in Step.
Smooth dent.
Repair, VRS1822 TASK 72-32-85-300-040 (REPAIR-040).
Repair, VRS1842 TASK 72-32-85-300-041 (REPAIR-041).
More than in Step.
Less than 20 percent of the total circumference of the acoustic linings.
Dent, kinked or raised perforation sheet.
Repair, VRS1822 TASK 72-32-85-300-040 (REPAIR-040).
Less than 20 percent of the total circumference acoustic linings.
Repair, VRS1842 TASK 72-32-85-300-041 (REPAIR-041).
More than in Step.
Loose, unbond.
NOTE
Check the acoustic lining for unbond by tap testing. The acoustic lining is tapped or hit lightly, with a metallic coin (not less than 1 in. (25.4 mm) ) or small metal rod with a ball end or Tool tapping. If the unbond is present directly below the point of impact, a change in pitch (hollow sound) will be emitted from the acoustic lining. Plot the result of the tap test, if necessary.
Examine the acoustic lining at Location 9.
SUBTASK 72-32-85-220-114 Examine the Fan Case Assembly (01-100) Acoustic Lining
Refer to Figure
Repair, VRS1413 TASK 72-32-85-300-047 (REPAIR-047).
More than in Step.
Worn.
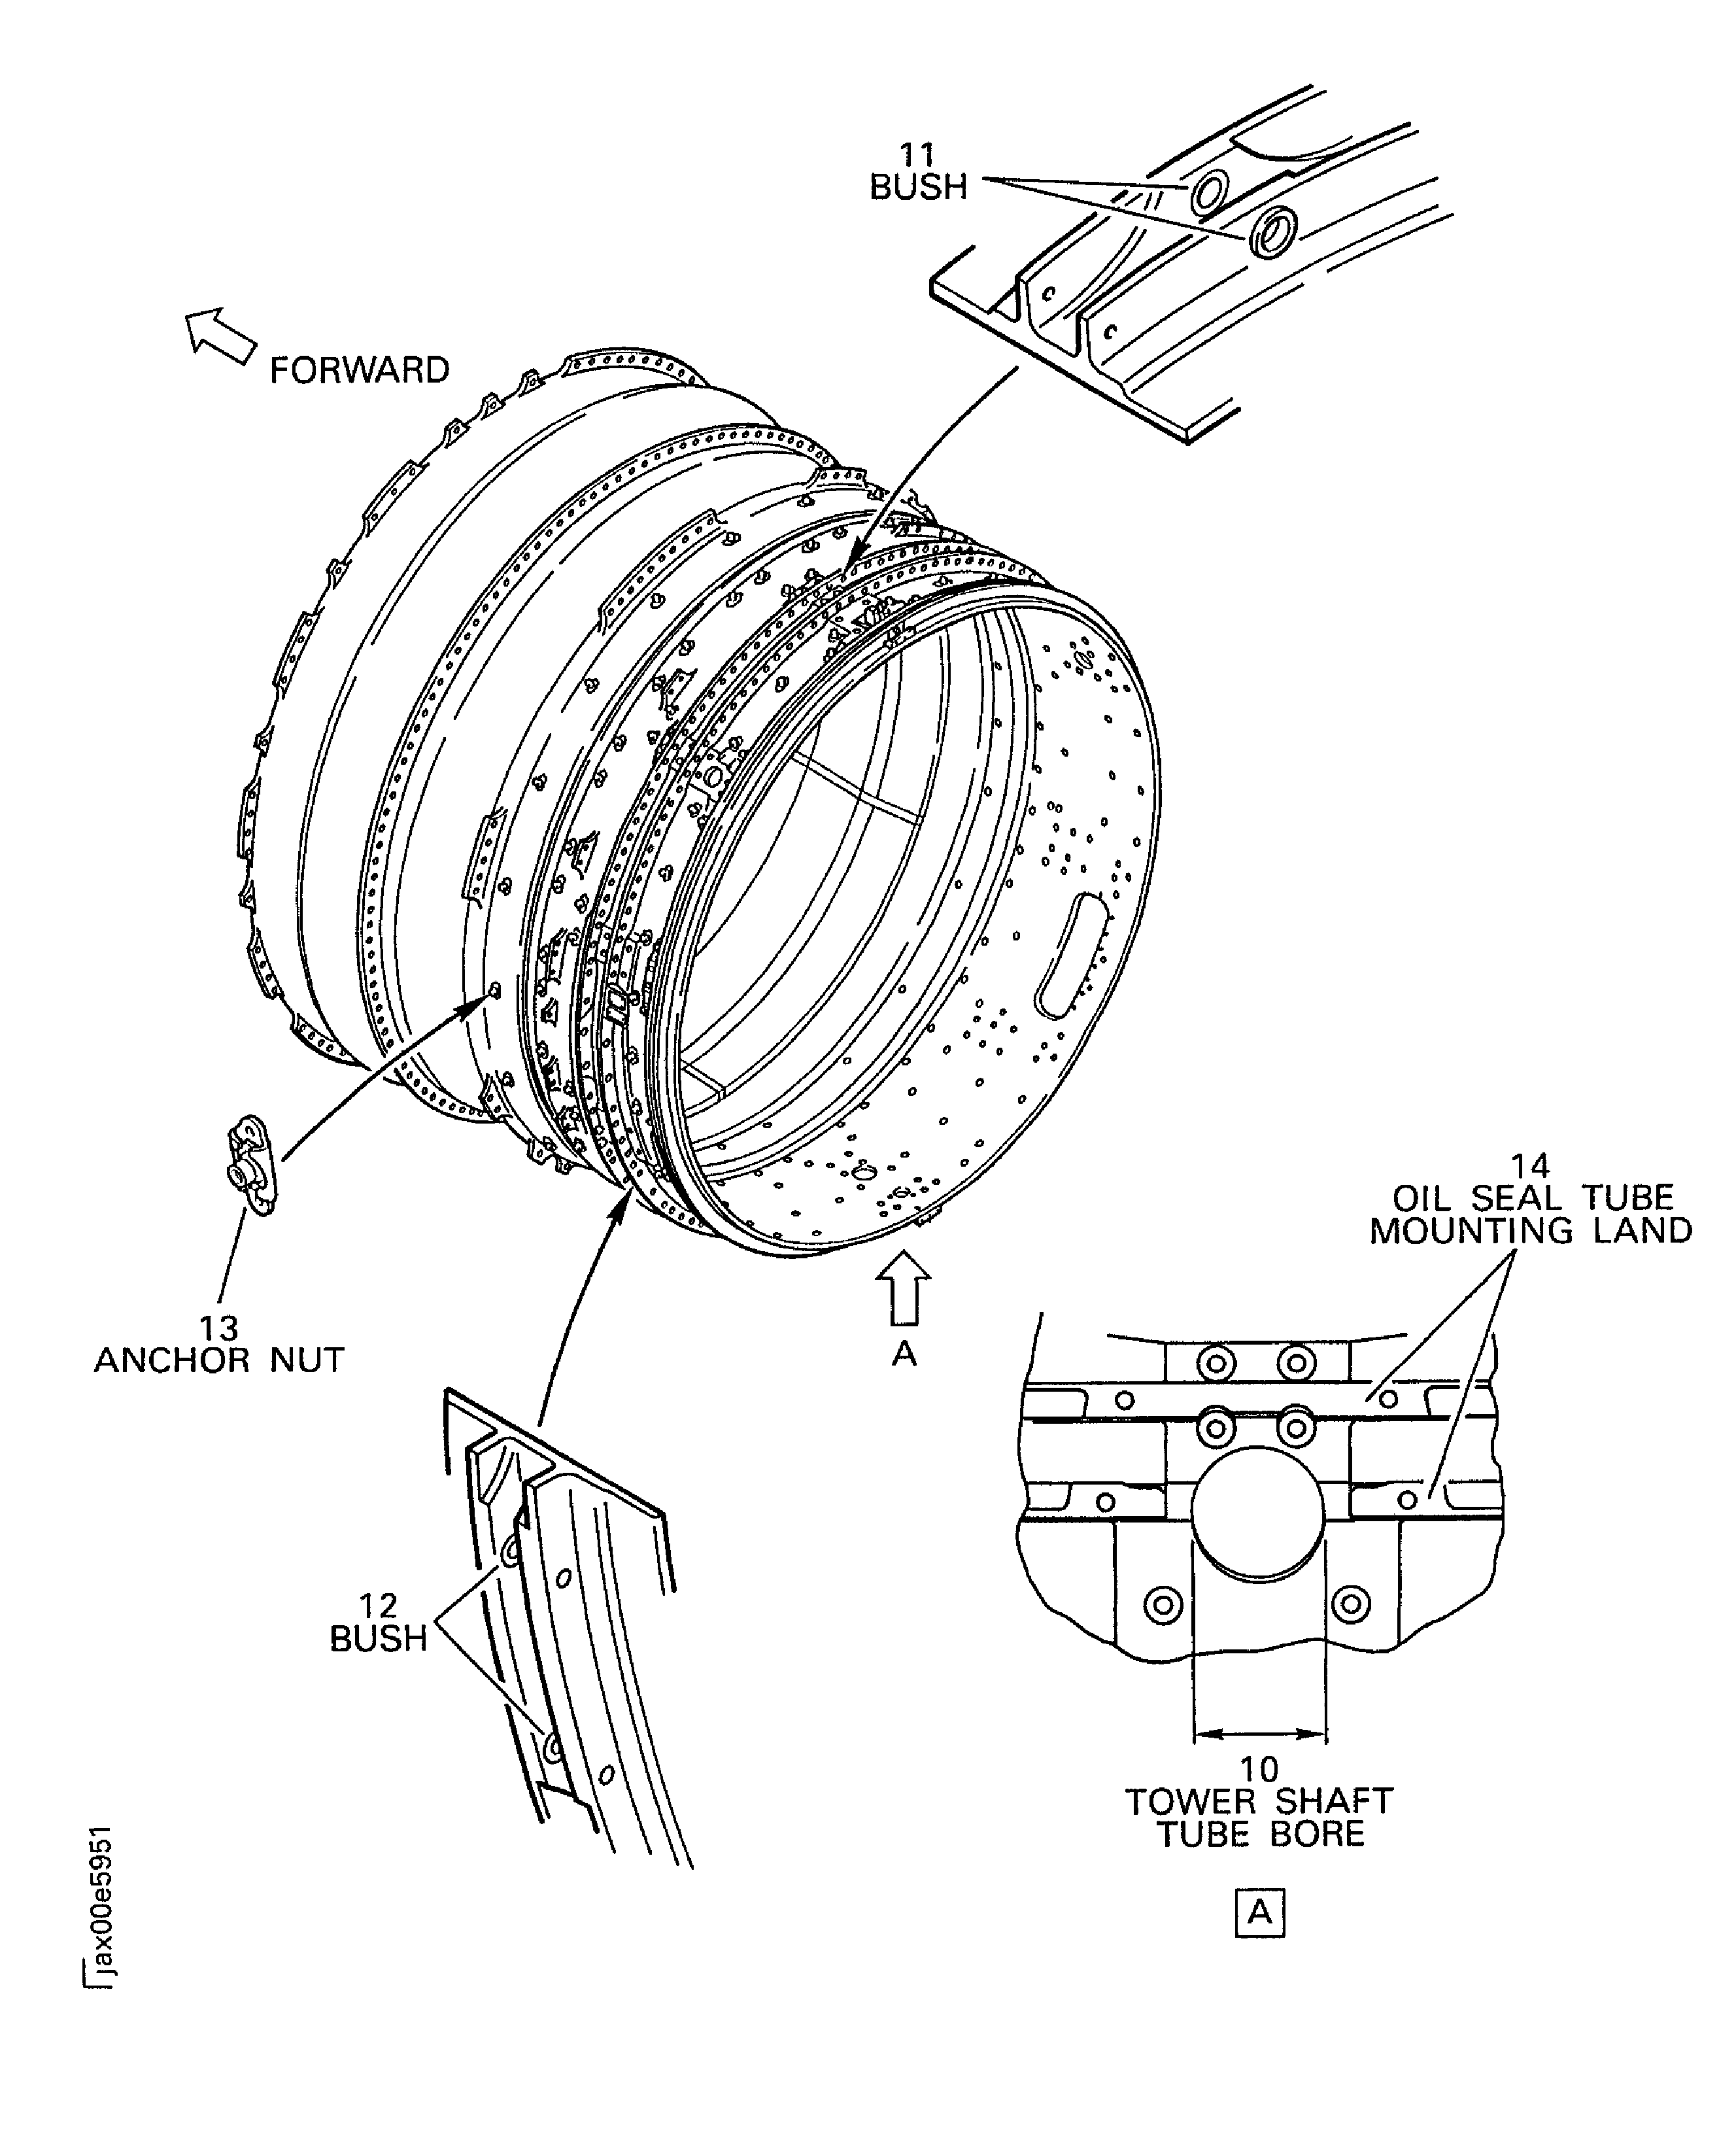
Examine the tower shaft tube bore at location 10.
SUBTASK 72-32-85-220-159 Examine the Fan Case Assembly (01-100) Tower Shaft Tube Bore
Refer to Figure.
Repair, VRS1712 TASK 72-32-85-300-046 (REPAIR-046).
More than in Step.
Worn on the bore.
Repair, VRS1712 TASK 72-32-85-300-046 (REPAIR-046).
More than in Step
Nicked, dented, scored and scratched on the bore.
Repair, VRS1712 TASK 72-32-85-300-046 (REPAIR-046). Rotation of the bush is permissible.
Axially loose missing bushes.
Examine the bush at Location 11.
SUBTASK 72-32-85-220-160 Examine the Fan Case Assembly (01-100) Bushes
Refer to Figure.
Repair, VRS1712 TASK 72-32-85-300-046 (REPAIR-046).
More than in Step
Worn on the bore.
Repair, VRS1712 TASK 72-32-85-300-046 (REPAIR-046).
More than in Step
Nicked, dented, scored and scratched.
Repair, VRS1712 TASK 72-32-85-300-046 (REPAIR-046). Rotation of the bush is permissible.
Axially loose missing bushes
Examine the bush at Location 12.
SUBTASK 72-32-85-220-161 Examine the Fan Case Assembly (01-100) Bushes
Refer to Figure.
Repair, VRS1418 TASK 72-32-85-300-012 (REPAIR-012).
Loose or damaged.
Examine the anchor nuts at Location 13.
SUBTASK 72-32-85-220-162 Examine the Fan Case Assembly (01-100) Anchor Nuts
Refer to Figure.
Repair, VRS1419 TASK 72-32-85-300-013 (REPAIR-013).
Loose or damaged.
Examine the screw thread inserts at Location 14.
SUBTASK 72-32-85-220-163 Examine the Fan Case Assembly (01-100) Screw Thread Inserts of the Oil Seal Tube Mount Land
Refer to Figure.
Repair, VRS1800 TASK 72-32-85-300-055 (REPAIR-055).
Nicked, dented, pitted, galled or scored
Examine the V-Groove at Location 15.
SUBTASK 72-32-85-220-192 Examine the Fan Case Assembly (01-100) V-Groove
Figure: Fan Case Assembly - Inspection/Check
Fan Case Assembly - Inspection/Check

Figure: Inspection Tool of Attrition Lining
Inspection Tool of Attrition Lining

Figure: Locations on the Fan Case Assembly
Locations on the Fan Case Assembly

